User Guide V 2.6. Please read this guide before operating your IrisVision device and keep it for future reference.
|
|
|
- Eleanor Lambert
- 5 years ago
- Views:
Transcription
1 User Guide V 2.6 Please read this guide before operating your IrisVision device and keep it for future reference.

2
3 Inside This Guide About IrisVision 4 What s Included 5 Device Overview 12 Using IrisVision 14 IrisVision Modes 24 Recommendations for Use 32 Charging IrisVision 34 Setting Up Wifi 38 Using the Bluetooth Remote 44 Audio Prompts & Rebooting 46
4 4 Welcome Thank you for purchasing an IrisVision Low Vision Aid system. This guide provides the essential information you need to set up and use your new IrisVision unit. For help with specifics and troubleshooting, you will receive a faster response by contacting your clinician, who is already acquainted with your needs. About IrisVision is an FDA registered Class-1 medical device and intuitive low vision aid that combines state-of-the-art virtual reality technology from Samsung with innovative custom software developed in collaboration with the nation s leading low vision experts at Johns Hopkins University. It is the most effective low vision aid available for individuals with Macular Degeneration, Diabetic Retinopathy, and other visual diseases.
5 5 What s Included Your IrisVision Low Vision Aid system comes with the following items: 1. IrisVision Display Unit 2. Goggles/Headset 3. Wireless Charging Pad 4. Fast Charger & Cable 5. Magnetic USB Cable 6. Carrying Case Note: External battery not included (optional)

6 6 What s Included IrisVision Display Unit


7 7 What s Included Goggles/Headset with adjustable straps

8 8 What s Included Wireless Charging Pad

9 9 What s Included Fast Charger & Cable (will be white)

10 10 What s Included Magnetic USB Type-C Connector & Cable

11 11 What s Included Carrying Case

12 12 Device Overview Goggles/Headset Focus Wheel (on top of headset) Screenshot/ Standby Button Mode Button Power Tab Touch Pad Brightness Buttons USB Type C Port Note: Some headset models don t include brightness control buttons. You can control brightness using the Config Menu. Visit the FAQ section of our website to learn how to use the Config Menu.


13 13 Device Overview IrisVision Display Unit Volume Buttons Power Button Recent Button Home Button Back Button Micro USB Connector Port (for charging)

14 14 Using IrisVision: Step 1 - Power Up Power on the Display Unit by pressing the blue/ gray tab for a few seconds. Wait for the Health & Safety Warning to complete.

15 15 Using IrisVision: Step 2 - Wear Headset In order for the buttons/touchpad to work on the Headset, the Headset needs to be on your head. Place the device over your eyes and pull the straps over your head. Adjust the velcro straps to achieve the best fit. We recommend that you wear your prescription distance glasses while using the device. Do not walk around while wearing IrisVision.


16 16 Using IrisVision: Step 3 - Set Up Focus The first screen you will see is the Focus Screen. Use the focus wheel on the top center of your goggles to adjust the focus until you get the clearest picture.

17 17
18 18 Using IrisVision: Step 4 - Live View Modes After focusing the device with the focus screen, press the mode button to enter Full Screen Mode. You can press the button again to switch to the other modes. There are 9 available modes:* 1. Scene Mode 2. RP Mode 3. Bioptic Mode 4. Television Mode 5. Reading Mode: Black/White 6. Reading Mode: Inverted 7. Line Reading Mode 8. Reading Mode: Green 9. Reading Mode: Yellow Please Note: Some modes are disabled by default. You will need to contact IrisVision support to enable those modes. In every mode you can use the brightness buttons to increase or decrease the brightness of the screen.


19 19 Mode Button Brightness Buttons
20 20 Using IrisVision: Step 5 - Taking a Snapshot While in any mode you can press the Screenshot/Standby button to take a screenshot of what you are looking at. The image you are looking at will freeze, and you will see a yellow camera icon appear in the top left. While in the screenshot you can zoom in or out using the touchpad. To exit the screenshot just click the Screenshot/Standby button again. If you press and hold the Screenshot/Standby button for a few seconds your screen will turn off and your device will enter into standby mode. While in standby mode, the device uses little power and will last up to 10 hours. To wake your device from standby mode, first have your unit on your head then click the Screenshot/ Standby button. Your screen should turn back on and will be on the focus screen.

21 Screenshot Standby Button 21
22 22 Using IrisVision: Step 6 - Zoom In/Out Next, place your right index finger on the touch pad. The touch pad is located on the right side of the headset. Be sure to take your finger off the touch pad in between swipes. Use your index finger to make several slow swiping motions on the touchpad towards you to increase magnication. To decrease magnication, use your index finger to make several slow swiping motions on the touchpad away from you. Using IrisVision: Step 7 - Bubble View Swipe up to enlarge the view bubble. The bubble can be expanded to fill the full screen. Swipe down to decrease the size of the bubble.

23 Touch Pad 23
24 24 IrisVision Live View Modes


25 25 Scene Mode Scene Mode with Bubble


26 26 Bioptic/Split Screen Mode Reading: Black/ White Reading: Inverted Line Reading Mode Reading Mode: Green Reading Mode: Yellow

27 27 RP (Retinitis Pigmentosa) Mode This mode allows you to change the Field of View (FOV) of the screen. This helps individuals with Retinitis Pigmentosa or Glaucoma to be able to see better by shrinking the image into a smaller viewing area. To increase the field of view, swipe up on the touchpad. To decrease the field of view, swipe down on the touchpad.
28 28 Bioptic/Split Screen Mode This mode provides a rectangle at the top center of the screen that allows you to magnify a specific section of the screen without losing the greater context of the view in front of you. Using the touch pad, swipe towards you to increase the magnification inside the rectangle. Swipe away from you to decrease the magnification inside the rectangle. The center point of the magnified view in the rectangle should correspond with the center of the unmagnified view. To practice viewing an object or face in the bottom portion of the screen, dip your chin, then insert that object into the rectangle to view it with more detail. Then lift your chin to return to the original scene. You will be able to do this more quickly over time with practice.
29 29 Television Mode Television mode is identical to Scene mode except that it will not cause the device to enter sleep mode automatically after a period of disuse (such as when you are watching a movie or a television show.) Reading Mode: Black/White This mode is for reading text material like books or papers without color. For reading magazines or materials with color it is best to return to scene mode. This mode presents reading material with black letters on a white background. This black on white mode has enhanced the brightness and contrast of letters. This mode may be useful when the text and background colors make it difficult to read (i.e., red on pink or beige on brown.)
30 30 Reading Mode: Inverted This mode is helpful for many different eye conditions by providing white letters on a black background. This enhances the contrast and also provides reduced glare on the screen, which can be helpful for those overwhelmed by bright scenes. Line Reading Mode The reading line mode, similar to the first reading mode, presents text in black letters on a white background only. This mode provides a magnification bar in the center of the screen to magnify one or more lines of text while allowing a normal view above and below the bar. First, swipe up on the touchpad to make the bar wider. Second, swipe towards you on the touchpad to increase text size to your best view of text. Third, swipe down on the
31 31 touchpad to decrease the bar size to isolate one or two lines of text. Reading Mode: Green This mode provides black text on a green background. This may also help by providing good contrast without the brightness of a white background. Use the toggle switch to make the green background brighter or darker. Adjust to your preference. Reading Mode: Yellow This mode provides black text on a yellow background. This may also help by providing good contrast without the brightness of a white background. Use the toggle switch to make the yellow background brighter or darker. Adjust to your preference. This mode can also be helpful when reading for extended periods of time and be more soothing to the eyes.
32 32 Recommendations for Use For additional tips and answers to FAQs, please visit: Bubble Size: We recommend keeping the bubble size at medium while zooming in on different objects. Keeping the bubble size at medium will help provide a better view of the surrounding environment. Once you have identified the object of interest you can increase the magnification inside the bubble by swiping towards you on the touch pad. To remove the bubble and return to full screen, swipe up four times slowly until the bubble disappears. Remember: do not walk around while wearing IrisVision. Reading: While reading, hold your reading material in front of you in a normal reading position and move your head, not your arms, to scan the text. The reading material can be brought closer to you (approximately 6
33 33 inches) or further away at any distance. For heavy books or reading materials you may consider using a bookstand if sitting at a table or desk so that the reading material is kept steady. A reading light may also help. Focus: The IrisVision has a camera with automatic focus. The camera may occasionally take a second or two to adjust its focus on an object. lf the camera fails to focus on a particular object, look away and then back at the object. Sleep Mode: Any time you take off the device and set it down, the device will go into sleep mode and the screen will turn black. By bringing the IrisVision up to your face and pushing the mode button, the screen will turn back on. This allows the Display Unit to conserve its battery power. The device will not enter sleep mode when in Television mode. It is recommended to turn off the
34 34 IrisVision unit when not in use. You can do so by pressing the blue/gray tab on top of the headset for a few seconds. Wireless Charging Instructions For additional help with wireless charging, please visit: After centering the IrisVision unit face down on the included wireless charging pad, you will hear a verbal prompt and see a blue light illuminate the pad when the unit is properly placed and the pad is plugged into the wall. If you do not hear this tone or see any illumination: Make sure the straps are not sitting inside the goggles as this will prevent the Display Unit from charging as the headset s sensors will think you are still wearing it.
35 35 Remove the Display Unit from the headset and place the back of the Display Unit (not the screen) directly onto the pad instead. After setting the device on the charger, the screen will turn black in a few minutes. When the Display Unit is fully charged, the blue light on the charging pad changes to green and you will hear a verbal prompt. If the blue light is not on or if it is flashing, the device is not charging. If your device powers down and, it is not responding to any button press, place the device on the wireless charger. It will take 2.5 hours to fully charge and it will automatically return to the Focus screen. Although the device turns back on within a few minutes of placing it on the Wireless Charger, we recommend that you let it fully charge before using it.
36 36 Wired Charging Instructions As an alternative, you may use the cord from the wireless charger and plug it into the display unit after removing the display unit from the headset. By using this method the Display Unit will charge faster, usually within one hour. NOTE: The IrisVision s battery lasts 3 to 4 hours. It can last 3+ hours with continuous use, and all day (8 to 10 hours) on standby. You can make the most of this time by powering the device off during activities when you are not using it.

37 37 Powering the IrisVision using the USB Type-C Port on Headset This power port can be used if you want to use the product for extensive and continous use beyond what the built-in battery can provide. You can use an external battery as a source of power. This method does not charge the built-in battery but provides an alternative source to operate the device. NOTE: This method of powering the device can sometimes cause it to overheat. In the case that it does overheat unplug the charging cable.

38 38 Setting Up Wifi IrisVision can be configured to connect to your Wi-Fi. A Wi-Fi connection allows our Tech Support team to assist you more efficiently. Note: IrisVision does not require Wi-Fi to function. Step 1: Remove IrisVision Display Unit from Headset Release the IrisVision display unit from the goggles by pushing the clip to the right of the display unit s camera away from the display unit. Carefully remove the display unit and


39 39 Step 2: Power on Display Unit If the display unit is not already powered on, you will need to power it on by pressing the power button on the right side when you are looking at the screen as shown.

40 40 Step 3: Configure Wi-Fi Tap the Apps icon located at the bottom of the home screen. Next, tap Settings, then Connections. At the top of the Connections Menu, tap Wi- Fi. Turn Wi-Fi on, then select your home or office Wi-Fi network. If you need to enter a password to access that network, do so now. It is recommended that you also select Auto Reconnect so that your device remembers this network in the future. Once the IrisVision display unit has connected to Wi-Fi, you will be ready to proceed to the next step.
41 41 Name of Your Network Other Network
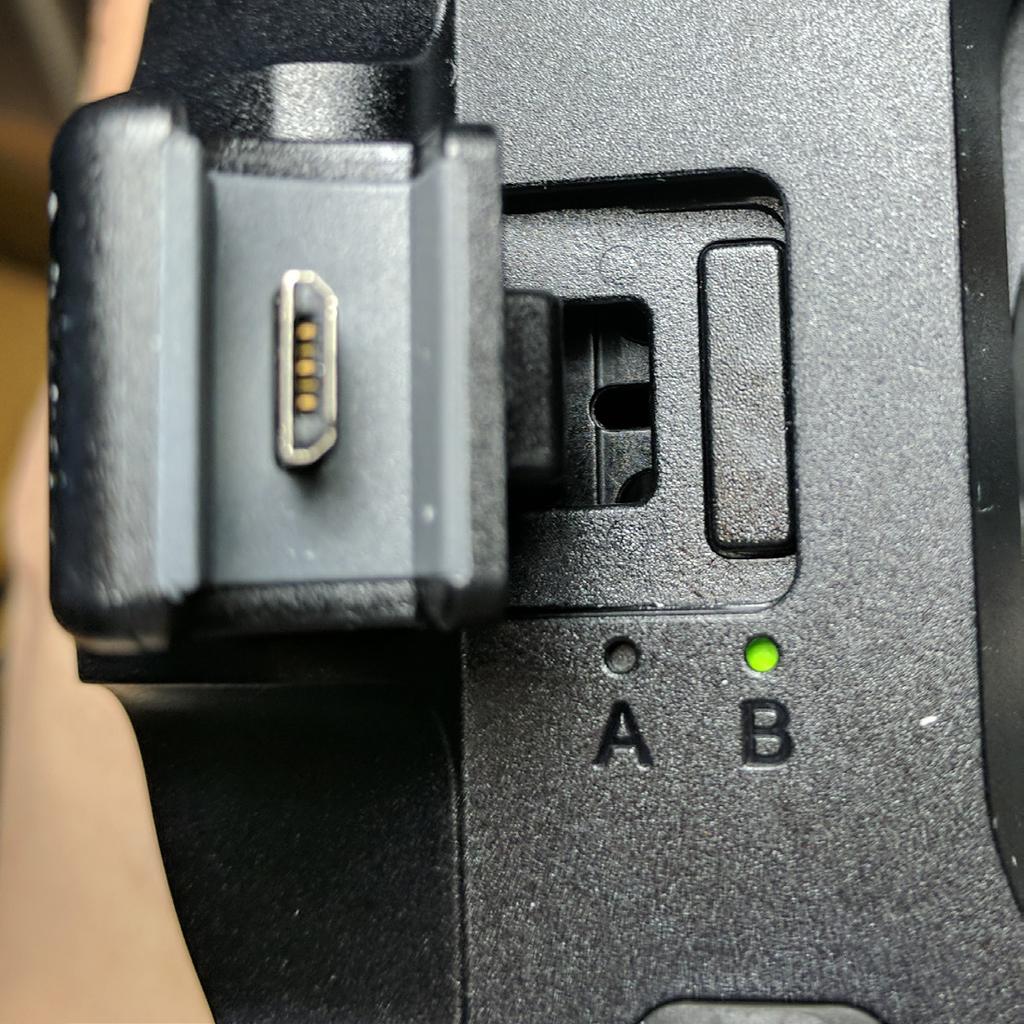
42 42 Step 4: Connecting Display Unit with Headset The headset has a connector and a clip with two positions: A & B. For the current model of IrisVision, it should remain in the B position. Also notice the small lock/unlock switch. The switch should always remain in the lock position. Insert the headset s connector into the display unit s connector. Gently push the display unit down into the mount until the clip snaps into place. You will hear a confirmation tone from the display unit if the headset and display unit are connected properly. Once connected, the IrisVision headset is ready to use. Note: IrisVision does not require Wi-Fi to function.

43 43

44 44 Using the Bluetooth Remote You will only need to use the joystick (1) and the on/off button on the remote (2). Both have been painted yellow. Pressing the on/off button will activate the device. A red indicator light will come on and begin blinking, indicating that the remote is now discoverable. 1 Joystick 2 On/Off Button
45 45 Using the Bluetooth Remote Once connected, you can use the joystick to take the function of the headset s touch pad - to navigate menus and control the vision bubble. Pressing up on the joystick makes the bubble larger, and pressing down makes it smaller. Pressing left zooms in within the bubble, and pressing right zooms out. Pushing the yellow on/off button allows you to switch between the different viewing modes. Make sure to turn off the remote when not in use by holding down the yellow on/off button. The red light will flash rapidly before turning off.
46 46 How to turn off Audio Prompts To turn off audible prompts in IrisVision, press the mode button to cycle through until you see the focus screen appear. While in the focus screen tap and hold the touchpad for 15 seconds. You will hear an audible prompt stating speech prompt disabled. This must be done while wearing the IrisVision unit. Follow the same process to enable the audio prompts back. How to Turn off Your Device To turn off your IrisVision, hold the blue power button on the headset for a few seconds. The screen will soon go black and the unit will power off. Once this happens your IrisVision will be off and can be put away. To turn your IrisVision back on you will need to hold
47 47 the power button down until you see the Display Unit wake up. How to Reboot Your Device A new feature - only if there seems to be a problem such as the screen freezing or not acting properly. You can reboot your device on any mode. To reboot your IrisVision, go to the brightness toggle switch on the front right of the headset. Hold the brightness down button for seconds. You will see the brightness level diminish, brighten again, and then the device will vibrate. Your IrisVision will then automatically reboot completely and after about a minute you will hear the Health and Safety message - it will then be ready to fully operate again.

48 IrisVision Support Contact Your Clinician In most cases your clinician will be able to respond to questions more quickly and efficiently because they are already familiar with your needs. Speak With an IrisVision Advocate IrisVision Advocates are standing by to assist you with any questions you may have about setting up or using your IrisVision system. Call Toll Free Us Visit Us Online Meet Us In-Person 5976 W. Las Positas Blvd Ste 126 Pleasanton, CA 94588
AWS DeepRacer Getting Started Guide
 AWS DeepRacer Getting Started Guide 1 Getting Started Guide Contents What s in the box Assemble your car Get connected Test drive Autonomous model management 2 What s in the box 1 2 6 8 9 5 11 10 4 7 3
TROUBLESHOOTING GUIDE
 TROUBLESHOOTING GUIDE Difficulty installing apps on LeapFrog Epic tablet Q: While purchased apps appear in the App Manager on the "Not installed" tab, the Install button is grayed out. How can I install
Tablet PC User Manual
 Tablet PC User Manual Please read all instructions carefully before use to get the most out of your Time2Touch Tablet PC. The design and features are subject to change without notice. Contents Important
For your safety and protection of the E-bot, please read and abide by the following important safety precautions.
 2 P age Safety Precautions For your safety and protection of the E-bot, please read and abide by the following important safety precautions. 1) Do not plug the AC adapter into a faulty electrical outlet.
Tablet PC User Manual
 Tablet PC User Manual Please read all instructions carefully before use to get the most out of your Time2Touch Tablet PC. The design and features are subject to change without notice. Contents Important
Chapter 1 Preparing Your ipads for Q-interactive
 Chapter 1 Preparing Your ipads for Q-interactive Q-interactive User Guide December 2016! Configuring Your ipad Settings for Q-interactive Before you can administer tests with Q-interactive, you need complete
User Manual. ipad 360 Keyboard Case. For more support, please us at Your questions will be answered promptly.
 User Manual ipad 360 Keyboard Case For more support, please email us at cs@yekbee.com Your questions will be answered promptly. 1 Overview Charging light Battery light Pairing light Function keys Up key
Android (A1000) Y4 Classrooms: User Guide
 Y4 Classrooms: User Guide") Android (A1000) Y4 Classrooms: User Guide Provided by the SDUSD Ed Tech Team i21 2014 Teachers - Version 3.25.2014 Table of Contents Basic Functionality... Navigation Tips... Taking a Screenshot... Finding
Android (A1000) Y4 Classrooms: User Guide Provided by the SDUSD Ed Tech Team i21 2014 Teachers - Version 3.25.2014 Table of Contents Basic Functionality... Navigation Tips... Taking a Screenshot... Finding
User Manual. Wireless IP Camera
 User Manual Wireless IP Camera Introduction Hi. Thank you for purchasing the AUKEY VT-CM1 Wireless Security IP Camera. Please read this user manual carefully and keep it in a safe place for future reference.
CONTENTS Chapter 1: Introduction... 1 Chapter 2: Getting to know your Prodigi... 2 Box Contents... 2 Prodigi Tablet at a glance... 2 Setting up...
 CONTENTS Chapter 1: Introduction... 1 Chapter 2: Getting to know your Prodigi... 2 Box Contents... 2 Prodigi Tablet at a glance... 2 Setting up... 4 Chapter 3: Using Prodigi... 6 Magnifying... 6 Capturing
wego write Predictable User Guide Find more resources online: For wego write-d Speech-Generating Devices
 wego TM write Predictable User Guide For wego write-d Speech-Generating Devices Hi! How are you? Find more resources online: www.talktometechnologies.com/support/ Table of contents Hardware and features...
Table of Contents Confirming the camera location
 Table of Contents 1. What is the SenseView PORTABLE...1 2. Safety precaution...2 3. Package...3 4. Configuration...4 5. After purchasing...6 (1)... Charging...6 (2)Remove LCD protective film...6 6. How
Table of Contents. Introduction 2 1. Intelligent Remote Control 2 2. Charging the Remote Control 3
 Table of Contents Introduction 2 1. Intelligent Remote Control 2 2. Charging the Remote Control 3 Getting Started 6 1. Activating the Remote Control 6 2. Selecting a Device 7 3. Operating a Device 8 4.
Contents. Introduction
 Page 1 of 15 Contents Introduction Getting Started Your Device at a Glance Charging Assembling the Power Adapter Turning On/Off, Unlocking Setting to Sleep and Waking Up Inserting and Removing a microsd
Savi Go Wireless Headset System WG101/B. User Guide
 Savi Go Wireless Headset System WG101/B User Guide Welcome Congratulations on purchasing your new Plantronics product. This user guide contains instructions for setting up and using your Savi Go WG101/B
Galaxy Tab S2 NOOK Key Features
 Galaxy Tab S2 NOOK Key Features Front-facing Camera Power/Lock Volume Memory Card Slot Recent Headset Jack Back Home Camera Speaker Speaker USB/Accessory Port Basic Functions Charging the Battery Before
GETTING STARTED HEALTH & SAFETY
 HEADSET USER MANUAL HEADPHONES 1. Pull out the 3.5 mm audio cable and insert the connector into the phone s headphone jack. Close the cover. iphone 7 users will need the adapter supplied with the phone.
Eye-Pal Vision Quick Start Rev. A
 Eye-Pal Vision Quick Start 440793-001 Rev. A Setting Up the Unit 1. Place the Eye-Pal Vision on a flat surface with the front panel and buttons, facing toward you. 2. Unfold the camera. Pull the camera
biosim App: Android Quick Reference Guide for i-limb devices
 biosim App: Android Quick Reference Guide for i-limb devices 1 Contents 1 Welcome and important points 2 Getting started 5 Activation 6 Firmware Update i-limb ultra revolution 12 Connection 12 Searching
biosim App: Quick Reference Guide for i-limb and virtu-limb devices
 biosim App: Quick Reference Guide for i-limb and virtu-limb devices 1 Contents 1 Welcome and important points 2 Getting started 5 Activation 6 Firmware Update i-limb ultra revolution 12 Connection 12 Searching
biosim App: Quick Reference Guide for i-limb and virtu-limb devices
 biosim App: Quick Reference Guide for i-limb and virtu-limb devices 1 Contents 1 Welcome and important points 2 Getting started 5 Activation 6 Firmware Update i-limb ultra revolution 12 Connection 12 Searching
TouchChat User Guide. For wego A-D Speech-Generating Devices. Find more resources online:
 wegotm A TouchChat User Guide For wego A-D Speech-Generating Devices Find more resources online: www.talktometechnologies.com/support/ Table of contents Hardware, power buttons and features... 2 Guided
Lenovo Miix User Guide. Read the safety notices and important tips in the included manuals before using your computer.
 Lenovo Miix 2 11 User Guide Read the safety notices and important tips in the included manuals before using your computer. Notes Before using the product, be sure to read Lenovo Safety and General Information
1. Introduction P Package Contents 1.
 1 Contents 1. Introduction ------------------------------------------------------------------------------- P. 3-5 1.1 Package Contents 1.2 Tablet Overview 2. Using the Tablet for the first time ---------------------------------------------------
Contents. Introduction. Getting Started. Navigating your Device. Customizing the Panels. Pure Android Audio. E-Books
 Contents Introduction Getting Started Your Device at a Glance Charging Assembling the Power Adapter Turning On/Off, Unlocking Setting to Sleep and Waking Up Inserting and Removing a microsd Card Connecting
Contents. Introduction. Getting Started. Navigating your Device. Customizing the Panels. Pure Android Audio. E-Books. Browsing the Internet
 Contents Introduction Getting Started Your Device at a Glance Charging Assembling the Power Adapter Turning On/Off, Unlocking Setting to Sleep and Waking Up Connecting to a Computer Navigating your Device
INTEGRATION OVERVIEW:
 AMX Intergration AMX INTEGRATION OVERVIEW: Take your motorized window treatment experience to the next level by integrating them into your AMX smart home control system. The integration supports isolated
Quick Start Guide D502PB. U.S Service Hotline : More support at
 Quick Start Guide D502PB U.S Service Hotline : 1-888-863-0138 More support at www.d2pad.info Overview ENGLISH 1 2 3 8 7 4 5 6 1 2 3 4 5 6 7 8 Volume Keys Status Bar Front Camera Menu Key Home Key Back
1. Introduction P Package Contents 1.
 1 Contents 1. Introduction ------------------------------------------------------------------------------- P. 3-5 1.1 Package Contents 1.2 Tablet Overview 2. Using the Tablet for the first time ---------------------------------------------------
CHAPTER 1 INTRODUCTION
 CONTENTS Chapter 1 Introduction... 2 Chapter 2 Getting to know your Prodigi... 3 Box Contents... 3 Prodigi Duo at a glance... 4 Setting up... 9 Chapter 3 Using Prodigi... 12 Using the Base... 12 Spot Reading...
Installing your Nokia Home
 Installing your Nokia Home 1. Installing the Nokia Home app 2. Plugging in your Nokia Home 3. Pairing your Nokia Home with your Device 4. Installing your Nokia Home: - Creating a Nokia account (optional)
Electronic data system application end user manual
 The MalariaCare Toolkit Tools for maintaining high-quality malaria case management services Electronic data system application end user manual Download all the MalariaCare tools from: www.malariacare.org/resources/toolkit.
The ipad Center for Innovation in Teaching and Research Presenter: Chad Dennis Instructional Technology Systems Manager
 The ipad Center for Innovation in Teaching and Research Presenter: Chad Dennis Instructional Technology Systems Manager ce-dennis@wiu.edu Copyright 2012 Center for Innovation in Teaching and Research 1
Quick Start. MyAir4 User Manual. This section will give you a brief description about each of the buttons found on the home screen.
 User Manual Quick Start... 3 HOME... 4 SIMPLE TIMER... 4 AIR CON... 5 ZONES... 6 PROGRAMS... 7 HELP... 11 SETTINGS... 12 MyZone - (optional feature)... 15 Constant Zones... 17 Android Tablet... 18 Smart
PROMPT VISUAL NOTIFICATION POD
 PROMPT VISUAL NOTIFICATION POD Prompt User Manual2014 CONTENTS OVERVIEW...3 STANDARD NOTIFICATIONS...4 INCLUDED IN THE BOX...4 THE PROMPT...3 CHARGING PROMPT...5 CONNECTING TO PROMPT...6 TURNING ON IOS
1. Product Description
 1. Product Description Hardware Description Note: The magnetic base can stick to any metal surface as per below diagram. This allows for better and more solid placement of the camera. 2. Installation 2.1
E-bot offers a variety of powerful features for low vision students and users of all ages including the following:
 2 Page Congratulations on your purchase of the E-bot. The E-bot, short for Education Robot, is a transportable video magnifier designed to meet the needs of the low vision student in a variety of situations.
Jabra motion. User Manual. jabra.com/motion
 Jabra motion User Manual jabra.com/motion 1. welcome...4 2. headset OVERVIEW...5 3. how to wear... 6 3.1 Height adjustment 6 3.2 Left or right ear wearing style 7 3.3 EARGEL POSITIONING 7 4. how to charge...
Introduction. MyAir5 User Guide
 User Guide Introduction... 3 Mode Page... 4 Zones Page... 10 Plans Page... 13 Setup Page... 17 Constant Zones... 19 Android Tablet... 20 Smart Phone Control Quick Setup Guide... 21 Network Troubleshooting...
Panoramic Talking Camera
 Panoramic Talking Camera IPC2201 home8alarm.com 1-844-800-6482 support@home8alarm.com 1 Table of Contents Chapter 1. Introduction... 1 1.1 System Requirement... 1 Chapter 2. Hardware Overview... 2 Chapter
my i-limb App: Quick Reference Guide for i-limb ultra revolution
 my i-limb App: Quick Reference Guide for i-limb ultra revolution 1 Contents 1 Welcome and important points 2 Getting started 5 Activation 6 Connection 6 Searching for another device 7 Authorized user access
Android (A7-40) Y5 Classrooms: User Guide
 Y5 Classrooms: User Guide") Android (A7-40) Y5 Classrooms: User Guide Provided by the SDUSD Ed Tech Team i21 2015 Teachers - Version 1.20.2015 Table of Contents Basic Functionality... Navigation Tips... Taking a Screenshot... Finding
Android (A7-40) Y5 Classrooms: User Guide Provided by the SDUSD Ed Tech Team i21 2015 Teachers - Version 1.20.2015 Table of Contents Basic Functionality... Navigation Tips... Taking a Screenshot... Finding
Wireless IP Bird Box Camera
 Wireless IP Bird Box Camera Model: 4901-18 Operation and Installation Manual 1 WELCOME... 3 PRODUCT OVERVIEW... 4 HARDWARE INSTALLATION... 4 Attach the External Power Adapter... 4 SMARTPHONE OR TABLET
ELAN INTEGRATION WITH THE SHADE STORE MOTORS ELAN INTEGRATION OVERVIEW:
 ELAN INTEGRATION WITH THE SHADE STORE MOTORS ELAN INTEGRATION OVERVIEW: Take your motorized window treatment experience to the next level by integrating them into your ELAN smart home control system. The
DrQuickLook MAZI PDA. User Guide
 DrQuickLook MAZI PDA User Guide 0 Table of Contents About the DrQuickLook PDA... 1-3 What Comes With the DrQuickLook PDA...1 Microsoft Surface 3 Tablet and DrQuickLook Custom Surround Diagram...2 Tablet
INTRODUCTION PARTS & ACCESSORIES STRUCTURE USING YOUR EXPLORĒ ATTACHING THE STRAP OPERATING YOUR EXPLORĒ
 INTRODUCTION... 1 1. PARTS & ACCESSORIES... 2 2. STRUCTURE... 3 3. USING YOUR EXPLORĒ 3... 4 3.1 ATTACHING THE STRAP... 5 3.2 OPERATING YOUR EXPLORĒ 3... 5 3.2.1 Power On/Off... 5 3.2.2 Zoom In/Zoom Out...
Digital Learner MacBook Air Quick Start Student User Guide
 Digital Learner MacBook Air Quick Start Student User Guide Howell Township Public Schools Digital Learner MacBook Air Quick Start Student User Guide The Digital Learner MacBook Air Quick Start Student
SC600W WIFI IP HIDDEN CAMERA
 USER MANUAL SC600W WIFI IP HIDDEN CAMERA 1 YEAR WARRANTY All RecorderGear brand products are backed by our 1 Year Warranty. For full details visit WWW.RECORDERGEAR.COM This Device is Compliant with USA
SC550W WIFI IP HIDDEN CAMERA
 USER MANUAL SC550W WIFI IP HIDDEN CAMERA 1 YEAR WARRANTY All RecorderGear brand products are backed by our 1 Year Warranty. For full details visit WWW.RECORDERGEAR.COM This Device is Compliant with USA
ONYX Flexible-arm. User s Guide. Freedom Scientific, Inc Revision C
 ONYX Flexible-arm User s Guide Freedom Scientific, Inc. 440480-001 Revision C PUBLISHED BY Freedom Scientific 11800 31 st Court North St. Petersburg, Florida 33716-1805 USA http://www.freedomscientific.com
Cloud Frame User's Manual
 Cloud Frame User's Manual For ongoing product improvement, this manual is subject to modification without prior notice. MODEL: CPF1510+ Before Operation Product Introduction Safety Precautions Package
GentivaLink ipad 4 Training Guide
 GentivaLink ipad 4 Training Guide Version 1.0 Box Contents Your ipad 4 device comes with the following: ipad 4 ipad 4 Wall Charger ipad 4 Lightning Data Cable Car Charger Targus Stylus Please ensure all
STUDIO 7.0 USER MANUAL
 STUDIO 7.0 USER MANUAL 1 Table of Contents Safety Information... 3 Appearance and Key Functions... 4 Introduction... 5 Call Functions... 6 Notifications Bar... 7 Contacts... 8 Messaging... 9 Internet Browser...
Crestron Intergration
 Crestron Intergration CRESTRON INTEGRATION OVERVIEW: Take your motorized window treatment experience to the next level by integrating them into your Crestron smart home control system. The integration
THE SHADE STORE MOTORS WITH AMAZON ALEXA
 THE SHADE STORE MOTORS WITH AMAZON ALEXA ABOUT THE SKILL: The Shade Store s motorized window treatments can be voice controlled easily through Amazon Alexa. Simple commands allow you to raise and lower
Virtual Communications Express Plantronics Headset Wireless Savi W740
 System Requirements Computer Supported Operating Systems: Windows XP, Windows Vista, Windows 7 Processor: 400 MHz Pentium processor or equivalent (Minimum); 1 GHz Pentium processor or equivalent (Recommended)
SteriClick Rechargeable Waterproof Keyboard with Touchpad. Tel
 User Manual SteriClick Rechargeable Waterproof Keyboard with Touchpad Tel. +61 3 9046 8507 Email: info@stericlick.com.au www.stericlick.com.au Copyright (c) 2016 STERICLICK PTY. LTD. ACN 615 700 948 INTRODUCTION
Portable video magnifier DM - 50
 Portable video magnifier DM - 50 Contents Caution... Overview... Contents of the package... Part names & Functions... Safety & Maintenance... Getting Started... Charging the Battery... Reading with the
Specifications. What s Inside The box
 Tablet of Contents Specifications.1 What s inside the box 1 Tablet Parts 2 Getting started...2 Connecting to the Internet..6 Task Bar..8 Install and Uninstall 9 Camera.10 HDMI.11 Trouble Shooting 11 Warranty..13
615HD Digital Video Camera
 615HD Digital Video Camera User Manual 2009-2011 Sakar International, Inc. All rights reserved. Windows and the Windows logo are registered trademarks of Microsoft Corporation. All other trademarks are
Package Content. QSG booklet. Warranty, legal & safety booklet. USB cable. Charger. Warranty ARCHOS 11,31
 Table of contents Package contents... 2 Getting started... 3 Description of the device... 4 Through the wizard... 6 Connecting to a WiFi network... 7 The Android TM interface... 8 Getting familiar with
Contents. Text Notations. Copyright. Using the digitizer pen (Optional) 10. Contents 3. Basic Items 4. Using the Slate PC Dock (Optional) 11
 10. Contents 3. Basic Items 4. Using the Slate PC Dock (Optional) 11") Contents Contents 3 Basic Items 4 Overview 5 Setting up the computer 8 Using the digitizer pen (Optional) 10 Using the Slate PC Dock (Optional) 11 Using the Bluetooth Wireless Keyboard (Optional) 14 Text
Contents Contents 3 Basic Items 4 Overview 5 Setting up the computer 8 Using the digitizer pen (Optional) 10 Using the Slate PC Dock (Optional) 11 Using the Bluetooth Wireless Keyboard (Optional) 14 Text
1. Search for ibaby Care in the App Store under phone apps, or in Google Play for all Android devices.
 M6 port diagrams Status Light DC Power Camera ID USB Port Reset Button DC Power: 5V DC, 2A power adapter (Use official ibaby brand power adapter only) Status Light: Displays 3 unique patterns to show different
Table of Contents. 2 Know your device. 4 Device setup. 8 Customize. 10 Connections. 11 Apps. 12 Contacts. 13 Messages. 14 Camera.
 Table of Contents 2 Know your device 4 Device setup 8 Customize 10 Connections 11 Apps 12 Contacts 13 Messages 14 Camera 15 Internet Know your device Front view Front Camera SIM Card Slot microsd Card
TM101W635L User s Guide
 TM101W635L User s Guide Customer Service NuVision Customer Service www.nuvision.com/assistance Phone: (800) 890-1288 Hours: 8:30am to 5:30pm PST M-F Email: cs@nuvision.com Register your tablet today at
my i-limb App: Quick Reference Guide for i-limb quantum
 my i-limb App: Quick Reference Guide for i-limb quantum 1 Contents 1 Welcome and important points 2 Getting started 5 Activation 6 Connection 6 Searching for another device 7 Authorized user access 8 Connection
Wireless Video/Audio Intercoms
 Wireless Video/Audio Intercoms User Set-Up Guide and Instructions BEC Integrated Solutions Williamsville, New York 716-689-0871 1 Table of Contents: B-WSP1.Page 3 B-WSP2 Page 8 B-WC2..Page 13 B-WI2 Page
Chapter 1: Preparing Your ipad for Optimal Assessment Experience
 Chapter 1: Preparing Your ipad for Optimal Assessment Experience Q-interactive User Guide April 014 Copyright 013. NCS Pearson, Inc. or its affiliate(s). All rights reserved. Q-interactive is a trademark
Smart Security at Every Corner of Your Home
 Spotlight Cam Wired Smart Security at Every Corner of Your Home Your new Spotlight Cam lets you extend the Ring of Security around your entire property. Now, you ll always be the first to know when someone
1. In-app Setup. 2. Physical Installation. 3. Features. 4. Troubleshooting
 Spotlight Cam Wired Smart Security at Every Corner of Your Home Your new Spotlight Cam lets you extend the Ring of Security around your entire property. Now, you ll always be the first to know when someone
Zoom-Twix/ Zoom-Office. Training Guide and User Manual OS Windows XP, Windows 7
 Zoom-Twix/ Zoom-Office Training Guide and User Manual OS Windows XP, Windows 7 Release 4.1.2 Revision date:_february 11, 2011 20 Main St Suite G2 Acton, MA 01720 800-681-5909 Patent Pending Table of Contents
Handheld Video Magnifier
 Zoomax TM Snow Handheld Video Magnifier V1.1 1 Contents Description...3 Accessories...3 Compositions:...4 Operation...5 Battery installation...5 Charging the battery...6 Install short strap...6 Operation
FAQ for KULT Basic. Connections. Settings. Calls. Apps. Media
 FAQ for KULT Basic 1. What do the Icons mean that can be found in notifications bar at the top of my screen? 2. How can I move an item on the home screen? 3. How can I switch between home screens? 4. How
THE SHADE STORE APP SETUP INSTRUCTIONS
 SETUP INSTRUCTIONS ABOUT THE APP: The Shade Store app allows for control of your motorized window treatments through your smartphone/tablet. The app allows for: Individual and group control Scene control
iminicam 1080p Wireless Spy Camera User Manual
 iminicam 1080p Wireless Spy Camera User Manual imini Spy Camera User Manual Introduction Thank you for choosing the imini Spy Camera. Experience cutting edge technology and enjoy the security that the
CONTROL4 INTEGRATION WITH THE SHADE STORE MOTORS CONTROL4 INTEGRATION OVERVIEW:
 CONTROL4 INTEGRATION WITH THE SHADE STORE MOTORS CONTROL4 INTEGRATION OVERVIEW: Take your motorized window treatment experience to the next level by integrating them into your Savant smart home control
Key Features: Be notified of incoming calls, texts, , calendar and social media events with vibration and LED light
 Product Overview Congratulations on your purchase of the MARTIAN WATCH! MARTIAN provides you with connectivity to your voice-command-enabled smartphone or tablet via Bluetooth wireless technology. Key
Lenovo IdeaPad Flex 10
 Lenovo IdeaPad Flex 10 User Guide Read the safety notices and important tips in the included manuals before using your computer. Notes Before using the product, be sure to read Lenovo Safety and General
20:50. Smart Wristband. Movement all day record. Clock. Track. Calorie. Pattern Detect. Pedometer. steps Sleep "30" Sleep Quality
 Movement all day record 中国电信 4G Today steps Sleep 20:50 9860 7"30" At Shennan Road 07:00 Walk 40min At Futian Road 07:40 Onvehicle 20min At middle School 08:00 Sedentary 45min At middle School 09:45 Walk
Jabra MOTION OFFICE. User Manual. jabra.com/motionoffice
 Jabra MOTION OFFICE User Manual jabra.com/motionoffice 1. WELCOME... 4 2. PRODUCT OVERVIEW... 6 2.1 TOUCHSCREEN BASE 2.2 HEADSET 2.3 BLUETOOTH ADAPTER (JABRA LINK 360 TM ) 2.4 OPTIONAL ACCESSORIES 3. HOW
BEAT 2.0 USER MANUAL
 BEAT 2.0 USER MANUAL FCC ID: 2ADLJBEAT20 The device complies with part 15 of the FCC Rules. Operation is subject to the following two conditions: (1) This device may not cause harmful interference, and
Generic OLLI Classroom Technology Updated March 22, 2019
 Generic OLLI Classroom Technology Updated March 22, 2019 Table of Contents TURN CLASSROOM LIGHTS ON/OFF...2 EQUIPMENT LOCATION...2 LOGIN TO THE COMPUTER...2 Unsuccessful Login...4 TURN ON AND CONTROL THE
Plantronics Wireless Headset Installation Guide
 Basic Set Up: Take the AC Power Supply adapter and plug one end into your wall outlet or power strip. The other end will plug into the back of the headset base, as shown in the following picture. Place
Room Classroom Technology Updated March 4, 2019
 Room 4-102 Classroom Technology Updated March 4, 2019 Table of Contents TURN CLASSROOM LIGHTS ON/OFF...2 EQUIPMENT LOCATION...2 LOGIN TO THE COMPUTER...3 Unsuccessful Login...3 TURN ON AND CONTROL THE
NEO 4.5. User Manual
 1 NEO 4.5 User Manual Table of Contents Safety Information... 3 Appearance and Key Function... 4 Introduction... 5 Call Functions... 6 Contacts... 7 Messaging... 8 Internet Browser... 9 Bluetooth & Wi-Fi...
Bluetooth Connectivity Guide
 1 Sonic Bluetooth Connectivity Guide Effective February 1, 2014 Bluetooth Connectivity Guide SoundGate 2 TV Adapter 2 Phone Adapter 2 www.sonici.com 2 Sonic Bluetooth Connectivity Guide This guide is designed
Phoebe LED Spectrum 10W RGB/Tuneable White downlight INSTALLATION AND APP INSTRUCTIONS
 Phoebe LED Spectrum 10W RGB/Tuneable White downlight INSTALLATION AND APP INSTRUCTIONS Contents 1. Product Installation...4 2. Space Requirements & Wiring Diagram...6 3. App Set-up & Adding Lights...7
Thank you for purchasing a Danew product. Your DSlide Has been designed to offer you a unique game experience on a touch tablet.
 USER GUIDE Thank you for purchasing a Danew product. Your DSlide Has been designed to offer you a unique game experience on a touch tablet. Before using your device, read carefully the use instructions
QUICK START GUIDE. Wireless Pan&Tilt IP Camera FSC880. Smart Reliable Secure. Faleemi Technologies Ltd.
 Wireless Pan&Tilt IP Camera QUICK START GUIDE FSC880 Smart Reliable Secure Faleemi Technologies Ltd www.faleemi.com support@faleemi.com support@faleemi.com www.facebook.com/faleemi Apple, Apple Store,
Troubleshooting with Kindles
 Troubleshooting with Kindles What issue are you experiencing with your Kindle? Internet/Connection Problem Locked Screen with Pin Kindle is speaking/green Border Screen Can t find App / New Content App
INSTRUCTION MANUAL Kingfisher Micro DVR w/ Button Cam SB-MSDVR660
 INSTRUCTION MANUAL Kingfisher Micro DVR w/ Button Cam SB-MSDVR660 Revised: March 15, 2013 Thank you for purchasing from SafetyBasement.com! We appreciate your business. We made this simple manual to help
User's Guide
 www.caberg-helm.com User's Guide CONTENTS 1. INTRODUCTION...3 2. PACKAGE CONTENTS...4 3. GETTING STARTED...5 Installing the Headset on Your Helmet... 5 Powering On... 6 Powering Off... 6 Charging the Headset...
CLOVER 10 Handheld Video Magnifier User Guide. Rev G
 CLOVER 10 Handheld Video Magnifier User Guide Rev G Contents Precaution 1 Quick Start 3 Overview 3 Compositions 5 Accessories 8 Battery Charging 9 Stand 11 Operation 13 Power Button 13 Beep Type 14 Beep
Embedded Application User Manual
 [ProPTT2] Embedded Application User Manual v3.2 August 2018 This document describes usage instruction for ProPTT2 Android Embedded Application. Copyright IMPTT Inc. All right reserved. CONTENTS 1. Introduction...
Mobile Recorder User Manual
 Mobile Recorder User Manual Ver. Q4 2009 Revised 3/05/2010 COBAN Technologies Inc. 12503 Exchange Drive, Suite 536 Stafford, Texas 77477 Tel: 1-281-277-8288 Fax: 1-281-277-8256 http://www.cobantech.com
Quick guide to connectivity and the ReSound Smart 3D app
 Quick guide to connectivity and the ReSound Smart 3D app Content Compatibility: Hearing aids and mobile devices...4 Get started with your iphone, ipad or ipod touch...6 Pair with your ReSound Smart Hearing
Cisco Unified IP Phone User Guide for Cisco Unified Communications Manager 8.5 (SCCP and SIP)
") Cisco Unified IP Phone User Guide for Cisco Unified Communications Manager 8.5 (SCCP and SIP) For Cisco Unified IP Phone 8941 and 8945 Americas Headquarters Cisco Systems, Inc. 170 West Tasman Drive San
Cisco Unified IP Phone User Guide for Cisco Unified Communications Manager 8.5 (SCCP and SIP) For Cisco Unified IP Phone 8941 and 8945 Americas Headquarters Cisco Systems, Inc. 170 West Tasman Drive San
Two-Line Speakerphone with Caller ID/Call Waiting 992
 0992_CIB_1ATT_FINAL_022105 2/22/04 4:46 PM Page II User's Manual Part 2 Two-Line Speakerphone with Caller ID/Call Waiting 992 In case of difficulty, visit our Service Center at www.telephones.att.com or
The Otto Home Control app allows for control of your motorized window coverings through your smartphone/tablet
 TM SET UP INSTRUCTIONS ABOUT THE OTTO HOME CONTROL APP The Otto Home Control app allows for control of your motorized window coverings through your smartphone/tablet THE APP ALLOWS FOR: Individual and
CLOVER 5 Handheld Video Magnifier User Guide. Rev E
 CLOVER 5 Handheld Video Magnifier User Guide Rev E Contents Precaution 1 Quick Start 3 Overview 3 Compositions 5 Accessories 8 Battery and Charging 9 Writing stand 14 Operation 15 Power Button 15 Beep