RingCentral. Mobile App Guide
|
|
|
- Domenic Jeffry Wheeler
- 6 years ago
- Views:
Transcription
1 RingCentral Mobile App Guide
2 RingCentral Mobile App Guide Table of Contents 1 6 Overview 7 With the RingCentral Mobile App You Can 14 Release Features 14 Contact Profile Image Sync 14 Active Call Button Change 14 Missed Call Notification 14 Paging 14 Account Federation 14 Six-Digit Extension Support 14 Live Reports 15 Share Fax/Voic to other apps 15 DTMF Postfixes Improvement 15 Quality of Service 15 RingOut Tips 15 Android-Specific Enhancements 15 Message Push Notifications 16 Voice Delay Enhancements 16 Echo Cancellation Enhancement 16 Offline Mode Support 16 Large Message List 16 Android N Compatibility 16 VoIP Calling 16 Android O Compatibility 16 ios-specific Enhancements 16 VoIP Calling 16 VoIP IPv6 Compatibility 16 Quick Reply from Text Message Notifications 16 ios 10 Compatibility (applies to all users) 17 ios CallKit Support 18 Supported Languages 19 The Main Menu 19 All Messages 20 Call Log 20 Filter Your Call Log 21 Favorite Contacts 21 Choose/Filter Groups in Contacts 22 Cloud Contacts 22 Spotlight Search for Contacts 23 Documents 24 RingCentral Meetings 24 Initiate a RingCentral Online Meeting 25 Join a RingCentral Online Meeting 26 Glip Team Collaboration App 27 My Profile Settings 28 Making a Phone Call 28 RingOut 29 Enable RingOut 29 Pre-call Controls 30 Conference Calling 1
3 RingCentral Mobile App Guide Table of Contents 2 31 Touch Tone Commands for Conference Calls 32 Join Now 33 Join Now (continued) 34 Business SMS 34 SMS to Faxing 35 Receiving and Viewing Faxes 35 To access faxes on your smartphone 35 Sending Faxes from the Mobile App 35 Adding files to your Documents folder 36 Choosing a Default Fax Cover Sheet 36 Addresses Than Can Send Faxes 36 To Send a Fax by 37 Send a Fax from Your Account 38 Active Call Controls 39 Call Recording 39 On-Demand Call Recording 39 Automatic Call Recording 41 Do Not Disturb 41 Presence 41 Administrator 42 User 43 Android 6 Marshmallow Permissions 44 Managing Your User Settings 44 Extension Settings 44 User Info 45 User Hours 45 Change User Password 46 Phones and Numbers 46 Add Phone 46 Intercom 47 Screening, Greeting, and Hold Music 47 Screening and Blocking Calls 48 After Hours Greeting 49 Call Handling and Forwarding 49 After-Hours Call Handling & Forwarding 50 Incoming Call Information 51 Call Flip 51 To Use Call Flip 51 Add Numbers to Your Call Flip List 52 Call Switch 52 Feature Summary 52 Notification Banner 52 Confirmation Dialog 53 Call Handling - Advanced Rules 53 Create an Advanced Rule (Custom Rule) 54 Messages & Notifications 2
4 RingCentral Mobile App Guide Table of Contents 3 54 Voic Greeting 54 To Record a Custom Voic Greeting 54 Notifications 56 Interactive Notifications 57 ios - Receiving an Incoming Call 58 ios - Retrieve a Voic 59 ios - Receive a Text Message 60 Android - Retrieve a Voic on Android 61 Android: Retrieve a Text Message 62 Application Settings 62 Call Settings 62 Extension Settings 62 Phone System 62 Billing - Admins Only 62 Reports - Admins Only 62 Mobile App Settings 62 Join Now 62 VoIP Calling 62 VoIP Only Mode 63 VoIP Service Availability 64 HD Voice 64 Secure Voice 65 Caller ID 66 RingOut Mode 67 Default Launching 67 Cloud Storage 67 Tell a Friend 67 Re-sync Messages Inbox 68 Admin Phone System Setting 69 Company Numbers and Info 69 Direct Extension Numbers 70 Using an Existing Number: Porting and Forwarding 70 To Transfer an Existing Number 70 To Forward Your Calls 71 Auto-Receptionist Settings 71 IVR Mode Single or Multi-level 71 Company Hours 71 Greeting and Company Calls 72 Company Greeting 72 Record Your Greeting Over the Phone 72 Operator Extension 73 Dial-by-Name Directory 74 Groups 75 Add a Call Queue Group 75 Call Queue Info 76 Call Queue Group Members Availability 76 Wait Times 3
5 RingCentral Mobile App Guide Table of Contents 4 77 Call Queue Greeting 78 To Record a Custom Greeting 79 Group Call Handling 79 Group Call Handling During Business Hours 79 Call Queue Handling After Hours 80 Advanced Call Handling for Groups: Rules 81 Group Messages/Voic Greetings 82 To Record a Custom Group Voic Greeting 82 Call Queue Notifications 84 IVR Group 84 Paging Only Groups 84 How to Page from a Mobile App Device 85 Group Messaging 86 Improved Group Messaging for ios 87 Other Administrator Settings 87 Some Settings Unique to the Administrator 87 About 87 Logout 87 Reports 88 Billing 88 Auto-Purchase 89 International Calling 89 Permissions for Individual Users 90 User Permissions: Making Users into Administrators 91 Express Setup for Administrators 91 How to Start 91 With an Existing RingCentral Office Account 92 To create a new RingCentral account 92 Schedule an Implementation Appointment 93 The Administrator Express Setup 93 Setting up Users 95 Set up Administrator Call Forwarding 95 Choosing Your Voic Greeting 96 Record a Custom Group Voic Greeting 96 User Settings 96 Phones & Devices 97 Add Call Queue Groups 97 Configure the Auto-Receptionist 97 Create a Company Greeting 97 Designate and Operator Extension 98 User Settings 98 Phones & Devices 99 Roles and Permissions 100 Company Contact Pictures 101 Network Handoff Reconnecting Sound 102 Changes to Call Incoming Notification 103 Active Call Screen Button Change 4
6 RingCentral Mobile App Guide Table of Contents Call Park 105 Appendix A - Reports 105 Historical Reports 107 Quality of Service Reports 110 Appendix B - Apple Watch Support 110 Access Messages from Apple Watch 111 Receiving a Voic Message 112 Receiving a Text Message 113 Notified with a Fax Message 113 Multiple Arriving Messages 114 Answering an Incoming Call 115 Multimedia Support (MMS) 116 Appendix C: Express Setup for Users 116 Activate Your Account 117 Your Account Security 120 Quickly Get Up and Running 120 Review Your User Profile 128 Voic Setup 128 Changing the Voic Greeting 132 Use RingCentral Anywhere 133 Congratulations! 134 Overview Page 134 To Find Information About 134 Knowledgebase Articles 135 While You are Using RingCentral Products 135 Attend a Training Webinar 135 Post in the RingCentral Community 135 Download Applications 136 Appendix D: Setup for Managers 137 RingCentral Customer Care 5
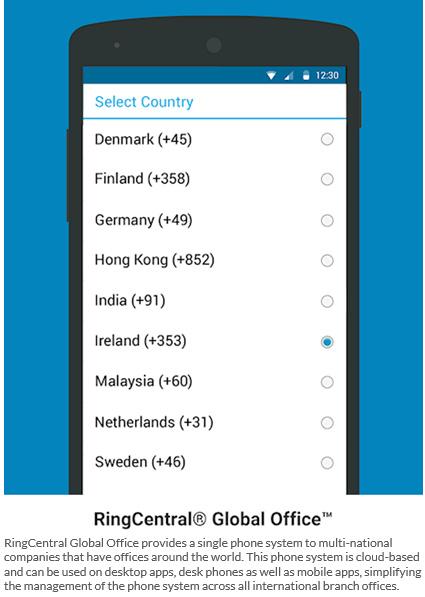
7 RingCentral Mobile App Guide Overview 6 Overview. The RingCentral mobile app puts the convenience and power of your entire business phone solution in the palm of your hand. Users can take and make calls, check messages, connect and collaborate through voice, fax, text, global conferencing and online meetings.* The mobile app is fully integrated with company directories, allowing individuals to see their contacts availability and eliminate phone tag or onhold time. This Presence feature shows the real-time status of coworkers extensions (busy or not) across all devices, including their smartphones and tablets. The RingCentral mobile app supports Bring Your Own Device (BYOD) initiatives, and empowers you and your employees with solutions such as company directory and a single business identity for voice, text, and fax all while reducing your costs on devices, improving employee productivity, and safeguarding your business data. *Business SMS (text), conferencing, and online meetings are available with selected RingCentral Office plans. Note: This document employs Android screens to illustrate managing and using the mobile app; iphone screens operate the same and look almost identical 6
8 RingCentral Mobile App Guide Overview 7 With the RingCentral Mobile App You Can Receive business calls and faxes; Check your voic and received faxes; Monitor call logs that provide a detailed history of incoming, outgoing, and missed calls; Create custom business greetings for business and after hours; Set up business voic greetings; Manage your call-handling and call screening rules; Host or join a global conference with up to 1,000 participants;* Host or join an online meeting with Web sharing of desktops and mobile screens.* ** Quickly access application functionality from a new pop-up menu. *Available with selected RingCentral Office plans. **Users can share their iphone screen via AirPlay to their RCM desktop client. Users can share their Android screen directly from the RCM Android app if their Android device is running OS 5.0 and higher. All features and functions can be accessed and managed by logging into your account on the RingCentral Web site. In addition, almost all of the Admin, User, and Group Manager features can be accessed and managed from the RingCentral Office Mobile app, as described in this document. See the Appendices at the end of this document for instructions on installing the Mobile app and setting up your account. 7

9 RingCentral Mobile App Guide Overview 8 8
10 RingCentral Mobile App Guide Overview 9 9
11 RingCentral Mobile App Guide Overview 10 10

12 RingCentral Mobile App Guide Overview 11 11
13 RingCentral Mobile App Guide Overview 12 12

14 RingCentral Mobile App Guide Overview 13 13
15 RingCentral Mobile App Guide Release Features 14 Release Features Contact Profile Image Sync Show contact photo in Spotlight (ios only) Download and show contact photo in Contacts (ios only) Download and show contact photo in Favorites (Android only; ios was done in 8.1). Active Call Button Change Redesign of the audio source icons on the active call screen and voic screen Easier to understand and consistent with native one. Hold button label will always display Hold and the button remains in pressed state while on Hold. Missed Call Notification Users are notified of missed calls via push notifications. Quickly call back or view missed calls using interactive notification buttons. Recents (Call Log) badge shows the number of unread missed calls. Paging FeaturesSave a paging group as a favorite. Make a page call to a paging group in your Contacts or favorites. Save a paging group as a favorite. Make a page call to a paging group in your Contacts or favorites. Account Federation Supports customers split across different accounts. Supports different operating procedures and limited operability across sites. Global Office accounts could be split across North America and UK to minimize impact during maintenance hours. Enables creation of accounts in multiple tiers, allowing for a mixand-match of certain feature sets. Customers should have unique extensions in the federation. Available Templates: System assigns unique extensions for users with duplicate extensions. Apply leading digits to all extensions to design all extensions in the same format. Standard extension validation before update. Contacts Filter filters company directory to display specific offices. Contact Details shows added Office field in contact details so that users can differentiate between their own company contacts and federated contacts. All users have access to the consolidated directory which they can use to find every user in the same federation. Six-Digit Extension Support On-demand feature for managing the maximum extension length value up to 6 digits; e.g., Retail. Available to all Office tiers RingCentral US & CAN. Limitations: 6-digit extensions conflict with countries with short numbers (Luxembourg, Italy, Australia). RingOut will still be restricted. Live Reports Same Reports entry in My Profile for all users (RingCentral Only). Users who have permission to see both Historical Reports and Live Reports. 14
16 RingCentral Mobile App Guide Release Features 15 Share Fax/Voic to other apps Users can now share their received voic s and faxes to any apps directly from the detail screen. Quality of Service Added ability to access key operational QoS metrics from mobile app settings. Dashboard widgets with key metrics (quality, registrations, and quality/volume ratio). Quality metrics on per-call basis at all endpoints. Available only for Super Admin Users with QoS turned on. RingOut Tips Added an educational tip screen when user tries to place a 1-leg RingOut call for the first time. Eliminates the need for the RingOut app to call the RingCentral server first so that it can bridge the call with the destination phone number. From ios 10.2 onward, Apple shows a confirmation dialog when any app tries to place a call via the iphone dialer, which cannot be dismissed by third-party apps (for security purposes). Android-Specific Enhancements These enhancements apply to Android phones: DTMF Postfixes Improvement Supports saving a phone number including, (pause)*(star), # (pound) to personal and cloud contacts. Promotes ease of use, simplicity, and customer empowerment. By allowing users to save frequently used special character sequences to their cloud of personal contacts, they can avoid entering automated system menu prompts while on conference calls. Message Push Notifications Changes in Android message push notifications: Sends message notifications for new Voic , text, and fax using push notifications (GCM) instead of persistent background connection. Saves battery. More reliable if the user is on Android 6.0 / Marshmallow with Doze or Standby modes enabled. 15

17 RingCentral Mobile App Guide Release Features 16 Note: GCM push requires minimum Google Play Service version 8.1. The user will be asked to update their Google Play Service if the installed version is too old. Voice Delay Enhancements Reduced voice delay. The efficiency of the improvement is between 35%~60%, depending on the device and Android OS. Devices with 8 cores CPU, like Samsung S5, and devices that support fast audio track, like Nexus 5, will see a 50-60% improvement. The voice experience will be very close to our ios app. Devices with 4 cores CPU and devices with 2 cores with built-in AEC will have a voice experience similar to the softphone. Devices with 1 core CPU will not see any improvements. Echo Cancellation Enhancement Enhance the Echo Cancellation algorithm on Android. Offline Mode Support Ability for user to open and use the app when there s no network connection. Previously, the user would be blocked on the login screen Large Message List Message Push Notifications Performance improvements. Android N Compatibility Office mobile applications will display the same language as the device if that language is supported in our application. VoIP Calling Faster call connection when user answers from a GCM push notification. Improved the VoIP voice quality for the top 10 frequently used devices (E.g. Samsung S7, Samsung S7 Edge, etc.). Fixed one-way audio bugs. Android O Compatibility Ensures release is compatible with new OS versions, eliminating crashes and any major UI bugs. Enables users to stay up to date with the latest OS versions. ios-specific Enhancements Improvements in sending or replying to text messages Improvements in launching the app when it is killed Support for ios 9 Default Font San Francisco VoIP Calling Increased the audio volume of VoIP calls so it s easier to hear. VoIP IPv6 Compatibility Support for VoIP under the IPv6 Apple network. Support for call recovery when the network switches between IPv4 and IPv6. Support for meeting Apple s criteria for submitting a new ios app after 6/1/16. See Quick Reply from Text Message Notifications Ability to reply to text messages in the notification tray directly in ios 9 and later. ios 10 Compatibility (applies to all users) 16

18 RingCentral Mobile App Guide Release Features 17 Office mobile applications will display the same language as the device if that language is supported in our application. ios CallKit Support Answer calls from the lock screen just like a native call. No more fumbling with the incoming call push notification. Users can choose to decline or accept incoming calls when already on an active Office@Hand VoIP call. No more abrupt interruptions or calls put on hold undesirably. ios 11 Compatibility Ensures release is compatible with new OS versions, eliminating crashes and any major UI bugs. Enables users to stay up to date with the latest OS versions. iphone X Compatibility Ensures release is compatible with iphone X hardware. Example when a call is answered from a locked screen. 17
19 RingCentral Mobile App Guide Supported Languages 18 Supported Languages The following languages are supported by RingCentral from release 9.4: US English UK English French Canadian French German Italian Spanish 18

20 RingCentral Mobile App Guide The Main Menu 19 The Main Menu All Messages When you log in, All Messages will be the first screen displayed on your Mobile app. The new interface provides immediate access to the most commonly used app features, shown on the top and bottom menus. Tap to filter for All Messages, Text, Voic , or Fax. Tap at the top of All Messages to create a new text or fax message. For example, tap Text to open the New Message screen. Tap and tick the open circle > then Delete to delete messages. All of your voic , text, and fax messages are immediately visible when you log in to your Mobile app. Recent messages that you have responded to appear in black; messages you have not read or heard appear in blue; and calls you missed appear in red. In the Search box, you can search for messages by sender name or number. Tap a message to listen, view, or read it. Tap the circled info icon to the right of the message to view information about it, and respond with: Call Send Text or Send Fax to the number Create New Contact Add to Existing Contact, or Block Number Some functions might not appear of certain permissions are restricted. Note: Text, Meetings and Conferencing are available for Office customers only. 19


21 RingCentral Mobile App Guide The Main Menu 20 Filter Your Call Log Tap on the All Calls screen to filter your Call Log. Tap Company Contacts; then tap Company Contacts. to see your filtered Call Log of Call Log The Call Log maintains your call history, including calls you placed, received, and missed. Missed calls displayed in red. Tap at the bottom of the All Messages screen to open your Call Log. The Call Log screen opens in the All Calls setting. Tap the caret next to to see All Calls or only your Missed Calls. Dial numbers by tapping a name or number displayed in your Call Log. (You must have a Direct Number to make outbound RingCentral calls from your smartphone.) Tap the info icon on the right side of an entry to see caller details (Patrice Smith in this example) and other options available to you. Tap the Trash icon to clear both the company call log and your extension call log. A Warning/Confirmation message will appear. 20


22 RingCentral Mobile App Guide The Main Menu 21 Favorite Contacts Find the people you need, fast. All Contacts lets you view your company, personal, and favorite contacts at all once. To see them, tap Contacts on the bottom menu of most app pages. (Company contacts come from the users in your RingCentral account and cannot be edited from the mobile app.) Tap ALL to Show (or Hide) All Android Contacts. Tap the caret next to All Contacts, then tap Company Directory to see only your contacts in your company directory; or tap Personal Contacts to view your personal contacts from your smartphone contacts list. When your Android contacts are hidden, none will display on your Company Directory page. Select Personal Contacts. Tap and select the contacts you want to display on your Personal Contacts page. Use the Search field at the top to find specific contacts by name. Tap a contact name (Alex Prazma in this example) to view details including extensions, direct and mobile numbers, and address. Choose/Filter Groups in Contacts On the All Contacts screen, tap the Filter icon. 21

23 RingCentral Mobile App Guide The Main Menu 22 Cloud Contacts Your contacts can be imported to the RingCentral cloud. When you download personal contacts from the server, they are automatically synced across the RingCentral cloud, Mobile app, and Desktop app. You may add these contacts to your Favorites, and then tap them for calling, messaging, and faxing. Spotlight Search for Contacts Spotlight Search for Contacts (ios only) permits a quick search for a RingCentral contact without launching the Mobile app. Use Case: A sales rep wants to make a quick call to the Accounting Manager to obtain an order approval while traveling. He uses Spotlight on his iphone to search his colleague s name. With a simple tap, he is able to view the phone numbers and tap again to make a call. 22


24 RingCentral Mobile App Guide The Main Menu 23 Documents Tap the Kebab Menu at the top of All Messages to access more features; then tap Tap the Documents caret to change the filter to view faxes saved in Drafts or faxes inprogress of being sent in the Outbox. to access documents imported from your or other apps. Then you can select them to send as a fax or in an . 23

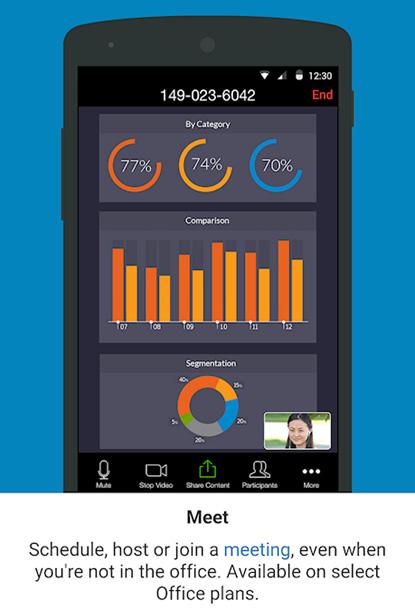
25 RingCentral Mobile App Guide The Main Menu 24 RingCentral Meetings RingCentral Meetings* adds the power of video conferencing and web sharing to your business communication. Hold faceto-face meetings in high definition and share your desktop or documents with anyone, anytime, anywhere. You can invite participants to join a meeting by or by SMS on mobile. They don t have to be RingCentral customers; they can download and run the RingCentral Meetings app free and join your meetings without needing to create an account or log in. See the RingCentral Meetings User Guide for system requirements and more information. *RingCentral Meetings is available for Office customers only. Initiate a RingCentral Online Meeting Tap the Kebab Menu at the top of All Messages. On the popup menu tap. If the Meetings app is not installed you will be prompted to download it from Google Play Store or itunes. If the Meetings app is installed, then tapping Meetings will open it. Next, select Join a Meeting or Sign In and start with or without video. RingCentral Meetings will start the web meeting and prompt you to invite participants. 24


26 RingCentral Mobile App Guide The Main Menu 25 Join a RingCentral Online Meeting Tap the Kebab Menu at at the top of All Messages. On the pop-up menu tap. If the Meetings app is not installed you will be prompted to download it from Google Play Store or itunes. If the Meetings app is installed, then tapping Meetings will open it. Next, select Join a Meeting or Sign In and start with or without video. Enter the Meeting ID and tap Go; then tap Join Meeting. Enter the Meeting. 25

27 RingCentral Mobile App Guide The Main Menu 26 Glip Team Collaboration App Glip is a real time productivity app that allows you to make your team more productive by offering multiple solutions in one place. With Glip you are able to: Streamline workflow with built-in apps such as calendars, task management, and file sharing Work at your desk with either Glip via web, desktop app, or be productive on the go with Glip Mobile. Switch between different modes of communication with options to either send messages via chat or video chat. Integrate your other tools with Glip, making it easier to collaborate. Learn more about Glip, here. To Launch Glip: Tap on the bottom of most app screens. If you are logged in and Glip is installed, Glip will launch automatically. Tap Install if Glip is not installed on your smartphone. Follow the screen prompts and create an account. 26
28 RingCentral Mobile App Guide My Profile Settings 27 My Profile Settings Tap your profile picture on the All Messages screen to open My Profile. It will show you your Status (Available or Busy) and give you the opportunity to Accept Calls, Accept Queue Calls, and activate Data (VoIP) Calling from your Mobile app. Tap Mobile App Settings to select your Caller ID and your calling Region. Also choose Join Now, your Default Launching setting, and your Cloud Storage location from Mobile App Settings. Tap Extension Settings to open another menu for configuring your Mobile app. See and set User Info, Screening, Greeting & Hold Music, Call Handling & Forwarding, Messages & Notifications, Outbound Caller ID, and Outbound Fax Settings from the Extension Settings screen. The contact profile image sync feature provides: Show contact photo in Spotlight (ios only) Download and show contact photo in Contacts (ios only) Download and show contact photo in Favorites (Android only; ios was done in 8.1). Admins only may tap Phone System, Billing, and Reports to access and change those settings and view call volume. See Other Administrator Settings on page 87 for more details. 27


29 RingCentral Mobile App Guide Making a Phone Call 28 Making a Phone Call To make a phone call, tap the Keypad icon at the bottom of most screens of the mobile app. Tap the numbers; then tap the green Handset. most pages, and choose a name and tap the small blue handset next to it. Or tap Contacts on the bottom menu to open All Contacts. Tap the caret next to All Contacts to display your Favorite Contacts. Other areas, such as the Call Log and the Messages screen, display phone numbers which you can tap to call. Near the top the keypad, tap the caret next to the number shown to select the caller ID to be displayed for your outbound calls. RingOut The RingOut feature allows you to mask your caller ID when making business calls from another phone, such as your personal cell phone. This tool allows you to make the call and send your account phone number instead as the caller ID to the party you are calling. It also keeps your current location private. For example, if you re working from home, you can initiate RingCentral calls from your smartphone, then connect and complete the call from your home phone. The person you re calling will see your RingCentral number. RingOut is accessed by tapping the keypad and then green Handset icon on the bottom of most mobile app screens, such as the Messages screen, and the Contacts screen, and the Call Log screen. Use the keypad that appears to dial the number you want to call. Your mobile app will do the rest. (To specify your RingOut phone, see RingOut Mode, next.) Note: RingCentral Pro customers and Canadian customers require a paid digital line for outbound calls. You can also choose a number in your contacts list. Tap the Contacts icon at bottom menu of 28


30 RingCentral Mobile App Guide Making a Phone Call 29 Enable RingOut To enable RingOut, turn off VoIP Calling. It will use your carrier service to make outbound calls. To make outbound calls via RingOut, the mobile app uses your cellphone s native calling system through your cellphone carrier. Use RingOut Mode to maintain your presentation on such calls, including such features as Caller ID and call logging. You keep your personal cellphone number private. RingOut calls use carrier voice minutes rather than your carrier data plan. RingOut lets you use your RingCentral business number from any phone you choose, including your smartphone. To configure, tap your photo at the top left of screen. On the My Profile screen, scroll down to Call Settings and tap Always Use Cellular Voice (RingOut). calls over Wi-Fi or a 3G/4G data connection. Using Wi-Fi instead of your wireless carrier s 3G or 4G network can save carrier voice and data charges, especially when traveling internationally. See details on VoIP Calling below. Incoming native calls will interrupt your VoIP call on ios. Answering the native call will place your VoIP call on hold. Rejecting the native call will auto- resume your VoIP call. Pre-call Controls Pre-call controls allow you to handle incoming calls in several ways: End and Answer mutes the ringtone and accepts an incoming call. To Voic sends caller directly to your voic . Hold & Answer mutes the ringtone, and places the call on hold and answers the incoming call. Reply with Message sends a voice response to the caller. The message can either be a pre-set text-to-speech reply or a custom text-to speech message. Choose a RingCentral device to set as your RingOut Mode phone. Or tap Another Phone to add phone numbers, and then tap one of them to be your RingOut device. To avoid accidentally sending calls to your personal voic (if you don t pick up when your phone rings, or if you misdialed), turn on Confirm Connection so the mobile app will prompt you to press 1 before it dials the number and connects your call. VoIP Calls The RingCentral Office Mobile app can make and receive calls using VoIP (Voice over IP) using an Internet connection. You can place and receive 29

31 RingCentral Mobile App Guide Conference Calling 30 Conference Calling Conference Calling is available on all RingCentral Office user plans. A single conference bridge phone number is provided for each account, shared by all users no need for your users to keep track of multiple bridge lines. Each user gets their own individual host and participant access code, so they can hold conference calls whenever they want, wherever they are. Each user can host a conference with up to 1000 attendees, using their IP desk phone while in the office, or their Desktop app on their desktop computer, or the RingCentral mobile app while on the go. Conferences are reservation-less you send an invite to participants, and the conference starts as soon as you join as host. To start a conference, tap More at the bottom of most screens and then tap Conferencing. The Conferencing screen shows the dial-in number, Host and Participant access codes, and Invite and Start Conference buttons. The host can mute participants, get caller counts, record conferences, and more. The main conferencing number is available in the U.S. In addition, incountry dial-in numbers are available for use in over 40 countries. For additional information including touch-tones to use for control during the conference, and a list of international dial-in phone numbers please visit this page: Touch Tone Commands for Conference Calls on page 31 and International Dial-In Numbers. Tap Invite with Text Messaging or Invite with to create a new SMS text message or that contains the conference number and the participant access code the attendee should use to join the meeting. Add a subject line and additional messaging, plus any attachments as needed, and tap Send. Note: You can attach documents from your files to the Invitation . Note: Invitees with RingOut enabled can join the conference automatically via their native dialer by simply tapping Join on the pop-up message. Tap JOIN AS HOST to log in automatically and begin your conference.. The conference host can control whether participants may join the conference call before the host does by selecting the Join before Host option on the mobile app. Your recipients can tap to join the meeting directly from the text invitation without dialing the number and entering the access code. 30
32 RingCentral Mobile App Guide Touch Tone Commands for Conference Calls 31 Touch Tone Commands for Conference Calls 31

33 RingCentral Mobile App Guide Join Now 32 Join Now. The Join Now feature provides the following: Easily send an to the group with a predefined message, such as Will be there in 10 minutes or a custom message to cancel the meeting or tell everyone you are switching conference rooms. Reply button on the Join Now screen. Also on interactive notifications for events with only one call to action. By default, replies to all (host and participants); user can remove people in the To: field. Available on RingCentral Mobile App and Carrier Partners Mobile App. For more information about Join Now, see this Knowledgebase article. Continues on next page... 32


34 RingCentral Mobile App Guide Join Now 33 Join Now (continued) 33
 phone numbers. This feature is available to all RingCentral Office customers.")

35 RingCentral Mobile App Guide Business SMS 34 Business SMS Business SMS integrates text messaging into your mobile app on your smartphone or tablet, as well as your desktop app. You can send and receive text messages to and from multiple extensions, or 10-digit local (non-toll-free) phone numbers. This feature is available to all RingCentral Office customers. Note: Users must have a DID connection to send an SMS to nonsubscribers of RingCentral. Send messages to clients, colleagues, and your groups without having to text each individual group member. Recipients can reply via Business SMS, or via their native SMS system. Send Business SMS messages to any non-toll-free number in the United States or to any RingCentral customer number even if the customer is traveling overseas. On the All Messages screen, received SMS messages are indicated by the SMS icon. Click on a message to view it, to respond to it, and to view the sender s contact information. To create a new message, 1. Tap the caret next to All Messages; then tap Text and to create a new message. 2. Enter names or phone numbers in the To: line, or select from your Contacts by tapping the blue plus sign. You can message anyone whose phone is able to receive text messages. You can message RingCentral colleagues by extension number. You can block unwanted SMS messages to your extension by blocking the phone number of the sender. You may unblock any time. 1. Tap More on the bottom menu; then tap Recent Calls. 2. Tap next to the caller you want to block. 3. On the Contact Info screen, tap. Also see Screening and Blocking Calls on page 47. When creating an SMS message, tap the caret to the right of the From line to select your default Caller ID for outbound messages. Note: Business SMS does not support international numbers and short code. Business SMS is available for Office customers only.. Group Messaging company contacts. allows you to send a message to two or more Group Messaging works only with Extensions and Contacts in the Company Directory. Messages sent to a Personal Contact will be sent as a separate message. For Group Messaging FAQs click here. SMS to 911 Sending an SMS to 911 on the Mobile app will pass control of this function to the native messaging application, and send the text directly to the 911 service. Note: Available only to US Office customers. 34

 Sending Faxes from the Mobile App All users with the latest RingCentral mobile app can send or forward documents (up to 20 MB) as fax messages to any contact anywhere from your ios and")
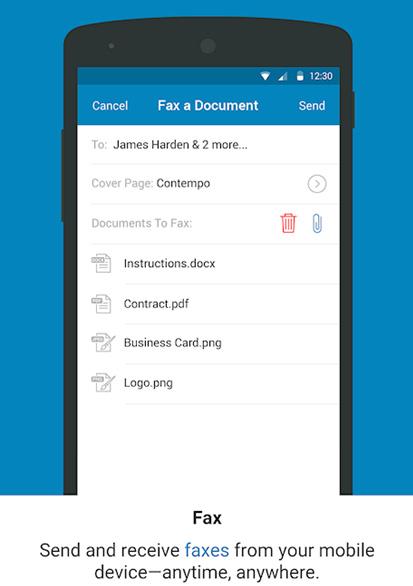
36 RingCentral Mobile App Guide Faxing 35 Faxing You can send, receive, and view faxes using the RingCentral mobile app. If you have an iphone, you can use that device s AirPrint function to directly print any fax. Receiving and Viewing Faxes Your RingCentral phone number by default receives both voice calls and faxes. (Optionally, you can set up specific extensions to receive only voice calls or only faxes.) Sending Faxes from the Mobile App All users with the latest RingCentral mobile app can send or forward documents (up to 20 MB) as fax messages to any contact anywhere from your ios and Android-powered devices. 1. On the fax screen, tap. 2. Enter recipient s phone number in the To: field. (You can also click the icon to choose a contact from your phone.) View the faxes you ve received on the All Messages screen of the RingCentral mobile app. You can also arrange to receive faxes as PDF attachments in your account. To access faxes on your smartphone 1. On the All Messages screen, tap Messages at bottom-left. 2. Tap caret to filter your messages. 3. Tap Fax to select your unseen fax message. 4. Tap to download your fax message. 5. Tap to view your new fax message. Unviewed fax messages will appear in gray on the All Messages screen; Viewed fax messages will appear in gray on the All Messages screen. 3. Select your Cover Page (optional) and fill it in. 4. To attach a document (optional) tap (Fax attachments can be up to 20MB) 5. Attach files or photos stored in Dropbox, Box, or your phone or tablet. 6. Authorize RingCentral to access your files (required only once). 7. Tap Send. Adding files to your Documents folder Files can be added to your Documents folder from attachments. 1. From your smartphone s app, open an and tap and hold the attachment name until the gray screen of app icons displays. 2. Tap the icon Open. The document will be added to the Documents folder, from which it can be selected for faxing. 35
37 RingCentral Mobile App Guide Faxing 36 Choosing a Default Fax Cover Sheet A cover sheet is attached to each fax you send through the RingCentral fax service. 1. On the Fax a Document screen, tap to select the default Contempo cover sheet. 2. Tap again to preview other available cover sheets. 3. Select the cover page you want and click Save. The variable information on the cover page will be filled in during the faxsending process. Addresses Than Can Send Faxes On the Fax Settings screen, under Faxes Sent via , under the line addresses permitted to send faxes add, one by one, the addresses from which users can send faxes by through your account with RingCentral. Click Add after each one; click Save when done. addresses might include alternate company accounts, personal accounts, or accounts for contractors. You can store up to five such addresses. When a fax is sent by as described below, the system checks the address of the sender, and sends the fax if it is on this approved list. Omitting the Cover Sheet When Subject is Blank is in the same information block. When you send a fax by , the subject line of the is put on the cover page. Check On to omit the cover page by sending the fax without a subject line. To Send a Fax by You can documents to a special RingCentral address that automatically converts the attachments into fax format and sends them to the fax number specified. You can send faxes by in this way from any address you have added to addresses permitted to send faxes described above. 1. Create an message. Attach one or more documents you wish to fax. 2. The text in the Subject Line of the will be added to the cover sheet. (If no subject line text is included, the cover sheet will be omitted if you set that feature as described above.) 3. Send the to the recipient s 10-digit fax number at the address rcfax.com. For example, to send a document to the fax number , you would use this address: @ rcfax.com. You can send the fax to multiple recipients by adding fax number-addresses, separated by a comma, thus:* @rcfax.com, @rcfax.com, @rcfax.com*. 36

38 RingCentral Mobile App Guide Faxing 37 Send a Fax from Your Account To send a Fax from your RingCentral Office Online Account, follow these steps: 1. Through a Web browser on your smartphone or desktop PC, log in to your online account at and click the FaxOut icon in the upper-right corner of the Web page. 2. Enter the fax numbers of the recipients in the To: box. 3. You can click the green plus sign to select fax numbers from your Contacts list. You can also select Groups, which will send the fax to each member of the Group for whom you have a fax number listed. 4. Create a Cover Page with a personal message (optional). 5. Click Browse to add one or more documents to fax. 6. Choose Send Now and then click the Send Now button to send your fax. 7. Or choose Schedule to schedule delivery for some future date. A wide variety of standard document types, including word processing, spreadsheet, and PDF documents, are recognized by the RingCentral Cloud Fax system. You can also send faxes using the Desktop app, which you can download and install on your Windows PC or Mac desktop. Share Fax/Voic to other apps Users can now share their received voic s and faxes to any apps directly from the detail screen. 37
39 RingCentral Mobile App Guide Active Call Controls 38 Active Call Controls Active Call Controls are soft keys accessible to conveniently use various features on your RingCentral mobile app. Mute deactivates your microphone for better incoming sound and minimizes background noise from your side of the call. Keypad allows you to use the keypad whenever you need to press numeric inputs to access a certain department or queue. Speaker allows you to toggle between using your headset and the loudspeaker of your device. Hold puts the other party on the line on hold. Tap Hold again to go back to the call. Record activates the On demand Call Recording feature on your extension. Recordings are saved in your extension's online account. Switch to Carrier will transfer a VoIP Call to your smart phone's mobile carrier so you can continue in the same call when VoIP degrades. Transfer will transfer your active call to a different extension. Park will Park the call in the cloud. A parked call can be retrieved by any authorized extension within the phone system. Flip allows you to flip your call form one device to another as long as you have configured your Call Flip settings properly. End Call ends an existing call. will return automatically to VoIP Calling over Wi-Fi when your Wi-Fi connection improves, providing VoIP Calls and Over 3G/4G are both enabled. See VoIP Calling on page 62 for details. You may hear a network handoff reconnecting sound to indicate an attempt to re-establish a VoIP call when that connection was previously lost. You will also see the message, Reconnecting... in the active call screen. Note: Auto Hand Off is enabled only when options VoIP Calls and Over 3G/4G are both selected. Three green lights indicate HD call quality should be good. Two yellow lights indicate some packet loss and/or jitter and your call quality may suffer. One red light indicates call quality may be too poor to use. If so, change locations to find a better Wi-Fi connection. If none is available, your service will automatically switch to your carrier voice plan. Your service 38
40 RingCentral Mobile App Guide Call Recording 39 Call Recording Two types of call recording are available: On-Demand and Automatic. On-Demand Call Recording Once On Demand Call Recording has been set up, users can activate call recording while taking a call on a RingCentral IP desk phone, or anywhere using the RingCentral mobile app. Press the Record button on the Call Control screen to start recording a call, and once again to end the recording. The Press the Record button on the Call Control screen to start recording a call, and once again to end the recording. The Start announcement will play when recording begins, and the Stop announcement will play when the recording ends. On-Demand Recordings are saved for 90 days. Download recordings to retain them longer by signing in to your online account and clicking Messages and then Recordings. Automatic Call Recording With Automatic Call Recording, the Administrator designates specific extensions for which all inbound and outbound calls will be recorded without further interaction by the user. Automatic Call Recording is activated and managed by the Administrator from the RingCentral online account, rather than from the mobile app. The Automatic Call Recording feature enables Administrators to record and review all calls to and from selected extensions. Automatic Call Recording is available to Administrators of RingCentral Office Premium and Ultimate plans. Administrators: Follow these instructions to enable Automatic Call Recording for selected extensions. 1. Log into your online account and from the Admin Portal, select Phone System. 2. Click Auto-Receptionist > Call Recording > Automatic Call Recording. 3. Click Enabled. 4. Review the call-recording waiver popup that warns of U.S. federal and state laws requiring consent to record calls. 5. Click the Users & Groups to Record bar. 6. For each user you wish to record, check Incoming and/or Outgoing. Click Save. 7. Click Call Recording Announcement to check and, optionally, edit the message that automatically plays to incoming callers when they call a user who has inbound call recording set to On; this announcement lets them know the call is being recorded. The message will be played just before ringing the user s phone. This message can be customized. 39

41 RingCentral Mobile App Guide Call Recording 40 When the Admin sets Automatic Call Recording, each User receives an alert that their incoming/outgoing calls are being recorded; when the Admin deselects a user, that user will receive another that their incoming or outgoing calls are no longer being recorded. Once a user extension has been activated by the Administrator, Automatic Call Recording will record all of that extension s incoming and/ or outgoing calls. Recordings are saved in the Administrator s Call Log, where they can be played back individually, or downloaded as a group as MP3 files. Automatic Call Recordings are saved in the cloud for 90 days. Download recordings to retain them for a longer period. Users can also review and download their own recorded calls. Users: If your Administrator has activated Automatic Call Recording for incoming to, or outgoing calls from, your extensions, you will get an letting you know. You will also get an when Automatic Call Recording is deactivated for your extensions. Once recordings are activated for incoming calls, an announcement will automatically play to incoming callers letting them know that their call is being recorded. However, if your Administrator has activated Automatic Call Recording for outgoing calls for your extensions, no such automated announcement is played when you call others; it is your obligation to let those you call know that the call is being recorded see Call Recording Important Legal Requirement. RingCentral provides default announcements to play before and after the call. Review, and create your own custom announcements if you wish; custom messages must comply with laws and regulations as noted above. Call Recording Important Legal Requirement Certain state and federal call recording laws apply to the use of this call recording feature by you and all users associated with your account. In some states, you and each user associated with your account are required to obtain consent from all parties to record a phone call. By using the RingCentral call recording feature, you and each user associated with your account are required and must agree to maintain compliance with all applicable state and federal laws and regulations. On behalf of your organization, you, as Administrator, agree to notify all users associated with your account of their obligation to comply with all applicable state and federal laws and regulations. You, as Administrator, and each user associated with your account, understand and agree that each of you are solely liable for compliance of such laws and regulations, and under no circumstances shall RingCentral be responsible or held liable for such compliance. 40

42 RingCentral Mobile App Guide Do Not Disturb 41 Do Not Disturb When you re busy and don t want to be interrupted, use Do Not Disturb to forward calls directly to voic . The default setting for your extension is Available. To change the setting to Busy, tap your photo to open your Profile; then tap Status. Next, tap Busy to send incoming calls to your number directly to voic . Presence Presence is a feature by which you can see if another user is on the phone. Presence-enabled RingCentral desktop IP phones use lights to indicate which specific user extensions are in use or on hold, with the user s permission. Users can monitor Presence from their Favorites tab, and manage their own Presence settings, from their mobile app. The Admin can manage Presence settings for all users Administrator Admins can use their smartphone app to set permission to share a user s presence status with colleagues by tapping their photo, then Users; selecting a user, then User Info; tapping the Phones & Numbers tab, then tapping Presence. Admins can set their own Presence as a user by selecting their own name/extension. Tap Appearance. If the user has no Presence-enabled phones, they will see the message: Currently none of the phones on your extension can show presence. Phones with the capability can be purchased from RingCentral by clicking Add Phone. As an Administrator, you can add Presence-enabled phones. (Users will get a message telling them to contact their Administrator to purchase phones.) If the user has a Presence-enabled desktop IP phone, its Presence status can be displayed as shown on the right, below. The first two lines (Line 1 and Line 2) are dedicated to that user and cannot be changed. Tap other user s extensions to choose colleagues whose presence you wish the user to monitor, from among those who have granted permission to show their presence status. 41


43 RingCentral Mobile App Guide Presence 42 When you add extensions for this user to monitor with Presence, you can also check Ring my phone when any user I am monitoring rings so the user will know when the monitored user s phone is ringing; and/or check Enable me to pick up a monitored line on hold so this user can act as backup to the other user. Under the tab Permissions you can check those colleagues who can monitor your phone s Presence. Then click Save. Now tap Permissions. Tap Share my presence. When On, this allows other users to see this user s presence status whether the user is on the line. Note that Presence detects calls to numbers/extensions. No matter which actual device the call is sent to, the system detects that the number/ extension is ringing, active, or on hold. You can also select other users who can pick up this user s phone calls. A user can thus answer a busy manager s calls or a call to a user who is in a meeting or out at lunch. User Manage your Presence settings from the mobile app by tapping your photo and then tapping Extension Settings > User Info. Tap the Phones & Numbers tab, then scroll down and tap Presence. Under the Appearance tab, view and manage your Presence settings for that phone. Or you may see the message Currently none of the phones on your extension can show Presence. Phones with Presence capability can be purchased from RingCentral by clicking Add Phones. (See your System Administrator, as only Admins can add phones.) 42

44 RingCentral Mobile App Guide Android 6 Marshmallow Permissions 43 Android 6 Marshmallow Permissions The Android 6 Marshmallow OS offers user controls over some application permissions, a feature already available on the ios 8. Users will be asked to turn ON the following permissions: Contacts (view local contacts) Phone (RingOut) Microphone (VoIP call) Storage (store fax/voic /documents/photo) 43

45 RingCentral Mobile App Guide Managing Your User Settings 44 Managing Your User Settings The first time you tap you will be offered the opportunity to add a photo to your profile, replacing the avatar. You may select an existing photo from your Desktop app, from your mobile phone, or take a new photo. When you tap Add, the photo replaces the avatar. Extension Settings This screen contains most of the functions you ll use to manage your own user settings.. When you add your photo to your profile page, it is synced automatically across the RingCentral cloud, and your colleagues will see your new photo in their RingCentral Mobile app and Desktop contacts. However, your new photo will not automatically replace the profile image for you (if any) that was manually added by your contacts. Most of the special customizable features of your RingCentral mobile app are found in the Profile area, particularly under Extension Settings. This includes such items as User Info, Call Handling & Forwarding, Messages & Notifications, and Outbound Caller ID. These features are the same for Users and for Administrators acting as Users. User Info To manage your basic settings, greetings, call screening, call handling, direct numbers and desktop phones if you have them, security settings, notifications, and more, tap User Info. 44


46 RingCentral Mobile App Guide Managing Your User Settings 45 Extension Number: Callers to your company number can reach you by entering this extension number. They can also reach you by dialing your Direct Number, if you have one. First Name/Last Name: You can edit your first and last names here. Record User Name: RingCentral uses text- tospeech to pronounce your name. If mispronounced, you can tap this item to correct the pronunciation. Or tap the Text-tospeech name field and type in a phonetic pronunciation. Login in to your online account to hear it. Contact Phone: This is an optional alternative phone number that might be used for call forwarding if you wish. Mobile Phone: Optional This address can be used for notifications. Use to Log In: Optional. User Hours Set user business hours here. Default is 24/7. If you set specific business hours here, you can then set separate call-handling rules for business hours and after hours. Tap User Hours. Tap 24 hours for incoming calls to be handled the same way all the time, including weekends. Tap Specify hours and specify the days and times you are available to take calls. Setting specific hours will allow you to set call-handling rules that apply during Business Hours and separate call-handling rules for After Hours. Also check the Time Zone setting at the bottom of this screen. When you re finished, tap Save. Change User Password You may also Change User Password form the User Info menu. If you forget your password when logging in, you may re-set it from the Reset Password mobile app screen. 45

47 RingCentral Mobile App Guide Managing Your User Settings 46 Phones and Numbers At the top of the User Info screen, tap Phones & Numbers. Here you will see the direct-dial numbers, if any, assigned to you. Conference Number: On this screen you will also see your company Conference Number, Host Code, and Participant Code. You can use this information to start or join a conference; or you can simply tap More and tap Conferencing to set up and manage your Conferences. Direct Numbers allow customers to contact you directly without having to go through the company receptionist or phone tree. If you have direct numbers, you can tap each number to select the number type voice and fax, voice only, or fax only for each. Tap Add a Direct Number if you are not an Administrator, you will receive a message to contact your Administrator to request direct numbers. If you do have Administrator privileges, you can add a Direct Number yourself. To add one or more numbers, tap Add Number and follow the screens to choose a Local, a Toll-Free, or a Vanity (custom) number. Additional charges for extra numbers will be provided on the Order Confirmation screen. Add Phone This is an Administrator function and must be done through the RingCentral online account. Administrators can add, remove, or reassign phones. Presence See Presence on page 41 for information about managing Presence settings Intercom Mobile app users can initiate Intercom by dialing *85 and entering the extension number of the user they wish to intercom with. See Touch Tone Commands for Conference Calls on page
. 1. Tap User Hours. 2. Turn On User Greeting. 3.")
48 RingCentral Mobile App Guide Screening, Greeting, and Hold Music 47 Screening, Greeting, and Hold Music Tap your photo and go to Extension Settings > Screening, Greeting & Hold Music. Choose the message callers will hear when they call you during business hours (or at all times if you are using 24 hours as your User Hours). 1. Tap User Hours. 2. Turn On User Greeting. 3. Tap Set Greeting. 4. On the Set Greeting screen, review the text of the default greeting. To hear it, tap Play. The Auto-Receptionist will read your name using text-to-speech technology. If you want to use the default greeting, tap Save (or Cancel if you have made no changes). 5. Or create a Custom greeting. 6. To record a Custom greeting: a. Tap Custom and then tap Record. b.provide a phone number for the system to call, or have it call your forwarding number (select one under the Forwarding Number dropdown below). c. Tap Call Now. d.ringcentral will call you and prompt you to record your greeting. e.on the User Greeting screen, a message will confirm that your custom message has been successfully received. f. To listen to your custom greeting later, access your account on the Web. g. Tap Cancel to return to the previous screen. Screening and Blocking Calls Under Set up call screening: 1. Turn on Call screening and choose Ask callers to say their name before connecting: a. If Caller ID is not present, b.if the caller is not in the user s Contact list, or c. Always. 2. Scroll down and turn on Audio while connecting. Tap Set Audio and select the style of music to be played to the caller. 3. Turn on Hold music. Tap Select Music and select the style of music to be played to the caller. Choose from a dozen and a half types of music from easy listening to jazz, country, classical, corporate, Latin, or none. You can also choose a simple ringtone. 4. To listen to the music options, tap the Play button. 5. Tap Blocked Calls and select from the options for blocking calls. a. All Calls If selected, you will not receive any calls or faxes made to this number, unless you select Allowed Numbers, below, and enter specific numbers or area codes. b.specific calls will block all calls and faxes from specific numbers or area codes you enter, or will block calls and faxes with no Caller ID. c. Specific numbers. d.calls and faxes with no caller ID. e.calls from Pay Phones. Each choice also lets you set the message callers will hear, such as This number is not available from your calling area or Mailbox Full. 6. Tap Save. Repeat this process with the After Hours tab. 47

49 RingCentral Mobile App Guide Screening, Greeting, and Hold Music 48 After Hours Greeting Note: In Call Handling/After Hours if you choose Only Play Greeting and Disconnect, you can choose a Default message or a Custom message. If in Call Handling/After Hours you instead chose to Unconditionally forward after-hours calls, or to send after-hours callers directly to voic , your After-Hours greeting will not be played. You can still set Blocked Calls handling. 48

50 RingCentral Mobile App Guide Call Handling and Forwarding 49 Call Handling and Forwarding Tap your photo. Tap Extension Settings > Call Handling & Forwarding. Review Business Hours and After Hours settings, and create Advanced call-handling rules. User Hours Call Handling & Forwarding 1. Under First ring, tap Desktop apps & Smartphones. 2. Switch Notify my Desktop apps to ON and set Wait before forwarding begins to the desired # of seconds (range 0 to 75 seconds). 3. Tap Save. Back at the Call Handling & Forwarding screen, choose from among the many options for determining which phones will ring, in what order, when calls come in during User business hours. Your RingCentral Direct Numbers, if you have any, are listed first.tap On for the ones you want to ring your during business hours.if you have no direct numbers, but only extensions, no numbers will be displayed here. Tap Add Phone to add non-ringcentral numbers you may have, such as your home phone. Tap the space next to the label; such as Home, and type in a phone number, then tap ON to activate it. To call outside numbers with extensions, put an asterisk between them, thus: [number] * [extension]. The system will dial the number, pause, and then dial the extension. Tap Forward calls to other user s phone to select other users on your RingCentral account to add to your forwarding list. Tap Change Ring Order to decide in which order phones will ring when using Ring Sequentially. Tap left caret when done. Tap Edit Ring Groups to check phones you want to be treated as a group. For example, if you use Ring Sequentially, then your Ring Order can include groups of numbers that will ring as a group (that is, simultaneously when it is their turn). Tap left caret when done. Tap Number of Seconds to set how long a given phone will ring before the call is forwarded to the next number, or sent to voic . (Keep in mind how many total rings callers will be subject to if the call is not answered.) Tap Sequentially or Simultaneously to have the phones to ring one after the other in the order given in Ring Order, or all at once. Tap Smartphone and Desktop to have your RingCentral Desktop call controller, if you have downloaded and installed it on your desktop computer, display incoming calls as soon as they come in. This gives you the opportunity to pick up the call on your Desktop app, or send it to voic , or otherwise manage the call before other call-handling rules begin. Select the number of rings to Wait before forwarding begins. After-Hours Call Handling & Forwarding Tap After Hours, then select: Send callers to voic You will be able to create a custom voic message or accept the default message. Play announcement and disconnect You will be able to create a custom announcement or accept the default message. Forward Calls Turn On phones listed under Ring these phones during after-hours. Unconditional Forwarding sends calls directly to a specified number without applying any call-handling or call-screening rules. 49
51 RingCentral Mobile App Guide Call Handling and Forwarding 50 Incoming Call Information At the bottom of the Call Handling & Forwarding screen, tap Incoming Call Information to set how inbound calls will be displayed to you on your device helpful for distinguishing business calls from personal calls. (Settings for Incoming Call Information are the same for both Business Hours and After Hours screens, not separate.) Incoming number displayed to me Typically you will see the Caller ID of an incoming call. You can tap Caller s Phone Number Options, just below, and choose, for callers whose Caller ID is blocked or unknown, to have displayed the number being called. You can also have a numeric prefix or suffix added to the Caller ID being displayed, which can be useful for immediately identifying calls from your RingCentral system, to distinguish them from incoming personal calls. Under Display this call information you can tap On RingCentral phones only or display the call information on All Phones. Alternately, tap Called Number to have the number being called displayed instead of the Caller ID. Again, this is useful for recognizing business calls. Play announcement before connecting. When you receive a call from the RingCentral system, whether directly or by call forwarding, you will hear You have a call; press 1 to accept. This tells you the call is a business call, rather than a personal call. You can set this feature so that you always get such an announcement, never get such an announcement, or only get such an announcement when the call is coming in to a non-ringcentral device such as when calls are forwarded to your home phone. Include Mailbox Name in announcement. The mailbox name being called is played as part of the incoming call information announcement for example, Mary, you have a call, or Sales, you have a call. Require my password to answer protects your business calls when on the road or at home by requiring your RingCentral login password for any calls coming through RingCentral, even calls forwarded to your home phone, for example. 50

52 RingCentral Mobile App Guide Call Flip 51 Call Flip RingCentral Call Flip lets you transfer live conversations from one device to another quickly and easily. For example, when you are on a call and arrive home after your commute, you can flip the call to your home phone. Simply dial two numbers and Flip. To manage Call Flip numbers, tap your photo and tap Extension Settings > Call Handling & Forwarding. At the bottom of Call Handling & Forwarding, tap the Call Flip bar. (You will find a Call Flip bar on both Business Hours and After Hours screens; settings are the same on both.) You will see a list of numbers/devices assigned to you, including desktop IP phones, smartphones, and the Desktop app, as well as numbers and extensions from your Company Contact list. The first eight positions are your Call Flip number positions. Use the up-and-down arrows to move entries up and down until you have populated your eight Flip positions to your satisfaction. (If you don t see the numbers you added, go back to the previous step and remember to Save before moving on to Call Flip.) The numbered entries not being used are labeled Unused. To Use Call Flip When you are on a phone call, press the asterisk key (*) and a number corresponding to the device to which it is assigned, and the call is transferred immediately to that device. For example, if you have the number 2 assigned to your home phone, tapping *4 while you are on a call will instantly transfer the call to your home phone. Call Flip makes it easy and convenient to flip calls from device to device as you move about. Add Numbers to Your Call Flip List Back on the main Call Handling & Forwarding screen, tap Ring my existing phone numbers, turn on other devices listed, and also to enter additional phone numbers such as your home phone, and tap them On. Tap Save. Tap Call Flip. You should see the phones you selected added to the Call Flip list. You can change the order (and thus the assigned Flip numbers) to suit. Note: A user can set up any specific key for a certain number or skip a certain key in the list. 51

53 RingCentral Mobile App Guide Call Switch 52 Call Switch Feature Summary Call Switch allows uses to handoff an active call from one endpoint to another, e.g. from the Desktop app to their mobile phone, from mobile phone to Desktop. Allows user to finish an urgent phone call taken on Desktop phone and transferred to mobile phone when necessary to leave office. No delay in picking up the transferred call. On-demand feature (will be enabled on account level, users with callswitch service feature turned on). Does not replace existing Call Flip feature. Use case is instant switch between calls when you re using multiple instances of RingCentral Office apps on mobile device and laptop, or you have two laptops and want to transfer the call to one of them. Notification Banner Switch banner will be displayed on top of screen when there is an active call can be switched to this endpoint. Confirmation Dialog After tapping the switch banner, a dialog including detail call information (name or phone number) will be shown. Notes: VoIP must be turned on. If off, User is prompted to turn it on to continue. Call Switch banner will be hidden when multiple VoIP calls are in progress. On-hold call will be removed from hold after switching to another endpoint. Call Switch is not supported if current user has multiple VoIP calls in progress. The banner will be hidden. This constraint is added in order to avoid confusion when switching a localaudio-mixed conferencing from the Desktop app. An on-hold call will be removed from hold after switching to another endpoint... For a two-leg RingOut case, call switch is not available until first leg is connected. 52
 1.")
54 RingCentral Mobile App Guide Call Handling - Advanced Rules 53 Call Handling - Advanced Rules Advanced Call Handling lets you create specific additional rules for your number or extension based on date and/or time of call, or Caller ID, or the number being called. These rules override your regular call handling rules for that number. Create an Advanced Rule (Custom Rule) 1. Tap your photo and Extension Settings > Call Handling & Forwarding > Advanced. 2. Tap Add Rule. 3. Give your rule a Name, then select the conditions: Date and/or Time the call comes in; the Caller ID of the caller; and/ or the Called Number. You can combine these selections. 4. Tap the caret at top right. 5. If you selected Date and/or Time as your rule condition, now select a Weekly Schedule, with specific times for each day if you wish. Or select a Specific Date Range. 6. If you selected Caller ID for this rule, enter one or more phone numbers, or choose names from your Contact List, or enter area codes or other partial numbers. 7. If you selected Called Number, choose the number(s) to which the rule will be applied. The choices will be the Main Number, or the Auto-Receptionist for the Group. 8. Tap and choose when to apply the rule: during Business hours, After hours, or Always. 9. Tap. 10. Select the action to take when incoming calls match this rule. a. Forward Calls: Then set custom Call Screening, Call Forwarding, or Messages handling for these calls. b.take Messages Only to send callers to voic . You can choose to take messages or not, and can customize the voic greeting. c. Play Announcement Only and then end the call. d.unconditional Forwarding, which immediately forwards the call to a number you then select, bypassing any other call handling, including greetings, call screening, voic , and Desktop app. e.you can also set Group Greetings and Call Handling for this rule, and under Messages choose a voic greeting and select the extension that will receive messages generated by use of this rule. f. Tap Done. Because these Rules can be made quite complex and sophisticated, it is a good idea to test a new rule to make sure it operates the way you intend. You can edit, changing details and conditions, turn the rule on and off, or delete any of these Rules by tapping Advanced from Call Handling, then tapping on the named Rule and making desired changes on the screens that follow. 53
55 RingCentral Mobile App Guide Messages & Notifications 54 Messages & Notifications The Messages & Notifications screen lets you manage your voic greetings, and receive notifications of received voic s, faxes, or missed calls. Tap your photo and Extension Settings > Messages & Notifications. Voic Greeting The steps to setting voic greetings are the same for Business Hours and for After Hours. Tap Take Messages to On or Off. When ON, tap Voic Greeting to view the script of the default voic greeting. To hear it, tap Play. If you want to use the default voic greeting, tap Cancel to return to the previous screen. Or record a Custom greeting. When Take Messages is turned OFF, tap Unavailable Greeting to view the script of the default voic greeting saying you are unavailable. To hear it, tap Play. If you want to use the default greeting, tap Cancel to return to the previous screen. Or record a Custom voic greeting. RingCentral will call you so you can record your greeting over the phone. To Record a Custom Voic Greeting 1. Tap Custom, then Record. 2. Provide a phone number; then tap Call Now. 3. RingCentral will call the number. Follow the instructions to record, review, and save the message. 4. On the Record over the Phone screen, tap Save. Repeat this process for the After Hours tab. Notifications At the bottom of the Messages & Notifications screen, tap Notifications. Here the Admin or the User can be notified, by or text message (SMS), of various events such as received voic , received faxes, missed calls, and fax transmission result messages. At the bottom of this screen is a toggle to switch between the Basic and Advanced screens. 54


56 RingCentral Mobile App Guide Messages & Notifications 55 On the Notifications Basic screen, you have the choice of sending notification by or by SMS*. Tap a choice to turn it ON or OFF. Scroll to the bottom to enter the address to receive notifications. This could be the user, or the Admin, or a receptionist, for example. Also at the bottom of the screen, tap Add Phone Number and enter a phone number to receive the text messages; the phone number can be that of the user, or the Admin, or someone else; it need not be a RingCentral number. Select the Carrier for that phone number, to ensure that the text message is correctly sent through that carrier s texting system. You can enter more than one phone number to receive SMS notifications. Tap Save. The and phone number selected are now displayed at the bottom of the Notifications page. At the bottom of the Notifications screen, tap Switch to Advanced. Now for each feature you turn ON for notification, you can then tap Options to select an address and a phone number for each feature individually. For notifications, you can also include any attachments, and also mark the message in your inbox as Received. 55

57 RingCentral Mobile App Guide Messages & Notifications 56 Interactive Notifications This feature allows you to perform quick actions on notifications without having to first open the application and then the notification. Actions you can perform: Answer a call (To Voic ; Answer) Retrieve a voic (Call, Play) Retrieve a text message (Call, Reply) Interactive notifications increase productivity by allowing you to swipe down and respond to your calls messages directly from the notification tray. Use Case: An event manager is waiting for a text message from the facility manager to confirm a shipment. His phone has been idle in the meeting. When a notification appears, he swipes down and instantly replies on the spot, without needing to launch the RingCentral app to reply. Options: Texts - Reply, Call Voic - Play, Call Group Texts - Replay 56
58 RingCentral Mobile App Guide Messages & Notifications 57 ios - Receiving an Incoming Call When you get an incoming call on your RingCentral mobile app, and your ios phone* is locked, you will get an Interactive Notification on your screen that you can swipe to the left for options. *Requires ios 8 or higher. Pressing the Answer button will immediately answer the call and launch the RingCentral mobile app. Pressing the To Voic button will send your caller to your RingCentral mailbox to leave a voice message. Pressing the x button will ignore the call. Swipe to the right. When you swipe the Interactive Notification to the right, it will launch the RingCentral mobile app with the Pre-Call Controls. Note: If your phone's Touch ID or Passcode is turned on, you may need to unlock your phone first by using your Touch ID or PIN. 57

59 RingCentral Mobile App Guide Messages & Notifications 58 ios - Retrieve a Voic When you get a voic on your RingCentral mailbox, and your ios phone* is locked, you will get an Interactive Notification on your screen that you can swipe to the left for options. *Requires ios 8 or higher. Swipe to the right. When you swipe the Interactive Notification to the right, it will launch the RingCentral mobile app play the voic . Pressing the Play button launches the RingCentral mobile app and plays the voic immediately. Pressing the Call button automatically launches the RingCentral mobile app and dials the number of the person who left the message. Pressing the x button ignores or clears the notification from your screen. Note: If your phone's Touch ID or Passcode is turned on, you may need to unlock your phone first by using your Touch ID or PIN. 58

60 RingCentral Mobile App Guide Messages & Notifications 59 ios - Receive a Text Message When you get a Text Message on your RingCentral mailbox, and your ios phone* is locked, you will get an Interactive Notification on your screen that you can swipe to the left for options. *Requires ios 8 or higher. Swipe to the right. When you swipe the Interactive Notification to the right, it will launch the RingCentral mobile app and play the text message thread. Pressing the Reply button will launch the RingCentral mobile app and open the text message thread and Compose. Pressing the Call button automatically launches the RingCentral mobile app and dials the number of the person who sent the text message. Pressing the x button ignores or clears the notification from your screen. Note: If your phone's Touch ID or Passcode is turned on, you may need to unlock your phone first by using your Touch ID or PIN. 59

61 RingCentral Mobile App Guide Messages & Notifications 60 Android - Retrieve a Voic on Android When you get a voic on your RingCentral mailbox, and your Android phone is locked, you will get an Interactive Notification on your screen that you can swipe down for options. The Play button will launch the RingCentral mobile app and play the voic immediately. Note: You may need to unlock your screen to execute the action. The Call button will automatically launch the RingCentral mobile app and dial the number of the person who left the message. Note: You may need to unlock your screen to execute the action. Swipe to left / swipe to right. Swiping the Interactive Notification to the left or right will ignore or clear the notification from your screen. Double tap. Tapping on Interactive Notification twice launches the RingCentral mobile app and plays the voic immediately. Note: You may need to unlock your screen to execute these actions. 60
62 RingCentral Mobile App Guide Messages & Notifications 61 Android: Retrieve a Text Message When you get a Text Message on your RingCentral mailbox, and your phone is locked, you will get an Interactive Notification on your screen that you can swipe down for options. The Play button will launch the RingCentral mobile app and open the text message thread and Compose. Note: You may need to unlock your screen to execute the action.. The Call button will automatically launch the RingCentral mobile app and dial the number of the person who sent the text message. Note: You may need to unlock your screen to execute the action. 61

63 RingCentral Mobile App Guide Application Settings 62 Application Settings Application settings for both users and administrators are accessed by tapping your profile photo to reach the My Profile screen. Call Settings Always Use VoIP Use VoIP only on Wi-Fi Always Use Cellular Voice (RingOut ) Extension Settings User Info Screening, Greeting & Hold Music Call Handling & Forwarding Messages & Notifications Outbound Caller ID Outbound Fax Settings Phone System Company Numbers & Info Auto-Receptionist Groups Users Phones & Devices Billing - Admins Only Reports - Admins Only Mobile App Settings Join Now Default Launching Cloud Storage Region Re-sync Messages Inbox VoIP Calling By default, VoIP Calls and Over 3G/4G are automatically turned ON when the mobile app is installed. This means that inbound and outbound calls will automatically go over Wi-Fi when that service is available, and over 3G/4G when Wi-Fi is not available. When Wi-Fi service becomes available again, your phone service will automatically switch back to Wi-Fi. back to Wi-Fi. Note: During network hand-off, the VoIP call will remain active for up to 2 minutes so the call is not interrupted while the hand-off occurs. Incoming VoIP calls over Wi-Fi avoid carrier voice plan charges. While you are overseas, Wi-Fi allows you to avoid international voice roaming charges, although data roaming charges may apply. Note: If VoIP is not available, an indicator will appear on the screen and the system will use RingOut only (see below). Select Always Use Cellular Voice (RingOut) to make calls using only your carrier voice plan. To enable RingOut, see RingOut Mode on page 66. Possible charges and lower voice quality may result. When you need to conserve battery power, choose Always Use VoIP; however, incoming calls will then use your carrier data plan, and lower voice quality may result. VoIP Only Mode When Use VoIP only on Wi-Fi is enabled, users can make and receive VoIP calls even when the platform server is down, as long as the SIP/ Telco server is up. ios users are supported by OPUS Variable Bit Rate technology, which reduces the bit rate when packet loss is high or there is network congestion. HD Voice* allows high quality audio on calls between supported RingCentral Desk Phones, Desktop Apps and Mobile Apps for Office Premium and Ultimate customers. *HD Voice on Premium and Ultimate tiers provide clearer conversations with reduced background noise. This feature works across all RingCentral endpoints capable of HD Voice. It is switched off for products not capable of HD Voice and those outside the network. 62

64 RingCentral Mobile App Guide Application Settings 63 VoIP Service Availability VoIP calls are not available in certain countries to comply with VoIP restriction in their regions. When VoIP service is not available, a message to that effect pops up, as shown on the second screen at right. To make calls when VoIP is not available, you can use RingOut Mode. 63

65 RingCentral Mobile App Guide HD Voice 64 HD Voice Premium and Ultimate editions will always try to use HD Voice when available. Clear conversation with background noise reduction; avoid miscommunication Provides better call experience within RingCentral services across all RingCentral end points When HD Voice is available, you will see the HD icon in the upper left corner of the on-call screen Secure Voice RingCentral offers end-to-end secure VoIP on all RingCentral endpoints desk phones, mobile apps and desktop apps. It ensures: Privacy and data integrity between two communicating entities. Safeguards communications prevent tampering and unauthorized interception of audio streams Secure VoIP is an opt-in service that users can turn on by contacting their RingCentral agent. 64
66 RingCentral Mobile App Guide Caller ID 65 Caller ID To set the number you want people to see when you place calls, tap your photo, then Extension Settings > Outbound Caller ID. Choose one of your phone numbers. Calls you make from your RingCentral local numbers will have the Company ID included in the Caller ID displayed to the called party. Learn more about Caller ID here. 65

67 RingCentral Mobile App Guide RingOut Mode 66 RingOut Mode To make outbound calls with RingOut Mode enabled, the RingCentral mobile app uses your cellphone s native calling system through your cellphone carrier. Use RingOut Mode to maintain your RingCentral identity on such calls, including such features as Caller ID and call logging. You can keep your personal cellphone number private. RingOut calls use carrier voice minutes rather than your carrier data plan. RingOut lets you use your business number from any phone you choose, including your smartphone. To configure, tap your photo, then Call Settings > Always Use Cellular Voice (RingOut). Choose a RingCentral device to set it as your RingOut Mode phone. Or tap Another Phone to add phone numbers; then tap one of them to be your RingOut device. To avoid accidentally sending calls to your personal voic (if you don t pick up when your phone rings), turn on Confirm Connection so RingCentral will prompt you to press 1 before it dials the number and connects your call. To Make a RingOut Call When either Wi-Fi or a data network is not available, your outbound calls will automatically use RingOut. You can also make a RingOut call by setting Always Use VoIP to Off. If in the Call Settings screen you set My Android as the device to take RingCentral calls, you will make outbound calls in the usual way use the dial pad or choose from your contact list. However, if in RingOut Mode you select Another Phone for example, if you want to make RingCentral calls from your hotel phone then, RingCentral will ring that phone first. When you pick up, RingCentral will then dial the outbound number and connect you. (If you set Confirm Connection, you ll be prompted to press 1 first.) NOTES RingOut calls use carrier voice-plan minutes. RingOut preserves your RingCentral calling identity, so those you call will see your selected RingCentral Caller ID. RingOut may save you from having to pay toll charges that would occur if you called directly from your smartphone. This is especially useful for international travelers. 66


68 RingCentral Mobile App Guide Default Launching 67 Default Launching Tap then Application Settings > Default Launching to turn on Call from Android Dialer to allow this app to place phone calls when you are using Android dialer. Cloud Storage RingCentral can access documents stored in select cloud-storage apps, such as Dropbox and Box, you have installed on your smartphone. Tap Cloud Storage in Application Settings to access the files you have stored in the cloud. You will now be able to fax documents directly from these cloud data apps. If you don t see one of your supported cloudstorage services displayed, download and install that service s app to your smartphone. Once installed and activated, the app and its stored documents should show up on the RingCentral Cloud Storage listing. Re-sync Messages Inbox Tap your photo, then Mobile App Settings > Re-sync Messages Inbox to re-synchronize all of your text, fax, and voic messages to the mobile app from your RingCentral account in the cloud. This would be useful if for example you feel your app is not receiving messages or voic that you expect. No data will be lost using this feature as all data is stored in the cloud. Tell a Friend Tap you photo, My Profile, then Application Settings > About > Tell a Friend to invite them to sign up for a free RingCentral mobile app trial. You will receive a discount on one month of service for every friend that becomes a RingCentral customer for at least 90 days Actual discount may vary from this example. 67
69 RingCentral Mobile App Guide Admin Phone System Setting 68 Admin Phone System Setting Express Setup helped you set up your phone system, numbers, Auto- Receptionist, users, and groups. You can change or update any of these settings at any time. In addition, as Administrator/Account Owner you can manage settings for your Company, Groups, and Users through the mobile app Phone System settings. These settings, along with the Billing settings, are available only to the administrators. (Users see only the two entries under User: My Extension Settings and Application Settings). To access the RingCentral phone system settings on your smartphone, start the app and log in. Tap your photo, then Phone System to see the screen from which you can manage Company, Group, and User settings, as well as your RingCentral desktop IP phones.. 68

70 RingCentral Mobile App Guide Company Numbers and Info 69 Company Numbers and Info Tap your photo, Phone System > Company Numbers and Info. Your RingCentral account includes direct toll-free, local and fax numbers. Each employee also has a direct-dial number. You can tap each number, and the Company ID, to manage it. To add one or more numbers, tap Add Number at the bottom of this screen, and follow the screens to choose a Local, a Toll-Free, or a Vanity (custom) number. Additional charges for extra numbers will be provided on the Order Confirmation screen. Once you have obtained extra numbers, you can return to this Company Number screen and edit each number s type (voice, fax, or both) and its assigned extension/user. Click Company Caller ID and edit the name there (up to 15 characters). This is the name you provided when you created your account. It will be added to the local phone number you use to make calls. (From toll-free numbers, only that tollfree number be displayed as the Caller ID.) Changes to this Caller ID can take a week or more to take full effect. View the Company Toll-Free Number; you cannot alter this number View the Company Local Number; you can delete this number if you wish. View the Company Fax Number; faxes are delivered by default to the extension you ve listed as the operator; you can change this to another extension; or delete the number. Direct Extension Numbers Scroll down Company Numbers to the Direct Extension Numbers listing. A direct extension is a full 10-digit phone number that can be called to reach a user directly. (Other company extensions are reached by calling the company number and entering the extension at the prompt.) You can tap a number to edit the following information for the direct extensions assigned to you and to your users: Whether this number accepts voice and fax (the default), voice only, or fax only. Whether calls to this number connect to an extension (user or group) or to the Auto-Receptionist. The extension is assigned to this number. You can also delete this number. 69
 eligible existing phone numbers from your current provider to your RingCentral service and also forward")


71 RingCentral Mobile App Guide Using an Existing Number: Porting and Forwarding 70 Using an Existing Number: Porting and Forwarding You can transfer (port) eligible existing phone numbers from your current provider to your RingCentral service and also forward calls to an existing number to your RingCentral number To Transfer an Existing Number To transfer a number or set of numbers to your RingCentral account, log into your account on the Web, at Go to Admin Portal > Phone System > Company Numbers and Info. Click Use My Existing Number at the bottom of the center column, and follow the instructions. Be certain to completely fill-in the Transfer My Existing Numbers Pre-Check form. To Forward Your Calls Forward calls to an existing number to your new RingCentral number. Log into RingCentral. Go to: Phone System. Click Company Info. Scroll to the bottom and click Use My Existing Number. Click Forward my calls to RingCentral. Fill in the existing number you wish to transfer, and follow the detailed instructions. 70

72 RingCentral Mobile App Guide Auto-Receptionist Settings 71 Auto-Receptionist Settings The Auto-Receptionist settings determine how incoming calls are handled for your company. Tap your photo, then Phone System > Auto-Receptionist. IVR Mode Single or Multi-level The default mode for the RingCentral IVR is single-level. Switching to multi-level allows deployment of a more sophisticated auto-receptionist menu to handle a large volume of incoming calls at one or more company locations. The multi-level IVR function supports up to 250 menus for each account you create. Multi-level IVR is available to RingCentral Office Premium and Ultimate customers in the US. To learn more click here. Company Hours On the Auto-Receptionist screen, tap Company Hours. Check 24 hours to have incoming calls handled the same way all the time, including weekends. Check Specify Hours to have separate call handling for Business hours and for After Hours. On the week display, choose business hours for each day, or Closed. Choose your Time Zone. Greeting and Company Calls Here you decide how to greet callers and route incoming company calls during your company s business hours and after hours, as well as setting up advanced call-handling rules. 1. From the Phone System screen, tap Auto-Receptionist. 2. Tap Greeting & Company Calls. 3. Select the Company Hours tab (if available). 4. Select Play company greeting if you d like callers to hear a default or custom greeting. You can select to play the default greeting, or create a custom greeting on the next screen. (See instructions below.) 5. Or select Bypass greeting to go to extension to bypass the Auto- Receptionist and connect calls directly to a specific extension. 6. Under If caller enters no action, you can select Connect to operator (extension 0). Or select Disconnect to automatically disconnect callers after the greeting is played three times with no action by the caller. 7. Select the After Hours tab to set call handling for after hours. (If you have Business Hours set to 24 hour you will get a pop-up message when you select the After Hours tab offering to let you change your business hours.) 8. Tap Save when done. 71

73 RingCentral Mobile App Guide Auto-Receptionist Settings 72 Company Greeting The Auto-Receptionist greets callers with a recorded message when they call your company. Your Auto-Receptionist is initially set to play a default greeting with your company name using text-to-speech technology (you can review the script of this default greeting by tapping Auto-Receptionist > Greeting & Company Calls > Greeting > Default. Press Play to hear the default greeting. Record Your Greeting Over the Phone 1. From the Phone System screen, select Auto-Receptionist. 2. Select Greeting & Company Calls. 3. Select the Company Hours or After Hours tab. 4. Tap Greeting. 5. Select Default or select Custom. 6. If you selected Custom, click the Record button. 7. In Call me at, select Forwarding number and choose one from the dropdown. 8. Or select Custom number, tap the field, then type in a phone number. 9. RingCentral will call you and prompt you to record your greeting. 10. Repeat this process for the After Hours tab. 11. Tap Done. Operator Extension Choose an extension to receive calls intended for the operator (extension 0). When callers press 0 or don t enter an extension number, the system will connect the call to the designated employee. 1. From the Settings screen tap Phone System, then Auto- Receptionist. 2. Tap Operator Extension. 3. Choose a name/extension of the user who will receive operator calls. 4. Tap Save. 72

74 RingCentral Mobile App Guide Auto-Receptionist Settings 73 Dial-by-Name Directory The Dial-by-Name Directory allows callers to find user and group extensions by spelling out the name on their phone keypads. Follow these steps. 1. From the Settings screen tap Phone System, then Auto- Receptionist. 2. Tap Dial-by-Name Directory. 3. Tap Dial-by-Name Directory to On. 4. Select as the Directory Extension a number that is not already in use as an extension. This will become the number callers will tap to get to the dial-by-name directory. 5. Tap Extensions in Directory. 6. Deselect any extensions to be excluded from your company s Dialby-Name Directory. This list includes both user extensions and group extensions. 7. Select to search by First Name or by Last Name. 8. Tap Done. When Dial-by-Name Directory is ON, callers will hear a recording that, in addition to telling them to dial an extension, also suggests they can dial the Directory Extension number in order to locate a user by name. When callers tap the Directly Extension, they are instructed to use their phone keypad to spell out the first three letters of the first name, or of the last name, of the person or group they wish to call. The system will connect them, or offer additional options if there is more than one choice. 73

75 RingCentral Mobile App Guide Groups 74 Groups Groups Support these features: Call Queues Call Monitoring Paging Multi-level IVR Menu Messages-Only Extension Announcement-Only Extension Shared Groups enable you to designate a group of employees with similar activities or services Benefits Better communication by grouping related members with similar activities beyond group functions. Increase communication efficiency with the new Paging feature. Broadcast announcements and emergency alerts to the entire organization or selected peers at the same time. The RingCentral Multi-level IVR is a hierarchal menu structure that expands the capability of the Auto-Receptionist feature. It allows companies to deploy a more sophisticated auto-receptionist menu to handle large call volumes, and to set up multiple phone reception points at one location or at multiple locations, such as retail stores and warehouses. To learn more about the multi-level IVR feature click here. Reduce missing important calls by enabling a call to be answered from any phone with the Shared Lines feature. Shared Lines feature allows calls made to one phone number to be answered by multiple phone devices. Answered calls can easily be handed off to other phones sharing the same phone number. Learn more about shared lines here. Call Queues Create a call queue group when you want a specific group of users (such as Sales, Support, or Billing) to share incoming calls. Each call queue can have an extension or direct (local or toll-free) number of its own. You can define specific business hours for each call queue and set up or text message notifications of any missed calls or voic s. Call Monitoring Group Call Monitoring allows authorized users (e.g., supervisors) to access calls made by their staff (agents) in real time. For instance, a sales manager can use call monitoring to help new agents get familiar with sales processes by: Monitoring their phone conversation with clients Whispering (coaching) to sales reps with new sales techniques Joining the conversation (barging) to provide additional information. 74

76 RingCentral Mobile App Guide Groups 75 Add a Call Queue Group 1. Tap you photo > Phone System > Groups. 2. Tap the plus sign (+) to the right of Call Queues. 3. Fill out the form: Give the new call queue an Extension Number and Extension Name, and add the designated Manager of this Call Queue group. 4. Tap to Select call queue members. 5. Click Save. Call Queue Info From the Groups menu, tap the name of a Call Queue group, then tap Call Queue Info, where you can edit or add information, as needed: Record or modify the pronunciation of the Call Queue Name. Enter a Contact Phone for the group. View Member Availability (according to how the members have set their Business Hours and After Hours). Enter an Address for the group. Set the Call Queue group s business Hours; incoming calls can be handled differently for Business Hours and for After Hours. Enter Regional Settings. Re-send the Welcome that is sent to the Group Manager and the Group Members if they haven t yet responded to their original invitation. This option goes away when this group s manager and members have all responded. You can also Delete the Call Queue. 75


77 RingCentral Mobile App Guide Groups 76 Call Queue Group Members Availability Tap on a specific Call Queue (Tech Support in this example) and on that group s Call Queue Info screen; scroll down and tap Members Availability to see the names of the group members who are Available or Unavailable. Wait Times 1. Go to Phone System > Groups. 2. Tap a specific Call Queue Group. 3. Tap Call Handling. 4. Scroll to the bottom and tap Member availability and wait times. Tap your photo > Phone System > Groups. Under each Call Queue group name there is a count of Available and of Unavailable members of that group. For example, the Tech Support call queue screen above shows 3 Available and 0 Unavailable. Available members can take phone calls. Unavailable members are on the phone, or are outside their set business hours. Options on this menu determine how inbound calls to the Group are handled, depending on the availability of the Group members, and how long it takes to connect to a given member. 76


78 RingCentral Mobile App Guide Call Queue Greeting 77 Options for Call Queue Group Member Availability and Wait Times Maximum time to wait for a Group member to answer a call before trying the next member in the Group rotation order, in minutes. Minimum post-call wrap-up time before agent s status is automatically set to available, in seconds. You can give the Group member some time to handle the results of the call, such as making notes. Maximum hold time to wait for an available Group member, in minutes, before transferring the on-hold call to the next member. Maximum Callers Waiting If the number of callers waiting exceeds (number), you can either send the next callers directly to voic , or disconnect after telling new callers of the heavy call volume. To access Call Queue Greeting 1. Tap your photo > Phone System > Groups. 2. Select a Call Queue group; then tap Greeting. To turn Call Queue Greeting to On: 1. Tap Set Greeting. 2. Tap Play to listen to the Default greeting. You can use this Default greeting (select Cancel to back out); or create a Custom greeting. Call Queue Business Hours Your Call Queue s business hours determine when calls will be routed to Group members and when after-hours rules will apply. 1. To access your current settings, tap Group Hours on the Group Info screen. 2. For Groups that handle all incoming calls the same at all times, select 24 hours. 3. Tap Specify hours to set the specific days and times the Group will be available to take calls. 4. When you re finished, tap Save. Call Queue Greeting The Auto-Receptionist greets callers when they call a Group in your company. Your phone system is initially set (On) to play a default greeting in which the Auto-Receptionist automatically reads the name of the Group (using text-to-speech technology) connecting the caller with a Group member. When Off, callers will connect directly to the Group member according to Company call-handling rules. Note: If you choose unconditional forwarding for after-hours calls, or send afterhours Group callers directly to voic , your after-hours Group greeting will not be played even if it is set to ON. Note: If you have specified Group Hours, then you will be able to set Greeting for business hours and separately for after hour. If you have not specified Group Hours but have set this Group s to 24 hours, then there will be only one Greeting, which will play at all times. From this screen you can also tap Blocked Calls. You can block All calls, calls from specific numbers, calls and/or faxes from callers with no Caller ID, calls from Pay Phones. In each case you can choose what message the blocked callers will hear. When done, tap Save. Tap Cancel to exit from Greetings. 77
. 3. Tap Call Now.")
79 RingCentral Mobile App Guide Call Queue Greeting 78 To Record a Custom Greeting 1. Tap Set Greeting; then tap Custom and then Record. 2. Provide a phone number for the system to call, or have it call your forwarding number (select one under the Forwarding number menu). 3. Tap Call Now. RingCentral will call you and prompt you to record your greeting. On the User Greeting screen, a message will confirm that your custom message has been successfully received. 4. To listen to your custom greeting later, access your account on the Web. 5. Tap Cancel to return to the previous screen. 78

80 RingCentral Mobile App Guide Group Call Handling 79 Group Call Handling Group call handling includes deciding the order in which calls are transferring to Group members; the music that is played while connecting the call; and Group member availability and wait times. To access and edit these settings, tap your photo > Phone System > Groups and select a Group. Tap Call Handling. Group Call Handling During Business Hours To manage the order in which calls are answered by Group members, tap Queue Hours at the top of the Call Handling screen. Tap Rotating to set calls to rotate among available queue members. Tap Simultaneously to set calls to ring all available queue extensions at the same time. Tap In fixed order, then tap Specify fixed order and decide the order by taping the up and down arrows to move queue member names up and down the list. Tap Back. Tap Audio While Connecting to On to select the music that will keep callers entertained while connecting, You can choose from among more than a dozen types of music. Tap the type of music you want, then tap Save. Call Queue Handling After Hours Now tap After Hours tab at the top of the Call Handling screen. Choose from the following settings for how to handle calls during your defined after-hours times, when no one is available to take calls: Play a greeting and disconnect Send callers to call queue voic Unconditional forwarding Connect to extension If you select Unconditional call forwarding, you will be prompted to enter a phone number. Unconditional call forwarding will forward all calls to the number you specify and override all after- hours settings, such as voic and greetings. Note: The after-hours setting becomes available only after you change Group business hours from the default 24 hours setting. 79


81 RingCentral Mobile App Guide Call Queue Handling After Hours 80 Advanced Call Handling for Groups: Rules Advanced Call Handling lets you create specific additional rules for that Group extension based on date and/or time of call, or Caller ID, or the number called. These rules override your regular call-handling rules for that extension. These rules can be useful for special situations such as promotions and events: Customers can call a contest number and get a special message or leave a message, for example; and the rule can be modified or turned off when the contest finishes. To create a Rule for a specific Group, tap your photo > Phone System; tap Group; then tap a specific Group. Tap Call Handling; then tap the Advanced tab. Tap Add Rule. On this Custom Rule screen, give your Rule a Name, then select the conditions: Date and/ or Time the call comes in; the Caller ID of the caller; and/or the Called Number. You can combine these selections. Tap right facing arrow at the top of the screen. If you selected Date and/or Time as your Rule condition, now select a Weekly Schedule and specific times for each day. Or select a Specific Date Range. Then tap Back, view your Conditions Summary, and tap Next. If you selected Caller ID for this rule, you can enter one or more phone numbers, or choose names from your Contact list, or enter area codes or other partial numbers. Tap Next. If you selected Called Number, choose the number(s) to which the Rule will be applied. The choices will be the Main Number, or the Group Auto-Receptionist. Tap each day in succession to set the hours to be applied to your new rule. Note: When setting the hours for each day, the selector button will default to OFF. Tap (don t slide) the selector to move the setting to the ON position. Then adjust the From and To hours for each day as desired. Press the left (back) arrow to advance the calendar to the next day and repeat setting until all days are programmed with the desired hours. 80


82 RingCentral Mobile App Guide Call Queue Handling After Hours 81 Tap right facing arrow at the top of the screen to see a summary of your Office Hours rule selections. Tap it again to set actions to take when incoming calls match this rule. Group Messages/Voic Greetings This setting is for the Group voic greeting, which callers to the group extension hear when they are sent to voic . 1. Tap your photo > Phone System; then tap a Call Queue group name. Scroll down and tap Messages & Notifications. 2. Tap Queue Hours or After Hours, if offered. 3. Tap Voic Greeting. Read or Play the script for the default greeting, or record a custom greeting. Transfer caller to call queue members: Then set custom Call Screening, Call Forwarding, or Messages handling for these calls. Play Announcement Only and then end the call. Take Messages Only to send callers to voic . You can choose to take messages or not, and can customize the voic greeting. Unconditional Forwarding, which immediately forwards the call to a number you then select, bypassing any other call handling, including greetings, call screening, voic , and Desktop app. Connect to extension. Connect directly to a specific extension. You can also set Group Greetings and Call Handling for this Rule, and under Messages choose a voic greeting and select the extension that will receive messages generated by use of this Rule. As you can see, there are rich programmatic possibilities with this Advance Rule feature. Tap right facing arrow at the top of the screen to save your selection. You can go back to edit the Rule, turn the rule on and off, change details and conditions, add more Rules, or delete a Rule. 81


83 RingCentral Mobile App Guide Call Queue Handling After Hours 82 To Record a Custom Group Voic Greeting 1. Tap Custom and then tap Record. At the bottom of this screen is a toggle to switch between the Basic and Advanced screens. 2. Provide a phone number for the system to call, or have it call your forwarding number (select one under the Forwarding Number menu). 3. Tap Call Now. 4. RingCentral will call you and prompt you to record your greeting. To designate a specific employee as the message recipient, tap Message Recipient and then tap the name of the employee. When you re finished, tap Save. Note: If you designate a Group member as the message recipient, Group messages will no longer be saved to the Group voic box. You can designate a Group member to receive voic messages. By default, RingCentral saves voic messages to a Group voic box. Call Queue Notifications Back at the Messages & Notifications screen, tap Notifications. Here the Admin or the User can be notified, by or text message (SMS), of various events such as received voic , received faxes, missed calls, and fax transmission result messages. 82


84 RingCentral Mobile App Guide Call Queue Handling After Hours 83 On the Basic screen, you have the choice of sending notification by and/or by SMS. Tap a choice to turn it On or Off. Scroll to the bottom to enter the address to receive notifications. This could be the user, or the Admin, or a receptionist, for example. Also at the bottom of the screen, tap Add Phone Number and enter a phone number to receive the text messages; the phone number can be that of the user, or the Admin, or someone else; it need not be a RingCentral number. Select the Carrier for that phone number, to ensure that the text message is correctly sent through that carrier s texting system. You can enter more than one phone number to receive SMS notifications. options for notifications. For each Notification feature you turn On you can tap Options and then select an address and phone number. For notifications, you can also include any attachments, and also mark the message in your inbox as Received.. Tap Save. The and phone number selected are now displayed at the bottom of the Notifications page. Tap Switch to Advanced at the bottom of the Notifications screen for an alternative set of 83
85 RingCentral Mobile App Guide IVR Group 84 IVR Group Only Admins can configure IVR menus and groups. For Premium and Ultimate accounts, RingCentral provides an intuitive graphical editor that enables Admins to easily build and manage IVR menus and call flows using a Visual IVR Editor via a tablet. Support is provided for up to 250 IVR menus per account. Paging Only Groups Paging* is a commonly required function in many locations such as warehouse/shipping centers, retail stores, schools, hospitals, etc. RingCentral Paging supports broadcasting through multiple desk phones (groups) and through overhead paging devices. See the RingCentral Office Admin Guide for details on how to set up paging groups. Your mobile devices cannot receive pages; the Paging feature is available only on desk phones and supported paging devices. How to Page from a Mobile App Device Mobile app users with paging permission can page a known paging group by dialing *84 followed by # and the number of the paging group, then # again. Note: The user must first enable VoIP calling on the mobile app device. See VoIP Calling on page 62. Paging group setup is reserved for Admins only. So is the IVR setup function. However, Admins can modify all Groups that are set up by all users. 84
86 RingCentral Mobile App Guide Group Messaging 85 Group Messaging Group Messaging allows you to send a message to a group via the Mobile app. To send a message to a group from your mobile device: 1. Launch the mobile app. 2. On the All Messages screen, tap at top right; then tap New Text. 3. Tap. Scroll down and tap the Group you want to send a message to (Sales in this example.). 4. Tap the sign to add more recipients. 5. Enter your message. 6. Tap the Send icon. Note: Group Messaging works only with Extensions and Contacts in the Company Directory. Messages sent to a Personal Contact will be sent as a separate message. Learn more about Group Messaging here. 85
, then add another group name (ex. sophia1) as shown in Screen 1. The system combines the two groups, as shown in Screen 2.")
87 RingCentral Mobile App Guide Improved Group Messaging for ios 86 Improved Group Messaging for ios For ios devices, the Group Message function has been improved. Now, when you type a group name (ex. sophia), then add another group name (ex. sophia1) as shown in Screen 1. The system combines the two groups, as shown in Screen 2. This saves you from having to compose your message to each group separately. 86

88 RingCentral Mobile App Guide Other Administrator Settings 87 Other Administrator Settings Under My Profile, there are some special settings for Administrators in Phone System, Billing, and Reports. Phone System gives the Administrator access to all settings for the company phone system. See Admin Phone System Setting on page 68 for details. Some Settings Unique to the Administrator Only Administrators can set and change Company settings. Administrators can create new Groups and edit any existing Group settings. (Group Managers can edit settings for their own Groups.) Administrators can make another user into an Administrator. Only Admins can purchase new desktop IP phones and only from the service web site. Only Administrators can review, manage, and assign company desktop phones. Administrators can turn on On-Demand Call Recording. Administrators can enable and manage International Calling, and authorize Auto- Purchase for International Calling charges. Only Administrators can access Reports. About Tap you photo to open My Profile. Then About to see What s New with this version of the mobile app; to read an Application Description; to Send Feedback ; or to Rate This App at app store sites. Logout Log out from the phone number and extension. Reports Reports are graphical representations of your RingCentral account's call activities. These Reports can be accessed easily on your mobile devices using the RingCentral mobile app. Reports are generated as a Summary, based on Queue Activity, User Activity, or Telephone Number on your RingCentral online account. Tap your photo, and then scroll down and tap. Example above shows call activity for a holiday. 7, 30, 60 and 90 days or any custom date range can be selected for Reports. See Appendix A - Reports on page
.")

89 RingCentral Mobile App Guide Billing 88 Billing Admins have access to the Billing menus, which include the plan, and the ability to change the current plan. Service Plan Click Service Plan to review your RingCentral service and costs, check your billing history, and purchase additional minutes (if you have admin rights). To change your plan, log in to your RingCentral account on your desktop. Auto-Purchase Per-minute charges for international calls (see next page) are not billed to your account. Instead, they are deducted from your prepaid Calling Credits account. Auto-Purchase ensures you will never run out of such Calling Credits. From this menu you can select a Calling Credits package of $20 or $100, which will be renewed automatically when you run low, thus preventing any interruption of service. Purchased funds will roll over month to month for up to 12 months. The price of international calls will vary according to the applicable international rate (see International Calling on page 89.). 88


 Permissions for Individual Users Once you have enabled International Calling, you can give or withhold permission to your individual users to make")
90 RingCentral Mobile App Guide Billing 89 International Calling Calls your users make to countries outside the United States incur charges. To manage your costs, outbound International Calling is disabled by default. Your users will not be able to call out of the U.S. unless you enable International Calling. On the Billing page, click International Calling, then click the Enable International Calling button to display and enable a list of countries and their calling areas. You can enable or disable specific calling areas. For your convenience, you can Search for specific areas, and display Enabled and Disabled areas. The per-minute costs for outbound calls are shown for each calling area for each country. (Callers from outside the U.S. can continue to reach your local (non-800) numbers regardless of your selection.) Permissions for Individual Users Once you have enabled International Calling, you can give or withhold permission to your individual users to make international calls to the countries you have activated. Tap your photo > Phone System > Users and at the top of the screen tap Permissions, then International Calling. All users are un-checked by default. In the right-hand column, click users you want to grant permission to make international calls, and click Save. 89


91 RingCentral Mobile App Guide Billing 90 User Permissions: Making Users into Administrators Permissions also lets you assign Administrator privileges to other users. Tap your photo > Phone System > Users and at the top of the screen, on the right side, tap Permissions. Tap Administrator. On the list of your users, tap the check box next to users you wish to grant Administrator privileges and tap Save. Note: Such users now have full Administrator access, except that they cannot delete the account owner, nor change the billing address and billing info settings. A warning message reminds you of the significance of adding someone as an administrator. 90
92 RingCentral Mobile App Guide Express Setup for Administrators 91 Express Setup for Administrators Download the RingCentral mobile app from the relevant mobile-phone app store, create a new RingCentral account, verify and activate, set up, configure your account, add users and groups, and more. Follow these easy steps to get started in no time. Note: You can also configure and manage your system by logging in to your online RingCentral online account from a Web browser; the steps are similar. How to Start Note: The RingCentral mobile app requires the account owner to have a wireless account. Billing for the RingCentral mobile app account is done through the wireless account. With an Existing RingCentral Office Account If you already have a RingCentral Office account (deskphone) account, install the mobile app so you can receive your business calls and manage your RingCentral account from your smartphone. From your smartphone: Go to your device s app store, search for RingCentral mobile app, download and install. Launch the app and log in with your RingCentral number, extension, and password. Or from your RingCentral online Web account, click the Tools dropdown menu on the far right of the menu bar, and select Mobile Apps. Select the appropriate app to install. It will start your app store interface so you can download the app. Follow your usual procedure for synchronizing the download to your mobile device: It will appear on your mobile device, or in the mobile app store, depending on how you have set up your mobile device. 91

93 RingCentral Mobile App Guide Schedule an Implementation Appointment 92 To create a new RingCentral account If you do not already have a RingCentral account, you can sign up from a browser or through your mobile-device app store. From a Web browser, go to RingCentral at: Click the Free Trial button or the Buy Now button. Or: From your smartphone, go to your device s App store, search for RingCentral mobile app, download and install it. Tap the RingCentral mobile app icon on your smartphone; then tap Free Trial or Buy Now. Note: Billing begins automatically at the expiration of the free-trial period. In either case, On the form offered, provide your contact information and set up a password. Follow the on screen steps to verify the wireless number that will be billed for this service. Select a plan based on the number of users you ll be setting up. Choose a main company toll-free or local number. Tap Setup Now to configure your RingCentral business phone system. (If you already have an account set up, you won t need to reconfigure.) Schedule an Implementation Appointment If you prefer, you can set up an appointment with a RingCentral Implementation Specialist, who will call you at the scheduled time and help set up your system. To do this, click the button Schedule Now, and choose an Appointment Date, and an appointment time from among the Available Slots. You can also enter Notes for the specialist. Click Schedule. Then back at the previous screen, click I will do it later. 92


94 RingCentral Mobile App Guide The Administrator Express Setup 93 The Administrator Express Setup If this is a new account, then after installing the RingCentral mobile app on your smartphone and activating it, when you first log into the app you ll be invited to follow the Express Setup, which will guide you through the process of setting up your account, adding users, creating groups, configuring your Auto-Receptionist, and more. It will be helpful to have on hand a list of your users, their contact numbers, and their addresses. If you skip the Express Setup, you will be offered the opportunity again the next time you log in. It is highly recommended that you take advantage of Express Setup to be able to get the most from your RingCentral mobile app. Setting up Users Your first task will be to set up your users. Start by verifying your own information under your photo > Extension Settings > User Info. On the Super Admin screen verify the User Info for yourself. Enter any changes needed and then click Save. 93

, their extension number, and a link they")
95 RingCentral Mobile App Guide The Administrator Express Setup 94 Tap your photo > Phone System > Users to add your first user. Tap the plus sign to open the Add User screen. Fill in the fields for that user: first and last name, and address. Click Save. Back at the Users screen tap the plus sign again to reopen the Add User screen. Continue until you have set up all of your users. Let each user know that they will receive an automatic RingCentral message like the one below, with their account number (business main phone number), their extension number, and a link they should click on the link in that to set their account password and security question. It will also prompt them to download the mobile app to their smartphones so they can start managing their own extensions. Note: The number of users you can have on your account depends on your plan. If you need to add more users than your current plan allows, you can change your plan and add more users at any time. Log in to using your RingCentral phone number and password. Select Billing, then click Change Plan and follow the on screen instructions to add more users to your plan. 94


96 RingCentral Mobile App Guide Set up Administrator Call Forwarding 95 Set up Administrator Call Forwarding Define your own extension s call-forwarding rules by deciding to which phones, in which order, will ring when you get a call to your RingCentral number. Tap your photo, then Extension Settings > Call Handling & Forwarding. Choosing Your Voic Greeting Back at Extension Settings, tap Messages & Notifications; then tap Voic Greeting. You can choose from a default message or record a custom message. Review the script of the default message, or tap Play to hear it. Your RingCentral numbers/extensions are listed. You can enter additional numbers, such as Work, Home, and Other. For numbers with extensions, put an asterisk between them, thus: [number] * [extension]. (The system will dial the number, pause, then dial the extension.) Tap the up and down carets to determine the order. Scroll down: Sequentially is checked calls to your extension will ring at the listed numbers in sequential order, until the call is answered. Or check Simultaneously to have calls ring all the listed devices at the same time. Tap Save to continue. Call Handling for your extension (101) is now set up. 95
. 3. Tap Call Now. 4.")

97 RingCentral Mobile App Guide Set up Administrator Call Forwarding 96 Record a Custom Group Voic Greeting 1. Tap Custom and then tap Record. 2. Enter a phone number for the system to call, or have it call your forwarding number (select one under the Forwarding Number menu). 3. Tap Call Now. 4. RingCentral will call you and prompt you to record your greeting. 5. When finished, click Save to return to the Messages & Notifications screen. 6. If you checked Custom and failed to record a message, you won t be able to continue until you do so, or check Default. User Settings The rest of your users will receive an instructing them to set up their own extension. If you choose to do it for them, tap your photo > Phone System > Users and then tap one user displayed on the Users page. Phones & Devices If you already have desktop IP phones installed, you can configure them now. If you have ordered phones, they will arrive Plug and Ring Ready. Once they are installed, you will be able to access your phone settings when you log in to your online account on the service Web site. As the Administrator, you can access settings for all phones associated with your RingCentral account by tapping your photo > Phone System > Phones & Devices. When finished, tap Save. 96

98 RingCentral Mobile App Guide Add Call Queue Groups 97 Tap a User Phone or tap Devices to see the details. Save any changes. Congratulations! Your RingCentral mobile app initial configuration is now complete, and you re all set to start taking and making calls. You can change all the settings later by logging in to your account online and selecting a menu under the Settings tab. Or you can log in to your mobile app and follow the instructions in the rest of this document to make selected changes. Tap Finish. Add Call Queue Groups Give your business phone system the flexibility of a much larger organization by creating call queue groups such as Sales, Support, and Billing. Follow the procedure on page 65 (Call Queues) to configure as many call queues as you need. RingCentral will send a message to the group manager s address with a single-use link. They should click on that link to confirm. It will take them to a Web page (on their desktop or on their mobile device) where they can set up their Group Manager password. Configure the Auto-Receptionist The Auto-Receptionist directs callers to the appropriate group or employee extension, or any U.S. phone number you choose. See Auto- Receptionist Settings on page 71. Create a Company Greeting The Auto-Receptionist will greet callers with a recorded message when they call. You can use the default greeting or you can create a custom greeting. See Company Greeting on page 72. Designate and Operator Extension You can designate an extension that will receive calls intended for the operator (extension 0). When callers press 0 or don t enter an extension number, the system will connect the call to the designated employee. See Operator Extension on page

99 RingCentral Mobile App Guide User Settings 98 User Settings The rest of your users will receive an instructing them how to set up their own extensions. It is not necessary for you to set up their extensions at this point, but you can do so if you wish. To set up a user extension, tap one displayed on this Users page. When finished, tap Save. Congratulations! Your RingCentral account initial configuration is now complete, and you re all set to start taking and making calls. You can change any of these settings at any time by logging into your account online and selecting by a menu under the Settings tab. Or you can log in to your mobile app and follow the instructions in the rest of this document to make selected changes. Phones & Devices If you already have desktop IP phones installed, you can configure them now. If you have ordered phones, they will arrive Plug and Ring Ready. Once they are installed, you will be able to access your phone settings when you log in to your online account on the service Web site. As the Administrator, you can access settings for all phones associated with your RingCentral account by going to your photo > Phone System > Phones & Devices. Tap a user phone from the list to show Phone Details. Review the settings and tap Save. 98
100 RingCentral Mobile App Guide Roles and Permissions 99 Roles and Permissions A new Roles and Permissions framework has been added. It supports the ability to enable/disable the areas shown in the table via the Roles and Permissions framework. Roles and Permissions Framework Mobile Roles and Permissions Applications: Mobile App Mobile Roles and Permissions Applications: Meetings App Mobile Roles and Permissions Features: SMS and Pager Mobile Roles and Permissions Features: Presence Mobile Roles and Permissions Features: Conference Mobile Roles and Permissions Features: Reports Mobile Roles and Permissions Settings: Block Phone Numbers Mobile Roles and Permissions Settings: My Profile Mobile Roles and Permissions Settings: Call Log Mobile Roles and Permissions Settings: Mobile Web Settings (Phone System, Billing, International Calling, Extension Settings) Mobile Roles and Permissions Features: Calling Policies QA Verification (Based on TAS changes, no client change) Mobile Roles and Permissions Features: International Calling 99
101 RingCentral Mobile App Guide Company Contact Pictures 100 Company Contact Pictures This feature supports showing your company profile contact image in: Contact Details Incoming Call screen Contacts list Favorites list* *If the image is already downloaded. 100

102 RingCentral Mobile App Guide Network Handoff Reconnecting Sound 101 Network Handoff Reconnecting Sound This feature causes users to hear a connecting sound during network handoff to indicate an attempt to re-establish a VoIP call when that connection was previously lost. Users will also see the message Reconnecting... in the active call screen. 101

103 RingCentral Mobile App Guide Changes to Call Incoming Notification 102 Changes to Call Incoming Notification Incoming Call Notification messages have been shortened and simplified: Shortened text from Incoming Call to Call from as that s already implied. Removed the text Tap to answer since users interact now by swiping the interactive notification. Old: Incoming Call from John Smith. Tap to answer. New: Call from John Smith. 102
104 RingCentral Mobile App Guide Active Call Screen Button Change 103 Active Call Screen Button Change Redesigned call screens provide improved layout for incoming and active calls. Hold button label will always display Hold and the button remains in pressed state while on Hold. 103


105 RingCentral Mobile App Guide Call Park 104 Call Park Park Locations provide mobile app users with access to private locations, set up by the RingCentral Office Admin, where group members may park active calls in the cloud and pick them up. The Admin assigns dedicated park locations to users in a private group. Those users can then see the Park Locations available, park calls at them, and pick up calls. 104
106 RingCentral Mobile App Guide Appendix A - Reports 105 Appendix A - Reports Historical Reports data, as a crosstab table, or as PDF. Administrators can also view the report dashboard from the RingCentral mobile app for ios and Android.. Under My Profile tap Reports. RingCentral Reports helps admins optimize the phone system by presenting usage analysis and trending metrics in an easy-to-read graphical format. With four separate Reportsviews and many filtering options, you can target your report to reveal exactly what you want to know to increase your business performance. The Summary report provides an overview of all call activity Total, Outbound, Inbound, Answered, Missed, Voic , and Average Hourly Activity during a selected date range. The Queue Activity report, visible to Account Administrators and Call Queue Managers, presents a summary of Total Call Volume, Total Talk Time, Average Call Duration, Missed Calls, and Time to Answer for each call queue selected during a date range. The User Activity report, visible to Account Administrators and Call Queue Managers, provides Total Call Volume, Average Number of Calls per User, Number of Inbound and Outbound Calls, Number of Call Per hour and Day, and Average Call Time for each selected user over a selected date range. The Phone Number Activity report, visible to Account Administrators and Call Queue Managers, provides Total Call Count, Average Calls per Day, and Average Inbound Call Duration for individual phone number over a selected date range. The Phone Number report provides (for Individual Numbers) the Total Call Count, the Average Calls per day, and the Average Call Duration for inbound calls. The Call Detail report (not available on mobile) provides details regarding calls made to a particular extension call direction, extension name, queue name, dialed number and so on. Reports can be exported as an image, as See additional reports on the next page. 105
107 RingCentral Mobile App Guide Appendix A - Reports 106 Reports - Queue Activity Reports - User Activity: Calls Answered and Outgoing Reports - Phone Activity 106
. Quality metrics on per-call basis at all endpoints.")
108 RingCentral Mobile App Guide Appendix A - Reports 107 Quality of Service Reports Added ability to access key operational QoS metrics from mobile app settings. Dashboard widgets with key metrics (quality, registrations, and quality/volume ratio). Quality metrics on per-call basis at all endpoints. Available only for Super Admin Users with QoS turned on. 107


109 RingCentral Mobile App Guide Appendix A - Reports 108 If you are an administrator for your account, you can access Quality of Service Reports. Under My Profile tap Reports, then tap Quality of Service. 108

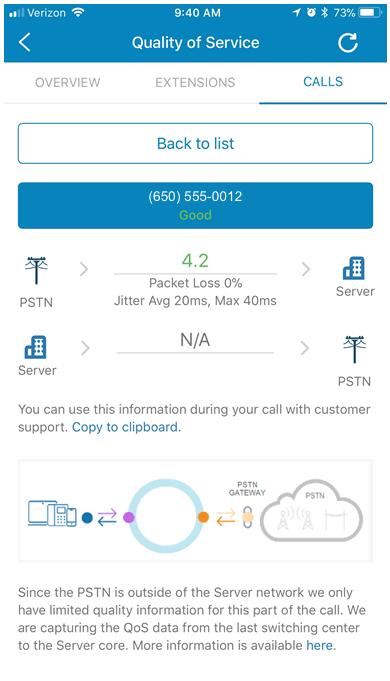
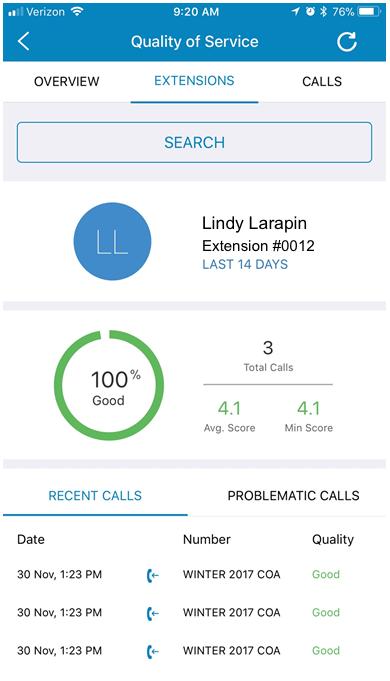
110 RingCentral Mobile App Guide Appendix A - Reports

111 RingCentral Mobile App Guide Appendix B - Apple Watch Support 110 Appendix B - Apple Watch Support Apple Watch Support provides instant notification when a call or message arrives, so you never have to miss anything important. You can handle an incoming call right from your wrist, by sending it to voic or by replying with a predefined message when you are not available to speak.* Apple Watch Support allows you to view your messages and your call log by recent contacts, where you can read and reply with text messages. With RingCentral for Office Ultimate edition, you can view voic text transcriptions on your Apple watch. You can also pair your Apple watch with your iphone (via Handoff) to play voic , make and return calls, or view faxes. In Canada only, Apple Watch provides support for the French Canadian language. RingCentral Mobile for Apple Watch is available for download on ios 9.1, or higher, to all RingCentral customers. Access Messages from Apple Watch Tap the RingCentral Icon to log in to the service Log in to an account on iphone (first time only) View recent conversations with up to 10 contacts Tap on a contact to view all activities Note: By default ios will send all notifications to the Apple Watch. This also applies to incoming VoIP call notification and therefore the iphone will not ring. Some users may not realize their Apple Watch has beeped or vibrated and may miss the incoming call notification on their watch. If they prefer they can disable notifications from displaying on their watch, but this will mean they will not get any RingCentral notifications on their watch. Unfortunately ios doesn t give users the ability to control this per notification within the app. 110
 Options: Play/listen to message by using Handoff on iphone Call back by using Handoff on iphone Dismiss/ignore calls Call 111")
112 RingCentral Mobile App Guide Appendix B - Apple Watch Support 111 Receiving a Voic Message Instant notification when a voic arrives Play (view transcription) Options: Play/listen to message by using Handoff on iphone Call back by using Handoff on iphone Dismiss/ignore calls Call 111

113 RingCentral Mobile App Guide Appendix B - Apple Watch Support 112 Receiving a Text Message Instant notification when a text message arrives Options: Reply with a canned message Call back by using Handoff on iphone View the message history 112


114 RingCentral Mobile App Guide Appendix B - Apple Watch Support 113 Notified with a Fax Message Multiple Arriving Messages Note: Fax cannot be viewed from an Apple Watch. Tap to view a list of messages and call logs. 113

115 RingCentral Mobile App Guide Appendix B - Apple Watch Support 114 Answering an Incoming Call Instant notification when an incoming call arrives Options for call handling: Answer call by using Handoff on iphone Send Caller to voic Reply with a canned message Dismiss/ignore calls 114

116 RingCentral Mobile App Guide Appendix B - Apple Watch Support 115 Multimedia Support (MMS) On Apple Watch: New message notification when a multimedia file is received image or video. Quick Reply with test; No outbound MMS from Apple Watch. 115
Mobile App Adminstrator Guide. Administrator Guide
 Mobile App Adminstrator Guide Administrator Guide RingCentral Office@Hand from AT&T Mobile App Administrator Guide Table of Contents Table of Contents Overview...4 Getting Started... 5 How to Start...5
Mobile App User Guide. Mobile App User Guide
 Mobile App User Guide Mobile App User Guide RingCentral Office@Hand from AT&T Mobile App User Guide Table of Contents Table of Contents Welcome... 3 Get Started Now...3 Express Setup...5 Log In to your
BT CLOUD PHONE. USER GUIDE FOR MY EXTENSION.
 BT CLOUD PHONE. USER GUIDE FOR MY EXTENSION. WHAT S IN THIS GUIDE. 1. Welcome to BT Cloud Phone. 3 2. Express setup. 4 3. Accessing the BT Cloud Phone Portal. 5 4. My Extension Dashboard. 6 4.1 Overview:
RingCentral Professional/Office. Basic Start Guide FOR ADMINISTRATORS
 RingCentral Professional/Office Basic Start Guide FOR ADMINISTRATORS Contents 3 Getting Started 4 How to access your account 5 The Overview Page 6 Messages 7 Activity Log 8 Contacts 9 Settings 10 Billing
User Guide. Start-up Guide for Users
 User Guide Start-up Guide for Users RingCentral Office@Hand from AT&T Start-up Guide for Users Table of Contents Table of Contents Welcome to RingCentral Office@Hand from AT&T...4 The Overview Page...
RingCentral Office Premium Edition
 RingCentral Datasheet RingCentral Office Premium Edition RingCentral Office Premium Edition Empower your business to communicate, collaborate, and connect via voice, team messaging and collaboration, audio
QUICK START GUIDE NTS HOSTED PBX CALL MANAGER. Welcome. Getting Oriented
 QUICK START GUIDE NTS HOSTED PBX Welcome Welcome to NTS Hosted PBX! This guide is intended to get you up and running with the basic features associated with the product. For more in-depth information,
Administrator Guide. Start-up Guide for Administrators
 Administrator Guide Start-up Guide for Administrators RingCentral Office@Hand from AT&T Start-up Guide for Administrators Table of Contents Table of Contents Welcome to RingCentral Office@Hand from AT&T...
RingCentral Office. User Guide
 RingCentral Office User Guide RingCentral Office User Guide Table of Contents 4 Welcome to RingCentral 4 Activate Your Account 5 Your Account Security 8 Quickly Get Up and Running 8 Review Your User Profile
Mobile App Department Manager Guide. Department Manager Guide
 Mobile App Department Manager Guide Department Manager Guide RingCentral Office@Hand from AT&T Mobile App Department Manager Guide Table of Contents Table of Contents Welcome... 3 Main Menu... 5 Messages...5
Hosted PBX QUICK START GUIDE. Customer Portal, Unified Desktop, Mobile and Meeting
 Hosted PBX QUICK START GUIDE Customer Portal, Unified Desktop, Mobile and Meeting HOSTED PBX CUSTOMER PORTAL WELCOME Welcome to Hosted PBX. This guide is intended to get you up and running with the Customer
The TELUS Business Connect Mobile solution. Admin guide
 The TELUS Business Connect Mobile solution Admin guide Table of contents. Part Getting started 4 Introduction 5 Admin homepage 5 Main functions 5 Admin Portal 5 My Extension 6 Do Not Disturb 7 RingOut
Collaborate App for Android Tablets
 The AT&T Collaborate service provides the Collaborate app to help you manage calls and conferences on your Android tablet on the go. The Collaborate app for Android tablets provides these communication
FusionWorks: Fusion Communicator for iphone 2/24/2016 USER GUIDE
 FusionWorks: Fusion Communicator for iphone 2/24/2016 Contents: About this Document.............................................................................................. 4 Audience and Purpose..........................................................................................
Collaborate App for Android Smartphones
 Collaborate App for Android Smartphones The AT&T Collaborate service provides the Collaborate app to help you manage calls and conferences on the go. The app comes in 3 versions: Collaborate - Mobile Collaborate
BT Cloud Phone. User guide for My Extension
 BT Cloud Phone User guide for My Extension 2 What s in this guide 999 or 112 emergency calls Each BT Cloud Phone number is registered to a specific address, so when you make a 999 or 112 call from this
BUSINESS VOICE. Helping You Do More. Cloud PBX & SIP Trunking
 BUSINESS VOICE Helping You Do More Cloud PBX & SIP Trunking STEP 1 Call Retrotel for a site visit. We will come at a specific time (not some 8 hour window). Grab your phone services bill. STEP 2 Pick the
StarLeaf App User Guide 28 February 2018
 StarLeaf App User Guide 28 February 2018 Contents Signing into the app 4 Minimum Requirements 4 Computers and Laptops 4 Android 5 iphone and ipad 5 Localization 5 Making a call 6 Calling outside of your
Syntel2 by Syntel Solutions Features
 Syntel2 by Syntel Solutions Features Interested in learning how our proven software platform can revitalize your business communications? With Syntel2 by Syntel Solutions, we give you the tools and features
IPMobility IPedge/VIPedge Feature Description 3/25/14
 IPMobility IPedge/VIPedge Feature Description 3/25/14 OVERVIEW The Toshiba IPMobility App allows a mobile device to act as an IPedge or Strata CIX system extension and provides users with the access to
HughesFlex Cloud PBX Quick Start Guide
 HughesFlex Cloud PBX Quick Start Guide www.hughesflex.com 309-277-4111 info@hughestel.com WELCOME Welcome to HughesFlex Cloud PBX! This guide is intended to get you up and running with the basic features
SASKTEL INTEGRATED BUSINESS COMMUNICATIONS (IBC)
") SASKTEL INTEGRATED BUSINESS COMMUNICATIONS (IBC) DESKTOP CLIENT USER GUIDE Version 4 January 2018 TABLE OF CONTENTS About the SaskTel IBC Desktop Client...3 Requirements...3 How to download and install
SASKTEL INTEGRATED BUSINESS COMMUNICATIONS (IBC) DESKTOP CLIENT USER GUIDE Version 4 January 2018 TABLE OF CONTENTS About the SaskTel IBC Desktop Client...3 Requirements...3 How to download and install
RingCentral for MINDBODY. User Guide
 RingCentral for MINDBODY User Guide RingCentral for MINDBODY User Guide Contents 2 Contents Introduction.............................................................. 3 About RingCentral for MINDBODY.....................................................
Contents Overview... 4 Install AT&T Toggle Voice... 4 Sign in to AT&T Toggle Voice... 5 Define your Location for Emergency Calls...
 Contents 1. Overview... 4 2. Install AT&T Toggle Voice... 4 Requirements... 4 3. Sign in to AT&T Toggle Voice... 5 4. Define your Location for Emergency Calls... 7 Update Your Registered Location for Emergency
OpenTouch Conversation for iphone
 OpenTouch Conversation for iphone User Manual OmniPCX Office Rich Communication Edition user OpenTouch Business Edition and Multimedia Services Conversation user OpenTouch Business Edition and Mutimedia
SASKTEL INTEGRATED BUSINESS COMMUNICATIONS (IBC)
") SASKTEL INTEGRATED BUSINESS COMMUNICATIONS (IBC) MOBILE CLIENT USER GUIDE June 2017 Version 1 TABLE OF CONTENTS Download the IBC Mobile Client Application... 3 Presence Status... 3 Contacts Tab... 3 Placing
SASKTEL INTEGRATED BUSINESS COMMUNICATIONS (IBC) MOBILE CLIENT USER GUIDE June 2017 Version 1 TABLE OF CONTENTS Download the IBC Mobile Client Application... 3 Presence Status... 3 Contacts Tab... 3 Placing
UC App for Android Mobile
 UC App for Android Mobile 2018 by Cox Communications. All rights reserved. No part of this document may be reproduced or transmitted in any form or by any means, electronic, mechanical, photocopying, recording,
Accession Desktop Communicator User Guide
 Welcome Accession Desktop Communicator is a unified communications softphone client that you can use on your PC or laptop. With Accession Desktop Communicator, all the rich functionality of your office
Getting Started with Lync 2010 for iphone
 Getting Started with Lync 2010 for iphone Getting started with Lync 2010 on the iphone» Requirements» Installing Lync» Removing Lync» Signing in to Lync» Signing out of Lync Requirements iphone 3GS, iphone
8x8 Virtual Offce Mobile User Guide for ios
 8x8 User Guide for ios Works with iphone, ipad and ipod Touch Version 4.0, October 2012 The Champion For Business Communications Table of Contents introduction...3 Features...3 Technical requirements...4
User Guide for Google
 User Guide Office@Hand for Google About Office@Hand for Google Office@Hand for Google provides seamless integration between your Google account and your Office@Hand services. It offers these features:
How to use the One Talk for Desktop app. User guide
 How to use the One Talk for Desktop app Contents About One Talk from Verizon... 5 One Talk delivers...5 A good fit for your business...5 System requirements... 5 Windows (64 bit):...5 Mac OS (64 bit):...5
Accession Communicator for Mobile
 Accession Communicator for Mobile Quick Start Guide ACCESSION COMMUNICATOR FOR MOBILE Your AireSpring phone service can be used to make or receive calls from your desk phone, your PC or MAC, and your mobile
RingCentral for Google. User Guide
 RingCentral for Google User Guide RingCentral for Google User Guide Contents 2 Contents Introduction............................................................... 4 About RingCentral for Google..........................................................
BIRCH COMMUNICATOR FOR MOBILE iphone GETTING STARTED GUIDE
 BIRCH COMMUNICATOR FOR MOBILE iphone GETTING STARTED GUIDE Table Of Contents 1 Getting Started...3 1.1 Installation... 3 1.2 Sign In... 3 2 Main Tabs...3 3 Contacts... 4 3.1 Add Contacts...4 3.2 Edit...4
Hosted PBX Quick Start Guide
 Hosted PBX Quick Start Guide P 800.892.0163 628 Oregon Street, Hiawatha, KS 66434 www.rainbowtel.net Polycom VVX 300 6 line, Monochrome screen for utility applications Polycom VVX 500 12 line, color screen
Managing your PBX- Administrator
 Managing your PBX- Administrator ACCESSING YOUR PBX ACCOUNT Navigate to https://voip.ancero.com/ and log in to the Ancero Utility VoIP portal account. If you would like your web browser to keep you logged
Cisco Unified Personal Communicator Release 8.5
 Frequently Asked Questions Cisco Unified Personal Communicator Release 8.5 FAQs 2 Basics 2 Setup 3 Availability 5 Contacts 8 Chat 10 Calls 18 Conference Calls 25 Voicemail 26 Web Meetings 27 Troubleshooting
OpenTouch Conversation for iphone
 OpenTouch Conversation for iphone User Manual OmniPCX Office Rich Communication Edition user OpenTouch Business Edition and Multimedia Services Conversation user OpenTouch Business Edition and Mutimedia
User Guide: Sprint Direct Connect Plus - ios. User Guide. Sprint Direct Connect Plus Application. ios. Release 8.3. December 2017.
 User Guide Sprint Direct Connect Plus Application ios Release 8.3 December 2017 Contents 1. Introduction and Key Features... 6 2. Application Installation & Getting Started... 8 Prerequisites... 8 Download...
ShoreTel Mobility User s Guide for iphone and ipod touch
 ShoreTel Mobility User s Guide for iphone and ipod touch Release 7.0 July 2013 Legal Notices Document and Software Copyrights Copyright 1998-2013 by ShoreTel Inc., Sunnyvale, California, USA. All rights
OpenTouch Conversation for Android Smartphone
 OpenTouch Conversation for Android Smartphone User Manual OmniPCX Office Rich Communication Edition user OpenTouch Business Edition and Multimedia Services Conversation user OpenTouch Business Edition
Virtual Communications Express User Guide Mobile for iphone
 User Guide Mobile for iphone Feature Overview By adding Virtual Communications Express Mobile to an ios platform, you can leverage a convenient and intuitive interface for mobile calling services. Calls
Communicator for Android. User Guide. Release 21.3
 Communicator for Android User Guide Release 21.3 Table of Contents Contents Table of Contents...2 1 Main Tabs...5 2 Contacts...6 2.1 Add Contacts... 6 2.2 Edit... 7 2.3 Filters... 7 3 Presence...8 4 Instant
BT CLOUD VOICE COMMUNICATOR USER GUIDE.
 BT CLOUD VOICE COMMUNICATOR iphone EDITION. USER GUIDE. WHAT S IN THIS GUIDE. 1. Introduction. 3 1.1 Overview 3 1.2 Audience 3 2. Requirements. 4 2.1 Hardware & Software Requirements 4 2.2 Licensing Requirements
OpenTouch Conversation for iphone
 OpenTouch Conversation for iphone User Manual OmniPCX Office Rich Communication Edition user R2.3 1722 Direct link to the Apple Store OPENTOUCH CONVERSATION APPLICATION PROVISIONING... II-3 RECOMMENDATIONS...
Zultys Mobile Communicator for iphone 4.0
 December 14 Zultys Mobile Communicator for iphone 4.0 Author: Zultys Technical Support Department This document covers basic use of the Zultys Mobile Communicator for iphone application. The Zultys Mobile
Zultys Mobile Communicator for iphone 8.0
 July 18 Zultys Mobile Communicator for iphone 8.0 Author: Zultys Technical Support Department This document covers basic use of the Zultys Mobile Communicator for iphone application. The Zultys Mobile
UNITY MOBILE IPHONE USER GUIDE
 UNITY MOBILE IPHONE USER GUIDE CONTENTS 1 Introduction... 2 2 How It Works... 3 3 Getting Started... 4 3.1 Login... 4 3.2 Linking Unity to the Mobile Device... 5 3.3 Specifying the Outgoing Call Option...
UBITY UC MOBILE IPHONE EDITION USER GUIDE
 UBITY UC MOBILE IPHONE EDITION USER GUIDE SECTION TITLE 1 UBITY UC MOBILE iphone Edition User Guide CONTENT 1 INITIAL SETUP... Page 3 2 CONFIGURING... Page 4 1. GETTING READY...Page 4 2. LOGGING IN...Page
Claranet Hosted Voice v2 Office UC Smartphone User Guide All Rights Reserved 2010 Claranet. Claranet Hosted Voice v2. Office UC Smartphone User Guide
 Claranet Hosted Voice v2 Office UC Smartphone User Guide March 2018 Contents Introduction... 3 Overview... 4 Application Description Office UC Smartphone... 5 Hardware & Software Description... 6 Firmware
Virtual Office Phone Service Setup Guide
 Setup Guide A guide for the Phone System Administrator Version 6.0, November 2010 Table of Contents Welcome to 8x8 Virtual Office!...3 8x8 Virtual Office Softphone...3 Activate Your 8x8 IP Phones...3 The
Voyant Connect User Guide
 Voyant Connect User Guide WELCOME TO VOYANT CONNECT 3 INSTALLING VOYANT CONNECT 3 MAC INSTALLATION 3 WINDOWS INSTALLATION 4 LOGGING IN 4 WINDOWS FIRST LOGIN 6 MAKING YOUR CLIENT USEFUL 6 ADDING CONTACTS
Avaya one-x Mobile User Guide for Windows Mobile
 Avaya one-x Mobile User Guide for Windows Mobile Release 5.2 January 2010 0.2 2009 Avaya Inc. All Rights Reserved. Notice While reasonable efforts were made to ensure that the information in this document
RingCentral Office. New Admin Setup
 RingCentral Office New Admin Setup RingCentral Office New Admin Setup Table of Contents 2 Welcome to RingCentral 2 Activate Your Account 3 Your Account Security 4 Create Your Password 5 Set Your PIN 6
April 18, 2014 P a g e 1
 Release Information... 3 New Functionality... 3 1. Overview... 5 2. Install AT&T Toggle Voice... 6 Requirements... 6 3. Sign in to AT&T Toggle Voice... 7 4. Enter your Location for Emergency Calls... 9
Hosted VoIP Administrator User Guide
 Hosted VoIP Administrator User Guide Table of Contents: 1. Call Continuity..... pg 1 2. Call Groups..... pg 2 3. Call Queues... pg 5 4. Caller ID... pg 9 5. Company Call Recording... pg 12 6. Conference
RingCentral for UK Desktop. User Guide
 RingCentral for UK Desktop User Guide RingCentral for UK Desktop Contents Contents Welcome... 3 What s New... 3 Desktop Login with Email and Google.......................... 4 Welcome Screen Enhancement..............................
Table of Contents. Phone Configuration
 User Manual 3.60 Table of Contents Phone Configuration... 1-5 Buttons... 1 Placing a Call... 1 Answering a Call... 2 DND... 2 Redial... 2 Call List / Callers... 2 Contacts... 2 Paging... 3 Transferring
UC App for Android Tablet
 UC App for Android Tablet 2018 by Cox Communications. All rights reserved. No part of this document may be reproduced or transmitted in any form or by any means, electronic, mechanical, photocopying, recording,
BIRCH COMMUNICATOR FOR MOBILE ANDROID TM
 BIRCH COMMUNICATOR FOR MOBILE ANDROID TM GETTING STARTED GUIDE Table Of Contents 1 Getting Started...3 1.1 Installation... 3 1.2 Sign In... 3 2 Main Tabs...3 3 Contacts... 4 3.1 Add Contacts...4 3.2 Edit...4
Table of Contents. The Home and More screens... 14
 Table of Contents SmartMeet Overview...1 From SmartMeet, you can:...1 Setup... 2 System requirements... 2 Downloading SmartMeet....3 Starting SmartMeet for the first time... 4 Add user details...5 To add
CenturyLink Business Communicator for Desktop
 CenturyLink Business Communicator for Desktop User Guide Release 2.0 Document Version 4 BusinessCommunicator_Guide_0517_v4 1 CenturyLink Business Communicator Guide Table of Contents 1 About CenturyLink
Android Softphone User Guide
 Android Softphone User Guide Dialer Screen From the main screen you can dial local extensions or external phone numbers, and access any of the Softphone features. NOTE: It is NOT to be used to dial 9-1-1.
MyOfficeSuite Desktop App
 MyOfficeSuite Desktop App USING THE MYOFFICESUITE DESKTOP APP TO BE MORE PRODUCTIVE CONTACT SUPPORT 1-888-623-VOIP OfficeSuiteSupport@Broadviewnet.com http://community.broadviewnet.com Table of Contents
2018 by Cox Communications. All rights reserved. No part of this document may be reproduced or transmitted in any form or by any means, electronic,
 UC App for ipad 2018 by Cox Communications. All rights reserved. No part of this document may be reproduced or transmitted in any form or by any means, electronic, mechanical, photocopying, recording,
BizVoice(Mobile ipn) User Guide Android
 User Guide Android") Chapter 1 : Getting Started 1. Client Download and Installation Step 1: Go to Google Play on your PC or your android device and search for < Mobile ipn >. Step 2: Download and install Mobile ipn. Note
Chapter 1 : Getting Started 1. Client Download and Installation Step 1: Go to Google Play on your PC or your android device and search for < Mobile ipn >. Step 2: Download and install Mobile ipn. Note
Frequently Asked Questions: Cisco Jabber Voice 9.1(6) for iphone
 for iphone") Frequently Asked Questions Frequently Asked Questions: Cisco Jabber Voice 9.1(6) for iphone Cisco Jabber Voice for iphone 2 Basics 2 Account Settings 7 Calls 9 Contacts and Directory Search 16 Voicemail
Frequently Asked Questions Frequently Asked Questions: Cisco Jabber Voice 9.1(6) for iphone Cisco Jabber Voice for iphone 2 Basics 2 Account Settings 7 Calls 9 Contacts and Directory Search 16 Voicemail
Take your business to the next level with fully integrated unified communications
 All your business communications, integrated, efficient, and reliable. Take your business to the next level with fully integrated unified communications INTERMEDIA UNITE Intermedia Unite is a cloud-based
Avaya one-x Mobile User Guide for Windows Mobile
 Avaya one-x Mobile User Guide for Windows Mobile 18-602903 Issue 2 December 2008 2008 Avaya Inc. All Rights Reserved. Notice While reasonable efforts were made to ensure that the information in this document
Table of Contents. iii
 TECHNICAL GUIDE Table of Contents MobileMeet Overview... 1 From MobileMeet, you can:... 1 Setup... 2 System requirements... 2 Bandwidth and Data Transfer... 3 Downloading MobileMeet... 4 Starting MobileMeet
C L O U D V O I C E B U S I N E S S P O R T A L
 C L O U D V O I C E B U S I N E S S P O R T A L A P P L I C A T I O N U S E R G U I DE O F F I C E U C S M A R T P H O N E, U C B U S I N E S S A N D U C T E A M E D I T I O N V E R S I O N 2. 0 Content
Mobile App Guide Utility Telecom Accession Communicator
 Mobile App Guide Utility Telecom Accession Communicator This guide is intended to help you understand how to set up Accession Communicator V2.28 for your smartphone. If you have any questions, call us
RingCentral for Google Chrome Extension. UK User Guide
 RingCentral for Google Chrome Extension UK User Guide RingCentral for Google UK User Guide Contents 2 Contents Introduction... 4 About RingCentral for Google Chrome Extension.............................................
SMART UC USER GUIDE - ios DECEMBER 2018
 SMART UC USER GUIDE - ios DECEMBER 2018 Vocus Level 10, 452, Melbourne, VIC 3000 vocus.com.au CONTENTS INTRODUCTION... 3 OVERVIEW... 3 MULTI DEVICE SUPPORT... 3 DISCLAIMERS... 3 GETTING STARTED... 4 INSTALLATION...
RingCentral for Desktop. User Guide
 RingCentral for Desktop User Guide RingCentral for Desktop Table of Contents 3 Welcome 4 What s New 4 Call Switch 5 Customize Hot Keys in Settings 5 System Requirements 6 Product Tour 9 Download and Install
Virtual Office Mobile
 ---------------------------------------------------------------------------- ------- --------- Virtual Office Mobile Copyright 2016, 8x8, Inc. All rights reserved. This document is provided for information
8x8 Virtual Office Online with Softphone User Guide
 User Guide Version 2.0, February 2011 Contents Introduction...4 System Requirements...4 Supported Operating Systems...4 Supported Browsers...4 Required ports...4 VoIP...4 Operating System Requirements...4
My Phone. My Phone - Overview. Signing In
 My Phone - Overview The Optus Loop My Phone portal gives you full access to your personal phone service settings, allowing you to customise and manage your service to suit your specific requirements. Within
ENTERPRISE SUBSCRIBER GUIDE
 ENTERPRISE SUBSCRIBER GUIDE Enterprise Subscriber Guide 880 Montclair Road Suite 400 Birmingham, AL 353 www. TABLE OF CONTENTS Table of Contents Introduction...6 Logging In...6 Navigation Bar, Sub-Menu
UNITY MOBILE FOR WP 8.1 END USER GUIDE
 UNITY MOBILE FOR WP 8.1 END USER GUIDE Contents 1. Introduction... 3 2. How It Works... 4 3. Getting Started... 5 3.1 Login... 5 3.2 Linking Unity to the Mobile Device... 5 3.3 Specifying the Outgoing
Software Features. Software Features
 Allworx Software Features Software Features Allworx Advanced options for improved communications. Allworx provides a wide range of software feature options to help your business increase its productivity,
Office Communicator for iphone. User Guide. Release
 Office Communicator for iphone User Guide Release 21.3.1 Table of Contents 1 About Communicator for iphone...4 2 Getting Started...5 2.1 Installation... 5 2.2 Sign In... 5 3 Main Tabs...6 4 Contacts...7
Virtual Office Phone Service Setup Guide
 Setup Guide A guide for the Phone System Administrator Version 4.0, July 2010 Table of Contents Welcome to 8x8 Virtual Office!...3 Activate Your 8x8 IP Phones...3 The 8x8 Self Service Portal...4 Set Up
AirePBX End User Guide
 AirePBX End User Guide Third Quarter 2012 Contents 1 Introduction 1-1 2 Making calls 2-1 1. Internally 2-1 2. Externally 2-1 3. Emergency calls 2-1 4. Speaker phone 2-1 5. Ending calls 2-1 3 Answering
Microsoft Lync 2013 Quick-Start Guide. ThinkTel Communications Professional Services Last Updated: June 18, 2013
 Microsoft Lync 2013 Quick-Start Guide ThinkTel Communications Professional Services Last Updated: June 18, 2013 Instant Messaging & Presence Accept an IM request Click anywhere on the picture display area
Signing in. Signing in. Which Skype should I use? Quick Start Guide. Sign in using your Massey address and password.
 Quick Start Guide Signing in Signing in Sign in using your Massey email address and password. Which Skype should I use? Skype for Business is for connecting with a co-worker or business associate. Skype
Today we ll be demonstrating Clarity's web portal where you can access all the features of Clarity s Phone System.
 Title: Introduction to Clarity Voice Phone Service Portal Hello and welcome to Clarity s Support Portal training. At Clarity Voice, we want to help you use your phones to make more sales and improve your
Rev
 Rev. 1.1.3 Copyright Notice Copyright 2014-2017 Telinta Inc. No part of this document may be reproduced or transmitted in any form or by any means, electronic or mechanical, for any purpose, without the
ICX Features for Users
 ICX UC & Cloud PBX With Cloud ICX, you have all tools needed to offer enterprise PBX, video, presence, instant messaging, contact center solutions, and mobility. ICX Features for Users IXICA ICX is a business
TELUS Business Connect for Google User Guide
 TELUS Business Connect for Google User Guide TELUS Business Connect for Google User Guide Contents 2 Contents Introduction... 4 About TELUS Business Connect for Google... 5 About this guide... 5 Basics...
Virtual Communications Express User Guide Desktop Softphone
 User Guide Feature Overview The Virtual Communications Express is a native Microsoft Windows and Apple Macintosh soft client, providing the following communication features: Premier User Standard User
AT&T Collaborate glossary
 Common terms associated with the AT&T Collaborate SM service. A B C D E F G H I J K L M N O P Q R S T U V W X Y Z A account codes A feature that lets administrators track and manage outgoing calls to keep
GLOBALMEET USER GUIDE
 GLOBALMEET USER GUIDE Release 3.8.1 July 2016 TABLE OF CONTENTS GlobalMeet Overview 4 Get the GlobalMeet Desktop Tools 5 Download and Install GlobalMeet 5 System Requirements 5 Getting Started 6 Sign in
Contacts, presence, and IM
 Want to shut your virtual office door? Presence is automatically set based on your Outlook calendar but you can change it temporarily if you want to. Presence status is a quick way for other people see
The guide is divided into sections which describe how to configure and manage different aspects of the Hosted PBX service for your business group.
 Welcome This guide is intended to help Business Group Administrators of FairPoint Communications Hosted PBX service to perform the various tasks needed to administer the system, such as: Managing lines,
Hosted VoIP End User Guide
 Hosted VoIP End User Guide Table of Contents: 1. Online Portal User Guide...pg 1 2. System Dial Codes... pg 6 3. Phone User Guides: a. PolyCom Guide... pg 7 b. Cisco Guide... pg 10 c. Yealink Guide...
ShoreTel Mobility for ipad User Guide. Release 7.0
 ShoreTel Mobility for ipad User Guide Release 7.0 Document and Software Copyrights Copyright 1998-2013 by ShoreTel Inc., Sunnyvale, California, USA. All rights reserved. Printed in the United States of
Frequently Asked Questions
 Frequently Asked Questions Frequently Asked Questions for Cisco Unified Personal Communicator 8.6 and Voice and Video Firmware 8.6 for Cisco Virtualization Experience Client 6215 FAQs 2 Basics 3 Setup
End User Guide. FastFind Links. Using Your Desk Phone. Using the User Web Portal. Voic . Answering Rules and Time Frames. Contacts.
 End User Guide Using Your Desk Phone FastFind Links Using the User Web Portal Voicemail Answering Rules and Time Frames Contacts Phones Music On Hold Call History Profile CONTENTS Contents... ii Introduction...