GXE502X User Manual 7/9/2008. GXE502X Users Manual. Version 03
|
|
|
- Blanche Ross
- 5 years ago
- Views:
Transcription


1 GXE502X Users Manual 1
2 Table of Contents 1. Introduction Extension Configuration Trunk Configuration Conference Bridge Hunt/Ring Group Configuration Auto-Attendant Configuration Call Queues Configuration System Configuration Advanced Options Configuration Reset & Reboot Status Reports Voic Configuration
3 1. Introduction Thank you for purchasing the Grandstream GXE502X IP-PBX, a SIP-based, affordable, feature-enriched converging communication platform designed to meet the communication requirements for small to medium sized enterprises. The GXE502X provides the cutting-edge IP-based communications that businesses demand while leveraging existing infrastructure and providing a smooth transition into IP telephony. Based on open-standard SIP, the GXE502X can easily integrate into and interoperate with other components of your existing communications network while providing a rich set of features to reduce costs and increase productivity. Built-in FXO and FXS ports enable the GXE502X to interface with analog lines and devices while concurrently registering to SIP trunks and SIP-based trunk gateways to maximize available communications resources. The PoE capability (LAN port) and low power consumption (15Watt Max.) solidify the GXE as an environment friendly solution (compared to similar PC based systems). This also ensures nonstop communication even during power outages (necessary UPS required) The GXE502X also includes an Express Setup wizard and an intuitive user interface that allows users to quickly configure extensions. Voic , fax mail, faxmail-to- , conference bridges and other enhanced features can be turned on with minimal effort via the GXE502X web configuration interface. The GXE s broad feature set, ease of operation and affordable price range make it ideal for any SMB. Equipment Packaging The GXE502X IP-PBX package contains: 1) One GXE502X IP-PBX unit 2) One 12 Volt power adapter 3) One Ethernet cable 2. Extension Configuration Phone Extensions The front end menu of the GXE web interface is the Phone Extensions menu. This menu and it s several different sub menus allow users to configure and add extensions with ease. Extensions for internal users can be created from the Express Setup menu of a factorydefault GXE502X or from the Phone Extensions menu at any time. The extensions can be local users (shown in Green in the Extensions Directory) in the internal network, or remote users connecting over the open Internet (shown in Blue in the Extensions Directory). This flexibility allows GXE502X users to bring their office extensions virtually anywhere that has a broadband Internet connection. This gives users easy access to personnel (home office and road warriors alike) without incurring any PSTN toll charges. 3

4 - Express Setup The Express Setup process allows users to automatically configure extensions by autoprovisioning Grandstream phones 1. This sub menu will appear ONLY on factory default GXE units or after performing a factory reset. Once the Express setup is executed, the sub menu will disappear. - Using the Express Setup wizard to create extensions and auto-provision phones. Please refer to the GXE502X Quick Start Guide for detailed instructions on setting up your GXE with the Express Setup wizard. Extension Length: All extensions will have the number of digits specified here. Extension Digit Prefix: All extensions will begin with this digit. Other digits can be used for peer systems, trunks or feature access codes Local IPPBX Number: A unique identifier number for the local GXE502X system. - Extensions Directory The Extensions Directory sub menu allows user to add, batch add, modify,and delete extensions, after the Express Setup process. - Using the Extensions Directory sub menu to create, modify, view, and delete extensions: The Extensions Directory section displays all SIP phone extensions configured on the GXE502X. This page also displays the IP address, firmware version and registration status of the end points. The following actions can be performed in this section: 1 Auto provisioning is currently only available for Grandstream phones 4

5 Add an extension: Clicking on the Add One Extension button Will load the extension configuration page. This page allows users to set all of the extension s settings. Click on the Submit button to add the extension or Cancel to abort the add extension process. Configuration Field Explanations: 1) User Name: Name of User as shown on the Extensions Directory screen 2) Department Name: The Name of the Department that the extension belongs to 3) Extension: The Extension number 4) Privilege: User Privileged. When combined with Dial Plan (feature pending), the administrator of the GXE502X can assign different privilege (like local calls only, long distance call allowed, etc) levels to various extensions on the GXE502X system to manage call control. 5) SIP Password: The password required to allow phones to register to GXE502X. This password must be synchronized between the GXE502X and registered SIP end points (ie. IP Phone & ATAs). 6) Voic Allowed: Toggles voic on and off for this extension.. 7) RTP Port Detection: Toggles the GXE s ability to detect RTP ports for remote extensions. This field is set to Yes on factory default units. 8) Ring Attempts Before Forward to Voic Configures the amount of rings before calls are forwarded to voic . (When voic is enabled) 9) Fax mail Allowed: Enables the faxmail feature for this extension. 10) Password to Retrieve Voic /Fax mail: The password required to retrieve Voic or Fax mail. 11) Call Forward 2 : Toggles Call Forwarding on and off. The factory default setting is OFF. 12) Call Forward Phone: The phone number the call will be forwarded to. (If you are forwarding to an external number like a cell phone, the proper dial pre-fix must be entered before the area code and phone number. Just like the normal dialing process) 13) Call Forward Rule: Configures the method in which calls are forwarded. 14) Time for No-Answer-Forwarding: The timer in which calls are routed to the Call Forward Number. Please make sure this timer is shorter than the voic timer if the extension has Voic enabled. 15) Do Not Disturb: When enabled, calls will go directly to voic (when VM is enabled). Calls will be rejected if voic is disabled. 2 Note: Call Forward can also be activated by using feature code. 5
6 16) Reboot Peer: When set to Yes, this feature will reboot registered (online) Grandstream endpoints when the Submit button is clicked. The GXE502X can force extensions to reboot via this method. 17) Session Keep Alive: This feature lets you configure different methods to keep the session alive: Update, Re-Invite, Session Timer/Automatic. The factory default value is Automatic. Grandstream recommends using the default setting. Batch add extensions: The Batch Add button allows you to manually add multiple extensions. The batch add configuration page lets you specify the range of extensions to add, as well as some general settings to apply to them. You may also modify the settings of these extensions through the Extensions Directory page. Click on the Submit button to add the extensions or Cancel to abort the batch add process. Modify an extension: The modify button allows you to modify all of the extensions settings. Click on the Modify button to the right of the extension you wish to modify to load the extension details page. To reboot the Grandstream phone/ata (remotely), set the Reboot Peer setting to Yes, then click on the Submit button to modify and/or reboot the extension or Cancel to go back to the extensions directory page. Delete: Click on the Delete button to the right of the extension you wish to delete. You will be prompted for confirmation via a dialog box; click OK to confirm or Cancel to go back to the extensions directory page. Batch delete: This feature lets you delete multiple extensions in one step. You can do this by selecting the checkbox on the extensions to be deleted, and clicking the Delete button below the column of checkboxes. To check all displayed extensions on the current page, check the uppermost checkbox, labeled All. Note that this only affects extensions on the current page; extensions on other pages will not be deleted. You will be prompted for confirmation via a dialog box; click OK to confirm or Cancel to go back to the extensions directory page. - Busy Lamp Field and Message Waiting Indication Busy Lamp Field (BLF) and Message Waiting Indication (MWI) support are enabled on the GXE502X by default. New voic messages will automatically trigger the MWI light on phones that support it to notify the user of new voic messages. To monitor the status of other extensions in the GXE502X, configure BLF keys on a (Grandstream) IP phone to the extension numbers to be monitored. The BLF key configuration can be found on the basic settings tab of your Grandstream GXP phone s web UI. The GXE502X will trigger the LED of BLF keys to signal when the monitored extension is idle (Green), ringing (Blinking Red) or busy (Solid Red). - General Settings 6
.")
7 The General Settings sub menu provides basic system information such as the extension digit length, IPPBX identification number, Internal (FXS port) phone/fax extension number, and the paging number to dial (if there is a speaker system connected to the AUDIO-OUT port). In the General Settings section, the following settings can be configured: Extension Number for Internal Phone/FAX ports: This field allows you to set the extension # for the TEL1 and TEL2 FXS ports on the GXE502X. Extension Number for Paging: Users may dial this number for group paging or announcements if there is an external speaker system connected to the AUDIO-OUT port on the back of the GXE502X. When finished, click on the Submit button to save your changes or Cancel to abort the changes. The Auto Provision sub menu provides users a method to Auto Provision Grandstream endpoints after the Express Setup process. - Auto Provisioning Extensions after Express Setup Click on Auto Provision under the Phone Extensions menu. Enter the starting and ending extensions for the phones (Make sure to enter numbers in the established digit frame structure) before connecting your Grandstream phones. Click the Start button to start the auto provisioning process. Once the Auto-Provision page starts refreshing you may connect your phones to your switch/hub. Click Stop when done. 3. Trunk Configuration PSTN trunks, SIP trunks, and SIP-based PSTN trunks (extended via Grandstream FXO Gateways) can all be configured on the GXE502X in the Trunk/Phone Lines menu. 7
8 The FXO and FXS port/line electric specification parameters and settings can be configured in this area as well. All of these will allow users of the GXE502X to make calls anywhere through multiple trunk types. - Internal PSTN Trunk Line Configuration (via FXO ports) The Internal PSTN Trunk Line Configuraiton page lets your configure the FXO ports on the back of the GXE502X to make and receive calls to and from the PSTN. Compatibility with different PSTN lines can be achieved by adjusting the related parameters on the Internal PSTN Trunk Line Configuration page. The default settings should function in most cases. Correct technical data must be obtained from local Telco carriers and implemented on the GXE502X before the lines will function. This data depends on the regional PSTN line characteristics. FXO Termination: This section lets you specify the line disconnect signaling and impedance. Enable Current Disconnect: Default is Yes. 8
9 This value should be used when the PSTN provider or local Telco Carries uses a line power drop to indicate call completion to the subscribing end point. In this case the FXO port of GXE502X will search for a power drop with the preconfigured time frame to disconnect call from a VoIP extension. Current Disconnect Threshold: This is a preconfigured value of duration for a line power drop used by specific service providers or Telco Carriers. For example, with a configured value of 500ms, the device will ignore any random voltage drops on the line if the duration of such a drop is less than 500ms. The call will NOT be considered as terminated, but will clear a call if a drop is equal or more than 500ms. This is useful to prevent unnecessary call drops in some low quality PSTN lines. However inappropriate parameters may cause calls to drop unexpectedly or cause the line not to release as expected. Please consult with the local Telco carrier before change this parameter. Enable Tone Disconnect: This feature causes a Busy Tone to be used as the FXO line disconnection signal when set to YES. Used by some Telcos or enterprise POT PBX. Polarity Reversal Disconnect: If set to Yes, calls will be terminated after a polarity signal reversal. The default value is No. AC Terminal Impedance Scheme: Users can select one of two options for the AC termination scheme: Country (rough and easy) or the Model of related Impedance values (real and complex). Please make note that inappropriate parameters may cause echo or popping noises on the lines. Please consult with your local Telco Carrier before configuring these fields. AC Terminal Impedance: This depends on whether Country or Model is selected, either 15 Countries are selectable or users have to select the Impedance value used by the local PSTN carriers. Call Progress Tones: This feature lets you configure tones to match the FXO line regional settings. In certain countries, the carriers or central office will send special tones to indicate certain events on the PSTN side. For example, when a call is disconnected from the remote side the other side will hear a busy tone indicating that the call is terminated. Also, a dial-tone is used by the central office to signal that it is ready to receive digits and process the call. Users can pre-configure these tones in the GXE502X. However users must know the correct frequency values and cadences of these tones from the PSTN carrier. Wrong parameters may cause the GXE502X to malfunction due to incorrect tone settings. Here is an example for the syntax for a busy tone in the U.S.A: Syntax: f1=freq@vol, f2=freq@vol, c=on1/off1-on2/off2-on3/off3; [...] (Note: freq: Hz; vol: -30-0dBm; c: (cadence) in msec, several cadences allowed) 9

10 Default US Busy Tone: Line Dialing Settings: This feature adjusts line dialing properties to adhere to the PSTN line requirements. DTMF Digit Length: The DTMF Digit Length is the play time of DTMF in milliseconds for each digit dialing out from the VOIP side to PSTN DTMF Digit Volume: The digit output power in dbm. DTMF Dial Pause: Dial pause is the time between 2 digits when dialing out through the PSTN. Wait for Dial-Tone: If set to Yes, the device will first obtain a PSTN line and wait for a dial tone from the central office. After obtaining the dial tone, the digits dialed will be sent to the central office. Minimum Delay Before Dial: This parameter lets users configure a variable delay before dialing the first digit into the PSTN. Caller ID Standard: This feature configures caller ID handling to match local PSTN settings. Caller ID scheme: This feature lets you select the model used by local PSTN provider. Please check with local PSTN carrier for configuration information. Current supporting including: Bellcore, ETSI, DTMF or NTT FSK Caller ID Minimum RX Level: This is an adjustable threshold value for the Caller ID signal strength received to help the device to recognize Caller ID from different networks. (-96-0dB. Default -40dB) FSK Caller ID Seizure Bits: This field lets you choose a value of alternating bits (zeros and ones) used for CID channel signaling. The Default is 200. FSK Caller ID Mark Bits: This feature lets you choose a value for the frequency modulated signal of alternating bits (zeros and ones) used for synchronization. Default
 for the rules to apply to. Dial Prefix: Lets you configure the dial prefix on outbound calls to specified trunk(s).")
11 Line Call Control: The following Line Call Control settings allow you to specify how inbound and outbound calls are handled. The FXO trunk(s) will begin to work ONLY after these fields are configured. Line: This field lets you specify a single line or a range of FXO port(s) for the rules to apply to. Dial Prefix: Lets you configure the dial prefix on outbound calls to specified trunk(s). When the call is sent out via this trunk, the prefix digit will be removed. Inbound Call Answer: In the first drop-down box of each row, select the destination for inbound call termination on the corresponding FXO trunk(s). The second drop-down box lets you select from the available destinations for the type selected. You can choose from the following types: Auto-Attendant, Extensions, and Hunt/Ring Groups. Enable Password: Enabling this field will password protect the trunk, you must enter the password when calling out using a trunk that has this feature enabled. Delete: Deletes an existing line call control rule. Add: Allow another line call control rule to be configured. Allow Other Peer Systems Use: Allows peered GXE502X(s) to dial through the local GXE502X(s) internal PSTN trunks. When finished, click on the Submit button to save the changes or Cancel to discard the changes. - Internal Phone/Fax Port: 11

12 In the Internal Phone/Fax Port section, the electrical and DTMF signaling settings of the two FXS ports on the back of the GXE502X can be configured for compatibility with local analog phone/fax devices. The extension numbers for these ports are set in the Phone Extensions menu, under the General Settings sub menu section. DTMF Transport Type: This field is used to specify the method of sending DTMF digits to the VoIP side. There are three possible options: in-band(audio), via RTP(RFC2833), or via SIP INFO. It is possible to select several methods. For example: ch1:t=<2833/audio/signal>;ch2:t=<2833/audio/signal>. Default: ch1-2:t=2833. SLIC Setting: subscriber line interfacing circuit configuration. This field should be configured based on local Telco standard and analogue phone/fax type. Caller ID Scheme: The following schemes are currently supported: Bellcore/Telcordia, ETSI-FSK, ETSI-DTMF, SIN 227 BT, & NTT Japan. Polarity Reversal: If set to Yes, the polarity will be reversed upon call establishment and termination, this is usually used for billing purposes. The Default is No. Current Disconnect: If set to Yes, this feature will use a momentarily voltage drop to signal remote party disconnects. Current Disconnect Duration: A configurable time threshold where the FXS port will drop off voltage on the line to indicate to the local party that the call is disconnected from the remote side. ( ms. Default 200 ms) Hook Flash Timing: The time period when the cradle is pressed (Hook Flash) to simulate a FLASH. Adjusting this time value correctly can prevent unwanted activation of the Flash/Hold and automatic ring-back. When finished, click on the Submit button to save your changes. - SIP trunk 12


13 SIP trunks can be viewed, created, or modified on the SIP Trunk Configuration page. All configured SIP trunks as well as their details and current status are displayed. Please see the following detailed explanations of the fields on the SIP Trunk Configuration page: Add: Clicking on the Add button Will display the Add SIP Trunk page. This page allows users to enter SIP trunk account and registration information. 13

14 o Trunk Name: Enter a descriptive name in this field to identify the configured trunk. o Trunk Active: Set to Enable to activate the SIP trunk to be configured. o Outgoing Call Password Protection: If configured to Yes, a password is required whenever calling out on the trunk. The default setting is No. o SIP Server URL: The SIP server IP or URL provided by your SIP trunk service provider. o Outbound Proxy URL: The Outbound Proxy or Session Border Controller IP or URL provided by the SIP trunk service provider. o Account Name: Lets you specify a name to identify the SIP trunk service provider. o Account ID: The Account ID provided by your service provider, usually the VoIP line/trunk number. o Authenticate ID: The Authenticate ID used by your VoIP or SIP trunk service provider. o Password: The password of the account provided by your service provider. o Registration Retry Interval: The expiration time interval for the GXE502X to retry or update registration. This is usually regulated by SIP server configured here. Reducing this time interval will keep registration more synchronized with the SIP server but with the cost of more registration packets sent to server. The default value is 600 seconds or 10 minutes. o Heart Beat: if set to Yes, the GXE502X will send a SIP OPTIONS Request frequently to check whether the SIP Proxy is still online. If the Proxy does not support by answering with a SIP 200 OK then the GXE502X will consider this trunk as disconnected. This feature is also used to keep a UDP port open when the GXE502X is behind a NAT firewall. o Max. Concurrent Calls Allowed: The maximum number of concurrent calls allowed by your SIP trunk service provider. This depends on whether dynamic or static SIP trunks are used. The number can range from 2 to numbers limited only by available bandwidth of the physical link pipe. o Dial Prefix: Sets the Dial Prefix digit(s) required to make an outbound call through this trunk. When the call is sent out via this trunk, the dial prefix digits will be removed. o Prepend Prefix: This field allows a prefix to be automatically added by the GXE502X to the outbound dialing digits. For example, if the SIP trunk service provider requires a + for all outgoing calls to be E.164 compatible, then input + here in this field. o Inbound Call Answer: This field lets your set the destination where incoming calls are terminated on this trunk. Callsl can be terminated into the Auto-Attendant (IVR), direct extensions, hunting/ring group or the conference bridge(s). 14
15 o Session Keep Alive: This field allows users to enable or disable usage of the session timer. This is enabled by default to: Automatic/Session Timer. o Session Expiration: The session timer enables SIP sessions to be periodically refreshed via a SIP request. If enabled, before the session interval expires, the GXE502X will send a SIP re-invite message to the SIP server, if this message is not replied the session will be terminated. This will avoid stalled sessions occupying the channel/bandwidth. Session Expiration is the timer (in seconds) at which the session is considered timed out if no successful session refresh transaction occurs beforehand. The default value is 180 seconds. Incorrect configurations could cause calls to get dropped. o Min-SE: The minimum session expiration (in seconds). The default value is 90 seconds. o Use DNS SRV: Default is No. Select Yes if the domain name of the SIP server or Outbound Proxy is compliant with RFC2782. The SIP trunk will not function properly if this field is not configured correctly. o Unregister on Reboot: Default is No. If set to Yes, The GXE502X will first send a registration request to remove all previous or multiple bindings by adding * in the SIP Contact Header. Please use this feature ONLY if the proxy supports removal binding requests. Otherwise the SIP trunk will not function properly. o Register Active: This parameter controls whether the GXE502X needs to send REGISTER messages to the Proxy Server before making or receiving calls. The default setting is Yes (for most dynamic SIP trunks). Note: For security reasons: If this is set to No (for most static SIP trunks) any incoming request MUST match the SIP server IP or the FQDN resolution must match the sending IP address. o CBCOM Encryption: If set to Yes, RTP will be encrypted as per the algorithms of CBCOM. The Default setting is No. o DID Switch: This field is used to route incoming calls when a DID (Direct Inward Dialing #) is used instead of the account ID. It is very helpful when there are several DIDs related to the same (static) trunk provided by your SIP Trunk Service Provider. Note: All SIP requests are verified by the GXE502X so the User Part of the SIP URI has to match the account ID or the DIDs. For outgoing calls when DID switch is enabled, the DID number in the list will be used in the From, Contact and PAI (P-Asserted- Identity) value. If a prepend prefix is configured, it will also be used as prefix for the DIDs. For example, if the DID is and for outgoing calls the service provider requires +, then configure the prepend prefix to + and add the DID Then will be used to match both incoming calls and also outgoing calls. 15
16 Click the Submit button to add the trunk or Cancel to go back. Modify: Click the Modify button to the right of the row displaying the status of the SIP trunk to modify the trunk s parameters. The SIP trunk details page will be displayed, allowing users to modify all of the SIP trunk s settings. When done, click the Submit button to save all the changes or click Cancel to go back. Delete: Click the Delete button on the far right of the row to delete the SIP trunk. Users will be prompted for confirmation via a dialog box; click OK to confirm or Cancel to go back. - External PSTN Trunk Line External (Grandstream) PSTN Gateways can be added to expand the GXE502X s PSTN trunks on the External PSTN Trunk Line Configuration page. External PSTN Trunk Line: When clicked, the external PSTN trunk configuration page is shown. This page allows users to administrate SIP peer connections via external PSTN trunk gateways. Add: Clicking on the Add button will load the Add External PSTN Trunk Line page: 16
17 o Trunk Name: A name to identify the configured trunk. Ex., A name for a Grandstream FXO Gateway could be GXW4104 or GXW4108. o Active: This allows users to turn the trunk ON or OFF. o Outgoing Call Password Protection: This is set to No by default. When configured, all outgoing calls via this trunk will be prompted for a password before the call is executed. o Protection Password: Password for the trunk outgoing call protection. o SIP Gateway URL: The IP address or FQDN domain name of the external PSTN Gateway. o Other UDP list: Please configure this field if you expect the GXE to receive SIP messages on additional ports (other than 5060) from your SIP gateway URL or IP.: o For example, If a GXW4104 is used, each FXO port will use a UDP port: port1=5060, port2=5062, port3=5064, port=5066; therefore, user needs to add Other UDP List using the following values: 5062;5064;5066. o Heart Beat: If set to Yes, the GXE502X will send a SIP OPTIONS Request periodically to check whether the Gateway is still online. If the Gateway does not respond by answering with a SIP 200 OK then the GXE502X will consider this trunk as disconnected. This feature is also used to keep UDP ports open when the GXE502X is behind a NAT firewall. o Max Concurrent Calls Allowed: The maximum amount of concurrent calls that are allowed on the gateway. This is limited by the amount of FXO ports on the gateway. o Dial Prefix: This sets the Dial Prefix digit(s) required for outbound calls to be routed through the trunk. When the call is sent out via this trunk, the dial prefix digits will be removed. 17
18 o Inbound Call Answer: This field sets the destination to terminate all incoming calls from the trunks listed. The call can be terminated into the Auto-Attendant (IVR), direct extensions, hunting/ring groups or the conference bridges (pending). o Session Keep Alive: This field allow users to enable or disable the usage of the session timer. This is enabled by default to: Automatic/Session Timer. The session timer enables SIP sessions to be periodically refreshed via a SIP request. When enabled, before the session interval expires, the GXE502X will send a SIP re- INVITE message to the SIP server. If there is no reply to this message the session will be terminated. This will avoid stalled sessions occupying the channel/bandwidth. o Session Expiration: The Session Expiration is the timer (in seconds) at which the session is considered timed out if no successful session refresh transaction occurs beforehand. The default value is 180 seconds. Incorrect configurations could cause calls to be dropped Or suspended. o Min-SE: The minimum session expiration (in seconds). The default value is 90 seconds. o Allow Other IPPBX Use: This field lets users to allow other networked peer GXE502X/IPPBX systems to use this trunk. The Default setting for this field is Yes. Click the Submit button to add the trunk or Cancel to go back. Modify: Clicking on the Modify button to the right of the SIP trunk will load the SIP trunk details page. This page is where users can modify all of the SIP trunk s settings. When done, click the Submit button to save all the changes or click Cancel to go back. Delete: Click the Delete button on the far right of the trunk status/details to delete the SIP trunk. Users will be prompted for confirmation via a dialog box; click OK to confirm or Cancel to go back. 4. Conference Bridge The GXE502X supports 2 (GXE5024) or 4 (GXE5028) password protected conference bridges that allow up to 12 (GXE5024) or 20 (GXE5028) simultaneous participants from PSTN trunks, SIP trunks or Internal Extensions. The Conference Bridge/Room numbers are configured automatically by GXE502X during the Express Setup process. At the factory default settings the conference bridges do not have password protection. Users can change the extension numbers of the bridges and set a password to by selecting the Conference Bridge menu. Renaming the conference bridge extension numbers and passwords: To rename an extension number on a conference bridge, enter the extension number (please make sure the number is not currently in use by a local extension) into the Extension field of a conference room. If you want to require users to enter a password before they can enter the room, input a numeric password in the Password field. When done, click the Submit button to save the changes. The changes will be written into the Flash memory and will take effect the next time the GXE502X is rebooted. 18

19 Conference Room Status When the conference bridges are occupied, users can click the Conference Bridge menu to check the status of each conference room: 5. Hunt/Ring Group Configuration Hunt/Ring groups can be configured on the GXE502X to balance the call traffic for multiple users and give callers a higher level of availability for incoming calls. Multiple ring methods and voic are supported. Hunt/Ring Group: Click the Hunt/Ring Group menu will display all of the configured hunt/ring groups. This page lets users add, modify, and delete ring groups. 19

20 Add: Clicking on the Add button displays the Add Hunt/Ring Group page where users can configure the hunt/ring group settings: o Extension: Enter an extension number for this ring group. The leading digit for this extension must correspond with the Leading Digit of Extensions field in the General Settings sub page of the Phone Extensions menu. o Group Name: Enter a name to identify this hunt/ring group. o Ring Mode: Select a ring method for this hunt/ring group. Parallel will ring all group members simultaneously, while Serial will ring members one at a time, starting from the first group member. A round-robin variation of Serial is also available, and is explained below. Setting this option to Serial will increase the time in which incoming calls are forwarded to voic compared to Parallel if there are more than 5 members in the group. o Serial Ring Attempts Per Member: This field lets you select the number of ring attempts to each group member before forwarding to the next member. Please make note that this field is available only if the Serial ring mode is enabled. o Serial Ring Interval: This field lets users select the ring time interval between ring group members (Serial only). o Waiting Tone: Lets users choose either a normal ring-back tone or the system music to be played back to the ring group caller. 20
21 o Members: List the phone extensions of the members of the ring group, separated by semicolons. o Round Robin of Serial Ring Starting Attempt: This allows the starting position of the ring group to increment for the next call to the group, instead of starting at the first member for all calls. Enter a number to specify the number of ring group members to be included in the round robin ring mode. To disable the round-robin mode, enter 1. To round-robin among all ring group members, enter the total number of ring group members listed. Example: - Ring group members: 6001;6002;6003; Round Robin of Serial Ring Starting Attempt: 3 The ring group incoming calls will round robin between 6001, 6002 and But 6004 will always be the last one to receive calls. o for Message Delivery 3 : Enter the address to deliver voic -to- messages for this ring group. o Password to Retrieve Voic Set a password to retrieve this voic /fax mail box. When finished, click the Submit button to save the changes or Cancel to discard. Modify: Click the Modify button to the right of the row displayed to select the ring group to be modified. This will load the hunt/ring group details page which allows users to modify all of the group s settings. When done, click the Submit button to save the changes or Cancel to go back. Delete: Click the Delete button on the far right of the row displayed to delete the ring group. Users will be prompted for confirmation via a dialog box; click OK to confirm or Cancel to go back. 6. Auto-Attendant Configuration Incoming calls can be directed to the Auto-Attendant to provide immediate and professional service to callers and automatically route calls to intended parties. It is also possible to schedule different auto-attendants rules to be played based on the time, date and day of the week. The Auto-Attendant menu displays all configured auto-attendant rules. 3 Note: Multiple addresses can be entered, separated by ;. 21
. Add: Click the Add button.")
22 - Voice Menu Configuration: The following actions can be performed in the Voice Menu sub menu section. Voice Menu is used by the Auto-Attendant or IVRs (Interactive Voice Response System). Add: Click the Add button. The voice menu details page will be displayed, allowing users to configure the voice menu for their new auto-attendant: 22

23 o Voice Menu Name: This field lets users enter a name for their auto-attendant. o Press x to trigger: Check the box next to each keypad digit to specify the flow of your auto attendant menu. Callers automatically have the option to enter internal extension numbers from the auto-attendant. To select the type of destination that calls will be forwarded to, select an option from the first drop-down box. Users can then select from available destinations of that type in the second drop-down box(if applicable). o No entry time out: This field lets users enter the minimum time callers have to enter a menu option before repeating the voice menu or exiting. o Play warning and repeat voice menu for up to: Select from the drop-down box the number of times for this auto-attendant (IVR) to be repeated when the caller does not enter any menu option, before exiting. o Fax To: This field allows the auto attendant to automatically route all incoming faxes to a specific extension. o Waiting Tone: This field allows users to select the system music or a normal ringback tone when waiting in the auto attendant. 23

24 The Auto Attendant Greeting voice prompt can be uploaded from a computer or recorded directly from a registered GXE extension:. - Upload file: Click the Browse button to search for voice prompt files on a local computer, select the file and click on the Submit button to add the file to auto-attendant. Please make sure that all uploaded files are converted via the correct tools - Record Prompt: This feature let users specify a local extension to record their auto attendant greeting message. Clicking on the submit button will cause the selected extension to receive a call from GXE502X that will prompt the user to record the voice prompt. Note: - Uploaded audio files must be in the following format: 8 KHz/16bit/ MONO.wav. - It is highly recommended to use the GXE502X IVR/System Prompt Conversion Tool to convert the wav file before uploading it to GXE502X. Using this tool will generate a ZIP file that can be uploaded via the same field. - Once the voice prompt is uploaded correctly, the message Voice Menu File does NOT EXIST will disappear and the user can preview the Voice menu by clicking the Preview button shown on the screen. Modify: Click the Modify button to the right of the voice menu to select the autoattendant/ivr to be modified. This will load the Modify Voice Menu page which allows users to re-configure the auto-attendant or IVR (Interactive Voice Response System) Delete: To remove a voice menu: Click the Delete button on the far right of the voice menu you wish to delete. Users will be prompted for confirmation via a dialog box; click OK to confirm or Cancel to go back. - Playing Rules Configuration: Playing Rules can be configured to dictate which auto-attendant is played based on user defined time and date conditions. The Playing Rules section displays all configured Voice Menu playing rules, and allows the following actions to be performed: Add: Clicking the Add button displays the playing rules details page which allows users to configure the time conditions required to play a specific auto-attendant Voice Menu: 24

25 o Play Voice Menu: This field lets users select the name of the auto-attendant voice menu that they wish to play from a drop-down box o Date: This field lets users configure the auto-attendant voice menu selected above to be played on a preset date or a range of dates. To specify by date, select the radio button beside Date and enter the date or a range of dates in the text field. o Day of Week: This field lets users configure the auto-attendant voice menu to be played on specific days of the week. Click on the Day of Week radio button and check the boxes beside each day of the week that you would like the auto-attendant to be played on. o Except on date(s): If you have configured the auto-attendant to play based on selected days of the week, you may enter exceptions such as a holiday where you would like another auto-attendant to be played. To do this you must enter the exception dates in the blank text field. Next, select the voice menu that you wish to use from the drop-down box on the far right. o Play Time: This field let you enter the time range to play the auto-attendant during days it is set to play. Important: Make sure that the current date and time are configured correctly under System Settings. Modify: Clicking the Modify button on right of the row will load the Modify Playing Ryles page. This page allows user to modify all of the voice menu s playing rules. When done, click the Submit button to save the changes or Cancel to go back. Delete: Click the Delete button on the far right of the row to delete unwanted rules. You will be prompted for confirmation via a dialog box; click OK to confirm or Cancel to go back. 25

26 7. Call Queues Configuration Call Queues give users (ie. call centers) an efficient means to have their calls answered in the order they were received to deliver top tier customer service. - In-Queue Announcements Configuration The In-Queue Announcements sub menu lets users configure the In-Queue Announcements for their group. In-Queue Announcement Name: This field allows users to enter a name (20 character limit) for the uploaded In-Queue Announcement file. In-Queue Announcement File: This field lets users specify the location of the audio file which will be uploaded. Users can type the path manually or click the Browse button to navigate and select the file on their computer. Note: - The In-Queue Announcement File must be in the following format: 8 KHz/16bit/MONO.wav or.zip (if you use the GXE502X IVR/System Prompt Conversion Tool). - It is highly recommended to use the GXE502X IVR/System Prompt Conversion Tool to convert files to the.wav format before uploading them to the GXE502X. - Agents Configuration Page Add: This page allows users to add an agent and configure its rules within the queue. User must specify the Name, Extension, SIP Password, Skill level, and address of the agent. Typical queues start with the most skilled agent. 26

27 Note: Agents must have the PUBLISH For Presence feature enabled in their phone s web UI. Having the Agent s extension registered on the phone side does not mean the call queue agent is online and ready to receive queued calls. Users can check the agents status on the GXE502X Web UI (see image below). Modify: Click the Modify button to the right of the row to select the Agent to be modified. The agent details page will be displayed. This page allows users to modify all of the agent settings. When done, click the Submit button to save the changes or Cancel to go back. Delete: Click the Delete button on the far right of the row to select the Agent to be deleted. Users will be prompted for confirmation via a dialog box; click OK to confirm or Cancel to go back. - Call Queues Configuration Add: Click on the Add button to load the Add Call Queue configuration page. This is the main configuration page for call queues configured on the GXE502X. 27

28 o Name: Enter the name of the call queue here. o Extension: Enter the extension of the call queue here. See the drop down box for a list of current extensions. o Priority: Lets you set the priority of the call queue from the drop down list. o Queue Status Update Frequency: This determines how often callers will be updated on the status of the queue via an uploaded update message. o Other Announcements: This determines the frequency in which any other announcements that the user has added will be played to callers in the queue. o Maximum Caller Wait Time: This field lets you set the maximum amount of time that callers will wait within the queue before being forwarded to voic . 28
29 o Maximum Queued Callers: This field allow users to set how many callers can be within the queue simultaneously. o Group Address for Voic Delivery: Enter the address where all voic for the queue/group will be delivered. o Agent Call Wrap-Up Time: This setting allows users to specify the amount of wrap-up time an agent will have before receiving another call (time between two calls). For example, an agent may need 1 minute of wrap-up time to document a call. o Listed Agents For This Queue: All configured agents for the queue will be displayed here. Users can select the available agents from the drop-down box and click the Add button to add the agent to the queue. o Automatic Call Distribution: This setting lets users configure, enable and disable skillbased call routing. If skill-based routing is enabled, users can configure the call to be routed to the least skilled or most skilled agent first. The skill level for each agent can be configured on the agent page. o Ring Mode to Agents of Same Skill Level: This feature is similar to that of hunt/ring groups as users can configure the mode in which agents of the same skill level will ring. Serial - Agents ring one at a time based on availability. Parallel - All agents ring simultaneously. Circular - A different agent will ring first each time a caller enters the queue. Least Busy - The least busy agent will ring first. o Serial Ring Attempts Per Member: If the serial ring mode is selected, you may select the number of ring attempts to each agent before forwarding the call to the next agent. o Serial Ring Interval: If the serial ring mode is selected, users may set the ring time interval (in seconds) between call queue members. o Call Queue Greeting Message: Upload an audio file for the queue greeting message. Users can type the path manually or click the Browse button to upload the file from your computer. Note: - The Call Queue Greeting Message must be in the following format: 8 KHz/16bit/MONO.WAV or a ZIP file if you use the GXE502X IVR/System Prompt Conversion Tool. - It s highly recommended to use the GXE502X IVR/System Prompt Conversion Tool to convert the wav file before uploading it to GXE502X. Modify: Click the Modify button to the right of the the Call Queue to be modified. The Call Queue details page will be displayed. Users can modify all of the Call Queue settings on this page. When done, click the Submit button to save the changes or Cancel to go back. Delete: Click the Delete button on the far right of the unwanted Call Queue. Users will then be prompted for confirmation via a dialog box; click OK to confirm or Cancel to go back. 29

30 8. System Configuration System configuration and administration can be configured via the System Configuration menu. The following sub menus can be used to manage different system configurations.. - Networking Setting The Networking Setting sub menu allows users to configure the LAN-side IP address and DHCP server settings, as well as the WAN-side settings like IP address of the WAN port, Dynamic DNS and port-forwarding settings. LAN Setting: Set the LAN-port IP address by entering the IP address used as the LAN Base IP. Enter the subnet mask in the LAN Subnet Mask setting. Note: Please be advised that this setting should be configured prior to auto-provisioning phones through the Express Setup menu. Otherwise the GXE502X will use an incorrect IP address for the SIP server after the LAN-port IP address changes. o DHCP Configuration: To use the GXE502X as a DHCP server on the LAN-side, set the DHCP Enable setting to Enable (It is enabled in the default settings). Users may specify the range of the IP addresses offered by the DHCP server by setting the Start of DHCP IP Pool and End of DHCP IP Pool settings. The DHCP IP Lease Time allows users to specify the number of hours an IP address is leased to a device before renewal. WAN Setting: o The WAN-port can be configured to be dynamically assigned via DHCP, to use PPPoE, or to be static. Select the radio button beside the option that you wish to use. To use PPPoE, enter the PPPoE account, password and DNS server information provided by the ISP in the provided fields. If statically configuring the WAN-port IP address, please enter the IP address details from the ISP in the provided fields. 30
.")
31 o WAN-side Access and Security: Accessibility and Security for management are considerations for whether or not to enable or disable HTTP/Telnet access from the WAN-side of the GXE502X. The default setting for WAN Side Http/Telnet Access is YES. At the default settings UPNP is turned OFF, but PPTP, IPSEC and L2TP VPN are enabled (pending). o Using Dynamic DNS: If the WAN-port IP of the GXE502X is dynamically assigned by your ISP, the GXE502X can use Dynamic DNS to obtain a fixed domain name which is always synchronized with the IP address of the GXE502X. Enable Dynamic DNS by setting the DDNS Active setting to Enable and setting the DDNS ISP type, site name, and account and password in the provided fields. If not using Dynamic DNS, set the DDNS Active setting to Disable. o Configuring port forwarding: 31
32 The GXE502X can be configured to perform port forwarding. In the Port Forwarding settings, enter the port to forward from the WAN-side, the LAN-side device IP address to forward to, the LAN-side device port to forward to, and the protocol (TCP, UDP, or both) to forward in the respective fields. When done, click on the Submit button to save your changes. - Route Configuration This sub menu is used to add static routes into the routing table. This feature is useful when there are destinations that cannot be reached using the default gateway or when there are several subnets in your local network. The interface can accept a network or host address to route. For example: Network= /24 can be reached through router , then: Destination IP: Mask: Gateway: Static route to host through router then: Destination IP: Mask: Gateway:
33 Click the Add button on the right to add the route in the routing table. Click the Delete button to delete the related route from the routing table. - System Setting System Setting sub menu Configuration: The System Settings sub menu contains various important internal system settings and allows configuration of several key features and functions of the GXE502X. The actions below and the associated settings appear in order from top to bottom on the GXE502X web UI: o Setting the Administrator login password: This is where you can change the administrator password of the GXE502X. The default password is admin. For security reasons, it is recommended to change the administrator password immediately after Express Setup. Please document the password in a secure place. For further security, you can disable WAN-side HTTP access or PING. o Administrator Contact information: 33


34 These fields are optional and provided to store the administrator s name, phone number, and address so that they can be contacted for any issue requiring attention. You may also enter a name in the System Name field to identify your GXE502X. o SIP Static Mapped IP and port Configuration: The SIP port for the GXE502X can be set to either the default of 5060 in the SIP Port field, or another port number may be used. The SIP Static Mapped WAN IP and the SIP Static Mapped WAN Port for Udp may also be changed in the respective fields. o SIP Static Mapped WAN Port for CBCom This Value is reserved for China s CBCOM SIP trunk provider. o Start of UDP Port for Media Transfer When this value is set, the GXE502X will use the value within value+2000 for the local UDP port for its media,this is useful when the GXE502X is behind a NAT and the NAT is configured to do port forwarding with value+2000 for UDP ports. o STUN Server ( for NAT traversal): If the GXE502X is behind a non-symmetric NAT router, it may be necessary to use STUN to allow GXE502X to reliably communicate via IP through the router. Enter a STUN server IP address or domain name in the STUN Server field. o Voic -to- Configuration:: To configure the GXE502X to send out voic via , the related SMTP setting must be configured. The receiving address can be configured in the Extensions Directory sub menu of Phone Extensions configuration. There are two ways to configure the GXE502X to send s: 1) Configure as client. This requires an SMTP server to forward all outgoing s via that particular authorized client account. Configure as MTA. This usually must be handled by the system administrator. This will analyze the destination address and resolve it using the domain name of the destination server. 34

35 Note: For spam prevention, many service providers reject or delete incoming s originating from a dynamic IP address or s that are not from a FQDN. If this is the scenario, the authorized client account is strongly recommended to prevent loss. To send using the as client method, the usermust enter the SMTP server, login name and password, as well as the address to send from. This will allow the GXE502X to send voice messages through to users and ring groups with the address configured when receiving voic messages. It is recommended to use a special account for voic to ,for example: bostonpbx@company.com o WAN side NTP Server: If this option is enabled, the GXE502X will try to synchronize the current time from the NTP server path configured and adjust to the specific time zone by selecting a time-zone or using a self-defined time zone. If disabled, the time has to be set manually in the Time field as shown below o LAN side NTP Server: If enabled, the GXE502X will function as an NTP server on the LAN side and will synchronize the time with the phones connected to the LAN port. This is ideal for a GXE502X installation without WAN side NTP access. o Self-Defined Time Zone Configuration: Select the correct time zone for the location of the GXE502X using the Time Zone drop-down box. Users may also enter a Self-Defined Time Zone, using the following syntax, to configure Day Light Savings Time. MTZ+6MDT+5,M4.1.0,M The Syntax: std offset dst [offset], start [/time], end [/time] Default is set to: MTZ+6MDT+5,M3.2.0,M MTZ+6MDT+5, (Time Zone) 35
 then the local time zone is west of the Prime Meridian, and negative (-) is east of Prime Meridian (A.K.A: International or Greenwich Meridian) M3.2.0,M11")
 The 2nd number indicates the nth iteration of the weekday: (1st Sunday, 3rd Tuesday ) The 3rd number indicates weekday: 0,1,2,..,6( for Sun, Mon, Tues,.")
36 This indicates a time zone with a 6 hour offset with 1 hour ahead which is U.S central time. If it is positive (+) then the local time zone is west of the Prime Meridian, and negative (-) is east of Prime Meridian (A.K.A: International or Greenwich Meridian) M3.2.0,M (Daylight Saving Time Rule) The 1st number indicates Month: 1,2,3.., 12 (for Jan, Feb,.., Dec) The 2nd number indicates the nth iteration of the weekday: (1st Sunday, 3rd Tuesday ) The 3rd number indicates weekday: 0,1,2,..,6( for Sun, Mon, Tues,..,Sat) Therefore, this example is the DST which starts from the second Sunday of March to the 1st Sunday of November. o Manual Selection of Fax: The default setting for this is No. GXE502X will automatically detect and receive faxes if a fax tone is detected. o System Music (MoH) Selection: Users can select a Music on Hold (MoH) source by setting the System Music drop-down box to choose either System Music Files of internally stored audio files or Audio-In to play audio from an external audio source (like an ipod or Radio). The source must be connected to the AUDIO IN jack on the back of the GXE502X. o Voic /Fax mail box storage quota: The voic and fax mail storage quota can be limited by different extension privilege levels. The mailbox storage limits (in percentages of total system memory) are also specified in the drop-down boxes beside each user privilege level. Formatted: French (France) When done, click on the Submit button to save your changes. 36
37 37
38 - Feature Codes GXE502X User Manual 7/9/2008 Feature codes allow GXE502X users to set features such as Call Forwarding and Do Not Disturb on related extensions, as well as access destinations such as the voic system. This page also allows users to customize the feature codes. The feature codes may be viewed or modified in the text field beside each feature name. Directory Assistance: Dial from a phone to have the GXE502X playback the phone s extension number. IVR/Voice Prompt Assistance: For listening to and recording voice prompts. Dial the feature code plus * 0 * [prompt number] * to listen to the voice prompt. Dial the feature code plus * 1 * [prompt number] * to record the voice prompt. Example: The voice prompt file number 350 Please enter the voic extension and # and the code feature is *68. - If you want to listen to this voice prompt, enter: *68*0*350* - If you want to record the voice prompt number 350, enter: *68*1*350* Enable Unconditional Call Forward: Dial the feature code plus [forward-to number] to enable unconditional call forwarding for the extension you are dialing with. Cancel Unconditional Call Forward: Cancel unconditional call forward, calls will ring in. Enable Call Forward on Busy: Dial the feature code plus [forward-to number] to turn on busy call forwarding for the extension you are dialing with. 38
39 Cancel Call Forward on Busy: Cancels call forward on busy; calls will ring when the user is on the phone. Enable Call Forward No-Answer: Dial the feature code plus [forward-to number] to turn on no-answer call forwarding for the extension you are dialing with. Cancel Call Forward No-Answer: Cancel call forward on no answer, calls will go to voic . Call Forward Status Inquiry: Enable Do-Not-Disturb: Calls will go straight to voic , or return busy if voic is disabled. Cancel Do-Not-Disturb: Cancel DND, calls will ring in normally. Intercom: Dial the Feature code + * + phone extension to page a specific extension. Example: The phone extension to page is 601 and the intercom feature code is *74. - To page that extension, you dial: *74*601. Important: To use the intercom feature correctly, the phone paged should have the option Allow Auto Answer by Call-Info enabled. Park: When in a call, an extension can transfer the other party to this feature code to park the call. Important: This must be performed as an attended transfer. During the transfer, the GXE502X will tell you the parking extension used for this call. Pickup: Dial the feature code plus * [parking extension] to pickup a call parked by the parking extension. Example: the pickup feature code is: *76 and the parking extension that the GXE502X gave to this parked call is To pick the parked call, you dial *76*100. Paging Group/Extension: Dial the feature code plus * [group/extension] to page an extension or a group. Example: the paging group/extension feature code is: *77, 601 is an extension number and a 610 is a ring group number (ring group members are: 603, 604, and 605). - To page the extension 601, dial *77* To page the group 610, dial *77*610 (will page all ring group members 603/604/605). Important: If the phone paged does not have the option Allow Auto Answer by Call-Info enabled, the phone will only ring and not answer. Such parameter needs to be enabled in the phone s web UI. Voice Mail: Dial the appropriate feature code to access the voic system. When done, click on the Submit button to save your changes. 39
40 40
41 - Firmware Upgrade GXE502X User Manual 7/9/2008 The Firmware Upgrade sub menu allows users to upload new firmware versions to the GXE502X and upload custom voice prompts. Please read the release notes carefully prior to upgrading your firmware to document the changes. Grandstream also recommends saving a backup file of all GXE502X configurations (please see the next section). The firmware upgrade will not overwrite your existing GXE502X configuration, but it is good practice to keep a backup copy in case. Once you have downloaded and uncompressed your new firmware, click the Browse button to find and select the gxe50xxfw file on your computer. This file is located in the image directory of the firmware package. After the file has been selected, click the Submit button and wait for the file to finish uploading. When finished, reboot the GXE502X to load the new firmware. Custom voice prompts may also be uploaded in the Firmware Upgrade sub menu. To upload your custom prompts browse to the prompt file in the System Prompt Image field and click the Submit button. You can upload zip files containing.wav files or a PV files that have been generated by the Grandstream Wavtools.exe prompt generator. 41
42 - Backup & Restore Configuration GXE502X User Manual 7/9/2008 GXE502X Configuration files may be downloaded to or uploaded from the computer in the Backup & Restore Configuration sub menu. It is good practice to keep a backup copy of your GXE s configuration file at all times. Configuration Backup: Select the Download Configuration radio button, and click the Submit button. You will be prompted to download the configuration file to their computer. Configuration Restore: Select the Upload Configuration radio button, and click the Browse button to find the configuration file on your computer. After the file has been selected, click the Submit button and wait for the file to finish uploading. The GXE502X will automatically reboot when finished, and load the configuration file. - Syslog Configuration The GXE502X can be configured to send out several levels of Syslog messages: Info, Warning, Error, and Debug. With a Syslog server setup to collect these messages, problems are easier to find and diagnose. The Syslog Configuration sub menu allows a Syslog server IP address and the Syslog level to be set. Enter the IP address of the Syslog server in the Syslog Server IP field, and use the Syslog Level drop-down box to specify the level. When done, click the Submit button to save the changes. 42

43 - System Level Backup & Restore The System Level Backup & Restore page allows users to Backup/Restore the entire system or specific portions such as: voic , system tones, announcements & voice menus. System Level Restore: This lets users browse to the backup file and click the Submit button to restore the contents of the file to the GXE502X system configuration. System Level Backup: Check the boxes next to the desired configuration components and click Submit to backup system level configuration data, System tone, Announcement, Voice Menu and/or Call queues. Users can also choose to backup voic and greetings for a specific extension by selecting an extension from the drop down menu. Important: - The Data checkbox is always checked. A backup cannot be performed without having it selected. - The system restoration can be done only by using a backup file from the same GXE502X series (e.g. GXE5024 to GXE5024). - Do NOT reboot the GXE502X when it is in the process of downloading the Backup file. 43

44 9. Advanced Options Configuration Remote GXE502X systems or other PBX systems can be peered with a local GXE502X. This allows local users to dial remote system extensions and the GXE502X will route the calls directly via IP to the remote system. In a networked multiple office environment, this provides the ability to reach remote colleagues through simple and familiar extension dialing but without incurring the toll costs of routing the call over the PSTN. The Advanced Options menu allows user to view, add, modify, and delete networked peer systems. - Peer Systems The Peer Systems sub menu displays all configured peer systems in details. The following actions can be performed to manage peer systems: Add: Clicking the Add button will load the add peer system page. where users can enter connectivity settings for the new peer system: o Trunk Name: This field lets you enter a name to identify this peer system o Peer URL: Enter the IP address or FQDN domain name of the peer system. 44
45 o Max Concurrent Calls: This field specifies the maximum number of concurrent calls allowed between the peer systems. o Prefix: The prefix digits for outbound calls to be recognized and routed to this peer system. When the call is sent to the networked peer system, the prefix digit is NOT removed. This is done slightly different than dialing out using other trunks on the GXE502X. Users may specify multiple prefixes for a peer system by separating them with a semicolon (i.e. 6;7). o IPPBX Number: This parameter is used to route calls based on the country or area code 4. o Heart Beat: if set to Yes, the GXE502X will send a SIP OPTIONS Request periodically to check whether the peer system is still online. If the peer does not respond with a SIP 200 OK then the GXE502X will consider this trunk or peer as disconnected. This feature is also used to keep UDP ports open when the GXE502X is behind a NAT firewall. o Session Keep Alive: This field allows users to enable or disable the session timer. This is set to Automatic/Session Timer in the factory default settings. o Session Expiration: The session timer enables SIP sessions to be periodically refreshed via a SIP request. If enabled, before the session interval expires, the GXE502X will send a SIP re-invite message to the SIP server. If this message is not replied to the session will be terminated. This will avoid dropped sessions occupying the channel/bandwidth. Session Expiration is the timer (in seconds) at which the session is considered timed out if no successful session refresh transaction occurs beforehand. The default value is 180 seconds. Incorrect configuration could cause calls to be dropped or suspended. o Min-SE: The minimum session expiration time (in seconds). The default value is 90 seconds. When done, click the Submit button to add the extension or Cancel to go back. Modify: Click the Modify button to the right of the row to select the peer system to be modified. The modify peer system page will be load. This page allows users to modify all of the peer system s settings. When done, click the Submit button to save changes or Cancel to go back. Delete: Click the Delete button on the far right to remove a peer system. Users will be prompted for confirmation via a dialog box; click OK to confirm or Cancel to go back. 4 Note: (Dial Plan/dynamic routing(pending)) will be used in the future. 45
46 - Template Upload The Template Upload sub menu page allows user to upload a configuration template which determines the parameters that will be configured on Grandstream endpoints during the GXE502X Express Setup process and the general Auto Provision process. Click the Browse button to locate the template file on your computer. Next click the Upload button to upload the template to the GXE502X. Note: - Custom templates can be created by using the Grandstream Configuration Template Generator tool available on the Grandstream website. 46

47 10. Reset & Reboot The Reset & Reboot menu allows you to reboot the GXE502X and perform a factory reset. Please backup the configuration file of your GXE502X before performing a factory reset. Rebooting: Select the Reboot radio button, and click the Submit button. The GXE502X will automatically perform a soft reboot. Users can log back into the GXE502X web portal when the ready LED lights up. Reset to default: Select the Reset to Default radio button, and click the Submit button. The GXE502X will reboot itself, and will boot up with the factory default settings. The web portal administrator password will revert back to the default password: admin. 47


48 11. Status GXE502X User Manual 7/9/2008 All the necessary information about the GXE502X is displayed in the status menu. 48

49 49
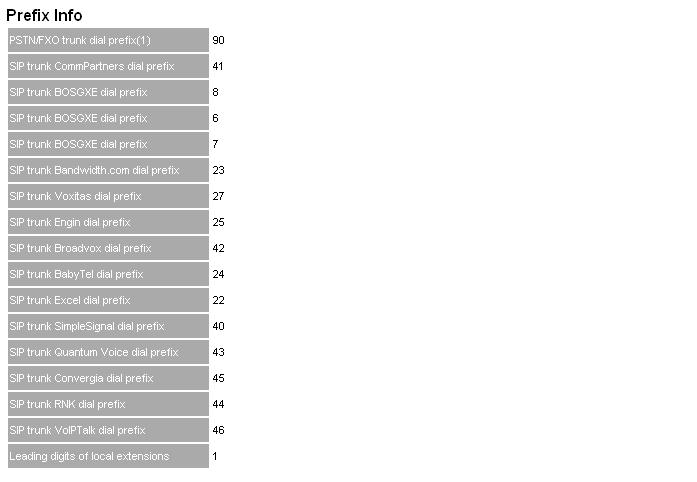
50 Status Menu Summary: GXE502X User Manual 7/9/2008 System Statistics: System ID, MACs, hardware/firmware version, system uptime are displayed. Network Status: Network connection information, IP of WAN and LAN, PPPoE status, DDNS. Peripheral Status: Displays the connection status of the FXO and FXS ports. User Activity Status: Displays the current user and registration status as well as the status of active calls. Prefix Info: This field outlines ALL of the prefix digits used as access codes for all trunk types (SIP trunks, external PSTN trunks and peer systems) on the GXE502X system. DHCP Clients Table: Lists the DHCP clients connected via the LAN port of GXE502X. Debug Info: Displays information used for debugging and troubleshooting. 50

51 12. Reports In the Reports menu, users can access very useful reports generated by the GXE502X that document System Statistics, Call Statistics and Call Records. The Call Records can also be downloaded from the GXE502X for 3 rd party billing analysis. - System Statistics The System Statistics sub menu section displays information regarding memory usage, faxes, and voice messages via pie charts and bar graphs. - Call Statistics The Call Statistics sub menu page displays information regarding the number and duration of inbound and outbound calls through various trunks (PSTN, SIP, Peer Systems). All of these statistics will be reset upon rebootting the GXE502X. 51
52 52
53 53
54 54
55 55
56 - Call Records The Call Records sub menu displays detailed information such as the Caller/Callee extension number as well as the start and end time for each inbound and outbound call. 56
 basis with a maximum record of 10000 calls.")
57 - Downloading (Call) Records GXE502X User Manual 7/9/2008 The CDR (Call Detail Record) can be downloaded from the GXE502X to your computer and exported to 3 rd party billing software companies for analysis. The file is in the.csv format and stored on a weekly (7 Day) basis with a maximum record of calls. It can be exported to an Excel Spreadsheet, other another compatible database or program for processing and printing. Click the Download button to the right of file name to download the record to your computer. 57
58 13. Voic Configuration The GXE502X allows users to manage voic via the IVR in their phones or through a personal web portal. This section summarizes how to manage voic and other settings using both of these methods. Configuring Voic through the IVR The default feature code for the voic IVR system is *99. After dialing this code users must enter their extension number and password. Once logged in, users are prompted by a basic IVR menu with multiple choices. See the following flow chart for reference. 58

59 Important: - The feature code used for voice mail can be found and modified under System configuration Feature codes (see the picture below). - Users can access the voic system from any phone connected to the GXE502X by dialing the voic feature code. - In order to access to voic , the GXE502X will ask for the extension number and password. The default voic password is the extension number. Please make note that both the GXE502X and all registered SIP phones must be configured with the same Send DTMF setting. The default Send DTMF mode on the GXE502X is via RFC

60 The Personal Web Portal GXE502X User Manual 7/9/ To log into the personal web portal for an extension. Log into the GXE502X Web GUI using the extension number as Login ID and voic password. If you have changed the default voic password via the voic IVR phone, you must input the updated password. After logging in, the following page will display 2. To view current voice mails, click the Voice Message sub menu on the left hand side of the interface. Doing this will load the voice mail management page. Users can manage (save & delete) the messages here as an alternative to using the voic IVR. This is a great feature for users that are constantly on the road. 60


61 3. To view the personal greeting, click the Personal Greeting sub menu button on the left hand side of the GUI. This will load the personal greeting management page for the extension. Users can upload.wav files from a PC and preview them here. 4. Click the Fax Message sub menu button on the left hand menu to load the fax message management page. Faxmail can be managed (save & delete) in a similar fashion to voic Important: - If you do not know the URL or IP address to access to the Personal Web Portal, please contact your the local system administrator. - Users can also receive voice and fax messages via . To receive them, users must specify a valid address in the Forward voice/fax mail to field. The administrator should enable this feature by configuring the SMTP server in the system settings. - The default voic /personal web portal password is the extension number. The same applies to the SIP registration password on the GXE502X. Users can change this via the IVR (press 2 press 3) or via the personal web portal (under General Profile). - Changing the voic /personal web portal password will NOT change the SIP password. The SIP password can only be changed by the Administrator. 61
GXE502X Users Manual
 GXE502X Users Manual For Release 1.0.1.50 1 Table of Contents 1. Introduction... 4 2. Extension Configuration... 4 3. Trunk Configuration... 10 4. Conference Bridge... 23 5. Hunt/Ring Group Configuration...
4 Port IP-PBX + SIP Gateway System
 4 Port IP-PBX + SIP Gateway System The IPG-40XG is an embedded Voice over IP (VoIP) PBX Server with Session Initiation Protocol (SIP) to provide IP extension phone connections for global virtual office
EP502/EP504 IP PBX 1.1 Overview
 1.1 Overview The EP502/EP504 is an embedded Voice over IP (VoIP) Server with Session Initiation Protocol (SIP) to provide IP extension phone connection for global virtual office of small-to-medium business
RP-FSO522 2-Line FXO, 2-Line FXS SIP IP Gateway. Feature
 RP-FSO522 2-Line FXO, 2-Line FXS SIP IP Gateway RP-FSO522 is an 2-Line FXO plus 2-Line FXS gateway with SIP protocol IP device which allows to connect 2 Lines of analog PSTN telephone line and connect
Grandstream Networks, Inc. UCM6200 Basic Configuration Guide
 Grandstream Networks, Inc. Table of Contents OVERVIEW... 4 SETUP GUIDE SCENARIO... 4 QUICK INSTALLATION... 5 Connecting the UCM6200... 5 Access UCM6200 series Web Interface... 5 CREATE USER EXTENSION...
ANSEL FXS / 1 PSTN. VoIP Telephone Adaptor. User Manual V1.10
 ANSEL 5518 1 FXS / 1 PSTN VoIP Telephone Adaptor User Manual V1.10 Quick Guide Step 1: Broadband (ADSL/Cable Modem) Connections for ANSEL 5518 A. Connect ANSEL 5518 WAN port to ADSL NAT Router as the following
HT801/HT802 Firmware Release Note IMPORTANT UPGRADING NOTE
 HT801/HT802 Firmware Release Note IMPORTANT UPGRADING NOTE Once HT801/HT802 is upgraded to 1.0.5.7 or above, downgrading to 1.0.2.x firmware version or lower is not supported. Once HT801/HT802 is upgraded
2FXS Analog Telephone Adapter
 2FXS Analog Telephone Adapter Product features Feature-rich telephone service over home or office Internet/ Intranet connection Auto-provisioning features for flexible, ease-of use IP PBX system integration
Version: epbxum_
 epbx-100a-128 User s Manual Version: epbxum_128.300 CH1. Overview 5 1.1 Specifications 5 1.2 Hardware Overview 7 1.2.1 Front Panel and LED Indication...7 1.2.2 Back Panel...8 CH2. Start to configure epbx-100a-128
The main purpose of this release is improving voice quality and addressing stability issues observed in previous releases.
 GRANDSTREAM NETWORKS Firmware Version: 1.3.4.9 Name of Product: GXW 410X Date: November 12, 2009 SUMMARY OF UPDATES The main purpose of this release is improving voice quality and addressing stability
Sipdex M200s IPPBX. Embedded. Support Any IP Phone. Softphone and SIP Client App
 Sipdex M200s IPPBX Based on embedded asterisk system, SIPDEX M200s IPPBX is a high quality, stable PBX without any moving parts and a very small footprint required minimum technology knowledge to deploy.
SPA400 Internet Telephony Gateway with 4 FXO Ports
 SPA400 Internet Telephony Gateway with 4 FXO Ports Administration and Configuration Guide v1.0 Using the SPA400 The SPA400 features the ability to connect up to four (4) standard analog telephones lines
Version: SIPPBXUM.100
 SIPPBX 6200A User s Manual Version: SIPPBXUM.100 CH1. Overview... - 5-1.1 Specifications... - 5-1.2 Hardware Overview... - 8-1.2.1 The Front Panel... - 8-1.2.2 The Back Panel... - 8 - CH2. Start to configure
IP/PRI/FXS/BRI PBX. User Manual. Version 2.0
 IP/PRI/FXS/BRI PBX User Manual Version 2.0 2 Table of Contents 1. Introduction... 6 1.1 Typical setup of IP/PRI/FXS/BRI PBX... 7 2. Getting Started With the IP/PRI/FXS/BRI PBX... 8 2.1 Hardware Setup...
HT812/HT814 Firmware Release Note IMPORTANT UPGRADING NOTE
 HT812/HT814 Firmware Release Note IMPORTANT UPGRADING NOTE Once HT812/HT814 is upgraded to 1.0.3.2 or above, downgrading to 1.0.2.x firmware version or lower is not supported. Once HT812/HT814 is upgraded
UCM6102/6104/6108/6116 Configuration
 UCM6102/6104/6108/6116 Configuration This document introduces manual configuration steps performed for interoperability testing between AccessLine and Grandstream UCM6102/6104/6108/6116. Configuration
TT11 VoIP Router 1FXS/1FXO TA User Guide
 TT11 VoIP Router 1FXS/1FXO TA User Guide Page 1 Table of Contents: 1.0 Introduction... 3 2.0 Package Contents... 3 3.0 Summary of LED & Connector Descriptions... 4 3.1 The Front LEDs... 4 3.2 The Rear
see the Cisco SPA100 Series Administration Guide for details. The configuration profile is uploaded to the Cisco SPA122 at the time of provisioning.
 * Note: Many specifications are programmable within a defined range or list of options. Please see the Cisco SPA100 Series Administration Guide for details. The configuration profile is uploaded to the
HT801/HT802 Firmware Release Note IMPORTANT UPGRADING NOTE
 HT801/HT802 Firmware Release Note IMPORTANT UPGRADING NOTE Once HT801/HT802 is upgraded to 1.0.3.2 or above, downgrading to 1.0.2.x firmware version or lower is not supported. Once HT801/HT802 is upgraded
New Rock Technologies, Inc. OM Series IP Telephony System. Administrator Manual OM20 OM50. Document Version:
 OM Series IP Telephony System Administrator Manual OM20 OM50 http://www.newrocktech.com Document Version: 201511 Amendment Records Document Rev. 01 (December 26, 2015) Copyright 2015 All Rights Reserved.
UCM6100 Series IP PBX Firmware Release Note
 UCM6100 Series IP PBX Firmware Release Note Table of Content FIRMWARE VERSION 1.0.10.39... 2 PRODUCT NAME... 2 DATE... 2 IMPORTANT UPGRADING NOTE... 2 UPGRADING INSTRUCTIONS... 2 CHANGES SINCE FIRMWARE
SoLink-Lite IP-PBX. Administrator Guide. (Version 1.0)
") SoLink-Lite IP-PBX Administrator Guide (Version 1.0) TABLE OF CONTENT 1.0 Introduction... 1 2.0 Setting Up the IP-PBX... 2 3.0 Logging On... 3 4.0 Configuring Network... 4 5.0 Configuring Hardware... 5
SoLink-Lite IP-PBX Administrator Guide (Version 1.0) TABLE OF CONTENT 1.0 Introduction... 1 2.0 Setting Up the IP-PBX... 2 3.0 Logging On... 3 4.0 Configuring Network... 4 5.0 Configuring Hardware... 5
Release Note for N412
 Yeastar Information Technology Co. Ltd. CONTENTS FIRMWARE VERSION 45.15.0.3... 3 FIRMWARE VERSION 45.15.0.1... 3 FIRMWARE VERSION 45.14.0.23... 5 FIRMWARE VERSION 45.14.0.22... 12 2/12 FIRMWARE VERSION
8-Port SIP VoIP Gateway (8 FXS)
") 8-Port SIP VoIP Gateway (8 FXS) Highlights Supports SIP 2.0 (RFC 326) Supports IPv6 and IPv4 simultaneously Up to 24 SIP service domains and Caller ID Supports auto HTTP provision and fax feature Flexible
8-Port SIP VoIP Gateway (8 FXS) Highlights Supports SIP 2.0 (RFC 326) Supports IPv6 and IPv4 simultaneously Up to 24 SIP service domains and Caller ID Supports auto HTTP provision and fax feature Flexible
HT801/HT802 Firmware Release Notes IMPORTANT UPGRADING NOTE
 HT801/HT802 Firmware Release Notes IMPORTANT UPGRADING NOTE Once HT801/HT802 is upgraded to 1.0.3.2 or above, downgrading to 1.0.2.x firmware version or lower is not supported. Once HT801/HT802 is upgraded
Setting Up a Mitel SX-2000 Digital PIMG Integration with Cisco Unity Connection
 Up a Mitel SX-2000 Digital PIMG Integration with Cisco Unity Connection Up a Mitel SX-2000 Digital PIMG Integration, page 1 Up a Mitel SX-2000 Digital PIMG Integration Task List for Mitel SX-2000 PIMG
D-Link DVG-1402S. Manual. 2Voice + 4SW VoIP Router. Version B.1. Building Networks for People
 D-Link DVG-1402S 2Voice + 4SW VoIP Router Manual Building Networks for People Version B.1 Contents Package Contents... 3 Introduction... 4 Rear Panel Connections... 5 Front Panel LEDs... 6 Features...
Internet Telephony PBX System
 Telephony PBX System System Highlights 20 concurrent calls and up to 100 registers HD voice codec G.722 for perfect voice quality Fax to Email / Email to Fax for Green Office Voicemail to Email for not
ICE-008 IP PBX. 1 Product Information 1.1 New Mini PBX. 1.2 Features System Features Call Handling Features
 ICE-008 IP PBX 1 Product Information 1.1 New Mini PBX ICE008 is a new generation office communication equipment that delivers traditional PBX (private branch exchange) functions and more with advanced
New Rock Technologies, Inc. OM Series IP Telephony System. Administrator Manual OM20 OM50. Document Version:
 OM Series IP Telephony System Administrator Manual OM20 OM50 http://www.newrocktech.com Document Version: 201511 Amendment Records Document Rev. 01 (December 26, 2015) Copyright 2016 All Rights Reserved.
2757 VoIP Phone Users Guide
 2757 VoIP Phone Users Guide Rev. 1.0 Table of Contents 1 Introduction... 5 1.1 Package Contents... 5 1.2 Features... 5 1.3 Basic Setup... 6 2 Network Setup... 8 2.1 Static IP Address... 8 2-2 PPPoE...11
Welltech WellGate User Manual
 Welltech WellGate 2626 An Easy to Use PBX Gateway User Manual Copyright 2009 Welltech Computer Co., Ltd. All right reserved Table of Contents Introduction...2 WellGate 2626 - An Easy to Use PBX Gateway...2
TG400/TG800 Series. VOIP Voice Gateway. Version: 2.0.1
 TG400/TG800 Series VOIP Voice Gateway USER MANUAL Version: 2.0.1 Default Login Details WAN IP Address: DHCP LAN IP Address: http://222.222.222.1 User Name: admin Password: admin Preface... 5 0.1 About
Please follow the steps that are listed here to get started with your Berkshire 10K ippbx telephone system.
 Please follow the steps that are listed here to get started with your Berkshire 10K ippbx telephone system. Step 1 Power-up and log into your PC. Unplug any existing ethernet cable from your PC. Step 2
Setting Up an Alcatel 4400 Digital PIMG Integration with Cisco Unity Connection
 up Alcatel 4400 Digital PIMG Integration with Cisco Unity Connection Up an Alcatel 4400 Digital PIMG Integration with Cisco Unity Connection, page 1 Up an Alcatel 4400 Digital PIMG Integration with Cisco
8-Port Telephony Gateway. Higher Density Voice Solution Scales with your Business PRODUCT DATA
 8-Port Telephony Gateway PRODUCT DATA Higher Density Voice Solution Scales with your Business Toll Quality Voice and Carrier- Grade Feature Support The SPA8000 delivers clear, high-quality voice communication
802.3af PoE SIP Analog Telephone Adapter
 802.3af PoE SIP Analog Telephone Adapter Product features Feature-rich telephone service over home or office Internet/ Intranet connection 802.3af/at PoE and auto-provisioning features for flexible, ease-of
CHAPTER 7 ADVANCED ADMINISTRATION PC
 ii Table of Contents CHAPTER 1 INTRODUCTION... 1 Broadband ADSL Router Features... 1 Package Contents... 3 Physical Details... 4 CHAPTER 2 INSTALLATION... 6 Requirements... 6 Procedure... 6 CHAPTER 3 SETUP...
WellGate 2504 ( 4-FXS ) and WellGate 2540 (4-FXO gateway) in Peer to Peer mode with Hotline by port to port application.
 and WellGate 2540 (4-FXO gateway) in Peer to Peer mode with Hotline by port to port application.") WellGate 2504 ( 4-FXS ) and WellGate 2540 (4-FXO gateway) in Peer to Peer mode with Hotline by port to port application. Note : Please use Windows XP IE 6.0 web browser or above version to configure both
WellGate 2504 ( 4-FXS ) and WellGate 2540 (4-FXO gateway) in Peer to Peer mode with Hotline by port to port application. Note : Please use Windows XP IE 6.0 web browser or above version to configure both
What you need today is Essence IPBX for tomorrow s productivity
 What you need today is Essence IPBX for tomorrow s productivity Energize your business with effective Essence IPBX system which comes with easy setup and administrator-friendly designs. Essence IPBX system
KTA1010 INSTALL GUIDE
 KTA1010 INSTALL GUIDE Table of Contents 1 Check for Required Items... 2 2 Installation... 2 2.1 Installation View... 2 2.2 Connection Chart to determine cable types... 3 3 Ready to use... 3 3.1 Network
Setting up Alcatel 4400 Digital PIMG Integration
 up Alcatel 4400 Digital PIMG Integration with Cisco Unity Connection Up an Alcatel 4400 Digital PIMG Integration with Cisco Unity Connection, on page 1 Up an Alcatel 4400 Digital PIMG Integration with
Expandable SIP Phone System. Expandable SIP Phone System
 Expandable SIP Phone System Key Features Included: + One DVX-1000 SIP IP PBX + One DIV-140 Trunk Gateway + Ten DPH-140S IP Telephones + Unified Management + Save On Long-distance Calling + Create an IP
Avaya PBX SIP TRUNKING Setup & User Guide
 Avaya PBX SIP TRUNKING Setup & User Guide Nextiva.com (800) 285-7995 2 P a g e Contents Description... 3 Avaya IP PBX Configuration... 3 Licensing and Physical Hardware... 4 System Tab Configuration...
Spectrum Enterprise SIP Trunking Service NEC Univerge SV8100 IP PBX Configuration Guide
 Spectrum Enterprise SIP Trunking Service NEC Univerge SV8100 IP PBX Configuration Guide About Spectrum Enterprise: Spectrum Enterprise is a division of Charter Communications following a merger with Time
Analog Telephone Adapter Setup for Q-SYS Softphone
 Analog Telephone Adapter Setup for Q-SYS Softphone This document applies to this Cisco device: SPA232D Introduction This document covers the use of the SPA232D in the role of analog telephone adapter (ATA)
Application Notes for Configuring the ADTRAN NetVanta UC Server with Avaya IP Office 6.1 Issue 1.0
 Avaya Solution & Interoperability Test Lab Application Notes for Configuring the ADTRAN NetVanta UC Server with Avaya IP Office 6.1 Issue 1.0 Abstract These Application Notes describe the procedure for
Grandstream IP Phone Configuration Guides
 Grandstream IP Phone Configuration Guides Version 1.0 Yeastar Information Technology Co. Ltd. Table of Contents FOR GRANDSTREAM GXP SERIES... 3 Register with MyPBX... 3 Provisioning for MyPBX... 5 Phone
Release Note for N412
 Version 45.14.0.X Yeastar Information Technology Co. Ltd. FIRMWARE VERSION 45.14.0.23 DATE October 8, 2016 CHANGES SINCE FIRMWARE RELEASE 45.14.0.22 NEW FEATURES 1. Added support for switching Follow Me
Cisco Small Business SPA2102, SPA3102, SPA8000, SPA8800, PAP2T
 ADMINISTRATION GUIDE Cisco Small Business SPA2102, SPA3102, SPA8000, SPA8800, PAP2T Analog Telephone Adapters Cisco and the Cisco Logo are trademarks of Cisco Systems, Inc. and/or its affiliates in the
Step 3 - How to Configure Basic System Settings
 Before configuring the IP address and network settings, complete Step 2 - How to Configure IP Address, network Settings, and Firewall. Verify the computer and the are connected to the same network, with
FTA-102L. Free Roaming Gateway. User Manual
 FTA102L Free Roaming Gateway User Manual FTA102L PORTech Communications Inc. Content 1. Introduction... 1 2. System Topology... 2 3. Function Description... 2 4. Parts list... 3 5. Dimension: 14*9*3 cm...
Contents. 2 V400 Series VoIP Gateway User Guide YML832 Rev1
 Contents 1. Introduction...4 Product Overview...4 Items that you will need and things you will need to know...5 NetComm V400 Series VoIP Gateway Features...6 Package Contents...9 Hardware Description...10
HT818 Firmware Release Note
 HT818 Firmware Release Note Table of Content FIRMWARE VERSION 1.0.10.6... 3 PRODUCT NAME... 3 DATE... 3 FIRMWARE FILE INFORMATION... 3 ENHANCEMENT... 3 BUG FIX... 3 NEW FEATURES OVERVIEW... 4 VISUAL MWI
Grandstream Networks, Inc. Peering HT8XX with GXW410X
 Grandstream Networks, Inc. Peering HT8XX with GXW410X Table of Contents OVERVIEW... 3 SCENARIO 1: PEERING ONE HT8XX WITH GXW410X... 4 HT8XX Configuration... 4 GXW410X Configuration... 6 One-To-One mapping...
CONFIGURING GRANDSTREAM IP PHONES AND GATEWAYS WITH THE 3CX PHONE SYSTEM
 CONFIGURING GRANDSTREAM IP PHONES AND GATEWAYS WITH THE 3CX PHONE SYSTEM CONFIGURING GRANDSTREAM GXP SERIES WITH THE 3CX PHONE SYSTEM 1. Ensure that you have created the extension that you wish to use
Contents. 2 SmartVoice Gateway(s) User Guide YML832 Rev1
 User Guide YML832 Rev1") Contents 1. Introduction...4 Product Overview...4 Items that you will need and things you will need to know...5 NetComm SmartVoice Gateway Features...6 SmartVoice Gateway Hardware Description...9 Front
Contents 1. Introduction...4 Product Overview...4 Items that you will need and things you will need to know...5 NetComm SmartVoice Gateway Features...6 SmartVoice Gateway Hardware Description...9 Front
Cisco Unified Communications UC320W Pre-Installation Site Information
 Cisco Unified Communications UC320W Pre-Installation Site Information Use this workbook to gather information from your customer before you install the Cisco Unified Communications UC320W at the site.
Brekeke PBX Version 3 Administrator's Guide (Basic) Brekeke Software, Inc.
 Brekeke Software, Inc.") Brekeke PBX Version 3 Administrator's Guide (Basic) Brekeke Software, Inc. Version Brekeke PBX version 3, Administrator s Guide (Basic) Copyright This document is copyrighted by Brekeke Software, Inc.
Brekeke PBX Version 3 Administrator's Guide (Basic) Brekeke Software, Inc. Version Brekeke PBX version 3, Administrator s Guide (Basic) Copyright This document is copyrighted by Brekeke Software, Inc.
HT812/HT814 Firmware Release Notes IMPORTANT UPGRADING NOTE
 HT812/HT814 Firmware Release Notes IMPORTANT UPGRADING NOTE Once HT812/HT814 is upgraded to 1.0.3.2 or above, downgrading to 1.0.2.x firmware version or lower is not supported. Once HT812/HT814 is upgraded
SV9100 SIP Trunking Service Configuration Guide for Cable ONE Business
 SV9100 SIP Trunking Service Configuration Guide for Cable ONE Business NDA-31871 Issue 1.0 NEC Enterprise Communication Technologies, Inc. reserves the right to change the specifications, functions, or
VG422R. User s Manual. Rev , 5
 VG422R User s Manual Rev 1.0 2003, 5 CONGRATULATIONS ON YOUR PURCHASE OF VG422R... 1 THIS PACKAGE CONTAINS... 1 CONFIRM THAT YOU MEET INSTALLATION REQUIREMENTS... 1 1. INSTALLATION GUIDE... 2 1.1. HARDWARE
Application Notes for TelStrat Engage Record Version 3.3 with Avaya Business Communication Manger Release 6.0 VoIP Recording Issue 1.
 Avaya Solution & Interoperability Test Lab Application Notes for TelStrat Engage Record Version 3.3 with Avaya Business Communication Manger Release 6.0 VoIP Recording Issue 1.0 Abstract These Application
Application Note 3Com VCX Connect with SIP Trunking - Configuration Guide
 Application Note 3Com VCX Connect with SIP Trunking - Configuration Guide 28 May 2009 3Com VCX Connect Solution SIP Trunking Table of Contents 1 3COM VCX CONNECT AND INGATE... 1 1.1 SIP TRUNKING SUPPORT...
5-3 Ring Dialing Plan General Dialing Rule Digit Manipulation Phone Book TEL Setting (FXS
 Contents 1 Introduction... 4 1-1 Physical Interface... 4 1-2 Feature... 4 1-3 Front Panel: LED Indicators... 5 1-4 Rear Panel: Cable connections... 6 1-5 QUICK SETUP... 7 2 Device Settings... 12 2-1 Network
HT802 Firmware Release Note IMPORTANT UPGRADING NOTE
 HT802 Firmware Release Note Once HT802 is upgraded to 1.0.3.2 or above, downgrading to 1.0.2.x firmware version or lower is not supported. Once HT802 is upgraded to 1.0.2.7, downgrading to 1.0.1.x firmware
Configure the ATA 191
 Telephony s, page 1 Product-Specific Configuration Parameters, page 7 Add Users to Cisco Unified page 12 Telephony s The following table lists the supported telephony features. Use Cisco Unified Communications
WellGate 2522 User Guide
 WellGate 2522 User Guide Contents CH1 Introduction... 4 1-1 Physical Interface... 4 1-2 IP Network connection... 5 1-3 Environmental... 5 1-4 Front Panel... 6 1-5 Rear Panel... 7 1-6 QUICK SETUP... 8 CH2
Grandstream GXE5024 Review
 Tom Keating CTO See original article at Grandstream GXE5024 Review July 27, 2009 digg In today's increasing cost-conscious economy, SMBs are looking for feature-rich IP- PBXs at the lowest cost. Many SMBs
Grandstream Networks, Inc. HT802 Analog Telephone Adaptor User Guide
 Grandstream Networks, Inc. HT802 Analog Telephone Adaptor User Guide COPYRIGHT 2016 Grandstream Networks, Inc. http://www.grandstream.com All rights reserved. Information in this document is subject to
VOI-9200 SIP IP PBX User Manual
 VOI-9200 SIP IP PBX User Manual Ver. 1.01-0701 Table of Contents 1. INTRODUCTION... 3 1.1. OVERVIEW... 3 1.2. FEATURE... 4 1.3. PACKAGE CONTENT... 5 1.4. PHYSICAL... 5 1.5. DEFAULT SETTINGS... 7 1.6. CONNECTION
CHAPTER 3 CONFIGURING THE SIP-PHONE THROUGH WEB PAGES STEP 1. BROWSE THE IP ADDRESS PREDEFINED VIA KEYPAD... 36
 WellPhone-305 SIP CHAPTER 1 OVERVIEW OF THE SIP-PHONE... 3 1. HARDWARE OVERVIEW... 4 1.Front View and Keypad function... 4 2.Back View...11 3.Specification of connector...11 2. SOFTWARE FEATURES AND SPECIFICATION...
Cisco SPA122 ATA with Router
 Data Sheet Cisco SPA122 ATA with Router Affordable and Feature-Rich Voice over IP (VoIP) Highlights Eliminate compromise on voice quality or features for phone and fax capabilities associated with Internet
Setting up the Grandstream Gateway for use with STAC VIP
 Setting up the Grandstream Gateway for use with STAC VIP Introduction The GXW4108 Gateway is a cost-effective way of converting the Comrex STAC VIP to use with POTS (or PSTN) telephone lines. The gateway
Configuring FXS Ports for Basic Calls
 Configuring FXS Ports for Basic Calls First Published: October 2, 2008 Last updated: March 19, 2010 This module describes how to configure analog Foreign Exchange Station (FXS) ports on a Cisco Integrated
PANASONIC. Optimum Business Trunking and the Panasonic KX-NCP500 IP PBX V Configuration Guide
 PANASONIC Optimum Business Trunking and the Panasonic KX-NCP500 IP PBX V2.0502 Configuration Guide PANASONIC Table of Contents 1. Overview 2. SIP Trunk Adaptor Set-up Instructions 3. Additional Set-up
Grandstream Networks, Inc. UCM6xxx SIP Trunks Guide
 Grandstream Networks, Inc. Table of Content INTRODUCTION... 4 REGISTER SIP TRUNKS... 5 Configuration... 5 DID / DOD Configuration... 9 Direct Inward Dialing (DID)... 9 Direct Outward Dialing (DOD)... 10
Broadvox Fusion SIP Trunks Configuration Guide PBX Platform: KX-TDA50
 Broadvox Fusion SIP Trunks Configuration Guide PBX Platform: KX-TDA50 3/20/2013 1 Overview This document describes the configuration procedures required for the KX-TDA50 to make full use of the capabilities
Cisco SPA112 2 Port Phone Adapter
 Data Sheet Cisco SPA112 2 Port Phone Adapter Affordable and Feature-Rich Voice over IP (VoIP) Highlights Eliminate compromise on voice quality or features for phone and fax capabilities associated with
Draft Version. Setup Reference guide for KX-HTS Series (Tested with HTS824 Version 1.5) Netia SIP Trunk service with External Router
 Netia SIP Trunk service with External Router") Draft Version Setup Reference guide for KX-HTS Series (Tested with HTS824 Version 1.5) Netia SIP Trunk service with External Router Version 0.1(PSN) 22th.June, 2017 SUMMARY This document is a reference
Draft Version Setup Reference guide for KX-HTS Series (Tested with HTS824 Version 1.5) Netia SIP Trunk service with External Router Version 0.1(PSN) 22th.June, 2017 SUMMARY This document is a reference
RX3041. User's Manual
 RX3041 User's Manual Table of Contents 1 Introduction... 2 1.1 Features and Benefits... 3 1.2 Package Contents... 3 1.3 Finding Your Way Around... 4 1.4 System Requirements... 6 1.5 Installation Instruction...
Application Notes for Configuring Cablevision Optimum Voice SIP Trunking with Avaya IP Office - Issue 1.1
 Avaya Solution & Interoperability Test Lab Application Notes for Configuring Cablevision Optimum Voice SIP Trunking with Avaya IP Office - Issue 1.1 Abstract These Application Notes describe the procedures
IP Commander for ios VoIP User Manual
 IP Commander for ios VoIP User Manual Copyright 2014, All Rights Reserved. Ver: R09 D/C: 103-0326 Table of Content 1. INTRODUCTION...4 2. GETTING STARTED...4 2.1 TUNING ON COMMUNICATOR AND CONNECTING IPAD...
Configuration Guide IP-to-IP Application
 Multi-Service Business Gateways Enterprise Session Border Controllers VoIP Media Gateways Configuration Guide IP-to-IP Application Version 6.8 November 2013 Document # LTRT-40004 Configuration Guide Contents
CONNECTION ELECTRONICS LTD.
 System Manual Version 1.0 Revised on 16-Apr-2010 CONNECTION ELECTRONICS LTD. NOTICE The information contained in this document is believed to accurate in all respects but is not warranted by Connection
Product Release Notice Synapse 3.0 Software
 Product Release Notice Synapse 3.0 Software Release Date: September 17 th, 2012 This document contains the release notes for AT&T Synapse version 3.0. This is a major release with many new features. Users
This guide assists users to configure the Allworx VoIP Phone System and XO SIP Services.
 Introduction This guide assists users to configure the Allworx VoIP Phone System and XO SIP Services. Prerequisites Completed the Allworx Technical training, and the main technician is either an Allworx
IPPBX IP02 User Manual
 For Firmware Version: V2.0 2013-08-23 Contents Contents... 1 1. Introduction... 4 2. Connection and Change IP Address of IPPBX... 5 2.1 Connection... 5 2.2 WAN Settings... 6 2.3 LAN Settings... 7 2.4 DHCP
EIP 7012 Essence VoIP Phone Administration Guide Version 1.0B
 Essence Technology EIP 7012 Essence VoIP Phone Administration Guide Version 1.0B Table of Contents 1 Introduction... 1 1.1 Hardware Overview... 1 1.2 Software Overview... 1 2 Keypad interface for IP Phone
Release Notes for DrayTek VigorBX 2000 series (UK/Ireland)
") Release Notes for DrayTek VigorBX 2000 series (UK/Ireland) Firmware Version 3.8.1.9 Release Type Critical Upgrade recommended immediately Release Date 21 st May 2018 Build Date 21 st May 2018 Revision
Release Notes for DrayTek VigorBX 2000 series (UK/Ireland) Firmware Version 3.8.1.9 Release Type Critical Upgrade recommended immediately Release Date 21 st May 2018 Build Date 21 st May 2018 Revision
User Guide Business Hosted Voice DOCUMENT VERSION: 4.0
 User Guide Business Hosted Voice DOCUMENT VERSION: 4.0 DATE OF ISSUE: 30 NOVEMBER 2018 Welcome! We want to help your business connect. We re sure you will enjoy the benefits of these services. Plus our
Application Notes for Avaya IP Office Release 8.0 with AT&T Business in a Box (BIB) over IP Flexible Reach Service Issue 1.0
 over IP Flexible Reach Service Issue 1.0") Avaya Solution & Interoperability Test Lab Application Notes for Avaya IP Office Release 8.0 with AT&T Business in a Box (BIB) over IP Flexible Reach Service Issue 1.0 Abstract These Application Notes
Avaya Solution & Interoperability Test Lab Application Notes for Avaya IP Office Release 8.0 with AT&T Business in a Box (BIB) over IP Flexible Reach Service Issue 1.0 Abstract These Application Notes
1 Page. Digital Voice Services Business User Guide
 1 Page Digital Voice Services Business User Guide Feature Access Codes *62 Voice Portal *86 Direct Voice Mail Retrieval *77 Anonymous Call Rejection Activation *87 Anonymous Call Rejection Deactivation
Application Notes for Configuring SIP Trunking Using Verizon Business IP Contact Center VoIP Inbound and Avaya IP Office Release 8.1 Issue 1.
 Avaya Solution & Interoperability Test Lab Application Notes for Configuring SIP Trunking Using Verizon Business IP Contact Center VoIP Inbound and Avaya IP Office Release 8.1 Issue 1.0 Abstract These
IPPBX IP02 User Manual
 For Firmware Version: V4.0 2015-11-16 Contents Contents...1 1. Introduction... 3 2. Connection and Change IP Address of IPPBX...5 2.1 Connection... 5 2.2 WAN Settings...6 2.3 LAN Settings... 7 2.4 DHCP
SAPEX. The All in One Embedded IP PBX Server
 Warm Welcome SAPEX The All in One Embedded IP PBX Server Introduction Pure IP-PBX Embedded Server Platform Registrar, Proxy, Presence and Voice Mail Servers : All-Integrated Open-Standard SIP Protocol
Draft Version. Setup Reference guide for KX-HTS Series (Tested with HTS32 Version 1.5) VozTelecom SIP Trunk service with Built-in Router
 VozTelecom SIP Trunk service with Built-in Router") Draft Version Setup Reference guide for KX-HTS Series (Tested with HTS32 Version 1.5) VozTelecom SIP Trunk service with Built-in Router Version 0.1(PSCEU) 29th.March, 2017 SUMMARY This document is a reference
Draft Version Setup Reference guide for KX-HTS Series (Tested with HTS32 Version 1.5) VozTelecom SIP Trunk service with Built-in Router Version 0.1(PSCEU) 29th.March, 2017 SUMMARY This document is a reference
User Manual NANO 2. Version 2.5
 Version 2.0 User Manual NANO 2 Version 2.5 Table of Contents 1. Introduction... 1 1.1. Typical setup of NanoPBX... 2 2. Getting Started With the NanoPBX... 3 2.1. Installation... 3 2.2. Accessing the GUI
Application Notes for Configuring CenturyLink SIP Trunking with Avaya IP Office Issue 1.0
 Avaya Solution & Interoperability Test Lab Application Notes for Configuring CenturyLink SIP Trunking with Avaya IP Office 6.1 - Issue 1.0 Abstract These Application Notes describe the procedures for configuring
Soft Phone Quick Start Guide
 i Soft Phone Quick Start Guide Soft Phone Quick Start Guide Version: 1.1 Firmware Version: V1.1.0 Date: 05/10/2010 Copyright Declarations Trademarks Copyright 2010 All rights reserved. This publication