Teacher User Guide. All you need to get started with Benchmark Universe and more! Building Literacy and Language for Life
|
|
|
- Suzan McDonald
- 6 years ago
- Views:
Transcription
1 All you need to get started with Benchmark Universe and more! Building Literacy and Language for Life
2 Contents About Benchmark Universe... 7 From our president, Tom Reycraft... 7 Sign in to Benchmark Universe... 8 Go to Benchmark Universe... 8 Before you sign in... 8 Sign in... 8 Forgot Password?... 9 Contact Technical Support... 9 About the Dashboard...10 Dashboard at a Glance...11 Personalize your Dashboard...16 Change your password...17 Compose a message...18 View class information and manage students...19 Approve, share, reject a book review (For Teachers)...19 Review a student s reading log...21 Write a book review (For Students)...22 Check Benchmark Universe server status...23 About the Library...24 Library at a Glance...25 About the Benchmark Advance Library...31 About the English Language Development Library...35 About the Benchmark Adelante Library...39 About the Assessments Library...43 About Writing Exemplars...47 Apply filters to the Library...50 Remove a filter and clear all filters...52 Search for specific book titles...53 Create a bookshelf...53 Add books to a bookshelf...54 Edit a bookshelf...55 Page 1
3 Customize a book...56 View customizations of a book...56 Add customized books to a bookshelf...57 Share customizations with all teachers...58 View School Customization Library notifications...59 Edit a shared customization...59 Remove a shared customization...61 Create an assignment...61 Assign assessments...63 Assign customized books...64 View student book reviews...66 About Component Types...66 About the Teacher's Resource System...68 About the Teacher's Novel Guide...72 About Ebooks...78 Ebook at a Glance Present Mode...78 Ebook at a Glance Edit Mode...80 Before you start...84 Switch between Edit and Present modes...84 Use Auto, Play, Stop, and Annotations settings...84 Manually turn ebook pages...85 Print an ebook...85 Adjust audio speed...86 Save a customized ebook...87 Add ebook annotations...88 View, search, and add customizations...93 Archive a customization...94 View, navigate, rename or delete ebook page thumbnails...94 Add new thumbnail pages...95 Add posters...96 Move or copy thumbnail pages...97 Add Close Reading notes...98 Page 2
4 Go back to Benchmark Universe...98 About eplanner...99 eplanner at a Glance...99 Create a plan Create a plan with review and routines Add routines Edit plan name Expand and collapse lesson details Change duration Move a lesson Add a lesson note Configure small groups Add materials Open a book Copy and move a book Copy a plan Add a lesson Edit a lesson Remove a lesson Add custom day Add non-teaching day Print a plan Print notes Delete a plan Customize the Standards Report Access the Teacher's Resource System Access the Read-Aloud Handbook About Assignments Assignments List at a Glance New Assignments at a Glance Edit Assignments at a Glance Create assignments using the Welcome to Assignments dialog Page 3
5 Add new assignments using the Assignments List page Add draft assignments using the Assignments List page Create assignments using My Templates Filter, sort, or search assignments Edit assignments using the Edit Assignments page Show or Hide student assignments Close an assignment Delete an assignment Delete all students from an assignment Delete a student(s) from an assignment View all notes View notes by student View notes using the Page button Print notes Customize materials for all students Customize materials for a student Edit a student s assignment status View assignments like a student Open a closed assignment About Manage Students Manage Students at a Glance Select a class or group View students in a class or group Search by student name View student details Print class roster Add a new group Add a new group by selecting a class and group Add a new group by selecting multiple groups Edit a group name Delete a group Delete one or multiple students in a group Page 4
6 About Assessments Assessments at a Glance Grade constructed responses View a student's correct, partial, and no credit answers View a student's assessment activity Experience an assessment like a student Decrease or increase font size Read line by line with the Line Reader Pause or restart assessment Complete an assessment Review questions and answers before submitting a test Submit a test About Legacy Reports (Flash) Reports Dashboard at a Glance View class, school, and district assessment scores View a student s assessment performance View a student s assessment score and class average Analyze class diagnostic data by assessment View Item Analysis Summary data Run an Item Analysis Student Report Print and export diagnostic data About Dashboard Reports (HTML) Reports Dashboard at a Glance (HTML) About the Class Average Score (HTML) Explorer Basics (HTML) View and print student results (HTML) View student results by question item using Reports (HTML) Create custom reports (HTML) View item analysis data (HTML) Run an Item Analysis Student Report (HTML) Batch print student reports by class (HTML) Analyze assessment data at the school level (HTML) Page 5
7 Group assessment data by standard, skill, topic or other tags (HTML) Analyze assessment data at the teacher level (HTML) Analyze assessment data at the class level (HTML) Reports Library (HTML) Appendix - Parent or Guardian Letter (English) Parent or Guardian Letter (Spanish) About the Data Dashboard Data Dashboard at a Glance Select a class Select a period View charts Print charts Page 6

8 About Benchmark Universe Benchmark Universe is a learning management system (LMS) that enables teachers to create bookshelves full of engaging ebooks in their libraries, provide students with reading assignments and assessments with a click of the mouse, blend classroom instruction with interactive resources, and more. Students benefit from using Benchmark Universe, too! Students can easily view and work on their reading assignments, write, and share book reviews with their teachers and classmates and perform other learning tasks. At Benchmark Education, we believe that building literacy is a partnership and collaborative effort among teachers, students and parents. From our president, Tom Reycraft "We at Benchmark Education Company are focused on continuing our tradition of developing the highest-quality curriculum resources for teachers and students, and we are proud to offer programs and products that are applicable in any teaching and learning environment." Page 7
9 Sign in to Benchmark Universe You must sign in before you can open and work with any of the resources available to you in Benchmark Universe. You can do a system check to ensure you have the hardware and software you need in order for Benchmark Universe resources to operate effectively and run smoothly. In addition, you can request a password reset if you forget your password, order a subscription, and get technical support. Go to Benchmark Universe School districts are provided with a unique Benchmark Universe website address that identifies the district or school. Contact your Technical Administrator for your unique Benchmark Universe website address and sign in credentials. Before you sign in Use the System Check link to ensure you have the hardware and software you need in order for Benchmark Universe resources and tools to run properly. Sign in The following System Check requirements must be set up by your technical administrator. Benchmark Universe URLs must be added to your school district's whitelist. Pop-ups must be enabled. Javascript must be enabled. Contact your technical administrator if you experience any system check related issues. You can use the Sign in page to sign in to Benchmark Universe, perform a system check, change your password, and contact Technical Support. Page 8
10 1. Type or copy the Benchmark Universe website address in the browser address bar and press Enter. The Benchmark Universe Sign in page appears. 2. Type your user name in the Type your user name box. 3. Type your password in the Type your password box and press Enter or click Sign In. Use the Sign Out button located at the top-right of any page when you are done using Benchmark Universe. Forgot Password? Use the Forgot Password link to change your password. Contact Technical Support Use the Technical Support link or telephone number to contact Technical Support about Benchmark Universe product subscriptions or issues. Page 9
11 About the Dashboard The Dashboard is the first page you see after you successfully sign in. Teachers can access the following tools and resources. Messages, Assignments, Manage Students, Book Reviews, Reading Log, and Help Benchmark Advance, Benchmark Adelante (Spanish), English Language Development, eplanner, and Assessments Some of the tools listed above are only available on the Dashboard if the teacher has the appropriate subscription(s). Student dashboards are different and do not have the following teacher's tools and resources. Reports, eplanner, Manage Students, and Teacher Resources System Student dashboards include a My Reading Log tool that shows their reading learning progress. Page 10
, Tips, Release Notes and Updates.")
12 Dashboard at a Glance Contemporary design Dashboard Legend - Contemporary Design Description 1. Benchmark Universe logo Go to the Dashboard from wherever you are in Benchmark Universe. 2. Help > Customer Support and System Check View Frequently Asked Questions (FAQs), Tips, Release Notes and Updates. Run a system check, view hardware and software system requirements and submit a Tech Support request. 3. Sign Out Sign out of Benchmark Universe. Page 11
13 4. Page Icon and Name and Switch Dashboard (on the right) Display a panel and navigate to Benchmark Universe tools and resources. Know where you are and what page you are working on. Note: The Page icon appears on all Benchmark Universe pages except for the Dashboard. Switch to a different Dashboard view. 5. Profile Information, View Profile button 6. My Messages, Assignments, Manage Students, Book Reviews, Reading Log, and Help See your name and district/school information. View and edit your profile including your picture. Use the following tools to: My Messages - compose and send/receive messages to and from students. Assignments - create assignments for students. Manage Students - add/remove students from classes; create and edit groups. Book Reviews - view, approve and share book reviews. Reading Log - view your students reading log details. Help - gain the knowledge you need to get started with Benchmark Universe resources and tools. Note: Contact your technical administrator if you do not see any class information in Manage Students. Page 12
14 7. Benchmark Advance, Benchmark Adelante (Spanish), English Language Development, eplanner, Assessments, My Library, and Reports Use the following resources to: Benchmark Advance Library - filter and view English materials and create bookshelves and assignments. Benchmark Adelante Library - filter and view Spanish materials and create bookshelves and assignments. English Language Development Library - filter and view ELD designated materials and create bookshelves and assignments. eplanner - create, manage, customize, print, and share plans. Assessments Library - filter and view assessments and create bookshelves and assignments. Data Dashboard - view key chart data across applications within Benchmark Universe (for subscribed users only) My Library - access other libraries, view materials like book titles, create bookshelves and assignments. Reports - run student and class related reports. Note: eplanner only appears on the Dashboard if your school has a subscription. 8. BenchmarkEducation.com and Privacy Policy links Go to the Benchmark Education website. View our Privacy Policy. Page 13
, Tips, Release Notes and Updates.")
15 Traditional design Dashboard Legend - Traditional Design Description 1. BenchmarkEducation.com Go to the Benchmark Education website. 2. Help > Customer Support and System Check View Frequently Asked Questions (FAQs), Tips, Release Notes and Updates. Run a system check, view hardware and software system requirements and submit a Tech Support request. 3. Sign Out Sign out of Benchmark Universe. 4. Benchmark Universe logo Go to the Dashboard from wherever you are in Benchmark Universe. Page 14
16 5. Profile Information, View Profile button See your name and district/school information. View and edit your profile including your picture. 6. Switch Dashboard Switch to another Dashboard view. 7. Page Icon and Name Display a panel and navigate to Benchmark Universe tools and resources. Know where you are and what page you are working on. Note: The Page icon appears on all Benchmark Universe pages except for the Dashboard. 8. My Library, Messages, Assignments, Reports, Book Reviews, Reading Log, eplanner, Data Dashboard, Manage Students, and Help 9. BenchmarkEducation.com and Privacy Policy links Use the following tools to: Go to the Benchmark Education website. View our Privacy Policy. Page 15
17 Personalize your Dashboard You can use the Profile page to view and edit your profile, including your picture, view class information, access Manage Students, and change your password. 1. Click the Profile link at the top right of any Benchmark Universe page. The Profile page appears. 2. Click Change Image, select an image from the image gallery and click Save. See the following topics for more information about the Dashboard. View class information Change your password Page 16
18 Change your password You can use the Profile page to change your password. 1. Click the Profile link at the top-right of any Benchmark Universe page. The Profile page appears. 2. Go to Profile Tools. 3. Click Change Password. A security question appears. Contact your technical administrator if you do not know the response to your security question. 4. Type your response in the Type your answer box. 5. Click Submit. The Change Password dialog appears. 6. Type your new password in the New Password box. 7. Retype your new password in the Retype new password box. The following message appears if the passwords do not match: Passwords must match. Please try again. 8. Click Submit. The Password Changed message appears. Page 17

19 Compose a message Connect with colleagues and students. You can receive input and provide feedback to your students in a moderated and private classroom setting by using the Message Center. The Message Center provides you with features which includes composing, sending, replying, printing, marking messages unread and deleting. Students are not able to send messages to each other. They are only able to send messages to their teachers. 1. Click Messages. The Message Center appears. 2. Click Compose. 3. Click the down arrow in the To box. A list of groups appears. 4. Select a group; if necessary, and recipient(s). 5. Type a subject in the Subject box. 6. Type the contents of your message in the message box. 7. Preview or keep editing the message, if necessary. 8. Click Send. Use the Reply, Mark Unread, Print, and Delete icons to perform other Message Center tasks. Page 18
20 View class information and manage students You can use the Profile link at the top-right of any Benchmark Universe page to view class information and manage students. 1. Click the Profile link at the top-right of any Benchmark Universe page. The Profile page appears. 2. Go to the Class Name list and view a list of classes and the number of students in each class. 3. Click the Manage Students link next to the class name to add and edit groups. Contact your technical administrator if no class information is available. Classes must be set up before you can add or edit groups in Manage Students. Approve, share, reject a book review (For Teachers) Create a community of readers and writers. Student book reviews are approved, shared or rejected by using the Book Reviews page. You can view a list of student book reviews that are pending your approval or by class. In addition, you can refer to the books, if necessary and print. Approve a book review 1. Click Book Reviews on the Dashboard. The Book Reviews page appears. 2. Find the book review and review the student's rating and comments. 3. Click the Approve button. The Book review is approved and shared message appears. 4. Click OK. Approved and Rejected book reviews are removed from the Book Reviews page. The Book Reviews page only shows book reviews that need to be reviewed by the teacher. Book reviews cannot be deleted from the Book Reviews page. Page 19
21 Reject a book review 1. Find the book review and review the student's rating and comments. 2. Click the Reject button. The Book review is rejected message appears. 3. Type a message for the student in the box. 4. Click OK. You can use the Print button to print book reviews. Review rejected book reviews 1. Find the rejected book review. 2. Click the Approve button. The Book review is approved and shared message appears. 3. Click OK. Review book reviews by class 1. Select a class. The Book Reviews by Class page appears. 2. Use the Up or Down arrows to sort by date or ebook title, if necessary. 3. Find a class review and click the Read Class Reviews link. All book reviews by class appear. You can open a book on the Book Reviews, Rejected Book Reviews, and Book Reviews by Class pages by clicking the book cover. See Write a book review (For Students) for more information about how students do book reviews. Page 20
22 Review a student s reading log Check your students reading progress by looking at their reading logs. You can review a student's reading log by using the Reading Log icon. The student's reading log page shows the number of books read, started, book review rating, comments, and status. In addition, you can write a book review of your own to share with your student(s) and print the reading log for parent-teacher and/or student conferences. 1. Click the Reading Log icon on the Dashboard. The Reading Log page appears. 2. Select a class (optional). 3. Use the Search bar to find a student and press Enter, if necessary. 4. Click the student's name. The student's Reading Log table appears. 5. Use the Up or Down arrows to sort by date, type, ebook title and status (optional). The Type column lets you know whether the student's reading activity is based on an assignment or independent reading. The ebook title provides you with a student's book review and reading history. The Status column shows the following statuses. Student reviewed - The student wrote and shared a book review. Student finished - The student read an assigned book and marked it done. Student will finish - The student started to read an assigned book, but has not marked it done. 6. Find a book review and click Read Review. 7. Review the student's rating and comments. 8. Click Add New Book Review to write a book review (optional). 9. Click the Close (x) icon. 10. Click Print, if necessary. You can open a book on the student's reading log by clicking the book cover. Page 21

23 Write a book review (For Students) Students can write book reviews by using the Gear icon located at the bottom-right of a book cover on any library page. 1. Find a book to review in your library. 2. Click the Gear icon. The Gear menu appears. 3. Click Reviews. 4. Click Add New Book Review. 6. Give the book a rating by selecting 1 to 5 stars. 7. Type your book review in the Review box. 8. Click Submit. This topic is included in the teacher's Dashboard overview so that teachers understand how students do book reviews. Page 22
24 Check Benchmark Universe server status You can check your network connection speed and the status of Benchmark Universe servers, databases, and services by using the Shield icon next to the Customer Support link. The Shield icon changes colors to show different speed levels. In addition, you can view which servers, databases and services are up or down. Check your network connection speed Move your mouse over the Shield icon located next to the Customer Support link. Green - Network connection speed is optimal and Benchmark Universe is fully operational. Yellow - Network connection speed is slow and Benchmark Universe is somewhat operational. Red - Network connection speed is very slow and Benchmark Universe may not be operational. Check servers, databases and services status Click the Shield icon located next to the Customer Support link. The Status page appears. Review the Servers, Databases and Services column and determine which servers, databases and services are down. The Estimated time message indicates when the server, database or service impacted is expected to be up and running. A system message appears with additional details at the top of the page. Page 23

25 About the Library Benchmark Universe consists of a series of resources and tools. The Benchmark Universe Resource Library is a major resource. Conceptually, it contains multiple libraries based on the Benchmark Advance, English Language Development, Benchmark Adelante and Assessments programs. The Benchmark Universe Resource Library is your master library. Each of the libraries within the master library contains materials specific to the program you have chosen to work with. See the Concept: Multi-purpose Libraries diagram below. You can use the different libraries to view, filter, search, and customize book titles. In addition, you can add bookshelves and assignments, and do book reviews all in one place! Have a favorite customization you want to share with your colleagues? You can do that too with the School Customization Library. Page 24
26 You can have one, a combination, or all of the following libraries on your Dashboard. Benchmark Advance Library English Language Development (ELD) Library Benchmark Adelante Library Assessments Library Which libraries you have access to is based on the type of subscriptions you have. The libraries have similar functionality and unique characteristics. For example, each library appears blank when you initially open the page. Use the Grade and other filters in the Filters area to get the materials you want. The materials are categorized based on the program and filters selected. See the Library at a Glance table to learn about each library s basic functionality. Some of the Library pages have unique characteristics; for example, the Assessments and School Customization Library. Library at a Glance You can use My Library to view, filter, search, and customize book titles. In addition, you can add bookshelves and assignments and do book reviews all in one place! Have a favorite customization you want to share with your colleagues? You can do that too with the School Customization Library. Page 25
27 Example: Benchmark Advance Library Library Legend Description 1. Library list Use the Library list to select one of the following libraries. 2. Filters area Filter the book titles in your library by: 3. Filter buttons (Toggle keys) Use the Filter buttons to set or clear the filters applied to your library. The filter buttons act as toggle keys and change color when selected. For example, the Product Type > book filter is yellow to show that the filter is selected and applied to the library. Page 26
28 Example: Benchmark Adelante Library Library Legend Description 4. Search bar Search by title or keyword 5. Filters bar and Start Over View the filters you have applied to your library, delete filters, or clear all filters and start over. Page 27
29 6. Materials product count, thumbnail, label, title, and Gear icon Use the Materials display area to: View the number of materials (products) found based on the filters applied to the library. Use the thumbnail to open the material or customization. Use the label to view the product type. For example, the product type label is E-Book in the Benchmark Adelante library. View a customization list below the thumbnail, if any. Use the Gear icon to: Open - open a book. More Information - open, read and get more information about a book including related Teacher Resources. Note: You may see multiple Related Teacher Resources like Teacher Guides in the More Information dialog based on your subscriptions. Add to Assignment - assign the book. Add to Bookshelf - add the book to a bookshelf. Reviews - review student book reviews. Note: Some Gear menus may not have all of the options listed above. Page 28
30 Example: Assessments Library Library Legend Description 7. Bookshelves View, access, and add bookshelves to your library. 8. School Customization Library View, add, and share customizations only with other teachers in a school. Page 29

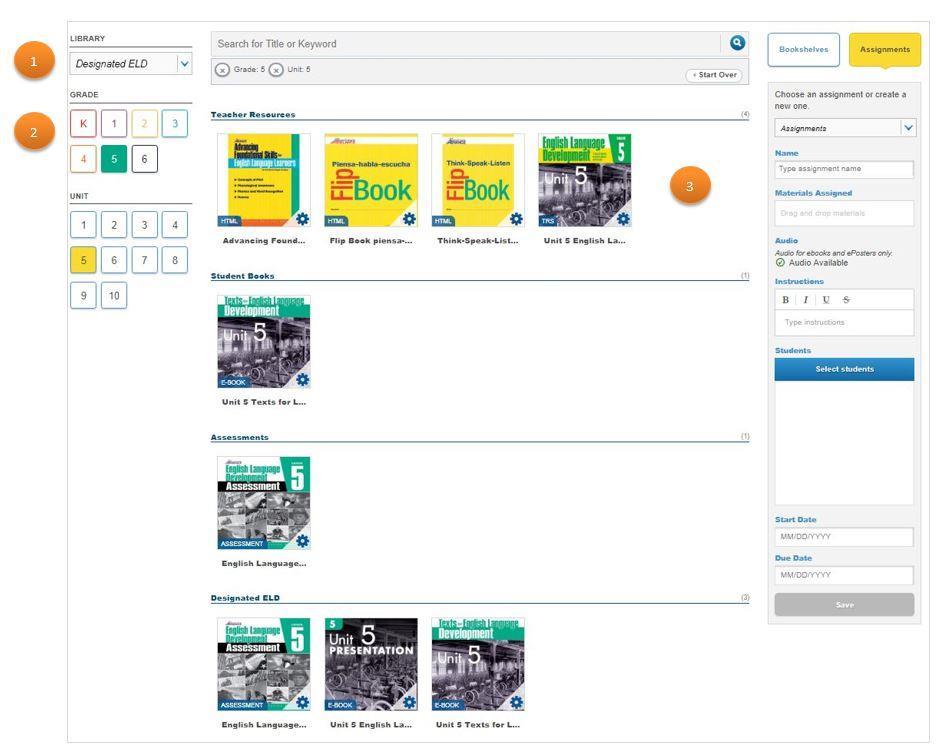
31 Example: Designated ELD Library Library Legend Description 9. Assignments View, edit, and add assignments. Page 30
32 About the Benchmark Advance Library The Benchmark Advance Library is based on the Benchmark Advance program. Benchmark Advance is a comprehensive English Language Arts/English Language Development program from Benchmark Education Company. The program is designed to address the goals, context and themes of ELA/Literacy and ELD instructions embodied in the English Language Arts/English Language Development Framework and to align seamlessly with the California Common Core State Standards for ELA/Literacy and the California English Language Development Standards. Benchmark Advance embodies the five themes of the California Framework through its rigorous, integrated reading, writing, speaking, and listening instruction. To meet the needs of districts implementing a reading collaborative, balanced approach or workshop model, Benchmark Advance enables all students to master rigorous learning goals with the support of strong differentiated instruction and responsive teaching based on ongoing assessments. Benchmark Advance Library at a Glance The Benchmark Advance program resources are available in multiple formats, including print, digital, and blended packages. The Benchmark Advance Library includes all of the digital products available for the program and appears as a button on the Dashboard. Page 31
33 Page 32
34 Benchmark Advance Library Legend Description 1. Library list Select a Benchmark Universe library. The Library list shows the name of the library you have selected to work with. You can use the Library list to go to another library. Note: The Benchmark Advance Library is the default. 2. Filters area Filter the book titles in your library by: Grade Unit Week Instructional Setting Component Type Note: Some of the libraries do not have all of the filters listed above. In addition, the filters act as a toggle key. You can click on a selected filter to clear it, if necessary. 3. Materials display area: Instructional Setting Category and Resources (Book Titles with Gear icon) View thumbnails with book type, title and customization information. User the Gear icon to: Launch open a book. More Info get more information about a book. Add to Assignment assign the book. Add to Bookshelf add the book to a bookshelf. Reviews review student book reviews. Page 33
35 The resources are grouped and categorized as follows: Unit at a Glance Whole Group Teachers Resources Whole Group Weekly Presentations Whole Group Texts and Resources Phonics/Word Study Tool Small Group Texts and Resources Assessment Intervention Designated ELD Home-School Program Support See About the Library for more information about the basic functionality of the Library. Page 34
36 About the English Language Development Library The English Language Development Library is based on the English Language Development (ELD) program. The designated English language Development components are provided for a protected instructional time. In Benchmark Advance, all ELD instruction focuses on language development standards in ways that build into and from content instruction. English learners do not read adapted texts. Instead they read shorter sections of the core complex text with enhanced visual support, and they unpack meaning as they deconstruct key sections to learn how English grammar and syntax work. All lessons serve as a preview or review of core instruction. Observation rubrics for the three modes of communication - collaborative, interpretive, and productive - serve as ongoing tools to help teachers monitor student progress and make instructional decisions. ELD Library at a Glance The English Language Development program resources are available in multiple formats, including print, digital, and blended packages. The English Language Development Library includes all of the digital products available for the program and appears as a button on the Dashboard. Page 35
37 Page 36
38 ELD Library Legend Description 1. Library list Select a Benchmark Universe library. The Library list shows the name of the library you have selected to work with. You can use the Library list to go to another library. Note: The ELD Library is the default. 2. Filters area Filter the book titles in your library by: Grade Unit Note: Some of the libraries have more filters in the Filters area. The filters listed above are specific to the ELD library. In addition, the filters act as a toggle key. You can click on a selected filter to clear it, if necessary. Page 37
39 3. Materials display area: Categories and Resources (Book Titles with Gear icon) View thumbnails with book type, title and customization information. User the Gear icon to: Launch open a book. More Info get more information about a book. Add to Assignment assign the book. Add to Bookshelf add the book to a bookshelf. Reviews review student book reviews. The resources are grouped and categorized as follows: Teacher Resources Student Books Assessment Note: The filters you select determine how your resources are grouped and categorize. All of the categories listed above may not appear on the Library page. See About the Library for more information about the basic functionality of the Library. Page 38
40 About the Benchmark Adelante Library The Benchmark Adelante Library is based on the Benchmark Adelante program. Benchmark Adelante is a comprehensive Spanish Language Arts/Spanish Language Development program from Benchmark Education Company. Benchmark Adelante is designed to address the goals, context and themes of SLA/Literacy and SLD instruction embodied in the English Language Arts/English Language Development Framework. It aligns seamlessly with the California Common Core ELA and California English Language Development Standards and addresses all of the augmentations and modifications outlined in the California Common Core en Español. Benchmark Adelante embodies the five themes of the California Framework through its rigorous, integrated reading, writing, speaking, and listening instruction. To meet the needs of districts implementing a reading collaborative, balanced approach, or workshop model for Spanish literacy instruction, Benchmark Adelante enables all students to master rigorous learning goals with the support of meaningful differentiated instruction and responsive teaching based on ongoing assessments. Benchmark Adelante is a parallel program to Benchmark Advance for English Language Arts/English Language Development, but it is not a direct translation. At every grade level, the program includes authentic, engaging literature by recognized, Spanish-speaking authors from all over the Spanish-speaking world. The program embraces the California ELA Framework's vision and commitment to bilingualism, biliteracy, and biculturalism, providing not only English language development resources for English learners but also Spanish language development resources for Spanish learners as well. Through contrastive analysis and explicit transfer lessons, students use their strengths in their first language to support their second language acquisition. Page 39

41 Benchmark Adelante Library at a Glance The Benchmark Adelante program resources are available in multiple formats, including print, digital, and blended packages. The Benchmark Adelante Library includes all of the digital products available for the program and appears as a button on the Dashboard. Page 40
42 Benchmark Adelante Library Legend Description 1. Library list Select a Benchmark Universe library. The Library list shows the name of the library you have selected to work with. You can use the Library list to go to another library. Note: The Benchmark Adelante Library is the default. 2. Filters area Filter the book titles in your library by: Grade Unit Week Instructional Setting Component Type Note: Some of the libraries do not have all of the filters listed above. The filters listed above are specific to the Benchmark Adelante library. The filters listed above are specific to the Assessments library. In addition, the filters act as a toggle key. You can click on a selected filter to clear it, if necessary. Page 41
43 3. Materials display area: Instructional Setting Category and Resources (Book Titles with Gear icon) View thumbnails with book type, title and customization information. User the Gear icon to: Open open a book. More Info get more information about a book. Add to Assignment assign the book. Add to Bookshelf add the book to a bookshelf. Reviews review student book reviews. Note: Book titles with the Customization label are ebooks with customizations. The resources are grouped and categorized as follows: Unit at a Glance Whole Group Teachers Resources Whole Group Weekly Presentations Whole Group Texts and Resources Phonics/Word Study Tool Small Group Texts and Resources Assessment Intervention Designated ELD Home-School Program Support See About the Library for more information about the basic functionality of the Library. Page 42
44 About the Assessments Library The Assessments Library is based on the Benchmark Advance, Benchmark Adelante, and English Language Development programs. The Assessment program consists of progress monitoring assessments that include performance tasks. Teachers can do the following with the Assessments program. Assess and prepare students for the new online test-taking environments. Help inform instruction with powerful reports. Monitor and reteach using data from reports to target your instruction. The Assessments library is an Assessments-only library. You cannot view or access other types of materials from the Assessments library. Page 43
45 Benefits of Progress Monitoring Assessments Progress Monitoring Assessments enable you to evaluate a student's progress weekly, at the end of a unit, and on an interim basis. In addition, performance tasks are included as an integral part of the assessment. Student achievement is captured and documented in the Assessments reporting tool to help you plan your instruction. See Reports for more information about the Assessments reporting tool. Assessments Library at a Glance The Benchmark Advance, Benchmark Adelante, and English Language Development program resources are available in multiple formats, including print, digital, and blended packages. The Assessments Library includes all of the digital assessment products available for these programs and appears as a button on the Dashboard. Page 44
46 Page 45
47 Assessments Library Legend Description 1. Library list Select a Benchmark Universe library. The Library list shows the name of the library you have selected to work with. You can use the Library list to go to another library. Note: The Assessments Library is the default. 2. Filters area Filter the assessments in your library by: Grade Unit Week Language Note: Some of the libraries have more filters in the Filters area. The filters listed above are specific to the Assessments library. In addition, the filters act as a toggle key. You can click on a selected filter to clear it, if necessary. Page 46
48 3. Materials display area: Assessment Category and Resources (Assessment Titles with Gear icon) View thumbnails with Assessment title and type. User the Gear icon to: Preview preview an assessment. Add to Assignment assign the assessment. Add to Bookshelf add the assessment to a bookshelf. The resources are grouped and categorized as follows: Weekly and Unit Assessments Interim Assessments and Performance Tasks Informal Assessments Foundational Skills Assessments Designated ELD Assessments Note: The filters you select determine how your resources are grouped and categorized. All of the categories listed above may not appear on the Library page. See About the Library for more information about the basic functionality of the Library. About Writing Exemplars The Writing Exemplars page has a variety of student writing samples for grades K through 6. Each writing sample includes annotations about the writing sample and an evaluation rubric that is aligned with the California Common Core State Standards. The writing exemplars are categorized by Narrative, Opinion/Argument, and Informational genre. Page 47

49 Writing Exemplars at a Glance Page 48
50 Writing Exemplars Library Legend Description 1. Filters area Filter the writing exemplars by: Grade Genre o o o Narrative type Opinion type Informational type Note: The filters act as toggle key. You can click on a selected filter to clear it, if necessary. 2. Search Search by writing exemplars title or keyword. 3. Filters bar and Start over View the filters you have applied to the Writing Exemplars page, delete filters, or clear all filters and start over. 4. Writing Exemplars area View Writing Exemplars PDF thumbnails with title and click to open. Page 49
51 Apply filters to the Library You can filter your library by using the specific filters available to you on each Library page. The Library pages appear blank until you select a filter. The Grade filter must be selected first before you select other filters or use the Search bar. Filter the Benchmark Advance Library 1. Click any, a combination, or all of the following filters. Grade Unit Week Instructional Setting 2. Click Component Type. The Component Type dialog appears with the filters you selected, if any. 3. Select any of the following Instructional Setting filters. Program Support Home-School Whole Group Small Group & Independent Reading Phonics/Word Study Tools Assessments Intervention English Language Development 4. Choose the Component type filters related to the Instructional Setting filter selected. 5. Click Submit. Page 50
52 Filter the Benchmark Adelante Library 1. Click any, a combination, or all of the following filters. Grade Unit Week Instructional Setting 2. Click Component Type. The Component Type dialog appears with the filters you selected, if any. 3. Select any of the following Instructional Setting filters. Material de apoyo para el programa Casa-Escuela Toda la clase Grupos pequeños y lectura independiente Fonética/Herramientas para el estudio de palabras Evaluación Intervención Desarrollo del idioma español 4. Choose the Component Type filters related to the Instructional Setting selected. 5. Click Submit. Page 51
53 Filter the English Language Development Library 1. Click any, a combination, or all of the following filters. Grade Unit Filer the Assessments Library 1. Click any, a combination, or all of the following filters. Grade Unit Week Language Filter the My Library page to get the specific book titles you need for your bookshelves. See Create a bookshelf for more information about creating bookshelves. Remove a filter and clear all filters You can remove a filter or multiple filters by using the Filter bar. You can also clear all filters and start over. 1. Find the filter you want to remove in the Filter bar below the Search bar. 2. Click X next to the filter name. 3. Continue the step above to remove additional filters, if necessary. Use Start Over to clear all filters from your library. Page 52
54 Search for specific book titles You can search for specific book titles by title or keyword. 1. Type a book title or keyword in the Search bar. 2. Press Enter or click the Magnifying glass icon. Create a bookshelf You can clear your search criteria by selecting the x icon in the Search bar and start a new search, if necessary. In addition, you can type Spanish book titles or keywords in the Benchmark Adelante Library Search bar to search for Spanish book titles. Bookshelves are a great way to organize books for specific learning activities. Creating bookshelves is easy to do on the Library page. You can create bookshelves by using the Add New Bookshelf button. 1. Click the Bookshelves tab, if necessary. This is the default and appears highlighted in yellow. 2. Click the Add New Bookshelf button. The Bookshelf name dialog appears. 3. Type the name of the bookshelf in the text box. 4. Click OK. The Bookshelf block appears below the Add New Bookshelf button. Bookshelf blocks are listed in alphabetical order. Drag a book title to the Add New Bookshelf button to create new bookshelves. Page 53
55 Add books to a bookshelf You can add books to a bookshelf by using the Gear icon. 1. Find the book you want to add to the bookshelf. 2. Click the Gear icon at the bottom-right of a book title. The Gear menu appears. 3. Click Add to Bookshelf. The Materials to Add and/or Select a bookshelf message and your bookshelves appear. 4. Scroll and find the bookshelf block and click to add the book. The number next to the bookshelf name shows the number of books added to the bookshelf. Drag a book title to add books to a current bookshelf. In addition, you can add the following resource types to a bookshelf. Assessment (E-Assess) Ebook HTML Image PDF Presentations (E-Present) TRS/SRM (Teacher's Resource System in English and Spanish) Video Page 54
56 Edit a bookshelf You can change a bookshelf name; delete book titles or bookshelves by clicking the bookshelf block. Edit a bookshelf name 1. Find a bookshelf and click to edit. The My Library > Bookshelf page appears. 2. Click and change the bookshelf name in the text box. Remove book titles from a bookshelf 1. Find a book title. 2. Click the Gear icon. The Gear menu appears. 3. Click Remove from Bookshelf. Delete a bookshelf 1. Find a bookshelf and click to edit. The My Library > Bookshelf page appears. 2. Ensure you have selected the correct bookshelf before deleting. 3. Click Delete below the bookshelf name. Deleted bookshelves cannot be restored. Page 55
57 Customize a book You can customize book titles with annotations and save multiple versions of a book as customizations. See About Ebooks for more information about customizing books. View customizations of a book You can view the customizations of a book by using the customized book title. 1. Find a customized book from your library or bookshelf. A customized book appears with the Present mode (blue) icon at the bottom-left of the book cover. Its title also appears in blue below the cover. 2. Click the customized title. The Customizations drop-down list box appears. 3. Click to choose a customization. The original book appears at the top of the Customizations list. Use the original book to create additional customizations, if necessary. Page 56
58 Add customized books to a bookshelf You can add customized books to a bookshelf from your library by using the Gear > Add to Bookshelf option. Note: These instructions only apply to customized books. 1. Find the customized book you want to add to the bookshelf. Customized books have a Present mode (blue) icon located at the bottom-left of a book cover. 2. Click the blue customized book title below the cover if you want to use another customized version of the book. The Customizations drop-down list box appears. 3. Choose the customization you want for the bookshelf. 4. Click the Gear icon at the bottom-right of a cover. The Gear menu appears. 5. Click Add to Bookshelf. The Materials to Add dialog and Bookshelf panel appear. The number of books added to the bookshelf block is updated. 6. Click the bookshelf block and ensure the customized book is added to the bookshelf. You can also drag your customized books to a bookshelf instead of using the Gear menu. You must choose the customized version of the book you want to add to the bookshelf before you drag. Page 57
59 Share customizations with all teachers You can share your favorite customizations with all teachers in your school by using the School Customization Library. Before you start You can only share customized books. You will receive the following message: Share customized books only if you attempt to add non-customized books or assessments to the School Customization Library. Shared customizations cannot be edited or removed by other teachers in the School Customization Library. Only you, as the original author of the customization, can remove a customization from the School Customization Library. Teachers cannot delete the School Customization Library. Teachers cannot edit the School Customization Library name. Share customizations 1. Select a customization from your library or bookshelf. Book titles with the Present mode (blue) icon are ebooks with customizations. 2. Drag the customization on to the School Customization Library. The School Customization Library background color changes to yellow and the Who would you like to notify dialog appears. 3. Select All Teachers or the teacher(s) you want to notify. 4. Click Notify. The number of customizations in the School Customization Library is updated. 5. Click the School Customization Library block and ensure the customization is added to the bookshelf. A notification with information about a shared customization is sent to the teachers selected. Page 58
60 View School Customization Library notifications You can view School Customization Library notifications and shared customizations by using the Messages button. 1. Click Messages on the Dashboard. The Message Center appears. 2. Click the customization notification message in the Subject area. The message appears with the shared customization link(s). 3. Select a shared customization link. The School Customization Library page appears. The shared customization has a yellow border. 4. Click the shared customization with the yellow border. The shared customization opens. Edit a shared customization There are two ways you can edit a shared customization. How you edit a shared customization is based on your role as either an author or recipient of a shared customization. Shared customizations cannot be edited in the School Customization Library. For teachers as authors editing the original customization These instructions only apply to editing customizations that have been shared and are available in the School Customization Library. 1. Select the original customization you shared from your library or bookshelf. Use the Customization list below the book cover if you have multiple customizations and ensure you have selected the original customization you want to edit. 2. Click the book cover to open the customization. The customization appears in Present mode. 3. Click the Edit mode (Hammer/Paintbrush) icon at the top of the ebook page. 4. Click the My Customizations arrow located at the left of an ebook page. The My Customizations panel appears. Page 59
61 5. Click the Pencil icon and edit the customization title. 6. Edit the customization as needed and save. 7. Go back to Benchmark Universe. 8. Drag the updated customization from your library or bookshelf on to the School Customization Library. See Remove a shared customization if you want to remove a shared customization that is outdated and no longer applicable. For teachers as recipients editing a shared customization 1. Go to the School Customization Library. 2. Find the shared customization you want to edit. 3. Click the Gear icon and select Add to Another Bookshelf. The Bookshelf panel appears. 4. Select one of your personal bookshelves. The bookshelf block number is updated. 5. Go to your personal bookshelf and find the shared customization you want to edit. 6. Click the book cover to open the customization. The customization appears in Present mode. 7. Click the Edit mode (Hammer/Paintbrush) icon at the top of the ebook page. 8. Click the My Customizations arrow located at the left of an ebook page. The My Customizations panel appears. 9. Click the Pencil icon and edit the shared customization title. 10. Edit the shared customization as needed and save. You can also drag shared customizations to your personal bookshelves instead of using the Gear menu. In addition, you can share your customization with other colleagues in your school by using the School Customization Library. Page 60
62 Remove a shared customization You, as the original author of a shared customization, can remove a customization from the School Customization Library by using the Gear icon. 1. Go to the School Customization Library. 2. Shift + Click to select the customization you want to remove. The customization appears with a yellow border. 3. Click the Gear icon at the bottom-right of the book cover. The Gear menu appears. 4. Click Remove from School Customization Library. The Remove from School Customization Library dialog appears. 5. Click Yes. Create an assignment You can quickly create assignments on the My Library page by using the Assignments tab. 1. Find a book from your library or bookshelf. 2. Click the Assignments tab. The Assignments tab is highlighted in yellow. 3. Type an Assignment name in the New Assignment Name box. 4. Drag a book(s) to the Materials Assigned box. The Materials Assigned box appears with a yellow background. Click X to delete the book from the assignment, if necessary. 5. Determine whether you want audio on or off for the assignment. 6. Click Audio Available, if necessary. A red (x) appears that shows audio is off. The Audio Available setting is a toggle key that is used to set audio on or off. This setting can only be used for ebooks and eposters. 7. Type your instructions in the Instructions box. Page 61
63 8. Click Select students. The Select class drop-down list appears. 9. Choose a class. The Groups and Students area appears. 10. Choose a group(s) and students. Use the Up/Down arrows to sort the groups and students in ascending or descending order. 11. Click Select all or Deselect all to select or clear all groups or students from the assignment, if necessary. 12. Preview the group(s) and student selections to ensure you have selected the correct group(s) and students for the assignment. Move your mouse over the group or student name and click X to delete the group(s) or students from the assignment, if necessary. 13. Click Done. 14. Type or select a start date in the Start Date box. 15. Type or select an end date in the End Date box. 16. Click Save. The Successfully saved message appears. Assignments with a future start date are not seen by Benchmark Universe student users until the start date becomes the current date. Page 62
64 Assign assessments You can assign assessments to students by using the Library Assignments panel. 1. Select a library on the Dashboard or from the Library list of a library you have selected to work with. 2. Select a Grade filter; for example, Go to Instructional Setting and select Assessment for all libraries except for the Assessments library. 4. Select other filters as needed to narrow your results. 5. Click the Assignments tab. The Assignments tab is highlighted in yellow. 6. Type an Assignment name in the New Assignment Name box. 7. Drag an assessment(s) to the Materials Assigned box. The Materials Assigned box appears with a yellow background. You can drag an assessment or use the Gear > Add to Assignment option when assigning assessments. Click X to delete the assessment from the assignment, if necessary. 7. Type your instructions in the Instructions box. 8. Click Select students. The Select class drop-down list appears. 9. Choose a class. The Groups and Students area appears. 10. Choose a group(s) and students. Use the Up/Down arrows to sort the groups and students in ascending or descending order. 11. Click Select all or Deselect all to select or clear all groups or students from the assignment, if necessary. 12. Preview the group(s) and student selections to ensure you have selected the correct group(s) and students for the assignment. Page 63
65 Move your mouse over the group or student name and click X to delete the group(s) or students from the assignment, if necessary. 13. Click Done. 14. Type or select a start date in the Start Date box. 15. Type or select an end date in the End Date box. 16. Click Save. The Successfully saved message appears. Assign customized books You can assign customized books from your library or bookshelf by using the Gear > Add to Assignment option. These instructions only apply to customized books. 1. Find the customized book you want to add to an assignment from your library or bookshelf. Customized books have a Present mode (blue) icon located at the bottom-left of a book cover. 2. Click the blue customized book title below the cover if you want to use another customized version of the book. The Customizations drop-down list box appears. 3. Click the down arrow and choose the customization you want for the assignment. 4. Click the Gear icon at the bottom-right of the cover. The Gear menu appears. 5. Click Add to Assignment. The customization appears in the Materials Assigned box. 6. Choose an assignment from the Existing assignments drop-down list or create a new assignment by typing a name for your assignment in the Name box. 7. Determine whether you want audio on or off for the assignment. 8. Click Audio Available, if necessary. A red (x) appears that shows audio is off. Page 64
66 The Audio Available setting is a toggle key that is used to set audio on or off. This setting can only be used for ebooks and eposters. In addition, you can only use the Audio Available setting when creating new assignments. Use the Assignments page to change the Audio Available setting and/or dates on existing assignments. 9. Click Select Students. The Select class drop-down list appears. 10. Select a class, group, and/or students. The group and/or student information selected is highlighted in yellow. Use the Up/Down arrows to sort the groups and students in ascending or descending order. 11. Click Select all or Deselect all to select or clear all groups or students from the assignment, if necessary. 12. Preview the group(s) and student selections to ensure you have selected the correct group(s) and students for the assignment. Move your mouse over the group or student name and click X to delete the group(s) or students from the assignment, if necessary. 13. Click Done. 14. Type or select a start date in the Start Date box. 15. Type or select an end date in the End Date box. 16. Click Save. The Successfully saved message appears. You can also drag your customized books to an assignment instead of using the Gear menu. You must choose the customized version of the book you want to add to the assignment before you drag. Page 65

67 View student book reviews You can view student book reviews from the Library page or bookshelf. 1. Find a book from your library or bookshelf. 2. Click the Gear icon at the bottom-right of a book title. The Gear menu appears. 3. Click Reviews. The Book Reviews dialog appears. 4. Find and review a student s book review. About Component Types Component types are a series of resources in multiple formats available to you by instructional setting. You can use the Component Type filter on the Benchmark Advance and Benchmark Adelante libraries to access these resources. Component Types at a Glance Page 66
68 Components Type Legend Description 1. Component Type Filter bar View and clear filters or start over. 2. Instructional Settings panel Use the Instructional Setting panel to select one of the following options: Program Support Home-School Whole Group Small Group Phonics/Word Study Tools Assessment Intervention Designated ELD Note: Your selection appears with a white background and blue font color. 3. Component Types area Choose a component type. Note: Your selection is highlighted in yellow. 4. Submit Submit and filter your resources on the library you have chosen to work with. Page 67
 is a comprehensive and program-specific collection of resources designed to support education professionals with literacy")
69 See the following components in action for more information. About the Teacher's Resource System The Teacher's Resource System (TRS) is a comprehensive and program-specific collection of resources designed to support education professionals with literacy teaching strategies for different grade levels and instructional settings. It incorporates the 5 Themes of Literacy Instruction which include: Content Knowledge - A focused, careful mapping of knowledge strands, fueling a deeper understanding of content Meaning Making - The instructional heartbeat of the program Foundational Skills - Explicit and systematic instruction that lays the groundwork for literacy achievement Language Development - Integrated, designated, and embedded throughout the program Effective Expression - Tools and instructional resources to create strong communicators The resources are available in different formats; for example, Ebook, HTML, PDF, and Video. You can easily and quickly get to the TRS resources by using the Benchmark Advance, English Language Development, Benchmark Adelante, and Assessments libraries. Page 68

70 The TRS is comprised of a 5-volume eguide set broken down by grade, unit, week, and lesson and includes the appropriate digital tools to support your instructional setting. Note: Not all of the instructional settings have a TRS. A TRS is referred to as a component type of the Whole Group instructional setting. Component type is used to describe the digital resources available per instructional setting. It is also a filter that you will use on the different libraries. Other instructional settings may have Teacher's Guide component types instead of a TRS. For example, the Small Group instructional setting has a Teacher's Guide component type. The Teacher's Novel Guide is another component type designed for Grades 3-6 novel reading instruction. See Component Types for more information. Page 69


71 Teacher's Resource System at a Glance Page 70
72 Teacher s Resource System Legend 1. Grade, Unit, and Week panel icon Description Show/hide the Grade, Unit, and Week multi-layered panel and select your filters. 2. TRS Breadcrumb trail View the filters you have selected and where you are in the TRS. 3. Previous/Next page navigation Go to the previous/next page in the TRS. 4. Video window and controls Click the arrow to watch the video associated with the TRS. Use the controls below the video window to: Start/pause the video. Slide the vertical bar left or right to go to a specific location in the video. Select the Audio icon or use the mouse to drag the gray shading left or right to change the volume. Select the Full Screen icon to watch the video in a full screen or toggle back to the original size. 5. Grade, Unit, Week panel Use the Grade, Unit, Week panel to filter and navigate to specific TRS sections. Page 71
73 About the Teacher's Novel Guide The Teacher's Novel Guide is a component type designed for novel reading instruction and learning for Grades 3-6. The Teacher's Novel Guide contains the following resources. Guide at a Glance (Teacher's Novel Guide) Novel Plot Summary Student Guide You can use the Benchmark Advance or Benchmark Adelante (Spanish) libraries and/or the Component Type filter to access and view the Teacher's Novel Guide. The Student Guide contains activities that can be viewed online and printed using a PDF reader. It also has its own navigation that is different from the Teacher's Resource System and Teacher's Guide. Page 72

74 Teacher's Novel Guide at a Glance Page 73
75 Page 74
76 Teacher s Novel Guide Legend Description 1. TNG Navigation banner Use the TNG Navigation banner to: Identify the program; for example, Benchmark Advance. Go to the Guide at a Glance section. Go to the Novel Plot Summary section. Go to the Student Guide. 2. Guide at a Glance section and Printer icon View the Guide at a Glance information and use the Printer icon to print the Guide at a Glance. 3. Novel Plot Summary section and Printer icon View the Novel Plot Summary and use the Printer icon to print the Plot Summary. 4. Student Guide Preview the different pages of the Student Guide as you move the mouse over each page. Use the Printer icon to open the PDF reader and view and print the Student Guide. Note: You can print different pages of the Student Guide by clicking the Print link next to each page. Page 75

77 Student Guide PDF Reader in Action Use the PDF Reader tools to view, print the Student Guide and more. Student Guide PDF Reader Legend Description 1. TNG Navigation banner Use the TNG Navigation banner to: Leave the PDF reader and go back to the Guide at a Glance section. Leave the PDF reader and go back to the Novel Plot Summary section. Leave the PDF reader and go back to the Student Guide. Page 76
78 2. Thumbnail icon View page thumbnails. Note: Show Document Outline and Attachments functionality is not available and the icons appear dimmed. 3. Sidebar Show/hide the Sidebar. 4. Search, Previous/Next page arrows, and Page Navigation box Search for specific content, go to the previous or next page, or type a specific page number. 5. Zoom controls Zoom in/out or select a Page Zoom setting from the drop-down list. 6. Open, Print, Download, and Bookmark icons Open, print, download, and bookmark PDF. 7. Additional tools arrow Use the Additional tools arrow to: Go to the first page or last page. Rotate page clockwise or counter clockwise. Enable/disable the Hand tool to scroll throughout PDF. View Document Properties. Note: Some of these tools may be restricted and not available for use. Page 77

79 About Ebooks Ebooks are more than just read-aloud resources used in the classroom. You can add pages, notes, shapes, text, bookmarks and links to enhance your lessons. In addition, multiple versions of an ebook can be customized and saved for specific learning activities. Ebook at a Glance Present Mode Page 78
80 Ebook in Present Mode Legend 1. Done button and Present/Edit Mode status indicator 2. Present/Edit Mode toggle keys and Audio Speed slider Description Go back to your library when you are done. View whether you are in Present or Edit mode. Switch between Present and Edit modes. View and decrease or increase the audio speed by using the Minus (-) or Plus (+) icons. Note: The default setting for the audio speed is 100% when you open an ebook. 3. Audio Speed slider, Auto On/Off, Play/Pause, Stop, and Annotations On/Off icons View and decrease or increase the audio speed by using the blue circle, Minus (-) or Plus (+) icons. Note: The default setting for the audio speed is 100% when you open an ebook. Play audio and turn pages automatically. Play, pause, or stop the audio. Enable and show annotations on an ebook during a presentation. Note: Annotations added to an ebook during a presentation are not saved. Annotations can only be saved in Edit mode. 4. Print and Save (inactive) Print pages or page notes. Note: The Save icon is dim (grey) and inactive. You must be in Edit mode to save changes to the ebook. 5. Teacher Resources View and select designated teacher resource(s) based on the subscriptions related to the ebook. Note: You will not see this icon if the ebook does not have any designated teacher resources. 6. Add Close Reading Notes icon and My Customizations Panel arrow Add Close Reading notes to the left and/or right of a page. View, search, and add new customizations. Page 79

81 7. Wrench icon Show the editing tools used to annotate an ebook. 8. Edit Tools: Mouse Pointer, Pen, Highlight, Shape, Shade, Text, Note, Bookmark, Link, and Zoom Select and show specific Tool options. Note: See the Ebook in Edit Mode Legend table for more information about using the Edit tools during a presentation. 9. Up or Down arrow Show or hide page thumbnails and use to go to specific pages. Ebook at a Glance Edit Mode Page 80
82 There are three preliminary icons that you will see when you open an ebook. Show the editing tools to annotate and customize your ebook. Show notes as links that you can use to go to a specific note on a page. Show bookmarks as links that you can use to go to a specific bookmarked page. Ebook in Edit Mode Legend 1. Done button and Edit/Present Mode status indicator 2. Edit/Present Mode toggle keys and Save needed message 3. Audio Speed slider, Auto On/Off, Play/Pause, Stop, and Annotations On/Off icons Description Go back to your library when you are done. View whether you are in Edit or Present mode. Switch between Edit and Present modes. Save changes made to the ebook. View and decrease or increase the audio speed by using the blue circle, Minus (-) or Plus (+) icons. Note: The default setting for the audio speed is 100% when you open an ebook. Play audio and turn pages automatically for the reader. Play, pause, or stop the audio. Enable and show annotations on an ebook. 4. Print and Save icons Print pages or page notes. Save a customized version of an ebook. 5. Teacher Resources View a designated resource related to the ebook; for example, Teacher's Guide. Page 81
83 6. Add Close Reading Notes iconand My Customizations Panel arrow 7. Wrench icon and Edit Tools: Mouse Pointer, Pen, Highlight, Shape, Shade, Text, Note, Bookmark, Link, and Zoom View, search, and add new customizations. Add Close Reading notes to the left and/or right of a page. Show or hide the Edit tools. Select and show specific Edit Tools. Write or draw with the Pen. Highlight text or draw with the Highlighter. Draw shapes with Shapes. Hide text or areas of an ebook with Shade. Add text to any page with Text. Add a bookmark to any page with Bookmark. Add a note to any page with Note. Add a link to any page with Link. Change the Zoom level or select a Zoom area on a page. Note: In Edit mode, you can only select and identify a Zoom area. Zoom areas can only be seen in Present mode. 8. Up or Down arrow Show or hide page thumbnails and use to go to specific pages. Page 82
84 9. Previous Page(s) arrow, Plus (+), Delete (X), Pencil icons and Next Page(s) arrow Go to previous pages. Use the +, x, and pencil icons to: Add new pages to an ebook. Delete pages. Rename a page. Go to next pages. Page 83
85 Before you start The following message appears when you open an ebook from your library or bookshelf. Create a customized version? You can create customized versions of an ebook for specific learning activities. The message provides you with the opportunity to do one of the following tasks by selecting either Yes or No. Yes: Name the customized version and open the ebook in Edit mode. The customization is saved with your name, current date, and time if you do not give it a name. We recommend that you name your customizations. No: Present or read the ebook. Switch between Edit and Present modes Ebooks have two modes that you can use for editing and presentation purposes. Both Edit and Present modes have similar functionality. There are some tools available in Edit mode that you will not be able to use in Present mode. The mode you are using appears at the top-left of the ebook. An ebook from your bookshelf or an assignment opens in Edit mode. An ebook from your library opens in Present mode. Click the Presentation or Edit mode toggle key. Tools not available in Present mode appear dim. Use Auto, Play, Stop, and Annotations settings You can use the Auto, Play, Stop, and Annotations settings to set the audio to automatically play and turn the pages of an ebook; play, pause, or stop the audio. You can also click on any word on a page to resume if you paused or stopped the audio. In addition, you can annotate the ebook with text, shapes, and more by selecting the appropriate icon. Page 84
86 Annotations must be set to On in order to view any current annotations and use the Edit tools. The Edit tools are not available and appear dim if Annotations is set to Off. Manually turn ebook pages You can manually turn the pages of an ebook when Auto is set to Off by moving the mouse over to the bottom-left or right corners of a page. The page corner turns up ready for you to click and turn the page. You can also swipe to turn the pages of an ebook if you are using a mobile device like a tablet. Print an ebook There are two ways to print an ebook. You can print the pages or notes. Page or Notes Print mode 1. Click the Print icon. The Print page appears with the Page and Notes Print options at the bottom of the page. 2. Select Page or Notes Print mode. The Page Print mode is the default. 3. Click Print. Click Back to go to the ebook. Page 85
87 Print an entire ebook There are various ebooks that can be printed as a PDF. This may include both teacher and student materials. Look for the Print ebook PDF option at the bottom of the ebook page. 1. Open the ebook. 2. Click the Print icon. The Print page appears with the Print ebook PDF option. 3. Click the Print ebook PDF option. The PDF appears. 4. Click the Print icon in the PDF. You will see this Print option in the following material for teachers. Benchmark Advance Weekly Presentation If you do not see the Print ebook PDF option at the bottom of the ebook page then the ebook is not available as a PDF and cannot be printed as a whole book. Adjust audio speed Teachers can adjust an ebook's audio speed to improve a student's reading comprehension. Students can improve their listening skills and overall level of comprehension by reducing an ebook's audio speed. The audio speed default is at 100% when an ebook is opened. You and your students can use the Audio Speed slider at the top of an ebook page to decrease or increase the audio speed. To decrease the audio speed 1. Open an ebook from a library or bookshelf. 2. Click to set Auto on, if necessary. 3. Slide the blue circle to the left on the Audio Speed slider or click the Minus (-) icon to the desired audio speed. 4. Click the Play button (right arrow) to listen to the audio. To increase the audio speed 1. Slide the blue circle to the right on the Audio Speed slider or click the Plus (+) icon to the desired audio speed. 2. Click the Play button (right arrow) to listen to the audio. Page 86
88 The audio speed can be set to a minimum of 80%, mid-point at 90%, and a maximum of 100%. You must stop or pause the audio if it is playing in order to change the speed. See About Ebooks for more information. Save a customized ebook You can save an ebook that you have customized with annotations in Edit mode only by clicking the Save icon. The Save icon has two states. Icon State Description Active (blue) You have made changes to the customization where a save is needed. Inactive (grey) You have not made changes to the customization where a save is required. Page 87
89 Add ebook annotations You can add annotations like text, notes, drawings, shapes, and links to an ebook to enhance your students learning experience. Click the right arrow to expand the topic and learn more about the Editing tools below. Edit mode Eraser 1. Click the Eraser icon. A pen appears with an Eraser tip. 2. Move the Eraser over the annotation or element you want to delete. 3. Press and drag to delete. Pen 1. Click the Wrench icon. The Edit tools appear at the right of the page. 2. Click Pen. The Pen tools appear. The mouse pointer changes to show which Edit tool you have selected. For example, the mouse pointer shows a pen when you select the Pen tool. 3. Choose any or all of the following Pen options. Pen Style - The default is highlighted in blue. Pen Color The default is black. 4. Drag the pen to write or draw on the page. The text or drawing and Trash Can appear. 5. Select the annotation and click the Trash Can to delete, if necessary. Square boxes referred to as handles appear when the annotation is selected. Click the mouse pointer icon at the top-right of the page to select the annotation if the handles do not appear. The annotation must be selected and the Trash Can must be visible in order to delete. Use the arrow at the bottom of the Pen tool set to go back to the Edit tools and select a different tool. This arrow appears at the bottom of any tool set you have selected to work with. Page 88
90 Highlight 1. Click Highlight. The Highlight tools appear. 2. Choose any or all of the following Highlight options. Highlight Style - The default is highlighted in blue. Highlight Color The default is yellow. Opacity The default is 50%. 3. Drag the highlighter to highlight text and areas on the page. The highlight and Trash Can appear. 4. Select the annotation and click the Trash Can to delete, if necessary. Shape 1. Click Shape. The Shape tools appear. 2. Choose any or all of the following Shape options. Shape Type The default is square. Shape Style - The default is highlighted in blue. Shape Border Color The default is black. Shape Fill Color The default is white. Shape Opacity The default is 50%. 3. Drag the mouse pointer to create a shape. The shape and Trash Can appears. 4. Select the annotation and click the Trash Can to delete, if necessary. Page 89
91 Shade 1. Click Shade. The Shade tools appear. 2. Choose any or all of the following Shade options. Shade Color The default is white. Shade Opacity The default is 100%. 3. Drag the mouse pointer to shade (hide) text or areas on a page. A shade block and Trash Can appear. 4. Select the shade block and click the Trash Can to delete, if necessary. You will not be able to view text or areas on a page that have been shaded in Present mode. Edit mode is used to identify text and areas in an ebook that you want to shade. Text 1. Click Text. The Text tools appear. 2. Choose any or all of the following Text options. Text Font The default is Arial. Text Size The default is 14 px (pixels). Text Color The default is red. Text Block Background Color The default is white. Text Block Background Opacity The default is 50%. Text Bold Text Italics Text Underline Text Left-Alignment Text Center-Alignment Text Right-Alignment Page 90
92 3. Drag the mouse pointer to create a text block on the page. A text block and Trash Can appear. 4. Type your text in the text block. 5. Select the annotation and click the Trash Can to delete, if necessary. Sticky Note 1. Click Note. The Note tools appear. 2. Select a Notes style (color). 3. Use the A+ or A- buttons to increase or decrease the font size. 4. Drag the mouse pointer to create a note block on the page. The note block and Trash Can appear. 5. Type a note. 6. Select the annotation and click the Trash Can to delete, if necessary. Your sticky notes are saved to the Notes panel. Click the Notes panel icon to view and go to your specific notes on a page. Bookmark There are two Bookmark icons that you will use to create and view bookmarks. You must be in Edit mode to create bookmarks. The Bookmark icon on the Wrench > Edit tools palette is used to create bookmarks. It looks like a ribbon. The other Bookmark icon (not inside the Edit tools palette) below the Page icon is used to view bookmarks. The View Bookmark icon can be used in Edit and Present modes. 1. Select the page(s) you want to bookmark. 2. Select the Wrench. The Edit tools palette appears. 3. Click Bookmark. The Create Bookmark dialog appears. 4. Type a bookmark title in the Title box. 5. Click Create. A bookmark (ribbon) appears at the top-left of the page. 6. Select the bookmark. A border around the bookmark and Trash Can appear. 7. Click the Trash Can to delete, if necessary. 8. Click the Wrench icon to close the Edit tools palette, if necessary. Page 91
93 Your bookmarks are saved to the Bookmark panel. Click the View Bookmark panel icon below the Page icon to view and go to your bookmarked pages. Link 1. Click Link. The Hyperlink dialog appears. 2. Type a hyperlink title in the Title box. 3. Type or copy/paste a website address in the Url box. 4. Click Create. A link icon appears on the page. You can only create links in Edit mode. You must be in Present mode to view the website or other type of link. Zoom 1. Click Zoom. The Zoom tools appear. 2. Select one of the following Zoom options. Zoom Area Drag the mouse pointer to create a Zoom area on a page. A Zoom area icon and Trash Can appear. Use the Trash Can to delete the Zoom area, if necessary. You can only view Zoom areas in Present mode. Zoom Page In (+): Increase the page size. Zoom Page 100%: Restore the page size to 100%, the default. Zoom Page Out (-): Decrease the page size. Page 92
94 Present mode Most of the Edit tools and instructions to annotate an ebook are also available and applicable in Present mode. The Shade, Bookmark, and Link tools are not available in Present mode; therefore, the instructions do not apply. Zoom area, sticky notes, and links have icons that appear in Edit/Present mode. Move the mouse pointer over the icon and click in Present mode to zoom, view sticky notes, and open links to websites. View, search, and add customizations You can view, search, and add new customizations by using the My Customizations arrow and panel. View customizations 1. Click the My Customizations arrow located at the left of an ebook page. The My Customizations panel appears. 2. Click the customization name you want to view. The My Customizations arrow acts as a toggle key. You can use it to slide the panel out (right arrow) or in (left arrow). Search customizations Type a keyword(s) in the Search for Customization box. The search results appear. Add new customization 1. Click the + New Customization button located at the bottom of the My Customizations panel. 2. Type a customization name in the box. Page 93
95 A default customization name that contains the date, time, and your name is automatically used if you do not type a name in the box. You can only create a customization from the original ebook. You cannot use a customization to create another customization. Edit customization name 1. Select the Pencil icon next to the customization name you want to edit. The customization name appears with a white background. 2. Type the new customization name in the area with the white background. Archive a customization You can archive any customization you have created by using the Thumbs-down icon on the Customizations panel. 1. Find and open the ebook with customizations from My Library or your bookshelf. 2. Click the My Customizations arrow located at the left of an ebook page. The My Customizations panel appears. 3. Find the customization you want to archive. 4. Click the Thumbs-down icon. The customization is removed from the My Customizations panel and archived. 5. Click the Archived tab. The customization appears in the Archived panel. Use the Thumbs-up icon to restore the customization, if necessary. View, navigate, rename or delete ebook page thumbnails You can view or hide the pages of an ebook as thumbnails by using the Up or Down arrow at the bottom-center of a page. Thumbnails are used for quick and easy navigation to a page. You can also use the thumbnails to rename or delete pages. Page 94
96 Navigate to a page Click the page thumbnail to go to a specific page. You can use the left or right arrows located in the Thumbnail view to navigate and view a series of previous or next pages in an ebook by clicking the arrows. Rename a page 1. Click the Pencil icon at the bottom-right of the page thumbnail. The Enter new page name dialog appears. 2. Type a name in the text box. 3. Click OK. The name appears at the bottom of the thumbnail. Delete a page 1. Click the X icon at the top-right of the page thumbnail. The Delete page dialog appears. 2. Ensure you are viewing the correct page before deleting. 3. Click OK. Deleted pages from an ebook cannot be restored. Add new thumbnail pages You can add new or YouTube video pages to an ebook for instructional and learning purposes. Blank Page 1. Determine where you want the new page to appear. 2. Click the Plus (+) icon in the Thumbnail view. The Create new page dialog appears. 3. Type a name in the Blank Page name box. 4. Click OK. The page appears at the location you specified. 5. Use the Edit tools to add annotations to the page and save. Page 95
97 Video page 1. Determine where you want the video page to appear. 2. Click the Plus (+) icon in the Thumbnail view. The Create new page dialog appears. 3. Select the Video Page tab. 4. Type a name in the Video Page name box. 5. Type or paste the video page address in the URL box. 6. Click OK. The page appears at the location you specified. Add posters We support the following video sharing platforms. YouTube Vimeo SchoolTube TeacherTube You can add posters and create a customization of all posters designated for a week's instruction by using the Add Page Plus (+) icon. In addition, you can add blank pages for notes and YouTube pages for videos. All posters, notes, and videos can be combined into one customization that you can easily access to enhance your student's learning experience. 1. Go to My Library and find a poster. 2. Open the poster. The Create a customization? message appears. 3. Click Yes. The Create a customization? message does not appear when you open a customized poster. You must be in Edit mode to add posters. You cannot add posters in Present mode. 4. Customize the poster, if necessary. 5. Click the Plus (+) icon in the Thumbnail view. The Create New Page dialog appears. 6. Click the Poster Page tab. Page 96
98 7. Type a name in the Page name box. 8. Select a poster from the Poster Page Thumbnail view. The poster appears in the Thumbnail view. 9. Click Done. You can add blank, YouTube, and poster pages to a poster. You can only add blank and YouTube pages to an ebook. The poster appears with a page 1 title if you do not name the poster. You can use the Pencil icon after it appears in the Thumbnail view to change the name. Move or copy thumbnail pages You can move or copy thumbnail pages by dragging the pages to a new location in the Thumbnail view. 1. Find and open an ebook. 2. Click the down arrow at the bottom-center of an ebook page. The Thumbnail view appears. 3. Find the thumbnail page you want to move or copy. 4. Drag the thumbnail page to a new location. The Move or copy page? message appears. 5. Click Move or Copy (Clone). 6. Click the thumbnail page to open and annotate, if necessary. 7. Click Save. Page 97
99 Add Close Reading notes You can add Close Reading notes to the left and right of an ebook page by using the Close Reading Notes icon. 1. Click the Close Reading Notes icon on the left or right of a page. The Close Reading Notes notepad appears. 2. Click and type your notes in the notepad. 3. Use the A+ or A- buttons in the Tools panel to increase or decrease the notes font size. 3. Click Close Reading Notes when you have completed your notes. Go back to Benchmark Universe You can go back to your library anytime or when you have completed your ebook customization or presentation by clicking the Done button next to Edit/Present mode at the top-left of the page. Save your ebook customization before you go back to your library. Page 98

100 About eplanner Before you start eplanner and the Teacher's Resource System are only available on a teacher s dashboard if the teacher has a subscription to these tools. eplanner is a powerful and flexible planning tool that is integrated with Benchmark Literacy programs. Begin the school year with a default plan that contains all of the instructional units from a Benchmark Literacy program. With eplanner you can create, manage, customize, print, and share your plans. eplanner at a Glance Page 99
101 eplanner Legend 1. My Plans, Delete Plans, and Create New Plan Description Shows your current plans and is used to select other plans. Use to delete a plan. 2. Plan Title and Pencil icon View and edit the plan title. Create a new plan by specifying a grade level, class, and start date or copy from an existing plan. 3. Standards Report and Print Customize the Standards Report that shows literacy standards covered and frequency of standards covered. Print and share a lesson or week view of your plan in a PDF format. 4. Manage, Expand All, and Collapse All Manage small group rotations, the Lesson Bin, add custom days/non-teaching day(s). Expand and show all lesson details. Collapse and hide all lesson details. 5. Week of Navigate to different weeks in your plan. 6. Unit/Week and Title Information Shows the current unit, week, and title. 7. Week Day and Time Information Shows the week day and total time allotted to lessons. The current day is highlighted in red. 8. Lesson Block Shows lesson details and time allotted to each lesson. Lessons are color-coded to show the following types. Green Whole Class Yellow Small Group Purple Individual Blue - Custom Page 100
102 9. Add Lesson Add a lesson; specify lesson details, duration, and standards. Create a plan There are two ways to create a plan in eplanner. You can use the Create Plan button on the Select your plan dialog or the Create New Plan link at the top-left of the page. 1. Click the Create Plan button or the Create New Plan link. The Create plan dialog appears. 2. Select a program/grade level. A 5-day lesson plan appears. You can only select the Benchmark Literacy programs that your district/school has subscribed to. 3. Name the plan. 4. Select a class. 5. Type or select a start date. 6. Configure your plan and select any or all of the following time frames for each day of the week. Read-Aloud Reading/Writing Mini-Lessons Small Group Reading Instruction Designated ELD Intervention 7. Click Groups and drag the group(s) to specific days on your plan. Use the Manage Students tool to create groups if no groups appear. See Configure small groups for more information about creating new groups. 8. Click X to remove the group from a day on your plan, if necessary. 9. Click Save. Page 101
103 Create a plan with review and routines You can create a plan with review and routines. In addition, you can add notes, materials, and lessons related to your review and routines. 1. Click the Create Plan button or the Create New Plan link. The Create plan dialog appears. 2. Select a Benchmark Literacy program/grade level. A 5-day lesson plan appears. You can only select the Benchmark Literacy programs that your district/school has subscribed to. 3. Name the plan. 4. Select a class. 5. Specify the number of routine days you want to include in your plan (up to a maximum of 20). 6. Type or select a start date. 7. Configure your plan by changing the default time frames for any of the following options (optional). Read-Aloud Reading/Writing Mini-Lessons Phonics Mini-Lessons Small Group Reading Instruction Designated ELD Intervention 8. Click to expand and view your group rotations, if any. 9. Drag the group(s) to specific days on your plan. Use the Manage Students tool to create groups if no groups appear. See Configure small groups for more information about creating new groups. Page 102
104 10. Click X to remove the group from a day on your plan, if necessary. 11. Click Save. See Add Routines for more information. Add routines You can add routines to your plan by using the Review and Routines button. Routines can only be added to plans that have routine days included in the plan. See Create a plan with review and routines for more information. 1. Create a plan with routine days, if necessary. The plan appears with review and routines days. 2. Click the Review and Routines button. The Review and Routines button expands. 3. Click Add Routines. The Add Routines dialog appears. 4. Select the routines to add. 5. Click Save. The routines appear in the Review and Routines block. 6. Click Add Materials. See Add Materials for more information. 7. Click Add Note, if necessary. The Lesson: Review and Routines dialog appears. 8. Type your note in the box. 9. Click Save. The note appears in the Review and Routines block. 10. Click Add Lesson, if necessary. See Add a lesson for more information. Page 103
105 11. Continue until all routines are added to the number of routine days specified in the plan. You can remove a routine by using the Remove Routine link. Edit plan name You can edit a plan's name by using the Pencil icon. 1. Select a plan. The plan opens. 2. Click the Pencil icon next to the plan name. The Plan Name box appears. 3. Edit the plan name. 4. Click Save. Expand and collapse lesson details You can view the details of an individual lesson or all lessons. You can also collapse or hide all lesson details. Expand and Collapse a lesson s details 1. Go to a specific day on your plan. 2. Click any lesson. The lesson block expands and shows the details. 3. Click the lesson again to collapse or hide the details. Expand and Collapse all lesson details 1. Click Expand All to view all lesson details. 2. Click Collapse All to collapse or hide all lesson details, if necessary. Change duration You can change the duration of your lesson blocks by using the Change duration option. Each lesson block has a default duration time. It can be changed to 10, 20, 30 minutes or up to one hour. In addition, the duration can be changed for the current or future lesson blocks. 1. Open your plan and select a week. 2. Find the day of the week to change the duration. Page 104
106 3. Find the lesson block and click to expand. 4. Click Change duration. The Duration dialog appears. 5. Select a duration on the Set lesson duration drop-down list. 6. Select one of the following options. Update only (title of lesson) block - updates the duration for the current lesson block. Update (title of lesson) blocks - updates the duration for multiple lesson blocks of the same type. o o o o Update multiple lesson blocks on Day # for current week (use if you have multiple lesson blocks of the same type; for example, Read-Aloud on the same day.) Update all days for current week Update Day # for current and future weeks Update all days for current and future weeks 7. Click Save. Move a lesson You can move a lesson in the same day, to a different weekday, or week. In the same day or different weekday 1. Find the lesson you want to move. 2. Drag the lesson to a new location in the same day or to a different weekday. When you move a lesson to a different weekday the original instructional day appears on the lesson block, for example, D1. This helps you keep track of lessons you have moved in your plan. To a different week 1. Click Manage with the Gear icon. The Manage drop-down list appears. 2. Select Lesson Bin. The Lesson Bin appears. 3. Find the lesson you want to move. Page 105
107 4. Drag the lesson to the Drag Lessons Here box. 5. Repeat the step above if you have multiple lessons that you want to move. 6. Use the Calendar icon or arrows to navigate to a different week. 7. Drag the lesson from the Lesson Bin to the appropriate weekday. 8. Repeat the step above until you have moved all lessons from the Lesson Bin. When you move a lesson to a different week the original instructional unit, week, and day appears on the lesson block, for example, U-1, W-1, D-1. This helps you keep track of lessons you have moved in your plan. Add a lesson note You can add notes to the lessons in your plan. 1. Click any lesson. The lesson block is expanded and shows the Add Note link. 2. Click Add Note. The Lesson/Add note dialog appears. 3. Type a note in the Add note box. 4. Click Save. A Note icon and the note you added appears in the expanded lesson block. Use the View/Edit Note link to view and edit the note, if necessary. The Lesson/Edit note dialog has a Delete note link for deleting notes that are no longer applicable. Configure small groups You can create new groups and determine when your small group lessons will take place. 1. Click Manage with the Gear icon. The Manage drop-down list appears. 2. Select Small groups. The Configure Small Groups dialog appears with the groups listed, if any. 3. Drag the group(s) you created to specific days on your plan. 4. Click Save and apply. Page 106
108 Use the New group button to create new groups for your small group configurations. Add materials You can easily add materials to the lessons in your plan. Simply, filter the book titles by name, grade, letter/number level, or comprehension strategy and then choose the books that meet the requirements of your lessons. 1. Click any lesson. The lesson block is expanded and shows the Add Materials link. 2. Click Add Materials. The Add Materials dialog appears. 3. Use any of the following filters. Type a book title in the Filter by name bar and click the Magnifying glass icon. Select a level (Letter or Number), Comprehension Strategy, or Grade from the left drop-down list. Select additional filters from the right drop-down list, if necessary. The books meeting your criteria are listed. Books are shown a grade above, below or at the Grade level filter you selected. 4. Use the right or left arrows to display previous or next series of books. 5. Choose the book(s) you want to add to your lesson. 6. Click Save. Use the Book info link to view information or launch book(s). Page 107
109 Open a book You can open (launch) books in eplanner for presentation and/or customization purposes by using the Add Materials link or a lesson block. Add Materials link 1. Click Add Materials. The Add Materials dialog appears. 2. Find the book you want to open. 3. Click Book info next to the book title. The Book info dialog appears. 4. Click Launch. The book appears in Present mode. 5. Conduct your presentation or click the Edit Mode icon and customize the presentation. Lesson block 1. Find the lesson block that contains the book(s) you want to open. 2. Click the lesson block to expand. 3. Click the book title. The Book info (Launch) dialog appears. 4. Click Launch. The book appears in Present mode. 5. Conduct your presentation or click the Edit Mode icon and customize the presentation. Customizations of a book appear in the My Customizations panel located in the reader and in the Customizations list below the book cover on the Library page. See About EBooks for more information. A book opens in its original format. Use the Customizations panel to view and open customized books. Page 108
110 Copy and move a book You can copy and move a book to other lessons in your plan. Copy a book 1. Find the book you want to copy. 2. Drag the book to another lesson in your plan. The Copy/Move dialog appears. 3. Click Copy. The book appears in 2 lessons, the original and other lesson selected. Move a book 1. Find the book you want to move. 2. Drag the book to another lesson in your plan. The Copy/Move dialog appears. 3. Click Move. The book only appears in the other lesson selected. Copy a plan You can copy a plan by using the Create New Plan > Copy From Existing option. 1. Select the plan you want to copy. The plan opens. 2. Click Create New Plan. 3. Click Copy From Existing. The Copy Plan dialog appears. The plan you selected appears in the Select plan to copy drop-down list. You can use the Select plan to copy drop-down list to select another plan, if necessary. 4. Click Next. The Copy Plan dialog appears. 5. Select one, a combination, or all of the following elements. Select All Custom Lessons Attached Resources Custom Instructional Days Notes Page 109
111 6. Click Next. 7. Type a plan name in the Name your plan box. 8. Choose a class. 9. Choose a start date. 10. Configure the plan by dragging your groups to specific days in the week, if necessary. 11. Click Save. Add a lesson You can add your own personal lessons like field trips or other types of instructional activities to your plan. 1. Select a week and weekday. 2. Click Add Lesson. The Add Lesson My Lessons dialog appears. 3. Type the name of your lesson in the Name box. 4. Type the details of your lesson in the Lesson box. You can also add or remove links in the Lesson box by selecting the Link icons in the toolbar. 5. Select a duration from the Duration drop-down list. 6. Click Add standard. The Standards dialog appears. 7. Click the standards you want listed at the left of the Standards dialog. The selected standards appear at the right of the dialog. 8. Click the selected standards at the right of the Standards dialog to clear any standards you do not want applied to the lesson. 9. Click Save. Page 110
112 Edit a lesson You can edit a lesson by using the Edit Lesson link. 1. Find the lesson you want to edit. 2. Click the lesson block to expand. 3. Edit any of the following lesson details. Name Use the Name box to change the lesson title. Plan Use the Plan box to change the plan details. Duration Use the Duration drop-down list to choose a duration. Standards Use the x icon to remove a standard and/or add standards. 4. Click Save. Remove a lesson You can remove a lesson by using the Remove Lesson link. 1. Find the lesson you want to remove. 2. Click the lesson block to expand. 3. Click Remove Lesson. You can remove a book from a lesson by using the x icon next to the book title. Page 111
113 Add custom day You can add custom days to your plan by using the Manage > Add Custom Day option. 1. Select a plan. The plan opens. 2. Select a week on the Week of drop-down list or use the arrows, if necessary. 3. Select Add Custom Day on the Manage drop-down list. The Insert Day(s) dialog appears. The current date and Custom Instructional Day are default settings. 4. Select a day. 5. Click OK. The day is highlighted in the plan and appears with a Add Lesson and Remove Day links. 6. Click Add Lesson. The Add Lesson My Lessons dialog appears. 7. Type a lesson title in the Name box. 8. Type lesson details in the Plan box. 9. Select a duration. 10. Add a standard. 11. Click Save. 12. Add more lessons to your custom day, if necessary. You can use the Remove Day link to remove the custom day, if necessary. Page 112
114 Add non-teaching day You can add non-teaching days to your plan by using the Manage > Add Custom Day option. 1. Select a plan. The plan opens. 2. Select a week on the Week of drop-down list or use the arrows, if necessary. 3. Select Add Custom Day on the Manage drop-down list. The Insert Day(s) dialog appears. The current date and Custom Instructional Day are default settings. 3. Select Non-Teaching Day. 4. Select a day(s) on the calendar. The number of days selected appears below the calendar with an option to reset, if necessary. 5. Type a description in the Add Day Description box. 6. Click OK. The day(s) is highlighted in the plan and appears with a Remove Day link. You can use the Remove Day link to remove the non-teaching day(s), if necessary. The lessons for the non-teaching days are moved to the next available teaching days in your plan. Page 113
115 Print a plan You can print and share a lesson or week view of your plan in a PDF format. Lesson (Detailed) View 1. Click the Print icon at the top-right of the page. The Print dialog appears. 2. Select Lesson View, if necessary. Lesson View is the default. 3. Type or select a start date. 4. Type or select an end date. 5. Determine whether you want to show the standards and your notes in the PDF. To show this information is the default. 6. Use the Display Standards or Display Notes check boxes to select or clear this information from appearing in the PDF. 7. Click Print. Week at a Glance (High-Level) View 1. Click the Print icon at the top-right of the page. The Print dialog appears. 2. Select Week at a Glance. 3. Select the week(s) you want to include in the PDF. 4. Click Print. You can also save the PDF to your computer and share with others by . Page 114
116 Print notes You can print and share a lesson view of your notes in a PDF format. Lesson View 1. Click the Print icon at the top-right of the page. The Print dialog appears. 2. Select Lesson View, if necessary. Lesson View is the default. 3. Type or select a start date. 4. Type or select an end date. 5. Determine whether you want to show the standards and notes or just the notes in the PDF. 6. Select one of the following options. Display Notes - shows standards and notes Display Notes Only - shows notes only 7. Click Print. You can also save the PDF to your computer and share with others by . Delete a plan You can delete a plan by using the Delete Plans link. 1. Go to Delete Plans at the top-left of the eplanner page. 2. Click Delete plans. The Delete plans dialog appears. 3. Find and select the plan you want to delete. The plan is highlighted in red. 4. Click Delete selected. The Confirm deletion dialog appears. 5. Click Yes, delete. Ensure you have selected the appropriate plan before you delete. You cannot undo. Page 115
117 Customize the Standards Report eplanner provides you with a Standards Report that you can customize to show the literacy standards covered or frequency of standards covered in your lessons. Standards Covered 1. Click the Standards Report icon at the top-right of the page. 2. Select Show Standards Covered, if necessary. This is the default. 3. Type or select a date range. 4. Click Show Report to preview the report. 5. Select a Standards strand, for example, Speaking and Listening (optional). Click Select standards. The Standards dialog appears. Choose the individual standards you want to show in the report and click Save. Click Show Report to refresh the data and preview the report anytime you make changes to the report s criteria. 6. Select one of the following See results by options. Day shows the standards covered by day. List shows the standards covered in a list by date range. Frequency of Standards Covered 1. Click the Standards Report icon at the top-right of the page. 2. Select Show Frequency of Standards Covered. 3. Type or select a date range. 4. Click Show Report to preview the report. 5. Select a Standards strand, for example, Reading Literature (optional). Click Select standards. The Standards dialog appears. Choose the individual standards you want to show in the report and click Save. Page 116
118 Click Show Report to refresh the data and preview the report anytime you make changes to the report s criteria. 6. Select one, a combination or all of the following See results by options. Unit shows the frequency of standards covered by unit. Week shows the frequency of standards covered by week. Day shows the frequency of standards covered. Use the Print option from your browser to print the Standards report, if necessary. Access the Teacher's Resource System eplanner provides you with easy access to the Teacher's Resource System. The Mini-Lessons block contains the lessons that you can use to open your Teacher s Guide instructional materials for the specific day and lesson you have selected. No more searching for the resources you need to conduct your lessons. All you need for a day s instruction is available to you online and in real time! 1. Go to the appropriate week and day in your plan that contains the Mini-Lessons block you want to use. 2. Click to expand the Mini-Lessons block. The Mini-Lessons titles appear. 3. Click Launch TRS. The Teacher s Guide appears based on the grade, unit, week, and day selected in your plan. 4. Click the instructional materials links you need for your lesson. The instructional materials appear as you teach your lesson. Page 117
119 Access the Read-Aloud Handbook eplanner provides you with easy access to the Read-Aloud Handbook. The Read-Aloud lesson block contains the Launch Read-Aloud link that you can use to open your Read-Aloud Handbook for the specific day you have selected. All you need for a day s instruction is available to you online! 1. Go to the appropriate week and day in your plan that contains the Read Aloud block you want to use. 2. Click to expand the Read-Aloud block. The Read-Aloud options appear. 3. Click Launch Read-Aloud. The Read-Aloud Handbook appears based on the grade, unit, week, and day selected in your plan. 4. Click the instructional materials links you need for your lesson. The instructional materials appear as you teach your lesson. About Assignments Assignments are created, edited, and your students progress is tracked by using the Assignments page. The Assignments page has two views. The first view shows an Assignments list that you can use to view past due and other types of assignment categories. The second view enables you to create and edit assignments as well as track students assignment progress. Both views have similar functionality and can be used to add and edit assignments. You can also create and do quick assignments on the Library page(s). Page 118
120 Assignments List at a Glance Page 119
121 Assignments List Legend Description 1. Drafts, Current, Closed, and My Templates Filter by current, closed, or draft assignments. Create assignments using My Templates. Note: My Templates contain assignments from expired district terms. 2. Sort by: Due Date, Class, Alphabetical Sort assignments by due date, class or assignment name in ascending or descending order. 3. Search by Keyword and Clear Search Criteria icon Search assignments by keyword and use the x icon to clear the search criteria. 4. Add New Assignment Go to the New Assignments page and add new assignments. 5. Assignment Category View assignments categorized as: Past Due Due Today Due Tomorrow No Due Date Due in the Future Page 120
122 6. Assignment Block View assignment name, due date, class, group and materials assigned 7. Assignment Name, Due Date, Class, Group, and Materials Assigned links Use to edit assignment name, due date, class, group, and materials assigned. 8. Show/Hide toggle button and Close Assignment (X) icon Show or hide student assignments. Close an assignment. New Assignments at a Glance Page 121
123 New Assignments Legend Description 1. Assignment Name box Name a new assignment. 2. Delete All Students, Notes, and Customize Materials icons Use the following icons to: x icon to delete all students from an assignment. Notes icon to view Close Reading and Sticky notes. Customize Materials icon to customize materials for all students or individual students. 3. Back to Assignments arrow Go back to the Assignments List page. 4. Student Assignment List with x icon View student assignment information like the student s name, start/due dates and status. Delete student(s) from an assignment. 5. Add Materials/Back to Students List Toggle Key Open My Library, select materials or go back to the Students Assignment List. 6. Assignments Panel Assign materials, set audio on or off, provide instructions, select students, choose start/due dates and save. Note: Audio Available is for ebooks and eposters only. 7. Save button Save the assignment. Page 122
124 Edit Assignments at a Glance Edit Assignments Legend Description 1. Assignment Name box Edit the assignment name. 2. Close and Delete Assignment Close or delete an assignment. 3. Delete Students, Notes, Customize Materials, and Last/First Name Sort icons Use the following icons to: x icon to delete all students or student(s) from an assignment. Notes icon to view Close Reading and Sticky notes. Customize Materials icon to customize materials for all students or individual students. Up/Down arrows to sort by last or first name. Page 123
125 4. Student Assignment List Status View student name, start/due dates, and the following assignment statuses: Not Started In Progress Completed Closed Note: Use the student's last and first name to view the student's assignment details. 5. Back to Assignments arrow Go back to the Assignments List page. 6. Add Materials/Back to Students List Toggle Key Open My Library, select materials or go back to the Students Assignment List. 7. Assignments Panel Assign materials, set audio on or off, provide instructions, select students, choose start/due dates and save. Note: Audio Available is for ebooks and eposters only. 8. Save button Save the assignment. Page 124
126 Create assignments using the Welcome to Assignments dialog A Welcome to Assignments dialog appears when you do not have any assignments and are creating assignments for the first time. You can review Assignments or use the Create New Assignment button to start creating assignments. The following steps only apply to teachers who do not have any student assignments. 1. Click Assignments on the Dashboard. The Welcome to Assignments dialog appears. 2. Click Assignments or Create New Assignment. The Create New Assignment page appears if you selected Create New Assignment. 3. Type an assignment name in the My New Assignment box. 4. Click Add Materials. The Library page appears. 5. Select a filter(s) or search by title or keyword. 6. Drag your materials to the Materials Assigned > Drag and drop resources here box. The Assignments panel changes to yellow and the materials you selected appear in the Materials Assigned box below the Back to Students List button. 7. Use the X icon to delete materials selected, if necessary. 8. Continue steps 6 and 7 until all materials for the assignment are added. 9. Determine whether you want audio on or off for the assignment. 10. Click Audio Available, if necessary. A red (x) appears that shows audio is off. The Audio Available setting is a toggle key that is used to set audio on or off. This setting can only be used for ebooks and eposters. 11. Type instructions in the Instructions box. 12. Click Select students. The Select class drop-down list appears. 13. Choose a class. The Groups and Students area appears. 14. Choose a group(s) and students. Page 125
127 Use the Up/Down arrows to sort the groups and students in ascending or descending order. 15. Click Select all or Deselect all to select or clear all groups or students from the assignment, if necessary. 16. Preview the group(s) and student selections to ensure you have selected the correct group(s) and students for the assignment. Group(s) and/or students selected are highlighted in yellow. Move the mouse over the Group or Student selection and click X next to group or student name to delete the group(s) or students from the assignment, if necessary. 17. Click Done. 18. Type or select a start date in the Start Date box. 19. Type or select an end date in the End Date box. 20. Click Save. The Successfully saved message appears. The Assignment list is updated and shows all relevant student information with a Not Started status. You can only assign materials from your library when using the Assignments page. You cannot assign materials from bookshelves. Page 126
128 Add new assignments using the Assignments List page You can add new assignments on the Assignments List page by using the Add New Assignment button. 1. Click Assignments on the Dashboard. The Assignments List page appears. 2. Click Add New Assignment. The New Assignment page appears. 3. Type an assignment name in the My New Assignment box. 4. Click Add Materials. The Library page appears. 5. Select a filter(s) or search by title or keyword. 6. Drag and drop your materials to the Materials Assigned > Drag and drop resources here box. The Assignments panel changes to yellow and the materials you selected appear in the Materials Assigned box below the Back to Students List button. 7. Use the X icon to delete materials selected, if necessary. 8. Continue steps 6 and 7 until all materials for the assignment are added. 9. Determine whether you want audio on or off for the assignment. 10. Click Audio Available, if necessary. A red (x) appears that shows audio is off. The Audio Available setting is a toggle key that is used to set audio on or off. This setting can only be used for ebooks and eposters. 11. Type instructions in the Instructions box. 12. Click Select students. The Select class drop-down list appears. 13. Choose a class. The Groups and Students area appears. 14. Choose a group(s) and students. Use the Up/Down arrows to sort the groups and students in ascending or descending order. 15. Click Select all or Deselect all to select or clear all groups or students from the assignment, if necessary. Page 127
129 16. Preview the group(s) and student selections to ensure you have selected the correct group(s) and students for the assignment. Group(s) and/or students selected are highlighted in yellow. Move the mouse over the Group or Student selection and click X next to group or student name to delete the group(s) or students from the assignment, if necessary. 17. Click Done. 18. Type or select a start date in the Start Date box. 19. Type or select an end date in the End Date box. 20. Click Save. The Successfully saved message appears. The Assignment list is updated and shows all relevant student information with a Not Started status. You can only add the following resource types to an assignment. Assessment (E-Assess) Ebook Presentation (E-Present) Video Note: A message appears if you attempt to add a resource not included in this list. Page 128
130 Add draft assignments using the Assignments List page You can add draft assignments in advance and specify date or other parameters when you are ready. You must at least specify an assignment name and assign materials to a draft assignment. 1. Click Assignments on the Dashboard. The Assignments List page appears. 2. Click Add New Assignment. The New Assignment page appears. 3. Type an assignment name in the My New Assignment box (required). Use the assignment name to identify draft assignments; for example, Ms. Ramos Independent Reading Assignment (Draft). You can use this naming convention to find your draft assignments on the Assignments List. You can edit the assignment name when you specify the dates. 4. Click Add Materials. The Library page appears. 5. Select a filter(s) or search by title or keyword. 6. Drag and drop your materials to the Materials Assigned > Drag and drop resources here box (required). The Assignments panel changes to yellow and the materials you selected appear in the Materials Assigned box below the Back to Students List button. 7. Use the X icon to delete materials selected, if necessary. 8. Continue steps 6 and 7 until all materials for the assignment are added. 9. Determine whether you want audio on or off for the assignment. 10. Click Audio Available, if necessary. A red (x) appears that shows audio is off. The Audio Available setting is a toggle key that is used to set audio on or off. This setting can only be used for ebooks and eposters. 11. Type instructions in the Instructions box. 12. Click Select students. The Select class drop-down list appears (optional). 13. Choose a class. The Groups and Students area appears. 14. Choose a group(s) and students. Page 129
131 Use the Up/Down arrows to sort the groups and students in ascending or descending order. 15. Click Select all or Deselect all to select or clear all groups or students from the assignment, if necessary. 16. Preview the group(s) and student selections to ensure you have selected the correct group(s) and students for the assignment. Group(s) and/or students selected are highlighted in yellow. Move the mouse over the Group or Student selection and click X next to group or student name to delete the group(s) or students from the assignment, if necessary. 17. Click Done. 18. Do not select an end date in the End Date box. 19. Click Save. The Successfully saved message appears. The Assignment list is updated and shows all relevant student information without a start date or due date. Draft assignments without dates or with a start date and no end date are categorized as No Due Date assignments. Page 130
132 Create assignments using My Templates You can create new assignments based on templates that contain assignments from expired district terms. Your assignments from district terms that have expired are automatically saved "behind the scenes" and made available to you as templates. All ebook customizations with annotations, close reading/sticky notes and assessments can be reused to create new assignments for the current district term when you select a template. The My Templates > District Term (button) labels are created by your Technical or District Administrator and may appear in an abbreviated format; for example, FY. The templates only contain assignment name and materials assigned information. All you have to do is select groups/students, provide instructions, specify new start/end dates, and save. See instructions below. 1. Click Assignments on the Dashboard. The Assignments List page appears. 2. Go to the My Templates area and select a district term. The My Templates page appears. 3. Find and click to select a template for your new assignment. The Edit Assignments page appears. 4. Edit the assignment name, if necessary. 5. Click Add Materials to add more materials to the assignment, if necessary. 6. View materials assigned in the Materials Assigned box and edit, if necessary. 7. Determine whether you want audio on or off for the assignment. 8. Type new or edit instructions in the Instructions box, if necessary. 9. Click Select Students and choose groups and/or students for the assignment. 10. Click Done. 11. Type or select a start date in the Start Date box. 12. Type or select an end date in the End Date box. 13. Click Save. The Successfully saved message appears. The Student Assignment list is updated and shows all relevant student information with a Not Started status. Page 131
133 Select the Back arrow to go back to the Assignments List page. All assignments including assignments created by templates appear in the list. You can also select the My Templates > District Term button that is highlighted (yellow) to go back to the Assignments list page if you decide not to create a template-based assignment. The My Templates > District Term button acts as a toggle key and enables you to move between the Assignments List and the My Templates List pages. See Add new assignments for more information. Filter, sort, or search assignments Filter the Assignments List You can filter the Assignments List by using the Drafts, Not Started, In Progress filters. Click one of the following filters. Drafts assignments with no start and/or due dates Current assignments that have started based on the start date Closed assignments that have been completed by students or closed by a teacher Sort the Assignments List You can sort the Assignments List by using the Sort by: Due Date, Class, or Alphabetical options. Click one of the following Sort by options. Due Date Class Alphabetical (Sort assignment name alphabetically in ascending or descending order) Page 132
134 Search Assignments You can use the Search assignments box to search for assignments by keyword and clear your search criteria. Search by keyword Type a keyword in the Search assignments box and press Enter. Clear search criteria Click the x icon to clear your search criteria in the Search assignments box and start a new search, if necessary. Edit assignments using the Edit Assignments page You can edit assignments and track your students progress by using the Edit Assignments page. 1. Click Assignments on the Dashboard. The Assignments List page appears. 2. Find the assignment you want to edit. 3. Click the Assignment Name, Due Date, or Class box. The Edit Assignments page appears. You can use any of the access points listed in Step 3 to get to the Edit Assignments page. Edit the Assignment name 1. Click the Assignment Name box. The grey border changes to blue. 2. Edit the Assignment name and click on a blank area of the page. 3. Click Save. Add materials 1. Click Add Materials. The Library page appears. 2. Find the materials you want to assign in your library. 3. Drag and drop materials to the Materials Assigned box. 4. Click Save. Page 133
135 Use the x icon to delete materials from the assignment, if necessary. Set audio on or off Click Audio Available to set audio on or off. Use the Assignments page to change the Audio Available setting and/or dates on existing assignments. Edit instructions 1. Click the Instructions box. 2. Edit your instructions. 3. Click Save. Select new or remove groups or students 1. Click Select students. The Select class drop-down list appears. 2. Choose a class. The Groups and Students area appears. 3. Choose a group(s) and students. Use the Up/Down arrows to sort the groups and students in ascending or descending order. 4. Click Select all or Deselect all to select or clear all groups or students from the assignment, if necessary. 5. Preview the group(s) and student selections to ensure you have selected the correct group(s) and students for the assignment. Group(s) and/or students selected are highlighted in yellow. Page 134
136 Move the mouse over the Group or Student selection and click X next to group or student name to delete the group(s) or students from the assignment, if necessary. 6. Click Done. Edit the Start date or Due date for all students 1. Click the Start Date or Due Date box in the Assignments panel. The calendar appears. 2. Select a Start date or Due date from the calendar. The Update the Start and Due date for all your students? message appears. 3. Click Yes. The Successfully saved message appears. The Start date or Due Date changes are not saved if you select No. Edit the Start date or Due date for a student(s) 1. Find the student(s) in the Students list. 2. Click the Start Date or Due Date in the student s row. The calendar appears. 3. Select a Start date or Due date from the calendar. The Start date or Due date is updated in the Students list. The Assignments and Library > Assignments pages are integrated with one another. Both pages will show your current changes. The assignment tracking functionality on the Assignments page is not available on the Library page(s). Use the Assignments page to change the audio and/or start/due dates. Audio and date changes cannot be done on the Library > Assignments panel when editing assignments. Page 135
137 Show or Hide student assignments You can show or hide student assignments by using the Show/Hide toggle button. Use the Show/Hide toggle button whenever you need your students to work on assignments during class time and not at home. By default, students can see all assignments you have created. Hide student assignments Click Hide. Show student assignments Click Show. Close an assignment You can close an assignment by using the Close Assignment (X) icon on the Assignments List page or the Close Assignment button on the Edit Assignments page. Close Assignment on the Assignments List page 1. Find and ensure you have selected the appropriate assignment before you close it. 2. Click the Close Assignment (X) icon. The Close assignment? message appears. 3. Click Yes. The assignment is closed and the Close Assignment (X) icon color changes to grey in the Assignments List. Close Assignment on the Edit Assignments page 1. Find and ensure you have selected the appropriate assignment before you close it. 2. Click the Close Assignment button. The Close assignment? message appears. 3. Click Yes. The assignment is closed and the Status icon color changes to grey in the Students List. Closed assignments do not appear on a student s Assignment page. You can open a closed assignment, if necessary. See Open a closed assignment for more information. You cannot close individual student assignments. Page 136
138 Delete an assignment You can delete an assignment by using the Delete Assignment button on the Edit Assignments page. 1. Find and ensure you have selected the appropriate assignment before you delete it. You cannot undo the Delete action. 2. Click the Delete Assignment button. The Delete this assignment? message appears. 3. Click Yes. The assignment is deleted and removed from the Assignments List page. Deleted assignments are removed from a student s Assignment page regardless of the student s previous assignment status. Delete all students from an assignment You can delete all students from an assignment by using the x icon in the Students List row header. 1. Click the x icon that appears in the Students List table header. The Delete all students? message appears. 2. Click Yes. All students are deleted from the assignment. You cannot undo the Delete All Students action. Page 137
139 Delete a student(s) from an assignment You can delete a student(s) from an assignment by using the x icon that appears next to the student s name. 1. Click the x icon that appears in the student s row. The Delete this student? message appears. 2. Click Yes. The student is deleted from the assignment. You cannot undo the Delete Student action. View all notes You can view all of your students Close Reading and Sticky notes by using the Notes icon in the Students List table header. In addition, you can easily go to yours or students notes by using the Page button in the Notes panel. 1. Click the Notes icon that appears in the Students List table header. The Assignment Notes dialog appears with notes for all students and all books. 2. Select any, a combination or all of the following filters, if necessary. All Students: Click the arrow and choose a student. All Books: Click the arrow and choose a book. All Pages: Click the arrow and choose a page. Close Reading Notes and/or Sticky Notes: Click one or both check boxes. 3. Scroll to view the notes that appear in the Notes panel. Page 138
140 View notes by student The following messages may appear in the Notes panel to let you know why and what type of data is missing. The data is unavailable. Please close and try again. The assignment does not have any books. The assignment does not have any students. The assignment does not have any notes. Sorry, no results found for you selection. A teacher s notes, if any, are combined with the student s notes and shown in the Notes panel. You can use the Notes icon that appears in the student s row to view Close Reading and Sticky notes by student. 1. Click the Notes icon that appears in the student s row. The Assignment Notes dialog appears with notes for the student selected and all books assigned. 2. Select any, a combination, or all of the following filters, if necessary. All Students: Click the arrow and choose a student. All Books: Click the arrow and choose a book. All Pages: Click the arrow and choose a page. Close Reading Notes and/or Sticky Notes: Click one or both check boxes. 3. Scroll to view the notes that appear in the Notes panel. Page 139

141 View notes using the Page button You can use the Page button on the Notes panel to access yours or students notes and edit in the ebook. 1. Click the Notes icon that appears in the Students List table header or in the student's row. 2. Select a filter. 3. Scroll to view the notes that appear in the Notes panel. 4. Click on the Page button; for example, Cover. The ebook opens the page. 5. View and/or edit the note, if necessary. The ebook opens in Present mode. You must select the Edit mode icon to edit the note. Page 140
142 Print notes You can print notes by using the Print button on the Assignment Notes dialog. 1. Go to the Edit Assignments page. 2. Click the Notes icon in the header or at the student row level. 3. Select any, a combination, or all of the following filters. All Students or a student All Books or a book All Pages or a page Close Reading Notes and/or Sticky Notes 4. Click Print. Customize materials for all students You can customize materials for all students by selecting the Customize All Materials (Open Book) icon on the Students List. The Customize All Materials icon is located in the Students List header. 1. Go to the Edit Assignments page. 2. Click the Customize All Materials icon in the Students List header. The Assignment > Customize Materials dialog appears. 3. Click the Open Book icon to view and edit books with or without customizations. 4. Customize or edit the customization and save. 5. Click the x icon and close the Assignment > Customize Materials dialog. Page 141
143 You can also view your students progress as a class by using the Assignment > Customize Materials dialog. The following scenarios are shown in the Status column. All students have not started the assignment. All or some students are in progress with the assignment. All students have completed the assignment. The assignment is closed for all students. Materials like assessments that do not have an Open Book icon cannot be opened or viewed from the Materials Assigned list. Assessment information can be viewed and analyzed by using the Reports icon on the Dashboard. See Reports for more information. Customize materials for a student You can customize materials for a student by selecting the Customize Student Materials (Open book) icon on the Students List row. 1. Go to the Edit Assignments page. 2. Find the student in the Students List. 3. Click the Customize Student Materials icon in the Students List row. The Assignment > Customize Materials dialog appears. 4. Click the Open Book icon to view and edit books with or without customizations. 5. Customize or edit the customization and save. 6. Click the x icon and close the Assignment > Customize Materials dialog. Page 142
144 Edit a student s assignment status You can edit a student s assignment status by using the Status icon on the Students List or Materials Assigned List. Students List 1. Go to the Edit Assignments page. 2. Find the student in the Students List. 3. Go to the Status column for the student. 4. Click the Status icon. The Status menu appears. 5. Select one of the following Status options. Not Started In Progress Completed The status is updated and appears in the Students List Status column. Materials Assigned List 1. Go to the Edit Assignments page. 2. Find the student in the Students List. 3. Click the student s Customize Materials icon. The Student s Assignment > Customize Materials > Materials list dialog appears. 4. Go to the Materials Assigned List. 5. Click the Status icon. The Status menu appears. 6. Select one of the following Status options. Not Started In Progress Completed The status is updated and appears in the Materials Assigned List Status column. Page 143
145 View assignments like a student Students can view their assignments by using Assignments on the Dashboard. An assignment table shows the status, assignment name, due date, and teacher name. The student can choose any of these items in the assignment table to view additional assignment details, complete and mark the assignment done. See Experience an assessment like a student for more information. Open a closed assignment You can open a closed assignment for a class or group when the need arises. Open a closed assignment for a class or group 1. Click Assignments on the Dashboard. The Assignments page appears. 2. Click the Closed button. The Closed Assignment page appears. 3. Search assignments, if necessary. 4. Select the Closed assignment you want to reopen. The Closed Assignment details page appears. All students have a Closed (grey) status shown in the Status column. 5. Click Open Assignment. The Open assignment? message appears. The assignment is opened and categorized on the Assignments List page based on the assignment s due date. For example, if the Open assignment has a past due date then the assignment is shown on the Past Due section of the Assignments List page. Page 144
146 The student s assignment status changes from Closed to Not Started, In Progress, or Completed. See example below. Teacher A opens a closed assignment for a class of six students. The students had the following assignment status. Student 1 Not Started Student 2 Not Started Student 3 In Progress Student 4 In Progress Student 5 Completed Student 6 Completed The same student assignment statuses are reflected in the open assignment. You can also use the check mark to quickly open multiple assignments on the Closed Assignment page. Page 145

147 About Manage Students Manage Students is used to create whole and small groups in order to target assignments to students with precision. You can view your student population by class or group. In addition, you can search for students, select all, and drag drop student names to add new groups from a class or other groups. Editing groups, deleting groups or students from a group is easy with the Pencil and Delete Group or Student icons. Contact your technical administrator if you do not see any classes when you open the Manage Students page. Classes must be set up by your technical administrator before you can create groups. Manage Students at a Glance Page 146
148 Manage Students Legend Description 1. My Students panel: Class View classes and select to view students in a class. 2. My Students panel: Group View groups and select to view students in a group. Note: You can select multiple classes and groups to view students. 3. My Students panel: Search Student Name box and Clear Search (x) icon Use to search by student name and clear search criteria. 4. My Students panel: Students List, Select All/Deselect All Toggle and Information icon Use the My Students panel to: Shows students in a class, group, or based on search criteria. Select all students to add a new group. Deselect all students. View student details like student name, user name, grade, and classes and groups the student belongs to. 5. My Groups panel: All Classes List Select a class to add new groups. 6. My Groups panel: Add New Group Use to add new groups. Page 147
149 7. My Groups panel: Groups List, Group Blocks, Show Students icon, Pencil icon, Delete Group and Delete Student icons Use the My Groups panel to: View groups, class, and student information. Edit the group name by using the Pencil icon. Delete the group. Delete a student(s) from a group. Select a class or group You can select a class or group to view student information by clicking on a class or group name on the My Students panel. Multiple classes and groups can be selected as well. The Students List shows all students that belong to the classes and/or groups you have selected. 1. Click the Manage Students icon on the Dashboard. The Manage Students page appears. 2. Click a class(es) or group(s) on the My Students panel. Click a selected class or group to cancel the selection, if necessary. Selected classes and/or groups are highlighted in a light purple color. View students in a class or group A Students List is shown when a class(es) or group(s) is selected on the My Students and Groups panels. The total number of students listed appears at the top-left of the list on the My Students panel. The number changes as classes or groups are selected. Page 148
150 Search by student name You can search for students in a class or group by using the Search Student Name box. 1. Go to the Manage Students page. 2. Select a class(es) or group(s) on the My Students panel. 3. Type a name in the Search Student Name box. 4. Click the Search (Magnifying glass) icon. The results are shown on the Students list. You can clear your search criteria by selecting the x icon in the Search bar and start a new search, if necessary. View student details You can view student details like student name, username, grade, and the classes and groups the student belongs to by using the Information (i) icon next to the student name on the Students list. The Information icon when selected shows the Student Details dialog. Click the Information (i) icon next to the student s name on the Students or Group block list. Print class roster You can print a class roster from the Manage Students page by using the Printer icon in the Students list. The class roster shows the student s first name, last name, and user name. The class roster is based on the classes, groups you have selected and the Search results displayed in the Students panel. For example, the class roster will show a single student s information if only one student is shown in the Students list. 1. Go to the Manage Students page. 2. Select a class and/or group. 3. Search for students, if necessary. 4. Review results in the Students list. Page 149
151 5. Click the Printer icon. The class roster appears. 6. Click Print. 7. Specify your Print parameters. 8. Click Print. Add a new group You can add a new group by using the Add New Group button. There are two ways to add new groups. You can use the My Students or My Groups panel. My Students panel 1. Go to the Manage Students page. 2. Select a class on the My Students panel. 3. Search and/or select students on the Students list or Select All. Students selected appear with a yellow background. 4. Select a class on the My Groups panel to confirm your class selection. The Add New Group button is active and shows the Add (+) icon. A message appears that reminds you to select a class from the All Classes list if no class on the My Groups panel is selected. 5. Drag and drop student names over the Add New Group button. A group block appears with the Group name box enabled. 6. Type a name in the Group name box and press Enter. The group appears below the Group label on the My Students panel. A default group name that contains the teacher s last name, date, and time is provided if you do not name the group. The group name block also shows the class the group is affiliated with. Page 150
152 My Groups panel 1. Go to the Manage Students page. 2. Select a class on the All Classes list. The Add New Group button is active and shows the Add (+) icon. 3. Click Add New Group. A group block appears with the Group name box enabled. 4. Type a name in the Group name box and press Enter. 5. Go to the My Students panel, search and/or select students on the Students list. Students selected appear with a yellow background and an Add Student arrow. 6. Click the Add Student arrow. The students selected appear in the Group block. You can click on any Add Student arrow to add students to a group if multiple students are selected. You can also use Select All to add all students to a new group. Page 151
153 Add a new group by selecting a class and group You can select students from a class and groups to add a new group by using the My Students panel. 1. Go to the Manage Students page. 2. Select a class and group on the My Students panel. The selected classes appear with a white background. 3. Search, if necessary, select students on the Students list or select all. Students selected appear with a yellow background. 4. Select a class on the My Groups panel to serve as the primary class and confirm your selection. The Add New Group button is active and shows the Add (+) icon. A message appears that reminds you to select a class if no class on the My Groups panel is selected. 5. Drag and drop student names over the Add New Group button. A group block appears with the Group name box enabled. 6. Type a name in the Group name box and press Enter. The group appears below the Group label on the My Students panel. A message appears if you attempt to add students to a group with the same students in it. Close the message and select other students to continue. Add a new group by selecting multiple groups You can select students from multiple groups to add a new group by using the My Students panel. 1. Go to the Manage Students page. 2. Select multiple groups on the My Students panel. The selected groups appear with a white background. Page 152
154 3. Search, if necessary, select students on the Students list or select all. Students selected appear with a yellow background. 4. Select a class on the My Groups panel to serve as the primary class and confirm your selection. The Add New Group button is active and shows the Add (+) icon. A message appears that reminds you to select a class if no class on the My Groups panel is selected. 5. Drag and drop student names over the Add New Group button. A group block appears with the Group name box enabled. 6. Type a name in the Group name box and press Enter. The group appears below the Group label on the My Students panel. Edit a group name You can edit a group name by using the Pencil icon. 1. Go to the Manage Students page. 2. Go to the My Groups panel and find the group you want to edit. 3. Click the Pencil icon to edit the group s name. 4. Edit the group name and press Enter. Delete a group You can delete a group from the My Groups panel by using the Delete Group icon. 1. Go to the Manage Students page. 2. Go to the My Groups panel and select a class, if necessary. 3. Find the group you want to delete. 4. Click the Delete Group (x) icon next to the group name. The Delete the group? message appears. 5. Click Yes. The group name is removed from the Groups list on the My Students panel. Page 153
155 Delete one or multiple students in a group You can delete students in a group by using the Remove Student icon in the Group block: Student list located in the My Groups panel. 1. Go to the Manage Students page. 2. Go to the My Groups panel and select a class, if necessary. 3. Find the group that contains the student(s) you want to delete. 4. Click the Remove Student (x) icon next to the student name. The Delete student from group message appears. 5. Click Yes. The student name(s) is removed from the Group block: Student list on the My Groups panel. About Assessments Before you start Assessment information will not be captured and documented in the Assessment reporting tool for teachers completing an assessment. Assessments are assigned to students by using the Library > Assignments panel or the Assignments > Add New Assignments page. Teachers have the ability to preview assessments and evaluate the student's online testing environment. You can use the tools available in the Assessments toolbar, review questions and answers, and take the test like a student. The questions and answers are presented to students in multiple formats. Text only Text and graphics Text and audio Some questions may be hidden and requires that the student listen to the question by selecting an Audio icon located within the assessment. Page 154

156 Assessments at a Glance Page 155
157 Assessments Legend Description 1. Assessments toolbar Use the Assessments toolbar to: Tools decrease/increase font size, zoom, change the page contrast color and read line by line with the Line Reader. Pause/Restart pause and restart an assessment. Test Questions review questions and answers before submitting test. Highlight Text - highlight text in the Reference section or questions. Answers to questions cannot be highlighted. Submit Test submit completed test. 2. Assessment title, number, and grade View assessment title, number, and grade information. 3. Reference panel View assessment instructions and content (passage). Note: The snapshot above shows the Highlight Text and Line Reader in action. 4. Resize arrows Use to resize the page. 5. Scroll icons Use to scroll and view more information. 6. Question and Answers panel View the question and select the correct answer. 7. Question number and total number of questions View the question number and total number of questions in assessment. 8. Previous and Next page arrows Go to the previous or next page question. Page 156
158 Grade constructed responses Assessments completed by your students are automatically graded for you. Your student's results are captured in the Reports tool for analysis at the district, class, and student level. However, assessments that contain constructed responses must be reviewed and graded by you before any results are captured. You can grade your student's constructed responses by using the Test Review and Manual Grading page. The only questions that you must grade are those with constructed responses. Understanding the Teacher's Assessment workflow for constructed responses The workflow is initiated by the student when he/she completes and submits an assessment with questions that contain constructed responses. Example The teacher receives a Message Center notification about the student s completed assessment that is pending review. Example Page 157

159 The teacher filters and finds assessments that are pending review. Example More about Review Test Assignments table Column - Left to Right Review, Deactivate, and Preferences icon Description Use the Pencil, X, and P icons to review, deactivate test assignments or change your preferences. Assigned Test assignment date Test Test name Class Class that received the test NS Number of students that have not started the test IP Number of students that are in progress PR Number of students that completed the test and are pending review Page 158

160 Fini Number of tests completed and submitted by students Code Code used by students to access the test Students Student name The teacher reviews and only grades questions with constructed responses. Example Page 159
161 More about the Assignment Reviewer page Section Test Info Description View test, teacher, and class information. Filter and grade by student, all question items or question items that need to be manually graded. Filter students by test status; for example, Pending Review. In addition, you can also view the number of students per test status. Filter by student and review the student s test status. Flags appear next to the student s name; for example, Red flag test is ready to submit, Green check mark test has been completed and submitted. Question List Shows total number of questions; for example, (10). View all questions or manually graded questions. Selected questions are highlighted in blue. Use the legend to identify the status of the question item; for example, a blue circle is a question item that has been answered by the student. Question Detail and Answers, View Reference(s) link View question details and answers for highlighted question items and references.. Overall Test Feedback Provide feedback about the test and save. Note: Your feedback; if selected, appears in the student s responses report (PDF). Grading and Feedback for Question Apply a grade, provide feedback about the question, and save. Note: Your feedback; if selected, appears in the student s responses report (PDF). Page 160


162 Submit Test Submit the test for reporting purposes at the student, class, and district level. The teacher submits graded assessment. Example The teacher reviews assessment-related data captured in the Reports tool. See example below. Page 161
163 See How to grade constructed responses for more information. How to grade constructed responses 1. Click Messages on the Dashboard. 2. Review completed Assessment notifications and identify which students need their constructed responses to be reviewed and graded. 3. Exit the Message Center and go back to the Dashboard. 4. Click Reports. 5. Click the Online Testing icon. The Test Review and Manual Grading tab appears. 6. Click the Test Review and Manual Grading tab. The Filter and Review Test Assignments page appears. 7. Filter the test assignment by selecting any or all of the following options. Grade Bank Class Date Time Subject Teacher Test Student Program 8. Click Apply Filters. 9. Go to the Review Test Assignments section and search for the tests you want to review, if necessary. 10. Select a test and click the Pencil icon or Review button. The Assignment Reviewer page appears with the Grade by Student default setting selected. 11. Select Grade by: Manually Graded Only in the Test Info section. Page 162
164 You can view all questions in the Questions List panel by clearing your Manually Graded Only selection. Select any question in the Question List panel to review question details and correct answers in the Question Detail and Answers panel (optional). 12. Select one of the following Filter Student By options, if necessary. Completed Ready to Submit Pending Review In Progress Paused Not Started 13. Select a student on the Select Student to Review drop-down list. The student s questions, details and answers appear. 14. Select a question, review response, and references, if necessary. 15. Type your feedback in the Overall Test Feedback box and save (optional). A teacher s feedback about the test and/or questions appears when you print a student s test results. 16. Select and apply a grade. 17. Type your feedback in the Question Feedback box and save (optional). 18. Continue until all constructed responses are reviewed and graded. 19. Click Submit Test. You must review and grade the assessment. The assessment related data will not appear in the Reports tool until you have reviewed, graded, and submitted the assessment. Page 163
165 Print student responses and more 1. Click Print in the Assignment Reviewer section after selecting a test and student. The Print Options dialog appears. 2. Select and/or clear any of the Print options. 3. Click Create PDF. The Successfully created PDF message appears. 4. Click OK. The PDF appears in a separate tabbed window. 5. Click the Print icon in the reader. 6. Click Print in the browser's Print panel. You can save the PDF to your computer; if necessary, by: Selecting the Download icon next to the Print icon at the top-right of the reader or Right-clicking on any page and selecting the Save As option on the short-cut menu. See View student results by question item for more information about viewing a student s completed assessment. View a student's correct, partial, and no credit answers You can view a student's answers by using the Correct, Partial, and No Credit filters on the Assignment Reviewer > Question List. 1. Click Reports. The Assignment Reviewer page shows Manually Graded Only answers by default. They are flagged as Reviewable. Student answers receive no credit until you manually grade their constructed responses. All other questions are automatically scored for you. 2. Click the Online Testing icon. The Review/Grade Online Tests tab appears. 3. Click the Review/Grade Online Tests tab. The Filter and Review Test Assignments page appears. Page 164
166 4. Filter the test assignment, if necessary. 5. Click Apply Filters. 6. Go to the Review Test Assignments section and search for the tests you want to review, if necessary. 7. Select a test and click the Pencil icon or Review button. The Assignment Reviewer page appears with the Grade by Student default setting selected. 8. Select Grade by: Item in the Test Info section. 9. Clear the Manually Graded Only selection. 10. Select the Filter Student By: Pending Review option, if necessary. 11. Select a student on the Select Student to Review drop-down list. The student's questions, details and answers appear. Each question in the Question List panel has a color flag at the top-right of the box that shows which answers are correct, received partial or no credit. 12. Use the Correct, Partial, and No Credit filters to filter the Question List. 13. Select a question, review answer, and references, if necessary. View a student's assessment activity You can view a student's assessment activity by using the Question Detail and Answers panel on the Assignment Reviewer page. The Question Detail and Answers panel shows the following information. The number of times a student visited the question during the assessment The time spent on a specific question The total time spent on the 1. Click Reports. 2. Click the Online Testing icon. The Review/Grade Online Tests tab appears. 3. Click the Review/Grade Online Tests tab. The Filter and Review Test Assignments page appears. 4. Filter the test assignment, if necessary. 5. Click Apply Filters. 6. Go to the Review Test Assignments section and search for the tests you want to review, if necessary. 7. Select a test and click the Pencil icon or Review button. The Assignment Reviewer page appears with the Grade by Student default setting selected. 8. Select Grade by: Item in the Test Info section. 9. Clear the Manually Graded Only selection. Page 165
167 10. Select the Filter Student By: Pending Review option, if necessary. 11. Select a student on the Select Student to Review drop-down list. The student's questions, details and answers appear. 12. Select a question in the Question List and view a student's assessment activity in the Question Detail and Answers panel. Experience an assessment like a student You can experience an assessment like a student by using the Gear icon > Preview option located at the bottom-right of an Assessment cover. Taking an assessment like a student provides teachers with insight into the student's test-taking experience. 1. Filter your library and find an assessment. 2. Click the Gear icon and select Preview. The Begin Test page appears. 3. Click Begin Test. The assessment appears. 4. Preview the assessment. See About Assessments for more information about assessments. Decrease or increase font size You can decrease or increase the font size in an assessment by using the Tools > Font Size option on the Assessments toolbar. 1. Click Tools on the Assessments toolbar. The Tools options appear. 2. Click the Font Size: A- or A+ icons to decrease or increase the font size. Continue to click the Font Size icons until you are satisfied with the font size displayed. Page 166
168 Read line by line with the Line Reader You can use the Line Reader to help you read the passage line by line by using the Tools > Line Reader option on the Assessments toolbar. 1. Click Tools on the Assessments toolbar. The Tools options appear. 2. Click the Liner Reader icon. The Liner Reader dialog appears. 3. Drag the Line Reader window to the content area you want to read. 4. Increase or decrease the Line Reader window by using the triangular dots on the right or the series of horizontal lines on the bottom of the dialog. 5. Click the X icon to close the Line Reader window when you are done. Pause or restart assessment You can pause or restart an assessment by using the Pause/Restart Test icon on the Assessments toolbar. 1. Click the Pause Test icon on the Assessments toolbar. The Test is paused dialog appears. 2. Click Yes to save and finish the test later. The test is saved and closed. The Student Test Login appears. 3. Click No to return to the test, if necessary. You need to log in to the assessment if you pause the test. Use the same test code and student information to continue taking the test. Complete an assessment You can review and answer each question by using the Previous or Next Question arrows located at the bottom-right of an assessment. The assessment opens with the Reference (passage) including instructions on the left and the questions and multiple choice answers on the right. 1. Review the question and click the option button next to the appropriate answer. 2. Click the Save answer and go to the next question right arrow to continue. 3. Repeat Step 2 until all questions are answered. Page 167
169 4. Click the Previous question left arrow to go to previous question, if necessary. 5. Review your questions and answers before submitting the test. See Submit a test for more information about submitting a completed test. Review questions and answers before submitting a test You can review the questions and answers of an assessment before submitting it by using the Test Questions icon on the Assessments toolbar. This is a quick and easy method to review and answer questions instead of going through the assessment page by page. 1. Click the Test Questions icon on the Assessments toolbar. The Test Questions dialog appears. 2. Click the down arrow to review the questions that have been answered and see which ones need to be answered. 3. Click on a question to go to the question in the assessment, and answer it, if necessary. 4. Click anywhere outside of the Test Questions dialog to close the dialog, if necessary. Questions flagged with an A (blue) icon are questions that have been answered. Questions flagged with a Q (green) icon are questions that need to be answered. Page 168
170 Submit a test You can submit a test by using the Submit Test icon on the Assessments toolbar. 1. Click the Submit Test icon on the Assessments toolbar. The Submit Test dialog appears with one of the following messages. You have completed the test. Would you like to submit now or keep working? You have unanswered questions. Would you like to submit now or keep working? 2. Click Yes (Submit Now) to submit the test. 3. Click No (Keep Working) to complete the test before submitting. You cannot go back to the test and change your answers once the test is submitted. Page 169
171 About Legacy Reports (Flash) For Flash Users of Assessments Reports Benchmark Universe Reports are an excellent resource for teachers. The reports provide teachers with assessment and class diagnostic data by student, school, district, standard, comprehension skill and more. You can use these reports to make informative changes to your lessons and know when to intervene to assist students. What s the difference between Flash and HTML Reports? You can view and run reports in the Flash format on computers only. The Flash report format cannot be used on mobile devices. The Flash Reports user interface (UI) is also different from the HTML Reports UI. Click the Legacy tab to access Reports in the Flash format. More about the HTML Reports Did you know that there is a more enhanced version of the Assessments Reports tool? You have access to the same information in a more contemporary and flexible user interface when you use the HTML Reports format. We recommend that you use the Dashboard (HTML) Reports so that you can access your reports on your computer and mobile devices! See About the Dashboard Reports for more information. Page 170

172 Reports Dashboard at a Glance Page 171
173 Reports Dashboard Legend Description 1. Reports Dashboard Menu bar Select a Dashboard menu item, for example, Item Analysis. 2. Filters: Period, Custom Report Set, District Data, and Teacher Data Use the filters to view data by a specific period, custom reports, district or teacher. 3. Summary Data Area View summary data details and select other options. 4. Class Diagnostic View class diagnostic data by assessment. 5. Student Reports View and customize student reports. View class, school, and district assessment scores You can view your class assessment scores and a comparative analysis of those scores with the rest of school and district. 1. Select the Summary Data check box. 2. Select the School Data check box. 3. Select the District Data check box. The results appear and show a high-level summary of your class performance. View a student s assessment performance You can view a student s assessment performance by using the Student Data button. Select the Student Data check box next to Summary Data. The Student Data table shows all assessments completed by students and their scores within a selected time frame. Page 172
174 View a student s assessment score and class average You can view a student s assessment score and class average by using the Student Reports button. Click the Student Reports button below the Student Data table. Analyze class diagnostic data by assessment You can analyze the assessment by question, standard, comprehension strategy, and student. This type of analysis will help you to develop intervention strategies for your students. 1. Go to the Reports Dashboard > Summary Data area. 2. Select a test. 3. Click the Class Diagnostic button. The Class Diagnostic dialog appears. 4. Select one of the following tabs. Questions View problem areas by question, percentage of students who answered the questions correctly, which students missed the question, and standards, skills, and strategies. Standards View and analyze students mastery of standards. Topics View and analyze students mastery of a comprehension strategy cluster. Skills - View and analyze students' mastery of skills. Other - View and analyze students' mastery of other specific characteristics based on your school's or district's assessment and reporting subscriptions. Students View and analyze a student s assessment performance by standards and comprehension strategy cluster. You may not see all of the Class Diagnostics tabs listed above. Some of the tabs are based on the type of assessment and reports subscriptions you have. Page 173
175 Export the Class Diagnostic > Student Report and use as a valuable student performance report. View Item Analysis Summary data You can use Item Analysis to analyze assessment results and identify common errors at the question item level. 1. Go to the Dashboard (with a number in parenthesis) at the top of the page (not the Dashboard tab). 2. Click Item Analysis. The Item Analysis page appears. 3. Click the Select New Test button. The Select Text dialog appears. 4. Select a subject, grade, and test and click Select Test. The assessment summary data appears and shows the test questions, correct answers, questions unanswered, and the percentage of students that selected a different answer. Run an Item Analysis Student Report The Item Analysis Student Report is a great report for parent conferences, report cards, and any other type of document required to show a student s performance. 1. Go to the Item Analysis page. 2. Click Select New Test, select the appropriate filters/options and click Select Test. 3. Click the District arrow to view District Summary data (optional). 4. Click the School arrow to view School Summary data (optional). 5. Click the Teacher arrow to view Teacher Summary data (optional). 6. Select a class; if necessary, in the Classes box. 7. Click Show Class Data. 8. Select or clear the Show options; for example, Show Tags. 9. Click Student Reports. A student s test results page appears and shows the student s responses and class average for each question. Page 174
176 10. Select or clear additional Tags, Hide, and Compare options. 11. Click Print to print an individual student's report or Print All to print all student reports. You can use the arrow keys at the bottom-right of the page to go to a previous or next student's report You may not see all of the Item Analysis options listed above. Some of the Item Analysis options are based on the type of assessment and reports subscriptions you have. Print and export diagnostic data You can print class or student diagnostic data as a PDF by using the Print icon. You can also export the diagnostic data as a text file by using either the Export button or arrow. The text file can be opened in Excel or Word if you want to include the data in a worksheet or document. About Dashboard Reports (HTML) For HTML Users of Assessments Reports Benchmark Universe Reports are an excellent resource for teachers. The reports provide teachers with assessment and class diagnostic data by student, school, district, standard, comprehension skill and more. You can use these reports to make informative changes to your lessons and know when to intervene to assist students. What's the difference between HTML and Flash Reporting? You can view and run reports in the HTML format on computers and mobile devices. The Flash report format only works on computers. The HTML Reports user interface (UI) is also different from the Flash Report UI. Click the Dashboard tab to access Reports in the HTML format. Page 175

177 Reports Dashboard at a Glance (HTML) See examples below. Benchmark Advance Teacher Dashboard Page 176

178 Benchmark Literacy Teacher Dashboard Page 177
179 Use the examples above to review the Reports Dashboard Legend. Reports Dashboard Legend 1. Teacher Dashboard Breadcrumb Trail links Description Go back or forward to different report pages/areas. 2. Teacher Name and Period icon View the teacher name (left) and select a period (right) for the report. Note: Use the Any date check boxes to view all assessment data instead of specifying a From and/or To date. 3. Filters bar Use the Filters bar to filter by: Type Subject Grade Minimum Results 4. View Class list and Select Tests buttons Use to review data at the teacher and class level. Use to view student results, summary results, item analysis, and group data. Note: Your role determines the level of assessment data you are able to view. For example, a district administrator is able to view assessment data at the district level. A school administrator is only able to view assessment data at the school level. A teacher is only able to view assessment data at the teacher and class level. 5. Assessments bar, Information icon, and Scroll bar View assessments in the Assessments bar. View information (i) about a specific assessment. Scroll to view and select an assessment. Page 178
180 Drag an assessment to the Assessment View area. 6. Achievement charts in color check box, Student Results for Displayed Tests and Print buttons Use to select or clear the color in the Achievement charts. Use to view student results for tests in the display area. Print student results. 7. Assessments View area and Assessment Analytics dialog Use to view analytics for multiple assessments. Use to view analytics for a specific assessment. 8. Classes list View class information, average score and more. 9. Student Results, Item Analysis, Class Diagnostic, Custom Reports and Grouping icons. View student results, item analysis of answers selected, class diagnostics at the standards, topics, skills, questions levels and other parameters, create custom and group reports. Note: The Student Results, Item Analysis, Class Diagnostic, Custom Reports and Grouping icons also appear on the Teacher > Class Dashboard. About the Class Average Score (HTML) Was this topic helpful? Let us know. We value your input. The class average score is calculated by the number of students that have taken the assessment and weighted by the point value of the question items that apply to each of the following tags. Standards Skills Topics Questions Depth of Knowledge (for users only) See example below. Page 179
181 There are five students in a class that completed an assessment. The assessment has five questions tagged with a particular standard. Each question item is worth one point. The total score is calculated by the number of students, number of questions, and the point value of each question item. 5 x 5 x 1 = 25 points The average score is calculated by the sum of all the points earned by each student in the class divided by the total score. Student A scored 5 points. Student B scored 5 points. Student C scored 4 points. Student D scored 4 points. Student E scored 3 points. The total score for the class and associated standard is 21 points. The average score for the class is 84% (21 divided by 25). The Class Average Score will vary because assessments have different point values associated with the question items and the tag selected in Class Diagnostics. Explorer Basics (HTML) There are several common and basic tasks that you can do on the Explorer page. Change a report period You can change a report period by using the Period calendar icon. 1. Click the calendar icon next to the Period: From date at the top-right of the Explorer page. The Select date range dialog appears. 2. Use the arrows to select a From date. 3. Use the arrows to select a To date. 4. Click OK. Page 180
182 Filter by type, subject, grade, and minimum results You can filter a report by using the Filters bar. Choose an option from any of the Filter drop-down lists. Type - shows assessment types that your district has subscribed to; for example, Linkit Subject - shows assessments based on the subject selected Grade - shows assessments based on the grade selected) Minimum Results - shows assessments administered with a certain minimum level of results The Assessments bar shows assessments that meet your filter criteria. View information about an assessment You can move the mouse over the Information (i) icon to view the following details about an assessment. Name Type Subject Grade Results View assessment analytics You can drag the assessment into the Assessment View area to view the following analytics. Number of Results Average Score Achievement bar shows distribution of Achievement levels including the percentage of students at each level Achievement levels are color-coded. These colors are used throughout the reporting platform. Page 181
183 Score Distribution chart shows distribution of student scores by decile band View multiple assessments You can drag multiple assessments into the Assessment View area. Assessments slide to the right to make room for other assessments. Use the scroll bar to view additional assessments. Print data You can print assessment-related data from any Reports page with a Print button. For Google Chrome Users Color Printing Only Use these instructions if you want to print in color and the data appears in black and white. You must use a color printer in order to print in color. 1. Click Print on any Reports page. The Print dialog and data appears. 2. Click More Settings. Additional options appear. 3. Select Background graphics. 4. Click Print. View and print student results (HTML) You can view and print the student results of an assessment by using the Student Results icon or the Student Results for Displayed Tests button. There are different ways or views to see student results. The following Student Results views can be selected on the View drop-down list when you select the Student Results for Displayed Tests button. Multiple results per row shows students results for multiple tests in a single row (default view). Single result per row shows students results for multiple tests in separate rows. Grouped by students show student results for multiple tests by student name. You must have an assessment open in the Assessment View area to access the Student Results icon. It is at the bottom-left of the assessment s analytics view. Use the Student Results for Displayed Tests button to view student results for multiple assessments open in the Assessment View area. Page 182
184 View student results 1. Click the Student Results icon or the Student Results for Displayed Tests button The Student Results page appears and shows the following information. At the top of the page o o Selected tests Period 2. Select a view on the View drop-down list (if you selected the Student Results for Displayed Tests button). In the Student Results table o o o o o o Assessment Name Student Name Student ID Assessment Date Percent of Correct Answers Raw Score The information that is shown in the Student Results table is based on the type of view that you selected. You may notice differences in the Student Results table. You can sort the columns listed above in ascending or descending order by clicking in the column heading area. An up or down arrow appears that shows you the Sort order. An average score is also displayed in the last row of the Student Results table. 3. Click Options. The Options list appears. 4. Select any of the following options. Select columns - choose the columns you want to view. Hide selected students - hide selected students in the Student Results table. Use Shift + Click or Ctrl + Click to select multiple students in a sequential or nonsequential order. Restore all students - show hidden student information. Export - export student results to a *.txt file. Page 183
185 Print student results 1. Click Print. The browser s Print dialog appears. 2. Select any of the Print options, if necessary. 3. Click Print. View student results by question item using Reports (HTML) You can view a student's results by question item by using the Review/Grade Online Tests page. The student's completed assessment shows the following information. Question list and total number of questions Question status - answered, unanswered, and reviewable (manually graded type of questions that require your review) Correct and incorrect answers References to the passage and other content used in the assessment 1. Click Reports on the Dashboard. 2. Click the Online Testing icon and Review/Grade Online Tests tab, if necessary. The Review/Grade Online Tests page appears. 3. Filter the test assignment by selecting any or all of the following options. Grade Bank (Not applicable to Benchmark Universe) Class Student Date Time Subject School Teacher Test Test Assignment Code 4. Click Apply Filters. Sort the Finished (Fini) column in ascending order (up) to find assessments that have been completed by the student. Page 184
186 5. Go to the Review Test Assignments section and search for the tests you want to review, if necessary. 6. Select a test and click the Pencil icon. The Assignment Reviewer page appears with the Grade by Student default setting selected. 7. Select the Grade by Item option in the Test Info section. 8. Select the following Filter Student By option, if necessary. Completed 9. Select a student on the Select Student to Review drop-down list. The student's questions, details and answers appear. 10. Select a question in the Question List panel. 11. Review student's response, correct answers, and references, if necessary. See Grade constructed responses for more information about manually grading your student s constructed responses. Create custom reports (HTML) You can create custom reports by using the Custom Reports icon. This resource enables teachers to select primary, secondary groupings, and tags like standard to create a variety of reports specific to your role and needs. You determine how far you want to drill down and what you want to view during the report creation process. Teachers and Administrators have access to different data. For Teachers See example below. Class > Student > Test You must have an assessment open in the Assessment View area to access the Custom Reports icon. It is next to the Class Diagnostic (stethoscope) icon at the bottom-left of the Assessment s Analytics dialog. Page 185
187 1. Click the Custom Reports icon. The Custom Reports page appears. 2. Select a Primary grouping on the drop-down list. 3. Select a Secondary grouping on the drop-down list. 4. Click Create Report. The report appears. 5. Click Set Filters. 6. Click one of the following tabs and select the appropriate options for the report. Classes Tags Demographics The Demographics tab is for those districts and schools that are using demographics data. This option may not apply to all districts and schools. 7. Click Close. 8. Click Show grid, chart and averages. 9. Click Show performance bars to view performance levels. 10. Select Print or Export. You must select Create Report anytime you change the parameters of the report. The report and chart view changes based on your primary, secondary grouping and filter selections. Page 186
188 The following options may appear when you select Standard as your primary grouping. Standard View Mastery View Show table, chart, values, descriptions, averages, score and chart type. Move the mouse pointer over the column headings in a table to sort; for example, Standard in an ascending or descending order. The chart changes and displays its values based on the sort parameters in the table. View item analysis data (HTML) You can use Item Analysis to analyze assessment results and identify common errors at the question item level. In addition, you can view the percentage of students that answered the questions correctly, incorrectly, and left unanswered. You can also choose to view the standards, topics, and skills associated with each question. You must have an assessment open in the Assessment View area to access Item Analysis. It is next to the Custom Reports icon at the bottom-left of the Assessment s Analytics dialog. 1. Click the Item Analysis icon. The Item Analysis page appears. 2. Click Show district results and Show school results, if necessary. 3. Click any, a combination, or all of the following options. Show standards Show topics Show skills Show other tags (if applicable to your subscription) Show question types Tags vary based on the assessment and report subscriptions you have. 4. Select a format for the answers on the Answers Labels drop-down list (optional). Page 187
189 The percentages are color-coded to show the following achievement levels. Red below 40% selected the correct answer. Orange between 40% - 60% selected the correct answer. Light Green 60% - 80% selected the correct answer. Green Over 80% selected the correct answer. You can click on any standard displayed in the table to view more aggregated information when you select Show standards. Run an Item Analysis Student Report (HTML) The Item Analysis Student Report is a great report for parent conferences, report cards, and any other type of document required to show a student s performance. 1. Go to the Item Analysis Reports page. 2. Click the Student Reports button on the Item Analysis page. The Student Reports page appears. 3. Select a class. The student names appear. 4. Select a student. The student's report appears. 5. Select any, a combination, or all of the following tags. Standards Topics Skills Question Types Other Tags (if applicable to your subscription) Raw tag scores or Sort by score Page 188
190 You must select at least one of the tags listed above to view the raw tag scores. Tags vary based on the assessment and report subscriptions you have. 6. Select any or all of the following options. Hide Points Possible Hide Correct Answers 7. Select one of the following Student Answers options. Show student answers (default) Conceal student answers Conceal correct answers 8. Select any, a combination, or all of the following Compare options. Class School District 9. Click Print. Page 189
191 Batch print student reports by class (HTML) You can batch print student Item Analysis reports by using the Student Reports > Print > Batch print class option. 1. Click Reports on the Dashboard. 2. Click the Reporting icon. 3. Click the Dashboard tab. 4. Click the Select Tests button. The Select Tests page appears. 5. Select a test in the Tests table. 6. Click Other Reports. 7. Select Item Analysis. 8. Click Student Reports. 9. Select a class on the Class drop-down list. 10. Select a student. 11. Click Print. 12. Select Batch print class. 13. Click the Batch Reports icon at the top next to Sign out. The PDF Reports dialog appears. It shows a list of reports by type, report name, date, and status. The Batch Reports icon is dim and turns green when the report has been processed. 14. Select a report on the list. 15. Click Open. The report opens as a PDF. 16. Click Close when you are done. Page 190
192 Analyze assessment data at the school level (HTML) You can analyze assessment data at the school level by using the View School drop-down list and Select Tests button. 1. Select a school on the View School drop-down list. The School Explorer page appears. 2. Click the Select Tests button. The Select Tests page appears. 3. Select any, a combination or all of the following filters. Test Type Grade Subject 4. Select the test(s) you want to analyze. The following buttons become available when tests are selected. View Student Results View Summary Results Other Reports 5. Select any of the following options to continue your analysis. View Student Results Other Reports > Item Analysis 6. Select the Show school results check box to view and compare Class and School results. The Item Analysis button remains dim if you selected multiple tests. You can only use the Item Analysis button one test at a time. You can also view and compare class and school results by selecting the Show school results check box in any Assessment Analytics dialog that appears in the Assessment View (display) area. Page 191
193 Group assessment data by standard, skill, topic or other tags (HTML) You can group assessment data by standard, skill, topic or other tags by using the tags on the Grouping page. 1. Click the Select Tests button. The Select Tests page appears. 2. Select any, a combination or all of the following filters. Test Type Grade (multiple grades can be selected) Subject 3. Select the test(s) you want to analyze on the Tests table. 4. Click the Other Reports button. The Other Reports list appears. 5. Click Grouping. The Grouping page appears. 6. Select one of the following tags. Standards Skills Topics Other Tags (if applicable to your subscription) 7. Click Set Filters. The Select Filters dialog appears. 8. Select one of the following tabs and options. Schools/Teachers/Classes (For Administrators) Classes (For Teachers) Choose a school/teacher/class listed in the box. Demographics Program Race Gender Page 192
194 The Demographics tab is for those districts or schools that are using demographics data. This option may not apply to all districts or schools. 9. Click Close. 10. Click Continue. The Grouping page appears with more options and the following information. If you select to group by then you will see Standard The standards associated with the assessment; for example, RL.3.1. Note: Assessments with a minimum of 4 items (questions) are selected by default. Other standards can be selected. Skill The skills associated with the assessment; for example, Identify Main Idea and Supporting Details. Topic The topics associated with the assessment; for example, Text Structures and Features. Oher Tags Additional tags; for example, Depth of Knowledge, specific to the type of subscription your district or school has obtained. Tags vary based on the type of assessment and report subscriptions you have. Move your mouse over the standards, skills, topics or other tags selected in the list to view more details. 11. Choose the number of groups to show in the report. The default is Select one of the following options. Use points scored (weighted) Use percent Page 193
195 13. Click Create Groups. The Group table appears and shows relevant information based on your criteria. 14. Select one of the following options. Group by cluster - similar skills and gaps (default) Group by averages The Reports platform uses an algorithm to group students with similar skills and gaps. Each group may not have an equal amount of students. The students are grouped by cluster. This is a default setting. In addition, you can drag students from one group to another in the Group table. 15. Click Next. Additional grouping parameters appear. 16. Select which group you want to view on the Group drop-down list. 17. Choose to show standards, skills, or topic descriptions. 18. Click the Change Group Name button to change the group name, if necessary. 19. Click Print or Print All to print the information for a specific group or all groups. 20. Click Export to export the Grouping information to a *.txt file, if necessary. Use the Back or Next button to go back or forward and change your Grouping report criteria, if necessary. Page 194
196 Analyze assessment data at the teacher level (HTML) You can analyze assessment data at the teacher > class level by using the View Class dropdown list. Teachers with multiple classes can view and select a class on the View Class dropdown list. Teachers with a single class can only view and select that class from the list. 1. Select a teacher on the View Teacher drop-down list. The Teacher Dashboard appears. 2. Click the Select Tests button. The Select Tests page appears. 3. Select any, a combination or all of the following filters. Test Type Grade Subject 4. Select the test(s) you want to analyze. The following buttons become available when tests are selected. View Student Results View Summary Results Other Reports 5. Select any of the following options to continue your analysis. View Student Results View Summary Results View Other Reports The Item Analysis button remains dim if you selected multiple tests. You can only use the Item Analysis button one test at a time. 6. Continue to select other options and parameters required to view class and student results. Page 195
197 Analyze assessment data at the class level (HTML) You can analyze assessment data at the teacher > class level by using the View Class dropdown lists. 1. Select a class on the View Class drop-down list. The Class Dashboard appears and shows the following assessment analytics in the Assessment View area. Class Average Score Raw Score Average Result count Achievement level bar 2. Click Show school and district results. The Assessment Analytics dialog shows the class, school and district results. 3. Click the Class Diagnostics (stethoscope) icon. The Class Diagnostic page appears. 4. Select any of the following options on the View drop-down list. Standards (default) Topics Skills Other Tags (if applicable to your subscription) Questions 5. Choose to restrict results to tests taken in this class, if necessary. 6. Choose to show only standards, topics, skills with a minimum number or more associated items. The Class Diagnostic table shows standards, topics, or skills description, number of items, and class average. View Class Diagnostics at the Question level 1. Select Questions on the View drop-down list. The Question/Average table appears. 2. Find the question you want to view. 3. Click the View Question arrow next to the Average score. 4. Select a question in the table. The Students who missed this question and Associated tags table appear. 5. View the students who missed the question, correct answer, and the standards, topics and skills associated with the question. Page 196

198 Use the Print button to select the current class and print Class Diagnostic data. Reports Library (HTML) The Reports Library contains a list of report samples. Each report sample has a series of instructions. You can use the Reports Library to view and run reports. Before you start Teachers can run reports by using the Report icons at the bottom of the Assessment Analytics dialog that appear when you drag and drop tests from the Ribbon (blue) area into the View (Details) area. The Report icons show results based on a single test. In addition, you can use the Select Tests page > Report buttons to run reports based on multiple tests selected. Report Icons Select Tests page > Report buttons From left to right Other Reports > Options Student Results (Green) Item Analysis (Purple) Class Diagnostic (Red) Custom (Yellow) Grouping (Blue) Page 197
199 Data Summary Reports Class, School, and District Comparative Analysis 1. Click Reports on the Dashboard. Reports open in a separate tabbed window. 2. Click the Reporting icon. 3. Click the Dashboard tab. The Teacher Dashboard appears. 4. Select a class on the View Class drop-down list. The Class Dashboard appears. 5. Find a test and select the following boxes to compare your class data with other classes at the school and district level. Show school results Show district results Your class, school, and district results, score, and mastery level will appear in the space shown in the example above. 6. Click Print (optional). Page 198
200 Student Results Use this report to track a student s performance for a single or multiple tests. 1. Click Reports on the Dashboard. Reports open in a separate tabbed window. 2. Click the Reporting icon. 3. Click the Dashboard tab. The Teacher Dashboard appears. 4. Click Select Tests. The Select Tests page appears. 5. Select filters; for example, Grade. 6. Select test(s) on the Tests table. 7. Select View Student Results. The Student Results page appears. Filtering by race or gender is not applicable to Benchmark Universe report users. 8. Click Options> Select columns and choose the columns you want to see in the report. 9. Select any, a combination or all of the following columns. Student ID Class Result Date Percent Raw 10. Use the Select All or Deselect All button to select or clear all columns (optional). 11. Click OK. Page 199
 icon on any test you have dragged and dropped into the Teacher or Class Dashboard Details area.")
201 12. Click Print (optional). You can use the other options to hide or show rows and export student results as CSV or Text file. In addition, you can access student results by using the Student Results (green) icon on any test you have dragged and dropped into the Teacher or Class Dashboard Details area. Class Diagnostic Report by Standards, Topics, Skills, Questions or Other Tags By Standards Use this report to analyze test data by performance on standards. Identify students who fall below standards mastery level for individual standards to inform reteaching and grouping opportunities. The mastery level can be adjusted to your needs. 1. Click Reports on the Dashboard. Reports open in a separate tabbed window. 2. Click the Reporting icon. 3. Click the Dashboard tab. The Teacher Dashboard appears. 4. Select a class on the View Class drop-down list. The Class Dashboard appears. Page 200
202 5. Find a test and select the Class Diagnostic (red stethoscope) icon. The Class Diagnostic page appears with a breakdown of the standards associated with the test and the following information. Test name Class name Number of test results Teacher name Class average percent score 6. Select other tags on the View drop-down list to switch and view class diagnostics by topics, skills, and questions (optional). 7. Type or select the number of standards to show with a certain number of question items or more. 8. Select a standard. The Students below mastery threshold table appears. 9. Use the Students below master threshold slider or arrows to change the threshold, if necessary. 10. Click Print (optional). You can use the Items and Avg. column headings in the Standards table to sort in an ascending or descending order. By Topics Use this report to analyze test data according to performance on comprehension strategies. Identify students who fall below standards mastery level for individual strategies to inform reteaching and grouping opportunities. The mastery level can be adjusted to your needs. 1. Click Reports on the Dashboard. Reports open in a separate tabbed window. 2. Click the Reporting icon. 3. Click the Dashboard tab. The Teacher Dashboard appears. Page 201
203 4. Select a class on the View Class drop-down list. The Class Dashboard appears. 5. Find a test and select the Class Diagnostic (red stethoscope) icon. The Class Diagnostic page appears with a breakdown of the standards associated with the test and the following information. Test name Class name Number of test results Teacher name Class average percent score 6. Select Topics on the View drop-down list. The Topic table appears. 7. Type or select the number of topics to show with a certain number of question items or more. 8. Select a topic. The Students below mastery threshold table appears. 9. Use the Students below master threshold slider or arrows to change the threshold, if necessary. 10. Click Print (optional). You can use the Items and Avg. column headings in the Standards table to sort in an ascending or descending order. By Skills Use this report to analyze data according to performance on skills. Identify students who fall below standards mastery level for individual skills to inform reteaching and grouping opportunities. The mastery level can be adjusted to your needs. 1. Click Reports on the Dashboard. Reports open in a separate tabbed window. 2. Click the Reporting icon. 3. Click the Dashboard tab. The Teacher Dashboard appears. Page 202
204 4. Select a class on the View Class drop-down list. The Class Dashboard appears. 5. Find a test and select the Class Diagnostic (red stethoscope) icon. The Class Diagnostic page appears with a breakdown of the standards associated with the test and the following information. Test name Class name Number of test results Teacher name Class average percent score 6. Select Skills on the View drop-down list. The Skill table appears. 7. Type or select the number of skills to show with a certain number of question items or more. 8. Select a skill. The Students below mastery threshold table appears. 9. Use the Students below master threshold slider or arrows to change the threshold, if necessary. 10. Click Print (optional). You can use the Items and Avg. column headings in the Standards table to sort in an ascending or descending order. By Questions Use this report to analyze data according to performance on questions. View question items, answers, average scores, students that missed questions, and associated tags. 1. Click Reports on the Dashboard. Reports open in a separate tabbed window. 2. Click the Reporting icon. 3. Click the Dashboard tab. The Teacher Dashboard appears. 4. Select a class on the View Class drop-down list. The Class Dashboard appears. Page 203

205 5. Find a test and select the Class Diagnostic (red stethoscope) icon. The Class Diagnostic page appears with a breakdown of the standards associated with the test and the following information. Test name Class name Number of test results Teacher name Class average percent score 6. Select Questions on the View drop-down list. The Item panel appears. 7. Select a question item number. The Students who missed this question and Associated tags panels appear. 8. Select the Question (Q) icon to view the question and correct answer. 9. Click Reference > Reference number to view the passage, if necessary. 10. Click the Close (X) icon when you are done with the passage and question. 11. Repeat steps 6 through 9 until you have completed your Class Diagnostic review. 12. Click Print (optional). Page 204
206 Class Diagnostics Reports by Other Tags Other Tags is based on the assessment and report subscriptions you have. It is not applicable for all assessment and report subscriptions. Use the same steps listed above and select the other tags you want to use for your class diagnostic results. Item Analysis Reports Item Analysis Summary Report Use this report to analyze and compare item-level responses and performance across all questions, standards, or skills for a particular assessment to identify patterns in student responses and common errors on a class, teacher, school, or district level. Individual student item analysis reports can be customized for various purposes including: student feedback, parent-teacher conferences, and remediation exercises. 1. Click Reports on the Dashboard. Reports open in a separate tabbed window. 2. Click the Reporting icon. 3. Click the Dashboard tab. The Teacher Dashboard appears. 4. Select a class on the View Class drop-down list. The Class Dashboard appears. 5. Find a test and select the Item Analysis (purple magnifying glass) icon. The Class Item Analysis page appears and shows the following information. Question Item Number Question and Answer Points Possible Average Points Earned Page 205
 icon to view the question and correct answer. 8. Click Reference > Reference number to view the passage, if necessary. 9.")
207 6. Select any, a combination, or all of the following filters. Show district results Show school results Show standards Show question type Section Answer labels 7. Select the Question (Q) icon to view the question and correct answer. 8. Click Reference > Reference number to view the passage, if necessary. 9. Click the Close (X) icon when you are done with the passage and question. 10. Click the down arrow to view a breakdown of points earned by each student for a specific question. 11. Click Print (optional). Item Analysis Student Level Report Use this report to create student reports that show standards mastery level and compare it to the class average. 1. Click Reports on the Dashboard. Reports open in a separate tabbed window. 2. Click the Reporting icon. Page 206
208 3. Click the Dashboard tab. The Teacher Dashboard appears. 4. Select a class on the View Class drop-down list. The Class Dashboard appears. 5. Find a test and select the Item Analysis (purple magnifying glass) icon. The Class Item Analysis page appears. 6. Click Student Results. The Student Reports page appears. 7. Click Sort by score (optional). 8. Select a student on the list. The student's Item Analysis Report appears and shows the following information. Student Name Test Name Result date Test Score Points Earned Class Average Class Name 9. Select any, a combination or all of the following options. Tags - Standards, Question Types, Show only tags, Raw tag scores, and Sort by score Items - Show item data Options - Hide Points Possible Compare - Class, School, and District 10. Click the Question Item number to view the question, correct answer, and reference passage, if necessary. 11. Click Print (optional). 12. Click Export at the bottom of the Students list to export the report as a CSV or TXT file. Page 207

209 Custom Student Performance Reports Use the Custom Reports tool to create a series of reports by selecting one or multiple tests, primary and secondary groupings, graph, and chart options. Student Performance in Standards Using a Single Test 1. Click Reports on the Dashboard. Reports open in a separate tabbed window. 2. Click the Reporting icon. Page 208
 icon below the Classes drop-down list. The Custom Reports page appears. 6. Select Student on the Primary grouping drop-down list. 7.")
210 3. Click the Dashboard tab. The Teacher Dashboard page appears. 4. Find a test in the ribbon area (blue) and drag it to Details area. 5. Click on the Custom Reports (yellow) icon below the Classes drop-down list. The Custom Reports page appears. 6. Select Student on the Primary grouping drop-down list. 7. Select Standard on the Secondary grouping drop-down list. 8. Click Create Report. The Student Performance in Standards report appears. 9. Click Print (optional). 10. Click Export to export the report as a CSV or TXT (Text) file (optional). Page 209
211 Student Performance in Skills Using Multiple Tests 1. Click Reports on the Dashboard. Reports open in a separate tabbed window. 2. Click the Reporting icon. 3. Click the Dashboard tab. The Teacher Dashboard page appears. 4. Click Select Tests. The Select Tests page appears. 5. Filter by Test Type, Grade, and Subject (optional). 6. Select any test(s) on the Tests table. 7. Click the Other Reports button and select Custom Reports. The Custom Reports page appears. 8. Select Student on the Primary grouping drop-down list. 9. Select Standard on the Secondary grouping drop-down list. 10. Click Create Report. The Student Performance in Skills report appears. 11. Click Print (optional). 12. Click Export to export the report as a CSV or TXT (Text) file (optional). Page 210

212 Grouping Reports Use the Grouping Reports tool to group students based on performance using tags like standards, topics, and skills. This efficient and objective tool supports grouping for classroom level intervention on differentiated learning activities. Grouping Report by Standards Using a Single Test 1. Click Reports on the Dashboard. Reports open in a separate tabbed window. 2. Click the Reporting icon. Page 211
213 3. Click the Dashboard tab. The Teacher Dashboard page appears. 4. Find a test in the ribbon area (blue) and drag it to Details area. 5. Click the Grouping (blue) icon below the Classes drop-down list. The Grouping page appears. 6. Select Standards from the Select the tags to use for grouping drop-down list, if necessary. This is the default tag. 7. Click Continue. The Standards table and other options appear. 8. Select up to a maximum of 10 standards on the Standards table or click Options and choose one of the following options (optional). Default Selection Select All Deselect All 9. Select the number of groups to create. 10. Select Group by cluster or Group by averages. Group by cluster is the default setting. 11. Click Create Groups. The Grouping table appears and shows the following information. Student names and IDs Weighted average scores across standards Standard proficiencies The column heading numbers represent the standards selected on the Standards table. Group number 12. Click Next. The Grouping page appears with additional options. 13. Select a different group from the Group drop-down list (optional). 14. Select Show standards descriptions (optional). 15. Click Change Group Name (optional). 16. Click Print or Print All (optional) 17. Click Export to export report to a CSV or TXT (Text file) (optional). 18. Click Save Group as Class (optional). 19. Click Back when you are done. Page 212
. 6. Select any tests on the Tests table. 7.")
214 Grouping Report by Skills Using Multiple Tests 1. Click Reports on the Dashboard. Reports open in a separate tabbed window. 2. Click the Reporting icon. 3. Click the Dashboard tab. The Teacher Dashboard page appears. 4. Click Select Tests. The Select Tests page appears. 5. Filter by Test Type, Grade, and Subject (optional). 6. Select any tests on the Tests table. 7. Click the Other Reports button and select Grouping. The Grouping page appears. 8. Select Skills from the Select the tags to use for grouping drop-down list, if necessary. This is the default tag. 9. Click Continue. The Skills table and other options appear. Page 213

215 10. Select up to a maximum of 10 skills on the Skills table or click Options and choose one of the following options (optional). Default Selection Select All Deselect All 11. Select the number of groups to create. 12. Select Group by cluster or Group by averages. Group by cluster is the default setting. 13. Click Create Groups. The Grouping table appears and shows the following information. Student names and IDs Weighted average scores across skills Skill proficiencies The column heading numbers represent the skills selected on the Skills table. Group number 14. Click Next. The Grouping page appears with additional options. 15. Select a different group from the Group drop-down list (optional). 16. Click Change Group Name (optional). 17. Click Print or Print All (optional) 18. Click Export to export report to a CSV or TXT (Text file) (optional). 19. Click Save Group as Class (optional). 20. Click Back when you are done. Page 214
216 Appendix - Parent or Guardian Letter (English) Dear Parent/Guardian, See your Sign in information below. Benchmark Universe is an online resource for classroom reading. Your child has been assigned to use Benchmark Universe to practice or complete an assignment. If you have any questions about this resource, please contact your child's teacher. We encourage you to support and help your child with the use of Benchmark Universe in order to complete assignments. How to Sign in URL: Username: 1. Type the Benchmark Universe URL (website address) in your browser's Address bar and press Enter. 2. Type your username in the Username box. 3. Type your password in the Password box. 4. Click Sign In. 1 Password: 2 3 Sincerely, 4 Teacher Name: How to Get to My Library Before you begin 1. Click My Library on the Dashboard. The My Library page appears with great books to read! 2. Use the filters or search for a book to read! Page 215
217 Run a System Check and review our requirements to ensure you have the hardware and software you need in order for Benchmark Universe resources to operate effectively and run smoothly. 1 2 You can do a system check on the Sign in page. How to Read a Book 1. Double-click on a book cover. A message appears. Note: Click No to read the book instead of creating a customization. 2. Click Auto and Play (right arrow). The book is read aloud. 2 1 How to Get Help 1. Click Help on the Dashboard. Page 216
218 2. Click What's New and learn about new features and enhancements. 2 1 How to Contact Tech Support techsupport@benchmarkeducation.com Phone: (Toll-Free) Page 217
219 Parent or Guardian Letter (Spanish) Estimado padre/representante, Vea continuación su información de registro. La escuela de su hijo/a usa Benchmark Universe como un recurso en línea para la lectura en la clase. Se le ha asignado a su hijo/a una tarea para completar a través de Benchmark Universe. Si usted tiene alguna pregunta acerca de este recurso, póngase en contacto con el maestro/a de su hijo/a. Lo alentamos a que apoye y ayude a su hijo/a al usar Benchmark Universe para que él o ella pueda completar sus tareas. URL: Cómo iniciar la session Usuario: 1. Escriba la dirección electrónica de Benchmark Universe en la barra de navegación y pulse Enter. 2. Escriba su nombre de usuario en Username. 3. Escriba su contraseña en Password. 4. Haga clic en Sign In. 1 Contraseña: 2 Atentamente, 3 4 Maestro/a: Cómo llegar a My Library Antes de comenzar Page 218
220 Ejecute una comprobación del sistema y revise nuestros requisitos para asegurarse de que tiene el hardware y software necesarios para que los recursos de Benchmark Universe funcionen con eficacia y sin problemas Haga clic en My Library en el Dashboard. Aparecerá la página My Library con los mejores libros para leer! 2. Use los filtros o busque un libro para leer. 2 Puedes hacer una comprobación del sistema en la página de iniciar la sesión. Cómo leer un libro 1. Haga doble clic en una portada de libro. Aparecerá un mensaje. Nota: Haga clic en No para leer el libro. 2. Haga clic en Auto y Play (flecha derecha). El libro es leído por locator/a. 2 1 Cómo obtener ayuda 1. Haga clic en Help en el Dashboard. Page 219
221 2. Haga clic en What's New para aprender acerca de nuevas características. 2 1 Cómo ponerse en contacto con nosotros para obtener asistencia técnica techsupport@benchmarkeducation.com Phone: (Toll-Free) Page 220
222 About the Data Dashboard The Data Dashboard provides teachers with a centralized location to instantly view key data across applications within Benchmark Universe. Student performance, reading activity, standards coverage, and other data is shown as pie and/or bar charts for student, class, and administrative reporting purposes. You can use the Data Dashboard to view and print the following information at the class or student level for a three week or year period. The 3 Weeks period is based on the current week and two weeks of previous activity. The Year period is based on the District Term established by your Technical Administrator. The District Term represents a district s calendar year. Assignments at a Glance - Not Started, In Progress, and Completed All Assignments - Not Started, In Progress, and Completed Assignments Due Tomorrow - Not Started, In Progress, and Completed Reading Activity by Letter Level Assessment Scores Assessment Mastery Standards Coverage When is the Data Dashboard updated? We are committed to providing you with data that is up to date and accurate. The data presented on the Data Dashboard is captured based on the following timeframes. Assignment charts every 24 hours Reading Activity real-time Assessment charts every 15 minutes Standards Coverage - based on what is scheduled in your plan if you have an eplanner subscription. Page 221

223 Quick Access to Benchmark Universe resources and tools You can access Benchmark Universe resources and tools from the Data Dashboard to manage your students assignments, assessments and reading activity including your standards coverage in eplanner. See how below. Assignments heading links to the Assignments page. Reading Activity heading links to the Reading Log. Coming soon! Assessments heading links to the Reports page. Standards Coverage heading links to the Standards Reports in eplanner. Coming soon! Data Dashboard at a Glance Page 222
Parent/Student User Guide
 All you need to get started with Benchmark Universe and more! Building Literacy and Language for Life Contents Meet Ellie and Dino... 3 What is Benchmark Universe?... 3 Sign in to Benchmark Universe...
Houghton Mifflin Harcourt and its logo are trademarks of Houghton Mifflin Harcourt Publishing Company.
 Guide for Teachers Updated September 2013 Houghton Mifflin Harcourt Publishing Company. All rights reserved. Houghton Mifflin Harcourt and its logo are trademarks of Houghton Mifflin Harcourt Publishing
Guide for K-6 Teachers
 Guide for K-6 Teachers 2009 Houghton Mifflin Harcourt Publishing Company. All rights reserved. Houghton Mifflin Harcourt and its logo are trademarks of Houghton Mifflin Harcourt Publishing Company. Microsoft
Code X Digital User s Guide
 Code X Digital User s Guide PDF0531 (PDF) Houghton Mifflin Harcourt Publishing Company Table of Contents Introduction... 4 Code X Digital and Scholastic Achievement Manager... 5 Enrolling Students and
SAM Settings and Reports for System 44 Next Generation
 SAM Settings and Reports for System 44 Next Generation For use with System 44 Next Generation version 2.6 or later and Student Achievement Manager version 2.6 or later or HMH Teacher Central Table of Contents
Unified Classroom: Class Pages
 Unified Classroom: Class Pages Unified Classroom April 2018 Release Unified Classroom: Class Pages Basics Contents Unified Classroom: Class Pages Basics... 3 Building Class Pages... 3 Access Class Pages...
Parent Student Portal User Guide. Version 3.1,
 Parent Student Portal User Guide Version 3.1, 3.21.14 Version 3.1, 3.21.14 Table of Contents 4 The Login Page Students Authorized Users Password Reset 5 The PSP Display Icons Header Side Navigation Panel
myngconnect.com Teacher User Manual
 myngconnect.com Teacher User Manual Table of Contents Teacher & Student eeditions... 2 Resources... 6 Accessing Resources... 6 Digital Library... 6 Teacher Resource Directory... 7 Assessment Resource Directory...
EXPLORING COURSE TOOLS
 EXPLORING COURSE TOOLS Now that we have covered the My Blackboard screen, let s explore the different tools that you might find within your course. NOTE: Your instructor controls which tools are available.
CANVAS TEACHER IOS GUIDE
 CANVAS TEACHER IOS GUIDE This work is licensed under a Creative Commons Attribution-NonCommercial-ShareAlike License Table of Contents Navigation...4 How do I download the Teacher app on my ios device?...5
Teacher Connect Interface User Guide v
 Teacher Connect Interface User Guide v. 6.4.0 Copyright 2002-2019 eschooldata, LLC All rights reserved. TABLE OF CONTENTS Overview... 3 Accessing Teacher Connect... 3 Quick Access Icon...3 Course Number...3
Introduction to Dropbox Management Add a Category Add a Folder Set Availability for Dropbox Folders Add Special Access...
 Dropbox Introduction to Dropbox Management... 2 Add a Category... 3 Add a Folder... 4 Set Availability for Dropbox Folders... 8 Add Special Access... 10 Reorder Folders and Categories... 12 Delete a Folder...
The following features and fixes are included in version for this product:
 HMH Teacher Central Version 1.0.x Release Notes This document outlines the changes in the HMH Teacher Central version 1.0.x releases. For the latest information about product updates, tips, and techniques,
Gaggle 101 User Guide
 Gaggle 101 User Guide Home Tab The Home tab is the first page displayed upon login. Here you will see customized windows or widgets. Once set, the widgets can be accessed directly by clicking on them from
PowerSchool Student and Parent Portal User Guide. PowerSchool Student Information System
 PowerSchool Student and Parent Portal User Guide PowerSchool Student Information System Released December 2016 Document Owner: Documentation Services This edition applies to Release 10.1 of the PowerSchool
Realize Reader Chrome App Version Early Learning User Guide
 Realize Reader 18.0 Chrome App Version 3.2.0 Early Learning User Guide 3/9/2018 Contents Contents ii What Is Realize Reader? 3 Use Realize Reader Mobile Apps 3 Complete Realize Reader Assignments 4 Use
CALIFORNIA. Guide to CAASPP Completion Status and Roster Management Administration
 CALIFORNIA Assessment of Student Performance and Progress Guide to CAASPP Completion Status and Roster Management 2017 18 Administration Smarter Balanced Summative Assessments for English Language Arts/Literacy
Kurzweil 3000 for Windows Getting Started
 Kurzweil 3000 Products Kurzweil 3000 for Windows Getting Started Kurzweil 3000 Web License Subscription A yearly subscription to licenses that includes several components working together to support students
Wisdom Master Pro (v2.0) User Guide for Students
 User Guide for Students") (v2.0) User Guide for Students e-campus Homepage 4 Log in to e-campus 6 Personal Area 6 I. My Courses... 6 II. My Portal... 12 III. My Profile... 16 IV. My Assignments... 18 V. My Tests... 19 VI. My Learning...
(v2.0) User Guide for Students e-campus Homepage 4 Log in to e-campus 6 Personal Area 6 I. My Courses... 6 II. My Portal... 12 III. My Profile... 16 IV. My Assignments... 18 V. My Tests... 19 VI. My Learning...
Quick Start Guide for Teachers
 Quick Start Guide for Teachers LOGGING IN 1. Navigate to www-k6.thinkcentral.com. 2. Select your state, district, and school. 3. To make subsequent logins easier, check Remember My Organization (optional).
PowerTeacher Administrator User Guide. PowerTeacher Gradebook
 PowerTeacher Gradebook Released June 2011 Document Owner: Documentation Services This edition applies to Release 2.3 of the PowerTeacher Gradebook software and to all subsequent releases and modifications
MOODLE MANUAL TABLE OF CONTENTS
 1 MOODLE MANUAL TABLE OF CONTENTS Introduction to Moodle...1 Logging In... 2 Moodle Icons...6 Course Layout and Blocks...8 Changing Your Profile...10 Create new Course...12 Editing Your Course...15 Adding
Student Guide INTRODUCTION TO ONLINE RESOURCES
 Student Guide INTRODUCTION TO ONLINE RESOURCES Date: 08. June. 2017 By: Technical Support Team STUDENT GUIDE southwales.unicaf.org 1)Introduction...4 2)Student Panel (SIS)...4 2.1)Student Panel (SIS) Login...4
Student Guide INTRODUCTION TO ONLINE RESOURCES
 Student Guide INTRODUCTION TO ONLINE RESOURCES Date: 12. March. 2018 By: Technical Support Team Table of Contents 1) Introduction 3 2) Student Panel (SIS) 3 2.1) Student Panel (SIS) Login 3 2.1.1) Definitions
CALIFORNIA. Guide to CAASPP Completion Status and Roster Management Administration
 CALIFORNIA Assessment of Student Performance and Progress Guide to CAASPP Completion Status and Roster Management 2018 19 Administration Smarter Balanced Summative Assessments for English Language Arts/Literacy
SPEEDGRADER ANDROID GUIDE
 SPEEDGRADER ANDROID GUIDE This work is licensed under a Creative Commons Attribution-NonCommercial-ShareAlike License Table of Contents Instructors...3 How do I download the SpeedGrader app on my Android
You will need the unique URL for your site and your username and password to login to Data- Director.
 Getting Started Step 1: Login to the DataDirector website: You will need the unique URL for your site and your username and password to login to Data- Director. You may change your password after you login.
EFM Community 3.1 Portal Administration Guide
 EFM Community 3.1 Portal Administration Guide WHITE PAPER For technical support please call: 1-800-787-8755 Or visit: Hwww.Vovici.comH Please contact Vovici technical support if you believe any of the
CANVAS BY INSTRUCTURE IOS GUIDE
 CANVAS BY INSTRUCTURE IOS GUIDE This work is licensed under a Creative Commons Attribution-NonCommercial-ShareAlike License Table of Contents All Users...5 What do Canvas text (SMS) message notifications
Chat Activity. Moodle: Collaborative Activities & Blocks. Creating Chats
 Chat Activity The Moodle chat tool allows communication between instructors and students in real time. Unlike in discussion forums, which are a means for asynchronous communication, online chat sessions
PowerSchool Student and Parent Portal User Guide. https://powerschool.gpcsd.ca/public
 PowerSchool Student and Parent Portal User Guide https://powerschool.gpcsd.ca/public Released June 2017 Document Owner: Documentation Services This edition applies to Release 11.x of the PowerSchool software
Parent. Portal. User. Manual
 EDUCATIONAL SERVICES Parent Portal User Manual Version 3.0 GENESIS STUDENT INFORMATION SYSTEM PARENT PORTAL Introduction 3 Logging In & Logging Out 4 Student Summary Dashboard The Dashboard Selecting a
OXFORD DIGITAL HELP GUIDE
 OXFORD DIGITAL HELP GUIDE oxforddigital.com.au NEED HELP? Contact Oxford Digital Support. Email digitalsupport.au@oup.com or call 1300 650 616. version 2.11 updated 10/03/2015 TABLE OF CONTENTS MY LIBRARY
Microsoft Windows SharePoint Services
 Microsoft Windows SharePoint Services SITE ADMIN USER TRAINING 1 Introduction What is Microsoft Windows SharePoint Services? Windows SharePoint Services (referred to generically as SharePoint) is a tool
New. MediaShare Instructor Interactive Training Guide. Page 1
 New MediaShare Instructor Interactive Training Guide Page 1 1/16/2014 New MediaShare Instructor Interactive Training Guide...1 System Requirements... 3 Operating Systems and Browsers... 3 Additional Software...
Coastal Bend College Learn Blackboard 9.1 Faculty Instructional Handbook
 Coastal Bend College Learn Blackboard 9.1 Faculty Instructional Handbook Distance Education Table of Contents LOGGING IN TO BLACKBOARD... 1 EXPLORING MY BLACKBOARD... 2 EXPLORING COURSE TOOLS... 5 ANNOUNCEMENTS...
Classroom Blogging. Training wiki:
 Classroom Blogging Training wiki: http://technologyintegrationshthornt.pbworks.com/create-a-blog 1. Create a Google Account Navigate to http://www.google.com and sign up for a Google account. o Use your
PARENT PORTAL VIEW LEARNING GUIDE
 PARENT PORTAL VIEW LEARNING GUIDE Central Susquehanna Intermediate Unit, USA TABLE OF CONTENTS Overview... 3 Account Registration... 3 Logging In... 5 Getting Help... 7 Navigating the Portal... 8 Messages...
Student Guide. By UNICAF University
 vnhgfj Student Guide By UNICAF University 1 2 Table of Contents 1) Introduction... 5 2) Student Panel (SIS)... 5 2.1) Student Panel (SIS) Login... 5 2.1.1) Definitions... 5 2.1.2) Registration Email...
Students are placed in System 44 based on their performance in the Scholastic Phonics Inventory. System 44 Placement and Scholastic Phonics Inventory
 System 44 Overview The System 44 student application leads students through a predetermined path to learn each of the 44 sounds and the letters or letter combinations that create those sounds. In doing
GUIDE FOR STUDENTS AND PARENTS. An orange ring means you have an assignment.
 Odyssey Quick Start Launch Pad and Assignments below Portfolio and Reports on page 2 FAQs on page 5 For Parents on page 7 GUIDE FOR STUDENTS AND PARENTS Launch Pad and Assignments This icon opens your
Realize Reader Windows App. User Guide
 Realize Reader 18.1 Windows App User Guide 6/12/2018 Contents Contents ii What Is Realize Reader 1 Use Realize Reader Mobile Apps 1 Navigate the Bookshelf 2 View Information About a Book 2 Download a Book
PowerSchool Parent Portal User Guide. PowerSchool 7.x Student Information System
 PowerSchool 7.x Student Information System Released December 2012 Document Owner: Documentation Services This edition applies to Release 7.6 of the PowerSchool software and to all subsequent releases and
Home Access Center User Assistance
 User Assistance Using Home Access Center Home Access Center Menu View another student Attendance Month View Page Change months View attendance details Calendar Page Customize calendar information Change
STUDENT HELP & WALKTHROUGH
 STUDENT HELP & WALKTHROUGH 2015 Jones & Bartlett Learning, LLC, An Ascend Learning Company Contents What are the browser and system requirements for running Navigate 2? 3 Why does Navigate 2 run a System
Realize Reader Chrome App Version User Guide
 Realize Reader 18.0 Chrome App Version 3.2.0 User Guide 3/9/2018 Contents Contents ii What Is Realize Reader 1 Use Realize Reader Mobile Apps 1 Navigate the Bookshelf 2 View Information About a Book 2
D2L: An introduction for FACULTY
 D2L: An introduction for FACULTY REAL. AMAZING. UNIT 1: Introduction to Desire2Learn... 1 WHAT IS D2L... 1 GETTING LOGGED IN TO D2L... 1 UWP PORTAL PAGE... 2 COMPLETING YOUR PROFILE... 2 WHAT IS THE LOCKER...
Palisades School District PowerSchool Parent Portal Guide
 Palisades School District PowerSchool Parent Portal Guide Get Started To get started, you must create a parent account in the PowerSchool Parent Portal. Create a Parent Account Use this procedure to create
Counselor Instructions for Genius SIS
 Counselor Instructions for Genius SIS To begin, log in to the NSO Genius page: http://mn.geniussis.com/publicwelcome.aspx?id=2 There is also a link from the NSO website: www.northernstaronline.org Username:
1. Enter your User ID or Address associated with your Chalk & Wire account.
 Once you have been provided with your Chalk & Wire User ID and Password, go to the Chalk & Wire login web page for your institution. If you do not know the correct URL, please visit ep.chalkandwire.com
Campus Portal User Guide
 Campus Portal User Guide www.ccsoh.us If you have more than one child enrolled in the Columbus City Schools, there will be only one username and password for all children. Please note that assignments
Goucher College Online Course Sites: Basic Navigation in Canvas
 Goucher College Online Course Sites: Basic Navigation in Canvas Find Your Course Material Edit a Topic Section Upload a File Drag and Drop Method to Upload a File Create a Content Page Create a Wiki Page
Selecting Items for the Assessment
 Selecting Items for the Assessment Users can add Unit Assessment Items and Formative Spiral Items to the assessment using the TCMPC item bank. Required Role(s): User, eplanner Site Access: District Resources
Illustrated Roadmap. for Windows
 Illustrated Roadmap for Windows This Illustrated Roadmap was designed to help the Computer Coordinator customize GradeQuick for their school and for teachers to make further customizations that will affect
PowerSchool Parent Portal User Guide. PowerSchool 7.x Student Information System
 PowerSchool 7.x Student Information System Released August 2013 Document Owner: Documentation Services This edition applies to Release 7.8.2 of the PowerSchool software and to all subsequent releases and
Introduction. Paradigm Publishing. SNAP for Microsoft Office SNAP for Our Digital World. System Requirements
 Introduction Paradigm Publishing Paradigm understands the needs of today s educators and exceeds the demand by offering the latest technological advancements for coursework settings. With the success of
Realize Reader ios Mobile App Version User Guide
 Realize Reader 18.1 ios Mobile App Version 5.0.0 User Guide 6/6/2018 Contents Contents ii What Is Realize Reader 1 Use Realize Reader Mobile Apps 1 Navigate the Bookshelf 2 View Information About a Book
Frequently Asked Questions
 Frequently Asked Questions WHAT IS PD IN FOCUS? PD In Focus is an award-winning online platform that features hundreds of hours of videos showing research-based teaching practices in action. Designed as
INSTRUCTOR MANUAL. February 2019 / Version Instructor Manual February 2019 / V11.2
 INSTRUCTOR MANUAL February 2019 / Version 11.2 1 INSTRUCTOR MANUAL CONTENTS 1. ABOUT 2. GETTING STARTED Side Panel Where To Locate Instructor Tools How To Exit Instructor Tools Providing Students With
Assessment Data Online: User s Guide
 Assessment Data Online: User s Guide Welcome to the new Assessment Data Online. This User s Guide is intended to help you understand the functionality of the website, access the various dashboards available,
Galileo K-12 Online: Digital Curriculum s Teacher Lesson Plan Builder Tools
 : Digital Curriculum s Teacher Lesson Plan Builder Tools Table of Contents Purpose... 3 Access, Preview, and Explore the Unit... 3 Access the Class Calendar... 3 Explore a Unit... 4 Access Lesson Plan
GUIDE FOR STUDENTS AND PARENTS. An orange ring means you have an assignment.
 Odyssey Quick Start Launch Pad and Assignments below Portfolio and Reports on page 2 FAQs on page 5 For Parents on page 8 GUIDE FOR STUDENTS AND PARENTS Launch Pad and Assignments This icon opens your
RTIm Direct User Manual
 RTIm Direct User Manual Centris Group 100 Merrick Road Suite 418 E Rockville Centre, NY 11570 516-766-4448 Customer Log In Reset Password Messaging Within RTIm Direct My Student Page Filters Student Details
esd Portal: Parent View User Guide v
 esd Portal: Parent View User Guide v. 5.9.0 Copyright 2002-2018 eschooldata, LLC All rights reserved. TABLE OF CONTENTS Overview... 3 Parent Portal Login Page... 3 Online Registration...4 Parent Portal
TxAIR Training Manual
 Introduction and Overview TxAIR, the Texas Achievement Items Repository, is a TEKS-aligned system that provides science and mathematics resources for grades 3 8, Integrated Physics and Chemistry, Biology,
esd Portal: Parent View User Guide v
 esd Portal: Parent View User Guide v. 5.0.0 Copyright 2002-2016 eschooldata, LLC All rights reserved. TABLE OF CONTENTS Overview... 3 Parent Portal Registration... 3 Logging In... 5 Getting Help... 7 Navigating
Odyssey Quick Start. Quick Links: Launch Pad and Assignments Portfolio and Reports FAQs For Parents GUIDE FOR STUDENTS AND PARENTS
 Odyssey Quick Start GUIDE FOR STUDENTS AND PARENTS Quick Links: Launch Pad and Assignments Portfolio and Reports FAQs For Parents Launch Pad and Assignments Click here to open your portfolio. Click this
System 44 Next Generation Software Manual
 System 44 Next Generation Software Manual For use with System 44 Next Generation version 2.4 or later and Student Achievement Manager version 2.4 or later PDF0836 (PDF) Houghton Mifflin Harcourt Publishing
Power School Parent Portal User Guide
 Power School Parent Portal User Guide Preface Use this guide to assist you while navigating the PowerSchool Parent Portal. This guide is based on the PowerSchool Parent Portal online help, which you can
Networks Florida Social Studies Primary Source Library K-5 Digital Training Guide
 Networks Florida Social Studies Primary Source Library K-5 Digital Training Guide Table of Contents Page Navigating Social Studies Content 2 Lesson Plans 3 My Calendar 4 Customize Lesson Plans 5 Lesson
PowerSchool Student and Parent Portal User Guide. PowerSchool 8.x Student Information System
 PowerSchool 8.x Student Information System Released July 2014 Document Owner: Documentation Services This edition applies to Release 8.0.1 of the PowerSchool software and to all subsequent releases and
National Geographic Learning Social Studies Courses Teacher s User Guide
 Table of Contents Logging in to the System... Using the Header Bar... Resources... 5 Navigating the Teacher s Edition... 6 Content Tools... 7 Assignments Assigning Reading and Tests... 9 Using the Gradebook...
PowerSchool 7.x Student Information System
 PowerSchool 7.x Student Information System Released May 2012 Document Owner: Documentation Services This edition applies to Release 7.2 of the PowerSchool software and to all subsequent releases and modifications
2016 Jones & Bartlett Learning, LLC, An Ascend Learning Company
 & 2016 Jones & Bartlett Learning, LLC, An Ascend Learning Company Contents _Toc499561954 What are the browser and system requirements for running Navigate 2?... 1 Why does Navigate 2 run a System Check?...
Edmodo for Teachers Guide (Taken directly from Edmodo s site.)
") Edmodo for Teachers Guide (Taken directly from Edmodo s site.) Table of Contents: 1. Teacher Sign Up 2. Create a Group 3. Manage Your Groups 4. Small Group 5. Co-Teaching 6. Student Sign up 7. Post a Message
Edmodo for Teachers Guide (Taken directly from Edmodo s site.) Table of Contents: 1. Teacher Sign Up 2. Create a Group 3. Manage Your Groups 4. Small Group 5. Co-Teaching 6. Student Sign up 7. Post a Message
VERSION 5.7 NOVEMBER 2011
 USER GUIDE VERSION 5.7 NOVEMBER 2011 Copyright 2009, 2010 Pearson Education, Inc. or its affiliate(s). All rights reserved. No part of this publication may be reproduced or transmitted in any form or by
Webmail 7.0 is an online client which runs in your web browser. Webmail 7.0 allows you to access your , contact list, and calendar from
 Webmail 7.0 is an online email client which runs in your web browser. Webmail 7.0 allows you to access your email, contact list, and calendar from any computer with an internet connection and a web browser.
Figure 1.1 GENESIS Log In Page
 TEACHERVUE User Guide Chapter One OVERVIEW OF THE TEACHERVUE SOFTWARE The TEACHERVUE software, frequently abbreviated TXP and also known as Teacher Experience, provides districts with an easy method to
Student User Guide (updated )
") Student User Guide (updated 2.06.06) Copyright 2005 iparadigms, LLC. All rights reserved. Contents Contents 1 Getting Started 4 Creating Your User Profile 4 Logging In 4 Enrolling in a Class 5 Submitting
Student User Guide (updated 2.06.06) Copyright 2005 iparadigms, LLC. All rights reserved. Contents Contents 1 Getting Started 4 Creating Your User Profile 4 Logging In 4 Enrolling in a Class 5 Submitting
CAHIIM HELP for Program Users
 CAHIIM HELP for Program Users 2018 CAHIIM Table of Contents GETTING STARTED... 1 Performing Basic Functions... 1 Logging In... 1 Logging Out... 1 Resetting Password... 1 Viewing or Changing User Information...
Organizing Course Content and Information
 Organizing Course Content and Information This document includes general overviews for using course organization tools in Canvas. Each tool includes information on reasons to use the tool, instructions
Kurzweil 3000 for Web Browsers (Kurzweil3000.com) Getting Started
 Getting Started") Kurzweil 3000 for Web Browsers (Kurzweil3000.com) Getting Started Audio Optical Systems - aos@kurzweilaustin.net - 512-454-8672 - www.kurzweilaustin.com What s included in your Kurzweil 3000 Subscription?
Kurzweil 3000 for Web Browsers (Kurzweil3000.com) Getting Started Audio Optical Systems - aos@kurzweilaustin.net - 512-454-8672 - www.kurzweilaustin.com What s included in your Kurzweil 3000 Subscription?
2013 EDITION. V-Camp Student. Guide. INTERACTIVE GUIDE Use the buttons shown below to navigate throughout this interactive PDF BACK
 V-Camp Student Guide INTERACTIVE GUIDE Use the buttons shown below to navigate throughout this interactive PDF BACK 03 EDITION V-Camp Student Guide Table of Contents Unit : Table of Contents...iii How
Pay with ACH User Guide
 Pay with ACH User Guide 1. Pay with ACH...2 2. Managing Sub-Users...17 3. System Setup...20 If you need assistance, please call 1-800-539-9039 and choose option 2, then option 1. 1. Pay with ACH Pay with
Using Home Access Center. Attendance Month View Page. Calendar Page. Career Plan Page. Classwork Page. Course Requests Page.
 Using Home Access Center Home Access Center Menu View another student Attendance Month View Page Change months View attendance details Subscribe to attendance email alerts Calendar Page Customize calendar
Logging In & Logging Out
 Logging In & Logging Out Logging In Logging into Genesis is very simple: 1. Go to the Web Access URL supplied with your district welcome packet. 2. Enter your Email Address in the Username field 3. Enter
Editor Training Guide
 Editor Training Guide Getting Started 1. To get into your web site: Open a web browser. Enter your school s web address: If site is not live: Enter temporary web address: Enter temporary username: Enter
Logging in to take the test
 Logging in to take the test When a student is ready to take the assigned assessment, he or she accesses ISBE Learn in a testing room under the direction of a Teacher, proctor, test monitor, or other educator.
Tyler SIS Student 360 Parent Portal
 To begin using the Parent Portal, follow these steps: 1.) Your password will be emailed to the address KSD has on record for you. 2.) Go to the Tyler SIS Student 360 web page https://sis.kunaschools.org/idkn360
Introduction to the SAM Student Guide 4. How to Use SAM 5. Logging in the First Time as a Pre-registered Student 5 Profile Information 7
 Contents Introduction to the SAM Student Guide 4 How to Use SAM 5 Logging in the First Time as a Pre-registered Student 5 Profile Information 7 Logging into SAM as a New User 9 Forgot Password 14 Grace
Teacher Resource Link (TRL) User Guide
 User Guide") Teacher Resource Link (TRL) User Guide Statewide Longitudinal Data System (SLDS) June 13, 2014 Page 1 of 22 Table of Contents WHAT IS THE TEACHER RESOURCE LINK?... 3 ACCESSING DIGITAL RESOURCES... 3 INTENDED
Teacher Resource Link (TRL) User Guide Statewide Longitudinal Data System (SLDS) June 13, 2014 Page 1 of 22 Table of Contents WHAT IS THE TEACHER RESOURCE LINK?... 3 ACCESSING DIGITAL RESOURCES... 3 INTENDED
System 44 Next Generation Software Manual
 System 44 Next Generation Software Manual For use with System 44 Next Generation version 3.x or later and Student Achievement Manager version 3.x or later Table of Contents Overview... 5 Instructional
User Guide. Chapter 6. Teacher Pages
 User Guide Chapter 6 s Table of Contents Introduction... 5 Tips for s... 6 Pitfalls... 7 Key Information... 8 I. How to add a... 8 II. How to Edit... 10 SharpSchool s WYSIWYG Editor... 11 Publish a...
Scholastic Interactive Teaching System User s Guide
 Scholastic Interactive Teaching System User s Guide For use with READ 180 Next Generation version 2.1 or later, READ 180 Enterprise Edition version 2.1 or later, System 44 version 2.1 or later, Expert
LessonVUE User Guide. Release May 2017
 LessonVUE User Guide Release 2018 May 2017 SISLVUG-08052015 The Edupoint software and any form of supporting documentation are proprietary and confidential. Unauthorized reproduction or distribution of
Activate Oktopus Software. Register Oktopus Blend License. 1. After installing the software and opening it, an activation window will appear.
 Activate Oktopus Software 1. After installing the software and opening it, an activation window will appear. 2. Type the 16 character product key into the box and click OK. 3. If there is an active internet
Home Access Center User Assistance
 User Assistance Using Home Access Center Home Access Center Menu View another student Attendance Month View Page Change months View attendance details Subscribe to attendance email alerts Calendar Page
Interactive Teaching System User s Guide
 Interactive Teaching System User s Guide June 23, 2015 For use with READ 180 Next Generation, READ 180 Enterprise Edition, System 44 Next Generation, System 44, Expert 21, and Scholastic Achievement Manager
Parent Portal. User Manual
 Parent Portal User Manual GENESIS STUDENT INFORMATION SYSTEM PARENT PORTAL Introduction 3 Logging In & Logging Out 4 Student Summary Dashboard The Dashboard Selecting a Student Attendance Daily Attendance
Test Information and Distribution Engine
 SC-Alt Test Information and Distribution Engine User Guide 2018 2019 Published January 14, 2019 Prepared by the American Institutes for Research Descriptions of the operation of the Test Information Distribution