Girl Scouts of America Adobe CQ5 Author s User Guide
|
|
|
- Edgar Jayson Rich
- 6 years ago
- Views:
Transcription


1 Girl Scouts of America Adobe CQ5 Author s User Guide Prepared by: NorthPoint Digital Version: 3.0 Date: March 3, 15
2 Table of Contents Introduction... Error! Bookmark not defined. I. User Roles & Authorization... Error! Bookmark not defined User & Group... Error! Bookmark not defined GSA Groups... Error! Bookmark not defined GSA Permissions... Error! Bookmark not defined National Content Analyst Permissions... Error! Bookmark not defined Council Approver / Reviewer Permissions... Error! Bookmark not defined Council Author Permissions... Error! Bookmark not defined Author Actions... Error! Bookmark not defined. II. Web Page Foundations... Error! Bookmark not defined. 2.0 Web Page Layout... Error! Bookmark not defined. 2.1 Web Page Elements... Error! Bookmark not defined. III. Login & Web Platform Content... Error! Bookmark not defined Login... Error! Bookmark not defined Classic UI / Context Editor Navigation... Error! Bookmark not defined Websites Console Navigation... Error! Bookmark not defined. 3.3 Editing a Page Content... Error! Bookmark not defined Site Admin View... Error! Bookmark not defined Content Finder Panel... Error! Bookmark not defined WYSIWYG Editor... Error! Bookmark not defined Sidekick... Error! Bookmark not defined. IV. Sidekick Tool... Error! Bookmark not defined. 4.0 Sidekick Modes... Error! Bookmark not defined Components tab... Error! Bookmark not defined Page Tab Controls... Error! Bookmark not defined Basic Tab in Page Properties:... Error! Bookmark not defined Implementing a Vanity URL using Page Properties... Error! Bookmark not defined. 4.4 Advanced Tab in Page Properties... Error! Bookmark not defined Council Form Tab... Error! Bookmark not defined. 4.6 Workflow Tab... Error! Bookmark not defined Council Workflow Process... Error! Bookmark not defined Activation Vs. Workflow... Error! Bookmark not defined. V. Scaffolding... Error! Bookmark not defined Training Videos Available on DXP Support Site... Error! Bookmark not defined Creating a Page through Scaffolding... Error! Bookmark not defined Ad Page Scaffolding... Error! Bookmark not defined Creating Ads/Right Rails... Error! Bookmark not defined Editing Ads/Right Rails... Error! Bookmark not defined Event Page Scaffolding... Error! Bookmark not defined. NorthPoint Digital Proprietary 1
3 Accessing both Single and Multiple Events in Scaffolding Error! Bookmark not defined Entering New Event Data... Error! Bookmark not defined Editing an Existing Event... Error! Bookmark not defined Activating an Event... Error! Bookmark not defined Activating Multiple Events... Error! Bookmark not defined Deleting an Event (APPROVERS / REVIEWER PERMISSIONS ONLY)... Error! Bookmark not defined News Page Scaffolding... Error! Bookmark not defined Accessing News scaffolding... Error! Bookmark not defined News Data Entry... Error! Bookmark not defined Activating a News Story... Error! Bookmark not defined Editing a News Story... Error! Bookmark not defined Contact Scaffolding... Error! Bookmark not defined Accessing Contacts... Error! Bookmark not defined Entering Contact data... Error! Bookmark not defined Activating a Contact... Error! Bookmark not defined Editing a Contact... Error! Bookmark not defined. 5.6 Forms... Error! Bookmark not defined Uploading a Form Asset... Error! Bookmark not defined Form Data Entry... Error! Bookmark not defined Activating Forms... Error! Bookmark not defined Editing a Form... Error! Bookmark not defined Deleting a Form (APPROVERS / REVIEWER PERMISSIONS ONLY) Error! Bookmark not defined. 5.7 Web Forms Web Form Basics Web Form Constraints List of Web Form Constraints Useful Web Form Components Web Form Calculations Web Form Data Storage Web Form "Thank You" Page Error! Bookmark not defined. 6.1 Adding Social Media Icons to Footer... Error! Bookmark not defined Terms & Conditions... Error! Bookmark not defined. VII. Don t Forgot About Tagging... Error! Bookmark not defined Creating a Tag... Error! Bookmark not defined. 7.2 Tagging Nomenclature... Error! Bookmark not defined Attaching a Tag to an Existing Digital Asset... Error! Bookmark not defined. VIII. Digital Asset Manager (DAM)... Error! Bookmark not defined. 8.0 DAM Navigation... Error! Bookmark not defined Uploading Assets to the DAM... Error! Bookmark not defined. NorthPoint Digital Proprietary 2
4 8.2 - Activating Assets in the DAM... Error! Bookmark not defined. NorthPoint Digital Proprietary 3
5 NorthPoint Digital Proprietary 4
6 Introduction The Girl Scouts of America has implemented a new Content Management System (CMS) that is the foundation for the web content for the 100+ councils in North America. This document is to serve as a reference guide to the Council Authors & Approvers / Reviewers to provide instructional information on the Adobe Experience Manger (AEM) CQ5 Web Platform. Scope This document will cover the following: Users/Groups and Permissions Website Layout and elements Accessing the site & navigation The Sidekick Scaffolding Page Footer Tagging Digital Asset Manager (DAM) NorthPoint Digital Proprietary 5
7 I. User Roles & Authorization As with most automated systems the user s role within the application determines their access that can be take action on specific areas within the system. For example, a user can be authorized to read or update a specific page. In this section we want to familiarize the reader with the user administration GSA s has employed in CQ. It describes what permissions are assigned to which Groups and the type of actions that can be taken by individuals in those groups User & Group The primary purpose for creating user groups in CQ is to help simplify the ongoing maintenance and administration as well as support a sustainable management process GSA Groups Girl Scout s has created four user groups or roles. The following table lists the active user groups with a brief description. NorthPoint Digital Proprietary 6
8 1.2 - GSA Permissions Group permission s defines what action/s a user is allowed to perform on a page (resource). Permission can be either allow or deny. Listed below are the GS National and Council permissions: National Content Analyst Permissions Actions Read Modify Create Delete Activate /Deactivate All Council Sites All DAM Resources X X X X X X X X X X Ads X X X X X Contacts X X X X X Events X X X X X News X X X X X Scaffolding X Tagging X X X X X Council Approver / Reviewer Permissions Actions Read Modify Create Delete Activate /Deactivate Council Site / X X X X X Pages National X X X X X /Council DAM Resources Ads X X X X X Contacts X X X X X Events X X X X X News X X X X X Tagging X X X X X Council Author Permissions Actions Read Modify Create Delete Activate /Deactivate Council Site /Pages DAM Resources X X X X X X X Ads X X X X Contacts X X X X Events X X X X NorthPoint Digital Proprietary 7
9 News X X X X Tagging X X X X Author Actions Next we look at a list of the different action types themselves: II. Web Page Foundations 2.0 Web Page Layout Each web page in the CMS is designed with a number of common elements, as shown below. NorthPoint Digital Proprietary 8

10 2.1 Web Page Elements It s important for authors & approvers to become familiar the standard web page elements that are being used to construct the Girl Scout site. Header: This section includes the logo and the top navigation. It should not be altered and must appear on all pages of the site. Main Navigation: The navigation tabs connects users with the most important sections of the site and gives them a sense of where they are and where they can go. It should not be altered and must appear on all pages of the site. Utility Navigation: Utility or often referred to as secondary navigation is for content groups that is of secondary interest to the user. Breadcrumbs: Show the path taken from the homepage to the current page. Breadcrumbs are automatically generated when creating a new page and are dependent on the node (i.e. folder) structure. Center Content: holds the main editorial content of the page. Text, images and other content may be added to this area. NorthPoint Digital Proprietary 9


11 Left/ Right Rail: This is a menu of links within a page s content area. These links should relate to the specific content of the page that they fall on. Components can be dynamic so that the latest information is pulled in automatically based on tags. Footer: information section at the bottom of a page, containing essential links, contact information, and copyright and privacy policy information. It must appear on the bottom of every page of a site and be consistent throughout. III. Login & Web Platform Content Login To login, navigate to AEM portal. Enter your username and password:. You will be forwarded to To make future access to your site easier, select Add Bookmark in your browser. After login, the CQ5 Welcome Page is presented. There are two methods for accessing content for editing. The first option provides you with the Classic CQ UI for access to site content. From here, you will also be able to create new pages. On the left tab, mouse over the right-hand side of the Projects section to display a computer logo and click it to start the Classic UI window, as shown below: NorthPoint Digital Proprietary 10


12 3.1 - Classic UI / Context Editor Navigation 1. Navigating from the Projects tab in Adobe Experience Manager, click on the Girl Scouts USA project container: 2. Clicking on the container will redirect you to the Girls Scouts Project page, where you have the options to open the Site or Assets containers. NorthPoint Digital Proprietary 11


13 3.2 - Websites Console Navigation The Websites console, also known as the Site Admin console provides access all the pages in your website; create, edit, and delete pages; start a workflow; activate and deactivate pages; restore pages; check external links; and access your user inbox. 1. Navigate to the Websites Link to open the Site Admin console. 2. The Site Admin s left panel displays your pages in the Girl Scouts Website. The pages are organized into a tree structure. For ease of navigation, sections can be expanded (+) or collapsed (-) as required to show child pages. A single click in the Websites tab on an expanded page (-) opens the Admin details of the page/s in the right window: NorthPoint Digital Proprietary 12


14 Websites Link / Site Admin Console Screen Explorer Tree Webpages/ Detail Pane Nodes The Site Admin s display provides key details about the current status of highlighted page primarily for Council Approvers / Reviewers actions. The following describes the information layout: 3. From the Explorer Tree with the Websites tab expanded, double clicking on any page opens that page on a new browser window for viewing or editing. The next image provides an example of double clicking on Our Mission and the new browser screen opened for editing: NorthPoint Digital Proprietary 13
15 3.3 Editing a Page Content There are two primary ways to view or edit your web content: using the Classic UI or the Context Editor. In the next two sections we will provide a brief look at both methods Site Admin View 1. Open the Websites console at the CQ5 Welcome Console: NorthPoint Digital Proprietary 14


16 2. Under the Girl Scouts USA English Page, Double click on a page or any subsequent page. Below is an example of a sample explorer tree navigation: Girl Scouts USA > Girl Scouts USA English > About Girl Scouts > Our Mission. 3. With the new browser screen open you are now ready to edit the page. The left panel is known as the Content Finder Panel holds stored Digital Assets that can be used in to editing the page. The Contextual Menu is the center content for the page. A small floating window known as Sidekick is displayed and used by authors to insert a new component on the page. Please see the Sidekick section to view the components available to Girl Scout authors. Left Navigation Sidekick Contextual menu - via right click NorthPoint Digital Proprietary 15


 editor for the")


17 3.3.2 Content Finder Panel The content finder is used for including a digital asset in the page. The example below shows how a photo can be included as a component in a page: WYSIWYG Editor Select your center content then right-click to expose the WYSIWYG ( What You See Is What You Get ) editor for the Contextual Menu. This allows authors to add, copy / paste or type using the editor. Rich Text Editor is a basic building block for inputting textual content into CQ. It forms the basis of various components, including: Text, Text Image & Table. WYSIWYG This is a standard editor the options are evident. Mousing over the icons in the WYSIWYG tray will reveal the names of the editing functions. The options and descriptions are found in the table below: NorthPoint Digital Proprietary 16
18 NorthPoint Digital Proprietary 17


19 3.3.4 Sidekick The screenshot below shows an example for using the Sidekick tool. Here the author is dragging the title component under the Sidekick s General Tab into the middle of the page, where the component box is located. A new title is displayed in the location of the component. Right-click the component to edit, delete or copy the title: IV. Sidekick Tool The Sidekick is a small box that appears in the authoring mode. It is a CQ tool is used by authors to switch modes while interacting with their content. It can perform a number of functions. The modes include edit, preview, design, scaffolding and reload. 4.0 Sidekick Modes The row of icons at the bottom of the Sidekick are used to switch modes for working with the pages: NorthPoint Digital Proprietary 18
20 When you open your webpage, the Sidekick usually appears on the right side. Normally you will mostly be using the first two tabs: Components and Page options Components tab Components are containers for specific types of content you can add to your page. The components tab allows you to pull or add components to your page. Later sections of this Guide go into detail about various components. One example, by adding the video component, you can place a video element on the page. Girl Scouts has created custom components that provide comprehensive functionality for the Council s website authors. When working with any components, you can add them either by double-clicking Drag components or assets here or dragging and dropping the component from the sidekick onto the page. The following table lists Girl Scout s components that are available from within the Sidekick. Best used for embedding either an online form or a digital book. Option to add an event. Provides the functionality to display feature or hero story. NorthPoint Digital Proprietary 19
21 Option to add information to the Footer Navigation. Provides the functionality to display frequently accessed forms. Component can be reused with different style-sheets and make implementing changes across browsers and mobile devices easier. Provides the functionality to add banner to hero. To include an image on the page. Option to add a news list item. Frequently used with text and image component. Primary use is for interior hero images. Option to add a new row. A search dialog with related search functionality. Primary use with a new text component. Option to add a search box. Frequently used to center an image, by dragging in the image and then using the rich text editor to center. NorthPoint Digital Proprietary 20
22 4.2 - Page Tab Controls This is where you will find a majority of page-level controls over the opened page. Page Properties has the controls that you will need to be familiar with as you construct your pages. Click on the Page icon in the top navigation of the Sidekick display the options. The options available to GS authors here are: Basic Tab in Page Properties: The page properties are where authors and approvers can control key properties for their page. Within page properties there are two groupings basic and advanced. The Basic options here include: NorthPoint Digital Proprietary 21


23 A sample of Page Properties with the basic tab selected is shown above Implementing a Vanity URL using Page Properties 1. Select a page of which you want to create a vanity URL. Open the sidekick and Open the Page Properties Window in the second tab of the sidekick: NorthPoint Digital Proprietary 22


24 2. In the Basic tab, open the Vanity URL section and type the path of the Vanity URL. The URL should be in the following format: /content/ council / vanity name Check the Redirect Vanity URL box if you want the page to redirect to the actual URL of the page. Click OK: 3. Next test the URL to ensure that the Vanity URL is working properly: 4.4 Advanced Tab in Page Properties In the Advanced Tab the single option is used by GS authors is Redirect. This option allows author s to add Redirects to pages. For example, if you want to redirect a page to another webpage, simply enter the website address in the Redirect to field. NorthPoint Digital Proprietary 23


25 A sample of Page Properties with the advanced tab selected is shown above. 4.6 Workflow Tab Workflows facilitate the process of preparing a web page for posting to the live site. Workflow controls the order of the steps that have to be performed on a page. There are two (2) workflow options available on the sidekick: Girl Scouts Authoring Approval Workflow Girl Scouts Preview Workflow Council Workflow Process 1. Author logs onto AEM and selects a page to run a workflow on. The author opens the sidekick and clicks on the Workflow Tab. 2. The author selects the Approval Rollout Workflow. The author enters a label for the workflow and any comments. The starts the workflow 3. The page is locked and cannot be unlocked until the workflow is completed. NorthPoint Digital Proprietary 24
26 4. The page s changes are pushed to the preview instance, which allows changes on content to be seen before it is published to the publishing instance. 5. An is sent to a Council Approver / Reviewer, which notifies him/her that the page has been submitted under workflow and that it must be approved or rejected. 6. The reviewer can view the author s changes to the page on preview or authoring. The reviewer opens the sidekick on the page where the workflow is initiated. The reviewer chooses to either approve or reject the page and submits comments about the reason for the decision. 7. If the page is rejected, the page s changes are not published. The author is notified of the rejection and the page is unlocked. The workflow completes. At this point, the Reviewer can edit the page and address the issues to make the changes themselves. The Reviewer must either Accept or Reject the edits to complete the workflow to unlock the page for further edits. 8. If the page is approved, the page s changes are published. The author is notified of the approval and the page is unlocked. The workflow completes Activation Vs. Workflow Activation is a CQ capability that allows a reviewer/author to publish Assets, Pages and any other GS Content. Activation has the same function as an Approval workflow, as it allows for the publishing of content onto the preview and publishing instance. However, Activation bypasses the approval process ( s, interaction between author and reviewer) and allows the user to publish content directly and quickly. Currently, Activation is only allowed for particular elements of a GS Council Site: Council News Elements Council Events Elements Council Assets (including but not limited to Forms and Documents, images, icons) Council Contact Elements Council Tags (Event categories, etc.) Authors and Reviewers have the limited capability to activate GS content and materials. Reviewers have the added permission to directly activate content pages, such as the homepage. Authors are not able to directly activate website pages that feature viewable content and must use the Approval workflow to do so. NOTE: It is strongly recommended for both authors and reviewers to submit any proposed changes to a News or Event page to the GS Approval Workflow. Activation is a function that should be used carefully, especially on pages that feature live, viewable content. NorthPoint Digital Proprietary 25
 to easily create pages based on a specified structure.")

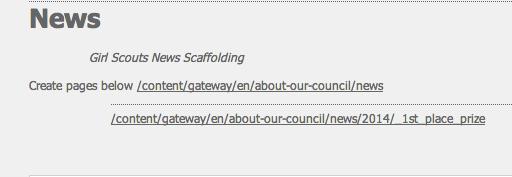
27 V. Scaffolding Sometimes you may need to create a set of pages that share the same structure but have differing content. With scaffolding you can use a form (a scaffold) to easily create pages based on a specified structure. Using scaffolding allows authors to save time, because using the standard CQ interface, you would need to create each page, then drag the appropriate components onto the page and fill each of the pages individually Training Videos Available on DXP Support Site The National Support team has created a support website that has a treasure trove of documentation for authors. The URL link to access the site is: On support website there are short video s to help authors with visualizing many of the Scaffolding operation steps. This training guide provides a note for the scaffolding items that have a support videos available on the support website Creating a Page through Scaffolding 1. To enter the scaffolding options, enter the URL: and enter your login. You should be in the Tools section of the CQ5 Admin Console after successful login: 2. On the folders sidebar, double click on the scaffolding option you want to create a page for (Tools > Default Page Scaffolding > gateway > ). For example, the Events scaffolding page will be opened: NorthPoint Digital Proprietary 26


28 3. Enter any required information for the page, including any image components, path data, metadata, etc. Click Create at the bottom of the scaffolding page to reveal a link at the top of the page that will forward you to your newly created scaffolding page Ad Page Scaffolding 1. Enter a title and image for the Ad: 2. Add Text for the Advertisement and a link. Click Create: 3. At the top of the page, a link to the ad page will be created. Click on it to be forwarded to the Ad Page: NorthPoint Digital Proprietary 27

 2. Select the ad page folder 3. Double click the ad you would like to edit 4. Once on the ad page, right click and hit edit 5.")
29 Creating Ads/Right Rails 1. Go to your home page and click on the website icon (global) 2. Once in the website view, navigate to the top of the page and select the tools icon (gears) 3. Go to your folder and double click ads 4. Enter in Title, Image, and direct the URL path or enter in external URL 5. Hit Create 6. Navigate to the top of the page and click the ad URL 7. Once on the ad page, click activate on your sidekick NOTE: Training video is available for this item on DXP website Editing Ads/Right Rails 1. Go to your home page and click on the website icon (global) 2. Select the ad page folder 3. Double click the ad you would like to edit 4. Once on the ad page, right click and hit edit 5. Make the desired edits to the ad form 6. Hit update 7. Hit activate on the sidekick Event Page Scaffolding 1. Add information about the event. A title, start date and Text are required for your event. 2. Click Create. A link to the newly-generated event will appear at the top of the page: NorthPoint Digital Proprietary 28
 3. Select, default page scaffolding 4. Select events, and double click 5.3.2 - Entering New Event Data 1. Enter title 2.")
 A: Enter search description (max 2 sentences) B: Enter in Color (example: #00AAE5) C: Enter registration link (example: ebiz) D: Tag (Category &")
30 3. Click the link to view your event page to confirm your change Accessing both Single and Multiple Events in Scaffolding 1. Select website view (global icon) 2. Select tools icon (7th one at the top of the page) 3. Select, default page scaffolding 4. Select events, and double click Entering New Event Data 1. Enter title 2. Enter start & end date 3. Enter start & end time 4. Region (if applicable) 5. Location 6. Address 7. Event Description (detailed version) A: Enter search description (max 2 sentences) B: Enter in Color (example: #00AAE5) C: Enter registration link (example: ebiz) D: Tag (Category & Program Level NOTE: REMOVE CATEGORY TAG AND PROGRAM LEVEL TAG BEFORE HITING CREATE) NorthPoint Digital Proprietary 29
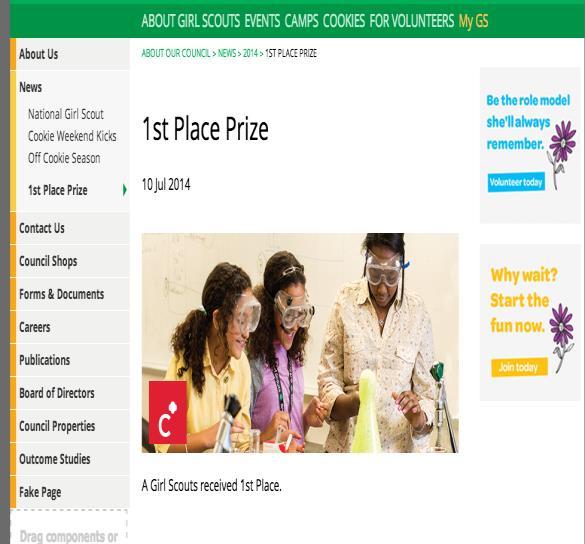
31 E: Drag in photo (if applicable, if no photo is loaded events displayed on the homepage will default to show a green arrow icon.) NOTE: Training video is available for this item on DXP website Editing an Existing Event 1. From the Events List Page select the event you wish to edit. 2. Select the scaffolding paper icon. 3. Make any edits to the event form. 4. Hit update at the bottom of the page. 5. Scroll to the top of the page, and click on the event URL. 6. Once on the event page, select the second tab (page) on the sidekick. 7. Select activate. NOTE: Training video is available for this item on DXP website Activating an Event 1. Once the event form is completed, click create at the bottom of the page. 2. Scroll to the top of the page and click on the event URL 3. Once on the event page, select the second tab (page) on the sidekick. 4. Select activate. NOTE: Training video is available for this item on DXP website Activating Multiple Events 1. Once the event form is completed, click create at the bottom of the page. 2. An event URL will appear at the top of the page, the event form will be cleared out and ready to populate content again. 3. Repeat steps from slides 2 and 3 until you have entered in all desired events. 4. Return to the tab titled CQ TOOLS Events and select the website icon (globe). 5. Navigate to your council folder, and select the events repository folder. 6. Select the year where your events occur 7. Highlight all non-activated events and hit activate (located at the top of the page) Deleting an Event (APPROVERS / REVIEWER PERMISSIONS ONLY) 1. In sidekick, select website view (global icon) 2. Navigate to your council folder, and select the events repository folder. 3. Highlight the event you wish to delete 4. Click the deactivate button. 5. Click the delete button. NOTE: Training video is available for this item on DXP website News Page Scaffolding 1. Enter any required information about the News Page including, Title, Date, Text, Description, External News URL, and Image. Click Create: NorthPoint Digital Proprietary 30


32 NorthPoint Digital Proprietary 31
33 2. A link to the newly-created News Page will be created. Click on it to view the News Page: Accessing News scaffolding 1. Go to your home page and click on the website icon (global) 2. Once in the website view, navigate to the top of the page and select the tools icon (gears) 3. Go to your folder and double click News NOTE: Training video is available for this item on DXP website News Data Entry 1. Type in the Title 2. Type in the Date 3. Copy and paste the article into the Text section 4. Enter in description field (recommendation: max 2 sentences) 5. Drag in an image (if applicable) 6. Hit create NOTE: Training video is available for this item on DXP website Activating a News Story 1. Scroll to the top of the page and click on the news URL 2. Once on the news article page, navigate to the page tab on your sidekick 3. Hit activate Editing a News Story 1. Go to your News page 2. Click the news article you would like to edit 3. Once on the desired news page, select the scaffolding icon (paper) on your sidekick 4. Make any edits to the news form 5. Hit update NOTE: Training video is available for this item on DXP website Contact Scaffolding 1. Enter the required information about a Contact by adding Name, Title, Phone Number, and Team. Click Create: NorthPoint Digital Proprietary 32
 2.")
 5. Hit Create 5.5.3 - Activating a Contact 1.")
34 2. The Contact Scaffolding will not generate a link to a non-visible page. To view the newly-created contact, navigate to Accessing Contacts 1. Go to your main site and select the website icon (globe icon) 2. Select the tools icon (gears) at the top of the page 3. Go to your folder and double click contact NOTE: Training video is available for this item on DXP website Entering Contact data 1. Fill in Name field 2. Fill in the person s title 3. Fill in their phone number 4. Fill in their team (example: department or service unit) 5. Hit Create Activating a Contact 1. Return to the tab titled CQ TOOLS Events and select the website icon (globe). 2. Go to your folder and click on the + button next to Contacts 3. Find desired contact 4. Highlight the contact 5. Hit activate NOTE: Training video is available for this item on DXP website. NorthPoint Digital Proprietary 33
35 Editing a Contact 1. Go to your home page and click on the website icon (global) 2. Go to your folder and click on the + button next to Contacts 3. Find desired contact 4. Double click 5. Once back on the site, navigate to the sidekick and select the scaffolding icon (paper) 6. Edit the desired field in the contact form 7. Hit update NOTE: Training video is available for this item on DXP website. 5.6 Forms Uploading a Form Asset 1. Go to your main site and select the website icon (global icon) 2. Select the Digital Assets (DAM) icon ( the camera icon) 3. Go to your council folder and select Forms and Documents 4. Select New at the top of the page. Browse your computer to find the file that you would like to upload. 5. Hit the upload button NOTE 1: Training video is available for this item on DXP website. NOTE 2: The file will upload to the last page of files Form Data Entry 1. Enter the Title 2. Enter the PDF Title 3. Enter a 1 sentence description of the form 4. Select the tags you wish to use Activating Forms 1. Hit the save button at the bottom of the page 2. Go back to the digital assets tab 3. Highlight the form and hit activate Editing a Form 1. Go to your main site and select the website icon (global icon) 2. Select the Digital Assets (DAM) icon ( the camera icon) 3. Go to your council folder and select Forms and Documents 4. Double click on the file you would like to edit 5. Edit the fields you would like to edit 6. Go back to the digital assets tab 7. Highlight form and hit activate NOTE: Training video is available for this item on DXP website Deleting a Form (APPROVERS / REVIEWER PERMISSIONS ONLY) 1. Go to your main site and select the website icon (global icon) NorthPoint Digital Proprietary 34
36 2. Select the Digital Assets (DAM) icon ( the camera icon) 3. Go to your council folder and select Forms and Documents 4. Select on the file you would like to edit 5. Select deactivate 6. Select delete NOTE: Training video is available for this item on DXP website. 5.7 Web Forms Note: If you want form to appear in the advanced search for forms, create your forms as child pages in the Forms section Web Form Basics 1: Click on the Girl Scouts Form tab in the sidekick 2: Drag in the form component 3: Drag in the text field component 4: Right click and select Edit a. TITLE AND TEXT (1 st tab) i. Element Name must be distinct to each component and cannot be repeated; include dashes to separate words (example: girl-name). This is what appears when councils receive data. ii. Title this is what will appear on the form; you have the option to hide iii. Description this appears under the text field if desired iv. Prefix appears in front of the field (ex: $) * All additional components must be placed between Start of Form and End of Form (above) Web Form Constraints 1: Select the Constraints tab 2: Check the required field 3: Put in required message a. Option to require information for submission b. Constraints: i) Currency Amount (xx.00) ii) Date (MM/DD/YY) iii) Phone Number as (xxx)xxx-xxxx iv) /Numeric/Year List of Web Form Constraints 1. Currency Amount: xx Date: MM/DD/YY 3. xxxx@xxx.xxx (extension =.org,.com, etc.) --> let's try not to use this one since it causes issues 4. No Whitespace: xxxx@xxx.xxx (extension =.org,.com, etc.) 5. Event Basics Constraint:? 6. Numeric No Whitespace:? Phone Number: (555) ? NorthPoint Digital Proprietary 35
37 8. Year: Year: This is the validation number for credit cards (CCV) = this is between 3 and 5 numeric characters Useful Web Form Components 1: Drag in Address Component a. Built in Name, Address, City, Zip, etc 2: Drag in the Checkbox Group Component a. Users can select multiple values b. TITLE AND TEXT (1 st tab) i. Value=Title (ex: thin-mint=thin Mint) 3: Drag in the Dropdown List Component a) Users can select only 1 item b) Identical set up to Checkbox Group component 4: Drag in Credit Card Details Component a) Users can enter information securely b) Does not currently connect to PayPal Web Form Calculations 1: Drag in the text fields for the information you need (example: Number of girls, Price per event ) 2: When entering the value names for each field, include underscores INSTEAD of dashes (so as to not confuse the dash for a subtraction sign) a. Number_of_girls b. Price_per_event 3: Drag in the Calculation Field component a. edit the element name, constraints, etc. 4: In the Expression tab, type in the expression with the value names of the fields you want to compute 5: Test the function a. Number_of_girls*price_per_event Web Form Data Storage Option 1: Data Repository 1: Go to your form and hit Edit 2: Click on the Advanced tab 3: In the Action Type field, select Store Content from the drop down menu NorthPoint Digital Proprietary 36


38 4: Hit Okay Option 2: ed Data 1: Go to your form and hit Edit 2: Click on the Advanced tab 3: In the Action Type field, select Mail from the drop down menu 4: Click the arrow next to Action Configuration 5: In the From field list a generic that does not need to exist so the person receiving the e- mail with the data knows this is an with form data Ex: noreply@kansasgirlscouts.org 6: In the Mailto field put the address for the person that will receive the 7: In the Subject field put the name of the form Web Form Thank You page 1: Go to the Page Properties Page in the sidekick 2: Create a child page 3: Create a Thank you page 4: Go to the Page Properties tab and hide the page in navigation 5: Hit Edit on your form and direct the path to the page you just created. For the best results when editing your page footer the National Support team recommends only editing using a FireFox browser with the CQ5 ACM platform. 6.1 Adding Social Media Icons to Footer The following steps describe how to add a social media icon to the page footer: 1. Navigate to the homepage you wish to edit and double click the footer at the bottom of the page: 2. A dialog will open. Navigate to the Social Media Icons tab: NorthPoint Digital Proprietary 37
39 3. Add a new item to add a social media icon and its associated link. In URL, add the external link you wish the icon to link to and in Icon Path add the path of the icon image: 4. Click OK and inspect that the changes were made correctly. NOTE: If the image skews the footer, try refreshing the page: Terms & Conditions VII. Don t Forgot About Tagging Tags are a quick and easy method of classifying content within your website. In technical terms, a tag is a piece of metadata assigned to a content node within CQ (usually a page). You can also think of them as keywords or labels that you attach to a page to help you find it again. The next sections describe adding a new tag and applying an existing tag to your page or document Creating a Tag 1. In sidekick, select website view (global icon) 2. Navigate to the tagging tab. NorthPoint Digital Proprietary 38

 5.")

40 3. Select your Council s folder. 4. Double click which tag folder you would like to edit. (categories= events tags) 5. Click the new button at the top of the page. NorthPoint Digital Proprietary 39


41 6. Enter in the required fields (title and name) 7. Select create 8. Highlight tag and activate. 7.2 Tagging Nomenclature *Please follow the text guidelines as shown in the chart below. Categories Forms & Documents categories forms_documents Program Level program-level NorthPoint Digital Proprietary 40

42 7.3 - Attaching a Tag to an Existing Digital Asset 1. Navigate to the DAM: 2. Select an asset to apply a tag to. Upload an asset if it is not present in the DAM as described in section 8.1: 3. Open the tags section to select a tag: NorthPoint Digital Proprietary 41
43 4. Open the girlscouts tab: 5. Under the tab, expand the folder that contains the desired tag: 6. Select a tag. It will be added to the Asset: NorthPoint Digital Proprietary 42
 CQ DAM (Digital Asset Management) is a digital asset management tool that is fully")

44 7. View the tag and click Save: VIII. Digital Asset Manager (DAM) CQ DAM (Digital Asset Management) is a digital asset management tool that is fully integrated with the CQ platform and enables your enterprise to share and distribute digital assets. Users across an organization can manage, store, and access images, videos, documents, audio clips, and rich media such as Flash files for use on the web, in print, and for digital distribution. NorthPoint Digital Proprietary 43
 console. 1.")
 folder.")
45 8.0 DAM Navigation The Digital Assets console lets you import and manage digital. This console is also referred to as the CQ5 DAM (Digital Asset Management) console. 1. In the CQ5 Welcome Page, click on the Digital Assets link to enter the DAM console: 2. Expand the girlscouts-shared folder and expand the en (English) folder. Clicking on any of the child folders will display assets in the main window: Uploading Assets to the DAM 1. Navigate to the DAM console and expand the girlscouts-shared folder: NorthPoint Digital Proprietary 44


46 2. Choose a subfolder under the girlscouts-shared folder that you want to upload an asset to. For example, an image can be uploaded to the girlscouts-shared > en > news > 2014 folder. Click the New button and select New File: Browse to the location on your local machine to where your asset is located to upload the file. Click upload: NorthPoint Digital Proprietary 45

47 The asset should appear in your main window for the folder chosen: Activating Assets in the DAM Before a new image/document can be used on a web page, it must be activated in the DAM. This process will make the image/document available via the Content Finder 1. Navigate to the Digital Assets link to open the Site Admin. 2. Use the Content Tree to select the item(s) you wish to activate, then select Activate option on header bar. 3. Once the indicator becomes green, the item will be available in the Content Finder and can be added to the content on web pages. NorthPoint Digital Proprietary 46
48 Appendix Frequently Used Content Management System (CMS) Terminology While you are working with Adobe s CQ you will come across a number of new terms and concepts that are important to have some basic understanding. Please review and familiarize yourself with the items listed below. NorthPoint Digital Proprietary 47
49 NorthPoint Digital Proprietary 48
50 NorthPoint Digital Proprietary 49
Introduction to Adobe CQ5
 UNDP Country Office User Guide Part I Introduction to Adobe CQ5 How to use Adobe CQ5 to build websites UNDP OC Web Team v1.1 1. How to log in to CQ5 1 Contents 1. How to log in to CQ5... 2 2. CMS terminology...
Percussion Documentation Table of Contents
 Percussion Documentation Table of Contents Intro to the Percussion Interface... 2 Logging In to Percussion... 2 The Dashboard... 2 Managing Dashboard Gadgets... 3 The Menu... 4 The Finder... 4 Editor view...
Drupal Basics. for COS and CLASS site maintainers
 Drupal Basics for COS and CLASS site maintainers Introduction This guide is meant as a starting point for site maintainers in the UNT College of Science and College of Liberal Arts and Social Sciences
Administrative Training Mura CMS Version 5.6
 Administrative Training Mura CMS Version 5.6 Published: March 9, 2012 Table of Contents Mura CMS Overview! 6 Dashboard!... 6 Site Manager!... 6 Drafts!... 6 Components!... 6 Categories!... 6 Content Collections:
Content Author's Reference and Cookbook
 Sitecore CMS 7.0 Content Author's Reference and Cookbook Rev. 130425 Sitecore CMS 7.0 Content Author's Reference and Cookbook A Conceptual Overview and Practical Guide to Using Sitecore Table of Contents
Managing Your Website with Convert Community. My MU Health and My MU Health Nursing
 Managing Your Website with Convert Community My MU Health and My MU Health Nursing Managing Your Website with Convert Community LOGGING IN... 4 LOG IN TO CONVERT COMMUNITY... 4 LOG OFF CORRECTLY... 4 GETTING
SCHULICH MEDICINE & DENTISTRY Website Updates August 30, Administrative Web Editor Guide v6
 SCHULICH MEDICINE & DENTISTRY Website Updates August 30, 2012 Administrative Web Editor Guide v6 Table of Contents Chapter 1 Web Anatomy... 1 1.1 What You Need To Know First... 1 1.2 Anatomy of a Home
Learn how to login to Sitefinity and what possible errors you can get if you do not have proper permissions.
 USER GUIDE This guide is intended for users of all levels of expertise. The guide describes in detail Sitefinity user interface - from logging to completing a project. Use it to learn how to create pages
NORTH CAROLINA A&T STATE UNIVERSITY CMS USER GUIDE. A Manual for the Cascade Server Content Management System (CMS)
") NORTH CAROLINA A&T STATE UNIVERSITY CMS USER GUIDE A Manual for the Cascade Server Content Management System (CMS) Table of Contents Chapter 1 - Getting Started... 3 Overview... 3 What is a Content Management
NORTH CAROLINA A&T STATE UNIVERSITY CMS USER GUIDE A Manual for the Cascade Server Content Management System (CMS) Table of Contents Chapter 1 - Getting Started... 3 Overview... 3 What is a Content Management
Introduction to the Learning Environment 8.3 to 8.4.x
 Introduction to the Learning Environment 8.3 to 8.4.x User Guide Second edition, November 30, 2009 Contents My Home Accessing your courses Searching for courses Navigating inside a course Lists Actions
EFM Community 3.1 Portal Administration Guide
 EFM Community 3.1 Portal Administration Guide WHITE PAPER For technical support please call: 1-800-787-8755 Or visit: Hwww.Vovici.comH Please contact Vovici technical support if you believe any of the
Adobe Experience Manager (AEM) Author Training
 Author Training") Adobe Experience Manager (AEM) Author Training McGladrey.com 11/6/2014 Foster, Ken Table of Contents AEM Training Agenda... 3 Overview... 4 Author and Publish Instances for AEM... 4 QA and Production Websites...
Adobe Experience Manager (AEM) Author Training McGladrey.com 11/6/2014 Foster, Ken Table of Contents AEM Training Agenda... 3 Overview... 4 Author and Publish Instances for AEM... 4 QA and Production Websites...
ScholarBlogs Basics (WordPress)
") Emory Center for Digital Scholarship Library and Information Technology Services ScholarBlogs Basics (WordPress) Table of Contents (click on the headings below to go directly to the section) Use of ScholarBlogs
Emory Center for Digital Scholarship Library and Information Technology Services ScholarBlogs Basics (WordPress) Table of Contents (click on the headings below to go directly to the section) Use of ScholarBlogs
Site Owners: Cascade Basics. May 2017
 Site Owners: Cascade Basics May 2017 Page 2 Logging In & Your Site Logging In Open a browser and enter the following URL (or click this link): http://mordac.itcs.northwestern.edu/ OR http://www.northwestern.edu/cms/
FileNET Guide for AHC PageMasters
 PageMasters have the permissions necessary to perform the following tasks with Site Tools: ACADEMIC HEALTH CENTER 2 Application Requirements...3 Access FileNET...3 Log in to FileNET...3 Navigate the Site...3
Cascade User Guide. Introduction. Key System Features. User Interface
 Cascade User Guide Introduction Key System Features User Interface Menus and Moving Through the System Files and Pages Working with Existing Pages File Action Menu Version Control Deleting files Restoring
GENERAL TEMPLATE AREAS
 1 GENERAL TEMPLATE AREAS SIU Headers SIU Headers are created and edited through the main administration of the CMS. Users do not have access edit SIU headers. Logo and Identifier Logo or the College Identifier
What is OU Campus? Log into OU Campus
 OU Campus v10 Content Providers User Guide This document is designed to provide (level 5) Content Providers with basic information needed to do most tasks. Those needing additional information are encouraged
FileNET Guide for AHC PageMasters
 ACADEMIC HEALTH CENTER 2 PageMasters have the permissions necessary to perform the following tasks with Site Tools: Application Requirements...3 Access FileNET...3 Login to FileNET...3 Navigate the Site...3
SharePoint User Manual
 SharePoint User Manual Developed By The CCAP SharePoint Team Revision: 10/2009 TABLE OF CONTENTS SECTION 1... 5 ABOUT SHAREPOINT... 5 1. WHAT IS MICROSOFT OFFICE SHAREPOINT SERVER (MOSS OR SHAREPOINT)?...
Content Author's Reference and Cookbook
 Sitecore CMS 7.2 Content Author's Reference and Cookbook Rev. 140225 Sitecore CMS 7.2 Content Author's Reference and Cookbook A Conceptual Overview and Practical Guide to Using Sitecore Table of Contents
Cascade V8.4 Website Content Management for the Site Manager UMSL
 Cascade V8.4 Website Content Management for the Site Manager UMSL Contents Purpose & How to Use This Guide... 5 Getting Started and Logging In... 5 Login... 5 Dashboard... 5 Notifications... 5 Setting
DRX Platform Manager DRX Platform Manager
 DRX Platform Manager 1 P a g e Table of Contents DRX Platform Manager... 1 Introduction to the DRX Platform Manager... 4 Getting Started... 4 Login... 4 Platform Manager... 4 DRX Application Configuration
Content Author's Reference and Cookbook
 Sitecore CMS 6 Content Author's Reference and Cookbook Rev. 080627 Sitecore CMS 6 Content Author's Reference and Cookbook A Conceptual Overview and Practical Guide to Using Sitecore Table of Contents Chapter
Hands-On Introduction to Queens College Web Sites
 Hands-On Introduction to Queens College Web Sites This handout accompanies training workshops for Queens College Content Editors who will manage and maintain the web content in their areas. Overview of
LEVEL 1 Site Administrator Grants permissions and manages access, manages main homepage.
 USING JOOMLA LEVEL 2 (TRAINING) OVERVIEW This document is designed to provide guidance and training for incorporating your department s content into to the Joomla Content Management System (CMS). Each
Last modified: Adobe Experience Manager
 Last modified: 5.30.17 Adobe Experience Manager Table of Contents Chapter 1: Introduction 1.1 Responsive Design 1.2 Edit Anywhere 1.3 Logging In Chapter 2: AEM Overview 2.1 Parent-Child Relationship 2.2
In the fourth unit you will learn how to upload and add images and PDF files.
 Introduction Here at SUNY New Paltz, we use the Terminal Four (T4) web content management system (CMS). This puts the power of editing content on our college s webpage in the hands of our authorized users.
EKTRON 101: THE BASICS
 EKTRON 101: THE BASICS Table of Contents INTRODUCTION... 2 TERMINOLOGY... 2 WHY DO SOME PAGES LOOK DIFFERENT THAN OTHERS?... 5 LOGGING IN... 8 Choosing an edit mode... 10 Edit in context mode (easy editing)...
BCI.com Sitecore Publishing Guide. November 2017
 BCI.com Sitecore Publishing Guide November 2017 Table of contents 3 Introduction 63 Search 4 Sitecore terms 66 Change your personal settings 5 Publishing basics 5 Log in to Sitecore Editing 69 BCI.com
EDITING AN EXISTING REPORT
 Report Writing in NMU Cognos Administrative Reporting 1 This guide assumes that you have had basic report writing training for Cognos. It is simple guide for the new upgrade. Basic usage of report running
Electronic Grants Administration & Management System - EGrAMS
 Electronic Grants Administration & Management System - EGrAMS Introduction EGrAMS is an enterprise-wide web-based scalable, configurable, business rule driven and workflow based end-to-end electronic grants
WEBSITE USER GUIDE V.4
 WEBSITE USER GUIDE V.4 SEC. 01 SEC. 02 SEC. 03 SEC. 04 SEC. 05 SEC. 06 CASCADE INTERFACE OVERVIEW LOGIN PAGE USER DASHBOARD SITE DIRECTORY EDITING PAGES PAGE EDITOR OVERVIEW STANDARD ROW COMPONENTS EDITING
Page Gentics Software GmbH Enterprise Portals and Content Management Systems
 1. 2012 Gentics Software GmbH Page 2 Table of Contents 1. Table of Contents... 3 2. Foreword Infoportal and Support... 6 3. First steps... 6 3.1 Login and logout... 6 3.2 Password change... 7 3.3 User
Training Manual and Help File
 Training Manual and Help File 30.06.2011 Update Manage Grow Welcome to your new Juniper Website Management System with CMS Introduction The Juniper Website Management System with CMS (Website Content Management
SharePoint 2010 Tutorial
 SharePoint 2010 Tutorial TABLE OF CONTENTS Introduction... 1 Basic Navigation... 2 Navigation Buttons & Bars... 3 Ribbon... 4 Library Ribbon... 6 Recycle Bin... 7 Permission Levels & Groups... 8 Create
Lava New Media s CMS. Documentation Page 1
 Lava New Media s CMS Documentation 5.12.2010 Page 1 Table of Contents Logging On to the Content Management System 3 Introduction to the CMS 3 What is the page tree? 4 Editing Web Pages 5 How to use the
Network Rail Brand Hub USER GUIDE
 Network Rail Brand Hub USER GUIDE The Brand Hub Using keywords, visual thumbnails and a more upto-date online interface, the new Brand Hub will make searching, browsing and downloading images, templates
Microsoft Windows SharePoint Services
 Microsoft Windows SharePoint Services SITE ADMIN USER TRAINING 1 Introduction What is Microsoft Windows SharePoint Services? Windows SharePoint Services (referred to generically as SharePoint) is a tool
Website Administration Manual, Part One
 Website Administration Manual, Part One A Guide to the CMS & Widgets Curry School of Education Website http://curry.virginia.edu The Curry Website Administrators Manual - Part One 2 The CMS The content
USER MANUAL DSM BRAND CENTER
 USER MANUAL DSM BRAND CENTER Introduction of DSM Brand Center Why are these instructions helpful for me? These instructions will help you to understand what the DSM Brand Center is, what you can do with
Logging Into Your Site
 This training document is meant as a step-by-step guide to creating and delivering a UW-Madison site in the current UW-Madison theme. In this training class, you will learn how to log in to access your
Welcome to the CP Portal
 Welcome to the CP Portal Access your school documents from home Launch Internet Explorer and navigate to: https://files.cpcsc.k12.in.us/htcomnet/ Click on Continue to this website (not recommended) Key
Pages are static content, generally linked in your navigation. They are used for things like your about page and contact page.
 North Star Marketing Client : The Guthrie Group Deliverable : Website Training +++ LOGGING IN AND OUT +++++++++ 1. Go to http://tgg.northstarmarketing.com/wp admin/. This is the address for the staging
08/10/2018. Istanbul Now Platform User Interface
 08/10/2018 Contents Contents...5 UI16... 9 Comparison of UI16 and UI15 styles... 11 Activate UI16... 15 Switch between UI16 and UI15...15 UI16 application navigator... 16 System settings for the user
AEM Complete Newsroom & Calendar Guide. Version 1 January, 2016
 AEM Complete Newsroom & Calendar Guide Version 1 January, 2016 1 Contents The News Room Adding a Newsroom... 3 The News Room Adding a Newsroom Archive Page... 5 The News Room Adding News Article Pages...
Mihaylo College Website Content Editing Guide
 Mihaylo College Website Content Editing Guide The following guide will take you through the steps necessary to update website content for https://business.fullerton.edu through the OmniUpdate (OUCampus)
Vetstreet Web Builder Editor Tool User Guide v2.1. Web Builder. User Guide v2.1
 Web Builder User Guide v2.1 Contact your Account Manager at (888) 799-8387 or email support@vetstreet.com with questions. Page 1 Index... 1 The Editor Tool... 7 Forgot Your Username or Password?... 7 How
ELM Server Exchange Edition ArchiveWeb version 5.5
 ELM Server Exchange Edition ArchiveWeb version 5.5 Copyright 2016 Lexmark. All rights reserved. Lexmark is a trademark of Lexmark International, Inc., registered in the U.S. and/or other countries. All
New Website User Manual
 New Website User Manual General Notes 3 How To Login To Your Website And Access Admin Dashboard 4 Adding / Editing Sliders 5 Home Slider 5 School Slider (Same steps for ALL school pages) - Add a Slide
Getting Started with the Aloha Community Template for Salesforce Identity
 Getting Started with the Aloha Community Template for Salesforce Identity Salesforce, Winter 18 @salesforcedocs Last updated: November 30, 2017 Copyright 2000 2017 salesforce.com, inc. All rights reserved.
Beginner Workshop Activity Guide 2012 User Conference
 Beginner Workshop Activity Guide 2012 User Conference TUESDAY, MARCH 6 2:00PM 5:00 PM Beginner Training Workshop Attendees will learn the end user functions of OU Campus TM. They will learn how to log
t4 Manual Teachers College, Columbia University
 Teachers College, Columbia University TABLE of CONTENTS I. INTERFACE OVERVIEW II. SECTION A. Add Section B. Modify Section C. Delete Section III. DEPARTMENT SECTION OVERVIEW A. Primary Slideshow or Carousel
C1 CMS User Guide Orckestra, Europe Nygårdsvej 16 DK-2100 Copenhagen Phone
 2017-02-13 Orckestra, Europe Nygårdsvej 16 DK-2100 Copenhagen Phone +45 3915 7600 www.orckestra.com Content 1 INTRODUCTION... 4 1.1 Page-based systems versus item-based systems 4 1.2 Browser support 5
CMS Training Reference Guide
 CMS Training Reference Guide Your training session may have been conducted on one of your sites Dev or Staging or Live To login, type your web address domain into a web browser and add (/admin) o Example:
HIRING MANAGER S JOB SITE USER S GUIDE. Fitchburg State University Hiring System
 HIRING MANAGER S JOB SITE USER S GUIDE Fitchburg State University Hiring System TABLE OF CONTENTS INTRODUCTION... 3 GETTING STARTED... 5 CREATING A POSTING.7 Creating Posting from Position Type... 7 Posting
Swiiit User Guide 09/11/2016
 Swiiit User Guide 09/11/2016 Contents Getting Started... 4 Overview of Main Tools... 5 Webpages... 6 Main pages (Sections)... 6 Rearrange Sections... 6 Subpages... 7 Change the Title of a Webpage... 8
We start by providing you with an overview of the key feature of the IBM BPM Process Portal.
 Lab 1 Process Portal 1.1 Overview This lab exercise will make you familiar with the key capabilities of the ready-to-use Process Portal included with IBM Business Process Manager (BPM). You will experience
Roxen Content Provider
 Roxen Content Provider Generation 3 Templates Purpose This workbook is designed to provide a training and reference tool for placing University of Alaska information on the World Wide Web (WWW) using the
Maximo Self Service Center
 Maximo Self Service Center Once you have received an email regarding your registration approval, go to the following web address: https://maximo.mysodexo.com Log in to the Self Service Center: Your User
Crocker Communications
 Crocker Communications Information Architecture Doc Version: 1.0 Creation Date: March 6, 2014 By: Knectar For: TSM Design, Crocker Communications Table of Contents Introduction Design and Assets Wireframes
DOCUMENTUM D2. User Guide
 DOCUMENTUM D2 User Guide Contents 1. Groups... 6 2. Introduction to D2... 7 Access D2... 7 Recommended browsers... 7 Login... 7 First-time login... 7 Installing the Content Transfer Extension... 8 Logout...
Unit 1: Working With Tables
 Unit 1: Working With Tables Unit Overview This unit covers the basics of working with Tables and the Table wizard. It does not include working with fields, which is covered in Units 3 and 4. It is divided
Evoq 9 Content Managers Training Manual
 Evoq 9 Content Managers Training Manual Table of Contents Chapter 1: User Login... 2 User Login...2 User Login Screen...2 User Logout...2 Chapter 2: Navigating within Evoq 9...3 Editing Bar...3 Dashboard...4
End-User Reference Guide El Camino College Compton Center
 End-User Reference Guide El Camino College Compton Center OU Campus Version 10 OmniUpdate, Inc. 1320 Flynn Road, Suite 100 Camarillo, CA 93012 OmniUpdate, Inc. 1320 Flynn Road, Suite 100 Camarillo, CA
Website Management with the CMS
 Website Management with the CMS In Class Step-by-Step Guidebook Updated 12/22/2010 Quick Reference Links CMS Login http://staging.montgomerycollege.edu/cmslogin.aspx Sample Department Site URLs (staging
Content User Guide. Pennsylvania Interactive. October 10, Training website -
 Content User Guide Pennsylvania Interactive October 10, 2014 Training website - http://www.training.pa.egov.com Table of Contents 1 INTRODUCTION... 6 1.1 Microsoft Office SharePoint Server... 6 2 ACCESS
HOTDOCS DOCUMENT SERVICES
 HotDocs Document Services ~ February 2012 Page 1 HOTDOCS DOCUMENT SERVICES Getting Started in the Cloud AT A GLANCE Sign up for HotDocs Document Services Receive contract order confirmation email Install
Creating a Website with Wordpress
 Creating a Website with Wordpress Wordpress Fundamentals Version 1.6 Fayette County Public Schools June 28, 2013 Sow-Foong Hedman Technology Web Team Contents What is Wordpress?... 4 Overview... 4 Key
General Training Curriculum
 General Training Curriculum Table of Contents 1.0 Getting Started 1.1 What is MODX? 1.2 Browser Support 1.3 How Do I Log In? 2.0 MODX Dashboard 2.1 What is a Dashboard? 2.2 Global Top Menu Bar 2.2.0 MODX
A*STAR SRDB User Guide
 A*STAR SRDB User Guide Document Version: 5.0 Revised Date: 23 rd March 2010 Document name: ASTAR_UserGuide_5.0.doc Page 1 of 43 Revision History Date Version Author Review By Summary of Changes 9 th July
How To Guide. Hannon Hill Corporation for Rowan University
 How To Guide Hannon Hill Corporation for Rowan University Hannon Hill Corporation 3423 Piedmont Road, Suite 520 Atlanta, GA 30305 www.hannonhill.com 678.904.6900 info@hannonhill.com Rowan University: How
Administrator Quick Guide
 1 Administrator Quick Guide Login Screen The first page employees will see when visiting their training site is the login screen. This is where employees must enter their username and password to access
PROFESSIONAL TUTORIAL. Trinity Innovations 2010 All Rights Reserved.
 PROFESSIONAL TUTORIAL Trinity Innovations 2010 All Rights Reserved www.3dissue.com PART ONE Converting PDFs into the correct JPEG format To create a new digital edition from a PDF we are going to use the
User s Manual. Beacon Technologies, Inc. 164-B Thatcher Rd. Greensboro, NC beacontechnologies.com
 Beacon Technologies, Inc. 164-B Thatcher Rd. Greensboro, NC 27409 User s Manual beacontechnologies.com Grossmont-Cuyamaca Community College District Version 1.4 January 26, 2015 Table of Contents 1. THE
Web Page Basics. FRSD Elementary Technology Workshop. February Presented by Lisa Stewart, Tammy Gianvito, and Diane Kaufmann
 Web Page Basics FRSD Elementary Technology Workshop February 2014 Presented by Lisa Stewart, Tammy Gianvito, and Diane Kaufmann Please save this booklet for future reference. 2 P a g e Notes and Questions
TrainingFinder Real-time Affiliate Integrated Network (TRAIN) Administrator Handbook. Version 3.2 (3/26/08) Public Health Foundation
 Administrator Handbook. Version 3.2 (3/26/08) Public Health Foundation") TrainingFinder Real-time Affiliate Integrated Network (TRAIN) Administrator Handbook Version 3.2 (3/26/08) Public Health Foundation Table of Contents About This Handbook 5 TRAIN Administrative Basics 6
TrainingFinder Real-time Affiliate Integrated Network (TRAIN) Administrator Handbook Version 3.2 (3/26/08) Public Health Foundation Table of Contents About This Handbook 5 TRAIN Administrative Basics 6
COUPONPAQ ADMIN USER GUIDE
 COUPONPAQ ADMIN USER GUIDE -2- Overview THANK YOU FOR CHOOSING COUPONPAQ SOFTWARE COUPONPAQ platform is the No 1 feature packed coupon distribution software on the market. It creates an effective incentive
College of Arts & Sciences
 College of Arts & Sciences RedDot CMS Guide for Site Editors This guide is designed to show you how to work with the RedDot Content Management System (CMS) at Georgia State University. Particularly, it
CreateASite Beginner s Guide
 Contents Getting Started... 3 Access the CreateASite Control Panel... 3 Select a Category/Subcategory... 4 Select a Template... 6 Change the Site Template... 10 Change Colours... 12 Change Fonts... 13
Colligo Engage Outlook App 7.1. Connected Mode - User Guide
 7.1 Connected Mode - User Guide Contents Colligo Engage Outlook App 1 Benefits 1 Key Features 1 Platforms Supported 1 Installing and Activating Colligo Engage Outlook App 2 Checking for Updates 3 Updating
Blackboard Portfolio System Owner and Designer Reference
 Blackboard Learning System Blackboard Portfolio System Owner and Designer Reference Application Pack 2 for Blackboard Learning System CE Enterprise License (Release 6) Application Pack 2 for Blackboard
Introduction to Moodle
 Introduction to Moodle Preparing for a Moodle Staff Development Session... 2 Logging in to Moodle... 2 Adding an image to your profile... 4 Navigate to and within a course... 6 Content of the basic template
Clay Tablet Connector for Adobe Experience Manager. User Guide. Version 2.3.0
 Clay Tablet Connector for Adobe Experience Manager User Guide Version 2.3.0 March 9, 2015 Copyright Copyright 2005-2015 Clay Tablet Technologies Inc. All rights reserved. All rights reserved. This document
MS Components: Quick Start
 MS Components: Quick Start A selection of the most commonly used CMS components with guides on why and how to use them Author: Vic Fascio, based on EMG s CCSF Component User Guide (the complete reference
CANVAS OBSERVER GUIDE
 CANVAS OBSERVER GUIDE This work is licensed under a Creative Commons Attribution-NonCommercial-ShareAlike License Table of Contents Introduction...3 What is the Observer role?...4 How can I use Canvas
eportfolio GENERAL USER
 eportfolio GENERAL USER Startup Guide [2016-17] Table of Contents Page 2: Introduction Logging in to your Digication account Page 3: Page 4: Steps to create an eportfolio from course template Steps to
ScholarOne Manuscripts. Editor User Guide
 ScholarOne Manuscripts Editor User Guide 28-November-2017 Clarivate Analytics ScholarOne Manuscripts Editor User Guide Page i TABLE OF CONTENTS INTRODUCTION... 1 Use Get Help Now and FAQs... 1 Site Configuration
Alfresco Alfresco Explorer QuickStart
 Alfresco 4.2.0 Contents... 3 Important notes...3 Starting with Explorer... 3 Toolbar... 4 Sidebar... 4 Working area...4 Logging in... 5 Adding new users...5 Creating spaces and content... 7 Creating a
ALES Wordpress Editor documentation ALES Research websites
 ALES Wordpress Editor documentation ALES Research websites Contents Login... 2 Website Dashboard... 3 Editing menu order or structure... 4 Add a new page... 6 Move a page... 6 Select a page to edit...
Getting Started with Office 365
 Getting Started with Office 365 First Steps Welcome to Office 365! Create a Desktop Shortcut to the Office 365 Website 1. Right-click your desktop and choose New Shortcut 2. In the table below, copy the
Enterprise Application Systems
 INFORMATION TECHNOLOGY Enterprise Application Systems Mt. San Antonio College Information Technology 1100 North Grand Avenue Building 23 Walnut, CA 91789 Help Desk 909.274.4357 Contents Accessing OmniUpdate
Poet Image Description Tool: Step-by-step Guide
 Poet Image Description Tool: Step-by-step Guide Introduction This guide is designed to help you use the Poet image description tool to add image descriptions to DAISY books. The tool assumes you have access
SharePoint General Instructions
 SharePoint General Instructions Table of Content What is GC Drive?... 2 Access GC Drive... 2 Navigate GC Drive... 2 View and Edit My Profile... 3 OneDrive for Business... 3 What is OneDrive for Business...
HOW TO USE THE CONTENT MANAGEMENT SYSTEM (CMS) TABLE OF CONTENTS
 TABLE OF CONTENTS") HOW TO USE THE CONTENT MANAGEMENT SYSTEM (CMS) TABLE OF CONTENTS GETTING STARTED (LOGIN) 2 SITE MAP (ORGANIZE WEBPAGES) 2 CREATE NEW PAGE 3 REMOVE PAGE 6 SORT PAGES IN CHANNEL 7 MOVE PAGE 8 PAGE PROPERTIES
HOW TO USE THE CONTENT MANAGEMENT SYSTEM (CMS) TABLE OF CONTENTS GETTING STARTED (LOGIN) 2 SITE MAP (ORGANIZE WEBPAGES) 2 CREATE NEW PAGE 3 REMOVE PAGE 6 SORT PAGES IN CHANNEL 7 MOVE PAGE 8 PAGE PROPERTIES
Odyssey File & Serve. Review Queue User Guide Release 3.11
 Odyssey File & Serve Review Queue User Guide Release 3.11 OFS-FS 200 3375 v.1 June 2015 COPYRIGHT AND CONFIDENTIALITY Copyright 2015 Tyler Technologies, Inc. All rights reserved. All documentation, source
Evoq 8 Content Managers Training Manual
 Evoq 8 Content Managers Training Manual Table of Contents Chapter 1: User Login... 2 User Login...2 User Login Screen...2 User Logout...2 Chapter 2: Navigating within Evoq 8...3 Editing Bar...3 Dashboard...4
New website Training:
 New website Training: Table of Contents 1. Logging in and out of the new site. 2. Edit Content a. How to edit content b. Paragraph types c. Adding links d. Adding an image e. Adding a document f. Saving
Web-Based Contract Management Services. Global Functions User Guide
 Web-Based Contract Management Services Global Functions User Guide Release 2.2 Oct 2016 About this Document This section describes the purpose of this document and the intended audience. Disclaimer This
RunClick Webinar and Video Conferencing Software. User Manual
 RunClick Webinar and Video Conferencing Software User Manual Visit RunClick.com for more details 1 Page Table of Contents Installation and Activation of RunClick Part 1: WordPress Fresh Installation Process