Blackboard QuickStart Guide for Students
|
|
|
- Mariah Dennis
- 5 years ago
- Views:
Transcription

1 Blackboard QuickStart Guide for Students This QuickStart guide will walk you through the process of logging in to Blackboard and submitting your work. If you do not know your login information for Blackboard, please contact your local Administrator for assistance. Step 1: Log into Your Blackboard Account 1. Enter your Username and Password. 2. Click Login. 1/61

2 Step 2: Navigate to Course & Select Assignment Locate the My Courses window on the right hand side of your screen. 1. Select the appropriate course by clicking on it. 2/61

3 2. Click on the Content option in the panel on the left hand side of your screen. 3/61

4 3. Click on the assignment that you wish to submit. NOTE: If you are not directed to the assignment in Chalk & Wire, this either indicates that the assignment you selected is not a Chalk & Wire assignment and should be submitted in Blackboard or that the assignment has not been set up correctly. If you receive an error message please contact your local Chalk & Wire administrator for assistance. 4/61
 that will be used to assess you, click on its name to view it. 2.")
5 Step 3: Review Chalk & Wire Assignment Your Chalk & Wire assignment will appear on your screen. 1. If you would like to review the Assessment Instrument (rubric) that will be used to assess you, click on its name to view it. 2. Your instructor may or may not have provided you with instructions within Chalk & Wire for the assignment. If you see an Instructions & Resources heading, click on the arrow to its left to reveal the instructions and resources. If you do not see anything listed below the "Add Content" menu, proceed to the next step. Do not navigate away from this screen prior to adding and submitting your work for assessment. 5/61
 http://integrationresources.chalkandwire.")
6 Step 4: Add Content to the Assignment 1. Use the Add Content drop down menu to select the appropriate method for adding content. Select your method for adding content: Add Text (Text Block) 6/61

7 Step 1: Access the Text Editor 1. Use the Add Content menu to select Text Block. Step 2: Choose Where to Add Content 7/61

8 You may add content anywhere on the page that an Insert Content Here bar appears. 2. Click on the Insert Content Here bar that corresponds with the space that you would like to add your content to reveal the Text Editor. Step 3: Add Text to Text Editor 3. Paste or Type text directly into the Text Editor. 4. Format your text using the Text Editor's formatting options. 5. Click Save, and then Close. Similar to MS Word, you must remember to save your work periodically to avoid the loss of any unsaved changes in the event of a power, or internet failure. 8/61

9 Add File The 'Add File' option allows you to upload files from your computer to your Chalk & Wire eportfolio. Each file that you upload will be placed in your portfolio, as well as saved in your File Library for later use. While many file types are available for upload in every Chalk & Wire site, certain types may not be available at your institution. For a complete list of acceptable file types, please contact your local Chalk & Wire Administrator. Step 1: Click on the 'Add File' Option 1. Use the Add Content menu to select Add File. 9/61
10 Step 2: Choose Where to Add Content You may add content anywhere on the page that an Insert Content Here bar appears. 2. Click on the Insert Content Here bar that corresponds with the space that you would like to add your content to reveal the Text Editor. 10/61
 or File from Library buttons to select your method of adding file(s) to the page Add File: This feature enables the user to upload a new file from hard drive, Dropbox or")
11 Step 3: Select Method for Adding File(s) 3. Use the Add File (default) or File from Library buttons to select your method of adding file(s) to the page Add File: This feature enables the user to upload a new file from hard drive, Dropbox or OneDrive to Chalk & Wire to add to the portfolio page. File from Library: This feature enables the user to select a previously uploaded file to add to the portfolio page. Select Add File or File from Library below for instructions: Add File 11/61
 from their Dropbox account.")

12 4. Select the method for uploading a file to Chalk & Wire: Add Files: This feature enables the user to select a file from their local hard drive. Choose from Dropbox: This feature enables the user to select file(s) from their Dropbox account. Choose from OneDrive: This feature enables the user to select file(s) from their OneDrive account. Alternatively, simply Drag and Drop your file onto the window. Choose the method that you would like to use below: The file(s) that were selected will appear in the uploading window. 12/61

13 5. Optionally Edit the Filename(s) of the file(s) that you would like to upload. 6. Optionally Remove the File from the list of file(s) that you would like to upload. 7. Click on the Start Uploading All button to begin the upload. You may only change the names of files that were added to the upload list using the 'Add File' option. If you would like to alter the names of files selected using Dropbox or OneDrive, you must do so in those accounts prior to selecting them for upload in Chalk & Wire. The upload process will begin, which you can track by watching the visual progress bar. 8. A Checkmark will appear in the file's row to indicate that it has been uploaded. 13/61


14 Once all of the files have been uploaded, 9. Click on the Left Pointing Arrow at the top of the Add File window to return to the regular portfolio view. Choose from OneDrive 1. Click on the Choose from OneDrive button. 14/61

15 2. Enter your User ID and Password for your OneDrive account. 3. Click Sign In. 15/61

16 4. Select the file in your Dropbox account that you would like to upload. 5. Click Choose. Choose from Dropbox 16/61

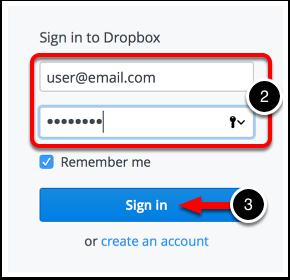
17 1. Click on the Choose from Dropbox button. 2. Enter your User ID and Password for your Dropbox account. 17/61

18 3. Click Sign In. 4. Select the file in your Dropbox account that you would like to upload. 5. Click Choose. Add Files /61

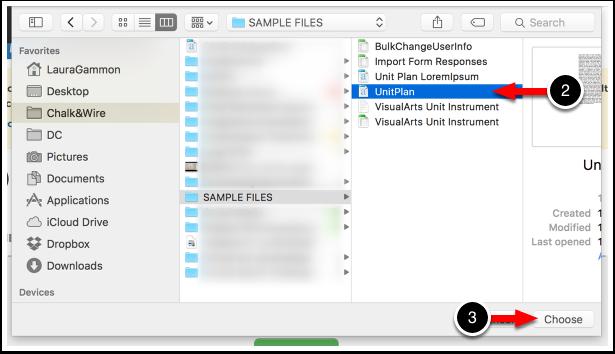
19 1. Click on the Add Files button. 19/61

20 2. Locate and Select the file that you would like to upload. 3. Click Choose. File from Library 1. Using the Sources column, locate the folder which contains the file(s) that you would like to add. If you have not customized your File Library, your files will be housed in the File Library folder. 2. In the middle column, locate and select the file(s) that you would like to add to your portfolio page. Click on the Add Selected button or Drag and Drop the file(s) into the third column. 3. Click Done. Insert Full Size Image Typically, students will use the Add File option to upload an image to their portfolio. Uploading an image file using the Add File feature places a thumbnail on your portfolio page. When the thumbnail is selected, the full size image will appear. In order to have the full size image placed directly on the portfolio page without a thumbnail, you must add your image via Text Editor. The Text Editor also provides users with the ability to manage the image's dimensions, ensuring that it works well in your portfolio layout. 20/61
21 Step 1: Add Image to File Library In order to add a Full Size Image to your portfolio page, it must already be uploaded and saved as an image within your Chalk & Wire account. Use the Add File method for adding content, and then delete the image thumbnail from your portfolio page. This will ensure that the image file has been saved to your account's File Library and is ready to use for adding to your portfolio page as a Full Size Image. Step 2: Access the Text Editor 1. Use the Add Content menu to select Text Block. 21/61
22 Step 3: Choose Where to Add Content You may add content anywhere on the page that an Insert Content Here bar appears. 2. Click on the Insert Content Here bar that corresponds with the space that you would like to add your content to reveal the Text Editor. 22/61


23 Step 4: Use the Text Editor's 'Library Image' Feature 3. Click on the Library Image button to reveal your account's File Library, which you will use to select the image file. Step 5: Select Image File from File Library 23/61

24 4. Using the Sources column, select the folder which contains the image file. If you have not added custom folders, you will select the File Library or Images folder; Both will contain the image file. 5. In the middle column, locate and select the file that you would like to add. Click Add Selected or Drag and Drop the file into the third column. 6. Click Done. Step 6: Optionally Edit File Size Double Click on the image to reveal image dimensions, which you may edit. If you do edit the dimensions, click Save. Step 7: Save the Image, and Close the Text Editor 7. Click Save, and then Close. Embed a YouTube Video 24/61
25 Uploading videos directly to Chalk & Wire can be a time consuming process due to the large nature of video file sizes. An alternative is to upload your video to YouTube, and embed the video directly onto your portfolio page. To embed a YouTube video in your portfolio you must ensure that you are copying the YouTube Embed Code and not the URL. To do this, go to and access your video. If you are unsure of how to upload a video to YouTube, please visit their help page How to Upload Videos. 25/61

26 Step 1: Retrieve Embed Code 1. Once you have accessed your video on YouTube, click the Share button located below the video. 2. Click on the Embed tab. 3. Select the smallest video size (420x315). 4. We recommend deselecting the option to show suggested videos when the video finishes. 5. Copy the embed code. 26/61

27 Step 2: Access the Text Editor Once you have copied the embed code from YouTube, access your portfolio and navigate to the section that you would like to add the video to. 6. Use the Add Content menu to select Text Block. 27/61

28 Step 3: Choose Where to Add Content You may add content anywhere on the page that an Insert Content Here bar appears. 7. Click on the Insert Content Here bar that corresponds with the space that you would like to add your content to reveal the Text Editor. 28/61


29 Step 4: Use Text Editor's 'Insert/Edit Video' Feature 8. Click on the Insert/Edit Video icon. 9. Click on the Embed tab. 10. Paste the video's embed code in the box. 29/61

30 11. Click OK. Step 5: Save Video Embedded in Text Block A grey box will appear as the video's placeholder in the text box. 12. Click Save. Once you are finished with the text box, click Close. 30/61

31 Step 6: Watch Video After saving and closing the text editor, you will see the video on your portfolio page. It is recommended that you watch the entire video on your portfolio page to ensure that it was embedded correctly. Create a Direct URL to File Creating a direct URL to an artifact allows a user to create text hyperlinks to an artifact within a secure portfolio, and/or post a URL link to a file anywhere on the internet, in s, etc. 31/61
32 Step 1: Access the Text Editor 1. Use the Add Content menu to select Text Block. Step 2: Choose Where to Add Content 32/61

33 You may add content anywhere on the page that an Insert Content Here bar appears. 2. Click on the Insert Content Here bar that corresponds with the space that you would like to add your content to reveal the Text Editor. Step 3: Browse for File 3. Under the Get Direct URL to File heading, click on the Browse button. 33/61

34 4. In the Sources column, select File Library. 5. In the File Library column, select the file that you would like to create a direct URL to. Either click on Add Selected or Drag and Drop the file into the File Chosen column. 6. Click Done. 34/61

35 Step 4: Select and Copy URL Once the direct URL has been created, it will appear below the Get Direct URL to File heading. 7. Highlight the URL. 8. Use CTRL + C on your keyboard, or right click and select Copy to copy the URL. You can now paste the URL wherever you would like elsewhere online, in an , on a blog, etc. Please view our sample Direct URL to File below: Insert Mathematical Formula The text editor available to users when authoring a portfolio now includes a LaTeX mathematical formula creator. This feature allows users to insert mathematical formulas into their portfolio, which normally could not be achieved using standard keyboard symbols. For more information about LaTeX Mathematics, please visit: /61
36 For a list of mathematical symbols, please visit: Step 1: Access the Text Editor 36/61
37 Step 2: Choose Where to Add Content You may add content anywhere on the page that an Insert Content Here bar appears. 2. Click on the Insert Content Here bar that corresponds with the space that you would like to add your content to reveal the Text Editor. 37/61

38 Step 3: Use the Text Editor's 'Insert Equation' Feature 3. Click on the Insert Equation button. 38/61

39 4. Type or Paste your equation into the Equation Editor. 5. Click Ok. 39/61

40 The equation will appear in the text editor window. 6. Click Save, and then Close. Journal Entries The Add Journal Entries option allows you to add existing journal entries to your portfolio from within your Chalk & Wire account. 40/61

41 Step 1: Access Journal Entries 1. Use the Add Content menu to select Journal Entries. 41/61
42 Step 2: Choose Where to Add Content You may add content anywhere on the page that an Insert Content Here bar appears. 2. Click on the Insert Content Here bar that corresponds with the space that you would like to add your content to reveal the Text Editor. 42/61
. Click on the Add Selected button or Drag and Drop the journal entry(ies) into the third column. 5. Click Done.")
43 Step 3: Select Journal Entry(ies) 3. Using the Sources column, select the Journal which contains the entry(ies) that you would like to add to the portfolio page. 4. In the middle column, locate and select the journal entry(ies). Click on the Add Selected button or Drag and Drop the journal entry(ies) into the third column. 5. Click Done. Add Form The 'Add Form' option allows you to add and complete a form from within your portfolio. 43/61
44 Step 1: Access Forms 1. Use the Add Content menu to select Form. 44/61
45 Step 2: Choose Where to Add Content You may add content anywhere on the page that an Insert Content Here bar appears. 2. Click on the Insert Content Here bar that corresponds with the space that you would like to add your content to reveal the Text Editor. 45/61

46 Step 3: Select Form 3. Using the Select Form drop down menu, select the form that you would like to complete. 4. Click Save. 46/61

47 Step 4: Complete and Save Form The form will appear on your portfolio page as a blue link. 5. Click on the Form to reveal its contents. 6. Provide Responses for all of the form questions, as required. 7. Click Save. 47/61

48 A confirmation message will appear to indicate that the form has been updated. 8. Click Close Form. If the form responses are required as a part of a submission, you must click Close Form for the portfolio page to update. If you have not clicked Close Form the page will not register the form responses as content. Link to a Portfolio Page The 'Link to a Portfolio Page' option allows you to add a hyperlink on one section of your portfolio that will 'jump' the another section. 48/61
49 Step 1: Access Link to Portfolio Page 1. Use the Add Content menu to select Link to a Portfolio Page. 49/61
50 Step 2: Choose Where to Add Content You may add content anywhere on the page that an Insert Content Here bar appears. 2. Click on the Insert Content Here bar that corresponds with the space that you would like to add your content to reveal the Text Editor. 50/61

51 Step 3: Select Portfolio Page for Internal Link You may only select a portfolio page from your current portfolio to link to. 3. Use the Select Page to Link to drop down menu to select another page in your portfolio to link to. 4. Click Save. Import Content When adding content to a portfolio you can import work from your other program Portfolios, Assignments and Collaborative workspaces within your Chalk & Wire account. 51/61

52 Step 1: Access the Import Content Feature 1. Click on the Import Content button, which can be found on the right hand side of your portfolio page. 52/61
53 Step 2: Select Content to Import You may import content from any Portfolio, Workspace, or Assignment within your Chalk & Wire account. 2. Select from where you would like to import content. The 'Choose a Portfolio/Workspace/Assignment' drop down menu will change depending on your selection above. 3. Select the Portfolio/Workspace/Assignment from which you would like to import content. 53/61


54 4. Select the section of the Portfolio/Workspace/Assignment that contains the content that you would like to import. Sections that do not contain content will not be selectable. Step 3: Import Selected Content & Return to Portfolio Page 5. Click Import. A confirmation message will appear in green. 6. Click Return to return to your portfolio page and review the imported content. 54/61

55 Step 5: Submit your Work Once you have added your work to the portfolio page, the Submit button will become enabled. 1. Click on the green Submit button. 55/61

56 A submission window will drop down on the screen. 2. Begin typing the Name(s) of the Assessor(s) to whom you wish to submit. As you type, matches in the system will appear. When the correct name appears, click on it to select it. The name will appear next to a checkmark to indicate that it has been selected. 3. Click Submit. 56/61

57 A message will appear to indicate that your content has been submitted. 4. Click on the Review Submission button if you would like to review the submission that you just made. If you do not see the "Content Submitted" message, or the "Status: Submitted" flag, your content has not been submitted. 57/61

58 Step 6: View Results Once your submissions have been assessed and the results made available to you, you can access and view them from the My Results screen. To access the My Results screen: 1. Click on the Main Menu Icon. 2. Click on the Work option. 58/61

59 3. Select My Results. 59/61

60 4. If your submission has already been assessed, its score will appear in the Score column. 5. If you wish to view the assessment details, including feedback comments and individual rubric criterion scores, click anywhere on the row for the submission. 60/61
61 6. When you see the pop up menu, select the View Summary or View Details option. If you wish to view the work that you submitted, select the Work option. If you would like to view more information about your assessor, or send them a message, select View Assessor Info. 61/61
QuickStart Guide for Students
 Once you have registered your Chalk & Wire account or received your User ID and Password, go to the Chalk & Wire login web page for your institution. If you do not know the correct URL, please visit ep.chalkandwire.com
Must be completed within the Pearson eportfolio environment. Please visit for more information.
 Important Information about edtpa Retakes If you are completing your edtpa for the first time, please disregard this information and skip to the next step - "Getting Started: Register with Pearson". Partial
Quick Start for Students Chalk and Wire
 Quick Start for Students Chalk and Wire Getting Started Chalk and Wire Account Creation Each student should receive an email with your login information to access the College of Education s instance of
Tk20 Campus Wide. Navigation Guide (STUDENT) Completing an Assessment Portfolio
 Completing an Assessment Portfolio") COMPLETING an ASSESSMENT PORTFOLIO Viewing an Assessment Portfolio 1. Click on Portfolios in the side bar. 2. Click on the Portfolio title located in the center of your screen. Browsing Portfolios Portfolio
COMPLETING an ASSESSMENT PORTFOLIO Viewing an Assessment Portfolio 1. Click on Portfolios in the side bar. 2. Click on the Portfolio title located in the center of your screen. Browsing Portfolios Portfolio
QuickStart Guide for Assessors
 Once you have been provided with your Chalk & Wire User ID and Password, go to the Chalk & Wire login web page for your institution. If you do not know the correct URL, please visit ep.chalkandwire.com
Blackboard Portfolio Quick Reference Guide for Students
 Blackboard Portfolio Quick Reference Guide for Students How to Create a Portfolio 1. On the My Institution tab, under Tools, click on the Portfolio link. 2. From the My Portfolios page, click the Create
1. Enter your User ID or Address associated with your Chalk & Wire account.
 Once you have been provided with your Chalk & Wire User ID and Password, go to the Chalk & Wire login web page for your institution. If you do not know the correct URL, please visit ep.chalkandwire.com
 To access Miami University Chalk & Wire please go to the URL: www.chalkandwire.com/muohio Log into system by using your Miami Unique ID. Your default password is MMDDSSSS MM: 2 digit birth month, DD: 2
Step 1: Upload a video (skip to Step 2 if you ve already uploaded a video directly from your ipod, Uploading to YouTube and Posting in Blackboard
 Uploading to YouTube and Posting in Blackboard This document will explain 1. How to upload videos from your computer to YouTube 2. How to obtain the URL (web link) or embed code for your video 3. How to
Quick Start for Assessors Chalk and Wire
 Quick Start for Assessors Chalk and Wire Getting Started Chalk and Wire Account Creation Each assessor and candidate should receive an email with your login information to access the JHCOE instance of
Portfolios - Student. Accessing Portfolios in Blackboard. Creating a Portfolio. Editing a Portfolio
 Blackboard Portfolios Blackboard's Portfolio tool is designed to help you to maintain documentation of your education, samples of your work, and evidence of your skills, to tell a carefully crafted story
ACADEMIC TECHNOLOGY SUPPORT
 ACADEMIC TECHNOLOGY SUPPORT Dropbox Student Quick Start Guide ats@etsu.edu 439-8611 www.etsu.edu/ats Table of Contents: Accessing Dropbox... 1 Navigating the Dropbox... 1 Adding Files to the Dropbox...
Tk20 Campus Wide. Navigation Guide (STUDENT) Completing a Field Experience Binder
 Completing a Field Experience Binder") VIEWING a Field Experience Binder To open a Field Experience Binder, locate it in your pending tasks. You can find your pending tasks by clicking on the flag icon in the top right of the screen. Note that
VIEWING a Field Experience Binder To open a Field Experience Binder, locate it in your pending tasks. You can find your pending tasks by clicking on the flag icon in the top right of the screen. Note that
QuickStart Guide for External Assessors
 Students may be required to submit their work to external assessors who do not have Chalk & Wire accounts. Additionally, administrators may send assessments directly to external assessors, which do not
What s New in Blackboard Faculty Tutorial
 What s New in Blackboard Faculty Tutorial Global Navigation menu: The new Notification area combines notices, alerts, messages, and other items from all of your courses in one place. Now you can find alerts
e-portfolios Benefits of an e-portfolio Showcase your best works Progress assessment Job search; present to employers Share with family and friends
 1 e-portfolios Digication training objective The objective is to learn the tools and features of Digication and gain the essential skills to use Digication to develop an electronic portfolio. What you
Locating the Dropbox Tool:
 This step- by- step guide will demonstrate how to utilize the Dropbox Tool in your course in Desire2Learn (D2L). Locating the Dropbox Tool: 1. Go to the Course Navigation Bar and locate the Dropbox Tool.
Submitting Assignments
 Submitting Assignments Blackboard s assignments feature allows the instructor to assign coursework for you to submit electronically. First, you need to locate the assignment. Your instructor will place
Getting Started with Ensemble Video
 Getting Started with Ensemble Video 1 The University Libraries in collaboration with IDeL, is currently providing Ensemble video to GVSU faculty and staff. Ensemble Video is a video hosting solution for
Publishing Narrated Presentations
 ACCC-ITL GUIDE Created By: Publishing Narrated Presentations Uploading Presentations to YouTube on PC Table of Contents Export a narrated PowerPoint...2 Upload a narrated PowerPoint to YouTube...3 Link
TurnItIn How Do I Set Up My Turnitin Assignment? How Do I Give Feedback to My Students in Turnitin?...109
 ASSIGNMENTS Table of Contents Assignment Settings... 4 How Do I Create an Assignment?... 5 How Do I Edit an Assignment?... 8 How Do I Create a Group Assignment?...11 How Do I Delete an Assignment?...18
Updating Instructor Information Instructions
 Updating Instructor Information Instructions Purpose: Updating Instructor Information walks through the process of updating the Instructor Information, which informs students who their instructor is and
BYU-Idaho Online Knowledgebase
 ASSIGNMENTS Table of Contents Assignment Settings...4 How Do I Create an Assignment?...5 How Do I Edit an Assignment?...8 How Do I Create a Group Assignment?...12 How Do I Delete an Assignment?...21 "Dropbox"
Turnitin Feedback Studio. Office of Distance Education
 VIEWING TURNITIN SIMILARITY REPORTS AND LEAVING FEEDBACK Turnitin is an external tool integrated into D2L to allow instructors to check the originality, add comments, and evaluate students written work.
Instructor Guide for Blackboard-Learn
 Instructor Guide for Blackboard-Learn Prepared by Vice-Dean of E-Learning Dr. Ahmed Youssef Khedr Deanship of IT and E-Learning Contents How to Log In to... 4 Explore Home Tab... 4 My Blackboard Tools...
Content Collection. How to Access Content Collection. From the homepage: From a course:
 Content Collection What is Content Management? Blackboard s Content Collection is a file repository which allows faculty to store, manage, and share content within personal user folders, course folders,
SECTION 1 - File Conversion (RECOMMENDED METHOD)
") INSERTING YOUTUBE VIDEOS ON WEBSITE This is the desired method of inserting a YouTube Video. Students are able to access it from their school account. If you are inserting the video for use from your teacher
INSERTING YOUTUBE VIDEOS ON WEBSITE This is the desired method of inserting a YouTube Video. Students are able to access it from their school account. If you are inserting the video for use from your teacher
4. Fill in your information. Choose an address for your PBworks wiki. Be sure to choose For Education as your workspace type.
 Creating Your First Wiki with PB Works 1. Go to the PB Wiki Site: http://www.pbworks.com 2. Click Sign Up 3. Select the Basic Plan which is the free plan and includes 2 GB of storage space. 4. Fill in
eportfolios First, request for an account through
 1 eportfolios Digication Training Objective The objective is to learn the tools and features of Digication and gain the essential skills to use Digication to develop an electronic portfolio. What you can
How to Access If Rubrics does not appear on your course navbar, click Edit Course, Tools, Rubrics to activate..
 KODIAK QUICK GUIDE Rubrics Overview Rubrics allow you to establish set criteria for grading assignments; you can attach Rubrics to Dropbox folders or Discussion topics so that the criteria are available
COURSE FILES. BLACKBOARD TUTORIAL for INSTRUCTORS
 OVERVIEW: Course Files provides file storage on the Blackboard server for a single course. Course Files within each course displays content for that specific course, not for other courses you teach. You
Lasell College s Moodle 3 Student User Guide. Access to Moodle
 Access to Moodle The first session of this document will show you how to access your Lasell Moodle course, how to login, and how to logout. 1. The homepage of Lasell Learning Management System Moodle is
Faculty User Guide: Assessing Submissions. Faculty User Guide: Assessing Submissions
 Faculty User Guide: Assessing Submissions Table of Contents Faculty Guide to Course Assignments... 3 Complete an Assessment... 3 Assess with a Rubric... 8 Evaluate and Re-Attach Submitted Non-LiveText
Using Blackboard Drive to upload/manage content in Blackboard Learn
 Using Blackboard Drive to upload/manage content in Blackboard Learn Downloading and Installing Blackboard Drive 1. Login to Blackboard Learn, and click on the Utilities Tab. 2. Locate the Blackboard Drive
Turnitin Feedback Studio Guide
 Turnitin Feedback Studio Guide Contents Enable Turnitin Feedback Studio... 2 Elements of the Assignment Inbox... 3 Feedback Studio Interface... 4 Page Navigation... 5 Feedback Layers... 5 Adding QuickMarks
Figure 1: Syllabus opened in Word Online. Click the File tab (1)
") Embedding Office 365 Files in Blackboard Introduction Today, as part of our faculty professional development, we are going to cover how to embed Microsoft Office files in Blackboard. The purpose of embedding
Embedding Office 365 Files in Blackboard Introduction Today, as part of our faculty professional development, we are going to cover how to embed Microsoft Office files in Blackboard. The purpose of embedding
Video Everywhere. What is it? Why Would I use it? How do I use it?
 Video Everywhere use Video Everywhere allows you to record videos from your webcam and post them to any area of the course that uses the text editor. This includes: Discussion Boards Items within your
PANOPTO: WEB MANAGEMENT INTERFACE
 Panopto's Web Management Interface offer's instructors the ability to manage and edit the recordings captured and uploaded using the Panopto desktop recorder. Access the Web Management Interface at http://panopto.nvcc.edu.
Canvas Instructor Quickstart Guide
 Canvas Instructor Quickstart Guide Canvas Instructor Quickstart Guide 1 Canvas Instructor Quickstart Guide 1.1 1.2 1.3 1.4 1.5 1.6 1.7 1.8 1.9 1.10 1.11 1.12 1.13 1.14 1.15 1.16 1.17 1.18 1.19 1.20 1.21
NYLearns Curriculum Administration:
 NYLearns Curriculum Administration: Creating a Curriculum Map May 2014 2 This page left intentionally blank 3 Contents Signing in to NYLearns... 4 Curriculum Mapping... 6 Creating Curriculum Maps... 7
erequest How to apply guide
 Overview is an application that assists UCB in request life cycle management. UCB has clear guidance in place on what they can support or sponsor. Online requests will go through an internal review and
Kaltura Media Mashup Tool
 OVERVIEW: Kaltura is a media (video, audio, images) hosting and creation application that is integrated into the Blackboard LMS. Kaltura allows students to easily create and share media wherever there
Tutorial: Input Grades in Blackboard
 Tutorial: Input Grades in Blackboard Get into the Grade Center The following steps will lead you to the Full Grade Center page (❶ - ❽). ❶ Enter the URL: blackboard.indstate.edu ❷ Enter username and password
Once file and folders are added to your Module Content area you will need to link to them using the Item tool.
 VITAL how to guides elearning Unit Last updated: 01.10.2010 Course Files tool Overview Course Files tool enables you to: Quickly copy large numbers of files into a VITAL module. Files can be dragged and
Embedding SoftChalk In Blackboard. SoftChalk Create 9
 Embedding SoftChalk In Blackboard SoftChalk Create 9 Revision Date: September 8, 2015 Table of Contents SOFTCHALK CLOUD... 1 ACQUIRE A CLOUD ACCOUNT... 1 CREATE FOLDERS IN YOUR SOFTCHALK CLOUD ACCOUNT...
Instructor Panopto Reference Guide
 Overview: Panopto is a YouTube-like service which allows both you and your students to securely record, edit, store and share videos within an NLU secured online environment. Referencing this guide you
D2L 10.3: Dropbox Quick Start Guide. 1. Select the Dropbox tool from the Evaluation link group on the Course navbar 2. Click the New Folder button
 D2L 10.3: Dropbox Quick Start Guide Overview The Dropbox is a tool that will allow you to create folders to hold students assignments and submissions. The Instructor of the course is then able to view
eportfolio User Guide
 eportfolio User Guide Contents Introduction... 4 Privacy and Sharing... 4 eportfolio Structure and Navigation... 5 Latest Changes I can View Block... 6 eportfolio Activities... 8 Getting Started... 9 Access
An Introduction to Box.com
 An Introduction to Box.com Box is an online file sharing and cloud content management service and it provides features such as: Security controls Space Mobility Online collaboration Mobile access Version
icc.edu/library Films on Demand Guide for Faculty and Staff
 icc.edu/library Films on Demand Guide for Faculty and Staff Finding Films on Demand on the Library website: From the homepage of ICC Library website locate the Library Collections menu and click on Streaming
Blackboard Student Quick Reference Guide
 Blackboard Student Quick Reference Guide Welcome to Blackboard, UTT s E-Learning System! This Quick Reference Guide is designed to help get you started using Blackboard Release 9.1.120113.0. Page 1 of
Introduction to Kaltura
 Introduction to Kaltura The Kaltura media content management system allows users to record, stream, and manage multimedia files. This industry-leading enterprise system offers many robust tools. This guide
Introduction of E-Portfolio System
 Introduction of E-Portfolio System E-Portfolio is an online compilation of documents that is flexible and is based on artifact evidences of which students are directly involved in a continuous reflection
Guide: ETG- 36 Effective: 20 May 2014 Page #: 1 of 74 Blackboard 9.1 SP 14 Instructor Manual
 Guide: ETG- 36 Effective: 20 May 2014 Page #: 1 of 74 Table of Contents Log in to Learn... 5 My Institution Tab... 6 Explore the My Institution Tab... 6 Modules... 7 Edit Module Content... 7 Customize
Creating a Community or Class in elibrary PRO
 Creating a Community or Class in elibrary PRO Whether you are an instructor hoping to create a virtual gathering place for your students or a group of professionals looking for a home for your new ideas
Creating your eportfolio and Networks
 Creating your eportfolio and Networks Epsilen Access is restricted to those with Epsilen accounts (must be logged in). Institution Access is restricted to members of your institution (must be logged in).
DRF Programs for Authors
 Table of Contents Access DRF Programs... 3 Overview... 4 Choose Style... 5 Add Content... 6 About the Work Area... 6 View Directions... 7 Text & Image... 8 Slideshow... 9 Standards... 10 Attachments...
Goucher College Online Course Sites: Basic Navigation in Canvas
 Goucher College Online Course Sites: Basic Navigation in Canvas Find Your Course Material Edit a Topic Section Upload a File Drag and Drop Method to Upload a File Create a Content Page Create a Wiki Page
build a digital portfolio in WebPlus X4
 How to build a digital portfolio in WebPlus X4 Get started Open Serif WebPlus and select Start New Site from the Startup Wizard. WebPlus will open a blank website for you. Take a few moments to familiarise
Taskstream Terminology
 Taskstream Terminology Author = the student Evaluator = the person grading submitted work or evaluating the author o Internal Evaluators (e.g., course instructors) o External Evaluators (e.g., site supervisors,
Kaltura Guidebook Table of Contents
 Kaltura Guidebook Table of Contents Upload a Video... 4 Kaltura Login... 5 FlashLine Account... 6 Media Upload... 7 Choose a file to upload... 8 Add Details... 9 Privacy Settings... 10 Review Upload...
my eportfolio Course objectives: Access to my eportfolio Build a new Portfolio Add and Edit Content Showcase and Customise Share with others
 my eportfolio Course objectives: Access to my eportfolio Build a new Portfolio Add and Edit Content Showcase and Customise Share with others Student Training and Support Phone (07) 334 64312 Email Web
OU Campus VERSION 10
 OU Campus VERSION 10 End User Manual Last Update: 9/8/2015 Contact Tish Sailer with comments or questions regarding this Manual. Contents INTRODUCTION...3 HELP DOCUMENTS AND SUPPORT... 3 ACCESSING PAGES
A step-by-step guide to eportfolio for assessors.
 A step-by-step guide to eportfolio for assessors. Sign in to eportfolio using your unique user ID & password. The link to eportfolio is: http://eportfolio.imiawards.org.uk/epa/ Notes: Candidates are allocated
Submitting Student Assignments with Kaltura
 Submitting Student Assignments with Kaltura Kaltura media can be used for Blackboard assignments that receive grades in multiple ways. Any standard discussion board, blog, wiki, or journal that you might
Microsoft Office 365 includes the entire Office Suite (Word, Excel, PowerPoint, Access, Publisher, Lync, Outlook, etc ) and an OneDrive account.
 and an OneDrive account.") Microsoft Office 365 Contents What is Office 365?... 2 What is OneDrive?... 2 What if you already have a Microsoft Account?... 2 Download Office for FREE... 3 How to Access OneDrive... 4 Office Online...
Microsoft Office 365 Contents What is Office 365?... 2 What is OneDrive?... 2 What if you already have a Microsoft Account?... 2 Download Office for FREE... 3 How to Access OneDrive... 4 Office Online...
Getting Started with Ensemble
 Getting Started with Ensemble Ensemble Video is an in-house video server like YouTube and was designed for publishing and sharing large media files, such as audio and video files. It can be used to share
Content - Creating New Topics (6/2016)
") Content - Creating New Topics (6/2016) After you have created and selected your Module, you should see two dropdown menus, New and Add Existing Activities, and the Bulk Edit button. These will allow you
Content - Creating New Topics (6/2016) After you have created and selected your Module, you should see two dropdown menus, New and Add Existing Activities, and the Bulk Edit button. These will allow you
e-portfolio User s Guide for Students
 e-portfolio User s Guide for Students Table of Contents Log In My Profile How to edit the Profile Page My Pages How to create new page How to edit/delete existing pages How to change the order of menus
Moodle plugin for the Online Video Service (OVS)
") Moodle plugin for the Online Video Service (OVS) Sharing videos in Moodle There are a number of ways to share videos in Moodle depending on where the videos are stored: 1. To embed a video from YouTube
Moodle plugin for the Online Video Service (OVS) Sharing videos in Moodle There are a number of ways to share videos in Moodle depending on where the videos are stored: 1. To embed a video from YouTube
Blackboard course design
 DEO team, Academic Registry www.bristol.ac.uk/digital-education Blackboard course design Updated: 8 th Jan 2018 Contents 1. About this guide... 2 2. Essential information... 2 3. Requesting a Blackboard
Buzz Student Guide BUZZ STUDENT GUIDE
 BUZZ STUDENT GUIDE 1 Buzz Student Guide The purpose of this guide is to enhance your understanding of the student navigation and functionality of Buzz, the Learning Management System used by Lincoln Learning
Digication eportfolio Student s Guide (Last update: 8/2017)
") Digication eportfolio Student s Guide (Last update: 8/2017) 2 Table of Contents Introduction... 1 Creating Your eportfolio... 3 Editing Your eportfolio... 4 Area 1: Top Menu Bar... 6 Area 2: The Main Tabs...
Digication eportfolio Student s Guide (Last update: 8/2017) 2 Table of Contents Introduction... 1 Creating Your eportfolio... 3 Editing Your eportfolio... 4 Area 1: Top Menu Bar... 6 Area 2: The Main Tabs...
Canvas Instructor Quickstart Guide
 Canvas Instructor Quickstart Guide Canvas Instructor Quickstart Guide 1 Canvas Instructor Quickstart Guide 1.1 1.2 1.3 1.4 1.5 1.6 1.7 1.8 1.9 1.10 1.11 1.12 1.13 1.14 1.15 1.16 1.17 1.18 1.19 1.20 1.21
Getting Started. 1 Check your . Typically, sent from (Note: You may need to check your junk/spam folder).
.") Q U ICKSTART G U ID E Getting Started How to Setup Account 1 Check your email. Typically, sent from noreply@edvance360.com. (Note: You may need to check your junk/spam email folder). 2 Select the link
Q U ICKSTART G U ID E Getting Started How to Setup Account 1 Check your email. Typically, sent from noreply@edvance360.com. (Note: You may need to check your junk/spam email folder). 2 Select the link
Blackboard Learn: Basics
 Blackboard Learn: Basics This document includes the following topics: 1. Log in Page 2 2. Find Your Courses Page 2 3. View Course Content Page 3 4. Add a Folder Page 3 5. Add a File Page 5 6. Add a Web
Desire2Learn eportfolio Tool NEIU Student Guide
 Desire2Learn eportfolio Tool NEIU Student Guide Introduction The Desire2Learn (D2L) eportfolio (ep) tool allows you to store, organize, reflect on, and share items that represent your learning. You can
Microsoft OneDrive. How to login to OneDrive:
 Microsoft OneDrive The beauty of OneDrive is that is accessible from anywhere you have an Internet connection. You can access it from a Mac or Windows computer. You can even access it on your SmartPhone
Moodle 2.2 Student User Guide My Private Files
 Moodle 2.2 Student User Guide My Private Files Using My Private Files My Private Files saves files in the cloud. Only the user may access it, but you can access it from any computer where you can access
Assessment Tools in D2L, Part 2: Dropbox
 Objectives: Assessment Tools in D2L, Part 2: Dropbox Familiarize yourself with the Dropbox capabilities in D2L. Create folders and categories in the Dropbox. Edit a folder. Delete a folder. View and evaluate
What is OU Campus? Log into OU Campus
 OU Campus v10 Content Providers User Guide This document is designed to provide (level 5) Content Providers with basic information needed to do most tasks. Those needing additional information are encouraged
OBJECTIVES. Introduction to mycourses
 OBJECTIVES Identify elements of mycourses from the instructor, designer and student perspective. Integrate content into a course in a variety of file formats. Learn to use the Communication Tools: Chat,
The aim of this guide is to offer specific support for the use of features and tools within Blackboard. This guide includes information on:
 Blackboard Guide for Students The aim of this guide is to offer specific support for the use of features and tools within Blackboard. This guide includes information on: What is Blackboard Accessing Blackboard
OU Campus. Web Editors Guide. University Information Technology Services. Training, Outreach, Learning Technologies, & Video Production
 OU Campus Web Editors Guide University Information Technology Services Training, Outreach, Learning Technologies, & Video Production Copyright 2015 University Information Technology Services Kennesaw State
Using Canvas: A Student Quickstart Guide SWOSU Center for Distance and elearning
 To log in, click on the Canvas button on the homepage or go to swosu.instructure.com Passwords have been reset for Canvas. Students will need to use their Dawgtag and their default password to log in.
Moodle Morsels from Sandy & Inkie. b. Click (Log in) on the upper right c. You will use your stpsb login, which is how you login to a computer
 on the upper right c. You will use your stpsb login, which is how you login to a computer") 1. To login to Moodle: a. https://moodle.stpsb.org Moodle Morsels from Sandy & Inkie b. Click (Log in) on the upper right c. You will use your stpsb login, which is how you login to a computer 2. Moodle
1. To login to Moodle: a. https://moodle.stpsb.org Moodle Morsels from Sandy & Inkie b. Click (Log in) on the upper right c. You will use your stpsb login, which is how you login to a computer 2. Moodle
Administrator Quick Guide
 1 Administrator Quick Guide Login Screen The first page employees will see when visiting their training site is the login screen. This is where employees must enter their username and password to access
Tk20 TUTORIALS: Common Core Teacher Standards (CCTS) eportfolio TABLE OF CONTENTS
 eportfolio TABLE OF CONTENTS") Tk20 TUTORIALS: Common Core Teacher Standards (CCTS) eportfolio TABLE OF CONTENTS Topic Page Introduction 2 Getting Started: Accessing Your Tk20 Portfolio 3 Submitting Work into Portfolio 5 Uploading a
Tk20 TUTORIALS: Common Core Teacher Standards (CCTS) eportfolio TABLE OF CONTENTS Topic Page Introduction 2 Getting Started: Accessing Your Tk20 Portfolio 3 Submitting Work into Portfolio 5 Uploading a
Visual Guide to Online Campus
 Contents Course Navigation... 2 Avatars..3 Text Editor... 4 Accessing Assignments... 6 Accessing Assessments... 9 Accessing and Participating in Discussions... 12 Discussion Forums and Threads... 14 Creating
In the fourth unit you will learn how to upload and add images and PDF files.
 Introduction Here at SUNY New Paltz, we use the Terminal Four (T4) web content management system (CMS). This puts the power of editing content on our college s webpage in the hands of our authorized users.
Blackboard 1: Course Sites
 Blackboard 1: Course Sites This handout outlines the material covered in the first of four workshops on teaching with Blackboard. It will help you begin building your Blackboard course site. You will learn
Connecture Platform Manager
 Connecture Platform Manager 1 P a g e Table of Contents Connecture Platform Manager... 1 Introduction to the Connecture Platform Manager... 3 Getting Started... 3 Login... 3 Dashboard... 3 Connecture Application
Introduction to Blackboard. 1. Go to 2. Click the Login button on the left side of the screen.
 Introduction to Blackboard Logging in: 1. Go to http://blackboard.sc.edu. 2. Click the Login button on the left side of the screen. 3. On the next screen type your Username and Password in the appropriate
Blackboard Portfolio System Owner and Designer Reference
 Blackboard Learning System Blackboard Portfolio System Owner and Designer Reference Application Pack 2 for Blackboard Learning System CE Enterprise License (Release 6) Application Pack 2 for Blackboard
Getting started with Panopto Instructors
 What is Panopto? Panopto is a video content management system for uploading, managing and sharing recorded lectures, flipped classroom videos, campus events, and more. It comes with built-in video analytics,
Introduction to Dropbox Management Add a Category Add a Folder Set Availability for Dropbox Folders Add Special Access...
 Dropbox Introduction to Dropbox Management... 2 Add a Category... 3 Add a Folder... 4 Set Availability for Dropbox Folders... 8 Add Special Access... 10 Reorder Folders and Categories... 12 Delete a Folder...
Manual Kaltura through Blackboard
 Manual Kaltura through Blackboard Instructor manual Version 1.6, May 2017 Applications management Blackboard, Student and Educational Affairs (SEA), Leiden University Table of Contents Log in to Blackboard...
Faculty User Guide: Video Assessment
 Faculty User Guide: Video Assessment LiveText Video Assessment User Guide Video Assessment Overview... 2 Faculty Assessment... 2 Assessing a student submission... 2 To assess a student submission containing
Using UWSuperior and Turnitin Together
 Using Learn@ UWSuperior and Turnitin Together Desire2Learn and Turnitin have added the ability to check the originality of documents submitted to the Dropbox in Learn@ UWSuperior to make Originality Checking
Welcome to you user manual for your website
 Welcome to you user manual for your website Your website is unique to you. We build our websites on the Wordpress platform. and each of our websites are designed to be different. To achieve this we use