Excel 2010 Essentials
|
|
|
- Shannon Harper
- 5 years ago
- Views:
Transcription

1 Excel 2010 Essentials Training Manual Narre Community Learning Centre Inc.
2 TABLE OF CONTENTS Module One: Getting Started... 4 Workshop Objectives... 5 Module Two: Opening and Closing Excel... 7 Opening Excel... 8 Understanding the Interface Using Backstage View Understanding Worksheets Understanding Workbooks Module Three: Your First Worksheet Entering Data Editing Data Using the Wrap Command Adding Rows and Columns Checking Your Spelling Module Four: Working with Excel Files Saving Files Publishing Files to PDF Sending Files via Closing Files Opening Files Module Five: Viewing Excel Data An Overview of Excel s Views Switching Views Creating Custom Views... 38
3 Using Zoom Switching Between Open Files Module Six: Printing Excel Data An Overview of the Page Layout Tab Setting Up Your Page Using Print Preview Printing Data Module Seven: Building Formulas The Math Basics of Excel Building a Formula Editing a Formula Copying a Formula Relative vs. Absolute References Module Eight: Using Excel Functions Formulas vs. Functions Using the SUM Function Using Other Basic Excel Functions Understanding the Formulas Tab Using the Status Bar to Perform Calculations Understanding the New Function Names Module Nine: Using Time Saving Tools Using AutoFill Using AutoComplete Sorting Data Filtering Data Adding Sparklines... 80
4 Module Ten: Formatting Your Data Changing the Appearance of Text Changing the Appearance of Numbers Setting Alignment Options Using Merge Removing Formatting Module Eleven: Advanced Formatting Tools Adding Borders Adding Fill Color Using Cell Styles Using Conditional Formatting Changing the Theme Module Twelve: Wrapping Up Words from the Wise
5 Did you know that Excel was first released in 1985? Module One: Getting Started Welcome to the Microsoft Excel 2010 Essentials workshop. Excel is the world s premier spreadsheet software. You can use Excel to analyze numbers, keep track of data, and graphically represent your information. With Excel 2010, you can manage more data than ever, with increased worksheet and workbook sizes. Excel also makes your job easier by providing an easy to use interface, and an array of powerful tools to help you turn your data into useable information and better information leads to better decision making! Page 4
6 Workshop Objectives Research has consistently demonstrated that when clear goals are associated with learning, it occurs more easily and rapidly. By the end of this workshop, you should be able to: Open and close Excel Differentiate between worksheets, workbooks, rows, columns, and cells Understand the new Interface and the new Backstage View Enter labels and values Edit data Add rows and columns Check spelling Open, close, and save workbooks (including publishing to PDF and sending via ) Switch between Excel views and create custom views Use Zoom Set up, Preview and print your workbook Build, copy and edit formulas Use absolute referencing appropriately Understand the difference between Formulas and Functions Understand the new Function Names Use the Formulas Tab Use basic Excel functions, including SUM, AVERAGE, MAX, and MIN Use the status bar to perform calculations Use AutoFill and AutoComplete Sort and filter data Use sparklines Page 5
7 Format text and numbers Use alignment options Merge cells Apply borders Use cell styles Use conditional formatting Change the workbook theme Page 6
8 Learning is the beginning of wealth. Jim Rohn Module Two: Opening and Closing Excel In this module, we will discuss how to open and close Excel. We will take a look at the interface and the new Backstage View. We will also explore the difference between worksheets and workbooks. Page 7
 to open the Start menu. 2.")
9 Opening Excel Use the following procedure to start Excel. 1. Select START (or press the Windows key on the keyboard) to open the Start menu. 2. Select ALL PROGRAMS. Page 8
10 Page 9 3. Next, highlight the Microsoft Office program group. Select MICROSOFT OFFICE EXCEL2010.
11 Understanding the Interface Excel 2010 has a new interface that builds on interface from the previous version of Excel. Excel 2010 uses the RIBBON interface that was introduced in Microsoft Office 2007 applications. Each TAB in the RIBBON contains many tools for working with your document. To display a different set of commands, click the tab name. BUTTONS are organized into groups according to their function. In addition to the TABS, Excel 2010 also makes use of the QUICK ACCESS TOOLBAR from the MS Office 2007 applications. The Formula bar is where you can edit contents of a cell. The Status Bar includes information about your worksheet when you highlight different cells. View the Excel interface, including the Ribbon, worksheet area, the Formula Bar, the Quick Access toolbar, and the Status Bar. Quick Access Toolbar Ribbon Formula Bar Worksheet area Multiple Worksheet Tabs Status Bar Page 10

12 Use the following procedure to customize the Quick Access Toolbar. 1. Select the arrow next to the Quick Access Toolbar. Add an item to the Quick Access Toolbar by selecting it from the list. You can remove an item by reopening the list and selecting the item again. Page 11

13 If you select More Commands, Excel opens the Customize window. To add a command, select the item from the list on the left and select ADD. Select OK when you have finished. Page 12
14 Using Backstage View Select the FILE tab in the Ribbon to open the Backstage view. The Backstage view is where you will find the commands for creating, saving, opening, and closing Excel files, as well as information about the current workbook. The Backstage view includes new interfaces for printing and sharing your workbooks. The Options command is also available to open a new screen for setting your Excel Options. Use the following procedure to view the Backstage View. 1. Select the File tab on the Ribbon. Excel displays the Backstage View, open to the Info tab by default. A sample is illustrated below. Page 13
15 Understanding Worksheets WORKSHEETS are simply collections of CELLS. A cell is the intersection of a ROW and a COLUMN. Columns labels are letters and row labels are numbers. Only one cell can be active at a time, and that cell is called the ACTIVE CELL. You can move around a worksheet using your mouse or your keyboard. Page 14

16 Understanding Workbooks A WORKBOOK is a collection of worksheets. When you save an Excel file, you are actually saving a workbook. A workbook includes 3 worksheets by default when you open a new file. You can change the names of these worksheets and add more worksheets to the workbook. You can also change the order of the worksheets. Use the following procedure to switch to a different worksheet. 1. At the bottom of the worksheet window, there are tabs for each worksheet in the workbook. Click on the sheet you want to view. Use the following procedure to rename a worksheet. 1. Right click on the sheet tab and select Rename from the context menu. Page 15
17 2. Enter the new name over the highlighted text. Use the following procedure to insert a new worksheet. 1. Click the New Worksheet tab. Excel opens the new worksheet to the first cell, so that you can begin entering data right away. You can rename the worksheet if needed. Use the following procedure to move a worksheet. 1. Click on the worksheet tab that you want to move and drag it to the new location in the workbook. Page 16
18 Being busy does not always mean real work. The object of all work is production or accomplishment and to either of these ends there must be forethought, system, planning, intelligence, and honest purpose, as well as perspiration. Seeming to do is not doing. Thomas Alva Edison Module Three: Your First Worksheet This module introduces you to your first worksheet, where you can enter or edit data. Your worksheets will have a purpose in mind, whether it is to add a series of numbers, like sales figures or expenses, or to track things like inventory or class registrations. Time spent thinking about the structure of your worksheet will pay off later, but you can also add rows and columns at any time to rearrange your data. This module will also introduce the ability to wrap cell contents and check your spelling. Page 17

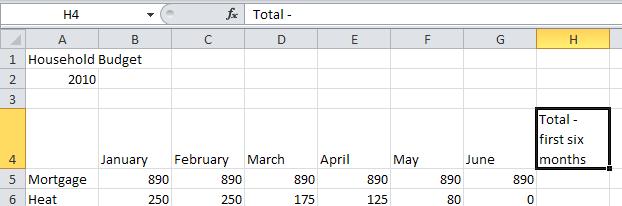
19 Entering Data Data is entered into cells. Click the cell you want, and type the desired entry. You can enter either numbers (VALUES) or text (LABELS) in Excel. Once you have finished typing, you can press Tab or Enter to complete the entry. When you type data into a cell, all of it is contained in that cell, even if it is not all visible at once. If you cannot see all of the data in your cell, you can widen the column. In the following example, Household Budget and Car Payment are both too long for the column width. Page 18

20 Use the following procedure to widen a column. 1. Click on the column you want to widen. Notice the cursor changes to a cross with double arrows. The screen tips indicate how wide in pixels the column currently is. 2. Drag the border to the new width Page 19

21 Editing Data Shown here is the relationship between the active cell and the Formula Bar. Page 20


22 Using the Wrap Command Use the following procedure to wrap the contents of a cell that contains a label. 1. Click the cell that you want to wrap. 2. Click the Wrap Text tool on the Ribbon. Use the following procedure to force a line break in a cell with wrapped contents. 1. Click on the cell with wrapped contents. The contents appear in the Formula Bar. 2. Place your cursor on the Formula Bar where you would like to force a line break. Press Alt+ ENTER. Page 21
23 Page 22


24 Adding Rows and Columns New columns are inserted to the left of your currently selected column, and new rows are inserted above your currently selected row. Use the following procedure to add a new row. 1. Highlight the row below where you want to insert a row. Click to the left of the row number to highlight the whole row. 2. Select Insert Sheet Rows from the Ribbon. The new row is highlighted. Page 23

25 Page 24

26 Checking Your Spelling To check your spelling, display the Review tab, and click the Spelling button (in the Proofing group). Use the following procedure to check spelling. 1. Select the Spelling tool on the Review tab of the Ribbon. Excel opens the Spelling dialog box and begins indicating any spelling errors. 2. Highlight the correct spelling and select Change. If the correct spelling is not listed, you can correct the spelling by editing the text in the Not in Dictionary field. Page 25
27 Quick Tip: Once you have saved your file, you can quickly update it by pressing Ctrl + S making sure you ll never lose your hard work! Module Four: Working with Excel Files This module working with Excel files, including how to open files and how to save them. It is important to save files early and often to protect your work. The file format introduced in Excel 2007 provides new options. In this module, we ll cover how to publish your worksheets as PDF files and how to send a workbook via . This module also discusses how to close Excel files. Page 26
 3.")
28 Saving Files The new Backstage View provides options for saving your files. You can also save a previously saved file using the keyboard shortcut or the Quick Access Toolbar. Use the following procedure to save a new file. 1. Select the File tab to open the Backstage view. 2. Select Save or Save As. (For unsaved data, either works the same.) 3. Navigate to the location where you want to store the file. 4. Enter the File Name. 5. Select Save. Page 27

29 Publishing Files to PDF PDF stands for Portable Document Format. Almost all computers have software to read a PDF file, making it an extremely portable file format. After loading the PDF add-in, it s just as easy to save a PDF as a regular workbook file. Use the following procedure to publish a workbook to a PDF file. 1. Select the File tab to open the Backstage view. Select the Share tab. 2. Select Create PDF/XPS Document under File Types. Select Create PDF/XPS Document. Page 28

30 3. Navigate to the location where you want to store the file. 4. Enter the File Name. 5. The default type is PDF. The Open file after publishing and Standard optimization are selected by default. These can be changed, if necessary. 6. Select Publish. Page 29

31 Sending Files via Use the following procedure to attach their files to an Select the File tab to open the Backstage view. Select the Share tab. 2. Select Send as Attachment. Excel opens an message with the file attached. You can enter the addressee and message contents as needed. Page 30

32 Closing Files If you have finished working on a workbook, but are continuing to work in Excel, you should close the file. Use the following procedure to close a file. 1. Select the File tab to open the Backstage view. 2. Select Close. Page 31
33 Opening Files The Backstage View includes the Open command, as well as a list of recently used files. You can use either method, or the Ctrl + O keyboard shortcut to open a file. Shown here is the Recent list in the Backstage View. Use the following procedure to open a file. 1. Select Open from the Backstage View. Page 32
34 2. Navigate to the location of the file you want to open. Highlight one or more files to open them. 3. Select Open. Page 33
35 Quick Tip: You can change the view and zoom control on the Status Bar at the bottom of the Excel window. Module Five: Viewing Excel Data Excel offers several options for viewing your worksheets. This module will provide an overview of the different views that are available. It also explains how to switch views and create a custom view. This module covers how to use the Zoom feature. Finally, this module discusses how to switch between different open files. Page 34
36 An Overview of Excel s Views The View tab controls how a worksheet appears on screen. Changing the worksheet view does not impact the way your worksheet prints, only the way you see it on your monitor. The different views are: Normal is the view used for entering data. Page Layout view displays what the data will look like when printed. You can use Page Layout view to add headers and footers to your worksheets. Page Break Preview allows you to adjust where the page breaks occur. You can drag the blue border to a new location for columns or rows to adjust the page breaks. Full screen view displays the worksheet using the full screen. It does not display the Ribbon or Status Bar. Press the ESC key to leave full screen view. Shown here is the View tab on the Ribbon. Page 35

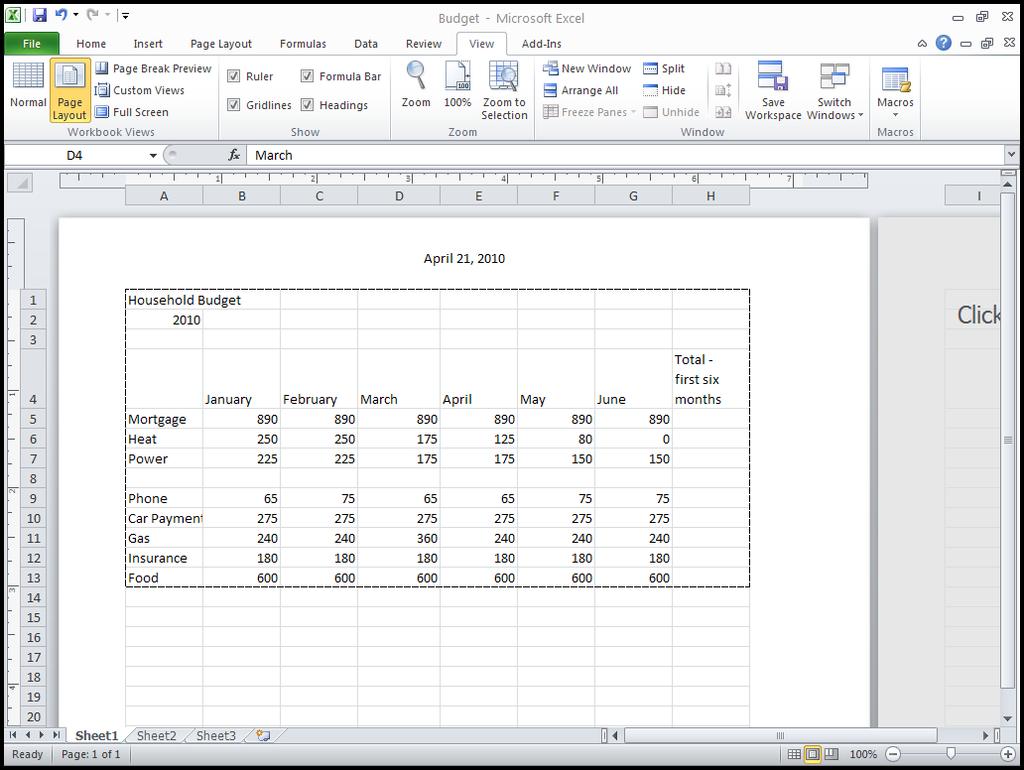
37 Switching Views Use the following procedure to view the Page Layout View. 1. Select the View tab. Select the Page Layout tool. There are three areas for the header and the footer. Investigate entering header content in the left, middle, and right of the header and/or footer. Page 36

38 Use the following procedure to view the Page Break Preview. 1. Select the View tab. Select the Page Break Preview tool. Investigate what happens if they move the blue borders. Switch to Page Layout View to see the difference. Page 37


39 Creating Custom Views A custom view is a set of settings that you can save for the active workbook and reapply at different times. This helps if you want to view the same data in different ways. Instead of creating different copies of the workbook to see the different views, or redoing a number of settings each time you want to change them, you can create multiple custom views for the workbook. The custom view only applies to the current workbook. Custom views can include a number of different settings, including column widths and page layout items such as headers and footers. Custom views can also include many features that will be covered later in this course. Use the following procedure to create a custom view. 1. Select Custom Views from the View tab on the Ribbon. Excel opens the Custom Views dialog box. 2. Select Add to open the Add View dialog box. Page 38


40 3. Enter the Name of your view. 4. Check the Print Settings box to include the print settings in your custom view. 5. Check the Hidden rows, columns and filter settings to include those in your custom view. 6. Select OK. Use the following procedure to apply a custom view. 1. Select Custom Views from the View tab on the Ribbon. 2. Highlight the View you want to apply and select Show. Page 39
41 Page 40

42 Using Zoom Excel allows you to zoom in or out so that you can make the type appear larger, or see more of your worksheet to check the layout. The View tab includes the zoom tools. Use the following procedure to zoom to a selection. 1. Highlight the area you want to view larger. 2. Select the Zoom to Selection tool from the View tab on the Ribbon. Page 41

43 3. Select 100% from the View tab on the Ribbon to return to the default zoom. Page 42

44 Switching Between Open Files Use the following procedure to switch from one worksheet to another. 1. Select the Switch Windows tool from the View tab on the Ribbon. Select the worksheet you want to view from the list. Page 43
45 Quick Tip: The new Backstage View includes many options for controlling how your Excel data prints. Module Six: Printing Excel Data This module discusses printing your worksheets. First, the module covers the Page Layout tab for setting up the worksheet page. Next, the module goes into more detail on setting up your pages. The module discusses how to use Print Preview, Finally, the module explains how to print your worksheets. Page 44
46 An Overview of the Page Layout Tab The Page Layout tab is used to set up your page. There following groups of buttons are on this ribbon: Themes Page Setup Scale to Fit Sheet Options Arrange Shown here is the Page Layout tab on the Ribbon. Page 45

47 Setting Up Your Page The Page Setup group on the Page Layout tab of the Ribbon includes several tools to help you set up your page. You can control the margins, orientation, and size of your page. You can also control the print area, if you don t want to print all of the contents of your worksheet. Finally, there is another opportunity to control page breaks. You can also include a background and printing titles. Use the following procedure to use custom margins. 1. Select Custom Margins from the Margins tool on the Page Layout tab of the Ribbon. Page 46
.")
48 Excel displays the Page Setup dialog box. 2. Use the up and/or down arrows to control each of the margins (in inches). When have finished, select OK. Page 47
49 Using Print Preview Shown here is the Print tab in the Backstage View. Page 48
50 Printing Data You can print a worksheet, an entire workbook, or any part of a worksheet. You can either print the active sheet (Quick Print) or control exactly what you print using the Print dialog. Page 49
51 All which is beautiful and noble is the result of reason and calculation. Charles Baudelaire Module Seven: Building Formulas The backbone of Excel is its ability to perform calculations. There are two ways to set up calculations in Excel: using formulas or using functions. Formulas are mathematical expressions that you build yourself. You need to follow proper math principles in order to obtain the expected answer. Building the formula is simply a matter of combining the proper cell addresses with the correct operators in the right order. This module will explore how to build, edit, and copy formulas. This module will also explain the difference between relative and absolute references. We will explore functions in the next module. Page 50
52 The Math Basics of Excel Excel performs calculations by combining the contents of cells using operators. There are several different types of operators to perform arithmetic, comparisons, and text concatenation operations, as well as to provide references to use in those calculations. Review the different types of operators. The Arithmetic operators are: + Plus Sign Adds values Minus Sign Subtracts values * Asterisk Multiplies values / Forward slash Divides values % Percent sign Finds the percentage of a value ^ Caret Exponentiation Finds the exponential value The Comparison operators are: = Equals sign Equates values > Greater than sign Indicates that one value is greater than the other < Less than sign Indicates that one value is less than the other >= Greater than or equal to Indicates that one value is greater than or equal to the other <= Less than or equal to Indicates that one value is less than or equal to the other <> Not Equal Indicates that values are not equal Text concatenation allows you to combine text from different cells into a single piece of text. The operator is the & sign. The reference operators combine a range of cells to use together in an operation. The reference operators are: : Colon A Range operator that produces a reference to all of the cells between the references on either side of the colon, Comma A Union operator that combines multiple range references Space An intersection operator that returns a reference to the cells common to the ranges in the formula Page 51

53 Building a Formula All formulas begin with the = symbol. To enter a formula, click the cell where you want the formula and begin typing. When you click on another cell, the contents of that cell will be included in the formula. Press Enter when you have finished entering the formula. Use the following procedure to enter a formula to calculate the Total Value in the sample worksheet 1. Click on the Total Value column for the first product (cell D4). 2. Enter the = sign to begin the formula. 3. Click on cell B4 to use it as the first value in the formula. Excel enters the reference as part of the formula. 4. Enter the * sign. 5. Click on cell C4 to use it as the second value in the formula. Excel enters the references as part of the formula. 6. Press ENTER to complete the formula. Excel moves to the next row and performs the calculations in the formula. The following illustration shows the answer to the calculation in the cell, and since the cell is active, you can see the formula in the Formula bar. Page 52
54 Page 53

55 Editing a Formula If you have made an error in a formula, you can easily correct it. Both the operators and the cell references can be edited. Use the following procedure to edit a formula. The following example uses an incorrect cell reference in a formula. 1. Click on the cell with the formula you want to correct to make it active. 2. Click on the Formula Bar. Excel highlights the cell references in the current formula. 3. Highlight the operator or cell references and either type over with the correct reference or operator, or click the correct cell to replace a cell reference. 4. Press ENTER to complete the formula. Excel calculates the formula and moves to the next row. Page 54
56 Page 55

57 Copying a Formula In Excel, you often repeat the same formula, changing only the cells you are referencing. You can easily copy the formula instead of having to re-enter it multiple times. If you are familiar with copy and paste from other applications, this is an easy way to copy a formula. You can also paste in multiple cells at once by highlighting all of them before pasting. Use the following procedure to copy and paste a formula. 1. Right click on the cell with the formula you want to copy. This displays the context menu. Select Copy. You can also click on the cell and use the keyboard shortcut: CTRL + C. Excel highlights the cell whose contents you are copying. This will remain highlighted until you finish pasting, in case you want to paste the cell contents more than once. 2. Right click on the cell where you want to copy the formula. Excel displays a number of paste options. To paste a formula, select Paste or Paste formula. You can also click on the cell and use the keyboard shortcut: CTRL + V. Page 56

58 3. You can repeat the paste as many times as desired. Or you can highlight multiple cells at once before pasting to repeat the paste for all highlighted cells. 4. Press ENTER to stop pasting. Page 57

59 Relative vs. Absolute References Copying formulas works because of RELATIVE REFERENCING. Formula references actually reference the cell relative to the formula location. This means that when you copy the formula, the new formulas reference cells in the same way as the original formula, but relative to the new cell location. However, ABSOLUTE REFERENCING references the exact same cell address no matter where the formula is copied. To create an absolute reference in Excel, put dollar signs before the column address and before the row address. For example, $A$2. Use the following procedure to copy a formula with an absolute reference. 1. Create a new column labeled Taxes. 2. Click on the Taxes column for the first product (cell E4). 3. Enter the = sign to begin the formula. 4. Click on cell B16 to use it as the first value in the formula. Excel enters the reference as part of the formula. Use the Formula Bar to enter dollar signs before the column and the row (i.e., $B$16). 5. Enter * and the relative reference in the Total Value column. 6. Press ENTER to complete the formula. Excel moves to the next row and performs the calculations in the formula. Copy the formula for the other products and click on some of them to see the results. Page 58
60 I can give you a six-word formula for success: Think things through - then follow through. Sir Walter Scott Module Eight: Using Excel Functions This module introduces Excel functions, which are a little like templates for common formulas. There are many different types of functions. This module will introduce the new function names introduced in Excel We ll take a look at the Formulas tab introduced in the Ribbon for Excel We ll look at the SUM function and other basic common functions. Finally, this module will explain how to use the Status Bar to perform simple calculations. Page 59
.")

61 Formulas vs. Functions Formulas combine cell references and operators to perform calculations. Functions use function names and arguments. The syntax for a function is always the same: =NAME(Arguments). Use the following procedure to open the Insert Function dialog box. 1. Click the Insert Function tool right next to the Formula Bar. Investigate the different categories and functions in the Insert Function dialog box. View the bottom part of the screen where the syntax and description of the function appear. Page 60
. 2.")
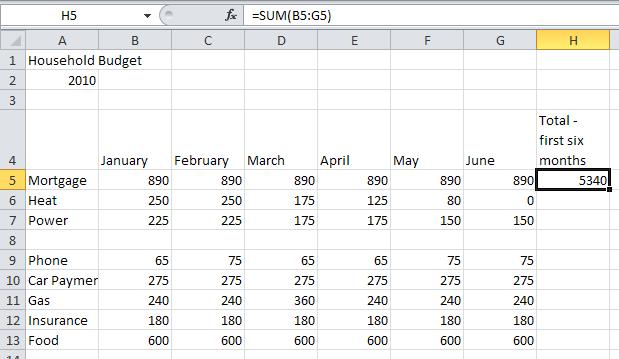
62 Using the SUM Function The SUM function adds up a series of numbers. Instead of having to repeatedly type + and click cell references, you can use the SUM function. Use the following procedure to use a SUM function to add the total for each category in the sample file 1. Click on the Total First Six Months column for the first category (cell H5). 2. Click on the SUM tool in the Editing Group on the Home tab of the Ribbon. 3. Excel enters the function with a default selection of the cell references you want to use in the function highlighted. 4. If the cell references are not accurate, you can drag the highlighted area to include additional cells or remove cells you do not want used in the function. 5. Press ENTER to complete the function. Excel performs the calculation and moves to the next row. In the following illustration, the cell with the function is active, so that you can see the function syntax in the Formula Bar and the result in the cell. Page 61
63 Page 62


64 Using Other Basic Excel Functions In addition to the SUM function, there are several other functions that are commonly used. You can access these by clicking the arrow next to the SUM tool on the Ribbon. Use the following procedure to use the AVERAGE function as an example of another function. 1. Add a new label in column I: Average. 2. Click on the cell in the Average column for the first category. 3. Click on the arrow next to the SUM function to see the list of other common functions. 4. Select Average. Excel enters the function with the most likely cell references. 5. Replace the cell references so that cell H5 is not included in the average. 6. Press ENTER to complete the function. Page 63
65 Understanding the Formulas Tab The Formulas tab on the Ribbon is used to help create functions. You can access Excel s functions in the Function Library group. This saves you the trouble of typing the function name, and provides you with some help entering the arguments. Shown here is the Formulas tab on the Ribbon. Page 64

66 Using the Status Bar to Perform Calculations To learn how to use the Status Bar to perform basic functions and to learn how to customize the Status Bar. Use the following procedure to customize the Status Bar. 1. Right click on the Status Bar to see a list of Functions that can be displayed. For this example, select MIN and MAX. 2. Press ESC or click elsewhere in the worksheet to close the Customize Status Bar list. Page 65

67 View the calculations performed when you highlight a group of cells. Page 66

68 Understanding the New Function Names Some of the functions in previous versions of Excel have been renamed. The new functions have improved performance. The old functions are available if you need backward compatibility. If you do not need compatibility with previous versions of Excel, always use the new function names for best performance. Shown here are the icons that appear when entering a function name. The old names have a yellow warning triangle next to them. Page 67
69 If you want work well done, select a busy man - the other kind has no time. Elbert Hubbard Module Nine: Using Time Saving Tools This module introduces some time saving tools to make basic worksheet creation even easier. The AutoFill feature can help you quickly repeat formulas or do things like fill in the days of the week or months of the year. The AutoComplete feature can help you to quickly write functions. This module will also look at sorting and filtering your data to efficiently find the data you need. Finally, this module will introduce Sparklines a new feature in Excel 2010 that allows you to create cell-sized graphs that can be helpful in showing trends. Page 68

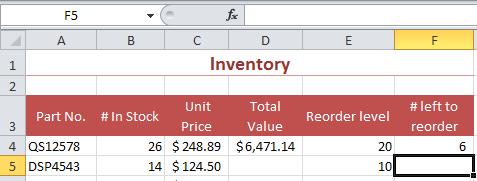
70 Using AutoFill AutoFill is a feature that quickly creates copies of a cell based on that cell s contents. If the cell contains a formula, the formula is repeated with relative references. If the cell contains a date, AutoFill creates a list with that date as the starting point. To use AutoFill, simply select the AutoFill handle and drag to fill the contents of consecutive rows or columns. The AutoFill handle is present for the active cell. It is a small square at the bottom right corner of the cell. You can only fill in one direction at a time. Use the following procedure to copy a formula using the AutoFill handle. This example uses the formula in the # Left to reorder column in the Inventory sample worksheet. 1. Click on the cell with the formula you want to copy. Excel displays a handle around the cell. 2. Drag the handle at the bottom right corner of the cell to the end of the range of cells where you want to copy the formula. 3. Release the mouse button at the end of the range. Excel displays a menu to help determine you AutoFill options. For this example, we want to Copy Cells. Page 69


71 Use the following procedure to create a list using AutoFill. This example creates new columns in the Budget worksheet to cover the second six months. 1. Create a new column heading with the text July in cell J4. 2. Click on that cell to make it active. Excel displays a handle around the cell. 3. Drag the handle across the columns. Excel displays a screen tip showing what AutoFill will place in those cells. 4. Release the mouse button at the end of the range. Excel displays a menu to help determine you AutoFill options. For this example, you can choose either Fill Series or Fill Months. Page 70

72 Using AutoComplete AutoComplete is an Excel feature that helps you save time. You can begin typing the name of a function that you want to use in a cell. Excel displays a list of functions that start with those letters. Then you can simply select the appropriate function from the drop down list. This helps save time for the functions you use frequently. It also helps ensure accuracy for your arguments in the function. Use the following procedure to use the AutoComplete feature. 1. Begin typing the SUM function. As soon as you type the Equals sign and the letter S, Excel displays a possible list of matching functions. 2. To select the SUM Function from the list, double-click on the SUM function. 3. Excel enters the function, but you must still enter the arguments. You can simply click on multiple cells, or click and drag to select a cell range. You can also type in the cell references. Page 71

73 4. Enter the final parenthesis mark to end the function. 5. Press ENTER to enter the function in the cell. Page 72

74 Sorting Data Excel allows you to sort your data in ascending or descending order by one or more columns. Data sorting works best when your columns have a label. When you sort, Excel keeps your rows together. Use the following procedure to sort. The part number column is used in this example. 1. Click on the column header. 2. Select the Sort & Filter tool from the Ribbon. 3. Select Sort A to Z or Sort Z to A. Use the following procedure to create a custom sort. 1. Click on one column header you want to use in your sort. 2. Select the Sort & Filter tool from the Ribbon. 3. Select Custom Sort. Excel opens the Sort dialog box. 4. You can choose the first column by which to sort from the Sort By drop down list. The options displayed match the column headers in your worksheet. 5. Select an option from the Sort On drop down list. Values is selected by default. 6. Select an Order from the drop down list. 7. To add another column to your sort, select Add Level. Repeat steps 4, 5, and 6 for the next sorting level. You can Delete the Level, Copy a Level, and rearrange the order of the sorting levels by using the up or down arrows. Page 73


75 8. Select OK when you have finished setting up your sort to see the results. Page 74


76 Filtering Data Filters allow you to view only data that matches certain criteria. Simple filters filter the data based on your select. There are also different types of more advanced filters, depending on your data. For example, number filters allow you to answer a variety of questions, using less than, greater than, or top ten. Text filters allow you to answer questions like begins with, ends with, or contains. There are also specialized filters for dates and other types of data. Filtering works best when all columns have headers. Excel places a small arrow in the column header to apply a filter. Use the following procedure to apply a simple filter. 1. Click in the column header for the column including the value you want to filter. Select the Sort & Filter tool from the Ribbon. Select Filter. Excel places a small icon in each column header for filtering. 2. Select the icon to see the Filter options. Page 75

77 3. You can uncheck the Select All check box to clear all of the values. Select the option(s) that include the values you want to see. For example, in the above illustration, Excel will only show the rows that include the value $ in this column. You can check multiple values. 4. Select OK to apply the filter. Excel includes a different small icon in the column header to indicate that a filter has been applied. It only shows the rows that match the filter. The other rows are still present, but hidden. Page 76


78 Use the following procedure to clear a filter. 1. Click the Filter icon next to the column header to open the Sort and Filter context menu. 2. Select Clear Filter From to clear the filter. Page 77

79 Use the following procedure to use a number filter. This example demonstrates a Greater Than number filter. 1. If you have not previously performed a filter on this worksheet, you may need to select the Sort & Filter tool from the Ribbon. Select Filter. Select the Filter icon next to the column header you want to filter. 2. Select Number Filters. Select Greater Than. Page 78


80 Excel displays the Custom Auto Filter dialog box. 3. Select the value from the second drop down list. 4. If you want to add to you filter, select either And or and select another column header from the drop down list. Select another value from the drop down list. 5. Select OK to apply the filter. Page 79

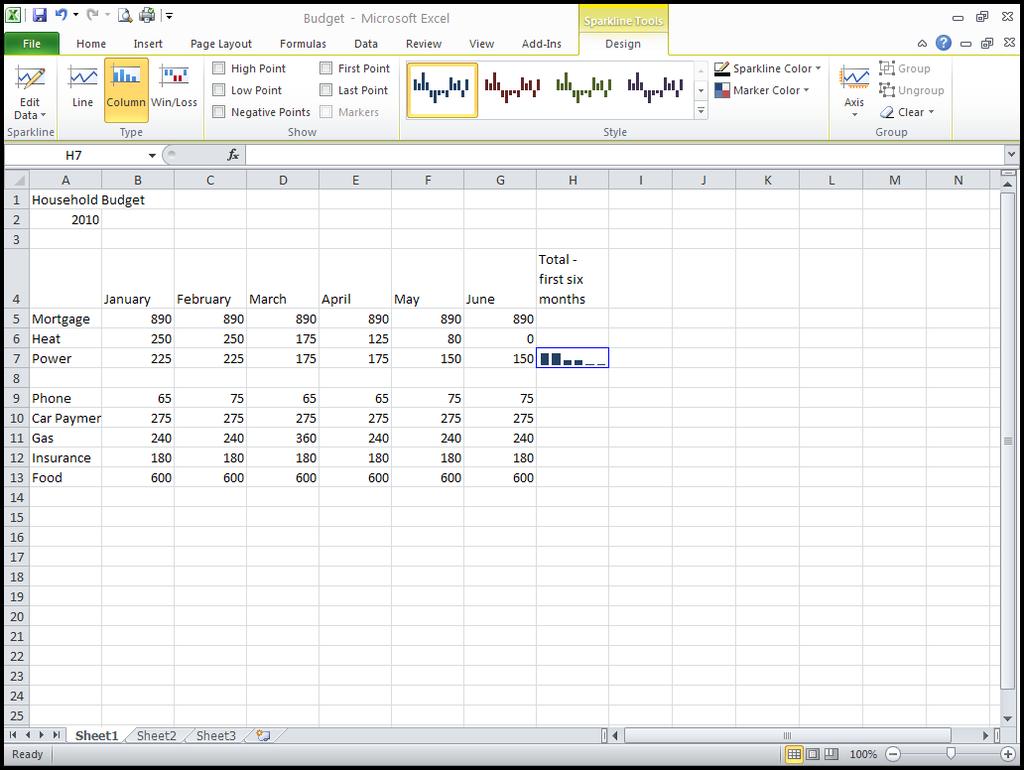
81 Adding Sparklines Sparklines are tiny charts that are actually in the background of a cell. Sparklines can be used to visually display trends that might be harder to spot just from the data alone. Sparklines provide valuable information at just a glance. Use the following procedure to create a sparkline. This example shows a sparkline for the heat category on the budget. 1. Click on the cell where you want to create the sparkline. 2. Click the Insert tab. 3. Click the type of Sparkline you want to include from the Sparklines group. For this example, line or bar chart work best. Page 80
82 Page 81
83 Quick Tip: Use the Undo arrow on the Quick Access toolbar to reverse unwanted changes. Module Ten: Formatting Your Data In this module, we will look at how to make your worksheet more appealing by changing the font type and size, alignment, formatting numbers, and by adding color and borders. This module also explains how to use the merge feature and how to remove formatting. Page 82

84 Changing the Appearance of Text There are a number of things you can do to enhance the appearance of your text. You can change the font, the size, the color, and you can add bold, italic, or underline effects. The Home tab includes many formatting options. There is also a context menu to easily apply formatting anytime. Use the following procedure to apply formatting to text. 1. Click on the cell or highlight a number of cells that you want to format. 2. Right-click to display the context menu, or use the formatting tools on the Home tab. a. Use the Font drop down list to select a new font for the text. b. Use the Font Size drop down list to select a new font size for the text. Alternatively, you can use the Increase Font Size or Decrease Font Size tools to adjust the font size2 point sizes at a time. c. Select Bold, Italics, or Underline to add these features to your text. Page 83

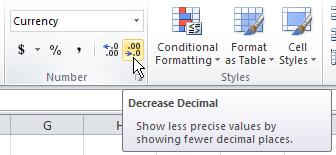
85 Changing the Appearance of Numbers You can format numbers in a variety of ways, by including symbols and/or decimal places, by formatting the numbers as a long or short date, by adding percentage signs, and other number formatting options. Use the following procedure to format a number as currency without decimals. 1. Click on the cell or highlight the cell range that you want to format. 2. Select the type of number formatting you want to use from the Number group drop down list in the Home tab of the Ribbon. 3. Select the Decrease Decimal tool (2 times) to remove the decimal places. Page 84
86 Page 85

87 Setting Alignment Options Alignment refers to the position of the contents within the cell. You can align the contents horizontally and vertically. You can also change the orientation of the cell contents. Use the following procedure to align cell contents. 1. Click on the cell or highlight the cell range that you want to align. 2. Select the type of alignment you want to use from the Alignment group tools in the Home tab of the Ribbon. Page 86

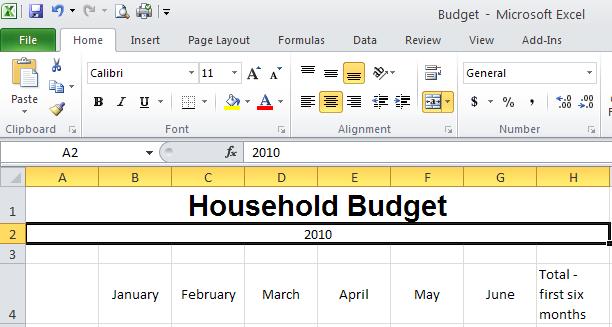
88 Using Merge Merge allows you to combine two or more cells into a single cell. This is useful for centering text across several columns. Use the following procedure to merge cells. 1. Highlight the cell range that you want to merge. 2. Select the Merge tool from the Home tab of the Ribbon. Select Merge & Center. Page 87
89 Page 88

90 Removing Formatting Formatting is not removed when you delete the contents of a cell. To see this, select a cell with formatting, and press Delete on your keyboard. Re-type the contents, and you ll see that the new contents are formatted. You must clear the formatting if you no longer need it. Use the following procedure to clear formatting. 1. Click on the cell or highlight the cell range that you want to clear. 2. Select the Clear tool from the Home tab on the Ribbon. 3. Select Clear Formats. Page 89
91 Quick Tip: Click the Dialog Box Launcher (the small button to the right of a group name on a tab) to access many different formatting options at once. Module Eleven: Advanced Formatting Tools This module introduces other ways to enhance your worksheet. You can add borders and fill color and apply styles. Conditional formatting allows you to format cells only if they meet certain conditions. You can also use Themes in your workbook to change many of the styles at once. Page 90

92 Adding Borders By default, there are no borders around any of the cells. However, you can add a variety of different borders using the Border button. Use the following procedure to add borders. 1. Highlight the cell or cell range where you want to apply your border. 2. Select the type of border you want to apply from the Borders tool on the Home tab of the Ribbon. Page 91

93 Adding Fill Color Fill color is how you add shading to the cells of your workbook. You can choose from standard colors, theme colors, or you can create a customized color. Use the following procedure to apply fill colors. 1. Highlight the cell or cell range where you want to apply your fill color. 2. Select the color you want to apply from the Fill Color tool on the Home tab of the Ribbon. Page 92

94 Using Cell Styles Styles are a group of formatting features that you can apply all at once. Styles provide more consistency to your workbooks and may be easier to apply to individual formatting features that you are going to use repeatedly. Use the following procedure to apply a cell style. 1. Highlight the cell or cell range where you want to apply your style. 2. Select the Cell Styles tool from the Home tab of the Ribbon to see the style gallery. 3. Select the style that you want to apply. You can see a preview before you select a style. Use the following procedure to create a new cell style. 1. Highlight the cell or cell range where you want to apply your style. 2. Select the Cell Styles tool from the Home tab of the Ribbon to see the style gallery. 3. Select New Cell Style to open the Style dialog box. Page 93

95 4. Enter a name for the style in the Style Name field. 5. Check the Style Includes boxes to indicate what formatting features the style should include. The options vary based on the active cell. 6. Select Format to open the Format Cells dialog box. 7. Use the Format Cells dialog box to indicate each formatting feature for the style. Select OK when you have finished indicating all of the formatting features for the style. a. The Number tab allows you to set number formatting for cells that contain values. b. The Alignment tab allows you to set text alignment for cells that contain text. c. The Font tab allows you to set the font for the style. d. The Border tab allows you to set customized borders for the style. e. The Fill tab allows you to set customized fill color for the style. f. The Protection tab allows you to protect the cells from changes if you use the Protection feature. Page 94

96 8. Select OK to save your style and close the Style dialog box. The new style appears at the top of the Cell Style gallery. Page 95


97 Using Conditional Formatting Conditional formatting changes the appearance of a cell based on the criteria you choose. Excel comes with built-in formats that you can customize to meet your needs. Use the following procedure to apply conditional formatting. In this example, we will format all monthly totals in the budget that are over $ Highlight the cell or cell range where you want to use conditional formatting. 2. Select the Conditional Formatting tool from the Home tab on the Ribbon. Select Highlight Cell Rules. Select Greater Than. Excel displays the Greater Than dialog box to help you complete the conditional formatting rule. 3. Enter 2500 in the left field. 4. Select a formatting option from the right drop down list. 5. Select OK to apply the conditional formatting. Page 96


98 Use the following procedure to create a new conditional formatting rule. 1. Highlight the cell or cell range where you want to use conditional formatting. 2. Select the Conditional Formatting tool from the Home tab on the Ribbon. Select New Rule. Excel opens the New Formatting Rule dialog box. Page 97
99 3. The options in this dialog box differ, based on the Rule Type you select. Select the Rule Type and follow the prompts to indicate the conditions for when to apply the formatting. 4. Select Format to open the FormatCells dialog box to create the formatting to apply when the conditions are met. 5. Select OK to save your rule and close the New Formatting Rule dialog box. Page 98

100 Changing the Theme A theme is a collection of formats that can be applied to a worksheet. It includes settings for colors, fonts, and effects (such as shadows and colors for graphics). If you change the theme for a worksheet after you have formatted cells, the theme may not override all of your customizations. Use the following procedure to apply a theme. 1. Select the Page Layout tab. 2. Select the Themes tool to see the Theme gallery. 3. Select a theme from the Theme gallery. Page 99
101 Man's mind, once stretched by a new idea, never regains its original dimensions. Oliver Wendell Holmes Module Twelve: Wrapping Up Although this workshop is coming to a close, we hope that your journey to improve your Excel skills is just beginning. Please take a moment to review and update your action plan. This will be a key tool to guide your progress in the days, weeks, months, and years to come. We wish you the best of luck on the rest of your travels! Words from the Wise We d like to leave you with a few thoughts to accompany you on your Excel learning journey. Remember to spend some time planning your worksheet. Be clear about why you are creating it. Remember that everything can be changed if needed. Save often, and backup your work regularly. Try to use cell references instead of numbers in your formulas and functions. Try to write a formula or function once, and then copy it or use AutoFill, instead of repeatedly writing it. Practice as much as you can, and as soon as you can. Remember the Undo button! If you find you are getting frustrated, come back to this manual, and try the guided exercises to refresh your skills. Page 100
Microsoft Excel 2010 Handout
 Microsoft Excel 2010 Handout Excel is an electronic spreadsheet program you can use to enter and organize data, and perform a wide variety of number crunching tasks. Excel helps you organize and track
Excel Main Screen. Fundamental Concepts. General Keyboard Shortcuts Open a workbook Create New Save Preview and Print Close a Workbook
 Excel 2016 Main Screen Fundamental Concepts General Keyboard Shortcuts Open a workbook Create New Save Preview and Print Close a Ctrl + O Ctrl + N Ctrl + S Ctrl + P Ctrl + W Help Run Spell Check Calculate
CHAPTER 4: MICROSOFT OFFICE: EXCEL 2010
 CHAPTER 4: MICROSOFT OFFICE: EXCEL 2010 Quick Summary A workbook an Excel document that stores data contains one or more pages called a worksheet. A worksheet or spreadsheet is stored in a workbook, and
EXCEL 2003 DISCLAIMER:
 EXCEL 2003 DISCLAIMER: This reference guide is meant for experienced Microsoft Excel users. It provides a list of quick tips and shortcuts for familiar features. This guide does NOT replace training or
Table of Contents. 1. Creating a Microsoft Excel Workbook...1 EVALUATION COPY
 Table of Contents Table of Contents 1. Creating a Microsoft Excel Workbook...1 Starting Microsoft Excel...1 Creating a Workbook...2 Saving a Workbook...3 The Status Bar...5 Adding and Deleting Worksheets...6
Microsoft Excel Important Notice
 Microsoft Excel 2013 Important Notice All candidates who follow an ICDL/ECDL course must have an official ICDL/ECDL Registration Number (which is proof of your Profile Number with ICDL/ECDL and will track
Office of Instructional Technology
 Office of Instructional Technology Microsoft Excel 2016 Contact Information: 718-254-8565 ITEC@citytech.cuny.edu Contents Introduction to Excel 2016... 3 Opening Excel 2016... 3 Office 2016 Ribbon... 3
Creating a Spreadsheet by Using Excel
 The Excel window...40 Viewing worksheets...41 Entering data...41 Change the cell data format...42 Select cells...42 Move or copy cells...43 Delete or clear cells...43 Enter a series...44 Find or replace
EXCEL 2007 TIP SHEET. Dialog Box Launcher these allow you to access additional features associated with a specific Group of buttons within a Ribbon.
 EXCEL 2007 TIP SHEET GLOSSARY AutoSum a function in Excel that adds the contents of a specified range of Cells; the AutoSum button appears on the Home ribbon as a. Dialog Box Launcher these allow you to
Introduction to Excel 2013
 Introduction to Excel 2013 Copyright 2014, Software Application Training, West Chester University. A member of the Pennsylvania State Systems of Higher Education. No portion of this document may be reproduced
Excel Select a template category in the Office.com Templates section. 5. Click the Download button.
 Microsoft QUICK Excel 2010 Source Getting Started The Excel Window u v w z Creating a New Blank Workbook 2. Select New in the left pane. 3. Select the Blank workbook template in the Available Templates
Microsoft Excel 2010 Basics
 Microsoft Excel 2010 Basics Starting Word 2010 with XP: Click the Start Button, All Programs, Microsoft Office, Microsoft Excel 2010 Starting Word 2010 with 07: Click the Microsoft Office Button with the
Microsoft Excel Chapter 2. Formulas, Functions, and Formatting
 Microsoft Excel 2010 Chapter 2 Formulas, Functions, and Formatting Objectives Enter formulas using the keyboard Enter formulas using Point mode Apply the AVERAGE, MAX, and MIN functions Verify a formula
Status Bar: Right click on the Status Bar to add or remove features.
 Excel 2013 Quick Start Guide The Excel Window File Tab: Click to access actions like Print, Save As, etc. Also to set Excel options. Ribbon: Logically organizes actions onto Tabs, Groups, and Buttons to
Excel 2010: Getting Started with Excel
 Excel 2010: Getting Started with Excel Excel 2010 Getting Started with Excel Introduction Page 1 Excel is a spreadsheet program that allows you to store, organize, and analyze information. In this lesson,
EXCEL TUTORIAL.
 EXCEL TUTORIAL Excel is software that lets you create tables, and calculate and analyze data. This type of software is called spreadsheet software. Excel lets you create tables that automatically calculate
WEEK NO. 12 MICROSOFT EXCEL 2007
 WEEK NO. 12 MICROSOFT EXCEL 2007 LESSONS OVERVIEW: GOODBYE CALCULATORS, HELLO SPREADSHEET! 1. The Excel Environment 2. Starting A Workbook 3. Modifying Columns, Rows, & Cells 4. Working with Worksheets
Excel Level 1
 Excel 2016 - Level 1 Tell Me Assistant The Tell Me Assistant, which is new to all Office 2016 applications, allows users to search words, or phrases, about what they want to do in Excel. The Tell Me Assistant
Excel 2010: Basics Learning Guide
 Excel 2010: Basics Learning Guide Exploring Excel 2010 At first glance, Excel 2010 is largely the same as before. This guide will help clarify the new changes put into Excel 2010. The File Button The purple
Microsoft How to Series
 Microsoft How to Series Getting Started with EXCEL 2007 A B C D E F Tabs Introduction to the Excel 2007 Interface The Excel 2007 Interface is comprised of several elements, with four main parts: Office
ENTERING DATA & FORMULAS...
 Overview NOTESOVERVIEW... 2 VIEW THE PROJECT... 5 NAVIGATING... 6 TERMS... 6 USING KEYBOARD VS MOUSE... 7 The File Tab... 7 The Quick-Access Toolbar... 8 Ribbon and Commands... 9 Contextual Tabs... 10
Gloucester County Library System. Excel 2010
 Gloucester County Library System Excel 2010 Introduction What is Excel? Microsoft Excel is an electronic spreadsheet program. It is capable of performing many different types of calculations and can organize
EVALUATION COPY. Unauthorized Reproduction or Distribution Prohibited
 INTRODUCTION TO MICROSOFT EXCEL 2016 Introduction to Microsoft Excel 2016 (EXC2016.1 version 1.0.1) Copyright Information Copyright 2016 Webucator. All rights reserved. The Authors Dave Dunn Dave Dunn
Introduction to Microsoft Excel 2010 Quick Reference Sheet
 Spreadsheet What is a spreadsheet? How is Excel 2010 different from previous versions? A grid of rows and columns that help to organize, summarize and calculate data. Microsoft Excel 2010 is built on the
Excel Shortcuts Increasing YOUR Productivity
 Excel Shortcuts Increasing YOUR Productivity CompuHELP Division of Tommy Harrington Enterprises, Inc. tommy@tommyharrington.com https://www.facebook.com/tommyharringtonextremeexcel Excel Shortcuts Increasing
Excel 2016: Part 1. Updated January 2017 Copy cost: $1.50
 Excel 2016: Part 1 Updated January 2017 Copy cost: $1.50 Getting Started Please note that you are required to have some basic computer skills for this class. Also, any experience with Microsoft Word is
Microsoft Office Excel
 Microsoft Office 2007 - Excel Help Click on the Microsoft Office Excel Help button in the top right corner. Type the desired word in the search box and then press the Enter key. Choose the desired topic
Advanced Excel. Click Computer if required, then click Browse.
 Advanced Excel 1. Using the Application 1.1. Working with spreadsheets 1.1.1 Open a spreadsheet application. Click the Start button. Select All Programs. Click Microsoft Excel 2013. 1.1.1 Close a spreadsheet
Rev. B 12/16/2015 Downers Grove Public Library Page 1 of 40
 Objectives... 3 Introduction... 3 Excel Ribbon Components... 3 File Tab... 4 Quick Access Toolbar... 5 Excel Worksheet Components... 8 Navigating Through a Worksheet... 9 Downloading Templates... 9 Using
Gloucester County Library System EXCEL 2007
 Gloucester County Library System EXCEL 2007 Introduction What is Excel? Microsoft E x c e l is an electronic s preadsheet program. I t is capable o f performing many diff e r e n t t y p e s o f c a l
course notes quick reference guide
 course notes quick reference guide Microsoft Excel 2010 Welcome to Excel 2010 Excel 2010 is the premier spreadsheet application from Microsoft. Excel 2010 makes it easier to analyze data quickly with new
Excel 2013 Intermediate
 Excel 2013 Intermediate Quick Access Toolbar... 1 Customizing Excel... 2 Keyboard Shortcuts... 2 Navigating the Spreadsheet... 2 Status Bar... 3 Worksheets... 3 Group Column/Row Adjusments... 4 Hiding
Excel: Introduction. Microsoft Office 2007.XLSX
 Excel: Introduction Microsoft Office 2007.XLSX 1 TEMPLATES Click on the OFFICE button NEW A list of templates appear (pre-created workbooks that can be reused and include formulas and formatting ) 2 KEYBOARD
Microsoft Excel 2010 Basic
 Microsoft Excel 2010 Basic Introduction to MS Excel 2010 Microsoft Excel 2010 is a spreadsheet software in the new Microsoft 2010 Office Suite. Excel allows you to store, manipulate and analyze data in
Spreadsheets Microsoft Office Button Ribbon
 Getting started with Excel 2007 you will notice that there are many similar features to previous versions. You will also notice that there are many new features that you ll be able to utilize. There are
Excel Basics. TJ McKeon
 Excel Basics TJ McKeon What is Excel? Electronic Spreadsheet in a rows and columns layout Can contain alphabetical and numerical data (text, dates, times, numbers) Allows for easy calculations and mathematical
Kenora Public Library. Computer Training. Introduction to Excel
 Kenora Public Library Computer Training Introduction to Excel Page 2 Introduction: Spreadsheet programs allow users to develop a number of documents that can be used to store data, perform calculations,
Changing Worksheet Views
 PROCEDURES LESSON 1: TOURING EXCEL Starting Excel 1 Click the Start button 2 Click All Programs 3 Click the Microsoft Office folder icon 4 Click Microsoft Excel 2010 Naming and Saving (Ctrl+S) a Workbook
Rev. C 11/09/2010 Downers Grove Public Library Page 1 of 41
 Table of Contents Objectives... 3 Introduction... 3 Excel Ribbon Components... 3 Office Button... 4 Quick Access Toolbar... 5 Excel Worksheet Components... 8 Navigating Through a Worksheet... 8 Making
Lecture- 5. Introduction to Microsoft Excel
 Lecture- 5 Introduction to Microsoft Excel The Microsoft Excel Window Microsoft Excel is an electronic spreadsheet. You can use it to organize your data into rows and columns. You can also use it to perform
TABLE OF CONTENTS. i Excel 2016 Basic
 i TABLE OF CONTENTS TABLE OF CONTENTS I PREFACE VII 1 INTRODUCING EXCEL 1 1.1 Starting Excel 1 Starting Excel using the Start button in Windows 1 1.2 Screen components 2 Tooltips 3 Title bar 4 Window buttons
Introduction to Microsoft Excel 2010
 Introduction to Microsoft Excel 2010 THE BASICS PAGE 02! What is Microsoft Excel?! Important Microsoft Excel Terms! Opening Microsoft Excel 2010! The Title Bar! Page View, Zoom, and Sheets MENUS...PAGE
Basic Microsoft Excel 2007
 Basic Microsoft Excel 2007 Contents Starting Excel... 2 Excel Window Properties... 2 The Ribbon... 3 Tabs... 3 Contextual Tabs... 3 Dialog Box Launchers... 4 Galleries... 5 Minimizing the Ribbon... 5 The
EXCEL BASICS: PROJECTS
 EXCEL BASICS: PROJECTS In this class, you will be practicing with three basic Excel worksheets to learn a variety of foundational skills necessary for more advanced projects. This class covers: Three Project
Contents Microsoft Excel Lesson 1: Entering Text and Numbers...4 The Microsoft Excel Window...4 The Microsoft Office Button...
 Contents Microsoft Excel 2007...4 Lesson 1: Entering Text and Numbers...4 The Microsoft Excel Window...4 The Microsoft Office Button...5 The Quick Access Toolbar...5 The Title Bar...5 The Ribbon...5 Worksheets...6
Microsoft Excel 2010
 Microsoft Excel 2010 omar 2013-2014 First Semester 1. Exploring and Setting Up Your Excel Environment Microsoft Excel 2010 2013-2014 The Ribbon contains multiple tabs, each with several groups of commands.
Ms excel. The Microsoft Office Button. The Quick Access Toolbar
 Ms excel MS Excel is electronic spreadsheet software. In This software we can do any type of Calculation & inserting any table, data and making chart and graphs etc. the File of excel is called workbook.
Contents. Introduction 15. How to use this course 18. Session One: Basic Skills 21. Session Two: Doing Useful Work with Excel 65
 Contents Introduction 15 Downloading the sample files... 15 Problem resolution... 15 The Excel version and locale that were used to write this book... 15 Typographical Conventions Used in This Book...
EXCEL BASICS: MICROSOFT OFFICE 2007
 EXCEL BASICS: MICROSOFT OFFICE 2007 GETTING STARTED PAGE 02 Prerequisites What You Will Learn USING MICROSOFT EXCEL PAGE 03 Opening Microsoft Excel Microsoft Excel Features Keyboard Review Pointer Shapes
MICROSOFT EXCEL BEYOND THE BASICS. MARY ANN WALLNER Contact Information:
 MICROSOFT EXCEL BEYOND THE BASICS MARY ANN WALLNER Contact Information: walln003@csusm.edu PRESENTING EXCEL Excel can be used for a wide variety of tasks: Creating and maintaining detailed budgets Tracking
Introduction to Excel
 Office Button, Tabs and Ribbons Office Button The File menu selection located in the upper left corner in previous versions of Excel has been replaced with the Office Button in Excel 2007. Clicking on
1 THE PNP BASIC COMPUTER ESSENTIALS e-learning (MS Excel 2007)
") 1 THE PNP BASIC COMPUTER ESSENTIALS e-learning (MS Excel 2007) 2 THE PNP BASIC COMPUTER ESSENTIALS e-learning (MS Excel 2007) TABLE OF CONTENTS CHAPTER 1: GETTING STARTED... 5 THE EXCEL ENVIRONMENT...
1 THE PNP BASIC COMPUTER ESSENTIALS e-learning (MS Excel 2007) 2 THE PNP BASIC COMPUTER ESSENTIALS e-learning (MS Excel 2007) TABLE OF CONTENTS CHAPTER 1: GETTING STARTED... 5 THE EXCEL ENVIRONMENT...
EXCEL BASICS: MICROSOFT OFFICE 2010
 EXCEL BASICS: MICROSOFT OFFICE 2010 GETTING STARTED PAGE 02 Prerequisites What You Will Learn USING MICROSOFT EXCEL PAGE 03 Opening Microsoft Excel Microsoft Excel Features Keyboard Review Pointer Shapes
MICROSOFT OFFICE. Courseware: Exam: Sample Only EXCEL 2016 CORE. Certification Guide
 MICROSOFT OFFICE Courseware: 3263 2 Exam: 77 727 EXCEL 2016 CORE Certification Guide Microsoft Office Specialist 2016 Series Microsoft Excel 2016 Core Certification Guide Lesson 1: Introducing Excel Lesson
Excel 2013 for Beginners
 Excel 2013 for Beginners Class Objective: This class will familiarize you with the basics of using Microsoft Excel. Class Outline: Introduction to Microsoft Excel 2013... 1 Microsoft Excel...2-3 Getting
Study Guide. PCIC 3 B2 GS3- Key Applications-Excel. Copyright 2010 Teknimedia Corporation
 Study Guide PCIC 3 B2 GS3- Key Applications-Excel Copyright 2010 Teknimedia Corporation Teknimedia grants permission to any licensed owner of PCIC 3 B GS3 Key Applications-Excel to duplicate the contents
Spreadsheet Concepts Using Microsoft Excel
 Spreadsheet Concepts Using Microsoft Excel lab 5 Objectives: Upon successful completion of Lab 5, you will be able to Create and edit a simple spreadsheet document Describe the advantage of using formulas
Introduction to Microsoft Excel 2010
 Introduction to Microsoft Excel 2010 This class is designed to cover the following basics: What you can do with Excel Excel Ribbon Moving and selecting cells Formatting cells Adding Worksheets, Rows and
Application of Skills: Microsoft Excel 2013 Tutorial
 Application of Skills: Microsoft Excel 2013 Tutorial Throughout this module, you will progress through a series of steps to create a spreadsheet for sales of a club or organization. You will continue to
INTRODUCTION... 1 UNDERSTANDING CELLS... 2 CELL CONTENT... 4
 Introduction to Microsoft Excel 2016 INTRODUCTION... 1 The Excel 2016 Environment... 1 Worksheet Views... 2 UNDERSTANDING CELLS... 2 Select a Cell Range... 3 CELL CONTENT... 4 Enter and Edit Data... 4
Changing Worksheet Views
 PROCEDURES LESSON 1: TOURING EXCEL Starting Excel From the Windows Start screen, click the Excel 2013 program tile 1 Right-click a blank area of the Windows Start screen 2 Click the All Apps button 3 Click
THE EXCEL ENVIRONMENT... 1 EDITING...
 Excel Essentials TABLE OF CONTENTS THE EXCEL ENVIRONMENT... 1 EDITING... 1 INSERTING A COLUMN... 1 DELETING A COLUMN... 1 INSERTING A ROW... DELETING A ROW... MOUSE POINTER SHAPES... USING AUTO-FILL...
DOING MORE WITH EXCEL: MICROSOFT OFFICE 2013
 DOING MORE WITH EXCEL: MICROSOFT OFFICE 2013 GETTING STARTED PAGE 02 Prerequisites What You Will Learn MORE TASKS IN MICROSOFT EXCEL PAGE 03 Cutting, Copying, and Pasting Data Basic Formulas Filling Data
Spreadsheet definition: Starting a New Excel Worksheet: Navigating Through an Excel Worksheet
 Copyright 1 99 Spreadsheet definition: A spreadsheet stores and manipulates data that lends itself to being stored in a table type format (e.g. Accounts, Science Experiments, Mathematical Trends, Statistics,
MODULE 01 INTRODUCTION TO MICROSOFT EXCEL
 2 Workbook Microsoft Excel Basics onlineacademy.co.za MODULE 01 INTRODUCTION TO MICROSOFT EXCEL Exploring the Excel Interface This course is an introduction to Microsoft Office Excel based on the 2013
ECDL Module 4 REFERENCE MANUAL
 ECDL Module 4 REFERENCE MANUAL Spreadsheets Microsoft Excel XP Edition for ECDL Syllabus Four PAGE 2 - ECDL MODULE 4 (USING MICROSOFT EXCEL XP) - MANUAL 4.1 USING THE APPLICATION... 4 4.1.1 FIRST STEPS
I OFFICE TAB... 1 RIBBONS & GROUPS... 2 OTHER SCREEN PARTS... 4 APPLICATION SPECIFICATIONS... 5 THE BASICS...
 EXCEL 2010 BASICS Microsoft Excel I OFFICE TAB... 1 RIBBONS & GROUPS... 2 OTHER SCREEN PARTS... 4 APPLICATION SPECIFICATIONS... 5 THE BASICS... 6 The Mouse... 6 What Are Worksheets?... 6 What is a Workbook?...
In this section you will learn some simple data entry, editing, formatting techniques and some simple formulae. Contents
 In this section you will learn some simple data entry, editing, formatting techniques and some simple formulae. Contents Section Topic Sub-topic Pages Section 2 Spreadsheets Layout and Design S2: 2 3 Formulae
Using Microsoft Excel
 Using Microsoft Excel Table of Contents The Excel Window... 2 The Formula Bar... 3 Workbook View Buttons... 3 Moving in a Spreadsheet... 3 Entering Data... 3 Creating and Renaming Worksheets... 4 Opening
Excel Tutorial 1
 IT٢.we Excel 2003 - Tutorial 1 Spreadsheet Basics Screen Layout Title bar Menu bar Standard Toolbar Other Tools Task Pane Adding and Renaming Worksheets Modifying Worksheets Moving Through Cells Adding
Microsoft Excel for Beginners
 Microsoft Excel for Beginners training@health.ufl.edu Basic Computing 4 Microsoft Excel 2.0 hours This is a basic computer workshop. Microsoft Excel is a spreadsheet program. We use it to create reports
Formatting Values. 1. Click the cell(s) with the value(s) to format.
 with the value(s) to format.") Formatting Values Applying number formatting changes how values are displayed it doesn t change the actual information. Excel is often smart enough to apply some number formatting automatically. For example,
Formatting Values Applying number formatting changes how values are displayed it doesn t change the actual information. Excel is often smart enough to apply some number formatting automatically. For example,
MS Excel Henrico County Public Library. I. Tour of the Excel Window
 MS Excel 2013 I. Tour of the Excel Window Start Excel by double-clicking on the Excel icon on the desktop. Excel may also be opened by clicking on the Start button>all Programs>Microsoft Office>Excel.
EXCEL 2010 PROCEDURES
 EXCEL 2010 PROCEDURES Starting Excel 1 Click the Start 2 Click All Programs 3 Click the Microsoft Office folder icon 4 Click Microsoft Excel 2010 Naming and Saving (Ctrl+S) a Workbook 1 Click File 2 Click
Microsoft Excel for Lawyers - The Fundamentals Reference Guide
 Microsoft Excel for Lawyers - The Fundamentals Reference Guide This guide includes step by step procedures for fundamental Excel commands and accompanies the Microsoft Excel for Lawyers -The Fundamentals
Intro to Excel. To start a new workbook, click on the Blank workbook icon in the middle of the screen.
 Excel is a spreadsheet application that allows for the storing, organizing and manipulation of data that is entered into it. Excel has variety of built in tools that allow users to perform both simple
ADD AND NAME WORKSHEETS
 1 INTERMEDIATE EXCEL While its primary function is to be a number cruncher, Excel is a versatile program that is used in a variety of ways. Because it easily organizes, manages, and displays information,
Excel 2016 Basics for Windows
 Excel 2016 Basics for Windows Excel 2016 Basics for Windows Training Objective To learn the tools and features to get started using Excel 2016 more efficiently and effectively. What you can expect to learn
Introduction to Microsoft Excel 2010
 Introduction to Microsoft Excel 2010 This class is designed to cover the following basics: What you can do with Excel Excel Ribbon Moving and selecting cells Formatting cells Adding Worksheets, Rows and
GO! with Microsoft Excel 2016 Comprehensive
 GO! with Microsoft Excel 2016 Comprehensive First Edition Chapter 2 Using Functions, Creating Tables, and Managing Large Workbooks Use SUM and Statistical Functions The SUM function is a predefined formula
Microsoft Excel Basics Ben Johnson
 Microsoft Excel Basics Ben Johnson Topic...page # Basics...1 Workbook and worksheets...1 Sizing columns and rows...2 Auto Fill...2 Sort...2 Formatting Cells...3 Formulas...3 Percentage Button...4 Sum function...4
Introduction to Excel 2007
 Introduction to Excel 2007 These documents are based on and developed from information published in the LTS Online Help Collection (www.uwec.edu/help) developed by the University of Wisconsin Eau Claire
Personal Budget Project. Objectives. By the end of this lesson, you will be able to:
 Personal Budget Project Objectives By the end of this lesson, you will be able to: Navigate an Excel Window Enter Labels and Values Use AutoSum Create formulas using math operators Use common functions
Excel 2013 Part 2. 2) Creating Different Charts
 Creating Different Charts") Excel 2013 Part 2 1) Create a Chart (review) Open Budget.xlsx from Documents folder. Then highlight the range from C5 to L8. Click on the Insert Tab on the Ribbon. From the Charts click on the dialogue
Excel 2013 Part 2 1) Create a Chart (review) Open Budget.xlsx from Documents folder. Then highlight the range from C5 to L8. Click on the Insert Tab on the Ribbon. From the Charts click on the dialogue
Basic Microsoft Excel 2011
 Basic Microsoft Excel 2011 Table of Contents Starting Excel... 2 Creating a New Workbook... 3 Saving a Workbook... 3 Creating New Worksheets... 3 Renaming a Worksheet... 3 Deleting a Worksheet... 3 Selecting
4Functions & Formulas
 The Original Quick Reference Guides Microsoft Excel 2010 Excel is a spreadsheet program that enables you to perform simple or complex calculations using a broad range of statistical and mathematical tools,
COMPUTING AND DATA ANALYSIS WITH EXCEL
 COMPUTING AND DATA ANALYSIS WITH EXCEL Lesson 1: Introduction to the Excel Environment 1 Scheme Introduction to spreadsheets The Excel Interface Menus Toolbars Built-in Help tool Workbooks, Worksheets,
Excel 2016 Basics for Mac
 Excel 2016 Basics for Mac Excel 2016 Basics for Mac Training Objective To learn the tools and features to get started using Excel 2016 more efficiently and effectively. What you can expect to learn from
PARTS OF A WORKSHEET. Rows Run horizontally across a worksheet and are labeled with numbers.
 1 BEGINNING EXCEL While its primary function is to be a number cruncher, Excel is a versatile program that is used in a variety of ways. Because it easily organizes, manages, and displays information,
Using Microsoft Excel
 Using Microsoft Excel Formatting a spreadsheet means changing the way it looks to make it neater and more attractive. Formatting changes can include modifying number styles, text size and colours. Many
Introduction to Microsoft Excel 2016
 Screen Elements: Introduction to Microsoft Excel 2016 The Ribbon The Ribbon is designed to help you quickly find the commands that you need to complete a task. Commands are organized in logical groups,
Contents. Introduction 13. Putting The Smart Method to Work 16. Session One: Basic Skills 23
 Contents Introduction 13 Feedback... 13 Downloading the sample files... 13 Problem resolution... 13 Typographical Conventions Used In This Book... 14 Putting The Smart Method to Work 16 Excel version and
Workbooks & Worksheets. Getting Started. Formatting. Formulas & Functions
 1 Getting Started Cells Workbooks & Worksheets Formatting Formulas & Functions Chart Printing 2 Getting Started Start a spreadsheet program Recognize the spreadsheet screen layout Use the ribbon,quick
General: All cells have this format by default. Numbers display as typed except that leading and trailing zeroes are deleted becomes 12.
 Home Ribbon: Formatting Tools Dialog Box Launcher: Click this symbol to open old-style dialog box giving additional options Allow text to appear on multiple lines in a cell Number Format box: Click here
Microsoft Excel 2010 Tutorial
 1 Microsoft Excel 2010 Tutorial Excel is a spreadsheet program in the Microsoft Office system. You can use Excel to create and format workbooks (a collection of spreadsheets) in order to analyze data and
COPYRIGHTED MATERIAL. Making Excel More Efficient
 Making Excel More Efficient If you find yourself spending a major part of your day working with Excel, you can make those chores go faster and so make your overall work life more productive by making Excel
4) Study the section of a worksheet in the image below. What is the cell address of the cell containing the word "Qtr3"?
 Study the section of a worksheet in the image below. What is the cell address of the cell containing the word Qtr3?") Choose The Correct Answer: 1) Study the highlighted cells in the image below and identify which of the following represents the correct cell address for these cells: a) The cell reference for the selected
Choose The Correct Answer: 1) Study the highlighted cells in the image below and identify which of the following represents the correct cell address for these cells: a) The cell reference for the selected
What is a spreadsheet?
 Microsoft Excel is a spreadsheet developed by Microsoft. It is a software program included in the Microsoft Office suite (Others include MS Word, MS PowerPoint, MS Access etc.). Microsoft Excel is used
Microsoft Office Excel 2007: Basic. Course Overview. Course Length: 1 Day. Course Overview
 Microsoft Office Excel 2007: Basic Course Length: 1 Day Course Overview This course teaches the basic functions and features of Excel 2007. After an introduction to spreadsheet terminology and Excel's
Microsoft Excel 2016 / 2013 Basic & Intermediate
 Microsoft Excel 2016 / 2013 Basic & Intermediate Duration: 2 Days Introduction Basic Level This course covers the very basics of the Excel spreadsheet. It is suitable for complete beginners without prior