Version 9.1 SmartPTT Monitoring. Dispatch Console User Guide
|
|
|
- Susan Ryan
- 5 years ago
- Views:
Transcription
1 Version 9.1 SmartPTT Monitoring December 2016
2 Table of Contents Table of Contents Interface Change Layout Monitoring Settings Database 22 Licenses 24 General Settings 25 Radioservers 27 Operators 30 Service 32 Save Dispatcher Settings 32 Restore Dispatcher Settings 33 Reports Monitoring Reports Monitoring Report 34 Event Log Report 35 Analytic Report 36 System Usage Report 38 Help 40 Remote Assistance 41

3 Interface interface can be divided into the following sections: 1. Main Menu 2. Main Area 3. Information Bar Main Menu The Main Menu bar contains options and commands which allow you to carry out the majority of the functions available in the application. There are also other menu items represented by an icon: The Settings button opens the Settings menu which allows you to configure system parameters.
4 3 The Help button opens the Help menu where you can read the help file, learn about the application or check for updates. The Change Operator button allows you to change the operator. At clicking on this button the dispatch console is restarted, and you can select another operator in the Authorization window. Main Area The Main Area is a central area of the application window and is used for opening functional windows and panels when operating in the application. Information Bar The Information Bar was designed to give the user information about the owner of the license and the application version. Here you can also see a special icon which notifies about the approaching license expiration date Change Layout There is an ability to adjust the layout of the opened panels in the Main Area. In order to do that, click on the tab of the opened panel, drag it to the location where you would like to place it and release. As soon as you start dragging the panel, new icons appear on the screen. The icons represent a new location of the panel on the screen.
5 4

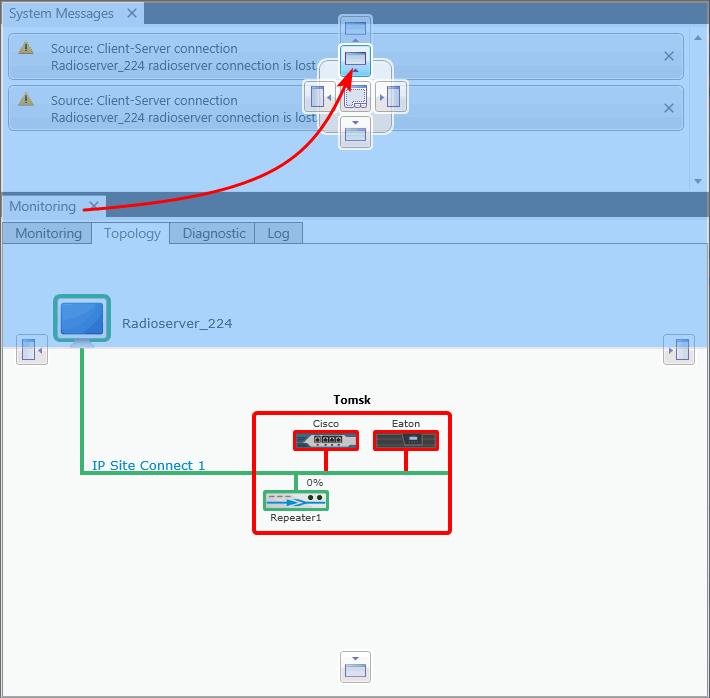
6 5 The table displays description of the icons. Icon Description Appears inside a panel, which means that you can either place the panel in any of the four positions beside the panel or insert it as a tab inside the panel. The four standalone icons can be used to place the panel in any position of the Main area outside any other panel. 1.2 Monitoring The Monitoring panel is a complex tool which gives a comprehensive outlook on the whole radio system. It includes four tabs: 1. Monitoring 2. Topology 3. Diagnostics 4. Event Log Monitoring Tab Monitoring graphical representation of data and voice received from MOTOTRBO repeaters, which allows observing the ongoing system operation. Each logical channel has a section for displaying transmitted packets in the form of colored vertical bars. The height of the bar corresponds to the level of the received signal; and the color corresponds to the event type according to the legend. In order to see the radioserver and its network in the Monitoring tab, make sure that the Monitoring service is enabled for this radioserver in SmartPTT Radioserver Configurator.

7 6 To use the Monitoring function in you should activate it in the SmartPTT Radioserver Configurator program. You can learn how to activate and configure it from SmartPTT Radioserver Configurator User guide. Graphical representation of data packets is displayed only for the selected network. Note: The list on the left shows only active networks (IP Site Connect, Capacity Plus, Linked Capacity Plus and Connect Plus) of SmartPTT Radioserver. If a network becomes inactive, it disappears from the list. Show Details when selected, events from different slots appear in separate blocks. Show Summary when selected, events from different slots appear in one block. When checking both parameters, all the three blocks are displayed. Data displayed in blocks: Name Description Call Private call from or to the radio subscriber
8 Name 7 Description Calling to a particular talkgroup Calling to all radio subscribers registered on one logical channel Emergency call from the radio Telephone call between a telephone subscriber and one radio Telephone call Group telephone call between the telephone subscriber and the talkgroup Registration information, that is information about radio availability in ARS the network GPS Coordinates of the radio with GPS support (GPS service) Тext Message Receiving and sending text messages (TMS service) Telemetry Transmitting and processing telemetry signals Indoor Location Radio's locations inside a building System events from MOTOTRBO equipment (data confirmation, private call confirmation, etc.) Call alert sent to the radio subscriber System Radio remote monitoring. This refers to the request only. The actual remote monitoring is highlighted as the private call. Emergency signal from the radio Levels displayed on the right to the blocks (High, Medium, Low) correspond to the RSSI level ranges: -80 or more (High), -80 to -100 (Medium) and -100 or lower (Low). The event log at the bottom of the screen gives more detailed information, namely the event type (ARS, GPS, Message, Emergency Call, etc.), date and time of the event, its duration, sender's and receiver's IDs, repeater ID and RSSI level, site ID (applied to LCP systems only), network name.
9 8 Topology Tab Topology schematic representation of active networks. A network topology is set in SmartPTT Radioserver Configurator and displayed in. Note: In order to see the radioserver and its network in the Topology tab, make sure that the Monitoring service is enabled for this radioserver in SmartPTT Radioserver Configurator. Graphical objects used in topology: Graphical Object Description Major alarm on device or no connection
10 Graphical Object 9 Description Device is connected or no alarms registered on device. Minor alarm is registered on device or there are more than 5 packets lost or corrupted. Repeater is turned off. Repeater is not connected. SmartPTT Radioserver Network in folded state Virtual repeater (i.e., SmartPTT Radioserver), or MNIS Slave hardware repeater Master hardware repeater Master virtual repeater Repeater is not connected, but it is included in the peer map. Repeater is connected, but it is not in the peer map. Location in folded and unfolded state Uninterruptible power supply Router
11 Graphical Object 10 Description Unknown device (any other device) Note: Network configuration is set in SmartPTT Radioserver Configurator. Repeaters, which are added but not active, are marked red. If network configuration is not set in SmartPTT Radioserver Configurator, the network topology will be generated automatically based on the information received from the available network repeaters. If IP-connection with the repeater is lost, it disappears from the topology screen. Repeater loading on both logical channels is displayed in percents above each repeater. Loading percentage grows steadily, not sharply, until the maximum value. When both logical channels are used, the maximum value is 100%, when only one logical channel is used 50%. A busy channel is represented by a yellow LED on the repeater. Repeater ID is displayed under repeater. Application peer ID is specified in SmartPTT Radioserver Configurator (Peer ID). Note: All the repeaters used in one network should have unique ID's. 1. Radioserver To fold and unfold the network, right-click on the radioserver and select Fold or Unfold respectively.

12 11 To view radioserver parameters and the ongoing performance information, right-click on the radioserver image and select Information. Operating System provides information on the OS used on the server. Processor Load displays current CPU load and other information about PC memory. Hard Disks provides information on the the available hard disks of the PC and their characteristics. Network Interfaces displays the network interface and the sub network mask of the PC.

13 12 Sensors displays platform status (for example, system temperatures, voltages, fans, power supplies and chassis intrusion). To operate remotely, right-click on the radioserver image and select Control. At that, the following window opens. Power Status shows the current status of the radioserver. There can be three statuses: Switched On Switched Off N/A Unknown (in this case check that IPMI settings are correct) Power Management (OS) allows users to turn off the radioserver at the OS level. Power Management (Hardware) allows users to turn on/off or to hard reset the radioserver computer at the hardware level. Note: If the radioserver computer is blocked, you can turn off the radioserver computer only at the hardware level. If you have more than one radioserver, you can arrange them in the Topology tab either vertically or horizontally. The layout can be selected in the Layout dropdown at the bottom of the Topology tab. The selected layout is applied not only to radioserver elements, but to all elements, which can be folded and unfolded.

14 13 2. Repeater To view repeater parameters and statistics, right-click on the repeater element and select Information. Repeater Parameters: Name Description Repeater Repeater ID IP-address Repeater IP-address Model Repeater model number Firmware Version Version of firmware used in repeater
15 14 Name Description Codeplug Version Repeater parameter block version Serial Number Repeater serial number Voice Calls Ability to transmit voice (Yes, No) Data Calls Ability to transmit data (Yes, No) Last Minute Statistics: Name Description Load Percent (%) Channel loading on repeater for the last 10 seconds Transmissions Started Number of times the PTT button was pressed Registration (ARS) Number of registration packets transmitted for the last minute GPS Number of GPS coordinates transmitted for the last minute Messages Number of text messages transmitted for the last minute Telemetry Number of telemetry packets transmitted for the last minute Broken Packets (RX) Number of packets (Rx) with errors, received for the last minute Max. Number of Broken Maximum number of broken packets (Rx) in a row Contiguous Packtes (RX) Number of Transmit Collision Number of not transmitted packets due to collisions on the Packets (TX) channel Uptime The time during which the repeater is available in the network

16 15 To operate remotely, right-click on the repeater element and select Control. At that, the following window opens. Note: You cannot operate virtual repeaters remotely, therefore, the Repeater Control window is available only for hardware repeaters connected to the radioserver. Current Channel channel used by the repeater. Channels are set in repeater settings with the help of MOTOTRBO Customer Programming Software (MOTOTRBO CPS). Power, TX transmitter power of repeater. There are high and low modes. Bands for both modes are specified in MOTOTRBO CPS. State allows switching the repeater to active or not active mode. When in the not active mode, repeater does not transmit any signals. To switch the repeater to the active mode, select On in the State field. Restart allows restarting repeater remotely. Apply applies settings specified in the Repeater Control window. Close closes the Repeater Control window without making changes in the repeater settings. 3. Uninterruptible Power Supply (UPS) Currently, you can select between Eaton, UPS ATS-Convers and Apc 5000 and any other UPS if you select Unk nown in the Type field. To view parameters and status information of UPS, right-click on the UPS element and select Information. Identification: Name Description Model UPS model
17 16 Name Description Serial Number Device serial number Firmware Firmware version IP-address IP-address Network Mask Network mask State: Name Description Alarm Details Informs about issues in UPS operation Input Power Source Input Power Source Output Power Source Output Power Source Last Battery Replacement Date and time when battery was replaced last time Parameters: Name Description Input Voltage (V) Input voltage level (V) Input Frequency (Hz) Input frequency level (Hz) Output Voltage (V) Output voltage level (V) Output Frequency (Hz) Output frequency level (Hz) Output Current (A) Output current level (A) Output Power (W) Output power level (W) Load (%) Eaton UPS loading in percent
18 17 Name Description Battery Charge (%) Battery charge left in percent Charge Left (hh:mm) Battery charge left in hours and minutes 4. Router Currently, you can select between Cisco and Huawei routers and any other router if you select Unk nown in the Type field. To view parameters and other information of the router, right-click on the element and select Information. Identification: Name Description Model Router model Serial Number Router serial number Alarms gives information about issues in the router operation. 5. Unknown Device Unknown device is any kind of device other than Cisco 2900 and Eaton To view information on the device, right-click on the element and select Information.


19 18 Parameters: Name Description System Name Name of the device System Description Description of the device Alarm Details Informs about issues in the device operation 6. Location To change the way Location is displayed, right-click on the Location element, or click on the Plus/Minus icon. There are two display modes: Folded Unfolded Folded location is displayed as an image inside a box. Unfolded displays which devices, repeaters and routers are used in this location.


20 19 To change the default image of Location, right-click on the object. At that, a drop-down will appear where you can either upload your own image or set the default image. The Diagnostics tab Diagnostics provides information about the current state of the connected MOTOTRBO repeaters.
.")
21 20 To select columns to be displayed, right-click on the menu bar with the column names. At that, the following list opens. Note: By default, all columns are enabled. On the right side of the panel you can find all the technical information about the repeater selected in the table, including the repeater's statistics, its properties, and alarms (if there are any). The Event Log tab The log is one of the best ways to learn about alarms, for example, it informs about repeater connection or about Cisco and Eaton state.
22 21 Note: Events with Critical, Major or Minor severity are highlighted red, pink and yellow respectively. Besides reviewing current events, Event Log provides the ability to view saved events for the particular time period. To review events for a time period, select Show Logged Events, define the period limits by using the calendars for start and end dates, select the radioserver from the drop-down and click Apply. 1.3 Settings The Settings menu allows you to configure system parameters: Database allows you to manage the system database, i.e., create new database or connect to the existing database. Licenses allows you to install licenses. General Settings allows you to tune the dispatch console, e.g., enable automatic system updates, select language, etc. Radioservers allows you to manage available radioservers, e.g., add new radioservers to be seen in the dispatcher console, assign profiles to the available radioservers. Operators allows you to add operators and manage their rights.

23 Database To connect to the database, expand the Settings menu in the Main Menu bar of the window and click Database. At that, a configuration window for database creation opens. Before creating a new database, connect to the database server. For this, fill in the Database server name field, and click Connect. In case of a successful connection, you will see the following message in the Database section: "Connection is established successfully!". If connection was not established, you will see a message with the error description at the bottom of the window.
24 23 Note: For the database server installed together with the SmartPTT dispatcher application enter the name using the format: Name of PC\SQLExpress (for example, MYCOMP\SQLExpress). Authorization Mode allows you to select authorization mode with the database. SQL Server Authorization you must have the login and password of the account which has access to the SQL server. Windows NT Authorization the user who has logged into the Windows system, must be listed in the SQL server s list of users to make connection. To create a new database, click Create Database. In the window that opened enter the name of the new database and click Save. Current database allows you to connect to one of the created databases. Restore Database allows you to restore the current database using automatic backups. To save the changes, click Finish. To apply the changes with the database, restart the dispatch console.

25 Licenses To use the SmartPTT application you need to install licenses. To install licenses, expand the Settings menu in the Main Menu bar of the window and click Licenses. The configuration window opens from where you can load license files which define functions available in the system. Click Install License the browse window will open. Specify the license file s location and click Open. The license is installed, and the system licensing window displays information on the license type and scope of functions. After the license is installed, the Install License button will change to the Restore License button. Clicking the Restore License button, you return to the previous license. After the Licensing window is closed, the latest displayed in the window license will be applied.

26 25 Note: If the radioserver and the dispatch console are installed on one and the same machine, you can install the licenses either in SmartPTT Radioserver Configurator or in. If the radioserver and the dispatcher console are installed on different PCs, you need to install the licenses in both applications General Settings In the General Settings window you can configure the global settings of the application (e.g., user interface language, automatic update, etc). To set the settings, expand the Settings menu in the Main Menu bar and select General Settings. At that, the following window will appear. Language: Allows you to change the language used in the dispatch console. After selecting a new language, restart to apply the change.
27 26 Windows authentication: It enables Windows authentication within the dispatch console. For that, create the operator with the name of the Windows user, or the Windows group to which the Windows user is assigned. Note: In Windows 7, for the domain Windows user only domain Windows groups will be checked. Starting from Windows 8, for the domain Windows user all Windows groups will be checked (whether domain or local). If Windows authentication is selected, the dispatch console is opened under the operator's account, whose name matches the name of the logged in Windows user, or Windows group to which this logged in Windows user is assigned. At that, the Authorization window will be skipped and the operator's password ignored. In the dispatch console, the button Change Operator will be unavailable and the user will not be able to change operator. If Windows authentication is not selected or the operator's name does not match the name of the logged in Windows user, or the Windows group, the Authorization window will open, and the user will need to select the operator and type the password. Ask for confirmation before closing or changing the operator: If selected, you will need to confirm before closing, or before changing the operator. To enable automatic update, select the Automatic Update check box. If the check box is selected, the system will be checking for updates on a regular basis. In the File path field specify the path to the ClientSetup.exe file, which you download together with SmartPTT Software Installation Package. If a new SmartPTT version is available, when you launch (or when you choose Check for Updates from the Help menu), the notification window will appear. Note: After downloading the new version of the system, it is not necessary to uninstall the previous version.


28 Radioservers To connect the existing radioserver to the dispatcher console, expand the Settings menu in the Main Menu bar and click Radioservers. The configuration window for setting up and configuring radioservers opens up. By default, the list of radioservers is empty. Click Add to open the window for adding radioservers.

29 28 Name radioserver name displayed in the list of radioservers. Address, Port radioserver IP address and port number to connect with the dispatcher (the default radioserver port number is 8888). Make sure that the Address and Port you enter match the Address and Port specified in SmartPTT Radioserver Configurator. In this example we use port Proxy:port is a proxy server IP address and port number of the connection. Fields Login and Password must be filled if authentication is enabled on the radioserver side. To enable authentication on the radioserver side, run SmartPTT Radioserver Configurator, click Radioserver, select Windows in the Authentication field. Currently, you can select only Windows authentication. If Windows authentication is selected, you can't connect the dispatcher console and the radioserver without indicating valid credentials in the Login and Password fields. If the radioserver computer makes part of a domain, indicate the domain login and password, if not indicate local login and password. Note: If No is selected in the Authentication field, make sure that the fields Login and Password in the dispatcher console are empty. Otherwise, the dispatcher console and the radioserver can't connect. Active if selected, the radioserver is available for connections. You should also remember that you do not have to remove the radioserver from the list to disable it. It is enough to clear the check box. After all the fields are completed, click OK. At that, the new radioserver appears in the list of radioservers. To edit the radioserver settings, select it in the list of radioservers and click Edit. To delete the radioserver, select it in the list of radioservers and click Delete. To find all the running radioservers in the network, click Search. IPMI Settings Intelligent Platform Management Interface (IPMI) is a standardized computer system interface used for out-of-band management of computer systems and monitoring of their operation.

30 29 SmartPTT system uses IPMI for managing and monitoring remote radioservers. With the help of IMPI you can not only learn about the hardware characteristics of the radioserver machine, but also turn it on/off remotely. To set up IPMI open the Server Settings window of the selected radioserver and then open the IPMI tab. Address, Port IP address and port number of the radioserver PC that are used to establish IPMI connection. Login and Password are obligatory fields. They must match the login and password set in IPMI configuration settings on the radioserver PC. Authentication authentication types. Use MD5 as default authentication type. Privilege depending on the privilege used, the user has different permissions. Use Administrative as default. For more information about the privileges, check the official IPMI documentation. Ciphers the list of ciphers to be used. Select the default cipher, that is RAKP-HMAC-SHA1, HMAC-SHA1-96, AES-CBC-128. Active select the check box to activate IPMI functionality for the radioserver.

31 30 Note: For more information about managing the radioserver with the help of IPMI, see Monitoring Operators By default, an operator with the name Administrator and no password is created in. The Administrator has full access to SmartPTT management functions. The Administrator can add new system operators and customize their access to specific functionality. To add a new operator, click Settings > Operators in the Main Menu bar. At that, the Operators window will be displayed.
, make sure that the new operator's name matches the name of a Windows user or Windows group.")
32 31 To add a new operator, click Add. A new window for adding operators opens up. Name: The operator s name. If Windows authentication is selected (Settings > General Settings), make sure that the new operator's name matches the name of a Windows user or Windows group. Status: The operator s status ( Active or "Archived"). Status in the archive is used for registered operators which are not used any longer, but cannot be removed from the system as the event log contains entries referring to them. Rights: A list of permissions which can be selected or cleared for each operator individually.an operator of the SmartPTT Monitoring system has the only right to Build reports, which allows to manage the reports. Set/Change Password: Sets new operator's password or changes the old one. To edit an operator, select it in the list of operators and click Edit. The edit window is displayed where you can change Name, Status and Password parameters. To delete an operator from the operators list, select it and click Delete. Note: You cannot delete the Administrator from the system.

33 To switch operators, click 32 in the Main Menu and after the dispatch console has restarted, select a new operator. 1.4 Service The Service menu allows you to carry out secondary functions, namely: Save Dispatcher Settings allows you to save current settings of the dispatcher console and database to restore them in the future. Restore Dispatcher Settings allows you to restore saved settings of the dispatcher console and the database Save Dispatcher Settings Starting from version 8.3 you can save and restore not only the event log database, but also the dispatch console settings. These includes: opened panels, the application interface language and other settings. To save current settings or database, open the Service menu and select Save Dispatcher Settings. At that, the following window opens up: Objects define what you want to save. You can select both, if needed. Archive File specify the path to the folder where you need the archive to be saved. To save the selected objects, click Save. To quit the window without saving, click Cancel. To restore the saved settings and database, see Restore Dispatcher Settings.
, open the Service menu and select Restore Dispatcher")
34 Restore Dispatcher Settings To restore the saved dispatch console settings or database (see how to save the dispatch console settings here), open the Service menu and select Restore Dispatcher Settings. At that, the following window will open: Archive File specify the path to the archive folder. Objects define what you want to restore. You can select more than one option. Override Dispatcher GUID if selected, globally unique ID is replaced with the imported value. After importing, there are two dispatch consoles with identical GUID s. If check box is not selected, globally unique ID is left unchanged. After importing, there are two dispatch consoles with same configuration settings, but different globally unique ID s. To restore the selected objects, click Restore. To quit the window, click Cancel. To apply the restored settings, restart the application. 1.5 Reports The Reports menu presents all the reports available in the system. Monitoring Report, Monitoring Analytics and Monitoring Log give you consolidated information collected during monitoring process Monitoring Reports Monitoring Reports allow creating the following reports: Monitoring Report, Event Log Report,

35 34 Analytic Report, System Usage Report. They are based on the data collected during the monitoring and filtered by different criteria. To create a report, in the Main Menu bar click Reports, point on Monitoring and click the needed type of report. Note: Before creating a report, make sure the radioserver is running and Monitoring is active in SmartPTT Radioserver Configurator Monitoring Report Monitoring Report gives such information as repeater ID, ID's of the calling and receiving parties, duration of the event and its type, RSSI and many other.

36 35 To create the report, expand the Reports menu in the Main Menu bar and under Monitoring select Report. At that, the following window appears. Period defines the time frame of the report. Radioserver defines the radioserver, whose database you want to use as a data source. System defines the radio system for which you want to build a report. In the drop-down list you can find both existing and removed radio systems. Network IDs are used for outdated radio systems, and names for existing ones. Subscriber selects the subscriber for whom the report is to be generated. If you select All, the report will be generated for all registered subscribers. UTC Time if UTC Time is selected, the report time will be converted to UTC format. If UTC Time is not selected, the local time of the radioserver PC will be shown in the report. Sort By you can select the column by which you want to sort the report data: network, repeater, slot, protocol, sender, receiver, duration, RSSI Event Log Report Event Log Report shows information about available devices in the system (e.g., repeaters, routers, uninterruptible power supplies) and alarms registered on these devices. To create the report, expand the Reports menu in the Main Menu bar and under Monitoring select Event Log. At that, the following window opens.


37 36 Period defines the time frame of the report. Radioserver defines the radioserver whose database you want to use as a data source. After clicking OK, the report opens automatically: Analytic Report Analytic Report is a graphical representation of the data received during a monthly monitoring process. To build a report, expand the Reports menu in the Main Menu bar, and under Monitoring select Analytics. At that, the following window opens.

38 37 Start Date specify the start date of the report. This is a monthly report, so the end date is calculated automatically. Radioserver select the available radioserver whose database will be used as a data source. Network select the radio system for which you want to build a report. The drop-down list contains all radio systems which have been ever used. Network ID s are used for old networks, and names for existing ones. Site select a site. This is used for Linked Capacity Plus networks. You can also build a report for all existing sites, or select no sites at all. Repeater select the particular repeater. You can also build a report for all repeaters. Subscriber select the subscriber for whom the report is to be built. You can build a report on all subscribers from the drop-down list. Report sample:

39 38 Export allows you to save the report in HTML format for further use System Usage Report System Usage Report provides information on the system load, operation time of the system, downtimes, and other information. To build the report, expand the Reports menu in the Main Menu bar and under Monitoring select System Usage. At that, the following window opens.

40 39 Period defines the time frame of the report. Radioserver select the available radioserver whose database will be used as a data source. System defines the radio system for which you want to build a report. In the drop-down list you can find both existing and removed radio systems. Network IDs are used for outdated radio systems, and names for existing ones.
41 40 After setting the parameters, click OK and the report will open in a new window. 1.6 Help The Help menu includes: Help. Here you can find useful information on the system objects and functionality. You can also open the SmartPTT Help file any time by pressing F1. About. It contains information on the application version, license, and the third-party software used in development process. Check for Updates.

42 Remote Assistance SmartPTT contains Remote Assistance program which provides the remote access to your computer for SmartPTT technical support engineer. Using this program he can resolve technical issues on your computer. To use Remote Assistance program: 1. Run Remote Assistance program from the Start menu. 2. Contact technical support engineer and pass your ID and password to it. 3. When the connection is established, you will see session window on the screen.

43 42 4. Chat function can be used for communication with the engineer. 5. To stop the session, click Close.
Version 9.2. SmartPTT Enterprise. Web Client User Guide
 Version 9.2 December 2017 Contents Contents 1 Introduction 3 2 SmartPTT Web Client Interface 4 3 Logging in and Changing User 6 4 7 4.1 Making and Receiving Voice Calls 8 4.2 Sending Messages 11 4.3 Finding
Version 9.1 SmartPTT Basic. Installation & Configuration Guide
 Version 9.1 SmartPTT Basic December 2016 Table of Contents Table of Contents 1.1 Introduction 2 1.2 Installation of the SmartPTT software 2 1.3 General SmartPTT Radioserver Configuration 6 1.4 SmartPTT
SmartPTT Advanced Deployment Guide
 SmartPTT Advanced Deployment Guide SmartPTT Advanced This Guide shows step-by-step the process of SmartPTT Advanced deployment and includes 5 major stages: SmartPTT Software Installation MotoTRBO Radios
TRBOnet Voice Recorder
 TRBOnet Voice Recorder User Guide Version 1.0 World HQ Neocom Software 8th Line 29, Vasilyevsky Island St. Petersburg, 199004, Russia US Office Neocom Software 15200 Jog Road, Suite 202 Delray Beach, FL
Version 9.2. SmartPTT Enterprise. Web Client Installation Guide
 Version 9.2 December 2017 Contents Contents 1 About This Document 3 2 System Requirements 4 1 Supported Web Browsers 4 3 System Preconfiguration 5 3.1 Registering ASP.NET 5 3.2 Turning on Windows Features
Version 9.1 SmartPTT Enterprise
 Version 9.1 SmartPTT Enterprise December 2016 2 The SmartPTT-based dispatching system can include several dispatch consoles, SmartPTT Radioservers and communication channels connecting them. Thus, technical
BeAware Corporate Edition Admin Console Version 6.8 Ascentive LLC
 User Manual BeAware Corporate Edition Admin Console Version 6.8 Ascentive LLC User Manual 1 Copyright Notice Copyright 2006 Ascentive LLC All Rights Reserved This document is protected by copyright law
FileCruiser. Administrator Portal Guide
 FileCruiser Administrator Portal Guide Contents Administrator Portal Guide Contents Login to the Administration Portal 1 Home 2 Capacity Overview 2 Menu Features 3 OU Space/Team Space/Personal Space Usage
IT Essentials v6.0 Windows 10 Software Labs
 IT Essentials v6.0 Windows 10 Software Labs 5.2.1.7 Install Windows 10... 1 5.2.1.10 Check for Updates in Windows 10... 10 5.2.4.7 Create a Partition in Windows 10... 16 6.1.1.5 Task Manager in Windows
Apptix Online Backup by Mozy User Guide
 Apptix Online Backup by Mozy User Guide 1.10.1.2 Contents Chapter 1: Overview...5 Chapter 2: Installing Apptix Online Backup by Mozy...7 Downloading the Apptix Online Backup by Mozy Client...7 Installing
MagicInfo Premium Server
 MagicInfo Premium Server Quick Start Guide This guide has been designed for your convenient and efficient use of MagicInfo-i Premium Edition. Refer to the MagicInfo Premium Server user guide for further
TRBOnet Enterprise. MOTOTRBO Link. Deployment Guide. Internet. US Office Neocom Software Jog Road, Suite 202 Delray Beach, FL 33446, USA
 TRBOnet Enterprise MOTOTRBO Link Deployment Guide World HQ Neocom Software 8th Line 29, Vasilyevsky Island St. Petersburg, 199004, Russia US Office Neocom Software 15200 Jog Road, Suite 202 Delray Beach,
Changing Settings for ViewMail for Outlook (Version 8.0 Only)
") Changing Settings for ViewMail for Outlook Note This content applies to ViewMail for Outlook version 8.0 only. For later ViewMail versions, see the Quick Start Guide for Cisco ViewMail for Microsoft Outlook
Changing Settings for ViewMail for Outlook Note This content applies to ViewMail for Outlook version 8.0 only. For later ViewMail versions, see the Quick Start Guide for Cisco ViewMail for Microsoft Outlook
KYOCERA Net Admin User Guide
 KYOCERA Net Admin User Guide Legal Notes Unauthorized reproduction of all or part of this guide is prohibited. The information in this guide is subject to change without notice. We cannot be held liable
BeAware Corporate Edition Admin Console. User Manual. BeAware Corporate Edition Admin Console Version 7.1. Ascentive LLC.
 User Manual BeAware Corporate Edition Admin Console Version 7.1 Ascentive LLC User Manual 1 Copyright Notice Copyright 2008 Ascentive LLC All Rights Reserved This document is protected by copyright law
DocAve for Salesforce 2.1
 DocAve for Salesforce 2.1 This document is intended for anyone wishing to familiarize themselves with the user interface and basic functionality of AvePoint s DocAve for Salesforce tool. System Requirements
Online Help StruxureWare Data Center Expert
 Online Help StruxureWare Data Center Expert Version 7.2.7 What's New in StruxureWare Data Center Expert 7.2.x Learn more about the new features available in the StruxureWare Data Center Expert 7.2.x release.
Cisco Unified Operating System Administration Web Interface for Cisco Emergency Responder
 Cisco Unified Operating System Administration Web Interface for Cisco Emergency Responder These topics describe the Cisco Unified Operating System (OS) Administration web interface for Cisco Emergency
Cisco Unified Operating System Administration Web Interface
 Cisco Unified Operating System Administration Web Interface ServerGroup, page 1 Hardware, page 2 Network Configuration, page 3 Software Packages, page 4 System, page 5 IP Preferences, page 6 Ethernet Configuration,
Configuring Communication Services
 This chapter includes the following sections: Configuring HTTP, on page 1 Configuring SSH, on page 2 Configuring XML API, on page 3 Enabling Redfish, on page 3 Configuring IPMI, on page 4 Configuring SNMP,
ELM Server Exchange Edition ArchiveWeb version 5.5
 ELM Server Exchange Edition ArchiveWeb version 5.5 Copyright 2016 Lexmark. All rights reserved. Lexmark is a trademark of Lexmark International, Inc., registered in the U.S. and/or other countries. All
1. Introduction Minimum system requirements Basic Concept Server mode
 1. Introduction TC Monitor is software for monitoring and control of Ethernet (TCW) and GSM/GPRS (TCG) controllers. The supported devices are TCW122B-CM, TCW181B-CM, TCW241, TCW220, TCW210-TH and TCG120.
TeamViewer Manual Manager
 TeamViewer Manual Manager Rev 12/2014 TeamViewer GmbH Jahnstraße 30 D-73037 Göppingen teamviewer.com Overview Table of Contents 1 Overview... 4 1.1 About TeamViewer Manager... 4 1.2 About this manual...
KYOCERA Device Manager User Guide
 KYOCERA Device Manager User Guide Legal Notes Unauthorized reproduction of all or part of this guide is prohibited. The information in this guide is subject to change without notice. We cannot be held
User Manual. ARK for SharePoint-2007
 User Manual ARK for SharePoint-2007 Table of Contents 1 About ARKSP (Admin Report Kit for SharePoint) 1 1.1 About ARKSP 1 1.2 Who can use ARKSP? 1 1.3 System Requirements 2 1.4 How to activate the software?
User and System Administration
 CHAPTER 2 This chapter provides information about performing user and system administration tasks and generating diagnostic information for obtaining technical assistance. The top-level Admin window displays
DSS User Guide. End User Guide. - i -
 DSS User Guide End User Guide - i - DSS User Guide Table of Contents End User Guide... 1 Table of Contents... 2 Part 1: Getting Started... 1 How to Log in to the Web Portal... 1 How to Manage Account Settings...
User Manual. Version 5.8
 User Manual Version 5.8 Information in this document is subject to change without notice. Copyright 2013-2018, Exacq Technologies, Inc. All rights reserved. Exacq Technologies is a trademark of Exacq Technologies,
1. Header There is an application icon, application title (RS-MGR2), minimize button, maximize button, and close button.
, minimize button, maximize button, and close button.") Section 1. Main screen After logging in, the Main screen is displayed. The Main screen consists of 4 parts: 1. Header 2. Top menu 3. System Configuration screen 4. Map screen NOTE: You need one RS-MGR2
Section 1. Main screen After logging in, the Main screen is displayed. The Main screen consists of 4 parts: 1. Header 2. Top menu 3. System Configuration screen 4. Map screen NOTE: You need one RS-MGR2
Sync User Guide. Powered by Axient Anchor
 Sync Powered by Axient Anchor TABLE OF CONTENTS End... Error! Bookmark not defined. Last Revised: Wednesday, October 10, 2018... Error! Bookmark not defined. Table of Contents... 2 Getting Started... 7
Legal Notes. Regarding Trademarks KYOCERA MITA Corporation
 Legal Notes Unauthorized reproduction of all or part of this guide is prohibited. The information in this guide is subject to change without notice. We cannot be held liable for any problems arising from
KASPERSKY LAB. Kaspersky Administration Kit version 6.0. Reference Book
 KASPERSKY LAB Kaspersky Administration Kit version 6.0 Reference Book KASPERSKY ADMINISTRATION KIT VERSION 6.0 Reference Book Kaspersky Lab Ltd. Visit our website: http://www.kaspersky.com/ Revision date:
Version 9.3. SmartPTT Enterprise. System Requirements
 Version 9.3 June 2018 Contents Contents 1 Introduction 3 2 Minimum Hardware Requirements for SmartPTT Dispatcher 5 3 Minimum Hardware Requirements for SmartPTT Radioserver 7 4 Networking Requirements 9
Peplink SD Switch User Manual. Published on October 25th, 2018
 Peplink SD Switch User Manual Published on October 25th, 2018 1 Table of Contents Switch Layout 4 Specifications 5 Hardware Overview 6 Quick Start Functions 7 Reset Switch 7 Connect Ethernet 7 Connect
Managing Inventory CHAPTER. Viewing Inventory Details
 CHAPTER 14 Viewing Inventory Details Cisco Prime Collaboration Manager maintains continuous, real-time discovery of device inventory. The Prime CM inventory automatically reflects every addition, deletion,
Chapter 3 Managing System Settings
 Chapter 3 Managing System Settings Using the System Settings Utility The navigation pane at the top of the web browser interface contains a System tab that enables you to manage your FS700TSSmart Switch
CLIQ Web Manager. User Manual. The global leader in door opening solutions V 6.1
 CLIQ Web Manager User Manual V 6.1 The global leader in door opening solutions Program version: 6.1 Document number: ST-003478 Date published: 2016-03-31 Language: en-gb Table of contents 1 Overview...9
TRBOnet Enterprise/PLUS
 TRBOnet Enterprise/PLUS Phone Interconnect User Guide Version 5.2 World HQ Neocom Software 8th Line 29, Vasilyevsky Island St. Petersburg, 199004, Russia US Office Neocom Software 15200 Jog Road, Suite
SmartDispatch Installation Guide
 SmartDispatch Installation Guide Copyright Information Hytera is the trademark or registered trademark of Hytera Communications Corporation Limited. (the Company) in PRC and/or other countries or areas.
SolarPower Pro. User s Manual. Management Software for Solar Inverter
 SolarPower Pro User s Manual Management Software for Solar Inverter Table of Contents 1. SolarPower Pro Overview... 2 1.1. Introduction... 2 1.2. Structure... 2 1.3. Features... 3 2. SolarPower Pro Install
User Manual WatchPower
 User Manual WatchPower Management Software for Inverter Table of Contents 1. WatchPower Overview... 1 1.1. Introduction... 1 1.2. Features... 1 2. WatchPower Install and Uninstall... 1 2.1. System Requirement...
Getting Started With the Cisco PAM Desktop Software
 CHAPTER 3 Getting Started With the Cisco PAM Desktop Software This chapter describes how to install the Cisco PAM desktop client software, log on to Cisco PAM, and begin configuring access control features
User Manual WatchPower
 User Manual WatchPower Management Software for SP Efecto / SP Brilliant (Plus) / SP Initial Table of Contents 1. WatchPower Overview...1 1.1. Introduction... 1 1.2. Features... 1 2. WatchPower Install
Dell SupportAssist Version 1.0 For Microsoft System Center Operations Manager User's Guide
 Dell SupportAssist Version 1.0 For Microsoft System Center Operations Manager User's Guide Notes, Cautions, and Warnings NOTE: A NOTE indicates important information that helps you make better use of your
CHAPTER. Introduction
 CHAPTER 1 Cisco Unified Communications Manager (formerly Cisco Unified CallManager) serves as the software-based call-processing component of the Cisco Unified Communications family of products. A wide
End User Manual. December 2014 V1.0
 End User Manual December 2014 V1.0 Contents Getting Started... 4 How to Log into the Web Portal... 5 How to Manage Account Settings... 6 The Web Portal... 8 How to Upload Files in the Web Portal... 9 How
BUSINESS LINE COMMPORTAL GUIDE
 wowforbusiness.com BUSINESS LINE COMMPORTAL GUIDE WOW! Business BCSE.U.1505.O Business Line CommPortal Guide Table of Contents Getting Started...3 Dashboard...4 Messages and Calls...5 Messages...5 Missed
rat Comodo EDR Software Version 1.7 Administrator Guide Guide Version Comodo Security Solutions 1255 Broad Street Clifton, NJ 07013
 rat Comodo EDR Software Version 1.7 Administrator Guide Guide Version 1.1.120318 Comodo Security Solutions 1255 Broad Street Clifton, NJ 07013 Table of Contents 1 Introduction to Comodo EDR...3 1.1 Purchase
TRBOnet PLUS. Quick Start Guide. Version 5.2. Internet. US Office Neocom Software Jog Road, Suite 202 Delray Beach, FL 33446, USA
 TRBOnet PLUS Quick Start Guide Version 5.2 World HQ Neocom Software 8th Line 29, Vasilyevsky Island St. Petersburg, 199004, Russia US Office Neocom Software 15200 Jog Road, Suite 202 Delray Beach, FL 33446,
Microsoft SQL Installation and Setup
 This chapter provides information about installing and setting up Microsoft SQL. Encrypted Database Not Supported, page 1 Install and Setup Microsoft SQL Server, page 1 Database Migration Required for
GRS Enterprise Synchronization Tool
 GRS Enterprise Synchronization Tool Last Revised: Thursday, April 05, 2018 Page i TABLE OF CONTENTS Anchor End User Guide... Error! Bookmark not defined. Last Revised: Monday, March 12, 2018... 1 Table
MagicInfo VideoWall Author
 MagicInfo VideoWall Author MagicInfo VideoWall Author User Guide MagicInfo VideoWall Author is a program designed to construct a VideoWall layout and create VideoWall content by adding various elements
Performing Administrative Tasks
 CHAPTER 6 This section provides information about administrative tasks. It includes these topics: Stopping and Restarting the Cisco License Manager Server, page 6-1 How to Manage Users, page 6-2 Working
User Guide Product Design Version 1.7
 User Guide Product Design Version 1.7 1 INTRODUCTION 3 Guide 3 USING THE SYSTEM 4 Accessing the System 5 Logging In Using an Access Email 5 Normal Login 6 Resetting a Password 6 Logging Off 6 Home Page
ForeScout Extended Module for Tenable Vulnerability Management
 ForeScout Extended Module for Tenable Vulnerability Management Version 2.7.1 Table of Contents About Tenable Vulnerability Management Module... 4 Compatible Tenable Vulnerability Products... 4 About Support
User Guide. K V1 7/05 Rev A
 NAVIGATOR REPORTER User Guide K10321-1V1 7/05 Rev A Table of Contents Conventions Used in This Manual... iii SECTION 1: General Description... 1-1 About Navigator Reporter...1-1 About User Manager...1-1
IPMI Configuration Guide
 IPMI Configuration Guide 1. Introduction of IPMI Server Manager... 2 2. IPMI Server Manager GUI Overview... 3 1 1. Introduction of IPMI Server Manager IPMI Server Manager allows remote access of computers
ProSafe Plus Switch Utility
 ProSafe Plus Switch Utility User Guide 350 East Plumeria Drive San Jose, CA 95134 USA May 2012 202-10524-04 2012 NETGEAR, Inc. All rights reserved No part of this publication maybe reproduced, transmitted,
Inventory Reports. Detailed Device Report CHAPTER
 CHAPTER 2 include the following device reports. Detailed Device Report Device Attributes Reports Generating a 24-Hour Inventory Change Report Hardware Reports Management Status Reports Software Reports
NMS300 Network Management System Application
 NMS300 Network Management System Application Quick Start Guide October 2013 202-11288-02 350 East Plumeria Drive San Jose, CA 95134 USA Support Thank you for purchasing this NETGEAR product. After installing
User Guide. 3CX Audio Scheduler. Version
 User Guide 3CX Audio Scheduler Version 15.5.21 "Copyright VoIPTools, LLC 2011-2018" Information in this document is subject to change without notice. No part of this document may be reproduced or transmitted
ADMINISTRATIVE USER GUIDE FOR THE APTI-LEARN LEARNING MANAGEMENT SYSTEM (LMS)
") ADMINISTRATIVE USER GUIDE FOR THE APTI-LEARN LEARNING MANAGEMENT SYSTEM (LMS) Software Version 2.6 September 2012 Prepared by EM-Assist This page left intentionally blank. Software Version 2.6; Document
ADMINISTRATIVE USER GUIDE FOR THE APTI-LEARN LEARNING MANAGEMENT SYSTEM (LMS) Software Version 2.6 September 2012 Prepared by EM-Assist This page left intentionally blank. Software Version 2.6; Document
User Guide. Kronodoc Kronodoc Oy. Intelligent methods for process improvement and project execution
 User Guide Kronodoc 3.0 Intelligent methods for process improvement and project execution 2003 Kronodoc Oy 2 Table of Contents 1 User Guide 5 2 Information Structure in Kronodoc 6 3 Entering and Exiting
User Manual PDUTracker
 User Manual PDUTracker Management Software for PDU Table of Contents 1. Overview... 1 1.1. Introduction... 1 1.2. Features... 1 2. Install and Uninstall... 1 2.1. System Requirement... 1 2.2. Software
Using the Control Panel
 Using the Control Panel Technical Manual: User Guide Creating a New Email Account 3. If prompted, select a domain from the list. Or, to change domains, click the change domain link. 4. Click the Add Mailbox
Fleet Manager Manual
 Fleet Manager Manual Contents Copyright Information... 4 SECTION 1 Before You Start... 5 Introduction:... 6 neoterra Systems Contact information:... 6 Some value-added inclusions within Fleet Manager :...
User Guide. Version 2.1
 Kaseya Backup and Disaster Recovery User Guide Version 2.1 August 11, 2008 About Kaseya Kaseya is a global provider of IT automation software for IT Solution Providers and Public and Private Sector IT
Create Account/Login. Create Account/Login
 User Manual Table of Contents Table of Contents Section 1: Create Account Login Section 2: Password Recovery Section 3: Add a Lockbox Section 4: Add a Listing Section 5: Dashboard - Approve Showing Requests
User s Manual. Version 5
 User s Manual Version 5 Copyright 2017 Safeway. All rights reserved. No part of this publication may be reproduced, transmitted, transcribed, stored in a retrieval system, or translated into any language,
User Manual MPPTracker
 User Manual MPPTracker Management Software for Solar Charge Controller Version: 1.0 Table of Contents 1. MPPTracker Overview... 1 1.1. Introduction... 1 1.2. Features... 1 2. MPPTracker Install and Uninstall...
Configuration Manager
 CHAPTER 7 This chapter describes how to perform routine Cisco VXC Manager configuration management tasks using the Administrator Console. It provides information on managing the configuration settings
you choose and by the roles the users are allowed to fulfill within the system. Finances Enter the monthly savings and costs for the project.
 Oracle Instantis EnterpriseTrack Quick Reference Guide for Release 8.5 Create a Proposal From the Top Navigation Bar, click Create Proposals/Charters. Enter all the required fields and click Save to save
USER GUIDE. BrightSign Network WebUI Version 3.1. BrightSign, LLC Lark Ave., Suite 200 Los Gatos, CA
 USER GUIDE BrightSign Network WebUI Version 3.1 BrightSign, LLC. 16795 Lark Ave., Suite 200 Los Gatos, CA 95032 408-852-9263 www.brightsign.biz TABLE OF CONTENTS Introduction 1 What Can I Do with the WebUI?
This guide details the deployment and initial configuration necessary to maximize the value of JetAdvantage Insights.
 HP JetAdvantage Insights Deployment Guide This guide details the deployment and initial configuration necessary to maximize the value of JetAdvantage Insights. 1. Overview HP JetAdvantage Insights provides
SIMATIC Automation License Manager Manual 02/2008 A5E
 s Contents SIMATIC Automation License Manager Product Overview 1 Installation 2 Working with the Automation License Manager 3 Glossar Index Manual 02/2008 A5E02128430-01 Safety Guidelines This manual contains
WhatsUp Gold Wireless v16.4
 WhatsUp Gold Wireless v16.4 Contents Welcome to WhatsUp Gold Wireless Wireless Overview... 1 Wireless accessibility... 3 Using WhatsUp Gold Wireless Discovering wireless devices... 4 Modifying wireless
Festo Field Device Tool FFT. Description. Online help FFT f [ ]
![Festo Field Device Tool FFT. Description. Online help FFT f [ ]](/thumbs/92/107768691.jpg "Festo Field Device Tool FFT. Description. Online help FFT f [ ]") FFT Description Online help FFT 8075018 2017-05f [8075020] Table of Contents 1 Information on the Festo Field Device Tool... 1 1.1 Overview... 1 1.2 Scan protocols... 2 1.2.1 Multicast... 2 1.2.2 Broadcast...
FFT Description Online help FFT 8075018 2017-05f [8075020] Table of Contents 1 Information on the Festo Field Device Tool... 1 1.1 Overview... 1 1.2 Scan protocols... 2 1.2.1 Multicast... 2 1.2.2 Broadcast...
DMR Conventional Series, Release Note R5.5
 DMR Conventional Series, Release Note R5.5 Sofware Version 5.05 Document Version 5.05.14 Software Release Date: 15-10-2013 Release Note 5-5_ENG V1.04 2013 Hytera Mobilfunk GmbH 31848 Bad Münder, Germany
User Manual. Eventide Inc. April 15, 2008
 MediaWorks TM User Manual Eventide Inc. April 15, 2008 New to MediaWorks? A handy Quick Start guide will help you install the software and begin monitoring your Eventide recorders right away. Familiar
HP ProLiant Agentless Management Pack (v 3.2) for Microsoft System Center User Guide
 for Microsoft System Center User Guide") HP ProLiant Agentless Management Pack (v 3.2) for Microsoft System Center User Guide Abstract This guide provides information on using the HP ProLiant Agentless Management Pack for System Center version
HP ProLiant Agentless Management Pack (v 3.2) for Microsoft System Center User Guide Abstract This guide provides information on using the HP ProLiant Agentless Management Pack for System Center version
Ekran System v.6.0 Privileged User Accounts and Sessions (PASM)
") Ekran System v.6.0 Privileged User Accounts and Sessions (PASM) Table of Contents About... 3 Using Privileged User Accounts... 4 Password Vault Configuration... 5 Defining Domain Administrator Credentials...
Ekran System v.6.0 Privileged User Accounts and Sessions (PASM) Table of Contents About... 3 Using Privileged User Accounts... 4 Password Vault Configuration... 5 Defining Domain Administrator Credentials...
Introducing Cisco IPICS
 CHAPTER1 The Cisco IP Interoperability and Collaboration System (Cisco IPICS) provides voice interoperability among disparate systems. It offers an IP standards-based solution that interconnects voice
Monitoring Location Servers and Site
 8 CHAPTER This chapter describes how to monitor location servers by configuring and viewing alarms, events, and logs. It also describes how to use Cisco WCS to view location server, client and asset tag
Configuring with the CMM Administration Tool
 CHAPTER 2 System administrators can configure their network using the CMM Administration Tool. This chapter covers: Performing Domain Management, page 2-1 Using Administrative Utilities, page 2-1 Configuring
Administrator s Guide
 Blade Manager 4.1 Administrator s Guide ClearCube Technology, Inc. Copyright 2005, ClearCube Technology, Inc. All rights reserved. Under copyright laws, this publication may not be reproduced or transmitted
Dell Command Intel vpro Out of Band
 Dell Command Intel vpro Out of Band Version 3.0 User's Guide Notes, cautions, and warnings NOTE: A NOTE indicates important information that helps you make better use of your product. CAUTION: A CAUTION
Real-Time Monitoring Configuration
 CHAPTER 7 This chapter contains the following information for configuring the Cisco Unified Presence Server Real-Time Monitoring Tool (RTMT). Some options that are available in the current version of the
SANTANDER TREASURY LINK USER GUIDE
 SANTANDER TREASURY LINK USER GUIDE Welcome to Santander Treasury Link Santander Treasury Link is a secure Web application that allows you to manage accounts, payments, transfers, reports, and users. This
Zultys Advanced Communicator ZAC 2.0 User Manual
 December 16 Zultys Advanced Communicator ZAC 2.0 User Manual Author: Zultys Technical Support Department Z u l t y s, I n c. 7 8 5 L u c e r n e S u n n y v a l e, C a l i f o r n i a, U S A 9 4 0 8 5
GOBENCH IQ Release v
 GOBENCH IQ Release v1.2.3.3 2018-06-11 New Add-Ons / Features / Enhancements in GOBENCH IQ v1.2.3.3 GOBENCH IQ v1.2.3.3 contains several new features and enhancements ** New version of the comparison Excel
Managing WCS User Accounts
 CHAPTER 7 This chapter describes how to configure global e-mail parameters and manage WCS user accounts. It contains these sections: Adding WCS User Accounts, page 7-1 Viewing or Editing User Information,
SCOUT SUSPENSE TRACKER Version 10.0
 SCOUT SUSPENSE TRACKER Version 10.0 USER S MANUAL For Civilian Personnel Management Service (CPMS) HPC-COM LLC Help Desk 800-795-1902 Updated: February 2011 Table of Contents SCOUT Suspense Tracker V10.0
Configuring Cisco TelePresence Manager
 CHAPTER 3 Revised: November 27, 2006, First Published: November 27, 2006 Contents Introduction, page 3-1 System Configuration Tasks, page 3-2 Security Settings, page 3-3 Database, page 3-4 Room Phone UI,
Manage Your Inventory
 About Inventory About Inventory, on page 1 Inventory and Cisco ISE Authentication, on page 2 Display Information About Your Inventory, on page 2 Types of Devices in the DNA Center Inventory, on page 6
Interactive Voice Response (IVR) Extension Type Guide
 Extension Type Guide") 4PSA VoipNow 2.0.3 Interactive Voice Response (IVR) Extension Type Guide For more information about 4PSA VoipNow, check: http://www.voipnow.com Copyrights 2002-2009 Rack-Soft, LLC. VoipNow is a registered
4PSA VoipNow 2.0.3 Interactive Voice Response (IVR) Extension Type Guide For more information about 4PSA VoipNow, check: http://www.voipnow.com Copyrights 2002-2009 Rack-Soft, LLC. VoipNow is a registered
BlackBerry Enterprise Server for Microsoft Office 365. Version: 1.0. Administration Guide
 BlackBerry Enterprise Server for Microsoft Office 365 Version: 1.0 Administration Guide Published: 2013-01-29 SWD-20130131125552322 Contents 1 Related resources... 18 2 About BlackBerry Enterprise Server
Managing WCS User Accounts
 7 CHAPTER This chapter describes how to configure global email parameters and manage WCS user accounts. It contains these sections: Adding WCS User Accounts, page 7-2 Viewing or Editing User Information,
Chapter 1. Configuring VPGO
 Chapter 1. Configuring VPGO The VPGO module is configured in the VISUAL PLANNING client. You can define as many VPGO templates as you need based on the three existing template types: Diary template Events
CleanMyPC User Guide
 CleanMyPC User Guide Copyright 2017 MacPaw Inc. All rights reserved. macpaw.com CONTENTS Overview 3 About CleanMyPC... 3 System requirements... 3 Download and installation 4 Activation and license reset
Metasys Database Manager Help Code No. LIT Software Release 9.0 Issued August 2017
 Code No. LIT-12011202 Software Release 9.0 Issued August 2017 Refer to the QuickLIT website for the most up-to-date version of this document. Document Introduction...2 Summary of Changes...2 Metasys Database