Online Backup- Secure, Fast and Simple
|
|
|
- Blaise Curtis
- 6 years ago
- Views:
Transcription

1 Online Backup- Secure, Fast and Simple Get 5GB of full featured Online Backup for free.features include Automatic Backup/ True Archiving/ Versioningl Continuous Backup/ Mapped Drive Backup and Web-based Backup Management. Copyright e Pro Softnet Corporation. All rights reserved.
2 Table of Contents Introduction to ZoneAlarm Backup Powered by IDrive 3 Features 4 Security Features 6 System Requirements 7 Download ZoneAlarm Backup 7 Install ZoneAlarm Backup Powered by IDrive 7 Login to ZoneAlarm Backup 8 ZoneAlarm Backup Settings 10 ZoneAlarm Backup Classic Interface 11 Menu Options 14 Tools 16 Activity Log 16 Help 16 Toolbar Options 17 Other Options 18 Working with ZoneAlarm Backup Classic 19 ZoneAlarm Backup Explorer Interface 34 ZoneAlarm Tray Menu 39 Uninstall ZoneAlarm Backup 41 Version Update 41 Technical Support 42 2
3 Introduction to ZoneAlarm Backup Powered by IDrive ZoneAlarm Backup powered by IDrive is a reliable online backup and restore application. It safeguards your critical data in case of system crash, by automatically backing it up. Customization options include the provision to modify the data set selected for backup, schedules, reporting options and more. Further, the graphical interface makes it easy to navigate through the application. Your data is encrypted on transmission and storage, ensuring its security. The other key features include data compression during file transfer that ensures quick backups, incremental backups that economize the bandwidth usage, Versioning where previous backed up copies of each file are maintained for restore to local machine, and Open and Mapped drive backup, among others. This application is ideal for individuals and small businesses with large backup needs. ZoneAlarm Backup has two interfaces ZoneAlarm Backup Classic and ZoneAlarm Backup Explorer. 3
4 Features ZoneAlarm Backup has the following features: File Versioning You can retrieve any of the previous 30 versions of a file (that was backed up to your account) to your local machine. Intuitive user interface The Microsoft Windows Explorer like interface makes it easy for you to navigate through the application. Ease-of-use You can drag-n-drop to restore files at the desired location, on the local machine. Efficient Backups Effective utilization of your Internet bandwidth as the data files are compressed during transmission. Further, only the modified portions of your files are backed up, resulting in quick backups. Unicode compliant Supports international character sets of most major languages including French, Spanish, German, Chinese, Japanese, Hebrew and Italian. Mapped Drive Support Your mapped drives are backed up - even when your computer is in the Log-Off state. Effective Bandwidth Usage You can adjust the Internet bandwidth usage for the application so that other web-based applications can also run smoothly. Automated Backups You can schedule the backup of data as per your convenience. It is backed up automatically at the scheduled time. Continuous Data Protection The application automatically recognizes the modified parts of files/ folders and backs them up in real time, thus offering you hands-free backup of data. True Archiving / Sync Data is not removed from your account until you manually delete it or run sync to match your desktop data to your account. You control your backup data. Open file backup The application performs reliable backups of your open/locked files like Outlook files (.pst), QuickBooks, MS-Excel and so on. 4
5 Compatibility The application works on most Windows Operating Systems including Windows, Vista and Mac. Timeline restore View and restore data as of a particular timeline to your local machine. Retrieve data from any location You can login via any web browser to your account and access backed up data, view log reports and restore data to your local machine. Web-based Search You can locate files/folders backed up to your account, from anywhere, through the web. View Logs You can view the log files of backups, restores, scheduled backups, and details of files / folders deleted from your account from any computer, using any standard browser. Restore data to any local machine You can restore data to any local computer, without installing the application on your machine. Manage multiple accounts You can create multiple accounts using the web interface and group them for easy management. Automatic power-off after the scheduled backup Selecting this option will automatically shut down your computer on completion of the scheduled backup. Start missed schedule backup This option allows the application to resume the scheduled backup automatically whenever your computer is switched on. Application Integrity Data backed up using ZoneAlarm Backup can only be accessed and restored only with the application. This preserves the integrity and security of your data. Proxy/firewall friendliness Advanced settings help you to connect to IDrive servers via proxy servers and enable them to easily backup data. Alert in case of scheduled backup fails You will receive a desktop alert in case your backup has not taken place. 5
6 Security Features ZoneAlarm Backup ensures that you alone can access your data. Encryption All your data is secured using 128-bit SSL encryption during transmission and 256-bit AES encryption on storage. ZoneAlarm Backup powered by IDrive enforces a user-defined encryption key that is known only to you. Not even the support personnel have access to it, thereby making your data secure. However, if you opt for the default encryption, the application provides the key, without the need for you to remember the same. All your data resides on raid-protected devices for additional protection and for fast recovery in case of hardware/software failures. Physical Security The application is hosted at world-class Internet data centers at California, which provide the physical environment necessary to keep the servers up and running 24X7. These world-class facilities are custom designed with raised floors, HVAC temperature control systems with separate cooling zones and seismically braced racks. They offer the widest range of physical security features, including state-of-the-art smoke detection and fire suppression systems, motion sensors, and round-the-clock secured access, as well as video camera surveillance and security breach alarms. Network Security We have a periodic third party review of our network infrastructure to check for known application and service vulnerabilities. Backups of backups User data resides on raid protected industry leading storage devices with multiple levels of redundancy. In addition, data is periodically backed up onto another set of devices for additional security. 6
7 System Requirements Microsoft Windows 2000 (Service pack 4), Windows 2000 Advanced Server, Windows 2003 Server, Windows XP Home/Professional, Windows Vista, Windows Home Server, Windows 2008 Server, Windows 7 (Administrator privileges to install and use the application). Internet Explorer 6 or later 512 MB RAM, 10 MB Free Hard Disk space for installed program, 20 MB or more recommended for local caching Download ZoneAlarm Backup Steps to download the application: 1. Go to 2. Click Download. 3. Click Save to save the setup file to your local system. Install ZoneAlarm Backup Powered by IDrive Steps to install the application: 1. After downloading the application, double-click the ZoneAlarmSetup.exe. The Install ZoneAlarm Backup screen is displayed. 2. Click Next to proceed with the installation. The License agreement screen is displayed. Click the I Agree button to proceed with the installation. 3. In the Where to Install?' screen, select the destination folder to which you want to install the application and click Next. A screen showing the installation progress is displayed. Click Finish to complete the process. 7

8 Login to ZoneAlarm Backup You can login to the application in the following ways: Double-click the ZoneAlarm Backup powered by IDrive icon on your Desktop. From the Start menu, go to Programs > ZoneAlarm Backup > ZoneAlarm Backup Explorer or ZoneAlarm Backup Classic for logging into ZoneAlarm Backup Explorer and ZoneAlarm Backup Classic respectively. Right-click the ZoneAlarm Tray Icon on the system tray and select Login ZoneAlarm Backup Schedule Backup or Login ZoneAlarmBackup Explorer for logging into ZoneAlarm Backup Classic or ZoneAlarm Backup Explorer interface respectively. Enter the Username/ and Password and click the Connect button. The Login screen has the following options: Reconnect Automatically on Login: This option automatically connects the application to your account on subsequent logins or on restarting the computer. Remember Username/Password and other Settings: This option saves the Username and Password so that you do not have to type it on subsequent logins. Note: All the above options are enabled by default. You can change them as per your convenience. 8
9 New User Signup This option allows you to sign up for an account. Forgot Password This option allows you to retrieve your password. It is sent to the address provided by you during registration Upgrade Account This option allows you to upgrade your account from the current storage limit to a higher storage limit. For details, visit our website Firewall Guidance This option enables you to adjust the settings such that the application can work behind the firewall. Connect This button allows you to login to the application. Close This button closes the Login screen. Advanced This button allows you to manage the proxy settings for the application. Note: On logging into an account for the first time, you can opt for the default encryption key or set your own key. If you opt for default, then there is no need to remember it. However, if you opt for your own encryption (private) key, then you have to remember and enter the encryption password to access your backed up data. 9

10 ZoneAlarm Backup Settings If you are behind a proxy server, enter the proxy details to login into the application. The application lets you set and change the proxy settings and enable the proxy authentication. Steps to update the proxy settings: 1. Click the Advanced button on the Login screen. The Proxy Settings screen is displayed. 2. Change the settings and click Apply Proxy Settings to save the settings or click Reset to enter the settings afresh. There are two types of proxy settings, one for the Internet and the other for server authentication. Enable HTTP/Socks Proxy Select the Enable HTTP/Socks Proxy option to set the Proxy server for your computer. This enables the following options: Enable HTTP Proxy Enable Socks Proxy Select any option and enter the Proxy Address and its Port Number. If the Internet Explorer browser has proxy settings, use the Get IE Settings button to get the xy setting information and set this as default. Enable Proxy Authentication Select the check box for Enable Proxy Authentication to set the proxy server credentials and enter the Username and Password. Note: The updates are reflected on subsequent login. 10

11 ZoneAlarm Backup Classic Interface ZoneAlarm Backup Classic s interface is simple, making it easy for you to navigate through the application. On a first time login to an account in a computer, the following screen is displayed. By default, the application backs up the 'My Documents', 'Desktop', Music, Pictures & Videos,with the frequency set to a random off-peak hour. You can edit the 'Contents of my Backup set' and/or schedule the backup as per your convenience. For Windows Vista system, the 'Desktop', 'Documents', 'Pictures', 'Videos' and 'Music' folders are backed up by default, with the frequency set to a random off-peak hour. The screen has the following options: Edit my Backup set takes you to the ZoneAlarm Backup Classic main screen from where you can update the 'Contents of my Backup set' and schedule backups. Edit Schedule Parameter opens the 'Scheduler' screen from where you can modify the scheduled backup options like day and time and set notification options and so on. Bandwidth Test lets you test the speed at which 1 GB of data can be backed up to or restored from your account. 11
12 The Close button closes the above screen and displays the main screen of the ZoneAlarm Backup Classic application 12

13 Classic Main Screen The ZoneAlarm Backup Classic main screen is shown below: The ZoneAlarm Backup Classic Main Screen has Backup and Restore tabs with the respective menu bar and toolbar options. The Backup tab helps set up data for scheduled or immediate backup while the Restore tab helps restore data to your local machine. The main screen can be categorized as follows: Menu Options Toolbar Options Other Options 13

14 Menu Options The menu bar has the following options: File The File menu has options that let you select files for automatic backup, connect to or disconnect from the account and exit the application. These include: Automatic Selection This option allows you to select your commonly used applications and file types for automatic backup. You can select or deselect the data for backup, using the check boxes. For this, from the menu bar, go to File and select Automatic Selection option. From the Automatic Selection screen, add/remove the applications and file types using the check boxes provided or click Reset button to change the selection. You can modify the selection by clearing the checkboxes. An Automatic Selection entry is displayed in the Contents of my Backup set pane. 14
15 Note: The check boxes are enabled for the applications available on the local computer. The check boxes for file types appearing after Lotus Notes are always enabled for selection irrespective of their availability on the local machine. You can also modify the files that you have selected for Automatic Selection by double-clicking the Automatic Selection entry displayed in the Contents of my Backup set pane. Connect This option lets you connect to the application. To use it, from the menu bar, go to File and select the Connect option. A 'Login' screen is displayed. Here, enter the Username and Password and click the Login button to login. Disconnect This option lets you disconnect from the application. To use it, from the menu bar, go to File and select the Disconnect option. Next, click Yes on the confirmation screen to logout of the application. Exit This option lets you close the ZoneAlarm Backup Classic application. To use it, from the menu bar, go to File and select the Exit option or click the Close button on the main screen. Note: The scheduled backup operation continues even after you exit from the Classic interface. Bandwidth Test The Bandwidth Test menu has options that let you test the upload and download speed. These include: Upload Speed This option lets you know the amount of data that can be uploaded per second and the time it will take to backup 1 GB of data to your account at this speed. Download Speed This option lets you know the amount of data that can be downloaded per second and how much time it will take to restore 1 GB of data to your account at this speed. 15
16 Tools The Tools menu has options that let you access ZoneAlarm Backup Explorer interface, customize the default settings of your application, exclude files/folders from the Backup set and so on. These include: Open ZoneAlarm Backup Explorer This option allows you to launch the ZoneAlarm Backup Explorer interface directly from ZoneAlarm Backup Classic interface. Preferences This option lets you take open file backups, exclude files/folders from backup, adjust the bandwidth usage of the application and so on. Mapped Drive Setup This option lets you backup the files/folders present on your network drive. Activity Log The Activity Log menu opens the Session Log screen that lets you view the log details of all the interactive backup/restore and scheduled backup jobs performed in a session. Help The Help menu has options that let you access the help manual, contact technical support team for queries/feedback, view product demo, access the website and so on. These include: Help Topics This option allows you to access the ZoneAlarm help manual. Send Error Report This option allows you to contact the technical support team in case you confront a problem while using the application. Quick Demo This option allows you to view a demo of application. Website This option lets you access the website. About ZoneAlarm Backup Powered by IDrive This option displays information on the version and release date of the ZoneAlarm Backup application installed on your computer. 16
17 Upgrade Account This option takes you to the corresponding web page from where you can upgrade your account. Toolbar Options The Toolbar has the following options: This option lets you schedule the backup of files/folders for a future date and time. It is enabled only on the Backup tab. Sync This lets you synchronize the data present in your account with that on your local computer. Search This option lets you locate files backed up to your account. Delete This option lets you delete the selected files/folder from your account. This toolbar option is enabled only on Restore tab. Timeline Restore It displays all the data backed up till the selected date and time. You can select and restore any file/ folder. 17
18 Other Options The ZoneAlarm Backup Classic interface has the following additional options Icons/ Buttons Description Backup Now This option lets you perform an immediate backup of files/folders. It is available on the Backup tab. Schedule Backup This option lets you schedule the backup of files/folders for a future date and time. It is available on the Backup tab. Restore Now This option lets you immediately restore the backed up files/folders. It is available on the Restore tab. Enable Continuous Backup This option allows the IDrive application to automatically recognize and perform the backup of files/folders that have recently been updated (within the last 10 minutes). It is available on the Backup tab. Recalculate This option lets you know the amount of space used in your IDrive account. Upgrade Account This option takes you to the corresponding IDrive web page from where you can upgrade your account. Reduce Storage Bring your storage in line with the available space by either removing the unwanted files from your account or choose Sync to match the data between your IDrive account and PC. Search This option helps you locate files backed up to your IDrive account. Timeline Restore View and restore data as of a particular timeline to your local machine. 18
19 Working with ZoneAlarm Backup Classic You can perform the following functions using the ZoneAlarm Backup Classic interface: Backup files and folders You can backup files/folders in the following ways: Backup Now Steps to take an immediate backup of files/folders using the Backup Now button: 1. Login to the application. 2. Open the Backup tab. 3. Select the files/folders to be backed up from the Backup pane. 4. Click the Backup Now button. The application starts the backup. 5. You may opt to view the logs on completion of the job. Using the right-click mouse option Steps to backup files/folders using the Windows Explorer: 1. Open the Windows explorer. 2. Right-click the file/folder to be backed up and from the menu, go to ZoneAlarm Backup > Backup this file/folder now option, to start the backup, as shown below. Using ZoneAlarm Tray Icon The ZoneAlarm Tray Icon allows you to perform an immediate backup of the scheduled job without logging into the application. For this, right-click the ZoneAlarm Tray Icon and select the Backup Now option. This starts an immediate backup of the previously created Backup set. Note: Ensure that you have logged into the application at least once before using this option. To access the General tab, from the menu bar, go to Tools > Preferences. 19

20 Preferences It has the General Tab and the Exclude Tab. The General tab has the following options: Bandwidth Throttle The Bandwidth Throttle feature helps optimize the bandwidth consumption so that your backups can take place uninterrupted and without hindrance to other applications. You can set separate bandwidths for the backups when the system is in use and when it is not. Bandwidth Throttle (when system is not in use): This option lets you set the bandwidth to be used by your system for backups, when it is not in use. By default, it is set to 100%. Note: The percentage set for Bandwidth Throttle is applicable for both scheduled and interactive backups. Auto Pause: Select the 'Auto-Pause' option from the check box to use this option. Auto-Pause option makes intelligent guesses on pausing and resuming backup to enable optimum desktop experience during user activity. 20

21 This option lets you set the bandwidth to be used by your system for backups, when it is in use. This allows other applications to run without hindrance. By default, it is set to 25%. Restore Destination This option prompts you to select the destination folder to which you want to restore your data. Advanced scheduling options Prompt to view log after each backup and restore operation: This option enables you to view the log files on completion of every backup / restore operation. Alert me if the scheduled backup fails: On selecting this option, you receive a desktop alert in case your backup has not taken place. Automatic power off after scheduled backup: This option shuts down the computer automatically on completion of the scheduled backup job. Wake up the computer from the Hibernate/Sleep mode: If you select this option, IDrive puts your computer in to active mode in case it has gone into the Hibernate / Sleep mode and performs the scheduled backup Automatic Sync: Automatically sync files between your desktop and your account with a lag of 30 days. In other words, if data is deleted from your desktop that is already backed up, the corresponding data in your account would be deleted after 30 days. This helps in keeping your account size optimal. Note: Since this may result in automatic deletion of data in your account, set this option carefully. Open file Backup This option allows you to backup open files like Outlook files (.pst), QuickBooks, Quicken, ACT, MS-Money, MS-Word, MS-Excel, MS-Access, MS FoxPro etc. This feature is available only for Windows XP, Windows 2003 servers and Windows Vista. 21

22 Exclude files and folders The Exclude files/folders option allows you to exclude files/folders from being backed up. For this, on the menu bar, go to Tools > Preferences and open the Exclude files/folders tab, as shown below. The excluded folders are marked in Red color on the 'Backup pane. The Exclude files/folders tab has the following options: Exclude files/folders based on full path name with two sub options Folders with full path name and Files with full path name. You can add the files/folders to the exclude list in the following ways: Through the Preferences menu option Steps to exclude a file/folder from being backed up: 1. Right click on the Folders with full path name or Files with full path name pane. 2. Select the Add option from the drop down menu. 22
23 3. Select the directory/folder/file from your local computer to be excluded from the Backup set and click OK. 4. Click Save to commit the changes and close the screen. Through ZoneAlarm Backup Classic Interface Steps to exclude files/folders from Backup set: 1. Right-click the file/folder on the Backup pane. 2. Select the Exclude this file from being a part of the backup list/exclude this folder from being a part of the backup list option to exclude the selected file/folder from the Backup set. Exclude files/folders based on partial name with two sub options Folders with full/part name or Files with full/part name You can exclude files/folders by giving partial name along with wildcard characters (*,?). Steps to exclude data from backup: 1. Right click the Files with part/full name or Folders with part/full name pane. 2. Select the Add option from the drop down menu. The Enter File/Folder Name screen is displayed. 3. Enter the partial name of the file/folder using the wildcard characters -- * and? that you want to exclude and click Exclude. 4. Click Save to commit the changes and close the screen. Note: The? replaces a single character in the file name. The * replaces one or more/no character(s) in the file name. To remove the files/folders from the Exclude Files and Folders tab, right-click the required folders/files and select the Remove option. The files/folders can be excluded from being backed up using ZoneAlarm Backup Classic interface only. 23
24 Bandwidth Test The Bandwidth Test option lets you know the current upload/download speed and the estimated time that would be required by application to backup /restore 1 GB of data at this speed. Upload Speed Steps to test the current upload speed: 1. Login to the application. 2. From the menu bar, go to Bandwidth Test and select the Upload Speed option. A screen showing the current upload speed and estimated time that would be required by the application to backup GB data at this speed to your account is displayed. Download Speed Follow the steps given below to test the current download speed: 1. Login to the application. 2. From the menu bar, go to Bandwidth Test and select the Download Speed option. A screen showing the current download speed and estimated time that would be required by the application to restore 1 GB data at this speed to your account is displayed. 24

25 Schedule Backups The Schedule Backup option allows you to schedule the backup of files/folders for a particular date, time and frequency. Steps to schedule backups: 1. Login to the application and click the Backup tab. 2. Click the Schedule Backup button. The Scheduler screen is displayed, as shown below. 3. Select the date, time, frequency and other options for backup as per your convenience and click the Close button. The application backs up of the selected files/folders at the scheduled time. The options available to set date, time and frequency of backup are: Week-Day Schedule backup on any day(s) of the week. 25
26 Month Schedule the backup any one day of the month on a particular day and time. Start the backup immediately This option lets you to perform an immediate backup of your files/folders. No Backup Schedule This option lets you delete the scheduled backup job. Notification This option allows you to receive notifications on the status of the scheduled backup jobs. For this, select the Notify always or Notify on failure option and enter the address in the Mail to field. You can set multiple addresses using the + button and receive log details of the scheduled backup job along with the notification by selecting the Send log extract option. You may opt to not receive any notification by selecting the Do not notify option. Minor Tweaks Auto-Pause This option makes intelligent guesses on pausing and resuming backup to enable optimum desktop appearances during user activity. Desktop Notification This option allows you to receive notifications on your desktop regarding the status of scheduled backup jobs. For this, select the option Show desktop notification on the completion of scheduled backup. Start the missed scheduled backup when the computer is turned on This option allows the application to resume the scheduled backup automatically whenever your computer is switched on. Cut-off Time This option stops the scheduled backup at the specific time, set by you. The backup is resumed at the next scheduled time from the point it was stopped. This ensures that the scheduled backups are not executed when the normal computer operations are going-on. Note: The application performs scheduled backup job even when your computer is in Log-Off mode. The Send log extract and Mail to options are disabled if the default option - Do not Notify - is selected. The Under the Hood button opens the Preferences screen from where you can set the Advanced options including Hibernate / Sleep mode settings, Open File Backup, Auto-Pause and more. 26

27 Search Files The application allows you to search for files present in your account and restore them to your local machine. To use the option, follow the steps given below: 1. Login to the application. 2. Click the Search toolbar option or enter the part/full file name in the Search Files to restore field and click the Search icon on the main screen. The File Search screen is displayed, as shown below: 3. Enter part/full name of the file to be located and click the Search button provided alongside. All the files matching the search criteria are displayed. 4. From the search result, select the desired file and click Restore to restore it to your local machine or Delete to delete it from your account. You can use Select All option to select all the listed files. You can filter the search using the following options: Match the whole file name Picture, Music and Video Files 27

28 Document Files (.doc and txt) All Files Delete Files and Folders You can delete files/folders from your account. To use this option, follow the steps given below: 1. Login to the application and open the Restore tab. 2. Select the files/folders that you want to delete from your account and click the Delete toolbar option. The 'File Deletion' screen listing the file(s) to be deleted is displayed. 3. Click the Delete button to delete the listed file(s) from your account. Backup Mapped Drives This option lets you backup the contents of your Mapped drive to your account. For this, follow the steps given below: 1. Open the Windows explorer. 2. Right-click My Computer and select the Map Network Drive option from the menu. 3. Select the network folder that you want to connect to as a Mapped drive, using the Browse button. 28
 in the My Computer entries. The Mapped drive thus created is now available on the application. 6. Select the files/ folders to be backed up from Backup pane.")

29 4. To connect to the computer with a different Username, click the Connect using a different Username link. The following screen is displayed: 5. Enter the Username and Password and click OK. You can see a Mapped drive named (ex: 'Z') in the My Computer entries. The Mapped drive thus created is now available on the application. 6. Select the files/ folders to be backed up from Backup pane. 7. From the menu bar, go to Tools and select the Mapped Drive Setup option. The Mapped Drive Setup screen is displayed, as shown below. 8. Enter the valid Username and Password for the Mapped drive that you have selected. 9. Click Save to save the settings and schedule the backup job. Note: The application performs scheduled backup of Mapped drives even when your computer is in the Log- Off mode. Sync Files and Folders The Sync feature lets you match the contents of your account with that of your local computer, for the selected folders. This feature is useful especially when you have been taking backups regularly and now removed some data from your local computer and wish to do the same from your account. 29

30 For this, follow the steps given below: 1. Login to the application. Select the folder, to be synchronized in your account and click the Sync toolbar option. A message explaining the sync operation is displayed. Click Continue to proceed. The following Sync screen listing the files present on your account but not on your computer, are listed. 2. Click the Sync button to start the operation or Cancel to cancel it. Send Error Report The Send Error Report feature lets you send a query to the technical support team, in case you encounter any issue while working with the application.. In the mail, classify the type of error or problem encountered so that we can provide a prompt solution. Steps to send an error report: 1. Login to the application. 2. From the menu bar, go to Help and select the Send Error Report option. The Feedback on ZoneAlarm Backup Powered by IDrive screen is displayed. 3. Enter your Username, id, contact number, trouble ticket number (if any) and the subject line. 4. Explain your problem or query in detail in the Message text box. Click Submit to send your feedback or query to the technical support team. You will receive an from the technical support team containing the Ticket Number for your query. You can use this as a reference in case you face the same problem again or find that it has not been resolved. For this purpose, in the Reports Feedback screen, a text box for Trouble Ticket No is provided. Here, enter the Ticket Number sent to you from the technical support team. You can do the same from ZoneAlarm Tray Icon on the tray bar. 30
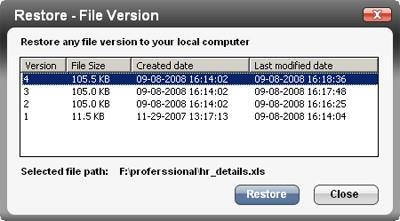
31 Enable Continuous Backup The Enable Continuous Backup option allows the application to automatically recognize the changes to files up to 50 MB and back them up in almost real time. The application backs up only the modified portions of the files. It stores each modified file as a separate version, thereby allowing you to view and/or restore any of the last 30 versions. Full backup is performed for newly created files and files that have not been backed up previously. Steps to perform the continuous backup: 1. Login to the application and open the Backup tab. 2. Select the files/folders that you want the application to automatically backup. 3. Click the Enable Continuous Backup button. The selected files are automatically evaluated for changes and backed up. The button name changes to Disable Continuous Backup when the continuous backup is enabled. Note: Temporary files, system files and Mapped drives are exempted from the Continuous Data Protection operation. The files selected for backup are listed under the Contents of My Backup set pane. You can view or modify these files. Restore Old Versions You can view the latest 30 versions of any file and restore any previous version. Steps to restore you file to the local machine: 1. Login to the application. 2. Click the Restore tab. 3. Double-click or right-click a file and select the View History option from the drop-down menu. 4. Select the version that you want to restore and click the Restore button. 31
32 32

33 Timeline Restore You can access this option from the Restore tab. It displays all the data backed up till the selected date and time. You can select and restore any file/folder to your local machine. 33

34 ZoneAlarm Backup Explorer Interface The ZoneAlarm Backup Explorer powered by IDrive offers a Windows Explorer like view of your account for access and restore of your backed up data. You can open the ZoneAlarm Backup Explorer interface in the following ways: Select Start > Programs > ZoneAlarm > ZoneAlarm Backup Explorer. Right-click the ZoneAlarm Tray Icon and select the Open ZoneAlarm Backup Explorer option. 34
35 Besides the regular Windows Explorer options, the ZoneAlarm Backup Explorer powered by IDrive has options specific to ZoneAlarm Name QuotaDisplay Refresh IDrive Search Classic Scheduler View Log View Version Help Logout Description Up-to-date information on the space occupied by folders and folders backed up to your account. Refreshes the updates made to files in your account. Locate files in your account, based on its full or partial name. Launch the IDrive Classic interface. View the log files for operations like restore, delete, interactive/scheduled backups and so on. View and restore any of the recent 30 versions of a file in your account. Access the IDrive Help Manual. Logout from the IDrive application. 35
36 Restore files and folders The ZoneAlarm Backup Explorer powered by IDrive interface makes it easy to restore your files and folders. You can restore your data in the following ways: Copy-n-Paste 1. Open the ZoneAlarm Backup Explorer interface. 2. Right-click the file/folder and select the Copy option from the menu and paste it to the desired location on your PC. Drag-n-drop 1. Open the ZoneAlarm Backup Explorer interface. 2. Select the file/folder and drag-n-drop the file/folder to its intended destination on your PC. 3. Select the 'open folder after completion of download' from the check box to open the file/folder automatically as soon as it is copied or downloaded. Restore to a specific destination 1. Open the ZoneAlarm Backup Explorer interface. 2. Right-click the file/folder and select the 'Restore to...' option from the menu. Select the location on the PC for restore. 36

37 View different versions of files The application stores upto 30 versions of each file backed up to your account. You can view different versions of a file. This option is only enabled for files. To view the different versions of the file, follow the steps given below: 1. Open the ZoneAlarm Backup Explorer interface. 2. Open the folder and select a file. The Versions option is enabled on the toolbar. 3. Right-click the file and select the View version option from the drop-down menu or click the Version toolbar option. Or Double-click on the file that you want to restore. Select the View Versions option from the IDrive Explorer Plug-in menu bar. 37

38 The File Versions screen displays with a list all the versions (up to 30). Note: The versions are stored on an incremental basis. If the file versions cross 30, the oldest version of the file is deleted and the 31st version of the file is backed up as 30th version. View Properties To view the property of a file/folder, right-click on it and select the Properties option from the drop-down menu. A Properties screen is displayed, which gives information on the file type, location, size and so on. 38

39 ZoneAlarm Tray Menu On installing the application, the ZoneAlarm Monitor icon is displayed on the system tray of your computer. On right-clicking it, a shortcut menu is displayed, with the following options: Upgrade Account This option takes you to the corresponding web page of the application from where you can upgrade your account. Status This option displays information about storage space of your account and backup jobs scheduled. Login - ZoneAlarm Backup Powered by IDrive - Schedule Backup This option opens the ZoneAlarm Backup Classic Interface. Login - ZoneAlarmBackup Powered by IDrive Explorer This option opens the ZoneAlarm Backup Explorer interface. Activity Log This option opens the 'Session Log' screen from where you can view the log details of all the backup, restore and other operations performed during the current session. Web Management This option enables you to manage your backup sets, schedule backups and view logs through any web browser. 39
40 Continuous Backup This option allows the application to automatically recognize and perform the backup of files/folders that have recently been updated (within the last 10 minutes). The color of the ZoneAlarm tray icon toggles between yellow and green to indicate that the Continuous Data Protection is in progress. Stop Scheduled Backup This option lets you stop all the scheduled backup jobs. Disabled Scheduled Backup This option lets you disable all the scheduled backup jobs. Manage All the Scheduled Jobs This option makes it easy for you to manage the scheduled backup jobs by letting you delete the scheduled backup jobs of the expired accounts while retaining the scheduled jobs of the others. Further, it allows you to view the scheduled backup jobs of all the users on the computer. To view and manage all the scheduled job, right-click the ZoneAlarm tray icon and select the Manage all the Scheduled Jobs option. A Manage all the Scheduled jobs screen is displayed. It has the following toolbar items: Edit: Lets you edit the selected scheduled job. You cannot edit the scheduled job with the status In Progress. Delete: Deletes the selected scheduled job. You cannot delete the scheduled job with the status In Progress. Refresh: Refreshes the scheduled list of records. Stop Transfer: Stops the progress of the selected scheduled job. Note: You do not have the provision to change the backup set of other users. Backup Now This option lets you take an immediate backup of your Backup set. Check for Updates This options lets you upgrade to the latest version of the application. Send Error Report This option lets you contact technical support team for queries, suggestions or to provide feedback. Help This option lets you access the ZoneAlarm help manual. Exit This option lets you close the ZoneAlarm tray menu. 40
41 Uninstall ZoneAlarm Backup Follow the steps given below to remove ZoneAlarm Backup completely from the local computer: 1. Go to Start > Programs > ZoneAlarm Backup and select Uninstall ZoneAlarm Backup. A message to stop all the scheduled backup jobs and to confirm the uninstallation is displayed. 2. Click Yes to continue the uninstallation. Note: It is not advisable to uninstall the application using the conventional method of removing an application (from Control Panel > Add or Remove Programs). Version Update To update the application with newer versions, from the ZoneAlarm tray menu, click the ' Check for Updates' option. A message confirming if you want to update to the latest version is displayed. Click 'Yes' to proceed. If the older version is available, it is automatically uninstalled. You need to restart your computer only if you install the ZoneAlarm Backup Explorer plug-in. 41
42 Technical Support Contact the address given below for all correspondence related to the ZoneAlarm Backup products. ZoneAlarm Backup Product Support Office Pro Softnet Corporation, ZoneAlarm Backup powered by IDrive Division, Mureau Road, Suite A, Calabasas, CA Telephone: ext 3 within USA ext 3 outside USA Monday - Friday, 6:00 AM to 6:00 PM PST Fax: support@idrive.com For more information, visit: 42
Online backup subscription service and security overview
 Online backup subscription service and security overview Abstract This White Paper is a ready reckoner for Small and Medium Enterprises (SMEs) for their data storage needs. Traditional tape-based backups
TABLE OF CONTENTS. Page 1 of 59
 Page 1 of 59 TABLE OF CONTENTS Introduction... 3 Features... 4 General Features... 4 IBackup Professional lets you view the log files of backup, restore, scheduled backup and the details of files and folders
Comodo Online Storage Software Version 2.0
 Comodo Online Storage Software Version 2.0 Guide Version 2.0.101211 Comodo Security Solutions 525 Washington Blvd. Jersey City, NJ 07310 Table of Contents 1. Introduction... 4 1.1.System Requirements...
GRS Enterprise Synchronization Tool
 GRS Enterprise Synchronization Tool Last Revised: Thursday, April 05, 2018 Page i TABLE OF CONTENTS Anchor End User Guide... Error! Bookmark not defined. Last Revised: Monday, March 12, 2018... 1 Table
Windows 2000 / XP / Vista User Guide
 Windows 2000 / XP / Vista User Guide Version 5.5.1.0 September 2008 Backup Island v5.5 Copyright Notice The use and copying of this product is subject to a license agreement. Any other use is prohibited.
Sync User Guide. Powered by Axient Anchor
 Sync Powered by Axient Anchor TABLE OF CONTENTS End... Error! Bookmark not defined. Last Revised: Wednesday, October 10, 2018... Error! Bookmark not defined. Table of Contents... 2 Getting Started... 7
DSS User Guide. End User Guide. - i -
 DSS User Guide End User Guide - i - DSS User Guide Table of Contents End User Guide... 1 Table of Contents... 2 Part 1: Getting Started... 1 How to Log in to the Web Portal... 1 How to Manage Account Settings...
Apptix Online Backup by Mozy User Guide
 Apptix Online Backup by Mozy User Guide 1.10.1.2 Contents Chapter 1: Overview...5 Chapter 2: Installing Apptix Online Backup by Mozy...7 Downloading the Apptix Online Backup by Mozy Client...7 Installing
End User Manual. December 2014 V1.0
 End User Manual December 2014 V1.0 Contents Getting Started... 4 How to Log into the Web Portal... 5 How to Manage Account Settings... 6 The Web Portal... 8 How to Upload Files in the Web Portal... 9 How
BackupVault Desktop & Laptop Edition. USER MANUAL For Microsoft Windows
 BackupVault Desktop & Laptop Edition USER MANUAL For Microsoft Windows Copyright Notice & Proprietary Information Blueraq Networks Ltd, 2017. All rights reserved. Trademarks - Microsoft, Windows, Microsoft
Server Edition USER MANUAL. For Microsoft Windows
 Server Edition USER MANUAL For Microsoft Windows Copyright Notice & Proprietary Information Redstor Limited, 2016. All rights reserved. Trademarks - Microsoft, Windows, Microsoft Windows, Microsoft Windows
Desktop & Laptop Edition
 Desktop & Laptop Edition USER MANUAL For Mac OS X Copyright Notice & Proprietary Information Redstor Limited, 2016. All rights reserved. Trademarks - Mac, Leopard, Snow Leopard, Lion and Mountain Lion
Anchor User Guide. Presented by: Last Revised: August 07, 2017
 Anchor User Guide Presented by: Last Revised: August 07, 2017 TABLE OF CONTENTS GETTING STARTED... 1 How to Log In to the Web Portal... 1 How to Manage Account Settings... 2 How to Configure Two-Step Authentication...
Getting Started with Soonr
 WWW.SOONR.COM Getting Started with Soonr A Quick Start Guide for New Users Soonr Inc. 12/19/2012 Revision 1.1 Copyright 2012, Soonr Inc., all rights reserved. Table of Contents 1 How Soonr Workplace Works...
Contents. Getting Started...1. Managing Your Drives...9. Backing Up & Restoring Folders Synchronizing Folders...52
 Contents Getting Started.....................................................1 Installing the Software...........................................1 Using the Maxtor System Tray Icon................................6
Server Edition. V8 Peregrine User Manual. for Microsoft Windows
 Server Edition V8 Peregrine User Manual for Microsoft Windows Copyright Notice and Proprietary Information All rights reserved. Attix5, 2015 Trademarks - Microsoft, Windows, Microsoft Windows, Microsoft
EasiShare Desktop User Guide
 Copyright 2016 by Inspire-Tech Pte Ltd. All rights reserved. All trademarks or registered trademarks mentioned in this document are properties of their respective owners. No part of this document may be
User Manual PDUTracker
 User Manual PDUTracker Management Software for PDU Table of Contents 1. Overview... 1 1.1. Introduction... 1 1.2. Features... 1 2. Install and Uninstall... 1 2.1. System Requirement... 1 2.2. Software
Agent and Agent Browser. Updated Friday, January 26, Autotask Corporation
 Agent and Agent Browser Updated Friday, January 26, 2018 2018 Autotask Corporation Table of Contents Table of Contents 2 The AEM Agent and Agent Browser 3 AEM Agent 5 Privacy Mode 9 Agent Browser 11 Agent
Server Edition USER MANUAL. For Mac OS X
 Server Edition USER MANUAL For Mac OS X Copyright Notice & Proprietary Information Redstor Limited, 2016. All rights reserved. Trademarks - Mac, Leopard, Snow Leopard, Lion and Mountain Lion are registered
DiskPulse DISK CHANGE MONITOR
 DiskPulse DISK CHANGE MONITOR User Manual Version 10.5 Feb 2018 www.diskpulse.com info@flexense.com 1 1 DiskPulse Overview...3 2 DiskPulse Product Versions...5 3 Using Desktop Product Version...6 3.1 Product
Spectrum Business Cloud Backup Quick Start Guide
 Spectrum Business Cloud Backup Quick Start Guide Table of Contents Introduction... 3 Administrator... 4 Set Up Spectrum Business Cloud Backup Admin Account... 4 Create Administrator Account... 4 Edit Administrator
Secure Single Sign On with FingerTec OFIS
 Secure Single Sign On with FingerTec OFIS User Guide CONTENTS 3 1 INTRODUCTION Welcome to OFIS Gateway 4-11 2 INSTALLATION & SETUP Registering Your OFIS Gateway Installing & Setting Up Your OFIS Gateway
Mozy User Guide Document Revision Date: Sept. 18, 2013
 Mozy User Guide Document Revision Date: Sept. 18, 2013 Mozy User Guide i Contents Overview... 1 Installing Mozy... 2 Using the Settings Window... 3 Select Files to Back Up with the File System Tab... 10
Server Edition. V8 Peregrine User Manual. for Linux and Unix operating systems
 Server Edition V8 Peregrine User Manual for Linux and Unix operating systems Copyright Notice and Proprietary Information All rights reserved. Attix5, 2015 Trademarks - Red Hat is a registered trademark
Nextiva Drive The Setup Process Mobility & Storage Option
 Nextiva Drive The Setup Process The Setup Process Adding Users 1. Login to your account and click on the Account icon at the top of the page (this is only visible to the administrator). 2. Click Create
Handbook: Carbonite Safe
 1 Welcome to Carbonite! Important Things to Know...4 Carbonite Features...5 Advanced/Add-On Features... 5 Setting Up and Installing...6 Starting a Trial... 7 Installing Carbonite for the First Time...
Drake Hosted User Guide
 Drake Hosted User Guide Last Revision Date: 1/2/2017 Support.DrakeSoftware.com (828) 524-8020 Drake Hosted User Guide Copyright The Drake Hosted User Guide, Drake Tax Software, and any other related materials
Quick Reference Guide
 Quick Reference Guide Quick Reference Guide Online Courier: Direct Download Direct Download is a Java -based program that serves as a secure access channel through which information is exchanged between
Concord Print2Fax. Complete User Guide. Table of Contents. Version 3.0. Concord Technologies
 Concord Print2Fax Complete User Guide Table of Contents Version 3.0 Concord Technologies 2018 1 Concord Technologies concordfax.com premiumsupport@concordfax.com Copyright 2017 CONCORD Technologies. All
User Guide. PCmover Professional for Windows XP. Laplink Software, Inc. User Guide MN-PCMPRO-XP-EN-08 (REV. 2014/07/08)
") 1 PCmover Professional The Only Software that Moves Programs, Files, and Settings to a New PC! Laplink Software, Inc. Customer Service/Technical Support: Web: http://www.laplink.com/contact E-mail: CustomerService@laplink.com
1 PCmover Professional The Only Software that Moves Programs, Files, and Settings to a New PC! Laplink Software, Inc. Customer Service/Technical Support: Web: http://www.laplink.com/contact E-mail: CustomerService@laplink.com
Administration Guide - NetApp File Archiver
 Page 1 of 100 Administration Guide - NetApp File Archiver TABLE OF CONTENTS OVERVIEW Introduction Key Features Terminology SYSTEM REQUIREMENTS DEPLOYMENT Installation Method 1: Interactive Install Method
Silk Performance Manager Installation and Setup Help
 Silk Performance Manager 18.5 Installation and Setup Help Micro Focus The Lawn 22-30 Old Bath Road Newbury, Berkshire RG14 1QN UK http://www.microfocus.com Copyright 2004-2017 Micro Focus. All rights reserved.
Online Help StruxureWare Data Center Expert
 Online Help StruxureWare Data Center Expert Version 7.2.7 What's New in StruxureWare Data Center Expert 7.2.x Learn more about the new features available in the StruxureWare Data Center Expert 7.2.x release.
Aspera Connect Windows XP, 2003, Vista, 2008, 7. Document Version: 1
 Aspera Connect 2.6.3 Windows XP, 2003, Vista, 2008, 7 Document Version: 1 2 Contents Contents Introduction... 3 Setting Up... 4 Upgrading from a Previous Version...4 Installation... 4 Set Up Network Environment...
Stellar Phoenix Outlook PST Repair - Technician User Guide
 Stellar Phoenix Outlook PST Repair - Technician 8.0.0.0 User Guide Overview Stellar Phoenix Outlook PST Repair - Technician offers a complete solution to repair damaged Microsoft Outlook Personal Storage
How to Install and Configure the Barracuda Outlook Add-In
 How to Install and Configure the Barracuda Outlook Add-In This article refers to the Barracuda Cloud Archiving Service and the Barracuda Outlook Add-In. For best results, confirm you are using the latest
Enterprise Server Edition
 Enterprise Server Edition USER MANUAL For Microsoft Windows Copyright Notice & Proprietary Information Redstor Limited, 2017. All rights reserved. Trademarks - Microsoft, Windows, Microsoft Windows, Microsoft
Veritas Desktop and Laptop Option Mac Getting Started Guide
 Veritas Desktop and Laptop Option 9.3.1 Mac Getting Started Guide 20-Nov-18 The software described in this document is furnished under a license agreement and may be used only in accordance with the terms
Assistant User Guide
 mydatavo Assistant User Guide 1 2 3 4 5 6 7 8 9 10 11 12 13 14 15 16 17 18 19 20 21 22 Table Of Contents Features...ii Introduction...1 1. Installing mydatavo Assistant...1 1 System Requirements... 1 1.2
has been retired This version of the software Sage 300 Construction and Real Estate ( formerly Sage Timberline Office)
") Sage 300 Construction and Real Estate ( formerly Sage Timberline Office) MyAssistant Installation Guide Version 15.1 This version of the software has been retired NOTICE This document and the Sage 300
Sage 300 Construction and Real Estate ( formerly Sage Timberline Office) MyAssistant Installation Guide Version 15.1 This version of the software has been retired NOTICE This document and the Sage 300
GigaCentral macos App User Guide V2.0. For GigaCentral User
 V2.0 For GigaCentral User Copyright 2018 by Inspire-Tech Pte Ltd. All rights reserved. All trademarks or registered trademarks mentioned in this document are properties of their respective owners. No part
KYOCERA Net Admin User Guide
 KYOCERA Net Admin User Guide Legal Notes Unauthorized reproduction of all or part of this guide is prohibited. The information in this guide is subject to change without notice. We cannot be held liable
User Guide Online Backup
 User Guide Online Backup Table of contents Table of contents... 1 Introduction... 2 Getting Started with the Online Backup Software... 2 Installing the Online Backup Software... 2 Configuring a Device...
Comodo LoginPro Software Version 1.0
 Comodo LoginPro Software Version 1.0 User Guide Guide Version 1.0.102512 Comodo Security Solutions 1255 Broad Street STE 100 Clifton, NJ 07013 Table of Contents 1.Introduction to Comodo LoginPro... 3 1.1.System
Seagate Manager. User Guide. For Use With Your FreeAgent TM Drive. Seagate Manager User Guide 1
 Seagate Manager User Guide For Use With Your FreeAgent TM Drive Seagate Manager User Guide 1 Seagate Manager User Guide Revision 2 2009 Seagate Technology LLC. All rights reserved. Seagate, Seagate Technology,
3.0. Manual and. Application note. USB Adapter
 3.0 USB Adapter Manual and Application note Index INTRODUCTION 1 CHAPTER 1 Package 2 Features 2 Bluetooth profile support 2 Drivers support 3 CHAPTER 2 Setup for Windows 98SE/ME/2000/XP 4 CHAPTER 3 Application
SoftBank Wireless Assistant Desktop Assistant Client User's Guide
 SoftBank Wireless Assistant Desktop Assistant Client User's Guide Ver.5.5 Rev.1.1 3 Contents Preface Introduction... 4 1 The Personal Edition Desktop Assistant... 4 2 Requirements... 4 Chapter 1 Checking
How to Install and Configure the Barracuda Outlook Add-In
 How to Install and Configure the Barracuda Outlook Add-In For best results, verify you are using the latest version of the Barracuda Outlook Add-In client. The Barracuda Outlook Add-In supports Outlook
Symantec Desktop and Laptop Option 8.0 SP2. Symantec Desktop Agent for Mac. Getting Started Guide
 Symantec Desktop and Laptop Option 8.0 SP2 Symantec Desktop Agent for Mac Getting Started Guide Disclaimer The information contained in this publication is subject to change without notice. Symantec Corporation
Chapter Title. Time Warner Cable Business Class Online Backup. Mac User Guide. Version 2.1.1
 Chapter Title Time Warner Cable Business Class Online Backup Mac User Guide Version 2.1.1 Table of Contents... 2 Chapter 1: About This Guide... 3 Chapter 2: Getting Started...4 Installing Online Backup...
NotifyMDM Device Application User Guide Installation and Configuration for Android
 NotifyMDM Device Application User Guide Installation and Configuration for Android NotifyMDM for Android, Version 3.x NotifyMDM for Android 1 Table of Contents NotifyMDM for Android 3 Installation Instructions
User Guide. Revised in Nov, enpowermanager. Version Power Management Software
 User Guide Revised in Nov, 2018 enpowermanager Version 5.3.2 Power Management Software enpowermanager User Guide - Table of Contents 1.0 Introduction to enpowermanager... 4 1.1 CurrentWare Components...
KYOCERA Net Admin Installation Guide
 KYOCERA Net Admin Guide Legal Notes Unauthorized reproduction of all or part of this guide is prohibited. The information in this guide is subject to change without notice. We cannot be held liable for
Colligo Engage Outlook App 7.1. Offline Mode - User Guide
 Colligo Engage Outlook App 7.1 Offline Mode - User Guide Contents Colligo Engage Outlook App 1 Benefits 1 Key Features 1 Platforms Supported 1 Installing and Activating Colligo Engage Outlook App 3 Checking
Home. User Guide. Home. Laplink Software, Inc. User Guide MN-PCMHOME-EN-08 (REV. 1/15/2014)
") 1 Home Laplink Software, Inc. Customer Service/Technical Support: Web: http://www.laplink.com/contact E-mail: CustomerService@laplink.com Laplink Software, Inc. 600 108th Ave. NE, Suite 610 Bellevue, WA
1 Home Laplink Software, Inc. Customer Service/Technical Support: Web: http://www.laplink.com/contact E-mail: CustomerService@laplink.com Laplink Software, Inc. 600 108th Ave. NE, Suite 610 Bellevue, WA
Workshare Desktop App. User Guide
 Workshare Desktop App User Guide February 2018 Workshare Desktop App User Guide Table of Contents Introducing the Workshare Desktop App...4 What is the Desktop App?... 5 Key features of the Workshare desktop
Citrix GoToAssist Express User Guide
 Citrix GoToAssist Express User Guide Citrix Online 2008 Citrix Online, LLC. All rights reserved. 6500 Hollister Avenue Goleta, CA 93117 (888) (888) 621-0538 Fax: (805) 690-6471 Table of Contents System
Atlona Manuals Software AMS
 AMS Atlona Manuals Software Version Information Version Release Date Notes 1 03/18 Initial release AMS 2 Welcome to Atlona! Thank you for purchasing this Atlona product. We hope you enjoy it and will take
Avalanche Remote Control User Guide. Version 4.1
 Avalanche Remote Control User Guide Version 4.1 ii Copyright 2012 by Wavelink Corporation. All rights reserved. Wavelink Corporation 10808 South River Front Parkway, Suite 200 South Jordan, Utah 84095
Zen Internet. Online Data Backup. Zen Vault Express for Mac. Issue:
 Zen Internet Online Data Backup Zen Vault Express for Mac Issue: 2.0.08 Tel: 01706 90200 Fax: 01706 902005 E-mail: info@zen.co.uk Web: www.zen.co.uk Zen Internet 2015 Contents 1 Introduction... 3 1.1 System
Veritas Desktop Agent for Mac Getting Started Guide
 Veritas Desktop Agent for Mac Getting Started Guide The software described in this document is furnished under a license agreement and may be used only in accordance with the terms of the agreement. Documentation
Comodo Cloud Software Version 2.2
 2 Comodo Cloud Software Version 2.2 User Guide Guide Version 2.2.012813 Comodo Security Solutions 1255 Broad Street STE 100 Clifton, NJ 07013 Table of Contents 1.Comodo Cloud - Introduction... 3 2.System
SolarPower Pro. User s Manual. Management Software for Solar Inverter
 SolarPower Pro User s Manual Management Software for Solar Inverter Table of Contents 1. SolarPower Pro Overview... 2 1.1. Introduction... 2 1.2. Structure... 2 1.3. Features... 3 2. SolarPower Pro Install
Drobo 5N2 User Guide
 Drobo 5N2 User Guide Contents 1 Drobo 5N2 User Guide... 6 1.1 Before You Begin... 7 1.1.1 Product Features at a Glance... 8 1.1.2 Checking Box Contents...10 1.1.3 Checking System Requirements...11 1.1.3.1
Enterprise Server Edition
 Enterprise Server Edition V8 Peregrine User Manual for Microsoft Windows Copyright Notice and Proprietary Information All rights reserved. Attix5, 2015 Trademarks - Microsoft, Windows, Microsoft Windows,
CamGuard Security System CamGuard Security System Manual
 CamGuard Security System Manual ZhiSoftware Brief Introduction...3 Features...3 System Requirements...3 Configuration...4 Add Camera...4 Device Options...4 About Alarm...5 Alarm Actions...6 Alarm Schedule...8
Network Management Utility
 4343-7705-02 Network Management Utility Foreword Welcome Network Management Utility is utility software that provides central control over printers, copiers, and other devices on a network. With Network
Getting Started With the Cisco PAM Desktop Software
 CHAPTER 3 Getting Started With the Cisco PAM Desktop Software This chapter describes how to install the Cisco PAM desktop client software, log on to Cisco PAM, and begin configuring access control features
PROMISE ARRAY MANAGEMENT ( PAM) USER MANUAL
 USER MANUAL") PROMISE ARRAY MANAGEMENT ( PAM) USER MANUAL Copyright 2002, Promise Technology, Inc. Copyright by Promise Technology, Inc. (Promise Technology). No part of this manual may be reproduced or transmitted
PROMISE ARRAY MANAGEMENT ( PAM) USER MANUAL Copyright 2002, Promise Technology, Inc. Copyright by Promise Technology, Inc. (Promise Technology). No part of this manual may be reproduced or transmitted
Avigilon Control Center Server User Guide
 Avigilon Control Center Server User Guide Version 4.12 PDF-SERVER-E-Rev1 Copyright 2012 Avigilon. All rights reserved. The information presented is subject to change without notice. No copying, distribution,
Dell Repository Manager Business Client Version 2.1 User s Guide
 Dell Repository Manager Business Client Version 2.1 User s Guide Notes, cautions, and warnings NOTE: A NOTE indicates important information that helps you make better use of your computer. CAUTION: A CAUTION
Practice Labs User Guide
 Practice Labs User Guide This page is intentionally blank Contents Introduction... 3 Overview... 3 Accessing Practice Labs... 3 The Practice Labs Interface... 4 Minimum Browser Requirements... 5 The Content
MagicInfo Premium Server
 MagicInfo Premium Server Quick Start Guide This guide has been designed for your convenient and efficient use of MagicInfo-i Premium Edition. Refer to the MagicInfo Premium Server user guide for further
Administrator s Guide
 Administrator s Guide 1995 2011 Open Systems Holdings Corp. All rights reserved. No part of this manual may be reproduced by any means without the written permission of Open Systems, Inc. OPEN SYSTEMS
Cox Business Online Backup Administrator Guide. Version 2.0
 Cox Business Online Backup Administrator Guide Version 2.0 2012 by Cox Communications. All rights reserved. No part of this document may be reproduced or transmitted in any form or by any means, electronic,
Top Producer for Palm Handhelds
 Top Producer for Palm Handhelds Quick Setup Top Producer Systems Phone number: 1-800-830-8300 Email: support@topproducer.com www.topproducer.com Fax: 604.270.6365 Top Producer for Palm handhelds Quick
Print Audit 6. Print Audit 6 Documentation Apr :07. Version: Date:
 Print Audit 6 Version: Date: 37 21-Apr-2015 23:07 Table of Contents Browse Documents:..................................................... 3 Database Documentation.................................................
CityVault Client Manual
 CityVault Client Manual Contents Preface: Preface...4 Chapter 1: Overview...5 Chapter 2: Installing CityVault...6 Downloading the CityVault Client...6 Installing the CityVault Client...6 Configuring CityVault...8
PROMISE ARRAY MANAGEMENT ( PAM) FOR FastTrak S150 TX2plus, S150 TX4 and TX4000. User Manual. Version 1.3
 FOR FastTrak S150 TX2plus, S150 TX4 and TX4000. User Manual. Version 1.3") PROMISE ARRAY MANAGEMENT ( PAM) FOR FastTrak S150 TX2plus, S150 TX4 and TX4000 User Manual Version 1.3 Promise Array Management Copyright 2003 Promise Technology, Inc. All Rights Reserved. Copyright by
PROMISE ARRAY MANAGEMENT ( PAM) FOR FastTrak S150 TX2plus, S150 TX4 and TX4000 User Manual Version 1.3 Promise Array Management Copyright 2003 Promise Technology, Inc. All Rights Reserved. Copyright by
Workstation Configuration
 Workstation Configuration December 15, 2017 - Version 9.3 - - - - - - - - - - - - - - - - - - - - - - - - - - - - - - - - - - - - - - - - - - - - - - - - - - - - - - - - - - - - - - - - - - - - - - - -
TABLE OF CONTENTS 1. SYSTEM REQUIREMENTS INSTALLATION ACCOUNT MANAGEMENT RAZER CORTEX GENERAL SETTINGS...
 Welcome to Razer Cortex, the nerve center of your entire gaming experience. From effortlessly finding the best deals on your games to launching and boosting them for peak pc performance while backing up
This option lets you reset the password that you use to log in if you do not remember it. To change the password,
 User s Guide Overview IDrive offers the most cost-effective BMR functionality with onsite disk image backup for SMBs. You can store entire data of hard disks including the operating system (OS) and application
Version 11. NOVASTOR CORPORATION NovaBACKUP
 NOVASTOR CORPORATION NovaBACKUP Version 11 2009 NovaStor, all rights reserved. All trademarks are the property of their respective owners. Features and specifications are subject to change without notice.
TABLE OF CONTENTS 1. SYSTEM REQUIREMENTS INSTALLATION ACCOUNT MANAGEMENT RAZER CORTEX GENERAL SETTINGS...
 Welcome to Razer Cortex, the nerve center of your entire gaming experience. From effortlessly finding the best deals on your games to launching and boosting them for peak pc performance while backing up
Professional. User Guide. Professional. Laplink Software, Inc. User Guide MN-PCMPRO-EN-08 (REV. 2014/04/10)
") 1 The Only Software that Moves Programs, Laplink Software, Inc. Customer Service/Technical Support: Web: http://www.laplink.com/contact E-mail: CustomerService@laplink.com Laplink Software, Inc. 600 108th
1 The Only Software that Moves Programs, Laplink Software, Inc. Customer Service/Technical Support: Web: http://www.laplink.com/contact E-mail: CustomerService@laplink.com Laplink Software, Inc. 600 108th
Client Installation and User's Guide
 IBM Tivoli Storage Manager FastBack for Workstations Version 7.1 Client Installation and User's Guide SC27-2809-03 IBM Tivoli Storage Manager FastBack for Workstations Version 7.1 Client Installation
Workstation Configuration
 Workstation Configuration December 12, 2017 - Version 9.4 - - - - - - - - - - - - - - - - - - - - - - - - - - - - - - - - - - - - - - - - - - - - - - - - - - - - - - - - - - - - - - - - - - - - - - - -
WAM!NET Submission Icons. Help Guide. March 2015
 WAM!NET Submission Icons Help Guide March 2015 Document Contents 1 Introduction...2 1.1 Submission Option Resource...2 1.2 Submission Icon Type...3 1.2.1 Authenticated Submission Icons...3 1.2.2 Anonymous
Qbox User Manual. Version 7.1
 Qbox User Manual Version 7.1 Index Page 3 Page 6 Page 8 Page 9 Page 10 Page 12 Page 14 Page 15 Introduction Setup instructions: users creating their own account Setup instructions: invited users and team
How to install the software of ZNS8022
 How to install the software of ZNS8022 1. Please connect ZNS8022 to your PC after finished assembly. 2. Insert Installation CD to your CD-ROM drive and initiate the auto-run program. The wizard will run
SIMATIC Automation License Manager Manual 02/2008 A5E
 s Contents SIMATIC Automation License Manager Product Overview 1 Installation 2 Working with the Automation License Manager 3 Glossar Index Manual 02/2008 A5E02128430-01 Safety Guidelines This manual contains
Configuration Manager
 CHAPTER 7 This chapter describes how to perform routine Cisco VXC Manager configuration management tasks using the Administrator Console. It provides information on managing the configuration settings
MagicInfo VideoWall Author
 MagicInfo VideoWall Author MagicInfo VideoWall Author User Guide MagicInfo VideoWall Author is a program designed to construct a VideoWall layout and create VideoWall content by adding various elements
Drobo B810n Getting Started Guide
 Drobo B810n Getting Started Guide Table of Contents 1: Before You Begin... 4 1.1 Product features at a glance... 4 1.2 Checking box contents... 5 1.3 Checking system requirements... 5 1.4 Checking hardware
Aventail Connect Client with Smart Tunneling
 Aventail Connect Client with Smart Tunneling User s Guide Windows v8.9.0 1996-2007 Aventail Corporation. All rights reserved. Aventail, Aventail Cache Control, Aventail Connect, Aventail Connect Mobile,
Dell Repository Manager Business Client Version 2.0 User s Guide
 Dell Repository Manager Business Client Version 2.0 User s Guide Notes, Cautions, and Warnings NOTE: A NOTE indicates important information that helps you make better use of your computer. CAUTION: A CAUTION
BounceBack 18. User Manual
 BounceBack 18 User Manual 2016 CMS Products, all rights reserved. All trademarks are the property of their respective owners. Features and specifications are subject to change without notice. The information
Handbook: Carbonite Safe
 1 Welcome to Carbonite! Important Things to Know...4 Carbonite Features...5 Setting Up and Installing...6 Starting a Trial... 7 Installing Carbonite for the First Time... 7 Buying a Subscription...9 Subscription