HOBOware User s Guide
|
|
|
- Frank Ward
- 6 years ago
- Views:
Transcription

1 HOBOware User s Guide Onset Computer Corporation Onset Computer Corporation. All rights reserved. Onset, HOBO, HOBOlink, HOBOware, BoxCar, and FlexSmart are trademarks or registered trademarks of Onset Computer Corporation for its data logger products and configuration/interface software. Macintosh is a registered trademark of Apple, Inc. Microsoft and Windows are registered trademarks of Microsoft Corporation. All other trademarks are the property of their respective companies R
2 Chapter 1: An Overview of HOBOware... 5 Installing HOBOware... 5 New HOBOware Features... 7 A Tour of the HOBOware Interface Working in Secure Mode: 21 CFR Part 11 Compliance Chapter 2 Working with HOBO Data Loggers Connecting Devices Launching Devices Launch Logger Window Launch Options for HOBO UX90 Series Loggers Launch Options for HOBO UX100 Series Loggers and the HOBO 4-Channel Thermocouple Logger (UX M) Launch Options for the HOBO 4-Channel Analog Logger (UX M) Launch Options for the HOBO 4-Channel Pulse Input Data Logger (UX x) Launch Options for the HOBO Plug Load Logger (UX ) Launch Options for Other U-Series Loggers Launch Options for the HOBO U30 and Other Station Loggers Multiple Logging Intervals Fast Logging Intervals Setting a Default Action on Multiple U-Series Devices Using Launch Utilities Filter Series at Launch Data Assistants Window (Scaling) Configure Alarms Advanced Sensor Properties: Pulse Frequency and Lockout Time Advanced Sensor Properties: Calibration Advanced Sensor Properties: Occupancy Statistics: Maximum, Minimum, Average, and Standard Deviation Filtered Series vs. Statistics Logging Burst Logging Checking Device Status The Status Window Stopping a Device Chapter 3 Reading Out, Plotting, and Analyzing Data Reading Out Data Plotting Data Opening Files Opening Files from Unsupported Loggers Working with Plots Using the Arrow Tool Using the Crosshair Tool Zooming, Panning, and Smart Scaling Plots Copying Data Points and the Plot Closing a Plot Viewing a Pie Chart
3 Printing Plot Elements Chapter 4 Modifying a Plot Setting Properties for Plot Elements Setting Axis Properties Setting Series Properties Setting Legend Properties Setting Title Properties Setting View Properties Adding a Graph Label Selecting a Subset of the Plot (Subset Statistics Tool) Moving a Series from Front to Back on the Plot Filtering a Series Cropping a Series Hiding/Showing or Removing a Series from a Plot Copying a Series to Another Plot Merging Files Converting Units Undoing and Redoing Plot Changes Saving Project Files Using Data Assistants Linear Scaling Assistant Pulse Scaling Assistant Barometric Compensation Assistant Conductivity Assistant Dissolved Oxygen Assistant Grains Per Pound Assistant Growing Degree Days Assistant kwh Assistant Exporting Data Exporting Table Data Exporting Data in Classic (BoxCar Pro) Format Exporting Details Formatting the Date/Time Column in Excel The Bulk Export Tool Importing Text Files Import Text Files Requirements Importing Files from HOBOlink Chapter 5 Hardware Reference Working with the HOBO U30 Station Controlling the Relay on the HOBO U30 Station Setting Alarms on a HOBO U30 Station Configuring FlexSmart Modules/Analog Sensor Ports Configuring Excitation Power Setting Voltage Ranges and Scaling Parameters Loading a Saved Configuration Resetting a Module to the Default Configuration Working with a Shuttle Offloading and Saving Shuttle Files The Shuttle Management Window Deleting Files from a Shuttle Configuring Loggers with the E50B2 Power & Energy Meter Checking Dates for the HOBO U26 Dissolved Oxygen Logger Sensor Cap
4 Using the Lab Calibration Tool with the HOBO U26 Dissolved Oxygen Logger Updating UX Series Logger Firmware Fixing "Read Header Failed" Error Chapter 6 HOBOnode Manager A Tour of HOBOnode Manager Viewing Real-Time Plots Determining Data Node Type Changing Logging and Connection Intervals Setting up External Sensors Configuring Scaling on a Sensor Wattnode Scaling Factors: T-WNB-3Y-208/T-WNB-3D-240/ T-WNB-3D Veris Scaling Factors: T-VER /T-VER Veris Scaling Factors: T-VER-H Veris Scaling Factors: T-VER-971BP Veris Scaling Factors: T-VER-PXU-L/T-VER-PXU-X Ion Scaling Factors: ION-TVOC Setting HOBOnode Manager Preferences Working with HOBOnode Manager Data Alarms The Network Map Maintenance & Troubleshooting Troubleshooting Chapter 7 Reference Setting Preferences General Preferences Export Settings Communications Preferences Plotting Preferences Data Assistant Preferences Display Preferences Warnings Preferences Restoring Default Preferences Menus The Toolbar Tips for Working with Multiple Loggers Setting the Language/Format on Your Computer Alarm & Readout Tool
5 Chapter 1: An Overview of HOBOware HOBOware software is used for launching, reading out, and plotting data from HOBO data loggers. With HOBOware, you can also check logger status, filter and export data, save changes to graphs in project files, and scale data with the Linear Scaling and Pulse Scaling data assistants. There are two versions of HOBOware: HOBOware and HOBOware Pro. HOBOware Pro offers the following additional features: Support for Conductivity, Dissolved Oxygen, and Water Level loggers Support for HOBO U-Shuttle and Waterproof Shuttle HOBOnode Manager and support for wireless HOBO data nodes Launch and readout time-saving options Additional data assistants (Barometric Compensation, Conductivity, Dissolved Oxygen, Grains Per Pound, Growing Degree Days, and kwh) Importing of text data Bulk Export Tool Pie charts for UX90 series loggers Additional plot preferences (font type, style, and color, and series and value axis rules) Subset statistics tool for graphing a subset of data Series cropping on plots 21 CFR Part 11 Compliance To upgrade from HOBOware to HOBOware Pro, call and ask for Onset Customer Service. Note: HOBOware supports the following languages: English, French, German, Japanese, Portuguese, and Spanish. The HOBOware user interface can display all of these languages as configured by your computer (see Setting the Language/Format on Your Computer). HOBOware documentation is available in English only. Videos for using HOBOware and data loggers are available on YouTube (search for Onset data loggers) or go to Installing HOBOware You can download and install HOBOware from the Onset website. HOBOware Pro is available from the Onset website or a software CD and requires a license key, which is located in the confirmation or online receipt you received when purchasing the software or on the back of the CD case. To upgrade from HOBOware to HOBOware Pro, call and ask for Onset Customer Service. Note: You must be an administrator to install HOBOware. Installing HOBOware or HOBOware Pro from the Onset Website To download HOBOware from the Onset website, go to the following URL and follow the instructions for downloading and installing HOBOware: 5
6 Installing HOBOware Pro from the Installation CD Windows Mac 1. Insert the CD in your computer s CD-ROM drive. The installation program should start automatically. If it does not, navigate to the CD drive in My Computer or Windows Explorer and double-click HOBOware_Setup.exe to launch the HOBOware installer. Note: HOBOware for Windows requires the Java Runtime Environment. If the correct Java Runtime Environment version is not already installed on your computer, the HOBOware Setup program will ask if you want to install it now. (You must be logged in as an administrator on your computer to install the Java Runtime Environment.) Click Yes and follow the prompts. After the Java Runtime Environment is installed, the HOBOware installation will continue. 2. Follow the prompts to install HOBOware. 3. To start HOBOware, double-click the HOBOware icon on your desktop or select Programs> Onset Applications > HOBOware from the Start menu. 1. Insert the CD in your computer s CD-ROM drive. 2. Double-click the CD icon in the Finder and double-click the HOBOware.pkg to launch the HOBOware installer. 3. When you reach the final screen of the installation program, click Restart. 4. After restarting, open HOBOware by double-clicking the HOBOware icon in your computer s Applications folder. Activating HOBOware Pro The first time you open HOBOware Pro, you will be prompted to enter your license key from the confirmation, online receipt, or the CD case. Type the license key in the License Key Manager and click OK. You will need to reopen HOBOware after entering the license key. Note that you will not be required to enter the license key when upgrading to subsequent versions of HOBOware. Running the Setup Assistant The HOBOware Setup Assistant appears the first time you open HOBOware to help you quickly select key settings for device types and serial ports, units of measurement, and data assistants. To run the Setup Assistant, click Start and follow the prompts to change some key preferences. Click Cancel to use HOBOware with its default settings. With the Setup Assistant, you can select: Device Types. Select USB, USB and serial devices, or serial devices only. If you select serial devices, you can choose the serial port. Unit System. Select either US or SI units. Data Assistants. Select the installed Data Assistants you want to show when relevant data is present. All supported Data Assistants are checked by default. You can also run the setup assistant at a later time. From the File menu in Windows or the HOBOware menu in Macintosh, select Preferences. Click the Setup Assistant button at the bottom of the Preferences window. Checking for Software Updates If you have an Internet connection, HOBOware will periodically ask if you would like it to check the Onset website for software updates. The default is to check once per week. To change the frequency: 6
7 1. From the File menu in Windows or the HOBOware menu on Macintosh, select Preferences 2. Select the General category on the left and then click Startup on the right. 3. Choose the frequency and the type of updates you want to check for and click OK. You can also check for updates manually at any time by selecting Check for Software Updates from the Help menu. Note: If you are using HOBOnode Manager with a HOBO ZW wireless network, you must stop device communication before you can upgrade HOBOware. New HOBOware Features The following features are available in HOBOware 3.7.2: Support for Japanese in the software user interface; Help and user guides are available in English only. HOBOware now requires Java 7 or higher (Java 1.7.0_17) for both Windows and Macintosh. Download the latest Java Runtime Environment (JRE) at The ability to quickly hide and show a series from the plot by right-clicking the series in the Details pane or by using the Edit menu or the right-click menu in the plot. New Features in Previous Releases HOBOware 3.7.1: HOBOware 3.7: HOBOware 3.6: HOBOware 3.5: HOBOware 3.4.1: Introduction of HOBOware, formerly known as HOBOware Lite. See an Overview of HOBOware for details on features in HOBOware and HOBOware Pro. Support for the new HOBO Plug Load logger (UX ), including launch capability, pre-launch filters, statistics logging, and the ability to stop and restart logging during a single deployment. Support for the new HOBO 4-Channel Analog logger (UX M), including launch capability, prelaunch filters, alarms, burst logging, statistics logging (maximum, minimum, average, and standard deviation), and the ability to stop and restart logging during a single deployment. A new preference for exporting the information in the Details Pane and series data from the Points Table in the same file. Support for the new HOBO 4-Channel Thermocouple logger (UX M), including launch capability, pre-launch filters, alarms, burst logging, statistics logging (maximum, minimum, average, and standard deviation), and the ability to stop and restart logging during a single deployment. The ability to assign labels to sensors for all logger models in the Launch Logger window, a feature previously only available for station loggers, such as the HOBO U30 and Micro Station. Enhancements to the export table data feature, including the ability to set the default order of measurement types in the Export Settings preferences and to quickly reorder series in the Export window by dragging them. Device menu options specific to HOBO U30 Stations are now available through a new "Manage U30" menu choice. 7
8 HOBOware 3.4: Support for the new HOBO UX100 series data loggers, including launch capability, pre-launch filters, alarms, burst logging, statistics logging (maximum, minimum, average, and standard deviation), and the ability to stop and restart logging during a single deployment. Pie charts for loggers with state series that you can view, print, and save as.png files for additional analysis beyond line graphs. This is especially helpful for light and occupancy data from UX90-005x and -006x loggers. A firmware upgrade tool that automatically detects when a new firmware file is available for UX90 and UX100 series data loggers and walks you through the update process. Improvements to the process of exporting data points, including the ability to select individual series or event types and to sort columns. A new preference for setting the logger launch description as the serial number so that you can easily differentiate files when launching and reading out several loggers of the same type. The ability to shows gaps in series when merging datafiles or when plotting a UX100 logger that had stopped and resumed logging. Improved the Network Map feature in HOBOnode Manager. (This requires a ZW Receiver firmware upgrade.) Support for the new Windows 8 operating system. The current list of supported operating systems is Windows 8, Windows 7 (Pro, Ultimate, and Home Premium), and Windows XP (Pro and Home) on the PC and OS X Versions 10.6.x, 10.7.x, and 10.8.x on Mac. Note: The Alarm & Readout Tool is no longer installed with HOBOware as of version 3.4. However, you will still have access to the software if it was installed with an older version of HOBOware. HOBOware 3.3.2: HOBOware 3.3.1: HOBOware 3.3: Support for the following languages and their associated formats in the software user interface: Spanish (Spain), Portuguese (Portugal), and German (Germany); Help and user guides are available in English only. Improved field calibration accuracy in the Conductivity Assistant. Support for the new HOBO U26 Dissolved Oxygen logger, including launch and readout capability, a Lab Calibration tool to calibrate the logger to 100% and/or 0% saturation, and a Dissolved Oxygen Data Assistant that corrects for measurement drift from fouling and generates salinity-adjusted DO concentration as well as percent saturation data. The ability to update firmware for receivers and data nodes in the HOBO ZW Wireless System, with the option to update a single device at a time or multiple data nodes in a group. A data encoding preference added to the General preferences that controls whether data in HOBOware is imported and exported based on UTF-8 or operating system standards. French language support for the software user interface (Help and user guides are available in English only). Support for the new HOBO UX90 series data loggers, including launch capability, advanced sensor configuration, and pre-launch filters. The models supported with this release are the State/Pulse/Event/Runtime logger (UX90-001x), Light On/Off logger (UX90-002x), Motor On/Off logger (UX90-004x), and Occupancy/Light logger (UX90-005x/-006x). 8
9 HOBOware 3.2.2: HOBOware 3.2.1: HOBOware 3.2: Enhanced display preferences for sorting data series in the Status and Plot Setup windows. A utility for upgrading the HOBOnode Manager database to improve performance. Performance improvements for the HOBO data nodes data delivery feature. A change to the FTP option for the HOBO data nodes data delivery feature so that it uses passive mode, which allows for better connections through firewalls. An update to the Conductivity Assistant, which includes refinements in the calculation of temperature compensation and a new option for non-linear, sea water compensation based on PSS-78. A revision to the calculation for T-CDI S and T-CDI S sensors when used with U-Series loggers ensuring data is displaying properly. Support for Java 7. The integration of the Alarm & Readout Tool, which is now automatically installed and available for use from the Tools menu. The ability for all non-administrator users to run HOBOware on Windows (administrator privileges are required to install HOBOware, map and unmap file assocations, and load new Data Assistants). Compatibility with imac and MacBook Pro and Intel Core i5 and i7 processors. A revision to the calculation for the S-SMD Soil Moisture Sensor ensuring data is displaying accurately. The option to create new files or overwrite existing ones via FTP when using the data delivery feature for HOBO Data Nodes. This allows you to automatically import wireless node CSV data into other applications, such as Microsoft Excel. A redesigned launch window for quick logger configuration and easy sensor setup. Faster processing times for opening large data files (512KB and up). The ability to configure filtered series when launching the logger, which automatically generates custom series, such as average temperature per day, when you read out the logger and plot data. The ability to configure Pulse Scaling, Linear Scaling, and kwh Data Assistant series when launching any logger with applicable external sensors Support for the new HOBO 4-Channel Pulse Input Data Logger (UX x), including advanced sensor configuration for setting maximum pulse frequency and lockout times as needed in raw pulse and event channels. Support for the new E50B2 Power & Energy Meter (T-VER-E50B2), including single-step configuration with the HOBO 4-Channel Pulse Input Data Logger (UX x) and automatic calculation of numerous additional data series for analysis. Support for the new HOBO Conductivity Logger (U24-002). The option to disable logging the battery channel by default on some loggers, which can extend battery life and memory space. Note: Loggers launched in HOBOware 3.2 or later with series created by the Pulse Scaling, Linear Scaling, and kwh Data Assistants or with filtered series cannot be read out in earlier versions of HOBOware. 9
 as well as the device currently selected or connected, if any.")

10 A Tour of the HOBOware Interface This is the main HOBOware window. Use the menu bar or tool bar to access all the features within HOBOware. The status bar at the bottom of the window shows the current view in place (as selected by the Window menu) as well as the device currently selected or connected, if any. This example shows a file that has been opened and plotted. There are three components to a plotted datafile: the Points Table, the Details Pane, and the Plot. The Points Table The Points Table is a list of data points, or values, and logged events displayed in the plot. The Points Table is linked to the graph: only the data for the series and events on the plot are listed in the Points Table. The data points are listed chronologically. Each point or event is listed in a single row and each series or event type is displayed in a column. You can resize the columns by clicking and dragging the dividers between the column headers. Use the arrow keys or scroll bars to move up, down, left, and right in the Points Table. Additionally, as you click the crosshair tool in the plot, the corresponding point is selected in the Points Table. Similarly, if you click a value or event cell in the Points Table, the crosshair will appear on the graph at the time corresponding to that cell. To resize the pane, drag the divider between the Points Table and the plot. To hide the Points Table, select Points Table from the View menu. 10

11 If you do not want the Points table to be displayed by default when you plot data, open the Preferences, select Plotting, and then Layout. Disable the "Show the points table when plotting data" checkbox. The Details Pane The Details Pane shows information for each series and event displayed in the plot including: Information about the devices, such as model and serial numbers. Deployment information, such as the launch description, deployment number, start time and time zone, logging interval, and battery voltage at launch. Series statistics, such as the total number of sensor samples and events, time of the first and last sample, and the maximum, minimum, average, and standard deviation for each sensor series in the plot. Audit trail information for secure files. Click the + or - button to expand or collapse an entry in the Details Pane. Click the Expand All/Collapse All buttons to expand or collapse the entire details tree. Click a series node in the details tree to select the corresponding series on the graph and corresponding column in the Points Table. Right-click a series to hide it on the plot and in the Points table. The hidden series will be grayed out in the Details Pane. Right-click a grayed out series to show that series or select Show All Hidden Series to show all series that were previously hidden. To resize the pane, drag the divider between the Details pane and the graph. To hide the Details Pane, select Details Pane from the View menu. If you do not want the Points table to be displayed by default when you plot data, open the Preferences, select Plotting, and then Layout. Disable the "Show the details table when plotting data" checkbox. The Plot The plot displays the data series and events in a graph. The plot has a time axis (x-axis) and a value axis (y-axis) for each series selected in the Plot Setup window. The title, displayed at the top of the plot by default, is the Description in the Plot Setup window. The legend, displayed to the right of the plot by default, lists the keys for each series (line colors and marker types). If the crosshair tool is in use, it also lists the date, time and point values currently selected by the crosshair. For secure files (.hsec and.dsec), a padlock icon appears in the legend next to the names of the series that were verified as original data. 11
12 To show or hide the title or legend, use the View menu. Double-click a plot element (series, axis, title, or legend) to change its properties or right-click the plot and select the item from the menu. For more details on working with plot, see Reading Out, Plotting, and Analyzing Data. Working in Secure Mode: 21 CFR Part 11 Compliance You can create secure files in HOBOware Pro to comply with 21 CFR Part 11, or simply to add a level of security when working with datafiles. When Secure Mode is enabled, HOBOware Pro begins an audit trail in the logger when you launch it and adds an encoded digital signature to the new datafile when you read it out. A digitally signed file, or "secure file," has a filename extension of.hsec (for most U-Series loggers) or.dsec (for station-type loggers). Notes: Issues may arise if you do not always use HOBOware Pro in the Secure Mode, if you sometimes use HOBOware, or if you sometimes use a version of HOBOware prior to The resulting file issues are described later in this section. This feature is not available for use with HOBOnode Manager and its associated ZW series data node files. Project (.hproj) and export files are not secure, even if you create them from secure files. To enable secure mode: 1. From the File menu in Windows or the HOBOware menu in Mac, select Preferences 2. Select General and then select Data Verification. 3. Select the Enable Secure Mode checkbox. 4. Click OK. When Secure mode is enabled, a padlock icon appears in the lower right corner of the main HOBOware Pro window Opening a Secure File and Data Verification Secure files can be opened with HOBOware Pro or greater. You can open.hsec files only with HOBOware or greater. 12
13 Every time you open a secure file even when you are not in Secure mode HOBOware verifies the encoded digital signature to detect whether the file has been corrupted or tampered with. When a file is verified as secure, the padlock icon appears in the legend next to the series that were verified as original data. Filtered series set up prior to launching or created after readout are not verified. Series that were created as a result of user input after readout, such as running a data assistant or entering a constant temperature value for pressure or humidity, are not verified. Series retain their verification status (and padlock icon) when copied and pasted into other plots. In the Details pane, audit trail information is displayed under the Data Verification node for each series. HOBOware Pro automatically obtains the Launch User and Readout User names from your computer's operating system. To save the Launch User name, you must have Secure Mode enabled when you launch the logger. If the digital signature cannot be verified when you open a file and even a single bit of data has changed since readout, a warning message will appear that verification has failed. This means that the file has been altered or become corrupted since it was originally saved. You may still be able to plot the data from the file, but the padlock icon will not display in the legend or there will be no signing information in the Details pane. You will still be able to perform typical HOBOware functions on the file. File Compatibility Depending on the type of logger, the version of HOBOware that launched the logger, and the version of HOBOware that reads out the logger, the resulting datafile may not be compatible with versions of HOBOware prior to or you may not be able to read out the logger at all. The following files are created when launching and reading out in these scenarios: Launching and reading out in non-secure mode with any version of HOBOware. A backwardcompatible datafile (.hobo or.dtf) is created. Launching in non-secure mode with any version of HOBOware and reading out in secure mode. A secure file (.hsec or.dsec) is created with an audit trail that lists the readout user, but not the launch user. Secure files are not backward-compatible. Launching in secure mode and reading out in a pre-2.3 version of HOBOware. Most U-Series loggers cannot be read out. A backward-compatible datafile (.dtf) is created for station loggers. Launching in secure mode and reading out in non-secure HOBOware 2.3. A datafile (.hobo) is created for U-Series loggers, but it is not backward-compatible. A backward-compatible datafile (.dtf) is created for station loggers. Launching and reading out in secure mode. A secure file (.hsec or.dsec) is created with a full audit trail. Secure files are not backward-compatible. 13
14 Chapter 2 Working with HOBO Data Loggers Working with HOBO data loggers involves the following basic steps: 1. Connect the logger to the computer for the initial setup and launch. 2. Launch the logger. Enter or select the appropriate parameters for the logger deployment and then launch, or start, the logger. 3. Check the status of the logger. You have the option of checking the current status of the logger and any current readings while it is still connected to the computer. This can be helpful to verify that the launch configuration is as expected. 4. Read out the logger. After deploying the logger, read out all recorded data and save it to a file. Many devices also work with shuttles that allow you to keep the logger in the field, but still read out any recorded data. You can then bring the shuttle back to the office, connect it to the computer, offload and save the files. 5. Plot the data. After reading out the logger and saving the data, you can select and define the data series you wish to plot in a graph. Data Assistants may be available for automatic scaling of certain data when plotting. 6. Analyze the data and customize the plot. There are numerous tools available for working with the data and changing the plot, such as exporting, filtering, merging files, cropping, and more. 7. Save changes to the plot as a project file. Changes to the axis, series, plot, and legend properties as well as any filtering or merging can be saved as an.hproj file. Connecting Devices Most HOBO data loggers and shuttles connect to the computer with a USB cable. The HOBO Weather Station, HOBO Micro Station, and HOBO Energy Logger connect to the computer with a serial cable (or to a USB port with a Keyspan serial adapter). Some loggers require an optic USB base station/coupler to connect to the computer. Consult the manual that came with your device for specific information about required base stations/couplers or cables. Once a device is properly connected to the computer as described below, the device name is listed in the status bar at the bottom of the main HOBOware window. Notes: For instructions on connecting HOBOware compatible shuttles or using the HOBO Waterproof shuttle as a base station, refer to the shuttle's user guide. For details on working with HOBO ZW Wireless Data Nodes, see HOBOnode Manager. Windows only: If the device has never been connected to this computer before, it may take some time for the computer to detect the new hardware and report that it has connected successfully. One or more messages will appear, indicating that new hardware has been found. You may also hear a chime. Windows only: Your computer may tell you to reboot before you can use the device. It is not necessary to reboot. 14
15 Connecting a USB logger or Shuttle To connect a logger or shuttle to HOBOware using a USB cable: 1. Open HOBOware. 2. Plug the large end of the USB interface cable into a USB port on the computer. 3. Plug the small end of the USB interface cable into the port on the device. For instructions on connecting shuttles or using the HOBO Waterproof Shuttle as a base station, refer to the shuttle s user guide. Connecting a Serial Device To connect a device to a computer using a serial cable: 1. Open HOBOware. 2. Plug the 9-pin end of the serial interface cable into a serial port on the computer or Keyspan adapter. 3. Plug the other end of the serial interface cable into the communications port on the device. (Refer to the diagram and instructions that came with the device if you need help finding the port.) 4. Click the Select Device icon on the toolbar to ensure that the device is listed in the Select Device window. Click the button next to the device in the window, then click OK. If you are using a serial port other than COM1 (PC) or Default (Macintosh), you will need to set up HOBOware to use another port. To change the serial port: 1. From the File menu in Windows or the HOBOware menu in Macintosh, select Preferences. 2. Select Communications. 3. Select the serial port you want to use. Note that checking multiple serial ports can take some time, even when no devices are attached. 4. Click OK. Connecting a Base Station/Coupler To connect a logger to a base station/coupler: 1. Open HOBOware. 2. Plug the base station/coupler cable into a USB port on the computer. Important: Make sure the base/station coupler is the correct model for the logger you want to use. Consult the manual that came with the logger if you are not sure. 3. Attach the logger to the base station/coupler as described in the documentation that came with your logger. Disconnecting a Device To disconnect the device, simply unplug the USB or serial cable or unplug the device from the base station/coupler. To attach another logger via a base station/coupler, remove the logger, leaving the base station/coupler connected and then connect the next logger. 15
16 Connecting Multiple Devices If your computer has multiple USB and serial ports, you can connect multiple devices and work with one at a time. When multiple devices are connected, the Select Device window opens every time you select Launch, Readout, Stop, or Status from the Device menu. Click the button next to a device on the list to select it, then click OK. The selected action will then proceed. The status bar lists the number of devices connected. To access the Select Device window at any time, click the Select Device Device from the Device menu. icon on the toolbar, or choose Select Click the Blink Device Light button in the Select Device window to verify that you have selected the appropriate device. This briefly illuminates the light on the devices that you have selected. If the device does not have a light, or if the light is not visible when the devices is in the base station/coupler, simply check the serial number (S/N) on your devices to make sure that it matches the one that is selected in this window. Notes: If serial devices are selected in Preferences, it may take some time for HOBOware to scan all the serial ports. You can select the device you want as soon as it is displayed. You do not have to wait for all of the ports to be scanned. Serial devices that you have added or removed are not reflected in the device count until you click the Select Device icon on the toolbar to update the device list. If you work with multiple U-Series devices frequently and are using HOBOware Pro, you can set the Default Action in the Device menu to Launch and enable Launch Time-Saving Options to work more efficiently. Launching Devices To set up a logger to record data, you must specify several parameters and launch, or start, the logger. Tip: Check that the time on the computer is correct before configuring a launch. If it is not correct, close HOBOware, update your computer's clock manually or synchronize it with an online time server (if available) and then reopen HOBOware. To launch a logger: 1. Connect the logger to the computer. 2. Click the Launch icon on the toolbar, or select Launch from the Device menu. 3. Different messages may appear depending on the state of the logger. Answer each of the prompts accordingly. A warning appears if the logger has already been launched. Click Yes to continue or click No to cancel. 4. Select the options for the launch in the Launch Logger window. 5. Click the Start button when you are finished choosing the launch settings. Note that the text on the Start button varies depending on when you chose logging to begin. HOBOware displays the progress of the launch and warns you not to unplug the logger while it is being configured. Once the logger begins logging, it will continue logging until the memory is full (if the logger is configured to stop logging when the memory fills), it is stopped, or the battery runs out. Launch Logger Window Use the Launch Logger window to set up your logger to record data. The Launch Logger window is divided into the following three panes: 16
17 Logger Information. The name of the logger currently selected appears at the top of this pane, which also includes the serial number, deployment number, and current battery level. Use the Description field to type up to a 40-character name for the logger deployment. The description you enter here will be used as the default file name when you read out the logger and save the data. It will also be the default title on the plot. For new loggers, the description defaults to the logger serial number. Click the Status button in this pane to see the current status of the logger and the settings used on the previous launch. A User Notes button may also appear for some loggers. Click it to enter more extensive notes about the deployment. Sensors. This pane displays a list of the sensors available for the logger. Choose the sensors, or channels, that you wish to log in this deployment, select any external sensors you may be using, and type labels for sensors as desired. Note that labels may not be applied to some calculated or derived channels, such as filtered series. This pane also displays any utilities available for your logger, such as Alarms, Scaling, and Filters. For the HOBO Plug Load logger (UX ) logger, you also have the option of configuring statistics for each channel in this pane. Deployment. Use this pane to select the logging interval (the rate at which you want the logger to record data) and to choose when the logger should begin recording data. Loggers can be configured to start logging immediately or on a specific date/time. Some loggers also can be configured to start at an interval or start with push button/coupler start. The coupler start (also known as a triggered start) involves removing the logger from its coupler or base station and then taking it to the deployment location. When you are ready for logging to begin, insert the logger in the coupler without the base station for three seconds. Refer to the logger manual for details. This pane also displays the logging duration, which is the approximate time it will take to fill the logger memory based on the logging interval, sensors, and other settings currently selected. For some loggers, you can also set a sampling interval, choose when to stop logging, and select other options in this pane. When you are done choosing the launch settings, click the button in the lower right-hand corner of the window to send the settings to the logger. Note that the button text changes based on when you chose to start logging. HOBOware Pro Tip: If you will be using the same launch settings for multiple deployments of the same logger type, select the Skip Launch Window Next Time checkbox to bypass this window the next time you launch a device. This will cause the next logger to be launched with either the previous launch settings or the current logger settings as set in Launch Time-Saving Options subcategory of the General preferences. The options available in the Logger Launch window vary depending on the type of logger you are using. For more details about launching your particular device, refer to the following topics: Launch Options for HOBO UX90 Series Loggers Launch Options for the HOBO UX100 Series Loggers and the HOBO 4-Channel Thermocouple Logger (UX M) Launch Options for the HOBO 4-Channel Pulse Input Data Logger (UX x) Launch Options for the HOBO Plug Load Logger (UX ) Launch Options for Other U-Series Loggers Launch Options for the HOBO U30 and Other Station Loggers 17

18 Launch Options for HOBO UX90 Series Loggers The following launch options are available for HOBO UX90 series data loggers. Note that the Launch Logger window may vary from the example shown below. Logger Information Sensors Description. Enter a description for the launch, up to 40 characters, in this field. This description is used as the default file name when you read out and save the data recorded by the logger. It is also the default title of the plot. Serial Number. This is the serial number for the logger. Note that some external sensors or devices also have serial numbers, which are not listed here. Deployment Number. This is the number of times (including this time) the logger has been launched. Each time you start a new launch, the deployment number increases by one. Battery Level. This shows the current battery level in the logger. Status. Click the Status button to check the logger settings from the previous launch. The Sensors List displays all internal and external sensors available for recording data. Choose the sensors, or channels, that you wish to log in this deployment. To configure a sensor: 1. Select the sensor(s) you wish to log. 2. Choose the measurement to log (e.g. State, Runtime, etc.) from the drop-down list. 3. Type a label for the sensor, if desired. 4. Complete additional details for the sensor. This will vary depending on what the logger will be measuring. For most sensors, type a name and select a description pair from the drop-down list. For external Pulse channels, click the button for the corresponding channel in the sensor list to select the sensor type as shown below. If you select Raw Pulse for the sensor type, you can use Data Assistants 18

19 to set up kwh (HOBOware Pro only) and pulse scaling information as necessary, which will also display on the logger LCD screen. Note that sensors that support Data Assistants at launch time display the kwh and/or scaling icon next to their name. 5. Repeat steps 1 through 4 if your logger supports multiple sensors. 6. Set the units that display on the logger's LCD screen. When the sensor is configured to log State or Runtime, choose either: "Time" to show the total amount of time the switch has been closed or on since logging began, ranging from seconds to days; or "%" to show the percentage of time the switch has been closed or on since logging began. When the sensor is configured to log Pulse or Event, the LCD will display the units in three characters. Accept either the default units or type your own three-character units. Notes on configuring sensors: Deployment Click the Filters button to create additional filtered series for any of the channels you configured. The filtered series will then be automatically calculated when you read out the logger and plot the data. Click the Advanced button to access the following settings specific to the logger: Pulse Frequency and Lockout Time, Occupancy, and Calibration. When setting up a pulse sensor, consider setting up the launch for a delayed or push button start and then connect the sensors/devices later before logging begins. Important: Sensors that are connected after logging begins may not log accurate data. The Occupancy/Light logger (UX90-005x/-006x) also automatically generates additional series upon reading out the logger to give you combined statistics, such as how long the lights were left on while the room was unoccupied. These series will be available in the Plot Setup dialog when opening the datafile. You have the option to record the logger's battery voltage at each sample time; this is the last channel in the sensors list. Like the other data channels, logging the internal battery channel consumes some of the logger's memory. Unless you suspect abnormal battery performance, you do not need to log the battery voltage. You can also hide the battery channel with Series preferences (in Preferences, select Display, then Series). Note that labels do not apply to calculated or derived channels, such as filtered series. Logging Interval. Select how often the logger will record data (only available for sensors configured to log Pulse or Runtime). You can choose either one of the preset logging intervals or specify a custom 19
20 logging interval. The minimum logging interval is one second and the maximum for most loggers is 18 hours, 12 minutes, and 15 seconds. The shorter the logging interval, the more quickly memory fills and battery power is consumed. See also Multiple Logging Intervals and Fast Logging Intervals. Logging Duration. This lists the approximate time it will take to fill the logger memory based on the logging interval and sensors currently selected. This is a theoretical estimate only; battery life and frequent state and event logging will affect your deployment. This estimate is only available when the sensors are configured to log Pulse or Runtime. For estimates with State and Event logging, refer to the logger documentation, also available at Start Logging. Select when to launch the logger. This defaults to the setting for the logger's previous launch (you can change this in HOBOware Pro with the Launch Time-Saving Options subcategory of the General preferences). You can choose to launch this logger: Now. Logging begins as soon as you click the Start button in the Launch Logger window. At Interval. Logging will begin at an exact interval (for example 9:00:00 rather than 8:47:00 when you choose a one-hour logging interval). The exact start time depends on the logging interval you choose. This option is only available when the sensors are configured to log Pulse or Runtime. Push Button. Logging will not start until you press the Start/Stop button on the logger and hold it down for at least three seconds. The LCD screen on the logger will display "Start" until you press the button. On Date/Time. Logging will begin at a date and time you specify, up to approximately six months from the present. The LCD screen will count down to that start date/time and then logging will begin. Stop logging. Select when you want the logger to stop logging. You can choose: When memory fills or Never (wrapping). If you select "When memory fills," then the logger will stop recording data once the memory is full. If you select "Never (wrapping)," the logger will record data continuously until either the logger battery runs out or you stop it. Once the logger is full, the newest data will overwrite the oldest data. When wrapping, the memory segment on the logger LCD screen will blink. Push button. When this option is selected, the logger will stop recording data when you press the Start/Stop button on the logger itself for 3 seconds. The LCD screen on the logger will display "Stop" when this option has been selected. Specific stop date. Select the date you want the logger to stop recording data. Choose either a preset time or set your own custom date and time. Options. Select "Turn LCD off" if you want the logger to operate in "stealth mode" with the LCD screen turned off. You can override this temporarily by pressing the Start/Stop button on the logger. The LCD will then remain illuminated for 10 minutes. Skip launch window next time (HOBOware Pro) Check this box if you would like to bypass the Launch Window the next time you choose Launch from the Device menu or click the Launch icon. This will cause the next logger to be launched with either the previous launch settings or the current logger settings as set in Launch Time-Saving Options subcategory of the General preferences. 20
. Note that the Launch Logger window may vary from the example shown below. Logger Information Sensors Description.")
21 Launch Options for HOBO UX100 Series Loggers and the HOBO 4-Channel Thermocouple Logger (UX M) The following launch options are available for HOBO UX100 series data loggers and the HOBO 4-Channel Thermocouple Logger (UX M). Note that the Launch Logger window may vary from the example shown below. Logger Information Sensors Description. Enter a description for the launch, up to 40 characters, in this field. This description is used as the default file name when you read out and save the data recorded by the logger. It is also the default title of the plot. Serial Number. This is the serial number for the logger. Note that some external sensors or devices also have serial numbers, which are not listed here. Deployment Number. This is the number of times (including this time) the logger has been launched. Each time you start a new launch, the deployment number increases by one. Battery Level. This shows the current battery level in the logger. Status. Click the Status button to check the logger settings from the previous launch. The Sensors List displays all sensors available for recording data. Choose the sensors, or channels, that you wish to log in this deployment. If connecting a thermocouple, select the appropriate type from the drop-down list. Type a label for the sensor, if desired. Notes: Click the Alarms button to set an alarm for this logger. Note that the Logging Mode must be set to Normal or Statistics to configure an alarm. For thermocouple loggers (UX M and UX M 21
22 Deployment models), alarms can only be configured on thermocouple channels; they are not available on the internal 10K thermistor (temperature) channel. Click the Filters button to create additional filtered series for any of the channels you configured. The filtered series will then be automatically calculated when you read out the logger and plot the data. You have the option to record the logger's battery voltage at each sample time; this is the last channel in the sensors list. Like the other data channels, logging the internal battery channel consumes some of the logger's memory. Unless you suspect abnormal battery performance, you do not need to log the battery voltage. You can also hide the battery channel with Series preferences (in Preferences, select Display, then Series). Note that labels do not apply to all calculated or derived channels, such as filtered series channels. Logging Interval. Select how often the logger will record data. You can choose either one of the preset logging intervals or specify a custom logging interval. The minimum logging interval is one second and the maximum for most loggers is 18 hours, 12 minutes, and 15 seconds. The shorter the logging interval, the more quickly memory fills and battery power is consumed. Logging Mode. Select the type of logging mode you wish to use: Normal, Burst Logging, or Statistics. With Burst Logging mode, you can configure the logger to use a different logging interval when specific conditions are met. With Statistics mode, you can configure the logger to calculate maximum, minimum, average, and standard deviation for all enabled sensors (except battery voltage) during logging at a sampling interval you specify. Keep in mind that the more statistics you record, the shorter the logger duration and the more memory is required. Once you launch the logger, the selected statistics will be displayed on the logger LCD. After you set up Burst or Statistics logging, there will be an Edit button next to Logging Mode in the Launch Logger window to make additional changes as necessary. Note that Normal or Statistics mode is required if you want to set up alarms for the logger. On thermocouple loggers, burst logging and statistics are only available on thermocouple channels and not on the internal temperature channel. Logging Duration. This lists the approximate time it will take to fill the logger memory based on the logging interval, logging mode, and sensors currently selected. This is a theoretical estimate only; battery life and other factors will also affect the deployment. Start Logging. Select when to launch the logger. This defaults to the setting for the logger's previous launch (you can change this in HOBOware Pro with the Launch Time-Saving Options subcategory of the General preferences). You can choose to launch this logger: Now. Logging begins as soon as you click the Start button in the Launch Logger window. At Interval. Logging will begin at an exact interval (for example 9:00:00 rather than 8:47:00 when you choose a one-hour logging interval). The exact start time depends on the logging interval you choose. On Date/Time. Logging will begin at a date and time you specify, up to approximately six months from the present. The LCD screen will count down to that start date/time and then logging will begin. Push Button. Logging will not start until you press the Start/Stop button on the logger and hold it down for at least three seconds. The LCD screen on the logger will display "Start" until you press the button. Stop Logging. Select when you want the logger to stop logging. You can choose: When memory fills or Never (wrapping). If you select "When memory fills," then the logger will stop recording data once the memory is full. If you select "Never (wrapping)," the logger will record data continuously until either the logger battery runs out or you stop it. Once the logger is full, the newest data will overwrite the oldest data. When "Never (wrapping)" is selected, a wrap 22
23 indicator icon will display on the logger LCD screen. Note: You cannot select "Never (wrapping)" on UX100 series loggers if Burst is selected for the Logging Mode. Push button. When this option is selected, the logger will stop recording data when you press the Start/Stop button on the logger for three seconds. The LCD screen on the logger will display "Stop" when this option has been selected. Resume logging on next button push. This setting is available when "Push button" is selected as a "Stop Logging" option. If you select this option, you can resume logging on the next even logging interval on a stopped logger by pressing the Start/Stop button for three seconds. For example, press the Start/Stop logging button on the logger once to stop logging. Then, a few minutes, hours, or even days later when you are ready to continue logging, press the Start/Stop button on the logger again and logging will resume at the next even logging interval (i.e. if the logging interval is set at 1 hour and you press the button at 10:15 AM, logging will not resume until 11:00 AM, which is the next even interval based on the 1-hour logging interval). You can then continue to start and stop logging as often as you'd like during this same deployment. Any gaps between when you stopped and restarted logging during this deployment will be reflected on the plotted data when you read out the logger. Once you relaunch the logger, a new deployment and datafile will begin. The data from the previous deployment will not be carried over to the new one. Specific stop date. Select the date you want the logger to stop recording data. Choose either a preset time or set your own custom date and time. Note: If you select a specific stop date and also have the logger configured to resume logging on the next button push, then the logger will stop logging at the date you select regardless of how many times you stop and restart the logger with the Start/Stop button. Options. Select "Turn LCD off" if you want the logger to operate in "stealth mode" with the LCD screen turned off. You can override this temporarily by pressing the Start/Stop button on the logger. The LCD will then remain illuminated for 10 minutes. Skip launch window next time (HOBOware Pro) Check this box to bypass the Launch Window the next time you choose Launch from the Device menu or click the Launch icon. This will cause the next logger to be launched with either the previous launch settings or the current logger settings as set in the Launch Time-Saving Options subcategory of the General preferences. Important: After you choose the launch settings in this window and click Start, the settings are then loaded into the logger. The LCD screen on the logger will display "LOAD" during this process. If you disconnect the logger from the USB cable before this process is finished, "Err" will appear on the LCD screen instead. If you see "Err" at any point during launch configuration, check the USB connection between the computer and the logger, reopen the Launch Logger window and click Start again. 23

24 Launch Options for the HOBO 4-Channel Analog Logger (UX M) The following launch options are available for the HOBO 4-Channel Analog logger (UX M). Note that the Launch Logger window may vary from the example shown below. Logger Information Sensors Description. Enter a description for the launch, up to 40 characters, in this field. This description is used as the default file name when you read out and save the data recorded by the logger. It is also the default title of the plot. Serial Number. This is the serial number for the logger. Note that some external sensors or devices also have serial numbers, which are not listed here. Deployment Number. This is the number of times (including this time) the logger has been launched. Each time you start a new launch, the deployment number increases by one. Battery Level. This shows the current battery level in the logger. Status. Click the Status button to check the logger settings from the previous launch. The Sensors list displays all internal sensors and external channels available for recording data. Choose the sensors, or channels, that you wish to log in this deployment. To configure a sensor: 1. Select the checkbox next to the channel number to enable the sensor. 2. Select the type of sensor or cable that will be connected to that channel on the logger as shown in the following example. 24

25 3. Type a label for the sensor, if desired. 4. Type a 3-character description for the units that the LCD will display for that sensor or use the default units. 5. Set up scaling for the sensor, if applicable. Click the Scaling button and enter the scaled values and units as recommended in the sensor documentation. 6. Repeat steps 1 through 5 for each sensor you wish to configure. Notes on configuring sensors: Although it is helpful to see the connected sensors/devices when setting up the launch, it is not required that you physically connect them while selecting sensor type options. You may set up the launch for a delayed or push button start, then connect the sensors/devices later, before logging begins. Be sure to connect each sensor into the correct numbered jack based on you configured the corresponding channel. Important: Sensors that are connected after logging begins may not log accurate data. Deployment Click the Filters button to create additional filtered series for any of the channels you configured. The filtered series will then be automatically calculated when you read out the logger and plot the data. You have the option to record the logger's battery voltage at each sample time; this is the last channel in the sensors list. Like the other data channels, logging the internal battery channel consumes some of the logger's memory. Unless you suspect abnormal battery performance, you do not need to log the battery voltage. You can also disable the battery channel with Series preferences (in Preferences, select Display, then Series).Note that labels do not apply to calculated or derived channels, such as filtered series. Although it is possible to set up more than one scaling value for each sensor, only the first scaling value for that sensor will be used. Logging Interval. Select how often the logger will record data. You can choose either one of the preset logging intervals or specify a custom logging interval. The minimum logging interval is one second and the maximum for most loggers is 18 hours, 12 minutes, and 15 seconds. The shorter the logging interval, the more quickly memory fills and battery power is consumed. If you did not select any channels to log, this field will be disabled. 25
26 Logging Mode. Select the type of logging mode you wish to use: Normal, Burst Logging, or Statistics. With Burst Logging mode, you can configure the logger to use a different logging interval when specific conditions are met. With Statistics mode, you can configure the logger to calculate maximum, minimum, average, and standard deviation for all enabled sensors (except battery voltage) during logging at a sampling interval you specify. Keep in mind that the more statistics you record, the shorter the logger duration and the more memory is required. Once you launch the logger, the selected statistics will be displayed on the logger LCD. After you set up Burst or Statistics logging, there will be an Edit button next to Logging Mode in the Launch Logger window to make additional changes as necessary. Note that Normal or Statistics mode is required if you want to set up alarms for the logger. Logging Duration. This lists the approximate time it will take to fill the logger memory based on the logging interval and sensors currently selected. This is a theoretical estimate only; battery life and other factors will affect your deployment. Start Logging. Select when to launch the logger. This defaults to the setting for the logger's previous launch (you can change this in HOBOware Pro with the Launch Time-Saving Options subcategory of the General preferences). You can choose to launch this logger: Now. Logging begins as soon as you click the Start button. At Interval. Logging will begin at an exact interval (for example 9:00:00 rather than 8:47:00 when you choose a one-hour logging interval). The exact start time depends on the logging interval you choose. Push Button. Logging will not start until you press the button on the logger and hold it down for at least three seconds. The Waiting LED will blink on the logger until you press the Start/Stop button. On Date/Time. Logging will begin at a date and time you specify, up to approximately six months from the present. The LCD screen will count down to that start date/time and then logging will begin. Stop logging. Select when you want the logger to stop logging. You can choose: When memory fills or Never (wrapping). If you select "When memory fills," then the logger will stop recording data once the memory is full. If you select "Never (wrapping)," the logger will record data continuously until either the logger battery runs out or you stop it. Once the logger is full, the newest data will overwrite the oldest data. Push button. When this option is selected, the logger will stop recording data when you press the Start/Stop button on the logger itself for 3 seconds. If you also configured a Push Button start, then you must wait 5 minutes after logging begins before you can use the button to stop logging. Resume logging on next button push. This setting is available when "Push button" is selected as a "Stop Logging" option. If you select this option, you can resume logging on the next even logging interval on a stopped logger by pressing the Start/Stop button for three seconds. For example, press the Start/Stop logging button on the logger once to stop logging. Then, a few minutes, hours, or even days later when you are ready to continue logging, press the Start/Stop button on the logger again and logging will resume at the next even logging interval (i.e. if the logging interval is set at 1 hour and you press the button at 10:15 AM, logging will not resume until 11:00 AM, which is the next even interval based on the 1-hour logging interval). You can then continue to start and stop logging as often as you'd like during this same deployment. Any gaps between when you stopped and restarted logging during this deployment will be reflected on the plotted data when you read out the logger. Once you relaunch the logger, a new deployment and datafile will begin. The data from the previous deployment will not be carried over to the new one. Specific stop date. Select the date you want the logger to stop recording data. Choose either a preset time or set your own custom date and time. Options. Select "Turn LCD off" if you want the logger to operate in "stealth mode" with the LCD screen turned off. You can override this temporarily by pressing the Start/Stop button on the logger. The LCD will then remain illuminated for 10 minutes. 26

27 Skip launch window next time (HOBOware Pro) Check this box if you would like to bypass the Launch Window the next time you choose Launch from the Device menu or click the Launch icon. This will cause the next logger to be launched with either the previous launch settings or the current logger settings as set in the Launch Time-Saving Options subcategory of the General preferences. Important: After you choose the launch settings in this window and click Start, the settings are then loaded into the logger. The LCD screen on the logger will display "LOAD" during this process. If you disconnect the logger from the USB cable before this process is finished, "Err" will appear on the LCD screen instead. If you see "Err" at any point during launch configuration, check the USB connection between the computer and the logger, reopen the Launch Logger window and click Start again. Launch Options for the HOBO 4-Channel Pulse Input Data Logger (UX x) The following launch options are available for the HOBO 4-Channel Pulse Input Data Logger (UX x). Note that the Launch Logger window may vary from the example shown below. Logger Information Description. Enter a description for the launch, up to 40 characters, in this field. This description is used as the default file name when you read out and save the data recorded by the logger. It is also the default title of the plot. Serial Number. This is the serial number for the logger. Note that some external sensors or devices also have serial numbers, which are not listed here. 27

28 Sensors Deployment Number. This is the number of times (including this time) the logger has been launched. Each time you start a new launch, the deployment number increases by one. Battery Level. This shows the current battery level in the logger. Status. Click the Status button to check the logger settings from the previous launch. The Sensors List displays all internal sensors and external channels available for recording data. Choose the sensors, or channels, that you wish to log in this deployment. To configure a channel: 1. If you are using the logger with an E50B2 Power & Energy Meter, then select for E50B2 Power & Energy Meter in the Configure Sensors drop-down list at the top of the Sensors pane. This will automatically preselect the appropriate channels and pulse scaling factors, which you can then customize further in the following steps. For all other sensors/devices, select Manually in the Configure Sensors drop-down list. 2. Make sure the checkbox is enabled for the external channel you wish to log. 3. Choose either Pulse, State, Event, or Runtime from the drop-down list. 4. For Pulse channels, click the button for the corresponding channel in the sensor list to select the sensor type as shown below. If you select Raw Pulse for the sensor type, you can use Data Assistants to set up kwh (HOBOware Pro only) and pulse scaling information as necessary. You can also adjust maximum pulse frequency and lockout time by clicking the Advanced button. Note that sensors that support Data Assistants at launch time display the Scaling and/or kwh icon next to their name. For State and Runtime channels, type a name and select a description. For Event channels, type a name, adjust the increment, and type a unit description (or accept the default "units" for the description). 5. Type a label for the sensor, if desired. 6. Repeat steps 1 through 5 for each channel you wish to configure. Notes on configuring sensors: Although it is helpful to see the connected sensors/devices when setting up the launch, it is not required that you physically connect them while selecting sensor type options. You may set up the launch for a delayed or push button start, then connect the sensors/devices later, before logging begins. Important: Sensors that are connected after logging begins may not log accurate data. Click the Filters button to create additional filtered series for any of the channels you configured. The filtered series will then be automatically calculated when you read out the logger and plot the data. 28
29 Deployment You have the option to record the logger's battery voltage at each sample time; this is the last channel in the sensors list. Like the other data channels, logging the internal battery channel consumes some of the logger's memory. Unless you suspect abnormal battery performance, you do not need to log the battery voltage. You can also disable the battery channel with Series preferences (in Preferences, select Display, then Series). Note that labels do not apply to calculated or derived channels, such as filtered series. Logging Interval. Select how often the logger will record data. You can choose either one of the preset logging intervals or specify a custom logging interval. The minimum logging interval is one second and the maximum for most loggers is 18 hours, 12 minutes, and 15 seconds. The shorter the logging interval, the more quickly memory fills and battery power is consumed. If you did not select any channels to log, this field will be disabled. Logging Duration. This lists the approximate time it will take to fill the logger memory based on the logging interval and sensors currently selected. This is a theoretical estimate only; battery life and frequent state and event logging will affect your deployment. If you are logging only state changes and events, no estimation is possible. Start Logging. Select when to launch the logger. This defaults to the setting for the logger's previous launch (you can change this in HOBOware Pro with the Launch Time-Saving Options subcategory of the General preferences). You can choose to launch this logger: Now. Logging begins as soon as you click the Start button. At Interval. Logging will begin at an exact interval (for example 9:00:00 rather than 8:47:00 when you choose a one-hour logging interval). The exact start time depends on the logging interval you choose. Push Button. Logging will not start until you press the button on the logger and hold it down for at least three seconds. The Waiting LED will blink on the logger until you press the Start/Stop button. On Date/Time. Logging will begin at a date and time you specify, up to approximately six months from the present. The Waiting LED will blink on the logger until logging begins on the selected date/time. Stop logging. Select when you want the logger to stop logging. You can choose: When memory fills or Never (wrapping). If you select "When memory fills," then the logger will stop recording data once the memory is full. If you select "Never (wrapping)," the logger will record data continuously until either the logger battery runs out or you stop it. Once the logger is full, the newest data will overwrite the oldest data. Push button. When this option is selected, the logger will stop recording data when you press the Start/Stop button on the logger itself for 3 seconds. If you also configured a Push Button start, then you must wait 5 minutes after logging begins before you can use the button to stop logging. Specific stop date. Select the date you want the logger to stop recording data. Choose either a preset time or set your own custom date and time. Options. Select "Turn LEDs off" if you want the logger to operate in "stealth mode," which disables the Logging LED on the logger. The Waiting LED and the Test button/activity lights will still remain operational when this option is selected. Skip launch window next time (HOBOware Pro) Check this box if you would like to bypass the Launch Window the next time you choose Launch from the Device menu or click the Launch icon. This will cause the next logger to be launched with either the previous launch 29
 The following launch options are available for the HOBO Plug Load logger (UX120-018).")
30 settings or the current logger settings as set in the Launch Time-Saving Options subcategory of the General preferences. Launch Options for the HOBO Plug Load Logger (UX ) The following launch options are available for the HOBO Plug Load logger (UX ). Note that the Launch Logger window may vary from the example shown below. This logger also has the ability to operate in meter mode without logging data. For details on that capability, refer to the logger manual. Logger Information Sensors Description. Enter a description for the launch, up to 40 characters, in this field. This description is used as the default file name when you read out and save the data recorded by the logger. It is also the default title of the plot. Serial Number. This is the serial number for the logger. Deployment Number. This is the number of times (including this time) the logger has been launched. Each time you start a new launch, the deployment number increases by one. Battery Level. This shows the current battery level in the logger. Status. Click the Status button to check the logger settings from the previous launch. You can also check status on the logger LCD (see the logger manual for details). The Sensors list displays all measurements available to log with this logger. To configure measurements: 1. Select the checkbox next to each measurement you want to log. The available measurements to log are: 30
31 RMS Voltage (V). RMS is root mean square. True RMS is the real or effective value of AC voltage for a circuit. RMS Current (A). True RMS is the real or effective value of current for a circuit. Active Power (W). The capacity of the circuit for performing work in a particular time (also known as real power). Active Energy (Wh or kwh). A watt-hour (Wh) is a unit of energy equivalent to one watt (1 W) of power expended for one hour (1 h) of time. kwh is a unit of energy equal to 1,000 watt-hours. Apparent Power (VA). The product of the current and voltage of the circuit. Power Factor (PF). The ratio of the active or real power flowing to the load to the apparent power in the circuit. It is a dimensionless number between 0 and Type a label for each enabled measurement, if desired. 3. Select the Max, Min, or Avg checkboxes (if available) to log statistics for each enabled measurement. The logger will calculate maximum, minimum, and average values at each logging interval based on the logger's fixed single-cycle sampling rate of 60 Hz or ms. For example, at a 1-minute logging interval, the statistics would be based on 3,600 samples (60 Hz x 60 seconds). This will result in up to three additional series per channel that record the following information at each logging interval: The maximum, or highest, sampled value, The minimum, or lowest, sampled value, and An average of all sampled values. Statistics are not available for Active Energy (kwh). Notes on configuring measurements: Deployment If statistics were configured, press the Next/Clear button on the logger for 1 second to cycle through the maximum and minimum values (as applicable) on the LCD screen. Average is not available for viewing on the LCD screen. Note that the maximum and minimum values displayed are not the values recorded at the logging interval. They are based on samples taken every ms during the entire logging period. To reset the starting point used to determine the maximum and minimum values shown on the LCD screen, press and hold the Next/Clear button for 3 seconds. See the logger manual for more details. Statistics are not available in the HOBOware Status window. You can plot the statistics series once you read out the logger. Click the Filters button to create additional filtered series for any of the measurements you configured. The filtered series will then be automatically logged and available when you read out the logger and plot the data. You have the option to record the logger's battery voltage at each sample time. Logging the internal battery channel consumes some of the logger's memory. Unless you suspect abnormal battery performance, you do not need to log the battery voltage. You can enable or disable the battery channel with Series preferences (in Preferences, select Display, then Series). Note that labels do not apply to calculated or derived series, such as filtered series. Logging Interval. Select how often the logger will record data. The shorter the logging interval, the more quickly memory fills and battery power is consumed. If you did not select any channels to log, this field will be disabled. 31
32 Logging Duration. This lists the approximate time it will take to fill the logger memory based on the logging interval and sensors currently selected. This is a theoretical estimate only; battery life and other factors will affect your deployment. Start Logging. Select when to launch the logger. This defaults to the setting for the logger's previous launch (you can change this in HOBOware Pro with the Launch Time-Saving Options subcategory of the General preferences). You can choose to launch this logger: Now. Logging begins as soon as you click the Start button. At Interval. Logging will begin at an exact interval (for example 9:00:00 rather than 8:47:00 when you choose a one-hour logging interval). The exact start time depends on the logging interval you choose. Push Button. Logging will not start until you press the button on the logger and hold it down for at least three seconds. The Waiting LED will blink on the logger until you press the Start/Stop button. On Date/Time. Logging will begin at a date and time you specify, up to approximately six months from the present. The LCD screen will count down to that start date/time and then logging will begin. Stop logging. Select when you want the logger to stop logging. You can choose: When memory fills or Never (wrapping). If you select "When memory fills," then the logger will stop recording data once the memory is full. If you select "Never (wrapping)," the logger will record data continuously until either the logger battery runs out or you stop it. Once the logger is full, the newest data will overwrite the oldest data. Push button. When this option is selected, the logger will stop recording data when you press the Start/Stop button on the logger itself for 3 seconds. If you also configured a Push Button start, then you must wait 5 minutes after logging begins before you can use the button to stop logging. Resume logging on next button push. This setting is available when "Push button" is selected as a "Stop Logging" option. If you select this option, you can resume logging on the next even logging interval on a stopped logger by pressing the Start/Stop button for three seconds. For example, press the Start/Stop logging button on the logger once to stop logging. Then, a few minutes, hours, or even days later when you are ready to continue logging, press the Start/Stop button on the logger again and logging will resume at the next even logging interval (i.e. if the logging interval is set at 1 hour and you press the button at 10:15 AM, logging will not resume until 11:00 AM, which is the next even interval based on the 1-hour logging interval). You can then continue to start and stop logging as often as you'd like during this same deployment. Any gaps between when you stopped and restarted logging during this deployment will be reflected on the plotted data when you read out the logger. Once you relaunch the logger, a new deployment and datafile will begin. The data from the previous deployment will not be carried over to the new one. Specific stop date. Select the date you want the logger to stop recording data. Choose either a preset time or set your own custom date and time. Options. Select "Turn LCD off" if you want the logger to operate in "stealth mode" with the LCD screen turned off. You can override this temporarily by pressing the Start/Stop button on the logger. The LCD will then remain illuminated for 10 minutes. Skip launch window next time (HOBOware Pro) Check this box if you would like to bypass the Launch Window the next time you choose Launch from the Device menu or click the Launch icon. This will cause the next logger to be launched with either the previous launch settings or the current logger settings as set in the Launch Time-Saving Options subcategory of the General preferences. 32

33 Important: After you choose the launch settings in this window and click Start, the settings are then loaded into the logger. The LCD screen on the logger will display "LOAD" during this process. If you disconnect the logger from the USB cable before this process is finished, "Err" will appear on the LCD screen instead. If you see "Err" at any point during launch configuration, check the USB connection between the computer and the logger, reopen the Launch Logger window and click Start again. Launch Options for Other U-Series Loggers The following launch options are available for USB U-Series loggers other than the UX90, UX100, and UX x. Note that the Launch Logger window may vary from the example shown below. Logger Information Sensors Description. Enter a description for the launch, up to 40 characters, in this field. This description is used as the default file name when you read out and save the data recorded by the logger. It is also the default title of the plot. Serial Number. This is the serial number for the logger. Note that some external sensors also have serial numbers, which are not listed here. Deployment Number. This is the number of times (including this time) the logger has been launched. Each time you start a new launch, the deployment number increases by one. Battery Level or State. This shows the current battery level in the logger or whether the battery state is good or bad (depending on the logger model). Status. Click the Status button to check the logger settings used in the previous launch. The Sensors List displays all internal sensors and external channels available for recording data. Choose the sensors, or channels, you wish to log in this deployment. To configure an external sensor: 1. Make sure the checkbox is enabled for the external channel you wish to configure. 2. Click the button for the corresponding channel in the sensor list to select the sensor type as shown below. If the external sensor has not been configured, the button reads <Sensor Type Not Selected>. Otherwise, the previous sensor type selected will be displayed on the button. 3. Select the measurement category and then the specific sensor part number and range (if applicable). Note that the sensor part number must match the part number listed on the shrink tube on the sensor cable to record accurate data. 4. Type a label for the sensor, if desired. 33
34 5. Repeat steps 1 through 4 for each additional external sensor you wish to configure. Notes on configuring sensors: Deployment Although it is helpful to see the connected sensors when setting up the launch, it is not required that you connect the sensors during launch set-up. You may set up the launch for a delayed or push button start, then connect the sensors later, before logging begins. Important: Sensors that are connected after logging begins will not log any data. Alternatively, if you select an external channel, but do not plug the sensor in, false data will be recorded for that channel. Some loggers with RH or pressure sensors require that you also select the internal temperature sensor to log relative humidity or pressure. The dependency may be noted in the sensors list (see Relative Humidity channel in the example above). Refer to the manual that came with your logger for additional information. When both the internal temperature and RH sensors are selected, dew point will be calculated automatically. If external events or states are available for your logger, you can enter names to identify the event and state channels that are in use. You can also rename the Open and Closed descriptions for each state, and enter increments and units for each event channel. Data Assistants let you create new data series by combining data recorded by the logger with additional data. When you use a Data Assistant from the Launch Logger window, the parameter set is saved and applied to data every time you read out a logger or open the resultant data file. The derived data is also shown when you check the latest readings in the Status window. Click the Scaling button to access the Data Assistants window and choose the Linear Scaling or Pulse Scaling Assistant. Click the Create button to run the assistant. After you enter values, click Save. Sensors that support Data Assistants at launch time display the Scaling icon next to their name. Some loggers have alarm functionality. Click the Alarms button, if available, to set alarms as desired. Sensors that have alarm functionality display the Alarms icon next to their name. Click the Filters button to create an additional filtered series, such as average temperature per day, automatically when you read out the logger and plot the data. You have the option to record the logger's battery voltage at each sample time; this is the last channel in the sensors list. Like the other data channels, logging the internal battery channel consumes some of the logger's memory. Unless you suspect abnormal battery performance, you do not need to log the battery voltage. You can also disable the battery channel with Series preferences (in Preferences, select Display, then Series). Note that labels do not apply to calculated or derived channels, such as filtered series. Logging Interval. Select how often the logger will record data. You can choose either one of the preset logging intervals or specify a custom logging interval. The shorter the logging interval, the more quickly memory fills and battery power is consumed. If you did not select any channels to log, this field will be disabled. See also Multiple Logging Intervals and Fast Logging Intervals. Logging Duration. This lists the approximate time it will take to fill the logger memory based on the logging interval and sensors currently selected. This is a theoretical estimate only; battery life and frequent state and event logging will affect your deployment. If you are logging only state changes and events, no estimation is possible. DO Sensor Cap Expires (HOBO U26 Dissolved Oxygen logger only). If a DO sensor cap is installed on the U26 logger, the date the cap expires is listed. The logger will not collect any data after the cap expires. For more details on the DO sensor cap, see Working with the HOBO U26 Dissolved Oxygen Logger. 34
.")
35 Start Logging. Select when to launch the logger. This defaults to the setting for the logger's previous launch (you can change this in HOBOware Pro with the Launch Time-Saving Options subcategory of the General preferences). For U-Series loggers, you can choose to launch the logger: Now. Logging begins as soon as you click the Start button. At Interval. Logging will begin at an exact interval (for example 9:00:00 rather than 8:47:00 when you choose a one-hour logging interval). The exact start time depends on the logging interval you choose. Push Button/Using Coupler. (Available only on certain loggers.) Logging will not start until you press the button on the logger and hold it down for at least three seconds, or return the logger to the coupler without the base station for at least three seconds (refer to your logger manual for more information). If the logger has a light, it will flash quickly when logging begins. On Date/Time. Logging will begin at a date and time you specify, up to approximately six months from the present. Skip launch window next time (HOBOware Pro) Check this box if you would like to bypass the Launch Window the next time you choose Launch from the Device menu or click the Launch icon. This will cause the next logger to be launched with either the previous launch settings or the current logger settings as set in the Launch Time-Saving Options subcategory of the General preferences. Launch Options for the HOBO U30 and Other Station Loggers The following launch options are available for Station loggers, which connect to the computer via serial cable instead of USB cable. Note that the Launch Logger window may vary from the example shown below. 35
36 Logger Information Sensors Description. Enter a description for the launch, up to 40 characters, in this field. This description is used as the default file name when you read out and save the data recorded by the logger. It is also the default title of the plot. Serial Number. This is the serial number for the logger. Note that some external sensors also have serial numbers, which are listed in the Sensors pane. Deployment Number. This is the number of times (including this time) the logger has been launched. Each time you start a new launch, the deployment number increases by one. Battery Level. This shows the current battery level in the logger. User Notes. Click this button to type up to 2000 characters of information about the deployment. This text will be displayed in the Details pane after you read out the logger and plot the data. Status. Click the Status button to check the logger settings from the previous launch. Only the sensors that are currently plugged in or built into the logger are listed. Sensors are listed in ascending order by serial number, regardless of their physical position in the logger. If you add or remove sensors, click the Refresh button to make sure your changes are seen by the logger and displayed in this list. You can assign a name to each sensor (up to 30 characters). This is helpful if you want to specify a location where the sensor will be placed or if you need to differentiate multiple sensors of the same type. Sensors must be connected prior to launching if you will be entering a name for the sensor or configuring FlexSmart modules or Analog Sensor Ports (use the Configure button to the right of the Label field). Otherwise, sensors do not have to be connected when setting up the launch. You may set up the launch for a delayed or push button start, then connect the sensors later before logging begins. Notes about configuring sensor channels: Do not attach more than 15 channels of sensors. The logger cannot accommodate more than 15 channels. In addition to logging up to 15 channels, the HOBO Energy Logger and HOBO U30 Station can record their internal battery channel (other sensors must be attached; the logger cannot log battery alone). The logger's battery voltage is recorded at each interval. However, logging the internal battery channel consumes some of the logger's memory. Unless you are using excitation power or suspect abnormal battery performance, you probably do not need to log the battery voltage in loggers other than the HOBO U30 Station. Always enable the logger's internal battery channel when logging with excitation power. This will help you determine whether and when excitation power was turned off during a deployment. HOBOware Pro Data Assistants let you create new data series by combining data recorded by the logger with additional data. When you use a Data Assistant from the Launch Logger window, the parameter set is saved and applied to data every time you read out a logger or open the resultant data file. The derived data is also shown when you check the latest readings in the Status window. You can use the following Data Assistants from the Launch window (others can only be used from the Plot Setup window): Pulse Scaling, Linear Scaling, and kwh (HOBOware Pro only). This feature is available for the HOBO U30, the HOBO H21 (Weather Station and Micro Station) and the HOBO H22 (Energy Logger) loggers. Click the kwh or Scaling button to access the Data Assistants window. Select the desired assistant and click the Create button to run the selected assistant. After you enter values, click Save. Sensors that support Data Assistants at launch time display the Scaling and/or kwh icon next to their name. 36
37 Deployment Click the Filters button to create an additional filtered series, such as average temperature per day, automatically when you read out the logger and plot the data. Note that labels do not apply to calculated or derived channels, such as filtered series. Logging Interval. Select how often the logger will record data. You can choose either one of the preset logging intervals or specify a custom logging interval. The minimum logging interval is one second and the maximum for most loggers is 18 hours, 12 minutes, and 15 seconds. The shorter the logging interval, the more quickly memory fills and battery power is consumed. Some sensors (specifically, the FlexSmart TRMS modules) require a logging interval of two seconds or greater. If you choose a faster logging interval, erroneous data will be logged on these channels. Sampling Interval. The sampling interval allows you to take multiple measurements within the logging interval, then average them together to create a single logged measurement. The sampling interval is optional and is valid only for sensors that support measurement averaging. Refer to the sensor's user manual to determine whether measurement averaging is available on the sensor. If you have at least one sensor that supports measurement averaging, click the Enable button, then set the sampling interval at less than or equal to the logging interval (up to four minutes). Rapid sampling (faster than one minute) will reduce the logger's battery life. If you do not have any sensors with measurement averaging or wish to turn off the sampling interval, click the Disable button. Logging Duration. This lists the approximate time it will take to fill the logger memory based on the logging interval and sensors currently selected. This is a theoretical estimate only; battery life and frequent state and event logging will affect your deployment. If you are logging only state changes and events, no estimation is possible. If you add or remove sensors while viewing the Launch window, click the Refresh button to get an updated Logging Duration. Start Logging. Select when to launch the logger. This defaults to the setting for the logger's previous launch (you can change this in HOBOware Pro with the Launch Time-Saving Options subcategory of the General preferences). You can choose to launch the logger: Now. Logging begins as soon as you click the Start button. If you do not have at least one sensor attached, the logger will not launch. At Interval. Logging will begin at an exact interval (for example 9:00:00 rather than 8:47:00 when you choose a one-hour logging interval). The exact start time depends on the logging interval you choose. Push Button. Logging will not start until you press the button on the logger and hold it down for at least three seconds. If the logger has a light, it will flash quickly when logging begins. This is not available for the U30 Station. On Date/Time. Logging will begin at a date and time you specify, up to approximately six months from the present. Save Settings in Logger. Logging will not start, but the launch settings will be saved so that you do not have to re-enter them when you are ready to launch at a later time. The next time you view the Launch window for this logger, the settings you entered will still be in place. Stop Logging. There are two options for stopping the logger: either "when memory fills" or "never (wrapping)." If you select "when memory fills," then the logger will stop recording data once the memory is full. If you select "never (wrapping)," the logger will record data continuously until either the logger battery runs out or you stop it. Once the logger is full, the newest data will overwrite the oldest data. 37
38 Skip launch window next time (HOBOware Pro) Check this box if you would like to bypass the Launch Window the next time you choose Launch from the Device menu or click the Launch icon. This will cause the next logger to be launched with either the previous launch settings or the current logger settings as set in the Launch Time-Saving Options subcategory of the General preferences. Note: For additional details on launching the HOBO U30 Station, see Working with the HOBO U30 Station. Multiple Logging Intervals Some loggers can be configured with multiple logging intervals, which allow you to define separate intervals for different phases of the deployment. To configure multiple logging intervals: 1. From the Device menu, select Launch. 2. In the Launch Logger window, click the Add New Interval button for each interval you wish to add (the maximum number of intervals allowed varies by logger model). If there is no Add New Interval button, then the logger does not support multiple logging intervals. 3. Set the hours, minutes, and seconds for each interval, and the number of samples you want the logger to record at each interval. 4. Use the Start and End times in the Duration column to decide how many samples to record at each interval. Note: Because internal logger events, such as coupler events, do take up some of the logger's memory, the number of samples and end times are only estimates. Frequent events will cause the logger to fill up sooner. 5. Set any other launch options and click Start. To delete an interval, click the Remove button next to the interval in the Launch Logger window. Fast Logging Intervals Some loggers can be configured with fast logging intervals, which allow you to log more than once per second, up to 100 measurements per second (hertz). To use fast logging intervals: Notes: 1. From the Device menu, select Launch. 2. In the Launch Logger window, click the Fast button. If there is no Fast button, then the logger does not support fast logging intervals. 3. Choose a logging frequency from the Hertz drop-down list or enter the logging interval in decimal form in the Sec field. 4. Set any other launch options and click Start. A logger cannot communicate with a computer or shuttle while it is logging at a fast interval. The logger will stop logging if you connect the logger to a computer, base station, or shuttle while it is logging in fast interval mode. Be aware that a fast logging interval typically means a very short logging duration. Make sure the logger will run long enough to collect the data you need. Disabling unnecessary channels can extend the logging duration and help to compensate for decreased duration while operating in fast interval mode. 38
39 Because fast logging deployments are so brief, the logger must be launched with a coupler or button start. Follow the instructions that came with your logger for a trigger (coupler or button) start. If the logger has a light, it will flash quickly when logging begins. Setting a Default Action on Multiple U-Series Devices By default, HOBOware does not take any action when you connect a device. You can change this behavior by setting a default action to Launch, Readout, or Get Status. This can save you time when working with multiple loggers of the same type. Note: This feature is only available with HOBOware Pro and U-Series loggers. To set a default action: 1. From the Device menu, select Default Action. 2. Select Launch, Readout, or Get Status. If you set the default action to launch, you can also change the preferences to automatically populate the Launch Logger window with the same settings as the previous launch. This is helpful if you are launching numerous loggers of the same type with the same settings. To set this preference: 1. Select Preferences from the File menu in Windows or the HOBOware menu in Macintosh. 2. Select General and then select Launch Time-Saving Options. 3. For the "Fill launch window with contents of" setting, select Previous Launch. 4. Click OK. When a device is connected, the default action you set will take place automatically. For example, if you chose Readout, HOBOware Pro will read out the logger immediately. You can then disconnect that logger, connect another logger, and the next logger will be read out automatically. If you connect a shuttle, the shuttle's new files will be offloaded automatically. Similarly, if you chose Launch for the Default Action, the Launch Logger window will open automatically when you connect the logger. The next time you connect a logger of the same time, the Launch Logger window will open automatically and be populated with the previous launch settings if you configured the Launch Time-Saving Options in the Preferences. A note will appear in the Launch Logger window when this preference is in use. Important Note for Windows: The first time you connect a device, the Default Action may not be triggered. After the device has been connected to the computer and disconnected at least once, the Default Action should then be triggered. Using Launch Utilities There are several utilities available from the Launch Logger window for setting up customized data series, configuring alarms, and setting advanced logger options. These utilities vary depending on the type of logger you are using. They include: Scaling Filters Alarms Advanced Sensor Properties: Pulse Frequency and Lockout Time Advanced Sensor Properties: Calibration Advanced Sensor Properties: Occupancy Statistics: Maximum, Minimum, Average, and Standard Deviation 39


40 Filtered Series vs Statistics Logging Burst Logging Filter Series at Launch As part of the launch setup, you can create a filtered series that automatically calculates additional values, such as maximum, minimum, average, or total, for a set interval upon readout of the logger. The filtered series is saved as an additional series in the datafile so it is always available when plotting your data. This saves you the time of manually filtering data for each series after readout using the regular HOBOware filter tool, although this tool is still available should you need to further filter data later. To set up a filtered series at launch: 1. Select the channel, or sensor type, you wish to filter. 2. Select the type of filter and the interval you wish to use. In this example, the type of filter is "Average Temperature" in every hour. Filters vary depending on the channel's measurement type. 3. Edit the Resultant Series Name as desired and click Create New Series. In this example, the Resultant Series Name is edited to be "Avg Hourly Temperature." 4. The newly created series is added to the Filtered Series list as shown below. To make a change to a filtered series, either double-click the series name or select the series name and click Edit. To delete a filtered series, select the series name and click Delete. 40

41 5. Repeat steps 1 through 4 to create additional filtered series. Not only can you create filtered series for all channels, but you can also create multiple filtered series on a single channel (for example, you can show the maximum, minimum, and average temperature for a single temperature channel). 6. Click Done when finished. The number of filtered series that you created is displayed on the Filter button in the Logger Launch window. 7. After you launch the logger and read it out, the filtered series will automatically be listed in the Plot Setup dialog, from which you can select the series you wish to plot. Note: If you change the GMT offset for the filtered series, the data points will not reflect that change. They will continue to be filtered based on times within the original GMT offset at launch. Notes: Loggers launched in HOBOware 3.2 with series created by the Pulse Scaling, Linear Scaling, and kwh Data Assistants or with filtered series cannot be read out in earlier versions of HOBOware. Filtered series created at launch time are not available for use with the Barometric Compensation, Grains Per Pound, and Conductivity Data Assistants. See also: Filtered Series vs. Statistics Logging Data Assistants Window (Scaling) When you run a Data Assistant from the Launch Logger window, you can create a derived series, which is an additional data series automatically calculated each time you read out the logger. The Data Assistants window lists only those assistants available for the currently selected sensor and logger at launch time. There may be other Data Assistants available for use after reading out the logger. To set up a derived series with a Data Assistant: 1. Select the Data Assistant you wish to use and click Create. 2. Select the information, or scaling parameters, you want the series to contain and click Save. 3. The new series appears in the My Derived Series list. Create additional series as desired. To make a change to a derived series, either double-click the derived series name or select it and then click Edit. To delete a derived series, select the series and then click Delete. 41
42 4. After you have finished creating or editing the derived series, click Done. Depending on the type of logger you are using, the total number of derived series created appears on the kwh and/or Scaling buttons in the Launch Logger window. Derived series are also listed in the Status window. Notes: After you launch the logger and read it out, the derived series will automatically be listed in the Plot Setup dialog, from which you can select the series you wish to plot. Loggers launched in HOBOware 3.2 with series created by the Pulse Scaling, Linear Scaling, and kwh Data Assistants or with filtered series cannot be read out in earlier versions of HOBOware. When setting up kwh or scaling for UX90 series loggers, the scaled series information will appear on the LCD screen on the logger. In addition, only the Energy series appears on the LCD screen when configuring kwh. Average power and cost series will not display on the screen; they are available in HOBOware only. Although it is possible to set up more than one scaling value for each sensor on the HOBO 4-Channel Analog logger (UX M), only the first scaling value for that sensor will be used. Configure Alarms You can set an alarm to trip when a sensor reading rises above or falls below a specified value on certain logger models, including the UA-001, U14-00x, UX100 series, UX M, and UX M loggers. Note: The U30 Station also has alarms capability; see Setting Alarms on a HOBO U30 Station for more details. To set an alarm: 1. If the Alarms window is not already open, click the Alarms button from the Launch Logger window. If there is no Alarms button, then the logger does not have alarm capability. If the Alarms button is disabled, be sure you have enabled logging on a sensor that supports alarms. If the Alarms button is disabled for a UX100 series, UX M, or UX M logger, make sure the Logging Mode is not set to Burst. Alarms are not available for these loggers when the Logging Mode is set to Burst in the Launch Logger window. 42

43 2. In the Alarms window, select the sensor that you want to have an alarm. Note: The example below is for a UX100 series logger. Any differences for other logger models are noted in these steps. 3. Select the High Alarm checkbox if you want an alarm to trip when the sensor reading rises above the high alarm value. Type the reading next to the High Alarm checkbox or drag the red upper slider. In this example, we've set an alarm to trip when the temperature rises above 85 F. 4. Select the Low Alarm checkbox if you want an alarm to trip when the sensor reading falls below the low alarm value. Type in the reading next to the Low Alarm checkbox or drag the blue lower slider. In this example, we've set an alarm to trip when the temperature falls below 32 F. Note: The actual values for the high and low alarm limits are set to the closest value supported by the logger. For example, the closest value to 85 F that the UX100 series logger can record is F and the closest value to 32 F is F. In addition, alarms can trip or clear when the sensor reading is within the logger specifications of 0.02 C resolution. This means the value that triggers the alarm may differ slightly than the value entered. For example, if the High Alarm is set to F, the alarm can trip when the sensor reading is F (which is within the 0.02 C resolution). 5. Set the "Number of out-of-range samples <displayed> (UX100 series, UX M, UX M, and U14-00x) <logged> (UA-001) before alarm is raised," which is the number of samples that are needed to trigger each alarm. For example, we've set this number to 5. This means there will need to be 5 sensor readings above 85 F or below 32 F before the alarm will trip. The time indicates how long it would take for the alarm to trip based on the number of samples you entered and the logging interval (UA-001 loggers) or the LCD refresh rate (UX100 series, UX M, UX M, and U14-00x). In the example above, it would take 1 minute for the alarm to trip (only if Consecutive is selected as described in the next step). Note: The UA-001 and U14-00x loggers have two "Number of out-ofrange samples..." fields: one for the high alarm and a separate one for the low alarm. 6. UX100 series, UX M, UX M, and UA-001 loggers only: Select either Cumulative or Consecutive for the Sensor Alarm Mode. If you select cumulative, then the alarm will trip after a 43
44 specific number of samples (as set in the previous step) are outside the limits (the high or low samples do not need to be consecutive). If you select Consecutive, then the alarm will trip after a specific number of samples (as set in the previous step) outside the limits are logged in a row. In the example above, if there are 5 readings in a row above 85 F, then an alarm will trip. If we had chosen Cumulative, the 5 readings could have taken place at any time during the deployment for the alarm to trip. 7. UX100 series, UX M, UX M, and U14-00x loggers only: Choose how long the logger should maintain the sensor alarm once it has tripped. Select "Host has relaunched logger" if you want the alarm to remain visible on the LCD until the next time you relaunch the logger. Select "Sensor reading within limits" if you want the alarm to clear once the sensor reading returns to the normal range between the high and low alarm limits. UX100 series, UX M, and UX M loggers have an additional option; select "Cleared with button press" if you want the alarm to remain on and visible on the LCD until you press the Alarm button on the logger. 8. U14-00x loggers only: You can set the Relay Contacts to Normally Open or Normally Closed as described in the logger manual. Click the Test Set Alarm button to test the relay switches. Deselect the "Set Alarm on Low Battery" checkbox if you do not want an alarm to trip when the logger's battery is running low. 9. Click OK to save the alarm settings and return to the Launch Logger window. Once the logger is launched, alarms will trip as determined by these settings. Logger alarms will display on the LCD screen for UX100 series, UX M, UX M, and U14-00x loggers. For UA-001 loggers, a "high" or "low" LED will blink when an alarm is tripped. Note for UX100 series, UX M, UX M, and U14-00x loggers: The alarm limits are only checked when the logger's LCD screen refreshes. This is every 15 seconds for UX100 series, UX M, and UX M loggers and every 30 seconds for U14-00x loggers. Therefore, if you set the logging interval to less than 15 seconds on a UX100 series, UX M, or UX M logger or less than 30 seconds on a U14-00x logger and the sensor reading falls outside the alarms limits, the alarm will not trip until the next refresh cycle. (UA-001 loggers check the alarm alarms at every logging interval.) When you read out the logger, high and low alarm levels will be displayed on the plot. In the example below, the temperature rose above 85 F so those readings are in the red, or high alarm, portion of the plot. The temperature never fell below the low alarm limit, which is the blue portion at the bottom of the plot. UX100 series, UX M, and UX M loggers also display alarm events showing when the alarm tripped (and cleared if applicable). In this example, there are "Chan 1 Alarm Tripped" and "Chan 1 Alarm Cleared" events showing when the temperature alarm tripped and cleared. The "Chan 1 Alarm Cleared" event contains the value that was furthest out of range for the sensor before the alarm cleared (see the Points table for the actual value). 44

45 Advanced Sensor Properties: Pulse Frequency and Lockout Time Use the Advanced Sensor Properties window to set the maximum pulse frequency for raw pulse channels and to specify a lockout time for raw pulse and event channels, which prevents false readings from mechanical sensors as their relay state changes. Setting maximum pulse frequency is not required, but it can help optimize logging duration. The maximum pulse frequency, multiplied by the logging interval, determines the maximum count of pulses possible within each interval. The logger then can use this value to adjust the amount of memory (bits) used to log each data point. This means the logger uses memory as efficiently as possible, which in turn maximizes logging duration. To configure maximum pulse frequency and lockout time: 1. Select the sensor that corresponds with the pulse channel you wish to configure. 2. Set the maximum pulse frequency, which controls how many pulses per second can be processed by the logger on a single pulse channel. The option to set the maximum pulse frequency is only available for raw pulse channels (sensors for which you have selected Raw Pulse as the sensor type in the Launch Logger window). Refer to the specifications in your sensor or device documentation for recommended maximum pulse frequency values. In general, the larger the maximum pulse frequency, the shorter the logging duration will be for the deployment. Note that the pulse frequency ranges in this window vary depending on the logger model. 3. Click the "Apply lockout time" checkbox if you wish to specify a time period when pulses will be ignored. Select the lockout time value from 1 to 10. On sensors with both pulse frequency and lockout time settings, lockout time will affect the maximum pulse frequency: the higher the lockout time, the lower the maximum pulse frequency will be. Notes: If the logger has multiple sensors, then all sensors will have the same lockout time. This means if you are using multiple sensors with different lockout time requirements, this may result in lost pulses or false pulses. Lockout time is only available for raw pulse channels and event channels. When lockout time is enabled, you can specify a value from 1 to 10 (with a default of 5), which is then multiplied by 100 milliseconds for a range of 0.1 to 1 second. The available range for the maximum pulse frequency is automatically recalculated based on the lockout time. For example, if the lockout time is set to 2, the maximum pulse frequency range changes to 0.01 to 5 Hz. The maximum pulse frequency also varies depending on the logger model. Refer to the specifications in the logger documentation for maximum pulse frequency (documentation is also available at 4. Click Save. Note that the selections will not take effect in the logger until you launch it. 45

46 Advanced Sensor Properties: Calibration Use the Advanced Sensor Properties window to set the calibration method used for internal light or motor sensors in UX90 series data loggers. The default calibration method is to "calibrate from logger," which is an autocalibration procedure using the Calibrate button on the logger. Alternatively, you can set the calibration method to a maximum or minimum sensitivity level as defined by HOBOware. To change the calibration method: 1. Select the sensor that corresponds with the internal light/motor channel you wish to configure. 2. Select "Calibrate from logger" to use auto-calibration or select "Set to maximum or minimum sensitivity" to use HOBOware for calibration. See below for more details on both procedures. 3. Click Save. Note that the selections will not take effect in the logger until you launch it. Calibrate from Logger Calibrating from the logger with the calibration button, also called auto-calibration, is used to calibrate the ON and OFF threshold of the logger to achieve reliable readings in an environment where motor or light levels are unknown prior to deployment or where logger light levels are variable. In the auto-calibration process, the light level or the AC magnetic field for a motor sensor is measured via a built-in analog-to-digital converter and the resulting value is used to generate a calibration threshold. The logger has a built-in hysteresis level of approximately 12.5% for the light sensor and 6.25% for the motor sensor to prevent the sensor from toggling between ON and OFF when the signal level is near the calibration threshold. This plot shows how the logger handles hysteresis. The logger interprets the signal as ON until it drops below the lower level of the calibration threshold. Once it switches to off, the signal will not switch back to ON until it bypasses the upper limit of the calibration level. 46

47 When auto-calibrating from the logger (button calibrating): 1. Deploy the logger near the light/motor to be monitored. Turn the light or motor on. 2. Press the Calibrate button for 1 second. The LCD screen will display the signal strength of the light/motor. The signal strength should ideally be at least 3 bars. Orient the logger as necessary to increase the signal strength. The signal strength indicator will remain on the display for ten minutes or until calibration is complete. 3. Press the Calibrate button for 3 seconds while HOLD appears on the LCD screen. For the light sensor, move your hand away from the logger to prevent shadowing. The logger will count down to the autocalibration and then display either PASS or FAIL after calibration is complete. 4. If the auto-calibration fails, point the sensor directly at the light or position it closer to the motor source and then repeat these steps. Set to Maximum/Minimum Sensitivity If you cannot manipulate the light source or access the motor, you can set the calibration level in this window. The lower the light/magnetic field level, the higher the sensitivity needs to be to record changes between ON and OFF conditions. For light sensors, the maximum sensitivity is approximately 100 lux (for rooms with low light levels, such as residential environments) and the minimum sensitivity is approximately 500 lux (for rooms with high light levels, such as retail environments). For motor sensors, the maximum sensitivity is approximately 40 mg (for a weak magnetic field) and the minimum sensitivity is set to approximately 100 mg (for a strong magnetic field). Advanced Sensor Properties: Occupancy Use the Advanced Sensor Properties window to set the timeout value for an occupancy sensor (UX90-005x/006x models). The timeout value is the period of inactivity required for the sensor to consider the area unoccupied. The timeout value is set to 1 minute by default. You can change this to one of the preset values or enter a custom value. To change the timeout value for an occupancy sensor: 1. Select the sensor that corresponds with the occupancy channel you wish to configure. 2. Select a preset timeout value as shown in the example below or select Custom and enter your own value in minutes and seconds. 3. Click Save. Note that the selections will not take effect in the logger until you launch it. Statistics: Maximum, Minimum, Average, and Standard Deviation You can configure UX100 series and some UX120 series loggers to calculate maximum, minimum, average, and standard deviation statistics for all enabled sensors during logging at each logging interval based on samples taken 47
48 at a rate you specify. This will result in up to four additional series per sensor that record the following information at each logging interval: The maximum, or highest, sampled value, The minimum, or lowest, sampled value, An average of all sampled values, and The standard deviation from the average for all sampled values. For example, let s say both the temperature and RH sensors have been enabled, the logging interval is set to 5 minutes and the sampling interval is set to 30 seconds (with maximum, minimum, average, and standard deviation all enabled). Once logging begins, the logger will measure and record the actual temperature and RH sensor values every 5 minutes. In addition, the logger will take a temperature and RH sample every 30 seconds and temporarily store them in memory. The logger will then calculate the maximum, minimum, average, and standard deviation using the samples gathered over the previous 5-minute period and log the resulting value(s). When reading out the logger, this would result in 10 data series (not including any derived series, such as dew point): two sensor series (with temperature and RH data logged every 5 minutes) plus eight maximum, minimum, average, and standard deviation series (four for temperature and four for RH with values calculated and logged every 5 minutes based on the 30-second sampling). Notes: Statistics are not available for logging if Normal or Burst has been chosen as the Logging Mode in the Launch Logger window. On thermocouple loggers, statistics are only available on thermocouple channels and not on the internal temperature channel. Maximum, minimum, and average statistics can be logged for a HOBO Plug Load logger (UX ), but they are configured differently than the following steps for the UX100 series and other UX120 series loggers. In addition, average statistics are not displayed on the LCD screen for this logger. The maximum and minimum values displayed are based on the entire deployment. See Launch Options for a HOBO Plug Load logger (UX ) for details. To configure statistics: 1. If the Statistics window is not already open, select Statistics from the Logging Mode drop-down menu in the Launch Logger window. Or, if Statistics has already been configured, click the Edit button. 2. Click the Maximum, Minimum, Average, and Standard Deviation checkboxes for each of the statistics you want to calculate during logging. Note that Average is automatically selected when selecting Standard Deviation. Important: Statistics apply to all enabled sensors; every selected statistic will be calculated for all sensors (except battery voltage). For example, if both the temperature and RH sensors have been selected in the Launch Logger window and you select Average, then the average will be calculated for both temperature and RH. In addition, the more statistics you record, the shorter the logger duration and the more memory is required. 3. Set the sampling interval, which must be less than and a factor of the logging interval. Choose either a preset sampling interval or select Custom and enter your own sampling interval. Keep in mind that the more frequent the sampling rate, the greater the impact on battery life. 48
 on the LCD screen (it")
49 4. Click OK when done. This will return you to the Launch Logger window. Click the Edit button next to Logging Mode in the Launch Logger window to make additional changes. Once logging begins, press the Alarm/Stats button on the logger for 1 second to cycle through the current maximum, minimum, average, and standard deviation data (as applicable) on the LCD screen (it is not available in the HOBOware Status window). You can plot the statistics series once you read out the logger. Filtered Series vs. Statistics Logging UX100 and some UX120 series loggers support filtered series and statistics logging, both of which involve calculating maximum, minimum, and average values that you can plot after the logger is read out. Both are accessed from the Launch Logger window (for filtered series, click the Filters button; for statistics logging, select Statistics as the Logging Mode or for a UX logger, select the Max, Min, and Avg checkboxes for each sensor). However, there are some key differences between the two features. Essentially, statistics logging is performed at the sampling interval of the logger while filters include data accumulated from a series of logged data points. The following table compares filtered series to statistics logging so that you can choose the best solution for your deployment. Note: There is also another filtering option available after you read out the logger, which is available from the Filter button on the toolbar. This allows you to create filtered series based on the data in the plotted datafile. For more information on filtering after reading out a logger, see Filtering a Series. What logger models work with this feature? Which sensors does this apply to? Which measurement types are compatible? Can I view the data on the logger's LCD screen (if available)? Filtered Series All logger models. Only those that you select; you must set up individual filters for each sensor. All measurement types, including state, event, pulse, and runtime. No, filtered series are only available after the logger is read out. Statistics Logging Only UX100 and some UX120 series loggers. Automatically calculated for all enabled sensors (each sensor selected in the Launch Logger window except for Battery) except for UX loggers, which require selecting Max, Min, or Avg for each sensor. Those supported by the individual logger. Yes, you can press the Alarm/Stats button on the logger to cycle through each of the enabled statistics. 49
50 What kind of data can be calculated with this feature? How often can data be calculated? Can I select different intervals for each calculated series? How is the data recorded? Filtered Series Maximum, minimum, and average; standard deviation is not available. By day, hour, minute, or second using samples taken at the logging interval. The filter interval should be greater than the logging interval. It is also recommended that it is a multiple of the logging interval so that every filter interval has an equal number of samples. Yes, you can select a different interval for each filter you set up. Sensor data is recorded at every logging interval and filtered data points are calculated at the rate you specified (for example, the average temperature is calculated every hour). This requires more memory as every sample is recorded. Statistics Logging Maximum, minimum, average, and standard deviation (the UX does not support standard deviation). For UX100, UX M, and UX M: Data is calculated at each logging interval using samples taken at the sampling interval. The sampling interval must be less than and a factor of the logging interval (i.e., if the logging interval is set to 10 minutes, statistics cannot be calculated every hour; the sampling interval would have to be less than and a factor of 10 minutes). For UX : Data is sampled at an internal logger rate of ms and statistics are logged at each logging interval. No, the intervals apply to all selected statistics. For UX100, UX M, and UX M: The logger takes a sample at every sampling interval, but only records statistics data at the logging interval. This requires less memory as every sample is not recorded. For UX : Data is sampled at an internal logger rate and statistics are logged at each logging interval. Burst Logging Burst logging is a logging mode available for UX100 series and some UX120 series loggers that allows you to set up more frequent logging when a specified condition is met. For example, let's say the logger is recording data at a 5- minute logging interval and burst logging is configured log every 10 seconds when the temperature goes above 85 F (the high level) or falls below 32 F (the low level). This means the logger will record data every 5 minutes as long as the temperature remains between 85 F and 32 F. Once the temperature reaches 90 F, for example, the logger will switch to the faster logging rate and record data every 10 seconds until the temperature falls back below the high level (or 85 F in this case). At that time, logging then resumes every 5 minutes at the normal logging interval. Similarly, if the temperature falls to 30 F, for example, then the logger would switch to burst logging mode again and record data every 10 seconds. Once the temperature rises back to 32 F, the logger will then return to normal mode, logging every 5 minutes. Notes: Burst logging is not available if alarms have been enabled for the logger. The Stop Logging option "Never (wrapping)" is not available when burst logging is configured. 50

51 The actual values for the burst logging levels are set to the closest value supported by the logger. For example, the closest value to 85 F that the logger can record is F and the closest value to 32 F is F. Burst logging mode can begin or end when the sensor reading is within the logger specifications of 0.02 C resolution. This means the value that triggers burst logging may differ slightly than the value entered. For example, if the High Level for a temperature alarm is set to F, burst logging can start when the sensor reading is F (which is within the 0.02 C resolution). Once the high or low condition clears, the logging interval time will be calculated using the last recorded data point in burst logging mode, not the last data point recorded in "normal mode." For example, let's assume the logger has a 10-minute logging interval and logged a data point at 9:05. Then, the high level was surpassed and burst logging began at 9:06. Burst logging then continued until 9:12, when the sensor reading fell back below the high level. Now back in normal mode, the next logging interval will be 10 minutes from the last burst logging point, or 9:22 in this case. If burst logging had not occurred, the next data point would have been at 9:15. A New Interval event will appear on the plot (if you select events for plotting in the Plot Setup window) each time the logger enters or exits burst logging mode. On thermocouple loggers, burst logging is only available on thermocouple channels and not on the internal temperature channel. To set up burst logging: 1. If the Burst Logging window is not already open, select "Burst logging" from the Logging Mode dropdown menu in the Launch Logger window. Or, if Burst logging has already been configured, click the Edit button. 2. Select the sensor you want to configure for burst logging. 3. Select the High Level checkbox if you want to set up a condition in which burst logging will occur when the sensor reading rises above the high level value. Type in the value or drag the red upper slider. 4. Select the Low Level checkbox if you want to set up a condition in which burst logging will occur when the sensor reading falls below the low level value. Type in the value or drag the blue lower slider. In this example, both the high and low levels were selected. You may choose only one if you wish. 51

52 5. Set the burst logging interval, which must be less than the logging interval. Select either a preset burst logging interval or select Custom and enter your own interval. Keep in mind that the more frequent the burst logging rate, the greater the impact on battery life and the shorter the logging duration. 6. Click OK when done. This will return you to the Launch Logger window. Click the Edit button next to Logging Mode in the Launch Logger window to make additional changes. Once the logger is launched, the high and low burst logging levels are only checked when the logger's LCD screen refreshes once every 15 seconds. Therefore, if you set the logging interval to less than 15 seconds and the sensor reading falls outside the levels, the burst logging will not log until the next 15-second refresh cycle. Important: If high and/or low levels have been configured for more than one sensor, then burst logging will begin when any high or low condition goes out of range. Burst logging will not end until all conditions on all sensors are back within normal range. Checking Device Status The Status window displays real-time information about the attached logger, including the current state of the logger, logging start time, current readings, and memory used. You can check the status for a logger whether it is waiting for logging to begin, actively logging (unless it is logging at a fast logging interval), or stopped. To check the status of a logger: 1. Connect the logger to the computer. 2. Click the Status icon on the toolbar, or select Status from the Device menu. You can also check the status by clicking the Status button on the Launch window, but this will show details from the previous launch. This is an example of the Status window. The information displayed varies depending on the logger that is connected. See Status window for details on the type of information displayed. 52
53 Important: Battery power is drained more rapidly while checking status. Keep this in mind when frequently checking status during a deployment. You can significantly reduce the demand on the battery by adjusting the Screen Refresh Interval to five seconds or higher (not available on all loggers). The Status Window The Status window displays the current status of the logger. If you clicked Status from the Launch Logger window, then details from the previous launch is displayed. The Status window is divided into three panes: Device Identification, Device Details, and Current Readings. Device Identification The Device Identification pane shows the logger selected for status. It lists the device name and model number, description entered when the logger was last launched (which is also used as the default file name and title in the plot), serial number, and firmware number. Device Details The Device Details pane shows detailed information about the logger deployment including the following items. Note that not all of these items are displayed for every logger model. Battery Level/Battery State. This is the condition of the battery. Consult the logger documentation for specifics on battery capacity. Memory Used. This is the percentage of logger memory used so far in the deployment. Consult the logger documentation for specifics on memory capacity. Note that if the battery died during logging, the Memory Used will be 100% even if only a small amount of the memory was used. Stops Logging. This displays the date/time or the condition under which the logger will stop logging. Last Launched. This is the date and time, including the offset to Greenwich Mean Time (GMT), when the logger was last launched. This is not necessarily the time when the first sample was recorded; it is the time all the launch settings were loaded in the logger. Delayed Start (if applicable). If the logger has been launched, but is waiting to start on a particular date/time or at the next interval, the scheduled start time is shown here in local time. Deployment Number. This is the number of times the logger has been launched, including the most recent launch. Logging Interval (if applicable). This is the rate at which the logger was set up to record data. If multiple logging intervals are available, the interval currently in use (if the logger is logging) will be shown in bold. Sampling Interval (if applicable). This is the rate at which sensors are sampling data in between the logging interval. DO Sensor Cap Information (HOBO U26 Dissolved Oxygen logger only). For HOBO U26 Dissolved Oxygen loggers, the DO sensor cap expiration date, initialization date, and manufactured date is shown. For more details about the DO sensor cap, see Checking Dates for the HOBO U26 Dissolved Oxygen Logger Sensor Cap. Current Status. This is a message that describes the state of the logger. Messages include: Awaiting Button/Coupler Start. The logger has been launched with a coupler or push button start (if available). Press and hold down the button on the logger for three seconds to begin logging, or follow the instructions that came with your logger if it offers a triggered (coupler) start but does not have a button. 53
54 Awaiting Delayed Start. The logger will begin recording data at a specific time because the logger was configured to start on a specific date/time or at the next interval. Launched, Logging. The logger has been launched is actively recording data. Logger Is Full. The logger has reached its memory capacity and is no longer recording data. Logger Is Stopped. The logger is not logging, is not full, and is not awaiting a start. On Hold for Later Launch. The logger has been launched with a Save Settings start (if available). Logging is not scheduled to begin, but the launch settings have been entered and saved. Relay is open/relay is closed. For the HOBO U30 Station, the current state of the relay is also displayed. Current States, if applicable. This is the current condition of the logger button(s). Refer to the logger documentation for details on logger operation, buttons, and interval events. Current Readings The Current Readings pane lists the latest measurement for each data series. Sensors that measure state changes do not show current readings. To change the order of series displayed in the Status window, go to the Preferences and select Display and then Series. You can also set the Screen Refresh Interval for some loggers. This is the frequency the current readings are updated, up to 3,600 seconds (one hour). A higher number results in less drain on the logger's battery. A Contact HOBOlink button also appears at the bottom of the Status window for the HOBO U30 Station only. Click this button when you want the HOBO U30 Station to connect to HOBOlink. When you click Contact HOBOlink, a confirmation message is displayed. Once you click Yes, the Status screen will close and then the HOBO U30 Station will attempt to connect to HOBOlink within 30 seconds. A warning may appear in the event that a live connection with HOBOlink is already underway. Notes: Readings are displayed for all available sensors, even if they are not being logged. Sensors not being logged are dimmed. If a logger has channels for external sensors, a description and reading will be given for the external channels even if no sensors are plugged in. For event loggers, the event count displayed in Current Readings will always start at zero, even if many events have already been logged. Sensor labels (if applicable) are displayed following the sensor name. For station loggers, the location (if defined) is displayed next to the reading. If a HOBO U30 Station has an Analog Sensor Port, readings for one or both channels are displayed. When a Station logger is logging, the last sample taken by the logger at the last interval will be displayed. The RSSI (Signal Level) is displayed for the HOBO U30/GSM Station. This helps you determine if there is enough signal strength in the current location for the HOBO U30 Station to contact a cellular tower for connecting with HOBOlink. Signal level is measured on a scale of 0 to 10, with 0 being no signal, 1 being a weak signal, and 10 being a strong signal Battery voltage is displayed for some loggers. For acceleration loggers only, color-coded tilt meters display X, Y, and Z-axis tilt graphically (relative to vertical, assuming that the only acceleration force on the logger is gravity). 54
55 Stopping a Device A logger automatically stops recording data when the memory is full (unless it has been configured to never stop logging) or when the battery runs down. Depending on the launch settings selected, you can also press the Start/Stop Logging button to stop logging on certain logger models. In addition, you can use HOBOware to stop the logger manually at any time. To stop a logger: 1. Connect the logger to the computer. 2. Click the Stop icon on the toolbar, or select Stop from the Device menu. After the logger has been stopped, the data remains in the logger until the next launch. Be sure to read out the logger before setting up the next launch. 55
56 Chapter 3 Reading Out, Plotting, and Analyzing Data After a logger has recorded data, you can then do the following: Read out the data from the logger Plot the data Modify the plot if desired Use Data Assistants Export the data Import data Reading Out Data To retrieve data recorded by a logger, you must read out the logger. Reading out the logger copies data from the logger to your computer, allowing you to save the data and plot it. During readout, the logger continues to record data unless you have stopped it or it is full. You can also read out many logger types to a shuttle and then offload the datafiles from the shuttle to your computer. See Offloading and Saving Shuttle Files for more details. To read out a logger to the computer: 1. Connect the logger to the computer. 2. Click the Readout icon on the toolbar or select Readout from the Device menu. If the logger is still logging, confirm whether to stop the logger. Click either Don't Stop or Stop as desired. 3. A progress bar displays while the data is being read out. Once the readout is complete, choose a location and/or a new filename or accept the default location and name to save the data. The default location is: C:\Documents and Settings\<user>\My Documents\HOBOware (for Windows XP) C:\Users\<user>\Documents\HOBOware (for Windows 7 or Windows 8) Users/<user>/Documents/HOBOware (for Macintosh OS X) If you save the file to a different folder, that folder will be the new default save location for future readouts. 4. Click Save. Most datafiles have a.hobo extension, but station loggers have a.dtf extension. If you are using HOBOware Pro in secure mode, the file extensions will be.hsec (U-Series loggers) or.dsec (Station loggers). 5. After saving the data, select the sensors and/or events you wish to display in a graph and click Plot. See the Plotting Data for more details on the options available when plotting. 56

57 Notes: Once a logger is read out, the data will remain in the logger memory until the next time the logger is launched. Logger memory is therefore never empty. You can read out some U-Series loggers when the batteries are low if the logger can be powered by a USB cable. In this case, a warning appears before the readout begins indicating the battery is very low and that you may experience communications problems. Once the readout is complete, be sure to replace the batteries as suggested. You can bypass the Save window during the readout process by setting the Readout Time-Saving Options in the General subcategory of Preferences. Plotting Data After you read out a logger or open a saved file, you can plot the data with the Plot Setup window like the following example. To plot the data: 1. Use the existing description or type a new one. The default description matches the one used when launching the logger and will be used for the plot title. 2. Select the series you wish to view on the plot. Click the All or None button to select or deselect all series, or click the checkboxes to select or deselect individual series. Series types can include: 57

58 Logged data series, which is a series containing the sensor measurements, state changes, or statistics (select loggers only) recorded by the logger. Derived series, which is a series calculated based on one or more logged data series. This could be an automatically generated series for a measurement type, such as Dew Point when temperature and RH is logged. Or, it could be a filtered or scaled series if you configured a filters or scaling with a data assistant in the Launch Logger window (select loggers only). Battery voltage, which lists the logger battery voltage recorded at each logging interval. 3. Change the default units for selected series if desired. You can also change the units for a series after it is plotted. 4. Select the internal logger events to view on the plot. Click the All or None button to select or deselect all events, or click the checkboxes to select or deselect individual events. Internal logger events are individually logged occurrences that can be recorded at any time during deployment, regardless of the logging interval. These events can include started or stopped logging, low battery, or an alarm trip. Refer to the logger manual for a complete list of internal events if applicable. 5. Adjust the time zone offset, if necessary. By default, data is shown in the offset used to launch the logger with HOBOware (not a shuttle). To select a different offset, enter the hours offset from GMT (UTC) in decimal form. You may find this useful if you logged in multiple time zones, or if you took the logger to a different time zone after launching it. 6. If data assistants are available, you can use them to create additional series. Select an assistant from the list and click Process to create a new series. 7. Click the Plot button to generate a plot. The plot is drawn and includes a title, a time axis (x-axis), one or more value axes (y-axis), and a legend. The data for each series are listed in a points table above the plot. Details about each series, such as the type of logger and deployment information are listed in the Details pane to the left of the plot. You can show or hide these elements using the View menu. To organize several plots, use the Window menu to switch between Tabbed View, Tile Horizontally, or Tile Vertically. Notes: To change the order of series displayed in the Plot Setup window, open the Preferences, select Display and then Series. 58
59 To change the series and events that are selected by default in the Plot Setup window or to control whether four possible Light/Occupancy series are derived on supported loggers, open the Preferences, select Plotting and then Plot Setup. To bypass the Plot Setup window when opening a datafile, open the Preferences, select General and then select Open File Time-Saving Options. If a pie chart icon appears in the Plot Setup window, this means the data in the file you are plotting can also be plotted in a pie chart. See Viewing a Pie Chart for more details. On some loggers, the Started and Stopped internal events can only occur once. However, UX100 series loggers can start and stop logging multiple times in a single deployment (as configured in the Launch Logger window). Multiple stopped and started events in a single file are not only displayed on the plot if selected in the Plot Setup window, but the resulting gap that occurs in the data is also represented in the series. In this example, the logger was stopped at 1:19 and then started again at 2:35; both events are on the plot. The temperature series shows a break between those two times. That represents the gap between when logging was stopped and when it resumed, both using the button on the logger. Opening Files HOBOware can open.hobo files from HOBO data loggers,.hproj HOBOware project files, and.dtf files from the HOBO U30 Station, Weather Station, Micro Station, or Energy Logger. The following files can be opened by HOBOware Pro: To open a file:.hsec, which are secure files (21 CFR Part 11 Conformance) from U-Series loggers..hproj, which is HOBOware Project file...dsec, which are secure files (21 CFR Part 11 Conformance) from Station loggers..txt,.csv, and most ASCII files can be imported. 59
60 1. Double-click a compatible file from Windows Explorer or Mac Finder. Or in HOBOware, click the Open icon on the toolbar or select Open Datafile from the File menu. 2. Select one or more files and click Open. 3. Select the series and/or events you wish to view in the plot and click the Plot button. If you selected multiple files to open, you will be prompted with a Plot Setup window for each file (unless you have set the preference to automatically plot data as described in General Preferences). To open a project file: 1. From the File menu, select Open Project. 2. Select a project (.hproj) file and click Open. Recently opened files are listed in the File menu. From the File menu, select Recent Files and then choose the file you wish to open. To empty the recent file list, select Recent Files from the File menu and then select Clear Recent Files. Opening Files from Unsupported Loggers Although the following loggers cannot be launched or read out using HOBOware, datafiles from these loggers can be opened and plotted. All graphing tools, filters, and Data Assistants can be used with the files and data can be exported to text and project files. H08 (8-bit) TBI/WTA H08 (12-bit) H20 H H H H H H TBI TBI WTA WTA WTA WTA H H H H

61 H06 H H H H H07 H H H14 H H H12 H H H Working with Plots There are several tools available for working with plots. Tools There are five tools available on the toolbar for viewing the plot and isolating data. Use the Arrow tool to point to and select items on the graph to edit their properties (through a rightclick menu). Use the Crosshair tool to zero in on a specific date and time in the plot and any data points associated with that date and time. Click the Crosshair icon and then place your cursor anywhere on the plot to draw a red vertical line at a particular point. Use the Hand Drag tool to move different areas of the graph into view (panning) or adjust the position of one series so it can be viewed more easily. This is particularly useful when you are zoomed into the graph and want to see another section of the graph without zooming out and then zooming back in on the new location. Use the Zoom tool to focus on one area of the graph, allowing you to see more detail. 61

62 Actions Use the Subset Statistics tool to view statistics for a particular time span (HOBOware Pro only). Use the Actions buttons on the toolbar to perform a number of actions on a plot or a series. Menus Use the Zoom In/Zoom Out buttons to keep the plot centered as you zoom. Click the Grow Graph at Full Scale button to return to the original, full-scale version of the plot when the datafile was first opened. Click the Open Properties button to open the properties window the plot element that is currently selected, such as axis, series, legend, or title. Use the Gridline buttons to toggle all horizontal or vertical gridlines on and off. You can also toggle gridlines on and off for each axis individually. Using the arrow tool, double-click an axis to get the Axis Properties window. Select or deselect the Show Gridlines checkbox to toggle the gridlines for that axis. Click the Point Markers button to toggle the point markers for all series on and off. To show or hide markers for an individual series, right-click the series to open the Series Properties window. Select or deselect the Mark Points checkbox to toggle the markers for that series. Click the Convert Units button to open the Convert Plot window, which allows you to convert the units on certain series on the plot to other units (for example, from degrees Fahrenheit to degrees Celsius). Click the Filter Series button the Filter Series window, which allows you to add a statistical series to the plot. Click the Pie Charts button if a pie chart is available for the plot (only available on loggers that support state series) Click the Add Graph Label button to open the Graph Label Properties window. Use the Edit and View menus to access various controls when working with a plot. You can also right-click an element in the plot to access many of the same options available from the Edit and View menu and to open properties windows. Using the Arrow Tool Use the Arrow tool to select items on the plot. Click the Arrow icon tool. on the toolbar or press A to select the arrow If you are currently using another tool and do not want to switch tools, press N on your keyboard to select each graph item (including hidden items, such as value axes for states or events) in sequence. The selected item (if visible) is shaded or boxed. You can then right-click the selected item, double-click it, or press the Enter key on your keyboard to open the Properties window for that item. 62
63 To deselect, click an area within the axes that does not have series data. Click the View menu and choose Select None or press D. Using the Crosshair Tool Use the crosshair tool to zero in on a specific date and time in the plot and any data points associated with that date and time. To use the crosshair: 1. Click the Crosshair icon on the toolbar or press C. 2. Click a point on the graph to mark it. 3. Click another point to move the marker. When you click on a graph, the nearest data point is selected. When series are very close together and the location you click is between two points, it is possible that the nearest point is not on the series you clicked. You can also mark the point on the graph by clicking the corresponding cell in the Points table. If you are zoomed in and click a point in the Points table that is outside the zoom area, the plot will scroll to that area of the graph. To prevent scrolling in this situation, go to the Preferences, select Plotting and then Points Table & Details Pane. Deselect the "When selected value in table is out of plot range, drag series to that value. The plot changes in several ways when the crosshair is in use. The Points table shifts to the row that contains the data point. Where the crosshair intersects a data point, a square surrounds the data point. The intersection points are also marked by small color-coded arrows on the left and right value axes. If the legend is displayed next to the graph, the point values for each series are updated to reflect the crosshair location. Values are listed in the legend differently depending on whether the data is a logged sample, state, or event: Values that are not in parentheses are actual data points logged at the time selected by the crosshair. Values in parentheses are estimated because there were no exact values for the series at the time selected by the crosshair. Zoom in or move the crosshair to see actual values. A value of " " indicates that there is no series data during the time selected. This is seen most frequently for events. If the time selection falls within an event series, but does not contain an event, parentheses surround the " " value. A value of "logged" indicates an internal logger event happened at the selected time. The legend must expand in height to list the point values. If your application window is too small to accommodate the expanded height, the values will not be added to the legend. You can still refer to the Points table to find the values of the selected points. To remove the crosshair from the graph, right-click the plot and select Remove Crosshair or choose remove Crosshair from the View menu. Zooming, Panning, and Smart Scaling Plots You can adjust the viewing area of the plot by zooming, panning, and smart scaling. Zooming There are two ways to zoom: either by using the zoom tool (or pressing Z) or by selecting Zoom In or Zoom Out from the toolbar or the View menu. Use the zoom tool to zoom anywhere on the plot that you select, clicking the right-mouse button to zoom in or out. Use the Zoom In/Zoom Out icons to keep the plot centered as you zoom. 63
64 When zooming: Panning Right-click to toggle between zoom in and zoom out. Check the symbol inside the zoom tool to determine the direction you are zooming. A plus sign (+) or arrows pointing outward will zoom in, while a minus sign (-) or arrows pointing in will zoom out. Click an area on the graph inside the axes to zoom one level (a factor of two). Continue clicking to zoom multiple levels. Hold down the left mouse button in one location to zoom continuously. Release the mouse button to stop zooming. Hold down the left mouse button while drawing a rectangle around the area you wish to zoom in on, then click inside the rectangle. The area inside the rectangle expands to fill the whole graph. To constrain the zoom to horizontal or vertical zooming, place the cursor over the axis you want to zoom and click the mouse button. Hold the mouse button down to continue to zoom. Or, press the X key while zooming to restrict motion horizontally and press the Y key while zooming to restrict motion vertically. If you are currently working with the crosshair, arrow, or hand tool, you can click the Zoom In/Out icons on the toolbar to quickly zoom into and out of the middle of the display without changing tools. Zooming will not work on an axis that is locked. To unlock an axis, double-click the axis with the arrow tool and deselect the Lock Axis Scaling and Tick Marks in the Axis Properties window. Use the hand drag tool or press H to pan the graph, which is dragging the plot viewing area along the x- or y- axis. Panning is especially helpful when you are zoomed into a detailed plot and want to focus on a different area without zooming out. Click within the graph and hold down the left mouse button to pan a different section of the graph into view. The graph follows the movement of the mouse, and the axes are continuously updated in response to the movement. To stop dragging, release the left mouse button. To limit dragging to horizontal or vertical panning, place the cursor over the axis you want to drag, hold down the mouse button, and drag in the direction you want the plot to move. Or, press the X key will dragging to restrict motion horizontally and press the Y key while dragging to restrict motion vertically. Similarly, click the axis associated with a series and hold down the left mouse button. Only the series connected with the axis will follow the movement of the mouse. Use the hand tool to move different areas of the graph into view or adjust the position of one series so it can be viewed more easily. This is particularly useful when you are zoomed into the graph and want to see another section of the graph without zooming out and then zooming back in on the new location. Panning will not work on an axis that is locked. To unlock an axis, double-click the axis with the arrow tool and deselect the Lock Axis Scaling and Tick Marks in the Axis Properties window. Smart Scaling When you first display a graph, the numerical bounds of the axes are on tick marks. After you have panned or zoomed, this may no longer be the case. Use smart scaling to correct that. With the hand drag, arrow, or crosshair tool, right-click anywhere on the graph and select SmartScale Graph. This will automatically adjust the axes to end on tick marks. Note: You can always return to the original plot view by clicking the View at Full Scale View menu. from the toolbar or the 64
65 Copying Data Points and the Plot To copy the data points from the Points Table to paste into other software: 1. Select the data you wish to copy in the Points Table. 2. Press Ctrl+C in Windows or Command-C in Macintosh to copy the data. Windows: press Ctrl + C Mac: press Command - C 3. Open any text editor, word processor, or spreadsheet software. 4. Press Ctrl+V in Windows or Command-V in Macintosh to paste the data into the other application. Fields are delimited by tabs, and records are separated by paragraph returns. You can also copy the plot as a bitmap for pasting into other programs and documents. To copy the plot: 1. From the Edit menu, select Copy Graph to Clipboard. 2. Go to the other application and paste the plot. Closing a Plot To close a single plot, click the on the tab or toolbar, or choose Close from the File menu. On Macintosh, click the red button in the upper-left corner of the internal frame containing the plot when in Tabbed View. To close all open plots, select Close All from the File menu. Important: Any changes you made to the plot are not saved when you close the datafile. You must save the plot as a project file to preserve the changes. Either select Save Project from the File menu before closing the plot or close the file and click Save when prompted. If you only want to save an image of the plot, you can paste a bitmap of the graph into another program and save it there. Note: If you do not want HOBOware to prompt you to save the plot as a project file when you close it, open the Preferences. Select Warnings and then select General. Deselect the "Prompt me if there is any remaining unsaved data when closing plot or application" checkbox. Viewing a Pie Chart Pie charts are available in HOBOware Pro for plotted state series, such as those from the UX90 data loggers. This provides you with a graphical representation of the data for viewing, saving, and printing in addition to the default line graph. This is particularly useful for the UX90 Occupancy/Light Data Logger (UX90-005x/-006x) because it allows you to quickly compare when the: Lights were on and the room was unoccupied Lights were on and the room was unoccupied Lights were off and the room was occupied Lights were off and the room was unoccupied To view a pie chart: 1. Open a file from a logger with state series and plot the state series and derived series (as applicable) that you want to view in the pie chart. Note that a pie chart icon appears in the Plot Setup window if the file you are opening can be plotted in pie chart. 2. Click the Pie Chart button on the toolbar. 65


66 3. A pie chart is drawn based on the selected series. In this example, light & occupancy are plotted in the pie chart. The legend at the bottom of the chart indicates what series each piece of the pie represents. Percentages for each pie wedge are shown in the yellow boxes. To change the series used to generate the pie chart, click the "Select a Series" drop-down arrow and then click the Update Chart button. To change the timeframe used to create the pie chart, change the Start and End Date/Time as necessary and then click the Update Chart button. To reset the pie chart to use the Start and End Date/Time for the current selected series, click the Reset/Show at Full Scale button. To save the pie chart as an image (.png file), click the Save button. To print the pie chart, click the Print button. 4. When you are done viewing pie charts, click the Close button. Notes: The pie chart button on the toolbar will only be enabled when one or more state series is plotted. If you have plotted data and the pie chart button is not enabled as expected, close the plot. Reopen the 66
67 file and make sure you select the state series from the Plot Setup window. Note that if the sensor channels were configured as runtime instead of state, then pie charts will not be available. If you merge datafiles, pie charts may not function properly if the time overlaps between merged series. If you are having difficulty viewing a pie chart for a merged file, try returning to the original separate files to view the individual pie charts from each file. If you are working with a plot that has two series, such as Light and Occupancy and you crop one of those series, the time range for the pie chart data will be constrained to the shorter of the two series. If you paste a new state series into the plot, it will also be available from the Select a Series pull-down list. You will need to select the series to view it in a pie chart; it will not display automatically. Printing Plot Elements Printing a Graph You can simply print the graph, or you can set up the page and preview it before printing. To set up the paper for printing the graph: 1. From the File menu, choose Page Setup. 2. Change the paper type, orientation, and margins as necessary and click OK. 3. From the File menu, choose Print Preview. 4. Zoom as necessary. 5. Click the Print icon to print directly from Print Preview. Or, click Close to exit the preview window without printing. To print the graph: 1. From the File menu, select Print or click the Print icon on the toolbar. 2. Select the appropriate printer, if applicable, and click OK. Printing Points and Details You can print all the data in the Points or Details panes. From the File menu, select Print Points (available only with Java 1.5 or higher) or Print Details. If you highlight a selection of points with your mouse before choosing Print Points, you will also be given the option to print only the selected points. 67
68 Chapter 4 Modifying a Plot Once data is plotted, there are many things you can do to further refine the plot. This includes: Setting Properties for Plot Elements Adding a Graph Label Selecting a Subset of the Plot (Subset Statistics Tool) Moving a Series from Front to Back on a Plot Filtering a Series Cropping a Series Hiding/Showing or Removing a Series from the Plot Copying a Series to Another Plot Merging Files Converting Units Undoing or Redoing Plot Changes Saving Project Files Setting Properties for Plot Elements You can set the properties for all the plot elements, including the axes, series, title, and legend. You can access the properties window for a plot element by selecting the Arrow tool and then right-clicking that element. Or, rightclick anywhere on the plot and select Other Graph Items and then choose a particular item. Setting Axis Properties Setting Series Properties Setting Legend Properties Setting Title Properties Setting View Properties There are also plotting preferences that control the global properties for all plots. To modify these settings, open the Preferences and select Plotting. With Plotting preferences, you can: Show or hide the Points table by default Show or hide the Details pane by default Include the sensor label in the Points table and Details pane by default Customize series lines for specific measurement types Set default minimum and maximum values for specific series types on the Value Axis 68

69 Enable auto-scrolling to keep marked points in view while zooming Automatically select all data series and/or events Automatically label the time axis Mark all points in a plot by default Include the sensor label in the legend Control whether horizontal and/or vertical gridlines are displayed automatically Set the font style and point size used in plots Enable or disable the undo/redo feature You can also use the Display preferences to set the default unit types and date/time format. Setting Axis Properties You can change the appearance of the time axis (x axis) and the value axis (y axis) on the plot. You can customize the axis name, change the location, bounds, tick marks, color, and more. To change the axis properties: 1. Double-click the axis in the plot with the arrow tool, or select the axis and click the Properties icon to open the Axis Properties window. 2. In the Name field, enter up to a 40-character name for the axis. The default name for a value axis is the unit type (for example, " F" is the name for a temperature axis and "%" is the name for an RH axis). The time axis does not have a default name. To add "Time" as the default name for this axis, open Preferences. Select Plotting and then select Other Options. Enable the "Label the time axis" checkbox. 3. Change the location of the axis. The value axis can be located on the left or right while the time axis can be located at the top or bottom 4. By default, tick marks are auto-calculated. Numbers or values are listed next to major tick marks and minor tick marks are not numbered. To change the default tick marks, select Custom Tick Marks and then choose the values for Major and Minor tick marks as desired. 69

70 5. Change the default bounds used on each axis. For the time axis, select the dates and times you want the axis to display. For the value axis, type the minimum and maximum value you want the axis to display. 6. You can also modify the appearance of the axis with these options: Show Gridlines. This toggles whether gridlines are displayed in the background. Gridlines are shown by default for the time axis, but not for the value axis. Hide Axis. This controls whether the axis is displayed or temporarily hidden. Lock Axis Scaling and Tick Marks. This controls whether the axis and associated tick marks remain in their original position when zooming or navigating with the hand tool. Locking the axis and tick marks helps to avoid inadvertently zooming or navigating to an area on the graph without data. Color. Black is the default color for the time axis. The color of the value axis matches the series color by default. You can change the color for either axis as desired. 7. Click Apply to update the plot and keep the Axis Properties window open. Click Done to update the plot and close the window. Setting Series Properties A series is the group of data points you selected to display in the plot. You can change the appearance of a series on the plot including the line style, point marker, alarm values, associated axes, and color. To change series properties: 1. Double-click the series you wish to modify or select the series and click the Properties icon to open the Series Properties window. 2. Change the default description. Type up to a 40-character name for the series. The series name will be updated in the legend, series pane, and details pane to the new name you entered. 3. Change the default units. Enter a different unit type as needed. The unit type will be updated in the legend, series pane, and details pane to the new unit type. Note that if you subsequently convert the 70
71 units while viewing the plot, your custom unit type will no longer be displayed. For example, let's say you change the unit type for a temperature series from F to "degrees." Then, while viewing the plot, you decide to convert the data points to Celsius. The unit type for the temperature series automatically changes to C instead of the custom "degrees" unit that you had entered. 4. Adjust the appearance of the lines with the following options: Connect Points. This controls whether the plotted data points in the series are connected with a line. Style. This changes the appearance of the line used to connect the points in a series. Width. This changes the width of the line used to connect the points in a series. Connect as Steps. This controls whether the lines between the points in a series are connected as a curve or a step. When this option is selected, the line drawn between points keeps the value of the previous point until the next point in the series. Connecting as steps is useful when plotting state or event series. 5. Set High Alarm and/or Low Alarm thresholds. Enabling alarms will show lines on the plot for the series to indicate a visual threshold over or under which data may be falling (for example, if you want to quickly see how many points fall below 32 degrees). Alarms are available for sensor measurement series only, not for state or event series. Select the High Alarm checkbox and type a value relative to the series where you want the maximum (red) alarm line to appear. Select the Low Alarm checkbox and type a value relative to the series where you want the minimum (blue) alarm line to appear. 6. Select the Mark Points checkbox to add a marker for each data point in the series. To avoid cluttering the plot, this option is only enabled by default for series with event data or that have only one data point. If you enable Mark Points, you can change the shape of the marker and the point size. 7. You can also modify the following: Time Axis. This allows you to create an additional time axis for this series. This is useful for comparing data from two different time periods. Value Axis. This changes the axis being used for the series. Choose one of the axes already in view or select New Value Axis from the dropdown list to create your own. Color. This changes the color used for the series. 8. Click Apply to update the plot and keep the Series Properties window open. Click Done to update the plot and close the window. Setting Legend Properties You can modify the Legend displayed on the plot. To change the Legend properties: 1. Double-click the Legend or right-click the plot with the arrow tool and select Other Graph Items > Legend Properties. 2. In the Legend Properties window, type a name for the Legend if desired. 71


72 3. Set the location to either the left or right of the plot. 4. Select the Show Border checkbox to have a box around the legend. Deselect this if you do not want the box around the legend. 5. Click Apply to update the plot and keep the Legend Properties window open. Click Done to update the plot and close the window. Setting Title Properties You can modify the title displayed on the plot. To change the Title properties: 1. Double-click the plot title or right-click the plot with the arrow tool and select Other Graph Items > Title Properties. 2. In the Title Properties window, change the default name if desired. The name originated from the Plot Setup window. 3. Set the location of the title to either the top or bottom of the plot. 4. Adjust the font, point size, and style. 5. Click Apply to update the plot and keep the Title Properties window open. Click Done to update the plot and close the window. Setting View Properties You can show or hide certain plot elements. To change the View properties for the plot: 1. Right-click the plot and select View Properties. 2. In the View Properties window, select the Show Legend checkbox if you want the Legend to be displayed on the plot. Deselect this checkbox if you do not want to see the Legend on the plot. 72


73 3. Select the Show Title checkbox if you want a title to be displayed on the plot. Deselect this checkbox if you do not want to see a title. 4. Select the Show Border checkbox if you want a border to be drawn around the plot. Deselect this checkbox if you do not want a border around the plot. 5. Click Apply to update the plot and keep the Title Properties window open. Click Done to update the plot and close the window. Adding a Graph Label You can add multiple labels to a graph to identify specific points or call attention to a region of the graph. To add a graph label: 1. Right-click the graph at the desired location and choose Add Graph Label from the pop-up menu to open the Graph Label Properties window. Or, select Add Graph Label from the Edit menu. Note: To change an existing label, double-click the label or select the label and click the Properties the toolbar. icon on 2. Type up to a 24-character name for the label. 73
74 3. Select the Attach to Series checkbox to attach the label to a point on the series. Choose the name of the series to attach it to from the drop-down list. Select the Include Data Value in Label checkbox to display the value of the point in the label. Select the compass point to described the preferred location of the label relative to the labeled point. Important: This indicates the preferred location of the label (space permitting) with respect to the data point it references. This is only available when the label is attached to a series. 4. Adjust the appearance of the label with these options: Draw Label Over Colored Background. Select this option if you want the label to appear in a box with a colored background. Label Color Background. If you chose to give the label a colored background, click this button to select a background color. Label Color Text. Click this button to select a color for the label text. % Transparency. Adjust the label's transparency, which refers to the ability to see the graph through the label. At 0%, the label is opaque and you cannot see the graph through it. At 100%, the label is invisible and only the graph can be seen. Font. Select a font for the label text. Font Size. Select a font size for the label text. 5. Click Apply to update the plot and keep the Graph Label Properties window open. Click Done to update the plot and close the window. Use the hand tool to drag the label to another location if necessary. If the label is attached to a series, you can drag the label to attach it to any other point on the graph. (The hand tool must be close enough to a point to attach the label.) Labels that are attached to a point will move with that point during zooming and panning. Freefloating labels do not move during zooming and panning. To delete a label from the graph, select the label you wish to remove and press the Delete key, or right-click the label and choose Remove from the menu that appears. Selecting a Subset of the Plot (Subset Statistics Tool) The Subset Statistics tool allows you to select a subset, or a range of data, of a graph, and display the maximum, minimum, average, and standard deviation for the measurements in that range (HOBOware Pro only). To use the Subset Statistics tool: 1. Select the Subset Statistics tool from the toolbar. The mouse cursor will change to the Subset Statistics Tool icon. 2. Draw the subset on the plot. With the left mouse button, click within the graph to define the start time of the subset and drag to the right. Release the mouse button when you reach the end time of the subset. The graph subset appears in the graph and the subset statistics pane appears beneath the Details pane as in the example below. Two black vertical indicators appear on the graph to show the range of the subset with date/time labels marking the start and end of the range. To move the vertical indicators and date/time labels, press the up or down arrow keys (make sure the Subset Statistics Tool is selected first). 74

 to move the right boundary.")
75 A subset bar is added to the time axis. Double-click this bar to toggle between showing and hiding the vertical indicators and date/time labels. If the plot has one than more time axis, this bar is attached to the one that was created when you first displayed the plot. Click inside the subset bar to drag it to a different time axis. To quickly adjust the start or end of the subset, click and drag the left or right end of the subset bar on the time axis (make sure the Subset Statistics Tool is selected first). You can also use the arrow keys to move the left boundary and Ctrl+arrow key (or Command-arrow key on Mac) to move the right boundary. Place the cursor in the middle of the subset bar and drag it to move the entire range left or right. To further refine the subset range: 1. Click the checkmark icon in the Subset Statistics pane. 2. The two checkboxes are enabled by default. Deselect "Show subset statistics for time bounds below" if you want to remove the subset from the current time axis. Note that only one time axis can have a subset. If you enable subset statistics for one time axis when another time axis already has a subset, the other time axis's subset will be removed. Deselect the "Show times, duration, & vertical indicators on graph" checkbox to toggle the display of subset indicators and labels on the plot. If you disable this option, the Subset Statistics pane and the shaded subset statistics bar on the time axis will still remain visible. 3. The easiest method to set a range for the subset is to indicate a fixed Start Date/Time or End Date/Time and then indicate the duration. Alternatively, you can enter both a Start Date/Time or End Date/Time without specifying a duration. 75


76 For example, to set a range beginning at 8:00 a.m. on 3/18/13 with a duration of 2 hours, set the Start Date to 3/18/13 and the Start Time to 8:00: AM. Select the Anchor Start Point checkbox and set the Duration to 2 hours as shown below. As another example, to set a range of 1 day ending at 10:00 PM on 3/18/13, set the End Date to 3/18/13 and the End Time to 10:00: PM. Select the Anchor End Point checkbox and set the Duration to 1 day. To remove the subset and related elements: Right-click the plot and select Remove Subset Stats, From the View menu, select Remove Subset Stats, or Click the X icon in the upper-right corner of the Subset Statistics pane. Moving a Series from Front to Back on the Plot You can shuffle the order of series by moving a series to the front or back on the plot. This is helpful if one series is hidden behind another. It also changes the order of series in the Details pane, Points table, and the legend. To change the order of the series: 1. Select the arrow tool. 2. Select the series you wish to move. 3. Right-click and select either Bring Series to Front or Send Series to Back. Filtering a Series You can filter data from existing series in the plot to create a new statistical series showing calculated data such as average, minimum, and maximum values over a specified period of time. This filter applies to existing data files only; there is an additional filter tool available when launching most loggers. To filter a series in a plot: 76


77 1. Select the series with the arrow tool, right-click it and select Filter Series. Or from the Edit menu, select Filter Series. 2. Select the statistic to use for the filter and the interval. The options available vary depending on the series type. In the example below, "Maximum Temp" in each day is selected. 3. Type a Resultant Series Name or use the default name entered based on the filter type. 4. Click OK. The new series is added to the graph, the Details pane, and the Points table. Note that when you apply a filter, the graph rescales to accommodate all the displayed data. Cropping a Series You can crop one or more series in a plot to focus on a particular date/time range instead of the default range in HOBOware Pro. To crop a series: 1. With the arrow tool, right-click the series you wish to plot and select Crop Series. To crop multiple series, right-click anywhere in the plot (without a series selected). 2. In the Crop Series window, make sure the series you want to crop is selected. Deselect any series you do not want to crop. 3. Enter the new Start Date/Time and End Date/Time for the series. The boundaries are limited to the minimum and maximum date/time of the Time Axis. If subset statistics have been added to the plot, the start and end points on the subset will be redefined automatically based on how it is affected by cropping. 4. Click the Crop button. The plot displays the cropped series. The Details pane and Points table are both updated to reflect the new cropped series. Hiding/Showing or Removing a Series from a Plot You can hide or show a series in the plot and in the Points table. This is helpful if the datafile contains multiple series and you cannot easily view them all together. You can then show or hide each series as you wish. 77
78 You can hide a series by: Right-clicking the series in the Details pane and selecting Hide Series. Selecting the series and then selecting Hide Series from the Edit menu. Selecting the series, right-clicking the plot, and then selecting Hide Series. Press and hold the Shift key while hiding the series to prevent the plot from rescaling. Once a series is hidden, it is grayed out in the Details pane. You can show the series again by: Right-clicking the series in the Details pane and selecting Show Series. Selecting the series in the Details pane and then selecting Show Series from the Edit menu. Selecting the series in the Details pane, right-clicking the plot, and then selecting Show Series. To show all previously hidden series, right-click a series in the Details pane, right-click the Plot, or select the Edit menu and then select Show All Hidden Series. You can also completely remove a series from the Details pane as well as the plot and the Points table. If you remove a series, it can only be recovered by reopening the original datafile or a saved project file that contains that series. To remove a series: 1. Select the arrow tool from the toolbar. 2. Click the series you wish to remove and press the Delete key or select Remove from the Edit menu. You can also right-click the series in the plot and click Remove or right-click the series in the Details pane and select Remove Series. Copying a Series to Another Plot To copy a series from one plot to another: 1. Open the source plot (the plot that includes the series you want to copy) and the destination plot (the plot where you want to paste the series). 2. In the source plot, choose the arrow tool and select the series you want to copy. From the Edit menu, select Copy Series or right-click the series and select Copy Series. Or, press Ctrl+C on Windows or Command-V on Macintosh. 3. Switch to the destination plot. From the Edit menu, select Paste Series or right-click the plot with the arrow tool and select Paste Series. Or, press Ctrl+V on Windows or Command-V on Macintosh. The new series is added to the graph, the Details pane, and the Points pane. Overlaying Series If the series you want to copy to the plot was logged at a different time, you will need to make some adjustments to the plot in order to view the series together. 1. Display the source plot(s) and the destination plot. 2. On the destination plot, choose the arrow tool 3. Double-click the time axis to access the Axis Properties window. 4. In the Axis Properties window, time a unique name in the Name field and click Done. 5. Copy a series from a source plot (right-click the series and select Copy Series). 6. Paste the series into the destination plot (from the Edit menu, select Paste Series). 78

79 7. Double-click the new time axis for the pasted series to open the Axis Properties window. 8. Type a unique name in the Name field, different than the name used in step 4, and click Done. 9. Repeat steps 5 through 8 for each series you want to paste. 10. Identify the periods of interest in each series you want to combine and note the times for each. Also, determine which period is the longest; this should be the length of time shown on each axis. 11. Double-click a time axis and adjust its Min and Max bounds. The new bounds should include the period of interest for the series, and be the same length as the longest period identified in the original time axis in the destination plot. Repeat for each time axis. 12. Use the hand tool on each time axis to adjust the series horizontally as needed. Merging Files This feature allows you to combine multiple datafiles one file. Note that only series of the same type and name can be merged and there cannot be an overlap in the time in the series. 1. Open the first file (oldest). 2. From the File menu, select Merge Datafile(s). 3. Select the datafiles you want to merge and click Open. 4. Select the series to plot. All series available in the selected datafiles are listed in the Select Series to Plot section. Click the checkbox to add or remove series as necessary, or select the All or None buttons in that section to select all series or no series accordingly. 5. All matching series available in the selected series will be populated with the corresponding series listed in the Merge With column. Each new series can only be merged with the series of the same measurement type and units. If no matching series is available in the plot, the Merge With column will display No Series for that series. If a matching series is found, you can still append the series without merging by choosing No Series from the corresponding drop-down list in the Merge With column. The series will be appended to the plot without being merged with any series. 79
80 6. Select any internal logger events to plot, if applicable. Click the checkbox to add or remove each event as necessary, or select the All or None buttons in that section to select all events or no events accordingly. 7. Click the Plot button to merge the selected series with their matching series. Save the new plot as a project file if desired. There will be a gap between the last sample in the older series and the first sample in the next series as shown here in both the Temperature and RH series. After the series have been merged, the Details Pane will be regenerated and the Series Statistics will be recalculated. The Points Table will be regenerated and will show samples of both series in one column. The new logger information is added to the Details Pane, showing the specific information about the different loggers that collected the data samples. Converting Units Plots display data points in either SI or US units as defined within the Preferences (select Display and then Default Unit System). You can switch between SI and US units on a single series or an entire plot without changing the overall system preferences. To change the units for a single series, right-click the series with the arrow tool and select Convert Series Units and then select the unit you want to use. To change the units for multiple series within the plot, click the Units icon from the Edit menu. on the toolbar or select Convert Units If a series can be configured with multiple units, there will be drop-down list in the units field as in the example below. Select the desired units from the drop-down list for all the series you wish to change and then click Convert. This changes the units displayed on the axis, in the legend, in the Details pane, and in the Points table. 80


81 1. For each series that supports unit options, select the desired units from the drop-down list 2. Click Convert. This changes the units displayed on the axis, in the legend, in the Details pane, and in the Points table. Undoing and Redoing Plot Changes You can undo and redo changes made to the plot display, including zooming, panning, crosshair placement, graph and axis properties modifications, and more. To undo the most recent change, click the Undo Action menu. icon on the toolbar or select Undo Action from the Edit To redo the most recent change that had previously been undone, click the Redo Action select Redo Action from the Edit menu. icon on the toolbar or When using the Edit menu for Undo or Redo, the most recent change is listed with the menu choice. In the following example, the most recent change that can be undone is to "Zoom Out." HOBOware keeps track of the changes that you make within each plot window and temporarily stores them as "undoable actions." To see a complete list of all the actions that can be undone or redone, click the down arrow to the right of either icon on the toolbar. 81
82 The number of undoable actions stored is set within the plot preferences. You can configure HOBOware to either store a specific number of undoable actions or an unlimited number. In addition, you can enable or disable the feature altogether. Note that storing an unlimited number of actions can impact HOBOware performance on slower computers. Saving Project Files A project file (.hproj) is a plot that you have customized using the various features and tools of HOBOware. When you open a project file, the plot appears as it did when you saved the project file and contains all of the same data. To save your current data with a customized view of the plot, click the Save icon on the toolbar, or choose Save Project from the File menu. To open an existing project file, choose Open Project from the File menu. Using Data Assistants With Data Assistants, you can create new series by combining data recorded by the logger with additional data for analysis. For example, the kwh Assistant converts logged pulse data from an energy transducer to kwh, average kw, and energy cost. When you read out a logger or open a datafile, all available assistants are listed in the Data Assistants section at the bottom of the Plot Setup window. To use a Data Assistant, click the assistant name to select it, and then click the Process button. For some data loggers, you can also run the Linear Scaling, Pulse Scaling, and kwh Data Assistants from the Launch Logger window to create additional data series that are automatically available each time you read out the logger and open the resultant data file. To use an assistant from the Launch Logger window, click the Scaling or kwh button and then double-click the desired assistant, or select the assistant and click the Create button. The following Data Assistants are available in both HOBOware and HOBOware Pro: Linear Scaling Assistant. Use the Linear Scaling Assistant to convert a data series from a compatible sensor to some other measurement. You enter two raw values and their corresponding measurement values. The conversion must be based on a linear relationship. Nonlinear scaling is not available. Pulse Scaling Assistant. Use the Pulse Scaling Assistant to convert a data series from a compatible sensor to some other measurement. You enter a raw value and its corresponding measurement value. The Pulse Scaling Assistant can be run during Plot Setup or at Launch. These Data Assistants are available in HOBOware Pro only: Barometric Compensation Assistant. Use the Barometric Compensation Assistant to compensate for barometric pressure and create a water level or sensor depth series. The BCA uses water pressure data from a HOBO U20 or U20L Water Level logger and additional information you provide. Conductivity Assistant. Use the Conductivity Assistant to apply compensation to absolute conductance data from a HOBO U24 Conductivity logger. Dissolved Oxygen Assistant. Use the Dissolved Oxygen Assistant to generate a series adjusted for salinity and a series for percent saturation based on data from a HOBO U26 Dissolved Oxygen logger. Also use this assistant to enter field calibration readings to compensate for fouling. Grains Per Pound Assistant. Use the Grains Per Pound Assistant to calculate the absolute amount of water in the air, based on temperature, humidity, dew point, and altitude. You can also create an altitude-corrected dew point series. Growing Degree Days Assistant. Use the Growing Degree Days Assistant to calculate growing degree days based on temperature data spanning at least one full calendar day (midnight to 82
83 midnight). Growing degree days are used for agricultural and turf management applications, such as estimating harvest time or pest growth. kwh Assistant. Use the kwh Assistant to convert logged pulse data from a WattNode, Veris, or other energy transducer to kwh, average kw, and energy cost. The kwh Assistant can be run during Plot Setup or at Launch. Default Settings The parameters last entered into any given Data Assistant will be the default used the next time the Data Assistant is run, unless it is being used to edit existing series. If you run a Data Assistant at Plot Setup time and then later you run it from the Launch Logger window, the default values are the value you entered at Plot Setup time. Hiding Assistants To prevent unwanted assistants from appearing in the Plot Setup window, or to bring back assistants that you have previously hidden, click the Manage button. This will open the Preferences window to allow you to change these settings. Software Updates If you have an Internet connection, HOBOware can periodically check the Onset website for software updates. This includes updates to your data assistants. The default is to check once per week, but you can configure HOBOware to check daily or monthly. In Preferences, go to the General pane and select Startup. In the Check for HOBOware Updates drop-down list, select how frequently you want the software to check for updates. You may also check for updates manually at any time. Choose Check for Updates from the Help menu. Installing a Data Assistant Data Assistants are installed automatically. There may also be times when a new Data Assistant is available between HOBOware releases and needs to be installed manually. To do this, click the Load button on the Plot Setup window and select the assistant's.jar file. Note: On Windows, you must be an administrator to load a new Data Assistant. To temporarily run HOBOware as an Administrator, right-click the HOBOware icon and select Run as Administrator. Enter the Administrator name and password as prompted. License Agreement This software is furnished in accordance with a separate license agreement included with the software, and subject to any restrictions set forth therein. For more information about Onset's licensing terms and policies, contact Onset Customer Service at LOGGERS, or visit Linear Scaling Assistant The Linear Scaling Assistant converts a data series from a compatible sensor to some other measurement when you enter two raw values and their corresponding measurement values. The conversion must be based on a linear relationship. Nonlinear scaling is not supported. Supported Sensors This assistant is available for the following sensors: CABLE-2.5-STEREO Voltage Input Cable CABLE-4-20-mA Input Cable CABLE-ADAPx 83

84 S-CIA-xxxx 12-bit 4-20mA Input Adapter S-VIA-xxxx 12-bit Voltage Input Adapter S-FS-CVIA FlexSmart Analog Module S-FS-TRMSA FlexSmart TRMS Module U30 Analog Sensor Port S-LWA-xxxx Leaf Wetness S-SMx-xxxx Soil Moisture The Linear Scaling Assistant can be applied only to logged data from these sensors. Other Types of Scaling There are also other types of scaling available that may apply to your configuration: FlexSmart modules are set up for scaling prior to launch, as part of the module configuration process. You can later rescale these scaled series using the Linear Scaling Assistant if you need to create a different measurement. See Configuring an Analog Module/Port. The Pulse Scaling Assistant is similar to the Linear Assistant, but only allows scaling of pulse data. Using the Linear Scaling Assistant 1. At launch time: Using a logger with a sensor that supports scaling at launch time, click the Launch icon on the toolbar. Click the Scaling button. Double click the assistant name or select the assistant and click the Create button. At plot setup: Read out a logger or open a file that supports linear scaling. Select the Linear Scaling Assistant and click the Process button. 2. In the Linear Scaling Assistant window, choose the data series you want to convert from the Raw Series drop-down list. 3. In the Scaled column of the Parameters panel, type the units name for the scaled series and enter the scaled values in the Scaled column to correspond with the numbers in the Raw column. (The default values in the Raw column are based on the high and low values supported by the sensor, but you may 84
. 6. Click the Create New Series button. 7.")
85 use different values, as long as those values fall within the sensor's range.) These numbers establish a linear relationship between raw and scaled values. 4. In the Resultant Series Name field, keep the default name or type a new one. 5. Type any User Notes concerning the series you are creating (optional). 6. Click the Create New Series button. 7. If you ran the assistant from the Launch window, the Scaling button displays the number of newly created series. If using this assistant while plotting, the new series is listed and selected in the Plot Setup dialog. Click the Plot button to display the series. 8. The scaled series will appear in the plot immediately or when you read out the logger if configuring this at launch time. The settings for the scaled series are listed in the Details pane of the plot: After the plot is displayed, you may apply minimum, maximum, and average filters to the scaled series as you would for any sensor data series. Pulse Scaling Assistant The Pulse Scaling Assistant converts a data series from a compatible sensor to some other measurement when you enter a raw value and its corresponding measurement value. The conversion must be based on a linear relationship. Nonlinear scaling is not supported The Pulse Scaling Assistant can be run from the Launch window (Pre-set Parameters) or from the Plot Setup window. If you run the assistant from the Plot Setup window, you must run the assistant each time you readout the logger or open a datafile. Supported Sensors This assistant is available for the following sensors: S-UCA-xxxx and S-UCC-xxxx Electronic Switch Pulse Input Adapter S-UCB-xxxx and S-UCD-xxxx Contact Closure Pulse Input Raw Pulse sensors connected to HOBO UX series loggers that support pulse logging Other Types of Scaling There are also other types of scaling available that may apply to your configuration: FlexSmart modules are set up for scaling prior to launch, as part of the module configuration process. See Configuring an Analog Module/Port. The Linear Scaling Assistant is similar to the Pulse Scaling Assistant, but has slightly different input options and is compatible with a different group of sensors. See the Linear Scaling Assistant for more information. 85


86 Using the Pulse Scaling Assistant 1. At launch time: Using a logger with a sensor that supports scaling at launch time, click the Launch icon on the toolbar. Click the Scaling button. Double click the assistant name or select the assistant and click the Create button. 2. At plot setup: Read out a logger or open a file that supports pulse scaling. Select the Pulse Scaling Assistant and click the Process button. 3. In the Pulse Scaling Assistant window, choose the data series you want to convert from the Raw Series drop-down list. 4. In the Scaled column of the Parameters panel, enter the units name for the scaled series and enter a scaled value in the Scaled box to correspond with the number in the Raw box. These numbers establish the relationship between the raw and scaled values. 5. In the Resultant Series Name field, keep the default name or type a new one. 6. Type any User Notes concerning the series you are creating (optional). 7. Click the Create New Series button. 8. If you ran the assistant from the Launch window, the Scaling button displays the number of newly created series. If using this assistant while plotting, the new series is listed and selected in the Plot Setup window. Click the Plot button to display the series. 9. The scaled series will appear in the plot immediately or when you read out the logger if configuring this at launch time. The settings for the scaled series are listed in the Details pane of the plot: After the plot is displayed, you may apply filters to the scaled series as you would for any other series. In addition to the minimum, maximum, and average filters that are available for most series, the scaled pulse series allows you to create a new series showing totals over a period of time. 86

87 Barometric Compensation Assistant The Barometric Compensation Assistant uses water pressure data from a HOBO U20 or U20L Water Level Logger and additional information from you to compensate for barometric pressure and create a water level or sensor depth series. After you use the assistant and display the plot, you may apply filters to the new series. To create a water level or sensor depth series: 1. Read out a logger or open a datafile that contains water pressure data from a U20 or U20L Water Level Logger. 2. From the Plot Setup window, select Barometric Compensation Assistant and click Process. 3. Provide Fluid Density information by choosing a water type (fresh, salt, or brackish), entering a specific constant value, or using the temperature series (if logged) to use temperature-compensated density assuming fresh water. 4. To enter a reference water level, check the Use a Reference Water Level box, enter the water level, and indicate whether it is in feet or meters. Enter the water level as a positive number if it is measured upward from a reference point below the water's surface, such as the water's height above sea level. Enter the water level as a negative number if it is measured downward from a reference point above the water's surface, such as a well cap. Then, from the drop-down, select the logged time and value that is closest to the time when you measured the water level. When selecting a logged value and time to link to the reference level, make sure the logger readings have stabilized. When a logger is first deployed in water, it takes some time for its 87

88 temperature to reach equilibrium. You will get the best accuracy if you link your reference reading to a stabilized logger reading. When using a reference water level, the resulting series data will contain water level values relative to this reference level. If you do not use a reference water level, the resulting series data will contain values for absolute sensor depth. 5. You can either use a barometric data file from another source, or enter a fixed barometric pressure. For the most accurate water level results, use a reference water level and a barometric data file. The barometric data can come from another HOBO U20 or U20L or U20L Water Level Logger in air; a HOBO Weather Station, HOBO Micro Station, HOBO U30, or HOBO Energy Logger; or a text file from another source. To use another file to provide barometric information, click the Use Barometric Datafile button and enter (or browse to) the name of a.hobo,.hsec,.dtf,.dsec, or.txt file that contains a barometric pressure series from an overlapping time period. You will have the option to display this series on the plot. Important: To use a.txt file, see Import Text Files Requirements. Note that time zone settings in.hobo, hsec,.dtf, and.dsec files are automatically adjusted to match the time zone used in the U20 or U20L data file. However, time zone settings in.txt files are assumed to match the time zone used in the U20 or U20L data file and are not adjusted. To use a constant pressure value, click the Use Constant Barometric Pressure button. Enter the constant value and indicate whether it is in psi or kpa. (You cannot use a constant pressure value in combination with a reference water level.) 6. Keep the default Resultant Series Name, or enter a new one. You may also enter User Notes concerning the series you are creating. Note: Your settings are retained, so you do not need to re-select your density and barometric file each time you use the Barometric Compensation Assistant as long as they still apply to the new water level data set. 7. Click Create New Series. The new series is listed and selected in the Plot Setup window. You can click Process on the Plot Setup window again to create another series using different barometric compensation parameters. 8. Click the Plot button. The scaled series will appear in the plot and the settings for the scaled series are listed in the Details pane: After the plot is displayed, you may apply minimum, maximum, and average filters to the new water level or sensor depth series as you would for any sensor data series in HOBOware Pro. Conductivity Assistant The Conductivity Assistant converts raw conductivity data from a U24 logger to Specific Conductance and/or Salinity. You can also use it to enter field calibration measurements recorded at the beginning and end of a deployment for calibration and to compensate for drift and sensor fouling effects. 1. Read out a U24 series logger or open a datafile from a U24 logger. 88


89 2. From the Plot Setup window, select the Conductivity Assistant and click the Process button. 3. In the Conductivity Assistant window, select the conductivity series that corresponds to the range of your data. Note: If you only selected one range at launch time, only one series will be listed. For the U logger, select either Conductivity Low Range when the data is always less than 1,000 µs/cm or select Conductivity Full Range (default) when the data goes above 1,000 µs/cm as shown below. For the U C logger, select either Conductivity Low Range when the data is always less than 10,000 µs/cm or select Conductivity High Range (default) when the data goes above 10,000 µs/cm as shown below. 4. Select your desired Temperature Compensation method. Use "Non-linear, Natural Water Compensation per EN27888" for freshwater lakes and streams. Use "Linear compensation default at 2.1 %/ C" or "Linear compensation at <your own value>" for NaCl solutions or other linear solutions. Use "Non-linear, Sea Water Compensation based on PSS-78" for salt water or salt marshes. 89
 values from your calibration readings")

90 5. Select a Calibration Method. By default, data is calibrated using the factory calibration. To enter your own calibration values, select "Use measured points for calibration" and then enter temperature and actual conductivity (not specific conductance) values from your calibration readings taken with a field meter. These field measurements will be used to provide calibrated conductivity and salinity data series by adjusting the data as a percentage of the reading. See Calibration below for more information. Starting and Ending Value: This method calibrates your data and adjusts for sensor drift or fouling. This assumes there is a linear change in calibration adjustment required. Starting value only: All readings are adjusted up or down by a fixed percentage of the reading based on this calibration point. Ending Value Only: The factory calibration value is used as the starting point. This assumes there is a linear change in calibration adjustment required. Note: You cannot use a zero-point calibration solution for starting and ending values. The first data point cannot be used as the ending value; consider using that as the starting value instead. 6. Select the Only Report Data Between the Selected Points checkbox if you want readings from before or after the calibration points to be removed from the resulting series. 7. In the Series Name field, keep the default name or type a new one. 8. Type any User Notes concerning the series you are creating (optional). 9. Click the Create New Series button. 10. The Plot Setup dialog lists a series called Specific Conductance (or the name you entered for Series Name). The default units are microsiemens/cm (µs/cm). You can change the units to millisiemens/cm (ms/cm) if desired. The default units for salinity are ppt (parts per thousand) and this cannot be changed. 11. Click the Plot button to plot the data. The Details Pane will show the series selected in the Plot Setup: 90
91 Calibration After the plot is displayed, you may apply minimum, maximum, and average filters to the scaled series as you would for any sensor data series in HOBOware Pro. 12. Save this plot as a Project to preserve this processed data. It is important to take temperature and conductivity calibration readings with a portable conductivity meter at both the beginning (launchtime) and end of a deployment (readout) because these readings are necessary for data calibration and to compensate for any measurement drift during deployment. The temperature and conductivity calibration readings should be the actual conductivity values (not in specific conductance at 25 C), and should be recorded in a notebook with the time and location of the reading. See the logger manual for details on different methods of obtaining water samples to record these values. Notes: 1. Once the logger is deployed and logging, record in a notebook the temperature and actual conductivity meter readings along with the date and time which will be entered into the Conductivity Assistance to correct the field data. 2. Before you remove the logger and read out its data, take another temperature and conductivity reading with the meter and record the exact date and time. 3. Enter these values under the "Use measured points for calibration" option in the Conductivity Assistant. Whenever a logger is removed for downloading data, clean the sensor window using a cotton swab with a mild detergent and rinse. If the water in the field is not accessible to the conductivity meter sensor, such as in a deep well, a bailer can be used to fetch a water sample for testing. See the logger manual for more details. Dissolved Oxygen Assistant The Dissolved Oxygen Assistant corrects for measurement drift from fouling and provides salinity-adjusted DO concentration as well as percent saturation data. 1. Read out a U26 series logger or open a datafile from a U26 logger. 2. From the Plot Setup window, select the Dissolved Oxygen Assistant and click the Process button. 3. With the Dissolved Oxygen Data Assistant, you can adjust the data for salinity (step 4), enter barometric pressure information for percent saturation calculation (step 5), select the resultant series you wish to generate (step 6), and enter field calibration data (step 7). 91
.")

92 4. Adjust for salinity. If you deployed the logger in saltwater, you must adjust for salinity to get either a DO concentration or percent saturation. To do this, select the "Adjust for Salinity" checkbox (you will also need to select the checkboxes under Resultant Series Information for the series you would like). Select whether the series should be adjusted based on salinity or specific conductance. If you chose salinity: Select "Salinity value" if you have a specific value from a conductivity meter reading or other source; type the value in ppt as shown below. This works well if the salinity is constant during the deployment. If the salinity changes during the deployment, select "Salinity datafile" to use a data file from a U24 conductivity logger or a text file. Click the Choose button and select the file. (See the Important note for more details about using files.) If you chose specific conductance: Select "Sp. cond. value" if you have a specific conductance value from a meter reading or other source; type the value in either µs/cm or ms/cm as shown below. This works well if the specific conductance is constant during the deployment. If it is not constant, select "Specific conductance datafile" to use a data file from a U24 conductivity logger or a text file. Click the Choose button and select the file. (See the Important note for more details about using files.) 92

93 Important: When using a file for salinity or specific conductance data, you can select either a.hobo file from a HOBO U24 Conductivity Logger or a.txt file from a U24 logger after it has been calibrated with the Conductivity Assistant. Using a U24.hobo file is the easiest while a calibrated U24 text file provides the highest accuracy. Follow these steps to create a text file from a U24 Conductivity Logger in the proper format: A. Click Cancel to close the DO Assistant and Plot Setup windows if they are open. B. From the File menu, select Preferences. C. In the General Preferences, select Export Settings. D. Click the "Use default BoxCar Pro export settings" button and click OK. This will ensure the text file you create is the proper format for the Dissolved Oxygen Assistant. E. From the File menu, select Open Datafile and select the U24.hobo file. F. In the Plot Setup window, select the Conductivity Assistant and click Process. G. In the Conductivity Assistant, create a calibrated specific conductance or salinity data series. H. Back in the Plot Setup window, select the specific conductance or salinity series only. Click None under Select Internal Events to Plot so that no events are plotted. I. Click the Plot button. J. From the File menu, select Export Table Data. Choose "Export to single file" if prompted. K. To use the calibrated conductivity file, open the DO file again. In the Plot Setup window, select the Dissolved Oxygen Assistant and click Process. Select the text file you just created in the previous step for the salinity or specific conductance datafile. This file will be used to generate the series adjusted for salinity. 5. Use barometric pressure (for percent saturation). Check the "Use barometric pressure (for percent saturation)" box if you want to generate a DO percent saturation series (you will also need to select the DO Percent Sat. checkbox under Resultant Series Information). For the best accuracy, use a data file from a HOBO Water Level logger deployed in the air or a nearby weather station. Select "Barometric Datafile" and click the Choose button to select the.hobo or.txt file. Important: If you are using a.txt file from a non-hobo device, it must follow specific requirements as described in Import Text File Requirements. If you do not have a barometric pressure file, then select "Barometric data value" and type in the average barometric pressure during your deployment in one of the five available units. If the barometric pressure readings are from barometric data that has been adjusted to sea level readings (such as those taken from a National Weather Service weather station), then you must also select the "For sea level barometric pressures, enter elevation" checkbox and type the elevation where the logger was deployed in either meters or feet. Absolute pressure values, such as those obtained from a HOBO Water Level logger, do not need to be adjusted for elevation. 93


94 6. Resultant Series Information. Make sure the series you want to plot are selected in the Resultant Series Information pane. To generate a series for adjusted DO concentration, check the "DO Adj Conc." box. To generate a series for percent saturation, check the "DO Percent Sat." box. The default series names display automatically to the right of the selected series. Edit those series names as needed. You can also type up to 250 characters of optional user notes. 7. Perform Field Calibration. Use field calibration to compensate for measurement drift due to fouling or if the logger was not lab calibrated. (Lab calibration typically remains accurate for the full 6-month life of the sensor cap if there is no fouling.) Check the "Perform field calibration" checkbox and select the type of field calibration: either "Using Dissolved Oxygen Meter or Dissolved Oxygen Titration" or "Using 100% Water-Saturated Air." For calibration using a dissolved oxygen meter or titration: Select the "Starting calibration point" checkbox and select the date/time of the calibration reading. View the logged data values shown in the drop-down box to be sure that the logger readings have stabilized. It is more important that you use a good stabilized logger reading than exactly matching the times. Type in the Meter/Titration DO Measurement in mg/l taken at that date/time. If using an ending calibration reading, or, if desired, select the "Ending calibration point" checkbox and select the date/time of that calibration reading. Make sure the logger reading you use for calibration is one from when the logger was in the water, keeping in mind that the logger time may be slightly different from the time used for your field readings. You can usually see the data points that were recorded when the logger was out of the water. Type in the Meter/Titration DO Measurement in mg/l for this ending calibration point. 94

95 Note: If only an Ending calibration point is entered ( Starting calibration point not checked), then the assistant will use the logger calibration for the starting calibration. This assumes you are starting with an accurately calibrated logger and saves you from having to do your own starting point calibration. However, if you select a Starting calibration point and no Ending calibration point, the series will be adjusted for the one calibration point. This may be accurate enough for applications where there is no significant fouling during the deployment time. For calibration using 100% water-saturated air: Select the "Starting calibration point" checkbox and the "Ending calibration point" checkbox and select the date/time for the first calibration reading. View the values shown in the drop-down list to be sure the readings are stable at this calibration point (using a calibration point from when the logger is in air or has not reached temperature equilibrium will result in incorrect calibration). Select the source of the barometric pressure readings. From the Barometric Pressure drop-down list, select "from the left" to use the barometric pressure data file already entered in the assistant or select "entered here" to enter a specific barometric pressure value in one of five available units. If you are using an ending calibration reading, select the Ending calibration point checkbox and select the date/time of that calibration reading following the same guidelines as you did for the starting calibration point. For the ending point, enter the barometric pressure information (select from the left or entered here as described above). 95


96 Check the "Only report data between selected points" if you want the new series to only include data between the selected calibration points. Leave this option unchecked to include all data. 8. Click the Create New Series button when finished entering information in the data assistant. 9. Depending on which series you selected to add, the Plot Setup dialog lists two news series: DO Adj Conc and DO Percent Sat (or the names you entered for Series Names). The default units for the DO Adj Conc series are mg/l. You can change the units to ppm if desired. 10. Click the Plot button to plot the data. After the plot is displayed, you may apply minimum, maximum, and average filters to the scaled series as you would for any sensor data series in HOBOware Pro. 11. Save this data and plot setup as a Project to preserve the new series you created for future use. 96

97 Field Values These are the minimum and maximum values allowable in the fields in this assistant. Measurement, Units Minimum Maximum pressure, mm Hg pressure, in Hg pressure, millibars ,114.0 pressure, kpa pressure, Pa 51, ,000 pressure, psi elevation, m , elevation, ft , salinity, ppt sp. cond., µs/cm ,000.0 sp. cond., ms/cm meter/titration DO conc, mg/l Grains Per Pound Assistant The Grains Per Pound Assistant calculates the absolute amount of water in the air, based on temperature, humidity, dew point, and altitude. You can also create an altitude-corrected dew point series. To create a grains per pound and altitude-corrected dew point series: 1. Read out a logger or open a datafile that contains temperature, humidity, and dew point series. 2. From the Plot Setup window, select the Grains Per Pound Assistant and click the Process button. 3. In the Grains Per Pound Assistant window, choose the data series you want to convert from the Temperature, Relative Humidity, and Dew Point Series drop-down lists. 4. To correct for the Altitude above Sea Level (optional), enter the altitude and use the drop-down menu to indicate whether this number is in feet or meters. 5. Select the Add Altitude-Corrected Dew Point Series to Graph checkbox to plot an altitude-corrected dew point series. 6. In the Resultant Series Name field, keep the default name or type a new one. 7. Type any User Notes concerning the series you are creating (optional). 8. Click the Create New Series button. The new grains per pound series (and altitude-corrected dew point series, if applicable) is listed and selected in the Plot Setup window. 97

98 9. Click the Plot button. The scaled series will appear in the plot and the settings for the scaled series are listed in the Details pane: After the plot is displayed, you may apply minimum, maximum, and average filters to the grains per pound and altitude-corrected dew point series as you would for any sensor data series in HOBOware Pro. Growing Degree Days Assistant The Growing Degree Days Assistant calculates growing degree days based on temperature data spanning at least one full calendar day (midnight to midnight). Growing degree days are used for agricultural and turf management applications, such as estimating harvest time or pest growth. One growing degree day (GDD) is equivalent to a one degree increase above a minimum threshold temperature for a period of one day. For example, assuming no horizontal cutoff, if the minimum threshold temperature is 70 F and the temperature was a constant 85 F for the day, the GDD for that day is 15 GDD. A single GDD value is calculated for each full calendar day of temperature data, and plotted at noon for that day. GDD values are cumulative; that is, the GDD for each day adds to the previous days GDD value. Important: Time of day is a factor in the GDD computation. When you launch a logger, be sure that your computer s clock is set to the proper time zone for the area where the logger will be deployed. If you try to correct it later by entering a different offset in the Plot Setup window, you may get confusing or misleading results. To create a series for growing degree days: 1. Read out a logger or open a datafile that contains data from a temperature sensor. 2. From the Plot Setup window, select Growing Degree Days Assistant and click the Process button. 3. In the Growing Degree Days Assistant window, choose the data series you want to convert from the Temperature Series drop-down list. 98
99 4. Select the Calculation Method you want to use. Average Method: Calculates the average of the high and low temperatures for the day (adjusted to the lower and upper thresholds, if necessary), then subtracts the low threshold to compute the GDD. Single Triangle (no Cutoff): Uses the low and high daily temperatures to compute a set of two linear equations to generate a triangle. The area between the curve and the low threshold is then used to compute the GDD. Single Triangle (with Horizontal Cutoff): Uses the low and high daily temperatures to compute a set of two linear equations to generate a triangle. Then it adjusts any temperatures above the upper threshold to the upper threshold. The remaining area between the curve and the low threshold is then used to compute the GDD. Single Sine (no Cutoff): Uses the low and high daily temperatures to compute a sine wave that assumes the low temperature occurred at midnight and the high temperature occurred at noon. The area between the curve and the low threshold is then used to compute the GDD. Single Sine (with Horizontal Cutoff): Uses the low and high daily temperatures to compute a sine wave that assumes the low temperature occurred at midnight and the high temperature occurred at noon. Then it adjusts any temperatures above the upper threshold to the upper threshold. The remaining area between the curve and the low threshold is then used to compute the GDD. Actual Temperature Method (no Cutoff): Uses the logging interval of the temperature data to perform a numerical integration. The area between the curve and the low threshold is used to compute the GDD. Actual Temperature Method (with Horizontal Cutoff): Adjusts any temperatures above the upper threshold to the upper threshold. Then it uses the logging interval of the temperature data to perform a numerical integration. The area between the curve and the low threshold is then used to compute the GDD. Actual Temperature Method (with Vertical Cutoff): Uses the logging interval of the temperature data to perform a numerical integration. Any interval in which the temperature exceeds the upper threshold is excluded from the calculation. The remaining area between the actual curve and the low threshold is then used to compute the GDD. 5. Select lower and upper Development Threshold values. These are the minimum and maximum thresholds that will be used in the GDD calculation. Use the sliders to set these thresholds, or enter the values manually. If the calculation method you chose does not use an upper threshold, the upper threshold option will be disabled. Temperatures are in degrees Fahrenheit if your default unit preference is US, and in degrees Celsius if your default unit preference is SI. 6. In the Biofix Parameters panel, choose a date that marks the beginning of the development phase for the Biofix date. The dates in this list are the full days contained in the datafile. 7. In the Degree Days to Event, enter the number of degree days needed to reach an event of interest (harvest time, pest emergence, etc.). This will create an alarm line on the graph to indicate when the event took place. Degree days are in Fahrenheit (DDf) if your default unit preference is US, and in Celsius (DDc) if your default unit preference is SI. 8. In the Event Description field, type any text to identify the event (optional). 9. In the Resultant Series Name field, keep the default name or type a new one. 10. Type any User Notes concerning the series you are creating (optional). 11. Click the Create New Series button. 99

100 12. The new series is listed and selected in the Plot Setup window. Click the Plot button. The scaled series will appear in the plot and the settings for the scaled series are listed in the Details pane: kwh Assistant The kwh Assistant converts logged pulse data to kwh, average kw, and energy cost with WattNode, Veris, or other energy transducers, and from Raw Pulse sensors attached to a HOBO 4-Channel Pulse Input Data Logger (UX x). This assistant can be applied to logged data from a S-UCA-xxxx or S-UCC-xxxx Electronic Switch Pulse Input Adapter. It is not compatible with the S-UCB-xxxx or S-UCD-xxxx Contact Closure Pulse Input Adapter. After you use the assistant and display the plot, you may apply filters to the new series. This data assistant is one of several launch utilities that can also be used at launch time for certain loggers. Using the kwh Assistant 1. At launch time: Using a logger or sensor that supports scaling at launch time, click the Launch icon on the toolbar. Click the Scaling button. Double click the assistant name or select the assistant and click the Create button. At plot setup: Read out a logger or open a file that supports kwh scaling. Select the kwh Assistant and click the Process button. 2. In the kwh Assistant window, choose the data series you want to convert from the Pulse Series dropdown list. 100
 If your transducer is not listed, select Other and enter the conversion factor.")
101 3. In the Setup panel, select the Energy Transducer that was used, and choose the model number from the drop-down list. (Since the Veris transducers have a switch to define kwh/pulse, you must specify that here as well.) If your transducer is not listed, select Other and enter the conversion factor. Choose the type of conversion (Wh/pulse per CT Rated Amp, Wh/pulse, or kwh/pulse) from the dropdown list. Refer to the manual that came with your energy transducer for help with identifying the conversion factor 4. Enter the current transformer size (in Amps) in the CT Size field. (Veris transducer CT sizes are predefined.) 5. In the Output Series panel, select one or more series you wish to create. For each series, you may keep the default Resultant Series Name or type a new one. To create a series that shows energy in kwh, check the Energy box. To create a series that shows average power, check the Average Power per interval box. To create a cost series, check the Usage Cost box and enter the cost per kwh. 6. Type any User Notes concerning the series you are creating (optional). 7. Click Create New Series. 8. If you are running this assistant at launch time, the kwh button displays the number of newly created series. If using this assistant while plotting, the new series is listed and selected in the Plot Setup window. Click the Plot button to display the series. 9. The scaled series will appear in the plot immediately or when you read out the logger if configuring this at launch time. The settings for the scaled series are listed in the Details pane of the plot: 101

102 After the plot is displayed, you may apply filters to the new series as you would for any other series in HOBOware Pro. In addition to the minimum, maximum, and average filters that are available for most series, the energy and cost series allow you to create new series showing totals over a period of time. Exporting Data While HOBOware offers many tools for analyzing data, there may be instances where you need to export data for use in other software. Refer to the following for exporting data and other related topics: Exporting Table Data Exporting Data in Classic (BoxCar Pro) Format Exporting Details Copying Points Data into Another Application Formatting the Date/Time Column in Excel The Bulk Export Tool Exporting Table Data You can export the data shown in the points table to a Microsoft Excel file or to a text file (.csv or.txt) for importing into other applications. You can also export the data points gathered in a ZW wireless network via the Plot/Export Wireless Data window. To export data: 1. From HOBOware files: Open a data or project file. Make sure the points table includes the series you want to export. This might include series pasted from other datafiles or series derived through filters or Data Assistants. Make any changes as necessary. From the Plot/Export Wireless Data window: Make the changes necessary to select the desired series and then click the Export button. Skip to step From the File menu, select Export Table Data or click the Export icon on the toolbar. 3. To change the export settings, click the Preferences button. Make any changes to the settings and then click OK in the Preferences window to return to the Export window. Note: Changes to the "Use export ordering rules" preference are not automatically displayed in the Export window; they will take effect the next time you open the Export window. 102
103 4. Select the series you wish to include in the exported file. Use the All and None buttons or the checkboxes in the Select column to make your changes. Note: Only the series that are listed in the points table in a plotted HOBOware file or selected from the Plot/Export Wireless Data window are available to export from this window. To make additional series appear in this window, click Cancel and go back to step The data will be exported in the order displayed in the Export window. To change this sort order, click a column header in the Export window. You can sort the Measurement, Units, sensor S/N, and Label columns in both ascending and descending order. Or, click a row to drag that series to a different position in the list. To return to the original sort order, click the Restore Order button. Note that if you have the export preferences set to "Use export ordering rules," then the series will be listed in the order defined in that preference when you click the Restore Order button. If the datafile contains series with measurement types that are not defined in the export ordering rules preference, then those series will be listed after the defined series. 6. Click the Export button and then select where you want to save the file. 7. Click Save. You can now open the exported file in Excel or another software application. Note that if you have the export preference "Include plot details in exported file" enabled, then any information in the Details pane of the plot will be included in the exported file along with the sensor data. Exporting Data in Classic (BoxCar Pro) Format BoxCar Pro is legacy software from Onset Computer. HOBOware includes a preference setting that allows you to export and import data in a format compatible with Onset's Box Car Pro software. To change the export preferences to use settings compatible with BoxCar Pro: 1. From the File menu in Windows or the HOBOware menu on Macintosh, select Preferences. 2. Select the General category and then click Export Settings. 3. Click the "Use classic export settings" button and then click OK. See Export Settings for details on all export preference settings. Exporting Details You can export the information in the Details pane to a text file, which can be opened in any text editor or imported into numerous applications, such as Microsoft Word or Excel. To export details: 1. Make sure the Details pane includes the series you want to export. This might include series pasted from other datafiles or series derived through filters or Data Assistants. 2. From the File menu, select Export Details. 3. Accept the default file name, or type a new name. 4. Click Save. If you would prefer to have the information in the Details pane and sensor data in the same file, select Preferences from the File menu in Windows or the HOBOware menu in Macintosh and click the General category. Click Export Settings and then enable the "Include plot details in exported file" checkbox and click OK. The next time you use the Export Table Data feature, the plot details will be included in the exported file along with the sensor data. 103
104 Formatting the Date/Time Column in Excel In Excel, dates and times for each data point may initially appear as ####### and times may not have seconds listed. To display the full date and time with seconds in Excel: 1. Adjust the time column width so you can see the whole date and time. 2. Select the time column from row 3 down. 3. From the Format menu, click Cells. 4. Select the Custom category and then select "m/d/yyyy h:mm" as the type. 5. Add ":ss" (or ":ss.000" if you used a fast logging interval) to the end of the string in the Type field: m/d/yyyy h:mm:ss (normal logging interval) m/d/yyyy h:mm:ss.000 (fast logging interval) 6. Click OK. The seconds should be listed automatically. To export the date and time in separate columns, go to Preferences> General > Export Settings and enable the "Date and time format: Separate into two columns" option. The Bulk Export Tool The Bulk Export Tool is a plug-in tool for HOBOware Pro that exports HOBOware files to text or Microsoft Excel format for use in other programs. This tool is particularly helpful when you need to export multiple files at once. With the Bulk Export Tool, you can export the following file types:.hobo.dtf.hsec.dsec Any naming conflicts are automatically resolved to prevent overwriting any pre-existing files. A log summarizing the export results is saved in the same directory as the newly exported files. The Bulk Export Tool uses the general export settings for HOBOware Pro. To configure the Export Settings, go to the File menu in Windows or the HOBOware menu in Macintosh and select Preferences. In the General category, select Export Settings. Using the Bulk Export Tool To export files with the Bulk Export Tool: 1. From the Tools menu, select Bulk File Export and then Select Files to Export In the Select Files to Export dialog, select the files you wish to export and click Continue. 104
. A message appears when the export is complete. Click OK.")

105 3. In the Choose Exports Folder dialog, navigate to the directory where you want the files to be exported and click Export. 4. A progress bar indicates the status of the export (if this happens very quickly, you may not see the bar). A message appears when the export is complete. Click OK. The exported files are saved to the specified directory. The native file extension is removed and appended with the file type selected in the export preferences (.txt,.csv, or.xls). For example, if the Export File Type preference is set to Excel, then exportfile.hobo is renamed exportfile.xls. If a file name already exists, new files will be appended with "_0", "_1" etc. For example: exportfile.xls exportfile_0.xls exportfile_1.xls 105
106 A log file showing the result of each exported file is also saved to the same directory. The log file lists either the successful export with the resulting file names or an error message if there was a problem. The log file has the date and time of the export in its file name like this: Export_<day>_<month>_<year>_<hour>_<minute>_<second>.log Important: The Bulk Export Tool will not export files properly if the "Show export dialog" setting is selected in the export preferences. To disable this setting, select Preferences from the File menu in Windows or the HOBOware menu in Macintosh. In the General category, select Export Settings. Make sure "Show export dialog" is not selected. Even if the "Automatically export table data upon readout of logger" option is disabled, the "Show export dialog" must not be selected for the Bulk Export Tool to export files properly. Your preferences must look like this: or this: but not like this: for files to export correctly. YAML You can choose to have YAML ("YAML Ain't a Markup Language") headers added to the exported files (they are not inserted by default). If enabled, YAML headers are inserted at the front end of the file. You can remove the YAML header using any text editor. YAML (rhymes with camel ) is a human-friendly, cross language; Unicode based data serialization language designed around the common native data structures of agile programming languages. For more information see yaml.org. To enable YAML headers: 1. Go to the File menu in Windows or the HOBOware menu in Macintosh and select Preferences. 2. Scroll down to the Bulk Export category and select YAML. 3. Check the Export with YAML Headers box. 106

107 Importing Text Files You can plot non-hoboware data by importing data from certain text files including: Text files that were created by Onset s Alarm & Readout Tool version 2.0 or higher. Text files that were exported from Onset's BoxCar Pro 4.3 software using the default BoxCar export settings. This allows you to view data from legacy Onset loggers that cannot be read out using HOBOware Pro. With some adjustments, you can open text files that were exported from other software or that you create. See Importing Text File Requirements for more details. Note: This feature is only available in HOBOware Pro. To import data from a properly formatted text file: 1. From the File menu, select Import Text Data. 2. Select a text file (.txt) and click Open. 3. If the text file was created by the Alarm & Readout Tool, go to step 8. Otherwise, HOBOware Pro attempts to parse the text file and displays the Text Import Information window. To conserve system resources, it displays only the first several records in the file. 4. Check the Delimiter Preview area to be sure the date, time, and data columns are separated correctly. If they are not, use the Data Separator, Date/Time Separator, and Decimal Separator pull-down menus to choose other delimiters until the data looks correct. You can resize the columns by clicking and dragging the dividers between the column headers. For text files that were not exported in BoxCar's default format, click the Edit Date/Time Format button and ensure that the import function is interpreting incoming date, time, and year formats and separators correctly. Use the current date and time displayed in the Sample panel as a guide. 5. When the Delimiter Preview is correct, click OK. 107
108 6. Depending on the file's contents, the Plot Setup window may be displayed at this time. If so, go to step 8. Otherwise, the Text File Information window is displayed. This window allows you to add optional information and change units, if needed. 7. Click OK. Type a description, which will become the plot title and be included in the Details pane. Select a model from the list. If you select Other/3rd Party, you can enter a description (up to 20 characters) of the logger or other data source in the next field. Type the logger's serial number, if applicable. Verify the units are correct for the data in the file. 8. The Plot Setup window opens. Select the series you wish to view in the plot and click Plot. The plot is displayed. You may want to save your work in a project (.hproj) file for quick viewing later. Import Text Files Requirements When you import a text file, the file must meet certain requirements. You can view or edit text files in a text editor or word processor. To delete, rearrange, or reformat columns of data, you may need to use a spreadsheet program. Remember to save the corrected file in text (.txt) format. This feature is only available in HOBOware Pro. Internal events recorded by loggers, such as Host Connected, Started, and Stopped, cannot be imported. Serial Number The file can contain an optional header for serial number information located at the beginning of the file, before the column headings. The header must have the phrase "Serial Number:" followed by a space, then the serial number, then two dashes: Serial Number: Note: Text files originating from HOBOlink and the Alarms & Readouts Tool may also contain YAML headers at the top of the file. Contents Below the header (if any), there should be the data, starting with column headings. There must be no other text in the file other than the optional header, column headings, and data. The first column must be date, the next must be time, and the rest must be data. Delimiters Valid delimiters for separating date and time and other data are commas, tabs, and semicolons. The delimiter used to separate the date from the time may be different from the delimiter used to separate the data. Do not use a space as a delimiter; there cannot by any spaces in the data. Date The date column must have the heading, "Date" and date values should be formatted as mm/dd/yy. If they are in a different format, remember to indicate the correct format in the Edit Date/Time Format window when you import the file. Date 12/31/04 12/31/04 01/01/05 01/01/05 108
109 Time The time column must have the heading, "Time" and time values should be formatted in 24-hour format as hh:mm:ss.sss (decimals are optional). If they are in a different format, remember to indicate the correct format in the Edit Date/Time Format window when you import the file. UTC offset is assumed to be the same as your computer's current time zone. Measurements Time 23:59:59 23:59: :00:00 00:00:00.5 No thousands separator can be used. Rows of data must be separated with a paragraph return. There must be a last blank row. Data column headings must have the format "Measurement (Units)". Additional information (such as channel number or serial number) can follow, but is optional. Only spaces can be used between the end of the measurement name and the opening parenthesis. An example is "RH (%)". RH (%) If the column header and units of an imported series exactly matches the text in the table below, HOBOware will recognize the measurement and be able to perform unit conversions, apply data assistants, etc. to that series. Measurements listed below that either have only one unit type, or can be any unit type, cannot have their units converted, but may still be used with applicable data assistants. Measurement Type Column Header Units Acceleration x accel, y accel, z accel g, m/s2, ft/s2 Active Energy watt-hours, kilowatt-hours Wh, kwh Active Power watts W Apparent Power volt-amps VA Carbon Dioxide co2 ppm Conductivity low range, full range, high range µs/cm, ms/cm Counts counts [any units] Dew Point dew point F, C Gust Speed gust speed m/s, km/hr, mph, knots Leaf Wetness leaf wetness [any units] Light Intensity intensity lux, lum/ft2 PAR par [any units] Power Factor power factor [any units] Pressure pres kpa, Pa, mbar, mm Hg, psi, in Hg Rain rain mm, in Reactive Power volt-amps-reactive VAR 109
110 Measurement Type Column Header Units Relative Humidity rh % RMS Current amps A RMS Voltage volts V Salinity salinity ppt Soil Moisture soil moisture [any units] Specific Conductance conductance µs/cm, ms/cm Sum Vector sum vector g, m/s2, ft/s2 Temperature temp F, C Tilt x tilt, y tilt, z tilt deg, rad Wind Speed wind speed m/s, km/hr, mph, knots Wind Direction wind dir [any units] Measurements that are not listed in the table (or do not exactly match the text below) can be exported, but without any units conversions or use of Data Assistants. These include: Air Velocity Battery Compressed Airflow Conductance Current Gauge Pressure Power Solar Radiation Temperature for Thermocouples Water Flow Volatile Organic Compound Voltage Asynchronous Events/Readings State Runtime Importing Files from HOBOlink This feature allows you to import the current data file for a remote HOBO U30 Station from HOBOlink directly into HOBOware for analysis. Note: This feature is only available in HOBOware Pro. To import a file from HOBOlink into HOBOware: 1. From the File menu, select Import Data File from HOBOlink. 110

111 2. Type the serial number for the HOBO U30 Station. 3. Type the Username and Password for the HOBOlink account. 4. Select the "Save this information" checkbox if you want to HOBOware to retain the username and password for future use. 5. Click Go to import the file into HOBOware. 111
112 Chapter 5 Hardware Reference Refer to the following topics for more information on using HOBOware with specific devices: Working with the HOBO U30 Station Configuring FlexSmart Modules/Analog Sensor Ports Working with a Shuttle Configuring Loggers with the E50B2 Power and Energy Meter Checking Dates for the HOBO U26 Dissolved Oxygen logger Sensor Cap Using the Lab Calibration Tool with the HOBO U26 Dissolved Oxygen Logger Updating UX Series Logger Firmware Fixing "Read Header Failed" Error Working with the HOBO U30 Station There are four models of the HOBO U30 Station: USB, cellular, ethernet, and wi-fi. The USB model works with HOBOware only. The cellular, ethernet, and wi-fi models are designed primarily for use with internet-based HOBOlink software, but can also work with HOBOware for specific tasks. This section describes when to use each of the four U30 Station models with HOBOware. HOBO USB U30 Station (U30-NRC) Use HOBOware for all tasks with the USB model, including launching, reading out, and checking status. You can also configure alarms, control the relay, configure excitation power, and set the scaling parameters. HOBO Cellular (U30-GSM), Ethernet (U30-ETH), and Wi-Fi (U30-WIF) U30 Stations Use HOBOlink to launch, read out, check status, configure alarms, and set up sensor scaling for cellular, ethernet, and wi-fi models. Although it is possible to perform these tasks with HOBOware, any parameters set in HOBOware will be overridden by the settings in HOBOlink. If you do attempt to launch, read out, or check the status using HOBOware, you may see a message indicating there is already a live HOBOlink session underway. You can choose to override the HOBOlink connection and use HOBOware instead. Alternatively, you may see a message indicating the HOBO U30 Station is busy and a HOBOware session cannot begin. Try again in a few minutes. These models connect to HOBOlink on a schedule that you determine. Data is automatically read out from the U30 Station and uploaded to HOBOlink. There may be circumstances in which you want to override this schedule and contact HOBOlink immediately. For example, if you moved the HOBO U30 Station to a different location and you want to make sure it can still connect to HOBOlink, but you don t want to wait until the next connection. To force an immediate connection to HOBOlink, connect the U30 Station to a USB port. Click the Contact HOBOlink button in the Status window. HOBOlink displays data read out from the HOBO U30 Station in line graphs and shows the readings from the last connection. The data is also saved in datafiles that can be downloaded and opened in HOBOware for additional analysis. While most tasks should be done using HOBOlink, the following tasks can only be completed in HOBOware: 112
113 Configuring the analog sensor port. This can only be done in HOBOware and is accessed through the Launch window. See Configuring FlexSmart Modules and Analog Sensor Ports for details. Changing the default relay setting or testing the relay. The default relay setting for the HOBO U30 Station is normally open and can only be changed in HOBOware. You can also use HOBOware to test the relay. See Controlling the Relay on the HOBO U30 Station for details. Testing the accuracy of individual smart sensors. Unplug all the sensors when the logger is not logging. Plug one sensor back in and check the current reading for the sensor in the Launch Logger window. Repeat this for the remaining sensors. Note: Sensors are listed in ascending order by serial number, regardless of their physical position in the logger. Checking cellular signal strength. Open the Status window in HOBOware to check the cellular signal for the HOBO U30 Station in its current location. This will help you determine if you need to reposition the station for optimal signal strength. Controlling the Relay on the HOBO U30 Station The U30 Station relay contact is a latching relay that can be configured as either Normally Open or Normally Closed. The factory-default setting is Normally Open. To change the relay from the Device menu: 1. Connect the HOBO U30 Station to the computer with the USB cable. 2. From the Device menu, select Manage U Select Control U30 Relay. 4. Select "Set default (deactivated) state." 5. Select either Open or Closed. To conduct an immediate test of the relay from the Device menu: 1. Connect the HOBO U30 Station to the computer with the USB cable. 2. From the Device menu, select Manage U Select Control U30 Relay. 4. Select "Activate (close) relay." You should hear a click in the HOBO U30 Station. 5. Select "Deactivate (open) relay." You should hear the click again. To change the relay and test it using the Sensor Alarms window: 1. From the Device menu, select Manage U Select Configure U30 Alarms and select Configure Alarms to open the Sensor Alarms window. 3. In the Relay Contacts section, select Normally Open or Normally Closed. 4. If you are setting an Alarm Action of Pulse Relay, you can set the Relay Pulse Width in milliseconds. 5. To test the relay, click the Close Relay or Open Relay button in the Sensor Alarms window. You should hear a click in the HOBO U30 Station. Click the button again to return to the default state. Use a digital multimeter to check for continuity to confirm that the relay is opened and closed as expected. 6. Click Set to send the alarm configuration to the U30 Station. 113

 or use the sliders.")
114 Setting Alarms on a HOBO U30 Station You can set alarm to trip for individual sensors on a HOBO USB 30 Station (U30-NRC). 1. From the Device menu, select Manage U30 > Configure U30 Alarms > Configure Alarms. 2. Select a sensor and click Add. 3. In the Alarm Configuration window, select the High Alarm checkbox if you want an alarm to trip when the sensor reading goes above a value you specify. Type a High Alarm value or drag the top slider to set a value. and/or the Low Alarm checkboxes. Type a value for the alarm in the box(es) or use the sliders. Select the Low Alarm checkbox if you want an alarm to trip when the sensor reading goes below a value you specify. Type a Low Alarm value or drag the bottom slider to set a value. Note: If you type a High or Low Alarm value, the software may adjust them slightly to the nearest values supported by the logger. 114

115 4. Set the number of samples that will be logged before the alarm trips. Note: To avoid unintended activation of the relay contact, set the number of samples to allow for anticipated breaches of the alarm threshold. If the measurement is still out of range when the number of samples is reached, the relay contact will be activated. 5. Select an action to occur when the alarm is triggered: Activate Relay (Open/Close), Deactivate, Pulse, Toggle, Open, Close. 6. Select the Deactivate on Alarm Clear checkbox if you want the alarm action to stop automatically once the alarm condition clears. 7. Click OK to save the changes. The alarm will now appear in the Sensor Alarms window. Select the alarm and click Edit if you need to make changes or click Delete to remove an alarm. 8. Click Set in the Sensor Alarms window when finished configuring alarms. Configuring FlexSmart Modules/Analog Sensor Ports You can configure HOBO Energy Logger FlexSmart modules and the HOBO U30 Station analog sensor port to accommodate a wide range of Onset and third-party sensors. You can set up these modules/ports while selecting launch settings or you can create and save different configurations to be loaded into the modules/ports whenever needed. Notes: Modules, ports, and sensors are listed in ascending order by serial number regardless of their physical position in the logger. This procedure is for creating a new configuration and sending it to a port. To send an already saved configuration to a port, see Loading a Saved Configuration. To configure an analog module or port, perform the following steps: 1. From the the Device menu, choose Configure Modules/Ports. 2. In the Select Sensor to Configure window, click the + sign to see the available modules/ports. If you are using the HOBO Energy Logger, you can attach additional modules while viewing this window. Click Refresh to update the module list. Note: The default channel names Voltage and Current can both be configured to measure voltage or current. For example, both channels can be used to monitor sensors with 4-20 ma output. 3. Select a sensor and then click the Configure button to open the Configure Sensor window. Note: You can also access this window from the Launch Logger window. Select the sensor and double-click the module/port name to expand it. Click the sensor name to select it and then click the Configure button. 4. In the Configure Sensor window, select the Sensor Name. Choose either a default name or select Custom and enter your own 16-character name, which you can also save to the list for future use. Note that a saved name is stored as a preference and removed when you restore preference defaults. 115
116 5. Set the excitation power, measurement type, and scaling as desired (options may vary depending on the sensor). For details on excitation power, see Configuring Excitation Power. If the module/port offers more than one type of input, select the correct the measurement type for the sensor. For details on scaling, see Setting Voltage Ranges and Scaling Parameters. 6. Although you do not have to save the configuration if you are going to send it to the module/port right away, you may find it convenient to save it for future use, especially if you have defined custom sensor settings. Click Save, type a name for the configuration file, and click Save again. By default, the file is saved to the following location with an extension of.hcfg. Windows: My Documents\HOBOware\Configs Mac: Users/<username>/Library/Application Support/HOBOware/Configs 7. Click Configure to send the currently displayed configuration to the module/port. The module/port will remain in this configuration until you send it a different configuration. Configuring Excitation Power You can configure sensor excitation power and warm up on the Analog Sensor Ports. Sensor excitation is a voltage output provided by the HOBO U30 Station to power a sensor that is connected to it. This power may be needed because the sensor is not self-powered or because the sensor s power capacity cannot support a long deployment. When sensor excitation is required, the logger can provide 12 V DC sensor excitation voltage up to 200 ma total for transducers that require external power for proper operation. The excitation voltage has a programmable warm up time and is controlled by the Analog Sensor Port. A warm up time can be up to 120 seconds. If the warm up required is longer than 120 seconds, or if you are not concerned with battery life, you may choose the Continuous option, which will power the sensor for the entire deployment. Providing excitation power drastically decreases the logger's battery life (consult the logger manual for more information). To save battery power, you may specify the minimum time needed to power the sensor before taking a measurement. For example, if you specify a Warm Up of one second and set the logging interval in the 116

117 logger to one minute, the logger will power the external sensor for one second, log data and then turn off the excitation power for the next 59 seconds. Always enable the logger's internal battery channel when logging with excitation power. If the battery becomes too low to provide excitation power, excitation power is turned off, but logging continues as long as the battery can power the logger. This will cause the further readings on that channel to become inaccurate. If you are logging the internal battery channel when this happens, an Excitation Off event will be shown in your datafile to mark the point at which excitation power was disabled. To configure excitation power: 1. From the Configure Sensor window, click the Set Excitation Power button. For information on accessing the Configure Sensor window, see Configuring FlexSmart Modules/Analog Sensor Ports. 2. Select the Excitation Power Used checkbox. 3. Select either Warm Up or Continuous mode. If you select Warm up, select the warm up time in seconds. In Warm up mode, the logger supplies excitation power for a brief period prior to each measurement. This mode allows you to select the minimum warm up time needed to allow for sensor stabilization, while conserving battery power. For example, if you specify a warm up of one second and set the Logging Interval to one minute, the HOBO U30 Station will power the external sensor for one second, log a measurement, and then turn off the excitation power for the next 59 seconds. The warm up time can be up to 120 seconds. If the warm up time selected is greater than the logging interval selected, the logger will interpret the excitation mode as continuous. In Continuous mode, the logger supplies constant excitation power to the sensor for the entire duration of the deployment. This mode will result in reduced battery life. Continuous mode is required if the sensor needs more than two minutes of warm up time. 4. Click OK. 5. Select Save to save these settings in a configuration for future use. Click Configure to send this configuration to the port immediately. 117
118 Setting Voltage Ranges and Scaling Parameters You can set voltage ranges and scaling parameters for the HOBO Energy Logger FlexSmart modules and the HOBO U30 Station in the Scaling Parameters panel of the Configure Sensor window. For information on accessing this window, see Configuring FlexSmart Modules/Analog Sensor Ports. To set the scaling or voltage range: 1. Check the Raw Units. This is the type of output the sensor has; either V or ma, corresponding to the type of sensor selected. Raw Value 1 and Raw Value 2 should be input in these units. For example, if the external sensor has an output of 4 20 ma, the raw units would be in ma. 2. Set Raw Value 1, which is the low raw value given by the external sensor. In the previous example, this would be 4 ma. 3. Set Raw Value 2, which is the high raw value given by the external sensor. In the previous example, this would be 20 ma. Important: The number entered for Raw Value 2 determines the voltage range the analog port will use. Use this table to determine what the range will be depending on the number entered in the Value 2 field. If the raw voltage entered in the Value 2 field is: The voltage range for the analog port will be: Less than V Greater than 2.5 and less than or 5V equal to 5 Greater than 5 and less than or 10V equal to 10 Greater than 10 and less than or 20V equal to Select the Scaled Units. Choose one of the predefined units from the pull-down list or select Custom to define units for other types of sensors. If you select Custom, type up to eight characters of the units associated with the sensor. For example, if you are using a flow meter, you could specify CFS (Cubic 118

119 Feet per Second) as the scaled unit. If you want to see data in particular SI or US units, you need to enter the appropriate scaling values in the next steps. Select the "Save this value for next time" checkbox to add this name to the Scale Units drop-down menu for future use. Note that a saved unit name is stored as a preference and removed when you restore preference defaults. Custom unit values do not allow for conversion between SI to US units. It is only a reference used to indicate how the module is configured and how the resulting data should be labeled. Click OK to save the changes and return to the Configure Sensor window. 5. Set Scaled Value 1, which is the value that will be displayed on the graph when the sensor reports a raw value equal to Raw Value 1. This value should be entered based on the Scaled Units selected in the previous step. 6. Set Scaled Value 2, which is the value that will be displayed on the graph when the sensor reports a raw value equal to Raw Value 2. This value should be entered based on the Scaled Units selected in Step Click the Save button to save this configuration for future use or click Configure to send these settings to the module/port immediately. Loading a Saved Configuration If you have created and saved a sensor configuration for a HOBO Energy Logger FlexSmart modules and the HOBO U30 Station analog sensor port, you can load it into any module/port of the same type. For example, a configuration for a FlexSmart TRMS module can be loaded into any other FlexSmart TRMS module, but not into a FlexSmart Analog module. To load a saved configuration: 1. From the Device menu, select Configure Modules/Ports. 2. Click the Load button to see a list of all defined configurations in the currently selected folder that are compatible with the module/port. 3. Choose a configuration. To use one of the defined configurations, click the button next to Use Configuration File, then click the button next to the name of the configuration file you want to use. To get a file from a different location, click Choose Folder and browse to the desired directory. If you are experiencing problems with the module, you can reset the channel to its default configuration. Select Use Default Module Configuration. 4. Click Continue. 5. To send the currently displayed configuration to the module/port, click Configure. The module/port will remain in this configuration until you send it a different one. Resetting a Module to the Default Configuration If you are experiencing problems with a module, you can reset it to the default configuration. 1. From the Device menu, select Configure Modules/Port. 119

120 2. Select a sensor and click Configure. 3. In the Configure Sensor window, click the Load button to view a list of all defined configurations in the currently selected folder that are compatible with the module/port. 4. Select Use Default Module Configuration and click Continue. 5. To send the currently displayed configuration to the module/port, click Configure. The module/port will remain in this configuration until you send it a different one. The following examples show the default configuration for the analog modules. The configuration is the same for both channels. Working with a Shuttle HOBO shuttles provide a convenient way to read out and relaunch loggers in the field. The HOBO U-Shuttle features a text display and is compatible with all loggers that can be used with HOBOware Pro. The HOBO Waterproof Shuttle communicates with optic loggers. Note: To use a U-Series logger (other than the HOBO U30 Station) with a shuttle, the logger must first be launched with HOBOware version 2.2 or higher at least once. Consult the shuttle user guide for details. After you read out a logger to the shuttle, you can then connect the shuttle to the computer and offload and save the files to view in HOBOware Pro. From the Device menu, select Manage Shuttle to open the Shuttle Management window to check the status and work with the shuttle. See Offloading and Saving Files from a Shuttle and Deleting shuttle files for more information on using the shuttle. Note: While the Shuttle Management window is displayed, the U-Shuttle remains on battery power for up to an hour. After one hour, or any time the U-Shuttle's main battery level becomes low, the window closes and the shuttle powers down. To further conserve the shuttle's battery life, you should close the window, disconnect the shuttle, and turn the shuttle off as soon as you finish working with it. U-Shuttle Firmware Updates Occasionally, a firmware update may be available for the U-Shuttle. To check whether an update is available or if you are directed to update the firmware from Onset Technical Support: 1. Connect the U-Shuttle to the computer. 120

121 2. From the Help menu, select Update Device Firmware and then select U-DT-1/U-DT-2 from the submenu. 3. Follow the instructions on the screen to complete the upgrade process. Offloading and Saving Shuttle Files To offload datafiles from a shuttle to a compute: 1. Connect the shuttle to the computer. Note: HOBO Shuttles require HOBOware Pro. 2. From the Device menu, select Manage Shuttle. Or, to quickly offload all the new datafiles on the shuttle, select Readout from the Device menu. 3. In the Shuttle Management window, choose files to offload. On the U-Shuttle, all files are selected by default if the shuttle has not been offloaded before. To deselect all files, click the Uncheck All button. To deselect individual files, click the checkbox next to each file. On the Waterproof Shuttle, only the files that have not been offloaded AND saved previously are selected by default. To select or deselect individual files, click the chexbox next to each file. Use the Check All and Uncheck All buttons next to Previously Offloaded Files and New Files (Not Offloaded) to control the selection of these groups of files. To automatically delete files after you offload and save them, select the Delete Contents Upon Offload checkbox. 4. Click the Offload Checked button when you are ready to begin offloading the files from the shuttle. Once offloading begins, the Offload Checked button will change to Cancel Offload. When offloading is complete, the Files on Shuttle panel in the Shuttle Management window will change to a Files Offloaded From Shuttle panel. 121

122 5. The Save Folder indicates where the offloaded files will be saved. To change the location where these files are saved, click Choose and browse to another folder. 6. To open the folder automatically after they are saved, select the Open Folder in Windows Explorer after Save checkbox on Windows or the Open Folder in Finder after Save checkbox on Macintosh. 7. Select the files to save. By default, all the offloaded files are selected for saving. To deselect individual files, click the checkbox next to each file. To deselect all files, click the Uncheck All button. To save all files if you already deselected a few, click the Check All button. 8. Make any changes to the listed datafile names if desired for the files you are saving. 9. Click the Save Checked buttons to save all selected files in the folder specified in step Click the Launch Shuttle to reset the shuttle clock and delete all files from the shuttle. See Deleting Files from a Shuttle for more information. The Shuttle Management Window Use the Shuttle Management window to work with the HOBO U-Shuttle and Waterproof Shuttle. Notes: HOBO Shuttles require HOBOware Pro. While the Shuttle Management window is displayed, the U-Shuttle remains on battery power for up to an hour. After one hour, or any time the U-Shuttle's main battery level becomes low, the window closes and the shuttle powers down. To further conserve the shuttle's battery life, you should close the window, disconnect the shuttle, and turn the shuttle off as soon as you finish working with it. The Waterproof Shuttle is powered by the USB port, and does not need to be turned off. The Device Details panel displays the following information about the shuttle: Device Type. The shuttle model and description. Serial Number. Serial number of the shuttle. Firmware Version. Version number of the shuttle's firmware. Main Batt Level (AA) (U-Shuttle only). The condition of the shuttle's main batteries. Consult the U-Shuttle manual for specifics on battery capacity. 122
123 Clock Batt Level (CR1225) (U-Shuttle only). The condition of the battery that provides backup power to the shuttle's clock. Consult the U-Shuttle manual for details. Battery Level (Waterproof Shuttle only). Condition of the shuttle's batteries when you opened the Waterproof Shuttle Management window. If the batteries are low, remember to change them before going into the field. Consult the Waterproof Shuttle manual for specifics on battery capacity. Last Launched. Date, time, and offset to Greenwich Mean Time (GMT, also known as UTC) when the shuttle was last launched. Computer clock. Time reported by the computer's clock. Shuttle clock. Status of the shuttle's clock in relation to the computer's clock. If the difference is more than five seconds, the shuttle clock label and icon will flash red. The shuttle's clock is synchronized to the computer when you launch the shuttle. Click the Sync Shuttle Clock button to synchronize the shuttle's clock to the computer clock without launching the shuttle. (Exit HOBOware Pro if you need to update the computer's clock first. Important: If the difference between the shuttle's clock and the computer's clock is more than 59 minutes, the Sync Shuttle Clock button is not available. You must launch the shuttle to correct the time difference The Files on Shuttle panel lists the logger datafiles that are available to be offloaded from the shuttle. If the shuttle is empty, this panel displays "No Files Available on Shuttle." Use the Check All/Uncheck All buttons to select or deselect all files. The details for each file are: Status. The message that describes the state of the datafile on the shuttle. The status message is replaced by a progress bar while the file is actively being offloaded. For the U-Shuttle, the status message "Awaiting Offload" appears when HOBOware Pro is offloading files from the shuttle and "Finished" after each file is offloaded. For the Waterproof Shuttle, files have the status message "Offloaded" only if the file has been offloaded from the shuttle and saved as a datafile. If the files has not been offloaded, or it has been offloaded but not saved, its status is listed as "Not Offloaded." Logger Type. Model and description of the logger where the datafile originated. Serial No. Serial number of the logger where the datafile originated. Launch Desc. Description in place when the logger was launched. This description will be the default datafile name. Launch Time. Date, time, and offset to Greenwich Mean Time (GMT, also known as UTC) when the shuttle was last launched. File Size. Actual size of the datafile. After clicking the Offload Checked button, the Files on Shuttle panel will change to a Files Offloaded from Shuttle panel. This panel lists the folder where the files will be saved (or click Choose to select a different directory). You can also select to a checkbox to automatically open the folder in Windows Explorer or Finder (Macintosh) after the files are saved. The serial number, Launch Description, and default file name is listed for each datafile. Click the Save Checked button to save all the selected files. Use the Launch Shuttle button to delete all files (whether saved or not) from the shuttle and to reset the clock. Launching the shuttle also repairs a corrupted header. Deleting Files from a Shuttle You can delete files from a shuttle after they have been offloaded and saved. Note: HOBO Shuttles require HOBOware Pro. To delete files from a shuttle: 1. From the Device menu, select Manage Shuttle. 123

124 2. Offload and save any files if necessary. You must at least offload all files before deleting (click Cancel Save if you do not want to save the files). If you are offloading a Waterproof Shuttle, select the Delete Contents Upon Offload checkbox to automatically delete all files after you offload and save them. 3. To delete ALL files regardless of whether they have been offloaded and saved, click the Launch Shuttle button. This will reset the shuttle's clock and its Last Launched time. To delete individual files from a Waterproof shuttle (you cannot delete individual files from a U- Shuttle), click the checkbox for each unwanted file. To select all files that have already been offloaded, click the Check All button next to Previously Offloaded Files. Click Delete Checked after you have selected all the files you want to delete. Note: The maximum amount of free memory available on a U-Shuttle is 3.94 MB because the header information on a HOBO U-Shuttle occupies 64 KB. Configuring Loggers with the E50B2 Power & Energy Meter When the E50B2 Power & Energy Meter (T-VER-E50B2) is combined with a supported logger, there is a custom setting available to quickly configure the applicable channels or sensor types. To access this setting: 1. Connect a logger to the computer that supports the meter, such as the HOBO 4-Channel Pulse Input Data Logger (UX x), and select Launch from the Device menu. 2. In the Launch Logger window, select "for E50B2 Power & Energy Meter" in the Configure Sensors drop-down list. The first three sensors, or data channels, listed will automatically be updated to display the appropriate settings for the E50B2 Power & Energy Meter as shown below. When these settings are selected, the logger will record the default values from the Onset Power Meter. This means that when you read out the logger, the first three data channels will record the following by default: 124

125 Reactive energy, at a rate of 1 pulse equal to 1 VARh Real energy, at a rate of 1 pulse equal to 1 Wh Amp hours, at a rate of 1 pulse equal to 0.01 Ah You can change the scaling for these three channels. Click one of the channel or sensor buttons and select the measurement type, sensor name, and then scaling factor. The example below shows changing scaling on channel 2 after clicking the "T-VER-E50B2 Wh (1000 Wh per pulse)" button. Note: The scaling factor must be the same for VARh and Wh channels. WARNING: If you change the default scaling parameters, you must also change the settings on the Onset Power Meter. Similarly, if you change the scaling on the device itself, you must also change the scaling in the software to match. Refer to the Compact Power and Energy Meter (T-VER-E50B2) Full Install Guide for details on how to change the settings on the device. 3. Select any other Launch settings as desired and then click Start to launch the logger with the Onset Power Meter settings (note that the Start button name changes depending on when you chose to begin logging). Additional Series for Plot Setup Datafiles from a logger with Onset Power Meter settings not only list logged sensor data, but they also contain additional derived series automatically calculated in relevant units. HOBOware uses the logged data from each of the three enabled sensors (reactive energy, real energy, and amp hours) to derive, or calculate, up to six additional data series that you can plot. These derived series are numbers 9 through 14 in the Plot Setup dialog box example below. Select the series you wish to view and then click Plot. These series are always available for plotting any time you open the datafile. 125

126 The following table lists the calculations for all derived series. It also specifies which of the three Onset Power Meter sensors/channels must be enabled at launch time for these series to be available upon readout. Derived Series Name Calculated By Requires these Channel(s) to be Enabled at Launch VAR VARh / (logging interval in seconds / 3600) Reactive Energy (VARh) VA VAh / (logging interval in seconds / 3600), where VAh = SQRT (Wh² + VARh²) Reactive Energy (VARh) and Real Energy (Wh) Volts (V) VAh / Ah, where VAh = SQRT (Wh² + VARh²) Reactive Energy (VARh) and Amp Hours (Ah) Power Factor (PF) Wh / VAh, where VAh = SQRT (Wh² + VARh²) Reactive Energy (VARh) and Real Energy (Wh) Power (W) Wh / (logging interval in seconds / 3600) Real Energy (Wh) Power (kw) Wh / (logging interval in seconds / 3600) / 1000 OR W / 1000 Real Energy (Wh) Amps (A) Ah / (logging interval in seconds / 3600) Amp Hours (Ah) Checking Dates for the HOBO U26 Dissolved Oxygen Logger Sensor Cap The HOBO U26 Dissolved Oxygen logger has a replaceable DO sensor cap intended for six months of use plus a one-month grace period. Once the cap is initialized, an internal clock within the logger will count down to the seven-month expiration date. A new sensor cap can be initialized several ways: 126

127 When the logger is launched, it will automatically be initialized when logging begins. You will be prompted to initialize it when checking the Status. You will be prompted to initialize it when using the Lab Calibration tool. If you replace an existing sensor cap while the logger is logging, it will automatically be initialized. Once the 7-month countdown begins, you can see information about the sensor cap in the Status window as shown below. In the Device Details pane, three key DO sensor cap dates are displayed: Expiration date, at which time you'll need to replace it with a new cap. Important: The logger will not collect any data after the cap has expired. Initialization date, which is the date the cap was initialized and the date the 7-month countdown began. Manufactured date; the cap has a shelf life and must be used within two years of this date. For details on installing or replacing the DO sensor cap, see the logger manual. Using the Lab Calibration Tool with the HOBO U26 Dissolved Oxygen Logger Lab calibration is available for HOBO Dissolved Oxygen (U26-001) loggers. Use this tool when you need to calibrate the logger before deploying it or after replacing an expired sensor cap. The tool sets the gain and offset adjustment values for the logger by: Restoring logger calibration values to the factory defaults, Using your own gain and offset adjustment values, or Calculating the values with a three-step calibration procedure. In the three-step procedure, the logger is first calibrated to 100% saturation by placing it in water-saturated air. Then, you can calibrate the logger to 0% saturation by placing it in sodium sulfite or another 0% oxygen environment (recommended if the logger will be deployed in water with DO levels of 4 mg/l or less). Important: Lab calibration only affects future launches; any data saved in the logger will be based on the previous calibration values. 127
128 To complete these steps, you will need fresh water, the calibration boot and sponge supplied with the logger, and a source for current barometric pressure at your current location. You will also need sodium sulfite solution and a 3 inch beaker if you will be calibrating to 0% saturation. The fresh water, logger, and sodium sulfite (if applicable) should be left out in the lab where the calibration is being done long enough so that they are at room temperature. If the logger had been deployed previously, make sure the sensor is clean and dry (see the logger manual for more details). To use the Lab Calibration tool: 1. Connect a HOBO Dissolved Oxygen logger to the computer. Stop the logger if it is currently logging or awaiting a coupler or delayed start. 2. From the Device menu, click Lab Calibration. Note: If the sensor cap is installed and it has not yet been initialized, you will be prompted to do so. Follow the instructions on the screen. The sensor cap will expire in seven months once initialized. 3. The current gain and offset adjustments are displayed in the top pane of the window, along with the date and time the last lab calibration was completed (if applicable). Completing Steps 1 through 3 in this window will result in new gain and offset adjustment values based on the current logger conditions. Continue to the next section for details on how to complete these steps. If you already know what the gain and offset values should be (for example, the values from a previous calibration that you want to use again) or want to return to the default factory values, click the I know my values, skip to Finish button. This will automatically move you to Step 3: Finish. Either click the Reset to Factory Defaults button or type in new gain adjustment and new offset adjustment values and click the Send Calibration to the Logger button. Note: If you decide you do not need to change the calibration, click Close to cancel the calibration and revert back to the last saved logger values. Step 1: 100% Saturation 1. Enter the barometric pressure for your current location in one of five available units. If the barometric pressure reading has been adjusted for sea level (such as a reading taken from the National Weather Service weather station), select the "If using sea level barometric pressure, enter elevation" checkbox and enter your elevation in either meters or feet. 2. Make sure the logger either has the protective guard or the anti-fouling guard installed (whichever guard you plan to use in the deployment) so that the sensor is covered. 3. Wet the small sponge that shipped with the logger with fresh water. Squeeze out any excess water. 4. Place the sponge in the end of the calibration boot. 5. Insert the logger in the calibration boot so that there is approximately a 1 cm (0.5 inch) overlap between the end of the boot and the body of the logger. This will ensure there is enough space between the end of the logger and the sponge (the logger should not be pressed up tightly against the sponge). 6. Wait for approximately 15 minutes until the logger reaches temperature equilibrium. Important: The logger will "go to sleep" if there is no activity for 30 minutes. To avoid this, click the "Get DO value from the logger" button as described next in step 7 well before 30 minutes have passed. If the logger does go to sleep, a message will appear indicating that there was a communication failure. You may need to close and reopen the Lab Calibration window to reactivate the logger. Follow the instructions on your screen. 7. Click the "Get DO value from the logger" button to display the 100% saturation results. You can click this button as often as needed. The results are updated each time you click the button. To check for equilibrium, click the Get DO value from the logger button several times in a row to check the current DO Conc from logger at 100% Saturation value. If the value remains the same or varies very little with each button click, then temperature equilibrium has likely been reached. 128
 If the logger will be deployed in water with DO levels greater than 4 mg/l, click the Skip this Step button. Otherwise, continue with the following procedure. 1.")
129 8. When you are satisfied with the results displaying, click the Next button to proceed to "Step 2: 0% Saturation." Step 2: 0% Saturation (optional) If the logger will be deployed in water with DO levels greater than 4 mg/l, click the Skip this Step button. Otherwise, continue with the following procedure. 1. Make sure the logger either has the protective guard or the anti-fouling guard installed (whichever guard you plan to use in the deployment) so that the sensor is covered. 2. Pour the sodium sulfite into the beaker so that it is about two-thirds full. 3. Place the sensor end of the logger into the solution so that the entire protective cap or anti-fouling guard and at least 2.5 cm (1 inch) of the logger body are submerged in the beaker. Allow it to rest on the bottom of the beaker. 4. Wait a few minutes until the logger reaches temperature equilibrium. Important: The logger will "go to sleep" if there is no activity for 30 minutes. If this happens, you will need to close and reopen the Lab Calibration window to reactivate the logger and, as a result, repeat the calibration for 100% saturation. To avoid this, click the "Get DO value from the logger" button as described next in step 5 well before 30 minutes have passed. 5. Click the Get DO value from the logger button to display the 0% saturation results. As with the 100% calibration, you can click this button as often as needed. The results are automatically updated each time you click the button. If the value remains the same or varies very little with each button click, then temperature equilibrium has likely been reached. 6. When you are satisfied with the results displaying in the Step 2: 0% Saturation tab, click the Next button to proceed to "Step 3: Finish." 129


130 Step 3: Finish The results from the first two steps are displayed as well as the overall calibration results and the new gain and offset adjustment values. If you are satisfied with the results, click the "Send Calibration to Logger" button. The logger will then be calibrated based on the new values. Click the Back button to return to a previous step if you wish to repeat Step 1 or Step 2. These values will not take effect until the logger is launched. If you do not want to save these values, click Close to cancel the calibration and revert back to the last saved logger values. Or, click "Reset to Factory Defaults to return to the original values. If you performed Step 2, then remove the logger from the solution and thoroughly rinse it with fresh water to remove any excess sodium sulfite. See the logger manual for additional details on cleaning the logger. 130
131 Updating UX Series Logger Firmware You can update the firmware in a UX series logger as needed with HOBOware. You may see that an update is available when opening the Launch Logger or Status window, or Onset Technical Support will notify you when this is necessary. If you download a firmware file as instructed by Onset Technical Support, then place the downloaded file into the following directory: For Windows 7 or Windows 8: C:\Users\Public\Documents\HOBOware Public Files\FWUpdates For Windows XP: C:\Documents and Settings\All Users\Shared Documents\HOBOware Public Files\FWUpdates For Macintosh: /Users/<user>/Documents/HOBOware/FWUpdates To update UX series logger firmware: 1. Connect a UX series logger to the computer. 2. Important: Stop and read out the logger and save the file before updating the firmware. The update process will delete all existing data in the logger so be sure to stop and read out the logger before continuing with the next step. 3. From the Help menu, select Update Logger Firmware and then select Update UX Series Logger Firmware. Note: This is not necessary if a message indicates that a firmware update is available after opening the Launch Logger or Status window. Continue with the next step instead. 4. If there is a newer firmware version available than the version currently installed in the logger, a message appears indicating a firmware update is available. Click Yes to continue. If a newer firmware version is not detected, then a message appears indicating there are no updates available for this logger. There may be instances where you have downloaded a firmware.hex file from the Onset website and need to locate this file. If so, click Yes when this message appears to find the file. Otherwise, click No to close the message and exit the update process. 5. In the Update UX Series Logger Firmware window, the suggested firmware file for use with the current logger is displayed. The logger model number will be listed within the file name for you to doublecheck that it is the correct version for the logger you are updating. If the file listed is the one you wish to use, then click Continue. If it is not the correct file or you wish to locate a different file based on instructions from Onset Technical Support, click Select Firmware and locate the appropriate file. Note: If you click Cancel, you may still be prompted for an additional firmware update in some instances. Click Cancel again to completely exit the procedure. 6. A message appears warning you not to disconnect the logger until the update process is complete. The update process should take a couple of minutes. If you have not already read out the logger and saved the data, then click No to cancel the update and return to step 2. Otherwise, if you are ready to update the firmware in the logger, click Yes to continue. 7. As the firmware update process takes place, "Boot" will display on the logger LCD screen. Do not disconnect the logger during this process. Once the update is complete, a message will appear indicating the update was successful. UX100 series loggers require an additional firmware update. A message will appear automatically if a second update is necessary. For HOBO Plug Load (UX ) loggers only: Once HOBO appears on the LCD screen, disconnect the USB cable and then reconnect it before continuing to the next step. Repeat steps 4 7 if another firmware update is available. Note: If "Boot" remains on the logger LCD screen after this is complete, the device may need to be reset. From the Device menu, select Utilities, and then select Reset UX Logger. If "Boot" still remains on the LCD screen, contact Onset Technical Support. 131
132 8. After the firmware update process is complete, you will need to launch the logger before you can use it again. If you'd like to launch the logger immediately, click Yes. Otherwise click No to close the message and click Launch from the Device menu to launch the logger at a later time. Fixing "Read Header Failed" Error Occasionally, when trying to launch, check status, or read out a U-Series logger (other than a HOBO U30 Station), HOBO Waterproof Shuttle, or HOBO U Shuttle, you may receive the following error: "Read Header Failed." These messages occur when a device's header cannot be read, usually because of a communication error or corrupted header. Disconnect the device from the computer, then reconnect it and try to launch, check status, or read out again. If you receive the message again, the header has probably become corrupted. The most common cause of header corruption is a communication problem during launch, such as the USB cable coming loose or an optical logger slipping out of its base station/coupler while the Launching Logger progress bar is displayed. In that case, there is a possibility that valid data has been logged, but cannot be read out. You can restore the header by launching the logger or shuttle. This will reset the device's launch options to factory defaults. However, it will also cause any logged data or offloaded data from a shuttle to be lost. If you receive a "Read Header Failed" message and are unable to read out the logger or offload a shuttle, please contact the vendor that sold you the device. It may be possible to retrieve the logged data. 132
133 Chapter 6 HOBOnode Manager HOBOnode Manager is the software tool within HOBOware Pro for setting up and managing a ZW wireless data network, which consists of a receiver, data nodes, and router nodes. For information about setting up a network, refer to the ZW Series Wireless Network Quick Start Guide available on For help with deploying a network in your facility, refer to the HOBO Data Node Deployment Guide also available at To open HOBOnode Manager for the first time, select the Device menu and choose Manage HOBO Data Node Network. Notes about operating HOBOnode Manager: When HOBOnode Manager is open, two HOBOware icons appear in the Windows taskbar. You cannot access HOBOnode Manager if a HOBOware window, such as Logger Launch or Status, is open. You can close HOBOnode Manager and leave HOBOware running, but you cannot close HOBOware and leave HOBOnode Manager running. If you close both HOBOnode Manager and HOBOware, device communication can continue to run, which allows incoming data from the network to be uploaded to the computer. A HOBOware icon appears in your system tray when device communication is running. Note that the next time you open HOBOnode Manager, it could take several minutes for the real-time plots to reflect all the stored data. To stop device communication, right-click (or left-click on a Mac) the system tray HOBOware icon to access the Device Communication menu, which shows the receiver status and has options for stopping device communication and starting HOBOnode Manager. Device communication must be stopped when updating HOBOware software. An icon appears in the status bar at the bottom of the main HOBOware window to show whether the receiver is currently connected. If the receiver is connected, you'll see this in the bottom right corner of the HOBOware window. If the receiver is disconnected, you'll see this instead. The "No devices connected" message next to the receiver icon does not refer to devices within your data node network; it indicates that other devices, such as loggers and shuttles, are not currently connected. If you were to connect a logger or a shuttle, that message is updated independently of the receiver icon. 133

134 A Tour of HOBOnode Manager This topic provides a description of the elements in HOBOnode Manager. 1. Tabs. Click the tabs to toggle between the Plots, Map, and Alarms pages. 2. Device Table. The Device Table displays information about the receiver and each node and configured sensor in your network. Use the Device Table to: Select a device by checking the appropriate box in the Select column. Double-click the <Enter label here> field to assign a name, or label, to the node or sensor. Type in the name and press Enter. See a list of all network devices in the Type column, which lists the device by part number, followed by sensor part number as applicable. View the serial number for the device in the S/N column. Check the current status of the device, listed in the Status column. Data nodes and router nodes are listed as either Active (communicating with the receiver) or Missing (not communicating with the receiver). As with data notes and router nodes, sensor status can be Active or Missing, but it also be listed as Off if it is an external sensor that has not been configured. Receiver status is either listed as Connected or Not Connected. See what the sensor is configured to measure in the Meas. type column. The measurement type is automatically filled in for internal sensors. The measurement type listed for external sensors is determined by the selections in the Configure Sensor dialog. Check the latest reading for each sensor in the Reading column, and the time that reading was taken in the Time column. View device readings in a real-time plot. Check the box in the Plot column to generate a realtime plot for that device. See what group(s) the sensor has been assigned to in the Group column. 134
135 Add the device to a map. Check the box in the Map column to add that device to the map. Drag the icon to the desired location on the map click the mouse button. Check whether an alarm has tripped for a specific device in Alarm column. A grey alarm icon means an alarm has not been set up for the device. A green alarm icon means an alarm has been set up, but has not tripped as of the latest reading. A red alarm indicates the alarm for that sensor has tripped. Check the signal strength between the device and receiver or the device and the nearest router in the Signal column. If the signal is low, there may be obstructions or other interference preventing the device from communicating to the receiver or router. Check the battery level for a specific device in the Battery column. You can change the sort order in a column by clicking the column header. Right-click anywhere in the Device Table to restore the sort order. You can also show or hide individual columns by clicking the icon above the vertical scroll bar in the Device Table. 3. Configuration Bar. Use the Configuration Bar to select all or none of the devices, to quickly change the sensor type for external sensors, to assign sensors to groups, or to open the Configure window for additional sensor settings. 4. Help button. Click this button to access HOBOnode Manager help. Click the Open topic with navigation link to open the full Help table of contents. 5. Actions button. From the Actions button, you can print a copy of the device table, edit preferences, or create a new deployment. 6. Plot/Export Data button. Click this button to open the Plot/Export Wireless Data window, from which you can select sensor data to plot in HOBOware or export to a.csv or.txt file for use in another program. 7. Form Network button. Click this button to create a network and add data nodes and router nodes to it. Viewing Real-Time Plots In the plots window, you can view sensor data in real-time plots. You can plot a maximum of 20 sensors at once. To view the real-time plot for sensors: 1. Select the Plot box in the Device Table for each sensor you want to view. 2. Select Sensor or Measurement view tab. In Sensor View, there is a separate plot for each sensor. In Measurement View, there is one plot for each Measurement Type (such as temperature), which may contain separate entries for multiple sensors. 3. Change the time frame of the plot using the Time Frame tabs. 135


136 Use the Sort Plots By drop-down list to change the order of the plots. Use the Reorder Plots arrow to reverse the order of plots. Use the Plot Toolbar to zoom in or out, pause the plot, or print the plot. Plotting Preferences To change preferences that apply to real-time plots only, see Setting HOBOnode Manager Preferences. Use the general HOBOware Plotting Preferences to change the appearance of plots. To apply changes to real-time plots, re-start HOBOnode Manager or uncheck the sensor Plot box and then re-check. To open the Plotting Preferences, from the main HOBOware menu select File > Preferences and then click the Plotting tab. Determining Data Node Type There are three types of devices displayed within HOBOnode Manager: the data receiver (ZW-RCVR), end-point data nodes (ZW-0xx), and node/routers. A node/router can be either a data node (ZW-0xx) that was initially powered by an AC adapter instead of batteries or a router node (ZW-ROUTER) that routes data only and does not have recording capability. Use the icons in the device table to identify data node types. This is particularly helpful if you need to verify whether a data node (ZW-0xx) is acting as a data node only or if it also has routing abilities. 136

137 For another way to see whether the device is a data node only or a data node/router, double-click the device to open the Configure Node dialog. Check the Device Type for the device part number and description. In the example below, the device is operating as a both a data node and a router so the Device Type is listed as "ZW-006 (Node/Router)." If this device was powered by batteries only, then it would be operating as a data node and not a router, and listed as "ZW-006 (Node)." Changing Logging and Connection Intervals There are two types of intervals associated with data nodes: the logging interval, which is how often the node records data and the connection interval, which is how often the node transmits data to the receiver. When a data node joins a network, it uses the default logging and connection intervals that are set within the general preferences (upon installation of the software, the default logging interval is 1 minute and the default connection interval is 10 minutes). However, you can also define logging and connection intervals on a per-node basis, which gives you the flexibility of having data nodes logging and transmitting data at different rates. Changing Default Values in Preferences To change the default logging and connection intervals, click the Actions button in HOBOnode Manager and select Edit HOBO Data Node Preferences. Or, within HOBOware, select File > Preferences on Windows or HOBOware > Preferences on Macintosh and click Data Nodes. The default logging and connection intervals are under the General category of the data node preferences. Select a preset value or set a custom interval. The minimum logging interval is 1 minute, and the minimum connection interval is 2 minutes. These default values will only be used for new data nodes that join the network. Changes to these default intervals will not affect data nodes that are already logging or that have been previously configured with their own individual logging or connection interval. Changing Intervals for Individual Data Nodes To change the logging and connection intervals on an individual data node: 1. Double-click the data node entry in the Device Table to open the Configure Device window. 137


138 2. Change the logging interval and connection interval as required. 3. Click OK. The changes will take effect the next time the data node connects to the receiver; they will only apply to that particular data node and its sensors. All other data nodes in the network will continue logging and connecting at their current intervals. Setting up External Sensors Important: Refer to the documentation that came with your sensor for specific connection and wiring information. Data nodes support various external sensors that plug into one of two kinds of ports: Most external sensors are not automatically configured. You must assign a sensor type for any external sensors connected to the data node (except for the External Temp/RH sensor). If you do not assign a sensor type, the device will not record any data for that sensor. The ZW-005 and the ZW-007 support the External Temp/RH sensor (Part # CABLE-TEMP/RH), which plugs into the External Temp/RH Sensor Port (#1 in the photo above). This sensor is preconfigured and you do not have to select a sensor type. Separate rows appear under the node for the Temperature and RH channels with corresponding entries in the Type column. Some data nodes support up to four configurable external sensors, which plug into one of the 2.5mm Stereo Ports shown (#2 in the photo above). You must select a Sensor Type in HOBOnode Manager for these sensors. When the data node appears in the Device Table, configurable external sensors will not have an entry in the Type column. 138


139 To select a Sensor Type for an external sensor: 1. Double-click the row for the sensor in the Device Table. 2. Select the Sensor Type from the drop-down list. 3. Add a label for the sensor (optional). 4. Click OK. Once you select a sensor type, the Status will change to ACTIVE and the appropriate measurement type will appear in the Measurement Type column. Some sensors must be scaling to give you meaningful data. Refer to Configuring Scaling on a Sensor for more details. Configuring Scaling on a Sensor Some sensors need to be scaled to provide meaningful data. Scaling is set through the Configure Scaling window. To open this window: 1. Double-click the sensor in the Device Table to open the Configure Sensor window. 2. Select the Sensor Type if not already selected. 3. Click the Configure button. To set scaling for the sensor: 1. Check the scaling type is correct. The scaling type is automatically selected based on the type of sensor selected. Linear scaling is enabled for analog sensors; pulse scaling is enabled for pulse sensors. Note: Click the View Scaling Factors button to see scaling factors by sensor. 2. Enter the scaled measurement type. The Raw Measurement is the source measurement type, such as Current, Voltage, or Counts. 139
140 3. Enter the scaled units. The Raw Units is the type of output the sensor uses, either V or ma, corresponding to the type of sensor selected. Raw Value 1 and Raw Value 2 should be entered using these units. 4. Type in the Raw and Scaled numbers for Value 1. For Raw Value 1, enter the low raw value given by the external sensor. For Scaled Value 1, enter the value in the same units that were specified in the Scaled Units box. The Scaled Value 1 is the value that will appear on the plot when the sensor reports a raw value equal to Raw Value Type in the Raw and Scaled numbers for Value 2. For Raw Value 2, enter the high raw value given by the external sensor. For Scaled Value 2, enter the value in the same units that were specified in the Scaled Units box. The Scaled Value 2 is the value that will appear on the plot when the sensor repors a raw value equal to Raw Value Click OK when done. Once scaling is configured on a sensor, the scaled icon will appear in the Meas. Type column in the Device Table. Scaling Factors Click the link below to see the scaling factors for your sensor model. Wattnode: T-WNB-3Y-208/ T-WNB-3D-240 / T-WNB-3D-480 Veris: T-VER / T-VER Veris: T-VER-H Veris: T-VER-971BP-200 Veris: T-VER-PXU-L/ T-VER-PXU-X Ion: T-ION-TVOC Wattnode Scaling Factors: T-WNB-3Y-208/T-WNB-3D-240/ T-WNB-3D-480 Use the table below to find the Kilowatt-hours per pulse for your CT Size and WattNode model and enter it in the Scaled Value 1 box. Cable Required/Sensor Type: CABLE-2.5-STEREO Example This example shows the values you would enter in the Configure Scaling window for a Wattnode 3Y-208 with a 5 amp CT. Pulse should be selected automatically. In the Scaled column, type "Energy" for Measurement and "kwh" for Units. For this example, the Raw Value 1 is "1" and the Scaled Value 1 is " " 140

141 Kilowatt-hours per pulse Kilowatt-hours per pulse CT Size (amps) Model #: 3Y-208/3D-240 Model #: 3D

 per sampling interval. Cable Required/Sensor Type: CABLE-2.")
142 Veris Scaling Factors: T-VER /T-VER The consumed energy in kilowatt-hours (kwh) per pulse for these sensors is determined by the DIP switch setting on the transducer. The default is 1.00 kwh / pulse, at which the scaling factor is 1 = 1. If you change the default DIP switch settings, adjust your scaling factors accordingly, as shown below. The data recorded by the data node will be the number of counts (pulses) per sampling interval. Cable Required/Sensor Type: CABLE-2.5-STEREO 1.0 kwh Per Pulse (Default) 0.5 kwh Per Pulse 142


143 0.25 kwh Per Pulse 0.10 kwh per Pulse Veris Scaling Factors: T-VER-H The T-VER-H has a selectable range for Linear Scaling: ma or Volts -> Amps. An AC-DC power adapter with a minimum of 35mA is required for excitation power. Cable Required/Sensor Type Use the appropriate cable to connect the sensor to the data node and select the corresponding cable in the Sensor Type drop-down when configuring the External Sensor in HOBOnode Manager. For 4-20mA output, use CABLE-4-20mA. 143


144 0-50 Amps For 0-5vdc output, use CABLE-ADAP Amps Amps Veris Scaling Factors: T-VER-971BP-200 The T-VER-971BP-200 has a selectable range for Linear Scaling of ma to Amps for current flow in both directions. Cable Type/Sensor Type Use a CABLE-4-20mA to connect the sensor to the data node and select CABLE-4-20mA in the Sensor Type dropdown when configuring the External Sensor in HOBOnode Manager. 144
 span.")
145 Notes: Span Setting Requires 35 to 110 ma excitation power depending on DC current load. An AC-DC power adapter with a minimum of 65mA is required. For currents over 120 Amps, supply voltage to CT must be at least 15V to maintain accuracy. Minimum Warm-up Time is 8-10 seconds. The H971 comes preset at the maximum (0-200A) span. To adjust the H971 to a different span, locate the potentiometer on the top of the device. This potentiometer is a multi-turn device, taking about 23 turns to adjust the span from ±20A to ±200A. Use the potentiometer to adjust the maximum amperage range used by the sensor. The smallest amperage range (0 to ±20 A) is set by turning the potentiometer fully counterclockwise; the greatest amperage range (0 to ±200 A) is set by turning the potentiometer fully clockwise. To determine the best amperage range for an application, first set the load to the maximum amperage that will be used. Use the LED as a guide to adjust the potentiometer to its optimum setting. Verify the measured output current matches the load current using a current clamp meter. LED Activity Steady green blink Rapid green blink Potentiometer Adjustment Turn CCW until LED blinks rapidly, then slowly turn CW just until blink returns to steady rate. Turn CW until LED blinks at a steady rate. For an alternate method, see the Veris Installation Manual: Scaling Graph 145

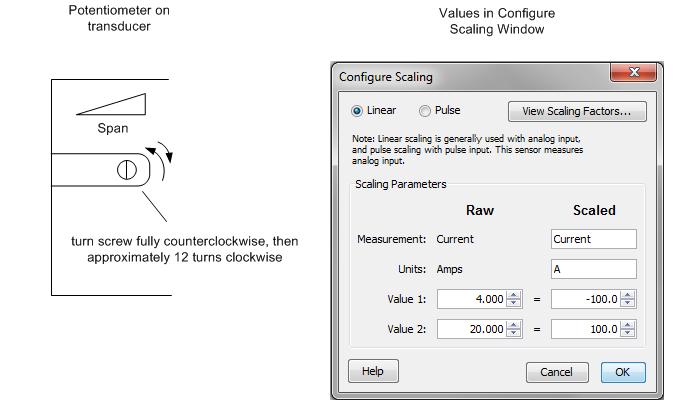
146 0-20mA 0-100mA 146

147 0-200mA Veris Scaling Factors: T-VER-PXU-L/T-VER-PXU-X These Veris differential pressure transducers use Linear Scaling, ma or Volts -> "WC". The analog output for these Veris sensors is determined by which screw terminals are connected either to a CABLE-4-20mA or to CABLE-ADAP5 or to CABLE-ADAP10. See the documentation that came with the hardware for details. Both models have switch-selectable ranges and scales. The examples below show the scaling parameters you enter in the Configure Scaling window for the supported output ranges and raw values. 147

148 0-0.1 in. W.C in. WC 148
149 0-0.5 in. WC in. WC 149

150 0-2.5 in. WC in. WC 150

151 in. WC Ion Scaling Factors: ION-TVOC The ION-TVOC uses Linear Scaling, ma -> ppm. Cable Required/Sensor Type: CABLE-4-20mA NOTES Requires Loop power of 22 ma. Lamp and electronics require 65 ma. An AC-DC power adapter with a minimum of 35mA is required for excitation power ppm 151


152 0-100 ppm ppm Setting HOBOnode Manager Preferences You can change preferences for several features within HOBOnode Manager. You can access HOBOnode Manager preferences one of two ways: In HOBOware, select File > Preferences on Windows or HOBOware > Preferences on Macintosh and click Data Nodes. At the bottom of the HOBOnode Manager window, click the Actions button and select Edit HOBO Data Node Preferences. General Preferences The following general preferences are available: Default Logging Interval. This is how often data nodes will log data. The default is 1 minute. 152

153 Default Connection Interval. This is how often data nodes will send data to the receiver. The default is 10 minutes. Timeout when forming network. This is the amount of time that you can add a data node to the network after you click the Form Network button. By default, Form Network mode will remain active until you click the X on the Form Network progress indicator. A node is MISSING when it is late by. This is how long a node must go without sending data to HOBOnode Manager for it to be marked as missing. When a data node is missing, its status in the Device Table will be MISSING, and a MISSING NODE alarm will be tripped (if configured). The default is 10 minutes. When the HOBOnode Manager is closed, keep device communication running. This controls whether device communication automatically remains running when you exit HOBOnode Manager. The default is to keep it running. Start the HOBOnode Manager and device communication automatically when HOBOware starts. This controls whether HOBOnode Manager and the device communication automatically starts immediately upon opening HOBOware. The default is to not automatically open HOBOnode Manager and the device communication when HOBOware is opened. Highlight row in table when clicking on a sensor or data node in the map. This controls whether the corresponding row in the device table is automatically highlighted when you select a device in the HOBOnode Manager map. This is enabled by default. Show informational popups in the device table when new nodes are added. This controls whether a message is displayed every time a new device is added to the device table. This is enabled by default. Alarms Preferences See Setting Alarms Preferences. Real-Time Plots Preferences You can customize the plots that appear in HOBOnode Manager by increasing the number of sensors you can plot at one time, adding the ability to view monthly data, displaying alarm thresholds, and more. These preferences are specific to real-time plots only. See Plotting Preferences for details on how to change general plot appearance, such as changing font type and size, adding gridlines, or modifying axis details. Maximum number of sensors to plot. Select how many data node sensors you want to be able to plot at one time within HOBOnode Manager. You can select from 1 sensor to 100, with a default of 20. Enable MONTH view in real-time plots. Select this checkbox to add a Month button to the Plots tab in HOBOnode Manager. You can then plot data by hour (4 hours), day, week, or month. The Month view is disabled by default. 153

154 Maximum number of days of observations to plot. Select how many days worth of data you want to view in the plot, up to 31. The default is 7 days. Show alarm thresholds on real-time sensor plots. Select this checkbox to add a visual indicator, or reference point, when a sensor alarm has tripped. Select Show alarm threshold as line to display the alarm threshold on the real time plots as a horizontal line. An example of this type of reference point is the red line in the following plot where an alarm was configured to trip at above 95 degrees Fahrenheit. Select Show alarm threshold as interval to display the alarm threshold as a shaded area: red when the alarm is above the specified threshold and blue when it is below. Using the same example, there is a red shaded area from above 95 degrees on the following plot instead of a single red line. Data Storage This lists the current location of the HOBOnode Manager database. For more information, see Data Storage Location. Sharing This provides options for sharing HOBOnode Manager data via HOBOnode Viewer or automatic data delivery. See Enabling HOBOnode Viewer and Setting up Data Delivery. 154
155 Working with HOBOnode Manager Data There are several ways you can analyze data gathered in HOBOnode Manager. In addition to the viewing the realtime plots and information in the Device Table, you can: Plot or export data for use in HOBOware or external programs Set up groups to organize data Set up a HOBOnode Viewer web page for viewing on a local area network Automatically send data to others via or FTP, or save it to a computer on a local area network Plotting or Exporting Wireless Data With HOBOnode Manager, you can view data and plots from your HOBO data node wireless network in real time, but you also have the ability to plot or export previously logged data. Using the Plot/Export Wireless Data capability, you can plot data directly in HOBOware or you can export it to a text or.csv file to open in another program for further analysis. You can pinpoint the exact data you wish to plot or export, allowing you to view data from: Current and/or previous network deployments, Specific data nodes, A subset of certain sensors from selected data nodes, Groups of data nodes as configured in HOBOnode Manager, and A specific date range or timeframe. In addition, you can save frequently used settings for quick plotting and exporting in the future and for use with data delivery, which allows you to share data automatically via , FTP, or saved to a drive on a regular schedule. To open the Plot/Export Wireless Data tool, click the Plot/Export Data button in HOBOnode Manager (or from the File menu in HOBOware, select Plot/Export Wireless Data). To use the Plot/Export Wireless Data tool: 1. Select the deployment that contains the data you wish to plot or export. 2. Select the data nodes with the sensors whose data you wish to plot or export. 155
156 3. Each sensor for the data node that you selected in Step 2 will appear in a list as shown below. Click the down arrow icon for each sensor you wish to plot or export, or click the Include All Sensors button if you want to plot or export data from all sensors in the list. Note: If you have set up groups in HOBOnode Manager, you can also sort and select sensors within those groups. See Using Groups in the Plot/Export window. The sensors that you selected will move from the top half of the Step 3 pane to the bottom half as shown below. In this example, all sensors were included and are now shown in the "Sensors to plot/export" list. If you wish to make changes, you can either click the up arrow icon remove a specific sensor from the list, or click the Exclude all sensors button to move all the sensors back to the top (you'll then need to select the sensors you wish to plot or export again). 4. Choose the time range for the data you wish to plot or export. Select Custom and specify your own start and end time, or select Preset and choose one of several pre-defined ranges from the drop-down list. 156

157 5. Once you have all the settings selected, click the Export or Plot button. Clicking the Export button will open the Export window. Clicking the Plot button opens the Plot Setup window, where you can select the series that will appear in the graph in HOBOware. Notes: If you want the current settings to always appear in the Plot/Export Wireless Data window, then select the "Use these settings as window default" checkbox. You can save different combinations of settings to a configuration file in the Plot/Export Wireless Data window for future use, or for use by the data delivery feature. Click the Save Settings button, type a name, and press Enter. Then click the Load Settings button and choose the configuration file you wish to use for the current plot or export. 157
 you want to add to a group.")
. 2. Click Groups. 3. Check desired groups(s). 4.")
158 Using Groups to Sort Sensors You can assign sensors to groups in the Device Table and then use them to sort rows in the table, or to refine a list of sensors in the Plot/Export Wireless Data window. Creating Groups and Adding Sensors 1. In the Device Table, select the sensor(s) you want to add to a group. 2. Click Groups. 3. In the <New Group> box, enter a name for the group and press Enter. The Group Name appears in the table for each sensor selected. Adding Sensors to a Group To add a sensor to an existing group: 1. Select the sensor(s). 2. Click Groups. 3. Check desired groups(s). 4. Click Apply Selected Groups. 158

 column header to sort")

159 See Using Groups in the Plot/Export Data Window. Sorting by Group Click the Group(s) column header to sort rows by groups. Deleting or Renaming a Group Select Manage Groups from the Groups drop-down. 159


160 The Manage Groups window appears. To change the name of the group click the Edit icon and enter the new name. To delete a group, click the X. Using Groups in the Plot/Export Wireless Data Window Once you have set up groups in the Device Table, you can use them to refine the list of available sensors in the Plot/Export Wireless Data window. To set up groups, see Using Groups to Sort Sensors. 1. Check the "Use Groups to filter list" box. 2. Click the Match any Group button. 3. Select Groups. Select the groups you want to include in the list. 4. Select the Match Criteria. Select "Match any selected Group" and any sensors that are a member of any of the groups selected will appear. Select "Match all selected Groups" and only sensors that are a member of all of the groups selected will appear. 5. Select OK. Only the sensors that match the group criteria will appear in the Node Sensors list. 160


161 Viewing Current Sort Criteria Enabling HOBOnode Viewer You can view plots and data from your HOBO data node network on your local area network with HOBOnode Viewer. While HOBOnode Manager requires a direct connection on a dedicated PC to monitor your network, HOBOnode Viewer gives you the flexibility to see data node plots and network status anywhere. This allows you to: Look at real-time data from your local area network with any browser Check on the data node network remotely to make sure it is running properly and that no devices are missing or alarms have tripped Share data with others by sending them a link to HOBOnode Viewer HOBOnode Viewer is a locally hosted website easily configured within HOBOware preferences. Once HOBOnode Viewer is enabled, HOBOware will create a link for your own web page that displays the real-time plots and data for your data node network. The HOBOnode Viewer web page will always be available as long as HOBOnode Manager remains open on the computer with your HOBOnode database. To access HOBOnode Viewer, you must first enable that feature within HOBOware preferences on the computer running a data node network. This will create a link to a HOBOnode Viewer web page that you can use and share with others. If you have not already set up a data node network using HOBOnode Manager, you must do that first and then you will be able to activate HOBOnode Viewer from the same computer. Windows note: If Windows Firewall is enabled on your computer, you may need to adjust the security settings to allow access to HOBOware before enabling HOBOnode Viewer. To check this, open Control Panel, go to Security, and select Allow a program through Windows Firewall (or click Windows Firewall and click the Exceptions tab on some versions of Windows). Make sure HOBOware is selected in the allowed access/exceptions list. Note that you must be administrator to make these changes. To enable HOBOnode Viewer: 1. Open the preferences for data nodes. From HOBOnode Manager, click the Actions button and select Edit HOBO Data Node Preferences. Or, to access preferences within HOBOware, select File > Preferences on Windows or HOBOware > Preferences on Macintosh and click Data Nodes. 2. Click Sharing within the Data Nodes preferences, and then click HOBOnode Viewer. 3. Select the Enable HOBOnode Viewer checkbox. 161

162 4. By default, the port number assigned for HOBOnode Viewer is You may use this one or change it to any other available port. In most cases, the default 8080 port number will be available. However, if this number is already in use by another web service application on the same computer, then you can change it to any other available port. There are 0 to 65,535 ports. Port numbers 0 to 1023 are restricted ports reserved for use by system services, such as FTP, Telnet, and HTTP. You may use any other available port number from 1024 to 65,535 for HOBOnode Viewer. 5. Click OK in preferences and then restart HOBOnode Manager (close HOBOnode Manager and then from the Device menu in HOBOware, select Manage HOBO Data Node Network to reopen it). HOBOnode Viewer will not be fully enabled until you restart HOBOnode Manager. 6. After HOBOnode Manager has restarted, return to the HOBOnode Viewer preferences. Click the link, or URL, to go to your HOBOnode Viewer web page. The URL has the following structure: htttp://<ip address>:<port number>/hobonodeviewer where <IP address> is the IP address for the computer where your data node network is running and <port number> is the port assigned for the HOBOnode Viewer in preferences. To share the URL with others, click the link and then copy the URL from your browser and paste it an message to send to others who would like to view your data node network. Note: HOBOnode Viewer is only available while HOBOnode Manager is running. If you close HOBOnode Manager and then attempt to access HOBOnode Viewer, the web page will not open. Also note that the HOBOnode Viewer will not be available outside your local area network unless you expose that computer outside of the network. Contact your IT department if you would like to expose the HOBOnode Viewer. To disable HOBOnode Viewer: 1. Open the preferences for data nodes. From HOBOnode Manager, click the Actions button and select Edit HOBO Data Node Preferences. Or, to access preferences within HOBOware, select File > Preferences on Windows or HOBOware > Preferences on Macintosh and click Data Nodes. 2. Click Sharing within the Data Nodes preferences, and then click HOBOnode Viewer. 3. Deselect the Enable HOBOnode Viewer checkbox. 4. Click OK in preferences and restart HOBOnode Manager. Using HOBOnode Viewer Many of the elements in HOBOnode Viewer are the same as HOBOnode Manager. Specifically, you can do the following with HOBOnode Viewer just as you would with HOBOnode Manager: Organize plots by sensor or by measurement type View plot data hourly, by day, by week, or by month (the month view must be enabled in the preferences for real-time plots) Sort the plots several ways, including by serial number, current reading, and alarm state 162

163 View a map of your network devices Check the device table for details on each device in your network Change the device table view by sorting the columns There are, however, some key differences between HOBOnode Manager and HOBOnode Viewer. HOBOnode Viewer, as its name implies, is a viewer only. Any changes you wish to make to your network, including updates to alarms or modifications to the map, need to be done directly in HOBOnode Manager. With HOBOnode Manager, you can see all available sensor channels on all devices, including those without a sensor type selected. HOBOnode Viewer displays enabled sensor channels only. If a device in HOBOnode Manager has a channel listed as OFF, then that channel will not appear in HOBOnode viewer. There may be some minor differences in plot appearance if you are comparing the plots in HOBOnode Viewer to HOBOnode Manager. In general, plots are nearly identical, but there could be slight differences in scaling. If you set up data delivery and chose to have files saved to your computer or a network drive, then a Data tab will be visible in HOBOnode Viewer with a list of all files delivered through that service as shown below. Click a file name to open or save the file. 163

164 Note: If you change the file directory location in the data delivery settings, then you must restart HOBOnode Manager before you can access the files from the Data tab in HOBOnode Viewer. Any changes you make to your network with HOBOnode Manager will be reflected in the HOBOnode Viewer upon the next refresh, or update. HOBOnode Viewer refreshes every 30 seconds. You can also use your browser s refresh feature if you want to see a change immediately. Important: HOBOnode Viewer is only available while HOBOnode Manager is running. If you close HOBOnode Manager and then attempt to access HOBOnode Viewer, the web page will not open. Always keep HOBOnode Manager running to ensure anyone accessing HOBOnode Viewer can see the real-time plots and data. Setting up Data Delivery With data delivery, you can automatically save recorded sensor data from nodes in your network to a single.txt,.csv, or.xls file on a regular schedule. This allows you to: Store data from your current data node network deployment for future reference and analysis, Access data remotely when you are away from the network, and Share data with others in a file that is distributed automatically via FTP or , or saved to a computer or network drive. Before you can set up data delivery, you must first select which nodes and sensors you wish to include in the file by saving the configuration settings. To do this: 1. From HOBOnode Manager, click the Plot/Export Data button. 2. Select the deployment name from the list. 164
165 3. Select the individual nodes you would like to include in the file or click the All button to select all nodes. 4. Select the sensors you would like to include in the file or click the Include all sensors button. 5. Make sure all the sensors you wish to share in your datafile appear in the Sensors to plot/export list. 6. Select Preset and choose a preset time range to determine how much data will be exported each time data delivery runs. In this example, we chose "Past 12 hours," which means only data from the past 12 hours will be exported via data delivery. The most recent 12 hours worth of data is shown for reference. Note: Do not choose a custom time range. This is for immediate exports only. If you choose a custom time range for data delivery, then data from that custom time-range only will be exported every time data delivery runs. 165


166 7. Click the Save Settings button and type a name, which will also be used for the data delivery file name, and press Enter. Your configuration settings will be saved. After you have selected the sensors you wish to include in the shared data file, you can then set up data delivery within Preferences. To do this: 1. Open HOBOnode Manager. 2. Click the Actions button and select Edit HOBO Data Node Preferences. 3. Select Sharing, and then select Data Delivery. Note: If you have not yet selected the sensors you wish to export, then you will see a message indicating you need to create and save a settings file. You must select the sensors in Plot/Export Wireless Data before continuing. 4. Select how often you want to save the data from your network, from 1 minute to 7 days. This will determine what schedule you use to share the data. 166


, username, and password for the FTP location where you want to place the file.")
167 5. Select the name of the saved settings that you created in Plot/Export Wireless Data, such as "Warehouse Zone A" in the example above. 6. Select how you would like to share the file: via , FTP, or saved to a computer or network location. You may select more than one method of sharing the file. Type the address where you want to send the file and select the checkbox if you want to compress the file before ing it. Note: Data delivery uses the same settings configured for alarm notifications. If you have never configured an alarm , you must do that first, even if you don t plan on setting any alarms. FTP: Enter the FTP server name, the directory name (remote folder), username, and password for the FTP location where you want to place the file. Test the FTP Connection to make sure it successfully delivers the file to the specified location. Select the checkbox if you want to compress the file before delivering it via FTP. Choose whether you want to overwrite the existing file at that FTP location each time a new file is transferred, or if you want to create a new time-stamped file each time. Saving it to a hard drive or network: Select the directory where you want to save the files. Choose whether you want to overwrite the file each time a file is saved, or if you want to create a new file each time. 167

168 When you are done configuring your data delivery settings, click OK in the main Preferences window. The sensor data from your data network will then be saved and shared on the schedule that you selected. The data will be saved as a.txt,.csv, or.xls file that you can import into HOBOware, Microsoft Excel, and other programs for analysis. The file type is determined by the export settings in Preferences. Notes: Data delivery will not run unless device communication is also running. This means if you opt to stop device communication when you close HOBOnode Manager, then data delivery will also stop. Once you restart the device communication, then data delivery will commence again on the previously configured schedule. The preferences for data delivery may include the names of settings files from old network deployments. If you enable data delivery and use the saved settings from an old deployment, you will see a message indicating "No data found for selected sensors." Choose a settings file from the current deployment, or create a new one with Plot/Export Wireless Data. Important: Data Delivery will not work properly if the "Show export dialog" setting is selected in the export preferences. To disable this setting, select Preferences from the File menu in Windows or the HOBOware menu in Macintosh. In the General category, select Export Settings. Make sure "Show export dialog" is not selected. Even if the "Automatically export table data upon readout of logger" option is disabled, the "Show export dialog" must not be selected for Data Delivery to work properly. Your preferences must look like this: or this: but not like this: for Data Delivery to work correctly. Tip: You can also share data from your HOBO data node network by enabling a HOBOnode Viewer webpage. When data delivery is configured to save files to your computer or a network drive, the files will also be available on the 168
169 Data tab in HOBOnode Viewer. Note that if you change the file directory used for data delivery when HOBOnode Viewer is enabled, you will need to restart HOBOnode Manager before you can access the files from the Data tab. Data Storage Location The HOBOnode Manager database is stored in the directory shown in the Data Storage Location field. This database includes all data recorded by the data nodes, settings for all deployments, alarm information, and other details related to your data node network. Onset recommends that you periodically back up the database to secure your data in case of a database or computer failure. You can back up the database to an external hard drive or network server using third-party backup software. You will also be asked to back up your database before running the HOBOnode Manager Database Upgrade Utility in HOBOware or later. Important: The database must be closed during a backup or restore. Before copying or restoring a database, close HOBOware, HOBOnode Manager, and Device Communication. Right-click (Windows) or left-click (Macintosh) the HOBOware system tray icon and select Stop Device Communication. The database is stored at the following location, as shown in the Data Storage Location field: Windows 7 and Windows 8 C:\Users\<user name>\appdata\local\onsetcomputercorporation\cosmos\db Windows XP C:\Documents and Settings\<user name>\application Data\Local\OnsetComputerCorporation\cosmos\db Macintosh OS 10.5 and 10.6 /Users/<user name>/documents/onsetcomputercorporation/cosmos/db Be sure to back up the entire "db" directory. To restore the database: 1. Obtain the "db" directory from your backup source. 2. Replace the "db" directory as shown in the Data Storage Location field with the backup copy. Alarms There are two types of alarms in HOBOnode Manager: sensor alarms and system alarms. With sensor alarms, you can set an alarm to trip when a sensor reading is out of a range you specify. With system alarms, you can set an alarm to trip when a node is missing from the network or has a low battery. You can also configure a heartbeat alarm, which periodically notifies you the receiver is active and communicating with the nodes in the network. You can also set alarm actions, or notifications, to alert you via , text, and/or audible/visual cue on your computer when an alarm trips. Note: When an alarm trips, HOBOnode Manager is opened, if it is not already. Click the Alarms tab to access the following: 169


170 1. Tabs. Click the Sensor tab to set or view sensor alarms. Click the System tab to set Missing Node, Heartbeat, and Low Battery alarms. 2. Add Sensor Alarm button (Sensor tab only). Click this button to go to the Add Sensor Alarms window. 3. Configured Alarms. Configured sensor alarms appear here. Use the filter to control what alarms shown in the sensor alarms pane. Note: If an alarm you configured is not appearing in the Alarms window, make sure the filter is set to show all. 4. Controls (Sensor tab only). Use the controls to apply an action to multiple alarms, including delete, copy, enable/disable, and apply default actions. 5. Tripped Alarms Log. All tripped alarms appear here. Click the Clear Log button to delete all tripped alarms. Alarms that have been configured, but not tripped, display as green alarm clock icons in both the Sensor and Systems tab as well as the Device Table (sensor alarms only). Once the alarm is tripped, the alarm clock icon changes to red. 170
171 Adding a Sensor Alarm A sensor alarm trips when a sensor reading is outside a threshold that you configure. You can set up actions so that you are notified by , text message, or by an audio or visual alarm in HOBOnode Manager when a sensor alarm trips. Once you create an alarm, you can copy it to multiple sensors of the same measurement type or the same measurement type and group. Note: Sensor data is sent to the receiver periodically (based on the Connection Interval) and not continuously. Therefore, there is a delay between the time the alarm condition occurs and is recorded by the sensor and when you are alerted by any notifications you have configured. The default Connection Interval is 10 minutes. For critical applications, you may want to decrease the Connection Interval so that you are alerted to alarm conditions more frequently. See Changing the Logging Interval and Connection Interval. Opening the Add Sensor Alarm window The first time you add an alarm for a sensor, you can click the alarm icon for the sensor in the Device Table. This will open the Add Sensor Alarm window with the sensor already selected. Otherwise, click the Alarms tab, then the Sensor tab, and then the Add Sensor Alarm button. With this method you will then need to select the sensor from a drop-down list. 1. Make sure the "Enable sensor alarm" checkbox is selected. 2. Select the sensor (if not already selected). If you accessed the Add Sensor Alarm window by clicking on the alarm icon in the Device Table, the sensor will automatically be populated. Otherwise, select the sensor you want to add the alarm to. 3. Configure Alarm Parameters. a. Select the threshold: Above, Below, or Outside Range. b. Enter the value for the alarm. c. Enter the Number of Data points. This is the number of readings that must be outside of the limits for the alarm to be tripped or cleared. 4. Configure Alarm Actions (Notifications). 5. Click Save. Note: Any time you edit an existing alarm, the alarm state is reset to untripped and the logged data points are reset to zero. Copying an Alarm to Other Sensors To copy an alarm to other sensors: 171
. The alarms are copied to the sensors, as shown below.")

 as shown below. This means the alarm is enabled.")
172 1. Select Alarm(s). Select the alarms you want to copy. You can select alarms for multiple measurement types and each alarm will only be copied for sensors of that type. 2. Click the Copy to button. 3. Select the copy option. You can copy the alarm to all sensors of the same Measurement Type, or to Measurement Type and Group(s). The alarms are copied to the sensors, as shown below. Enabling a Missing Node Alarm A Missing Node alarm trips when a data node has not connected to the receiver within the specified timeframe. The default period to determine that a node is missing is 10 minutes. You can change this in the Preferences. To enable a missing node alarm: 1. Click the Alarms tab. 2. Click the System tab and select the checkbox in the Enable column for Missing Node. If alarm actions have already been configured by a previous edit, then the Status icon for Missing Node will change to an active alarm icon (green) as shown below. This means the alarm is enabled. If an Edit Missing Node Alarm dialog box appears or you wish to make additional changes to this alarm, then proceed to next step. 3. An Edit Missing Node Alarm dialog box may open automatically. If it does not and you wish to change the settings, then click the Edit icon for Missing Node as shown above. 172

173 4. Make sure the "Enable missing node alarm" checkbox is selected. 5. By default, the alarm will trip after the node is missing for 10 minutes. Click the Preferences button if you wish to change the default time period. 6. Add one or more alarm actions, which is how you will be notified when the alarm trips. You can be notified via or text, or by a visual cue or audible sound on the computer where HOBOnode Manager is running. 7. Click Save. The changes you made to the missing node alarm are displayed on the System tab. Note: Nodes may temporarily go missing after upgrading their firmware as described in Upgrading the Firmware for a Receiver or Single Data Node or Updating the Firmware for Multiple Data Nodes. In most instances, the node will not be reported as missing after upgrading its firmware. However, depending on how long the upgrade process takes and the length of the connection interval, the node may occasionally be reported as missing. If a node is reported as missing after updating its firmware, wait one or two connection intervals for the node to reappear. For example, if the connection interval is set to 20 minutes, wait for 40 minutes to make sure the node reappears. If the node is then still reported as missing, add it back to the network by following these steps: 1. Click the Form Network button in HOBOnode Manager. 2. Press the reset button with a quick 1-second push to reactivate the data node. 3. Verify that the data node appears in the HOBOnode Manager table and is identified as a router or data node as expected (see Determining Data Node Type). To change the type of data node, see Converting an End-Point Node to a Router Node or Converting a Router Node to an End-Point Node. Enabling a Heartbeat Alarm If you enable a Heartbeat alarm, a heartbeat is generated every 12 hours (configurable) to let you know that the system is up and running. If you do not receive a heartbeat notification, check the status of your receiver and restart HOBOware if necessary. To configure a heartbeat alarm: 1. Click the Alarms tab. 2. Click the System tab and select the checkbox in the Enable column for Heartbeat. If alarm actions have already been configured by a previous edit, then the Status icon for Heartbeat will change to an active alarm icon (green) as shown below. This means the alarm is enabled. If an Edit Heartbeat dialog box appears or you wish to make additional changes to this alarm, then proceed to next step. 173

174 3. An Edit Heartbeat dialog box may open automatically. If it does not and you wish to change the settings, then click the Edit icon for Heartbeat as shown above. 4. Make sure the "Enable heartbeat alarm" checkbox is enabled. 5. Select how often you want to generate a heartbeat and what time you want to start. 6. Add one or more alarm actions, which is how you will be notified when the alarm trips. You can be notified via or text, or by a visual cue or audible sound on the computer where HOBOnode Manager is running. 7. Click Save. The changes you made to the heartbeat alarm are displayed on the System tab. Enabling a Low Battery Alarm You can set an alarm to trip when the battery level in a data node or a router drops below a specific threshold. This can help you determine when it is time to change the batteries for devices in your network. The low battery alarm is a system-wide alarm, which means it applies to all devices (either all nodes or all nodes and routers) in the network. You cannot set a low battery alarm for some nodes and not others. To configure a low battery alarm: 1. Click the Alarms tab. 2. Click the System tab and select the checkbox in the Enable column for Low Battery. If alarm actions have already been configured by a previous edit, then the Status icon for Low Battery will change to an active alarm icon as shown below. This means the alarm is enabled. If an Edit Low Battery dialog box appears or you wish to make additional changes to this alarm, then proceed to next step. 174

175 3. An Edit Low Battery dialog box may open automatically. If it does not and you wish to change the settings, then click the Edit icon for Low Battery as shown above. 4. Make sure the "Enable low battery alarm" checkbox is enabled. 5. Select the battery level at which you want the alarm to trip, from 10 to 50%. For example, if you choose 20%, then the alarm will trip once the device's remaining battery power drops below 20%. 6. Select whether the battery alarm should trip for nodes only or for both nodes and routers. Notes: You cannot set a low battery alarm for a receiver because it should always be powered by an AC adapter. In addition,you should not set a low battery alarm for routers that do not have batteries installed. If your routers are powered by AC adapters only and do not have backup batteries installed, then you should set the battery alarm for nodes only. 7. Add one or more alarm actions, which is how you will be notified when the alarm trips. You can be notified via or text, or by a visual cue or audible sound on the computer where HOBOnode Manager is running. 8. Click Save. The changes you made to the low battery alarm are displayed on the System tab. Note: If the low battery alarm was previously configured and had tripped, then clicking Save will clear the tripped state. If the newly saved settings result in an alarm condition, then the alarm will trip at the next connection interval. Adding Alarm Actions (Notifications) An alarm action is a notification when an alarm trips or and/or clears. You can configure the alarm action to notify you in four ways: Via 175


176 Via text message With a visible message on your computer With a sound on your computer Before you set up or text notifications, you must configure your SMTP settings. See Setting Alarm Preferences. 1. Click the Add New Action button. A new action is added. Tip: To save time, you can configure default alarm actions. See Setting Alarm Preferences for information. 2. Select the type of notification: , Text Message, Visible, or Audible. 3. Enter information or make a selection depending on the type of notification. Note: If you add an or text notification and you have not already set up your SMTP settings, you will be prompted to do so. Enter the address where you want the alarm notification sent. Text Message: Enter the address where you want the alarm notification sent. Visible: No further configuration required. A pop-up window will appear in HOBOnode Manager if the alarm trips. Audible: Select the sound that you want to play when an alarm trips. Click the Play icon to hear the alarm. Note: If multiple audible alarms are set, only the most recent will play. Any other actions configured for the alarm will be sent. 4. Check the "Perform on clear" box if you want a notification when the alarm clears. If you only want a notification when the alarm clears and not when it is tripped, change the drop-down selection to "only." 5. Add Notes to be included in the alarm notification (optional). 6. Click Save. To add another action, repeat the procedure. 176


177 Setting Alarm Preferences Before you add sensor alarms, set up your Alarm Preferences for notifications and create default actions (notifications). To open the Preferences window, click Actions at the bottom of the HOBOnode Manager window and select Edit Data Node Preferences. 1. Enter SMTP settings for or text notifications. To receive or text message alarm notifications, enter the Server IP Address for your mail server, and enable SSL or authentication if required by your network. See your Network Administrator or your Internet Service Provider for information; see also Alarm /Text Configuration for more information. 2. Send a test . Enter your address and click the Send Test button to verify that your settings are correct. Make sure you check your Junk Mail or Spam folder for the if it is not in your inbox. 3. Add default alarm actions (optional). Entering default alarm actions simplifies alarm configuration. For example, instead of entering the same address for every alarm, you can select an address from a list of drop-down entries when you add the alarm action. For more details on alarm actions, see Adding Alarm Actions. If you check "For new sensor alarms, automatically add all default actions" when you click the Add Sensor Alarm button, the alarm actions you configured are automatically added, as shown below. This is helpful if you want the same actions for every alarm. Alarm /Text Configuration You must configure the SMTP Settings to allow from the data node network to get to your recipients. If your data node network is within a corporate network environment, you should contact your Network Administrator (IT/MIS dept.) for this information. Also, they may need to add the receiver to a White List to allow it to relay through the corporate server. 177
178 If you use a private mail account such as Yahoo or Google, or if you do not know your corporate information, you can get the outgoing mail parameters from your mail provider. The following are links to this information for some providers. For other providers, search the Internet for SMTP Settings for <provider name>." Gmail Hotmail Sending an Alarm to a Cell Phone To send an to your cell phone when an alarm occurs, enter the address for your cell phone. These are the formats for some cell phone providers. For others, contact your provider. Alltel [10-digit phone number]@message.alltel.com Example: @message.alltel.com AT&T [10-digit phone number]@txt.att.net Example: @txt.att.net Boost Mobile [10-digit phone number]@myboostmobile.com Example: @myboostmobile.com Nextel (now part of Sprint Nextel) [10-digit telephone number]@messaging.nextel.com Example: @messaging.nextel.com Sprint PCS (now Sprint Nextel) [10-digit phone number]@messaging.sprintpcs.com Example: @messaging.sprintpcs.com T-Mobile [10-digit phone number]@tmomail.net Example: @tmomail.net Verizon [10-digit phone number]@vtext.com Example: @vtext.com Virgin Mobile USA [10-digit phone number]@vmobl.com Example: @vmobl.com 178

179 The Network Map Place icons on the Network Map to help you keep track of your devices. You can expand Information Balloons on the device to view status information and sensor readings. You can also import a custom background image, such as a floor plan. 1. Map Tab. To view the Network Map, click the Map tab. 2. Information Balloons. Click a device in the Network Map to open a pop-up that shows current readings and other device information. To have pop-ups appear automatically, click the Configure Map icon and select "Show Information Balloon when adding new data nodes and on startup." You can also adjust how much information is included in the balloon. See Configuring the Network Map for more information. 3. Imported Map Image. To customize your map background image, see Customizing the Network Map Background. 4. Add Device to Map. To add a device to the map, check the Map box in the Device Table and then click in the map where you want to place the icon. 5. Connection Path. Lines on the map show the path each device takes to the receiver. You can monitor the communication between a data node and the data receiver by checking the connection paths between devices. If a device has missed a scheduled connection, the path will become a dotted line. To change the path color, see Configuring the Network Map. 6. Tools. Use the Zoom tools to zoom in and out of the map. Click the Configure Map button to access additional map settings. Use the Refresh Network Paths button to see the latest path that the devices are taking to get to the receiver. Paths can change if a data node is moved or because the original path was obstructed. 179


180 Note that if an alarm has tripped on a node, the node icon on the network map will have a red ring around it like this: Adding a Device to the Network Map To add a device to Network Map. 1. In the Device Table, check the Map box for the receiver to add it to the map. 2. Move the icon to the location of the receiver and click the left mouse button. 3. Check the Map box for a node to add it to the map. 4. Move the icon to the location of the device and click the left mouse button. 5. Repeat steps 3 and 4 for each node you want to add to the map. Configuring the Network Map You can customize the paths and information balloons on the Network Map, and you can use your own Click the Configure icon in the top left of the Network Map to open the Network Map Configuration window. 180


181 In the Node Paths pane, select the Show Path to Receiver checkbox Paths to show or hide connection paths between nodes. To change the path color, click the Choose button. Select a new color from the Swatches tab, or enter HSB or RGB values and click OK. In the Information Balloons pane, select the Information Balloon Type, as either: Simplified to show only label and readings, or Expanded to show all device information. To change the background color on the balloon, click the Information Balloon Color drop-down arrow and select a color. Select the "Show Information Balloon when adding new data nodes and on startup" checkbox to automatically display the balloons any time you open HOBOnode Manager or add a new icon to the map. To change the map image, see Customizing the Network Map Background. Customizing the Network Map Background You can upload a custom image to the Network Map to represent your floor plan. 181

182 1. Click the Configure icon in the top left corner of the map. 2. Click the Choose button in the Network Map Configuration window. 3. Select the image file from the Open window. 4. Click Open. 5. Click OK to close the Network Map Configuration window and display the new image. To revert to the default image, click Restore. If you don't have an image to upload, you can create one using any drawing program following these guidelines: There are 3 scale levels available for an image in the Network Map, depending on the size of the image you upload. The larger the size, the more zoom levels you will have. 1,000 x 1,000 (minimum size) - 1 zoom level 2,000 x 2,000-2 zoom levels 3,000 x 3,000 (maximum size) - 3 zoom levels All images are converted to squares in the Network Map, so for best results your overall image should be a square. Inside the main square, add a smaller square or rectangle to roughly represent your building. Add squares or rectangles to represent rooms in your building where you will place nodes. Add descriptive labels to each room such as "Office," "Cooler," or "Boiler Room." Some programs will also have other images you can add to the room such as desks and computers to help you narrow the location of the node. Set the properties of the image to your desired resolution. For best results enter 4,000 x 4,000 pixels. Maintenance & Troubleshooting Once your ZW Wireless Data Node Network is running, refer to the following topics for maintenance and troubleshooting tips: Changing External Sensor Type Moving or Removing a Data Node Converting a Router Node to an End-Point Node (Switching from AC Power to Battery Power) Converting an End-Point Node to a Router Node (Switching from Battery Power to AC Power) 182

183 Database Backup and Restore HOBOnode Manager Database Upgrade Utility Creating a New Deployment Updating Firmware for a Receiver or Single Data Node Updating Firmware for Multiple Data Nodes Troubleshooting Changing External Sensor Type Many types of HOBO data nodes can be configured with external sensors. One of the benefits of using external sensors is that you can swap them out when necessary for different ones if you want to modify your wireless network. Or, you can disable the external sensor channel if you don't need it for your current network deployment. To change the type of external sensor associated with a data node: 1. Double-click the external sensor you wish to change in the HOBOnode Manager device table. 2. Select the sensor from the Sensor Type drop-down list. 3. Make any other changes as necessary and click OK. Note: While the HOBOnode Manager device table will display the change to the sensor type immediately, data for the new sensor will not display until the next connection interval. To deselect, or turn off, an external sensor: 1. Double-click the external sensor you wish to change in the HOBOnode Manager device table. 2. Scroll to the end of the Sensor Type drop-down list and select <No sensor attached>. 183


184 3. Make any other changes as necessary and click OK. The HOBOnode Manager device table will then change the status for that external sensor to OFF as shown below. Any plots and alarms associated with that sensor will also be removed from HOBOnode Manager. Shortcut: In the device table, click the checkbox next to the external sensor, then click the Sensor Type button and select the sensor from the list. This can be done for many sensors at once by selecting more than one sensor at a time in the device table. For details on setting up a HOBO data node with an external sensor for the first time, see Setting Up an External Sensor. For details on scaling sensor data, see Configuring Scaling on a Sensor. Moving or Removing a Data Node If you will not be using a data node for an extended period of time, you may want to deactivate it to stop measurements and save batteries. To deactivate a data node, use a paper clip to press the Activate button as shown in the photo below for 5 seconds until the red LED starts flashing. 184
185 To later reactivate the data node, select Form Network from HOBOnode Manager and briefly depress the Activate button on the node. If you do not want a data node to appear in HOBOnode Manager, double-click the device row in the Device Table and then click Remove Node in the Configure Node window. If you move a data node to a new location, make sure the green LED is still blinking once per 10 seconds to indicate that the node still has a connection to the receiver. If the red LED is blinking, the connection path is broken. Try adjusting the orientation of the data node or moving it closer to the receiver to minimize obstructions. You may need to add a router to re-establish a connection. If moving a data node changes the primary power source, see the following: Switching from AC Power to Battery Power Switching from Battery Power to AC Power Converting a Router Node to an End-Point Node (Switching from AC Power to Battery Power) If you initially power up a node using an AC adapter, it will operate as a router node. If you need to convert the router node into an end-point node that operates on battery power only, follow this procedure. 1. Deactivate the data node by pressing the reset button on the data node with a paper clip until the red LED starts flashing repeatedly (about 5 seconds). 2. Disconnect the data node from AC power. 3. If batteries are installed, remove them. 4. Wait at least 30 seconds to clear the memory. 5. Reinstall the batteries. Do not plug in the AC adapter. 6. Click Form Network in HOBOnode Manager. 7. Press the reset button with a quick 1-second push to reactivate the data node. 8. Verify that the data node appears in the HOBOnode Manager table and is identified as a node (no routing capabilities). See Determining Data Node Type. Converting an End-Point Node to a Router Node (Switching from Battery Power to AC Power) If you initially power up a node using batteries, it will operate as an end-point node with no routing capabilities. If you need to convert the end-point node into a router node that operates on AC power, follow this procedure so that HOBOnode Manager recognizes the data node as having routing capabilities. 1. Deactivate the data node by pressing the reset button on the data node with a paper clip until the red LED starts flashing repeatedly (about 5 seconds). 2. Remove the batteries from the data node. 3. Wait at least 30 seconds to clear the memory. 4. Plug the data node into an AC power outlet. 5. Click Form Network in HOBOnode Manager. 6. Press the reset button with a quick 1-second push to reactivate the data node. 7. Verify that the data node appears in the HOBOnode Manager table and is identified as a router. See Determining Data Node Type. 8. Reinstall the batteries for backup purposes. 185
186 Database Backup and Restore It is recommended that you periodically back up your database to secure your data in case of a database failure. You can back up your database to an external hard drive or network server using third-party backup software. If you should ever need to restore your database, simply replace the primary database with the backup. Important: The database must be closed during a backup or restore. Before copying or restoring a database, close HOBOware, HOBOnode Manager, and Device Communication. Right-click (Windows) or left-click (Macintosh) the HOBOware system tray icon and select Stop Device Communication. The database is stored at the following location: Windows 7 and Windows 8 c:\users\<user name>\appdata\local\onsetcomputercorporation\cosmos\db Windows XP c:\documents and Settings\<user name>\application Data\OnsetComputerCorporation\cosmos\db Mac OS 10.5 and 10.6 /Users/<user name>/documents/onsetcomputercorporation/cosmos/db To rename the database, modify the name of the db folder by adding the deployment location or the date (example: "db-11-10"). Note: HOBOnode Manager will be empty after renaming the database. You will need to form a new network. HOBOnode Manager Database Upgrade Utility HOBOnode Manager databases created in HOBOware or earlier must be upgraded with the HOBOnode Manager Database Upgrade Utility to improve performance and response time. This utility is automatically opened the first time you access the HOBOnode Manager database in HOBOware or later. Before you can upgrade the database with the utility, you must first go to the data storage location to back up the database (and the entire db directory). After the backup is complete, click Start in the utility to begin the upgrade process. Progress will be displayed while the upgrade takes place. Important: The larger your database, the longer it will take the upgrade to complete. Please be prepared for the utility to run for an hour or more. You will not be able to access any features in HOBOnode Manager or HOBOware while the utility is running. Any data recorded while the upgrade is running will be saved and available in HOBOnode Manager once the upgrade is complete. In addition, this utility requires free disk space equivalent to double the size of the current database. For example, if your database is 450 MB, then you will need at least 900 MB free disk space on the computer for the utility to complete its process. Once the upgrade is complete, the database will be close to its original size. Creating a New Deployment The first time you form a HOBO data node wireless network, the initial deployment, or network configuration, is created automatically for you. This first deployment can continue indefinitely. However, you also have the option to create a new deployment if you need to move your current network to a new location or if you'd like to configure a different set of sensors in a new network, for example. This allows you to more easily distinguish between two separate networks or deployments of nodes when they are plotted or exported from HOBOware. You have the option of either creating a new deployment that is an exact copy of the previous one (all devices, alarms, and settings will be copied as currently configured) or consists of a new network (only system alarms and alarm logs are copied). Note: Creating a new deployment does not create a new database. All data recorded in the previous deployment is saved and can be accessed through Plot/Export Data. To create a new deployment: 186

. Click OK. 3.")

187 1. Click the Actions button in HOBOnode Manager and select Create New Deployment. 2. Type a name for the new deployment. Select the Copy the current network to the new deployment checkbox if you want to use the current deployment as the basis for the new deployment (HOBOnode Manager will automatically be filled in with your current network devices, alarms, and settings). If you do not copy the current network, then you will need to form a new network (only system alarms and alarm logs will appear in HOBOnode Manager). Click OK. 3. A message appears indicating that the current network deployment will end and a new deployment will be started. Click Yes to continue, or click No to return to the Create New Deployment dialog. 4. From the Device menu in HOBOware, select Manage HOBO Data Node Network to restart HOBOnode Manager. 5. If you chose to copy the current network to the new deployment, then HOBOnode Manager opens with all devices listed. Plots will begin displaying the new network data at the next scheduled connection interval. If you did not copy the old network, then you will be prompted to form a new network. Both the newly created deployment and the previous deployment are listed in the Plot/Export Wireless Data window. Click the Plot/Export button in HOBOnode Manager to see the deployment list as shown in the example below. Deployments are listed from newest to oldest. The initial deployment is labeled "First Deployment" by default. Any subsequent deployments are listed with the name you entered in the Create New Deployment dialog. The start time for the current deployment (the deployment at the top of the list) is the time the new deployment was created, which is also the end time for the previous deployment on the list.the end time for the current deployment is the current time. Updating Firmware for a Receiver or Single Data Node Occasional firmware updates may be necessary for the devices in your network. Follow these steps if you are directed by Onset Computer to upgrade the firmware in the receiver or a single data node. To update several data nodes in the network at once, see Updating Firmware for Multiple Data Nodes. 187

188 Important Notes Before you Begin: Updating the firmware generally takes two to three minutes for a receiver and four to six minutes for a data node. You cannot cancel the update process once it starts. If you need to update both the receiver and data nodes, update the receiver first to provide the best network performance. After the receiver update is complete, wait for HOBOnode Manager to display the latest data from all the nodes. Once each node has communicated with the newly updated receiver and the latest data appears in the device table, then you can continue with updating the firmware in the nodes. When updating the receiver firmware, the entire network will automatically shut down and restart. A data node should be powered the same way as it was when it was originally configured to ensure it remains a part of the network once the update is complete. This means a router node must be plugged into an AC adapter and an end-point data node must have batteries installed and not be plugged into an AC adapter. See Determining Data Node Type for details on identifying routers and end-point nodes in HOBOnode Manager. To update firmware: 1. Place the firmware.hex file(s) in the appropriate directory. Do not rename the files. For Windows 7 and Windows 8: C:\Users\Public\Documents\HOBOware Public Files\FWUpdates For Windows XP: C:\Documents and Settings\All Users\Shared Documents\HOBOware Public Files\FWUpdates For Macintosh: /Users/<user>/Documents/HOBOware/FWUpdates 2. HOBOware, HOBOnode Manager, and ZW Device Communication must be restarted to correctly identify the firmware files. Close HOBOware and HOBOnode Manager if open. If prompted to leave the device communication running in the background, click No. If HOBOware and HOBOnode Manager were already closed, but device communication was running, right-click (or left-click on a Mac) the HOBOware icon in the system tray select Stop Device Communication. 3. Open HOBOware and HOBOnode Manager again. Wait for new data to be updated in HOBOnode Manager. 4. In HOBOnode Manager, double-click the receiver (ZW-RCVR) or node you want to update in the Device Table (or select the receiver or node and click Configure). 5. Click the "Update device firmware" button in the Configure Receiver or Configure Node window (Configure Receiver is shown in the following example). 188


189 Notes: If the "Update device firmware" button is disabled, HOBOnode Manager is still being updated after its restart. Keep the Configure window open and wait for a few more minutes for the button to become enabled. If the "Update device firmware" button does not appear, double-check that the firmware.hex file is in the correct directory as described in Step 1. A battery-powered end-point node with a current firmware version of 64 must be temporarily converted to an AC-powered router node before you can update the firmware. If a message displays indicating you cannot complete the update, follow the steps in Converting an End- Point Node to a Router Node first and then repeat Steps 2 and 3 again. 6. A message appears listing details about the device and any notes about the update process. Click Cancel if you do not want to update the device at this time. Otherwise, click Continue. 7. The firmware is updated in the device; check the progress on the screen during the update as shown in the following example of a node being updated. Notes: When the firmware is saved to the device, the LED will flash red on the receiver and green on a data node. A message appears at the end when the update is successfully completed. 189

190 After a data node has been updated, it may to take one or two connection intervals before new data is displayed in HOBOnode Manager. For example, if the connection interval is set for 10 minutes, it may take two connection intervals, or about 20 minutes, for new data to appear. If new data still isn't appearing after two connection intervals have passed, power cycle the data node (unplug the adapter and/or remove the batteries then plug the adapter back in and/or reinstall the batteries). If HOBOnode Manager still is not displaying data after power cycling the data node as described above or if the data node is listed as missing in HOBOnode Manager after updating the firmware, add it back to the network by following these steps: 1. Click the Form Network button in HOBOnode Manager. 2. Press the reset button with a quick 1-second push to reactivate the data node. 3. Verify that the data node appears in the HOBOnode Manager table and is identified as a router or data node as expected (see Determining Data Node Type). To change the type of data node, see Converting an End-Point Node to a Router Node or Converting a Router Node to an End- Point Node. Updating Firmware for Multiple Data Nodes Occasional firmware updates may be necessary for the data nodes in your network. If new versions of firmware files are detected in the HOBOware FWUpdates directory (exact location described below), then an Update Firmware in Data Nodes option appears in the Actions drop-down menu in HOBOnode Manager as shown below. Follow these steps if you are directed by Onset Computer to upgrade the firmware in multiple data nodes. To update the firmware in the receiver or in a single data node at a time, see Updating Firmware for a Receiver or Single Data Node. Important Notes Before you Begin: Firmware.hex files must be present in the appropriate directory. (Do not rename the files.) For Windows 7 and Windows 8: C:\Users\Public\Documents\HOBOware Public Files\FWUpdates For Windows XP: C:\Documents and Settings\All Users\Shared Documents\HOBOware Public Files\FWUpdates For Macintosh: /Users/<user>/Documents/HOBOware/FWUpdates If you need to update the firmware in both the receiver and data nodes, update the receiver first for best network performance. Follow the steps in Updating Firmware for a Receiver or Single Data Node. After the receiver update is complete, wait for HOBOnode Manager to display the latest data from all the nodes. Once each node has communicated with the newly updated receiver and the latest data appears in the device table, then you can continue with updating the firmware in data nodes. 190
191 A data node should be powered the same way as it was when it was originally configured to ensure it remains a part of the network once the update is complete. This means a router node must be plugged into an AC adapter and an end-point data node must have batteries installed and not be plugged into an AC adapter. A battery-powered end-point node with a current firmware version of 64 must be temporarily converted to an AC-powered router node before you can update the firmware. These nodes will not be displayed in the list of data nodes waiting for an update. Follow the steps in Converting an End- Point Node to a Router Node first, then update the firmware in each of these nodes one at time as described in Updating Firmware for a Receiver or Single Data Node. Although data will continue to be transmitted and stored in the receiver while this upgrade takes place, it will not be available in HOBOnode Manager until after the upgrade is complete. Therefore, select a time to perform the upgrade when you do not need real-time access to your data. Nodes may be temporarily reported as missing after being upgraded. If you have enabled the Missing Node alarm for any nodes in your network, consider only upgrading a few nodes at a time to minimize the potential for nodes to be reported as missing and the Missing Node alarm to trip. Steps 1. Once the firmware.hex files are in the correct location as described in the Important Notes Before you Begin, you must restart HOBOware, HOBOnode Manager, and Device Communication. Close HOBOware and HOBOnode Manager if open. If prompted to leave the device communication running in the background, click No. If HOBOware and HOBOnode Manager were already closed, but device communication was running, right-click (or left-click on a Mac) the HOBOware icon in the system tray select Stop Device Communication. 2. Open HOBOware and HOBOnode Manager again. Wait for new data to be updated in HOBOnode Manager. 3. From the Actions menu in HOBOnode Manager, click Update Firmware in Data Nodes. If this option does not appear in the menu, wait for a few more minutes for HOBOnode Manager to finish updating in Step 2. If it still does not display, double-check that the firmware.hex files are in the correct directory and repeat Steps 1 through 3 again. 4. A list of all nodes waiting to be updated is displayed. Click the checkbox next to each node you want to update or click Select All to choose all the nodes in the list. 5. Click the Updated Checked button to start the update process for all the nodes selected in the list. Each node will be updated one by one, with the progress displayed next to the node and a detailed progress listed in the bottom pane of the window. Important: Clicking Cancel will not immediately stop all updating. When you click Cancel, the node update in progress will continue until finished. The Cancel button will also change to read "Cancel requested." Once the update is complete for that node, the update for the remaining nodes will be canceled. Click the Update button to restart the update process for the remaining nodes. 191
. Click Close to return to HOBOnode Manager.")
192 6. Once the update is complete, click the Save button to save the log detailing the update procedure to a text file called "FirmwareUpdateLog.txt" (saved in C:\Users\<User Name>\Documents on Windows and in the <User Name> folder on Mac). Click Close to return to HOBOnode Manager. Notes: After a data node has been updated, it may to take one or two connection intervals before new data is displayed in HOBOnode Manager. For example, if the connection interval is set for 10 minutes, it may take two connection intervals, or about 20 minutes, for new data to appear. If new data still isn't appearing after two connection intervals have passed, power cycle the data node (unplug the adapter and/or remove the batteries then plug the adapter back in and/or reinstall the batteries). If HOBOnode Manager still is not displaying data after power cycling the data node as described above or if the data node is listed as missing in HOBOnode Manager after updating the firmware, add it back to the network by following these steps: 1. Click the Form Network button in HOBOnode Manager. 2. Press the reset button with a quick 1-second push to reactivate the data node. 3. Verify that the data node appears in the HOBOnode Manager device table and is identified as a router or data node as expected (see Determining Data Node Type). To change the type of data node, see Converting an End-Point Node to a Router Node or Converting a Router Node to an End-Point Node. Troubleshooting General Network Connection Issues If you are having problems connecting data nodes to the receiver, or they are losing a connection after they have been joined to the network, you may be experiencing issues with a conflicting wireless device. To reset the radio channel, double-click the receiver row in the Device Table and in the Configure Receiver window click the Reset button. You will then need to form the network again. Receiver Will Not Connect to HOBOnode Manager Make sure the USB plug is secure on both ends. Try unplugging and plugging the receiver back in. 192
193 Data Node Cannot Join Network Positioning: If you are having trouble getting a data node to join the network, try repositioning the node within the space. Move the data node away from any obstacles (such as metal walls, stairwells, elevator shafts) that may exist between it and the receiver. Distance: The data node may be too far from the receiver to obtain a signal. Try moving the data node closer to the receiver, or add a router or router/node between the data node and the receiver. Make sure the receiver is in Form Network mode (RED and GREEN LEDs alternating). Make sure you have pressed the button on the bottom of the node and that the RED and GREEN LEDs are alternating. Try pressing the button again. Debugging There are a number of debugging and logging options in HOBOnode Manager. If you are working with Onset Technical Support on an issue, you may be asked to enable debugging options and send a log file to Onset. No readings for a sensor For external sensors, make sure the connection to the data node is secure and that you have assigned a Sensor Type (does not apply to the External Temp/RH Sensor). No Plot Appears for a Sensor Make sure you have checked the Plot box in the Device Table for the sensor. Extreme Sensor Readings If you are seeing extreme sensor readings, make sure the sensor cable is securely plugged into the node. Alarms If an alarm you configured is not appearing in the Alarms window, make sure the filter is set to Show all. Security Connection Messages on Macintosh If the firewall setting is enabled in the security system preferences on a Macintosh, you may encounter a security warning message every time you open HOBOnode Manager. To turn off this message, go to System Preferences, select Security, and turn off the firewall. Note: Keeping the firewall turned on and adjusting the advanced settings to allow all incoming connections for HOBOware does not resolve the problem. Firewall Messages on Windows Windows Firewall must allow access to HOBOware.exe for HOBOnode Viewer to run properly. To allow HOBOware access, open Control Panel, go to Security, and select Allow a program through Windows Firewall (or click Windows Firewall and click the Exceptions tab on some versions of Windows). Make sure HOBOware is selected in the allowed access/exceptions list. Changing Locale The language in use at the time the original HOBO data node network database was created is the only language that can be used for that database. You cannot switch to another language. If you need to change the locale on the computer that contains your HOBO data node network database, you will need to: 1. Back up and then move or rename the database. 2. Change the locale on the computer. 3. Form a new network to create a database that operates in the new locale. 193
194 Chapter 7 Reference Setting Preferences Menus The Toolbar Tips for Working with Multiple Loggers Setting the Language Format on Your Computer Alarm & Readout Tool Setting Preferences You can change the default behavior of HOBOware in the categories listed below. Preference settings are unique for each user login on your computer. The following categories are available: General. Set preferences for Launch Time-Savings Options, Readout Time-Savings Options, Open File Time-Saving Options, Export Settings, Selecting Devices, File Associations, Startup, Data Verification, and Data Encoding. Communications. Set preferences for Device Types, Serial Ports, Device Speeds, and Other Options. Plotting. Set preferences for Fonts, Lines, Value Axis, Layout, Points Table and Details Pane, Gridlines, Plot Setup, Other Options, Undo & Redo. Data Assistants. Set show/hide preferences for HOBOware Data Assistants. Display. Set preferences for Default Unit System, Date/Time, and Series. Warnings. Set preferences for various warning types. Data Nodes. Set preferences for HOBOnode Manager, including General, Alarms, Real-Time Plots, Data Storage, and Sharing (HOBOware Pro only). Alarms. Set preferences for the Alarms & Readout Tool, including Alarm Conditions, Readouts, Notifications, Messages, and Warnings (HOBOware Pro only). Important: The Alarm & Readout Tool is no longer installed with HOBOware as of version 3.4. Information in the help system is included for reference only for existing Alarm & Readout Tool users. Bulk Export. Set YAML preference for Bulk Export Tool (HOBOware Pro only). Some preferences have one of the following icons next to them, indicating a difference in behavior between HOBOware and HOBOnode Manager (HOBOware Pro only). You can save preference settings and reload them as needed (HOBOware Pro only). Click the Save Preferences button at the top of the Preferences window and type a name in the pop-up field to save all currently selected preferences. You can then click the Load Preferences button and select the name you typed in to load those preference settings back into the Preferences window. 194
195 See also: Restoring Default Preferences General Preferences Use the General category within Preferences to control a variety of HOBOware behavior, including launching, reading out, opening files, exporting, selecting devices, and more. To change these settings: 1. From the File menu on Windows or the HOBOware menu on Macintosh, select Preferences. 2. Select the General category on the left and then click the subcategory you wish to change. 3. Adjust any of the settings described below and then click OK. Launch Time-Saving Options (HOBOware Pro only) When launching. Select "Show launch screen" to display the Launch Logger window when you select Launch from the Device menu or click the Launch icon on the toolbar, or select "Automatically launch" to bypass this window and launch the logger with the default settings. Selecting "Automatically launch" is particularly useful if you want to launch several loggers quickly without changing any settings. The default settings are determined by the "Fill launch window with contents of" preference. For HOBOware Pro only: If you select "Automatically launch" and also set the Default Action from the Device menu to Launch, this feature allows you to launch several U-Series loggers in a row simply by connecting and disconnecting each logger to the computer. Fill launch window with contents of. Select "Current logger" to show the logger's most recent launch settings (as stored in the logger memory) in the Launch Logger window. Select "Previous launch" to show the same settings used in the most recent launch. This is helpful if you want to launch several loggers of the same type with similar settings or if you want to set up several loggers to start at the same time with the same logging interval. An indicator on the Launch Logger window will remind you when this preference is use. Note that "Previous launch" does not apply if you are launching different types of loggers; instead the settings in the logger's memory will be used. When "Previous launch" is selected, you also can select the "Use previous sensor labels" checkbox to automatically fill any sensor label fields with the labels from the previous launch. Default launch type. This preference controls what displays by default in the "Start logging" field in the Launch Logger window"previous launch type" is selected, then the "Start logging" field will display the same setting used for the logger's last launch. For example, if the logger was last configured to start logging "Now" selected, then the "Start logging" field will default to "Now" for the next launch. Note that if the previous launch was set to start "At interval," the "Start logging" field will default to start "On Date/Time." If "Launch now," "Launch at interval," "On specified date/time," or "Button or coupler start" is selected, then that launch type will automatically be selected in the "Start logging" field in the Launch Logger window regardless of how the logger was previously launched. Note that if you choose "Button or coupler start" and the logger does not support that feature, then the "Start logging" field will default to "Now." Important: If you set the "Fill launch window with contents of" preference to "Previous launch," then the "Default launch type" preference will be ignored in favor of the "Start logging" setting used in the last launch. Logger launch description. This preference controls what displays by default in the Description field in the Launch Logger window. If you select "Default launch description," then the Description field will display the description used the last time the logger was launched. If you select "Logger S/N," then the logger serial number will automatically be listed in the Description field. Selecting "Logger S/N" can 195


196 help to easily differentiate files when launching and reading out several loggers of the same type. Note that whatever is listed in the Description field is also used as the default file name when reading out and saving the logger data. Readout Time-Saving Options (HOBOware Pro only) When saving datafile. This preference controls whether the Save window displays automatically when reading out a file. Select "Show save dialog" if you want the Save window to display every time you read out a logger and specify a location and name for the file, or accept the default file name. Select "Automatically save" if you do not want to display the Save window during the readout process. The file will automatically be saved with the default name (the description in the Launch Logger window) and in the default location (as described in Reading Out the Logger). When plotting. This preference controls the default plot behavior when reading out a logger. Select "Show plot setup" to display the Plot Setup window after reading out and saving the file. Select "Automatically plot" if you want to bypass the Plot Setup window and instead automatically plot the data after reading out and saving the file. This option is not recommended if you will be using Data Assistants, which are accessed through the Plot Setup window. Select "Do not plot" if you do not want to plot the data at all. This is useful if you are reading out several loggers and prefer to look at the plots later. You can always open the saved datafile and plot it at that time. For HOBOware Pro only: You can adjust the Readout Time-Saving Options and set the Default Action from the Device menu to Readout to quickly read out several U-Series loggers in a row by connecting and disconnecting each logger to the computer. To do this choose "Automatically save" for "When saving datafile," choose "Do not plot" for "When plotting," and deselect the "Ask to stop logging before reading out a running logger" checkbox. Ask to stop logging before reading out a running logger. When this checkbox is selected, a message appears every time you read out a logger that is still recording data. The message asks whether you want to stop the logger or let it continue logging data during the readout process. If you deselect this checkbox, a logger that is still recording data will automatically continue logging during readout. Open File Time-Saving Options (HOBOware Pro only) This preference controls whether the Plot Setup window is automatically displayed when opening a file. Select "Show plot setup" if you want the Plot Setup window to display every time you open a file. Select "Automatically plot" if you want to bypass the Plot Setup window and automatically generate the plot each time you open the file. This is not recommended if you will be using Data Assistants, which are accessed through the Plot Setup window. 196

197 Export Settings See Export Settings for details on the preferences in this subcategory. Selecting Devices This preference controls when the Select Device window is displayed. If you select "Show Select Device window if two or more devices are found, even if one is already selected," then the Select Device window will display any time more than one device is connected to the computer. This allows you to choose the device you want to work with any time you select Launch, Readout, Status, or Stop from the Device menu. If you select "Only show Select Device window if a device has not been selected," then the Select Device window will only display the first time you select Launch, Readout, Status, or Stop. That device will then remain selected until you change it with the Select Device icon on the toolbar. File Associations Use this preference to control the association of HOBOware file types on Windows. Note: You must have administrator privileges on the computer to change file type associations. To temporarily run HOBOware as an Administrator, right-click the HOBOware icon and select Run as Administrator. Enter the Administrator name and password as prompted. By default, files with the extensions of.hobo,.hsec, and.hproj (HOBO files) and.dtf and.dsec (DTF files) are automatically associated with HOBOware. This means that these files are identified by a HOBOware icon and can be opened by double-clicking them. Click the Map or UnMap buttons to change the file type associations. Startup Show splash screen on startup. This preference controls whether the HOBOware graphic, or splash screen, appears every time you open the software. Check for HOBOware updates. This setting controls how frequently, if it all, HOBOware automatically checks the Onset website for any software updates. The default setting is once per week. When checking for HOBOware updates. These settings control whether you are notified about all new software updates or only those that affect the currently installed components. The default is to check for any new updates. 197
. The digital signature is indicated by a filename extension of.hsec for hobo files and.dsec for dtf files.")


198 Data Verification (HOBOware Pro Only) Select this option to enable Secure Mode and have HOBOware Pro add a digital signature to new datafiles when you read out loggers (for environments where 21 CFR Part 11 is being employed). The digital signature is indicated by a filename extension of.hsec for hobo files and.dsec for dtf files. The signature will be verified each time you open the datafile to ensure its integrity. This option is disabled off by default. Data Encoding Data encoding controls how special characters are displayed in files that are imported into and exported from HOBOware. The default is to use UTF-8, a common character encoding protocol for software. Select "Windows default" if characters are not displaying correctly in imported and exported files in Windows. Export Settings Use the Export Settings preferences to customize how data is formatted when you export the table data from a plotted HOBOware file, to set up automatic export upon readout, to include plot details in an exported file, and to set export ordering rules. To access these settings: 1. From the File menu on Windows or the HOBOware menu on Macintosh, select Preferences. 2. Select the General category and then click Export Settings. 3. Adjust any of the settings described below and then click OK. 198
 or a Microsoft Excel file (.xls). Export table data column separator.")
199 Use classic export settings. Click this button to change the export settings to the default settings used with BoxCar Pro software, which is Onset legacy software released before HOBOware. Export file type. Select how you want exported data to be saved: either to a text file (.csv or.txt) or a Microsoft Excel file (.xls). Export table data column separator. This setting controls the column separator for exported text files. (If you selected Excel for the export file type, then this option is disabled.) Select Comma, Tab, or Semicolon. When Comma is selected as the column separator, the data will be saved to a.csv file that can be imported into Excel. When Tab or Semicolon is selected, the data will be saved to a.txt file. Include line number column. By default, exported files include line numbers. Uncheck this box if you do not want line numbers in the file (for example, to export in BoxCar Pro software format). Include plot title in header. Uncheck this box if you do not want the plot title included in the header of the exported file. This option is primarily for compatibility with the BoxCar Pro software format. Always show fractional seconds. Check this box to show fractional seconds in the time-stamped data points. This is primarily for compatibility with the BoxCar Pro software format. Separate date and time into two columns. By default, the date and time of a logged data point is exported as a single column to facilitate graphing in spreadsheet programs. Check this box to split the date and time into two columns. No quotes or commas in headings, properties in parenthesis. Check this box if you do not want quotations marks and commas in the exported file's column headers. Sensor properties, or units, (such as F or RH) will be listed in parenthesis instead of quotation marks when this setting is enabled. This option is primarily for compatibility with the BoxCar Pro software format. Include logger serial number. When this setting is enabled, the logger's serial number will be listed in each column header in the exported file. This is useful if you are exporting data series that were copied and pasted from plots that originally came from different loggers. 199
200 Include sensor serial number, or label (if available). When this setting is enabled, each sensor's serial number or label (if available) will be listed in each column header in the exported file. This is especially useful when exporting data from multiple sensors recording the same measurement type (for example, three temperature sensors). Note: If "No quotes or commas in headings, properties in parenthesis" is selected, the label (if available) will be added to the column header instead of the sensor serial number. Date format. Select the format in which you want the date to be shown (Month, Day, Year; Day, Month, Year; or Year, Month, Day). Date separator. Select either a slash ( / ) or a dash ( - ) to separate the months, day, and year in the date format. Time format. Select whether to show the time in a 12-hour or 24-hour format. Positive number format. Select the format in which positive numbers are displayed (for example: 1,234.56; 1 234,56; 1.234,56; or ). Negative number format. Select the format in which negative numbers are displayed (for example: -123, 123-, or (123). Automatically export table data upon reading out a logger. Select this option if you want HOBOware to automatically create an export file each time you read out a logger (note that you must save and plot the data before the exported file will be created). When this setting is enabled, the default option is to export the data to a single file (as controlled by "Bypass export dialog and save as single file"). This will result in an exported file saved in the same directory as the datafile offloaded from the logger. Both files will also have the same prefix. If you do not want to save it to the default directory or use the default name, then select "Show export dialog" instead to select your own directory or name. Include plot details in exported file. When this setting is enabled, the information that appears to the left of the plot in the Details pane (series information, the type of logger, deployment information, etc.) will be included in the exported file along with the sensor data. This option only applies to text (.txt or.csv) file type exports, not Excel. It also requires that the file is saved and plotted before exporting. Therefore, it is not compatible with exports done via the Bulk Export Tool or HOBOnode Manager's Data Delivery and Plot/Export Wireless Data features. Finally, select a tab or semicolon for the "export table data column separator" when using this option. If you choose a comma separator, then details may span multiple cells. Use export ordering rules. Select this option to define the order that series are listed in the Export window by default. Select the measurement type from the drop-down list and then click Add to add it to the ordering rules list. In this example, we have set the order to temperature, RH, rain, wind speed, and then wind direction. This means the Export window will always show any temperature, RH, rain, wind speed, and then wind direction series first in the list, in that order, followed by any series that were not defined in the rules. (You can override this order as needed in the Export window by clicking the column header or dragging a row.) To delete an item from the ordering rules, click the measurement type and then click Remove. To change the order of items, drag them up or down. 200


201 Communications Preferences Use the Communications category within Preferences to set the default device type, serial port, device speed, and status window operation. To change these settings: Device Types 1. From the File menu on Windows or the HOBOware menu on Macintosh, select Preferences. 2. Select the Communications category on the left and then click the subcategory you wish to change. 3. Adjust any of the settings described below and then click OK. This preference controls the type of devices HOBOware recognizes when connected to the computer: USB, serial, or both. If you only use USB loggers or serial loggers, select the corresponding preference. This will save time as HOBOware will only check the USB or serial port(s) for a connected device when selecting Launch, Readout, Status, or Stop from the Device menu. If you use both USB and serial loggers regularly, select "USB and serial devices." You can also quickly change this preference by using the pull-down menu next to the Select Device icon toolbar. on the Serial Ports This preference controls which serial ports you want HOBOware to check for a connected device. Click Select All to check all serial ports displayed in this list or choose specific serial ports. Note that if you want to use only one port, you can have only one serial logger connected at a time. Alternatively, checking multiple serial ports can cause slow performance even when no loggers are connected. 201

202 Device Speeds Serial port speed. Select "Fast serial enabled" to read out a serial logger at a speed appropriate for most systems. Disable this option only if you are having communication problems with the logger, such as when the logger is connected via a slow serial-to-lan bridge device. Communication between the computer and the logger is slower when this option is disabled. USB logger readout. Select "Fast readout enabled" to read out a USB logger quickly. Disable this option only if you are having communication problems with the logger. Communication between the computer and the logger is slower when this option is disabled. Other Options Select "Close the status window on logger disconnect or communication error" if you want the Status window to close automatically (on the next refresh) if it is open when you remove the interface cable, base station, or coupler from the logger, or if communication is interrupted for another reason. Deselect this option if you want to leave it open. Note that if the Status window was opened from the Launch Logger window, it will close automatically even if this option is not selected. Plotting Preferences Use the Plotting Preferences to control fonts, series lines, Y-axis, and several other plot elements. To change these settings: Notes: 1. From the File menu on Windows or the HOBOware menu on Macintosh, select Preferences. 2. Select the Plotting category on the left and then click the subcategory you wish to change. 3. Adjust any of the settings described below and then click OK. To apply certain preferences to a single series, double-click the series to open the Series Properties window. To apply changes to real-time plots in HOBOnode Manager, restart HOBOnode Manager or remove the plot for the sensor and then add it back (deselect the Plot checkbox for the sensor to remove it and then select the Plot checkbox again to add it back. 202


203 Fonts Use the Fonts Preferences to control the font size, type, style, and color for most text on the graph (type, style, and color preferences available in HOBOware Pro only). Note that the plot title font will be two points larger than the selected font size. Lines (HOBOware Pro only) Use the lines preferences to define the appearance of lines in the plot for a specific series type. Rules added will appear in the panel at the bottom. Only one rule can be added per series type. To delete a rule, click the delete button on the row. When plotting multiple rules of the same type. If "Use the same color for each series" is selected, then multiple series of the same unit type (for example, multiple temperature series) are plotted with the same color, but with different line styles (solid, dashed, dotted, etc) to differentiate them. If "Use a different color for each series" is selected, then multiple series of the same unit type will be plotted in different colors. The series will still be attached to a single, common Y-axis, but only one series will match the axis color. Use Rules. Select this box to set up rules for series lines on the plots. Then select the series type for the rule you want to set up. Select the size and style of the series line. Click the Choose button to select a line color. Click the Add Rule button to create the rule. Line size, style, and color will be applied on series lines, the corresponding Y-axis (value axis), and its corresponding representation in the legend. This rule will be overridden by any changes you make in the Series or Axis Properties window. To add another rule, select a different Series Type, choose the settings, and then click Add Rule. To delete a rule, select it and click the Remove button. Value Axis (HOBOware Pro only) Select the Use Rules box to set up rules about the minimum and maximum values used on the Y-axis (value axis) for a specific measurement type. Select the measurement type and then type in the minimum (Bound Min) and maximum (Bound Max) you want to use. Select the Unit Type and then click Add Rule to create the rule. This rule can be overridden by any changes you make in the Axis Properties window. To add another rule, select a different measurement type, choose the settings, and then click Add Rule. To delete a rule, select it and click the Remove button. 203
 in points table and details pane.")
.")
204 Layout Show the details pane when plotting data. Select this preference to automatically display the details pane with the plot. Show the points table when plotting data. Select this preference to automatically display the points table with the plot. Points Table & Details Pane Use sensor Label (if available) in points table and details pane. Select this preference to display the sensor label (if available) as added in the Launch Logger window with corresponding column header in the points table and in the details pane. This is especially useful if there are multiple sensors of the same measurement type in the same file (for example, a HOBO Micro Station datafile with three temperature sensors). When selected value in table is out of plot range, drag series to that value. Normally, if the plot is zoomed in and you select a point in the Points table that is outside the zoom area, the plot will scroll so the marked point is in view, while retaining your zoom factor. Clear this box if you do not want to scroll to points outside of the current view. Gridlines Enable horizontal gridlines when plotting data. By default, horizontal gridlines are not displayed when you open a plot. Enable this option if you always want a new plot to display gridlines for all value axes. Enable vertical gridlines when plotting data. By default, vertical gridlines are always displayed when you open a plot. Clear this checkbox if you never want a new plot to display gridlines for the time axis. 204
.")

205 Plot Setup Automatically select all data series for plotting. By default, some series (such as Dew Point) are not selected for display in the Plot Setup window. Enable this option if you want every series to be selected automatically in the Plot Setup window. Automatically select internal events for plotting (e.g. Button Up/Down, Host Connected, EOF). By default, all internal events are selected for display in the Plot Setup window. Disable this option if you do not want these events to be selected automatically in the Plot Setup window. Automatically select pre-defined Data Assistants or Filtered series for plotting instead of the source series. This option controls whether any series from Data Assistants and filters that you configured in the Launch Logger window are automatically selected in the Plot Setup window. Disable this option if you do not want these series selected automatically in the Plot Setup window. When Light and Occupancy are enabled as State on the same logger, derive four possible Light/Occupancy state channels. For UX90-005x and -006x series loggers, this option controls whether four additional data series are automatically calculated and available for plotting. These series are: Lights on & occupied (Light On & Occ) Lights on & unoccupied (Light On & Unocc) Lights off & occupied (Light Off & Occ) Lights off & unoccupied (Light Off & Unocc) Disable this option if you do not want these series to be generated when plotting data. Other Options Mark all points when plotting data. This preference controls whether each data point is marked on the series. Point markers are not displayed by default (except for events and for a series with only one data point) to avoid cluttering the plot. Enable this option if you want all points to be marked on every series whenever you display a plot. Keep in mind, however, that marking all points on a large plot takes longer and consumes more system memory. Label the time axis. Select this option if you want the default label "Time" to be displayed with the time axis (X-axis). Use sensor labels (if available) in legend. Select this option if you want any available sensor labels as added in the Launch Logger window to appear in the legend with the series name. 205

206 Undo & Redo This preference controls whether you can undo and redo the changes you make to plots. When the Undo & Redo preference is enabled, you can specify how many changes to plots will be stored within HOBOware. If you select "Number of stored undoable actions," then there will be a limit to the number of changes to the plots that you can undo. For example, if you choose to store 25 undoable actions, then you will be able to undo the last 25 changes that you made to the plots, but not the 26th. You can configure HOBOware to store from 1 to 50 undoable actions (changes to the plot) with this setting. If you select "Enable unlimited undoable actions," then there will be no limit to the number of changes to the plots that you can undo. Note that storing an unlimited number of actions can impact HOBOware performance on slower computers. Data Assistant Preferences Use the Data Assistant category within Preferences to control which Data Assistants are displayed in the Plot Setup window. To change these settings: 1. From the File menu on Windows or the HOBOware menu on Macintosh, select Preferences. 2. Select the Data Assistant category on the left and then click the Data Assistants subcategory. 3. Adjust any of the settings described below and then click OK. When you read out a logger or open a datafile, all compatible Data Assistants are listed in the Plot Setup window by default. Deselect the checkboxes for any assistants that you do not want to display in the Plot Setup window. Or, click Show All to display all compatible assistants in the Plot Setup window or Hide All to display none of them. Display Preferences Use the Display category within Preferences to control the default units, date/time format, and series options displayed in plots. To change these settings: 1. From the File menu on Windows or the HOBOware menu on Macintosh, select Preferences. 206
.")
207 2. Select the Display category on the left and then click the subcategory you wish to change. 3. Adjust any of the settings described below and then click OK. Default Units This preference controls the units used throughout HOBOware: either US or SI (Metric). This will change the units shown on the axis, legend, points, and details the next time you display a plot. This will also change the current readings the next time you open the Status window. Date/Time These settings control how the date and time appears in HOBOware. Changes you make are shown in the date and time sample. Any plots that may be open when you make changes to the date and time display will require the plots to be redrawn, which may take several seconds. As noted in the preferences, date and time formatting beyond what is specified in these settings are determined by the computer operating system. Note: When you export a file, the date and time are exported as determined by the Export Settings in Preferences (except for year format, which is only controlled by these Date/Time settings in the Display category. If you open the file in Excel, the dates and times may be automatically reformatted to Excel's default date and time format, which you may customize within Excel. Date format. This controls how the date is displayed: Month, Day, Year; Day, Month, Year; or Year, Month, Day. Date separator. This controls what character is displayed between the month, day, and year: a slash (/) or a dash (-). Year format. This controls whether the year is listed as two of four digits. Time format. This controls whether the time is shown in 12- or 24-hour format. Use locale for all. Click this button to use the default settings for the current locale as configured in the operating system. 207

208 Series Use the Series preferences to customize how data series are sorted in the Status and Plot Setup windows and to set battery series options. Select a sort order. Choose one of the following four ways to sort the series displayed in the Status and Plot Setup windows: Logger's default: Series are sorted the same way they were listed in the Launch Logger window. Enabled: All series selected, or enabled, for logging are displayed at the top of the list. Label: Series are sorted by their label name, if available. Labels can be sorted in ascending or descending order (alphabetically or numerically depending on the label entered). Measurement: Series are sorted by measurement type alphabetically in ascending or descending order. Display derived series below their source series. A derived series is one that is calculated rather than recorded by a sensor. Some loggers have the capability to create datafiles that not only have logged sensor data, but also additional derived series automatically calculated in relevant units. One example is a logger with a temperature/rh sensor. The logger records a data series for temperature and another for humidity (two source series), which are used to calculate a dew point data series (the derived series). In addition, some loggers support filtering at launch time and using data assistants before or after launch, which also results in derived series. Select this option if you want any derived series to be displayed immediately following its source series in the Status and Plot Setup windows. By default, this option is disabled, which means all derived series are displayed at the bottom of the data series list. Note that status window support is limited for station loggers, such as the U30 Station. Show the option to log battery. This setting controls whether you have the option to enable or disable the battery series in the Launch Logger window when applicable. You can configure some loggers to record the battery voltage at every logging interval. When this option is selected, you can choose whether to record the battery voltage at launch time. If this setting is not selected, then you cannot record the battery voltage and it will not be shown in the Launch Logger window. This setting is enabled by default. Display logger's battery series in the last position. This setting controls whether the optional battery series is displayed at the bottom of the data series list in the Launch Logger, Status, and Plot Setup windows regardless of any other series settings. If this setting is not enabled, the position of the battery series in the data series list will vary based on other preferences. This setting is enabled by default. Warnings Preferences Use the Warnings Preferences to disable warning pop-ups that you do not want to appear. Before you do so, however, keep in mind that the warnings are intended to help prevent mistakes and inadvertent data loss. Review each warning carefully before disabling it. To re-enable a warning, re-select the check box. 208

209 To disable all of the warnings in a group, click the Select None button for that group. To enable all of the warnings in a group, click the Select All button for that group. You access the Warnings Preferences by going to File > Preferences > Warnings. To change these settings: General 1. From the File menu on Windows or the HOBOware menu on Macintosh, select Preferences. 2. Select the Warnings category on the left and then click the subcategory you wish to change. 3. Adjust any of the settings described below. To disable all the warnings in a group, click the Select None button for that group. To enable all the warnings in a group, click the Select All button for that group. Click OK in the Preferences window to save changes. There is any remaining unsaved data when closing a plot or application. This warning reminds you when you made changes to a plot, but haven't saved the changes to a project file. The project file being opened was created with a different version of HOBOware. This message warns you if you are opening a project file that was saved in different version of HOBOware than you are currently using. In some instances, there may be differences in software versions that could affect the project file. Warnings Before the Launch Screen These preferences control warnings that appear when the logger is connected to the computer and you select Launch from the Device menu or the Launch icon from the toolbar. If enabled, these warnings will display before the Launch Logger window is opened. The logger is waiting for a delayed start. This warning indicates that the logger has already been configured to start logging on a specific date and time; logging has not begun. The logger is waiting for a triggered start. This warning indicates that the logger has already been configured to launch with a push button or triggered start, but logging has not begun. The logger is currently logging (Station Loggers only). This warning indicates the a station-type logger (U30, HOBO Weather Station, HOBO Micro Station) is currently recording data. The logger needs to be readout (USB devices only). This warning indicates the data on the USB logger (U-Series) has not been offloaded, or read out, yet. 209

210 Warning After the Launch Screen These preferences control warnings that appear after you click the Start button in the Launch Logger window. The Temperature channel is disabled but required to log Pressure. For some loggers that record barometric pressure data, the temperature must also be logged. This message warns you if you selected the pressure sensor or channel in the Launch Logger window, but not temperature. The Temperature channel is disabled but required to log Relative Humidity. For some loggers that record relative humidity data, the temperature must also be logged. This message warns you if you selected the relative humidity sensor or channel in the Launch Logger window, but not temperature. The specified delay time is in the past. This warning indicates that you have selected a start date or time for logging that is in the past instead of the future. The specified delay time is past the sensor cap expiration. This warning indicates that the date or time you selected for the launch to begin is past the U26 Dissolved Oxygen logger sensor cap expiration date. The logging duration could extend past the sensor cap expiration. This warning indicates that projected logging duration (the amount of time it takes for the logger's memory to fill) lasts beyond the U26 Dissolved Oxygen logger sensor cap expiration date. The logging interval specified is too small for the TRMS module. This warning indicates that the logging interval (how often the logger records data) is not supported by the TRMS module in a U30 station logger. The Battery channel is disabled but recommended when using excitation power. This warning indicates that the battery channel in the Launch Logger window has not been selected on a U30 or FlexSmart logger configured to use excitation power. The logger's battery power is too low to provide excitation to external sensors. This warning indicates the battery is too low for a U30 or FlexSmart logger that has been configured to power excitation to external sensors. The Battery channel is enabled but will not log data without other sensors attached. This warning indicates that you have only selected the battery channel in the Logger Launch window and no other sensors. The header size of an optic logger may cause problems with older shuttle firmware. This warning indicates that if you will be offloading an optic logger to a HOBO shuttle, the shuttle should have the latest firmware installed. Otherwise, the header size (part of the logger data file) could cause the offload to fail or result in a corrupted file. 210
, open the Preferences window (click the File menu in Windows or the HOBOware menu on Macintosh and select Preferences). Click the Restore Defaults button.")
211 Restoring Default Preferences To return all preferences to their original settings in both the Preferences and custom-defined Launch Logger window settings (State Description, % or Time, Logging Interval), open the Preferences window (click the File menu in Windows or the HOBOware menu on Macintosh and select Preferences). Click the Restore Defaults button. A message appears asking if you are sure you want to restore all preferences to their default values. Click Yes to restore the default preferences. In addition to the options configured in the Preferences window, the following settings are also affected: Data File Folder Locations. When you restore the preference defaults, the default folder locations for datafiles, text files, and project files is reset to: C:\Documents and Settings\<user>\My Documents\HOBOware (for Windows XP) C:\Users\<user>\Documents\HOBOware (for Windows 7 or Windows 8) Users/<user>/Library/Application Support/HOBOware (for Macintosh OS X) FlexSmart modules or Analog Sensor Ports channel names and units. Any custom-defined channel names and units for FlexSmart modules or Analog Sensor Ports are removed from the pulldown menus in the Configure Channel window. However, this will not affect customized channel names and units that you saved in configuration files (.hcfg). HOBOware software updates. The date and time of the most recent check for HOBOware software updates will not be retained. A message will appear next time you reopen HOBOware asking if you want to check for updates. Custom-defined Launch Logger window menus. Any custom-defined Launch Logger window settings, such as State Description, % or Time, Logging Interval, will be cleared. 211

212 Menus The following menus are available in HOBOware: HOBOware (on Macintosh) File Device Edit View Tools Window Help The HOBOware Menu The HOBOware menu is available on Macintosh only. Some of the menu options available from the File menu in Windows are displayed here instead on Macintosh. The HOBOware menu options are: About HOBOware. Select this option to open a compatible datafile. See Opening Files for more information. Preferences. Select this option to open the Preferences window where you can change the default settings in HOBOware. See Setting Preferences for more information. Services. This is a Macintosh operating system menu option. Hide HOBOware. This option hides HOBOware from view. Hide Others. This option hides all currently open programs except for HOBOware from view. Show All. This option displays all currently open programs. Quit. Select this option to close HOBOware. 212
. Select this option to add a datafile to the end of another datafile.")
213 The File Menu From the File Menu, you can open and close datafiles and projects, import and export data, and print plot elements. The File menu options are: Open Datafile(s). Select this option to open a compatible datafile. See Opening Files for more information. Merge Datafile(s). Select this option to add a datafile to the end of another datafile. See Merging Datafiles for more information. Open Project. Select this option to open a HOBOware project. See Opening Files for more information. Plot/Export Wireless Data. This applies to a ZW series wireless network and is only available in HOBOware Pro. See Plotting or Exporting Wireless Data for more information. Recent Files. Select this option to quickly access the last 10 files you opened. Close. Select this option to close the active file or project. Close All. Select this option to close all open files and projects. Save Datafile. Select this option to save the active datafile. Save Project. Select this option to save the active project. Import Text Data. Select this option to import and graph non-hoboware data in certain text files (available in HOBOware Pro only). See Importing Text Files for more information. Import Text File from HOBOlink. Select this option to open a text file generated by HOBOlink for a HOBO U30 Station. Export Details. Select this option to export the information in the Details Pane into a text file that can be opened in any text editor or imported into many other types of programs (word processors, spreadsheets, etc.). See Exporting Details for more information. 213

214 Export Table Data. Select this option to export the points shown in the Points table to a text file (.csv or.txt) or Microsoft Excel (.xls) file. See Exporting Table Data for more information. Page Setup. Select this option to set up the paper size, margins, and orientation for printing a plot. Print Preview. Select this option to preview the page for printing a plot. Print. Select this option to print a prot. Print Details. Select this option to print the Details Pane. Print Points. Select this option to print the Points Table. Preferences. Select this option to open the Preferences window where you can change the default settings in HOBOware. See Setting Preferences for more information. Note that Preferences is available from the HOBOware menu on Macintosh. Quit. Select this option to close HOBOware. Note that this is available from the HOBOware menu on Macintosh. The Device Menu Use the Device menu to launch, read out, and stop loggers as well as access HOBOnode Manager and work with other features for specific devices. The Device menu options are: Launch. Select this option to open the Launch Logger window where you can set launch settings and start the logger. Readout. Select this option to offload, or read out, data from the logger to your computer, allowing you to save the data in a datafile and view the plot in HOBOware. Status. Select this option to view the current status of the logger, including current readings (for some sensors), remaining battery, and logger memory. Stop. Select this option to stop a device. Manage Shuttle. Select this option to manage a HOBO shuttle (available for HOBOware Pro only). See Working with a Shuttle for more information. Manage HOBO Data Node Network. Select this option to open the HOBOnode Manager where you can manage a ZW series wireless network (available for HOBOware Pro only). Configure Modules/Ports. Select this option to configure analog sensor ports on the HOBO U30 station logger or FlexSmart modules. 214

215 The Edit Menu Manage U30. Select this option to access features specific to the HOBO U30 Station. From this menu option, select Control U30 Relay to configure the default state of a relay or to activate or deactivate the relay for testing. See Controlling the Relay on the HOBO U30 Station for more information. Or, select Configure U30 Alarms to set up alarms on the HOBO U30 Station. Lab Calibration. Use this option to open the Lab Calibration tool used with the HOBO U26 Dissolved Oxygen Logger. Select Device. Use this option to select a device currently connected to the computer. Default Action. Select this option to set up HOBOware to perform the same action (Launch, Readout, or get Status) every time a logger is connected (available for HOBOware Pro only). See Repeating an Action on Multiple U-Series Devices for more information. Utilities. Use the Utilities submenus to select one of the three Force Offload options only if you are having problems reading out your device or as directed from Onset Technical Support. You can also select the Reset UX Logger submenu option as directed by Onset Technical Support. Use the Edit menu to modify the plot, including filtering series, removing series, setting properties, and converting units. The Edit menu options are: Filter Series. Select this option to create a new series based on statistical analysis of an existing series over specified periods of time. See Filtering a Series for more information. Copy Series. Select this option to copy a series and then paste it into another plot. See Copying a Series to another Plot for more information. Paste Series. Select this option to paste a series into another plot. See Copying a Series to another Plot for more information. Add Graph Label. Select this option to access the Graph Label Properties window to add labels to a plot that identify specific points or call attention to a region of the graph. See Adding Labels to a Graph for more information. Hide/Show Series and Show All Hidden Series. Select Hide to hide a series from the plot and the Points table (it will be grayed out in the Details pane). To show an individual series that was previously hidden, select a grayed out series in the Details pane and then select Show Series from this menu. To show all series that were previously hidden, select Show All Hidden Series. Remove Series. Select this option to remove series from a plot after you have selected it in the graph or the Details pane. If you remove a series, it can only be recovered by reopening the original datafile or a saved project file that contains the series. 215

216 Graph Properties. Select this option to access the Series Properties window. See Setting Series Properties for more information. Convert Units. Select this option to access the Convert Plot window, which allows you to convert some or all of the series on the currently focused plot to other units (for example, from degrees Fahrenheit to degrees Celsius). Note that changing the units will result in the entire plot being redrawn. See Converting Units for more information. Undo Action. Select this option to undo the last change made to the current plot. The most recent change is listed after the Undo Action menu choice. In this example, the most recent change to the plot was to "Zoom Out." See Undo and Redoing Plot Changes for more information. Redo Action. Select this option to redo the last change that was previously undone. See Undo and Redoing Plot Changes for more information. Copy Graph to Clipboard. Select this option to copy the graph to the clipboard to paste it into another application. The View Menu Use the View menu to change the appearance of the plot, including zooming, showing or hiding components, marking points, and setting gridlines. The View menu options are: Zoom In. Select this option to zoom in on the plot. Zoom Out. Select this option to zoom out on the plot. View Full Scale. Select this option to view the plot in full scale. Details Pane. Select this option to show or hide the Details Pane. Points Table. Select this option to show or hide the Points Table. Show Title. Select this option to show or hide the title of the plot. Show Legend. Select this option to show or hide the plot legend. Mark All Points. Select this option to mark all points on the plot. 216
217 Vertical Gridlines. Select this option to show or hide vertical gridlines on the plot. Horizontal Gridlines. Select this option to show or hide horizontal gridlines on the plot. Select None. Select this option to deselect all elements in the plot. Remove Crosshair. Select this option to remove crosshairs from the graph. Remove Subset Stats. Select this option to remove subset statistics from the plot. Bring Series To Front. Select this option to bring a series to the front on the plot on top of all other series. Send Series To Back. Select this option to send a series to the back of the plot behind all other series. The Tools Menu Use the Tools menu to access the Bulk File Export tool, which allows you to export numerous datafiles at one time. See the Bulk Export Tool for more information. Note: The Alarm & Readout Tool is also available from this menu if it was installed in older version of HOBOware Pro. This tool is no longer installed as of HOBOware version 3.4. The Window Menu Use the Window menu to organize several plots. The Window menu options are: Tabbed View. With this option, plots are layered as tabs so you can see the file name of each open plot (or "Untitled*" for an unsaved datafile). You can also get to this view by clicking the Tabs icon in the lower left of the window. Tile Horizontally. Select this option to arrange up to five plots horizontally. If six or more plots are open, they will be tiled as a grid. You can also get to this view by clicking the Horizontal Tile icon in the lower left of the window. Tile Vertically. Select this option to arrange up to five plots vertically. If six or more plots are open, they will be tiled as a grid. You can also get to this view by clicking the Vertical Tile icon in the lower left of the window. Tip: You can open the same datafile multiple times to create different views of the graph, then use the Tile commands on the Window menu (or resize and move the windows manually) to see all of them at once. This is helpful if you want to zoom in on several different areas and view them side-by-side, see the detail of a small area while the full graph is still in view, or view each series in a different window. The Help Menu Use the Help menu to get more information about HOBOware, upgrade the software and certain devices, and request help from Onset Technical Support. 217

218 The Help menu options are: HOBOware Help. Select this option to open the help system, displaying the full table of contents. Check for Software Updates. Select this option to check if there are any HOBOware updates available on the Onset website. You can also set the general startup settings in Preferences to automatically check for software updates on a schedule that you select. Update Device Firmware. Select this option to check if there are firmware updates available for certain devices. This option is only enabled when either a HOBO U-Shuttle or HOBO UX series logger is connected to the computer. Select the appropriate submenu for your device, either "Update U-DT- 1/U-DT-2 Firmware" for a HOBO U-Shuttle or "Update UX Series Logger Firmware" for a logger. You likely will only need to do this as directed by Onset Technical Support. Note that firmware updates for HOBO ZW series receivers and data nodes are completed within HOBOnode Manager. Manage License Key. Select this option if you need to enter a new license key. This is only necessary if you are upgrading from HOBOware to HOBOware Pro. Enable/Disable Logging. Select this option to turn on or off logging within HOBOware. When logging is enabled, a series of text files will be generated and saved every time you use HOBOware. It is recommended that you only enable logging when requested to do so by Onset Technical Support, who may need additional files to troubleshoot any technical problems you may be having with the software. Submit Technical Support Request. Select this option if you are having a problem with HOBOware and would like to request help from Onset Technical Support. Fill in all the requested information in the form, including your name, address, logger/device model name and serial number, and a detailed description of the problem you are encountering. About HOBOware. Select this option to see which version of HOBOware you are using in Windows. This option is available from the HOBOware menu on Macintosh. The Toolbar The toolbar, located at the top of the main HOBOware window, allows point-and-click access to the most frequently used functions. Pause the pointer over each icon on the toolbar for a description of each tool. Launch - Readout - Status - Stop - - Opens the Launch window. - Opens the Readout window. - Opens the Status window, which displays the logger's state and current readings. -Stops a logging logger. 218
219 Select Device - - Opens the select Device window, which displays available devices. The accompanying pulldown menu allows you to specify whether you want HOBOware to look for USB devices, serial devices, or both. Set Default Units - - Change the default unit type between US and SI. Any changes you make will take effect with the next plotted file. Undo Action - Redo Action - - Undoes the most recent change made to the plot. - Redoes the most recent change that was undone to the plot. Open - Save - Close - - Launches the Open window, from which you can open HOBOware files. - Opens the Save window, from which you can save the plot as a project (.hproj) file. - Closes the currently focused plot. Export - - Opens the Export Options window, from which you can configure settings for exporting a text file of the data (in.csv or.txt format) for use in spreadsheet and other applications. Print - - Prints the graph as it appears on your screen. Arrow - - Launches the Arrow Tool, which you can use to point to and select items on the graph to edit their properties. Crosshair - - Launches the Crosshair Tool, which you can use to display values for points on the graph and crossreferences them to cells in the Points pane. Hand Drag - - Launches the Hand Drag Tool, which you can use to scroll an axis or the entire graph. Zoom - -Launches the Zoom Tool, which you can use to adjust the scaling of an axis or the entire graph. Subset Statistics - -(HOBOware Pro Only) Launches the Subset Statistics Tool, which you can use to view statistics for a particular time span. Zoom In - Zoom Out - - Launches the Zoom In Tool, which allows you to zoom in on a smaller area of the graph. - Launches the Zoom Out Tool, which allows you to zoom out to a larger area of the graph. Show Graph at Full Scale - - Resets the scale of a graph to accommodate all of the displayed data. Graph Properties - axis). Vertical Gridlines - Horizontal Gridlines - - Opens the properties window for the element currently selected (such as series, legend, - Toggles vertical gridlines on or off. -Toggles horizontal gridlines on or off. Mark Points - -Toggles point markers on or off. Convert Units - -Opens the Convert Units window, which allows you to convert some or all of the series on the currently focused plot to other units (for example, from degrees Fahrenheit to degrees Celsius). Filter Series - periods of time. -You can create a new series based on statistical analysis of an existing series over specified 219


220 Pie Chart - series. -Opens the Pie Chart window in which you can view, print, and save a pie chart for plotted state Add Graph Label - -Opens the Graph Labels Properties dialog, which allows you to add a label to the plot or to a specific series, and change the appearance of that label. Help - - Opens the Help. Tips for Working with Multiple Loggers HOBOware Pro has several built-in features that allow you to bypass some of the repetitive work of launching and reading out multiple loggers. These features not only will save you time, but also will help ensure your loggers are launched with consistent settings. Follow these tips if you plan to launch or read out many numerous loggers of the same type with identical settings. General Settings Change the Device Types preference to one device type. Depending on the selections you made when installing HOBOware, it may be configured to search for both serial and USB devices. If you are only using USB devices you can bypass the Select Device Type and save time. To bypass the Select Device Type window, select Preferences from the File menu. Under the Communications preferences, select Device Types. Choose either "USB devices only" or "Serial devices only." Launching Multiple Loggers Check the Description name. Use a logger serial number or your own unique identifier in the Description field in the Launch Logger window as shown in the example below. The name of the launch description is important because it is also used as the default file name when you read out the logger. Using unique names here will eliminate the need to individually name files during readout. If you plan on launching multiple loggers of the same type with the same settings (i.e. start time, logging interval, etc.), set up and start one logger first. To do this, open the Launch Logger window for one logger. Enter your settings for the launch. Double-check that they are correct and then start the launch. Setting and starting this one logger will create a model for all the other loggers of the same type to follow. The key to success is making sure the settings are exactly as you want so be sure to double-check or even triple-check them. You want to be certain the first logger is right! Set the Launch Time-Saving preferences to use the previous logger s launch settings. From the File menu, select Preferences. Select General and then click Launch Time-Saving Options. Under 220
. Change the Default Action option (USB devices only). Under the Device menu in HOBOware, change the Default Action from \"Do Nothing\" to \"Launch.")
221 "When launching," select "Show launch screen" and under "Launch with contents of," select "Previous launch" to use the same launch settings from the last logger that was launched (same logger model only). Change the Default Action option (USB devices only). Under the Device menu in HOBOware, change the Default Action from "Do Nothing" to "Launch." If you also set the launch time-saving preferences to "Automatically launch," then this allows you to launch numerous U-Series loggers in a row simply by plugging and unplugging individual loggers. If you set the launch time-saving preferences to "Show launch screen," this will still save you the step of manually selecting Launch from the toolbar or the Device menu for each logger. Change this back to "Do Nothing" when you re done. Note: If this is the first time you have used the logger on the computer, you may have to plug the logger in, unplug it, and then plug it back in. Test that your changes have taken effect. Connect a different logger of the same type to the computer. The Launch Logger window for that logger should immediately open the settings should match what you set up in the first logger. Press Enter or click the Start button in the Launch Logger window and the logger will start (note that the wording on the Start button may vary depending on when logging is scheduled to begin). You can do this repeatedly for loggers of the same type. Optional: Set the preferences to skip the launch window. If you are comfortable with the previous steps, you can also set up HOBOware to bypass the Launch Logger window entirely. From the File menu, select Preferences. Select General and then click Time-Saving Options. Under "When launching," select "Automatically Launch" to skip the launch window. Note: If you need to change the launch description for each logger, then select "Show launch screen" instead. Reading Out Multiple Loggers Set the Readout Time-Saving preferences. From the File menu, select Preferences. Select General and then click Readout Time-Saving Options. Under "When Saving datafile," select "Automatically 221


222 save" instead of "Show save dialog." Under "When plotting," select "Do not plot." This bypasses the save dialog that normally appears during readout and automatically saves the data file to the default directory without plotting the data. Note: If you also want the logger to continue logging after readout, uncheck the "Ask to stop logging before reading out a running logger" checkbox. If you need to stop the logger, keep that option checked. You ll then see a prompt to stop the logger during each readout. Change the Default Action option. Under the Device menu in HOBOware, change the Default Action to "Readout." This feature will automatically initialize the Readout sequence every time you connect a logger to the computer (with HOBOware open). This will still save you the step of manually selecting Readout from the toolbar or the Device menu for each logger. Setting the Language/Format on Your Computer The HOBOware user interface has been translated from English into four languages, which are supported by four specific formats. These languages and formats are: French (France), German (Germany), Japanese (Japan), Portuguese (Portugal), and Spanish (Spain). To change the language displayed in the HOBOware user interface, you must change the language/format settings on your computer as described below. Notes: The supported languages only work with the specific format or country listed above. For example, Portuguese is supported in the Portugal format only and not with Brazil. The HOBOware Help and all related documentation are available in English only. If you are using HOBOnode Manager: The language in use at the time the original HOBO data node network database was created is the only language that can be used for that database. You cannot switch to another language. If you need to change the locale on the computer that contains your HOBO data node network database, you must first back up and then move or rename the database before changing the locale on the computer. Then, form a new network to create a database that operates in the new locale. 222
223 On Windows 7 and Windows 8: 1. Close HOBOware. 2. Open the Control Panel and select "Region and Language." 3. Under the Formats tab, select the desired language/format and click OK to save the changes. 4. Reopen HOBOware. On Windows XP: 1. Close HOBOware. 2. Open the Control Panel and double-click the "Regional and Language Options." 3. Under the Regional Options tab, select the desired language/format and click OK to save the changes. 4. Reopen HOBOware. On Macintosh OS X: 1. Close HOBOware. 2. Open System Preferences and access the "Language & Text" Preferences. 3. Under the Language tab, drag the desired language to the top of the list. If the desired language does not appear in the list, click the "Edit List " button to add it. 4. Under the Formats tab, ensure the correct Region is selected in the drop-down menu. Example: For Spanish (Spain), Spanish must be first in the Language list, and Spain must be selected under the Region drop-down menu. 5. Reopen HOBOware. Alarm & Readout Tool IMPORTANT: The Alarm & Readout Tool is no longer installed with HOBOware as of version 3.4. This help section is included for reference only for existing Alarm & Readout Tool users. The Alarm & Readout Tool is a plug-in tool that works in conjunction with HOBOware Pro to monitor select HOBO data loggers, read them out, and notify you when sensor and logger conditions fall outside the limits you specify. Notes: Alarm sensor conditions cannot be set on state or event channels. Only logger conditions, such as communication, memory, and battery level, can be monitored for state and event loggers (U9-001 and U11-001). To set up a scheduled readout for a state and event loggers (U9-001 or U models) with partial readouts, the battery channel must be configured to log valid timestamps using any battery logging interval. UX series loggers are not supported with this tool. Data assistant and filtered series configured at launch time are not compatible with this tool. These series will cause the tool to read the data incorrectly. Alarm & Readout Tool notifications do not support SSL or port configuration. Connecting loggers The Alarm & Readout Tool can perform scheduled readouts and monitor sensor conditions, communication status, memory usage, and battery level on supported loggers. 223
224 Tip: Loggers that require a base station to communicate will experience more rapid battery drain when left in the coupler. Refer to your logger's manual for more information. For most reliable operation, it is recommended that you use direct USB or serial port connections for your loggers and base stations. If your computer does not have a serial port, you may use a USB port with a Keyspan USB Serial Adapter. In addition, remote connections to USB loggers are possible with a Keyspan or Tibbo USB Server connected to a local Ethernet port. (It is recommended that you use the Tibbo USB Server with Windows only.) The Alarm & Readout Tool does not support connecting serial loggers to a USB server via a serial adapter. Using the Alarm & Readout Tool: 1. Connect a logger to the computer. The logger can be logging, waiting for a delayed or button start, or stopped. Important: A serial logger that is waiting for a delayed or button start cannot provide an updated sensor reading until the logger begins logging. Once a serial logger begins logging, it can only provide the last logged value. Tip: To avoid disrupting an active deployment, do not attach sensors to a serial logger if it is already logging. 2. If you want to include scheduled readouts in your configuration, launch the logger (if it is not already launched) before starting the monitor. The logger must be logging, or waiting for a delayed or trigger start, in order to perform scheduled readouts. If you plan to use partial readouts with a wrap-enabled logger, the logger must not have wrapped before you start the monitor. If the logger wraps after the monitor is started but before the first partial readout, partial readouts will be discontinued. 3. From the Tools menu, choose Manage Alarms, then choose New Configuration. 4. Create and save a configuration. You must create at least one alarm condition OR readout schedule for each logger in the configuration. 5. Click Start on the Configure Alarms and Readouts dialog to begin monitoring the logger. Software updates If you have an Internet connection, HOBOware Pro can periodically check the Onset website for software updates, including updates to the Alarm & Readout Tool. The default is to check once per week, but you can configure HOBOware Pro to check daily or monthly. In Preferences, go to the General pane. Click Startup and then select the how often you want to Check for HOBOware Updates. You can also check for updates manually at any time. Choose Check for Updates from the Help menu. Related Topics: Configuration See Configuration for creating, saving, and exporting configurations. See Monitoring for starting, viewing, hiding, and stopping the Alarm & Readout Tool monitor. See Readout for the numbering scheme for readout files, and describe the format of text files. See Preferences for the customizations that help you get the most out of the Alarm & Readout Tool. IMPORTANT: The Alarm & Readout Tool is no longer installed with HOBOware as of version 3.4. This help section is included for reference only for existing Alarm & Readout Tool users. The Alarm & Readout Tool uses configuration files to save definitions of groups of loggers, alarm conditions, and scheduled readouts. 224
225 Create and save a configuration Open and edit a saved configuration Export a configuration Creating and Saving a Configuration To begin, open HOBOware Pro and connect the loggers and sensors you want to include in the configuration. The loggers can be logging, waiting for a delayed or button start, or stopped. Tip: You must create at least one alarm condition OR readout schedule for each logger in the configuration. If you want to include scheduled readouts in your configuration, launch the logger now (if it is not already launched). Once you start the monitor, the logger must be launched and either logging, or waiting for a delayed or button start in order to perform scheduled readouts. If you plan to use partial readouts with a wrap-enabled logger, the logger must not have wrapped before you start the monitor. If the logger wraps after the monitor is started, but before the first partial readout, partial readouts will be discontinued. Tip: To avoid disrupting an active deployment, do not connect sensors to a serial logger if it is already logging. Important: A serial logger that is waiting for a delayed or button start cannot provide an updated sensor reading until the logger begins logging. Once a serial logger begins logging, it can only provide the last logged value. Then take the following steps: 1. Use the logger list and Logger pane to select and organize loggers. 2. Use the Alarms pane to define alarm conditions. 3. Use the Readouts pane to schedule readouts. 4. Use the Notifications pane to set up notifications. 5. Use the Messages pane to construct messages. 6. Click Save to save the configuration. By default, configurations are saved in the Documents\HOBOware\Alarms folder with an extension of.halrm. 7. To start the monitor now, click Start. If the monitor is already running, you will be warned that the monitor will stop the previous configuration before running the new one. To close the Configure Alarms and Readouts dialog without saving changes or starting the monitor, click Cancel. Logger Pane 1. From HOBOware Pro's Tools menu, choose Manage Alarms & Readouts, then choose New Configuration. The Configure Alarms and Readouts dialog is displayed with the Logger pane selected. 2. Click Add Logger to select the loggers for this configuration. From the resulting Add Loggers dialog, select the loggers you want to include, then click OK. 3. The loggers you chose will appear in the logger list on the left side of the Configure Alarms and Readouts dialog. Click the folder icon to create "groups" to organize your loggers. Logger groups can help you set up alarms or readout schedules for similar types of loggers. To add a logger to a group, click the logger's name to select it, then drag it to the group's folder. To delete a logger from the configuration, click the logger's name, then click the trash icon. 225
226 To delete a group and all the loggers in it, click the group's name, then click the trash icon. (If you do not want to delete all of the loggers that are in the group, drag them out of the group before deleting it.) 4. In the Logger pane, enter a Name (up to 25 characters) that will be used to identify the currently selected logger in the monitor, scheduled readouts, and notifications. The first 25 characters of the logger's most recent Launch Description will be used as the default; if you change the text here, the logger's Launch Description will not be affected. 5. Enter the number of retry attempt(s) (if any) the Alarm & Readout Tool should make if the selected logger fails to respond for an alarm check or readout attempt. For most applications, one retry should be enough; there is a 60-second delay between retries. If the Alarm & Readout Tool encounters frequent logger communication failures during a deployment, you may wish to increase the number of retries. Tip: If the Interval for alarm conditions or readouts is too short to accommodate all retries, the remaining retries will be skipped so as not to delay the start of the next interval. Alarms Pane Alarms Fields 1. To define alarm conditions, click the Alarms icon near the bottom of the Configure Alarms and Readouts dialog. 2. Click a logger's name in the logger list to set the interval at which alarm conditions will be checked, and define alarm conditions for that logger. 3. To copy this logger's alarm settings to other loggers in this configuration, select the setting you want to copy (interval, sensor condition(s), logger condition(s), or all Alarm settings) from the first dropdown next to the Copy button. Then select the destination loggers from the second drop-down. You may choose a logger group, an individual logger, or Group: Loggers for all loggers. Click Copy to complete this step. Logger Selected Copied intervals and logger conditions replace the destination loggers' alarm settings with those of the current logger. Copied sensor conditions are added to the destination loggers' existing conditions, if any. They do not replace any sensor conditions that have already been defined for those loggers. When copying a sensor condition to a destination logger that is a different model than the source logger, the software tries to identify a similar sensor on the destination logger. If it does not find one, or if the sensor on the destination logger has a different measurement range than the sensor on the source logger, you will receive a warning message. You should then review the alarm conditions for each logger to make sure that they are what you expect. Logger whose alarm settings are displayed. To work with alarm conditions for a different logger, select the logger from the logger list to the left. Interval How often the Alarm & Readout Tool should check this logger for alarm conditions. The minimum alarm interval is one second for USB loggers and five seconds for serial loggers. The maximum is 23 hours, 59 minutes, and 59 seconds. 226
227 This interval is directly related to the sensor condition durations. If you change the interval after you have set up sensor conditions, be sure to adjust the sensor condition durations accordingly. Tip: If the logger requires a base station/coupler to communicate, refer to your logger's manual to determine whether it will go to "sleep" if the computer does not communicate with it more often than every 30 minutes. When loggers are added to a configuration and set to similar alarm intervals, the amount of time needed for the monitor to complete a polling cycle increases. (Adding sensor alarm conditions also slightly increases the amount of time needed.) This is particularly true of serial loggers. If a polling cycle takes longer than the interval, you will see unpredictable behavior in the monitor window and a delay in notifications. You may need to experiment to determine the best interval for your needs. If you encounter problems, a longer interval is recommended. Longer intervals also put less demand on the logger's battery. (Refresh) If you have added sensors to a serial logger (or removed them), click this button to update the sensor list. Important: If you have removed a sensor for which a sensor condition has already been defined, the sensor condition will be deleted when you click Refresh. Also, if the logger is logging, clicking Refresh will cause the list to revert to the sensors that were connected at launch. Conditions to trip alarms (Sensors tab) Sensor conditions that have been added to this configuration. When any of these conditions are met, the monitor sends a notification. Note that a sensor can have more than one condition. Important: State and event channel activity cannot trigger alarms. To add a condition to this list, click Add Condition and use the dropdown lists to describe the condition. Choose a sensor, comparison type, value, units (if applicable), and duration needed to generate an alarm. Tip: The units you choose for a sensor condition will always be the units displayed for that condition in the monitor window and details, even if you switch units (US/SI) in HOBOware Pro preferences. The For Duration is directly related to the Interval. For example, if your Interval is 15 minutes, you can choose a Duration of 0, 15 minutes, 30 minutes, etc. With a Duration of 0, the alarm will trip on the first reading that meets the sensor condition. If the Duration is equal to the Interval (in this example, 15 minutes), the alarm will trip only if the condition is met for two consecutive readings; if the Duration is equal to two intervals (in this example, 30 minutes), the alarm will trip only if the condition is met for three consecutive readings; and so forth. To remove a sensor condition from this list, click the trash icon Conditions to trip alarms (Loggers tab) next to the condition. Click the Logger tab to select logger conditions (communication, memory, or battery) that can trip the alarm. These conditions are also subject to the Interval for alarms. When any of these conditions are met during an alarm interval, the monitor sends a notification. When unable to communicate with logger: This condition occurs only after all logger communication attempts, including retries, for a given alarm interval have failed. (It does not apply to communication failures that occur during scheduled readouts; this condition can be enabled on the Readouts pane.) When memory used is at or above n%: This condition occurs when logger memory reaches a threshold you specify. (Note that a serial logger that has been launched with wrapping enabled will always be at 100% once it has wrapped.) Tip: If you choose the memory and/or battery conditions, be sure to specify limits for these conditions. When battery level/voltage is at or below n: This condition occurs when battery power reaches a threshold you specify. 227
228 Readouts Pane Important: To perform a scheduled readout, the logger must be logging, or waiting for a delayed or trigger start when you start the monitor. Tip: There are many preferences related to the formatting of text files and datafiles. 1. To schedule readouts, click the Readouts icon near the bottom of the Configure Alarms and Readouts dialog. 2. Click a logger's name in the logger list to schedule readouts for that logger. 3. Complete the Readouts pane. Readout options are described below. Logger Selected Logger whose readout schedule is displayed. To work with the readout schedule for a different logger, select the logger from the logger list to the left. Mode Type of readout, if any, for this logger. Select Disabled if you do not want to schedule readouts for this logger. Full reads out the full contents of the logger. (Refer to Preferences for options.) Performing a full readout each time puts more strain on the logger's battery. Partial starts reading out where the last scheduled readout ended. (Refer to Preferences for options.) The initial partial readout reads out the full contents of the logger. Tips for partial readouts: Interval Partial readouts cannot be performed on loggers that have multiple logging intervals defined. If the logger was launched with wrap enabled, you will not be able to create data (.dtf) files with partial readouts. However, you will still be able to create text (.txt) files. The logger must have the same deployment number at readout time as it did when you started the monitor. If you relaunch the logger while the monitor is running, the deployment number will increase, and partial readouts will fail. If you plan to use partial readouts with a wrap-enabled logger, the logger must not have wrapped before you start the monitor. If the logger wraps after the monitor is started, but before the first partial readout, partial readouts will be discontinued. How often the Alarm & Readout Tool should read out the logger. Select a readout frequency from one minute to 364 days, 23 hours, and 59 minutes. Tip: If the logger requires a base station/coupler to communicate, refer to your logger's manual to determine whether it will go to "sleep" if the computer does not communicate with it more often than every 30 minutes. When loggers are added to a configuration and set to similar readout intervals, the amount of time needed for the monitor to complete a readout cycle increases. This is particularly true of serial loggers. If a readout cycle takes longer than the interval, you will see unpredictable behavior in the monitor window, and a delay in readouts and notifications. You may need to experiment to determine the best interval for your needs. If you encounter problems, a longer interval is recommended. Longer intervals also put less demand on the logger's battery. Tip: If you launch a serial logger with wrapping enabled, make a note of the logging duration on the Launch window in HOBOware Pro to determine how often you need to read out the logger to avoid missing data. For 228
229 example, if the logger will fill and wrap within six days with the connected sensors and you configure the Alarm & Readout Tool to read it out every seven days, you will miss a day's worth of data each week. If data loss is detected, scheduled readouts will fail, and no further readout attempts will be made. File name Keep the default File name (the logger name), or enter a new one. Tip: Be sure to use a unique file name for each of the loggers in a configuration. Local Disk Enable Local Disk to store the files on the machine that is running the Alarm & Readout Tool. It is a good idea to save files locally, even if you also plan to send them via or upload them to an FTP site. This will provide you with a backup of the data if your network connection is lost. When you enable Local Disk, the words "Local Disk" will turn red to remind you to configure local disk settings. Click the Edit button and complete the Manage Data Storage dialog. Click Choose to select a file location. The default location for saved files is the Documents\HOBOware\Readouts folder. Specify a File format (data or text) for the resulting file. (You may select both data and text; this will result in the creation of two files.) Datafiles (.hobo and.dtf) can be opened directly in HOBOware Pro. Text files can easily be imported into HOBOware Pro, or used in spreadsheets and many other programs. Tip: If you selected partial readouts and the logger has wrap enabled, data (.dtf) will not be available. Attachment Enable Attachment to have the files sent as an attachment. When you enable Attachment, the words " Attachment" will turn red to remind you to configure attachment settings. Click the Edit button and complete the Manage Data Storage dialog. FTP In the To field, enter the full addresses (up to 120 characters), separated by semicolons, where you want the to be delivered. In the From field, enter the full address where you want the to originate. In the Subj field, enter up to 30 characters for the subject line of the message. In the remaining fields, enter the information required by your SMTP server. You may be able to find this information in your software. If you do not know which settings to use, contact your system administrator or Internet service provider. Click Test to verify that the settings are correct. The Alarm & Readout Tool should confirm that the test message was sent, and you should receive a message at the To address. Finally, specify a File format (data or text) for the resulting file. (You may select both data and text; this will result in the creation of two files.) Datafiles (.hobo and.dtf) can be opened directly in HOBOware Pro. Text files can easily be imported into HOBOware Pro, or used in spreadsheets and many other programs. Tip: If you selected partial readouts and the logger has wrap enabled, data (.dtf) will not be available. Enable FTP to upload the file to an FTP site. When you enable FTP, the word "FTP" will turn red to remind you to configure FTP settings. Click the Edit button and complete the Manage Data Storage dialog. Enter the information required by the FTP host. (Do not include "ftp://" in the FTP host field.) If you do not know which settings to use, contact your system administrator or Internet service provider. 229
230 Notify me Click Test to verify that the settings are correct. The Alarm & Readout Tool should confirm that a test file was uploaded, and you should find a test file named "test.txt" at the FTP site. Specify a File format (data or text) for the resulting file. (You may select both data and text; this will result in the creation of two files.) Datafiles (.hobo and.dtf) can be opened directly in HOBOware Pro. Text files can easily be imported into HOBOware Pro, or used in spreadsheets and many other programs. Tip: If you selected partial readouts and the logger has wrap enabled, data (.dtf) will not be available. Select the conditions for which you want to be notified. When any selected condition is met, the monitor sends a notification immediately. Copy When readout is successful: This condition occurs when a scheduled readout has completed, and the resulting file has been saved, ed, or uploaded to an FTP site. Tip: It is possible to be notified of a successful readout, but not receive the expected with the attached datafile or text file. The Alarm & Readout Tool cannot tell if something goes wrong after the was sent. When readout fails: This condition occurs when a scheduled readout (and all retry attempts) failed due to a communication error; or if there was an error saving the file, ing it, or uploading it to an FTP server. To copy this logger's readout settings to other loggers in this configuration, select the setting you want to copy (mode, interval, Local Disk settings, Attachment settings, FTP settings, or notifications) from the first dropdown next to the Copy button. Then select the name of a logger group, the name of an individual logger, or Group: Loggers (to select all loggers) from the second drop-down. Click Copy to complete this step. Notifications Pane Tip: There are many preferences for notifications. 1. To define notifications, click the Notifications icon near the bottom of the Configure Alarms and Readouts dialog. Notification settings apply to all loggers. 2. Choose one or more notification methods and options. Readout options are described below. Tip: In general, the reliability of and mobile text messaging depends on many factors, including but not limited to SMTP servers, wireless service provider, routers, receiving devices, and even environmental forces such as solar flares. This variability means that messages may not be delivered in a timely manner, and could even be delivered out of order. If you often get messages late or out of order, you may be able to improve your odds by using multiple notification methods, and/or multiple addresses (in different domains) in the To: field, separated by semicolons. For example: john@onsetcomp.com; mary@onsetcomp.com Enable to send notifications. When you enable , the word " " will turn red to remind you to configure settings. Click the Edit button and complete the Manage Notification Methods dialog. In the To field, enter the full addresses (up to 120 characters), separated by semicolons, where you want the message to be delivered. In the From field, enter the full address where you want the message to originate. 230
231 In the Subj field, enter up to 30 characters for the subject line of the message. In the remaining fields, enter the information required by your SMTP server. You may be able to find this information in your software. If you do not know which settings to use, contact your system administrator or Internet service provider. Click Test to verify that the settings are correct. The Alarm & Readout Tool should confirm that the test message was sent, and you should receive a message at the To address. Text Message to Mobile Device Enable Text Message to Mobile Device to send a text message to an SMS-enabled mobile device, such as a cellular telephone or a pager. When you enable this notification method, the words "Text Message to Mobile Device" will turn red to remind you to configure text message settings. Click the Edit button and complete the Manage Notification Methods dialog. This setup dialog is similar to the dialog for , but there is a 15-character limit for the Subj field. Tip: There is a maximum length preference for mobile text messages. Launch Program Enable Launch Program to have the Alarm & Readout Tool launch a program on the host computer. When you enable this notification method, the words "Launch Program" will turn red to remind you to configure program settings. Click the Edit button and complete the Manage Notification Methods dialog. Click Choose and browse to the program you would like to run. If you want the program to use a file as input, enable Pass file into program as argument and enter the file location and name in the File field. Host Computer Enable this option if you want to the monitor to play a sound and attempt to grab the focus on the host computer. You may change the sound in Preferences. Notify me Specify how often you want to be notified of alarm conditions. You can be notified at the start of each alarm condition (once for continuous alarm condition); you can be notified at every duration of a continuous alarm condition (every duration for continuous alarm condition); or you can have the monitor notify you just once, at the start of the first alarm, and then stop the monitor (at first alarm condition, then stop monitor). Tip: These options apply to alarm condition notifications only. Notifications of readout success or readout failure are sent once per readout. Notify me when an alarm condition clears Enable this option if you want to receive a notification when the alarm condition has returned to a non-alarm state. Send heartbeat every You can have the host machine send you regularly scheduled notifications to let you know that the monitor is still running and able to communicate while you are away. Enable this option and specify how often you want to be notified. Messages Pane 1. To construct the message that will be sent by certain notification methods, click the Messages icon near the bottom of the Configure Alarms and Readouts dialog. Message settings apply to all loggers. 231
232 2. The top portion of this dialog lists the items you can include in a notification message. Select all of the items you would like to include. A sample message, based on your choices, appears below this area. 3. To include additional, customized text in the message, enable "Add text to notification message" and type the text in the area below this option. Opening and Editing a Saved Configuration Once you have created and saved a configuration, you can open it to review settings, change the settings, and start the monitor. Tip: When the monitor is running, you can access the Configure Alarms and Readouts dialog for the current configuration by clicking Configure on the Alarm and Readout Monitor dialog. Changes that you make to the configuration will not take effect until the next time you start the monitor. 1. From the Tools menu, choose Manage Alarms & Readouts, then choose Open Configuration. Select the configuration and click Open. The Configure Alarms and Readouts dialog is displayed. 2. Review the settings and make changes, if desired. 3. To save changes to the existing configuration file, click Save. To save the changes to a new configuration file with a different name, click Save As. 4. To start the monitor now, connect the loggers and sensors (if applicable) that are defined in the configuration. If any loggers in the configuration have scheduled readouts enabled, be sure those loggers are launched, and either actively logging, or awaiting a delayed or triggered start. Click Start. If the monitor is already running, you will be warned that the monitor will stop the previous configuration before running the new one. Important: A serial logger that is waiting for a delayed or button start cannot provide an updated sensor reading until the logger begins logging. Once a serial logger begins logging, it can only provide the last logged value. Tip: To avoid disrupting an active deployment, do not connect sensors to a serial logger if it is already logging. 5. To close the Configure Alarms and Readouts dialog without starting the monitor, click Cancel. Exporting a Configuration To export a configuration to a text file, open the configuration and click Export. By default, exported configurations are saved in the Documents\HOBOware\Alarms folder with an extension of.txt. Monitoring IMPORTANT: The Alarm & Readout Tool is no longer installed with HOBOware as of version 3.4. This help section is included for reference only for existing Alarm & Readout Tool users. The alarm and readout monitor polls the loggers and sensors at the intervals specified by the configuration, compares the values to the alarm conditions, and notifies you if an alarm is triggered. It also performs scheduled readouts and stores and/or sends the resulting files, as applicable. Start the monitor View the monitor details Hide the monitor Stop the monitor Tip: The alarm and readout monitor uses your computer's system clock to determine when to poll loggers and read them out. If you (or an automated program) adjust the time backwards while the monitor is running, the next polling and/or readout time will be delayed until the clock reaches that time. Automatic time changes caused by 232
233 the start and end of Daylight Saving Time, and manual changes to your time zone setting, do not cause a delay in the monitor. Starting the Monitor Tip: The alarm and readout monitor uses your computer's system clock to determine when to poll loggers and read them out. If you (or an automated program) adjust the time backwards while the monitor is running, the next polling and/or readout time will be delayed until the clock reaches that time. Automatic time changes caused by the start and end of Daylight Saving Time, and manual changes to your time zone setting, do not cause a delay in the monitor. 1. From the Tools menu, choose Manage Alarms & Readouts, then choose Open Configuration. Select the configuration you want and click Open. The Configure Alarms and Readouts dialog is displayed. 2. Connect the loggers and sensors (if applicable) that are defined in the configuration. The loggers can be logging, waiting for a delayed or button start, or stopped. Any loggers that have scheduled readouts must be either logging, or awaiting a delayed or triggered start when you start the monitor. The loggers should be logging by the time of the first scheduled readout. Serial loggers that are scheduled for partial readouts and have wrap enabled must not wrap before the first scheduled readout; if they are wrapped, the readout will fail. Important: A serial logger that is waiting for a delayed or button start cannot provide an updated sensor reading until the logger begins logging. Once a serial logger begins logging, it can only provide the last logged value. Tip: To avoid disrupting an active deployment, do not attach sensors to a serial logger if it is already logging. 3. Click Start. If the monitor is already running, you will be warned that the monitor will stop the previous configuration before running the new one. The Alarm and Readout Monitor dialog is displayed, and an alarm icon appears in the lower right corner of the main HOBOware Pro window. 4. Each logger has its own panel in the monitor window, which lists the logger name, monitored conditions, and a countdown to the next reading. To view details about the logger's status, click the logger's panel. Once the monitor is running, if there is a communication failure, any sensor readings are italicized and in purple text to indicate that they are not current. If the logger is in an alarm condition, the logger name is displayed in red text. If a sensor is in an "above" alarm condition, its text is displayed in red. If it is in a "below" alarm condition, its text is displayed in blue. If it is "okay," its text is black. If a monitored logger condition (communication, memory, battery status, or readout ) is in an alarm condition, its icon is displayed in red. Otherwise, the icon is green. A icon indicates a notification failure. Because different loggers may be read at different intervals, the Next Readout and Next Alarm Check at the top of the monitor window lets you know when the next readout and alarm check will be taken for the configuration. To access the configuration dialog for the current configuration, click Configure. Changes that you make to the configuration will not take effect until the next time you start the monitor. 5. You can continue to use HOBOware Pro to work with other loggers and datafiles. In addition, you can work with the monitored loggers in HOBOware Pro when the monitor is not taking a reading. 233
234 Tip: A logger cannot communicate with HOBOware Pro and the monitor at the same time. If both applications attempt to access the logger at the same time, you will receive communication errors. Viewing the Monitor Details To view the details of a logger's condition while the monitor is running, click the logger's panel in the Alarm and Readout Monitor dialog. The following explains the fields on the Alarm and Readout Monitor - Details window. Monitor started: Time when the monitor was started. Monitor number: Number of times the monitor has been started. Each time you start the monitor, the Alarm & Readout Tool's internal counter (the monitor number) increases by one. If the monitor performs readouts, the monitor number is added after the file name, before the sequence number (if any). Notification method(s): Notification methods in use. This can be any combination of , mobile text message, launch program, or host computer. Last notification at: Time when the most recent notification was sent. If this is "None Sent," no notifications have been sent yet. Click View to see the text of the last notification that was sent. Select logger: This box lists the loggers that are being monitored. The information in this dialog refers to the logger that is currently highlighted in the logger list. To view details for a different logger, click that logger's name. Name: Description that was entered for the logger on the Configure Alarms and Readouts dialog. Device: Model and serial number of the logger. Communication: Communication protocol for this logger (USB or serial). Readout Mode: Readout mode selected for this logger (full, partial, or disabled). Interval (readouts): Frequency with which the monitor is reading out the logger. Readout Storage: Storage method(s) for the resulting datafile or text file (local disk, attachment, or FTP). Last Readout: Time when the last readout was performed. If a scheduled readout has not been performed yet, this is "None." Next Readout: Time of the next scheduled readout attempt, if applicable, and a countdown timer. If readouts can no longer be performed on the logger (because the logger was relaunched, or has stopped, filled up, wrapped more than once between readouts so that data was lost, or wrapped before the first partial readout), the countdown timer will read 00:00:00. If you are not sure why readouts were cancelled, pause the mouse pointer over the countdown timer for an explanation. Interval (alarms): The frequency with which the monitor is polling the logger for alarm conditions. Last Alarm Check: Time when the last alarm check was performed. Next Alarm Check: Time of the next scheduled alarm check, if applicable, and a countdown timer. Monitored sensor conditions (not labeled): This box lists the sensor conditions, if any, that were defined for this logger, along with their current values as of the last reading. If a sensor is in an "above" alarm condition, its text is red. If it is in a "below alarm condition, its text is blue. If it is "okay," its text is black. If there is a communication failure, the current reading is italicized and in purple text to indicate that it is outdated. 234
235 Monitored logger conditions (not labeled): The area at the bottom of the window lists the logger conditions (communication, memory, battery status, and readout ), if any, that were defined for this logger. The memory icon also displays the amount of memory that has been used. If one of these items is in an alarm condition, its icon is red. Otherwise, it is green. Hiding the Monitor To hide the monitor without stopping it, click the Hide button on the Alarm and Readout Monitor dialog, or choose Hide Monitor from the Manage Alarms & Readouts submenu on HOBOware Pro's Tools menu. The alarm clock icon will remain in the lower right corner of the main HOBOware Pro window to remind you that the monitor is active, and the icon will turn red and "jump" when an alarm is triggered. In addition, if the configuration is set to notify on the host machine when an alarm is triggered, the monitor window will open automatically at that time. To restore the monitor window at any time, click the alarm clock icon Manage Alarms & Readouts submenu on HOBOware Pro's Tools menu. Stopping the Monitor, or choose Show Monitor from the To stop the monitor, click the Stop button on the Alarm and Readout Monitor dialog, or choose Stop Monitor from the Manage Alarms & Readouts submenu on HOBOware Pro's Tools menu. This ends all readouts and notifications until you start the monitor again. After all alarm checks and readouts in progress have finished, the Stop button becomes a Start button, and the Hide button becomes a Close button. You can restart the monitor by clicking the Start button, or close it by clicking the Close button. You can define a configuration to stop the monitor immediately after sending the first alarm notification. Enable the "at first alarm condition, then stop monitor" option on the Notifications pane. There are also preference settings that cause the monitor to stop automatically. In Alarm Preferences, in the Notification category, enable "Stop monitor after N notifications sent" if you want the monitor to stop after sending a specific number of notifications. Enable "Stop the monitor if sending a notification fails" if you want the monitor to stop when it is unable to send a notification. Readout Files IMPORTANT: The Alarm & Readout Tool is no longer installed with HOBOware as of version 3.4. This help section is included for reference only for existing Alarm & Readout Tool users. When you use the Alarm & Readout Tool to perform scheduled readouts, you have a choice of creating datafiles (.hobo and.dtf) and/or text (.txt) files. Only HOBOware can open datafiles, but text files can be imported easily into HOBOware Pro, and be viewed in text editors, spreadsheets, and other kinds of software. Note: When reading out files to text file format, the data is in SI units. Preferences set to US in HOBOware are not followed. Readout file numbering scheme The Alarm & Readout Tool employs a simple numbering scheme to avoid overwriting files that have been created as a result of scheduled readouts. Each time you start the monitor, the Alarm & Readout Tool's internal counter (the monitor number) increases by one. If the monitor performs readouts, the monitor number is added after the file name, before the sequence number (if any). For example, consider a configuration with two loggers LoggerA and LoggerB. Each logger will be read out once per day, over a period of seven days. LoggerA is configured for partial readouts, which (with default Preference settings) results in one file. LoggerB is configured for full readouts, which (again, with default Preference settings) results in seven files. The first time you start the monitor, the monitor number is 1. When you stop the monitor, you should have eight files: LoggerA_1.hobo, and LoggerB_1_0000.hobo, LoggerB_1_0001.hobo, LoggerB_1_0002.hobo, etc. 235
236 The next time you start the monitor, the monitor number is 2. When you stop the monitor, you should again have eight files: LoggerA_2.hobo, and LoggerB_2_0000.hobo, LoggerB_2_0001.hobo, LoggerB_2_0002.hobo, etc. The monitor number advances every time you start the monitor, even if no readouts are performed. If the monitor number reaches 99,999, it will roll over to 1. Tip: Be careful when renaming files while they are still in their original location. If, for some reason, you rename "MyLogger_1.txt" to "MyLogger_2.txt," the file could be overwritten the second time you run the monitor. Text File Format The first section of the text file contains the header. This header conforms to YAML standards, allowing maximum compatibility with other software. The remainder of the file contains the data. There are three sections in the text file header: Data Format Logger Info Series Info The second section of the text file contains the data. Header Section: Data Format This section of the header includes detailed information about the way your text file is formatted. datetimedelimiter, datadelimiter, and decimalseparator identify (between double-quotes) the character used to separate date and time; the character used to separate data values from one another; and the character that is used as a decimal. dateformat and timeformat describe the way dates and times are formatted within the file. These formats are determined by the preference settings in HOBOware Pro and the regional format settings of your operating system. For example, 07/31/06 would be represented as MM/dd/yy. (Single-digit values have leading zeros.) Uppercase HH refers to 24-hour time (e.g., 15:00:00). Lowercase hh refers to 12-hour time (e.g., 3:00:00 PM). This time format should be followed with "a" to denote an AM/PM indicator (hh:mm:ss a). Lowercase ss refers to whole seconds. Uppercase SSS refers to milliseconds. Lowercase mm refers to minutes. Uppercase MM refers to months. gmtoffset and daylightsavings indicate the offset, in hours, from GMT on the computer that launched the logger, and whether the computer was in Daylight Saving Time when the logger was launched (true or false). Header Section: Logger Info This section of the header contains information about each logger that has data in this file. There is one subsection for each logger. (For scheduled readouts, there is only one logger per file.) The first line of each subsection is: - &# where "#" is an integer that counts the loggers in this file, beginning with 1. (For scheduled readouts, &1 is the only subsection.) 236
237 The remaining fields in each subsection list the logger's launch description, model, vendor, etc., similar to the fields on the Status window in HOBOware Pro. Header Info: Series Info This section of the header lists each column in the file, excluding the first column ("#") and date/time column. There is one subsection for each series. Series are listed in the same order as their columns within the data. Data Section Preferences The first field of each subsection is name, followed by the series name. The next field is type, which can be value, state, event, or internalevent. For value, external event, and state series, type is followed by unitname. Values and external events have only one unitname. For state series, the two states are listed on two separate lines, with the high state listed first. For value series only, OMClassName, OMPartNumber, OMUnitIndex, OMChannelType, and OMValuePattern provide additional series information to Onset's software. The location, if any, is the location string for a serial logger sensor. The last field of each subsection is logger. This identifies the logger that logged this series or provided the data from which this series was derived (such as dew point). The logger is identified as *# where "#" corresponds to the logger number in the Logger Info section. (For scheduled readouts, *1 is the only logger.) Data is separated from the file header by a row of hyphens. The first row of data consists of the column headings. Each column heading is enclosed in double quotation marks (" ") and separated by the datadelimiter character. The first column header is "#"; the second column header is "Time, GMT-04.00" (or whatever offset is appropriate). The remaining columns identify each series name and unit type, if applicable, in the format "Series Name, Unit" (enclosed in double quotation marks). Each series, including states, external events, and internal logger events, has its own column. (There are preferences that allow you to include more information in the series column headers.) The first column is the point number, as shown in a HOBOware datafile. The date and time are separated by the datetimedelimiter character. (There is a preference that allows you to split date and time into two columns.) For internal logger events, the field value is Logged; otherwise, there is no field value. No zeros or spaces are used for fields that do not contain values. Rows of data are separated with a paragraph return. Thousands separators are not used. Two thousand (2,000) is expressed as IMPORTANT: The Alarm & Readout Tool is no longer installed with HOBOware as of version 3.4. This help section is included for reference only for existing Alarm & Readout Tool users. When you install the Alarm & Readout Tool, an Alarms pane is added to the HOBOware Pro preferences dialog. To change preferences: 1. From the HOBOware Pro (Macintosh) or File (Windows) menu, choose Preferences. 237
238 2. Click the Alarms icon to open the Alarms pane. 3. Make changes as needed in the Alarm Conditions, Readouts, Notification, Messages, and Warnings preference groups and click OK. Clicking the Restore Defaults button on the Preferences dialog will restore all preferences, including HOBOware Pro and Alarm & Readout Tool preferences. Readout Preferences The following preferences are available in the Readouts group: For full readouts: If you have configured loggers for full readouts, a new file is normally created at every readout, with the file name you entered in the configuration, followed by the monitor number, followed by a numeric suffix to identify the sequence (the sequence number). For example, LoggerA_X_0000.hobo, LoggerA_X_0001.hobo, etc. where X is the monitor number. If you prefer to keep only one file, select "overwrite existing file at each readout." This setting is not recommended when performing full readouts to text files for serial loggers that have wrapping enabled; once the logger has wrapped, the data from the beginning of the deployment will be lost when the original file is overwritten. For partial readouts: If you have configured loggers for partial readouts, a new text file or datafile is created with the first readout, and subsequent partial readouts are normally appended to this file. To control the size of text files only, enable "for text files, create new file when appended file exceeds" and enter the number of rows. This will not split a readout into multiple files; rather, it will create a new file only when the existing file has already exceeded this limit. Each file name will have a monitor number, followed by a numeric suffix to identify the sequence (the sequence number). For example, LoggerB_X_0000.txt, LoggerB_X_0001.txt, etc. where X is the monitor number. You can also have the Alarm & Readout Tool create a new text file for every partial readout. Select "create new file at each readout." Each file name will have a monitor number, followed by a numeric suffix to identify the sequence (the sequence number). For example, LoggerA_X_0000.txt, LoggerA_X_0001.txt, etc. where X is the monitor number. Tip: When performing scheduled readouts, the Alarm & Readout Tool will use the preference settings that were in effect when you started the monitor. If you change any of the following Readouts preferences while the monitor is running, the new settings will not take effect until the next time you start the monitor. Text file data column separator: This setting controls how the columns are separated in the text file. Choose comma, semicolon, or tab. Text file date and time format: Separate into two columns. By default, date and time are kept in a single column in the text file to facilitate graphing in spreadsheet programs. If enabled, this setting splits the date and time into two columns. Include logger serial number in column header: This setting adds the logger s serial number to each column header when a text file is saved. This is especially useful if you plan to analyze data from different loggers. Include sensor serial number (if available) in column header: This setting adds the sensor s serial number, if it has a serial number, to each column header when a text file is saved. This is especially useful if your data includes similar series that were recorded on different sensors; for example, three different temperature series. Include sensor location (if available) in column header: This setting adds the sensor s location string, if it had a location defined at the last launch, to each column header when a text file is saved. This is especially useful if your data includes similar series that were recorded on different sensors; for example, three different voltage sensors. 238
239 Alarm Condition Preferences The following preferences are available in the Alarm Conditions group: Include channel number in sensor description: For USB loggers, you may include the channel number in the sensor description. This is especially helpful if you are using external sensors. Include location in sensor description: For serial loggers, you may include the location that was defined for the sensor the last time the logger was launched. Notification Preferences The following preferences are available in the Notifications group: Enable notification logging: Enable this option if you would like the Alarm & Readout Tool to keep a log of all notifications that have been created. You may find this helpful if you suspect that you are not receiving all of your notifications due to problems with your or text messaging service. The log file will be named NotificationLog.txt, and it will be overwritten each time you start the monitor. For Windows users, the notification log will be located in: C:\Documents and Settings\username For Macintosh users, the notification log will be located in: ~\Library\Logs For new configurations, remember notification settings from the last started configuration: If you generally use the same notification settings for each configuration, enabling this option will save you some time when creating new configurations. For text messages...: Some mobile text messaging services have maximum message length limits. To ensure that you do not miss any text notifications, enable this option and enter the limit in the Text Message Limit box. If a notification exceeds this number of characters, it will be sent in a series of shorter messages. Stop the monitor if sending a notification fails: Enable this option if you want the monitor to stop if it is not able to send a notification. Stop monitor after N notifications sent: To stop the monitor after a certain number of notifications are sent, enable this option and specify the number of notifications. This helps you limit unnecessary battery drain on the logger and the expense of frequent text messaging if you will not be able to stop the monitor directly at the host system. Enable sound for host notification: By default, notifications on the host machine are accompanied by a sound. You can select a different sound file, or disable the sound by unchecking the box. To change the sound played with the notification, select a sound from the dropdown list, or click Choose to browse to the.wav file you want to use. To preview the sound, click the icon. Message Preferences The following preference is available in the Messages group: Select the following Message items by default: If you want to include or exclude certain items from most notification messages, select the items you want to include here. These will become the default message items when you create a new configuration. 239

240 Warning Preferences Some warning dialogs offer you a checkbox to disable the warning so that you do not see it again. You can also disable (and re-enable) these warning preferences here. There are unsaved file changes: If you try to start the monitor or cancel the configuration dialog when the displayed configuration contains settings that have not been saved, this warning gives you a chance to save the changes before the configuration dialog closes. The configuration file being opened was created with a different version of the Alarm & Readout Tool: Configuration files from the previous version of this software ("Real Time Alarm Software") are fully compatible with the current version. If you save the configuration file after you open it, it will be updated to the current version. If the configuration includes references to serial loggers, you should click Refresh on the Sensors tab of the Alarms pane before saving the file. This will add more information about the sensors to the configuration file. The monitor is running when closing the application: If you try to quit HOBOware Pro while the monitor is running, this warning reminds you that quitting HOBOware Pro will stop the monitor, and gives you a chance to cancel. There may be concurrent logger access: This warning appears if you try to communicate with (add or refresh) a logger in the Configure Alarms and Readouts dialog while the logger is included in the currently running alarm and readout monitor. 240
HOBOware User s Guide
 HOBOware User s Guide Onset Computer Corporation 470 MacArthur Blvd. Bourne, MA 02532 www.onsetcomp.com/support/contact Mailing Address: P.O. Box 3450 Pocasset, MA 02559-3450 Phone: 1-800-LOGGERS (1-800-564-4377)
HOBOware User s Guide 1
 HOBOware User s Guide 1 Onset Computer Corporation 470 MacArthur Blvd. Bourne, MA 02532 www.onsetcomp.com Mailing Address: P.O. Box 3450 Pocasset, MA 02559 3450 Phone: 1 800 LOGGERS (1 800 564 4377) or
Contents. Contents... 1 Introduction... 4 An Overview of HOBOware... 4
 Contents Contents... 1 Introduction... 4 An Overview of HOBOware... 4 Installing HOBOware... 6 Installing HOBOware or HOBOware Pro from the Onset Website... 6 Installing HOBOware Pro from the Installation
Contents. Onset Computer Corporation 470 MacArthur Blvd. Bourne, MA Contents Introduction... 3 An Overview of HOBOware...
 Contents Contents... 1 Onset Computer Corporation 470 MacArthur Blvd. Bourne, MA 02532 Introduction... 3 An Overview of HOBOware... 3 Installing HOBOware... 5 Installing HOBOware or HOBOware Pro from the
Contacting Onset. Copyrights and Trademarks
 Contacting Onset For support, please contact the company that you bought the products from: Onset Computer Corporation or an Onset Authorized Dealer. Onset Computer Corporation 470 MacArthur Blvd. Bourne,
Onset Computer Corporation 470 MacArthur Blvd. Bourne, MA Part #: MAN-BHW-GS Doc #: B. 28 HOBOware Getting Started Guide
 Onset Computer Corporation 470 MacArthur Blvd. Bourne, MA 02532 This software is furnished in accordance with a separate license agreement included with the software, and subject to any restrictions set
Getting Started. onset computer corporation. Software for HOBO Data Loggers & Devices
 onset computer corporation HOBOware Pro Software for HOBO Data Loggers & Devices Getting Started This software is furnished in accordance with a separate license agreement included with the software, and
USB-5100 Series. USB Data Loggers for Windows and Mac. Software Help
 USB-5100 Series USB Data Loggers for Windows and Mac Software Help Document Revision 6 December 2015 Copyright 2015 Trademark and Copyright Information Measurement Computing Corporation, InstaCal, Universal
Getting Started: Using HOBOware with HOBO Data Loggers
 This software is furnished in accordance with a separate license agreement included with the software, and subject to any restrictions set forth therein. For more information about Onset's licensing terms
Contents. 2 Getting Started: Using HOBOware with HOBO Data Loggers
 Contents Introduction... 4 An Overview of HOBOware... 5 Installing HOBOware... 6 Before You Begin... 6 License Key... 6 Steps for Windows... 7 Steps for Macintosh... 7 Using the HOBOware Setup Assistant
Contents. 2 Getting Started: Using HOBOware with HOBO Data Loggers
 Contents Introduction... 4 An Overview of HOBOware... 5 Installing HOBOware... 6 Before You Begin... 6 License Key... 6 Steps for Windows... 7 Steps for Macintosh... 7 Using the HOBOware Setup Assistant
onset computer corporation Lite HOBOware Software for HOBO Data Loggers & Devices User s Guide Doc #: C
 onset computer corporation HOBOware Lite Software for HOBO Data Loggers & Devices User s Guide Doc #: 10819-C This software is furnished in accordance with a separate license agreement included with the
Software for HOBO loggers
 Measurement, Control, and Datalogging Solutions Software for HOBO loggers HOBOware Software Pro and Lite versions HOBOware Pro is available for both for Windows and MAC and is Onset's most powerful software
HOBO State Data Logger (UX90-001x) Manual
 Manual") HOBO State Data Logger (UX90-001x) Manual The HOBO State/Pulse/Event/Runtime data logger records state changes, electronic pulses and mechanical or electrical contact closures from external sensing devices.
HOBO State Data Logger (UX90-001x) Manual The HOBO State/Pulse/Event/Runtime data logger records state changes, electronic pulses and mechanical or electrical contact closures from external sensing devices.
HOBO Temp Data Logger (UX ) Manual
 Manual") HOBO Temp Data Logger (UX100-001) Manual The HOBO Temp data logger records temperature in indoor environments with its integrated sensor. Using HOBOware, you can easily configure the logger alarm to trip
HOBO Temp Data Logger (UX100-001) Manual The HOBO Temp data logger records temperature in indoor environments with its integrated sensor. Using HOBOware, you can easily configure the logger alarm to trip
HOBOmobile User s Guide
 HOBOmobile User s Guide Onset Computer Corporation 470 MacArthur Blvd. Bourne, MA 02532 www.onsetcomp.com Mailing Address: P.O. Box 3450 Pocasset, MA 02559-3450 Phone: 1-800-LOGGERS (1-800-564-4377) or
HOBO Occupancy/Light Data Logger (UX90-005x/-006x) Manual
 Manual") HOBO Occupancy/Light Data Logger (UX90-005x/x) Manual UX90-005x The HOBO Occupancy/Light data logger monitors room occupancy up to 5 or 12 meters away (depending on the model) as well as indoor light changes
HOBO Occupancy/Light Data Logger (UX90-005x/x) Manual UX90-005x The HOBO Occupancy/Light data logger monitors room occupancy up to 5 or 12 meters away (depending on the model) as well as indoor light changes
HOBO Temp/RH 3.5% Data Logger (UX ) Manual
 Manual") HOBO Temp/RH 3.5% Data Logger (UX100-003) Manual The HOBO Temp/RH data logger records temperature and relative humidity (within 3.5% accuracy) in indoor environments with its integrated sensors. Using
HOBO Temp/RH 3.5% Data Logger (UX100-003) Manual The HOBO Temp/RH data logger records temperature and relative humidity (within 3.5% accuracy) in indoor environments with its integrated sensors. Using
HOBOmobile User s Guide
 HOBOmobile User s Guide Onset Computer Corporation 470 MacArthur Blvd. Bourne, MA 02532 www.onsetcomp.com Mailing Address: P.O. Box 3450 Pocasset, MA 02559-3450 Phone: 1-800-LOGGERS (1-800-564-4377) or
HOBO Motor On/Off Data Logger (UX90-004x) Manual
 Manual") HOBO Motor On/Off Data Logger (UX90-004x) Manual The HOBO Motor On/Off data logger records motor on and off conditions by detecting the AC magnetic fields given off by a rotating motor using its internal
HOBO Motor On/Off Data Logger (UX90-004x) Manual The HOBO Motor On/Off data logger records motor on and off conditions by detecting the AC magnetic fields given off by a rotating motor using its internal
HOBO Temp/RH 2.5% Data Logger (UX ) Manual
 Manual") HOBO Temp/RH 2.5% Data Logger (UX100-011) Manual The HOBO Temp/RH data logger records temperature and relative humidity (within 2.5% accuracy) in indoor environments with its integrated sensors. Using
HOBO Temp/RH 2.5% Data Logger (UX100-011) Manual The HOBO Temp/RH data logger records temperature and relative humidity (within 2.5% accuracy) in indoor environments with its integrated sensors. Using
HOBO Light On/Off Data Logger (UX90-002x) Manual
 Manual") Test Equipment Depot - 800.517.8431-99 Washington Street Melrose, MA 02176 - TestEquipmentDepot.com HOBO Light On/Off Data Logger (UX90-002x) Manual The HOBO Light On/Off data logger monitors indoor light
Test Equipment Depot - 800.517.8431-99 Washington Street Melrose, MA 02176 - TestEquipmentDepot.com HOBO Light On/Off Data Logger (UX90-002x) Manual The HOBO Light On/Off data logger monitors indoor light
HOBO External Temp/RH Data Logger (UX ) Manual
 Manual") HOBO External Temp/RH Data Logger (UX100-023) Manual The HOBO External Temp/RH data logger records temperature and relative humidity in an indoor environment with its external sensor. Using HOBOware, you
HOBO External Temp/RH Data Logger (UX100-023) Manual The HOBO External Temp/RH data logger records temperature and relative humidity in an indoor environment with its external sensor. Using HOBOware, you
USB-5100 Series Multi-Channel Data Loggers
 Multi-Channel Data Loggers Features Stand-alone, remote multi-channel data loggers The USB-5104 is a high-accuracy, four-channel thermocouple data logger that records temperature in indoor environments
USB-5100 Series Multi-Channel Data Loggers
 Multi-Channel Data Loggers Features Stand-alone, remote multi-channel data loggers USB-5104 is a high-accuracy, fourchannel thermocouple data logger that records temperature in indoor environments Supports
User s Guide. onset computer corporation. Software for HOBO Data Loggers & Devices
 onset computer corporation HOBOware Lite Software for HOBO Data Loggers & Devices User s Guide Thank you for purchasing Onset products. Our loggers and software are designed to be easy to use, with many
BoxCar Pro 4.3 for Windows
 Page 1 of 6 BoxCar Pro 4.3 for Windows Onset offers two Windows applications for logger and data management. BoxCar Pro 4.3 is a powerful enhanced version of BoxCar that adds features for graphing, data
HOBOlink User s Guide
 HOBOlink User s Guide Onset Computer Corporation 470 MacArthur Blvd. Bourne, MA 02532 www.onsetcomp.com Mailing Address: P.O. Box 3450 Pocasset, MA 02559-3450 Phone: 1-800-LOGGERS (1-800-564-4377) or 508-759-9500
BoxCar Pro 4.3 User s Guide
 Index BoxCar Pro 4.3 User s Guide 76 BoxCar Pro User s Guide Chapter 4: Other Functions Thank you for purchasing Onset products. Our loggers and software are designed to be easy to use. For a quick start,
For HOBOware Pro Software. User s Guide
 kwh Assistant For HOBOware Pro Software User s Guide License Agreement This software is furnished in accordance with a separate license agreement included with the software, and subject to any restrictions
HOBO U-Shuttle (U-DT-x) Manual
 Manual") HOBO U-Shuttle (U-DT-x) Manual The U-DT-1 is compatible with all U-Series loggers (except the HOBO U30 Station), all UX-Series loggers, HOBO Weather Stations and Micro Stations (H21), and the HOBO Energy
HOBO U-Shuttle (U-DT-x) Manual The U-DT-1 is compatible with all U-Series loggers (except the HOBO U30 Station), all UX-Series loggers, HOBO Weather Stations and Micro Stations (H21), and the HOBO Energy
For HOBOware Pro Software. User s Guide
 Pulse Scaling Assistant For HOBOware Pro Software User s Guide License Agreement This software is furnished in accordance with a separate license agreement included with the software, and subject to any
HOBO U-Shuttle (U-DT-x) Manual
 Manual") HOBO U-Shuttle (U-DT-x) Manual The U-DT-1 is compatible with all U-Series loggers (except the HOBO U30 Station), all UX-Series loggers, HOBO Weather Stations and Micro Stations (H21), and the HOBO Energy
HOBO U-Shuttle (U-DT-x) Manual The U-DT-1 is compatible with all U-Series loggers (except the HOBO U30 Station), all UX-Series loggers, HOBO Weather Stations and Micro Stations (H21), and the HOBO Energy
HOBO Waterproof Shuttle (U-DTW-1) Manual
 Manual") HOBO Waterproof Shuttle (U-DTW-1) Manual The HOBO Waterproof Shuttle performs several major functions: Reads out all logger information (serial number, deployment number, data, etc.) from loggers in the
HOBO Waterproof Shuttle (U-DTW-1) Manual The HOBO Waterproof Shuttle performs several major functions: Reads out all logger information (serial number, deployment number, data, etc.) from loggers in the
MANAGING A WIRELESS HOBONODE NETWORK
 MANAGING A WIRELESS HOBONODE NETWORK - 62 - Introduction System Overview HOBOnodes (also known as HOBO Data Nodes) can be used to measure a wide variety of parameters including temperature, humidity, voltage,
HOBOmobile User s Guide ios
 HOBOmobile User s Guide ios Onset Computer Corporation 470 MacArthur Blvd. Bourne, MA 02532 www.onsetcomp.com/support/contact Mailing Address: P.O. Box 3450 Pocasset, MA 02559-3450 Phone: 1-800-LOGGERS
PRODUCT CATALOG. Data Loggers External Sensors Software Accessories
 PRODUCT CATALOG Data Loggers External Sensors Software Accessories WELCOME! Thank you for your interest in Onset the world leader in data loggers. At Onset, we know how important your data is to you. Our
HOBOware Alarm & Readout Tool User s Guide
 HOBOware Alarm & Readout Tool User s Guide 15015 A Thank you for purchasing Onset products. Our loggers and software are designed to be easy to use. This software is furnished in accordance with a separate
FLOWgate500. Software Manual. Software Manual FLOWgate500 Release 2.2. Revision number: V2.2. Manufacturer: SICK AG. Erwin-Sick-Str.
 FLOWgate500 Software Manual Software Manual FLOWgate500 Release 2.2 Revision number: V2.2 Manufacturer: SICK AG Erwin-Sick-Str.1 D-79183 Waldkirch Germany Place of manufacture: SICK Engineering GmbH Bergener
DaqPRO Solution. User Guide INNOVATIVE MONITORING SOLUTIONS ALL IN ONE SOLUTION FOR DATA LOGGING AND ANALYSIS.
 INNOVATIVE MONITORING SOLUTIONS www.fourtec.com User Guide including DaqLab FACTORIES Monitoring product quality throughout the entire manufacturing cycle TESTING STANDARDS Ensuring quality control and
TempLog & RH/TempLog User Guide. Sixth Edition First print Printed in July
 TempLog & RH/TempLog User Guide Sixth Edition First print Printed in July 2003 www.4oakton.com Contents Using the Guide... 15 Chapter 1 OaktonLog... 17 1.1. Overview... 18 1.2. Getting Started... 19 1.3.
Committed to Quality. MicroLogPRO Solution. User Guide
 Committed to Quality MicroLogPRO Solution User Guide MicroLogPRO & MicroLog Plus User Guide Third Edition First Print April 2007 Fourier Systems Ltd. Contents Using the Guide... 1 Compliance with FDA
FileMaker. Mobile 2.1. User s Guide. For Windows, Mac, Palm OS, and Pocket PC. Companion for Palm OS and Pocket PC
 For Windows, Mac, Palm OS, and Pocket PC FileMaker Mobile 2.1 Companion for Palm OS and Pocket PC User s Guide 2000-2002 FileMaker, Inc. All Rights Reserved. FileMaker, Inc. 5201 Patrick Henry Drive Santa
Getting Started With the Cisco PAM Desktop Software
 CHAPTER 3 Getting Started With the Cisco PAM Desktop Software This chapter describes how to install the Cisco PAM desktop client software, log on to Cisco PAM, and begin configuring access control features
Wind Speed and Direction Logger Kit
 Wind Speed and Direction Logger Kit Below are the 3 main components of the Wind Speed and Direction logger that is the Hobo Micro Station data logger, Hoboware 2.6 software for weather station applications
Logger Pro 3. Quick Reference
 Logger Pro 3 Quick Reference Getting Started Logger Pro Requirements To use Logger Pro, you must have the following equipment: Windows 98, 2000, ME, NT, or XP on a Pentium processor or equivalent, 133
Navigator Software User s Manual. User Manual. Navigator Software. Monarch Instrument Rev 0.98 May Page 1 of 17
 User Manual Navigator Software Monarch Instrument Rev 0.98 May 2006 Page 1 of 17 Contents 1. NAVIGATOR SOFTWARE 2. INSTALLATION 3. USING NAVIGATOR SOFTWARE 3.1 STARTING THE PROGRAM 3.2 SYSTEM SET UP 3.3
DATA LOGGING SOFTWARE FOR 4-WAY BALL VALVE DIGITAL MANIFOLD
 DATA LOGGING SOFTWARE FOR 4-WAY BALL VALVE DIGITAL MANIFOLD The Mastercool Data Logger Application provides all the necessary Recorder and Display Functions to record, display and save new data or playback
TFA. KlimaLogg Pro. User Manual. Revision: 1.1
 TFA KlimaLogg Pro User Manual Revision: 1.1 Table of Contents Overview... 2 Getting Started... 2 Setting up the KlimaLogg Pro device... 2 Installing the USB-Stick... 2 Installation... 2 System Requirements...
RMS Monitoring Software System Operation
 RMS Monitoring Software System Operation 2017 ROTRONIC AG Bassersdorf Switzerland 2017 ROTRONIC AG Bassersdorf Switzerland Page 2 of 27 Contents Contents... 3 1 Overview... 4 1.1 System Requirements...
DwyerLog Logger Interface Software
 DwyerLog Logger Interface Software USER S GUIDE Version 1.4x March 21, 2013 Dwyer Instruments, Inc 102 Indiana Hwy 212 Michigan City, IN 46360 Phone: (219) 879-8868 Fax: (219) 872-9057 http://www.dwyer-inst.com
First Edition Termologger USB & OSAKA MicroLab Lite User guide
 First Edition Termologger USB & OSAKA MicroLab Lite User guide First Print February 2007 Introduction The Termologger USB is a compact 16-bit USB data logger designed for accurate temperature monitoring
Sentrol Cloud User s Guide Ver. 2.01
 Ver. 2.01 Copyright 2016 Nietzsche Enterprise Co., Ltd. All rights reserved Nietzsche Enterprise reserves the right to make changes and improvements to its products without notice. Contact Information:
FileMaker. Mobile 7. User s Guide. For Windows, Mac, Palm OS, and Pocket PC. Companion for Palm OS and Pocket PC
 For Windows, Mac, Palm OS, and Pocket PC FileMaker Mobile 7 Companion for Palm OS and Pocket PC User s Guide 2000-2004 FileMaker, Inc. All Rights Reserved. FileMaker, Inc. 5201 Patrick Henry Drive Santa
2009 Davis Instruments Corp. All rights reserved. Information in this document is subject to change without notice.
 FCC Part 15 Class B Registration Warning This equipment has been tested and found to comply with the limits for a Class B digital device, pursuant to Part 15 of the FCC Rules. These limits are designed
Agilent 34826A BenchLink Data Logger for 34980A. Getting Started Guide. Agilent Technologies
 Agilent 34826A BenchLink Data Logger for 34980A Getting Started Guide Agilent Technologies Notices Agilent Technologies, Inc. 2006 No part of this manual may be reproduced in any form or by any means (including
Track-It User s Guide. 1. Table of Contents. Track-It User Guide
 Track-It User s Guide Track-It is a PC based (Windows XP / Vista/ Windows 7) program to enable a user to program and view data from the Track-It series of micro data loggers. The program allows the loggers
ADS PrimeWorks User Manual
 ADS PrimeWorks User Manual November 2010 QR 775018 A0 ADS LLC 4940 Research Drive Huntsville, AL 35805 Telephone (256) 430-3366 / Fax (256) 430-6633 www.adsenv.com Copyright 2010 ADS LLC. All rights reserved.
MicroLite & MicroLab Lite User Guide. First Edition First Print February 2007 Fourier Systems Ltd.
 MicroLite & MicroLab Lite User Guide First Edition First Print February 2007 Fourier Systems Ltd. Contents Introduction... 1 Chapter 1 Using the MicroLite... 2 1.1. Overview... 3 1.2. Getting Started...
Technology Primer. HOBO Data Nodes: Advanced Technology for Wireless Energy and Environmental Monitoring
 Technology Primer HOBO Data Nodes: Advanced Technology for Wireless Energy and Environmental Monitoring HOBO data nodes are portable devices that record and transmit measurements wirelessly to a computer
KYOCERA Net Viewer User Guide
 KYOCERA Net Viewer User Guide Legal Notes Unauthorized reproduction of all or part of this guide is prohibited. The information in this guide is subject to change without notice. We cannot be held liable
Podium Plus Data Analysis Software. User Manual. SWIS10 Version
 SWIS10 Version Issue 1.10 February 2005 Contents 1 Introduction 6 1.1 What is Podium Plus? 6 1.2 About This Manual 6 1.3 Typographical Conventions 7 1.4 Getting Technical Support 7 2 Getting Started 8
TriLink. User Guide. ISE, Inc. Second Edition October 2007 Fourier Systems
 ISE, Inc. 10100 Royalton Rd. Cleveland, OH 44133 Tel: (440) 237-3200 Fax: (440) 237-1744 http://iseinc.com TriLink User Guide Second Edition October 2007 Fourier Systems Contents Introduction...7 Chapter
ConsolePlus (EA- SWP- PLUS) User Manual Ver. 3.2
 User Manual Ver. 3.2") ConsolePlus (EA- SWP- PLUS) User Manual Ver. 3.2 Contents 1. Quick start Guide... 3 2. Features... 4 3. Dependences... 5 4. Accessories... 6 5. Installation... 7 6. Introduction... 9 6.1. General Tab...
ConsolePlus (EA- SWP- PLUS) User Manual Ver. 3.2 Contents 1. Quick start Guide... 3 2. Features... 4 3. Dependences... 5 4. Accessories... 6 5. Installation... 7 6. Introduction... 9 6.1. General Tab...
Notes on installing and using the OM-USB-5201 and OM-USB-5203 data logging devices
 Notes on installing and using the OM-USB-5201 and OM-USB-5203 data logging devices Thank you for purchasing the OM-USB-5201 or OM-USB-5203 device from Omega Engineering! Please read this sheet to help
DOWNLOAD KIT CYCLOCOMPUTER INTRODUCTION. Download unit & Download Software [e-train Data Ver.3] for Windows 98/ME/2000/XP
![DOWNLOAD KIT CYCLOCOMPUTER INTRODUCTION. Download unit & Download Software [e-train Data Ver.3] for Windows 98/ME/2000/XP](/thumbs/78/78392561.jpg "DOWNLOAD KIT CYCLOCOMPUTER INTRODUCTION. Download unit & Download Software [e-train Data Ver.3] for Windows 98/ME/2000/XP") CYCLOCOMPUTER Download unit & Download Software [e-train Data Ver.3] for Windows 98/ME/2000/XP 0365510 (ENG) 3 INTRODUCTION The CC-TR100 Download Kit contains the software e-train Data TM Ver. 3 and the
CYCLOCOMPUTER Download unit & Download Software [e-train Data Ver.3] for Windows 98/ME/2000/XP 0365510 (ENG) 3 INTRODUCTION The CC-TR100 Download Kit contains the software e-train Data TM Ver. 3 and the
User Guide. Model Temperature Datalogger Kit Model Temperature and Humidity Datalogger Kit Model SW276 Datalogging Software SW276
 User Guide Model 42265 Temperature Datalogger Kit Model 42275 Temperature and Humidity Datalogger Kit Model SW276 Datalogging Software SW276 Introduction Congratulations on your purchase of Extech Instrument
Tinytag Explorer Quick Start Guide
 Tinytag Explorer Quick Start Guide Tinytag Explorer Quick Start Guide Contents About this Guide 04 What you Need 05 Installing Tinytag Explorer 06 Starting Tinytag Explorer 07 Activating Tinytag Explorer
KYOCERA Net Viewer 5.3 User Guide
 KYOCERA Net Viewer. User Guide Legal Notes Unauthorized reproduction of all or part of this guide is prohibited. The information in this guide is subject to change without notice. We cannot be held liable
CyberComm Pro 2.4 Data Acquisition Software Installation & User Guide. CyberScan DO 1500
 CyberComm Pro 2.4 Data Acquisition Software Installation & User Guide CyberScan DO 1500 Bench Dissolved Oxygen Meter Technology Made Easy... 68X292341 Rev.0 01/04 PREFACE Thank you for selecting the CyberScan
FileMaker. Mobile 2. User s Guide. For Windows, Mac, and Palm OS. Companion for Palm OS
 For Windows, Mac, and Palm OS FileMaker Mobile 2 Companion for Palm OS User s Guide 2000-2002 FileMaker, Inc. All Rights Reserved. FileMaker, Inc. 5201 Patrick Henry Drive Santa Clara, California 95054
Version 4.1 June Xerox Device Agent (XDA) Lite User Guide
 Lite User Guide") Version 4.1 June 2013 Xerox Device Agent (XDA) Lite User Guide 2008-2013 Xerox Corporation. All rights reserved. Xerox and Xerox and Design are trademarks of Xerox Corporation in the US and/or other countries.
Version 4.1 June 2013 Xerox Device Agent (XDA) Lite User Guide 2008-2013 Xerox Corporation. All rights reserved. Xerox and Xerox and Design are trademarks of Xerox Corporation in the US and/or other countries.
Software User's Guide
 Software User's Guide Brother QL-series The contents of this guide and the specifications of this product are subject to change without notice. Brother reserves the right to make changes without notice
RMS Monitoring Software System Operation
 System Operation 2016 ROTRONIC AG Bassersdorf Switzerland Contents Contents... 2 1 Overview... 3 1.1 System Requirements... 3 1.1.1 Browser... 3 2 System Login... 4 3 Data Views... 5 3.1 Alarm Symbols...
Legal Notes. Regarding Trademarks KYOCERA MITA Corporation
 Legal Notes Unauthorized reproduction of all or part of this guide is prohibited. The information in this guide is subject to change without notice. We cannot be held liable for any problems arising from
9936A LogWare III. User s Guide. Revision
 9936A LogWare III User s Guide Revision 680301 Table of Contents 1 Introduction... 1 1.1 Symbols Used...1 1.2 Conventions...1 1.3 What is LogWare?...1 1.4 License Agreement...2 1.5 Requirements...2 1.6
testo Comfort Software Professional 4 Instruction manual
 testo Comfort Software Professional 4 Instruction manual 2 1 Contents 1 Contents 1 Contents...3 2 About this document...5 3 Specifications...6 3.1. Use...6 3.2. System requirements...6 4 First steps...7
GXLink MultiChannel Wave Inserter Model SP-631
 800173-0A Digital High Speed GXLink MultiChannel Wave Inserter Model SP-631 User Manual Copyright 2009 It is prohibited to copy, reproduce or distribute this information in whole or in part without the
Nortech Client Software. User Manual MAN R2.0
 Nortech Client Software User Manual MAN-00083 R2.0 All rights reserved. No part of this publication may be reproduced, stored in a retrieval system, or transmitted in any form, be it electronically, mechanically,
INSTRUCTION MANUAL MODEL 8081 DIGITAL RECORDER
 INSTRUCTION MANUAL MODEL 8081 DIGITAL RECORDER Revision B February 2013 P/N 8081-0005 S/N 2001 N. Indianwood Ave., Broken Arrow, Oklahoma 74012 Tel: 918-250-7200 Telefax: 918-459-0165 E-mail: Chandler.sales@ametek.com
Thank you for choosing Loadstar Sensors. Need additional help? Call us at or us at
 LoadVUE User Guide LoadVUE LoadVUE Lite Thank you for choosing Loadstar Sensors. Need additional help? Call us at 510-623-9600 or email us at support@loadstarsensors.com LoadVUE is compatible with Windows
Logger Pro 3 Release Notes
 Logger Pro 3 Release Notes Version 3.3 May 6, 2004 Contents: Install Notes What s changed in Logger Pro 3.3 Logger Pro 3.3 Known Issues What s changed in Logger Pro 3.2.1 What s changed in Logger Pro 3.2
NORDSON CORPORATION AMHERST, OHIO USA
 CanWorks Operator Interface Tracking PLUS for CanWorks Systems with SM-2 Spray Monitors User Guide Part 1018132A NORDSON CORPORATION AMHERST, OHIO USA 2002 Nordson Corporation. All rights reserved. CanWorks,
KMnet Viewer. User Guide
 KMnet Viewer User Guide Legal Notes Unauthorized reproduction of all or part of this guide is prohibited. The information in this guide is subject to change for improvement without notice. We cannot be
PC APPLICATION SOFTWARE WEATHER OS (MODEL: WMR100 / WMR200 / WMRS200 / I300 / I600 / EMS100 / RMS300 / RMS600) USER GUIDE IMPORTANT: LAUNCH SOFTWARE
 USER GUIDE IMPORTANT: LAUNCH SOFTWARE") PC APPLICATION SOFTWARE WEATHER OS (MODEL: WMR100 / WMR200 / WMRS200 / I300 / I600 / EMS100 / RMS300 / RMS600) USER GUIDE CONTENTS Launch Software...1 Installation...1 Select language...1 Select cities
PC APPLICATION SOFTWARE WEATHER OS (MODEL: WMR100 / WMR200 / WMRS200 / I300 / I600 / EMS100 / RMS300 / RMS600) USER GUIDE CONTENTS Launch Software...1 Installation...1 Select language...1 Select cities
Getting Started Guide. IMU Research I Measure U Limited
 Getting Started Guide IMU Research 9.53 g Impact Load Analysis 2018 I Measure U Limited Contents 1 Introducing the Sensor 3 2 IMU Research Mobile App 4 2.1 Installation on ios 4 3 Lightning Desktop App
testo Comfort Software Professional 4 Instruction manual
 testo Comfort Software Professional 4 Instruction manual 2 1 Contents 1 Contents 1 Contents... 3 2 About this document... 5 3 Specifications... 6 3.1. Use... 6 3.2. System requirements... 6 4 First steps...
User s Guide. For Windows, Mac, Palm OS, and Pocket PC. Companion for Palm OS and Pocket PC
 For Windows, Mac, Palm OS, and Pocket PC FileMMobile aker8 Companion for Palm OS and Pocket PC User s Guide 2000-2006 FileMaker, Inc. All Rights Reserved. FileMaker, Inc. 5201 Patrick Henry Drive Santa
Network Management Software ALLNET Zone Controller
 Network Management Software ALLNET Zone Controller For ALL0558N / ALL02850N / ALL02860ND / ALL02880ND User Manual v1.0 Table of Contents 1. Installation & Un-installation... 4 1.1. Install NMS Suite...
DVR 514 Digital Video Recorder
 DVR 514 Digital Video Recorder User Manual 2010 Sakar International, Inc. All rights reserved. Windows and the Windows logo are registered trademarks of Microsoft Corporation. All other trademarks are
Manual Supplement. Manual Title: 2680A/2686A Users Supplement Issue: 1 Print Date: June 2002 Issue Date: 9/06 Revision/Date: 1, 4/04 Page Count: 9
 Manual Supplement Manual Title: 2680A/2686A Users Supplement Issue: 1 Print Date: June 2002 Issue Date: 9/06 Revision/Date: 1, 4/04 Page Count: 9 This supplement contains information necessary to ensure
ZENworks Reporting System Reference. January 2017
 ZENworks Reporting System Reference January 2017 Legal Notices For information about legal notices, trademarks, disclaimers, warranties, export and other use restrictions, U.S. Government rights, patent
DriveWizard Plus Instruction Manual
 DriveWizard Plus Instruction Manual To properly use the product, read this manual thoroughly. MANUAL NO. TOEP C730600 20C Table of Contents Safety Symbols and Markings...4 Manual Overview...5 Related Manuals...5
HelmView 450 Model HV450. Operation Manual Section 78
 HelmView 450 Model HV450 Operation Manual 00-02-0870 2015-04-16 Section 78 In order to consistently bring you the highest quality, full-featured products, we reserve the right to change our specifications
VANGUARD LOAD TAP CHANGER ANALYZER (LTCA) VERSION 2.xx SOFTWARE MANUAL. LTCA-10, LTCA-40, WRM-10P, WRM-40, TRM-20, TRM-40, TRM-203, and TRM-403
 VERSION 2.xx SOFTWARE MANUAL. LTCA-10, LTCA-40, WRM-10P, WRM-40, TRM-20, TRM-40, TRM-203, and TRM-403") VANGUARD LOAD TAP CHANGER ANALYZER (LTCA) VERSION 2.xx SOFTWARE MANUAL For Use with Vanguard s LTCA-10, LTCA-40, WRM-10P, WRM-40, TRM-20, TRM-40, TRM-203, and TRM-403 Load Tap Changer Analyzers and Winding
VANGUARD LOAD TAP CHANGER ANALYZER (LTCA) VERSION 2.xx SOFTWARE MANUAL For Use with Vanguard s LTCA-10, LTCA-40, WRM-10P, WRM-40, TRM-20, TRM-40, TRM-203, and TRM-403 Load Tap Changer Analyzers and Winding
InTemp System User s Guide
 InTemp System User s Guide Onset Computer Corporation 470 MacArthur Blvd. Bourne, MA 02532 www.onsetcomp.com Mailing Address: P.O. Box 3450 Pocasset, MA 02559-3450 Phone: 1-800-LOGGERS (1-800-564-4377)
Working with PDF s. To open a recent file on the Start screen, double click on the file name.
 Working with PDF s Acrobat DC Start Screen (Home Tab) When Acrobat opens, the Acrobat Start screen (Home Tab) populates displaying a list of recently opened files. The search feature on the top of the
Thermodata Viewer software
 Thermodata Viewer software Thermodata Viewer consists of a set of tools to configure temperature temperature loggers an download, view and save the resulting data. It is designed for users in the commercial