Introduction:... 3 What s in the Box:... 3 System Requirements:... 3 Serialization and Activation... 4 Software layout... 6 SpyderPRINT Software...
|
|
|
- Briana Donna Holland
- 6 years ago
- Views:
Transcription

1 User Guide
2 Introduction:... 3 What s in the Box:... 3 System Requirements:... 3 Serialization and Activation... 4 Software layout... 6 SpyderPRINT Software... 7 Welcome Screen... 7 Before You Begin... 8 Print Quality Check... 9 Media Settings Check Begin Profiling Profiling Print Target Printing the Target Spectro Calibration Profiling Create Measurement File SpyderProof View Advanced Editiing Save Profile Process Complete Begin Profiling Selecting an existing Measurement File... 26
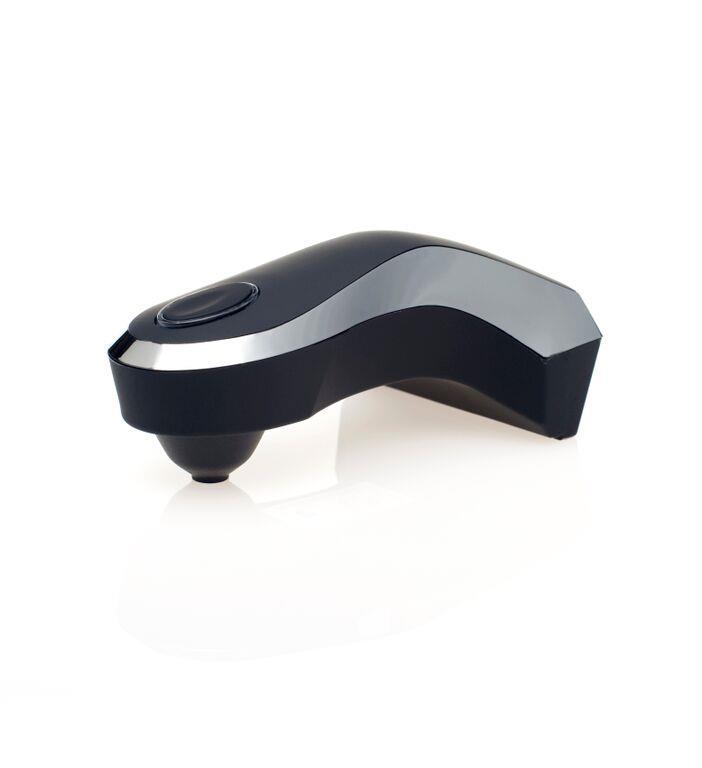
3 Introduction: Thank you for purchasing your new Spyder PRINT. This document will offer a step by step guide for using your SpyderPRINT to get the best possible colors from your printer. What s in the Box: SpyderPRINT Spectrocolorimeter Sensor Base SpyderGuide USB cable Welcome Card - Including serial number, warranty information, and download instructions System Requirements: USB Port Windows 7 32/64, Windows 8.0, /64, Windows 10 32/64 Mac OS X 10.7, 10.8, 10.9, Monitor Resolution 1280x768 or greater, 16-bit video card (24 recommended), 1 GB of available RAM, 500MB of available hard disk space Internet connection for software download

4 Serialization and Activation First, download and install the SpyderPRINT software from the Datacolor website (follow the link included in the package). Next, make sure that your SpyderPRINT is plugged into a USB port on your computer; make sure it is a direct port, not on a keyboard, hub, or extension cable. Enter your serial number located on the welcome card, or license code from your if you have already registered the software on another machine. With the easy automated activation, please make sure that your computer is connected to the internet and that no firewall blocks your software from communicating with the Datacolor activation server.
5 Save the with the license code. You will need either this or the original serial number from the card in the SpyderPRINT package if you want to use the device on another computer.
6 Software layout The software that comes with your SpyderPRINT is a wizard, which will walk you through the process step by step. We have outlined the steps below to help you through the process. There are a few differences between the Windows and Mac versions that will be highlighted when necessary.

7 SpyderPRINT Software Welcome Screen When you run the SpyderPRINT software you will be greeted with the Welcome Screen. Here you have two choices, to Learn about Color Management or to Profile Your Printer. If you are new to Color Management you may want to go through the Learn about Color Management section to learn more about the process and familiarize yourself with the terms and concepts before getting started. Once you are confident you can click on the Profile Your Printer and click "Next".
8 Before You Begin Printer description and other options: Here you can enter the name of your printer, type of paper and ink used and any driver media settings you may be using. This information will be printed automatically at the bottom of the profiling "target" sheets to help keep track of the settings that you will eventually use when actually printing the target sheets. It is not necessary to fill in all of the fields, but can be useful down the road.
9 Print Quality Check (optional) Clicking on this will give you a test page to print to ensure that your printer is functioning properly (all inks working and nozzles not clogged). Enter your printer name and any note you would like to add; these will be displayed on the printed page. You can also choose whether to print a full page or just use a quarter page by selecting the Full Sheet check box. Next, click on the Print Quality Check Image box to proceed. A Page Setup box will appear. Choose the printer you wish to use, paper size, and orientation. We recommend using landscape mode when printing full sheets. Next a "Print" dialogue box will appear; check your settings and press the Print button.
10 Media Settings Check (optional) This screen lets you print a "Media Setting Check" image at different driver media settings (paper type, output resolution, etc.) to assure that the media setting choice is optimal before printing a full profiling target for the printer. If the choice is not optimal, then the resulting profile will not have the color range or detail it would have from an optimal setting, and it's likely that prints with these settings will have various kinds of cosmetic issues. The basic idea is to print this image, with color management turned off in the driver, the same way the target sheets will eventually be printed, so that you can see how the same kind of color squares will eventually print with one or more profiling target sheets. An example of "not optimal" would be using the wrong paper type setting for a non-standard paper type and getting too much ink on the paper, which can produce irregular mottling and streaking of printed colors. More information is available by clicking on the help button at the top of the screen.
11 Begin Profiling On this screen you will select whether to print and measure a Target or Select an existing measurement. Click Print and Measure a Target to create a new profile. Click Select an Existing Measurement File to view, adjust or build profiles from a previously created measurement set (Go to Page 26 to learn more about this setting).

12 Profiling Print Target Here you have a number of choices regarding which test target to print out and measure. The EZ Targets have larger, wider patches that make them easier to measure. They print on twice as many sheets of paper as the Classic Targets. Either kind of target, EZ or Classic, can be measured with or without the SpyderGuide. The purpose of the guide is to help you align the Spectro with the rows of patches while moving from left to right whether you're measuring by patch or strip. Most printers will perform well with the High Quality Target, with or without Extended Grays. With some printer configurations, it can be beneficial to print the extra set of Extended Grays for your profile target sheet set, even if you aren't printing Black and White. Once you have selected the appropriate target, press the "Print" button.

13 Printing the Target After you click "Print Target", the print dialogue box will appear on your computer. Choose the printer you are looking to create a profile for, select the appropriate paper size, set to landscape orientation,.25 inch margins (.635 centimeters), print single sided, and then we need to turn off any color management features. On a Windows machine this means turning on Barrier Free color management. On a Macintosh you want to turn off Color Sync and select in Printer. (Windows)

14 (Macintosh) Once color management has been turned off, proceed to print the pages of the target. There is an option, when printing multiple target sheets, to print either all sheets, or just one at a time. To print your targets one sheet at a time, use the small target preview in the Wizard screen to switch to the page you want to print; then click the Print Target button and tell it to only print One sheet. Repeat this process for each sheet in the target. With multi-sheet targets, each sheet will be automatically labeled with a page number. You must measure the sheets in the proper order to build a correct printer profile. We recommend that you let the target sheets dry for at least 15 minutes after printing. Depending on the printer, paper, and ink set, you may want to wait longer. Some inks develop, deepen and darken on certain papers more slowly, and you don t want to take measurements until (a) the ink is fully dried and won t smear during measurements, and (b) the color of the printed patches has locked in and won t change further.
15 Spectro Calibration Place your Spectro onto its base and press the button on the top, this will create a white balance for your Spectro. Make sure the white tile of the base is clean and the Spectro is aligned properly on it. It is critically important to calibrate properly to assure accurate measurements.

16 Profiling Create Measurement File On step 1 you will name your Measurement File, which creates a formatted text file that will contain the measurements you are about to take. Click "Save". On step 2 you will be starting with an "empty" measurement file that you created in step 1. Click on the "Open Patch Reading Screen" button to begin the measurement process for the set of target sheet(s) that you've printed and allowed to dry.

17 This is the window that opens whenever you re going to measure patches from target prints. What you re seeing is a grid of color patch slots that corresponds to the physical patches printed in the Target you chose. The grid is labelled in columns by letter, and in rows by number, to also correspond to the physical target print. The bold 1 in the lower right, beneath the patches, reminds you that this is Page 1 in the target. The two popups in the lower right corner of the window are used to set the measuring mode; and the display mode. In this example, measuring mode is set to Strip (the other choice is Patch). The display mode for the window defaults to Split (the other choices are Pure and Measured ). When in Split mode, each patch rectangle is drawn in 2 colors: the upper left corner of the rectangle is drawn in the pure RGB color that exists for that patch in the target. The pure color is the raw RGB color that was sent through the printer driver and which, when the target has been correctly printed, will have produced an uncalibrated color patch for you to measure. So for example, for the red patch in the target ( full RGB red of (255, 0, 0), that s the pure color displayed for that patch in the window. The lower right corner of each patch rectangle is drawn in whatever color you ve measured into that slot. In this example, all of the patch rectangles have white in the lower right corner because they re empty none of them are measured yet.

18 If you switch display mode to Pure, the entire window will redraw showing all patch rectangles filled fully with the Pure colors. This will let you quickly see what the Pure representation of the target print looks like. It s important to understand that these Pure colors are ideal, and simply represent the colors in the target image before you printed it. When you print the target correctly (all color management turned off), the resulting target print will be uncalibrated and the printed color patches will look different than these Pure ideals. When you measure these uncalibrated patches in the target print, SpyderPRINT will then calculate a profile that will correct for this uncalibrated state of the printer.
19 If you switch display mode to Measured, then all of the rectangles in the Target window are filled only with the measured color. Here, this means that the entire window appears with empty white patches because nothing has been measured yet.

20 If this is your first time measuring patches in a target, you may want to take the brief tutorial on how to read the patches. The tutorial will show you the appropriate speed to read the targets if you re using strip mode, which measures by row. The other mode you can measure in is patch, which measures by each color patch. Once you feel comfortable you can begin reading your own target. Place the Spectro on the first patch on the next line and repeat. Once this page is finished, click on the 2 nd page and that will appear, repeat until all pages have been read. Once finished you can review your targets, if there is a red box around the patch, it should be read again, this indicates some sort of an error with that particular patch. While in the View/Measure mode you can toggle back and forth between the split and measured mode to see the full size targets and measurements.

21 Once you are satisfied with your readings, press the next button, this will process and create your profile.

22 SpyderProof View On this page you can preview what an image looks like when soft proofed vs not soft proofed. Select your rendering intent, either: Saturations, Perceptual, Relative Colorimetric, or Absolute Colorimetric. Click on the Soft proof button below to see the difference. You can zoom into the images to see them enlarged or to zoom out.
23 Advanced Editing If you wish to make changes to your profile, you can click on the Advanced editing button to bring up a series of sliders to make changes to your profile.
24 Save Profile Once you are happy with your profile, enter a name for it, usually with the printer and paper type, and click save.

25 Process Complete Congratulations, you have finished building your profile! You can either quit the program, start building another profile, or continue editing the one you just created.
26 Begin Profiling Selecting an existing Measurement File You can select a previously created profile to continue editing it here. You can go back in and re-read any or all of your patches and once done you can view the results in SpyderProof as well as edit them under Advanced Editing. Once completed you can re-save this file under a new or the existing name. Datacolor, Spyder and SpyderPRINT are trademarks or registered trademarks of Datacolor. Copyright 2015 Datacolor. All rights reserved
nt Colorations 8 Version: Last update: July 2015 neotextil Index
 nt Colorations 8 Version: 8.0.1 Last update: July 2015 neotextil Index 1 Index 1. Introduction..... 3. 1.1 Technical requirements..... 3 2. Installation.. and Activation of the Plug-ins... 4 2.1 Installation...
nt Colorations 8.0 Version: Last update: May 2015 neotextil Index
 nt Colorations 8.0 Version: 8.0.1 Last update: May 2015 neotextil Index 1 Index 1. Introduction...... 3 1.1 Technical requirements.... 3 2. Installation and Activation. 4 2.1 Installation. 4 2.2 Activation....
DESKTOP PUBLISHING FOR PRINT PRODUCTION PRACTICAL
 DESKTOP PUBLISHING FOR PRINT PRODUCTION PRACTICAL M Scheme By, A.Paramasivam, Lecturer (SS) S.Marimuthu, Lecturer Department of Printing Technology Arasan Ganesan Polytechnic College Sivakasi Ex.No. 1
View: Gamut Warning. Print with Preview (Photoshop CS)
") 100 Soft-Proofing the document in an RGB working space, the image is in the best color space for editing. Eventually the file will need to be converted to the print/output space. Further editing can be
100 Soft-Proofing the document in an RGB working space, the image is in the best color space for editing. Eventually the file will need to be converted to the print/output space. Further editing can be
Printer Driver Operation Guide CMP EN
 Printer Driver Operation Guide CMP0019-00 EN Copyrights and Trademarks Copyrights and Trademarks Copyrights and Trademarks No part of this publication may be reproduced, stored in a retrieval system, or
table of contents notices special features getting started printing hp deskjet 6120 series printer
 hp deskjet 6120 series printer table of contents notices notices and acknowledgements terms and conventions accessibility using the onscreen user's guide special features getting started printer features
Microsoft Word 2007 on Windows
 1 Microsoft Word 2007 on Windows Word is a very popular text formatting and editing program. It is the standard for writing papers and other documents. This tutorial and quick start guide will help you
Creating Your RGB Custom Printer Profile in Photoshop (Version CS4 & Earlier)
") Creating Your RGB Custom Printer Profile in Photoshop (Version CS4 & Earlier) 1) Prepare your Printer & Monitor: A) Assure that your printer is loaded with the proper paper & ink. Remember that you need
Creating Your RGB Custom Printer Profile in Photoshop (Version CS4 & Earlier) 1) Prepare your Printer & Monitor: A) Assure that your printer is loaded with the proper paper & ink. Remember that you need
WELCOME TO ALL-TECH SYSTEMS & CO INTRODUCTION TO MICROSOFT WORD TUTORIAL
 WELCOME TO ALL-TECH SYSTEMS & CO INTRODUCTION TO MICROSOFT WORD TUTORIAL 1 Microsoft Office Word 2010 allows you to create and edit personal and business documents, such as letters, reports, invoices,
Quick Crash Scene Tutorial
 Quick Crash Scene Tutorial With Crash Zone or Crime Zone, even new users can create a quick crash scene diagram in less than 10 minutes! In this tutorial we ll show how to use Crash Zone s unique features
Chapter 1. Getting to Know Illustrator
 Chapter 1 Getting to Know Illustrator Exploring the Illustrator Workspace The arrangement of windows and panels that you see on your monitor is called the workspace. The Illustrator workspace features
ColorAnt - Quick Start Guide
 ColorAnt - Quick Start Guide ColorAnt is a software which, among other things, enables you to smooth and correct measurement value files (spectrophotometrically) and to average them intelligently. This
EssEntial indesign skills Brought to you By InDesign
 10 EssEntial indesign skills Brought to you By InDesignSkills 10 Essential InDesign Skills by InDesignSkills www.indesignskills.com Copyright 2014 Illustration: Henry Rivers Contents In this ebook you
Adobe Illustrator. Quick Start Guide
 Adobe Illustrator Quick Start Guide 1 In this guide we will cover the basics of setting up an Illustrator file for use with the laser cutter in the InnovationStudio. We will also cover the creation of
2015 Electronics For Imaging. The information in this publication is covered under Legal Notices for this product.
 2015 Electronics For Imaging. The information in this publication is covered under Legal Notices for this product. 9 March 2015 Contents 3 Contents...5 Print measurement pages...5 Measuring a measurement
ezimagex2 User s Guide Version 1.0
 ezimagex2 User s Guide Version 1.0 Copyright and Trademark Information The products described in this document are copyrighted works of AVEN, Inc. 2015 AVEN, Inc. 4595 Platt Rd Ann Arbor, MI 48108 All
MAKING TABLES WITH WORD BASIC INSTRUCTIONS. Setting the Page Orientation. Inserting the Basic Table. Daily Schedule
 MAKING TABLES WITH WORD BASIC INSTRUCTIONS Setting the Page Orientation Once in word, decide if you want your paper to print vertically (the normal way, called portrait) or horizontally (called landscape)
All textures produced with Texture Maker. Not Applicable. Beginner.
 Tutorial for Texture Maker 2.8 or above. Note:- Texture Maker is a texture creation tool by Tobias Reichert. For further product information please visit the official site at http://www.texturemaker.com
Microsoft Word 2011 Tutorial
 Microsoft Word 2011 Tutorial GETTING STARTED Microsoft Word is one of the most popular word processing programs supported by both Mac and PC platforms. Microsoft Word can be used to create documents, brochures,
WorkForce Pro WP-4090 User's Guide
 WorkForce Pro WP-4090 User's Guide Contents WorkForce Pro WP-4090 User's Guide... 9 Product Basics... 10 Printer Parts Locations... 10 Printer Parts - Top... 11 Printer Parts - Back... 12 Printer Parts
EDITING SHAPES. Lesson overview
 3 CREATING AND EDITING SHAPES Lesson overview In this lesson, you ll learn how to do the following: Create a document with multiple artboards. Use tools and commands to create basic shapes. Work with drawing
Forms for Palm OS Version 4 Manual
 Forms for Palm OS Version 4 Manual Revision Date 12/05/2007 HanDBase is a Registered Trademark of DDH Software, Inc. All information contained in this manual and all software applications mentioned in
hp photosmart 7150 basics guide
 hp photosmart 7150 basics guide control panel The following table is a quick reference guide to the buttons that appear on your printer s control panel. CANCEL RESUME POWER contents 1 get started.........................................
A Step-by-step guide to creating a Professional PowerPoint Presentation
 Quick introduction to Microsoft PowerPoint A Step-by-step guide to creating a Professional PowerPoint Presentation Created by Cruse Control creative services Tel +44 (0) 1923 842 295 training@crusecontrol.com
Forms Desktop for Windows Version 4 Manual
 Forms Desktop for Windows Version 4 Manual Revision Date 12/05/2007 HanDBase is a Registered Trademark of DDH Software, Inc. All information contained in this manual and all software applications mentioned
InDesign Tools Overview
 InDesign Tools Overview REFERENCE If your palettes aren t visible you can activate them by selecting: Window > Tools Transform Color Tool Box A Use the selection tool to select, move, and resize objects.
Budget Exercise for Intermediate Excel
 Budget Exercise for Intermediate Excel Follow the directions below to create a 12 month budget exercise. Read through each individual direction before performing it, like you are following recipe instructions.
Word: Print Address Labels Using Mail Merge
 Word: Print Address Labels Using Mail Merge No Typing! The Quick and Easy Way to Print Sheets of Address Labels Here at PC Knowledge for Seniors we re often asked how to print sticky address labels in
disclabel help: what is disclabel?
 disclabel help: what is disclabel? disclabel helps you make great-looking labels for your CDs, DVDs, and related materials mightier than the pen. Features: Start with a pre-designed template, or make your
Copyright Notice. Trademarks
 Copyright Notice All rights reserved. No part of this publication may be reproduced, stored in a retrieval system, or transmitted in any form or by any means, electronic, mechanical, photocopying, recording,
Excel 2016 Basics for Windows
 Excel 2016 Basics for Windows Excel 2016 Basics for Windows Training Objective To learn the tools and features to get started using Excel 2016 more efficiently and effectively. What you can expect to learn
2014 Simplify3D. Quick Start Guide
 Quick Start Guide Preparation Installing Simplify3D Software 3 The Configuration Assistant 4 The Interface Layout 5 3D Printing Workflow Import Process Settings Preview Print! Import 7 Process Settings
ASK Printer Driver
 ASK 2500 Printer Driver INSTRUCTION MANUAL V1.00 August, 2009 1/19 1. Applicable OS... 3 2. Recommended PC conditions... 3 3. To install Printer Driver... 4 4. Functions... 5 4.1. Display Version
table of contents notices special features getting started printing hp deskjet 5550 series
 user's guide TOC hp deskjet 5550 series table of contents notices notices and acknowledgements terms and conventions accessibility using the onscreen user's guide special features getting started printer
How to Create Custom Name Badge Inserts with a Mail Merge in Microsoft Word 2007
 Many people know that you can use the Mail Merge feature in Microsoft Word 2007 to easily create mailing labels, but did you know you can use it to quickly create custom name badge inserts? Here, you will
CheckBook Pro 2 Help
 Get started with CheckBook Pro 9 Introduction 9 Create your Accounts document 10 Name your first Account 11 Your Starting Balance 12 Currency 13 We're not done yet! 14 AutoCompletion 15 Descriptions 16
MAPLOGIC CORPORATION. GIS Software Solutions. Getting Started. With MapLogic Layout Manager
 MAPLOGIC CORPORATION GIS Software Solutions Getting Started With MapLogic Layout Manager Getting Started with MapLogic Layout Manager 2011 MapLogic Corporation All Rights Reserved 330 West Canton Ave.,
DVR 514 Digital Video Recorder
 DVR 514 Digital Video Recorder User Manual 2010 Sakar International, Inc. All rights reserved. Windows and the Windows logo are registered trademarks of Microsoft Corporation. All other trademarks are
DVR 528 Digital Video Camera
 DVR 528 Digital Video Camera User Manual 2010 Sakar International, Inc. All rights reserved. Windows and the Windows logo are registered trademarks of Microsoft Corporation. All other trademarks are the
Application of Skills: Microsoft Excel 2013 Tutorial
 Application of Skills: Microsoft Excel 2013 Tutorial Throughout this module, you will progress through a series of steps to create a spreadsheet for sales of a club or organization. You will continue to
Zpen User s Guide. Version 4.0
 1 Version 4.0 Table of Contents 2 Table of Contents Table of Contents...2 Preface...4 Chapter 1... 5 Introduction to the Zpen...5 Digital Pen...6 Receiver...6 Zpen capabilities and features...7 System
Introduction to Excel
 Introduction to Excel Written by Jon Agnone Center for Social Science Computation & Research 145 Savery Hall University of Washington Seattle WA 98195 U.S.A. (206)543-8110 November 2004 http://julius.csscr.washington.edu/pdf/excel.pdf
Designing & Creating your GIS Poster
 Designing & Creating your GIS Poster Revised by Carolyn Talmadge and Kyle Monahan 4/24/2017 First think about your audience and purpose, then design your poster! Here are instructions for setting up your
-Using Excel- *The columns are marked by letters, the rows by numbers. For example, A1 designates row A, column 1.
 -Using Excel- Note: The version of Excel that you are using might vary slightly from this handout. This is for Office 2004 (Mac). If you are using a different version, while things may look slightly different,
Part II: Creating Visio Drawings
 128 Part II: Creating Visio Drawings Figure 5-3: Use any of five alignment styles where appropriate. Figure 5-4: Vertical alignment places your text at the top, bottom, or middle of a text block. You could
DVR 505 Digital Camcorder
 DVR 505 Digital Camcorder User Manual 2016 Sakar International, Inc. All rights reserved. Windows and the Windows logo are registered trademarks of Microsoft Corporation. All other trademarks are the property
Learn more about Pages, Keynote & Numbers
 Learn more about Pages, Keynote & Numbers HCPS Instructional Technology May 2012 Adapted from Apple Help Guides CHAPTER ONE: PAGES Part 1: Get to Know Pages Opening and Creating Documents Opening a Pages
Trash in the Dock. May 21, 2017, Beginners SIG The Dock (Part 3 of 3)
") Note: This discussion is based on MacOS, 10.12.4 (Sierra). Some illustrations may differ when using other versions of macos or OS X. Credit: http://tidbits.com/e/17088 ( macos Hidden Treasures: Dominate
Note: This discussion is based on MacOS, 10.12.4 (Sierra). Some illustrations may differ when using other versions of macos or OS X. Credit: http://tidbits.com/e/17088 ( macos Hidden Treasures: Dominate
ASK Mac OS X Printer Driver. Instruction Manual
 ASK 4000 Mac OS X Printer Driver Instruction Manual For Mac OS X 10.7(Lion) V1.00 April, 2012 Introduction You will find the installation steps of ASK-4000 Printer Driver for Mac OS X 10.7(Lion), how to
Embedding Photoshop Curves in ICCs
 Embedding Photoshop Curves in ICCs Paul Roark 7-30-07 This tutorial shows how to use Roy Harrington s Create ICC-RGB to make ICCs that can control B&W inksets that utilize Photoshop curves. These include
e-bridge Color Profile Tool Quick Start Guide
 e-bridge Color Profile Tool Quick Start Guide 1 Contents 1. Installation... 3 1.1. Installing the e-bridge Color Profile Tool Software... 3 1.1. Removing the e-bridge Color Profile Tool... 4 1.2. Installing
Open Microsoft Word: click the Start button, click Programs> Microsoft Office> Microsoft Office Word 2007.
 Microsoft Word 2007 Mail Merge Letter The information below is devoted to using Mail Merge to create a letter in Microsoft Word. Please note this is an advanced Word function, you should be comfortable
Using MS Publisher. Launch MS Publisher: Start > All Programs > Microsoft Office > Publisher. Setting up Document Size and Orientation
 Designing and Creating your GIS Poster Revised by Carolyn Talmadge 1/20/2015 First think about your audience and purpose then design your poster! Here are instructions for setting up your poster using
Photoshop tutorial: Final Product in Photoshop:
 Disclaimer: There are many, many ways to approach web design. This tutorial is neither the most cutting-edge nor most efficient. Instead, this tutorial is set-up to show you as many functions in Photoshop
Window Designer. Opening Screen: When you start Window Designer, you will see the Opening Screen. Here you will be choosing from 4 options:
 Window Designer Opening Screen: When you start Window Designer, you will see the Opening Screen. Here you will be choosing from 4 options: New Design: Use this option when no pre-built templates are available
Lesson 4: Introduction to the Excel Spreadsheet 121
 Lesson 4: Introduction to the Excel Spreadsheet 121 In the Window options section, put a check mark in the box next to Formulas, and click OK This will display all the formulas in your spreadsheet. Excel
How to use Excel Spreadsheets for Graphing
 How to use Excel Spreadsheets for Graphing 1. Click on the Excel Program on the Desktop 2. You will notice that a screen similar to the above screen comes up. A spreadsheet is divided into Columns (A,
What s new in ZePrA 5?
 What s new in ZePrA 5? ZePrA 5 is a major new version of our color server. It addresses several new features our clients have requested. The first of the two main new features is regarding speed improvements
Thank you for purchasing a ZT-1300 printer! The following guide will help you install the equipment and software that goes with your ZT-1300 printer.
 Thank you for purchasing a ZT-1300 printer! The following guide will help you install the equipment and software that goes with your ZT-1300 printer. It is strongly recommended that you read through the
Dreamweaver Handout. University of Connecticut Prof. Kent Golden
 Dreamweaver Handout University of Connecticut Prof. Kent Golden Kent@GoldenMultimedia.com www.goldenmultimedia.com Main goal of this handout: To give you the steps needed to create a basic personal website
Designing & Creating your GIS Poster
 Designing & Creating your GIS Poster Revised by Carolyn Talmadge, 11/26/2018 First think about your audience and purpose, then design your poster! Here are instructions for setting up your poster using
Excel 2016: Part 1. Updated January 2017 Copy cost: $1.50
 Excel 2016: Part 1 Updated January 2017 Copy cost: $1.50 Getting Started Please note that you are required to have some basic computer skills for this class. Also, any experience with Microsoft Word is
Kenora Public Library. Computer Training. Introduction to Excel
 Kenora Public Library Computer Training Introduction to Excel Page 2 Introduction: Spreadsheet programs allow users to develop a number of documents that can be used to store data, perform calculations,
Copyright 1984 VisiCorp All Rights Reserved. Printed in U.S.A.
 Copyright 1984 VisiCorp All Rights Reserved. Printed in U.S.A. Visi On Word Program Copyright 1984 VisiCorp All Rights Reserved. Epson MX-80 TM is a trademark of Epson America, Inc. Visi OnTM, Visi On
Moving to the Mac A GUIDE FOR NEW USERS OF MAC OS X. [Type here]
![Moving to the Mac A GUIDE FOR NEW USERS OF MAC OS X. [Type here]](/thumbs/90/103934001.jpg "Moving to the Mac A GUIDE FOR NEW USERS OF MAC OS X. [Type here]") [Type here] Moving to the Mac A GUIDE FOR NEW USERS OF MAC OS X This guide is aimed at those who are new to using Mac s. It assumes that you have prior knowledge of using a computer, probably a PC. The
[Type here] Moving to the Mac A GUIDE FOR NEW USERS OF MAC OS X This guide is aimed at those who are new to using Mac s. It assumes that you have prior knowledge of using a computer, probably a PC. The
Welcome to Introduction to Microsoft Excel 2010
 Welcome to Introduction to Microsoft Excel 2010 2 Introduction to Excel 2010 What is Microsoft Office Excel 2010? Microsoft Office Excel is a powerful and easy-to-use spreadsheet application. If you are
Learning Worksheet Fundamentals
 1.1 LESSON 1 Learning Worksheet Fundamentals After completing this lesson, you will be able to: Create a workbook. Create a workbook from a template. Understand Microsoft Excel window elements. Select
Microsoft Word Introduction
 Academic Computing Services www.ku.edu/acs Abstract: This document introduces users to basic Microsoft Word 2000 tasks, such as creating a new document, formatting that document, using the toolbars, setting
Help For TorontoMLS. Report Designer
 Report Designer Creating Report Designs... 2 Report Designer Toolbar... 6 Positioning Items... 8 Layout Basics... 11 Aligning Items... 14 Editing and Deleting Report Designs... 17 Report Designer Tips...
Shape Cluster Photo Written by Steve Patterson
 Shape Cluster Photo Written by Steve Patterson Before After Step 1: Create A New Document Let's begin by creating a new Photoshop document. Go up to the File menu in the Menu Bar along the top of the screen
Excel. Spreadsheet functions
 Excel Spreadsheet functions Objectives Week 1 By the end of this session you will be able to :- Move around workbooks and worksheets Insert and delete rows and columns Calculate with the Auto Sum function
Roland COLORCHOICE Pro. Ver. 4.1 USER S MANUAL
 Roland COLORCHOICE Pro Ver. 4.1 USER S MANUAL Thank you very much for purchasing the Roland printer. To ensure correct and safe usage with a full understanding of this product s performance, please be
Lesson 4 - Creating a Text Document Using WordPad
 Lesson 4 - Creating a Text Document Using WordPad OBJECTIVES: To learn the basics of word processing programs and to create a document in WordPad from Microsoft Windows. A word processing program is the
Need help? Call: / DOCMAIL: ADVANCED USER GUIDE
 DOCMAIL: ADVANCED USER GUIDE Version 3.2 November 2018 1 CONTENTS Welcome to Docmail 4 Navigating around Docmail 4 Overview of the Docmail main page 6 Library 7 Create / Edit Document 9 Create / Edit Text
Quick Start Guide. ASR Automated Systems Research Inc. Toll free: Fax:
 Quick Start Guide ASR Automated Systems Research Inc. Toll free: 1-800-818-2051 Phone: 604-539-0122 e-mail: support@asrsoft.com Fax: 604-539-1334 www.asrsoft.com Copyright 1991-2014 ASR Automated Systems
2. Write Your Test Questions & Create Interactions Page 12
 This guide will show you how to create a computer-based test using Authorware 4.0 or higher. These instructions are for use on both Macintosh and IBM (Windows) computers. It is recommended that you purchase
Grade 8 FSA Mathematics Practice Test Guide
 Grade 8 FSA Mathematics Practice Test Guide This guide serves as a walkthrough of the Grade 8 Florida Standards Assessments (FSA) Mathematics practice test. By reviewing the steps listed below, you will
EXCEL BASICS: MICROSOFT OFFICE 2007
 EXCEL BASICS: MICROSOFT OFFICE 2007 GETTING STARTED PAGE 02 Prerequisites What You Will Learn USING MICROSOFT EXCEL PAGE 03 Opening Microsoft Excel Microsoft Excel Features Keyboard Review Pointer Shapes
The American University in Cairo. Academic Computing Services. Excel prepared by. Maha Amer
 The American University in Cairo Excel 2000 prepared by Maha Amer Spring 2001 Table of Contents: Opening the Excel Program Creating, Opening and Saving Excel Worksheets Sheet Structure Formatting Text
Microsoft Access 2016 Intro to Forms and Reports
 Microsoft Access 2016 Intro to Forms and Reports training@health.ufl.edu Access 2016: Intro to Forms and Reports 2.0 hours Topics include using the AutoForm/AutoReport tool, and the Form and Report Wizards.
Creating a Brochure in Publisher
 Creating a Brochure in Publisher If you closed the Flyer, as indicated above, you will see the Microsoft Publisher Task Pane on the left side of your screen. Click the Brochures selection in the Publication
Windows is a registered trademark of Microsoft in the U.S. and other countries.
 User s Guide First Edition (February 1999) The following paragraph does not apply to any country where such provisions are inconsistent with local law: LEXMARK INTERNATIONAL, INC., PROVIDES THIS PUBLICATION
Using Mail Merge in Microsoft Word 2003
 Using Mail Merge in Microsoft Word 2003 Mail Merge Created: 12 April 2005 Note: You should be competent in Microsoft Word before you attempt this Tutorial. Open Microsoft Word 2003 Beginning the Merge
Setup and Print Guide: Photoshop Elements 8 & 9
 Ricoh GX7000 Mac OS X ICC Profile Setup and Print Guide: Photoshop Elements 8 & 9 IMPORTANT: Before proceeding, please be sure you have the correct ICC Profile installed. For assistance with ICC Profile
GIrtlProof Reference Manual Windows NT 4.0 / Win 2k / Win XP
 GIrtlProof Reference Manual Windows NT 4.0 / Win 2k / Win XP Version 3.27 RIP Version 6.0 Copyright by Xitron, Inc. All rights reserved. No part of this publication may be reproduced, stored in a retrieval
The first time you open Word
 Microsoft Word 2010 The first time you open Word When you open Word, you see two things, or main parts: The ribbon, which sits above the document, and includes a set of buttons and commands that you use
THANK YOU! Thank you for your purchase from LittleSizzle! We hope that you love your item and find it easy to edit and print.
 INSTRUCTION GUIDE THANK YOU! Thank you for your purchase from LittleSizzle! We hope that you love your item and find it easy to edit and print. If at any time you have any questions or run into any issues,
MAPLOGIC CORPORATION. GIS Software Solutions. Getting Started. With MapLogic Layout Manager
 MAPLOGIC CORPORATION GIS Software Solutions Getting Started With MapLogic Layout Manager Getting Started with MapLogic Layout Manager 2008 MapLogic Corporation All Rights Reserved 330 West Canton Ave.,
Infowise Smart Print Pro User Guide
 Infowise Smart Print Pro 1 Contents Introduction... 3 Installation... 3 Registration... 3 Print Settings... 3 Print Templates... 3 General Settings... 4 Display... 5 PDF Settings... 6 Advanced Mode Editing...
Introducing Gupta Report Builder
 Business Reporting Chapter 1 Introducing Gupta Report Builder You can use Report Builder to design reports. This chapter describes: Our approach to building reports. Some of the reports you can build.
Manual for MantraJet 1100 CD/DVD auto-printer
 Manual for MantraJet 1100 CD/DVD auto-printer Rev 1.03 September 7, 2010 Table of contents Specifications...3 Unpacking MantraJet 1100...4 Quick installation reference MantraJet 1100...7 Installation of
Artisan 1430 User's Guide
 Artisan 1430 User's Guide Artisan 1430 User's Guide Welcome to the Artisan 1430 User's Guide. Product Basics See these sections to learn about the basic features of your product. Printer Parts Locations
Touring the Mac S e s s i o n 4 : S A V E, P R I N T, C L O S E & Q U I T
 Touring the Mac S e s s i o n 4 : S A V E, P R I N T, C L O S E & Q U I T Touring_the_Mac_Session-4_Feb-22-2011 1 To store your document for later retrieval, you must save an electronic file in your computer.
How to use the Hofstra Webcrd Online Print Shop
 How to use the Hofstra Webcrd Online Print Shop First things first, we need to get to the online print shop. To do this open an Internet Explorer window and type into the bar labeled Address : exactly
Installing the Printer Software
 4 Printing Your First Page Attaching the Paper Support 7 1 Checking the Printer 6 2 Plugging in the Printer 3 Installing the Ink Cartridges 5 Installing the Printer Software Connecting the Printer 4012581-00
TRAINING SESSION Q2 2016
 There are 8 main topics in this training session which focus on the Sketch tools in IRONCAD. Content Sketch... 2 3D Scene Background Settings... 3 Creating a new empty Sketch... 4 Foam with cut out for
Frame Editor 2 Manual
 Chaos Culture Frame Editor 2 Manual Setup... 2 Editing clips... 2 Editing basics... 4 Managing colors... 6 Using effects... 7 Descriptions of the effects... 9 Fixed velocity... 9 Random velocity... 9 Rotate...
TUTORIAL. Ve r s i on 1. 0
 TUTORIAL Ve r s i on 1. 0 C O N T E N T S CHAPTER 1 1 Introduction 3 ABOUT THIS GUIDE... 4 THIS TUTORIAL...5 PROJECT OUTLINE...5 WHAT'S COVERED...5 SOURCE FILES...6 CHAPTER 2 2 The Tutorial 7 THE ENVIRONMENT...
Pagoda/Hypar 3. Manual
 Pagoda/Hypar 3 Manual Armstrong-White Automation (NZ) Ltd Armstrong-White Automation (NZ) Ltd 22 Kereru Grove, Greenhithe, North Shore City 0632 (Auckland), New Zealand. ph +64 9 413-7642 fax +64 9 413-7643
Quick Start Guide to using Light Converse along with Pangolin LD2000 and BEYOND
 Quick Start Guide to using Light Converse along with Pangolin LD2000 and BEYOND First Steps Regardless of when or from whom you purchased Light Converse, we recommend you do the following steps before