WELCOME TO ALL-TECH SYSTEMS & CO INTRODUCTION TO MICROSOFT WORD TUTORIAL
|
|
|
- Elinor Dixon
- 5 years ago
- Views:
Transcription
1 WELCOME TO ALL-TECH SYSTEMS & CO INTRODUCTION TO MICROSOFT WORD TUTORIAL 1 Microsoft Office Word 2010 allows you to create and edit personal and business documents, such as letters, reports, invoices, s and books. By default, documents saved in Word 2010 are saved with the.docx extension. Microsoft Word can be used for the following purposes To create business documents having various graphics including pictures, charts, and diagrams. To store and reuse readymade content and formatted elements such as cover pages and sidebars. To create letters and letterheads for personal and business purpose. To design different documents such as resumes or invitation cards etc. To create a range of correspondence from a simple office memo to legal copies and reference documents. Audience This tutorial has been designed for computer users who are willing to learn Microsoft Word in simple steps and they do not have much knowledge about computer usage and Microsoft applications. This tutorial will give you enough understanding on MS Word from where you can take yourself to higher levels of expertise. Prerequisites Before you begin with this tutorial, we assume you have a basic understanding of Computer peripherals like mouse, keyboard, monitor, screen, etc. and their basic operations.

2 Getting Started With Ms Word In this chapter, we will discuss how to get started with Word We will understand how to start a Word 2010 application in simple steps. Assuming you have Microsoft Office 2010 installed in your PC, to start the Word application, follow these steps 2 Step 1 Click the Start button.
3 Step 2 Click the All Programs option from the menu. 3
4 Step 3 Search for Microsoft Office from the submenu and click it. 4

5 Step 4 Search for Microsoft Word 2010 from the submenu and click it. 5

6 This will launch the Microsoft Word 2010 application and you will see the following window. 6
7 7 EXPLORE WINDOW IN WORD 2010 In this chapter, we will understand how to explore Window in Word Following is the basic window which you get when you start the Word application. Let us understand the various important parts of this window.

8 8 File Tab The File tab replaces the Office button from Word You can click it to check the Backstage view. This is where you come when you need to open or save files, create new documents, print a document, and do other file-related operations. Quick Access Toolbar This you will find just above the File tab. This is a convenient resting place for the most frequently used commands in Word. You can customize this toolbar based on your comfort. Ribbon

9 Ribbon contains commands organized in three components 9 Tabs These appear across the top of the Ribbon and contain groups of related commands. Home, Insert, Page Layout are examples of ribbon tabs. Groups They organize related commands; each group name appears below the group on the Ribbon. For example, group of commands related to fonts or group of commands related to alignment, etc. Commands Commands appear within each group as mentioned above. Title bar This lies in the middle and at the top of the window. Title bar shows the program and document titles. Rulers Word has two rulers - a horizontal ruler and a vertical ruler. The horizontal ruler appears just beneath the Ribbon and is used to set margins and tab stops. The vertical ruler appears on the left edge of the Word window and is used to gauge the vertical position of elements on the page. Help The Help Icon can be used to get word related help anytime you like. This provides nice tutorial on various subjects related to word. Zoom Control Zoom control lets you zoom in for a closer look at your text. The zoom control consists of a slider that you can slide left or right to zoom in or out; you can click the + buttons to increase or decrease the zoom factor. View Buttons
10 The group of five buttons located to the left of the Zoom control, near the bottom of the screen, lets you switch through the Word's various document views. Print Layout view This displays pages exactly as they will appear when printed. Full Screen Reading view This gives a full screen view of the document. Web Layout view This shows how a document appears when viewed by a Web browser, such as Internet Explorer. Outline view This lets you work with outlines established using Word s standard heading styles. Draft view This formats text as it appears on the printed page with a few exceptions. For example, headers and footers aren't shown. Most people prefer this mode. 10 Document Area This is the area where you type. The flashing vertical bar is called the insertion point and it represents the location where text will appear when you type. Status Bar This displays the document information as well as the insertion point location. From left to right, this bar contains the total number of pages and words in the document, language, etc. You can configure the status bar by right-clicking anywhere on it and by selecting or deselecting options from the provided list. Dialog Box Launcher This appears as very small arrow in the lower-right corner of many groups on the Ribbon. Clicking this button opens a dialog box or task pane that provides more options about the group.
11 11 Entering Text - Microsoft Word 2010 In this chapter, let us discuss how to enter text with Microsoft Word Let us see how easy it is to enter text in a Word document. We assume you know that when you start Word, it displays a new document by default as shown below

12 12 Document area is the area where you type your text. The flashing vertical bar is called the insertion point and it represents the location where the text will appear when you type. keep the cursor at the text insertion point and start typing the text. We typed only two words "Hello Word" as shown below. The text appears to the left of the insertion point as you type

13 13 The following are the two important points that will help you while typing You do not need to press Enter to start a new line. As the insertion point reaches the end of the line, Word automatically starts a new one. You will need to press Enter, to add a new paragraph. When you want to add more than one space between words, use the Tab key instead of the spacebar. This way you can properly align text by using the proportional fonts.
14 Save Document In Word In this chapter, we will discuss how to save a document in Word Saving New Document Once you are done with typing in your new Word document, it is time to save your document to avoid losing work you have done on a Word document. Following are the steps to save an edited Word document Step 1 Click the File tab and select the Save As option.

15 15 Step 2 Select a folder where you will like to save the document, Enter the file name which you want to give to your document and Select the Save As option, by default it is the.docx format.

16 16 Step 3 Finally, click on the Save button and your document will be saved with the entered name in the selected folder. Saving New Changes There may be an instance when you open an existing document and edit it partially or completely, or an instance where you may like to save the changes in between editing of the document. If you want to save this document with the same name, then you can use either of the following simple options
17 Just press the Ctrl + S keys to save the changes. Optionally you can click on the floppy icon available at the top left corner and just above the File tab. This option will also help you save the changes. You can also use the third method to save the changes, which is the Save option available just above the Save As option as shown in the above screenshot. 17 If your document is new and it was never saved so far, then with either of the three options, Word will display a dialogue box to let you select a folder, and enter the document name as explained in case of saving new document.
18 18 Setting Text Fonts in Word 2010 In this chapter, we will discuss how to set the text fonts and size in Word Microsoft word allows you to use different fonts with different size. You can change your document's appearance by changing the fonts and their size. Usually you use different fonts for paragraphs and headings. It is important to learn how to use different fonts. This chapter will teach you how to change a font and its size in simple steps. Change the Font Type & Size We will understand in brief the font buttons that we will further use in this tutorial. Following is a screenshot to show you a few font related buttons.

19 19 Step 1 Select the portion of text the font of which needs to be changed and click the Home tab. Now click the Font Type button to list down all the fonts available as shown below.

20 20 Step 2 Try to move the mouse pointer over the listed fonts. You will see that the text font changes when you move the mouse pointer over different fonts. You can use the Font Scroll Bar to display more fonts available. Finally select a desired font by clicking over the font name in the list. We have selected MV Boli as the font for our sample text.

21 21 Step 3 Similar way, to change the font size, click over the Font Size button which will display a font size list. You will use the same procedure to select a desired font size that you have used while selecting a font type.

22 22 Use Shrink and Grow Buttons You can use a quick way to reduce or enlarge the font size. As shown in the first screenshot, the Shrink Font button can be used to reduce the font size whereas the Grow Font button can be used to enlarge the font size.

23 23 Try to click either of these two buttons and you will see the effect. You can click a single button multiple times to apply the effect. Each time you click either of the buttons, it will enlarge or reduce the font size by 1 point. Clear Formatting Options All the setting can be reset to plain text, or the default formatting. To reset text to default settings Step 1 Select the portion of text that you want to reset. Step 2 Click the Clear Formatting button in the Home Tab Font group, or simply use Ctrl + SPACEBAR.

24 24 Text Decoration In Word 2010 In this chapter, we will discuss text decoration in Word When we use the term decorate, it means decorate by putting the text in italics, underlining the text or making it bold to look fancier and much more. In this chapter, we will also learn how we can strikethrough a text. Making text bold We use bold text to give more emphasis on the sentence. It is very simple to change a selected portion of text into bold font by following two simple steps Step 1 Select the portion of text that the font of which needs to be made bold. You can use any of the text selection methods to select the portion of text. Step 2 Click the Font Bold [ B] button in the Home Tab Font group, or simply use Ctrl + B keys to make the selected portion of text bold.
25 25 Making Text Italic An italic text appears with a small inclination and we use the italicized text to differentiate it from other text. It is very simple to change the selected text into italic font by following two simple steps Step 1 Select the portion of text the font of which needs to be italicized. You can use any of the text selection methods to select the portion of text. Step 2 Click the Font Italic [ I] button in the Home Tab Font group, or simply use the Ctrl + I keys to convert the portion of text in italic font.
26 26 Underline the Text An underlined portion of text appears with an underline and we use the underlined portion of text to make it more distinguished from other text. It is very simple to change the selected text into underlined font by following two simple steps Step 1 Select the portion of text which needs to be underlined. You can use any of the text selection method to select the portion of text. Step 2 Click Font Underline [ U] button in the Home Tab Font group, or simply use the Ctrl + U keys to put an underline under the text.
27 27 Strikethrough the Text Strikethrough portion of text will look as if a line has been drawn through the middle of it. A strikethrough portion of text indicates that it has been deleted and that the portion of text is not required any more. It is very simple to change a selected portion of text into a strikethrough portion of text by following two simple steps Step 1 Select the portion of text that you want to change to a bold font. You can use any of the text selection method to select the portion of text. Step 2 Click Font Strikethrough [ abc] button in the Home Tab Font group to put a line in the middle of the text which is called strikethrough the text.

28 28 Change Text Colour In Word 2010 In this chapter, we will discuss how to change text colours in Word We will also understand how to mark text which should look like it was marked with a highlighter pen. In addition, we will learn how to apply different effects on portions of text. Change Font Colours The text that we type comes in black by default; you can always change the colour of the font to a colour of your choice. It is very simple to change the text colour by following two simple steps Step 1 Select the portion of text the font colour of which needs to be changed. You can use any of the text selection method to select the portion of text. Step 2 Click the Font Colour button triangle to display a list of colours. Try to move your mouse pointer over different colours and you will see the text colour will change automatically. You can select any of the colours available by simply clicking

29 over it. If you click at the left portion of the Font Colour button, the selected colour gets applied to the text automatically; you need to click over the small triangle to display a list of colours. 29 If you do not find a colour of your choice, you can use the More Colours option to display the colour pallet box which allows you to select a colour from a range of colours. Highlight Text with Colours You can highlight a selected portion of text using any colour and it will look like it was marked with a highlighter pen. Usually we highlight a text using yellow colour. It is very simple to highlight a portion of text with a colour by following two simple steps Step 1 Select the portion of text that needs to be highlighted with colour. You can use any of the text selection method to select the portion of text. Step 2 Click the Text Highlight Colour button triangle to display a list of colours.

30 Try to move your mouse pointer over different colours and you will see the text colour changes automatically. You can select any of the colours available by simply clicking over it. If you click at the left portion of the Text Highlight Colour button, then the selected colour gets applied to the portion of text automatically; you need to click over the small triangle to display a list of colours. 30 Apply Text Effects Microsoft word provides a list of text effect which add to the beauty of your document, especially to the cover page or the headings of the document. This is very simple to apply various text effects by following two simple steps Step 1 Select the portion of text that you want to change to a bold font. You can use any of the text selection method to select the portion of text. Step 2 Click the Text Effect button to display a list of effects including shadow, outline, glow, reflection etc. Try to move your mouse pointer over different effects and you will see the text effect will change automatically. You can select any of the text

31 effect available by simply clicking over it. 31
32 Header And Footer In Word 2010 In this chapter, we will discuss how to add header and footer in Word Headers and footers are parts of a 32 document that contain special information such as page numbers and the total number of pages, the document title, company logo, any photo, etc. The header appears at the top of every page, and the footer appears at the bottom of every page. Add Header and Footer The following steps will help you understand how to add header and footer in a Word document. Step 1 Click the Insert tab, and click either the Header button or the Footer button that which needs to be added first. Assume you are going to add Header; when you click the Header button it will display a list of built-in Headers from where you can choose any of the headers by simply clicking on it.
33 33 Step 2 Once you select any of the headers, it will be applied to the document in editable mode and the text in your document will appear dimmed, Header and Footer buttons appear on the Ribbon and a Close Header and Footer button will also appear at the top-right corner.

34 34 Step 3 Finally, you can type your information whatever you want to have in your document header and once you are done, click Close Header and Footer to come out of the header insertion mode. You will see the result as follows.

35 35 You can follow a similar procedure to add footer in your document. Edit Header and Footer The following steps will help you understand how to edit the existing header or footer of your document. Step 1 Click the Insert tab, and click either the Header button or Footer button or whatever you want to edit. Assume you are going to edit the Header, so when you click the Header button it will display a list of options including the Edit Header option.

36 Step 2 Click on the Edit Header option and Word will display the editable header as shown in the following screenshot. 36

37 37 Step 3 Now you can edit your document header and once you are done, click Close Header and Footer to come out of the edit header mode. You can follow a similar procedure to edit the footer in your document.

38 Use Graphics In Word 2010 In this chapter, we will discuss how to use graphics in Word You can add beauty to your Microsoft Word documents by inserting a variety of graphics. This chapter will teach you two ways of adding graphics. Adding Picture in Document 38 The following steps will help you add an existing picture in your word document. It is assumed that you already have a picture available on your machine before you add this picture in your Word document. Step 1 Click on your document where you want to add a picture. Step 2 Click the Insert tab and then click the Picture option available in illustrations group, which will display the Insert Picture dialog box. Step 3 You can select a required picture using the Insert Picture dialog box. When you will click

39 the Insert button, selected picture will be inserted in your document. You can play with your inserted picture in different ways, like you can apply quick styles to your picture, you can resize it, or you can change its colour too. To try it, just -lick your inserted image and Word will give you numerous options available under the Format tab to format your inserted graphics. 39 You can try yourself to insert other available graphics like Clipart, Different Shapes, Charts and SmartArt or Screenshots. Adding WordArt in Document WordArt provides a way to add fancy words in your Word document. You can document your text in a variety of ways. The following steps will help you add WordArt in your document. Step 1 Click in your document where you want to add WordArt. Step 2 Click the Insert tab and then click the WordArt option available in the Text group; this will display a

40 gallery of WordArt. 40 Step 3 You can select any of the WordArt style from the displayed gallery by clicking on it. Now you can modify the inserted text as per your requirement and you can make it further beautiful by using different options available. To try it, just double-click your inserted WordArt and Word will give you numerous options available from the Format tab to format your image. Most frequently used options are Shape Styles and WordArt Styles.

41 41 You can try yourself to apply different options on the inserted WordArt by changing its shape styles, colours, WordArt Styles, etc.

42 Create A Table In Word 2010 In this chapter, we will discuss how to create a table in Word A table is a structure of vertical columns and horizontal rows with a cell at every intersection. Each cell can contain text or graphics, and you can format the table in any way you want. Usually the top row in the table is kept as a table header and can be used to put some informative instruction. Create a Table 42 The following steps will help you understand how to create a table in a Word document. Step 1 Click the Insert tab followed by the Table button. This will display a simple grid as shown below. When you move your mouse over the grid cells, it makes a table in the table that appears in the document. You can make your table having the desired number of rows and columns. Step 2 Click the square representing the lower-right corner of your table, which will create an actual table in your document and Word goes in the table design mode. The table design mode has many options to work with

43 as shown below. 43 Step 3 This is an optional step that can be worked out if you want to have a fancy table. Click the Table Styles button to display a gallery of table styles. When you move your mouse over any of the styles, it shows real time preview of your actual table.

44 44 Step 4 To select any of the styles, just click the built-in table style and you will see that the selected style has been applied on your table.

45 45 Delete a Table Following are the simple steps to delete an existing table from a word document. Step 1 Click anywhere in the table you want to delete. Step 2 Click the Layout tab, and click the Delete Table option under the Delete Table Button to delete the complete table from the document along with its content.

46 46 Merging Cells In Word 2010 In this chapter, we will discuss how to merge table cells in Word Microsoft Word allows the merging of two or more cells to create one large cell. You will frequently need to merge columns of the top row to create the title of the table. You can merge cells either row-wise or column-wise, rather you cannot merge cells diagonally. This chapter will teach you how to merge multiple rows or columns. Merging Cells The following steps will help you merge table cells in a Word document. Step 1 Bring your mouse pointer position inside the first cell that you want to merge. Now press the Shift key and click the cells around the cell which you want to merge into the first cell. This will highlight the cells which you click and they will be ready to be merged.


47 47 Step 2 Now click the Layout tab and then click the Merge Cells button which will merge all the selected cells. After merging the cells, all the content of the cells will be scrambled which you can fix later as you like. For
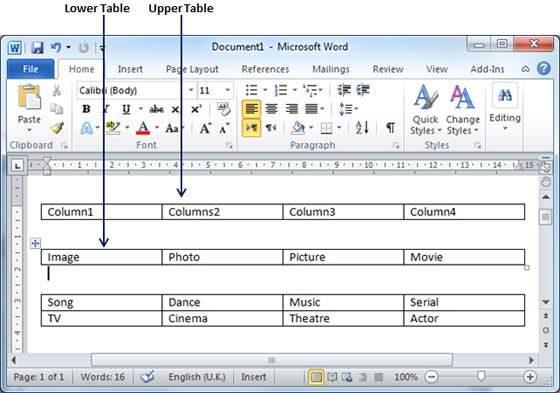
48 example, you can convert the merged cells text into title or some other description. For example, let us have centre-aligned and bigger font text as follows on top of the table. Split A Table In Word 2010 In this chapter, let us discuss how to split a table in Word Microsoft Word allows splitting a table into multiple tables but a single operation will always divide a table into two tables. This chapter will teach you how to split a table into two smaller tables. 48 Split a Table Following are the simple steps to split a table into two tables in a Word document. Step 1 Bring your mouse pointer position anywhere in the row that should appear as the first row of the new table. Step 2 Now click the Layout tab and then click the Split Table button which will split the table into two tables and the selected row will become the first row of the lower table.

49 49 After splitting the table into two tables, you can further divide it into two parts and you can continue dividing the Word tables as long as a table has more than one row.
50 50
Microsoft Excel is a spreadsheet tool capable of performing calculations, analyzing data and integrating information from different programs.
 About the Tutorial Microsoft Excel is a commercial spreadsheet application, written and distributed by Microsoft for Microsoft Windows and Mac OS X. At the time of writing this tutorial the Microsoft excel
Mi c r o s o f t Wo r d Qu i c k Re f e r e n c e Ca r d
 Tech Talk # 5 Mi c r o s o f t Wo r d Qu i c k Re f e r e n c e Ca r d Introduction by Renae Schmidt Hello! Welcome to Tech Talk #5. This week we are sharing a Microsoft Word 2010 Quick Reference Card.
BASIC MICROSOFT POWERPOINT
 BASIC MICROSOFT POWERPOINT PART ONE PHONE: 504-838-1144 IT Training Team Jefferson Parish Library EMAIL: jpltrain@jplibrary.net In this class you will learn to: Launch, close, and interact with Microsoft
Word 2010 Guide. A Complete Overview for Connect Users
 Word 2010 Guide A Complete Overview for Connect Users Chapter 1: Introduction... 4 Chapter 2: Getting Around Word... 4 Quick Access Toolbar... 4 The Ribbon... 4 Backstage View... 5 Dialog Box Launcher...
Microsoft Word 2010 Part 1: Introduction to Word
 CALIFORNIA STATE UNIVERSITY, LOS ANGELES INFORMATION TECHNOLOGY SERVICES Microsoft Word 2010 Part 1: Introduction to Word Summer 2011, Version 1.0 Table of Contents Introduction...3 Starting the Program...3
PowerPoint 2010 Level 1 Computer Training Solutions Student Guide Version Revision Date Course Length
 Level 1 Computer Training Solutions Version 1.2 Revision Date Course Length 2012-Feb-16 6 hours Table of Contents Quick Reference... 3 Frequently Used Commands... 3 Manitoba ehealth Learning Management
Contents. Launching Word
 Using Microsoft Office 2007 Introduction to Word Handout INFORMATION TECHNOLOGY SERVICES California State University, Los Angeles Version 1.0 Winter 2009 Contents Launching Word 2007... 3 Working with
Microsoft Word 2010 Tutorial
 1 Microsoft Word 2010 Tutorial Microsoft Word 2010 is a word-processing program, designed to help you create professional-quality documents. With the finest documentformatting tools, Word helps you organize
Microsoft Office Training Skills 2010
 Lesson 3 - Creating Documents with MS word 2010 Introduction to Word Processing MS-Word 2010 is word processing application that is used create and edit documents such as: Books, letters, reports, newsletters,
Lesson 2 Quick Tour and Features
 Lesson 2 Quick Tour and Features Objectives Students will format a document page. Students will use a spell-checker. Students will copy, cut, and paste text. Students will adjust paragraph indentations.
PowerPoint Module 2: Modifying a Presentation
 1. In the Outline pane, a highlighted slide icon next to the slide number indicates that the slide is selected. True PowerPoint 26 LEARNING OBJECTIVES: BESK.OFIN.16.297 - Enter text in Outline view 2.
Lesson 4 - Creating a Text Document Using WordPad
 Lesson 4 - Creating a Text Document Using WordPad OBJECTIVES: To learn the basics of word processing programs and to create a document in WordPad from Microsoft Windows. A word processing program is the
Word Select New in the left pane. 3. Select Blank document in the Available Templates pane. 4. Click the Create button.
 Microsoft QUICK Word 2010 Source Getting Started The Word Window u v w x z Opening a Document 2. Select Open in the left pane. 3. In the Open dialog box, locate and select the file you want to open. 4.
Word Tutorial 3. Creating a Multiple- Page Report COMPREHENSIVE
 Word Tutorial 3 Creating a Multiple- Page Report COMPREHENSIVE Objectives Format headings with Quick Styles Insert a manual page break Create and edit a table Sort rows in a table Modify a table s structure
Introduction to Microsoft Word 2008
 1. Launch Microsoft Word icon in Applications > Microsoft Office 2008 (or on the Dock). 2. When the Project Gallery opens, view some of the available Word templates by clicking to expand the Groups, and
Word 2013 Quick Start Guide
 Getting Started File Tab: Click to access actions like Print, Save As, and Word Options. Ribbon: Logically organize actions onto Tabs, Groups, and Buttons to facilitate finding commands. Active Document
button Double-click any tab on the Ribbon to minimize it. To expand, click the Expand the Ribbon button
 PROCEDURES LESSON 1: CREATING WD DOCUMENTS WITH HEADERS AND FOOTERS Starting Word 1 Click the Start button 2 Click All Programs 3 Click the Microsoft Office folder icon 4 Click Microsoft Word 2010 1 Click
Microsoft Word 2011 Tutorial
 Microsoft Word 2011 Tutorial GETTING STARTED Microsoft Word is one of the most popular word processing programs supported by both Mac and PC platforms. Microsoft Word can be used to create documents, brochures,
Word Getting Started The Word Window u vw. Microsoft QUICK Source. Creating a New Blank Document. Creating a New Document from a Template
 Microsoft QUICK Source Word 2007 Getting Started The Word Window u vw x y z u Quick Access Toolbar contains shortcuts for the most commonly used tools. v Microsoft Office Button contains common file and
Microsoft Word Important Notice
 Microsoft Word 2013 Important Notice All candidates who follow an ICDL/ECDL course must have an official ICDL/ECDL Registration Number (which is proof of your Profile Number with ICDL/ECDL and will track
Microsoft Word 2010 Basics
 1 Starting Word 2010 with XP Click the Start Button, All Programs, Microsoft Office, Microsoft Word 2010 Starting Word 2010 with 07 Click the Microsoft Office Button with the Windows flag logo Start Button,
Microsoft Word 2007 on Windows
 1 Microsoft Word 2007 on Windows Word is a very popular text formatting and editing program. It is the standard for writing papers and other documents. This tutorial and quick start guide will help you
Word 3 Microsoft Word 2013
 Word 3 Microsoft Word 2013 Mercer County Library System Brian M. Hughes, County Executive Action Technique 1. Insert a Text Box 1. Click the Insert tab on the Ribbon. 2. Then click on Text Box in the Text
Title bar: The top most bar in Word window that usually displays the document and software names.
 1 MICROSOFT WORD Table of Contents LINC ONE Hiding Standard toolbar, Formatting toolbar, and Status bar: To hide the Standard toolbar, click View Toolbars on the Menu bar. Check off Standard. To hide the
Table of Contents The University of Akron These materials were developed and are owned by The University of Akron. All rights reserved.
 Table of Contents COURSE OVERVIEW... 2 CONVENTIONS USED IN THIS MANUAL... 3 LESSON 1: SYMBOLS... 4 INSERTING SYMBOLS... 4 USING AUTOCORRECT TO INSERT SYMBOLS... 5 TURN ON AUTOCORRECT... 5 LESSON 2: SPECIAL
MICROSOFT WORD 2010 Quick Reference Guide
 MICROSOFT WORD 2010 Quick Reference Guide Word Processing What is Word Processing? How is Word 2010 different from previous versions? Using a computer program, such as Microsoft Word, to create and edit
Introduction to Microsoft Word 2010
 Introduction to Microsoft Word 2010 Microsoft Word is a word processing program you can use to write letters, resumes, reports, and more. Anything you can create with a typewriter, you can create with
Quick Access Toolbar. You click on it to see these options: New, Open, Save, Save As, Print, Prepare, Send, Publish and Close.
 Opening Microsoft Word 2007 in the practical room UNIT-III 1 KNREDDY 1. Nyelvi beállítások az Office 2007-hez (Language settings for Office 2007 (not 2003)) English. 2. Double click on the Word 2007 icon
PowerPoint 2016 Building a Presentation
 PowerPoint 2016 Building a Presentation What is PowerPoint? PowerPoint is presentation software that helps users quickly and efficiently create dynamic, professional-looking presentations through the use
Word 2016 Guide. A Complete Overview for Connect Users
 Word 2016 Guide A Complete Overview for Connect Users Chapter 1: Introduction... 5 Chapter 2: Getting Around Word... 5 Quick Access Toolbar... 5 The Ribbon... 5 Backstage View... 7 Dialog Box Launcher...
University of Sunderland. Microsoft Word 2007
 Microsoft Word 2007 10/10/2008 Word 2007 Ribbons you first start some of the programs in 2007 Microsoft Office system, you may be surprised by what you see. The menus and toolbars in some programs have
MICROSOFT WORD 2010 BASICS
 MICROSOFT WORD 2010 BASICS Word 2010 is a word processing program that allows you to create various types of documents such as letters, papers, flyers, and faxes. The Ribbon contains all of the commands
Introduction to Microsoft Office PowerPoint 2010
 Introduction to Microsoft Office PowerPoint 2010 TABLE OF CONTENTS Open PowerPoint 2010... 1 About the Editing Screen... 1 Create a Title Slide... 6 Save Your Presentation... 6 Create a New Slide... 7
European Computer Driving Licence
 European Computer Driving Licence E C D L S y l l a b u s 5. 0 Module 6 Presentation ECDL Syllabus 5 Courseware Module 6 Contents USING THE APPLICATION... 1 OPENING & CLOSING MS POWERPOINT & PRESENTATIONS...
MS Word Basics. Groups within Tabs
 MS Word Basics Instructor: Bev Alderman L e t s G e t S t a r t e d! Open and close MS Word Open Word from the desktop of your computer by Clicking on the Start>All programs>microsoft Office >Word 2010
Exploring Microsoft Office Word 2007
 Exploring Microsoft Office Word 2007 Chapter 3: Enhancing a Document Robert Grauer, Keith Mulbery, Michelle Hulett Objectives Insert a table Format a table Sort and apply formulas to table data Convert
Microsoft Office Illustrated. Creating Documents with Word 2007
 Microsoft Office 2007- Illustrated Creating Documents with Word 2007 Objectives Understand word processing software Explore the Word program window Start a document Save a document 2 Objectives Select
DOING MORE WITH WORD: MICROSOFT OFFICE 2010
 DOING MORE WITH WORD: MICROSOFT OFFICE 2010 GETTING STARTED PAGE 02 Prerequisites What You Will Learn USING MICROSOFT WORD PAGE 03 Viewing Toolbars Adding and Removing Buttons MORE TASKS IN MICROSOFT WORD
WORD XP/2002 USER GUIDE. Task- Formatting a Document in Word 2002
 University of Arizona Information Commons Training Page 1 of 21 WORD XP/2002 USER GUIDE Task- Formatting a Document in Word 2002 OBJECTIVES: At the end of this course students will have a basic understanding
Reference Services Division Presents WORD Introductory Class
 Reference Services Division Presents WORD 2010 Introductory Class CLASS OBJECTIVES: Navigate comfortably on a Word page Learn how to use the Ribbon tabs and issue commands Format a simple document Edit,
Introduction to Word 2010
 Introduction to Word 2010 Screen Elements 4 1 2 3 5 10 6 7 8 9 1. File Tab: The File tab will bring you into the Backstage View. The Backstage View is where you manage your files and the data about them
Microsoft PowerPoint 2013 Beginning
 Microsoft PowerPoint 2013 Beginning PowerPoint Presentations on the Web... 2 Starting PowerPoint... 2 Opening a Presentation... 2 File Tab... 3 Quick Access Toolbar... 3 The Ribbon... 4 Keyboard Shortcuts...
Beginning PowerPoint: 2010 A Presentation Software
 Beginning PowerPoint: 2010 A Presentation Software Objective 1: Review Screen Layout PowerPoint 2010 offers a similar user interface as 2007. The top portion of the window has a new structure for PowerPoint
Introduction to Microsoft Word 2007 Quickguide
 Introduction to Microsoft Word 2007 Quickguide Opening Word -Click the Start button -Click Programs from the start menu -Select Microsoft Office -Click Microsoft Office Word 2007 -A new blank document
Microsoft PowerPoint 2016 Basics Unit 9 Final Review - Student Notes Directions: Fill in the blanks.
 Directions: Fill in the blanks. 1. PowerPoint Window Layout 2. File Tab When clicked, opens - automatically opens the Info option by default Holds the following options: - Info - New - Open - Save - Save
Word Learning Technology and Training Services. Angelo State University
 Word 2010 Angelo State University http://elearning.angelo.edu elearning@angelo.edu 942-2334 ext 6263 MCS-106 Overview Contents New Look... 4 File Menu... 4 Quick Access Toolbar... 4 Ribbon... 4 Document
Introduction to Microsoft Word 2010
 CDU Short Courses Introduction to Microsoft Word 2010 A 2 day course delivered by Charles Darwin University. COURSE INFORMATION This course focuses on basic document production using Microsoft Word 2010
DOING MORE WITH WORD: MICROSOFT OFFICE 2007
 DOING MORE WITH WORD: MICROSOFT OFFICE 2007 GETTING STARTED PAGE 02 Prerequisites What You Will Learn USING MICROSOFT WORD PAGE 03 Viewing Toolbars Adding and Removing Buttons MORE TASKS IN MICROSOFT WORD
PowerPoint. Tutorial 1 Creating a Presentation. Tutorial 2 Applying and Modifying Text and Graphic Objects
 PowerPoint Tutorial 1 Creating a Presentation Tutorial 2 Applying and Modifying Text and Graphic Objects Tutorial 3 Adding Special Effects to a Presentation COMPREHENSIVE PowerPoint Tutorial 1 Creating
CSE111 Introduction to Computer Applications
 CSE111 Introduction to Computer Applications Lecture 4 Introduction to MS Word 2010-Part 1 Prepared by Asst. Prof. Dr. Mohamed KURDI Revised and presented by Asst. Prof. Dr. Samsun M. BAŞARICI Summary
Microsoft Word 2016 LEVEL 1
 TECH TUTOR ONE-ON-ONE COMPUTER HELP COMPUTER CLASSES Microsoft Word 2016 LEVEL 1 kcls.org/techtutor Microsoft Word 2016 Level 1 Manual Rev 11/2017 instruction@kcls.org Microsoft Word 2016 Level 1 Welcome
BEDI INTERNATIONAL SCHOOL, BAREILLY. CHAPTER: 3( Managing files and folders)
") BEDI INTERNATIONAL SCHOOL, BAREILLY CLASS: V SUBJECT: Computer CHAPTER: 3( Managing files and folders) A. Fill in the blanks: 1. MS Windows is an Operating System. 2. To customize the desktop, right-click
BEDI INTERNATIONAL SCHOOL, BAREILLY CLASS: V SUBJECT: Computer CHAPTER: 3( Managing files and folders) A. Fill in the blanks: 1. MS Windows is an Operating System. 2. To customize the desktop, right-click
Introduction to Microsoft Office 2016: Word
 Introduction to Microsoft Office 2016: Word Last Updated: September 2018 Cost: $2.00 Microsoft Word is a word processing software. You can use it to type letters, reports, and other documents. This class
11.1 Create Speaker Notes Print a Presentation Package a Presentation PowerPoint Tips... 44
 Contents 1 Getting Started... 1 1.1 Presentations... 1 1.2 Microsoft Office Button... 1 1.3 Ribbon... 2 1.4 Mini Toolbar... 2 1.5 Navigation... 3 1.6 Slide Views... 4 2 Customize PowerPoint... 5 2.1 Popular...
Introduction to Microsoft Word 2010
 Introduction to Microsoft Word 2010 Microsoft Word is a word processing program you can use to write letters, resumes, reports, and more. Anything you can create with a typewriter, you can create with
Microsoft Word Basics. Pages 21-45
 Microsoft Word Basics Pages 21-45 1 Viewing a Document in Word Print Layout Shows how a document will look when it is printed. This view, which is the default, allows you to see headers and footers, columns,
MICROSOFT WORD. Table of Contents. What is MSWord? Features LINC FIVE
 Table of Contents What is MSWord? MSWord is a word-processing program that allows users to insert, edit, and enhance text in a variety of formats. Word is a powerful word processor with sophisticated editing
Week 5 Creating a Calendar. About Tables. Making a Calendar From a Table Template. Week 5 Word 2010
 Week 5 Creating a Calendar About Tables Tables are a good way to organize information. They can consist of only a few cells, or many cells that cover several pages. You can arrange boxes or cells vertically
SKILL AREA 210: USE A WORD PROCESSING SOFTWARE. Lesson 1: Getting Familiar with Microsoft Word 2007 for Windows...5
 Contents Microsoft Word 2007...5 Lesson 1: Getting Familiar with Microsoft Word 2007 for Windows...5 The Microsoft Office Button...6 The Quick Access Toolbar...6 The Title Bar...6 The Ribbon...6 The Ruler...6
Microsoft Word Create by: Alberto De La Cruz
 Microsoft Word 2010 CH 1:Creating, Formatting, and Editing a Word Document with Pictures CH 2: Creating a Research Paper with Citation and References CH 3: Creating a Business Letter with a Letterhead
MS WORD. You can use it for writing letters, reports and so on.
 MS WORD MS WORD 2 You can use it for writing letters, reports and so on. Starting Word application 3 To start MS. Word do the following: 1. From the Start button on the taskbar, select All Programs. 2.
Computer Nashua Public Library Introduction to Microsoft Word 2010
 Microsoft Word is a word processing program you can use to write letters, resumes, reports, and more. Anything you can create with a typewriter, you can create with Word. You can make your documents more
Microsoft Word: Steps To Success (The Bare Essentials)
") Microsoft Word: Steps To Success (The Bare Essentials) Workbook by Joyce Kirst 2005 Microsoft Word: Step to Success (The Bare Essentials) Page Contents 1 Starting Word 2 Save 3 Exit 5 Toolbars, Alignment,
Microsoft Word: Steps To Success (The Bare Essentials) Workbook by Joyce Kirst 2005 Microsoft Word: Step to Success (The Bare Essentials) Page Contents 1 Starting Word 2 Save 3 Exit 5 Toolbars, Alignment,
Powerful presentation solutions from Microsoft Improve the way you create, present, and collaborate on presentations. Use enhanced multimedia
 Powerful presentation solutions from Microsoft Improve the way you create, present, and collaborate on presentations. Use enhanced multimedia capabilities to deliver presentations with more impact. www.microsoft.com/powerpoint
Learning Word The ABCs of Microsoft Word. 8/19/2015 The Computor Tutor 1
 Learning Word 2013 The ABCs of Microsoft Word 8/19/2015 The Computor Tutor 1 The Program Open Word Margins are preset to Normal, 1 inch for Top, Bottom, Right & Left; change by clicking on Page Layout
Microsoft Word Intermediate March 25, Exercise 1: Open Word Click on Word. OR Click Start. Click All Programs. Click Microsoft Office.
 Microsoft Word Intermediate March 25, 2014 Exercise 1: Open Word Click on Word. OR Click Start. Click All Programs. Click Microsoft Office. Exercise 2: Create a new document Click File Tab. Select New.
Table of Contents. Word. Using the mouse wheel 39 Moving the insertion point using the keyboard 40 Resume reading 41
 Table of Contents iii Table of Contents Word Starting Word What is word processing? 2 Starting Word 2 Exploring the Start screen 4 Creating a blank document 4 Exploring the Word document window 5 Exploring
New York City College of Technology. Microsoft Word Contact Information:
 New York City College of Technology Microsoft Word 2016 Contact Information: 718-254-8565 ITEC@citytech.cuny.edu Opening Word 2016 Begin by clicking on the bottom left corner icon on the desktop. From
4) Study the section of a worksheet in the image below. What is the cell address of the cell containing the word "Qtr3"?
 Study the section of a worksheet in the image below. What is the cell address of the cell containing the word Qtr3?") Choose The Correct Answer: 1) Study the highlighted cells in the image below and identify which of the following represents the correct cell address for these cells: a) The cell reference for the selected
Choose The Correct Answer: 1) Study the highlighted cells in the image below and identify which of the following represents the correct cell address for these cells: a) The cell reference for the selected
Microsoft PowerPoint Tutorial
 Microsoft PowerPoint Tutorial Contents Starting MS PowerPoint... 1 The MS PowerPoint Window... 2 Title Bar...2 Office Button...3 Saving Your Work... 3 For the first time... 3 While you work... 3 Backing
Introduction to MS Office Somy Kuriakose Principal Scientist, FRAD, CMFRI
 Introduction to MS Office Somy Kuriakose Principal Scientist, FRAD, CMFRI Email: somycmfri@gmail.com 29 Word, Excel and Power Point Microsoft Office is a productivity suite which integrates office tools
MS Word Basic Word 2007 Concepts
 MS Word Basic Word 2007 Concepts BWD 1 BASIC MS WORD CONCEPTS This section contains some very basic MS Word information that will help you complete the assignments in this book. If you forget how to save,
What can Word 2013 do?
 Mary Ann Wallner What can Word 2013 do? Provide the right tool for: Every aspect of document creation Desktop publishing Web publishing 2 Windows 7: Click Start Choose Microsoft Office > Microsoft Word
Microsoft Office Training Skills 2010
 Microsoft Office Training Skills 2010 Lesson 5 Working with pages, Tables, Shapes and Securing Documents Adding Page color Add color to the background of one or several pages in the document. 1. Click
Basic Microsoft Word 2013
 Basic Microsoft Word 2013 1 Basic Microsoft Word 2013 General Notes: In Office 2013, tabs exist at the top; these are referred to as ribbons. The commands on each tab are organized into groups. The commands
Lesson 1: Getting Familiar with Microsoft Word 2007 for Windows
 Lesson 1: Getting Familiar with Microsoft Word 2007 for Windows Microsoft Word is a word processing software package. You can use it to type letters, reports, and other documents. This tutorial teaches
Center for Faculty Development and Support Creating Powerful and Accessible Presentation
 Creating Powerful and Accessible Presentation PowerPoint 2007 Windows Tutorial Contents Create a New Document... 3 Navigate in the Normal View (default view)... 3 Input and Manipulate Text in a Slide...
Introduction to Microsoft Word 2007 LESSON OBJECTIVES LESSON CONTENTS
 Introduction to Microsoft Word 2007 LESSON CONTENTS About a Word Processor About Microsoft Word 2007 as a type of word processor Understanding the User Interface of MS-Word 2007 Creating and Managing Files
Table of Contents. Contents
 Spring 2009 R.A. Table of Contents Contents Opening PowerPoint... 2 PowerPoint 2007 Interface... 2 PowerPoint Features... 2 Creating, Opening and Saving Presentations... 3 Creating a Presentation... 3
Microsoft PowerPoint 2010 Beginner
 Microsoft PowerPoint 2010 Beginner To start Microsoft PowerPoint: - Go to Start > Search > Word. - You can also double-click any Microsoft PowerPoint document. Layout File Tab Quick Access Toolbar Tabs
Introduction. Getting Started. Selecting a Template. 1 of 1
 1 of 1 Introduction Visual materials are one of the most effective means of communicating a message. They can give a presentation a professional quality. Visuals help a speaker to be well prepared, organized,
Power Point. Created with the Freeware Edition of HelpNDoc: Single source CHM, PDF, DOC and HTML Help creation
 Power Point Introduction PowerPoint is a presentation software package. With PowerPoint, you can easily create slide shows. Trainers and other presenters use slide shows to illustrate their presentations.
Microsoft Office Suite
 Module 3 MODULE OVERVIEW Part 1 Getting Familiar with Microsoft Word 2007 for Windows Part 2 Microsoft Word 2007 Basic Features Part 3 More Basic Features Microsoft Office Suite Microsoft Word 2007 Part
DOING MORE WITH WORD: MICROSOFT OFFICE 2013
 DOING MORE WITH WORD: MICROSOFT OFFICE 2013 GETTING STARTED PAGE 02 Prerequisites What You Will Learn USING MICROSOFT WORD PAGE 03 Viewing Toolbars Adding and Removing Buttons MORE TASKS IN MICROSOFT WORD
Microsoft Office. Microsoft Office
 is an office suite of interrelated desktop applications, servers and services for the Microsoft Windows. It is a horizontal market software that is used in a wide range of industries. was introduced by
1 THE PNP BASIC COMPUTER ESSENTIALS e-learning (MS Powerpoint 2007)
") 1 THE PNP BASIC COMPUTER ESSENTIALS e-learning (MS Powerpoint 2007) 2 THE PNP BASIC COMPUTER ESSENTIALS e-learning (MS Powerpoint 2007) TABLE OF CONTENTS CHAPTER 1: GETTING STARTED... 4 MICROSOFT OFFICE
1 THE PNP BASIC COMPUTER ESSENTIALS e-learning (MS Powerpoint 2007) 2 THE PNP BASIC COMPUTER ESSENTIALS e-learning (MS Powerpoint 2007) TABLE OF CONTENTS CHAPTER 1: GETTING STARTED... 4 MICROSOFT OFFICE
The American University in Cairo. Academic Computing Services. Word prepared by. Soumaia Ahmed Al Ayyat
 The American University in Cairo Academic Computing Services Word 2000 prepared by Soumaia Ahmed Al Ayyat Spring 2001 Table of Contents: Opening the Word Program Creating, Opening, and Saving Documents
Using Microsoft Word. Table of Contents
 Using Microsoft Word Table of Contents The Word Screen... 2 Document View Buttons... 2 Selecting Text... 3 Using the Arrow Keys... 3 Using the Mouse... 3 Line Spacing... 4 Paragraph Alignment... 4 Show/Hide
Microsoft Excel 2010 Basic
 Microsoft Excel 2010 Basic Introduction to MS Excel 2010 Microsoft Excel 2010 is a spreadsheet software in the new Microsoft 2010 Office Suite. Excel allows you to store, manipulate and analyze data in
CHAPTER 01 - INTRODUCTION
 Chapter 01, Introduction to MS PowerPoint 2007 CHAPTER 01 - INTRODUCTION PowerPoint is presentation software that helps you create a slide show presentation and supplements, such as handouts and speaker's
OneNote 2013 Guide A Complete Overview for Connect Users
 OneNote 2013 Guide A Complete Overview for Connect Users Contents Chapter 1: Introduction... 6 Chapter 2: Getting Around OneNote... 6 Quick Access Toolbar... 6 The Ribbon... 6 Backstage View... 7 Saving...
MS Word 2010 An Introduction
 MS Word 2010 An Introduction Table of Contents The MS Word 2010 Environment... 1 The Word Window Frame... 1 The File Tab... 1 The Quick Access Toolbar... 4 To Customize the Quick Access Toolbar:... 4
Getting Familiar with Microsoft Word 2010 for Windows
 Lesson 1: Getting Familiar with Microsoft Word 2010 for Windows Microsoft Word is a word processing software package. You can use it to type letters, reports, and other documents. This tutorial teaches
Creating a Newsletter
 Chapter 7 Creating a Newsletter In this chapter, you will learn the following to World Class standards: Setting the Margins Changing the Font and Font Size Inserting a Table Inserting a Picture Adding
Lesson 8: Presentation Enhancements Microsoft PowerPoint 2016
 Lesson 8: Presentation Enhancements Microsoft PowerPoint 2016 IN THIS CHAPTER, YOU WILL LEARN HOW TO Set up presentations for delivery. View and change slide masters. Add WordArt text. Create hyperlinks.
Excel Main Screen. Fundamental Concepts. General Keyboard Shortcuts Open a workbook Create New Save Preview and Print Close a Workbook
 Excel 2016 Main Screen Fundamental Concepts General Keyboard Shortcuts Open a workbook Create New Save Preview and Print Close a Ctrl + O Ctrl + N Ctrl + S Ctrl + P Ctrl + W Help Run Spell Check Calculate
PowerPoint Multiple OUTPUT types Paper Onscreen Web presentation 6 x 6 rule 6 points 6 words
 PowerPoint 1 PowerPoint Multiple OUTPUT types: Paper Onscreen Web presentation 6 x 6 rule no more than 6 points per slide No more than 6 words per point Placeholder area of a slide reserved for text or
Microsoft PowerPoint 2010 Beginning
 Microsoft PowerPoint 2010 Beginning PowerPoint Presentations on the Web... 2 Starting PowerPoint... 2 Opening a Presentation... 2 File Tab... 3 Quick Access Toolbar... 3 The Ribbon... 4 Keyboard Shortcuts...
Anleitungen für Word 2016 als Word-Dokument zum Ausdrucken und fürs Intranet
 Anleitungen für Word 2016 als Word-Dokument zum Ausdrucken und fürs Intranet 19 Text and Tabs Tabs (tab stops) help you to write a list, for example, for an order or invoice. Larger spaces should not be
San Pedro Junior College. WORD PROCESSING (Microsoft Word 2016) Week 4-7
 Week 4-7") WORD PROCESSING (Microsoft Word 2016) Week 4-7 Creating a New Document In Word, there are several ways to create new document, open existing documents, and save documents: Click the File menu tab and then
WORD PROCESSING (Microsoft Word 2016) Week 4-7 Creating a New Document In Word, there are several ways to create new document, open existing documents, and save documents: Click the File menu tab and then