Ansee App User Manual
|
|
|
- Georgiana Wells
- 6 years ago
- Views:
Transcription


1 Ansee App User Manual Version: 2.1 May, 2016
2 Ansee App User Manual 1. Function Introduction Download and Installation Register Account Add Camera Add Accessories Main Interface Operation More Setup Interface Operation Smart Life Video Play Alarm Message Smart Lock Operation Smart Socket Operation Magnetic Lock Smart Light Control Switch Smart Curtain Controller CH2O Detector, Gas Detector, CO Detector My Album Account Security Attentions


3 1. Function Introduction (1). Ansee APP supports Android and IOS system. It is a professional monitoring App suitable for home, retail and office security. No matter where User are, user can check real-time videos, playback record videos, make two-way communication, set arming and disarming remotely through cellphone. It supports P2P cloud and push video function. What s more, this app is well integrated with video function and alarm functions. User can add multiples alarm accessory and make alarm linkage between alarm accessory and IP Camera. Besides, it is also integrated with smart home function. By adding Ansee smart home accessory, user can control household equipments remotely through cellphone. (2). At present, this APP supports OS of Android4.0 and IOS 6.1 and above. 2. Download and Installation (Android APP) (IOS APP) (1). User can download the App by scanning above QR code in the user manual, or search ansee in Google Player and apple store. (2). Install the APP after download. To make sure normal working, please allow the APP to gain related authority in cellphone. The size of APP is about 20M. It is suggested to download it under WIFI environment. After finished installation, register one account to use all function. 3. Register Account 3


4 Picture1: Login Interface Picture2.: Register Interface (1). After finished installation, please open the APP. As it s first time to use, it will go to APP login interface as picture1. If User doesn t have an account, please click new account in the lower right corner to enter the register interface as picture2. Please choose User country and the area code (very important), enter User cellphone number and new password, click get to gain the verification code. Then enter the correct verification code and register an account. Remark: If no message received after click get, please wait patiently ; For the same cellphone, one verification code will be sent within 1 minute; same IP can only get 10 verification codes within one day; One cellphone can only register one account. If not received any SMS after click get, please go to application authority panel to enable the notification authority for this APP. (2). After register succeed, go back to login interface, the system will automatically identify current status and region( if recognize wrongly, please change it manually). Please enter User cellphone number and password to login. If forget the password, User can get it back through the Forget Password button on the lower left corner. 4

5 Remark: The first cellphone used to register account is regarded as main cellphone by default. After Account Protection Function is enabled, even if related account information is stolen, bad people is unable to access this account. This function can protect user s security account well. 4. Add camera Picture1 :Main Interface Picture2:Add Camera Interface (1). After Login succeed, the main interface will load and display a list of cameras. Since it s the first time to login the APP, the camera list is empty. User can add cameras through the + on the top right corner, then User can see different type of cameras(as picture2), Please follow the below steps 1~6 to add the camera. 5


6 Step1 Step2 Step3 Step4 6

. Please insert the PIN to SET hole for 2 seconds until User hear di sound.")
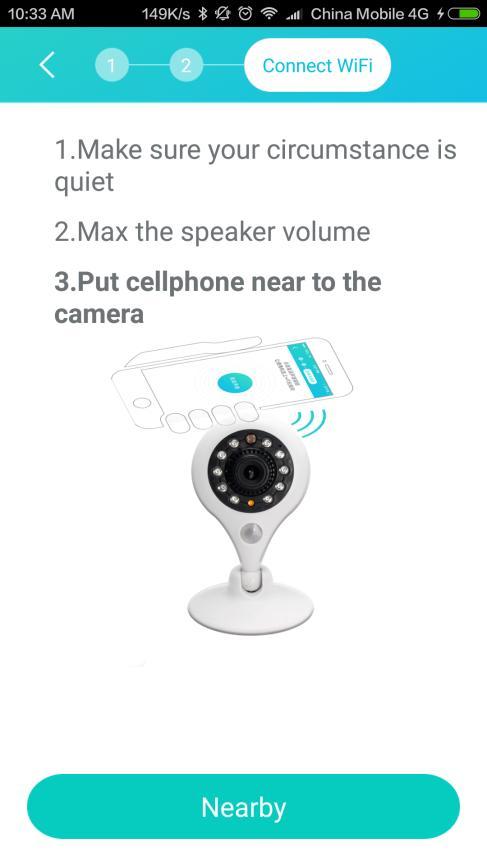
7 Step5 Step6 (2). Please pay attention to below 4 points when add camera: Firstly, please choose the WiFi which User cellphone is connected to(as some android mobile phones haven t activated the WIFI switch function which leads to WIFI switch failure and affect the communication between cellphone and camera). Also make sure the password is correct. Secondly, turn on the power for about 2 minutes, the camera starts to work (yellow LED flashes). Please insert the PIN to SET hole for 2 seconds until User hear di sound. Thirdly, please put the cellphone close to the top of camera, keep quiet and send sound wave as above picture shows. If User have sent sound wave several times, but don t receive any receiving success notification, please check whether User have put the loudspeaker closely to the top of camera or change another position and try again. After receive successfully, please click next step immediately. Fourthly, after camera gain WIFI and password, it will connect automatically which takes about 0 ~120 seconds. Please wait patiently. (3). If add failed, the reasons may be as below : The WIFI password is not correct. 7
, so camera is unable to connect to this WiFi.")
8 Please check if User have enabled the WIFI anti rub network. This setting may cause the failure of connecting network. WiFi router connected to too many devices(for example, most TP-Link router can only connect to 16 devices), so camera is unable to connect to this WiFi. WiFi is 5G frequency bands or WPA/WPA2 enterprise class router. Our device only supports 2.4G frequency band at present. The WIFI signal nearby is too weak, please put the camera within the WIFI coverage. Connection timed out, please try again. (4). When User are going to choose a WIFI, but no WIFI signal appears, maybe the positioning authority of APP is banned by system, please enable the APP positioning authority and try again. (5). After add the camera successfully, don t forget to give the camera a good name. (6). If user need to add other type of camera, please follow the guidance in the APP. 5. Add Accessories Smart Control Interface Smart Security Interface 8
9 (1). Before add accessories, please prepare the smart accessories. If need to purchase accessories, please contact us. (2). The camera supports to add over 20 kind of smart accessories. We have accessories from smart control to smart security, including below accessories: Smart control module: Smart Door Lock, Smart Power Socket, Smart Light Control Switch, Smart Curtain Controller, Magnetic Lock etc. Smart Security module: Remote controller (material object), Emergency Button, Door Sensor Detector, Smoke Detector, Gas Detector, Infrared Detector, CO Detector, CH2O Detector, Infrared Detection of Human Body (PIR, Default), Welcome Detector. Other Module:(Care of kinsfolk, Smart Community)is under development. (3). If need to add accessories, firstly please click the + on the top right of Smart Home Page, choose Add Accessories as shown in the following pictures, select the corresponding type of accessories, and enter the QR code scanning interface. Please find the barcode on the back of the accessories. After scanning successfully (user can also manually Input the barcode), enter the interface of binding camera. Remark: when install the accessories, make sure the distance between accessories and camera is within 30m. Otherwise the camera might lose connection with the accessories, and and can not control the accessories. (4). Each accessory can only be bound to one camera, after bind a camera, user can receive push messages through APP once triggered alarm. After bind a camera, please give the accessories with a easy remember name such as bedroom power socket, main door lock etc., the name should include the install position to distinguish different accessories. Please see below detailed operation pictures: 9


10 Accessories Type Selection Interface Bar Code Scanning Interface Bind Camera Interface Bar Code Manual Input Interface 10
11 6. Main Interface Operation Main Interface (1). As the picture above shows, the main interface display the camera list by default. Each camera display in one window. User can check the camera status in the lower left corner as below: :Camera on-line :Camera off-line Meantime, there are other icons in the lower right corner: :Camera is recording :Camera is arming :Camera is disarming :Camera is in a status of privacy (2). Each column include remote controller and setting button, click remote controller to enter remote control interface: 11

12 SOS button : After click it, user whom has logged in this account will receive push message of emergency help. ON button stands for arming: Click it, the camera will enter arming status, meanwhile all the accessories which have connected to this camera will enter arming status. Once triggered alarm, the camera will send alarm message to cellphone APP. OFF button stands for disarming: After click it, except some detector which works for 24 hours (such as emergency button, gas detector, smoke detector, CO detector, CH2O detector), other accessories in activity zone and entry zone (such as door sensor detector, infrared detector, PIR, Holcomb detector) will be disabled. button stands for mute function: once alarm occurs, press this button for muting. Remote Controller Interface Alarm Plan Interface 12

13 Camera Setup Interface Alarm Plan (3). Click the setting button, and enter the camera setting interface. Click the camera name to view related device information, bound WiFi, camera type and also can modify the camera name and so on. Click the alarm plan to set up the arming schedule. Users can arbitrarily set the time period and choose cycle period. User can turn on/off the alarm plan through the button on the right side. If want to delete the alarm plan, please long press to delete it. Remark: The priority of the alarm plan is higher than arming/disarming by remote controller. In other words, if User have set up the alarm plan, the camera will enter arming status when during the preset period, no matter the current status is arming or disarming. Beyond the preset period, it will enter disarming status automatically. 13
 first. Turn on the power and the camera will start video recording automatically.")
14 Record Schedule Interface Time Cycle Settings Interface (4). Enter Record Schedule interface, the camera will make record for 24 hours. User needs to turn off the power and insert the SD card (support max. 32G ) first. Turn on the power and the camera will start video recording automatically. User can play back to check the record of any time period. User can set the video recording Cycle based on week. If user doesn t want to use the recording schedule, click the button on the right side to turn off or long press to delete it. Current SD card recording is in overwritten format. If user wants to keep the record file, please pull up the SD card back up files manually. (5). Privacy mode is disabled by default. For privacy security reason, if user doesn t want other people who already logged in this account to watch the video, he can activate this mode. Under this mode, only the cellphone which activate the privacy mode can watch the video, other cellphone can not watch the video even they have logged in same account, also they can t close this privacy mode. Remark: The privacy mode is only valid for 8 hours. It will automatically turn off after 8 hours. (This is to avoid that the cellphone which opened the privacy mode was lost or long time not opened and the camera can not be accessed). 14
15 (6).If the camera image is found upside down, user can correct it through the correcting camera image in the settings. (7).If users want to change other WIFI, revise it through WIFI configuration. (8). Alarm interval time setting is persistent 60s by default. When alarm occurs, the camera will send alarm alert which lasts for 1 minute. User can adjust the interval time between two alarm, to avoid repeated alarms in a short time. Users can also customize the time length of the alarm alert. If it is set to 0, when alarm occurs, there is only one di sound and then goes into silence status. If user doesn t want the camera to make sound when alarm occurs, there are two ways: First, set the alarm time to 0 ; Second, turn on the muting switch in smart home ->smart security-> infrared detector accessories. (9). One camera can only bind with one cellphone account currently. If user doesn t need this camera or need to bind another cellphone account, please delete this camera first. The camera will keep the existed learned accessories even user deleted the camera in previous account. (10). reboot device button: remotely restart the camera when it s under abnormal situation. 7. More Setup Interface Operation 15
16 (1). Click button on the top left of main interface to enter more setup interface. This interface includes viewing account information, password modification, push settings, version update, feedback, and so on. Among these items, the video adaptive connection is opened by default. To make sure the video connection speed, the camera will give priority to P2P video connection. But if the network environment is poor, please turn off this switch. The APP can get video through server forwarding to assure normal video play. (2). push setting interface shows the push switch of all cameras under this account. By default, all switch are enabled. It is suggested to keep these functions enabled, otherwise user can t receive push message when the alarm occurs. (3). For frequent questions encountered in app operation, please check the FAQ in the APP menu. (4). This APP will automatically detect updated version every time when user logged in. Please choose to update the new version or not. (5). User can feedback the problem with us through the user feedback interface, we will promptly reply to user, User can also see our reply in this interface. (6). If User want to know more information about our company, please visit our official website: (7). When user doesn t use current cellphone to login this account, please click the exit account button, then it will go back to login interface, Login interface provides function of remember the account number and password. If user wants to delete this account forever, please delete the account in the drop-down window of login interface. 8. Smart Home 16

17 Smart Life Interface Smart Security interface (1). The purpose of smart home is to combine smart security and smart control to maximize the camera into a smart device. User can remote operate smart lock, magnetic lock, smart power socket, smart light controller and curtain through Smart Control menu. User can install the accessories in the Smart Security menu to gain a smart and safety life. Please check chapter 11~16 for detail operation of all accessories. (2). There are two level menu in the management of accessories. Main menu is the types of accessories, showing the qty of related accessory. Click main menu to open sub menu, where display various smart accessories of general information, including name, binding cameras, power and communication status, as well as the current status of the switch. If certain accessory is in abnormal, it will display in Red to remind user. (3). The detailed function for each accessory is listed below: Remote Controller(material object):the function is same as remote controller in the cellphone APP, but User can easily remote-operate the camera without pick up his cellphone. User only need to press one key to arming and disarming. The elderly can press SOS key for help if there s any emergency. This function is valid for 24 hours, and not affected by arming/disarming. 17
18 Emergency Button: this accessory can achieve one key alarm function when there s an emergency. After press this button, the cellphone APP will receive emergency help alarm message, and the camera will take snapshot and make record. All the cellphone APP which have logged in this account can view the live video and two-way talk with the person whom seek for help. This function is valid for 24 hours, and not affected by arming/disarming. Door Sensor Detector: Usually it s installed on the door, when the door is open, the camera will give alarm if it s under arming status. Remark: it s invalid when the camera is under disarming status. Smoke Detector: It will trigger alarm when a fire occurs or the smoke concentration is too high. The cellphone App will receive alarm message, This accessory is valid for 24 hours, and not affected by arming/disarming. PIR Motion Detector(Embedded): This infrared detect function is embedded in camera. It can detect the flow of people around 5 meters. When someone is walking within the alarm range and the camera is under arming status, it will trigger alarm. It is invalid when camera is under disarming status. PIR Curtain Motion Detector: This accessory configure with more powerful PIR sensor, which can work 30m far from camera. When under arming status, it will give alarm if someone is walking within 10 meters. It is invalid when under disarming status. Welcome Detector: Usually used in entrance of shop / warehouse, when someone enters or exits, it will make sound as welcome. When the shop is closed at night, and the camera is under arming status, this accessory can effectively give alarm for trespassing. It is invalid when the camera is under disarming status. CH2O Detector, CO Detector, Gas Detector: Please check chapter

19 Settings Interface of Security Accessories (4).All accessories has an enable/disable switch under accessory info menu. click any smart accessory, User will enter the setting interface as above picture. There s an enable switch, turn on is valid, turn off is invalid. For the PIR (infrared detector), mute function is available. In the menu of each accessory information, there are UID, information of binding camera, defense zone type, and the setting of alarm snapshot delay time(for accessories like door sensor detector, need to set the alarm snapshot delay time according to actual situation ). User can also revise the accessories name and alarm delay time in this interface, 9. Video Play 19

20 Video Play Interface Smart Control Interface when Video Play (1). Click any camera in the camera list to enter the video play interface. If the cellphone and camera are in the same LAN, the camera will play HD video by default. If not, In order to get faster video stream, the camera will play fluent video by default. User can change HD/Fluent through the button on the top left. (2). When playing video, the camera will activate two-way audio function by default. User can click loudspeaker button on the top right to turn off. (3). When playing video, user can horizontally slide the image through video window, and click the Full Screen button on the top right to achieve full screen play. For PTZ camera, we can also achieve PTZ control function. (4). Recording timeline is in the bottom of video window. Blue parts means there is video records during this period. User can drag the timeline to playback videos. The detailed time below timeline is real time in live monitoring and recording time in playback respectively. When user is playing back the video record, he can go back to real time video after click the button in the lower right corner. 20
.")
.")
21 (5). Record, Snapshot, two-way audio functions are available in the main window. Hold to talk and release to hear sound(this is invalid in playback part. User can make record/snapshot in live monitoring or video playback. Go to My album to check the snapshots and recording videos. Please see chapter 15 fore more details. (6). The fluency of the video depends on the network environment of the user's mobile phone and camera. If the network environment is poor, it is recommended to use fluency mode, otherwise it will cause video lag. On the top of video window, it shows current network real time download speed.. (7). Our camera supports the visualization of remote smart control function, which is one of our featured advantages. Click the Smart Control button, the interface shows the accessories list which can be controlled remotely as above picture on the right side. User can easily turn on/off the accessories. 10. Alarm Message Alarm Message Interface Message Detail Interface (1). When the accessory triggers alarm, it will push alarm message to app and app will POP up unread messages. Alarm message on the title bar shows the total number of the alarm 21
22 message, also it provides the function of sorting the message by unread, time, type and device. (2). By default the alarm messages is sorted by time and the latest alarm message will be shown on the top. User can click the alarm message to enter detailed interface (picture on the right side), and check the alarm time, alarm camera, name of alarm accessory, ID of accessory. User can also view the real time video or download the snapshots and video record. (3). Click on the top left and user can mark all unread messages as read; click button on the top right, user can edit and delete corresponding message. To assure the fluency of APP, we suggest to regularly delete the messages which were already read.. (4). The download picture will be saved in built-in storage card( or external SD card, File path:/camera Family/Down Picture. 11. Smart Lock Operation Smart Lock interface 22

. Network connection: Find the smart lock in Smart Control menu. Click it to enter the detailed information window.")
23 Smart door lock is one of the main products of our smart home, through the camera, we can achieve remote control on the lock(lock & unlock). Adding process is very easy: click "+" button in the upper right corner of Smart Home, Select add new accessories and scan/manual input the barcode of smart lock. Select a camera to bind and set a name for smart lock at last. Please note: after add it successfully, please apply network connection for the smart door lock. That is to say the smart lock should get authentication from IP camera. (1). Network connection: Find the smart lock in Smart Control menu. Click it to enter the detailed information window. Then click Network connection in the network status bar, a pop-up window appears: Please make sure that user have installed the battery, and the initialization is completed (voice broadcast is completed). Long-press + button on the back of smart lock for over 5 seconds till the red LED of battery flashes for one time. Release the button and the smart lock will automatically send net connection request. Please wait for seconds. Remark : User should operate according to above steps. Please stay at the net connection pop- up window till the APP prompts Network connection succeed. If close 23
.")
24 the net connection pop-up window, user will not receive the Network connection succeed pop-up window, but the APP will automatically update the networking status. If the network status display normal, means net connection succeed. To achieve the remote control about each smart lock, applying network connection is needed. (2). Remote lock/unlock smart lock: Remote Unlock Interface Remote Lock Interface Remote Unlock: Click Remote Unlock button in the remote open interface, the pop-up window shown above remote unlock interface. After user inputs correct password, click Remote Unlock button, the smart lock will enter the status of request unlock. Meantime, the guest needs to press # button on the smart lock keyboard within 30 seconds, then the door will open. Of course, the guest could press # first and then ask the host to remote open the lock. If the host remotely unlock the lock within 1minute, the smart lock will also be opened. Remote Lock: Click the Remote Lock button in the remote lock interface and a pop up window will appear. after user inputs the correct password, click Remote Lock button, the 24
25 APP will return instructions within 10s whether to send success. Please note for saving power, the smart lock will go dormancy status at a cycle of20 minutes. So the remote lock instructions will be executed within 20 minutes. Please check the lock status later. Remember Password: In order to meet the needs of different users, there is password remember function. The password will be automatically remembered in APP and user can realize onekey lock/unlock the lock remotely. (3) View the status: Name of smart lock :Click button to modify. ID of smart lock: Unique ID, for distinguish each smart lock. Status of smart lock: There are Lock and Unlock type. Under lock status, door can not be opened. Under unlock status, door can be opened. Network status: If the smart lock hasn t applied network connection, it displays network application button, If already apply net connection, then it display whether to connect with camera, if the communication is normal, it display as normal, if can t communicate, display as not connected. Battery status: When lock works normal, it works normal. When the battery voltage is low, it will remind user to replace battery. Bind Device: It displays the cameras that the lock is bound with. If the camera location is changed later which leads to abnormal communication, user can delete the camera and bind it again. (4). Unlock Records: 25

26 Through the lock/unlock records in the smart lock interface, user can check the detailed information about unlock personnel records, remote lock/unlock records. The detailed records of lock/unlock shows all the records of this month. User can check the lock/unlock records of any month within 1 year through button on the top right corner. In the personnel unlock records, user can add remarks (cardholders name ) for each card according to card number, and check the unlock records for each cardholders. Also, user can set push function, by default APP will activate this function for all cardholders. If any cardholders open the door, APP will receive the push message. In remote lock/unlock records menu, user can check the lock/unlock records which operated by APP within one year. (5). Delete the accessory If no need to use this accessory any longer, please delete it, and user can not remotely control it after deletion. (6). The camera will enter disarming status after smart lock is unlocked successfully. 26
27 12. Smart Socket Operation (1). Add Smart Socket Click + on the top right corner of smart home to add new accessories. Choose add smart socket, and go into scan barcode interface. Scan/manual input the barcode of smart socket. Then, choose one camera to bind and set the name of smart socket. (2). Turn on/off Each time after accessing the corresponding smart socket, APP will go to check current status of the socket. During the query period, the switch is disabled. After the query is completed, it will show current status of the switch: unknown, turned-on and turned-off. The communication status between socket and camera was displayed in the lower left corner. It shows Communication in normal when connected successfully. If the camera can not control smart socket, it shows disconnected. For example, if the socket moves to other position, the communication between camera and socket maybe failed, then it shows disconnected. In this case, user should consider whether the socket is too far from the camera or the multiple wall leads to signal attenuation. Please keep the socket and camera within 30 meters. When the query is completed, user can click to remotely turn on/off the socket. 27
.")
28 (3). Status Details Click the details button in the lower right corner to enter the detailed interface. User can modify the name of smart socket, check the unique ID of current smart socket, and the information of bound camera. (4). Delete: If no need to use APP to control the smart socket any longer, user can delete it in the details interface. 13.Magnetic Lock Magnetic Lock Interface Setting interface Magnetic lock is a series of our smart home, through the camera, user can achieve remote lock and unlock for the magnetic lock. Adding process is very easy: click "+" button in the upper right corner of smart home, select add new accessories, and scan / manual input the bar code of magnetic lock, then select a camera to bind and set a name for magnetic lock later. 28
29 (1). Remote lock/unlock the magnetic lock. Remote Unlock Interface Remote Lock Interface Remote Unlock: Click Remote Unlock button in the remote unlock interface, the pop-up window shows above remote unlock interface(left picture). After user inputs correct password, click Remote Unlock button, if the network is under normal circumstances, door will be opened remotely successfully. Remote Lock: Click the Remote Lock button in the remote lock interface, the pop-up window shows above remote lock interface(right picture). After user inputs correct password, click Remote Lock button, if the network is under normal circumstances, door will be closed remotely successfully. Remember password: In order to meet the needs of different users, there is password remember function. The password will be automatically remembered in APP and user can realize onekey lock/unlock the lock remotely. 29

30 (2). View the status: Click button in the top right corner of magnetic lock interface to enter the setting interface. Name of smart lock: Click button to modify. ID of smart lock: unique ID, to distinguish each smart lock. Status of smart lock: There are Lock and Unlock type. Under lock status, door can not be opened. Under unlock status, door can be opened. Network status: If the smart lock hasn t applied network connection, it displays network connection button. If already applied network connection, it displays whether to connect camera or not. If the communication is normal, it display normal. If can t communicate, displays disconnected. Battery status: Under normal circumstances, it displays normal. When the battery voltage is low, it will remind user to replace battery. Bind device: It displays the camera that the lock is bound with. If the camera location is changed later which leads to abnormal communication, user can delete the camera and bind it again. (3). Lock /unlock records 30

31 Through the lock /unlock records in the smart lock interface, user can check the detailed information about unlock personnel records, remote unlock/lock records. The detailed records of lock/unlock shows all the records of this month. User can check the lock/unlock records of any month of one year through button in the top right corner. In the personnel unlock records, user can add remarks (cardholders name) for each card according to card number, and check the unlock records for each cardholders. Also, user can set push function. By default the APP will activate this function for all cardholders. When anyone of the cardholders opens the door, APP will receive the push message, and user can know detailed information. In remote lock/unlock records menu, user can check the lock/unlock records which operated by APP within one year. (4). Delete this accessories If no need to use this accessory any longer, please delete it and user can not remotely control lock after deletion. 14. Smart Light Control Switch 31

32 (1). Add smart light control switch: Click + on the top right corner of smart home interface, select add new accessories, choose add smart light control switch, and then enter the scan barcode interface, scan/ manual input the bar code of smart light control switch. After that choose one camera to 32
33 bind and select the type of smart light control switch [support the switch types like first gear, adjust light, second gear, third gear]. Please choose the corresponding type and click next step to set the name of smart light control switch. (3). Switch operation: Smart light control switch supports both live wire and live & neutral wire type. Please note that live wire switch can not display the on/off status, while live & neutral wire switch can check the on/off status. By default, APP divides the 3 gears into K1/K2/K3. Each time when enter smart light control switch interface, APP will check the status of the light control switch. During the query period, the switch is disabled. After the query is completed, it will show the status of the switch: On/Off. The smart light control switch which supports adjust light( first gear), user can adjust the light from dark to bright. The communication status between smart light control switch and camera was displayed in the lower left corner, which shows Communication in normal when connected successfully. If the camera can not control the smart socket, it shows disconnected. For example, if the socket was moved to other place, the communication between camera and light control switch maybe disconnected. Then it shows disconnected. In this case, user should consider whether the socket is too far from the camera or multiple wall leads to signal attenuation. Please keep the light control switch and camera within 30 meters. When query is completed, user can turn on/off for all the switches as above picture Smart Curtain Controller. 33
.")
34 Curtain Controller interface Curtain Controller Setting Interface (1). Add curtain controller: Click + on the top right corner of smart home interface and select add new accessories. Choose add curtain controller, enter the scan barcode interface, and scan/manual input the barcode of curtain controller. After that choose one camera to bind, and set the name of curtain. (2). Switch operation: Each time when enter the corresponding curtain controller interface, APP will check the status of the curtain controller. During the query period, the controller is disabled. After the query is completed, it will show the 3 current status of the curtain: opened, closed, and half opened. The communication status between curtain controller and camera displays in the lower left corner. It shows Communication in normal when connects successfully. If camera can not control curtain controller, it shows disconnected. To ensure good communication, please keep the curtain controller and camera within 30 meters. The curtain controller can be visually operated in the video player interface. After user send the turn on/off command, please wait patiently, as it needs some time to 34


35 operate. In the process of opening and closing, user can stop it at any time to keep the curtain in a semi open status. 16. CH2O Detector, Gas Detector, CO Detector CH2O Detector Overview Interface for All Accessories CH2O Detail Interface 35
36 CH2O trend chart Optimization Suggestion Interface (1). Add CH2O detector: Click + on the top right corner of smart home interface and select add accessories. Choose Add CH2O Detector and enter scan barcode interface. Scan/manual input the barcode of curtain controller. After that choose one camera to bind and set a name for CH2O Detector. (2). List Preview: In the smart security interface, select the CH2O detector and deploy it. User can easily browse current concentration of all CH2O detector. The concentration is divided into four grades: Normal, Super-standard, Mid Super-standard, Severe Super-standard. Display current concentration, temperature and humidity of each CH2O detector. This accessory works for 24hours, and will not be affect by arming/disarming. When the concentration of CH2O exceeds standard value, it will send alarm signal and the APP will receive push message immediately. (3). CH2O details interface. As above picture, click the corresponding CH2O detector to enter details interface. User can view current concentration, temperature, humidity. It also display whether current concentration value is within warning range or not. Once reaching Super-standard value, please leave right away. Battery status and communication status display in the lower left corner of concentration values. It shows current voltage of battery and the camera's communication status. When battery is in low voltage, please replace it in time. When display disconnected, please check whether the CH2O detector is working normally or not, and whether the distance between detector and camera is within 30 meters. Each time when entering the detailed interface, app will get the latest CH2O concentration. But if the bind camera is offline, APP can not refresh the latest data. (4). Trend: 36

37 Click "trend" button and user can check the statistical data of the latest day/ month/year. For the first time to enter the statistics data interface, user may need to wait for a few seconds to get related statistical data. Click "+" and "-" button on the upper right corner to zoom in and out the trend chart. (5). Optimization Suggestions: Some suggestions on removing formaldehyde are available. (6). Delete: If no need to use the CH2O detector any longer, user can delete it by using the delete button on the bottom of CH2O details interface. CO Detector (1). Add CO Detector: Click + on the top right corner of smart home interface and select add accessories. Choose Add CO Detector and enter scan barcode interface. Scan/manual input the barcode of curtain controller. After that choose one camera to bind and set a name for CO Detector. (2). List Preview: 37
38 In the smart security interface, select the CO detector and deploy it. User can easily browse current concentration of all CO detector. The concentration is divided into four grades: Normal, Super-standard, Mid Super-standard, Severe Super-standard. Display current concentration, temperature and humidity of each CO detector. This accessory works for 24hours, and will not be affect by arming/disarming. When the concentration of CO exceeds standard value, it will send alarm signal and the APP will receive push message immediately. (3). CO details Interface: As above picture, click the corresponding CO detector to enter details interface. User can view current concentration, temperature, humidity. It also display whether current concentration value is within warning range or not. Once reaching Super-standard value, please leave right away. Battery status and communication status display in the lower left corner of concentration values. It shows current voltage of battery and the camera's communication status. When battery is in low voltage, please replace it in time. When display disconnected, please check whether the CO detector is working normally or not, and whether the distance between detector and camera is within 30 meters. Each time when entering the detailed interface, app will get the latest CO concentration. But if the bind camera is offline, APP can not refresh the latest data. (4). Trend: Click "trend" button and user can check the statistical data of the latest day/ month/year. For the first time to enter the statistics data interface, user may need to wait for a few seconds to get related statistical data. Click "+" and "-" button on the upper right corner to zoom in and out the trend chart. 38
.")
.")
39 (5). Optimization Suggestions: Some suggestions on removing CO are available. (6). Delete: If no need to use the CO detector any longer, user can delete it by using the delete button on the bottom of CO details interface. Gas Detector (1). Add Gas Detector: Click + on the top right corner of smart home interface and select add accessories. Choose Add Gas Detector and enter scan barcode interface. Scan/manual input the barcode of curtain controller. After that choose one camera to bind and set a name for Gas Detector. (2). List Preview: In the smart security interface, select the Gas detector and deploy it. User can easily browse current concentration of all Gas detector. The concentration is divided into four grades: Normal, Super-standard, Mid Super-standard, Severe Super-standard. Display current concentration, temperature and humidity of each Gas detector. 39
40 This accessory works for 24hours, and will not be affect by arming/disarming. When the concentration of Gas exceeds standard value, it will send alarm signal and the APP will receive push message immediately. (3). Gas details Interface: As above picture, click the corresponding Gas detector to enter details interface. User can view current concentration, temperature, humidity. It also display whether current concentration value is within warning range or not. Once reaching Super-standard value, please leave right away. Battery status and communication status display in the lower left corner of concentration values. It shows current voltage of battery and the camera's communication status. When battery is in low voltage, please replace it in time. When display disconnected, please check whether the Gas detector is working normally or not, and whether the distance between detector and camera is within 30 meters. Each time when entering the detailed interface, app will get the latest Gas concentration. But if the bind camera is offline, APP can not refresh the latest data. (4). Trend: Click "trend" button and user can check the statistical data of the latest day/ month/year. For the first time to enter the statistics data interface, user may need to wait for a few seconds to get related statistical data. Click "+" and "-" button on the upper right corner to zoom in and out the trend chart. (5). Optimization Suggestions: Some suggestions on removing Gas are available. (6). Delete: If no need to use the Gas detector any longer, user can delete it by using the delete button on the bottom of Gas details interface. 17. My Album 40


41 My Album Interface Edit Interface The snapshots or video recording file will be saved in My Album. User can filter them by 3 type like ALL, Video, Photo. Also, click button to delete the videos and photos. To avoid deleting files in My Album by mistake when user uninstall the APP, all the videos and photos are saved in built-in storage card( or SD Card). The file path is: /Camera Family/photo. If user wants copy these files, please find them in this path. Meanwhile, My Album maintenance database is also established in this path. Even user re-installs the APP, the previous data will be recovered. Click to open certain photo or video. User can use the system software or other software to open these files, also they can send or share the files. 18. Account Security 41
42 Account Protect Interface Apply for Authority There is account protection function. The cellphone which is used to register account will be regarded as main cellphone(register cellphone) according to it s IEMI code Other cellphones which have logged in this account will be regarded as deputy cellphone. The deputy cellphone can t manage the login authority of other cellphone, but only can get the login authority. The register cellphone can manage the login authority of deputy cellphone. User can enable or disable the account protection function in main cellphone. Once the protection function is enabled, other mobile phone needs to be verified before log in. When other cellphone needs to log in the account, the APP will remind user to have SMS verification. After verification succeed, the cellphone will become a deputy cellphone. After entering more settings interface through main cellphone, please find Account Protection menu as above picture shows. If this function is enabled, user can check all the login details like cellphone type, latest login time and place. If user wants to disallow certain cellphone s login, please clock edit button in the top right corner and delete this cellphone information. After deletion, the deputy cellphone is unable to login even there is correct password. If the main cellphone needs to change or it s lost, and user wants to switch the deputy phone to main cellphone, please enter the account protection interface, click The mobile phone as a registered mobile phone button to apply. 42
43 19. Attentions (1). When the APP notifies user that there s a new version, please try to update the APP, as we may have fixed some bugs or new function is added. (2). If user have met some problems when using our products, please refer to FAQ interface. If user still can t solve the problems, please leave message in the feedback section, and our customer service will reply it at the first time. (3). When adding camera to APP, please strictly follow the guidance process. If failed, please click? button for help. Besides, user can contact us directly. (4).Since the Android system is a self customized system developed based on Android kernel, many mobile phone may disable the app to obtain certain authority from unknown system. Please allow the app to obtain the authority, otherwise it will affect APP performance. (5). Please ensure that the app restart is not disabled by other security software, otherwise it may affect push notification function. (6). Please make sure that the APP display notification authority is not disabled. Otherwise it will affect user to get related notification. 43
Installation guide for IP Camera G2
 Installation guide for IP Camera G2 Part I: Mobile Network connection For better experience the convenience that brought by this product, please download mobile phone software before using this product.
Features: (no need for QR Code)
") The Capp-Sure series brings a revolution in surveillance. Utilising a range of high-quality IP Wireless cameras, Capp-Sure provides stunning video clarity and optional Talk-Back audio over internet via
The Capp-Sure series brings a revolution in surveillance. Utilising a range of high-quality IP Wireless cameras, Capp-Sure provides stunning video clarity and optional Talk-Back audio over internet via
1. Product Description
 1. Product Description Hardware Description Note: The magnetic base can stick to any metal surface as per below diagram. This allows for better and more solid placement of the camera. 2. Installation 2.1
Smart Wireless WIFI Camera Instructions
 Smart Wireless WIFI Camera Instructions Dear users, Thanks for using this product. Please read the users' manual carefully and keep it for future reference. Thank you. 1 Content 1, How to download the
Smart Wireless Camera Instructions
 Smart Wireless Camera Instructions Dear customer, welcome to use our product, if you don t like this camera and want to return it to us, in order to protect your privacy and delete the video history from
IP Camera APP User Instruction
 IP Camera APP User Instruction Based on Android3.1.8 2016.06.01 1 Download and install the APP... 3 2 Register an account... 3 3 Retrieve password... 5 4 Associated account login...7 5 Add cameras... 8
Saviour App User Manual. User Manual to use app. This documents describe the Saviour app functionalities for end user.
 Saviour App User Manual User Manual to use app This documents describe the Saviour app functionalities for end user. Introduction This document describes the Saviour app to use Saviour Indoor, Outdoor
IOS Client. Manual. Tip: To protect your privacy, please modify the machine after landing factory
 IOS Client Manual Tip: To protect your privacy, please modify the machine after landing factory password and please keep the user name and password. Manual version: versions date Description V1.0 2013.5.31
HOME SECURITY KIT. USER MANUAL SMART PROTECTION WITH THE ALL-IN-ONE SOLUTION. SMART WINDOW SENSOR SMART POWER SOCKET SMART MOTION SENSOR SMART IP CAM
 HOME SECURITY KIT. SMART PROTECTION WITH THE ALL-IN-ONE SOLUTION. SMART WINDOW SENSOR SMART POWER SOCKET SMART IP CAM SMART MOTION SENSOR USER MANUAL SL-900100/900111 HOME SECURITY KIT A/B SHORT INSTRUCTION
Ctdigi.com. Instruction manual. Production by S & W Technology Labs
 Ctdigi.com Instruction manual Production by S & W Technology Labs I. Install app II. Guard camera Guard camera Introduction Accessory Sensor Scenario Guard 360 Introduction - Catalog - Install app Scenario
Enrich and Secure Your Life. User Manual. (G6 Plus Camera) Hunan Gaozhi Science And Technology Co., Ltd.
 Hunan Gaozhi Science And Technology Co., Ltd.") Enrich and Secure Your Life User Manual (G6 Plus Camera) Hunan Gaozhi Science And Technology Co., Ltd. Content 1. Structure....3 2. Main Parameter... 4 3. Networking Diagram... 5 3.1.1. WIFI Connection...
Enrich and Secure Your Life User Manual (G6 Plus Camera) Hunan Gaozhi Science And Technology Co., Ltd. Content 1. Structure....3 2. Main Parameter... 4 3. Networking Diagram... 5 3.1.1. WIFI Connection...
User Guide LC4. Before using this product, please read the guide carefully to avoid any damage to the product.
 User Guide LC4 Before using this product, please read the guide carefully to avoid any damage to the product. 1. Product Description 1.1 Packing list IP Camera User Manual Before using this product, please
User manual.
 User manual www.zositech.com 1 Product Overview Thank you for choosing ZOSI IP camera. For more instructions, please visit www.zositech.com. 1 2 3 6 5 4 7 1 Microphone 2 Indicating lamp 3 Lens 4 Micro-SD
Smart Home System Kit
 Smart Home System Kit IP SECURITY ALARM SERIES More information, please visit the online CD information on the website http//netcam360.com 0 P a g e BRIEF INSTRUCTION 1. Start Infrared box camera a. Install
Cloud WiFi Camera. Operation Manual
 Cloud WiFi Camera Operation Manual Dear user, welcome to use this product, please read the operating instruction carefully before using this product and keeping this manual for future use. 1 Main Function
D3D Security Pvt ltd
 D3D Security Pvt ltd Copyright Notice @ 2017 D3D. All right reserved. All text instructions on product information and services are protected by copyright or other intellectual property, any use of the
USER MANUAL. Mac Version
 USER MANUAL Mac Version Contents 1 Software Introduction... 1 1.1 Summary... 1 1.2 Install and Uninstall... 1 1.2.1 Install the Software... 1 2 Login Software... 3 2.1 Login... 3 2.2 Control Panel Instruction...
VMS-A1 Client Software. User Manual
 VMS-A1 Client Software User Manual Contents Contents... 2 Chapter1. Overview... 4 1.1 Description... 4 1.2 Features & Functions... 4 Chapter2. Update Info... 6 Chapter3. Starting VMS-A1... 7 3.1 Installing
ALIBI Witness 2.0 v3 Smartphone App for Apple ios Mobile Devices User Guide
 ALIBI Witness 2.0 v3 Smartphone App for Apple ios Mobile Devices User Guide ALIBI Witness 2.0 v3 is a free application (app) for Apple ios (requires ios 7.0 or later). This app is compatible with iphone,
SURVEILLANCE KIT USER MANUAL. All in One Series
 SURVEILLANCE KIT USER MANUAL All in One Series Contents Part one Basic Operation 1 1. Basic Installation 1 1. Hard Disk Installation 1 2. Mouse Connection 1 2. Starting 1 3. Turn Off 1 4. Login 2 5. Preview
Article DE-WCV-WIFIDB010. WIFI doorbell USER MANUAL
 Article DE-WCV-WIFIDB010 WIFI doorbell USER MANUAL (V1.0) Product Parameter Video Ffrequency 720p lens, angle: 125 degrees Infrared night vision 850 Terminal System IOS6.0+ Android 4.4+ Voice Frequency
WiFi Video Doorbell. User Manual
 WiFi Video Doorbell User Manual Introduction Content With Hisilicon Hi3518E processor and H.264 compression technology, this Wifi video intercom provides smooth realtime video transmission while keeps
User Manual For AT-100BW/200BW
 User Manual For AT-100BW/200BW www.alptopsecurity.com support@alptopsecurity.com This manual is written based on the current version of the software and hardware. If there are any inaccuracies or imperfect
Cloud WiFi Camera. Operation Manual
 Cloud WiFi Camera Operation Manual Dear user, welcome to use this product, please read the operating instruction carefully before using this product and keeping this manual for future use. 1 Main Function
HD Pan Tilt IP Camera
 IP Camera User Guide Version 1.0.0.1 HD Pan Tilt IP Camera NIP-09L2J NIP-16L2J NIP-22L2J NIP-21L2J Page 1 Content 1. Hardware installation... 4 1.1 Hardware connection... 4 1.2 Network connection...5 1.3
HD Pan Tilt IP Camera
 IP Camera User Guide Version 1.0.0.1 HD Pan Tilt IP Camera Page 1 Content 1. Hardware installation... 4 1.1 Hardware connection... 4 1.2 Network connection...5 1.3 WPS setting...5 2. ipad, iphone App introduction...5
NVMS User Manual
 NVMS-1000 User Manual Contents 1 Software Introduction...1 1.1 Summary... 1 1.2 Operation Environment... 1 1.3 Install and Uninstall... 2 1.3.1 Install the Software... 2 1.3.2 Uninstall the Software...
Fseye Mobilephone Client User Manual V1.0.0
 Fseye Mobilephone Client User Manual V1.0.0 1 Contents Contents... 2 1. Product Introduction... 3 1.1 Product overview... 3 1.2 Product main functions... 3 2. Software Installation... 3 2.1 Operating environment
CUSAM WIFI Video Doorbell User Manual
 CUSAM WIFI Video Doorbell User Manual CSW01 CSW02 Index 1. Product brief introduction and setup guide (pg. 3 ~ 5) 1.1. Download WIFI Video Doorbell App 1.2. Product appearance 1.3. Installation diagram
Introduction. Package Checklist. Minimum System Requirements. Registering Your Product. More Help
 Introduction Keep a watch on your family, pet, home or office 24/7, even when you re not there. Creative Live! Cam IP SmartHD gives you a live update on your phone, wherever you are. Get activity alerts,
1. Introduction Overview Product Information... 3
 1. Introduction... 3 1.1 Overview... 3 1.2 Product Information... 3 2. Device Connection... 3 2.1 Connection Diagram... 3 2.2 Wi-Fi Setting... 4 2.2.1 Set up WiFi by Mobile Phone... 4 2.2.2 WPS/QSS One
Hik-Connect Mobile Client Software (ios)
") User Manual V1.1.0 UD01586B 1 COPYRIGHT 2015 Hangzhou Hikvision Digital Technology Co., Ltd. ALL RIGHTS RESERVED. Any and all information, including, among others, wordings, pictures, graphs are the properties
User Manual V1.1.0 UD01586B 1 COPYRIGHT 2015 Hangzhou Hikvision Digital Technology Co., Ltd. ALL RIGHTS RESERVED. Any and all information, including, among others, wordings, pictures, graphs are the properties
Product Manual for Floodlight Cam
 Product Manual for Floodlight Cam 1. Product Introduction Product Name : Floodlight Camera Combo 1) Product description: The security camera is the best choice for people who looking for a security camera
User Operating Manual
 User Operating Manual Contents 1 Introduction... 1 1.1 Acknowledgements... 1 1.2 Safety Notice... 1 1.3 Abbreviation/term... 2 2 Brief Product Introduction... 3 2.1 Diagram for TABLET... 3 2.2 Introduction
Quick Install Guide. Model: PLC-223W, PLC-233W
 Quick Install Guide Model: PLC-223W, PLC-233W This installation guide provides basic instructions for installing the PLC-213W/ PLC-223W/PLC-233W indoor wireless IP camera on your network. By following
NVMS User Manual
 NVMS-1000 User Manual Contents 1 Software Introduction...1 1.1 Summary... 1 1.2 Operation Environment... 1 1.3 Install and Uninstall... 2 1.3.1 Install the Software... 2 1.3.2 Uninstall the Software...
Chapter 1 Introduction of the Camera 4. Chapter 2 Install Reolink App System Requirement Install the App 5
 Content Chapter 1 Introduction of the Camera 4 Chapter 2 Install Reolink App 5 2.1 System Requirement 5 2.2 Install the App 5 Chapter 3 Device Management 7 3.1 Add New Device 7 3.2 Modify Camera Login
OUTDOOR SECURITY CAMERA WITH LED FLOODLIGHT
 OUTDOOR SECURITY CAMERA WITH LED FLOODLIGHT Wifi Security Camera With LED Floodlight Features 20W with 1600 Lumens Indoor and Outdoor Wifi IP Camera with LED flood light Passive IR and Motion sensor Support
Fseye Mobilephone Client User Manual V1.38 Contents 1. Product Introduction Product overview Product main functions Software
 Fseye Mobilephone Client User Manual V1.38 Fseye Mobilephone Client User Manual V1.38 Contents 1. Product Introduction... 1 1.1 Product overview... 1 1.2 Product main functions... 1 2. Software Installation...
IdeaTab A1000L-F. User Guide V1.0. Please read the Important safety and handling information in the supplied manuals before use.
 IdeaTab A1000L - UserGuide IdeaTab A1000L-F User Guide V1.0 Please read the Important safety and handling information in the supplied manuals before use. file:///c /Users/xieqy1/Desktop/EN UG/index.html[2013/8/14
Full manual Nedis SmartLife
 Full manual Nedis SmartLife Download the app: Nedis SmartLife from Apple App store or Google Play Store. Create account Select country code and enter full national phone number or email address and then
WiFi Wireless Video Door Phone. User Manual
 WiFi Wireless Video Door Phone User Manual Introduction With Hisilicon Hi3518E hardware platform, this WIFI/IP video intercom doorbell uses H.264 image compression. Its picture transmission data is small
NVMS User Manual. Version 2.1.0
 NVMS-1000 User Manual Version 2.1.0 Contents 1 Software Introduction... 1 1.1 Summary... 1 1.2 Operation Environment... 1 1.3 Install and Uninstall... 2 1.3.1 Install the Software... 2 1.3.2 Uninstall
Do not place or mount Ocli 1 in an area where it will be exposed to water. Ocli 1 is designed for indoor use.
 1 Manual: Ocli 1 with Observeye Viewer App for Android Setting Up Ocli 1 Live Viewing with Ocli 1 Recording Video and Taking Snapshots Using Advanced Features Setting Up Ocli 1 Place or Mount the Camera
Instruction Manual. Wi-Fi Full HD 1080p IP Concealed Junction Box Hidden Camera. V 1.3
 Instruction Manual Wi-Fi Full HD 1080p IP Concealed Junction Box Hidden Camera After Sales Support techsupport@123anfang.com www.yooseecamera.com V 1.3 Hardware Installation 1. Connect the power supply
Ansee Web Server. User Manual. Version: V2.1
 Ansee Web Server User Manual Version: V2.1 May, 2016 Ansee Web Server User Manual 1. Browsing LAN Video and Device Parameter and Web settings... 2 1.1.Browsing under LAN Mode... 2 2.Checking Device Parameter
IP Camera Quick Start Guide ==================== H Series V3.1
 IP Camera Quick Start Guide ==================== H Series V3.1 1. Package Contents IP Camera 5V Power Adaptor Bracket and Screws Wi-Fi Antenna Network Cable Quick Start Guide 2. Get Started Step-1 Download
SC550W WIFI IP HIDDEN CAMERA
 USER MANUAL SC550W WIFI IP HIDDEN CAMERA 1 YEAR WARRANTY All RecorderGear brand products are backed by our 1 Year Warranty. For full details visit WWW.RECORDERGEAR.COM This Device is Compliant with USA
User s Manual of DVR ULTIMAX. Remote Client Software V wersja 2.40
 User s Manual of DVR ULTIMAX Remote Client Software V 4.0.1 ULTIMAX-304 ULTIMAX-308 ULTIMAX-316 ULTIMAX-504 ULTIMAX-508 ULTIMAX-516 ULTIMAX-704 ULTIMAX-708 ULTIMAX-716 wersja 2.40 Index 1 Software Install,
Virtual Keypad App Help Last update: 2017/02/02
 Virtual Keypad App Help 16461 Last update: 2017/02/02 Table of Contents Virtual Keypad App Help Center... 1 Managing Your App Account... 2 Using Your App... 3 System in Alarm... 4 Contacting Your Security
LView Mobile client User Manual
 LView Mobile client contents 1. Product Introduction... 2 1.1 Product overview... 2 1.2 Product main functions... 2 2. Software Installation... 3 2.1 Operating environment requirements... 3 2.2 Get software...
IPC 112N. High Definition Capture Cam. Smart Security Wi-Fi Cam. User Manual
 IPC 112N High Definition Capture Cam Smart Security Wi-Fi Cam User Manual 2009-2018 Sakar International, Inc. All rights reserved. Windows and the Windows logo are registered trademarks of Microsoft Corporation.
BitVision App. User Manual. Version: V
 BitVision App User Manual Version: V8.1.50.5 Thanks for buying our company's products, any questions or needs, please contact us at any time. About this Instruction This instruction is universal version
STORM Video Management Software User s Manual
 STORM Video Management Software User s Manual Version 2.0.1 Table of Contents 1. OVERVIEW AND ENVIRONMENT... 1 1.1 Overview... 1 1.2 STORM Interface... 1 2. LOGIN... 5 2.1 Initialize Device... 5 2.2 Login
IP Camera CMS User manual (Android Version) 1. IP Camera CMS User Manual (Android Version) V1.3
 1. IP Camera CMS User Manual (Android Version) V1.3") IP Camera CMS User manual (Android Version) 1 IP Camera CMS User Manual (Android Version) V1.3 IP Camera CMS User manual (Android Version) 2 Content 1. Software description... 3 2. One key to configure
IP Camera CMS User manual (Android Version) 1 IP Camera CMS User Manual (Android Version) V1.3 IP Camera CMS User manual (Android Version) 2 Content 1. Software description... 3 2. One key to configure
H Series MiNi High Speed Dome. IP Camera. May 2011 V User Manual
 H Series MiNi High Speed Dome IP Camera May 2011 V1.1.0.1.2 User Manual Index 1 INTRODUCTION... 3 2 FUNCTION AND FEATURES... 3 3 APPEARANCE AND INTERFACE... 4 4 NETWORK CONNECTING... 7 2 1 Introduction
FreeIP App. User Manual. Version: V
 FreeIP App User Manual Version: V8.1.24.5 Thanks for buying our company's products, any questions or needs, please contact us at any time. About this Instruction This instruction is universal version for
W Box VMS BOX T E C H N O L O G I E S.
 W Box VMS BOX T E C H N O L O G I E S www.wboxtech.eu Contents Contents... 1 Overview... 3 1.1 Description... 3 1.2 Running Environment... 3 1.3 Function Modules... 3 Live view... 6 2.1 User Registration
Version B Wi-Fi IP CAMERA
 HD Version B-1.0.0 Wi-Fi IP CAMERA Quick Start Guide Table of Contents Get Started... 1 Hardware Installation... 1 Live Video... 2 Live Video via Wi-Fi... 6 Camera Settings... 8 Change Password... 8 Alarm
Carkuda (VTG500X) User Manual
 User Manual") Carkuda (VTG500X) User Manual Contents Carkuda Concepts Quick Start Installing Carkuda Mirror Using Carkuda Mirror Using Carkuda Smartphone App Technical Specifications Packing List FAQs Revision History
Carkuda (VTG500X) User Manual Contents Carkuda Concepts Quick Start Installing Carkuda Mirror Using Carkuda Mirror Using Carkuda Smartphone App Technical Specifications Packing List FAQs Revision History
HD 1080 Pro Black Box Security Wi-Fi Camera
 HD 1080 Pro Black Box Security Wi-Fi Camera User Manual Version: Oct, 2017 Content Quick Guide...P2 Overview...P3 Packing List...P3 Product structure...p4 Camera Part Setting...P5 Camera name and password
Panoramic Talking Camera
 Panoramic Talking Camera IPC2201 home8alarm.com 1-844-800-6482 support@home8alarm.com 1 Table of Contents Chapter 1. Introduction... 1 1.1 System Requirement... 1 Chapter 2. Hardware Overview... 2 Chapter
LeFun IP Camera Quick Install Guide
 LeFun IP Camera Quick Install Guide Website: www.lefunsmart.com E-mail: support@lefunsmart.com Catalog 1. Introduction... 2 1.1. Thank you for Choosing LeFun IP Camera... 2 1.2. Introducing LeFun IP Camera...2
Everything in your eyes. ismartviewpro. (For iphone) User Manual VER 5.0
 User Manual VER 5.0") IP Cloud Network Camera Everything in your eyes ismartviewpro (For iphone) User Manual 2018-01 VER 5.0 1. ismartviewpro Summary ismartviewpro (iphoneversion) is developed application software based on
IP Cloud Network Camera Everything in your eyes ismartviewpro (For iphone) User Manual 2018-01 VER 5.0 1. ismartviewpro Summary ismartviewpro (iphoneversion) is developed application software based on
Smart Phone Monitoring Software User s Manual
 Smart Phone Monitoring Software User s Manual Version 3.43 Table of Contents 1 OVERVIEW... 1 1.1 General Introduction... 1 1.2 Features... 1 1.3 Compatible Models... 1 2 DOWNLOADING AND INSTALLATION...
KB Door Bell Camera Setup Guide
 Knowledge Base Text: Jimmy Wang KB Door Bell Camera Setup Guide Key Features: Replacing to the existing doorbell button, no extra wire needed * 2.1MP 1080P Full HD @30fps with audio 180 panoramic view
Commercial in Confidence. Operation Manual. For TCP/IP with SIP Digital (700) System The Seasons Series. Indoor Monitor
 System The Seasons Series. Indoor Monitor") Operation Manual For TCP/IP with SIP Digital (700) System The Seasons Series Indoor Monitor Remark Please follow the user manual for correct installation and testing, if there is any doubt please call
Operation Manual For TCP/IP with SIP Digital (700) System The Seasons Series Indoor Monitor Remark Please follow the user manual for correct installation and testing, if there is any doubt please call
iminicam 1080p Wireless Spy Camera User Manual
 iminicam 1080p Wireless Spy Camera User Manual imini Spy Camera User Manual Introduction Thank you for choosing the imini Spy Camera. Experience cutting edge technology and enjoy the security that the
Android mobile client to usethe new manual
 Android mobile client to usethe new manual Directory 1.Introduction... 1 2. Getting Started... 2 3.Add / Edit / Delete Device... 2 3.1 Add Device... 2 3.2 Edit/Delete Device... 5 4.Device Management...
User Manual. Smart Lock. Please read this manual before operating your Smart Lock, and keep it for further reference. 40
 User Manual Smart Lock Please read this manual before operating your Smart Lock, and keep it for further reference. 40 I. Introduction Thank you for choosing the AKASO Smart Lock. The new Smart Lock uses
HSIP2 User Manual. ios Application Android Application PC Setup
 HSIP2 User Manual ios Application Android Application PC Setup Please read all instructions carefully before use to get the most out of your HSIP2 Wireless Surveillance Camera. The design and features
QUICK GUIDE. Instruction Manual. UFO Camera
 QUICK GUIDE Instruction Manual UFO Camera Contents 1. Things to Note before Getting Started 3 1.1 High-speed WiFi Internet Connection 3 1.2 SSID and Password 3 1.3 Operating System Requirements 3 2. Get
(SeTracker2)User guide
User guide") (SeTracker2)User guide Please read the manual carefully before using the product, in order to go through the installation and setup. The color of the product is subject to the real product. steps before
(SeTracker2)User guide Please read the manual carefully before using the product, in order to go through the installation and setup. The color of the product is subject to the real product. steps before
Sentrol Cloud User s Guide Ver. 2.01
 Ver. 2.01 Copyright 2016 Nietzsche Enterprise Co., Ltd. All rights reserved Nietzsche Enterprise reserves the right to make changes and improvements to its products without notice. Contact Information:
Wi-Fi Pan & Tilt Camera AlwaysSafe App Manual. ios and Android. English
 Wi-Fi Pan & Tilt Camera AlwaysSafe App Manual ios and Android English Contents Contents Getting Started Adding a Camera 4 Configuring Initial Settings 6 Setting up Email Alerts 8 Editing the Email Alerts
User manual of WIFI camcorder
 User manual of WIFI camcorder 一 Attention: 1. Please strictly abide by the relevant national laws; this product may not be used for illegal purposes, otherwise take the consequence by yourself. 2. Please
Version: DSD0221EN01. Quick Start Guide
 Version: DSD0221EN01 Quick Start Guide Table of Contents Quick Installation Guide... 1 What s in the Box... 1 Quick Start Guide... 2 Notes for Installation... 2 Operation Steps for ios Device... 3 Live
Wireless PIR Smoke Detector IP Camera
 Wireless PIR Smoke Detector IP Camera Model: 2643-62/2650-62/2651-62 en Operation and Installation Manual 1 WELCOME... 4 PRODUCT OVERVIEW... 5 HARDWARE INSTALLATION... 5 Attach the External Power Adapter...
Gynoii Smart Baby Monitor. User Guide
 Gynoii Smart Baby Monitor User Guide 1. Overview of the camera 1. Light sensor 2. Infrared LEDs 3. Lens assembly 4. Built-in microphone 5. Built-in speaker 6. DC 5V power input 7. Reset button 8. LED indicator
Wi-Fi Pan & Tilt Camera AlwaysSafe App Manual. ios and Android. English
 Wi-Fi Pan & Tilt Camera AlwaysSafe App Manual ios and Android English Contents Contents Getting Started Adding a Camera 4 Configuring Initial Settings 6 Setting up Email Alerts 8 Editing the Email Alerts
Smart Watch: GM8588. User Guide. Please read the manual before use.
 Smart Watch: GM8588 User Guide Please read the manual before use. 1. Safety Warning The information in this document won t be modified or extended in accordance with any notice. The watch should be charged
NVMS1000. User Manual
 NVMS1000 User Manual Contents 1 Software Introduction... 1 1.1 Summary... 1 1.2 Operation Environment... 1 1.3 Install and Uninstall... 2 1.3.1 Install the Software... 2 1.3.2 Uninstall the Software...
CarDVR-210 WiFi GPS. User Manual
 CarDVR-210 WiFi GPS User Manual Names of Parts GPS Receiver Slot Lens Micro HDMI Port Speaker Tripod Mount LCD Panel Mic Status Indicator Micro USB Port microsd Card Slot Power/Menu Button Record Button
vmeyecloud iphone Cellphone Monitoring client English manual Written by : the test department Write the date: Version:V1.0
 vmeyecloud iphone Cellphone Monitoring client English manual Written by : the test department Write the date:2013.9.2 Version:V1.0 Contents Contents... 2 1. Introduction... 3 1.1 Brief Introduction...
1. Search for ibaby Care in the App Store under phone apps, or in Google Play for all Android devices.
 M6 port diagrams Status Light DC Power Camera ID USB Port Reset Button DC Power: 5V DC, 2A power adapter (Use official ibaby brand power adapter only) Status Light: Displays 3 unique patterns to show different
User Manual (Not all functions applicable for RSCM W)
") User Manual (Not all functions applicable for RSCM-121001W) Support Email:techsupport@rosewill.com 1 CONTENT 1 Android Operation... 3 1.1 Android App Installation... 3 1.2 App Interface... 4 1.2.1 Interface...
User Manual (Not all functions applicable for RSCM-121001W) Support Email:techsupport@rosewill.com 1 CONTENT 1 Android Operation... 3 1.1 Android App Installation... 3 1.2 App Interface... 4 1.2.1 Interface...
WIRELESS HD CCTV Kit CMS Software
 English WIRELESS HD CCTV Kit CMS Software Instruction Manual KIT MODELS HGNVK-48302 / 48304 / 88304 / 88308 www.iget.cz Contents 1. Set Up and Login 1.1 Set Up 1.2 Set Up Wizard 1.3 Users Login 2. Real
BEAT 2.0 USER MANUAL
 BEAT 2.0 USER MANUAL FCC ID: 2ADLJBEAT20 The device complies with part 15 of the FCC Rules. Operation is subject to the following two conditions: (1) This device may not cause harmful interference, and
INNOV.NET PTY LTD. User guide
 User guide Version1 2016 0 Contents Compatibility... 1 What s in the package?... 1 Setup the RM Pro... 1 Meaning of the LED indicators... 2 Setup e-control on your smartphone... 2 Can I program a remote
Wireless Wi-Fi Video Doorbell
 Wireless Wi-Fi Video Doorbell Quick Start Guide Thank you for choosing the product. Please read through the guide before use, and keep it well for future reference. Note: Product photos and pictures are
HSIP2 User Manual. ios Application Android Application PC Setup
 HSIP2 User Manual ios Application Android Application PC Setup Please read all instructions carefully before use to get the most out of your HSIP2 Wireless Surveillance Camera. The design and features
Outdoor User Manual. ios Application Android Application PC Setup
 Outdoor User Manual ios Application Android Application PC Setup Please read all instructions carefully before use to get the most out of your Outdoor Wireless Surveillance Camera. The design and features
ZNV Client User Manual (Android)
") ZNV Client User Manual (Android) SHENZHEN ZNV TECHNOLOGY CO., LTD. 1 Contents 1 Device Connection...
ZNV Client User Manual (Android) SHENZHEN ZNV TECHNOLOGY CO., LTD. 1 Contents 1 Device Connection...
Smart Watch Plus User Guide
 Smart Watch Plus User Guide Please read the manual before use. Disclaimer CO-PILOT has made every effort to ensure that all the information contained in this manual is accurate and reliable. However, the
THE SMART WAY TO ANSWER YOUR DOOR USER MANUAL
 THE SMART WAY TO ANSWER YOUR DOOR USER MANUAL IMPORTANT PLEASE READ THIS MANUAL CAREFULLY BEFORE OPERATING THE SYSTEM AND RETAIN FOR FUTURE REFERENCE. All devices, with the exception of the External Siren
FAQ for KULT Basic. Connections. Settings. Calls. Apps. Media
 FAQ for KULT Basic 1. What do the Icons mean that can be found in notifications bar at the top of my screen? 2. How can I move an item on the home screen? 3. How can I switch between home screens? 4. How
NVMS1000. User Manual
 NVMS1000 User Manual Contents 1 Software Introduction... 1 1.1 Summary... 1 1.2 Operation Environment... 1 1.3 Install and Uninstall... 2 1.3.1 Install the Software... 2 1.3.2 Uninstall the Software...
Please Download and install the Wanscam APP before you set up the IP Camera. Search on Google Play store and APP Store for E-View 7
 Wanscam User Manual for Mobile Phone APP Download Please Download and install the Wanscam APP before you set up the IP Camera. Search on Google Play store and APP Store for E-View 7 One Key Setting Functionality
Guarding Expert Client Software. User Manual UD02162N
 Guarding Expert Client Software User Manual UD02162N User Manual About this Manual This Manual is applicable to Guarding Expert Client Software. The Manual includes instructions for using and managing
WI-FI GARAGE DOOR CONTROLLER WITH CAMERA USER MANUAL
 WI-FI GARAGE DOOR CONTROLLER WITH CAMERA USER MANUAL Contents Introduction 4 Product Features 5 Garage Door Controller LED Indicators 6 What s Included 7 Wi-Fi Requirements 8 Mobile Device Requirements