1. Overview System Requirements Backup Once Boot Environment Builder Build Windows-PE based Boot Environment...
|
|
|
- Kellie Evans
- 6 years ago
- Views:
Transcription


1 Server Edition / Desktop Edition Operation Manual 1 st Edition December, 2017
2 Table of Contents 1. Overview... 1 System Requirements Installation Product Activation Backup... 8 Backup Once... 8 Scheduled Backup Boot Environment Builder Build Windows-PE based Boot Environment Restore File Recovery System Recovery Image Manager Verify Image Consolidate Image Files Archive Backup Image File Compute MD5 hash value Delete Mount Backup Image Manage Remote Host
3 Push Install Network client management console vstandby ImageBoot APPENDIX ActiveImage Protector & Support Information... 75
4 1. Overview ActiveImage Protector is a backup and recovery solution designed with the latest sector-based disk imaging technology to flexibly support Windows machines in a variety of system environments ranging from legacy machines to the latest virtual machines. ActiveImage Protector provides features essential for a backup solution such as Hot Imaging feature allowing you to back up a running system, Cold Imaging feature enabling you to create a backup image of a clean Windows system before starting it up, fast Incremental Backup that includes only the sectors that have changed since the last full or incremental backup image was written, Command Line Interface allowing backups to be administered by third-party system management tools. System Requirements The following are the system requirements for ActiveImage Protector Server Edition / Desktop Edition. Before you start using ActiveImage Protector Server Edition / Desktop Edition, please ensure that the following system requirements are met. CPU Main Memory (RAM) Hard Disk DVD-ROM Drive Supported Operating System Pentium 4 or above CPU 1024MB or more is required. 650MB or more of available disk space is required. Necessary to install the product, boot or start up ActiveImage Protector boot environment Windows: Windows Server 2016, Windows Server 2012 and 2012 R2, Windows Server 2008 (x86/x64) and 2008 R2, Windows Storage Server 2016, Windows Storage Server 2012 and 2012 R2, Windows Storage Server 2008 and 2008 R2, Windows Server 2003 SP2(x86/x64)R2 Hypervisor: Windows Server 2016 Hyper-V (Hot & Cold Imaging), Windows Server 2012 and 2012 R2 Hyper-V (Hot & Cold Imaging), Windows Server 2008 R2 Hyper-V (Hot & Cold Imaging) * As to the limitations for using the product, please refer to the release note included in ActiveImage Protector s media. * This document includes the screen shots captured in Server Edition, the operating procedures are the same for Desktop Edition. 1
5 2. Installation The following are the operating procedures required to install ActiveImage Protector on the machine specified as backup source. 1. Set the product media to the machine to start the installation launcher. Click on [Install ActiveImage Protector 2018]. If the launcher does not start, please execute Launch.exe in the product media. 2. Click [Next]. 3. Please review the End User's License Agreement. Check the box next to [I accept the terms of the License Agreement] to continue the installation. Click [Next]. 2


6 4. Enter the product key. [Activate afater the install completes] option may be selected to automatically activate the product upon completion of the installation process. Click [Next]. 3
7 5. Select [Typical] for the setup type and click [Next]. 6. Review the installation settings and click [Install] to complete the installation. 4
8 7. Please wailt until installation of ActiveImage Protector completes. 8. Upon completion of the product installation, eject the product media and select [Reboot now] to reboot the machine immediately and [Finish]. The machine is automatically rebooted. 5
9 3. Product Activation Manual activation of the installed ActiveImage Protector terminates the live trial period. If the [Activate after the install completes...] was checked to automatically activate the product upon completion of installation, the following procedures are not required. Two types of activation practices are supported; one is traditional online activation over the internet and the other is offline activation on standalone machine with no internet connection due to security reason. Offline activation: No auto-update over network No communication updating you with the latest information about ActiveImage Protector is provided from NetJapan. The following are the operating procedures for online activation. 1. Start ActiveImage Protector Windows Server 2008 R2 or earlier server OS: Click [Start] [All Programs] [NetJapan] [ActiveImage Protector]. Windows 7 or earlier Desktop OS: Click [Start] [All Programs] [NetJapan] [ActiveImage Protector]. Windows Server 2012 or later server OS: Click [Start] [Applications] [NetJapan] [ActiveImage Protector]. Windows Server 8 or later Desktop OS: Click [Start] [Applications] [NetJapan] [ActiveImage Protector]. 6
![2. Click [Help] and select [Activation] from the](/docs-images/78/77518498/images/10-1.jpg "drop down menu. 3.")
![Enter the product key and click [Activation]. 4.](/docs-images/78/77518498/images/10-3.jpg "When you get the following message, activation")
10 2. Click [Help] and select [Activation] from the drop down menu. 3. Enter the product key and click [Activation]. 4. When you get the following message, activation process completes. Click [OK]. 7
11 4. Backup Backup Once The following are the operating procedures for Backup Once. 1. Start ActiveImage Protector Windows Server 2008 R2 or earlier server OS: Click [Start] [All Programs] [NetJapan] [ActiveImage Protector]. Windows 7 or earlier Desktop OS: Click [Start] [All Programs] [NetJapan] [ActiveImage Protector]. Windows Server 2012 or later server OS:Click [Start] [Applications] [NetJapan] [ActiveImage Protector]. Windows Server 8 or later Desktop OS: Click [Start] [Applications] [NetJapan] [ActiveImage Protector]. 8
12 2. Click [Backup] [Backup Once]. 3. Select backup source. The following example shows that the entire disk is selected for the backup source. Click [Entire Disk] and check the checkbox for [Disk 0]. When the backup source is selected, click [Next]. 9

13 4. Select a target destination for the backup image. The following example show that \\ \disk in the network shared folder is specified for the target destination. Click [Select Folder]. 5. Please specify the path for the location of the target destination. Please enter the following path \\ \disk for the target destination and press Enter key. 10

14 6. Please enter the credentials to access the target destiantion. User Name must be specified in Host Name \ User Name format. The following example shows that the host name and user name aipuser are entered. The credentials are predefined to access the destination folder. Enter \\ \aipuser for [User Name] and the password for [Password]. Click [Connect]. 7. Ensure the target destination is correctly specified and click [Select Folder]. 11
15 8. Specify the backup image file name. The following example shows that backup01 is specified for the image file (the file extention is automatically entered.) Enter backup01 for [File Name] and click [Next]. 9. The backup configuration and option settings are displayed. Review the settings and click [Done] to start the backup task. 12

16 10. When the backup task is started, the current task information is displayed in [Dashboard]. 11. When the progress of [Running] task indicates 100%, the backup process is completed. 13
17 Scheduled Backup The following are the operating procedures for Scheduled Backup. 1. Start ActiveImage Protector. Windows Server 2008 R2 or earlier server OS: Click [Start] [All Programs] [NetJapan] [ActiveImage Protector]. Windows 7 or earlier Desktop OS: Click [Start] [All Programs] [NetJapan] [ActiveImage Protector]. Windows Server 2012 or later server OS: Click [Start] [Applications] [NetJapan] [ActiveImage Protector]. Windows Server 8 or later Desktop OS: Click [Start] [Applications] [NetJapan] [ActiveImage Protector]. 2. Click [Backup] [Create Backup Schedule]. 14
![3. Select backup source. The following example shows that the entire disk is selected for the backup source. Click [Entire Disk] and check the checkbox for [Disk 0].](/docs-images/78/77518498/images/18-0.jpg "When the backup source is selected, click [Next]. 4. Select a target destination for the backup image. The following example shows that \\192.168.123.")
18 3. Select backup source. The following example shows that the entire disk is selected for the backup source. Click [Entire Disk] and check the checkbox for [Disk 0]. When the backup source is selected, click [Next]. 4. Select a target destination for the backup image. The following example shows that \\ \disk in the network shared folder is specified for the target destination. Click [Select Folder]. 15
19 5. Please specify the path for the location of the target destination. Please enter the following path \\ \disk for the target destination and press Enter key. 6. Please enter the credentials to access the target destiantion. User Name must be specified in Host Name \ User Name format. The following example shows that the host name and user name aipuser are entered. The credentials are predefined to access the destination folder. Enter \aipuser for [User Name] and the password for [Password]. Click [Connect]. If you specify the same target destination that you selected before, since the credentials are saved, the windows for the above step 5 and 6 are skipped. 16
20 7. Ensure the target destination is correctly specified and click [Select Folder]. 8. Specify the backup image file name. The following example shows that schedule 01 is specified for the task name, backup02 for the image file name (the file extention is automatically entered.) Enter schedule 01 for [Task Name], backup02 for [File Name]. 17
21 9. Configure Compression settings. ActiveImage Protector provides two compression types. One is Standard Compression that offers the common file / folder compression tool same as ZIP. The other is Deduplication Compression designed to create index for every block of backup stream and delete duplicated blocks when identified while creating a backup image file. Deduplication Compression feature efficiently and dramatically reduces backup storage space requirements on a server hosting multiple virtual machines. Check the checkbox for [Compression] in [Option] pane. When [Deduplication Compression] option is selected, [Level 2] (Optimized) and [Change temp folder] are enables. The compression level goes up according to the compression ratio. When a backup task runs in boot environment, the temporary work folder is located on memory by default, therefore, please be aware that the available space in the temporary work folder may be insufficient. If the backup source includes large data volume, please change the temporary work folder to other location such as the target destination. 18
![10. To enable Deduplication Compresshin feature by default, go to [Preference] [Deduplication] and check the checkbox for [Set as default compression] and select [Deduplication Compression] for](/docs-images/78/77518498/images/22-0.jpg "[Default Level]. Click [Apply]. 11. Schedule type can be selected to configure the backup schedule. The following example shows the weekly backup schedule settings.")
22 10. To enable Deduplication Compresshin feature by default, go to [Preference] [Deduplication] and check the checkbox for [Set as default compression] and select [Deduplication Compression] for [Default Level]. Click [Apply]. 11. Schedule type can be selected to configure the backup schedule. The following example shows the weekly backup schedule settings. Base backup: Weekly Incremental backup: Weekly Base backup: Every Sunday at 1:00 AM Incremental backup: From Monday to Friday at 1:00 AM 19
![After configuring the settings, click [OK]. 12.](/docs-images/78/77518498/images/23-0.jpg "Configure the option settings including Retention Policy, BootCheck and Consolidation for post backup processing.")
![Check the checkbox for [Enable Retention Policy] option and enter 3 for [Number of image sets to retain:] (3 sets of](/docs-images/78/77518498/images/23-1.jpg "incremental backup files are retained in the target destination before deletion).")
23 After configuring the settings, click [OK]. 12. Configure the option settings including Retention Policy, BootCheck and Consolidation for post backup processing. Check the checkbox for [Enable Retention Policy] option and enter 3 for [Number of image sets to retain:] (3 sets of incremental backup files are retained in the target destination before deletion). Please configure the BootCheck settings in [Post Backup Process] section. Check the checkbox for [ImageCheck] and [Unconfigured]. 20
![13. In [ImageCheck] tab, check the checkbox for [Enable BootCheck]. 14. Click [Consolidation] tab. Check the checkbox for [Enable Consolidation].](/docs-images/78/77518498/images/24-0.jpg "Incremental backup saves processing time, however, recurring scheduled backup tasks creates a growing and sometimes unmanageable number of incremental files.")

24 13. In [ImageCheck] tab, check the checkbox for [Enable BootCheck]. 14. Click [Consolidation] tab. Check the checkbox for [Enable Consolidation]. Incremental backup saves processing time, however, recurring scheduled backup tasks creates a growing and sometimes unmanageable number of incremental files. Consolidation consolidates an uninterrupted series of backup image files in the same generation set to facilitate file management. The following example shows that 15 consolidated files are retained while the latest 30 incremental files are saved. Consolidation task runs whenever a new incremental backup file is created. Click [Done] to go back to [Schedule] window. 21
![When the option settings are configured, click [Next]. 15. In [Summary] window, review the backup configuration and options.](/docs-images/78/77518498/images/25-1.jpg "Click [Done] to complete backup setting. 16. Go to [Dashboard] [Schedule] to monitor the created schedle.")
25 When the option settings are configured, click [Next]. 15. In [Summary] window, review the backup configuration and options. Click [Done] to complete backup setting. 16. Go to [Dashboard] [Schedule] to monitor the created schedle. The scheduled backup task runs according to the schedule you specified. 22
![5. Boot Environment Builder Build Windows-PE based Boot Environment 1. Start by selecting [BE Builder (Windows PE)] from the [Utilities] menu bar. 2.](/docs-images/78/77518498/images/26-0.jpg "Microsoft Windows ADK or AIK is required to be installed on the host to build the Windows PE based boot environments.")
26 5. Boot Environment Builder Build Windows-PE based Boot Environment 1. Start by selecting [BE Builder (Windows PE)] from the [Utilities] menu bar. 2. Microsoft Windows ADK or AIK is required to be installed on the host to build the Windows PE based boot environments. As for Windows ADK, please select the following components to install: Deployment Tools Windows Preinstallation Environment (Windows PE) 23
27 3. [Welcome to Boot Environment Builder] window comes up, then click on [Next]. 4. Specify the Windows PE toolkit needed for the installed operating system by clicking the appropriate radio button. The 32-bit version of Windows PE boot environment can be built on 64-bit host. The information of a specific Windows PE toolkit can be displayed. Click [Next]. 24
].")
28 5. Specify device driver(s) to include in the boot environment. Network and storage device drivers included in the current system are detected and listed on the left pane. Click [Load INF file] to add a driver by selecting INF file if the driver is not listed. After selecting a driver to add, click on [==>] to include the driver in [Embedded driver(s)]. To exclude a driver from [Embedded driver(s)], select the driver and click on [<==]. Click [Next]. * Only LAN (Ethernet) driver is supported as network driver. 25
![6. Specify the Language, Keyboard type, Time zone and/or Display resolution for the Windows PE boot environment by selecting the preferred option from the drop-down menu. Click [Next]. 7.](/docs-images/78/77518498/images/29-0.jpg "Select the bootable media to build the boot environment. PreBoot environment - Creates the boot environment in the system volume to boot from the hard disk.")
29 6. Specify the Language, Keyboard type, Time zone and/or Display resolution for the Windows PE boot environment by selecting the preferred option from the drop-down menu. Click [Next]. 7. Select the bootable media to build the boot environment. PreBoot environment - Creates the boot environment in the system volume to boot from the hard disk. ISO Images - Creates an ISO image file in the specified location. The created ISO file may be burned to DVD media at a later time. * [DVD media] option is not provided for Windows XP/2003. After creating ISO image, please use a third-party writing software to burn the ISO image to DVD media. USB device boot environment - Creates boot environment on a USB memory device. The USB media currently connected to the PC may be selected. All data on the selected USB media device will be erased. * [USB device boot environment] option is not provided for Windows XP/2003. Click [Next]. 26


30 8. Please review the configured settings. Click [< Prev] to make changes to previous settings. Click on a node to go back to a specific page. Click on [Build Windows PE environment] to display the confirmation message. Click on [OK] to start building Windows PE environment. You can monitor the progress in the following window. 27

31 28 9. When boot environment creation completes, the following message is displayed. Click on [OK] to close the window.
32 6. Restore File Recovery A specific file or folder can be restored from a backup image file to a specified location. Please take the following procedures. 1. Start ActiveImage Protector. Windows Server 2008 R2 or earlier server OS: Click [Start] [All Programs] [NetJapan] [ActiveImage Protector]. Windows 7 or earlier Desktop OS: Click [Start] [All Programs] [NetJapan] [ActiveImage Protector]. Windows Server 2012 or later server OS: Click [Start] [Applications] [NetJapan] [ActiveImage Protector]. Windows Server 8 or later Desktop OS: Click [Start] [Applications] [NetJapan] [ActiveImage Protector]. 29
33 2. Select [Recovery] [File Recovery]. 3. Select the backup image file in [Backup Destination]. You can specify the path for the destination. This example shows that \\ \disk is specified for the destination. Press Enter key. 30
34 4. Select the backup source host from the list and recovery point. Click [Next]. The information of the selected recovery point (image) is displayed in [Backup Information]. 31
35 32 5. Check the checkbox for the items in [Backed up files] to restore. The selected items are listed in [Recovery Items]. The following Recovery Options may be configured. Copy ACL - The selected file is restored keeping Access Control List (ACL) configured for restore source file. Not overwrite existing folder or file If there already exists a file / folder in the destination, the file / folder is restored under a unique name instead of overwriting the existing file.
 to select the](/docs-images/78/77518498/images/36-0.jpg "destination to save the restored item.")
36 6. Click[ ](Browse) to select the destination to save the restored item. Click [Save]. 33
![7. Click [Done] to start the recovery process.](/docs-images/78/77518498/images/37-2.jpg "System Recovery The following are the operating procedures for system recovery by using boot environment in USB device or optical media built with ActiveImage Protector BE Builder.")
37 7. Click [Done] to start the recovery process. System Recovery The following are the operating procedures for system recovery by using boot environment in USB device or optical media built with ActiveImage Protector BE Builder. Note: Please be aware that, as a result of system recovery, the data stored in local folder are entirely purged. 1. Set the boot media to your machine and boot into the boot environment from the boot media. Please wait until boot environment completedly boots up. 34

![This example shows that [Use the Following IP address] is selected. Please configure the settings according to your network environment.](/docs-images/78/77518498/images/38-2.jpg "Specify 192.168.123.76 for [IP Address:], 255.255.255.0 for [Subnet mask], 192.168.123.254 for [Default gateway], Select [Use the following DNS server address] and enter 192.")
38 2. Please configurethe network settings in order to access the network shared folder specified for the target destination. Select [Utilities] [Network Setting]. 3. [NetJapan Network Config] windows is displayed. This example shows that [Use the Following IP address] is selected. Please configure the settings according to your network environment. Specify for [IP Address:], for [Subnet mask], for [Default gateway], Select [Use the following DNS server address] and enter Click [Apply] and [OK] to complete the settings. 35
![36 4. Go to [Option] [Launch Command Prompt] and ensure that the settings such as IP Address are correctly](/docs-images/78/77518498/images/39-0.jpg "configured. Enter ipconfig command and press Enter key.")
39 36 4. Go to [Option] [Launch Command Prompt] and ensure that the settings such as IP Address are correctly configured. Enter ipconfig command and press Enter key. Make sure that the IP address is correctly specified.
![5. Select [Recovery] [Volume](/docs-images/78/77518498/images/40-0.jpg "Recovery]. 6. Enter \\192.168.")

40 5. Select [Recovery] [Volume Recovery]. 6. Enter \\ \disk for [Backup Destination] and press Enter key. 37


41 7. For user authentication, please enter \aipuser for user name and predefined passwork. Click [Connect]. 8. Select Source Computer and Recovery Point. Click [Next]. 38
![9. [Restore Settings] window is displayed. 10.](/docs-images/78/77518498/images/42-0.jpg "Right-click on the restore source selected in [Source Objects] and select Disk")
42 9. [Restore Settings] window is displayed. 10. Right-click on the restore source selected in [Source Objects] and select Disk 0 - Basic (GPT) for [Target]. 39
![11. Please review the settings in [Target Settings] and click](/docs-images/78/77518498/images/43-1.jpg "[Next]. 12. Review the summary and click [Done] to complete.")
43 11. Please review the settings in [Target Settings] and click [Next]. 12. Review the summary and click [Done] to complete. 40

44 13. Restore task started. 14. When the Progress reatches 100%, the recovery task completed. Select [Operation] [End] to shut down or reboot the machine. Ensure that the restore task successfully completed. 41
45 7. Image Manager Image Manager tools provide a number of options that provide efficient management of backup image files. 1. Start ActiveImage Protector. Windows Server 2008 R2 or earlier server OS: Click [Start] [All Programs] [NetJapan] [ActiveImage Protector]. Windows 7 or earlier Desktop OS: Click [Start] [All Programs] [NetJapan] [ActiveImage Protector]. Windows Server 2012 or later server OS: Click [Start] [Applications] [NetJapan] [ActiveImage Protector]. Windows Server 8 or later Desktop OS: Click [Start] [Applications] [NetJapan] [ActiveImage Protector]. 2. Select [Image Manager] - [Image Manager]. 42

46 3. Select a backup image file. Verify Image 1. Verify the integrity of a backup image. Select a file then click [Verify]. 43

47 2. Upon completion of Verify task, the status and progress are displayed as follows. Consolidate Image Files 1. Select multiple incremental backup images to consolidate them into a single incremental file. Select the files and click [Consolidate] in the right pane. You can configure the following option settings. Keep original image files - By default, the original image files will be deleted after the consolidated file is created. Check this box to retain the original files. Compute MD5 - Check this box to create an MD5 checksum file for the consolidated image file. Execution Priority - Depending on the number of processes running on the system, adjust the execution priority for the consolidation process. Post task execution processing - Choices included are to [Reboot] or [Shutdown] once the consolidated file is created. 44


48 2. Upon completion of the consolidation task, the following window is displayed. Archive Backup Image File 1. Archive feature unifies a base image file and an uninterrupted series of incremental files in the same generation set into a full backup file and saves it under a different name. Select a full (base image file) and incremental files from the same generation set. 45


49 46 2. You can configure the following option settings. Compute MD5 - Creates an MD5 checksum file for the archived file. Priority - Depending on the number of processes running on the system, adjust the execution priority for the archiving process. Post task execution processing - Choices included are to [Reboot] or [Shutdown] once the archived file is created.

50 3. Upon completion of Archive task, the following information is displayed in Dashboard window. Compute MD5 hash value 1. Create an MD5 checksum for the selected image file. This can be used as a security measure to check if internal tampering of the image file has occurred in a copy of the image. 47


51 2. Upon completion of computing MD5, the following information is displayed in Dashboard window. Please make sure that the MD5 file is created by using Windows Explorer. 48

![Go to [Image Manager] and select [Mount Image]. 2. Select the backup image to mount.](/docs-images/78/77518498/images/52-2.jpg "If the selected image includes multiple disks, select a disk. Select a volume to mount from the image.")
52 Delete You can select to delete a base or incremental image file(s). Please keep in mind that this type of deletion cannot be undone. Mount Backup Image 1. Go to [Image Manager] and select [Mount Image]. 2. Select the backup image to mount. If the selected image includes multiple disks, select a disk. Select a volume to mount from the image. Specify the drive letter and click [Mount]. The image file can be mounted as read-only (default) by selecting the [Mount as Read-only] option. 49
53 50 3. In the mounted image file, you can select and open or copy a file / folder in the same manner as you operate read-only drive in Windows Explorer.
54 4. To unmount the image file, Select a mount point from the [Mounted Volume]. Click [Unmount]. *Uncheck [Mount as Read-only] option to mount the image file as writable. The changes made to the image file are saved in a differential image file (.aix) after the volume is unmounted. 51
![8. Manage Remote Host This topic describes Push Install and Network Client Management Console. These features are enabled by selecting [Console] in [Preferences] menu.](/docs-images/78/77518498/images/55-0.jpg "Push Install Please select [Enable Push Install] option in [Advanced Options] in the above [Preference] Window. 1. Start ActiveImage Protector.")
55 8. Manage Remote Host This topic describes Push Install and Network Client Management Console. These features are enabled by selecting [Console] in [Preferences] menu. Push Install Please select [Enable Push Install] option in [Advanced Options] in the above [Preference] Window. 1. Start ActiveImage Protector. Windows Server 2008 R2 or earlier server OS: Click [Start] [All Programs] [NetJapan] [ActiveImage Protector]. Windows 7 or earlier Desktop OS: Click [Start] [All Programs] [NetJapan] [ActiveImage Protector]. Windows Server 2012 or later server OS: Click [Start] [Applications] [NetJapan] [ActiveImage Protector]. Windows Server 8 or later Desktop OS: Click [Start] [Applications] [NetJapan] [ActiveImage Protector]. 52
![2. Select [Push Install] in [Utilities] menu.](/docs-images/78/77518498/images/56-0.jpg "To install ActiveImage Protector, select")

![3. Select [Install Package].](/docs-images/78/77518498/images/56-3.jpg "Enter [Product Key] and [Number of Licenses]")
56 2. Select [Push Install] in [Utilities] menu. To install ActiveImage Protector, select [Install or upgrade NetJapan software on the remote network computers] and click [Next ]. 3. Select [Install Package]. Enter [Product Key] and [Number of Licenses] and click [Next]. 53

57 4. Please specify the host to install the product. You can search for the host name from the networked hosts or directly enter the host name. You can specify the criteria and filtering conditions to search for a specific networked host. Windows network : A search for host computers on the same network is performed. Windows Active Directory : A list of host computers in the specified Active Directory is obtained. Search all computers:all hosts are searched. Search by Product Installed : The hosts on which ActiveImage Protector is installed are listed. Search No Product Installed : The hosts on which ActiveImage Protector is not installed are listed This example shows that [Search all computers] option is selected. Check the checkbox for SERVER02 in the host list on which ActiveImage Protector is not installed, and click [Next]. 5. You can configure the installation option settings. Please select the components to install in [Component] option. [Options] provides the options for post-installation behavior (reboot / activate). Do not reboot the system : Select this option not to reboot the system upon completion of the product installation. Your computer must be restarted to complete the installation and start operation of the ActiveImage Protector agent even when this option is enabled. Automatically activate : Upon completion of the product installation you can predefine whether the product is automatically activated. 54


58 Enter credentials and click [Next]. 6. Review the settings and click [Install]. Installation of ActiveImage Protector starts. 55
59 7. Upon completion of installation, [Succeeded] is indicated for [Status] in the following window. Click [Close] to end Push Install. Network client management console You can monitor the status and manage ActiveImage Protector installed on a networked remote host. 1. Start ActiveImage Protector. Windows Server 2008 R2 or earlier server OS: Click [Start] [All Programs] [NetJapan] [ActiveImage Protector]. Windows 7 or earlier Desktop OS: Click [Start] [All Programs] [NetJapan] [ActiveImage Protector]. Windows Server 2012 or later server OS: Click [Start] [Applications] [NetJapan] [ActiveImage Protector]. Windows Server 8 or later Desktop OS: Click [Start] [Applications] [NetJapan] [ActiveImage Protector]. 56
![2. Before you start using Remote Control feature, you need to display a list of remote hosts in [Management Console] window. Click [Add New Computers]. 3. Specify the host to add to the list.](/docs-images/78/77518498/images/60-1.jpg "You can add a new computer by selecting [Discover] or [Manual]. This example show that [Discover] and [Search all computers] option are selected.")
60 2. Before you start using Remote Control feature, you need to display a list of remote hosts in [Management Console] window. Click [Add New Computers]. 3. Specify the host to add to the list. You can add a new computer by selecting [Discover] or [Manual]. This example show that [Discover] and [Search all computers] option are selected. Check the checkbox for Server02 in the host list and click [Add]. 57


61 4. Enter the credentials to access the host. 5. Server02 is added to the Managed Computers list. 58
62 6. Select a host from the list and double-click or right-cllick on the host. Select [Remote] from the context menu to directly connect to agent installed on remote host from the console. 7. When connection is successfully established, the status bar is green-colored. Now oneclick offers execution of scheduling backup tasks on remote network hosts and monitoring log information. 8. Double-click on the local host name to disconnect from the remote host. 59

63 9. vstandby vstandby is a software solution that creates and maintains dormant virtual replicas of physical or virtual machines to provide a switch-over option in the event of failure of the source machine. This virtual standby virtual replica is kept current by taking scheduled incremental P2V boot points of the source machine. This ensures a successful start-up of the standby virtual machine created at the point in time before the system failure. vstandby is equally valuable as a tool for migrating legacy physical machines to an ESXi or Hyper-V host in real-time. Minimal downtime is expected as NetJapan's P2V technology is utilized for the migration of the legacy machines. For detailed system requirements, please refer to NetJapan web site. 1. To start creating a virtual standby replica, click [vstandby] from the left menu. [Welcome to vstandby] window is displayed. Click [Create Virtual Standby Replica]. 60
![2. Select the source disk to create the standby virtual machine by checking the checkbox for the source disk in the disk map or the list. Click [Next]. 3.](/docs-images/78/77518498/images/64-0.jpg "Select ESXi or Hyper-V for the target host to create virtual standby replica. This example shows that [Hyper-V] is selected. Enter 192.168.123.")
64 2. Select the source disk to create the standby virtual machine by checking the checkbox for the source disk in the disk map or the list. Click [Next]. 3. Select ESXi or Hyper-V for the target host to create virtual standby replica. This example shows that [Hyper-V] is selected. Enter and click [Connect]. 61

65 4. Enter credentials to log in Hyper-V host. Enter Administrator for [User Name] and the predefined password for [Password]. 5. Hyper-V Host Information is displayed. Click [Next]. 62
66 6. [Configure Virtual Standby Replica] window is displayed. Please configure the virtual standby replica settings. In [VM Settings] please enter [VM Name], [VHD(X) Name], [Select Volume], [Disk Type]. In Network Settings please enter [Virtual Switch], [IP Config]. Click [Next]. [Virtual Switch] is configured on host machine and [IP Address] configured on source machine. 7. You can configure weekly or monthly intervals for creating incremental boot points of the standby virtual machine. The following example shows Weekly schedule setting window. Click [Next]. 63
67 8. Please configure the option settings. You can configure the maximum limit (up to 30) for the number of boot points to create for a virtual standby replica. When the number of the boot points reaches the predefined limit, the most and the second obsolete boot points are merged. Set the priority for the vstandby Windows process. Adjusting the priority setting can allocate more or less CPU time for the vstandby processes. This is all dependent on the number of other mission critical applications running on the protected machine. Click [Next]. 9. [Summary] window is displayed. Review the settings and click [Finish]. 64

![immediately, click [OK]. 11.](/docs-images/78/77518498/images/68-1.jpg "Dashboard monitors scheduled")
68 10. vstandby task is created. If you wan to run the task immediately, click [OK]. 11. Dashboard monitors scheduled recurring tasks. 65
69 12. When a virtual standy replica is created, the following window is displayed. 13. On Hyper-V host, you can monitor the virtual standby replica as follows. 66
70 10. ImageBoot ImageBoot immediately starts a virtual machine from any ActiveImage Protector backup image file. ImageBoot is developed based on NetJapan s virtual conversion technology but bypasses lengthy physical to virtual conversion and recovery process. As is often the case, it takes about a couple of hours to restore a 1TB backup image file. The use of ImageBoot enables you to boot a backup image file as a virtual machine in as little as two minutes. Microsoft Hyper-V, VMware Workstation/Player are supported for hypervisor. The following are the examples for practical use of ImageBoot. Common disaster recovery approaches include backup image boot test to provide confidence that your backup images are bootable. However, it s time cosuming and cumbersome process The use of ImageBoot lets you bypass the lengthy test process. The use of incremental backup images enables to locate the point of a system failure. However, you need to check the entire incremental backup files to identify the cause of the problem. Combined with the recovery process, it takes quite long. The use of ActiveImage Protector s regularly scheduled backups and ImageBoot help you identify the point of failure bypassing recovery process. ImageBoot facilitates verification of P2V migration. ImageBoot provides confidence in P2V migration by using a backup image file. vstandby, as stated above, also provides immediate start-up of the standby virtual machine. The difference between the two products is that ImageBoot immediately starts a ActiveImage Protector backup image file. Without the need for making changes to the backup image files, a backup image file of the source machine can be booted. ImageBoot lets you perform testing upgraded version of an application or updated services. 67


71 1. ImageBoot has to be installed from the product media or the setup file downloaded from NetJapan s Web Site. When you use the launcher, please select [Install ImageBoot]. Setup Wizard is launched as follows. 68


72 2. Please carefuly review the End User's License Agreement. Specify the installation folder and the preferred language to install the package (you may not need to change the default settings.) 69
73 70
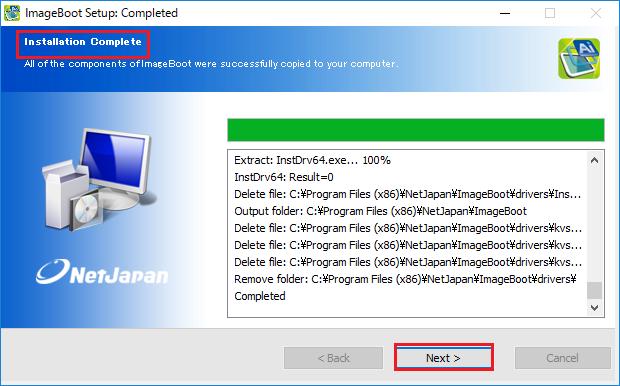
![3. The installation completes with the following window of the setup wizard. Click [Close] to end the setup wizard. 4. Start ImageBoot.](/docs-images/78/77518498/images/74-0.jpg "Windows Server 2008 R2 or earlier server OS: Click [Start] [All Programs] [NetJapan] [ActiveImage Protector].")
74 3. The installation completes with the following window of the setup wizard. Click [Close] to end the setup wizard. 4. Start ImageBoot. Windows Server 2008 R2 or earlier server OS: Click [Start] [All Programs] [NetJapan] [ActiveImage Protector]. Windows 7 or earlier Desktop OS: Click [Start] [All Programs] [NetJapan] [ActiveImage Protector]. Windows Server 2012 or later server OS: Click [Start] [All Programs] [NetJapan] [ActiveImage Protector]. Windows Server 8 or later Desktop OS: Click [Start] [All Programs] [NetJapan] [ActiveImage Protector]. 71

![Click [Next]. 6.](/docs-images/78/77518498/images/75-1.jpg "Select a backup image file created by using ActiveImage Protector in [Select")
75 5. ImageBoot starts. This example shows that [Boot an AIP image as a New Virtual Machine] is selected. Click [Next]. 6. Select a backup image file created by using ActiveImage Protector in [Select Image]. Check in the checkbox for Disk 0 in [Select Disk]. Please make sure that Yes is indicated for [Boot]. Click [Next]. 72

![Please configure the settings, i.e., [VM name], [CPU], [Memory], [NIC].](/docs-images/78/77518498/images/76-1.jpg "Click [Boot]. 8. P2V process starts. 9.")
76 7. Select a hypervisor. This example shows that [Microsoft Hyper-V] is selected. Please configure the settings, i.e., [VM name], [CPU], [Memory], [NIC]. Click [Boot]. 8. P2V process starts. 9. Virtual machine, virtual network adapter are created. 73


77 10. Thereafter, Windows system boots up. When Windows OS boots up, device preparation phase may take place. 11. This example shows that a virtual machine is booted from a backup image file of Windows Server
78 APPENDIX ActiveImage Protector & Support Information NetJapan s Web Site You will find the product information as well as direct links to download documentation, our full installers or update installers, etc: ActiveImage Protector FAQ You can access the support FAQ. For your inquiry about ActiveImage Protector, please contact: Global Sales Dept., NetJapan Inc. sales@netjapan.com Phone: Fax: The software and the related documentation are proprietary products of NetJapan, Inc., and are copyrighted to the company. Copyright(c) 2017 NetJapan, Inc. All rights reserved. ActiveImage Protector, ActiveImage Protector Server, ActiveImage Protector Desktop, ActiveImage Protector IT Pro, ActiveImage Protector for Hyper-V Enterprise, ReZoom it!, ActiveImage Protector Linux, ActiveImage Protector Virtual, ActiveImage Protector Cluster, ActiveImage Protector Cloud, ActiveImage Protector Basic, ImageBoot, ImageCenter LE, BootCheck are trademarks of NetJapan, Inc. Other brands and product names mentioned in this news release are trademarks or registered trademarks of their respective holders. 75
1. Initial Setting and Installation of ActiveVisor... 1
 ActiveVisor Startup Guide 1 st Edition August, 2018 Contents 1. Initial Setting and Installation of ActiveVisor... 1 1.1 System Requirements... 1 1.2 Installation of ActiveVisor... 2 1.3 Initial Settings
Server / Desktop Edition. Quick Start Guide. (Second Edition;Feb. 29, 2016 )
") Server / Desktop Edition Quick Start Guide (Second Edition;Feb. 29, 2016 ) 2016 Copyright NetJapan, Inc. All Rights Reserved. The software and the related documentation are proprietary products of NetJapan,
Server / Desktop Edition Quick Start Guide (Second Edition;Feb. 29, 2016 ) 2016 Copyright NetJapan, Inc. All Rights Reserved. The software and the related documentation are proprietary products of NetJapan,
Product Summary. ActiveVisor
 ActiveVisor Product Summary 2 nd Edition November, 2018 Index Objective 3 Overview 4 Components of ActiveVisor 8 Main Features 10 Console 12 Site Settings 13 Backup 17 Schedule 20 vstandby 21 Client settings
Practical Operation Seminar. First Edition
 Practical Operation Seminar First Edition 1. What is vstandby? New concept design of Virtual Standby Availability Solution Standby Availability Solution to configure standby virtual machine originated
ActiveImage Protector 2016 R2 SP1. Backup and Recovery of Domain Controller User Guide First Edition - March 23, 2017
 ActiveImage Protector 2016 R2 SP1 Backup and Recovery of Domain Controller User Guide First Edition - March 23, 2017 This user guide provides a detailed description about backup and recovery procedures
ActiveImage Protector 2016R2SP1. Backup and Recovery of Domain Controller User Guide First Edition - March 23, 2017
 ActiveImage Protector 2016R2SP1 Backup and Recovery of Domain Controller User Guide First Edition - March 23, 2017 This user guide provides a detailed description about backup and recovery procedures of
Services Configuration guide
 Services Configuration guide When storing a copy of your backups (client s backups) in NetJapan Cloud, it is necessary to follow this configuration guide. Alternatively, you can order our Remote installation
Integrating RDX QuikStor TM into NetJapan ActiveImage TM Protector
 Integrating RDX QuikStor TM into NetJapan ActiveImage TM Protector Backup is the life insurance of a company as it protects its systems and data. Backup also ensures that valuable data is available after
Integrating RDX QuikStor into NetJapan ActiveImage Protector
 Integrating RDX QuikStor into NetJapan ActiveImage Protector INTEGRATION BRIEF Backup is the life insurance of a company as it protects its crown jewels. Backup ensures data availability and business continuity
Features - Microsoft Data Protection Manager
 Page 1 of 36 Features - Microsoft Data Protection Manager TABLE OF CONTENTS OVERVIEW NEW FEATURES SYSTEM REQUIREMENTS SUPPORTED FEATURES GETTING STARTED - DATA PROTECTION MANAGER DEPLOYMENT GETTING STARTED
Kaseya 2. User Guide. Version 6.5 and 1.1
 Kaseya 2 System Backup and Recovery User Guide Version 6.5 and 1.1 December 18, 2014 Agreement The purchase and use of all Software and Services is subject to the Agreement as defined in Kaseya s Click-Accept
How to install the software of ZNS8022
 How to install the software of ZNS8022 1. Please connect ZNS8022 to your PC after finished assembly. 2. Insert Installation CD to your CD-ROM drive and initiate the auto-run program. The wizard will run
This option lets you reset the password that you use to log in if you do not remember it. To change the password,
 User s Guide Overview IDrive offers the most cost effective BMR functionality with onsite disk image backup for SMBs. Store entire data of hard disks including the operating system (OS) and application
version 5.4 Installation Guide
 version 5.4 Installation Guide Document Release Date: February 9, 2012 www.phdvirtual.com Legal Notices PHD Virtual Backup for Citrix XenServer Installation Guide Copyright 2010-2012 PHD Virtual Technologies
Veritas System Recovery 18 Management Solution Administrator's Guide
 Veritas System Recovery 18 Management Solution Administrator's Guide Documentation version: 18 Legal Notice Copyright 2018 Veritas Technologies LLC. All rights reserved. Veritas and the Veritas Logo are
ActiveImage Protector 2016R2SP1. Backup and Recovery of Oracle Database Second Edition - March 23, 2017
 ActiveImage Protector 2016R2SP1 Backup and Recovery of Oracle Database Second Edition - March 23, 2017 This user guide provides a description about backup and recovery procedures of Oracle database by
Veritas System Recovery Disk Help
 Veritas System Recovery Disk Help About recovering a computer If Windows fails to start or does not run normally, you can still recover your computer. You can use the Veritas System Recovery Disk and an
C A S P E R TECH EDITION 10 USER GUIDE
 TM C A S P E R TM TECH EDITION 10 USER GUIDE Copyright and Trademark Information Information in this document is subject to change without notice. Federal law prohibits unauthorized use, duplication, and
Installing Acronis Backup Advanced Edition
 2015 Installing Acronis Backup Advanced Edition BEST PRACTISE Table of Contents Acronis Backup Advanced components... 4 Management Server... 4 Acronis Storage Node... 4 Agents / Appliance... 4 Bootable
User Guide. Version R95. English
 Cloud Backup User Guide Version R95 English September 11, 2017 Copyright Agreement The purchase and use of all Software and Services is subject to the Agreement as defined in Kaseya s Click-Accept EULATOS
StorageCraft Recovery Environment User Guide
 StorageCraft Recovery Environment User Guide StorageCraft Copyright Declaration StorageCraft ImageManager, StorageCraft ShadowProtect, StorageCraft Cloud, and StorageCraft Cloud Services, together with
InMage Scout Standard Quick Install Guide. Version 1.3
 InMage Scout 8.0.1 Standard Quick Install Guide Version 1.3 Table: Document History Document Document Version Date 1.0 26 th Feb 2015 Standard version 1.1 7 th April 2015 Minor update Remarks 1.2 28 th
Veritas System Recovery Disk Help
 Veritas System Recovery Disk Help About recovering a computer If Windows fails to start or does not run normally, you can still recover your computer. You can use the Veritas System Recovery Disk and an
NovaBACKUP. User Manual. NovaStor / May 2014
 NovaBACKUP User Manual NovaStor / May 2014 2014 NovaStor, all rights reserved. All trademarks are the property of their respective owners. Features and specifications are subject to change without notice.
Backup Table of Contents:
 Table of Contents: Manage Tickets Configure Ticketing 362 Chapter 10 - Sadjadi et al. Introduction The need for an accurate, easy to use and secure backup and recovery system is well recognized. The success
InMage Scout Standard Quick Install Guide. Version 1.5
 InMage Scout 8.0.1 Standard Quick Install Guide Version 1.5 Table: Document History Document Document Version Date 1.0 26 th Feb 2015 Standard version 1.1 7 th April 2015 Minor update Remarks 1.2 28 th
Acronis Backup & Recovery 11.5
 Acronis Backup & Recovery 11.5 Installation Guide Applies to the following editions: Update 2 Advanced Server Server for Windows Virtual Edition Server for Linux Advanced Server SBS Edition Workstation
This option lets you reset the password that you use to log in if you do not remember it. To change the password,
 User s Guide Overview IDrive offers the most cost-effective BMR functionality with onsite disk image backup for SMBs. You can store entire data of hard disks including the operating system (OS) and application
Install ISE on a VMware Virtual Machine
 Supported VMware Versions, page 1 Support for VMware vmotion, page 1 Support for Open Virtualization Format, page 2 Virtual Machine Requirements, page 3 Virtual Machine Resource and Performance Checks,
Backup App V7. Quick Start Guide for Windows
 Backup App V7 Quick Start Guide for Windows Revision History Date Descriptions Type of modification 30 Jun 2016 First Draft New 25 Nov 2016 Added Restore Options to Ch 8 Restoring Data; Combined Technical
vmguardian 3.0 Practical Operation Seminar First Edition
 vmguardian 3.0 Practical Operation Seminar First Edition 1. Feature Overview ESX(i) Virtual Machine Backup vmguardian is a software appliance designed to backup virtual machines developed on ESX(i). Backup
Chapter 10 Protecting Virtual Environments
 Chapter 10 Protecting Virtual Environments 164 - Protecting Virtual Environments As more datacenters move to virtualize their environments and the number of virtual machines and the physical hosts they
Paragon Protect & Restore
 Paragon Protect & Restore ver. 3 Centralized Backup and Disaster Recovery for virtual and physical environments Tight Integration with hypervisors for agentless backups, VM replication and seamless restores
HySecure Quick Start Guide. HySecure 5.0
 HySecure Quick Start Guide HySecure 5.0 Last Updated: 25 May 2017 2012-2017 Propalms Technologies Private Limited. All rights reserved. The information contained in this document represents the current
Nortel Media Application Server 5.1. Installation NN
 NN44450-300 Document status: Standard Document issue: 01.03 Document date: 15 October 2008 Product release: Release 5.1 Job function: and Commissioning Type: Technical document Language type: English All
DSI Optimized Backup & Deduplication for VTL Installation & User Guide
 DSI Optimized Backup & Deduplication for VTL Installation & User Guide Restore Virtualized Appliance Version 4 Dynamic Solutions International, LLC 373 Inverness Parkway Suite 110 Englewood, CO 80112 Phone:
1. Overview... 2 Documentation... 2 Licensing... 2 File Archiving requirements... 2
 User Guide BackupAssist User Guides explain how to create and modify backup jobs, create backups and perform restores. These steps are explained in more detail in a guide s respective whitepaper. Whitepapers
USER GUIDE. CTERA Agent for Windows. June 2016 Version 5.5
 USER GUIDE CTERA Agent for Windows June 2016 Version 5.5 Copyright 2009-2016 CTERA Networks Ltd. All rights reserved. No part of this document may be reproduced in any form or by any means without written
Acronis Backup & Recovery 11.5
 Acronis Backup & Recovery 11.5 User Guide Applies to the following editions: Update 2 Advanced Server Server for Windows Virtual Edition Server for Linux Advanced Server SBS Edition Workstation Advanced
Arcserve Backup for Windows. Release Summary r16
 Arcserve Backup for Windows Release Summary r16 Legal Notice This Documentation, which includes embedded help systems and electronically distributed materials, (hereinafter referred to as the Documentation
Veritas System Recovery 16 Management Solution Administrator's Guide
 Veritas System Recovery 16 Management Solution Administrator's Guide Documentation version: 2017 Legal Notice Copyright 2017 Veritas Technologies LLC. All rights reserved. Veritas and the Veritas Logo
Configuration Note. AudioCodes One Voice for Microsoft Skype for Business. CloudBond 365. Backup and Restore Functionality. Version 9.
 7 Configuration Note AudioCodes One Voice for Microsoft Skype for Business CloudBond 365 Backup and Restore Functionality Version 9.5 Update 4 Configuration Note Contents Table of Contents 1 Introduction...
Install ISE on a VMware Virtual Machine
 Supported VMware Versions, page 1 Support for VMware vmotion, page 1 Support for Open Virtualization Format, page 2 Virtual Machine Requirements, page 3 Virtual Machine Resource and Performance Checks,
About the XenClient Enterprise Solution
 About the XenClient Enterprise Solution About the XenClient Enterprise Solution About the XenClient Enterprise Solution XenClient Enterprise is a distributed desktop virtualization solution that makes
Backup Solution Testing on UCS B and C Series Servers for Small-Medium Range Customers (Disk to Tape) Acronis Backup Advanced Suite 11.
 Acronis Backup Advanced Suite 11.") Backup Solution Testing on UCS B and C Series Servers for Small-Medium Range Customers (Disk to Tape) Acronis Backup Advanced Suite 11.5 First Published: June 24, 2015 Last Modified: June 26, 2015 Americas
Backup Solution Testing on UCS B and C Series Servers for Small-Medium Range Customers (Disk to Tape) Acronis Backup Advanced Suite 11.5 First Published: June 24, 2015 Last Modified: June 26, 2015 Americas
DriveClone Workstation. Users Manual
 DriveClone Workstation Users Manual Contents Chapter 1: Introduction... 3 Chapter 2: Install and uninstall DriveClone Workstation... 3 2.1 System Requirement... 3 2.2 Installing DriveClone Workstation...
Installation of Cisco Business Edition 6000H/M
 Installation Overview, page 1 Installation Task Flow of Cisco Business Edition 6000H/M, page 2 Installation Overview This chapter describes the tasks that you must perform to install software on your Business
Backup App v7. Quick Start Guide for Windows
 Backup App v7 Quick Start Guide for Windows Revision History Date Descriptions Type of modification 30 Jun 2016 First Draft New 25 Nov 2016 Added Restore Options to Ch 8 Restore Data; Combined Technical
CASPER SECURE DRIVE BACKUP. for BitLocker Drive Encryption S TARTUP D ISK C REATOR G UIDE
 TM CASPER SECURE DRIVE BACKUP for BitLocker Drive Encryption S TARTUP D ISK C REATOR G UIDE TM Copyright and Trademark Information Information in this document is subject to change without notice. Federal
Backup Tab. User Guide
 Backup Tab User Guide Contents 1. Introduction... 2 Documentation... 2 Licensing... 2 Overview... 2 2. Create a New Backup... 3 3. Manage backup jobs... 4 Using the Edit menu... 5 Overview... 5 Destination...
Physical & Virtual Workload Migration to HC3 with Clonezilla Live
 Physical & Virtual Workload Migration to HC3 with Clonezilla Live Quickstart Guide Any information listed here is not a substitute for the product s User Guide or Support and is not covered under the ScaleCare
Farstone TotalDeploy User Guide
 Farstone TotalDeploy User Guide 1 Introduction to TotalDeploy...3 1.1 Overview...3 1.1.1 What is TotalDeploy...3 1.1.2 Who needs TotalDeploy?...3 1.1.3 TotalDeploy infrastructure...3 1.2 What you can do
Paragon Exact Image. User Manual CONTENTS. Introduction. Key Features. Installation. Package Contents. Minimum System Requirements.
 Paragon Exact Image User Manual CONTENTS Introduction Key Features Installation Package Contents Minimum System Requirements Basic Concepts Backup Operations Scheduling Interface Overview General Layout
Install ISE on a VMware Virtual Machine
 Supported VMware Versions, page 1 Support for VMware vmotion, page 1 Support for Open Virtualization Format, page 2 Virtual Machine Requirements, page 2 Virtual Machine Resource and Performance Checks,
Install ISE on a VMware Virtual Machine
 ISE Features Not Supported in a Virtual Machine, page 1 Supported VMware Versions, page 1 Support for VMware vmotion, page 2 Support for Open Virtualization Format, page 2 Virtual Machine Requirements,
Disaster Recovery Workflow
 CHAPTER 4 InMage CDP starts with the FX/VX agent, also known as "DataTap," which is used to monitor all writes to disk. A small amount of memory on the source machine is reserved by the DataTap (250MB).
HP Data Protector Media Operations 6.11
 HP Data Protector Media Operations 6.11 Getting started This guide describes installing, starting and configuring Media Operations. Copyright 2009 Hewlett-Packard Development Company, L.P. Part number:
Acronis Backup Advanced Version 11.5 Update 6
 Acronis Backup Advanced Version 11.5 Update 6 APPLIES TO THE FOLLOWING PRODUCTS Advanced for Windows Server Advanced for Linux Server Advanced for PC Advanced for VMware / Hyper-V / RHEV / Citrix XenServer
XenClient Upgrade Guide
 XenClient Upgrade Guide XenClient Upgrade Guide XenClient Upgrade Guide This document provides information about upgrading XenClient components. It includes guidelines for VM updates, and how to track
Introduction. How Does it Work with Autodesk Vault? What is Microsoft Data Protection Manager (DPM)? autodesk vault
? autodesk vault") Introduction What is Microsoft Data Protection Manager (DPM)? The Microsoft Data Protection Manager is a member of the Microsoft System Center family of management products. DPM provides continuous data
Introduction What is Microsoft Data Protection Manager (DPM)? The Microsoft Data Protection Manager is a member of the Microsoft System Center family of management products. DPM provides continuous data
C A S P E R USER GUIDE V ERSION 5.0
 TM C A S P E R TM USER GUIDE V ERSION 5.0 Copyright and Trademark Information Information in this document is subject to change without notice. Federal law prohibits unauthorized use, duplication, and
Physical Imaging Rapid Recovery - Bare Metal Restore
 Physical Imaging Rapid Recovery - Bare Metal Restore Applicable Products These instructions apply to the following products: - MSP Overview Bare Metal Recovery (BMR) allows you to restore a physical image
Hands-On Lab. Windows Azure Virtual Machine Roles. Lab version: Last updated: 12/14/2010. Page 1
 Hands-On Lab Windows Azure Virtual Machine Roles Lab version: 2.0.0 Last updated: 12/14/2010 Page 1 CONTENTS OVERVIEW... 3 EXERCISE 1: CREATING AND DEPLOYING A VIRTUAL MACHINE ROLE IN WINDOWS AZURE...
Getting Started with ESX Server 3i Installable Update 2 and later for ESX Server 3i version 3.5 Installable and VirtualCenter 2.5
 Getting Started with ESX Server 3i Installable Update 2 and later for ESX Server 3i version 3.5 Installable and VirtualCenter 2.5 Getting Started with ESX Server 3i Installable Revision: 20090313 Item:
Imaging the HP Z240 Workstation
 Technical white paper Imaging the HP Z240 Workstation with Windows 10 Pro (64-bit) and Microsoft Deployment Toolkit (MDT) 2013 v1.2 A system image enables you to automate the deployment of computers in
VMware Mirage Web Management Guide. VMware Mirage 5.9.1
 VMware Mirage Web Management Guide VMware Mirage 5.9.1 VMware Mirage Web Management Guide You can find the most up-to-date technical documentation on the VMware Web site at: https://docs.vmware.com/ The
Dell Server Deployment Pack Version 2.1 for Microsoft System Center Configuration Manager User's Guide
 Dell Server Deployment Pack Version 2.1 for Microsoft System Center Configuration Manager User's Guide Notes, Cautions, and Warnings NOTE: A NOTE indicates important information that helps you make better
Dell Storage Compellent Integration Tools for VMware
 Dell Storage Compellent Integration Tools for VMware Version 4.0 Administrator s Guide Notes, Cautions, and Warnings NOTE: A NOTE indicates important information that helps you make better use of your
Vembu BDR Suite. Free vs Paid Edition. Backup & Disaster Recovery. VEMBU TECHNOLOGIES TRUSTED BY OVER 60,000 BUSINESSES
 Vembu BDR Suite Free vs Paid Edition VEMBU TECHNOLOGIES www.vembu.com Free vs Paid Edition The Free Edition of Vembu BDR suite products comprises of mandate features which ensure data protection for both
Client Installation and User's Guide
 IBM Tivoli Storage Manager FastBack for Workstations Version 7.1 Client Installation and User's Guide SC27-2809-03 IBM Tivoli Storage Manager FastBack for Workstations Version 7.1 Client Installation
Lab: Deploying Operating System Images Using SMS 2003
 Lab: Deploying Operating System Images Using SMS 2003 Objectives After completing this lab, you will be able to: Install the OS Deployment Feature Pack. Install USMT 2.6 to capture and restore user state
Acronis Backup & Recovery 11
 Acronis Backup & Recovery 11 Update 0 User Guide Applies to the following editions: Advanced Server Virtual Edition Advanced Server SBS Edition Advanced Workstation Server for Linux Server for Windows
Installing the Operating System or Hypervisor
 If you purchased E-Series Server or NCE Option 1 (E-Series Server or NCE without a preinstalled operating system or hypervisor), you must install an operating system or hypervisor. This chapter includes
File Archiving Whitepaper
 Whitepaper Contents 1. Introduction... 2 Documentation... 2 Licensing... 2 requirements... 2 2. product overview... 3 features... 3 Advantages of BackupAssist... 4 limitations... 4 3. Backup considerations...
C A S P E R USER GUIDE V ERSION 10
 TM C A S P E R TM USER GUIDE V ERSION 10 Copyright and Trademark Information Information in this document is subject to change without notice. Federal law prohibits unauthorized use, duplication, and distribution
Veeam Endpoint Backup
 Veeam Endpoint Backup Version 1.5 User Guide March, 2016 2016 Veeam Software. All rights reserved. All trademarks are the property of their respective owners. No part of this publication may be reproduced,
8 MANAGING SHARED FOLDERS & DATA
 MANAGING SHARED FOLDERS & DATA STORAGE.1 Introduction to Windows XP File Structure.1.1 File.1.2 Folder.1.3 Drives.2 Windows XP files and folders Sharing.2.1 Simple File Sharing.2.2 Levels of access to
VX 9000E WiNG Express Manager INSTALLATION GUIDE
 VX 9000E WiNG Express Manager INSTALLATION GUIDE 2 VX 9000E WiNG Express Manager Service Information If you have a problem with your equipment, contact support for your region. Support and issue resolution
Parallels Virtuozzo Containers 4.6 for Windows
 Parallels Parallels Virtuozzo Containers 4.6 for Windows Deploying Microsoft Clusters Copyright 1999-2010 Parallels Holdings, Ltd. and its affiliates. All rights reserved. Parallels Holdings, Ltd. c/o
Cisco Emergency Responder Installation
 Overview, page 1 Hardware and Software Prerequisites, page 1 System Preparations, page 2 Installation and Migration on the Cisco UCS Server, page 4 Installation on a New System, page 13 Emergency Responder
User Guide - Exchange Database idataagent
 Page 1 of 208 User Guide - Exchange Database idataagent TABLE OF CONTENTS OVERVIEW Introduction Key Features Add-On Components Customized Features for Your Exchange Version Terminology SYSTEM REQUIREMENTS
Client Installation and User's Guide
 IBM Tivoli Storage Manager FastBack for Workstations Version 7.1.1 Client Installation and User's Guide SC27-2809-04 IBM Tivoli Storage Manager FastBack for Workstations Version 7.1.1 Client Installation
Virtual Appliance User s Guide
 Cast Iron Integration Appliance Virtual Appliance User s Guide Version 4.5 July 2009 Cast Iron Virtual Appliance User s Guide Version 4.5 July 2009 Copyright 2009 Cast Iron Systems. All rights reserved.
UBDR GOLD VERSION 3.0 USER GUIDE
 UBDR GOLD VERSION 3.0 USER GUIDE UBDR Gold Version 3.0 User Guide The software described in this guide is furnished under a license agreement and may be used only in accordance with the terms of the agreement.
Installation. Power on and initial setup. Before You Begin. Procedure
 Power on and initial setup, page 1 Customize ESXi host for remote access, page 4 Access and configure ESXi host, page 6 Deploy virtual machines, page 13 Install applications on virtual machines, page 14
Getting Started with ESXi Embedded
 ESXi 4.0 Embedded vcenter Server 4.0 This document supports the version of each product listed and supports all subsequent versions until the document is replaced by a new edition. To check for more recent
Deploying Cisco UCS Central
 This chapter includes the following sections: Obtaining the Cisco UCS Central Software from Cisco, page 1 Using the Cisco UCS Central OVA File, page 2 Using the Cisco UCS Central ISO File, page 4 Logging
ElasterStack 3.2 User Administration Guide - Advanced Zone
 ElasterStack 3.2 User Administration Guide - Advanced Zone With Advance Zone Configuration TCloud Computing Inc. 6/22/2012 Copyright 2012 by TCloud Computing, Inc. All rights reserved. This document is
Kaseya 2. User Guide. Version 1.0
 Kaseya 2 Imaging & Deployment User Guide Version 1.0 August 16, 2011 About Kaseya Kaseya is a global provider of IT automation software for IT Solution Providers and Public and Private Sector IT organizations.
Administration GUIDE. Virtual Server idataagent (VMware) Published On: 11/19/2013 V10 Service Pack 4A Page 1 of 225
 Published On: 11/19/2013 V10 Service Pack 4A Page 1 of 225") Administration GUIDE Virtual Server idataagent (VMware) Published On: 11/19/2013 V10 Service Pack 4A Page 1 of 225 User Guide - Virtual Server idataagent (VMware) Table of Contents System Requirements
Administration GUIDE Virtual Server idataagent (VMware) Published On: 11/19/2013 V10 Service Pack 4A Page 1 of 225 User Guide - Virtual Server idataagent (VMware) Table of Contents System Requirements
File Protection. Whitepaper
 Whitepaper Contents 1. Introduction... 2 Documentation... 2 Licensing... 2 Modes of operation... 2 Single-instance store... 3 Advantages of... 3 2. Backup considerations... 4 Exchange VM support... 4 Restore
 Trend Micro Incorporated reserves the right to make changes to this document and to the product described herein without notice. Before installing and using the product, please review the readme files,
Symantec Backup Exec Quick Installation Guide
 Symantec Backup Exec 2010 Quick Installation Guide 20047221 Installing Backup Exec This document includes the following topics: System requirements Before you install About the Backup Exec service account
User Guide. Version 2.1
 Kaseya Backup and Disaster Recovery User Guide Version 2.1 August 11, 2008 About Kaseya Kaseya is a global provider of IT automation software for IT Solution Providers and Public and Private Sector IT
ViconNet Version 6 XX Installation and Upgrade Guide.
 Installation and Upgrade Guide XX222-01-02 ViconNet Version 6 Vicon Industries Inc., 89 Arkay Drive, Hauppauge, New York 11788 Tel: 631-952-2288 Fax: 631-951-2288 Toll Free: 800-645-9116 24-Hour Technical
NovaBACKUP. User Manual. NovaStor / April 2016
 NovaBACKUP User Manual NovaStor / April 2016 2016 NovaStor, all rights reserved. All trademarks are the property of their respective owners. Features and specifications are subject to change without notice.
NovaBACKUP Virtual Dashboard
 June 2016 NovaBACKUP Virtual Dashboard User Manual Features and specifications are subject to change without notice. The information provided herein is provided for informational and planning purposes
Setting Up the Dell DR Series System on Veeam
 Setting Up the Dell DR Series System on Veeam Dell Engineering April 2016 A Dell Technical White Paper Revisions Date January 2014 May 2014 July 2014 April 2015 June 2015 November 2015 April 2016 Description
The following table lists the supported upgrade paths to Cisco Finesse Release 11.5(1).
.") Supported Paths, page 1 Aligned Partitions Support, page 1 Perform, page 2 Perform Rollback, page 4 Supported Paths The following table lists the supported upgrade paths to Cisco Finesse Release 11.5(1).
Supported Paths, page 1 Aligned Partitions Support, page 1 Perform, page 2 Perform Rollback, page 4 Supported Paths The following table lists the supported upgrade paths to Cisco Finesse Release 11.5(1).
Vembu ImageBackup. Microsoft Windows Servers Desktops Laptops VEMBU TECHNOLOGIES PARTNERS.
 Vembu Microsoft Windows Servers Desktops Laptops VEMBU TECHNOLOGIES PARTNERS Vembu Technologies Founded in 2002 10+ Years of Experience Headquartered in Chennai 100+ Countries 4000+ Partners 2 60000+ Businesses