Web4BIS User Guide Version 3.3
|
|
|
- Charleen Douglas
- 5 years ago
- Views:
Transcription


1 Web4BIS User Guide Version 3.3
2 WEB4BIS User Guide - Table of Contents Table of Contents 1. Login and Logout in WEB4BIS Administration Change User Data Change Person Information Change Login Information Change Partner Information Information Support Select Language Message Administration Message States Overview Message Overview Message Actions Sort in the Message Overview Display Details Orders Order Change Order Response Delivery Forecast Inventory Report Self Billing Invoice / Invoice XML Download PDF Display Show Business Case Overview Approve Orders (Order Response) Approve Orders (Order Response) without Changes Approve Orders (Order Response) with Changes Creating invoices Invoices from internal suppliers Invoices from external suppliers Search Message Status Changes Message limit Deleting Messages


3 WEB4BIS User Guide - Login and Logout in WEB4BIS 1. Login and Logout in WEB4BIS The WEB4BIS login screen is available on the internet at Please log in using the user information provided by Siemens. You are strongly advised to change the password immediately after you log in for the first time. If you have forgotten your password please use the Forgot your password? link. At the next step you are advised to enter the address which is associated to your Web4BIS profile. After confirming a new password will be created and sent to the address. You can terminate your working session with WEB4BIS at any time using the "Logout" link on the menu bar (marked in orange). You can then log in again under either the same or a different username. -3-

4 WEB4BIS User Guide - Administration 2. Administration 2.1. Change User Data WEB4BIS allows you to modify your user data. Clicking on the "User Data" link on the top menu bar takes you to the appropriate mask Change Person Information You can change your personal data (name, address, phone number, address, etc.) using the administration function. The WEB4BIS administrator has already filled in the above fields with the data supplied during WEB4BIS registration, but you can change these data at any time. It is important to keep your personal information up-to-date at all times, particularly your address and phone number, because these may change often. * -4-

5 WEB4BIS User Guide - Administration s are sent to the address given in " 1"; the type(s) of the depends on the option(s) selected in the checkboxes beneath the address field. If the "Avis- " box is checked, an is sent to the specified address each time a message is received. If the "Reminder- " option is checked, a reminder is sent to the recipient if WEB4BIS contains unread messages for more than 2 days. The address given in " 1" is used automatically as the sender address for order confirmations. You can also enter additional addresses in the Avis 1 and Avis 2 fields; Consequently Avis- s are also sent to these addresses. The fields marked with a red asterisk are mandatory. Click on the "Save changes" button to apply your changes. If you want to discard your changes, click on the "Cancel" button Change Login Information Immediately after you log in for the first time, you should change your password and select one that is easy to remember. This is done on the "Login information" tab. Have your old password ready because you are prompted to enter it on this tab. On the "Login information" tab you can also specify the standard language you want to work with. When you change the language, all information is then shown in the language you select. The fields marked with a red asterisk are mandatory. -5-
6 WEB4BIS User Guide - Administration Change Partner Information Several users may be assigned to each WEB4BIS partner. Changes in partner information apply for all users. On the "Partner information" tab you can change the name or address of your partner profile. The fields marked with a red asterisk are mandatory. Certain items of information, such as Role, Interface or BIS sender profile, may not be changed by you, but only by the Web4BIS administrator. Interface configures as which kind of supplier you are classified. There are two options: internal and external. This interferes directly with the process of creating invoices, because internal and external suppliers will see different text fields and forms and are able to change different values (e.g. more partner address data and accounting data for internal suppliers). Furthermore you can have a look at your authorizations here, that means if you have the authorization to create order responses or invoices at all. If missing, you will not see the buttons creating invoice and approve order and the symbol for creating invoices. You are not enabled to change these settings, this is reserved to the administrator. -6-

7 WEB4BIS User Guide - Administration -7-
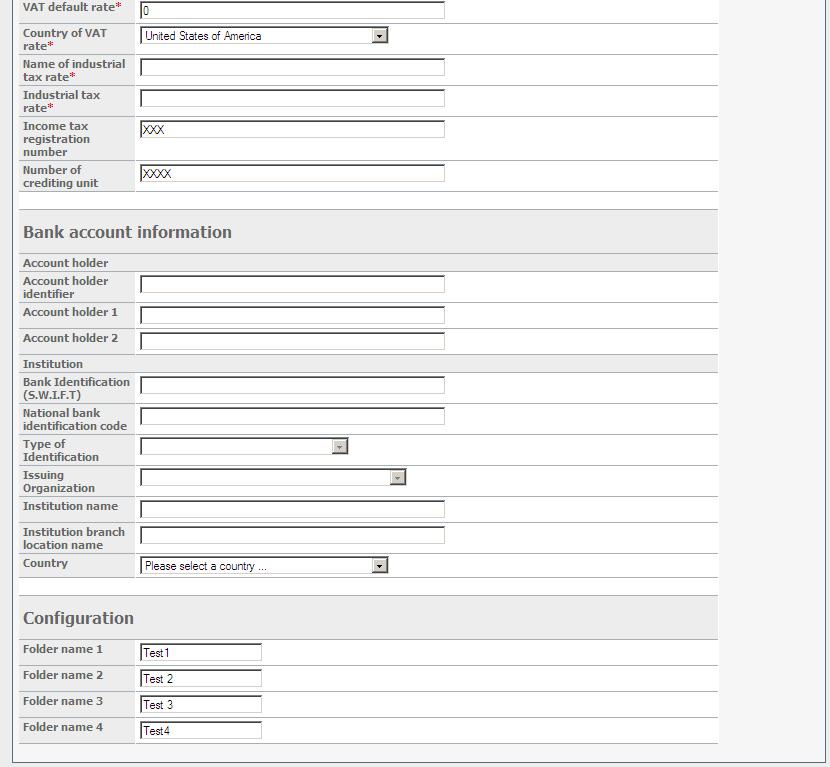
8 WEB4BIS User Guide - Administration If you have the authorization to create invoices, the Invoice information part will be visible to you at this location. Here you can configure details regarding the invoice. Only internal suppliers have the option to fill in the number of the crediting unit. 2.2 Information By clicking on the info link on the top menu bar you can get further information, for example the current version of the userguide for Web4BIS. 2.3 Support If you have any questions or need help please contact our support team by clicking Support. 2.4 Select Language If you want to switch languages for a short time only, or somebody else who speaks a different language is working under your username, the language can be changed by clicking on "English" or "German" on the menu bar. However, at the next login, the system reverts to the standard language specified in the user data. -8-

9 3. Message Administration The current version of Web4BIS supports receiving the following message types: Orders Order Changes Delivery Forecasts Inventory Reports Self Billing Invoices The current version of Web4BIS supports creating the following message types: Order Responses Invoices 3.1. Message States Overview The message states overview is displayed automatically when you log in. It lists, for example, how many messages of the various message types have been received or viewed. New messages are always located in the "Received" folder. When you open a message, it is automatically moved into the "Viewed" folder. Furthermore you can move messages that you no longer need to the "Short Time Archive" folder, which is emptied by the system at regular intervals. You should ensure that you do not keep too many messages in the "Received" and "Viewed" folders by emptying these folders from time to time. Clicking on the numbers in the columns takes you to the message overview for the corresponding message type. Click here to go to the message overview for viewed orders. -9-

10 You can also go directly to the individual message overviews at any time without going via the message status overview. The "Overview", "Drafts" and "Short Time Archive" folders are shown on the left-hand menu bar. If you have the authorization, there is also the option Create Invoice. The "Overview" folder is subdivided into the individual message types to enable a faster navigation. You can move messages between folders. Messages are moved automatically when you view them (see Display Details). If you want to move messages manually, you can do this in the detail message view using the "Move into Received", "Move into Short Time Archive" and "Move from Short Time Archive" buttons. If you click on "Move into Received", received and already viewed messages are moved to the "Received" folder. If you click on "Move from Short Time Archive", the messages are moved into the "Viewed" folder and created messages are moved into the "Outbox" folder (assuming they were previously moved from there) or into the "Drafts" folder (assuming they were previously moved from there). Clicking on "Move into Short Time Archive" always moves messages into the short-term archive. -10-
, such as order reference, message type and orderer. 3.")
11 3.2. Message Overview The message overview lists the various messages in tabular form. Each line of the table displays specific message contents (known as meta attributes), such as order reference, message type and orderer Message Actions The message overview provides a range of message actions. Every message action is marked with a different symbol. The message actions includes a sorting function, a detail viewing option, downloading a XML-file, downloading a printable PDF-version of a message and showing the business case for a message. In case of the order response overview there is another symbol for creating invoices, but it will be shown only with the necessary authorization Sort in the Message Overview The message overview appears at many points in WEB4BIS; for instance, in the overview of orders and order confirmations, in the short-term archive, in search results, etc. This view always includes options for sorting the messages on specific criteria as well as the option of performing a number of actions. You can sort messages by clicking on one of the underlined fields. A small black triangle indicates the sort criterion and the sort sequence (ascending or descending). -11-

12 In the above screenshot, the messages are sorted by date/time and the oldest messages are shown first. If you want to show the most recent messages first, click on "Date/Time" to reverse the sort sequence Display Details You can display the details of a message by clicking on the spectacles icon in the message overview. The detail view is split into different tabs depending on the type of message Orders The detail view of an order consists of the tabs "Head Data", "Item Data" and "General Data". The "Head Data" contains the most important part of the message s data. -12-


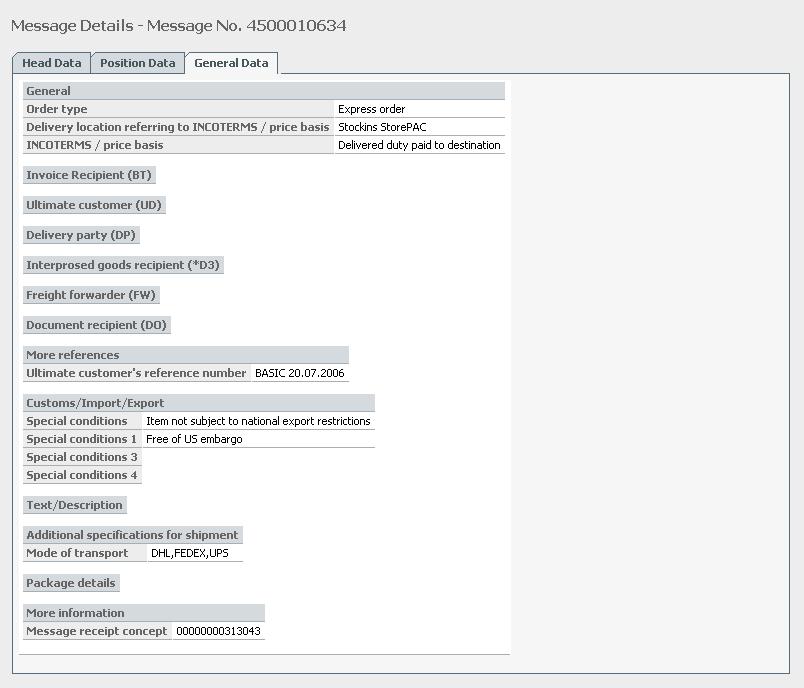
13 The "Item Data" tab provides an overview of the individual line items. In this overview you can display further item details by clicking on the "Item details" action link of the item. The "General Data" tab contains supplementary message data. -13-
14 -14-


15 Order Change The detail view of an order change consists of the tabs "Head Data", "Item Data" and "General Data". The "Head Data" contains the most important part of the message s data. The "Item Data" tab provides an overview of the individual line items. In this overview you can display further item details by clicking on the "Item details" action link of the item. The "General Data" tab contains supplementary message data. -15-

16 Order Response The detail view of an order response consists of the tabs "Head Data", "Item Data", "General Data" and Charges/Discounts. The "Head Data" contains the most important part of the message s data. -16-


17 The "Item Data" tab provides an overview of the individual line items. In this overview you can display further item details by clicking on the "Item details" action link of the item. The "General Data" tab contains supplementary message data. -17-


18 The "Charges/Discounts" tab contains information about additional charges and discounts Delivery Forecast The detail view of a delivery forecast consists of the tabs "Head Data", "Item Data" and "General Data". The "Head Data" contains the most important part of the message s data. The "Item Data" tab provides an overview of the individual line items. In this overview you can display further item details by clicking on the "Item details" action link of the item. The "General Data" tab contains supplementary message data. -18-


19 Inventory Report The detail view of an inventory report consists of the tabs "Head Data" and "Item Data. The "Head Data" contains the most important part of the message s data. The "Item Data" tab provides an overview of the individual line items. In this overview you can display further item details by clicking on the "Item details" action link of the item. -19-


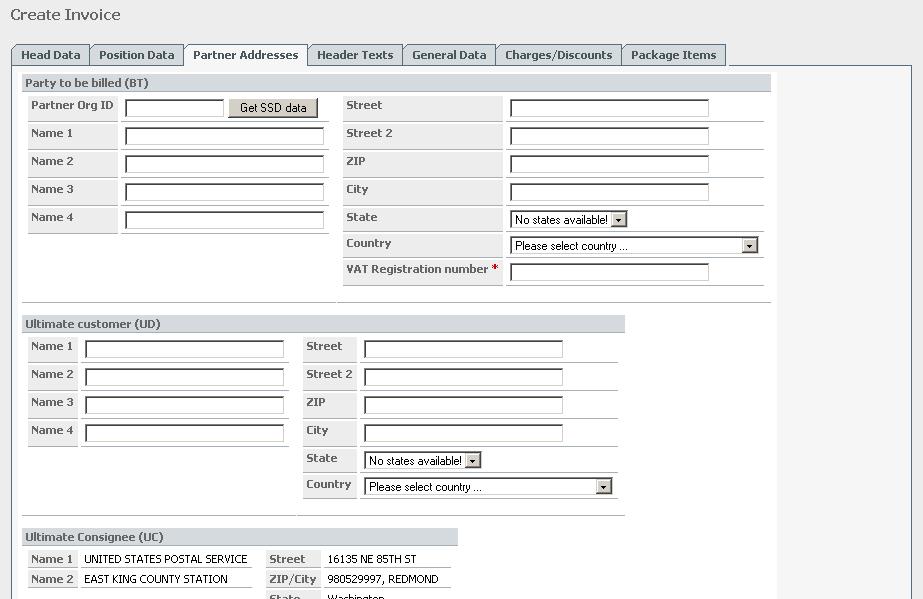
20 Self Billing Invoice / Invoice The detail view of a self billing invoice / invoice consists of the tabs "Head Data", "Item Data", "Partner Addresses", Header Texts, General Data and Charges/Discounts. In case of an internal supplier you will also find the tab package items. The "Head Data" contains the most important part of the message s data. The "Item Data" tab provides an overview of the individual line items. In this overview you can display further item details by clicking on the "Item details" action link of the item. The Partner Addresses tab provides a summary of the involved partners and their addresses. -20-


21 The Header Texts tab provides customer-specific header texts of the invoice. The "General Data" tab contains supplementary message data. -21-


22 The "Charges/Discounts" tab contains information about additional charges and discounts. The tab package items contains information about packaging for example size, weight, packaging character, etc. This tab is only visible for internal suppliers. -22-

23 3.3.3 XML Download Click on the "XML Download" function link in the message overview to download a message in XML format. Afterwards the message can be stored on a local hard disk PDF Display In the message overview you can also see, print and save messages in PDF format. A new window opens when you click on the PDF icon Show Business Case Overview It is often useful to have an at-a-glance overview of all messages involved in a business case. The "Show Business Case" function link is provided in the message overview for this purpose. Clicking on this link displays all messages (of all message types) with the same order reference number, so that you see all messages at a glance and can navigate through them faster. -23-

24 3.4. Approve Orders (Order Response) Before you can confirm an order, you first must go to the detail view of the order (see Display Details). There you have the option of sending an order confirmation with or without changes. Please keep in mind, that orders can be approved with authorization only (the authorization status can be looked up in the user data partner information) Approve Orders (Order Response) without Changes Clicking on the "Approve without changes" button generates an order confirmation without changes. A mask appears in which a confirmation number must be entered. This number is arbitrary and can consist of letters as well as digits. It is intended for administration purposes so that you can find order confirmations more easily. Clicking on "Cancel" aborts order confirmation, clicking on "Send" sends the order confirmation. Order confirmations that you have just sent are placed in the "Order response" folder and labeled as "sent". Once the transaction is completed as far as you are concerned, click on the "Move into Short Time Archive" button in the detail view to move the order confirmation to the short-term archive for future deletion. The status is then set to "completed". If you want to undo this action, call up the detail view and click on "Move from Short Time Archive" to move the message back into the "Order confirmations" folder Approve Orders (Order Response) with Changes Sometimes it is necessary to send an order confirmation with changes; for example, if you are forced to make partial deliveries instead of a single delivery, or if you want or need to make delivery on another date. You do this using the "Approve with changes" button in the detail view. -24-
 to make your changes.")
25 You are again prompted to enter an order confirmation number. You should make any changes necessary before you confirm the order. You must navigate on the individual tabs (Item data, General data, Charges/Discounts) to make your changes. Charges/Discounts: You can specify surcharges or discounts (for example, material surcharges or rebates) on header level when you confirm an order. Select an appropriate name ("Rebate", for instance) from the list and enter a percentage and a price in EUR, as well as a meaningful description. -25-

26 Apply the rebate by clicking on the "Add" button (you can delete it again after selecting it by clicking on the "Delete" button). You can add several charges and discounts, which then apply to the entire order. (If you want to apply charges and discounts to specific line item, you must enter these separately on the "Item Data" tab.) -26-
27 General Data: You can add general information to the order confirmation; for example, a price basis or the reference location for the price basis. You can also add your own comments. -27-


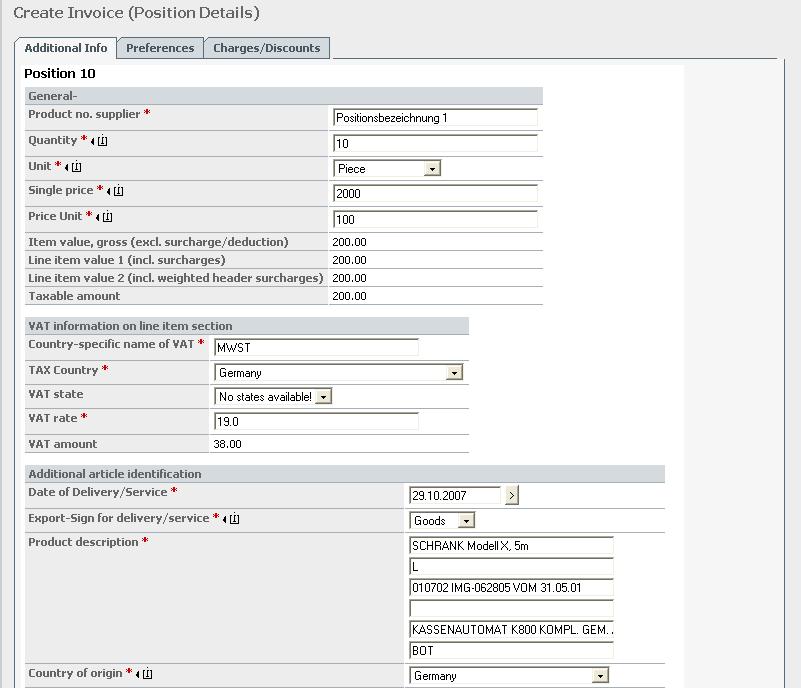
28 Item Data: If you want to make changes on line item level, do this on the "Item Data" tab. There you have the option of rejecting an item or making changes which refer to a single item only. Reject line item If you want to reject a line item, click on the arrow icon. The item is then labeled as "Not accepted". You can undo this at any time by clicking on the checkbox, which then shows a green checkmark. If you want to edit a line item, you must click on the pen icon. You can edit additional information, charges and discounts, and partial deliveries to the items. On the "Additional Info" tab you can amend basic line item characteristics such as price of quantity. You can also specify a new delivery date, or select "to be defined" if you do not know the exact delivery date. -28-

29 Note that any changes and settings that you make here apply only for the current line item and not for all items (and therefore not for the entire order). If you want to make partial deliveries, you must add details on the "Partial Deliveries" tab. You can specify the quantity for each partial delivery and also provide date information (the exact delivery date, "already -29-

30 delivered" or "to be defined"). You can create a partial delivery by clicking on "Add". When you edit partial deliveries, make sure that the sum of all partial delivery quantities is the same as the total quantity for the line item. You can define discounts or surcharges for a specific item on the "Charges/Discounts" tab. You do this in the same way as on header level, as described above. When you have finished editing and have checked that all your entries are correct, click on the "Update & Back" button below the tab. If you want to undo all your entries on line item level, click on "Cancel". Regardless of which button you click, you are taken back to the "Item Data" tab. Order editing is now complete and you can confirm or cancel the transaction. To confirm, click on "Save draft"; this saves the order confirmation in "Drafts". If you want to send the confirmation immediately, click on "Send message". If you save a message so that you can send it later, you must later search for it in the "Drafts" folder. Once you have found it, you must switch to the message detail view. Clicking on the "Update draft" button gives you a further opportunity to revise a saved order confirmation. -30-

 Creating invoices based on an order response For creating invoices based on an order reference you have to go to the order response message overview.")
31 After editing you must click Approve. Then You have the opportunity to send the message immediately or to send a copy, which means that the message is still stored in the Drafts folder Creating invoices The process of creating invoices differs between internal and external suppliers. The following shows both ways Invoices from internal suppliers If you are authorized for creating invoices, you can create them as internal supplier by two different ways: Creating invoices based on an order response Creating invoices without order reference a) Creating invoices based on an order response For creating invoices based on an order reference you have to go to the order response message overview. Please keep in mind, that only sent order responses can serve as a base for an invoice. -31-

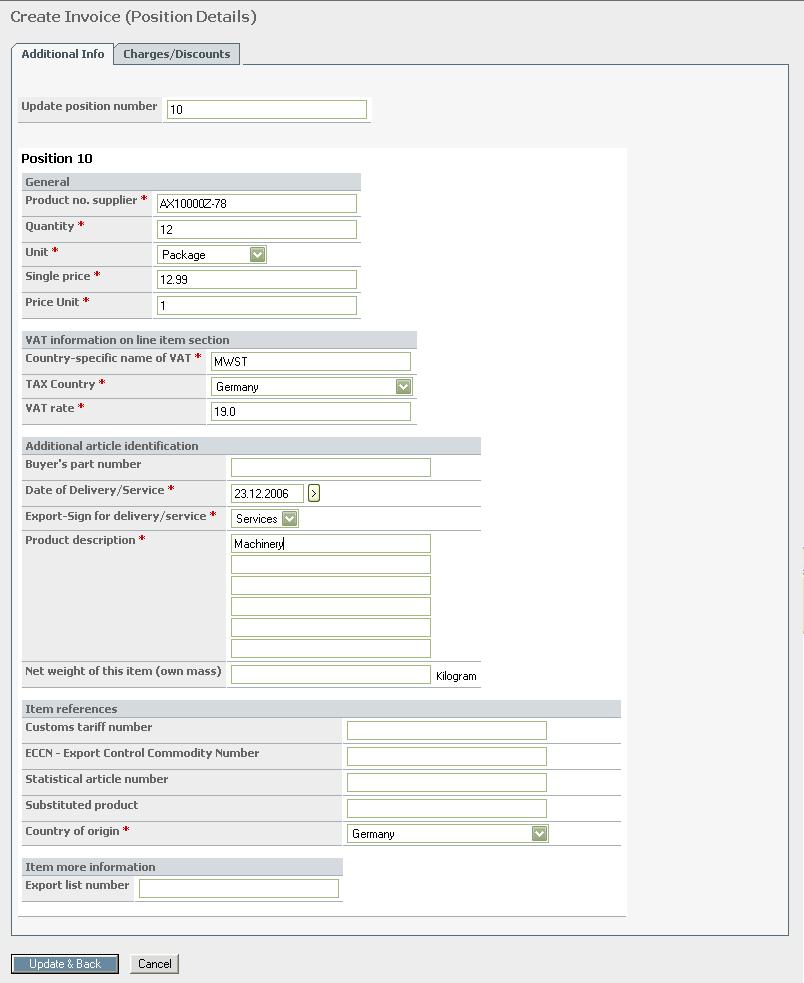
32 By clicking the rightmost symbol you reach the invoice creation form. If you have opened an order response (watch details), you can also reach the form by clicking the create invoice -button. Web4BIS has transferred the order response s data into the invoice form now. Some values have to be filled manually by your own. It is important, that all the values marked with a red asterisk are filled, because they are mandatory. Head Data contain the basic invoice information. Every description field marked with a red asterisk is a mandatory field, that means you have to put values in there. Values in the white marked description fields can be changed by you contrary to fix values, that can not be changed anymore (for example VAT/Tax number or supplier adress). You can choose your own invoice number, but please make sure, that it is not too short. The number must consist of your ARE (don t overwrite) followed by a number defined by you. You can also complete the Buyer Info by getting the data from the SSD (Siemens Keycode Database) or choose the document type. The button Calculation provides you with the invoice s current amount. If you change anything in the Item Data or change Charges/Discounts you have to calculate again to see the current invoice amount. Please keep in mind, that the total sum is calculated again when sending the invoice, so this button is just for your own information. In Item Data you can find information about the items in detail. -32-

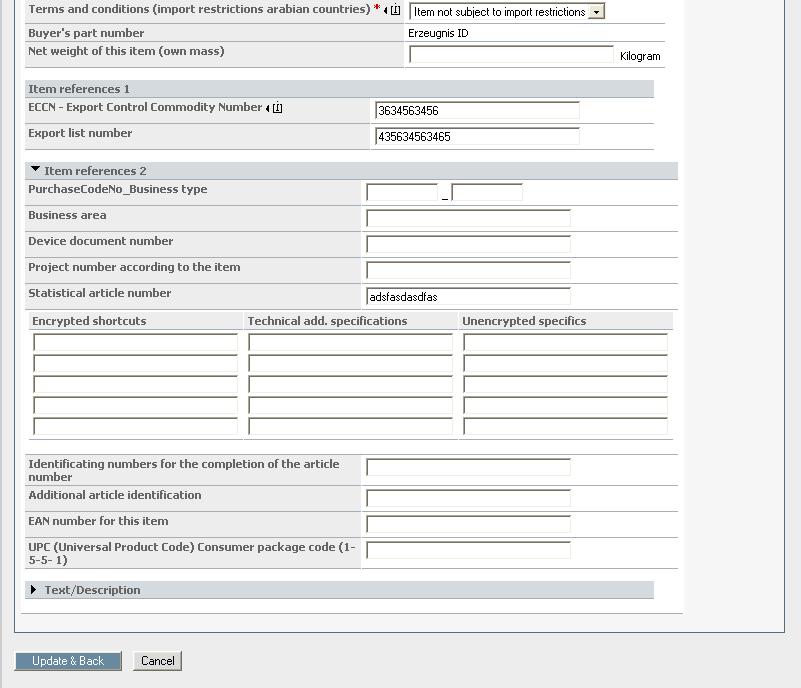
33 You have the option to delete single items by marking the items and clicking the button Delete and to change items by clicking on the pencil button. When updating an item you can fill in Additional Info and Charges/Discounts. Internal suppliers can fill in a lot of information compared to external suppliers. Internal suppliers for example can fill in item references, item more information or encrypted short cuts. You need to edit each line item (and supply mandatory fields there) before you can send the invoice. -33-
34 -34-


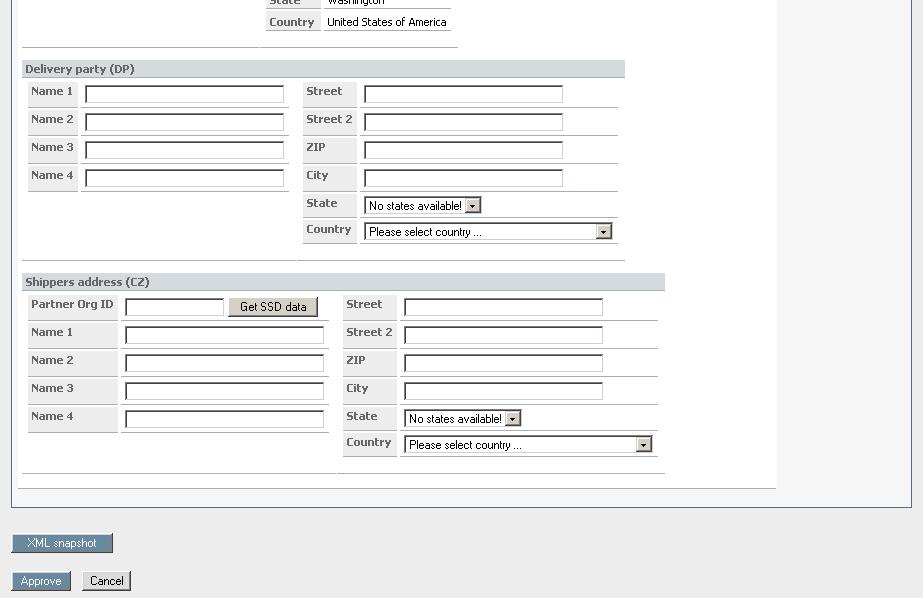
35 Preferences provides you with the possibility to create preference rules. You can select several countries by pressing the CTRL key during selection. Changes are accepted by clicking on the button Update & back. Charges/Discounts provides you with the possibility to change given conditions, delete them or to create new ones. Changes are accepted by clicking on the button Update & back. The tab Partner Adresses gives the possibility to specify a range of different partner addresses. Being an internal supplier, you can enter more addresses than external suppliers. Whereas the ultimate consignee address is taken over from the order response, you can (if relevant) fill in the ultimate customer, the delivery party and the shipper s address manually. The party to be billed can be updated with the SSD s entries automatically by entering the partner s Org-ID and clicking the button Get SSD data. -35-
36 -36-
37 In Header Texts you can enter your own header texts or additional information. In General Data you can specify for example the country of destination or the currency. -37-

38 The date of conversion rate and the date of delivery note can be specified easily by clicking on the button >, similar to this process in other message types. You can choose the date out of a calendar, which appears after clicking on the button. The tab Charges/Discounts offers the possibility to create charges or discounts for the whole invoice. The process is the same as for charges and discounts on item scale. -38-

39 In Package items you can specify the packaging, for example height and weight of a freight. This feature is only for internal suppliers. When you have finished creating your invoice, click on the Approve button. By clicking the Cancel button you will abort the invoice creation process. Once you have entered all details, you can confirm the invoice using the "Approve" button. The procedure can be cancelled at any time by clicking on the "Cancel" button. You can save the invoice as a draft using the button Save draft. In this case no checks will be carried out. -39-

40 After approving the invoice the following process is the same for creating an invoice without order reference and based on an order response. So this part will be explained in detail at the end of this chapter. b) Creating invoices without order reference If you wish to create an invoice without order reference, just follow the link Create-Invoice on the left menu bar. The invoice form is shown and filled only with the data saved in your partner administration. In Head Data it is very helpful to use the Get SSD Data button, so that you do not have to fill in every detail of the customerinfo manually. For this you need to type in your partner s Org-ID. A The tab Item Data requires more effort because every item has to be filled in manually. In contrary to external suppliers, internal suppliers have more options to fill in, just like in the invoice based on an order response. By clicking the button Add you can add items. -40-

41 This brings up a new line item mask Preferences and Charges/Discounts can be specified the way described in invoice creation based on an order reference. After clicking Update & back the item view is updated. You can delete single items by marking them and clicking the button Delete. -41-


42 In the tab Partner Addresses a range of addresses can be specified: Party to be billed, ultimate customer, ultimate consignee, delivery party, shippers address. The party to be billed can be filled comfortably by clicking the button Get SSD Data, after specifying the invoice receiver s Org-ID. The tab Header Texts gives you the opportunity to give descriptions, hints and other remarks. -42-

43 The tabs General Data, Charges/Discounts and Package Items can be filled as in creating invoice based on an order response. To approve your invoice, just click the Approve button. Note: By approving the message several checks and inquiries are initiated, to make sure, that the invoice corresponds with the Siemens rules. If the message does not comply with these rules the errors are shown so that you can correct them. In case of all checks being successful, you have the following options to proceed: The invoice can be saved as draft, sent or downloaded as PDF/XML. A draft can be modified several times before sending it as final invoice. -43-
 Creating invoices based on an order response For creating invoices based on an order reference you have to go to the order response message overview.")
44 3.5.2 Invoices from external suppliers If you are authorized for creating invoices, you can create them as external supplier by two different ways: Creating invoices based on an order response Creating invoices without order reference a) Creating invoices based on an order response For creating invoices based on an order reference you have to go to the order response message overview. Please keep in mind, that only sent order responses can serve as a base for an invoice. By clicking the right symbol you reach the invoice creation form. If you have opened an order response (watch details), you can also reach the form by clicking the create invoice -button. Web4BIS has transferred the order response s data into the invoice form now. Some data have to be filled manually by your own. It is important, that all the values marked with a red asterisk are filled, because they are mandatory. Head Data contain the basic invoice information. -44-
.")
45 Every description field marked with a red asterisk is a mandatory field, that means you have to put values in there. Values in the white marked description fields can be changed by you contrary to fix values, that can not be changed anymore (for example VAT/Tax numbers or supplier address). You can choose your own invoice number. You can also complete the Buyer Info by getting the data from the SSD (Siemens Keycode Database) or choose the document type. As external supplier it is very important, that the ordering party is part of a list stored at the EDI Service, because external suppliers are not allowed to send invoices to arbitrary Siemens Partner. If you have problems here, please contact the Web4BIS support. The button Calculation provides you with the invoice s current amount. If you change anything in the Item Data or change Charges/Discounts you have to calculate again to see the current invoice amount. Put please keep in mind, that the total sum is calculated again when sending the invoice, so this button is just for your own information. In Item Data you can find information about the items in detail. -45-
46 You have the option to delete single items by marking the items and clicking the button Delete and to change items by clicking on the pencil button. When updating an item you can fill in Additional Info and Charges/Discounts. In Additional Info you can specify general data regarding an item. -46-
47 Charges/Discounts provides you with the possibility to change given conditions, delete them or to create new ones. -47-


48 Changes are accepted by clicking on the button Update & back. The tab Partner Addresses contains the adress of the ultimate consignee. In Header Texts you can enter your own header texts or additional information. -48-


49 In General Data you can specify additional invoice details such as currency. -49-

50 The date of delivery note can be specified easily by clicking on the button >, similar to this process in other message types. You can choose the date out of a calendar, which appears after clicking on the button. The tab Charges/Discounts offers the possibility to create charges or discounts for the whole invoice. The process is the same as for charges and discounts on item scale. When you have finished creating your invoice, click on the Approve button. By clicking the Cancel button you will abort the invoice creation process. Once you have entered all details, you can confirm the invoice using the "Approve" button. The procedure can be cancelled at any time by clicking on the "Cancel" button. You can save the invoice as a draft using the button Save draft. In this case no checks will be carried out. After approving the invoice the following process is the same for creating an invoice without order reference and based on an order response. So this part will be explained in detail at the end of this chapter. b) Creating invoices without order reference If you wish to create an invoice without order reference, just follow the link Create-Invoice on the left menu bar. -50-

51 The invoice form is shown and filled only with the data saved in your partner administration. In Head Data it is very helpful to use the Get SSD Data button, so that you do not have to fill in every detail manually. For this you need to type in your partner s Org-ID. As external supplier it is very important, that the ordering party is part of a list stored at the EDI Service, because external suppliers are not allowed to send invoices to every Siemens Partner. If you have problems here, please contact the Web4BIS support. A The tab Item Data requires more effort because every item has to be filled in manually. By clicking the button Add you can add items. -51-

52 This brings up a new line item mask -52-
53 -53-

54 Charges/Discounts can be specified the way described in invoice creation based on an order reference. After clicking Update & back the item view is updated. You can delete single items by marking them and clicking the button Delete. In the tab Partner Adresses the ultimate consignee address can be specified manually. In Header Texts you can enter your own header texts or additional information. -54-

55 The tabs General Data and Charges/Discounts can be filled as in creating invoice based on an order response. To approve your invoice, just click the Approve button. Note: By approving the message several checks and inquiries are initiated, to make sure, that the invoice corresponds with the Siemens rules. If the message does not comply with these rules the errors are shown so that you can correct them. In case of all checks being successful, you have the following options to proceed: The invoice can be saved as draft, sent or downloaded as PDF/XML. A draft can be modified several times before sending it as final invoice. -55-
, or alternatively you can search for messages within a given period.")
56 3.6. Search If you want to find a specific message quickly, you can select the "Search" option on the top menu bar at any time. In the search mask you can search for messages by means of a specific order reference number (assuming that you know it), or alternatively you can search for messages within a given period. When searching by means of a specific reference number you can find messages with the exact name by choosing equals, messages beginning with the number or name by choosing begins, the messages ending with the number or name by choosing ends and messages containing the number or the name by choosing contains. You can enter the corresponding dates manually or select them in a calendar. You can hide the calendar by clicking on the ">" button a second time. You are also able to search by message type or message status. Combinations of both are also possible. The search results are shown in the familiar message overview. In the list of results you can perform the same actions as in the message overview (see 3.3 Message Actions) -56-


57 3.7. Message Status Changes You can trace message status changes in the message details. For example, you can see when a message was received, when it was viewed, or when it was moved to the Short Time Archive (in other words, when it was "completed"). Click on the "Status changes" button to view status changes. -57-


58 3.8. Message limit Every partner has a limit to the messages that can be stored in the working folders. You can find the limit number in your User Data below the login information. You can not change the limit on your own. If the number of the messages stored in the folders Orders, Order Responses, Delivery Forecasts, Inventory Reports and Invoices exceeds the limit, the message functionality will be restricted. To use Web4BIS with the full range of functions, please move the messages no longer needed to the Short Time Archive. -58-


59 3.9. Deleting Messages You can delete the messages not needed anymore from the short time archive. Please confirm deleting the selected messages in the Short Time Archive by clicking the button Delete. -59-
USER GUIDE FOR SUPPLIERS. OpusCapita Business Network
 USER GUIDE FOR SUPPLIERS OpusCapita Business Network Contents 1. Introduction... 3 2. Finalizing registration and changing your password... 4 2.1 Finalize your registration... 4 2.2 Change your forgotten
Secure Transfer Site (STS) User Manual
 User Manual") Secure Transfer Site (STS) User Manual (Revised 3/1/12) Table of Contents Basic System Display Information... 3 Command Buttons with Text... 3 Data Entry Boxes Required / Enabled... 3 Connecting to the
Secure Transfer Site (STS) User Manual (Revised 3/1/12) Table of Contents Basic System Display Information... 3 Command Buttons with Text... 3 Data Entry Boxes Required / Enabled... 3 Connecting to the
People. Processes. Integrating Globally.
 People. Processes. Integrating Globally. Course: isupplier for Suppliers Table of Contents Table of Contents Course Introduction...4 L1: Vendor Registration... 6 Register for isupplier using SteelTrack
Responding to a BT Sourcing Activity on Oracle via isupplier
 Responding to a BT Sourcing Activity on Oracle via isupplier A users guide for Suppliers responding to an RFI, RFP, RFQ, Auction, ITT or Tender electronically with BT using our new Oracle ebusiness Suite
Carrefour Belgium e-invoice
 CertiONE Level 1 - Bizmail Carrefour e-invoice 1 User manual CertiONE Bizmail Carrefour Belgium e-invoice Retail Supplier Community CertiONE Level 1 - Bizmail Carrefour e-invoice 2 Table of contents 1
User s Guide. (Virtual Terminal Edition)
") User s Guide (Virtual Terminal Edition) Table of Contents Home Page... 4 Receivables Summary... 4 Past 30 Day Payment Summary... 4 Last 10 Customer Transactions... 4 View Payment Information... 4 Customers
User s Guide (Virtual Terminal Edition) Table of Contents Home Page... 4 Receivables Summary... 4 Past 30 Day Payment Summary... 4 Last 10 Customer Transactions... 4 View Payment Information... 4 Customers
AKENEOPIM User Guide Version 1.3. End-user role USER GUIDE END-USER ROLE. Version 1.3. Copyright AKENEO SAS The Open Source PIM
 USER GUIDE END-USER ROLE CONTENTS Glossary 6 Key Concepts 7 Channel 7 Connector 7 Family 7 Category 8 Completeness 9 Variant group 9 First steps into Akeneo PIM 11 Login 11 Recover password 11 Change your
Order Management Bookings - Getting Started Guide for Manufacturers
 Order Management Bookings - Getting Started Guide for Manufacturers Table Of Contents Order Management Bookings Getting Started Guide... 3 Purpose of this Document... 3 What is Order Management Bookings?...
TIS HELP FOR INDEPENDENT OPERATORS CONTENTS
 TIS HELP FOR INDEPENDENT OPERATORS CONTENTS 1 INTRODUCTION... 3 1.1 TIE... 3 1.2 Account set up in TIS... 3 1.3 VAT number (EU only)... 3 1.4 Business license number (China only)... 3 1.5 Access levels...
Rabo Supplier Finance User Manual - Suppliers -
 Rabo Supplier Finance User Manual - Suppliers - Page 2 of 33 Table of Contents 1 About This Document... 3 1.1 Objectives of This Document... 3 1.2 Inside This Document... 3 2 Rabo Supplier Finance platform...
ORBIT User Manual v 1.0 July 2012 ORBIT USER MANUAL. Page 1 of 24
 ORBIT USER MANUAL Page 1 of 24 Dear Customer, This User Manual is intended to give you a brief overview of ORF S Online Resource Booking and Information Terminal ORBIT and will hopefully answer most of
SRM Training Manual Supplier
 SRM Training Manual Supplier Create Date: 10/10/2016 REVIEW: 005 Last Modify Date: 11/09/2016 AM/NS Calvert SRM TECHNICAL SUPPORT EMAIL: AMNS_SupplierTechSupport@ArcelorMittal.com PHONE: 866-377-7754 Summary
TIS HELP VCCS TECHNICAL INFORMATION SHOP (TIS) INSTRUCTION FOR INDEPENDENT OPERATORS
 INSTRUCTION FOR INDEPENDENT OPERATORS") VCCS TECHNICAL INFORMATION SHOP (TIS) INSTRUCTION FOR INDEPENDENT OPERATORS CONTENTS 1 INTRODUCTION... 3 1.1 Account set up... 3 1.1.1 Independent operators with TIE access... 3 1.2 Login for registered
VCCS TECHNICAL INFORMATION SHOP (TIS) INSTRUCTION FOR INDEPENDENT OPERATORS CONTENTS 1 INTRODUCTION... 3 1.1 Account set up... 3 1.1.1 Independent operators with TIE access... 3 1.2 Login for registered
ISUPPLIER PORTAL USER MANUAL ADERP VERSION 1.0
 ISUPPLIER PORTAL USER MANUAL ADERP VERSION 1.0 Contents Contents... i Oracle isupplier Portal Overview...1 Recommended Browsers and Settings...2 Advanced Settings...2 Turn-off pop-up blocker or Allow pop-up
ADERP ISUPPLIER PORTAL USER MANUAL VERSION 1.2
 ADERP ISUPPLIER PORTAL USER MANUAL VERSION 1.2 Document Control Change Record 4 Date Author Version Change Reference 12-Dec-2016 DOF 1.0 08-Feb-2017 DOF 1.1 Updated with new URL links 23-Mar-2017 DOF 1.2
Sourcing Buyer User Guide
 Sourcing Buyer User Guide Version 6.4 August 2011 Copyright 2002-2011 Ion Wave Technologies, Inc. Springfield, Missouri Welcome to Enterprise Sourcing! This manual is intended to provide buyers an instructional
Sappi Ariba Network. Summit Guided Session: Account Configuration
 Sappi Ariba Network Summit Guided Session: Account Configuration 1 Manage invitation letter + 2 Landing Page Sappi 2 1 1 Open the Invitation Letter that you received at your email address from ordersender-prod@ansmtp.ariba.com
CUBuyplusR. Browser s Guide
 CUBuyplusR Browser s Guide This guide will review how to search for products and add them to your cart. In addition, the procedure for generating a purchase request will be outlined as well as tracking
All hardware and software names are brand names and / or trademarks of their respective manufacturers.
 TecWeb 5.0 User Manual Version: 1.8 (Release 8) Author: TecCom Solution Management Date: 05.12.2017 Supported browsers: Internet Explorer 11 Edge Firefox Chrome The compilation of texts and pictures was
Basware Portal for Receiving Basware Commerce Network
 Basware Portal for Receiving Basware Commerce Network Copyright 1999-2016 Basware Corporation. All rights reserved. Disclaimer This product or document is copyrighted according to the applicable copyright
AgencyExpress 3 User Guide
 AgencyExpress 3 User Guide Updated for Winter Release 2010 2 Table of Contents AgencyExpress User Guide Welcome to AgencyExpress 3!... 4 Browser Requirements... 5 Logon to AgencyExpress... 6 Forgot Your
Out-of-State Tobacco Products Wholesale Dealer s Report
 Out-of-State Tobacco Products Wholesale Dealer s Report Logging Into EDS Log in with the user id and password provided through the EDS registration process and click on the Login button. If you have not
ETS Global E-Commerce Platform User Guide V2.1. Table of contents 1. LOGIN TO THE ONLINE ACCOUNT... 3
 Table of contents 1. LOGIN TO THE ONLINE ACCOUNT... 3 1.1. First Login - initialize your password... 3 1.2. Renewal of your password... 4 2. ACCOUNT MANAGEMENT... 6 2.1. B2B user creation / edition...
PARENT PORTAL VIEW LEARNING GUIDE
 PARENT PORTAL VIEW LEARNING GUIDE Central Susquehanna Intermediate Unit, USA TABLE OF CONTENTS Overview... 3 Account Registration... 3 Logging In... 5 Getting Help... 7 Navigating the Portal... 8 Messages...
Sourcing. Supplier Maintenance and Company Administration Buyer User Guide
 Sourcing Supplier Maintenance and Company Administration Buyer User Guide Version 6.1 Ion Wave Technologies, Inc. 2002-2008 Table of Contents Table of Contents...2 Welcome to Supplier Maintenance and Company
Online Ordering Manual
 Online Ordering Manual for the Pay-LESS website www.paylessoffice.com Customer Log In... 2-3 Finding Your Account Number... 4 Searching for Products... 5-6 Quick Order... 7-8 Product Comparison... 9-10
TRAINING GUIDE - REGISTERED SUPPLIER GUIDE Lamprell Energy Limited Procurement and Supply Chain. Version: 1.0
 TRAINING GUIDE - REGISTERED SUPPLIER GUIDE Lamprell Energy Limited Procurement and Supply Chain Version: 1.0 Table of Contents Introduction... 3 Login... 3 Login Assistance... 3 Homepage... 4 Sourcing...
SNC Quick Reference Guide v1.0
 SNC Quick Reference Guide v1.0 Page: 2 Table of Contents Table of Contents... 2 General navigation... 3 Queries... 8 Personalize your screen... 11 Alerts... 14 Notifications... 17 Assign Partner Product
PRISM - FHF The Fred Hollows Foundation
 PRISM - FHF The Fred Hollows Foundation MY WORKSPACE USER MANUAL Version 1.2 TABLE OF CONTENTS INTRODUCTION... 4 OVERVIEW... 4 THE FHF-PRISM LOGIN SCREEN... 6 LOGGING INTO THE FHF-PRISM... 6 RECOVERING
How to Login Transaction Management
 How to Login Transaction Management 1. 2. 1. Open a web browser and go to https://www.bvonesource.com/wps/portal 2. Input User ID and Password, then press Login. In case forget your password, please press
Alamo Ag Customer Service Interface Guide
 Alamo Ag Customer Service Interface Guide - Rev 12/2014 2 Contents Logging On...4 Request Access 5 Opening Screen.6 What s New Screen.8 Edit Profile.10 E-Parts Look-up.12 Navigation Tree.14 Product Line/Printable
Business Online and Mobile Banking User Guide
 Business Online and Mobile Banking User Guide 1. Online Enrollment 2. Login Process & Device Registration 3. Accounts & Accounts Details and Transaction History 4. Activity Center 5. Secure Messages 6.
Pepkor webcom Quick Reference Guide. Version Date: 2013/12 Version Number: 1.3
 Pepkor webcom Quick Reference Guide Version Date: 2013/12 Version Number: 1.3 Table of Contents 1 INTRODUCTION... 4 2 LOGGING IN... 4 3 NAVIGATE INSIDE WEBCOM... 5 3.1 MAIN SECTION 5 3.1.1 Home... 5 3.1.2
Tobacco Products Manufacturer s and Importer s Report
 Tobacco Products Manufacturer s and Importer s Report Logging Into EDS Log in with the user id and password provided through the EDS registration process and click on the Login button. If you have not
Quick Data Entry Guide
 Quick Data Entry Guide 1 Contributing to the V3P database (data entry) This quick data entry guide provides an overview of the data submission procedure to the V3P database. Before submitting data, please
Present and Pay. User Manual Payer Analyst
 Present and Pay User Manual Payer Analyst Table of Contents 1.0 Glossary of Terms... 1 2.0 How to Use this Manual... 3 3.0 Common User Features and Functions... 3 3.1 Present and Pay User Interface...
In-State Tobacco Products Wholesale Dealer s Report
 In-State Tobacco Products Wholesale Dealer s Report Logging Into EDS Log in with the user id and password provided through the EDS registration process and click on the Login button. If you have not registered,
Administrator Guide. November 2010
 Administrator Guide November 2010 AppShore Inc. Administrator Guide Table of Contents Overview...2 Logging into AppShore...2 How to upgrade a subscription...3 How to close your AppShore account...4 Roles...5
RONA e-billing User Guide
 RONA e-billing Contractor Self-Service Portal User Guide RONA e-billing User Guide 2015-03-10 Table of Contents Welcome to RONA e-billing What is RONA e-billing?... i RONA e-billing system requirements...
Opaali Portal Quick guide
 Opaali Portal Quick guide Company information Telia Finland Oyj Teollisuuskatu 15, 00510 HELSINKI, FI Registered office: Helsinki Business ID 1475607-9, VAT No. FI14756079 1 (40) Page 2 (40) Copyright
Division of Alcoholic Beverages and Tobacco. Beverages Shipped To/Within Florida
 Division of Alcoholic Beverages and Tobacco Beverages Shipped To/Within Florida Key Points to Know Electronic reports are also due by the 10 th of each month. It might be necessary to turn off the internet
esa-p EXTENDED GUIDE How to SUBMIT and APPROVE a MAC Confirmation
 esa-p EXTENDED GUIDE How to SUBMIT and APPROVE a MAC Confirmation esa-p Extended Guide How to SUBMIT and APPROVE a MAC Confirmation CHANGE LOG REASON FOR CHANGE VERSION DATE PARAGRAPH(S) Update of the
Guideline Supplier Processes
 Guideline Supplier Processes Order Processing Technical Connection Bid Submitting Requests for Information Submitting Bids at Auctions Document Retrieval Version 4.5.0 Version 4.5.0 August 2010 Table of
Purchase Order Processor
 Purchase Order Processor Last Update: 6/26/13 Digital Gateway, Inc. All rights reserved ii Table of Contents PO PROCESSOR... 1 SETUP... 5 CONNECTION SETTINGS... 5 Overview... 5 PO Processor Settings Manager...
E-Online User Guide Updated for version January 14, 2013
 E-Online User Guide Updated for version 2.0 - January 14, 2013 Client Version Once your company has been approved and set-up on E-Online and users have been given usernames and passwords, they can log-on
ActivePay CARDHOLDER GUIDE
 ActivePay CARDHOLDER GUIDE PNC - ACTIVEPAY CARDHOLDER TRAINING MANUAL TABLE OF CONTENTS Accessing the PNC ActivePay Web Application 2 Self Registration for Cardholders.. 3 Forgotten Username or Password
Kean University. System Guide. cougar.kean.edu. Your window to the world
 Kean University E-Mail System Guide cougar.kean.edu www.kean.edu Your window to the world USING KEAN UNIVERSITY E-MAIL SYSTEM (COUGAR) This document is divided into three sections: Messenger Express Basics:
Welcome to the Cub Cadet Dealer Community. Any questions please
 Welcome to the Cub Cadet Dealer Community Any questions please email dealercommunitysupport@cubcadet.com Go to www.mtdcommunity.com Initial Log In - Enter User ID & Password you received in the email -
Ariba Network Configuration Guide
 Ariba Network Configuration Guide Content Account Configuration Basic Profile Email Notifications Electronic Order Routing Electronic Invoice Routing Remittances Test Account Creation Managing Roles and
Requisitioner Training Manual
 Requisitioner Training Manual Larry McWilliams Procurement Department lmcwilli@kent.edu Revised December 2018 0 Introduction The purpose of this training guide is to familiarize the user with FlashCart,
web po user guide Supplier
 web po user guide Supplier web po user guide table of contents supplier section 1 before you begin section 2 getting started and the basics section 3 Web PO Supplier Administration section 4 Viewing Purchase
Electronic Sales Platform User s Manual
 Electronic Sales Platform User s Manual Version 1.1 2018 St. Petersburg 2 CONTENTS Preface... 3 1 Introduction... 4 1.1 Workstation Requirements and Settings... 4 1.2 Starting application... 5 2 Summary
Station Web Ordering/Inventory Reporting Portal User Guide
 Last Updated: 07/15/2015 Page 1 of 23 Version 2.9.8 Introduction to New Web Portal... 3 Introduction... 3 Helpdesk Procedure... 3 Accessing the Web Portal... 4 Main Page / Web Portal Interface... 4 Menu
Your step-by-step instructions to getting started on ipage. Includes:
 Your step-by-step instructions to getting started on ipage. Includes: Ordering Setting up Selection Lists What's on ipage Managing Your Relationship with Spring Arbor Through ipage Welcome to ipage, Spring
Division of Alcoholic Beverages and Tobacco. Beer Manufacturer s Monthly Report
 Division of Alcoholic Beverages and Tobacco Beer Manufacturer s Monthly Report Logging Into EDS Log in with the user id and password provided through the EDS registration process and click on the Login
Fixed Income Clearing Corporation
 MBS RTTM Web Front End Remote Access Coordinator User Guide Date: 09/26/2011 Version #: 4.0 Distributed by: Distribution: FICC Remote Access Coordinators for MBS Web Front End Fixed Income TABLE OF CONTENTS
SCP Embraer Supplier Guide
 SCP Embraer Supplier Guide Revised 1 Contents Introduction... 5 Getting Started... 5 How to Log In to SCP... 5 Steps to Complete First Time Login... 6 Steps to Log-in to SCP... 7 General Navigation and
PORTA ONE. PORTA Billing100. Customer Self-Care Interface.
 PORTA ONE PORTA Billing100 Customer Self-Care Interface www.portaone.com Customer Care Interface Copyright notice & disclaimers Copyright (c) 2001-2006 PortaOne, Inc. All rights reserved. PortaBilling100,
WCB Online A User Guide for Tiered Service Providers
 WCB Online User Guide for Tiered Service Providers WCB Online A User Guide for Tiered Service Providers A Nova Scotians safe and secure from workplace injury Table of Contents WCB Online 1 Profile Creation
GlobeNewswire. GlobeNewswire, User s Guide USER S GUIDE. Version: 1.16 Issued: By: Global Corporate Services 12/06/
 GlobeNewswire USER S GUIDE Version: 1.16 Issued: 2011-06-12 By: Global Corporate Services 12/06/2011 1.16 1 (31) Table of Contents 1. INTRODUCTION... 4 1.1 Document Objectives... 4 1.2 Document conventions...
ecashiering Table Of Contents
 ecashiering Table Of Contents Overview... 2 Logging in to ecashiering... 2 ecashiering Tab... 3 Payment Management... 3 Digital Delivery Account Managment... 7 Patient Pay Online Tab... 8 Account Summary...
Ariba Network BP Light Account Guide SAP Ariba. All rights reserved. V1.2
 Ariba Network BP Light Account Guide V1.2 Introduction The purpose of this document is to provide the information suppliers need to setup and manage their Light Account. This document is specific to Light
User Manual TypMaster/DD 3.1 PDC ECM&CRM&BI. Version 1.2 Last Revised Status Final Author Frank Merath / Ingrid Restle
 User Manual TypMaster/DD 3.1 PDC ECM&CRM&BI Version 1.2 Last Revised 2012-08-20 Status Final Author Frank Merath / Ingrid Restle Privacy note: Internal Imprint Copyright 2012 by T-Systems T-Systems International
Foreword. Trademarks bavel is a trademark of Voxel Group.
 User s Manual for the PARTNER PORTAL Foreword Data and design subject to change without notice. Supply subject to availability. 2016 Copyright Voxel Group We reserve all rights in this document and in
InView 5 User Guide v 1.8
 InView 5 User Guide v 1.8 Tushar Bhamare Version 1.0 05-May-2017 Contents 1 Introduction... 4 2 Overview... 5 3 Sitemap and Navigation... 7 4 General... 8 4.1 Access Inview... 8 4.2 Customer, Hub and Client
emerge Help Document Table of Contents
 Table of Contents Logging Into emerge... 2 Navigation Bar... 3 Main Menu... 4 Creating a New Order... 6 Order Checklist... 6 Information... 7 Overview... 8 Geography... 9 List Select... 12 Demographics...
emerge Help Document Table of Contents
 Table of Contents Logging Into emerge... 2 Navigation Bar... 3 Main Menu... 4 My Account... 6 My Information... 6 Manage Lists... 7 Manage Seeds... 8 Search/Add Suppress... 9 Update My Suppress... 10 Creating
WebPrint Quick Start User Guide
 WebPrint Quick Start User Guide Getting Started Accessing Print Center Navigate your Web browser to Print Center Log in page. If you do not have an acocunt, you will need to create a new User account.
Online Appointment Booking System
 Online Appointment Booking System User Guide Version 8.1 TABLE OF CONTENTS 1. Registering Your Account with LifeLabs 2 1.1 STEP 1 Terms of Use 3 1.2 STEP 2 - Complete the registration form 4 2. Booking
ACH Payments. User Guide
 ACH Payments User Guide Table of Contents Overview... 2 Supported SEC Codes... 2 Create Batch... 2 Creating a Free Form Batch... 3 Creating a Batch from a Template... 14 Manage Batch Templates... 21 Transaction
e-invoicing on the e-prior Supplier Portal
 EUROPEAN COMMISSION DIRECTORATE-GENERAL INFORMATICS Information Systems Directorate e-invoicing on the e-prior Supplier Portal User Manual (full functionality) Version 1.40 Date: 15/12/2011 Author: Denis
REPSPARK USER GUIDE 1
 REPSPARK USER GUIDE 1 TABLE OF CONTENTS INTRODUCTION 3 CREATING A LOGIN Creating a Username and Password 4 Reset Password 5 GETTING STARTED Editing Profile Information 4 PRODUCTS Product Availability 6
View my bill online. User guide
 View my bill online User guide View my bill online With View My Bill Online, you can monitor the conferencing charges to your account anytime from anywhere. It s easier than ever to get the charge details
Oracle Sourcing Supplier Guide
 Oracle Sourcing Supplier Guide Table of Contents Sourcing Application Help and Support... 4 Requirements... 5 How to Use this Guide... 6 Module 1: Oracle Sourcing Basics... 7 Section 1-1 Login to Oracle
Internet Data Exchange - General Navigation - View and Confirm Purchase Orders and Scheduling Agreements
 Internet Data Exchange - General Navigation - View and Confirm Purchase Orders and Scheduling Agreements Table of Contents Page 3 What is Internet Data Exchange (IDE) Page 4 - Benefits / Access Page 5
Sales Order Processing
 Windows Print Management System Sales Order Processing Sales Order Processing Contents Sales Order Processing Contents Sales Order Processing Contents... 1.1 Introduction to SOP... 2.1 Stock Type... 3.1
USER GUIDE Time and Attendance User Administration Human Capital Management Suite
 USER GUIDE Time and Attendance User Administration Human Capital Management Suite Ormed Information Systems Ltd. Version 1.2 (January 2015) What s Inside What s Inside...1 Introduction...2 Procedures...3
Open House Guide User Manual
 Open House Guide User Manual About this Service The Desert Sun offers a self-serve online ad placement platform for Realtors and home sellers to advertise open house listings. For Realtors, the system
FedEx Office Print Online Corporate
 FedEx Office Print Online Corporate Quick Reference Guide Upload and Print Log in to FedEx Office Print Online Corporate 1. FedEx Office Print Online Corporate is accessible to University Faculty and Staff
GSA QMAC. Transportation Service Provider (TSP) TransPort Integrator User Guide. TransPort Integrator Service. Version 3.0
 TransPort Integrator User Guide. TransPort Integrator Service. Version 3.0") GSA QMAC TransPort Integrator Service Transportation Service Provider (TSP) TransPort Integrator User Guide Version 3.0 Change Log Version # Date of Change Section Description of Change Changed By 1.0
GSA QMAC TransPort Integrator Service Transportation Service Provider (TSP) TransPort Integrator User Guide Version 3.0 Change Log Version # Date of Change Section Description of Change Changed By 1.0
User Guide Respond to Request for Information (RFI)
") OVERVIEW This User Guide describes how Suppliers participates in Request for Information (RFI) events related to Pre- Qualification, Category Related Qualifications, Sourcing Pre-Screenings or Communications
OVERVIEW This User Guide describes how Suppliers participates in Request for Information (RFI) events related to Pre- Qualification, Category Related Qualifications, Sourcing Pre-Screenings or Communications
TungSpot User Manual Last Update 5/20/2013
 TungSpot User Manual Last Update 5/20/2013 TungSpot User Manual 1. Introduction... 2 1.1 Overview... 2 1.2 Login... 2 1.3 Navigation Tools... 3 2. Homepage... 4 2.1 Overview of Home Page... 4 2.2 My Purchases...
1-Stop Connections Pty Ltd. Train Consist. User Guide
 1-Stop Connections Pty Ltd Train Consist User Guide The contact for all matters relating to this support manual is: 1-Stop Customer Support Centre 1-Stop Connections Pty Ltd Suite 7005, Thakral Bayside
I-SUPPLIER MODULE. isupplier Module
 I-SUPPLIER MODULE isupplier Module Authored by: Kiran Katti Version: 1.1 Date: 06-January-2015 Table of Contents Terms Used in the User Manual:... 2 Introduction to isupplier... 4 Requirements/Software
Catalog Content Management
 Catalog Content Management Documentation Version 2.12 December 2017 Product Management CCMT Documentation 2 of 23 Content 1. Introduction... 3 1.1 Network requirements... 3 2. Catalog Management Process...
USER MANUAL LEICA GEOSYSTEMS / HEXAGON SUPPLIER PORTAL
 USER MANUAL LEICA GEOSYSTEMS / HEXAGON SUPPLIER PORTAL Leica Geosystems AG Heinrich-Wild-Strasse CH-9435 Heerbrugg Switzerland Hotline: +41 71 727 4343 Phone +41 71 727 31 31 www.leica-geosystems.com 0
Website Ordering User Guide (New customer) https://www.finelinetech.com/fasttrak_ userguide/
 https://www.finelinetech.com/fasttrak_ userguide/") Website Ordering User Guide (New customer) https://www.finelinetech.com/fasttrak_ userguide/ Contact Information: US: support@finelinetech.com Asia: support@finelinetech.com.hk Customer Service: USA: 1-800-500-8687
Website Ordering User Guide (New customer) https://www.finelinetech.com/fasttrak_ userguide/ Contact Information: US: support@finelinetech.com Asia: support@finelinetech.com.hk Customer Service: USA: 1-800-500-8687
Alcoholic Beverage Distributor s Monthly Report
 Alcoholic Beverage Distributor s Monthly Report Log in with the user id and password provided through the EDS registration process and click on the Login button. If you have not registered, click on the
Division of Alcoholic Beverages and Tobacco. Liquor Distiller s and Rectifier s Monthly Report
 Division of Alcoholic Beverages and Tobacco Liquor Distiller s and Rectifier s Monthly Report Logging Into EDS Log in with the user id and password provided through the EDS registration process and click
FULFILLMENT. Worldwide Golf Shops. WebForms Reference Guide. Volume 1
 Worldwide Golf Shops FULFILLMENT WebForms Reference Guide Volume 1 April 2016 TABLE OF CONTENTS Introduction What is EDI? WebForms Navigation Inbox/Sent/Drafts Purchase Order Acknowledgement Advance Ship
Need help? Call: / DOCMAIL: ADVANCED USER GUIDE
 DOCMAIL: ADVANCED USER GUIDE Version 3.2 November 2018 1 CONTENTS Welcome to Docmail 4 Navigating around Docmail 4 Overview of the Docmail main page 6 Library 7 Create / Edit Document 9 Create / Edit Text
SUPPLIER GUIDE PROCONTRACT THE TENDER PROCESS WITHIN FOR
 SUPPLIER GUIDE FOR THE TENDER PROCESS WITHIN PROCONTRACT Contents Viewing the Exercise Details/Documents... 3 The Questionnaire/Tender/Quote Documents... 9 Discussions... 11 Question and Answer Facility...
Creating a profile in the Global Personnel Recruitment System
 Creating a profile in the Global Personnel Recruitment System CONTENTS I. Registration... 2 II. Personal details... 4 III. Education... 7 IV. Experience... 10 V. Languages... 14 VI. Other... 17 VII. Skills...
Supplier User Guide for Responding to Atlantic Lottery Tender Opportunities
 Supplier User Guide for Responding to Atlantic Lottery Tender Opportunities Version 4 Released November 2017 TABLE OF CONTENTS OVERVIEW... 3 Help & Support... 3 Definitions... 3 GENERAL FLOW OF SUPPLIER
Buyers Work Centre: Amending Orders
 Buyers Work Centre: Amending Orders Responsibility Navigate iprocurement Buyer Buyers Work Centre > Orders You are restricted to what amendments can be made to orders. The following amendments can be made:
International Trade Online
 International Trade Online USER GUIDE For informational purposes only, not considered an advertisement. INTERNATIONAL TRADE ONLINE International Trade Online is the web-based offering from M&T Bank to
PROFESSIONAL DEVELOPMENT ADVISOR (PDA) USER GUIDE
 USER GUIDE") PROFESSIONAL DEVELOPMENT ADVISOR (PDA) USER GUIDE PDA Account Registration On the America s Health Insurance Plans website (www.ahip.org/courses ), Click Register and submit your information. Please note
PROFESSIONAL DEVELOPMENT ADVISOR (PDA) USER GUIDE PDA Account Registration On the America s Health Insurance Plans website (www.ahip.org/courses ), Click Register and submit your information. Please note
(1) Order confirmation expected If an order confirmation is not given in the expected time frame, a reminder will be sent out
 Order confirmation expected If an order confirmation is not given in the expected time frame, a reminder will be sent out") Overview in order to reduce communication errors and increase the quality of the delivery dates, we have implemented a new Tool in our supplier workplace supporting following processes: - Acknowledge of
Overview in order to reduce communication errors and increase the quality of the delivery dates, we have implemented a new Tool in our supplier workplace supporting following processes: - Acknowledge of
Attorney Training Manual
 Attorney Training Manual Contact Information Phone Number: -855-264-2237 Email: efilingsupport@judicial.state.co.us Revised May 207 Table of Contents LOGIN / REGISTER ORGANIZATION... 2 NAVIGATION BAR...
Updating Content in Product Manager
 Updating Content in Product Manager 1. Log in to the system at https://buyers.procserveonline.com/otis/login.html?marketplaceid=2&locale=en_gb, entering username and password. If you have forgotten your