Installation Guide V1.2
|
|
|
- Hilary Morrison
- 5 years ago
- Views:
Transcription


1 + Welcome to the Connected Home Installation Guide V1.2
2
3 MyAir Installation Guide Contents 1 - SYSTEM OVERVIEW 2 - OVERVIEW 3 - COMPATIBILITY 4 - SETUP 5 - DAIKIN ( DK) SETUP 6 - FUJITSU ( FJ) SETUP 7 - LG ( LG) SETUP 8 - MITSUBISHI ELECTRIC ( ME) SETUP 9 - SAMSUNG ( BDSAM) SETUP 10 - PANASONIC ( PA) SETUP 11 - TOSHIBA ( TO) SETUP 12 - HITACHI ( HIT) SETUP 14 - MITSUBISHI HEAVY IND. ( MHI) 15 - SYSTEM CONFIGURATION installation guide 17 Installation Guide V1.2 1
 Zone Motor 10x Zone Motors [CLIP24] EXT TOUCH MY+ SCREEN CB CB EXT MY+ EXT 8 NA MyAir+ Only MyLights LM (if installed) Wired Wall Sensor (if installed) PART NO.")

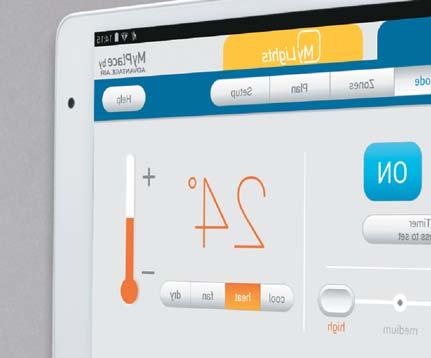
4 Favourites Groups Scenes SetUp Help 1 - SYSTEM OVERVIEW Master Favourites Master WIR Ensuite Hall Way Entry Rocco Jade Bathroom Guest Kitchen Dining Living Indoor Unit OR CM / SAM OTHER EXT MY+ RF Wall Sensor (if installed) Zone Motor 10x Zone Motors [CLIP24] EXT TOUCH MY+ SCREEN CB CB EXT MY+ EXT 8 NA MyAir+ Only MyLights LM (if installed) Wired Wall Sensor (if installed) PART NO. OPTIONS DESCRIPTION DK / FJ / LG / ME / PA / BDSAM / TO / MHI / HIT Control Box - Extender (MyLights + WSW) CLIP24 - Zone Motor - AC + DC Power Supply WSRF - Wall Sensor RF (Wireless) WSW - Wall Sensor Wired TSP7 8 Wall Mounted Touchscreen V7 Only use approved components as listed here. Any unauthorised changes to system components may pose a safety risk, make the product non-compliant with safety standards and any failure may not be covered by manufacturer s warranty. Installation Guide V1.2 2
5 2 - OVERVIEW Below is the control box with each of its ports and setting switches labled. System ID Dipswitch Settings Dipswitch TSP Tablet Connection NA (MyAir+ only) Connection (Used for wired wall sensors) Power Supply Connection () EXT MY+ TOUCH SCREEN Link to Indoor Unit CM / SAM OTHER 2 Pin Samsung / Carrier / Midea 4 Pin Daikin / Fujitsu / LG / Mitsubishi / Samsung / Panasonic Zone Motors 1-10 Antenna Location (Used for RF wall sensors) Installation Guide V1.2 3
6 3 - COMPATIBILITY The following table lists the air conditioner brands that the supports. Some brands require a special version of the in order to communicate with their units. The part numbers are listed in the second column. BRAND CB PART NO. CABLE CARRIER 2 PIN DAIKIN DK 4 PIN FUJITSU FJ 4 PIN LG LG 4 PIN MIDEA 2 PIN MITSUBISHI ELEC ME 4 PIN MITSUBISHI HEAVY IND. MHI 4 PIN PANASONIC PA 4 PIN SAMSUNG ( 14KW ) 2 PIN SAMSUNG ( 16KW) BDSAM 4 PIN TOSHIBA TO 4 PIN HITACHI HIT 4 PIN HAIER 2 PIN RINNAI 2 PIN Installation Guide V1.2 4
7 4 - SETUP The standard Control Box will control units from the following suppliers: Carrier; Midea; Rinnai; Haier or Samsung (14kW or less.) The setup uses a SAM cable for Samsung, Rinnai and Haier units and a CM cable for the Carrier and Midea units. Setup for Samsung units: 1. Ensure power to the air conditioner is OFF. 2. Connect Samsung Remote (MWR-WE10), then turn power ON. 3. Configure static pressure using manufacturers instructions. Run unit in cooling / heating to test, then power OFF. 4. Disconnect the Samsung remote from the indoor unit and replace with SAM cable. Connect the other end of the SAM cable to the CB. CABLE CORE COLOUR RED BLACK INDOOR UNIT TERMINAL F4 F3 5. Go to Section 15 SYSTEM CONFIGURATION to complete install. Setup for Carrier / Midea units: 1. Ensure power to the air conditioner is OFF. 2. Connect the CM cable from the CB to the connector in the indoor unit that is used for the standard Carrier / Midea controller. 3. Connect the ground cable to the indoor unit chassis. 4. On the indoor unit PCB set the 2 dip switches labeled SW1 and SW2 to the positions shown. Switch Value ON 1 2 ON 1 SW1 1 2 OFF ON SW1 SW2 SW2 1 ON 5. Go to Section 15 SYSTEM CONFIGURATION to complete install. See over page for Rinnai and Haier setup... Installation Guide V1.2 5
8 SETUP Setup for Rinnai units: 1. Ensure power to the air conditioner is OFF. 2. Connect Rinnai remote, then turn power ON. 3. Run unit in cooling / heating to test, then power OFF. 4. Disconnect the Rinnai remote from the indoor unit and replace with SAM cable. Connect the other end of the SAM cable to the CB. CABLE CORE COLOUR RED BLACK INDOOR UNIT TERMINAL CN29-X CN29-Y 5. Go to Section 15 SYSTEM CONFIGURATION to complete install. Setup for Haier units: 1. Ensure power to the air conditioner is OFF. 2. Connect Haier remote, then turn power ON. 3. Run unit in cooling / heating to test, then power OFF. 4. Follow Haier instructions and connect a YCJ-A002 Modbus adapter board (supplied by Haier) to the indoor unit. Then connect the SAM cable to the CB and then wire the other end to the modbus board terminals. CABLE CORE COLOUR RED BLACK MODBUS BOARD TERMINAL CN1-A CN1-B 5. Go to Section 15 SYSTEM CONFIGURATION to complete install. IMPORTANT: 1. The Standard Haier remote must be installed to provide temperature sensing. 2. MyZone functionality is not available for Haier units. Installation Guide V1.2 6
9 5 - DAIKIN ( DK) SETUP DK setup steps are as follows: 1. Connect the Daikin wired remote to the indoor unit in the roof space. 2. Power up the air conditioner & run the unit to test correct operation of indoor & outdoor unit. 3. Using the Daikin wired remote change the field settings for use with either the Return Air Sensor or a MyZone Sensor (if supplied) Return Air Sensor Menu Setting Value MyZone Sensor Menu Setting Value How to set Daikin field settings: a. Press and hold the CANCEL Button (bottom right corner button) b. Select Field setting list and press MENU/ENTER (middle round button) c. Use the UP / DOWN buttons to select the Menu number. d. Press the LEFT / RIGHT buttons to select the Setting. e. Press the UP / DOWN buttons to change the Value. f. Press MENU / ENTER button (middle round button) to save this setting. g. Select YES to the question Is it settled by setting? h. Repeat for any other required field settings. 4. Power off the Daikin air conditioner & remove Daikin wired remote control from system. 5. Connect the supplied cable from the CB to the indoor unit. Wire the cable cores to the terminals as shown below: CABLE CORE COLOUR RED BLACK INDOOR UNIT TERMINAL P1 P2 6. Go to Section 15 SYSTEM CONFIGURATION to complete install. Installation Guide V1.2 7
10 6 - FUJITSU ( FJ) SETUP FJ setup steps are as follows: Optional: Connect a Fujitsu remote control and check unit works, before installing MyAir controls. 1. Ensure power to the air conditioner is off & the Fujitsu wired remote control is not connected to the system. 2. Connect the supplied cable from the CB to the indoor unit. Wire the cable cores to the terminals as shown below: CABLE CORE COLOUR RED WHITE BLACK INDOOR UNIT TERMINAL 1 (RED) 2 (WHITE) 3 (BLACK) 3. Go to Section 15 SYSTEM CONFIGURATION to complete install Note: If Auto Field Settings are disabled on the CB (see section 12) then the field settings will need to be set manually from a Fujitsu remote, to the values shown below. Return Air Sensor Function Number Setting Value MyZone Sensor Function Number Setting Value LG ( LG) SETUP LG setup steps are as follows: Optional: Connect a LG remote control and check unit function, before installing MyAir controls. 1. Ensure power to the air conditioner & controls is off. 2. Remove the LG wired remote controller and connect the supplied cable from the CB to the connector for the remote. 3. Go to Section 15 SYSTEM CONFIGURATION to complete install Installation Guide V1.2 8
11 8 - MITSUBISHI ELECTRIC ( ME) SETUP ME setup steps are as follows: Optional: Connect a Mitsubishi remote control and check the unit works, before installing MyAir controls. 1. Ensure power to the air conditioner & controls is off. 2. Check that the Mitsubishi Electric wired remote control is not connected to the system. 3. Connect the supplied cable from the CB to the indoor unit. Wire the cable cores to the terminals as shown below: CABLE CORE COLOUR INDOOR UNIT TERMINAL RED 1 BLACK 2 4. Go to Section 15 SYSTEM CONFIGURATION to complete install 9 - SAMSUNG ( BDSAM) SETUP BDSAM setup steps are as follows: 1. Connect the Samsung wired remote (MWR-WE10N) to the indoor unit in the roof space. IMPORTANT: This is a required step, the unit will not run without first connecting the Samsung remote. 2. Run the unit & test correct operation of indoor & outdoor unit. 3. Connect the supplied cable from the CB to the indoor unit. Wire the cable cores to the terminals as shown below: CABLE CORE COLOUR RED BLACK INDOOR UNIT TERMINAL F3 F4 4. Go to Section 15 SYSTEM CONFIGURATION to complete install Installation Guide V1.2 9
12 10 - PANASONIC ( PA) SETUP PA setup steps are as follows: 1. Connect the Panasonic wired remote to the indoor unit in the roof space. 2. Using the Panasonic wired remote change the field settings for use with either the Return Air Sensor or a MyZone Sensor (if supplied) Return Air Sensor Menu Setting Value 1 0A Panasonic Remote CZ-RTC2 MyZone Sensor Menu Setting Value 1 0A Return Air Sensor Menu Setting Value Panasonic Remote CZ-RTC4 MyZone Sensor Menu Setting Value How to set Panasonic field settings for Menu s 1 & 2: Menu 1 a. Press and hold the MODE (Top Right) & TIMER SET buttons together for 5 seconds. b. Use UP & DOWN TEMPERATURE buttons to change the 1st value c. Use UP & DOWN TIMER buttons to change the 2nd value d. When you are done press the SET button e. Repeat from step b to set second required code f. Press the SPANNER button to return to main screen Menu 2 a. Press and hold the SPANNER, SET & CANCEL buttons together for 5 seconds. b. Use UP & DOWN TEMPERATURE buttons to change the 1st value c. Use UP & DOWN TIMER buttons to change the 2nd value d. When you are done press the SET button e. Press the SPANNER button to return to main screen 3. Power off the Panasonic air conditioner & remove Panasonic wired remote control from system. 4. Connect the supplied cable from the CB to the indoor unit. Wire the cable cores to the terminals as shown below: CABLE CORE COLOUR RED INDOOR UNIT TERMINAL R1 BLACK R2 5. Go to Section 15 SYSTEM CONFIGURATION to complete install Installation Guide V1.2 10
13 11 - TOSHIBA ( TO) SETUP TO setup steps are as follows: 1. Connect the Toshiba wired remote to the indoor unit in the roof space. 2. Power up the air conditioner & run the unit to test correct operation of indoor & outdoor unit. 3. Using the Toshiba wired remote change the field settings (DN code) for use with either the Return Air Sensor or a MyZone Sensor (if supplied) Return Air Sensor DN Code Value MyZone Sensor DN Code Value How to set Toshiba field settings: a. Push the MENU button to display the menu screen. b. Push & hold the MENU + DOWN buttons at the same time for 4 seconds to open the field settings menu. c. Use the DOWN arrow to select option 5, DN CODES d. Press F2 then use UP / DOWN arrow to navigate to the required DN code e. Press F2 to move right & highlight DATA value f. Use UP/DOWN arrow to set required value g. Use the MENU button to fix (store) the setting & press F1 to confirm h. Press the RETURN button to go back to the field settings menu, you will see an hour glass for approx. 30 seconds. i. Press RETURN twice more to go back to main screen j. Repeat all the steps for each required setting 4. Power off the Toshiba air conditioner & remove Toshiba wired remote control from system. 5. Connect the supplied cable from the CB to the indoor unit. Wire the cable cores to the terminals as shown below: CABLE CORE COLOUR RED BLACK INDOOR UNIT TERMINAL A B 6. Go to Section 15 SYSTEM CONFIGURATION to complete install Installation Guide V1.2 11
14 12 - HITACHI ( HIT) SETUP HIT setup steps are as follows: 1. Connect the Hitachi wired remote to the indoor unit in the roof space. 2. Power up the air conditioner & run the unit to test correct operation of indoor & outdoor unit. 3. Using the Hitachi wired remote change the field settings for use with either the Return Air Sensor or a MyZone Sensor (if supplied.) OPERATION MODE RETURN AIR SENSOR MYZONE SENSOR THERMISTOR SELECTION I.U Thermistor THM of RCSW How to set Hitachi field settings: a. Press and hold the Return button ( ) and the Menu button ( ) simultaneously for more than 3 seconds to enter settings mode. Settings mode can only be entered when the AC unit is not running. b. Scroll down to the Function Selection option using the Down arrow ( ) and press the OK button. c. Scroll down to Item C5 using the Down arrow ( ). Check the value 00 is set. If not 00, scroll left or right using the arrow ( ) buttons unit 00 is shown and press the OK button. Select YES to the question when prompted Confirm function selection setting? and press the OK button to save the setting. d. Scroll down to the Thermistor Selection option using the Down arrow ( ) and then press the OK button. e. Press the left or right arrow ( ) to scroll to select the correct option outlined in step #3 above. f. Press the OK button to enter the new selection. g. Select YES using the left arrow ( ) to the question when prompted Confirm setting of thermistor selection? h. Press the OK button to save this setting. i. Press the Return button ( ) to exit from settings mode. 4. Power off the Hitachi air conditioner & remove Hitachi wired remote control from system. Continues over page... Installation Guide V1.2 12
15 13 - HITACHI ( HIT) SETUP 5. Connect the supplied cable from the CB to the indoor unit. Wire the cable cores to the terminals as shown below: CABLE CORE COLOUR RED BLACK INDOOR UNIT TERMINAL A B 6. Go to Section 15 SYSTEM CONFIGURATION to complete install 14 - MITSUBISHI HEAVY IND. ( MHI) MHI setup steps are as follows: 1. Ensure power to the air conditioner is off & you have not connected the Mitsubishi Heavy Industries wired remote to the air conditioner indoor unit. 2. Connect the supplied cable from the CB to the indoor unit. Wire the cable cores to the terminals as shown below: CABLE CORE COLOUR RED BLACK INDOOR UNIT TERMINAL X Y 3. Go to Section 15 SYSTEM CONFIGURATION to complete install Installation Guide V1.2 13
16 15 - SYSTEM CONFIGURATION Now the (and variants) have been paired to the indoor unit. The following steps will complete the system configuration. IMPORTANT: Due to heat transfer in summer, the CB should be installed at least 1m away from roofing materials, such as roof tiles. 1. Connect the zone motors, touch screen and antenna NOTE: Antenna only supplied when wireless temperature sensors are ordered IMPORTANT: Keep control cables, such as the TSP cable and the indoor unit link cable, away from other 240V cables or devices. 2. Check System ID, the System ID dipswitch is found on the CB. If there are multiple systems in one install then the System ID for each CB must be set to a different switch combination. The System ID may also need to be changed if a clash occurs with nearby installations. 3. Check the Settings dipswitch: Switch no. 2 must be in the ON position, Switch no. 5 must be ON to use the Return Air Sensor OR in the OFF position to use a MyZone Sensor. System ID Dipswitch Settings Dipswitch NOTE: For Fujitsu units only, Auto Field Settings are disabled when switch no. 10 is in the ON position. 4. Plug power supply into control box. IMPORTANT: The power transformer () must be plugged into a surge protected power outlet/point. 5. Configure a sensor for each zone. Wireless a. Set the System ID on each sensor to match your control box. b. Set the zone number by flicking the appropriate switch on (eg if you would like to set a sensor as zone 6 you would flick only switch 6 ON.) Wired Set the zone number by flicking the appropriate switch on (eg if you would like to set a sensor as zone 6 you would flick only switch 6 ON.) Continues over page... Installation Guide V1.2 14
17 16 - SYSTEM CONFIGURATION 6. Power up the air conditioning system. 7. Open the MyPlace app on the home page of the wall mounted touch screen 8. Press the SETUP button 9. Press the TECH SETUP button. 10. Enter password to access the setup. 11. Press Run Wizard, and follow the prompts on the screen. 12. When you have completed the setup wizard press ADVANCED to see additional options below. SET ACTIVATION CODE (Optional 21-day activation feature) By setting a 4-digit activation (lock-out) code the air con system will stop working after 21 days, it is STRONGLY recommended that your company always uses the same 4-digit pin code, and that everyone in your company knows this number. If the pin code to a system is forgotten, the control box requires replacing to activate the system. BALANCE ZONES This is where you can balance your zones if needed. For example: if zone 6 has too much air flow we could set MAX 80% this would result in the motor never driving past the 80% open position, the customer will not see these changes on the zone screen. TEMPERATURE SENSORS This screen allows you to check each sensor is operating correctly, each zone will display one of the below: Multiple sensors on this zone - Two or more sensors are configured to the same zone or you may be picking up a neighbour s system in which case you would need to change the System ID, via the System ID dipswitch in the CB. Battery Low - Check that the antenna is fitted to the CB, ensure there is a battery fitted within the sensor & the sensor is within range. Sensor OK - Check that all sensors show OK before proceeding. SENSOR NOT DISPLAYED: No sensor set for this zone, it will be % control only. If you have a sensor in this zone check the battery strip is removed, check battery inserted correctly. Check System ID is correct & check that only one sensor is configured for each zone. Installation Guide V1.2 15
18
19 MyAir+ Installation Guide Contents 1 - SYSTEM OVERVIEW 2 - MASTER / SLAVE CB 3 - HOME SCREEN Installation Guide V1.2 17
20 Master Entry Favourites WIR Groups Scenes Ensuite SetUp Help Hall Way Rocco Jade Bathroom Guest Kitchen Dining Living CM / SAM OTHER CM / SAM OTHER CM / SAM OTHER 1 - SYSTEM OVERVIEW Slave CB s EXT MY+ TOUCH SCREEN Master Favourites Master CB Indoor Unit OR CM / SAM OTHER EXT MY+ TOUCH SCREEN EXT MY+ 10x RF Wall Sensors (if installed) [RFWS] 10x Zone Motors [CLIP24] EXT TOUCH MY+ SCREEN CB EXT MY+ EXT 8 MyLights LM (if installed) Wired Wall Sensor (if installed) TOUCH SCREEN Slave CB s cannot be connected to Mylights & Do not have a TSP All other setup can be the same as the Master (ie. Up to 10 RFWS & 10 Zone Motors per CB) EXT MY+ MyAir+ allows for an installation to include up to 4 Air Conditioner (AC) units all controlled from the same TSP (touchscreen.) Installation Guide V1.2 18
21 Master Favourites Master Entry Favourites WIR Groups Scenes Ensuite SetUp Help Hall Way Rocco Jade Bathroom Guest Kitchen Dining Living Master Entry CM / SAM OTHER Favourites WIR Groups Scenes Ensuite SetUp Help Hall Way Rocco Jade Bathroom Guest Kitchen Dining Living CM / SAM OTHER CM / SAM OTHER CM / SAM OTHER 2 - MASTER / SLAVE CB There can only be one TSP connected per system. The Master is the CB that is connected to the TSP. NOTE: If MyLights is to be installed the LM s need to connect to the Master CB and not a Slave CB. If only one slave CB is required then the slave may be connected directly to the master as shown. Master Favourites Master CB CM / SAM OTHER EXT TOUCH MY+ SCREEN Slave CB TOUCH SCREEN EXT MY+ In cases where there is more than one Slave a EXT MY+ module must be used as shown below. Slave CB s EXT MY+ TOUCH SCREEN Master CB CM / SAM OTHER EXT MY+ TOUCH SCREEN EXT MY+ EXT TOUCH MY+ SCREEN EXT MY+ TOUCH SCREEN EXT MY+ Installation Guide V1.2 19

22 3 - HOME SCREEN Once the MyPlace app has been run the MyAir+ tab will display the home screen as shown above. Each icon set represents a single Air Conditioner, pressing in the top left area of the icon will open that Air Conditioning unit. Each AC unit operates as a MyAir system and can be setup as per the MyAir section of this manual. 4 - WIRING The cable length between the CB s and the MY+ EXT should be as follows: CB LENGTH OF CABLE (CB to MY+ EXT) MASTER 0.5m SLAVE 12m or 25m Installation Guide V1.2 20
23
Variable Air Management System. Installation Guide V1.1
 Variable Air Management System Installation Guide V1.1 Installation Guide Contents 1 - OVERVIEW 2 - INSTALLATION PROCEDURE 3 - TOUCH SCREEN SETUP 4 - TROUBLE SHOOTING 1 2 3 4 Installation Guide V1.1 1
Quick Start. MyAir4 User Manual. This section will give you a brief description about each of the buttons found on the home screen.
 User Manual Quick Start... 3 HOME... 4 SIMPLE TIMER... 4 AIR CON... 5 ZONES... 6 PROGRAMS... 7 HELP... 11 SETTINGS... 12 MyZone - (optional feature)... 15 Constant Zones... 17 Android Tablet... 18 Smart
Introduction. MyAir5 User Guide
 User Guide Introduction... 3 Mode Page... 4 Zones Page... 10 Plans Page... 13 Setup Page... 17 Constant Zones... 19 Android Tablet... 20 Smart Phone Control Quick Setup Guide... 21 Network Troubleshooting...
Failure to follow WARNING is very likely to result in such grave consequences as death or serious injury
 Warning Read these Safety Precautions carefully to ensure correct installation. This manual classifies precautions into WARNING and CAUTION. Failure to follow WARNING is very likely to result in such grave
Welcome to the Connected Home. Installation Guide V1.1
 Welcome to the onnected Home Installation Guide V. Mys Installation Guide ontents - EETRIA SAFETY - SYSTEM OVERVIEW 3 - OVERVIEW 4 - IGHT ID (ID) FIG. 5 - ED SPEIFIATIS 6 - REAY MODUE (RM) 7 - REAYS 8
CoolPlug CooLinkHub HVAC Bridge. Quick Installation Guide
 Bridge Quick Installation Guide Warning Read and understand the following Safety Guidelines and Warnings to ensure a safe installation Failure to follow WARNING may result in injury or death. This equipment
AirTouch 3 Zone Control System
 airtouch AirTouch 3 Zone Control System User Manual airtouch.net.au 2017 Polyaire Pty Ltd Liability Please read the instructions before installing this Zone Control System. Polyaire Pty Ltd does not accept
Smart Home Systems. User Manual V1.3
 Smart Home Systems User Manual V1.3 My User Manual This manual covers all of the My product line. You can jump to a relevant product using the tabs on the right had side. My consists of: Smart Air Conditioning
CoolMasterNet Technical Data CoolMasterNet Universal Interface Adapter for HVAC Systems
 CoolMasterNet Universal Interface Adapter for HVAC Systems Document Revision 0.6 4/25/20 20 CoolAutomation LTD. Attention 1. During the HVAC system automatic operations the CoolMasterNet must be disconnected
AirTouch 2 Zone Control System
 AirTouch 2 Zone Control System User Manual www.polyaire.com.au 2016 Polyaire Pty Ltd Liability Please read the instructions before installing this Zonemaster Zoning Control System. Polyaire Pty Ltd does
Central Controller Operation & Installation Manual
 Central Controller Operation & Installation Manual YCZ-A004 CONTENT Function introduction of central controller... 1 Part info for central controller... 2 Page & Key Explanation... 4 Address Setting When
CoolPlug CooLinkHub HVAC Bridge. Quick Installation Guide
 CoolPlug CooLinkHub HVAC Bridge Quick Installation Guide Warning Read and understand the following Safety Guidelines and Warnings to ensure a safe installation Failure to follow WARNING may result in
CoolMasterNet Technical Data CoolMasterNet Universal Interface Adapter for HVAC Systems
 CoolMasterNet Technical Data CoolMasterNet Universal Interface Adapter for HVAC Systems Document Revision 0.3 3/23/2015 Attention 1. During the HVAC system automatic operations the CoolMasterNet must be
Smart Home Systems. User Manual V2.0
 Smart Home Systems User Manual V2.0 MyAir User Manual Contents 1 - INTRODUCTION 4 2 - MODE SCREEN 5 3 - ZONES SCREEN 7 4 - MYZONE (OPTIONAL) 8 5 - MOTION ZONE (OPTIONAL) 9 6 - CONSTANT ZONES 10 7 - FRESH
Advantage Air Status Codes End User
 Advantage Air Status Codes End User This document is a compilation of status codes for Advantage Air Control Systems; you can use this to find the definition of the fault code displayed on your MyAir 3/4/5
ZONETOUCH DAMPER CONTROL SYSTEM Operation Manual
 ZONETOUCH DAMPER CONTROL SYSTEM Operation Manual www.zonemaster.com.au www.polyaire.com.au 2012 Polyaire Pty Ltd TABLE OF CONTENTS 1) Features 2 2) Wall Controller Layout (Touchpad) 2 3) Manual On/Off
izone 400 to 435 Air Conditioning Control Systems
 Installation, Configuration & User Manual for izone 400 to 435 Air Conditioning Control Systems Need this manual in a larger format? Download a copy www.izone.com.au Airstream Pty Ltd reserves the right
WELCOME. For customer support or any inquiries, please visit our web site at or contact us at
 WELCOME Congratulations on purchasing the GBF Smart Four Wire Intercom System. Our factory engineers were the first to enable multiple security cameras being monitored through a smart mobile device and
OPERATION INSTRUCTIONS
 2018 Lennox Industries Inc. Dallas, Texas, USA OPERATION INSTRUCTIONS V0STAT52 Wireless Indoor Unit Controller CONTROLS 507459-04 05/2018 This manual must be left with the owner for future reference. IMPORTANT
Home Screen...4. Quick Start Guide...5. MyAir Standalone Zone Controls only...5. MyAir Zone Controls With Integrated Unit On/Off Control...
 User Manual Home Screen...4 Quick Start Guide...5 MyAir Standalone Zone Controls only...5 MyAir Zone Controls With Integrated Unit On/Off Control...5 Getting Started...6 Daily Usage and Seasonal Adjustment...7
Table of Contents. e-zone User Manual
 User Guide Table of Contents Introduction... 4 HOME... 5 SIMPLE TIMER... 5 AIR CON... 6 ZONES... 7 PROGRAMS... 8 Rename/Delete Programs... 10 Disable Programs... 11 HELP... 12 SETTINGS... 13 Text Colour...
ADVANCED TECHNICAL MANUAL AAC1 SMALL SYSTEM CONTROL CONSOLE. Redefine your comfort zone.
 ADVANCED TECHNICAL MANUAL AAC1 SMALL SYSTEM CONTROL CONSOLE ATM ACC1 Table of Contents Safety Precautions... 3 Overview... 4 Specifications... 4 Installation... 5 Control Console Operation... 9 2 Advanced
If you require more information about your controllers features or functions, please follow below links;
 If you require more information about your controllers features or functions, please follow below links; MY PLACE / MY AIR USER MANUAL EZONE USER MANUAL ZONE 10E USER MANUAL Experiencing issues with your
basicdim Wireless Wireless module for basicdim
 Wireless Wireless module for Product description Wireless controllable with a Android / ios smart device o need for an external gateway device Forms automatically a wireless communication network with
Lighting Controls and Connectivity basicdim. basicdim Wireless Passive Module Wireless module for basicdim
 Wireless Passive Module Wireless module for Product description Wireless controllable with a Android / ios smart device No need for an external gateway device Forms automatically a wireless communication
Note: Clean Work area of all or any debris after Repair.
 Scope: Details: Required Tools For Reference when repairing the: Display / Assembly Replacement ESD Strap (From Kit): Phillips #00 Screwdriver Tweezers Plastic Spudger Plastic Opening Pick Personal Protective
COMFORT CONTROL CENTER SERVICE INSTRUCTIONS
 USA SERVICE OFFICE Dometic Corporation 2320 Industrial Parkway Elkhart, IN 46516 574-294-2511 CANADA Dometic Corporation 46 Zatonski, Unit 3 Brantford, ON N3T 5L8 CANADA 519-720-9578 For Service Center
Biometric finger print entry system.
 Biometric finger print entry system. Installation / Operating Instructions. v1.0b ML-E-BIO-KIT (non-bluetooth) ML-E-BTBIO-KIT (Bluetooth Enabled) Table of Contents Introduction.... 3 Installation & Operating
Control system. Type FSL-CONTROL II. Modular, stand-alone room control system, specially for decentralised ventilation systems (with bus communication
 X X testregistrierung Control system Type Central BMS interface DCP-FSL II-Stand-alone Pressure independent control valve Straight-way valve Modular, stand-alone room control system, specially for decentralised
INSTALLATION MANUAL Wired Remote Control
 INSTALLATION MANUAL Wired Remote Control MWR-SH00 System Air Conditioner E DB98-28133A(1) Safety Precautions This installation manual describes how to install the wired remote control. For installation
XTS36 Touch Screen X10 Lighting Control System Operating Manual
 X10 Lighting Control System Operating Manual 1 X10 Lighting Control System Operating Manual Rev 1.2 Introduction...3 Software Overview...4 How to Install...5 USB Driver Installation...6 Configuration Software
STEWARD Home Automation Application
 STEWARD Home Automation Application Table of Contents 1.1 Introduction to Steward.... 1 1.2 What can Steward do?.... 1 1.3 How it works?.... 1 1.4 Definitions..... 2 1.5 Icons.... 4 1.6 External Application
IS-IR-WIFI-1 User Manual
 IS-IR-WIFI-1 User Manual Issue date: 06/2014 r1 Intesis Software S.L. 2014 Intesis Software S.L. All rights reserved. This document has been carefully written by Intesis Software SL. and a lot of effort
INSTALLATION MANUAL. Remote controller BRC315D7
 INSTALLATION MANUAL 2 3 4 2 2 S M S M PCB J5 J8 2 3 5 4 5 6 6 7 P2 P P2 P a d 2 b c 4 3 UNIT No. GROUP SETTING e 3 7 4 5 6 7 6 5 2 READ THIS MANUAL ATTENTIVELY BEFORE STARTING UP THE UNIT. DO NOT THROW
MAKING MODERN LIVING POSSIBLE. Installation Guide. Twin Kit 086L
 MAKING MODERN LIVING POSSIBLE Installation Guide 086L70 www.heating.danfoss.com Danfoss A/S is not liable or bound by warranty if these instructions are not adhered to during installation or service. The
INSTALLATION & USER MANUAL
 INSTALLATION & USER MANUAL MODELS EVMS & GSVMS with Rain Sensor 00--0 Fax: 0-- csm@wascoproducts.com www.wascoskylights.com Eastern Facility: Spencer Drive, Unit A, Wells, ME 000 Western Facility: Echo
ACTRONCONNECT Wireless control of your air conditioner at your fingertips.
 Controls Wireless control of your air conditioner at your fingertips. That s better. That s Actron. ActronAir. Because Australia needs Australian air conditioning. The year 1984 saw Advanced Australia
REMOVE COVERS. 1. Remove three screws from the Side Panel (L). 2. Slide the Side Panel (L) backward, and raise it to remove from the printer.
. 2. Slide the Side Panel (L) backward, and raise it to remove from the printer.") REMOVE COVERS 1. Remove three screws from the Side Panel (L). 2. Slide the Side Panel (L) backward, and raise it to remove from the printer. 3. Fully open the Top Cover. 4. Release the tab on the right
REMOVE COVERS 1. Remove three screws from the Side Panel (L). 2. Slide the Side Panel (L) backward, and raise it to remove from the printer. 3. Fully open the Top Cover. 4. Release the tab on the right
INSTALLATION MANUAL For authorized service personnel only.
 AIR CONDITIONER SIMPLE REMOTE CONTROLLER (WIRED TYPE) UTY-RSNUM INSTALLATION MANUAL For authorized service personnel only. English Français Español Contents. SAFETY PRECAUTIONS...2 2. ACCESSORIES...2 3.
aeria aerialb x - ultra ultra User Manual
 aerialb x - ultra User Manual Thank you for choosing this DishTV Freeview High Definition Digital Set Top Box. You will be be able to receive all Freeview HD UHF High Definition and Standard Definition
Casambi App FAQ
 Casambi App FAQ The information in this document is subject to change without notice and should not be construed as a commitment by ELT. Please, check for the most updated information. ELT assumes no responsibility
Table of Contents CHAPTER 1: FCC WARNINGS... 7 CHAPTER 2: SAFETY INSTRUCTIONS... 9
 Table of Contents CHAPTER 1: FCC WARNINGS.................................... 7 CHAPTER 2: SAFETY INSTRUCTIONS.............................. 9 CHAPTER 3: SPECIFICATIONS..................................
VT8600 Series Installation Guide. Rooftop Unit, Heat Pump and Indoor Air Quality Controller
 VT8600 Series Installation Guide Rooftop Unit, Heat Pump and Indoor Air Quality Controller 2 Installation Guide VT8600 Series If replacing an existing Room Controller, label wires before removal of Controller.
KNX is a European Standard Protocol used for household and industrial Buliding Management System (BMS).
.") PRODUCT NEWS Products News: New HC-A16KNX PAGE 1 / 8 Summary 1. This advanced product news introduces the new product HC-A16KNX. 2. The details are indicated in the description. Description 1. Applicable
PRODUCT NEWS Products News: New HC-A16KNX PAGE 1 / 8 Summary 1. This advanced product news introduces the new product HC-A16KNX. 2. The details are indicated in the description. Description 1. Applicable
MM-A20 BMS Interface for Mitsubishi Electric Split Air-Conditioning
 MM-A20 BMS Interface for Mitsubishi Electric Split Air-Conditioning Installation and User Guide www.microtrol.co.uk Contents 1. Supplied Parts...2 2. Important Information...3 3. Product Overview...4
MCS-TOUCHSCREEN Auto Disk Clean up
 APP093 - MCS-Touchscreen Error 16 Auto Diskcleanup Procedure Micro Control Systems APPLICATION NOTE APP-093 MCS-TOUCHSCREEN Auto Disk Clean up Revision History Date Author Revision Description 07/31/2014
3. Alignment and Adjustments
 3. 3-1 Test Mode How to Approach Test Mode You can approach the Test Mode by pressing the on/off switch of indoor unit for 5 seconds. on/off switch Test Mode Operation Option After installing the air conditioner,
INTRODUCTION Busch-SmartTouch KNX. The 7 SmartTouch
 INTRODUCTION The 7 SmartTouch Motivation and objectives - your smart display for the smart buildings of today. A smart display with many integrated applications for smart buildings, like KNX controls and
IntesisBox. v.0.1. User Manual Issue Date: 12/2017 r1.3 EN
 IntesisBox HS-RC-MBS-1 v.0.1 Modbus RTU (EIA-485) Interface for Hisense air conditioners. Compatible with commercial line of air conditioners commercialized by Hisense. User Manual Issue Date: 12/2017
Installation, Start-up and Operating Instructions
 Installation, Start-up and Operating Instructions EVOLUTION SMART SENSOR FOR ZONING Cancels: NEW II ZONESMS-0-1 7-04 NOTE: Read the entire instruction manual before starting the installation. This symbol
Electronic data system application end user manual
 The MalariaCare Toolkit Tools for maintaining high-quality malaria case management services Electronic data system application end user manual Download all the MalariaCare tools from: www.malariacare.org/resources/toolkit.
Operation Guide CT32 ENGLISH
 Operation Guide CT32 The CT32 communicating thermostat operates via a high-quality, easy-to-use touch screen. To set or adjust your CT32, simply touch your finger firmly to the screen. The screen will
CITRIX NAVIGATION & ACCESSING myhr
 INTRODUCTION This guide details how to log into Citrix and navigate to the myhr Home page. If you have any difficulty throughout this process please contact ICT (extension 43000). After 20 minutes of inactivity,
DK-AC-KNX-1. Specifications. Main features. Info
 IntesisBox 2015 DK-AC-KNX-1 IntesisBox DK-AC-KNX-1 allows monitoring and control, fully bi-directionally, all the operational parameters of DAIKIN air conditioners from KNX installations. Compatible with
Compact Genset Controller, CGC 400 What's in the delivery? The first steps Push-buttons and LEDs
 QUICK START GUIDE Compact Genset Controller, CGC 400 What's in the delivery? The first steps Push-buttons and LEDs DEIF A/S Frisenborgvej 33 DK-7800 Skive Tel.: +45 9614 9614 Fax: +45 9614 9615 info@deif.com
Mini Mini GlobiLab Software Quick Start Guide
 Mini Mini GlobiLab Software Quick Start Guide This Guide is intended to help you get your Mini up and running quickly. For more detailed instructions, please see the Getting to Know Your Mini document
Robot Light V2. User Manual
 Robot Light V2 User Manual 2 Please read over this manual before operating the light. Introduction Unpacking: Thank you for purchasing the Robot Light V2. Every Robot Light V2 has been thoroughly tested
AFCS Fluid Guard 2 Model
 671108 SRVIC GUID AFCS Fluid Guard 2 Model 343596 Alemite, LLC 167 Roweland Drive, Johnson City, Tennessee 37601 www.alemite.com Copyright 2016 by Alemite, LLC FORM: 671108 Version 1 Contents xplanation
Elevation Window Control System
 Elevation Window Control System Keypad installation and user guide August 2013 copyright by ASSA ABLOY WARNINGS Read these instructions prior to the activation of the keypad. Save this user guide in a
Home Monitoring and Control service provided by Verizon Online LLC
 Home Monitoring and Control service provided by Verizon Online LLC A separate subscription to Verizon FiOS TV is required for use with FiOS TV service. About This Manual This manual is designed for online
IntesisBox PA-AC-MBS-1
 IntesisBox PA-AC-MBS-1 v.2.3 Modbus RTU (EIA-485) Interface for Panasonic air conditioners. Compatible with Etherea line air conditioners commercialized by Panasonic. User s Manual Issue Date: 11/2017
Tracksa Light Marshal User Manual
 Tracksa Light Marshal User Manual Table of Contents Introduction 3 Presentation 4 Safety Instructions 5 Charging of Batteries 6 Post Remote 8 Clerk of the Course Remote 10 Training Remote 12 Mainboard
Software Installation Guide. Version 1.1
 Software Installation Guide Version 1.1 Thank you for choosing an Airtopia product You are advised to read this manual carefully; it contains all the information you need about the right conditions for
USER S MANUAL. DAS-G01 The Power of Tomorrow
 USER S MANUAL DAS-G01 The Power of Tomorrow Richmond Heights 2018 0 USER S MANUAL DAS-G01 The Power of Tomorrow Richmond Heights 2018 Page 1 USER'S MANUAL TABLE OF CONTENTS Page # 1.0 GENERAL INFORMATION...
Veris Sensors App. Quick Start Guide Pressure Monitoring. For Use with Differential Pressure / Air Velocity Transducers. Introduction.
 ZL0174-0C Page 1 of 7 2019 Veris Industries USA 800.354.8556 or +1.503.598.4564 / support@veris.com 0319 Quick Start Guide Pressure Monitoring Veris Sensors App For Use with Differential Pressure / Air
INNOV.NET PTY LTD. User guide
 User guide Version1 2016 0 Contents Compatibility... 1 What s in the package?... 1 Setup the RM Pro... 1 Meaning of the LED indicators... 2 Setup e-control on your smartphone... 2 Can I program a remote
USER MANUAL. 7" Intelligent Digital Video Doorphone Indoor Unit TIP-DPH-INT7. Product Overview Product Description
 7" Intelligent Digital Video Doorphone Indoor Unit Product Overview...1 Product Description...1 Basic Function...2 UI Interface Introduction and Operation Instruction...3 Installation Instruction...18
INTRODUCTION...1 FEATURES...1 PACKAGE CONTENTS... 1 TECHNICAL SPECIFICATIONS...2 SYSTEM REQUIREMENT..3 CABLE DIAGRAMS.3 PRODUCT DETAILS 4
 TABLE OF CONTENTS INTRODUCTION...1 FEATURES....1 PACKAGE CONTENTS... 1 TECHNICAL SPECIFICATIONS....2 SYSTEM REQUIREMENT..3 CABLE DIAGRAMS.3 PRODUCT DETAILS 4 HARDWARE INSTALLATION 5 USAGE 5 ON SCREEN DISPLAY
INNOV.NET PTY LTD. User guide
 User guide 0 Contents Compatibility... 1 What s in the package?... 1 Add device... 2 Legend... 2 Meaning of the LED indicators... 2 Setup the RM Mini 3... 3 Setup e-control on your smartphone... 3 How
DAIKIN Internet remote control unit
 DAIKIN Internet remote control unit User s manual v1, May 2013 http://harizanov.com This is a part of an open source project that I have worked on and documented here. The Daikin Internet remote control
VIRON CONNECT POOL AND SPA CONTROLLER
 VIRON CONNECT AND CONTROLLER Updating the Colour Touch Firmware www.astralpool.com.au Consumer Care Centre Number: 1300 186 875 Updating the Colour Touchscreen Firmware The Colour Touchscreen firmware
Two remote controller system with one Lossnay Basic System (Refer to page C-10) Multiple Lossnay units with one remote controller.
 Multiple Lossnay units with one remote controller.") Control CHAPTER 1 System Design 1. System Examples One with one remote Multiple units with one remote Two remote system with one Basic System (Refer to page C-10) Non-polar Two wires Power supply Remote
Control CHAPTER 1 System Design 1. System Examples One with one remote Multiple units with one remote Two remote system with one Basic System (Refer to page C-10) Non-polar Two wires Power supply Remote
IntesisBox Modbus Server - LON
 IntesisBox Server - LON Gateway for integration of LON devices into enabled control systems. Integrate Air Conditioning from the main manufacturers (DAIKIN, Mitsubishi Electric, Mitsubishi Heavy Industries,
SmartHome Management Guide for Tenant V
 SmartHome Management Guide for Tenant V10.6.15 Copyright 2015 PointCentral Table of Contents Welcome... 3 Before Starting You ll Need... 3 Login to PointCentral... 3 Best Practices... 4 Login Management...
CB17 CONTROL SYSTEM USER MANUAL
 CB1 CTROL SYSTEM USER MANUAL INDEX 1. CTROL BOX 2. CB1 CTORL PANEL LAYOUT AND WIRE CNECTI INDICATI 3. SYSTEM SET UP PROCEDURE 3.1 TRANSMITTER MEMORIZINGAND ERASING PROCESS 3.2 SYSTEM LEARNING PROCESS 3.3
7. PCB AND FUNCTIONS
 Contents. PCB AND FUNCTIS. Outdoor Unit Control PCB... - -. Outdoor Unit Control PCB CR-C0DXH... - -. Outdoor Unit FAN PCB FAN-C00DXH... - -. Outdoor Unit FAN PCB FAN-C0DXH... - -. Outdoor Unit Filer PCB
Product Manual. Surge Protected Metal 7- Port USB 2.0 Hub DIN RAIL Mount Kit NEC Chip
 Surge Protected Metal 7- Port USB 2.0 Hub DIN RAIL Mount Kit NEC Chip Product Manual Coolgear, Inc. Version 1.1 September 2017 Model Number: USBG-7DU2i 2 USBG-7DU2i Product Manual Revision History Revision
Graphical User Interface V1.0.3
 Graphical User Interface V1.0.3 Application User Guide 2015 MCI Solutions. All rights reserved. 240815-01 www.mcisolutions.ca Page ii Getting Started Table Of Contents Introduction.................................................
LED controllers. ZUPP Property Group, Qld. With the revolution in LED Lighting, comes the need for control.
 LED controllers ZUPP Property Group, Qld With the revolution in LED Lighting, comes the need for control. Our range of LED controllers puts that control literally at your fingertips. Designed to be simple
Setup Instructions for Upgrading the Windows XP Panasonic CF-19 Toughbook to Windows 7
 Setup Instructions for Upgrading the Windows XP Panasonic CF-19 Toughbook to Windows 7 Installation Setup Please ensure that the Windows XP CF-19 Toughbook to be upgraded is plugged in but powered OFF
IntesisBox. for EnOcean
 IntesisBox for EnOcean your partner for systems integration INTERIOR PORTADA General catalogue 2013 KNX MODBUS BACNET LONWORKS ASCII OPC SERVER Intesis Software S.L. C/ Milà i Fontanals, 1 bis 1º 08700
M A C 3 Wind Speed Alarm & Controller
 M A C 3 Wind Speed Alarm & Controller Installation Instructions Thank you for purchasing the MAC3 wind speed alarm and controller. This manual is designed to lead you through a step-by-step process to
CONTROLLER INSTALLATION OPERATION & QUICK START
 CONTROLLER INSTALLATION OPERATION & QUICK START Controller: 8403-066 ECU Series Controller Manual: 2100-559 Supersedes: NEW File: Tab 19 Date: 05-02-11 Page 1 of 6 TABLE OF CONTENTS Installation Note...
HydroGuard Expert Pool Manual
 HydroGuard Expert Pool Manual Draft 09 May 2006 Swimming Pool Quality Communication and Monitoring Preface Intended Use This manual is for qualified and trained pool service technicians who will install
Automate Pulse Set-Up Instructions
 Automate Pulse Set-Up Instructions ABOUT THE AUTOMATE SHADES SKILL The Automate Pulse app allows for control of your motorized window coverings through your smartphone/tablet THE APP ALLOWS FOR: Individual
Nextiva S4300-BR. Installation Guide
 Nextiva S4300-BR Installation Guide Unauthorized use, duplication, or modification of this document in whole or in part without the written consent of Verint Systems Inc. is strictly prohibited. By providing
USER HELP GUIDE. NOTE: We suggest that the user s device be upgraded to the most current version.
 USER HELP GUIDE Android Devices (4.4-5.1) Requirements: To install the fansync application on your Android device, the device must be supported by the manufacturer and have BLE enabled. Your Android device
The Otto Home Control app allows for control of your motorized window coverings through your smartphone/tablet
 TM SET UP INSTRUCTIONS ABOUT THE OTTO HOME CONTROL APP The Otto Home Control app allows for control of your motorized window coverings through your smartphone/tablet THE APP ALLOWS FOR: Individual and
All your entertainment in one place
 Quick Start Guide What s inside Step 1. Unpack the box Important Tips Step 2. Connect to your Broadband Modem Step 3. Connect to your TV Antenna Step 4. Connect to your TV Step 5. Power up your Fetch Mighty
IO-INTERFACE. Procon. INSTALLATION MANUAL Version 1.01 MITSUBISHI ELECTRIC FOR INSTALLERS
 Procon IO-INTERFACE FOR INSTALLERS INSTALLATION MANUAL Version 1.01 For safe and correct use, please read this installation manual thoroughly before installing the PROCON IO-INTERFACE. MITSUBISHI ELECTRIC
Samsung SmartThins Wifi ET-WV525. Samsung SmartTings Wifi Pro ET-WV535. User Manual
 Samsung SmartThins Wifi ET-WV525 Samsung SmartTings Wifi Pro ET-WV535 User Manual English (USA). 02/2018. Rev.1.0 www.samsung.com Table of Contents Getting started 3 Read me first 4 About SAMSUNG Connect
PRODUCT INFORMATION MANUAL SECTION: 7-I POWERVIEW MOTORISATION OVERVIEW HELLO POWERVIEW MOTORISATION OVERVIEW
 HELLO POWERVIEW MOTORISATION OVERVIEW A new way to connect The latest innovation that fits perfectly with today s connected lifestyle has been introduced into the Luxaflex Window Fashions range. PowerView
VRF Control System. Judy Ouyang Technical Support Engineer
 VRF Control System Judy Ouyang Technical Support Engineer Individual Centralized BMS Gateway Intelligent Control PC/Network 1 Individual control 2 Centralized control 1.1 Wireless controllers 1.2 Wired
For more information, visit User Manual
 For more information, visit www.humaxdigital.com/uk User Manual What s in the box? Espresso Remote Control / Batteries Quick Start Guide AC Adaptor Quick start Guide GB2 1 2 3 4 5 Getting to Know Your
AUDIO AND VIDEO DOOR ENTRY SYSTEM WITH NEXA CODED PANEL
 AUDIO AND VIDEO DOOR ENTRY SYSTEM WITH NEXA CODED PANEL 2 INTRODUCTION First and foremost we would like to thank you for purchasing this product. Our commitment to satisfying our customers can be seen
OneControl Tablet OWNER'S MANUAL. Rev: Page 1 OneControl Tablet Owner's Manual
 OneControl Tablet OWNER'S MNUL Rev: 12.11.2017 Page 1 OneControl Tablet Owner's Manual TBLE OF CONTENTS Safety and System Information 2 System Information 2 Operation 3 Power On/Off 3 Connecting the OneControl
Virtual Keypad App Help Last update: 2017/02/02
 Virtual Keypad App Help 16461 Last update: 2017/02/02 Table of Contents Virtual Keypad App Help Center... 1 Managing Your App Account... 2 Using Your App... 3 System in Alarm... 4 Contacting Your Security
INTELLI-HOOD TROUBLESHOOTING GUIDE
 INTELLI-HOOD TROUBLESHOOTING GUIDE Melink Corporation (513) 965-7300 www.melinkcorp.com Last Updated 7/22/2015 Table of Contents Page I. About this Document 2 II. Related Documents 2 III. Glossary of Abbreviations
16 Port USB 3.0 Metal Hub w/surge Protection Rack/DIN-RAIL Mountable Coolgear, Inc. Version 1.1 September 2017 Model Number:
 16 Port USB 3.0 Metal Hub w/surge Protection Rack/DIN-RAIL Mountable Product Manual Coolgear, Inc. Version 1.1 September 2017 Model Number: USB3-16U1 2 USB3-16U1 Product Manual Revision History Revision
Please take serious note of the following warnings:
 TPDIN-SC48-20 MPPT Solar Controller with Passive PoE Switch Wireless Base Stations and Client Devices Surveillance Cameras Remote Control Remote Lighting Off Grid Electronics Congratulations! on your purchase