Dynamic Panels. User Guide
|
|
|
- Ferdinand Bradford
- 5 years ago
- Views:
Transcription

1 User Guide
2 Contents 1. Introduction to Getting Started Making a Panel Dynamic: Overview Working with BackStage / Automation Engine Making Text Objects Dynamic Using Dynamic Fields Categories and Types Formatting Dynamic Fields Editing Multiple Dynamic Text Objects at Once Making Ink Patches Dynamic Making Inks Dynamic Using the Existing Ink Order Making Individual Inks Dynamic Changing an Object's Dynamic Ink Selecting and Zooming Editing a Dynamic Panel Adding Objects to a Dynamic Panel Making Objects Static Again Deleting Dynamic Objects Reflowing Text Updating Your Preferences When Are Dynamic Fields Auto-Updated ii

3 1. Introduction to With the plug-in for Adobe Illustrator, you can make artwork panels (showing document, ink or job information) dynamic. This means that the panels will synchronize with the host document or job, and display the correct ink, document and / or job information for that document / job. When you paste them into another document, they will be automatically updated to reflect the new document's information. This means you can reuse panels in many documents, without having to manually update all the information every time. You can use the plug-in with new or existing panels, and you can make text or other objects (ink patch, logo, etc.) dynamic. The example below shows an Illustrator document containing two artwork panels, with the Dynamic Panels palette to its left. Notice that when copy / pasting the two panels in another document, the information in these panels gets updated automatically to reflect the new document's information. 3 1

4 1 Note: This user guide assumes you already have installed, licensed, and ready to run. 4
5 2. Getting Started This Getting Started chapter will show you how to make a simple dynamic panel, from a single text object. 1. Open a file containing an artwork panel in Illustrator (create an artwork panel if your file doesn't contain one). 2. Select a text object in the artwork panel. 3. Go to Window > Esko > to open the palette. 4. Check that the object is still selected, and click the Create a Panel link in the middle of the palette. This adds your text object to the dialog, and moves it to a new layer called Panel

6 2 5. Double-click the text object in the palette. This opens the Edit Text Art dialog. You can see the existing text in the Content area. The existing text is static, which means it won't change when you paste your panel into another document. You can make all or part of the text dynamic, to have it change with every document you paste your panel into. Note: If you want to have some static text, just leave that part of the text as it is (or type in new text) in the Content area. 6. To get dynamic text, you need to insert dynamic fields. Place your cursor where you want the field to be, or select the text to replace with a field, and click the Insert Field... button. 7. In the Insert Field dialog that opens, choose the fields to insert: a) choose a field Category, for example Barcodes, Date & Time... 6
7 b) in that Category, choose the Field you want to use (see Categories and Types on page 14 for a list of available categories and fields), c) if applicable, choose the Format to use for your chosen Field (see Formatting Dynamic Fields on page 17 for details), Note: The Preview line shows how the field will be resolved in the current document (you can see this both in the Insert Field and the Edit Text Art dialogs). d) when you are satisfied with how your field will look like, click OK. The dynamic parts of a text object will appear between square brackets. 7 2

8 2 In the palette, you can see a icon that indicates that the text object is now dynamic. In your document, the dynamic object is resolved with the document information. 8
9 3. Making a Panel Dynamic: Overview With the plug-in, you can make any artwork panel dynamic, so its information updates automatically for every document you paste it in. In your panel, you can make any type of object dynamic (ink patch, logo, other design element...). 1. Open a file containing an artwork panel in Illustrator (create an artwork panel if your file doesn't contain one). 2. Select one or more text object(s) in the artwork panel and make it/them dynamic (see Making Text Objects Dynamic). 3. Select one or more ink patch(es) in the panel and make it/them dynamic (see Making Ink Patches Dynamic on page 21). 4. Copy your dynamic panel into another document. The dynamic text objects and ink patches in your panel update automatically to reflect the new document's information. 9 3
10 4 4. Working with BackStage / Automation Engine If you are working with a BackStage / Automation Engine server, you can use the server s Job and Product information in your dynamic panels (see Categories and Types on page 14). For information on how to connect to BackStage / Automation Engine, see the Data Exchange documentation. For details on Job and Product information, see the BackStage / Automation Engine documentation. 10

11 5. Making Text Objects Dynamic 1. Open a file containing an artwork panel in Illustrator (create an artwork panel if your file doesn't contain one). 2. Select one or more text object(s) in the panel. 3. Go to Window > Esko > to open the palette. 4. Click the Create a Panel link in the middle of the palette. Tip: You can also use the New Panel button entry in the fly-out menu. at the bottom of the palette, or the New Panel This adds your text object(s) to the palette, and moves it / them to a new layer called Panel 1. Note: You can create multiple panels in a single document. 5. Double-click (one of) the text object(s) in the palette. This opens the Edit Text Art dialog. You can see the existing text in the Content area. 11 5
12 5 The existing text is static, which means it won't change when you paste your panel into another document. You can make all or part of the text dynamic, to have it change with every document you paste your panel into. Note: If you want to have some static text, just leave that part of the text as it is (or type in new text) in the Content area. 6. To get dynamic text, you need to insert dynamic fields. Place your cursor where you want the field to be, or select the text to replace with a field, and click the Insert Field... button. 7. In the Insert Field dialog that opens, choose the fields to insert: a) choose a field Category, for example Barcodes, Date & Time... b) in that Category, choose the Field you want to use (see Categories and Types on page 14 for a list of available categories and fields), c) if applicable, choose the Format to use for your chosen Field (see Formatting Dynamic Fields on page 17 for details), 12
 when you are satisfied with how your field will look like, click OK. The dynamic parts of a text object will appear between square brackets.")
13 Note: The Preview line shows how the field will be resolved in the current document (you can see this both in the Insert Field and the Edit Text Art dialogs). d) when you are satisfied with how your field will look like, click OK. The dynamic parts of a text object will appear between square brackets. In the palette, you can see a icon that indicates that the text object is now dynamic. In your document, the dynamic object is resolved with the document information. 13 5

14 5 8. Repeat steps 5 to 7 for each text object you want to make dynamic. 5.1 Using Dynamic Fields Categories and Types Barcodes Number of Barcodes Barcode Type Barcode Code Bar Width Reduction Barcode Magnification Barcode Device Compensation Barcode Narrow Bar Date & Time Date Time Date and Time Document 14 File Name Fonts Layer Names CMYK Profile RGB Profile Color Mode
15 Trim Box Media Box Art Box File Info (XMP) Description Author Document Title Author Title Inks Number of Inks Number of Technical Inks Ink Names Technical Ink Names Short Ink Names Ink Types Ink Dotshapes Ink Angles Ink Rulings Job (Automation Engine) Note: The fields in the Job (Automation Engine) category take the Automation Engine job folder information instead of the document information. For example, the Ink Names field in this category will show the ink names defined in the job parameters, not the document's ink names. Important: All Job related information requires an active connection with an Automation Engine server. Job Name Order ID Sub Order ID Description Due Date Project ID Last Actor Job URL Category Custom Field 1 Custom Field 2 Custom Field 3 Custom Field 4 Custom Field 5 Custom Field 6 Customer ID 15 5
16 5 Customer Name Customer Description Customer Contact Name 1 Customer Contact Name 2 Customer Contact Name 3 Customer Contact 1 Customer Contact 2 Customer Contact 3 Job Parameters Number of Barcodes Barcode Type Barcode Code Bar Width Reduction Barcode Magnification Barcode Device Compensation Barcode Narrow Bar Number of Inks Number of Technical Inks Ink Names Technical Ink Names Short Ink Names Ink Types Ink Dotshapes Ink Angles Ink Rulings Links Placed Files XML Content Files Structural Design File Product (Automation Engine) Important: All Product related information requires an active connection with an Automation Engine server. 16 Product Name Product ID Customer Name Customer Product Reference Product Description Product Part Name Product Part Status Custom Field 1 Custom Field 2 Custom Field 3 Product Part Custom Field 1 Product Part Custom Field 2 Product Part Custom Field 3
.")
17 System Illustrator Version Creative Suite Version OS Type OS Version Short User Name Full User Name Formatting Dynamic Fields You can format certain fields so they look a certain way (for example, have the date in European or American format). You can use predefined formats or create custom formats. You can also choose to use a different format for each field, or the same format for all fields. Using an Existing Format You can choose an existing format to apply to your field in the Format list. For example, use [name][ext] to display the file name and extension when using the File Name field. Tip: Hover over to get more information about the different formats. 17 5
. Note: The items in square brackets, like [major], are dynamic, the rest of the text is static.")
18 5 Defining a Custom Format To define your own field format: 1. Choose Custom in the format list. 2. Define your format in the box below (using the predefined formats and the information under for help). Note: The items in square brackets, like [major], are dynamic, the rest of the text is static. Use the Enter key to get a new line. 3. Check how your format resolves for the current file in the Preview line. 4. Click OK when you are satisfied. Repeating the Format for All Items If the field you want to use can have several values (e.g. Fonts, Ink Names, Placed Files...), you can put them all in one dynamic object. You can also set the same format for all those values at once. 18

19 After choosing an existing format or defining a custom one: 1. Select Repeat format for all items. 2. Choose the Separator you want to use between the values (Comma, Space...). Note: You can also specify your own separator by typing it directly in the Separator list. 3. When you are satisfied with what you see in the Preview, click OK. 5.2 Editing Multiple Dynamic Text Objects at Once Once you have defined several dynamic text objects, you can easily edit them if necessary. 1. Select the dynamic text objects to edit in the palette and double-click them. 2. In the Edit Text Art dialog, select an object to edit in the Text Art column, and edit the Content, Fields, Format... Do this for each object you want to edit. 19 5

20 5 3. Click OK when you are done. 20

21 6. Making Ink Patches Dynamic A dynamic panel containing ink information is composed of dynamic ink patches. Each patch shows a specific document ink: for example, you can set the first patch to show the first document ink. The ink order used is the order shown in the Ink Manager plug-in. 1. Open a file containing an artwork panel in Illustrator (create an artwork panel if your file doesn't contain one). 2. Select the ink patches you want to include in your dynamic panel. 3. Go to Window > Esko > to open the palette. 4. Click the Create a Panel link in the middle of the palette. Tip: You can also use the New Panel button entry in the fly-out menu. at the bottom of the palette, or the New Panel Your ink patches are moved to a new layer called Panel 1. Note: The palette doesn't list ink patches in a panel, only text objects. 5. Make your ink patches dynamic. You can either: make them all dynamic at once, using the existing ink order to assign dynamic inks to your patches (see Making Inks Dynamic Using the Existing Ink Order on page 22), individually pick the dynamic ink to use for each patch (see Making Individual Inks Dynamic on page 24). 21 6
 in the palette, and click Make Inks Dynamic... in the fly-out menu.")
22 6 Note: If you need to use different dynamic inks later, you can always change them (see Changing an Object's Dynamic Ink on page 24). 6.1 Making Inks Dynamic Using the Existing Ink Order 1. Select the panel containing the ink object(s) in the palette, and click Make Inks Dynamic... in the fly-out menu. This opens the Make Inks Dynamic dialog. 22
 is assigned DP Ink 1, the second is assigned DP Ink 2, etc.")
23 This dialog shows all the ink patches you selected, with the inks sorted the same way as in the Ink Manager plug-in. Each ink you selected is assigned a Dynamic Ink: the first ink in the list (here Process Cyan) is assigned DP Ink 1, the second is assigned DP Ink 2, etc. Tip: If you want the ink order to be different, drag and drop the inks in the Ink Manager to rearrange them. When you paste the dynamic panel into another document, DP Ink 1 will be assigned to the first ink of that document (first in the Ink Manager list). This means that the dynamic ink patch that has DP Ink 1 assigned will show that first ink. 2. Optionally, you can convert an ink (e.g. the ink used for linework and text) to DP Darkest Ink. When pasting dynamic objects containing DP Darkest Ink in a document, they will get colored in the darkest ink available in that document (either Process Black or another dark ink). In the Preferences, you can define whether this should always be Process Black if available (see Preferences on page 32). 3. Click OK. Your inks are now dynamic. 23 6

24 6 6.2 Making Individual Inks Dynamic 1. Open the Swatches palette. 2. Select one of the patches of your panel. 3. Click on a dynamic swatch to assign it to that ink patch. Note: You can choose from 15 regular DP Ink swatches, 8 DP Technical Ink swatches and 1 DP Darkest Ink swatch. 4. Repeat for each ink patch to make dynamic. 6.3 Changing an Object's Dynamic Ink To change the dynamic ink assigned to an ink patch / object: 1. Select the ink patch. Note: Select several patches / objects at once if you want them all to have the same dynamic ink. Attention: Each object must have only one ink (spot or process) in its stroke or fill. 2. Click Apply Dynamic Ink... in the palette's fly-out menu. 3. In the Apply Dynamic Ink dialog, choose the new dynamic ink to assign to your object(s). 24

25 4. Click OK. 25 6
 to select the corresponding object in your document.")
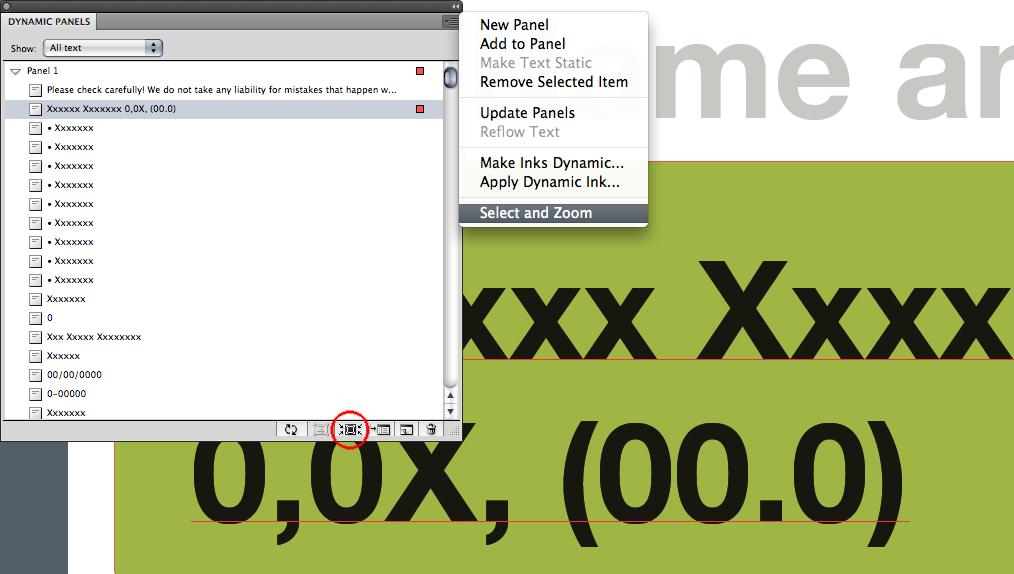
26 7 7. Selecting and Zooming Select a dynamic object in your document to also select it in the palette. Click at the far right of an entry in the palette (where the red square is) to select the corresponding object in your document. To select a document object and zoom on it from the palette: a) select the corresponding entry in the palette, b) click the Select and Zoom button or use Select and Zoom in the fly-out menu. 26
27 27 7
28 8 8. Editing a Dynamic Panel 8.1 Adding Objects to a Dynamic Panel If you have already created a dynamic panel, but want to add extra objects to it: 1. Select the object(s) you want to add to the panel. 2. Click the Add to Panel button the fly-out menu. at the bottom of the palette, or the Add to Panel entry in 3. Make your object(s) dynamic as explained in Making Text Objects Dynamic (for text objects) or Making Ink Patches Dynamic on page 21 (for other objects). 8.2 Making Objects Static Again To remove an object from the dynamic panel only (keep it as a regular object in your document): For all object types: cut and paste the object from the panel layer (e.g. Panel 1) into another layer. For text objects: select it in the palette and click Make Text Static in the flyout menu. This only works on dynamic text (with a 28 icon).
, use the Illustrator functionality to expand objects. 8.")

29 Tip: To only see dynamic text objects in the palette, select Dynamic text only in the Show filter. Note: If you want make your whole dynamic panel static again (turn it into regular artwork), use the Illustrator functionality to expand objects. 8.3 Deleting Dynamic Objects To remove an object from the dynamic panel and the artwork panel in your document: 1. In the palette, select the object you want to remove from your dynamic panel. 2. Click the Remove Selected Item button or use Remove Selected Item in the fly-out menu. 3. Confirm the object removal. The object is now completely removed. 29 8

30 8 8.4 Reflowing Text If the text box is a part of the panel, resizing using standard transform tool will resize it "as is" instead of reflowing the text inside resized text box. Click the Reflow Text button or use Reflow Text in the fly-out menu to switch transform tools temporarily to the reflow mode. To do this, click the Reflow Text button or use Reflow Text in the fly-out menu. 8.5 Updating Your When you paste a dynamic panel into a document, the information in the dynamic panel is updated automatically. But when some information used in a dynamic panel (text or other object, document information, job / product information...) is changed later, the panel needs to be updated again. 30

31 Note: If you want the panels to be updated automatically, you can set this in the Preferences. You can choose to have them updated when: the information used in the panel changes, you save the file as Normalized PDF / launch a task on it on your BackStage / Automation Engine server. See Preferences on page 32 for details. If the panels are not updated automatically, and some associated information is changed, you will see a pen icon near the affected dynamic object(s). To update the affected object(s), click the Update Panels button the fly-out menu. or use Update Panels in 31 8
, it needs to be updated again.")
32 9 9. Preferences You can find the Preferences under Illustrator > Preferences > Esko > Dynamic Panels Preferences When pasting a dynamic panel in a document, the information in the panel is updated automatically. But if you then make changes to the document's artwork or change other information used in the panel (document metadata, job information...), it needs to be updated again. Select Update Artwork Panel when Associated Information Changes to have your document's panels updated automatically after making changes to your document. Select Update Panels when Writing Normalized PDF or Launching Server Task to automatically check for artwork changes and update the panels if necessary when saving your document as Normalized PDF or launching a task on it on your BackStage / Automation Engine server. Note: If you choose not to have the panels updated automatically, you will need to use the Update Panels button to update your panels after making changes to your artwork. Always Consider Process Black as the Darkest Ink: When a dynamic ink patch using DP Darkest Ink is copied into a file, that patch will be: Process Black if this option is selected (and Process Black is available in the file), the darkest ink (the ink with the least luminosity), whether or not it is Process Black, if this option is deselected (for example the darkest ink could be Pantone Reflex Blue). 9.1 When Are Dynamic Fields Auto-Updated Ink information (fields in the Inks category): when the Ink Manager list is updated. Fonts field (in the Document category): when saving the document, exporting to Normalized PDF or using the File > Esko XMP dialog. Placed files (in the Links category): when saving the document, exporting to Normalized PDF or using the File > Esko XMP dialog. Fields in the File Info (XMP) category: when using the File Info dialog from Illustrator's File menu. Dynamic Content's XML Files: when switching between documents. All other fields are updated live. 32
Dynamic Marks. User Guide
 User Guide Contents 1. Copyright Notice... 3 2. Getting started... 5 2.1 Creating a first Mark Set...5 3. The Dynamic Marks palette...6 3.1 Adding a Standard Mark...7 3.2 Adding objects as Mark... 7 4.
User Manual Version 1.1 January 2015
 User Manual Version 1.1 January 2015 - 2 / 112 - V1.1 Variegator... 7 Variegator Features... 7 1. Variable elements... 7 2. Static elements... 7 3. Element Manipulation... 7 4. Document Formats... 7 5.
COLOR AND GRADIENT MIXERS IN EXCENTRO 1.8
 COLOR AND GRADIENT MIXERS IN EXCENTRO 1.8 Excentro application has two inspector windows where user can mix colors, tints or gradients that could be set as attributes to paths of guilloche objects. These
PASS4TEST. IT Certification Guaranteed, The Easy Way! We offer free update service for one year
 PASS4TEST IT Certification Guaranteed, The Easy Way! \ http://www.pass4test.com We offer free update service for one year Exam : 9A0-088 Title : Adobe IIIustrator CS4 Exam Vendors : Adobe Version : DEMO
Actualtests.9A QA
 Actualtests.9A0-351.51.QA Number: 9A0-351 Passing Score: 800 Time Limit: 120 min File Version: 5.6 http://www.gratisexam.com/ 9A0-351 Adobe Illustrator CC Recertification Exam Marvelous planning guide
ArtPro Generating PDF from ArtPro 10
 ArtPro Generating PDF from ArtPro 10 EskoArtwork May 2011 Table of Contents 1 General...4 2 PDF output for file exchange and ripping in all environments...7 3 PDF output for use in an EskoArtwork environment...12
Exam : 9A Title : Adobe IIIustrator CS4 Exam. Version : Demo
 Exam : 9A0-088 Title : Adobe IIIustrator CS4 Exam Version : Demo 1. While working on a document to be printed on an offset press you decide to print a composite proof to examine the results of color trapping
InDesign ACA Certification Test 50 terms hollymsmith TEACHER
 InDesign ACA Certification Test 50 terms hollymsmith TEACHER reccommended use: matching, test, etc You cannot rotate the graphic around its upper-left corner with the Free Transform tool. The content is
Adobe 9A Adobe InDesign CS 2 ACE.
 Adobe 9A0-045 Adobe InDesign CS 2 ACE http://killexams.com/exam-detail/9a0-045 QUESTION: 151 You have applied a linear gradient to an object. Which should you use to change the gradient so that it progresses
PowerLayout Client. User Guide
 User Guide Contents 1. Introduction...3 2. Preparing your PowerLayout Client output... 4 3. Plate and Sheet settings...5 4. Grid Settings... 7 5. Output Settings...9 6. Open / save PowerLayout Client settings...
Automation Engine. Getting Started
 Getting Started 05-2017 Contents 1. Installing Server and Clients... 4 2. Changing the Language used in the Pilot... 5 3. Starting or Updating the Pilot... 6 4. The Pilot's Main Window... 7 5. Concepts
Variable Data Printing Esko DeskPack Front-end Example
 XXX Variable Data Printing Esko DeskPack Front-end Example September 2007 Copyright 2007 Esko-Graphics, Gent, Belgium All rights reserved. This material, information and instructions for use contained
A QUICK TOUR OF ADOBE ILLUSTRATOR CC (2018 RELEASE)
") A QUICK TOUR OF ADOBE ILLUSTRATOR CC (2018 RELEASE) Lesson overview In this interactive demonstration of Adobe Illustrator CC (2018 release), you ll get an overview of the main features of the application.
A QUICK TOUR OF ADOBE ILLUSTRATOR CC (2018 RELEASE) Lesson overview In this interactive demonstration of Adobe Illustrator CC (2018 release), you ll get an overview of the main features of the application.
Fiery EXP8000 Color Server SERVER & CONTROLLER SOLUTIONS. Fiery Graphic Arts Package
 Fiery EXP8000 Color Server SERVER & CONTROLLER SOLUTIONS Fiery Graphic Arts Package 2004 Electronics for Imaging, Inc. The information in this publication is covered under Legal Notices for this product.
TRAINING MODULE APOGEE PREPRESS 8.0 VERSIONING
 TRAINING MODULE APOGEE PREPRESS 8.0 VERSIONING This document is only a preview of the training module. If you would like to obtain more information about this training module, please contact your local
4) Verify that the Color Type text box displays Process and that the Color Mode text box displays CMYK.
 Verify that the Color Type text box displays Process and that the Color Mode text box displays CMYK.") Oahu Magazine Cover Follow the instructions below to complete this assignment: Create Process Color Swatches 1) Download and open Oahu Magazine Cover from Mrs. Burnett s website. 2) Display the Swatches
Oahu Magazine Cover Follow the instructions below to complete this assignment: Create Process Color Swatches 1) Download and open Oahu Magazine Cover from Mrs. Burnett s website. 2) Display the Swatches
InDesign Part II. Create a Library by selecting File, New, Library. Save the library with a unique file name.
 InDesign Part II Library A library is a file and holds a collection of commonly used objects. A library is a file (extension.indl) and it is stored on disk. A library file can be open at any time while
How to Prepare Your Cards for Press Using InDesign
 How to Prepare Your Cards for Press Using InDesign This Tutorial is Divided into Sections: 1. What do I Need? What is InDesign? 2. How to start a new document with InDesign (the template explained) 3.
Dynamic VDP for Adobe Illustrator. User Guide
 Dynamic VDP for Adobe Illustrator User Guide Contents 1. How to convert a static design to variable job... 4 1.1 Tutorial: Converting a static design to a variable job... 4 2. The Dynamic VDP Database...
Automation Engine 16 Normalized PDF in Automation Engine
 16 Normalized PDF in Automation Engine 06-2016 Contents 1. Introduction...3 2. What Makes a Normalized PDF Special?... 4 3. Which Tasks Require PDF Normalization?...5 4. How do PDF Tasks Work with Normalized
9 Using Appearance Attributes, Styles, and Effects
 9 Using Appearance Attributes, Styles, and Effects You can alter the look of an object without changing its structure using appearance attributes fills, strokes, effects, transparency, blending modes,
6 COLOR AND PAINTING. Lesson overview
 6 COLOR AND PAINTING Lesson overview In this lesson, you ll learn how to do the following: Use color modes and color controls. Create, edit, and paint with colors using the Control panel and shortcuts.
Introduction To Photoshop Basics!!
 Digital Art I (ARTS 2348) Prof Bradly Brown Introduction To Photoshop Basics Learning Objectives By the end of this tutorial, we should be able to learn the following: 1. Creating a new Document 2. Using
ArtPro Object Based Screening in a PDF workflow: Recommendations TechNote
 ArtPro Object Based Screening in a PDF workflow: Recommendations TechNote EskoArtwork May 2011 This document describes how to use ArtPro object based screening in a PDF workflow. 1 Screening technologies
On the Web sun.com/aboutsun/comm_invest STAROFFICE 8 DRAW
 STAROFFICE 8 DRAW Graphics They say a picture is worth a thousand words. Pictures are often used along with our words for good reason. They help communicate our thoughts. They give extra information that
Ink Tools for Adobe Photoshop 16. User Guide
 Ink Tools for Adobe Photoshop 16 User Guide 09-2016 Contents 1. Copyright Notice...4 2. Installation and Setup...6 2.1 Installing the Ink Tools...6 2.2 Esko Setup... 6 2.2.1 Plug-in Overview... 7 2.2.2
Window Designer. Opening Screen: When you start Window Designer, you will see the Opening Screen. Here you will be choosing from 4 options:
 Window Designer Opening Screen: When you start Window Designer, you will see the Opening Screen. Here you will be choosing from 4 options: New Design: Use this option when no pre-built templates are available
Microsoft Excel 2010
 Microsoft Excel 2010 omar 2013-2014 First Semester 1. Exploring and Setting Up Your Excel Environment Microsoft Excel 2010 2013-2014 The Ribbon contains multiple tabs, each with several groups of commands.
boostx for Adobe Illustrator 16 User Guide
 16 User Guide 10-2016 Contents 1. Copyright Notice...3 2. Using boostx...5 2.1 Starting boostx... 5 2.1.1 boostx Preferences...5 2.2 Selecting Objects... 6 2.2.1 Area Select Tool...6 2.2.2 Dust Select
File Preparation & Design considerations
 File Preparation & Design considerations A Guide to Creating Proper Files for Print UGS Design Guide Page 1 table of contents document Setup document dimensions bleeds Creating a New document photoshop
Adobe InDesign CS6 Tutorial
 Adobe InDesign CS6 Tutorial Adobe InDesign CS6 is a page-layout software that takes print publishing and page design beyond current boundaries. InDesign is a desktop publishing program that incorporates
Adding Objects Creating Shapes Adding. Text Printing and Exporting Getting Started Creating a. Creating Shapes Adding Text Printing and Exporting
 Getting Started Creating a Workspace Pages, Masters and Guides Adding Objects Creating Shapes Adding Text Printing and Exporting Getting Started Creating a Workspace Pages, Masters and Guides Adding Objects
Creating Digital Illustrations for Your Research Workshop III Basic Illustration Demo
 Creating Digital Illustrations for Your Research Workshop III Basic Illustration Demo Final Figure Size exclusion chromatography (SEC) is used primarily for the analysis of large molecules such as proteins
EssEntial indesign skills Brought to you By InDesign
 10 EssEntial indesign skills Brought to you By InDesignSkills 10 Essential InDesign Skills by InDesignSkills www.indesignskills.com Copyright 2014 Illustration: Henry Rivers Contents In this ebook you
SETTINGS AND WORKSPACE
 ADOBE ILLUSTRATOR Adobe Illustrator is a program used to create vector illustrations / graphics (.ai/.eps/.svg). These graphics will then be used for logos, banners, infographics, flyers... in print and
Xerox igen 5 Press with the 5 th Print Station. Design and file preparation guidelines
 Xerox igen 5 Press with the 5 th Print Station Design and file preparation guidelines TABLE OF CONTENTS Introduction... 3 The 5 th print station process... 4 Choke and spread adjustments... 6 Gamut extension
Canvas Tips and Techniques
 Corporate Flow Image Editing Illustration Canvas Tips and Techniques Web Automation Page 1 Text Effects Creative Department Copyright 1995-2003 ACD Systems of America, Inc. (Formerly Deneba Software) Protected
bridge essential skills
 bridge essential skills Gain a working knowledge of Bridge. Understand how to change the contents and appearance or the workspace. Learn how to use Mini Bridge to access assets inside Photoshop Download,
Adobe InDesign CC Tips and Tricks
 Adobe InDesign CC Tips and Tricks 5 Ways to reduce the size of your InDesign files 1. Don t copy and paste image content from Photoshop or a web browser. 2. Don t leave unused page items in your files
Working with spot colors
 Tutorial Working with spot colors Software version: Asanti 3.0 Document version: April 5, 2017 This tutorial will teach you how to use spot colors in Asanti. In classic printing techniques, such as offset
Welcome to Desktop Publishing with InDesign!
 Welcome to Desktop Publishing with InDesign! What We ll Cover Today What is InDesign? Preparing a print project Creating a new document InDesign interface Working with layers and links Formatting and managing
HOW TO MAKE A PRINT READY PDF FROM...
 ARTWORK GUIDELINES At SPM we work in all the major software programs and are happy to assist in any way we can to make your job run as smoothly as possible. Hopefully the following pages will help in setting
Creating a PDF/X-1a from InDesign
 Creating a PDF/X-1a from InDesign Recommendations for Application Settings, General Design Guidelines, and Exporting to a PDF/X-1a (Screen shots for this manual were created from a Mac. If you are using
Work Smart: Microsoft Office 2010 User Interface
 About the Office 2010 User Interface You can use this guide to learn how to use the new features of the Microsoft Office Ribbon. Topics in this guide include: What s New in the Office 2010 User Interface
How to Prepare Your Cards for Press Using Scribus
 How to Prepare Your Cards for Press Using Scribus This Tutorial is Divided into Sections: 1. What is Scribus? 2. What Do I Need to Get Started? 3. Setting Up Your Scribus Document 4. Creating Master Pages
Actual4Test. Actual4test - actual test exam dumps-pass for IT exams
 Actual4Test http://www.actual4test.com Actual4test - actual test exam dumps-pass for IT exams Exam : 9A0-035 Title : Adobe Illustrator CS ACE Exam Vendors : Adobe Version : DEMO Get Latest & Valid 9A0-035
File Preparation Guide
 File Preparation Guide COLOUR Follow the steps inside to ensure an easy transition from artwork to print. You can also download our distiller and preflight settings to assist with your file preparation.
Page 1. Fireworks Exercise
 Page 1 Fireworks Exercise 1. Create a New Fireworks Document - File>New. For this exercise, choose 800 for width, 600 for height, resolution 72 pixels/inch, canvas color to Transparent, then choose OK.
DESKTOP PUBLISHING FOR PRINT PRODUCTION PRACTICAL
 DESKTOP PUBLISHING FOR PRINT PRODUCTION PRACTICAL M Scheme By, A.Paramasivam, Lecturer (SS) S.Marimuthu, Lecturer Department of Printing Technology Arasan Ganesan Polytechnic College Sivakasi Ex.No. 1
PowerPoint 2010: Basics Learning Guide
 PowerPoint 2010: Basics Learning Guide What s a PowerPoint Slide? PowerPoint presentations are composed of slides, just like conventional presentations. Like a 35mm film-based slide, each PowerPoint slide
Using Adobe Photoshop
 Using Adobe Photoshop 2 In this section we ll look at some essential things you need to know in order to use Photoshop effectively. First of all, we ll take a look at customising Photoshop s settings and
Using Adobe Photoshop
 Using Adobe Photoshop 2 In this section we ll look at some essential things you need to know in order to use Photoshop effectively. First of all, we ll take a look at customising Photoshop s settings and
01 - Basics - Toolbars, Options and Panels
 InDesign Manual 01 - Basics - Toolbars, Options and Panels 2017 1st edition This InDesign Manual is one of an introductory series specially written for the Arts and Humanities Students at UEA by the Media
4 TRANSFORMING OBJECTS
 4 TRANSFORMING OBJECTS Lesson overview In this lesson, you ll learn how to do the following: Add, edit, rename, and reorder artboards in an existing document. Navigate artboards. Select individual objects,
Interface. 2. Interface Adobe InDesign CS2 H O T
 2. Interface Adobe InDesign CS2 H O T 2 Interface The Welcome Screen Interface Overview The Toolbox Toolbox Fly-Out Menus InDesign Palettes Collapsing and Grouping Palettes Moving and Resizing Docked or
Dynamic Content. User Guide
 User Guide Contents 1. Welcome to the User Guide...4 1.1 What s New in 12.1...4 1.2 Copyright Notice...4 2. Getting Started...6 3. Basics...9 3.1 Introducing...9 3.1.1 Why?... 9 3.1.2 Benefits of Using...
Display Systems International Software Demo Instructions
 Display Systems International Software Demo Instructions This demo guide has been re-written to better reflect the common features that people learning to use the DSI software are concerned with. This
Making the Gradient. Create a Linear Gradient Swatch. Follow these instructions to complete the Making the Gradient assignment:
 Making the Gradient Follow these instructions to complete the Making the Gradient assignment: Create a Linear Gradient Swatch 1) Save the Making the Gradient file (found on Mrs. Burnett s website) to your
Standard Toolbar. Main Toolbar. Page Sorter. Action Toolbar
 TEAMBOARD DRAW This is an annotation software that can be used with the interactive pen to write or draw on the projection surface. This software also provides advanced tools for saving and editing annotations
OnPoint s Guide to MimioStudio 9
 1 OnPoint s Guide to MimioStudio 9 Getting started with MimioStudio 9 Mimio Studio 9 Notebook Overview.... 2 MimioStudio 9 Notebook...... 3 MimioStudio 9 ActivityWizard.. 4 MimioStudio 9 Tools Overview......
2 Solutions Chapter 3. Chapter 3: Practice Example 1
 1 Solutions This section includes the step by step solutions for the practice exercise for the following chapters and sections: Chapter 3 Chapter 4 Chapter 5 Chapter 11: Rainbow Springs sample test Final
Appleworks 6.0 Word Processing
 Appleworks 6.0 Word Processing AppleWorks 6.0 Starting Points What s New in AppleWorks 6.0 AppleWorks 6.0 is a versatile and powerful program that integrates the best of everything you need - word processing,
Adobe Illustrator. Quick Start Guide
 Adobe Illustrator Quick Start Guide 1 In this guide we will cover the basics of setting up an Illustrator file for use with the laser cutter in the InnovationStudio. We will also cover the creation of
CREATING THE FUNKY BUSINESS CARD
 CREATING THE FUNKY BUSINESS CARD This is what the final product should look like. 1. Open Illustrator 2. Create a new document (file new) Name your document. Change the units to inches. Change the document
EXPORTING ASSETS. Lesson overview
 15 EXPORTING ASSETS Lesson overview In this lesson, you ll learn how to do the following: Create pixel-perfect drawings. Use the Export For Screens command. Work with the Asset Export panel. Generate,
Interface. 2. Interface Illustrator CS H O T
 2. Interface Illustrator CS H O T 2. Interface The Welcome Screen The Illustrator Workspace The Toolbox Keyboard Shortcuts Palette Control Setting Preferences no exercise files Illustrator CS H O T Illustrator
Automation Engine. Quality Control tools
 Quality Control tools 10-2017 Contents 1. Concept and Overview... 5 2. Viewer...6 2.1 Introduction... 6 2.2 2.3 2.4 2.5 2.1.1 Supported File Types... 8 2.1.2 Starting the Viewer from the Pilot... 9 User
Quick Guide for Photoshop CC Basics April 2016 Training:
 Photoshop CC Basics Creating a New File 1. Click File > New 2. Keep Default Photoshop Size selected in the Preset drop-down list. 3. Click OK. Showing Rulers 1. On the Menu bar, click View. 2. Click Rulers.
THE KEY PRODUCTION GUIDE TO SUPPLYING ARTWORK
 THE KEY PRODUCTION GUIDE TO SUPPLYING ARTWORK introduction Thank you for using Key Production to manufacture your vinyl, CD or DVD. We will endeavour to make your product the best possible, because we
Comics with Illustrator
 Comics with Illustrator Adobe Illustrator is a vector graphics software which allows artists to create illustrations, logos, comics, and more. Vector graphics are different from Raster graphics found in
Creating & Sending PDF Files Using Piedmont s Print Driver. PageMaker PC
 Creating & Sending PDF Files Using Piedmont s Print Driver PageMaker PC Quick Overview for Creating New Documents Go to PageMaker and open the file that you want to send Go to the File menu - select Document
File Guidelines FILE GUIDELINES
 FILE GUIDELINES When designing files for print, it is important to understand file requirements and standards to avoid production issues. Follow these guidelines while getting started in the design process
November Copyright 2016 Open Systems Holdings Corp. All rights reserved.
 This document describes the intended features and technology for TRAVERSE 11 as of November, 2016. Features and technology are subject to change and there is no guarantee that any particular feature or
ITEC185. Introduction to Digital Media
 ITEC185 Introduction to Digital Media ADOBE ILLUSTRATOR CC 2015 What is Adobe Illustrator? Adobe Illustrator is a program used by both artists and graphic designers to create vector images. These images
Press the Plus + key to zoom in. Press the Minus - key to zoom out. Scroll the mouse wheel away from you to zoom in; towards you to zoom out.
 Navigate Around the Map Interactive maps provide many choices for displaying information, searching for more details, and moving around the map. Most navigation uses the mouse, but at times you may also
Corel Draw 11. What is Vector Graphics?
 Corel Draw 11 Corel Draw is a vector based drawing that program that makes it easy to create professional artwork from logos to intricate technical illustrations. Corel Draw 11's enhanced text handling
Create ruler guides. Create a ruler guide
 Create ruler guides Ruler guides are different from grids in that they can be positioned freely on a page or on a pasteboard. You can create two kinds of ruler guides: page guides, which appear only on
ARTWORK REQUIREMENTS Artwork Submission
 Artwork Submission GRAPHICS APPLICATIONS AND ACCEPTED FILE TYPES Submitting your artwork as a print ready PDF file is preferred (MAC or PC). We will also accept files created in Adobe Illustrator, Photoshop,
DrawPlus X8. Quick Start Guide. Simple steps for getting started with your drawing.
 DrawPlus X8 Quick Start Guide Simple steps for getting started with your drawing. In this guide, we will refer to specific tools, toolbars and tabs. Use this visual reference to help locate them on the
CPM-200 User Guide For Lighthouse for MAX
 CPM-200 User Guide For Lighthouse for MAX Contents Page Number Opening the software 2 Altering the page size & Orientation 3-4 Inserting Text 5 Editing Text 6 Inserting Graphics 7-8 Changing the Colour
ai-cut plugin User Manual
 User Manual Contents 1. Copyright Notice... 3 2. Installing ai-cut...5 2.1 Compatibility...5 2.2 Installation...5 2.2.1 Installing ai-cut on Windows...5 2.2.2 Installing ai-cut on Mac... 5 3. Using ai-cut...
Publishing Electronic Portfolios using Adobe Acrobat 5.0
 Step-by-Step Publishing Electronic Portfolios using Adobe Acrobat 5.0 2002, Helen C. Barrett Here is the process we will use to publish a digital portfolio using Adobe Acrobat. The portfolio will include
How to create interactive documents
 Adobe InDesign Guide How to create interactive documents You can use Adobe InDesign to create dynamic web content or interactive documents. InDesign supports export to web-ready HTML or interactive PDF.
Shape and Line Tools. tip: Some drawing techniques are so much easier if you use a pressuresensitive
 4Drawing with Shape and Line Tools Illustrator provides tools for easily creating lines and shapes. Drawing with shapes (rectangles, ellipses, stars, etc.) can be a surprisingly creative and satisfying
Xerox FreeFlow Print Server Clear Dry Ink User Guide Bring out the shine!
 Helpful Tips when Designing with Clear Dry Ink Xerox Color 800/1000 Presses FreeFlow Print Server Clear Dry Ink User Guide Dry Ink in itself adds a certain amount of sheen to the page. To maximize the
ADOBE 9A Adobe InDesign CS3 ACE. Download Full Version :
 ADOBE 9A0-055 Adobe InDesign CS3 ACE Download Full Version : http://killexams.com/pass4sure/exam-detail/9a0-055 , E QUESTION: 109 By default, which fonts are NOT included when an InDesign file is packaged?
Automation Engine. Working with Shuttle
 Working with Shuttle 01-2017 Contents 1. What is Shuttle?... 3 2. Installing Shuttle... 4 3. Shuttle Setup...5 3.1 Configuring Shuttle in Automation Engine... 5 3.2 Making Tickets Public...6 3.3 Shuttle
Creative Effects with Illustrator
 ADOBE ILLUSTRATOR Creative Effects with Illustrator PREVIEW OVERVIEW The object is to create a poster with a unified color scheme by compositing artwork drawn in Illustrator with various effects and photographs.
CREATING PRINT FILES FROM MICROSOFT PUBLISHER 2007
 CREATING PRINT FILES FROM MICROSOFT PUBLISHER 2007 These instructions does not guarantee the correct creation of your print files. Rather they are intended as an assistance. If you are not familiar with
Help us make this document better smarttech.com/docfeedback/ SMART Ink 3.1 USER S GUIDE FOR WINDOWS OPERATING SYSTEMS
 Help us make this document better smarttech.com/docfeedback/170830 SMART Ink 3.1 USER S GUIDE F WINDOWS OPERATING SYSTEMS Trademark notice SMART Ink, SMART Notebook, SMART Meeting Pro, Pen ID, smarttech,
Passit4sure.9A QA
 Passit4sure.9A0-350.50.QA Number: 9A0-350 Passing Score: 800 Time Limit: 120 min File Version: 5.1 http://www.gratisexam.com/ Rectified a number of inquiries replies after affirmation. I passed the test
Matrox MuraControl for Windows
 Matrox MuraControl for Windows User Guide (for software version 6.00) 20179-301-0600 2017.09.25 Contents About this user guide... 6 Using this guide... 6 More information... 6 Overview... 7 Supported Matrox
C941dn Multimedia Production Platform Device. Printing with Spot Clear or White Toner
 C941dn Multimedia Production Platform Device Printing with Spot Clear or White Toner Printing with the C941dn: the industry s only 5-color LED device. With your C941dn Multimedia Production Platform device
FLOOR COVERING VISUALIZER Use this interactive PDF to explore the visualizer. Instructions and information will appear in these bubbles.
 FLOOR COVERING VISUALIZER Use this interactive PDF to explore the visualizer. Instructions and information will appear in these bubbles. Use the page down or next button to start this guided tour. NEXT
8.25 x Standard Perfect Binding
 8.25 x 10.75 Standard Perfect Binding Instructions for Adobe Photoshop Learn More: www.adobe.com/photoshop 8.25 x 10.75 Standard Perfect Binding Page Count: 20 pages min, 384 pages max, multiple of 2 PDF
How to use. Home page
 Home page Double click WebCam Companion 3 to launch the application, the home page appears with 4 main features: Capture, Edit, Annotation and E-book. 11 1 Home page The Extras menu gives you access to
Severe Weather Safety PSA
 Contents Add Text 2 Format Text 3 Add Stickers 4 Resize Stickers 8 Change the Color of the Canvas 9 Name the Project 12 Add a Page 12 Practice Adding and Formatting Text 13 Use the Paint Brush Tool 14
13 PREPARING FILES FOR THE WEB
 13 PREPARING FILES FOR THE WEB Lesson overview In this lesson, you ll learn how to do the following: Create and stylize a button for a website. Use layer groups and artboards. Optimize design assets for
Using Microsoft Journal
 Using Microsoft Journal By Scott Badger You can create notes in your own handwriting. You ll be able to leave your ink notes they way they are and use the search option or you can convert your handwriting
White Underprint for Illustrator User Guide
 White Underprint for Illustrator 14.1 User Guide 06-2015 Contents 1. Copyright Notice... 3 2. White Underprint...5 3. Adding and Removing White Underprint...6 4. White Underprint settings...7 5. White