INTRODUCTION... 3 VIRTUALSET MAKER TOUR... 4 MENU BAR... 4 LAYERS PANE... 4 LAYER CONTROL... 6 Q & A SERVICE AND SUPPORT...
|
|
|
- Erik Lamb
- 5 years ago
- Views:
Transcription

1
2 INTRODUCTION... 3 VIRTUALSET MAKER TOUR... 4 MENU BAR... 4 LAYERS PANE... 4 LAYER CONTROL... 6 Q & A SERVICE AND SUPPORT... 16

3 Introduction Virtualset Maker can now be used as a standalone application so that it can be installed on your PC just like any other standard software. Before you install Virtualset Maker on your PC, make sure your PC meets the following requirement: The Virtualset Maker can also be used as a standalone application on the PC, which, however, needs to meet the minimum system requirements as described below: CPU: i3 Processor or faster Memory: 4GB RAM Graphic Card: GPU with DirectX 11 Operating System: Windows 7 (64 bits) or above Monitor resolution of 1680 x 1050 or higher After Virtualset Maker is installed on your PC, double-click on the VIRTUALSET maker icon on the desktop and bring up the startup page as shown in the diagram below. Before you start, please ensure your monitor resolution is set to 1680x1050 or higher. VIRTUALSET Maker Pane 1 is the preview area that allows you to view all modifications made to the virtualset. Pane 2 contains the order of all layers, where you can define their relationships in a virtualset. Pane 3 is the controller part, which are tools for zoom, rotation and file change of the layers.
4 VirtualSet Maker Tour Menu Bar On the menu bar of Virtualset Maker, you will find four options: File, Edit, Configuration and Help. The table below lists all sub-options and their corresponding descriptions. File Edit Configuration New Load Save Save as Exit Undo Redo Language Talent Type Talent 2 Type Opens a new file Loads an existing file Saves the current design Save the design in a different name (Overwrite protection function is available) Exits the Virtualset Maker Erases the last change done to the virtualset Reverses the undo command English Simplified Chinese Traditional Chinese Japanese Full Full body shot Desk Desk shot Middle Half body shot Custom Custom shot Customize Click to search the custom shot Full Full body shot Desk Desk shot Middle Half body shot Custom Custom shot Customize Click to search the custom shot Help About End User License Agreement (EULA) Layers Pane First of all, open a new file in VIRTUALSET maker and find the layers pane on the right of the window. The layers pane (pane 2) offers the user four options: Create: Delete: Raise: Lower: Add graphic layers Remove graphic layers Move a graphic layer up a layer Move a graphic layer down a layer To start editing, at the top-left corner of the layers pane, locate the create icon and click on it to select the layers. A dialogue box Select layer type will open, on which the user will be able to find five layer types.
 Please note that the suggested resolution of the studio layer is 2880 x 1620 (16:9).")
5 Source A (Talent): Camera shot layer Source B (Screen): A secondary screen embedded in virtualset Source C (Talent 2) A second camera shot layer Static Layer: Logo layer (adjustable images) Studio Layer: Graphic layers (image will be stretched to the current display resolution) Please note that the suggested resolution of the studio layer is 2880 x 1620 (16:9). This is the standard virtualset resolution in TVS You can of course use other resolutions but you will need to fine-tune your image later. Select Studio Layer to browse the hard disk and click on the Add button to import an image file to VIRTUALSET maker from the disk. Browse the disk for the files and single clicking on the file name allows you to preview the image in the preview area.


6 After the image is imported, you will be able to see two icons, eyes and solo, in the layers pane (pane 2) beside the image thumbnail. Their functions are described below: Eyes Click to make a particular layer visible in the editor Solo Click on this button to hide all other layers except the selected layer object Layer Control At the bottom left hand corner of Virtualset Maker, there are various options available for the user to manipulate the layers (While Studio layer is selected, some image layer options will be disabled). Name Name of the selected layer Path of the selected file for static logo layer and studio layer Image Click to browse the hard disk for image files Solo Visible Opaque Click to remove the image from the layer Checking this option hides all other layers except the selected layer. Unchecking this option hides the selected layer. This option is only available for the talent layer and checking this option blackens the background of the selected talent layer.

7 This option is enabled once either one of the talent layer, screen layer or static logo layer is selected. Points Mode allows the user to do all kinds of transformation on the selected layer, i.e. the logo, talent rectangle and the screen rectangle can be adjusted to various shapes as shown in the diagram below. Edit Mode Reset Transformation In Rectangle Mode, the user is only allowed to adjust the size of the rectangle without changing the shape. Click on Reset Transformation will restore the selected layer to its default shape and size. Next, import a logo (static layer) from the disk and place it above the studio layer.

8 VIRTUALSET maker gives the user the capability to manipulate the layer orientation. Once the logo is imported, you will see that the controllers in pane 3 are enabled. The example below illustrates how you can zoom, rotate and position a datavideo logo using the five controllers outlined as follows. The goal is to pave the studio layer with the datavideo logo. Position Knob Zoom Slide Bar Knob for rotation along x-axis Knob for rotation along y-axis Knob for rotation along z-axis The logo can be flipped along the x-axis. Knob for rotation along x-axis

9 The logo can be flipped along the y-axis. Knob for rotation along y-axis The user can also tilt the logo sideways. Knob for rotation along z-axis Finally, use the position knob to move the datavideo logo to the desired position and the zoom slide bar to finetune the logo to the appropriate size. The diagram below shows you the final work with the floor covered with datavideo logo.

10 After all graphic layers are arranged in place, import the screen layer (Source B), which will be shown in VIRTURALSET maker as a green rectangular box. Screen is where the video or picture are placed after program starts. Adjust and move the green rectangular screen to the respective desired size and position using the controllers in pane 3. In addition, the screen size and shape can also be adjusted by pulling or dragging the four corners.


11 Please note that the Virtualset Maker allows the user to place up to six screens on the studio layer. The diagram below depicts a virtualset with two screens. If you have already placed all six layers on the studio layer, the screen option (Source B) will then no longer be shown on the Select Layer Type dialogue box.
12 The last layer to be imported to the virtualset will be the talent layer (Source A or C). Virtualset Maker allows the user to place two talent layers on the studio layer. However, Sources A and C are one-time selections so they will not be shown on the Select Layer Type dialogue box once they are selected. Please note: TVS-1000 supports only one talent layer (Source A), so even if your virtualset is designed for the two-talent scenario (Source A and Source C), only one talent will appear on the TVS-1000 system. TVS-1200 supports two talent layers (Source A and Source C), but if your virtualset is designed for the one-talent scenario (Source A), only one talent will appear on the TVS-1200 system.


13 After importing the talent layer, the user will find that there is a white frame enclosing the talent. This is the confinement defined for talent movement, in other words, it is the coverage of a camera lens during actual shooting. After everything is in place, fine-tune your talent layer size and move the talent layer to the desired position. Finally, save your virtualset on the disk, and please remember that checking Mark set as not writable applies overwrite protection to the set. After the virtualset is saved, close VIRTUALSET Maker, and import the set to the Production Live Module to start the virtual studio tour.

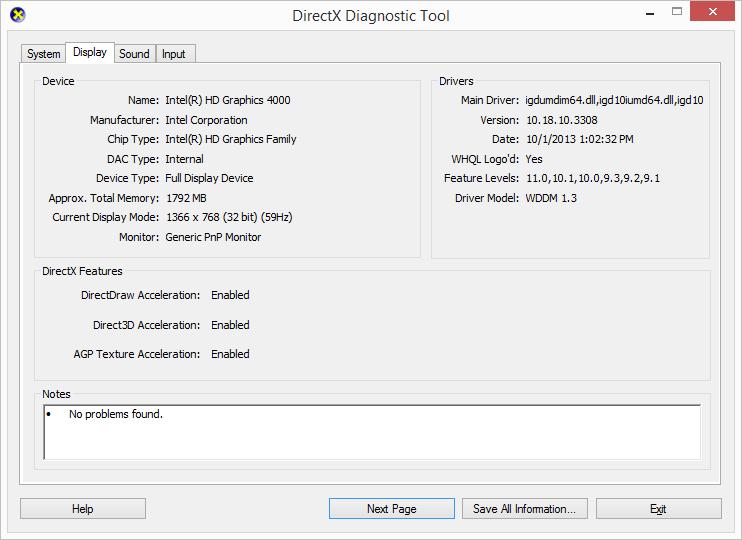
14 Q & A How to check if my graphic card s GPU is DirectX 11 compatible? First, you should call your graphic card vendor for information on your graphic card or check on the vendor s website to make sure that the graphic card is DirectX 11 compatible. After that, open DirectX Diagnostic Tool which will help you to check whether your PC meets the minimum requirement. To run DirectX Diagnostic Tool, click the Start Button and in the search box, type dxdiag and then press ENTER. The DirectX Diagnostic Tool window will then pop up as shown in the diagram below. To check the DirectX versions that your graphic card driver supports, click the Display tab and you will find the supported DirectX versions listed in the red box as shown in the diagram below.
15
16 Service and Support
Anatomy of a Window (Windows 7, Office 2010)
") Anatomy of a Window (Windows 7, Office 2010) Each window is made up of bars, ribbons, and buttons. They can be confusing because many of them are not marked clearly and rely only on a small symbol to indicate
Anatomy of a Window (Windows 7, Office 2010) Each window is made up of bars, ribbons, and buttons. They can be confusing because many of them are not marked clearly and rely only on a small symbol to indicate
Intermediate Microsoft Word 2010
 Intermediate Microsoft Word 2010 USING PICTURES... PAGE 02! Inserting Pictures/The Insert Tab! Picture Tools/Format Tab! Resizing Images! Using the Arrange Tools! Positioning! Wrapping Text! Using the
2. To change the view of the pictures, click the Thumbnail View button.
 1 2 3 4 5 7 6 8 9 1. Click the down arrow to find your picture(s). 2. To change the view of the pictures, click the Thumbnail View button. 3. If you are only resizing ONE picture: Click on the picture
Table of Contents. Logos Imaging Application User s Manual Version Page 1
 Table of Contents About... 4 System Requirements... 5 Uninstall Previous Versions... 5 Install LIA 6.0... 6 Install the Device Drivers... 13 Register... 14 Getting Help... 14 Technical Support... 14 Workspace
THE PAINT WINDOW. At the very top is the Title Bar, just as in all programs, below it is a very simple Menu Bar and below that is the Ribbon.
 This is a typical view of the top of the Paint window. THE PAINT WINDOW At the very top is the Title Bar, just as in all programs, below it is a very simple Menu Bar and below that is the Ribbon. The Title
Click Install View Touch. Installation starts. Click Next. Click Finish.
 1. Please read the instructions carefully. Improper installation may cause permanent damages, which may not be covered by the warranty. 2. Check all the parts in the package against the following parts
icms Pro USER S Manual Ver 1.4
 icms Pro USER S Manual Ver 1.4 Contents Panes... 7 How Can User Rights Affect Your Use of icms Pro SW?... 10 Minimum System Requirements... 11 Installing the icms Pro SW... 12 Download icms Pro from icatchinc
CAPTURE. USER GUIDE v1
 CAPTURE USER GUIDE v1 INTRODUCTION About The Logitech Capture app makes creating content with your webcam as easy as lights, camera, Capture. Start recording high-quality videos the second you plug in
Publisher 2016 Foundation SAMPLE
 Publisher 2016 Foundation Publisher 2016 Foundation Microsoft Publisher 2016 Foundation - Page 2 2015 Cheltenham Group Pty. Ltd. All trademarks acknowledged. E&OE. No part of this document may be copied
Microsoft Publisher 2013 Foundation. Publisher 2013 Foundation SAMPLE
 Microsoft Publisher 2013 Foundation Publisher 2013 Foundation Microsoft Publisher 2013 Foundation - Page 2 2013 Cheltenham Group Pty. Ltd. All trademarks acknowledged. E&OE. No part of this document may
Microsoft Windows 7 - Illustrated Unit A: Introducing Windows 7
 Microsoft Windows 7 - Illustrated Unit A: Introducing Windows 7 Objectives Start Windows and view the desktop Use pointing devices Use the Start button Use the taskbar Work with windows 2 Objectives Use
Publisher 2016 Foundation. North American Edition SAMPLE
 Publisher 2016 Foundation Publisher 2016 Foundation North American Edition Microsoft Publisher 2016 Foundation - Page 2 2015 Cheltenham Group Pty. Ltd. All trademarks acknowledged. E&OE. No part of this
Creating a Presentation
 Creating a Presentation 1.1 Double Click the PowerPoint icon on the desktop Or Click on the start menu Type PowerPoint into the search box Click on the PowerPoint icon 1.2 Click Blank Presentation 1 How
NSCC SUMMER LEARNING SESSIONS MICROSOFT OFFICE SESSION
 NSCC SUMMER LEARNING SESSIONS MICROSOFT OFFICE SESSION Module 1 Using Windows Welcome! Microsoft Windows is an important part of everyday student life. Whether you are logging onto an NSCC computer or
A+ Suite Software. User Manual
 A+ Suite Software User Manual 2012.03 Table of Contents Introduction... 1 Minimum System Requirements... 1 Using the A+ Plug-in for PowerPoint... 2 Spotlight... 2 Visor... 3 Setting... 3 Floating Toolbox...
SeeSnake HQ User Guide
 SeeSnake HQ User Guide SeeSnake HQ Version 1.53.85.1426 23 May 2010 About SeeSnake HQ 3 Digital Technology 3 Installation and Updates 5 Windows XP 5 Windows Vista 5 Windows 7 5 The Home Window 6 Home Toolbar
SMART Recorder. Record. Pause. Stop
 SMART Recorder The recorder is used to record actions that are done on the interactive screen. If a microphone is attached to the computer, narration can be recorded. After the recording has been created,
icms Pro USER s MANUAL Ver 1.0
 icms Pro USER s MANUAL Ver 1.0 Contents Target Audience for this Document... 5 Copyright, Trademarks and Important Information... 5 Copyright... 5 Disclaimer... 5 Introduction... 6 Tabs... 6 Panes... 7
Microsoft PowerPoint Tutorial
 Microsoft PowerPoint Tutorial Contents Starting MS PowerPoint... 1 The MS PowerPoint Window... 2 Title Bar...2 Office Button...3 Saving Your Work... 3 For the first time... 3 While you work... 3 Backing
User Guide Belltech Systems, LLC
 User Guide Belltech Systems, LLC http://www.belltechsystems.com May, 2006 1. Introducing Belltech CaptureXT 2. Installation and Uninstallation Installation Running the Application Uninstallation 3. User
Configuring RUSHWORKS 3n1 for tracking using the Setup Utility
 Configuring RUSHWORKS 3n1 for tracking using the Setup Utility System Operation For best results, the camera should be positioned in the rear center of the room, between 30 and 50 from the front coverage
By: Ms. Fatima Shannag Ms. Essra Al-Mousa. Edited by: Khawlah Almutlaq
 By: Ms. Fatima Shannag Ms. Essra Al-Mousa 1 PowerPoint web app PowerPoint Web App is a limited version of PowerPoint, enabling you to display information through slide shows A PowerPoint presentation is
SMART Meeting Pro 4.2 personal license USER S GUIDE
 smarttech.com/docfeedback/170973 SMART Meeting Pro 4.2 personal license USER S GUIDE Product registration If you register your SMART product, we ll notify you of new features and software upgrades. Register
Table of contents. I Preface. II First steps 1. 3D stage 2. Your first stage
 Table of contents I Preface 1 II First steps 3 1. 3D stage 2. Your first stage III User mode 2 3 7 1. Rendering options 2. Resolution 3. Cameras 4. DMX levels 5. Universes patch 6. Movie recorder 6 7 7
SMART Meeting Pro PE 4.1 software
 Help us make this document better smarttech.com/feedback/170973 SMART Meeting Pro PE 4.1 software USER S GUIDE Product registration If you register your SMART product, we ll notify you of new features
Getting Started Guide
 SnagIt Getting Started Guide Welcome to SnagIt Thank you for your purchase of SnagIt. SnagIt is the premier application to use for all of your screen capturing needs. Whatever you can see on your screen,
Editing Videos. Overview. 1. Open the Editor
 Editing Videos Overview The Panopto editor allows for easy web-based editing from any modern browser. You can perform quick, non-destructive edits to any video on the Panopto platform and deliver exactly
How to Make a Movie in imovie How to Make a Movie Trailer in imovie How to Color Correct a Movie in imovie
 How to Make a Movie in imovie How to Make a Movie Trailer in imovie How to Color Correct a Movie in imovie 1. Make sure you are using the Mac. Make a Movie in imovie 2. If your files are on an external
StudioPrompter Tutorials. Prepare before you start the Tutorials. Opening and importing text files. Using the Control Bar. Using Dual Monitors
 StudioPrompter Tutorials Prepare before you start the Tutorials Opening and importing text files Using the Control Bar Using Dual Monitors Using Speed Controls Using Alternate Files Using Text Markers
Using SymPrint to Make Overlays, Templates & More...
 Welcome to SymPrint SymPrint is an easy-to-use tool for creating communication overlays, worksheets, classroom activities and more using a modern toolbar and common-sense interface modeled after the programs
FactoryLink 7. Version 7.0. Client Builder Reference Manual
 FactoryLink 7 Version 7.0 Client Builder Reference Manual Copyright 2000 United States Data Corporation. All rights reserved. NOTICE: The information contained in this document (and other media provided
Contents. Introducing Clicker Paint 5. Getting Started 7. Using The Tools 10. Using Sticky Points 15. Free resources at LearningGrids.
 ClickerPaintManualUS.indd 2-3 13/02/2007 13:20:28 Clicker Paint User Guide Contents Introducing Clicker Paint 5 Free resources at LearningGrids.com, 6 Installing Clicker Paint, 6 Getting Started 7 How
Central Management Software for NVR-915 / NVR-1615 CV5-M256
 Central Management Software for NVR-915 / NVR-1615 Table of Contents Chapter 1. Main Console... 4 1.1 Tool Bar... 4 1.2 NVR List... 5 1.3 Division List... 7 1.4 Group List... 9 1.5 PTZ Panel...11 1.6 Operation
CHAIRSIDE 2009 USER MANUAL
 INSTALLATION TECHNICAL SUPPORT For technical assistance, please contact DHC Software at Local : (416) 429-7003 Toll free in North America 1-800-519-6569 Don t forget to check in with our website regularly
Point 2 View User Manual
 Point 2 View User Manual www.ipevo.com 6. Table freerec of Contents 1 Getting Started... 3 Key benefits of your Point 2 View:... 3 Flexible positioning... 3 Easy autofocus... 3 Smart P2V Software... 3
Figure 4-9. Click Finish button, system pops up a dialogue box. Click the OK button, the startup wizard is complete. See Figure 4-10.
 For detailed information, please refer to chapter 4.11.4.1.1. Figure 4-9 Finish button, system pops up a dialogue box. the OK button, the startup wizard is complete. See Figure 4-10. Figure 4-10 4.4 Preview
Introduction. Starting the Program. Exploring the User Interface
 Introduction Microsoft PowerPoint 2010 is a presentation program that offers various effects, themes, layouts, and formatting options that can be used to quickly and efficiently create and share dynamic
Version: 01P02B. U3 Map Maker Operational Guide
 Contents 1. Map Maker Software Overview... 4 1.1 Features... 4 1.2 Remarks... 4 1.3 Supported Devices... 4 2. Installing U3 Map Maker... 5 2.1 System Requirements... 5 2.2 Map Maker Installation... 5 3.
Ancient Cell Phone Tracing an Object and Drawing with Layers
 Ancient Cell Phone Tracing an Object and Drawing with Layers 1) Open Corel Draw. Create a blank 8.5 x 11 Document. 2) Go to the Import option and browse to the Graphics 1 > Lessons folder 3) Find the Cell
Design and Print Instruction Manual
 Diamond Design Design and Print Instruction Manual Contents Installation 1 Installing the Diamond Design Software 2-3 Installing the ORIGINAL Argox OS-214 printer drivers 4 Installing the EXCEL Argox OS-314
FaceCam 321 Table of Contents
 FaceCam 321 Table of Contents FaceCam 321 Features.2 Set up the device 2 I.P.M(Image Protection Mechanism) setting.3 Using Instant Messenger Application.3 Arcsoft Webcam Companion 4.4 How to use WCC4..4-7
Learning the Pro/ENGINEER Interface
 2 Learning the Pro/ENGINEER Interface This chapter introduces the Pro/ENGINEER interface tools: the menus, the dashboards, the selection tools and the viewing controls. As you go through this chapter,
Adobe Illustrator CS Design Professional GETTING STARTED WITH ILLUSTRATOR
 Adobe Illustrator CS Design Professional GETTING STARTED WITH ILLUSTRATOR Chapter Lessons Create a new document Explore the Illustrator window Create basic shapes Apply fill and stroke colors to objects
Getting Started With Windows 7
 Getting Started With Windows 7 Congratulations. your computer was just upgraded to the Windows 7 Operating System. The Start Button (same as Vista) The Start Menu Computer = Libraries = My Computer Documents
CHAPTER 1 COPYRIGHTED MATERIAL. Getting to Know AutoCAD. Opening a new drawing. Getting familiar with the AutoCAD and AutoCAD LT Graphics windows
 CHAPTER 1 Getting to Know AutoCAD Opening a new drawing Getting familiar with the AutoCAD and AutoCAD LT Graphics windows Modifying the display Displaying and arranging toolbars COPYRIGHTED MATERIAL 2
Getting Started with Crazy Talk 6
 Getting Started with Crazy Talk 6 Crazy Talk 6 is an application that generates talking characters from an image or photo, as well as facial animation for video. Importing an Image Launch Crazy Talk and
A Guide to Processing Photos into 3D Models Using Agisoft PhotoScan
 A Guide to Processing Photos into 3D Models Using Agisoft PhotoScan Samantha T. Porter University of Minnesota, Twin Cities Fall 2015 Index 1) Automatically masking a black background / Importing Images.
Contents. Version 1.5 and later. Introduction Panel Descriptions Sending Still Images to the VR-4HD... 12
 VR-4HD RCS is software designed to control the VR-4HD remotely using a computer. By connecting the VR-4HD and a computer via USB, along with operating the unit from the computer, you can also save and
DVR 514 Digital Video Recorder
 DVR 514 Digital Video Recorder User Manual 2010 Sakar International, Inc. All rights reserved. Windows and the Windows logo are registered trademarks of Microsoft Corporation. All other trademarks are
Using IPACS Webserver:
 Using IPACS Webserver: Logging On: The IPACS Webserver can be accessed from any PC with internet connectivity. 1. Open Internet Explorer or your internet service provider. 2. Type the IPACS web address
Libraries. Multi-Touch. Aero Peek. Sema Foundation 10 Classes 2 nd Exam Review ICT Department 5/22/ Lesson - 15
 10 Classes 2 nd Exam Review Lesson - 15 Introduction Windows 7, previous version of the latest version (Windows 8.1) of Microsoft Windows, was produced for use on personal computers, including home and
Table of Contents Lesson 1: Introduction to the New Interface... 2 Lesson 2: Prepare to Work with Office
 Table of Contents Lesson 1: Introduction to the New Interface... 2 Exercise 1: The New Elements... 3 Exercise 2: Use the Office Button and Quick Access Toolbar... 4 The Office Button... 4 The Quick Access
Texas School for the Blind and Visually Impaired. Using The Drawing Tools in Microsoft Word 2007 for Tactile Graphic Production
 Texas School for the Blind and Visually Impaired Outreach Programs 1100 West 45 th Street Austin, Texas, 78756 Using The Drawing Tools in Microsoft Word 2007 for Tactile Graphic Production Developed by:
Publisher 2013 Foundation SAMPLE
 Publisher 2013 Foundation Publisher 2013 Foundation Microsoft Publisher 2013 Foundation - Page 2 2013 Cheltenham Group Pty. Ltd. All trademarks acknowledged. E&OE. No part of this document may be copied
Vision Pointer Tools
 Vision Pointer Tools Pointer Tools - Uses Pointer Tools can be used in a variety of ways: during a Vision Demo to annotate on the master station s screen during a Remote Control session to annotate on
Adobe Premiere: Getting Started
 Prepared by Ansel Herz for the UW Department of Communication http://www.com.washington.edu/tech/irc/ Questions? Comments? Contact Kristina Bowman at kriscb@uw.edu. Adobe Premiere: Getting Started This
[Not for Circulation] This document provides a variety of shortcuts for working in PowerPoint 2007.
![[Not for Circulation] This document provides a variety of shortcuts for working in PowerPoint 2007.](/thumbs/72/67772637.jpg "[Not for Circulation] This document provides a variety of shortcuts for working in PowerPoint 2007.") PowerPoint Shortcuts This document provides a variety of shortcuts for working in PowerPoint 2007. Using Slides from Other Presentations To add a slide from an existing presentation to the current presentation,
PowerPoint Shortcuts This document provides a variety of shortcuts for working in PowerPoint 2007. Using Slides from Other Presentations To add a slide from an existing presentation to the current presentation,
SolidWorks Intro Part 1b
 SolidWorks Intro Part 1b Dave Touretzky and Susan Finger 1. Create a new part We ll create a CAD model of the 2 ½ D key fob below to make on the laser cutter. Select File New Templates IPSpart If the SolidWorks
Using the CMA Warp Editor
 Using the CMA Warp Editor Overview The Warp Editor feature lets you adjust Axon HD, Axon HD Pro, DLHD or MMS100 output to match complex projection surfaces. These forms allow the projection to match irregular
3ds Max Cottage Step 1. Always start out by setting up units: We re going with this setup as we will round everything off to one inch.
 3ds Max Cottage Step 1 Always start out by setting up units: We re going with this setup as we will round everything off to one inch. File/Import the CAD drawing Be sure Files of Type is set to all formats
HIP2P Network Video Camera Client Terminal User Manual
 HIP2P Network Video Camera Client Terminal User Manual Document version:5.1 Page 1 of 34 } Preface Thank you for using our company's products. The network video camera client terminal is used to implement
Keys for selecting tools
 Keys for selecting tools Use these shortcuts in the Tools panel. In most cases, you can momentarily switch tools by holding down the keyboard shortcut for the tool. Selection tool V V Rotation tool W W
TruEmbroidery Software Program
 1 Page Get to Know TruE Studio, an Application of the TruEmbroidery Software Program By Janie Lantz TruE Studio gives you tools to create quick designs or combine existing embroideries. Save as unmerged
CreateASite Beginner s Guide
 Contents Getting Started... 3 Access the CreateASite Control Panel... 3 Select a Category/Subcategory... 4 Select a Template... 6 Change the Site Template... 10 Change Colours... 12 Change Fonts... 13
1. Introduction and system and hardware requirements
 Table of Contents 1. Introduction and system and hardware requirements... 3 2. Installation of the Wardrobe Module... 4 3. Starting work with the module... 7 3.1. Introduction... 7 3.2. Basic Options Wizard
Customizing FlipCharts Promethean Module 2 (ActivInspire)
") Customizing FlipCharts Promethean Module 2 (ActivInspire) Section 1: Browsers The browsers (located on the left side of the flipchart) are menus for various functions. To view the browsers, click Main
Customizing FlipCharts Promethean Module 2 (ActivInspire) Section 1: Browsers The browsers (located on the left side of the flipchart) are menus for various functions. To view the browsers, click Main
INDEX PART 1. BASICS...
 INDEX PART 1. BASICS... 3 1.1. SYSTEM REQUIREMENTS... 3 1.1.1. Windows Operating System... 3 1.1.2. Linux Operating System... 3 1.1.3. Mac Operating System... 3 1.2. SOFTWARE INSTALLATION AND UNINSTALL...
Prezi is a wonderful presentation tool to help make classroom or online instruction easy and
 Prezi is a wonderful presentation tool to help make classroom or online instruction easy and engaging. The following 5 steps will help you learn the basics of creating a Prezi presentation. This presentation
Table of Contents. Revu ipad. v3.6. Navigation. Document Manager. File Access. Markups. Signature Tool. Field Verification Measurements
 Table of Contents Navigation Document Manager File Access Markups Signature Tool Field Verification Measurements Editing Properties Tool Sets & the Tool Chest Markups List Forms Studio Sessions Studio
InDesign Basics. Adobe
 Adobe InDesign Basics Craig Polanowski 1. Begin by creating a new document. Chances are pretty good that you will want to turn off the facing pages setting and create single pages instead of spreads. One
Amazing Designs Apps Instruction Manual
 Amazing Designs Apps Instruction Manual Amazing Designs Apps is a new embroidery software system from Amazing Designs that contains multiple features, in different toolpacks that are activated separately.
Photoshop Fundamentals
 Lesson 3 Photoshop Fundamentals Photoshop Fundamentals How to Navigate your Document Zooming in and out To zoom in and out on your Photoshop document, hold down the Command key (Ctrl on Win) and press
User Guide. Web Intelligence Rich Client. Business Objects 4.1
 User Guide Web Intelligence Rich Client Business Objects 4.1 2 P a g e Web Intelligence 4.1 User Guide Web Intelligence 4.1 User Guide Contents Getting Started in Web Intelligence 4.1... 5 Log into EDDIE...
Summer 2012 Animation
 1/20? July 15, 2012 2/20 Outline?? 4/20 A Sequence of Images Shown Rapidly in Succession? Figure : Leap Frog Source: http://education.eastmanhouse.org/discover/kits 5/20 Flip Books? Figure : Flip Book
Chapter 4 Printing and Viewing a Presentation Using Proofing Tools I. Spell Check II. The Thesaurus... 23
 PowerPoint Level 1 Table of Contents Chapter 1 Getting Started... 7 Interacting with PowerPoint... 7 Slides... 7 I. Adding Slides... 8 II. Deleting Slides... 8 III. Cutting, Copying and Pasting Slides...
SMART Board Quick Reference
 The Ready Light Your SMART Board interactive whiteboard includes a Ready Light that indicates the status of your interactive whiteboard. Color of Ready Light Not lit Solid green Flashing green Solid red
5. ADOBE AFTER EFFECTS MANUAL
 5. Introduction to Adobe After Effects Version 1.0-0913 2013 by VirTra Inc. All Rights Reserved. VirTra, the VirTra logo are either registered trademarks or trademarks of VirTra in the United States and/or
Convert any PC into Photobooth
 Convert any PC into Photobooth www.dgflick.com Table of Contents Table of Contents... 1 1.0. Introduction... 2 2.0. System Requirements... 3 3.0. Opening the Toolbox Getting Started... 4 3.1. Registration...
GraphWorX64 Productivity Tips
 Description: Overview of the most important productivity tools in GraphWorX64 General Requirement: Basic knowledge of GraphWorX64. Introduction GraphWorX64 has a very powerful development environment in
User s Guide
 User s Guide 03.28.2017 Accessing Pathfinder Edge Pathfinder Edge can be accessed from anywhere you have an internet connection and a web browser. To ensure the best performance, we recommend using Pathfinder
Using Microsoft Power Point
 Using Microsoft Power Point Using the Menus in both the English and Japanese Versions Toolbars Shortcuts Resources on the Web Contents Menus Page Main Menu 1 File Menu 2 Edit Menu 3 View Menu 4 Insert
StitchSketch User s Manual
 StitchSketch User s Manual Ver. 1.0 Copyright 2012 Keiji Ikuta / Mozusystems, LLC Overview StitchSketch (previously called KG-Chart Mobile) is developed by Keiji Ikuta, a creator of popular software program
ipims USER s MANUAL (ORION IP Device Total Management SW) Ver 1.2 by sj
 Ver 1.2 by sj") ipims USER s MANUAL (ORION IP Device Total Management SW) Ver 1.2 by sj Contents Contents... 2 Target Audience for this Document... 5 Minimum System Requirements... 5 Introduction... 6 Tabs... 6 Panes...
ipims USER s MANUAL (ORION IP Device Total Management SW) Ver 1.2 by sj Contents Contents... 2 Target Audience for this Document... 5 Minimum System Requirements... 5 Introduction... 6 Tabs... 6 Panes...
DVR 520 / 1.8 Digital Video Recorder
 DVR 520 / 1.8 Digital Video Recorder User Manual 2010 Sakar International, Inc. All rights reserved. Windows and the Windows logo are registered trademarks of Microsoft Corporation. All other trademarks
Microsoft PowerPoint 2010 Beginner
 Microsoft PowerPoint 2010 Beginner To start Microsoft PowerPoint: - Go to Start > Search > Word. - You can also double-click any Microsoft PowerPoint document. Layout File Tab Quick Access Toolbar Tabs
Getting Started with. PowerPoint 2010
 Getting Started with 13 PowerPoint 2010 You can use PowerPoint to create presentations for almost any occasion, such as a business meeting, government forum, school project or lecture, church function,
*Note that LL Studio can also work in Stand-alone mode with an SD card.
 PC System requirements: Operating System : Microsoft Windows XP / Windows Vista / Windows 7 / Windows 8 C.P.U : Intel Pentium IV at 2.0 GHz (or higher) Video Card : 128 MB VRAM Memory : 1 GB RAM Hard Disk
1 ZoomBrowser EX Software User Guide 5.0
 1 ZoomBrowser EX Software User Guide 5.0 Table of Contents (1/2) Chapter 1 Chapter 2 Chapter 3 What is ZoomBrowser EX? What Can ZoomBrowser EX Do?... 4 Guide to the ZoomBrowser EX Windows... 5 Task Buttons
Promethean Board. Guide to Basics
 Promethean Board Guide to Basics 1 Table of Contents Introduction... 3 Aligning the Projector Image... 3 Calibrating the ACTIVboard... 4 Opening ACTIVstudio/Creating a Profile... 4 Features Located Within
Microsoft Word 2010 Basics
 1 Starting Word 2010 with XP Click the Start Button, All Programs, Microsoft Office, Microsoft Word 2010 Starting Word 2010 with 07 Click the Microsoft Office Button with the Windows flag logo Start Button,
Microsoft PowerPoint Tutorial
 Microsoft PowerPoint Tutorial GETTING STARTED Microsoft PowerPoint is one of the most popular presentation programs supported by both Mac and PC platforms. Microsoft PowerPoint can be used to create interactive
Interface. 2. Interface Photoshop CS/ImageReady CS for the Web H O T
 2. Interface Photoshop CS/ImageReady CS for the Web H O T 2. Interface The Welcome Screen Interface Overview Using the Toolbox Using Palettes Using the Options Bar Creating a Tool Preset Resetting Tools
LED VIDEO WALL CONTROLL SYSTEM USERS MANUAL. PAW GmbH 04/2013 1
 LED VIDEO WALL CONTROLL SYSTEM USERS MANUAL PAW GmbH 04/2013 1 INDEX 1 INHALT 2 INTRODUCTION... 6 2.1 Features... 6 2.2 Operating Environment... 6 2.2.1 Operating system... 6 2.2.2 Hardware Configuration...
XPress 2.3 Annotation
 XPress 2.3 Annotation XPress is our popular desktop annotation and white boarding application. Starting with XPress version 2.2 you can create XPress documents using our Mac or Windows version and then
Bringing Learning to Life in VR. Teacher s Guide to Cyber Anatomy 3D
 Bringing Learning to Life in VR Teacher s Guide to Cyber Anatomy 3D Contents How to Get the Most From Cyber Anatomy 3D for zspace Transform your classroom with compelling, innovative technology that can
Microsoft Office. Microsoft Office
 is an office suite of interrelated desktop applications, servers and services for the Microsoft Windows. It is a horizontal market software that is used in a wide range of industries. was introduced by
Mill Mouse User Guide. Ver. 4.1 Author: topolo-z
 Mill Mouse User Guide Ver. 4.1 Author: topolo-z Contents Introduction Features System requirements Installation Launch Mill Mouse Basic functions Change click action To change click action frequently Zoom
THE EASTMAN Easicut v2.1
 THE EASTMAN Easicut v2.1 User's Manual This manual must be used in conjunction with the M9000 Machine Instruction and Service manual, Form #E-509-Instructions. 779 Washington St., Buffalo, N.Y. 14203-1396
USING THE TRIBALL FOR POSITIONING
 USING THE TRIBALL FOR POSITIONING Although many important positioning tools are available, none are as versatile as the TriBall tool. This TriBall tool offers complete repositioning of many items: Shapes
XPEL DAP SUPPORT. DAP Tool List & Overview DESCRIPTION ICON/TOOL (SHORTCUT)
") Pointer (S) Left-click on individual entities to add them to the current selection (selected entities will turn red). If the entity selected is a member of a group, the entire group will be added to the
Pointer (S) Left-click on individual entities to add them to the current selection (selected entities will turn red). If the entity selected is a member of a group, the entire group will be added to the