UCS Director 5.4 Windows/Linux CSV Workflow Deployment
|
|
|
- Posy Tate
- 5 years ago
- Views:
Transcription
1 UCS Director 5.4 Windows/Linux CSV Workflow Deployment The purpose of this document is to illustrate the steps to implement the CSV Workflow that can be used for Windows or Linux VM deployments. The CSV File can contain a single VM or Multiple VMs. This CSV VM Deployment workflow is a modification to the VM Deployment with USER IP INPUT which can be found here: The original workflow was built on UCSD this new workflow addresses some script changes to address going to UCSD 5.4. Other additional features include cleaning up/deleting the CSV file from /opt/infra/uploads/ when the workflow is complete, added vdc Template Input for the CSV Inputs, removed the second future workflow input and rearranged the CSV Inputs in the CSV File. For details on how and why this workflow works including the script itself can be found at the link above. Also included in this document are the steps to create a vdc and vdc Template and all of the policies needed to create them. Assumptions/Requirements You have a Single or Multi-Node Deployment of UCS Director 5.4. You have access to vcenter where your UCS Director has been deployed. You have existing Windows and Linux Templates in your vcenter and have been tested for Guest Customization. Useful Documents Cisco UCS Director Administration Guide, Release 5.4 Software/OS levels Listed below are the software and OS versions that were used for the testing and building this document. UCS Director 5.4 VMware 5.1 VMWare Windows Server 2008 R2 Enterprise Template VMware RHEL 6.2 Template
2 Table of Contents Table of Contents Perquisites - Create Virtual/Hypervisor Policies Add VMware Network Policy Add VMware Storage Policy Add Virtual Storage Catalog Add VMware Computing Policy Add VMware System Policy Add End User Self-Service Policy for VMware Add Virtual Data Center Add vdc Service Profile Create Standard Catalog item for Windows Create Standard Catalog item for Linux Setup File Browser Download File Browser files and extract to local PC Upload fileupload.jar to UCS Director Primary Node Add fileupload.jar to run.sh file to load during boot up Import File Browser Execute File Browser Workflow Verify/Test File Browser is working Deploy CSV Workflow Download CSV Workflow Import CSV Workflow Configure CSV Workflow Create CSV File Execute Workflow Create Advanced Catalog item for CSV Workflow Test CSV Workflow... 66


3 1. Perquisites - Create Virtual/Hypervisor Policies Before Importing the Windows/Linux CSV workflow, we configure the following prerequisites Add VMware Network Policy Create a VMware Network Policy. From UCSD GUI, Navigate to Policies -> Virtual Hypervisor Policies -> Network -> VMware Network Policy -> select Add. You will notice a Default policy with errors. This policy was automatically created when we added the vcenter Virtual Account. We will delete this policy after we create the new one. Enter a Policy Name, Policy Description, drop down and select a Cloud Name(vCenter Virtual Account) and select + for VM Networks.


4 Enter a Name for the NIC Alias, select Show policy level portgroups check box, select Allow end user to override IP Address check box, drop down and select VMXNET3, click + to add Port Groups. Click Select for Port Group Name. Enter your Port Group name in the filter on the right to narrow down the results. Select one of your Port Groups from the list and then click Select. Note: This Port Group name is specifically named to work with the Windows/Linux CSV Workflow from the UCSD Communities Site.

5 Drop down and select Static for IP Address Type, drop down and select Inline IP Pool for IP Address Source, enter any IP Address for Static IP Pool, Enter a Subnet Mask, enter a Gateway IP Address for that subnet and click Submit. Note: The IP Address can literally be any IP Address because this will get overwritten by the workflow but you have to have something in these field as they are mandatory. Click OK.
6 Review and Click Submit. Click OK.
7 Review and click Submit. Click OK.

8 Delete the original Default Policy. Policies -> Virtual/Hypervisor Policies -> Network -> VMware Network Policy -> select the Default Policy -> click Delete. Click Delete. Click OK.


9 1.2. Add VMware Storage Policy Add Virtual Storage Policy. From UCSD GUI, Navigate to Policies -> Virtual Hypervisor Policies -> Storage -> VMware Storage Policy -> select Add. Enter a Policy Name, Policy Description, drop down and select your Cloud Name/vCenter, select Use Shared Data Store only, deselect Use Local Storage, deselect Use NFS, select Allow Resizing of Disk, leave everything else default and click Next.


10 On the Additional Disk Policies section, leave everything default and click Submit. Click OK. Delete the Default Storage Policy. Navigate to Policies -> Virtual Hypervisor Policies -> Storage -> VMware Storage Policy -> select the Default Storage Policy -> select Delete. Click Delete. Click OK.

11 1.3. Add Virtual Storage Catalog Add Virtual Storage Catalog. From UCSD GUI, Navigate to Policies -> Virtual Hypervisor Policies -> Storage -> Virtual Storage Catalog -> select Add. Enter a Catalog Name, optional Catalog Description, drop down and select your vcenter/cloud Name and click Next.

12 Enter a name for the Storage Entry Name, select the Storage Policy we created in the previous section and click Submit. Click OK.


13 1.4. Add VMware Computing Policy Add VMware Computing Policy. From UCSD GUI, Navigate to Policies -> Virtual Hypervisor Policies -> Computing -> VMware Computing Policy -> select Add. Enter a Policy Name, Policy Description, select your Cloud Name/vCenter Account, drop down and select Include Selected Clusters for Host Node/Cluster Scope and click Select for Selected Clusters. Select the cluster(s) you want to deploy VMs to and click Select.
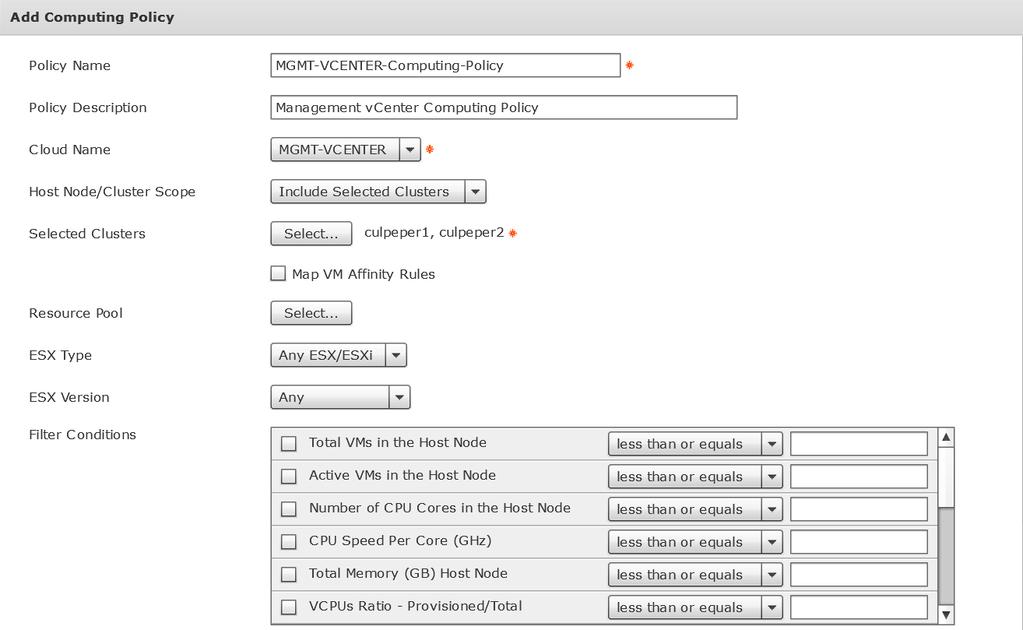


14 Leave everything else default and click Submit. Click OK.

15 Delete the Default Computing Policy. Navigate to Policies -> Virtual Hypervisor Policies -> Computing -> VMware Computing Policy -> select the Default Computing Policy -> select Delete. Click Delete. Click OK.

16 1.5. Add VMware System Policy Add VMware System Policy. From UCSD GUI, Navigate to Policies -> Virtual Hypervisor Policies -> Service Delivery -> VMware System Policy -> select Add. Enter a Policy Name, Policy Description, ${VMNAME} for VM Name Template, select End User VM Name or VM Prefix, enter ${VMNAME} for Host Name Template, select the timezone where this vcenter resides, enter your domain name, drop down and select Windows and Linux for VM Image Type. Continued on next Page
17 Enter your Windows Product ID, License Owner Name, Organization, select Create a unique SID, enter the Administrator Password, select your timezone, select Workgroup and enter a Workgroup name and click Submit. Click OK.

18 1.6. Add End User Self-Service Policy for VMware Add an End User Self-Service Policy. From UCSD GUI, Navigate to Policies -> Virtual Hypervisor Policies -> Service Delivery -> End User Self-Service Policy -> select Add. Drop down and select VMware for Account type. Click Submit.

19 Enter a Policy Name, Policy Description, select all options and click Submit. Click OK.


20 1.7. Add Virtual Data Center Add a Virtual Data Center. From UCSD GUI, Navigate to Policies -> Virtual Hypervisor Policies -> Virtual Data Centers -> vdc -> select Add. Drop down and select VMware for Account Type. Click Submit.

21 Enter a vdc Name, vdc Description, drop down and select the Cloud Name/vCenter and click Select for Group. Find and select the Group Name you want and click Select.


22 Select all the Policies we created in the previous sections, including VMware All Buttons and click Add. Click OK.

23 1.8. Add vdc Service Profile Add vdc Service Profile. From UCSD GUI, Navigate to Policies -> Virtual Hypervisor Policies -> Virtual Data Centers -> vdc Service Profiles -> select Add. Enter a vdc Profile Name, vdc Description, drop down and select the Cloud Name/vCenter and click Select for Group. Find and select the Group Name you want and click Select.

24 Select all the Policies we created in the previous sections, including VMware All Buttons and click Add. Click OK.
25 2. Create Standard Catalog item for Windows 2012 Add Windows 2012 R2 Standard Catalog item. From UCSD GUI, Navigate to Policies -> Catalogs -> All User Groups (Should be selected by default) -> select Add. This standard catalog is used to select the VMware Windows 2012 R2 Template that will be used/cloned to create the Windows 2012 R2 VMs. This template must be created and available in vcenter. Drop down and select Standard for Catalog Type. Click Submit.
26 Enter a name for the Catalog Name, enter a description for Catalog Description, drop down and select an icon for Catalog Icon and click Select for Selected Groups. Enter your group name in the filter on the right and then select your group then click Select. Deselect Publish to end users and click Select for Image. Enter your Windows 2012 Template name in the filter on the right, select the template check box and click Select.

27 Review and click Next. Accept all the defaults and click Next.
28 Leave default and click Next. Leave default and click Next. Leave default and click Next.
29 Review and click Submit. Click OK.


30 3. Create Standard Catalog item for Linux Add a Linux Standard Catalog item. From UCSD GUI, Navigate to Policies -> Catalogs -> All User Groups (Should be selected by default) -> select Add. This standard catalog is used to select the VMware Linux Template that will be used/cloned to create the Linux VMs. This template must be created and available in vcenter. Drop down and select Standard for Catalog Type. Click Submit.
31 Enter a name for the Catalog Name, enter a description for Catalog Description, drop down and select an icon for Catalog Icon and click Select for Selected Groups. Enter your group name in the filter on the right and then select your group then click Select. Deselect Publish to end users and click Select for Image. Enter your Linux Template name in the filter on the right, select the template check box and click Select.

32 Review and click Next. Drop down and select Linus OS, accept all other defaults and click Next.


33 Leave default and click Next. Leave default and click Next. Leave default and click Next.
34 Review and click Submit. Click OK.


35 4. Setup File Browser In order to use the CSV File Upload, you will need to setup UCS Director to be able to browse for the CSV file on your local PC Download File Browser files and extract to local PC Download fileupload.zip and FileUpload.wfx.zip from the Cisco UCS Director Community site. Link to communities site: Download both fileupload.zip and FileUpload.wfx.zip to your local PC. Extract FileUpload.wfdx.zip to your local PC. Extract fileupload.zip to your local PC.

36 4.2. Upload fileupload.jar to UCS Director Primary Node Using WinSCP, upload the fileupload.jar to /opt/infra/inframgr on the UCSD Primary Node as root user account. SSH to the Primary Node to verify the fileupload.jar is in the /opt/infra/inframgr directory. enter the following command: ls -lr /opt/infra/inframgr grep fileupload


37 4.3. Add fileupload.jar to run.sh file to load during boot up SSH to the Primary Node using the root account. Use vi to edit run.sh to include fileupload.jar : vi /opt/infra/inframgr/run.sh Enter i for insert and cursor to the i in inframgr.jar and type fileupload.jar: Press esc, then enter :wq! to write the changes and quit vi editor verify the changes have been saved: cat /opt/infra/inframgr/run.sh Reboot the Primary Node to load the fileupload.jar file. During system startup, you should see a screen similar to the one below.
38 When the system is completely up, you will see the login screen as seen below.


39 4.4. Import File Browser Log into the UCS Director GUI and Navigate to Policies -> Orchestration -> Workflows -> Click Import. Click Upload. Select Click and select a file from your computer. Browse to the FileUpload.wfdx workflow and select Open.


40 You will see a status of the upload and then once complete you will see the following File Ready for use.. Click the x to close the window. You should see the following screen, click Next. Here you could leave everything default but I decided to create a new folder, File Browser, to place these workflows in and then click Import. Click OK for complete status.


41 4.5. Execute File Browser Workflow You should see the following workflows under the File Browser workflow folder. Execute the custom-workflow RegisterFileUploadInputType. It will register the new input type file upload. You can then use this type for file uploading. Right Click on the workflow and select Execute now. Select Submit.


42 Click Show Detail Status. Wait until you see a Complete status then click Close.


43 4.6. Verify/Test File Browser is working Execute the workflow FileUploadTask. Right Click on the FileUploadTask workflow and select Execute now. If you get the following screen, then you have successfully implemented the file browser workflow. Note: If your File Browser quits working, you may have to re-execute the custom-workflow RegisterFileUploadInputType.

44 5. Deploy CSV Workflow 5.1. Download CSV Workflow Download CSV VM (Windows Linux) Deployment.zip file from the UCS Director Communities Site to your local PC. The file can be found here: Extract the CSV VM (Windows Linux) Deployment.zip file.


45 5.2. Import CSV Workflow Log into the UCS Director GUI and Navigate to Policies -> Orchestration -> Workflows -> Click Import. Click Upload. Select Click and select a file from your computer. Browse and select CSV VM (Windows Linux) Deployment.wfdx then click Open.

46 Wait until you see File ready for use. then click the x in the top right corner to close the window. Review and click Next. Optional Select Import Workflows to Folder, enter a new folder name and click Import. Click OK.


47 5.3. Configure CSV Workflow Gather Rest API Access Key. Click on admin to open admin properties. Click Advanced and then select Copy Key Value. Close the window by pressing the x. Navigate to Policies -> Orchestration -> Workflows -> expand Sam Workflows -> select CSV VM Deployment v5 -> right click and select Workflow Designer. Click Edit Workflow Properties. Review and click Next.


48 Select vdc Input Label and then select the pencil to edit it. Choose any VDC from the Drop down. The CSV file will overwrite this so it isn t important but a valid one needs to be chosen. Click Submit. Click OK. Select Password Input Label and then the pencil to edit the UCSD Password.

49 Enter the UCSD Admin GUI password and click Submit. Click OK. Select Key Input Label and then the pencil to edit the UCSD Password. Paste the Key we copied earlier from the admin properties and click Submit.


50 Click OK. Choose Catalog and select the pencil to edit it. Select any valid Catalog and click Submit. The CSV input value will override this value. Click OK. Select VM_Owner and select the pencil to edit it.


51 Select any valid VM Owner and click Submit. The CSV input value will override this value. Click OK. Select VDC_Template and select the pencil to edit it. Select any valid vdc Template and click Submit. The CSV input value will override this value.

52 Click OK. Select rpassword and select the pencil to edit it. Enter the UCSD Root password and click Submit. Click OK.


53 Review and click Next. Leave default and click Submit. Click OK. Click Validate Workflow.
54 Click OK.
55 5.4. Create CSV File Open a new txt document and populate with the following fields: VM Name, Comment about VM, CPU, Memory, DiskSize, vdc, vdc Template, Catalog, IP,Netmask,Gateway,SecondaryNetwork(0,1),SecondaryIP,SecNetmask,SecGateway,VMOwner VM Name: Name of VM (Hostname) Comment: Comments CPUs: Number of CPUs Memory: Memory Size Disk Size: Disk Size in GB VDC: vdc Name VDC Template: vdc Template Catalog: Name of the Standard Catalog (Defines the OS) IP: IP address Netmas : Netmask Gatewa: Default Gateway Secondary Network FLAG: Either 0 if no 2nd Network, 1 to add 2nd NIC Secondary IP: IP address of 2nd NIC SecNetmask: Netmask of 2nd NIC 2nd Default Gateway: Default Gateway of 2nd nic (if real address is used, will override default gateway in Linux) normally use VM Owner: Valid UCSD user Example contents of CSV file (One line per VM): vmname6,comment6,2,2048,20,operations-vdc2,vdc- Template2,RHEL6, , , ,0, , , ,operator vmname7,comment7,2,2048,20,operations-vdc2,vdc- Template2,RHEL6, , , ,0, , , ,operator Save the file as.txt. I saved mine as samcsvsinglevmv4.txt as you will see in the next section.


56 6. Execute Workflow Navigate to Policies -> Orchestration -> Workflows -> expand Sam Workflows -> select CSV VM Deployment v5 -> right click and select Execute now. Click Browse. Select the CSV File and then click Open.


57 Click Upload. Click OK. Click Submit.

58 Click Show Detail Status. Click the Log tab and the click Refresh. This will bring you to the end of the log. Once you see Waiting for Child Workflow to Finish, you can open a new tab to director and Navigate to the Child workflow service request to monitor the VM Build.


59 On a new tab in your browser, Navigate to Organizations -> Service Requests -> Service Requests -> click Refresh -> double click on the Service Request Create VM to see the details and status. Similarly to the Admin Workflow, you can select the Log tab and monitor the status or stay on the Workflow Status and wait until you see the status change to Complete, then click Close. Go back to the Admin Workflow Service Request to see its status.


60 Wait until you see the Complete Status and then click Close. Verify your VM was created in vcenter. Verify the CSV file samcsvsinglevmv4.txt has been deleted from /opt/infra/uploads on the Primary Node.


61 To delete/cleanup this test VM, Rollback both the Create VM request. To delete/cleanup this test VM, Rollback both the Admin Workflow request.


62 7. Create Advanced Catalog item for CSV Workflow Create an Advanced Catalog Item to call the CSV VM Deployment workflow. Navigate to Policies -> Catalogs -> Catalogs -> click Add. Select Advanced. Select Submit.

63 Enter a Catalog Name, Catalog Description, select a Catalog Icon, click Select for Selected Groups. Select the Group you want to see this item when they log into the portal. Click Select. Click + to add a Folder. Enter a Folder Name and click Add.


64 Click OK. Verify details and click Next. Click Select to select a Workflow. To narrow the results, enter CSV in the Filter on the right. Select the CSV VM Deployment workflow and click Select.


65 Verify and click Next. Verify details and click Submit. Click OK. Verify Folders.


66 8. Test CSV Workflow Use a different browser and log into UCS Director with a user in the NSS-Admin group. My ucsduser is in that group so I will use this account for the test. Double click All Data Centers folder to open it. Double click the CSV VM Deployment All DCs workflow to create a request (execute the workflow). Review and click Next.


67 Click Browse to browse for the CSV file. Browse and select the file then click Open. Click Upload. Click OK then click Next. Review and click Submit. Click OK.

68 Click the Services icon. You will see both the Admin Workflow and the Create VM In Progress. Double click on both workflows to monitor the status. You will notice the information is much less verbose than the admin sees. You can go back to the other browser where you are logged in as admin to see the details. Create VM Status.
69 Admin Workflow Status.

70 To delete/cleanup this test VM, Rollback Admin Workflow request. Select Skip user approval who initiated the Service Request and click Submit. Click OK.

71 To delete/cleanup this test VM, Rollback Create VM request. Select Skip user approval who initiated the Service Request and click Submit. Click OK.
Managing VMware vcenter Site Recovery Manager
 Managing VMware vcenter Site Recovery Manager This chapter contains the following sections: About VMware vcenter Site Recovery Manager, page 1 Overview of SRM Configuration, page 2 Integrating SRM with
Creating Application Containers
 This chapter contains the following sections: General Application Container Creation Process, page 1 Creating Application Container Policies, page 3 About Application Container Templates, page 5 Creating
Creating Application Containers
 This chapter contains the following sections: General Application Container Creation Process, page 1 Creating Application Container Policies, page 2 About Application Container Templates, page 5 Creating
Multiple Disk VM Provisioning
 This chapter contains the following sections: About, page 1 Workflow for, page 2 About Templates with Multiple Disks, page 2 Assigning Disk Categories, page 2 Defining Storage Policies, page 3 Creating
Cisco UCS Director Baremetal Agent Installation and Configuration Guide, Release 5.2
 UCS Director Baremetal Agent Installation The purpose to this document is to illustrate the steps to install the UCS Director Baremetal Agent (PXE Server) which can be used to write/use workflows that
Cisco Virtual Application Container Services 2.0 Lab v1
 Cisco Virtual Application Container Services 2.0 Lab v1 Last Updated: 02-SEP-2015 About This Solution Cisco Virtual Application Container Services (VACS) enables simplified deployment of Secure Application
Cisco VDS Service Broker Software Installation Guide for UCS Platforms
 Cisco VDS Service Broker 1.0.1 Software Installation Guide for UCS Platforms Revised: May 2013 This document provides detailed instructions for installing the Cisco Videoscape Distribution Suite Service
Overview of the Self-Service Portal
 This chapter contains the following sections: Cisco UCS Director Self-Service Portal, page 1 Logging into the Self-Service Portal, page 1 Examining the Interface, page 4 Cisco UCS Director Self-Service
Using a Virtual Machine for Cisco IPICS on a Cisco UCS C-Series Server
 CHAPTER7 Using a Virtual Machine for Cisco IPICS on a Cisco UCS C-Series Server This chapter describes how to configure a virtual machine (VM) on a Cisco UCS C-Series server. You can install and operate
Installing and Upgrading Cisco Network Registrar Virtual Appliance
 CHAPTER 3 Installing and Upgrading Cisco Network Registrar Virtual Appliance The Cisco Network Registrar virtual appliance includes all the functionality available in a version of Cisco Network Registrar
Securing Containers Using a PNSC and a Cisco VSG
 Securing Containers Using a PNSC and a Cisco VSG This chapter contains the following sections: About Prime Network Service Controllers, page 1 Integrating a VSG into an Application Container, page 4 About
Cisco Prime Service Catalog Virtual Appliance Quick Start Guide 2
 Cisco Prime Service Catalog 11.1.1 Virtual Appliance Quick Start Guide Cisco Prime Service Catalog 11.1.1 Virtual Appliance Quick Start Guide 2 Introduction 2 Before You Begin 2 Preparing the Virtual Appliance
Managing ReadyClones
 HX Data Platform ReadyClones Overview, on page 1 Benefits of HX Data Platform ReadyClones, on page 1 Supported Base VMs, on page 2 ReadyClone Requirements, on page 2 ReadyClone Best Practices, on page
ECDS MDE 100XVB Installation Guide on ISR G2 UCS-E and VMWare vsphere Hypervisor (ESXi)
") ECDS MDE 100XVB Installation Guide on ISR G2 UCS-E and VMWare vsphere Hypervisor (ESXi) Revised: November, 2013 Contents Overview, page 1 Guidelines and Limitations, page 1 Prerequisites, page 2 Installation
ECDS MDE 100XVB Installation Guide on ISR G2 UCS-E and VMWare vsphere Hypervisor (ESXi) Revised: November, 2013 Contents Overview, page 1 Guidelines and Limitations, page 1 Prerequisites, page 2 Installation
Installing Cisco WebEx Social
 CHAPTER 2 This chapter describes how to install Cisco WebEx Social. This chapter includes these topics: Before You Begin, page 2-1 3.1, page 2-1 Before You Begin Before you begin installation, review the
Installing and Configuring vcloud Connector
 Installing and Configuring vcloud Connector vcloud Connector 2.6.0 This document supports the version of each product listed and supports all subsequent versions until the document is replaced by a new
Securing Containers Using a PNSC and a Cisco VSG
 Securing Containers Using a PNSC and a Cisco VSG This chapter contains the following sections: About Prime Network Service Controllers, page 1 Integrating a VSG into an Application Container, page 3 About
Multiple Disk VM Provisioning
 This chapter contains the following sections: About, page 1 Overview of the Procedure for, page 2 About Templates with Multiple Disks, page 2 Assigning Disk Categories, page 2 Defining Storage Policies,
Installing and Configuring vcloud Connector
 Installing and Configuring vcloud Connector vcloud Connector 2.5.0 This document supports the version of each product listed and supports all subsequent versions until the document is replaced by a new
Cisco Prime Collaboration Deployment
 Install System Requirements for Installation, page 1 Browser Requirements, page 2 IP Address Requirements, page 2 Virtualization Software License Types, page 3 Frequently Asked Questions About the Installation,
Managing Virtual Data Centers
 This chapter contains the following sections: Virtual Data Centers, page 1 VDC Actions, page 2 Virtual Data Center Service Profiles, page 7 Virtual Data Centers A Virtual Data Center (VDC) is a logical
IaaS Integration for Multi- Machine Services. vrealize Automation 6.2
 IaaS Integration for Multi- Machine Services vrealize Automation 6.2 You can find the most up-to-date technical documentation on the VMware website at: https://docs.vmware.com/ If you have comments about
Managing the VM Lifecycle
 This chapter contains the following sections:, page 1 Managing VM Power, page 2 Resizing a VM, page 3 Resizing a VM Disk, page 4 Managing VM Snapshots, page 5 Managing Other VM Actions, page 7 You can
Redhat OpenStack 5.0 and PLUMgrid OpenStack Networking Suite 2.0 Installation Hands-on lab guide
 Redhat OpenStack 5.0 and PLUMgrid OpenStack Networking Suite 2.0 Installation Hands-on lab guide Oded Nahum Principal Systems Engineer PLUMgrid EMEA November 2014 Page 1 Page 2 Table of Contents Table
Installation of Cisco Business Edition 6000H/M
 Installation Overview, page 1 Installation Task Flow of Cisco Business Edition 6000H/M, page 2 Installation Overview This chapter describes the tasks that you must perform to install software on your Business
Orchestration Workflow Tasks for PXE Boot
 This chapter contains the following sections: About the, page 1 Prerequisites for Workflows with PXE Boot Tasks, page 1 Setup PXE Boot Task, page 2 Monitor PXE Boot Setup Task, page 5 Remove PXE Boot Setup
KEMP360 Central - VMware vsphere. KEMP360 Central using VMware vsphere. Installation Guide
 KEMP360 Central using VMware vsphere Installation Guide VERSION: 5.0 UPDATED: JUNE 2016 Table of Contents 1 Introduction... 3 1.1 Document Purpose... 3 1.2 Intended Audience... 3 Prerequisites... 3 2 Installing
FileCruiser VM Quick Configuration Guide For Trial Version V1.0
 FileCruiser VM Quick Configuration Guide For Trial Version V1.0 Contents How to configure FileCruiser VM... 4 Setup Wizard: Time Zone page... 6 Setup Wizard: Network page... 7 Setup Wizard: Service Server
IaaS Integration for Multi-Machine Services
 IaaS Integration for Multi-Machine Services vcloud Automation Center 6.1 This document supports the version of each product listed and supports all subsequent versions until the document is replaced by
UCS Director: Tenant Onboarding Cisco ACI & Microsoft HyperV. Dec. 2016
 UCS Director: Tenant Onboarding Cisco ACI & Microsoft HyperV Dec. 2016 The following presentation covers tenant onboarding in UCS Director with ACI and a HyperV-based VMM Domain Tenant Onboarding: Quick
Deploying the Cisco Tetration Analytics Virtual Appliance in Microsoft Azure
 Deploying the Cisco Tetration Analytics Virtual Appliance in Microsoft Azure About, on page 1 Prerequisites for, on page 1, on page 3 AboutDeployingtheCiscoTetrationAnalyticsVirtualAppliance in Microsoft
Deploying Cisco UCS Central
 This chapter includes the following sections: Obtaining the Cisco UCS Central Software from Cisco, page 1 Using the Cisco UCS Central OVA File, page 2 Using the Cisco UCS Central ISO File, page 4 Logging
Controller Installation
 The following describes the controller installation process. Installing the Controller, page 1 Controller Deployment, page 2 Controller Virtual Hard Disk Storage, page 4 Custom Controller Web UI Certificates,
akkadian Provisioning Manager Express
 akkadian Provisioning Manager Express Version 4.11.04 Release Notes September 14 th, 2017 Copyright and Trademarks: I. Copyright: This website and its content is copyright 2017 Akkadian Labs, LLC. All
Creating Workflows. Viewing the Task Library. Creating a Workflow. This chapter contains the following sections:
 This chapter contains the following sections: Viewing the Task Library, page 1 Creating a Workflow, page 1 Example: Creating a Workflow, page 13 Resolving Workflow Validation Issues, page 16 Changing Flow
EventTracker: Virtual Appliance
 EventTracker: Virtual Appliance Quick Start Guide Version 8.1 Build 9 Publication Date: Feb. 8, 2016 EventTracker 8815 Centre Park Drive Columbia MD 21045 www.eventtracker.com Abstract The EventTracker
EventTracker: Virtual Appliance
 Quick Start Guide Version 7.6 Publication Date: Sep 18, 2014 EventTracker 8815 Centre Park Drive Columbia MD 21045 www.eventtracker.com Abstract The EventTracker Virtual Appliance enables you to capture
How to Deploy a Barracuda NG Vx using Barracuda NG Install on a VMware Hypervisor
 How to Deploy a Barracuda NG Vx using Barracuda NG Install on a VMware Hypervisor The OVA package uses a default configuration that may not be suitable for your deployment. If you want to use multiple
Installing the Cisco Nexus 1000V Software Using ISO or OVA Files
 Installing the Cisco Nexus 1000V Software Using ISO or OVA Files This chapter contains the following sections: Installing the VSM Software, page 1 Installing the VSM Software Installing the Software from
IBM Single Sign On for Bluemix Version December Identity Bridge Configuration topics
 IBM Single Sign On for Bluemix Version 2.0 28 December 2014 Identity Bridge Configuration topics IBM Single Sign On for Bluemix Version 2.0 28 December 2014 Identity Bridge Configuration topics ii IBM
VMware ESX ESXi and vsphere. Installation Guide
 VMware ESX ESXi and vsphere Installation Guide UPDATED: 28 March 2018 Copyright Notices Copyright 2002-2018 KEMP Technologies, Inc. All rights reserved. KEMP Technologies and the KEMP Technologies logo
Virtual Appliance User s Guide
 Cast Iron Integration Appliance Virtual Appliance User s Guide Version 4.5 July 2009 Cast Iron Virtual Appliance User s Guide Version 4.5 July 2009 Copyright 2009 Cast Iron Systems. All rights reserved.
Preparing Virtual Machines for Cisco APIC-EM
 Preparing a VMware System for Cisco APIC-EM Deployment, page 1 Virtual Machine Configuration Recommendations, page 1 Configuring Resource Pools Using vsphere Web Client, page 4 Configuring a Virtual Machine
Preparing Virtual Machines for Cisco APIC-EM
 Preparing a VMware System for Cisco APIC-EM Deployment, on page 1 Virtual Machine Configuration Recommendations, on page 1 Configuring Resource Pools Using vsphere Web Client, on page 4 Configuring a Virtual
VMware vsphere 5.5: Install, Configure, Manage Lab Addendum. Lab 3: Configuring VMware ESXi
 VMware vsphere 5.5: Install, Configure, Manage Lab Addendum Lab 3: Configuring VMware ESXi Document Version: 2014-07-08 Copyright Network Development Group, Inc. www.netdevgroup.com NETLAB Academy Edition,
Installation Prerequisites
 This chapter includes the following sections: Supported Platforms, page 1 Supported Web Browsers, page 2 Required Ports, page 2 System Requirements, page 3 Important Prerequisites for Installing Cisco
How to Deploy vcenter on the HX Data Platform
 First Published: 2016-07-11 Last Modified: 2019-01-08 vcenter on HyperFlex Cisco HX Data Platform deployment, including installation and cluster configuration and management, requires a vcenter server
TCPWave DDI Virtual Machine Installation Guide
 TCPWave DDI Virtual Machine Installation Guide Version 1.1 TCPWave IPAM and Remote Virtual Server Software Born in the Cloud, Made for the Cloud 1 2017 TCPWave Inc. All Rights Reserved. TCPWave DDI Virtual
Configuring High Availability for VMware vcenter in RMS All-In-One Setup
 Configuring High Availability for VMware vcenter in RMS All-In-One Setup This chapter describes the process of configuring high availability for the VMware vcenter in an RMS All-In-One setup. It provides
UDP Director Virtual Edition Installation and Configuration Guide (for Stealthwatch System v6.9.0)
") UDP Director Virtual Edition Installation and Configuration Guide (for Stealthwatch System v6.9.0) Installation and Configuration Guide: UDP Director VE v6.9.0 2016 Cisco Systems, Inc. All rights reserved.
UDP Director Virtual Edition Installation and Configuration Guide (for Stealthwatch System v6.9.0) Installation and Configuration Guide: UDP Director VE v6.9.0 2016 Cisco Systems, Inc. All rights reserved.
Managing System Administration Settings
 This chapter contains the following sections: Setting up the Outgoing Mail Server, page 2 Working with Email Templates, page 2 Configuring System Parameters (Optional), page 5 Updating the License, page
HiveManager Virtual Appliance QuickStart
 This QuickStart describes the installation of a HiveManager Virtual Appliance. Introduction to HiveManager Virtual Appliance Before you can install the HiveManager Virtual Appliance, you must first install
Deploying the Cisco ASA 1000V
 CHAPTER 2 This chapter includes the following sections: Information About the ASA 1000V Deployment, page 2-1 Downloading the ASA 1000V OVA File, page 2-7 Deploying the ASA 1000V Using the VMware vsphere
Multi-Machine Guide vcloud Automation Center 5.2
 Multi-Machine Guide vcloud Automation Center 5.2 This document supports the version of each product listed and supports all subsequent versions until the document is replaced by a new edition. To check
Tenant Onboarding. Tenant Onboarding Overview. Tenant Onboarding with Virtual Data Centers
 Overview, page 1 with Virtual Data Centers, page 1 with Resource Groups, page 5 Overview In Cisco UCS Director, tenants enable you to securely control and allocate the virtual and physical infrastructure
Creating Workflows. Viewing the Task Library. Creating a Workflow. This chapter contains the following sections:
 This chapter contains the following sections: Viewing the Task Library, page 1 Creating a Workflow, page 1 Example: Creating a Workflow, page 12 Resolving Workflow Validation Issues, page 15 Changing Flow
FlexPod Infrastructure Automation. September 2016 SL10295 Version 1.0.0
 September 2016 SL10295 Version 1.0.0 1 Introduction to FlexPod Automation This lab demonstrates how to use FlexPod Automation to automate the configuration of a FlexPod (UCS Mini, Nexus Switches, Clustered
Application Provisioning
 Overview, page 1 Application Categories, page 1 Application Containers, page 2 Catalogs, page 7 Self-Service Provisioning, page 8 Overview After you have allocated your resources among your user groups,
Using the vcenter Orchestrator Plug-In for vcloud Director 1.0
 Using the vcenter Orchestrator Plug-In for vcloud Director 1.0 vcenter Orchestrator 4.1 vcloud Director 1.0 vcloud Director 1.0.1 This document supports the version of each product listed and supports
Network Configuration for Cisco UCS Director Baremetal Agent
 Network Configuration for Cisco UCS Director Baremetal Agent This chapter contains the following sections: About the Network Configuration Options, page 1 Single Network for Management and PXE, page 1
Cisco Mini ACI Fabric and Virtual APICs
 Cisco Mini ACI Fabric and Virtual APICs New and Changed 2 Cisco Mini ACI Fabric and Virtual APICs Overview 2 Installing and Configuring Physical APIC 3 Installing and Configuring Virtual APIC 3 Upgrading
vsphere Host Profiles 17 APR 2018 VMware vsphere 6.7 VMware ESXi 6.7 vcenter Server 6.7
 17 APR 2018 VMware vsphere 6.7 VMware ESXi 6.7 vcenter Server 6.7 You can find the most up-to-date technical documentation on the VMware website at: https://docs.vmware.com/ If you have comments about
vcloud Director Tenant Portal Guide 04 OCT 2018 vcloud Director 9.5
 vcloud Director Tenant Portal Guide 04 OCT 2018 vcloud Director 9.5 You can find the most up-to-date technical documentation on the VMware website at: https://docs.vmware.com/ If you have comments about
 Trend Micro Incorporated reserves the right to make changes to this document and to the product described herein without notice. Before installing and using the product, please review the readme files,
EventTracker: Virtual Appliance
 Quick Start Guide Version 7.5 Publication Date: Nov 18, 2013 EventTracker 8815 Centre Park Drive Columbia MD 21045 www.eventtracker.com About This Guide Abstract The EventTracker Virtual Appliance enables
Cisco Business Edition 7000 Installation Guide, Release 10.6
 First Published: July 08, 2015 Americas Headquarters Cisco Systems, Inc. 170 West Tasman Drive San Jose, CA 95134-1706 USA http://www.cisco.com Tel: 408 526-4000 800 553-NETS (6387) Fax: 408 527-0883 Text
Installing Cisco MSE in a VMware Virtual Machine
 Installing Cisco MSE in a VMware Virtual Machine This chapter describes how to install and deploy a Cisco Mobility Services Engine (MSE) virtual appliance. Cisco MSE is a prebuilt software solution that
Using the vcenter Orchestrator Plug-In for vcloud Director 5.5. vrealize Orchestrator 5.5
 Using the vcenter Orchestrator Plug-In for vcloud Director 5.5 vrealize Orchestrator 5.5 You can find the most up-to-date technical documentation on the VMware website at: https://docs.vmware.com/ If you
Installing Cisco Virtual Switch Update Manager
 This chapter contains the following sections: Information About Cisco Virtual Switch Update Manager, page 1 Compatibility Information for Cisco Virtual Switch Update Manager, page 1 System Requirements
If you re not using VMware vsphere Client 4.1, your screens may vary. ITEM Example s Values Your Values
 Quick Start Guide If you re not using VMware vsphere Client 4.1, your screens may vary. VXOA VIRTUAL APPLIANCES VMware vsphere / vsphere Hypervisor In-Line Deployment (Bridge Mode) 2012 Silver Peak Systems,
Quest VROOM Quick Setup Guide for Quest Rapid Recovery for Windows and Quest Foglight vapp Installers
 Quest VROOM Quick Setup Guide for Quest Rapid Recovery for Windows and Quest Foglight vapp Installers INTRODUCTION Setup of Quest VROOM requires installation of Rapid Recovery and Foglight for Virtualization
Cisco Unified Communications Manager (CallManager) 11.5 Virtual Server Template (OVA)
 11.5 Virtual Server Template (OVA)") Cisco Unified Communications Manager (CallManager) 11.5 Virtual Server Template (OVA) 1.0 Overview 2.0 Scope 3.0 Deployment Options 4.0 Changes from previous releases 5.0 Instructions 6.0 Trademarks and
Cisco Unified Communications Manager (CallManager) 11.5 Virtual Server Template (OVA) 1.0 Overview 2.0 Scope 3.0 Deployment Options 4.0 Changes from previous releases 5.0 Instructions 6.0 Trademarks and
Installing or Upgrading ANM Virtual Appliance
 CHAPTER 2 This chapter describes how to deploy Cisco ANM Virtual Appliance 4.3 (new installation) and how to upgrade from ANM software version 4.1 or 4.2 to software version 4.3. This chapter includes
Smart Install in LMS CHAPTER
 CHAPTER 6 Smart Install (SI) is a plug-and-play configuration and image management feature that provides zero-touch deployment for new switches. You can configure SI on a switch which will then be the
Managing Virtual Machines
 CHAPTER 7 A virtual machine is a software computer (just like a physical computer), which runs an operating system and applications. Virtual machines run on the VMware vsphere Hypervisor TM. You can use
Quick Start Guide for Vmware. Version 2.5 Vmware vsphere Instance
 Quick Start Guide for Vmware Version 2.5 Vmware vsphere Instance CONTENTS 1. Introduction 1.1 Running Gemini appliance on Vmware vsphere 1.1.1 Supported Versions 1.1.2 System Requirement 1.1.3 Note on
Migrating vrealize Automation 6.2 to 7.1
 Migrating vrealize Automation 6.2 to 7.1 vrealize Automation 7.1 This document supports the version of each product listed and supports all subsequent versions until the document is replaced by a new edition.
Deploying the Cisco Tetration Analytics Virtual
 Deploying the Cisco Tetration Analytics Virtual Appliance in the VMware ESXi Environment About, on page 1 Prerequisites for Deploying the Cisco Tetration Analytics Virtual Appliance in the VMware ESXi
 Trend Micro Incorporated reserves the right to make changes to this document and to the product described herein without notice. Before installing and using the product, please review the readme files,
Customizing Workflow Components
 This chapter contains the following sections: Creating a Compound Task, page 1 Creating Custom Approvals, page 3 Creating Custom Inputs, page 4 Macros, page 5 Creating a Compound Task A compound task is
Plexxi HCN Plexxi Connect Installation, Upgrade and Administration Guide Release 3.0.0
 Plexxi HCN Plexxi Connect Installation, Upgrade and Administration Guide Release 3.0.0 May 3, 2018 100 Innovative Way - Suite 3322 Nashua, NH 03062 Tel. +1.888.630.PLEX (7539) www.plexxi.com Legal Notices
Quest VROOM Quick Setup Guide for Quest Rapid Recovery for Windows and Quest Foglight vapp Installers
 Quest VROOM Quick Setup Guide for Quest Rapid Recovery for Windows and Quest Foglight vapp Installers INTRODUCTION Setup of Quest VROOM requires installation of Rapid Recovery and Foglight for Virtualization
Reset the Admin Password with the ExtraHop Rescue CD
 Reset the Admin Password with the ExtraHop Rescue CD Published: 2018-01-19 This guide explains how to reset the administration password on physical and virtual ExtraHop appliances with the ExtraHop Rescue
VMware Adapter for SAP Landscape Management Installation Configuration and Administration Guide for VI Administrators
 VMware Adapter for SAP Landscape Management Installation Configuration and Administration Guide for VI Administrators Product version 1.4.1 running on vsphere 6.0 VMware Adapter for SAP Landscape Management
VMware Adapter for SAP Landscape Management Installation Configuration and Administration Guide for VI Administrators
 VMware Adapter for SAP Landscape Management Installation Configuration and Administration Guide for VI Administrators Product version 1.4.1 running on vsphere 5.5 VMware Adapter for SAP Landscape Management
Cisco Modeling Labs OVA Installation
 Prepare for an OVA File Installation, page 1 Download the Cisco Modeling Labs OVA File, page 2 Configure Security and Network Settings, page 2 Deploy the Cisco Modeling Labs OVA, page 12 Edit the Virtual
MOVE AntiVirus page-level reference
 McAfee MOVE AntiVirus 4.7.0 Interface Reference Guide (McAfee epolicy Orchestrator) MOVE AntiVirus page-level reference General page (Configuration tab) Allows you to configure your McAfee epo details,
Using the vrealize Orchestrator OpenStack Plug-In 2.0. Modified on 19 SEP 2017 vrealize Orchestrator 7.0
 Using the vrealize Orchestrator OpenStack Plug-In 2.0 Modified on 19 SEP 2017 vrealize Orchestrator 7.0 You can find the most up-to-date technical documentation on the VMware website at: https://docs.vmware.com/
VMware vcloud Director Evaluator s Guide TECHNICAL WHITE PAPER
 VMware vcloud Director Evaluator s Guide TECHNICAL WHITE PAPER Table of Contents 1. Getting Started.... 4 1.1 About This Guide... 4 1.2 Intended Audience.... 4 1.3 Help and Support During the Evaluation....
vrealize Suite Lifecycle Manager 1.0 Installation and Management vrealize Suite 2017
 vrealize Suite Lifecycle Manager 1.0 Installation and Management vrealize Suite 2017 vrealize Suite Lifecycle Manager 1.0 Installation and Management You can find the most up-to-date technical documentation
Configure the Cisco DNA Center Appliance
 Review Cisco DNA Center Configuration Wizard Parameters, page 1 Configure Cisco DNA Center Using the Wizard, page 5 Review Cisco DNA Center Configuration Wizard Parameters When Cisco DNA Center configuration
vrealize Suite Lifecycle Manager 1.1 Installation, Upgrade, and Management vrealize Suite 2017
 vrealize Suite Lifecycle Manager 1.1 Installation, Upgrade, and Management vrealize Suite 2017 You can find the most up-to-date technical documentation on the VMware website at: https://docs.vmware.com/
KEMP 360 Central for vsphere. Installation Guide
 KEMP 360 Central for vsphere Installation Guide UPDATED: 09 October 2018 Copyright Notices Copyright 2002-2018 KEMP Technologies, Inc. All rights reserved. KEMP Technologies and the KEMP Technologies logo
Using the VMware vrealize Orchestrator Client
 Using the VMware vrealize Orchestrator Client vrealize Orchestrator 7.0 This document supports the version of each product listed and supports all subsequent versions until the document is replaced by
Archiware Pure Quick Start Guide
 Archiware Pure Quick Start Guide Content 1 System Requirements... 3 1.1 Hardware Requirements... 3 1.2 Supported Hypervisors... 3 1.3 Deployment Requirements... 3 2 Deploying the Virtual Appliance... 4
Cisco UCS Director Red Hat Enterprise KVM Management Guide, Release 6.0
 Cisco UCS Director Red Hat Enterprise KVM Management Guide, Release 6.0 First Published: 2016-09-16 Americas Headquarters Cisco Systems, Inc. 170 West Tasman Drive San Jose, CA 95134-1706 USA http://www.cisco.com
VPN Solutions for Zerto Virtual Replication to Azure. IPSec Configuration Guide
 VPN Solutions for Zerto Virtual Replication to Azure IPSec Configuration Guide VERSION 1.0 AUGUST 2017 Table of Contents 1. Overview... 2 1.1 Use Cases... 2 2. Proofs of Concept and Lab Usage... 2 2.1
Using vrealize Operations Tenant App as a Service Provider
 Using vrealize Operations Tenant App as a Service Provider Using vrealize Operations Tenant App as a Service Provider You can find the most up-to-date technical documentation on the VMware Web site at:
Implementing Infoblox Data Connector 2.0
 DEPLOYMENT GUIDE Implementing Infoblox Data Connector 2.0 2017 Infoblox Inc. All rights reserved. Implementing Infoblox Data Connector, July 2017 Page 1 of 31 Contents Overview... 3 Prerequisites... 3
EMC ViPR Controller. Create a VM and Provision and RDM with ViPR Controller and VMware vrealize Automation. Version 2.
 EMC ViPR Controller Version 2.3 Create a VM and Provision and RDM with ViPR Controller and VMware vrealize Automation 302-002-205 01 Copyright 2015- EMC Corporation. All rights reserved. Published in USA.