28-Sep-2017 Page 1 of 97
|
|
|
- Buck Phelps
- 6 years ago
- Views:
Transcription
1 Contents Install Recommendation / System Requirements User Edit Importing a User List Add a User Delete User(s) Edit Multiple Users ( Global Controls ) Sort / Filter User List User List Print User List User List Preferences Required Test Retest Frequency User Department User Shift User Groups Department Manager Leave Time Leave Time Import Certification Date Certification Dates Import Periodic Test PIN Reset User Status (ESD Test Status) Logs Logs -Access Control Logs -Attendance Logs -Certification Logs - ESD Test Log Logs -Leave Time Logs - Time Clock Log Statistics Stats - Test Machine Stats - User Pass Fail Percentage Stats - User Compliance History User Change History UESD Test History Archive Report Test Machine Access Control Enable Time Clock Enable Network ID Communication Port PIN Checking Door Relay Display Language WEB SmartLog Status Monitor Network Status Monitor Admin Admin Password / PINs Auto Start Auto Shutdown Database Backup / Restore Archive Data Automated Backup System Restore Database Utilities Compact and Repair Database Import Transaction File SmartLog V5 Database Update Database Size Alert Remove Program Backups Server Setup External Address Lists Group Headers Language Leave Type Edit Network Admin Web Monitors Web User Status Monitor Web Test Log Monitor Network Applications Remote Status Application Status Display Application Remote Admin Application Data Sync Import from Database User Import from Database Time Clock Import from Database Import from File User Import from File Leave Time Import from File Export To Database ESD Status Export to Database Time Clock Export to Database ESD Log Export to Database Export to File ESD Status Export to File Time Clock Export to File Program License Support / Vendor Information System Logs Time Clock Not Clocked In Status User ID User ID Change Link Unknown IDs Allow User ID to Perform Test on SmartLog Non Sequential Badge Number (SmartLog V5 Only) 28-Sep-2017 Page 1 of 97
2 Contents (continued) Admin - Scheduled Reports Send to Dept Manager(s) Scheduled Recipients Scheduled Report Filter Additional Scheduled Report Filters Admin Alerts Alert Log Alert Recipients Alert Names and Descriptions Alert Preferences Calibration High Fail Percentage Database Size No ESD Test after Clock IN Failed without Retesting Max Consecutive Failures ESD Certification Expiring Moving TEAM5 Software / Restoring to a new computer Tables Repairing a TEAM5 Database Repairing a TEAM Basic Database 28-Sep-2017 Page 2 of 97

3 Install 1. Insert the TEAM5 Installation CD into the CD-ROM drive of the computer and follow the following on-screen prompts: System Requirements License Agreement Install TEAM5 View / Print Manual Check for Update Note: If you cannot locate the TEAM5 Installation CD, it is available for download off the DescoEMIT.com website. 2. Once installation is complete, insert the Green USB License Key into an available USB Port of the computer. The system should recognize the new hardware and will automatically install. 3. Once the hardware is installed, start the TEAM5 by double clicking the shortcut icon on your desktop or selecting TEAM5 from the windows start menu. DO NOT REMOVE OR MISPLACE the Green USB Flash Drive License Key. It must remain connected to the computer in order to run and access the TEAM5 software. If misplaced or lost, please contact the factory for a quote. It s recommended a Desktop Shortcut be added during install for quick access to TEAM5. TEAM5 has been designed exclusively for use with the EMIT SmartLog. Please contact EMIT or your local sales representative for a current list of compatible hardware. TEAM5 is comprised of a windows data management collection program, MS Access database, and an client (for use with an SMTP server). 28-Sep-2017 Page 3 of 97
4 System Requirements.Net Framework The Remote Admin and Remote Status programs require the Microsoft.net 4.5 Framework or later. Single Use Computer If possible, TEAM5 should be the only application running on the computer. TEAM5 is Windows Resource and Network intesive. Other application competeing for the the same resources may cause performance and stability problems. Single Login The computer running TEAM5 should be set up to allow on one login at a time. When logging out, the windows environment should be set up to allow TEAM5 to keep running after log off. Recommendations Windows ID Full Windows Adminstrator ID Priviledges Recommended. TEAM5 should always be run under the same Windows Id, as some Windows ID schemes create seperate file areas for each ID. The ID must be able to create/read/modify/delete registry settings. The ID must be able to create/read/modify/delete files in the ( C:\Program Files\TEAM5 ) folder and all sub folders. Virus and other Scanning and Update programs. If a Virus, Update or other scanning program needs to lock files in the C:\Program Files\TEAM5, TEAM5 should be shut down prior to the scan or update program. An automated daily shutdown/restart service is provided within TEAM to insure that TEAM is not running when Virus, Update or Backup programs which lock files are running. This service should be used in conjunction with the scheduler built into most Virus, Update and Backup programs to prevent file locking problems that may cause the TEAM database and or shared network resources to be unavailable. Firewalls If you use the TEAM5 Network Status Monitor feature or the Scheduled Backup feature firewalls should be configured to allow TEAM5 to create/read/modify/delete files in the chosen network folders. If you use Virtual Com Ports to communicate with SmartLog Testers over a local area network, firewalls should not prevent TEAM5 or the virtual com port software from sending and receiving data over the network. ID If your organization uses an integrated Windows/Network/ login, we recomend a specific ESD ID be created for sent from TEAM5. To use the TEAM5 scheduled features, your server must be able to accept incomming SMTP messages from TEAM5. Backups Backups should always be made to a network or removable storage device. This is to ensure the TEAM5 system may be restored on a new computer in the event of catastrophic failure of the primary TEAM5 Server. 28-Sep-2017 Page 4 of 97
5 Moving TEAM5 Software Please review the section titled Moving TEAM5 Software and make this document available to your system administrators so they are prepared restore TEAM5 Software and Data in case your server fails or needs to be ugraded. Virtual Machines VM must be configured to allow only one Window login at a time. This is to insure only one instance of TEAM5 has access to virtual COM ports and the Database. When establishing a remote access session with the TEAM5 VM, if another operator is already logged in, their session must be assumed, not abandoned. Abandoned windows sessions prevent TEAM5 from closing the database and may result in an unreadable database. 28-Sep-2017 Page 5 of 97
 Import Leave Time Import Certification Dates Operation Manual Add User Remove Users Undo")
6 User Edit User Edit Overview The User Edit page is used to add, delete, edit and report on all users in the TEAM5 Database. Show/Hide Multi User Update Controls Green Arrows - Apply Multi User Update Import User List Select User(s) Import Leave Time Import Certification Dates Operation Manual Add User Remove Users Undo Changes Search Users Sort List Filter List Save List to File List Print List Save Changes User Change History Display Preferences Current Date/Time Importing a User List To import a user list from a file; - On the User Edit page, Click the Import User List icon The Import Users window is displayed. - Select the default test requirements, department and shift for the users you are about to import. Note: Each user's test requirement may be modified individually after the import. Note: Department and shift are optional. - Select a file to import. The format for the import file is displayed in the center of the import window. After selecting the import file, the list of users is displayed. Note: User information may be edited before importing. Note: One or more users may be excluded from import by checking Do Not Import. - Click Import. 28-Sep-2017 Page 6 of 97

7 Add A User To add users one at a time; - Click the Add Users icon The New ID window is displayed. - Enter the required user information Required Test, Retest, Department, User Type, User ID, Test ID, and Name - Enter optional information Shift, Group 1 / 2, Certification Date, Periodic Test - Click Save Please See User Attribute Table for a definition of user data. Delete User(s) - Check one or more users to delete - Click the Delete User icon Edit Multiple Users ( Global Controls ) - Check one or more users to change - Adjust one or more of the user attributes ( Required Test, Retest, Dept, Shift, Group 1, Group 2, Certification Date, Periodic, PIN Reset) - Click the corresponding Apply icon - Click the Save Icon Sort / Filter User List The sort control allows the list to be sorted by up to 4 columns in ascending or descending order. This example will resort the user list by Department then by Last Name. 28-Sep-2017 Page 7 of 97


8 Sort / Filter ( continued ) The Filter control allows the list to be limited by one or more column values. This example will filter the user list to show only people in Department User List To a list of users; - Select one or more users - Click the icon The Select Report Columns window will appear - Uncheck any columns you do not want to appear on the report - Click Continue The Select Recipients Window will appear - Select one or more recipients - If you want to include an additional message with the ed report, type text into the message box - Choose the body and attachment format - Click to send 28-Sep-2017 Page 8 of 97

9 Print User List To print a list of users; - Select one or more users - Click the print icon The Printer - Include / Exclude Data window will appear - Select a Printer - Uncheck any columns you do not want to appear on the report - Click Print User List Preferences To change user list appearance preferences; - Click the Preference icon The Preferences Window is displayed. Any of the data columns may be hidden by un-checking the box next to the column name. This is often used to hide columns like Group 1/ 2 if they are not used. Additionally the screen may be split to lock columns at the left and allow non visible columns to be viewed on the right. To split the screen; -Check the Split Screen box - Close the preferences window To display test IDs with leading zeros; - Check the leading zeros box To gain more display area for data, you may hide the global controls to the left of the user list by un-checking the Global Controls box, then closing the preferences window. 28-Sep-2017 Page 9 of 97

10 Required Test The Required Test determines the type of test that a user must perform at a SmartLog configured for ESD testing. This table describes each of the test requirements. ESD Test Requirements Table Test Name Description SmartLog V3 SmartLog V4-V5 Wrist Only One wrist strap must be tested Yes Yes Foot Only Two Heel Straps must be tested Yes Yes Foot And Wrist One wrist strap AND Two Heel Straps must be tested Yes Yes Foot OR Wrist One wrist strap OR Two Heel Straps must be tested Yes Yes Foot with Wrist Optional If a Wrist Strap is plugged in to the tester, Both Heel and Wrist will be tested. If no wrist strap is plugged in, only heel strap will be tested No Yes User Choice After scanning badge, user may choose Wrist Only, Foot Only or Both No Yes No Test Required User is not required to perform ESD test No Yes To change the test requirement for more than one user; - Check each user to be changed - Click the Required Test link Required Test Link The Required Test window is displayed - Select a test requirement and click Save To change the test requirement for just one user; - Click the test requirement for the user The Required Test window is displayed. - Select a test requirement and click Save To save changes click the save icon at the top of the User Edit Page Required Test Link 28-Sep-2017 Page 10 of 97

11 Retest Frequency Retest Frequency is the length of time that a Passed ESD test is valid. If a person passes a test at 9:00 AM and their Retest Frequency is set 4Hours they will be required to re-test at 1PM to avoid be reported at "Not Tested". The Retest Frequency period may also effect other systems such as Access Control devices that require a Passed ESD test for entry or for Manufacturing Systems requiring a Passed ESD test to perform a manufacturing process. To change more than one user's Retest Frequency; - Check each user to be changed - Adjust the Retest Control - Click the apply icon To change Retest for just one user; - Click the Retest setting for the user The Retest Frequency window is displayed. Click to change Retest Frequency - Adjust Retest Frequency and click Save To save changes click the save icon at the top of the User Edit Page 28-Sep-2017 Page 11 of 97


12 User Department The User Department is used to sort and filter people on reports and user lists. For a detailed list of user attributes see the User Attribute Table. To change one or more user's Department; - Check each user to be changed - Click the Department link The Select Department window is displayed - Select a Department and click Save If the department is not listed, you can create a new department by entering text into the New Department box. To change the Department for just one user; - Click the Department link for the user. The Select Department window is displayed. - Select the Department and click Save. To save changes click the save icon at the top of the User Edit Page Department Link 28-Sep-2017 Page 12 of 97

13 User Shift The User Shift is used to sort and filter people on reports and user lists. For a detailed list of user attributes see the User Attribute Table To change one or more user's Shift; - Check each user to be changed - Click the Shift link The Select Shift window is displayed - Select a Shift and click Save If the Shift is not listed, you can create a new shift by entering text into the New shift box. To change the Shift for just one user; - Click the Shift link for the user. The Select Shift window is displayed. - Select the Shift and click Save To save changes click the save icon at the top of the User Edit Page 28-Sep-2017 Page 13 of 97
 Groups, like Department and Shift, are used to sort and filter people on reports and user lists.")
14 User Groups In addition to Department and Shift, users can be assigned to two different groups. Group 1 and Group 2 can be any name ( Examples: Clean Room or Quality Assurance) Groups, like Department and Shift, are used to sort and filter people on reports and user lists. The Titles "Group 1" and "Group 2" may be customized to apply to your business. To Change these names go to the Admin - Preferences - Group Headers page. To add one or more users to a Group; - Check each user to be added - Enter the Group Name in the Group box - Click the Set Group Arrow To change the Group for just one user; - Click the Group link for the user The Edit Group window is displayed. - Enter the new Group name, or enter nothing to remove the Group association. - Click Save To save changes click the save icon at the top of the User Edit Page 28-Sep-2017 Page 14 of 97
15 Department Manager When a person is assigned as a Department Manager, an address is also required. This address is used by the Scheduled Service. By checking a Department ID on a scheduled report, TEAM will filter the report to include only people in the selected department. The report is then automatically ed to Department Managers For a detailed list of user attributes see the User Attribute Table To change Department Manager Assignment; - Click the Mgr (Manager) link To save changes click the save icon at the top of the User Edit Page 28-Sep-2017 Page 15 of 97

16 Leave Time Assigning Leave Time to a person, prevents the person from appearing on reports as Not Tested. For a detailed list of user attributes see the User Attribute Table To change a person's Leave Time; - Click the Leave Time link Note: Red Leave Icons indicate one or more future dates are assigned to this person as leave time. The Leave Date(s) edit window is displayed. - Choose the Leave Type to be assigned - Choose a date range - Click the Add Leave Date(s) icon - Click Save To save changes click the save icon at the top of the User Edit Page 28-Sep-2017 Page 16 of 97
17 Leave Time Import Using the Leave Time Import function, a list of leave dates may be imported from a text file. To import a list of Leave dates; - Click the Import Leave Time icon on the user Edit page The Import Leave window is displayed. - Select the Date format, Column Delimiter, and file location In case your file does not include a text description of each leave date, the Default Leave date will be used. - Click Import icon to complete the import. 28-Sep-2017 Page 17 of 97


18 Certification Date The Certification Date is used to prevent access to a person when their certification has expired. For a detailed list of user attributes see the User Attribute Table To change one or more user's Certification Date; - Check each user to be changed - Click the Certification Date Link The Choose Date Shift window is displayed - Select a date or No Date No Date prevents all certification checking. - Click the Set Certification Date icon To change the Certification Date for just one user; - Click the Certification link for the user. The Choose Date Shift window is displayed - Select a date or No Date No Date prevents all certification checking. - Click Save To save changes click the save icon at the top of the User Edit Page 28-Sep-2017 Page 18 of 97

19 Certification Dates Import The Certification Dates Import process allows a list of certification dates to be imported into the TEAM database. To import a list of certification dates. - Click the Import Certification Icon The Import Leave window is displayed. - Select the Date format, Column Delimiter, and file location - Select the delimiter - Select the import file - Click Import icon to complete the import. 28-Sep-2017 Page 19 of 97
20 Periodic Test People with the Periodic attribute, do not perform ESD tests on a daily basis. The Periodic Test attribute is used to prevent these people from appearing on reports as "Not Tested". For a detailed list of user attributes see the User Attribute Table To change a person's Periodic Test setting; - Click the Periodic link for the user. A "Y" will appear in the periodic cell when the person is designated as testing only periodically. To save changes click the save icon at the top of the User Edit Page PIN Reset The PIN (Personal Identification Number) is a four digit number that is used to confirm the identification of a person after they have scanned their badge. The PIN is optional. Users are only prompted to enter a PIN if the feature is enabled on the Test Machine Page. PINs are set by the user the first time they log in, or after an administrator has reset the PIN on the User Edit page. To reset the PIN for one or more people; - Check each user to be changed - Click the PIN Reset Icon To save changes click the save icon at the top of the User Edit Page 28-Sep-2017 Page 20 of 97

21 User Status (ESD Test Status) The User Status report shows the status of users for a specific date and time. The following graphic shows how the User Status page controls are used to report user status. Status Time Set report time to previous date/ time Current Status Set report time to current date/time Refresh Manually refresh all report data Report Auto Refresh Report will automatically refresh each minute when checked. Note: Real time data collection and reporting performance will be reduced with Auto Refresh ON Exclude Never Tested Click remove all users who have never tested Exclude Unknown ID Uncheck to show test ID that have not been assigned to a user Search Search by User ID, Test ID or User name Sort Order Filter (Selectively exclude data) / Print / Save Display Preferences: Show / Hide Columns Split Screen Test ID Display Style Leave Time History Click to view leave time dates. Pass / Fail Percentages Status Color coded status Red = FAIL Green = Pass Yellow = Not Tested Grey = Not Tested Violet = Leave Time Maroon Certification Expired Test History Click to view test history report. 28-Sep-2017 Page 21 of 97
22 Logs - Access Control The Access Control Log shows all badge scans through an Access Control Point and indicates if the person was allowed or denied access. To Configure a SmartLog as an Access Control Point, see the Test Machine page. Set report date range Refresh Report Search Change Sort Order Filter (Selectively exclude data) / Print / Save Preferences: Show / Hide Columns 28-Sep-2017 Page 22 of 97
23 Logs -Attendance Log The Attendance Log shows a one month view of users and indicates if a person performed an ESD test, did not perform an ESD test, or was on Leave Time. The following graphic shows how the Attendance Log Page controls are used to generate an attendance log report. Shown with (T) Tested, (L) Leave Time, (.) No Tests. See second figure for Test Counts. Select Month/Year and Click Retrieve Log Show or Hide Test Statistics Test Indicator Selector Search Sort Filter Legend (T) Tested (L) Leave Time (.) No Tests / Print / Save Display Preferences: Show / Hide Columns Split Screen Test ID Display Style ESD Statistics Attendance report shown with number of tests performed each day. 28-Sep-2017 Page 23 of 97

24 Logs - Certification The Certification Log shows all users how have been assigned a Certification Date. Users who have not been assigned a Certification Date do not appear on the list. Certification Dates are used to prevent users from Access and Testing when the Certification Date is expired. To enabled this feature, see the Test Machine section. Refresh Report Search Change Sort Order Filter (Selectively exclude data) / Print / Save Preferences: Show / Hide Columns 28-Sep-2017 Page 24 of 97

25 Logs - ESD Test Log The ESD Test Log report shows a sequential log of all tests performed during a specific date/time range. The following graphic shows how the ESD Test Log page controls are used to report the ESD Test Log. Log date Range Set report time to previous date/ time Current Day Set report time to current date/time Refresh Manually refresh all report data Search Search by User ID, Test ID or User name Sort Order Filter (Selectively exclude data) / Print / Save Preferences: Show / Hide Columns Split Screen Test ID Display Style Reset Date Range Changes the report start time to midnight today and end time to the current date/time 28-Sep-2017 Page 25 of 97
26 Logs - Leave Time The Leave Time log shows all users who have been assigned one more dates as Leave Time. Leave Time dates are used to prevent users from appearing on status reports as "Failed or Not Tested" Set report date range Refresh Report Search Change Sort Order Filter (Selectively exclude data) / Print / Save Preferences: Show / Hide Columns 28-Sep-2017 Page 26 of 97
27 Logs - Time Clock Log The Time Clock Log shows the IN and OUT Time clock punches for a date/time range. The following graphic shows how the Time clock Log page controls are used to generate a Time Clock Log report. There are three sources for Time Clock data within TEAM5, Recorded on a SmartLog Imported from a third party database Imported from a text file export from an external system. TEAM5 also automatically exports data to external databases and to a file for import into an external system. See the Admin - Network Admin - Data Sync section. Set report date range Refresh Report Search Change Sort Order Filter (Selectively exclude data) / Print / Save Preferences: Show / Hide Columns 28-Sep-2017 Page 27 of 97

28 Stats - Test Machine The test Machine statistics page shows the Pass / Fail percentage by test machine for a specific date range. 28-Sep-2017 Page 28 of 97

29 Stats - User Pass Fail Percentage The User Pass Fail Percentage stats page shows the Pass / Fail percentage over a period of time for a selected group of users. 28-Sep-2017 Page 29 of 97
30 Stats - User Compliance The User Compliance page shows the percentage of passed tests compared to the number of required tests over a period of time. 28-Sep-2017 Page 30 of 97
31 History - User Change The User Change History Log shows all changes made to each user record. For each change, a time period is shown showing when the specific change was valid, followed by the current record. 28-Sep-2017 Page 31 of 97

32 History - ESD Test Archive The ESD Test Archive show data previously archived and no longer in the current database. Archiving of data allows database size to be managed while retaining a history of ESD Tests and the state of the user record at the time of the test. 28-Sep-2017 Page 32 of 97

33 Test Machine The Test Machine page shows the current status of all test machines and allows individual settings for each test machine to be modified. This graphic shows how Test Machine page controls are used to view and manage test machine data. Restrict by Department When enabled, only people from selected departments are allowed access. Access Control When enabled, SmartLog is capable of controlling access to specific areas of a facility via a door relay actuator. Time Clock When enabled, SmartLog is capable of collecting Time Clock Data and ESD test Data Network ID Each SmartLog is assigned a unique two digit ID (00 to 64) Communication Port Ports may be virtual links to Ethernet adapters or real com ports. More than one device may share a port when daisy chained. Operational Status When disabled, no data sent to or received from device ESD Test Override When enabled, the person's individual ESD test requirement is ignored, and the person is prompted to perform the Override Test. PIN Checking When PIN Checking is enabled, users must enter PIN number in addition to scanning badge before ESD Testing, gaining Access Control or Entering Time Clock Punch Relay Time The door relay will activate for the number of seconds listed after a passed ESD test or Access Control Log In. Model The version of SmartLog. Calibration Sets the SmartLog Calibration date Location Name The location name is a descriptive name appearing on reports indicating where a transaction occurred. SmartLog List This list shows the settings for each individual SmartLog Common Settings These settings apply to ALL SmartLogs Analog Values When checked, analog values are recorded with test results. Display Language This control allows the display language to be changed on all SmartLogs Allow Access to Known IDs Only When checked only valid IDs are allowed to Perform ESD Tests, Clock IN/Out and Enter an Access Control Point. When Not Checked, Unknown ID are prompted to perform Last Poll Time The last time TEAM was able to communicate with a SmartLog Network Status This window shows the current status of all 28-Sep-2017 the Default Test. Page 33 of 97 SmartLogs Machine Type Displays the type of SmartLog as read from the device ID Count The Number of IDs currently loaded on the SmartLog Last TX Time The last time a transaction was recorded on the SmartLog Transactions Today The number of transactions recorded since midnight Transaction Count The total number of transactions recorded since the last SmartLog Master Reset Location The Name of the physical location of the SmartLog

34 Admin The Admin page is used to make program preferences settings, setup automated database maintenance, setup network applications and schedule reports. A picture of each admin page is provided with help details. Admin - Password / PINS Password and PIN Preferences 28-Sep-2017 Page 34 of 97

35 Admin - Auto Start If TEAM5 is running in a Virtual or Shared Windows environment and it is possible to have multiple simultaneous Windows sessions running, do not enable Auto Start Only enable Auto Start when the Windows environment has been restricted to allow only one person to be logged in to windows at a time. The computer running TEAM5 must be configured to allow only one Windows login at a time. This is to insure only one instance of TEAM5 has access to virtual COM ports and the Database. When establishing a remote access session with the TEAM5 Computer, if another operator is already logged in, their session must be assumed, not abandoned. Abandoned windows sessions prevent TEAM5 from closing the database and may result in an unreadable database. 28-Sep-2017 Page 35 of 97

36 Admin - Auto Shutdown This control is used to ensure TEAM5 is not running when other programs like; Backups, Scanners, and Updates are run. These programs can lock files and folders used by TEAM5 and cause unexpected program behavior and data loss. 28-Sep-2017 Page 36 of 97

37 Admin - Database Backup / Restore This page allows data to be backed up and restored manually and to scheduled backups. Archive Data The Archive function moves data from the current database into a separate archive database. This reduces the current database size, thus maintaining performance. An audit report showing all archived data is shown on the Logs / Stats -page. Automated Backup Daily backups are recommended. The backup location should always be on a physically different computer than the computer TEAM5 is running on. System Restore If TEAM5 needs to be installed on a new computer, use the "Restore Database" function on this page after re-installing TEAM5 on the new computer. All data and preference setting will be restored. 28-Sep-2017 Page 37 of 97

38 Admin - Database Utilities See the help text shown here for details of each Database utility. Admin - Database Utilities - Compact and Repair Database. Database problems caused by corrupt search indexes can be repaired using this utility. This utility creates a new database can copies all information in the current database to the new database. In the process, search indexes are restored and optimized. Import Transaction File The transaction long on a SmartLog V5 can be extracted using the SL_Setup.exe application found in the C:\Program Files\TEAM5 folder. This utility allows extracted transaction files to be imported into the current TEAM5 database. Database Update This utility allows custom database scripts created by TEAM Support to be run by the Administrator. This is used when databases cannot be transferred to support in whole and repairs must be made in production. 28-Sep-2017 Page 38 of 97
39 Admin - Database Utilities (continued) Database Size Alert This utility uses the TEAM5 Alert System to send an to one or more people when the database size nears a preset size limit. For best performance the database file size should be kept below 2 megabytes. Here is the Link to the Archive Data function. Remove Program Backups Each time the TEAM5 program is updated, a backup folder is created containing the previous program version and a backup of the current database. This utility removed these redundant backups to conserve disk space. 28-Sep-2017 Page 39 of 97
40 Admin - This page is used to configure the Server used by TEAM5 to send Report and Alert s. Admin - Server Setup The Admin - page has two controls, Server and External Addresses. The Server controls are used to identify an outgoing SMTP server and the address used by TEAM to send s. - Server Setup To Enable ; - Click Server Setup The Test Mail Server Connection window is displayed If your server requires an ID and Password to send , - Check the box ID / Password Required and enter ID and Password - Enter address of sender - Enter the name or IP address of the server - Enter the address of the recipient - Click the Test button 28-Sep-2017 Page 40 of 97


41 Server Test PASSED Server Test FAILED Additional Error Details Additional Error Details may also be shown in a pop up dialog similar to this External Address and Address Lists The External Address List is a list of addresses to which s may be sent (either from a manually generated or scheduled report). Reports may be sent to one or more Lists and to External addresses. The Admin - preference page allows lists and external addresses to be managed. Internal addresses are those assigned to people in the TEAM5 database. to edit internal addresses, go to the User Edit page and click on the cell for a specific person. 28-Sep-2017 Page 41 of 97
42 Admin - Group Headers Two user attributes in team5 are called Group1 and Group2 by default. These are used to sort and filter reports by specific groups of users. The names "Group 1" and "Group 2" can be changed to match a category that applies to your organization. 28-Sep-2017 Page 42 of 97

43 Admin - Language See help text displayed on this figure for details. 28-Sep-2017 Page 43 of 97
44 Admin - Leave Type Edit See help text displayed on this figure for details. 28-Sep-2017 Page 44 of 97
45 Network Admin The Network Admin page allows configuration of TEAM5's Web and Network Applications and the import and export of data between TEAM5 and External data Sources/Locations. TEAM5 Enterprise has several network applications and interfaces, this table describes each. After the table are instructions showing how to enable each of the network items. Name Type Description Web User Status Monitor HTML (WEB Page) output TEAM publishes a set of web pages showing the current ESD testing Status of all people in the TEAM Database. The status is near real time, TEAM refreshes the pages after each polling cycle if a test has been performed during the polling cycle. Remote User Status Program Network Application The Remote User Status Monitor is another way to view ESD status data. This program resides on a shared network folder and may be run by anyone who has access to the network location. The program shows all users in the system and their current as well as their 31 day test history. Controls are provided to filter data by Department and other user categories so that a manager can view only the people in their area of responsibility rather than listings of hundreds to thousands of people. Remote User Admin Network Application The Remote User Admin program is used to Add/Delete and modify users from a network computer. Auto User Import from File or Database Network Interface The Auto User Import process is used to synchronize the user in TEAM with an HR Employee List or other Employee Management System. Auto User Import, automatically imports a list of users including User Adds (new user), User Deletes, and User Modifications (changes to a user profile). Auto Leave Time Import Network Interface The Auto Leave Time Import process is used to leave time in TEAM with an HR Employee List or other Employee Management System. Auto User Import, automatically imports a list of leave dates and updates each user profile associated with the leave date. Status Export to File Network Interface The Status Export to File process, is used to synchronize ESD Test status with Manufacturing and other systems external to TEAM. After each polling cycle, TEAM updates a text file with the current ESD test status for all users. This file can then be imported into other systems. Status Export to Database Network Interface The Status Export to Database process, is used to synchronize ESD Test status with Manufacturing and other systems external to TEAM. After each polling cycle, TEAM updates an external database with the current ESD test status for all users. Time Clock Export to File or Database Network Interface The Time Clock Export process, is used to send Time Clock data to your Time and Attendance and/or Payroll system. After each polling cycle, TEAM updates a file with the current (midnight to current time of day) Time clock data. DESCO Legacy Export Network Interface This process exports all ESD test transactions to an Access Database named TESTER.MDB to support customers who have systems that depend on the legacy database. 28-Sep-2017 Page 45 of 97

46 Network Admin - Web Monitors There are two "Web Monitors" which show ESD Test information in a Browser. Each Web monitor is designed to operate out of a shared network folder. Note: Each Web Monitor requires a separate shared network folder. Network Admin -Web User Status Monitor To enable the Web Status Monitor; - Go to the Admin - Network Admin page and Click Web Monitors - In the Web User Status Section, Click the Network Location Icon The Browse for Folder window will appear. - Choose a network folder. If you want these reports to be available to anyone on your network, choose a public folder, or you can restrict access using your organization's network security policy. - Check the Enable Box. - Click the Reload icon. This will refresh all web pages in the network location. - To view the Web pages, navigate to the network location and open the file named ( index.htm ) 28-Sep-2017 Page 46 of 97

47 Web User Status Options To change options, click the Options icon in the Web User Status Monitor section of the Amin - Network Admin page Performance Options are designed to improve the performance of data exports for customers with large databases. Typically these options do not need to be changed from the default settings unless data export is degrading system performance. Browser Options This option allows the web pages to automatically refresh after a preset number of minutes. This option can be disabled if frequent browser refresh cause performance issues with web browser. Data Security Options are designed to hide the user ID from publically viewed pages. 28-Sep-2017 Page 47 of 97


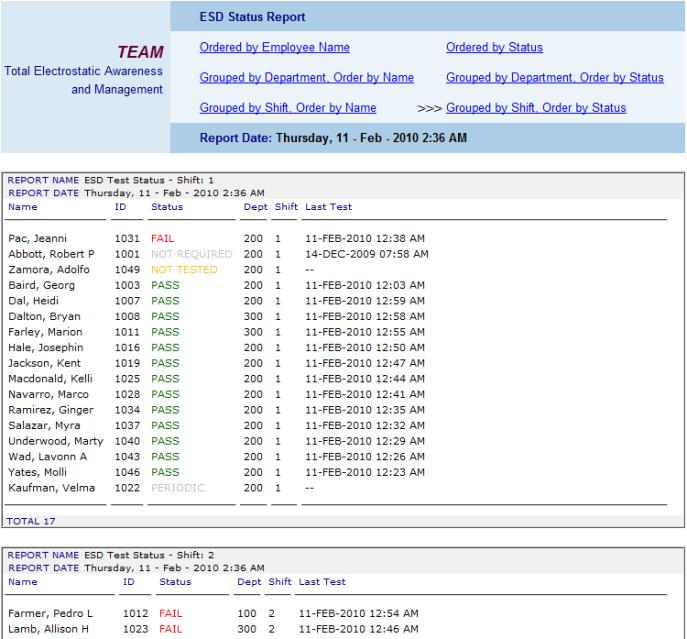
48 WEB Status Monitor - Report Examples Order by Employee Name Order by Status Grouped by Department, order by Name Grouped by Department, Order by Status Grouped by Shift, order by Name Grouped by Shift, Order by Status 28-Sep-2017 Page 48 of 97


49 Web Test Log Monitor The Web Test Log Monitor shows from one to seven days of test log history. The Test log shows each individual test and may be sorted by time of day, name of person testing etc. The logs may also be grouped by test Location and User Attributes such as Department, Shift etc. To enable the Web Test Log Monitor; - Go to the Admin - Network Admin page and Click Web Monitors In the "Web Test Log Monitor" section Click the "Enable Web Test Log Monitor" check box. - To adjust how the Web Test Log is updated and displayed Click the Options icon Performance Options are provided to reduce the update frequency and amount of data displayed. Large databases ( users) may required adjusting these options to prevent poor server performance. The Sorting / Grouping and Data to Display options allow the appearance of the web pages to be changed. 28-Sep-2017 Page 49 of 97

50 Web Test Log Example Web Page 28-Sep-2017 Page 50 of 97

51 Network Applications The TEAM5 Remote Status and TEAM5 Remote Admin applications are network applications allowing ESD Test and User data to be viewed and edited via a shared network drive. When setting up a workstation to access the Network Applications, simply create a shortcut a mapped network drive in which the Network Application resides. The Mapped Drive shortcut must include a drive letter in the range (D:...Z:) The Remote User Status application is a read only application that shows current and historical (up to 31 days) ESD test data, Leave Time, and User Requirements. The Status Display application shows current ESD Test of each person in the system, or each person on the current shift. This application is intended to be used with a large screen display. The list of Not Tested or Failed users is updated on each polling cycle and the list automatically scrolls when there is more than one page of data. The Remote User Admin application allows users to added, deleted, or modified. Typically this application is used by the person issuing new test badges to employees and visitors. After enter the new person into the TEAM System via the Remote Admin application, the user may begin testing immediately. 28-Sep-2017 Page 51 of 97

52 Remote User Status Application The Remote User Status Monitor is another way to view ESD status data. This program resides on a shared network folder and may be run by anyone who has access to the network location. The program shows all users in the system and their current as well as their 31 day test history. Controls are provided to filter data by Department and other user categories so that a manager can view only the people in their area of responsibility rather than listings of hundreds to thousands of people. User Status Application - Server Setup To enable the Remote User Status Application; - Go to the Admin - Network Admin - Network Apps page - In the Remote User Status Program section, Click the Network Location Icon The Browse for Folder window will appear. - Choose a network folder. If you want this program to be available to anyone on your network, choose a public folder. Access can be restricted using your organization's network security policies. - Check the Enable Box. - Click the Reload icon. This will refresh all data linked to the network location. Remote User Status Options To change options, click the Options icon in the Web Remote Status section of the Admin - Network Admin page There are two option types, Performance and Data Security Performance options are designed to improve the performance of data exports for customers with large databases. Typically these options do not need to be changed from the default settings unless data export is degrading system performance. Data Security options are designed to hide the User ID and or Test ID from publically viewed pages. Language Options change the language the Remote Status Program is displayed in. 28-Sep-2017 Page 52 of 97


53 Remote User Status Monitor Client Setup To access this program from other computers on your network; - Create a shortcut on the remote computer that points to a mapped network drive containing this network location To insure the shortcut continues to work after the manager has logged out/and back in to Windows; - Verify the drive pointed to is permanently mapped Remote User Status Monitor Application This diagram show the general usage of controls on the Monitor Program. ESD Status Color coded status History Reporting Date See next History section for more details Last Update The Date/Time data was last updated. Auto Refresh When checked the screen automatically refreshes when new data received from the TEAM5 Server Preferences Allows the Passed and Other Status lists to be customized by filtering and sorting. Also allows toggling of Data Columns On/Off. Report Current data view may be printed, ed or saved to a file. Summary This summary shows counts by status, user counts and last update time Remote User Status Filter/Search/Sort To filter data, so that only one Department is shown; - Click the Preferences - Filter button The Filter Data window is displayed. - Select the Department(s) to be displayed - Click Apply Filter(s) Repeat the same process to Search or Sort data. To Show or Hide specific data columns; - Open the Preferences -Show Hide Data Drop down menu. Check columns to be shown, un-check to hide columns. 28-Sep-2017 Page 53 of 97


54 Remote User Status Test History Clicking on a User's record in the Remote Status application will open the User Detail window which displays the User's profile, Test History, and Leave Dates Remote User Status Test Log The Remote Status Test Log shows a chronologic list of all tests performed by all users. This list can be searched, sorted, and filtered using the same controls as those on the ESD Status page. 28-Sep-2017 Page 54 of 97

55 Remote User Status - Attendance Log The Attendance log shows list of all days in a selected month. If a person has tested on a given day, a "T" is shown If no tests were performed on the date a "." is shown. The report has the same Search, Sort, Filter and Reporting options that are available on the ESD Status page. 28-Sep-2017 Page 55 of 97

56 Remote User Status - Leave Time Edit The Leave Time edit feature of the Remote Status Program allows department manager to edit leave time employees while viewing current status data, To enable Leave Time Edit on the Remote Status Program. - Define one or more Department managers on the User Edit page of the TEAM5 server or via the Remote Admin Application. - On the TEAM5 Server, Go to the Admin - Network Admin page - Select Network Apps page - In the Remote Status Section, Click the Options icon - In the "Leave Time Edit section, check the box named "Allow Dept Managers to edit Leave Time - Verify Polling is ON to ensure this new setting to sent to the Remote Status Application To Edit Leave Time in the Remote Status Application - Start the Remote Status Application With the ESD Status tab selected, - Click on a user name to display the details about the user. - Click the Leave time tab At the bottom of the page, - Click "Login to Edit Leave Time" - Enter the Department Managers Test/Badge ID and PIN. Not the Department manager's User ID. Manager's PIN number can be reset on the TEAM5 server "User Edit" page. If the manager has not previously logged in or if their PIN has been reset the default PIN is 0000 (Four Zeros) The manager will be prompted to change their PIN before proceeding to edit leave dates. Only one login is required each time the Remote Status application is started. 28-Sep-2017 Page 56 of 97


57 Status Display Application The Status Display application shows Failed and Not Tested users on a large screen display. This applications is typically run in a commonly visible area as a reminder for operators who have not tested or failed their last test. Like the Remote Status application, this application is run from a shared network folder. Status Display Application - Server Setup To enable the Status Display Application; - Go to the Admin - Network Admin - Network Apps page - In the Status Display section, Click the Network Location Icon The Browse for Folder window will appear. - Choose a network folder. - Check the Enable Box. - Click the Reload icon. This will refresh all data linked to the network location. Remote User Status Options To change options, click the Options icon in the Web Remote Status section of the Admin - Network Admin page There are two option types, Performance and Data Security Performance options are designed to improve the performance of data exports for customers with large databases. Typically these options do not need to be changed from the default settings unless data export is degrading system performance. Data Security options are designed to hide the User ID and or Test ID from publically viewed pages. If your organization has multiple shifts, select the option to "Show only operator on current shift" This option causes the display to refresh at the beginning of each shift showing only operators on the current shift. To set up shift start and end times, go to the Admin - Shift Admin page. To assign operators to a shift, go to the User Edit page. 28-Sep-2017 Page 57 of 97


58 Remote User Admin Application The remote User Admin Application allows management of Users by one or more managers from a shared network folder. More than one manager may access and edit user data using this application. Remote User Admin Server Setup The Remote User Admin program is used to Add/Delete and modify users from a network computer. Access to the Remote User Admin program is User ID and Password protected. For instructions to add Remote Administrators see the Admin Preferences section To enable Remote User Admin; - Go to the Admin - Network Admin - Network Apps page - In the Remote User Admin section, Click the Network Location Icon The Browse for Folder window will appear. - Choose a network folder. If you want this program to be available to anyone on your network, choose a public folder. Access can be restricted access using your organization's network security policies. - Click the New User Defaults icon The New User Defaults window is displayed. This Required Test and Retest Frequency setting is applied to any new user added using the Remote Admin Program. These are just default values and may be changed during the Add process or at any time after the user is added. - Click Save In the Remote User Admin section of the Admin - Network Admin page - Check the Enable Box. - To run the program, navigate to the network location and open the file named ( TEAM5_Remote_Admin.exe ) 28-Sep-2017 Page 58 of 97


. The change password window is displayed.")

59 Remote User Admin Client Setup To access this program from other computers on your network; - Create a shortcut on the remote computer that points to a mapped network drive containing this network location To insure the shortcut continues to work after the manager has logged out/and back in to Windows; - Verify the drive pointed to is permanently mapped Remote User Admin Program To run the Remote User Admin Program; - Follow instructions in the previous section Remote User Admin Client Setup - Start the Remote Admin program from the shortcut created in the previous section. - Enter a User ID and Password If you have not set up any remote Administrators, follow instructions in the Admin - Preferences section. If this is the first time the ID has logged in, the password will be ( password ). The change password window is displayed.. - Enter a new password After logging in the TEAM5 Remote Admin main menu is displayed. Note: the Name of the Administrator currently logged in is displayed in the lower left of the menu. Remote User Admin -Adding a New User To add a new user; - Click the Add User Icon The New User window is displayed. - Enter the User ID and Test ID - Click Continue 28-Sep-2017 Page 59 of 97

60 Adding a new User ( continued ) The TEAM5 Remote Admin - User Edit window is displayed. For a description of each individual user attribute, see the User Attribute Table - After entering user information, Click Save Changes. 28-Sep-2017 Page 60 of 97

61 Remote User Admin - Modify User From the TEAM5 Remote Admin Main Menu, - Click Modify User, Select a user by double clicking on the user name. The TEAM5 Remote Admin - User Edit window is displayed. For a description of each individual user attribute, see the User Attribute Table - After editing user information, Click Save Changes. 28-Sep-2017 Page 61 of 97

62 Data Sync There are several methods to sync data between ETAM5 and other systems. Data Sync Import allows the automated import of User data including Adding of new users, modifying existing users and removal of users. Data Sync Export is an automated process that exports ESD test results to External SQL databases and Text Files. Additionally TEAM exports Time Clock data to Text Files. The Data Sync Import and Export Control panels are located on the Admin - Network Admin - Data Sync pages. Import from Database User Import from Database There are two automated database imports User and Time Clock. The User import automatically synchronizes the TEAM5 User List with an external database. The Time Clock Import synchronizes TEAM5 with a Time Clock system to allow the status of "Not Clocked In" to be displayed on ESD status reports. 28-Sep-2017 Page 62 of 97

63 Data Sync - User Import from Database (continued) The User Import from database process allows TEAM5 to synchronize the user list with an external system. To enable this process, Go to the Admin - Network Admin - Import from Database page. This is the import table structure and control codes. Table Name: User Col1 ActionCode VCHAR(1) NULLABLE Col2 UserID VCHAR(255) PRIMARY KEY Col3 BadgeID VCHAR(255) NOT NULL Col4 FirstName VCHAR(255) NOT NULL Col5 LastName VCHAR(255) NOT NULL Col6 MiddleName VCHAR(255) NULLABLE col7 Department VCHAR(255) NOT NULL col8 Shift VCHAR(255) NULLABLE Col9 Group1 VCHAR(255) NULLABLE Col10 Group2 VCHAR(255) NULLABLE Col11 VCHAR(255) NULLABLE Col12 CertExpireDate DATETIME NULLABLE Col13 Manager VCHAR(1) NULLABLE Col14 Periodic VCHAR(1) NULLABLE Code Values Action Code = D, To delete user. Manager = Y, To make user a department manager. Periodic = Y, User is not required to test daily. 28-Sep-2017 Page 63 of 97

64 Data Sync - User Import from File There are two automated file imports in TEAM5, User and Leave Time. The User import automatically synchronizes the TEAM5 User List with an external file containing User information. The Leave Time Import synchronizes TEAM5 with a file containing Leave Dates for individual users. 28-Sep-2017 Page 64 of 97
, User Deletes, and User Modifications (changes to a user profile).")
65 Data Sync - User Import from File (continued) The User Import from file process is used to synchronize the users in TEAM with an HR Employee List or other Employee Management System. Auto User Import, automatically imports a list of users including User Adds (new user), User Deletes, and User Modifications (changes to a user profile). Note: If a user appears more than once in an import file, only the last entry will be processed. To enable the User Import from File; - Go to the Admin - Network Admin - Import from File page - In the User Import section, Click the Network Location Icon The Browse for Folder window will appear. - Choose a network folder. If you want this program to be available to anyone on your network, choose a public folder. Access can be restricted access using your organization's network security policies. - Click the File Format icon The Import Options window is displayed. To specify a fixed file name; - Uncheck the box named ( Don't specify file name...) - Enter the name of the file To import any file with file extension TXT; - Check the box named ( Don't specify file name...) - Choose the Field Delimiter (A field delimiter is the character used to separate the various data items in a record (row/one line) of data. 28-Sep-2017 Page 65 of 97

66 Data Sync - User Import from File (continued) Delete All Option and Optional Delete There are two options to control how exiting users are updated. Delete all users not in import file will remove all users in the TEAM5 database that are not in the import file. Disable update when optional items are blank. This option prevents user updates when the import system does not have one or more of the optional attributes; Shift, Group 1, Group 2 and Periodic flag. 28-Sep-2017 Page 66 of 97

67 Data Sync - Leave Time Import from File The Auto Leave Time Import process is used to synchronize user leave time date in TEAM with other Employee Management Systems. To enable the Leave Time Import from File; - Go to the Admin - Network Admin - Data Sync Import page - In the Leave Time Import section, Click the Options Icon The Import Leave Date List Options window will be displayed. This options window allows the file format to be customized. The File name, Default Leave type and Date Formats are shown in the first three sections. The Import File Format is shown in the last section. After adjusting the import file format, Click the Save icon to save changes and exit the window. 28-Sep-2017 Page 67 of 97

68 Data Sync - Time Clock Import from Database The Time Clock Import from Database process automatically imports time clock transactions from an external SQL database. To access the Time Clock Export to Database control, Go to the Admin - Network Admin - Export to Database page. Time Clock Import Table structure Table Name: TimeClockHist Col1 IDX NUMERIC(INT) PRIMARY KEY Col2 UserID VCHAR(255) NULLABLE Col3 BadgeID VCHAR(255) NULLABLE Col4 TCCode VCHAR(255) NOT NULL Col5 TCLocation VCHAR(255) NULLABLE Col6 TCTimeStamp DATETIME NOT NULL Note: Although Nullable, one of the values UserID or BadgeID are required IDX: IDX is a counter maintained by the external database. It should be set up as an automated field. Team uses this field to sync data between TEAM5 and the Import table. TCCode: I (In), O (Out) by default, this code can be modified in TEAM5 to be any one character code. TCLocation: The physical location where the Time Clock transaction was recorded. 28-Sep-2017 Page 68 of 97


 icon The System DSN List window is displayed. - Select the DSN of your database.")
69 Data Sync - ESD Status Export to Database The ESD Status Export to Database process, is used to synchronize ESD Test status with Manufacturing and other systems external to TEAM. After each polling cycle, TEAM updates an external database with the current ESD test status for all users. To enable ESD Status Export to Database; - Go to the Admin - Network Admin page - In the Status Export to Database section, Click the Table Name Icon The Table Name window is displayed. - Enter the name of the table to which data will be exported. This example uses an Access Database included with TEAM5 This example database includes a table named ESD_STATUS. Your table name may be named differently. - Click the Database (DSN) icon The System DSN List window is displayed. - Select the DSN of your database. If you do not see your database listed, add a DSN using the Windows ODBC Data Source Administrator. 28-Sep-2017 Page 69 of 97

70 ESD Status Export to Database (continued) - Click the Data to Export icon. The Data to Export window is displayed. This window lists all data elements available for export from TEAM to other systems. The first three colums are required. The Primary Key is User ID Data Types are listed as MS Access equivelents. Please check with your DDMS provider for a translation from these data types to you DBMS - Click Save 28-Sep-2017 Page 70 of 97
71 ESD Status Export to Database (continued) Special provisions have been made for Oracle vs SQL Server data/time formats. At the top of the Admin - Network Admin - Export to Database page check the radio button for Oracle or SQL server. 28-Sep-2017 Page 71 of 97

72 Data Sync - Time Clock Export to Database One per polling cycle, when new time clock data is collected, the data is immediately exported to an external database table. The table schema, DSN, ID and Password are set up on the Admin - Network Admin - Export to Database page. Time Clock Export to database table schema. Table name (TimeClockHist) and all column name show here are fixed. 28-Sep-2017 Page 72 of 97
73 Data Sync - ESD Log Export to Database The ESD Log Export to Database sends each recorded ESD test to an external database in the order data is collected from each SmartLog. Data is exported once per polling cycle when data have been collected. The table schema, DSN, ID and Password are set up on the Admin - Network Admin - Export to Database page. 28-Sep-2017 Page 73 of 97

74 Data Sync - ESD Log export to Database (continued) This is the ESD Log Export able schema. Please note the first six columns are required and column names are fixed. Table name is specified on the previous page. 28-Sep-2017 Page 74 of 97

75 Data Sync - Export to File TEAM5 Data Sync will export ESD Status and Time Clock data to files. On the Admin - Network Admin - Export to File page, each function can be enabled / disabled and the file location specified. The column delimiter and date/time format can be selected from a number of choices by clicking File format. 28-Sep-2017 Page 75 of 97

76 ESD Status Export to File The ESD Status Export to File process, is used to synchronize ESD Test status with Manufacturing and other systems external to TEAM. After each polling cycle, TEAM updates a text file with the current ESD test status for all users. This file can then be imported into other systems. To enable Status Export to File; - Go to the Admin - Network Admin page - In the Status Export to File section, Click the Network Location Icon The Browse for Folder window will appear. - Choose a network folder. If you want this program to be available to anyone on your network, choose a public folder. Access can be restricted access using your organization's network security policies. - Click the File Name icon The File Name window is displayed. - Enter the name of the file that TEAM will export data to. - Click Save 28-Sep-2017 Page 76 of 97

77 Status Export to File ( continued ) File Export Format To set the file export format; - Click the File Format icon The File Format window is displayed - Check each column to include in the export file Data Options - Date Time Format - Choose the Date / Time format that is compatible with the system that will read the TEAM export file. Data Options - Column Delimiter - Choose the Column Delimiter that is compatible with the system that will read the TEAM export file. - Click Save In the Status Export to file section - Check the Enable box. To test the File Export; - Click the Test File Export icon - Navigate to the File Export network location and open the file to verify data is being exported in the format you expect. - Delete the Test Export file In case of drive mapping or network problems, you may need to refresh the export file manually. To Refresh the export file at any time; - Click the Refresh Export File icon. 28-Sep-2017 Page 77 of 97
 Time clock data.")

78 Time Clock Export to File The Time Clock Export to File process, is used to send Time Clock data to your Time and Attendance and/or Payroll system. After each polling cycle, TEAM updates a file with the current (midnight to current time of day) Time clock data. To enable Time Clock Export to File; - Go to the Admin - Network Admin page - In the Time Clock Export to File section, Click the Network Location icon The Browse for Folder window will appear. - Choose a network folder. - Click the File Name icon The File Name window is displayed. \ - Enter the name of the file that TEAM will export data to. 28-Sep-2017 Page 78 of 97

79 Time Clock Export to File (continued) - Click the File Format icon. - Choose User ID and/or Test ID - The column order can be adjusted using the Move up/down buttons. Data Options - Choose the Date/Time format that is compatible with the system that will read the TEAM export file. - Choose the Column Delimiter that is compatible with the system that will read the TEAM export file. 28-Sep-2017 Page 79 of 97

80 Program License The Admin - Program License page shows the current license information. License can be updated from this page by clicking the "Update License" icon and entering a new license key. 28-Sep-2017 Page 80 of 97

81 Support / Vendor Info Contact information for your TEAM5 Vendor and contact information is shown on the Admin - Support / Vendor page. 28-Sep-2017 Page 81 of 97
82 System Logs System logs show TEAM5 activity in chronological order. Logs from the current day or any date range may be displayed on this page. 28-Sep-2017 Page 82 of 97

83 Admin - Time Clock The Admin - Time Clock page contains various time punch settings and a special ESD Status of Not Clock In. See description below for more details. 28-Sep-2017 Page 83 of 97

84 Admin - User ID The User ID is used to Identify an Operator and typically does not change. Whereas the TEST ID / Badge Number may change each time anew badge is issued. User ID Change When enabled, Administrators can change User IDs from any on the User management applications such as Remote Admin and the User Edit page on the main TEAM5 Application. Link Unknown IDs When operators begin testing before their User ID and Badge Number have been entered into TEAM5, this page allows any ESD Test transactions with unknown IDs to be linked with the user after the user information is added to TEAM5. Allow User ID to Perform Test on SmartLog When enabled, the operator may enter their User ID from the keypad on the SmartLog Pro in case they do not have their badge. Non Sequential Badge Number (SmartLog V5 Only) This does not apply to the SmartLog Pro. Check this box when you have large blocks of non-sequential badge numbers for better ID lookup performance on the SmartLog V5. 28-Sep-2017 Page 84 of 97
 of each department.")
85 Admin - Scheduled Reports The Admin - Scheduled Reports page allows an unlimited number of scheduled reports to be sent at a specific time of day and day of week. Reports may be sent to a one or more addresses, lists, and directly to the department manager(s) of each department. Reports may be filtered to show only people who have for example, tested and failed, and no retest was performed before the scheduled report is generated. This report can be sent directly to the address of the individual who failed the test. Any report may also be archived to a file. Typically reports are archived to a shared network location to insure auditable reports are available even if the computer running TEAM5 is down. The report list may be sorted and filtered to make report schedule management easier. If a report schedule is missed due to an server or network problem, any report may be re-sent within 24 hours by clicking the "Re Send" icon. By clicking on any report, or clicking "Add a new report" the "Scheduled Report Settings" window will be displayed. 28-Sep-2017 Page 85 of 97
86 Admin - Scheduled Reports (continued) All attributes of a scheduled report may be edited from the "Scheduled Reports Settings" window. Send to Dept Manager(s) - When the "Send To Department Manager(s)" box is checked each report is split into several reports so that a department manager will only see the people in their department. This feature creates a report with a smaller number of people so that managers do not need to scroll through hundreds or thousands of names. Scheduled Recipients In addition to Department Mangers, reports may also be directed to any number of external addresses. Scheduled Report Filter The reports may also be customized by applying a report filter. - Click the filter icon The Report Filter window is displayed - Check or Un-check Values and columns to add or remove from report. - Click save 28-Sep-2017 Page 86 of 97
87 Admin - Scheduled Reports (continued) Save Settings After adjusting report settings, click the save icon to the right of the Day of week selector. Additional Scheduled Report Filters By clicking the Report Filter Icon on the Admin - Scheduled Reports page the filter window will be displayed. The filter window allows scheduled reports to be filtered by ESD Status, Department, Shift, Group1 and Group2. 28-Sep-2017 Page 87 of 97

88 Admin - Alerts The TEAM5 Alert System sends s to managers when certain critical system or user event occur. The Alert System has three pages Alert Log, Alert and Preferences Alert Log The Alert Log page shows system alerts for a specific time period. To access the Alert Log; - Click the Alerts page - Click the Choose Date Range icon - Select Begin / End date - Click the Refresh Icon 28-Sep-2017 Page 88 of 97

89 Admin - Alerts (continued) Alert Recipients The Alert Recipients page allows address lists and individual addresses to be assigned to Alerts. To access the Alert Recipients Page; - Click the Alerts Page - Click the Alert Recipients Page - To Edit the recipient list for any Alert, click the edit ion and select recipients. 28-Sep-2017 Page 89 of 97
90 Admin - Alerts (continued) Automatic Alert Names and Descriptions Alert Name Auto Backup Calibration Daily Database Compact and Repair Alert Database size exceeded alert limit DESCO Legacy Export Failed ESD Test without Re-Testing Leave Time Import from File License Expiring Max Consecutive Failed Tests Alert No ESD Test after Clock IN Operator Certification Expiring Remote User Admin Remote User Status Smartlog Communication Smartlog High Fail Percentage Status Export to Database Status Export to File Time Clock Export to Database Time Clock Export to File User Import from File or Database Web User Status Monitor Description Alert is sent if TEAM is unable to complete a backup due to a network drive being unavailable.' Alert is sent once a day prior to calibration expiring on any Smartlog. Alert is sent when database compact and repair can not complete and a manual database repair must be performed. Alert is sent when database size exceeds a preset limit. Alert is sent when TEAM is unable to write data to the legacy export database "Smartlogger".' Alert is sent when a user tests and fails and does not re-test and pass within a preset time limit. Alert is sent if TEAM is unable to import data from a Leave Time Import File or if shared network drive is unavailable.' For Systems not using a USB License Dongle, Alert is sent prior to the Soft-License Key expiring. Alert is generated when one or more people have failed more consecutive tests than are allowed. An is sent to the Department Manager(s) of the person who generated the alert. Alert is sent when a user clocks in but does not perform an ESD test and pass within a preset time limit. Note: Time Clock Import from File or Database must be enabled on the Admin - Net Admin page. Alert is sent once a day prior to certifications expiring for any operator Alert is sent when the Remote Admin Application, shared network folder can not be written to. Alert is sent when the Remote Status Application, shared network folder can not be written to. Alert is sent when a Smartlog can not be found online. Alert is sent when a Smartlog exceeds a preset Pass/ Fail Ratio. Alert is sent when the Export to Database function can not locate the external database. Alert is sent when the Export to File function can not write to the external network file location. Alert is sent when the Time Clock Export to Database function can not locate the external database. Alert is sent when the Time Clock Export to File function can not write to the external file location. Alert is sent if TEAM is unable to import data from a User Import File or Database.' Alert is sent when the Network Status Monitor, shared network folder can not be written to. 28-Sep-2017 Page 90 of 97
91 Admin - Alerts (continued) Alert Preferences Several of the system and ESD status alerts have a number of preferences used to control how the alerts are generated. These are the Alerts with additional preference settings. Calibration High Fail Percentage 28-Sep-2017 Page 91 of 97
 Database")

92 Alert Preferences (continued) Database Size No ESD Test after Clock IN 28-Sep-2017 Page 92 of 97

93 Alert Preferences (continued) Failed without Retesting Max Consecutive Failures 28-Sep-2017 Page 93 of 97
94 Alert Preferences (continued) ESD Certification Expiring 28-Sep-2017 Page 94 of 97
95 Moving TEAM5 Software / Restoring to a new computer This procedure details how to move the TEAM5 software and database from one computer to another. Procedure 1 ( Use this procedure if the old system is NOT operational) - Locate last backup from old system - Install Software on new system - Restore data. Procedure 2 ( Use this procedure if the old system is operational) - Backup Data ***IMPORTANT - DO NOT SKIP THIS STEP*** - Install Most Recent Updates to Old System - Backup Data a second time - Install software on new system - Restore data from old system Backup Old System If your old system is non-functional then locate the most recent automated backup. The Backup is comprised of two files: yyyy-mm-dd hh.mm.ss ap_team5.database.bak yyyy-mm-dd hh.mm.ss ap_team5.registry.bak Where yyyy-mm-dd hh.mm.ss ap = the date and time the backup was performed. Open the registry backup file using Windows Notepad and read the version number of the program. Example: app_version If this version does not match the current version, please call DESCO to get the install program that matches your older version. If your old system is functional Perform a manual backup. - Select the Admin - Database page, Click Backup Now - Update TEAM with the latest version - Do a second backup Install Software on New System 1) Move License Dongle Remove the license dongle from the old computer and install it on the new system. Here is a link to the USB License Drivers for XP and Vista 2) Re-Install TEAM Install TEAM on the new system. IMPORTANT: If your old system is not working, use the old install program. Restore Database and Preferences on New System Go to the Admin tab and click the "Restore" icon. A window will be displayed that will allow you to choose the location of each of the backup files. After selecting both backup files, click "Restore" Apply Updates END If you have an older version of TEAM5, Download and run the latest version of TEAM5 Update from the page. 28-Sep-2017 Page 95 of 97

96 Repairing a TEAM5 Database If a TEAM5 database becomes corrupt, it may be possible to repair the database using the Microsoft JETCOMP.EXE program. This program and the database file are located in the folder: C:\Program Files\TEAM5\DB To Repair a database; - Using Windows Explorer, open the TEAM5 Database folder C:\Program Files\TEAM5\DB - Rename the TEAM5 database file from TEAM5.mdb to TEAM5_bak.mdb - Open the JETCOM.EXE program - Select the file you just renamed as the (Source) - Enter the following as the (Destination) C:\Program Files\TEAM5\DB\TEAM5.mdb - Click the 'Compact' button - The Status Bar at the bottom of the window will show the progress of database repair process. - When the Status Bar shows "Ready", the repair process is complete - Click Exit - Restart TEAM 28-Sep-2017 Page 96 of 97

97 Repairing a TEAM Basic Database If the Team Basic database becomes corrupt, it may be possible to repair the database using the Microsoft JETCOMP.EXE program. This program and the database file are located in the folder: C:\Program Files\TEAM Basic\DB To Repair a database; - Using Windows Explorer, open the TEAM Basic Database folder C:\Program Files\TEAM Basic\DB - Rename the database file from team_basic.mdb to team_basic_bak.mdb - Open the JETCOM.EXE program - Select the file you just renamed as the (Source) - Enter the following as the (Destination) C:\Program Files\TEAM Basic\DB\team_basic.mdb - Click the 'Compact' button - The Status Bar at the bottom of the window will show the progress of database repair process. - When the Status Bar shows "Ready", the repair process is complete - Click Exit - Restart Team Basic 28-Sep-2017 Page 97 of 97
TEAM5 Operation Manual
 Contents System Overview Version Feature Comparison Chart Install Recommendations User Edit Importing a User List Add a User Delete User(s) Edit Multiple Users ( Global Controls ) Sort / Filter User List
SmartLog X 3 TEAM Basic Software Installation and Operation Instructions
 TECHNICAL BULLETIN TB-7501 SmartLog X 3 TEAM Basic Software Installation and Operation Instructions Made in America Figure 1. SmartLog X 3 Description TEAM Basic Software will allow you and your computer
CLIQ Web Manager. User Manual. The global leader in door opening solutions V 6.1
 CLIQ Web Manager User Manual V 6.1 The global leader in door opening solutions Program version: 6.1 Document number: ST-003478 Date published: 2016-03-31 Language: en-gb Table of contents 1 Overview...9
DSS User Guide. End User Guide. - i -
 DSS User Guide End User Guide - i - DSS User Guide Table of Contents End User Guide... 1 Table of Contents... 2 Part 1: Getting Started... 1 How to Log in to the Web Portal... 1 How to Manage Account Settings...
VERSION ASSET TRACKING SYSTEM USER MANUAL STARTER EDITION
 VERSION 4.20.3 ASSET TRACKING SYSTEM USER MANUAL STARTER EDITION ATS USER MANUAL- STARTER EDITION TABLE OF CONTENTS ATS User Manual- Starter Edition... 2 Table of Contents... 2 Quick Start Overview...
Medivators Data Management Software Installation / User Manual
 Medivators Data Management Software Installation / User Manual For DSD and SSD Endoscope Reprocessors Medivators is a registered trademark of Minntech Corporation. Windows and Windows Explorer, Excel,
Getting Started The Outlook Web Access Window
 QUICK Source Microsoft Outlook Web Access in Exchange Server 2003 Getting Started The Outlook Web Access Window ❶ ❷ ❸ ❹ ❺ ❻ ❼ ❽ Using the Reading Pane The Reading Pane allows you to view your e-mail messages
TimeCard Manager Basic
 TimeCard Manager Basic Program Guide Installation and Setup Basics Continued Install Software 1 Card Management Software Setup View Employee Time Cards 24 Host/Server Security & Settings 2 Print Card Data
ATX Document Manager. User Guide
 ATX Document Manager User Guide ATX DOCUMENT MANAGER User Guide 2008 CCH Small Firm Services. All rights reserved. 6 Mathis Drive NW Rome, GA 30165 No part of this manuscript may be copied, photocopied,
Help Contents Manual
 Help Contents Manual TimeClick 18 018 Last Updated: February 18 1 Table of Contents WHAT TO EXPECT WITH THIS MANUAL... 4 Resources Found on Website and Blog... 4 Contact Customer Support Team... 4 PREFERENCES...
EMIT SIM Software Installation and User Manual
 TECHNICAL BULLETIN TB-6579 EMIT SIM Software Installation and User Manual Made in the United States of America Description EMIT SIM (Smart Ionization and Monitoring) is designed to monitor and record the
Outlook: Web Access. Outlook: Web Access AIS Vienna
 Outlook: Web Access AIS Vienna Table of Contents Introduction to OWA...1 Log On... 1 OWA Workspace... 2 Hiding/Displaying the Reading Pane... 3 Collapsing/Expanding the Outlook Bar... 4 Log Off... 5 Sending
ipac Access Controller
 STANLEY MANUFACTURED ACCESS CONTROL ipac Access Controller QUICK START GUIDE QUICK USER GUIDE Contents Standalone Interface...3 ipac at a Glance...3 Button and Functions...4 Screen Display...4 Information
Fiery proserver User Guide
 Fiery proserver User Guide Congratulations on your purchase of the EFI Fiery proserver, a powerful production solution for your printer. Before you begin Make sure that you have: About this document Installed
Anchor User Guide. Presented by: Last Revised: August 07, 2017
 Anchor User Guide Presented by: Last Revised: August 07, 2017 TABLE OF CONTENTS GETTING STARTED... 1 How to Log In to the Web Portal... 1 How to Manage Account Settings... 2 How to Configure Two-Step Authentication...
Wholesale Lockbox User Guide
 Wholesale Lockbox User Guide August 2017 Copyright 2017 City National Bank City National Bank Member FDIC For Client Use Only Table of Contents Introduction... 3 Getting Started... 4 System Requirements...
EntraPass (W10) Installation Guide Kantech-OnBoard systems
 Installation Guide Kantech-OnBoard systems") Overview Purpose ExacqVision recorders now include Kantech EntraPass Corporate Edition software. The purpose of this document is to guide the technician or installer through the process of installing and
Overview Purpose ExacqVision recorders now include Kantech EntraPass Corporate Edition software. The purpose of this document is to guide the technician or installer through the process of installing and
Business ebanking User Guide
 Business ebanking User Guide If you have any questions, please contact Business ebanking Support at 1-800-593-4345 Contents About Business Online Banking... 3 System Requirements/Considerations... 4 Password
EntraPass Installation Guide Kantech-OnBoard systems
 EntraPass Installation Guide Overview Purpose ExacqVision recorders now include Kantech EntraPass Corporate Edition software. The purpose of this document is to guide the technician or installer through
Work expectations will be included in your appraisal during the Recognition Phase of the performance management process.
 Monitoring is the day-to-day activity of paying attention to how the employee s work is going. Both the supervisor and employee track progress toward meeting the work expectations that were established
CA Output Management Web Viewer
 CA Output Management Web Viewer User Guide Release 12.1.00 This Documentation, which includes embedded help systems and electronically distributed materials, (hereinafter referred to as the Documentation
ESD Monitoring, Ionization & Test. SmartLog V5. ESD Data Acquisition System. Rev Made in United States of America.
 EMIT ESD Monitoring, Ionization & Test SmartLog V5 ESD Data Acquisition System Rev. 2013-05 Features and Benefits The patented* EMIT SmartLog V5 is designed for fast, frequent, and accurate testing of
User Addendum User Box Scan support on the Fiery E C-KM Color Server, version 1.1
 User Addendum User Box Scan support on the Fiery E 10 50-45C-KM Color Server, version 1.1 This document describes installing software for User Box scan support on the Fiery E 10 50-45C-KM Color Server,
End User Manual. December 2014 V1.0
 End User Manual December 2014 V1.0 Contents Getting Started... 4 How to Log into the Web Portal... 5 How to Manage Account Settings... 6 The Web Portal... 8 How to Upload Files in the Web Portal... 9 How
KYOCERA Net Admin User Guide
 KYOCERA Net Admin User Guide Legal Notes Unauthorized reproduction of all or part of this guide is prohibited. The information in this guide is subject to change without notice. We cannot be held liable
Protegent Total Security Solution USER GUIDE Unistal Systems Pvt. Ltd. All rights Reserved Page 1
 Protegent Total Security Solution USER GUIDE 2007-2017 Unistal Systems Pvt. Ltd. All rights Reserved Page 1 Table of Contents PROTEGENT TOTAL SECURITY...3 INSTALLATION...4 REGISTERING PROTEGENT TOTAL SECURITY...
Marquette University Time and Attendance
 2016 Marquette University Time and Attendance TM02 Manager/Timekeeper Functions This guide helps you learn the most commonly used manager/timekeeper functions in EmpCenter Time and Attendance. The intended
Calendar & Buttons Dashboard Menu Features My Profile My Favorites Watch List Adding a New Request...
 remitview User Guide 1 TABLE OF CONTENTS INTRODUCTION... 3 Calendar & Buttons... 3 GETTING STARTED.... 5 Dashboard.... 7 Menu Features... 8 PROFILE.... 10 My Profile... 10 My Favorites... 12 Watch List...
CITO2 Installation & User Instructions
 CITO2 Installation & User Instructions DD 56107 Stoneridge Electronics Ltd 1. Installation...4 1.1. System Requirements...4 1.2. Installing CITO2...4 1.3. Uninstalling CITO2...4 2. Starting and closing
DeLoad. User s Manual UM-0084-A0. datataker and DeLoad are either registered trademarks or trademarks of Datataker Pty. Ltd.
 DeLoad User s Manual UM-0084-A0 Software & Manual Datataker Pty. Ltd. 2003-2004 All rights reserved Information in this document is subject to change without notice and does not represent a commitment
Intelligent Security & Fire
 Milestone XProtect Basis 4.0 Milestone XProtect Basis+ 4.0 Getting Started Guide 2005 PDF version Dear Milestone Customer, This Getting Started Guide explains how to install and use key features in Milestone
GRS Enterprise Synchronization Tool
 GRS Enterprise Synchronization Tool Last Revised: Thursday, April 05, 2018 Page i TABLE OF CONTENTS Anchor End User Guide... Error! Bookmark not defined. Last Revised: Monday, March 12, 2018... 1 Table
Halcyon Spooled File Manager GUI. v8.0 User Guide
 Halcyon Spooled File Manager GUI v8.0 User Guide Copyright Copyright HelpSystems, LLC. All rights reserved. www.helpsystems.com US: +1 952-933-0609 Outside the U.S.: +44 (0) 870 120 3148 IBM, AS/400, OS/400,
Qbox User Manual. Version 7.1
 Qbox User Manual Version 7.1 Index Page 3 Page 6 Page 8 Page 9 Page 10 Page 12 Page 14 Page 15 Introduction Setup instructions: users creating their own account Setup instructions: invited users and team
D3000.Lite User s Guide
 D3000.Lite User s Guide 2011 Datawatch Systems, Inc. Datawatch Systems is a registered trademark of Datawatch Systems, Inc. For Datawatch D3000.Lite Version 1.2 Manual release date: March 1, 2010 Datawatch
U.S. Pharmacopeia Pharmacopeial Forum. USP-PF Online Quick Start Guide
 U.S. Pharmacopeia Pharmacopeial Forum USP-PF Online Quick Start Guide Contents GETTING STARTED... 2 Document Conventions... 2 Technical Requirements... 2 LOGIN AND LOGOFF... 2 Logging On... 3 Logging Off...
RedBeam Inventory Tracking User Manual
 RedBeam Inventory Tracking User Manual Contact us at www.redbeam.com. Page 1 Table of Contents Table of Contents... 2 Overview... 4 RedBeam Inventory Tracking... 4 PC Prerequisites... 4 Mobile Computer
First Access Express OPERATOR GUIDE
 First Access Express OPERATOR GUIDE October 2016 Cutting edge simplicity Table of Contents Introduction... 4 PC Requirements... 5 Step 1. Software Installation... 5 Complete Installation Server and Client...
Unit III: Working with Windows and Applications. Chapters 5, 7, & 8
 Unit III: Working with Windows and Applications Chapters 5, 7, & 8 Learning Objectives In this unit, you will: Launch programs and navigate the Windows task bar. Perform common windows functions. Customize
BeAware Corporate Edition Admin Console. User Manual. BeAware Corporate Edition Admin Console Version 7.1. Ascentive LLC.
 User Manual BeAware Corporate Edition Admin Console Version 7.1 Ascentive LLC User Manual 1 Copyright Notice Copyright 2008 Ascentive LLC All Rights Reserved This document is protected by copyright law
Strike View 7.0 SERVER CLIENT SIMULATOR USER S GUIDE
 Strike View 7.0 SERVER CLIENT SIMULATOR USER S GUIDE Strike View Version 7.0 1 TABLE OF CONTENTS SECTION 1 CONTACT...3 SECTION 2 WARRANTY...4 SECTION 3 OVERVIEW...5 SECTION 4 HARDWARE REQUIREMENTS...6
Sync User Guide. Powered by Axient Anchor
 Sync Powered by Axient Anchor TABLE OF CONTENTS End... Error! Bookmark not defined. Last Revised: Wednesday, October 10, 2018... Error! Bookmark not defined. Table of Contents... 2 Getting Started... 7
(APPLIES ONLY TO CLIENTS WHO ENABLE THIS FEATURE)
") V 4.6.1.January2018 Document version 01-10-2018-02 End of Year LMS Updates Admin Guide NOTE: This DRAFT guide should provide a brief overview and screenshots of the End of Year LMS updates. All items in
V 4.6.1.January2018 Document version 01-10-2018-02 End of Year LMS Updates Admin Guide NOTE: This DRAFT guide should provide a brief overview and screenshots of the End of Year LMS updates. All items in
KYOCERA Net Viewer User Guide
 KYOCERA Net Viewer User Guide Legal Notes Unauthorized reproduction of all or part of this guide is prohibited. The information in this guide is subject to change without notice. We cannot be held liable
Managing WCS User Accounts
 CHAPTER 7 This chapter describes how to configure global e-mail parameters and manage WCS user accounts. It contains these sections: Adding WCS User Accounts, page 7-1 Viewing or Editing User Information,
DATA ARCHIVING SOFTWARE V.
 Interscan Corporation. ARC-MAX III - DATA ARCHIVING SOFTWARE V. 2.1.0.9 OPERATION MANUAL 1 Contents 1 Opening the program.... 3 2 Login Window... 3 2 Menu & Toolbar... 4 2.1 Current Data Display... 5 2.2
ECR Vault User Guide. An ImageDirector product from Milner Technologies, Inc. ECR Vault Version 8.0
 ECR Vault User Guide An ImageDirector product from Milner Technologies, Inc. ECR Vault Version 8.0 COPYRIGHT Copyright 1995-2015 Milner Technologies, Inc. This manual and the software described in it are
Fiery proserver User Guide
 Fiery proserver User Guide Congratulations on your purchase of the Fiery proserver, a powerful production solution for your printer. Before you begin Make sure that you have: About this document Installed
ELM Server Exchange Edition ArchiveWeb version 5.5
 ELM Server Exchange Edition ArchiveWeb version 5.5 Copyright 2016 Lexmark. All rights reserved. Lexmark is a trademark of Lexmark International, Inc., registered in the U.S. and/or other countries. All
User Guide For Version 4.0
 User Guide For Version 4.0 Easy-to-use, Complete Cyber Cafe Management Software by icafe Manager User Guide Contents Chapter 1: Introduction 7 1.1 About the Manual 7 1.2 Intended Audience 7 1.3 Conventions
Frequently Asked Questions
 Frequently Asked Questions Frequently Asked Questions for Cisco Unified Personal Communicator 8.6 and Voice and Video Firmware 8.6 for Cisco Virtualization Experience Client 6215 FAQs 2 Basics 3 Setup
IT Essentials v6.0 Windows 10 Software Labs
 IT Essentials v6.0 Windows 10 Software Labs 5.2.1.7 Install Windows 10... 1 5.2.1.10 Check for Updates in Windows 10... 10 5.2.4.7 Create a Partition in Windows 10... 16 6.1.1.5 Task Manager in Windows
exacqvision-entrapass (W10) Installation Guide
 Installation Guide") 1 Overview Purpose ExacqVision recorders now include Kantech Entrapass CE software. The purpose of this document is to guide the technician or installer through the process of installing and registering
1 Overview Purpose ExacqVision recorders now include Kantech Entrapass CE software. The purpose of this document is to guide the technician or installer through the process of installing and registering
Upgrading the Server Software
 APPENDIXB This appendix describes how to upgrade or reinstall the Cisco PAM server software, desktop client software, and Gateway module firmware. Contents Upgrade Notes for Release 1.5.0, page B-2 Obtaining
User Interface (Windows Edition)
") User Interface (Windows Edition) User Interface (Windows Edition) 1 Overview 1.1 1.2 1.3 1.4 1.5 1.6 1.7 1.8 1.9 1.10 1.11 Top Level Navigation 4 Navigation Menus 5 Expanding Navigation Category Menus
User Interface (Windows Edition) User Interface (Windows Edition) 1 Overview 1.1 1.2 1.3 1.4 1.5 1.6 1.7 1.8 1.9 1.10 1.11 Top Level Navigation 4 Navigation Menus 5 Expanding Navigation Category Menus
Wavelink Avalanche Site Edition Java Console User Guide. Version 5.3
 Wavelink Avalanche Site Edition Java Console User Guide Version 5.3 Revised 04/05/2012 ii Copyright 2012 by Wavelink Corporation. All rights reserved. Wavelink Corporation 10808 South River Front Parkway,
Quick Start Guide for Windows
 for Windows The Eudora 5.1 User Manual for Windows is on the Eudora CD included in the product box. If you prefer a printed and bound copy, you can purchase one from www.eudora.com or call 1-800-2-EUDORA
Quick Guide 0005C: Installing and Using e-bridge (Secure Messaging) on a Windows PC
 on a Windows PC") Quick Guide 0005C: Installing and Using e-bridge (Secure Messaging) on a Windows PC (This guide only covers the Secure Messaging function of e-bridge) I. Downloading and Installing e-bridge for Windows
Quick Guide 0005C: Installing and Using e-bridge (Secure Messaging) on a Windows PC (This guide only covers the Secure Messaging function of e-bridge) I. Downloading and Installing e-bridge for Windows
NORDSON CORPORATION AMHERST, OHIO USA
 CanWorks Operator Interface Tracking PLUS for CanWorks Systems with SM-2 Spray Monitors User Guide Part 1018132A NORDSON CORPORATION AMHERST, OHIO USA 2002 Nordson Corporation. All rights reserved. CanWorks,
GNAV Pro. Quick Reference Guide. NEC NEC Corporation of America. April 2010 NDA-30295, Revision 7
 GNAV Pro Quick Reference Guide NEC NEC Corporation of America April 2010 NDA-30295, Revision 7 Liability Disclaimer NEC Corporation of America reserves the right to change the specifications, functions,
VI-CENTER EXTENDED ENTERPRISE EDITION GETTING STARTED GUIDE. Version: 4.5
 VI-CENTER EXTENDED ENTERPRISE EDITION GETTING STARTED GUIDE This manual provides a quick introduction to Virtual Iron software, and explains how to use Virtual Iron VI-Center to configure and manage virtual
Table of Contents.
 Table of Contents http://www.advancedactuators.com 1. Items Included with the ThumbLock PCMU:... 2 2. IMPORTANT NOTE:... 2 3. Supported Operating Systems:... 2 Section 1 Installing the ThumbLock PCMU Software...
Web Mail Check v 1.0
 Web Mail Check v 1.0 TABLE OF CONTENTS LAUNCHING WEB MAIL CHECK... 3 HOME PAGE... 4 LOG IN... 4 LANGUAGE... 5 DIRECTIONS... 5 READING MESSAGES... 8 HEADERS... 10 PRINTER FRIENDLY VERSION... 11 REPLYING
Verity Central Quick Reference Manual. Document ID A04
 Verity Central Quick Reference Manual Document ID 6620-003-A04 Welcome to Verity Central. This Quick Reference Manual is intended to be used in tandem with the Verity Central Technical Reference Manual,
ACCESS CONTROL SOFTWARE V3.1 REFERENCE MANUAL
 ACCESS CONTROL SOFTWARE V3.1 REFERENCE MANUAL 01/2004 Centaur is a registered trademark of Position Technology INC. Pro-Report, Tracker, FrontGuard and FrontView are trademarks of Position Technology Inc.
Marquette University Time and Attendance
 2016 Marquette University Time and Attendance TM01 Student Employee Time and Attendance This guide helps you learn the most commonly used student employee functions in EmpCenter Time and Attendance. The
AbraScan Test Strip Reader Digital Reading of Test Strips for the Determination of Cyanotoxins in Contaminated Water Samples
 AbraScan Test Strip Reader Digital Reading of Test Strips for the Determination of Cyanotoxins in Contaminated Water Samples Product No. 475025 1. General Description The AbraScan RDS-1500 Test Strip Reader
CMS IP Software Documentation
 CMS IP Software Documentation Documentation Version August 2012 General Description. The CMS-IP software is used in conjunction with the L7700 IP Controller and displays real time information from the
PCGENESIS TECHNICAL SYSTEM OPERATIONS GUIDE
 PCGENESIS TECHNICAL SYSTEM OPERATIONS GUIDE 1/7/2019 Section C: The VerraDyne Print Manager Topic 1: Configuring the VerraDyne Print Manager, V1.1 Revision History Date Version Description Author 1/7/2019
Clock Comms User guide
 Clock Comms User guide Table of Contents Clock Comms...4 Getting Started... 5 Installing... 6 Setup - Welcome... 8 Setup - License Agreement... 9 Setup - Select Destination Location... 11 Setup - Start
Administrator Training. IDC TMWeb System. Control Room Technologies. IDC Corporation and. Presented for GM. April 2003 IDC Corporation
 IDC TMWeb System Administrator Training Presented for GM By IDC Corporation and Control Room Technologies April 2003 IDC Corporation 2003 1 Topics of Discussion Introduction to the system Steps to setup
Using the Control Panel
 Using the Control Panel Technical Manual: User Guide Creating a New Email Account 3. If prompted, select a domain from the list. Or, to change domains, click the change domain link. 4. Click the Add Mailbox
BeAware Corporate Edition Admin Console Version 6.8 Ascentive LLC
 User Manual BeAware Corporate Edition Admin Console Version 6.8 Ascentive LLC User Manual 1 Copyright Notice Copyright 2006 Ascentive LLC All Rights Reserved This document is protected by copyright law
Export and Import Authority Records
 OCLC Connexion Browser Guides Export and Import Authority Records Last updated: May 2016 OCLC Online Computer Library Center, Inc. 6565 Kilgour Place Dublin, OH 43017-3395 Revision History Date Section
Edit contains commands for adding, deleting, and changing configurations. The functions listed are dependent on what is highlighted in the tree.
 7 Menu Items 7.1 Edit Edit contains commands for adding, deleting, and changing configurations. The functions listed are dependent on what is highlighted in the tree. 7.1.1 Add Terminal Edit > Add Terminal
Table of Contents Overview of Fingerprint Technology...3 Introduction...3 System Requirements...4 Installation Guide...5
 Table of Contents Overview of Fingerprint Technology...3 Introduction...3 System Requirements...4 Installation Guide...5 Connecting the AccuTime Scanner...5 Installing the software...5 Initial startup
Security Explorer 9.1. User Guide
 Security Explorer 9.1 User Guide Security Explorer 9.1 User Guide Explorer 8 Installation Guide ii 2013 by Quest Software All rights reserved. This guide contains proprietary information protected by copyright.
EM L04 Using Workflow to Manage Your Patch Process and Follow CISSP Best Practices
 EM L04 Using Workflow to Manage Your Patch Process and Follow CISSP Best Practices Hands-On Lab Description Most corporations today have some form of patch process in place. In this session, you will learn
P r o f e s s i o n a l 4. 6 G e t t i n g S t a r t e d G u i d e
 Milestone XProtect P r o f e s s i o n a l 4. 6 G e t t i n g S t a r t e d G u i d e Dear Milestone Customer, With the purchase of Milestone XProtect Professional you have chosen a very powerful and intelligent
User Guide. Version R92. English
 AuthAnvil User Guide Version R92 English October 9, 2015 Agreement The purchase and use of all Software and Services is subject to the Agreement as defined in Kaseya s Click-Accept EULATOS as updated from
A-Scan Manager. Quick Reference Guide. Rev 1.04
 A-Scan Manager Quick Reference Guide Rev 1.04 Table of Contents 1. Quick Start Guide 1.1. Installing the A-Scan Manager Software.....4 1.2. Launch the A-Scan Manager Applications..7 1.3. Simple Preferences
Kaseya 2. User Guide. Version 7.0. English
 Kaseya 2 AntiMalware User Guide Version 7.0 English January 6, 2015 Agreement The purchase and use of all Software and Services is subject to the Agreement as defined in Kaseya s Click-Accept EULATOS as
CIS4Windows8Final. Name: Class: Date: Multiple Choice Identify the choice that best completes the statement or answers the question.
 Name: Class: Date: CIS4Windows8Final Multiple Choice Identify the choice that best completes the statement or answers the question. 1. Windows 8 is a/an _ for a computer. a. operating system b. software
WEB TIME SUPERVISOR GUIDE
 Revised 02/23/2018 WEB TIME SUPERVISOR GUIDE CLIENT RESOURCE PAYLOCITY.COM TABLE OF CONTENTS Web Time... 3 Home... 15 Employees... 28 Reports... 130 Web Kiosk Setup... 132 Glossary... 156 Index... 158
Time Reorder Utility User Manual
 Time Reorder Utility User Manual Revisions...3 Introduction...4 Getting Started...5 Running Modes...7 Tray icon menu...7 Enter Password...8 Connections...8 Define Connections...8 Verify Connections...9
SLS-ENVR2016 Network Video Recorder V2.2.2 Quick Setup Guide
 SLS-ENVR2016 Network Video Recorder V2.2.2 Quick Setup Guide The SLS-ENVR2016 series NVR is an intelligent and compact appliance that provides a network interface to monitor, record and playback video
Manage and Edit Sessions
 Manage and Edit Sessions With TurningPoint, you can stop and save a session, and pick up where you left off at a later time. You can also use a TurningPoint setting to create back-up files of your session.
Amazon WorkMail. User Guide Version 1.0
 Amazon WorkMail User Guide Amazon WorkMail: User Guide Copyright 2017 Amazon Web Services, Inc. and/or its affiliates. All rights reserved. Amazon's trademarks and trade dress may not be used in connection
CCC ONE Comp-Est. New Install Reference Guide. version 4.5 and above
 CCC ONE Comp-Est New Install Reference Guide version 4.5 and above Quick Reference Guide Table of Contents... 1 Step One: Before you begin... 3 Step Two: Plan your install... 4 Step Three: Start the install...
Quick Start Guide. ITDFoodSafety.com T3QSSW
 4680 Lipscomb St. N.E. Suite 1 Palm Bay, FL 32905 Office: 321-676-3194 Fax: 321-674-7018 Info@ITDFoodSafety.com Quick Start Guide T3QSSW-140708 ITDFoodSafety.com Introduction Installing the PC software
Tapit 6 Call Accounting Software Manual
 Tapit 6 Call Accounting Software Manual Table of Contents DOCUMENT REVISION RECORD 7 RELATED DOCUMENTATION 7 TAPIT 6 CALL ACCOUNTING MANUAL 8 MINIMUM SYSTEM REQUIREMENTS 8 INSTALLATION 9 BEFORE INSTALLING
Outlook 2010 One. Wednesday, August 7, 9-11 am. Agenda:
 Page 1 Outlook 2010 One Wednesday, August 7, 9-11 am Agenda: Outlook Search Options Working with Attachments Creating a Signature Marking a Message as Read Flag an item for Follow-Up Reply, Reply All &
With the purchase of ONSSI NetDVMS you have chosen an extremely powerful and intelligent surveillance solution.
 Dear ONSSI Customer, With the purchase of ONSSI NetDVMS you have chosen an extremely powerful and intelligent surveillance solution. This Getting Started Administrator Guide will explain how to install
User Guide. Version R95. English
 Anti-Malware (Classic) User Guide Version R95 English July 20, 2017 Copyright Agreement The purchase and use of all Software and Services is subject to the Agreement as defined in Kaseya s Click-Accept
User Guide. Version R93. English
 Anti-Malware User Guide Version R93 English March 17, 2017 Copyright Agreement The purchase and use of all Software and Services is subject to the Agreement as defined in Kaseya s Click-Accept EULATOS
BackupVault Desktop & Laptop Edition. USER MANUAL For Microsoft Windows
 BackupVault Desktop & Laptop Edition USER MANUAL For Microsoft Windows Copyright Notice & Proprietary Information Blueraq Networks Ltd, 2017. All rights reserved. Trademarks - Microsoft, Windows, Microsoft
GOBENCH IQ Release v
 GOBENCH IQ Release v1.2.3.3 2018-06-11 New Add-Ons / Features / Enhancements in GOBENCH IQ v1.2.3.3 GOBENCH IQ v1.2.3.3 contains several new features and enhancements ** New version of the comparison Excel
KASPERSKY LAB. Kaspersky Administration Kit version 6.0. Reference Book
 KASPERSKY LAB Kaspersky Administration Kit version 6.0 Reference Book KASPERSKY ADMINISTRATION KIT VERSION 6.0 Reference Book Kaspersky Lab Ltd. Visit our website: http://www.kaspersky.com/ Revision date:
Pepkor webcom Quick Reference Guide. Version Date: 2013/12 Version Number: 1.3
 Pepkor webcom Quick Reference Guide Version Date: 2013/12 Version Number: 1.3 Table of Contents 1 INTRODUCTION... 4 2 LOGGING IN... 4 3 NAVIGATE INSIDE WEBCOM... 5 3.1 MAIN SECTION 5 3.1.1 Home... 5 3.1.2
Infinova SS200T3R Embedded VMS Box
 Infinova SS200T3R Embedded VMS Box WARNING Embedded VMS advanced maintenance is special activity and it is highly recommended that only trained engineers operate the maintenance procedures. Incorrect configuration