When Worlds Collide: Autodesk Revit Structure in a Multidiscipline Firm
|
|
|
- Brent Morris
- 5 years ago
- Views:
Transcription
1 When Worlds Collide: Autodesk Revit Structure in a Multidiscipline Firm Janelle Meagher, PE KlingStubbins, Inc., a Jacobs Company Natasha Luthra KlingStubbins, Inc., a Jacobs Company SE5011: This class will use several key example projects to address the workflow, coordination, ownership, and graphical issues associated with creating multidiscipline models. The class will cover the pros and cons of using linked vs. shared models among disciplines. We will explore how the ownership of model elements (slabs, walls, floors, MEP fixtures, etc.) interacts among models and discuss the best practices for assigning ownership. We will explore key aspects of developing an efficient workflow process to maintain model accuracy when linking models to analysis software. We will discuss different workflow options for projects that can be applied regardless of whether you use round tripping or not. You will learn to use linked views to facilitate coordination across disciplines in an efficient manner and how to develop the level of detail for model geometry used in the structural model to increase the functionality of clash detection software with Autodesk Navisworks Manage. Learning Objectives At the end of this class, you will be able to: Identify solutions for visibility issues in multidiscipline models (structural+architectural+mep) Assign and track ownership of elements within models to the appropriate discipline Evaluate workflow issues between analysis software and Revit Structure Create the appropriate level of detail to maximize clash detection within your model About the Speakers Janelle Meagher is a professional engineer in the field of structural engineering working in the KlingStubbins Washington, D.C., office. She has been working in the industry for nine years, and graduated with a bachelor of science in civil engineering from Drexel University. She has been using Autodesk Revit Structure for six years, and is an active member of the BIM Standards Committee at KS which works to develop standards, templates, workflow, and to push the boundaries of BIM and digital design. She was a speaker at AU in 2010, and is a regular presenter at KlingStubbins in-house Revit Structure training sessions. She has worked on a variety of multidiscipline BIM projects ranging in size from a small bus stop canopy structure to an 18-story 300,000 square foot data center. jmeagher@klingstubbins.com Natasha Luthra is the digital design coordinator for the KlingStubbins Washington, D.C., office. She is an active member of the BIM Standards Committee at KS which works to develop standards, templates, workflow, and to push the boundaries of BIM and digital design. She has a bachelor s and a master s degree in architecture, and has worked on various projects as an intern architect as well as a DDC. In her role as a DDC, she oversees Autodesk Revit operations for projects of all sizes from a 6 million square foot campus to a 20,000 square foot museum project, and she is a regular presenter at various Revit user groups and Revit forums. She is a LEED AP and is interested in the intersection of cutting edge technology and design. nluthra@klingstubbins.com

2 Before we get into the intricacies of the software and learn how to work through issues with working on multi-discipline projects you should take some time to answer some big picture questions. Your responses to these questions will help clarify your path forward and make the model creation and setup process much easier. Model Creation and Setup Scope of work Are you a small architectural firm intending to cover all structural aspects of your project? Are you a structural consultant working with an architectural firm? Or are you a large architecture & engineering firm that collaborates on massive Revit projects? Based on the above replies you will know if you need to purchase independent licenses of Revit Structure or if you can suffice with the Structure tab in Revit Architecture. The second most important set of questions will relate to the size and scope of the projects you work on. This will help decide if you can model all your geometry in one model or if you need multiple models to document the project. I hesitate to draw this conclusion based on file size alone since this not a comprehensive indicator how easy or difficult it will be to work in the software. You should also consider the following and may in fact be a more reliable indicator of how your model should be set up. What is the scale of your project? If the scope of your project is not very large you may be able to work entirely in one model. This will certainly help eliminate some issues with coordination between models but if your scope expands you may find it easier to break up the project. If you have a large project [large floor plate/multiple wings to your building or multiple buildings] you will most likely need to split up the model. It is always better to split up the model by discipline rather than scope of work as connecting any systems in individual disciplines across models is an impossible task. How many people are going to be accessing your model? This is an aspect that we don t normally think of while deciding on the number of models but can have a huge impact on the team workflow and access to the central file. Picture this; you have 25 users on a large project team in one MEP model [say 10 HVAC, 5 Electrical, 5 Lighting and 5 Plumbing]. If each user saves diligently every hour and it takes each one of them 30 seconds to synchronize to central, that s 12.5 minutes of every hour when the central file is not accessible. Compound this with a deadline and large changes being made to the model [leading to much longer save times] and you have a frustrated team of people who can get no work done. 2

3 We have found a good rule of thumb is no more than users in one model. If the team will have more than that, we automatically spilt up the Revit file. Level of Development We will spend more time on this topic in a later section but it is important to remember that as you add more detail to your model the file size will also increase exponentially. Logistics of Project Some logistical issues you should also consider Are you co-located? There is a much greater value in having your entire team and central file located in one place and accessing the same server. This will help with software issues arising from working across networks and allow for much better communication overall. Being able to see changes as they happen in your model cannot and will not be able to replace any direct communication between teams. 3
4 A brief note on your hardware capacity, remember that in a shared environment like Revit files, you are only as fast as your slowest machine. One person taking 10 extra minutes to save [since he doesn t have the hardware capacity he needs] will cause a backup for everyone trying to save after him [Refer image on previous page] If you generally work on larger projects and only occasionally on a smaller scale, you may want to always follow a workflow that involves multiple models. Conversely, if you only rarely work on large projects you may choose to always follow the one-model method. We prefer to err on the side of multiple models but your process may dictate otherwise. Visibility Graphics Once you make a decision on your model creation process you will then focus on creating a standard template. There is great value in consistency and a standardized workflow. You will be able to build a template that is geared towards this process and your users will always know what to expect setup-wise as they move from one project to another. For example, if you follow a consistent method you will be able to set up view templates that automatically display correct graphic information from different disciplines. If you are working in one combined model you can use the discipline function of each view to help drive your visibility. On the other hand, if you are working in multiple models, you will most likely need to set up a series of linked views to help format the information visible from your linked models. You will also need to consider if your project employs phasing. Depending on if you are in one combined model or multiple ones you will either need to customize phase overrides appropriately and you may have to manually map individual phases between various models. Shared Coordinates If you do decide to use multiple models, the most important aspect you will have to master [with respect to setup, of course] is the process to set up Shared Coordinates. You may be aware that Revit does not include the concept of a 0,0 position hence, it is critical to set up shared coordinates to insure that all your models remain located consistent with each other. You will find multiple White papers and Revit forums that will help you master this process. Some suggestions; set up a separate Revit model just for Shared Coordinates and use this model to link in all other models and publish coordinates to. We also use an additional low tech approach to insure that we know if our models are moved. We have an Admin view in each model that only contains some detail lines [Think of X marks the spot], in our shared coordinates model we set up one view that looks only at these Admin views. If a model is moved, we have a clear graphical representation of this change and can use it to re-orient our models. 4
5 Things to remember Some more aspects of the Revit workflow to keep in mind while making the decision on model creation: Consider the use of families in your projects. You will recall that families once loaded into the project environment do not reload automatically. This may be an issue if you are using the same family in multiple models. For example, if the same titleblock is loaded into multiple models [for each discipline] and a change is made to this titleblock by the architects, the other disciplines will have to manually reload the family to make sure that the family is consistent across the project. You will also want to make sure that all families being used across disciplines [Lighting fixtures in the MEP model hosted on the ceiling grid in the Architecture model or Floor drains in the MEP model hosted on the floor in the Structural model] are made face hosted or non hosted. If they are not hosted as such, you will not be able to host these families on elements from a linked model. Finally, it is important to remember that drafting and annotation lines only show up in linked views across models. If you have a workflow that involves a lot of drafting/annotation work that needs to be referenced by various disciplines you may want to work in one combined model or create a series of specific linked views. No matter which method you choose, making this decision early on will make for a much smoother workflow and will drive a lot of your decisions along the modeling & documentation process. 5


6 Ownership of Elements Assigning ownership of elements within a model depends on many factors. Some of the things that need to be taken into consideration are the number of different disciplines in a model, weather the model is a shared model or a linked model and who should ultimately be responsible for each element. These are items that should be decided at the beginning of the project and would normally be included in part of a Building Information Model (BIM) Execution Plan. In our firm the structural discipline normally takes ownership of levels, grids, columns, slabs and bearing walls. However, the architects usually have a Revit model created before the structural engineers do requiring the architects to temporarily have ownership of the levels, grids, columns, slabs and walls. The transfer of ownership is generally done using the copy/monitor command. Copy/ Monitor Uses The copy/monitor command can be found under the Collaborate tab in Revit Structure under the Coordination ribbon. When Copy/Monitor is selected there are 2 different options that become available. One is to Use Current Project and one is to Select Link. The Use Current Project option is used most often when all disciplines are using a shared model. The Select Link option is used when each disciple has its own model and the models are linked together for coordination and documentation (similar to Xrefs in AutoCAD). There are only certain elements within a model that can be Copy/monitored. Elements that can be copy/monitored: Levels Grids Columns Walls (bearing and non-bearing) Floors Elements that cannot be copy/monitored: Slanted Columns In-place elements and families Design options Phasing (phase is not inherited) Items that are assigned to a construction phase can be copy monitored, however the phase that is assigned to the element is not transferred over to the new element. Once the element is copied the phase would have to be reassigned. 6
7 Workflow of Element Ownership At the beginning of a project the architect starts the BIM model and will populate it with levels, grids, columns, slabs and walls among other architectural items. This is used to develop the schematic phase of the project. After the schematic phase the structural, mechanical, electrical, and plumbing disciplines begin to create their own Revit models. At the beginning of the project it is decided who will eventually take control over the various different elements. At our firm the levels and grids are placed on their own work set (Shared Levels and grids) and are ultimately owned by the structural discipline. The structural discipline also takes ownership of columns, the structural portion of a floor slab (architecture still maintains ownership of the finishes) and bearing walls. Non-bearing walls continue to be maintained by architecture. Even though the structural and architectural disciplines maintain the ownership of levels, grids, columns, slabs and walls it is important to keep the other disciplines informed of changes that are made throughout the design since mechanical, electrical and plumbing often have elements that are hosted on the floor slabs, walls and ceilings. The general workflow for creating and maintaining a shared or linked model is as follows: Architecture creates the Revit model with levels, grids, columns, walls and other architectural elements Structural copy/monitors grids levels and columns Structural copies slabs (monitor is not used and this decision is explained further below) Structural copies bearing walls (monitor is not used and this is discussed further below) Structural adds beams and all other structural elements Architecture deletes columns and changes slab depth to the depth of the finish floor When changes are made to the model all disciplines are notified via Revit will issue a coordination warning when link is reloaded or once change is made if model is shared Changes can be reviewed by each discipline and an action taken The copy/monitor process and the tracking of changes is handled a little differently for each type of element. Levels, Grids and Columns Levels, grids and columns are all handled similarly when structural creates them from the architectural model. All of these are both copied and monitored. This is done because the location of the levels, grids and columns directly affects each discipline (architecture, structural, MEP, etc) and therefore requires a more automated approach for how these locations are monitored. Changes to the locations of each of these elements often signify major design changes as well, which would trigger the need for them to be more closely monitored. Once the copy/monitor tab is hit in the Collaboration ribbon another ribbon displays and the Options tab should be selected. This will create a pop up window that will provide the following copy/monitor options for each element: 7


8 The Categories and Types to copy portion allows you to map the copied element to a specific type for the new element. These should usually be the same if you are using companywide standards. The Additional Copy Parameters are generally dealing with creating a suffix or prefix to a level or Grid name. However, for the Columns tab there is an option to split the columns up by levels. This is an option that really can be done either way. If the option is checked it will take all the columns from the architectural model and split them up by level. This way when the model is brought into the analysis software it will already have the columns split up and the design will be done on a per level basis. If the box is unchecked the columns can always be split up once it is brought into the analysis software. Slabs Slabs are created by structural by using the copy/monitor command and selecting the slabs from the architectural link. The slabs are only copied and not monitored because the frequent nature of the architects changing the slabs to different types due to the different finishes throughout the building. Once structural copies the slab it is then changed to the structural core only. At this point the architects can change all of the slabs in their model to the floor finish only. The architects can leave the whole slab system in their model if they choose, but this should be noted so that when clash detection is done duplicates may come up as occupying the same space in both the architectural and the structural models. Slabs are monitored through the use of linked views. At the beginning of the job we have the architects set up linked views for each floor level that shows the floor slabs only. This way when we want to coordinate edge of slab locations it is very easy to see where the edge of slab is and how or where it was moved to when a change happens. Below is an example of how a linked view is set up and how it is viewed. 8


9 One item to watch out for when you are editing slabs is to be aware of how the MEP discipline is using the slab. Often times floor drains are hosted on slabs or hosted to the face of a slab. So, when a change 9

10 is made to the slab edge, depth or location both the architects and the MEP disciplines need to be made aware. Walls Linked Model Walls are set up a little differently if you are using a shared model or a linked model. In a linked model the structural engineer will copy only the bearing walls from the architectural link. This is handled very similar to slabs. The bearing walls are maintained by the structural engineer and the non-bearing walls are owned and maintained by the architect. The bearing walls are copied only (not monitored) and are coordinated through the use of Linked views. See above for more on setting up the linked views. Items to watch out for with walls are hosted receptacle families. So, electrical should also be included in any conversations or notifications about wall changes. Walls Shared Model With a shared model there is a new tool available in Revit 2012 in both Revit Structure and Revit Architecture. The Parts tool allows for the use of a single wall that is used by both architecture and structural. Previously duplicate walls were required because the wall types for architecture often included both the structural core and all of the finish elements like gyp board, brick, etc. Usually, the structural engineers did not want to see all of the extra information on our drawings so we were forced to create a new wall in the exact same place for our structural bearing wall. With the new parts function each element in a wall type can now be isolated. This allows for a single wall that can be displayed with all parts for the architectural drawings and only the core part for the structural drawings. This is done through the use of a filter on the structural views. Below are the 3 examples of how the walls can be displayed (Original, Parts, and Parts w/ a filter applied) 10

11 The Parts command can be activated by selecting a wall and then selecting the parts tool. To create a filter in a view so that only the core of the wall is shown, go to the view you want to apply the filter to. Go to the view visibility tab and then add a new filter by doing the following: 11
12 Workflow for Analysis Software Now that the model has been started it is important to set up the analytical model and physical model of the elements within the Structural model. Adjusting the analytical model as the model is being built will save you a lot of time in the long run and will also help you address what items need to be modeled accurately for multi-discipline clash coordination. Setting up the analytical model can be different depending on what analysis software you are using, however, most of the Revit setup should be the same no matter what software you are using. Analysis Software with Revit links Robot Structural Analysis RAM Structural System RISA-3D & RISAFloor ADAPT-Builder CSC Fastrack Building Designer/Orion Project Storm, etc.. While there are many platforms available, this session and handout will deal strictly with RAM Structural System. Things to Consider before setting up the analysis model Before the model is even started there are some items that need to be considered. The first question that should be asked is which platform you are starting with. Are you going from Revit to the analysis software or from the analysis software to Revit? Perhaps these questions are best answered if you know the architect has already created a reasonable Revit model. If this is the case then it may be easy to copy/monitor the structural elements and quickly build a model in Revit first. Or maybe you have already done some bay studies in the analysis software in which case it may be easier to start in the analysis software. The import or export can be done either way, so it really is a project by project decision. We have found that round-tripping may run a little more smoothly if the project is actually started in Revit first and then brought out to the analysis software. With this concept the workflow would be as follows: Step 1 Architect creates the model Step 2 Structural copy/monitors levels, grids, columns, slabs and walls Step 3 Structural adjusts elements and fixes analytical model Step 4 Structural adds miscellaneous beams required for structural framing (remember beam sizes are not important since the sizes will be changed in the analysis model) Step 5 Analysis checks are run in Revit prior to export Step 6 Export the model to the analysis software Step 7 Add loads in analysis software Step 8 Modify slab spans as required to ensure deck is spanning in proper direction Step 9 Run analysis software and perform design Step 10 Export model back to Revit Step 11 Notify all disciplines that changes to the structure have been made so they can reload their link if linked models are used Step 12 Coordinate changes with disciplines and make changes to structure 12


13 Step 13 Export model back to analysis software Step 14 Repeat steps 9 thru 13 as often as required Step 15 Print contract documents Adjusting the Analytical Model With the release of Revit Structure 2012 there were a lot of changes with the way the analytical model is adjusted and how the information for the analytical model is accessed. These changes make it much easier to modify the location of the analytical model and are a big improvement from previous versions. In Revit Structure 2012 the analytical model has been completely separated from the physical model and a new tool has been added in the view settings bar in the lower left-hand corner of the screen which allows you to isolate the analytical model. Columns When you are modeling columns in Revit the physical model should have the top and bottom offsets set to the splice location of the column so that differences in column widths from floor to floor can be taken into consideration by architecture. If the column is not extended up to the splice location and there is a change in column size from floor to floor the architects may not account for the proper size when they are setting the column cover dimensions, so this is an important feature that is often overlooked. Now that the physical model is set to the actual top and bottom locations it is important to adjust the analytical model. For columns it is best to always have the alignment method of the analytical model set to Projection and the base projection should be set to the Base Level Reference and the top projection should be set to Top Level Reference. It is important to remember that the analytical model properties can only be accessed by selecting the analytical model only. An example of both the physical model properties and the analytical model properties for a column can be seen below: 13


14 Beams When you are modeling beams in Revit the physical model should be offset below the slab. This elevation can change throughout a floor level, especially if you have slab depressions for architectural floor finishes like terrazzo or stone. Now that the physical model is set to the actual beam location it is important to adjust the analytical model. For beams it is best to always have the alignment method of the analytical model set to Projection and the start and end projections should be set to the actual floor level. An example of both the physical model properties and the analytical model properties for a beam can be seen below: 14


15 Floors and Footings When you are modeling floors and slab foundations in Revit the physical model should be set to the actual required location. For floors the alignment method of the analytical model should be set to Projection and the projection should be set to Level. This is slightly different for foundation slabs. For foundation slabs the projection should be set to Top of Slab, this is because foundation slabs are often used at the base of a column which is offset from a Level. The physical model and analytical model of isolated foundations and wall foundations automatically snap to the physical/analytical model of the column or wall that they are supporting so there is no need to modify these as long as the bottom of the column/wall analytical model is set to the proper setting. Miscellaneous Framing Often times in jobs there are miscellaneous framing elements that are placed in the Revit model that do not need to be exported out for analysis. Some of these items included curtain wall supports, curbs, screen walls for mechanical rooftop equipment, and folding partition supports. There are two ways that these miscellaneous pieces can be handled. Since they will always need to be part of the Revit model (especially curtain wall supports for duct clash detection) deleting them from the model is not an option. We have the option when the model is exported for analysis to only do a selective export. This option is only recommended if the job is fairly small and has limited items that will not be exported. This can easily be achieved by creating a 3D view and call it Analysis Export. Within the Analysis Export view any item that should not be transferred to the analysis model should be hidden from view. That way when you are ready to do an export you can go to the view and select the whole model for selective export. By default all items that are hidden are not selected and will not be transferred to the analysis model. As it was stated before this can get cumbersome as the model gets bigger and more items need to be left out of the model. A more effective approach is to do a full model export and simply uncheck Enable Analytical Model in the physical model properties of any item that should not be exported to the analysis model. Below are some examples of this approach (screen wall and curb): 15


16 Revit Analysis Checks Before exporting the model it is important to run the Revit Analysis Checks. By running these checks you will be able to catch most errors that would occur and crash the model during the export. Running these checks also ensures that all of the members are properly supported prior to export. These checks can be accessed in the Analyze tab and are located in the Analytical Model Tools ribbon. Once the checks are run any warnings found should be investigated and fixed prior to export Advanced Analytical Adjustments During the Revit analysis checks it may find that some members have unsupported ends. This is most easily fixed by the new advanced analytical adjustment feature in Revit From the warning you can identify the element ID that is unsupported. You can either hit the Show button on the warning or go to a 3D view and do an ID search for the element (I find the second option more effective at pinpointing the element). Once the element is found in the 3D view crop the view and Isolate the analytical model. Then once the analytical model element is selected a new ribbon pops up and Analytical Adjust can be selected. 16


17 This will then add black nodes at the ends of the analytical members that can simply be dragged to the proper location. See below: Preparing to Export to Analysis Software When you are ready to export your model to an analysis software program you can go to the Add-Ons tab in Revit Structure. From here you will select External Tools and select the option, Export to RAM. Once this option is selected a new window will pop up for the RAM export. Important items to note on this screen are the Mappings and Setting tabs. The mapping tab,, is used to link certain family types in Revit to the floor, beam, slab, etc type in the analysis software program. The most important thing to remember when you are creating your mapping file is that the deck type label must be exactly identical to the label listed in your analysis software. For 17


18 example if I have a Revit slab that is a 3 composite deck with 3 ¼ of lightweight concrete I want to be sure that I am mapping that slab type in Revit to the CMC-USD 3.0LokFloor defined in RAM Revit Mapping File RAM Deck Properties The Settings tab has three main areas. One tab lists update options, another tab lists an offset option and the third tab allows you to indicate what warnings you want to have reported. The Update option tab will allow you to decide which items you want to be updated. This is important if you come across items that do not transfer properly. For instance Revit does not support continuous footings so any continuous footings input into RAM will not transfer back to Revit. Another item that you may want to uncheck is braces. In RAM braces are only brought across if they are listed as being set to Top of Member. There are many times when the detailing of your braces will not allow this due to geometry if you need to have the braces modeled accurately in Revit. So, an option would be to not transfer the braces from Revit to RAM and then add the braces separately in RAM. This means any updates to foundations or braces would have to be made manually in either program. The offset tab is useful because RAM inserts everything at 0,0,0 and sometimes your Revit model may be set to Shared Coordinates with the actual coordinates and elevations of the building being reference. The offset tab allows you to place these coordinates into the model so that when the model is brought back to Revit it is inserted at the proper location. 18


19 Items that need to be added in Analysis Software Once you are in the analysis software and the model has been created there are a few items that need to be added and checked. The first item that needs to be added is the loads that will determine the size of the members. All surface loads, line loads, point loads and snow loads should be input into the model through the analysis software that you are using. It is important to know how these loads transfer over from the analysis software you are using to Revit. If you are using RAM all surface loads should be input using the Whole Diaphragm option in lieu of the Whole Floor option. This is done because if the Whole Floor option is chosen then the loads when they are brought back into Revit do not get clipped back to the slab edge as you can see below. If Whole Diaphragm was used then the loads would have been clipped back to the slab edge. Another item that should be addressed while you are in the analysis model is to verify the span of the deck. This is especially important if you have a radial grid and your deck span varies from bay to bay. When modifying the decks it is best to use the Change Polygon command in RAM to adjust the spans from what is shown in Revit. By using the Change Polygon command it will not break the link that was originally created from the Revit model. Once the loads and the decks have been added and verified you can then go ahead and run the analysis model and perform the design of all the members. Export back to Revit Now that the full design of the model is complete you can export the model back into Revit by using the Add-Ins, External Tools, and Import Model from RAM command. After the import is finished a notice should be sent out to all disciplines notifying them that the model has been updated with all the proper member sizes. This will allow the other disciplines to start checking how your updates may affect them. For instance, the architects would verify ceiling heights, mechanical would verify room for or clashes with ductwork, plumbing may check for piping interference with beams locations, etc. As everyone continues to coordinate changes can be made in the Revit model and then exported back into the analysis program to verify the design. 19
20 Tips, Tricks and Items to Remember for Linking Analysis Software to Revit Continuous foundations in RAM are not supported by Revit Cantilevers in Revit must be split into 2 members or they will not export to RAM Braces analytical model must be set to top of brace or it will not export to RAM Mapping files should be kept up to date Adjust the analytical model as you go and only add the analytical model to required elements Roundtrip only as required 20
21 Coordination and Clash Detection Regardless of if you have one model or multiple ones, once a certain amount of modeling is done, you will want to compare and coordinate the various disciplines. An early and through discussion of what elements need to be modeled such that they can be clashed with each other is key to a well-coordinated project. Agreeing on a comprehensive Level of Development can help ease this process. On a purely technical note, there should also be early discussion and agreement on a shared coordinate system so that when multiple models are brought together in a 3rd party software like Navisworks, the model is correctly located. One set of documents that can help you get started on this discussion is the AIA E : Building Information Modeling Protocol Exhibit. A free sample of this can be obtained from the AIA at This document describes 5 different levels of development for 5 general levels of completeness of your Building Information Model; you will want to adjust this list to suit your discussion. For example, at KlingStubbins we have modified the information from this document and created a BIM Baseline document that classifies these categories and levels of completion into a more traditional organization of Conceptual Design, Schematic Design, Design Development & Construction Documentation [see associated PowerPoint for examples]. We then use this BIM Baseline as a jumping off point for a comprehensive understanding of what elements will be modeled and when we can reasonably expect to clash these elements against each other. Clash Detection There are multiple software available to help you conduct your clash detection process including one built natively in Revit. Depending on the frequency of clash detection as well as your Level of Development you may want to choose to continue to run these tests in Revit or invest in a 3 rd part software. We have used both the detection capabilities of Revit as well as Autodesk Navisworks, here is a quick review of both based on our experience. Clash Detection in Revit Revit has a somewhat rudimentary clash detection tool that is called Interference Check built into the software itself. This can be helpful if you are looking to coordinate elements within your model or any other model created in Revit. It has the advantage of being easy to use and that it does not require an additional learning curve. Since you are creating these clashes in the tool that you are creating your model in [unlike a 3 rd party software] it is also much easier to track and make changes as you see them. Unfortunately, the tool itself is not very robust and suffers from a lack of fine grain control over the elements you can clash against. As you can see in the image, you can only clash one category against another and can make no allowances for tolerances etc. 21

22 Clash Detection in Navisworks One major advantage this approach has is a reduction in file size. Navisworks will compress your Revit file to a much smaller footprint and allow you to clash against models not created in natively in Revit [if you are working with outside consultants]also, you will be able to set up custom rules and tolerances in Navisworks that will let you create a more realistic and useful Clash report. On the other hand, the major disadvantage to using Navisworks is way-finding. On a large project it can be very hard to orient yourself in the model and be able to pinpoint where you are and where exactly the clashes exist. Also, sometimes it can be very hard to distinguish between various elements graphically. Most elements come in into Navisworks in shades of grey and unless you are looking at the properties of specific elements you may find it frustrating to quickly and easily distinguish between various elements/models etc. Here is how we have learnt to work around these drawbacks using a combination of custom Revit families and new tools available in the latest release of Navisworks. 22


23 3D Grid Family I take no credit for the idea or execution of this family, it has been around on the Revit forums for a few years now. You may have noticed that grids created in Revit do not show up 3D, hence, when exported to Navisworks they will not visible. Since we frequently use grids to help us orient ourselves in the project we look to this family to export the grid information to Navisworks. This family is made up of Model Text arrayed along a Model Line and allows you to input grid names into this Model Text such that it is visible in 3D. There is some amount of duplication and manual work required; since you will have to physically place and populate the information in this family. However, once it has been set up in your project it can be extremely helpful while running clashes in Navisworks. In this example below, we can now very quickly tell that our clash exists near the intersections of gridlines L and 6. 23

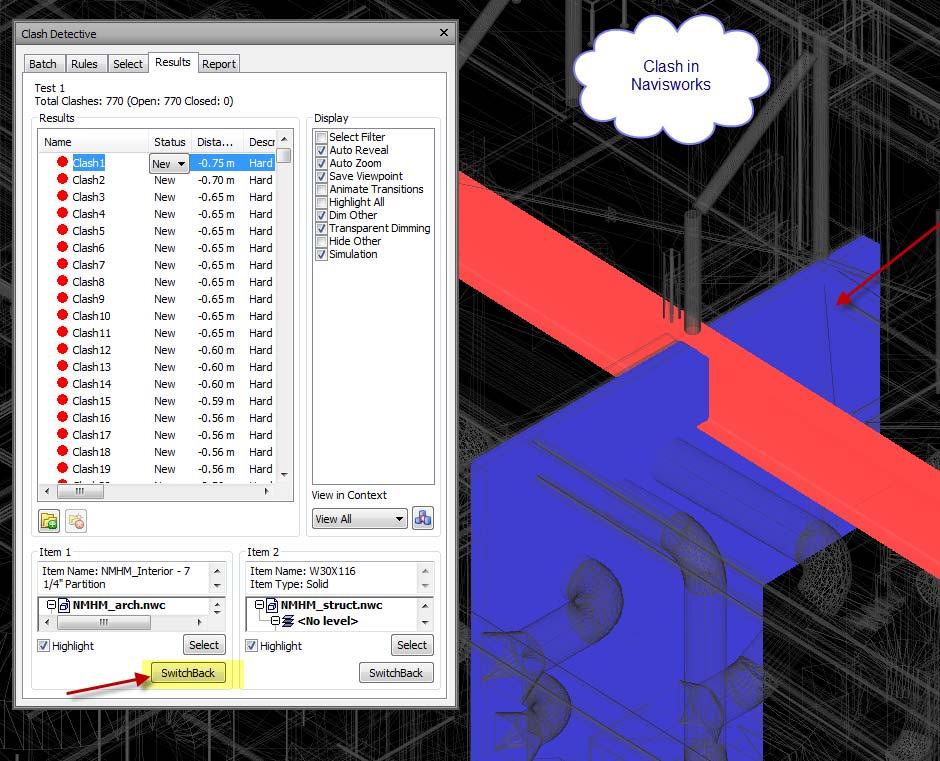
24 Revit Switchback in Navisworks One drawback of the family above is if you have a project with a large number of floors you will have to copy this set of families along each level and potentially rename the grids to include the level information. There is a new tool in Navisworks 2012 that may be more helpful in such scenarios. You can only access this in Revit 2012 and will have to install an additional plugin called Navisworks Switchback. Open Revit, start a new project and enable this plugin. Now you can close your new project but don t close the session, Revit is in switchback mode. In Navisworks now when you click the Switchback button, Revit will load the relevant project, find and select the element and zoom to it. Keep in mind that you will have to be working in a.nwc file exported from Revit. In my testing what I found most helpful was that not only did Revit open my project it also opened to the view my export was created from. This can be very useful if you set up your coordination view to display only certain information. 24
25 25


26 Appearance profiler and selection sets In previous releases of Navisworks you have been able to create specific selection sets to organize your elements in the NWC/NWD format, however, the latest release of the software allows you to graphically represent this selection set or specific properties. Say, for example, you create separate selection sets for roof decks, floors and precast slabs. You can use the Appearance Profiler to assign a specific color and transparency to this selection set, allowing you to quickly distinguish between these various elements. 26
27 Summary In conclusion we would just like to reiterate the importance of communication. In any team and any project communication is important but is it absolutely critical when you are working across disciplines, models and software. Revit is a very powerful tool but it is ultimately just a tool to help you design and build your project in the best way you can. 27
Effective Collaboration Techniques for the Architect and Consulting Engineer Using Copy/Monitor in Autodesk Revit
 Effective Collaboration Techniques for the Architect and Consulting Engineer Using Copy/Monitor in Autodesk Revit AB5281-V This class will move you beyond the basics of the project execution plan and will
Getting Along: Coordinating Architectural and Structural Design with Autodesk Revit Structure
 11/30/2005-8:00 am - 9:30 am Room:N. Hemispheres (Salon A2) (Dolphin) Walt Disney World Swan and Dolphin Resort Orlando, Florida Getting Along: Coordinating Architectural and Structural Design with Autodesk
Multi-Discipline Project Coordination with Autodesk Revit. Jim Stoneberger Avatech Solutions Neal O Neill Avatech Solutions
 Multi-Discipline Project Coordination with Autodesk Revit Jim Stoneberger Avatech Solutions Neal O Neill Avatech Solutions Origins Internal Origin, (0,0,0 in Revit) Revit does have an internal Origin point
Beyond the Limits: Using Autodesk Revit and Navisworks Manage for Design Collaboration on Large-Scale Projects
 Beyond the Limits: Using Autodesk Revit and Navisworks Manage for Design Collaboration on Large-Scale Projects Joseph Huang MWH Global Luther Lampkin MWH Global SE4259 This class covers best practices
The power of BIM for structural engineering. Autodesk Revit. Structure
 The power of BIM for structural engineering. Autodesk Revit Structure Improve Efficiency, Accuracy, and Coordination Concurrent modeling for structural design, analysis, and coordinated documentation Building
Multidiscipline Collaboration
 Founded in 1948 EPMC Firm all disciplines in house 1000+/- employees in 23 offices worldwide Global experience includes projects in 32 countries and 48 states Established BIM Research and Development in
Autodesk Revit. Structure
 The power of BIM for structural engineering. Autodesk Revit S L N E TW R K Structure Improve Efficiency, Accuracy, and Coordination Concurrent modeling for structural design, analysis, and coordinated
Cross-Discipline Coordination in Autodesk s Revit Platform
 Cross-Discipline Coordination in Autodesk s Revit Platform Matt Dillon The DC CADD Company, Inc. AB214-4 The Revit platform offers many opportunities and tools for coordination that have not been possible
Introduction to Autodesk Revit Structure
 11/30/2005-5:00 pm - 6:30 pm Room:N. Hemispheres (Salon E2) (Dolphin) Walt Disney World Swan and Dolphin Resort Orlando, Florida Nicolas Mangon - Autodesk SD35-1 This year, Autodesk is introducing the
Revit. Website:
 Revit Email: info@computertraininingwales.co.uk Website: www.computertrainingwales.co.uk Revit Beginner The objective of this Revit training course is to give delegates the fundamental skills to use the
Revit MEP 2013 Overview Day 1. William Johnson Senior MEP/AEC Application Specialist
 Revit MEP 2013 Overview Day 1 William Johnson Senior MEP/AEC Application Specialist CLASS SCHEDULE 9:00am Training Starts 10:30am 10:45am Morning Break 12:00pm 1:00pm Lunch Break 2:30pm 2:45pm Afternoon
Revit Structure. Autodesk Navisworks
 What is BIM? Autodesk BIM is an intelligent model-based process that helps owners and service providers achieve business results by enabling more accurate, accessible, and actionable insight throughout
What's New in Autodesk Revit Structure 2013? Rebecca Frangipane - KJWW Engineering Consultants
 Rebecca Frangipane - KJWW Engineering Consultants SE1485 This class will cover the new features for Autodesk Revit Structure 2013 software. We will examine new features for creating and manipulating parts,
Using Autodesk Ecotect Analysis and Building Information Modeling
 Autodesk Ecotect Analysis 2010 Using Autodesk Ecotect Analysis and Building Information Modeling This document helps you to get the most from Autodesk Ecotect Analysis software and building information
Tekla Structures and Autodesk Revit useful geometry exchange
 Tekla Structures and Autodesk Revit useful geometry exchange General guidance: Updated: 2nd June, 2014 (New material is starred) David Lash Engineering Segment FROM Autodesk Revit Architectural to Tekla
Questions and Answers
 Revit Structure 2009 Questions and Answers Revit Structure software uses a single, intelligent model to coordinate all the tasks structural engineers and drafters need to complete during the building design
TRAINING GUIDE FOR ADVANCE STEEL USERS
 TRAINING GUIDE FOR ADVANCE STEEL USERS Page 2 An Introduction to the Guide... 9 1 Welcome...11 1.1 Autodesk Revit...12 1.2 New in Revit 2018...13 2 Installation...14 2.1 System Requirements and License...15
The foundation of BIM for structural engineering. Autodesk Revit. Structure 2010
 The foundation of BIM for structural engineering. Autodesk Revit Structure 2010 Building Information Modeling for Structural Engineering Integrated tools for modeling, coordination, analysis, design documentation,
Revit MEP Project Setup Procedure
 NOTE: The following summarize the steps required to set up a Revit MEP project from scratch where an architectural model is linked into the MEP project. This information is not authorized by Autodesk and
What's New GRAITEC Advance PowerPack 2016
 What's New GRAITEC Advance PowerPack 2016 Table of contents WELCOME TO GRAITEC POWERPACK FOR REVIT... 5 NEWS... 6 Managers... 6 1: Family Manager... 6 BIM Connect... 7 1: Compliancy with Autodesk Revit
Questions and Answers
 Revit Structure2009 Questions and Answers Revit Structure software uses a single, intelligent model to coordinate all the tasks structural engineers and drafters need to complete during the building design
BIM Diploma content ( included courses) : Training course Course Levels Duration Outputs Revit MEP
 : Training course Course Levels Duration Outputs Revit MEP") What is BIM? Autodesk BIM is an intelligent model-based process that helps owners and service providers achieve business results by enabling more accurate, accessible, and actionable insight throughout
What is BIM? Autodesk BIM is an intelligent model-based process that helps owners and service providers achieve business results by enabling more accurate, accessible, and actionable insight throughout
Effective Collaboration using Autodesk Revit Structure and Autodesk Building Systems
 AUTODESK REVIT STRUCTURE AUTODESK BUILDING SYSTEMS Effective Collaboration using Autodesk Revit Structure and Autodesk Building Systems This white paper explains how structural engineers using Autodesk
Because After all These Years I Still Don t Get it!
 BILT North America 2017 Westin Harbour Castle Toronto August 3-5 Session 3.2 Shared Coordinates: Because After all These Years I Still Don t Get it! Class Description In an effort to reveal the system
Modeling Large-Scale Refrigeration Projects and the Necessary Steps to Stay Organized and Accurate
 Nik Weller LEO A DALY MP3735 Using Autodesk Revit software to model a large-scale refrigeration project with thousands of valves to schedule all needing their own identification while also dealing with
In Union There Is Strength: AutoCAD and Autodesk Revit in Concert
 November 30 December 3, 2004 Las Vegas, Nevada In Union There Is Strength: AutoCAD and Autodesk Revit in Concert Christopher S. Mahoney, AIA BD32-3 This session is intended to introduce Autodesk Revit
Table of Contents. What's New in GRAITEC Advance PowerPack 2018 WELCOME TO GRAITEC ADVANCE POWERPACK FOR REVIT NEWS... 5 IMPROVEMENTS...
 What's New 2018 Table of Contents WELCOME TO GRAITEC ADVANCE POWERPACK FOR REVIT 2018... 4 NEWS... 5 1: Compliancy with Revit 2017 and Revit 2018... 5 2: Prepare Background Model... 5 3: Link Background
ARCHITECTURE & GAMES. A is for Architect Simple Mass Modeling FORM & SPACE. Industry Careers Framework. Applied. Getting Started.
 A is for Architect Simple Mass Modeling One of the first introductions to form and space usually comes at a very early age. As an infant, you might have played with building blocks to help hone your motor
Structural Engineering Training courses :
 Structural Engineering Training courses : Course BIM Structural Diploma Revit Structure Robot Structure Analysis Autocad Structure Detailing Navis Works BIM Structural Diploma BIM structural diploma maximize
Building Information Modeling
 Chapter Building Information Modeling 1 Building information modeling (BIM) is an integrated workflow built on coordinated, reliable information about a project from design through construction and into
Autodesk REVIT (Architecture) Mastering
 Mastering") Autodesk REVIT (Architecture) Mastering Training details DESCRIPTION Revit software is specifically built for Building Information Modeling (BIM), empowering design and construction professionals to bring
Autodesk REVIT (Architecture) Mastering Training details DESCRIPTION Revit software is specifically built for Building Information Modeling (BIM), empowering design and construction professionals to bring
All In the Family: Creating Parametric Components In Autodesk Revit
 All In the Family: Creating Parametric Components In Autodesk Revit Matt Dillon D C CADD AB4013 The key to mastering Autodesk Revit Architecture, Revit MEP, or Revit Structure is the ability to create
Massing for Revit MEP. Simon Whitbread
 TM Massing for Revit MEP Simon Whitbread Got Your Attention? Good! The Wire Frame Model 1. Open the existing file: C:\RTCAUS2011\20-Massing for Revit MEP\01 Massing for Revit MEP.rvt 2. Open the Level
Autodesk Revit Architecture Certification Preparation
 John Herridge Autodesk, Inc. Glenn Katz Autodesk, Inc. AB3585 Autodesk Certification signifies your experience and expertise to employers and clients around the world and, as such, is a very powerful asset
Linking RISA Software with Revit 2017: Beyond the Basics
 Linking RISA Software with Revit 2017: Beyond the Basics Matt Brown, S.E. RISA Technologies Join the conversation #AU2016 Class summary The Link between RISA and Revit has existed for more than a decade
Importing and Coordinating Models
 Bonus Chapter 6 Importing and Coordinating Models It s amazing that we re up to Bonus Chapter 6, and yet I m sure many readers are still unclear about how BIM fits in here. Yes, most of the previous chapters
BIM Diploma content ( included courses) : Training course Course Levels Duration Outputs Revi t Architecture
 : Training course Course Levels Duration Outputs Revi t Architecture") What is BIM? Autodesk BIM is an intelligent model-based process that helps owners and service providers achieve business results by enabling more accurate, accessible, and actionable insight throughout
What is BIM? Autodesk BIM is an intelligent model-based process that helps owners and service providers achieve business results by enabling more accurate, accessible, and actionable insight throughout
Who Turned the Lights Out? Lighting Analysis with Autodesk Revit MEP 2012 and Autodesk 3ds Max Design 2012
 Who Turned the Lights Out? Lighting Analysis with Autodesk Revit MEP 2012 and Autodesk 3ds Max Design 2012 Eric Bogenschutz BSA LifeStructures MP5719 In this class, we will discuss multiple different lighting
Fast Content for AutoCAD MEP 2015
 David Butts Gannett Fleming MP6393 AutoCAD MEP 2015 software, a world-class design and drafting application, is the Zen master of mechanical, electrical, and plumbing design software. The software continues
Advanced Tips for Better Translation Autodesk Revit 2010 IES
 Advanced Tips for Better Translation Autodesk Revit 2010 IES IES Worldwide Support Series A. Chan and M. Farrell What is a gbxml? When you click on Set Model Properties, even though you are doing it within
StruSoft StruXML Revit Add-In Manual: Using Revit FEM-Design link
 StruSoft StruXML Revit Add-In Manual: Using Revit FEM-Design link StruSoft AB Fridhemsvägen 22 SE-217 74, Malmö, Sweden www.strusoft.com Version: June 19th, 2017 Copyright Copyright 2017 by StruSoft. All
BIM. The Fastest Way to Quickly & Easily Insert and Modify Elements that are used in Revit project
 BIM The Fastest Way to Quickly & Easily Insert and Modify Elements that are used in Revit project BIM Tree Manager Working with Elements Dynamic Tree allows easily to navigate, find, modify any element
StruSoft StruXML Revit Add-In Manual: Using Revit FEM-Design link
 StruSoft StruXML Revit Add-In Manual: Using Revit FEM-Design link StruSoft AB Fridhemsvägen 22 SE-217 74, Malmö, Sweden www.strusoft.com Version: January 4th, 2017 Copyright Copyright 2017 by StruSoft.
Autodesk Revit Structure & AutoCAD Revit Series Structure
 Autodesk Revit Structure software uses a single intelligent model to coordinate all the tasks structural engineers and drafters need to complete during the building design process from preliminary and
Interoperability with Structural Disciplines
 Interoperability with Structural Disciplines GRAPHISOFT Visit the GRAPHISOFT website at http://www.graphisoft.com for local distributor and product availability information. Interoperability with Structural
Sheets and Revisions A Super Duper Click Saver Production
 Sheets and Revisions A Super Duper Click Saver Production Jarod Schultz, Director of Autodesk Services 1 P a g e J a r o d S c h u l t z, i n i t i a l. a e c 2 P a g e J a r o d S c h u l t z, i n i t
Design Integration Using Autodesk Revit 2020
 Daniel John Stine AIA, CSI, CDT Design Integration Using Autodesk Revit 2020 Architecture, Structure and MEP SDC P U B L I C AT I O N S Better Textbooks. Lower Prices. www.sdcpublications.com ACCESS CODE
Linking your Revit Structure model with RISA-3D / RISA Floor
 RISA TECHNOLOGIES, RISA-3D / RISA Floor AUTODESK REVIT STRUCTURE WHITE PAPER Linking your Revit Structure model with RISA-3D / RISA Floor Autodesk Revit Structure users can now leverage the full power
Building Information ModelingChapter1:
 Chapter 1 Building Information ModelingChapter1: Building information modeling (BIM) is an integrated workflow built on coordinated, reliable information about a project from design through construction
Complete Display Control in Autodesk Architectural Desktop
 11/30/2005-10:00 am - 11:30 am Room:N. Hemispheres (Salon D) (Dolphin) Walt Disney World Swan and Dolphin Resort Orlando, Florida Complete Display Control in Autodesk Architectural Desktop Matt Dillon
Capitalize on the Collaboration between Architectural and Structural Software for Complex Projects
 Capitalize on the Collaboration between Architectural and Structural Software for Complex Projects Paul Boireau - former employee of Boll und Partner, now director of BIM Solutions Centre Jochen Tanger
Building Information Modeling
 Chapter Building Information Modeling 1 Building information modeling (BIM) is an integrated workflow built on coordinated, reliable information about a project from design through construction and into
Revit MEP. Autodesk Navisworks
 What is BIM? Autodesk BIM is an intelligent model-based process that helps owners and service providers achieve business results by enabling more accurate, accessible, and actionable insight throughout
Autodesk Revit Structure Autodesk
 Autodesk Revit Structure 2011 What s New Top Features Autodesk Revit Structure 2011 Software Enhanced Design Features Fit and Finish Slanted columns Beam systems and trusses Concrete clean-up Concrete
Revit and Dynamo For Landscape Architecture AR20475
 Revit and Dynamo For Landscape Architecture AR20475 William Carney BIM Director, BSA LifeStructures https://www.linkedin.com/in/wcarney Join the conversation #AU2016 Class summary This class will demonstrate
Schedule Anything in Autodesk AutoCAD MEP
 Matt Dillon Enceptia (Assistant/Co-presenter optional) [Arial 10] MP1424-L Learning Objectives At the end of this class, you will be able to: Explain the purpose of Property Set Definitions Create a custom
Architecture Engineering Training courses : Course BIM Architecture Diploma Revit Architecture 3D Max Vasari Navis Works Photoshop For Architects
 Architecture Engineering Training courses : Course BIM Architecture Diploma Revit Architecture 3D Max Vasari Navis Works Photoshop For Architects BIM ARCHITECTURAL DIPLOMA ( Design and visualization ):
The Consulting Engineer s Guide to Implementing Revit Structure
 The Consulting Engineer s Guide to Implementing Revit Structure Speaker: James Lupton James Lupton Consultants and Digital Construction (ATC) Assistant/Co-presenter: to be confirmed SE314-1 This session
What are Annotations? Workflow Methodology. Limitations. Annotations All Streams. Chris Needham. C3 Consulting Solutions
 Chris Needham C3 Consulting Solutions What are Annotations? Workflow Methodology Limitations Annotations Tags Symbols Dimensions Text Grids Levels *Scope Boxes 1 What are tags? Graphic symbols that reflect
This class is focused on the use of Revit for construction purposes.
 Session 4 Beyond Design (Bouygues) Class Description This class is focused on the use of Revit for construction purposes. You will see how to use Parts and Assemblies features in the construction workflow,
Revit Architecture Syllabus Total duration: 80 hours (Theory 40 Hours + Lab 40 Hours)
") Faculty Start Date End Date No of Students Revit Architecture Syllabus Total duration: 80 hours (Theory 40 Hours + Lab 40 Hours) Introduction About BIM Introduction to Autodesk Revit Architecture Revit
Faculty Start Date End Date No of Students Revit Architecture Syllabus Total duration: 80 hours (Theory 40 Hours + Lab 40 Hours) Introduction About BIM Introduction to Autodesk Revit Architecture Revit
Trademarks. Copyright 2018 by StruSoft. All rights reserved.
 StruSoft AB Fridhemsvägen 22 SE-217 74, Malmö, Sweden www.strusoft.com Version: June 28th, 2018 Copyright 2018 by StruSoft. All rights reserved. Content of this publication may not be reproduced or transmitted
Using the Revit Extensions for Steel Framed Floor Design and Analysis
 Using the Revit Extensions for Steel Framed Floor Design and Analysis David J. Odeh, PE, SECB Odeh Engineers, Inc., North Providence, RI Many structural engineering firms have adopted Autodesk Revit Structure
Design Integration Using Autodesk Revit 2018 Architecture, Structure and MEP
 Daniel John Stine CSI, CDT Design Integration Using Autodesk Revit 2018 Architecture, Structure and MEP SDC P U B L I C AT I O N S Better Textbooks. Lower Prices. www.sdcpublications.com ACCESS CODE UNIQUE
Revit Structure 2010 FUNDAMENTALS
 Revit Structure 2010 FUNDAMENTALS INSIDE: SUPPLEMENTAL FILES ON CD SDC PUBLICATIONS Schroff Development Corporation www.schroff.com Better Textbooks. Lower Prices. Module 1: The Basics of Revit Structure
Virginia Western Community College ARC 221 Architectural CAD Applications Software I
 Virginia Western Community College ARC 221 Architectural CAD Applications Software I Prerequisites CAD 241 Course Description Teaches the principles and techniques of architectural drawing practices through
May the Force Be With You: Autodesk Revit Tips and Tricks
 May the Force Be With You: Autodesk Revit Tips and Tricks David Cohn AB122-1R Do you want to become a Revit master? In this fun and informative class, you ll learn a host of Revit tips and tricks that
Course BIM MEP Diploma Revit MEP Navis Works
 Course BIM MEP Diploma Revit MEP Navis Works BIM Electromechanical Diploma : BIM MEP diploma maximize the BIM workflow optimization and gives the engineer the full capabilities to perform MEP Model consists
Autodesk Revit 6. Preview Guide. Contents
 Autodesk Revit 6 Preview Guide Contents Contents... 1 Welcome to Autodesk Revit... 3 About This Guide... 3 Autodesk Revit Terms... 3 What s New for 6.0... 4 Multi-user Element Borrowing... 4 Design Options...
NU REVIT TUTORIAL. Page 1 of 7
 NU REVIT TUTORIAL Instructor: David Snell, AIA LEED AP BD+C Tutorial 2: 2016-02-01 Page 1 of 7 Annotations All functions contained in the Annotate tab create 2D view specific elements. These elements will
Covers Autodesk Advance Steel fundamentals, so you become quickly productive with the software
 Covers Autodesk Advance Steel fundamentals, so you become quickly productive with the software Autodesk Advance Steel 2017 www.autodesk.com new Autodesk Advance Steel users. It is recommended that you
Command Name Icon Short cut Ribbon Panel Command Name Icon Short cut Ribbon Panel. Truss Home Structure Load Family Insert Load from Library
 Beam BM Home Structure Insert from File Insert Import Structural Wall WA Home Structure Image Insert Import Structural Column CL Home Structure Manage Images Insert Import Structural Floor SB Home Structure
EDSL Guide for Revit gbxml Files
 EDSL Guide for Revit gbxml Files Introduction This guide explains how to create a Revit model in such a way that it will create a good gbxml file. Many geometry issues with gbxml files can be fixed within
Get Connected Autodesk Revit MEP Connectors Demystified
 Get Connected Autodesk Revit MEP Connectors Demystified Shawn C. Zirbes CAD Technology Center, Inc. ASST MP59319 Having trouble getting your Autodesk Revit MEP families to connect to systems in your project?
DPR Model Slicer v3. Help Document
 DPR Model Slicer v3 Help Document What is DPR Model Slicer v3?... 2 What operating systems does it support?... 3 Is it compatible with previous releases?... 3 How does it work?... 4 How to create a new
MECHANICAL CALCULATIONS USING REVIT
 MECHANICAL CALCULATIONS USING REVIT PRESENTATION OVERVIEW ASHRAE 62.1 VENTILATION RATE PROCEDURE VS. ASHRAE 170 SPACE VENTILATION CREATE SPACES CREATE ZONE LEGEND CREATE A SPACE LEGEND HOW TO CREATE AND
Autodesk Revit Structure: The Complete Solution for Steel Buildings (SE2342) Kevin Lea CSC Inc David Zabka Design Data
 Kevin Lea CSC Inc David Zabka Design Data") Autodesk Revit Structure: The Complete Solution for Steel Buildings (SE2342) Kevin Lea CSC Inc David Zabka Design Data SE2342 Learning Objectives At the end of this class, you will be able to: Implement
Autodesk Revit Structure: The Complete Solution for Steel Buildings (SE2342) Kevin Lea CSC Inc David Zabka Design Data SE2342 Learning Objectives At the end of this class, you will be able to: Implement
Importing and Exporting FilesChapter1:
 Importing and Exporting FilesChapter1: Chapter 1 You can use Revit Architecture to import and export various file types, including AutoCAD and AutoCAD Architecture DWG files to use as design aids. You
Midas Link for Revit Structure
 Midas Gen Technical Paper Table of Contents Introduction Getting Started Send Model to midas Gen Update Model from midas Gen Applicable data for midas Link for Revit Structure What is Updated from midas
Autodesk Revit MEP: Fast Families for Engineers David Butts Gannett Fleming
 David Butts Gannett Fleming MP2531-L Once you start using Revit MEP, you find out that you need to learn how to create custom families and fast! This hands-on lab starts with the basics of creating custom
Autodesk Tinkercad Badge Guide
 Autodesk Tinkercad Badge Guide Abstract: Gain basic understanding of creating objects in Tinkercad; personalize and prepare those objects for TinkerCrafting (Minecraft import) Authors: John Helfen & Lynn
Roundabout Design Using AutoCAD Civil 3D 2010 Intersection Tools
 Roundabout Design Using AutoCAD Civil 3D 2010 Intersection Tools Marie-Pierre Lebel Consortech Solutions CV214-1 Learn how to leverage the new intersection design tools from AutoCAD Civil 3D 2010 for use
An Introduction to Autodesk Revit Massing, Surface Divisions, and Adaptive Components
 An Introduction to Autodesk Revit Massing, Surface Divisions, and Adaptive Components Chad Smith KarelCAD, Australia AB2463-L As the Revit massing tools become more polished and robust, users are becoming
Lighting Design and Analysis in Revit
 PRODUCT REVIEW By: Dan Stine Lighting Design and Analysis in Revit As the Building Information Modeling () movement continues to evolve or mature it is only natural that we now have more advanced features
Placing Spaces. Let Me Try! Before you begin. The following files are needed for this Let Me Try exercise: M_c04_archi_spaces_rmp2015.
 Placing Spaces Before you begin The following files are needed for this Let Me Try exercise: For Imperial: For Metric: c04_archi_spaces_2016.rvt M_c04_archi_spaces_rmp2015.rvt To access the files from
Making AutoCAD better for architects.
 Making AutoCAD better for architects. With Autodesk Architectural Desktop you get flexibility in both implementation and use, the efficiency of real-world building objects, and the very best AutoCAD based
Revit Structure 3 ETABS Data Exchange
 Revit Structure 3 ETABS Data Exchange Overview This document describes how to exchange Building Information Modeling (BIM) data between Revit Structure 3 and ETABS, a three-dimensional physical object
Making Your Label Styles Work For You in C3D
 Making Your Label Styles Work For You in C3D Mark Hultgren Smith Engineering CV110-5 Once you have completed this course, you'll understand and be able to apply the methods for developing a complete set
Software Development & Education Center. Revit 2013
 Software Development & Education Center Revit 2013 (Architecture BIM MEP Structure Family Editor) Autodesk Revit Architecture Essential Objective The primary objective of this course is to teach students
BLD How the Implementation of Revit for Rebar Detailing helped us win more business
 BLD126386 How the Implementation of Revit for Rebar Detailing helped us win more business Jonathan Hand Graitec Ltd Learning Objectives Learn how to use Revit tools for reinforcement Learn how to implement
Smart Sprinklers. Easy way of working with sprinklers
 Easy way of working with sprinklers Working with MEP elements Smart Sprinklers extension Smart Sprinklers application for Autodesk Revit MEP......allows designers to quickly distribute sprinklers in the
REVIT BEGINNERS. BOOKLET D Revit Architecture 2016
 Faculty of Engineering, Design & Construction Departments Engineering (Civil & Mechanical) and Sustainable Design Image Ray Georgiou 3D View, Visual Style Consistent Colours, Shadows On Student Name: REVIT
Customize Your Environment
 26 c h a p t e r 2 Customize Your Environment Every vector drawing program comes with default settings. In general, the defaults are OK, but customizing your preferences will make creating your vector
Update Enhancement List
 AUTODESK REVIT 2015 Update Enhancement List * Indicates an issue that was reported by a Revit user. Improvements made in Update Release 14 Revit 2015 build: 20160512_1515 Revit 2015 R2 build: 20160512_0715
the NXT-G programming environment
 2 the NXT-G programming environment This chapter takes a close look at the NXT-G programming environment and presents a few simple programs. The NXT-G programming environment is fairly complex, with lots
Connect the Dots: A Series of Sessions
 Connect the Dots: A Series of Sessions These sessions will cover the procedures for working in a Large Team Workflow BIM Project. The software products used for these sessions are: Revit Architecture Revit
CADS Revit Scia Engineer Link Best Practices
 CADS Revit Scia Engineer Link Best Practices Copyright 2013 Computer and Design Services Limited Contents Contents... 2 1 Installation... 4 2 Work Flow... 5 2.1 Revit Architecture Model to Scia Engineer
Revit Modeling Guideline
 January 1 Revit Modeling Guideline 1 Table of Contents Complex foundation elements... 3 Steel elements and reference lines... 4 Architectural walls... 5 Basic walls with complex geometry... 5 Slanted walls...
Suite en It Up with Autodesk ReCap
 Chad Studer ADSK Solutions RC3165 Static and mobile laser scanning technologies capture millions of points and provide photorealistic interactive virtual sites known as point clouds. With Autodesk ReCap
COPYRIGHTED MATERIAL. Making Excel More Efficient
 Making Excel More Efficient If you find yourself spending a major part of your day working with Excel, you can make those chores go faster and so make your overall work life more productive by making Excel