Autodesk Revit MEP: Fast Families for Engineers David Butts Gannett Fleming
|
|
|
- Jeffrey Anderson
- 5 years ago
- Views:
Transcription
1 David Butts Gannett Fleming MP2531-L Once you start using Revit MEP, you find out that you need to learn how to create custom families and fast! This hands-on lab starts with the basics of creating custom content by walking you through the most efficient way to create your model. We will help you understand different engineering object behavior, explain how to add parameters for families and schedules, and wrap up by reviewing additional tools such as lookup tables, model review family tools, and family guides. Learn where you can save time and money on one of the most important parts of Revit MEP component families! Learning Objectives At the end of this class, you will be able to: Describe key family concepts for family types and categories Explain the four key starter concepts: reference planes, labels, solids, and constraints Describe additional resources: lookup table review, Revit modeling guidelines, shared parameter converter, and model review tools Assess when and how to use shared versus family parameters About the Speaker David is an energetic, highly motivated BIM specialist with Gannett Fleming, a large engineering and architectural firm based in Camp Hill, Pennsylvania. His Autodesk product expertise extends to Revit MEP, AutoCAD MEP, Revit Architecture, AutoCAD Architecture, Navisworks, Green Building Studio, Plant 3D and more. David's responsibilities include managing the implementation of BIM for the engineering aspects of the firm, providing training, customization, and programming for the Autodesk MEP product lines. He also works as BIM manager for several projects (including water and wastewater treatment, transit, and pharmaceutical), and has also worked as a project manager for Autodesk-related specialty projects. Prior to joining Gannett Fleming, David worked in the Autodesk reseller channel as a training manager and applications engineer for the Autodesk building design and construction product line. He is based in the firm's Raleigh, North Carolina, office and has been speaking at AU for many years. dabfvnc1@nc.rr.com
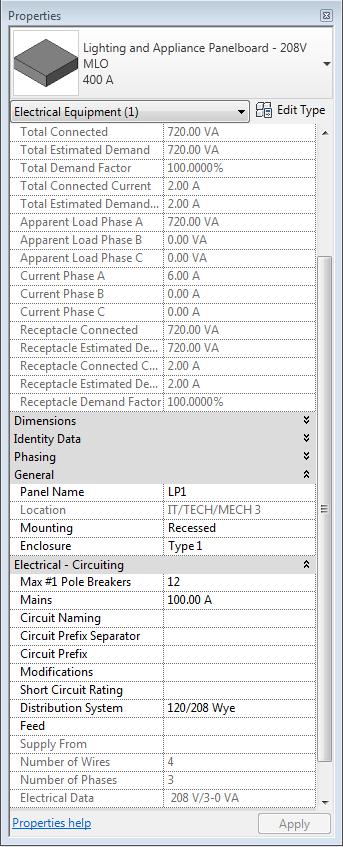
2 Introduction More than any version of Revit, Revit MEP 2012 demands a high number of families to be created for projects. To be fair, architecture and structure have their share, but since the MEP documents typically account for 60-70% of a construction document set, there s a lot of content that has to be developed. While the program has a lot of parts included, you ll still wind up spending a substantial amount of time creating HVAC, electrical, plumbing and other families for your projects. In this lab, we re focusing on four areas that will help you get your families finished faster, while helping you save time in the project. The resources for the lab also include samples of families to help you get started, so let s take off and get your families fast! Family Types and Categories Let s start by reviewing the default types of families: - Non-hosted similar to a block in AutoCAD, this item can be placed anywhere in a model, and is referenced to the level it s placed on. - Hosted Including face based types for generic faces, walls, ceilings, etc., this type is attached to another surface if the surface moves, the family moves. Typically the most widely used type is non-hosted, and is common for most end-of line mechanical and electrical equipment. In our firm, we prefer non-hosted for plumbing and light fixtures as well. For hosted families, we start with generic face based for data, communication, lighting, electrical, security and telephone devices. It s also important to understand how different types of families serve different purposes. An example of a hosted family that I would use for electrical equipment includes power panelboards. Power panels, which are defined by how they re used, automatically include a connection for devices, so they can be assigned to a panel. This is controlled by the family category. By changing the category to a different subtype, such as other panel, the behavior of the panel changes. For first example, open rvt pick the blue electrical panel, and then choose Edit Family to see how the panel is defined. 2


3 1. Review the category change it to other panel. 2. Load the family into project and use the overwrite parameters option. 3. Try to connect the receptacles in the room to the panel (select all of the receptacles in the room choose the Power option on the Create Systems panel when the Electrical Circuits tab appears, pick the Select Panel tool) they won t do it, since it isn t a power panelboard. 3
4 4. Edit the family again, and change it back to panelboard. Reload into project check its distribution system (which should have stayed as a 120/208 Wye), then try to connect it will work this time because the category is correct for the use. 5. Select the panel again note the instance properties. The category tells Revit how to associate power panel specific parameters: 4
5 5 6.

6 7. Select the Motor Control Center, and notice how the type of information changes we use Switchboard as the part type for our MCC panels, to get the panel schedule to look and behave the way we want. 8. Change to the 1-Mech view. Pick the outdoor air handling unit, and then edit the family. Go to category, and review the types. Mechanical Equipment is a little less complicated there s only two types. The Normal part type is used for equipment that sits at the end of the duct line, while the Breaks into option allows it to be attached to a duct component. Both mechanical and electrical equipment are end of line sources, so they have different behavior they only define systems when they re connected up to other higher devices, but in most cases the rest of the MEP families for HVAC and electrical connect to them. Revit provides both generic family templates, and templates that already have the category assigned. Usually, you can select one of these templates and start to create your family but we ve got a better way to do this. We ll come back to this the next step is to learn how to use a repeatable process to quickly create the families you need. 6

7 Four Starter Components Reference Planes/Labels/Solids/Constraints Mechanical and electrical equipment represent the majority of content that we create. In order to do this efficiently, you have to understand the key elements to making a family. There are four parts: 1. Reference Planes these invisible surfaces are used to create the boundaries of your family. They also are used to control the size and shape, and are associated with the dimensions of the model. Reference planes also are used to place connectors for electrical, duct, pipe, conduit and cable tray components. 2. Labels After the references planes are defined, you add dimensions to control the reference planes. The dimensions are edited after they re placed to create a dimension label. The most common example of dimensional labels are ones that control length, width and height of a solid in a family but they can also be used to set the size of connections, and more 3. Solids the shapes that define the model, we add these once the reference planes are located in the model, and the dimensional labels add. To define the solid, you create the sketch by snapping to the reference planes once the solid is defined, if the reference planes move, the solid changes shape. 4. Constraints are the final step you take to associate the solid to the reference plane. You can add constraints while you re defining the solid, or after the solid is created. The constraint defines the relationship between the reference plane, the label and the solids in a family. 7

8 Let s walk through the steps of creating the components keep in mind that if you consistently repeats these steps in sequence, you ll gain speed quickly. 1. Start by creating a new family from the generic model.rft file the RFT file is the template that is used to create an.rfa, which is the file that gets loaded into the project. 2. Begin by defining the reference planes. Start with the floor plan view, ref level this is the same view you would have if creating a 2D block from the top. The reference plane tool is on the Home tab: There are already two reference planes in the view the vertical plane divides the left and right sides, while the horizontal plane defines the front and back the front is always the bottom side of the intersection. The intersection represents the insertion point (0,0 for the AutoCAD users). 3. The reference plane tool is located on the Home tab. If the component is to be placed by its center, add four reference planes around the centered planes as shown: Before After 4. Once the planes are added, add dimensions to define labels. From the annotation, tab, pick the aligned dimension: 8

9 5. Pick the reference planes in sequence as shown left, center, right then place the dimension string by picking a point between the planes. 6. Once they re placed, choose the EQ grip to make them equidistant this will make the object grow or reduce in size based on the overall dimension, from the center of the model. 7. Repeat this step to add the equidistant dimensions to the front, center and back planes: 9
10 8. Once these are added, we can place overall dimensions for width (pick the front and back planes) and length (pick the left and right planes): 9. Now that we have the horizontal planes defined, let s add the 3D aspect by added a reference plane for the height. Change to the front elevation and add a reference plane. 10. After it s placed, add a dimension to indicate the height of the unit. A quick way to do this is to pick the dimension grip the dimension will become permanent: 10

11 One note I always name planes name the plane controlling Height as Unit Top (not to be confused with Carrot Top). BIG tip: Name all your reference planes it makes it easy to pick them out when setting a work plane current! 11. Once the dimensions are added, we can add the labels. Pick the height dimension on the options bar, select the label tool. 11

12 12. Choose ADD PARAMETER when the dialog appears, name the parameter Height (these are case sensitive, so use Title Case so it looks professional). 13. Select OK to finish. Close this view to go back to the plan view. 14. Edit the left to right dimension, and add the label, LENGTH. 15. Edit the front to back dimension, and add the label WIDTH. 12

13 Here s the tip be consistent, try to use the same labels for all types of equipment, regardless of how they re used. Next, we ll add the solid some users add this first, but by already having the planes, I can use them to create the solid, and constrain it while I create it so it moves when the reference planes move. 16. From the Home tab, select Extrusion. On the ribbon, pick the rectangle to create box shape. 17. Snap to the lower left corner first, then pick the upper right corner. We re going to jump ahead to the constrain part notice all the locks these are constraint locks and appear whenever you use a reference plane or other surface to create a solid. Pick all four locks to constrain the solid to the reference plane. 13

14 18. Pick the green check mark on the ribbon to finish the solid. If you don t create all constraints when you build the part, you can always come back and add a constraint later. 19. Change to the front view notice how the top of the solid doesn t match the height. Pick the modify tab, and then pick the align tool. 14

15 20. Always pick the item you want to stay in place first when using the align tool, so pick the reference plane first. 21. Next pick the top of the solid the solid will match the plane. Pick the lock icon to constrain the top of the solid to the plane. 15

16 Pick Modify to complete the command. Now you ve covered the four main parts for defining the geometry of the model. Here s the fast part save this family as Raw Mechanical Equipment NON-HOSTED. You can now use this family as a starter family, instead of using the RFT template. If you were to rename the family y changing its extension to an RFT file, then everything you ve created to this point is locked and uneditable so we don t do this. We just leave it as an RFA file, and keep it with our other family templates. There s more you can add to this family to save you time we ll cover this a little later. 22. Undo what you ve done back to the start point. Name this Vendor Mechanical Equipment Non-Hosted. 23. Now you can import a vendor s 3D.SAT,.DWG or.skp (Sketchup) model to create your part. From here you can add a connector, parameters, etc. as needed to complete the model. Let s try this from the insert tab, select Import CAD. When the dialog opens, select the Grinder Pump 3D drawing. NOT SO FAST change the colors to Black and White; the positioning to Origin to Origin, and uncheck the Orient to View option: 24. Open will bring the model into the family. If you get a warning dialog box, ignore it. 16
17 25. Change to front view. To move the part, you ve got to unpin it, so select the 3D model pick the pushpin grip to unpin it: 26. Once it s unpinned, move it so the insertion point is at the intersection of the reference level and vertical plane: 27. Change to the left view move the part to align it with the vertical reference plane: 17
18 28. Now that you ve got the model defined, you can add connectors and other parameters as needed. We ll add the connectors for now, so switch to a 3D view. From the Home tab, choose the pipe connector tool. Add connectors to the pipe connection points on the pump: Note: Use the View Cube to orbit around the model to place the connectors. The connectors will be constrained to the surface they are placed on (the only exception is the conduit surface connector, which can be located anywhere along a specific surface). 29. Next up pick the Electrical Connector tool from the home tab, and add the connector to the top of the motor: 18

19 30. Pick Modify to complete the command then pick the electrical connector. Change the properties of the connector to match the image below: 31. With connectors, you need to edit each connection and define its parameters. Remember that any parameters you want to include in a connection (such as the voltage), in most cases, should be defined as a shared parameter. 32. With the pipe connections, select one make sure that you set the parameters such as size and flow to what you want. One item you ll want to change is the name of the connection be clear, so that when it s picked, you can see what s purpose is: 19
 to turn its visibility on and off.")
20 Once you ve added the connectors, load this one into the project. It s controlled by Mechanical Equipment since that s how we started this family, so use the visibility graphics command (VG) to turn its visibility on and off. The part is now ready to use review the type and instance properties, and connect pipes if you ve got the time. You now have a more accurate representation of the part, when you work with the vendor to provide the true models. When to Use Shared Parameters vs. Family Parameters Now that we have the modeling part of the family complete, let s take a look at the data associated with the model. Revit includes a couple of primary parameters you ll use with families shared and family. The key different is that Shared parameters can be used to populate schedules and tags. Shared parameters are stored in a text file, which can only be edited in Revit. Family Parameters are for the most part dimensional parameters but some default values, such as electrical load classification, or apparent load, can still be added to schedules depending on the part type. The best approach is to make any parameter shared, if you might use it in a schedule, tag or both. Super Tip: Once a shared parameter is added to your family or project, that parameter belongs to that family or project. If changes have to be made to the parameters, the change should be made in the shared parameter file, and then updated in the affected family or project file. It s critical to plan how you re defining the Shared Parameters before placing them in families or projects. 20


21 One way to get the parameters exposed is to use an associated parameter, which looks at the default family parameter, and makes it available to use in a schedule. It has to be the same units and format to work, so we ll check to see if the parameter is a family parameter first. 1. Select one of the light fixtures in the project. Choose the Edit family tool on the ribbon to review it: 2. Once the family is open, check the family types: 3. When the dialog appears, select the Load Classification Parameter. Choose the modify icon to review how it s defined: 21
22 4. Right now it s a family parameter, so we need to convert it to a shared parameter in order for it to be scheduled. Select the Shared Parameter option, and then pick Select: If you get a dialog asking you to choose a shared parameter file, browse to the class dataset folder under the model guide folder > general_guide, and select the Revit Master Shared Parameters v2_1.txt file. If the default parameter group is not Construction, choose the Edit button, and then locate this file. We ll talk more about this file in the next section. 5. Once you get to the shared parameters dialog, change the group to Electrical Loads. Select the Load Classification parameter, and then choose OK: 22
23 6. Notice than the name is now grayed out since it s now controlled by the shared parameter. Leave it as a type for now, since we want this to apply to all examples. Select OK twice to complete the command and exit the family types dialog. 7. Now we want to check the connector, to make sure the connector s load classification value is exposed, and can be used in a schedule. Select the electrical connector, and look at the properties palette: 8. Notice how the Load Classification is grayed out that means it s already associated with another parameter to check this, pick the associate button on the right side of the field (note if it s not grayed out in your model, go ahead and associate it): 23

24 9. This opens the Associate Family Parameter dialog. As long as the units and format are the same, the parameter is associated with the one we just made into a shared parameter so now it can be scheduled. Select OK to close this dialog. Normally, you d have to actually edit the family and assign this value directly to the connector, but with some families, they re already assigned. By having it defined as a shared parameter now, it has great flexibility and use in the model. In the next section, we ll examine how to quickly load shared parameters into your families. Important note: Avoid using a character in a parameter name that can be interpreted as a mathematical symbol. Example: parameter name Load Classification or Load_Classification, NOT Load-Classification. So characters such as: +, -, *, /, or ^ are no-no s. Additional Resources Lookup Tables/Model Guidelines/Shared Parameter Convertor/Model Review There s a lot more to families than we can cover in one lab, so let s review some additional resources. There are four tools you can edit and review, to help you get your parts defined correctly. Lookup Tables We ll start with lookup tables. With some parts, you have a lot of combinations for example, pipe fittings use hundreds of combinations. In our case we needed a ductile iron flange instead of a grey iron flange, so we ll duplicate the part, since it already has the same values. 1. Use the open command to open a family from the dialog, pick the Imperial Library content shortcut. From the default content library, browse to this folder Piping\Fittings\Gray Iron Flanges\Class 125 folder. Open the Flanged Threaded GI Class 125 family: Note: For this class, the file is also located in the class dataset folder, under Gray Iron Flanges. 2. Once it s open, go to the Family Types dialog on the properties panel: 24

25 There are two things to look at here the first is the lookup table name the second are the parameters that are associated with the dimensional parameters. The lookup table is a.csv table file that is used to list sizes for the default parameters. Since this file can be edited with Microsoft Excel, open the Flange Threaded GI Class 125.csv file located in the class folder by double clicking on it: 25

26 Note the headers across the top the first column nominal size of the fitting. The remaining headers are associated with the parameters in the family. The format goes something like this: PARAMETERNAME##PARAMETERTYPE##PARAMETERUNITS. So, for the second parameter, FDIA is the flange outside diameter parameter. Looking back at the family types, it s associated with the Flange Diameter value: So, rather than taking up a bunch of instance parameters and having to define a large number of types, you can duplicate this table, and edit the parameters. The parameters in a lookup table can be these types: Number just a raw number, up to 6 decimal places; Length a measurement, which can be made in feet, inches, millimeters, etc. Area square footage/yard/meter value; Volume cubic footage/yard/meter value; Angle measured as number values, but applied to the rotation angle for example, the angle of elbows would use this value So if I wanted the table to read inches instead of millimeters, change the last part of the statement, from FDia##length##millimeters to FDia##length##inches. 26


27 3. Let s edit this file delete the rows for sizes 1 to 3.5 by deleting the entire set of rows: 4. Save the file as Flange Threaded DI Class 125.csv. If you get the follow warning, select Yes: 5. Copy this to the default library for lookup tables, under the Pipe folder (note: the file cannot be used unless it is saved as a.csv file, and located in the folder specified for your lookup tables this is usually in the same location as your default content. 6. Go back to the fitting family type change the lookup table to look at your new table. If you don t copy the CSV file first, you ll get an invalid formula error, so make sure you have the CSV file in the pipes lookup table folder (can t say this enough)/ Now the part can be placed with the new sizes. The sizes you deleted will no longer be available. Here s a big tip: When possible, use and edit existing tables it s much faster we bought ours from CADWorks, and then expanded them Revit Modeling Guidelines A few years back, Autodesk published the Revit Model Content Style Guide. Version 2.1 was release in late 2009 but it still have relevance in how it identifies parameters. Here s the fast part it already comes with a master shared parameter file to help the MEP engineer get started. To help you get started and see what s available, begin by opening the Revit Master Parameters List XLS file. This file shows you the category, part type, parameter name, group, type, GUID, discipline and type of parameter. What I really like about this file is that it also lists what parameters are default system parameters that occur in every Revit project: 27


28 Use this file to help you plan how you re going to use these parameters in your families. To use the shared parameters file in your families, do this: 1. On the manage tab (either in family or project files), select the Shared Parameters tool. 2. Browse to the class dataset folder under the model guide folder > general_guide, select the Revit Master Shared Parameters v2_1.txt file: 28


29 3. Select Open. This will set this file as the default source for your shared parameters. Once it s set, change the group to electrical loads. Pick the Apparent Load parameter, and then pick properties: 29

30 4. You can t modify a shared parameter once it s created, so you have to create it from scratch if you need to add one. Be aware if you delete a parameter, then add it back with the same name, the GUID identifier will also be changed so you could have two parameters in a model with the same name, but sourced by different components. Once you get your parameters set, stick with them and test, test, test. Big tip: Load your shared parameters to your starter families. Exporting and Converting to Shared Parameters Every once in a while, you ll need to export parameters you have loaded into a project, so they can be used in another project. You may also want to convert family parameters to shared parameters, so they can be used in a schedule. Revit includes an extension, the Shared/Project Parameter tool that helps you convert these parameters. For example, we might have received or edit a family where Ballast Voltage and Load Classification were defined as a family parameter, but we want to use them in a schedule. Let s see how this works. 1. Open the project file, rvt. From the extensions tab, select the Tools option on the Autodesk Revit Extensions panel. Select the Shared/Project Parameters tool. 2. When the dialog appears, there are three file locations and a file you need to select: 30
31 Source Files Location Specifies which files will be changes use the Skip option to exclude backup files; Destination Files Location Specifies the location of the modified files; Log File Location The program generates a log activity file here; Shared Parameter file - specifies what shared parameter file will be used as a source of the data. 3. Once you have all of the locations set, copy and paste any number of families you wish to convert into the source folder. These original files will not be modified. In your dataset, we ve already included a series of light fixtures from the default library that have the Ballast Voltage and Load Classification set as family parameters. 4. Then click Configuration; ; this will read all of the groups and parameters from the shared parameters text file you specified. Expand any groups and highlight a parameter. Click the right arrow to add it to the list to replace as a shared parameter. Specify which category to group the parameter under: 31

32 Note: When you copy a parameter from the left column to the right, it no longer appears in the left column. 5. Click OK when complete. 6. Click Run to start the conversion process. The modified family files will be copied into the destination files location. Open one of the families and make sure the parameter is now a shared parameter: 7. From the dataset folder, load the updated Plain Recessed Lighting Fixture.rfa file into the project, using the overwrite parameters option. Select one of the lights, and review the type parameters the updates parameters can now be used in a schedule. A BIG point in order for this to work, the matching shared parameter already has to exist and be formatted the same way for units in the shared parameter file, in order for this to work. One nice side effect of the utility since it s also saving the file, it will save it in the current release so that s a step you won t have to take when converting old files. If you run the utility to add shared parameters to a file that doesn t have the family parameter, it will simply load the shared parameter in the file. In some cases, you ll still need to associate parameters with connectors, but this still saves a tremendous amount of time, especially if you re tailoring a lot of families to meet your standards. Here are a few more tips from the help file about using the Shared Parameter Converter: For the parameter of source file not contains the same name with configuration -- Add the shared parameter according to configuration. 32

33 For some family parameters with same name already exist in source files -- Change the parameter from family parameter to shared parameter, and assign to the group (except for "other" group) according to configuration. For some family parameters with same name and different properties (Instance/Type) already exist in source file -- Change the parameter from family parameter to shared parameter only, other properties constant For some shared parameter with same name already exist in source file -- it will regarded this file as failed file and copy it to failed folder, which is at the same lever of the destination folder Model Review You can also use the Model Review extension (available only to subscription customers) to check parameters in families and make sure they match. The first step is to review the different reports that can be used to check the project. To do this, select the Manage Tool on the Add-ins Tab (on the Model Review panel) From the File menu, select Open. There is a custom review file I ve made for the class, so open the Load Classification Check.bcf file to review its settings. 33
34 Select the Details tab. This particula check is looking for Lighting fixture families that have the Load Classification shared parameter assigned. The Filter tab includes the specific category of Families, and is looking only at light fixtures but you can edit this file and add other category types as needed (for example, electrical fixtures). Close the dialog. From the Add-ins tab, choose the Check tool on the Model Review panel: 34
35 The Model review dialog allows you to run the test against the current model, the current model and linked models, or an entire folder of models. Make sure Current Model is selected and choose OK. After the check is finished, a report will appear from here, you can see where any errors occurred you can also check the fix box, which takes you to any part that wasn t correct, so it can be fixed. 35

36 Conclusion So you ve had a chance to get a quick look at the things I look for in families, how to build your starter families, and how to edit them quickly. As you get your library built, you ll appreciate how this consistent approach has helped your designers get their projects out the door faster and better coordinated. Here s another thing to try out check out Autodesk Inventor Fusion, available online for free at the Autodesk labs these utility really helps you review, edit and convert different formats of 3D model files we use it almost daily. The download is available at this site until May 1, 2012: For more tips and trick, refer to my blog, The MEP CAD Engineer, at Thanks for attending! 36
Faster Families for Autodesk Revit MEP David Butts Gannett Fleming, Inc
 David Butts Gannett Fleming, Inc MP6895-L (Repeat of MP1477-L) New and improved for Revit MEP 2013! It is time to learn how to get your content modeled quickly and save money on your projects. This hands-on
Fast Content for AutoCAD MEP 2015
 David Butts Gannett Fleming MP6393 AutoCAD MEP 2015 software, a world-class design and drafting application, is the Zen master of mechanical, electrical, and plumbing design software. The software continues
Perfecting the System for the Autodesk Revit MEP Project David Butts Gannett Fleming, Inc
 Perfecting the System for the Autodesk Revit MEP Project David Butts Gannett Fleming, Inc MP1478-L In Autodesk Revit software, systemss help us to manage the MEP design in several ways, but the main items
Smokin Hot AutoCAD MEP 2011 Tips
 David Butts Gannett Fleming ME333-1 Join us for this fast paced, information filled AutoCAD MEP infopalooza - and have fun at the same time! Discover my favorite tips, tricks and best practices for AutoCAD
AutoCAD MEP 2010 Advanced Tips and Tricks
 Speaker Name David Butts MP214-1L The primary goal of this course is to take a deep dive into the more advanced features of AutoCAD MEP 2010, which will better assist users in meeting their design, documentation
Revit Architecture 2015 Basics
 Revit Architecture 2015 Basics From the Ground Up Elise Moss Authorized Author SDC P U B L I C AT I O N S Better Textbooks. Lower Prices. www.sdcpublications.com Powered by TCPDF (www.tcpdf.org) Visit
Revit Architecture. So you want to start a family? Veronica Lamb S2-2
 Revit Architecture So you want to start a family? Veronica Lamb S2-2 Course Summary: Learn the basics of creating families in Revit Architecture. This course is suited for individuals with little to no
Revit MEP 2013 Overview Day 1. William Johnson Senior MEP/AEC Application Specialist
 Revit MEP 2013 Overview Day 1 William Johnson Senior MEP/AEC Application Specialist CLASS SCHEDULE 9:00am Training Starts 10:30am 10:45am Morning Break 12:00pm 1:00pm Lunch Break 2:30pm 2:45pm Afternoon
Elise Moss Revit Architecture 2017 Basics From the Ground Up SDC. Better Textbooks. Lower Prices.
 Elise Moss Revit Architecture 2017 Basics From the Ground Up SDC P U B L I C AT I O N S Better Textbooks. Lower Prices. www.sdcpublications.com Powered by TCPDF (www.tcpdf.org) Visit the following websites
Creating Pipe Fittings in Revit MEP
 Session 11 Creating Pipe Fittings in Revit MEP Class Description Pipe fittings are the one of the most complex and misunderstood component families in Revit. This presentation will begin by outlining the
Modeling Large-Scale Refrigeration Projects and the Necessary Steps to Stay Organized and Accurate
 Nik Weller LEO A DALY MP3735 Using Autodesk Revit software to model a large-scale refrigeration project with thousands of valves to schedule all needing their own identification while also dealing with
What's New GRAITEC Advance PowerPack 2016
 What's New GRAITEC Advance PowerPack 2016 Table of contents WELCOME TO GRAITEC POWERPACK FOR REVIT... 5 NEWS... 6 Managers... 6 1: Family Manager... 6 BIM Connect... 7 1: Compliancy with Autodesk Revit
All In the Family: Creating Parametric Components In Autodesk Revit
 All In the Family: Creating Parametric Components In Autodesk Revit Matt Dillon D C CADD AB4013 The key to mastering Autodesk Revit Architecture, Revit MEP, or Revit Structure is the ability to create
Revit MEP Project Setup Procedure
 NOTE: The following summarize the steps required to set up a Revit MEP project from scratch where an architectural model is linked into the MEP project. This information is not authorized by Autodesk and
REVIT ARCHITECTURE 2016
 Page 1 of 6 REVIT ARCHITECTURE 2016 Revit Architecture 2016: CREATE A CHAMFERED COLUMN COMPONENT About creating a chamfered column family typical to the Victorian cottage style. Add the column to your
Victaulic Tools for Revit
 Victaulic Tools for Revit User Manual Revit 2016, 2017, 2018 Table of Contents Introduction Section 01 Licensing Page 3 Section 02 Pipe Tools (Pipe / Duct Splitting) Page 4 Section 03 Pipe Tools (Pipe
Schedule Anything in Autodesk AutoCAD MEP
 Matt Dillon Enceptia (Assistant/Co-presenter optional) [Arial 10] MP1424-L Learning Objectives At the end of this class, you will be able to: Explain the purpose of Property Set Definitions Create a custom
Course BIM MEP Diploma Revit MEP Navis Works
 Course BIM MEP Diploma Revit MEP Navis Works BIM Electromechanical Diploma : BIM MEP diploma maximize the BIM workflow optimization and gives the engineer the full capabilities to perform MEP Model consists
Plumbing in Autodesk Revit MEP: You re No Longer Just a Subcategory
 Plumbing in Autodesk Revit MEP: You re No Longer Just a Subcategory Speaker: Kristin Woodard CADD Microsystems MP1823 This class is designed to improve design efficiency specifically for the plumbing discipline.
Autodesk Revit 2013 BIM Management
 Autodesk Revit 2013 BIM Management Template and Family Creation SDC P U B L I C AT I O N S Schroff Development Corporation Better Textbooks. Lower Prices. www.sdcpublications.com Chapter 1 Creating Custom
Introduction In this document, users will Llearn how to utilize SysQue Systems Pipe, and how to draw Pipe into their projects.
 Systems Pipe Summary Learn to utilize Systems Pipe for Revit 206. Contents Introduction SysQue Systems Pipes SysQue Systems Pipes Menu Modeling Using Systems Pipe Introduction In this document, users will
Autodesk REVIT (Architecture) Mastering
 Mastering") Autodesk REVIT (Architecture) Mastering Training details DESCRIPTION Revit software is specifically built for Building Information Modeling (BIM), empowering design and construction professionals to bring
Autodesk REVIT (Architecture) Mastering Training details DESCRIPTION Revit software is specifically built for Building Information Modeling (BIM), empowering design and construction professionals to bring
create 2 new grid lines
 STEP 1: open your class-01 Project file _ go to Level 1 _ select grid line 1 _ type CO (copy) _ repeat for grid line 3 as shown in image 1 Architectural Column STEP 2: from the Ribbon under the Home tab
May the Force Be With You: Autodesk Revit Tips and Tricks
 May the Force Be With You: Autodesk Revit Tips and Tricks David Cohn AB122-1R Do you want to become a Revit master? In this fun and informative class, you ll learn a host of Revit tips and tricks that
Placing Spaces. Let Me Try! Before you begin. The following files are needed for this Let Me Try exercise: M_c04_archi_spaces_rmp2015.
 Placing Spaces Before you begin The following files are needed for this Let Me Try exercise: For Imperial: For Metric: c04_archi_spaces_2016.rvt M_c04_archi_spaces_rmp2015.rvt To access the files from
Building Revit Families Saturday, September 21 9:00 a.m.- noon
 Building Revit Families Saturday, September 21 9:00 a.m.- noon Part 1: IntroducBon Brandon Henson, PE ASPE, CharloHe Chapter member UNC CharloHe, BSME Licensed Professional Engineer in NC Worked with Revit
Get Connected Autodesk Revit MEP Connectors Demystified
 Get Connected Autodesk Revit MEP Connectors Demystified Shawn C. Zirbes CAD Technology Center, Inc. ASST MP59319 Having trouble getting your Autodesk Revit MEP families to connect to systems in your project?
Revit 2018 Architecture Certification Exam Study Guide
 ELISE MOSS Autodesk Autodesk Certified Instructor Revit 2018 Architecture Certification Exam Study Guide Certified User and Certified Professional SDC P U B L I C AT I O N S Better Textbooks. Lower Prices.
RushForth Tools for Revit: User Guide
 Table of Contents (Click to Jump to Section) PARAMETER TRANSFORMER... 3 PARAMETER TRANSFORMER: FILTER TAB... 3 PARAMETER TRANSFORMER: MODIFY TAB... 7 PARAMETER TRANSFORMER: EXCEL TAB... 11 PARAMETER TRANSFORMER:
BIM. The Fastest Way to Quickly & Easily Insert and Modify Elements that are used in Revit project
 BIM The Fastest Way to Quickly & Easily Insert and Modify Elements that are used in Revit project BIM Tree Manager Working with Elements Dynamic Tree allows easily to navigate, find, modify any element
The Ten Commandments of Equipment and Part Building in Autodesk AutoCAD Plant 3D
 The Ten Commandments of Equipment and Part Building in Autodesk AutoCAD Plant 3D Creg Dieziger Sr. Designer, Morrison-Maierle, Inc. PD2940-L 90 Minutes - Hands-on Lab - 12/3/13 (Tuesday) 8:00 AM In this
Creating Specific Views and Match Lines
 Creating Specific Views and Match Lines As you can see, the Autodesk Revit Architecture platform is all about the views. In fact, by using Revit, not only are you replacing the application you use for
What's New in Autodesk Revit Structure 2013? Rebecca Frangipane - KJWW Engineering Consultants
 Rebecca Frangipane - KJWW Engineering Consultants SE1485 This class will cover the new features for Autodesk Revit Structure 2013 software. We will examine new features for creating and manipulating parts,
Tips and tricks. AutoCAD 2010
 Tips and tricks AutoCAD 2010 Parametric Drawing Powerful new parametric drawing functionality in AutoCAD 2010 enables you to dramatically increase productivity by constraining drawing objects based on
Revit 2017 Architecture Certification Exam Study Guide
 ELISE MOSS Autodesk Autodesk Certified Instructor Revit 2017 Architecture Certification Exam Study Guide Certified User and Certified Professional SDC P U B L I C AT I O N S Better Textbooks. Lower Prices.
GstarCAD Complete Features Guide
 GstarCAD 2017 Complete Features Guide Table of Contents Core Performance Improvement... 3 Block Data Sharing Process... 3 Hatch Boundary Search Improvement... 4 New and Enhanced Functionalities... 5 Table...
User Interface Revit s user interface is adaptive, changing based on your selections and views. options. Room Tag Split Elements
 NU REVIT TUTORIAL Instructor: David Snell, AIA LEED AP BD+C Tutorial 1: 2016-01-25 Page 1 of 8 User Interface Revit s user interface is adaptive, changing based on your selections and views. Application
BIM Diploma content ( included courses) : Training course Course Levels Duration Outputs Revit MEP
 : Training course Course Levels Duration Outputs Revit MEP") What is BIM? Autodesk BIM is an intelligent model-based process that helps owners and service providers achieve business results by enabling more accurate, accessible, and actionable insight throughout
What is BIM? Autodesk BIM is an intelligent model-based process that helps owners and service providers achieve business results by enabling more accurate, accessible, and actionable insight throughout
Revit MEP. Autodesk Navisworks
 What is BIM? Autodesk BIM is an intelligent model-based process that helps owners and service providers achieve business results by enabling more accurate, accessible, and actionable insight throughout
Sheets and Revisions A Super Duper Click Saver Production
 Sheets and Revisions A Super Duper Click Saver Production Jarod Schultz, Director of Autodesk Services 1 P a g e J a r o d S c h u l t z, i n i t i a l. a e c 2 P a g e J a r o d S c h u l t z, i n i t
Because After all These Years I Still Don t Get it!
 BILT North America 2017 Westin Harbour Castle Toronto August 3-5 Session 3.2 Shared Coordinates: Because After all These Years I Still Don t Get it! Class Description In an effort to reveal the system
Tutorial Second Level
 AutoCAD 2018 Tutorial Second Level 3D Modeling Randy H. Shih SDC PUBLICATIONS Better Textbooks. Lower Prices. www.sdcpublications.com Powered by TCPDF (www.tcpdf.org) Visit the following websites to learn
SketchUp Quick Start For Surveyors
 SketchUp Quick Start For Surveyors Reason why we are doing this SketchUp allows surveyors to draw buildings very quickly. It allows you to locate them in a plan of the area. It allows you to show the relationship
GEN20626 Creating Dynamic Blocks in AutoCAD Only You Can Prevent Bloated Block Libraries
 GEN20626 Creating Dynamic Blocks in AutoCAD Only You Can Prevent Bloated Block Libraries Tracy Chadwick Hutchinson Community College Learning Objectives Learn how to create Dynamic Blocks that can stretch,
CHAPTER 1 COPYRIGHTED MATERIAL. Getting to Know AutoCAD. Opening a new drawing. Getting familiar with the AutoCAD and AutoCAD LT Graphics windows
 CHAPTER 1 Getting to Know AutoCAD Opening a new drawing Getting familiar with the AutoCAD and AutoCAD LT Graphics windows Modifying the display Displaying and arranging toolbars COPYRIGHTED MATERIAL 2
May the Force Be With You Revit Tips and Tricks
 May the Force Be With You Revit Tips and Tricks David Cohn Do you want to become a Revit master? In this fun and informative class, you ll learn a host of Revit tips and tricks that you can take home and
See What You Want to See in Revit 2016
 See What You Want to See in Revit 2016 Michael Massey Senior AEC Application Consultant @mgmassey01 Join the conversation #AU2015 Presenting Today.. Mike Massey Senior AEC Application Specialist 25+ Years
DOING MORE WITH EXCEL: MICROSOFT OFFICE 2013
 DOING MORE WITH EXCEL: MICROSOFT OFFICE 2013 GETTING STARTED PAGE 02 Prerequisites What You Will Learn MORE TASKS IN MICROSOFT EXCEL PAGE 03 Cutting, Copying, and Pasting Data Basic Formulas Filling Data
NU REVIT TUTORIAL. Page 1 of 7
 NU REVIT TUTORIAL Instructor: David Snell, AIA LEED AP BD+C Tutorial 2: 2016-02-01 Page 1 of 7 Annotations All functions contained in the Annotate tab create 2D view specific elements. These elements will
Autodesk Inventor - Basics Tutorial Exercise 1
 Autodesk Inventor - Basics Tutorial Exercise 1 Launch Inventor Professional 2015 1. Start a New part. Depending on how Inventor was installed, using this icon may get you an Inch or Metric file. To be
CHAPTER 1 COPYRIGHTED MATERIAL. Finding Your Way in the Inventor Interface
 CHAPTER 1 Finding Your Way in the Inventor Interface COPYRIGHTED MATERIAL Understanding Inventor s interface behavior Opening existing files Creating new files Modifying the look and feel of Inventor Managing
Beyond the Limits: Using Autodesk Revit and Navisworks Manage for Design Collaboration on Large-Scale Projects
 Beyond the Limits: Using Autodesk Revit and Navisworks Manage for Design Collaboration on Large-Scale Projects Joseph Huang MWH Global Luther Lampkin MWH Global SE4259 This class covers best practices
Effective Collaboration using Autodesk Revit Structure and Autodesk Building Systems
 AUTODESK REVIT STRUCTURE AUTODESK BUILDING SYSTEMS Effective Collaboration using Autodesk Revit Structure and Autodesk Building Systems This white paper explains how structural engineers using Autodesk
CET Designer 9.5 Release Notes
 CET Designer 9.5 Release Notes Important Notices Starting from this release, CET Designer is only available in a 64-bit version. For computers with damaged graphics drivers or a graphics unit that does
Placing Air Terminals
 Placing Air Terminals Before you begin The following files are needed for this Let Me Try exercise: For Imperial: For Metric: c05_office-space_tut1.rvt M_ c05_office-space_tut1.rvt To access the files
Multi-Discipline Project Coordination with Autodesk Revit. Jim Stoneberger Avatech Solutions Neal O Neill Avatech Solutions
 Multi-Discipline Project Coordination with Autodesk Revit Jim Stoneberger Avatech Solutions Neal O Neill Avatech Solutions Origins Internal Origin, (0,0,0 in Revit) Revit does have an internal Origin point
Excel 2013 Beyond TheBasics
 Excel 2013 Beyond TheBasics INSTRUCTOR: IGNACIO DURAN Excel 2013 Beyond The Basics This is a class for beginning computer users. You are only expected to know how to use the mouse and keyboard, open a
Autodesk Inventor for Plant Kimberley Hendrix, Solutions Consultant D3 Technologies, LLC Tulsa, OK
 Kimberley Hendrix, Solutions Consultant D3 Technologies, LLC Tulsa, OK PD2681 I have all of our equipment modeled already for fabrication in Autodesk Inventor. Do I have to recreate that for my AutoCAD
Ogres Have Layers: Beginning with their Templates
 12/3/2008-10:15 am - 11:45 am Room:Murano 3301 (PTD) Ogres Have Layers: Beginning with their Templates Colleen Klein - Training Content Manager, MasterGraphics and David Braun (Assistant); Volker Cocco
Table of Contents. What's New in GRAITEC Advance PowerPack 2018 WELCOME TO GRAITEC ADVANCE POWERPACK FOR REVIT NEWS... 5 IMPROVEMENTS...
 What's New 2018 Table of Contents WELCOME TO GRAITEC ADVANCE POWERPACK FOR REVIT 2018... 4 NEWS... 5 1: Compliancy with Revit 2017 and Revit 2018... 5 2: Prepare Background Model... 5 3: Link Background
Building Professional Services
 Building Professional Services How to create Drawings from your models using Bentley Building Electrical Systems and the USACE Dataset: The Electrical Discipline Master Model: The Discipline Master Model
Exercise Guide. Published: August MecSoft Corpotation
 VisualCAD Exercise Guide Published: August 2018 MecSoft Corpotation Copyright 1998-2018 VisualCAD 2018 Exercise Guide by Mecsoft Corporation User Notes: Contents 2 Table of Contents About this Guide 4
REVIT - NONCEILING BASED LIGHTS
 TUTORIAL C-29C: REVIT - NONCEILING BASED LIGHTS This Tutorial explains how to create your own light fixture that can be placed anywhere. Most lights in Revit are ceiling based/hosted meaning that you have
Smart Hangers. Powerful solution for placing hangers in BIM model
 Powerful solution for placing hangers in BIM model Working with MEP elements Smart Hangers extension Autodesk Revit Architecture/Structure/MEP and Autodesk Revit BIM software Smart Hangers powerful solution
Revit Architecture 2016 Parametric Families
 Page 1 of 6 Revit Architecture 2016 Parametric Families Revit Architecture 2016: Create a Railing Post and a Railing Type This White Paper follows on from my previous White paper for October where we created
How Smart Are Your Tables? Jeanne Aarhus Aarhus Associates, LLC
 How Smart Are Your Tables? Jeanne Aarhus Aarhus Associates, LLC AC2251-L Are you using tables in AutoCAD software to their fullest potential? Do you still manually collect data from your AutoCAD file,
Blocks reduce drawing size since multiple instances of a block are stored in one definition.
 AGENDA: 1. Blocks and Controlling Block Properties 2. Creating and Inserting Blocks 3. Editing Blocks after Insertion 4. Storing Blocks Blocks A block is a collection of entities, grouped together and
Step 2: To begin creating subregions, be sure you still have the Site Floor Plan selected and then click on the Massing and Site tab (1). Under this t
. Under this t") Abstract: This step by step guide will help you understand how to create subregions in Revit. These subregions will allow you to represent hardscapes and turf areas in your site model. **These steps begin
Abstract: This step by step guide will help you understand how to create subregions in Revit. These subregions will allow you to represent hardscapes and turf areas in your site model. **These steps begin
Quick Start Guide - Contents. Opening Word Locating Big Lottery Fund Templates The Word 2013 Screen... 3
 Quick Start Guide - Contents Opening Word... 1 Locating Big Lottery Fund Templates... 2 The Word 2013 Screen... 3 Things You Might Be Looking For... 4 What s New On The Ribbon... 5 The Quick Access Toolbar...
Getting Started. Introduction to the Basics. Cadpipe Control Center
 Getting Started Introduction to the Basics Cadpipe Control Center When you first select the Cadpipe Program icon on your desktop, you will automatically start up the Cadpipe Control Center. The control
Leveraging 2D Data in 3D Modeling
 Leveraging D Data in 3D Modeling Leveraging D Data in 3D Modeling As more and more companies switch to 3D modeling the question of utilizing existing D data and referenced D data from collaborative sources
Achieving Contentment with the AutoCAD Architecture Content Browser Douglas Bowers, AIA
 Achieving Contentment with the AutoCAD Architecture Content Browser Douglas Bowers, AIA AB110-3 If you have created AutoCAD Architecture (formerly ADT) object styles and want to know how to easily share
EXCEL + POWERPOINT. Analyzing, Visualizing, and Presenting Data-Rich Insights to Any Audience KNACK TRAINING
 EXCEL + POWERPOINT Analyzing, Visualizing, and Presenting Data-Rich Insights to Any Audience KNACK TRAINING KEYBOARD SHORTCUTS NAVIGATION & SELECTION SHORTCUTS 3 EDITING SHORTCUTS 3 SUMMARIES PIVOT TABLES
An Introduction to Autodesk Revit Massing, Surface Divisions, and Adaptive Components
 An Introduction to Autodesk Revit Massing, Surface Divisions, and Adaptive Components Chad Smith KarelCAD, Australia AB2463-L As the Revit massing tools become more polished and robust, users are becoming
Introduction to Autodesk Revit Structure
 11/30/2005-5:00 pm - 6:30 pm Room:N. Hemispheres (Salon E2) (Dolphin) Walt Disney World Swan and Dolphin Resort Orlando, Florida Nicolas Mangon - Autodesk SD35-1 This year, Autodesk is introducing the
DOING MORE WITH EXCEL: MICROSOFT OFFICE 2010
 DOING MORE WITH EXCEL: MICROSOFT OFFICE 2010 GETTING STARTED PAGE 02 Prerequisites What You Will Learn MORE TASKS IN MICROSOFT EXCEL PAGE 03 Cutting, Copying, and Pasting Data Filling Data Across Columns
Schedules Can t Do That in Revit 2017
 Schedules Can t Do That in Revit 2017 Michael Massey Senior AEC Application Consultant @mgmassey01 Join the conversation #AU2016 Presenting Today.. Mike Massey Senior AEC Application Specialist 25+ Years
MAPLOGIC CORPORATION. GIS Software Solutions. Getting Started. With MapLogic Layout Manager
 MAPLOGIC CORPORATION GIS Software Solutions Getting Started With MapLogic Layout Manager Getting Started with MapLogic Layout Manager 2008 MapLogic Corporation All Rights Reserved 330 West Canton Ave.,
Importing and Exporting FilesChapter1:
 Importing and Exporting FilesChapter1: Chapter 1 You can use Revit Architecture to import and export various file types, including AutoCAD and AutoCAD Architecture DWG files to use as design aids. You
SketchUp Tool Basics
 SketchUp Tool Basics Open SketchUp Click the Start Button Click All Programs Open SketchUp Scroll Down to the SketchUp 2013 folder Click on the folder to open. Click on SketchUp. Set Up SketchUp (look
SolidWorks Intro Part 1b
 SolidWorks Intro Part 1b Dave Touretzky and Susan Finger 1. Create a new part We ll create a CAD model of the 2 ½ D key fob below to make on the laser cutter. Select File New Templates IPSpart If the SolidWorks
Tutorials. Lesson 3 Work with Text
 In this lesson you will learn how to: Add a border and shadow to the title. Add a block of freeform text. Customize freeform text. Tutorials Display dates with symbols. Annotate a symbol using symbol text.
TRAINING GUIDE FOR ADVANCE STEEL USERS
 TRAINING GUIDE FOR ADVANCE STEEL USERS Page 2 An Introduction to the Guide... 9 1 Welcome...11 1.1 Autodesk Revit...12 1.2 New in Revit 2018...13 2 Installation...14 2.1 System Requirements and License...15
draw reference planes click on EQ Parametric Truss STEP 1: from the big R _ scroll over New _ click on Family
 Parametric Truss STEP 1: from the big R _ scroll over New _ click on Family STEP 2: select Structural Framing - Complex and Trusses from the list of templates _ click on Open STEP 3: type RP (reference
Update Enhancement List
 AUTODESK REVIT 2015 Update Enhancement List * Indicates an issue that was reported by a Revit user. ** Indicates an issue resolved within the Multi-Category Schedules Hotfix for Autodesk Revit 2015 Update
Importing and Coordinating Models
 Bonus Chapter 6 Importing and Coordinating Models It s amazing that we re up to Bonus Chapter 6, and yet I m sure many readers are still unclear about how BIM fits in here. Yes, most of the previous chapters
CET Designer 9.5 Release Notes
 CET Designer 9.5 Release Notes November 19, 2018 Important Notices Starting from this release, CET Designer is only available in a 64-bit version. For computers with damaged graphics drivers or a graphics
SolidWorks 2½D Parts
 SolidWorks 2½D Parts IDeATe Laser Micro Part 1b Dave Touretzky and Susan Finger 1. Create a new part In this lab, you ll create a CAD model of the 2 ½ D key fob below to make on the laser cutter. Select
ekaizen Lessons Table of Contents 1. ebook Basics 1 2. Create a new ebook Make Changes to the ebook Populate the ebook 41
 Table of Contents 1. ebook Basics 1 2. Create a new ebook 20 3. Make Changes to the ebook 31 4. Populate the ebook 41 5. Share the ebook 63 ekaizen 1 2 1 1 3 4 2 2 5 The ebook is a tabbed electronic book
Creating a New Plan File
 1 Tutorial NAME Creating a New Plan File 2 The first step in creating your own design is to open and name a new plan file. 1. From the MENU BAR, select File, New Plan. 2. From the MENU BAR, select File,
AGENT123. Full Q&A and Tutorials Table of Contents. Website IDX Agent Gallery Step-by-Step Tutorials
 AGENT123 Full Q&A and Tutorials Table of Contents Website IDX Agent Gallery Step-by-Step Tutorials WEBSITE General 1. How do I log into my website? 2. How do I change the Meta Tags on my website? 3. How
Back to Flat Producing 2D Output from 3D Models
 Back to Flat Producing 2D Output from 3D Models David Cohn Modeling in 3D is fine, but eventually, you need to produce 2D drawings. In this class, you ll learn about tools in AutoCAD that let you quickly
Autodesk Revit Building Family Editor - From the Beginning
 11/29/2005-8:00 am - 11:30 am Room:Americas Seminar [Lab] (Dolphin) Walt Disney World Swan and Dolphin Resort Orlando, Florida Autodesk Revit Building Family Editor - From the Beginning Stephen Stafford
Improving Productivity with Parameters
 Improving Productivity with Parameters Michael Trull Rocky Brown Thursday, January 25, 2007 Improving Productivity with Parameters Part I The Fundamentals Parameters are variables which define the size
Top Productivity Tips for AutoCAD 2009
 Top Productivity Tips for AutoCAD 2009 Jonathan Christie Course Summary: Find out how to apply new and existing AutoCAD power tools and watch your drafting productivity improve. Learn how to re-use design
INTRODUCTION... 1 UNDERSTANDING CELLS... 2 CELL CONTENT... 4
 Introduction to Microsoft Excel 2016 INTRODUCTION... 1 The Excel 2016 Environment... 1 Worksheet Views... 2 UNDERSTANDING CELLS... 2 Select a Cell Range... 3 CELL CONTENT... 4 Enter and Edit Data... 4
WHCC Sports and Events
 WHCC Sports and Events We re using ROES Events as our ordering software for Sports and Events. This is a special version of ROES, written specifically for high volume events. There are two primary differences
Quick Tips to Using I-DEAS. Learn about:
 Learn about: Quick Tips to Using I-DEAS I-DEAS Tutorials: Fundamental Skills windows mouse buttons applications and tasks menus icons part modeling viewing selecting data management using the online tutorials
CheckBook Pro 2 Help
 Get started with CheckBook Pro 9 Introduction 9 Create your Accounts document 10 Name your first Account 11 Your Starting Balance 12 Currency 13 We're not done yet! 14 AutoCompletion 15 Descriptions 16
ISSUE #4 / SPRING 2017
 REVIT PURE PRESENTS PAMPHLETS ISSUE #4 / SPRING 2017 CAD revitpure.com Copyright 2017 - BIM Pure productions WHAT IS THIS PAMPHLET? Revit Pure Pamphlets are published 4 times a year by email. Each edition