How to Design Programs Teachpacks
|
|
|
- Scot Stone
- 6 years ago
- Views:
Transcription
1 How to Design Programs Teachpacks Version 6.11 October 30, 2017 Teaching languages are small subsets of a full programming language. While such restrictions simplify error diagnosis and the construction of tools, they also make it impossible (or at least difficult) to write some interesting programs. To circumvent this restriction, it is possible to import teachpacks into programs written in a teaching language. In principle, a teachpack is just a library written in the full language, not the teaching subset. Like any other library, it may export values, functions, etc. In contrast to an ordinary library, however, a teachpack must enforce the contracts of the lowest teaching language into which it is imported and signal errors in a way with which students are familiar at that level. This chapter covers the teachpacks for How to Design Programs. 1
2 Contents 1 HtDP Teachpacks Manipulating Images: "image.rkt" Images Modes and Colors Creating Basic Shapes Basic Image Properties Composing Images Manipulating Images Scenes Miscellaneous Image Manipulation and Creation Simulations and Animations: "world.rkt" Simple Simulations Interactions A First Example Converting Temperatures: "convert.rkt" Guessing Numbers: "guess.rkt" MasterMinding: "master.rkt" Playing MasterMind: "master-play.rkt" Simple Drawing: "draw.rkt" Drawing on a Canvas Interactions with Canvas Hangman: "hangman.rkt" Playing Hangman: "hangman-play.rkt" Managing Control Arrows: "arrow.rkt" Manipulating Simple HTML Documents: "docs.rkt" Working with Files and Directories: "dir.rkt" Graphing Functions: "graphing.rkt" Simple Graphical User Interfaces: "gui.rkt" An Arrow GUI: "arrow-gui.rkt" Controlling an Elevator: "elevator.rkt" Lookup GUI: "lkup-gui.rkt" Guess GUI: "guess-gui.rkt" Queens: "show-queen.rkt" Matrix Functions: "matrix.rkt" Matrix Snip HtDP/2e Teachpacks Batch Input/Output: "batch-io.rkt" IO Functions Web Functions Testing Image Guide Overlaying, Above, and Beside: A House
3 2.2.2 Rotating and Overlaying: A Rotary Phone Dial Alpha Blending Recursive Image Functions Rotating and Image Centers Image Interoperability The Nitty Gritty of Pixels, Pens, and Lines The Nitty Gritty of Alpha Blending Images: "image.rkt" Basic Images Polygons Overlaying Images Placing Images & Scenes Rotating, Scaling, Flipping, Cropping, and Framing Images Bitmaps Image Properties Image Predicates Equality Testing of Images Pinholes Exporting Images to Disk Worlds and the Universe: "universe.rkt" Background Simple Simulations Interactions A First Sample World The World is not Enough The Universe Server A First Sample Universe itunes: "itunes.rkt" Data Definitions Exported Funcions Abstraction: "abstraction.rkt" Loops and Comprehensions Pattern Matching Algebraic Data Types Planet Cute Images Characters Blocks Items Ramps Buildings Shadows Porting World Programs to Universe The World is Not Enough Porting World Programs Porting Image Programs
4 1 HtDP Teachpacks 1.1 Manipulating Images: "image.rkt" (require htdp/image) package: htdp-lib NOTE: This library is deprecated; use 2htdp/image, instead. For the foreseeable time, we will continue to support the teachpack for your existing programs. The teachpack provides functions for constructing and manipulating images. Basic, colored images are created as outlines or solid shapes. Additional functions allow for the composition of images Images (image? x) Ñ boolean? x : any/c Is x an image? (image=? x y) Ñ boolean? x : image? y : image? Are x and y the same image? Modes and Colors Mode (one-of/c 'solid 'outline "solid" "outline") A Mode is used to specify whether painting a shape fills or outlines the form. (struct color (red green blue) #:extra-constructor-name make-color) red : (and/c natural-number/c (<=/c 255)) green : (and/c natural-number/c (<=/c 255)) blue : (and/c natural-number/c (<=/c 255)) RGB color? 4
5 A RGB describes a color via a shade of red, blue, and green colors (e.g., (make-color )). Color (or/c symbol? string? color?) A Color is a color-symbol (e.g., 'blue) or a color-string (e.g., "blue") or an RGB structure. (image-color? x) Ñ boolean? x : any Determines if the input is a valid image Color Creating Basic Shapes In DrRacket, you can insert images from your file system. Use PNG images whenever possible. In addition, you can create basic shapes with the following functions. (rectangle w h m c) Ñ image? w : (and/c number? (or/c zero? positive?)) h : (and/c number? (or/c zero? positive?)) m : Mode c : Color Creates a w by h rectangle, filled in according to m and painted in color c (circle r m c) Ñ image? r : (and/c number? (or/c zero? positive?)) m : Mode c : Color Creates a circle or disk of radius r, filled in according to m and painted in color c (ellipse w h m c) Ñ image? w : (and/c number? (or/c zero? positive?)) h : (and/c number? (or/c zero? positive?)) m : Mode c : Color Creates a w by h ellipse, filled in according to m and painted in color c (triangle s m c) Ñ image? s : number? m : Mode c : Color 5
6 Creates an upward pointing equilateral triangle whose side is s pixels long, filled in according to m and painted in color c (star n outer inner m c) Ñ image? n : (and/c number? (>=/c 2)) outer : (and/c number? (>=/c 1)) inner : (and/c number? (>=/c 1)) m : Mode c : Color Creates a multi-pointed star with n points, an outer radius for the max distance of the points to the center, and an inner radius for the min distance to the center. (regular-polygon s r m c [angle]) Ñ image? s : side r : number? m : Mode c : Color angle : real? = 0 Creates a regular polygon with s sides inscribed in a circle of radius r, using mode m and color c. If an angle is specified, the polygon is rotated by that angle. (line x y c) Ñ image? x : number? y : number? c : Color Creates a line colored c from (0,0) to (x,y). See add-line below. (text s f c) Ñ Image s : string? f : (and/c number? positive?) c : Color Creates an image of the text s at point size f and painted in color c Basic Image Properties To understand how images are manipulated, you need to understand the basic properties of images. (image-width i) Ñ integer? i : image? 6
7 Obtain i s width in pixels (image-height i) Ñ integer? i : image? Obtain i s height in pixels For the composition of images, you must know about pinholes. Every image come with a pinhole. For images created with the above functions, the pinhole is at the center of the shape except for those created from line and text. The text function puts the pinhole at the upper left corner of the image, and line puts the pinhole at the beginning of the line (meaning that if the first two arguments to line are positive, the pinhole is also in the upper left corner). The pinhole can be moved, of course, and compositions locate pinholes according to their own rules. When in doubt you can always find out where the pinhole is and place it where convenient. (pinhole-x i) Ñ integer? i : image? Determines the x coordinate of the pinhole, measuring from the left of the image. (pinhole-y i) Ñ integer? i : image? Determines the y coordinate of the pinhole, measuring from the top (down) of the image. (put-pinhole i x y) Ñ image? i : image? x : number? y : number? Creates a new image with the pinhole in the location specified by x and y, counting from the left and top (down), respectively. (move-pinhole i delta-x delta-y) Ñ image? i : image? delta-x : number? delta-y : number? Creates a new image with the pinhole moved down and right by delta-x and delta-y with respect to its current location. Use negative numbers to move it up or left Composing Images Images can be composed, and images can be found within compositions. 7
8 (add-line i x1 y1 x2 y2 c) Ñ image? i : image? x1 : number? y1 : number? x2 : number? y2 : number? c : Color Creates an image by adding a line (colored c) from (x1,y1) to (x2,y2) to image i. (overlay img img2 img*...) Ñ image? img : image? img2 : image? img* : image? Creates an image by overlaying all images on their pinholes. The pinhole of the resulting image is the same place as the pinhole in the first image. (overlay/xy img delta-x delta-y other) Ñ image? img : image? delta-x : number? delta-y : number? other : image? Creates an image by adding the pixels of other to img. Instead of lining the two images up on their pinholes, other s pinhole is lined up on the point: (make-posn (+ (pinhole-x img) delta-x) (+ (pinhole-y img) delta-y)) The pinhole of the resulting image is the same place as the pinhole in the first image. The same effect can be had by combining move-pinhole and overlay, (overlay img (move-pinhole other (- delta-x) (- delta-y))) (image-inside? img other) Ñ boolean? img : image? other : image? 8
9 Determines whether the pixels of the second image appear in the first. Be careful when using this function with jpeg images. If you use an image-editing program to crop a jpeg image and then save it, image-inside? does not recognize the cropped image, due to standard compression applied to JPEG images. (find-image img other) Ñ posn? img : image? other : image? Determines where the pixels of the second image appear in the first, with respect to the pinhole of the first image. If (image-inside? img other) isn t true, find-image signals an error Manipulating Images Images can also be shrunk. These shrink functions trim an image by eliminating extraneous pixels. (shrink-tl img width height) Ñ image? img : image? width : number? height : number? Shrinks the image to a width by height image, starting from the top-left corner. The pinhole of the resulting image is in the center of the image. (shrink-tr img width height) Ñ image? img : image? width : number? height : number? Shrinks the image to a width by height image, starting from the top-right corner. The pinhole of the resulting image is in the center of the image. (shrink-bl img width height) Ñ image? img : image? width : number? height : number? Shrinks the image to a width by height image, starting from the bottom-left corner. The pinhole of the resulting image is in the center of the image. 9
10 (shrink-br img width height) Ñ image? img : image? width : number? height : number? Shrinks the image to a width by height image, starting from the bottom-right corner. The pinhole of the resulting image is in the center of the image. (shrink img left above right below) Ñ image? img : image? left : number? above : number? right : number? below : number? Shrinks an image around its pinhole. The numbers are the pixels to save to left, above, to the right, and below the pinhole, respectively. The pixel directly on the pinhole is always saved Scenes A scene is an image, but with the pinhole in the upper-left corner, i.e. an image where pinhole-x and pinhole-y both return 0. Scenes are particularly useful with the 2htdp/universe and htdp/world teachpacks, since it displays only scenes in its canvas. (scene? x) Ñ boolean? x : any/c Is x an scene? (empty-scene width height) Ñ scene? width : natural-number/c height : natural-number/c creates a plain white, width x height scene. (place-image img x y s) Ñ scene? img : image? x : number? y : number? s : scene? 10
11 creates a scene by placing img at (x, y) into s; (x, y) are computer graphics coordinates, i.e., they count right and down from the upper-left corner. (nw:rectangle width height solid-or-outline c) Ñ image? width : natural-number/c height : natural-number/c solid-or-outline : Mode c : Color creates a width by height rectangle, solid or outlined as specified by solid-or-outline and colored according to c, with a pinhole at the upper left corner. (scene+line s x0 y0 x1 y1 c) Ñ scene? s : scene? x0 : number? y0 : number? x1 : number? y1 : number? c : Color creates a scene by placing a line of color c from (x0, y0) to (x1, y1) using computer graphics coordinates. In contrast to the add-line function, scene+line cuts off those portions of the line that go beyond the boundaries of the given s Miscellaneous Image Manipulation and Creation The last group of functions extracts the constituent colors from an image and converts a list of colors into an image. List-of-color : list? is one of: ; empty ; (cons Color List-of-color) ; Interpretation: represents a list of colors. (image->color-list img) Ñ List-of-color img : image? Converts an image to a list of colors. 11
12 (color-list->image l width height x y) Ñ image? l : List-of-color width : natural-number/c height : natural-number/c x : natural-number/c y : natural-number/c Converts a list of colors l to an image with the given width and height and pinhole (x,y) coordinates, specified with respect to the top-left of the image. The remaining functions provide alpha-channel information as well. Alpha channels are a measure of transparency; 0 indicates fully opaque and 255 indicates fully transparent. (struct alpha-color (alpha red green blue) #:extra-constructor-name make-alpha-color) alpha : (and/c natural-number/c (<=/c 255)) red : (and/c natural-number/c (<=/c 255)) green : (and/c natural-number/c (<=/c 255)) blue : (and/c natural-number/c (<=/c 255)) A structure representing an alpha color. (image->alpha-color-list img) Ñ (list-of alpha-color?) img : image? to convert an image to a list of alpha colors (alpha-color-list->image l width height x y) Ñ image? l : (list-of alpha-color?) width : integer? height : integer? x : integer? y : integer? Converts a list of alpha-colors l to an image with the given width and height and pinhole (x,y) coordinates, specified with respect to the top-left of the image. 1.2 Simulations and Animations: "world.rkt" (require htdp/world) package: htdp-lib NOTE: This library is deprecated; use 2htdp/universe, instead. For guidance on how to convert your htdp/world programs to use 2htdp/universe, see 2.8 Porting World Programs to Universe 12
13 Note: For a quick and educational introduction to the teachpack, see How to Design Programs, Second Edition: Prologue. As of August 2008, we also have a series of projects available as a small booklet on How to Design Worlds. The purpose of this documentation is to give experienced Racketers a concise overview for using the library and for incorporating it elsewhere. The last section presents A First Example for an extremely simple domain and is suited for a novice who knows how to design conditional functions for symbols. The teachpack provides two sets of tools. The first allows students to create and display a series of animated scenes, i.e., a simulation. The second one generalizes the first by adding interactive GUI features Simple Simulations (run-movie r m) Ñ true r : (and/c real? positive?) m : [Listof image?] run-movie displays the list of images m at the rate of r images per second. (run-simulation w h r create-image) Ñ true w : natural-number/c h : natural-number/c r : number? create-image : (-> natural-number/c scene) creates and shows a canvas of width w and height h, starts a clock, making it tick every r (usually fractional) seconds. Every time the clock ticks, run-simulation applies createimage to the number of ticks passed since this function call. The results of these applications are displayed in the canvas. Example: (define (create-ufo-scene height) (place-image UFO 50 height (empty-scene ))) (define UFO (overlay (circle 10 'solid 'green) (rectangle 40 4 'solid 'green))) (run-simulation (/ 1 28) create-ufo-scene) 13
14 1.2.2 Interactions An animation starts from a given world and generates new ones in response to events on the computer. This teachpack keeps track of the current world and recognizes three kinds of events: clock ticks; keyboard presses and releases; and mouse movements, mouse clicks, etc. Your program may deal with such events via the installation of handlers. The teachpack provides for the installation of three event handlers: on-tick-event, on-key-event, and on-mouse-event. In addition, it provides for the installation of a draw handler, which is called every time your program should visualize the current world. The following picture provides an intuitive overview of the workings of "world". 14
15 The big-bang function installs World_0 as the initial world; the callbacks tock, react, and click transform one world into another one; done checks each time whether the world is final; and draw renders each world as a scene. World any/c For animated worlds and games, using the teachpack requires that you provide a data definition for World. In principle, there are no constraints on this data definition. You can even keep it implicit, even if this violates the Design Recipe. (big-bang width height r world0) Ñ true width : natural-number/c 15
16 height : natural-number/c r : number? world0 : World (big-bang width height r world0 animated-gif?) Ñ true width : natural-number/c height : natural-number/c r : number? world0 : World animated-gif? : boolean? Creates and displays a width x height canvas, starts the clock, makes it tick every r seconds, and makes world0 the current world. If it is called with five instead of four arguments and the last one (animated-gif?) is true, the teachpack allows the generation of images from the animation, including an animated GIF image. (on-tick-event tock) Ñ true tock : (-> World World) Tells big-bang to call tock on the current world every time the clock ticks. The result of the call becomes the current world. KeyEvent (or/c char? symbol?) A KeyEvent represents key board events, e.g., keys pressed or released, by the computer s user. A char? KeyEvent is used to signal that the user has hit an alphanumeric key. Symbols such as 'left, 'right, 'up, 'down, 'release denote arrow keys or special events, such as releasing the key on the keypad. (key-event? x) Ñ boolean? x : any is x a KeyEvent (key=? x y) Ñ boolean? x : key-event? y : key-event? compares two KeyEvent for equality (on-key-event change) Ñ true change : (-> World key-event? World) Tells big-bang to call change on the current world and a KeyEvent for every keystroke the user of the computer makes. The result of the call becomes the current world. Here is a typical key-event handler: 16
17 (define (change w a-key-event) (cond [(key=? a-key-event 'left) (world-go w -DELTA)] [(key=? a-key-event 'right) (world-go w +DELTA)] [(char? a-key-event) w] ; to demonstrate order-free checking [(key=? a-key-event 'up) (world-go w -DELTA)] [(key=? a-key-event 'down) (world-go w +DELTA)] [else w])) MouseEvent (one-of/c 'button-down 'button-up 'drag 'move 'enter 'leave) A MouseEvent represents mouse events, e.g., mouse movements or mouse clicks, by the computer s user. (on-mouse-event clack) Ñ true clack : (-> World natural-number/c natural-number/c MouseEvent World) Tells big-bang to call clack on the current world, the current x and y coordinates of the mouse, and a MouseEvent for every action of the mouse by the user of the computer. The result of the call becomes the current world. (on-redraw to-scene) Ñ true to-scene : (-> World Scene) Tells big-bang to call to-scene whenever the canvas must be redrawn. The canvas is usually re-drawn after a tick event, a keyboard event, or a mouse event has occurred. The generated scene is displayed in the world s canvas. (stop-when last-world?) Ñ true last-world? : (-> World boolean?) Tells big-bang to call last-world? whenever the canvas is drawn. If this call produces true, the clock is stopped; no more tick events, KeyEvents, or MouseEvents are forwarded to the respective handlers. As a result, the canvas isn t updated either. Example: The following examples shows that (run-simulation (/ 1 28) create-ufo-scene) is a short-hand for three lines of code: (define (create-ufo-scene height) (place-image UFO 50 height (empty-scene ))) (define UFO (overlay (circle 10 'solid 'green) (rectangle 40 4 'solid 'green))) 17
18 (big-bang (/1 28) 0) (on-tick-event add1) (on-redraw create-ufo-scene) Exercise: Add a condition for stopping the flight of the UFO when it reaches the bottom A First Example Understanding a Door Say we want to represent a door with an automatic door closer. If this kind of door is locked, you can unlock it. While this doesn t open the door per se, it is now possible to do so. That is, an unlocked door is closed and pushing at the door opens it. Once you have passed through the door and you let go, the automatic door closer takes over and closes the door again. Of course, at this point you could lock it again. Here is a picture that translates our words into a graphical representation: The picture displays a so-called "state machine". The three circled words are the states that our informal description of the door identified: locked, closed (and unlocked), and open. The arrows specify how the door can go from one state into another. For example, when the door is open, the automatic door closer shuts the door as time passes. This transition is indicated by the arrow labeled "time passes." The other arrows represent transitions in a similar manner: "push" means a person pushes the door open (and let s go); 18
19 "lock" refers to the act of inserting a key into the lock and turning it to the locked position; and "unlock" is the opposite of "lock". Simulations of the World Simulating any dynamic behavior via a program demands two different activities. First, we must tease out those portions of our "world" that change over time or in reaction to actions, and we must develop a data representation D for this information. Keep in mind that a good data definition makes it easy for readers to map data to information in the real world and vice versa. For all others aspects of the world, we use global constants, including graphical or visual constants that are used in conjunction with the rendering functions. Second, we must translate the "world" actions the arrows in the above diagram into interactions with the computer that the world teachpack can deal with. Once we have decided to use the passing of time for one aspect and mouse movements for another, we must develop functions that map the current state of the world represented as data into the next state of the world. Since the data definition D describes the class of data that represents the world, these functions have the following general contract and purpose statements: ; tick : D -> D ; deal with the passing of time (define (tick w)...) ; click : D Number Number MouseEvent -> D ; deal with a mouse click at (x,y) of kind me ; in the current world w (define (click w x y me)...) ; control : D KeyEvent -> D ; deal with a key event (symbol, char) ke ; in the current world w (define (control w ke)...) That is, the contracts of the various hooks dictate what the contracts of these functions are once we have defined how to represent the world in data. A typical program does not use all three of these actions and functions but often just one or two. Furthermore, the design of these functions provides only the top-level, initial design goal. It often demands the design of many auxiliary functions. Simulating a Door: Data Our first and immediate goal is to represent the world as data. In this specific example, the world consists of our door and what changes about the door is whether it is locked, unlocked but closed, or open. We use three symbols to represent the three states: 19
20 SD ; DATA DEF. ; The state of the door (SD) is one of: ; 'locked ; 'closed ; 'open Symbols are particularly well-suited here because they directly express the state of the door. Now that we have a data definition, we must also decide which computer actions and interactions should model the various actions on the door. Our pictorial representation of the door s states and transitions, specifically the arrow from "open" to "closed" suggests the use of a function that simulates time. For the other three arrows, we could use either keyboard events or mouse clicks or both. Our solution uses three keystrokes: #\u for unlocking the door, #\l for locking it, and #\space for pushing it open. We can express these choices graphically by translating the above "state machine" from the world of information into the world of data: Simulating a Door: Functions Our analysis and data definition leaves us with three functions to design: automatic-closer, which closes the time during one tick; door-actions, which manipulates the time in response to pressing a key; and render, which translates the current state of the door into a visible scene. 20
21 Let s start with automatic-closer. We know its contract and it is easy to refine the purpose statement, too: ; automatic-closer : SD -> SD ; closes an open door over the period of one tick (define (automatic-closer state-of-door)...) Making up examples is trivial when the world can only be in one of three states: given state desired state locked locked closed closed open closed ; automatic-closer : SD -> SD ; closes an open door over the period of one tick (check-expect (automatic-closer 'locked) 'locked) (check-expect (automatic-closer 'closed) 'closed) (check-expect (automatic-closer 'open) 'closed) (define (automatic-closer state-of-door)...) The template step demands a conditional with three clauses: (define (automatic-closer state-of-door) (cond [(symbol=? 'locked state-of-door)...] [(symbol=? 'closed state-of-door)...] [(symbol=? 'open state-of-door)...])) The examples basically dictate what the outcomes of the three cases must be: (define (automatic-closer state-of-door) (cond [(symbol=? 'locked state-of-door) 'locked] [(symbol=? 'closed state-of-door) 'closed] [(symbol=? 'open state-of-door) 'closed])) Don t forget to run the example-tests. For the remaining three arrows of the diagram, we design a function that reacts to the three chosen keyboard events. As mentioned, functions that deal with keyboard events consume both a world and a keyevent: 21
22 ; door-actions : SD Keyevent -> SD ; key events simulate actions on the door (define (door-actions s k)...) given state given keyevent desired state locked #zu closed closed #zl locked closed #zspace open open open The examples combine what the above picture shows and the choices we made about mapping actions to keyboard events. From here, it is straightforward to turn this into a complete design: (define (door-actions s k) (cond [(and (symbol=? 'locked s) (key=? #\u k)) 'closed] [(and (symbol=? 'closed s) (key=? #\l k)) 'locked] [(and (symbol=? 'closed s) (key=? #\space k)) 'open] [else s])) (check-expect (door-actions 'locked #\u) 'closed) (check-expect (door-actions 'closed #\l) 'locked) (check-expect (door-actions 'closed #\space) 'open) (check-expect (door-actions 'open 'any) 'open) (check-expect (door-actions 'closed 'any) 'closed) Last but not least we need a function that renders the current state of the world as a scene. For simplicity, let s just use a large enough text for this purpose: ; render : SD -> Scene ; translate the current state of the door into a large text (define (render s) (text (symbol->string s) 40 'red)) (check-expect (render 'closed) (text "closed" 40 'red)) The function symbol->string translates a symbol into a string, which is needed because text can deal only with the latter, not the former. A look into the language documentation revealed that this conversion function exists, and so we use it. Once everything is properly designed, it is time to run the program. In the case of the world teachpack, this means we must specify which function takes care of tick events, key events, and redraws: 22
23 (big-bang 'locked) (on-tick-event automatic-closer) (on-key-event door-actions) (on-redraw render) Now it s time for you to collect the pieces and run them in big-bang to see whether it all works. 1.3 Converting Temperatures: "convert.rkt" (require htdp/convert) package: htdp-lib The teachpack convert.rkt provides three functions for converting Fahrenheit temperatures to Celsius. It is useful for a single exercise in HtDP. Its purpose is to demonstrate the independence of form (user interface) and function (also known as model ). (convert-gui convert) Ñ true convert : (-> number? number?) Consumes a conversion function from Fahrenheit to Celsius and creates a graphical user interface with two rulers, which users can use to convert temperatures according to the given temperature conversion function. (convert-repl convert) Ñ true convert : (-> number? number?) Consumes a conversion function from Fahrenheit to Celsius and then starts a read-evaluateprint loop. The loop prompts users to enter a number and then converts the number according to the given temperature conversion function. A user can exit the loop by entering x. (convert-file in convert out) Ñ true in : string? convert : (-> number? number?) out : string? Consumes a file name in, a conversion function from Fahrenheit to Celsius, and a string out. The program then reads all the number from in, converts them according to convert, and prints the results to the newly created file out. Warning: If out already exists, it is deleted. Example: Create a file with name "in.dat" with some numbers in it, using your favorite text editor on your computer. Define a function f2c in the Definitions window and set teachpack to "convert.rkt" and click Run. Then evaluate 23
24 (convert-gui f2c) ; and (convert-file "in.dat" f2c "out.dat") ; and (convert-repl f2c) Finally inspect the file "out.dat" and use the repl to check the answers. 1.4 Guessing Numbers: "guess.rkt" (require htdp/guess) package: htdp-lib The teachpack provides functions to play a guess-the-number game. Each function display a GUI in which a player can choose specific values for some number of digits and then check the guess. The more advanced functions ask students to implement more of the game. (guess-with-gui check-guess) Ñ true check-guess : (-> number? number? symbol?) The check-guess function consumes two numbers: guess, which is the user s guess, and target, which is the randomly chosen number-to-be-guessed. The result is a symbol that reflects the relationship of the player s guess to the target. (guess-with-gui-3 check-guess) Ñ true check-guess : (-> digit? digit? digit? number? symbol?) The check-guess function consumes three digits (digit0, digit1, digit2) and one number (target). The latter is the randomly chosen number-to-be-guessed; the three digits are the current guess. The result is a symbol that reflects the relationship of the player s guess (the digits converted to a number) to the target. Note: digit0 is the least significant digit that the user chose and digit2 is the most significant one. (guess-with-gui-list check-guess) Ñ true check-guess : (-> (list-of digit?) number? symbol?) The check-guess function consumes a list of digits (digits) and a number (target). The former is a list that makes up the user s guess, and the latter is the randomly chosen numberto-be-guessed. The result is a symbol that reflects the relationship of the player s guess (the digits converted to a number) to the target. Note: the first item on digits is the least significant digit that the user chose, and the last one is the most significant digit. 24
25 1.5 MasterMinding: "master.rkt" (require htdp/master) package: htdp-lib The teachpack implements GUI for playing a simple master mind-like game, based on a function designed by a student. The player clicks on two colors and the program responds with an answer that indicates how many colors and places were correct. (master check-guess) Ñ symbol? check-guess : (-> symbol? symbol? symbol? symbol? boolean?) Chooses two secret colors and then opens a graphical user interface for playing Master- Mind. The player is prompted to choose two colors, via a choice tablet and mouse clicks. Once chosen, master uses check-guess to compare them. If the two guesses completely match the two secret colors, check-guess must return 'PerfectGuess; otherwise it must return a different, informative symbol. 1.6 Playing MasterMind: "master-play.rkt" (require htdp/master-play) package: htdp-lib The teachpack implements the MasterMind game so that students can play the game and get an understanding of what we expect from them. (go name) Ñ true name : symbol? chooses a secret three-letter word, opens a canvas and a menu, and asks the player to guess the word. 1.7 Simple Drawing: "draw.rkt" (require htdp/draw) package: htdp-lib The teachpack provides two sets of functions: one for drawing into a canvas and one for reacting to canvas events. NOTE: This library is deprecated; use 2htdp/image (probably in conjunction with 2htdp/universe), instead. You may continue to use the library for solving exercises from How To Design Programs, First Edition but do consider switching to How To Design Programs, Second Edition instead. 25
26 1.7.1 Drawing on a Canvas DrawColor: (and/c symbol? (one-of/c 'white 'yellow 'red 'blue 'green 'black)) These six colors are definitely provided. If you want other colors, guess! For example, 'orange works, but 'mauve doesn t. If you apply the function to a symbol that it doesn t recognize as a color, it raises an error. (start width height) Ñ true width : number? height : number? Opens a width x height canvas. (start/cartesian-plane width height) Ñ true width : number? height : number? Opens a width x height canvas and draws a Cartesian plane. (stop) Ñ true Closes the canvas. (draw-circle p r c) Ñ true p : posn? r : number? c : DrawColor Draws a c circle at p with radius r. (draw-solid-disk p r c) Ñ true p : posn? r : number? c : DrawColor Draws a c disk at p with radius r. (draw-solid-rect ul width height c) Ñ true ul : posn? width : number? height : number? c : DrawColor Draws a width x height, c rectangle with the upper-left corner at ul. 26
27 (draw-solid-line strt end c) Ñ true strt : posn? end : posn? c : DrawColor Draws a c line from strt to end. (draw-solid-string p s) Ñ true p : posn? s : string? Draws s at p. (sleep-for-a-while s) Ñ true s : number? Suspends evaluation for s seconds. The teachpack also provides clear- functions for each draw- function: (clear-circle p r c) Ñ true p : posn? r : number? c : DrawColor clears a c circle at p with radius r. (clear-solid-disk p r c) Ñ true p : posn? r : number? c : DrawColor clears a c disk at p with radius r. (clear-solid-rect ul width height c) Ñ true ul : posn? width : number? height : number? c : DrawColor clears a width x height, c rectangle with the upper-left corner at ul. (clear-solid-line strt end c) Ñ true strt : posn? end : posn? c : DrawColor 27
28 clears a c line from strt to end. (clear-solid-string p s) Ñ true p : posn? s : string? clears s at p. (clear-all) Ñ true clears the entire screen Interactions with Canvas (wait-for-mouse-click) Ñ posn? Waits for the user to click on the mouse, within the canvas. DrawKeyEvent: (or/c char? symbol?) A DrawKeyEvent represents keyboard events: char?, if the user pressed an alphanumeric key; symbol?, if the user pressed, for example, an arror key: 'up 'down 'left 'right (get-key-event) Ñ (or/c false DrawKeyEvent) Checks whether the user has pressed a key within the window; false if not. DrawWorld: For proper interactions, using the teachpack requires that you provide a data definition for DrawWorld. In principle, there are no constraints on this data definition. You can even keep it implicit, even if this violates the Design Recipe. The following functions allow programs to react to events from the canvas. (big-bang n w) Ñ true n : number? w : DrawWorld Starts the clock, one tick every n (fractal) seconds; w becomes the first current world. (on-key-event change) Ñ true change : (-> DrawKeyEvent DrawWorld DrawWorld) 28
29 Adds change to the world. The function reacts to keyboard events and creates a new Draw- World. (on-tick-event tock) Ñ true tock : (-> DrawWorld DrawWorld) Adds tock to the world. The function reacts to clock tick events, creating a new current world. (end-of-time) Ñ DrawWorld Stops the world; returns the current world. 1.8 Hangman: "hangman.rkt" (require htdp/hangman) package: htdp-lib The teachpack implements the callback functions for playing a Hangman game, based on a function designed by a student. The player guesses a letter and the program responds with an answer that indicates how many times, if at all, the letter occurs in the secret word. (hangman make-word reveal draw-next-part) Ñ true make-word : (-> symbol? symbol? symbol? word?) reveal : (-> word? word? word?) draw-next-part : (-> symbol? true) Chooses a secret three-letter word and uses the given functions to manage the Hangman game. (hangman-list reveal-for-list draw-next-part) Ñ true reveal-for-list : (-> symbol? (list-of symbol?) (list-of symbol?) (list-of symbol?)) draw-next-part : (-> symbol? true) Chooses a secret word a list of symbolic letters and uses the given functions to manage the Hangman game: reveal-for-list determines how many times the chosen letter occurs in the secret word; draw-next-part is given the symbolic name of a body part and draws it on a separately managed canvas. In addition, the teachpack re-exports the entire functionality of the drawing library; see 1.7 Simple Drawing: "draw.rkt" for documentation. 29
30 1.9 Playing Hangman: "hangman-play.rkt" (require htdp/hangman-play) package: htdp-lib The teachpack implements the Hangman game so that students can play the game and get an understanding of what we expect from them. (go name) Ñ true name : symbol? chooses a secret three-letter word, opens a canvas and a menu, and asks the player to guess the word Managing Control Arrows: "arrow.rkt" (require htdp/arrow) package: htdp-lib The teachpack implements a controller for moving shapes across a canvass. (control-left-right shape n move draw) Ñ true shape : Shape n : number? move : (-> number? Shape Shape) draw : (-> Shape true) Moves shape n pixels left (negative) or right (positive). (control-up-down shape n move draw) Ñ true shape : Shape n : number? move : (-> number? Shape Shape) draw : (-> Shape true) Moves shape n pixels up (negative) or down (positive). (control shape n move-lr move-ud draw) Ñ true shape : Shape n : number? move-lr : (-> number? Shape Shape) move-ud : (-> number? Shape Shape) draw : (-> Shape true) Moves shape N pixels left or right and up or down, respectively. Example: 30
31 ; A shape is a structure: ; (make-posn num num) ; RAD : the radius of the simple disk moving across a canvas (define RAD 10) ; move : number shape -> shape or false ; to move a shape by delta according to translate ; effect: to redraw it (define (move delta sh) (cond [(and (clear-solid-disk sh RAD) (draw-solid-disk (translate sh delta) RAD)) (translate sh delta)] [else false])) ; translate : shape number -> shape ; to translate a shape by delta in the x direction (define (translate sh delta) (make-posn (+ (posn-x sh) delta) (posn-y sh))) ; draw-it : shape -> true ; to draw a shape on the canvas: a disk with radius (define (draw-it sh) (draw-solid-disk sh RAD)) ; Run: ; this creates the canvas (start ) ; this creates the controller GUI (control-left-right (make-posn 10 20) 10 move draw-it) 1.11 Manipulating Simple HTML Documents: "docs.rkt" (require htdp/docs) package: htdp-lib The teachpack provides three functions for creating simple HTML documents: Annotation An Annotation is a symbol that starts with ă and ends in ą. An end annotation is one that starts with ă/. (atom? x) Ñ boolean? x : any/c 31
32 Determines whether or not a value is a number, a symbol, or a string. (annotation? x) Ñ boolean? x : any/c Determines whether or not a symbol is a document annotation. (end-annotation x) Ñ Annotation x : Annotation Consumes an annotation and produces a matching ending annotation. (write-file l) Ñ true l : (list-of atom) Consumes a list of symbols and annotations and prints them out as a "file". Sample session: set teachpack to "docs.rkt" and click Run: > (annotation? 0) false > (annotation? '<bold>) true > (end-annotation 0) end-annotation: not an annotation: 0 > (write-file (list 'a 'b)) a b 1.12 Working with Files and Directories: "dir.rkt" (require htdp/dir) package: htdp-lib The teachpack provides structures and functions for working with files and directories: (struct dir (name dirs files) #:extra-constructor-name make-dir) name : (or/c string? symbol?) dirs : (listof dir?) files : (listof file?) Represents directories (file folders) in the teaching languages. (struct file (name size date content) #:extra-constructor-name make-file) 32
33 name : (or/c string? symbol?) size : integer? date : (or/c 0 date?) content : any/c Represents files in the teaching languages. The struct s date field is optional for clients. Calling make-field with three arguments fills the time field with 0. (create-dir path) Ñ dir? path : string? Turns the directory found at path on your computer into an instance of dir. (struct date (year month day hours minutes seconds) #:extra-constructor-name make-date) year : natural-number/c month : natural-number/c day : natural-number/c hours : natural-number/c minutes : natural-number/c seconds : natural-number/c Represents dates for file construction. Sample: Set teachpack to "dir.rkt" or add (require htdp/dir) to the definitions area. Clicking on Run and asking for the content of the current directory will produce something like this: > (create-dir ".") (make-dir "." '() (cons (make-file "arrow.scrbl" 1897 (makedate ) "") (cons (make-file "convert.scrbl" 2071 (makedate ) "") (cons (make-file "dir.scrbl" 1587 (makedate ) "") (cons (make-file "docs.scrbl" 1259 (makedate ) "") (cons (make-file "draw.scrbl" 5220 (makedate ) "") (cons (make-file "elevator.scrbl" 1110 (makedate ) "")))))))) 33
34 Using "." usually means the directory in which your program is located. In this case, the directory contains no sub-directories and six files. Note The library generates file names as strings, but the constructors accept symbols for backwards compatibility. Note Soft links are always treated as if they were empty files. Changed in version 1.0 of package htdp-lib: built in 1996 for HtDP/1e Changed in version 1.4: Fri Jul 8 13:09:13 EDT 2016 added optional date field to file representation, added strings as representations of file names 1.13 Graphing Functions: "graphing.rkt" (require htdp/graphing) package: htdp-lib The teachpack provides two functions for graphing functions in the regular (upper right) quadrant of the Cartesian plane (between 0 and 10 in both directions): (graph-fun f color) Ñ true f : (-> number? number?) color : symbol? Draws the graph of f with the given color. (graph-line line color) Ñ true line : (-> number? number?) color : symbol? Draws line, a function representing a straight line, with a given color. For color symbols, see 1.7 Simple Drawing: "draw.rkt". In addition, the teachpack re-exports the entire functionality of the drawing library; see 1.7 Simple Drawing: "draw.rkt" for documentation Simple Graphical User Interfaces: "gui.rkt" (require htdp/gui) package: htdp-lib The teachpack provides functions for creating and manipulating graphical user interfaces. We recommend using 2htdp/universe instead. Window A Window is a data representation of a visible window on your computer screen. 34
35 GUI-ITEM A GUI-Item is a data representation of an active component of a window on your computer screen. (create-window g) Ñ Window g : (listof (listof GUI-ITEM)) Creates a window from the matrix of gui items g. (window? x) Ñ boolean? x : any/c Is the given value a window? (show-window w) Ñ true w : Window Shows w. (hide-window w) Ñ true w : window Hides w. (make-button label callback) Ñ GUI-ITEM label : string> callback : (-> event% boolean) Creates a button with label and callback function. The latter receives an argument that it may safely ignore. (make-message msg) Ñ GUI-ITEM msg : string? Creates a message item from msg. (draw-message g m) Ñ true g : GUI-ITEM m : string? Displays m in message item g and erases the current message. (make-text txt) Ñ GUI-ITEM txt : string? Creates an text editor (with label txt) that allows users to enter text. 35
36 (text-contents g) Ñ string? g : GUI-ITEM Determines the current contents of a text GUI-ITEM. (make-choice choices) Ñ GUI-ITEM choices : (listof string?) Creates a choice menu from choices that permits users to choose from some alternatives. (choice-index g) Ñ natural-number/c g : GUI-ITEM Determines the choice that is currently selected in a choice GUI-ITEM; the result is the 0-based index in the choice menu Example 1: > (define w (create-window (list (list (make-button "QUIT" (lambda (e) (hidewindow w))))))) ; A button appears on the screen. ; Click on the button and it will disappear. > (show-window w) ; The window disappears. Example 2: ; text1 : GUI-ITEM (define text1 (make-text "Please enter your name")) ; msg1 : GUI-ITEM (define msg1 (make-message (string-append "Hello, World" (makestring 33 #\space)))) ; Event -> true ; draws the current contents of text1 into msg1, prepended with "Hello, " (define (respond e) (draw-message msg1 (string-append "Hello, " (textcontents text1)))) 36
37 ; set up window with three "lines": ; a text field, a message, and two buttons ; fill in text and click OKAY (define w (create-window (list (list text1) (list msg1) (list (make-button "OKAY" respond) (make-button "QUIT" (lambda (e) (hide-window w))))))) 1.15 An Arrow GUI: "arrow-gui.rkt" (require htdp/arrow-gui) package: htdp-lib The teachpack provides functions for creating and manipulating an arrow GUI. We recommend using 2htdp/universe instead. modelt (-> button% event% true) A modelt is a function that accepts and ignores two arguments. (control) Ñ symbol? Reads out the current state of the message field. (view s) Ñ true s : (or/c string? symbol?) Displays s in the message field. (connect l r u d) Ñ true l : modelt r : modelt u : modelt d : modelt Connects four controllers with the four directions in the arrow window. Example: ; Advanced (define (make-model dir) 37
38 (lambda (b e) (begin (view dir) (printf " a n" (control))))) (connect (make-model "left") (make-model "right") (make-model "up") (make-model "down")) Now click on the four arrows. The message field contains the current direction, the print-out the prior contents of the message field Controlling an Elevator: "elevator.rkt" (require htdp/elevator) package: htdp-lib The teachpack implements an elevator simulator. It displays an eight-floor elevator and accepts mouse clicks from the user, which are translated into service demands for the elevator. (run NextFloor) Ñ any/c NextFloor : number? Creates an elevator simulator that is controlled by NextFloor. This function consumes the current floor, the direction in which the elevator is moving, and the current demands. From that, it computes where to send the elevator next. Example: Define a function that consumes the current state of the elevator (three arguments) and returns a number between 1 and 8. Here is a non-sensical definition: (define (controller x y z) 7) It moves the elevator once, to the 7th floor. Second, set the teachpack to "elevator.rkt", click Run, and evaluate (run controller) 1.17 Lookup GUI: "lkup-gui.rkt" (require htdp/lkup-gui) package: htdp-lib 38
39 The teachpack provides three functions: (control index) Ñ symbol? index : natural-number? reads out the indexth guess choice, starting with 0 (view msg) Ñ true/c msg : (or/c string? symbol?) displays its msg argument in the message panel (connect event-handler) Ñ true/c event-handler : (-> button% event% true/c) connects a controller (handler) with the Check button displays frame Example: (connect (lambda (e b) (view (control)))) This example simply mirrors what the user types in to the message field Guess GUI: "guess-gui.rkt" (require htdp/guess-gui) package: htdp-lib The teachpack provides three functions: (control index) Ñ symbol? index : natural-number? reads out the indexth guess choice, starting with 0 (view msg) Ñ true/c msg : (or/c string? symbol?) displays its msg argument in the message panel (connect handler) Ñ true/c handler : (-> button% event% true/c) 39
40 connects a controller (handler) with the Check button displays frame Example: (connect (lambda (e b) (begin (printf "0th digit: s n" (control 0)) (view (control 0))))) 1.19 Queens: "show-queen.rkt" (require htdp/show-queen) package: htdp-lib The teachpack provides the function show-queen, which implements a GUI for exploring the n-queens problem. (show-queen board) Ñ true board : (list-of (list-of boolean?)) The function show-queen consumes a list of lists of booleans that describes a board. Each of the inner lists must have the same length as the outer list. The trues correspond to positions where queens are, and the falses correspond to empty squares. The function returns nothing. In the GUI window that show-queen opens, the red and orange dots show where the queens are. The green dot shows where the mouse cursor is. Each queen that threatens the green spot is shown in red, and the queens that do not threaten the green spot are shown in orange Matrix Functions: "matrix.rkt" (require htdp/matrix) package: htdp-lib The experimental teachpack supports matrices and matrix functions. A matrix is just a rectangle of objects. It is displayed as an image, just like the images from 1.1 Manipulating Images: "image.rkt". Matrices are images and, indeed, scenes in the sense of the 1.2 Simulations and Animations: "world.rkt". No educational materials involving matrices exist. The functions access a matrix in the usual (school-mathematics) manner: row first, column second. The functions aren t tuned for efficiency so don t expect to build programs that process lots of data. 40
41 Rectangle A Rectangle (of X) is a non-empty list of lists containing X where all elements of the list are lists of equal (non-zero) length. (matrix? o) Ñ boolean? o : any/c determines whether the given object is a matrix? (matrix-rows m) Ñ natural-number/c m : matrix? determines how many rows this matrix m has (matrix-cols m) Ñ natural-number/c m : matrix? determines ow many columns this matrix m has (rectangle->matrix r) Ñ matrix? r : Rectangle creates a matrix from the given Rectangle (matrix->rectangle m) Ñ Rectangle m : matrix? creates a rectangle from this matrix m (make-matrix n m l) Ñ matrix? n : natural-number/c m : natural-number/c l : (Listof X) creates an n by m matrix from l NOTE: make-matrix would consume an optional number of entries, if it were like makevector (build-matrix n m f) Ñ matrix? n : natural-number/c m : natural-number/c f : (-> (and/c natural-number/c (</c m)) (and/c natural-number/c (</c n)) any/c) 41
42 creates an n by m matrix by applying f to (0,0), (0,1),..., ((sub1 m),(sub1 n)) (matrix-ref m i j) Ñ any/c m : matrix? i : (and/c natural-number/c (</c (matrix-rows m))) j : (and/c natural-number/c (</c (matrix-rows m))) retrieve the item at (i,j) in matrix m (matrix-set m i j x) Ñ matrix? m : matrix? i : (and/c natural-number/c (</c (matrix-rows m))) j : (and/c natural-number/c (</c (matrix-rows m))) x : any/c creates a new matrix with x at (i,j) and all other places the same as in m (matrix-where? m pred?) Ñ (listof posn?) m : matrix? pred? : (-> any/c boolean?) (matrix-where? M P) produces a list of (make-posn i j) such that (P (matrix-ref M i j)) holds (matrix-render m) Ñ Rectangle m : matrix? renders this matrix m as a rectangle of strings (matrix-minor m i j) Ñ matrix? m : matrix? i : (and/c natural-number/c (</c (matrix-rows m))) j : (and/c natural-number/c (</c (matrix-rows m))) creates a matrix minor from m at (i,j) Matrix Snip The htdp/matrix teachpack exports the snip-class object to support saving and reading matrix snips. snip-class : (instance/of matrix-snip-class%) An object to support 2D matrix rendering. 42
43 2 HtDP/2e Teachpacks 2.1 Batch Input/Output: "batch-io.rkt" (require 2htdp/batch-io) package: htdp-lib The batch-io teachpack introduces several functions and a form for reading content from files and one function for writing to a file IO Functions All functions that read a file consume the name of a file and possibly additional arguments. They assume that the specified file exists in the same folder as the program; if not they signal an error: (read-file f) Ñ string? f : (or/c 'standard-in 'stdin (and/c string? file-exists?)) reads the standard input device (until closed) or the content of file f and produces it as a string, including newlines. Example: > (read-file "data.txt") "hello world \n good bye \n\ni, for 1, am done " assuming the file named "data.txt" has this shape: hello world good bye i, for 1, am done Note how the leading space in the second line translates into the space between the newline indicator and the word "good" in the result. (read-1strings f) Ñ (listof 1string?) f : (or/c 'standard-in 'stdin (and/c string? file-exists?)) reads the standard input device (until closed) or the content of file f and produces it as a list of one-char strings, one per character. Example: 43
44 > (read-1strings "data.txt") '("h" "e" "l" "l" "o" " " "w" "o" "r" "l" "d" " " "\n" " " "g" "o" "o" "d" " " "b" "y" "e" " " "\n" "\n" "i" "," " " "f" "o" "r" " " "1" "," " " "a" "m" " " "d" "o" "n" "e" " ") Note how this function reproduces all parts of the file faithfully, including spaces and 44
45 newlines. (read-lines f) Ñ (listof string?) f : (or/c 'standard-in 'stdin (and/c string? file-exists?)) reads the standard input device (until closed) or the content of file f and produces it as a list of strings, one per line. Example: > (read-lines "data.txt") '("hello world " " good bye " "" "i, for 1, am done ") when "data.txt" is the name of the same file as in the preceding item. And again, the leading space of the second line shows up in the second string in the list. If the last line is not terminated by a newline, the functions acts as if there were one. (read-words f) Ñ (listof string?) f : (or/c 'standard-in 'stdin (and/c string? file-exists?)) reads the standard input device (until closed) or the content of file f and produces it as a list of strings, one per white-space separated token in the file. Example: > (read-words "data.txt") '("hello" "world" "good" "bye" "i," "for" "1," "am" "done") This time, however, the extra leading space of the second line of "data.txt" has disappeared in the result. The space is considered a part of the separator that surrounds the word "good". (read-words/line f) Ñ (listof (listof string?)) f : (or/c 'standard-in 'stdin (and/c string? file-exists?)) reads the standard input device (until closed) or the content of file f and produces it as a list of lists, one per line; each line is represented as a list of strings. Example: > (read-words/line "data.txt") '(("hello" "world") ("good" "bye") () ("i," "for" "1," "am" "done")) The results is similar to the one that read-words produces, except that the organization of the file into lines is preserved. In particular, the empty third line is represented as an empty list of words. If the last line is not terminated by a newline, the functions acts as if there were one. 45
46 (read-words-and-numbers/line f) Ñ (listof (or number? string?)) f : (or/c 'standard-in 'stdin (and/c string? file-exists?)) reads the standard input device (until closed) or the content of file f and produces it as a list of lists, one per line; each line is represented as a list of strings and numbers. Example: > (read-words-and-numbers/line "data.txt") '(("hello" "world") ("good" "bye") () ("i," "for" "1," "am" "done")) The results is like the one that read-words/line produces, except strings that can be parsed as numbers are represented as numbers. If the last line is not terminated by a newline, the functions acts as if there were one. (read-csv-file f) Ñ (listof (listof any/c)) f : (or/c 'standard-in 'stdin (and/c string? file-exists?)) reads the standard input device (until closed) or the content of file f and produces it as a list of lists of comma-separated values. Example: > (read-csv-file "data.csv") '(("hello" "world") ("good" "bye") ("i" "am" "done")) where the file named "data.csv" has this shape: hello, world good, bye i, am, done It is important to understand that the rows don t have to have the same length. Here the third line of the file turns into a row of three elements. (read-csv-file/rows f s) Ñ (listof X?) f : (or/c 'standard-in 'stdin (and/c string? file-exists?)) s : (-> (listof any/c) X?) reads the standard input device (until closed) or the content of file f and produces it as reads the content of file f and produces it as list of rows, each constructed via s. Examples: 46
47 > (read-csv-file/rows "data.csv" (lambda (x) x)) '(("hello" "world") ("good" "bye") ("i" "am" "done")) > (read-csv-file/rows "data.csv" length) '(2 2 3) The first example shows how read-csv-file is just a short form for read-csvfile/rows; the second one simply counts the number of separated tokens and the result is just a list of numbers. In many cases, the function argument is used to construct a structure from a row. (read-xexpr f) Ñ xexpr? f : (or/c 'standard-in 'stdin (and/c string? file-exists?)) reads the standard input device (until closed) or the content of file f and produces it as an X-expression, including whitespace such as tabs and newlines. Assumption: the file f or the selected input device contains an XML element. It assumes the file contains HTML-like text and reads it as XML. Example: > (read-xexpr "data.xml") '(pre () "\nhello world\ngood bye\n\ni, for 1, am done\n") assuming the file named "data.xml" has this shape: <pre> hello world good bye i, for 1, am done </pre> Note how the result includes "\\n" for the newlines. (read-plain-xexpr f) Ñ xexpr? f : (or/c 'standard-in 'stdin (and/c string? file-exists?)) reads the standard input device (until closed) or the content of file f and produces it as an X-expression, without whitespace. Assumption: the file f or the selected input device contains an XML element and the content of this element are other XML elements and whitespace. In particular, the XML element does not contain any strings as elements other than whitespace. Example: > (read-plain-xexpr "data-plain.xml") 47
48 '(pre () (line ((text "hello world"))) (line ((text "good bye"))) (line ()) (line ((text "i, for 1, am done")))) assuming the file named "data-plain.xml" has this shape: <pre> <line text="hello world" /> <line text="good bye" /> <line /> <line text="i, for 1, am done" /> </pre> Compare this result with the one for read-xexpr. There is only one writer function at the moment: (write-file f cntnt) Ñ string? f : (or/c 'standard-out 'stdout string?) cntnt : string? sends cntnt to the standard output device or turns cntnt into the content of file f, located in the same folder (directory) as the program. If the write succeeds, the function produces the name of the file (f); otherwise it signals an error. Example: > (if (string=? (write-file "output.txt" "good bye") "output.txt") (write-file "output.txt" "cruel world") (write-file "output.txt" "cruel world")) "output.txt" After evaluating this examples, the file named "output.txt" looks like this: cruel world Explain why. Warning: The file IO functions in this teachpack are platform dependent. That is, as long as your programs and your files live on the same platform, you should not have any problems reading the files that programs wrote and vice versa. If, however, one of your programs writes a file on a Windows operating system and if you then copy this output file to a Mac, reading the copied text file may produce extraneous return characters. Note that this describes only one example of possible malfunction; there are other cases when trans-platform actions may cause this teachpack to fail. 48
49 2.1.2 Web Functions All functions that read a web-based XML consume a URL and possibly additional arguments. They assume that the computer is connected to specified part of the web, though they tolerate non-existent web pages (404 errors) (read-xexpr/web u) Ñ xexpr? u : string? reads the content of URL u and produces the first XML element as an xexpr? including whitespace such as tabs and newlines. If possible, the function interprets the HTML at the specified URL as XML. The function returns #f if the web page does not exist (404) (read-plain-xexpr/web u) Ñ xexpr? u : string? reads the content of URL u and produces the first XML element as an xexpr? without whitespace. If possible, the function interprets the HTML at the specified URL as XML. The function returns #f if the web page does not exist (404) (url-exists? u) Ñ boolean? u : string? ensures that the specified URL u does not produce a 404 error. (xexpr? u) Ñ boolean? u : any? checks that the given value is an X-expression in the following sense: ; Xexpr is one of: ; symbol? ; string? ; number? ; (cons symbol? (cons [List-of Attribute] [List-of Xexpr])) ; (cons symbol? [List-of Xexpr]) ; ; Attribute is: ; (list symbol? string?) ; (list 'a "some text") is called an a-attribute ; and "some text" is a's value. 49
50 Note that full Racket uses a wider notion of X-expression. (xexpr-as-string x) Ñ string? x : xexpr? renders the given X-expression as a string. (url-html-neighbors u) Ñ (listof string?) u : string? retrieves the content of URL u and produces the list of all URLs that refer to.html pages via an <a> tag Testing (simulate-file process str...) simulates a file system for the function process, which reads a file and may produce one. Note: this form is under development and will be documented in a precise manner after it is finalized and useful for a wide audience. 2.2 Image Guide This section introduces the 2htdp/image library through a series of increasingly complex image constructions and discusses some subtle details of cropping and outline images Overlaying, Above, and Beside: A House To build a simple-looking house, we can place a triangle above a rectangle. > (above (triangle 40 "solid" "red") (rectangle "solid" "black")) We can give the house two roofs by putting two triangles next to each other. 50
51 > (above (beside (triangle 40 "solid" "red") (triangle 40 "solid" "red")) (rectangle "solid" "black")) But if we want the new roof to be a little smaller, then they do not line up properly. > (above (beside (triangle 40 "solid" "red") (triangle 30 "solid" "red")) (rectangle "solid" "black")) Instead, we can use beside/align to line up the two triangles along their bottoms instead of along the middles (which is what beside does). > (define victorian (above (beside/align "bottom" (triangle 40 "solid" "red") (triangle 30 "solid" "red")) (rectangle "solid" "black"))) > victorian To add a door to the house, we can overlay a brown rectangle, aligning it with the center bottom of the rest of the house. > (define door (rectangle "solid" "brown")) > (overlay/align "center" "bottom" door victorian) 51
52 We can use a similar technique to put a doorknob on the door, but instead of overlaying the doorknob on the entire house, we can overlay it just on the door. > (define door-with-knob (overlay/align "right" "center" (circle 3 "solid" "yellow") door)) > (overlay/align "center" "bottom" door-with-knob victorian) Rotating and Overlaying: A Rotary Phone Dial A rotary phone dial can be built by from a black disk and 10 little white ones by placing the white disks, one at a time, at the top of the black disk and then rotating the entire black disk. To get started, lets define a function to make little white disks with numbers on them: > (define (a-number digit) (overlay (text (number->string digit) 12 "black") (circle 10 "solid" "white"))) We ll use place-and-turn to put the numbers onto the disk: > (define (place-and-turn digit dial) (rotate 30 (overlay/align "center" "top" (a-number digit) dial))) For example: > (place-and-turn 0 (circle 60 "solid" "black")) 0 52
53 > (place-and-turn 8 (place-and-turn 9 (place-and-turn 0 (circle 60 "solid" "black")))) We can write a single function to put all of the numbers together into the dial: > (define (place-all-numbers dial) (place-and-turn 1 (place-and-turn 2 (place-and-turn 3 (place-and-turn 4 (place-and-turn 5 (place-and-turn 6 (place-and-turn 7 (place-and-turn 8 (place-and-turn 9 (place-and-turn 0 dial))))))))))) > (place-all-numbers (circle 60 "solid" "black")) 53
54 That definition is long and tedious to write. We can shorten it using foldl: > (define (place-all-numbers dial) (foldl place-and-turn dial '( ))) > (place-all-numbers (circle 60 "solid" "black")) To finish off the dial, we need to rotate it a little bit to its natural position and put a white disk in the center of it. Here s the inner dial: > (define inner-dial (overlay (text " " 9 "black") (circle 30 "solid" "white"))) and here s a function to build the entire rotary dial, with an argument that scales the dial: > (define (rotary-dial f) (scale f (overlay inner-dial (rotate -90 (place-all-numbers (circle 60 "solid" "black")))))) > (rotary-dial 2) 54
55 Looking at the image, it feels like the numbers are too close to the edge of the dial. So we can adjust the place-and-turn function to put a little black rectangle on top of each number. The rectangle is invisible because it ends up on top of the black dial, but it does serve to push the digits down a little. > (define (place-and-turn digit dial) (rotate 30 (overlay/align "center" "top" (above (rectangle 1 5 "solid" "black") (a-number digit)) dial))) > (rotary-dial 2) 55
56 Alpha Blending With shapes that have opaque colors like "red" and "blue", overlaying one on top completely blots out the one one the bottom. For example, the red rectangle here completely covers the blue one. > (overlay (rectangle "solid" (color )) (rectangle "solid" (color ))) But 2htdp/image also supports colors that are not completely opaque, via the (optional) fourth argument to color. > (overlay (rectangle "solid" (color )) (rectangle "solid" (color ))) 56
57 In this example, the color (color ) looks just like the color (color ) when the background is white. Since white is (color ), we end up getting 1/2 of 255 for the red and blue components and 255 for the green one. We can also use alpha blending to make some interesting effects. For example, the function spin-alot takes an image argument and repeatedly places it on top of itself, rotating it each time by 1 degree. > (define (spin-alot t) (local [(define (spin-more i θ) (cond [(= θ 360) i] [else (spin-more (overlay i (rotate θ t)) (+ θ 1))]))] (spin-more t 0))) Here are some uses of spin-alot, first showing the original shape and then the spun shape. > (rectangle "solid" (color )) > (spin-alot (rectangle "solid" (color ))) 57
58 > (triangle 120 "solid" (color )) > (spin-alot (triangle 120 "solid" (color ))) > (isosceles-triangle "solid" (color )) > (spin-alot (isosceles-triangle "solid" (color ))) Recursive Image Functions It is also possible to make interesting looking shapes with little recursive functions. For example, this function repeatedly puts white circles that grow, evenly spaced around the edge of the given shape: > (define (swoosh image s) (cond 58
59 [(zero? s) image] [else (swoosh (overlay/align "center" "top" (circle (* s 1/2) "solid" "white") (rotate 4 image)) (- s 1))])) > (swoosh (circle 100 "solid" "black") 94) More conventional fractal shapes can also be written using the image library, e.g.: > (define (sierpinski-carpet n) (cond [(zero? n) (square 1 "solid" "black")] [else (local [(define c (sierpinski-carpet (- n 1))) (define i (square (image-width c) "solid" "white"))] (above (beside c c c) (beside c i c) (beside c c c)))])) > (sierpinski-carpet 5) 59
) (square 1 \"solid\" (first colors))] [else (local [(define c (colored-carpet (rest colors))) (define i (square (image-width c) \"solid\" (car colors)))] (above (beside c c c) (beside c i")
60 We can adjust the carpet to add a little color: > (define (colored-carpet colors) (cond [(empty? (rest colors)) (square 1 "solid" (first colors))] [else (local [(define c (colored-carpet (rest colors))) (define i (square (image-width c) "solid" (car colors)))] (above (beside c c c) (beside c i c) (beside c c c)))])) > (colored-carpet (list (color ) (color ) (color ) (color ) (color ) (color ))) 60
 (square 1 \"solid\" \"black\")] [else (local [(define smaller (koch-curve (- n 1)))] (beside/align \"bottom\" smaller (rotate 60 smaller) (rotate -60 smaller) smaller))])) > (koch-curve 5) And then put")
61 The Koch curve can be constructed by simply placing four curves next to each other, rotated appropriately: > (define (koch-curve n) (cond [(zero? n) (square 1 "solid" "black")] [else (local [(define smaller (koch-curve (- n 1)))] (beside/align "bottom" smaller (rotate 60 smaller) (rotate -60 smaller) smaller))])) > (koch-curve 5) And then put three of them together to form the Koch snowflake. > (above (beside 61
62 (rotate 60 (koch-curve 5)) (rotate -60 (koch-curve 5))) (flip-vertical (koch-curve 5))) Rotating and Image Centers When rotating an image, some times the image looks best when it rotates around a point that is not the center of the image. The rotate function, however, just rotates the image as a whole, effectively rotating it around the center of its bounding box. 62
63 For example, imagine a game where the hero is represented as a triangle: > (define (hero α) (triangle 30 "solid" (color α))) > (hero 255) rotating the hero at the prompt looks reasonable: > (rotate 10 (hero 255)) > (rotate 20 (hero 255)) > (rotate 30 (hero 255)) but if the hero has to appear to spin in place, then it will not look right, as you can kind of see if we use α-blending to represent old positions of the hero: > (overlay (rotate 0 (hero 255)) (rotate 10 (hero 125)) (rotate 20 (hero 100)) (rotate 30 (hero 75)) (rotate 40 (hero 50)) (rotate 50 (hero 25))) What we d really want is for the hero to appear to rotate around the centroid of the triangle. To achieve this effect, we can put the hero onto a transparent circle such that the center of the whole image lines up with the centroid of the triangle: > (define (hero-on-blank α) (define the-hero (hero α)) (define w (image-width the-hero)) (define h (image-height the-hero)) (define d (max w h)) (define dx (/ w 2)) ; centroid x offset (define dy (* 2/3 h)) ; centroid y offset (define blank (circle d "solid" (color ))) (place-image/align the-hero (- d dx) (- d dy) "left" "top" blank)) 63
64 and now the rotating hero looks reasonable: > (overlay (rotate 0 (hero-on-blank 255)) (rotate 10 (hero-on-blank 125)) (rotate 20 (hero-on-blank 100)) (rotate 30 (hero-on-blank 75)) (rotate 40 (hero-on-blank 50)) (rotate 50 (hero-on-blank 25))) Image Interoperability Images can connect to other libraries. Specifically: images are snip% objects, so can be inserted into text% and pasteboard% objects they implement the convert protocol for 'png-bytes they implement the pict-convert protocol, and there is a low-level interface for drawing directly into a dc<%> object: render-image The Nitty Gritty of Pixels, Pens, and Lines The image library treats coordinates as if they are in the upper-left corner of each pixel, and infinitesimally small (unlike pixels which have some area). Thus, when drawing a solid square of whose side-length is 10, the image library colors in all of the pixels enclosed by the square starting at the upper left corner of (0,0) and going down to the upper left corner of (10,10), so the pixel whose upper left at (9,9) is colored in, but the pixel at (10,10) is not. All told, 100 pixels get colored in, just as expected for a square with a side length of 10. When drawing lines, however, things get a bit more complex. Specifically, imagine drawing the outline of that rectangle. Since the border is between the pixels, there really isn t a natural pixel to draw to indicate the border. Accordingly, when drawing an outline square (without a pen specification, but just a color as the last argument), the image library uses a pen whose width is 1 pixel, but draws a line centered at the point (0.5,0.5) that goes down and around to the point (10.5,10.5). This means that the outline slightly exceeds the bounding box of the shape. Specifically, the upper and left-hand lines around the square are within the bounding box, but the lower and right-hand lines are just outside. 64
65 This kind of rectangle is useful when putting rectangles next to each other and avoiding extra thick lines on the interior. For example, consider building a grid like this: > (define s1 (square 20 'outline 'black)) > (define r1 (beside s1 s1 s1 s1 s1 s1)) > (above r1 r1 r1 r1 r1 r1) The reason interior lines in this grid are the same thickness as the lines around the edge is because the rectangles overlap with each other. That is, the upper-left rectangle s right edge is right on top of the next rectangle s left edge. The special case of adding 0.5 to each coordinate when drawing the square applies to all outline polygon-based shapes that just pass color, but does not apply when a pen is passed as the last argument to create the shape. For example, if using a pen of thickness 2 to draw a rectangle, we get a shape that has a border drawing the row of pixels just inside and just outside the shape. One might imagine that a pen of thickness 1 would draw an outline around the shape with a 1 pixel thick line, but this would require 1/2 of each pixel to be illuminated, something that is not possible. Instead, the same pixels are lit up as with the 2 pixel wide pen, but with only 1/2 of the intensity of the color. So a 1 pixel wide black pen object draws a 2 pixel wide outline, but in gray. > (define p1 (make-pen "black" 1 "solid" "round" "round")) > (rectangle "outline" p1) When combining pens and cropping, we can make a rectangle that has a line that is one pixel wide, but where the line is drawn entirely within the rectangle. This rectangle has a two-pixel wide black pen, but we can crop out the outer portion of the pen. > (define p2 (make-pen "black" 2 "solid" "round" "round")) > (define s2 (crop (rectangle "outline" p2))) > s2 65
66 Using that we can build a grid now too, but this grid has doubled lines on the interior. > (define r2 (beside s2 s2 s2 s2 s2 s2)) > (above r2 r2 r2 r2 r2 r2) While this kind of rectangle is not useful for building grids, it is important to be able to build rectangles whose drawing does not exceed its bounding box. Specifically, this kind of drawing is used by frame and empty-scene so that the extra drawn pixels are not lost if the image is later clipped to its bounding box. When using image->color-list with outline shapes, the results can be surprising for the same reasons. For example, a 2x2 black, outline rectangle consists of nine black pixels, as discussed above, but since image->color-list only returns the pixels that are within the bounding box, we see only three black pixels and one white one. > (image->color-list (rectangle 2 2 "outline" "black")) (list (color ) (color ) (color ) (color )) The black pixels are (most of) the upper and left edge of the outline shape, and the one white pixel is the pixel in the middle of the shape The Nitty Gritty of Alpha Blending Alpha blending can cause imprecision in color comparisons resulting in shapes that appear equal? even though they were created with different colors. This section explains how that happens. To start, consider the color (make-color ). This color is nearly the darkest shade of black, but with lots of transparency, to it renders a light gray color on a white background, e.g.: 66
67 > (rectangle "solid" (make-color )) If the background had been green, the same rectangle would look like a darker shade of green: > (overlay (rectangle "solid" (make-color )) (rectangle "solid" "green")) Surprisingly, this shape is equal to one that (apparently) has a different color in it: > (equal? (rectangle 'solid (make-color )) (rectangle 'solid (make-color ))) #t To understand why, we must look more carefully at how alpha blending and image equality work. Image equality s definition is straightforward: two images are equality if they are both drawn the same. That is, image equality is defined by simply drawing the two shapes on a white background and then comparing all of the pixels for the two drawings (it is implemented more efficiently in some cases, however). So, for those shapes to be equal, they must be drawn with the same colors. To see what colors were actually drawn, we can use image->color-list. Since these images use the same color in every pixel, we can examine just the first one: 67
68 > (first (image->color-list (rectangle 'solid (make-color )))) (color ) > (first (image->color-list (rectangle 'solid (make-color )))) (color ) As expected from the equal? test, the two colors are the same, but why should they be the same? This is where a subtle aspect of alpha blending and drawing comes up. In general, alpha blending works by taking the color of any shapes below the one being drawn and then combining that color with the new color. The precise amount of the combination is controlled by the alpha value. So, if a shape has an alpha value of α, then the drawing library multiplies the new shapes color by (/ α 255) and the existing shape s color by (- 1 (/ α 255)) and then adds the results to get the final color. (It does this for each of the red, green, and blue components separately.) Going back to the two example rectangles, the drawing library multiplies 50/255 by 1 for the first shape and multiplies 50/255 by 2 for the second shape (since they are both drawn on a white background). Then rounds them to integers, which results in 0 for both colors, making the images the same. 2.3 Images: "image.rkt" (require 2htdp/image) package: htdp-lib The image teachpack provides a number of basic image construction functions, along with combinators for building more complex images out of existing images. Basic images include various polygons, ellipses and circles, and text, as well as bitmaps. Existing images can be rotated, scaled, flipped, and overlaid on top of each other. In some situations images are rendered into bitmaps (e.g. when being shown in the DrRacket Interactions window) In order to avoid bad performance penalties, the rendering process limits the area of the images to about 25,000,000 pixels (which requires about 100 MB of storage) Basic Images (circle radius mode color) Ñ image? radius : (and/c real? (not/c negative?)) mode : mode? color : image-color? In the context of this documentation, a bitmap denotes a special form of image?, namely a collection of pixels associated with an image. It does not refer to the bitmap% class. Typically such image-bitmaps come about via the Insert Image... menu item in DrRacket 68
69 (circle radius outline-mode pen-or-color) Ñ image? radius : (and/c real? (not/c negative?)) outline-mode : (or/c 'outline "outline") pen-or-color : (or/c pen? image-color?) Constructs a circle with the given radius, mode, and color. Note that when the mode is 'outline or "outline", the shape may draw outside of its bounding box and thus parts of the image may disappear when it is cropped. See The Nitty Gritty of Pixels, Pens, and Lines (in the 2.2 Image Guide ) for a more careful explanation of the ramifications of this fact. If the mode argument is 'outline or "outline", then the last argument can be a pen struct or an image-color?, but if the mode is 'solid or "solid", then the last argument must be an image-color?. Examples: > (circle 30 "outline" "red") > (circle 20 "solid" "blue") > (circle "blue") (ellipse width height mode color) Ñ image? width : (and/c real? (not/c negative?)) height : (and/c real? (not/c negative?)) mode : mode? color : image-color? (ellipse width height mode pen-or-color) Ñ image? width : (and/c real? (not/c negative?)) height : (and/c real? (not/c negative?)) mode : (or/c 'outline "outline") pen-or-color : (or/c image-color? pen?) Constructs an ellipse with the given width, height, mode, and color. Note that when the mode is 'outline or "outline", the shape may draw outside of its bounding box and thus parts of the image may disappear when it is cropped. See
70 The Nitty Gritty of Pixels, Pens, and Lines (in the 2.2 Image Guide ) for a more careful explanation of the ramifications of this fact. If the mode argument is 'outline or "outline", then the last argument can be a pen struct or an image-color?, but if the mode is 'solid or "solid", then the last argument must be an image-color?. Examples: > (ellipse "outline" "black") > (ellipse "solid" "blue") > (ellipse "blue") (line x1 y1 pen-or-color) Ñ image? x1 : real? y1 : real? pen-or-color : (or/c pen? image-color?) Constructs an image representing a line segment that connects the points (0,0) to (x1,y1). Examples: > (line "black") > (line "red") > (line "red") (add-line image x1 y1 x2 y2 pen-or-color) Ñ image? image : image? x1 : real? 70
71 y1 : real? x2 : real? y2 : real? pen-or-color : (or/c pen? image-color?) Adds a line to the image image, starting from the point (x1,y1) and going to the point (x2,y2). Unlike scene+line, if the line passes outside of image, the image gets larger to accommodate the line. Examples: > (add-line (ellipse "outline" "maroon") "maroon") > (add-line (rectangle "solid" "gray") "maroon") > (add-line (rectangle "solid" "darkolivegreen") (make-pen "goldenrod" 30 "solid" "round" "round")) (add-curve image x1 y1 angle1 pull1 x2 y2 angle2 pull2 pen-or-color) Ñ image? image : image? 71
72 x1 : real? y1 : real? angle1 : angle? pull1 : real? x2 : real? y2 : real? angle2 : angle? pull2 : real? pen-or-color : (or/c pen? image-color?) Adds a curve to image, starting at the point (x1,y1), and ending at the point (x2,y2). The angle1 and angle2 arguments specify the angle that the curve has as it leaves the initial point and as it reaches the final point, respectively. The pull1 and pull2 arguments control how long the curve tries to stay with that angle. Larger numbers mean that the curve stays with the angle longer. Unlike scene+curve, if the line passes outside of image, the image gets larger to accommodate the curve. Examples: > (add-curve (rectangle "solid" "black") / /3 "white") > (add-curve (rectangle "solid" "black") "white") > (add-curve (add-curve 72
73 (rectangle "solid" "black") / /2 (make-pen "white" 4 "solid" "round" "round")) / /2 (make-pen "white" 4 "solid" "round" "round")) > (add-curve (rectangle "solid" "black") "red") (add-solid-curve image x1 y1 angle1 pull1 x2 y2 angle2 pull2 color) Ñ image? image : image? x1 : real? y1 : real? angle1 : angle? pull1 : real? x2 : real? y2 : real? 73
74 angle2 : angle? pull2 : real? color : image-color? Adds a curve to image like add-curve, except it fills in the region inside the curve. Examples: > (add-solid-curve (rectangle "solid" "black") "white") > (add-solid-curve (add-solid-curve (rectangle "solid" "black") / "white") / "white") > (add-solid-curve (add-solid-curve (rectangle "solid" "black") / "white") / "white") 74
75 > (add-solid-curve (rectangle "solid" "black") "red") Added in version 1.2 of package htdp-lib. (text string font-size color) Ñ image? string : string? font-size : (and/c integer? (<=/c 1 255)) color : image-color? Constructs an image that draws the given string, using the font size and color. Examples: > (text "Hello" 24 "olive") Hello > (text "Goodbye" 36 "indigo") Goodbye If the string contains newlines, the result pict will have multiple lines. Example: 75
76 > (text "Hello and\ngoodbye" 24 "orange") Hello and Goodbye The text size is measured in pixels, not points, so passing 24 to text should result in an image whose height is 24 (which might not be the case if the size were measured in points). Example: > (image-height (text "Hello" 24 "olive")) 30 Changed in version 1.7 of package htdp-lib: When called with strings that have newlines, text returns multipleline images. (text/font string font-size color face family style weight underline?) Ñ image? string : string? font-size : (and/c integer? (<=/c 1 255)) color : image-color? face : (or/c string? #f) family : (or/c "default" "decorative" "roman" "script" "swiss" "modern" "symbol" "system" 'default 'decorative 'roman 'script 'swiss 'modern 'symbol 'system) style : (or/c "normal" "italic" "slant" 'normal 'italic 'slant) weight : (or/c "normal" "bold" "light" 'normal 'bold 'light) underline? : any/c Constructs an image that draws the given string, using a complete font specification. The face and the family combine to give the complete typeface. If face is available on the system, it is used, but if not then a default typeface based on the family is chosen. The style controls if the face is italic or not (on Windows and Mac OS, 'slant and 'italic are the same), the weight controls if it is boldface (or light), and underline? determines 76
77 if the face is underlined. For more details on these arguments, see font%, which ultimately is what this code uses to draw the font. Examples: > (text/font "Hello" 24 "olive" "Gill Sans" 'swiss 'normal 'bold #f) Hello > (text/font "Goodbye" 18 "indigo" #f 'modern 'italic 'normal #f) Goodbye > (text/font "not really a link" 18 "blue" #f 'roman 'normal 'normal #t) not really a link empty-image : image? The empty image. Its width and height are both zero and it does not draw at all. Examples: > (image-width empty-image) 0 > (equal? (above empty-image (rectangle "solid" "red")) (beside empty-image (rectangle "solid" "red"))) #t Combining an image with empty-image produces the original image (as shown in the above example) Polygons (triangle side-length mode color) Ñ image? side-length : (and/c real? (not/c negative?)) mode : mode? color : image-color? (triangle side-length outline-mode pen-or-color) Ñ image? 77
78 side-length : (and/c real? (not/c negative?)) outline-mode : (or/c 'outline "outline") pen-or-color : (or/c pen? image-color?) Constructs a upward-pointing equilateral triangle. The side-length argument determines the length of the side of the triangle. Note that when the mode is 'outline or "outline", the shape may draw outside of its bounding box and thus parts of the image may disappear when it is cropped. See The Nitty Gritty of Pixels, Pens, and Lines (in the 2.2 Image Guide ) for a more careful explanation of the ramifications of this fact. If the mode argument is 'outline or "outline", then the last argument can be a pen struct or an image-color?, but if the mode is 'solid or "solid", then the last argument must be an image-color?. Example: > (triangle 40 "solid" "tan") (right-triangle side-length1 side-length2 mode color) Ñ image? side-length1 : (and/c real? (not/c negative?)) side-length2 : (and/c real? (not/c negative?)) mode : mode? color : image-color? (right-triangle side-length1 side-length2 outline-mode pen-or-color) Ñ image? side-length1 : (and/c real? (not/c negative?)) side-length2 : (and/c real? (not/c negative?)) outline-mode : (or/c 'outline "outline") pen-or-color : (or/c pen? image-color?) Constructs a triangle with a right angle where the two sides adjacent to the right angle have lengths side-length1 and side-length2. Note that when the mode is 'outline or "outline", the shape may draw outside of its bounding box and thus parts of the image may disappear when it is cropped. See
79 The Nitty Gritty of Pixels, Pens, and Lines (in the 2.2 Image Guide ) for a more careful explanation of the ramifications of this fact. If the mode argument is 'outline or "outline", then the last argument can be a pen struct or an image-color?, but if the mode is 'solid or "solid", then the last argument must be an image-color?. Example: > (right-triangle "solid" "black") (isosceles-triangle side-length angle mode color) Ñ image? side-length : (and/c real? (not/c negative?)) angle : angle? mode : mode? color : image-color? (isosceles-triangle side-length angle outline-mode pen-or-color) Ñ image? side-length : (and/c real? (not/c negative?)) angle : angle? outline-mode : (or/c 'outline "outline") pen-or-color : (or/c pen? image-color?) Creates a triangle with two equal-length sides, of length side-length where the angle between those sides is angle. The third leg is straight, horizontally. If the angle is less than 180, then the triangle will point up and if the angle is more, then the triangle will point down. Note that when the mode is 'outline or "outline", the shape may draw outside of its bounding box and thus parts of the image may disappear when it is cropped. See The Nitty Gritty of Pixels, Pens, and Lines (in the 2.2 Image Guide ) for a more careful explanation of the ramifications of this fact. If the mode argument is 'outline or "outline", then the last argument can be a pen struct or an image-color?, but if the mode is 'solid or "solid", then the last argument must be an image-color?. Examples: 79

80 > (isosceles-triangle "solid" "seagreen") > (isosceles-triangle "solid" "aquamarine") > (isosceles-triangle "solid" "lightseagreen") To create a triangle given known sides and angles, the following family of functions are useful: triangle/sss, if all three sides are known triangle/ass, triangle/sas, or triangle/ssa, if two sides and their included angle are known triangle/aas, triangle/asa, or triangle/saa, if two angles and their shared side are known. They all construct a triangle oriented as follows: (triangle/sss side-length-a side-length-b side-length-c mode color) Ñ image? 80
81 side-length-a : (and/c real? (not/c negative?)) side-length-b : (and/c real? (not/c negative?)) side-length-c : (and/c real? (not/c negative?)) mode : mode? color : image-color? (triangle/sss side-length-a side-length-b side-length-c outline-mode pen-or-color) Ñ image? side-length-a : (and/c real? (not/c negative?)) side-length-b : (and/c real? (not/c negative?)) side-length-c : (and/c real? (not/c negative?)) outline-mode : (or/c 'outline "outline") pen-or-color : (or/c pen? image-color?) Creates a triangle where the side lengths a, b, and, c are given by side-length-a, sidelength-b, and, side-length-c respectively. Note that when the mode is 'outline or "outline", the shape may draw outside of its bounding box and thus parts of the image may disappear when it is cropped. See The Nitty Gritty of Pixels, Pens, and Lines (in the 2.2 Image Guide ) for a more careful explanation of the ramifications of this fact. If the mode argument is 'outline or "outline", then the last argument can be a pen struct or an image-color?, but if the mode is 'solid or "solid", then the last argument must be an image-color?. Examples: > (triangle/sss "solid" "seagreen") > (triangle/sss "solid" "aquamarine") > (triangle/sss "solid" "lightseagreen") 81
82 (triangle/ass angle-a side-length-b side-length-c mode color) Ñ image? angle-a : angle? side-length-b : (and/c real? (not/c negative?)) side-length-c : (and/c real? (not/c negative?)) mode : mode? color : image-color? (triangle/ass angle-a side-length-b side-length-c outline-mode pen-or-color) Ñ image? angle-a : angle? side-length-b : (and/c real? (not/c negative?)) side-length-c : (and/c real? (not/c negative?)) outline-mode : (or/c 'outline "outline") pen-or-color : (or/c pen? image-color?) Creates a triangle where the angle A and side length a and b, are given by angle-a, sidelength-b, and, side-length-c respectively. See above for a diagram showing where which sides and which angles are which. Note that when the mode is 'outline or "outline", the shape may draw outside of its bounding box and thus parts of the image may disappear when it is cropped. See The Nitty Gritty of Pixels, Pens, and Lines (in the 2.2 Image Guide ) for a more careful explanation of the ramifications of this fact. If the mode argument is 'outline or "outline", then the last argument can be a pen struct or an image-color?, but if the mode is 'solid or "solid", then the last argument must be an image-color?. Examples: > (triangle/ass "solid" "seagreen") > (triangle/ass "solid" "aquamarine") > (triangle/ass "solid" "lightseagreen") 82
83 (triangle/sas side-length-a angle-b side-length-c mode color) Ñ image? side-length-a : (and/c real? (not/c negative?)) angle-b : angle? side-length-c : (and/c real? (not/c negative?)) mode : mode? color : image-color? (triangle/sas side-length-a angle-b side-length-c outline-mode pen-or-color) Ñ image? side-length-a : (and/c real? (not/c negative?)) angle-b : angle? side-length-c : (and/c real? (not/c negative?)) outline-mode : (or/c 'outline "outline") pen-or-color : (or/c pen? image-color?) Creates a triangle where the side length a, angle B, and, side length c given by sidelength-a, angle-b, and, side-length-c respectively. See above for a diagram showing where which sides and which angles are which. Note that when the mode is 'outline or "outline", the shape may draw outside of its bounding box and thus parts of the image may disappear when it is cropped. See The Nitty Gritty of Pixels, Pens, and Lines (in the 2.2 Image Guide ) for a more careful explanation of the ramifications of this fact. If the mode argument is 'outline or "outline", then the last argument can be a pen struct or an image-color?, but if the mode is 'solid or "solid", then the last argument must be an image-color?. Examples: > (triangle/sas "solid" "seagreen") > (triangle/sas "solid" "aquamarine") 83
84 > (triangle/sas "solid" "lightseagreen") (triangle/ssa side-length-a side-length-b angle-c mode color) Ñ image? side-length-a : (and/c real? (not/c negative?)) side-length-b : (and/c real? (not/c negative?)) angle-c : angle? mode : mode? color : image-color? (triangle/ssa side-length-a side-length-b angle-c outline-mode pen-or-color) Ñ image? side-length-a : (and/c real? (not/c negative?)) side-length-b : (and/c real? (not/c negative?)) angle-c : angle? outline-mode : (or/c 'outline "outline") pen-or-color : (or/c pen? image-color?) Creates a triangle where the side length a, side length b, and, angle c given by sidelength-a, side-length-b, and, angle-c respectively. See above for a diagram showing where which sides and which angles are which. Note that when the mode is 'outline or "outline", the shape may draw outside of its bounding box and thus parts of the image may disappear when it is cropped. See The Nitty Gritty of Pixels, Pens, and Lines (in the 2.2 Image Guide ) for a more careful explanation of the ramifications of this fact. If the mode argument is 'outline or "outline", then the last argument can be a pen struct or an image-color?, but if the mode is 'solid or "solid", then the last argument must be an image-color?. Examples: > (triangle/ssa "solid" "seagreen") 84
85 > (triangle/ssa "solid" "aquamarine") > (triangle/ssa "solid" "lightseagreen") (triangle/aas angle-a angle-b side-length-c mode color) Ñ image? angle-a : angle? angle-b : angle? side-length-c : (and/c real? (not/c negative?)) mode : mode? color : image-color? (triangle/aas angle-a angle-b side-length-c outline-mode pen-or-color) Ñ image? angle-a : angle? angle-b : angle? side-length-c : (and/c real? (not/c negative?)) outline-mode : (or/c 'outline "outline") pen-or-color : (or/c pen? image-color?) Creates a triangle where the angle A, angle B, and, side length c given by angle-a, angleb, and, side-length-c respectively. See above for a diagram showing where which sides and which angles are which. Note that when the mode is 'outline or "outline", the shape may draw outside of its bounding box and thus parts of the image may disappear when it is cropped. See The Nitty Gritty of Pixels, Pens, and Lines (in the 2.2 Image Guide ) for a more careful explanation of the ramifications of this fact. If the mode argument is 'outline or "outline", then the last argument can be a pen struct or an image-color?, but if the mode is 'solid or "solid", then the last argument must be an image-color?. 85
86 Examples: > (triangle/aas "solid" "seagreen") > (triangle/aas "solid" "aquamarine") > (triangle/aas "solid" "lightseagreen") (triangle/asa angle-a side-length-b angle-c mode color) Ñ image? angle-a : angle? side-length-b : (and/c real? (not/c negative?)) angle-c : angle? mode : mode? color : image-color? (triangle/asa angle-a side-length-b angle-c outline-mode pen-or-color) Ñ image? angle-a : angle? side-length-b : (and/c real? (not/c negative?)) angle-c : angle? 86
87 outline-mode : (or/c 'outline "outline") pen-or-color : (or/c pen? image-color?) Creates a triangle where the angle A, side length b, and, angle C given by angle-a, sidelength-b, and, angle-c respectively. See above for a diagram showing where which sides and which angles are which. Note that when the mode is 'outline or "outline", the shape may draw outside of its bounding box and thus parts of the image may disappear when it is cropped. See The Nitty Gritty of Pixels, Pens, and Lines (in the 2.2 Image Guide ) for a more careful explanation of the ramifications of this fact. If the mode argument is 'outline or "outline", then the last argument can be a pen struct or an image-color?, but if the mode is 'solid or "solid", then the last argument must be an image-color?. Examples: > (triangle/asa "solid" "seagreen") > (triangle/asa "solid" "aquamarine") > (triangle/asa "solid" "lightseagreen") (triangle/saa side-length-a angle-b angle-c mode color) Ñ image? 87
88 side-length-a : (and/c real? (not/c negative?)) angle-b : angle? angle-c : angle? mode : mode? color : image-color? (triangle/saa side-length-a angle-b angle-c outline-mode pen-or-color) Ñ image? side-length-a : (and/c real? (not/c negative?)) angle-b : angle? angle-c : angle? outline-mode : (or/c 'outline "outline") pen-or-color : (or/c pen? image-color?) Creates a triangle where the side length a, angle B, and, angle C given by side-length-a, angle-b, and, angle-c respectively. See above for a diagram showing where which sides and which angles are which. Note that when the mode is 'outline or "outline", the shape may draw outside of its bounding box and thus parts of the image may disappear when it is cropped. See The Nitty Gritty of Pixels, Pens, and Lines (in the 2.2 Image Guide ) for a more careful explanation of the ramifications of this fact. If the mode argument is 'outline or "outline", then the last argument can be a pen struct or an image-color?, but if the mode is 'solid or "solid", then the last argument must be an image-color?. Examples: > (triangle/saa "solid" "seagreen") > (triangle/saa "solid" "aquamarine") 88
89 > (triangle/saa "solid" "lightseagreen") (square side-len mode color) Ñ image? side-len : (and/c real? (not/c negative?)) mode : mode? color : image-color? (square side-len outline-mode pen-or-color) Ñ image? side-len : (and/c real? (not/c negative?)) outline-mode : (or/c 'outline "outline") pen-or-color : (or/c pen? image-color?) Constructs a square. Note that when the mode is 'outline or "outline", the shape may draw outside of its bounding box and thus parts of the image may disappear when it is cropped. See The Nitty Gritty of Pixels, Pens, and Lines (in the 2.2 Image Guide ) for a more careful explanation of the ramifications of this fact. If the mode argument is 'outline or "outline", then the last argument can be a pen struct or an image-color?, but if the mode is 'solid or "solid", then the last argument must be an image-color?. Examples: > (square 40 "solid" "slateblue") > (square 50 "outline" "darkmagenta") 89
90 (rectangle width height mode color) Ñ image? width : (and/c real? (not/c negative?)) height : (and/c real? (not/c negative?)) mode : mode? color : image-color? (rectangle width height outline-mode pen-or-color) Ñ image? width : (and/c real? (not/c negative?)) height : (and/c real? (not/c negative?)) outline-mode : (or/c 'outline "outline") pen-or-color : (or/c pen? image-color?) Constructs a rectangle with the given width, height, mode, and color. Note that when the mode is 'outline or "outline", the shape may draw outside of its bounding box and thus parts of the image may disappear when it is cropped. See The Nitty Gritty of Pixels, Pens, and Lines (in the 2.2 Image Guide ) for a more careful explanation of the ramifications of this fact. If the mode argument is 'outline or "outline", then the last argument can be a pen struct or an image-color?, but if the mode is 'solid or "solid", then the last argument must be an image-color?. Examples: > (rectangle "outline" "black") > (rectangle "solid" "blue") (rhombus side-length angle mode color) Ñ image? side-length : (and/c real? (not/c negative?)) angle : angle? mode : mode? color : image-color? 90
91 (rhombus side-length angle outline-mode pen-or-color) Ñ image? side-length : (and/c real? (not/c negative?)) angle : angle? outline-mode : (or/c 'outline "outline") pen-or-color : (or/c pen? image-color?) Constructs a four sided polygon with all equal sides and thus where opposite angles are equal to each other. The top and bottom pair of angles is angle and the left and right are (- 180 angle). Note that when the mode is 'outline or "outline", the shape may draw outside of its bounding box and thus parts of the image may disappear when it is cropped. See The Nitty Gritty of Pixels, Pens, and Lines (in the 2.2 Image Guide ) for a more careful explanation of the ramifications of this fact. If the mode argument is 'outline or "outline", then the last argument can be a pen struct or an image-color?, but if the mode is 'solid or "solid", then the last argument must be an image-color?. Examples: > (rhombus "solid" "magenta") > (rhombus "solid" "mediumpurple") (star side-length mode color) Ñ image? side-length : (and/c real? (not/c negative?)) mode : mode? color : image-color? (star side-length outline-mode color) Ñ image? side-length : (and/c real? (not/c negative?)) outline-mode : (or/c 'outline "outline") color : (or/c pen? image-color?) Constructs a star with five points. The side-length argument determines the side length of the enclosing pentagon. 91
92 Note that when the mode is 'outline or "outline", the shape may draw outside of its bounding box and thus parts of the image may disappear when it is cropped. See The Nitty Gritty of Pixels, Pens, and Lines (in the 2.2 Image Guide ) for a more careful explanation of the ramifications of this fact. If the mode argument is 'outline or "outline", then the last argument can be a pen struct or an image-color?, but if the mode is 'solid or "solid", then the last argument must be an image-color?. Example: > (star 40 "solid" "gray") (star-polygon side-length side-count step-count mode color) Ñ image? side-length : (and/c real? (not/c negative?)) side-count : side-count? step-count : step-count? mode : mode? color : image-color? (star-polygon side-length side-count step-count outline-mode pen-or-color) Ñ image? side-length : (and/c real? (not/c negative?)) side-count : side-count? step-count : step-count? outline-mode : (or/c 'outline "outline") pen-or-color : (or/c pen? image-color?) Constructs an arbitrary regular star polygon (a generalization of the regular polygons). The polygon is enclosed by a regular polygon with side-count sides each side-length long. The polygon is actually constructed by going from vertex to vertex around the regular polygon, but connecting every step-count-th vertex (i.e., skipping every (- step-count 1) vertices). For example, if side-count is 5 and step-count is 2, then this function produces a shape just like star. 92
93 Note that when the mode is 'outline or "outline", the shape may draw outside of its bounding box and thus parts of the image may disappear when it is cropped. See The Nitty Gritty of Pixels, Pens, and Lines (in the 2.2 Image Guide ) for a more careful explanation of the ramifications of this fact. If the mode argument is 'outline or "outline", then the last argument can be a pen struct or an image-color?, but if the mode is 'solid or "solid", then the last argument must be an image-color?. Examples: > (star-polygon "solid" "seagreen") > (star-polygon "outline" "darkred") > (star-polygon "solid" "cornflowerblue") (radial-star point-count inner-radius outer-radius mode color) Ñ image? point-count : (and/c integer? (>=/c 2)) inner-radius : (and/c real? (not/c negative?)) outer-radius : (and/c real? (not/c negative?)) mode : mode? color : image-color? (radial-star point-count inner-radius outer-radius outline-mode pen-or-color) Ñ image? point-count : (and/c integer? (>=/c 2)) 93
94 inner-radius : (and/c real? (not/c negative?)) outer-radius : (and/c real? (not/c negative?)) outline-mode : (or/c 'outline "outline") pen-or-color : (or/c pen? image-color?) Constructs a star-like polygon where the star is specified by two radii and a number of points. The first radius determines where the points begin, the second determines where they end, and the point-count argument determines how many points the star has. Examples: > (radial-star "solid" "darkslategray") > (radial-star "outline" "black") (regular-polygon side-length side-count mode color) Ñ image? side-length : (and/c real? (not/c negative?)) side-count : side-count? mode : mode? color : image-color? (regular-polygon side-length side-count outline-mode pen-or-color) Ñ image? side-length : (and/c real? (not/c negative?)) side-count : side-count? outline-mode : (or/c 'outline "outline") pen-or-color : (or/c pen? image-color?) Constructs a regular polygon with side-count sides. 94
95 Note that when the mode is 'outline or "outline", the shape may draw outside of its bounding box and thus parts of the image may disappear when it is cropped. See The Nitty Gritty of Pixels, Pens, and Lines (in the 2.2 Image Guide ) for a more careful explanation of the ramifications of this fact. If the mode argument is 'outline or "outline", then the last argument can be a pen struct or an image-color?, but if the mode is 'solid or "solid", then the last argument must be an image-color?. Examples: > (regular-polygon 50 3 "outline" "red") > (regular-polygon 40 4 "outline" "blue") > (regular-polygon 20 8 "solid" "red") (pulled-regular-polygon side-length side-count pull angle mode color) Ñ image? side-length : (and/c real? (not/c negative?)) side-count : side-count? pull : (and/c real? (not/c negative?)) angle : angle? mode : mode? color : image-color? (pulled-regular-polygon side-length side-count pull angle outline-mode pen-or-color) Ñ image? side-length : (and/c real? (not/c negative?)) side-count : side-count? pull : (and/c real? (not/c negative?)) angle : angle? 95
96 outline-mode : (or/c 'outline "outline") pen-or-color : (or/c pen? image-color?) Constructs a regular polygon with side-count sides where each side is curved according to the pull and angle arguments. The angle argument controls the angle at which the curved version of polygon edge makes with the original edge of the polygon. Larger the pull arguments mean that the angle is preserved more at each vertex. Note that when the mode is 'outline or "outline", the shape may draw outside of its bounding box and thus parts of the image may disappear when it is cropped. See The Nitty Gritty of Pixels, Pens, and Lines (in the 2.2 Image Guide ) for a more careful explanation of the ramifications of this fact. If the mode argument is 'outline or "outline", then the last argument can be a pen struct or an image-color?, but if the mode is 'solid or "solid", then the last argument must be an image-color?. Examples: > (pulled-regular-polygon /3 30 "solid" "blue") > (pulled-regular-polygon /2-10 "solid" "red") > (pulled-regular-polygon "solid" "purple") > (pulled-regular-polygon "solid" "purple") > (pulled-regular-polygon "solid" "blue") 96
97 Added in version 1.3 of package htdp-lib. (polygon vertices mode color) Ñ image? vertices : (listof (or/c real-valued-posn? pulled-point?)) mode : mode? color : image-color? (polygon vertices outline-mode pen-or-color) Ñ image? vertices : (listof (or/c real-valued-posn? pulled-point?)) outline-mode : (or/c 'outline "outline") pen-or-color : (or/c pen? image-color?) Constructs a polygon connecting the given vertices. Note that when the mode is 'outline or "outline", the shape may draw outside of its bounding box and thus parts of the image may disappear when it is cropped. See The Nitty Gritty of Pixels, Pens, and Lines (in the 2.2 Image Guide ) for a more careful explanation of the ramifications of this fact. If the mode argument is 'outline or "outline", then the last argument can be a pen struct or an image-color?, but if the mode is 'solid or "solid", then the last argument must be an image-color?. Examples: > (polygon (list (make-posn 0 0) (make-posn ) (make-posn 60 0) (make-posn )) "solid" "burlywood") > (polygon (list (make-pulled-point 1/ /2-20) (make-posn ) (make-pulled-point 1/ /2 20) (make-posn )) "solid" "burlywood") 97
98 > (polygon (list (make-posn 0 0) (make-posn 0 40) (make-posn 20 40) (make-posn 20 60) (make-posn 40 60) (make-posn 40 20) (make-posn 20 20) (make-posn 20 0)) "solid" "plum") > (underlay (rectangle "solid" "mediumseagreen") (polygon (list (make-posn 0 0) (make-posn 50 0) (make-posn 0 50) (make-posn 50 50)) "outline" (make-pen "darkslategray" 10 "solid" "round" "round"))) > (underlay (rectangle "solid" "mediumseagreen") (polygon (list (make-posn 0 0) (make-posn 50 0) (make-posn 0 50) (make-posn 50 50)) "outline" (make-pen "darkslategray" 10 "solid" "projecting" "miter"))) 98
99 Changed in version 1.3 of package htdp-lib: Accepts pulled-points. (add-polygon image posns mode color) Ñ image? image : image? posns : (listof posn?) mode : mode? color : image-color? Adds a closed polygon to the image image, with vertices as specified in posns (relative to the top-left corner of image). Unlike scene+polygon, if the polygon goes outside the bounds of image, the result is enlarged to accommodate both. Note that when the mode is 'outline or "outline", the shape may draw outside of its bounding box and thus parts of the image may disappear when it is cropped. See The Nitty Gritty of Pixels, Pens, and Lines (in the 2.2 Image Guide ) for a more careful explanation of the ramifications of this fact. If the mode argument is 'outline or "outline", then the last argument can be a pen struct or an image-color?, but if the mode is 'solid or "solid", then the last argument must be an image-color?. Examples: > (add-polygon (square 65 "solid" "light blue") (list (make-posn 30-20) (make-posn 50 50) (make-posn )) "solid" "forest green") > (add-polygon (square 65 "solid" "light blue") (list (make-posn 30-20) (make-pulled-point 1/ /2-30) (make-posn )) "solid" "forest green") 99
100 > (add-polygon (square 180 "solid" "yellow") (list (make-posn ) (make-posn ) (make-posn 46 36) (make-posn 93 44) (make-posn 89 68) (make-posn )) "outline" "dark blue") > (add-polygon (square 50 "solid" "light blue") (list (make-posn 25-10) (make-posn 60 25) (make-posn 25 60) (make-posn )) "solid" "pink") Changed in version 1.3 of package htdp-lib: Accepts pulled-points. (scene+polygon image posns mode color) Ñ image? image : image? posns : (listof posn?) mode : mode? color : image-color? 100
101 Adds a closed polygon to the image image, with vertices as specified in posns (relative to the top-left corner of image). Unlike add-polygon, if the polygon goes outside the bounds of image, the result is clipped to image. Some shapes (notably those with 'outline or "outline" as the mode argument) draw outside of their bounding boxes and thus cropping them may remove part of them (often the lower-left and lower-right edges). See The Nitty Gritty of Pixels, Pens, and Lines (in the 2.2 Image Guide ) for a more careful discussion of this issue. Examples: > (scene+polygon (square 65 "solid" "light blue") (list (make-posn 30-20) (make-posn 50 50) (make-posn )) "solid" "forest green") > (scene+polygon (square 65 "solid" "light blue") (list (make-posn 30-20) (make-pulled-point 1/ /2 30) (make-posn )) "solid" "forest green") > (scene+polygon (square 180 "solid" "yellow") (list (make-posn ) (make-posn ) (make-posn 46 36) (make-posn 93 44) (make-posn 89 68) (make-posn )) "outline" "dark blue") 101
102 > (scene+polygon (square 50 "solid" "light blue") (list (make-posn 25-10) (make-posn 60 25) (make-posn 25 60) (make-posn )) "solid" "pink") Changed in version 1.3 of package htdp-lib: Accepts pulled-points Overlaying Images (overlay i1 i2 is...) Ñ image? i1 : image? i2 : image? is : image? Overlays all of its arguments building a single image. The first argument goes on top of the second argument, which goes on top of the third argument, etc. The images are all lined up on their centers. Examples: > (overlay (rectangle "solid" "orange") (ellipse "solid" "purple")) 102
103 > (overlay (ellipse "solid" "red") (ellipse "solid" "black") (ellipse "solid" "red") (ellipse "solid" "black") (ellipse "solid" "red") (ellipse "solid" "black")) > (overlay (regular-polygon 20 5 "solid" (make-color )) (regular-polygon 26 5 "solid" (make-color )) (regular-polygon 32 5 "solid" (make-color )) (regular-polygon 38 5 "solid" (make-color )) (regular-polygon 44 5 "solid" (makecolor ))) (overlay/align x-place y-place i1 i2 is...) Ñ image? x-place : x-place? y-place : y-place? i1 : image? i2 : image? is : image? Overlays all of its image arguments, much like the overlay function, but using x-place and y-place to determine where the images are lined up. For example, if x-place and y-place are both "middle", then the images are lined up on their centers. Examples: > (overlay/align "left" "middle" (rectangle "solid" "orange") (ellipse "solid" "purple")) > (overlay/align "right" "bottom" (rectangle "solid" "silver") (rectangle "solid" "seagreen") 103
104 (rectangle "solid" "silver") (rectangle "solid" "seagreen")) (overlay/offset i1 x y i2) Ñ image? i1 : image? x : real? y : real? i2 : image? Just like overlay, this function lines up its image arguments on top of each other. Unlike overlay, it moves i2 by x pixels to the right and y down before overlaying them. Examples: > (overlay/offset (circle 40 "solid" "red") (circle 40 "solid" "blue")) > (overlay/offset (overlay/offset (rectangle "solid" "black") (circle 20 "solid" "darkorange")) 70 0 (circle 20 "solid" "darkorange")) > (overlay/offset (overlay/offset (circle 30 'solid (color )) 26 0 (circle 30 'solid (color ))) 0 26 (circle 30 'solid (color ))) 104
105 (overlay/align/offset x-place y-place i1 x y i2) Ñ image? x-place : x-place? y-place : y-place? i1 : image? x : real? y : real? i2 : image? Overlays image i1 on top of i2, using x-place and y-place as the starting points for the overlaying, and then adjusts i2 by x to the right and y pixels down. This function combines the capabilities of overlay/align and overlay/offset. Examples: > (overlay/align/offset "right" "bottom" (star-polygon "solid" "navy") (circle 30 "solid" "cornflowerblue")) > (overlay/align/offset "left" "bottom" (star-polygon "solid" "navy") (circle 30 "solid" "cornflowerblue")) 105
106 (overlay/xy i1 x y i2) Ñ image? i1 : image? x : real? y : real? i2 : image? Constructs an image by overlaying i1 on top of i2. The images are initially lined up on their upper-left corners and then i2 is shifted to the right by x pixels to and down by y pixels. This is the same as (underlay/xy i2 (- x) (- y) i1). See also overlay/offset and underlay/offset. Examples: > (overlay/xy (rectangle "outline" "black") 20 0 (rectangle "outline" "black")) > (overlay/xy (rectangle "solid" "red") (rectangle "solid" "black")) > (overlay/xy (rectangle "solid" "red") (rectangle "solid" "black")) > (overlay/xy (overlay/xy (ellipse "outline" "black")
107 (ellipse "solid" "forestgreen")) (ellipse "solid" "forestgreen")) (underlay i1 i2 is...) Ñ image? i1 : image? i2 : image? is : image? Underlays all of its arguments building a single image. It behaves like overlay, but with the arguments in the reverse order. That is, the first argument goes underneath of the second argument, which goes underneath the third argument, etc. The images are all lined up on their centers. Examples: > (underlay (rectangle "solid" "orange") (ellipse "solid" "purple")) > (underlay (ellipse "solid" "red") (ellipse "solid" "black") (ellipse "solid" "red") (ellipse "solid" "black") (ellipse "solid" "red") (ellipse "solid" "black")) > (underlay (ellipse "red") (ellipse "red") (ellipse "red") (ellipse "red") (ellipse "red") (ellipse "red")) 107
108 (underlay/align x-place y-place i1 i2 is...) Ñ image? x-place : x-place? y-place : y-place? i1 : image? i2 : image? is : image? Underlays all of its image arguments, much like the underlay function, but using x-place and y-place to determine where the images are lined up. For example, if x-place and y-place are both "middle", then the images are lined up on their centers. Examples: > (underlay/align "left" "middle" (rectangle "solid" "orange") (ellipse "solid" "purple")) > (underlay/align "right" "top" (rectangle "solid" "seagreen") (rectangle "solid" "silver") (rectangle "solid" "seagreen") (rectangle "solid" "silver")) > (underlay/align "left" "middle" (rectangle "seagreen") (rectangle "seagreen") (rectangle "seagreen") (rectangle "seagreen")) (underlay/offset i1 x y i2) Ñ image? 108
109 i1 : image? x : real? y : real? i2 : image? Just like underlay, this function lines up its first image argument underneath the second. Unlike underlay, it moves i2 by x pixels to the right and y down before underlaying them. Examples: > (underlay/offset (circle 40 "solid" "red") (circle 40 "solid" "blue")) > (underlay/offset (circle 40 "solid" "gray") 0-10 (underlay/offset (circle 10 "solid" "navy") (circle 10 "solid" "navy"))) (underlay/align/offset x-place y-place i1 x y i2) Ñ image? x-place : x-place? y-place : y-place? i1 : image? x : real? y : real? i2 : image? Underlays image i1 underneath i2, using x-place and y-place as the starting points for the combination, and then adjusts i2 by x to the right and y pixels down. 109
110 This function combines the capabilities of underlay/align and underlay/offset. Examples: > (underlay/align/offset "right" "bottom" (star-polygon "solid" "navy") (circle 30 "solid" "cornflowerblue")) > (underlay/align/offset "right" "bottom" (underlay/align/offset "left" "bottom" (underlay/align/offset "right" "top" (underlay/align/offset "left" "top" (rhombus "solid" "navy") (star-polygon "solid" "cornflowerblue")) (star-polygon "solid" "cornflowerblue")) (star-polygon "solid" "cornflowerblue")) (star-polygon "solid" "cornflowerblue")) 110
111 (underlay/xy i1 x y i2) Ñ image? i1 : image? x : real? y : real? i2 : image? Constructs an image by underlaying i1 underneath i2. The images are initially lined up on their upper-left corners and then i2 is shifted to the right by x pixels to and down by y pixels. This is the same as (overlay/xy i2 (- x) (- y) i1). See also underlay/offset and overlay/offset. Examples: > (underlay/xy (rectangle "outline" "black") 20 0 (rectangle "outline" "black")) > (underlay/xy (rectangle "solid" "red") (rectangle "solid" "black")) > (underlay/xy (rectangle "solid" "red") (rectangle "solid" "black")) > (underlay/xy (underlay/xy (ellipse "solid" "gray") 111
112 10 15 (ellipse "solid" "forestgreen")) (ellipse "solid" "forestgreen")) (beside i1 i2 is...) Ñ image? i1 : image? i2 : image? is : image? Constructs an image by placing all of the argument images in a horizontal row, aligned along their centers. Example: > (beside (ellipse "solid" "gray") (ellipse "solid" "darkgray") (ellipse "solid" "dimgray") (ellipse "solid" "black")) (beside/align y-place i1 i2 is...) Ñ image? y-place : y-place? i1 : image? i2 : image? is : image? Constructs an image by placing all of the argument images in a horizontal row, lined up as indicated by the y-place argument. For example, if y-place is "middle", then the images are placed side by side with their centers lined up with each other. Examples: > (beside/align "bottom" (ellipse "solid" "lightsteelblue") (ellipse "solid" "mediumslateblue") 112
113 (ellipse "solid" "slateblue") (ellipse "solid" "navy")) > (beside/align "top" (ellipse "solid" "mediumorchid") (ellipse "solid" "darkorchid") (ellipse "solid" "purple") (ellipse "solid" "indigo")) > (beside/align "baseline" (text "ijy" 18 "black") (text "ijy" 24 "black")) ijyijy (above i1 i2 is...) Ñ image? i1 : image? i2 : image? is : image? Constructs an image by placing all of the argument images in a vertical row, aligned along their centers. Example: > (above (ellipse "solid" "gray") (ellipse "solid" "darkgray") (ellipse "solid" "dimgray") (ellipse "solid" "black")) (above/align x-place i1 i2 is...) Ñ image? 113
114 x-place : x-place? i1 : image? i2 : image? is : image? Constructs an image by placing all of the argument images in a vertical row, lined up as indicated by the x-place argument. For example, if x-place is "middle", then the images are placed above each other with their centers lined up. Examples: > (above/align "right" (ellipse "solid" "gold") (ellipse "solid" "goldenrod") (ellipse "solid" "darkgoldenrod") (ellipse "solid" "sienna")) > (above/align "left" (ellipse "solid" "yellowgreen") (ellipse "solid" "olivedrab") (ellipse "solid" "darkolivegreen") (ellipse "solid" "darkgreen")) Placing Images & Scenes Placing images into scenes is particularly useful when building worlds and universes using 2htdp/universe. (empty-scene width height) Ñ image? width : (and/c real? (not/c negative?)) height : (and/c real? (not/c negative?)) (empty-scene width height color) Ñ image? width : (and/c real? (not/c negative?)) height : (and/c real? (not/c negative?)) color : image-color? 114
115 Creates an empty scene, i.e., a white rectangle with a black outline. Example: > (empty-scene ) The three-argument version creates a rectangle of the specified color with a black outline. (place-image image x y scene) Ñ image? image : image? x : real? y : real? scene : image? Places image onto scene with its center at the coordinates (x,y) and crops the resulting image so that it has the same size as scene. The coordinates are relative to the top-left of scene. Some shapes (notably those with 'outline or "outline" as the mode argument) draw outside of their bounding boxes and thus cropping them may remove part of them (often the lower-left and lower-right edges). See The Nitty Gritty of Pixels, Pens, and Lines (in the 2.2 Image Guide ) for a more careful discussion of this issue. Examples: > (place-image (triangle 32 "solid" "red") (rectangle "solid" "gray")) > (place-image (triangle 64 "solid" "red") (rectangle "solid" "gray")) 115
116 > (place-image (circle 4 "solid" "white") (place-image (circle 4 "solid" "white") 0 6 (place-image (circle 4 "solid" "white") 14 2 (place-image (circle 4 "solid" "white") 8 14 (rectangle "solid" "goldenrod"))))) (place-image/align image x y x-place y-place scene) image : image? x : real? y : real? x-place : x-place? y-place : y-place? scene : image? Ñ image? Like place-image, but uses image s x-place and y-place to anchor the image. Also, like place-image, place-image/align crops the resulting image so that it has the same size as scene. Some shapes (notably those with 'outline or "outline" as the mode argument) draw outside of their bounding boxes and thus cropping them may remove part of them (often the lower-left and lower-right edges). See The Nitty Gritty of Pixels, Pens, and Lines (in the 2.2 Image Guide ) for a more careful discussion of this issue. Examples: > (place-image/align (triangle 48 "solid" "yellowgreen") "right" "bottom" (rectangle "solid" "mediumgoldenrod")) 116
117 > (beside (place-image/align (circle 8 "solid" "tomato") 0 0 "center" "center" (rectangle "outline" "black")) (place-image/align (circle 8 "solid" "tomato") 8 8 "center" "center" (rectangle "outline" "black")) (place-image/align (circle 8 "solid" "tomato") "center" "center" (rectangle "outline" "black")) (place-image/align (circle 8 "solid" "tomato") "center" "center" (rectangle "outline" "black")) (place-image/align (circle 8 "solid" "tomato") "center" "center" (rectangle "outline" "black"))) (place-images images posns scene) Ñ image? images : (listof image?) posns : (listof posn?) scene : image? Places each of images into scene like place-image would, using the coordinates in posns as the x and y arguments to place-image. Some shapes (notably those with 'outline or "outline" as the mode argument) draw outside of their bounding boxes and thus cropping them may remove part of them (often the lower-left and lower-right edges). See The Nitty Gritty of Pixels, Pens, and Lines (in the 2.2 Image Guide ) for a more careful discussion of this issue. Example: > (place-images (list (circle 4 "solid" "white") (circle 4 "solid" "white") (circle 4 "solid" "white") (circle 4 "solid" "white")) (list (make-posn 18 20) (make-posn 0 6) 117
118 (make-posn 14 2) (make-posn 8 14)) (rectangle "solid" "goldenrod")) (place-images/align images posns x-place y-place scene) images : (listof image?) posns : (listof posn?) x-place : x-place? y-place : y-place? scene : image? Ñ image? Like place-images, except that it places the images with respect to x-place and y- place. Some shapes (notably those with 'outline or "outline" as the mode argument) draw outside of their bounding boxes and thus cropping them may remove part of them (often the lower-left and lower-right edges). See The Nitty Gritty of Pixels, Pens, and Lines (in the 2.2 Image Guide ) for a more careful discussion of this issue. Example: > (place-images/align (list (triangle 48 "solid" "yellowgreen") (triangle 48 "solid" "yellowgreen") (triangle 48 "solid" "yellowgreen") (triangle 48 "solid" "yellowgreen")) (list (make-posn 64 64) (make-posn 64 48) (make-posn 64 32) (make-posn 64 16)) "right" "bottom" (rectangle "solid" "mediumgoldenrod")) (scene+line scene x1 y1 x2 y2 pen-or-color) Ñ image? 118
119 scene : image? x1 : real? y1 : real? x2 : real? y2 : real? pen-or-color : (or/c pen? image-color?) Adds a line to the image scene, starting from the point (x1,y1) and going to the point (x2,y2); unlike add-line, this function crops the resulting image to the size of scene. Some shapes (notably those with 'outline or "outline" as the mode argument) draw outside of their bounding boxes and thus cropping them may remove part of them (often the lower-left and lower-right edges). See The Nitty Gritty of Pixels, Pens, and Lines (in the 2.2 Image Guide ) for a more careful discussion of this issue. Examples: > (scene+line (ellipse "outline" "maroon") "maroon") > (scene+line (rectangle "solid" "gray") "maroon") > (scene+line (rectangle "solid" "darkolivegreen") (make-pen "goldenrod" 30 "solid" "round" "round")) 119
120 (scene+curve scene x1 y1 angle1 pull1 x2 y2 angle2 pull2 color) Ñ image? scene : image? x1 : real? y1 : real? angle1 : angle? pull1 : real? x2 : real? y2 : real? angle2 : angle? pull2 : real? color : (or/c pen? image-color?) Adds a curve to scene, starting at the point (x1,y1), and ending at the point (x2,y2). The angle1 and angle2 arguments specify the angle that the curve has as it leaves the initial point and as it reaches the final point, respectively. The pull1 and pull2 arguments control how long the curve tries to stay with that angle. Larger numbers mean that the curve stays with the angle longer. Unlike add-curve, this function crops the curve, only showing the parts that fit onto scene. Some shapes (notably those with 'outline or "outline" as the mode argument) draw outside of their bounding boxes and thus cropping them may remove part of them (often the lower-left and lower-right edges). See The Nitty Gritty of Pixels, Pens, and Lines (in the 2.2 Image Guide ) for a more careful discussion of this issue. Examples: > (scene+curve (rectangle "solid" "black") / /3 "white") 120
121 > (scene+curve (rectangle "solid" "black") "white") > (scene+curve (add-curve (rectangle "solid" "black") / /2 "white") / /2 "white") > (scene+curve (rectangle "solid" "black") "red") 121
122 2.3.5 Rotating, Scaling, Flipping, Cropping, and Framing Images (rotate angle image) Ñ image? angle : angle? image : image? Rotates image by angle degrees in a counter-clockwise direction. Examples: > (rotate 45 (ellipse "solid" "olivedrab")) > (rotate 5 (rectangle "outline" "black")) > (rotate 45 (beside/align "center" (rectangle "solid" "darkseagreen") (rectangle "solid" "darkseagreen"))) See also Rotating and Image Centers. (scale factor image) Ñ image? factor : (and/c real? positive?) image : image? Scales image by factor. The pen sizes are also scaled and thus draw thicker (or thinner) lines than the original image, unless the pen was size 0. That pen size is treated specially to mean the smallest available line and thus it always draws a one-pixel wide line; this is also the case for 'outline and "outline" shapes that are drawn with an image-color? instead of a pen. Examples: 122
123 > (scale 2 (ellipse "solid" "blue")) > (ellipse "solid" "blue") (scale/xy x-factor y-factor image) Ñ image? x-factor : (and/c real? positive?) y-factor : (and/c real? positive?) image : image? Scales image by x-factor horizontally and by y-factor vertically. Examples: > (scale/xy 3 2 (ellipse "solid" "blue")) > (ellipse "solid" "blue") (flip-horizontal image) Ñ image? image : image? Flips image left to right. Flipping images with text is not supported (so passing flip-horizontal an image that contains a text or text/font image inside somewhere signals an error). Example: > (beside 123
124 (rotate 30 (square 50 "solid" "red")) (flip-horizontal (rotate 30 (square 50 "solid" "blue")))) (flip-vertical image) Ñ image? image : image? Flips image top to bottom. Flipping images with text is not supported (so passing flip-vertical an image that contains a text or text/font image inside somewhere signals an error). Example: > (above (star 40 "solid" "firebrick") (scale/xy 1 1/2 (flip-vertical (star 40 "solid" "gray")))) (crop x y width height image) Ñ image? x : real? y : real? width : (and/c real? (not/c negative?)) height : (and/c real? (not/c negative?)) image : image? Crops image to the rectangle with the upper left at the point (x,y) and with width and height. Some shapes (notably those with 'outline or "outline" as the mode argument) draw outside of their bounding boxes and thus cropping them may remove part of them (often the lower-left and lower-right edges). See The Nitty Gritty of Pixels, Pens, and Lines (in the 2.2 Image Guide ) for a more careful discussion of this issue. Examples: 124
125 > (crop (circle 40 "solid" "chocolate")) > (crop (ellipse "solid" "dodgerblue")) > (above (beside (crop (circle 40 "solid" "palevioletred")) (crop (circle 40 "solid" "lightcoral"))) (beside (crop (circle 40 "solid" "lightcoral")) (crop (circle 40 "solid" "palevioletred")))) (crop/align x-place y-place width height image) Ñ image? x-place : x-place? y-place : y-place? width : (and/c real? (not/c negative?)) height : (and/c real? (not/c negative?)) image : image? Crops image to a rectangle whose size is width and height and is positioned based on x-place and y-place. Some shapes (notably those with 'outline or "outline" as the mode argument) draw outside of their bounding boxes and thus cropping them may remove part of them (often the lower-left and lower-right edges). See The Nitty Gritty of Pixels, Pens, and Lines (in the 2.2 Image Guide ) for a more careful discussion of this issue. Examples: > (crop/align "left" "top" (circle 40 "solid" "chocolate")) 125
126 > (crop/align "right" "bottom" (ellipse "solid" "dodgerblue")) > (crop/align "center" "center" (circle 25 "solid" "mediumslateblue")) > (above (beside (crop/align "right" "bottom" (circle 40 "solid" "palevioletred")) (crop/align "left" "bottom" (circle 40 "solid" "lightcoral"))) (beside (crop/align "right" "top" (circle 40 "solid" "lightcoral")) (crop/align "left" "top" (circle 40 "solid" "palevioletred")))) Added in version 1.1 of package htdp-lib. (frame image) Ñ image? image : image? Returns an image just like image, except with a black, single pixel frame drawn around the bounding box of the image. Example: > (frame (ellipse "solid" "gray")) Generally speaking, this function is useful to debug image constructions, i.e., to see where certain sub-images appear within some larger image. Example: > (beside (ellipse "solid" "lightsteelblue") (frame (ellipse "solid" "mediumslateblue")) (ellipse "solid" "slateblue") (ellipse "solid" "navy")) 126
127 (color-frame color image) Ñ image? color : (or/c pen? image-color?) image : image? Like frame, except with the given color. Added in version 1.1 of package htdp-lib Bitmaps DrRacket s Insert Image... menu item allows you to insert images into your program text, and those images are treated as images for this library. Unlike all of the other images in this library, those images (and the other images created by functions in this section of the documentation) are represented as bitmaps, i.e., an array of colors (that can be quite large in some cases). This means that scaling and rotating them loses fidelity in the image and is significantly more expensive than with the other shapes. See also the 2htdp/planetcute library. (bitmap bitmap-spec) bitmap-spec = rel-string id Loads the bitmap specified by bitmap-spec. If bitmap-spec is a string, it is treated as a relative path. If it is an identifier, it is treated like a require spec and used to refer to a file in a collection. Examples: > (bitmap icons/stop-16x16.png) > (bitmap icons/b-run.png) (bitmap/url url) Ñ image? url : string? 127
128 Goes out on the web and downloads the image at url. Downloading the image happens each time this function is called, so you may find it simpler to download the image once with a browser and then paste it into your program or download it and use bitmap. (bitmap/file ps) Ñ image? ps : path-string? Loads the image from ps. If ps is a relative path, the file is relative to the current directory. (When running in DrRacket, the current directory is set to the place where the definitions window is saved, but in general this can be an arbitrary directory.) (image->color-list image) Ñ (listof color?) image : image? Returns a list of colors that correspond to the colors in the image, reading from left to right, top to bottom. The list of colors is obtained by drawing the image on a white background and then reading off the colors of the pixels that were drawn. Examples: > (image->color-list (rectangle 2 2 "solid" "black")) (list (color ) (color ) (color ) (color )) > (image->color-list (above (beside (rectangle 1 1 "solid" (make-color 1 1 1)) (rectangle 1 1 "solid" (make-color 2 2 2))) (beside (rectangle 1 1 "solid" (make-color 3 3 3)) (rectangle 1 1 "solid" (make-color 4 4 4))))) (list (color ) (color ) (color ) (color )) (color-list->bitmap colors width height) Ñ image? colors : (listof image-color?) width : (and/c real? (not/c negative?)) height : (and/c real? (not/c negative?)) Constructs a bitmap from the given colors, with the given width and height. Example: 128
129 > (scale 40 (color-list->bitmap (list "red" "green" "blue") 3 1)) (freeze image) Ñ image? image : image? (freeze width height image) Ñ image? width : (and/c real? (not/c negative?)) height : (and/c real? (not/c negative?)) image : image? (freeze x y width height image) Ñ image? x : real? y : real? width : (and/c real? (not/c negative?)) height : (and/c real? (not/c negative?)) image : image? Freezing an image internally builds a bitmap, crops the image, draws the cropped image into the bitmap and then uses the bitmap to draw that image afterwards. Typically this is used as a performance hint. When an image both contains many sub-images and is going to be drawn many times (but not scaled or rotated), using freeze on the image can substantially improve performance without changing how the image draws (assuming it draws only inside its bounding box; see also The Nitty Gritty of Pixels, Pens, and Lines ). If freeze is passed only the image argument, then it crops the image to its bounding box. If it is given three arguments, the two numbers are used as the width and height and the five argument version fully specifies where to crop the image Image Properties (image-width i) Ñ (and/c integer? (not/c negative?) exact?) i : image? Returns the width of i. Examples: > (image-width (ellipse "solid" "orange"))
130 > (image-width (circle 30 "solid" "orange")) 60 > (image-width (beside (circle 20 "solid" "orange") (circle 20 "solid" "purple"))) 80 > (image-width (rectangle 0 10 "solid" "purple")) 0 (image-height i) Ñ (and/c integer? (not/c negative?) exact?) i : image? Returns the height of i. Examples: > (image-height (ellipse "solid" "orange")) 40 > (image-height (circle 30 "solid" "orange")) 60 > (image-height (overlay (circle 20 "solid" "orange") (circle 30 "solid" "purple"))) 60 > (image-height (rectangle 10 0 "solid" "purple")) 0 (image-baseline i) Ñ (and/c integer? (not/c negative?) exact?) i : image? Returns the distance from the top of the image to its baseline. The baseline of an image is the place where the bottoms any letters line up, but without counting the descenders, e.g. the tail on y or g or j. Unless the image was constructed with text, text/font or, in some cases, crop, this will be the same as its height. Examples: > (image-baseline (text "Hello" 24 "black")) 23 > (image-height (text "Hello" 24 "black")) 30 > (image-baseline (rectangle "solid" "black")) 100 > (image-height (rectangle "solid" "black"))
131 A cropped image s baseline is the same as the image s baseline, if the cropping stays within the original image s bounding box. But if the cropping actually enlarges the image, then the baseline can end up being smaller. Examples: > (image-height (rectangle "solid" "black")) 20 > (image-baseline (rectangle "solid" "black")) 20 > (image-height (crop (rectangle "solid" "black"))) 5 > (image-baseline (crop (rectangle "solid" "black"))) 5 > (image-height (crop (rectangle "solid" "black"))) 30 > (image-baseline (crop (rectangle "solid" "black"))) Image Predicates This section lists predicates for the basic structures provided by the image library. (image? x) Ñ boolean? x : any/c Determines if x is an image. Images are returned by functions like ellipse and rectangle and accepted by functions like overlay and beside. Additionally, images inserted into a DrRacket window are treated as bitmap images, as are instances of image-snip% and bitmap%. (mode? x) Ñ boolean? x : any/c Determines if x is a mode suitable for constructing images. It can be one of 'solid, "solid", 'outline, or "outline", indicating if the shape is filled in or not. It can also be an integer between 0 and 255 (inclusive) indicating the transparency of the image. The integer 255 is fully opaque, and is the same as "solid" (or 'solid). The integer 0 means fully transparent. (image-color? x) Ñ boolean? x : any/c 131
132 Determines if x represents a color. Strings, symbols, and color structs are allowed as colors. For example, "magenta", "black", 'orange, and 'purple are allowed. Colors are not case-sensitive, so "Magenta", "Black", 'Orange, and 'Purple are also allowed, and are the same colors as in the previous sentence. If a string or symbol color name is not recognized, black is used in its place. The complete list of colors is the same as the colors allowed in color-database<%>, plus the color "transparent", a transparent color. (struct color (red green blue alpha) #:extra-constructor-name make-color) red : (and/c natural-number/c (<=/c 255)) green : (and/c natural-number/c (<=/c 255)) blue : (and/c natural-number/c (<=/c 255)) alpha : (and/c natural-number/c (<=/c 255)) The color struct defines a color with red, green, blue, and alpha components that range from 0 to 255. The red, green, and blue fields combine to make a color, with the higher values meaning more of the given color. For example, (make-color ) makes a bright red color and (make-color ) makes a bright purple. The alpha field controls the transparency of the color. A value of 255 means that the color is opaque and 0 means the color is fully transparent. The constructor, make-color, also accepts only three arguments, in which case the three arguments are used for the red, green, and blue fields, and the alpha field defaults to 255. (struct pulled-point (lpull langle x y rpull rangle) #:extra-constructor-name make-pulled-point) lpull : real? langle : angle? x : real? y : real? rpull : real? rangle : angle? The pulled-point struct defines a point with x and y coordinates, but also with two angles (langle and rangle) and two pulls (lpull and rpull). These points are used with the polygon function and control how the edges can be curved. The first two pull and angle arguments indicate how an edge coming into this point should be curved. The angle argument indicates the angle as the edge reaches (x,y) and a larger 132
133 pull argument means that the edge should hold the angle longer. The last two are the same, except they apply to the edge leaving the point. Added in version 1.3 of package htdp-lib. (y-place? x) Ñ boolean? x : any/c Determines if x is a placement option for the vertical direction. It can be one of "top", 'top, "bottom", 'bottom, "middle", 'middle, "center", 'center, "baseline", 'baseline, "pinhole", or 'pinhole. Using "pinhole" or 'pinhole is only allowed when all of the image arguments have pinholes. See also image-baseline for more discussion of baselines. (x-place? x) Ñ boolean? x : any/c Determines if x is a placement option for the horizontal direction. It can be one of "left", 'left, "right", 'right, "middle", 'middle, "center", 'center, "pinhole", or 'pinhole. Using "pinhole" or 'pinhole is only allowed when all of the image arguments have pinholes. (angle? x) Ñ boolean? x : any/c Determines if x is an angle, namely a real number (except not +inf.0, -inf.0 or +nan.0). Angles are in degrees, so 0 is the same as 360, 90 means rotating one quarter of the way around a circle, and 180 is halfway around a circle. (side-count? x) Ñ boolean? x : any/c Determines if x is an integer greater than or equal to 3. (step-count? x) Ñ boolean? x : any/c Determines if x is an integer greater than or equal to 1. (real-valued-posn? x) Ñ boolean? x : any/c 133
134 Determines if x is a posn whose x and y fields are both real? numbers. (struct pen (color width style cap join) #:extra-constructor-name make-pen) color : image-color? width : (and/c real? (<=/c 0 255)) style : pen-style? cap : pen-cap? join : pen-join? The pen struct specifies how the drawing library draws lines. A good default for style is "solid", and good default values for the cap and join fields are "round". Using 0 as a width is special; it means to always draw the smallest possible, but visible, pen. This means that the pen will always be one pixel in size, no matter how the image is scaled. The cap determines how the ends of a curve is drawn. The join determines how two lines are joined. Examples: > (line (pen "red" 10 "long-dash" "round" "bevel")) > (line (pen "red" 10 "short-dash" "round" "bevel")) > (line (pen "red" 10 "long-dash" "butt" "bevel")) 134
135 > (line (pen "red" 10 "dot-dash" "butt" "bevel")) > (line (pen "red" 30 "dot-dash" "butt" "bevel")) (pen-style? x) Ñ boolean? x : any/c Determines if x is a valid pen style. It can be one of "solid", 'solid, "dot", 'dot, "long-dash", 'long-dash, "short-dash", 'short-dash, "dot-dash", or 'dot-dash. (pen-cap? x) Ñ boolean? x : any/c Determines if x is a valid pen cap. It can be one of "round", 'round, "projecting", 'projecting, "butt", or 'butt. (pen-join? x) Ñ boolean? x : any/c Determines if x is a valid pen join. It can be one of "round", 'round, "bevel", 'bevel, "miter", or 'miter. 135
136 2.3.9 Equality Testing of Images Two images are equal? if they draw exactly the same way at their current size (not necessarily at all sizes) and, if there are pinholes, the pinholes are in the same place. This can lead to some counter-intuitive results. For example, two completely different shapes that are the same size and are drawn with the transparent color are equal: Example: > (equal? (circle 30 "solid" "transparent") (square 60 "solid" "transparent")) #t See also The Nitty Gritty of Alpha Blending Pinholes A pinhole is an optional property of an image that identifies a point somewhere in the image. The pinhole can then be used to facilitate overlaying images by lining them up on the their pinholes. When an image has a pinhole, the pinhole is drawn with crosshairs on the image. The crosshairs are drawn with two one-pixel wide black lines (one horizontal and one vertical) and two one-pixel wide white lines, where the black lines is drawn.5 pixels to the left and above the pinhole, and the white lines are drawn.5 pixels to the right and below the pinhole. Accordingly, when the pixel is on an integral coordinate, then black and white lines all take up a single pixel and in the center of their intersections is the actual pinholes. See The Nitty Gritty of Pixels, Pens, and Lines for more details about pixels. When images are overlay d, underlay d (or the variants of those functions), placed beside, or above each other, the pinhole of the resulting image is the pinhole of the first image argument passed to the combining operation. When images are combined with placeimage (or the variants of place-image), then the scene argument s pinhole is preserved. (center-pinhole image) Ñ image? image : image? Creates a pinhole in image at its center. Examples: > (center-pinhole (rectangle "solid" "red")) 136
137 > (rotate 30 (center-pinhole (rectangle "solid" "orange"))) (put-pinhole x y image) Ñ image? x : integer? y : integer? image : image? Creates a pinhole in image at the point (x,y). Example: > (put-pinhole 2 18 (rectangle "solid" "forestgreen")) (pinhole-x image) Ñ (or/c integer? #f) image : image? Returns the x coordinate of image s pinhole. Example: > (pinhole-x (center-pinhole (rectangle "solid" "red"))) 5 (pinhole-y image) Ñ (or/c integer? #f) image : image? Returns the y coordinate of image s pinhole. Example: > (pinhole-y (center-pinhole (rectangle "solid" "red"))) 5 (clear-pinhole image) Ñ image? image : image? 137
138 Removes a pinhole from image (if the image has a pinhole). (overlay/pinhole i1 i2 is...) Ñ image? i1 : image? i2 : image? is : image? Overlays all of the image arguments on their pinholes. If any of the arguments do not have pinholes, then the center of the image is used instead. Examples: > (overlay/pinhole (put-pinhole (ellipse "solid" "red")) (put-pinhole (ellipse "solid" "blue"))) > (let ([petal (put-pinhole (ellipse "solid" "purple"))]) (clear-pinhole (overlay/pinhole (circle 30 "solid" "yellow") (rotate (* 60 0) petal) (rotate (* 60 1) petal) (rotate (* 60 2) petal) (rotate (* 60 3) petal) (rotate (* 60 4) petal) (rotate (* 60 5) petal)))) (underlay/pinhole i1 i2 is...) Ñ image? i1 : image? 138
139 i2 : image? is : image? Underlays all of the image arguments on their pinholes. If any of the arguments do not have pinholes, then the center of the image is used instead. Examples: > (underlay/pinhole (put-pinhole (ellipse "solid" "red")) (put-pinhole (ellipse "solid" "blue"))) > (let* ([t (triangle 40 "solid" "orange")] [w (image-width t)] [h (image-height t)]) (clear-pinhole (overlay/pinhole (put-pinhole (/ w 2) 0 t) (put-pinhole w h t) (put-pinhole 0 h t)))) Exporting Images to Disk In order to use an image as an input to another program (e.g., Photoshop or a web browser), it is necessary to represent it in a format that these programs can understand. The save-image function provides this functionality, writing an image to disk using the PNG format. Since this format represents an image using a set of pixel values, an image written to disk generally contains less information than the image that was written, and cannot be scaled or manipulated as cleanly (by any image program). The save-svg-image function writes an SVG file format representation of the file to the disk that, unlike save-image produces an image that can still be scaled arbitrarily look as good as scaling the image directly via scale. 139
140 (save-image image filename [width height]) Ñ boolean? image : image? filename : path-string? width : (and/c real? (not/c negative?)) = (image-width image) height : (and/c real? (not/c negative?)) = (image-height image) Writes an image to the path specified by filename, using the PNG format. The last two arguments are optional. If present, they determine the width and height of the save image file. If absent, the width and height of the image is used. (save-svg-image image filename [width height]) Ñ void? image : image? filename : path-string? width : (and/c real? (not/c negative?)) = (image-width image) height : (and/c real? (not/c negative?)) = (image-height image) Writes an image to the path specified by filename, using the SVG format. The last two arguments are optional. If present, they determine the width and height of the save image file. If absent, the width and height of the image is used. 2.4 Worlds and the Universe: "universe.rkt" (require 2htdp/universe) package: htdp-lib The universe.rkt teachpack implements and provides the functionality for creating interactive, graphical programs that consist of plain mathematical functions. We refer to such programs as world programs. In addition, world programs can also become a part of a universe, a collection of worlds that can exchange messages. The purpose of this documentation is to give experienced Racketeers and HtDP teachers a concise overview for using the library. The first part of the documentation focuses on world programs. Section A First Sample World presents an illustration of how to design such programs for a simple domain; it is suited for a novice who knows how to design conditional functions for enumerations, intervals, and unions. The second half of the documentation focuses on "universe" programs: how it is managed via a server, how world programs register with the server, etc. The last two sections show how to design a simple universe of two communicating worlds. Note: For a quick and educational introduction to just worlds, see How to Design Programs, Second Edition: Prologue. As of August 2008, we also have a series of projects available as a small booklet on How to Design Worlds. 140
141 2.4.1 Background The universe teachpack assumes working knowledge of the basic image manipulation operations, either htdp/image or 2htdp/image. As far as this extended reference is concerned, the major difference between the two image teachpacks is the assumption that htdp/image programs render their state as scenes, i.e., images that satisfy the scene? predicate. Recall that htdp/image defines a scene to be an image whose pinhole is at (0,0). If your program uses the operations of 2htdp/image, all images are also scenes. While the operations of this teachpack work with both image teachpacks, we hope to eliminate htdp/image in the not-too-distant future. All example programs are already written using 2htdp/image operations. We urge programmers to use 2htdp/image when they design new world and universe programs and to rewrite their existing htdp/image programs to use 2htdp/image Simple Simulations The simplest kind of animated world program is a time-based simulation, which is a series of images. The programmer s task is to supply a function that creates an image for each natural number. Handing this function to the teachpack displays the simulation. (animate create-image) Ñ natural-number/c create-image : (-> natural-number/c scene?) opens a canvas and starts a clock that ticks 28 times per second. Every time the clock ticks, See DrRacket applies create-image to the number of ticks passed since this function call. The Background for scene?. results of these function calls are displayed in the canvas. The simulation runs until you click the Stop button in DrRacket or close the window. At that point, animate returns the number of ticks that have passed. Example: (define (create-ufo-scene height) (underlay/xy (rectangle "solid" "white") 50 height UFO)) (define UFO (underlay/align "center" "center" (circle 10 "solid" "green") (rectangle 40 4 "solid" "green"))) 141
142 (animate create-ufo-scene) (run-simulation create-image) Ñ natural-number/c create-image : (-> natural-number/c scene?) animate was originally called run-simulation, and this binding is retained for backwards See compatibility Background for scene?. (run-movie r m) Ñ [Listof image?] r : (and/c real? positive?) m : [Listof image?] run-movie displays the list of images m, spending r seconds per image. When the animation is stopped, a list of the remaining, undisplayed images are returned Interactions The step from simulations to interactive programs is relatively small. Roughly speaking, a simulation designates one function, create-image, as a handler for one kind of event: clock ticks. In addition to clock ticks, world programs can also deal with two other kinds of events: keyboard events and mouse events. A keyboard event is triggered when a computer user presses a key on the keyboard. Similarly, a mouse event is the movement of the mouse, a click on a mouse button, the crossing of a boundary by a mouse movement, etc. Your program may deal with such events via the designation of handler functions. Specifically, the teachpack provides for the installation of four event handlers: on-tick, on-key, on-mouse, and on-pad. In addition, a world program must specify a render function, which is called every time your program should visualize the current world, and a done predicate, which is used to determine when the world program should shut down. Each handler function consumes the current state of the world and optionally a data representation of the event. It produces a new state of the world. The following picture provides an intuitive overview of the workings of a world program in the form of a state transition diagram. 142
143 The big-bang form installs World_0 as the initial WorldState. The handlers tock, react, and click transform one world into another one; each time an event is handled, done is used to check whether the world is final, in which case the program is shut down; and finally, render renders each world as an image, which is then displayed on an external canvas. WorldState : any/c The design of a world program demands that you come up with a data definition of all possible states. We use WorldState to refer to this collection of data, using a capital W to distinguish it from the program. In principle, there are no constraints on this data definition though it mustn t be an instance of the Package structure (see below). You can even keep it 143
144 implicit, even if this violates the Design Recipe. (big-bang state-expr clause...) clause = (on-tick tick-expr) (on-tick tick-expr rate-expr) (on-tick tick-expr rate-expr limit-expr) (on-key key-expr) (on-pad pad-expr) (on-release release-expr) (on-mouse mouse-expr) (to-draw draw-expr) (to-draw draw-expr width-expr height-expr) (stop-when stop-expr) (stop-when stop-expr last-scene-expr) (check-with world?-expr) (record? r-expr) (close-on-stop cos-expr) (display-mode d-expr) (state expr) (on-receive rec-expr) (register IP-expr) (port Port-expr) (name name-expr) starts a world program in the initial state specified with state-expr, which must of course evaluate to an element of WorldState. Its behavior is specified via the handler functions designated in the optional clauses, especially how the world program deals with clock ticks, with key events, with mouse events, and eventually with messages from the universe; how it renders itself as an image; when the program must shut down; where to register the world with a universe; and whether to record the stream of events. A world specification may not contain more than one on-tick, to-draw, or register clause. A big-bang expression returns the last world when the stop condition is satisfied (see below) or when the programmer clicks on the Stop button or closes the canvas. The only mandatory clause of a big-bang description is to-draw (or on-draw for backwards compatibility): (to-draw render-expr) render-expr : (-> WorldState scene?) tells DrRacket to call the function render-expr whenever the canvas must be drawn. See The external canvas is usually re-drawn after DrRacket has dealt with an event. Its size Background for is determined by the size of the first generated image. scene?. 144
145 (to-draw render-expr width-expr height-expr) render-expr : (-> WorldState scene?) width-expr : natural-number/c height-expr : natural-number/c tells DrRacket to use a width-expr by height-expr canvas instead of one deter- See mined by the first generated image. For compatibility reasons, the teachpack also supports the keyword on-draw in lieu of to-draw but the latter is preferred now. All remaining clauses are optional. To introduce them, we need one more data definition: HandlerResult : is a synonym for WorldState until The World is not Enough Background for scene?. (on-tick tick-expr) tick-expr : (-> WorldState HandlerResult) tells DrRacket to call the tick-expr function on the current world every time the clock ticks. The result of the call becomes the current world. The clock ticks at the rate of 28 times per second. (on-tick tick-expr rate-expr) tick-expr : (-> WorldState HandlerResult) rate-expr : (and/c real? positive?) tells DrRacket to call the tick-expr function on the current world every time the clock ticks. The result of the call becomes the current world. The clock ticks every rate-expr seconds. (on-tick tick-expr rate-expr limit-expr) tick-expr : (-> WorldState HandlerResult) rate-expr : (and/c real? positive?) limit-expr : (and/c integer? positive?) tells DrRacket to call the tick-expr function on the current world every time the clock ticks. The result of the call becomes the current world. The clock ticks every rate-expr seconds. The world ends when the clock has ticked more than limitexpr times. 145
146 A KeyEvent represents key board events. KeyEvent : string? For simplicity, we represent key events with strings, but not all strings are key events. The representation of key events comes in distinct classes. First, a single-character string is used to signal that the user has hit a "regular" key, such as "q" stands for the q key; "w" stands for the w key; "e" stands for the e key; "r" stands for the r key; and so on. Some of these one-character strings look somewhat unusual: " " stands for the space bar (#\space); "\r" stands for the return and enter key (#\return); "\t" stands for the tab key (#\tab); and "\b" stands for the backspace key (#\backspace). Here is "proof" that these strings really have length 1: > (string-length "\t") 1 On rare occasions your programs may also encounter "\u007f", which is the string representing the delete key (aka rubout). Second, some keys have multiple-character string representations. Strings with more than one character denote arrow keys or other special events, starting with the four most important ones: "left" is the left arrow; "right" is the right arrow; "up" is the up arrow; "down" is the down arrow; Here are some others that you may encounter: "start" "cancel" "clear" "shift" "rshift" "control" "rcontrol" 146
147 "menu" "pause" "capital" "prior" "next" "end" "home" "escape" "select" "print" "execute" "snapshot" "insert" "help" function keys: "f1", "f2", "f3", "f4", "f5", "f6", "f7", "f8", "f9", "f10", "f11", "f12", "f13", "f14", "f15", "f16", "f17", "f18", "f19", "f20", "f21", "f22", "f23", "f24" "numlock" "scroll" The following four count as keyevents even though they are triggered by physical events on some form of mouse: "wheel-up" "wheel-down" "wheel-left" "wheel-right" The preceding enumeration is neither complete in covering all the events that this library deals with nor does it specify which events the library ignores. If you wish to design a program that relies on specific keys on your keyboard, you should first write a small test program to find out whether the chosen keystrokes are caught by the library and, if so, which string representations are used for these events. (key-event? x) Ñ boolean? x : any determines whether x is a KeyEvent (key=? x y) Ñ boolean? x : key-event? y : key-event? 147
148 compares two KeyEvent for equality (on-key key-expr) key-expr : (-> WorldState key-event? HandlerResult) tells DrRacket to call the key-expr function on the current world and a KeyEvent for every keystroke the user of the computer makes. The result of the call becomes the current world. Here is a typical key-event handler: (define (change w a-key) (cond [(key=? a-key "left") (world-go w -DELTA)] [(key=? a-key "right") (world-go w +DELTA)] [(= (string-length a-key) 1) w] ; order-free checking [(key=? a-key "up") (world-go w -DELTA)] [(key=? a-key "down") (world-go w +DELTA)] [else w])) The omitted, auxiliary function world-go is supposed to consume a world and a number and produces a world. (on-release release-expr) release-expr : (-> WorldState key-event? HandlerResult) tells DrRacket to call the release-expr function on the current world and a KeyEvent for every release event on the keyboard. A release event occurs when a user presses the key and then releases it. The second argument indicates which key has been released. The result of the function call becomes the current world. A PadEvent is a KeyEvent for a game-pad simulation via big-bang. The presence of an on-pad clause superimposes the game-pad image onto the current image, suitably scaled to its size: PadEvent : key-event? It is one of the following: 148
149 "left" is the left arrow; "right" is the right arrow; "up" is the up arrow; "down" is the down arrow; "w" to be interpreted as up arrow; "s" to be interpreted as down arrow; "a" to be interpreted as left arrow; "d" to be interpreted as right arrow; " " is the space bar; "shift" is the left shift key; "rshift" is the right shift key; (pad-event? x) Ñ boolean? x : any determines whether x is a PadEvent (pad=? x y) Ñ boolean? x : pad-event? y : pad-event? compares two PadEvent for equality (on-pad pad-expr) pad-expr : (-> WorldState pad-event? HandlerResult) tells DrRacket to call the pad-expr function on the current world and the KeyEvent for every keystroke that is also a PadEvent. The result of the call becomes the current world. Here is a typical PadEvent handler: ; ComplexNumber PadEvent -> ComplexNumber (define (handle-pad-events x k) (case (string->symbol k) [(up w) (- x 0+10i)] [(down s) (+ x 0+10i)] [(left a) (- x 10)] [(right d) (+ x 10)] [( ) x0] [(shift) (conjugate x)] [(rshift) (stop-with (conjugate x))])) 149
150 When a big-bang expression specifies an on-pad clause, all PadEvents are sent to the on-pad handler. All other key events are discarded, unless an on-key and/or an on-release clause are specified, in which case all remaining KeyEvents are sent there. To facilitate the definition of on-pad handlers, the library provides the pad-handler form. (pad-handler clause...) clause = (up up-expr) (down down-expr) (left left-expr) (right right-expr) (space space-expr) (shift shift-expr) Creates a function that deals with PadEvents. Each (optional) clause contributes one function that consumes a World and produces a world. The name of the clause determines for which kind of PadEvent the function is called. Using the form is entirely optional and not required to use on-pad. Indeed, padhandler could be used to define a plain KeyEvent handler if we could guarantee that players never hit keys other than PadEvent keys. All clauses in a pad-handler form are optional: (up up-expr) tick-expr : (-> WorldState HandlerResult) Creates a handler for "up" and "w" events. (down down-expr) tick-expr : (-> WorldState HandlerResult) Creates a handler for "down" and "s" events. (left left-expr) tick-expr : (-> WorldState HandlerResult) Creates a handler for "left" and "a" events. (right right-expr) tick-expr : (-> WorldState HandlerResult) Creates a handler for "right" and "d" events. 150
151 (space space-expr) tick-expr : (-> WorldState HandlerResult) Creates a handler for space-bar events (" "). (shift shift-expr) tick-expr : (-> WorldState HandlerResult) Creates a handler for "shift" and "rshift" events. If a clause is omitted, pad-handler installs a default function that maps the existing world to itself. Here is a PadEvent handler defined with pad-handler: ; ComplexNumber -> ComplexNumber (define (i-sub1 x) (- x 0+1i)) ; ComplexNumber -> ComplexNumber (define (i-add1 x) (+ x 0+1i)) ; ComplexNumber -> ComplexNumber ; deal with all PadEvents (define handler (pad-handler (left sub1) (right add1) (up i-sub1) (down i-add1) (shift (lambda (w) 0)) (space stop-with))) ; some tests: (check-expect (handler 9 "left") 8) (check-expect (handler 8 "up") 8-1i) A MouseEvent represents mouse events, e.g., mouse movements or mouse clicks, by the computer s user. MouseEvent : (one-of/c "button-down" "button-up" "drag" "move" "enter" "leave") All MouseEvents are represented via strings: "button-down" signals that the computer user has pushed a mouse button down; "button-up" signals that the computer user has let go of a mouse button; "drag" signals that the computer user is dragging the mouse. A dragging event occurs when the mouse moves while a mouse button is pressed. 151
152 "move" signals that the computer user has moved the mouse; "enter" signals that the computer user has moved the mouse into the canvas area; and "leave" signals that the computer user has moved the mouse out of the canvas area. (mouse-event? x) Ñ boolean? x : any determines whether x is a MouseEvent (mouse=? x y) Ñ boolean? x : mouse-event? y : mouse-event? compares two MouseEvents for equality (on-mouse mouse-expr) mouse-expr : (-> WorldState integer? integer? MouseEvent HandlerResult) tells DrRacket to call mouse-expr on the current world, the current x and y coordinates of the mouse, and a MouseEvent for every (noticeable) action of the mouse by the computer user. The result of the call becomes the current world. For "leave" and "enter" events, the coordinates of the mouse click may be outside of the (implicit) rectangle. That is, the coordinates may be negative or larger than the (implicitly) specified width and height. Note 1: the operating system doesn t really notice every single movement of the mouse (across the mouse pad). Instead it samples the movements and signals most of them. Note 2: while mouse events are usually reported in the expected manner, the operating system doesn t necessarily report them in the expected order. For example, the Windows operating system insists on signaling a "move" event immediately after a "button-up" event is discovered. Programmers must design the on-mouse handler to handle any possible mouse event at any moment. (stop-when last-world?) last-world? : (-> WorldState boolean?) tells DrRacket to call the last-world? function at the start of the world program and after any other world-producing callback. If this call produces #true, the world program is shut down. Specifically, the clock is stopped; no more tick events, KeyEvents, or MouseEvents are forwarded to the respective handlers. The big-bang expression returns this last world. 152
153 (stop-when last-world? last-picture) last-world? : (-> WorldState boolean?) last-picture : (-> WorldState scene?) tells DrRacket to call the last-world? function at the start of the world program See and after any other world-producing callback. If this call produces #true, the world Background for scene?. program is shut down after displaying the world one last time, this time using the image rendered with last-picture. Specifically, the clock is stopped; no more tick events, KeyEvents, or MouseEvents are forwarded to the respective handlers. The big-bang expression returns this last world. (struct stop-with (w)) w : HandlerResult signals to DrRacket that the world program should shut down. That is, any handler may return (stop-with w) provided w is a HandlerResult. If it does, the state of the world becomes w and big-bang will close down all event handling. Similarly, if the initial state of the world is (stop-with w), event handling is immediately closed down. (check-with world-expr?) world-expr? : (-> Any boolean?) tells DrRacket to call the world-expr? function on the result of every world handler call. If this call produces #true, the result is considered a world; otherwise the world program signals an error. (record? r-expr) r-expr : any/c tells DrRacket to enable a visual replay of the interaction, unless #f. The replay action generates one png image per image and an animated gif for the entire sequence in the directory of the user s choice. If r-expr evaluates to the name of an existing directory/folder (in the local directory/folder), the directory is used to deposit the images. (close-on-stop cos-expr) cos-expr : (or/c boolean? natural-number/c) 153
154 tells DrRacket whether to close the big-bang window after the expression is evaluated. If cos-expr is #false, which is the default, the window remains open. If cos-expr is #true, the window closes immediately. Finally, if cos-expr is a natural number, the window closes cos-expr seconds after the end of the evaluation. (display-mode d-expr) d-expr : (or/c 'fullscreen 'normal) informs DrRacket to choose one of two display modes: 'normal or 'fullscreen. The 'normal mode is the default and uses the size specifications from the to-draw clause. If the 'fullscreen mode is specified, big-bang takes over the full screen. (state expr) if not #f, DrRacket opens a separate window in which the current state is rendered each time it is updated. This is useful for beginners who wish to see how their world evolves without having to design a rendering function or for general debugging of world programs. (name name-expr) name-expr : (or/c symbol? string?) provide a name (namer-expr) to this world, which is used as the title of the canvas. The following example shows that (run-simulation create-ufo-scene) is a shorthand for three lines of code: (define (create-ufo-scene height) (underlay/xy (rectangle "solid" "white") 50 height UFO)) (define UFO (underlay/align "center" "center" (circle 10 "solid" "green") (rectangle 40 4 "solid" "green"))) (big-bang 0 (on-tick add1) (to-draw create-ufo-scene)) Exercise: Add a condition for stopping the flight of the UFO when it reaches the bottom. 154
155 2.4.4 A First Sample World This section uses a simple example to explain the design of worlds. The first subsection introduces the sample domain, a door that closes automatically. The second subsection is about the design of world programs in general, the remaining subsections implement a simulation of the door. Understanding a Door Say we wish to design a world program that simulates the working of a door with an automatic door closer. If this kind of door is locked, you can unlock it with a key. While this doesn t open the door per se, it is now possible to do so. That is, an unlocked door is closed and pushing at the door opens it. Once you have passed through the door and you let go, the automatic door closer takes over and closes the door again. When a door is closed, you can lock it again. Here is a diagram that translates our words into a graphical representation: Like the picture of the general workings of a world program, this diagram displays a socalled state machine. The three circled words are the states that our informal description of the door identified: locked, closed (and unlocked), and open. The arrows specify how the door can go from one state into another. For example, when the door is open, the automatic door closer shuts the door as time passes. This transition is indicated by the arrow labeled time. The other arrows represent transitions in a similar manner: push means a person pushes the door open (and let s go); lock refers to the act of inserting a key into the lock and turning it to the locked position; and 155
156 unlock is the opposite of lock. Hints on Designing Worlds Simulating any dynamic behavior via a world program demands two different activities. First, we must tease out those portions of our domain that change over time or in reaction to actions, and we must develop a data representation for this information. This is what we call WorldState. Keep in mind that a good data definition makes it easy for readers to map data to information in the real world and vice versa. For all others aspects of the world, we use global constants, including graphical or visual constants that are used in conjunction with the rendering operations. Second, we must translate the actions in our domain the arrows in the above diagram into interactions with the computer that the universe teachpack can deal with. Once we have decided to use the passing of time for one aspect, key presses for another, and mouse movements for a third, we must develop functions that map the current state of the world represented as data from WorldState into the next state of the world. Put differently, we have just created a wish list with three handler functions that have the following general contract and purpose statements: ; tick : WorldState -> HandlerResult ; deal with the passing of time (define (tick w)...) ; click : WorldState Number Number MouseEvent -> HandlerResult ; deal with a mouse click at (x,y) of kind me ; in the current world w (define (click w x y me)...) ; control : WorldState KeyEvent -> HandlerResult ; deal with a key event ke ; in the current world w (define (control w ke)...) That is, the contracts of the various handler designations dictate what the contracts of our functions are, once we have defined how to represent the domain with data in our chosen language. A typical program does not use all three of these functions. Furthermore, the design of these functions provides only the top-level, initial design goal. It often demands the design of many auxiliary functions. The collection of all these functions is your world program. An extended example is available in How to Design Programs/2e. 156
157 2.4.5 The World is not Enough The library facilities covered so far are about designing individual programs with interactive graphical user interfaces (simulations, animations, games, etc.). In this section, we introduce capabilities for designing a distributed program, which is really a number of programs that coordinate their actions in some fashion. Each of the individual programs may run on any computer in the world (as in our planet and the spacecrafts that we sent out), as long as it is on the internet and as long as the computer allows the program to send and receive messages (via TCP). We call this arrangement a universe and the program that coordinates it all a universe server or just server. This section explains what messages are, how to send them from a world program, how to receive them, and how to connect a world program to a universe. Messages After a world program has become a part of a universe, it may send messages and receive them. In terms of data, a message is just an S-expression. S-expression An S-expression is roughly a nested list of basic data; to be precise, an S- expression is one of: a string, a symbol, a number, a boolean, a char, or a list of S-expressions, or a prefab struct of S-expressions. Note the list clause includes empty of course. (sexp? x) Ñ boolean? x : any/c determines whether x is an S-expression. Sending Messages Each world-producing callback in a world program those for handling clock tick events, keyboard events, and mouse events may produce a Package in addition to just a World- State: 157
158 HandlerResult is one of the following: WorldState Package where Package represents a pair consisting of a WorldState and a message from a world program to the server. Because programs only send messages via Package, the teachpack does not provide the selectors for the structure, only the constructor and a predicate. (package? x) Ñ boolean? x : any/c determine whether x is a Package. (make-package w m) Ñ package? w : any/c m : sexp? create a Package from a WorldState and an S-expression. Recall that event handlers return a HandlerResult, and we have just refined this data definition. Hence, each handler may return either a WorldState or a Package. If an event handler produces a Package, the content of the world field becomes the next world and the message field specifies what the world sends to the universe. This distinction also explains why the data definition for WorldState may not include a Package. Connecting with the Universe Messages are sent to the universe program, which runs on some computer in the world. The next section is about constructs for creating such a universe server. For now, we just need to know that it exists and that it is the recipient of messages. IP string? Before a world program can send messages, it must register with the server. Registration must specify the internet address of the computer on which the server runs, also known as an IP address or a host. Here a IP address is a string of the right shape, e.g., " " or " LOCALHOST : string? the IP of your computer. Use it while you are developing a distributed program, especially while you are investigating whether the participating world programs collaborate in an appropriate manner. This is called integration testing and differs from unit testing quite a bit. 158
159 A big-bang description of a world program that wishes to communicate with other programs must contain a register clause of one of the following shapes: (register ip-expr) ip-expr : string? connect this world to a universe server at the specified ip-expr address and set up capabilities for sending and receiving messages. If the world description includes a name specification of the form (name SomeString) or (name SomeSymbol), the name of the world is sent along to the server. (port port-expr) port-expr : natural-number/c specifies port on which a world wishes to receive and send messages. A port number is an integer between 0 and When a world program registers with a universe program and the universe program stops working, the world program stops working, too. Receiving Messages Finally, the receipt of a message from the server is an event, just like tick events, keyboard events, and mouse events. Dealing with the receipt of a message works exactly like dealing with any other event. DrRacket applies the event handler that the world program specifies; if there is no clause, the message is discarded. The on-receive clause of a big-bang specifies the event handler for message receipts. (on-receive receive-expr) receive-expr : (-> WorldState sexp? HandlerResult) tells DrRacket to call receive-expr for every message receipt, on the current WorldState and the received message. The result of the call becomes the current WorldState. Because receive-expr is (or evaluates to) a world-transforming function, it too can produce a Package instead of just a WorldState. If the result is a Package, its message content is sent to the server. The diagram below summarizes the extensions of this section in graphical form. 159
160 A registered world program may send a message to the universe server at any time by returning a Package from an event handler. The message is transmitted to the server, which may forward it to some other world program as given or in some massaged form. The arrival of a message is just another event that a world program must deal with. Like all other event handlers receive accepts a WorldState and some auxiliary arguments (a message in this case) and produces a WorldState or a Package. When messages are sent from any of the worlds to the universe or vice versa, there is no need for the sender and receiver to synchronize. Indeed, a sender may dispatch as many messages as needed without regard to whether the receiver has processed them yet. The messages simply wait in queue until the receiving server or world program takes care of them. 160
161 2.4.6 The Universe Server A server is the central control program of a universe and deals with receiving and sending of messages between the world programs that participate in the universe. Like a world program, a server is a program that reacts to events, though to different events than worlds. The two primary kinds of events are the appearance of a new world program in the universe and the receipt of a message from a world program. The teachpack provides a mechanism for designating event handlers for servers that is quite similar to the mechanism for describing world programs. Depending on the designated event handlers, the server takes on distinct roles: A server may be a pass through channel between two worlds, in which case it has no other function than to communicate whatever message it receives from one world to the other, without any interference. A server may enforce a back and forth protocol, i.e., it may force two (or more) worlds to engage in a civilized tit-for-tat exchange. Each world is given a chance to send a message and must then wait to get a reply before it sends anything again. A server may play the role of a special-purpose arbiter, e.g., the referee or administrator of a game. It may check that each world plays by the rules, and it administrates the resources of the game. As a matter of fact, a pass-through server can become basically invisible, making it appear as if all communication goes from peer world to peer in a universe. This section first introduces some basic forms of data that the server uses to represent worlds and other matters. Second, it explains how to describe a server program. Worlds and Messages Understanding the server s event handling functions demands several data representations: that of (a connection to) a world program and that of a response of a handler to an event. The server and its event handlers must agree on a data representation of the worlds that participate in the universe. (iworld? x) Ñ boolean? x : any/c determines whether x is an iworld. Because the universe server represents worlds via structures that collect essential information about the connections, the teachpack does not export any constructor or selector functions on worlds. 161
162 (iworld=? u v) Ñ boolean? u : iworld? v : iworld? compares two iworlds for equality. (iworld-name w) Ñ (or/c symbol? string?) w : iworld? extracts the name from a iworld structure. iworld1 : iworld? an iworld for testing your programs iworld2 : iworld? another iworld for testing your programs iworld3 : iworld? and a third one The three sample iworlds are provided so that you can test your functions for universe programs. For example: (check-expect (iworld=? iworld1 iworld2) #false) (check-expect (iworld=? iworld2 iworld2) #true) Each event handler produces a state of the universe or a bundle, which is a structure that contains the server s state, a list of mails to other worlds, and the list of iworlds that are to be disconnected. (bundle? x) Ñ boolean? x : any/c determines whether x is a bundle. (make-bundle state mails low) Ñ bundle? state : any/c mails : (listof mail?) low : (listof iworld?) creates a bundle from a piece of data that represents a server state, a list of mails, and a list of iworlds. The list of iworlds in the third field of the bundle are removed from the list of participants from which to expect messages. If disconnecting from these worlds results in an empty list of participants, the universe server is restarted in the initial state. A mail represents a message from an event handler to a world. The teachpack provides only a predicate and a constructor for these structures: 162
163 (mail? x) Ñ boolean? x : any/c determines whether x is a mail. (mak to content) Ñ mail? to : iworld? content : sexp? creates a mail from a iworld and an S-expression. Universe Descriptions A server keeps track of information about the universe that it manages. One kind of tracked information is obviously the collection of participating world programs, but in general the kind of information that a server tracks and how the information is represented depends on the situation and the programmer, just as with world programs. UniverseState : any/c The design of a universe server demands that you come up with a data definition for all possible server states. For running universes, the teachpack demands that you come up with a data definition for (your state of the) server. Any piece of data can represent the state. We just assume that you introduce a data definition for the possible states and that your event handlers are designed according to the design recipe for this data definition. The server itself is created with a description that includes the first state and a number of clauses that specify functions for dealing with universe events. (universe state-expr clause...) clause = (on-new new-expr) (on-msg msg-expr) (on-tick tick-expr) (on-tick tick-expr rate-expr) (on-tick tick-expr rate-expr limit-expr) (on-disconnect dis-expr) (state expr) (to-string render-expr) (port port-expr) (check-with universe?-expr) creates a server with a given state, state-expr. The behavior is specified via handler functions through mandatory and optional clauses. These functions govern how the server deals with the registration of new worlds, how it disconnects worlds, how it sends messages 163
164 from one world to the rest of the registered worlds, and how it renders its current state as a string. Evaluating a universe expression starts a server. Visually it opens a console window on which you can see that worlds join, which messages are received from which world, and which messages are sent to which world. For convenience, the console also has two buttons: one for shutting down a universe and another one for re-starting it. The latter functionality is especially useful during the integration of the various pieces of a distributed program. The mandatory clauses of a universe server description are on-new and on-msg: (on-new new-expr) new-expr : (-> UniverseState iworld? (or/c UniverseState bundle?)) tells DrRacket to call the function new-expr every time another world joins the universe. The event handler is called with the current state and the joining iworld, which isn t on the list yet. In particular, the handler may reject a world program from participating in a universe, by simply returning the given state or by immediately including the new world in the third field of the resulting bundle structure. Changed in version 1.1 of package htdp-lib: allow universe handlers to return a plain universe state (on-msg msg-expr) msg-expr : (-> UniverseState iworld? sexp? (or/c UniverseState bundle?)) tells DrRacket to apply msg-expr to the current state of the universe, the world w that sent the message, and the message itself. Changed in version 1.1 of package htdp-lib: allow universe handlers to return a plain universe state All proper event handlers produce a state of the universe or a bundle. The state of the universe is safe-guarded by the server until the next event, and the mails are broadcast as specified. The list of iworlds in the third field of the bundle are removed from the list of participants from which to expect messages. The following picture provides a graphical overview of the server s workings. 164
165 In addition to the mandatory handlers, a program may wish to add some optional handlers: (on-tick tick-expr) tick-expr : (-> UniverseState (or/c UniverseState bundle?)) tells DrRacket to apply tick-expr to the current state of the universe. Changed in version 1.1 of package htdp-lib: allow universe handlers to return a plain universe state (on-tick tick-expr rate-expr) 165
166 tick-expr : (-> UniverseState (or/c UniverseState bundle?)) rate-expr : (and/c real? positive?) tells DrRacket to apply tick-expr as above; the clock ticks every rate-expr seconds. Changed in version 1.1 of package htdp-lib: allow universe handlers to return a plain universe state (on-tick tick-expr rate-expr) tick-expr : (-> UniverseState (or/c UniverseState bundle?)) rate-expr : (and/c real? positive?) limit-expr : (and/c integer? positive?) tells DrRacket to apply tick-expr as above; the clock ticks every rate-expr seconds. The universe stops when the clock has ticked more than limit-expr times. Changed in version 1.1 of package htdp-lib: allow universe handlers to return a plain universe state (on-disconnect dis-expr) dis-expr : (-> UniverseState iworld? (or/c UniverseState bundle?)) tells DrRacket to invoke dis-expr every time a participating world drops its connection to the server. The first argument is the current state of the universe server, while the second argument is the (representation of the) world that got disconnected. The resulting bundle usually includes this second argument in the third field, telling DrRacket not to wait for messages from this world anymore. Changed in version 1.1 of package htdp-lib: allow universe handlers to return a plain universe state (port port-expr) port-expr : natural-number/c specifies port on which a universe wishes to receive and send messages. A port number is an integer between 0 and (to-string render-expr) render-expr : (-> UniverseState string?) tells DrRacket to render the state of the universe after each event and to display this string in the universe console. 166
167 (check-with universe?-expr) universe?-expr : (-> Any boolean?) ensure that what the event handlers produce is really an element of UniverseState. (state expr) if not #f, DrRacket opens a separate window in which the current state is rendered each time it is updated. This is mostly useful for debugging server programs. Exploring a Universe In order to explore the workings of a universe, it is necessary to launch a server and several world programs on one and the same computer. We recommend launching one server out of one DrRacket tab and as many worlds as necessary out of a second tab. For the latter, the teachpack provides a special form. (launch-many-worlds expression...) evaluates all sub-expressions in parallel. Typically each sub-expression is an application of a function that evaluates a big-bang expression. When all worlds have stopped, the expression returns all final worlds in order. Once you have designed a world program, add a function definition concerning big-bang to the end of the tab: ; String -> World (define (main n) (big-bang... (name n)...)) Then in DrRacket s Interactions area, use launch-many-worlds to create several distinctively named worlds: > (launch-many-worlds (main "matthew") (main "kathi") (main "h3")) The three worlds can then interact via a server. When all of them have stopped, they produce the final states, here 10, 25, and 33. For advanced programmers, the library also provides a programmatic interface for launching many worlds in parallel. 167
168 (launch-many-worlds/proc thunk-that-runs-a-world...) Ñ any... thunk-that-runs-a-world : (-> any/c) invokes all given thunk-that-runs-a-world in parallel. Typically each argument is a function of no argument that evaluates a big-bang expression. When all worlds have stopped, the function expression returns all final worlds in order. It is thus possible to decide at run time how many and which worlds to run in parallel: > (apply launch-many-worlds/proc (build-list (random 10) (lambda (i) (lambda () (main (number->string i)))))) A First Sample Universe This section uses a simple example to explain the design of a universe, especially its server and some participating worlds. The first subsection explains the example, the second introduces the general design plan for such universes. The remaining sections present the full-fledged solution. Two Ball Tossing Worlds Say we want to represent a universe that consists of a number of worlds and that gives each world a turn in a round-robin fashion. If a world is given its turn, it displays a ball that ascends from the bottom of a canvas to the top. It relinquishes its turn at that point and the server gives the next world a turn. Here is an image that illustrates how this universe would work if two worlds participated: 168
169 The two world programs could be located on two distinct computers or on just one. A server mediates between the two worlds, including the initial start-up. Hints on Designing Universes The first step in designing a universe is to understand the coordination of the worlds from a global perspective. To some extent, it is all about knowledge and the distribution of knowledge throughout a system. We know that the universe doesn t exist until the server starts and the worlds are joining. Because of the nature of computers and networks, however, we may assume little else. Our network connections ensure that if some world or the server sends two messages to the same place in some order, they arrive in the same order (if they arrive at all). In contrast, if two distinct world programs send one message each, the network does not guarantee the order of arrival at the server; similarly, if the server is asked to send some messages to several distinct world programs, they may arrive at those worlds in the order sent or in the some other order. In the same vein, it is impossible to ensure that one world joins before another. Worst, when someone removes the connection (cable, wireless) between a computer that runs a world program and the rest of the network or if some network cable is cut, messages don t go anywhere. Due to this vagaries, it is therefore the designer s task to establish a protocol that enforces a certain order onto a universe and this activity is called protocol design. From the perspective of the universe, the design of a protocol is about the design of data representations for tracking universe information in the server and the participating worlds and the design of a data representation for messages. As for the latter, we know that they must be S-expressions, but usually world programs don t send all kinds of S-expressions. The data definitions for messages must therefore select a subset of suitable S-expressions. As for the state of the server and the worlds, they must reflect how they currently relate to the universe. Later, when we design their local behavior, we may add more components to their state space. In summary, the first step of a protocol design is to introduce: a data definition for the information about the universe that the server tracks, call it UniverseState; a data definition for the world(s) about their current relationship to the universe; data definitions for the messages that are sent from the server to the worlds and vice versa. Let s call them S2W for messages from the server to the worlds and W2S for the other direction; in the most general case you may need one pair per world. If all the worlds exhibit the same behavior over time, a single data definition suffices for step 169
170 2. If they play different roles, we may need one data definition per world. Of course, as you define these collections of data always keep in mind what the pieces of data mean, what they represent from the universe s perspective. The second step of a protocol design is to figure out which major events the addition of a world to the universe, the arrival of a message at the server or at a world to deal with and what they imply for the exchange of messages. Conversely, when a server sends a message to a world, this may have implications for both the state of the server and the state of the world. A good tool for writing down these agreements is an interaction diagram. Server World1 World2 'go < 'go > Each vertical line is the life line of a world program or the server. Each horizontal arrow denotes a message sent from one universe participant to another. The design of the protocol, especially the data definitions, have direct implications for the design of event handling functions. For example, in the server we may wish to deal with two kinds of events: the joining of a new world and the receipt of a message from one of the worlds. This translates into the design of two functions with the following headers, ; Bundle is ; (make-bundle UniverseState [Listof mail?] [Listof iworld?]) ; UniverseState iworld? -> Bundle ; next list of worlds when world iw is joining ; the universe in state s (define (add-world s iw)...) ; UniverseState iworld? W2U -> Bundle ; next list of worlds when world iw is sending message m to ; the universe in state s (define (process s iw m)...) Finally, we must also decide how the messages affect the states of the worlds; which of their callback may send messages and when; and what to do with the messages a world receives. Because this step is difficult to explain in the abstract, we move on to the protocol design for the universe of ball worlds. 170
171 Designing the Ball Universe Running the ball universe has a simple overall goal: to ensure that at any point in time, one world is active and all others are passive. The active world displays a moving ball, and the passive worlds should display something, anything that indicates that it is some other world s turn. As for the server s state, it must obviously keep track of all worlds that joined the universe, and it must know which one is active and which ones are passive. Of course, initially the universe is empty, i.e., there are no worlds and, at that point, the server has nothing to track. While there are many different useful ways of representing such a universe, we just use the list of iworlds that is handed to each handler and that handlers return via their bundles. The UniverseState itself is useless for this trivial example. We interpret non-empty lists as those where the first iworld is active and the remainder are the passive iworlds. As for the two possible events, it is natural to add new iworlds to the end of the list; and it is natural to move an active iworld that relinquishes its turn to the end of the list, too. The server should send messages to the first iworld of its list as long as it wishes this iworld to remain active. In turn, it should expect to receive messages only from this one active iworld and no other iworld. The content of these two messages is nearly irrelevant because a message from the server to an iworld means that it is the iworld s turn and a message from the iworld to the server means that the turn is over. Just so that we don t confuse ourselves, we use two distinct symbols for these two messages: A GoMessage is 'it-is-your-turn. A StopMessage is 'done. From the universe s perspective, each world is in one of two states: A passive world is resting. We use 'resting for this state. An active world is not resting. We delay choosing a representation for this part of a world s state until we design its local behavior. It is also clear that an active world may receive additional messages, which it may ignore. When it is done with its turn, it will send a message. Server World1 171
172 <================== 'it-is-your-turn > World2 <========================================== 'done < 'it-is-your-turn > 'done < 'it-is-your-turn > Here the double-lines (horizontal) denote the registration step, the others are message exchanges. The diagram thus shows how the server decides to make the first registered world the active one and to enlist all others as they join. Designing the Ball Server The preceding subsection dictates that our server program starts like this: ; teachpack: universe.rkt ; UniverseState is '* ; StopMessage is 'done. ; GoMessage is 'it-is-your-turn. The design of a protocol has immediate implications for the design of the event handling functions of the server. Here we wish to deal with two events: the appearance of a new world and the receipt of a message. Based on our data definitions and based on the general contracts of the event handling functions spelled out in this documentation, we get two functions for our wish list: ; Result is ; (make-bundle [Listof iworld?] ; (list (mak iworld? GoMessage)) ; '()) ; [Listof iworld?] iworld? -> Result ; add world iw to the universe, when server is in state u (define (add-world u iw)...) 172
173 ; [Listof iworld?] iworld? StopMessage -> Result ; world iw sent message m when server is in state u (define (switch u iw m)...) Although we could have re-used the generic contracts from this documentation, we also know from our protocol that our server sends a message to exactly one world. Note how these contracts are just refinements of the generic ones. (A type-oriented programmer would say that the contracts here are subtypes of the generic ones.) The second step of the design recipe calls for functional examples: ; an obvious example for adding a world: (check-expect (add-world '() world1) (make-bundle (list world1) (list (mak world1 'it-is-your-turn)) '())) ; an example for receiving a message from the active world: (check-expect (switch (list world1 world2) world1 'done) (make-bundle (list world2 world1) (list (mak world2 'it-is-your-turn)) '())) Note that our protocol analysis dictates this behavior for the two functions. Also note how we use world1, world2, and world3 because the teachpack applies these event handlers to real worlds. Exercise: Create additional examples for the two functions based on our protocol. The protocol tells us that add-world just adds the given world structure recall that this a data representation of the actual world program to the given list of worlds. It then sends a message to the first world on this list to get things going: (define (add-world univ wrld) (local ((define univ* (append univ (list wrld)))) (make-bundle univ* (list (mak (first univ*) 'it-is-your-turn)) '()))) Because univ* contains at least wrld, it is acceptable to create a mail to (first univ*). Of course, this same reasoning also implies that if univ isn t empty, its first element is an active world and is about to receive a second 'it-is-your-turn message. 173
174 Similarly, the protocol says that when switch is invoked because a world program sends a message, the data representation of the corresponding world is moved to the end of the list and the next world on the (resulting) list is sent a message: (define (switch univ wrld m) (local ((define univ* (append (rest univ) (list (first univ))))) (make-bundle univ* (list (mak (first univ*) 'it-is-your-turn)) '()))) As before, appending the first world to the end of the list guarantees that there is at least this one world on this list. It is therefore acceptable to create a mail for this world. Start the server now. (universe '() (on-new add-world) (on-msg switch)) Exercise: The function definition simply assumes that wrld is iworld=? to (first univ) and that the received message m is 'done. Modify the function definition so that it checks these assumptions and raises an error signal if either of them is wrong. Start with functional examples. If stuck, re-read the section on checked functions from HtDP. (Note: in a universe it is quite possible that a program registers with a server but fails to stick to the agreed-upon protocol. How to deal with such situations properly depends on the context. For now, stop the universe at this point by returning an empty list of worlds. Consider alternative solutions, too.) Exercise: An alternative state representation would equate UniverseState with world structures, keeping track of the active world. The list of world in the server would track the passive worlds only. Design appropriate add-world and switch functions. Designing the Ball World The final step is to design the ball world. Recall that each world is in one of two possible states: active or passive. The second kind of world moves a ball upwards, decreasing the ball s y coordinate; the first kind of world displays something that says it s someone else s turn. Assuming the ball always moves along a vertical line and that the vertical line is fixed, the state of the world is an enumeration of two cases: ; teachpack: universe.rkt ; WorldState is one of: ; Number %% representing the y coordinate ; 'resting (define WORLD0 'resting) 174
175 ; A WorldResult is one of: ; WorldState ; (make-package WorldState StopMessage) The definition says that initially a world is passive. The communication protocol and the refined data definition of WorldState imply a number of contract and purpose statements: ; WorldState GoMessage -> WorldResult ; make sure the ball is moving (define (receive w n)...) ; WorldState -> WorldResult ; move this ball upwards for each clock tick ; or stay 'resting (define (move w)...) ; WorldState -> Image ; render the world as an image (define (render w)...) Let s design one function at a time, starting with receive. Since the protocol doesn t spell out what receive is to compute, let s create a good set of functional examples, exploiting the structure of the data organization of WorldState: (check-expect (receive 'resting 'it-is-your-turn) HEIGHT) (check-expect (receive (- HEIGHT 1) 'it-is-your-turn)...) Since there are two kinds of states, we make up at least two kinds of examples: one for a 'resting state and another one for a numeric state. The dots in the result part of the second unit test reveal the first ambiguity; specifically it isn t clear what the result should be when an active world receives another message to activate itself. The second ambiguity shows up when we study additional examples, which are suggested by our approach to designing functions on numeric intervals (HtDP, section 3). That is we should consider the following three inputs to receive: HEIGHT when the ball is at the bottom of the image; (- HEIGHT 1) when the ball is properly inside the image; and 0 when the ball has hit the top of the image. In the third case the function could produce three distinct results: 0, 'resting, or (makepackage 'resting 'done). The first leaves things alone; the second turns the active world into a resting one; the third does so, too, and tells the universe about this switch. 175
176 We choose to design receive so that it ignores the message and returns the current state of an active world. This ensures that the ball moves in a continuous fashion and that the world remains active. Exercise: One alternative design is to move the ball back to the bottom of the image every time 'it-is-your-turn is received. Design this function, too. (define (receive w m) (cond [(symbol? w) HEIGHT] ; meaning: (symbol=? w 'resting) [else w])) Our second function to design is move, the function that computes the ball movement. We have the contract and the second step in the design recipe calls for examples: ; WorldState -> WorldState or (make-package 'resting 'done) ; move the ball if it is flying (check-expect (move 'resting) 'resting) (check-expect (move HEIGHT) (- HEIGHT 1)) (check-expect (move (- HEIGHT 1)) (- HEIGHT 2)) (check-expect (move 0) (make-package 'resting 'done)) (define (move x)...) Following HtDP again, the examples cover four typical situations: 'resting, two end points of the specified numeric interval, and one interior point. They tell us that move leaves a passive world alone and that it otherwise moves the ball until the y coordinate becomes 0. In the latter case, the result is a package that renders the world passive and tells the server about it. Turning these thoughts into a complete definition is straightforward now: (define (move x) (cond [(symbol? x) x] [(number? x) (if (<= x 0) (make-package 'resting 'done) (sub1 x))])) Exercise: what could happen if we had designed receive so that it produces 'resting when the state of the world is 0? Use your answer to explain why you think it is better to leave this kind of state change to the tick event handler instead of the message receipt handler? Finally, here is the third function, which renders the state as an image: 176
177 ; WorldState -> Image ; render the state of the world as an image (check-expect (render HEIGHT) (underlay/xy MT 50 HEIGHT BALL)) (check-expect (render 'resting) (underlay/xy MT (text "resting" 11 "red"))) (define (render w) (underlay/xy (cond [(symbol? w) (underlay/xy MT (text "resting" 11 "red"))] [(number? w) (underlay/xy MT 50 w BALL)]) 5 85 (text name 11 "black"))) Here is an improvement that adds a name to the image and abstracts over the name at the same time: ; String -> (WorldState -> Image) ; render the state of the world as an image (check-expect ((draw "Carl") 100) (underlay/xy (underlay/xy MT BALL) 5 85 (text "Carl" 11 "black"))) (define (draw name) (lambda (w) (overlay/xy (cond [(symbol? w) (underlay/xy MT (text "resting" 11 "red"))] [(number? w) (underlay/xy MT 50 w BALL)]) 5 85 (text name 11 'black)))) By doing so, we can use the same program to create many different worlds that register with a server on your computer: ; String -> WorldState ; create and hook up a world with the LOCALHOST server (define (create-world n) (big-bang WORLD0 (on-receive receive) (to-draw (draw n)) 177
178 (on-tick move) (name n) (register LOCALHOST))) Now you can use (create-world 'carl) and (create-world 'sam), respectively, to run two different worlds, after launching a server first. Exercise: Design a function that takes care of a world to which the universe has lost its connection. Is Result the proper contract for the result of this function? 2.5 itunes: "itunes.rkt" (require 2htdp/itunes) package: htdp-lib The itunes.rkt teachpack implements and provides the functionality for reading the collection of tracks exported from itunes. In itunes, select Library from the File menu and then choose Export Library. Doing so exports a description of your itunes collection as a file in XML format Data Definitions (struct track (name artist album time track# added play# played) #:extra-constructor-name make-track) name : string? artist : string? album : string? time : natural-number/c track# : natural-number/c added : date? play# : natural-number/c played : date? is one representations for the music tracks in an itunes collection. An instance records that the track has title name, is produced by artist, belongs to album, plays for time milliseconds, is positioned at track#, was added at date added, has been played play# times, and was last played at played date. (struct date (year month day hour minute second) #:extra-constructor-name make-date) year : natural-number/c month : natural-number/c 178
179 day : natural-number/c hour : natural-number/c minute : natural-number/c second : natural-number/c is a representations of dates in an itunes collection. An instance records six pieces of information: the date s year, month (between 1 and 12 inclusive), day (between 1 and 31), hour (between 0 and 23), minute (between 0 and 59), and second (between 0 and 59). In this context, we introduce the following data definitions: ; Track is a track? ; Date is date? ; LTracks is one of: ; '() ; (cons Track LTracks) ; LLists is one of: ; '() ; (cons LAssoc LLists) ; LAssoc is one of: ; '() ; (cons Association LAssoc) ; Association is (cons string? (cons BSDN '())) ; BSDN satisfies either string?, integer?, real?, Date, or boolean? Exported Funcions (read-itunes-as-lists file-name) Ñ LLists file-name : string? creates a list-of-lists representation for all tracks in file-name, an XML export from an itunes library. Effect reads an XML document from file-name Example: 179
180 (read-itunes-as-lists "Library.xml") (read-itunes-as-tracks file-name) Ñ LTracks file-name : string? creates a list-of-tracks representation for all tracks in file-name, an XML export from an itunes library. Effect reads an XML document from file-name Example: (read-itunes-as-tracks "Library.xml") (create-track name artist album time track# added play# played) Ñ (or/c track? false?) name : string? artist : string? album : string? time : natural-number/c track# : natural-number/c added : date? play# : natural-number/c played : date? creates a track representation if the inputs live up to their predicates. Otherwise it produces #false. Note This is a checked constructor. > (create-track "one" "two" "three" 4 5 (create-date ) 7 (create-date )) 180
181 (track "one" "two" "three" 4 5 (date ) 7 (date )) > (create-track "one" "two" "three" 4 5 "a date" 7 "another date") #f (create-date year month day hour minute second) Ñ (or/c date? false?) year : natural-number/c month : natural-number/c day : natural-number/c hour : natural-number/c minute : natural-number/c second : natural-number/c creates a date representation if the inputs live up to their predicates. Otherwise it produces #false. Note This is a checked constructor. > (create-date ) (date ) > (create-date "four" 5 6) #f In addition to the above, the teachpack exports the predicates for Track and Date plus all selectors: track? track-name track-artist track-album track-time track-track# track-added track-play# track-played date? date-year date-month date-day date-hour date-minute date-second 181
182 2.6 Abstraction: "abstraction.rkt" (require 2htdp/abstraction) package: htdp-lib The abstract.rkt teachpack provides some additional abstraction facilities: comprehensions and loops, matching, and algebraic data types. Most of these are restricted versions of full-featured constructs in other members of the Racket family so that students of HtDP/2e don t stumble across syntactic oddities. HtDP/2e introduces loops and matching in an intermezzo, with the sole purpose of acknowledging the existence of powerful linguistic mechanisms. Algebraic data types are provided for those who think teaching the features of functional programming is more important than teaching universally applicable ideas of program design. Added in version 1.1 of package htdp-lib Loops and Comprehensions (for/list (comprehension-clause comprehension-clause...) body-expr) comprehension-clause = (name clause-expr) evaluates body-expr for the parallel sequences of values determined by the comprehension-clause s. Each comprehension-clause binds its name in body-expr. The for/list expression evaluates all clause-expr to generate sequences of values. If a clause-expr evaluates to a list, its items make up the sequence values; natural number n, the sequence of values consists of the numbers 0, 1,..., (- n 1); string, its one-character strings are the sequence items. For sequences generated by in-range and in-naturals, see below. Finally, for/list evaluates body-expr with name... successively bound to the values of the sequences determined by clause-expr... > (for/list ((i 10)) i) '( ) 182
183 > (for/list ((i 2) (j '(a b))) (list i j)) '((0 a) (1 b)) > (for/list ((c "abc")) c) '("a" "b" "c") The evaluation stops when the shortest sequence is exhausted. > (for/list ((i 2) (j '(a b c d e))) (list i j)) '((0 a) (1 b)) (for*/list (comprehension-clause comprehension-clause...) body-expr) evaluates body-expr for the nested sequences of values determined by the comprehension-clause s. Each comprehension-clause binds its name in the expressions of the following comprehension-clauses as well as body-expr. > (for*/list ((i 2) (j '(a b))) (list i j)) '((0 a) (0 b) (1 a) (1 b)) > (for*/list ((i 5) (j i)) (list i j)) '((1 0) (2 0) (2 1) (3 0) (3 1) (3 2) (4 0) (4 1) (4 2) (4 3)) With nesting, the evaluation does not stop when the shortest sequence is exhausted because comprehension-clauses are evaluated in order: > (for*/list ((i 2) (j '(a b c d e))) (list i j)) '((0 a) (0 b) (0 c) (0 d) (0 e) (1 a) (1 b) (1 c) (1 d) (1 e)) (for/or (comprehension-clause comprehension-clause...) body-expr) iterates over the sequences generated by the comprehension-clause s like for/list. It produces the first non-#false value, if any, and #false otherwise. > (for/or ([c "abcd"]) (if (string=? "x" c) c #false)) #f 183
184 > (for/or ([c (list #false 1 #false 2)]) c) 1 (for*/or (comprehension-clause comprehension-clause...) body-expr) iterates over the sequences generated by the comprehension-clauses like for*/list. It produces the first non-#false value, if any, and #false otherwise. > (for*/or ([i 2][j i]) (if (> j i) (list i j) #false)) #f (for/and (comprehension-clause comprehension-clause...) body-expr) iterates over the sequences generated by the comprehension-clause s like for/list. If any evaluation of body-expr produces #false, the loop stops and returns #false, too; otherwise, the loop produces the result of the last evaluation of body-expr. > (for/and ([c '(1 2 3)]) (if (> c 4) c #false)) #f > (for/and ([c '(1 2 3)]) (if (< c 4) c #false)) 3 (for*/and (comprehension-clause comprehension-clause...) body-expr) iterates over the sequences generated by the comprehension-clauses like for*/list. If any evaluation of body-expr produces #false, the loop stops and returns #false, too; otherwise, the loop produces the result of the last evaluation of body-expr. > (for*/and ([i 2][j i]) (if (< j i) (list i j) #false)) '(1 0) (for/sum (comprehension-clause comprehension-clause...) body-expr) iterates over the sequences generated by the comprehension-clause s like for/list. It adds up the numbers that body-expr evaluates to. > (for/sum ([i 2][j 8]) (max i j)) 1 184
185 (for*/sum (comprehension-clause comprehension-clause...) body-expr) iterates over the sequences generated by the comprehension-clauses like for*/list. It adds up the numbers that body-expr evaluates to. > (for*/sum ([i 2][j i]) (min i j)) 0 (for/product (comprehension-clause comprehension-clause...) bodyexpr) iterates over the sequences generated by the comprehension-clause s like for/list. It multiplies the numbers that body-expr evaluates to. > (for/product ([i 2][j 3]) (+ i j 1)) 3 (for*/product (comprehension-clause comprehension-clause...) bodyexpr) iterates over the sequences generated by the comprehension-clauses like for*/list. It multiplies the numbers that body-expr evaluates to. > (for*/product ([i 2][j i]) (+ i j 1)) 2 (for/string (comprehension-clause comprehension-clause...) bodyexpr) iterates over the sequences generated by the comprehension-clause s like for/list. It collects the one-character strings that body-expr evaluates to with implode. > (for/string ([i "abc"]) (int->string (+ (string->int i) 1))) "bcd" (for*/string (comprehension-clause comprehension-clause...) bodyexpr) iterates over the sequences generated by the comprehension-clause s like for/list. It collects the one-character strings that body-expr evaluates to with implode. 185
186 > (for*/string ([i "ab"][j (- (string->int i) 90)]) (int->string (+ (string->int i) j))) "abcdefgbcdefghi" (in-range start end step) Ñ sequence? start : natural-number/c end : natural-number/c step : natural-number/c (in-range end) Ñ sequence? end : natural-number/c generates a finite sequence of natural numbers. If start, end, and step are provided, the sequence consists of start, (+ start step), (+ start step step),... until the sum is greater than or equal to end. > (for/list ([i (in-range )]) i) '(1 4 7) If only end is provided, start defaults to 0 and step to 1: > (for/list ([i (in-range 3)]) i) '(0 1 2) > (for/list ([i (in-range 0 3 1)]) i) '(0 1 2) (in-naturals start) Ñ sequence? start : natural-number/c generates an infinite sequence of natural numbers, starting with start. > (define (enumerate a-list) (for/list ([x a-list][i (in-naturals 1)]) (list i x))) > (enumerate '(Maxwell Einstein Planck Heisenberg Feynman)) '((1 Maxwell) (2 Einstein) (3 Planck) (4 Heisenberg) (5 Feynman)) > (enumerate '("Pinot noir" "Pinot gris" "Pinot blanc")) '((1 "Pinot noir") (2 "Pinot gris") (3 "Pinot blanc")) Pattern Matching 186
187 (match case-expr (pattern body-expr)...) pattern = name literal-constant (cons pattern pattern) (name pattern...) (? name) dispatches like a cond, matching the result of case-expr sequentially against all pattern s. The first successful match triggers the evaluation of the matching body-expr, whose value is the result of the entire match expression. The literal constants commonly used are numbers, strings, symbols, and '(). Each pattern that contains names binds these names in the corresponding body-expr. Matching a value with a pattern proceeds according to the following rules. If the pattern is a name, it matches any value; literal-constant, it matches only the literal constant; (cons pattern_1 pattern_2), it matches when the value is an instance of cons, and its first/rest fields match pattern_1 and pattern_2, respectively; (name pattern...), it matches when the value is an instance of the name structure type, and its field values match pattern...; (? name), it matches when name refers to a predicate function and the latter produces #true on the given value. Furthermore, if the given pattern is name and the value is V, name stands for V during the evaluation of the corresponding body-expr. The following match expression distinguishes cons es with '() in the second position from all others: > (define (last-item l) (match l [(cons lst '()) lst] [(cons fst rst) (last-item rst)])) > (last-item '(a b c)) 'c With?, a match can use a predicate to distinguish arbitrary values: 187
188 > (define (is-it-odd-or-even l) (match l [(? even?) 'even] [(? odd?) 'odd])) > (is-it-odd-or-even '1) 'odd > (is-it-odd-or-even '2) 'even A match expression can also deal with structure instances: > (define-struct doll (layer)) > (define (inside a-doll) (match a-doll [(? symbol?) a-doll] [(doll below) (inside below)])) > (inside (make-doll (make-doll 'wood))) 'wood Note, however, that the pattern uses just doll, the name of the structure type, not makedoll, the constructor name Algebraic Data Types (define-type type (variant (field predicate)...)...) type = name variant = name field = name predicate = name defines structure types variant... with fields field..., respectively. In addition, it defines constructors that enforce that the field values satisfy the specified predicate. Finally, it introduce the name type as the name for the union of all variant structure types and type? as a predicate that determines whether a value belongs to this class of values. Consider the following type definition: (define-type BTree (leaf (info number?)) (node (left BTree?) (right BTree?))) 188
189 It defines two structure types: (define-struct leaf (info)) (define-struct node (left right)) The make-leaf constructor signals an error when applied to any other values but numbers, while make-node accepts only instances of BTree. Finally, BTree? is a predicate that recognizes such instances: > (make-leaf 42) (leaf 42) > (make-node (make-leaf 42) (make-leaf 21)) (node (leaf 42) (leaf 21)) > (BTree? (make-node (make-leaf 42) (make-leaf 21))) #t And here is how a constructor fails when applied to the wrong kind of values: > (make-leaf 'four) make-leaf: contract violation expected: (or/c undefined? number?) given: 'four in: the 1st argument of (-ą (or/c undefined? number?) leaf?) contract from: make-leaf blaming: use (assuming the contract is correct) at: program:2.0 (type-case type case-expr (variant (field...) body-expr)...) dispatches like a cond, matching the result of case-expr sequentially against all variant s. The first successful match triggers the evaluation of the matching body-expr, whose value is the result of the entire type-case expression. A type-case expression also ensures that (1) the collection variant cases covers all variant structure type definitions in type and (2) that each variant clauses specifies as many fields as the definition of type specifies. Assume that the following definition is placed in the scope of the above type definition for BTree: (define (depth t) (type-case BTree t [leaf (info) 0] [node (left right) (+ (max (depth left) (depth right)) 1)])) 189
190 This function definition uses a type-case for BTree and the latter consists of two clauses: one for leafs and one for nodes. The function computes the depth of the given tree. > (depth (make-leaf 42)) 0 > (depth (make-node (make-leaf 42) (make-leaf 21))) Planet Cute Images (require 2htdp/planetcute) package: htdp-lib The 2htdp/planetcute library contains the Planet Cute art by Daniel Cook (Lostgarden.com). The images are designed to be overlaid with each other to build scenes for use in games. Here is an example image taken from the Planet Cute website. ; stack : non-empty-list-of-images -> image ; stacks 'imgs' on each other, separated by 40 pixels (define (stack imgs) (cond [(empty? (rest imgs)) (first imgs)] [else (overlay/xy (first imgs) 0 40 (stack (rest imgs)))])) > (beside/align "bottom" (stack (list wall-block-tall stone-block)) (stack (list character-cat-girl stone-block stone-block stone-block stone-block)) water-block (stack (list grass-block dirt-block)) (stack (list grass-block dirt-block dirt-block))) 190
191 The Planet Cute images also include some shadows that can improve the look of your game; see the Shadows section for an overview of how to use them Characters character-boy : image? 191
192 character-cat-girl : image? character-horn-girl : image? character-pink-girl : image? 192
193 character-princess-girl : image? enemy-bug : image? speech-bubble : image? 193
194 2.7.2 Blocks brown-block : image? dirt-block : image? grass-block : image? 194

195 plain-block : image? stone-block-tall : image? stone-block : image? 195
196 wall-block-tall : image? wall-block : image? water-block : image? 196

197 wood-block : image? Items chest-closed : image? chest-lid : image? 197


198 chest-open : image? gem-blue : image? gem-green : image? 198


199 gem-orange : image? heart : image? key : image? 199


200 rock : image? selector : image? tree-short : image? 200


201 tree-tall : image? tree-ugly : image? yellow-star : image? 201


202 2.7.4 Ramps ramp-east : image? ramp-north : image? 202


203 ramp-south : image? ramp-west : image? Buildings door-tall-closed : image? 203


204 door-tall-open : image? roof-east : image? roof-north-east : image? 204


205 roof-north-west : image? roof-north : image? roof-south-east : image? 205

206 roof-south-west : image? roof-south : image? roof-west : image? 206


207 window-tall : image? Shadows The shadow images are intended to be overlaid on the other blocks when they appear in certain configurations, as detailed here. 207
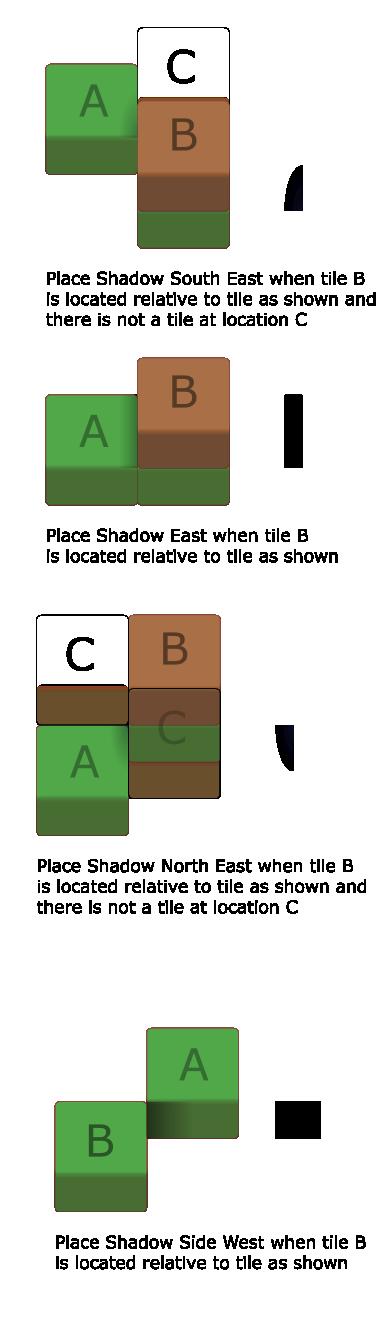
208 208
209 209
210 210
211 shadow-east : image? shadow-north-east : image? shadow-north-west : image? 211

212 shadow-north : image? shadow-side-west : image? shadow-south-east : image? 212

213 shadow-south-west : image? shadow-south : image? shadow-west : image? 213
Graphics: Legacy Library
 Graphics: Legacy Library Version 5.1 February 14, 2011 (require graphics/graphics) The viewport graphics library is a relatively simple toolbox of graphics commands. The library is not very powerful; it
Do a domain analysis by hand-drawing three or more pictures of what the world program will look like at different stages when it is running.
 How to Design Worlds The How to Design Worlds process provides guidance for designing interactive world programs using big-bang. While some elements of the process are tailored to big-bang, the process
Animations involving numbers
 136 Chapter 8 Animations involving numbers 8.1 Model and view The examples of Chapter 6 all compute the next picture in the animation from the previous picture. This turns out to be a rather restrictive
Implementing HtDP Teachpacks, Libraries, and Customized Teaching Languages
 Implementing HtDP Teachpacks, Libraries, and Customized Teaching Languages Version 7.0 July 27, 2018 DrRacket has two different mechanisms for making available additional functions and functionality to
PLT Miscellaneous Libraries: Reference Manual
 PLT Miscellaneous Libraries: Reference Manual PLT (scheme@plt-scheme.org) Version 200 June 2002 Copyright notice Copyright c 1996-2002 PLT Permission to make digital/hard copies and/or distribute this
GOALS [HTDP/2e Chapters 1 through 3.5]
![GOALS [HTDP/2e Chapters 1 through 3.5]](/thumbs/90/101822391.jpg "GOALS [HTDP/2e Chapters 1 through 3.5]") Lab 1 GOALS [HTDP/2e Chapters 1 through 3.5] This week's lab will help you to practice: Using Dr.Racket: Interactions vs. Definitions; Stepper; Error messages; Indentation Simple image functions; using
Lab 1 GOALS [HTDP/2e Chapters 1 through 3.5] This week's lab will help you to practice: Using Dr.Racket: Interactions vs. Definitions; Stepper; Error messages; Indentation Simple image functions; using
Spring CS Homework 3 p. 1. CS Homework 3
 Spring 2018 - CS 111 - Homework 3 p. 1 Deadline 11:59 pm on Friday, February 9, 2018 Purpose CS 111 - Homework 3 To try out another testing function, check-within, to get more practice using the design
Working with images and scenes
 Working with images and scenes CS 5010 Program Design Paradigms Bootcamp Mitchell Wand, 2012-2014 This work is licensed under a Creative Commons Attribution-NonCommercial 4.0 International License. 1 Lesson
The purpose of this lesson is to familiarize you with the basics of Racket (a dialect of Scheme). You will learn about
. You will learn about") Lesson 0.4 Introduction to Racket Preliminaries The purpose of this lesson is to familiarize you with the basics of Racket (a dialect of Scheme). You will learn about Expressions Numbers, Booleans, and
Lesson 0.4 Introduction to Racket Preliminaries The purpose of this lesson is to familiarize you with the basics of Racket (a dialect of Scheme). You will learn about Expressions Numbers, Booleans, and
Animations that make decisions
 Chapter 17 Animations that make decisions 17.1 String decisions Worked Exercise 17.1.1 Develop an animation of a simple traffic light. It should initially show a green disk; after 5 seconds, it should
MrLib: Extra GUI Libraries
 MrLib: Extra GUI Libraries Version 6.6 July 22, 2016 1 Contents 1 Aligned Pasteboard 4 1.1 aligned-pasteboard.......................... 4 1.2 horizontal-pasteboard%.......................... 4 1.3 vertical-pasteboard%...........................
+ Inheritance. Sometimes we need to create new more specialized types that are similar to types we have already created.
 + Inheritance + Inheritance Classes that we design in Java can be used to model some concept in our program. For example: Pokemon a = new Pokemon(); Pokemon b = new Pokemon() Sometimes we need to create
Contents. Introducing Clicker Paint 5. Getting Started 7. Using The Tools 10. Using Sticky Points 15. Free resources at LearningGrids.
 ClickerPaintManualUS.indd 2-3 13/02/2007 13:20:28 Clicker Paint User Guide Contents Introducing Clicker Paint 5 Free resources at LearningGrids.com, 6 Installing Clicker Paint, 6 Getting Started 7 How
THE UNIVERSITY OF BRITISH COLUMBIA CPSC 110: MIDTERM 1 Part B May 26, Important notes about this examination
 THE UNIVERSITY OF BRITISH COLUMBIA CPSC 110: MIDTERM 1 Part B May 26, 2014 Last Name: First Name: Signature: UBC Student #: Important notes about this examination 1. This exam has two separate parts. Your
Part 1: Basics. Page Sorter:
 Part 1: Basics Page Sorter: The Page Sorter displays all the pages in an open file as thumbnails and automatically updates as you add content. The page sorter can do the following. Display Pages Create
Adobe Illustrator. Always NAME your project file. It should be specific to you and the project you are working on.
 Adobe Illustrator This packet will serve as a basic introduction to Adobe Illustrator and some of the tools it has to offer. It is recommended that anyone looking to become more familiar with the program
Model-View-Controller Architecture
 Model-View-Controller Architecture CS 5010 Program Design Paradigms Bootcamp Lesson 11.3 Mitchell Wand, 2012-2015 This work is licensed under a Creative Commons Attribution-NonCommercial 4.0 International
How to...create a Video VBOX Gauge in Inkscape. So you want to create your own gauge? How about a transparent background for those text elements?
 BASIC GAUGE CREATION The Video VBox setup software is capable of using many different image formats for gauge backgrounds, static images, or logos, including Bitmaps, JPEGs, or PNG s. When the software
How to draw and create shapes
 Adobe Flash Professional Guide How to draw and create shapes You can add artwork to your Adobe Flash Professional documents in two ways: You can import images or draw original artwork in Flash by using
CS 2110 Fall Instructions. 1 Installing the code. Homework 4 Paint Program. 0.1 Grading, Partners, Academic Integrity, Help
 CS 2110 Fall 2012 Homework 4 Paint Program Due: Wednesday, 12 November, 11:59PM In this assignment, you will write parts of a simple paint program. Some of the functionality you will implement is: 1. Freehand
Figure 1: NC > 2 Axis menu > Options
 Click To See: How to Use Online Documents SURFCAM Online Documents J 685)&$0Ã5HIHUHQFHÃ0DQXDO 7 &21),*85$7,21722/6 7.1 INTRODUCTION SURFCAM s default configuration parameters are contained in the SURFCAM.INI
Premiere Pro Desktop Layout (NeaseTV 2015 Layout)
") Premiere Pro 2015 1. Contextually Sensitive Windows - Must be on the correct window in order to do some tasks 2. Contextually Sensitive Menus 3. 1 zillion ways to do something. No 2 people will do everything
Premiere Pro 2015 1. Contextually Sensitive Windows - Must be on the correct window in order to do some tasks 2. Contextually Sensitive Menus 3. 1 zillion ways to do something. No 2 people will do everything
Programming Project 1
 Programming Project 1 Handout 6 CSCI 134: Fall, 2016 Guidelines A programming project is a laboratory that you complete on your own, without the help of others. It is a form of take-home exam. You may
c.def (pronounced SEE-def) Language Reference Manual
 Language Reference Manual") c.def (pronounced SEE-def) Macromedia Flash TM animation language Language Reference Manual Dennis Rakhamimov (dr524@columbia.edu), Group Leader Eric Poirier (edp29@columbia.edu) Charles Catanach (cnc26@columbia.edu)
c.def (pronounced SEE-def) Macromedia Flash TM animation language Language Reference Manual Dennis Rakhamimov (dr524@columbia.edu), Group Leader Eric Poirier (edp29@columbia.edu) Charles Catanach (cnc26@columbia.edu)
The Racket Drawing Toolkit
 The Racket Drawing Toolkit Version 6.12.0.3 Matthew Flatt, Robert Bruce Findler, and John Clements February 14, 2018 (require racket/draw) package: draw-lib The racket/draw library provides all of the
GIMP WEB 2.0 ICONS. Web 2.0 Icons: Circle Completed Project. Notice that the default new layer background fill is transparency. Click the Ok button.
 GIMP WEB 2.0 ICONS WEB 2.0 ICONS: CIRCLE ICON OPEN GIMP or Web 2.0 Icons: Circle Completed Project Step 1: To begin a new GIMP project, from the Menu Bar, select File New. At the Create a New Image dialog
Part 7 More fill styles and an effect
 Part 7 More fill styles and an effect Introduction To break the uniformity of the grass fill style, this part will continue creating fill styles and adding sheets show how to copy fill styles show how
Introduction to version Instruction date
 Introduction to version 1.1.0 Instruction date 16.5.2008 Windows and Files Start by creating the window Open FCS data file By right-clicking the axis the list of available parameters appear. Right-click
[ the academy_of_code] Senior Beginners
![[ the academy_of_code] Senior Beginners](/thumbs/73/69558996.jpg "[ the academy_of_code] Senior Beginners") [ the academy_of_code] Senior Beginners 1 Drawing Circles First step open Processing Open Processing by clicking on the Processing icon (that s the white P on the blue background your teacher will tell
[ the academy_of_code] Senior Beginners 1 Drawing Circles First step open Processing Open Processing by clicking on the Processing icon (that s the white P on the blue background your teacher will tell
ROTOSCOPING AND MATTE PAINTING In Blender v2.48a
 In the world of Visual Effects, Rotoscoping, Matte Painting and Garbage Painting are necessary and complementary functions. They are used each time a cut-out in the image is necessary, to remove a background
L E S S O N 2 Background
 Flight, Naperville Central High School, Naperville, Ill. No hard hat needed in the InDesign work area Once you learn the concepts of good page design, and you learn how to use InDesign, you are limited
PLoT: Graph Plotting
 PLoT: Graph Plotting Version 5.2 Neil Toronto November 8, 2011 (require plot) PLoT provides a flexible interface for producing nearly any kind of plot. It includes many common
Unit 21 - Creating a Navigation Bar in Macromedia Fireworks
 Unit 21 - Creating a Navigation Bar in Macromedia Fireworks Items needed to complete the Navigation Bar: Unit 21 - House Style Unit 21 - Graphics Sketch Diagrams Document ------------------------------------------------------------------------------------------------
Spiky Sphere. Finding the Sphere tool. Your first sphere
 Spiky Sphere Finding the Sphere tool The Sphere tool is part of ShapeWizards suite called MagicBox (the other tools in the suite are Pursuit, Shell, Spiral). You can install all these tools at once by
Adobe Premiere Pro CC 2015 Tutorial
 Adobe Premiere Pro CC 2015 Tutorial Film/Lit--Yee GETTING STARTED Adobe Premiere Pro CC is a video layout software that can be used to create videos as well as manipulate video and audio files. Whether
CISC 1600, Lab 2.1: Processing
 CISC 1600, Lab 2.1: Processing Prof Michael Mandel 1 Getting set up For this lab, we will be using Sketchpad, a site for building processing sketches online using processing.js. 1.1. Go to http://cisc1600.sketchpad.cc
Education and Training CUFMEM14A. Exercise 2. Create, Manipulate and Incorporate 2D Graphics
 Education and Training CUFMEM14A Exercise 2 Create, Manipulate and Incorporate 2D Graphics Menu Exercise 2 Exercise 2a: Scarecrow Exercise - Painting and Drawing Tools... 3 Exercise 2b: Scarecrow Exercise
OnPoint s Guide to MimioStudio 9
 1 OnPoint s Guide to MimioStudio 9 Getting started with MimioStudio 9 Mimio Studio 9 Notebook Overview.... 2 MimioStudio 9 Notebook...... 3 MimioStudio 9 ActivityWizard.. 4 MimioStudio 9 Tools Overview......
Intermediate/Advanced. Faculty Development Workshop FSE Faculty retreat April 18, 2012
 Intermediate/Advanced Faculty Development Workshop FSE Faculty retreat April 18, 2012 Remote Desktop Sharing Quick Reference Guide for Moderators The Moderator or a Participant may request control of another
Introduction to SolidWorks for Technology. No1: Childs Toy
 Introduction to SolidWorks for Technology No1: Childs Toy Table of Contents Table of Contents... 1 Introduction... 2 Part Modelling: Cab... 3 Part Modelling: Base... 6 Part Modelling: Wheel... 12 Assembly:
Was this document helpful? smarttech.com/docfeedback/ SMART Ink 5.2 USER S GUIDE
 Was this document helpful? smarttech.com/docfeedback/171190 SMART Ink 5.2 USER S GUIDE Trademark notice SMART Ink, SMART Notebook, SMART Meeting Pro, Pen ID, smarttech, the SMART logo and all SMART taglines
Interactive Powerpoint. Jessica Stenzel Hunter Singleton
 Interactive Powerpoint Jessica Stenzel Hunter Singleton Table of Contents iii Table of Contents Table of Contents... iii Introduction... 1 Basics of Powerpoint... 3 How to Insert Shapes... 3 How to Insert
Customizing FlipCharts Promethean Module 2 (ActivInspire)
") Customizing FlipCharts Promethean Module 2 (ActivInspire) Section 1: Browsers The browsers (located on the left side of the flipchart) are menus for various functions. To view the browsers, click Main
Customizing FlipCharts Promethean Module 2 (ActivInspire) Section 1: Browsers The browsers (located on the left side of the flipchart) are menus for various functions. To view the browsers, click Main
SNOWFLAKES PHOTO BORDER - PHOTOSHOP CS6 / CC
 Photo Effects: Snowflakes Photo Border (Photoshop CS6 / CC) SNOWFLAKES PHOTO BORDER - PHOTOSHOP CS6 / CC In this Photoshop tutorial, we ll learn how to create a simple and fun snowflakes photo border,
The Fundamentals. Document Basics
 3 The Fundamentals Opening a Program... 3 Similarities in All Programs... 3 It's On Now What?...4 Making things easier to see.. 4 Adjusting Text Size.....4 My Computer. 4 Control Panel... 5 Accessibility
ADOBE ILLUSTRATOR CS3
 ADOBE ILLUSTRATOR CS3 Chapter 2 Creating Text and Gradients Chapter 2 1 Creating type Create and Format Text Create text anywhere Select the Type Tool Click the artboard and start typing or click and drag
CENTAUR S REAL-TIME GRAPHIC INTERFACE V4.0 OPERATOR S MANUAL
 CENTAUR S REAL-TIME GRAPHIC INTERFACE V4.0 OPERATOR S MANUAL TABLE OF CONTENTS Installation... 6 Introduction to Centaur s real-time Graphic Interface... 6 Computer Requirements... 7 Operating System
Art, Nature, and Patterns Introduction
 Art, Nature, and Patterns Introduction to LOGO Describing patterns with symbols This tutorial is designed to introduce you to some basic LOGO commands as well as two fundamental and powerful principles
A new clients guide to: Activating a new Studio 3.0 Account Creating a Photo Album Starting a Project Submitting a Project Publishing Tips
 Getting Started With Heritage Makers A Guide to the Heritage Studio 3.0 Drag and Drop Publishing System presented by Heritage Makers A new clients guide to: Activating a new Studio 3.0 Account Creating
Creating and Editing Images in Paint Shop Pro Version XI. File Types
 Creating and Editing Images in Paint Shop Pro Version XI Paint Shop Pro (PSP) from JASC software (http://www.jasc.com) is an imageediting and creation program. You can download a 30-day trial version from
Adobe InDesign CS6 Tutorial
 Adobe InDesign CS6 Tutorial Adobe InDesign CS6 is a page-layout software that takes print publishing and page design beyond current boundaries. InDesign is a desktop publishing program that incorporates
Step 1: Create A New Photoshop Document
 Snowflakes Photo Border In this Photoshop tutorial, we ll learn how to create a simple snowflakes photo border, which can be a fun finishing touch for photos of family and friends during the holidays,
How to create shapes. Drawing basic shapes. Adobe Photoshop Elements 8 guide
 How to create shapes With the shape tools in Adobe Photoshop Elements, you can draw perfect geometric shapes, regardless of your artistic ability or illustration experience. The first step to drawing shapes
Designer Reference 1
 Designer Reference 1 Table of Contents USE OF THE DESIGNER...4 KEYBOARD SHORTCUTS...5 Shortcuts...5 Keyboard Hints...5 MENUS...7 File Menu...7 Edit Menu...8 Favorites Menu...9 Document Menu...10 Item Menu...12
Computer and Programming: Lab 1
 01204111 Computer and Programming: Lab 1 Name ID Section Goals To get familiar with Wing IDE and learn common mistakes with programming in Python To practice using Python interactively through Python Shell
The Macromedia Flash Workspace
 Activity 5.1 Worksheet The Macromedia Flash Workspace Student Name: Date: Identify the Stage, workspace, Timeline, layers, panels, Tools panel, and Property inspector. The Macromedia Flash Workspace 5-35
How to Make a Sign. Eagle Plasma LLC. Accessing the included step by step.dxf files
 Eagle Plasma LLC How to Make a Sign Accessing the included step by step.dxf files The following tutorial is designed to teach beginners, screen by screen, to create a simple sign project. In this lesson
Transforming Objects and Components
 4 Transforming Objects and Components Arrow selection Lasso selection Paint selection Move Rotate Scale Universal Manipulator Soft Modification Show Manipulator Last tool used Figure 4.1 Maya s manipulation
HBS Training - IT Solutions. PlanWeb. Intermediate
 HBS Training - IT Solutions PlanWeb Intermediate CONTENTS Logging on to the system...3 The PlanWeb Window...5 The Tool Bar...6 The Status Bar...6 The Map Window...6 The Information Window...7 Changing
Homework: Simple functions and conditionals
 Homework: Simple functions and conditionals COMP 50 Fall 2013 This homework is due at 11:59PM on Monday, September 16. If all goes well, you will download an extension to DrRacket that enables you to submit
Honors Computer Science Python Mr. Clausen Program 7A, 7B
 Honors Computer Science Python Mr. Clausen Program 7A, 7B PROGRAM 7A Turtle Graphics Animation (100 points) Here is the overview of the program. Use functions to draw a minimum of two background scenes.
Version 5.0. Alexander Friedman and Jamie Raymond. June 6, 2010
 PLoT: Graph Plotting Version 5.0 Alexander Friedman and Jamie Raymond June 6, 2010 PLoT (a.k.a. PLTplot) provides a basic interface for producing common types of plots such as line and vector field plots
Paint Tutorial (Project #14a)
") Paint Tutorial (Project #14a) In order to learn all there is to know about this drawing program, go through the Microsoft Tutorial (below). (Do not save this to your folder.) Practice using the different
Paint Tutorial (Project #14a) In order to learn all there is to know about this drawing program, go through the Microsoft Tutorial (below). (Do not save this to your folder.) Practice using the different
Images. Version February 2, 2012
 Images Version 5.2.1 Neil Toronto February 2, 2012 This library contains convenient functions for constructing icons and logos, and will eventually offer the same for other bitmap%s.
Module 5: Lists. Readings: HtDP, Sections 9, 10.
 Module 5: Lists Readings: HtDP, Sections 9, 10. Lists are the main tool used in Racket to work with unbounded data. As with conditional expressions and structures, the data definition for lists leads naturally
HBS Training - IT Solutions. PlanWeb. Introduction
 HBS Training - IT Solutions PlanWeb Introduction CONTENTS Logging on to the system...3 The PlanWeb Window...5 The Tool Bar...6 The Status Bar...6 The Map Window...6 The Information Window...7 Changing
SCRATCH MODULE 3: NUMBER CONVERSIONS
 SCRATCH MODULE 3: NUMBER CONVERSIONS INTRODUCTION The purpose of this module is to experiment with user interactions, error checking input, and number conversion algorithms in Scratch. We will be exploring
10 Connector Designer
 PRELIMINARY Connector Designer 10-1 10 Connector Designer About this Section In this section you will learn how to create your own custom connectors and edit them using the optional software connector
Learning to use the drawing tools
 Create a blank slide This module was developed for Office 2000 and 2001, but although there are cosmetic changes in the appearance of some of the tools, the basic functionality is the same in Powerpoint
In this exercise you will be creating the graphics for the index page of a Website for children about reptiles.
 LESSON 2: CREATING AND MANIPULATING IMAGES OBJECTIVES By the end of this lesson, you will be able to: create and import graphics use the text tool attach text to a path create shapes create curved and
Introduction to SolidWorks Basics Materials Tech. Wood
 Introduction to SolidWorks Basics Materials Tech. Wood Table of Contents Table of Contents... 1 Book End... 2 Introduction... 2 Learning Intentions... 2 Modelling the Base... 3 Modelling the Front... 10
SlickEdit Gadgets. SlickEdit Gadgets
 SlickEdit Gadgets As a programmer, one of the best feelings in the world is writing something that makes you want to call your programming buddies over and say, This is cool! Check this out. Sometimes
Lab 7: OCaml 12:00 PM, Oct 22, 2017
 CS17 Integrated Introduction to Computer Science Hughes Lab 7: OCaml 12:00 PM, Oct 22, 2017 Contents 1 Getting Started in OCaml 1 2 Pervasives Library 2 3 OCaml Basics 3 3.1 OCaml Types........................................
Document Manager 6.0 Users Manual by Scanlon Associates
 Document Manager 6.0 Users Manual by Scanlon Associates Version 6.0.70725 I Document Manager 6.0.70725 Table of Contents Part I Getting Started 2 1 Steps to a Successful... Implementation 2 2 Edit Document...
Spring 2011 Workshop ESSENTIALS OF 3D MODELING IN RHINOCEROS February 10 th 2011 S.R. Crown Hall Lower Core Computer Lab
 [1] Open Rhinoceros. PART 1 INTRODUCTION [4] Click and hold on the Boundary Lines in where they form a crossing and Drag from TOP RIGHT to BOTTOM LEFT to enable only the PERSPECTIVE VIEW. [2] When the
Keynote 08 Basics Website:
 Website: http://etc.usf.edu/te/ Keynote is Apple's presentation application. Keynote is installed as part of the iwork suite, which also includes the word processing program Pages and the spreadsheet program
4 working with SHAPE layers lesson overview
 4 Working with Shape Layers Lesson overview In this lesson, you ll learn to do the following: Create custom shapes. Customize a shape s fill and stroke. Use path operations to transform shapes. Animate
Recipes4Success. Draw and Animate a Rocket Ship. Frames 5 - Drawing Tools
 Recipes4Success You can use the drawing tools and path animation tools in Frames to create illustrated cartoons. In this Recipe, you will draw and animate a rocket ship. 2012. All Rights Reserved. This
Graphics. Setting Snap to Grid
 2 This chapter describes how to add static and dynamic graphics to a control panel and how to create and use custom graphics. Any visible item on a LookoutDirect control panel is a graphic. All graphics
Work with Shapes. Concepts CHAPTER. Concepts, page 3-1 Procedures, page 3-5
 3 CHAPTER Revised: November 15, 2011 Concepts, page 3-1, page 3-5 Concepts The Shapes Tool is Versatile, page 3-2 Guidelines for Shapes, page 3-2 Visual Density Transparent, Translucent, or Opaque?, page
Racket: Modules, Contracts, Languages
 Racket: Modules, Contracts, Languages Advanced Functional Programming Jean-Noël Monette November 2013 1 Today Modules are the way to structure larger programs in smaller pieces. Modules can import and
GIMP WEB 2.0 BADGES. GIMP is all about IT (Images and Text) OPEN GIMP
 OPEN GIMP") GIMP WEB 2.0 BADGES and Badges: Circle with Flap Completed Project WEB 2.0 BADGES: CIRCLE WITH FLAP GIMP is all about IT (Images and Text) OPEN GIMP Step 1: To begin a new GIMP project, from the Menu Bar,
GIMP WEB 2.0 BADGES and Badges: Circle with Flap Completed Project WEB 2.0 BADGES: CIRCLE WITH FLAP GIMP is all about IT (Images and Text) OPEN GIMP Step 1: To begin a new GIMP project, from the Menu Bar,
GeoWeb Portal. User Manual
 GeoWeb Portal User Manual Purpose The GeoWeb Portal (GWP) is a map viewing and publishing site. It is designed to allow people to build their own maps and review the data that is attached to the elements
Creative Effects with Illustrator
 ADOBE ILLUSTRATOR Creative Effects with Illustrator PREVIEW OVERVIEW The object is to create a poster with a unified color scheme by compositing artwork drawn in Illustrator with various effects and photographs.
Google SketchUp Design Exercise 1
 Google SketchUp Design Exercise 1 The first thing students like to do in SketchUp is make a basic house and try out different colors and materials. They also love making windows and doors, and trying out
Adobe. Photoshop CC. Alberto Seveso. CLASSROOM IN A BOOK The official training workbook from Adobe. Andrew Faulkner & Conrad Chavez
 Adobe Photoshop CC 2015 ERRATA release 2015.5 RELEASE Alberto Seveso CLASSROOM IN A BOOK The official training workbook from Adobe Andrew Faulkner & Conrad Chavez ERRATA AND FEATURE UPDATES Errata and
animation, and what interface elements the Flash editor contains to help you create and control your animation.
 e r ch02.fm Page 43 Wednesday, November 15, 2000 8:52 AM c h a p t 2 Animating the Page IN THIS CHAPTER Timelines and Frames Movement Tweening Shape Tweening Fading Recap Advanced Projects You have totally
WideQuick Remote WideQuick Designer
 FLIR ThermoVision CM training This manual is starting off with a quick instruction on how to start the system and after that there are instructions on how to make your own software and modify the FLIR
User Guide Belltech Systems, LLC
 User Guide Belltech Systems, LLC http://www.belltechsystems.com May, 2006 1. Introducing Belltech CaptureXT 2. Installation and Uninstallation Installation Running the Application Uninstallation 3. User
Lesson 1 Parametric Modeling Fundamentals
 1-1 Lesson 1 Parametric Modeling Fundamentals Create Simple Parametric Models. Understand the Basic Parametric Modeling Process. Create and Profile Rough Sketches. Understand the "Shape before size" approach.
Getting Started Guide
 SnagIt Getting Started Guide Welcome to SnagIt Thank you for your purchase of SnagIt. SnagIt is the premier application to use for all of your screen capturing needs. Whatever you can see on your screen,
REMEMBER TO BRING YOUR MEMORY STICK TO EVERY LAB!
 CS 1033 Multimedia and Communications Lab 07: Introduction to Animation using Photoshop REMEMBER TO BRING YOUR MEMORY STICK TO EVERY LAB! LAB #7 - Exercise 1 Objectives: Upon completion of Exercise 1 you
Input, output, and sequence
 Chapter 29 Input, output, and sequence For this chapter, switch languages in DrRacket to Advanced Student Language. In the real world, we don t usually give a computer all the information it needs, all
Module 4A: Creating the 3D Model of Right and Oblique Pyramids
 Inventor (5) Module 4A: 4A- 1 Module 4A: Creating the 3D Model of Right and Oblique Pyramids In Module 4A, we will learn how to create 3D solid models of right-axis and oblique-axis pyramid (regular or
Pen Tool, Fill Layers, Color Range, Levels Adjustments, Magic Wand tool, and shadowing techniques
 Creating a superhero using the pen tool Topics covered: Pen Tool, Fill Layers, Color Range, Levels Adjustments, Magic Wand tool, and shadowing techniques Getting Started 1. Reset your work environment
Advanced Special Effects
 Adobe Illustrator Advanced Special Effects AI exercise preview exercise overview The object is to create a poster with a unified color scheme by compositing artwork drawn in Illustrator with various effects
COMPUTER AIDED ARCHITECTURAL GRAPHICS FFD 201/Fall 2013 HAND OUT 1 : INTRODUCTION TO 3D
 COMPUTER AIDED ARCHITECTURAL GRAPHICS FFD 201/Fall 2013 INSTRUCTORS E-MAIL ADDRESS OFFICE HOURS Özgür Genca ozgurgenca@gmail.com part time Tuba Doğu tubadogu@gmail.com part time Şebnem Yanç Demirkan sebnem.demirkan@gmail.com
Revit Architecture 2015 Basics
 Revit Architecture 2015 Basics From the Ground Up Elise Moss Authorized Author SDC P U B L I C AT I O N S Better Textbooks. Lower Prices. www.sdcpublications.com Powered by TCPDF (www.tcpdf.org) Visit
ESCHERLIKE developed by Géraud Bousquet. User s manual C03-04 STROKE WIDTH C03-05 TRANSPARENCY C04-01 SAVE YOUR WORK C04-02 OPEN A FILE
 Summary ESCHERLIKE 1.3.2 developed by Géraud Bousquet User s manual EscherLike is a software program that makes it easy to draw all the regular tilings of the plane. There are 93 different tilings (and
COS 116 The Computational Universe Laboratory 10: Computer Graphics
 COS 116 The Computational Universe Laboratory 10: Computer Graphics As mentioned in lecture, computer graphics has four major parts: imaging, rendering, modeling, and animation. In this lab you will learn