Course # 101. Model MicroMV Flow Technical Training. Pressure/Flow Instrumentation DFC Education
|
|
|
- Ellen Chase
- 5 years ago
- Views:
Transcription

1 Course # 101 Pressure/Flow Instrumentation DFC Education Model MicroMV Flow Technical Training Released Dec Revision Jan 2008 Revision July 2010
2 Course material developed by: Dynamic Flow Computers S.W. Fwy Stafford, Texas Telephone: Fax: Internet: While this information is presented in good faith and believed to be accurate, DFC does not guarantee satisfactory results from reliance upon such information. Nothing contained herein is to be construed as a warranty or guarantee, expressed or implied, regarding the performance, merchantability, fitness or any other matter with respect to the products, nor as a recommendation to use any product or process in conflict with any patent. DFC reserves the right, without notice, to alter or improve the designs or specifications of the products described herein. When installing, operating, or maintaining any equipment referenced in this training aid, you should always reference the applicable manuals or call your local DFC sales or service office for assistance. The training material contained in this manual was developed by DFC for their exclusive use. This manual and the material contained herein may not be copied, reproduced, sold, given, or disclosed to third parties, or otherwise used in whole or in part without the prior written permission of the Dynamic Flow Computers Technical Services. Printed in U.S.A.
3 Table of Contents iii Table of Contents Introduction ix About This Training Manual ix Prerequisites x Customer Satisfaction Survey x How To Use This Training Manual x Conventions xi What You Need For Training xi Hardware and Software xi Reference Material xi Section 1: Flow Fundamentals 1-1 Flow Technologies 1-3 Why DP? 1-4 DP Flowmeter Components 1-5 Flow Equations 1-8 Sources of Flow Errors 1-11 Discharge Coefficient 1-12 Reynolds Number 1-13 Traditional Compensated Flow MV Fully Compensated Flow 1-16 Progress Check 1-18 Section 2: Overview 2-1 MV Components 2-2 Block Diagram 2-3 Sensor Design DP 2-4 Sensor Design AP 2-5
4 Introduction ix Introduction About This training Manual This training manual is designed to be used for Instructor Led Training. A qualified DFC Service or Measurement instructor will present video (slides, LCD panel, Projector) information to the students that should match this training manual. The instructor will bring up additional information as needed. The intent is to have an instructor led class that leads to a high degree of interaction between the students and instructor. Students will also reference the MicroMV manual to assist with this training. Upon completion of this manual you will be able to : Understand Flow Technology and Primary and secondary elements Identify MicroMV Parts and explain their functionality Configure and test the MicroMV using the Dynacom Calibrate the MicroMV Smart Transmitter using Dynacom Configure and test the MicroMV using Dynacom Properly install and troubleshoot the MicroMV Flow Computer
5 Prerequisites x Prerequisites The information in this manual assumes the student has some knowledge of basic pressure and flow fundamentals and instrumentation. Customer Satisfaction Survey After completion of this training course please take a few minutes to complete the Customer Satisfaction Survey located behind the front cover. When you finish please give it to the instructor, or if you wish please mail or fax it to him/her at a later time. Your feedback is important to us. How to Use This Training Manual This training manual is divided into several sections. There will be a series of topics that will be discussed in section. After most sections there will be a few brief questions that need to be answered. Please make certain that you take the time to complete the questions before the next section is started. There also will be training activities at the end of a few sections. Make every attempt to complete the training activity as this could give the hands on experience needed to perform your jobs in the future. If you have any questions please ask your instructor!
6 Conventions xi Conventions return when referenced means press the Enter ) key on PC. What You Need For Training Hardware and Software MicroMV flow Computer Power Supply Volt DC Multi Meter 4 1/2 Digits Pressure Source 0.015% Accuracy Decade Box PC with Dynacom & Modbus Master Reference Material It is strongly recommended that the following Dynamic Flow Computers documents are available while completing this training manual. MicroMV MANUAL
7 Flow Fundamentals 1-1 Flow Fundamentals In this section you will learn the basics of flow fundamentals and how DP flow is used on the MicroMV. After completing this section, you should be able to: Describe the basic DP flow equation Describe the fully compensated Mass flow equation used by the MicroMV Understand why DP flow is used in many applications. Describe the two main components of a DP Flowmeter (or Head meter) Understand the benefits of using the MicroMV to measure flow
8 Basic Flow Principles Flow Fundamentals 1-2 Flow metering requires an understanding of flowmeter technology, the process, and fluid physical properties.
9 Flow Technologies Flow Fundamentals 1-3 FLOW TECHNOLOGIES MASS VOLUMETRIC CORIOLIS THERMAL NO MOVING PARTS MOVING PARTS MAGS Vortex Turbine PD HYBRID THERMAL Ultrasonic VARIABLE AREA DIFFERENTIAL PRESSURE ORIFICE ANNUBAR NOZZLE ELBOW TAPS VENTURI
10 Why DP? Flow Fundamentals 1-4 DP Flow Well Known and well accepted technology Recognized by standards organizations worldwide API, AGA, ASME, ANSI, ISO, BS, etc. Widest range of applications Extensive choice of primary elements. Lower instrument purchase cost Largely independent of line size. Highly repeatable when properly specified and installed No moving parts - proven reliability
11 DP Flowmeter Components Flow Fundamentals 1-5 DP or head meters consist of two main components, the primary device and the secondary device. PRIMARY - placed in the pipe to restrict the flow. Orifice, Venturi, Nozzle, Pitot-Static Tube, Elbow, and Wedge. SECONDARY - measures the differential pressure. SECONDARY PRIMARY
12 How Do They Work? Flow Fundamentals 1-6 Line Pressure Flow Restriction in Line cause a differential Pressure Q m = K DP P T
13 Other Head Producing Elements Flow Fundamentals 1-7 Venturi Nozzle Diamond II Annubar
14 Flow Equations Flow Fundamentals 1-8 Traditional DP Flow Simple DP Flow Q = constant(k) DP Partial Compensated Flow Simplified Mass Flow Q mass = constant(k) DP P T MicroMV Dynamically Compensated Flow Full Dynamically Compensated Mass Flow Q mass = N C d E Y 1 d 2 DP( )
15 Compensated Flow Equation Flow Fundamentals 1-9 With partial compensation, a constant is used for C d E Y 1 d 2 Flow Coefficients X Flow Q mass = constant(k) DP P T Flow Coefficients are NOT Constant! The MicroMV Dynamically Calculates Flow Coefficients Flow Coefficients X X X X X X X Flow X X X X Q mass = N C d E Y 1 d 2 DP( ) Traditional flow uncertainty is eliminated!
16 ASME-ISO Flow Equation Flow Fundamentals 1-10 Units Conversion factor Velocity of Approach Factor Orifice Bore Q m = N C d E Y1 d 2 DP(p) Discharge Coefficient Gas Expansion Factor Density
17 Sources of Flow Error Flow Fundamentals 1-11 Sources of Traditional DP Flow Uncertainty - In Order of Error Contribution 1 Discharge Coefficient #1 for Liquids 2 Density #1 for Gases 3 Gas Expansion Factor 4 Thermal Changes to Pipe/Orifice 5 Transmitter Performance
18 Discharge Coefficient Flow Fundamentals 1-12 Concentric Square-edge Orifice C d Reynolds Number
19 Reynolds Number Flow Fundamentals 1-13 Reynolds Number Dimensionless number Indicates flow profile Laminar Transition Turbulent Reynolds Number (Pipe I.D.) ( Velocity) (Density) Viscosity
20 Discharge Coefficient Flow Fundamentals 1-14 Concentric Square-edge Orifice Q m = N C d E Y1 d 2 DP(p) C d Reynolds Number LIQUIDS GASES
21 Traditional Compensated Flow Traditionally, compensated DP mass flow has been accomplished using a system. DP = FT= Flow Transmitter AP/GP = PT = Pressure Transmitter Temperature = TT = Temperature Transmitter Flow Computer = FC Flow Fundamentals 1-15 PT FC FIC FT TT FE
22 MicroMV Fully Compensated Flow Flow Fundamentals 1-16 Output of MicroMV is fully compensated flow value One instrument does it all
23 Fully Compensated Mass Flow Flow Fundamentals The transmitter uses the downloaded EA information along with DP, AP, and T information to compute fully compensated mass flow -- real time! Gas Expansion Factor Units Conversion Factor Q mass = N C d E Y 1 d 2 Beta Ratio Pressure Isentropic Exp. DP DP( ) Bore of Differential Prod. Temp. Discharge Coefficient Velocity of Approach Factor Density Beta Ratio Pipe I.D. Orifice Bore Temp Reynolds Number Pipe I.D. Velocity Viscosity Density DP Temp Pressure Temp Compress. Factor Gas Constant Beta Ratio Temp. Data Entered Measured Calculated Compress. Factor Gas Constant Molecular Weight Fluid Constants Pressure Temp.
24 AGA3 Mass Flowrate K F a d 2 (MLB/HR) Y (DP Flowing Density) Net Flowrate Mass Flowrate (LB/HR) (CF/HR) Density@60 Gross Flowrate Mass Flowrate (LB/HR) Flowing Density (CF/HR) (Refer to Orifice Metering of Natural Gas, 3rd edition.) Where: N C E c d v velocity of Y expansion unit conversion constant orifice d D density of plate coefficient approach factor orifice plate bore diameter from reference diameter meter tube internal diameter from reference diameter the fluid DP orifice differential at of factor flowing pressure discharge conditions
25 API 14.3 Mass Flowrate N c C 4 (MLb/Hr) d E v Y d 2 ( 2DP ) 10 3 Net Flowrate Mass Flowrate (Lb/Hr) Density@60 F Lb/Hr Lb/Hr (Refer to Orifice Metering of Natural Gas, 3rd edition.) Where: N c unit conversion constant Gross Flowrate C E d v velocity of Y expansion factor d D density of DP orifice differential Mass Flowrate (LB/HR) Flowing Density orifice plate coefficient of approach factor the fluid at pressur flowing discharge orifice plate bore diameter from reference diameter meter tube internal diameter from reference diameter conditions
26 Wedge Wedge Gross Flowrate Gal/Hr F a K 2 d DP SG Net Flowrate Gross Flowrate Flowing Density@60 F Density Gal/Hr Mass Flowrate Gross Flowrate MLb/Hr Flowing Density Conversion Factor Where DP Differential Pressure,inches of water SG F a Liquid Specific Gravity at flowing conditions Flow Expansion Factor (Data Entry) K 2 d Flow Coefficient (Data Entry)
27 Venturi C Y Fa Mass Flowrate DP 4 1- (MLb/Hr) d 2 Net Flowrate Mass Flowrate(Lb/Hr) Reference Density (CF/Hr) Gross Flowrate Mass Flowrate(Lb/Hr) Flowing Density (CF/Hr) Refer to Miller Measurement Engineering Handbook Where C discharge coefficient C (manual entry) Y expansion factor d D density of DP differential venturi bore diameter at reference meter tube internal diameter at reference the fluid pressure at flowing conditions
28 AGA7 Total (Pulses/Second) Gross Flowrate Nominal K Factor (Pulses/UM) (UM/Hr) 3600 Gross Net Flowrate (UM/Hr) Flowrate (UM/Hr) Meter Factor Flowing Reference Density Density Mass Flowrate Gross (MLB/Hr) Flowrate (UM/Hr) Flowing Density Meter factor 1000 Factor Note : UM Unit of Measurement (Selectable by Data 0 BBL 1 Gal 2 CF Factor Conversion Factor Entry)
29 V-Cone Mass Flowrate 4 2g c D Cf Y Psf Fa q mass (Hour) Net Flowrate Gross Flowrate q q mass reference mass flowing Hour Energy Flowrate Where : g c Cf D Psf Y Net Flowrate HeatingValue /1000 demnsionalconversion constant Flow Coefficient of the meter FlowingFluidDensity( LB / FT 3) MeterInsideDiameter( Feet) D. Pr essure( Poundsforcepersquarefoot ) Adiabatic Expansion Factor for Contoured Elements
30 DENSITY EQUATIONS Sarasota Density GM/CC Sarasota density is calculated using the frequency signal produced by a Sarasota densitometer, and applying temperature and pressure corrections as shown below. Corrected Density = Where : DCF = Density Correction Factor T P T P 0 p D t0 coef coef 0 cal = T DCF coef T 0 p 2D (T - T = Calibration constant,mass/volume, gm/cm t = Densitometer oscillation period in microseconds. = A calibration constant in microseconds = Temperature coefficient in microseconds/ F P = Flowing pressure ( t-t 1 +K( t-t cal 2T 0 p 0 p ) + P 0 p coef in PSIG = Pressure coefficient in microseconds/psig = Calibration pressure in PSIG 0 ) ) (P - P cal ) + T 3 0
31 UGC Density GM/CC UGC density is calculated using the frequency signal produced by a UGC densitometer, and applying temperature and pressure corrections as shown below Corrected Density= DCF P K 0, K Where : 1, K DCF = Density Correction Factor K = Pressure Constant P K T off T cal d = K K 1 flowing t + K {[ K( P = Calibration Constants t = Densitometer oscillation 2 t 2 +d ) 10 ] + [ K period in microseconds = Pressure Offset = Temperature Coefficient = Temperature coefficient in microseconds/ F off -6 T ( T flowing -T cal )] + d}
32 Solartron Density GM/CC Solartron density is calculated using the frequency signal produced by a Solartron densitometer, and applying temperature and pressure corrections as shown below. Density at 68F and 0 PSIG Where D t K 0 K t Densitometer Oscillation K0,K1,K 2 Calibration Constants 1 K 2 t 2 Period Supplied in microseconds by Solartron Temperature Corrected Density DT D 1 K (T-68 )] K (T-68 ) [ Where T Temperature in F Temperature and Pressure Corrected Density Additional Equation for Velocity of Sound Effects DP DL( 1 K 20P) K 21P The following equation can Where : provide more accurate P Pressure in PSIG measurement for LPG products in the density range of D K 20 K 20 A K 20BP (D is in gm/cc). Contact Solarton to get information about K 21 K 21A K 21BP KR and KJ constants. K, K, K, K Calibration Constants Supplied by Solarton 20A 20B 21A 21B
33 Additional Equation for Velocity of Sound Effects The following equation can provide more accurate measurement for LPG products in the density range of D (D is in gm/cc). Contact Solarton to get information about KR and KJ constants. D vos DP K r ( DP K j ) 3 Let K r 0.0 outside this range.
34 UGC2 Density GM/CC UGC density is calculated using the frequency signal produced by a UGC densitometer, and applying temperature and pressure corrections as shown below Corrected K 0 Density = DCF {[ P, K Where : 1, K KP1, KP2 KT1, KT 2 t = Densitometer oscillation period in microseconds DCF = Density Correction Factor T d = K cal 2 0 flowing + K t + K 1 = Calibration Constants 2 t x( KP 1+d KP2)] + [( KT1 dxkt 2) x( T 2 = Pressure Constants = Temperature Coefficients = Temperature coefficient in microseconds/ F flowing -T cal )] + d}
35 Propylene Density Density at flowing Temperature and pressure is calculated using API Chapter (API 2565) Temperature Range F Pressure Range Saturation 1600 PSIA Ethylene Density Ethylene density is calculated using API Chapter Temperature Range F Pressure Range PSIA NBS 1045 Temperature Range F Pressure Range PSIA NIST14 Temperature Range F
36 DENSITY EQUATIONS (Without Live Densitometer) If API Table is selected: Flowing Density Where CTL T T T where : API CPL Density@ 60 F gm cm e- 1 Correction T Actual K 0 3 T T - T K 2 T API Product density at reference temperature in API Gravity at reference temperature 1 -F(P-P ) (1 (0.8 e CTL for temperature effect on liquid ( ASTM D1250 ) Reference 1 T Correction of Density of Water T T )) Correction CPL for expansion at reference temp. gm cm compressibility on liquid 3
37 Flowing Density 60 F CTL CPL Where CTL T T Density of Water T API Product density at reference temperature in where : API CPL gm cm e Correction for temperature effect on liquid ( ASTM D1250 ) T Actual K T T - T K API Gravity at reference temperature T 1 -F(P-P (1 (0.8 e Reference T T T )) Correction of expansion at reference temp. gm cm Correction for compressibility on liquid ) 3
38 Where: P = Flowing pressure in PSIG Pe = Equilibrium pressure, calculated from the equations developed by Dr.R.W. Hankinson and published as GPA Technical Publication No.15, or override value Temperature Range: -50 F to 140 F. Relative Density Range: 0.49 to F = Compressibility factor Using API Chapter for liquids 0-90 API Using API Chapter for Hydrocarbons Temperature Range: -50 F to 140 F Relative Density: Density is converted from gm/cm3 to lb/ft3 via the conversion factor. K0 and K1 in the above equations are physical constants from the API Manual and are given in the table below for various product types. However, for products between the jet group and gasoline use constants A and B in the following equation:

39 Additional Products K0 and K1 are physical constants from the API Manual and are given in the table below for various product types. For products between the jet group and gasoline use constants A and B in the following equation: T A B T 2
40 Progress Check Flow Fundamentals 1-18 Answer these questions before continuing to the next section of this manual. Question 1: List three types of technologies that can be used for flow measurements: Question 2: List the two components (devices) used in DP flow measurements: Question 3: What is the flow formula used by the MicroMV? Question 4: What are the four variables that determine the value of the Reynolds number?
41 Overview 2-1 Overview In this section you will learn the theory of operation of the Model MicroMV flow computer, its components, measurement technique, options, and specifications. After completing this section, you should be able to: Identify and describe the major components and the functionality of those components. Explain the theory of operation of the module. Explain the available Inputs & outputs. Explain the basic specifications.
42 3095MV Components Overview 2-2 H L MicroMV Flow computer RTD Cable Shielded or Armored
43 Back Panel


44 Electronics Board Overview 2-8 Functions Calculations Damping Diagnostics Memory Communications Configuration
45 Temperature Sensor Overview 2-9 Connection Head 58, 68, or 78 RTD P t

46 Product Information Overview 2-11 Product Data Sheet or Comprehensive Catalog Features/Benefits Dimensional Drawings Specifications Options Ordering Information
47 Block Diagram Overview 2-3 Sensor Module Electronics Digital Communication SPI (Ribbon Cable) Microprocessor -Rerange -Flow Calculation -Diagnostics -Engineering Units Digital-to-Analog Signal Conversion Digital Protocol Analog Output Signal to Control System Module Temperature Sensor Module Assembly - Correction Coefficients - Module Information - Sensor Linearization - Diagnostic Non-Volatile Memory -Range Values -Transmitter Configuration RAM RTD PC with Dynacom Piezoresistive AP Sensor Capacitive Sensor High Low A/D µ D/A Communications
48 DP Capacitance Sensor Design Overview 2-4 Sensing element is really two capacitor plates with a common sensing diaphragm Process pressure is transmitted through the fill fluid to the center of the sensor Sensing diaphragm deflects proportional to differential pressure Differential capacitance is measured electrically through leads inside sensor Inherent overpressure protection
49 Overview 2-5 AP/GP Piezoresistive Sensor Design Isolating Diaphragm Resistance Element (Environmentally Sealed Sensing Diaphragm) Process Connection Fill Fluid Tube Sensing element is a Wheatstone bridge circuit Process pressure transmitted through fill fluid to center of sensor Sensing diaphragm deflects proportional to process pressure Deflection of the sensing diaphragm changes bridge resistance
50 Rosemount MV-205 Sensor Module Overview 2-6 The sensor module contains the metal DP and thin film polysilicon sensors. Range 1 DP: 0.5 TO 25 inh 2 0 Range 2 DP: 0-25 TO 250 inh 2 0 Range 3 DP: 0-10 TO 1000 inh 2 0 Range C GP: 0-8 TO 800 psig Range D GP: 0-36 TO 3626 psig Range 3 AP: 0-8 TO 800 psi Range 4 AP: 0-36 TO 3626 psi
51 Sensor Module Cutaways Connection to Electronics Board Sensor Board with Module Memory and Microprocessor Overview 2-7 Protective Cover DP Capacitance Sensor AP or GP Peizo-Resistive Coplanar Isolators
52 Specifications MASS FLOW Fully compensated for pressure, temperature, density, and viscosity variances over operating range. Reference Accuracy Qm = NC d EY 1 d 2 DP(p) +1.0% of Mass Flow over 8:1 flow range (64:1 DP range) for liquids and gases Differential Pressure Reference Accuracy 0.075%+ of span for spans from 1:1 to 10:1 URL For range downs greater than 10:1 of URL Absolute/Gage Pressure Accuracy = [ ( URL / Span )]% of Span Reference Accuracy % of Span for spans from 1:1 to 6:1 of URL For range downs greater than 6:1 of URL, Accuracy = [ ( URL / Span )]% of Span Process Temperature (RTD) Range -300 to 1500 Degree F (-185 to 815 degree C) Accuracy +1.0 degree F (0.56 degree C) Note: Reference MicroMV manual for further information Overview 2-12
53 Progress Check Overview 2-13 Answer these questions before continuing to the next section of this manual. Question 1: How many process sensors are actually available with the MicroMV? List them: Question 2: What configuration options are available for changing on the Electronics board? Question 3: What variables are available as digital outputs on the MicroMV? Question 4: Typically, what type of RTD is installed to the MicroMV?
54 Installing Dynacom Request a Dyancom CD : Hardware requirements for the installation: Windows Operating System (Win95, Win98, Win98SE, win2000, WinNT, WinXP) For a Windows NT machine: Service Pack 3 or later. (Service Pack 5 Update is Included in the Installation Disk) Internet Explorer 5 or later. (Internet Update is Included in the Installation Disk) For an NT or Win2000 Machine: Administrator level access to create an ODBC system DNS. Minimum disk space available: 16 MB. 1 Serial Communication Port

55 Installing Dynacom, just insert the installation CD in the CD unit and the following menu will pop up automatically:
56 Continue Installation Click on the button for the application you are trying to install Run the setup process Setup will start and guide you through the different steps needed to install the application. If your computer doesn t pop up the installation menu automatically you can go the windows Start button, select Run, and type D:\start.exe, where D is the letter for your CD unit.
57 Configuration File The configuration file is an archive that contains the information or data used by the flow computer to determine calculation settings (Pipe ID, Flow Equation, Meter ID, etc.) and input/output assignments. Open the configuration file using the Configuration File Open option on the main menu or pressing the open button in the toolbar. Once the file is open the file name will appear on the upper left corner of the window, so you can verify that the desired file was open. REMEMBER: Note: In case the flow computer is a liquid application, remember to End Batch after the configuration in downloaded for the changes to take effect.
58 Downloading a configuration file to the flow computer. Open a Configuration File Open option on the main menu or pressing the open button in the toolbar Once the file is open the file name will appear on the upper left corner of the window, so you can verify that the desired file was open. Connect to the Flow Computer either by using the Tools Connect to Device option on the main menu, the button on the vertical toolbar, or by pressing the [F5] key on the keyboard. Go to the configure device option either by using the Tools Meter Configuration option, the button on the vertical toolbar, or by pressing the [F10] key on the keyboard.
59 Downloading a configuration file to the flow computer. Connect to the Flow Computer either by using the Tools Connect to Device option on the main menu, the button on the vertical toolbar, or by pressing the [F5] key on the keyboard. Once you are connected the application it will show an ONLINE status on the lower right corner of the main window. Failure to communicate can occur because of a communication wiring problem wrong PC port selection communication parameter mismatch between PC and MicroMV (Modbus type, parity, baud rate, etc.) lack of power to the MicroMV Flow Computer. To use Tools Com Settings Auto Detect Settings option, the user must insure that only one MicroMV computer is connected to the PC. More than one MicroMV Flow Computer in the loop will cause data collisions and unintelligible responses.
60 Downloading a configuration file to the flow computer. Go to the configure device option either by using the Tools Meter Configuration option, the button on the vertical toolbar, or by pressing the [F10] key on the keyboard. Because you are connected to a device, a window will appear asking you if you want to read the configuration from the connected meter, Press NO since what we want is to write the PC file to the flow computer. A configuration window will now appear showing you the information in the configuration file You can check these values to make sure this is the file you want to send to the flow computer. Once you have checked that the configuration is correct, press the [Download] button. A blue bar indicating the progress of the download will appear at the bottom of the application window, after that the information in the configuration file will be in the flow computer.
61 What is an Image File? An image file is an EPROM code for a certain purpose (liquid, gas, prover, etc.) The image file is only done when an application upgrade is needed. When an image file is downloaded to the flow computer, all the information in the computer is lost (configuration and historical data), so make sure to retrieve all the important information before changing the image file.
62 How to download an Image File Download an image file through RS232 port only. To Download an Image File to the Flow Computer select the Tools Download Program option form the main menu or press the button in the toolbar. A small dialog will appear asking for the file name of the image file (Image file have the extension.img). Type it in or use the Browse button to locate it. Once the file name is in place press Download. If a retry message of small dialog appears, try to use Tools Com Settings Auto Detect Settings option, the user must insure that only one MicroMV computer is connected to the PC. More than one MicroMV Flow Computer in the loop will cause data collisions and unintelligible responses. Failure to communicate can occur because of a communication wiring problem, wrong PC port selection, communication parameter mismatch between PC and MicroMV (Modbus type, parity, baud rate, etc.) or lack of power to the MicroMV Flow Computer. After the device is detected, then you can follow steps described above.
63 Download Note Warning messages will remind you that this action will erase ALL the information in the flow computer. The download task will take about 7 minutes to be completed. Once the image file is in place, the flow computer is ready to be configured (enter calculation parameters and I/O assignments).

64 Website - DFM Configuration Software Step 1. Go to our website Step 2. Click on the Software link located on the left hand side of the web page. You will be presented with two options: Windows software and DOS software. The following flow computer applications have Windows software: EChart MicroMVL MicroMS4 MicroMVA Sfc33G Air V.2 Sfc332L MicroML1 If you don t see your application listed here it means it only has DOS software. Step 3. Select either Windows or DOS software based on Step 2.
 Step 5. The file will start to transfer to your computer.")
65 Website- Download Step 4. On the new screen presented to you click on the application that you are trying to download. Once you hit the link it will ask you if you want to run or save the file in you computer. Select SAVE. (See illustration 1) Step 5. The file will start to transfer to your computer. The download time depends on your Internet connection speed and the type of application that being downloaded. Step 6. When the download if finish. Press the OPEN button to start the setup process. (See Illustration) Step 7. Follow the steps in the application setup.
66 Website Image File (Firmware) Check the version number of image file. The image file is only done when an application upgrade is needed. Step 1. Go to our website Step 2. Click on the Software link located on the left hand side of the web page, then you select Firmware option. The following flow computer applications have IMAGE: EChart MicroMVL MicroMS4 MicroMVA MicroMG4 MicroMVG MicroML1 MicroMG5 MicroML4
67 Website Image File (Firmware) Step 3. On the new screen presented to you click on the application that you are trying to download. Once you hit the link it will ask you the location and file name to be saved. Step 4. The file will start to transfer to your computer. The download time depends on your Internet connection speed and the type of application that being downloaded. Step 5. After the download is finished, then follow the steps in the image downloading setup.
68 Getting acquainted with the flow computer wiring: Back terminal wiring: The back terminal wiring indicates the overall positions of the terminal plugs and their functions. Though the back panel s jumpers are also shown, refer to the next drawing, Back Panel Jumpers, for information on their settings and functions. The MicroMV receives its power via the.top two pins on Terminal P1, on the left of the board. Also on Terminal P1 from top to bottom are inputs to the four serial connections To the right (P4), from top to bottom, are two turbine inputs, density frequency input, and switch/status inputs and output. Terminal P3, at the lower bottom, handles analog inputs and outputs. These are, in order from right to left, analog output one, analog input 1 & 2, RTD excitation, analog 3 & 4 or RTD, analog input return. Analog 3&4 can be used as RTD input 1,but the jumper for the RTD excitation has to be installed, and the flow computer has to be configured for RTD input.
69 Back Terminal wiring
70 INPUT/OUTPUT: Assigning and Ranging Inputs Input/Output Assignment We will now configure your Micro MV Liquid Flow Computer s inputs and outputs. The flow computer allows the user to configure the inputs and outputs. The flow computer will not use the unassigned inputs.
71 How to assign a transmitter to an I/O point Click Configure Device, configuration menu is prompted On configuration menu, click Input Assignment Enter assignments for DP, temperature, pressure, density and spare inputs. Assignment (1-n). Assignments 1-4 are analog inputs attached to terminal of the back panel. These inputs accept 4-20mA or 1-5 volts input and are suitable for temperature, pressure, density, or spare inputs. An assignment 5 is strictly RTD (temperature) input only for the meter, densitometer or spare. Assignment 7 indicates a density frequency input; it is assigned automatically once you choose live density frequency input in the setup menu at density type Assignment 10 (module 1) is for Rosemount multi-variable module only. DP, pressure, and temperature for the meter can be assigned. When a frequency type primary element is hooked to the flow computer, the Multi Variable pressure and temperature can be used and the DP becomes a spare input that could be assigned for strainer differential.
72 Ranging the Transmitter Inputs Enter the range values: after assigning the inputs scroll down to the transducer inputs assignment menu to scale the 4-20mA. Enter the value Enter both values similar to the way the transmitter is ranged. 1-5 volts is equivalent to 4-20mA. Enter the 1 volt value at the 4mA, and 5 volt value at 20mA. When the Multi Variable is used the 4-20 ma scale has no effect on anything and does not need to be configured for that input. The reason is simply that the flow computer gets the data via digital communication from the transmitter in engineering units, and therefore a scale is not needed. Normal pressure range is , temperature 40 to 1200, DP 250 to 250, or -830 to 830 inches of water.
73 Ranging Cont d. Enter the high and low limits: high limits and low limits are simply the alarm points in which you would like the flow computer to flag as an alarm condition. Enter these values with respect to the upper and lower range conditions. Try to avoid creating alarm log when conditions are normal. For example: If the line condition for the pressure is between 0 to 500 PSIG. then you should program less than zero for low pressure alarm, and 500 or more for high pressure alarm. High limits are also used in the SCALE for the Modbus variables. The high limit is equivalent to or The low limit is not used for calculating the scale. The scale starts at zero to wherever the high limit value.
74 Calibrating Cont d. Set up the fail code: Maintenance and Failure Code values tell the flow computer to use a default value in the event the transmitter fails. The default value is stored in Maintenance. There are three outcomes: the transmitter value is always used, no matter what (Failure Code = 0); the Maintenance value is always used, no matter what (Failure Code = 1); and the Maintenance value is used only when the transmitter s value indicates that the transmitter has temporarily failed (Failure Code = 2).
75 RTD Calibration RTD inputs will skip 4-20 ma assignment because RTD is a raw signal of 50 (ohms) to 156. Readings beyond that range require a 4-20 ma signal to the flow computer or using the built in Rosemount Multi Variable transmitter. The Rosemount Multivariable has a range of degrees Fahrenheit. Density coefficients for raw frequency inputs are programmed in this menu. The menu will only show parameters relevant to the live density selected (i.e., Solartron or UGC, etc.).
76 Wiring! CAUTION! Wiring to the flow computer is very straightforward and simple. But still it is very important to get familiar with the wiring diagram.
77 Analog Inputs
78 Wiring Analog Inputs Typical wiring for analog input 1 is shown in the drawing. Analog inputs 3 and 4 are to the left of analog 1 and 2 separated by the RTD excitation. Note that the analog input has only one common return that is the -Ve signal of power supply powering the transmitters. When wiring 1-5 volts, make sure to calibrate the flow computer for the 1-5 volt signal because the flow computer calibration defaults for the 4-20 ma, which is different from the 1-5 volts. JP2 must be removed for 1-5 volt inputs. The jumpers for analog 1-4 are in order from right to left. It is possible to remove the first two jumpers for analog 1 & 2 in for 1-5 volts signal and have analog in 3 & 4 as 4 20 ma signal. Signal line impedance provided by our flow computer is 250.
79 4-20 ma NOTE NOTE: The 4-20mA or 1-5 volt DOES NOT source power to the transmitters. You can use the DC power feeding the flow computer to power the 4-20mA loops IF that power supply is FILTERED.
80 RTD Wiring 100 platinum can be used; a temperature range of -43 F to +300 F can be measured. RTD is to the left of analog in 1&2. The RTD excitation jumper has to be installed for the RTD to function. In the figure below, notice that the RTD requires three wire connections. Internal excitation current source generated is in the micro AMP range. RTD can be wired to multi-variable directly through specially provided cable. This wiring diagram describes wiring directly into the flow computer and not into the multi-variable.
81 RTD wiring
82 Wiring Analog output Wiring diagram shows typical Analog output wiring. Notice that analog outputs will regulate 4-20 ma current loops but DOES NOT source the power for it. External power is required. Assigning/Ranging the 4-20mA Analog Outputs: Go to the I/O assignment main menu and click Analog Output Assignment. A selection menu is prompted. Select the analog output number, and then enter what the 4 ma output will indicate and the 20 ma. Make sure that the 20 ma assignment value exceeds the upper range limit of what you assigned the Analog output for, otherwise the analog output will not update beyond 20 ma.
83 Analog Output
84 Additional I/O

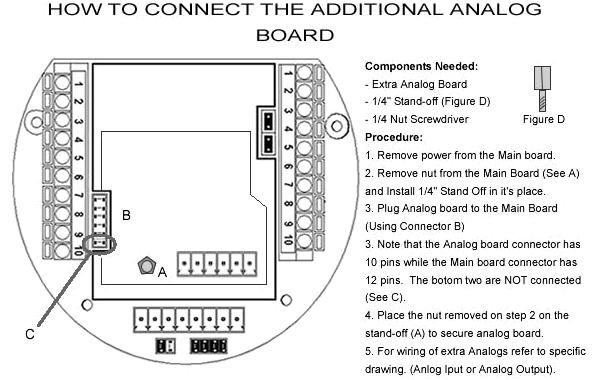
85 Back Panel: Additional A/O Addition analog output board is required to have additional 3 analog outputs.

86 Ack panel/; Additional A/I Addition analog input board is required to have additional 5 analog inputs.
87 Turbine In wiring Go to view main menu click turbine under Wiring Drawings. Two drawings above each other will show typical wiring for turbine meter 1 and turbine meter 2. When dual pick ups from the same turbine are connected, use the inputs for turbine 1 for pickup 1 and turbine 2 for the second pickup coil. When connecting sine wave directly from the pickup coil make sure the distance from the pickup coil to the flow computer is very short less than 50 feet with shielded cable. In the event there is presence of noise, the distance must be shortened. When connecting sine wave signal, the JP4 jumper for meter 1 must not be installed and JP5 jumper for meter 2 must not be installed. (JP4 and JP5 must be off when using sine wave). On the other hand, when using square wave, the square wave signal can be sinusoidal but has to be above 5 volts peak to peak with less than 0.4 volts offset in order for the flow computer to read it. The JP4 jumper for meter 1 must be installed and JP5 jumper for meter 2 must be installed.
88 Turbine Input location The turbine input is on the top of terminal P3 The third pin down from the top is Turbine/PD input 2 plus and below it is Turbine 2 minus. The third frequency input (fifth pin down) has the positive input and the negative is the power input ground. If a different power supply is used to power the densitometer then the power return for that input needs to be connected to the Micro MV power ground.
89 Turbine Meter Wiring
90 Turbine Wiring Note! NOTE! When connecting square wave input, JP4 and JP5 connect the turbine return to the flow computer power return. Therefore, signal polarity is very important. Reverse polarity could result in some damage or power loss. When sine wave is used the signal polarity is usually of no significance.
91 Turbine Wiring w Daniel 1817 PREAMP
92 Turbine Wiring w Daniel 1818 PREAMP
93 RS-232 Connection Locating the RS-232 The RS 232 is located on the left terminal block. The third, fourth, fifth, and sixth pins of the RS232 below the power input. The RS 232 RTS pin can be used for printing reports or shares common pin with the regular RS232 port. WARNING: When the RS-232 terminal is used with a modem, external protection on the phone line is required. Jumper DTR to DSR, RTS to CTS, and disable software handshake on the modem RS232 connection
94 RS-232 Wiring
95 Printer Connection
96 RS-485 Connection RS 485 wiring is shown in the wiring diagram under RS 485. Two Rs485 channels are available for Modbus communication or as a master to other slave devices. i.e. gas G.C., external Modbus slave devices and token passing ring. The maximum distance when 18-gauge wire is used is 4000 feet. WARNING: When the RS-485 terminal is used, external transient protection and optical isolation is required, especially for long distance wiring.
97 RS-485 Connection
98 Wiring Status inputs D/I There are 4 digital inputs or outputs that are user configurable. The configuration software will configure the input to be a status input or a switch output. The fourth digital I/O is optional and can only be used if the 2nd RS485 is not used. The standard status input has 4 volts of noise hysteresis, with on trigger point of 5 volts and an off point of 1 Volt.
99 Wiring D/I
100 Wiring Of Switch/Pulse Output Switch one and two can be on /off or pulse type output up to 125 pulse per second. Notice that the switch outputs are transistor type outputs (open collector type with maximum DC rating of 350 ma continuous at 24 VDC) connection Status Input /switch output 1 Switch Maximum rating: volts Switch Output Range: 5-28 VDC Status Input Rating: 6-28 VDC Status Input /switch output 2 Switch Maximum rating: volts Switch Output Range: 5-28 VDC Status Input Rating: 6-28 VDC Status Input /switch output 3 Switch- Maximum rating: volts Switch Output Range: 5-28 VDC Status Input Rating: 6-28 VDC
101 Switch putput wiring
102 Density input Wiring When using a live densitometer input with frequency signal, the signal can be brought into the MicroMV in its raw form. The MicroMV accepts a sine wave or square with or without DC offset Note: When wiring the density input polarity is of significance and reverse polarity could result in some damage or power loss. The density signal is on connector P4, the third and fourth pin down from the top. The fifth pin down is density plus, When Density input is 4-20mA it should be connected as a regular 4-20mA signal to the analog input and not the density frequency input.
103 Density Wiring
104 Calibration Calibrations are performed under Calibration. Select inputs to be calibrated, and then select full, single, offset calibration method. To use default calibration Select Analog Input Select Reset calibration method Now verify the live reading against the flow computer reading
105 Calibrating A/I (4-20 or 1-5) Offset Calibration: For simple offset type calibration simply induce the signal into the analog input and make sure the MicroMV is reading it. After you verify that the MicroMV recognized the analog input, enter the correct ma reading, and then click OK. The offset type calibration is mainly used when a small offset adjustment needs to be changed in the full-scale reading. The offset will apply to the zero and span. Offset is the recommended method for calibrating the temperature input. Induce live values to verify the calibration.
106 Calibrating A/I (4-20 or 1-5) Full Calibration Method: To perform full calibration be prepared to induce zero and span type signal. 1. Induce the low end signal i.e. 4mA in the analog input. 2. Click inputs to be calibrated under calibration menu, click full calibration, enter the first point - the analog input value i.e. 4mA, and then click OK button. 3. Now be ready to enter the full-scale value. Simply induce the analog signal and then enter the second value i.e. 20mA, and then click OK button Induce live values to verify the calibration.
107 RTD Calibration RTD Calibration is a 2-step process. The first step is a one time procedure to verify transducer linearity and is done at the time the meter is being setup. The second step is the routine calibration sequence. Step 1 Linearity Verification Use a Decade box with F settings. Connect RTD cable to this resistive element for verification of linearity. Verify low and high points. It must be within ½ degree. Connect the actual RTD element and compare with a certified thermometer. If not within ½ degree do a Full Calibration (See Full Calibration below). If problem persists verify other elements such as RTD Probe, connections, shield, conductivity of connectors, etc. The purpose of the above procedure is to verify zero and span and make sure that the two points fall within the expected tolerance. Step 2 Routine Calibration Once Linearity has been verified through Step 1, the routine calibration procedure is reduced to simply connecting the actual RTD and doing an offset point calibration (see offset calibration below). Calibration after that will be simple verification for the stability of the transmitter. If it drifts abnormally then you need to verify the other parts involved.
108 Calibration Procedures through Dynacom At the top menu, go to Calibration and Select RTD Input. RESET TO DEFAULT CALIBRATION 1. Select Reset calibration method 2. Now verify the live reading against the flow computer reading OFFSET CALIBRATION: 1. Select offset calibration method. 2. Induce a live value and wait for 10 seconds for the reading to stabilize. Then enter the live value. The value entered must be in Ohm only. 3. Now verify the live reading against the flow computer reading FULL SCALE CALIBRATION: Prepare low range resistive input (i.e., 80 Ohm.) and High range resistive input (i.e., 120. Ohm). Go to the calibration menu and select RTD full calibration method. Induce the low end (80 Ohm.) resistive signal and then wait 10 seconds, enter live value in Ohm, and click OK button. 3. Induce the High range signal (120 Ohm.) and wait 10 seconds, then enter 120 Ohm and click OK button. Now verify the live reading against the flow computer reading.
109 Calibrating A/O Follow the following steps to calibrate the analog output against the end device 1. Go to the calibration menu, select analog output, and then select method. Full calibration will cause the flow computer to output the minimum possible signal 4 ma. Enter the live output value reading in the end device i.e. 4 ma and click OK button. Now the flow computer will output full scale 20 ma. Enter the live output i.e. 20 then click OK button. 2. Now verify the output against the calibration device.
110 Calibrating MV Calibrations are performed under Calibration.. Select inputs to be calibrated, and then select full, single, offset calibration method. Offset calibration 1. Induce live value for pressure or DP. 2. Select Multivariable DP or pressure. 3. Select offset calibration method, enter offset, and click OK button. 4. Now read induce live values to verify the calibration. Full scale calibration 1. Induce live value for pressure or DP. Select Multivariable DP or pressure Select full calibration method Induce the low range signal, enter the first point, and then click OK button. Induce the high range signal, enter the second point, and then click OK button. Now verify the live reading against the flow computer reading.
111 Calibrating MV To use default calibration 1. Select Multivariable DP or pressure 2. Select Reset calibration method 3. Now verify the live reading against the flow computer reading While doing calibration before downloading any of the calibrated values, it is a good practice to verify that the MicroMV close reading to the induced value. The DP reading must be re-calibrated for the zero offset after applying line pressure.
112 Calibrating MV Temperature (RTD) RTD Calibration is a 2-step process. The first step is a one time procedure to verify transducer linearity and is done at the time the meter is being setup. The second step is the routine calibration sequence. Step 1 Linearity Verification 1. Use a Decade box with F settings. 2. Connect RTD cable to this resistive element for verification of linearity. Verify low and high points. It must be within ½ degree. 3. Connect the actual RTD element and compare with a certified thermometer. 4. If not within ½ degree do a Full Calibration (See Full Calibration below). If problem persists verify other elements such as RTD Probe, connections, shield, conductivity of connectors, etc. The purpose of the above procedure is to verify zero and span and make sure that the two points fall within the expected tolerance. Step 2 Routine Calibration Once Linearity has been verified through Step 1, the routine calibration procedure is reduced to simply connecting the actual RTD and doing an offset point calibration (see offset calibration below). Calibration after that will be simple verification for the stability of the transmitter. If it drifts abnormally then you need to verify the other parts involved.
113 Calibration Form Dynacom At the top menu, go to Calibration and Select RTD Input. RESET TO DEFAULT CALIBRATION 1. Select Reset calibration method 2. Now verify the live reading against the flow computer reading OFFSET CALIBRATION: 1. Select offset calibration method. 2. Induce a live value and wait for 10 seconds for the reading to stabilize. Then enter the live value. The value entered must be in Degrees only. 3. Now verify the live reading against the flow computer reading FULL SCALE CALIBRATION: 1. Prepare low range resistive input (i.e., 80 Ohm.) and High range resistive input (i.e., 120. Ohm). 2. Go to the calibration menu and select RTD full calibration method. Induce the low end (80 Ohm.) resistive signal and then wait 10 seconds, enter the equivalent temperature in degrees, and click OK button. 3. Induce the High range signal (120 Ohm.) and wait 10 seconds, then enter the temperature degrees equivalent to 120 Ohm and click OK button. 4. Now verify the live reading against the flow computer reading.
114 Digital I/O Verification Verifying digital inputs and outputs Use the diagnostic menu. A live input and output is displayed. On the top of the screen pulse inputs and density frequency input are shown. Compare the live value against the displayed value on the screen. Failure to read turbine input could be a result of a bad preamplifier or the jumper selection for sine and square wave input are not in the correct position. Refer to wiring diagram View Wiring Drawing Turbine for proper turbine input wiring. Density input can be sine or square wave with or without DC offset. Minimum accepted signal has to be greater than 1.2 volt peak to peak. Status input is shown below the frequency input to the left of the screen. When the status input is on, the live diagnostic data will show ON. Minimum voltage to activate the status is 6 volts with negative threshold of 2 volts. The switch outputs are open collector and require external voltage.
115 Bench Testing Bench Testing 3-1 In this section you will learn how to prepare a Model MicroMV for bench calibration. After completing this section, you will be able to: List all equipment necessary to calibrate a Model MicroMV. Explain the importance on accuracy of test equipment. Explain the load chart. Properly connect the electrical connections.
116 Bench Test Equipment Bench Testing 3-2 Power Supply: Multi Meter: Example could be a Fluke 8840A V dc 4½ Digit Pressure Source: 0.015% Accuracy Service Centers typically use one of the following types: Ametek PK - 854WCSS 0.015% Of Reading * Ametek RK % Of Reading * Ametek HK % Of Reading * * Corrected to Local Gravity PC with Dynacom & Modbus Master (with cables)
117 Terminal Blocks Bench Testing 3-4 Z S PWR 7-28 VDC PWR 7-28 VDC Rs232Tx Rs232Rx Rs232Rts/Prntr Common AN. IN RET An. IN4/RT D An.IN3/RT D RTD Exec Freq1+ Freq1- Freq2+ Freq2- Freq3+ St/Sw 1 St/Sw2 St/Sw4 (opt) An.IN2 AN.IN1 DAC1- DAC To Electronics + + POWER SUPPLY

118 Wiring Bench Testing VDC Z S 4.00 ma PWR 7-28 VDC PWR 7-28 VDC R s232tx R s232rx R s232rts/prntr C ommon Freq1+ Freq1- Freq2+ Freq2- Freq3+ St/Sw 1 St/Sw2 St/Sw4 (opt) AN. IN RET An. IN4/RTD An.IN3/RTD R TD Exec An.IN2 AN.IN1 DAC1- DAC
119 Lab 1: Wiring the MicroMV Bench Testing Power the MicroMV per the diagrams in the previous pages and the MicroMV manual.
120 Progress Check Bench Testing 3-7 Answer these questions before continuing to the next section of this manual. Question 1: two pieces of equipment needed to check the configuration of the MicroMV? Question 2: Question 3: Question 4:
121 Configuration Data Entry Configuration Menus Configuration E. A. 4-1 In this section you will learn the how to configure the MicroMV After completing this section, you should be able to: Explain the difference between configuring the MicroMV with magnetic switches and the Dynacom program Install the Dynacom program. Configure a MicroMV using the Dynacom program. Set up and test flow calculations using the Dynacom program.
122 Configuration File through Dyancom Introduction to the MicroMVL Software The Micro MV Liquid software is constructed around a menu-driven organization New Create a new file to store all the programmed information for one Micro MV Liquid Flow Computer. After a file is opened it becomes the currently active file, its contents can be viewed and its parameters can be edited. Open Use this function to open an existing configuration file. After a file is opened it becomes the currently active file, its contents can be viewed and its parameters can be edited. When this function is chosen a list of existing configuration files is displayed. Select the file to be opened. Close Close or exit configuration file. Save When permanent modifications are performed on a file, user must save the new changes before exiting the program, or proceeding to open a different file. Save As Use Save As to save the parameters in the currently active file (that is, the parameter values currently being edited) to a new file. The original file will remain in memory.
123 View Menu View Drawings Select the wiring diagram to be displayed. (See details in chapter 1) Back Panel Analog Input RTD Analog Output Status Input Switch Output Turbine Densitometer RS 232 RS 485
124 Tools Com Settings Port - Communication Port Number (1,2,3,4) Enter the PC port used to communicate with the Micro MV Liquid Flow Computer. Baud Rate Note: this parameter must be set the same for both the PC and the Micro MV Liquid Flow Computer for communication to occur. Baud rate is defined as number of bits per second. The available selections are 1200, 2400, 4800, 9600, or Parity Note: this parameter must be set the same for both the PC and the Micro MV Liquid Flow Computer for communication to occur. RTU - NONE ASCII - EVEN or ODD Set the parity to match the Modbus Type. Data Bits Options available: 5, 6, 7, or 8. Generally used: 8 for RTU mod, 7 for ASCII mode. Stop Bits Options available: 1, 1.5,or28. Generally used: 1.
125 Tools - Modbus Modbus Type Note: this parameter must be set the same for both the PC and the Micro MV Liquid Flow Computer for communication to occur. The Modbus Communication Specification is either Binary RTU or ASCII. Unit ID Number The Unit ID Number is used strictly for communication purposes; it can take any value from 1 to 247. Only one master can exist in each loop. Note: Do not duplicate the Unit ID number in a single communication loop! This situation will lead to response collisions and inhibit communications to units with duplicate ID numbers. Time Out The amount of time in seconds the program will wait for an answer from the flow computer. Retry Times Retry times for the program to communicate with the flow computer in case of timeout.
126 Tools - Comm Auto Detect Settings Click this button and the configuration program will attempt to communicate with a single Micro MV Liquid Flow Computer at different baud rates and formats. Failure to communicate can occur because of a wiring problem, wrong PC port selection, communication parameter mismatch between PC and Micro MV Liquid Flow Computer (Modbus type, parity, baud rate, etc.) or lack of power to the Micro MV Liquid Flow Computer. To use this feature, the user must insure that only one Micro MV Liquid Flow Computer is connected to the PC. More than one Micro MV Liquid Flow Computer in the loop will cause data collisions and unintelligible responses
127 Meter Data Meter ID Up to 8 characters. This function will serve as meter tag. Flow Equation Type (1-4) 1 =API 14.3 (NEW AGA3) 2 =Wedge 3 =Venturi 4 =AGA7 (TURBINE or Frequency Type Input) 5 = V-Cone Select the desired calculation mode. API 14.3 is the latest orifice calculations introduced in 1994 All new installations are recommended to use API 14.3 for orifice calculations.
128 Meter Data Flow Rate Low/High Limit The high/low flow rate alarm is activated, when net flow rate exceeds or is below the set limit. The alarm will be documented with time, date, and totalizer. Volume Units Select desired units 0=BBL, 1=GAL, 2=CF, or 3=MCF. The Micro MV Liquid Flow Computer will perform the proper conversion routine from barrels to gallons to cubic feet. Water Salinity Factor Water salinity factor is controlled by the amount of salt in water. Typical value would be around 1.2. The salinity value affect water correction factor for the net calculations.
129 Meter Data API 14.3 Data (New AGA3) To set API 14.3 flow parameters, set Flow Equation Type = 1, and click eq. settings button. You will then access a submenu in which you can set the parameters below. Pipe I.D. Inches Orifice ID Inches Pipe ID in inches is the measured inside pipe diameter to 5 decimals at reference conditions. Orifice ID in inches is the measured diameter of the orifice at reference conditions. DP Cut off The Micro MV Liquid Flow Computer suspends all calculations whenever the DP, in inches of water column, is less than this value. This function is vital for suppressing extraneous data when the DP transmitter drifts around the zero mark under no-flow conditions.
130 Meter Data Y Factor (0=None,1=Upstream,2=Downstream) Y factor is the expansion factor through the orifice. The user must enter the position of the pressure and temperature sensors. Select y=1 if the sensors are installed upstream of the orifice plate. Select y=2 if the sensors are down stream of the orifice plate. Isentropic Exponent (Specific Heat) Ratio of specific heat is a constant associated with each product. Even though it varies slightly with temperature and pressure, in most cases it is assumed as a constant. Viscosity in Centipoise Viscosity is entered in centipoise even though viscosity will shift with temperature and pressure; the effect on the calculations is negligent. Therefore using a single value is appropriate in most cases. Reference Temperature of Orifice Reference temperature of orifice is the temperature at which the orifice bore internal diameter was measured. Commonly 68 F is used.
131 Meter Data Orifice Thermal Expansion Coeff. E-6 Orifice thermal expansion is the linear expansion coefficient of orifice material. Type 304 and 316 Stainless9.25 E-6 Monel7.95 E-6 Carbon Steel6.20 E-6 Reference Temperature of Pipe Reference temperature of pipe is the temperature at which the pipe bore internal diameter was measured. Commonly 68 F is used. Pipe Thermal Expansion Coeff. E-6 Pipe thermal expansion is the linear expansion coefficient of pipe material. Type 304 and 316 Stainless9.25 E-6 Monel7.95 E-6Carbon Steel6.20 E-6
132 Meter Data Wedge Meter Data To set Wedge meter flow parameters, Flow Equation Type = 2, and click eq. settings button. You will then access a submenu in which you can set the parameters below. Pipe I.D. Inches Orifice ID Inches Pipe ID in inches is the measured inside pipe diameter to 5 decimals at reference conditions. Orifice ID in inches is the measured diameter of the orifice at reference conditions. DP Cutoff The Micro MV Liquid Flow Computer suspends all calculations whenever the DP, in inches of water column, is less than this value. This function is vital for suppressing extraneous data when the DP transmitter drifts around the zero mark under no-flow conditions.
133 Flow Coeff. Kd2 and Expansion Factor Fa Flow Rate (GPM) DP SG F a K d2 DP ( x F a x K d 2 ) SG differential pressure,inches of liquid specific gravity at Expansion coefficient of Discharge coefficient of flow conditions wedge wedge water
134 Meter Data Cont d. Venturi Data To set Venturi flow parameters, set Meter Data Flow Equation Type = 3, and click eq. settings button. You will then access a submenu in which you can set the parameters below. Pipe I.D. Inches Pipe ID in inches is the measured inside pipe diameter to 5 decimals at reference conditions. Orifice ID Inches Orifice ID in inches is the measured diameter of the Venturi throat. DP Cutoff The Micro MV Liquid Flow Computer suspends all calculations whenever the DP, in inches of water column, is less than this value. This function is vital for suppressing extraneous data when the DP transmitter drifts around the zero mark under no-flow conditions.
135 Meter Data Cont d. Y Factor (0=None,1=Upstream,2=Downstream) Y factor is the expansion factor through the Venturi. The user must enter the position of the pressure and temperature sensors. Select y=1 if the sensors are installed upstream of the Venturi. Select y=2 if the sensors are down stream of the Venturi. Isentropic Exponent (Specific Heat) Ratio of specific heat is a constant associated with each product. Even though it varies slightly with temperature and pressure, in most cases it is assumed as a constant. Reference Temperature of Orifice Reference temperature of orifice is the temperature at which the orifice bore internal diameter was measured. Commonly 68 F is used.
136 Meter Data Cont d. Orifice Thermal Expansion Coeff. E-6 Orifice thermal expansion is the linear expansion coefficient of Venturi throat material. Type 304 and 316 Stainless9.25 E-6Monel7.95 E-6Carbon Steel6.20 E-6Pipe Thermal Expansion Coeff. E-6 Pipe thermal expansion is the linear expansion coefficient of pipe material. Type 304 and 316 Stainless9.25 E-6Monel7.95 E-6Carbon Steel6.20 E- 6Discharge Coefficient C This value is the discharge coefficient for Venturi flow equations. The default value is
137 AGA AGA 7 Data (Turbine or Frequency-generating Flow Meter) To set AGA 7 flow parameters, set Meter Data Flow Equation Type = 4 and click eq. settings button You will then access a submenu in which you can set the parameters below. K Factor K Factor is the number of pulses per unit volume, i.e pulses/unit. The meter s tag would normally indicate the K Factor. Meter Factor Meter Factor is a correction to the K Factor for this individual meter, applied multiplicatively to the K factor. Flow Cutoff Frequency (0-99) The Micro MV Liquid Flow Computer will quit totalizing, when frequency is below the set limit. This feature is to reduce extraneous noise appearing as data when the meter is down for period of time. The totalizer will stop totalizing when the turbine frequency is below the limit. Mass Pulse Enter 1 to select mass pulse input in LB.
138 AGA Retroactive Meter Factor If zero is selected, the meter factor will not apply to the entire batch. It will only apply from the time the new meter factor is entered. Retroactive meter factor, on the other hand, will apply to the entire batch and the entire batch is re-calculated, using the new meter factor. Gross Include Meter Factor Enter 1 to include meter factor in gross flow. Linear Factor Enter the different correction factors for the meter at different flow rates. The flow computer will perform linear interpolation. Notice that even though using this feature to enhance the measurement accuracy, performing audit trail on a linearized meter factor is very difficult.
139 V-Cone V-Cone Data Flow Equation Type = 5 Meter I.D. Cone ID Meter ID in inches is the measured inside pipe diameter at reference conditions. Cone ID is the measured diameter of the Cone at reference conditions. DP Cutoff The Micro MV Liquid Flow Computer suspends flow rate calculations whenever the DP, in inches of water column, is less than this value. This function is vital for suppressing extraneous data when the DP transmitter drifts around the zero mark under no-flow conditions.
140 VCone Cont d. Y Factor Selection & Description 0 Non-Compressible Fluids 1 Compressible Fluids Precision Tube 2 Compressible Fluids Wafer and Cone Isentropic Exponent (Specific Heat) Ratio of specific heat is a constant associated with each product. Even though it varies slightly with temperature and pressure, in all cases it is assumed as a constant. Flow Coefficient Enter flow coefficient of the meter. Pipe Thermal Expansion Coefficient E-6 Pipe material coefficient of thermal expansion. Note: the value is typically between 5.0e-6 and 10.0e-6. Cone Thermal Expansion Coefficient E-6 Cone material coefficient of thermal expansion. Note: the value is typically between 5.0e-6 and 10.0e-6.
141 Other Parameters Company Name Up to 20 characters. The company name appears in the reports. Meter Location Up to 20 characters. This entry appears only in the report and serves no other function. Day Start Hour (0-23) Day start hour is used for batch operation. If daily batch is selected, the batch will end at day start hour, all batch totalizers and flow-weighted values are reset. Disable Alarms Use Disable Alarms to ignore alarms. When the alarm function is disabled alarms are not logged. Alarms are also not logged if the DP is below the cut-off limit. Battery Voltage Reading Enable this feature to read battery voltage. The battery alarm low is activated, when the voltage is below 11.2 volts. Old CPU boards do not have this feature. Uncheck the box to disable battery low alarm.
142 Other Parameters Common Parameters This feature allows the Flow Computer to use the transmitters on meter one to substitute and compensate for meter two. Atmospheric Pressure This pressure is local pressure or contracted atmospheric pressure. (i.e PSI). Select Scale Value Scale value use high limit parameters. Full-scale value can be selected using with sign bit or as 4095 analog values. Example: Temperature high limit is set as 150 Degree F. and current temperature reading is 80 Degree F Scale value will read = 80/150x32767 (if 0 is selected), or 2184=80/150 x 4095 (if 1 is selected) Meter Bank Single or two meters run configuration per individual Micro MV Liquid Flow Computer. Enter '1', if two meters are connected to the flow computer. Bi-Directional This feature allows a status input to give direction for meter one and two, just meter one, meter two. Bi-directional totalizers will totalize accordingly. Stream Selection Single stream can be single meter or bank of two meters. Dual streams allow the user to monitor independent products on separate streams simultaneously.
143 Display Parameters Station Total Station total can add meter one and two, subtract meter one from meter two, or just ignore this feature by selecting none. Station Total does not affect, destroy or otherwise alter the data from either meter. When Station Total is other than none, an additional data parameter, Station Total, is generated by the Micro MV Liquid Flow Computer and appears in reports and on the live display monitor. Select Flow Rate Display The flow rate will be based on daily basis, hourly, or minute. Flow Rate Average Second The flow rate is averaged for 1-10 seconds to minimize fluctuating flow rate conditions. This number averages the current flow rate by adding it to the previous seconds flow rate, and then displays an averaged smoothed number. Only a low-resolution pulse meter requires this function.
144 Printing Print Intervals in Minutes (0-1440) When the second port (RS-232) of the Micro MV Liquid Flow Computer is configured as printer port, a snapshot report is generated every print interval (i.e., every five minutes, every hour, or every ten hours). Enter 0 to disable interval report. Disable Interval Report Enter 1 not to print interval report when there is on flow during the batch. GM/CC Conversion Factor This factor is used to reference the density to density of water (i.e ) to establish specific gravity.
145 Run Switching Run Switching Run switching is used to switch from tube one to tube two, when flow rate reaches certain limits. The Micro MV Liquid Flow Computer has one active output that can be dedicated to this function. The time delay allows for some delay in switching. Note: if Run Switching is being used, then the meter should be configured for a single stream (see Set Up under Meter). Run Switch High Set Point When this flow rate value is exceeded and after the delay timer expires, the switch output will activate. This output normally opens meter run two. The Micro MV Liquid Flow Computer provides open collector type output that requires external power. Run Switch Low Set Point When the flow rate drops below this value and stays below it until the delay timer expires, the output switch will be turned off to shut meter two.
146 Daylight Saving Time (DST) Daylight Saving Time (DST) Enabling Daylight Saving Time (also called Summer Time ) sets the Flow Computer to automatically forward its time by one hour at 2:00 AM on a preset day ( Spring Forward ) of the year and roll back on a second date( Fall Back ). If left in auto mode, the computer calculates the DST dates based on USA standards, which are, Spring Forward the first Sunday of April and Fall Back the last Sunday of October. For countries with other DST dates, the user can enter dates manually. For example, European Summer Time starts the last Sunday in March and ends the last Sunday in October. Effects of DST on Historical Data Given the sudden time change that DST creates, the historical reports will show an hour with zero flow at 2:00 AM of Spring Forward Day and an hour with double flow at 1:00 AM of Fall Back Day, to achieve consistent 24-Hour a day flow records.
147 INPUT/OUTPUT I/O TRANSDUCER INPUT TAGS Up to 8 alphanumeric ID number. The transmitters are referred to according to the TAG ID. All alarms are labeled according to TAG ID. The multi-variables are referred to according to the TAG ID. All alarms are labeled according to TAG ID. STATUS INPUT/SWITCH OUTPUT ASSIGNMENT Status Input Assignment User can select any one of status input and assign it to input point. Assignment Comments 1 End Meter#1 Batch End the batch for Meter #1 and reset batch totalizer 2 End Meter#2 Batch End the batch for Meter #2 and reset batch totalizer 3 totalizers End Meter#1/#2 Batch End the batch for Meter#1 and #2; reset both batch 4 Alarm Acknowledge Reset the previous occurred alarms output bit 5 meters Flow Direction Off = forward and ON = reverse. For bi-directional 6 Spare Input#1 7 Spare Input#2 8 Spare Input#3 9 Event Status 10 Product ID Bit 0 Product ID Bits: Before ending batch, user can use status bits to select next product. These bits are read immediately at batch end.see the following table to specify a product. 11 Product ID Bit 1 12 Product ID Bit 2 13 Print Request Step 1: set port 2 RTS type to 1 ( Printer) Step 2: When this status is activated, the Micro MV Liquid Flow Computer will send the Request Report to the printer via the printer port. 14 Calibration Mode 15 Meter#2 Flow Direction 16 Display Freeze Set to ON to halt scrolling and allow for continuous monitoring 17 Display Toggle The display will scroll as the user toggles the status
148 Product ID Bits Product Bit 2Product Bit 1Product Bit 0Product Number001= 1010= 2011= 3100= 4101= 5110= 6111= 7 Examples: Assign Status Input #1 5 Assign Status Input #2 14 Assign Status Input #3 15 User is using status input #1 to monitor the flow direction of a bidirectional meter, and is using the remaining three inputs to monitor the product ID. When Status Input #2= 0 and #3= 1 and #4= 0, then product #2 is being monitored.
149 Switch Output Assignment User can assign an output to each of the Micro MV Liquid Flow Computer s output switches from this list. The Micro MV Liquid Flow Computer switch outputs are open collector type, requiring external D.C power. Outputs in the top list, Pulse Outputs, require a definition of pulse output per unit volume. Therefore a Pulse Output Width must be defined when one of these switch types are chosen. These outputs are available through switches 1 or 2 only. Outputs in the bottom list, Contact Type Outputs, are ON/OFF type outputs. They can be assigned to any of the four switch outputs. Switches 1 and 2 can be pulse or contact type output; switches 3, 4 are contact-type output only. Assignments Pulse Outputs Meter 1 Meter 2 Station Gross Net Mass
150 Assignments Contact Type Outputs METER #: 1 2 Meter-Independent Parameters Batch Ended (5 sec) Day Ended (5 seconds) 119 Batch Preset Warn Dens. Period Low 146 Batch Preset Dens. Period High 147 Meter Down Temperature Out of Range 148 Flow Low Gravity Out of Range 149 Flow High Pressure Out of Range 150 Temperature Low Active Alarms 151 Temperature High Occurred Alarms 152 Pressure Low Status Input #1 157 Pressure High Run Switch 158 Density Low Remote Control 159 Density High Boolean Points* Dens.Temp Low Examples: Dens.Temp High = Pressure out of range DP Low = Net flow rate, station total DP High = Flow rate high, Meter #1 Direction Forward DFC MicroMV Flow Direction Computer Course Reverse
151 Pulse Output and Pulse Output Width Pulse Output is used to activate a sampler or external totalizer. The number selected will be pulses per unit volume or per unit mass. If 0.1 pulse is selected, the one pulse will be given every 10-unit volumes has passed through the meter. Pulse Output Width is the duration, in milliseconds, of one complete pulse cycle (where each cycle is the pulse plus a wait period, in a 50/50 ratio). For example: If POW = 500 msec, the Micro MV Liquid Flow Computer at most can produce one pulse each second regardless of the pulse per unit volume selected (500 msec pulse msec wait). If POW = 10 msec the Micro MV Liquid Flow Computer can produce up to 50 pulses per second. The Micro MV Liquid Flow Computer s maximum pulse output is 125 pulses/sec. The Pulse Output in combination with the Pulse Output Width should be set so that this number is not exceeded. Note Boolean Points Assignment 170 Boolean Point 70 Boolean Points Assignment 171 Boolean Point 71 etc.
152 Analog Output Assignments TAG ID Up to 8 alphanumeric ID number. The transmitters are referred to according to the TAG ID. All alarms are labeled according to TAG ID 4-20mA 4-20mA selection must be proportional and within the range of the selected parameter. 4-20mA signals are 12 bits. Assignments: Meter 1 Meter 2 Station Gross Flowrate Net Flowrate Mass Flowrate
153 Analog Output Assignment Meter 1 Meter2 Meter-Independent Parameters DP Spare #1 33 Temperature Spare #2 34 Pressure Remote Control* 35 Density LB/FT Density Temperature LB/FT DP LOW DP HIGH API Specific Gravity Density Pressure API@ SG@ Meter PID Density GM/CC 44 45
154 Liquid Flow Computer Display Assignment Display assignment selects up to 16 assignments. The Micro MV Liquid Flow Computer will scroll through them at the assigned delay time. Assignment 4 Digits Selection, where 1st Digit: 0: Forward 1: Reverse 2nd Digit: 1: Meter#1 2: Meter#2 3: Station 3rd and 4th Digit: Selection (see table below)
155 Digit 3 and 4 assignment Selection Description 01 Flow Rate 02 Batch Total 03 Daily Total 04 Cum. Total 05 Previous Daily Total 06 Previous Batch Total 07 DP/DP Low, High 08 Temperature, Pressure 09 Density, Density at Base 10 Density Frequency, Densitometer Period, Density GM/CC 11 SG,SG@60, API, API@60 12 Product 13 Cali. Mass Flow Rate 14 Date/Time 15 Alarm 16 Spare #1, Spare #2 17 Density Temperature, Density Pressure 18 Last Batch Average Temperature, Pressure, Density 19 Last Batch Average API, SG, GM/CC 20 Program Variable #1-#4 21 Program Variable #5-#8
156 2 Digits Selection 20 Program Variable #1-#4 21 Program Variable #5-#8 22 Battery Voltage/ Image Version Examples: 0113 Display Meter #1 Forward Previous Daily Gross Total 0104 Display Meter #1 Forward Batch Gross Total 1104 Display Meter #1 Reverse Batch Gross Total 1206 Display Meter #2 Reverse Batch Mass Total 138 Display Meter #1 Temperature
157 Modbus Shift Reassigns Modbus address registers on one Micro MV Liquid Flow Computer to variables for easy polling and convenience. Use Modbus Shift to collect values in scattered Modbus registers into a consecutive order. The Micro MV Liquid Flow Computer will repeat the assigned variables into the selected locations. Note: some Modbus registers are 2 byte/16 bit, and some are 4 byte/32 bit. Register size incompatibility could cause rejection to certain address assignments. Refer to the manual for more details and a listing of the Modbus Address Table Registers. Note: Modbus shift registers are for READ ONLY Example: you want to read the current status of switches #1 and #2 (addresses 2617 and 2618) and the Forward and Reverse Daily Gross Total for Meter #1 (Addresses 3173 and 3189). Make assignments such as: 3082= = = =3189 *Note: Modbus shift registers are READ ONLY registers.
158 Boolean Statement & Functions Each programmable Boolean statement consists of two Boolean variables optionally preceded a Boolean 'NOT' function (/) and separated by one of the Boolean functions (&, +, *). Each statement is evaluated every 100 milliseconds. Boolean variables have only two states 0 (False, OFF) or 1 (True, ON). Any variable (integer or floating point) can be used in the Boolean statements. The value of Integer or floating point can be either positive (TRUE) or negative (FALSE). Boolean Functions Symbol NOT / AND & OR + EXCLUSIVE OR * Boolean points are numbered as follows: 0001 through 0050 Digital I/O Points 1 through Status Input/Digital Output # Status Input/Digital Output # Status Input/Digital Output # Status Input/Digital Output # Spare 0070 through 0099 Programmable Boolean Points (Read/Write)
159 Boolean Points 0100 through 0199 Meter #1 Boolean Points 0200 through 0299 Meter #2 Boolean Points 1st digit always 0, 2nd digit meter number, 3rd and 4th digit-selection 0n01 Gross Flow Pulses 0n02 Net Flow Pulses 0n03 Mass Flow Pulses 0n04 Spare 0n05 Meter Active 0n06 Batch Ended Flag (last 5 Seconds) 0n07 Any Active Alarms 0n08-0n10 Spare 0n11 DP Override in use 0n12 Temperature Override in use 0n13 Pressure Override in use 0n14 Density Override in use 0n15 Densitometer Temperature Override in use 0n16 Densitometer Pressure Override in use 0n16-0n19 Spare 0n20 Flow Rate High Alarm 0n21 Flow Rate Low Alarm 0n22 Temperature High Alarm 0n23 Temperature Low Alarm 0n24 Pressure High Alarm 0n25 Pressure Low Alarm 0n26 Density High Alarm 0n27 Density Low Alarm 0n28 Densitometer High Alarm 0n29 Densitometer Low Alarm 0n30 DP Inches High Alarm 0n31 DP Inches Low Alarm 0n32 Densitometer Period High Alarm 0n33 Densitometer Period Low Alarm 0n34 Densitometer Pressure High Alarm 0n35 Densitometer Pressure Low Alarm
160 Boolean Points 301 through 0699 Spare 0701 through 0799 Station Boolean Points Station Gross Flow Pulses Station Net Flow Pulses Station Mass Flow Pulses N/A 0705 Day Ended Flag (Last 5 Seconds) Spare 0711 Run Switch 0801 through 0899 Command Boolean Points Request Snapshot Report Alarm Acknowledge End Meter #1 Batch End Meter #2 Batch 805 End Meter#1 and Meter#2 Batch
161 Input Assignment DP/Pressure/Temperature Assignment The Micro MV Liquid Flow Computer provides 4 analog inputs, 4 status input/switch outputs, one density frequency input, two turbine inputs, one 4 wire RTD inputs, and multi variable inputs. In order for the Micro MV Liquid Flow Computer to read the live input, the input must be properly assigned and properly wired. 0= Not Used 3= Analog 3 7 = Dens.Freq (Not Selectable) 1= Analog 1 4= Analog 4 10 = Multi. Variable Module 2= Analog 2 5= RTD 1 21= Analog 5 22= Analog 6 23= Analog 7 24= Analog 8 24= Analog 9
162 A/I assignment 4mA and 20mA Enter the 4mA value and the 20mA value for the transducer. Note that these values cannot be edited if Assignment = 0 or 10. Therefore to set the parameter the Temperature Assignment parameter cannot equal zero, or 10. Low/High Limit Enter the low and high limits. When live values exceeds high limit or less than low limit, an alarm log will be generated. Note that this value cannot be edited if Assignment = 0. Therefore to set the parameter Meter Temperature Low Limit the Temperature Assignment parameter cannot equal zero.
163 Maintenance Value It is the value to be used when the transmitter fails or while is being calibrated. Set fail code to 1 while calibrating. Note that this value cannot be edited if Assignment = 0. Therefore to set the parameter Meter Temperature Maintenance the Temperature Assignment parameter cannot equal zero. Fail Code Fail Code 0: always use the live value even if the transmitter failed. Fail Code 1: always use the maintenance value Fail Code 2: use maintenance value if transmitter failed. I.e. 4-20mA is >21.75 or <3.25)
164 Stack DP The Micro MV Liquid Flow Computer allows the user to select dual DP transmitters on each meter for better accuracy and a higher range flow. Use in conjunction with the DP Switch High % parameter setting. DP Switch High % The Micro MV Liquid Flow Computer will begin using the high DP when the low DP reaches the percent limit assigned in this entry. Example: DP low was ranged from 0-25 inches and switch % was set at 95%. When low DP reaches in (= 0.95 * 25) the Micro MV Liquid Flow Computer will begin using the high DP provided the high DP did not fail. When the high DP cell drops below 23.75, the Flow Computer will start using the Low DP for measurement.
165 Density Density Type If live density is connected to the meter, user must enter the density type. Raw density frequency or a 4-20mA input can be selected. This density will be used to calculate mass flow and net flow. Density Type Type 0 Densitometer None Density 4 20 ma Type Type 0 Type 1 Type 2 Specific Gravity 4-20mA API Gravity 4-20mA Density Signal 4-20mA in GM/CC Type ma
166 Density Density 4-20mA Type (Density Unit) Note that this type of input requires the user to choose a subtype, as indicated in the table above. Use Meter Temperature as Density Temperature Allows the meter temperature to calculate the effect of temperature on the densitometer. Make sure the meter and density temperature are similar to avoid measurement errors. Use Meter Pressure as Density Pressure To allow the meter pressure to calculate the effect of pressure on the densitometer. Make sure the meter and density pressure are similar to avoid measurement errors. Spare Assignment Spare input is used for display and alarm purpose only. It is not used in the calculation process. To read spare input value, use the diagnostic screen
167 Communication Ports Unit ID Number The Unit ID Number is used strictly for communication purposes; it can take any value from 1 to 247. Note: Do not duplicate the Unit ID number in a single communication loop! This situation will lead to response collisions and inhibit communications to units with duplicate ID numbers. Only one master can exist in each loop. Flow Computer Ports Port #1/#3 Modbus Type Note: this parameter must be set the same for both the PC and the Micro MV Liquid Flow Computer for communication to occur. The Modbus Communication Specification is either Binary RTU or ASCII.
168 Port 1 & 3 Port #1/#3 Parity Note: this parameter must be set the same for both the PC and the Micro MV Liquid Flow Computer for communication to occur. RTU - NONE ASCII - EVEN or ODD Set the parity to match the Modbus Type. Port #1/#3 Baud Rate Note: this parameter must be set the same for both the PC and the Micro MV Liquid Flow Computer for communication to occur. Baud rate is defined as number of bits per second. The available selections are 1200, 2400, 4800, 9600, or Port #1/#3 RTS Delay This function allows modem delay time before transmission. The Micro MV Liquid Flow Computer will turn the RTS line high before transmission for the entered time delay period.
169 Port 2 Port #2 Baud Rate Baud rate is defined as number of bits per second. The available selections are 1200, 2400, 4800, 9600, or Port #2 Modbus Type Note: this parameter must be set the same for both the PC and the Micro MV Liquid Flow Computer for communication to occur. The Modbus Communication Specification is either Binary RTU or ASCII. Port #2 Parity RTU - NONE ASCII - EVEN or ODD Set the parity to match the Modbus Type. Select 0=RTS, 1=Printer RTS line has dual function selection: either RTS for driving request to send or transmit to serial printer. To use serial printer interface for printing reports, i.e. batch, daily, and interval Connect the serial printer to RTS and common return, and select 1 for printer. Port 2 RTS Delay This function allows modem delay time before transmission. The Micro MV Liquid Flow Computer will turn the RTS line high before transmission for the entered time delay period.
170 Printer Board Baud rate is defined as number of bits per second. The available selections are 1200, 2400, 4800, or Printer Number of Nulls This function is used because no hand shaking with the printer is available and data can become garbled as the printer s buffer is filled. The Micro MV Liquid Flow Computer will send nulls at the end of each line to allow time for the carriage to return. Printers with large buffers do not require additional nulls. If data is still being garbled, try reducing the baud rate to 1200.
171 Integration To 3 rd Party Slave Unit The Micro MV can poll up to three slaves Slave Unit The Slave Unit ID Number is used strictly for communication purposes It can take any value from 1 to 247. VT Variable Type Variable type describes the position of high, low words of slave device. When a 32 bits (two words) register is polled, it is essential to define where the highest significant word is.
172 Slave Data Definetion Code Description Sequence in words 0 2 registers of 16 bits integers High, Low 1 1 register of 32 bits floating Low, High 2 2 registers of 16 bits floating Low, High 3 1 register of 32 bits integer High, Low 4 2 registers of 16 bits integers Low, High 5 1 register of 32 bits floating High, Low 6 2 registers of 16 bits floating High, Low 7 1 register of 32 bits integer Low, High
173 Destination Address Destination defines where the polled variables are used in the flow computer. Variable statements and other pre-defined locations are accepted. Pre-defined locations are temperature, pressure, and density. Variables can be accessed through the display and reports. 0 Floating Var#1 (7086) 10 Integer Var#1(5081) 20 Meter#1 TF.Deg.F 1 Floating Var#1 (7087) 11 Integer Var#2(5083) 21 Meter#1 PF.PSIG 2 Floating Var#1 (7088) 12 Integer Var#3(5085) 22 Meter#1 DF.LB/FT3 3 Floating Var#1 (7089) 13 Integer Var#4(5087) 23 Meter#2 TF.Deg.F 4 Floating Var#1 (7090) 14 Integer Var#5(5089) 24 Meter#2 PF.PSIG 5 Floating Var#1 (7091) 15 Integer Var#6(5091) 25 Meter#2 DF.LB/FT3 6 Floating Var#1 (7092) 16 Integer Var#7(5093) 7 Floating Var#1 (7093) 17 Integer Var#8(5095) 8 Floating Var#1 (7094) 18 Integer Var#9(5097) 9 Floating Var#1 (7095) 19 Integer Var#10(5099)
174 ADDR - Source Address Source defines the actual registers being polled from the slave device. Source address is considered to be continuous without zero address in between. Example: Meter #1 density uses micro motion density. Slave ID = Micro Motion ID VT = 2, DEST=22, ADDR=248
175 Batch Parameters Day Start Hour Day start hour is used for batch operation. If daily batch is selected, the batch will end at day start hour. All batch totalizers and flow weighted values are reset. Batch Type If daily batch selected, the batch will end at the day start hour. On demand type will end the batch, when the Micro MV Liquid Flow Computer is requested to end the batch manually. Time-based batch type will end batch at batch set date and day start hour. Flow-based batch type will end batch when flow drops below cut off frequency. Batch Starting Date If time based batch is selected, use this entry to determine the date to end the batch. Disable Batch Preset Disable batch preset is to eliminate the warning and alarms associated with batch presets. Batch Preset does not end batch, it will provide switch output and warning indications. Batch Ticket Number This number will increment by one at the end of batch. Next Batch Preset/Warning Volume Enter the batch preset volume and batch preset warning for the next batch. Next Batch Product Number Enter the product number for the next batch.
176 Products End the current batch is required to use the new product data settings. Product Number Up to 16 products. Product Name Up to 16 characters. Table A is for Crude, the Table B is for refined products, the Table C is for special products - butadiene, toluene. OLD Tables are used for LPG and NGLs. Table selection: 0= 5A/6A 8= OLD23/24 16= Water 1= 6A 9= OLD24 17= Ethylene-API2565-NBS1045 2= 5B/6B 10= 24C 18= New 23/24 3= 6B 11= 6C 19= ASTM1550A/B 4= 23A/24A 12= API2565-Propylene 20= ASTM1550B 5= 24A 13= API2565 Ethylene 21= NIST14* 6= 23/24B 14= Pure Butadiene 22= PPMIX 7= 24B 15= NBS = Brine Water
177 Product Tables For this Product Use this Table Under these Conditions Crude oil, natural gasoline, drip gasoline 6A,24A Density is known Crude oil, natural gasoline, drip gasoline 5A/6A,23A/24A Live densitometer used Gasoline, naphthalene, jet fuel, aviation fuel, kerosene, diesel, heating oil, furnace oil 5B/6B,23B/24B live density is used Gasoline, naphthalene, jet fuel, aviation fuel, kerosene, diesel, heating oil, furnace oil 6B,24B No live density is used Benzene, toluene, styrene, ortho-xylene, meta-xylene, acetone 6C/24C All conditions LPG OLD 23/24 live density is used LPG OLD 24 Density is known LPG New 23/24 All conditions ASTM1550A/B live density is used ASTM1550B Density is known Mixture Property NIST14 All conditions PPMix PPMIX Live density is used
178 Products Tables -Cont d. When Ethylene-API2565-NBS1045 is selected and API2565 is out of range, NBS 1045 is used for calculations. Light products: GPA15 is used to calculate vapor pressure. Pressure correction is performed per Ch , Ch Alpha T E-6 The Alpha T will be prompted only if table 6C or 24C is selected. Enter Alpha T value, the number entered will be divided by Example: Entered Value 335 (Actual value ) This Parameter is Required For These Tables API Gravity at 60 Deg.F 1, 3, 11 Specific Gravity at 60 Deg.F 5, 7, 9, 10, 14 Density at 60 Deg.F 12, 13, 15, 16, 17 Alpha T E-6 10, 11
179 PID Parameters PID Configuration (PID) Proportional Integral Derivative control We call this function PID, however the flow computer performs Proportional Integral control. And does not apply the Derivative. The Derivative is not normally used in flow and pressure control operations and complicates the tuning operation Use Flow Loop (Valid entries are 0 or 1) Enter 1 if the computer performs flow control. Enter 0 if the flow computer does not perform flow control. Flow Loop Maximum Flow rate Enter the maximum flow rate for this meter. This rate will be basis for maximum flow rate to control at. Flow Set Point Enter the set point. The set point is the flow rate that the flow computer will try to control at.
180 PID Configuration Cont d Flow Acting forward or reverse Enter 0 if the control is direct acting, Enter 1 if the control is reverse acting. Direct acting is when the output of the controller causes the flow rate to follow in the same direction. The output goes up and the flow rate increases. A fail Close valve located in line with the meter will typically be direct acting. If the Controller output signal increases, the control valve will open more causing the flow rate to increase. Reverse acting is when the output of the controller causes the opposite action in the flow rate. A fail open valve in line with the meter will typically be reverse acting. If the Controller output increases the control valve will close some causing the flow rate to decrease. Care must be taken to study where the valves are located in relation to the meter and whether the valves are fail open or fail close to understand if the controller should be direct or reverse acting. Some control valves can be fail in position (especially Electrically actuated control valves). This valve should be studied to understand if the actuators themselves are direct or reverse acting.
181 PID Configuration Cont d Use Pressure Loop (Valid entries are 0 or 1) Enter 1 if the computer performs pressure control. Enter 0 if the flow computer does not perform pressure control. Pressure Maximum Enter the Maximum pressure for this meter. This pressure will be basis for Maximum pressure to control at. Pressure Set Point Enter the set point. The set point is the pressure that the flow computer will try to control at.
182 PID Cont d Pressure Acting forward or reverse Enter 0 if the control is direct acting, Enter 1 if the control is reverse acting. Direct acting is when the output of the controller causes the pressure to follow in the same direction. The output goes up and the pressure increases. A fail open valve located in the line down stream of the meter will typically be direct acting to maintain the pressure at the meter. An Increase in the output from the controller will cause the control valve to close thus causing the pressure to increase. Reverse acting is when the output of the controller causes the opposite action in the flow rate. A fail close valve in the line down stream of the meter will typically be reverse acting to maintain the pressure at the meter. An increase in the output signal will cause the valve to open, which will cause the pressure to be released thus causing the pressure to decrease. Care must be taken to study where the valves are located in relation to the meter and whether the valves are fail open or fail close to understand if the controller should be direct or reverse acting. Some control valves can be fail in position (especially Electrically actuated control valves). These valves should be studied to understand if the actuators themselves are direct or reverse acting.
183 System Data Output System Data Minimum Output Enter the minimum output percent (default to 0) System Data Maximum Output Enter the maximum output percent (default to 100.0) Signal Selection If flow loop and pressure loops are both configured in the PID control loop, select high or low signal to be the output. PID flow Base PID flow rate base can be gross, net, or mass flow rate.
184 PID Tuning Flow Controller Gain (Allowable Entries ) The gain is effectively 1/Proportional Band. The basis of theory for proportional band is the relationship of the percentage of the output of the controller to the percentage of the change of the process. In this case, if the control output changes 5% the flow rate should change 5%, the proportional band would be 1.0 and the gain would be 1.0. If the percentage of the output is 5% and the flow rate would change by 10%, the proportional band would be 2 and the Gain would be 0.5 However since you do not know until you are flowing the effect of the output on the flow rate, you have to start somewhere. A good starting point is to use a proportional band of 0.5 if the valve is properly sized.
185 PID Tuning Flow Controller Reset (Allowable Range ) Reset is the number of minutes per repeat is the time interval controller adjusts the output to the final control element. If the reset is set at 2, the flow computer will adjust the signal to the flow control valve every 2 minutes. If the Reset is set at 0.3, the output signal will be adjusted approximately every 20 seconds, until the process and set point are the same. The rule of thumb is the reset per minute should be set slightly slower that the amount of time it takes for the control valve and the flow rate to react to the flow computer output signal changing. This can only be determined when there is actual flow under normal conditions. It is best to start the reset at 0.3 or reset the signal every 3 minutes, if the control valve is properly sized.
186 PID Tuning Pressure Controller Gain (Allowable Entries ) The gain is effectively 1/Proportional Band. The basis of theory for proportional band is the relationship of the percentage of the output of the controller to the percentage of the change of the process. In this case, if the control output changes 5% the pressure should change 5%, the proportional band would be 1.0 and the gain would be 1.0. If the percentage change of the output is 5% and the pressure would change by 10%, the proportional band would be 2 and the Gain would be 0.5. However since you do not know until you are flowing the effect of the output on the pressure, you have to start somewhere. A good starting point is to use a proportional band of 0.5 if the control element is properly sized.
187 PID Tuning Pressure Controller Reset (Allowable Range ) Reset is the number of times per minute the controller adjusts the output to the control valve. If the reset is set at 2, the flow computer will adjust the signal to the final control element every 2 minutes. If the Reset is set at 0.3, the output signal will be adjusted approximately every 20 seconds, until the process and the set point are the same. The rule of thumb is the reset per minute should be set slightly slower that the amount of time it takes for the control valve and the pressure to react to the flow computer changing the output. This can only be determined when there is actually flow under normal conditions. It is best to start the reset at 0.3 or reset the signal every 3 minutes, if the control element is properly sized.
188 PID OPERATING Click PID Loops icon to display PID output percentage, flow, and pressure data. To change setup, select entries under PID menu.
189 Calibration Calibrations are performed under Calibration.. Select inputs to be calibrated, and then select full, single, offset calibration method. (See details in chapter 1) Calibrate Mode To calibrate Flow Computer, totalizers will continue at same rate where live parameters will show actual value, i.e. flow rate, DP, pressure etc. Enter 1 to enable this feature. Set time (1-9 Hour) This entry is the duration for the calibrate mode. After time expires, the Micro MV Flow Computer will resume its normal operation. Mass Flow Rate Override Override the mass flow rate during the calibration.
190 Parameter Overrides Temperature Override This value is entered when no live temperature is available, or when a different value from the live value should be used. Pressure Override Pressure override can be used when no live pressure transmitter is connected to the Micro MV Liquid Flow Computer. DP Override DP override can be used when no live DP transmitter is connected to the Micro MV Liquid Flow Computer. API/SG/Density Override Enter Gravity Override to replace current gravity. The gravity override is a non-retroactive gravity and will not override the product file gravity. It only applies to the current running batch. Orifice ID Override Orifice ID in inches is the measured diameter of the orifice at reference conditions. Current Batch Preset Enter the value to override the current batch preset or batch preset warning volume
191 Parameter Override Equilibrium Pressure Override Enter equilibrium pressure override to the current batch. Alpha T E-6 Override Enter Alpha T Override to the batch. It will not affect the Alpha T value in the product file. Alpha T is the thermal expansion coefficient for the selected product. The flow computer divides by Example: = 355 / (value entered is 335 for an Alpha T of ) Wedge Fa Override and Wedge Kd2 Override Venturi C Override The value is the discharge coefficient for Venturi flow equations. The default value is.9950
192 SYSTEM DATE AND TIME Change the date and time for the flow computer. Reset Cumulative Totalizer Enter reset code to reset accumulated volume. Non-resettable gross and net accumulated volume will roll over at Non-resettable mass accumulated volume will roll over at Clear System Enter reset system code to reset all data. End Batch The batch will end if requested through this menu. The current batch totalizer and flow weighted data will reset to zero. Non-resettable totalizers are not affected by the batch resetting.

193 Historical Data VIEW, CAPTURE AND STORE To retrieve historical data, go to Historical Data menu. The View option retrieves the data from the flow computer but does not store the information into the database. The second option, Capture and Store, retrieves the information, shows it on the screen and stores it on the database. On any of these options, a small dialog like the following appears to select the amount of reports to get and from which one to start. The valid data entries are shown at the bottom of the dialog. The available types of reports are:
194 Historical Data Previous Hourly Data Up to 32 previous hourly data are stored in the Flow Computer. Enter first report and the Flow Computer will go backward from that selected report. Current hour cannot be selected. Previous Daily Data Up to 35 previous daily reports can be retrieved. Last Month Data Last month data is stored in the Flow Computer. Select meter number to display, print, or capture. Current month data cannot be retrieved. Alarm Report Up to 100 previous alarm data can be retrieved. The data are starting from the most recent to the oldest. Audit Report The audit trail report shows configuration parameter that has changed which could influence the calculated numbers. The Flow Computer provides up to 100 event logs. One purpose for audit trail is to back track calculation errors that result from mistakes by the operator of the flow computer operator. Batch Report Up to 32 previous batch reports can be retrieved
195 Viewing Previously Captured Data Once a report is stored in the database using the Historical Data Capture and Store option it can be seen using the Previously Captured Reports option under the Historical Data Menu. When the option is selected, a dialog will appear asking for the name of the report you want to see. There is a View last captured report option than will show the data acquired the last time from a device. If you want to see another report different than the last one just type the name of the report in the space provided. The browse button can be used to see the list of reports stored in the database.


196 Exporting & Printing Reports Once the data is retrieved from the Flow Computer it is shown in a report format, like the picture above. On this window there are several buttons. Arrow buttons let you go through all the reports captured. The Print Button (shown o the picture) lets you print the report to any printer installed in your computer. The printed version will look just like it is shown on the screen. The Export Button allows the user to save the report in different formats. Once the button is pressed a small dialog appears showing the different formats available (see following picture).
197 Exporting Reports Excel or TXT In the first box select the format you want the file to have. Excel, Word or HTML formats are recommended because they preserve the report format. The plain text formats (text-format, CSV comma separated values, tabseparated values) include all the information but will require user modification to improve readability. The other text formats are text or paginated text. IMPORTANT: when a report is exported to text format it can only be 80 character wide, thus, some numbers might appear together making it hard to determine their original values. (i.e. values and on following columns might appear as ). Once the export format is selected, press OK and a dialog will appear asking for the file name that you want for the report. Type in the name and press SAVE.
198 Scheduled Auto Polling Automatic Data Polling Use the Historical Data Scheduled Auto Polling to retrieve report information from devices in a periodic basis automatically. These are the following settings: Enable Automatic Data Retrieval: Check this option to enable the automatic polling. If the automatic polling function is enabled an AUTOPOLL message will appear on the application s status bar (bottom-right corner of the application window). Reports to Retrieve: check the reports you want to get from the devices, you can select as many as you want, just make sure the polling interval is long enough to allow the PC to retrieve the archive. For example, if the computer is programmed to poll 100 reports every 10 seconds, there will not be enough time to get the report before the next poll starts and data will be overlapped. Report Name: provide a name to the reports captured so they will be available for viewing, printing and exporting. Starting Day: Type the date where the poll is going to start. Select Every Day is the date doesn t matter. Polling Time: select the time you want the automatic polling to start, then select Poll One Time if you want to execute these poll only once or select Poll Every and type the polling interval for periodic polls. For example, to poll every hour and a half select Poll Every and type 90 in the Minutes field. IMPORTANT: Do not use straight hours as starting time (i.e. 7:00, 8:00). The flow computer calculates and updates its information at the beginning of the hour so if data is retrieved at this time it might be erroneous. Allow about 5 minutes for the flow computer to update the data. Polling List: Add all the units you want to get data from on every poll. You can add up to 100 units. To add a unit just click Add and then type the unit s Modbus ID number. NOTE: The file C:\AutoPoll.log will contain all the logs for the automatic poll, it will tell if there was a problem or if the data was retrieved successfully.
199 Data Entry Through Front Panel Display Four Keys ESC/Mode, Enter/Select, down arrow key, right arrow key These keys can be used by using a reflective object. The reflective object must be placed in front of the key to get a response. Function ESC/Mode Key This key serves dual functions. In order to access the data entry, the mode key has to be activated. The mode key is on/off type key. This key will get the security code prompt, and then using select, enter key with the arrow keys to access the program. Place the reflective object on and then off for each step. Once the data menu function access is completed, exit by using the escape key. Select/Enter Key It is used to stop screen from scrolling, to select data entry, and accept the data configurations. It is on/off type key. Place the reflective object in front of key, and then move away before the next step. Down Arrow Key, Right Arrow Key Scrolling keys, the Right Arrow Key function is to scroll right way for selecting the number to be changed, and then changing the number by using Down Arrow Key


200 MAIN MENU It consists primarily of series of topics. Your valid choices are the two Arrow Keys and select/enter key. Use Down or Right Arrow keys to make your selection and then use select/enter key. Use Esc/Mode key to go back to previous mode. Enter the right security code to be able to change data.

201 Calibrate /1=M.Var Enter 0 to calibrate analog input 1-4, RTD, analog output 1-4, or enter 1 to calibrate multivariable. Enable Calibrate Mode Enter 1 to enable calibrate mode. Calibration mode will set the flow computer to continue totalizing at same rate while all values are still showing live readings.

 Induce the signal into the analog input, wait for 10")
202 Calibrate Analog Input, RTD 0=Offset is a single point calibration that will offset zero and span. 1=Full zero and span must be calibrated. 2=Reset to factory calibration. Offset (Single Point) Induce the signal into the analog input, wait for 10 seconds for the reading to stabilize, then enter the offset.


203 Full (Zero and Span Calibration) Calibrate Low Point (4mA or 75,), induce the known live value for the low set point, and wait for 10 seconds for the reading to stabilize. Now enter in that value. Calibrate High Point (20mA or 120 ), induce the known live value for the high set point, and then wait for 10 seconds for the reading to stabilize. Now enter in that value. Reset (Use Default) Enter 2 to use manufacture default.

 1.The screen will show the minimum possible signal 4mA.")
 Enter 2 to use manufacture default.")
204 Calibrate Analog Output 0=Offset is a single point calibration that will offset zero and span. 1=Full zero and span must be calibrated. 2=Reset to factory calibration. Offset (Single Point) Enter the live output value reading in the end device. Full (Zero and Span Calibration) 1.The screen will show the minimum possible signal 4mA. Enter the live output value reading in the end device i.e. 4mA. 2. Now the flow computer will output full scale 20mA. Enter the live output i.e. 20mA Reset (Use Default) Enter 2 to use manufacture default.


205 Calibrate Multivariable Select DP, Pressure, or Temperature to be calibrated. Enter the calibrate method (0=Offset, 1=Full, 2=Reset).


206 Calibrate Multivariable Offset (Single Point) Induce the live value, then enter the offset Full (Zero and Span Calibration) 1.Calibrate Low Point - induces the low range signal, and enters in that value. Calibrate High Point - induce the high range signal, and enter in that value. Reset (Use Default) Enter 2 to use manufacture default

207 Override Meter No DEGF/PSIG/M.F. DEGF - Temperature Deg.F This value is entered when no live temperature is available, or when a different value from the live value should be used. PSIG Pressure PSIG This value is entered when no live temperature is available, or when a different value from the live value should be used. M.F. Meter Factor Enter the value to change current meter factor (AGA7 Method)
208 Override Meter VenturiC/Wedge FA/KD2 Venturi C Override is the discharge coefficient for venturi flow equations. The value is default to Wedge Fa Override and Wedge Kd2 Override Grav/DCF/EquP/AlphaT Gravity Override is to replace current gravity. The gravity override is a non-retroactive gravity. It will not override the product file gravity. It only applies to the current running batch. DCF- Density Correction Factor Equp Override is to replace current equilibrium pressure Alpha T Override is to replace current Alpha Tit will not effect the value in the product file. Enter number assuming that is divided by Example: = 355/ Orifice/Pipe/DP Orifice ID in inches is the measured inside pipe diameter to 5 decimals at reference conditions Pipe ID in inches is the measured diameter of the orifice at reference conditions. DP Override in inches of water.


209 Batch/Date/Time End Batch M1 Next Product Number - Enter the meter#1 product number for next batch. M2 Next Product Number Enter the meter#2 product number for next batch. End Batch Enter 1 to end meter#1, 2 to end meter#2, or 3 to end both meter batches.

210 Change Date/ Time Change Date Enter Month (1-12), Day (1-31), Year(0-99) and then enter 1 to change date. Change Time Enter Hour (0-23), Minute (0-59), Second (0-59) and then enter 1 to change time.

211 Print/Configuration Print Configuration


212 Configure Meter Flow Equation
213 AGA3/New AGA3/Venturi/Wedge Meter Pipe I.D. Inches Orifice ID Inches Pipe ID in inches is the measured inside pipe diameter to 5 decimals at reference conditions. Orifice ID in inches is the measured diameter of the orifice at reference conditions. DP Cutoff The Micro MV Gas Flow Computer suspends all calculations whenever the DP, in inches of water column, is less than this value. This function is vital for suppressing extraneous data when the DP transmitter drifts around the zero mark under no-flow conditions. Viscosity in Centipoise Even though viscosity will shift with temperature and pressure changes, the effect on the calculations is negligent. Therefore using a single value is appropriate in most cases. Enter viscosity in centipoise. Wedge Kd2 Venturi C Venturi C is the discharge coefficient for venturi flow equations. The value is default to.9950.
214 AGA7 (Frequency Input) K Factor K Factor is the number of pulses per unit volume, i.e pulses/unit. The meter s tag would normally indicate the K Factor. Meter Factor Meter Factor is a correction to the K Factor for this individual meter, applied multiplicatively to the K factor. Flow Cutoff The Micro MV Liquid Flow Computer will quit totalizing, when frequency is below the set limit. This feature is to reduce extraneous noise appearing as data when the meter is down for period of time. The totalizer will stop totalizing when the turbine frequency is below the limit.

215 Configure I/O Examples: 3 = Mass Flow Rate, Meter #1 24 = Density, Meter #2 9 = Gross Flow Rate, Station Total
216 Assignment Note: Assignments 4, 8, and 12 are not used. **Note: Remote control output can be controlled through the Modbus communication link
217 Meter I/O I/O 4mA Enter the 4mA value for the transducer. 20mA Enter the 20mA value for the transducer

218 Status Input /Switch Output Assignment Assignment

219 Product ID Bits Examples: Assign Status Input #1 5 Assign Status Input #2 14 Assign Status Input #3 15 User is using status input #1 to monitor the flow direction of a bidirectional meter, and is using the remaining three inputs to monitor the product ID. When Status Input #2= 0 and #3= 1 and #4= 0, then product #2 is being monitored.
220 Switch Output Assignment User can assign an output to each of the Micro MV Gas Flow Computer s output switches from this list. The Micro MV Gas Flow Computer switch outputs are sourcing through switch power input power. Outputs in the top list, Pulse Outputs, require a definition of pulse output per unit volume. A Pulse Output Width must be defined when one of these switch types are chosen. These outputs are available through switch 1 or 2 only. Outputs in the bottom list, Contact Type Outputs, are ON/OFF type outputs. They can be assigned to any of the four switch outputs. Switches 1 and 2 can be pulse or contact type output; switches 3, 4 are contact-type output only

221 Assignments Contact Type Output Boolean Points Assignment 170 Boolean Point 70 Boolean Points Assignment 171 Boolean Point 71 etc.

222 Flow Computer Display Assignment Display assignment select up to 16 assignments. The Micro MV Liquid Flow Computer will scroll through them at the assigned delay time Assignment 4 Digit Selection, where 1st Digit: 1: Reverse 0: Forward 2nd Digit: 2: Meter#2 1: Meter#1 3: Station 3rd and 4th Digit: Selection (see table below) Examples: 0113 Display Meter #1 Forward Previous Daily Gross Total 0104 Display Meter #1 Forward Batch Gross Total 1104 Display Meter #1 Reverse Batch Gross Total 1206 Display Meter #2 Reverse Batch Mass Total Display Meter #1 Temperature
223 Pulse Output Pulse Output and Pulse Output Width Pulse Output is used to activate a sampler or external totalizer. The number selected will be pulses per unit volume or per unit mass. If 0.1 pulse is selected, the one pulse will be given every 10 unit volumes has passed through the meter. Pulse Output Width is the duration, in milliseconds, of one complete pulse cycle (where each cycle is the pulse plus a wait period, in a 50/50 ratio). For example: if POW = 500 msec, the Micro MV Liquid Flow Computer at most can produce one pulse each second regardless of the pulse per unit volume selected (500 msec pulse msec wait). If POW = 10 msec the Micro MV Liquid Flow Computer can produce up to 50 pulses per second. The Micro MV Liquid Flow Computer s maximum pulse output is 125 pulses/sec. The Pulse Output in combination with the Pulse Output Width should be set appropriately
224 Other Day Start Hour (0-23) Day start hour is used for daily totalizer reset operation. Print Intervals in Minutes (0-1440) When the second port (RS-232) of the Micro MV Gas Flow Computer is configured as printer port, a snapshot report is generated every print interval (i.e., every five minutes, every hour, or every ten hours). Flow Rate Selection The flow rate will be based on hourly basis, daily, or minute. Disable Alarms Use Disable Alarms to ignore alarms. When the alarm function is disabled alarms are not logged. Alarms are also not logged if the DP is below the cut-off limit. Snapshot Report If the Micro MV Liquid Flow is configured as a printer port, then enter 1 to print snapshot report

225 Modbus Data MODBUS PROTOCOL TRANSMISSION MODE ASCII FRAMING Framing is accomplished by using colon (:) character indicating the beginning of frame and carriage (CR), line feed (LF) for the end of frame ASCII MESSAGE FORMAT RTU FRAMING Frame synchronization is done by time basis only. The Smart Flow Computer allows 3.5 characters time without new characters coming in before proceeding to process the message and resetting the buffer. RTU MESSAGE FORMAT
Dynamic Flow Computers, Inc Southwest Freeway, Suite 320 Stafford, TX Ph: (281) Fax: (281)
 Fax: (281)") Dynamic Flow Computers, Inc. 12603 Southwest Freeway, Suite 320 Stafford, TX 77477 Ph: (281) 565-1118 Fax: (281) 565-1119 www.dynamicflowcomputers.com Micro MV Training Section 1: Course Description Our
Dynamic Flow Computers, Inc. 12603 Southwest Freeway, Suite 320 Stafford, TX 77477 Ph: (281) 565-1118 Fax: (281) 565-1119 www.dynamicflowcomputers.com Micro MV Training Section 1: Course Description Our
MicroMVL/Micro100 Liquid OPERATORS MANUAL
 MicroMVL/Micro100 Liquid OPERATORS MANUAL Flow Computer Liquid Version 11104 W Airport Blvd, Suite 108 & 148 Stafford, Texas 77477 USA (281) 565-1118 Fax (281) 565-1119 WARRANTY Dynamic Flow Computers
MicroMVG/Micro100 GAS OPERATORS MANUAL
 MicroMVG/Micro100 GAS OPERATORS MANUAL Flow Computer Gas Version 11104 W.Airport Blvd, Suite 108 & 148 Stafford, Texas 77477 USA (281) 565-1118 Fax (281) 565-1119 WARRANTY Dynamic Flow Computers warrants
EPLUS-GL OPERATORS MANUAL
 EPLUS-GL OPERATORS MANUAL Flow Computer GAS/LIQUID Version 11104 W.Airport Blvd, Suite 108 & 148 Stafford, Texas 77477 USA (281) 565-1118 Fax (281) 565-1119 WARRANTY Dynamic Flow Computers warrants to
Rosemount 1595 Conditioning Orifice Plate
 Product Data Sheet Rosemount 1595 Rosemount 1595 Conditioning Orifice Plate Designed to provide superior performance in short straight pipe run applications Requires only two diameters of straight pipe
Fox Thermal Instruments, Inc.
 Fox Thermal Instruments, Inc. THERMAL MASS FLOW METER & TEMPERATURE TRANSMITTER FT3 View www.foxthermalinstruments.com 399 Reservation Road Marina, CA. 93933 104845 Rev. D Notice FOX THERMAL INSTRUMENTS
Foundation Fieldbus Flow Computer
 DynamicFB Foundation Fieldbus Flow Computer Background Dynamic Flow Computers, Inc. has over 20 years of experience in the measurement and data acquisition for the Oil and Gas industry. We found our competitive
SFC500 DIN Liquid Pulse OPERATORS MANUAL
 SFC500 DIN Liquid Pulse OPERATORS MANUAL Flow Computer Liquid Pulse Version 11104 W.Airport Blvd, Suite 108 & 148 Stafford, Texas 77477 USA (281) 565-1118 Fax (281) 565-1119 WARRANTY Dynamic Flow Computers
ECHART-GL OPERATORS MANUAL
 ECHART-GL OPERATORS MANUAL Flow Computer GAS/LIQUID Version 12603 Southwest Freeway, Suite 320 Stafford, Texas 77477 USA (281) 565-1118 Fax (281) 565-1119 WARRANTY Dynamic Flow Computers warrants to the
Rosemount 1595 Conditioning Orifice Plate
 Product Data Sheet Rosemount 1595 Rosemount 1595 Conditioning Orifice Plate Designed to provide superior performance in short straight pipe run applications Requires only two diameters of straight pipe
Product Data: Micro MV 100
 The Micro MV 100 is a three meter bi-directional field mounted flow computer which can be used for all liquid and gas applications, including custody or non-custody measurements. The Micro MV 100 flow
Fox Thermal Instruments, Inc.
 Fox Thermal Instruments, Inc. THERMAL MASS FLOW METER & TEMPERATURE TRANSMITTER FT2A View www.foxthermalinstruments.com 399 Reservation Road Marina, CA. 93933 105406 Rev. A Notice FOX THERMAL INSTRUMENTS
Scanner 2000 microefm
 NUFLO Scanner 2000 microefm Flow Computer Data Logger Multi-variable Transmitter PID Controller Mounts directly to turbine meters, orifice meters and cone meters The Scanner 2000 microefm is among the
MODEL 8000MP LEVEL SENSOR
 1 MODEL 8000MP LEVEL SENSOR INSTRUCTIONS FOR INSTALLATION, OPERATION & MAINTENANCE VISIT OUR WEBSITE SIGMACONTROLS.COM 2 SERIES 8000MP LEVEL SENSOR 1. DESCRIPTION The Model 8000MP Submersible Level Sensor
V-Cone Metering Program
 Flow Computer Division V-Cone Metering Program (For the FloBoss 103) User Manual (QER 03Q022) Form A6147 December 2005 Revision Tracking Sheet December 2005 This manual may be revised periodically to incorporate
Hawk Alarms and Sensor Error Codes
 AN-003-d Application Label1 Note 4188 93 St Edmonton Alberta Canada T6E 5P5 Ph: 780-944-1377 Fax: 780-944-1406 www.calscan.net Hawk Alarms and Sensor Error Codes Hawks with version 4.57 or higher firmware
NF770 Temperature Compensation Liquid Flow Computer
 NF770 Temperature Compensation Liquid Flow Computer Overview Mass Flow measurement at a comparatively low cost can be achieved using the Model NF770 Liquid Flow Computer, an RTD temperature sensor and
MST2000 Loop Powered Multivariable SMARTFLOW Transmitter
 MST2000 Loop Powered Multivariable SMARTFLOW Transmitter MST2000 Loop Powered Multivariable SMARTFLOW Transmitter Brandt Instruments MST2000 Series Loop Powered Multivariable SMARTFLOW Transmitter sets
Inc. FLO-CAL Liquid Calibration System FLO-CAL SOFTWARE FLEXIBLE DESIGN TO MEET YOUR LIQUID FLOW CALIBRATION REQUIREMENTS
 FLEXIBLE DESIGN TO MEET YOUR LIQUID FLOW CALIBRATION REQUIREMENTS FLO-CAL A portable Liquid Flow Standard FLO-CAL INSTRUMENT Data acquisition and interface tool with flow meter frequency and analog signals.
INSTRUCTION MANUAL STATION CONTROLLER SC1000 MOTOR PROTECTION ELECTRONICS, INC.
 INSTRUCTION MANUAL STATION CONTROLLER SC1000 MOTOR PROTECTION ELECTRONICS, INC. 2464 Vulcan Road, Apopka, Florida 32703 Phone: (407) 299-3825 Fax: (407) 294-9435 Revision Date: 9-11-08 Applications: Simplex,
Yokogawa Y-Flow Master Database 62102
 Instruction Manual IM 04Q01A04-01E-A Yokogawa Y-Flow Master Database 62102 Yokogawa Y-Flow Master Database 62102 Yokogawa Corporation of America 2 Dart Road, Newnan, Georgia U.S.A. 30265 Tel: 1-800-258-2552
INTEGRATED SYSTEMS AND CONTROL, INC. User s Hardware Manual. PCMNET V 7. xx
 INTEGRATED SYSTEMS AND CONTROL, INC. User s Hardware Manual PCMNET V 7. xx INTEGRATED SYSTEMS AND CONTROLS, INC. PCMNET Users Manual Revised 2/4/2005 2003-2005 Integrated Systems and Control. Inc. PO Box
Purpose of Today s Presentation
 Metering, Monitoring, and Verification APPA Institute for Facilities Management February 6, 2014 Purpose of Today s Presentation To provide a broad understanding of: Metering installation and application
TRAINING GUIDE LEVEL 3 MODBUS WRITE IMPORT COMMAND
 OleumTechTM TRAINING GUIDE LEVEL 3 MODBUS WRITE IMPORT COMMAND MUST BE FAMILIAR WITH LEVEL 1 TRAINING MATERIALS BEFORE MOVING FORWARD Doc ID# 80-6010-001b TABLE OF CONTENTS 1. WHAT IS NEW WRITE IMPORT
Rosemount 1595 Conditioning Orifice Plate
 Rosemount 1595 Conditioning Orifice Plate Ordering information Rosemount 1595 Conditioning Orifice combines a flow conditioner with an orifice plate into a highly accurate primary element. Requires only
HIGH ACCURACY PRESSURE TRANSDUCERS
 HIGH ACCURACY PRESSURE TRANSDUCERS PX409-100GV, RUGGEDIZED DESIGN For Aerospace, Automotive, Test and Industrial Applications U 0.08% BSL Includes Linearity Hysteresis and Repeatablity U Broad Temperature
Safety. 2. Configuration - Operation 2.1 RTD Selection 2.2 Driver Test Header. 3. Diagnostics 3.1 ph Input 3.2 Temperature Input
 Safety 1. Installation 1.1 PT:Services 1.2 erature Compensation of 1.3 Controller Services 1.4 Driver Card Installation 1.5 Sensor Part Numbers 1.6 Sensor Wiring 2. Configuration - Operation 2.1 Selection
DigitalFlow GC868 Panametrics Clamp-On Gas Ultrasonic Flowmeter. GE Sensing. Applications. Features
 Applications The DigitalFlow GC868 clamp-on gas flowmeter is a complete ultrasonic flow metering system for measurement of most gases, including: Natural gas Compressed air Fuel gases Erosive gases Corrosive
DWYER INSTRUMENTS, INC. Series AVUL Air Velocity Transmitter. Specifications - Installation and Operating Instructions.
 Series AVUL Air Velocity Transmitter Specifications - Installation and Operating Instructions Bulletin P-AVUL 3-49/64 [95.71] 2-43/64 [67.92] 1/2 NPS 3-3/16 [80.81] 1-19/32 [40.59] 31/32 24.58 3-33/64
FloBoss TM 107/107E Flow Manager Overview
 FloBoss TM 107/107E Flow Manager Overview New Technology New Features and Benefits. 1of 39 Introducing the FloBoss 107 The FloBoss 107 Flow Manager introduces a new technology platform to the FloBoss family
JT400 Multivariable Transmitter
 Product Specification Sheet JT400 Multivariable Transmitter Wireless Ultra Low Power Platform with Integrated, Chart Replacement Data Logging and I/O The industry s first, ultra-low power, multivariable
Foxboro HTG Driver Programmable Serial Interface Card Series 2
 Foxboro HTG Driver Programmable Serial Interface Card Series 2 USER MANUAL Rev. P1.59 July 16, 2012 DeltaV is a trademark of Emerson Process Management, Inc Emerson Process Management, Inc. 1998, 1999.
Model FP-100 General Specification
 Model General Specification Features! Improved metering accuracy and functionality! Single key access to most important parameters! Display of data in userselectable, engineering units! Self diagnostics
MI-2667 Annubar Flow Calculation Program
 Flow Computer Division MI-2667 Annubar Flow Calculation Program (For the FloBoss 103) User Manual (QER 05Q038) D301833X012 Form A6194 October 2005 Revision Tracking Sheet October 2005 This manual may be
DSTCAL Software User Manual 09/16/09 WD1037 Rev E Revised 09/09/14
 DSTCAL Software User Manual 09/16/09 WD1037 Rev E Revised 09/09/14 Wahl Instruments, Inc. 234 Old Weaverville Road Asheville, NC 28804 Toll Free 800-421-2853 Phone 828-658-3131 Fax 828-658-0728 www.palmerwahl.com
DPC DPC PRECISION DIGITAL MASS FLOW CONTROLLER WITH MULTI-GAS FUNCTIONALITY
 43 Design Features Simultaneously displays Mass Flow, Volumetric Flow, Pressure and Temperature. Multi-Gas functionality: support for 90 different gases and gas mixes. User Defined Mixture functionality
Flow Computer. FloWEB
 Flow Computer FloWEB FloWEB > Flow Computer Introduction FloWEB flow computer acquires primary data directly from flowmeters, temperature sensors, pressure and differential pressure transmitters, density
WS115 BREAKOUT ADAPTER USER MANUAL
 STATIC WATER LEVEL MEASUREMENT WS115 BREAKOUT ADAPTER USER MANUAL www.enoscientific.com Page 1 Eno Scientific 1606 Faucette Mill Rd Hillsborough, NC 27278 USA www.enoscientific.com 910-778-2660 Copyright
ULTRASONIC SERIAL I/O INTERFACE
 Flow Computer Division ULTRASONIC SERIAL I/O INTERFACE User Manual (QER 02Q017) Form A6133 February 2003 Revision Tracking Sheet February 2003 This manual may be revised from time to time to incorporate
Industrial Wet/Wet Differential Pressure Transducer
 Industrial Wet/Wet Differential Pressure Transducer With High Over Pressure Capacity mv/v Output 0-5 Vdc Output 4-20 ma Output Model MD1-002DV Model MB1-100DV L 735 Basic Unit 1 bar = 14.5 psi 1 kg/cm
Table of Contents. General Information. Document Sure-Aire Flow Monitoring System. User and Service Manual WARNING CAUTION
 Document 476092 User and Service Manual Installation, Operation and Maintenance Manual Please read and save these instructions for future reference. Read carefully before attempting to assemble, install,
1. Installation. 2. Configuration - Operation. 3. Specifications. Safety
 Safety 1. Installation 1.1 OP_ext: Services 1.2 Driver Card Installation 1.3 Sensor Types 1.4 Sensor Wiring 1.5 Controller Wiring 2. Configuration - Operation 2.1 Replaces ph Sensor 2.2 AS -Flex Series
MODBUS Message Protocol MODEL FT3
 MODBUS Message Protocol FOR MODEL FT3 THERMAL MASS FLOWMETER & TEMPERATURE TRANSMITTER Fox Thermal Instruments, Inc. 399 Reservation Road Marina, CA 93933 (831) 384-4300 Fax: (831) 337-5786 104985, Revision
CDD4 Duct Carbon Dioxide Transmitter
 Drill or punch a 1-1/8 or 1-1/4 hole in the duct at the preferred location and insert the probe into the hole to mark the enclosure mounting holes. Remove the unit and drill the four mounting holes. Clean
Explosion-Proof Gauge Pressure Transmitter
 Technology Solutions T EK-B AR 3120A Explosion-Proof Gauge Pressure Transmitter PRESSURE www.tek-trol.com Flow Level Temperature Pressure Valves Analyzers Accessories TekValSys Introduction The Tek-Bar
AUTOMATION. Operator s Manual PG-7. Full Access. Doc Part Rev B, 07/18. Automation Products Group, Inc.
 AUTOMATION P R O D U C T S GROUP, INC. Operator s Manual PG-7 Full Access Doc. 9003312 Part 200180 Rev B, 07/18 Tel: 1/888/525-7300 Fax: 1/435/753-7490 www.apgsensors.com E-mail: sales@apgsensors.com PG7
XRC G Panel Mount XSeries G4 Products Remote Controller
 Data Sheet XRC G4 6990 Panel Mount XSeries G4 Products Remote Controller INTRODUCTION XSeries G4 devices, from the Totalflow division of ABB provide functionality only possible through the convergence
ES-762. Utility Metering Flow Computer with Multichannel Aux. Inputs & Totalizers
 EZ Setup - Guided Setup for First Time Users Utility Metering of Steam and Heating or Cooling Water Energy Two Auxiliary 4-20mA Analog Inputs Four Auxiliary Pulse Inputs and Totalizers for Secondary Measurement
DCT7088 Portable Digital Correlation Transit Time Flowmeter
 DCT7088 Portable Digital Correlation Transit Time Flowmeter DCT7088 Portable Digital Correlation Transit Time Flowmeter Applications HVAC Potable water Ultrapure liquids De-ionized water Petroleum products
Providing the missing piece in your Condition Based Monitoring platform
 QUALITROL Transformer Monitoring System Providing the missing piece in your Condition Based Monitoring platform Modular design; full customization of monitoring parameters to meet specification Reduce
MicroMVL Release History. Note: Changes in black mean new features or capabilities and red changes mean corrections from previous versions.
 MicroMVL Release History Note: Changes in black mean new features or capabilities and red changes mean corrections from previous versions. Version Release Date Changes 2.23 18-May-2018 Fixed Audit Trail
MicroTrans EQ Signal Processor. Operation & Maintenance Manual
 MicroTrans EQ Signal Processor Operation & Maintenance Manual Engineered for accuracy, applicability, durability and simplicity in HVAC air systems and industrial process control loops TABLE OF CONTENTS
D115 The Fast Optimal Servo Amplifier For Brush, Brushless, Voice Coil Servo Motors
 D115 The Fast Optimal Servo Amplifier For Brush, Brushless, Voice Coil Servo Motors Ron Boe 5/15/2014 This user guide details the servo drives capabilities and physical interfaces. Users will be able to
Ch En 475: Introduction to Instrumentation and Signal Processing with Labview
 Ch En 475: Introduction to Instrumentation and Signal Processing with Labview Measurement Instrumentation Rapid, on-line measurement of temperature, pressure, liquid level, flow rate and composition is
D-100 FLOW DISPLAY MODBUS Network Interface Installation Guide
 MODBUS D-100 FLOW DISPLAY MODBUS Network Interface Installation Guide 11451 Belcher Road South, Largo, FL 33773 USA Tel +1 (727) 447-6140 Fax +1 (727) 442-5699 www.onicon.com sales@onicon.com 03-18 0657-9
INSTALLATION INSTRUCTIONS
 www.altroniccontrols.com INSTALLATION INSTRUCTIONS EXACTA 21 MONITORING AND CONTROL SYSTEM CAUTION: The EXACTA 21 CONTROL SYSTEM is CSA CERTIFIED FOR use in Class I, GROUPS C & D, Division 2 hazardous
Transducers & Transmitters HART USERS MANUAL. GP:50 New York LTD Long Road Grand Island, NY USA
 Transducers & Transmitters Industrial & Aerospace Pressure Measurement WWW.GP50.COM HART USERS MANUAL GP:50 New York LTD. 2770 Long Road Grand Island, NY 14072 USA Tel. (716) 773-9300 Fax (716) 773-5019
FloBoss 107 Flow Manager Instruction Manual
 Part Number D301232X012 Form Number A6206 June 2017 FloBoss 107 Flow Manager Instruction Manual Remote Automation Solutions Revision Tracking Sheet June 2017 This manual may be revised periodically to
DPM DPM MULTI PARAMETER - MULTI GAS MASS FLOW METER
 MULTI PARAMETER - MULTI GAS MASS FLOW METER 1 MULTI PARAMETER - MULTI GAS MASS FLOW METER Design Features Multi-Parameter functionality: Mass Flow, Volumetric Flow, Gas Pressure and Temperature. Multi-Gas
TRACKER 240 SERIES. Load Cell and Weighing Indicators. A Precision Measurement Instrument with Outstanding Features
 TRACKER 240 SERIES Load Cell and Weighing Indicators A Precision Measurement Instrument with Outstanding Features TRACKER 240 SERIES INDICATORS Ratiometric Measurement Tare and Auto Transducer Excitation
Micro Motion Technical Overview and Specification Summary
 Product Data Sheet PS-00235, Rev. K April 2011 Micro Motion Technical Overview and Specification Summary Emerson s world-leading Micro Motion Coriolis flow and density measurement devices have set the
HygroClip M22 Series. 2-wire loop powered humidity temperature transmitters INSTRUCTION MANUAL
 HygroClip M22 Series 2-wire loop powered humidity temperature transmitters INSTRUCTION MANUAL 20060329 CONTENTS Overview... 3 Operation... 5 Power supply... 5 HygroClip S digital probe... 5 Temperature
MODCELL 2050R Single Loop Controllers
 Isolated universal process and remote set-point input Four internal set-points No jumpers required to define instrument parameters Ratio/bias on process and remote set-point Totalizer Ramp/soak profile
MIST Version 2.0 USER S GUIDE. Preliminary Version. INTRODUCTION...2 General Description...2 Models Available...2
 1 MIST Version 2.0 USER S GUIDE Preliminary Version INTRODUCTION...2 General Description...2 Models Available...2 INSTALLATION...2 Unpacking...2 Mechanical Installation...3 Electrical Wiring...3 Stand-alone
Enron Modbus I/O Driver (Series 2) Programmable Serial Interface Card
 Programmable Serial Interface Card") Enron Modbus I/O Driver (Series 2) Programmable Serial Interface Card USER MANUAL Rev. P1.55 June 4, 2009 DeltaV is a trademark of Emerson Process Management, Inc Emerson Process Management, Inc. 1998,
Enron Modbus I/O Driver (Series 2) Programmable Serial Interface Card USER MANUAL Rev. P1.55 June 4, 2009 DeltaV is a trademark of Emerson Process Management, Inc Emerson Process Management, Inc. 1998,
QUALITROL QTMS Transformer Monitoring System
 QUALITROL QTMS Transformer System Providing the Missing Piece in Your Condition Based Platform Modular design; full customization of monitoring parameters to meet specification Reduce installation and
Scanner 2000 microefm QuickStart. Installing the Scanner Remote Mount. Direct Mount NUFLO. Part No , Rev. A
 NUFLO Part No. 30165024, Rev. A Scanner 2000 microefm QuickStart Installing the Scanner 2000 H L H L Flow Direct Mount To install the Scanner 2000 microefm using a direct mount to an orifice or cone meter
Automationdirect.com. D i r e c t L o g i c M a g n e t i c P u l s e I n p u t C o p r o c e s s o r F 4-8 M P I
 Automationdirect.com D i r e c t L o g i c 0 5 M a g n e t i c P u l s e I n p u t C o p r o c e s s o r F - 8 M P I Manual Order Number: F-8MPI-M TRADEMARKS AutomationDirect.com is a Trademark of Automationdirect.com
SINGLE-CHANNEL PROCESS CONTROLLERS & TEMP. DISPLAYS D3820/D3830 Series
 The Digitec Series D3800 Panel Meters offer many features and performance capabilities to suit a wide range of industrial applications. The D3820 and D3830 are available in the ranges of 4-20mA, 0-10 VDC,
GFC114. Low Power Flow Computer FEATURES
 Low Power Flow Computer FEATURES l UNIVERSAL INPUT, 5 khz, CAN POWER THE l SIMPLIFIED MENUS AND PROGRAMMING l NO NEED OF AMPLIFIERS OR LINEARIZERS l SEVEN DIGIT RATE WITH PROGRAMMABLE DECIMAL PLACES l
Series TFXB Ultra. Transit Time Ultrasonic Flow Meter, Clamp-on, Liquid, Single-Channel
 Series TFXB Ultra Transit Time Ultrasonic Flow Meter, Clamp-on, Liquid, Single-Channel Part 1. General 1.1 Scope A. This section describes the requirements for an ultrasonic flow measurement transmitter
ZFM ZFM DIGITAL MASS FLOW METER
 BULLETIN EM20180402 25 BULLETIN EM20180402 Design Features n Multi-gas/Multi-range functionality up to 8 bar (currently for 6 gases). n Full scale covered flow ranges from 3.125 sml/min to 10 sl/min are
Calibrating HART Transmitters. HCF_LIT-054, Revision 1.1
 Calibrating HART Transmitters HCF_LIT-054, Revision 1.1 Release Date: November 19, 2008 Date of Publication: November 19, 2008 Document Distribution / Maintenance Control / Document Approval To obtain
NI2400/NI816/NI4866 DATALOGGER NI2400/NI816/NI /16/24 CHANNEL ETHERNET DATA LOGGER with Embedded Web Server
 DATALOGGER NI2400/NI816/NI4866 8/16/24 CHANNEL ETHERNET DATA LOGGER with Embedded Web Server DATASHEET Rev. 08 del 08/10/2018 Redatto da R&D Approvato da MKT GENERAL 1SPECIFICATIONS NI4866 NI816 NI2400
Schedule of Accreditation issued by United Kingdom Accreditation Service 2 Pine Trees, Chertsey Lane, Staines-upon-Thames, TW18 3HR, UK
 2 Pine Trees, Chertsey Lane, Staines-upon-Thames, TW18 3HR, UK Exploration Drive Aberdeen Science and Energy Park Aberdeen AB23 8HZ Contact: Mr Graham Robertson Tel: +44(0)1224 708500 Fax: +44(0)1224 772
MTII4200 Level Transmitter Installation, Operation & Maintenance Instructions
 Specialists in Liquid Level Indication MTII4200 Level Transmitter Installation, Operation & Maintenance Instructions Section: M500 Bulletin: M500.31 Date: 05-17-16 Supersedes: 09-30-11 1. INTRODUCTION
Model User Manual Revision E 04/29/99. OEM Gaging System. Part Number R01
 04/29/99 Model 3800 OEM Gaging System User Manual Revision E Part Number 028585-R01 Information in this document is subject to change without notice. No part of this document may be reproduced or transmitted
MICRO SERIES PROCESS DISPLAYS LARGE DIGIT MODELS
 The MICRO SERIES PROCESS DISPLAYS LARGE DIGIT MODELS Mighty-5 DPM MODELS Micro-P & Mighty-1 Mighty-1 Micro-P ELECTRO-NUMERICS, INC. Introduction The Electro-Numerics family of Digital Panel Meters and
Electro-Magnetic Flowmeters Converters
 Data Sheet D-FMC-MagMaster-Conv_5 Electro-Magnetic Flowmeters Converters MagMaster Pulsed DC technology incorporates benefits of AC systems Keypad configurable A choice of engineering parameters in engineering
Universal IV Water Cut Meter
 DREXELBROOK DATA SHEET Universal IV Water Cut Meter with Density Compensation Use the Best For over 50 years, Drexelbrook has been the world s leader in capacitive based measurements by providing reliable
PAS 9737/AI-SMT ENGINEERING SPECIFICATION
 Document PAS54 Spec Revision C (7/3/8) PAS 9737/AI-SMT ENGINEERING SPECIFICATION 64 CHANNEL, 6 BIT VME ANALOG INPUT CARD PCB Revision D (7/3/8) Additional copies of this manual or other Precision Analog
TRACKER 220 SERIES. Digital Panel Indicators. A Complete Range of Universal Input Digital Panel Indicators for Temperature and Process Measurement
 TRACKER 220 SERIES Digital Panel Indicators A Complete Range of Universal Input Digital Panel Indicators for Temperature and Process Measurement TRACKER 220 SERIES INDICATORS Universal Input Analogue Output
The Tracker 220 Series A Complete Range of Universal Input Digital Panel Indicators for Temperature and Process Measurement
 Acquisition Measurement Control The Tracker 220 Series A Complete Range of Universal Input Digital Panel Indicators for Temperature and Process Measurement TRACKER 220 SERIES INDICATORS Universal Input
TPE 1464 Series Pressure Transducer
 TPE 1464 Series Pressure Transducer Description The KMC TPE 1464 series of pressure transducers incorporate a gauge pressure transmitter featuring low hysteresis, excellent repeatability, and longterm
MPXH6300A, 20 to 300 kpa, Absolute, Integrated, Pressure Sensor
 Freescale Semiconductor Document Number: Data Sheet: Technical Data Rev. 6.0, 09/2015, 20 to 300 kpa, Absolute, Integrated, Pressure Sensor Freescale's series sensor integrates on-chip, bipolar op amp
CII: Current Input, Isolated
 Safety 1. Application CII Driver Card 2. Installation 2.1 Services 2.2 Driver Card Installation 2.3 Driver Wiring 3. Configuration - Operation 3.1 Diagnostics 3.2 Calibration 4. Specifications Safety Electrical
ORDERING INFORMATION # of Ports Pressure Type Device Name
 Freescale Semiconductor Data Sheet: Technical Data High Temperature Accuracy Integrated Silicon Pressure Sensor for Measuring Absolute Pressure, On-Chip Signal Conditioned, Temperature Compensated and
Technical Bulletin, Recalculating a Previous Batch within the Flow Computer
 Last Updated: 03-June-2009 TB-980202C Technical Bulletin, OMNI FLOW COMPUTERS, INC. 12620 West Airport Boulevard, Suite 100 Sugar Land, Texas 77478 United States of America Phone-281.240.6161 Fax: 281.240.6162
KOBOLD PDA Series Digital Pressure Transmitter
 KOBOLD PDA Series Digital Pressure Transmitter PDA-153 Series User Instructions KOBOLD Instruments Inc. 1801 Parkway View Drive Pittsburgh, PA 15205 Phone (412) 788-2830 Fax (412)-788-4890 www.koboldusa.com
Stellar Instruments. SC1 Controller & Display System. General User s Manual. Copyright 2013 Stellar Instruments 1
 Stellar Instruments SC1 Controller & Display System General User s Manual Copyright 2013 Stellar Instruments 1 Contents Section 1 General... 3 Section 2 Base Unit A (Multi-Event Programmable Timer)...
Conductivity Transmitters
 Conductivity Transmitters CDTX-90 Series Starts at $ 576 Electronics Only Display in µs, ms, kω, MΩ, ppm (TDS) Simulate Function Programmable Temperature Compensation Relay Options Dual Output Option Allows
Purpose of Today s Presentation
 Metering, Monitoring, and Verification Part 1 APPA Institute for Facilities Management Scottsdale, AZ September 15, 2015 Purpose of Today s Presentation To provide a broad understanding of: Metering installation
Rosemount 1595 Conditioning Orifice Plate
 Reference Manual Rosemount 1595 Conditioning Orifice Plate www.rosemount.com Reference Manual 00809-0100-4828, Rev BA Rosemount 1595 Rosemount 1595 Conditioning Orifice Plate NOTICE Read this manual before
Quantum III. Compact DC Drive Package. Slitter DC Drive Package. Quantum III
 Compact DC Drive Package The delivers a DC drive package that integrates the intelligence of the Mentor II with a space saving design that incorporates many accessories typically required in the North
Square D Sy/Max Driver Programmable Serial Interface Card
 Square D Sy/Max Driver Programmable Serial Interface Card USER MANUAL Rev. P1.10 July 15, 2003 DeltaV is a trademark of Emerson Process Management, Inc Emerson Process Management, Inc. 1998, 1999. All
Freescale Semiconductor Data Sheet: Technical Data
 Freescale Semiconductor Data Sheet: Technical Data High Temperature Accuracy Integrated Silicon Pressure Sensor for Measuring Absolute Pressure, On-Chip Signal Conditioned, Temperature Compensated and
Series ULT Ultrasonic Level Transmitter
 Bulletin L-45 Series ULT Ultrasonic Level Transmitter Specifications - Installation and Operating Instructions 3 29/32 [99.21] 4 9/32 [108.74] 2X 1/2 NPT ø3 21/64 [84.53] 8 1/16 [204.79] Series ULT Ultrasonic
Circuit Breaker Sentinel (CBS) for SF 6. power circuit breakers
 for SF 6. power circuit breakers") Circuit Breaker Sentinel (CBS) for SF 6 power circuit breakers Circuit Breaker Sentinel (CBS) for SF 6 power circuit breakers It is widely recognized that the concept of periodic equipment maintenance
Circuit Breaker Sentinel (CBS) for SF 6 power circuit breakers Circuit Breaker Sentinel (CBS) for SF 6 power circuit breakers It is widely recognized that the concept of periodic equipment maintenance
TOXALERT MODEL AIR 2000
 TOXALERT MODEL AIR 2000 NOTE: Toxalert s Model GVU-CO 2 Sensor is the same as the Air2000R. Microprocessor-based, Infrared Environmental CO 2 Sensor OPERATOR S MANUAL TOXALERT TM INTERNATIONAL INC. P.O.
PC CONFIGURATOR Model: 27HUCFG. Users Manual , Minamitsumori, Nishinari-ku, Osaka JAPAN Tel: Fax:
 Model 27HU Universal Temperature Transmitter PC CONFIGURATOR Model: 27HUCFG Users Manual 5-2-55, Minamitsumori, Nishinari-ku, Osaka 557-0063 JAPAN Tel: +81-6-6659-8201 Fax: +81-6-6659-8510 http://www.m-system.co.jp/