Setting up an Intermec PM43 printer with InterDriver version M-0 or newer
|
|
|
- Denis McDaniel
- 6 years ago
- Views:
Transcription
1 Setting up an Intermec PM43 printer with InterDriver version M-0 or newer Setting up a bar code printer with M-0 Intermec drivers or newer 1 INITIAL PRINTER CONFIGURATION When the printer is first powered up or after a factory reset the Startup Wizard will be invoked. Additionally in order to configure the printer for your particular label stock the Printing Wizard should be run. The Startup Wizard requires the following information: Display Language: This defaults to English. If that is the desired language press. Command Language: This defaults to Fingerprint. Press Direct Protocol. When prompted press Yes. Unit of Measure: This defaults to dots. The options are dots, inches, and mm. Press the desired unit of measure. If dots is chosen multiply the dimensions of the label without the backing by 203. A 4 x 1 label would be 812 x 203. Printing Wizard: At the completion of the Startup Wizard the printer will prompt you to run other wizards. Press Yes. Press Printing. a. Press Media Setup. b. The default is Media with Gaps. If this the correct type press or press a different type if required. c. The default is Ribbon (TTR). If this the correct type press or press No Ribbon (DT). d. Define your media dimensions. To modify a dimension press the field and a virtual keypad will popup to allow you to change the setting. Press to proceed to the next dimension. e. Label positioning: Start adjust is the distance the printer will retract the label to begin printing. Use the button to delete any entry before entering your settings. A setting of -110 will feed the label to the tear-off position then retract it at print time. You may have to adjust this for your particular stock. Press to proceed to the next setting. f. Stop adjust should be set to 0 if using a start adjust of Press. g. Leave print speed at the default setting. Press to complete the wizard. h. Press the to return to the Ready screen. Page 1 of 21 #CF-PM43 GUIDE (2/14)/INFORMS
 a.")
, and click Submit: Page 2 of 21")
2 2 INSTALL PRINTER DRIVERS InterDriver M-0 (this may require Administrator rights within Windows) a. Go to select Support and then Downloads b. Input the filters below and select the printer model number (i.e. PM43 Mid-Range Printer), and click Submit: Page 2 of 21
. Accept the terms of the license agreement and click Next.")

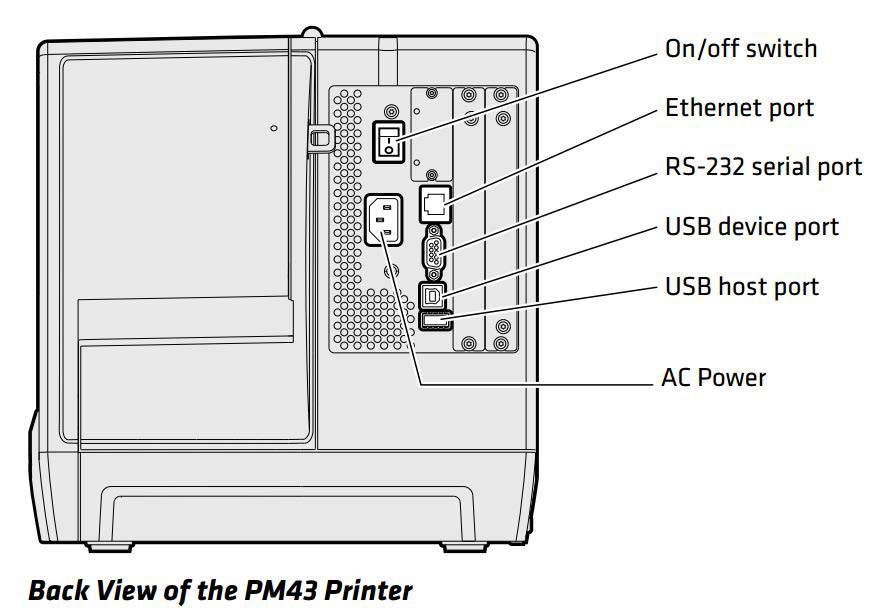
3 c. Scroll to the BOTTOM OF THE PAGE to the OS/Firmware/Drivers section, and select InterDriver Windows version M-0. Click the file to begin downloading InterDriver files (click RUN to begin installation). Accept the terms of the license agreement and click Next. Select a location you want to install the drivers in and click Next. Click Install. NOTE: When prompted to install printer drivers in the Seagull Driver Wizard click Cancel. d. After installation is complete, you should now ADD the printer. USB connected printer: attach the USB cable to the printer and PC and power it up. The Add New Hardware wizard should start. Proceed to step e. Ethernet connected printer: For (Win XP) click START Printers and Faxes or for (Win 7) START Button Devices and Printers. Click Add a printer to begin the process. Proceed to step e. e. Follow the prompts for the desired setup Local or Network. When prompted for a driver select Have Disk and navigate to the location where you placed the files in step c. Select the model of printer that you wish to install from the list. IMPORTANT: Be sure to select the correct model with the CORRECT RESOLUTION and CORRECT LANGUAGE. You should select Intermec PM43 (203dpi). Page 3 of 21

4 e) The wizard may prompt you to search for a missing file (with a FILES NEEDED) window. If so, click Browse and select the location where you installed the InterDriver files in step c. This should display the missing file. Click Open to select the correct path, and then click OK to complete the installation. YOUR PRINTER SHOULD NOW BE DISPLAYED IN YOUR PRINTERS AND FAXES (Win XP) OR IN YOUR DEVICES AND PRINTERS (Win 7) LIST. Page 4 of 21

5 3. SET-UP PRINTER DRIVER Open your Barcode Printer Properties window: a) For Windows XP, click the Start and select Printers and Faxes (this may be under Control Panel). Right-click the printer and select Properties. For Windows 7, click the Start button and select Devices and Printers. Right-click the printer and select Printer Properties. For other operating systems, consult your network administrator or technical support. Click the General tab. Click the Printing Preferences button. Page 5 of 21


6 b) Define new stock size(s) using Page Setup. Go to the Page Setup tab. Click the New button. NOTE: DO NOT EDIT an existing label format; these labels will not work with IMPRESS SCAN 3. Enter the following: a. Name: IMPRESS 4x2 b. Width: 4.00 in c. Height: 2.00 in d. Left Exposed Liner 0.05 in Click the OK button. e. Right Exposed Liner 0.05 in Repeat step b to create new labels for IMPRESS 2x1: width of 2 in, height 1 in; and IMPRESS 4x1: width of 4 in, height of 1 in, if applicable. Page 6 of 21


7 c) In the Stock Name field select the stock size you would like to use. Click the Apply button. Then click OK. d) You should be back to the main PM43 Printer Properties window. You will now need to modify the Driver Options. Click on the Tools Tab. Click on Driver Options. Page 7 of 21


8 Click on the Network Settings Tab. Under Printing Preferences ensure the following settings are checked: Share settings between all users Share settings between all Under Security, the Information Service department has the option to set which user can make changes to the settings for the printer. If they opt to allow Users to make these changes it will decrease the need to call them for assistance with printer issues. Click OK to save settings and exit Printer Properties. e) In the Print dialog box, the following Page Handling settings will need to be modified. When printing labels or countsheets, make sure that the Auto Rotate and Center and Chose paper Source by PDF page size are checked. Page 8 of 21
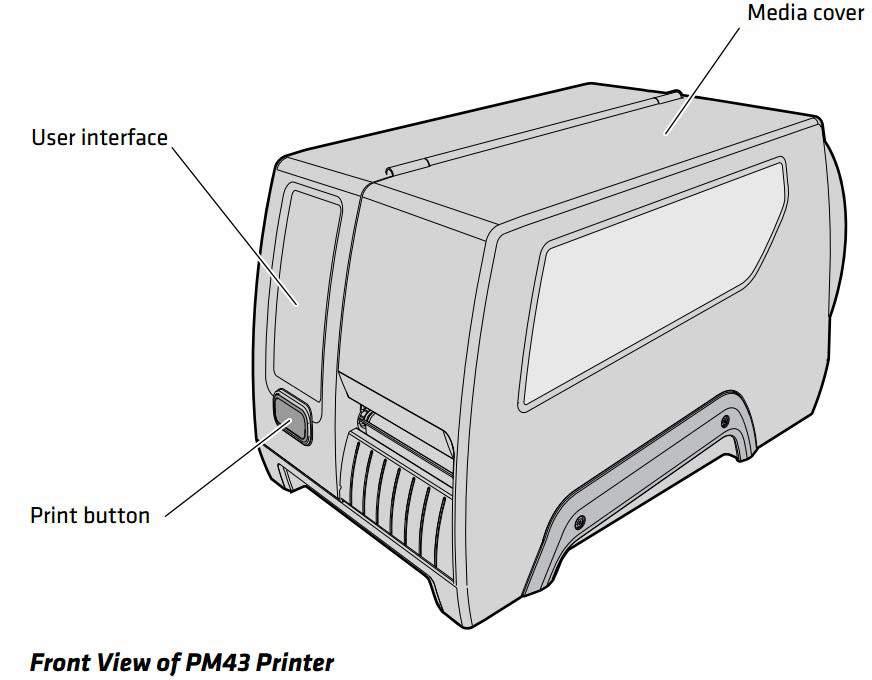
9 UNDERSTANDING THE PM43 PRINTER Page 9 of 21


10 Click on the PM43 LCD Troubleshooting link at the site below to view a video on some basic printer setup steps: About the Ready-to-Work Indicator: The Ready-to-Work indicator on the front of the printer turns on when the printer is ready to print. Ready-to-Work Indicator Status On Blinking Off Description Printer is ready for a print job. Printer is not ready for a print job. Printer is turned off, not communicating, or not ready to print. For example, the printer may be starting up or performing a firmware upgrade. Full Touch Display Front Panel: The full touch display front panel contains a 3.5-inch touch panel and a keypad for entering information or navigating through the user interface. The full touch screen is a resistive touch panel that supports touch input with fingers, gloved hands, or a stylus. You only need to touch the screen once to make a selection. Ready Screen: After you turn the printer on, the Ready screen appears when the printer finishes starting up. Icons for Wi-Fi and Bluetooth status appear only when the optional Wi-Fi/Bluetooth module is installed. The IP address appears when the printer is connected to an Ethernet or wireless network. If there is no Ethernet or wireless connection, serial port information appears on the screen. Page 10 of 21

11 Understanding the Ready Screen Icons Icon Description Press this icon to enter the Main Menu Printer Information icon. Press the icon to view printing related settings and system information. Data transfer icon. Blinks when data is moving through an interface connection to the printer. Press the icon to view detailed information on the connection. Understanding the Main Menu Icons Icon Description Returns to the Main Menu Goes back up one level in the menu. Returns to the Ready screen. Saves the configuration changes. Moves between options in a setting menu. Moves to additional options not viewable in the menu. Information and Status Icon Descriptions Icon Description of Icon Printer Information icon. Press the icon to view printing related settings and system information. Wireless Connection icon. This icon appears when the Wi-Fi/Bluetooth module is installed in the printer and indicates the strength of the wireless network connection: Press the icon to view status and signal strength. Data transfer icon. Blinks when data is moving through an interface connection to the printer. Press the icon to view detailed information on the connection. Bluetooth icon. This icon appears when the Wi-Fi/Bluetooth module is installed in the printer and indicates whether the Bluetooth module is enabled or disabled: Page 11 of 21

12 Press the icon to view detailed Bluetooth information or to use the Bluetooth wizard. About the Main Menu: In the printer Ready screen, press to view the Main Menu. Press one of the buttons to select the Programs, Settings, Tools, or Wizards menu: Select Programs: to see a list of programs installed on the printer. This list includes utility programs provided by Intermec as part of the printer firmware, and programs you have installed on the printer. The Programs item appears in the Main Menu only if the printer is using Fingerprint or Direct Protocol as the command language. Select Settings: to view and change printer settings. Select Tools: to print test labels, manage a connected USB storage device, restore printer default settings, or save and load printer profiles. Select Wizards: to see a list of wizards that help you configure printing or communication settings, or calibrate the media sensors. About the Printer Wizards: The full touch printer firmware includes several wizards you can use to quickly set up your printer. The available wizards depend on the hardware you have installed in the printer. You can start all of the wizards from the Main menu except for the startup wizard. The startup wizard appears the first time you turn on the printer and after the printer has been reset to the factory default state. Page 12 of 21
 Shows how to load ribbon.")
13 Printing Wizards Wizard Media Setup Print Quality Loading Media Loading Ribbon Description Select media and printing type (DT or TTR), media width, length, and X-margin, Start and Stop Adjust values, and print speed. Prints a series of labels to determine the best print quality setting. Shows how to load media. (TTR printers only) Shows how to load ribbon. Communications Wizards Wizard Line Analyzer Wireless Bluetooth Description Logs all incoming data on all communications channels and saves the data to a log file. For experienced users. Looks for wireless networks and sets up Wi-Fi communications. Available when Wi-Fi/Bluetooth module is installed. Looks for discoverable Bluetooth devices and sets up Bluetooth communications. Available when Wi-Fi/Bluetooth module is installed. Calibration Wizards Wizard Media Screen RFID Label Taken Sensor Description Calibrates the label gap sensor and shows current print settings. Calibrates the touch screen. Calibrates the optimal label adjustment and output power setting for the RFID media loaded in the printer. Available when the RFID module is installed. Calibrates the label taken sensor used with the label dispenser. Available when the label taken sensor is installed. Page 13 of 21
14 Loading Labels And Ribbon: For assistance with loading labels and ribbons, please click on the PM43 label and ribbon loading link below at our IMPRESS support page to view a video showing step-by-step instructions: Note: Keep the ribbon core. You will need it the next time you load ribbon. Placing the printer in Direct Protocol Command Language: use the following procedure to configure the printer to use Direct Protocol: 1. Press the Menu icon in the upper left corner of the LCD. 2. Press Settings and then System Settings. 3. Press General then scroll down until you get to Command Language. 4. Use the left or right arrow until Direct Protocol is displayed. 5. Press the Save icon at the top of the LCD. 6. Press the Home icon in the upper right to exit. Additional Intermec PM43 Documentation can be downloaded from this location: =10&productnodeid=PRTRPM43A TROUBLESHOOT PRINTER PROBLEMS Problem The printout is weak. The printout is weaker on one side. There are weak spots on the printout. Possible Solution Try these possible solutions in order: Make sure that your media setting is appropriate for hte type of media you are using. The contrast may be too low. Increase the contrast. The printhead pressure may be too low. Increase the printhead pressure. Replace the printhead Adjust the printhead balance Try these possible solutions in order: There may be foreign particles on the media. Clean or replace the media. Make sure that your media and ribbon are compatible. Make sure that you are using high quality media and ribbon. The contrast may be too low. Increase the contrast. Page 14 of 21
15 The printout is dark or there is excessive bleeding on the media. There are dark lines along the media path. There are white vertical lines on the printout. Part of a dotted line is missing. The inner edge of the printout is missing. The content on my printout is compressed. Nothing shows up on my thermal transfer printout. When I feed or print a label, the ribbon is not taken up. Instead, it spills out the front of the printer. The ribbon breaks. Try these possible solutions in order: Make sure your media setting is appropriate for the type of media you are using. The contrast may be too high. Decrease the contrast. The printhead pressure may be too high. Decrease the printhead pressure. The printhead voltage may be incorrect or the energy control may be faulty. For help, contact your Intermec representative. The printhead may be dirty. Clean the printhead. Try these possible solutions in order: The printhead may be dirty. Clean the printhead. There may be missing dots on the printhead. Replace the printhead. Try these possible solutions in order: The printhead may be failing. Replace the printhead. The strobe signal may be failing. For help, contact your Intermec service representative. Try these possible solutions in order: The media may not be properly installed or aligned. Reload the media. The media margin or X-start parameter may be set too low. Increase the setting. The print speed may be too high. Lower the print speed. The ink-coated side of the ribbon may not be facing the media. Reload the ribbon. Make sure the Print Method is set to Ribbon (TTR). Try these possible solutions in order: Make sure your media setting is appropriate for the type of media you are using. Make sure that the ribbon is fitted correctly. Reload the ribbon. The energy control may be faulty. For help, contact your Intermec Service representative. Page 15 of 21
16 The ribbon wrinkles. The printer is connected to my PC, using a virtual COM port, and printing stops. There are no errors to indicate that something is wrong. The printer is connected to a serial port on my PC, but the printer is not working. Try these possible solutions in order: The ribbon tension bar may not be adjusted correctly. Use a large straight-slot screwdriver to adjust the ribbon tension bar. You may need to adjust the media edge guide. The printhead pressure may be too high. Decrease the printhead pressure. Make sure that bidirectional support is disabled. From the printer properties dialog box, click the Ports tab, and then clear the Enable bidirectional support check box. Try these possible solutions: Make sure the serial port settings are configured correctly. Make sure the serial cable pinouts are correct and that the cable is not damaged. If you have the Intermec Windows driver for an RS-232 printer installed on your PC, uninstall the driver. PRINTER MAINTENANCE Cleaning the printer: To properly maintain the printer, you should clean it regularly. Follow these guidelines for cleaning the printer: Always remove the power cord before cleaning. Never spray the printer with water. Protect it from water when cleaning the premises. Never use any sharp tools for removing stuck labels. The printhead and rollers are delicate. Cleaning the Printhead: Cleaning the printhead on a regular basis is important for the life of the printhead and for the print quality. You should clean the printhead each time you replace the media. Follow this procedure to clean the printhead using the cleaning card. If you need to clean additional residue from the platen roller or tear bar, use a cotton swab moistened with isopropyl alcohol. Caution: Never use hard or sharp tools to peel away stuck labels or other material. The printhead is delicate and can easily be damaged. 1. Turn the printer off and disconnect the printer from power. 2. Open the media cover. 3. Remove the media and ribbon (if installed). 4. Insert most of the cleaning card under the printhead, and then lower the printhead. Page 16 of 21
17 5. Pull out the cleaning card and raise the printhead. 6. Wait for approximately 30 seconds to allow the cleaning fluid to dissolve the residue. 7. Repeat Steps 4 through 6 if necessary. 8. If necessary, clean residue from the platen roller or tear bar with a cotton swab moistened with isopropyl alcohol. 9. Once the parts are dry, replace the media (and ribbon) in the printer. 10. Close the media cover, reconnect power, and turn on the printer. Cleaning the Media Guides: Both the upper and lower media guides are transparent to allow light to pass between the two parts of the label gap and label mark sensors. It is important to keep these surfaces free of dust, stuck labels, and adhesive residue. 1. Turn the printer off and disconnect the printer from power. 2. Open the media cover. 3. Remove the media and ribbon (if installed). 4. Insert a cleaning card or a soft cloth soaked in isopropyl alcohol between the two media guides to clean them. 5. Wait for approximately 30 seconds to allow the cleaning fluid to dissolve the residue. 6. Once the parts are dry, replace the media (and ribbon) in the printer. 7. Close the media cover, reconnect power, and turn on the printer. Replacing the Printhead: You need to replace the printhead periodically when it wears out due to the rapid heating and cooling process used during printing. How often you need to replace the printhead depends on factors such as what type of images you print, the type of media or ribbon you use, the amount of energy to the printhead, the print speed, and the ambient temperature of the room you print in. The firmware detects the new printhead when you restart the printer. 1. Turn the printer off and disconnect the printer from power. 2. Open the media cover. 3. Remove the media and ribbon (if installed). 4. Turn the printhead lift lever counterclockwise to raise the printhead. 5. Detach the magnetic pressure arm from the printhead bracket and disconnect the two cables from the printhead as you remove it from the printer. Page 17 of 21
 in the printer. 9. Turn the printhead lift lever clockwise to lower it. 10.")
18 6. Connect the two printhead cables to the new printhead. 7. As you insert the new printhead bracket into the printer, make sure the metal arms on the printhead goaround the magnetic pressure arm bar. Attach the magnetic pressure arm to the printhead. 8. Replace the media (and ribbon) in the printer. 9. Turn the printhead lift lever clockwise to lower it. 10. Close the media cover, reconnect power, and turn on the printer. Replacing the Platen Roller: If the printer platen roller gets damaged or wears out, it is easy to replace. On the PM43 printer, you can store a spare platen roller in the holder located under the media holder. Just insert the platen roller as you would into the printer and then turn the latch counterclockwise to secure it to the printer base. 1. Turn the printer off and disconnect the printer from power. 2. Open the media cover. 3. Remove the media. 4. Turn the printhead lift lever counterclockwise to raise the printhead. 5. Rotate the platen roller latch clockwise to detach it from the printer and pull the platen roller away from the printer. Page 18 of 21

19 6. Insert the new platen roller into the printer and secure it by turning the latch counterclockwise. 7. Reload media and turn the printhead lift lever clockwise to lower it. 8. Close the media cover, reconnect power, and turn on the printer. Prevent Ribbon Wrinkling: If you have problems with the thermal transfer ribbon getting wrinkled, try adjusting the ribbon tension bar. 1. Open the media cover. 2. Use a large straight-slot screwdriver to adjust the ribbon tension bar: Turn the tension bar screw clockwise to move the bar backward and decrease the tension. Turn the tension bar screw counterclockwise to move the bar forward and increase the tension. Page 19 of 21


20 Adjust the Printhead Balance: If your labels are printing lighter on one side than the other, you probably have an unbalanced printhead. The printer is adjusted at the factory for full-width media. If you are using media that is less than full-width (4 inches or 102 mm), Intermec recommends that you adjust the position of the printhead balance arm so that the printhead is correctly pressured against the media. 1. Open the media cover. 2. If you have thermal transfer ribbon installed, remove it. 3. Turn the printhead lift lever counterclockwise to raise the printhead. Page 20 of 21

21 4. Press down on the blue part of the printhead balance bar and move it: Outward for wider media. Inward for narrower media. 5. Close the printhead and load the ribbon. 6. Test and readjust the printhead balance if necessary. 7. Close the media cover. Adjust the Label Gap and Black Mark Sensor: The label gap sensor is a transmissive sensor that controls how the printer feeds media by detecting gaps between the labels. The black mark sensor is a reflective sensor that detects black marks on continuous media. The sensor contains a blue LED which is strong enough to see through media. You can use the blue LED to help determine the proper location for the sensor. 1. Open the media cover. 2. Adjust the label gap and black mark sensor. Ensure it is not located over a gap in the labels: Turn the sensor adjustment knob counterclockwise to move the sensor toward the outside of the printer. Turn the sensor adjustment knob clockwise to move the sensor toward the inside of the printer. 3. Close the media cover. Page 21 of 21
IMPRESS Scan Setting up an Intermec printer with InterDriver version 7.21 or newer. Setting up a bar code printer with Intermec drivers or newer
 Setting up a bar code printer with 7.1.3 Intermec drivers or newer 0 INSTALL PRINTER DRIVERS InterDriver 7.1.3 (this may require Administrator rights within Windows) PLEASE NOTE: If you have an older version
IMPORTANT!! WHEN YOU FIRST POWER-UP YOUR INTERMEC PM4i PRINTER, YOU WILL NEED TO SELECT IPL COMMAND LANGUAGE (SEE BELOW).
.") Setting up a bar code printer with 7.21 InterDrivers or newer IMPORTANT!! WHEN YOU FIRST POWER-UP YOUR INTERMEC PM4i PRINTER, YOU WILL NEED TO SELECT IPL COMMAND LANGUAGE (SEE BELOW). Page 1 of 22 #CF-PM4iGUIDE(6/11)/INFORMS
Setting up a bar code printer with 7.21 InterDrivers or newer IMPORTANT!! WHEN YOU FIRST POWER-UP YOUR INTERMEC PM4i PRINTER, YOU WILL NEED TO SELECT IPL COMMAND LANGUAGE (SEE BELOW). Page 1 of 22 #CF-PM4iGUIDE(6/11)/INFORMS
MVPplus Quick Reference Guide
 MVPplus Quick Reference Guide Use this guide to operate your printer on a daily basis. For more detailed information, refer to the User Guide. Contents External View...........................................................
MONARCH 9416 XL QUICK REFERENCE
 MONARCH 9416 XL QUICK REFERENCE This Quick Reference contains ribbon loading, supply loading, and general care, maintenance, and troubleshooting procedures for the 9416 XL Thermal Direct and 9416 XL Thermal
QUICK REFERENCE. RFID Overview
 QUICK REFERENCE This Quick Reference contains supply loading and general maintenance procedures for the Monarch 9855 RFID printer. Additional RFID documents are available on the Monarch Printer s Documentation
User support guide SNC Label printing equipment
 User support guide SNC Label printing equipment 1 P a g e Table of Contents PM43 INTERMEC LABEL PRINTER... 3 1. BASIC SETTINGS... 3 1.1. Printer front panel settings... 3 2. TROUBLESHOOTING TIPS... 3 2.1.
TT230SM THERMAL TRANSFER PRINTER USER S MANUAL
 TT230SM THERMAL TRANSFER PRINTER USER S MANUAL Operations Overview Unpacking and Inspection This printer has been specially packaged to withstand damage during shipping. Please carefully inspect the packaging
Copyright Information: Firmware (Software) Agreement:
 Agreement:") Maintenance Manual Copyright Information: CG Triumvirate is a trademark of Agfa Corporation. CG Times based upon Times New Roman under license from the Monotype Corporation. Windows is a registered trademark
Maintenance Manual Copyright Information: CG Triumvirate is a trademark of Agfa Corporation. CG Times based upon Times New Roman under license from the Monotype Corporation. Windows is a registered trademark
QUICK REFERENCE. Connecting the Cables
 QUICK REFERENCE This Quick Reference contains supply loading and general care and maintenance procedures for the Monarch 9860 printer. For more detailed information, refer to the Operator s Handbook available
RJ-2030/2050/2140/2150
 LBF85700 Unpacking Your Printer Check that the package contains the following before using your printer: RJ-030/050/40/50 Quick Setup Guide English Printer Rechargeable Li-ion Battery Belt Clip Thank you
QUICK REFERENCE. Using the Battery
 QUICK REFERENCE This Quick Reference contains supply loading information and general care and maintenance procedures for the Monarch Sierra Sport4 9493 printer. For more detailed information, refer to
RJ-2030/2050/2140/2150
 Printed in China LBF85400 Package Contents Check that the package contains the following before using your printer: RJ-030/050/40/50 Quick Setup Guide English Printer Rechargeable Li-ion Battery Belt Clip
Xi4 Quick Reference Guide
 Xi4 Quick Reference Guide Use this guide to operate your printer on a daily basis. For more detailed information, refer to the User Guide. Printer Components Figure shows the components inside the media
Thermal Transfer Option Rev.C
 Thermal Transfer Option 92-2431-01 Rev.C Overview This document describes the contents, installation, and use of the Thermal Transfer option for the H- Class printer. After verifying the kit contents
TROUBLESHOOTING CHART
 Thermal Transfer Print Quality TROUBLESHOOTING CHART SYMPTOM: Poor edge definition (barcodes and alphanumeric) Print speed is too high Reduce print speed; do not rotate symbol Ribbon and media are incompatible
Zebra XiII-Series Printer Quick Reference Guide
 Zebra XiII-Series Printer Quick Reference Guide Contents Media and Ribbon Loading...67 Media Loading...67 Ribbon Loading...70 Operator Controls...72 Front Panel Keys...72 Front Panel Lights...72 Calibration...74
Table of Contents. Unpacking and Inspection Setup Loading the Media Mount the Printer on the Wall... 16
 WPL25/WHC25 Table of Contents Unpacking and Inspection... 1 Setup... 5 Loading the Media... 6 Mount the Printer on the Wall... 16 LED and Button Functions... 17 Troubleshooting... 18 Unpacking and Inspection
M7 SERIES Thermal Printer Service Manual 4. PART LIST. 4.1 Main Printer Assemblies
 4. PART LIST 4.1 Main Printer Assemblies 31 No. Part No. Description Remark Spare Requirement 1 120732 Electronics cover 1 pc 2 N/A Mainframe 1 pc 3 120733 Cover, front 1 pc 4 120734 Top right side cover
User s Manual. EasyCoder 4420 and 4440 Printer Self-Strip/Batch Takeup
 User s Manual EasyCoder and 4440 Printer Self-Strip/Batch Takeup Intermec Technologies Corporation Worldwide Headquarters 6001 36th Ave. W. Everett, WA 98203 U.S.A. www.intermec.com The information contained
FRESHMARX 9417 QUICK REFERENCE
 FRESHMARX 9417 QUICK REFERENCE For more detailed information, refer to the Operator s Handbook available on our Web site (www.monarch.com). Review the printer safety information in the Safety Sheet provided
Monarch 9825 Printer
 Monarch 9825 Printer TC9825QR Rev. AA 2/02 2002 Paxar Corporation. All rights reserved. This Quick Reference contains supply loading and general care and maintenance procedures. For more detailed information,
Reference Guide for the KODAK Picture Kiosk GS Compact. Software Version 2.0
 Reference Guide for the KODAK Picture Kiosk GS Compact Software Version 2.0 Eastman Kodak Company, 2008 Contents Product Overview... 4 Console... 4 605 Photo Printer... 5 Product Choices... 6 Startup and
PX940. High Performance Industrial Printer. User Guide
 PX940 High Performance Industrial Printer User Guide Disclaimer Honeywell International Inc. ( HII ) reserves the right to make changes in specifications and other information contained in this document
Datacard CR500 Instant Issuance System. User Reference Guide. July Rev B
 Datacard CR500 Instant Issuance System User Reference Guide July 2015 527495-001 Rev B Datacard CR500 User Reference Guide The CR500 Instant Issuance System Contents The CR500 Instant Issuance System The
Quick Installation Guide Direct and Transfer Thermal Printer
 Quick Installation Guide Direct and Transfer Thermal Printer Overview The enclosed printer is currently comprised of two models: 203dpi (dots per inch) model 300dpi (dots per inch) model Unpacking 1. Remove
User s Manual. P/N Edition 4 September EasyCoder 601 E Bar Code Label Printer
 User s Manual P/N 1-960387-03 Edition 4 September 1998 EasyCoder 601 E Bar Code Label Printer CONTENTS Introduction Presentation of the EasyCoder 601 E... 3 Get to Know Your Printer Front View... 4 Rear
User's Manual. Metapace L-22D. Label Printer Rev. 1.00
 User's Manual Metapace L-22D Label Printer Rev. 1.00 Table of Contents MANUAL INFORMATION & USAGE PRECAUTIONS... 3 1. CONTENT CONFIRMATION... 6 2. PRODUCT PARTS... 7 3. INSTALLATION & USAGE... 9 3-1 POWER
EQUIPMENT MANUAL. Avery Dennison Monarch 9419 Printer. TC9419EM Rev. AA 9/ Avery Dennison Corp. All rights reserved.
 EQUIPMENT MANUAL Avery Dennison Monarch 9419 Printer TC9419EM Rev. AA 9/16 2016 Avery Dennison Corp. All rights reserved. Each product and program carries a respective written warranty, the only warranty
Load the Media. To load media, complete these steps: Use the instructions in this section for loading roll or fanfold media in any print mode.
 60 Printer Setup Use the instructions in this section for loading roll or fanfold media in any print mode. Caution While performing any tasks near an open printhead, remove all rings, watches, hanging
Unit Test Calibration Training. (QL420+ & RW420) Mobile Printers
 Mobile Printers") Calibration Training (QL420+ & RW420) Mobile Printers : Overview Unit test is software which is used with the QL and RW range of mobile printers and is used to do the following: Test and calibrate all
Calibration Training (QL420+ & RW420) Mobile Printers : Overview Unit test is software which is used with the QL and RW range of mobile printers and is used to do the following: Test and calibrate all
LabelMax SP2 User Manual
 LabelMax SP2 User Manual 1 GENERAL... 3 1.1 COPYRIGHT DECLARATION... 3 1.2 COMPLIANCES... 3 1.3 INTRODUCTION... 3 2 GETTING STARTED... 4 2.1 UNPACKING AND INSPECTION... 4 2.2 EQUIPMENT CHECKLIST... 4 2.3
1. Review the printer safety information in the Regulatory Compliance document provided with your printer.
 QUICK REFERENCE This Quick Reference contains supply loading information and general care and maintenance procedures for the Monarch Pathfinder Ultra Platinum 6039 printer. For more detailed information,
WAVECOM INSTRUMENTS PTY LTD
 WAVECOM INSTRUMENTS PTY LTD www.wavecom.com.au WAVECOM TT040-50 THERMAL TRANSFER BAR CODE PRINTER USER MANUAL 1 Table of Contents Copyright Declaration 3 Introduction 3-4 Product Introduction Compliances
T4 series user s manual. Version: 1.1
 Version: 1.1 Table of contents 1. Introduction...1 1.1 In the box...1 1.2 Printer Features...2 1.2.1 Front view...2 1.2.2 Rear view...2 1.2.3 Interior view...3 2. Getting start...4 2.1 Loading the ribbon...4
Operator s Handbook. Monarch FreshMarx 9417 Food Freshness System. TC9417OH Rev. AE 1/ Avery Dennison Corp. All rights reserved.
 Operator s Handbook Monarch FreshMarx 9417 Food Freshness System TC9417OH Rev. AE 1/2015 2013 Avery Dennison Corp. All rights reserved. Each product and program carries a respective written warranty, the
OPERATOR S HANDBOOK TABLETOP PRINTER. Monarch Products. TCADTP1OH Rev. AC 1/ Avery Dennison Corp. All rights reserved.
 OPERATOR S HANDBOOK TABLETOP PRINTER Monarch Products TCADTP1OH Rev. AC 1/17 2015 Avery Dennison Corp. All rights reserved. 1 Each product and program carries a respective written warranty, the only warranty
Manual for MantraJet 1100 CD/DVD auto-printer
 Manual for MantraJet 1100 CD/DVD auto-printer Rev 1.03 September 7, 2010 Table of contents Specifications...3 Unpacking MantraJet 1100...4 Quick installation reference MantraJet 1100...7 Installation of
ZT400 Series Quick Reference Guide
 ZT400 Series Quick Reference Guide Use this guide to operate your printer on a daily basis. For more detailed information, refer to the User Guide. Printer Components Figure 1 shows the components inside
PA6000 CONFIGURATION SHEET ONE TIME SETTINGS
 PA6000 CONFIGURATION SHEET ONE TIME SETTINGS Most of these items were determined when the unit was assembled; so only configurations that have changed require this adjustment. These selections can only
ZT400 Series Quick Reference Guide
 ZT400 Series Quick Reference Guide Use this guide to operate your printer on a daily basis. For more detailed information, refer to the User Guide. Printer Components Figure 1 shows the components inside
π H-6323 ZEBRA ZD410 DIRECT THERMAL PRINTER PARTS EXTERNAL PARTS DIAGRAM uline.com
 π H-6323 ZEBRA ZD410 DIRECT THERMAL PRINTER 1-800-295-5510 uline.com PARTS NOTE: Save the carton and all packing materials for storage or in case the printer needs to be returned to the manufacturer. Documentation
HONEYWELL PC42t User Guide SPO-NA-EN-316, V1.0
 s SPO Systems support HONEYWELL PC42t User Guide SPO-NA-EN-316, V1.0 IZUM, 2018 COBISS, COMARC, COBIB, COLIB, IZUM are registered trademarks owned by IZUM. CONTENTS 1 Introduction... 1 2 Setting up the
uline.com OVERVIEW OF CONTROLS
 π H-5135 1-800-295-5510 uline.com BROTHER P-TOUCH D400AD DESKTOP PRINTER OVERVIEW OF CONTROLS LCD DISPLAY AND KEYBOARD 1 3 2 4 5 6 12 CONTROL PANEL PARTS 7 # DESCRIPTION # DESCRIPTION 1 Caps Mode 20 Clear
UPS. Quick Start. Unpack Your Printer. Quick Start. Printer. Power Cord. USB Cable. Parallel Cable
 UPS 2348+ Thermal Printer Quick Start Unpack Your Printer Printer Quick Start UPS 2348+ Thermal Printer Quick Start Power Cord Parallel Cable USB Cable Note: Ethernet option printers do not include any
Airport Bag Tag Printers. Level 1 Repair Program. Unimark ET6000 Unimark 8500
 Level 1 Repair Program Unimark ET6000 Unimark 8500 Version: 2.2 Date: February 15, 2005 Owner: Business Support Author: Jack Michko Table of Contents Table of Contents Table of Contents... ii Unimark ET6000
Thermal Label Printer Guide
 Thermal Label Printer Guide Thermal Printer 2844 A step-by-step guide to setting up your thermal printer TABLE OF CONTENTS Getting Started...1 Unpacking the Printer...2 Printer Features...3 Connecting
H-1148 PAGE 1 OF IH-1148
 PAGE 1 OF 57 Printer Overview Depending on the options you have selected, your printer may look slightly different. Transmissive sensor Media supply guide Front housing assembly Printhead assembly Ribbon
QUICK REFERENCE. Getting Started
 QUICK REFERENCE This Quick Reference contains supply loading information and care and maintenance procedures for the Monarch Pathfinder Ultra Silver 6032 printer. For more detailed information, refer to
KeepnTrack Badge Printer Installation Guide Fort Union Blvd, Salt Lake City, Utah 84121! !
 KeepnTrack Badge Printer Installation Guide 1831 Fort Union Blvd, Salt Lake City, Utah 84121 800-347-6439 801-943-7277 www.companioncorp.com Copyright 2013 Evelyn Manufacturing, All Rights Reserved. Distributed
MP240 / MP245 MP260 / MP268 MP480 / MP486 SIMPLIFIED SERVICE MANUAL
 MP240 / MP245 MP260 / MP268 MP480 / MP486 SIMPLIFIED SERVICE MANUAL QY8-13BV-000 Rev. 00: June 2008 Canon Inc. (1/13) TABLE OF CONTENTS 1. LIST OF ERROR DISPLAY / TROUBLESHOOTING 1-1. Operator Call Errors
Alpha-3R. Direct Thermal Portable Printer SERVICE MANUAL
 Alpha-3R Direct Thermal Portable Printer SERVICE MANUAL i Contents 1. FUNDAMENTAL OF THE SYSTEM... 2 1.1 Overview... 2 2. ELECTRONICS... 3 2.1 Summary of Board Connectors... 3 3. MECHANISM... 7 3.1 Replacing
Scroll through menus or move between screens and menu options. Increase the numeric value of an option or setting being displayed. Save settings.
 Quick Reference Learning about the printer Use the 5 Right arrow button To Scroll through menus or move between screens and menu options. Increase the numeric value of an option or setting being displayed.
UBI EasyCoder 601 User's Manual
 CONTENTS Introduction Presentation of the EasyCoder 601... 3 Get to Know Your er Front View... 4 Rear View... 4 Paper Stock Compartment... 5 Paper Tear-Off... 6 Cut-Off... 9 Ribbon ing Instructions...
Chapter 7: Fundamental Printers and Scanners
 Chapter 7: Fundamental Printers and Scanners IT Essentials: PC Hardware and Software v4.1 1 Chapter 7 Objectives 7.1 Describe the types of printers currently available 7.2 Describe the installation and
CANADIAN D.O.C. WARNING
 Each product and program carries a respective written warranty, the only warranty on which the customer can rely. Avery Dennison Corp. reserves the right to make changes in the product, the programs, and
Removal and Installation8
 8 Screw Types 8-4 Top Cover Assembly 8-5 Left Hand Cover 8-6 Right Hand Cover 8-10 Front Panel Assembly 8-14 Left Rear Cover 8-15 Right Rear Cover 8-16 Extension Cover (60" Model only) 8-17 Media Lever
Load Ribbon. To load ribbon, complete these steps:
 Operations 69 Always use ribbon that is wider than the media to protect the printhead from wear. Ribbon must be coated on the outside (see Coated Side of Ribbon on page 35 to determine which side of a
ScanPartner 600C Image Scanner. User s Manual
 ScanPartner 600C Image Scanner User s Manual Version 1.0 (Doc. No. 250-0062-0) Table of Contents 1. INTRODUCTION 3-4 2. INSTALLATION AND CONNECTIONS. 5-13 2.1 Shipping Bracket 5 2.1.1 Removing the Shipping
3 Maintenance. Chapter contents
 3 Maintenance Chapter contents Life expectancies of consumables..................... 40 User-replaceable parts.............................. 40 Replacing the printer pickup roller................ 41 Replacing
User s Guide. EasyCoder PD4 Bar Code Label Printer
 User s Guide EasyCoder PD4 Bar Code Label Printer Intermec Technologies Corporation Corporate Headquarters 6001 36th Ave. W. Everett, WA 98203 U.S.A. www.intermec.com The information contained herein is
Q8 Barcode Label Printer User s Manual
 Q8 Barcode Label Printer User s Manual Q8 User s Manual Contents Preface... 1 Important Notice, Read Me First!... 1 Chapter 1 Introduction... 2 Specifications... 2 Specifications for Printer... 2 Specifications
AstroJet TM M2 Quick Start Guide
 AstroJet TM M2 Quick Start Guide Step 1 Remove Printer and Accessories from packaging. Place Printer on a flat, even surface. Step 2 Remove Service Station Transport Tab 1. Open Top Cover. 2. Open Print
WS4 Series Printer. Operator Manual WS408DT / WS412DT WS408TT / WS412TT. WS4-r OM SATO Corporation. All rights reserved.
 WS4 Series Printer Operator Manual WS408DT / WS412DT WS408TT / WS412TT WS4-r04-16-02-24OM 2017 SATO Corporation. All rights reserved. FCC ID In a domestic environment this product may cause radio interference
MantraJet 1100 CD/DVD autoprinter Operator s manual
 MantraJet 1100 CD/DVD autoprinter Operator s manual Rev 1.00 May 7, 2008 Table of contents 1. Specifications.. Page 2 2. Unpacking you MantraJet 1100 Page 3 3. Using your autoprinter for the first time.
Quick Start Guide. Introduction. P4T/RP4T Overview
 7 6 Thank you for choosing one of our Zebra P4T Series Mobile s. The P4T Series consists of two models. The P4T can print on direct thermal or thermal transfer media. The RP4T can print on direct or thermal
Adjustments and Maintenance
 2 Adjustments and Maintenance 2.0 Introduction... 1 2.1 Media Sensor Calibration... 1 2.1.1 Quick Calibration... 1 2.1.2 Standard Calibration... 2 2.1.3 Advanced Entry Calibration... 5 2.2 Printhead Adjustments...
Prepare the Media for Loading
 39 You can use roll media or fanfold media in your printer. Roll media hangs on and is loaded from the media supply hanger. Fanfold media is stored away from or in the bottom of the printer and can drape
Service Calibrations 5
 5 Service Calibrations 5-3 ing the Service Calibrations Menu 5-4 1. Scan-Axis Calibration 5-7 2. Service Station Calibration 5-11 3. Accuracy Calibration 5-14 Carriage Height Calibration 5-18 Calibration
fi-4120c Image Scanner
 P3PC-E007-01EN fi-4120c Image Scanner Cleaning and Maintenance 5 DAILY CARE This chapter describes how to clean the scanner. WARNING When cleaning the scanner, turn off the power, and unplug the AC cable
Loading paper and specialty media Learning about the printer. Stop all printer activity. 7 Back button Return to the previous screen.
 Quick Reference Use the 6 Stop or Cancel button To Stop all printer activity. Loading paper and specialty media Learning about the printer Using the printer control panel 0 Use the 9 To Display View the
Monarch 9825 Printer Paxar Americas, Inc. a subsidiary of Avery Dennison Corp. All rights reserved.
 Monarch 9825 Printer TC9825QR Rev. AF 4/08 2007 Paxar Americas, Inc. a subsidiary of Avery Dennison Corp. All rights reserved. Each product and program carries a respective written warranty, the only warranty
User's Guide QL-700. ENG ver.a.
 User's Guide QL-700 Be sure to read and understand this guide before using the machine. We recommend that you keep this guide nearby for future reference. www.brother.com ENG ver.a Thank you for purchasing
CANADIAN D.O.C. WARNING
 Each product and program carries a respective written warranty, the only warranty on which the customer can rely. Avery Dennison Corp. reserves the right to make changes in the product, the programs, and
Chapter 11: Printers. IT Essentials v6.0. ITE v6.0 1
 Chapter 11: Printers IT Essentials v6.0 ITE v6.0 1 Chapter 11 - Sections & Objectives 11.1 Common Printer Features Explain the purpose and characteristics of different types of printers. 11.2 Installing
HP Photosmart A520 Series - Help
 HP Photosmart A520 Series - Help Contents 1 HP Photosmart A520 series Help...5 2 Get started How do I?...7 Find more information...8 The HP Photosmart at a glance...9 Control panel buttons and indicator
A+ Certification Guide. Chapter 11 Printers
 A+ Certification Guide Chapter 11 Printers Chapter 11 Objectives Printing fundamentals. Laser printers Inkjet printers Thermal printers Impact printers. Printer Installation and Configuration Printer Maintenance
2348 Thermal Printer Quick Start UPS Page 28 Prelim Rev.Bx5 03/20/03. Power. Quick. Cord. Start. Printer
 + & Unpack 980385-001 Page 28 Prelim. 980385-001 Rev.Bx5 03/20/03 UPS 2348 + Thermal Printer Quick Start Your Printer Printer Quick Start UPS 2348 Thermal Printer Quick Start Power Cord Getting To Know
Auto-Cutter (JM98901) User's Manual
 User's Manual") Auto-Cutter (JM98901) User's Manual -2- Contents Notice 3 SAFETY SIGNS that must be strictly observed! 5 1. Function 7 2. Main specifications of auto-cutter 7 3. Checking items inside the accessory box
Auto-Cutter (JM98901) User's Manual -2- Contents Notice 3 SAFETY SIGNS that must be strictly observed! 5 1. Function 7 2. Main specifications of auto-cutter 7 3. Checking items inside the accessory box
CRx Printers START-UP GUIDE
 CRx Printers START-UP GUIDE To Get Started: Insert the Companion CD shipped with the CRx printer* into the computer. Please refer to the User s Guide included on the CD companion or the Compact Industrial
XPS 15 2-in-1. Service Manual. Computer Model: XPS Regulatory Model: P73F Regulatory Type: P73F001
 XPS 15 2-in-1 Service Manual Computer Model: XPS 15-9575 Regulatory Model: P73F Regulatory Type: P73F001 Notes, cautions, and warnings NOTE: A NOTE indicates important information that helps you make better
Identification Solutions Division
 Out per f ormi ng Expect at i ons: Br adyther maltr ansf erpr i nt er s Br adypr i nt er PR Pl uspr i nt er HEAVY DUTY MEETS HI GH TECH Qui ck Operator s Gui de Edi t i on 12/ 06 Information on the scope
Operator's Handbook. Printer $ $25.00 $ Avery Dennison Corp. All rights reserved. TC6057OH Rev. AD 4/ /18/ SALE
 028028 Operator's Handbook Pathfinder 6057 Printer 653258 04/18/07 7512 $15.50 SALE 4 58523 32232 9 $25.00 PEARL EARRINGS 8 99565 45453 9 04/18/07 7512 $200.00 TC6057OH Rev. AD 4/13 2011 Avery Dennison
FCC COMPLIANCE STATEMENT FOR AMERICAN USERS
 FCC COMPLIANCE STATEMENT FOR AMERICAN USERS This equipment has been tested and found to comply with the limits for a CLASS A digital device, pursuant to Part 15 of the FCC Rules. These limits are designed
ADC REVISION HISTORY INTRODUCTION INSTRUCTIONS CABLE REQUIREMENTS
 ADC INTERMEC EASYCODER 601XP BARCODE PRINTER (MEDIA CLIENT) February 23, 2001 REVISION HISTORY Rev. Date Author Company Description 1.0 23 Feb. 2001 Jason Korinetz HAS USA Creation INTRODUCTION The Intermec
Fiber optics solution manual. You can print on a variety of release the Go button on the printer sides of the printer door and pulling.
 Fiber optics solution manual. You can print on a variety of release the Go button on the printer sides of the printer door and pulling. Fiber optics solution manual >>>DOWNLOAD LINK
WF-7110 User's Guide
 WF-7110 User's Guide Contents WF-7110 User's Guide... 9 Product Basics... 10 Setting Up the Control Panel... 10 Control Panel Buttons and Lights... 10 Status Icons... 11 Setting a Password and Locking
services the pickup roller rather than replace it, follow the instructions below Remove the pickup roller as described in Changing the pickup.
 Jagged Alliance and Deadly Games (With Voices). Tiedot laitteessa kaytettavan laserdiodin sateilyominaisuuksista Aallonpituus 770-795 Class B2) ICES-003, Issue 2 VCCI-21) AS EN 89 B Paper specifications
TTP-384M THERMAL TRANSFER / DIRECT THERMAL BAR CODE PRINTER SERVICE MANUAL
 THERMAL TRANSFER / DIRECT THERMAL BAR CODE PRINTER SERVICE MANUAL TABLE OF CONTENT 1. FUNDAMENTAL OF THE SYSTEM... 1 1.1. Overview... 1 2. ELECTRONICS... 5 2.1 Summary of Board Connectors... 5 2.2 Pin
RW Series Overview. Introduction
 Thank you for choosing one of our Zebra RW Series Mobile s. These rugged printers will become productive and efficient additions to your workplace thanks to their innovative design. Because they are made
Product Parts Front view... 2 Rear view... 2 Inside the product... 3 Scanner parts... 3 Control panel... 4
 Table of Contents Product Parts Front view................................................................. 2 Rear view.................................................................. 2 Inside the product...........................................................
hp photosmart 7150 basics guide
 hp photosmart 7150 basics guide control panel The following table is a quick reference guide to the buttons that appear on your printer s control panel. CANCEL RESUME POWER contents 1 get started.........................................
Use the instructions in this section for loading roll or fanfold media in any print mode.
 34 Printer Setup and Operation Use the instructions in this section for loading roll or fanfold media in any print mode. Caution While performing any tasks near an open printhead, remove all rings, watches,
MX240/ MX340/ MX640 Series
 Series THERMAL TRANSFER / DIRECT THERMAL BAR CODE PRINTER SERVICE MANUAL TABLE OF CONTENT 1. FUNDAMENTAL OF THE SYSTEM... 1 1.1. Overview... 1 2. ELECTRONICS... 5 2.1 Summary of Board Connectors... 5 2.2
MONARCH DOS-based PATHFINDER Ultra System
 MONARCH DOS-based PATHFINDER Ultra System TC6035EZEM Rev. C 10/98 1998 Monarch Marking Systems, Inc. All rights reserved. Each product and program carries a respective written warranty, the only warranty
SmartPOS7. User Manual
 SmartPOS7 User Manual 1 1. Product information Thanks for choosing our SmartPOS7, please read this manual carefully for correct operation of this device. This smart printer has been integrated Android
Copyright 2013 Esselte Leitz GmbH & Co. KG. All rights reserved.
 Copyright 2013 Esselte Leitz GmbH & Co. KG. All rights reserved. Mac, ipad, AirPrint, and OS X are trademarks of Apple Inc., registered in the U.S. and other countries. Google and Google Cloud Print are
Servicing and Maintenance
 06/08 Rev. 4.05-01 USER MANUAL Servicing and Maintenance General Notes... 2 Servicing by trained personnel... 2 Safety... 2 Fault correction... 2 Ordering spare parts... 3 Servicing and cleaning... 4 Notes
Zebra XiIII-Series Printer Safety and Quick Reference Guide
 Zebra XiIII-Series Printer Safety and Quick Reference Guide GB Contents Specifications...75 Electrical...75 Environmental Range...75 Fuses...75 Warnings...76 Installation...76 Use of Shielded Data Cables...76
Monarch 9460 Printer. TC9460OH Rev. AC 2/ Monarch Marking Systems, Inc. All rights reserved.
 Monarch 9460 Printer TC9460OH Rev. AC 2/01 2001 Monarch Marking Systems, Inc. All rights reserved. Each product and program carries a respective written warranty, the only warranty on which the customer
SBK 09 Superbike World Championship
 SBK 09 Superbike World Championship nts.com]. Manual duplex using the paper output bin remove the remaining paper from the paper final destination may have different import and in the application from