WEB TENSION TECHNOLOGY
|
|
|
- Allen Gardner
- 6 years ago
- Views:
Transcription
1 WEB TENSION TECHNOLOGY BLH LCt-104 HTU Web Tension Transmitter Operator s Manual TM056 RevB 6/1/11 Doc 35109
2 NOTICE BLH makes no representation or warranties of any kind whatsoever with respect to the contents hereof and specifically disclaims any implied warranties or merchantability or fitness for any particular purpose. BLH shall not be held liable for errors contained herein or for incidental or consequential damages in connection with the furnishing, performance, or use of this publication or its contents. BLH reserves the right to revise this manual at any time and to make changes in the contents hereof without obligation to notify any person of such revision or changes. Call (781) for BLH Field Service
3 Table of Contents SECTION 1. General Information SYSTEM DESCRIPTION Introducing the Plug-n-Web-it Concept The Safe-Weigh Software System The LCt-104 Front Panel Main Configuration Flow Diagram Serial Communication OPTIONS Mounting Options Analog Output Options Allen-Bradley Remote I/O Network MODBUS RTU Protocol MODBUS RTU Protocol on UART board MODBUS Plus Protocol DeviceNet Protocol PROFIBUS Protocol LCT-104 PERFORMANCE SPECIFICATIONS LCT-104 ORDERING SPECIFICATIONS WARRANTY POLICY FIELD ENGINEERING SECTION 2. System Installation INTRODUCTION MOUNTING Display Console Mounting Smart Junction Box Mounting ELECTRICAL CONNECTIONS The LCt-104 Rear Panel Module Interconnection Transducer Signal Inputs Mains (AC) Power Serial Communication Analog Output (Option) Digital (Remote) Inputs Open Collector Set point Outputs (Optional) Triac Set point Relay Outputs (Optional)
4 SECTION 3. Calibration SYSTEM CALIBRATION (CALIBRAT) Setup SYSTEM PARAMETERS Number of HTU Load Cells Display Units Decimal Point Location Capacity Front Panel Display Counts KEYPAD CALIBRATION ENABLE MODE FUNCTION CELL ENABLES DESCRIPTION DEGRADE MODE SYMMETRICAL SYSTEM CHECK SYMMETRICAL SYSTEM CROSS CHECKING COMPLEMENTING DATA Vertical inputs: Channels One and Three Horizontal Inputs: Channels Two and Four Hardware Correction of Vertical or Horizontal Inputs SECTION 4. Dynamic Digital Filter GENERAL Digital Averaging Band Selection Conversion Selection Filter Set-Up Procedures SECTION 5. Front Panel Display Functions FRONT PANEL FUNCTIONS Horizontal Bar Graph Vertical Bar Graph Alarm Status Annunciators Configuring the L/R Key Configuring The ZERO Key The F/T Key SECTION 6. Process Outputs Output Definition Set-Up Procedure SERIAL COMMUNICATION Transmit Only Output Formats
5 6.2.2 Full/Half Duplex Bi-Directional Interface SET POINT CONFIGURATION Main Set point Function and Selections Entering/Altering Main Set points Dribble Set point Function and Selection SECTION 7. System Diagnostics OVERVIEW DIAGNOSTIC USER DIAGNOSTIC VERSION ZERO RECALL SELECTING LIMITS Zero Limit Overload Limit Motion Limit Selections FRONT PANEL KEY TEST CHECK REMOTE INPUTS TEST/VERIFY THE ANALOG OUTPUT TEST/TROUBLESHOOT THE SERIAL OUTPUT TEST/TROUBLESHOOT THE OPTIONAL DEVICENET OR PROFIBUS OUTPUT SECTION 8. The LCt-104 Security System INTRODUCTION Lock On/Off Menu Locks Key Locks PASSWORD ACCESS Selecting/Storing a Password Entering the Password SECTION 9. Operation and Tension GENERAL FORCE DISPLAY MODE TENSION DISPLAY ANGLE DISPLAY ZERO OPERATION INDIVIDUAL CHANNEL DISPLAYS ERROR DETECTION AND CORRECTION TENSION PARAMETER SELECTIONS AND OPERATION Web Units Web Decimal Point Adjustment
6 9.8.3 P/inches or N/meters: Wrap Angle Auto Wrap - Maintain Constant Tension Angle Reference SECTION 10. Allen-Bradley Remote I/O INTERCONNECT CABLE RIO OVERVIEW THE ALLEN-BRADLEY PLC THE REMOTE l/o INTERFACE Operational Overview Interface Configurations Discrete Data Transfers BLOCK DATA TRANSFERS Interface Basics A Perpetual Pointer Fault Evaluation Remote Filter Configuration SECTION 11. Modbus Protocols MODBUS RTU PROTOCOL Common Data Format Modbus RTU Functions Supported Setup MODBUS PLUS INTERFACE Routing Path Addressing Global Data Transfers Wiring and Node Addressing Configuration Data Formatting Flashing LED Status Manipulating The Front Panel Display SECTION 12. Profibus Protocol THE INTERFACE DEFINED Profibus DP GSD Files (see paragraph 12.7) INTERFACE WIRING LCt-104 MENU CHANGES IIO Menu Changes
7 Diagnostic Menu Changes Display Menu Changes DATA EXCHANGE FORMATS Produced Data (LCt-104 Transmission) Consumed Data (LCt-104 Receive) LED STATUS INDICATION LCt-104 Status Profibus Network Status Profibus GSD FILE SECTION 13. DeviceNet Protocol THE INTERFACE DEFINED General ODVA DeviceNet Description LCt-104 DeviceNet Interface Description INTERFACE WIRING LED STATUS INDICATION LCt-104 Status DeviceNet Network Status LCt-104 MENU CHANGES I/O Menu Changes Diagnostic Menu Changes Display Menu Changes DATA EXCHANGE FORMATS Produced Data (LCt-104 Transmission) Consumed Data (LCt-104 Receive) DeviceNet EDS FILE Trademark Usage Acknowledgments Allen-Bradley is a trademark of Allen-Bradley Company, Inc. PLC and PLC-5 are trademarks of Allen-Bradley Company, Inc. Modbus is a trademark of Schneider Automation. DeviceNet is a trademark of ODVA
 signals and display the resultant force, tension, or angle data, live on the console display.")
8 SECTION 1. General Information 1.1 SYSTEM DESCRIPTION The LCt-104 system s patented synchronous digital measurement of multi-cell systems establishes the new benchmark in web tension technology. Systems individually digitize each HTU transducer (s) signals and display the resultant force, tension, or angle data, live on the console display. Measuring each individual HTU load cell provides greater system resolution and accuracy. The LCt-104 Expert Technology process web tension system (Figure 1-1) consists of two modules designed to convert the mv/v signal from strain gage type force transducers (load cells) into a high resolution digital signal representing force or tension. HTU load cells connect directly to the smart junction box located in the immediate vicinity of the web tension machinery being used. Resultant force/tension/angle signals are communicated from the smart junction box directly to the console display module located up to 200 to feet away. Console units operate at either 115 or 230 VAC and provide regulated, fault protected 10 VDC excitation for HTU strain gage transducers. Standard features include an RS- 422/485 serial port with PC interface or simplex output ASCII, a sigma delta type A/D converter for each transducer, and dynamic digital filtering. Options include up to four high-resolution analog outputs, eight programmable set points, Profibus, DeviceNet, Allen-Bradley Remote I/O, and Modbus Plus, Modbus RTU Protocol, communication and serial ACSII digital communication interfaces. The Smart Junction Box enclosure is constructed entirely of stainless steel and rated NEMA 4X. Available cable glands provide 1 J-box jumper required for distances greater than 200 ft. access for load cell connection while maintaining NEMA integrity. Console Display Modules are housed in an aluminum case with a powder coated aluminum panel mounting bezel. NEMA 4/4X wall mount enclosures are available as options. Simple entry of calibration data, and filter selections is accomplished using the front panel keypad. All electrical connections are made at the rear panel with unpluggable screw terminal connectors Introducing the Plug-n-Web-it Concept The BLH Plug-n-Web-it concept takes advantage of technology to minimize start-up time and the operator learning curve. Intuitive configuration menus, self configuration of many set-up parameters, and simple pushbutton type digital calibration combine together to make the LCt-104 one of the easiest process instruments to configure and operate. Figure 1-1. Both Modules of the LCt-104 System The Safe-Weigh Software System Safe-Weigh software system benefits include Expert System, Dynamic Digital Filtering, and a wide range of proven DCS/PLC connectivity options. Expert System Diagnostics provides online preventative maintenance information that quickly identifies electrical and/ or mechanical 1-1
 General Electric, Johnson Yokogawa, Honeywell, and other PLC/DCS devices eliminates the risks associated with digital integration of")
9 problems. Dynamic Digital Filtering ensures precise, repeatable set point control in noisy web environments. Proven connectivity with Allen- Bradley, Modicon (AEG Schneider) General Electric, Johnson Yokogawa, Honeywell, and other PLC/DCS devices eliminates the risks associated with digital integration of data information into the process control environment The LCt-104 Front Panel All configuration, calibration, and operation transactions are performed using the front panel push buttons and the high intensity vacuum fluorescent display (Figure 1-2). The user-friendly design separates the operating push buttons (Force/Tension, Zero, L/R, and Print) from the configuration menu keypad. The two line alphanumeric display indicates Force or Tension data and status while in the operate mode and provides instructions etc. during the configuration mode. Figure 1-2. The LCt-104 Console Front Panel. 1-2
10 Figure 1-3. The LCt-104 Main Flow Diagram 1-3
11 1.1.4 Main Configuration Flow Diagram LCt-104 configuration is performed using the menu driven keypad on the right side of the front panel and follows the flow diagram presented in Figure 1-3. This diagram shows the overall structure and general guidelines of LCt-104 setup, calibration, filter, display, I/O, diagnostic, and security configuration routines. Detailed explanations of sub menu parameter selections are provided in sequential chapters, starting with Section III. To browse through the menus, press MENU and use the arrow keys to move across menu subjects, or up and down within a menu. Parameters are not actually changed until the edit and enter keys are used Serial Communication Standard LCt-104s are equipped with a single serial communication port that can be selected to operate as an RS-422 full duplex, or RS-485 half-duplex port. The type selection is made using a series of DIP switches, Console Display, rear panel. Protocol selection is made within the keypad menu structure. Standard units ship with ASCII protocol for communication with a printer, PC, remote display, or data logger. This port can be selected for continuous or demand operation. Extensive diagnostics verify transmit and receive, proper parity and framing, and a visualization function allows the user to view the actual serial transmit and receive characters. See Section II for wiring information and Section VI for protocol information. 1.2 OPTIONS LCt-104 units are available with several different application enhancement options. Options include various mounting enclosures, analog output selections, and custom network interfaces/protocols. All options will be fully defined later in this manual Mounting Options For units located in a general factory/plant floor, or if corrosive, hose down, or sanitary requirements are a factor, a NEMA 4X stainless steel enclosure is available (Console Display). For Div. 2 hazardous locations, units are available with CSA approval as non-incendive devices Analog Output Options Systems are available with a 16 bit analog output with industry standard 4-20 ma operation. Set-up and calibration of this output is accomplished using the menu keypad and can be configured to track force or tension data. Loop diagnostics are also provided to verify that the analog connection is intact. See Section II for wiring information and Section VI for configuration details. NOTE: Four analog outputs are available for tracking force and tension data simultaneously (paragraph 1.2.7) Allen-Bradley Remote I/O Network The Allen-Bradley Remote I/O interface is a communication link that supports remote, time critical I/O control communications between a master processor and a remote I/O slave. It is typically used to transfer I/O bit images between the master and slave. Each LCt104 system represents a quarter (1/4) Rack of discrete I/O with 32 bits of input and output image files to the scanning PLC. All data and status information uses discrete reads and writes to communicate scale information to the PLC in the shortest time possible. Block data transfers are used to communicate non-time critical diagnostic and calibration data, and remotely configure web feature limits and digital filter parameters MODBUS RTU Protocol MODBUS is often recognized as an industry standard method of digital communication protocol between a master or host computer and a slave device. This protocol was originally developed by Modicon to communicate discrete and analog information between a PLC and a master host. As implemented in the LCt-104, this protocol efficiently communicates force and diagnostics information to a MODBUS Master Driver equipped host. 1-4
12 1.2.5 MODBUS RTU Protocol on UART board Same as implemented above RTU but on a separate board freeing up communications on serial port to drive a printer or remote display, or for communications for the PC interface mode. Also supplies a RS232 connection MODBUS Plus Protocol MODBUS Plus protocol allows the LCt-104 systems to communicate on a peer-to-peer network link with Modicon 984 and Quantum PLC devices DeviceNet Protocol DeviceNet is a low cost industrial network designed to easily connect up to 64 "cell" type devices to a PLC/ PC. Information in this Section XIII defines the LCt-104 DeviceNet register allocations and interface instructions PROFIBUS Protocol Profibus is a Siemens industrial network designed to easily connect up to 127 "cell" type devices to a PLC/ PC. Information in the Profibus defines the LCt-104 Profibus register allocations and interface instructions. 1.3 LCT-104 PERFORMANCE SPECIFICATIONS Performance Internal Resolution 4,194,304 total counts Max. Display Resolution 3,000,000 total counts Max. Res. Per Channel 1,000,000 counts Conversion Speed selectable 7.5, 15, 30, and 60 conversions per second Sensitivity (Noise) % full scale (max +/-16 counts w/o filter) Full Scale Range +/-35 mv/channel Dead Load Range 100% Input Impedance 10 M-ohms, min. per channel Load Cell Excitation 10 V (65 ma/channel max) Remote Sense user configurable, each channel Linearity +/ % of full scale Calibration Repeatability 0.3 μv per count Temperature Coefficient Span/Zero +/-2ppm/ C Environment Operating Temperature Storage Temperature Humidity Voltage (Console) (Jbox) Power Display/Operator Interface Type Approval Active Digits -10 to 55 C (12 to 131 F) -20 to 85 C (-4 to 185 F) 5 to 90% rh, non-condensing 17/230 +/-15% 50/60 Hz 16 VDC 12 watts max high intensity cobalt green vacuum fluorescent 7 digit alpha numeric.59" high for weight: 8 digit alphanumeric.39" 1-5
13 CSA Isolated Analog Output Type DC Set point Outputs - 8 (Optional) Type Operating Voltage ON Voltage OFF State Leakage Power AC Set point Outputs - 8 (Optional) Type Operating Voltage AC Frequency ON State Voltage Drop 1.2 Min - Max Load Current Leakage Current Power Digital Inputs Logic 0' (Low) Logic 1' (High) Mechanical Relay 0' Mechanical Relay 1' C22.2 (Class l, li,iii; Div.2; Groups A-G) 16 bit digital to analog Current 4-20 ma (600 ohm max load) open collector (current sinking) 5-35 VDC ma ma VDC external supply required triac VAC Hz Vrms 5mA - 1A full rated load voltage external supply required less than 0.5VDC, sink 3mA (min) 10 to 28 VDC (TTL open collector) closed (one side = digital common, the other side = input) open (input internally pulled up) Network Serial Communication (Std) Type RS-485 Half Duplex (Multi-Drop) Baud 9.6K, 28.8K and 56.7k Simplex Data Output (Standard) Type RS-485 (Simplex) Baud 1200 or 9600 Data Format (Selectable) ASCII 7 data bits, even parity, stop bit Terminal/Computer Interface (Optional) Interface Type RS-485 half duplex (standard) Baud 1200 or 9600 Protocol duplex command/response format ASCII 7 data bits, even parity, stop bit Special Protocols (Optional) Modbus Special Interface (Optional) Allen Bradley Remote l/o - RTU Protocol 1/4 logical rack 1-6
14 Modbus Plus DeviceNet Profibus peer-to-peer (with global data) ODVA specified Siemens protocol 1.4 LCT-104 ORDERING SPECIFICATIONS Designator Option Numbers Option Definition [M] Mounting NEMA 4X Panel Mount NEMA 4X Stainless Steel Wall Mount Enclosure None (nothing installed) [A] Expansion Slot A Uart Card (R76) Modbus Plus Allen-Bradley Remote I/O Profibus ODVA DeviceNet [P] Process Outputs Remote Inputs (standard) #1 with Analog Output #1 with (4) Individual Analog Outputs [C] Communication RS-485, RS-422, or Multi-Drop RS-422 with PC Interface - ASCII Print Format #1 with Modbus RTU Protocol [B] Expansion Slot B None (standard) 8 Open Collector DC Outputs 8 Solid State Relay Outputs [M] Cable Standard Length Cable ft Special Length Cable Over 200 ft Interconnecting cable part number is Specify length when ordering. 1-7
15 1.5 WARRANTY POLICY BLH warrants the products covered hereby to be free from defects in material and workmanship. BLH s liability under this guarantee shall be limited to repairing or furnishing parts to replace, f.o.b. point of manufacture, any parts which, within three (3) years from date of shipment of said product(s) from BLH s plant, fail because of defective workmanship or material performed or furnished by BLH. As a condition hereof, such defects must be brought to BLH s attention for verification when first discovered, and the material or parts alleged to be defective shall be returned to BLH if requested. BLH shall not be liable for transportation or installation charges, for expenses of Buyer for repairs or replacements or for any damages from delay or loss of use for other indirect or consequential damages of any kind. BLH may use improved designs of the parts to be replaced. This guarantee shall not apply to any material which shall have been repaired or altered outside of BLH s plant in any way, so as in BLH s judgment, to affect its strength, performance, or reliability, or to any defect due in any part to misuse, negligence, accident or any cause other than normal and reasonable use, nor shall it apply beyond their normal span of life to any materials whose normal span of life is shorter than the applicable period stated herein. In consideration of the forgoing guarantees, all implied warranties are waived by the Buyer, BLH does not guarantee quality of material or parts specified or furnished by Buyer, or by other parties designated by buyer, if not manufactured by BLH. If any modifications or repairs are made to this equipment without prior factory approval, the above warranty can become null and void. 1.6 FIELD ENGINEERING Authorized BLH Field Service Engineers are available around the world to install LCt-104 based web tension measurement systems and/or train factory personnel to do so. The field service department at BLH is the most important tool to assure the best performance from your application. Field service phone numbers are listed below. Factory: (Main Number) (781) Canada: (416) or (800)
16 SECTION 2. System Installation 2.1 INTRODUCTION This chapter provides LCt-104 system mounting and electrical installation information. Instruments will operate accurately (to specification) in locations with temperatures ranging from -10 C to +55 C (+14 F to F). The installation location should be free of vibration. Unless equipped with the proper enclosure option, instruments should not be located in areas containing explosive or corrosive vapors. In all installations, ac (mains) power should be supplied from a clean (transient free) instrument power source. 2.2 MOUNTING Display Console Mounting The LCt-104 Display Console is shipped with the necessary hardware for panel mounting. Outline and panel cutout dimensions are depicted in Figure 2-1. Installation of panel mount adapters is shown in Figure 2-2. Display Console units can be located up to 200 feet from the junction box Smart Junction Box Mounting Locate the NEMA 4X junction box centrally, within cable reach of the HTU load cells, to ensure maximum system performance. Figure 2-3 shows the j-box outline dimensions and mounting hole designations. Four pre-punched holes enable wall or bracket mounting in the immediate load cell vicinity. 2.3 ELECTRICAL CONNECTIONS The LCt-104 Rear Panel Figure 2-4 (page 2-3) shows the LCt-104 Display Console rear panel where most connections are made Module Interconnection Connect the Smart Junction Box to the Display Console Module using the four lead cable supplied by BLH. Carefully connect this cable to both modules as designated in Figure 2-5. Be certain to connect the cable shield to the SHIELD terminal on BOTH modules. Cable length will be determined per sales order instructions. Figure 2-1. LCt-104 Display Console Outline Dimensions 2-1
17 2-2
 input leads from HTU s are wired directly to the junction box circuit board as shown in Figure 2-6.")
18 Figure 2-4. Display Console Rear Panel Electrical Connections - Remote I/O Option Shown Figure 2-5. Display Console to Smart Junction Box Interconnect Wiring Diagram Transducer Signal Inputs Transducer (load Cell) input leads from HTU s are wired directly to the junction box circuit board as shown in Figure 2-6. HTU load cells and junction box cables are shipped with prestripped, tinned leads so that leads need only be inserted in the proper terminal location and the screw above tightened securely. Lead designations are clearly labeled for standard BLH color coded load cell cables Mains (AC) Power LCt-104 instruments are shipped ready to connect to 115 VAC (50 or 60 Hz) as shown in Figure 2-7. If requested, units will be factory configured for 220-VAC operation, otherwise, remove the rear panel and change the internal voltage selection switch as shown in Figure 2-8. Each instrument is protected with a 1/4 amp, 250 volt T type fuse located adjacent to the ac power socket. If the fuse opens, replace it with the same type, current, and voltage rating. 2-3

19 LCt-104 Junction Box Wiring Diagram HTU Channel Connectio Wire Color -EXC Black Channel 1 -SEN -SIG Red Vertical Cell 1 +SIG White +SEN +EXC Green SHIELD -EXC Channel 2 -SEN Horizontal Cell -SIG Orange 1 +SIG Blue +SEN +EXC SHIELD -EXC Black Channel 3 -SEN -SIG Red Vertical Cell 2 +SIG White +SEN +EXC Green SHIELD -EXC Channel 4 -SEN Horizontal Cell -SIG Orange 2 +SIG Blue +SEN +EXC SHIELD Figure 2-6. Load Cell Connection Designations Figure 2-7. Ac Mains Power Connection 2-4

.")
 Analog current output is optional on LCt-104 instruments.")

20 2.3.7 Digital (Remote) Inputs Figure 2-8. Ac Power Selection Switch Serial Communication A 4-socket mating half connector is provided for serial communication wiring. Connect wires for either RS-485 or RS-422 operation as shown in Figure 2-9. Note that connector position 5 is a ground terminal and should be used for three-wire, RS-485 communication networks. Set DIP switch S1 positions 1-4 for desired interface function (Figure 2-9 lower section). See Section VI for details concerning serial interfacing Analog Output (Option) Analog current output is optional on LCt-104 instruments. Units are factory prepared for either 0-24 or 4-20 ma operation, depending upon sales order instruction. Use the two-socket mating half terminal connector to attach plus and minus signal wires as shown in Figure Route wires away from ac power lines and other EMI sources to prevent interference. Section VI provides analog output configuration procedures. Figure 2-9. The Serial Communication Interface Figure Analog Output Configuration 2-5
, Force/Tension (F/T), and PRINT keys. Interconnecting wire/cable length should not exceed 50 feet.")
 When installed, optional solid state triac outputs operate at 12 to 240 VAC and handle loads of 50 ma to 1 amp.")
21 Certain front panel key functions can be initiated remotely using the rear panel digital inputs. Figure 2-11 gives wiring designations for remote operation of the ZERO, Left/Right (L/R), Force/Tension (F/T), and PRINT keys. Interconnecting wire/cable length should not exceed 50 feet. Route wires/cable away from ac power lines and other EMI sources to prevent interference. Figure Open Collector Relay Wiring Figure Remote Input Switch Configuration Triac Set point Relay Outputs (Optional) When installed, optional solid state triac outputs operate at 12 to 240 VAC and handle loads of 50 ma to 1 amp. Operationally, they are identical to the open collector set point outputs defined in paragraph Wire outputs in accordance with Figure Open Collector Set point Outputs (Optional) Units with eight open collector type set point outputs (optional) can be configured for main or dribble operation with inflight compensation (see Section VI). Outputs are open collector type, capable of sinking 35 ma at 1.2 VDC. Wire set point outputs as shown in Figure Figure Triac Relay Wiring Arrangements 2-6
22 SECTION 3. Calibration System calibration consists of three features; system calibration (CALIBRAT), Cell Enable (OFF/ON), and Compliment Cell Data. To begin with parameter entries, press the MENU key until CAL MENU is displayed. Press the down arrow key for a display of CAL CALIBRAT. 3.1 SYSTEM CALIBRATION (CALIBRAT) After installation, setup and calibration are the next steps in preparing an LCt-104 system for operation (see main menu diagram, Figure 1-3). Setup and calibration parameters are established easily using the front panel display and eight configuration keys. Figure 3-1 (page 3-2) presents details for setup parameter entry and Figure 3-2 (page 3-3) shows procedures for LCt- 104 keypad calibration. 3.2 Setup SYSTEM PARAMETERS Setup establishes system operating parameters such as system capacity, decimal point location, display units, count by, etc. Follow the flow diagram presented in Figure 3-1 to enter or alter setup parameters Number of HTU Load Cells The first parameter entry requests the number of system load cells. Simply enter the number of HTU system cells (1 or 2). This value defines the system for the LCt-104 and will affect subsequent parameter entries as well as system performance Display Units Designate the desired display units as pounds (LB) or Newtons (NT). Selection also appears on print outs and other serial communication transactions. NOTE: Even if the system uses two HTU load cells enter only the value of a single cell, not the combination of both Front Panel Display Counts Define the count value of each display increment by selecting 1, 2, 5, 10, 20, 50, or 100 (note that decimal selection still applies). Note that before the count value is selected, the LCt-104 will automatically attempt to achieve the best possible resolution. 3.3 KEYPAD CALIBRATION LCt-104 system calibration is extremely simple. Entry parameters are located on the label of each cell and on the accompanying Calibration Certificate sheet (Figure 3-3). LCt-104 instruments are factory calibrated with a very precise mv/v measurement device. The keypad calibration method establishes a relationship between force and mv/v, resulting in an extremely accurate electrical type of calibration. Keypad calibration requires a calibration sheet (Figure 3-3, page 3-4, or side of physical cell) for each HTU load cell. The cal. sheet presents the load cell mv/v output reading for both vertical (Z) and horizontal (X) values. Sheets also include a zero balance (no load) mv/v reading. Keypad calibration allows for the entry of zero balance and a single span point. On dual-cell systems (typical), zero balance and span points must be entered for both bridges, vertical and horizontal, of EACH cell. Thus a typical HTU calibration requires four passes through the cal loop (see Figure 3-2) Decimal Point Location Position the decimal point as desired for tension/force display and serial communication Capacity Enter the HTU load cell capacity value. 3-1

23 Figure 3-1. Setup Parameter Entries 3-2

24 Figure 3-2. Calibration Methods and Procedures 3-3
25 Figure 3-3. Sample HTU Load Cell Calibration Certificate 3.4 ENABLE MODE FUNCTION CELL ENABLES DESCRIPTION During normal HTU system operation, all enables should be on; this means that the HTU system is fully operational. There are two enables for each HTU cell (vertical and horizontal), four for two HTU s as follows: Cell #1 - on the display console, is the off/on enable for the vertical input from the first HTU. Cell #2 - on the display console, is the off/on enable for the horizontal input from the first HTU. 3-4
26 Cell #3 - on the display console, is the off/on enable for the vertical input from the second HTU. Cell #4 - on the display console, is the off/on enable for the horizontal input from the second HTU DEGRADE MODE In degrade mode, shutting off the enables of a defective HTU cell allows continued operation until the cell can be replaced. This only applies to a two cell (left right measurement system. In a single cell system, the faulty cell must be replaced. Degrade mode decreases the force measurement approx. by approx. 50% but allows system operation until the (faulty cell) swap is made and all enables are turned back on SYMMETRICAL SYSTEM CHECK Enables can be used to quickly isolate a problem on one side of web. The system operator simply turns off the enables for a single cell to see if one side has more mechanical or electrical noise that the opposing side. In a symmetrical system each side should be showing the same force and angle measurement so with ability to turn either side on/off will reveal differences immediately SYMMETRICAL SYSTEM CROSS CHECKING A two sided system (with two HTU s) works symmetrically. This allows system cross checking to be applied in order to achieve a model or profile of system performance, if desired. This profile combines a vertical component of one HTU with the horizontal component of the other HTU (system will run at Vs. the force) and shows the resultant of the two opposite HTU s acting as one HTU. This model can be used anytime to check for mechanical or electrical noise problems during system operation. 3.5 COMPLEMENTING DATA Complemented data routines are used for setting up correct polarity on vertical and horizontal channels. This may be used if customer has installed units and finds that one-channel components in reverse direction of the other channel Vertical inputs: Channels One and Three Vertical channel are typically positive, indicating that force is being applied in a downward direction on both (or a single HTU transducer) causing positive mv/v signal(s) display(s). Or an upward force can be applied resulting a negative force casing negative mv/v signal(s) display(s). In either case, signals are always in phase with each other, so the only reason for using the complement data routine on the vertical inputs would be to produce positive going numbers which may be easier to work with in using communication protocols Horizontal Inputs: Channels Two and Four Horizontal components are sometimes out of phase because layout of application of HTU (s). This can be corrected so that each input gives an in phase signal. If force on one HTU is out of phase (opposite direction) with the other horizontal signal, it can be changed so that both are in phase with each other. Actually, this must be done because they will cancel each other if left opposing Hardware Correction of Vertical or Horizontal Inputs: Input signals also may be changed by reversing signal (+,-) wiring. This, however, means that one traducer is wired differently than the standard configuration shown in manual. Complementing data allows system wiring to remain consistent with manual designated instructions (no swapping signal (+,-) wiring). But, if swapping inputs is more convenient or easier to document, it will not affect system performance. 3-5
27 SECTION 4. Dynamic Digital Filter 4.1 GENERAL The LCt-104 uses a two stage digital filter. Each stage requires parameter entries as shown in Figure 4-1 (next page). Also required is selection for the conversion speed of the analog to digital signal which will affect filter length time (response). Make parameter entries while viewing live tension force changes on the front panel display. This unique feature allows editing of parameters to fine tune precision settings Digital Averaging The filter first stage calculates a running average of tension input readings. Available selections are OFF, and 1-12 (see Figure 4-1). With averaging OFF the response time will be maximum and noise reduction will be least. With higher settings, response time increases and noise levels are diminished. Using a `first in - first out' algorithm, running averaging provides display updates every A/D cycle regardless of the number of readings averaged. However, since each conversion averaged adds one more A/D cycle to the filter length, the larger the averaging selection, the longer the filter length becomes Band Selection The second stage of the filter, BAND, is applied after averaging is selected. A BAND value between 0 and 100 must be entered as shown in Figure 4-1. Dynamic Digital Filtering constantly compares the amount of input signal change between consecutive conversions. If the differences for all cells fall within the BAND setting, a mathematical filter attenuates the conversion to conversion variation. Once the difference for any cell (between conversions) exceeds the BAND selection, the BAND filter is canceled and the display tracks live tension with maximum response. To achieve the best overall filter response, keep the BAND selection as low as possible without hindering system performance (see next paragraph for set-up instructions). If the BAND setting is higher than necessary, sensitivity to small tension changes will be reduced Conversion Selection Conversion speed selection plays a role in filtering. If the conversion speed is decreased, the length of the filter response time will be longer. When adjusting filter parameters, try a slower conversion speeds first since they usually generate less noise. If, however, the response time is not appropriate then increase the conversion rate and repeat filter procedure Filter Set-Up Procedures Setting filter parameters requires a balance between achieving maximum noise reduction and maintaining quick response and good sensitivity to real tension changes. The goal of filter set-up is to use the lowest averaging and BAND selections needed for smooth system display/operation. If selections are higher than necessary, accurate detection of small tension changes may be hindered. Using the six steps presented below, tune the system to its maximum performance level. 1. Begin with the BAND set at a low value (approx. 4-10). 2. Increase averaging until the noise (watch display) is reduced to the least significant digit (approx. +/- 10 divisions). 3. Increase BAND, if necessary, to reduce the remaining noise to the desired level. 4. If increasing the BAND value does not reduce the noise, return to averaging and select the next higher setting, then repeat step three. 5. If the BAND value required to quiet the display becomes large (65-100), it may be better to use more averaging. Try to achieve the best balance between BAND (small tension change sensitivity reduction) and averaging (longer response time). 6. If a stable tension display cannot be achieved with reasonable selections, it 4-1
28 may be necessary to change the instrument set-up to reduce sensitivity, or select a different conversion rate. Figure 4-1. Filter Parameter Selections 4-2
29 SECTION 5. Front Panel Display Functions 5.1 FRONT PANEL FUNCTIONS The front panel display of the LCt-104 (Figure 5-1) includes a two line alpha numeric digital display for tension and status information as well as horizontal and vertical bar graphs and diagnostic alarm annunciators. The bar graphs and alarm annunciators can be used for several different functions as defined in the following paragraphs. Use the display menu flow diagram (Figure 5-2) to configure the front panel functions for desired system operation Horizontal Bar Graph The horizontal bar graph is considered the primary level indicator and is typically used to monitor horizontal web balance. vacuum fluorescent segments located under the 0 to 100% bar graph give instant visual reference to pulling effects. Select ON to use; OFF for no function. Choose force, tension, or percent tracking and then enter the starting and ending tension values. Note that this indicator also can be configured for reverse polarity depending upon the starting and ending values Vertical Bar Graph The vertical bar graph indicates vertical tension balance. Located to the right of the tension display area, this indicator provides a graphical representation of 0 to 100% in 10% increments (each arrow = 10% capacity). Select ON to use; OFF for no function. Choose force, tension, or percent tracking and then enter the starting and ending tension values. Note that this indicator also can be configured for reverse polarity depending upon the starting and ending values Alarm Status Annunciators Eight front panel alarm/status annunciators provide ongoing system diagnostic information. Each annunciator can be configured to represent 1 of 11 conditions; OFF (no function), system in motion, zero limit exceeded, overload limit exceeded, serial communication receive, serial communication transmit, serial communication parity error, serial framing error, analog output fault, analog output over high selection, analog output under low selection, Allen- Bradley Remote I/O, DeviceNet, Profibus, or Modbus Plus status. Once configured as A1-A8, vacuum fluorescent segments will be illuminated when configured condition is true. Configure each annunciator consecutively as shown in Figure Configuring the L/R Key The L/R side key is used when two HTU s are used. Pressing this key when Force or angle is displayed will show the forces or angles for each side. This key should be used to view the right or left side of the web roll. The typical association is left HTU = Channel #1 and #2 and right HTU = tchannel #3 and #4. Of course, right or left can depend on position of operator, so it is good to setup the Web roll for correct observation by user. Figure 5-1. LCt-104 Front Panel Functions 5-1
30 Figure 5-2. LCt-104 Front Panel Function Configuration Menu 5-2
31 When L/R is pressed, selection of A or B blinking will be displayed for left or right reading. The reference angle is shown only if the auto wrap feature is turned on. Acquiring a new angle can be perform by pressing the EDIT key, as soon as this is done new reference will be displayed. NOTE: There is no side display for tension; total tension is the only displayed value, if auto wrap is on Configuring The ZERO Key The zero key allows the canceling of roll weight associated with vertical and horizontal inputs. When zero is pressed, the dead weight of each input is subtracted and the displayed data reads zero Ib/nt. The true weight reading, associated with each channel (without crosstalk applied), can be viewed by pressing the INDV key and then pressing EDIT key. True weight values for each input are displayed by continued pressing of the INDV key The F/T Key The F/T (force/angle/tension) key typically toggles the system between its three modes of operation (see SECTION IX) when pressed. Menu configuration allows angle and tension modes to be deselected (Y = no for tension or angle modes of operation), if desired. If angle and tension modes are turned off, the instrument will display only force data at all times, otherwise the key will toggle between all operational modes. A second selection determines the power-up mode of operation. Select FORCE, ANGLE, or TENSION to establish the default power up mode. NOTE: If angle and/or tension modes are deselected, they cannot be designated for power-up default. 5-3

32 SECTION 6. Process Outputs Output Definition LCt-104 systems provide up to four highresolution analog current outputs, representing either force or tension, for driving external process equipment/recorders. Units are configured for either 4-20 or 0-24 ma operation (note: 100 ohm load resistance reduction with 0-24 ma) depending upon sales order instructions. Output(s) is based upon a 16-bit digital to analog (D-A) conversion, which represents up to one part in of analog precision. Output scaling is performed after calibration and can be ranged for any portion of the force or tension output curve Set-Up Procedure Connect a current meter to the rear panel analog output points (see Figure 2-10 for +, - designations) and proceed with ANALOG I/O configuration as shown in Figure 6-1 duplex interfacing with a more sophisticated host device. MODBUS RTU, Modbus Plus, Profibus, Allen-Bradley Remote I/O, and DeviceNet options are defined in later Sections of this manual Transmit Only Output Formats Both the PRINT and CON T ASCII output formats are transmit only. The print format is designed for use in conjunction with the front panel PRINT key. Pressing the PRINT key transmits all data strings that are selected `YES in Figure 6-1 to the printer. Table 6-1 shows the printer output format used for each transmitted data string. Table 6-1. The Printer Output Format 6.2 SERIAL COMMUNICATION LCt-104 units come with a versatile, bidirectional, serial communication port. Electronically, this port can be configured for RS-422 multi-drop (loop), RS- 422 full duplex (point-to-point, transmit/receive), or RS-485 half duplex (point-to-point, transmit then receive) operation. Selection is made via rear panel DIP switch positions 1-4 (see Figure 2-9). After selecting the electrical interface, the port operating parameters must be entered using the flow diagram presented in Figure 6-1. Figure 6-2 (page 6-3) provides a full description of each (serial communication) parameter block depicted in Figure 6-1. Note that certain parameter entries are dependent upon the print format selection (accessed by pressing edit when SERIAL I/O is displayed). Standard indicators offer 3 formats; PRINT for output to a printer, CON T (continuous) for constant output to a data logger, PLC, etc., and PC for full 6-1
33 Figure 6-1. Analog and Serial Communication Parameter Entries 6-2
34 Figure 6-2. Definition of Serial Communication Terms The CON T output string is defined in Table 6-2. Continuous output transmissions occur at the time rate selected in Figure 6-1. Continuous outputs feed force tension, status, and address information to a remote data logger or PLC type device without operator intervention. Output string formats can be modified to accommodate custom interface requirements (Figure 6-1). Leading zeros can be replaced with ASCII spaces. STX (start of text), address, and instrument status can be omitted by selecting NO. Units can be expanded or abbreviated in the print format and dropped altogether from the continuous format. Line feed can be deleted from 6-3

35 the CRLF output or both characters can be replaced by an ASCII space. Figure 6-2 provides definitions for each parameter to assist in formatting custom output strings. Table 6-2. The Continuous Output Format Full/Half Duplex Bi-Directional Interface If PC output format is selected, units are capable of transmitting and receiving ASCII data strings. Table 6-3 (page 6-6) presents digit for digit data and syntax information for this interface. Basically, the LCt-104 has 92 internal (EEPROM) registers that store all calibration, configuration, operation, and live force/tension data parameters. The PC format allows data in these registers to be read or rewritten. By re-writing operating parameters, LCt-104 systems can be quickly reconfigured by a remote host device. Note: Downloading data to the Model LCt-104 is accomplished by sending a 3 character command, the data enclosed in brackets <>, and a carriage retum as shown in Table 6-3. The response will be staggered depending upon the time it takes to store the data. First the command will be resumed and then after the data is stored the CRLF (carriage return/line feed) or next command will be returned. Several additional tables are provided to explain PC interfacing. Table 6-4 (page 6-7) provides examples of EEPROM reading/writing, and error code exchanges. Table 6-5 (page 6-8) demonstrates live weight transactions. 6.3 SET POINT CONFIGURATION Model LCt-104 controllers provide eight outputs for set point operation. Standard units offer open collector/ TTL signals at the rear panel connector. Optionally, triac based analog outputs may be ordered. In either case, the output signals are identical, based upon configuration selections presented in Figure 6-1. Following the flow diagram to select main or dribble function for each output used. Also, select the polarity (valve `ON' above or below set point) and a tag description (name) for each set point Main Set point Function and Selections Main corresponds to the actual desired force or tension set point value. To avoid relay chatter (subsequent off/on fluctuations), enter an INFLIGHT value which corresponds to the main value plus a small fluctuation tolerance band. Set point polarity (i.e. valve on below or above selected value) can be configured for each main set point. The TAG selection allows each main set point to be designated by an alphanumeric name or number. Tag designations are communicated through the PC and PLC interfaces to a host device. NOTE: BLH recommends that set point relays should always "OPEN" when an error condition is detected. This, however, is a customer based decision. 6-4
36 6.3.2 Entering/Altering Main Set points Main set point values may be entered/ altered at any time by pressing the front panel STPNT key. Use the procedure shown in Figure 6-3 to enter/alter main set points Dribble Set point Function and Selection Dribble or secondary set points are not used in the LCt104 at this time. Figure 6-3. Entering or Altering Main Set points 6-5

37 Table 6-3. PC Interface Register Allocations 6-6


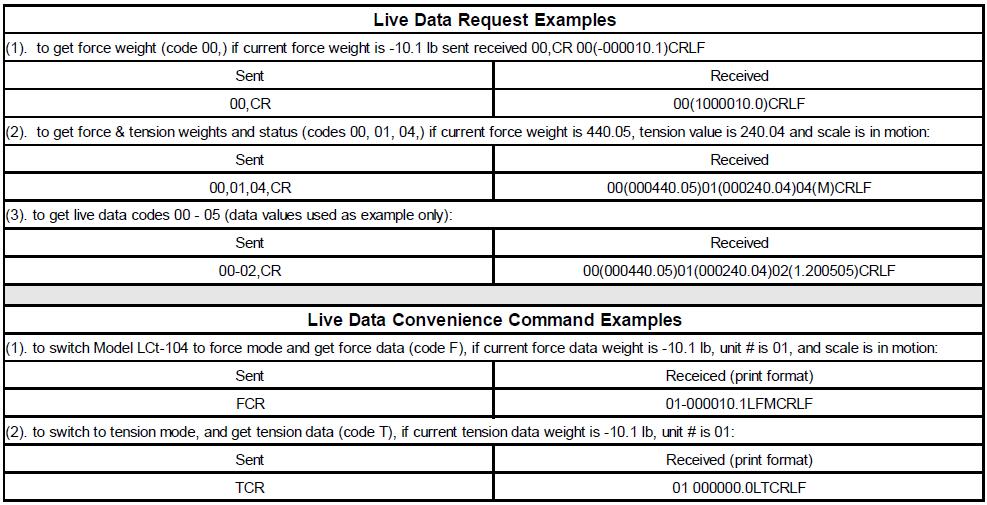
38 Table 6-3. PC Interface Register Allocations (continued) Table 6-4. Interface Error Code Definitions Table 6-5. PC Interface Live Data Transactions 6-7

39 6-8

40 Table 6-6. PC Interface Set point Data Transactions 6-9

41 Table 6-6 con t. PC Interface Set point Data Transaction Examples 6-10
42 SECTION 7. System Diagnostics 7.1 OVERVIEW LCt-104 diagnostics provide easy access to critical operating system data, and test/verification procedures for many indicator functions. Figure 7-1 (next page) presents the diagnostic flow diagram. Follow the procedures in this diagram to view values, set function limitations, test the front panel keypad, and verify I/O functions. 7.2 DIAGNOSTIC USER Diagnostic user provides three registers for storage of customer tag and calibration records. Users may enter a tag number, current calibration date, and projected date of next calibration, if desired. 7.3 DIAGNOSTIC VERSION Diagnostic version provides the software version for the front end and the jbox, the installed option code derived from the ordering specification, the serial number, and the date of the factory calibration. Also included is the baud rate for the jbox/front end interface. 7.4 ZERO RECALL Recall allows operating personnel to view current zero values. Press the INDV UNITS key to see values for individual cell channels. 7.5 SELECTING LIMITS Diagnostic limits allow operator entry of not-toexceed values for critical system functions. Most of these selections can be assigned to a front panel annunciator (A1-A8, paragraph 5.1.3) to provide visual indication of the error condition Zero Limit The value entered for zero will limit the range of the front panel zero keys (recommended 2-20%). The zero keys will not function beyond if the range is exceeded Overload Limit This value is critical for system protection. Repeated system overloading may permanently damage load cells and other process equipment. Enter a value of up to 150% of system capacity Motion Limit Selections Motion determines how many counts must be exceeded before the in motion alarm annunciator is activated. The motion timer determines how long the motion alarm remains activated after the motion condition is cleared. 7.6 FRONT PANEL KEY TEST DIAG KEYPAD allows an operator to functionally test any/all front panel keys. Press any two keys simultaneously to exit. 7.7 CHECK REMOTE INPUTS DIAG INPUTS is a check of all remote inputs. If inputs are inactive, their respective numbers will appear (54321). Once activated, the input number will change to a dash. 7.8 TEST/VERIFY THE ANALOG OUTPUT DIAG ANALOG tests the analog output. Test should be performed with a current meter attached. Testing firstly shows the actual analog count value being transmitted. Since the analog output is based on a 16-bit D-A conversion, the percent of span can be calculated by dividing the displayed counts by Secondly, any value may be entered to test the analog output. Enter a known value such as (max setting) and check current meter for appropriate output. Exiting this menu will automatically discontinue the test mode. 7-1
43 Figure 7-1. LCt-104 System Diagnostic Routines 7-2
44 7.9 TEST/TROUBLESHOOT THE SERIAL OUTPUT DIAG SERIAL provides the means to view both the transmit and receive buffers. After pressing EDIT, use the left/right arrow keys to increment forward or decrement backward through the selected buffer and view the hexadecimal value of each character. Using this procedure, incoming data requests can be checked for protocol/ syntax accuracy and compared to LCt-104 output responses TEST/TROUBLESHOOT THE OPTIONAL DEVICENET OR PROFIBUS OUTPUT DIAG DEVICE N provides the means to view the status of the OPTION PROTOCOL interface. After pressing EDIT, scroll through the menu to see the error number (if an error exists), the number of resets, and the current values of the receive and transmit buffers. 7-3
45 SECTION 8. The LCt-104 Security System 8.1 INTRODUCTION From password access to individually selectable menu and key locks, LCt-104 software protects the entire system from overt tampering or accidental data/configuration/calibration alterations. Figure 8-1 (next page) presents the security menu flow diagram. Follow the procedures designated to secure as many parameters as desired Lock On/Off Lock On restricts access to the security menu and all other menus/keys designated as locked. If locked, the designated password (see paragraph 8.2) must be entered to gain access to the security menu. Units are shipped with the lock Off to allow initial configuration without a password Menu Locks Any or all of the LCt-104 main menus can be locked to prevent parameter changes. To lock a menu, choose ON by pressing the EDIT and RIGHT arrow keys in sequence. Then press ENTER to store. Once a menu is designated as locked access to that menu is barred. To unlock a locked menu, return to the security menu, enter the correct password, and change the status to OFF Key Locks Five of the LCt-104 front panel keys can be locked to prohibit key function. Keys that can be locked are; ZERO, L/R, F/T, PRINT, and EDIT. To lock a key, choose ON by pressing the EDIT and RIGHT arrow keys in sequence. Then press ENTER to store. If a key is designated as locked, it will not function when pressed. To unlock a locked key, return to the security menu, enter the correct password, and change the status to OFF. 8.2 PASSWORD ACCESS If lock ON is selected (paragraph 8.1.1), a password must be entered to regain access to the security menu. The following paragraphs explain how to select and enter a password. Once a password is chosen, it should be written down and stored in a confidential area Selecting/Storing a Password A password can be any combination of alphanumeric characters up to seven digits long. It is not necessary to use all seven digits. At the PASSWORD display, key in the designated characters using the arrow keys (LEFT/RIGHT to change digits, UP/DOWN to select character). When the password is correctly displayed, press ENTER to store. 8.3 Entering the Password If the lock is ON, the password must be entered to access the security menu. With the display reading SECURITY (a row of dashes above), press EDIT. Use the arrow keys to enter the complete password, as it was stored, on the row above SECURITY. When the correct password is displayed, press ENTER. Note that entering the password does not turn the lock off; it simply allows access to the security menu. If the lock is left ON, the password must be entered each time the security menu is accessed. 8-1
46 Figure 8-1. Security Menu Options. 8-2
47 SECTION 9. Operation and Tension 9.1 GENERAL LCt-104 indicator/transmitters power up in the force, tension, or angle mode depending upon the selection made in paragraph If no critical system errors are detected, the front panel display will show the selected mode current value. Tension parameter selections (see paragraph 9.8) affect system operation. Therefore, the tension menu, Figure 9-3, is included in this Section. Figure 9-1 presents the front panel switch functions for the operating mode. F/T toggles the operating mode from force to angle to tension (if all enabled). ZERO performs push to zero and L/R switches the display from cell A to cell B (2 cell system only). PRINT/COM transmits the current display and status data to a printer if print format is selected. If the LCt-104 is connected to a host computer or PLC; F/T, L/R, ZERO, and PRINT functions can be initiated remotely using the rear panel digital inputs. 9.2 FORCE DISPLAY MODE In the force mode, all of the live weight of the system is displayed on the front panel. Live weight does not include the dead weight of the roll or other mechanical equipment that is factored out during calibration. To view individual side force values, press the L/R key. (A and B) cells. To view individual side angle values, press the L/R key. 9.5 ZERO OPERATION A new zero can be acquired to compensate for changes in the dead load of the system due to roll changes etc. Acquiring a new zero reference value does not affect the slope of the calibration. The push to zero range in the LCt-104 can be configured from OFF to 100% of system capacity (or ). Zero may be acquired only if the system is not in motion and the zero limit has not been exceeded. 9.6 INDIVIDUAL CHANNEL DISPLAYS Viewing individual channel (2 per cell) live, throughout the entire process, allows operating personnel to profile system trends or tendencies and adjust equipment for maximum performance. Although the total system may never overload, certain cells may experience overload or underload moments which can affect cell integrity, longevity, and ultimately, product quality. LCt-104 technology allows operating personnel to view individual load cell data in one of three forms. In accordance with Figure 9-2, view either the unit force value (individual units), millivolt per volt signal (individual mv/ V), or the percent of total load (individual %) each cell channel is carrying. Figure 9-1. Front Panel Operating Keys 9.3 TENSION DISPLAY Tension displays the actual tension value as combination of both left and right (A and B) cells. To view individual side tension values, press the L/R key. 9.4 ANGLE DISPLAY Angle displays the actual resultant force angle value (FR) as a combination of both left and right 9-1

48 9.7 ERROR DETECTION AND CORRECTION Should an error condition occur, a scrolling message will appear on the bottom line of the front panel display. As much as possible, messages define the exact error and suggest a remedy. Once the error is cleared, the scrolling message will stop and normal operation will resume. Table 9-1 presents all error messages with recommended solutions. Figure 9-2. Individual Load Cell View Keys 9-2
49 9.8 TENSION PARAMETER SELECTIONS AND OPERATION Figure 9-3 presents tension parameter selections and a brief description of each. Parameters entered can affect system operation so please consider options carefully. If LB or NT (calibration parameters) units are selected, operation is unaffected. Choosing PLI (pounds per linear inch) or N/M (Newton meters) changes the display readout and potentially operation. With PLI or N/M selected an additional choice, Auto wrap (OFF/ ON) is available. Choosing auto wrap automatically changes the tension output as wrap angles change. In winding/rewinding zones, wrap angles change as the roll diameter increases or decreases. This unique feature facilitates smooth winding with consistent tension force as the roll size increases or decreases. Read the following paragraphs and enter the tension operation parameters that offer optimal machine function Web Units Web units are based upon selection of units in calibration routine. If pounds were selected (LB) the choice here is (LB or PLI) pounds or pounds per Linear inch. If Newtons were selected in calibration routine the choice here is (NT or N//M) Newtons or Newtons per meter. Selecting LB or N requires only entry of wrap angle. Selecting PLI or N/M requires input of next three entries Web Decimal Point Adjustment Displayed tension data can be shifted or corrected. Web length when entered causes displayed tension data to decrease. Adjusting the decimal point position can increase resolution and enhance the data display. Three decimal places are available for tension resolution enhancement. Note, however, that this decimal selection is combined with the calibration decimal value previously selected. Therefore, if one decimal place is used for system calibration and two decimal places are used for the tension display, the end result will equal three decimal places. Note: Setting the tension decimal place too high can result in a display overrun. Look at the tension data without a tension decimal point applied, and then increase tension resolution to desired level P/inches or N/meters: Enter value for inches or meters down to 1/10 of inch or meter. The highest setting can is one thousand inches or meters Wrap Angle Enter the web wrap in degrees; entry must be between 1.0 and This measurement is the amount of wrap covering the roll from entry point to exit point Auto Wrap - Maintain Constant Tension Turning the auto wrap feature on allows for constant tension to be monitored and maintained. This feature needs a reference angle to be acquired first (see next step). Auto wrap increase or decreases the tension automatically as exit or entry angles change on the roll feeding or reeling the product. In zones with changing angles, tension needs to be adjusted because accurate measurement is based upon angle or amount of roll wrap Angle Reference Angle reference can be written by inputting the value here on this screen or by going to operate mode and selecting the angle display. Viewing the angle display, press the side (L/R) key, till an R appears indicating the current reference angle. Now press the edit key the new reference angle is acquired. Pressing the left arrow key here will also show the difference between the current reading for angle and the reference angle, which is used to calculate the new tension data and keep tension constant. 9-3
50 Figure 9-3. Tensioner Parameter Entries. 9-4

51 SECTION 10. Allen-Bradley Remote I/O This chapter describes the Allen-Bradley Remote l/o (RIO) communication link between the LCt-104 Process Web Tension System and an Allen-Bradley PLC-5. Remote l/o interfacing uses technologies licensed to BLH from Allen- Bradley. Functionally this simple digital interface expedites the transfer of tension/force data, system status, and diagnostic information. It also significantly simplifies the retrieval and download of filter and other set-up parameters INTERCONNECT CABLE LCt-104 units ordered with the Allen-Bradley Remote l/ O option have an additional 3-socket mating half connector. Connector and wiring designations are presented in Figure Connect 'Blue Hose' cable to the supplied connector as designated RIO OVERVIEW The Allen-Bradley Remote l/o (RIO) interface is a communications link that supports remote, time critical l/o control communications between a master processor and a remote l/o slave unit. It is typically used to transfer l/o bit images between the master and slave. The LCt104 represents a quarter (1/4) rack of discrete l/o with 32-bit input and output image files. Time critical system information (tension/force and status data) is communicated to the PLC using discrete read and write commands. Block transfers are used to upload and download nontime critical information such as diagnostic, status, and individual channel data THE ALLEN-BRADLEY PLC Allen Bradley PLC-5 programmable controllers are typically used as part of a distributed process automation architecture. A variety of 1771 series racks and l/o modules are available for local or remote discrete and analog process control. PLC-5 units digitally communicate to other devices using a conventional RS-232 or serial port in addition to special interface ports such as Data Highway Plus, Scanner Communications, and Remote l/o Adapter THE REMOTE l/o INTERFACE Operational Overview The Allen-Bradley Remote l/o (RIO) interface is standard on many PLC-2, 3, and 5 series programmable logic controllers. The technology used in the interface and licensed by Allen- Bradley to BLH enables the LCt104 system to communicate tension/force information to the PLC as if it were 1/4 rack of discrete l/o. Using the standard RIO interface port to represent tension/ force data as simple discrete l/o, a low cost reliable communication link between the PLC and system is established. Standard PLC ladder logic instructions convert binary data to an integer or floating point weight value without special software drivers and scan delays that occur when data block transfers are used. The LCt also communicates status information, and diagnostic data to the PLC. NOTE: Transfer data differs according to mode selection. Figure Allen-Bradley Remote I/O Cable Connection 10-1
52 Figure Remote I/O Menu and Cable Considerations CONFIGURATIONS: One Quarter Rack. The LCt-104 s configured to act as 1/4 rack of l/o using 2 input words and 2 output words in the PLC's l/o image table. Four LCt-104's constitute 1 full rack, each using a different starting quarter. Discrete Transfer. Tension/force data and operating status information transmitted through discrete transfer using the PLC's Remote l/o image table. Block Transfer. Block data transfers are initiated by the PLC ladder logic program to obtain more in depth status, diagnostic, and individual load cell data. Word Integrity Is Ensured. LCt's always transmit both input image table words intact. To ensure word integrity on the PLC side, immediate writes to the output image table should be written low word first Interface Configurations Baud rate, rack address, starting quarter, and last rack designations are all configured through the LCt l/o sub-menu (Figure 10-2). Access the l/o sub menu (reference operator's manual for keypad functions), step to the l/o RIO display, and make selections. The LCt is able to be addressed up to rack number 77 (octal). Additional Figure 10-2 information provides a relationship table for baud rate, cable length, last rack termination resistance, and the number of LCts on the RIO loop. Careful consideration must be given to all four factors to ensure proper RIO loop operation. 10-2
53 Discrete Data Transfers Output Image Table The PLC-5 initiates the communication interface by transmitting two words from the output image table (Figure 10-3). The first word is regarded as a 'spare' by the LCt-104. The second word contains the commands that the PLC-5 expects the LCt-104 system to perform. Word 2 controls set points, filter selection, filter operation, and operating mode status. Table 10-1 shows the structure and bit definition of each Output Image Table word Input Image Table After evaluating the contents of the output image table, the LCt-104 responds by transmitting two words to the input image table (Figure 10-4). The first word contains signed integer weight data. The second word contains the upper order data bits, system status, error condition, and set point status information. Table 10-2 defines the bit structure of both input words. 10-3

54 Figure and Table Remote I/O Output Image Table Bit Designations 10-4
 write command containing a register location pointer.")
55 Figure and Table Remote I/O Input Image Table Bit Designations 10.5 BLOCK DATA TRANSFERS Interface Basics Block data transfers are initiated by the ladder logic program write (BTW) and read (BTR) commands. The transfer sequence begins when the PLC sends a one word (1 6-bit integer) write command containing a register location pointer. This pointer is the 16 bit integer value of the first register the PLC wishes to read (factory default upon shipment is register 1). Table 10-3 presents all available single and double word register locations. After establishing the starting register location, the PLC then transmits a read transfer block command telling the LCt-104 how many words of information are needed Block Transfer Reads (BTRs) Once the register location pointer value is established, the PLC logic program must issue a block transfer read command to obtain information. A BTR can request up to 64 words of LCt-104 information (see Table 103). The LCt responds to 10-5

56 the BTR by transmitting the number of words requested, starting at the pointer location. NOTE: The first word transmitted by the LCt will be the register pointer value. This word is added at the beginning of the transmission to 'echo' the pointer value prior to transmitting requested data. Therefore, the BTR command MUST add 1 to the number of words requested. If the PLC needs four words of LCt information, the BTR request must be for five words (Figure 10-5). Figure A Block Transfer Read Command Figure A Block Transfer Write Command (read) repeatedly without having to re-write the register location word. Of course the register pointer can be changed as often as needed, but the last written location will always be remembered, even during power down. This feature saves a lot of BTWs when the PLC is monitoring a particular register or block of registers over a period of time Fault Evaluation Four status words, register locations 1, 2, 3, and 4 provide detailed explanations of error conditions experienced by the LCt-104 system. When a fault is detected, bit 15 (fault) in word 2 of the input image table is set to a '1' to alert the PLC of an error condition. The PLC must then perform a BTR of the four status registers to evaluate and correct the error. Table 10-4 gives the status word bit designations Remote Filter Configuration The filter 'pore' parameter can be changed onthe-fly by the PLC. This unique feature allows optimal, predetermined filtering parameters to be implemented at critical moments during system operation. Changing filter parameters throughout the process ensures data stability and maximum system response to actual tension/force changes. The pole parameter is stored at register location 136 (Table 10-3). Make pole selections in accordance with Section IV guidelines Block Transfer Writes (BTWs) Some registers may be written to by the PLC (indicated by a 'W' in the R/W column table 10-3). This allows parameters such as filter, set point, and diagnostic values to be down loaded on-the-fly by the PLC ladder logic program. When writing to the LCt-104, the first word must be the register location pointer. Therefore, the program MUST always add 1 to the BTW command length (Figure 1 0-6). For example, to change the filter value, the BTW length must equal 2 with the first word being the filter register location pointer and the second word being the new pole value A Perpetual Pointer One advantage to block transfers is that the register pointer is retained in LCt-104 EEPROM memory. When a write block selects (points to) a register location, that location may be accessed 10-6

57 Table Allen-Bradley Remote I/O Register Allocations. 10-7


58 Table Status Register Bit Definitions 10-8


59 Table 10-4 con t. Status Register Bit Definitions 10-9
60 SECTION 11. Modbus Protocols 11.1 MODBUS RTU PROTOCOL This interface method is applicable to virtually any PC or other process control computer with Modbus RTU Master communication capability. The interface provides tension/force and diagnostic information and allows for remote control of, zero, force/tension, and print functions. Information is transmitted in blocks of data, thereby minimizing polling and response time delays. The interface operates with the LCt- 104 configured as the slave device and the host computer as the master. To initiate Modbus RTU protocol, simply select the Modbus format as shown in Figure 6-1 (page 6-2). Modbus RTU uses the standard LCt-104 RS-485/422 communication port and requires no hardware alterations. RTU format also available on UART or with RS232 (see Figure 11-1a) Common Data Format Table 11-2 presents a complete overview of Modbus register and bit allocations. Table 11-2 information which appears in conventional text applies to both Modbus RTU and Modbus PLUS formats. Allocations which pertain only to Modbus Plus appear in italic text. In addition to Table 11-2 information, the following data formats and definitions are identical for both Modbus protocol options: Tension/force Data (BLH format for Modbus Plus) - Two 16 bit signed integers, the first (high) integer must be multiplied by and then added to the second (low) integer. Status and setup parameters - One 16 bit unsigned integer. Alpha data - For each register: high byte is first character, low byte is second character. NOTE: If a decimal point is required the resulting value must be multiplied by the appropriate fraction, i.e for hundreds of a unit. In the case of mv/v values the multiplier is The LCt-104 range is ( / ). NOTE: counts refers to displayed counts. If displayed tension/force is counting by 2 lb increments then presetting a register to 9 would mean 18 lbs Modbus RTU Functions Supported 02 Read Input Status 03 Read Holding Registers 06 Preset Single Register 16 (10 Hex) Preset Multiple Registers Setup Modbus RTU format, Device address, baud rate, and parity are all selectable under the SERIAL 1 section of the I/O MENU MODBUS PLUS INTERFACE is an official ModConnect Partner. As such, BLH has been authorized by Schneider Automation to incorporate Modbus Plus Communication Technology in its LCt-104 series product line. Modbus Plus protocol allows the LCt-104 to communicate on a peer-to-peer network link with Modicon 984 and Quantum PLC devices. LCt-104 units with the Modbus Plus option have a custom rear panel with a specific MODBUS PLUS connector (see Figure 11-1b next page and paragraph ). The Modbus Plus interface does not use the standard LCt-104 RS- 485/422 communication port. 11-1

61 Figure 11-1a. Modbus RTU Rear Panel (UART Version) with Interface Designations Figure 11-1b. Modbus Plus Rear Panel with Address Designations Table Routing Path Address Designations 11-2
62 Routing Path Addressing The LCt-104 Modbus Plus node is a Host Computer node with 8 data-slave input paths. When using Read/ Write MSTR operations, or multiple Modbus Plus networks, take note of the message routing format. A routing address is five bytes in length. This allows communication between multiple Modbus Plus Networks over Bridge Mux hardware devices. Since the LCt is a host computer node, two of the five routing address bytes are required to identify it. The next-to-last non-zero byte specifies the network node station address (1-64). The last nonzero byte specifies the input path or task number (1-8) to which the message is assigned. The other three routing address bytes allow communication through up to 3 Bridge Mux Devices. Table 11-1 depicts the address routing path for an LCt device at address 12, using path/task number 1. NOTE: If multiple devices access the same LCt, BLH recommends using a different task/path number for each requesting device. This will prevent address contention problems. NOTE: Host device routing path format is different from PLC designated device addressing. When using PLC designated devices, the input path/task number is not required since it is automatically selected. NOTE: BLH assumes reader/operator familiarity with Modbus Plus token passing network operation. Readers/operators unfamiliar with Modbus Plus should obtain the Modicon Modbus Plus Network Planning and Installation Guide (GM- MBPL-001) and Modicon Ladder Logic Block Library User Guide (840 USE ) from the Schneider Corporation Global Data Transfers For high speed process control, BLH recommends that global data transfers be used. LCt-104 Global data allocations are defined in the Figure 11-2 parameter selection menu Wiring and Node Addressing Wiring is simply a matter of connecting the Modicon supplied, 9 pin D-type connector cable to the LCt-104 rear panel Modbus PLUS D-type socket mating half (see Figure 11-1b). LCt-104 nodes may occupy any station address location from 1 to 64. Selection is made at the rear panel (see table in Figure 11-1b) DIP Switch designated ADDRESS. Add 1 to the switch selection to obtain the actual address (i.e., selection-0 +1 =1). DIP switch positions 7 and 8 are unused. NOTE: Switch selections are read only during power-up. If the address selection is changed, the instrument must be powered down and then powered up again Configuration Figure 11-2 presents the Modbus Plus configuration menu. Parameters are as follows: ADDRESS is non-configurable. It simply indicates that the network has recognized the LCt- 104 device at the designated address. GLOBAL DATA allows up to 7 words of live tension/ force and status data to be selected for broadcast with each token pass. Each item selected represents two words of global data. The first item selected YES becomes the first two words, the second YES becomes words three and four, and so forth. The seven available selections, status 1-4, tension, force, and angle are defined in Figure ROTATION is non-configurable. Rotation shows the time used for one complete token pass of all network nodes Data Formatting Table 11-2 presents a complete overview of Modbus register and bit allocations. Table 11-2 information which appears in conventional text applies to both Modbus RTU and Modbus Plus formats. Allocations which pertain only to Modbus Plus appear in bold italic text. 11-3
. NOTE: If a decimal point is required the resulting value must be multiplied by the appropriate fraction, i.e. 0.01 for hundreds of a unit. In the case of mv/v values the multiplier is 0.")
63 BLH formatted tension/force data consists of two 16 bit signed integers, the first (high) integer must be multiplied by and then added to the second (low) integer (see illustration, top of next column). NOTE: If a decimal point is required the resulting value must be multiplied by the appropriate fraction, i.e for hundreds of a unit. In the case of mv/v values the multiplier is The LCt-104 range is ( / ). NOTE: counts refers to displayed counts. If displayed tension/force is counting by 2 lb increments then presetting a register to 9 would mean 18 lbs Flashing LED Status A flashing green ACTIVE LED located on the LCt- 104 rear panel (Figure 11-1) indicates the status of Modbus Plus network operation. To interpret flash patterns, refer to the Modbus Plus Planning Guide (GM-MBPL004). NOTE: To display flashing status on the LCt-104 front panel, configure an Alarm/Status Annunciator for Modbus Plus Status indication (see Section V) Manipulating The Front Panel Display Provision has been made for the host PLC to display messages on the LCt-104 front panel display. Messages may occupy both the upper (7 character) and lower (8 character) display lines (Figure 11-3, page 11-8). To send a message, the host PLC transmits the message coded in conventional ASCII characters* to registers thru along with a display control word; register Information written to these LCt104 registers determines not only the message content but also the display time period. When the host message display time period expires, the LCt-104 will revert to its normal tension/force/status display. See Table 11-2 and Figure 11-3 for a detailed breakout of register allocations and byte designations. Host messages displayed on the LCt front panel can be used to alert operators to error conditions, prompt required inputs, etc. NOTE: Host messages are not displayed if the LCt104 is in any calibration or parameter configuration menu mode. 11-4
64 Figure Parameter Selection Menu and Global Data Designations 11-5

65 Table Modbus RTU and Plus Register Allocations 11-6


66 Table Status Word Bit Designations 11-7


67 Table Status Word Bit Designations (continued) 11-8

68 Figure Front Panel Display Write - Register and Byte Allocations 11-9
69 SECTION 12. Profibus Protocol This chapter defines the optional Profibus interface as it pertains to BLH LCt-104 instruments. Profibus, standardized in the European standard EN , is the operational network interface for Siemens PLC based control systems THE INTERFACE DEFINED Consisting of three communication levels, the interface structure was designed for high-speed (up to 12 mbaud) communication between master (typically PLC) and slave devices Profibus DP Although three communication levels exist, LCt- 104 units communicate only at the Profibus DP (decentralized periphery) level. At this level, LCt s are dedicated slaves with no master status or functionality. They cannot manipulate the bus or control token passes. They will respond quickly, however, to any master device on the network GSD Files (see paragraph 12.7) GSD files are required to establish communication on the Profibus network. GSD files contain all device specific parameters such as supported baud rates, message lengths, I/O numbers, and diagnostic messaging. BLH supplies two GSD files on the accompanying diskette included with each order. Read the HINTSGSD.rtf file contained on this diskette and load the appropriate GSD file into the master(s) network device. reliable network operation, BLH recommends that the first and last network node be powered up at all times LCt-104 MENU CHANGES With the Profibus option installed, parameter selections change in several menus. These changes override definitions and selections presented in earlier chapters of this manual IIO Menu Changes With Profibus installed, other expansion slot A interfaces are disabled. Figure 11-2 shows the modified I/O menu with Profibus available rather than Modbus Plus or Allen-Bradley Remote I/O. Additional Profibus selections allow individual units to be reset or taken offline. NOTE: Use GO commands to take the LCt-104 off-line momentarily. This prevents the unit from transmitting data invalid messages to the master controller while parameters/settings are being changed INTERFACE WIRING Figure 12-1 depicts the LCt-104 rear panel wiring arrangements. Simply connect a shielded, twowire twisted pair cable to the PROFIBUS terminal. Cable shielding MUST BE connected at both ends to ensure proper operation. BLH recommends using a Siemens nine-pin, sub D connector with integrated termination (PN 6ES7972-0BA10-0XA0). If another connector is used, mandatory A and B signals must be accommodated as well as provision for termination, when required. For 12-1

70 Figure Rear Panel Profibus Connector and Pin Designations Figure Profibus I/O Menu Change 12-2
71 Diagnostic Menu Changes Figure 12-3 presents changes to the diagnostic menu. Added features define Profibus errors if they occur and current online/offline status. Figure Profibus Diagnostic Menu Change 12-3

72 Display Menu Changes See Figure 12-4 for alarm annunciator changes. The Profibus selection allows the lower rear panel network status LED activity to be mirrored on one of the eight front panel annunciators. Behavior of this LED is network specific and defined in Figure Figure Display Menu Changes 12.4 DATA EXCHANGE FORMATS LCt-104 Profibus input and output data formats consist of up to 8 bytes each as shown in Table Each grouping of two bytes constitutes one 16-bit word. Table Data Exchange Formats Produced Data (LCt-104 Transmission) The input data string is transmitted by the LCt- 104 to the requesting master device. Each string consists of eight bytes and breaks down as follows: Byte 1. Message #: Message # is an echo of the first byte of the output data string (transmitted by the master). This is used by the master for data transfer verification. Byte 2. Input data ID: Data ID code as shown in Table Bytes 3 & 4. Status: The LCt-104 operating status, each bit of the word made up of bytes 3 & 4 represents specific operating status. The descriptions of the bits are in Table Bits 0-7 are in Byte 3, bits 8-15 are in Byte

73 Bytes 5-8 (Words 3 & 4). Input data: These two words contain the actual weight value (low word and then high word). Word 3, low word, is a 16 bit signed integer to with byte 5 being the low byte. Word 4, high word, is a 16 bit signed integer times with byte 7 being the low byte. If word 3 = 2 and word 4 = 1 the total data value would be ( ). Table Status Word Definitions as well. Byte 2 of the Profibus output provides output data ID code as shown in Table Bytes 3 & 4 (Word 2). Command: This command word is used by Profibus master to control LCt-104 (as a slave). The meanings of commands are shown in Table Bytes 5-8 (Words 3 & 4). Output Data: The third and forth words of the Profibus output are low word and high word of the actual download data. Word 3, low word, is a 16 bit signed integer to Word 4, high word, is a 16 bit signed integer times See example in Inputs Words 3 & 4 definition. See Table 5 for ID codes and definitions of writable data. Table Profibus Master Command List Consumed Data (LCt-104 Receive) Output data is transmitted to the LCt-104 by the requesting master. It consists primarily of command and ID data. ID data is defined in Table Each string consists of eight bytes and breaks down as follows: Byte 1. Message #: Any number between 0 and 255 generated by the master and copied by the LCt-104 into the first byte of the input string. This is for host data transfer verification. Byte 2. Output data ID: When the Profibus master issues a download command, it must include the output data ID and the output data Data sequence format: Bytes 5-8 (Words 3,7 & 4,8). Input Data: Byte 5 swaps with byte 6 & byte 7 swaps with byte 8. Bytes 5-8 (Words 3,7 & 4,8). Output Data: Byte 5 swaps with byte 6 & byte 7 swaps with byte 8. STANDARD format is Byte 5 low and byte 6 high, byte 7 low and byte 8 high. SWAPPED format is Byte 5 high and byte 6 low, byte 7 high and byte 8 low. NOTE: ASCII data and some bit data are not reversible. Ex. Set point output name... See register Tables for details 12-5
74 Table Profibus Data Identification Codes 12-6
75 Table Profibus Data Identification Codes (cont.) 12-7
76 Table Profibus Data Identification Codes (cont.) 12-8
 FOR DISPLAY MESSAGING: REGISTER 94 CONTROL if bit 0 = 1 apply data in registers 95&96 to upper display if bit 1 = 1 apply data in registers 97&98 to lower display if bit 2 = 1 & bit 0 = 1 flash the")
77 Table Profibus Data Identification Codes (cont.) FOR DISPLAY MESSAGING: REGISTER 94 CONTROL if bit 0 = 1 apply data in registers 95&96 to upper display if bit 1 = 1 apply data in registers 97&98 to lower display if bit 2 = 1 & bit 0 = 1 flash the upper display if bit 3 = 1 & bit 1 = 1 flash the lower display if bit 4 = 1 keep display on until this bit is written again as 0 bits 5-7 are spares, set to zero timer; bits 8-15 are the display timer, each increment adds 50 msec i.e = 50msec = 100 msec timer Note: For display messaging all following hex code are acceptable. **30-7A (hex) numbers and letters or symbols, also space 20H or minus 2DH** Note: Messaging will only display if LCt-104 is in operating display mode. (no menu routines) Table Profibus Status Registers 1 and


78 Table Profibus Status Registers 3 and

 are provided for LCt104 Profibus operation.")
79 12.5 LED STATUS INDICATION Two bicolor (red/green) LED indicators are mounted beside the network connector (Figure 13-1). The upper LED indicates LCt-104 status while the lower LED displays the Profibus Network Status. If an LED is flashing, the nominal flash rate is 500ms ON, and 500ms OFF LCt-104 Status The upper (LCt-104 status) LED indicator flash sequences are defined in the following Table: Profibus Network Status The lower (network status) LED indicator flash sequences are defined in the following Table: 12.6 Profibus GSD FILE Two GSD files (Table 12-7 and 12-8) are provided for LCt104 Profibus operation. A GSD file (Electronic Data Sheet) establishes a simple format that includes the device's configurable parameters and public interfaces to those parameters. It provides user friendly configuration tools that can be easily updated without having to constantly revise the configuration software tool. GSD files are used by network tools to read or set device parameters. Hints for Using the Right GSD File Always attempt to establish system operation with Revision 1 GSD code - Vblh_021.gsd as presented in Table This code defines the real LCt-104 diagnostic length, thereby using less memory in the Master device. Table Revision 1 GSD Code (Vblh_021.gsd) ;**************************** ; GSD-file for BLH LCT-SERIES ; GSD - Revision 1 ;**************************** #Profibus_DP ; GSD_Revision=1 Vendor_Name = BLH Model_Name = LCT Profibus Slave Revision = Version 1.0 Ident_Number = 0x086B Protocol_Ident = 0 Station_Type = 0 FMS_supp = 0 Hardware_Release = 1.0 Software_Release = _supp=1 19.2_supp= _supp= _supp=1 500_supp=1 1.5M_supp=1 3M_supp=1 6M_supp=1 12M_supp=1 MaxTsdr_9.6=60 MaxTsdr_19.2=60 MaxTsdr_93.75=60 MaxTsdr_187.5=60 MaxTsdr_500=100 MaxTsdr_1.5M=150 MaxTsdr_3M=250 MaxTsdr_6M=450 MaxTsdr_12M=800 Bitmap_Device= DP_NORM ; ; Slave-Specification: Auto_Baud_supp=1 Min_Slave_Intervall=2 Max_Diag_Data_Len=7 Slave_Family=0 Max_Module=0 Max_Input_Len=8 Max_Output_Len=8 Max_Data_Len=16 ; ; UserPrmData: Length and Preset: User_Prm_Data_Len=0 ; ; <Module-Definition-List> 12-11
80 Module = 8 Bytes In/Out cons. 0x97,0xA7 EndModule If communication cannot be established with Vblh_021.gsd, use the Revision Vblh_020.gsd code presented in Table This code uses more memory and limits the number of slaves the Master can access. However, it may work for some older Master devices that do not function with Revision 1. Table Revision 0 GSD Code (Vblh_020.gsd) ;======================= ; GSD-file for BLH GSD Rvision 0 ; Stand : 01/05/04 ;======================= ; #Profibus_DP ; ; ;Instrument Identification ; Vendor_Name = BLH Model_Name = LCt Profibus Slave Revision = Version 1.0 Ident_Number = 0x086B Protocol_Ident = 0 Station_Type = 0 FMS_supp = 0 Hardware_Release = 1.0 Software_Release = 1.00 ; ; ;Baudrates ; 9.6_supp = _supp = _supp = _supp = 1 500_supp = 1 1.5M_supp = 1 3M_supp=1 6M_supp=1 12M_supp=1 ; ; ;Maximum responder time for baudrates ; MaxTsdr_9.6 = 60 MaxTsdr_19.2 = 60 MaxTsdr_93.75 = 60 MaxTsdr_187.5 = 60 MaxTsdr_500 = 100 MaxTsdr_1.5M = 150 MaxTsdr_3M = 250 MaxTsdr_6M = 450 MaxTsdr_12M = 800 ; Redundancy = 0 Repeater_Ctrl_Sig = 2 24V_Pins = 0 ; ; ;Slave specific data ; Freeze_Mode_supp = 0 Sync_Mode_supp = 0 Auto_Baud_supp = 1 Set_Slave_Add_supp = 0 User_Prm_Data_Len = 0 ; ; Default user parameter string ;User_Prm_Data = 0x00 ;# of defaults specified here must match # specified for Maximum length of user paramter data Min_Slave_Intervall = 2 Modular_Station = 0 Max_Input_Len = 8 Max_Output_Len = 8 Max_Data_Len = 16 ; Module = 4/4 Bytes In & 4/4 bytes Out 0x93, 0x93, 0xA3, 0xA3 EndModule 12-12
81 SECTION 13. DeviceNet Protocol This chapter defines the optional DeviceNet interface as it pertains to LCt-104 instruments. DeviceNet is a low cost industrial network designed to easily connect up to 64 "cell" type devices to a PLC/PC. Information in this section defines the LCt-104 DeviceNet register allocations and interface instructions THE INTERFACE DEFINED General ODVA DeviceNet Description DeviceNet is one of the world's leading devicelevel networks for industrial automation. In fact, more than 40% of end users surveyed by independent industry analysts report choosing DeviceNet over other networks. DeviceNet offers robust, efficient data handling because it is based on Producer/Consumer technology. This modern communications model offers key capabilities that allow the user to effectively determine what information is needed and when. Users also benefit from ODVA's strong conformance testing policies, which ensure that products are interoperable. As a result, users can mix-and-match products from a variety of suppliers and integrate them seamlessly. NOTE: ODVA stands for Open DeviceNet Vendor Association. For all specifications, wiring, power, cable lengths, etc., please access the ODVA web site. Reference: Specifications DeviceNet Volume II, release 2.0 (latest release), web address: LCt-104 DeviceNet Interface Description The LCt-104 DeviceNet interface uses vendor supplied product technology. This product has passed the compliance specifications set forth by ODVA and is registered with them (ODVA) by the vendor. BLH embeds this product in the LCt-104 to communicate tension and parameter data to a connected device. BLH is registered with ODVA as Vendor # INTERFACE WIRING Figure 13-1 depicts the LCt-104 rear panel DeviceNet connector. Each unit has a DeviceNet compatible sealed micro connector. Make connections in accordance with pinouts as shown LED STATUS INDICATION Two bicolor (red/green) LED indicators are mounted beside the network connector (Figure 13-1). The upper LED indicates LCt-104 status while the lower LED displays the DeviceNet Network Status. If an LED is flashing, the nominal flash rate is 500ms ON, and 500ms OFF LCt-104 Status The upper (LCt-104 status) LED indicator flash sequences are defined in the following Table: LED Status Off Flashing Red Solid Red Flashing Green Solid Green Red/Green LCp-1 04 Network Status No Power Recoverable configuration fault ( invalid firmware, OEM data, or personality data) Hardware error No errors, client interface is not open No errors, client interface is active Configuration mode DeviceNet Network Status The lower (network status) LED indicator flash sequences are defined in the following Table: LED Status Off Flashing Red Solid Red DeviceNet Network Status No Power I/O connection in timed-out state or other recoverable fault Unrecoverable fault 13-1
82 Flashing Green Solid Green Red/Green Device is online but has no connections Device online with established connections Device is in communication faulted state and responding to an identify communication faulted request 13.4 LCt-104 MENU CHANGES With the DeviceNet option installed, parameter selections change in several menus. These changes override definitions and selections presented in earlier chapters of this manual. The following pages discuss specific changes to several menus I/O Menu Changes With DeviceNet installed, other expansion slot A interfaces are disabled. Figure 13-2 shows the modified I/O menu with DeviceNet available rather than Modbus Plus, Allen-Bradley Remote I/O, or Profibus. Baud rates, address selections, and commands can be selected though the front panel display under the I/O DeviceNet menu. Baud rate selection must be identical to the master control setting. The Mac ID address must be uniquely different from all other nodes. Additional DeviceNet selections allow individual units to be reset or taken off-line. NOTE: Go commands can be used if an operator wants to change settings on the LCt- 104 and does not want invalid data to be sent to the master controller. Also if a customer wants to change baud rate or Mac id, the LCt-104 must be off line. NOTE: Upon power up the LCt-104 will attempt to link to a master host. Reset: This command is a hard reset of the DeviceNet interface. Reset also transpires during power up. Go online: This command can be issued from the LCt-104 to instruct the DeviceNet interface to initiate communication with a master. Go offline: This command can be issued from the LCt-104 to instruct the DeviceNet interface to stop communication with a master. Figure I/O Menu Changes Diagnostic Menu Changes Figure 13-3 presents changes to the diagnostic menu. Two added features define DeviceNet errors if they occur and current online/offline status Display Menu Changes See Figure 13-4 for alarm annunciator changes. The DeviceNet selection allows the lower rear panel network status LED activity to be mirrored on one of the eight front panel annunciators. Behavior of this LED is network specific and defined in Figure
83 Figure Diagnostic Menu Changes. 13-3

84 Figure Display Menu Changes 13.5 DATA EXCHANGE FORMATS LCt-104 DeviceNet input and output data formats consist of up to 8 bytes each as shown in Table 13-1, each grouping of two bytes constitutes one 16-bit word. Table Data Exchange Formats Produced Data (LCt-104 Transmission) The input data string is transmitted by the LCt- 104 to the requesting master device. Each string consists of eight bytes and breaks down as follows: Byte 1. Message #: Message # is an echo of the first byte of the output data string (transmitted by the master). This is used by the master for data transfer verification. Byte 2. Input data ID: Data ID code as shown in Table Bytes 3 & 4. Status: The LCt-104 operating status, each bit of the word made up of bytes 3 & 4 represents specific operating status. The descriptions of the bits are in Table Bits 0-7 are in Byte 3, bits 8-15 are in Byte

85 Bytes 5-8 (Words 3 & 4). Input data: These two words contain the actual tension value (low word and then high word). Word 3, low word, is a 16 bit signed integer to with byte 5 being the low byte. Word 4, high word, is a 16 bit signed integer times with byte 7 being the low byte. If word 3 = 2 and word 4 = 1 the total data value would be ( ). Table Status Word Definitions as well. Byte 2 of the DeviceNet output provides output data ID code as shown in Table Bytes 3 & 4 (Word 2). Command: This command word is used by DeviceNet master to control LCt-104 (as a slave). The meanings of commands are shown in Table Bytes 5-8 (Words 3 & 4). Output Data: The third and forth words of the DeviceNet output are low word and high word of the actual download data. Word 3, low word, is a 16 bit signed integer to Word 4, high word, is a 16 bit signed integer times See example in Inputs Words 3 & 4 definition. See Table 5 for ID codes and definitions of writable data. Table DeviceNet Master Command List DeviceNet Interface Commands Command ID Description 0 Null Command 1 Switch to Force 2 Switch to Angle 3 Switch to Tension 4 Zero Force Weight 5 Acquire Ref Angle 6 Download Data 7 Clear Status Errors Consumed Data (LCt-104 Receive) Output data is transmitted to the LCt-104 by the requesting master. It consists primarily of command and ID data. ID data is defined in Table Each string consists of eight bytes and breaks down as follows: Byte 1. Message #: Any number between O and 255 generated by the master and copied by the LCt-104 into the first byte of the input string. This is for host data transfer verification. Byte 2. Output data ID: When the DeviceNet master issues a download command, it must include the output data ID and the output data Data sequence format: Bytes 5-8 (Words 3,7 & 4,8). Input Data: Byte 5 swaps with byte 6 & byte 7 swaps with byte 8. Bytes 5-8 (Words 3,7 & 4,8). Output Data: Byte 5 swaps with byte 6 & byte 7 swaps with byte 8. STANDARD format is Byte 5 low and byte 6 high, byte 7 low and byte 8 high. SWAPPED format is Byte 5 high and byte 6 low, byte 7 high and byte 8 low. NOTE: ASCII data and some bit data are not reversible. Ex. Set point output name... See register Tables for details 13-5
LCp-104 Weighing System Operator s Manual
 BLH Nobel LCp-104 Weighing System Operator s Manual TM049 RevE 12/1/15 Doc 35116 NOTICE BLH Nobel makes no representation or warranties of any kind whatsover with respects to the contents hereof and specifically
LCt-104 FEATURES HTU MODE FEATURES APPLICATIONS DESCRIPTION CONFIGURATION
 FEATURES Individually digitized transducer forces for 4 web tension transducers (1, 2, or 4 zone coniguration) View left, right, and total; force, tension and angle values 100% digital calibration no dead
Safe-Weigh Process Weighing System
 FEATURES Patented synchronization techniques for digitized load cells Proactive diagnostics assure system performance Dynamic digital filtering 1 million count resolution per load cell OPTIONAL FEATURES
DXP-40 FEATURES APPLICATIONS DESCRIPTION CONFIGURATION
 FEATURES Individually digitized transducer data Continuous Expert System diagnostics Dynamic digital filtering 750,000 count resolution psr channel 20 updates/sec. Multi-function set-up and calibration
LCp-100 Weight Indicator/Transmitter
 Precision Force and Weight Measurement Technologies LCp-100 Weight Indicator/Transmitter Process Applications: Mix Tanks Blenders Reactors Product Description Hardware Features 1 Million Count Resolution,
DXp-10 and DXp-15 Weight Transmitter
 Precision Force and Weight Measurement Technologies DXp-10 and DXp-15 Weight Transmitter Applica pplications: Inventory Weighing Process Weighing Web Tension Measurement Product Description l Microprocessor
BLH. DXp-40 Interface Manual Allen-Bradley Remote I/O WEIGH SYSTEM TECHNOLOGY. TM014 Rev D 6/1/11 Doc 35105
 WEIGH SYSTEM TECHNOLOGY BLH DXp-40 Interface Manual Allen-Bradley Remote I/O TM014 Rev D 6/1/11 Doc 35105 NOTICE BLH makes no representation or warranties of any kind whatsoever with respect to the contents
LCI User Manual mantracourt.com
 LCI User Manual mantracourt.com LCI Load Cell Junction Box with Fault Monitor Contents Chapter 1 Introduction to the LCI... 2 Chapter 2 Installing the LCI... 3 Chapter 3 Setting up the LCI... 4 Sequence
The IQ240 panel mount load cell indicator is a precision digital indicator for load cell and strain gauge applications.
 IQ240 Panel Mount Load Cell Indicator Data sheet English 1.01 Introduction The IQ240 panel mount load cell indicator is a precision digital indicator for load cell and strain gauge applications. The high
The IQ300 wall mount load cell indicator is a precision digital indicator for load cell and strain gauge applications.
 IQ300 Wall Mount Load Cell Indicator Data sheet English 1.01 Introduction The IQ300 wall mount load cell indicator is a precision digital indicator for load cell and strain gauge applications. The high
SYSTEM CALIBRATION TECHNOLOGY
 SYSTEM CALIBRATION TECHNOLOGY BLH Nobel HTU Web Tension Transducer Installation Instructions TM044 RevD 8/21/15 Doc 35128 NOTICE BLH Nobel makes no representation or warranties of any kind whatsover with
LCI Load Cell Junction Box with Fault Monitor
 LCI Load Cell Junction Box with Fault Monitor User Manual www.mantracourt.co.uk The LCI Load Cell Failure Alarm Manual Chapter 1 Introduction to the LCI...2 Chapter 2 Installing the LCI...3 Figure 2.1
DFI 7000 DIGITAL FORCE INDICATOR USER S GUIDE 1.0 INTRODUCTION 2.0 DESCRIPTION. 2.1 Configuration. 2.2 Specifications
 DFI 7000 DIGITAL FORCE INDICATOR USER S GUIDE 1.0 INTRODUCTION The DFI 7000 Signal Conditioner-Indicator is a complete 4-1/2-digit signal conditioner and indicator housed in a 1/8 DIN case. This unit provides
The LT1300 wall mount load cell indicator is a precision digital indicator for load cell and strain gauge applications.
 LT1300 Wall Mount Load Cell Indicator Datasheet English 1.00 Introduction The LT1300 wall mount load cell indicator is a precision digital indicator for load cell and strain gauge applications. The high
TRACKER 240 SERIES. Load Cell and Weighing Indicators. A Precision Measurement Instrument with Outstanding Features
 TRACKER 240 SERIES Load Cell and Weighing Indicators A Precision Measurement Instrument with Outstanding Features TRACKER 240 SERIES INDICATORS Ratiometric Measurement Tare and Auto Transducer Excitation
LAUREL. Laureate Digital Panel Meter for Load Cell & Microvolt Input ELECTRONICS, INC. Features. Description
 Description LAUREL ELECTRONICS, INC. Features Laureate Digital Panel Meter for Load Cell & Microvolt Input 20, 50, 100, 250 & 500 mv ranges Span adjust from 0 to ±99,999, zero adjust from -99,999 to +99,999
High Voltage DC Meter
 High Voltage DC Meter Javelin D PD644 0-300 VDC input NEMA 4X, IP65 front Scale in engineering units Sunlight readable LED display 4-20 ma analog output Two form C 3 A relays option RS-485 serial communications
D1000M SERIES FOR MODBUS SENSOR TO COMPUTER INTERFACE MODULES
 D1000M SERIES FOR MODBUS SENSOR TO COMPUTER INTERFACE MODULES D1000 FEATURES Complete sensor to RS-232/RS-485 interface. 500V rms analog input isolation. 15 bit measurement resolution. Continuous self-calibration;
TABLE OF CONTENTS INTRODUCTION. 3. Analog Input Analog Output Digital Input Digital Output OPERATIONAL DESCRIPITON.. 7 PROGRAMMING AND INITIAL SETUP.
 DIVERSIFIED HEAT TRANSFER SERIES 700 STEAM GENERATOR CONTROLLER INSTRUCTION MANUAL VISIT OUR WEBSITE AT SIGMACONTROLS.COM SERIES 700 DHT STEAM GENERATOR MANUAL 042514 2 TABLE OF CONTENTS INTRODUCTION.
12-36 VDC/12-24 VAC Power Option 4-Digit Display, 0.56 (14.2 mm) or 1.20 (30.5 mm)
 or 1.20 (30.5 mm)") 4-20 ma & Relay Output Features 4-20 ma, ± 10 V, TC & RTD Inputs 12-36 VDC/12-24 VAC Power Option 4-Digit Display, 0.56 (14.2 mm) or 1.20 (30.5 mm) 24 VDC @ 200 ma Transmitter Power Supply Options Type
4-20 ma & Relay Output Features 4-20 ma, ± 10 V, TC & RTD Inputs 12-36 VDC/12-24 VAC Power Option 4-Digit Display, 0.56 (14.2 mm) or 1.20 (30.5 mm) 24 VDC @ 200 ma Transmitter Power Supply Options Type
Installation, Testing, and Operating Procedures 30 AMP PORTABLE AND PERMANENT SERIES GFCI SINGLE and MULTIPHASE
 IMPORTANT! Please read all the information on this sheet. SAVE THESE INSTRUCTIONS! NOTICE BEFORE USING READ INSTRUCTIONS COMPLETELY. TO BE INSTALLED BY A QUALIFIED ELECTRICIAN IN ACCORDANCE WITH NATIONAL
5504 Thermocouple Analog Input Module
 550 Thermocouple Analog Input Installation, Operation and Maintenance Setup Manual 5/9/0 Safety Information The information provided in this documentation contains general descriptions and/or technical
MYRIAD QLC 4-CHANNEL MONITOR/CONTROLLER INSTRUCTION MANUAL
 MYRIAD QLC 4-CHANNEL MONITOR/CONTROLLER INSTRUCTION MANUAL VISIT OUR WEBSITE SIGMACONTROLS.COM MYR QLC MANUAL 013114 2 TABLE OF CONTENTS INTRODUCTION 3 Ordering Information Specifications Features WIRING
PC 150. Digital Bench Scale. Operation Manual
 PC 150 Digital Bench Scale Operation Manual Revision 1.2 September 14, 2000 1996-2000 Transcell Technology, Inc. Contents subject to change without notice. Transcell Technology, Inc. 35 Waltz Drive Wheeling,
MODEL 715AN QUADRATURE DEGREES COUNTER
 MODEL 715AN QUADRATURE DEGREES COUNTER DESIGN CONCEPTS INC 707 N. Lindenwood Olathe, Kansas 66062 PHONE: (913) 782-5672 FAX: (913) 782-5766 E-MAIL : info@dcimeters.com 0411 TABLE OF CONTENTS 2. Features
Model 815 User s Manual
 Model 815 User s Manual CAUTION Risk of electrical shock. Do not remove cover. No user serviceable parts inside. Refer servicing to qualified service personnel. Weigh-Tronix reserves the right to change
SP6R Level Controller Operation Manual
 SP6R Level Controller Operation Manual www.sjerhombus.com SP6R LEVEL CONTROLLER INTRODUCTION SJE-Rhombus, an industry leader in water and wastewater pump controls, introduces the SP6R Level Controller.
LAUREL. Laureate Digital Panel Meter for Process and Ratiometric Signals ELECTRONICS, INC. Features. Description
 LAUREL ELECTRONICS, INC. Laureate Digital Panel Meter for Process and Ratiometric Signals Features Reads process signals from ±200 mv to ±600V or ±2 ma to ±5A full scale Ratiometric mode for bridges and
OZONE SWITCH Model OS-6. OS-6 Features
 USER MANUAL OZONE SWITCH Model OS-6 OS-6 Features The OS-6 is an industrial grade ozone controller and monitor. The OS-6 design is optimized for accuracy and ease of installation, setup and operation.
WEIGH SYSTEM TECHNOLOGY
 WEIGH SYSTEM TECHNOLOGY BLH LCc-II Cell Calibrator Operator s Manual TM036 RevC 6/1/11 Doc 35113 1 NOTICE BLH makes no representation or warranties of any kind whatsoever with respect to the contents hereof
Simplified information where and how you want it.
 ConsolIdator 4 & 8 Multi-channel controllers Simplified information where and how you want it. ConsoliDator 4 Model PD940 ConsoliDator ConsoliDator 4 Features Four 4-20 Inputs Four 4-20 Outputs ConsoliDator
Pump-Down Controller MODEL mA Input Scalable 4-20mA Output Duplex Pump Alternation Hand-Off-Auto Controls Dual Run-time Meters
 DESCRIPTION Pump-Down Controller Input Scalable Output Duplex Pump Alternation Hand-Off-Auto Controls Dual Run-time Meters The Model 4052 Pump-Down Controller provides total control for duplex pumping
MYRIAD LC1 LEVEL CONTROLLER INSTRUCTION MANUAL
 MYRIAD LC1 LEVEL CONTROLLER INSTRUCTION MANUAL VISIT OUR WEBSITE SIGMACONTROLS.COM MYR LC1 MANUAL 062114 TABLE OF CONTENTS INTRODUCTION 3 Ordering Information Specifications Features Dimensions WIRING
UWE-1707 SERIES CONTENTS OPERATION MANUAL ELECTRONIC WEIGHING INDICATOR 1. SPECIFICATIONS 2. INSTALLATION
 UWE-1707 SERIES CONTENTS ELECTRONIC WEIGHING INDICATOR OPERATION MANUAL 1. SPECIFICATIONS PLEASE READ THIS MANUAL VERY CAREFULLY BEFORE ATTEMPT TO OPERATE THE SCALE 2. INSTALLATION 3. ROUTINE OPERATION
Tempco Instruction Manual
 Tempco Instruction Manual 1/16 DIN Solid State Temperature Controller Relay Output Solid State Output For Heating Model Numbers: TEC-901, TEC-902, TEC-905 Temperature controls in this series are designed
HIGH-VOLTAGE DC METER
 HIGH-VOLTAGE DC METER Javelin D PD644 0-300 VDC input NEMA 4X, IP65 front Scale in engineering units Sunlight readable LED display 4-20 ma analog output Two form C 3 A relays option RS-485 serial communications
Trident and Trident X2 Digital Process and Temperature Panel Meter
 Sign In New User ISO 9001:2008 Certified Quality System Home Products Online Tools Videos Downloads About Us Store Contact Policies Trident and Trident X2 Digital Process and Temperature Panel Meter Products
QC-3265 Checkweigher User s Manual
 QC-3265 Checkweigher User s Manual CAUTION Risk of electrical shock. Do not remove cover. No user serviceable parts inside. Refer servicing to qualified service personnel. Weigh-Tronix reserves the right
MP-2000 Dual Channel LVDT/RVDT Readout/Controller
 Large backlit dual channel display Menu driven setup and calibration 100 to 240 VAC line powered MIN, MAX, TIR, A+B and A-B functions 2.5, 3.3, 5 and 10kHz selectable excitation Analog and RS232 outputs
PIECAL 322 Automated Thermocouple Calibrator Operating Instructions. Product Description. Practical Instrument Electronics
 PIECAL 322 Automated Thermocouple Calibrator Operating Instructions Product Description Easy to use With the PIECAL 322-1 you can check & calibrate all your thermocouple instruments and measure thermocouple
NOTE: The F2 button and the 4 LED annunciators do not function on the LD-ACF-I. To use these features, ask about the LD-ACF-R4/R4A.
 Large display AC frequency indicator The is a sophisticated microprocessorbased indicator designed specifically to monitor AC frequency. Intuitive scrolling text menus, (activated from the front panel),
SA SERIES Arlingate Lane, Columbus, Ohio (614)
") SA SERIES 2080 Arlingate Lane, Columbus, Ohio 43228 (614) 850-5000 Sensotec, Inc. SA Series Instruction Manual Sensotec Part Number: 008-0131 - 00 Rev. A: January 1996 Copyright Notice: 2080 Arlingate
SA SERIES 2080 Arlingate Lane, Columbus, Ohio 43228 (614) 850-5000 Sensotec, Inc. SA Series Instruction Manual Sensotec Part Number: 008-0131 - 00 Rev. A: January 1996 Copyright Notice: 2080 Arlingate
Hybrid AC Driver [GCNC-1110]
![Hybrid AC Driver [GCNC-1110]](/thumbs/86/94474371.jpg "Hybrid AC Driver [GCNC-1110]") Page 1 Installation Manual and Datasheet Page 2 Key Features Smooth and quiet operation at all speeds and extremely low motor heating Industrial grade performance for an alternating current servo motor
Page 1 Installation Manual and Datasheet Page 2 Key Features Smooth and quiet operation at all speeds and extremely low motor heating Industrial grade performance for an alternating current servo motor
Wide Bandwidth Strain Gage Input 3B18 FEATURES APPLICATIONS PRODUCT OVERVIEW FUNCTIONAL BLOCK DIAGRAM
 Wide Bandwidth Strain Gage Input 3B18 FEATURES Wideband (20 khz) single-channel signal conditioning module. Module Bandwidth is user-selectable between 20 khz and 100Hz, with user-supplied filter caps
Characteristics and functioning
 Characteristics and functioning 1/27 enod4-c Characteristics and functioning NU-eNod4C-ETH-E-1014_216706-A 1 ENOD4 PRODUCT RANGE... 4 1.1 General presentation... 4 1.2 Versions and options... 4 1.2.1 Versions...
Eco Sensors OZONE CONTROLLER Model OS-6 Instructions for Use. General and New Features
 Eco Sensors OZONE CONTROLLER Model OS-6 Instructions for Use General and New Features The OS-6 is an industrial grade Ozone controller and monitor. The OS-6 design has been optimized for accuracy, ease
7561-PSD Manual Portable Battery Powered Indicator
 7561-PSD Manual Portable Battery Powered Indicator Lebow Products Inc. 1728 Maplelawn Drive P.O. Box 1089 Troy, Michigan 48084-1089 (800) 803-1164 Phone: (248) 643-0220 FAX: (248) 643-0259 Visit our web
Standard Options. Model 4100 Position Indicating Meter. Three Phase Motor Control. Positran Transmitter
 Standard Options Model 4100 Position Indicating Meter A percent-of-full-travel meter is supplied with a trim potentiometer resistor, terminal block and connectors. A potentiometer is required in the actuator
System StrainSmart Data Acquisition System. Micro-Measurements FEATURES DESCRIPTION MODEL 5100B SCANNER SPECIFICATIONS
 FEATURES From 5 to 1200 input channels can be configured as needed at any time Inputs accepted from strain gages and strain-gagebased transducers (Model 5110A), thermocouples (Model 5120A), sensors with
Eco Sensors OZONE CONTROLLER Model OS-6 Instructions for Use. General and New Features
 Eco Sensors OZONE CONTROLLER Model OS-6 Instructions for Use General and New Features The OS-6 is an industrial grade Ozone controller and monitor. The OS-6 design has been optimized for accuracy, ease
ES-600 Ozone Controller Operation Manual
 ES-600 Ozone Controller Operation Manual Questions about your product? Find answers here: Web: www.ozonesolutions.com/es-600 Phone: 712-439-6880 Ozone Solutions OZONE CONTROLLER Model ES-600 Instructions
QUALITY POWER SOLUTIONS BACKED UP BY REAL-WORLD ENGINEERING EXPERIENCE
 QUALITY POWER SOLUTIONS BACKED UP BY REAL-WORLD ENGINEERING EXPERIENCE User s Manual SR250HL Power Supply/ Float Charger for Lead Acid Batteries STANDARD FEATURES OPTIONAL FEATURES 3 Relay Alarms-Form
USER INSTRUCTION MANUAL FOR LOADCELL TRANSMITTER MODEL TDC/I/0550 (SOFTWARE: VER2A) INDEX
 INDEX") USER INSTRUCTION MANUAL FOR LOADCELL TRANSMITTER MODEL TDC/I/0550 (SOFTWARE: VER2A) INDEX DOCUMENT NO: TDC 0550 MANUAL - 2 1.0) INTRODUCTION. PAGE 2 1.1) ABOUT THIS MANUAL. PAGE 2 1.2) INTRODUCTION. PAGE
USER INSTRUCTION MANUAL FOR LOADCELL TRANSMITTER MODEL TDC/I/0550 (SOFTWARE: VER2A) INDEX DOCUMENT NO: TDC 0550 MANUAL - 2 1.0) INTRODUCTION. PAGE 2 1.1) ABOUT THIS MANUAL. PAGE 2 1.2) INTRODUCTION. PAGE
User's Guide. MiniTec TM Series Model MN25 MultiMeter
 User's Guide MiniTec TM Series Model MN25 MultiMeter Warranty EXTECH INSTRUMENTS CORPORATION warrants this instrument to be free of defects in parts and workmanship for one year from date of shipment (a
Model ST-FT1 DIGITAL FORCE / TORQUE INDICATOR. User s Guide
 Model ST-FT1 DIGITAL FORCE / TORQUE INDICATOR Thank you Thank you for purchasing a Mesa Labs Model ST-FT1 digital force / torque indicator, designed for use with a remote torque sensor. With proper usage,
PROGRAMMABLE MESSAGE DISPLAYS
 PROGRAMMABLE MESSAGE DISPLAYS AVG UTICOR Programmable Message Displays (PMDs), are found in numerous applications throughout all industries. PMDs are extremely versatile products, enabling your PLC or
TM0-1 AMPLIFIER / CONDITIONER MODULE OPERATORS MANUAL. Transducer Techniques R
 TM0-1 AMPLIFIER / CONDITIONER MODULE OPERATORS MANUAL Transducer Techniques R 42480 RIO NEDO, TEMECULA, CA 92590 (909) 719-3965 FAX (909) 719-3900 URL: http://www.ttloadcells.com E-mail: tti@ttloadcells.com
ACTIONI/Q Q498. DC Powered DC Input Field Configurable Isolator with Math Functions
 ACTIONI/Q Q498 DC Powered DC Input Field Configurable Isolator with Math Functions Q498-0000 Provides 2 Isolated Analog Inputs, 1 Analog Output & 1 Frequency Output, as well as a Discrete Input & Output
Model SC500. Programmable Single-Channel Transducer Indicator/Conditioner DESCRIPTION FEATURES
 Programmable Single-Channel Transducer Indicator/Conditioner DESCRIPTION The SC series models are self-calibrating microprocessorbased transducer signal conditioners when used with sig mod equipped transducers.
PDW30 Point-To-Point Wireless Bridge
 PDW30 Point-To-Point Wireless Bridge WIRELESS WIreless System FEATURES Wire Replacement in a Rugged, Industrial Housing Inputs and Outputs on Both Field Units Simple to Order, Configure, & Install 1 Mile
Isolated Wideband Voltage Input 3B40 / 3B41 FEATURES APPLICATIONS PRODUCT OVERVIEW FUNCTIONAL BLOCK DIAGRAM
 Isolated Wideband Voltage Input 3B40 / 3B41 FEATURES Interfaces, amplifies, protects& filters wide-bandwidth (h0 khz) single-channel analog voltage inputs. Module provides simultaneous precision voltage
Characteristics and functioning
 Characteristics and functioning 1/1 enod4-t Characteristics and functioning 216702-C_NU-eNod4T-ETH-E-0314 2/2 enod4-t Characteristics and functioning 216702-C_NU-eNod4T-ETH-E-0314 1 ENOD4 PRODUCT RANGE...
CTI 2551-A 8-CHANNEL ISOLATED THERMOCOUPLE INPUT MODULE INSTALLATION AND OPERATION GUIDE. Version 1.3 CTI Part # * *
 CTI 2551-A 8-CHANNEL ISOLATED THERMOCOUPLE INPUT MODULE INSTALLATION AND OPERATION GUIDE Version 1.3 CTI Part #062-00305-013 *062-00305-011* 2551-AIOG 110106 $25 Copyright 2006 Control Technology Inc.
MICRO SERIES PROCESS DISPLAYS LARGE DIGIT MODELS
 The MICRO SERIES PROCESS DISPLAYS LARGE DIGIT MODELS Mighty-5 DPM MODELS Micro-P & Mighty-1 Mighty-1 Micro-P ELECTRO-NUMERICS, INC. Introduction The Electro-Numerics family of Digital Panel Meters and
CTI 2550 EIGHT CHANNEL ISOLATED ANALOG INPUT MODULE INSTALLATION AND OPERATION GUIDE. Version 2.0 CTI Part # IOG $25
 CTI 2550 EIGHT CHANNEL ISOLATED ANALOG INPUT MODULE INSTALLATION AND OPERATION GUIDE Version 2.0 CTI Part #062-00102 2452IOG 092205 $25 ii CTI 2550 Installation and Operation Guide Copyright 2005 Control
User's Guide. 1/16 th DIN ph Controller. Model 48PH2. Introduction
 User's Guide 1/16 th DIN ph Controller Model 48PH2 Introduction Thank you for selecting the Extech Model 48PH2 controller. This 1/16 th DIN-size controller offers dual display, high resolution measurements,
CDD4 Duct Carbon Dioxide Transmitter
 Drill or punch a 1-1/8 or 1-1/4 hole in the duct at the preferred location and insert the probe into the hole to mark the enclosure mounting holes. Remove the unit and drill the four mounting holes. Clean
AirTest Model CN9000 Series Sensor Controller
 AirTest Model CN9000 Series Sensor Controller AirTest Model CN9000 Series Sensor Controller THEORY OF OPERATION A basic CN9000 configuration consists of Input/Process/Display combination modules, a 3 relay
Global Water Instrumentation, Inc.
 Global Water Instrumentation, Inc. 11390 Amalgam Way Gold River, CA 95670 T: 800-876-1172 Int l: (916) 638-3429, F: (916) 638-3270 PRODUCT NAME: 3101 Conductivity Controller - 1 - Global Water s Conductivity
Isolated Voltage Input 3B30 / 3B31 FEATURES APPLICATIONS PRODUCT OVERVIEW FUNCTIONAL BLOCK DIAGRAM
 Isolated Voltage Input 3B30 / 3B31 FEATURES Interfaces, amplifies, & filtersanalog input voltages. Narrow-bandwidth (3Hz) single-channel single conditioning. Module provides simultaneous precision voltage
MD9 MULTIDROP INTERFACE INSTRUCTION MANUAL
 MD9 MULTIDROP INTERFACE INSTRUCTION MANUAL REVISION: 01/05/03 COPYRIGHT (c) 1987-2003 CAMPBELL SCIENTIFIC, INC. This is a blank page. WARRANTY AND ASSISTANCE The MD9 MULTIDROP INTERFACE is warranted by
This Datasheet for the IC660BBA026. Block 24/48Vdc Analog Current Source 6 Inputs.
 This Datasheet for the IC660BBA026 Block 24/48Vdc Analog Current Source 6 Inputs http://www.cimtecautomation.com/parts/p-14421-ic660bba026.aspx Provides the wiring diagrams and installation guidelines
LPG STM 94442A User s Manual
 1 LPG STM 94442A User s Manual This Manual belongs to: Company: 3 Table of Contents Features....... 4 Hardware Installation...5 Monitor Mounting Dimensions.....7 Monitor Specifications...8 Sender Specifications.....9
LAUREL. Laureate RTD Temperature Panel Meter / Controller ELECTRONICS, INC. Features. Description. Specifications
 LAUREL ELECTRONICS, INC. Laureate RTD Temperature Panel Meter / Controller Features Factory calibrated for 100Ω platinum, 10Ω copper & 120Ω nickel RTDs 2, 3 or 4-wire connection with lead resistance compensation
GASGUARDIAN RD3 Remote Display OPERATING & INSTALLATION MANUAL
 GASGUARDIAN RD3 OPERATING & INSTALLATION MANUAL 3GasGuardian RD Operating and Instruction Manual Table of Contents General description... 4 Installation... 4 Locating the GasGuardian RD1... 4 Installation
Installation Instructions
 Installation Instructions (Catalog Number 1771-OD) This document provides information on: Because of the variety of uses for the products described in this publication, those responsible for the application
Secured Series: Hub Plus Kit Single Door Controller Package Installation Manual
 Secured Series: Hub Plus Kit Single Door Controller Package Installation Manual This package is designed to simplify the connections to our Secured Series Hub Plus Controller. This will translate into
Vorne Industries. 2000S Series Serial Input Alphanumeric Display User's Manual
 Vorne Industries 2000S Series Serial Input Alphanumeric Display User's Manual 1445 Industrial Drive Itasca, IL 60143-1849 Telephone (630) 875-3600 Telefax (630) 875-3609 2000S Series Serial Input Alphanumeric
500 Business Center Drive Pittsburgh, PA USA CAGE 1BGJ7. SwitchMaster R5000 Series Ultra-Compact Ganged A/B Switching System
 Market Central www.secureswitch.com 500 Business Center Drive Pittsburgh, PA 15205 USA 412.494.2800 CAGE 1BGJ7 SwitchMaster R5000 Series Ultra-Compact Ganged A/B Switching System July, 2014 COMPLETE 2
POWER SERIES Plus Watt-VAR / Watt-Power Factor Digital Switchboard Meter User s Manual IM2492WVPF-1
 POWER SERIES Plus Watt-VAR / Watt-Power Factor Digital Switchboard Meter User s Manual General Description The POWER SERIES Plus digital switchboard meters incorporate the latest DSP microprocessor technology.
DFI 9000 PORTABLE DIGITAL INDICATOR USER S GUIDE
 DFI 9000 PORTABLE DIGITAL INDICATOR USER S GUIDE www.cooperinstruments.com PH: 540-349-4746 FAX: 540-347-4755 CONTENTS 1.0 INTRODUCTION...1 2.0 SETUP AND USE...1 2.1 Your DFI 9000...1 2.2 Additional Tools...1
A0-10 ANALOG OUTPUT. Instruction Manual April 2001 NALOG OUTPUT
 A0-10 ANALOG OUTPUT Instruction Manual April 2001 NALOG OUTPUT Safety Guidelines Warning notices must be observed to ensure personal safety as well as that of others, and to protect the product and the
Description, continued
 DL424/425 DirectLine Sensor Module for DL5000 Dissolved Oxygen Probes Overview 70-82-03-48 4/02 Page of 8 Specification The DirectLine DL424/425 Sensor Modules are part of a family of products developed
Simplified information where and how you want it.
 ConsolIdator 4 & 8 Multi-channel controllers Simplified information where and how you want it. ConsoliDator 4 Model PD940 ConsoliDator ConsoliDator 4 Features Four 4-20 Inputs Four 4-20 Outputs ConsoliDator
1/32-DIN TEMPERATURE CONTROLLER INSTALLATION, WIRING AND OPERATION MANUAL FORM 3882
 1/32-DIN TEMPERATURE CONTROLLER INSTALLATION, WIRING AND OPERATION MANUAL FORM 3882 This manual is intended for use in support of installation, commissioning and configuration of the 1/32-DIN Temperature
LAUREL ELECTRONICS, INC.
 LAUREL ELECTRONICS, INC. Laureate RTD Temperature Panel Meter / Controller Features Factory calibrated for 100Ω platinum, 10Ω copper & 120Ω nickel RTDs 2, 3 or 4-wire connection with lead resistance compensation
PRO 360. Owner's Manual
 One-Year Limited Warranty If, within one year from the date of original purchase, the Pro 360 Digital Protractor fails to function because of defects in materials or workmanship, the manufacturer will,
MODCELL 2050R Single Loop Controllers
 Isolated universal process and remote set-point input Four internal set-points No jumpers required to define instrument parameters Ratio/bias on process and remote set-point Totalizer Ramp/soak profile
Industrial SBU Product User s Manual
 Industrial SBU Product User s Manual EUROPEAN COUNTRIES WARNING This is a Class A product. In a domestic environment this product may cause radio interference in which the user may be required to take
PIECAL 520B & 521B Thermocouple Source Operating Instructions
 PIECAL 520B & 521B Thermocouple Source Operating Instructions (Shown without optional boot) Product Description (Shown with optional boot) Easy to use With the PIECAL 520B/521B you can check & calibrate
PD765 TRIDENT. Trident Series Process & Temperature Meters.
 PD765 Trident Series Process & Temperature Meters TRIDENT PROCESS & Temp 4-20 ma, ± 10 V, TC & RTD Inputs 4-Digit Display, 0.56 (14.2 mm) or 1.20 (30.5 mm) Type 4X, NEMA 4X, IP65 Front 1/8 DIN Shallow
AEXX SERIES MULTI-FUNCTION CLOCK/TIMERS
 FN:XXMFCT1.DOC AEXX SERIES MULTI-FUNCTION CLOCK/TIMERS AEXX SERIES MULTI-FUNCTION CLOCK/TIMERS REV 04/09/09 DESCRIPTION The AEXX Series of Multi-Function Clock/Timers are available with 1, 2.3, 4, 8, or
700 SERIES DPC DUPLEX PUMP CONTROLLER INSTRUCTION MANUAL
 1 700 SERIES DPC DUPLEX PUMP CONTROLLER INSTRUCTION MANUAL VISIT OUR WEBSITE SIGMACONTROLS.COM 700 DPC MANUAL 072114 2 TABLE OF CONTENTS INTRODUCTION 3 Ordering Information Specifications Features WIRING
SINGLE-CHANNEL PROCESS CONTROLLERS & TEMP. DISPLAYS D3820/D3830 Series
 The Digitec Series D3800 Panel Meters offer many features and performance capabilities to suit a wide range of industrial applications. The D3820 and D3830 are available in the ranges of 4-20mA, 0-10 VDC,
AEXX-273 SERIES WIRELESS CONTROLLED PACE CLOCKS
 FN:273MAN1.DOC AEXX-273 SERIES WIRELESS CONTROLLED PACE CLOCKS DESCRIPTION AEXX-273 Series Wireless Controlled Pace Clocks are available in with 1", 2.3", 4", 8", or 12" high digits, visible from 5 feet
Pennsylvania Scale Company Model 400B Battery Powered Digital Indicator Operation & Calibration Manual
 Pennsylvania Scale Company Model 400B Battery Powered Digital Indicator Operation & Calibration Manual Pennsylvania Scale Company 1042 New Holland Avenue Lancaster PA 17601 For online interactive tech
FA-2448 SIX POSITION Filter Wheel
 15 Discovery Way, Acton, MA 01720 Phone: (978)263-3584, Fax: (978)263-5086 Web Site: www.acton-research.com Operating Instructions Acton Research Corporation FA-2448 SIX POSITION Filter Wheel Rev. 3.05.17
The PM1000 series is a universal 4 digit LED plug-on display for transmitters with 4-20mA 2 wire output and fitted with DIN43650 connector.
 PM1000 SERIES PLUG-ON DISPLAY BRIGHT LED DISPLAY INDICATION RANGE -999 TO +9999 FITS TO DIN 43650 CONNECTOR PLUG-ON TO ANY TRANSMITTER WITH 4-20MA OUTPUT EASY TO SCALE ON SITE ROBUST DESIGN SET POINT OPTION
V E1B Snap-in I/O Module
 V200-18-E1B Snap-in I/O Module The V200-18-E1B plugs directly into the back of compatible Unitronics OPLCs, creating a selfcontained PLC unit with a local I/O configuration. Features 16 isolated digital
MODBUS MANUAL For the AccUView UV Transmission Monitor
 MODBUS MANUAL For the AccUView UV Transmission Monitor HF scientific, inc. 3170 Metro Parkway Ft. Myers, FL 33916 Phone: 239-337-2116 Fax: 239-332-7643 E-Mail: info@hfscientific.com Website: www.hfscientific.com