X400 User s Guide
|
|
|
- Phoebe Hubbard
- 5 years ago
- Views:
Transcription
1 X400 User s Guide
2 COPYRIGHT INFORMATION Copyright 2009 Oki Data Americas, Inc. All rights reserved. DOCUMENT INFORMATION X400 User s Guide PN Revision 1.2 December, 2009 DISCLAIMER Every effort has been made to ensure that the information in this document is complete, accurate, and up-to-date. Oki assumes no responsibility for the results of errors beyond its control. Oki also cannot guarantee that changes in software and equipment made by other manufacturers and referred to in this guide will not affect the applicability of the information in it. Mention of software products manufactured by other companies does not necessarily constitute endorsement by Oki. While all reasonable efforts have been made to make this document as accurate and helpful as possible, we make no warranty of any kind, expressed or implied, as to the accuracy or completeness of the information contained herein. The most up-to-date drivers and manuals are available from the Oki web site: TRADEMARK INFORMATION Oki, Oki Printing Solutions and Microline are registered trademarks of Oki Electric Industry Company, Ltd. EFI, Fiery, the Fiery logo, and Spot-On are registered trademarks of Electronics for Imaging, Inc. in the U.S. Patent and Trademark Office. Fiery Link, SendMe, and the EFI logo are trademarks of Electronics for Imaging, Inc. Microsoft, MS-DOS and Windows are registered trademarks of Microsoft Corporation. Apple, Macintosh, Mac and Mac OS are registered trademarks of Apple Computer. Other product names and brand names are registered trademarks or trademarks of their proprietors. CAUTION! This product complies with EN55022 Class B. However, when fitted with the optional scanner and/or finisher, compliance to EN55022 is Class A. In a domestic environment this configuration may cause radio interference, in which case the user may be required to take adequate measures.
3 TABLE OF CONTENTS What You Get...3 Controls, Indicators, and Connections...4 Printer Power Connection...6 Printer Interface Connection...6 Loading Labels or Tags...8 Loading Ribbon...9 Selecting the Label Sensor Type Sensor Calibration Using the Printer...12 Printing a Self-Test Label...12 Feeding Blank Labels...13 Label Reprint...13 Sending Data to the Printer...13 Resetting the Printer...13 Printing Labels...14 Controlling the Printer Using Direct Commands...14 Routine Maintenance...14 What To Do If...15 POWER light is not lit...16 ERROR light is lit or flashing...16 Label will not feed...17 Host stops responding...17 Labels feed continuously...17 Poor print quality...18 Printer Specifications...19 Communication Ports...21 Serial Input Cable...21 Parallel Input Cable...22 Serial Port Parameters...22
4 OKIPOS X400 Software...23 Label Gallery Free...23 Windows Drivers...24 Media and Supplies...24
5 What You Get The OKIPOS X400 Printers come complete and ready to install and print labels. Your unit carton contains the following items: OKIPOS X400 Printer 90 Watt Power Supply Warranty/Safety/Regulatory Guide User s Guide CD-ROM Containing: OKIPOS X400 User s Manual OKIPOS X400 Programming Reference Guide Windows Printer Driver for OKIPOS X400 3
6 Controls, Indicators, and Connections Device Name Primary Function Use Power Switch Power control Applies power to printer. FEED Button POWER indicator ERROR LED Power Input Advances print media Indicates power status Indicates error status Connects the power supply 1 Pressing FEED while applying power, a test label will be printed. 2. Pressing FEED during printing will cause the printing to pause. 3. To feed a blank label or last printed label. 4. To reset the settings to factory defaults. 1 Normally ON when power is turned on. 2. Blinks when ribbon error, media error or other error occurres. 1 Normally OFF. 2. Blinking in unison with POWER indicator indricates media error. 3. Alternate blinking with POWER indicator indricates ribbon error. 4. Blinking for other errors, e.g. RS232 error. Connect to power module provided with printer. Serial Port Data input DB9S connector for connection to host RS232 port. Parallel Port Data input Centronics compatible connector for connection to host parallel port. 4


7 Print Head Release Top Cover Unlocks print head Protects print media and mechanism Push both releases downward to release print head. Lift to open. Push inward at hinge to remove. Parallel Port Power Input 5

8 Printer Power Connection 1. Plug the output of the power module provided with the printer into the connector on the rear panel. 2. Plug the power module into an AC outlet having the proper voltage. 3. Place the power switch in I position to turn on the power. Note If the FEED button is pressed after a label is printed, the last label will be printed again; otherwise a blank label is fed. To clear the image buffer inside the printer press and hold the FEED button for at least 5 seconds untill the ERROR indicator is lit, then release the FEED button. Important! The required AC voltage is marked on the power supply. Confirm that your AC voltage matches the power supply input specificaton. Do not use any power supply other than the one provided with the printer. Printer Interface Connection 1. Connect the interface cable to the parallel printer port on the computer. 2. Connect the other end to the parallel input port on the printer.. 6
9 7
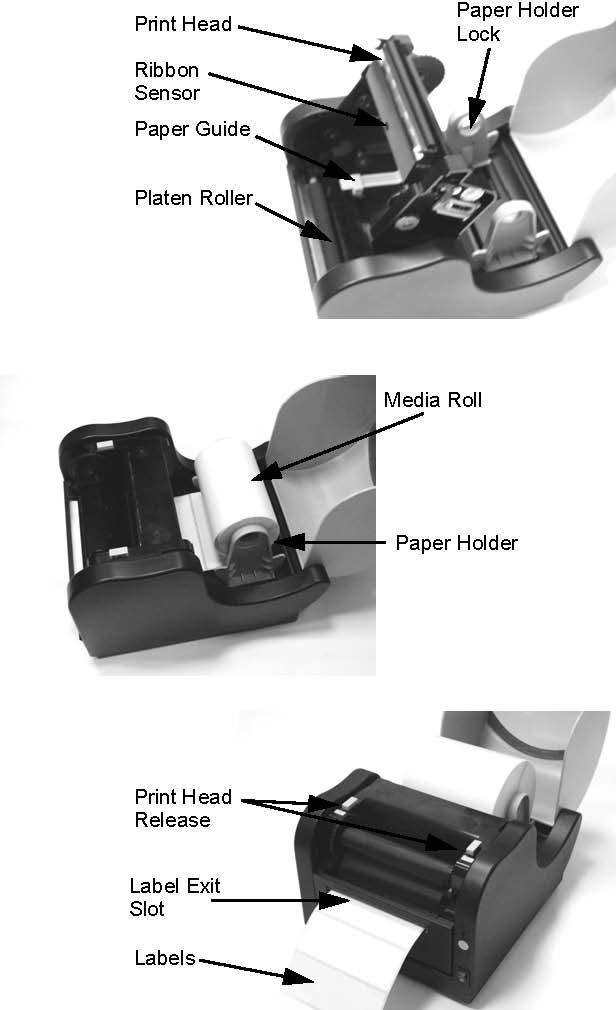
10 Loading Labels or Tags 1. Lift the top cover. 2. Press the two print head releases down to unlock the print head. 3. Unwind a few labels from the roll. Labels should be wound face-in for the best results. 4. Slide the center justified paper holders apart until the label roll will drop down between them. 5. The paper holdersare spring loaded and will automatically retract when released. Make sure the label holder spindles fit inside the label roll core and the roll spins freely. 6. Lock the paper holders in place by pressing down on the purple lock tab on the left paper holder. 7. Place media roll in the paper tray such that the media unwinds from the bottom of the roll toward the front of the printer. The label image surface must face up as it passes under the print head. 8. Move the purple paper guides in place to fix the label position. they should lightly contact the outside edges of the label backing. Make sure the label material is routed beneath the guides. 9. Slip the free end of the media under the print head and out the front paper exit. 10. Lower the print head and press it down firmly until it locks closed on both sides. 11. Close the top cover. 12. Wait until the ERROR LED stops blinking. Press the FEED button to feed a label or to resume printing. 8
11 Loading Ribbon The OKIPOS X400 thermal transfer printer transfers ink from a ribbon to the label to produce an image. 1. Lift the top cover. 2. Press the two print head releases down to unlock the print head module and expose the ribbon supply spindles. 3. Unwrap the new ribbon and unwind 4" from the roll. The end of the ribbon is attached to a take-up core. 4. Observe the notches on both end of the supply core and the take-up core. These notches must fit on the corresponding nibs on both the supply and take-up spindles. 5. Roll several turns of ribbon on the take-up core. The coated side of the ribbon must be on the outside of the take-up roll. 6. Place the left notch of the take-up core into the nib of left take-up spindle. 7. Place the right notch of the take-up core into the nib of right take-up spindle. 8. Pull the ribbon down, over the print head and insert the supply core onto the left supply spindle, making sure the notches in the core fit over the nibs. 9. Place the right end of the supply core into the right spindle, lining up the notches with the spindle nibs. Note Make sure the (coated) dull side of the ribbon is to the outside where the ink will be in contact with the label media. 10. Turn the take-up spindle to pull the ribbon over the print head without any slack. Check to make sure there are no ribbon wrinkles. 11. Lower the print head and press it firmly until it locks closed on both sides. 12. Close the top cover. 9


12 13. Wait until the ERROR LED stops blinking and goes OFF; press the FEED button to feed a label or to resume printing. Take-Up Core Dull Side on Bottom Spindle Notches Right Take-Up Spindle Right Supply Spindle 10
13 Selecting the Label Sensor Type OKIPOS X400 printers can use Eye-mark, gap or notch label sensing. The sensing method used by the printer must match to the media being used. If you are using label printing software, it should provide a mean to set up these parameters. See your software documentation for details. If you are writing your own software or controlling the printer using direct commands, you must use printer commands to set up the printer mode and sensing method. Refer to the programming information provided in the Program.pdf file for further information. Note The Program.pdf file is in Adobe Acrobat format. To view it, you must install Adobe Acrobat Reader which is included on the CD-ROM. Sensor Calibration The OKIPOS X400 uses a single sensor element for both direct thermal (without a ribbon) and thermal transfer (with a ribbon) printing. The method of printing can be selected by using configuration settings in the software program or by sending the command directly to the printer (Please refer to the Programming Guide). The mode of operation can be determined by running a Self Test Label. A OKIPOS X400 unit is calibrated at the factory for use with OKI standard ribbon and media. Other ribbon/media combinations may or may not index properly with these settings. If you are experiencing difficulty with label indexing and are not using OKI labels and/or ribbon, it may be necessary to recalibrate the unit for your particular ribbon/ media. This can be done by selecting the Calibration buttons provided in the Label Gallery Free software or the Windows Printer Driver. If you are not using either of these, you will have to send the calibration command directly to the printer. See the Programming Guide for instructions on using the Sensor Calibration command. Important! The ribbon must be installed in the printer when calibrating in the thermal transfer mode. 11

14 Using the Printer Printing a Self-Test Label Printing a self-test label checks the printer overall operability. To run a self-test, confirm that the printer is loaded and connected to AC power and no print jobs are in process. Then: 1. Turn off the power. 2. Press and hold the FEED button. 3. Turn on the power. 4. After the printer starts printing release the FEED button. 5. After the self-test label finishes printing, the printer will enter the hex dump mode. To return to normal operation you must cycle printer power. Important! The printer will be in hex dump mode after printing the selftest label. It cannot print normal labels in hex dump mode. The printer will return to normal operation only when you cycle printer power. 12
15 Feeding Blank Labels To feed a label you press the FEED button if there is no image in the printer buffer. To clear the image buffer you must press and hold the FEED button for at least 5 seconds and then release the FEED button. Label Reprint If the last label printed has not been cleared from the printer buffer, pressing the FEED button causes the last printed label to be reprinted. Sending Data to the Printer To print labels using data sent from a host computer or terminal: 1. Connect the host and printer serial or parallel ports together using a correctly wired interface cable (refer to the wiring information). 2. If you are using the serial port, confirm that the host and printer are using the same communication parameters. 3. Confirm that the POWER indicator is lit and the ERROR indicator is off. 4. Send your data to the printer. Resetting the Printer Some commands with parameters can be saved in the printer. They are in non-volatile memory that can be kept permanently unless they are changed by other commands with different parameters. To reset the parameters to factory settings, follow the procedure below. 1. Install ribbon and media. 2. Turn on the printer. 3. Press and hold the FEED button for about 30 seconds until the printer starts printing. 4. Release the button. 5. The printer will print a test label and enter hex dump mode. 6. Restart the printer for normal printing. 13
16 Note When holding the FEED button, the indicator status will change, but should be ignored even if the ERROR indicator becomes lit. Printing Labels To print labels, the host computer sends commands to the printer via the serial or parallel communication port. If you are using label printing software, the computer and software control the entire printing process. You only need to set up the printer, start your label printing program, and follow its instructions. Contact the software supplier or manufacturer if you encounter difficulties. Controlling the Printer Using Direct Commands You can also produce labels by sending commands directly to the printer. Simple ASCII commands control the printer. You can write command files using any text editor program that can output ASCII text (including the control codes). Since printer programming is potentially complex, programming information is not provided here. A printer command reference and basic programming procedure are provided on the CD-ROM packed with the printer. The file OKIPOS X400 Manual.pdf on the disk is in Adobe Acrobat format, readable using the Adobe Acrobat Reader provided in the AcroRead directory on the CD-ROM or can be downloaded free of charge from This program will allow you to search the contents of the manual and/or print a hard copy. If you need programming information and are not using Windows, contact our Service Hotline. Routine Maintenance OKIPOS X400 needs very little maintenance other than occasional cleaning. If cleaning the printer body is required, using soft cloth moistened with a mild detergent cleaner. Clean the print head if it appears dirty or if print quality is poor. Print head cleaning is easy and fast: 1. Unlatch and raise the print head if it is not already raised. 14
17 2. Using a soft cotton sheet moistened alcohol, clean all dirt and label residue from the print head, paying particular attention to the print line. Caution! Do not clean the print head or drive roller using abrasive or metallic objects, ammonia-based cleaners or other harsh chemicals. The practices can cause serious damage and will void the warranty. 3. Wipe the platen roller with the cleaning cloth. To reach all portions of the platen roller, press the FEED button. The roller will rotate 1/4 turn each time you press the FEED button when the print head is unlatched. Caution! Keep all objects clear of the platen roller when you press the FEED button 4. Confirm that the label sensor is unobstructed. Clean away any obstruction with a soft brush if necessary. 5. Resume the media loading procedure, or if there is already media in the printer, lower and lock the print head. 6. Resume normal operation. What To Do If OKIPOS X400 is very reliable, so printing problems are unlikely. If you do think you have a printer problem, proceed as follows: Confirm that the printer has the right media installed, and that it is loaded correctly. See page 5 for media loading instructions. 1. Confirm that the printer is connected to its power supply and the supply is plugged into an AC outlet having the proper voltage. 2. Open the print head and inspect the media path. Remove any obstructions, and clean the print head and drive roller according to the instructions on page
18 3. Press down firmly on both print head latches to confirm that they are closed. 4. Confirm that the printer ERROR indicator is off. 5. Print a self-test label as described on page Restart the printer. 7. Press the FEED button to confirm that the printer will feed a blank label or last printed label. 8. Review the common problems described in the following section. 9. If these steps do not correct the problems, contact your dealer or our Technical Support Department. Note The information here assumes you are using label printing software. If you are programming the printer, please review the information in the OKIPOS X400 Manual.pdf file located on the CD-ROM. Common Problems And Their Solutions POWER light is not lit Double-check the AC source and the power supply connections. Disconnect the cable between the printer and host, then restart the printer. If the POWER light becomes lit with the host disconnected, suspect a host computer or cabling problem. ERROR light is lit or flashing 1. If both ERROR and POWER indicators are flashing in unison, it means media error (media out or gap was not detected). 2. If ERROR and POWER indicators are flashing alternately, it means ribbon empty or ribbon not installed. 3. POWER is lit and ERROR is flashing 4. Flashing ERROR indicator: Long OFF, shorter ON: Cover is open or there is problem in cover sensor. 16
19 Others: If you are using the serial communication check the parameters on both the printer and the host. Self-test label will not print 1. If printing in the direct thermal mode, confirm that you have loaded direct thermal media. 2. Disconnect the cable between the printer and the host computer. Restart the printer and try to print a self-test label again. Label will not feed 1. Confirm that the print media is loaded correctly. 2. Restart the printer and confirm that the printer POWER indicator is lit and ERROR indicator is off. Press the FEED button. 3. If the printer still does not feed, disconnect the communication cable and repeat step 2. If the printer feeds with the cable disconnected, suspect a problem with the host computer or cable. Host stops responding or displays printer not ready message 1. Review your software setup, following the instructions provided with the software. 2. Confirm that the host-to-printer communication cable is connected and undamaged. If using the serial port, confirm that you are using a null modem cable or adaptor. 3. If using the serial port, confirm that the host and printer are using the same parameters. The self-test label shows the current printer serial port parameters. 4. If using a communication switch between the host and printer, remove the switch and connect the printer directly to the host. 5. Restart both printer and host, run the original software, and try again. Labels feed continuously 1. Check that the print media is loaded correctly. Confirm that the gap/mark goes through media sensor. 17
20 2. Confirm that the sensor type (Eye-mark or gap) in your software setup matches yours print media. Poor print quality 1. Confirm that the print media is properly loaded, and there is no side-to-side motion of the paper as it feeds through the printer. 2. Check your software print darkness and print speed settings. These settings may need adjustment for optimum results. 3. Try different print media. Old or inferior quality media will degrade print quality. 4. If you are printing in the direct thermal mode, make sure you are using direct thermal labels. 18
21 Printer Specifications Print Method Max Ribbon Length Max Ribbon Roll OD Ribbon Core ID Ribbon Core OD Weight (including power module) Print Head Density Print Speed Media Media Width Max Roll Diameter Label Roll Core ID Max Print Width Max Print Length Min Label Length Min Inter-Label Gap Max Inter-Label Gap Media Sensing (Left side, adjustable) Interface Ports Baud rate Flow Control OKIPOS X400 Thermal Transfer or Direct Thermal 328 ft. (100m) 1.5 in. (38mm) 0.5 in.(12.8mm) 0.72 in. (18.4mm) 8.1 lbs. (3.67kg) 203 dpi (8 dot/mm) 1 ips (25.4mm/s), 2 ips (50.8mm/s), 3 ips (76.2mm/s), 4 ips (101.6mm) Continuous paper, Paper Labels, Vinyl Labels, Tag 4.3 in. (108mm) 5 in. (127mm) 1 in. (25.4mm) 4.1 in. (104mm) 50 in. (1270mm).39 in. (10mm) 0.08 in. (2mm) 1 in. (25.4mm) See-through sensor for die-cut gap or notched media; Reflective sensor for Eye-mark; Continuous Material 9-pin RS232 Serial & 36-pin Centronics 9600, & bps X-On/X-Off and RTS/CTS protocols 19
22 Memory Bar Codes Supported Bar Code Rotations Bar Code Ratios Fonts Text Rotation Graphic Formats Graphic Rotation Electrical Size Environment Approvals Accessories Additional Memory 2MB total RAM; 2MB flash memory UPC, EAN8/13, EAN128, Code39, Code93, MSI, I25, M25, Postnet Bookland, Code 128, UCC 128, Codabar, MaxiCode, PDF417 0 o ; 90 o ; 180 o ; 270 o 1:2; 1:3; 2:5 Code Page 858, Others available. U;S; M; WB; WL; XU; XS; XM; XB; XL; OCR-A/B; Vector Font (50 ~ 999 dots) 0 o ; 90 o ; 180 o ; 270 o OKI Hex/Binary; PCX; and BMP Formats 0 o ; 90 o ; 180 o ; 270 o 110/220 VAC±10%, 50/60 HZ 197mm (7.76 ) x 257mm (10.2 ) x 164mm (6.5 ) Operating : 4 ~ 38 o C (30 ~ 80 RH, non condensing) Storage : -20 ~ 50 o C (25 ~ 85 RH, non condensing) CE, FCC Class A, TUV, UL/CUL, CCC Dispenser; RS232C Interface Cable; Cutter 2MB, 4MB additional flash memory 20
23 Communication Ports OKIPOS X400 printers are equipped with a standard Centronics parallel and an RS232 communication port, wired as shown below. Serial Input Cable (DB9S) Pin # Description 2 RXD (data to printer) 3 TXD (data from printer) 4 DTR, always high 5 GROUND 6 DSR, connected to pin 4, always high 7 RTS (printer busy) 8 CTS 1,9 +5V 21
24 Parallel Input Cable (Centronics 36 pin) Pin # Description 1 STROBE 2~9 Data bits ACK 11 Busy 12 PE (Paper End) 13 Select, always high 16 Signal Ground 17 Chassis Ground 18 +5V DC 19~30 Ground 32 Fault Serial Port Parameters OKIPOS X400 printers are configured as Data Terminal Equipment (DTE) equipment, and use Request-To-Send/Clear-To-Send (RTS/CTS) handshaking or X-On/X-Off flow control (control characters are DC2 and DC4). The serial port supports the following parameters: Speed Parity Data Bits 9600,19200 or bps Odd, Even or None 7 or 8 bits Stop Bit(s) 1 or 2 Default Parameters 9600 bps, No parity, 8 data bits, 1 stop bit 22
25 Note OKIPOS X400 printers require a null modem cable (pin 2-3 and 7-8 cross connected) when connected to another DTE device such as a personal computer. The OKI serial cables are wired in a null modem configuration. Other cables may require an external null modem adapter. OKIPOS X400 Software Two basic software packages are supplied on the Label Gallery Free CD-ROM included with each OKIPOS X400 printer. Each package allows you to easily change the configuration of the printer and print labels. Label Gallery Free Label Gallery Free is a basic label design and printing software package. It supports all OKI printers. Label Gallery Free requires a Pentium based computer with at least 32 MB of free RAM and 32-bit Windows OS (9x, ME, NT, 2000, XP) and 15 MB of available hard You can upgrade to more featured versions of Label Gallery. Please contact your dealer for upgrade information. The Label Gallery Free CD-ROM will Autorun when it is inserted in your computer if Autorun is enabled on your computer. If Autorun is not enabled, you may manually load the software by placing the CD-ROM in your CD drive and then selecting RUN from the Start Menu. Enter X:\START.EXE (where X is the drive letter associated with your CD drive). Follow the instructions on the screen, After the software has been installed, you must then install the OKI Windows Printer Driver from the same install screen. You can also manually install the Printer Drivers by using the Add New Printer selection in the Printer Folder and following the instructions.when the list of printers is displayed, be sure to select Have Disk. When asked for the disk with the driver, enter X:\Drivers\ and select the OKI printer model from the list. Label Gallery Free stores the printer configuration with each label format. When you enter the program and select New Label, a Label Setup window is opened. You enter the basic information about your label (Width, length, etc.) in this box. Selecting the Next in the lower right corner will take you to the Select Printer window where you select the 23
26 printer model that will be used to print the label. Selecting Printer Setup opens a Printer Driver where the operating parameters of the printer can be configured. Windows Drivers The OKIPOS X400 Windows Drivers lets you print labels using virtually any Windows application program. The driver can be installed using the Label Gallery Free START.EXE setup wizard or can be loaded like any other Windows printer driver using Add Printer from the Windows Control Panel. The driver is located in the Drivers directory on the CD-ROM. After the driver is installed, you can send data to the OKIPOS X400 just like any other printer on your system: simply specify the OKIPOS X400 model in the Print dialog box of your Windows application.. Media and Supplies The OKIPOS X400 comes from the factory set up to operate with OKI media supplies that are shipped with the printer. These supplies have been carefully selected to give optimum results with your printer. Contact OKI sales for ordering information.other may or may not give acceptable results. It is also probable that you will have to calibrate the sensors and heating settings before acceptable results are obtained. Calibration is accomplished by using the Windows driver or by selecting of the Printer Settings/Advanced/Immediate/Calibrate from the File menu. Instructions for calibrating the printer for use with different media supplies is contained in the OKIPOS X400 Printer Programming Guide found on the OKIPOS X400 series Ready-To-Go CD-ROM. 24
27
MONARCH 9416 XL QUICK REFERENCE
 MONARCH 9416 XL QUICK REFERENCE This Quick Reference contains ribbon loading, supply loading, and general care, maintenance, and troubleshooting procedures for the 9416 XL Thermal Direct and 9416 XL Thermal
Barcode Blaster CL. Cognitive An Axiohm Company. User s Guide. Direct thermal linerless bar code printer. Models BL BL423002
 Barcode Blaster CL Direct thermal linerless bar code printer Models BL422003 BL423002 User s Guide Cognitive An Axiohm Company TM CSIPN:10-00-0204 REV. C February 19, 1999 Barcode Blaster printers are
T4 series user s manual. Version: 1.1
 Version: 1.1 Table of contents 1. Introduction...1 1.1 In the box...1 1.2 Printer Features...2 1.2.1 Front view...2 1.2.2 Rear view...2 1.2.3 Interior view...3 2. Getting start...4 2.1 Loading the ribbon...4
LabelMax SP2 User Manual
 LabelMax SP2 User Manual 1 GENERAL... 3 1.1 COPYRIGHT DECLARATION... 3 1.2 COMPLIANCES... 3 1.3 INTRODUCTION... 3 2 GETTING STARTED... 4 2.1 UNPACKING AND INSPECTION... 4 2.2 EQUIPMENT CHECKLIST... 4 2.3
01/04 Rev USER/SERVICE MANUAL AP 3.4. Specifications
 01/04 Rev. 1.1-02 USER/SERVICE MANUAL Specifications Technical Specifications... 2 Device type, use... 2 Dimensions... 2 Performance Data... 2 Label material... 3 Ribbon... 3 Connections, device data...
TT230SM THERMAL TRANSFER PRINTER USER S MANUAL
 TT230SM THERMAL TRANSFER PRINTER USER S MANUAL Operations Overview Unpacking and Inspection This printer has been specially packaged to withstand damage during shipping. Please carefully inspect the packaging
English. Copyright Brady Worldwide, Inc. All rights reserved. (US and Canada)
") Copyright This manual is copyrighted with all rights reserved. No portion of this manual may be copied or reproduced by any means without the prior consent of Brady Worldwide, Inc. While every precaution
Copyright This manual is copyrighted with all rights reserved. No portion of this manual may be copied or reproduced by any means without the prior consent of Brady Worldwide, Inc. While every precaution
Q8 Barcode Label Printer User s Manual
 Q8 Barcode Label Printer User s Manual Q8 User s Manual Contents Preface... 1 Important Notice, Read Me First!... 1 Chapter 1 Introduction... 2 Specifications... 2 Specifications for Printer... 2 Specifications
TTP-244 / TTP-244 Plus THERMAL TRANSFER / DIRECT THERMAL BAR CODE PRINTER USER S MANUAL
 TTP-244 / TTP-244 Plus THERMAL TRANSFER / DIRECT THERMAL BAR CODE PRINTER USER S MANUAL CONTENTS 1. PRODUCT INTRODUCTION... 2 1.1 Compliances... 2 2. GETTING STARTED... 3 2.1 Unpacking and Inspection...
QUICK REFERENCE. RFID Overview
 QUICK REFERENCE This Quick Reference contains supply loading and general maintenance procedures for the Monarch 9855 RFID printer. Additional RFID documents are available on the Monarch Printer s Documentation
FCC Notice. Trademarks. Copyright. Disclaimer
 FCC Notice This device complies with Part 15 of the FCC Rules. Operation is subject to the following two conditions: (1) this device may not cause harmful interference, and (2) this device must accept
CANADIAN D.O.C. WARNING
 Each product and program carries a respective written warranty, the only warranty on which the customer can rely. Avery Dennison Corp. reserves the right to make changes in the product, the programs, and
User's Guide QL-700. ENG ver.a.
 User's Guide QL-700 Be sure to read and understand this guide before using the machine. We recommend that you keep this guide nearby for future reference. www.brother.com ENG ver.a Thank you for purchasing
G-2108/G-3106 User s Manual
 FCC Notice This device complies with Part 15 of the FCC Rules. Operation is subject to the following two conditions: (1) this device may not cause harmful interference, and (2) this device must accept
QUICK REFERENCE. Connecting the Cables
 QUICK REFERENCE This Quick Reference contains supply loading and general care and maintenance procedures for the Monarch 9860 printer. For more detailed information, refer to the Operator s Handbook available
Quick Installation Guide Direct and Transfer Thermal Printer
 Quick Installation Guide Direct and Transfer Thermal Printer Overview The enclosed printer is currently comprised of two models: 203dpi (dots per inch) model 300dpi (dots per inch) model Unpacking 1. Remove
X Series Label Printer. User s Manual ZMIN TECHNOLOGIES Version 1.3. Part Number:
 X Series Label Printer User s Manual ZMIN TECHNOLOGIES 2012-9-17 Version 1.3 Part Number: 2012 Shenzhen ZMIN Technologies Co.,Ltd. All rights reserved. ZMIN is a registered trademark of Shenzhen ZMIN Technologies
Table of Contents. Unpacking and Inspection Setup Loading the Media Mount the Printer on the Wall... 16
 WPL25/WHC25 Table of Contents Unpacking and Inspection... 1 Setup... 5 Loading the Media... 6 Mount the Printer on the Wall... 16 LED and Button Functions... 17 Troubleshooting... 18 Unpacking and Inspection
CANADIAN D.O.C. WARNING
 Each product and program carries a respective written warranty, the only warranty on which the customer can rely. Avery Dennison Corp. reserves the right to make changes in the product, the programs, and
Users Manual STP-103II. Thermal Printer Rev
 Users Manual STP-103II Thermal Printer Rev. 1.00 http://www.bixolon.com Safety Precautions The instructions shown below must be followed to prevent possible danger or damage by using the product incorrectly.
User s Guide QL-720NW
 User s Guide QL-720NW Be sure to read and understand this guide before using the machine. We recommend that you keep this guide nearby for future reference. Not all models are available in all countries.
Advantage LX Desktop Label Printer USER GUIDE
 Advantage LX Desktop Label Printer USER GUIDE LXG-UG00000 Rev. C 12/18 Copyright 2018, CognitiveTPG CognitiveTPG is a trademark of CognitiveTPG. Microsoft and Windows are trademarks of Microsoft Corporation.
Hard Disk Drive (HDD) Data Protection Kit Installation Instructions
 Data Protection Kit Installation Instructions") Hard Disk Drive (HDD) Data Protection Kit Installation Instructions 59399801 2009 by Oki Data Americas, Inc. All rights reserved. Disclaimer Every effort has been made to ensure that the information in
Hard Disk Drive (HDD) Data Protection Kit Installation Instructions 59399801 2009 by Oki Data Americas, Inc. All rights reserved. Disclaimer Every effort has been made to ensure that the information in
CT4 0 0 / CT4 1 0 Pl u g & Pl a y Reta i l Pr i n ter
 CT4 0 0 / CT4 1 0 ( Japan H Q ) ( Si ngapore) ( M al ay si a) ( T hai l and) ( Chi na) ( U SA ) ( Bel gi um) ( UK ) ( Germany ) ( Pol and) ( Hol l and) SA T O Cor por at i on Bar Code SA T O El ectroni
MODEL : LK-B24 LABEL PRINTER
 J. STEPHEN Lab., Ltd. 28-6, Gajangsaneopdong-ro, Osan-si, Gyeonggi-do,18103, Republic of Korea TEL : +82-31-8077-5000 FAX : +82-31-459-8880 www.miniprinter.com MODEL : LK-B24 LABEL PRINTER B24 Rev.E 09/17
FCC Notice. Trademarks. Copyright. Disclaimer
 FCC Notice This device complies with Part 15 of the FCC Rules. Operation is subject to the following two conditions: (1) this device may not cause harmful interference, and (2) this device must accept
Monarch 9825 Printer
 Monarch 9825 Printer TC9825QR Rev. AA 2/02 2002 Paxar Corporation. All rights reserved. This Quick Reference contains supply loading and general care and maintenance procedures. For more detailed information,
MODEL : SLK-TE20X Series Receipt Printer User s Manual
 MODEL : SLK-TE20X Series Receipt Printer User s Manual TE20X Series Rev.F 03/16 All specifications are subject to change without notice Table of Contents 1. Parts Identifications 1. Parts Identifications
Xerox 8264E Color Wide Format Printer 100kg Unwinder / Winder
 November 2009 70P3070 Xerox 8264E Color Wide Format Printer 00kg Unwinder / Winder 2009 Xerox Corporation. All rights reserved. Xerox, the sphere of connectivity design, and Xerox 8264E Color Wide Format
USER MANUAL SMS - 400
 USER MANUAL SMS - 400 Table of Contents Introduction... 4 Proprietary Statement... 4 Product Improvements... 4 FCC Compliance Statement... 4 Liability Disclaimer... 4 Getting Started... 6 Unpacking Printer...
MODEL : AP-8220 U Receipt Printer User s Manual
 MODEL : AP-8220 U Receipt Printer User s Manual AP-8220 U Rev.A 10/14 All specifications are subject to change without notice Table of Contents 1. Parts Identifications 1. Parts Identifications 3 2. Setting
RT322 LE810DT. User s Guide my.okidata.com
 RT322 LE810DT User s Guide 59320201 my.okidata.com Copyright Information Copyright 2010 by Oki Data. All Rights Reserved Document Information LE810DT User s Guide P/N 59320201 Revision 1.2 April, 2010
MODEL : TRP-100-II Receipt Printer User s Manual
 MODEL : TRP-100-II Receipt Printer User s Manual All specifications are subject to change without notice Table of Contents 1. Parts Identifications 3 2. Setting up the printer 4 2.1 Unpacking 4 2.2 Connecting
9-pin dot matrix printer
 9-pin dot matrix printer All rights reserved. No part of this publication may be reproduced, stored in a retrieval system, or transmitted in any form or by any means, electronic, mechanical, photocopying,
MODEL : LK-T200 Receipt Printer User s Manual
 SEWOO TECH CO.,LTD. Doosung BD, 689-20, Geumjeong-dong, Gunpo-si, Gyeonggi-do, 435-862, Korea TEL : +82-31-459-8200 FAX : +82-31-459-8880 www.miniprinter.com MODEL : LK-T200 Receipt Printer User s Manual
ZEBRA LP/TLP2844 PRINTER SPECIFICATIONS
 ZEBRA LP/TLP2844 PRINTER SPECIFICATIONS Standard Features Optional Features Factor Options Printing Specifications Media Specifications Ribbon Specifications Font Specifications Barcode Symbologies & Specifications
WAVECOM INSTRUMENTS PTY LTD
 WAVECOM INSTRUMENTS PTY LTD www.wavecom.com.au WAVECOM TT040-50 THERMAL TRANSFER BAR CODE PRINTER USER MANUAL 1 Table of Contents Copyright Declaration 3 Introduction 3-4 Product Introduction Compliances
Setting up an Intermec PM43 printer with InterDriver version M-0 or newer
 Setting up an Intermec PM43 printer with InterDriver version 7.3.5 M-0 or newer Setting up a bar code printer with 7.3.5 M-0 Intermec drivers or newer 1 INITIAL PRINTER CONFIGURATION When the printer is
MODEL : SLK-TL100 Receipt Printer User s Manual
 J. STEPHEN Lab., Ltd. 28-6, Gajangsaneopdong-ro, Osan-si, Gyeongi-do, 447-210, Korea TEL : +82-31-459-8200 FAX : +82-31-459-8880 www.miniprinter.com MODEL : SLK-TL100 Receipt Printer User s Manual TL100
MVPplus Quick Reference Guide
 MVPplus Quick Reference Guide Use this guide to operate your printer on a daily basis. For more detailed information, refer to the User Guide. Contents External View...........................................................
Specification PM SER IES T h erm al B a rcodep rinters
 Specification PM SER IES T h erm al B a rcodep rinters P M 3120 Proficient in Commercial POS Receipt printers 1. Introduction...2 1.1 Safety Warning...2 1.2 Note...2 2. General Information...3 2.1 Introduction...3
MODEL : LK-T210 Receipt Printer User s Manual
 SEWOO TECH CO.,LTD. Doosung BD, 689-20, Geumjeong-dong, Gunpo-si, Gyeonggi-do, 435-862, Korea TEL : +82-31-459-8200 FAX : +82-31-459-8880 www.miniprinter.com MODEL : LK-T210 Receipt Printer User s Manual
QUICK REFERENCE. Using the Battery
 QUICK REFERENCE This Quick Reference contains supply loading information and general care and maintenance procedures for the Monarch Sierra Sport4 9493 printer. For more detailed information, refer to
FEC-80T Receipt Printer User s Manual
 FEC-80T Receipt Printer User s Manual All specifications are subject to change without notice TABLE OF CONTENTS 1. Parts Identifications 3 2. Setting up the printer 4 2.1 Unpacking 4 2.2 Connecting the
Manual for MantraJet 1100 CD/DVD auto-printer
 Manual for MantraJet 1100 CD/DVD auto-printer Rev 1.03 September 7, 2010 Table of contents Specifications...3 Unpacking MantraJet 1100...4 Quick installation reference MantraJet 1100...7 Installation of
ScanPartner 600C Image Scanner. User's Manual
 ScanPartner 600C Image Scanner User's Manual Version 1.0 Fujitsu Computer Products of America, Inc. Notice FCC Class B Computing Devices (Federal Communications Commission Radio Frequency Interference
Cub CB-724e / CB-534e
 Cub CB-724e / CB-534e THERMAL TRANSFER / DIRECT THERMAL BAR CODE PRINTER USER S MANUAL Contents 1. Introduction...1 2. Getting Started...1 2.1 Unpacking and Inspection...1 2.2 Equipment Checklist...1 2.3
Monarch 9460 Printer. TC9460OH Rev. AC 2/ Monarch Marking Systems, Inc. All rights reserved.
 Monarch 9460 Printer TC9460OH Rev. AC 2/01 2001 Monarch Marking Systems, Inc. All rights reserved. Each product and program carries a respective written warranty, the only warranty on which the customer
User's Manual. Metapace L-22D. Label Printer Rev. 1.00
 User's Manual Metapace L-22D Label Printer Rev. 1.00 Table of Contents MANUAL INFORMATION & USAGE PRECAUTIONS... 3 1. CONTENT CONFIRMATION... 6 2. PRODUCT PARTS... 7 3. INSTALLATION & USAGE... 9 3-1 POWER
MODEL PORTI-T. (Kiosk&Ticket Printer) Rev. 2.0
 Rev. 2.0") MODEL PORTI-T (Kiosk&Ticket Printer) Rev. 2.0 WOOSIM SYSTEMS Inc. #501, Daerung Technotown 3th, 448, Gasan-Dong, GeumChun-Ku, Seoul, Korea Tel : +82-2-2107-3700 Fax : +82-2-2107-3707 URL: http://www.woosim.com
MODEL PORTI-T (Kiosk&Ticket Printer) Rev. 2.0 WOOSIM SYSTEMS Inc. #501, Daerung Technotown 3th, 448, Gasan-Dong, GeumChun-Ku, Seoul, Korea Tel : +82-2-2107-3700 Fax : +82-2-2107-3707 URL: http://www.woosim.com
TRP-100 Receipt Printer User s Manual
 TRP-100 Receipt Printer User s Manual All specifications are subject to change without notice TABLE OF CONTENTS 1. Parts Identifications 3 2. Setting up the printer 4 2.1 Unpacking 4 2.2 Connecting the
MODEL : TRP100-III Receipt Printer User s Manual
 MODEL : TRP100-III Receipt Printer User s Manual All specifications are subject to change without notice A software tool is available to configure the printer settings on AURES technical website: www.aures-support.fr
MODEL : PR-T25 Receipt Printer User s Manual
 MODEL : PR-T25 Receipt Printer User s Manual All specifications are subject to change without notice Table of Contents 1. Parts Identifications 1. Parts Identifications 3 2. Setting up the printer 4 2.1
Product Update. Overview. Table of Contents
 Product Update Overview This Product Update explains the changes to the products listed below. Microline 320/321 Turbo Microline 320/321 Turbo / n Microline 390/391 Turbo Microline 390/391 Turbo / n Microline
DLXi Desktop Label Printer USER GUIDE
 DLXi Desktop Label Printer USER GUIDE Built to Last... Designed to Connect. POWER READY DLX-UG00000 Rev. D 12/18 Copyright 2018, CognitiveTPG, LLC CognitiveTPG is a trademark of CognitiveTPG. Microsoft
TTP-244 / TTP-244 Plus THERMAL TRANSFER / DIRECT THERMAL BAR CODE PRINTER USER S MANUAL
 TTP-244 / TTP-244 Plus THERMAL TRANSFER / DIRECT THERMAL BAR CODE PRINTER USER S MANUAL CONTENTS 1. PRODUCT INTRODUCTION... 2 1.1 Compliances... 2 2. GETTING STARTED... 3 2.1 Unpacking and Inspection...
CRx Printers START-UP GUIDE
 CRx Printers START-UP GUIDE To Get Started: Insert the Companion CD shipped with the CRx printer* into the computer. Please refer to the User s Guide included on the CD companion or the Compact Industrial
KeepnTrack Badge Printer Installation Guide Fort Union Blvd, Salt Lake City, Utah 84121! !
 KeepnTrack Badge Printer Installation Guide 1831 Fort Union Blvd, Salt Lake City, Utah 84121 800-347-6439 801-943-7277 www.companioncorp.com Copyright 2013 Evelyn Manufacturing, All Rights Reserved. Distributed
Changing the Size of the Paper in the Paper Tray For Local Printing For Network Printing (WorkCentre PE120i only)...1.
...1.") Quick Start Guide CONTENTS Step 1: Unpacking... 1.3 Step 2: Installing the Toner Cartridge... 1.5 Step 3: Loading Paper... 1.7 Changing the Size of the Paper in the Paper Tray.. 1.9 Step 4: Connecting
Quick Start Guide CONTENTS Step 1: Unpacking... 1.3 Step 2: Installing the Toner Cartridge... 1.5 Step 3: Loading Paper... 1.7 Changing the Size of the Paper in the Paper Tray.. 1.9 Step 4: Connecting
Compact Printer. User Manual CP-2240 CP-2240Z.
 Compact Printer User Manual CP-2240 CP-2240Z http://www.argox.com service@argox.com V1.2-11-12-2017 i Liability Disclaimer Argox Corporation takes steps to assure that the company s published engineering
Zebra XiII-Series Printer Quick Reference Guide
 Zebra XiII-Series Printer Quick Reference Guide Contents Media and Ribbon Loading...67 Media Loading...67 Ribbon Loading...70 Operator Controls...72 Front Panel Keys...72 Front Panel Lights...72 Calibration...74
Thermal Printer User s Manual
 Thermal Printer User s Manual 2684 User s Manual No. 980350-001 Rev. A 2001 Zebra Technologies Corporation ii 980350-001 Rev. A FOREWORD This manual provides installation and operation information for
HiTi P310W. user manual V_0.1.
 HiTi P310W user manual www.hiti.com V_0.1 TABLE OF CONTENTS Chapter 1. Important Safety Instruction Environments 1-1 Handling Instruction 1-2 Handling Instruction for Consumable and Printed Output 1-3
Operator and Technical Reference Manual
 Se Applicator Print Engines Operator and Technical Reference Manual M-8459Se, M-8460Se, M-8485Se M-8490Se PN 9001073 Rev C SATO America, Inc. 10350-A Nations Ford Rd. Charlotte, NC 28273 Main Phone: (704)
EQUIPMENT MANUAL. Avery Dennison Monarch 9419 Printer. TC9419EM Rev. AA 9/ Avery Dennison Corp. All rights reserved.
 EQUIPMENT MANUAL Avery Dennison Monarch 9419 Printer TC9419EM Rev. AA 9/16 2016 Avery Dennison Corp. All rights reserved. Each product and program carries a respective written warranty, the only warranty
MantraJet 1100 CD/DVD autoprinter Operator s manual
 MantraJet 1100 CD/DVD autoprinter Operator s manual Rev 1.00 May 7, 2008 Table of contents 1. Specifications.. Page 2 2. Unpacking you MantraJet 1100 Page 3 3. Using your autoprinter for the first time.
Thermal Receipt Printer Instruction Manual
 Thermal Receipt Printer Instruction Manual Save the user manual for future reference. Table of Contents A. IMPORTANT SAFETY NOTIFICATION... 1 B. PRODUCT OVERVIEW... 3 Main Features... 3 Packing... 4 Specification...
This package contains: 1 UC-232A USB-to-Serial Converter 1 Installation Disk 1 User Manual If anything is damaged or missing, contact your dealer.
 User Manual UC-232A Read this guide thoroughly and follow the installation and operation procedures carefully in order to prevent any damage to the units and/or any devices that connect to them. This package
ScanPartner 600C Image Scanner. User s Manual
 ScanPartner 600C Image Scanner User s Manual Version 1.0 (Doc. No. 250-0062-0) Table of Contents 1. INTRODUCTION 3-4 2. INSTALLATION AND CONNECTIONS. 5-13 2.1 Shipping Bracket 5 2.1.1 Removing the Shipping
2D Image Handheld Scanner
 1 Revision History Changes to the original manual are listed below: Version Date Description of Version 1.0 9/6/2018 Initial release i Important Notice No warranty of any kind is made in regard to this
MODEL : LK-TL200 Receipt Printer User s Manual
 SEWOO TECH CO.,LTD. 28-6, Gajangsaneopdong-ro, Osan-si, Gyeongi-do, 447-210, Korea TEL : +82-31-459-8200 FAX : +82-31-459-8880 www.miniprinter.com MODEL : LK-TL200 Receipt Printer User s Manual TL200 Rev.
Addmaster Corporation
 IJ-1000 Ink-Jet Validation Printer Specification Addmaster Corporation Address: 225 East Huntington Drive Monrovia, CA 91016 Web: www.addmaster.com Phone: (626) 358-2395 FAX: (626) 358-2784 Document: ij1w.doc
T4+ series user s manual. Version: 1.1
 Version: 1.1 Table of contents 1. Introduction... 1 1.1 In the box... 1 1.2 T4+ Printer Features... 2 1.2.1 Front view... 2 1.2.2 Rear view... 2 1.2.3 Interior view... 3 1.3 T4e+ Printer Features... 4
1. Checking Your Box. Printer. * Sample Media * Ribbon. User s Manual CD Rom Disk. Power Adapter. * Not available for A-50
 1. Checking Your Box Receiving the box of your printer, you are advised to check first for the possible shipping damage. There are two ways you can do it: 1. Inspect the outer appearances of both the box
FCC COMPLIANCE STATEMENT FOR AMERICAN USERS
 FCC COMPLIANCE STATEMENT FOR AMERICAN USERS This equipment has been tested and found to comply with the limits for a CLASS A digital device, pursuant to Part 15 of the FCC Rules. These limits are designed
USER GUIDE. to the CP130. Thermal Printer
 USER GUIDE to the CP130 Thermal Printer Revision: 1.0 Filename: CP130 Users Guide v1 0.doc Date: 29 March 2011 1 TABLE OF CONTENTS 1 Table of Contents... 2 2 Introduction... 3 2.1 Notes on Printer Firmware
MODEL : SLK-T12EB Receipt Printer User s Manual
 J. STEPHEN Lab., Ltd. 28-6, Gajangsaneopdong-ro, Osan-si, Gyeonggi-do, 447-210 Republic of Korea TEL : +82-31-8077-5000 FAX : +82-31-459-8880 www.miniprinter.com MODEL : SLK-T12EB Receipt Printer User
Quick Start Guide. LabelWriter
 Quick Start Guide LabelWriter 450 Duo Copyright 2010 Sanford, L.P. All rights reserved. Revised 12/10. No part of this document or the software may be reproduced or transmitted in any form or by any means,
DOT MATRIX PRINTER SP6000 SERIES
 DOT MATRIX PRINTER SP6000 SERIES Hardware Manual < Approval: CEL > Trademark acknowledgments SP6000 : Star Micronics Co., Ltd. Notice All rights reserved. Reproduction of any part of this manual in any
DS-800. ::: Receipt Printer User s manual :::
 DS-800 ::: Receipt Printer User s manual ::: All specifications are subjected to change without notice TABLE OF CONTENTS 1. Parts Identifications 2 2. Setting up the printer 3 2.1 Unpacking 3 2.2 Connecting
Copyright Information: Firmware (Software) Agreement:
 Agreement:") Maintenance Manual Copyright Information: CG Triumvirate is a trademark of Agfa Corporation. CG Times based upon Times New Roman under license from the Monotype Corporation. Windows is a registered trademark
Maintenance Manual Copyright Information: CG Triumvirate is a trademark of Agfa Corporation. CG Times based upon Times New Roman under license from the Monotype Corporation. Windows is a registered trademark
Monarch 9414 Printer. TC9414EM 7/99 Rev. AB 1999 Monarch Marking Systems, Inc. All rights reserved.
 Monarch 9414 Printer TC9414EM 7/99 Rev. AB 1999 Monarch Marking Systems, Inc. All rights reserved. Each product and program carries a respective written warranty, the only warranty on which the customer
Getting Started. Read Me First. series. Photo Printer
 Photo Printer series Getting Started Read Me First Make sure to read this manual before using the printer. Please keep it in hand for future reference. Symbols Used in This Document Instructions including
TTP/TDP 243/342 THERMAL TRANSFER / DIRECT THERMAL BAR CODE PRINTER USER S MANUAL
 TTP/TDP 243/342 THERMAL TRANSFER / DIRECT THERMAL BAR CODE PRINTER USER S MANUAL CONTENTS 1. PRODUCT INTRODUCTION... 1 1.1 Compliances... 1 1.2 Warranty Information... 1 1.2.1 Thermal Print Head... 2 1.2.2
User's Manual SRP-770II. Label Printer Rev
 User's Manual Label Printer Rev. 1.12 http://www.samsungminiprinters.com Table of Contents Manual Information & Usage Precautions 3 1. Content Confirmation 7 2. Product Part Names 8 3. Installation & Usage
COMPACT PRINTER SERIES
 COMPACT PRINTER SERIES USER S MANUAL CP-2140 / CP-2140Z / CP-2140E CP-3140L / CP-3140ZL CP-3140LE / CP-3140ZLE Website: http://www.argox.com 1 Table of Contents 1. Introduction... 5 Proprietary Statement...
UPS. Quick Start. Unpack Your Printer. Quick Start. Printer. Power Cord. USB Cable. Parallel Cable
 UPS 2348+ Thermal Printer Quick Start Unpack Your Printer Printer Quick Start UPS 2348+ Thermal Printer Quick Start Power Cord Parallel Cable USB Cable Note: Ethernet option printers do not include any
HP Deskjet F2100 All-in-One series. Basics Guide
 HP Deskjet F2100 All-in-One series Basics Guide Hewlett-Packard Company notices The information contained in this document is subject to change without notice. All rights reserved. Reproduction, adaptation,
Quick Start Guide. 1. Unpacking your LabelWriter Printer. Follow these steps to install the LabelWriter printer and print your first label.
 Quick Start Guide Copyright 2009 Sanford, L.P. All rights reserved. Revised 4/09. No part of this document or the software may be reproduced or transmitted in any form or by any means or translated into
Monarch 9825 Printer Paxar Americas, Inc. a subsidiary of Avery Dennison Corp. All rights reserved.
 Monarch 9825 Printer TC9825QR Rev. AF 4/08 2007 Paxar Americas, Inc. a subsidiary of Avery Dennison Corp. All rights reserved. Each product and program carries a respective written warranty, the only warranty
THERMAL TRANSFER/ DIRECT THERMAL BARCODE PRINTER USER S MANUAL
 ITPP075 THERMAL TRANSFER/ DIRECT THERMAL BARCODE PRINTER USER S MANUAL i Copyright Information 2016 Zhuhai Hengquan Barcode equipment Co., Ltd. The copyright in this manual, the software and firmware in
Copyright 2013 Esselte Leitz GmbH & Co. KG. All rights reserved.
 Copyright 2013 Esselte Leitz GmbH & Co. KG. All rights reserved. Mac, ipad, AirPrint, and OS X are trademarks of Apple Inc., registered in the U.S. and other countries. Google and Google Cloud Print are
LBP-810 Laser Printer
 LBP-810 Laser Printer Getting Started Guide IMPORTANT: Read this manual carefully before using your printer. Save this manual for future reference. Copyright Copyright 2001 Canon Inc. All information in
EPSON ActionLaser Read This First. eepa POLLUTION PREVENTER
 EPSON ActionLaser 1400 Read This First eepa POLLUTION PREVENTER This booklet is to help you set up your printer and begin printing quickly. It also gives you instructions for routine maintenance. If you
K Service Source. StyleWriter
 K Service Source StyleWriter K Service Source Basics StyleWriter Basics Introduction - 1 Introduction The StyleWriter is a serial bubble jet ink-on-demand printer. The StyleWriter prints up to 1/3 page
MODEL : SLK-TS400EB. Receipt Printer User s Manual. TS400EB Rev. B 07/16. All specifications are subject to change without notice
 MODEL : SLK-TS400EB Receipt Printer User s Manual TS400EB Rev. B 07/16 All specifications are subject to change without notice Table of Contents 1. Parts Identifications 1. Parts Identifications 3 2.
Installation. Installation 1
 Installation 1 Installation The SP35 printer is easy to install and use. It is also flexible; you can connect and use it in many different ways. Most often, one printer is connected to one PC. However,
04/04 Rev USER + SERVICE MANUAL 64-xx 64-xx dispenser TT4. Specifications
 04/04 Rev. 3.00-02 USER + SERVICE MANUAL Specifications Technical Specifications... 2 Device types, use... 2 Dimensions... 3 Performance data... 4 Specifications especially for TT4... 6 Automatic ribbon
RT200/RT230 BARCODE PRINTER USER MANUAL
 RT200/RT230 BARCODE PRINTER USER MANUAL User Manual: RT200 series Version : Rev. 1.3 Issue Date : 2012.10.25 P/N : 920-014311-00 RT200/RT230 USER MANUAL CONTENTS 1 Barcode Printer 001 1.1 Box Content 001
RJ-2030/2050/2140/2150
 Printed in China LBF85400 Package Contents Check that the package contains the following before using your printer: RJ-030/050/40/50 Quick Setup Guide English Printer Rechargeable Li-ion Battery Belt Clip