T4+ series user s manual. Version: 1.1
|
|
|
- Letitia Ward
- 5 years ago
- Views:
Transcription

1 Version: 1.1
2 Table of contents 1. Introduction In the box T4+ Printer Features Front view Rear view Interior view T4e+ Printer Features Front view Rear view Interior view Getting start Loading the ribbon Loading the media T4+ Connecting interfaces RS-232 port (Serial port) USB Slave Ethernet (Option) T4e+ / T4De+ Connecting interfaces USB Slave Ethernet (Option) Power on the printer T4+ Control panel T4e+ / T4De+ Control panel Printer options Peeler installation Cutter installation LCD screen icons LCD screen information Graphic symbol on LCD screen Configuration Menu structure Parameters setup User Setup Communication setup Print Setup I
3 5.2.4 Test Memory Form Warning message Printer status Troubleshooting LCD error message Specifications T4+ series general specifications Universal Serial Bus (USB) port pin assignment Serial port pin assignment Ethernet module port pin assignment Appendix A II
4 About this user s manual Firstly, thank you for purchasing Sbarco s T4+ series printer. T4+ series printer could provide you a reliable, easy and clear way to print all kinds of labels and barcodes you need. This user s manual is described with a large quantity of illustrations, let the users understand, step by step, how to work this printer to its best. This manual includes also the troubleshooting section which could provide a pre-way to eliminate or find out the troubles, without the help of technician. If users still cannot banish the troubles from the printer, please contact directly the distributors. III
5
6 1. Introduction 1.1 In the box After unpacking, please inspect carefully and make sure that you receive all the necessary parts as below: Printer Power supply Power Cord (varies by country) Software CD ROM Quick start guide USB cable If any parts are missing, please contact the service department of your distributor. Save the carton and all packing materials in case you need to reship back. 1
7 1.2 T4+ Printer Features Front view Rear view Power switch Power jack RS-232 port USB slave Ethernet option USB master Micro SD slot. 2
8 1.2.3 Interior view 3


9 1.3 T4e+ / T4De+ Printer Features Front view Rear view 4
10 1.3.3 Interior view 5


11 2. Getting start 2.1 Loading the ribbon 1. Pulling the release latches on two sides toward the front of printer to open the printer cover. 2. Open the ribbon cover by pushing the ribs (as shown in green) of ribbon cover. Do not open the ribbon cover by pushing the cover edge which installed the blade to tear off the label. It might hurt your hands if you push it hard. 6
12 3. Insert the ribbon roll to the supply spindle. 4. Rotate the supply hub until the notches align and lock in to the left side of supply hub. 7
13 5. Insert an empty media core into the take up spindle. Rotate the take up hub until the notches align and lock on the left side of take up hub. 6. Pull the ribbon out from the roll and stick it with the adhesive tape on the empty ribbon take up core. 8
14 7. Rotate the take up hub on the left side of ribbon spindle till the ribbon is pulled tight. Note: The loading path of ribbon roll (outside wound) 9
15 2.2 Loading the media Whether the roll media is inside or outside wound, they could be used in this printer and loaded in the same way. 1. Open the printer cover by pulling the release latch toward the front of printer. 2. Press the holder latch and pull the media holders open. Place the media roll on the holders and push media holder toward the roll by pressing the holder latch. Release the latch when the media is on the holder firmly. 10


16 3. Pull the media so it could extend out the printer. Please make sure the printing surface is facing up. 4. Before pushing the media under the guides, adjust the label gap senor to appropriate position to detect the labels with gap, hole or black mark. 11


17 5. Push the media under the both sides of guides. Note: The loading path of label roll (inside and outside wound) 12
18 2.3 T4+ Connecting interfaces The following interfaces could be connected to PC to operate the printer: RS-232 port (Serial port) USB Slave 13
19 2.3.3 Ethernet (Option) 14
20 2.4 T4e+ / T4De+ Connecting interfaces The following interfaces could be connected to PC to operate the printer: USB Slave Ethernet (Option) 15
21 2.5 Power on the printer 1. Make sure the printer power switch is off 2. Plug the power connector into the power socket at the rear side of printer. 3. Plug the power cord on the power outlet. 4. Turn the printer power switch to on. Caution. Please ensure that the printer power is off before connecting the interface cable. Connecting the interface cable while printer power is on might cause the damage on printer. 16
22 2.6 T4+ Control panel The key functions are available under the printer READY mode Button Appearance Function Menu Enter the menu list to setup the printer configuration Feed Feed a blank label The key functions are available under the printer PRINTING mode Button Appearance Function Cancel Stop and cancel the current printing job Removes the error status when problem is resolved. Pause Stop and restart the printing process The key functions are available in Menu System Button Appearance Function Return Return back to previous menu level Up Scroll up the menu options Increase the parameter values Down Scroll down the menu options Decrease the parameter values Enter Confirm the selected option 17
23 Buttons light Cancel Cancel Menu Cancel Pause Cancel Pause Cancel Feed Flash in red Bi-sound Flash in red light Flash in blue light Bi-sound Flash in red light Flash in blue light Bi-sound Flash in blue light Flash in blue light (Alternately) Bi-sound Flash in red light Flash in blue light Bi-sound Error message Ribbon out (error) Label out (error) Top cover opened Error message Gap out Error message Label out (error) Overheat Overheating protection (Print automatically when the temperature drops) Error message Ribbon out (error) 18
24 2.7 T4e+ / T4De+ Control panel The key functions are available under the printer READY mode Button Appearance Function Func. Enter printer function mode Feed Feed a blank label Note: Press func. key for over 3 seconds to enter the function mode. When printer is in function mode, Func. key will keep flashing till the Func. key is pressed again to escape the function mode. The key functions are available under the printer PRINTING mode Button Appearance Function Cancel Stop and cancel the current printing job Removes the error status when problem is resolved. Pause Stop and restart the printing process 19
25 Press func key for over 3 seconds to enter Function mode: Button Appearance Function Func Quit Function mode Cancel Calibrate the label Pause Dump mode Feed 1. Press func key to Print self test page 2. Press func key for over 3 seconds to factory default Press Cancel key for over 3 seconds to enter Advanced Calibration mode: Button Appearance Function Func High Sensitive mode Cancel Quit Cancel mode Pause Normal mode Feed Low Sensitive mode 20
26 Buttons light Cancel Flash in red light Error message Ribbon out (error) Label out (error) Top cover opened Cancel Func. Flash in red light Flash in blue light Error message Gap out Cancel Pause Flash in red light Flash in blue light Error message Label out (error) Cancel Pause Cancel Feed Flash in blue light Flash in blue light (Alternately) Flash in red light Flash in blue light Overheat Overheating protection (Print automatically when the temperature drops) Error message Ribbon out (error) 21
27 3. Printer options 3.1 Peeler installation 1. Push the platen bearing tabs on the right and left sides upwards and rotate them backwards to the end. 22
28 2. Lift vertically the platen from the bottom case of printer. 3. Lift vertically the front cover from the bottom case of printer. 23
29 4. Insert the peeler cable to printer. (Please follow the correct connector side as figure shown to insert the cable) 5. Insert firstly the right side of peeler module to the relative holes of printer (arrow 1), press the lower part of left side of module (arrow 2), then push the left side of module to the relative holes of printer to fix firmly the peeler module on printer (arrow 3). 24
30 6. Screw up the metal plate on the platen. The metal plate with arrow symbol is upward side. 7. Put the platen screwed with metal plate back to printer. 8. Assure the platen is fixed firmly in printer. 25
31 9. Push the platen bearing tab forward to lock the platen. 10. Lead the label through the back of peel-off bar, as figure show. 26
32 11. Close the top cover 12. Pull the label to the direction as the figure show, then push the peel-off panel back to printer. 27
33 13. Press the Feed button to test the peeler function. Note: The transfer board need to be installed before installing the peeler kit. 28
34 3.2 Cutter installation 1. Push the platen bearing tabs on the right and left sides upwards and rotate them backwards to the end. 29
35 2. Lift vertically the platen from the bottom case of printer. 3. Lift vertically the front cover from the bottom case of printer. 30
36 4. Connect the cutter cable to printer. 5. Slide vertically the hooks of cutter both side into the slot. 31
37 6. Push the cutter hooks to the bottom of two hooks slots, and make sure that lower hooks are fixed firmly on the hooks holes. 7. Put the platen back in the printer. 32
38 8. Lock the platen bearing tabs. 9. Thread the label through the cutter inside slot and press the label under the media guides. 33
39 10. Close the printer top cover. Note: The transfer board needs to be installed before installing the cutter. Please do not touch or insert your fingers into the cutter mouth while cutter is active. It will cause extremely hurt. 34

 Printer current")
40 4. LCD screen icons 4.1 LCD screen information LCD screen information consists 6 parts to show the printer status. Buttons status bar Device status (when printer is in Ready status) Printer current status and setting level Time and setting icon Menu pages Printer current setting level, it shows only when printer is in menu function 35
41 4.2 Graphic symbol on LCD screen Device status bar Symbol Description Buzzer on (buzzer symbol will be shown when buzzer is set to on) SD card inserted (SD card symbol will be shown when SD card is inserted) USB master interface (keyboard or scanner) inserted (USB master symbol will be shown when interface is inserted Button status bar: the symbol will be shown on the button status bar when the button function is available. Symbol Description Feed labels. Scroll down Scroll up Enter Escape Main menu Pause Cancel 36
42 5. Configuration 5.1 Menu structure Main menu Sub-menu Description Information User Setup Comm. Setup Print Setup Language LCD Contrast Buzzer Button Sound Date Time Default Password RS-232 Ethernet Transfer mode Print mode Speed Darkness Label type Printer configuration information Change menu language Contrast of LCD Adjust the buzzer sound Button sound switch Set the RTC Date Set the RTC time Initiate to factory default Set the password to lock the change of parameter Set RS-232 parameter Ethernet status and set configuration Thermal transfer or thermal direct Set to peeler, cutter or tear off function Printing speed Printing heat value Select the label type 37
43 Test Memory Form Gap sensor Print width Print X offs Print Y offs TPH Y offs Back Y offs Error reprint Cancel mode Print Config. Line Mode Label calibration Dump mode Cutter Free size List Delete files Clear memory Run the form Select label sensor type Set the print width Adjust the origin of printer horizontal coordinate Adjust the origin of printer vertical coordinate Set the print head vertical offset Set the label stop position for peeler, cutter or tear-off mode Reprint the previous label when error occurs Stop printing the current job Print the printer configuration Print in line mode Calibrate the label Print the dump data Test cutter function Show the free memory size in SDRAM and SD card List the forms, images and fonts in memory device Delete separately the stored forms, images and fonts in memory Delete all stored forms, images and fonts in the memory Execute the stored form in memory 38
44 F/W update Auto form Execute automatically the selected form as the printer is power on Update firmware directly from the SD card Note: Only the T4+ model which installed with the LCD screen can show the functions this in chapter. 39
45 5.2 Parameters setup User Setup Parameter Explanation Default Language LCD Contrast Buzzer Button Sound Date Time Default Password Change menu language Languages: English, German, Portuguese, Traditional Chinese, Simplified Chinese, Japanese, Thai, Turkish, Spanish, Persian, Russian, Malaysian Contrast of LCD display Value: from 0~5 Adjust the buzzer sound Value: off, 1~3 Button sound switch Yes/No Set Real-Time clock date This parameter allows users to set the date Type: Year/Month/Date Set Real-Time clock time This parameter allows users to set the time Type: hour/minute/second Set the parameters to factory default This parameter allows users to set all the parameters back to factory default Set the password to protect the parameters This function allows users to set the password to lock the parameters change of User, Communication and Print Setup to prevent the other users to change it carelessly. Password value range: 0000~9999 English Level 2 Volume 1 None None None None
46 5.2.2 Communication setup Parameter Explanation Default RS-232 Ethernet Baud rate Selection: 1200 ~ Parity Selections: None, Odd, Even Data bits Selections: 7, 8 bits Stop bits Selection: 1, 2 Status (Ethernet)-Show only the Ethernet status Config. Method-DHCP or Static IP IP address Net Mask Gateway MAC address Configure (Ethernet)-Configure the Ethernet DHCP-Issuing the IP address by DHCP server Static IP- Issuing the IP address by operator 9600 None 8 bits 1 DHCP 41
47 5.2.3 Print Setup Parameter Explanation Default Transfer mode Print mode Speed Darkness Label type Label sensor Print width Print X offs Print Y offs TPH Y offs Back Y offs Change the printing mode This setting could change the printing mode Selection: By Command, Direct thermal, Thermal Transfer Select the print mode This setting changes the label delivery mode. Selection: Normal, Tear off, Peel off, cut Adjust the printing speed This setting could change the printing speed Selection: 1, 2, 3, 4 ips Adjust print darkness This setting could adjust the printing quality by the printing heat Selection: 0~30 Select the label type This setting could select the media. Selection: Gap/Notch, Mark, continuous Change the label sensor type This setting could change the convenient sensor type to detect the label. Selection: By command, see-through, reflective Adjust the print width This setting determines the printable area by setting the printing dot. Selection: 120~832 dots Adjust the horizontal origin of coordinate Selection: -600~+600 dots Adjust the vertical origin of coordinate Selection: -600~+600 dots Adjust the print head vertical offset Selection: -720~+120 dots Set the label stop position Selection: -120~+400 dots By command Normal 3 16 Gap/Notch By command 832 dots
48 Error reprint Cancel mode Repeat the previous label when error occurs When the error occurs and the printing stops, this function will reprint the label which was interrupted. Selection: Enable, Disable Set the cancel mode This function allows users to cancel printing immediately or after completing a label Selection: Page complete, immediate Enable Page complete 43
49 5.2.4 Test Parameter Print Configuration Line Mode Label calibration Dump mode Cutter Explanation Print all the printer configurations Print in line mode Calibrate the label Print the Dump mode information Cutter function test Memory Parameter Free size List Delete files Clear memory Explanation Shows the available memory size on SD card and Flash. List the stored forms, images and fonts in SD card and Flash. Delete the stored forms, images and fonts in SD card and Flash. Clear all the stored forms, images and fonts in SD card and Flash Form Parameter Run the form Auto form Explanation Execute the form stored in the SD card or Flash. This function allows users to run automatically the selected form stored in memory when users re-power on the printer. 44
50 5.2.7 Warning message Icon Explanation No form found No Image found No font found No F/W found No Batt. found Password error SD lock No cutter found No SD found Cutter jam No Ether found Flash ROM Full Form in SD card or Flash is not found. Check if the files are exactly stored in the memory device Image in SD card or Flash is not found. Check if the image is exactly stored in the memory device Font in SD card or Flash is not found. Check if the font is exactly stored in the memory device Firmware files are not stored in the SD card when updating the firmware. Battery is not installed in the printer when setting time and date Check if the battery power runs out or not installed well Wrong password is entered Enter the correct password to modify the protected parameters Printer cannot write the data to SD card Unlock the SD card Cutter is not installed on printer when execute the cutter test SD card in not installed in printer when updating the printer Check if printer is well inserted in printer Cutter jams when execute the cutter test Check if the labels stick in cutter Ethernet module is not installed in printer Check if the Ethernet module is installed or well installed Internal flash ROM is full Delete un-necessary files to store the current files 45
51 5.2.8 Printer status Icon Feed Cancel Pause Wait peel Wait on demand Value saved Dumpping data Push to cal Status description Feeding the label Cancel the current printing job. Pause the current printing job. Wait to peel the printed label to print the next label Wait to press the feed button to print next label. (*This function is available only on sending the command) Save the change of parameters to printer Catch the data from communication port and send to printer to print out. Press the Feed button to calibrate the label. (*This function is available on Label Cal ) Note: Only the T4+ model which installed with the LCD screen can show the functions this in chapter. 46
52 6. Troubleshooting 6.1 LCD error message LCD Displayed Possible problem Resolution Label gap out Label out Ribbon out Cover open Update fail TPH fail Check sum error No cutter found Cutter jam No time shown on LCD Improper sensor type Label senor cable is disconnected or loose Sensor windows are dirty Improper media sensor position Load the continuous label, but the label type is set to Gap/notch or Mark type Label runs out Ribbon runs out Ribbon roll is not loaded correctly Printer cover is open Firmware update fails TPH cable is disconnected TPH is faulty damaged Firmware update fails. Cutter is not installed when printing Cutter jams when printing Battery is dropped No electricity in battery Ensure the sensor type, reflective or see-through, is selected correctly Reconnect or tighten up the sensor cable Clean the receiver sensors and emitter sensor Adjust the media sensor to correct position Load the correct media or set the label type to current using media type Reload new media roll Reload new ribbon roll Ensure the ribbon supply and take up core are fixed correctly Close the printer cover Re-update the firmware Connect the TPH cable Replace a new TPH Re-update the firmware Check if cutter is installed in printing Check if labels stick in cutter Reload the battery and reset time Reload new battery and reset time 47
53 Note: Only the T4+ model which installed with the LCD screen can show the functions this in chapter. Problems occur will be shown on Flashing the Cancel button in red. 48
54 7. Specifications 7.1 T4+ series general specifications Model T4+ T4e+ T4De+ Resolution 203/300 dpi Print mode Direct Thermal/Thermal Transfer CPU 32-bit CPU Memory RAM: 128MB SDRAM ROM: 128MB Flash ROM Expendable slot for Micro SD card (up to 32GB) RAM: 64MB SDRAM ROM: 64MB Flash ROM Print speed 203 dpi 1 to 5 ips (option up to 6 ips ) /300 dpi 1 to 4 ips Max. print length 150 (3810mm) Print width 4.1 (104mm) Sensor type Moveable see-through and Moveable reflective sensor reflective sensor Ribbon sensor Ribbon sensor Cover open sensor Cover open sensor Display Backlight LCD display 128x64 dots N/A Control panel 4 multi-functional keys 4 status LED light 1 error LED light 4 functional keys 4 status LED light 1 error LED light Media Maximum label width: 4.33 (110mm) Minimum label width: 0.59 (15mm) Maximum roll diameter: 5 (127mm) Core diameter: 1.0 (25.4mm) Media thickness: (0.06mm) to (0.2mm) Media type: Continuous, die-cut, tag, fan-fold, black mark Ribbon OD: (39mm) Max length: 100m Width: 1.0 (25.4mm) to 4.3 (110mm) ID: 0.5 (12.7mm) Ribbon type: Wax, wax/resin, resin Interfaces USB slave port USB slave port 49
55 1D barcodes USB master port Option: Serial port RS-232, Ethernet port Serial port RS /100Mbps, Bluetooth Option: Ethenet port 10/100Mbps, Bluetooth Code39 standard or extended, Code39 with check digit, Code93, Code128 UCC, Code128 auto A,B,C modes, Codabar, EAN8, EAN8/13 2&5 digit add-on, EAN13, Interleaved 2 of 5, Interleaved 2 of 5 with check digit, Interleaved 2 of 5 with human readable check digit, UCC/EAN 128, UPC A, UPC A 2&5 digit add-on, UPC E, UPC E 2&5 digit add-on, UPC Interleaved 2 of 5, Code11 2D barcodes Data Matrix, MaxiCode, PDF417, QR code Fonts 5 internal expandable bitmap fonts (alpha-numeric) 2 internal expandable bitmap fonts (numeric only) Downloadable soft font 4 directions: 0, 90, 180, 270 degrees Image PEPL: PCX, Direct binary graphic PDPL: PCX, BMP, HEX Options Peeler kit Cutter Ethernet module Power Switching power adapter Input: 100 to 240V, 1.8A, 50~60Hz Output: 24V, 2.5A Audio Beep sound when error occurs N/A Real Time Clock Factory default N/A Factory default Environment Operation: 5 to 45 (40 to ) Storage: -20 to 50 (-4 to ) Humidity Operation: 10% to 90% non condensing Storage: 5% to 95% non condensing Printer dimension Width: mm (7.83 ) Length: mm (10.36 ) Height: mm (7.41 ) Weight: 2KG Certification CE, FCC class A, CB, CCC, BSMI CAUTION: Risk of explosion if battery is replaced by an incorrect type. Dispose of used batteries according to the instructions. 50
56 7.2 Universal Serial Bus (USB) port pin assignment Connector type: Type A and B USB A (Master) USB B (Slave) Pin Function 1 VBUS 2 D- 3 D+ 4 GND Note: Master VBUS provides +5V max current 500mA. Slave VBUS is N/C. For more information about USB, please visit the website: 51
57 7.3 Serial port pin assignment Pin Printer side 1 N/C 2 TXD 3 RXD 4 DSR 5 GND 6 DTR 7 CTS 8 RTS 9 +5V Note: Serial port provides +5V max current 500mAh Note: Serial port is available on T4+ model 7.4 Ethernet module port pin assignment Pin Signal 1 Tx+ 2 Tx- 3 Rx+ 6 Rx- 52
58 Appendix A Standalone operation on T4+, T4e+ and T4De+ SBARCO provides users to operate the T4+ series printer alone without connecting PC to print labels by using normal USB interface keyboard or scanner. Especially, users can select whenever any forms stored in printer s memory or SD card to print through the LCD monitor on T4+ This section shows the way how to operate the standalone operation on T4+, T4e+ and T4De+. 53

59 Description of keyboard With normal keyboard, T4+ series could be executed standalone operation without connecting PC. The description of keyboard function is as below: Printer Status Main Menu Sub Menu Key functoin Description Ready Printing F1 F2 Enter / Exit LCD Menu Cancel printing job. F4 F3 Feed Pause printing job. Printer Status Main Menu Sub Menu Key functoin Description # $ % ^ & * ( ) - + ` 0 ~ 9 _ = { } : " < >? [ ] \ ;,. / Form Operation FORM RUN THE FORM AUTO FORM A ~ Z a ~ z 0 ~ 9 Space ESC Caps Lock Left Shift Right Shift Backspace Home Delete End Num Lock Data Control Key 54
60 Printer Status Main Menu Sub Menu Key functoin Description Scroll up. Scroll down. MENU ITEM ESC Return to last menu level. Enter Etner menu item. Scroll up. Scroll down. SETTING ESC Return. Enter Save DATE Scroll up. USER SETUP Enter Save / Next setting item. DARKNESS Add Value PRINT WIDTH LCD Menu PRINT SETUP TIME PRINT X OFFS PRINT YOFFS Scroll down. Reduce Value PASSWORD TPH Y OFFS BACK Y OFFS ESC ESC Return. Reutrn Enter Save TEST MEMORY FORM F/W UPDATE PRINT CONFIG PRINT TEST LABEL CAL. DUMP MODE CUTTER FREE SIZE LIST DELETE FILES CLEAR MEMORY RUN THE FORM AUTO FORM ESC Enter Add item Next item Return Select / Run funtcion. 55


61 Form making in T4+ 1. Create a new blank label 2. Select form type and press Finish button 56


62 3. Edit a form 4. Enter the Text or Barcode in editing field 57

63 5. Click twice on the Text, select Keyboard input in Source field. 6. Enter the prompt text would like to be shown on LCD monitor. Enter also the max. characters. 58

64 7. Follow the last step for the other variable text. 8. Press Print button and Modify button to modify the form name 59

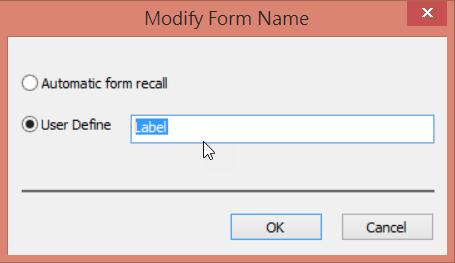
65 9. Modify the form name 60

66 10. After modifying the form name, press Download and Save to load the form to memory device. 11. There 3 ways you could store the form into Printer s: RAM, Flash ROM or SD card. 61

67 12. The form could be also stored in PC or SD card inserted in PC 13. After downloading the form into the printer s flash ROM, check the FORM LIST in memory of printer menu. The form name Label will be shown in FORM list. Note: This feature is available only on T4+ R: Form is stored in printer s SDRAM. The Form will disappear when printer s power is off F: Form is stored in printer s Flash ROM. The Form is saved in memory even power off the printer D: Form is stored in SD card. 62

68 14. Select the form Shipping label in the menu of RUN THE FORM 15. Follow the prompt text you set to enter the data from the keyboard: Enter the commodity Enter the model No Enter the quantity 63

69 16. Then, the printer will print the label quantity you set, if you set already the print quantity. 64


70 Form making in T4e+ / T4De+ (Scan to print) 1. Create a new form 2. Edit a label 65


71 3. Click twice on barcode to set the Source Keyboard Input 4. In print, set the form as Automatic form recall. The form name will be changed automatically to AUTOFR 66

72 5. Save the Auto form in printer 6. When the Auto form is sent and saved in T4e+ / T4De+ printer, the light of FUNC key on panel will extinguishes. It means it is Auto Form mode. The Scanner with USB interface could be plugged into the printer for Scan to Print function. 7. Pressing FUNC key could quit the AUTO FORM mode, and light of FUNC key will be on. When repower the printer, it will enter automatically the AUOTO FORM mode. 67
73 Instruction Guide of SD card After saved files into SD card, all of these files can be managed through PC. You can check description and detailed steps in the following parts: 1. After complied file, insert SD card into printer. 2. The function of saving editing record can be activated by records setup. 68

74 3. Click the records setup, then check enable the storage function. Choose the items which are needed to be recorded, and then click >>. Besides, << can be used to delete item

75 4. You can add or remove items according to your need. Click OK after you completed selection. 70
76 5. Remove SD card from printer and insert it into PC, the description of folders is showed below: Folder Category of file Extension FRM from.frs REC record.csv IMG image.ims FNT font.fns 71
77 Check Out Printing Records If you need to check out printing records, open the folder REC and then find out the file which is named the same as form. format. After opening the file, all of the printing records will show up via Excel file 72
78 Download Firmware This part is the instruction of how to download firmware through SD card. There are steps in the following: 1. Save firmware file into SD card. Note that the file must be named FwRLS.fwt. 73


79 2. Press MENU, and then choose F/W update. 3. Press YES, and then the printer will update to the firmware version which has been chosen. 4. You can check out the firmware version in INFORMATION. 74
80 Files converter (frm. frs.) Put the files you want to convert into a new folder, and then copy the converter named Transfer2FRS.exe from the CD to the folder. < New folder > < CD > 75

81 < Execute converter > < Convert completely > 76
82 < Move to SD card > Insert an empty SD card into the printer, and it will be added 4 folders automatically. Copy the converted files to the folder named FRM. < SD card > < FRM folder > 77
83 Modification record Version Date Modification Page Ver Oct-17 First release. N/A Ver Apr-18 Add converter 75 78
T4 series user s manual. Version: 1.1
 Version: 1.1 Table of contents 1. Introduction...1 1.1 In the box...1 1.2 Printer Features...2 1.2.1 Front view...2 1.2.2 Rear view...2 1.2.3 Interior view...3 2. Getting start...4 2.1 Loading the ribbon...4
ZEBRA LP/TLP2844 PRINTER SPECIFICATIONS
 ZEBRA LP/TLP2844 PRINTER SPECIFICATIONS Standard Features Optional Features Factor Options Printing Specifications Media Specifications Ribbon Specifications Font Specifications Barcode Symbologies & Specifications
TT230SM THERMAL TRANSFER PRINTER USER S MANUAL
 TT230SM THERMAL TRANSFER PRINTER USER S MANUAL Operations Overview Unpacking and Inspection This printer has been specially packaged to withstand damage during shipping. Please carefully inspect the packaging
Table of Contents. Unpacking and Inspection Setup Loading the Media Mount the Printer on the Wall... 16
 WPL25/WHC25 Table of Contents Unpacking and Inspection... 1 Setup... 5 Loading the Media... 6 Mount the Printer on the Wall... 16 LED and Button Functions... 17 Troubleshooting... 18 Unpacking and Inspection
01/04 Rev USER/SERVICE MANUAL AP 3.4. Specifications
 01/04 Rev. 1.1-02 USER/SERVICE MANUAL Specifications Technical Specifications... 2 Device type, use... 2 Dimensions... 2 Performance Data... 2 Label material... 3 Ribbon... 3 Connections, device data...
Q8 Barcode Label Printer User s Manual
 Q8 Barcode Label Printer User s Manual Q8 User s Manual Contents Preface... 1 Important Notice, Read Me First!... 1 Chapter 1 Introduction... 2 Specifications... 2 Specifications for Printer... 2 Specifications
Quick Installation Guide Direct and Transfer Thermal Printer
 Quick Installation Guide Direct and Transfer Thermal Printer Overview The enclosed printer is currently comprised of two models: 203dpi (dots per inch) model 300dpi (dots per inch) model Unpacking 1. Remove
TTP-244 / TTP-244 Plus THERMAL TRANSFER / DIRECT THERMAL BAR CODE PRINTER USER S MANUAL
 TTP-244 / TTP-244 Plus THERMAL TRANSFER / DIRECT THERMAL BAR CODE PRINTER USER S MANUAL CONTENTS 1. PRODUCT INTRODUCTION... 2 1.1 Compliances... 2 2. GETTING STARTED... 3 2.1 Unpacking and Inspection...
MONARCH 9416 XL QUICK REFERENCE
 MONARCH 9416 XL QUICK REFERENCE This Quick Reference contains ribbon loading, supply loading, and general care, maintenance, and troubleshooting procedures for the 9416 XL Thermal Direct and 9416 XL Thermal
MODEL : LK-B24 LABEL PRINTER
 J. STEPHEN Lab., Ltd. 28-6, Gajangsaneopdong-ro, Osan-si, Gyeonggi-do,18103, Republic of Korea TEL : +82-31-8077-5000 FAX : +82-31-459-8880 www.miniprinter.com MODEL : LK-B24 LABEL PRINTER B24 Rev.E 09/17
WAVECOM INSTRUMENTS PTY LTD
 WAVECOM INSTRUMENTS PTY LTD www.wavecom.com.au WAVECOM TT040-50 THERMAL TRANSFER BAR CODE PRINTER USER MANUAL 1 Table of Contents Copyright Declaration 3 Introduction 3-4 Product Introduction Compliances
LabelMax SP2 User Manual
 LabelMax SP2 User Manual 1 GENERAL... 3 1.1 COPYRIGHT DECLARATION... 3 1.2 COMPLIANCES... 3 1.3 INTRODUCTION... 3 2 GETTING STARTED... 4 2.1 UNPACKING AND INSPECTION... 4 2.2 EQUIPMENT CHECKLIST... 4 2.3
TTP-244 / TTP-244 Plus THERMAL TRANSFER / DIRECT THERMAL BAR CODE PRINTER USER S MANUAL
 TTP-244 / TTP-244 Plus THERMAL TRANSFER / DIRECT THERMAL BAR CODE PRINTER USER S MANUAL CONTENTS 1. PRODUCT INTRODUCTION... 2 1.1 Compliances... 2 2. GETTING STARTED... 3 2.1 Unpacking and Inspection...
X Series Label Printer. User s Manual ZMIN TECHNOLOGIES Version 1.3. Part Number:
 X Series Label Printer User s Manual ZMIN TECHNOLOGIES 2012-9-17 Version 1.3 Part Number: 2012 Shenzhen ZMIN Technologies Co.,Ltd. All rights reserved. ZMIN is a registered trademark of Shenzhen ZMIN Technologies
RT200/RT230 BARCODE PRINTER USER MANUAL
 RT200/RT230 BARCODE PRINTER USER MANUAL User Manual: RT200 series Version : Rev. 1.3 Issue Date : 2012.10.25 P/N : 920-014311-00 RT200/RT230 USER MANUAL CONTENTS 1 Barcode Printer 001 1.1 Box Content 001
FASTMARK 4600 PLUS CONTROL PANEL OPERATION. Front Panel
 FASTMARK 4600 PLUS CONTROL PANEL OPERATION Front Panel The front panel includes - LCD display - 3 LED status indicators (READY, MEDIA and RIBBON) - 3 control buttons (FEED, PAUSE and CANCEL) LCD display
FCC Notice. Trademarks. Copyright. Disclaimer
 FCC Notice This device complies with Part 15 of the FCC Rules. Operation is subject to the following two conditions: (1) this device may not cause harmful interference, and (2) this device must accept
Cub CB-724e / CB-534e
 Cub CB-724e / CB-534e THERMAL TRANSFER / DIRECT THERMAL BAR CODE PRINTER USER S MANUAL Contents 1. Introduction...1 2. Getting Started...1 2.1 Unpacking and Inspection...1 2.2 Equipment Checklist...1 2.3
FCC Notice. Trademarks. Copyright. Disclaimer
 FCC Notice This device complies with Part 15 of the FCC Rules. Operation is subject to the following two conditions: (1) this device may not cause harmful interference, and (2) this device must accept
USER MANUAL SMS - 400
 USER MANUAL SMS - 400 Table of Contents Introduction... 4 Proprietary Statement... 4 Product Improvements... 4 FCC Compliance Statement... 4 Liability Disclaimer... 4 Getting Started... 6 Unpacking Printer...
User s Guide QL-720NW
 User s Guide QL-720NW Be sure to read and understand this guide before using the machine. We recommend that you keep this guide nearby for future reference. Not all models are available in all countries.
Product Specifications DT4 & DT2 Desktop Printers
 Product Specifications DT4 & DT2 Desktop Printers Download Fonts Model DT4 DT2 Resolution Direct Thermal 203 dpi (8 dot/mm) Print Speed 4 IPS (102 mm/s) 4 IPS (102 mm/s) Print 4.25 (108 mm) 2.12 (54 mm)
User's Manual. Metapace L-22D. Label Printer Rev. 1.00
 User's Manual Metapace L-22D Label Printer Rev. 1.00 Table of Contents MANUAL INFORMATION & USAGE PRECAUTIONS... 3 1. CONTENT CONFIRMATION... 6 2. PRODUCT PARTS... 7 3. INSTALLATION & USAGE... 9 3-1 POWER
MODEL : AP-8220 U Receipt Printer User s Manual
 MODEL : AP-8220 U Receipt Printer User s Manual AP-8220 U Rev.A 10/14 All specifications are subject to change without notice Table of Contents 1. Parts Identifications 1. Parts Identifications 3 2. Setting
Barcode Printer LP 46 NEO. Rev : A, Product Description : User Manual LP 46 Neo
 USER S MANUAL Barcode Printer LP 46 NEO Rev : A, Product Description : User Manual LP 46 Neo Safety Instructions Before installing and using the printer, please read the following items carefully. 1. Safety
THERMAL TRANSFER/ DIRECT THERMAL BARCODE PRINTER USER S MANUAL
 ITPP075 THERMAL TRANSFER/ DIRECT THERMAL BARCODE PRINTER USER S MANUAL i Copyright Information 2016 Zhuhai Hengquan Barcode equipment Co., Ltd. The copyright in this manual, the software and firmware in
MODEL : LK-P31 MOBILE PRINTER
 J. STEPHEN Lab., Ltd. 374-2, Gajang-dong, Osan-si, Gyeonggi-do, 447-210, Korea TEL : +82-31-459-8200 FAX : +82-31-459-8880 www.miniprinter.com MODEL : LK-P31 MOBILE PRINTER P31 Rev. B 11/16 All specifications
G-2108/G-3106 User s Manual
 FCC Notice This device complies with Part 15 of the FCC Rules. Operation is subject to the following two conditions: (1) this device may not cause harmful interference, and (2) this device must accept
User's Guide QL-700. ENG ver.a.
 User's Guide QL-700 Be sure to read and understand this guide before using the machine. We recommend that you keep this guide nearby for future reference. www.brother.com ENG ver.a Thank you for purchasing
QUICK REFERENCE. RFID Overview
 QUICK REFERENCE This Quick Reference contains supply loading and general maintenance procedures for the Monarch 9855 RFID printer. Additional RFID documents are available on the Monarch Printer s Documentation
CANADIAN D.O.C. WARNING
 Each product and program carries a respective written warranty, the only warranty on which the customer can rely. Avery Dennison Corp. reserves the right to make changes in the product, the programs, and
USER S MANUAL. Label Printer BTP-L540. Shandong New Beiyang Information. Technology Co., Ltd
 USER S MANUAL Label Printer BTP-L540 Shandong New Beiyang Information Technology Co., Ltd Declaration Information in this document is subject to change without notice. SHANDONG NEW BEIYANG INFORMATION
MODEL : SLK-TE20X Series Receipt Printer User s Manual
 MODEL : SLK-TE20X Series Receipt Printer User s Manual TE20X Series Rev.F 03/16 All specifications are subject to change without notice Table of Contents 1. Parts Identifications 1. Parts Identifications
MODEL : TRP100-III Receipt Printer User s Manual
 MODEL : TRP100-III Receipt Printer User s Manual All specifications are subject to change without notice A software tool is available to configure the printer settings on AURES technical website: www.aures-support.fr
MODEL : LK-P41B. All specifications are subject to change without notice
 MODEL : LK-P41B All specifications are subject to change without notice Table of Contents 1. Unpacking Standard 1. Product overview 3 2. Unpacking 3. Usage and Installation 5 3-1. Control panel usage
FCC COMPLIANCE STATEMENT FOR AMERICAN USERS
 FCC COMPLIANCE STATEMENT FOR AMERICAN USERS This equipment has been tested and found to comply with the limits for a CLASS A digital device, pursuant to Part 15 of the FCC Rules. These limits are designed
QUICK REFERENCE. Connecting the Cables
 QUICK REFERENCE This Quick Reference contains supply loading and general care and maintenance procedures for the Monarch 9860 printer. For more detailed information, refer to the Operator s Handbook available
M7 SERIES Thermal Printer Service Manual 4. PART LIST. 4.1 Main Printer Assemblies
 4. PART LIST 4.1 Main Printer Assemblies 31 No. Part No. Description Remark Spare Requirement 1 120732 Electronics cover 1 pc 2 N/A Mainframe 1 pc 3 120733 Cover, front 1 pc 4 120734 Top right side cover
Setting up an Intermec PM43 printer with InterDriver version M-0 or newer
 Setting up an Intermec PM43 printer with InterDriver version 7.3.5 M-0 or newer Setting up a bar code printer with 7.3.5 M-0 Intermec drivers or newer 1 INITIAL PRINTER CONFIGURATION When the printer is
MODEL : LK-B10 4 DESKTOP LABEL PRINTER
 MODEL : LK-B10 4 DESKTOP LABEL PRINTER All specifications are subject to change without notice A software tool is available to configure the printer settings on AURES technical website: www.aures-support.fr
ZEBRA GX420D, GX420T AND GX430T PRINTER SPECIFICATIONS
 111 ZEBRA GX420D, GX420T AND GX430T PRINTER SPECIFICATIONS Specifications are provided for reference and are based on printer tests using Genuine Zebra supplies. Results may vary in actual application
Specification PM SER IES T h erm al B a rcodep rinters
 Specification PM SER IES T h erm al B a rcodep rinters P M 3120 Proficient in Commercial POS Receipt printers 1. Introduction...2 1.1 Safety Warning...2 1.2 Note...2 2. General Information...3 2.1 Introduction...3
1. Checking Your Box. Printer. * Sample Media * Ribbon. User s Manual CD Rom Disk. Power Adapter. * Not available for A-50
 1. Checking Your Box Receiving the box of your printer, you are advised to check first for the possible shipping damage. There are two ways you can do it: 1. Inspect the outer appearances of both the box
Impressora Argox X-2300
 Impressora Argox X-2300 A Impressora Argox X-2300 oferece um alto desempenho, além de ser fácil de usar e oferecer flexibilidade ao usuário. Possui impressão direta de transferência térmica com resolução
MODEL : LK-P41B MOBILE PRINTER
 SEWOO TECH CO.,LTD. Doosung BD, 689-20, Geumjung-dong, Gunpo-si, Gyeonggi-do, 435-862 South Korea TEL : +82-31-459-8200 FAX : +82-31-459-8880 www.miniprinter.com MODEL : LK-P41B MOBILE PRINTER Rev. 2.0
Label Printer QL-810W/820NWB. Quick Setup Guide (English)
") Label Printer QL-810W/820NWB Quick Setup Guide (English) Label Printer QL-810W/820NWB Printed in China D00RPG001 Quick Setup Guide (English) Available Manuals Product Safety Guide This guide provides safety
Label Printer QL-810W/820NWB Quick Setup Guide (English) Label Printer QL-810W/820NWB Printed in China D00RPG001 Quick Setup Guide (English) Available Manuals Product Safety Guide This guide provides safety
uline.com OVERVIEW OF CONTROLS
 π H-5135 1-800-295-5510 uline.com BROTHER P-TOUCH D400AD DESKTOP PRINTER OVERVIEW OF CONTROLS LCD DISPLAY AND KEYBOARD 1 3 2 4 5 6 12 CONTROL PANEL PARTS 7 # DESCRIPTION # DESCRIPTION 1 Caps Mode 20 Clear
MVPplus Quick Reference Guide
 MVPplus Quick Reference Guide Use this guide to operate your printer on a daily basis. For more detailed information, refer to the User Guide. Contents External View...........................................................
CANADIAN D.O.C. WARNING
 Each product and program carries a respective written warranty, the only warranty on which the customer can rely. Avery Dennison Corp. reserves the right to make changes in the product, the programs, and
MODEL : LK-TL200 Receipt Printer User s Manual
 SEWOO TECH CO.,LTD. 28-6, Gajangsaneopdong-ro, Osan-si, Gyeongi-do, 447-210, Korea TEL : +82-31-459-8200 FAX : +82-31-459-8880 www.miniprinter.com MODEL : LK-TL200 Receipt Printer User s Manual TL200 Rev.
LabelStation Pro XL THERMAL TRANSFER / DIRECT THERMAL BAR CODE PRINTER USER MANUAL
 LabelStation Pro XL THERMAL TRANSFER / DIRECT THERMAL BAR CODE PRINTER USER MANUAL 1 Contents 1. Introduction...3 1.1 Product Introduction 1.2 Compliances 2. Operations Overview...4 2.1 Unpacking and Inspection
Standard Features. Optional Features
 105SLPlus PRINTER SPECIFICATIONS Specifications are provided for reference and are based on printer tests using Zebra brand ribbons and labels. Results may vary in actual application settings or when using
EQUIPMENT MANUAL. Avery Dennison Monarch 9419 Printer. TC9419EM Rev. AA 9/ Avery Dennison Corp. All rights reserved.
 EQUIPMENT MANUAL Avery Dennison Monarch 9419 Printer TC9419EM Rev. AA 9/16 2016 Avery Dennison Corp. All rights reserved. Each product and program carries a respective written warranty, the only warranty
This manual contains proprietary information of Argox Information Co., Ltd. It is intended solely for the
 F1 User s Manual Proprietary Statement This manual contains proprietary information of Argox Information Co., Ltd. It is intended solely for the information and use of parties operating and maintaining
MODEL : SLK-T12EB Receipt Printer User s Manual
 J. STEPHEN Lab., Ltd. 28-6, Gajangsaneopdong-ro, Osan-si, Gyeonggi-do, 447-210 Republic of Korea TEL : +82-31-8077-5000 FAX : +82-31-459-8880 www.miniprinter.com MODEL : SLK-T12EB Receipt Printer User
MODEL : SLK-TS400EB. Receipt Printer User s Manual. TS400EB Rev. B 07/16. All specifications are subject to change without notice
 MODEL : SLK-TS400EB Receipt Printer User s Manual TS400EB Rev. B 07/16 All specifications are subject to change without notice Table of Contents 1. Parts Identifications 1. Parts Identifications 3 2.
MODEL : SLK-TL100 Receipt Printer User s Manual
 J. STEPHEN Lab., Ltd. 28-6, Gajangsaneopdong-ro, Osan-si, Gyeongi-do, 447-210, Korea TEL : +82-31-459-8200 FAX : +82-31-459-8880 www.miniprinter.com MODEL : SLK-TL100 Receipt Printer User s Manual TL100
MODEL : TRP-100-II Receipt Printer User s Manual
 MODEL : TRP-100-II Receipt Printer User s Manual All specifications are subject to change without notice Table of Contents 1. Parts Identifications 3 2. Setting up the printer 4 2.1 Unpacking 4 2.2 Connecting
Quick Start Guide. LabelWriter
 Quick Start Guide LabelWriter 450 Duo Copyright 2010 Sanford, L.P. All rights reserved. Revised 12/10. No part of this document or the software may be reproduced or transmitted in any form or by any means,
Reference Guide for the KODAK Picture Kiosk GS Compact. Software Version 2.0
 Reference Guide for the KODAK Picture Kiosk GS Compact Software Version 2.0 Eastman Kodak Company, 2008 Contents Product Overview... 4 Console... 4 605 Photo Printer... 5 Product Choices... 6 Startup and
FCC Notice Trademarks Copyright Disclaimer
 USER MANUAL FCC Notice This device complies with Part 15 of the FCC Rules. Operation is subject to the following two conditions: (1) this device may not cause harmful interference, and (2) this device
05/04 Rev USER / SERVICE MANUAL AP 4.4 AP 5.4. Specifications
 05/04 Rev. 1.2-03 USER / SERVICE MANUAL Specifications Device Types, Application... 2 AP 4.4... 2 AP 5.4... 2 Options... 3 Technical Specifications... 4 Dimensions... 4 Performance Data... 4 Labelling
Overview: Product Overview UHF RFID Desktop Printer
 Overview: RFID enabled printer is an ADVANCED FEATURES AND RFID CAPABILITIES IN A COMPACT, EASY TO USE DEVICE. Extending regular broad range of RFID printers, the delivers UHF RFID printing and encoding
MODEL : LK-P21B MOBILE PRINTER
 SEWOO TECH CO.,LTD. 374-2, Gajang-dong, Osan-si, Gyeonggi-do, 447-210, Korea TEL : +82-31-459-8200 FAX : +82-31-459-8880 www.miniprinter.com MODEL : LK-P21B MOBILE PRINTER P21B Rev. C 11/14 All specifications
User's Manual SRP-770II. Label Printer Rev
 User's Manual Label Printer Rev. 1.12 http://www.samsungminiprinters.com Table of Contents Manual Information & Usage Precautions 3 1. Content Confirmation 7 2. Product Part Names 8 3. Installation & Usage
TTP/TDP 243/342 THERMAL TRANSFER / DIRECT THERMAL BAR CODE PRINTER USER S MANUAL
 TTP/TDP 243/342 THERMAL TRANSFER / DIRECT THERMAL BAR CODE PRINTER USER S MANUAL CONTENTS 1. PRODUCT INTRODUCTION... 1 1.1 Compliances... 1 1.2 Warranty Information... 1 1.2.1 Thermal Print Head... 2 1.2.2
Trademark Acknowledgements
 T2N User s Manual 1 This document contains proprietary information protected by copyright. No part of this document may be reproduced, copied, translated, or incorporated in any other material in any form
Compact Printer. User Manual CP-2240 CP-2240Z.
 Compact Printer User Manual CP-2240 CP-2240Z http://www.argox.com service@argox.com V1.2-11-12-2017 i Liability Disclaimer Argox Corporation takes steps to assure that the company s published engineering
TTP-384M THERMAL TRANSFER / DIRECT THERMAL BAR CODE PRINTER SERVICE MANUAL
 THERMAL TRANSFER / DIRECT THERMAL BAR CODE PRINTER SERVICE MANUAL TABLE OF CONTENT 1. FUNDAMENTAL OF THE SYSTEM... 1 1.1. Overview... 1 2. ELECTRONICS... 5 2.1 Summary of Board Connectors... 5 2.2 Pin
MODEL : LK-B10 4 DESKTOP LABEL PRINTER
 MODEL : LK-B10 4 DESKTOP LABEL PRINTER All specifications are subject to change without notice RISK OF EXPLOSION IF BATTERY IS REPLACED BY AN INCORRECT TYPE. DISPOSE OF USED BATTERIES ACCORDING TO THE
TX200/ TX300/ TX600 Series
 Series THERMAL TRANSFER / DIRECT THERMAL BAR CODE PRINTER SERVICE MANUAL TABLE OF CONTENT 1. OVERVIEW... 3 1.1 Front View... 3 1.2 Interior View... 4 1.3 Rear View... 5 2. ELECTRONICS... 7 2.1 Summary
LevelOne. User Manual KVM-0831/KVM /16-Port Combo KVM Switch w/ Expansion Slot. Ver
 LevelOne KVM-0831/KVM-1631 8/16-Port Combo KVM Switch w/ Expansion Slot User Manual Ver. 1.0-0706 ii Safety FCC This equipment has been tested and found to comply with Part 15 of the FCC Rules. Operation
Zebra XiII-Series Printer Quick Reference Guide
 Zebra XiII-Series Printer Quick Reference Guide Contents Media and Ribbon Loading...67 Media Loading...67 Ribbon Loading...70 Operator Controls...72 Front Panel Keys...72 Front Panel Lights...72 Calibration...74
RT700x/RT730x BARCODE PRINTER USER MANUAL
 RT700x/RT730x BARCODE PRINTER USER MANUAL User Manual: RT700x series Version : Rev. 1.2 Issue Date : 2013.06.06 P/N : 920-014911-00 1 RT700x/RT730x USER MANUAL CONTENTS 1 Barcode Printer 001 1.1 Box Content
TRP-100 Receipt Printer User s Manual
 TRP-100 Receipt Printer User s Manual All specifications are subject to change without notice TABLE OF CONTENTS 1. Parts Identifications 3 2. Setting up the printer 4 2.1 Unpacking 4 2.2 Connecting the
IMPRESS Scan Setting up an Intermec printer with InterDriver version 7.21 or newer. Setting up a bar code printer with Intermec drivers or newer
 Setting up a bar code printer with 7.1.3 Intermec drivers or newer 0 INSTALL PRINTER DRIVERS InterDriver 7.1.3 (this may require Administrator rights within Windows) PLEASE NOTE: If you have an older version
FEC-80T Receipt Printer User s Manual
 FEC-80T Receipt Printer User s Manual All specifications are subject to change without notice TABLE OF CONTENTS 1. Parts Identifications 3 2. Setting up the printer 4 2.1 Unpacking 4 2.2 Connecting the
Label Printer Quick Setup Guide QL-800
 Label Printer Quick Setup Guide QL-800 QL-800 Quick Setup Guide (English) Label Printer QL-800 Printed in China D00RPE001 Quick Setup Guide (English) Thank you for purchasing the QL-800! Read the Product
Zebra XiIII-Series Printer Safety and Quick Reference Guide
 Zebra XiIII-Series Printer Safety and Quick Reference Guide GB Contents Specifications...75 Electrical...75 Environmental Range...75 Fuses...75 Warnings...76 Installation...76 Use of Shielded Data Cables...76
H-1148 PAGE 1 OF IH-1148
 PAGE 1 OF 57 Printer Overview Depending on the options you have selected, your printer may look slightly different. Transmissive sensor Media supply guide Front housing assembly Printhead assembly Ribbon
MODEL : LK-T210 Receipt Printer User s Manual
 SEWOO TECH CO.,LTD. Doosung BD, 689-20, Geumjeong-dong, Gunpo-si, Gyeonggi-do, 435-862, Korea TEL : +82-31-459-8200 FAX : +82-31-459-8880 www.miniprinter.com MODEL : LK-T210 Receipt Printer User s Manual
English. Copyright Brady Worldwide, Inc. All rights reserved. (US and Canada)
") Copyright This manual is copyrighted with all rights reserved. No portion of this manual may be copied or reproduced by any means without the prior consent of Brady Worldwide, Inc. While every precaution
Copyright This manual is copyrighted with all rights reserved. No portion of this manual may be copied or reproduced by any means without the prior consent of Brady Worldwide, Inc. While every precaution
TTP-245C / TTP-343C / TTP-244CE THERMAL TRANSFER / DIRECT THERMAL BAR CODE PRINTER USER S MANUAL
 TTP-245C / TTP-343C / TTP-244CE THERMAL TRANSFER / DIRECT THERMAL BAR CODE PRINTER USER S MANUAL Contents Copyright Declaration... i 1. Introduction... ii 1.1 Product Introduction... ii 1.2 Compliances...
MODEL : LK-T200 Receipt Printer User s Manual
 SEWOO TECH CO.,LTD. Doosung BD, 689-20, Geumjeong-dong, Gunpo-si, Gyeonggi-do, 435-862, Korea TEL : +82-31-459-8200 FAX : +82-31-459-8880 www.miniprinter.com MODEL : LK-T200 Receipt Printer User s Manual
Copyright 2013 Esselte Leitz GmbH & Co. KG. All rights reserved.
 Copyright 2013 Esselte Leitz GmbH & Co. KG. All rights reserved. Mac, ipad, AirPrint, and OS X are trademarks of Apple Inc., registered in the U.S. and other countries. Google and Google Cloud Print are
π H-7978 LOW PROFILE FLOOR SCALE LABEL PRINTER OVERVIEW OF CONTROLS uline.com PARTS # DESCRIPTION
 π H-7978 LOW PROFILE FLOOR SCALE LABEL PRINTER 1-800-295-5510 uline.com OVERVIEW OF CONTROLS 7 6 8 9 1 PARTS # DESCRIPTION 1 Top Cover 2 Base Housing 3 Top Cover Open Button 4 Backing Paper Opening 5 Label
STANDARD FEATURES OPTIONAL FEATURES ACCESSORIES. Connectivity Options
 Printer Specifications Specifications are provided for reference and are based on printer tests using Zebra brand supplies. Results may vary in actual application settings or when using other than recommended
TOSHIBA Potable Printer B-EP4DL SERIES. Maintenance Manual. Document No. EO Original Sep., 2008 (Revised ) PRINTED IN JAPAN
 PRINTED IN JAPAN") TOSHIBA Potable Printer B-EP4DL SERIES Maintenance Manual Original Sep., 2008 (Revised ) Document No. EO18-33023 PRINTED IN JAPAN WARNING! Follow all manual instructions. Failure to do so could create
TOSHIBA Potable Printer B-EP4DL SERIES Maintenance Manual Original Sep., 2008 (Revised ) Document No. EO18-33023 PRINTED IN JAPAN WARNING! Follow all manual instructions. Failure to do so could create
Xi4 Quick Reference Guide
 Xi4 Quick Reference Guide Use this guide to operate your printer on a daily basis. For more detailed information, refer to the User Guide. Printer Components Figure shows the components inside the media
V-Series Plus User s Manual
 V-Series Plus User s Manual Rev. Oct 2009 FCC COMPLIANCE STATEMENT FOR AMERICAN USERS This equipment has been tested and found to comply with the limits for a CLASS A digital device, pursuant to Part 15
MAN UAL R E V IS IO N E N A B -8 8 H MIN I T herma l P rinter U S E R 'S M AN UAL
 MAN UAL R E V IS IO N E N. A B H MIN I T herma l P rinter U S E R 'S M AN UAL NOTICE You must use the only supplied adapter. It is dangerous to use other adapters. Do not fall the printer down and avoid
QL-1110NWB. Applications for Use with Computers. Applications for Use with Mobile Devices. Quick Setup Guide (English) NOTE
 NOTE") D00ZC6001 QL-1110NWB Quick Setup Guide (English) Thank you for purchasing the QL-1110NWB Label Printer! Read the Product Safety Guide first, then read this Quick Setup Guide for the correct setup procedure.
D00ZC6001 QL-1110NWB Quick Setup Guide (English) Thank you for purchasing the QL-1110NWB Label Printer! Read the Product Safety Guide first, then read this Quick Setup Guide for the correct setup procedure.
π H-6323 ZEBRA ZD410 DIRECT THERMAL PRINTER PARTS EXTERNAL PARTS DIAGRAM uline.com
 π H-6323 ZEBRA ZD410 DIRECT THERMAL PRINTER 1-800-295-5510 uline.com PARTS NOTE: Save the carton and all packing materials for storage or in case the printer needs to be returned to the manufacturer. Documentation
MODEL PORTI-T. (Kiosk&Ticket Printer) Rev. 2.0
 Rev. 2.0") MODEL PORTI-T (Kiosk&Ticket Printer) Rev. 2.0 WOOSIM SYSTEMS Inc. #501, Daerung Technotown 3th, 448, Gasan-Dong, GeumChun-Ku, Seoul, Korea Tel : +82-2-2107-3700 Fax : +82-2-2107-3707 URL: http://www.woosim.com
MODEL PORTI-T (Kiosk&Ticket Printer) Rev. 2.0 WOOSIM SYSTEMS Inc. #501, Daerung Technotown 3th, 448, Gasan-Dong, GeumChun-Ku, Seoul, Korea Tel : +82-2-2107-3700 Fax : +82-2-2107-3707 URL: http://www.woosim.com
User's Manual SRP-770II/770IIE. Label Printer Rev
 User's Manual Label Printer Rev. 1.19 http://www.bixolon.com Table of Contents Manual Information & Usage Precautions 3 1. Content Confirmation 7 2. Product Part Names 8 3. Installation & Usage 10 3-1
Users Manual STP-103II. Thermal Printer Rev
 Users Manual STP-103II Thermal Printer Rev. 1.00 http://www.bixolon.com Safety Precautions The instructions shown below must be followed to prevent possible danger or damage by using the product incorrectly.
10/04 Rev USER-/SERVICE MANUAL AP 7.t. Specifications
 10/04 Rev. 3.01-00 USER-/SERVICE MANUAL Specifications Device Types, Application... 2... 2 plus... 2 Options... 2 Technical Specifications... 3 Dimensions... 3 Performance Data... 3 Labelling Material...
Monarch 9460 Printer. TC9460OH Rev. AC 2/ Monarch Marking Systems, Inc. All rights reserved.
 Monarch 9460 Printer TC9460OH Rev. AC 2/01 2001 Monarch Marking Systems, Inc. All rights reserved. Each product and program carries a respective written warranty, the only warranty on which the customer
TM200 USER S MANUAL USER S MANUAL. for THERMAL RECEIPT PRINTER
 USER S MANUAL for THERMAL RECEIPT PRINTER TM200 USER S MANUAL This is a general guide for TM200 direct thermal printer, and not all functions will perform in every printer. Other than specified in this
COMPACT PRINTER SERIES
 COMPACT PRINTER SERIES USER S MANUAL CP-2140 / CP-2140Z / CP-2140E CP-3140L / CP-3140ZL CP-3140LE / CP-3140ZLE Website: http://www.argox.com 1 Table of Contents 1. Introduction... 5 Proprietary Statement...