Comodo Dome Antispam MSP Software Version 1.0
|
|
|
- Calvin Owen
- 5 years ago
- Views:
Transcription
1 Comodo Dome Antispam MSP Software Version 1.0 Administrator Guide Guide Version Comodo Security Solutions 1255 Broad Street Clifton, NJ, 07013
2 Table of Contents 1 Introduction to Comodo Dome Antispam - MSP Purchase Licenses Add More Users, Domains or Time to your Account License Information Get Started Incoming Filtering Configuration Configure Your Mail Server Configure MX Record Update MX Records in Windows 2003/2008 Server Update MX Records on a host using BIND (and the 'named' daemon) Update MX Records for Comodo DNS Update MX Records for GoDaddy Update MX Records for Enom Update MX Records for Network Solutions Update MX Records for Yahoo! Small Business Update MX Records for 1and Update MX Records for 4D Web Hosting Update MX Records for DNS Park Update MX Records for DreamHost Update MX Records for DynDNS Update MX Records for IX Web Hosting Update MX Records for No-IP Update MX Records in CPanel Outgoing Filtering Configuration Per-User Authentication Outgoing Smarthost setup Configure QMail to use a Smarthost Configure PostFix to use a Smarthost Configure Sendmail to use a Smarthost Configure Exchange 2000/2003 to use a Smarthost Configure Exchange 2007/2010 to use a Smarthost Configure Exchange 2013/2016 to use a Smarthost Configure Office 365 to use a Smarthost Configure Exim to use a Smarthost Configure Exim / cpanel to use a Smarthost Configure Exim / Directadmin to use a Smarthost DNS Configuration The Admin Console Login to the Admin Console The Dashboard Area Domain Management Domains
3 Add a Domain Delete Domains Edit Domains Validate Domains Manage a Domain Domain Dashboard Incoming Outgoing Management Domain Audit Log Domain Rules Account Management User Account Management Manage User auto-import View User History Import Users from LDAP Audit Log Administrator Account Management Administrators User Groups & Permissions Admin Groups & Permissions My Comodo Account My Profile Users History Customer Management End User License and Subscriber Agreements View License Information Manage Report Subscriptions Configure Language for Messages from CDAS Notification Settings CDAS Reports - An Overview Quarantine Report Domain Statistics Report Auto-Imported Users Report Quarantine Release Report Reported Spam Report Appendix 1 - CDAS Error Codes Appendix 2 - CDAS Feature List Appendix 3 - Troubleshooting LDAP Appendix 4 - Useful Links About Comodo Security Solutions
4 1 Introduction to Comodo Dome Antispam - MSP Comodo Dome Antispam - MSP (CDAS) is an filtering solution that blocks spam, -borne viruses and other unwanted mail from reaching user in-boxes. CDAS can be quickly configured for any system and can be up and running in no time. Features and benefits include: Antispam protection for incoming mails Antispam protection for outgoing mails Enhances productivity of employees and servers Intuitive web interface facilitates easy use and configuration Easy management of domains restrictions Whitelist / blacklist recipients and senders Archiving incoming mails 4
5 Guide Structure This guide is intended to take you through the configuration and use of Comodo Dome Antispam - MSP and is broken down into the following main sections. The guide can be navigated using the bookmark links on the left. Purchase License - How to purchase CDAS licenses. Add More Users, Domains Or Time To Your Account - Describes how to obtain domains, add more users to your account. License Information - Describes how to keep track of subscription status and various license related alerts. Getting Started - Describes how to configure your mail server with the CDAS service Incoming Filtering Configuration Outgoing Filtering Configuration The Administrative Interface - Provides a snapshot of main functional areas of CDAS. Login to the Administrative Interface - How to login into the CDAS interface. The Dashboard Area - Describes briefly about Domain management, Account management, Customer management and Statistics area. Domain Management- Detailed explanation on how to add domains, edit domain and manage domains. This section also deals with adding users to whitelist and blacklist and view log reports. Audit Log - Detailed explanation on how to view and export log reports for all the domains in the account. Account Management - Detailed explanation on how to add new administrators and change login passwords, subscription to periodical reports and configure language for messages from CDAS. Customer Management - Provides information on accounts. CDAS Reports - An Overview - An Overview of the Domain and Quarantine summary reports periodically generated and sent to the administrators and users by CDAS. Appendix 1 - CDAS Error Codes Appendix 2 - CDAS Feature Table Appendix 3 -Troubleshooting LDAP Appendix 4 - Useful Links 1.1 Purchase Licenses In order to use CDAS, you must first purchase a license for the service. There are two ways you can purchase licenses: Through Comodo Accounts Manager Through Comodo One - MSP interface Comodo Accounts Manager Visit or click 'Buy Now' link on the website. 5

6 Select 'Dome Antispam' and choose a license term. The longer the license term, the more money you save. For example, 1 domain/5 users/1 month license costs $7 per month. However 1 domain/5 users/1 year license costs only $36 saving of $48 per year over the per-month option. Choose the quantity of domains, users and storage space you want. Select the region closest to you. We will set up your instance in this zone to improve performance. Enter your contact details and billing address details under 'Customer Information' 6
7 If you already have a Comodo account, select 'Existing Comodo User' and enter your username and password If you don't have a Comodo account, select 'New Comodo User' and enter your details to create a new account Complete the payment details section 7
8 Select the checkbox under Communication Options if you want to subscribe for newsletters from Comodo. 8


9 Read the 'End User License/Subscriber Agreement' and tick the checkbox to agree Click 'Continue'. After your order has been successfully processed, you will see the following order confirmation screen: Click 'Place Order' Your account will be created and your licenses are now active. You will also receive a confirmation with your order details. You can login to CDAS - MSP through the URL contained in the confirmation mail. You can view your license details in the main interface after activation. See 'License Information' for more information. The number of users and domains allowed by all your licenses combined is shown in the Customer Info page. 9


10 Comodo One - MSP interface Login to your Comodo One - MSP account and click 'Store' Click '30 Days Free Trial' or 'Buy' on the Comodo Dome Antispam tile You will be taken to the subscription page. Your login username will be pre-populated and cannot be changed. Enter your Comodo One account password in the 'Password' field and click 'Login' 10


11 Any licenses you have already purchased will be listed in the next step. Click 'Buy Now' to subscribe for a new license Select the license type: Single Domain License - One domain. For example, xyz.com or abc.xyz.com, can be configured. You can also select how many users you want to license. Multi-Domain License - More than one domain. For example, you can configure xyz.com, abc.org, abc.xyz.com etc. You can also select how many users you want to license. Select the license term Click 'Next' 11

12 Enter your contact details and billing address details under 'Customer Information' Click the 'End User License/Service Agreement' link to read the EULA for Dome Antispam. Accept the agreement by selecting the checkbox. Click 'Next' View your order and to enter your payment card information in the next step. 12

13 Review your order, enter your credit card/debit card details and click 'Next'. Your order summary will be displayed. 13

14 Click 'Next' to view instructions and complete the purchase process. 14

15 Click 'Finish' You can login to CDAS - MSP from the Comodo One console by selecting 'Applications' > 'Dome Antispam MSP'. You can view your license details in the main interface after activation. See 'License Information' for more information. The number of users and domains allowed by all your licenses combined is shown in the Customer Info page. 1.2 Add More Users, Domains or Time to your Account You can purchase additional licenses in order to add more users, domains or time. There are two ways to do this: Through Comodo Accounts Manager Through Comodo One MSP interface Comodo Accounts Manager Visit Please read on for a step-by-step guide to this process. 15
. If you choose EU, your service will use our EU servers.")
16 Select 'Dome Antispam' product and subscription term To add additional domains, users and/or archive space, choose your requirements from the respective drop-downs without selecting a base package. Select the region in which you want to use the license (choose the region closest to your company network). If you choose EU, your service will use our EU servers. If you choose US, your service will use our US servers. Enter your contact details and billing address details under 'Customer Information' 16
17 Select 'Existing Comodo User' and enter your username and password Note: Fields marked with * are mandatory. Select your payment method and complete the required payment fields: 17

18 If you want to be kept informed about Comodo products and updates, select the 'Communication Options' checkbox: 18

19 Read the 'End User License/Subscriber Agreement' and tick the checkbox to agree Click 'Continue'. After your order has been successfully processed, you will see the following order confirmation screen: Review your order details and click the 'Place Order' button to confirm your order. Your order summary will be displayed. 19

20 Your account will be created and your licenses are now active. You will also receive a confirmation with your order details. You can login to CDAS - MSP through the URL contained in the confirmation mail. You can view your license details in the main interface after activation. See 'License Information' for more information. The number of users and domains allowed by all your licenses combined is shown in the Customer Info page. Comodo One MSP interface Login to your Comodo One - MSP account Click 'Management' then select 'Applications' from the drop-down 20


21 Your licensed applications are shown as tiles: Click the 'Comodo Dome Antispam MSP' tile Open the 'subscriptions' tab Click the 'Add New Subscription' button: 21

 that you have already purchased are")
22 You will be taken to the subscription page. Your login username will be pre-populated and cannot be changed. Enter your Comodo One account password in the 'Password' field and click 'Login' License(s) that you have already purchased are listed in the next step. 22


23 Click 'Buy New' to subscribe for a new license Select the license type - The drop-down list changes according to the option selected. For example, if you choose 'Users', the drop-down will allow you to select additional users. Select license term - The period ranges from 1 month to 3 years. Click 'Next' 23

24 The contact details will be pre-populated. Update the details if required. Click the 'End User License/Service Agreement' link to read the EULA for Dome Antispam. Accept the agreement by selecting the checkbox. Click 'Next' View your order and enter your payment card information in the next step. 24
25 Review your order, enter your credit card/debit card details and click 'Next'. Your order summary will be displayed. 25

26 Click 'Next' to view instructions and complete the purchase process. 26


27 Click 'Finish' The subscription will be automatically activated. A confirmation will also be sent to your registered address. 27
28 1.3 License Information To avoid service interruptions, we advise you to keep track of your usage limits and the number of days remaining on your licenses. You can upgrade or downgrade your license as required. You will receive renewal reminders via shortly before your licenses expire. Antispam license holders that do not have a Comodo One account can view the license information in CDAS - MSP Antispam license holders that also have a C1 account have two options view the license details in CDAS or in C1 View license information in CDAS - MSP You can view your account status in the 'Customer Management' area in the main interface. Log in to Comodo Dome Antispam - MSP Click 'License Management' from the 'Customer management' drop-down menu on the left The image below shows an example of a customer who has purchased multiple licenses: The 'License Management' panel shows details about your CDAS subscription(s). 'Max. number of users' shows the total number of users allowed by all licenses combined. 'Max. number of domains' shows the total number of domains allowed by all licenses combined. Name The name of the account is displayed in the title bar. CAM login: Displays the login user name for the account in Comodo Accounts Manager (CAM) at The administrator can use this login username to log in to CAM for purchasing additional licenses and renewal of existing licenses. CAM Displays the address for the account as registered at CAM. Totals Number of users: The total number of enrolled users belonging to all the domains. 28

29 Max. number of users: The total number of users that can be added as per all the subscriptions made for the account, that is, number of users cannot exceed the number given in this field for all domains included. Number of domains: The number of domains enrolled for account. Max. number of domains: The total number of domains that can be added as per all the subscriptions made for the account. Disk quota: Displays the total storage space allotted in CDAS server for archiving incoming messages as per all the subscribed packages, in GB. Disk space: Displays the storage space used by the archived mails in the CDAS server. Subscriptions The following details are displayed for each subscription: Max. number of users: The maximum number of users that can be added to the account as per the subscription, that is, number of users cannot exceed the number given in this field for all domains included. Max. number of domains: The maximum number of domains that can be added as per the subscription. License expiration date: The date till which the license is valid for the subscription. Disk quota: The maximum storage space allotted for mail archive in the CDAS server, as per the subscription. Enabled: Displays whether the subscription is active or not. The 'Reminder' button allows you to choose an address to receive license expiry reminders, and to specify the period of time before expiry that you wish to receive them. Please note this button will be available if you have logged in to CDAS using CAM account credentials. Administrators will start receiving license renewal reminders via 30 days (default) before your license(s) are due to expire. Note: The number of days before expiration of license that you start to receive license renewal reminders and the number of reminders per day that you receive depends on the settings configured in CDAS. An example of license renewal reminder is shown below: If you have multiple licenses and if one of them has expired, then the number of domains and users allowed for that license will be deducted from the total number of allowed domains and users. No error message will be displayed if the usage is still limited within the total domains and users allowed for the remaining license(s). An alert will be displayed at the top of the interface on the day when all the license(s) have expired. An example of the message is shown below. There is a grace period of 60 days after license expiry to allow customers time to renew. During this time, your s will continue to be delivered to your domain through CDAS but without any spam filtering. You also cannot add new domains or users and cannot enable quarantine. Otherwise, you can login in and view/use the service normally. 29
30 After the grace period expires, all domains and quarantined mails in your account will be purged and you will not be able to log into the account. Administrators can upgrade or downgrade his/her account using Comodo Accounts Manager (CAM) at You can use the login details provided at the time of purchasing the service. Note: Any license upgrade or downgrade for your account will not be effected immediately. However, the changes will be reflected in the interface after a certain period of time depending on the settings configured in CDAS. After downgrading your existing account or after a license has expired, if the number of domains and / or users is more than permitted, an upgrade subscription message will be displayed at the top of the CDAS interface. Some examples of alert messages are shown below: When the domain limit is exceeded: You will not be able to add new domains until some of the current domains are removed. CDAS filter will continue to function and you can add new users. When the user limit is exceeded: You will not be able to add new users until some of the current users are removed. CDAS filter will continue to function and you can add new domains. View license information in C1 Antispam license holders with a C1 account can view their antispam licenses in the C1 subscription page Licenses purchased via C1 are automatically shown in the C1 subscription page Licenses purchased via CAM but must be 'activated' in C1 before their details can be viewed. Click here to view the process of activating the licenses purchased via CAM. To view license details in C1 Login to your Comodo One - MSP account Click 'Management' then select 'Applications' from the drop-down 30


31 Your licensed applications are shown as tiles: Click the 'Comodo Dome Antispam MSP' tile Open the 'subscriptions' tab All your Antispam MSP licenses will be displayed on the left. Click on a license to view its details on the right side. To activate licenses purchased via CAM Login to your Comodo One - MSP account Click 'Management' then select 'Applications' from the drop-down Click 'Comodo Dome Antispam MSP' tile then 'Add New Subscription' button from the 'Subscriptions' tab 31
 that you have already purchased will be listed in the next step.")
32 You will be taken to the subscription page. Your login username will be pre-populated and cannot be changed. Enter your Comodo One account password in the 'Password' field and click 'Login' License(s) that you have already purchased will be listed in the next step. Subscriptions bought via C1 will be automatically activated and show as 'In-Use'. License(s) purchased via CAM will be displayed as 'Valid'. To activate a license purchased via CAM, select it and click 'Activate Selected'. Please note the license is already activated for the product and this activation is done to view its details in C1 subscription page. 32

33 That's it. Your license will be activated and can be viewed in the subscriptions page. Click 'Go to 'My Subscriptions' to view the licenses in the C1 interface 33

34 2 Get Started After creating your account, the next step is configuring your mail server to work with the CDAS service. There are two service servers, one in the US and other in the EU. You should use the server best suited to your location and your requirements. The CDAS service URLs are: European Union mxpool1.spamgateway.comodo.com mxpool2.spamgateway.comodo.com United States mxpool1.us.spamgateway.comodo.com Note - Mail server MX records. C1 customers that enrolled via should use the EU service server URL. Customers that enrolled via should use the US service server URL. The following sections explain how to configure CDAS for your environment: Incoming Filtering Configuration Configuring your mail server Configuring MX record Outgoing Filtering Configuration 2.1 Per-user authentication Outgoing Smarthot setup Incoming Filtering Configuration This section explains how you have to configure your mail server and point your domain MX records to CDAS service. Configure your mail server Configure MX record Configure Your Mail Server Step 1: Disable Sender Policy Framework (SPF) checks, or add CDAS service domains to the SPF whitelist. If you don't do one of the above, you may get an error message when you add a domain: Step 2: Add your domain to the CDAS service. 34
 records of your domain to point to the CDAS service domain.")
35 To add a domain: Login to CDAS system, go to domain management and add domain. Step 3: Point mail server MX records to CDAS service domain. See the next section 'Configuring MX Record' for more details Configure MX Record The next step is to update the Mail Exchange (MX) records of your domain to point to the CDAS service domain. Please ensure that you replace your old domain MX records with CDAS service domains according to your preferred region. Background: The MX record is responsible for specifying the mail server for incoming and outgoing messages of a domain. A domain can have several MX records pointing to different mail servers. When an is passed to/from your domain, the mail is handled by the first available mail server as per your priority. You can define new MX records or change mail server priority as required. Note - Mail server MX records. C1 customers that enrolled via should use the EU service server URL. Customers that enrolled via should use the US service server URL This section explains how to update your MX records so that all mails to/from your domain are passed through the CDAS spam filtering service. Click the following links for detailed explanations based on the DNS software/web hosting service you use. Windows Server 2003/
36 BIND (and the "named" daemon) Comodo DNS GoDaddy Enom Network Solutions Yahoo! SmallBusiness 1and1 4D Web Hosting DNS Park DreamHost DynDNS IX Web Hosting No-IP Cpanel Update MX Records in Windows 2003/2008 Server 1. Open Control Panel by clicking Start > Control Panel and click 'Administrative Tools'. 2. Select 'DNS'. 3. Open the 'Forward Lookup Zones' folder. 4. To back up the current configuration, right-click the sub-folder for the mail domain you are configuring, select 'export' from the context sensitive menu and save the configuration in a safe location. 5. Open the zone/domain sub-folder for that mail domain. 6. Delete all the existing MX records in that zone/domain. 7. Create a new record for your primary mail server. Enter the FQDN of your preferred CDAS service domain. CDAS primary service domains are: EU: mxpool1.spamgateway.comodo.com US: mxpool1.us.spamgateway.comodo.com Assign a priority of 1 as this is your primary service. Click OK to save your record. 8. Create a new record for your secondary mail server. Enter the FQDN of your preferred CDAS service domain. CDAS secondary service domains are: EU: mxpool2.spamgateway.comodo.com Please note there is no secondary service domain for the US based service. Leave it blank. Assign a priority of 2 as this is your secondary service. Click 'OK' to save your record. 9. Right-click the zone/domain folder and select 'Properties' from the pop-up menu. 10. Select the 'Start of Authority (SOA)' tab, click the 'Increment' button and click 'OK'. 36
 3. Delete all the existing \"MX\" lines for that domain. 4.")
37 Update MX Records on a host using BIND (and the 'named' daemon) 1. Make a backup copy of the zone file (or named.conf) that you intend to edit for MX record updates. 2. Open the Zone file for the mail domain you are configuring (or go to the part of named.conf being used for that zone) 3. Delete all the existing "MX" lines for that domain. 4. Enter a new "IN MX" record with the lowest preference value and enter the FQDN of your preferred CDAS service domain. CDAS primary service domains are: EU: mxpool1.spamgateway.comodo.com US: mxpool1.us.spamgateway.comodo.com Assign a priority of 1 as this is your primary service. 5. Enter a new "IN MX" record with the next lowest preference value and enter the FQDN of your preferred CDAS service domain. CDAS secondary service domains are: EU: mxpool2.spamgateway.comodo.com Please note there is no secondary service domain for the US based service. Leave it blank. Assign a priority of 2 as this is your secondary service. 6. Find the "@ IN SOA" record and increment the serial number (on the second line of the record). 7. Save the file and check it with named-checkconf. 8. Restart the 'named' daemon Update MX Records for Comodo DNS 1. Log in to DNS.com administrative console at by entering your login address and password. 2. Select the domain for which you want to update the MX records, from the "Select domain" drop down menu. 3. Click the "View / Manage" button beside the row labeled "@ (mail)". 37

38 The existing MX records will be displayed at the left hand side pane. 38
 Enter \"1\" in the 'Priority' field to set higher priority for the primary server Enter the FQDN of your preferred CDAS service domain in the 'Answer'")
39 4. Delete the existing records by clicking the thrash can icons. 5. Set the primary mail server. Under 'Create Record': Enter TTL as 3600 (secs) Enter "1" in the 'Priority' field to set higher priority for the primary server Enter the FQDN of your preferred CDAS service domain in the 'Answer' field CDAS primary service domains are: EU: mxpool1.spamgateway.comodo.com US: mxpool1.us.spamgateway.comodo.com Click 'Save' 6. Again click the "View / Manage" button beside the row labeled "@ (mail)" and set the secondary mail server. Under Create Record': Enter TTL as 3600 (secs) Enter "2" in the 'Priority' field to set lower priority for the secondary server 39

 and have your account number ready.")
40 Enter the FQDN of your preferred CDAS service domain in the 'Answer' field CDAS secondary service domains are: EU: mxpool2.spamgateway.comodo.com Please note there is no secondary service domain for the US based service. Leave it blank. Click 'Save' The MX records for your domain are updated now. But it may take up to 48 hours for the changes to take effect. Setup should now be complete and mail filtering effected on all configured domains. If you experience problems, please open a ticket at support.comodo.com or call COMODO ( ) and have your account number ready. We have experienced technicians on hand to help troubleshoot any configuration issues Update MX Records for GoDaddy 1. Log in to GoDaddy administrative console at by entering your customer number or login name, entering your password, and clicking the 'Secure Login' button. 2. Click 'My Domains' from the 'Domains' drop-down menu. 3. Select the domain for which you want to update the MX records, from the 'Domain Name' column. 4. Click 'Total DNS Control and MX Records' from the Details page. 5. Delete the existing MX records by clicking the 'X' buttons. 40

41 Tip: If you do not want to delete the existing records at this moment, you can set them with lower priority. Click the 'Edit' button beside each and set the priority with higher numbers like 10, 20 and so on. You can delete these records at a later time after your changes have taken effect. 6. Click 'Add New MX Record'.The interface for adding a new MX record will appear. To set the primary server: Enter "1" in the 'Priority' field. Enter "@" in the Host Name field. In the 'Enter Goes To Address' field, enter the FQDN of your preferred CDAS service domain. CDAS primary service domains are: EU: mxpool1.spamgateway.comodo.com US: mxpool1.us.spamgateway.comodo.com Select '1 week' from the TTL drop-down. Click 'OK'. To set the secondary server: Click 'Add New MX Record' again. The interface for adding a new MX record will appear. Enter "2" in the 'Priority' field. Enter "@" in the Host Name field. In the 'Enter Goes To Address' field, enter the FQDN of your preferred CDAS service domain. CDAS secondary service domains are: EU: mxpool2.spamgateway.comodo.com Please note there is no secondary service domain for the US based service. Leave it blank. Select '1 week' from the TTL drop-down. Click 'OK'. The MX records for your domain are updated now. But it may take up to 48 hours for the changes to take effect Update MX Records for Enom 1. Log in to Enom administrative console at by entering your 'Login ID', 'Password' and clicking 'Login'. 41
42 2. Click the 'Domains' tab and select 'My Domain Names'. 'Manage Domains' page will be opened 3. Choose the domain for which the MX records are to be updated. 4. Select the + icon under the 'Total DNS Control' list in the 'Domain Details' panel. A sub-list will appear. 5. Click 'Total DNS Control And MX Records'. The 'Manage MX Records and DNS Zone File panel' will appear. 6. Click 'Launch Total DNS Control Manager'. The 'DNS Manager' interface will appear. 7. Delete the existing MX records. Tip: If you do not want to delete the existing records at this moment, you can set them with lower priority. Click the 'Edit' button beside each and set the priority with higher numbers like 10, 20 and so on. You can delete these records at a later time after your changes have taken effect. 8. Click 'Add New MX Record'. The 'MX (Mail Exchangers) Record Wizard' will appear. To set the primary server: Enter "1" in the 'Priority Value' field. Enter "@" in the Enter a Host Name field. In the 'Enter Goes To Address' field, enter the FQDN of your preferred CDAS service domain. CDAS primary service domains are: EU: mxpool1.spamgateway.comodo.com US: mxpool1.us.spamgateway.comodo.com Select '1 week' from the TTL drop-down. Click 'Add'. To set the secondary server: Enter "2" in the 'Priority Value' field. Enter "@" in the Enter a Host Name field. In the 'Enter Goes To Address' field, enter the FQDN of your preferred CDAS service domain. CDAS secondary service domains are: EU: mxpool2.spamgateway.comodo.com Please note there is no secondary service domain for the US based service. Leave it blank. Select '1 week' from the TTL drop-down. Click 'Add'. 9. Click 'Continue'. The 'DNS Manager main page' will reappear when you've finished. The MX records for your domain are updated now. But it may take up to 48 hours for the changes to take effect Update MX Records for Network Solutions 1. Log in to Network Solutions administrative console at by entering your 'User ID', 'Password', selecting 'Manage All Services' from 'Log-in to' dropdown and clicking 'Login'. 2. Click 'Edit DNS' under 'DNS Settings'. (If this is the first time you are editing the DNS settings, then click 'Custom DNS Setting'). The 'Edit DNS' interface will appear. 3. Click 'Continue' in the 'DNS Manager-Advanced Tools'. The 'DNS Manager - Advanced Tools' interface will appear. 42
43 4. Click Add/Edit in the 'Mail Servers' panel. The 'Mail Servers' table will be displayed. 5. Delete the existing MX records. Tip: If you do not want to delete the existing records at this moment, you can set them with lower priority. Edit the 'Mail Servers' table to set the priority with higher numbers like 10, 20 and so on for the existing records. You can delete these records at a later time after your changes have taken effect. 6. Update the 'Mail Servers' table with the information in the following table. Priority 1 Mail Server Enter the FQDN of your preferred CDAS service domain. CDAS primary service domains are: EU: mxpool1.spamgateway.comodo.com US: mxpool1.us.spamgateway.comodo.com 2 Enter the FQDN of your preferred CDAS service domain. CDAS secondary service domains are: EU: mxpool2.spamgateway.comodo.com Please note there is no secondary service domain for the US based service. Leave it blank. 7. Click 'Save'. The MX records for your domain are updated now. But it may take up to 48 hours for the changes to take effect Update MX Records for Yahoo! Small Business 1. Log in to Yahoo! Small Business administrative console at by entering your 'Yahoo ID', 'Password' and clicking 'Sign In'. 2. Click 'Domain' from he tool bar. 3. Click 'Manage Advanced DNS Settings'. 4. Click 'Change MX Records'. 5. Delete the existing MX records. Tip: If you do not want to delete the existing records at this moment, you can set them with lower priority. Edit the 'MX Records to set the priority with higher numbers like 10, 20 and so on for the existing records. You can delete these records at a later time after your changes have taken effect. 6. Enter the MX record for primary server with the FQDN of your preferred CDAS service domain in the first open text box. CDAS primary service domains are: EU: mxpool1.spamgateway.comodo.com US: mxpool1.us.spamgateway.comodo.com 7. Set the priority for the primary server as "1" 8. Enter the MX record for secondary server with the FQDN of your preferred CDAS service domain in the second open text box. CDAS secondary service domains are: 43
44 EU: mxpool2.spamgateway.comodo.com Please note there is no secondary service domain for the US based service. Leave it blank. 9. Set the priority for the secondary server as "2" 10. Click 'Submit'. The MX records for your domain are updated now. But it may take up to 48 hours for the changes to take effect Update MX Records for 1and1 1. Log in to 1and1 administrative console at by entering your 'Customer ID' (Account Number or Domain name), 'Password' and clicking 'Login'. 2. Click 'Administration' tab 3. Click 'Domains'. The 'Domain Overview' page will appear. 4. Choose the domain for which the MX records are to be updated. 5. Select 'Edit DNS Settings' from the DNS menu. 6. Click 'Advanced DNS Settings' and choose 'Other mail server' from the options. 7. Delete the existing MX records. Tip: If you do not want to delete the existing records at this moment, you can set them with lower priority. Edit the 'MX Records to set the priority with higher numbers like 10, 20 and so on for the existing records. You can delete these records at a later time after your changes have taken effect. 8. Enter the MX 1/Prio and MX 2/Prio fields with the following information. MX 1/Prio Enter the FQDN of your preferred CDAS service domain. CDAS primary service domains are: EU: mxpool1.spamgateway.comodo.com US: mxpool1.us.spamgateway.comodo.com MX 2/Prio Enter the FQDN of your preferred CDAS service domain. CDAS secondary service domains are: EU: mxpool2.spamgateway.comodo.com Please note there is no secondary service domain for the US based service. Leave it blank. 9. Click 'OK'. The MX records for your domain are updated now. But it may take up to 48 hours for the changes to take effect Update MX Records for 4D Web Hosting 1. Log in to your 4D Web Hosting administrative console at by entering your 'Username', 'Password' and clicking 'Login'. 2. Click 'Configure'. 3. Click 'MX Records' from the Configuration options. 4. Replace the top two records with the following: 44
45 Enter the FQDN of your preferred CDAS service domain Primary CDAS primary service domains are: EU: mxpool1.spamgateway.comodo.com US: mxpool1.us.spamgateway.comodo.com Enter the FQDN of your preferred CDAS service domain Secondary CDAS secondary service domains are: EU: mxpool2.spamgateway.comodo.com Please note there is no secondary service domain for the US based service. Leave it blank. 5. Click 'Update MX Records'. The MX records for your domain are updated now. But it may take up to 48 hours for the changes to take effect Update MX Records for DNS Park 1. Log in to DNS Park administrative console at 2. Click 'DNS Hosting' from the left hand side navigation. 3. Choose the domain for which the MX records are to be updated. 4. Click 'Mail Records (MX)'. 5. Under 'MX Resource records', Replace the hostname at 1st priority row with the FQDN of your preferred CDAS service domain and click 'Update' CDAS primary service domains are: EU: mxpool1.spamgateway.comodo.com US: mxpool1.us.spamgateway.comodo.com Replace the hostname at 2nd priority row with the FQDN of your preferred CDAS service domain and click 'Update' CDAS secondary service domains are: EU: mxpool2.spamgateway.comodo.com Please note there is no secondary service domain for the US based service. Leave it blank. 6. Delete other existing MX records. Tip: If you do not want to delete these records at this time, you can do it later, after your changes have taken effect. The MX records for your domain are updated now. But it may take up to 48 hours for the changes to take effect Update MX Records for DreamHost 1. Log in to DreamHost administrative control panel at by entering your address/web ID and Web panel password. 2. Click 'Mail' from the left hand side navigation and select 'MX' from the options. 3. Click 'Edit' beside the domain name for which the MX records are to be updated. 4. Delete all existing MX records under 'Custom MX Records'. 45
46 5. In the first text box, enter the FQDN of your preferred CDAS service domain CDAS primary service domains are: EU: mxpool1.spamgateway.comodo.com US: mxpool1.us.spamgateway.comodo.com 6. In the second text box, enter the FQDN of your preferred CDAS service domain CDAS secondary service domains are: EU: mxpool2.spamgateway.comodo.com Please note there is no secondary service domain for the US based service. Leave it blank. 7. Click 'Update your custom MX records now!' The MX records for your domain are updated now. But it may take up to 48 hours for the changes to take effect Update MX Records for DynDNS 1. Log in to DynDNS administrative console at by entering your Username and password. 2. Click 'My Services'. 3. Click 'Custom DNS' beside the domain for which the MX records are to be updated, under 'Zone Level Services'. 4. Select all the entries under 'Mail exchanger Records' and click 'Delete MX'. 5. Click 'Add New MX'. 6. Set the primary mail server: Enter the FQDN of your preferred CDAS service domain CDAS primary service domains are: EU: mxpool1.spamgateway.comodo.com US: mxpool1.us.spamgateway.comodo.com Select '5' for preference to set higher priority for the primary server Click 'Modify MX' Click 'Return to...' 7. Set the secondary mail server Enter the FQDN of your preferred CDAS service domain CDAS secondary service domains are: EU: mxpool2.spamgateway.comodo.com Please note there is no secondary service domain for the US based service. Leave it blank. Select '10' for preference to set lower priority for the secondary server Click 'Modify MX' Click 'Return to...' The MX records for your domain are updated now. But it may take up to 48 hours for the changes to take effect Update MX Records for IX Web Hosting 1. Log in to IX Web Hosting administrative control panel at by entering your login address and password. 2. Click 'Manage' under 'Hosting Account'. 46
47 3. Choose the domain for which the MX records are to be updated. 4. Disable the existing MX records by clicking the 'On' button. 5. Click 'Edit' next to 'DNS Configuration'. 6. Delete the existing MX records. Tip: If you do not want to delete the existing records at this moment, you can set them with lower priority. Edit the 'MX Records to set the priority with higher numbers like 10, 20 and so on for the existing records. You can delete these records at a later time after your changes have taken effect. 7. Click 'Add DNS MX Record'. 8. Enter the primary and secondary mail servers one by one as given in the table below. Click 'Submit' after entering each record. Name Data Leave Blank 1 Data (Second box) Enter the FQDN of your preferred CDAS service domain. CDAS primary service domains are: EU: mxpool1.spamgateway.comodo.com US: mxpool1.us.spamgateway.comodo.com Leave Blank 2 Enter the FQDN of your preferred CDAS service domain. CDAS secondary service domains are: EU: mxpool2.spamgateway.comodo.com Please note there is no secondary service domain for the US based service. Leave it blank. The MX records for your domain are updated now. But it may take up to 48 hours for the changes to take effect Update MX Records for No-IP 1. Log in to No-IP administrative console at by entering your login address and password. 2. Click 'Host/Redirects' from the left hand side navigation. 3. Click 'Modify' beside the domain name for which the MX records are to be updated. 4. Navigate to 'Mail Options' section at the bottom of the page 5. Replace the MX record entry at the first field with the FQDN of your preferred CDAS service domain CDAS primary service domains are: EU: mxpool1.spamgateway.comodo.com US: mxpool1.us.spamgateway.comodo.com 6. Replace the MX record entry at the second field with the FQDN of your preferred CDAS service domain CDAS secondary service domains are: EU: mxpool2.spamgateway.comodo.com Please note there is no secondary service domain for the US based service. Leave it blank. 7. Delete the other MX records. 47

48 Tip: If you do not want to delete the existing records at this moment, you can set them with lower priority. Edit the 'MX Records to set the priority with higher numbers like 10, 20 and so on for the existing records. You can delete these records at a later time after your changes have taken effect. The MX records for your domain are updated now. But it may take up to 48 hours for the changes to take effect Update MX Records in CPanel This section explains how to update MX records for your domain if you or your web hosting service provider use CPanel as webhosting control interface. 1. Login to your administrative console. CPanel will be opened. 2. Click 'MX Entry' icon under 'Mail' The MX Entry Maintenance panel will be opened. 3. Select the domain for which the MX record has to be changed from the Domains area. 4. Ensure that 'Local Mail Exchanger' option is selected under ' Routing'. If not, select the option and click the 'Change' button. 48
49 5. Delete the entries under 'MX Records' by clicking the 'Delete' links Tip: If you do not want to delete the existing records at this moment, you can set them with lower priority. Click 'Edit' and set the priority with higher numbers like 10, 20 and so on. You can delete these records at a later time after your changes have taken effect. 6. Set the primary mail server under 'Add New Record' Enter '0' in Priority field Enter the FQDN of your preferred CDAS service domain in the Destination field CDAS primary service domains are: EU: mxpool1.spamgateway.comodo.com US: mxpool1.us.spamgateway.comodo.com 49
50 Click 'Add New record'. The new MX Record pointing to CDAS service will be added 7. Set the secondary mail server under 'Add New Record' Enter '1' in Priority field Enter the FQDN of your preferred CDAS service domain in the Destination field CDAS secondary service domains are: EU: mxpool2.spamgateway.comodo.com Please note there is no secondary service domain for the US based service. Leave it blank. Click 'Add New record'. The new MX Record pointing to CDAS service will be added The MX records for your domain are updated now. But it may take up to 48 hours for the changes to take effect. 2.2 Outgoing Filtering Configuration CDAS allows you to configure outgoing filter that is independent of incoming filtering. You can set up outgoing filter for each user or if that is too cumbersome, you can set up the filtering server as a smarthost. Click the following links for more details. Per-user authentication Outgoing Smarthost setup DNS Configuration 50
51 Note: You can use only one of the methods, Per-user authentication or Outgoing Smarthost setup, for outgoing filtering. But DNS configuration is mandatory Per-User Authentication To set up outgoing filtering for a user, make sure that the user is a valid outgoing user. This can be done in the Outgoing section of the Manage Domain interface. You can also configure outgoing user to represent an IP address and anybody from this configured IP can send mail. To add an outgoing user, click 'Users' and 'Add' in the 'Outgoing users' interface. You can also import users from CSV file or from Incoming users. See the section Users to know how to configure an outgoing user Outgoing Smarthost setup If you use a dynamic IP or you are unable to get the proper PTR records set up then you might need to consider using a smarthost. In this case all outgoing messages would be sent to CDAS mailserver and the actual recipient would be contacted by CDAS mailserver itself. Please note that for smarthost option, user authorization should be handled on your side, either by IP address or by using SMTP AUTH. A smarthost allows an SMTP server to route to an intermediate mail server. This can ease mail server management. This enables you to route messages over a connection that may be more direct or less costly than other routes. The smart host is similar to the route domain option for remote domains. The difference is that, after a smart host is designated, all outgoing messages are routed to that server. With a route domain, only messages for the remote domain are routed to a specific server. If you set up a smart host, you can still designate a different route for a remote domain. The route domain setting overrides the smart host setting. You can route all incoming / outgoing messages for remote domains through a smarthost instead of sending them directly to the domain to reduce spam from the recipient's mail server via the default SMTP port. There are two service servers, one in the US and other in the EU. You should provide the hostname of the DAS server that you are using as your preferred CDAS service domain. The CDAS service URLs are: European Union mxpool1.spamgateway.comodo.com mxpool2.spamgateway.comodo.com United States mxpool1.us.spamgateway.comodo.com Note - Mail server MX records. C1 customers that enrolled via should use the EU service server URL. Customers that enrolled via should use the US service server URL The following sections explain how to configure outgoing smarthost: Configure QMail Configure PostFix Configure Sendmail to use a Smarthost Configure Exchange 2000/2003 Configure Exchange 2007/2010 to use a Smarthost Configure Exchange 2013/2016 to use a Smarthost 51
52 Configure Office 365 to use a Smarthost Configure Exim Configure Exim / cpanel Configure Exim / Directadmin Configure QMail to use a Smarthost Routing all mails to a smarthost The file where SMARTHOST relaying to smarthost settings are kept is named smtproutes and is usually found in /var/qmail/control/. We use the hostname 'mxpool1.spamgateway.comodo.com' (EU based server) and mxpool1.us.spamgateway.comodo.com (US based server) on port 587 as outgoing server: European Union echo: mxpool1.spamgateway.comodo.com:587" > /var/qmail/control/smtproutes United States echo: mxpool1.us.spamgateway.comodo.com:587" > /var/qmail/control/smtproutes This command will set qmail that all your mails will be routed to mxpool1.spamgateway.comodo.com:587 or mxpool1.us.spamgateway.comodo.com:587 according to your preferred routing (will remove other existing lines). Routing all mails for a specific domain to a smarthost : Note: The information below relates to a very specific customer requirement and is not recommended for most deployments. A configuration like this can cause problems which will be hard to troubleshoot. Unless you are sure you need to use this setup, please explore the other available options for routing mail. European Union echo "example.com: mxpool1.spamgateway.comodo.com:587" >> /var/qmail/control/smtproutes United States echo "example.com: mxpool1.us.spamgateway.comodo.com:587" >> /var/qmail/control/smtproutes This will route outgoing to "example.com" via the smarthost. (rest of the lines will be kept) Configure PostFix to use a Smarthost You should provide the hostname of the DAS server that you are using as your preferred CDAS service domain. Routing all mails to a smarthost : These instructions assume the postfix config files live in /etc/postfix/main.cf In/etc/postfix/main.cf add the line: European Union relayhost = mxpool1.spamgateway.comodo.com:587 United States relayhost = mxpool1.us.spamgateway.comodo.com:587 52
53 Routing all mails for a specific domain to a smarthost : Note: The information below relates to a very specific customer requirement and is not recommended for most deployments. A configuration like this can cause problems which will be hard to troubleshoot. Unless you are sure you need to use this setup, please explore the other available options for routing mail. Add a line to /etc/postfix/transport: European Union example.com smtp: mxpool1.spamgateway.comodo.com:587 United States example.com smtp: mxpool1.us.spamgateway.comodo.com:587 generate a postmap file : postmap hash:/etc/postfix/transport To use the transport file, add or edit a line in /etc/postfix/main.cf: transport_maps = hash:/etc/postfix/transport Restart Postfix and all mail. The mail for selected domains should go trough the Smarthost Configure Sendmail to use a Smarthost You should provide the hostname of the DAS server that you are using as your preferred CDAS service domain. Routing all mails to a smarthost : Edit/etc/sendmail.cf and add the following line: European Union DSmxpool1.spamgateway.comodo.com United States Dsmxpool1.us.spamgateway.comodo.com Restart Sendmail Configure Exchange 2000/2003 to use a Smarthost You should provide the hostname of the DAS server that you are using as your preferred CDAS service domain. Routing all mails to a smarthost : In the Exchange System Manager, expand the Administrative Groups container. Expand the desired administrative group, and expand the Routing Groups container. Expand the routing group you need to work with, right-click the Connectors folder, and select New. Select SMTP Connector. On the General tab, enter a name to identify the connector. Select Forward All Mail Through This Connector To The Following Smart Hosts, and enter mxpool1.spamgateway.comodo.com (for EU based DAS server) or mxpool1.us.spamgateway.comodo.com (for US based DAS server) Default SMTP Server -> Properties -> Delivery Tab -> Outbound Connections -> TCP Port set to 587. Routing all mails for a specific domain to a smarthost : 53
54 Note: The information below relates to a very specific customer requirement and is not recommended for most deployments. A configuration like this can cause problems which will be hard to troubleshoot. Unless you are sure you need to use this setup, please explore the other available options for routing mail. Do all steps mentioned above and continue on with the following: Under Local Bridgeheads, click Add, and select the SMTP server that will become the SMTP bridgehead for its routing group. On the Address Space tab, click Add, select SMTP, and click 'OK'. In the Domain box, add the name of the remote location's domain (e.g., example.com), and click 'OK'. Click 'OK' three times to exit the SMTP connector configuration. Restart the Microsoft Exchange Routing Engine service and the SMTP service Configure Exchange 2007/2010 to use a Smarthost You should provide the hostname of the DAS server that you are using as your preferred CDAS service domain. Routing all mails to a smarthost : A Send Connector must already have been created and configured correctly on the Hub Transport server. Open Exchange Management Console. Click on the '+' next to Organization Configuration. Select Hub Transport and select the 'Send Connectors' tab. Right-click on the existing Send Connector, select 'Properties' and go to the Network tab. Select "Route mail through the following smart hosts:" and click 'Add'. Enter mxpool1.spamgateway.comodo.com (for EU based DAS server) or mxpool1.us.spamgateway.comodo.com (for US based DAS server) - you need to use port 587 for both. If you have more then one Smarthost, repeat the previous two steps. The changes to the Send Connector will take effect immediately without you having to reboot the server or restart any services. In order to change the port to 587 you will have to issue the following command in the Exchange Powershell Console: Set-SendConnector -identity "NAME OF CONNECTOR" -Port:587 Restart the transport service. Routing all mails to a smart host with Username-Password or IP based Authentication: A Send Connector must already have been created and configured correctly on the Hub Transport server. Open Exchange Management Console. Click on the + next to Organization Configuration. Select Hub Transport and select the 'Send Connectors' tab. Right-click on the existing Send Connector, select 'Properties' and go to the 'Network' tab. Select "Route mail through the following smart hosts:" and click 'Add'. In the FQDN section enter mxpool1.spamgateway.comodo.com, mxpool2.spamgateway.comodo.com (for EU based DAS server) or mxpool1.us.spamgateway.comodo.com (for US based DAS server) Click 'Change' under the smart-host authentication. 54
55 For Basic Authentication Select 'Basic Authentication' and tick the 'Basic Authentication over TLS' box. Add your username and password that was previously created in CDAS Outgoing Users configuration page. Click 'OK' For IP based Authentication Select 'None' Click 'OK' Then add outbound IP of Exchange Server in CDAS Outgoing Users configuration page. The changes to the Send Connector will take effect immediately without you having to reboot the server or restart any services. In order to change the port to 587 you will have to issue the following command in the Exchange Powershell Console: Set-SendConnector -identity "NAME OF CONNECTOR" -Port:587 Restart the transport service Configure Exchange 2013/2016 to use a Smarthost You should provide the hostname of the DAS server that you are using as your preferred CDAS service domain. Routing all mails to a smarthost : A 'send connector' must already have been created and configured correctly on the hub transport server. Open 'Exchange Admin Center' (EAC). Select 'Mail flow' on the left then click 'Send Connectors'. Select the existing send connector to view its properties. Click 'Delivery' Select "Route mail through the following smart hosts:" under 'Specify how to send mail with this connector' and click the '+' button to add the smart host name. Enter mxpool1.spamgateway.comodo.com (for EU based CDAS server) or mxpool1.us.spamgateway.comodo.com (for US based CDAS server) in the 'add smart host' dialog. If you have more then one smarthost, repeat the previous three steps. If you need to route all mails to the smart host with Username-Password or IP based Authentication, continue with the following settings: For Basic Authentication Select 'Basic Authentication' under Smart host authentication Tick the Offer basic authentication only after starting TLS box Add your username and password that was previously created in CDAS Outgoing Users configuration page Click 'Save' For IP based Authentication Select 'None' Click 'Save' Then add outbound IP of your Exchange Server in CDAS Outgoing Users configuration page Under 'Address Space', click the '+' button in the 'Add Domain' window Select 'SMTP' for 'Type' Enter '*' in the Fully Qualified Domain Name (FQDN) field 55

56 Click 'Save' Under 'Source Server', click '+' in the 'Select a server' window. Select a mailbox server that will be used to send to the internet via the 'Client Access' server Click 'Finish' The changes you've made will take effect straight away without requiring a reboot or restarting any services Configure Office 365 to use a Smarthost Note Make sure you have activated Office 365 in Dome AS MSP. Go to 'Outgoing' > 'Office 365 Activation' then complete the activation procedure. Click here for more information. Set up outbound mail in Office 365: Login to your Microsoft Office 365 administrator center account Click 'Admin' from the left-menu Click 'Exchange': Click 'mail flow' on the left Click 'connectors' in the top navigation: 56
57 Add an 'Outbound Connector': Select 'Office 365' in the 'From' drop-down menu Select 'Partner Organization' in the 'To' drop-down menu: Click 'Next' Enter a descriptive name for the outbound connector in the 'Name' field Click 'Next' 57
58 'When do you want to use this connector?' - Select 'Only when I have a transport rule set up that redirects messages to this connector' Click 'Next' 58
59 'How do you want to route messages' Select 'Route through these smart hosts' Click + sign to add smart host as port25.domeasmsp.cdome.net in the opening page and click Save. Page will be updated as below. Click Next. 59
60 'How should Office 365 connect to your partner organization's server?' - Select: 'Always use Transport Layer Security (TLS) to secure the connection' AND 'Issued by a trusted certificate authority'. This will make sure the connection to the mail server is securely encrypted and authentic. Click 'Next' 60
61 Review your settings. Check all information in the confirmation screen is as it should be, then click 'Next': 61
62 'Validate this connector' - Add an address at which you can receive mail in the field provided, then click 'Validate'. 62
63 If you receive the validation to the specified address, then the STATUS will change to Succeeded. This means that Office 365 connector can connect to your smart host. Click 'Save' to complete connector configuration. 63
64 Configure Exim to use a Smarthost You should provide the hostname of the DAS server that you are using as your preferred CDAS service domain. Routing all mails to a smarthost : To configure the mailserver Exim, edit your Exim configuration file (e.g. /etc/exim/exim.conf). Add in the routers section (after begin routers): spamgateway_smarthost_router: driver = manualroute transport = spamgateway_smarthost_transport route_list = $domain mxpool1.spamgateway.comodo.com::587 (for EU based DAS server) or $domain mxpool1.us. spamgateway.comodo.com::587 (for US based DAS server) no_more Make sure the local mail route is before smarthost, if you don't want local mail to be forwarded. Add in the transports section (after begin transports): spamgateway_smarthost_transport: driver = smtp hosts_require_tls = * Routing all mails for a specific domain to a smarthost: Note: The information below relates to a very specific customer requirement and is not recommended for most 64
65 deployments. A configuration like this can cause problems which will be hard to troubleshoot. Unless you are sure you need to use this setup, please explore the other available options for routing mail. Put the domain in place of the $domain value in the route_list (above). For multiple domains you can use: route_list = domain.example.com mxpool1.spamgateway.comodo.com::587 ; domain.example.org mxpool1.spamgateway.comodo.com::587 (for EU based DAS server) or route_list = domain.example.com mxpool1.us.spamgateway.comodo.com::587 ; domain.example.org mxpool1.us.spamgateway.comodo.com::587 (for US based DAS server) Restart Exim for the changes to take effect Configure Exim / cpanel to use a Smarthost Routing all mails to a smarthost : Go to the "Exim Configuration Editor" in WHM. Choose "Advanced Editor". Add in the routers section (after begin routers, and after the democheck: router block): smarthost_dkim: driver = manualroute domains =!+local_domains require_files = "+/var/cpanel/domain_keys/private/${sender_address_domain}" transport = remote_smtp_smart_dkim route_list = $domain mxpool1.spamgateway.comodo.com::587 (for EU based DAS server) or $domain mxpool1.us. spamgateway.comodo.com::587 (for US based DAS server) smarthost_regular: driver = manualroute domains =!+local_domains transport = remote_smtp_smart_regular route_list = $domain mxpool1.spamgateway.comodo.com::587 (for EU based DAS server) or $domain mxpool1.us. spamgateway.comodo.com::587 (for US based DAS server) Then add in the transports section (after begin transports): remote_smtp_smart_dkim: driver = smtp hosts_require_tls = * interface = ${if exists {/etc/mailips}{${lookup{$sender_address_domain} lsearch*{/etc/mailips}{$value}{}}}{}} helo_data = ${if exists {/etc/mailhelo}{${lookup{$sender_address_domain} lsearch*{/etc/mailhelo}{$value}{$primary_hostname}}}{$primary_hostname}} dkim_domain = $sender_address_domain dkim_selector = default dkim_private_key = "/var/cpanel/domain_keys/private/${dkim_domain}" dkim_canon = relaxed remote_smtp_smart_regular: driver = smtp hosts_require_tls = * interface = ${if exists {/etc/mailips}{${lookup{$sender_address_domain} lsearch*{/etc/mailips}{$value}{}}}{}} helo_data = ${if exists {/etc/mailhelo}{${lookup{$sender_address_domain} 65
66 lsearch*{/etc/mailhelo}{$value}{$primary_hostname}}}{$primary_hostname}} Save the configuration. All the outgoing mail will be relayed trough the filterserver and accept original and DKIM signed s. Routing all mails to a smarthost with SMTP Authentication: Go to the "Exim Configuration Editor" in WHM. Choose "Advanced Editor". do not include "begin authenticators". Otherwise, simply append our 4 lines and leave out our "begin authenticators". begin authenticators spamgateway_login: driver = plaintext public_name = LOGIN client_send = : username@example.com : youruserpassword Add a Router in the Router Configuration Box. send_via_spamgateway: driver = manualroute domains =! +local_domains transport = spamgateway_smtp route_list = "* mxpool1.spamgateway.comodo.com::587 byname" (for EU based DAS server)or "* mxpool1.us.spamgateway.comodo.com::587 byname" (for US based server) host_find_failed = defer no_more Add a Transport to the Transport Configuration Box. (for EU based DAS server) spamgateway_smtp: driver = smtp hosts = mxpool1.spamgateway.comodo.com hosts_require_auth = mxpool1.spamgateway.comodo.com hosts_require_tls = mxpool1.spamgateway.comodo.com (for US based server) spamgateway_smtp: driver = smtp hosts = mxpool1.us.spamgateway.comodo.com hosts_require_auth = mxpool1.us.spamgateway.comodo.com hosts_require_tls = mxpool1.us.spamgateway.comodo.com Restart Exim. Extra: Routing all mails for a specific domain to a smarthost with individual outgoing accounts: To be able to set custom settings/limits for outgoing users, use the information above (Routing with SMTP Authentication) with a small change. Use this: client_send = : ${extract{user}{$ {lookup{$sender_address_domain}lsearch{/etc/exim_spamgateway}}}} : 66
67 ${extract{pass}{$ {lookup{$sender_address_domain}lsearch{/etc/exim_spamgateway}}}} instead of the client_send in the previous example. To create a file called /etc/exim_spamgateway with the following structure, use this : domain1.com: domain2.com: user=user@domain1.com user=user@domain2.com pass=abc pass=xyz Extra: Limiting Outgoing for certain domains This option can be combined with the individual accounts configuration to restrict outgoing only to specific domains. You can add the following entry (underneath domains) in the router : senders = ^.*@domain1.com : ^.*@domain2.com Configure Exim / Directadmin to use a Smarthost Edit your Exim configuration file (e.g. /etc/exim.conf). Add in the routers section (after begin routers): spamgateway_smarthost_router: driver = manualroute domains =! +local_domains ignore_target_hosts = /8 condition = "${perl{check_limits}}" transport = spamgateway_smarthost_transport route_list = $domain mxpool1.spamgateway.comodo.com::587 (for EU based DAS server) or $domain mxpool1.us.spamgateway.comodo.com::587 (for US based DAS server) no_more This replaces the existing "lookuphost:" router which should be commented. Add in the transports section (after begin transports): spamgateway_smarthost_transport: driver = smtp hosts_require_tls = * Restart Exim. 67
68 2.2.3 DNS Configuration The following SPF record needs to be added to your public DNS: include:_spf.antispamgateway.comodo.com 3 The Admin Console The admin console is the nerve center of Comodo Dome Antispam - MSP (CDAS), allowing you to add domains, add administrators and users, manage accounts and more. Once logged-in, admins can navigate to different areas of the console by clicking the tabs in the left menu. Main Functional Areas Dashboard - View graphical summaries of domain quota usage, user quota usage, archive quota usage, details of domain and user license expiration. See The Dashboard Area for more details. Domains - Configure your CDAS protected domains. The area allows you to add, remove, edit and manage domains. Admins can set filters, view quarantined mails, set restrictions, view logs, accept blacklist requests and more. See Domain Management for more details. Audit Log - View records of actions initiated by users and administrators for all domains belonging to an account. See Audit Log for more details. Account Management Add edit or delete administrators 68

69 Change admin password Manage subscriptions to domain and quarantine summary reports. Create user and administrator groups / Configure user and group permissions View user history for your domains within a particular date range. See Account Management for more details. Customer Management Activate or deactivate customers View and manage customer details such as name, maximum number of users, maximum number of domains, incoming archive space and license expiration date Manage subscriptions to domain and quarantine summary reports for a customer Configure template settings for messages sent from CDAS. See Customer Management for more details. Click the support.comodo.com link at the bottom of interface to visit the Comodo support portal - an online knowledge base and support ticketing system. This is the fastest way to get assistance with any CDAS issues you my encounter. Various areas of the application display a help button guide page for the area. 3.1 at top-right. Click this button to open the dedicated help Login to the Admin Console You can login to the admin console directly by visiting the service URL, or you can login via the C1 interface. Antispam license holders that do not have a Comodo One account should login at the service URL Antispam license holders that also have a C1 account have two options login directly at the service URL, or login via the C1 console. Direct Login You can login into your account using any internet browser. The service URL depends on the CDAS service domain that you subscribed for: EU URL - USA URL - Login to the interface with your CDAS username and password. 69

70 Please note, your account will be locked after three failed attempts login attempts. Contact your Comodo account manager if you need to unlock your account. Login via C1 interface Login to your C1 account Click 'Applications' then 'Dome AntiSpam MSP' from the applications list Dome AntiSpam MSP will open at the dashboard: 70

71 3.2 The Dashboard Area The dashboard contains important statistics and charts about your Dome Antispam deployment. You can export any chart as a pdf by clicking the download icon in the top right corner of each panel. 71

72 Domain Quota Usage The number of domains used and the number remaining on your current license. Each domain that you set up for spam filtering will take one domain from the pool remaining on your license. Place your mouse cursor over any chart sector to view more details. Click an item in the legend to add or remove it from the chart. User Quota Usage Number of users protected by spam filtering and the number remaining on your current license. Each user that you protect with spam filtering will take one user from the pool remaining on your license. Place your mouse cursor over any chart sector to view more details. Click an item in the legend to add or remove it from the chart. Archive Quota Usage The quantity of mail archive space already used and the amount remaining on your current license. Place your mouse cursor over any chart sector to view more details. Click an item in the legend to add or remove it from the chart. 72


73 Domain License Expiration Quantity of domains and domain license expiry dates. Y axis - Domain count X axis - Timeline Green bars - Total number of domains allowed by all unexpired licenses. Yellow line - Actual number of domains active on your account. Out-of-quota - Shown if the actual number of domains is greater than the total allowed by your licenses. Red line - Date when a license is due to expire. Place your mouse cursor over any bar to see when the license is set to expire. User License Expiration Quantity of users and license expiry dates. Y axis - User count X axis - Timeline Green bars - Total number of users allowed by all unexpired licenses. Yellow line - Actual number of users active on your account. Out-of-quota - Shown if the actual number of users is greater than the total allowed by your licenses. Red line - Date when a license is due to expire. Place your mouse cursor over any bar to see when the license is set to expire Domain Management The 'Domains' area allows admins to configure your domains for spam protection. You can add, delete edit, validate and manage domains. You can configure policy settings such as size restrictions and permitted file-extensions for attachments. You can also view logs of all configuration changes. 73
74 Tip: CDAS can generate reports which summarize all mail activity on a domain. See CDAS Reports - An Overview for more details Domains As the name suggests, the 'Domains' area lets administrators to perform domain management tasks such as adding, deleting, editing and validating a domain. Various settings such as size restrictions and extensions of attached files in s can be configured for any listed domain. Click 'Domains' on the left to open the 'Domains' area. The interface opens with a list of all domains that you have added to CDAS - MSP: Use the following links for more help: Add a domain Delete a domain Edit a domain Validate a domain Manage a domain Sort Entries Click the domain column heading to switches the sorting of the entries based on the ascending/descending order of the entries. Use 'Filter' options to search particular domain(s) 74


75 Click anywhere on the 'Filters' tab to open the filters area. To add more filters, click To remove a filter, click the icon beside it. Available filters are: Domain: Will execute a search of domain names according to the text in the 3rd field and the condition selected in column 2. Activated: Will execute a search of activated/not activated domains. Use the conditions in column 2 and the checkbox to determine whether you want to search for activated or not activated domains. Aliases: Will execute a search of domain name aliases according to the text in the 3rd field and the condition selected in column 2. When you select any one of the above options in the first drop-down, the following filters are available in the second drop-down: Equals: Displays the domain or alias name that was entered in full in the text box. Contains: Displays all domain or alias name(s) that contains the words entered in the text box. Not Contains: Displays all domain or alias name(s) that does not contain the words entered in the text 75
 that ends with the words entered in the text box. Click 'Apply Filter' after selecting the filters.")
76 box. Starts With: Displays all domain or alias name(s) that starts with the words entered in the text box. Not Equals: Displays all domain or alias name(s), except the one entered in the text box. Ends With: Displays all the domain or alias name(s) that ends with the words entered in the text box. Click 'Apply Filter' after selecting the filters. Click anywhere on the 'Filters' tab to close the filters area. Click the button to display all the domains. Note: To display all the domains after using the filters option, you have to first click anywhere on the Filters tab to close the filters area and then click the 'Refresh' button Add a Domain Admins with appropriate privileges can add domains, configure the number of users per domain, and define a domain's destination route. The number of domains that you can add depends on your subscription plan. To add a domain Click the 'Domains' menu item on the left Click the 'Add' button The 'Add domain' dialog will open: 76

77 Domain - Enter a valid domain name Destination route - Enter the final mail server address. This is the address to which CDAS will forward mail after antispam filtering. Timezone - Set the zone for this domain. CDAS will use this time-zone for events which concern that domain. Specifically, the quarantine list, archive list, log search, reports and report subscriptions. Domain user limit Set the max. number of users that can be added to this domain. 'Unlimited' lets you add, but not exceed, the number of users permitted by your current license. Max. users for a domain can also be configured in the 'Domain Settings' area. Check Route Will retrieve routing information from the domain's DNS. If the result contains CDAS service domain details (mxpool1.spamgateway.comodo.com EU, or mxpool1.us.spamgateway.comodo.com US), then it means that DNS MX record was already updated to work with CDAS. You must enter your real MX record as the destination route. For example mail.exampledomain.com. 77
78 Click 'Proceed' to save a domain. Note: The number of users that you can add for all the domains belonging to your account depends on your subscription plan. For example, if the subscription plan for your account allows you to add 1000 users and you have three domains, then you can add 300 users for domain 1, 300 users for domain 2 and 400 users for domain 3. You can set any value between 0 and in the 'Max. number of users' field, but CDAS checks if the total number of users for all domains is within your license limit. Click 'Save' to add the configured domains. Note: When you create a new domain, addresses 'abuse@addeddomain' and 'postmaster@addeddomain' will be added by default in Recipient Whitelist. Click here for more details. The following success message will be displayed, along with a reminder to validate the domain within 24 hours: If you have already configured the domain's MX record for CDAS before adding the domain to the CDAS interface, then only the success message will be displayed. See 'Configuring MX Record' for details about configuring MX records and 'Validating Domains' for details about domain validation. 78
 that you want to delete Click the 'Delete' button Tip: You can select multiple domains to")
79 Delete Domains To delete a domain Click the 'Domains' menu item on the left Check box the domain(s) that you want to delete Click the 'Delete' button Tip: You can select multiple domains to delete by pressing and holding the Shift or Ctrl keys. A notice will be displayed warning you that the users belonging to the selected domains to be deleted will also be removed. Click 'OK' to confirm. The selected domain(s) will be deleted Edit Domains You can change the destination route of domain and check its route. Please note that the name of the domain cannot be edited. Edit a domain Click the 'Domains' menu item on the left Select the domain that you want to modify 79

80 Click the 'Edit domain' button You can edit the destination route, timezone and max. users for the domain. You cannot change the domain name. Destination route - The final mail server address. This is the address to which CDAS will forward mail after antispam filtering. Timezone - The zone for this domain. CDAS will use this time-zone for events which concern that domain. Specifically, the quarantine list, archive list, log search, reports and report subscriptions. Domain user limit The max. number of users that can be added to this domain. 'Unlimited' lets you add, but not exceed, the number of users permitted by your current license. Max. users for a domain can also be configured in the 'Domain Settings' area. Check Route Will retrieve routing information from the domain's DNS. If the result contains CDAS service domain details ( mxpool1.spamgateway.comodo.com - EU, or mxpool1.us.spamgateway.comodo.com US), then it means your DNS MX record was already updated to work with CDAS. You must enter your real MX record as the destination route. For example mail.exampledomain.com. Note: The total of users that you can add across all your domains depends on your license. You can set any value between 0 and in the 'Max. number of users' field, but CDAS checks if the total number of users for all domains is within your license limit. Click 'Save' to confirm the changes. 80

81 Validate Domains All domains in CDAS MSP have to be validated in order to demonstrate your ownership of the domains. This can be done in two ways: The first method is to configure the MX record for the domain to the CDAS service before adding the domain in the CDAS interface. When you add this domain it will be automatically validated since only a person in control of the domain is able to modify MX records. See 'Configuring MX Record' for details about configuring MX record to CDAS. The second method is to add the domain to CDAS first then validate ownership by providing an authentication code sent to postmaster@your_domain.com The following tutorial explains the second method. Please note that domains which have not been validated will be grayed out and marked as 'False' in the 'Activated' column. To validate a domain Click the 'Domains' menu item on the left Select the domain that you want to validate Click the 'Validate domain' button The 'Validate domain' dialog will open: A mail containing the validation code will have been sent to postmaster@your-domain.com immediately after adding a domain. Click 'Resend ' to send this mail again. Enter the code the field and click 'OK' CDAS will verify the code and, if successful, the domain will be activated: 81
82 Non-validated domains should be validated within 24 hours or they will be automatically removed from the interface. Note: Domain control validation (DCV) is only required for new domains added after the release of CDAS version Any domains added prior to v do not require DCV. Later releases may enforce DCV on all domains in stages Manage a Domain Administrators can configure various settings for a selected domain: view quarantined mails, set restrictions, add users as recipient whitelist or blacklist, add new users and view log reports for the domain. This section is divided into seven main subsections. Namely, Domain dashboard, Incoming, Outgoing, management, Audit log, Domain Rules and Account management. Click on the respective tabs to expand or close the subsection in the left. To manage a domain Click the 'Domains' menu on the left Select the domain that you want to manage, then click the 'Manage Domain' button Alternatively, click on the domain name in the 'Domains' column OR Right-click on the domain name in the 'Domains' column to open in a new tab or window 82
83 The configuration tabs for the selected domain will open on the left. By default, the 'Domain dashboard' for the selected domain will be displayed. Click the following links for more details: Domain Dashboard Incoming Outgoing Management Domain Audit Log Domain Rules Account Management Domain Dashboard CDAS domain dashboards provide a fast heads-up on mail activity on your protected domains. Statistics include the number of quarantined mails, release requests, whitelist requests, blacklist requests, incoming mails archive quota usage and more. You can export the dashboards to image or pdf file by clicking the download icon at the top-right of each item. To open a domain dashboard Click the 'Domains' menu on the left Select the domain that you want to manage 83

84 Click the 'Manage Domain' button Alternatively, click on the domain name in the 'Domains' column OR Right-click on the domain name in the 'Domains' column to open in a new tab or window The dashboard of the selected domain will be displayed: The buttons along the top of the dashboard allow you to view and take action on important items: Quarantine - Quarantined mails of all users of the selected domain. See Quarantine for more details. Release requests - Requests from users on the selected domain to release quarantined mails. See Released Requests for more details. 84


85 Whitelist requests - Requests from users on the selected domain to whitelist the senders of quarantined mails. See Whitelisted Requests for more details. Blacklist requests - Requests from users on the selected domain to blacklist the senders of quarantined mails. See Blacklisted Requests for more details. The 'Mails Statistics' area provides a graphical as well as pie chart representation of the mails that were blocked, viruses blocked and more. Place your mouse cursor over a graph to view more details. Click on a legend item to add or remove it from a graph. The 'Archive quota usage' area shows how much storage space has been used to archive incoming mails. The graph shows the disk space used per day for the last two weeks. Place your mouse cursor over a graph to view the space used on a specific date. See Managing Archived Mails for more details. The 'Delivery queue statistics' area provides details of filtered mails that are queued in CDAS servers for delivery at a later time. 85

86 It also displays the average time of queued mails for the previous day in CDAS servers before delivery. See Delivery Queue for more details. 86

87 Incoming The 'Incoming' area lets you view quarantined mails, configure spam detection settings, set spam alerts, add local recipients, and more. Click the following links for more details: Quarantine Managing Archived Mails Incoming Spam detection settings Report Spam Delivery Queue Local Recipients Clear Incoming Cache Log Search Domain Aliases Domain Settings Manage Report Subscriptions for Selected Domain 87

88 Relay Restrictions Geolocation Restrictions Quarantine View all quarantined s and their headers for all users on the selected domain. Release quarantined s to the intended recipient if you decide that a particular is not spam. Delete selected or all spam mails Tip: CDAS periodically generates a report on all s moved to quarantine. Reports are ed to admins You can configure the reports in Dashboard> Account Management > Admin > Add Administrators or Edit Administrators. See CDAS Reports - An Overview for more details. Open the quarantined interface Click 'Quarantine' on the 'Incoming' drop-down menu on the left 88


89 The quarantined area will open: Click any column header to sort items in ascending/descending order. Click anywhere on the 'Filters' tab to open the filters area: To add more filters, click Click to remove a filter. The following filters are available: 89
90 Subject: Searches subject-lines of quarantined mails for the text entered in column 3, and the condition selected in column 2. From: Searches quarantined mails for the name or address entered in column 3, and the condition selected in column 2. To: Searches quarantined mails for the name or address entered in column 3, and the condition selected in column 2. Reason: Searches quarantined mails for the reason specified in column 3, and the condition selected in column 2. Recipient: Searches intended recipients of quarantined mails for the name or address specified in column 3, and the condition selected in column 2. When you select any one of the above options in the first drop-down, the following conditions are available: Contains: Displays all quarantined mails that contain the words entered in the text box Not Contains: Displays all quarantined s that don't contain the words entered in the text box Other options available in the first drop-down in the filters area: Date: Will execute a search of mail received dates according to the date selected in the calendar box (column 3) and the condition selected in column 2. Size (KB): Will execute a search of mails according to the size selected or entered in third field (column 3) and the condition selected in column 2. If 'Date' is selected, the following conditions are available: Equals: Displays the quarantined s that have the same date as the selected date in the third box from the calendar Less than: Displays the quarantined s with dates less than the selected date in the third box from the calendar Greater than: Displays the quarantined s with dates greater than the selected date in the third box from the calendar If 'Size' is selected, the following conditions are available: Less than: Displays the quarantined s with size less than the selected or entered size in the third box Greater than: Displays the quarantined s with size greater than the selected or entered size in the third box Click 'Apply Filter' after selecting the filters. Click anywhere on the 'Filters' to close the filters area. Click the button to display all the quarantined s. Note: To display all the quarantined s after using the filters option, you have to first click anywhere on the 'Filters' tab to close the filters area then click the 'Refresh' button. View Details of Quarantined Mails The details like subject, sender, recipient, date and size of the mails added to the quarantine can be viewed in two ways: In the same CDAS window In a new CDAS window To view details of quarantined mails in the same CDAS window Select the mail that you want to view in the quarantined area Click the 'Show Message' button 90

91 OR Click on the link in the subject column that you want to view its details. The details of the selected will be displayed. Click 'All headers' to view the headers which contain the tracking information of the mail detailing the path it has crossed before reaching the recipient. The headers give full details of the sender, route, recipient, sent date, mail type and so on and enable you to check the authenticity of the mail. 91

92 Check the details of the mail and ascertain whether it is a spam mail or not. You can choose to either release the mail or delete it. Click 'Whitelist this sender' to add the sender to Sender Whitelist Click 'Blacklist this Sender' to add this sender to Sender Blacklist. See 'Whitelist / Blacklist' for more details. To view the details of a quarantined mail in a new CDAS window Select the mail that you want to view in the quarantined area Right-click on the link in the subject column and select to open in a new tab or new window. 92


93 The browser may display a warning pop-up window notification. Click the 'Options'> then select 'Allow pop-ups for...' to allow to open new message in a new window. Click again 'Show message in new window'. The details of the selected mail will be displayed in a new CDAS window. 93

94 To release a quarantined mail After viewing the details and ensuring that the selected is not a spam you can choose to release the mail to the recipient. Select the mail that you want to release and click the 'Release' button. An alert will confirm the release of the selected . Click 'OK' to confirm the release The will be released to the address and the mail will no longer be in the quarantined list. To add a sender to whitelist After ascertaining that s sent by particular senders are not spam, administrators can choose to add them to 'Sender Whitelist' from this interface. Once added to whitelist, s sent by these senders will not be quarantined. Select the mail that you want to add the sender to whitelist Click 'More actions' > 'Whitelist this Sender'. 94


95 An alert will be displayed. Click 'OK' to confirm to add the sender to whitelist. See 'Sender Whitelist' for more details. To add a sender to blacklist Administrators can choose to add senders to 'Sender Blacklist' from the Quarantine interface also. Once the selected senders are added to blacklist, all s from them to the selected domain will be automatically blocked. Select the mail that you want to add the sender to blacklist Click 'More actions' > 'Blacklist this Sender'. A confirmation will be displayed: 95

96 Click 'OK' to confirm to add the sender to blacklist. See 'Sender Blacklist' for more details. To delete a quarantined mail Select the mail that you want to delete and click the 'Delete' button A confirmation request will be displayed: Click 'OK' to delete the selection . The selected mail will be deleted and will no longer be in the quarantined mail list. To delete all the quarantined mails, click 'More actions' > 'Delete all'. 96

97 An alert will be displayed to confirm the deletion. Click 'OK' to delete all quarantined s. All the quarantined s for the selected domain will be deleted. Managing Archived Mails CDAS is capable of storing a copy of all incoming mails for all domains belonging to an account. A customer can purchase the archive storage space via Comodo Accounts Manager (CAM). From the archived mails interface, an administrator with appropriate privileges can view details of the message, report spam, resend s if required, retain messages from being removed, add the sender to Domain Rules and delete messages. The archived messages can be deleted manually or can be automated to be cleaned periodically. The settings for auto cleanup can be configured in the Domains Settings interface. To open the archived interface: Click the 'Archive' from the 'Incoming' drop-down on the left. 97


98 The archived area of the selected domain will open: Sorting the Entries Click any column heading switches the sorting of the entries based on the ascending/descending order of the entries as per the information displayed in the respective column. Page Filter The page filter on the top-right has three options: 98


 and")
99 Show archive: Lists only the archived mails Show reported as spam: Lists mails that are reported as spam Show archive and reported as spam: Lists both archived mails and mails that are reported as spam Select the option from the drop-down before using the filter option described below. Using Filter option to search archived s Click anywhere on the 'Filters' to open the filters area. To add more filters, click To remove a filter, click the for narrowing down your search. icon beside it. Available filters are: Subject: Will execute a search of subject according to the text entered in the text box (column 3) and the condition selected in column 2. From: Will execute a search of senders according to the text entered in the text box (column 3) and the 99
100 condition selected in column 2. To: Will execute a search of users according to the text entered in the text box (column 3) and the condition selected in column 2. When you select any one of the above options in the first drop-down, the following conditions are available: Contains: Displays all archived mails that contain the words entered in the text box Not Contains: Displays all archived s that don't contain the words entered in the text box Other options available in the first drop-down in the filters area: Date: Will execute a search of mail received dates according to the date selected in the calendar box (column 3) and the condition selected in column 2. Size (KB): Will execute a search of mails according to the size selected or entered in third field (column 3) and the condition selected in column 2. Attachments: Will execute a search of mails according to the checkbox status (column 3) whether enabled or disabled. If enabled, all archived mails with attachments will be displayed. Marked as retained: Will execute a search of mails according to the checkbox status (column 3) whether enabled or disabled. If enabled, all archived mails that are marked as retained will be displayed. If 'Date' is selected, the following conditions are available: Equals: Displays the archived s that have the same date as the selected date in the third box from the calendar Less than: Displays the archived s with dates less than the selected date in the third box from the calendar Greater than: Displays the archived s with dates greater than the selected date in the third box from the calendar If 'Size' is selected, the following conditions are available: Less than: Displays the archived s with size less than the selected or entered size in the third box Greater than: Displays the archived s with size greater than the selected or entered size in the third box Click 'Apply Filter' after selecting the filters. The application will search the respective column(s) according to the filter(s) set and display the result. Click anywhere on the 'Filters' to close the filters area. Click the button to display all the archived s. Note: To display all the archived s after using the filters option, you have to first click anywhere on the Filters tab to close the filters area and then click the 'Refresh' button. View Details of Archived Mails The details like subject, sender, recipient, date and size of the mails in the archive can be viewed in two ways: In the same CDAS window In a new CDAS window To view details of archived mails in the same CDAS window: In the archived area, select the mail that you want to view and click the 'Show Message' button 100

101 OR Click on the link in the subject column that you want to view its details. The details of the selected will be displayed. To view the headers, which contain the tracking information of the mail detailing the path it has crossed before reaching the recipient, click 'All headers' tab. The headers give full details of the sender, route, recipient, sent date, mail type and so on. To view the details of archived mails in a new CDAS window In the archived area, select the mail that you want to view, right-click on the link in the subject column and select to open in a new tab or new window. 101

102 The browser may display a warning pop-up window notification. Click the 'Options' > select 'Allow pop-ups for...' to allow to open new message in a new window. Click again 'Show message in new window'. The details of the selected mail will be displayed in a new CDAS window. To report archived mails as spam After viewing the details and ensuring that the selected is a spam you can choose to report it as a spam. Select the mail that you want to report as spam and click 'Report spam'. 102

103 An alert will be displayed to confirm selected as spam. Click 'OK' to confirm. A success message will be displayed and the icon indicating the is reported as spam will be shown under the 'Actions' column. The mail will be forwarded to the spam address displayed in the Incoming Spam Detection Settings interface for analysis by experts. Refer to the explanation under Incoming Spam Detection Settings for more details. To add a sender to whitelist Administrators can choose to add the senders to 'Sender Whitelist' from this interface. Once added to whitelist, s sent by these senders will not be quarantined. Select the mail that you want to add the sender to whitelist and then click 'Whitelist this Sender' An alert will be displayed to confirm adding the sender to whitelist. 103

104 Click 'OK' to confirm to add the sender to whitelist. Refer the section 'Sender Whitelist' for more details. To add a sender to blacklist Administrators can choose to add the senders to 'Sender Blacklist' from this interface. Once the selected senders are added to blacklist, all s from them to the selected domain will be automatically blocked. Select the mail that you want to add the sender to blacklist and then click 'Blacklist this Sender' An alert will be displayed to confirm adding the sender to blacklist. Click 'OK' to confirm to add the sender to blacklist. Refer the section 'Sender Blacklist' for more details. To resend s from archive The archived mails can be sent to the recipients if required. CDAS will still retain a copy of mails in the archive even after they are sent. Select the mail that you want to resend and click 'Resend '. 104

105 An alert will be displayed to confirm resending s. Click 'OK' to confirm. A success message will be displayed. To delete archived mails Select the mail that you want to delete and click the 'Delete' button An alert will be displayed to confirm deletion. 105

 from being cleared, then these mails can be marked as 'Retain message'.")
106 Click 'OK' to confirm. The selected mail will be deleted and will no longer be in archive. To delete all the archived mails, click 'More actions' > 'Delete all'. An alert will be displayed to confirm the deletion. Click 'OK' to delete all archived s. To exclude mails from auto-clean operations CDAS can be configured in the Domain Settings area to automatically purge s from archive after the configured period. If administrators wants to retain (s) from being cleared, then these mails can be marked as 'Retain message'. Select the mail(s) that you want to retain and then click 'More actions' > 'Retain Message'. The following confirmation box appears: Click 'OK' to confirm. 106


107 A confirmation dialog will be displayed and the retained messages are indicated by the anchor icons under the Actions column. To remove the retained status for a mail, select the retained message and then click 'More actions' > 'UnRetain Message'. An alert will be displayed to confirm selected (s) from retain status. Click 'OK' to confirm. 107

108 A confirmation dialog will be displayed and the anchor icons under the Actions column are no longer displayed indicating their unretained status. Incoming Spam detection settings This area lets you configure the sensitivity of the spam filter and general settings such as spam notation and quarantine retention. CDAS runs several rules on each as it passes through the spam filters. Each rule checks the mail for a specific spam attribute. The rule will assign a score to a mail based on the degree to which the mail exhibits that attribute. A message's total spam score depends on the weighted value of all rules combined. For example, if you set the spam threshold to 0.33, any mail that has a score higher than 0.33 will be treated as spam and quarantined. The higher the threshold, the more likely that some spam messages may get delivered. The maximum possible threshold is 1. We advise you to test settings for a week to arrive at the best setting for your company. Configure incoming spam detection Click 'Incoming' on the left and choose 'Spam detection Settings' This opens the spam detection interface for the selected domain: 108

109 Quarantine enabled Enabled - Mail identified as spam is quarantined. Disabled Spam is not quarantined but is delivered with a modified subject line. You can set the text which is appended to the subject line in the Probable Spam notation / Spam Notation fields. Messages identified as 'probable spam' are always sent to the recipient, and not quarantined, even if this option is enabled. See 'Probable spam threshold setting to set the sensitivity. Days saved - Enter the number of days that you want mails to be retained in quarantine. The maximum number of days that can be set is Quarantined mails that are not checked, released or deleted within the stipulated days will be automatically deleted from quarantine. Spam threshold - Enter any value between 0.1 and 1.0. All mails with a score above that value are classed as spam and quarantined as explained above. Please note this value should be always higher than 'Probable spam threshold' value. Spam notation - The prefix that will be appended to the subject line of all 'Spam' s sent to users. For example, "<Spam> Order two Rolex watches and get a free carton of Viagra" - where <Spam> is the text entered in the 'Spam notation' field. Note - this only applies IF quarantine has been disabled (i.e. If the 'Quarantine Enabled' box is not checked). Probable spam threshold - Enter any value between 0.0 and the value entered in Spam threshold field. All mails that are having a score value above that is set in this field will be identified as unsure mails and will be delivered to recipients with the subject line as set in the Probable Spam notation / Spam Notation field. Probable spam notation - The prefix that will be appended to the subject line of all 'probable spam' s sent to users. For example, "<Potentially Spam> Cheap deals on Dell computers" where <Potentially Spam> is the text entered in the 'Probable spam notation' field. Quarantine response - Choose the response to be sent by CDAS to the SMTP server that delivered a message in the event that a mail is identified as spam. Note - If you have enabled quarantine functionality, then spam/malicious mail will be quarantined (and not delivered to the recipient) regardless of your choice here. These options merely determine what message CDAS will send back to the SMTP mail server. The available options are: Rejected - Will inform the SMTP server that the has been rejected by CDAS and placed in quarantine. Accepted - The has passed the CDAS spam filters and detected as a spam will be placed in quarantine in silent mode. Spam - Displays the address to which the mails reported as spam from the 'Report Spam' interface and the 'Archive' interface will be forwarded. By default, mails reported as spam by the administrators will be forwarded to spam@antispamgateway.comodo.com for analysis by experts at Comodo. Once a reported mail is confirmed as spam, Comodo will update its mail filters to quarantine similar mails in future. Refer to the explanations under Managing Archived Mails and Report Spam for more details on forwarding the suspicious mails for analysis. Notify user about new quarantine message - Select this option if you wish CDAS to send a 109
110 notification to the intended recipient, if a spam addressed to the recipient is intercepted by CDAS and moved to Quarantine. The notification will contain a link to the and a link for the user to login to the CDAS User interface. The recipient will be able to click the link to directly read the , without logging-in to CDAS. The lifetime of the link is one day. If the user has not clicked the link within a day, the link will expire. If the user needs to respond to or delete the quarantined , the user can click the next link to login to CDAS, view their quarantined mails and carry out their desired actions Suspicious attachment notation - The prefix that will be appended to the subject line of all mails identified with suspicious attachments like malware and macros and forwarded to the recipient or to a different address, a configured in the Domain Rules. Refer to the explanation under Rules in the section Domain Rules for more details. For example, "[Suspicious attachment] Your lucky draw" - where [Suspicious attachment] is the text entered in the 'Suspicious attachment notation' field. Comodo RBL - Comodo's Real-time Blackhole List (RBL) is a blacklist of locations which are known to send spam. This list is continuously updated by Comodo. Quarantine message - If the IP address of the message sender is in the RBL, then the incoming will be quarantined. Reject message - If the IP address of the message sender is in the RBL, then the incoming will be rejected. Disabled - CDAS filters will not check Comodo RBL. Reject s contains credit card number - If enabled, s that contain credit card numbers will be rejected. Credit card numbers have a certain structure that CDAS filters can recognize, so s containing random numbers will not be rejected. Enable Containment Containment is a security technology whereby attachments with an 'unknown' trust rating are run inside a secure, sandbox environment. Files in containment are run with heavily restricted privileges. They cannot access other processes, cannot access important system files, and cannot access user data. From the user's point-of-view, the attachment opens and runs as normal on their computer. This provides a groundbreaking combination of high security with no loss of usability. Background - Each attachment is checked by our filters and awarded a trust rating. This can be 'Safe' (the file is on our whitelist), 'Malware' (the file is on our blacklist), or 'Unknown' (the file does not yet have a trust rating). Because unknown files could be malware, we run them in containment on the endpoint while testing them on our servers. If the tests find the file is safe then it is released from containment. If the tests find the file is harmful then it is, of course, quarantined. You can disable this setting for particular users if required. See 'User Account Management' for more info on this. Note The containment feature is only available to EU customers at this stage. We will roll out the feature to US customers in subsequent releases. Click 'Save' for your settings to take effect. Click 'Reset to default' to undo any changes. Report Spam The 'Report Spam' feature allows you to upload and submit suspected junk s that have got through our spam filters. Comodo will analyze reported mails and, if we confirm them as spam, will update our filters to quarantine similar mails in future. CDAS accepts a range of different mail formats including.eml and.msg. Users can also report spam by sending it to spam@antispamgateway.comodo.com. Add the spam as an attachment in.eml or.msg format. Report a spam mail 110
 is/are stored in your system.")
111 Click 'Incoming' on the left then select 'Report spam'. The 'Report Spam' interface will open: Click the 'Upload' button Navigate to the location where the suspected (s) is/are stored in your system. Select the mail that you want to report as spam and click 'Open'. The maximum size of the file that can be uploaded is 9 MB. 111


112 Note: Make sure to upload the file in format only and size should not exceed 9 MB. Otherwise, the following warning message will be displayed. The mail will be processed for uploading... and success message will be displayed. 112

113 Click the button to close the message. Delivery Queue CDAS delivers incoming s which pass its filters directly to the destination server(s). Whenever a destination is unavailable, all filtered mails are queued on the CDAS servers for delivery at a later time. s that are permanently rejected by the destination server with a 5xx error code will not be queued and are rejected by the CDAS system. Queued messages are automatically retried for delivery for a period of time that is set in 'Maximum days to retry' in domain settings (for example, 4 days).the automatic retry schedule is given below: During the first two hours, queued messages are retried for delivery at a fixed interval of 15 minutes. During the next 14 hours, queued messages are retried for delivery at a variable time interval starting from 15 minutes and multiplied by 1.5 with each attempted delivery. For example, after the first 15 minutes, the subsequent attempts will be after 22.5 minutes, 34 minutes and so on. From 16 hours to 4 days after the delivery failure, queued messages are retried for delivery at a fixed interval of every 6 hours. After 4 days, all queued messages will be bounced to the respective senders. The messages will be frozen if the bounce cannot be delivered immediately and retried for delivery at a fixed time interval of 3 days for the first 21 days. At the end of this period, delivery of messages will have failed permanently. The delivery queue area lets you view queued mails, configure queue alerts and analyze delivery diagnostics Manage the delivery queue Click 'Incoming' > 'Delivery queue' in the left-hand menu: The 'Incoming Delivery Queue' interface of the selected domain will open: 113


114 Sort the Entries Click any column heading to sort entries in ascending/descending order. Use the 'Filter' option to search queued s Click anywhere on the 'Filters' stripe to open the filters area. To add more filters, click 114
 and the condition selected in column 2.")
115 You can remove a filter by clicking the icon beside it. Available filters are: Queue ID: Will execute a search of Queue ID according to the text entered in the text box (column 3) and the condition selected in column 2. Queue name: Will execute a search of Queue name according to the text entered in the text box (column 3) and the condition selected in column 2. Recipient - Will indicate the address of the recipient that is in the delivery request. Message size - Will execute the message size settings according to the number selected in the 'Filters'. Subject: Will execute a search of subject according to the text entered in the text box (column 3) and the condition selected in column 2. Last action: Will execute a search of Last action according to the text entered in the text box (column 3) and the condition selected in column 2. Server name: Will execute a search of Server name according to the text entered in the text box (column 3) and the condition selected in column 2. Delay reason - Will indicate the reason an is queued and cannot be delivered immediately. When you select any one of the above options in the first drop-down, the following conditions are available: Contains: Displays all queued mails that contain the words entered in the text box Equals: Displays the queued s that have the same words as entered in the text box Not Equals: Displays the queued s that do not have the words entered in the text box Not Contains: Displays all queued s that don't contain the words entered in the text box Starts With: Displays all queued mails that starts with the words entered in the text box. Ends With: Displays all queued mails that ends with the words entered in the text box. Other options available in the first drop-down in the filters area: Sender: Will execute a search of senders according to the text entered in the text box (column 3) and the condition selected in column 2. Recipient: Will execute a search of users according to the text entered in the text box (column 3) and the 115

116 condition selected in column 2. Message size: Will execute a search of mails according to the size selected or entered in third field (column 3) and the condition selected in column 2. If 'Sender' and/or 'Recipient' option is selected, the following conditions are available: Contains: Displays all queued mails that contain the words entered in the text box Not Contains: Displays all queued s that don't contain the words entered in the text box If ' Message Size' is selected, the following conditions are available: Less than: Displays the queued s with size less than the selected or entered size in the third box Greater than: Displays the queued s with size greater than the selected or entered size in the third box Click 'Apply Filter' after selecting the filters. The application will search the respective column(s) according to the filter(s) set and display the result. Click anywhere on the 'Filters' tab to close the filters area. Click the button to display all the queued s. Note: To display all queued s, first click anywhere on the 'Filters' stripe to close the filters area then click 'Refresh'. View Headers of Queued s Select an from the delivery queue and click the 'Show headers' button. 116

117 View Diagnostics Delivery diagnostics allow mail server admins to inspect the reasons why a mail did not send correctly. These diagnostics are also useful when working with Comodo support on an issue. Select an from the delivery queue then click the Delivery Diagnostic button: Configure Delivery Queue Alerts The 'Alerts' feature lets you configure notification s to be sent if there is a delivery delay. You will need to allow the alerting server to send you these alerts, so please add mxsrv10.antispamgateway.comodo.com [ ] to your firewall/transport rules if necessary. 117

118 Send alert to: Enter one or more addresses as alert recipients. You can specify 2 possible criteria that will trigger notifications: If queue contains more than 'n' items - CDAS will send a notification mail if the number of queued mails reaches or exceeds the number specified in this field If remains in the queue for more than n hour(s): CDAS will send a notification mail when the oldest mail in the queue exceeds the age you specify (max age = 72 hours). If you select both criteria, you will receive separate notifications for each trigger. If you uncheck both boxes, notifications will be canceled Alert frequency determines how often you will receive delivery delay notifications. Possible values are between 5360 minutes. Local Recipients CDAS can perform cached recipient call-outs to check whether recipient addresses actually exist at the destination mail servers. You can configure CDAS to accept mails to valid accounts in the destination server by enabling the 'Local Recipients' feature. Important Note: If 'Local Recipients' feature is enabled, all recipients have to be added manually to the 'Local Recipients' interface. Otherwise, even valid users for that domain will not receive s. Comodo recommends that this option should be used in specific cases only and is not required in normal circumstances. To add local recipients Click 'Incoming' on the left then select 'Local recipients'. 118


119 The 'Local Recipients' configuration area for the selected domain will open: Select the 'Use local recipients' check-box and click the 'Save' button Click the 'Add' button The 'Add local recipient' dialog box will open. 119

120 Enter the recipient's in the field Click the 'Save' button Repeat the process till you have added all users. To remove a local recipient Select the user that you want to delete and click the 'Delete' button 120

121 Click 'OK' to confirm. The selected recipient will be deleted from the list Tip: You can select multiple recipients to delete by pressing and holding the Shift or Ctrl keys. Import local recipients from a CSV file You can add many new users at a time by importing from a file. The users should be saved in separate lines as shown below: user1 user2 user3 Click the 'Import from CSV file' to import new users from a CSV file. 121


122 Click 'Upload', navigate to the location where the file is saved and click the 'Open' button. The maximum size of the file that can be uploaded is 9 MB. The upload will be placed in the import tasks queue and the progress of the upload will be displayed. If you want to remove the upload from the queue, click the 'Remove import task' button. The 'Remove import task' deletes only the remaining part of an in-progress task. On completion of the upload process, the results will be displayed. 122

123 The local recipients from.csv file will be uploaded and the administrator who carried out the task will receive a notification about the import task completion. Clear Incoming Cache When an for a certain recipient is permanently rejected by the destination server with a 5xx error code, the destination address of the recipient is considered invalid and all s sent to the recipient will be rejected. CDAS filtering servers caches this information locally for up to two hours. The CDAS interface allows you to clear the call-out cache without waiting for the servers to clear it. To clear incoming cache Click 'Incoming' on the left then select 'Clear incoming cache'. 123

124 The 'Clear incoming cache' interface will open: Click the 'Clear' button The callout cache for the incoming domain is cleared. 124

125 Click the button to close the notification. Log Search Log searches allow you to look for specific mails for a domain. You can refine your search by various parameters like sender, recipient and more. To search logs for incoming mails Click 'Incoming' on the left then select 'Log search'. 125

126 The 'Log search (incoming)' interface for the selected domain will open: 126

127 Date range: Select the date range for which you want to search the log file. The date range for which the log search can be processed depends on the settings configured in Domain Settings > Log retention period. Message ID: Enter a unique message identifier (optional ) Sender: Enter a sender address in this field. Recipient: Enter the address in this field (for example, 'testuser1'). Sender IP: Enter the IP address of the sender. Sender нost: Enter the sender host name. Predicate: You have the option to select either 'AND' or 'OR' in the drop-down. When you choose 'AND' option, all the entered search terms will be searched together and when you choose 'OR' option, the application will search any of the search items entered. Include results from the last minutes: If selected, CDAS will include messages that are currently being migrated from the filtering server to the logging server in the search results. Click the 'Search' button. CDAS will search for the entered terms and display the results. 127
128 Domain Aliases CDAS lets you add multiple domains as aliases for a specific domain. Mails sent to the alias will be filtered and delivered to users at the target domain. For example, if you add testdomain.org as an alias domain for testdomain.com, then mail sent to user1@testdomain.org will be filtered and delivered to user1@testdomain.com. The 'To:' headers in the will still display the original recipient as user1@testdomain.org. Note: Your MX records should be configured appropriately for the alias after adding domain aliases to CDAS. To add domain aliases Click 'Incoming' > 'Domain aliases' in the left-hand menu 128


129 The 'Domain Aliases' interface will open: Click the 'Add' button to add a domain alias. The 'Add domain alias' dialog box will open Enter the domain alias name in the 'Alias' field 129


130 Click the 'Save' button. The domain will be added to the main domain as alias and will be listed in the interface. To delete a domain alias, Select the domain alias from the list Click 'Delete' Click 'OK' to confirm the deletion. The selected domain alias will be deleted from the list. Domain Settings The 'Domain Settings' interface let you configure settings such as log retention period, maximum number of users and more for the selected domain. To configure domain settings Click 'Incoming' > 'Domain settings' in the left-hand menu 130

131 The 'Domain Settings' interface of the selected domain will open: 131

132 Maximum bounces: Enter the maximum number of message bounces that each recipient in the selected domain can receive per hour (messages from postmaster addresses or with an empty envelope sender). Please note that if the number of bounces exceeds the limit set in this field, the messages are not quarantined but are permanently rejected and will not be received later. You can set this to a low value if users at the selected domain do not send mails to invalid addresses frequently. By default this field is set to Log retention period: All spam and non-spam connections to a domain are logged in the CDAS server. By default the storage period of this log is 30 days. You can store the log for a longer period by entering the number of days that you want to store in the field. After the end of set period, the log data will be moved to a separate storage and cannot be retrieved. Maximum days to retry: If the destination route has temporary problems, the messages are queued and automatically retried at fixed intervals for the number of days entered in the field. Even after this period if the s cannot be delivered, they are bounced to the sender. By default, this is set to 4 days, the main reason being that the senders should be aware that his\her messages are not being delivered for 4 days. Change locale for system messages: Choose the language used for messages sent to domain administrators. Max. number of users: Enter the maximum of users that can be added for this domain. Leaving this setting as 'Unlimited' will allow you to add up to, but not exceed, the maximum number of users permitted by your current license. This can also be done while creating a domain or in the editing domain interface. Enable archive cleanup: Allows you to enable or disable the auto-clean up of archived incoming mails in the archive storage. This option is available for customers that has purchased archive storage from Comodo. Retain Archived items for: Allows you to set the period in months or days, for which the archived mails should be retained in the archive storage, if you have enabled archive clean-up. The messages that are older than the period set in this field will be purged automatically. Enable user auto-login: If enabled, end-users can login into their CDAS account without entering their credentials. On first login, the users will be asked to confirm their auto login. The users can also change the 132
133 settings on their 'My Profile' page. The users' credentials will be stored in the browser' as auto-login cookie and will be valid for the number of days that is entered in the next field 'Days before cookie expiration'. Days before cookie expiration: Enter the validity period in days of the auto-login cookie for end-users. This is only relevant if you have enabled user-auto-login. Upon expiry of the cookie, users need to provide login credentials to access their CDAS account. The validity period starts after each successful user login. for license notification: Enter the address for receiving license notifications for this domain. You can enter different addresses for different domains for receiving notifications with respect to CDAS license. If the field is left blank, then license notifications will be sent to admins' registered address in Comodo Accounts Manager (CAM). Timezone - Allows you to choose the zone for the domain, depending on the location from which it is hosted. CDAS will use the selected time-zone for events which concern that domain, especially for maintaining the quarantine list, archive list, log search, reports and report subscriptions. Note: The number of users that you can add for all the domains belonging to your account depends on your subscription plan. For example, if the subscription plan for your account allows you to add 1000 users and you have three domains, then you can add 300 users for domain 1, 300 users for domain 2 and 400 users for domain 3. You can set any value between 0 and in the 'Max. number of users' field, but CDAS checks if the total number of users for all domains is within your license limit. Click 'Reset to default' to reset default settings in CDAS. Click the 'Save' button. A confirmation dialog indicating the successful configuration of the domain settings will be displayed. Click 'X'. Manage Report Subscriptions for Selected Domain Allows you to configure subscriptions to domain, user import, and quarantine reports generated for a domain. You can also specify which administrators of the domain should receive the reports. See CDAS Reports - an Overview for more information on reports. To access Manage report subscriptions interface Click 'Incoming' on the left then choose 'Manage report subscriptions'. 133
134 The 'Manage report subscriptions' interface will open: 134


135 Report recipients - Enter the addresses of the domain administrators to whom the reports should be sent. You can enter multiple addresses separated by a comma. Note: The 'Report recipients' field will not be auto-populated as it does in the interface of Customer Management > Managing Report Subscriptions The interface lets you configure the delivery schedule for each type of report. Click on the respective strip to expand the configuration pane for a report type. You can configure subscriptions for five types of reports from this interface: Quarantine Report - The periodical report which can be configured to be received hourly, daily, weekly or monthly will contain a detailed statistics of the mails that are identified as spam or containing malicious content and moved to Quarantine of the domain automatically by CDAS. Refer to CDAS Reports - An Overview for more details. 135

136 Domain Statistics Report - The periodical report which can be configured to be received hourly, daily, weekly or monthly will contain a detailed statistics of number of users, mails that have been received at and sent from the domain, number of spams identified and blocked and so on. Refer to CDAS Reports - An Overview for more details. Users auto-import report - The periodical report which can be configured to be received hourly, daily, weekly or monthly will contain details of new users that were auto-imported based on incoming mails received for them at the mail server. For more details on configuring CDAS for auto-importing new users, refer to the section Managing User Auto-import. Fore more details on the reports, refer to the section CDAS Reports - An Overview. Quarantine Release Report - The periodical report which can be configured to be received hourly, daily, weekly or monthly will contain a detailed statistics of the quarantined mails that are released by the administrator to the recipient. Refer to CDAS Reports - An Overview for more details. Reported Spam Report - The periodical report which can be configured to be received hourly, daily, weekly or monthly will contain a detailed statistics of the mails that are reported as spam by administrators and users. Refer to CDAS Reports - An Overview for more details. Configure report subscriptions If you want the administrators of the account to receive the periodical reports, select the 'Enabled' checkbox in the row of the respective report type. If both the reports are required, you can select both the checkboxes. Leave the 'Send empty' checkbox unchecked if empty reports are not to be sent to recipients. Select the frequency of the report to be sent to the administrators from the options for: Quarantine Report Domain Statistics Report User Auto-Import Report Quarantine Release Report and Reported Spam Report Quarantine Report Hour - The reports will be generated and sent to the administrators every hour or at the selected hour(s) of the day or date chosen from 'Day of month' or 'Day of week' columns. Day of month - The reports will be generated and sent to the administrators every day or on the specific day every month chosen at the hour selected from the 'Hour' column. Day of week - The reports will be generated and sent to the administrators every day or on the specific day every week chosen at the hour selected from the 'Hour' column. Start date - Displays the start date of the report generation depending on the options chosen (as 136

 of the day or date chosen from 'Day of month' or 'Day of week' columns.")
137 per Greenwich Mean Time (GMT)). Report length - Displays the period of the report that will be generated depending on the options chosen. Domain Statistics Report Period - Enables you to set the period to be covered in the report. The report will contain the statistics of all the domains in the account for the past one hour, one week, one month or one year, as selected from drop-down from the scheduled report time. Hour - The reports will be generated and sent to the administrators every hour or at the selected hour(s) of the day or date chosen from 'Day of month' or 'Day of week' columns. Day of month - The reports will be generated and sent to the administrators every day or on the specific day every month chosen at the hour selected from the 'Hour' column. Day of week - The reports will be generated and sent to the administrators every day or on the specific day every week chosen at the hour selected from the 'Hour' column. Start date - Displays the start date of the report generation depending on the options chosen (as per Greenwich Mean Time (GMT)). Report length - Displays the period of the report that will be generated depending on the options chosen. User Auto-Import Report Hour - The reports will be generated and sent to the administrators every hour or at the selected hour(s) of the day or date chosen from 'Day of month' or 'Day of week' columns. Day of month - The reports will be generated and sent to the administrators every day or on the specific day every month chosen at the hour selected from the 'Hour' column. Day of week - The reports will be generated and sent to the administrators every day or on the specific day every week chosen at the hour selected from the 'Hour' column. 137

138 Start date - Displays the start date of the report generation depending on the options chosen (as per Greenwich Mean Time (GMT)). Report length - Displays the period of the report that will be generated depending on the options chosen. Quarantine Release Report Hour - The reports will be generated and sent to the administrators every hour or at the selected hour(s) of the day or date chosen from 'Day of month' or 'Day of week' columns. Day of month - The reports will be generated and sent to the administrators every day or on the specific day every month chosen at the hour selected from the 'Hour' column. Day of week - The reports will be generated and sent to the administrators every day or on the specific day every week chosen at the hour selected from the 'Hour' column. Start date - Displays the start date of the report generation depending on the options chosen (as per Greenwich Mean Time (GMT)). Report length - Displays the period of the report that will be generated depending on the options chosen. Reported Spam Report Hour - The reports will be generated and sent to the administrators every hour or at the selected hour(s) of the day or date chosen from 'Day of month' or 'Day of week' columns. Day of month - The reports will be generated and sent to the administrators every day or on the specific day every month chosen at the hour selected from the 'Hour' column. Day of week - The reports will be generated and sent to the administrators every day or on the specific day every week chosen at the hour selected from the 'Hour' column. Start date - Displays the start date of the report generation depending on the options chosen (as 138
139 per Greenwich Mean Time (GMT). Report length - Displays the period of the report that will be generated depending on the options chosen. Click 'Save' for your settings to take effect. Click the 'Reset settings to default' button to disable all the reports. The 'Report Recipients' field will not be cleared. Relay Restrictions The 'Relay restrictions' interface lets you specify message transfer agents (MTA), mail servers, or other mail relays from which incoming mail should be accepted or rejected. For example, a business that has regional offices can configure their regional systems to accept only incoming s from servers at the home office. Administrators can define organization names from which mails should be accepted or rejected. CDAS parses the mail headers of each incoming mail to ensure the existence of an MTA IP address or FQDN of the organization before accepting the mail. If you don't know the name of an organization, you can search for it using the 'Lookup' feature. Enter the IP address of the sender domain. To add a relay restriction rule Click 'Incoming' from the left then select 'Relay Restrictions'. 139

140 The 'Relay restrictions' interface for the domain will open: 140

141 Select the 'Restrict acceptance to the following relay servers' check box Click the 'Add' button. The 'Add/Edit restriction' dialog will appear: Enter the organization name in the 'Organization name' text box If you are not sure about the organization name, obtain the IP address of the mail server from any incoming mail from the organization and enter it in the 'Lookup IP for organization name' field. Click 'Lookup' to perform the search. CDAS will perform a lookup from WHOIS.com website and auto-populate the Organization name field. Choose the acceptance policy for s from the organization's mail server: Accept - All mails from the selected organizations will be accepted. Those from other organizations will be blocked. Reject - All mails from the selected organizations will be blocked. Those from other organizations will be accepted. Click 'Save' for the rule to take effect. Repeat the process till you have added all the organizations. The administrator need to add a rule for each organization from which the mails are to be accepted or rejected. Illustrations: 1. For example, if you want to accept mails only from two domains, namely gooddomain1.com and gooddomain2.com and reject mails from all the other mail servers, create two rules, one for gooddomain1.com and other for gooddomain2.com. Rule 1 - Accept gooddomain1.com and block all other domains Rule 2 - Accept gooddomain2.com and block all other domains Only the incoming mails from gooddomain1.com and gooddomain2.com will be accepted. Those from all the other domains will be rejected. 141
142 2. For example, if you want to block mails only from two domains, namely baddomain1.com and baddomain2.com and allow mails from all the other mail servers, create two rules, one for baddomain1.com and other for baddomain2.com. Rule 1 - Reject baddomain1.com and allow all other domains Rule 2 - Reject baddomain2.com and allow all other domains Only the incoming mails from baddomain1.com and baddomain2.com will be blocked. Those from all the other domains will be accepted. You can create any number of 'Allow' and 'Reject' rules. The 'Accept 'rules have more priority and reject rules will be skipped in case of any rule conflict. The incoming mails from blacklisted domains in the global or domain blacklist will be rejected even if they are accepted by the relay restrictions rules. The priority order of rules checked on allowing an is as follows: 1. Global blacklist 2. Domain whitelist/blacklist 3. Relay restriction rules 4. Per user whitelist/blacklist Note: The 'Relay restrictions' is disabled for TRIAL customers. Edit Relay Restriction Rules You can change the organization name or acceptance policy of any rule at any time. To edit a rule Choose the rule to be edited and click the 'Edit' button. 142

143 The Add/Edit restriction dialog will appear. Edit the fields and policy options as required. For more details refer to the explanation under To add a Relay. Click 'Save' for your changes to take effect. Removing Relay Restriction Rules You can remove unwanted rules at anytime from CDAS. To remove a Relay Restriction rule Choose the rule you want to remove and click the 'Delete' button 143

144 Click 'OK' in the confirmation dialog. Geolocation Restrictions You can set rules that allow or block access to the CDAS console based on the country from which the connection attempt was made. To create a geolocation policy Click 'Incoming' on the left then click 'Geolocation restrictions': 144


145 The 'Geolocation restrictions' interface for the domain will open: Enable geolocation restrictions - Activate location based access restrictions. If enabled, administrators need to add restriction rules. 145

146 From this interface, you can: Add geolocation restriction rules Edit a geolocation restriction rules Delete a geolocation restriction rules To add a new geolocation restriction rule Click the 'Add' button The 'Add country restriction' dialog will appear. Select the country from the 'Choose country' drop-down 146

147 Choose the geolocation restriction policy for accessing the CDAS web interface Accept - Admins and users from these countries are allowed to access the domain management interface Reject - Admins and users from these countries are not allowed to access the domain management interface Click 'Save' to create the policy Repeat the process to add more rules To edit a geolocation restriction rule A geolocation restriction policy cannot be edited for a country. But you can change the country for the policy. Select the rule for which you want to change the country and click the 'Edit' button 147

148 Select a different country from the drop-down Click the 'Save' button for the changes to take effect To delete a geolocation restriction rule Select the policy that you want to remove from the list and click the 'Delete' button Click 'OK' to confirm the removal of the selected geolocation restriction rule from the list The rule will be removed from the list. 148
149 Outgoing To send outgoing , you need to add a valid user to the filter cluster. This can be done from the web interface. The following ports are available for the outgoing service: SMTP AUTH: Port 25 or 587 SMTP StartTLS Port 587 SMTP SSL Port 465 Comodo recommends port 587. The outgoing service listens by default on all IPv4 addresses activated on the server. Create a separate outgoing user on the filtering cluster for each end-user to relay outgoing . Use automatic user locking to close the account if abuse is detected. There are two methods you can for per-user authentication: The first is to instruct all end-users to authenticate directly to the filter cluster for their outgoing s. The second is to configure your SMTP server to authenticate each user separately to the filter cluster for all outgoing mail. When using per-user authentication for outgoing mail, ensure you set usage limits correctly and enable automatic locking. If you find per-user authentication too cumbersome, you can use smarthost setup as an alternative. You add a single outgoing account to the filtering server and point all outgoing s to this server, thus using the filter cluster as smarthost. Most servers have a 'smarthost setting' feature which lets you easily accomplish the task of configuring outgoing filtering. Make sure to disable automatic user locking setting to prevent the full server account getting locked because a single user sent out spam. Also enable block spam so that individual spam messages will be stopped and the administrator notified. While using smarthosting setup for outgoing mail filtering, ensure to set the limits correctly per user based on the server. The 'Outgoing' area lets you: Set up spam checks on outgoing mail. Clear the outgoing mail server cache. Search for outgoing messages. Integrate Office 365 with CDAS. 149

150 Click the following links for more details: Clear outgoing cache Log search Users Office 365 Activation Clear outgoing cache CDAS continuously performs a cached recipient callouts to check that recipient addresses existing/nonexisting accounts at the destination mail servers to minimize the number of recipient callouts. When an for a certain recipient is permanently rejected by the destination server with a 5xx error code, the destination address of the recipient is considered invalid and all s sent to the recipient will be rejected. CDAS filtering servers caches this information locally for up to two hours. CDAS interface allows you to clear the callout cache without waiting for the servers to clear it. To clear outgoing cache Click the 'Clear outgoing cache' from the 'Outgoing' drop-down on the left The 'Clear outgoing cache' interface will be displayed: 150

151 Click the 'Clear' button. The call-out cache for the outgoing domain is cleared. Click 'X' to close the 'Cache successfully cleared' dialog box. Log search The 'Log Search' option allows you to search for a specific outgoing message. Click the Log search form the 'Outgoing' drop-down on the left The 'Log Search (Outgoing)' interface will be displayed: Date range: The date range for which you want to search the log file. The date range for which the log search can be processed depends on the settings configured in Domain Settings > Log retention period. Message ID: A unique message identifier (optional ) 151
. Sender IP: The IP address of the sender. Sender нost: The sender host name.")
152 Sender: The sender address in this field. User: The username of the outgoing address for in this field (for example, 'testuser1'). Recipient: The address in this field. (for example, Sender IP: The IP address of the sender. Sender нost: The sender host name. Predicate: There are two available options to select from the the drop-down: 'AND' or 'OR' If 'AND' is selected - All the entered search terms will be searched together If 'OR' is selected - The application will search any of the search items entered. Classification: The type of that you want to search from the drop-down options. Include results from the last minutes: If selected, CDAS will include messages that are currently being migrated from the filtering server to the logging server in the search results. Click the 'Search' button. CDAS will search for the entered terms and display the results. Click the 'Download' button to get a report on outgoing mail, including its delivery status. 152

153 Users The content of outgoing mail should be checked because sending out spam can damage your corporate reputation. Configure User's Client for Outgoing Mail Filtering The clients of the users added for outgoing filtering must be configured to point to CDAS service. In the 'Account Settings' interface of the user's client, enter the following details: Smtp server: mxpool1.spamgateway.comodo.com (for EU based service) or mxpool1.us.spamgateway.comodo.com (for US based service) according to your preferred CDAS service domain. Connection Security: STARTTLS or SSL Port : 587 Username: <username@domainname.com> To access the 'Outgoing users' interface: Click the Users' from the 'Outgoing' drop-down on the left 153


154 The 'Users' interface will be displayed: Sorting Entries Click any column heading switches the sorting of the entries based on the ascending/descending order of the entries as per the information displayed in the respective column. Using Filter option to search users Click anywhere on the 'Filters' to open the filters area. 154
 and the condition selected in column 2.")
 that contain the words entered in the text box.")
155 To add more filters, click To remove a filter, click the for narrowing down your search. icon beside it. Available filters are: Username: Will execute a search of usernames according to the text in the text box (column 3) and the condition selected in column 2. If 'Username' is selected, the following conditions are available: Equals: Displays all usernames that match the text entered in the text box. Not Equals: Displays all users except the one entered in the text box. Contains: Displays all username(s) that contain the words entered in the text box. Not Contains: Displays all username(s) that do not contain the words entered in the text box. Starts With: Displays all usernames(s) that starts with the words entered in the text box. Ends With: Displays all usernames(s) that ends with the words entered in the text box. Click 'Apply Filter' after selecting the filters. The application will search the respective column(s) according to the filter(s) set and display the result. Click anywhere on the 'Filters' to close the filters area. 155

156 Click the button to display all the outgoing users. Note: To display all users after using the filters option, you have to first click anywhere on the 'Filters' to close the filters area then click the 'Refresh' button. To add a new user Click the 'Add' button at the top. The 'Add outgoing user' dialog will open: Enter the username for the new outgoing user that will be first part of the address. For example, testuser. The address of the added user will be testuser@testdomain.com. Enter the password in the Password filed. If the 'Password' field is left blank, then the 'Username' must be an IP address, and any connection from that IP will be considered authenticated without needing to use SMTP AUTH (Note: authorizing IP addresses may be disabled on the system). Click the 'Edit outgoing settings' button to configure outgoing settings for the user. The 'Add outgoing settings' dialog will expand: 156
157 Automatic lock - CDAS will prevent a user from sending mail if it detects they have sent out spam or malware. You can set the length of this ban in the 'User lock timeout' field. User lock timeout - Time in minutes that a user is banned from sending mail if CDAS detects their account has sent spam. See 'Automatic lock' above. Maximum unlocks by timeout - The number of times the locked out user will be unlocked for sending out mails. After reaching the maximum limit, the user will be locked out from sending any mails till it is unlocked by the administrator. Enable outgoing limits - Activate / deactivate limits on outgoing mails. Limit per month - The number of mails that can be sent per month Limit per week - The number of mails that can be sent per week Limit per day - The number of mails that can be sent per day Limit per hour - The number of mails that can be sent per hour. Limit per minute - The number of mails that can be sent per minute. 157

158 Valid sender address required - If enabled, outgoing mails must have valid sender address. Maximum number of recipients per day - Maximum number of recipients that a user can send mails per day. Invalid recipient limit: - The number of invalid recipients that a user can send mails to. Maximum days to retry - Maximum number of days CDAS will retry to send queued outgoing mails after which they are bounced to the user. Quarantine response - Determines the response that CDAS will send to the SMTP server that delivered a message in the event that the mail is identified as spam. Note - If you have enabled quarantine functionality, then spam/malicious mail will be quarantined (and not delivered to the recipient) regardless of your choice here. These options merely determine what message CDAS will send back to the SMTP mail server. Options: Rejected - Will inform the SMTP server that the wasn't delivered to recipient. (By default is 'Rejected'.) Accepted - The senders will not be notified if the outgoing mails are detected as spam. They will be blocked and not delivered to recipients. Click the 'Save' button. To delete an existing user Select the user you want to delete from the list and click 'Delete' button. 158


159 Tip: You can select multiple users to delete by pressing and holding the Shift or Ctrl keys. Click 'OK' to confirm. To edit an existing user You can reset password, modify the outgoing settings configured from the 'Add outgoing user' interface. Select the user that you want to edit from the list and click the 'Edit' button. 159
160 Click the 'Edit outgoing settings' button Reset the password and / or make other changes as explained in the 'Add outgoing user' section. Click the 'Save' button to confirm your changes. To manually lock outgoing user Due to administrative or any other reason if you want to prevent a user from sending out mails, the 'Lock' feature allows you to do so. Select the user that you want to lock, click 'More actions' drop-down > 'Lock' 160
 can be unlocked from this")
161 The selected user will be locked from sending mails with status 'Manual'. To manually unlock outgoing user A user who has been locked either manually or automatically (see Edit outgoing settings) can be unlocked from this interface. Select the user that you want to unlock, click 'More actions' > 'Unlock'. 161


162 The user will be unlocked and he can send mails. To import outgoing users from CSV file Administrators can import many users from a file to the outgoing users list at a time. The users should be saved in the format shown below as an example: user1,domainname,password user2,domainname,password To import outgoing users from a CSV file, click 'More actions' > 'Import from CSV file' 162


163 Click the 'Upload' button and navigate to the location where the file is saved and click the 'Open' button. The upload progress will be displayed......and when completed, the results will be displayed. The administrator who carried out the task will receive a notification about the import task completion. Import from incoming users Administrators can add all incoming users to the outgoing users list by importing. If there is an outgoing user with the same name, the import of incoming user will be skipped. To import outgoing users from incoming users, click 'More actions' > 'Import from Incoming users' 163


164 The upload progress will be displayed......and when completed, the results will be displayed. 164

165 The administrator who carried out the task will receive a notification about the import task completion. Office 365 Activation You can integrate Office 365 with Dome so outgoing s pass through the antispam filters Note Office 365 integration is only available to EU customers at this stage. We will roll out the capability to US customers in subsequent releases. After integration, you have to set up an 'Outbound Connector' in Office 365. Click 'Domains' > Select the domain you want to integrate > Click 'Manage domain' Click 'Outgoing' > 'Office 365 Activation' to start the integration process: Check the 'Office 365 Activation' box and click 'Save' 165


166 The activation request is submitted and the status will change to 'In Progress' Comodo will make the necessary configuration changes. Once finished, the status will change to 'Completed'. The next step is for you to set up an outbound connector in your Office 365 account. This will relay and filter outgoing traffic via Dome AS. Click here to find out how to set up an Office 365 outbound connector Management Dome Antispam allows you to configure the maximum size of each and choose which file types are acceptable as attachments. You can also accept or reject user requests. Users can request that you release quarantined s or add senders to the blacklist/whitelist. 166
167 Click the following links for more details: size restriction Blocked extensions Released requests Blacklisted requests Whitelisted requests Size Restriction CDAS lets you set the maximum size of each to preserve bandwidth and storage space. Administrators can set the maximum size anywhere up to 250 MB. If you require a size above 250 MB, please contact your account manager at Comodo. Alternatively, open a ticket at support.comodo.com or call COMODO ( ). Please have your account number ready. To set size restriction Click ' management' on the left and then click ' size restriction' 167


168 The ' restrictions' interface of the domain selected will open: Enter the maximum allowed size (up to 250 MB) of an . Incoming and outgoing s larger than the value set here will be rejected. 168

169 If you enter a value more than 250 MB, an alert will be displayed to contact your account manager at Comodo. The size will be automatically set to 250 MB. Click 'Save' to confirm your changes. Blocked Extensions CDAS allows you to automatically block attachments with specific file extensions. For example, you may want to block all attachments with a.exe extension because they may contain malware. Click here to see the complete list of extensions that you can block. Note If you have enabled containment in 'Incoming' > 'Spam Detection Settings', then Dome AS will automatically block malicious files and attachments. Add a blocked file extension Click ' management' on the left then click 'Blocked extensions' 169

170 The 'Blocked extensions' interface of the domain will open: 170


171 A list of default blocked extensions is displayed. You can sort the blocked extensions list alphabetically in ascending or descending order by clicking the 'Blocked extensions' title bar. Click the 'Add' button to include another blocked extension: Enter the extension name to be blocked in the text box You can add many extensions at a time by clicking the icon. 171


172 Click the 'Save' button The entered extensions will be added to the list. To delete an extension, select it from the list and click 'Delete' on the top left Click 'OK' to confirm The selected blocked extension will be deleted from the list and attachment with this file extension will be allowed provided it passes the size restriction filter. Click 'Reset to default' to restore default blocked extensions in CDAS. 172
173 List of blocked Extensions e csh lib msh psc1 vbe adp dll lnk msh1 psc2 vbs air exe mad msh1xml pst vbscript app gadget maf msh2xml reg vsm as hlp mag mshxml rgs vsmacros asf hta mam msi scf vss asp html maq msp scr vst asx htr mar mst script vsw bas iim mas nexe sct vxd bat inf mat nws sh widget bin ins mau ocx shb wmd btm inx mav ops shs wmf cab isp maw otm swf wms cer isu mda paf sys wmz chm its mdb pcd tmp ws cil jar mde pif u3p wsc cmd job mdt prf udf wsf com js mdw prg upx wsh cpl jse mdz ps1 url xap crt ksh msc ps1xml vb xml Released Requests Users can request that you release their quarantined s to them. You can choose to accept or reject these requests. The release requests will be displayed in the interface and sent to admins whose addresses were added to the notification field Users who requested the release will also receive notifications. Note: Users who have been designated as 'power users' can release quarantined mails without admin approval. See 'User Groups & Permissions' and 'Managing Permissions' for more details. To open the released requests interface Click ' management' on the left then click 'Released requests' 173


174 The 'Release requests' interface will open: All current requests will be shown. Each row shows information about the requested user, subject, the sender, details of the recipients, details of recipients in CC list, the date they were sent and more. View Details of Release Request Mails The details such as user, subject, sender, recipient, date, reason and size of the mails requested for release can be viewed in two ways: 174


175 In the same CDAS window In a new CDAS window To view details of release requested mails in the same CDAS window: Click ' Management' then 'Released requests' Select the mail that you want to view and click the 'Show Message' button. OR Click the link in the subject column to view its details. The details of the selected will be displayed. To view headers, which contain the tracking information of the mail details about the path it has crossed before reaching the recipient, click 'All headers' tab. The headers give full details of the sender, route, recipient, sent date, mail type and so on and enable you to check the authenticity of the mail. Check the details of the mail and ascertain whether it is a spam mail or not. You can choose to either accept the mail or reject it. If the mail is accepted, it will be released to the user's inbox. If it is rejected, the will no longer be in the released s list. Please note that s will continue to remain in the Quarantined list irrespective of the action taken. To view details of release requested mails in a new CDAS window: Click 'Release request' and select the mail that you want to view Right-click on the link in the subject column and select 'Open link in New Tab' or 'Open Link in New Window' to open in a new tab or new window. 175


176 The details of the selected mail will be displayed in a new CDAS window. To accept the release request from users After viewing the details and ensuring that the selected is not a spam you can choose to release the mail to the recipient. Select the mail that you want to release and click the 'Accept' button. An alert will be displayed to confirm the release of selected to the requested user. 176
177 Click 'OK' to confirm the release. The will be released to the user and the mail will no longer be in the released mail list. The mail will be removed from the quarantine area and it will be archived if archive space is available for the domain. To reject the release request from users After viewing the details of the and if not satisfied with its authenticity you can choose to reject the request from the user. Select the mail that you want to reject and click the 'Reject' button. An alert will be displayed to confirm the rejection of selected . Click 'OK' to confirm the rejection. The will not be released to the user and the mail will no longer be in the released mail list. However, it will continue to remain in the Quarantined list. Use filters to search release requests Click anywhere on the 'Filters' tab to open the filters area. 177
 and the condition selected in column 2.")
 and the condition selected in column 2.")
178 You can add more filters by clicking You can remove a filter by clicking the for narrowing down your search. icon beside it. Available filters are: Subject: Will execute a search of subject according to the text entered in the text box (column 3) and the condition selected in column 2. From: Will execute a search of senders according to the text entered in the text box (column 3) and the condition selected in column 2. To: Will execute a search of users according to the text entered in the text box (column 3) and the condition selected in column 2. Reason: Will execute a search of words in the reason column according to the text entered in the text box (column 3) and the condition selected in column 2. When you select any one of the above options in the first drop-down, the following conditions are available: Contains: Displays all quarantined mails that contain the words entered in the text box Equals: Displays all quarantined mails that contain only the words entered in the text box Not Equals: Displays all quarantined mails that do not contain only the words entered in the text box Not Contains: Displays all quarantined s that don't contain the words entered in the text box Starts with: Displays all quarantined s that starts with the words entered in the text box Ends with: Displays all quarantined s that ends with the words entered in the text box Other options available in the first drop-down in the filters area: Date: Will execute a search of mail received dates according to the date selected in the calendar box (column 3) and the condition selected in column 2. Size: Will execute a search of mails according to the size selected or entered in third field (column 3) and the condition selected in column
179 If 'Date' is selected, the following conditions are available: Equals: Displays the quarantined s that have the same date as the selected date in the third box from the calendar Less than: Displays the quarantined s with dates less than the selected date in the third box from the calendar Greater than: Displays the quarantined s with dates greater than the selected date in the third box from the calendar If 'Size' is selected, the following conditions are available: Less than: Displays the quarantined s with size less than the selected or entered size in the third box Greater than: Displays the quarantined s with size greater than the selected or entered size in the third box Click 'Apply Filter' after selecting the filters. The application will search the respective column(s) according to the filter(s) set and display the result. Click anywhere on the 'Filters' tab to close the filters area. Click to display all the release requested s. Note: To display all release request s after using the filters option, you have to first click anywhere on the 'Filters' tab to close the filters area, then click the 'Refresh' button. Blacklisted Requests The 'Quarantine' interface lets users view s intended for them but moved to quarantine. The interface also lets users request that senders of quarantined mails are added to the blacklist. The blacklist request will be sent to you via and also added to the Management > Blacklist Requests interface. You can approve or reject the requests. Senders added to the blacklist after a request will only be blacklisted for the requester. Subsequent mails from the sender to the user in question will be rejected. This applies even if the sender is in the general sender whitelist. See Sender Whitelist and Blacklist Senders Per User for more details. To view blacklisted requests Click ' management' on the left then select 'Blacklisted requests' 179


180 The 'Blacklisted requests' interface will open: The interface shows all blacklist requests from users. The list has columns which show requesting user, subject, sender, recipients, CC list, date sent, the reason they were quarantined and the size of the . The last column shows whether there is any attachment with the mail. 180

181 Viewing Details of Blacklisted Requests The details such as user, subject, sender, recipient, date, reason and size of the mails requested for blacklisting can be viewed in two ways: In the same CDAS window In a new CDAS window To view details of blacklisted requests in the same CDAS window: Select the mail that you want to view and click the 'Show Message' button. Click on the link in the subject column that you want to view its details. or The details of the selected will be displayed. 181
182 Click 'All headers' tab to view the headers containing the tracking information of the mail - detailing the path it has crossed before reaching the recipient. The headers give full details of the sender, route, recipient, sent date, mail type and so on and enable you to check the authenticity of the mail. Check the details of the mail and ascertain whether it is a spam mail or not. You can choose to either accept the mail or reject it for blacklisting the sender. If the request is accepted, the sender will be added to 'Blacklist Senders Per User'. If it is rejected, the will be no longer in the blacklisted requests s list. Please note that s will continue to remain in the Quarantined list irrespective of the action taken. To view details of blacklisted requests in a new CDAS window: In the blacklisted requests area, select the mail that you want to view and click the 'Show message in new window' button or right-click and select to open in a new tab or new window. 182

183 The details of the selected mail will be displayed in a new CDAS window. 183


184 To accept the blacklist request from users After viewing the details, you can choose to accept the request from user to add the sender to blacklist senders per user list. Select the mail that you want to add the sender to blacklist and click the 'Accept' button. 184
185 An alert will be displayed to confirm adding the sender to 'Blacklist Senders Per User'. Click 'OK' to confirm the acceptance. The sender of the will be added to 'Blacklist senders per user. See the section 'Blacklist Senders Per User' for more details. To reject the blacklist request from users After viewing the details of the , you can choose to reject the request from the user. Select the mail that you want to reject and click the 'Reject' button. An alert will be displayed to confirm the rejection of selected . Click 'OK' to confirm the rejection. The sender will not be added to blacklist and the selected will no longer be in the blacklisted s list. Use Filter option to search blacklisted requests 185
 and the condition selected in column 2.")
 and the condition selected in column 2.")
186 Click anywhere on the 'Filters' stripe to open the filters area. To add more filters, click You can remove a filter by clicking the icon beside it. Available filters are: Subject: Will execute a search of subject according to the text entered in the text box (column 3) and the condition selected in column 2. From: Will execute a search of senders according to the text entered in the text box (column 3) and the condition selected in column 2. To: Will execute a search of users according to the text entered in the text box (column 3) and the condition selected in column 2. Reason: Will execute a search of words in the reason column according to the text entered in the text box (column 3) and the condition selected in column 2. When you select any one of the above options in the first drop-down, the following conditions are available: Contains: Displays all quarantined mails that contain the words entered in the text box Equals: Displays all quarantined mails that contain only the words entered in the text box Not Equals: Displays all quarantined mails that do not contain only the words entered in the text box Not Contains: Displays all quarantined s that don't contain the words entered in the text box Starts with: Displays all quarantined s that starts with the words entered in the text box Ends with: Displays all quarantined s that ends with the words entered in the text box Other options available in the first drop-down in the filters area: Date: Will execute a search of mail received dates according to the date selected in the calendar box (column 3) and the condition selected in column 2. Size: Will execute a search of mails according to the size selected or entered in third field (column 3) and the condition selected in column 2. If 'Date' is selected, the following conditions are available: 186
187 Equals: Displays the quarantined s that have the same date as the selected date in the third box from the calendar Less than: Displays the quarantined s with dates less than the selected date in the third box from the calendar Greater than: Displays the quarantined s with dates greater than the selected date in the third box from the calendar If 'Size' is selected, the following conditions are available: Less than: Displays the quarantined s with size less than the selected or entered size in the third box Greater than: Displays the quarantined s with size greater than the selected or entered size in the third box Click 'Apply Filter' after selecting the filters. The application will search the respective column(s) according to the filter(s) set and display the result. Click anywhere on the 'Filters' tab to close the filters area. Click the button to display all the blacklisted requests s. Note: To display all blacklist requests first click anywhere on the 'Filters' stripe to close the filters area then click 'Refresh'. White-listed Requests The 'Quarantine' interface lets users view s intended for them but moved to quarantine. The interface also lets users request that senders are added to the whitelist - usually because they think the mail is from a legitimate sender. The whitelist request will be sent to you via and also added to the Management > Whitelisted Requests interface. You can approve or reject the requests. Senders added to the white-list after a request will only be white-listed for the requester. Subsequent mails from the sender to the user in question will be allowed without antispam checks. See Sender Whitelist and Whitelist Senders Per User for more details. To open the whitelisted requests interface Click ' management' on the left then select ''Whitelisted requests'. 187


188 The 'Whitelisted requests' interface will open: The interface shows all white-list requests from users. The list has columns which show requesting user, subject, sender, recipients, CC list, date sent, the reason they were quarantined and the size of the . The last column shows whether there is any attachment with the mail. Viewing Details of Whitelisted Requests The details such as user, subject, sender, recipient, date, reason and size of the mails requested for whitelisting can be viewed in two ways: 188

189 In the same CDAS window In a new CDAS window To view details of whitelisted requests in the same CDAS window: Select the mail that you want to view and click the 'Show Message' button. Click on the link in the subject column that you want to view its details. or The details of the selected will be displayed. 189
190 To view the headers, which contain the tracking information of the mail detailing the path it has crossed before reaching the recipient, click 'All headers' tab. The headers give full details of the sender, route, recipient, sent date, mail type and so on and enable you to check the authenticity of the mail. Check the details of the mail and ascertain whether it is a spam mail or not. You can choose to either accept the mail or reject it for whitelisting the sender. If the request is accepted, the sender will be added to 'Whitelist sender per user'. If it is rejected, the will be no longer in the whitelisted requests list. Please note that s will continue to remain in the Quarantined list irrespective of the action taken. To view details of whitelisted requests in new CDAS window: In the whitelisted requests area, select the mail that you want to view and click the 'Show message in new window' button or right-click and select to open in a new tab or new window. 190

191 The details of the selected mail will be displayed in a new CDAS window. 191

192 To accept the whitelist request from users After viewing the details, you can choose to accept the request from user to add the sender to whitelist senders per user list. Select the mail that you want to add the sender to whitelist and click the 'Accept' button. An alert will be displayed to confirm adding the sender to 'Whitelist sender per user'. Click 'OK' to confirm the acceptance. The sender of the will be added to 'Whitelist sender per user'. See the section 'Whitelist Sender Per User' for more details. To reject the whitelist request from users After viewing the details of the , you can choose to reject the request from the user. Select the mail that you want to reject and click the 'Reject' button. 192


193 An alert will be displayed to confirm the rejection of user's request. Click 'OK' to confirm the rejection. The sender will not be added to whitelist and the selected will no longer be in the whitelisted requests list. Use Filter option to search whitelist requests Click anywhere on the 'Filters' stripe to open the filters area. To add more filters, click 193
 and the condition selected in column 2.")
194 You can remove a filter by clicking the icon beside it. Available filters are: Subject: Will execute a search of subject according to the text entered in the text box (column 3) and the condition selected in column 2. From: Will execute a search of senders according to the text entered in the text box (column 3) and the condition selected in column 2. To: Will execute a search of users according to the text entered in the text box (column 3) and the condition selected in column 2. Reason: Will execute a search of words in the reason column according to the text entered in the text box (column 3) and the condition selected in column 2. When you select any one of the above options in the first drop-down, the following conditions are available: Contains: Displays all quarantined mails that contain the words entered in the text box Equals: Displays all quarantined mails that contain only the words entered in the text box Not Equals: Displays all quarantined mails that do not contain only the words entered in the text box Not Contains: Displays all quarantined s that don't contain the words entered in the text box Starts with: Displays all quarantined s that starts with the words entered in the text box Ends with: Displays all quarantined s that ends with the words entered in the text box Other options available in the first drop-down in the filters area: Date: Will execute a search of mail received dates according to the date selected in the calendar box (column 3) and the condition selected in column 2. Size: Will execute a search of mails according to the size selected or entered in third field (column 3) and the condition selected in column 2. If 'Date' is selected, the following conditions are available: Equals: Displays the quarantined s that have the same date as the selected date in the third box from the calendar Less than: Displays the quarantined s with dates less than the selected date in the third box from the calendar Greater than: Displays the quarantined s with dates greater than the selected date in the third box from the calendar If 'Size' is selected, the following conditions are available: Less than: Displays the quarantined s with size less than the selected or entered size in the third box Greater than: Displays the quarantined s with size greater than the selected or entered size in the third box Click 'Apply Filter' after selecting the filters. 194
195 The application will search the respective column(s) according to the filter(s) set and display the result. Click anywhere on the 'Filters' tab to close the filters area. Click the button to display all the whitelisted requests s. Note: To display all whitelist requests first click anywhere on the 'Filters' stripe to close the filters area then click 'Refresh' Domain Audit Log CDAS keeps a record of actions initiated by users and administrators for a selected domain. The 'Audit Log' area allows administrators to: Configure and view these log reports. Keeps a consolidated log for all domains belonging to an account. To know more about consolidated log for all domains, see Audit Log for more details. This section explains about audit log for a selected domain. Click the following links for more details: Audit Log Configuration View Domain Log Audit Log Configuration CDAS keeps a record of all actions initiated by administrators and users. However, some of the actions can be 195

196 configured not be recorded such as releasing quarantined items, updating sender whitelist and blacklist senders per user. The screen also allows administrators to add recipients to whom the notifications will be sent. To configure audit log Click the Configuration' from the 'Audit log' drop-down on the left The 'Audit Configuration' area will be displayed: Quarantined item released Create audit log entry - If enabled, CDAS records the release of quarantined mails. Send notification - If enabled, notification mails for quarantined mails release will be sent to recipients added in the 'Notification recipient's' box. Whitelist rules updated Create audit log entry - If enabled, CDAS records any updates to Whitelist senders per user interface Send notification - If enabled, notification mails for updates to Whitelist senders per user interface will be sent to recipients added in the 'Notification recipient's' box. Blacklist rules updated Create audit log entry - If enabled, CDAS records any updates to Blacklist senders per user interface. Send notification - If enabled, notification mails for updates to Blacklist senders per user interface will be sent to recipients added in the 'Notification recipient's' box. Notification recipients - Enter the addresses of the persons to whom the notifications for the above mentioned actions will be sent. Please note that any addresses of the recipient's can be entered here. 196


197 View Domain Log The log screen allows admins with appropriate privileges to view the logs of the selected domain. To view the audit log of the selected domain Click the 'Log' from 'Audit log' drop-down on the left The 'Audit log' screen will be displayed: Sorting Entries Click any column heading switches the sorting of the entries based on the ascending/descending order of the entries as per the information displayed in the respective column. The sorting option is not available for 'Operation description' column. Using Filter options to search particular event(s) Click anywhere on the 'Filters' tab to open the filters area. To add more filters, click 197
 and the condition selected in column 2.")
198 To remove a filter, click the icon beside it. Available filters are: Login: Will execute a search of log entries according to the text entered in the text box (column 3) and the condition selected in column 2. Details: Will execute a search of log entries according to the text entered in the text box (column 3) and the condition selected in column 2. When you select any one of the above options in the first drop-down, the following conditions are available: Contains: Displays all log entries that contain the words entered in the text box Equals: Displays all log entries that contain only the words entered in the text box Not Equals: Displays all log entries that do not contain only the words entered in the text box Not Contains: Displays all log entries that don't contain the words entered in the text box Starts with: Displays all log entries that starts with the words entered in the text box Ends with: Displays all log entries that ends with the words entered in the text box Other options available in the first drop-down in the filters area: Date: Will execute a search of log entries according to the date selected in the calendar box (column 3) and the condition selected in column 2. Role: Will execute a search of log entries according to the role selected in the third field (column 3) and the condition selected in column 2. Operative description: Will execute a search of log entries according to the action selected in the third field (column 3) and the condition selected in column 2. If 'Date' is selected, the following conditions are available: Equals: Displays the log entries that have the same date as the selected date in the third box from the calendar Less than: Displays the log entries with dates less than the selected date in the third box from the calendar Greater than: Displays the log entries with dates greater than the selected date in the third box from the calendar If 'Role' is selected, the following conditions are available: 198
199 Equals: Displays all log entries that is equal to the role selected in column 3. Not Equals: Displays all log entries that except the role selected in column 3. If 'Operative description' is selected, the following conditions are available: Equals: Displays all log entries that is equal to the event selected in column 3. Not Equals: Displays all log entries that except the event selected in column 3. Click 'Apply Filter' after selecting the filters. The application will search the respective column(s) according to the filter(s) set and display the result. Click anywhere on the 'Filters' to close the filters area. Click the button to display all the entries. Note: To display all the log entries after using the filters option, you have to first click anywhere on the Filters tab to close the filters area and then click the 'Refresh' button. The following table provides the details of actions initiated by user/administrator and shown under Operation Key and Operation Description columns in the log report: S.No. Operation Key Operation Description 1 DELETE_ _FROM_QUARANTINE_BY_FILTE Delete quarantined messages by filter R 2 DELETE_ _FROM_QUARANTINE Delete quarantined message 3 RELEASE_ _FROM_QUARANTINE Release quarantined message 4 WHITELIST_RECIPIENT Whitelist recipient 5 BLACKLIST_RECIPIENT Blacklist recipient 6 UNWHITELIST_RECIPIENT Remove recipient from the whitelist 7 UNBLACKLIST_RECIPIENT Remove recipient from the blacklist 8 WHITELIST_SENDER Whitelist sender 9 BLACKLIST_SENDER Blacklist sender 10 UNWHITELIST_SENDER Remove sender from the whitelist 11 UNBLACKLIST_SENDER Remove sender from the blacklist 12 RESET_TO_DEFAULT_WHITELISTED_SENDERS Reset senders whitelist 13 RESET_TO_DEFAULT_WHITELISTED_RECIPIEN Reset recipients whitelist TS 14 RESET_TO_DEFAULT_BLACKLISTED_SENDERS Reset senders blacklist 15 RESET_TO_DEFAULT_BLACKLISTED_RECIPIEN Reset recipients blacklist TS 16 WHITELIST_SENDER_DOMAIN Whitelist all senders of the domain 17 WHITELIST_RECIPIENT_DOMAIN Whitelist all recipients of the domain 199
200 18 BLACKLIST_SENDER_DOMAIN Blacklist all senders of the domain 19 BLACKLIST_RECIPIENT_DOMAIN Blacklist all recipients of the domain 20 USER_WHITELIST_REQUEST_PER_USER Request whitelist sender for user 21 USER_BLACKLIST_REQUEST_PER_USER Request blacklist sender for user 22 USER_RELEASE_REQUEST Release request 23 USER_CANCEL_WHITELIST_REQUEST_PER_US Cancel request whitelist sender ER for user 24 USER_CANCEL_BLACKLIST_REQUEST_PER_US Cancel request blacklist sender ER for user 25 USER_CANCEL_RELEASE_REQUEST Cancel release request 26 ACCEPT_WHITELIST_REQUEST_PER_USER Accept request whitelist sender for user 27 ACCEPT_BLACKLIST_REQUEST_PER_USER Accept request blacklist sender for user 28 ACCEPT_RELEASE_REQUEST Accept release request 29 REJECT_WHITELIST_REQUEST_PER_USER Reject request whitelist sender for user 30 REJECT_BLACKLIST_REQUEST_PER_USER Reject request blacklist sender for user 31 REJECT_RELEASE_REQUEST Reject release request 32 SPAM_DETECTION_SETTINGS Update spam detection settings 33 SPAM_DETECTION_SETTINGS_RESET_TO_DEF Reset spam detection settings AULT 34 DELETE_ _FROM_ARCHIVE_BY_FILTER Delete archived messages by filter 35 DELETE_ _FROM_ARCHIVE Delete archived message 36 RESEND_ _FROM_ARCHIVE Resend archived message 37 REPORTS_AS_SPAM Reports archived message as a SPAM 38 QUARANTINE_ Quarantine message 39 ACCEPT_AND_ARCHIVE_ Accept and archive message 40 MARK_ _AS_SPAM Mark message as spam 41 ACCEPT_ Accept message 42 WHITELIST_USER_SENDER Whitelist sender for user 43 BLACKLIST_USER_SENDER Blacklist sender for user 44 UNWHITELIST_USER_SENDER Remove sender from the user whitelist 45 UNBLACKLIST_USER_SENDER Remove sender from the user blacklist 200
201 46 QUARANTINE_REPORT_SUBSCRIPTION_UPDAT Quarantine report subscription update E 47 QUARANTINE_REPORT_SUBSCRIPTION_RESET Quarantine report subscription reset to default _TO_DEFAULT 48 DOMAIN_STATISTICS_REPORT_SUBSCRIPTION Domain report subscription update _UPDATE 49 DOMAIN_STATISTICS_REPORT_SUBSCRIPTION Domain report subscription reset to default _RESET_TO_DEFAULT 50 DOMAIN_ADD Add domain 51 DOMAIN_DELETE Remove domain 52 ADMIN_ADD Add admin 53 ADMIN_EDIT Edit admin settings 54 ADMIN_DELETE Remove admin 55 ADMIN_UNLOCK Unlock admin 56 ADMIN_REGENERATE_PASSWORD Regenerate password for admin 57 ADMIN_PASSWORD_UPDATE Update password for admin 58 SYSTEM_NOTIFICATIONS_TEMPLATE_CHANGE System notifications template change 59 ADMIN_PERMISSIONS_GROUP_ADD Add admin permission group 60 ADMIN_PERMISSIONS_GROUP_DELETE Remove admin permission group 61 ADMIN_PERMISSIONS_GROUP_UPDATE Update admin permission group 62 ADMIN_PERMISSIONS_CHANGE_DEFAULT_GRO Change default admin permission group UP 63 ADMIN_PERMISSIONS_ASSIGN_GROUP Assign admin permission group by selection 64 REPORT_SPAM_BY_FILE Report delivered message as spam 65 DOMAIN_DESTINATION_ROUTES_UPDATE Update destination routes 66 DOMAIN_LOCAL_RECIPIENTS_ADD Add local recipient 67 DOMAIN_LOCAL_RECIPIENTS_DELETE Remove local recipient 68 DOMAIN_LOCAL_RECIPIENTS_STATE_CHANGE Local recipients state change 69 DOMAIN_ALIASES_ADD Add domain alias 70 DOMAIN_ALIASES_DELETE Remove domain alias 71 DOMAIN_SETTINGS_UPDATE Update domain settings 72 DOMAIN_SETTINGS_RESET_TO_DEFAULT Reset domain settings to default 73 DOMAIN_RELAY_RESTRICTIONS_ADD Add relay restriction 74 DOMAIN_RELAY_RESTRICTIONS_UPDATE Update relay restriction 201
202 75 DOMAIN_RELAY_RESTRICTIONS_DELETE Remove relay restriction 76 DOMAIN_RELAY_RESTRICTIONS_STATE_CHAN GE Relay restriction state change 77 DOMAIN_OUTGOING_USER_ADD Add outgoing user 78 DOMAIN_OUTGOING_USER_SETTINGS_UPDAT E Edit outgoing user 79 DOMAIN_OUTGOING_USER_DELETE Remove outgoing user 80 DOMAIN_OUTGOING_USER_LOCK Lock outgoing user 81 DOMAIN_OUTGOING_USER_UNLOCK Unlock outgoing user 82 DOMAIN_OUTGOING_USER_PASSWORD_UPDA Update password for outgoing user TE 83 DOMAIN_ _SIZE_RESTRICTION_CHANGE size restriction change 84 DOMAIN_BLOCKED_EXTENSIONS_UPDATE Update blocked extensions 85 DOMAIN_BLOCKED_EXTENSIONS_RESET_TO_ DEFAULT Reset blocked extensions to default 86 DOMAIN_AUDIT_CONFIGURATION_CHANGE Audit configuration change 87 DOMAIN_LDAP_CONFIGURATION_CHANGE LDAP configuration change 88 DOMAIN_INCOMING_USER_ADD Add incoming user 89 DOMAIN_INCOMING_USER_EDIT Edit incoming user 90 DOMAIN_INCOMING_USER_DELETE Remove incoming user 91 DOMAIN_INCOMING_USER_UNLOCK Unlock incoming user 92 DOMAIN_INCOMING_USER_REGENERATE_PAS Regenerate password for incoming user SWORD 93 DOMAIN_INCOMING_USER_PASSWORD_UPDAT Update password for incoming user E 94 DOMAIN_INCOMING_USER_ALIASES_UPDATE 95 DOMAIN_INCOMING_USER_MOVE_USER_TO_A Move user to alias LIAS 96 DOMAIN_INCOMING_USER_MOVE_ALIAS_TO_U Move alias to incoming user SER 97 USER_PERMISSIONS_GROUP_ADD Add user permission group 98 USER_PERMISSIONS_GROUP_DELETE Remove user permission group 99 USER_PERMISSIONS_GROUP_UPDATE Update user permission group 100 USER_PERMISSIONS_CHANGE_DEFAULT_GRO Change default user permission group UP 101 USER_PERMISSIONS_ASSIGN_GROUP Update incoming user aliases Assign user permission group by selection 202

203 Export Log Report to CSV The log report can be exported to a comma separated value (CSV) file and is limited to 10,000 entries per file. If the entries exceed this value, exporting cannot be done and a warning will be displayed. Please note that exported file will display the entries in the same sorted order as in the interface. To export log report to csv file Click the 'Export to CSV by filter' button. The 'File Download' dialog will be displayed. Click 'Open' to view the file with an appropriate application Click 'OK' to save the file to your computer. The values in the log report will be separated by commas and this file can be opened with Excel or Openoffice Calc for easy analysis Domain Rules Create granular filtering rules for each domain in order to blacklist, whitelist or forward mails. Rules can be based on sender, recipient, source/destination server, subject line, suspicious attachments and more. 203

204 Note: Under default conditions, CDAS will filter all incoming mails to all domains that have been enabled in the 'Domains' area. The following table offers more details on each rule type: Rule Type Description Notes Domain Rules ('Create Rule...') Create granular rules to blacklist, whitelist or forward mail based on one or more criteria. Criteria include sender, sender mail server, recipient, relay server, subject line and suspicious attachment. TLD & gtld Rules Mail from all TLDs is allowed by default. This interface allows you to block selected TLDs. Allow or block mails based on top level domain. 204
205 Recipient Whitelist Always allow mail sent to these recipients. Sender Whitelist Always allow mail received from these senders. Recipient Blacklist Always block mail sent to these recipients. Sender Blacklist Always block mail received from these senders. Whitelist senders per user Always allow mail from specific addresses to specific users. Blacklist senders per user Always block mail from specific addresses to specific users. For example, CDAS will allow/block mails to/from but will filter as normal to/from You can bulk import addresses from.csv or add manually. For example, CDAS will allow/block mails from to but will continue to filter mail from to You can bulk import addresses from General Advice If you are troubleshooting issues with a particular address, please check all interfaces listed under 'Domain Rules'. Rule priorities can be summarized as follows: 1. Size Restriction 2. Domain Whitelist rules 3. Sender/Recipient Whitelist 4. Domain Blacklist rules 5. Sender/Recipient Blacklist 6. TLD & gtld blacklist rule 7. Per user White list 8. Per user Black list 9. Blocked Extensions CDAS will stop applying rules on first match (if any). ' Size Restrictions' have a higher priority than domain rules. CDAS will still block mails that exceed ' Size Restriction' regardless of any rules. ' Blocked Extensions' have a lower priority than domains rules. CDAS will not stop mails containing a blocked extension if there is a whitelist rule which green-lights the message. Whitelist domains rules take precedence over blacklist domain rules. Whitelist/blacklist rules in the domain rules section take precedence over 'per user' whitelist/blacklist rules. Click the following links for more details. Rules TLD and gtld Rules Recipient Whitelist 205

206 Sender Whitelist Recipient Blacklist Sender Blacklist Whitelist Senders Per User Blacklist Senders Per User Rules Administrators can create rules to filter inbound mails based on sender, recipient, source and relay/mta server, subject line, attachments and so on. There are three types of filtering rules: Blacklist rule - Blocks inbound mails based on one or more filter criteria. Criteria include sender, recipient, mail servers/relays and specific subject line. Whitelist rule - Allows mails to pass through, without security checks, based on one or more filter criteria. Criteria include sender, recipient, mail servers/relays and specific subject line. Forward rule - Forwards mails based on one or more filter criteria, to a set address. Criteria include sender, recipient, mail servers/relays and specific subject line. For example, you can create rules to block all mails from a specific mail server, allow all mails from a specific sender to a specific recipient, forward all mails containing a specific text string in the subject line and so on. To open the 'Create Rule' interface In the left-hand menu, click 'Domain Rules' > 'Create Rule' The 'Create Rule' interface will open: The 'Create Rules' interface shows all current mail filtering rules and their parameters. Mail Filtering Rules - Column Descriptions Column Header Description Rule Type Whether the rule is for blacklisting, whitelisting or forwarding. Sender The sender whose mails will be intercepted by the rule. Recipient The recipient whose mails will be intercepted by the rule. Received from External mail server that sent the mail. Received by Mail server which received the mail. Subject Mails containing the subject line in this column will be intercepted by the rule. 206


207 Forward to The address to which mails satisfying the conditions are forwarded. This column only applies only to 'Forward' rules. Suspicious attachment Whether or not the rule should apply only to mails containing suspicious attachments Sort the Entries Click any column header to sort rules in the ascending/descending order of the entries in that column. Does not apply to the 'Suspicious attachment' column header. Use 'Filters' to search rules Click anywhere on the 'Filters' stripe to open the filters area. Select the field from the first drop-down, choose the condition from the second drop-down and enter the search criteria in the third field. To add more filters, click To remove a filter, click the. icon beside it. Available filters are: Rule Type - Filters rules based on type selected from the right drop-down and the condition selected in middle drop-down. Sender - Filters rules based on sender's address entered in part or full, in the right text field and condition chosen from the middle drop-down Recipient - Filters rules based on recipient's user name entered in part or full, in the right text field and condition chosen from the middle drop-down. Received from - Filters rules based on hostname or IP address of external mail server entered in part or full, in the right text field and condition chosen from the middle drop-down. Received by - Filters rules based on hostname or IP address of internal mail server entered in part or full, in the right text field and condition chosen from the middle drop-down. Subject - Filters rules based on subject line entered in part or full, in the right text field and condition chosen from the middle drop-down. Forward to - Filters rules based on forward address entered in part or full, in the right text field and condition chosen from the middle drop-down. 207

208 Suspicious attachment rule - Filters rules created for suspicious attachment based on condition chosen from the middle drop-down and option from the checkbox at the right. Click 'Apply Filter' after selecting the filters and selecting the conditions to view the filtered results. To close the 'Filters' area, click anywhere on the 'Filters' stripe. To remove the filters and to view all the rules, choose the 'Filters' area then button Create a new mail filter rule Click the 'Add' button. This will open the 'Add blacklist rule' dialog: Suspicious attachment rule: By default, all mails containing suspicious attachments will be quarantined by CDAS. A 'Suspicious attachment rule' lets you define specific actions if a malicious attachment is found in a mail. For example, you may want mails with a suspicious attachment from a specific sender, addressed to a particular recipient to be forwarded to a certain address. Note. Enabling 'Suspicious attachment rule' means the rule only applies to mails which meet your conditions AND contain a suspicious attachment. It will not intercept mails which meet the conditions but do not contain a suspicious attachment. Rule type - Select the rule type. The available options are: 208
209 BLACKLIST - All mails with fields satisfying the parameters entered in the options below, will be blocked. WHITELIST - All mails with fields satisfying the parameters entered in the options below, will be passed without security checks. FORWARD - All mails with fields satisfying the parameters entered in the options below, will be forwarded to the address entered in the 'Forward ' field. Sender - Enter the address of the sender, mails sent by whom are to be intercepted by the rule. You can use wildcard characters (*,?) to enter username/domain name in part, so that all mails containing sender address with partial text entered in this field will be intercepted. For example, entering '*@hell.com' intercepts mails from all users from the domain name 'hell.com', entering 'evilspirit@*', processes all mails with sender name 'evilspirit' from any domain and entering *@* intercepts all the mails with parameters entered in the fields below. Recipient - Enter the username part of the address of the recipient, mails sent to whom are to be intercepted by the rule. The domain name part will be auto-populated with the domain name from which the rule is created. You can use wildcard characters (*,?) to enter username in part, so that all mails containing 'To' address with partial text entered in this field will be intercepted. Received from - Enter the hostname or IP address of the external mail server, mails sent from which, are to be intercepted by the rule. You can use wildcard characters (*,?) to enter server name in part. For example, entering 'mailxxx*' will intercept all mails that contain "mailxxx" in part in the 'Received From' field of the mail header. To specify all sender mail servers, enter just the wildcard character. Received by - Enter the primary relay of the sending server or the MTA, mails sent through which, are to be intercepted by the rule. You can use wildcard characters (*,?) to enter server name in part. For example, entering 'mailyyy*' will intercept all mails that contain "mailyyy" in part in the 'Received By' field of the mail header. To specify all mail servers, enter just the wildcard character. Subject - Enter keywords that you want the rule to search for in the subject lines of s. The rule will apply if any of these words are found. Please note the search sub-string may match values in the middle of the word. Leading and trailing spaces will be trimmed. Forward - This field is available only for 'FORWARD' rule. Enter the address to which the s containing values in the header as configured in the fields above are to be forwarded. Click 'Save' to add the rule to the list of rules. To edit a rule Select the rule to be edited and click the 'Edit' button from the top. 209

210 The 'Edit filter rule' dialog will appear for the rule. This dialog is similar to the 'Add rule' dialog. For descriptions of the options in this dialog, please see the explanation above. Edit the values in the fields as required and click 'Save'. To remove a rule Select the rule you want to remove and click the 'Delete' button. 210

211 A confirmation dialog will appear. Click 'OK' to remove the rule. TLD and gtld Rules CDAS allows administrators to restrict mails based on the top level domain name (TLD) of the external mail server. By default CDAS accepts mails from servers with all TLD names. Administrators can choose to allow mails only from selected TLDs and block mails from others. Administrators can also add custom TLDs and configure to accept or block mails from them. To open the TLD and gtld Rules interface Click 'Domain Rules' > 'TLD & gtld Rules' in the left-hand menu. The TLD configuration interface will open: 211


212 The 'Accepted domains' interface categorizes TLDs according to location and gtlds by alphabetical grouping. These categories are shown in the column headers and are known as 'Rule Groups'. All TLDs are enabled (accepted) by default. You can disable TLDs/gTLDs from which you do not want to accept mail. The interface also allows you to: Add new custom TLDs Configure TLD based mail filtering To add a new custom TLD Click 'Add' from the Accepted domains interface 212
213 The 'Add filter rule dialog' will appear. Choose the category from the 'Rule group' drop-down Enter the TLD name, without the '.' prefix, in the 'Domain suffix' text field Click 'Save' to add the TLD to the list To allow mail from mail servers with the new TLD, leave it selected To block the mails from the mail servers with the new TLD, de-select it. To configure TLD based mail filter Deselect TLDs from which you want to block mail. Enable TLDs from which you want to accept mail. Recipient Whitelist Since all filtering for whitelisted recipients is disabled, we recommend you use this option only in special circumstances. For example - abuse@domain.com and postmaster@domain.com The recipient whitelist interface lets you: Add users to recipient whitelist Export the list to CSV file for use in future Remove users from recipient whitelist Reset the list - Delete all whitelisted recipients except the default recipients by clicking the 'Reset to default' button To configure recipient whitelist Click 'Domain Rules' > 'Recipient whitelist' in the left-hand menu. By default, the selected domain will have 'abuse' and 'postmaster' as whitelisted recipients. Add Users to Recipient List You can add recipients to the whitelist in the following ways: 213

214 Manually add recipients Import recipients from a CSV file To manually add recipients Click 'Domain Rules' > 'Recipient whitelist' in the left-hand menu. Click 'Add' to add a new user to the list The 'Add' dialog will open: Enter the recipient's name in the ' ' text field and click the 'Save' button. To add a particular set of recipients to the whitelist, prefix or suffix the wildcard * in the text field. For example, enter *.stores for all the recipients in stores department to be whitelisted. To add a whole domain to whitelist, enter the wildcard * in the text field and click the 'Save' button. Now all the recipients in that domain will be whitelisted. The recipient's name will be added to the list. 214


215 To import users from CSV file Administrators can import many users to the recipient whitelist from a.csv file Users should be specified in the following format: Click the 'Import from CSV file' to import users to whitelist from a CSV file The 'Upload' dialog will open: Click the 'Upload' button and navigate to the location where the file is saved and click the 'Open' button. The maximum size of the file that can be uploaded is 9 MB. The upload will be placed in import tasks queue and the progress of the upload will be displayed. 215

216 To remove the upload from the queue Click the 'Remove import task' button. If the task is in progress, 'Remove import task' deletes only the remaining part of the task. On completion of the upload process, the results will be displayed: The recipient whitelist from.csv file will be uploaded and the administrator who carried out the task will receive a notification about the import task completion. Export the Recipient Whitelist to CSV file You can save the configured recipient whitelist by exporting it as a CSV file. If required in future, administrators can import users from the csv file (for example, for a new account or after a reset). To export the list 216

217 Click the 'Export to CSV file' button to save the list of whitelisted recipients as a CSV file A file download dialog will be displayed. Click 'OK' and navigate to the location in your computer and save the file or the file will be downloaded to your download folder. Delete Users from the Recipient Whitelist Select the recipient from the list and click the 'Delete' button 217

218 Click 'OK' to confirm your changes. Sender Whitelist All filtering is disabled on mail sent by white-listed senders to recipients at the selected domain. The only exception is that mail from a white-listed sender which contains a suspicious attachment will still be blocked UNLESS the 'Suspicious attachment rule' is enabled. This may seem counter-intuitive on first reading. The following table shows how the 'Suspicious Attachment' option affects a sender white-list rule: Suspicious Attachment option Rule Type 1 Enabled Rule Type 2 Disabled Suspicious file detected? White-listing applied? Yes Yes No Yes Yes No No Yes Use Type 1 if you want all mails from a sender to be whitelisted and received, including those that contain suspicious attachments. Use Type 2 if you want to white-list all mails from a sender except those that contain suspicious attachments. See the Rules section if you need more details. Comodo strongly recommends white-listing a sender only when the system wrongly blocks s from a trusted sender. White-listing a sender over-rules 'Blacklist senders per user'. See Blacklist Senders Per User for more details. Add users to Sender whitelist Export the list to CSV file for use in future Remove users from Sender whitelist 218


219 Reset the list - Delete all whitelisted senders and make the list empty by clicking the 'Reset to default' button To configure sender whitelist Click 'Domain Rules' > 'Sender Whitelist' in the left-hand menu. The 'Sender whitelist' interface of the selected domain will be displayed: Add Users to Sender Whitelist You can add recipients to a white list in two ways: Manually add senders Import senders from a CSV file To manually add senders Click 'Add' to open the add whitelisted sender dialog: Enter the sender name in the ' ' text-box and sender's domain name after symbol and click the 'Save' button. Repeat the process to add more whitelisted senders. To add a particular set of senders to whitelist, prefix or suffix the wildcard character * in the ' ' text field and senders' domain name after symbol. For example, enter *stores.com for all the senders in stores department to be whitelisted. 219

220 To add a specific username from any mail domain to the whitelist, enter the username in the mail text field and the wildcard character * after symbol. For example, enter john@* for whitelisting the username 'john' with any domain name. To add a set of users or specific username from any domain with a specific top level domain (TLD) name like.com,.org, enter the wildcard character * or username in the text field and enter * followed by the TLD after symbol. For example, '*@*.com' will whitelist all the senders from all the domains ending with '.com'. To add a whole domain to whitelist, enter the wildcard character * in the text field and domain after symbol and click the 'Save' button. Now all the senders with the entered domain name will be whitelisted. The list of whitelisted senders will be displayed. To import senders to whitelist from CSV file Administrators can import multiple senders from a.csv file. The senders' addresses should be saved in the following format: sender1@domainname1 sender2@domainname2 sender3@domainname3 Click the 'Import from CSV file' to import senders to whitelist from a CSV file. 220


221 Click 'Upload', navigate to the location where the file is saved and click the 'Open' button. The maximum size of the file that can be uploaded is 9 MB. The upload will be placed in import tasks queue and the progress of the upload will be displayed. To remove the upload from the queue Click the 'Remove import task' button. The 'Remove import task' deletes only a remaining part of not imported task. On completion of the upload process, the results will be displayed. 221

222 The sender whietlist from.csv file will be uploaded and the administrator who carried out the task will receive a notification about the import task completion. Export the Sender Whitelist to CSV Click 'Export to CSV file' to save the list of whitelisted senders as a CSV file 222

223 A file download dialog will be displayed. Click 'OK' and navigate to the location in your computer and save the file or the file will be downloaded to your download folder. Delete Users from the Sender Whitelist To delete a sender from the whitelist, select the sender from the list and click the 'Delete' button. 223

224 Click 'OK' to confirm your changes. Recipient Blacklist CDAS will automatically block all s to blacklisted recipients. Blocked messages will not be quarantined and legitimate SMTP mail servers will send a bounce message to the sender. Administrators can: Add users to the recipient blacklist Export the list to CSV file for use in future Remove users from recipient blacklist Reset the list - Remove all senders from the blacklist by clicking the 'Reset to default' button To configure recipient blacklist Click the 'Recipient blacklist' from the 'Domain Rules' drop-down on the left The 'Recipient blacklist' interface of the selected domain will be displayed: 224

225 Add Users to Recipient Blacklist You can add recipients to the black list in the following ways: Manually add the recipients Import recipient from a CSV file To manually add recipients Click 'Add' to add a new user to the list The 'Add' dialog box will open: 225


226 Enter the recipient name in the textbox and click the 'Save' button. Repeat the process to add more recipients to blacklist. To add a particular set of recipients to blacklist, prefix or suffix the wildcard * in the ' ' text field. For example, enter *.stores for all the recipients in stores department to be blacklisted. To add a whole domain to blacklist, enter the wildcard * in the ' ' text field and click the 'Save' button. Now all the recipients in that domain will be blacklisted. The list of blacklisted recipients will be displayed. To import users to blacklist from CSV file Administrators can import multiple users to the recipient blacklist from a.csv file. Users should be specified in the.csv in the format shown below: user1@testdomain user2@testdomain user3@testdomain Click the 'Import from CSV file' button to import users to blacklist from a CSV file. 226

227 Click 'Upload', navigate to the location where the file is saved and click the 'Open' button. The maximum size of the file that can be uploaded is 9 MB. The upload will be placed in import tasks queue and the progress of the upload will be displayed. To remove the upload from the queue Click the 'Remove import task' button. 'Remove import task' deletes only the remaining part of an 'inprogress' task. On completion of the upload process, the results will be displayed. The recipient blacklist from.csv file will be uploaded and the administrator who carried out the task will receive a notification about the import task completion. Export the Recipient Blacklist to CSV file 227

228 Administrators can save the recipient blacklist by exporting it as a CSV file. If required in future, the administrator can import the users from the csv file, for example for a new account or after a reset. To export the list Click the 'Export to CSV file' to save the list of blacklisted recipients as a CSV file A file download dialog will be displayed. Click 'OK' and navigate to the location in your computer and save the file or the file will be downloaded to your download folder. Delete Users from the Recipient Blacklist Select the recipient from the list and click the 'Delete' button 228

229 Click 'OK' to confirm your changes. The user will be removed from the blacklist and the mails addressed to the user will be allowed as per the existing filter settings in CDAS. Sender Blacklist CDAS will automatically block all s from blacklisted senders. Blocked messages will not be quarantined and most mail servers will send a bounce message to the sender. The sender blacklist interface allows admins to: Add users to sender blacklist Export the list to CSV file for use in future Remove users from sender blacklist Reset the list - Delete all blacklisted senders and make the list empty by clicking the 'Reset to default' button To configure sender blacklist Click the 'Sender blacklist' from the 'Domain Rules' drop-down on the left The 'Sender blacklist' interface of the selected domain will be displayed: 229

230 Adding Users to Senders Blacklist You can add senders to black list in two ways: Manually adding the senders Importing from a CSV file To manually add senders Click 'Add' to add a new blacklisted sender The 'Add' dialog box will be displayed: Enter the sender name in the ' ' textbox and sender's domain name after symbol and click the 'Save' button. Repeat the process to add more blacklisted senders. 230

231 To add a particular set of senders to blacklist, prefix or suffix the wildcard character * in the ' ' text field and senders' domain name after symbol. For example, enter *stores.com for all the senders in stores department to be blacklisted. To add a specific username from any mail domain to the blacklist, enter the username in the mail text field and the wildcard character * after symbol. For example, enter john@* for blacklisting the username 'john' with any domain name. To add a set of users or specific username from any domain with a specific top level domain (TLD) name like.com,.org, enter the wildcard character * or username in the text field and enter * followed by the TLD after symbol. For example, '*@*.com' will whitelist all the senders from all the domains ending with '.com'. To add a whole domain to whitelist, enter the wildcard character * in the text field and domain after symbol and click the 'Save' button. Now all the senders with the entered domain name will be whitelisted. To add a particular set of senders to blacklist, prefix or suffix the wildcard * in the ' ' text field and senders' domain name after symbol. For example, enter *.stores for all the senders in stores department to be blacklisted. To add a whole domain to blacklist, enter the wildcard * in the ' ' text field and domain after symbol and click the 'Save' button. Now all the senders with the domain name entered will be blacklisted. The list of blacklisted senders will be displayed. To import senders to blacklist from CSV file Administrators can import many senders from a file to Sender blacklist at a time. The senders' address should be saved in the format shown below as an example: sender1@domainname1 sender2@domainname2 sender3@domainname3 Click the 'Import from CSV file' to import senders to blacklist from a CSV file. Click 'Upload', navigate to the location where the file is saved and click the 'Open' button. The maximum size of the file that can be uploaded is 9 MB. 231

232 The upload will be placed in import tasks queue and the progress of the upload will be displayed. To remove the upload from the queue Click the 'Remove import task' button. The 'Remove import task' deletes only a remaining part of not imported task. On completion of the upload process, the results will be displayed. 232

233 The sender blacklist from.csv file will be uploaded and the administrator who carried out the task will receive a notification about the import task completion. Exporting the Sender Blacklist to CSV file The administrator can save the configured sender blacklist by exporting it as a CSV file. If required in future, the administrator can import the users from the csv file, for example for a new account or after a reset. To export the list Click the 'Export to CSV file' to save the list of blacklisted senders as a CSV file 233

234 A file download dialog will be displayed. Click 'OK' and navigate to the location in your computer and save the file or the file will be downloaded to your download folder. Deleting Users from the Sender Blacklist Select the sender from the list and click the 'Delete' button. 234

235 Click 'OK' to confirm your changes. The sender(s) will be removed from the blacklist. The s from the senders will be allowed as per the existing filter settings in CDAS. Whitelist Senders Per User Admins can permit certain senders for specific recipients - even if those senders are blacklisted elsewhere/for other users. Senders can be manually whitelisted for a specific recipient, or can be imported from.csv. They can also be added after a user request. All filtering is disabled for whitelisted senders to specific recipients Comodo strongly recommends you only use this option after analyzing the request is genuine and warranted. To configure sender whitelist per user Click 'Domain Rules' > 'Whitelist senders per user' in the left-hand menu. 235

236 The 'Whitelist senders per user' interface will be displayed: 236

 and the condition selected in column 2.")
237 Sort Entries Click any column header to sort entries in ascending/descending order of the entries in the column. Use Filters to search senders and recipients Click anywhere on the 'Filters' tab to open the filters area. To narrow your search, add more filters by clicking To remove a filter, click the icon beside it. Available filters are: Sender: Will execute a search of senders according to the text in the text box (column 3) and the condition selected in column 2. Recipient: Will execute a search of recipients according to the text in the text box (column 3) and the condition selected in column 2. The following conditions are available: 237
238 Equals: Displays all senders / recipients that match the text entered in the text box. Not Equals: Displays all senders / recipients except the one entered in the text box. Contains: Displays all senders / recipients that contain the words entered in the text box. Not Contains: Displays all senders / recipients that do not contain the words entered in the text box. Starts With: Displays all senders / recipients that start with the words entered in the text box. Ends With: Displays all the senders / recipients that end with the words entered in the text box. Click 'Apply Filter' after selecting the filters. The application will search the respective column(s) according to the filter(s) set and display the result. Click anywhere on the 'Filters' to close the filters area. Click the button to display all users. Note: To display all the Whitelist senders after using the filters option, you have to first click anywhere on the Filters tab to close the filters area and then click the 'Refresh' button. From this interface administrators can: Add senders to whitelist per user Export the list to CSV file for use in future Remove senders from Whitelist senders per user list Add Senders to Whitelist Per User You can add senders to whitelist in the following ways: Manually add senders Import senders from a CSV file Add from a 'Whitelist request' from a user Manually add senders Administrators can manually specify the whitelisted sender and corresponding recipient as follows: Click 'Add' to add a new sender to the list. The 'Add sender' dialog box will be displayed: 238


239 Enter the sender's username in the textbox and sender's domain name after symbol in the first row. Enter the recipient's name in the Recipient text box in the second row. Note: The recipient should be a valid user. Click 'Save' button. Repeat the process to add more whitelisted senders for the user. The list of whitelisted senders will occur. 239

240 Import senders from a CSV file Administrators can import a multiple senders at a time from a comma separated values (CSV) file to Sender whitelist per user. The list of whitelisted senders and respective recipients can be created using notepad or a speadsheet application like MS Excel or OpenOffice Calc and saved in.csv format. Each line in the.csv file should contain the sender's address and the username of the recipient or sender's address and the recipient's address, separated by a comma. An example is shown below: sender1@anydomain.com, recipient1 sender2@anydomain.com, recipient2@domain.com sender3@somedomain.com, recipient3 To import senders to whitelist from CSV file Click the 'Import from CSV file' from the 'Whitelist senders per user' interface. The 'Upload' dialog will appear. Click 'Upload', navigate to the location where the file is saved and click the 'Open' button. The maximum size of the file that can be uploaded is 9 MB. The upload will be placed in import tasks queue and the progress of the upload will be displayed. If you want to remove the upload from the queue, click the 'Cancel import from the CSV file' button. The 'Cancel import from the CSV file' deletes only a remaining part of not imported task. 240


241 On completion of the upload process, the results will be displayed. The sender whitelist per user from.csv file will be uploaded and the administrator who carried out the task will receive a notification about the import task completion. 241

242 Add from Whitelist requests from users The administrator can add senders to whitelist based on the requests of the users. See Management > Whitelisted Requests for more details. Export the Whitelist senders per user list to CSV file The administrator can save the whitelist senders per user list by exporting it as a CSV file. If required in future, the administrator can import the users from the csv file, for example for a new account or after a reset. To export the list Click the 'Export to CSV file' button to save the list of whitelisted senders per user as a CSV file A file download dialog will be displayed. Click 'OK' and navigate to the location in your computer and save the file or the file will be downloaded to your download folder. Delete Senders from Whitelist To delete a sender from the whitelist, select the sender from the list and click the 'Delete' button. 242

243 Click 'OK' in the confirmation dialog. Blacklist Senders Per User Allows admins to prevent certain senders from sending mail to specific users. This feature is useful in scenarios where you want to allow mails from a particular sender to all users in the domain but want to block the sender for a particular recipient in the domain. Senders can be added manually, imported from.csv and from a user request. To configure sender blacklist per user Click 'Domain Rules' > 'Blacklist senders per user' in the left-hand menu: 243


244 The 'Blacklist senders per user' interface will be displayed: 244
 and the condition selected in column 2.")

245 Use Filters to search senders and recipients Click anywhere on the 'Filters' stripe to open the filters area. To add more filters, click To remove a filter, click the icon beside it. Available filters are: Sender: Will execute a search of senders according to the text in the text box (column 3) and the condition selected in column 2. Recipient: Will execute a search of recipients according to the text in the text box (column 3) and the condition selected in column 2. The following conditions are available: Equals: Displays all senders / recipients that match the text entered in the text box. Not Equals: Displays all senders / recipients except the one entered in the text box. Contains: Displays all senders / recipients that contain the words entered in the text box. Not Contains: Displays all senders / recipients that do not contain the words entered in the text box. Starts With: Displays all senders / recipients that start with the words entered in the text box. Ends With: Displays all the senders / recipients that end with the words entered in the text box. Click 'Apply Filter' after selecting the filters. The application will search the respective column(s) according to the filter(s) set and display the result. 245

246 Click anywhere on the 'Filters' stripe to close the filters area. Click the button to display all users. Note: To display all the Blacklist senders after using the filters option, you have to first click anywhere on the Filters tab to close the filters area and then click the 'Refresh' button. From this interface you can: Add senders to blacklist per user Export the list to CSV file for use in future Remove senders from blacklist senders per user list Adding Senders to Blacklist Per User You can add senders to blacklist in the three ways: Manually add senders Import senders from a CSV file Add senders from Blacklist requests from users Manually add senders The administrator can manually specify the senders to be whitelisted for specific recipients, one-by-one to be added. To manually add senders to blacklist per user basis Click 'Add' to add a new sender to the list. The 'Add sender' dialog box will be displayed: Enter the sender's username in the textbox and sender's domain name after symbol in the first row. 246

247 Enter the recipient's name in the Recipient text box in the second row. Note: The recipient should be a valid user. Click 'Save' button. Repeat the process to add more blacklisted senders for the user. The list of blacklisted senders will be displayed. Import senders from a CSV file Administrators can import a multiple senders at a time from a comma separated values (CSV) file to Sender blacklist per user. The list of blacklisted senders and respective recipients can be created using notepad or a speadsheet application like MS Excel or OpenOffice Calc and saved in.csv format. Each line in the.csv file should contain the sender's address and the username of the recipient or sender's address and the recipient's address, separated by a comma. An example is shown below: sender1@anydomain.com, recipient1 sender2@anydomain.com, recipient2@domain.com sender3@somedomain.com, recipient3 To import senders to Blacklist from CSV file Click the 'Import from CSV file' from the 'Blacklist senders per user' interface. The 'Upload' dialog will appear. 247

248 Click 'Upload', navigate to the location where the.csv file is saved and click the 'Open' button. The maximum size of the file that can be uploaded is 9 MB. The upload will be placed in import tasks queue and the progress of the upload will be displayed. If you want to remove the upload from the queue, click the 'Cancel import from CSV file' button. The 'Cancel import from CSV file' deletes only a remaining part of not imported task. On completion of the upload process, the results will be displayed. 248
249 The sender blacklist per user from.csv file will be uploaded and the administrator who carried out the task will receive a notification about the import task completion. Adding senders from Blacklist requests from users The administrator can add senders to blacklist based on the requests of the users. Refer to the section Management > Blacklisted Requests for more details. Exporting the Blacklist senders per user list to CSV file The administrator can save the blacklist senders per user list by exporting it as a CSV file. If required in future, the administrator can import the users from the csv file, for example for a new account or after a reset. To export the list Click the 'Export to CSV file' button to save the list of blacklisted senders per user as a CSV file 249


250 A file download dialog will be displayed. Click 'OK' and navigate to the location in your computer and save the file or the file will be downloaded to your download folder. Delete Senders from the Blacklist To delete a sender from the blacklist, select the sender from the list and click the 'Delete' button. Click 'OK' in the confirmation dialog. 250
 servers.")
251 Account Management The 'Account Management' interface allows you to manage users for a selected domain. Admins can reset passwords for users, allow or deny access to user accounts, import users from.csv file and import users from Active Directory (AD) servers. Administrators can also view users' login history. See User History for more details. Click the following links for more details: Users User auto-import Users history Importing Users from LDAP User Account Management The 'Users' area lets you manage users for a selected domain. You can add/import users, delete users, edit user accounts, reset passwords and configure user permissions. Admins can also configure aliases from this interface. Click the following links for more details: 251

252 Manage Users Add New Users Delete Users Edit Users Unlock Users Import Users from CSV Manage User Permissions Aliases Moving to Aliases Import Aliases from CSV Forward mails to another user Other actions Manage Users Click 'Account management' on the left then click 'Users': 252


253 This open the 'Users' interface of the selected domain: Click any column header to sort items in ascending/descending order of the entries in that column. Sorting is not available for the 'Aliases' and 'Group' columns. Use filters to search for users Click anywhere on the 'Filters' stripe to open the filters area. You can add more filters by clicking for narrowing down your search. 253
254 You can remove a filter by clicking the icon beside it. Available filters are: Username: Will execute a search of usernames according to the text in the text box (column 3) and the condition selected in column 2. If 'Username' is selected, the following conditions are available: Equals: Displays all usernames that match the text entered in the text box. Not Equals: Displays all users except the one entered in the text box. Contains: Displays all username(s) that contain the words entered in the text box. Not Contains: Displays all username(s) that do not contain the words entered in the text box. Starts With: Displays all username(s) that start with the words entered in the text box. Ends With: Displays all the username(s) that end with the words entered in the text box. Other options available in the first drop-down in the filters area: Enabled: Sorts the results based on whether a user is enabled or disabled. When you select this option in the first drop-down, 'equals' is the only option available in the second drop-down: Equals: Displays the results of enabled users when the checkbox beside it is selected. When the checkbox is not selected, it displays the list of users who are not enabled. Last Login: Sorts the results based on the last login details of users. When you select this option in the first drop-down, the following filters are available: Equals: Displays the list of users whose last login date is the same as the selected date in the third box from the calendar. Less than: Displays the list of users whose last login date is less than the selected date in the third box from the calendar. Greater than: Displays the list of users whose last login date is greater than the selected date in the third box from the calendar. Alias username: Will execute a search of user alias name according to the text in the text box (column 3) and the condition selected in column 2. When you select this option in the first drop-down, the following filters are available: Contains: Displays all users with alias name(s) that contain the words entered in the text box. Equals: Displays all users with alias names that match the text entered in the text box. Not Equals: Displays all users except those with the alias name entered in the text box. Not Contains: Displays all user alias name(s) that do not contain the words entered in the text box. Starts With: Displays all user alias name(s) that start with the words entered in the text box. Ends With: Displays all the user alias name(s) that end with the words entered in the text box. Alias Domain: Will execute a search of domain alias name according to the text in the text box (column 3) and the condition selected in column 2. When you select this option in the first drop-down, the following filters are available: Contains: Displays all users with domain alias name(s) that contain the words entered in the text box. Equals: Displays all users with domain alias names that match the text entered in the text box. Not Equals: Displays all users except those with the domain alias name entered in the text box. Not Contains: Displays all user domain alias name(s) that do not contain the words entered in the text box. Starts With: Displays all user domain alias name(s) that start with the words entered in the text 254
 and the condition selected in column 2.")
255 box. Ends With: Displays all the user domain alias name(s) that end with the words entered in the text box. Forward to: Will execute a search of forwarded to user names according to the text in the text box (column 3) and the condition selected in column 2. When you select this option in the first drop-down, the following filters are available: Equals: Displays all usernames that match the text entered in the text box. Not Equals: Displays all users except the one entered in the text box. Contains: Displays all username(s) that contain the words entered in the text box. Not Contains: Displays all username(s) that do not contain the words entered in the text box. Starts With: Displays all username(s) that start with the words entered in the text box. Ends With: Displays all the username(s) that end with the words entered in the text box. Group: Will execute a search of users belonging to the user group selected from the drop-down in the third column and the condition selected in column 2. When you select this option in the first drop-down, the following filters are available: Equals: Displays all users from the group selected from the third drop-down. Not Equals: Displays all the users excluding those belonging to the group selected from the third drop-down. Click 'Apply Filter' after selecting the filters. The application will search the respective column(s) according to the filter(s) set and display the result. Click anywhere on the 'Filters' to close the filters area. Click the button to display all users. Note: Click anywhere on the 'Filters' tab to close the filters area. Click the 'Refresh' button to remove filters. Add a new user Click the 'Add' button. The 'New user' dialog will be displayed: 255

256 Enter the username of a new user that will be first part of the address. For example, if you type 'alice', the address of the user will be 'alice@domainname.com'. By default, the user will be enabled. Clear the 'Enabled' box to deny the new user access to CDAS. You can enable the user in the Edit user interface later on. You can choose to add the new user to Recipient Whitelist from this interface itself. Select the checkbox beside the 'Whitelist ' to add the user to Recipient Whitelist. The administrators can also determine whether the users will get the reports or not. By default, it is enabled. Deselect the 'Send quarantine reports' box to disable this option. Select the 'Send invitation' box to send an invitation mail to the recipient address entered in the 'Username' text box. Select 'Non human' if the address is a no-reply or common mailing list such as 'sales@...' Select 'Public ' if the address is published somewhere, for example on a customer facing website. Enabling this box will allow CDAS to more accurately filter spam for this type of address. You can choose whether containment feature should be enabled / disabled for the user. This setting overrides the containment settings configured for the domain. Enable Containment The options available are: Enable Disable Use domain settings (Enable) Applies the domain settings for containment to the user. Default value is 'Enabled' for a domain. Click the 'Save' button. Note: If the user is disabled and subscribed for periodical Quarantine Reports, the subscription will also be canceled. 256

257 An to the added user will be sent automatically containing password to access CDAS. The password can be reset in the edit interface. The added user will be displayed in the list. Note: The number of users that can be added depends on the plan subscribed by you and the maximum number of users limit configured for the domain in the Add Domains / Edit Domains / Domain Settings interfaces. When you exceed the limit of users, the following will be displayed while adding a new user. To delete an existing user Select the user you want to delete from the list and click the 'Delete' button Click 'OK' to confirm your changes. 257


258 The user(s) will be removed from the list. To edit an existing user You can select to allow or deny permission for the users to access their CDAS account in the edit interface as well as enable or disable quarantine report generation for the user. Select the user you want to edit from the list and click the 'Edit' button. The 'Edit user' dialog will appear. Enabled - Allows the user to access the CDAS interface. Whitelist - Adds the user to the Recipient Whitelist. Disable 'Send quarantine reports' checkbox, if you do not want the user to get quarantine reports. By default it is enabled. Click the 'Save' button to confirm your changes. Note: Any active subscriptions or scheduled reports for the user will be automatically canceled if access to CDAS is disabled. 258

259 To unlock users Users who try to login to CDAS with wrong credentials will be automatically locked after three unsuccessful attempts. They will be able to try again only after 30 minutes from the time of lockout. CDAS administrators can unlock these users immediately without waiting for the timeout period to end, so that the users can try to login again to CDAS. The locked out users will be displayed with a lock icon beside them. Select the locked user from the list and click the 'Unlock' button. A confirmation dialog will be displayed. Click 'OK' to unlock the selected locked user. The user now can try to login again without waiting for the lockout time period to end. To import users from CSV file You can add many new users at a time by importing from a file. The users should be saved in 'comma separated value' (CSV) as shown below: username1,domainname,true username2,domainname,false To import new users from a CSV file click 'More actions' > 'Import from CSV file' 259


260 The 'Upload' dialog will be displayed. Click the 'Upload' button and navigate to the location where the file is saved and click the 'Open' button. The upload progress will be displayed......and when completed, the results will be displayed. 260


261 The administrator who carried out the task will receive a notification about the import task completion. Note: The number of users that can be added depends on the plan subscribed by you and the maximum number of users limit configured for the domain in the Add Domains / Edit Domains / Domain Settings interface. CDAS will stop importing users after the number of users allowed for the account is reached and a warning will be displayed. Managing Permissions for users CDAS allows you to assign permissions to users that will determine what they can and cannot do in CDAS - MSP. Administrators can create policies and assign them to users from this interface. See Groups & Permissions for more details on how to create groups and policies. A new user will be automatically assigned default permission settings. To assign permissions for a user Select the user(s) and click 'More actions' > 'Manage permissions' 261

 and 'Power User' groups will be available and administrators can add,")
262 The 'User Groups & permissions' interface will appear. The interface displays the list of groups available with same or different permission levels for each group. By default, 'User (Default) and 'Power User' groups will be available and administrators can add, edit groups and assign permissions to users. See the section ''Groups & Permissions for more details. Select the group from the list. 262


263 The permissions set for this group will be displayed on the right. Click the 'Assign to selected users' button to set permissions for selected user or multiple users. Click 'Assign to filtered users' button to set permissions for selected group to all users or to all users found by filter. Click 'OK' in the confirmation window. The selected user(s) will be assigned to the group and successfully assigned message will be displayed. 263


264 The interface also displays the new group assigned for the selected user under the 'Group' column. Add the user aliases CDAS allows admins to add a user alias name to organize s related to different groups or functions into a single inbox automatically. The users can protect their real address. Select a user and click 'More actions' > 'Aliases' to add user aliases. Enter the full alias address of the user. Note: The alias address must be of any domain belonging to the account. 264


265 Click the Save button. Note: Users cannot add an alias by themselves. To add multiple aliases click the button. To remove an added alias row click the icon beside it. After adding a user to an alias, admins can extract him/her as a user. Click the 'Aliases' button after selecting the user. In the 'User Aliases' dialog next to the added alias row, the 'Extract as user' button will be displayed. Click the 'Extract as user' button. The confirmation dialog will be displayed. Click 'OK' The user extracted from the 'User Aliases' dialog box will be added to list of users in the respective domain added as alias and will be placed in the default group. 265


266 Note: The number of users that can be added for an account depends on the plan subscribed by you. When you exceed the limit of users, a warning will be displayed. Moving user account to aliases CDAS allows admins to move an existing user as an alias for another user for any domain available in your account. Select the user then click 'More actions' > 'Move to aliases' Type the full address of the user for whom the alias has to be added. Note: The user and domain should be valid and belong to your account. Click the 'Save' button. 266
 Importing alias from CSV file You can add many aliases to existing user(s) at a time for the selected domain and / or for other domains available for your account by importing from a file.")
267 Now, the selected user has become an alias of another user. (This could be for the same domain or another domain belonging to your account.) Importing alias from CSV file You can add many aliases to existing user(s) at a time for the selected domain and / or for other domains available for your account by importing from a file. The aliases should be saved in 'comma separated value' (CSV) as shown below: Example 1 The following example shows how you can add alias for two users for the selected domain. alias@domain.com username1, username2 Example 2 The following example shows how you can add alias for users for the selected domain and other domains available for your account. alias@domain.com username1, username2, username3@domain2 Please note that for adding many aliases at a time, each alias should be separated by a paragraph line. For example: alias1@domain.com username1, username2 alias2@domain.com username1, username2, username3@domain2 To assign alias for users from a CSV file Click 'More actions' > 'Import alias from CSV file' 267


268 The 'Upload' dialog will be displayed. Click the 'Upload' button and navigate to the location where the file is saved and click the 'Open' button. The upload progress will be displayed. 268


269 ...and when completed, the results will be displayed. The administrator who carried out the task will receive a notification about the import task completion. Forwarding mails to another user CDAS allows administrators to add a forwarding address for a user. This is useful when a user is on vacation or unavailable for sometime but the mails addressed to him should be attended immediately. Please note the forwarded user should also be in the same domain. Select the user whose mails have to be forwarded to another user and then click 'More actions' > 'Forward to' The 'Forward settings...' dialog will be displayed: 269


270 Select the 'Enable forwarding' check box Enter the user name of the recipient to whom the mails have to be forwarded in the 'Forward all user messages to' field Click the 'Save' button The forwarded user will be added and a success message will be displayed. The incoming mails of the selected user will be automatically forwarded to the added user in the domain. When the selected user logs in to his/her CDAS account, an alert will be displayed at the top of the interface. To remove the forwarded mail address for a user, select the user, click 'More actions' > 'Forward to' The 'Forward settings...' dialog will be displayed: 270
271 Deselect the 'Enable forwarding' check box Delete the username in the 'Forward all user messages to' field Click the 'Save' button The forwarded user will be removed and a success message will be displayed. Other Actions To allow user to access to CDAS interface, click the 'More actions' > 'Enable'. A confirmation dialog will be displayed. If you want to allow access to user selected by applying filter, apply filters and click 'More actions' > 'Enable by filter'. A confirmation dialog will be displayed. Click the 'More actions' and select the 'Regenerate password'. The password will be reset for the user in case it is forgotten. The new password will be sent to the user's automatically. The user has to use this new password to access CDAS. A confirmation dialog will be displayed. To send invitation to new created users, select users and click 'More actions' > 'Send invitation'. A confirmation dialog will be displayed Manage User auto-import CDAS can automatically import users belonging to a managed domain after receiving the first mail addressed to the user. Each new user will be imported in around 30 minutes and sent an invitation mail containing an activation link and credentials for their CDAS user account. New users can activate their CDAS account by clicking the link in the invitation mail or by logging-in to CDAS with the credentials provided in mail. Administrators have the option to receive a notification whenever a new user is auto-imported into CDAS The 'User auto-import' interface allows administrators to enable and configure the auto-import feature. To access the User Auto-Import interface Open the 'Domains' interface and select the domain you wish to configure Click the 'Manage Domain' button to open the 'Domain Management' interface. Select 'Account management' on the left then choose 'Users auto-import' 271


272 The 'Users auto-import' interface will open: Enable auto-import - Select this option to activate the feature. 272

273 Automatically enable imported users - Allows all auto-imported users to access their CDAS user account. Send invitation to imported users - Sends invitation mails to newly imported users. The mail will contain the activation link and their login credentials. Notify administrators about imported users - Select this option if admins should be notified whenever a new user is auto-imported. You can specify administrators (including self) to whom the notification mails are to be sent in the 'Notification recipients' box. The notification contains the imported user name and the domain name. Notification recipients - Enter the addresses of admins to whom notification s should be sent. You can enter multiple address, separated by commas. Click 'Save' for your settings to take effect View User History The 'Users History' area contains a log of user activities on CDAS. You can filter users by IP address, last login, domain, username and/or location. Note: This interface will only show user connections to the current domain (the domain that is shown near the top of the interface). If required, you can view user connections for all domains in the 'Account Management section' (click 'Dashboard' then, in the 'Account Management' section, click 'User's History' sub tab). The remainder of this page explains how to access the history interface and how to use filters to create custom searches. To view user history Open the 'Domains' interface and select a domain Click the 'Manage Domain' button to open the 'Domain Management' interface. Click 'Account management' on the left then 'Users history'. 273


274 The 'Users history' interface of the selected domain will open: Sort the Entries Click any column header to sort items in ascending/descending order of the entries in that column. The sorting option is not available for 'Login Duration' column. Use filters to search for users Click anywhere on the 'Filters' stripe to open the filters area. 274


275 You can add more filters by clicking You can remove a filter by clicking the for narrowing down your search. icon beside it. Available filters are: Username: Will execute a search of usernames based on the search criteria entered in the third text box and the selected condition. Domain: Will execute a search of domains based on the search criteria entered in the third text box and the selected condition. IP: Will execute a search of IP Addresses based on the search criteria entered in the third text box and the selected condition. Location: Will execute a search of locations based on the search criteria entered in the third text box and the selected condition. If any of the above options is selected in the first drop-down, the following conditions are available: Equals: Displays all entries that match the text entered in the text box. Not Equals: Displays all entries except the one entered in the text box. Contains: Displays all entries that contain the words entered in the text box. Not Contains: Displays all entries that do not contain the words entered in the text box. Starts With: Displays all entries that start with the words entered in the text box. Ends With: Displays all entries that end with the words entered in the text box. Other options available in the first drop-down in the filters area: Last Login: Sorts the results based on the last login details of users. If 'Last Login' is selected, the following conditions are available: 275
276 Equals: Displays the users whose last login is same as the selected date in the third box from the calendar Less than: Displays the users whose last login dates are less than the selected date in the third box from the calendar Greater than: Displays the users whose last login dates are greater than the selected date in the third box from the calendar Click 'Apply Filter' after selecting the filters. The application will search the respective column(s) according to the filter(s) set and display the result. Click anywhere on the 'Filters' to close the filters area. Click the button to display all the users. Note: Click anywhere on the 'Filters' tab to close the filters area. Click the 'Refresh' button to remove filters Import Users from LDAP In addition to adding users manually and importing users from CSV, you can import the users from domain's Active Directory (AD) server. CDAS can be configured to import users from your AD server using the Lightweight Directory Access Protocol (LDAP). CDAS periodically synchronizes with the AD server to automatically add or removal users based on changes made to the AD server. Click the following links for more details: LDAP Import Configuration LDAP Import Confirmation List LDAP Import Ignore List Troubleshooting LDAP LDAP Import Configuration The LDAP Import Configuration interface allows you to to configure CDAS to import users from the domain's Active Directory server. Comodo strongly recommends that a separate LDAP/AD account be created for the purpose of the CDAS login and that this user account should be allocated read-only permissions. To configure LDAP import Open the 'Domains' interface and select the domain into which you want to import users. Click the 'Manage Domain' button to open the 'Domain Management' interface. Click 'Account management' on the left and select 'LDAP import configuration'. 276

277 The 'LDAP import configuration' interface will open: 277
278 Connection Settings Host (IP Address or Name) - Enter the hostname or external IP address of the AD server. If your organization uses the same physical server AD and the Mail Exchange server, then enter the host name or IP address of the mail server. Port - Enter the port number of the Active Directory server's LDAP port. 389 is the default port for non-ssl connections ('Use SSL To Connect?' box NOT checked) 636 is the default port if SSL connection is active ('Use SSL To Connect?' box checked) Use SSL To Connect? - Select the 'Yes' check box if you wish us to use secure LDAP. To use secure LDAP, you need to install an SSL certificate from a trusted Certification Authority (CA) on your AD server. Self-signed certificates are not allowed. Note: SSL access should have been enabled for the AD Server before enabling the SSL option. Login/Query Settings LDAP login name: - Account username which CDAS should use to login to the AD server. Preferably, a new user account should be created especially for the CDAS server. The user account should have 'read' privileges to the AD server. The username can be of the format 'username' or 'username@domainname.com' Password - Enter the password of the LDAP user account above. Remember Credentials - Enable this option if you wish CDAS server to store the username/password of the user account in order to automatically login. 278
279 Note: If you enable automatic synchronization, the 'Remember Credentials' option will not be visible because CDAS will store the username and password by default. This will allow CDAS to connect to the AD server at the set time interval to update the user base. The option will become visible if 'Synchronization Interval' setting is set as 'no auto updates'. Synchronization interval - If you wish to configure CDAS to automatically connect to the AD server and synchronize the user base, select the time interval for synchronization from the drop-down. Else, select 'No auto updates'. BaseDN - Distinguished Name of the user object in Active Directory. By default, the BaseDN field will contain the Domain Component (DC) values based on the domain name for which LDAP is configured. You can add/change the values of the strings 'Container Name (CN)', 'Organizational Unit (OU)' and 'domain name' depending on the users to be imported from the Active Directory. Example: For adding users from Container 'Users', Organizational unit 'Organization' and domain 'example.com', the administrator has to enter the following: CN=Users, OU = Organization, DC=example, DC=com Filter - Enables the Administrator to specify filter parameters users/addresses to be imported from the AD server. Each filter parameter should be defined within parentheses. Common filter parameters are explained below: (objectclass=<ad user type>) - Specifies the user accounts to look for from the domain's Active Directory. (Default = (objectclass=user)) (mail=*<domain name>) - Instructs CDAS to import only the users that have a defined SMTP account within the domain. By default, the filter is pre-added with the parameter (mail=*@<current domain name>) to import the users that have addresses on the current domain. You can add any number of (mail=) filters if you wish to add several domain names Example: (mail=*@domainname1.com)(mail=*@domainname2.com) To import all enabled users from the Active Directory irrespective of any specific domain name, enter the parameter as '(mail=*)'. To modify a filter parameter to be exclusive rather than inclusive, add an exclamation mark (!) before the opening parenthesis of any parameter. This will instruct the query to ignore any users which fall into that category. For example, if one wanted to configure a query to find users with mail enabled at any domain EXCEPT domainname.com, the filter should include the following: (mail=*)!(mail=*@domainname.com). To import all enabled users from the Active Directory irrespective of any specific domain name, enter the parameter as '(mail=*)'. Note: CDAS can only import LDAP users that have addresses on domains that you have added to CDAS in the Domains interface. To successfully import users, you must make sure the domain of their addresses has been added to CDAS AND that the LDAP Import is configured for each individual domain from the Domain Management are of the respective domain. Mail attribute - Enter the LDAP display name of the contact address attribute of the AD Server. By default, this attribute name will be 'mail' for AD servers or the distinguished name (DN) or common user login name for the AD server. On other servers like Novel or OpenLDAP this attribute may be different and server specific. Override existing records: Allow CDAS to create user accounts as found on LDAP server - Select this checkbox if you wish new users added in the AD server to be automatically added to CDAS during synchronization. If you do not 279

280 select this option, you can manually import the new users from the LDAP import confirmation page. Allow CDAS to delete user accounts not found on LDAP server - Select this checkbox if you wish users removed from AD server, to be automatically removed from CDAS during synchronization. If you do not select this option, you can manually remove users from the LDAP import confirmation page. Information Settings Send Reports - If enabled, CDAS will send notifications to the administrator whenever new users are created or users are removed either automatically, (if 'Allow to create users?'/'allow to delete users?' are enabled) or manually from the LDAP import confirmation page. Last synchronization time (GMT) - Displays the date and time of last manual or scheduled synchronization with AD server, in GMT. Notification area - Contains information about errors that occurred during synchronization. In most cases, this will contain the same information that is provided with the "Test connection" feature. Note - this area is only visible if errors occur. To check the configuration and connectivity, click 'Test Connection'. If the connection is established successfully then the success message will be displayed with the total number of users detected from the AD server. Click 'Save' to store your configuration. Click 'Save and run synchronization now' to store your configuration and synchronize the CDAS user base with the AD server. LDAP Import Confirmation List The LDAP import confirmation list interface displays the list of: Users created at the AD server and not yet been imported into CDAS Users not present on AD server and not yet been removed from CDAS if ''Allow to create users?' / 'Allow to delete users?' are not enabled in LDAP import configuration interface, along with the list of users created in CDAS. The administrator can import the users created at AD server into CDAS manually and remove existing users from this interface. Administrators can also initiate an on-demand synchronization from this interface. To view LDAP import confirmation list Open the 'Domains' interface and select a domain Click the 'Manage Domain' button to open the 'Domain Management' interface. Click 'Account management' on the left then select 'LDAP import confirmation list'. 280


281 The 'LDAP import confirmation list' interface will open: The screen shows users added to and removed from the AD server with existing users created on CDAS. This list reflects the difference between CDAS users and AD users, considering the LDAP ignore list. Users present in AD which are not present in CDAS will have the status 'Create' Users not present in AD but present in CDAS will have the status 'Delete' Sort the Entries 281


282 Click any column header to sort items in ascending/descending order of the entries in that column. The sorting option is not available for 'Login Duration' column. Use filters to search for users Click anywhere on the 'Filters' stripe to open the filters area. You can add more filters by clicking You can remove a filter by clicking the for narrowing down your search. icon beside it. Available filters are: Username: Will execute a search of usernames according to the text in the third text box and the selected condition. If 'Username' is selected, the following conditions are available: Equals: Displays all usernames that match the text entered in the text box. Not Equals: Displays all users except the one entered in the text box. Contains: Displays all username(s) that contain the words entered in the text box. Not Contains: Displays all username(s) that do not contain the words entered in the text box. Starts With: Displays all username(s) that start with the words entered in the text box. Ends With: Displays all the username(s) that end with the words entered in the text box. Other options available in the first drop-down in the filters area: 282


283 Status: Sorts the results based on whether a user's status is 'Create' or 'Delete' selected from third column and condition selected from second column. If 'Status' is selected, the following conditions are available: Equals: Displays the users whose status is as chosen in third column Not Equals: Displays the users whose status is opposite to that chosen in third column Click 'Apply Filter' after selecting the filters. The application will search the respective column(s) according to the filter(s) set and display the result. Click anywhere on the 'Filters' tab to close the filters area. Click the button to display all users. Note: Click anywhere on the 'Filters' tab to close the filters area. Click the 'Refresh' button to remove filters. To run a manual on-demand synchronization, click 'Run synchronization now' If you have not selected the option Remember credentials in LDAP Import Configuration interface, you will be asked to enter the username and password for CDAS to access the AD server. Enter the LDAP login credentials and click 'OK'. CDAS server will connect to your AD server and start detecting the changes in the users in the AD server. All the users added to the AD server will be displayed as a list. To import or delete users selected by applying filter, apply filters as described above and click 'More actions' > 'Apply import by filter'. To import or delete a set of selected users, select the users and click 'More actions' > 'Apply import by selection'. 283

284 To import all users created at the AD server and to delete all the users removed from AD server at once, clear all the filters and click 'More actions' > 'Apply import by filter'. A confirmation dialog will be displayed. Click 'OK'. The import progress will be displayed. On completion, the selected users will be imported or deleted in synchronization with the AD server. Note: The number of users that you can add for all the domains belonging to your account depends on your subscription plan. For example, if the subscription plan for your account allows you to add 1000 users and you have three domains, then you can add 300 users for domain 1, 300 users for domain 2 and 400 users for domain 3. You can set any value between 0 and in the 'Max. number of users' field in the Add Domains / Edit Domains / Domain Settings interface, but CDAS checks if the total number of users for all domains is within your license limit. To move selected users to Ignore List, select the users and click 'Move to Ignore list' and click 'OK' in the confirmation dialog. Users moved to ignore list will be skipped from next synchronization with the AD server. LDAP Import Ignore List The LDAP import ignore list interface displays a list of users to be skipped from being created or deleted in CDAS during synchronization with the AD server. Users can be moved to ignore list from the LDAP Import Confirmation List interface or manually added. Once added to the ignore list, the user will be skipped from the AD server from the next synchronization operation. 284


285 To view LDAP import ignore list Open the 'Domains' interface and select the domain Click the 'Manage Domain' button to open the 'Domain Management' interface. Click 'Account management' tab > 'LDAP import ignore list' sub tab. The 'LDAP import ignore list' interface will be displayed. 285
 and the condition selected in column 2.")
286 Sort the Entries Click the 'Username' column header to sort items in ascending/descending order of the usernames Use filters to search for users Click anywhere on the 'Filters' stripe to open the filters area. Available filters are: Username: Will execute a search of usernames according to the text in the text box (column 3) and the condition selected in column 2. The following conditions are available: Equals: Displays all usernames that match the text entered in the text box. Not Equals: Displays all users except the one entered in the text box. Contains: Displays all username(s) that contain the words entered in the text box. Not Contains: Displays all username(s) that do not contain the words entered in the text box. Starts With: Displays all username(s) that start with the words entered in the text box. Ends With: Displays all the username(s) that end with the words entered in the text box. Click 'Apply Filter' after selecting the filters. The application will search the respective column(s) according to the filter(s) set and display the result. Click anywhere on the 'Filters' to close the filters area. Click the button to display all users. Note: Click anywhere on the 'Filters' tab to close the filters area. Click the 'Refresh' button to remove filters. To add users to ignore list Click 'Add'. The Add ignored user dialog will be displayed. 286

287 Enter the user names to be added to the ignore list Click the Click Save to add the users. icon to add more users A 'Successfully added' message will be displayed at the top. To remove the users from the ignore list Select the users and click 'Remove from ignore list'. A confirmation dialog will be displayed. Click OK. The users will be removed from the list and a 'Successfully deleted' message will be displayed at the top. Users removed from the ignore list will be imported to or deleted from CDAS based on changes in the AD server, during the next synchronization if 'Allow to create users?'/'allow to delete users?' are enabled in LDAP import configuration interface. Users removed from the ignore list will be listed in the LDAP import confirmation list interface based on changes in the AD server, during the next synchronization if 'Allow to create users?'/'allow to delete users?' are not enabled in LDAP import configuration interface Audit Log CDAS keeps a record of actions initiated by users and administrators for all domains belonging to an account. The 'Audit log' area allow administrators with appropriate privileges to view these log reports. CDAS also keeps logs of domains separately for each domain. For more details on selected domain audit log, see Domain Audit Log. This section explains about the consolidated log for all domains available in the account. To view Audit log Click the 'Audit log' in the 'Dashboard' area to view log details for all the domains will be displayed. 287
 Click anywhere on the 'Filters' tab to open the filters area.")
288 Sorting the Entries Click any column heading to switch the sorting of the entries based on the ascending/descending order of the entries as per the information displayed in the respective column. The sorting option is not available for 'Operation description' column. Using Filter options to search particular event(s) Click anywhere on the 'Filters' tab to open the filters area. You can add more filters by clicking for narrowing down your search. 288
 and the condition selected in column 2 Login: Will execute a search of log")
289 You can remove a filter by clicking the icon beside it. Available filters are: Domain: Will execute a search of log entries according to the text entered in the text box (column 3) and the condition selected in column 2 Login: Will execute a search of log entries according to the text entered in the text box (column 3) and the condition selected in column 2 Details: Will execute a search of log entries according to the text entered in the text box (column 3) and the condition selected in column 2 When you select any one of the above options in the first drop-down, the following conditions are available: Contains: Displays all log entries that contain the words entered in the text box Equals: Displays all log entries that contain only the words entered in the text box Not Equals: Displays all log entries that do not contain only the words entered in the text box Not Contains: Displays all log entries that don't contain the words entered in the text box Starts with: Displays all log entries that starts with the words entered in the text box Ends with: Displays all log entries that ends with the words entered in the text box Other options available in the first drop-down in the filters area: Date: Will execute a search of log entries according to the date selected in the calendar box (column 3) and the condition selected in column 2 Role: Will execute a search of log entries according to the role selected in the third field (column 3) and the condition selected in column 2 Operation Description: Will execute a search of log entries according to the action selected in the third field (column 3) and the condition selected in column 2 If 'Date' is selected, the following conditions are available: Equals: Displays the entries that have the same date as the selected date in the third box from the calendar Less than: Displays the entries with dates less than the selected date in the third box from the calendar Greater than: Displays the entries with dates greater than the selected date in the third box from the calendar 289
290 If 'Role' is selected, the following conditions are available: Equals: Displays all log entries that is equal to the role selected in column 3 Not Equals: Displays all log entries that except the role selected in column 3 If 'Operative description' is selected, the following conditions are available: Equals: Displays all log entries that is equal to the event selected in column 3 Not Equals: Displays all log entries that except the event selected in column 3 Click 'Apply Filter' after selecting the filters. The application will search the respective column(s) according to the filter(s) set and display the result. Click anywhere on the 'Filters' tab to close the filters area Click the button to display all the entries The following table provides the details of actions initiated by user/administrator and shown under Operation Key and Operation Description columns in the log report: S.No. Operation Key Operation Description 1 ACCEPT_AND_ARCHIVE_ Accept and archive message 2 ACCEPT_BLACKLIST_REQUEST Accept blacklist request 3 ACCEPT_BLACKLIST_REQUEST_PER_USER Accept request blacklist sender for user 4 ACCEPT_ Accept message 5 ACCEPT_RELEASE_REQUEST Accept release request 6 ACCEPT_WHITELIST_REQUEST Accept whitelist request 7 ACCEPT_WHITELIST_REQUEST_PER_USER Accept request whitelist sender for user 8 ADD_GEOLOOKUP_RESTRICTION Add geolookup restriction 9 ADMIN_ADD Add admin 10 ADMIN_DELETE Remove admin 11 ADMIN_EDIT Edit admin settings 12 ADMIN_PASSWORD_UPDATE Update password for admin 13 ADMIN_PERMISSIONS_ASSIGN_GROUP Assign admin permission group by selection 14 ADMIN_PERMISSIONS_CHANGE_DEFAULT_GRO Change default admin permission group UP 15 ADMIN_PERMISSIONS_GROUP_ADD Add admin permission group 16 ADMIN_PERMISSIONS_GROUP_DELETE Remove admin permission group 17 ADMIN_PERMISSIONS_GROUP_UPDATE Update admin permission group 18 ADMIN_REGENERATE_PASSWORD Regenerate password for admin 19 ADMIN_UNLOCK Unlock admin 20 ADMIN_VIEW_MESSAGE_CONTENT Admin view message content 290
291 21 ARCHIVE_MESSAGE Archive message 22 BLACKLIST_DOMAIN_RULE Blacklist domain rule 23 BLACKLIST_RECIPIENT Blacklist recipient 24 BLACKLIST_RECIPIENT_DOMAIN Blacklist all recipients of the domain 25 BLACKLIST_REQUEST Blacklist request 26 BLACKLIST_SENDER Blacklist sender 27 BLACKLIST_SENDER_DOMAIN Blacklist all senders of the domain 28 BLACKLIST_USER_SENDER Blacklist sender for user 29 CANCEL_BLACKLIST_REQUEST Cancel blacklist request 30 CANCEL_WHITELIST_REQUEST Cancel whitelist request 31 CHANGE_FORWARD_SETTINGS_FOR_INCOMIN Change forward settings for incoming user G_USER 32 DELETE_ _FROM_ARCHIVE Delete archived message 33 DELETE_ _FROM_ARCHIVE_BY_FILTER Delete archived messages by filter 34 DELETE_ _FROM_QUARANTINE Delete quarantined message 35 DELETE_ _FROM_QUARANTINE_BY_FILTE Delete quarantined messages by filter R 36 DOMAIN_ADD Add domain 37 DOMAIN_ALIASES_ADD Add domain alias 38 DOMAIN_ALIASES_DELETE Remove domain alias 39 DOMAIN_AUDIT_CONFIGURATION_CHANGE Audit configuration change 40 DOMAIN_BLOCKED_EXTENSIONS_RESET_TO_ DEFAULT Reset blocked extensions to default 41 DOMAIN_BLOCKED_EXTENSIONS_UPDATE Update blocked extensions 42 DOMAIN_DELETE Remove domain 43 DOMAIN_DESTINATION_ROUTES_UPDATE Update destination routes 44 DOMAIN_ _SIZE_RESTRICTION_CHANGE size restriction change 45 DOMAIN_INCOMING_USER_ADD Add incoming user 46 DOMAIN_INCOMING_USER_ALIASES_UPDATE Update incoming user aliases 47 DOMAIN_INCOMING_USER_DELETE Remove incoming user 48 DOMAIN_INCOMING_USER_EDIT Edit incoming user 49 DOMAIN_INCOMING_USER_MOVE_ALIAS_TO_U Move alias to incoming user SER 50 DOMAIN_INCOMING_USER_MOVE_USER_TO_A Move user to alias LIAS 291
292 51 DOMAIN_INCOMING_USER_PASSWORD_UPDAT Update password for incoming user E 52 DOMAIN_INCOMING_USER_REGENERATE_PAS Regenerate password for incoming user SWORD 53 DOMAIN_INCOMING_USER_UNLOCK Unlock incoming user 54 DOMAIN_LDAP_CONFIGURATION_CHANGE LDAP configuration change 55 DOMAIN_LOCAL_RECIPIENTS_ADD Add local recipient 56 DOMAIN_LOCAL_RECIPIENTS_DELETE Remove local recipient 57 DOMAIN_LOCAL_RECIPIENTS_STATE_CHANGE Local recipients state change 58 DOMAIN_OUTGOING_USER_ADD Add outgoing user 59 DOMAIN_OUTGOING_USER_DELETE Remove outgoing user 60 DOMAIN_OUTGOING_USER_LOCK Lock outgoing user 61 DOMAIN_OUTGOING_USER_PASSWORD_UPDA Update password for outgoing user TE 62 DOMAIN_OUTGOING_USER_SETTINGS_UPDAT E Edit outgoing user 63 DOMAIN_OUTGOING_USER_UNLOCK Unlock outgoing user 64 DOMAIN_RELAY_RESTRICTIONS_ADD Add relay restriction 65 DOMAIN_RELAY_RESTRICTIONS_DELETE Remove relay restriction 66 DOMAIN_RELAY_RESTRICTIONS_STATE_CHAN GE Relay restriction state change 67 DOMAIN_RELAY_RESTRICTIONS_UPDATE Update relay restriction 68 DOMAIN_REQUEST_CREATED Domain request created 69 DOMAIN_SETTINGS_RESET_TO_DEFAULT Reset domain settings to default 70 DOMAIN_SETTINGS_UPDATE Update domain settings 71 DOMAIN_STATISTICS_REPORT_SUBSCRIPTION Domain report subscription reset to default _RESET_TO_DEFAULT 72 DOMAIN_STATISTICS_REPORT_SUBSCRIPTION Domain report subscription update _UPDATE 73 DOMAIN_VALIDATED_BY_CODE Domain validated by code 74 DOMAIN_VALIDATED_BY_MX Domain validated by MX 75 DOMAIN_VALIDATED_CODE_REGENERATED Domain validation code regenerated 76 _QUARANTINE_ALERT quarantine alert 77 ENABLE_GEOLOOKUP_RESTRICTIONS Enable geolookup restrictions 78 ENABLE_USER Enable user 79 FORWARD_BY_RULE_ Forward by rule 80 FORWARD_DOMAIN_RULE Forward domain rule 292
293 81 FORWARD_ _LOOP_EXCEPTION Forward loop exception 82 FORWARD_TO Forward to 83 FORWARDED_BY_RULE_ _IS_LOOPED Forwarded by rule is looped 84 IMPORT_INCOMING_USER Import incoming user 85 LICENCE IS RETORED Licence is restored 86 LICENCE_IS_EXPIRED Licence is expired 87 MARK_ _AS_SPAM Mark message as spam 88 MIGRATE_DOMAIN Migrate domain 89 NON_HUMAN_ _TYPE Non human type 90 PUBLIC_ _TYPE Public type 91 QUARANTINE_ Quarantine message 92 QUARANTINE_RELEASE_REPORT_SUBSCRIPTI Quarantine release report subscription reset to ON_RESET_TO_DEFAULT default 93 QUARANTINE_RELEASE_REPORT_SUBSCRIPTI Quarantine release report subscription update ON_UPATE 94 QUARANTINE_REPORT_SUBSCRIPTION_RESET Quarantine report subscription reset to default _TO_DEFAULT 95 QUARANTINE_REPORT_SUBSCRIPTION_UPDAT Quarantine report subscription update E 96 REJECT_BLACKLIST_REQUEST Reject blacklist request 97 REJECT_BLACKLIST_REQUEST_PER_USER Reject request blacklist sender for user 98 REJECT_RELEASE_REQUEST Reject release request 99 REJECT_RELEASE_REQUEST Reject release request 100 REJECT_WHITELIST_REQUEST Reject whitelist request 101 REJECT_WHITELIST_REQUEST_PER_USER Reject request whitelist sender for user 102 RELEASE_ _FROM_QUARANTINE Release quarantined message 103 REMOVE_BLACKLIST_DOMAIN_RULE Remove blacklist domain rule 104 REMOVE_DOMAIN_BY_VALIDATION_TIMEOUT Remove domain by validation timeout 105 REMOVE_FORWARD_DOMAIN_RULE Remove forward domain rule 106 REMOVE_GEOLOOKUP_RESTRICTION Remove geolookup restriction 107 REMOVE_WHITELIST_DOMAIN_RULE Remove whitelist domain rule 108 REPLY_ON_ARCHIVED_MESSAGE Reply on archived message 109 REPORT_SPAM_BY_FILE Report delivered message as spam 110 REPORTED_SPAM_REPORT_SUBSCRIPTION_R Reported Spam report subscription reset to default 293
294 ESET_TO_DEFAULT 111 REPORTED_SPAM_REPORT_SUBSCRIPTION_U Reported Spam report subscription update PDATE 112 REPORTS_AS_SPAM Reports archived message as a SPAM 113 RESEND_ _FROM_ARCHIVE Resend archived message 114 RESET_SPAM_DETECTION_SETTINGS_TO_DEF Reset spam detection settings to default AULT 115 RESET_SYSTEM_NOTIFICATIONS_TEMPLATE_T Reset system notifications template to default O_DEFAULT 116 RESET_TO_DEFAULT_BLACKLISTED_RECIPIEN Reset recipients blacklist TS 117 RESET_TO_DEFAULT_BLACKLISTED_SENDERS Reset senders blacklist 118 RESET_TO_DEFAULT_WHITELISTED_RECIPIEN Reset recipients whitelist TS 119 RESET_TO_DEFAULT_WHITELISTED_SENDERS Reset senders whitelist 120 SEND_INVITATION_TO_USER Send invitation to user 121 SPAM_DETECTION_SETTINGS Update spam detection settings 122 SPAM_DETECTION_SETTINGS_RESET_TO_DEF Reset spam detection settings AULT 123 SYSTEM_NOTIFICATIONS_TEMPLATE_CHANGE System notifications template change 124 TLD_DOMAIN_RULE TLD domain rule 125 UNBLACKLIST_RECIPIENT Remove recipient from the blacklist 126 UNBLACKLIST_SENDER Remove sender from the blacklist 127 UNBLACKLIST_USER_SENDER Remove sender from the user blacklist 128 UNWHITELIST_RECIPIENT Remove recipient from the whitelist 129 UNWHITELIST_SENDER Remove sender from the whitelist 130 UNWHITELIST_USER_SENDER Remove sender from the user whitelist 131 UPDATE_BLACKLIST_DOMAIN_RULE Update blacklist domain rule 132 UPDATE_FORWARD_DOMAIN_RULE Update forward domain rule 133 UPDATE_USERS_AUTO_IMPORT_SETTINGS Update users auto-import settings 134 UPDATE_WHITELIST_DOMAIN_RULE Update whitelist domain rule 135 USER_BLACKLIST_REQUEST_PER_USER Request blacklist sender for user 136 USER_CANCEL_BLACKLIST_REQUEST_PER_US Cancel request blacklist sender for user ER 137 USER_CANCEL_RELEASE_REQUEST 138 USER_CANCEL_WHITELIST_REQUEST_PER_US Cancel request whitelist sender for user ER Cancel release request 294
295 139 USER_PERMISSIONS_ASSIGN_GROUP Assign user permission group by selection 140 USER_PERMISSIONS_CHANGE_DEFAULT_GRO Change default user permission group UP 141 USER_PERMISSIONS_GROUP_ADD Add user permission group 142 USER_PERMISSIONS_GROUP_DELETE Remove user permission group 143 USER_PERMISSIONS_GROUP_UPDATE Update user permission group 144 USER_RELEASE_REQUEST Release request 145 USER_WHITELIST_REQUEST_PER_USER Request whitelist sender for user 146 USERS_AUTOUsers auto-import report subscription reset to IMPORT_REPORT_SUBSCRIPTION_RESET_TO_ default DEFAULT 147 USERS_AUTOIMPORT_REPORT_SUBSCRIPTION_UPDATE Users auto-import report subscription update 148 WHITELIST_DOMAIN_RULE Whitelist domain rule 149 WHITELIST_RECIPIENT Whitelist recipient 150 WHITELIST_RECIPIENT_DOMAIN Whitelist all recipients of the domain 151 WHITELIST_REQUEST Whitelist request 152 WHITELIST_SENDER Whitelist sender 153 WHITELIST_SENDER_DOMAIN Whitelist all senders of the domain 154 WHITELIST_USER_SENDER Whitelist sender for user 295

296 Export Log Report to CSV The log report can be exported to a comma separated value (CSV) file and is limited to 10,000 entries per file. If the entries exceed this value, exporting cannot be done and a warning will be displayed. Please note that exported file will display the entries in the same sorted order as in the interface. To export log report to csv file Click the 'Export to CSV by filter' button. The 'File Download' will open: Click 'Open with' or 'Save File' to view / save the file with an appropriate application to your computer Сlick 'OK' The values in the log report will be separated by commas and this file can be opened with Excel or Openoffice Calc for easy analysis. 296
297 3.2.3 Administrator Account Management The 'Account Management' area lets an admin with appropriate privileges to add new administrators for the same account. This area also allows the administrator to configure permissions for users and administrators, reset passwords and change the login status from enabled to disabled and vice-versa. Admins who have logged in using the CAM credentials will have an additional icon 'Login to my Comodo account' through which you can access your CAM account. If logged in as an administrator, the 'Account Management' area will differ depending on the privileges configured for the administrator. See 'Admin Groups & Permissions' for more details. Click the following links for more details: Managing Administrators User Groups & Permissions Admin Groups & Permissions Manage Comodo Account My Profile Users History 297

298 Administrators In this interface, an administrator with appropriate privileges can add new administrators, delete existing administrators, set permission levels as well as edit the login status and regenerate new password for existing administrators. Refer to the section 'Admin Groups & Permissions' for more details on administrative privileges. Click the following links for more details: Managing Administrators Adding New Administrators Deleting Administrators Editing Administrators Managing Permissions for Administrators Managing Administrators Click the 'Admins' from the 'Account management' drop-down menu on the left The 'Admins' interface displays a list of administrators with their CDAS enabled/disabled status, their last login date and time, to which group they belong and the domains that they can manage. 298


299 Click the up/down arrows in the respective column headers to sort the entries in ascending or descending order based on the login, enabled status or last login time Using the filter option to search administrators Click anywhere on the 'Filters' to open the filters area. You can add more filters by clicking You can remove a filter by clicking the for narrowing down your search. icon beside it. Following are the options in the first drop-down in the filters area: Login: Will execute a search of admins according to the text in the text box (column 3) and the condition selected in column 2. When you select this option in the first drop-down, the following filters are available in the second drop-down: Equals: Displays the results based on the administrator name that was entered in full in the text box. 299
300 Not Equals: Displays all administrator(s), except the one entered in the text box. Contains: Displays all administrator(s) that contains the words entered in the text box. Not Contains: Displays all administrator(s) that does not contain the words entered in the text box. Starts With: Displays all administrator(s) that starts with the words entered in the text box. Ends With: Displays all administrator(s) that ends with the words entered in the text box. Other options available in the first drop-down in the filters area: Enabled: Sorts the results based on administrators' enabled / disabled status. When you select this option in the first drop-down, 'equals' is the only option available in the second drop-down: Equals: Displays the results of enabled administrator(s) when the checkbox beside it is selected. When the checkbox is not selected, it displays the list of administrator(s) who are not enabled. Last Login: Will execute a search of admins according to the date selected in the calendar (column 3) and the condition selected in column 2. When you select this option in the first drop-down, the following filters are available: Equals: Displays the list of administrator(s) that has the last logged in on the same date as the selected date in the third box from the calendar. Less than: Displays the list of administrator(s) that has the last logged in on dates less than the selected date in the third box from the calendar. Greater than: Displays the list of administrator(s) that has the last logged in on dates greater than the selected date in the third box from the calendar. Group: Will execute a search of admins according to the group selected in last drop-down (column 3) and the condition selected in column 2. Equals: Displays the results based on the group name that is selected in the drop down list from the third box. Not Equals: Displays all administrator(s), except the one selected in the drop down list from the third box. Click 'Apply Filter' after selecting the filters. The application will search the respective column(s) according to the filter(s) set and display the result. Click anywhere on the 'Filters' to close the filters area. Click the button to display all administrators. Note: To display all the administrators after using the filters option, you have to first click anywhere on the Filters tab to close the filters area and then click the 'Refresh' button. To add a new administrator Click the 'Add' button. 300
 - Enter the email addresses at which the new administrator should receive CDAS notification emails.")

301 The 'New administrator' dialog will be displayed. Login - Enter the new administrator's valid address as login username. System notifications (s) - Enter the addresses at which the new administrator should receive CDAS notification s. It can be the same address as the login name and / or alternative address(es) of up to a maximum of five. The quarantine requests from users, for blacklisting, whitelisting, or releasing quarantined s and notifications such as of imports of users, local recipients and users via LDAP from CSV files will be sent to the addresses specified in this field. See Management for more details. Status - Enables to change the login status of the new administrator. By default, this box is selected, that is, the new administrator can access CDAS interface. Subscribe s to global reporting - Selecting this checkbox enables the new administrator to receive the periodical domain and quarantine summary reports of all domains belonging to the account at the address specified as login user name. Refer to CDAS Reports - an Overview for more details. Click the 'Save' button. The administrator will be added to the list and be placed in the default group. The privileges to the administrator can be configured according to his/her role. See 'Managing Permissions for Administrators' for more details. An to the added administrator will be sent automatically containing password to access CDAS. The password can be reset in the edit interface. The added administrator will be displayed in the list. 301
302 To delete an administrator Select the administrator to delete and click 'Delete' button. A confirm dialog will be displayed warning you that the selected administrators will be deleted. Click 'OK' to confirm the deletion. The selected administrator(s) will be deleted from the list. To edit an existing administrator You can reset the password, change the CDAS notification address(es) and allow or deny permission for the administrators to access their CDAS account in the edit interface. Select the administrator you want to edit from the list and click the 'Edit' button 302
 of up to a maximum of five.")
303 The 'Edit administrator' dialog box will be displayed. System notifications (s) - Enter the addresses at which the new administrator should receive CDAS notification s. It can be the same address as the login name and / or alternative address(es) of up to a maximum of five. The quarantine requests from users, for blacklisting, whitelisting, or releasing quarantined s and notifications such as of imports of users, local recipients and users via LDAP from CSV files will be sent to the addresses specified in this field. Refer to the section Management for more details. Tip: The currently logged-in administrator can configure the Quarantine notification address in Dashboard > Account Management > My Profile dialog. Status - Enables to change the login status of the administrator Regenerate password - Reset the password for the administrator in case it is forgotten. The new password will be sent to the administrator's automatically. The administrator has to use this new password to access CDAS Click the 'Save' button to confirm your changes. Managing Permissions for Administrators CDAS allow administrators with appropriate privileges to assign permissions for other administrators that will determine what he/she can do and cannot do while logged into their respective CDAS admin interface. The administrators can create policies and assign them to other administrators from this interface. See 'Admin Groups & Permissions' for more details on how to create groups and policies for administrators. A new administrator will be automatically assigned default permission settings. To assign permissions for an administrator Select the administrator or multiple administrators that you want assign permissions and click the 'Manage permissions' button. 303
 group will be available and administrators can add, edit groups and assign permissions to other administrators.")
304 The 'Admin Groups & Permissions' interface will be displayed. The interface displays the list of groups available with same or different permission levels for each group. By default, 'Power Administrators (Default) group will be available and administrators can add, edit groups and assign permissions to other administrators. See the section 'Admin Groups & Permissions' for more details. Select the group from the list. The permissions set for this group will be displayed on the right side. 304
.")

305 The permissions set for this group will be displayed on the right side. Click the 'Assign to selected admins' button to set permissions for selected admin(s). Click 'Assign to filtered admins' button to set permissions for administrators found by filter. Click 'OK' in the confirmation dialog. The selected admin(s) will be added to the group and a confirmation message will be displayed. The interface also displays the new group assigned for the selected admin(s) under the 'Group' column. 305


306 User Groups & Permissions The 'User Groups & Permissions' interface allows admins with appropriate privileges to create user groups and to set group permissions. You can create multiple groups, each with different permission levels. When you assign users to a group they will inherit the permissions of the group. The user interface will vary according to a user's permission level. See 'Manage Permissions for Users' in 'User Account Management' for help with this. To create user groups Click the 'User groups & permissions' from the 'Account management' drop-down menu on the left The 'User Groups & permissions' interface will be displayed By default, two user groups, Power User and Users (Default), will be available. These two groups cannot be either edited nor deleted. Click any one of them will display the permission levels assigned for the group in the right side. 306
307 Click on the arrow beside a permission will display the tree structure of second level of permissions, if available. For users in the 'Power User' group, all permission levels will be enabled. The 'Release quarantine messages' option will not be available to users in the regular 'Users' group. This means that if a user is assigned to the 'Power User' group, he / she can release quarantined messages from the quarantined mails list without approval from the administrator. See Released Requests in ' Management' for more details. Permission Levels Incoming Log Search - Allows a user to search and view the log of all incoming mails. Outgoing Log Search - Allows a user to search and view the log of all outgoing mails. Report Spam - Allows a user to report a mail as spam mail. User report subscriptions - Allows a user to configure periodical quarantine report generation. Quarantine Show Message - Allows a user to view quarantined s in same window or separate window. Release messages - Allows a user to release a quarantined mail without approval from the administrator. Delete messages - Allows a user to delete a quarantined mail without approval from the administrator. Archive View - Allows a user to view archived s in same window or separate window. Resend - Allows a user to resend archived s to himself / herself. Reply all - Allows a user to reply to all archive s Forward - Allows a user to forward an archive composed earlier Create mail request - Allows a user to configure request for CDAS notifications. Change user settings - Allows a user to configure himself / herself as recipient whitelist. Whitelist / Blacklist Manage whitelist senders per user - Allows a user to manage sender whitelist for his / her mail account Manage blacklist sender per user - Allows a user to mange sender blacklist for his / her mail account 307

308 Click the following links for more details. Adding a new group Editing a group Deleting a group Making a group as default To add a new group To add a new group and configure permission levels, click the 'Add' button A new group creating page will be displayed. Enter the name of the group in the text field under the 'Name' column. Note: To enable the permission levels in the right side for that group, click the 'Edit' button on the top. 308
309 Click the 'Save' button. The newly created group will be displayed in the interface with the allotted permissions to it. Now, users of domains belonging to the account can be assigned to this newly created group. See 'Managing Permissions for Users' in 'User Account Management' on how to add users to predefined groups. To edit a group You can edit the name of an existing group and / or change the permission levels. Select the group from the list and click the 'Edit' button. 309
310 Change the permission levels and / or the name of the group. Click the 'Save' button for the changes to take effect. The users in the group that is edited will be automatically reassigned to the edited group. To delete a group Select the group from the list and click the 'Delete' button. 310

311 Click 'OK' in the confirmation dialog. The selected group will be deleted from the list. Note 1: If you delete a group, users assigned to that group will be automatically moved to default group. You have to reassign the users if required. Note 2: If you delete a user group created by the administrator and marked as default, then the 'Users' group that was shipped with the product will be set as default. All the users from the deleted group will be automatically migrated to the 'Users' group. To make a group as default CDAS allows administrators to make an existing group as default group. Newly added users and users belonging to an existing group whose name was deleted will be automatically moved to this default group. Select a group from the list and click the 'Make default' button. A success dialog will be displayed. 311

312 Click 'OK'. The selected group will be displayed as default group. Note: If you delete a user group created by the administrator and marked as default, then the 'Users' group that was shipped with the product will be set as default. All the users from the deleted group will be automatically migrated to the 'Users' group Admin Groups & Permissions The 'Admin Groups & Permissions' interface allows admins with appropriate privileges to create administrator groups. Each group can be configured with different permission levels. This simplifies the process of configuring permission levels for each administrator. New or existing administrators belonging to the account can be simply assigned to a group with a preset policy. The admin interface will vary according to his/her permission level. See 'Managing Permissions for Administrators' in 'Administrators' for how to add administrators to predefined groups. To create admin groups Click the 'Admin Groups & Permissions' from the 'Account management' drop-down menu on the left The 'Admin Groups & Permissions' interface will be displayed. 312

313 By default, Power Administrator group will be available. This default group cannot be either edited nor deleted. Tick a group from the right side to view the permission levels assigned for it. Click on the arrow beside a permission to display the tree structure of second level of permissions, if available. 313
314 For administrators in the 'Power Administrators' group, all permission levels will be enabled. The 'Permission' level is divided into two categories, 'All customer permissions' and 'All domain permissions'. The customer permissions deals with providing privileges for adding domains, configuring user permissions, report management and so on The domain permission level deals with providing access to particular domain(s). This is very useful if you want to restrict administrators to manage selected domains only. Permission Levels All customer permissions - View and manage all customer related tasks. Add domain - Add new domain(s) Admin management - View and manage administrators for the account. View - Only view the list of administrators. Unlock - Unlock previously blocked administrators. Manage - Manage administrators for the account. User permissions - View and manage 'User Groups & Permissions' View - Only view 'User Groups & Permissions' Manage - Manage 'User Groups & Permissions' Admin permissions - View and manage 'Admin Groups & Permissions' View - Only view 'Admin Groups & Permissions' Manage - Manage 'Admin Groups & Permissions' Report management - View and manage report subscriptions View - Only view report subscriptions Change - View and manage report subscriptions User session history view - View user sessions history for all domains in the account View customer info - View information about the customer. Locale - View and manage message locale sent to a user View - Only view messages locale Change - View and manage messages locale Change user limit per domain - Configure the number of users for each domain in the account. template management - Edit the template for user's notification s. Audit log - Configure and view log for the permitted domain. Log - View and export the log for the permitted domain. All domain permissions - Assign domain(s) management. Assigned Domain(s) - Manage domains, incoming and outgoing users, s, audit log and reports. View - Only view the assigned domains. Change - Edit the assigned domain(s) Remove - Remove the assigned domain(s). User Management - View and manage incoming users, outgoing users, whitelist recipients and blacklist recipients. Incoming user - View, manage and unlock incoming users. View - Only view list of incoming users. Manage - View and manage incoming users. Unlock - Unlock users immediately without waiting for the timeout period to end. Change forward settings - Change forward settings for incoming users Outgoing user - View, manage, lock/unlock and import from incoming users. 314
315 View - Only view list of outgoing users. Manage - View and manage outgoing users. Outgoing settings - Configure a list of outgoing users. Lock/Unlock - Lock or unlock outgoing users from sending out mails. Import from incoming - Import outgoing users from the list of incoming users. Whitelist recipients - View and manage whitelist recipients. View - Only view list of whitelisted recipients. Manage - View and manage whitelist recipients. Blacklist recipients - View and manage whitelist recipients. View - Only view list of blacklisted recipients. Manage - View and manage blacklist recipients. Users auto-import - Automatically import all new incoming users bases on incoming flow View - Only view list of users auto-import recipients. Manage - View and manage users auto-import recipients. Domain geolookup restrictions - View and manage CDAS web interface access control policies View - Only view the access control polices Manage - View and manage access control policies Domain management - View and manage all domain related tasks. Local recipients - View and manage local recipients. View - Only view list of local recipients. Manage - View and manage local recipients. Domain alias - View and manage domain aliases View - Only view the list of domain aliases. Manage - View and manage domain aliases. filter settings - View and configure incoming spam detection settings. View - Only view incoming spam detection settings. Change - View and configure "Spam threshold" and "Probable spam threshold" fields. Threshold - Configure changes for "Spam threshold" and "Probable spam threshold" fields in the Incoming Spam detection settings Domain settings - View and change domain settings. View - Only view the list of domain settings. Change - View and configure domain settings. LDAP - View and configure LDAP settings for importing users. View - Only view LDAP settings and list of imported users. Change - View and configure LDAP settings for importing users. Quarantine - View and manage quarantined mails. View - Only view the list of quarantined mails. Delete - Deleted quarantined mails from the list. Release - Release quarantined mails to the recipients. View mail content - Only view quarantined mails from the list. Archive - View and mange copy of incoming mails in archive. View - Only view archived mails. Resend - Resend archived mails to recipients. Retain - Retains archived mails from being purged automatically. Delete - Delete archived mails. 315
316 View mail content - View mail content of archived mails. Incoming delivery queue - View and mange queued mails. View - Only view queued mails. Retry - Retry to send queued mails to recipients. Alerts - Queue notification Incoming Log Search - Search incoming mails log. Outgoing Log Search - Search sent mails log. Clear incoming cache - Clear incoming callout cache. Clear outgoing cache - Clear outgoing callout cache. User session history view - View user sessions history for the assigned domain(s). Management - View and configure all management related settings and tasks. size - View and configure size settings. View - Only view size settings. Change - View and configure size settings. Blocked extensions - View and manage blocked extensions. View - Only view the list of blocked extensions. Change - View and manage blocked extensions. Whitelist senders - View and manage sender whitelist. View - Only view sender whitelist. Manage - View and manage sender whitelist. Blacklist senders - View and manage sender blacklist. View - Only view sender blacklist. Manage - View and manage sender blacklist. Release requests - View and manage requests from users for release of quarantined mails. View - Only view the list of requests from users for release of quarantined mails. Manage - View and manage requests from users for release of quarantined mails. Whitelist requests - View and manage requests from users to whitelist senders. View - Only view the list of requests from users for adding senders to whitelist. Manage - View and manage requests from users to whitelist senders. Blacklist requests - View and manage requests from users to blacklist senders. View - Only view the list of requests from users for adding senders to blacklist. Manage - View and manage requests from users to blacklist senders. Report spam - Upload mails to CDAS for reporting them as spam. Create rule - Create and manage administrators rules. View - Only view administrators rules. Manage - View and manage administrators rules. Whitelist sender rule - View and manage rules for adding senders to whitelist View - Only view the whitelist sender rules Manage - View and manage whitelist sender rules Blacklist sender rule - View and manage rules for adding senders to blacklist View - Only view the blacklist sender rules Manage - View and manage blacklist sender rules Whitelist senders per user - View and manage whitelisted senders per user. View - Only view list of whitelisted senders per user. Manage - View and manage whitelisted senders per user. Blacklist senders per user - View and manage blacklisted senders per user. 316
317 View - Only view list of blacklisted senders per user. Manage - View and manage blacklisted senders per user. Domain relay restrictions - View and configure relay restriction rules View - Only view relay restriction rule Manage - View and manage relay restriction rules Audit log - Configure and view log for the permitted domain. Configuration - Configure the log settings for the permitted domain. Log - View and export the log for the permitted domain. Report management - View and configure settings for periodical domain and quarantine summary reports for the permitted domain. View - Only view the configured settings for periodical domain and quarantine summary reports for the permitted domain. Change - View and configure settings for periodical domain and quarantine summary reports for the permitted domain. Click the following links for more details. Adding a new admin group Editing a admin group Deleting a admin group Making a admin group as default Adding a New Admin Group To add a new admin group and configure permission levels, click the 'Add' button A new admin group creating page will be displayed 317

318 Enter the name of the group in the text field under the 'Name' column. Note: To enable the permission levels in the right side, click the 'Edit' for that group. 318

319 Click 'Save' button. The newly created group will be displayed in the interface. Now, administrators belonging to the account can be assigned to this newly created group. See 'Managing Permissions for Administrators' in 'Administrators' on how to add users to predefined groups. Editing an admin group You can edit the name of an existing group and / or change the permission levels. Select the group from the list and click the 'Edit' button. 319


320 Change the permission levels and / or the name of the group. Click the 'Save' button for the changes to take effect. The admins in the group that is edited will be automatically reassigned to the edited group. Deleting an admin group Select it from the list and click the 'Delete' button. Click 'OK' in the confirmation dialog. The selected group will be deleted from the list. Note 1: If you delete a group, admins assigned to that group will be automatically moved to default group. You have to reassign the administrators if required. Note 2: If you delete an admin group created by the administrator and marked as default, then the 'Power Administrator' group that was shipped with the product will be set as default. All the admins from the deleted group 320

321 will be automatically migrated to the 'Power Administrator' group. Making an admin group as default CDAS allows administrators to make an existing group as a default group. Newly added administrators and administrators belonging to an existing group whose name was deleted will be automatically moved to this default group. Select a group from the list and click the 'Make default' button. A success dialog will be displayed: Click 'OK'. The selected group will be displayed as default group. Note: If you delete an admin group created by the administrator and marked as default, then the 'Power Administrator' group that was shipped with the product will be set as default. All the admins from the deleted group will be automatically migrated to the 'Power Administrator' group. 321

322 My Comodo Account This feature will be available in the 'Account management' if you have logged in to CDAS using CAM account credentials. Click the 'Login to my Comodo account' to open page. From here you can: Add more subscriptions for CDAS account Change your password Change contact information Sign up to other Comodo products...and many more. For more details on CAM account, visit our online website at My Profile The 'My Profile' interface lets currently logged-in administrator to change his login password to CDAS as well as to change settings for idle session timeout and CDAS notification address. You can open 'My profile' interface in two ways: Click the 'Account management' on the left to expand then 'My profile'. Alternatively, click 'My Account' > 'My Profile' at the top-right. 322


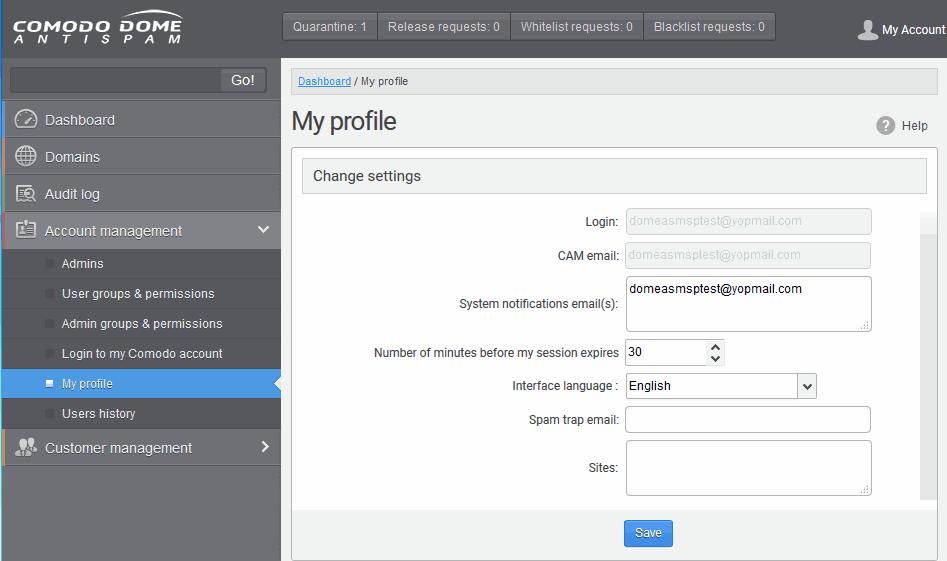
323 The 'My Profile' interface will open: 323

324 Note: The interface will vary depending on the login credential that you have used to access CDAS. The password can be changed after logging in to the CAM account. To set idle session timeout and change system notifications address Click the 'My profile' from the 'Account management' drop-down menu on the left Login - The user-name of the currently active user. Administrators can use this to log in to CAM to purchase additional licenses and renew existing licenses. CAM The address for the account as registered at Comodo Accounts Manager (CAM). System notifications (s) - Enter the addresses at which the new administrator should receive CDAS notification s. It can be the same address as the login name and / or alternative address(es) of up to a maximum of five. The quarantine requests from users, for blacklisting, whitelisting, or releasing quarantined s and notifications such as of imports of users, local recipients and users via LDAP from CSV files will be sent to the addresses specified in this field. See Management for more details. Number of minutes before my session expires - You can set the idle session timeout period in the box. Enter the period in minutes or increase / decrease the period by clicking the up / down arrow. The valid entry is between 1 minute and 120 minutes. Please note this feature will not be available if an administrator is logged into CDAS using CAM credentials. Spam trap (Optional) - If you already have a special 'spam-trap' address then please enter it here to further improve CDAS message filtering. Sites (Optional) - Enter the URLs of all websites owned by your company in order to further improve spam filtering. Click 'Save' for your changes to take effect. 324
325 Users History The 'Users History' area in 'Administrator Account Management' allows admins to view user history for all domains within a particular date range. From here you can filter users by IP address, last login, domain, username and/or location. By default, the most recent 15 records will be displayed. Use of filters to create custom searches is covered in more detail here Customer Management The 'Customer Management' area allows an administrator to: View the details of the account they are logged into Create an account Update the product and extend your license term Configure subscriptions for the periodical Domain and Quarantine summary reports for domains Customize the 'support information' area in the notification s that are generated for activities such as while adding a new user, password regeneration, quarantine request and quarantine report. Click the following links for more details: End user license agreements Viewing customer information Managing subscriptions for reports Configuring language for messages from CDAS Notification settings 325

326 End User License and Subscriber Agreements The 'End User License / Subscription Agreement' interface displays the complete Comodo Dome Antispam - MSP End-User License and Subscriber Agreement. To view End User License/Subscription Agreement Click 'Customer management' tab from the left hand side navigation to expand it and then click the 'EndUser License/Subscriber Agreement.' tab from the sub menu. The 'EULA/ Subscription Agreement' interface will be displayed: View License Information The 'License Management' interface provides administrators with usage information. To view the license management screen: Click the License Management from the 'Customer management' drop-down on the left The example below shows a customer with multiple licenses: 326

327 The 'License Management' panel displays details of subscription(s) for your account. For multiple licenses, the number of users and domains that are allowed for all the licenses purchased will be added and displayed at the bottom most subscription column. From the 'License Management' panel the you can get the the details of subscription(s) for the CDAS account. For multiple licenses, the number of users and domains that are allowed for all the licenses purchased will be added and displayed at the bottom most subscription column. Name The name of the account is displayed in the title bar. CAM login: The login user name for the account in Comodo Accounts Manager (CAM) at The administrator can use this login username to log in to CAM for purchasing additional licenses and renewal of existing licenses. CAM The address for the account as registered at CAM. Totals Number of users: The total number of enrolled users belonging to all the domains. Max. number of users: The total number of users that can be added as per all the subscriptions made for the account, that is, number of users cannot exceed the number given in this field for all domains included. Number of domains: The number of domains enrolled for account. Max. number of domains: The total number of domains that can be added as per all the subscriptions made for the account. Disk quota: The total storage space allotted in CDAS server for archiving incoming messages as per all the subscribed packages, in GB. Disk space: The storage space used by the archived mails in the CDAS server. Subscriptions The following details are displayed for each subscription: Max. number of users: The maximum number of users that can be added to the account as per the subscription, that is, number of users cannot exceed the number given in this field for all domains included. Max. number of domains: The maximum number of domains that can be added as per the subscription. License expiration date: The date till which the license is valid for the subscription. 327

328 Disk quota: The maximum storage space allotted for mail archive in the CDAS server, as per the subscription. Enabled: Displays whether the subscription is active or not. The 'Reminder' button allows you to choose an address to receive license expiry reminders, and to specify the period of time before expiry that you wish to receive them. Please note this button will be available if you have logged in to CDAS using CAM account credentials Manage Report Subscriptions The 'Manage report subscriptions' interface lets you to configure subscriptions to 'Domain' and 'Quarantine' summary reports of all enrolled domains. Refer to CDAS Reports - an Overview for more details. To access Manage report subscriptions interface Click Manage report subscriptions from the 'Customer management' drop-down on the left The 'Manage report subscriptions' interface will open: The 'Report recipients' field will be auto-populated with the addresses of all the administrators available for the account and enabled for the same, at the time of adding them. The report recipients can be added or removed from this interface by entering the administrator's address or deleting them and clicking the 'Save' button at the bottom. The administrator can configure the subscription for two types of reports from this interface: Quarantine Report - The periodical report which can be configured to be received hourly, daily, weekly or monthly, will contain a detailed statistics of the mails that are identified as spam or containing malicious content and moved to Quarantine of the domain automatically by CDAS. See CDAS Reports - An Overview for more details. Domain Report - The periodical report which can be configured to be received hourly, daily, weekly or 328

329 monthly, will contain a detailed statistics of number of users, mails that have been received at and sent from the domain, number of spams identified and blocked and so on. See CDAS Reports - An Overview for more details. To configure the subscription of the reports You can expand/collapse a report configuration section by clicking on the respective strip. If you want the administrators to receive the periodical reports, select the 'Enabled' checkbox in the row of the respective report type. If both the reports are required, you can select both the checkboxes. Leave the 'Send empty' checkbox unchecked if reports without any statistics need not to be sent to recipients. Select the frequency at which the reports are to be sent to the administrators. Quarantine Report Hour - The reports will be generated and sent to the administrators every hour or at the selected hour(s) of the day or date chosen from 'Day of month' or 'Day of week' columns. Day of month - The reports will be generated and sent to the administrators every day or on the specific day every month chosen at the hour selected from the 'Hour' column. Day of week - The reports will be generated and sent to the administrators every day or on the specific day every week chosen at the hour selected from the 'Hour' column. Start date - Displays the start date of the report generation depending on the options chosen (as per Greenwich Mean Time (GMT)). Report length - Displays the period of the report that will be generated depending on the options chosen. Domain Statistics Report 329

330 Period - Enables you to set the period to be covered in the report. The report will contain the statistics of all the domains in the account for the past one hour, one week, one month or one year, as selected from dropdown from the scheduled report time. Hour - The reports will be generated and sent to the administrators every hour or at the selected hour(s) of the day or date chosen from 'Day of month' or 'Day of week' columns. Day of month - The reports will be generated and sent to the administrators every day or on the specific day every month chosen at the hour selected from the 'Hour' column. Day of week - The reports will be generated and sent to the administrators every day or on the specific day every week chosen at the hour selected from the 'Hour' column. Start date - Displays the start date of the report generation depending on the options chosen (as per Greenwich Mean Time (GMT)). Report length - Displays the period of the report that will be generated depending on the options chosen. Click 'Save' for your settings to take effect. Click the 'Reset settings to default' to disable both Quarantine and Domain statistics reports. The 'Report Recipients' field will not be cleared Configure Language for Messages from CDAS The 'System messages locale' allows the administrator to configure the language of messages displayed and sent to the administrators of the domains by CDAS, according to the location of the administrators. To configure for the language of messages Click 'System messages locale' from the 'Customer management' drop-down menu on the left The 'System messages locale' interface will be displayed: 330

331 Select the language in which CDAS should display and send its messages from the 'Change locale for system messages' drop-down. The messages will be displayed/sent in the selected language to the administrators of the domain managed by the currently logged in administrator. Click 'Save' The locale successfully set message will be displayed Notification Settings By default, all the notification mails sent to administrators and users on various events like adding a new user, password regeneration, quarantine request or periodical report mails like quarantine report will contain the links to the online help guide and Comodo support in the footer. The ' template settings' area allows you customize the footer for adding their contact and support information. To customize the notification s Click the template settings' from the Customer management' drop-down on the left The ' template settings' interface will be displayed: 331

332 Please note the customization can be done only in html format. Check 'Change default footer' box if you want to edit details. Edit the details in html format as per your requirement and click 'Save' button. Click the 'Reset to default' button to display Comodo support information in the notification s. 4 CDAS Reports - An Overview Comodo Dome Antispam - MSP can generate five kinds of reports - 'Quarantine report', 'Domain statistics report', 'User import report', 'Quarantine Release Report' and 'Reported Spam Report'. Reports are sent via to administrators and users as configured Global Reports and Domain level Reports 1. Global reports are for all domains covered by the customer account. See 'Managing Subscriptions for Reports' under 'Customer Management' for more details on the account level. 2. Domain level reports are specific to a domain. See 'Manage Report Subscriptions for Selected Domain' under 'Incoming' section for reports on domain levels. Reports will be delivered at the scheduled times in the language set for the account. CDAS creates five kinds of reports: Quarantine Report - A statistical breakdown of mails identified as spam or malicious that were moved to quarantine by CDAS. The report can be configured to be received hourly, daily, weekly or monthly. Domain Statistics Report - A comprehensive report which covers all mail activity for the domain. This includes information covering the number of users; mails that have been received at and sent from the domain; number of mail identified spam/malicious; number of mails blocked and so on. The report can be configured to be received hourly, daily, weekly or monthly by the administrator. Users auto-import report - The periodical report containing details of new users that were auto-imported 332
333 into CDAS for each domain, based on incoming mails received for them at the mail server. The report can be configured to be received hourly, daily, weekly or monthly by the administrator. The user auto-import reports are generated only for the domain level and not for the customer account level. Quarantine Release Report - The periodical report containing details of mails that were released from the quarantine list by both administrators and users with appropriate privileges. The report can be configured to be received hourly, daily, weekly or monthly by the administrator. The quarantine release reports are generated only for the domain level and not for the customer account level. Reported Spam Report - A detailed report of mails that were reported as spam by administrators as well as users with appropriate privileges. The report also includes details of mails that were uploaded as spam to CDAS. The report can be configured to be received hourly, daily, weekly or monthly by the administrator. The reported spam reports are generated only for the domain level and not for the customer account level. Reports can be enabled or disabled per administrator in Dashboard > Account Management > Admin > Add Administrators or Edit Administrators. While the first two reports, Quarantine Report and Domain Statistics Report, are available for all the domains as well as for a specific domain, other reports are available for specific domains only. 4.1 Quarantine Report The Quarantine Report contains a list of mails that were identified as spam or containing malicious content and were moved to Quarantine automatically by CDAS, with the details on sender, receiver, date and attachments. You can view the contents of a mail by clicking its subject line from the report. Administrator Domain Level - The Report generated for an administrator will contain the details of the mails moved to quarantine of the selected domain. Customer Level - The Report generated for an administrator will contain the details of the mails moved to quarantine of all the domains belonging to the account. User - The Report generated for a user will contain the details of the mails moved to quarantine of the user. The report can be subscribed to be received hourly, daily, weekly or monthly for an administrator and daily, weekly or monthly for a user. Hourly - The reports will be generated and sent every hour to the administrators through . Daily -The reports will be generated and sent daily to the administrators/user through . Weekly - The reports will be generated and sent to the administrators/user through on every seventh day from the start date set in the 'Start date' field. The report will contain details of the mails quarantined during the past seven days. The first report will be sent on the start date and will contain the statistics for the remaining days of the week from the day of configuration and subsequently every seven days. Monthly - The reports will be generated and sent to the administrators/user through on every 30th day from the start date set in the 'Start date' field. The report will contain details of the mails quarantined during the past 30 days. The first report will be sent on the start date and will contain the statistics for the remaining days of the month from the day of configuration and subsequently every 30 days. An example of a Quarantine report is shown below: 333
.")
334 Click the 'Subject' of a mail to open the mail in a new CDAS window. You need to login to CDAS to read the mail in the new window. 4.2 Domain Statistics Report The Domain Statistics Report provides details on all the mail activities on the domain(s). This includes information covering the number of users; mails that have been received at and sent from the domain; number of mail identified as spam/malicious; number of mails blocked and so on. The report can be configured to be received hourly, daily, weekly, monthly or yearly by the administrators. Domain Level - The report will contain only the details of domain statistics of the selected domain. Customer Level - The report will contain the details of domain statistics of all the domains belonging to the account. Note: The Domain Statistics Report is available only to the administrators. The report can be subscribed to be received hourly, daily, weekly, monthly or yearly. Hourly - Reports will be generated and sent every hour to the administrators through . Daily - Reports will be generated and sent daily to the administrators through . Weekly - Reports will be generated and sent to the administrators on every seventh day from the start date set in the 'Start date' field. The report will contain details of the mail activities for the domains during the past seven days. The first report will be sent on the start date and will contain the statistics for the remaining days of the week from the day of configuration and subsequently every seven days. Monthly - Reports will be generated and sent to the administrators on every 30th day from the start date set in the 'Start date' field. The report will contain details of the mail activities for the domains during the past 30 days. The first report will be sent on the start date and will contain the statistics for the remaining 334
335 days of the month from the day of configuration and subsequently every 30 days. Yearly - Reports will be generated and sent to the administrators on every 365th day from the start date set in the 'Start date' field. The report will contain details of the mail activities for the domains during the past 12 months. The first report will be sent on the start date and will contain the statistics for the remaining months of the year from the day of configuration and subsequently every 12 months. An example of a 'Domain Statistics Report' is shown below: 4.3 Auto-Imported Users Report The 'Users Auto-Import' Report provides details on all new users belonging to a managed domain, that were automatically imported to CDAS on receiving an incoming mail addressed to them at the mail server. The autoimported users are sent with an invitation containing login credentials for them to access the CDAS user interface. For more details on managing auto-import, refer to the section Manage User auto-import. Note: The user auto-import reports are generated only for the domain level and not for the customer account level. The report is available only to the administrators. The report contains the following details: Imported users count - The total number of users automatically imported into CDAS within the report time period. Enabled users count - The number of auto imported users that have activated their account by clicking the link in the invitation mail or logging-in to CDAS using the credentials provided in the mail. Invited users count - The number of auto imported users that have been sent the invitation mails but yet to activate their account. User names list - The list of auto imported users. 335

336 An example of a 'Users Auto-Import Report' is shown below: 4.4 Quarantine Release Report The 'Quarantine Release Report' provides details of mails that were released from quarantine by the administrators as well as by the users with appropriate privileges. This also includes quarantine release requests accepted by administrators. Note: The quarantine release reports are generated only for the domain level and not for the customer account level. The report is available only to the administrators. The report can be subscribed to be received hourly, daily, weekly, monthly or yearly. Hourly - The reports will be generated and sent every hour to the administrators through . Daily -The reports will be generated and sent daily to the administrators through . Weekly - The reports will be generated and sent to the administrators through on every seventh day from the start date set in the 'Start date' field. The report will contain details of the mail activities for the domains during the past seven days. The first report will be sent on the start date and will contain the statistics for the remaining days of the week from the day of configuration and subsequently every seven days. Monthly - The reports will be generated and sent to the administrators through on every 30th day from the start date set in the 'Start date' field. The report will contain details of the mail activities for the domains during the past 30 days. The first report will be sent on the start date and will contain the statistics for the remaining days of the month from the day of configuration and subsequently every 30 days. Yearly - The reports will be generated and sent to the administrators through on every 365th day from the start date set in the 'Start date' field. The report will contain details of the mail activities for the domains during the past 12 months. The first report will be sent on the start date and will contain the statistics for the remaining months of the year from the day of configuration and subsequently every 12 months. 336

337 An example of a Quarantine Release Report is shown below: 4.5 Reported Spam Report The 'Reported Spam Report' provides details of mails that were reported as spam by the administrators as well as by the users with appropriate privileges. This also includes details of mails uploaded from the 'Report Spam' interface. Note: The reported spam reports are generated only for the domain level and not for the customer account level. The report is available only to the administrators. The report can be subscribed to be received hourly, daily, weekly, monthly or yearly. Hourly - The reports will be generated and sent every hour to the administrators through . Daily -The reports will be generated and sent daily to the administrators through . Weekly - The reports will be generated and sent to the administrators through on every seventh day from the start date set in the 'Start date' field. The report will contain details of the mail activities for the domains during the past seven days. The first report will be sent on the start date and will contain the statistics for the remaining days of the week from the day of configuration and subsequently every seven days. Monthly - The reports will be generated and sent to the administrators through on every 30th day from the start date set in the 'Start date' field. The report will contain details of the mail activities for the domains during the past 30 days. The first report will be sent on the start date and will contain the statistics for the remaining days of the month from the day of configuration and subsequently every 30 days. Yearly - The reports will be generated and sent to the administrators through on every 365th day from the start date set in the 'Start date' field. The report will contain details of the mail activities for the domains during the past 12 months. The first report will be sent on the start date and will contain the statistics for the remaining months of the year from the day of configuration and subsequently every 12 months. An example of a Reported Spam Report is shown below: 337

338 338
Comodo Dome Antispam MSP Software Version 2.12
 Comodo Dome Antispam MSP Software Version 2.12 Administrator Guide Guide Version 2.12.111017 Comodo Security Solutions 1255 Broad Street Clifton, NJ, 07013 Table of Contents 1 Introduction to Comodo Dome
Comodo Antispam Gateway Software Version 2.12
 Comodo Antispam Gateway Software Version 2.12 Administrator Guide Guide Version 2.12.112217 Comodo Security Solutions 1255 Broad Street Clifton, NJ, 07013 Table of Contents 1 Introduction to Comodo Antispam
Comodo Antispam Gateway Software Version 2.2
 Comodo Antispam Gateway Software Version 2.2 Administrator Guide Guide Version 2.2.052215 Comodo Security Solutions 1255 Broad Street Clifton, NJ, 07013 Table of Contents 1 Introduction to Comodo Antispam
Comodo Antispam Gateway Software Version 1.12
 Comodo Antispam Gateway Software Version 1.12 Administrator Guide Guide Version 1.12.123013 Comodo Security Solutions 1255 Broad Street STE 100 Clifton, NJ, 07013 Table of Contents 1 Introduction to Comodo
Comodo Comodo Dome Antispam MSP Software Version 2.12
 Comodo Comodo Dome Antispam MSP Software Version 2.12 User Guide Guide Version 2.12.111517 Comodo Security Solutions 1255 Broad Street Clifton, NJ, 07013 Table of Contents 1 Introduction to Comodo Dome
Comodo Antispam Gateway Software Version 2.12
 Comodo Antispam Gateway Software Version 2.12 User Guide Guide Version 2.12.112017 Comodo Security Solutions 1255 Broad Street Clifton, NJ, 07013 Table of Contents 1 Introduction to Comodo Antispam Gateway...3
Comodo Antispam Gateway Software Version 2.11
 Comodo Antispam Gateway Software Version 2.11 User Guide Guide Version 2.11.041917 Comodo Security Solutions 1255 Broad Street Clifton, NJ, 07013 Table of Contents 1 Introduction to Comodo Antispam Gateway...3
Comodo Antispam Gateway Software Version 2.1
 Comodo Antispam Gateway Software Version 2.1 User Guide Guide Version 2.1.010215 Comodo Security Solutions 1255 Broad Street Clifton, NJ, 07013 Table of Contents 1 Introduction to Comodo Antispam Gateway...
Partner Documentation Reseller Portal Guide
 2 Partner Documentation 1. Introduction and Enrollment One of the benefits of MSP Consortium membership is access to Comodo's range of enterprise security and management tools at greatly discounted rates.
Mail Assure. Quick Start Guide
 Mail Assure Quick Start Guide Last Updated: Wednesday, November 14, 2018 ----------- 2018 CONTENTS Firewall Settings 2 Accessing Mail Assure 3 Application Overview 4 Navigating Mail Assure 4 Setting up
Mail Assure Quick Start Guide
 Mail Assure Quick Start Guide Version: 11/15/2017 Last Updated: Wednesday, November 15, 2017 CONTENTS Getting Started with Mail Assure 1 Firewall Settings 2 Accessing Mail Assure 3 Incoming Filtering 4
Partner Documentation Reseller Portal Guide
 2 Partner Documentation 1.Introduction and Enrollment One of the benefits of MSP Consortium membership is access to Comodo's range of enterprise security and management tools at greatly discounted rates.
Comodo Device Manager Software Version 4.0
 Comodo Device Manager Software Version 4.0 CDM Cloud Portal Setup Guide Guide Version 4.0.061815 Comodo Security Solutions 1255 Broad Street Clifton, NJ 07013 Comodo Device Manager - Cloud Portal Setup
Comodo SiteInspector Software Version 3.3
 Comodo SiteInspector Software Version 3.3 Administrator Guide Guide Version 3.3.032812 Comodo Security Solutions 1255 Broad Street STE 100 Clifton, NJ 07013 Table of Contents 1 Introduction to Comodo SiteInspector...
Comodo Accounts Management Software Version 17.0
 2 Comodo Accounts Management Software Version 17.0 Reseller Portal Guide Guide Version 17.0.121917 Comodo Security Solutions 1255 Broad Street Clifton, NJ 07013 Table of Contents 1.The Reseller Portal...3
Comodo Accounts Management Software Version 23.0
 2 Comodo Accounts Management Software Version 23.0 Reseller Portal Guide Guide Version 23.0.083018 Comodo Security Solutions 1255 Broad Street Clifton, NJ 07013 Table of Contents 1.The Reseller Portal...3
Comodo Accounts Management Software Version 15.0
 2 Comodo Accounts Management Software Version 15.0 Reseller Portal Guide Guide Version 15.0.072117 Comodo Security Solutions 1255 Broad Street Clifton, NJ 07013 Table of Contents 1.The Reseller Portal...
Comodo Dome Antispam Software Version 6.0
 St rat Comodo Dome Antispam Software Version 6.0 Admin Guide Guide Version 6.6.051117 Comodo Security Solutions 1255 Broad Street Clifton, NJ 07013 Table of Contents 1 Introduction to Dome Anti-spam...
Comodo Dome Shield - Admin Guide
 rat Comodo Dome Shield Software Version 1.12 Administrator Guide Guide Version 1.12.111717 Comodo Security Solutions 1255 Broad Street Clifton, NJ 07013 Table of Contents 1 Introduction to Comodo Dome
Comodo Dome Antispam Software Version 6.0
 St rat Comodo Dome Antispam Software Version 6.0 Admin Guide Guide Version 6.7.073118 Comodo Security Solutions 1255 Broad Street Clifton, NJ 07013 Table of Contents 1 Introduction to Dome Anti-spam...5
Comodo Dome Firewall Central Manager Software Version 1.2
 3rat Comodo Dome Firewall Central Manager Software Version 1.2 Administrator Guide Guide Version 1.2.042418 Comodo Security Solutions 1255 Broad Street Clifton, NJ 07013 Table of Contents 1 Introduction
Sectigo Accounts Management
 Sectigo Accounts Management Software Version 7.0 User Guide Guide Version 7.0.030414 2018 Sectigo. All rights reserved. Table of Contents 1. Introduction To Sectigo Accounts Management...3 2. My Account...5
Comodo Dome Shield. Administrator Guide Guide Version Software Version 2.4. Comodo Security Solutions 1255 Broad Street Clifton, NJ 07013
 rat Comodo Dome Shield Software Version 2.4 Administrator Guide Guide Version 2.4.032019 Comodo Security Solutions 1255 Broad Street Clifton, NJ 07013 Table of Contents 1 Introduction to Comodo Dome Shield...3
CCloud for ios Devices
 CCloud for ios Devices User Guide Guide Version 3.0.010215 Comodo Security Solutions 1255 Broad Street Clifton, NJ 07013 Table of Contents 1. CCloud for ios - Introduction... 3 1.1.Starting Comodo Cloud...
rat Comodo EDR Software Version 1.7 Administrator Guide Guide Version Comodo Security Solutions 1255 Broad Street Clifton, NJ 07013
 rat Comodo EDR Software Version 1.7 Administrator Guide Guide Version 1.1.120318 Comodo Security Solutions 1255 Broad Street Clifton, NJ 07013 Table of Contents 1 Introduction to Comodo EDR...3 1.1 Purchase
Integrating Trend Micro Hosted Security with Google Gmail
 A Trend Micro Integration Guide I November 2017 Integrating Trend Micro Hosted Email Security with Google Gmail» This guide provides the steps necessary to configure Google Gmail to work with Trend Micro
Comodo SecureBox Management Console Software Version 1.9
 6. Comodo SecureBox Management Console Software Version 1.9 Administrator Guide Guide Version 1.9.032817 Comodo Security Solutions 1255 Broad Street Clifton, NJ 07013 Table of Contents 1.Introduction to
Comodo cwatch Network Software Version 2.23
 rat Comodo cwatch Network Software Version 2.23 Administrator Guide Guide Version 2.23.060618 Comodo Security Solutions 1255 Broad Street Clifton, NJ 07013 Table of Contents 1 Introduction to Comodo cwatch
Mail Assure. User Guide - Admin, Domain and Level
 Mail Assure User Guide - Admin, Domain and Email Level Last Updated: Friday, June 15, 2018 ----------- 2018 CONTENTS Getting Started 1 Useful Links 1 What's New 1 Accessing Mail Assure 6 User Permissions
Comodo One Software Version 3.8
 rat Comodo One Software Version 3.8 Dome Cloud Firewall Quick Start Guide Guide Version 1.1.061118 Comodo Security Solutions 1255 Broad Street Clifton, NJ 07013 Comodo Dome Cloud Firewall Quick Start This
Important Information
 May 2014 Important Information The following information applies to Proofpoint Essentials US1 data center only. User Interface Access https://usproofpointessentials.com MX Records mx1-usppe-hosted.com
Comodo SecureBox Management Console Software Version 1.9
 6. Comodo SecureBox Management Console Software Version 1.9 Quick Start Guide Guide Version 1.9.041918 Comodo Security Solutions 1255 Broad Street Clifton, NJ 07013 Comodo SecureBox Management Console
How to Configure Office 365 for Inbound and Outbound Mail
 How to Configure Office 365 for Inbound and Outbound Mail You can configure Microsoft Office 365 with the Barracuda Email Security Service as your inbound and/or outbound mail gateway. If you make setting
You can find more information about the service at
 Introduction The purpose of this guide is to familiarize you with ExchangeDefender and walk you through the configuration, management and deployment of the service. ExchangeDefender is a transparent, cloud-based
Step 2 - Deploy Advanced Security for Exchange Server
 Step 2 - Deploy Advanced Email Security for Exchange Server Step 1. Ensure Connectivity and Redundancy Open your firewall ports to allow the IP address ranges based on your Barracuda Email Security Service
Configuring the SMA 500v Virtual Appliance
 Using the SMA 500v Virtual Appliance Configuring the SMA 500v Virtual Appliance Registering Your Appliance Using the 30-day Trial Version Upgrading Your Appliance Configuring the SMA 500v Virtual Appliance
You should not have any other MX records for your domain name (subdomain MX records are OK).
.") Network Configuration In order to properly deploy ExchangeDefender, you need to make several changes on your network. First, you have to change your MX record to point all of your inbound mail to ExchangeDefender.
Network Configuration In order to properly deploy ExchangeDefender, you need to make several changes on your network. First, you have to change your MX record to point all of your inbound mail to ExchangeDefender.
Step 1 - Set Up Essentials for Office 365
 The standalone Office 365 Standalone Email Security option is available for purchase only through the Barracuda Self-Service Gateway or Barracuda MSP. This article assumes you are deploying Barracuda Services
How to Configure Esva for Office365
 How to Configure Esva for Office365 This article addresses configuring Office 365 with Libra Esva as your inbound and/or outbound mail gateway. You can specify the appliance as an inbound mail gateway
Comodo cwatch Web Security Software Version 1.0
 rat Comodo cwatch Web Security Software Version 1.0 Webhost Reseller Guide Guide Version 1.0.121916 Comodo Security Solutions 1255 Broad Street Clifton, NJ 07013 Table of Contents 1 Introduction to Comodo
Office 365 Standalone Security
 The standalone Email Security option is available for purchase only through the Barracuda Self-Service Gateway or Barracuda MSP. Once you complete the Essentials for Office 365 Wizard, the Essentials page
Comodo One Software Version 3.16
 rat Comodo One Software Version 3.16 Service Desk Staff Guide Guide Version 4.6.112817 Comodo Security Solutions 1255 Broad Street Clifton, NJ 07013 Table of Contents 1 Introduction to Service Desk Module...3
Contents. Limitations. Prerequisites. Configuration
 Welcome to your Netmail Secure trial The trial version of Netmail Secure allows you to evaluate Netmail Secure from within your own corporate domain. Included is a sample mail feed that is automatically
Ciphermail Webmail Messenger Administration Guide
 CIPHERMAIL EMAIL ENCRYPTION Ciphermail Webmail Messenger Administration Guide October 27, 2017, Rev: 8630 Copyright 2013-2017, ciphermail.com. CONTENTS CONTENTS Contents 1 Introduction 4 2 Admin login
Comodo Dome Shield - Admin Guide
 rat Comodo Dome Shield Software Version 1.16 Administrator Guide Guide Version 1.16.062718 Comodo Security Solutions 1255 Broad Street Clifton, NJ 07013 Table of Contents 1 Introduction to Comodo Dome
Comodo cwatch Web Security Software Version 2.10
 rat Comodo cwatch Web Security Software Version 2.10 Website Administrator Guide Guide Version 2.10.042018 Comodo Security Solutions 1255 Broad Street Clifton, NJ 07013 Table of Contents 1 Introduction
Step 1 - Set Up Essentials for Office 365
 For each Barracuda Cloud Control account, you can have either a linked Barracuda Email Security Gateway appliance or a Barracuda Email Security Service subscription. You cannot use a single Barracuda Cloud
Comodo Internet Security Software Version 11.0
 Comodo Internet Security Software Version 11.0 Installation Guide Guide Version 11.0.080918 Comodo Security Solutions 1255 Broad Street Clifton, NJ, 07013 United States 1. CIS Installation Please read
To create a few test accounts during the evaluation period, use the Manually Add Users steps.
 Once you complete the Essentials for Office 365 Wizard, the Essentials page displays in Barracuda Cloud Control. Click Set up additional domains to go to the Barracuda Email Security Service Domains page,
Comodo IT and Security Manager Software Version 6.4
 Comodo IT and Security Manager Software Version 6.4 End User Guide Guide Version 6.4.040417 Comodo Security Solutions 1255 Broad Street Clifton, NJ 07013 Table of Contents 1. Introduction to Comodo IT
Comodo Next Generation Security Information and Event Management Software Version 1.4
 rat Comodo Next Generation Security Information and Event Management Software Version 1.4 Administrator Guide Guide Version 1.4.101915 Comodo Security Solutions 1255 Broad Street Clifton, NJ 07013 Table
Important Information
 February 2017 Important Information The following information applies to Proofpoint Essentials US2 data center only. User Interface Access https://usproofpointessentials.com MX Records mx1-usppe-hosted.com
Comodo One Software Version 3.18
 rat Comodo One Software Version 3.18 Service Desk Staff Guide Guide Version 4.8.122817 Comodo Security Solutions 1255 Broad Street Clifton, NJ 07013 Table of Contents 1 Introduction to Service Desk Module...
Synology MailPlus Server Administrator's Guide. Based on MailPlus Server 1.4.0
 Synology MailPlus Server Administrator's Guide Based on MailPlus Server 1.4.0 Table of Contents Chapter 1: Introduction Chapter 2: Getting Started with MailPlus Server Connect Synology NAS to the Internet
Comodo Cloud Drive Software Version 1.0
 2 Comodo Cloud Drive Software Version 1.0 User Guide Guide Version 1.0.112017 Comodo Security Solutions 1255 Broad Street STE 100 Clifton, NJ 07013 Table of Contents 1. Introduction to Comodo Cloud Drive...
Workshare Protect Server 3.8. Solutions Guide
 Workshare Protect Server 3.8 Solutions Guide July 2017 Workshare Protect Server 3.8 Solutions Guide Table of Contents Chapter 1: Introducing Workshare Protect Server...5 What is Workshare Protect Server?...
Comodo One. Quote Manager Administrator Guide Guide Version Software Version 3.26
 rat Comodo One Software Version 3.26 Quote Manager Administrator Guide Guide Version 3.26.110818 Comodo Security Solutions 1255 Broad Street Clifton, NJ 07013 Table of Contents 1 Introduction to Quote
Comodo Certificate Manager
 Comodo Certificate Manager Introduction to Auto-Installer Comodo CA Limited, 3rd Floor, 26 Office Village, Exchange Quay, Trafford Road, Salford, Greater Manchester M5 3EQ, United Kingdom. Certificate
Office 365 Integration Guide Software Version 6.7
 rat Office 365 Integration Guide Software Version 6.7 Guide Version 6.7.061418 Comodo Security Solutions 1255 Broad Street Clifton, NJ 07013 Table of Contents 1 Introduction...3 1.1 Email Flow Explanation...3
Comodo cwatch Network Software Version 1.4
 rat Comodo cwatch Network Software Version 1.4 Administrator Guide Guide Version 1.4.010918 Comodo Security Solutions 1255 Broad Street Clifton, NJ 07013 Table of Contents 1 Introduction to Comodo cwatch
Comodo IT and Security Manager Software Version 6.6
 Comodo IT and Security Manager Software Version 6.6 End User Guide Guide Version 6.6.053117 Comodo Security Solutions 1255 Broad Street Clifton, NJ 07013 Table of Contents 1. Introduction to Comodo IT
Comodo cwatch Web Security Software Version 1.6
 rat Comodo cwatch Web Security Software Version 1.6 Quick Start Guide Guide Version 1.6.010918 Comodo Security Solutions 1255 Broad Street Clifton, NJ 07013 Comodo cwatch Web Security - Quick Start Guide
LabTech Ignite Installation
 LabTech LabTech Ignite Installation LABTECH IGNITE INSTALLATION... 1 Overview... 1 Readiness Checklist... 1 Server Installation... 2 Creating a Client Import File... 17 Using SSL Connections... 18 SSL
User Guide. Version R92. English
 AuthAnvil User Guide Version R92 English October 9, 2015 Agreement The purchase and use of all Software and Services is subject to the Agreement as defined in Kaseya s Click-Accept EULATOS as updated from
Comodo Web Application Firewall for Plesk Software Version 2.11
 2 Comodo Web Application Firewall for Plesk Software Version 2.11 Administrator Guide Guide Version 2.11.120418 Comodo Security Solutions 1255 Broad Street Clifton, NJ 07013 Table of Contents 1. Comodo
Comodo Internet Security Software Version 10.1
 Comodo Internet Security Software Version 10.1 Installation Guide Guide Version 10.1.012218 Comodo Security Solutions 1255 Broad Street Clifton, NJ, 07013 United States 1. CIS Installation Please read
Comodo IT and Security Manager Software Version 6.9
 Comodo IT and Security Manager Software Version 6.9 End User Guide Guide Version 6.9.072817 Comodo Security Solutions 1255 Broad Street Clifton, NJ 07013 Table of Contents 1. Introduction to Comodo IT
SECTION 5 USING STUDENT
 SECTION 5 USING STUDENT EMAIL 5. USING STUDENT EMAIL On enrolling at the University all students automatically have an email account created. Account creation depends on a student successfully enrolling
Comodo Web Application Firewall for Plesk Software Version 2.11
 2 Comodo Web Application Firewall for Plesk Software Version 2.11 Administrator Guide Guide Version 2.11.011317 Comodo Security Solutions 1255 Broad Street Clifton, NJ 07013 Table of Contents 1. Comodo
Comodo IT and Security Manager Software Version 5.4
 Comodo IT and Security Manager Software Version 5.4 End User Guide Guide Version 5.4.090716 Comodo Security Solutions 1255 Broad Street Clifton, NJ 07013 Table of Contents 1. Introduction to Comodo IT
Managing Spam. To access the spam settings in admin panel: 1. Login to the admin panel by entering valid login credentials.
 Email Defense Admin Panel Managing Spam The admin panel enables you to configure spam settings for messages. Tuning your spam settings can help you reduce the number of spam messages that get through to
Comodo One Software Version 3.3
 rat Comodo One Software Version 3.3 Patch Management Module Administrator Guide Guide Version 2.2.101316 Comodo Security Solutions 1255 Broad Street STE 100 Clifton, NJ 07013 Table of Contents 1 Introduction
Welcome to ContentCatcher 3.0! If this is your first time using ContentCatcher 3.0, here s a great way to start. We ll walk you through the essential
 Welcome to ContentCatcher 3.0! If this is your first time using ContentCatcher 3.0, here s a great way to start. We ll walk you through the essential first steps so your team can work efficiently and productively
WORKSHARE PROTECT SERVER 3.6 SOLUTIONS GUIDE
 WORKSHARE PROTECT SERVER 3.6 SOLUTIONS GUIDE February 2017 Workshare Protect Server Solutions Guide Table of Contents Chapter 1. Introducing Workshare Protect Server... 5 What is Workshare Protect Server?...
Licensing Guide. BlackBerry Enterprise Service 12. Version 12.0
 Licensing Guide BlackBerry Enterprise Service 12 Version 12.0 Published: 2014-11-13 SWD-20141118133401439 Contents About this guide... 5 What is BES12?... 6 Key features of BES12...6 Product documentation...
Adding your IMAP Mail Account in Outlook 2013 on Windows
 Adding your IMAP Mail Account in Outlook 2013 on Windows Replace example.co.za with your domain name as it was sent to you by Visualize IT 1. Launch Outlook 2. Select File on the top left menu bar 3. Select
WeCloud Security. Administrator's Guide
 WeCloud Security Administrator's Guide WeCloud Security Administrator's Guide WeCloud Security provides a variety of useful features within a user-friendly web console to manage the functions including
Comodo One Software Version 3.26
 rat Comodo One Software Version 3.26 Service Desk Staff Guide Guide Version 4.16.101018 Comodo Security Solutions 1255 Broad Street Clifton, NJ 07013 Table of Contents 1 Introduction to Service Desk Module...3
User Guide. Customer Self Service (CSS) Web Application Progress Software Corporation. All rights reserved.
 Web Application Progress Software Corporation. All rights reserved.") User Guide Customer Self Service (CSS) Web Application 1993-2017 Progress Software Corporation. Version 2.1 March 2017 Table of Contents Welcome... 3 Accessing the Customer Self Service (CSS) Web Application...
User Guide Customer Self Service (CSS) Web Application 1993-2017 Progress Software Corporation. Version 2.1 March 2017 Table of Contents Welcome... 3 Accessing the Customer Self Service (CSS) Web Application...
CUSTOMER CONTROL PANEL... 2 DASHBOARD... 3 HOSTING &
 Table of Contents CUSTOMER CONTROL PANEL... 2 LOGGING IN... 2 RESET YOUR PASSWORD... 2 DASHBOARD... 3 HOSTING & EMAIL... 4 WEB FORWARDING... 4 WEBSITE... 5 Usage... 5 Subdomains... 5 SSH Access... 6 File
Comodo Online Storage Software Version 2.0
 Comodo Online Storage Software Version 2.0 Guide Version 2.0.101211 Comodo Security Solutions 525 Washington Blvd. Jersey City, NJ 07310 Table of Contents 1. Introduction... 4 1.1.System Requirements...
Trustwave SEG Cloud Customer Guide
 Trustwave SEG Cloud Customer Guide Legal Notice Copyright 2017 Trustwave Holdings, Inc. All rights reserved. This document is protected by copyright and any distribution, reproduction, copying, or decompilation
Using Centralized Security Reporting
 This chapter contains the following sections: Centralized Email Reporting Overview, on page 1 Setting Up Centralized Email Reporting, on page 2 Working with Email Report Data, on page 4 Understanding the
Sophos Central Partner. help
 help Contents About help...1 About...2 Dashboard... 3 Alerts...4 Logs... 5 Audit Logs...5 Sophos Central...7 Sophos Central customers...7 Sophos Central Licenses... 7 Managed Customer Usage... 9 Trial
PAN 802.1x Connector Application Installation Guide
 PAN 802.1x Connector Application Installation Guide Version 1.2 "Copyright CodeCentrix. All rights reserved 2015. Version 1.2 Contact Information CodeCentrix www.codecentrix.co.za/contact Email: info@codecentrix.co.za
Comodo Korugan Software Version 1.8
 rat Comodo Korugan Software Version 1.8 Unified Threat Management Administrator Guide Guide Version 1.8.050515 Comodo Security Solutions 1255 Broad Street Clifton, NJ 07013 Table of Contents 1 Introduction
Kerio Connect. Step-by-Step. Kerio Technologies
 Kerio Connect Step-by-Step Kerio Technologies 2011 Kerio Technologies s.r.o. All rights reserved. This guide provides detailed description on Kerio Connect, version 7.3. All additional modifications and
Comodo One Mobile Software Version 1.16
 Yesrat Comodo One Mobile Software Version 1.16 User Guide Guide Version 1.16.032817 Comodo Security Solutions 1255 Broad Street Clifton, NJ 07013 Table of Contents 1 Introduction to C1 Mobile...3 1.1 Signing
Rat. Service Desk. Quick Start Guide. Software version 4.16 Guide version ITarian 1255 Broad Street Clifton, NJ 07013
 Rat Service Desk Quick Start Guide Software version 4.16 Guide version 4.16.110618 ITarian 1255 Broad Street Clifton, NJ 07013 Itarian Service Desk - Quick Start Guide This tutorial explains how ITarian
WEBppliance for Windows User Administrator's Help
 WEBppliance for Windows User Administrator's Help September 23, 2003 Contents About This Document...3 How to use this Help system...4 Getting started...6 What to do first... 6 Viewing your account settings...
SonicWall Secure Mobile Access SMA 500v Virtual Appliance 8.6. Getting Started Guide
 SonicWall Secure Mobile Access SMA 500v Virtual Appliance 8.6 Getting Started Guide Copyright 2017 SonicWall Inc. All rights reserved. SonicWall is a trademark or registered trademark of SonicWall Inc.
Step 3 - Deploy Advanced Security and Compliance for Exchange Server
 Step 3 - Deploy Advanced Email Security and Compliance for Exchange Server Use this article to deploy the Barracuda Cloud Archiving Service component for Exchange Server 2007 and 2010 in your environment.
Comodo Unknown File Hunter Software Version 5.0
 rat Comodo Unknown File Hunter Software Version 5.0 Administrator Guide Guide Version 5.0.073118 Comodo Security Solutions 1255 Broad Street Clifton, NJ 07013 Table of Contents 1 Introduction to Comodo
Associate User Manual. vatmate is a trading division of ivat Limited
 Associate User Manual vatmate is a trading division of ivat Limited Change History Version Date Changed by Description 1.0 12-May-2017 Gareth M. Davies Base lined 1.1 05-Sep-2017 Tim Myerson Updated images
Step 4 - Choose Your Deployment
 https://campus.barracuda.com/doc/51190798/ CONFIGURE G SUITE JOURNALING You must configure G Suite to send archived mail directly to the Barracuda Cloud Archiving Service. Google IP address ranges and user
Trusted Advisor User Guide. inty CASCADE v 2.9.0
 Trusted Advisor User Guide inty CASCADE v 2.9.0 Table of Contents 1. Overview... 2 2. Logging in to inty CASCADE... 2 2.1 Forgotten Password... 4 2.2 Password Complexity... 5 3. Home Page... 7 4. Navigation...
Comodo One Software Version 3.26
 rat Comodo One Software Version 3.26 Network Assessment Tool Administrator Guide Guide Version 1.3.113018 Comodo Security Solutions 1255 Broad Street Clifton, NJ 07013 Table of Contents 1 Introduction
Setting up Microsoft Office 365
 Integration Guide Revision G McAfee SaaS Email Protection Securing Exchange Online in Microsoft Office 365 Setting up Microsoft Office 365 Use this guide to configure Microsoft Office 365 and Microsoft
Getting Started Guide moduscloud
 Getting Started Guide moduscloud Hi and welcome to moduscloud! If this is your first time using moduscloud, here s a great way to start. We ll walk you through the essential first steps so your team can
Comodo cwatch Web Security Software Version 3.0
 rat Comodo cwatch Web Security Software Version 3.0 Website Administrator Guide Guide Version 3.0.050918 Comodo Security Solutions 1255 Broad Street Clifton, NJ 07013 Table of Contents 1 Introduction to