Procurer User Manual
|
|
|
- Caroline Holt
- 5 years ago
- Views:
Transcription
1 MTR Corporation Limited Procurer User Manual of Secure Electronic Tendering System Version : 1.6 Date : 18-Dec-2013 Status : Final Document ID : Prepared By Global e-business Services Limited
2 I. Overview... 1 A. Log on to E-Tendering System... 2 II. Procurer Profile... 5 A. Update Company Information... 5 B. Add New User... 6 C. Update User Information and Change Password... 8 D. Update Other User Information and Change Password E. Delete User Account F. Forgot Password III. System Maintenance A. Create New Project B. Search & View New / Existing Project C. Update Existing Project D. Delete Project E. Create New Trade F. Search & View Existing Trade G. Update Existing Trade H. Delete Existing Trade I. Assign or Update Registration Administrator J. Web Maintenance K. Standard Document Maintenance L. Reminder for E-Cert Renewal M. Access Control IV. Registration A. Create Registration Team B. View, Modify & Delete Existing Registration Team C. Search New / Existing Registration D. View & Assign Team for New Registration E. Verify New Registration (Verifier) F. Upload New Document / Delete Existing Document for Verified Registration (Verifier) G. Approve / Reject New Registration (Approver) H. Send Rejected Notice to New Registration (Verifier) I. Update Registration J. Review Update of Registration (Changes made by Supplier) K. Approve Update of Registration (Changes made by Supplier) L. Reject Update of Registration (Changes made by Supplier) M. Export Registration Data to CSV N. Resend Account Password to Supplier O. Suspension & Expiry for Supplier V. Advertisement A. Post Advertisement B. Search & View Advertisement C. Manage Advertisement D. Download Interest List E. Suspend Advertisement VI. PreQualification A. Post PreQualification B. Modify PreQualification Information and Documents C. Delete PreQualification Notice D. Search & Review PreQualification E. Create PreQualification Box F. View & Answer Query on PreQualification G. Check / Edit PreQualification List & Check Prequalification Status H. Download PreQualification Submission I. Shortlist Tenderer List J. Postpone PreQualification Closing Date K. Suspend PreQualification VII. PreQualification Assessment A. Post PreQualification Q&A
3 B. Review PreQualification Q&A C. Issue PreQualification Q&A D. Maintain PreQualification Q&A E. Download PreQualification Q&A Attachments F. Modify PreQualification Q&A G. Modify PreQualification Q&A Documents H. Open PreQualification Q&A I. Close PreQualification Q&A J. Close all PreQualification Non-Tender Box Q&A VIII. Post Tender Notice A. Prepare BQ and FOT Documents B. Prepare Tender Notice C. Search & View Tender Notice D. Upload & Delete Tender Document Files E. Review Tender Notice F. Modify Tender Information G. Delete Tender Notice H. Approve Tender Notice & Create Tender Box IX. Manage Tender Notice A. Tendering Process B. Post Tender Addendum C. Modify Addendum Document & Info D. Approve Tender Addendum E. Check / Edit Tenderer List & Check Tenderers' Status F. Postpone / Advance Tender Notice G. Suspend Tender Notice H. Answer Query I. Download Tender Box J. Disable Download Tender Box K. Receive No Offer X. Open Tender Box XI. Tender Assessment A. Post Tender Q&A (Tender Box Q&A) B. Search & View Tender Q&A C. Review Q&A (Tender Box Q&A) D. Approve Q&A (Tender Box Q&A) E. Maintain Q&A (Tender Box Q&A) F. Download Q&A Box (Tender Box Q&A) G. Post Q&A (Non-Tender Box Q&A) H. Review Q&A (Non-Tender Box Q&A) I. Issue Q&A (Non-Tender Box Q&A) J. Maintain Q&A (Non-Tender Box Q&A) K. Download Q&A Attachments (Non-Tender Box Q&A) L. Modify Q&A Information M. Modify Q&A Documents N. Open Tender Box Q&A O. Open Non-Tender Box Q&A P. Update Gap List Q. Close all Non-Tender Box Q&A R. Send Letter of Clarification (LOC) S. Send Letter of Acceptance (LOA) XII. Tender Award XIII. Report / Log A. Contractors (Trade, Safety) Report B. Contractors (Trade, Status of Registration) Report C. Contractors Performance Report D. Contract Progress Report E. Project Status Report F. Contracts (Trade) Report G. Award Contracts Report
4 H. Tender Closing Report I. Payment Transaction Report J. Digital Cert Report K. Closing Activities Report L. Upload Activities Report M. Audit Trail Report N. Error Log Report O. Activity Log Report P. File Transfer History Q. Security Report R. E-Cert Reminder Log XIV. Data Archiving A. Submit De-Archive Request B. Search & View De-Archive Request XV. Site Map XVI. Access Right Matrix
5 I. Overview In this manual, the operation of the E-Tendering System in different sections is described. Here is an overview of the business process flow. e-tendering Business Process Flow e-tendering Process BEGIN 1. Setup Project, Registration Admin, RegistrationTeam, Trade Need Prequalification Advertisement? Yes 2. Post Advertisement No No Need Prequalification? Yes 3. Post Prequalification 4. Tender Issue 5. Tender Return 6. Open Tender Box 7. Tender Assessment 8. Tender Award e-tendering Process END Note: The terms contractor and supplier as used throughout this manual should be referred to supplier / contractor. Page 1 of 263
 Logon Procedure: Step 1.")

6 A. Log on to E-Tendering System Before logon to the E-Tendering System, please make sure that the computer is connected with Internet through browser and meet the following minimum requirements. Operating system: Browser: Internet Service: Windows XP or above Internet Explorer 6 or above Any one of the Internet Service Provider (ISP) Logon Procedure: Step 1. Click Registered Supplier / Contractor on homepage of to initiate the logon screen. Step 2. Type in User ID and Password. Then click Login button to logon. Step 3: If it is the first time logging in to the system, the user would be required to change his password, then enter the NEW password and CONFIRM the new password entered by inputting the password again. Page 2 of 263

7 Note: Please make sure your password is at least 8 characters long. Below message will be shown if password is less than 8 characters long: Please make sure your password is consist of below group: Lower case alphabets Upper case alphabets Numbers Special characters (characters on the keyboard other than the above three group Otherwise error message will be shown: Page 3 of 263


8 Your password should be changed at every 180 days Account locked after consecutive 5 failures of logon attempt Below error message will be shown if you update the password using previous one: Note: Please click Logout button upon finishing of working in the system. Page 4 of 263

9 II. Procurer Profile A. Update Company Information Step 1. Go to the menu bar at the top and click Profile - Update Company Info. This function is controlled by the access right of Update MTRC Info under Procurer Profile. Step 2. Change the information in the fields below. And note that all the fields are mandatory. Input the English name and address in case there is no Chinese company name and address. Step 3. Press Submit button after finishing the change. Step 4. An acknowledgement message will be shown when the change is submitted successfully. Step 5. Click on the Home button to go back to the main page. Page 5 of 263

10 B. Add New User Step 1. Go to the menu bar at the top and click Add New User under Profile. This function is controlled by the access right of Create New User under Procurer Profile. Step 2. Input user information in the fields below. The length of the password must be more than 5 alphanumeric characters. Step 3. Press Submit button after completing the input. Step 4. An acknowledgement message will be shown when the new user information is submitted successfully. Page 6 of 263
11 Step 5. Click Add More to add another new user, and repeat Step 2 to 4. Or click Home to go to the main page. Page 7 of 263


12 C. Update User Information and Change Password Step 1. Go to the menu bar at the top and click Update User Info under Profile. All users could update their own information except their own title and could also change their own password. Step 2. Change the information in the fields below. Step 3. Change password (type new password and confirm by entering it again). Step 4. Press Submit button after completing the change. Step 5. An acknowledgement message will be shown when the change is submitted successfully. Page 8 of 263
13 Step 6. Click Update More button when more information is needed to be updated and repeat Step 2 to 5. Page 9 of 263


14 D. Update Other User Information and Change Password Step 1. Go to the menu bar at the top and choose Update User Info under Profile. This function is controlled by the access right of Search & View, Change Password and Modify & Delete under Procurer Profile. Step 2. Select a user from the user list below. Step 3. Change the information of the user selected. Step 4. Press Submit button after completing the change. Page 10 of 263

15 E. Delete User Account Step 1. Go to the menu bar at the top and choose Update User Info under Profile. This function is controlled by the access right of Search & View and Modify & Delete under Procurer Profile. Step 2. Select a user from the drop-down user list. Step 3. Press the Delete button to delete the user account. Step 4. Confirmation message will be prompted by the system. Press OK button to confirm deletion of the user. To cancel the action, click Cancel button. Warning : Once an account of an user is deleted, it cannot be re-activated again. A new account for the user should only be created. Page 11 of 263

16 F. Forgot Password Step 1. Go to the home page, click Registered Supplier / Contractor, then click Forgot Password button. Step 2. Input User Name and , which should be the user s address with the company. Click Submit button, the system will reset the password and the new password to the user s address. Page 12 of 263
17 III. System Maintenance A. Create New Project Before proceeding for any electronic tendering process, either a project created before should be used for the tendering process or a new project should be created as follows: Step 1. Go to the menu bar at the top and click Create New Project under Maintenance. This function is controlled by the access right of Create New under Project. Step 2. Input new project information (*- Required Field). Step 3. Assign users to execute or view this project (including posting of advertisement, prequalification, prequalification Q&A, tender and tender Q&A). Step 4. Specify if the project to be active or inactive. Active the user who has the appropriate access right can manage this project (e.g. post advertisement, prequalification or tender) Inactive All inactive projects will not be listed in the drop down project list for procurer to select. (e.g. Post Adv, Post PQ and Post Tender) Page 13 of 263

18 Step 5. Press Submit button after finishing of the information filling. Step 6. An acknowledgement message will be shown when the new project is created successfully. Step 7. Click on the Create More and repeat Step 2-6 to create another project. Page 14 of 263

19 B. Search & View New / Existing Project Step 1. Go to the menu bar at the top and click Search Project under Maintenance. This function is controlled by the access right of Search & View under Project. And only the Project member can view the project details. Step 2. Input search criteria about the project. By Project Name By Last Modify Date By Project Status: active or inactive Step 3. The search result can be sorted by Project Name or Last Modified Date, default sorted by Last Modified Date. Step 4. Press Submit button after selecting the criteria. Page 15 of 263

20 Step 5. The search result will be displayed as shown below. Project Name Step 6. Select a specific project by clicking Project Name. Step 7. View the project information and user list as shown. Step 8. Press Close button after viewing. Page 16 of 263
21 C. Update Existing Project Step 1. Go to the menu bar and click Search Project under Maintenance. This function is controlled by the access right of Modify Existing under Project. Any only the Project member can update the project details. Step 2. Input search criteria about the project. By Project Name By Last Modify Date By Project Status: active or inactive Step 3. The search result can be sorted by Project Name or Last Modified Date, default sorted by Last Modified Date. Step 4. Press Submit button after selecting the criteria. Step 5. The search result will be displayed as shown below. Page 17 of 263


22 Step 6. Select a specific project by clicking Project Name. Step 7. Update the project information project name and/or project status. Step 8. Change the user assigned to this project by selecting other user from the combo box. Step 9. Click Submit button when the update is finished. Step 10. An acknowledgement message will be shown when update is submitted successfully. Page 18 of 263


23 D. Delete Project Step 1. Search Project as described in Section B Step 2. The search result will be displayed as shown below. This function is controlled by the access right of Delete Existing under Project. Step 3. Select a specific project by checking the box before project name. User can click Check All button to select all project or click Uncheck All button to deselect all checked project(s). Page 19 of 263
24 Step 4. Click Delete Checked button to delete the checked project(s). Step 5. Click OK of the confirmation dialog to continue the action. Or click Cancel to terminate the action. The following message will be displayed after the project(s) are deleted. Notice : This is the function ONLY for procurer to delete project that has not been used in any Adv, PQ, or Tender. Procurer must be sure that no Adv, PQ, or Tender is associated with the project before deletion. Once the project is deleted, all the Adv, PQ and Tender linked to that project will not be able to be retrieved again. Page 20 of 263
 and trade name (*Required Field). Note that there are three parts in a trade code.")
25 E. Create New Trade Step 1. Go to the menu bar at the top and choose Create New Trade under Maintenance. This function is controlled by the access right of Create New under Trade. Step 2. Input new trade code (e.g ) and trade name (*Required Field). Note that there are three parts in a trade code. For the first trade, please assign a unique twodigit trade code in the first part of the trade code. To create a sub-trade under a trade created, please type in the trade code of the trade in the first part and assign a two-digit code in the second part of the trade code. To create a sub-sub-trade under a sub-trade, please type in the code of the trade and sub-trade in first and second parts of the trade code and assign a twodigit code in the third part of the trade code. Sub-trade or sub-sub-trade can only be created when the trade code of the preceding level has been created. Page 21 of 263
26 Step 3. Click Submit button when the input is completed. Step 4. An acknowledgement message will be shown when trade is created successfully. Step 5. If the trade code has already been existed, there will be an error message shown and the new trade will not be created. Page 22 of 263


27 F. Search & View Existing Trade Step 1. Go to the menu bar at the top and click Search Trade under Maintenance. This function is controlled by the access right of Search & View under Trade. Step 2. Input search criteria about the trade. By Trade Code By Trade Name Step 3. The search result can be sorted by the following criteria. By Trade Code By Trade Name By Last Modified Date Step 4. Press Submit button after selecting the criteria. Step 5. The search result will be displayed as shown below. Page 23 of 263

 Step 7. View the trade information trade name and trade code as shown. Step 8.")
28 Step 6. Select a trade by clicking the Trade Code. (The first zero in the second and third parts of the trade code is for system display only. The second and third parts of the trade code are only constituted by the second and third digits.) Step 7. View the trade information trade name and trade code as shown. Step 8. Press Close button after viewing. Page 24 of 263
29 G. Update Existing Trade Step 1. Follow Step 1 to Step 5 under Section F, Search and View Existing Trade. Step 2. Update information of trade code by selecting a specific trade. This function is controlled by the access right of Modify Existing under Trade. Step 3. Click Submit to update the information. Step 4. An acknowledgment message will be shown after successful update. Page 25 of 263

 are deleted successfully. An Notice : This is the function ONLY for procurer to delete trade that has not been used in any Adv, PQ, or Tender.")
30 H. Delete Existing Trade Step 1. Follow Step 1 to Step 5 under Section F, Search and View Existing Trade. Step 2. A trade can be deleted by first checking the box and click Delete Checked. Message will be prompted by the system to confirm the deletion. This function is controlled by the access right of Delete Existing under Trade. User can click Check All button to select all trade displayed or click Uncheck All button to deselect all checked trade(s). Step3. Press OK button to confirm the deletion of the checked trade(s). acknowledgement message will be shown if the trade(s) are deleted successfully. An Notice : This is the function ONLY for procurer to delete trade that has not been used in any Adv, PQ, or Tender. Procurer must be sure that no Adv, PQ, or Tender is associated with the trade before deletion. Once the trade is deleted, all the Adv, PQ and Tender linked to that trade will not be able to be retrieved again. Page 26 of 263


31 I. Assign or Update Registration Administrator Step 1. Go to the menu bar at the top and click Assign Registration Admin under Maintenance. This function is controlled by the access right of Registration Approval Path under Others. Step 2. Choose user as registration administrator from the drop down list as shown below. Page 27 of 263

32 Step 3. Check box if the system is required to send to the registration administrator every time when new registration is received. Step 4. Click Submit button to confirm assignment. Step 5. An acknowledgement message will be shown when registration administrator has been assigned successfully. The registration administrator can be changed according to the steps mentioned above. Page 28 of 263


33 J. Web Maintenance Step 1. Go to the menu bar to choose Web Maintenance under Maintenance". This function is controlled by the access right of Web Maintenance under Others. Step 2. Select language type. Step 3. Select Destination. Page 29 of 263
 4.")
34 There are five destinations to choose: 1. General Information (Page after logon) 2. Registration Procedure 3. Contractor's Safety Management Questionnaire (file for download under Job Reference in New Registration Form) 4. Environmental Management Questionnaire (file for download under Job Reference in New Registration Form) 5. Homepage (Page before logon) 6. Contact Us For example, the page shown after user logon can be updated by selecting General Information. Step 4. Click the Browse button and select the.htm file Step 5. Click Submit button to confirm update. Page 30 of 263

35 K. Standard Document Maintenance Step 1. Go to the menu bar to choose Standard Document Maintenance under Maintenance. This function is controlled by the access right of Standard Document Maintenance under Others. Step 2. Specify Folder Name and Click Create Folder to create Folder. Note: - Folder Name is limited to 128 characters - File Name is limited to 255 characters Step 3. Select Documents, specify Desc, Revision, Revision Date and Click Upload Document to upload document to system. Noted: Allow User export File List to Excel with report title, generated at and page number. Click Export to Excel button Page 31 of 263
36 L. Reminder for E-Cert Renewal a. E-tendering system can automatically send notification to supplier when e-cert is near to expiry - Allow to define days to be expired system configuration file. System Configuration File: Portal.ini [ecert] SendReminder=Y DaysToBeExpired= Reminder Subject=Renewal of Digital Certificate for MTRCL E-Tendering System Note The system can only support 2 templates only 0 = post-reminder negative = post-reminder positive = pre-reminder Page 32 of 263
37 Pre-reminder: Page 33 of 263
38 Post-reminder: Note: - Allow to send reminder with multiple attachments (PDF) - Allow to change templates and attachments in the system configuration file. Page 34 of 263
39 b.. E-tendering system will also automatically send to procurer and attached with Daily e-cert Reminder Report to specified address ( To ) and distribution list ( CC ) Note: - Allow to change recipients (To and CC) in the system configuration file. Template: <TotalNoOfReminders> total no. of reminders sent. For details, please refer to attached report. Report Layout: Note: - column show the address of Principle Account Page 35 of 263
40 c. Allow system administrator to change reminder text System Configuration File: Procurer\00001\eCertNotApplied.htm <table width="100%" border="0" cellspacing="0" cellpadding="0" class="normtext"> <tr> <td> <p>the electronic tendering system makes uses of Digital Certificate and Public Key Infrastructure to maintain the required security. Digital Certificate is used for authentication of the registered company s identity as well as signing and encryption of the company s submissions in pre-qualification and tendering process. This security measure is being widely used world wide for electronic transactions.</p> <p></p> <p>for company registered in Hong Kong, you are required to apply an 1024 bit Organisational e-cert under your registered company name through Hongkong Post. For the detailed procedures and charges of acquiring Organisational e-cert, please visit the Procurer\00001\eCertExpired.htm <table width="100%" border="0" cellspacing="0" cellpadding="0" class="normtext"> <tr> <td> <p>the electronic tendering system makes uses of Digital Certificate and Public Key Infrastructure to maintain the required security. Digital Certificate is used for authentication of the registered company s identity as well as signing and encryption of the company s submissions in pre-qualification and tendering process. This security measure is being widely used world wide for electronic transactions.</p> <p></p> <p>for company registered in Hong Kong, you are required to apply an 1024 bit Organisational e-cert under your registered company name through Hongkong Post. For the Page 36 of 263
41 Procurer\00001\iCertNotApplied.htm <table width="100%" border="0" cellspacing="0" cellpadding="0" class="normtext"> <tr> <td> <p>the electronic tendering system makes uses of Digital Certificate and Public Key Infrastructure to maintain the required security. Digital Certificate is used for authentication of the registered company s identity as well as signing and encryption of the company s submissions in pre-qualification and tendering process. This security measure is being widely used world wide for electronic transactions.</p> <p></p> Procurer\00001\iCertExpired.htm <table width="100%" border="0" cellspacing="0" cellpadding="0" class="normtext"> <tr> <td> <p>the electronic tendering system makes uses of Digital Certificate and Public Key Infrastructure to maintain the required security. Digital Certificate is used for authentication of the registered company s identity as well as signing and encryption of the company s submissions in pre-qualification and tendering process. This security measure is being widely used world wide for electronic transactions.</p> <p></p> <p>for overseas company or Joint Venture/ Consortium company, you can acquire to apply a Digital Certificate online through the system.</p> </td> Page 37 of 263


42 M. Access Control Step 1. Go to the menu bar to choose Access Control under Maintenance. This function is controlled by the access right of Access Control under Others. Step 2. Choose Title for which right of control is required to be changed. Step 3. Check the box(es) for assigning access right or uncheck checked item to retrieve the right assigned. Page 38 of 263
43 Step 4. Click Submit button to confirm update. An acknowledgement message will be shown if the access control is updated successfully. Page 39 of 263
44 IV. Registration Process flow on registration of supplier in e-tendering Registration Begin New supplier submit registration application in e-tendering Send rejected notice to Supplier and CC Reg Administrator notice to administrator notice to Verifier No Registration Administrator assign the application to a registration team. Is information completed? Yes Verifier review the submission, assign trade, and safety class to supplier. Verified? No Ask supplier for more information Re-registration after rejection Supplier can directly contact verifier about the reject application. Verifier can change the application status from Send Rejected Notice to Verified notice to Approver Yes No notice to verifier Approver review the application and confirm acceptance? Yes Send success reg. notice with password to supplier. Total 6 user ID & password (included principal account) SETS-SUP CTF SET-SUP DAT Register supplier information will export for EAMS update on daily basis notice to administrator Registration End System Administrator Page 40 of 263

45 A. Create Registration Team Step 1: Choose Create New Team under Registration. This function is controlled by the access right of Create New under Team. Step 2: Input team name and choose staff as verifier and approver for registration. Step 3: Check box if the system is required to send to the verifier and approver for registration. Step 4: Click Submit button to confirm update. Confirmation message will be shown as below upon successful update. Note: If the registration team is set to inactive, it will not be shown for assigning team for new registration. But the verifier of the inactive team will still receive the from supplier requesting for information update and be able to update the registration information once the registration is assigned to the team. Page 41 of 263


46 B. View, Modify & Delete Existing Registration Team Step 1. Choose Search Team under Registration. This function is controlled by the access right of Search & View under Team. Search criteria about the registration team are: a. Team Name b. Last modify date range c. Status of the registration team Step 2. Choose searching criteria: Team Name, Last Modify Date, or Active Status. By default the sorting order for the searching result is ordered by last modified date. Searching result can also be ordered by Team Name. Step 3. Click Submit button to display the search result. Page 42 of 263

47 Step 4. Click Team Name to view details. Step 5. Change verifier and approver shown in the above screen as required. Moreover, procurer user must have the access right in both Search View and Modify Existing in order to modify team member information. Step 6. Click Submit button to confirm changes. Step 7. Existing registration team can be deleted. This function is controlled by the access right of Delete Existing under Team. Search the team to be deleted as per Step 1 to 3 above. Page 43 of 263
. Step9. Press OK button to confirm the deletion of the checked team(s).")
48 Step 8. The team can be deleted by first checking the box beside the team and click Delete Checked. Message will be prompted by the system to confirm the deletion. User can click Check All button to select all teams displayed or click Uncheck All button to deselect all checked team(s). Step9. Press OK button to confirm the deletion of the checked team(s). acknowledgement message will be shown if the trade(s) are deleted successfully. An Page 44 of 263
49 Notice: Delete Team function is ONLY for procurer to delete registration team that has not been assigned for any registration. Procurer must be sure that no supplier registration is associated with the team before deletion. Once the registration team is deleted, information of all suppliers assigned to that registration team will not be able to be updated. Page 45 of 263

50 C. Search New / Existing Registration Step 1. Go to the menu bar at the top and click Search Registration under Registration. This function is controlled by the access right of Search & View under New Registration. Step 2. Input search criteria about the registration. By Company Name By Trade By Permanent List Indicator By Application Received Date By Newly Approved on List By Team By Registration Status By Keywords (Company Name, Address, Nature of Business) Step 3. The search results can be sorted by By Receive Date (Descending) Page 46 of 263


51 By Ref By Company Name By Status By Review Date By Approval Date Step 4. The search result will be shown as below: By default the search result is ordered by the Receive Date. The company name and the registration status will be shown. Step 5. Click on the Ref of a specific supplier/contractor to view registration details. Page 47 of 263

52 Page 48 of 263

 Step 3. New registrations with status Pending to verify will be displayed. Step 4.")
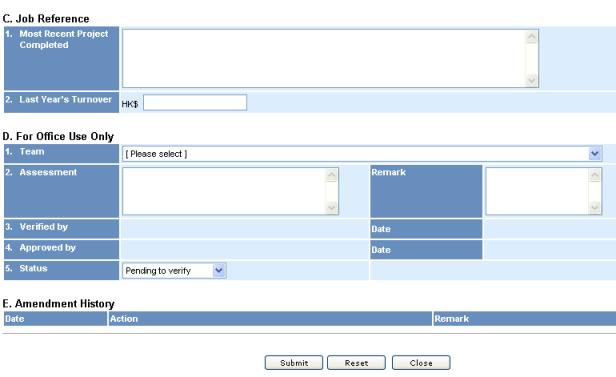
53 D. View & Assign Team for New Registration Step 1. When a new company has submitted the registration application, the user who is assigned as Registration Administrator will receive an when an alert setting is made. Step 2. Go to the menu bar at the top and click Search Registration. (Please follow Step 1 to Step 3 under Section C Search New / Existing Registration. Please choose Pending to verify as criteria in Status.) Step 3. New registrations with status Pending to verify will be displayed. Step 4. Click on the Ref of a specific company to view registration details including principal account info, company background and job reference, etc. Page 49 of 263

54 Page 50 of 263

55 Step 5. Go to Section F to download and/or view the attached documents by applicant. Procurer can also upload existing files about this company. For uploading files in section F, procurer user must have the access right for Download Job Ref. Attachment otherwise the whole section will not be displayed. Step 6. Go to Section D For Office Use Only, assign Registration Team for the registration. The System will only accept Team assigned by registration administrator. All other information updated by the registration administrator will not be saved. (Registration Administrator is the only person that can assign registration team and he must have the access right for Assign Registration Team under New Registration.) Step 7. Click Submit button to finish assignment. completion. Confirmation will be shown after Note: Registration team for a new registration can be reassigned by the registration administrator if the new registration has not been verified by the verifier. If the mode of Auto Assign Team is turned on, the registration will assigned to specified team automatically and the verifier will informed by notification. Page 51 of 263
 and search the")

56 E. Verify New Registration (Verifier) Step 1. After the registration administrator has assigned the registration team, the verifier of the team should receive an (if alert is set in registration team record) and search the registration following Step 1 to Step 4 as illustrated in Search New / Existing Registration. Please choose Pending to Verify as criteria in Status. Step 2. Check the information in registration form. Step 3. Amend information if any. Step 4. Go to Section F to download /view the attached documents by applicant. Verifier can also upload existing files about this company. Step 5. Go to Section A1 General Information, and select appropriate trade(s). (If the trade code is consisted of two or three levels, please select sub-trade names in boxes). Check the box Is in Permanent List if the contractor is already in the Permanent List of Qualified Contractors. Press Add" button to confirm. (Notice: the logon user must have access right in Page 52 of 263
 for the company. (Maximum trades: 180) Verifier must have access right for Assign Trade under New Registration. Step 7.")

57 Assign Trade otherwise the Add button will not be displayed.). The maximum no. of Trade to be assigned is 180. Step 6. Highlight approved trade and click Remove button to delete trade if necessary. Repeat Step 5 as required to include more trade(s) for the company. (Maximum trades: 180) Verifier must have access right for Assign Trade under New Registration. Step 7. Assign safety class and validity date if appropriate. Step 8. Go to section D - Type in assessment information in the Remarks Box as necessary. If the application is rejected, reason for rejection should be stated in the Assessment Box. (Notice: Logon user must have access right in Modify & Update Info otherwise the Submit button will not be displayed. Moreover, only verifier can change the status from Pending to verify to Verified and he must also have the right for Change Status (Pending for Verify Verified under New Registration.) Step 9. Choose Verified under status to allow approver to check and approve the registration or choose Send Rejected Notice to reject the application. Page 53 of 263
58 Step 10. Press Submit button when the verification is finished. Step 11. The following confirmation will appear upon successful submission. Note : Verifier can delete the registration, which was submitted by someone tampering with the System, by clicking the Delete button. Page 54 of 263

59 F. Upload New Document / Delete Existing Document for Verified Registration (Verifier) Step 1. Search the registration following Step 1 to Step 4 as illustrated in Search New / Existing Registration. Please choose Verified as criteria in Status. Step 2. The registration pending to be approved will be shown as status Verified. Step 3. Go to Section F to download / view the attached documents by applicant. Verifier can also upload new files or delete existing files about this company. Page 55 of 263
60 G. Approve / Reject New Registration (Approver) Step 1. When the registration application is verified, the staff member who is assigned as approver will receive an for approval if alert is chosen before. Or the approver will need to check registration pending for approval under his/her account. Step 2. Search the registration according to Step 1 to Step 3 as illustrated in Section C. Choose Status as Verified. Step 3. The registration pending to be approved will be shown as status Verified. Step 4. Click on the Ref to select a specific company to view the verified registration details. Amend the information, if any. Step 5. Go to section D - Click Approved or Rejected on the status and then press Submit button. Type in assessment information in the Remarks Box as necessary. State reasons in the Assessment Box if the application is rejected. (Notice: user must have access right for Modify & Update Info under New Registration otherwise the Submit button will not be displayed. Moreover, only approver can change the status from Verified to Approved or Rejected and he must have the right for Change Status (Verified Approved under New Registration.) Page 56 of 263

61 The following confirmation will be shown. Step 6. After the registration is approved, the system will automatically send to the supplier about the new accounts and passwords. Step 7. If the registration is rejected, the system will send to the verifier to follow up. If the approver rejects the application, then an about registration rejection will be sent to the verifier. And the verifier should send a rejection to the supplier by changing the status from Rejected to Send Rejected Notice. The rejected notice will also be c.c. to the Registration Administrator. Once a new registration is approved, the info of the new supplier will be exported as interface file for the Logistic Team s updating of records in EAMS. Page 57 of 263


62 H. Send Rejected Notice to New Registration (Verifier) Step 1. When the registration application is rejected by the approver, the verifier shall send rejected notice to the supplier. Step 2. Search the registration according to Step 1 to Step 3 as illustrated in Section C. Step 3. The registration will be shown as rejected. Step 4. Click on the Ref to view the registration details. Step 5. Choose Send Rejected Notice under status. Verifier can also input or edit assessment result in the Assessment Box. The assessment result will be sent to the supplier in the reject notice . Step 6. Click Submit button so that the system will send to the applicant. The following acknowledgement will then be displayed. Page 58 of 263
63 A reject notice is sent to the supplier notifying for the rejection of the application. The rejected notice will also be c.c. to Registration Administrator. The status of the supplier can be subsequently changed by the verifier from Send Rejected Notice to Verified if the registration details are updated. Page 59 of 263

64 I. Update Registration There are two types of Update Registration Requests. Change of information by Supplier (e.g. change of address) System will automatically send an to the verifier of the Registration Team assigned to the supplier with a html format attachment. The information that has been modified will be displayed in red so that verifier can view the updated supplier information. Verifier reviews the update request and can (i) recommend to the approver for approval or (ii) reject the update request. Approver can (i) approve the update request or (ii) reject the update request. Detailed procedures are described in subsequent sections. Verifier changes information (e.g. safety class) Approver approves or rejects the update request. Step 1. Verifier searches the specific registration that needs to be updated. (Please follow procedures as described in Section C.) Step 2. Verifier changes the information on the registration. Verifier can describe what changes have been made in the Remark Box for easy tracking in future. Page 60 of 263
 Step 4.")
65 Step 3. Verifier presses Submit button to confirm and an onscreen acknowledgement will be shown. Approver will receive requesting for update approval. (Notice: Verifier must have access right in Search & View & Modify & Update under Approval List, otherwise the submit button will not be displayed.) Step 4. Approver searches the specific registration that needs to be updated. (Please follow procedures as described in Section C.) Step 5. Approver checks the changes of the information on the registration as notified by the verifier. Approver clicks the Update Approve button to approve the changes or clicks the Update Reject to reject the changes. This function is controlled by the access right Amendment Approval under Approval List. Page 61 of 263

66 Note: Procurer user cannot make any other change to the supplier information after the Submit button has been clicked by the verifier, until the update has been approved or rejected by the approver. Moreover, once the information updating process is initiated, whether by the procurer or supplier, the relevant supplier cannot be selected for the advertisement list, prequalification list and tenderer list before the update has been approved by approver or rejected by the verifier or approver. Verifier changes information (Trade Class) System approves the update request. Step 1. Verifier searches the specific registration that needs to be updated. (Please follow procedures as described in Section C.) Step 2. Verifier changes the information on the registration. Verifier can describe what changes have been made in the Remark Box for easy tracking in future. Page 62 of 263


67 Step 3. Verifier presses Submit button to confirm and an onscreen acknowledgement will be shown. Approver will receive for notify Trade Class updated. (Notice: Verifier must have access right in Search & View & Modify & Update under Approval List, otherwise the submit button will not be displayed.) System Coordinator changes information (Supplier s Company Address) System approves the update request. Page 63 of 263


68 Step 1. System Coordinator searches the specific registration that needs to be updated. (Please follow procedures as described in Section C.) Step 2. System Coordinator changes the Company Address on the registration. Step 3. System Coordinator presses Submit button to confirm and an onscreen acknowledgement will be shown. Supplier will receive for notify Company Address Updated. (Notice: System Coordinator must have access right in Search & View & Update Address under Approval List, otherwise the submit button will not be displayed. notification will be sent to special group of users as defined in configuration table.) Page 64 of 263
 Step 2. System Coordinator changes the Cert Type on the registration. Step 3.")
69 System Coordinator changes information (Supplier s Cert Type) System approves the update request. Step 1. System Coordinator searches the specific registration that needs to be updated. (Please follow procedures as described in Section C.) Step 2. System Coordinator changes the Cert Type on the registration. Step 3. System Coordinator presses Submit button to confirm and an onscreen acknowledgement will be shown. Supplier will receive for notify Cert Type Updated. (Notice: System Coordinator must have access right in Search & View & Update Cert Type under Approval List, otherwise the submit button will not be displayed. notification will be sent to special group of users as defined in configuration table.) Page 65 of 263
70 Page 66 of 263
71 J. Review Update of Registration (Changes made by Supplier) Step 1. When the registration information is updated by supplier, the user who is assigned as verifier of the registration team for the supplier will receive an for review. Step 2. Search the specific updated registration which needs to be reviewed. (Please follow Step 1 to Step 4 under Section C.) Step 3. View the information on the registration. The updated information is shown in red beside or below the existing information. Verifier can describe what changes have been made in the Remark Box for easy tracking in future. Step 4. Press Submit button to confirm. An acknowledgement message will be shown. (Notice: Verifier must have access right in Search & View & Modify & Update under Approval List, otherwise the submit button will not be displayed.) Page 67 of 263

72 K. Approve Update of Registration (Changes made by Supplier) Step 1. After the verifier has reviewed the update registration details, the approver of the Registration Team assigned to the supplier will receive an notification for approval. This function is controlled by the access right Amendment Approval under Approval List. Step 2. Search the specific updated registration which needs to be approved. (Please follow Step 1 to Step 4 under Section C.) Step 3. View the information on the registration. The updated information is shown in red beside or below the existing information. Step 4. Press Update Approve button to confirm. An acknowledgement message will be shown. (Notice: Approver must also have access right in Search & View & Modify & Update under Approval List otherwise the Update Approve button will not be displayed.) Once a registration update is approved, the new info of the supplier will be exported as interface file for Logistic Team s updating of records in EAMS. Page 68 of 263

73 L. Reject Update of Registration (Changes made by Supplier) Step 1. When the registration information is updated by supplier, the user who is assigned as verifier of the registration team will receive an for review. Approver of the registration team will receive an for approval after the updated registration information has been reviewed by verifier. Step 2. Search the specific updated registration which needs to be reviewed or approved. (Please follow Step 1 to Step 4 under Section C.) Step 3. View the information on the registration. The updated information is shown in red beside or below the existing information. Changes rejected by verifier Step 4. Verifier presses Update Reject button to reject the update. An acknowledgement message will be shown. All the to-be-updated registration information is rejected and no change is made to the existing information. Supplier will receive to notify the rejection. Page 69 of 263
74 Changes rejected by approver after verified by verifier Step 4. Approver presses Update Reject button to reject the update. An acknowledgement message will be shown. All the to-be-updated registration information is rejected and no change is made to the existing information. Supplier and Verifier will receive to notify the rejection. Page 70 of 263

75 M. Export Registration Data to CSV Step 1. If registration data is required in a soft copy, the search result of the registration(s) can be exported to csv format. This function is controlled by the access right of Search & View & Export under Approval List. Step 2. Click Export to CSV in the search result page. Step 3. Open the exported CSV file. The contents will be as below. Page 71 of 263

76 N. Resend Account Password to Supplier Step 1. Search the registration that needs account password to be resent. Step 2. Go to Section D For Office Use Only, click Resend button. with all account information and passwords for the registration will be sent to the address of the principal account of the supplier. (Notice: User must have access right in Search & View & Resend Password under Approval List otherwise the Resend Password button will not display.) Page 72 of 263
77 O. Suspension & Expiry for Supplier Expired Status & Expiry date Every time when the supplier logs on the system, the system will check the expiry date, which is assigned by the system upon new registration approval. When the expiry date is reached, the system will extend the expiry date for a year to allow the supplier to log on the system. (Note: User cannot change the registration status of a supplier from Approved to Expired.) Suspended Status & Suspension Until Date Verifier of the registration team assigned for a supplier can change the registration status of the supplier from Approved to Suspended or vice versa. No approval process is required for such status change. To change the registration status from Approved to Suspended, the Suspension Until Date field must be input to record the date of suspension of a supplier. The suspended supplier cannot log on the system and cannot be selected for advertisement, prequalification and tender under the system. To reinstate a suspended supplier, the verifier of the registration team assigned for the supplier shall change the registration status from Suspended back to Approved. Page 73 of 263
78 V. Advertisement 2. Post advertisement for contract 2. Post adv. for contract BEGIN Create Adv. with contract. Click submit button. Post advertisement 1. select project 2. contract ref ** support multiple contracts contract title contract category contract description trade closing date attachment for advertisement Select advertisement supplier list. Click submit button. Advertisement list 1. by supplier name (matched trade) 2. by address Post advertisement to web notice to supplier Iterative Process Add new supplier to advertisement list Supplier reply interest on required contract(s) Download interest list Suspend advertiisement notice to additional supplier notice to supplier 2. Post adv. for contract End Page 74 of 263
 Step 3.")
79 A. Post Advertisement Step 1. Go to the menu bar and choose Post Advertisement under Advertisement. This function is controlled by the access right of Create & Post under Advertisement. Step 2. Input an advertisement reference number or Click Generate Advertisement Ref to generate reference number by the system. (No duplication is allowed in the system.) Step 3. Select project and input the subject of the advertisement. Step 4. Input advertisement closing date and time. (The contractors have to express their interest before closing time). The format for Generate Adv. Ref = ADYYMM99 Step 5. Input contract no. / tender ref. no. (the no. entered should not be duplicated with other contract no. already stored under the system), contract title, contract category, contract description. etc. Step 6. Select trade for the contract. Page 75 of 263
.")
80 Step 7. Input contract information, such as closing date of prequalification application, tender type, estimated range of cost, etc. Step 8. Upload attachment file, if any, and add the file description. If there is more than one file, please press the More File button to upload more file(s). If the file input is not required, the check box in front of the file should be unchecked. Note that only the files with a checked checkbox would be uploaded. Please uncheck the box if the file attachment is not required to be uploaded. Step 9. If there are more than one contract for the advertisement, please press Add More Contract to continue inputting information for another contract(s). Step 10. Repeat Step 5 to Step 9, as it is needed. Step 11. In case a contract(s) input is to be discarded, please choose No under Contract Needed so that the contract will not be displayed in the advertisement. Page 76 of 263

81 Step12. Click Submit button after finishing the input. Step13. Click OK button to confirm. Step 14. An acknowledgement message will be shown if the advertisement is posted successfully. Step 15. Press Advertisement List button to select contractors. This button is controlled by the access right of Adv Contractor List under Advertisement. Page 77 of 263
 can be added if the company does not exist in the contractor list and then click Add Email.")
82 Step 16. Add company name to the Advertisement List. a. Select the company(s) from the contractor list of the same trade code as the advertisement and click Add button. b. Select all companies of the same trade code as the advertisement by clicking Add All button. c. address(es) can be added if the company does not exist in the contractor list and then click Add . d. To remove a company from the advertisement list, highlight the supplier name in the grid and then click the Remove button. e. To remove all companies listed in the grid, click the Remove All button. Step 17. Press Submit button after finishing the selection of companies for the advertisement list. An acknowledgement message will be shown. Remarks: More companies can be added to the advertisement list before the advertisement closing date. (Please follow the Search & View Advertisement procedures to select the advertisement first.) Step 18. notification will be sent to the selected companies. Page 78 of 263


83 B. Search & View Advertisement Step 1. Go to the menu bar at the top and click Search Advertisement under Advertisement. This function is controlled by the access right of Search & View under Advertisement. Step 2. Input searching criteria and click Submit button. Searching criteria are: 1) Closing date range 2) Issue date range 3) Key words in Adv. Ref or Adv Subject Step 3. The search result of advertisement will be shown. Click the Ref link to view the details. By default the search result will be ordered by adv. closing date. The search result can also be sorted by Advertisement Ref, Subject, Issue Date or Closing Date. Page 79 of 263

84 Page 80 of 263
85 C. Manage Advertisement Before the advertisement is closed, the invitation list can be viewed and revised. Step 1. Search the advertisement. Step 2. Click Advertisement Invitation List to view the invitation list. This button is controlled by the access right of Adv Contractor List under Advertisement. More companies can be added to the advertisement invitation list before the advertisement closing date. Page 81 of 263

 who has expressed their interest will be shown.")
86 D. Download Interest List After the advertisement is closed, the list of contractors expressed interest can be viewed. Step 1. Search the advertisement. Step 2. Click Download Interest List button to view the list. This button is controlled by the access right of View Interest List under Advertisement. Step 3. The company(s) who has expressed their interest will be shown. Note: The list of contractors expressed interest can also be viewed before the advertisement is closed. Page 82 of 263

87 E. Suspend Advertisement After the advertisement is posted, the advertisement can be suspended. This function is controlled by the access right of Suspend under Advertisement. Step 1. Search the advertisement. Step 2. Click Suspend button and then click OK to confirm. The acknowledgement of suspending advertisement will be shown as below. The advertisement will be suspended and notice will be sent out to all the suppliers in the advertisement list and the suppliers which have expressed interest to the advertisement. Page 83 of 263
88 VI. PreQualification 3. Post Prequalification No to Reviewer to Reviewer 3. Post PQ BEGIN Create PQ. Click submit button Restricted PQ? Yes Select PQ list 1. select project then select or input contract ref 2. PQ ref = PQ + contract ref project contract ref contract title contract category trade subject info = contract description (adv) attachment PQ document 1. by supplier name (matched trade) 2. by address 3. Interested list No Reviewer reviews/modifies PQ Creator modifies PQ Creator modifies PQ List if required Reviewer deletes PQ Reviewed PQ? Inform Reviewer to Reviewer to Approver Yes No Approver reviews/ modifies PQ Yes Creator/Reviewer modifies PQ Creator/Reviewer modifies PQ List if required Approver deletes PQ Issue PQ? Yes Inform Approver to Approver Yes to selected Suppliers Restricted PQ? Post PQ to web No to All Approved or Expired Suppliers Iterative Process Supplier submit query Amend PQ supplier list notice to procurer Yes Forward query Forward query? No Postpone PQ Track Status of PQ submission Submit PQ If the supplier has been deleted from the PQ list. Supplier will not be able to search PQ, download PQ doument, or submit PQ. Suspend PQ notice to supplier Receive query answer notice to new supplier Answer query 1. Answer query (private) 2. Answer query (public) notice to supplier Download PQ submission to short listed supplier regret letter to unsuccessful supplier Prequalification Assessment Short list supplier 3. Post PQ End Page 84 of 263


89 A. Post PreQualification Step1. Go to the menu bar at the top and click Post Prequalification under PreQualification. This function is controlled by the access right of Post under New PQ Notice. Step 2. Select Project Name Step 3. Select Contract Ref (If not available, please choose Not Applicable.) Step 4. Type in a unique Contract Ref, Contract Title and Contract Category if contract is not available. Info will be filled by the system if advertisement has been posted for the contract. Step 5. Select Trade for the PQ if contract is not available. Step 6. Type in PreQualification reference number (Note that it should be unique. It can be generated by clicking Generate PreQualification Ref.) Page 85 of 263

90 Default value for the function Generate PreQualification Ref = PQ + contract ref. Step 7. Input Subject, PQ Issue Date and Closing Date. Step 8. Choose Access Type of PQ. It can be either: a. Open: ALL contractors of approved or expired status can search the PQ and submit the questionnaire back. b. Restricted: only selected contractor can search the PQ and submit the questionnaire back. Step 9. Upload prequalification document by clicking Browse to choose file to be uploaded and then type the file description. Press More File button if there is more than one file and repeat choosing more files for upload. To upload the documents, make sure the checkbox for the particular file is checked and only for those checked could be uploaded to the server. For excluding the files selected, simply uncheck the check box. At least one document must be uploaded. Step 10. Press Submit button and an acknowledgement message will be shown. At the same time, an notice will be sent to the reviewer assigned for the project. Step 11. Press PreQualification List to select contractor list. This button is controlled by the access right of PQ Contractor List under New PQ Notice. a. Add the company name(s) who have expressed their interest to the advertisement for the contract from the drop down list of Supplier List from Interest List of Advertisement and click Add ; OR, Page 86 of 263
 who are not in the drop down list of Supplier List from Interest List of Advertisement or Trade Related Suppliers and click Add Email.")
91 b. Select the company name(s) from the drop down list of Trade Related Suppliers and click Add, which would only include with the contractors of approved or expired status; OR, c. Input the address of the company(s) who are not in the drop down list of Supplier List from Interest List of Advertisement or Trade Related Suppliers and click Add . (Note: Such companies invited will receive notification of the Prequalification. However, in order to view the Prequalification Notice and perform the subsequent actions for the Prequalification in the system, the companies must be registered under the system.) Note: Press the Add All button will add all the contractors in a drop down list. Contractor selected can be removed by selecting the contractor in the box and then clicking the Remove button. Clicking the Remove All button will remove all the contractors listed in the box. Page 87 of 263

92 Notice: The function for checking or amending the PreQualification list is available in the PreQualification Notice created. And it is under the access control of Check & Amend PQ Contractor List under PQ Notice section. To use the function, first search and select the PreQualification Notice as described in Section D, then click the PreQualification List button and follow a to c of Step 11. Step 12. Press Submit button after selecting the contractor list. At the same time, an notice will be sent to reviewer. Step 13. An acknowledgement message will be shown as follows. Note: For Open prequalification, no prequalification list is required. All contractors of approved or expired status will be notified in by the system. Page 88 of 263
93 B. Modify PreQualification Information and Documents The modification functions are controlled by the access right of Post or Review PQ or Create PQ Box under New PQ Notice and are only allowed when the prequalification notice is Created or Reviewed. I) Modify PQ Information Step 1. Go to the menu bar at the top and click Search PreQualification under PreQualification. Details can be referred to Section D. This function is controlled by the access right of Search & View under PQ Notice. Step 2. Input search criteria like closing date, issue date, stage etc. Step 3. Choose Created or Review in Stage. Step 4. The PreQualification notices will be shown and the status of PQs shown in the search result is Created or Reviewed. Click the Ref link to view the details. Step 5. Click on the Update PQ Info button to modify the information of PQ. Page 89 of 263

94 Step 6. The PQ created with an existing contract could be modified as shown below. Modify all the required fields for PQ and then click Update. Closing time of the prequalification can also be changed by all users having right for PQ modification. The acknowledgement of update PQ information is as below. Page 90 of 263

95 Step 7. The PQ created with a new contract could be modified as shown below. Modify all the required fields for PQ and then click Update. Closing time of the prequalification can also be changed by all users having right for PQ modification. The acknowledgement is as below. PQ and contract information are updated. Page 91 of 263
96 Page 92 of 263
97 II) Uploading More Documents Step 1 Search and select the prequalification notice as described in Section D and then go to the PreQualification Document section. Step 2. Click on the Browse button and select for the required file. Step 3. For more than one document, click on the More File button. Then repeat Step 2 to select more file. Step 4. Click on the Upload Documents button to upload the selected files to the server. Acknowledgement will be displayed as below. Notes: 1. At least one of the file fields has to be filled before uploading documents. 2. At least one of the checkboxes has to be ticked before uploading documents. 3. If the checkbox is ticked, the corresponding file field has to be filled. 4. Only for those files which have the checkbox ticked will be uploaded to the server. 5. Create PQ Box function would not be proceeded if no files are in the PreQualification Document section. 6. File description of the file already uploaded can be changed by uploading the same file with new file description. Page 93 of 263

98 III) Deleting PQ Documents Step 1. Search and view the prequalification notice and then go to the PreQualification Document section. Step 2. Locate the file to be deleted and then click on the Delete button on the corresponding line. Step 3. Click OK to confirm deletion. Acknowledgement will be displayed as below. Page 94 of 263

99 C. Delete PreQualification Notice The PQ deletion function is controlled by the access right of Review PQ or Create PQ Box under New PQ Notice and should be only allowed when the prequalification notice is Created or Reviewed. Step 1. Go to the menu bar at the top and click Search PreQualification under PreQualification. Details can be referred to Section D. This function is controlled by the access right of Search & View under PQ Notice. Step 2. Input search criteria like closing date, issue date, stage etc. Step 3. Choose Created or Review in Stage. Step 4. The PreQualification notices will be shown and the status of PQs shown in the search result is Created or Reviewed. Click the Ref link to view the details. Step 5. Click on the Delete PQ button to delete PQ. Page 95 of 263

100 Step 6. A confirmation alert will be prompted and click OK to continue. a. The acknowledgement of PQ created with an existing contract ref is shown below. b. The acknowledgement of PQ created with a new contract ref is shown below. c. The acknowledgement of PQ created with a new contract ref and the contract ref is being used by another tender is shown below. Tender have to be deleted before deleting the current PQ. The tender ref is indicated in the acknowledgement. Page 96 of 263


101 After deleting the tender related to the contract ref, delete the PQ again and the acknowledgment is shown below. Page 97 of 263

102 D. Search & Review PreQualification Step 1. Go to the menu bar at the top and click Search PreQualification under PreQualification. This function is controlled by the access right of Search & View under PQ Notice. Searching criteria are: 1) PQ Closing Date 2) PQ Issue Date 3) PQ Stage 4) Keywords in PQ Ref or Subject By default the search result will be ordered by issue date. Search result can also be ordered by Prequalification Ref, Subject and Closing Date. Step 2. Input search criteria like closing date, issue date, stage etc. Step 3. Choose Created in Stage. Step 4. The PreQualification notices with status Created will be shown. Click the Ref link to view the details. Step 5. View the PQ details. Page 98 of 263

103 Step 6. Modify prequalification list or PQ details as described in previous sections if required. The function of the invitation list modification is under the access control of Check & Amend PQ Contractor List under PQ Notice section. Step 7. Press Reviewed button to confirm completion of reviewing. controlled by the access right of Review PQ under New PQ Notice. This button is Step 8. The following message will appear. At the same time, an notice will be sent to approver assigned for the project. Step 9. The status of the PQ will be changed to Reviewed. Page 99 of 263
104 E. Create PreQualification Box Step 1. Go to the menu bar at the top and click Search PreQualification. Searching criteria are: 1) PQ Closing Date 2) PQ Issue Date 3) PQ Stage 4) Keywords in PQ Ref or Subject By default the search result will be ordered by issue date Step 2. Input search criteria and also select Reviewed in Stage. Step 3. The search result of PreQualification notice will be shown. Click the Ref link to view the details. Step 4. View the PQ details. Step 5. Modify prequalification list or PQ details as described in previous sections if required. The function of the prequalification list modification is under the access control of Check & Amend PQ Contractor List under PQ Notice section. Page 100 of 263
105 Step 6: Press Create PreQualification Box button and confirm OK. controlled by the access right of Create PQ Box under New PQ Notice. This button is Step 7. An acknowledgement message will be shown and click Close button to exit. Step 8. notifications will be sent to the selected contractors in the prequalification list for restricted PQ and to all contractors of approved or expired status for open PQ. Page 101 of 263
. Step 3.")
106 F. View & Answer Query on PreQualification Step 1. The procurer user, who is a contact person of a PQ or the one creates the PQ notice, will receive s about queries raised by the contractors. Step 2. Search and view the specific PQ (Please refer to Section D Step 1-2). Step 3. The query with attachment files (if any), and name of contractor who has submitted the query, will be shown in the Private Query Section at the bottom of the PQ Notice. Step 4. Press Answer Query button to answer the query. This button is controlled by the access right of Answer PQ Clarification under PQ Notice. a. Type the answer in the text box. b. Attach document file (if any) by clicking the Browse button. c. Decide to answer the query privately (only the contractor who submitted the query can see the query and answer) or publicly (All contractors in the prequalification list can also see the query and answer but not knowing the name of contractor who submitted the query, Procurer can select question and / or attachment to disclose to all contractors). Step 5. Query can also be forwarded to other users by inputting the address and press Forward button. (No file attachment will be forwarded.) The receiver should log on Page 102 of 263
 If the other users do not have an account in the system, the relevant files should be downloaded and forwarded to the users using ordinary e-mail application. Step 6.")
107 his / her account to download the query file. (Only user assigned to the project can download the query file.) If the other users do not have an account in the system, the relevant files should be downloaded and forwarded to the users using ordinary application. Step 6. Press Submit button and then OK button to confirm and an acknowledgement message will be shown. notification will only be sent to the contractor who submitted the query no matter it is a public or private answer. Remarks: a) If the answer is public, the answer will be shown to all contractors in the prequalification list, and the question and / or question attachment can be selected to disclose to all contractors (but the contractors cannot see the name of the contractor submitted the query). All contractors will receive a notification. b) If the answer is private, only the contractor submitted the query will receive notification and see the query and answer. Page 103 of 263

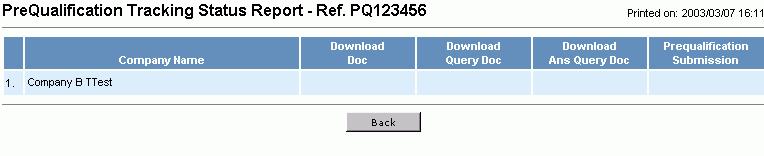
108 G. Check / Edit PreQualification List & Check Prequalification Status Step 1. Search the PQ and click the specific PQ Ref. Step 2. Click PreQualification List button to view the prequalification invitation list. This button is controlled by the access right of Check & Amend PQ Contractor List under PQ Notice. Step 3. The PQ list will be shown. Add contractor to PQ List: Choose company from Supplier List from interest list of Advertisement or list of Trade related suppliers and click Add button to add the company to the PQ list. Or type in address under Inviting Unregistered suppliers and click Add button. (Note: Such companies invited will receive notification of the Prequalification. However, in order to view the Prequalification Notice and perform the subsequent actions for the Prequalification in the system, the companies must be registered under the system.) Delete contractor from PQ List: Choose company or address in PQ List box and click Remove button. Or click Remove All to delete all companies. Step 4. Click Track Status button to view current status so that tracking status report will be shown. This button is controlled by the access right of Check Status under PQ Notice. Page 104 of 263

109 Page 105 of 263
. Step 3.")
110 H. Download PreQualification Submission Step 1. After PreQualification closing date/time is reached, PQ submitted by the contractor can be downloaded and assessed. Step 2. Search the PQ and find the specific PQ under Search PreQualification. (Please refer to Section D Step 1-2). Step 3. The System will validate and compress all attachments into a zip file thru a batch mode after closing time +5 minutes, and System will show Download program in process when doing the batch job. Page 106 of 263

111 Step 4. The System will notify the PreQualification s creator which specified in the Project via that the zip file is ready for download, and show the Download PQ Attachments button when the PreQualification Attachments is ready for download. Page 107 of 263


112 Once the download is completed, user can unzip the PQ attachment. Page 108 of 263

113 Step 5. Find the.zip file in the hard disk and unzip all the files. Step 6. Open the Prequalificationbox.mdb by MS Access. Page 109 of 263

114 Step 7. Open PQBoxSummary.txt to have a quick view on the PQ box report. Page 110 of 263
115 Step 8. Find the corresponding.zip files and unzip them to read the attachment files sent by each contractor. Page 111 of 263
. Step 2. Press Short List button to select list of prequalified contractors.")
116 I. Shortlist Tenderer List After assessment of the PQ submissions, the prequalified contractors can be shortlisted. Step 1. Search the PQ and find the required PQ under Search PreQualification (Please refer to Section D Step 1-2). Step 2. Press Short List button to select list of prequalified contractors. This button is controlled by the access right of Short List for Tender under PQ Box. Step 3. Select the contractor for shortlisting and click Add or click Add All button to select all contractors submitted PQ questionnaires. To remove contractor listed in the shortlist, highlight a contractor name in the grid then click the Remove button. To remove all contractors listed in the shortlist, click the Remove All button. Page 112 of 263

117 Step 4. Press Submit button to confirm. Step 5. An acknowledgement message will be shown and notification for shortlisting will be sent to successful contractors for the PreQualification as selected in Step 3 above. notification of regret letter will also be sent to unsuccessful contractors, who have submitted PQ via the system. (Note: For those contractors submitted PQ by paper submission, notification should be prepared manually.) Page 113 of 263
118 J. Postpone PreQualification Closing Date Step 1. Search the PQ and click the specific PQ Ref. (Please refer to Section D Step 1-2). Step 2. Input the new closing date/time of the PQ, and click Change Closing Date button. This button is controlled by the access right of Postpone under PQ Notice. Step 3. An acknowledgement message will be shown and notification will be sent out to the selected contractors in the prequalification list for restricted PQ and to all contractors of approved or expired status for open PQ. Page 114 of 263

119 K. Suspend PreQualification Step 1. Search the PQ and click the specific PQ Ref. (Please refer to Section D Step 1-2). Step 2. Click Suspend button, and click OK for the suspension confirmation. This button is controlled by the access right of Suspend under PQ Notice. Step 3. An acknowledgement message will be shown and notification will be sent out to the selected contractors in the prequalification list for restricted PQ and to all contractors of approved or expired status for open PQ. Page 115 of 263
120 VII. PreQualification Assessment 7. PreQualification Assessment 7. PreQualification Assessment BEGIN Procurer can send Q&A to Short list supplier who submitted PQ. Iterative Process Create PQ Q&A Close all PQ Q&A to Reviewer No Reviewer reviews/modifies PQ Q&A Creator modifies PQ Q&A Review PQ Q&A Reviewed? Inform Reviewer Yes to Approver Approver reviews/modifies PQ Q&A Yes Create Q&A Box Reviewers/Creator modifies PQ Q&A Inform Approver Issue PQ Q&A notice to tenderer Post PQ Q&A to web Suspend notice to tenderer Postpone/Advance notice to tenderer Check Status for PQ Q&A document download Tenderers submit PQ Q&A Disable PQ Q&A immediately Download unencrypt PQ No Q&A Close all PQ Q&A 7. PreQualification Assessment END Page 116 of 263

 Press More File for multiple files. Note that only those files with a checked check box will be uploaded. Step 3.")
121 A. Post PreQualification Q&A Step 1. Find a PQ which has been closed and press Post PQ Q&A button in the PQ notice. The Post PQ Q&A function is controlled by the access right of Post under New PQ Q&A. Step 2. Post PQ Q&A information. Input Q&A Ref or generate it by the system automatically. Input Q&A subject. Assign issue date, closing date & time (Q&A closing date can only be modified by the approver assigned for the project when the status of the Q&A notice = Reviewed). Select only ONE tenderer who has submitted the PQ offer. Upload Q&A document file(s) Press More File for multiple files. Note that only those files with a checked check box will be uploaded. Step 3. Press Submit button to confirm. Step 4. An acknowledgement message will be shown. An notification will be sent to the reviewer assigned for the project. Page 117 of 263


122 B. Review PreQualification Q&A Step 1. Search the PQ Q&A by clicking Search PQ Q&A under Q&A on the top menu. Step 2. Check the details. Press Update PQ Q&A Info button to amend details, if needed. Alternatively, the Reviewer can inform the Creator manually to amend the details. Check the details and press Reviewed button to review. An notification will be sent to the approver assigned for the project. This button is controlled by the access right of Review under New PQ Q&A. Page 118 of 263

123 C. Issue PreQualification Q&A Step 1. Search the PQ Q&A and find the specific PQ Q&A. Step 2. Check the details and follow Step 2 of Section B to amend details of PQ Q&A if required. Step 3. After checking the details, press the Issue PQ Q&A button to approve the PQ Q&A. If the PQ Q&A is created successfully, an acknowledgement message will be shown and will be sent to the selected tenderer. This button is controlled by the access right of Issue PQ Q&A under New PQ Q&A. Before the Issue PQ Q&A button is pressed, PQ Q&A closing time can also be changed by inputting the new closing time and then clicking Change Closing Date button. Step 4. Click OK to confirm or Cancel to return to the PQ Q&A notice. Page 119 of 263
124 Step 5. An acknowledgement message will be shown and click Close to exit. Page 120 of 263

125 D. Maintain PreQualification Q&A Step 1. Search the PQ Q&A and find the specific PQ Q&A. Step 2. Press Track Status to view current status. This button is controlled by the access right of Check Status under PQ Q&A Notice. Step 3. Press Suspend button to suspend PQ Q&A when necessary. This button is controlled by the access right of Suspend under PQ Q&A Notice. If the Suspend button is pressed, will be sent to the selected tenderer. Step 4. Change closing date/time and press Change Closing Date button to either advance or postpone the closing date/time. The closing date/time must be later than the current date/time. If the closing date/time has been changed, will be sent to the selected tenderer. This button is controlled by the access right of Postpone under PQ Q&A Notice. Page 121 of 263
126 E. Download PreQualification Q&A Attachments User can download PQ Q&A Attachment at anytime even when the PQ Q&A has not been closed. Step 1. Search the PQ Q&A and find the specific PQ Q&A. Step 2. Click Download PQ Q&A Attachment button. This button is controlled by the access right of Download PQ Q&A Box under PQ Q&A Box. Step 3. Choose file location to save the PQ Q&A Attachment to the local hard disk. Step 4. Open the file to view contents. Page 122 of 263

127 F. Modify PreQualification Q&A This function could be applied to PQ Q&A before issuing to the selected tenderer. Also it is controlled by the access right of Post, Review or Issue PQ Q&A under New PQ Q&A. Step 1. Search the PQ Q&A and find the specific PQ Q&A. Step 2. Click Update PQ Q&A Info button. Modify the PQ Q&A information as required. Step 3. Click Update to update the information of PQ Q&A. An acknowledgement message will be shown and click Close to exit. Page 123 of 263
128 Page 124 of 263


129 G. Modify PreQualification Q&A Documents This function could be applied to PQ Q&A before issuing to the tenderer. Also it is controlled by the access right of Post, Review or Issue PQ Q&A under New PQ Q&A. Step 1. Search the PQ Q&A and find the specific PQ Q&A. Step 2. To delete a PQ Q&A document, press Delete button. Then acknowledgement would be shown as below. Step 3. To add more documents, press the Browse button and search for the file to be uploaded. The check box in front of the file has to be checked in order to be uploaded to sever. Then press Upload Documents after finished selecting files. The acknowledgement would be shown as below. Note: File description can be modified by uploading the same file with new file description. Page 125 of 263

130 H. Open PreQualification Q&A Step 1. Open the zipped file of the PQ Q&A downloaded. Step 2. Open the Q&AboxSummary.txt to view the PQ Q&A Box Report. Page 126 of 263

131 Step 3. Another way of viewing the PQ Q&A box report is to open the MS Access file TenderBox.mdb. Step 4. Select the PQ Q&A answers in the zip file and unzip to read the attachments. Page 127 of 263

132 I. Close PreQualification Q&A For PQ Q&A, tenderer can still submit response even after the PQ Q&A closing time is elapsed. To close the PQ Q&A, the Short List function as described below should be used. Step 1. Search the PreQualification and select the specific PreQualification. Step 2. Press Short List and confirm OK to continue. This function is controlled by the access right of Short List for Tender under PQ Box. All the PQ Q&A, closing time of which has been elapsed, will be closed. Note: All PQ Q&A will also be closed at the time when the Short List Notice is sent. Note: After close PQ Q&A, no submission by tenderers allow and the PQ attachments still allow to download. Page 128 of 263

133 J. Close all PreQualification Non-Tender Box Q&A For all PQ non-tender box Q&A, tenderer can still submit response even after the Q&A closing time is elapsed. To close the non-tender box Q&A, the Close All PQ Q&A function as described below should be used. Step 1. Search the PreQualification and select the specific PreQualification. Step 2. Press Close All PQ Q&A and confirm OK to continue. This function is controlled by the access right of Short List for Tender under PQ Box. All the PQ non-tender box Q&A will be closed. Note: All non-tender box Q&A will also be closed at the time when tenderers are short listed. Page 129 of 263
134 VIII. Post Tender Notice 4. Post Tender * For create Tender and Import Standard Document, please refer to Appendix to Reviewer 1. by supplier name (matched trade) 2. PQ short list creator has option to by pass the reviewer or not. (click the button "Submit for Approval w/o Review") No 4. Post Tender BEGIN Create Tender. Click submit button Restricted Tenderer List? Yes Select Tenderer List Case 1 1. select project 2. select contract ref 3. contract title = contract title contract category = contract category trade = contract trade tender ref = contract ref subject = contract title info (user input) attachment tender document Case 2 1. select project 2. select contract ref = User Input(not applicable) 3. contract title (user input) contract category (user input) trade = (user input) tender ref = (user input) subject = (user input) info (user input) attachment tender document Need Review? to Reviewer Yes No No Reviewer reviews/ modifies Tender Creator modifies Tender Creator modifies Tenderer List if required Reviewer deletes Tender Reviewed? Inform Reviewer to Reviewer to Approver Yes No Approver reviews/ modifies Tender Yes Create Tender Box? Creator/Reviewer modifies Tender Inform Approver Creator/Reviewer modifies Tenderer List if required to Approver Approver deletes Tender Yes Yes to selected Tenderers Restricted Tender? Post Tender to web No to All Approved or Expired Suppliers 4. Post Tender End Page 130 of 263
135 A. Prepare BQ and FOT Documents Both BQ and FOT can be created similarly. Each BQ or FOT is allowed to setup with maximum 10 consecutive columns of labels and 10 consecutive columns of inputs. The steps of setup are shown as below: Step 1. Open the Excel program. Then type in all the statements and items for tenderers to fill in like below. All the shaded fields will be marked as the input fields. Step 2. Setup labels: Go to the top of BQ or FOT. Select one of the cells then define a name to the cell. Page 131 of 263

136 Type in the name and select the cell Refers to: then click Add. Repeat this step so that label1 to label10 are added. Step 3. Setup inputs: Go to the top of BQ or FOT. Select the cells below those are defined as label. Type in the name input1, then click Add. Repeat this step so that input1 to input10 are added. Page 132 of 263

137 Step 4. Define number of labels. Select those defined cell. Then type in the number of labels. If it is required for 10 labels, then it should be 10 in input cell also. Step 5. Define number of inputs. The value in input cells is suggested to be the same as in the label cell. The matching of input to label cells should be like this: input1 = label1, input2 = label2 and so on. Otherwise, consolidate summary report may not be listed in correct format. Step 6. Define the item name. Select the item that typed in previously. Then define its name as label1_1, where the next item would be name as label1_2 and so on until label1_ + value of label. Repeat this step for label2, for the first one it should be named as label2_1 and so on. Page 133 of 263

138 Step 7. Define the item input name. Select the input field for the corresponding item. Then define its name as input1_1 if the corresponding item name is label1_1, where the next item would be named as input1_2 matched with item label1_2 and so on until input1_ + value of input. Repeat this step for input2, for the first one it should be named as input2_1 and so on. Step 8. Unlock the input item cells. As the whole document will be locked and protected by password, it is required to unlock those input item cells for tenderers input. Highlight the input item cells and then right-click to select Format Cell function. And then select the Protection tab and uncheck the Locked field. Page 134 of 263


139 Step9. Set protection to document. After setting up those name for each label and input and the content of document, name the worksheet as BQ or FOT. Then save the document to file with file name BQ.xls or FOT.xls. Select from the manual bar for setting protection of sheet. Then enter password. Please check that all the fields should be locked except those input fields items. Then save the document again. Page 135 of 263

140 Note that for BQ and FOT, the creation method would be the same. Moreover, all label fields will be displayed in the summary report before all the inputs fields. Page 136 of 263
 a. If the contract ref.")
141 B. Prepare Tender Notice Step 1. Go to the menu bar at the top and click Post Tender Notice under E-Tendering. This function is controlled by the access right of Post under New Tender Notice. Step 2. Select a project from the drop down list. Input a contract ref (same contract ref used for more than one tender is not allowed by the system) a. If the contract ref. has already been used in the system for advertisement or PQ, please select project name and the contract ref from the drop down list box. b. If the contract ref. has not been used in the system, please select project name and contract ref = not applicable. Step 3. Type in Contract Ref, Contract Title, Contract Category and Trade if not applicable is chosen on the contract ref list. Step 4. Type in Tender Ref and Subject. If the contract ref. selected has already been used in the system for advertisement or PQ, the related information of the contract will be retrieved and filled into the tender notice. Step 5. Determine if tender submission is divided into Financial and Technical Document. Yes contractor submits financial and technical proposals separately Page 137 of 263
.")
142 No contractor submits financial proposals together with technical proposals Step 6. Choose Issue Date and Closing Date & Time. Before tender issue, tender closing date can be modified by the approver assigned for the project only (with the appropriate access right and status of the tender notice of Reviewed ). Moreover closing date/time cannot be modified to earlier than or equal to current date/time. Step 7. Determine Access type. Restricted: Only tenderer in the tenderer list can search, view and submit offer to this tender. Open: All contractors of approved or expired status can search, view, and submit offer to this tender. Step 8. Type in Info for the tender. Step 9. Correct contact person information if any. Step 10. Press Save button to create the Tender Notice. Step 11. An acknowledgement message will be shown. Page 138 of 263


143 Step.12. Press OK button. Step 13. Type in folder name for tender document and click Create Folder button. Note: - Folder Name is limited to 128 characters - File Name is limited to 255 characters Step 14. Click Browse button to choose file for upload. Press More File button if there are more than one file and repeat choosing more files for uploading to the same folder. Page 139 of 263


144 Step 15. Repeat Step 13 and 14 for more folders when necessary. Note that only for those folders and files with a checked checkbox would be uploaded. Step 16. Select Standard Documents, input the Folder name to where the selected Standard Document is to be placed. If the folder name does not exist, the system will create the new folder automatically for placement of the selected Standard Document. Note: - Folder Name is limited to 128 characters - File Name is limited to 255 characters Step 17. For Open Tender Box 1) Press Submit for Approval w/o Review button if the review process is to be bypassed. In such case, the tender notice will directly go for the approval process. At the same time, an alert will be sent to approver assigned for the project. Page 140 of 263
145 2) or press Submit button if the review process of the tender notice is required according to the normal process. At the same time, an alert will be sent to the reviewer assigned for the project. 3) or press Save button if the Tender Notice is not ready to submit to Reviewer or Approver. 4) An acknowledgement message will be shown. Step 18. For Restricted Tender Box, press Save button to upload the Tender Document and Standard Document to System. Step 19. An acknowledgement message will be shown. Page 141 of 263

146 Step 20. Click on Tenderer List. This button is controlled by the access right of Tenderer List under New Tender Notice. a. If there is PQ for the contract, procurer can select tenderers from the PreQualification Shortlisted Suppliers drop down list box and then provide the alias. b. If there is no PQ for the contract, please select suppliers of the corresponding trade in the Trade Related Suppliers combo box and then type in the alias. Step 21. Click Add button to add tenderer from the list of PreQualification Shortlisted Suppliers or from the list of Trade Related Suppliers. Contractor added in the Tenderer List can be removed by selecting the contractor and then clicking the Remove button. All contractors in the Tenderer List box can be removed by clicking the Remove All button. Note: The following message will be prompted if the supplier already in the list: Page 142 of 263
147 The following message will be prompted if the alias is already used. Step 22. Click the Button in the Tenderer List 1) Press Submit for Approval w/o Review button if the review process is to be bypassed. In such case, the tender notice will directly go for the approval process. At the same time, an alert will be sent to approver assigned for the project. 2) or press Submit button if the review process of the tender notice is required according to the normal process. At the same time, an alert will be sent to the reviewer assigned for the project. 3) or press Save button if the Tender Notice is not ready to submit to Reviewer or Approver. Page 143 of 263
148 Step 23. An acknowledgement message will be shown and an will be sent to reviewer assigned for the project. Tips for Alias: One assigned => the alias can t be changed. Page 144 of 263

149 C. Search & View Tender Notice Step 1. Go to the menu bar at the top and click Search Tender Notice under E-Tendering. Step 2. Input search criteria like closing date, issue date, stage etc. and sorting order. Click Submit button. Step 3. The tender notices meeting the search criteria will be shown. Click the Tender Reference Number link of a tender notice to view the details. Note: The listing will be displayed in single row per record as default (Collapse All). You may move the cursor to the field using the Tooltip to view the full description. If you want to expand the record to display the full description of the fields, you may click Expand All button. The screen display will be as follows: Page 145 of 263

150 Page 146 of 263


151 D. Upload & Delete Tender Document Files Upload and delete tender document function are controlled by the access right of Post, Review and Create Tender Box under New Tender Notice. This action could only take place before the issue of tender. Step 1. Go to the menu bar at the top and click Search Tender Notice under E-Tendering. Choose Created or Reviewed as criteria in status. Step 2. Select the tender notice to view the details by clicking the Ref link. Step 3. When necessary to upload more files, create a new folder by typing the folder name then click the Create Folder button. The folder name could be the same as the existing folder and the newly uploaded documents would be placed in the existing folder. Select tender document files by clicking Browse button and select file. Press More File button to repeat attachment of more files. Press Upload Documents to confirm. Notes: When procurer wants to add more files to the existing folder, procurer needs to create a folder of the same folder name as the existing folder. Then the system will add the new file to the existing folder automatically. Only those folders and files with a checked checkbox would be uploaded. Note: - Folder Name is limited to 128 characters - File Name is limited to 255 characters Page 147 of 263
152 If user wants to change the description in one of the tender document files, then user can upload the same tender document file with different description. System will automatically update the description. Step 4. Acknowledgement of upload tender documents is shown as above. Step 5. Click Back to return to the tender notice. For deletion of a file of the tender document uploaded, press Delete button beside the desired document file. Then a confirmation alert is prompted. Click OK to continue or Cancel to abort. Step 6. Acknowledgement of Deleting Tender document file is shown as below. Step 7. Click Back to view tender notice again. For deletion of one folder from the tender document, press Delete Folder button beside the desired document folder. Then a confirmation alert is prompted. Click OK to continue or Cancel to abort. Step 8. Acknowledgement of Deleting Tender document folder is shown as below. Page 148 of 263

153 For import Standard document in the Tender Notice, press Import Standard Document button. Step.9. Select the Standard Document and specify the Folder name where the selected Standard Document is to be placed. Press Import button. Then a confirmation alert is prompted. Click OK to continue or "Cancel" to abort. Note: - Folder Name is limited to 128 characters - File Name is limited to 255 characters Step 10. Acknowledgement of import Standard document successful is shown as below. Page 149 of 263
154 Page 150 of 263
155 E. Review Tender Notice Step 1. Go to the menu bar at the top and click Search Tender Notice under E-Tendering. Choose Waiting for Review as criteria in status. Step 2. Select the tender notice to view the details by clicking the Ref link. Step 3. Press Reviewed button to confirm that the tender has been reviewed. An acknowledgement message will be shown and an will be sent to the approver assigned for the project. The review button is controlled by the access right of Review under New Tender Notice. Page 151 of 263

. Then click on the Update button.")
156 F. Modify Tender Information Modify Tender Notice function is controlled by the access right of Post or Review or Create Tender Box under New Tender Notice. This action could only take place before the issue of tender. Step 1. Go to the menu bar at the top and click Search Tender Notice under E-Tendering. Choose Created or Reviewed as criteria in status. Step 2. Select the tender notice to view the details by clicking the Ref link. Click on Update Tender Info to update tender information. Step 3. Modify all the required fields (fields with red asterisk must be filled). Then click on the Update button. If the tender is created with an existing contract ref from PreQualification or Advertisement, then the update page would be as below. Page 152 of 263

157 Step 4. Acknowledgement of update would be shown as below. Step 5. If the contract ref of tender is created at the tender stage, then the update page would be as below. All the tender information except the contract ref. and trade can be updated. Page 153 of 263

158 Step 6. Acknowledgement of update would be shown as below. Page 154 of 263

159 G. Delete Tender Notice Step 1. Search and view for the tender notice. Then click on the Delete Tender button. Notice: Function for deleting tender will only be available to procurer who has access right in Review Tender or Create Tender Box under New Tender Notice. Otherwise, the Delete Tender button will not be displayed. Step 2. Click OK on the confirmation message to continue the deletion process. Step 3. The acknowledgement of deleting of tender (created with an existing contract ref) successfully is as below and only the tender is deleted. Step 4. If the contract ref of tender was newly created at tender stage and is now being used by other PQ, the acknowledgement of deleting such tender is as below. No tender and contract would be deleted until the related PQ is deleted. And the related PQ ref is shown. Page 155 of 263
160 Step 5. After deleting the related PQ, then click the Delete Tender button. The acknowledgement of deleting tender and contract information is shown below. For deletion of a tender notice created with a new contract ref, the same acknowledgement as below will also be displayed. Page 156 of 263


161 H. Approve Tender Notice & Create Tender Box Step 1. Go to the menu bar at the top and click Search Tender Notice under E-Tendering. Step 2. Select the tender notice by clicking the Ref link and the status as reviewed. Step 3. View the tender notice details and press Create Tender Box button to approve issue of tender. This button is controlled by the access right of Create Tender Box under New Tender Notice. Confirm OK to create the tender box. Moreover, approver can press Tenderer List button to review tenderers selected or change the tender closing date before approval of the tender issue. Page 157 of 263
 Procurer has an option to generate new key or use the default Corporation s key by clicking Submit button.")
162 Step 4. Generate key for this tender (Security warning may be prompted. Please press Yes button.) Procurer has an option to generate new key or use the default Corporation s key by clicking Submit button. Corporation key the key held by Secretary of Tender Board New key generate new key or key pairs for each tender. If Corporation s key is selected, then upon clicking the Submit button, the tender will be issued. notice will be sent to selected tenderers for restricted tender and all contractors of approved or expired status for open tender. Step 5. If generate new key is selected, type password in the pop-up text box Tender Private Key Password. (The password should be 6 8 digits or alphabets.) Then press Generate button beside Please click here to generate tender key to generate the key. When procurer decides to receive tender offer in two different boxes (separately into Financial and Technical offers), the key generation screen as follows will be displayed for procurer to generate two keys. Type in the password and click the Generate button to generate the technical private key and then repeat the same process for generating the financial private key. Page 158 of 263
 Notes: It is recommended to save the keys in a floppy and do not save them in the hard disk. Step 7. Click Save button. The following acknowledgement will be shown.")
163 Step 6. A pop-up file saving box will be shown. Please change the default file name (e- Cert.der) and save it in a safe place. (e.g. file name : Tech/Fin - Tender Ref No.der) Notes: It is recommended to save the keys in a floppy and do not save them in the hard disk. Step 7. Click Save button. The following acknowledgement will be shown. Step 8: The screen below appears. Click Submit button. Page 159 of 263
164 or Step 9. An acknowledgement message will be shown. At the same time, notice will be sent to selected tenderers for restricted tender and all contractors of approved or expired status for open tender. Note that the key files and the corresponding passwords are required for the tender opening. They should be kept in a safe place. The Corporation s key will be renewed when necessary, or at least annually, to reduce the chance that it would be leaked to outsiders. Appropriate measures have to be taken so that they can only be accessed by authorized persons. Page 160 of 263
165 IX. Manage Tender Notice 5. Tender Return 5. Tender Return BEGIN Iterative Process Suspend notice to tenderer Post Addendum notice to approver Approve Addendum notice to tenderer Yes Forward query Receive query answer Submit query notice to procurer Forward query? No Answer query 1. Answer query (private) 2. Answer query (public) to tenderer Check Status for tender document, query, query answer & addendum download Tenderers submit tender offer (Financial & Technical) Normal Offer? Yes No notice to procurer user (No Offer) Amend tenderer list remove tenderer Postpone/ Advance notice to tenderer Amend tenderer list add tenderer notice to new tenderer Disable tender immediately Disable tender submission right after tender closing time In between tender posted --> tender closed: 1. check status 2. post addendum 3. answer query (public, private) 4. amend tenderer list 5. suspend 6. postpone/advance (must be later than current date/time) 5. Tender Return END Page 161 of 263
166 A. Tendering Process The tendering process is performed in sequential order as shown in following table. Tender Status Created Waiting for Review Reviewed Issued Postponed Closed Suspended Expired Created Waiting for Review (new) Reviewed Issued Postponed Closed Suspended Expired Tender is created Tender is waiting for review Tender is waiting for create tender box Allow to download Tender's closing date tender document and Tender's closing date is eariler than system Tender is suspended receive tender is changed date response Allow to download tender document and Tender's closing date receive tender is eariler than system Tender is suspended response, and date Tender's closing date is changed Tender box is created and Tender's closing date is eariler than system date Tender box is created and tender is suspended Tender's closing date is eariler than system date Tender's closing date is eariler than system date Tender's closing date is eariler than system date Tender's closing date is eariler than system date or Tender's issue date is later than system date Page 162 of 263


167 B. Post Tender Addendum This function is controlled by the access right of Create Addendum and Search under Tender Notice. Step 1. Go to the menu bar at the top and click Search Tender Notice. Step 2. Select the tender notice by clicking the Ref link. Step 3. Type the addendum information with maximum of 500 characters and upload the file for the addendum. Create new folder by typing the folder name then click the Create Folder button. Page 163 of 263

168 Upload tender addendum files by clicking Browse button and select file. Press More File button to repeat attachment of more files if necessary. Press Upload Documents to confirm. Only those folders and files with a checked checkbox would be uploaded. Repeat the above steps for adding more folders as required. Note: - Folder Name is limited to 128 characters - File Name is limited to 255 characters Step 4. An acknowledgement message will be shown. An about addendum will be sent to the approver assigned for the project. Page 164 of 263
169 C. Modify Addendum Document & Info Note this function is controlled by the access right of Create Addendum or Post Addendum under Tender Notice. And it should only be allowed to update on existing addendum if the addendum is not yet approved. Step 1. Go to the menu bar at the top and click Search Tender Notice under E-Tendering. Step 2. Select the tender notice by clicking the Ref link. Step 3. Type in the revised addendum information with maximum of 500 characters. Upload new files for the existing addendum as follows: Create new folder by typing the folder name then click the Create Folder button. For uploading new file to an existing folder, the name of the existing folder should be typed. Upload tender document files by clicking Browse button and select file. Press More File button to repeat attaching more files if necessary. Press Update to confirm. Only those folders and files with a checked checkbox would be uploaded. Note: - Folder Name is limited to 128 characters - File Name is limited to 255 characters Step 4. An acknowledgement message will be shown. Page 165 of 263
170 Step 5. For deletion of individual file, click on the Delete button beside the addendum document and then click OK to continue. If procurer wants to change the description in one of the addendum document file, user can upload the same addendum document file with different description. System will automatically update the description. Step 6. The acknowledgement of deleting addendum file is as below. Step 7. To delete all contents in a folder, click Delete Folder button next to the addendum folder and then click OK to continue. Page 166 of 263
171 Step 8. The acknowledgement of deleting addendum file folder is as below. Page 167 of 263

172 D. Approve Tender Addendum Step 1. Go to the menu bar at the top and click Search Tender Notice under E-Tendering. Step 2. Select the tender notice by clicking the Ref link. Step 3. Click the hyperlink to download and view the file. Press Approve button to approve. This button is controlled by the access right of Post Addendum under Tender Notice. Step 4. Click OK button in screen below to confirm approval. Step 5. An acknowledgement message will be shown. The system will send about tender addendum to all the tenderers in the tenderer list. Note : For Open Tender, those contractors being registered in the Tracking Status Report, i.e. downloading tender document, downloading tender query file, downloading tender query answer file, downloading addendum file, will receive about tender addendum. Moreover, those contractors submitted tender offer or tender query will also receive about tender addendum. Page 168 of 263


173 E. Check / Edit Tenderer List & Check Tenderers' Status Step 1. Find the specific tender and click Tenderer List button. This button is controlled by the access right of Check & Amend Tenderer List under Tender Notice. Step 2. The tenderer list will be shown. The following message will be prompted if the supplier already in the list: Page 169 of 263

174 The following message will be prompted if the alias is already used. Once the tender is issued out, the system will remember the alias, you must add the supplier which removed from the list as the same previous alias. Page 170 of 263


175 Step 3. Press Track Status button to view the status for documents download as below. The Track Status button is controlled by the access right of Check Status under Tender Notice. Page 171 of 263

176 F. Postpone / Advance Tender Notice Step 1. Find the specific tender. Step 2. Change the closing date / time. Step 3. Click on Change closing Date button to either advance or postpone the tender closing date / time. This button is controlled by the access right of Postpone under Tender Notice. Step 4. Click OK button to confirm changing of closing date / time. Step 5. An acknowledgement message will be shown. notification will be sent to the tenderers in the tenderer list. For Open Tender, all contractors of approved or expired status will receive the notification. Page 172 of 263
177 Page 173 of 263
178 G. Suspend Tender Notice Step 1. Find the specific tender. Step 2. Press Suspend to suspend the tender notice. This button is controlled by the access right of Suspend under Tender Notice. Step 3. Click OK to confirm the suspension. Step 4. An acknowledgement message will be shown. notification will be sent to the tenderers in the tenderer list. The tender notice will be disabled immediately after the suspension of the tender. For Open Tender, all contractors of approved or expired status will receive the notification. Page 174 of 263
179 Page 175 of 263

 or publicly (No). The query answer will only email to the tenderer initiated the query no matter procurer answer the query privately or publicly.")
180 H. Answer Query Step 1. The procurer s staff, who is assigned the contact person for the tender or creates the tender notice, will receive an about the queries raised from tenderers. Step 2. Find the specific tender and query and click Answer Query button for the query. This button is controlled by the access right of Answer Clarification under Tender Notice. Step 3. Enter text in the Answer box. Attach document files if any by clicking Browse button to choose file(s). More files can be attached by clicking the More File button. Step 4. The procurer can choose answer query privately (Yes) or publicly (No). The query answer will only to the tenderer initiated the query no matter procurer answer the query privately or publicly. Privately Only the tenderer who submits the query can receive notification and view the answer in the system. Page 176 of 263
181 Publicly All tenderers in the tenderer list for restricted tender and all contractors of approved or expired status for open tender can receive notification and view the query and answer even they are not the tenderer who submits the query, Procurer can select question and / or attachment to disclose to all contractors. However, the other tenderers cannot see the name of the tenderer submitted the query. Step 5. The query can be forwarded to other users by inputting the address and press Forward Query button. (No attachment will be forwarded.) The receiver should log on his/ her account to download the query file. (Only user assigned to the project can download the query file.) If the other users do not have an account in the system, the relevant files should be downloaded and forwarded to the users using ordinary application. Step 6. Press Submit button when answer has been typed and/or files attached and confirm OK for reply to the tenderer. An acknowledgement will be shown. Notes: Private Query would be separated from public query. Page 177 of 263
. The user can exclude compression / zipping of any tender box by ticking the checkbox.")
, show the Tender Box size and")
182 I. Download Tender Box Step 1. Go to the menu bar at the top and click Download Tender Box. This button is controlled by the access right of Download Tender Box under Tender Box. Step 2. System will show any closed tender and which zip file is not generated. (listed by Contract Ref.). The user can exclude compression / zipping of any tender box by ticking the checkbox. Enter number in the Rank Box to set Download Tender Box rank priority, then click Submit button. Step 3. System will then re-arrange the listing sequence according to the priority setting and tender box size (smallest size tender box will be compressed first), show the Tender Box size and estimated time required to complete the validation and compression process. The System Page 178 of 263
183 will notify the person under an address list set in the parameter file via that the zip file is ready for download. Step 4. System will show the Download Tender Box button when the zip file is ready for download. Press Download Tender Box to download the tender offers. Note: If no ranking provided, just click Submit button, the files will download according to the closing time and file size (small size file will download first). Page 179 of 263

184 J. Disable Download Tender Box Step 1. Find the specific tender which has been closed. Step 2. Press Disable Tender Box to disable further downloads of the tender offers. This button is controlled by the access right of Disable Tender Box Download under Tender Box. Page 180 of 263

185 K. Receive No Offer If tenderer uses the Submit No Offer function to decline submission of a tender offer, the procurer user assigned for Receive No Offer under the project setup will receive the following notification generated by the system. Page 181 of 263

186 X. Open Tender Box Step 1. Click and Open Open Tender Box icon Step 2. Logon and enter password for Group A and B users. Step 3. Click Login Step 4. The open tender box program is restricted to have one user in group A, another user in group B. New user can be created by system administrator. Every time one new user can be created. The system administrator can assign user belongs to group A or group B by selecting the radio button. Page 182 of 263


187 Step 5. Select Tender Box under Private Key List for. Step 6. Select the file for the Corporation s Key or the key generated for the tender by clicking the Browse button and enter password. Step 7. Click Add button. Step 8. Click Finished button Step 9. Locate the tender offer by clicking the Browse button. Step 10. Check Print Tender Report and Offer(s) after Decryption if required. Page 183 of 263


188 Step 11. Identify the destination of the decrypted file by clicking the Browse button. Step 12. Click Decrypt. The tender submissions will be stored in a folder named as TenderBox+tender box no. in the destination path. Tender offers will be stored in separate folders according to the tenderer s alias and the Tender Offer ID as follows: Step 13. Click OK under Tender Box Decryption Completed dialogue. View Process Log for the completion of decryption. Page 184 of 263


189 Step 14. Click Preview to preview tender box report and tender box summary report or exception report, select Print Tender Box Report and Print Tender Box Summary Report or Print Tender Box Exception Report if any exception find during open tender process and then click Print to print the Tender Box Report and Tender Box Summary Report. All tender offer documents can be printed by select Print All Tender Offer Documents and then click Print. Page 185 of 263

190 For non two-envelop submission, system will generate following Tender Box Report after tender box open. Page 186 of 263
191 Page 187 of 263

192 Page 188 of 263

193 For two-envelop submission, system will generate following Tender Box Report after technical tender box open. Page 189 of 263
194 For non two-envelop submission, system will generate following Tender Box Summary Report after tender box open For two-envelop submission, system will generate following Financial Tender Box Summary Report after financial tender box open. Page 190 of 263
 of any fail to decrypt submission. A file named form.")
195 For two-envelop submission, system will generate following Technical Tender Box Summary Report after technical tender box open. System will generate following Tender Box Exception Report and list out the tender offer id and status (reason) of any fail to decrypt submission. A file named form.doc will generate by the system which include the Remark input by the supplier during offer submission. Content for form.doc for supplier submit No Offer Page 191 of 263
196 Content for form.doc for supplier submit offer Page 192 of 263
197 XI. Tender Assessment 7. Tender Assessment 7. Tender Assessment BEGIN Procurer can send Q&A, LOC, LOA to supplier who submitted tender offer. Iterative Process Create Q&A Close all non-tender box Q&A to Reviewer No Reviewer reviews/modifies Q&A Creator modifies Q&A Select tenderer to send notice for LOC Review Q&A Reviewed? Inform Reviewer notice for LOC to tenderer Yes to Approver Approver reviews/ modifies Q&A Yes Reviewers/Creator modifies Q&A Create Q&A Box Inform Approver Issue Tender Box Q&A Yes Tender Box Q&A Required? notice to tenderer No Issue Non- Tender Box Q&A Post Q&A to web Suspend notice to tenderer Postpone/Advance notice to tenderer Check Status for Q&A document download Tenderers submit Q&A Disable Q&A box immediately For open Q&A box please refer. to 6. Open tender box. Yes 6. Open Tender Box Tender Box Q&A? No Download unencrypt Q&A Select tenderer to send notice for LOA Close all non-tender box Q&A notice for LOA to tenderer 7. Tender Assessment END Page 193 of 263


198 A. Post Tender Q&A (Tender Box Q&A) Step 1. Find a tender which has been closed. Step 2. Press Post Q&A. This button is controlled by the access right of Post under New Q&A. Page 194 of 263
.")

199 Step 3. Enter Q&A information. Select only ONE tenderer who has submitted the tender offer. Input Q&A Ref or generate it by the system automatically. Input the Q&A subject. Assign issue date, closing date & time (Q&A closing date can only be modified by the approver assigned for the project when the status of the Q&A notice = Reviewed). Upload Q&A document file(s) Press More File for multiple files. For Tender box Q&A, please select Tender Box Q&A as the return type. Note that only those files with a checked check box will be uploaded. Alert message will be prompted if the selected tenderer has no offer record in the system. Alert message will be prompted if the selected tenderer has no reply record in the system. Page 195 of 263
200 Step 4. Create gap list (optional) and press Submit button to confirm. (gap list: Buyer can list the requirement information) Step 5. An acknowledgement message will be shown. An notification will be sent to the reviewer assigned for the project. Page 196 of 263


201 B. Search & View Tender Q&A Step 1. Click Search Tender Q&A under Q&A on the top menu. This function is controlled by the access right of Search under Q&A Notice. The Tender Q&A could be searched by selecting one of the trade codes at the Trade section, by the Tender Q&A issue or closing date range at the Issue Date or Closing Date section. The Stage section is used to search by the Tender Q&A status including Created, Issued, Postponed, Closed, Suspended, Expired and Reviewed. Tender Q&A could also be searched by the keyword from Tender Q&A ref or subject at the Keywords section. The result could be sorted by Tender Q&A ref, subject, issue date or closing date. Alternatively, Tender Q&A can be searched by inputting the Tender Ref in the Section Search by Tender Ref as follows. In such case, all the Tender Q&A of the Tender Ref will be displayed. Step 2. Input the searching criteria and select the sorting order. Click Submit. Page 197 of 263


202 Step 3. Click ref number to view Q&A. Page 198 of 263

203 C. Review Q&A (Tender Box Q&A) Step 1. Search the Q&A and find the specific Q&A. Step 2. Press the Update Q&A Info to amend the Q&A details or inform the creator manually for making the amendments. Step 3. Press Reviewed button to review the Q&A after checking the details. An notification will be sent to the Approver assigned for the project. This button is controlled by the access right of Review Q&A under New Q&A. Page 199 of 263

204 D. Approve Q&A (Tender Box Q&A) Step 1. Search the Q&A and find the specific Q&A. Step 2. Check the Q&A details by clicking the ref no. Modify the Q&A details by clicking the Update Q&A Info button, if needed. Alternatively, the Reviewer / Creator can be informed manually to modify the Q&A. Step 3. Having checked all the details, press the Create Q&A button to approve the Q&A. If the Q&A box is created successfully, an acknowledgement message will be shown and will be sent to the selected tenderer. This button is controlled by the access right of Create Q&A Box / Issue Q&A under "New Q&A". Before the Create Q&A button is pressed, Q&A closing time can also be changed by inputting the new closing time and then clicking Change Closing Date button. Step 4. Click OK to confirm or Cancel to return to the Q&A notice. Step 5. An acknowledgement message will be shown and click Close to exit. Page 200 of 263


205 E. Maintain Q&A (Tender Box Q&A) Step 1. Search the Q&A and find the specific Q&A Ref. Step 2. Press Track Status to view current status so that tracking status report will be shown. This button is controlled by the access right of Check Status under Q&A Notice. Step 3. Press Suspend button to suspend the Q&A if required. This button is controlled by the access right of Suspend under Q&A Notice. If the Suspend button is pressed, will be sent to the selected tenderer. Step 4. When necessary, change the closing date/time and press Change Closing Date button to either advance or postpone the closing date/time. The closing date/time must be later than the current date/time. If the closing date/time has been changed, will be sent to the selected tenderer. This button is controlled by the access right of Postpone under Q&A Notice. Page 201 of 263
. The user can exclude compression / zipping of any Q&A box by ticking the checkbox.")
206 F. Download Q&A Box (Tender Box Q&A) Step 1. Go to the menu bar at the top and click Download Q&A Box under Q&A. This button is controlled by the access right of Download Q&A Box under Q&A. Step 2. System will show any closed Q&A and which zip file is not generated. (listed by Contract Ref.). The user can exclude compression / zipping of any Q&A box by ticking the checkbox. Enter number in the Rank Box to set Download Q&A Box rank priority, then click Submit button. Step 3. System will then re-arrange the listing sequence according to the priority setting and tender box size (smallest size Q&A box will be compressed first), show the file size of Q&A Box and estimated time required to complete the validation and compression process. The System will notify the Tender Q&A s contact point and an address list set in the parameter file via that the Q&A Box is ready for download. Step 4. System will show the Download Q&A Box button when the zip file is ready for download. Press Download Q&A Box to download the tender offers. Page 202 of 263

207 Note: If no ranking provided, just click Submit button, the files will download according to the closing time and file size (small size file will download first). To terminate the Download Q&A Box function for the Q & A, press Disable Q&A Box. This button is controlled by the access right of Disable Q&A Box under Q&A Box. A confirmation alert will be prompted and click OK to continue. The Download Q&A Box and the Disable Q&A Box buttons will not be shown again. Page 203 of 263

 Press More File for multiple files.")
208 G. Post Q&A (Non-Tender Box Q&A) Step 1. Find a tender which has been closed and press Post Q&A button in the tender notice. The Post Q&A function is controlled by the access right of Post under New Q&A. Step 2. Post Q&A information. Input Q&A Ref or generate it by the system automatically. Input Q&A subject. Assign issue date, closing date & time (Q&A closing date can only be modified by the approver assigned for the project when the status of the Q&A notice = Reviewed). Select only ONE tenderer who has submitted the tender offer. Upload Q&A document file(s) Press More File for multiple files. For Non Tender box Q&A, please select Non Tender Box Q&A as the return type. Note that only those files with a checked check box will be uploaded. Step 3. Create gap list (optional) and press Submit button to confirm. Step 4. An acknowledgement message will be shown. An notification will be sent to the reviewer assigned for the project. Page 204 of 263
209 Page 205 of 263

210 H. Review Q&A (Non-Tender Box Q&A) Step 1. Search the Q&A by clicking Search Q&A under Q&A on the top menu. Step 2. Check the details. Press Update Q&A Information button to amend details, if needed. Alternatively, the Reviewer can inform the Creator manually to amend the details. Check the details and press Reviewed button to review. An notification will be sent to the approver assigned for the project. This button is controlled by the access right of Review Q&A under New Q&A. Page 206 of 263

211 I. Issue Q&A (Non-Tender Box Q&A) Step 1. Search the Q&A and find the specific Q&A. Step 2. Check the details and follow Step 2 of section K to amend details of Q&A if required. Step 3. After checking the details, press the Issue Q&A button to approve the Q&A. If the Q&A is created successfully, an acknowledgement message will be shown and will be sent to the selected tenderer. This button is controlled by the access right of Create Q&A Box / Issue Q&A under New Q&A. Before the Issue Q&A button is pressed, Q&A closing time can also be changed by inputting the new closing time and then clicking Change Closing Date button. Step 4. Click OK to confirm or Cancel to return to the Q&A notice. Step 5. An acknowledgement message will be shown and click Close to exit. Page 207 of 263


212 J. Maintain Q&A (Non-Tender Box Q&A) Step 1. Search the Q&A and find the specific Q&A. Step 2. Press Track Status to view current status. This button is controlled by the access right of Check Status under Q&A Notice. Step 3. Press Suspend button to suspend Q&A when necessary. This button is controlled by the access right of Suspend under Q&A Notice. If the Suspend button is pressed, will be sent to the selected tenderer. Step 4. Change closing date/time and press Change Closing Date button to either advance or postpone the closing date/time. The closing date/time must be later than the current date/time. If the closing date/time has been changed, will be sent to the selected tenderer. This button is controlled by the access right of Postpone under Q&A Notice. Page 208 of 263
213 K. Download Q&A Attachments (Non-Tender Box Q&A) For non-tender box Q&A, user can download Q&A Attachment at anytime even when the Q&A has not been closed. Step 1. Search the Q&A and find the specific Q&A. Step 2. Click Download Q&A Attachment button. This button is controlled by the access right of Download Non-Tender Box Q&A under Q&A Box. Step 3. Choose file location to save the Q&A Attachment to the local hard disk. Step 4: Open the file to view contents. Page 209 of 263


214 L. Modify Q&A Information This function could be applied to both Tender Box and Non Tender Box Q&A before issuing to the selected tenderer. Also it is controlled by the access right of Post, Review or Create Q&A Box / Issue Q&A under New Q&A. Step 1. Search the Q&A and find the specific Q&A. Step 2. Click Update Q&A Info button. Modify the Q&A information as required. Step 3. The update would only allow user to add more items to the gap list by clicking the More List button or modify the items in the gap list but not delete any item in the gap list. Page 210 of 263

215 Step 4. Click Update to update the information of Q&A. An acknowledgement message will be shown and click Close to exit. Page 211 of 263

216 M. Modify Q&A Documents This function could be applied to both Tender Box and Non Tender Box Q&A before issuing to the tenderer. Also it is controlled by the access right of Post, Review or Create Q&A Box / Issue Q&A under New Q&A. Step 1. Search the Q&A and find the specific Q&A. Step 2. To delete a Q&A document, press Delete button. Then acknowledgement would be shown as below. Step 3. To add more documents, press the Browse button and search for the file to be uploaded. The check box in front of the file has to be checked in order to be uploaded to sever. Then press Upload Documents after finished selecting files. The acknowledgement would be shown as below. Note: File description can be modified by uploading the same file with new file description. Page 212 of 263

217 N. Open Tender Box Q&A Step 1. Activate the Open Tender Box program as detailed in Section IX. Select Q&A Box under Private Key List for. Step 2. Insert the Corporation s key file by clicking Browse button and select the file and enter password. Step 3. Click Add button. Step 4. Click Finished button. Step 5. Click Browse button to locate the Q&A box downloaded. Step 6. Identify destination path by clicking the Browse button. Page 213 of 263


218 Step 7. Check Print Tender Box Q&A Report and Q&A Answer(s) After Decryption box if required. Step 8. Click Decrypt button. The Q&A submissions will be stored in a folder named as TenderBox+tender box no. in the destination path. Q&A submissions will be stored in separate folders according to the tenderer s alias and the Q&A Offer ID as follows: Step 9. Click "OK" button and view process log for the completion of decryption. Step 10. Click Preview button to preview Q&A Report or select Print QA Box Report and then click Print to print the Q&A Report. All Q&A submission can be printed by select Print All QA Offer Documents and then click Print. Page 214 of 263

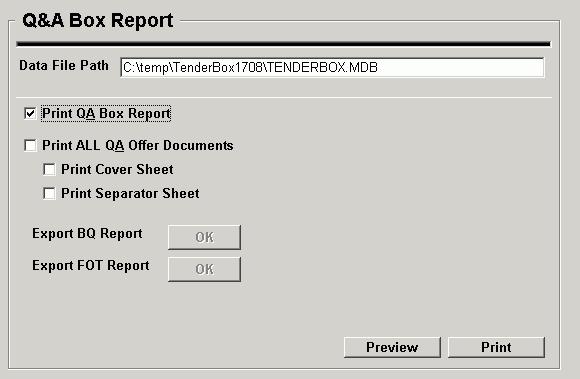
219 Page 215 of 263

220 O. Open Non-Tender Box Q&A Step 1. Open the zipped file of the non-tender box Q&A downloaded. Step 2. Open the Q&AboxSummary.txt to view the Q&A box report. Step 3. Another way of viewing the Q&A box report is to open the MS Access file TenderBox.mdb. Page 216 of 263

221 Step 4. Select the Q&A answers in the zip file and unzip to read the attachments. Page 217 of 263


222 P. Update Gap List This function could be applied to both Tender Box and Non Tender Box Q&A which has been created with the gap list and the Q&A is closed. This function is controlled by the access control Update Gap List under Q&A Notice. Step 1. Search the tender and select the specific tender ref. Step 2. Check the desired gap list check box then press Update Gap List button. The acknowledgement would be shown as below: Note : Each item of the gap list is allowed to be updated once. Page 218 of 263

223 Q. Close all Non-Tender Box Q&A For all non-tender box Q&A, tenderer can still submit response even after the Q&A closing time is elapsed. To close the non-tender box Q&A, the Close Non Tender Box Q&A function as described below should be used. Step 1. Search the tender and select the specific tender. Step 2. Press Close Non Tender Box Q&A and confirm OK to continue. This function is controlled by the access right of Post LOA under LOC & LOA. All the non-tender box Q&A, closing time of which has been elapsed, will be closed. Note: All non-tender box Q&A will also be closed at the time when the notification for LOA is sent. Tips: All non-tender box Q&A will be closed automatically after 1 year. Page 219 of 263
224 R. Send Letter of Clarification (LOC) Step 1. Search the tender and select the specific tender. Step 2. Press Post LOC button. This button is controlled by the access right of Post LOC under LOC & LOA. This function should be available for procurer right after the tender is closed and before posting of LOA. Step 3. Select the tenderer from Tenderer List, to which LOC is to be sent. All invited tenderers could be selected to issue LOC in regardless it has submission or not, or whether it has submitted offer or no offer, with reply or no reply. Alert message will be prompted if the selected tenderer has no offer record in the system. Alert message will be prompted if the selected tenderer has no reply record in the system. Step 4. Click Send button and confirm OK to continue. Page 220 of 263
225 Alert message will be prompted to alert the buyer already sent LOC to the tenderer and click OK to send this LOC again Step 5. If the LOC notice is posted successfully, an acknowledgement will be shown. Step 6. The following notification will be sent to the selected tenderer. Page 221 of 263
 are still not yet closed. Note: Tender box Q&A with auto close feature.")

226 S. Send Letter of Acceptance (LOA) Step 1. Search the tender and select the specific tender. Step 2. Press Post LOA button. This function is controlled by the access right of Post LOA under LOC & LOA. Alert message will be prompted if non tender box Q&A(s) are still not yet closed. Note: Tender box Q&A with auto close feature. However, non tender box Q&A required close manually, thus an warning message should be shown to alert user before issue LOA. Step 3. Select the tenderer from Tenderer List, to which LOA is to be sent.. All invited tenderers could be selected to issue LOA in regardless it has submission or not, or whether it has submitted offer or no offer, with reply or no reply. Alert message will be prompted if the selected tenderer has no offer record in the system. Alert message will be prompted if the selected tenderer has no reply record in the system. Page 222 of 263
227 Step 4. Press Send button, confirm OK to continue and an notification will be sent to selected tenderer. Step 5. If the LOA notice is posted successfully, an acknowledgement will be shown. Step 6. The following notification will be sent to the selected tenderer. Note: - All non tender box Q&A(s) will be closed by system (if any) Page 223 of 263
228 XII. Tender Award 8. Tender Award 8. Tender Award BEGIN Publish Award button clicked? Yes Fill in all required information 1. Award date 2. Amount 3. Amount to be included in regret letter or not 4. Contractor Name 5. Contractor Address 6. Publish publicly or not Post tender award to web Send regret letter to unsuccessful tenderers e-tendering Process END Page 224 of 263


229 Step 1. Search the tender and find the specific tender. Step 2. Press Publish Tender Award Notice button. This button is controlled by the access right of Post Contract Award Notice under Tender Box and is only shown after posting the LOA. Step 3. Fill in tender award information. The Contractor Name and Contractor Address will be automatically filled by the system. The automatically filled information can be changed as required. Input the Contract Sum in the Amount field. Select Yes beside the Amount field if the amount is to be shown in the regret letter or select No otherwise. Page 225 of 263
230 Select Yes for Is Public? if the tender award notice is posted publicly. In this case, all registered suppliers/contractors could view the award in the system. Select No for Is Public? if the award notice is posted non-publicly. In this case, only procurer can view the award in the system. Step 4. Press Submit button and confirm OK to continue. of Regret Letter will be sent to unsuccessful tenderers, who have submitted tenders via the system. (Note: For those tenderers submitted tenders by paper submission, notification should be prepared manually.) Page 226 of 263
. Step 3.")

231 XIII. Report / Log Various types of report / log can be viewed in the system. A. Contractors (Trade, Safety) Report Step 1. Click Report / Log. Step 2. Click the report Contractors (Trade, Safety). Step 3. Select the desired trade code(s) (not more than 6 trade codes) and safety class(es) or it will be searched for all trades or safety classes by default. The report output can be sorted by Name of Contractor, Status of Registration or Safety Class. Then click Submit to view the contractor's details as below. Page 227 of 263

232 The report can be output to csv format by clicking the Export to CSV button. Page 228 of 263
 (not more than 6 trade codes), permanent list indicator, registration status(es) or safety class(es), it will be")

233 B. Contractors (Trade, Status of Registration) Report Step 1. Click Report / Log. Step 2. Click the report Contractors (Trade, Reg). Step 3. Select the desired trade code(s) (not more than 6 trade codes), permanent list indicator, registration status(es) or safety class(es), it will be searched for all trade, permanent list indicator, registration status or safety classes by default. The report output can be sorted by Name of Contractor, Status of Registration, Safety Class, Date of Application or Date of Approval. Then click Submit to view the contractors details as below. Page 229 of 263


234 The report can be output to csv format by clicking the Export to CSV button. Page 230 of 263
 from the menu bar under")


235 C. Contractors Performance Report Step 1. Click Contractors (Performance) from the menu bar under Report / Log. Step 2. Search contractor by different criteria. Step 3. Click Submit to view any contractor that matches with the searching criteria. Step 4. Select the desired contractor then click Submit to view the contractor's details as below. Page 231 of 263


236 Step 5. Click Export to CSV button to output the result to CSV format. Page 232 of 263
 from the menu bar under Report")

237 D. Contract Progress Report Step 1. Click the Contract (Progress) from the menu bar under Report / Log. Step 2. Select the contract. Step 3. Click Submit to view the report. Step 4. The Contract Progress Report will be shown: Page 233 of 263

238 Step 5. Click Export to CSV to output to CSV format. Page 234 of 263

239 E. Project Status Report Step 1. Click the Project Status from the menu bar under Report / Log. Step 2. Choose project code and select the sorting criteria as required. The result could be sorted by the contract ref or tender ref. Step 3. Click Submit to view the report. Step 4. The Project Status Report is shown as below. Page 235 of 263


240 Step 5. Click Export to CSV to output to CSV format. Page 236 of 263
 from the menu bar under Report / Log.")


241 F. Contracts (Trade) Report Step 1. Click the Contract (Trade) from the menu bar under Report / Log. Step 2. Identify criteria for the required report. The trade is required and the Sort by is optional. The result could be sorted by the contract ref or the tender ref. Step 3. Click Submit to view the report. The Contract (Trade) Report is shown as below. Step 4. Click Export to CSV to output to CSV format. Page 237 of 263

242 Page 238 of 263

243 G. Award Contracts Report Step 1. Click the Award Contract from the menu bar under Report / Log. Step 2. Identify criteria for the required report. Select the date range of tender closing date and also the Sort by as required. The result could be sorted by the contract ref or the tender ref. Step 3. Click Submit to view the report as shown below. The report can be output to csv format by clicking the Export to CSV button. Page 239 of 263


244 H. Tender Closing Report Step 1. Click the Tender Closing from the menu bar under Report / Log. Step 2. Identify criteria for the required report. Select the date range of tender closing date and select the Sort by as required. The result could be sorted by the closing date & time or the tender/q&a ref. Step 3. Click Submit to view the report as shown below. The report can be output to Excel format by clicking the Export to Excel button. Page 240 of 263


245 I. Payment Transaction Report Step 1. Click the Payment Transaction from the menu bar under Report / Log. Step 2. Identify reporting criteria for the required report e.g. contractor name, transaction type, date range or transaction status. The output of the report can be sorted by transaction date, contractor name or transaction type. Step 3. Click Submit to view the report as shown below. The report can be output to csv format by clicking the Export to CSV button. Page 241 of 263

 Show Latest Only - Certificate Status will not change to Status and with following options.")
246 J. Digital Cert Report Step 1. Click the Digital Cert Report from the menu bar under Report / Log. Step 2. Identify criteria for the required report. Select the date range of Cert issue date, input contractor company name and also the Sort by as required. The result could be sorted by the issue date & company name. Note: - Report Type and its options remain unchanged. - Currently, Report Type with following options. Show All History (default) Show Latest Only - Certificate Status will not change to Status and with following options. Show All (default) Active - Currently, Key Length with following options. Show All 1024 bits 2048 bits - Currently, Cert Type with following options. I-Cert and E-Cert I-Cert Only E-Cert Only Page 242 of 263


247 Step 3. Click "Submit" to view the report as shown below. Step 4. The report can be output to csv format by clicking the Export to CSV button. Page 243 of 263


248 K. Closing Activities Report Step 1. Click the Closing Activities Report from the menu bar under Report / Log. Step 2. Identify criteria for the required report. Select the date range of tender closing date, default start from system date to all future date. Select the Sort by as required. The result could be sorted by the closing date or the Adv / PQ / PQ Q&A / Tender / Tender Q&A / Non Tender Box Q&A ref. Step 3. Click Submit to view the report as shown below. The report can be output to Excel format by clicking the Export to Excel button. Page 244 of 263

249 L. Upload Activities Report Step 1. Click the report Upload Activities Report from the menu bar under Report / Log Step 2. Identify criteria for the required report. Step 3. Click Submit to view the report as shown below. Step 4. The report can be output to csv format by clicking the Export to CSV button. Page 245 of 263

250 Page 246 of 263


251 M. Audit Trail Report Step 1. Click the report Audit Trail from the menu bar under Report / Log. Step 2. Identify criteria for the required report. Select the report type and date range of the action taken. It could also be searched by User ID. The report types included are the management and interface report. Step 3. Click Submit to view the report as shown below. Page 247 of 263


252 N. Error Log Report Step 1. Click the Error Log from the menu bar under Report / Log. Step 2. Identify criteria for the required report. Select the error type and date range of the action taken. It could also be searched by User ID and User Name. The error types included are LogOn/LogOff, Interface, Report, CRL. Step 3. Click Submit to view the report as shown below. Page 248 of 263

253 O. Activity Log Report Step 1. Click the Activity Log from the menu bar under Report / Log. Step 2. Identify criteria for the required report. Select the activity type and date range of the action taken. It could also be searched by User ID and User Name. The activity types included are Maintenance, Registration, Advertisement, PreQualification, Tender, Q&A, Assessment, Report, Quotation, Audit Log, Interface, CRL. Step 3. Click Submit to view the report as shown below. Page 249 of 263


254 P. File Transfer History Step 1. Click the File Trans History from the menu bar under Report / Log. Step 2. Identify criteria for required report. Select the file type, action and date range of the action taken. It could also be searched by User ID and User Name. The file types included are Advertisement, PreQualification, Tender, Q&A. And the actions included are Download and Upload. Step 3. Click Submit to view the report as shown below. Page 250 of 263


255 Q. Security Report Step 1. Click the Security Report from the menu bar under Report / Log. Step 2. Identify criteria for the required report. Select logon date range of the action taken. It could also be searched by User ID and User Name and Company Name. Step 3. Click Submit to view the report as shown below. Page 251 of 263


256 R. E-Cert Reminder Log Step 1. Click the E-cert reminder log from the menu bar under Report / Log. Step 2. Identify criteria for the required report. Step 3. Click Submit to check the report Note : There are two types in Reminder types column: - Pre-reminder: will inform supplier e-cert to be expired before e-cert expiry day and on expiry day - Post-reminder: will inform supplier e-cert has expired after e-cert expiry day. Page 252 of 263
 at the end of the filename.")
257 XIV. Data Archiving To vacate sufficient storage space for new tenders, outdated attachment files (with tender closing date exceeding 3 years) will be archived to Archival Server and not accessible via the Production Server. The archived document would be associated with the word (Archived) at the end of the filename. However, you may request to de-archive the archived attachment files to Production Server for reviewing and checking when needed. A. Submit De-Archive Request Step 1. If you want to de-archive certain data, please log in the e-tendering system and click New De-Archive Request under Maintenance for request. This function is controlled by the access right of "Submit De-Archive Request" under Data Archiving. Step 2. After click, the following page will be shown: Please type the certain ref- (Adv / PreQualification / PQ Q&A / Tender / Tender Q&A) in the field Page 253 of 263

258 If the ref does not exist in the data which already archived, after click Submit, the page will be shown: Page 254 of 263
259 If the ref does exist in the data which already archived, after click Submit the page will be shown: Page 255 of 263

260 B. Search & View De-Archive Request Step 1. If you want to search and view de-archive request, you can search by click Search De-Archive Request under Maintenance. This function is controlled by the access right of "Search & View De-Archive Request" under Data Archiving. Step 2. Input search criteria like date range, status etc. and sorting order. Click Submit button. Step 3. Click the ID to view detail information about this request Page 256 of 263

261 Page 257 of 263


262 XV. Site Map Step 1. Click the Site Map from the menu bar. Step 2. The site map for procurer is as shown below. Page 258 of 263

263 XVI. Access Right Matrix Page 259 of 263
264 Appendix - Details flow for post Tender Notice Scenario 1 - Post Open Tender Notice Note: Button is restricted by Access Control List Scenario 1 - Post Open Tender Notice Display blank Tender Notice form with Save and Reset button Note: Button is restricted by Access Control List Enter Tender General Information, i.e. Tender Ref, Contract related details, Tender Subject, Issue & Closing Date, Access Type. Set Tender Stage to Created Yes Is Open Tender No Scenario 2 - Post Restricted Tender Notice 1 Display Post Tender Document form with Submit for Approval w/o Review, Submit for Review, Save and Reset button Upload Tender Document and Import Standard Document New! For Open Tender Notice, Submit for Approval w/o Review and Submit for Review button will show on Post Tender Document page and Update Tender Document page. Tender Docume nt exists? No 1 No Tender Docume nt exists? Yes Yes Set Tender Stage to Reviewe d Set Tender Stage to Waiting for Review New! Send to approver Send to reviewer Display system message with Back button End Scenario 3 - Update Open Tender Notice Page 260 of 263

265 Scenario 2 - Post Restricted Tender Notice User Right: Department Head E&P Scenario 2 - Post Restricted Tender Notice Display blank Tender Notice form with Save and Reset button Enter Tender General Information, i.e. Tender Ref, Contract related details, Tender Subject, Issue & Closing Date, Access Type. Set Tender Stage to Created Scenario 1 - Post Open Tender Notice Yes Is Open Tender No No Display Post Tender Document form with Save and Reset button Tender Docume nt exists? Upload Tender Document and Import Standard Document Yes Display system message with Tenderer List and Back button Scenario 4 - Update Restricted Tender Notice 5 Display Tenderer List form with Submit for Approval w/o Review, Submit for Review, Save and Close button Enter Tenderer List New! For Restricted Tender Notice, Submit for Approval w/o Review and Submit for Review button will show on Tenderer List page only. Set Tender Stage to Reviewe d Set Tender Stage to Waiting for Review New! Tendere r Exists? No 5 Send to approver Send to reviewer End Page 261 of 263
266 Scenario 3 - Update Open Tender Notice Note: Button is restricted by Access Control List Scenario 3 - Update Open Tender Notice 7 Display Tender Notice form with Submit for Approval w/o Review, Submit for Review, Upload Tender Documents, Import Standard Document, Update Tender Info and Delete Tender button Yes Tender Stage is Created? No 7 Display Tender Notice form with Reviewed, Upload Tender Documents, Import Standard Document, Update Tender Info and Delete Tender button Yes Tender Stage is Waiting for Review? No 7 Display Tender Notice form with Create Tender Box, Change Closing Date, Upload Tender Documents, Import Standard Document, Update Tender Info and Delete Tender button Yes Tender Stage is Reviewed? No 8 Display Tender Notice form with Change Closing Date, Track Status, Suspend and Upload Addedum Info & Documents button Yes Tender Stage is Issued or Postponed? No 8 Display Tender Notice form with Track Status button Yes Tender Stage is Suspende d or Closed? 8 End Page 262 of 263
267 Scenario 3 - Update Open Tender Notice (Con t) Note: Button is restricted by Access Control List Tender Stage Is Created, Waiting for Review or Reviewed Tender Stage Is Created, Waiting for Review or Reviewed 7 Tender Stage Is Created Tender Stage Is Created For Open Tender Notice, Submit for Approval w/o Review and Submit for Review button will show on Post Tender Document page and Update Tender Document page. New! Retain Tender Stage Tender Docume nt exists? No A No Tender Docume nt exists? Set Tender Stage to Reviewe d Set Tender Stage to Waiting for Review Yes New! Send to approver Send to reviewer Scenario 3 - Update Open Tender Notice A Page 263 of 263

268 Scenario 4 - Update Restricted Tender Notice Note: Button is restricted by Access Control List Scenario 4 - Update Restricted Tender Notice 10 Display Tender Notice form with Tenderer List, Upload Tender Documents, Import Standard Document, Update Tender Info and Delete Tender button Yes Tender Stage is Created? No 10 Display Tender Notice form with Reviewed, Tenderer List, Upload Tender Documents, Import Standard Document, Update Tender Info and Delete Tender button Yes Tender Stage is Waiting for Review? No 10 Display Tender Notice form with Create Tender Box, Tenderer List, Change Closing Date, Upload Tender Documents, Import Standard Document, Update Tender Info and Delete Tender button Yes Tender Stage is Reviewed? No 11 Display Tender Notice form with Change Closing Date, Tenderer List, Track Status, Suspend and Upload Addedum Info & Documents button Yes Tender Stage is Issued or Postponed? No 11 Display Tender Notice form with View Tenderer List nd Track Status button Yes Tender Stage is Suspende d or Closed? 11 End Tender Stage Is Created, Waiting for Review, Reviewed, Issued or Postponed 10 Tender Stage Is Created, Waiting for Review or Reviewed Tender Stage Is Created, Waiting for Review or Reviewed 12 Retain Tender Stage Scenario 4 - Update Restricted Tender Notice Page 264 of 263
MTR CORPORATION. User Guide for E-Tendering System R3.16 TABLE OF CONTENTS SYSTEM REQUIREMENT... 1 NEW SUPPLIER / CONTRACTOR REGISTRATION...
 MTR CORPORATION User Guide for E-Tendering System R3.16 TABLE OF CONTENTS SYSTEM REQUIREMENT... 1 NEW SUPPLIER / CONTRACTOR REGISTRATION... 2 LOGON FOR REGISTERED SUPPLIER / CONTRACTOR... 6 UPDATE USER
MTR CORPORATION E-Tendering User Guide for Suppliers
 MTR CORPORATION E-Tendering User Guide for Suppliers TABLE OF CONTENTS SYSTEM REQUIREMENT... 2 NEW SUPPLIER / CONTRACTOR REGISTRATION... 20 LOGON FOR REGISTERED SUPPLIER / CONTRACTOR... 24 UPDATE USER
Managing Supplier Information on
 Managing Supplier Information on www.webportunities.net In most buyer organisations supplier s information and documents are managed manually. This is a very time consuming task and often documents have
Compliance Desktop Technology Platform Admin User Guide
 Compliance Desktop Technology Platform Admin User Guide Table of Contents 1. Logging into ComplianceDesktop... 4 1.1 ComplianceDesktop Landing Page... 4 1.2 Requesting a New Password... 4 1.3 Requesting
Isi Net User Manual for Bank customers
 1 Table of Contents 1 Introduction and overview... 4 1.1 Isi Net User Types... 4 1.2 Accessing the Isi Net service... 5 1.2.1 User Login... 5 1.2.2 User Logout... 7 1.3 User Interface... 7 1.3.1 Menus...
THE HONG KONG SCHOOL SPORTS FEDERATION STUDENT ATHLETES ONLINE REGISTRATION SYSTEM USER MANUAL
 THE HONG KONG SCHOOL SPORTS FEDERATION STUDENT ATHLETES ONLINE REGISTRATION SYSTEM USER MANUAL Table of Content 1. School Teacher... 2 1.1 Login... 2 1.2 Forgot Password... 3 1.3 Create Batch... 3 1.4
MARYLAND HOSPITAL DATA REPOSITORY DATA COLLECTION SYSTEM
 MARYLAND HOSPITAL DATA REPOSITORY DATA COLLECTION SYSTEM TABLE OF CONTENTS I. Overview II. III. IV. Function Key Definitions Access the Maryland Hospital Data Repository Main Menu a) View Submitted Data
BBVA Compass Spend Net Payables
 User Guide BBVA Compass Spend Net Payables User Guide Vault Services Table of Contents Introduction 2 Technical Requirements 2 Getting started 3 Sign In 3 General Navigation 4 Upload/Create Payment 5
Secure Transfer Site (STS) User Manual
 User Manual") Secure Transfer Site (STS) User Manual (Revised 3/1/12) Table of Contents Basic System Display Information... 3 Command Buttons with Text... 3 Data Entry Boxes Required / Enabled... 3 Connecting to the
Secure Transfer Site (STS) User Manual (Revised 3/1/12) Table of Contents Basic System Display Information... 3 Command Buttons with Text... 3 Data Entry Boxes Required / Enabled... 3 Connecting to the
ECONOMIC OPERATOR USER MANUAL EUROPEAN DYNAMICS S.A.
 Republic of Armenia Armenian e-procurement System (ARMEPS) ECONOMIC OPERATOR USER MANUAL EUROPEAN DYNAMICS S.A. Table of Contents Table of Contents... 2 1. ARMEPS workflow and terms... 8 2. General Functionality...
ICPS Factory User Manual Ver: 08
 Thank you for using the ICPS Responsible Sourcing Platform of ICTI CARE (hereafter, the ICPS system or the system). Prior to using this system, applicant factories are encouraged to read through this user
Training Manual for HR Managers ( Business Unit Admin level)
") UK Umbrella Service Ltd online DBS applications Training Manual for HR Managers ( Business Unit Admin level) UK Umbrella Service Ltd Page 1 of 12 1 Accessing the system: From the Log In page: https://ukdbschecks.employmentcheck.org.uk/user_login.php
UK Umbrella Service Ltd online DBS applications Training Manual for HR Managers ( Business Unit Admin level) UK Umbrella Service Ltd Page 1 of 12 1 Accessing the system: From the Log In page: https://ukdbschecks.employmentcheck.org.uk/user_login.php
Construction Workers Registration System. User Manual. Construction Industry Council
 Construction Workers Registration System User Manual Construction Industry Council Last Update: April 2018 The Construction Industry Council (CIC) The contents of this document remain the property of,
Present and Pay. User Manual Payer Analyst
 Present and Pay User Manual Payer Analyst Table of Contents 1.0 Glossary of Terms... 1 2.0 How to Use this Manual... 3 3.0 Common User Features and Functions... 3 3.1 Present and Pay User Interface...
The Ethic Management System (EMS) User guide
 User guide") The Ethic Management System (EMS) User guide On the web browser, type the URL link: https://www.witsethics.co.za Click on Login (on right corner of top menu bar) to access the Ethics Management System
The Ethic Management System (EMS) User guide On the web browser, type the URL link: https://www.witsethics.co.za Click on Login (on right corner of top menu bar) to access the Ethics Management System
eproc strategic procurement Supplier - Quick Reference Guide Version 3.7
 eproc strategic procurement Guide Version 3.7 1 Overview of eproc 2 How to register in eproc 3 First Connection 4 How to perform the main activities 5 Contact and Help 2 1 Overview of eproc 2 How to register
F4E Industry & Associations Portal User Guide
 F4E Industry & Associations Portal User Guide F4E Industry Portal Phase 2 THE EUROPEAN JOINT UNDERTAKING FOR ITER AND THE DEVELOPMENT OF FUSION ENERGY TABLE OF CONTENTS 1 INTRODUCTION... 4 2 THE F4E INDUSTRY
Respondent Help Guide
 Respondent Help Guide https://nqphnetender.openwindowscontracts.com Welcome to the Northern Queensland Primary Health Network etendering Portal. Using NQPHN s etendering Portal is free for all users. There
Online Trade License System User Manual
 GUWAHATI MUNICIPAL CORPORATION Online Trade License System User Manual 7/5/2017 Version no. 1.0 TABLE OF CONTENTS INTRODUCTION... 2 USER MANUAL - CITIZEN... 3 USER MANUAL - OPERATOR... 16 USER MANUAL DEALING
USER MANUAL. Disclaimer
 USER MANUAL Disclaimer The instructions in this document have been carefully checked for accuracy and are presumed to be reliable. Smart I Electronics Systems Pvt. Ltd. and its writers assume no responsibility
Employer Self Service (ESS) User Quick Guide
 User Quick Guide") Employer Self Service (ESS) User Quick Guide i Table of Contents Getting Started 6 Accessing the Employer Self Service (ESS) Portal 6 Maintaining Account Settings 7 Switching Employers within Session 7
Employer Self Service (ESS) User Quick Guide i Table of Contents Getting Started 6 Accessing the Employer Self Service (ESS) Portal 6 Maintaining Account Settings 7 Switching Employers within Session 7
Service Desk user guide. FAQ document
 FAQ document Table of contents Introduction... 4 I. Cockpit IT Service Manager... 4 II. Some definitions... 4 Interface presentation... 5 I. Navigation... 5 A. Homepage... 5 B. Hamburger menu... 6 C. Badges...
FileTime Administrators efiling Guide
 FileTime Administrators efiling Guide In this guide you will find the answer to virtually any question you have about eservice in the efiling Manager system. View to the manage table of contents your firm
Document Management System. for QC Postfunding Review
 Document Management System for QC Postfunding Review Contents Quick Overview: How to Submit Documents to FM Processing... iii How to Log in to the Document Management System (DMS)... iv How to Search for
User Guide of PIP System for Employers
 User Guide of PIP System for Employers https://pip.cintec.cuhk.edu.hk/jobs/index.php Enquiry: Placement and Internship Programme Coordinator Centre for Innovation and Technology The Chinese University
Administrator Guide. Position Manager 11 Effective 4/9/2018
 Administrator Guide Position Manager 11 Effective 4/9/2018 Contents System Administration 4 Career Site 6 Acknowledgement Text 6 Career Site Settings: Acknowledgement Text Detail 6 Adding an Acknowledgement
Provider Secure Portal User Manual
 Provider Secure Portal User Manual Copyright 2011 Centene Corporation. All rights reserved. Operational Training 2 August 2011 Table of Contents Provider Secure Portal... 5 Registration... 6 Provider -
Test Information and Distribution Engine
 SC-Alt Test Information and Distribution Engine User Guide 2018 2019 Published January 14, 2019 Prepared by the American Institutes for Research Descriptions of the operation of the Test Information Distribution
Guide for Tenderer. Contact Us for FREE Training & Presentation
 etender Guide for Tenderer Powered by: GLOBAL PCK SOLUTIONS SDN 3-2 Jalan SU 1E, Persiaran Sering Ukay 1 Sering Ukay, 68000 Ampang, Selangor, Malaysia Tel :+603-41623698 Fax :+603-41622698 Email: info@pck.com.my
AndroPay Admin Center Getting Started
 USER MANUAL AndroPay Admin Center Getting Started Introduction: The Customer Administration Center, or Admin Center, is your central site for all things AndroPay. Through the Admin Center, you can upload
NZ Online Forms for Research Software Manual
 NZ Online Forms for Research Software Manual Version 1.5 Released May 2016 2 P a g e N Z O n l i n e F o r m s f o r R e s e a r c h 1 INTRODUCTION... 6 2 GETTING STARTED... 6 2.1 Creating an Account...
FUNCTIONAL ARCHITECTURE...
 Table of contents 1 INTRODUCTION... 3 1.1 Definitions... 3 2 FUNCTIONAL ARCHITECTURE... 3 3 CQF HOMEPAGE... 5 3.1 User Profiles Login enabling... 5 3.2 "Contact us" function... 6 3.3 "Login" function...
USER GUIDE. EBMS SECURE MailGate
 USER GUIDE EBMS SECURE EMAIL MailGate USER REGISTRATION When a secure email is sent to a new user, Secure Mailbox generates a notification and sends it to their email account. The notification contains
Welcome. to the. Contractor/Supplier. User Guide
 Welcome to the Contractor/Supplier User Guide SAFcomm Pty Ltd PO Box 1105 Eagle Farm QLD 4009 info@safcomm.com.au www.safcomm.com.au Page 2 NEW USERS - SOME QUICK TIPS... 3 NEW CONTRACTOR/SUPPLIER REGISTRATION...
Help for Suppliers. (UK Public Sector)
") Help for Suppliers (UK Public Sector) Version 12.3 Copyright BravoSolution 2011, All Rights Reserved HELP FOR SUPPLIERS... 1 (UK PUBLIC SECTOR)... 1 HELP FOR SUPPLIERS (UK PUBLIC SECTOR)... 8 DASHBOARD
Help for Suppliers (UK Public Sector) Version 12.3 Copyright BravoSolution 2011, All Rights Reserved HELP FOR SUPPLIERS... 1 (UK PUBLIC SECTOR)... 1 HELP FOR SUPPLIERS (UK PUBLIC SECTOR)... 8 DASHBOARD
pg. 1 Author Tutorial
 pg. 1 Author Tutorial Contents 1. Registration... 4 2. Signing In... 5 3. Search Bar... 6 4. Notifications... 6 5. Message Box... 6 6. Chat Box... 7 7. Logout... 7 8. The User Dashboard... 8 9. New Manuscript
PRISM - FHF The Fred Hollows Foundation
 PRISM - FHF The Fred Hollows Foundation MY WORKSPACE USER MANUAL Version 1.2 TABLE OF CONTENTS INTRODUCTION... 4 OVERVIEW... 4 THE FHF-PRISM LOGIN SCREEN... 6 LOGGING INTO THE FHF-PRISM... 6 RECOVERING
INAB CAB Portal User Guide
 INAB CAB Portal User Guide CRM 2 INAB Cab Portal User Guide CRM Documentation Issue 2 June 2018 Contents 1. Login...4 1.1. Set up Portal password... 5 1.2. Login... 6 1.3. Forgot my password... 7 1.4.
Introduction. Automatic gate opening no more swiping
 Introduction This user guide is intended for companies and drivers to use the functionality available in the TAMS System Manage your entire Auckland Airport access account via the internet! One simple
Federal Vendor Portal & e-invoicing User Guide. January 2018
 Federal Vendor Portal & e-invoicing User Guide January 2018 Federal Vendor Portal IMPORTANT NOTICE TO: Deloitte s Federal Practice Suppliers As part of our due diligence to pre-qualify suppliers for potential
Step by Step Supplier Guide
 Step by Step Supplier Guide to the CSW-JETS E-Tendering Supplier Portal 1 Page 1 of 16 Introduction This Step-By-Step Guide is provided to assist you in using the CSW-JETS supplier E- Tendering portal
Supplier User Guide for AL Oracle isupplier
 Supplier User Guide for AL Oracle isupplier Version Date March 2017 TABLE OF CONTENTS Table of Contents... 2 OVERVIEW - ISUPPLIER... 4 Help & Support... 4 Definitions... 4 SYSTEM LOGIN & NAVIGATION...
8 Registering for a Call
 8 Registering for a Call To formally participate in a Call, you must register for it. This step requires filling in your company details. If you wish to participate in a Call as an individual, you can
I. ATTORNEY ADMINISTRATION OVERVIEW...3. HELP CENTER...4 Documents Web Tutorials Online Seminar Technical Support INVITE A CLIENT TO MYCASEINFO...
 I. ATTORNEY ADMINISTRATION OVERVIEW...3 II. III. IV. HELP CENTER...4 Documents Web Tutorials Online Seminar Technical Support INVITE A CLIENT TO MYCASEINFO...7-8 CLIENT MANAGEMENT Sorting and Viewing Clients...8-9
PRUinvoice User Guide. Version 1.2 (November 2017) Finance
 Finance") PRUinvoice User Guide Version 1.2 (November 2017) Finance PRUinvoice User Guide Content Page Content Page Logging In 3 New Features Submit Invoice 4 Submit Proforma Invoice and Credit Note 6 Submit Invoice
PRUinvoice User Guide Version 1.2 (November 2017) Finance PRUinvoice User Guide Content Page Content Page Logging In 3 New Features Submit Invoice 4 Submit Proforma Invoice and Credit Note 6 Submit Invoice
Electronic Certificate Submission Process. Michael Guymon;Dharshun Sharma;Harsimran Mann;Christian Green;Diondre Montgomery
 SPACEX PROCESS DOCUMENT Title: Document No.: Procedure Owner: Department: Electronic Certificate Submission Process SPD-00035912 Debra Randel SUPPLY CHAIN MANAGEMENT DOCUMENT APPROVAL Approved Version:
CLIQ Web Manager. User Manual. The global leader in door opening solutions V 6.1
 CLIQ Web Manager User Manual V 6.1 The global leader in door opening solutions Program version: 6.1 Document number: ST-003478 Date published: 2016-03-31 Language: en-gb Table of contents 1 Overview...9
Apollo Online Assessment Environment
 Apollo Online Assessment Environment Guide for Registered Users Apollo is a trademark of PSI Services LLC. All rights reserved. talentteam@psionline.com +44 (0)1483 752 900 1 Contents 1. Introduction 3
DSS User Guide. End User Guide. - i -
 DSS User Guide End User Guide - i - DSS User Guide Table of Contents End User Guide... 1 Table of Contents... 2 Part 1: Getting Started... 1 How to Log in to the Web Portal... 1 How to Manage Account Settings...
End User Manual. December 2014 V1.0
 End User Manual December 2014 V1.0 Contents Getting Started... 4 How to Log into the Web Portal... 5 How to Manage Account Settings... 6 The Web Portal... 8 How to Upload Files in the Web Portal... 9 How
Oracle Sourcing Supplier Guide
 Oracle Sourcing Supplier Guide Table of Contents Sourcing Application Help and Support... 4 Requirements... 5 How to Use this Guide... 6 Module 1: Oracle Sourcing Basics... 7 Section 1-1 Login to Oracle
Online Record Book. Award Leader Web User Guide The Duke of Edinburgh s International Award Foundation. 02/04/2018 Version: 1.7
 Online Record Book Award Leader Web User Guide The Duke of Edinburgh s International Award Foundation 02/04/2018 Version: 1.7 2017 The Duke of Edinburgh s International Award Foundation Version control
ESDA-Operation Manual Version 1.0. E-platform for School Development & Accountability (ESDA) Operation Manual. Nov [Version 1.
 Operation Manual. Nov [Version 1.") E-platform for School Development & Accountability (ESDA) Operation Manual Nov 2005 [Version 1.0] Copyright 2005 Education and Manpower Bureau Page 1 Table of Contents About this Operation Manual... 6
E-platform for School Development & Accountability (ESDA) Operation Manual Nov 2005 [Version 1.0] Copyright 2005 Education and Manpower Bureau Page 1 Table of Contents About this Operation Manual... 6
Arrow Contract Management System. Electronic Tendering Guide
 Arrow Contract Management System Electronic Tendering Guide CONTENTS 1. RECEIVING & VIEWING A TENDER INVITATION... 3 2. LOGGING INTO PROCON... 4 3. OBTAINING TENDER DOCUMENTS... 5 4. HOW TO RESPOND ELECTRONICALLY
Improving procurement visibility and control. Guide to Using the Supplier Portal
 Improving procurement visibility and control Guide to Using the Supplier Portal 1 About the Supplier Portal The Supplier Portal you are using is provided solely for the purposes of the buying organisation
Travelife Online Reporting and Benchmarking System. Manual for Group Managers
 Travelife Online Reporting and Benchmarking System Manual for Group Managers Version 1.2 July 2013 Colophon This manual was published by Travelife for Tour operators and Travel agents, the sustainability
ACHieve Access 4.3 USER GUIDE
 ACHieve Access 4.3 USER GUIDE TABLE OF CONTENTS SECTION 1: OVERVIEW...3 Chapter 1: Introduction...3 How to Use This Manual...3 Overview of ACHieve Access Administrative Functions...3 System Access and
AgentWorks Administrator and Manager User Guide - Release 12.5
 AgentWorks Administrator and Manager User Guide - Release 12.5 March 21, 2013 2012 MoneyGram InternationalAll rights reserved. Table of Contents Registration Overview... 2 1. Initial Log In AgentWorks
HOW TO SUBMIT A TENDER/Quotation
 HOW TO SUBMIT A TENDER/Quotation 1 1. Tender Submission Process 1.1. Please visit www.procurement.petrosa.com, then click Login. 1.2. Please enter your login details - username (ZAH number), user code
USER GUIDE THE ELECTRONIC COMMUNICATION PLATFORM. Version 2.11
 USER GUIDE THE ELECTRONIC COMMUNICATION PLATFORM Version 2.11 March 2018 Table of Contents Overview of the Electronic Communication Platform (ECP)... 4 1.1. The ECP Homepage... 4 1.1.1 Global Header...
MTR E-Tendering System New System Requirements and Setup Guide (Effective on Cut-Off Date : 14 November 2016)
") (R3.16) MTR E-Tendering System (Effective on Cut-Off Date : 14 November 2016) IE 6 will not be supported effective on 14 November 2016 (Cut-Off-Date) System Requirement: The system will only support the
(R3.16) MTR E-Tendering System (Effective on Cut-Off Date : 14 November 2016) IE 6 will not be supported effective on 14 November 2016 (Cut-Off-Date) System Requirement: The system will only support the
User Guide Respond to Request for Information (RFI)
") OVERVIEW This User Guide describes how Suppliers participates in Request for Information (RFI) events related to Pre- Qualification, Category Related Qualifications, Sourcing Pre-Screenings or Communications
OVERVIEW This User Guide describes how Suppliers participates in Request for Information (RFI) events related to Pre- Qualification, Category Related Qualifications, Sourcing Pre-Screenings or Communications
People. Processes. Integrating Globally.
 People. Processes. Integrating Globally. Course: isupplier for Suppliers Table of Contents Table of Contents Course Introduction...4 L1: Vendor Registration... 6 Register for isupplier using SteelTrack
etendering PORTAL User Manual Product Version 7-0-4
 etendering PORTAL User Manual Product Version 7-0-4 Open Windows Software Pty Ltd ABN 22 605 191 375 635 Glenferrie Road, Hawthorn VIC 3122, Australia Phone: +61 3 9819 5088 Email: support@openwindows.com.au
EZ-Pay V2.1.0 User Guide HR21 Website: Table of Contents
 Table of Contents 1. Introduction and Overview...3 2. Setup...4 2.1 Initial Setup (For First Time Login Only)... 4 2.2 Company Setup... 6 2.3 Payroll Setup... 7 2.3.1 Payment Type Maintenance... 7 2.3.2
Instructions for Contractors: Bid Pre-Qualification
 Instructions for Contractors: Bid Pre-Qualification Quality Bidders is an online pre-qualification service for California school districts that allows contractors to submit applications to become a pre-qualified
Recruitment Guide for External Applicants
 Directorate General Human Resources, Budget and Organisation ECB-PUBLIC Recruitment Guide for External Applicants 19 June 2012 Page 1 Table of Contents 1. Getting Started with SAP e-recruiting 3 1.1 Searching
Recruitment Standard Operating Procedures Profile Management and Job Application for External Candidates
 Recruitment Standard Operating Procedures Profile Management and Job Application for External Candidates HRMD - PARTNERING WITH YOU TOWARDS EXCELLENCE Register African Union Login Access the Login screen
GETS Procurement Officer Guide. School Infrastructure. Education Infrastructure Service (EIS)
") Education Infrastructure Service (EIS) GETS Procurement Officer Guide School Infrastructure School Property Procurement GETS Procurement Officer Guide 2017-2 Page 1 of 19 Index Section Page 1. Glossary
Education Infrastructure Service (EIS) GETS Procurement Officer Guide School Infrastructure School Property Procurement GETS Procurement Officer Guide 2017-2 Page 1 of 19 Index Section Page 1. Glossary
Calendar & Buttons Dashboard Menu Features My Profile My Favorites Watch List Adding a New Request...
 remitview User Guide 1 TABLE OF CONTENTS INTRODUCTION... 3 Calendar & Buttons... 3 GETTING STARTED.... 5 Dashboard.... 7 Menu Features... 8 PROFILE.... 10 My Profile... 10 My Favorites... 12 Watch List...
RISKMAN QUICK REFERENCE GUIDE TO SYSTEM CONFIGURATION & TOOLS
 Introduction This reference guide is aimed at RiskMan Administrators who will be responsible for maintaining your RiskMan system configuration and also to use some of the System Tools that are available
isolve page launches with a Single-Sign-On, so you don't need to enter a separate password
 USER MANUAL Introduction Welcome to Celebrating You!!!! Celebrating You allows you to recognize your people in a simple way using Recognition portal. The user interfaces on the portal have been designed
RTO / TRAINER USER MANUAL
 Dear RTO / Trainer System User, Welcome to profile21 system, This user guide describes the basic functions of the profile21 software application. Login Helpdesk Email Go to the profiling website: www.profile21.com.au
awarding excellence Parnassus FAQs
 Parnassus FAQs This document is designed to help answer frequently asked questions and resolve problems that you might encounter when using Parnassus. Please note that some of the screen shots will not
(The mandatory fields are marked with an * asterix)
") Welcome, You have received a link so you can register on The Finning Supplier Portal. This link will take you straight to the first step of the pre-qualification questionnaire page. There are 4 steps in
Welcome, You have received a link so you can register on The Finning Supplier Portal. This link will take you straight to the first step of the pre-qualification questionnaire page. There are 4 steps in
VHIMS QUICK REFERENCE GUIDE TO SYSTEM CONFIGURATION & TOOLS
 Introduction VHIMS QUICK REFERENCE GUIDE TO SYSTEM CONFIGURATION & TOOLS This reference guide is aimed at VHIMS Administrators who will be responsible for maintaining your VHIMS system configuration and
Wisdom Master Pro (v2.0) User Guide for Students
 User Guide for Students") (v2.0) User Guide for Students e-campus Homepage 4 Log in to e-campus 6 Personal Area 6 I. My Courses... 6 II. My Portal... 12 III. My Profile... 16 IV. My Assignments... 18 V. My Tests... 19 VI. My Learning...
(v2.0) User Guide for Students e-campus Homepage 4 Log in to e-campus 6 Personal Area 6 I. My Courses... 6 II. My Portal... 12 III. My Profile... 16 IV. My Assignments... 18 V. My Tests... 19 VI. My Learning...
ebid exchange Users Guide
 ebid exchange Users Guide ebid Systems 911 Hildebrand Lane NE, Suite 201 Bainbridge Island, WA 98110 888-291-8430 support@ebidsystems.com www.ebidsystems.com Table of Contents Vendors Page Overview 4 Login/Password
SRM Training Manual Supplier
 SRM Training Manual Supplier Create Date: 10/10/2016 REVIEW: 005 Last Modify Date: 11/09/2016 AM/NS Calvert SRM TECHNICAL SUPPORT EMAIL: AMNS_SupplierTechSupport@ArcelorMittal.com PHONE: 866-377-7754 Summary
WEM ECC Contracts - User guide
 WEM ECC Contracts - User guide Introduction... 3 ECC Project Managers / Contractors Guide... 7 Contract Data Explained... 7 Pain / Gain... 8 Updating project incentivised cost forecasts... 11 Access to
Manual for User PTTEP EXTRADRIVE
 Manual for User PTTEP EXTRADRIVE Provided For: PTT Exploration and Production Public Company Limited Prepared by PTT ICT Solutions Company Limited. PREPARED BY: REVIEWED BY: Team Leader: Jakkarin Sangsuk
JITs Portal. User Manual
 JITs Portal User Manual November 2017 JITs Portal 1 Table of Contents Chapter 1 Introduction... 2 1.1 What is the JITs Portal?...3 1.2 User Guide structure...4 Chapter 2 Working with the JITs Portal...
Vendor Registration and Training
 Vendor Registration and Training Bid Express Registration Guide Bid Express Vendor Guide February 2015 Prepared By Address: 5700 SW 34th Street, Suite 1235, Gainesville, Florida 32608-5371 Web: www.infotechfl.com
WELCOME TO IRECRUIT. Contents: Step 1: How to Register.3. Step 2: Search for Jobs Step 3: Apply for a Job..23
 WELCOME TO IRECRUIT irecruit is our online job search and application system. Use irecruit to search and apply for advertised UTS jobs. You can also use irecruit to set up job alerts tailored to your job
Individual (Submit by appointment) User Guide for QA i-portal
 User Guide for QA i-portal") Individual (Submit by appointment) User Guide for QA i-portal Version 1.0 Examples shown in this User Guide are for demonstration purpose only. They might not reflect the actual information published on
Individual (Submit by appointment) User Guide for QA i-portal Version 1.0 Examples shown in this User Guide are for demonstration purpose only. They might not reflect the actual information published on
Light Account Process Step by step Guide
 Light Account Process Step by step Guide DISCLAIMER: This training material is created by UTC Climate, Controls & Security to help its suppliers register for Light Accounts and navigate the dashboard.
Azzule Premium Supply Chain Program Quick Reference Guide
 New to the Azzule Premium SCP? Here are a few quick tips to get you started. Customers Manage your customer list, review data permissions granted, send data, and view summary of data that has been transferred
Online CDC service. HowTo guide for certifying organisations
 Online CDC service HowTo guide for certifying organisations Disclaimer While every reasonable effort has been made to ensure that this document is correct at the time of printing, the State of NSW, its
e-lms Electronic Lodgement of Mailing Statements User Guide Version 4.5
 e-lms Electronic Lodgement of Mailing Statements User Guide Version 4.5 Copyright Statement Copyright the Australian Postal Corporation 2016. All rights reserved. No part of this document may be reproduced,
UNOPS esourcing vendor guide. A guide for vendors to register on UNGM, and submit responses to UNOPS tenders in the UNOPS esourcing system
 A guide for vendors to register on UNGM, and submit responses to UNOPS tenders in the UNOPS esourcing system Version: 1.4 By: UNOPS Procurement Group Date: 1 November 2017 TABLE OF CONTENTS 1. Purpose
Printable Documentation
 Printable Documentation The complete text of the Online Help Updated April 10, 2007 Table Of Contents Administrative... 1 Add a picture to your Agent Profile... 1 Add a bio to your agent profile... 1 Add
PCS-Tender. Supplier Response Guide
 PCS-Tender Supplier Response Guide Version 3.2 October 2016 Page 1 Contents Creating a Response to a Tender... 3 The Settings Area... 3 Saving a Response... 5 Qualification Envelope Example... 5 Technical
Date Author Version Change Reference Abd Elrahman Gamal V1.0 No Ref. Copy No. Name Position
 1 Document Control Change Record Date Author Version Change Reference 23 10-2016 Abd Elrahman Gamal V1.0 No Ref. Reviewers Shadi Diab Kamran Shaikh Name Position Manager, Supply Chain Management Applications
Comodo Antispam Gateway Software Version 2.11
 Comodo Antispam Gateway Software Version 2.11 User Guide Guide Version 2.11.041917 Comodo Security Solutions 1255 Broad Street Clifton, NJ, 07013 Table of Contents 1 Introduction to Comodo Antispam Gateway...3
Staffordshire County Council esourcing Portal User Guide
 Staffordshire County Council esourcing Portal User Guide Version 1.11 (6 th February 2018) These instructions have been produced to assist suppliers using the electronic sourcing platform. The County Council
ONLINE TRADE SERVICES USER GUIDE
 ONLINE TRADE SERVICES USER GUIDE Contents 1 Welcome 4 2 Using Online Trade Services for the first time 5 3 System Features (Service Administrator) 11 3.1 Overview 11 3.2 Change profile 11 3.3 Jurisdiction
The Social Value Portal
 The Social Value Portal User Guidance v4.0 Summary Register at http://socialvalueportal.com/supplier-registration/ You will receive a username, and be prompted to setup a password. Login at http://socialvalueportal.com/svp-login/
CME Request Center NR/Cert User Manual. 07 Mar 2018
 User Manual 07 Mar 2018 Disclaimer Neither futures trading nor swaps trading are suitable for all investors, and each involves the risk of loss. Swaps trading should only be undertaken by investors who
User Guide Regions Association Image Lockbox Online
 User Guide Regions Association Image Lockbox Online 2012 Regions Bank. Regions Lockbox Services subject to product terms and conditions. Rev. 111312 Association Image Lockbox User Guide Association Image
Welcome to Client Access Web!
 Welcome to Client Access Web! Introduction W elcome to the Express Collections Client Access Portal. This portal has been crafted so that you, our valued client, can have convenient and secure access to