MovieRecorder 4 & MovieRecorder Express 4
|
|
|
- Jordan George
- 5 years ago
- Views:
Transcription


1 MovieRecorder 4 & MovieRecorder Express 4 User Manual Version February

2 MovieRecorder 4 is a very intuitive program with a lot of features and functions. What follows is a brief explanation of how to use the application, beginning with installation instructions, followed by a description of the User Interface and then with instructions on how to get the most from the application. In addition to this user manual, you can also find a lot of information: on our website: at the bottom of the MovieRecorder page, you will find: - to download the latest version of MovieRecorder - Resources: where you most probably found this manual, but also with some Sample AppleScripts and other White Papers - Tech Specs: where you will find recommendations on what you need, what drivers to use, what video cards and codecs are compatible, etc. in our Release notes. on our support desk, there a lot of information is available in the help center. on our YouTube channel, and don t forget to follow us on Twitter and Facebook for the latest Softron news. What s new in MovieRecorder 4? MovieRecorder 4 brings a lot of new features, among which: Fully configurable user interface NDI sources External audio sources Effects and overlays HEVC (H.265) support Save and restore configurations "Express" version Improved Viewers Layout With MovieRecorder 3, all the Viewers had exactly the same size, and the layout could not be customized. In MovieRecorder 4, the user interface is fully configurable. For each number of Viewers, we provide different types of layouts with some bigger and smaller viewers: - 2 -
 can either be turned off completely, turned on, or only visible when you hover your mouse")

3 We provide already quite a few layouts, but these can be customized if you want to. Just send us an to receive the instructions on how to do your custom layout if that s what you want to do. Additionally, you can: Customize Overlays (what is displayed on top of the Viewers such as TC, sources, etc ) can either be turned off completely, turned on, or only visible when you hover your mouse on top of the viewer. You can switch the position of 2 Sources in Viewers with a simple drag and drop. You can temporarily view one Viewer in "Full Screen". For that, click on the "Full Screen" icon at the bottom right of a Viewer. Improved Configuration and recording controls Enable Sources: It is even easier to enable multiple sources at once, or assign them to some Viewers. Just select all the sources in the sources list, and just drag and drop it on the first viewer you want a source to be assigned to. That s it, all sources will be assigned to the next Viewers. Enable/disable Destinations: You can also enable/disable/solo a destination on all sources at once. For that, right click on any destination in the destination list in the left pane, and select the menu you want. This is very useful if you often change the destination you use. Gang Controls: With MovieRecorder 3, you had to "select" all sources you wanted to control with the gang controls. But sometimes users had issues with some sources that they did not notice were not selected. Now in the viewers layout selection menu, you can opt for a different behavior such as to gang controls all sources that are visible in the current viewer layout, even if they are not "selected". Or to do gang controls on all sources, even if not in the viewers, and not selected. NDI sources (This feature is only available in MovieRecorder, not in MovieRecorder Express) - 3 -


4 As we support NDI output in our playback applications, it is only logical that we have now added the ability to record any NDI sources on your network. Also compatible with NDI HX if drivers are installed. External audio sources (This feature is only available in MovieRecorder, not in MovieRecorder Express) The ability to use external audio sources (including MADI and Dante) instead of SDI embedded audio will help those who want to record the audio coming from an audio mixer without the need of expensive SDI embedders. MovieRecorder 4 supports all the audio sources that are available to the macos. Coupled with the Audio Mapping available in the AVPresets, this brings a lot of flexibility to your Audio configuration. Effects and overlays (This feature is only available in MovieRecorder, not in MovieRecorder Express) You can now crop, deinterlace, rotate, and resize your video before it is encoded. We've had multiple requests for the ability to rotate the signal 90 for display on LCD monitors placed sideways, or to crop portions of the image. You'll also love the ability to overlay text, the current timecode, or even an image to your recording. As it's a "per destination" setting, you can have one signal recorded with overlays, and another as a clean recording. The multiple destinations available with MovieRecorder will be even more handy with this new feature! - 4 -

5 HEVC (H.265) support With the advent of 4K, an even more efficient codec than H.264 was needed. This is why HEVC/H265 has been created. Files can be compressed to 40% of the size of an H.264 compression without losing quality. But that encoding efficiency required a lot of horsepower, and even the highest end Mac Pro was not able to encode to HEVC in real time. And for MovieRecorder, as we encode live, we need real time! With macos 10.13, Apple has added the ability to use the HEVC hardware acceleration available on some computers (those running the 6th Generation Intel Core and over), allowing us to fully take advantage of the codec. Save and restore configurations (This feature is only available in MovieRecorder, not in MovieRecorder Express) You can now save a given MovieRecorder configuration: Sources (which one are enabled and their name and configuration), Destinations (name and configuration), AVPresets (the user preset ones), Viewers Layout (how each source are assigned to each viewer, which destinations are enabled, etc ), Scheduled recordings (name and configuration) VTR batch lists (name and configuration). And then later on you can restore that configuration (and choose what you want to restore, you can restore just the destinations for example). This will make your workflow much smoother if you have different shows, all using the same MovieRecorder but that need to record to different destinations, or codecs. The feature can also be used if you want to keep a backup of a configuration before running tests on a new show, with new setups, etc.. You can even double-click on a saved configuration so MovieRecorder will start with that specific configuration
6 All codecs now included in the "standard license" In MovieRecorder 3, some codecs and wrappers required to purchase the Pro Codecs option. We now include in the standard license (or MovieRecorder 4, not in MovieRecorder Express), all codecs and wrappers. There is no option to be purchased anymore. If you did purchase the pro codecs for MovieRecorder 3, your upgrade to MovieRecorder will be even more affordable. Note that all our licenses are backwards compatible but a MovieRecorder 4 license will not include the "Pro codecs" option, so you won t be able to use it in MovieRecorder 3 and have the "Pro codecs" option enabled. Unless you did an upgrade from MovieRecorder 3 with the Pro codecs option to MovieRecorder 4. In that case you keep the Pro Codecs option. WARNING: As there has been a lot of changes in the codecs, we could not keep your user AVPresets, and you will have to do them again. Improved performances for some codecs Some codecs have much better performances in encoding. For example XDCAM encoding has been improved. More changes And there s a lot more, sometimes smaller changes and improvements that we have done but that don t make up to a feature list, but that we feel can help you: We have now improved the behavior when a Volume mounts or unmounts. You will see a warning sing next to your destination if the Volume is not present. That way you can react much quicker if there is any kind of issue. We also add a warning if the selected volume is more than 90% full as there can be performance issues. If a specific AVPreset is missing, or incompatible with the destination, instead of reverting back to the default AVPreset, we indicate that it is missing. Added a "single view" for the web page remote control. So it is easier to control on iphones for example. Added a "Reel" number in the Metadata popover. This reel number can be used in the custom naming feature. This allows you to better control the file numbering for example. This reel number will also be added in the TC track of the movie file. Added the "AVPreset" as a token in the custom naming feature. So you can automatically name your files with the name of the AVPreset used in the destination. Added keyboard shortcuts for the gang record controls. Added a "slave mode" so a second MovieRecorder can be slaved to the main one for redundancy. And even more smaller fine tuning And we continue to work on some exciting new features that will be added to MovieRecorder 4 for free, so stay tuned. "Express" version As we know some customers won t need some of the more advanced features of MovieRecorder 4, users can now choose for MovieRecorder Express. See below for the differences between the 2 versions
7 - 7 -
8 Main differences between MovieRecorder Express and MovieRecorder Important Note: In this document, to keep things simple, we will mainly use the word "MovieRecorder". We will just indicate which features are only for MovieRecorder, so if you are using MovieRecorder Express you can skip these parts. We offer two versions of our ingest application. MovieRecorder Express is the "entry-level" ingest solution from Softron, while MovieRecorder offers more advanced features. You can compare the 2 versions in the feature list of the MovieRecorder page on our website. But here are a few explanations on the main differences: Multiple Destinations: Record to multiple destinations at once so you can, for example, record to 2 different storage devices for redundancy, and/or record to 2 different codecs. Supported Codecs: In addition to ProRes and H.264, MovieRecorder can also record to AVC-Intra, DV/DVCPRO, DNxHD, IMX, JPEG2000, XDCAM, XAVC Supported Wrappers: MovieRecorder can record to MXF (either to OpAtom for MXF DNxHD or Op1a for all other supported codecs), as well as QT. Closed Captioning: If a valid CC signal is detected on the input, a CC icon will be displayed. Record CEA-608 or CEA-708 Closed captioning tracks. Metadata: Add metadata to the recorded file, either as a side car file or embedded in the movie (the embedded option is available only in QuickTime). External audio sources: Instead of using the audio input of the video device (AJA, Blackmagic-Design, Deltacast), use external audio, such as the built-in audio input of the Mac, or Dante audio, etc. Effects and Overlays: In AVPresets, you can choose to rotate, crop, scale, overlay TC, Text, and/or a graphic (such as your logo). Save and restore configurations VTR Control and batch capture: Control a VTR with an RS422 port, create batch lists, and capture them. Ideal if you have a lot of tapes to capture. Remote Source "Slave" mode: You can set a remote source to do exactly the same thing as the source you are controlling. This is a great solution for redundancy, so you can have multiple computers start and stop recording at the same time. Before Installation If you use a video device from AJA, Blackmagic Design or Deltacast, make sure the device is physically connected. Double check that all cables and hardware are installed correctly. Also check that you have the appropriate version of the driver and OS: 1. On the Softron website, check which driver and OS is recommended for the card you use. 2. Download the appropriate driver from the AJA, Blackmagic-Design or Deltacast website. 3. Make sure you use a compatible version of Mac OS - 8 -
9 Once the drivers are installed, verify the settings of your card using the Preference pane or control application (if applicable) included with the hardware. For example, with a Blackmagic-Design card, you may want to change whether the input is through the SDI or the HDMI connector. Software Installation 1. Download the software from our website. 2. Unzip the downloaded file. 3. Drag and drop the MovieRecorder (or MovieRecorder Express) Application into your Applications folder. First Start 1. Double click on the MovieRecorder icon or select the icon in the Applications folder and use your File > Open command to launch the application. 2. When prompted with the message that MovieRecorder.app is an application downloaded from the Internet. Are you sure you want to open it? Click on Open. 3. A license agreement window will open. Enter your name and address for the registration. Tick the check-box and click on Accept. 4. Enter an admin password to install the required components. 5. If you have a dongle connected to the computer with valid licenses for MovieRecorder, the application will start right away. 6. If you do not have a dongle connected, a license window will open to offer you three choices: Register: if you own a serial number, click on this button and follow the procedure to activate it. You can read more about the activation procedures on our support desk. Buy: if you don t have a serial number, but want to buy one, click on that button. Demo: if you want to try the application in DEMO mode, click here. In DEMO mode, MovieRecorder is fully functional. The only limitation is that a blue frame will be written to the file every few seconds. Note that the license window will only open the first time you start the application. If you want to add a license, or upgrade later on, you can access the license window in the Menu MovieRecorder 4 > License 7. That s it you are ready to use MovieRecorder 4! - 9 -
 the Destinations 2.")
10 1. Overview of the User Interface There are 2 windows in MovieRecorder: The "Main" window where you can setup and control MovieRecorder The "Activity & Logs" Window 1.1. The main window In the main window of MovieRecorder, three are three areas: 1. The left panel with the list and configuration of: the Sources (Local and Remote) the Destinations 2. The center area with the multiple "Viewers" where you can preview and control the different Sources 3. The right panel where you can: Create and edit Scheduled Recordings Control VTRs and create batch lists (not available in MovieRecorder Express)

11 1.2. The Activity and Logs window In the Activity and Logs window there are two areas: 1. At the top is the "Activity" area where there are many different gauges that offers a quick view of how the different computers, sources and destinations perform. If you see some gauges filling up and getting red, it is usually not a good thing. For an explanation of what each gauge means, you can hover your mouse on any of them and a Tooltip should appear with a brief explanation. We also have an article in our Help Center that explains more about this. 2. Below is the "Logs" area where you may see important warnings. If anything issues arise during the recording, you will see some messages or warnings there. Note that you can filter what is seen by using the search field at the top right of the area. There are also a few options at the bottom of this window: Show on Error: when enabled, the log window will automatically open when there is a log shown in the lower area. Leave it enabled if you want to be warned about possible issues. Disable it if you don t want to be disturbed. Now: the log area will always show you the latest log. Reset Warnings: Clears the logs, as well as all attention signs that were shown on sources or destinations (unless they are permanent warnings such as a Volume not mounted for a destination) Search: Allows you to search for a specific logs in the logs shown
12 2. Enable and Set Up Sources The Sources tab is where you will select the sources (or inputs) from which you will be recording. There are three kinds: Local Sources, NDI Sources and Remote Sources Local Sources Local Sources are video devices that are connected directly to your Mac. You can connect most AJA or Blackmagic-Design devices, as well as our M Family devices (M 80, M 62, M 44, as well as the X (3G) versions of those devices). Depending on the type of device that you connect, you will be able to see more or less Sources. Some devices can have multiple inputs, while others have just one. Check our website for the list of compatible video devices Enable Sources Any sources connected to your system will automatically show up in the Local Sources section, provided their driver is installed (and up-to-date). The sources will be given a default name, based on the device name and the number of the input, but you can always rename them either: in the Sources list directly (click on the name and leave the mouse for a few seconds) in the setup window, accessed by clicking on the gear icon, in the "Source Name" field. Note that sources are sorted using the "Source Name, but you can also sort them using the default device name. To change the sort method, right click on the Sources list and select either "Sort by name" or "Sort by device. If the device does not show up, check that: The device is properly plugged in. The drivers for your device are properly installed. You can download drivers from the manufacturer s website. Here are the links to AJA, Blackmagic-Design and Deltacast. Make sure that the appropriate version of the drivers are installed (if not, you should see a warning in the Logs area of the "Activity and Logs" window). Some devices (AJA and M Family) will only show up if they are connected when the application starts. If you connect the device after MovieRecorder started, it will not show up. Quit and restart MovieRecorder to see them
 To set up a source, either: Click on the \"gear\" icon Double-click on the Source cell Right-click on the source cell and select \"Edit Settings\" This will open a")

13 To use a source, just enable the appropriate box in front of the Source s name: Setting up Local Sources (all) To set up a source, either: Click on the "gear" icon Double-click on the Source cell Right-click on the source cell and select "Edit Settings" This will open a popover window wherein you can change a number of settings, including the Source Name, as well as the Video, Audio and Timecode Settings. Depending on the type of device that you use, the layout and options might differ slightly. For all devices you will be able to configure the following settings. If a source refuses to enable and show a warning icon, click on the warning icon. This will show the Activity and Logs" window. Check the logs area for a possible explanation. The most common reasons for that are: The device is already in use by another application The device is not properly configured You do not have enough licenses (you need one license per source/channel)
14 Video Settings Input Format: Automatically detect the input format: This is very useful if you are changing a lot across different types of video formats. If the above option is disabled, you will have to manually select the incoming video format in the popup menu below. Force 16:9 Aspect Ratio (SD only): If you are capturing form SD sources, you will be able to set wether your source is 16:9 or not. Pixel Format: choose between YUV 8 or 10 bits The available input video and pixel formats depend on the type of video device used. If you don t see a video or pixel format in the popup menus, it means that your video device does not support it. Check with the device manufacturer. If you don t change the video format often, we would recommend to disable the auto detect feature. Indeed, some video device can be sensitive and sometimes report a format change when there was not, or when there are instability in the signal, it can also have some weird behaviors Audio Settings First you will be able to select the Audio Source. Either: Video Device Audio: when you want to record the audio that gets in the video device that you use. Depending on the type of device you use, it will either be the audio embedded in the SDI, or analog audio if your device supports that. External Audio Sources: when you want to record the audio coming from a different source than the video device. (not available in MovieRecorder Express) MovieRecorder (not MovieRecorder Express) can use any audio sources that are visible to the macos as an external audio source. It can be a built-in audio input on your Mac, or a USB audio device that you have connected to your Mac, and it can even be supported IP audio protocols such as Dante, which is very useful in todays s workflows. Basically if you see an audio input in the System Preferences > Sound > Inputs pane, you should be able to use it in MovieRecorder
.")
15 To see the available audio sources, click on the popup menu "Sources" in the Audio Settings of the sources settings popover. You may also select your preferred Sample Size (the available sample sizes presented depend on the type of device used). If necessary you may set a "Delay Offset" if there is a disparity between the audio and video signals. The delay is in frames, and will delay the audio for the amount of frames set there. This is even more useful if you use an external audio source as the Video and Audio pipelines will be different and usually audio will arrive quicker than video, and thus you will need to add a delay. Note that you cannot map audio in the sources settings. If you need to "map" the audio, this is done in the AVPresets preferences, using custom presets. The reason it is done in AVPresets (and thus relative to destinations) is so you may have different audio mapping for different destinations (for example, for users with multiple languages) Timecode Settings For each source, you can choose between Video card timecode (when it is the video device that provides the TC) and Application timecode (when the video device does not provide the TC and it is retrieved by an external device such as an audio input for Audio LTC)
.")

 have a timecode input.")

16 Video card timecode The video card timecode uses the timecode that is provided by the video device (there is no need then to setup anything in the MovieRecorder preferences). The type of Timecode available on the device will depend on the type of device used. Typically there may be a few timecode sources available on the device: Embedded Timecode. Is the timecode that is embedded in the SDI signal, either in RP188, LTC, VITC Audio LTC Timecode. Some devices (check on the manufacturers website) have a timecode input. Usually it is either an XLR or BNC connector that will receive an Audio LTC timecode signal. If you want the video card to read the timecode from that connector, you have to open either "AJA Control Panel" or "Blackmagic Desktop Video Setup" applications to set it up: Application timecode The Application Timecode uses the timecode that is set in the preferences of MovieRecorder. To change the application timecode source, go in the preferences of MovieRecorder and select the "Timecode" pane:


17 In the first dropdown menu, you can choose from 3 timecode sources for the application timecode: Audio LTC: select the audio input on which the Audio LTC is received. You will be able to use the same audio inputs that are available for your system audio, as well as all the sources that are set to use "Videocard Timecode" (to use the timecode of a given source for all sources at the same time, see Timecode "Sharing" below for more info on this) Mac Clock: will simply use the time of day of your Mac to generate a timecode Timecode Systems: is a company that provide timecode generators that can broadcast timecode over WiFi or Ethernet. You can read more about this the following help center article. When using a video device with an Audio LTC timecode input, always select "Videocard timecode" to use the timecode input. A common mistake is to select "Application timecode" and then in the MovieRecorder preference to select "Audio LTC" and then select the video card. This won t work Timecode "Sharing" In MovieRecorder 4 it is possible to share the Timecode of a source with other sources. So, for example, if you use an M 80, you can have only one SDI input with embedded TC and share it with all the other 8 sources. Or with an AJA Io 4K to share the RS422 timecode input with the other inputs. This reduces the requirement to have a TC embedded for each signal. This is a 2 step process: Make sure that at least one source uses "Video Card Timecode" (and not Application Timecode): Then go to the MovieRecorder preferences, and you should now see the source as a possible Application Timecode Source

18 Specifics of "Blackmagic-Design" Sources With Blackmagic-Design, the popup to set up the sources should look something like this: If you need to change other settings than the ones shown there, use the "Blackmagic Desktop Video Setup" application. For example, you might: select which input you want to use (if for example your device has a SDI and HDMI input), enable downscaling on one of the inputs, set if you want to use p or psf, set if you want to use the available timecode input, set the "Connector Mapping" on certain devices

19 Specifics of "AJA" Sources With AJA there are a few more settings to configure in MovieRecorder: Indeed, the AJA Control Panel application is not really intended for addressing independently the multiple channels of some AJA devices, such as the 4 channels of an AJA io 4K or a Corvid 88. In AJA Control Panel, you will only set the following things: the source of the reference signal the timecode source. All the other settings will be done directly in MovieRecorder, so do not worry about setting the frame buffer format, etc In addition to the "regular" settings regarding the video format, etc, for AJA devices you will be able to set: HDMI: Some AJA device have an HDMI output, but, for example, the Io 4K has just one HDMI input, but 4 sources available. This sets which input you should use for the HDMI input instead of the SDI input. Up/Down Conversion: Sets the up or down conversion that will be done. Note that if your device has a Ufc and 4K firmware (as does the Io 4K), up and downscaling may only be available when the card is loaded with the "Ufc firmware, and thus have only 2 inputs. Acquire card: if enabled, only MovieRecorder will be able to use the device, so you won t be able to use it with OnTheAir Video, for example. It is recommended to leave this on so other applications will not interfere
20 There are other things to know about using MovieRecorder 4 with AJA devices, and we recommend reading the following article: Recommendations-on-using-AJA-devices-with-MovieRecorder-and-our-ingestapplications Specifics of "Deltacast" Sources (M 80, M 62, M 40) If you are using an M 80, M 62 or M 40 (or their 3G X equivalents, such as the M 80X), then all the setup happens in MovieRecorder, and there is nothing to be configured elsewhere


21 2.2. NDI Sources Setting up NDI Sources MovieRecorder is compatible with NewTek s Network Device Interface, or NDI, allowing you to access sources connected over IP, via an Ethernet cable. To add an NDI Source, first click on the + icon to the right of the NDI Sources section on the Sources panel. Doing so pops up a window listing all NDI Sources available on the network. Enable whichever ones you d like to be able to use, and it will then show in the sources list and you can then enable the sources the same way you enable a Local Source. Note that NDI sources can take a few seconds to receive the signal. If you click on the gear icon to adjust some of the settings, note that you may only change the Source Name, but not the Video Mode, the Pixel Format, and the number of Audio Channels as these depend on what we receive from the NDI source

22 2.3. Remote Controlled Sources You may also access sources that are not directly connected to your Mac. For example, you can control multiple MovieRecorder 4 applications remotely. We have customers who have up to 49 inputs in their facility, and they can all control them from just one computer and one screen. You can use a demo version of MovieRecorder to control another MovieRecorder, as you only need to pay the license for an actual source Setup the MovieRecorder you want to control Before doing anything, first check on the computer that you want to control that the "Remote Control" option is enabled. You may also want to check: Name: the name under which you will see it in the MovieRecorder that will control it. The default name is the Mac Bonjour Name, but you can change it to whatever you like, provided it is unique. If you named two or more MovieRecorders the same way, there will be a conflict, and you won t know which one you control. Port Number: the default is 8080, but if that port is not available in your network because the Firewall blocks it, you can change that value Single Viewer HTTP UI: when you want to use the built-in web page of MovieRecorder and only have one source to control. The webpage will have just one Viewer instead of multiple ones. Password: sets whether the password is required or not. Enabled, only the individuals with the password can control MovieRecorder.!!! You may need to quit and restart MovieRecorder after you change any of those settings
, and simply click on the + icon at on the bottom left of the Remote Sources panel. A pop-up window will appear.")
23 Adding Remote Controlled Sources with "Bonjour" Now that your MovieRecorder on "Computer A" is ready to be controlled, open MovieRecorder on "Computer B" (as a reminder, it can be a demo version), and simply click on the + icon at on the bottom left of the Remote Sources panel. A pop-up window will appear. If "Computer B" is located in the same local area network as "Computer A, you will see it listed with the name you have specified in its preferences. Double-click on the name of the Computer you want to control, it will then be added to the list: Then if you click on the Disclosure" icon, it will show the list of sources available remotely:

24 You can then use the remote sources the same way you use local sources (with some limitations; see below). You can either drag and drop a source name to a Viewer or select it in the Viewers Source selection menu: Adding Remote Sources with a manual IP address If your Mac does not show up in the list, it may be that you are not in the same subnet, and you will have to add the remote computer using its IP address. To do so, click on the Add by Address button. Another window will pop up; enter the IP Address there
25 Working with password protected remote sources If on Computer A you have required a password to be able to connect to it, there will be an additional window that will popup when you connect: Enter the password that you have specified and set if you want to save it in the keychain. If you save it, the next time you start MovieRecorder, you won t have to enter the password anymore to control it but only store the password on a trusted computer. When a remote source is unlocked, the little lock next to the computer name will show as unlocked, and its sources will be listed below Lock/Unlock a remote source If you want to lock a computer to prevent other users from controlling it, just click on the lock. If its sources were used in any of the Viewers, they will not show up anymore. To unlock it just click on the same lock icon. If the password was saved in the keychain you won t be asked to enter it; if not, you will have to enter the password again to unlock it. When a remote source is greyed out, it means that the computer cannot be reached. Check your internet connection, and that MovieRecorder is running on the remote computer, and that "Remote Control" is enabled in the preferences

 and select Enable Slave Mode.")
26 Slave Mode (Slave mode is not available in MovieRecorder Express) For redundancy, MovieRecorder 4 offers a "Slave Mode", so that you can have another MovieRecorder record at the same time. Ingest will then happen through two separate Macs. Below we will talk about Master and Slave Macs. The Slave Mac is the one that will follow all that the Master Mac is doing. To set this up: Setup a Source on the "Master" and "Slave" Mac MovieRecorders to bear the same name. It may be necessary to change their names. Make sure that the names are strictly identical. On the "Master" Mac add the "Slave" Mac as a "Remote Controller" source. Then in the list, right click on the Slave Mac (not on the sources themselves) and select Enable Slave Mode. Once enabled, you will now see an S next to the computer name. Once this is setup, when you record from the "Master" MovieRecorder, if (for example) you start recording on a Source named "Source 1, and if the "Slave" MovieRecorder also has a source named "Source 1", that source will start recording as well. Same thing if you stop recording, etc Note that: we cannot guarantee frame accuracy the start and stop of the recordings may be a few frames off between the 2 computers Only basic controls are slaved. We haven t yet implemented more advanced controls such as metadata, etc If you have such a request don t hesitate to let us know and we ll see what we can do

27 3. Set Up Destinations The Destinations tab opens a panel wherein you can create and setup destinations. By default there is one destination created. If the panel is not visible, you can reveal it by clicking on the small icon in the upper right corner Destinations defined A destination is: a location where you will record the file a video codec and other settings that you ll discover below Creating a Destination To create a new destination, click on the + icon on the bottom left of the panel. In MovieRecorder, a window will pop up, offering you the choice to record using a QuickTime or MXF container

28 In MovieRecorder Express, you will not be able to choose between QuickTime and MXF; a QuickTime destination will be immediately created. As well, in MovieRecorder Express you may not select multiple playout destinations at one time for a recording. By default, destinations chosen in QuickTime will be displayed as QuickTime Destination while those in MXF will be displayed as MXF Destination. You can rename them directly in the list (as well as in the Destination settings popover window). Just click on the name and leave the mouse there. Note that destination names must be unique (just as is the case with Source names). You can also duplicate destinations in two ways: Right-click on a destination and select "Duplicate" Drag and drop it while holding the "alt" key down 3.3. Setting Up a QuickTime Destination You may modify the Destinations by clicking on the gear symbol or by double-clicking on the appropriate destination. In addition to changing the Destination Name, you may change: Location: set where you would like to save the recording. Naming & Metadata: set how MovieRecorder will automatically name your files and add metadata to it. (Metadata is not available in MovieRecorder Express) Edit-while Ingest: set the type of QuickTime Movies created (None, Segmented or Classic). A/V Presets: Select a recommended or custom A/V Preset. Auto Split: Set if you want MovieRecorder to automatically split the recordings into multiple files. These settings are detailed more thoroughly in the following pages
29 Location This is where you select where you want to record the video file. You can also set whether or not you want to "Erase Existing File(s). When this option is disabled, and a file already exists in the folder you are recording to, MovieRecorder will append a number to the file to avoid deleting it. You can set the format and location of that counter in the custom "Naming" tokens. If the option is enabled, MovieRecorder will delete the file that has the same name. You can record to almost any kind of storage. As long as the Volume mounts on the Mac and you have enough bandwidth to record the number of channels, you should be good. As usual we recommend testing with a free demo version of the application available on our website. You can measure the read and write speed of storage solutions using software such as Blackmagic Disk Speed Test or AJA System Test, but remember that these applications measure the speed at a specific time. You may want to let the test run for a few days, as there are some things that can temporarily impact the performances of a storage, such as: Some use SSD caches. So if you write small amount of data, the speed will be huge, but if you write a lot of data for a long period of time, these caches will fill up, and you will write directly on the slower parts of the storage. They can have some temporary maintenance operations, usually happening in the middle of the night. Copying or duplicating files at the same time will impact performances, so test a "real life" scenario, with people working on the storage as usual. If you are using a NAS, make sure that the whole infrastructure is properly cabled, etc A wrong router or bad cable can ruin a whole network. About error handlings on storage: If the folder you have selected does not exist when you start recording, MovieRecorder will create it if it has write permissions to (new in MovieRecorder 4) If the Volume is getting full or is not mounted we will show a warning icon next to the destination

30 Naming In the Naming and Metadata section, there are 2 parts. Let s talk about the Naming" function first. You may set up MovieRecorder to automatically name your files by clicking on the gear icon to the right of the Name section. A pop-up window will show with the heading Name Format. There will be an empty panel, beneath which are a number of Tokens that you can use to name your files. Simply drag the tokens you would like to use to name your file into the Name Format panel, in whatever order you would like the file name to be displayed. For example, if you would like to name your file by the date it is recorded, you would drag the Year, Month, and Day Tokens into the panel (plus the Hour, Minute, and Second if you would like to narrow down the parameters even further). You can also type any characters in the Name Format area, and these will be added to the file name

.")
31 "Recording Name" token The "Recording Name" token is the name that you set in the Viewer window: If you don t set any "naming format, then your file name will be the one displayed in the Viewer. However, if you set a naming format by using tokens, but do not include the "Recording Name token, the recording name in the viewer won t appear in your file name "Formatting" token Some tokens can be formatted in different ways. These are the ones that have a little arrow on them (Year, Month, Day, Counter). To change the format, click on the arrow and select the format. For example, you can choose the Month to be set as April," or 04," etc Automatically create subfolders A very useful and unique feature of MovieRecorder is the ability to automatically create subfolders. To do that add a forward slash ( / ) key where you would like to add the folder to the file path. For example, if you wanted to create a subfolder that holds all of the files within a particular year, and then a subfolder with the month and day, and then the file name to use first the Source Name, the Destination Name and Recording Name, all separated by an underscore, you would pull Tokens into the Name Format panel as follows:
32 Sometimes MovieRecorder can automatically append some information to the file name. For example, if you have one source that records to two destinations, but in the custom naming you don t add the destinations token, it will still be added to the file. Otherwise you could create conflicts and have 2 destinations writing to the same file Metadata (Metadata is not available in MovieRecorder Express) Metadata are used to add information about the recorded files. This metadata can be retrieved by Media Asset Management. We cover the metadata part in a specific section below Edit-While-Ingest You may use MovieRecorder 4 to edit your files (with the QuickTime Container), even as they are being recorded. You may opt for one of three Edit-While-Ingest destinations: None, Segmented, or Classic. None: With this, you opt not to use the Edit-While-Ingest feature. Note that this type of file will only be readable when they are "closed" at the end of the recording. This means that if there is an issue before the file can be closed, the file will not be readable nor recoverable. This is why we recommend to use either Segmented or Classic modes instead. Segmented: With Segmented, there is no predefined duration to set. The file is growing upon ingest and is a much more modern format that supports many codecs (such as XDCAM or H.264). But: The growing files will only work in Final Cut Pro X. Other editing solutions support segmented movies, but only after the recording is complete. Files are not usable during the first 10 seconds of recording, and they are updated every 10 seconds. You cannot use them in the project and see them growing there. You can only see the portion of the file that was there when you inserted it into the timeline, unless you trim it manually. You cannot use segmented movies to do edit-while-ingest in multicam clips. Classic: With Classic, you have to set a predefined duration, and some codecs (such as H. 264) are not supported. But: Classic Movies are growing both in Final Cut Pro X and Adobe Premiere Pro. You can immediately use the file. You can place the whole file (with its predefined duration) in the project and cut it from there. Note that this works only in Final Cut Pro X. The file will not grow in the timeline of Adobe Premiere, except when using a trick explained in the help center article
33 You can use classic movies to do edit-while-ingest in multicam clips in Final Cut Pro X to do a live Multicam edit while the recording is still taking place. For more information on using the Edit-while Ingest feature, refer to the Knowledge Base article appropriate to the editing software you are using: HOW TO: Do Edit-While-Ingest with MovieRecorder 3 and Final Cut Pro X, or HOW TO: Do edit-while-ingest with MovieRecorder 3 and Adobe Premiere Pro CC. You may Edit, Delete, or Duplicate any Destinations you have set up by clicking on the gear icon on the bottom of the Sources panel and selecting the appropriate action. You can also delete a Destination by highlighting it and clicking on the - icon Setting up an MXF Destination (MXF destinations are not available in MovieRecorder Express) For the most part, setting up MXF Destinations is the same as setting up QT Destination. However, a few features are not available in MXF: Metadata may not be embedded into the file a sidecar must be created, if metadata is desired. All MXF files are generated with the "Open" flag, so they can be used for edit-whileingest on editing solutions that support it. You may decide between two muxing settings for the codecs: either XDCAM or Generic OP1a. The difference between XDCAM and Generic Op1a is the way we respect the standard. With "pure" XDCAM, we can only accept audio tracks with maximum one channel per track and no CC track. With the "Generic Op1a", we are more flexible but therefore do not strictly adhere to the XDCAM standard Edit-while-ingest with MXF files Edit-while-ingest with MXF files is possible too. It is, in fact, the file wrapper that Adobe recommends to use. Avid Media Composer supports edit-while-ingest with MXF files too, but please read the following article to know all that is required
. Indeed codecs such as H.264 or H.")
34 3.5. Selecting and Modifying A/V Presets MovieRecorder 4 is capable of recording to many codecs (see our MovieRecorder web page, under codecs and formats, for the full list). Depending on the chosen codec, you will be able to record more or less channels (also depending on the format). Indeed codecs such as H.264 or H.265 (HEVC) are very demanding compared to codecs such as ProRes. Note that MovieRecorder Express is limited to the ProRes family of codecs, and does not have the full availability of codecs available in MovieRecorder Recommended and User Presets We have created a set of "Recommended Presets" for most codecs. These cannot be modified by the user. That way you know that they won t be modified and correspond to what is usually recommend (for example XDCAM has a specific audio configuration that is required for MXF XDCAM). We tried to limit the list, so we have not done all configurations
35 possible and some codec flavors (such as some DNxHD) are not available as recommended presets. But you can create any number of "User Presets" for which you can change the video codec, the effects, and audio configuration and mapping. To create a user preset, you may want to start from a recommended preset. Highlight it in the list on the left, and then Duplicate it in one of three ways: Right click and select Duplicate. Click on the gear icon at he bottom left of the panel and selecting Duplicate from the popup menu. Click on the Duplicate button on the bottom right corner of the panel. Once you do so, a copy of the Recommended Preset will appear beneath the User Presets area, and the panel to the right will be opened up to allow you to make modifications to the video, effects and audio settings. You may rename the AVPreset name by clicking on the Preset Name box and rewriting it to whatever name you prefer
36 Video - General Settings Under the video tab, first select the codec used. Then, depending on the codec selected, you may have some additional options for that codec. For example, for ProRes you can select the flavor you want (Proxy, LT, HQ, ) and for codecs such as H.264 you will be able to set the bitrate, profile level and format Video - Effects (Effects are not available in MovieRecorder Express) You may also add a number of effects to the file: You can crop the recording. You can deinterlace the file. You can rotate the recording 90 clockwise or counterclockwise, or 180. You can change the output resolution. This is especially useful after cropping a recording to restore it to an HD format, for example Video - Overlays (Overlays are not available in MovieRecorder Express) You may also overlay Timecode and/ or the Source Name to the recording, or you may overlay an image (by aligning it as desired, and then choosing a path to the image file). Video Effects and Overlays can greatly impact performances. So before enabling any effect or overlay, and start a recording session, make sure that your computer can sustain the increased resources required. As always run tests before going into production, using the same type of video signal as you will be using as performances can vary a lot if the video is more or less complex to encode Audio Edit the Audio Setting by clicking on the Audio Tab. Add (or remove) tracks by clicking on the + icon at the bottom of the panel, and you may duplicate channels by highlighting one and clicking on the gear icon then select "Duplicate"

.")
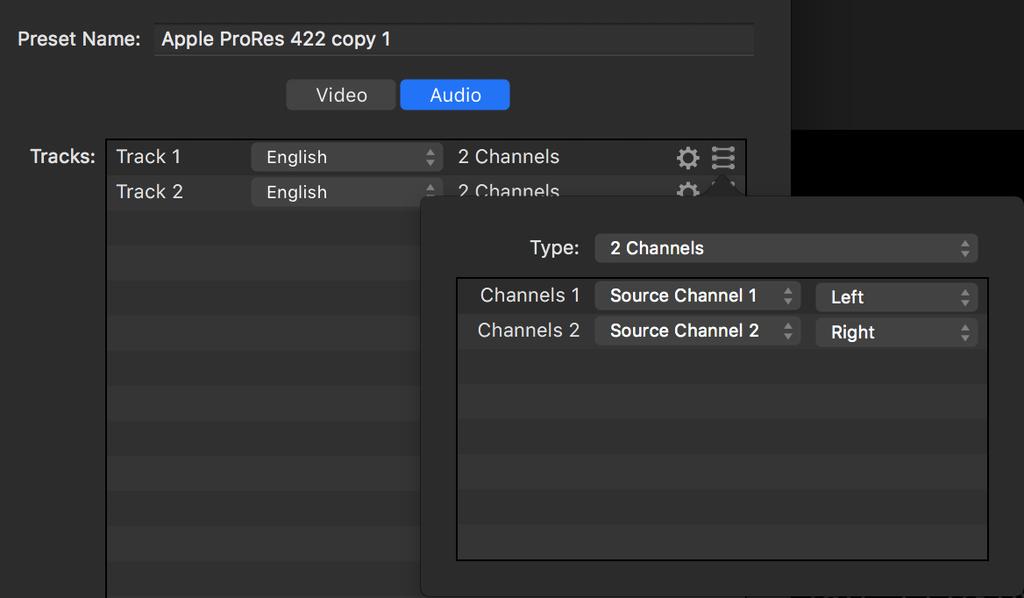
37 You can also change the language of the track by clicking on English and clicking on the language of choice from the pop-up selection. This language will be assigned to the QuickTime audio track created. Click on the gear icon on a track line to change the audio codec settings: Change the audio codec: Linear PCM or AAC. Then depending on the audio codec you can choose the bit rate, sample rate and wether it is big or little endian. Click on the "ladder" icon on a track line to change the audio tracks and mapping: Adjust the number of audio channels you want to record in that specific track (up to 8). Then for each channel you may select which source channel to use, and to which speaker to which output the audio will be mapped
38 - 38 -
 by clicking on the Viewers setup icon at the top right")
39 4. Viewers Area: Layout and controlling sources 4.1. Setup the Viewers layout If you have multiple sources, you can display any number of Viewers (up to 49, depending on the size of your display) by clicking on the Viewers setup icon at the top right corner of the window: Select the number of Viewers to be displayed, then select the layout you want to use: If you enable the option "Size to Fit", the Viewers will fill the size of the MovieRecorder window. When enabled, the Viewers can be larger than the Window itself and thus you may not see all sources at once. To resize the Viewers, use the bottom right corner of the first Viewer, click, drag and drop to set it to the size you need. Note that we provide a set of layouts but this can be customized. Thus if you don t see the layout that would suit you, get in touch with us and we ll explain how to customize the Views to fit your needs. From there, as well, you can set up the behavior when you will use the gang controls (see below the section about gang controlling multiple sources at once)

40 4.2. Assign sources to Viewers Once sources are enabled, you will be able to assign them to Viewers to see the incoming format and control the recording for it. You can either: Click on the "Select a Source " menu at the top left of any Viewers. Then select the Source you want. You can select either a Local, NDI, or Remote Source. Alternatively, you can enable a source with a simple drag-and-drop: click on the source cell in the sources list, and drag and drop it into any of the Viewers. You can also select multiple sources at once and drag and drop them to the Viewers area. This will assign all of them to the Viewers at once, and enable them if they were not enabled yet
 You can set which pieces of")

41 4.3. Controlling the Overlays on the Viewers A great deal of useful information can be displayed on the viewers, including the Timecode, the recording s duration (while recording), and VU meters: (Some Overlays may not be available in MovieRecorder Express, for example the metadata and CC icons as these features are not available in MovieRecorder Express) You can set which pieces of information is displayed using the controls in the upper right corner of the UI: The first icon above is to select the number of viewers that are visible, as previously discussed in section The second icon is used to set up the presence of VU meters. Clicking it pulls up a pop-up menu, from which you can select how many meters will be displayed. There are three different settings for the VU meter display: off (the icon will be white on a gray background); on when you move your cursor over the viewer (white on a black background); or always on (blue on a black background). Clicking on the icon cycles through the three choices. The third icon is for TC display. As in the VU meters, clicking on the icon cycles through off; on when moving a cursor over the viewer; or always on
42 The fourth icon allows you to display or hide the information presented in the outer corners of the viewers: the Source Name (upper left), the Destination Name (upper right), volume controls (see below) and full-screen (lower right corner), and the metadata tag (see section above). When the icon is blue on a black field, the information is displayed; when white on black, it is hidden
, you can enable one or more destinations to a given source.")
43 4.4. Enabling Destinations (In MovieRecorder Express, you ll only be able to enable one destination at a time) When no destination is enabled for a given source, it shows a warning in the middle of the viewer: "No Destination Enabled : Once destinations are configured (see below), you can enable one or more destinations to a given source

44 There are multiple ways to enable a destination for a source: Click on "Destinations " at the top right of a viewer, and enable the destination(s) you want to use: In the Destinations list in the left pane, right-click on a destination and select either: - "Enable On All Sources" to enable that destination on all sources visible in the viewers. - "Disable On All Sources" to disable that destination on all sources visible in the viewers. (Not available in MovieRecorder Express) - "Solo On All Sources" to enable only that destination on all sources visible in the viewers (all other destinations will be disabled). (Not available in MovieRecorder Express) Drag and drop a destination on to a Viewer with either of these modifier keys: - "No modifier keys": the destination will be enabled on the Viewer. - "Alt": the destination will be "solo" on that viewer, all the others will be disabled. - "Shift": the destination will be enabled on all the Viewers. - "Shift + Alt": the destination will be "solo" on all the Viewers. Note that the enable on all feature only works for local or NDI sources, it does not work for remote sources. Why should I use multiple destinations? Typically multiple destinations can be useful either for: Recording the same codec to multiple volumes, so you have a backup (in case of hardware failure, for example). If the AV Preset is the same, we will encode the signal only once, and write the same frames to the 2 (or more) destinations. This means that it does not use a lot more CPU to encode to multiple destinations. Record a High-Res and Proxy. The same source is recorded to two different codecs and/or frame sizes. So you have one high resolution version together with a lower resolution that is easier to work with as it will use less bandwidth
45 The number of destinations that can be enabled at once will depend on a few things: If you use MovieRecorder Express, you ll be able to enable just one destination at a time. the computer. The encoding happens on the CPU, so the better the CPU, the more destinations you will be able to do. the format and fps of the signal. Of course you ll be able to do less encodings in 4K than in HD. the codec used. Some codecs are more demanding than others. H.264, for example, is one of the most demanding codecs. Some computers (all the Intel Core i5 and i7 processors) have a hardware acceleration chip for H.264 encoding of one channel, and one encoding process can happen on that chip. So, for example, on a Mac mini, if you encode one H.264 destination almost no CPU will be used. the storage. It is difficult to give exact numbers, especially as they can change with macos versions, drivers, hardware, etc so check on our website in the tech specs area, or contact us for more information


46 4.5. Other controls on Viewers Audio Preview Clicking on the Speaker icon at the bottom right of each Viewer mutes (or un-mutes) your audio on the viewer. Clicking and holding the Speaker icon opens another window that allows you to set up your Audio Channels for the viewer. But if you want to control the Volume of all Viewers at the same time, you can do that at the bottom of the Viewers window: Temporary Fill Screen You can also set one of the Viewer temporarily to fill the screen by clicking on the Fill screen icon at the bottom right of each Viewer:

47 5. Recording with MovieRecorder Basic Controls Recording is simple and intuitive with MovieRecorder 4. To do so, simply hover your mouse on a Viewer and click on the corresponding record controls that show up. Click on the red Record button to start recording (the only button available), the Viewer will then be circled in red and a "REC" will show up at the top:

48 Note that the controls changed slightly and you can now select: Stop recording Pause recording (this is only available for "Classic" destinations) Time the recording: Clicking on the Timer button pulls up a pop-up window that allows you to either finish in a certain amount of time, or to end at a certain time. This is very useful if you don t want to forget to stop the recording:

49 5.2. Gang Recording You can set up MovieRecorder 4 to control multiple recordings at once. Once one or more viewers are selected, gang controls appear on the bottom of the UI. You can use them to control all of the selected viewers with the touch of a button. There are three modes of Gang controls available in MovieRecorder 4. These are set in the Viewers layout popover: Only Selected Sources in Viewers: This is how MovieRecorder 3 used to behave: When you use the gang controls, only the Viewers selected (highlighted in blue) will be controlled. You can use the cmd+a keyboard shortcut to quickly select all. All Sources in Viewers: In this case, you don t need to worry about the selection, all the sources visible in Viewers will be controlled. All Enabled Sources: Here even Sources that are not visible will be controlled by the gang controls. This can be useful if for example you have used the temporary full screen feature of one Viewer. Below are the keyboard shortcuts that can be used that will have the same behavior as clicking on the gang controls in the user interface (so it depend on your gang controls settings): cmd + 1: Select/Deselect Viewer 1 cmd + 2: Select/Deselect Viewer
50 cmd + #: Select/Deselect Viewer that corresponds to the number cmd + R: Record cmd + K: Stop cmd + P: Pause cmd + T: Timer (pulls up the Timer settings window) cmd + N: Gang Naming (allows you to name all ganged recordings at once) cmd + L: Lock the viewer(s) cmd + U: Unlock the viewer(s) 5.3. Controlling Remotely Controlled Sources Recording remotely controlled sources is done in the same matter as local sources. You highlight whichever viewers you would like to control, and either use the individual viewer s controls, or you can gang record multiple sources with the gang controls on the bottom of the UI. However, you do not have full control over the remote MovieRecorder application(s). You may only record, pause, stop, or set the timer(s) remotely; you many not set schedules, change destinations, edit sources or destinations, and so on
 You may create Metadata Sets under the Metadata tab of the Preferences menu: MovieRecorder 4 comes with")
51 6. Working with metadata 6.1. Create and Edit Metadata Sets (The Metadata feature is not available in MovieRecorder Express) You may create Metadata Sets under the Metadata tab of the Preferences menu: MovieRecorder 4 comes with a QuickTime metadata set, which you can add more data items to by clicking on the + icon on the bottom left area of the window, and you can remove data items by highlighting them and then clicking on the - icon. You may also duplicate an item by highlighting another item and clicking on the gear symbol, then selecting Duplicate on the pop-up menu. You may also create your own metadata sets from scratch by clicking on the Metadata Set box, then clicking on the Edit option. This will bring up another window showing a list of previously created metadata sets. You can add or remove sets by clicking on the + or - icons, or duplicate sets by clicking on the gear icon. If you add a new metadata set, you can rename it by double-clicking on the Untitled Metadata Set and typing in the desired name. You will then need to add your own metadata items, as described above. Each metadata item can be modified by highlighting the object and then adjusting the parameters in the right side of the panel. You can change the Name of the item and the type (your choices are: text, multiple choice, number, date/time, or boolean), and you can set
52 default values in the Default Value box (by typing the value, or by clicking on the Tokens button and dragging and dropping the values into the box, or by importing the metadata) Enable the type of metadata you need in the destination Now that your metadata set is ready, you will need to configure your destinations to use You may set up how the metadata for your recorded files is saved. To do so, click on the gear icon next to the Metadata section. A pop-up menu will appear, with two empty boxes (or one, if using the MXF wrapper). Clicking the top box, labeled Embedded (Quicktime), embeds the metadata into the file (note that this option is only available with the Quicktime wrapper). Clicking the Sidecar box creates an XML file that includes the metadata. Do not enable any of those 2 boxes if you don t want to create metadata at all. When creating a sidecar file you can decide a few more settings: the format of the XML that will be generated by selecting what Type of asset manager you would like to use (either Axle, Cantemo Portal, or CatDV). the Location of the Sidecar file. Either set it to be the same location as the Movie file, or choose another path entirely. when, during the recording process, you would like to create the sidecar file Set the metadata for the source With your metadata set configured and your destination set, now you are ready to add some metadata values to your recordings. First make sure that the source uses the destination you have set with the metadata type you need to record. At the bottom left corner of each Viewer you will see a "tag" icon. Click on it to reveal the metadata popover window

53 At the top of the window, select the metadata set you want to use. Then below, if you want to use the "default" value you have set in your Metadata Set, you don t need to do anything. If you want to add a different value, simply enable the checkbox in front and change the Value. To revert to the default value, just uncheck the checkbox. Then make sure to click on "Apply". If you don t your modifications will be lost when you close the popover window. The Reel number at the bottom is a specific metadata item that is written in the Timecode track of your quicktime Movie. It can also be used as a token in the custom naming feature

54 7. VTR Control (The VTR Control and Batch Capture feature is not available in MovieRecorder Express) MovieRecorder 4 may be used to digitize VTR. For details, see the white pages article HOW TO: Use VTR Control and Batch Capture
55 8. Scheduled Recordings You may schedule when you would like a recording to begin and end (at a specific date or on specific days of the week). Any schedules you have previously set up will be listed on the panel beneath the Schedule tab; if the box is checked, the schedule is active and the recording will begin and end as specified. You may create new schedules by clicking on the + icon on the bottom left of the panel. A pop-up window will appear with a number of customizable features. Under Recording Name is a box within which you may enter the name of the recording to be scheduled. Below that is the Type of schedule, either Weekly (wherein you would check the boxes beneath the day(s) of the week you would like to record) or Specific Date (wherein you would input the date you would like to record). Below the Type is the Time (hh:mm) boxes, wherein you would input the Start Time and Duration of the recording; the End Time will be automatically calculated (alternatively, you could input the Start Time and the End Time, and the Duration would be calculated). Below that you must select the Source of the recording. Click on the Sources box and scroll down to and select the appropriate Source. Below that is the Destinations section, where you may select which destination(s) to which you would like to record. You may Edit, Delete, or Duplicate any Schedules you have set up by clicking on the gear icon at the bottom left corner of the Schedule panel and selecting the appropriate action. You can also delete a Schedule by highlighting it and clicking on the - icon


56 9. Saving and Restoring Configurations (The "Save and Restore" feature is not available in MovieRecorder Express) After setting up everything up for a production, you may want to use the same configuration for a future event. Doing so is as simple as clicking MovieRecorder>Save Configuration As This will bring up a pop-up window to enter and save the name of the Configuration. The next time you need that, or a similar, configuration, you can pull it back by clicking on MovieRecorder>Restore Configuration, and then clicking on the desired configuration. A pop-up window will appear allowing you to select which parts of the configuration you would like to recall: the sources, Destinations, AV Presets, Viewers Layout, Scheduled Events, and/ or the VTR Batch List. After you select the desired items, click on the Restore button and MovieRecorder will reconfigure itself to meet those requirements. The next time you request that same configuration, the pop-up window will appear again, with the same items enabled (though you may disable individual items if you desire), and you can quickly restore that configuration again. You may also wish to find where the Configuration file is kept, and can do so by clicking on MovieRecorder>Reveal Configuration Folder in Finder. Below is a screenshot depicting the location of the Configuration commands:

57 10. Using GPI Commander with MovieRecorder 4 MovieRecorder is integrated with GPICommander, and can easily be controlled by that device. To set it up, go to MovieRecorder>Preferences and click on the GPI tab: Any connected GPICommanders will be detected by the software, and will be displayed in the GPICommander to Use menu. There are 2 ways to use the GPI outputs. Everything is explained in the user interface when you select one or the other, so just try it out
58 11. Recording with Closed Captioning (You can not record Closed Captioning with MovieRecorder Express) As long as the incoming video signal has valid Closed Captioning (see our White Pages article How to Do Closed Captioning with Movie Recorder for details), the Closed Captions will be included in the recorded file. For HD files in CEA 708, a CC icon will be present in the bottom left hand corner of the viewer if the signal is detected; the way CEA 608 is embedded into the SD file, however, precludes this from happening. See the White Pages article above for an explanation of how to detect the presence of CC in SD files
, and so we must constantly evolve our product to adapt to changes made in those applications. As such, bugs do sometimes sneak up on us.")
59 12. When Something Goes Wrong While we strive to ensure that MovieRecorder be as stable a platform as is humanly possible, there is a lot of interaction between our software and other pieces of your workflow (your MacOS, video card drivers, switchers, etc.), and so we must constantly evolve our product to adapt to changes made in those applications. As such, bugs do sometimes sneak up on us. Should any issues arise while utilizing MovieRecorder, the first place to look for answers to potential causes is our white pages on our Softron Support Desk website. Keeping an eye on the Performance Gauges in the Activity & Logs window (accessed via Window>Show Activity & Logs Window) is also a valuable resource. The Performance Gauges show the performance of your computer as it runs the application, and may prove a useful indicator as to what could be causing issues. See our Troubleshooting: The Log Window Explained article for details. And also keep in mind that for the life of the product, your application includes free support. The best way to reach us is via Help>Contact Support in the user interface of the application (see below for image). Through that button you can collect the technical logs from the application and open a support ticket on our Support Desk. It is important that when opening a ticket that you supply as much information as possible, including the date and time of the incident(s)
Multicam Logger User Manual. Multicam Logger 2. User Manual. Version 1.0 December Multicam Logger User Manual
 Multicam Logger 2 User Manual Version 1.0 December 2018-1- Multicam Logger is a useful post-production tool that allows a user to log all of the different angles (or inputs) used in a live multi-camera
The Playlists User Interface. Each feature of the above UI is described briefly hereafter:
 The Playlists User Interface OnTheAir Video 3 is a very intuitive program, with a lot of features and functions. What follows is a brief overview of each of the features, beginning with an overview of
Online Help Browser Requirements Safari *Please note: Episode 7 does not support OS X or previous versions of Mac OS X.
 System Requirements Episode 7.3 Release Notes Mac Minimum System Requirements Operating System: OS X 10.11 or higher (Includes macos Sierra 10.12) RAM: 8 GB or more 256 GB hard disk space, with 300 MB
TimeSlipping with MovieRecorder 3 and OnTheAir Video/Express 3
 WHITE PAPER Softron Media Services provides Mac based ingest and playout systems. MovieRecorder 3 is Softron s third generation ingest application. It s user interface is configurable depending on the
This means that Avid users now have the same simple workflow available to them as users of Apple Final Cut Pro:
 Using AJA with Avid NLEs Opening up the Avid workflow to read native ProRes QuickTime files directly through the Ki Pro gives our customers access to new ways of working that increase productivity and
Switch Release Notes. Switch
 Switch 3.0.1 Release Notes Switch Telestream Switch is an award-winning cross platform media player, inspector, and correction tool for professionals. Switch comes in three versions: Switch Player (free),
Marsis Playout. Playout Automation Software. User Manual AVMEDA.
 Playout Automation Software User Manual ABOUT US Avmeda, based in Las Vegas, Nevada developing and distributing professional and broadcast applications. Our core software modules are Standalone & Server
AVC-Intra QT v1.0 Manual
 AVC-Intra QT v1.0 Manual 20th of January 2010 table of contents AVC-Intra QT 1.0 3 Installation and Activation... 3 Using AVC-Intra QT in QuickTime Player...17 Using AVC-Intra QT in Final Cut Pro...21
Cinedeck File-Based Insert Editing & Live-to-File Recording The Ultimate Virtual Tape Environment Daine Pearson - Cinedeck
 Cinedeck File-Based Insert Editing & Live-to-File Recording The Ultimate Virtual Tape Environment Daine Pearson - Cinedeck Files - The Good, Bad and Ugly: Changes and advances in technology tend simultaneously
CinePlay! User Manual!
 CinePlay User Manual 1 CinePlay! User Manual! CinePlay is a professional Mac media player complete with timecode overlays, markers, masking, safe areas and much more. It is ideal for dailies, portfolios,
Stomp Manual. shinywhitebox ltd
 Stomp Manual shinywhitebox ltd Table of Contents Stomp's Manual... 3 What does Stomp do?...3 Cropping...3 Easy to use...3 Batch mode...3 Filtering...4 Overview of the UI... 5 User Interface...5 From here
Online Help Browser Requirements Safari *Please note: Episode 7 does not support OS X or previous versions of Mac OS X.
 System Requirements Episode 7.5 Release Notes Mac Minimum System Requirements Operating System: OS X 10.11 or higher (Includes macos Sierra 10.12) RAM: 8 GB or more 256 GB hard disk space, with 300 MB
OPEN THE HOTLINE CLIENT
 OPEN THE HOTLINE CLIENT Everything in the Hotline universe starts with the Client Toolbar; it launches all of the Client s major functions. 1 Double-click the Hotline icon on your desktop. The Hotline
For today, choose Format: NTSC Rate: Use: DV-NTSC Anamorphic (North American, widescreen)
") Final Cut Pro Final Cut Pro is a sophisticated video-editing program made by Apple. It is the editing software of choice for multimedia journalists using Apple computers, and is comparable to Adobe's Premiere
Final Cut Pro Final Cut Pro is a sophisticated video-editing program made by Apple. It is the editing software of choice for multimedia journalists using Apple computers, and is comparable to Adobe's Premiere
CheckBook Pro 2 Help
 Get started with CheckBook Pro 9 Introduction 9 Create your Accounts document 10 Name your first Account 11 Your Starting Balance 12 Currency 13 We're not done yet! 14 AutoCompletion 15 Descriptions 16
Microcontroller Compatible Audio File Conversion
 Microcontroller Compatible Audio File Conversion Created by Mike Barela Last updated on 2018-06-07 09:10:45 PM UTC Guide Contents Guide Contents Convert Sound Files in Audacity Audacity Download Audacity
Cinegy Capture 11 System Recommendations. Cinegy GmbH. Document version: 5fb73c9
 Cinegy Capture 11 System Recommendations Cinegy GmbH Document version: 5fb73c9 Table of Contents 1. Operating Systems Support.......................................................................... 1
How to Make a Movie in imovie How to Make a Movie Trailer in imovie How to Color Correct a Movie in imovie
 How to Make a Movie in imovie How to Make a Movie Trailer in imovie How to Color Correct a Movie in imovie 1. Make sure you are using the Mac. Make a Movie in imovie 2. If your files are on an external
Media 100 Suite Version Release Notes. Boris FX - Media 100 is pleased to offer Media 100 Suite Version
 MEDIA 100 A BUSINESS UNIT OF BORIS FX Media 100 Suite Version 2.0.1 Release Notes Boris FX - Media 100 is pleased to offer Media 100 Suite Version 2.0.1. This is an upgrade release from all previous versions
HDMI Video Outputs 1 x HDMI 1.4b type A connector. Analog Video Inputs Y, B-Y, R-Y/NTSC/PAL. Analog Video Outputs None
 Product Technical Specifications UltraStudio HD Mini UltraStudio HD Mini features professional broadcast quality connections that include 3G-SDI, analog YUV and composite NTSC/PAL video inputs, along with
Quick Start Guide. Published: March 14, 2013
 Quick Start Guide Published: March 14, 2013 Ki Pro Quad - Quick Start Guide Introduction This guide is intended as a basic overview of the AJA Ki Pro Quad setup and operation. A complete Installation and
Matrox MuraControl for Windows
 Matrox MuraControl for Windows User Guide (for software version 6.00) 20179-301-0600 2017.09.25 Contents About this user guide... 6 Using this guide... 6 More information... 6 Overview... 7 Supported Matrox
Analog Audio Outputs 2 Channels of professional balanced analog audio via XLR connectors.
 Product Technical Specifications UltraStudio 4K Rack mount Thunderbolt or Thunderbolt 2 based capture and playback "break out box" with latest high performance technology including 4:4:4 and dual channel
SeeSnake HQ User Guide
 SeeSnake HQ User Guide SeeSnake HQ Version 1.53.85.1426 23 May 2010 About SeeSnake HQ 3 Digital Technology 3 Installation and Updates 5 Windows XP 5 Windows Vista 5 Windows 7 5 The Home Window 6 Home Toolbar
Contents. Setting the EMP NS Connection Operation. Connecting with EMP NS Connection. Using a Computer to Set Up, Monitor and Control Projectors
 Operation Guide 1 Contents 2 EasyMP Summary...4 Installing the Software...5 Software Supplied...5 Installing...5 Connecting with EMP NS Connection Overview of EMP NS Connection...8 Two Connection Modes
Manual Updated Tuesday, January 16, 2017
 Manual Updated Tuesday, January 16, 2017 What is ProVideoServer? ProVideoServer is a Mac-based video server capable of outputting up to 4 channels of SDI or HD-SDI broadcast video from a single computer,
HyperDeck Studio Mini
 Product Technical Specifications HyperDeck Studio Mini HyperDeck Studio Mini is a portable broadcast quality deck that records ProRes onto commonly available SD cards. You get 6G-SDI for recording all
Cinedeck MCC. Multi-Channel Controller. USER GUIDE - Cinedeck MCC Version RX3G - ZX 20, 40, 45 - MX
 Cinedeck MCC Multi-Channel Controller USER GUIDE - Cinedeck MCC Version 14.01.03.1 RX3G - ZX 20, 40, 45 - MX Contacting Cinedeck General Information: For non-support general inquiries, please contact us
You cannot use the Animation Key button to remove animation on a clip, track, or timeline effect when there are expressions in that effect.
 Avid DS 11.1 Known Issues and Limitations This section provides information on known limitations that were not addressed in this release. Any available workaround procedures are also documented, when possible.
Media Composer Features List
 Media Composer s List Apply Mask Regions Vertical Scroll in Timeline Bin View Icons Navigate with Mouse Scroll Wheel 9-way Multicam for XDCAM HD 50 Add or Remove Items in the Audio Mixer Tool Add Effects
USER MANUAL. Database Explorer. Version December 2014 USO RESTRITO
 USO RESTRITO USER MANUAL Database Explorer Version 6.57 - December 2014 USER MANUAL IPDirector 6.57 Database Explorer Copyright EVS Broadcast Equipment SA Copyright 2005-2014. All rights reserved. Disclaimer
Apptix Online Backup by Mozy User Guide
 Apptix Online Backup by Mozy User Guide 1.10.1.2 Contents Chapter 1: Overview...5 Chapter 2: Installing Apptix Online Backup by Mozy...7 Downloading the Apptix Online Backup by Mozy Client...7 Installing
Lightspeed Live Capture
 Lightspeed Live Capture Lightspeed Live Capture Release Notes Capture V2.1 November 7, 2017 About This Release These release notes describe the major release of Lightspeed Live Capture v2.1 and can be
Digital Video. Part II: Introduction to Editing and Distribution
 Digital Video Part II: Introduction to Editing and Distribution Contact Information The University of Utah Student Computing Labs Macintosh Support mac@scl.utah.edu We Will Cover History of video editing
Flip4Mac Image Server Component
 Flip4Mac Image Server Component Version 2.2 T E L E S T R E A M 2008 Telestream, Inc. Table of Contents Overview Flip4Mac Image Server Component....................... 1 Flip4Mac Image Server Component
Copyright 2018 MakeUseOf. All Rights Reserved.
 15 Power User Tips for Tabs in Firefox 57 Quantum Written by Lori Kaufman Published March 2018. Read the original article here: https://www.makeuseof.com/tag/firefox-tabs-tips/ This ebook is the intellectual
Parallels Toolbox for Windows User's Guide
 Parallels Toolbox for Windows User's Guide Parallels International GmbH Vordergasse 59 8200 Schaffhausen Switzerland Tel: + 41 52 672 20 30 www.parallels.com Copyright 1999-2018 Parallels International
Ecamm Live for Facebook User Guide
 Ecamm Live for Facebook User Guide Ecamm Live is a Facebook Live streaming app for Mac. Use the app to broadcast camera video, pre-recorded video, Skype video calls, or your Mac s screen, along with an
Preparing Video Files for the Aja Ki Pro
 Preparing Video Files for the Aja Ki Pro rev. 04/12/16 The Gene Siskel Film Center has the ability to play Apple Pro Res files from an Aja Ki Pro hard drive player/recorder. r CC 2015. Aja Ki Pro. The
BCI.com Sitecore Publishing Guide. November 2017
 BCI.com Sitecore Publishing Guide November 2017 Table of contents 3 Introduction 63 Search 4 Sitecore terms 66 Change your personal settings 5 Publishing basics 5 Log in to Sitecore Editing 69 BCI.com
Operators Upgrade Notes
 Media Composer Software Operators Upgrade Notes Paul Sampson paul@paul-sampson.ca Table of Contents INTRODUCTION...3 TERMINOLOGY CHANGES...4 CUSTOM PROJECT SIZES...5 DISPLAY AND MONITOR CHANGES...6 SELECTING
BLUEFISH444 ADOBE QUICK START v5.13.2
 BLUEFISH444 ADOBE QUICK START v5.13.2 Bluefish444 ADOBE User guide Introduction Bluefish444, the Professionals choice, supports Adobe Creative Suite to bring true uncompressed 12- bit HD-SDI IO to users
ilovehue.net FROM FCP TO RESOLVE Mathieu Marano
 FROM FCP TO RESOLVE Mathieu Marano mat@ilovehue.net www.ilovehue.net Table of Contents Purpose Prepare your FCP Project Compatible media Good practice Cleaning the timeline Media Manager Receiving a graded
Flip4Mac XDCAM. Components Version 2.1 T E L E S T R E A M Telestream, Inc.
 Flip4Mac XDCAM Components Version 2.1 T E L E S T R E A M 2005-2007 Telestream, Inc. Table of Contents Overview Flip4Mac XDCAM..................................... 1 Flip4Mac XDCAM Features..............................
Avid recommends that you read all the information in this ReadMe file thoroughly before installing or using any new software release.
 ggg Date Revised Changes Made 21 March 2014 Release Media Director 1.0 18 June 2014 Release Media Director 1.0.1 16 December 2014 Release Media Director 1.1 Important Information Avid recommends that you
VCube Release Notes. Updates: Please check our Web site periodically for information, patches and updates.
 VCube Release Notes Updates: Please check our Web site http://www.merging.com periodically for information, patches and updates. VCUBE 5.1 Release Notes NEW FEATURE: Blackmagic design Video Cards Support:
HDMI Video Outputs 1 x HDMI 1.4b type A connector. Analog Video Inputs Y, B-Y, R-Y/NTSC/PAL. Analog Video Outputs None
 Product Technical Specifications UltraStudio HD Mini UltraStudio HD Mini features professional broadcast quality connections that include 3G-SDI, analog YUV and composite NTSC/PAL video inputs, along with
icms Pro USER S Manual Ver 1.4
 icms Pro USER S Manual Ver 1.4 Contents Panes... 7 How Can User Rights Affect Your Use of icms Pro SW?... 10 Minimum System Requirements... 11 Installing the icms Pro SW... 12 Download icms Pro from icatchinc
K2 Media Server & Storage Platform
 K2 Media Server & Storage Platform 1. Are K2 clients PCs with standard I/O boards? No. K2 clients are purpose-built devices with the performance, reliability and real-time processes necessary for use in
The AiM Codec for Windows and OSX
 The AiM Codec for Windows and OSX The Avolites Ai server plays QuickTime movies, but it uses its own special codec called AiM. The AiM codec is not installed with QuickTime by default, but is free to download
USING VANTAGE PLAYBACK SERVICE FOR AVID INTERPLAY TRANSFER ENGINE
 App Note USING VANTAGE PLAYBACK SERVICE FOR AVID INTERPLAY TRANSFER ENGINE Synopsis... 2 Installing Telestream Playback Service... 3 Configuring Interplay Transfer Engine... 13 Avid Media Composer and
AGENT123. Full Q&A and Tutorials Table of Contents. Website IDX Agent Gallery Step-by-Step Tutorials
 AGENT123 Full Q&A and Tutorials Table of Contents Website IDX Agent Gallery Step-by-Step Tutorials WEBSITE General 1. How do I log into my website? 2. How do I change the Meta Tags on my website? 3. How
12 Duplicate Clips and Virtual Clips
 12 Duplicate Clips and Virtual Clips Duplicate clips and virtual clips are two powerful tools for assembling a video program in Premiere. Duplicate clips can be useful for splitting clips into a number
Camtasia Studio 5.0 PART I. The Basics
 Camtasia Studio 5.0 Techsmith s Camtasia Studio software is a video screenshot creation utility that makes it easy to create video tutorials of an on screen action. This handout is designed to get you
EDGE, MICROSOFT S BROWSER
 EDGE, MICROSOFT S BROWSER To launch Microsoft Edge, click the Microsoft Edge button (it s the solid blue E) on the Windows Taskbar. Edge Replaces Internet Explorer Internet Explorer is no longer the default
Premiere Pro Desktop Layout (NeaseTV 2015 Layout)
") Premiere Pro 2015 1. Contextually Sensitive Windows - Must be on the correct window in order to do some tasks 2. Contextually Sensitive Menus 3. 1 zillion ways to do something. No 2 people will do everything
Premiere Pro 2015 1. Contextually Sensitive Windows - Must be on the correct window in order to do some tasks 2. Contextually Sensitive Menus 3. 1 zillion ways to do something. No 2 people will do everything
Multi-Channel Multi-Format Ingest SD-HD-IP.
 Multi-Channel Multi-Format Ingest SD-HD-IP HABARIINGEST Signal-Based Capture live feeds, VTR tapes, Panasonic P2 memory cards and Sony XDCAM optical disks or schedule an ingest based on a time and date.
A new clients guide to: Activating a new Studio 3.0 Account Creating a Photo Album Starting a Project Submitting a Project Publishing Tips
 Getting Started With Heritage Makers A Guide to the Heritage Studio 3.0 Drag and Drop Publishing System presented by Heritage Makers A new clients guide to: Activating a new Studio 3.0 Account Creating
Adobe Premiere Pro CC 2015 Tutorial
 Adobe Premiere Pro CC 2015 Tutorial Film/Lit--Yee GETTING STARTED Adobe Premiere Pro CC is a video layout software that can be used to create videos as well as manipulate video and audio files. Whether
Windows Movie Maker / Microsoft Photo Story Digital Video
 Windows Movie Maker / Microsoft Photo Story Digital Video http://intranet/technology/index.html TRC HELP DESK X5092 April 2006 Photo Story and Movie Maker Microsoft Photo Story 3 allows you to create fantastic
Moving to the Mac A GUIDE FOR NEW USERS OF MAC OS X. [Type here]
![Moving to the Mac A GUIDE FOR NEW USERS OF MAC OS X. [Type here]](/thumbs/90/103934001.jpg "Moving to the Mac A GUIDE FOR NEW USERS OF MAC OS X. [Type here]") [Type here] Moving to the Mac A GUIDE FOR NEW USERS OF MAC OS X This guide is aimed at those who are new to using Mac s. It assumes that you have prior knowledge of using a computer, probably a PC. The
[Type here] Moving to the Mac A GUIDE FOR NEW USERS OF MAC OS X This guide is aimed at those who are new to using Mac s. It assumes that you have prior knowledge of using a computer, probably a PC. The
User Guide MXF MXF Import Component V 1.0
 User Guide F li p 4 M a c MXF MXF Import Component V 1.0 C 2005 Telestream, Inc. Table of Contents What is MXF Import?.................................................................. 1 Supported Digital
VCube Release Notes. Updates: Please check our Web site periodically for information, patches and updates.
 VCube Release Notes Updates: Please check our Web site http://www.merging.com periodically for information, patches and updates. VCUBE 6.0 Release Notes VCube v6 is supported on Windows 7-64bit. Note:
USER MANUAL. Version April 2013 USO RESTRITO
 USER MANUAL Version 2.1 - April 2013 Copyright EVS Broadcast Equipment Copyright 2011-2013. All rights reserved. Disclaimer The information in this manual is furnished for informational use only and subject
Media 100 Suite Version Release Notes
 MEDIA 100 A BUSINESS UNIT OF BORIS FX Media 100 Suite Version 1.7.1 Release Notes Boris FX - Media 100 is pleased to offer Media 100 Suite Version 1.7.1. This is an upgrade release from all previous versions
SoundCode Exchange MXF Users Guide
 SoundCode Exchange MXF Users Guide Version 2.0 Quicktime Import Component MXF To Pro Tools Utility Application Pro Tools Export PlugIn (SoundCode Exchange Only) for Macintosh OS X and Windows XP /Vista
MXF/DNxHD with ALEXA SUP 6.0
 MXF/DNxHD with ALEXA SUP 6.0 WHITE PAPER Digital Workflow Solutions, 5 April 2012 Version History Version Author Change Note 2011-12-20 Grafwallner First document draft 2012-02-15 Temmler AMA Volume Plugin
itx Integrated Playout Platform
 Supplement itx Integrated Playout Platform Key Functions Event Time Specification Every schedule item within itx has a time mode which defines how the item will behave with respect to other items within
New Features in Final Cut Pro 6
 New Features in Final Cut Pro 6 This is an overview of the new features in Final Cut Pro 6. For more information about these features and their use, see the Final Cut Pro 6 User Manual. Open Format Timeline
R E L E A S E N O T E S V E R S I O N
 R E L E A S E N O T E S V E R S I O N 4. 2. 3 The information in this document is subject to change without notice and does not represent a commitment on the part of ArKaos Pro S.A. No part of this publication
Voyant Connect User Guide
 Voyant Connect User Guide WELCOME TO VOYANT CONNECT 3 INSTALLING VOYANT CONNECT 3 MAC INSTALLATION 3 WINDOWS INSTALLATION 4 LOGGING IN 4 WINDOWS FIRST LOGIN 6 MAKING YOUR CLIENT USEFUL 6 ADDING CONTACTS
T2 Express 3, Pro 3 and Elite 3 Digital Recorder/Players
 Datasheet T2 Express 3, Pro 3 and Elite 3 Digital Recorder/Players Each of the three T2 digital recorder/players models (T2 Express 3, Pro 3 and Elite 3) brings full high-definition capture and playback
Adobe Premiere: Getting Started
 Prepared by Ansel Herz for the UW Department of Communication http://www.com.washington.edu/tech/irc/ Questions? Comments? Contact Kristina Bowman at kriscb@uw.edu. Adobe Premiere: Getting Started This
SDI Audio Inputs 16 channels embedded in SD and HD. Sync Inputs Tri-Sync or Black Burst. independantly con gurable as either Input or Output
 DeckLink Quad 2 Technical Speci cations Description DeckLink Quad 2 features 8 independent SDI capture and playback channels in a single card! Fully compatible with the previous 4 channel model, this new
Creating a short stop motion animation with Adobe Photoshop CC. Open Adobe Photoshop CC. A note about embedding
 Creating a short stop motion animation with Adobe Photoshop CC Open Adobe Photoshop CC A note about embedding Photoshop CC never embeds video or sound into your document. Instead, it links to the original
VCube Release Notes. Updates: Please check our Web site periodically for information, patches and updates.
 VCube Release Notes Updates: Please check our Web site http://www.merging.com periodically for information, patches and updates. VCUBE 4.1 Release Notes IMPROVEMENTS H264 support Playback Improved realtime
Matrox MXO2 Release Notes (Mac OS version) March 18, vy
 March 18, vy") Matrox MXO2 Release Notes (Mac OS version) March 18, 2011 vy11077-401-0221 Trademarks Matrox Electronic Systems Ltd.... Matrox, Matrox MAX, Matrox Vetura, MXO Adobe Systems Inc... Adobe, After Effects,
Matrox MXO2 Release Notes (Mac OS version) March 18, 2011 vy11077-401-0221 Trademarks Matrox Electronic Systems Ltd.... Matrox, Matrox MAX, Matrox Vetura, MXO Adobe Systems Inc... Adobe, After Effects,
Selection tool - for selecting the range of audio you want to edit or listen to.
 Audacity Quick Guide Audacity is an easy-to-use audio editor and recorder. You can use Audacity to: Record live audio. Convert tapes and records into digital recordings or CDs. Edit sound files. Cut, copy,
icms Pro USER s MANUAL Ver 1.0
 icms Pro USER s MANUAL Ver 1.0 Contents Target Audience for this Document... 5 Copyright, Trademarks and Important Information... 5 Copyright... 5 Disclaimer... 5 Introduction... 6 Tabs... 6 Panes... 7
Using Metadata with the FS-5 and Final Cut Pro Matt McEwen
 Using Metadata with the FS-5 and Final Cut Pro Matt McEwen Metadata is becoming an important part of modern video production. With the advent of tapeless acquisition devices such as the FS-5, which are
Matrox MuraControl for Windows
 Matrox MuraControl for Windows User Guide (for software version 7.00) 20179-301-0700 2018.06.12 Contents About this user guide... 6 Using this guide... 6 More information... 6 Overview... 7 Supported Matrox
USER MANUAL. Version May 2015
 USER MANUAL Version 6.60 - May 2015 USER MANUAL IPClipLogger 6.60 Disclaimer This manual and the information contained herein are the sole property of EVS Broadcast Equipment SA and/or its affiliates
USER MANUAL. VTR Control Panel. Version December 2014 USO RESTRITO
 USO RESTRITO USER MANUAL VTR Control Panel Version 6.57 - December 2014 USER MANUAL IPDirector 6.57 VTR Control Panel Copyright EVS Broadcast Equipment SA Copyright 2005-2014. All rights reserved. Disclaimer
Transcoding SDK. Professional Transcoding Engine
 Transcoding SDK Professional Transcoding Engine Formerly known as Reference SDK, Transcoding SDK offers improved quality and performance as well as exciting new features and stability enhancements to further
JUSTICE AV SOLUTIONS LOUISVILLE, KENTUCKY USER MANUAL 3.1
 JUSTICE AV SOLUTIONS LOUISVILLE, KENTUCKY USER MANUAL 3.1 Table of Contents 1 Introduction... 3 2 Installation... 4 2.1 Minimum System Requirements... 4 2.2 Installation... 4 3 Logging In... 6 3.1 New
IN THIS CLASS WE ARE GOING TO LEARN THE BASIC FEATURES OF WINDOWS 8.1 WITH HANDS ON TRAINING THE CLASS WILL RUN ON THE SPEED OF THE AVERAGE STUDENT
 1 IN THIS CLASS WE ARE GOING TO LEARN THE BASIC FEATURES OF WINDOWS 8.1 WITH HANDS ON TRAINING EACH CLASS WILL RUN APPROXIMATELY 40 MINUTES WE WILL PICK UP WHERE WE LEFT OFF AT THE NEXT CLASS THE CLASS
SASKTEL INTEGRATED BUSINESS COMMUNICATIONS (IBC)
") SASKTEL INTEGRATED BUSINESS COMMUNICATIONS (IBC) DESKTOP CLIENT USER GUIDE Version 4 January 2018 TABLE OF CONTENTS About the SaskTel IBC Desktop Client...3 Requirements...3 How to download and install
SASKTEL INTEGRATED BUSINESS COMMUNICATIONS (IBC) DESKTOP CLIENT USER GUIDE Version 4 January 2018 TABLE OF CONTENTS About the SaskTel IBC Desktop Client...3 Requirements...3 How to download and install
Apogee MetaRecorder. User s Guide v1.0.1
 Apogee MetaRecorder User s Guide v1.0.1 Table of Contents Getting Started Quickly Welcome to MetaRecorder Navigating in MetaRecorder In Depth: Scenes View In Depth Markers View In Depth Settings View Sharing
Interface. 2. Interface Photoshop CS/ImageReady CS for the Web H O T
 2. Interface Photoshop CS/ImageReady CS for the Web H O T 2. Interface The Welcome Screen Interface Overview Using the Toolbox Using Palettes Using the Options Bar Creating a Tool Preset Resetting Tools
BACKUP HD SERIES USER MANUAL
 BACKUP HD SERIES USER MANUAL THANK YOU for purchasing the Clickfree Backup appliance. These instructions have been assembled to help you with the using the product, but generally we re hoping that it is
Analog Audio Inputs 4 Channels of professional balanced analog audio via 1/4 inch jack connectors.
 Product Technical Specifications DeckLink Studio 4K If you work with a wide range of analog video and audio gear, and need to move seamlessly between SD, HD, 2K and Ultra HD, then DeckLink Studio 4K is
A Quick-Reference Guide. To access reddot: https://cms.hampshire.edu/cms
 Using RedDot A Quick-Reference Guide To access reddot: https://cms.hampshire.edu/cms For help: email reddot@hampshire.edu or visit http://www.hampshire.edu/computing/6433.htm Where is... Page 6 Page 8
EDITING GUIDE (EDIT SUITES)
") PREMIERE PRO CC (VERSION 2015.2) EDITING GUIDE (EDIT SUITES) Version 3.3 (FEB 2016) PREMIERE PRO CC EDIT GUIDE - La Trobe University 2015 latrobe.edu.au 2 What do you want to do? 3 1. Back up SD card footage
PREMIERE PRO CC (VERSION 2015.2) EDITING GUIDE (EDIT SUITES) Version 3.3 (FEB 2016) PREMIERE PRO CC EDIT GUIDE - La Trobe University 2015 latrobe.edu.au 2 What do you want to do? 3 1. Back up SD card footage
Call Reporter Pro Software
 Call Reporter Pro Software Call Management Features User Guide Version 1.05 Date & Issue: Issue 1 June 2017 www.usbcallrecord.com This guide is Copyright Intelligent Recording Limited 2017 Introduction
Avigilon Control Center Web Client User Guide
 Avigilon Control Center Web Client User Guide Version: 4.12 Standard PDF-WEBCLIENT-S-E-Rev2 Copyright 2013 Avigilon. All rights reserved. The information presented is subject to change without notice.
Editing in Premiere Pro CC 2015
 Editing in Premiere Pro CC 2015 Lesson 1: Exploring the Interface Exploring the Interface The Source Window The Program Window The Settings Menu Revealing the Video Scopes The Workspace Bar The Project
Configuring System using Startup Wizard
 Configuring System using Startup Wizard Release 1.0 Password Configuration When using a CCTV Security Pros system for the first time, you are required to set a login password for the admin account (system
Premiere Pro Manual Basics - Toolbars, Options and Panels
 Premiere Pro Manual 01 - Basics - Toolbars, Options and Panels 2017 1st edition This Premiere Pro Manual is one of an introductory series specially written for the Arts and Humanities Students at UEA by
COPYRIGHTED MATERIAL. Using Adobe Bridge. Lesson 1
 Lesson Using Adobe Bridge What you ll learn in this lesson: Navigating Adobe Bridge Using folders in Bridge Making a Favorite Creating metadata Using automated tools Adobe Bridge is the command center
SDI Audio Inputs 16 channels embedded in SD and HD. SDI Audio Outputs 16 channels embedded in SD and HD. Sync Input Tri-Sync or Black Burst.
 Product Technical Specifications DeckLink Quad 2 DeckLink Quad 2 features 8 independent SDI capture and playback channels in a single card! Fully compatible with the previous 4 channel model, this new