Moving graphic examples are included on some pages. To view them you need the Flash plugin on your
|
|
|
- Kimberly Holt
- 5 years ago
- Views:
Transcription
1 Print: Introduction Introduction Understanding the basic components of the Millennium circulation environment and how each function works is key to efficiently using Millennium Circulation. Because there are often multiple ways of performing different tasks, this tutorial will introduce you to the various methods, and you will be able to decide which method is the most comfortable or most efficient for you or your staff. This tutorial starts with creating a patron record and then follows the steps used for most common circulation desk functions in an order in which you might normally encounter them. You'll walk through step-by-step instructions, examples, tips, and annotated illustrations of the Millennium Circulation environment. When you complete this tutorial, you will know and understand: The basic components of the Millennium patron record and how to create and edit a patron record How to check out and check in item records Different ways to search, display, create and modify a hold How to charge money, collect money and adjust fines close window [6/2/2005 4:04:12 PM]
2 Print: Navigation & Requirements Navigation & Requirements NAVIGATION At the bottom of each page are links to the next and previous pages. We recommend you follow through the tutorial steps using the Next Page links. A menu bar near the top of each page lists each section in the tutorial, with your current location highlighted in red. You can select a different section from the menu bar. At any time you can select from the drop down menus on the navigation bar across the top of each page. Within pages there are links to other pages in the tutorial. Use your browser's Back button to return to your previous place in the tutorial. Links to pages outside the tutorial open in a separate browser window. To return to the tutorial, close the external link window, or click on the tutorial window to make it active. Hot Tips are used to highlight information that either illustrates or expands a point in the tutorial text. They can be recognized by the icon: Moving graphic examples are included on some pages. To view them you need the Flash plugin on your computer. You can download the latest Flash from this link Use the and buttons to control the Flash movie. Review or Close when finished. RECOMMENDED SOFTWARE AND HARDWARE SETTINGS Web browser: Netscape Communicator v.4.5 or above; Internet Explorer v.4.5 or above For optimal viewing: Web browser: Netscape Communicator v.6.0 or above; Internet Explorer v.5.5 or above Monitor setting: 1024 x 768 resolution or higher, with browser window maximized Colors: at least 256 or higher PRINTING You can print individual tutorial pages and screens from within a Web browser using the 'Print this page' icon The complete tutorial can also be printed in PDF format. To view and print it you need Adobe Acrobat Reader software which you can download from Customers who would like to mount this tutorial on a local server for the use of their staff, without having to allow them full access to CSDirect, may download the tutorial as a ZIP file (size 4.6Mb). After the file has been downloaded and unzipped into the Local directory of choice you will see a list of individual html pages. Double click to open a page called index.html and the tutorial will be accessible. (1 of 2) [6/2/2005 4:04:25 PM]
3 Print: Navigation & Requirements Please contact us if you have questions, comments or problems. close window (2 of 2) [6/2/2005 4:04:25 PM]
4 Print: Using Millennium Circulation Using Millennium Circulation Common Elements In using Millennium you will find many elements to be common to all of the applications. Included within this tutorial and the User Manual are explanations and examples of these elements. Using Java Components The Millennium applications all use a Java-based, graphical interface. Java programs are very similar to Windows programs in that there are often multiple ways to access the same mode or function. For example, there may be a menu command, a keyboard command, or a screen button. The tutorial is designed to be a self-guided introduction to the Circulation system, which can be taken before training, in order to introduce trainees to screens and concepts that they will be using. Note that the labels and values of fields are highly customizable and so may not match your system exactly. However, the concepts and capabilities should be true for all Millennium systems. close window [6/2/2005 4:04:37 PM]
5 Print: Patron Registration & Editing Patron Registration & Editing In Millennium Circulation, the process of registering a patron is the same as creating a Patron Record. In this tutorial two possible methods for creating a Patron Record are presented. The first method is to create a full Patron Record at the time of registration, using the New Patron Record command. The Insert Patron Record window will appear. (1 of 2) [6/2/2005 4:04:46 PM]

6 Print: Patron Registration & Editing The second method allows you to save time at registration by creating a brief Patron Record, called an On-The- Fly Patron Record, then later editing the record to add additional information. close window (2 of 2) [6/2/2005 4:04:46 PM]


7 Print: Creating a Patron Record Creating a Patron Record To create a new Patron Record from Circulation Desk mode, you can either select the New Patron command from the File menu, or click on the New button on the toolbar. The first time you create a new record, the system may prompt you to select a Patron Record template, depending on whether your login has more than one template in its "Preferred" settings. Click on the name of the template you would like to use, and then choose the Select command. You can also double-click on the name of the template. If your login has been assigned only one template, the patron registration will begin without any prompt for template. NOTE: If you choose an incorrect template, have your supervisor or system coordinator show you how to adjust the New Record Tab in Settings, available under the Admin menu. (1 of 3) [6/2/2005 4:08:32 PM]

8 Print: Creating a Patron Record Millennium Circulation offers a Wizard, or a series of dialogs, to assist you in entering patron information. For each field that appears in the selected template, Millennium Circulation prompts you to enter a value for that field. After entering data for the displayed field, choose the Next button, or use your keyboard Enter key to proceed to the next field in the wizard. NOTE: If you make an error and have already chosen Next, you cannot correct it right away. Once you have responded to all of the wizard prompts, you will have the opportunity to edit the record you just created to make any corrections. To exit from the wizard without creating the record, choose the Cancel New Record Creation button. (2 of 3) [6/2/2005 4:08:32 PM]
9 Print: Creating a Patron Record NOTE: In this tutorial, as the process of creating a Patron Record proceeds, some information about each field will be mentioned. For additional information, refer to the User Manual, Page # : Appendix Fixedlength Fields Patron Records & Page # : Appendix Variable-length Fields Patron Records Also note that the order of the wizard fields in your template may be different than the template being used in this tutorial, which prompts for information in the order that it appears in the record. close window (3 of 3) [6/2/2005 4:08:32 PM]


10 Print: Date Fields Date Fields The first field in this template is Expiration Date, which is a Fixed-length Field. This field can be used to block a patron from checking out items if his or her registration has expired. There are several ways to enter the date, which will work anytime you encounter a date field in Millennium Circulation: Enter the date in the format used by your library, e.g. type in two digits each for the month, day and year. As you begin to type, the system will fill in the first two digits of the year. Double click in the white area of the date prompt, or type the letter C (the command to use the calendar). (1 of 4) [6/2/2005 4:08:44 PM]


11 Print: Date Fields The single arrow buttons are used to move forward and back one month. The double arrow buttons are used to move forward and back one year. To select a date, it is important that you actually click on the date you want, so that the text at the top of the dialog box displays the correct date. For example, to make the expiration date one year later, click on the double right arrow to move forward one year and then click on the date one year from today. Note that the year has changed in the top date display. (2 of 4) [6/2/2005 4:08:44 PM]

12 Print: Date Fields Click on the OK button to fill in the Expiration Date field. If your patrons' registration expires one year from today, an easy way to enter the expiration date is to type the letter T, which is the command to enter today's date, then backspace over the last digit of the year and enter next year. (3 of 4) [6/2/2005 4:08:44 PM]
13 Print: Date Fields NOTE: To remove a date (i.e., to make the date field blank) type the letter B, which is the command to blank out a date field. close window (4 of 4) [6/2/2005 4:08:44 PM]


14 Print: Fixed-Length Fields Click on the desired code, then click OK. If you type an invalid code, Millennium Circulation offers a pop-up menu of valid codes. You can use the <space> bar to trigger this menu. Click on the code to select, or use the arrow keys to scroll through the list and press Enter to select. If you know the code you would like to enter, you can also type in that code at the prompt. It is important that you choose the correct PTYPE, or Patron Type, code when creating a new Patron Record. (2 of 5) [6/2/2005 4:09:00 PM]

15 Print: Fixed-Length Fields This numeric code is one of three elements, and the only one from the Patron Record, that determines the correct Loan Rule to use for this patron at the time of a circulation transaction. The Loan Rule is used to determine the correct due dates for items and other circulation parameters. The Birth Date field functions like the Expiration Date field and other date fields on the system. You can type in the date or use the calendar. If you type in the birth date for patrons born in the 20th century, be sure to backspace over the first two digits of the year, the '20'. Replace them with '19'. NOTE: When you type '1' in the year field, the system will fill in the '9', so you only need to type for a birth year of (3 of 5) [6/2/2005 4:09:00 PM]


16 Print: Fixed-Length Fields The valid codes for Home Library are the same Location Codes used in all records on the system, such as Bibliographic and Item Records. If you retrieve the list of codes, you may find that it is a very long list. It is probably easier to type in the appropriate home library code for your patrons, or the correct code may have been set in the default template. (4 of 5) [6/2/2005 4:09:00 PM]

17 Print: Fixed-Length Fields The PMESSAGE, or Patron Message field, is an optional field that adds a generic message to the Patron Record. If you enter a value, the message will display each time the Patron Record is retrieved. Here is a list of some sample PMESSAGEs: If you want no message to appear, you would choose the null, or hyphen, value. close window (5 of 5) [6/2/2005 4:09:00 PM]

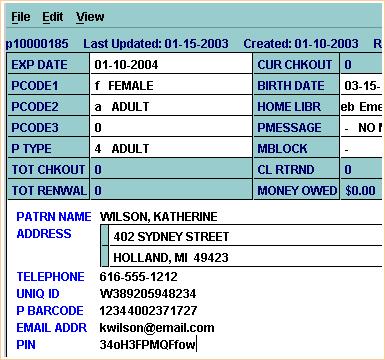
18 Print: Variable-Length Fields Variable-Length Fields The next group of wizard prompts are for Variable-length Fields. Remember that the fields and/or field labels on your system may be different than this example. The ID field is the unique identifying number for this patron, such as driver's license or state ID number in a public library, or the student's registration number in an academic library. For Patron Name, be sure to enter the patron's last name first, followed by a comma, space, then first name and middle initial. Notices to patrons will be addressed to the patron name in first name, last name order, with the comma used as the indicator of where the last name ends. Note that there are multiple lines provided for mailing address; in this example, the first line is for street or PO box, and the second is for city, state and zip. If you need additional lines, press Shift+Enter, or right-click and select Insert Line from the pop-up menu. If applicable, enter the patron's telephone number and complete address. (1 of 2) [6/2/2005 4:09:10 PM]
19 Print: Variable-Length Fields The patron's barcode can either be scanned or keyed in. close window (2 of 2) [6/2/2005 4:09:10 PM]

20 Print: Completing the Record Completing the Record After you have completed all of the wizard prompts, Millennium Circulation allows you to edit the Patron Record you just created to make any corrections. When you are finished, be sure to save your record by clicking on the Save button on the toolbar, or using the Ctrl+S keyboard shortcut. At this point, the record is ready to be used to check out items for the patron, or you can close out of the record if you are finished. (1 of 2) [6/2/2005 4:09:20 PM]

21 Print: Completing the Record For additional information, refer to the User Manual, Page # : Creating a Patron Record close window (2 of 2) [6/2/2005 4:09:20 PM]

22 Print: Duplicate Checking Duplicate Checking There is an additional system feature you may encounter when creating Patron Records. The Patron ID index, and/or the Barcode index, can be checked for duplicate entries to prevent the creation of a duplicate record for the same patron. For example, after entering the data in the ID wizard prompt, and clicking on the Next button or using the Enter key, the system searches the index of patron IDs. If the system finds a duplicate record, it will display in a separate window. If the system finds more than one duplicate record, the system will display a browse list of the records. To replace the record you are creating with the entry that has been found, choose the Use Patron Record button. Millennium Circulation then retrieves the Patron Record to use for checkout or other functions. (1 of 2) [6/2/2005 4:15:20 PM]
23 Print: Duplicate Checking close window (2 of 2) [6/2/2005 4:15:20 PM]

24 Print: Creating Patron Records "On-The-Fly" Creating Patron Records "On-The-Fly" On-The-Fly records can be used when there is a line of patrons waiting to be served and the library has chosen to create brief records to be completed at a later time. It is important to understand that unless fixed fields are entered in the original template, statistics will be lost for items that have been checked out to an On-The-Fly patron. To create a Patron Record On-The-Fly, be sure the current mode is set to Circulation Desk and then scan a new, unused patron barcode. NOTE: Some libraries do not allow On-The-Fly patron records. If this is the case, the ability to create them can be turned off. Rather than having to choose a template, Millennium Circulation can be configured to default to your library's own on-the-fly template. You can then enter the data in each of the wizard prompts. (1 of 3) [6/2/2005 4:16:11 PM]

25 Print: Creating Patron Records "On-The-Fly" When you are finished entering the data, Millennium Circulation allows you to edit the Patron Record you just created to make any corrections. Note that the barcode you scanned is automatically included in the Patron Record. (2 of 3) [6/2/2005 4:16:11 PM]


26 Print: Creating Patron Records "On-The-Fly" Be sure to save your record by clicking on the Save button on the toolbar, or using the Ctrl+S keyboard shortcut. Note that in on-the-fly records, the PMESSAGE field is automatically filled in with the On-the-fly message. This message will appear each time this Patron Record is retrieved. It alerts the operator that further editing of the Patron Record may be required. Click OK and the record is now ready to be used to check out items for the patron. For additional information, refer to the User Manual, Page # : Creating Patron Records On-The-Fly & Page # : Indicating a Patron Record was Created On-The-Fly close window (3 of 3) [6/2/2005 4:16:11 PM]


27 Print: Editing a Patron Record Editing a Patron Record To edit a Patron Record in Circulation Desk mode, first retrieve the Patron Record. After retrieving it, you can open the record for editing by clicking on the Edit button on the toolbar, or, use the Edit Patron command from the Edit menu or the keyboard command Ctrl+Shift+E. If you are authorized for editing, Millennium Circulation opens an editing window displaying the contents of the Patron Record. You can modify the fixed-length and variable-length fields in the record in the editing window. (1 of 3) [6/2/2005 4:16:26 PM]
 Millennium Circulation asks you if you want to save changes to the record before closing it. http://innhouse.iii.")
28 Print: Editing a Patron Record To save your changes and close the editing window, choose the Save/Close (Save/Cl ) button on the toolbar, or use the keyboard command Ctrl+S. If you choose the Close button (or the keyboard shortcut Alt+Q) Millennium Circulation asks you if you want to save changes to the record before closing it. (2 of 3) [6/2/2005 4:16:26 PM]
29 Print: Editing a Patron Record The following pages will explain in detail how to edit a record. close window (3 of 3) [6/2/2005 4:16:26 PM]

30 Print: Fixed-Length Fields Fixed-Length Fields When you first open a Patron Record for editing, the cursor will appear in the first fixed-length field, in this case the Expiration Date. You can use the tab key to move through the codes and values in the fixed-length fields. When you reach the last fixed-length field, the cursor will move to the first variable-length field, and you can tab through the field labels and data. You can also single-click in the code or value area of the field, if you prefer to type in a code. For example, click in the Patron Agency field and type in the correct value. (1 of 3) [6/2/2005 4:16:44 PM]
31 Print: Fixed-Length Fields To display the wizard prompt for a field for editing, double-click on the label or name of the field. For example, choose a validated field such as Patron Message, and the wizard prompt displays a list of valid codes. Click on the code you wish to enter, and then choose OK. For a non-validated field, such as Birth Date, you can either click on the field label to display the calendar, or you can key the date into the field directly. In Millennium, dates are stored with a 4 digit year and the date prompt is hard-coded to be "20yr" for the year portion, e.g. "mo-dy-20yr" if you use U.S. date format. So there are two types of behavior depending on whether the date needed is after January 1, 2000, or whether it is before. (2 of 3) [6/2/2005 4:16:44 PM]

32 Print: Fixed-Length Fields close window (3 of 3) [6/2/2005 4:16:44 PM]

33 Print: Variable-Length Fields Variable-Length Fields There are several ways to choose the command for inserting a variable-length field into the Patron Record: Edit menu - Insert Field command Keyboard command, Ctrl+I Right-click in variable-length field, select Insert Field (1 of 7) [6/2/2005 4:17:23 PM]


34 Print: Variable-Length Fields Insert button on the toolbar Any of these methods will cause Millennium Circulation to display the wizard prompt for variable-length fields, which has a drop-down menu to choose the appropriate type of field. The letters on the left of this list of field names are called Field Group Tags. (2 of 7) [6/2/2005 4:17:23 PM]


35 Print: Variable-Length Fields After selecting the field you wish to enter, you can then key in the data. Then click OK or use the Enter key. A new field may be inserted out of order. The fields will be arranged in standard order when you save the record. (3 of 7) [6/2/2005 4:17:23 PM]

36 Print: Variable-Length Fields You have the ability to insert a new line within an existing address field. Be sure the cursor is in the line above where you want to insert the new line, then either right-click and choose the Insert Line command, or use the keyboard command Shift+Enter. This is useful for adding apartment numbers, business names, in care of, etc. If you need to delete one line of the address, do not use the Delete Field command, as this will delete the entire address field. Use the Delete Line command instead. An alternate method for inserting a variable-length field is to press Enter from anywhere in the bottom section of the record. Millennium Circulation waits for you to enter a Field Group Tag for the type of field you want to enter (for example 't' for telephone number). The field name is filled in, and you can then proceed to enter the data. (4 of 7) [6/2/2005 4:17:23 PM]
37 Print: Variable-Length Fields It doesn't matter where the cursor is in the record for you to insert a new field. After saving the record, the fields will be re-arranged so that the display is in a standard order. You can also re-order the fields by choosing the Refresh command from the View Menu. (5 of 7) [6/2/2005 4:17:23 PM]

38 Print: Variable-Length Fields To correct typographical errors, you can select some or all of the data in a field to change. For example, click and drag the mouse to select one or more letters and then type in the correction. You can also select an entire word by double-clicking on it. The Millennium Editor also uses the normal menu/keyboard editing commands (Cut, Copy, and Paste) as well as having Undo and Redo commands. (6 of 7) [6/2/2005 4:17:23 PM]

39 Print: Variable-Length Fields close window (7 of 7) [6/2/2005 4:17:23 PM]

40 Print: Additional Editing Functions Additional Editing Functions To delete a field from a Patron Record, be sure the cursor is in the field you want deleted first, then choose the Delete Field command. You can choose it from the right-click menu, or from the Edit menu, or use the keyboard shortcut, Ctrl+D. (1 of 9) [6/2/2005 4:17:35 PM]
41 Print: Additional Editing Functions NOTE: Do not use the Delete button in the toolbar - this is used for deleting entire Patron Records. In this example, if a patron forgets his or her PIN, which allows access to patron functions in the Web OPAC, you can delete the PIN from the Patron Record. The next time these functions are accessed by the patron, the patron will be prompted to enter a new PIN. (2 of 9) [6/2/2005 4:17:35 PM]


42 Print: Additional Editing Functions If you accidentally delete the incorrect field in a Patron Record, you can use the Undo command in the Edit menu or Ctrl+Z from the keyboard to restore the field. (3 of 9) [6/2/2005 4:17:35 PM]

43 Print: Additional Editing Functions (4 of 9) [6/2/2005 4:17:35 PM]

44 Print: Additional Editing Functions NOTE: PINs are encrypted in Patron Records so you will not be able to tell them to patrons. In addition to the PMESSAGE, or Patron Message fixed field, which can be used to add generic messages to a Patron Record, there is a variable-length Message field that allows you to add specific text messages to a Patron Record. The Message field also displays whenever you retrieve a Patron Record. (5 of 9) [6/2/2005 4:17:35 PM]


45 Print: Additional Editing Functions You can add more than one Message field to a Patron Record, but only the first field in the group will display when you retrieve the record. You can reorder the fields by first clicking in one of the Message fields, then using one of the commands Move To Top of Group, Move To Bottom of Group, or Move Up or Move Down commands, from either the Edit menu or right-click menu. (6 of 9) [6/2/2005 4:17:35 PM]

46 Print: Additional Editing Functions This will reorder the Message fields so that the first one is the one that will display when the Patron Record is retrieved. (7 of 9) [6/2/2005 4:17:35 PM]

47 Print: Additional Editing Functions For additional information, refer to the User Manual, Page # : Maintaining Records close window (8 of 9) [6/2/2005 4:17:35 PM]

48 Print: Deleting a Patron Record Deleting a Patron Record If you are authorized, you can delete Patron Records in Millennium Circulation. In Circulation Desk mode, retrieve the Patron Record and select the Edit option. You can choose the Delete Patron Record command from the File menu, (1 of 5) [6/2/2005 4:19:10 PM]

49 Print: Deleting a Patron Record or click the Delete button on the toolbar. (2 of 5) [6/2/2005 4:19:10 PM]

50 Print: Deleting a Patron Record Millennium Circulation prompts you to verify that you really want to delete the Patron Record. Choosing Yes will delete the record; if you choose No the record will remain on the system. (3 of 5) [6/2/2005 4:19:10 PM]


51 Print: Deleting a Patron Record NOTE: Once you have deleted a Patron Record there is not any way to restore it. You cannot delete a Patron Record if the patron has items currently checked out or other outstanding circulation transactions. (4 of 5) [6/2/2005 4:19:10 PM]

52 Print: Deleting a Patron Record After Millennium Circulation prompts you to verify that you really want to delete the Patron Record, and you choose Yes, a warning message will be displayed that you cannot delete the record. For additional information, refer to the User Manual, Page # : Deleting Records close window (5 of 5) [6/2/2005 4:19:10 PM]

53 Print: Linking Patron Records Linking Patron Records Millennium Circulation offers the optional capability to create a Family Record Group, which consists of several linked Patron Records. The feature enables library staff to link two or more related Patron Records and then quickly view the checked-out items, fines, and bills associated with a household or other group. The feature can assist libraries that hold parents responsible for their children's circulation activity. Staff can access the children's records from the parents' records during check out. Once you have retrieved a Patron Record belonging to a family group in Millennium Circulation, the Linked Patrons tab displays the group to which the patron belongs. In this example, the currently displayed patron belongs to a family group consisting of the three patrons listed in the table. To link Patron Records to each other, be sure you are in Circulation Desk mode. Retrieve one of the Patron Records you want to link, then click on the Linked Patrons tab. Choose the Link button. Millennium Circulation opens a Patron Record search window. Select an index for your search from the clickable drop-down menu. In this example, select the patron Name index. Key in your search. If Millennium Circulation does not find an exact match, you can select the correct patron in the browse list, and then choose the Select button. (1 of 3) [6/2/2005 4:23:01 PM]


54 Print: Linking Patron Records The patron is added to the family group and the Linked Patrons tab is updated. While viewing a family group in a patron's Linked Patrons tab, you can retrieve any of the other patrons in the group. To do this, select the patron from the table and choose the Go To Patron button. Millennium Circulation retrieves the selected Patron Record. Note that the Linked Patrons tab will be identical in all Patron Records belonging to a group. To remove a patron from its family group, select the patron you want to remove. Note that you can select more than one Patron Record to remove from the group. Choose the Unlink button. (2 of 3) [6/2/2005 4:23:01 PM]


55 Print: Linking Patron Records The patron will be deleted from the group. In case you selected the currently retrieved Patron Record, Millennium Circulation prompts: Remove link from current patron? Choose Yes to remove the patron from the family group. If you select all or all but one of the group members and then click Unlink, Millennium Circulation prompts: All patrons in this linked group will be unlinked and the group will be deleted from the system. Continue? Choose Yes to delete the family group from the system. For additional information, refer to the User Manual, beginning on Page # : Linking Patron Records close window (3 of 3) [6/2/2005 4:23:01 PM]

 displays a Search/Browse screen that allows you to search by any Patron Record Index, e.g.")
56 Print: Checking Out Items Checking Out Items To start checking out items, be sure you are in Circulation Desk mode, and that the Check Out tab is selected. If it is not already displaying, the first step is to retrieve the patron's record. The easiest way is to key or scan the patron's barcode at the barcode prompt. NOTE: The Search button (or Alt+S command) displays a Search/Browse screen that allows you to search by any Patron Record Index, e.g., Name, Unique ID, Barcode. (1 of 6) [6/2/2005 4:23:21 PM]


57 Print: Checking Out Items After Millennium Circulation has successfully retrieved the patron record, a brief display of the record appears in the upper right section of the screen. Then, retrieve the item record by keying or scanning the item barcode at the barcode prompt. When you successfully retrieve an item record, Millennium Circulation determines the Loan Rule to apply to the check out, which determines the appropriate due date for the item. On the Check Out tab, the system displays the item barcode, title, and due date. When you are finished with a patron record it is important that you close the record, so that the transactions are fully processed. This can be done in a number of ways: Click the Close button on the toolbar, or use the keyboard shortcut for the Close command, ALT+Q (2 of 6) [6/2/2005 4:23:21 PM]

58 Print: Checking Out Items Key or scan a different patron barcode at the barcode prompt. This will close the current patron record and retrieve the next patron record. An alternate method to retrieve a patron record is to search by patron name. At the barcode prompt, key the letter 'n' (which is the index tag for Patron Name) followed immediately (no spaces) by the search string (i.e., all or part of the patron name), then press the Enter key. NOTE: The Search button (or Alt+S command) displays a Search/Browse screen that allows you to search by any Patron Record Index, e.g., Name, Unique ID, Barcode. If the search does not result in a direct hit, Millennium Circulation will show a Browse Display based on the search. (3 of 6) [6/2/2005 4:23:21 PM]


59 Print: Checking Out Items To view more information about the entries in the browse list, click on the Expand All button. To return to the original display, click on the Collapse All button. The line of any patron in the Browse Display can be highlighted by single-clicking with the mouse or using the keyboard arrow keys. Note that the brief display in the upper right frame changes based on the patron that is highlighted: (4 of 6) [6/2/2005 4:23:21 PM]


60 Print: Checking Out Items To retrieve the highlighted patron record double-click with the mouse, press the Enter key, or click on the Select button. When the Check Out tab and the other tabs - AND the brief patron record in the upper right frame - are displayed, the patron record has been selected. (5 of 6) [6/2/2005 4:23:21 PM]


61 Print: Checking Out Items To return to the browse display, click on the Browse button on the toolbar. To close out of the browse display, click on the Close button on the toolbar. For additional information, refer to the User Manual, Page # : Checking Out Items & Page # : How Millennium Circulation Calculates the Due Date for a Check-Out close window (6 of 6) [6/2/2005 4:23:21 PM]

62 Print: Overriding The Calculated Due Date Overriding The Calculated Due Date If you are authorized, Millennium Circulation allows you to override the system-calculated due date for the current check out. Immediately after checking out an item, choose the Change Due Date button. Millennium Circulation displays the Change Due Date dialog. Using the calendar, you may choose a date up to 365 days from the current date. To move forward one month, click on the single right arrow (>). To move forward one year, click on the double right arrow (>>). NOTE: Only days the library is open are available to choose. To select a date, it is important that you actually click on the date you would like and have the text at the top of the dialog box change. For example, to make the due date one month later: click on the single right arrow (>) click on the date you want to choose (1 of 4) [6/2/2005 4:23:39 PM]


63 Print: Overriding The Calculated Due Date be sure it's changed at the top of the dialog then click OK. The new due date will display on the Check Out tab. If you would like to apply the selected date to all subsequent checkouts for the current patron, after choosing the Change Due Date button, you can choose the Use this date in rest of check-outs for this patron box. NOTE: This box appears only when you choose the Change Due Date button from the Check Out tab. Millennium Circulation will not apply this due date to the check outs that are performed for subsequent patrons. Alternately, once you have checked out several items to a particular patron, you can select some of the items, and change the due date only on those selected items. In the following example, the due date will be changed only for the videorecordings being checked out: (2 of 4) [6/2/2005 4:23:39 PM]


64 Print: Overriding The Calculated Due Date For additional information, refer to the User Manual, Page # : Overriding the Calculated Due Date (3 of 4) [6/2/2005 4:23:39 PM]
65 Print: Overriding The Calculated Due Date close window (4 of 4) [6/2/2005 4:23:39 PM]

66 Print: Printing Date Due Slips Printing Date Due Slips To print date due slips for checked out items, be sure the Print Slip check box on the Check Out tab is selected. If your library normally prints date due slips, the default setting will be that the box is checked. Depending on how the system is configured, it will either print a date due slip for each item immediately after it is checked out, or it will print a single slip with all items for the patron when you close the current record or retrieve another patron record. NOTE: The Print Slip check box may not appear at all if your library does not normally print date due slips. For additional information, refer to the User Manual, Page # : Printing Date Due Slips close window [6/2/2005 4:23:54 PM]


67 Print: Possible Messages When Checking Out an Item to see this dialog box: If a patron record has multiple messages, this would be the easiest way to view all the messages. NOTE: The Messages button may be disabled on your library system. The second type of messages are Patron Blocks and other warnings that will display as you attempt to check out items to a patron. NOTE: These blocks may require authorization to override. Following are several examples of patron blocks: If a patron's registration has expired, this is the type of message that will display if today's date is later than the date in the patron's Expiration Date field in the patron record. Note that you can Override (if authorized) or choose not to override this block. If a patron owes too much money, this is the type of message that will display. The maximum amount owed may vary depending on the type of patron. (2 of 5) [6/2/2005 4:24:07 PM]
68 Print: Possible Messages When Checking Out an Item Sometimes a patron will have more than one block. Here's an example of a patron that is blocked both because the registration has expired AND too much money is owed. If a Manual Block was assigned to a patron record, Millennium Circulation displays the message associated with the value of the MBLOCK, or Manual Block, field in the patron record. For example, in this case the MBLOCK indicates the patron has an invalid address. Millennium Circulation can notify you if an item is for library use only and/or the item is non-circulating. If the STATUS code in the Item Record is set to Library Use Only, then the following dialog will display: (3 of 5) [6/2/2005 4:24:07 PM]

69 Print: Possible Messages When Checking Out an Item If the Loan Rule specifies that an item is non-circulating, the following dialog will display: NOTE: If you get a "non-circulating" message for an item that should be allowed to circulate, it may mean that there is a problem with either the Item Record or Patron Record fields used to determine the Loan Rule. If the item you are trying to check out is checked out to another patron (for example, if the previous patron returned the item and the item was re-shelved without having been checked in), Millennium Circulation warns you and offers to automatically check in the item ('clear that checkout'). If you answer Yes, Millennium Circulation first checks in the item before checking it out to the current patron. Millennium Circulation notifies you if the patron has checked out more items than the MAX ITEMS element in the Automatic Patron Blocks table. The message indicates that the patron has exceeded a certain number of items limit. (4 of 5) [6/2/2005 4:24:07 PM]
70 Print: Possible Messages When Checking Out an Item Additionally, Millennium Circulation warns you if the patron is close to reaching the MAX ITEMS Limit of checked out items. If MAX ITEMS is greater than 25, the system produces a warning message whenever the patron is within 5 items of the maximum. If MAX ITEMS is less than or equal to 25, the warning message displays whenever the patron is within 2 items of the maximum. For additional information, refer to the User Manual, Page # : Possible Messages (Checking Out an Item) & Page # : Displaying Patron Messages close window (5 of 5) [6/2/2005 4:24:07 PM]

71 Print: Checking In Items Checking In Items There are two ways to check in items, depending on whether or not you want to be able to perform other functions for the patron once you check in the items. In either case, when you check an item back in to the library system, Millennium Circulation unlinks the item record from the patron record and checks for holds on the item or title. The two methods of checking in items are called Check In (Patron Present), accessed from Circulation Desk mode, Check In tab: and Check In (No Patron), which has its own Navigation Bar icon: (1 of 2) [6/2/2005 4:24:21 PM]

72 Print: Checking In Items Using either method, you can optionally backdate check ins, and/or deal with patron financial functions. For additional information, refer to the User Manual, Page # : Checking In Items close window (2 of 2) [6/2/2005 4:24:21 PM]


73 Print: Checking In Items - Patron Present You can also choose the Check In tab before you retrieve a patron record. In this case, you would key or scan the item barcode first. (2 of 4) [6/2/2005 4:24:33 PM]


74 Print: Checking In Items - Patron Present Millennium Circulation retrieves and displays the associated patron record, as well as checking in the item. Be sure to close the patron record when you are done. (3 of 4) [6/2/2005 4:24:33 PM]

75 Print: Checking In Items - Patron Present If your library allows patrons to request a check in receipt, be sure the Print Receipt check box is selected before checking in any items for this patron. If your library normally prints check in receipts, the default setting will be that the box is checked. For additional information, refer to the User Manual, Page # : Checking In Items - Patron Present close window (4 of 4) [6/2/2005 4:24:33 PM]
: 1.Change the mode to Check-In (No Patron). 2.")

76 Print: Checking In Items - No Patron Checking In Items - No Patron To check in items without the patron being present (for example, when emptying the book drop): 1.Change the mode to Check-In (No Patron). 2.Key or scan the Item barcode(s) to retrieve the item record(s) from your Innovative database. For each item you check-in, the system will display the item barcode, the patron name, and, if applicable, any fine amount due and the status of the item. (1 of 2) [6/2/2005 4:25:50 PM]

77 Print: Checking In Items - No Patron Clicking on Close will clear the display. For additional information, refer to the User Manual, Page # : Checking In Items - No Patron close window (2 of 2) [6/2/2005 4:25:50 PM]

78 Print: Backdating Checked In Items Backdating Checked In Items Using either Check In (Patron Present) or Check-In (No Patron), Millennium Circulation allows you to enter any date previous to today to be used as the check in date. Backdating the check in has the effect of reducing or eliminating fines for items that would otherwise be considered overdue. Millennium Circulation records today's date in the item record, but shows the backdated date in any fine displays. This function is often used to check in items that have been left in the book drop overnight, or if the library was closed due to unusual circumstances. To backdate an item: 1. Before checking in the item, choose the Backdate button. 2. Millennium Circulation displays the Backdate calendar dialog. To move back to the previous month, click on the single left arrow (<). Note that only previous days are available to choose. 3. To select a date, it is important that you actually click on the date you want, so that the text at the top of the dialog box displays the correct date. For example, to make the due date yesterday, click on the appropriate box, make sure the date is changed at the top, then click OK. (1 of 2) [6/2/2005 4:26:01 PM]


79 Print: Backdating Checked In Items Millennium Circulation then updates the Check-In Date box and you can begin checking in items. To quickly clear that date after you have finished checking in the backdated items, switch to another mode or, if you are using Circulation Desk mode, you could also click on another tab. For additional information, refer to the User Manual, Page # : Backdating Checked-in Items close window (2 of 2) [6/2/2005 4:26:01 PM]


80 Print: Checking In Items That Have Special Conditions Checking In Items That Have Special Conditions Millennium Circulation informs you if it encounters any situations that require user intervention. Note that you must acknowledge every message before the item is checked back into the system. There are two types of special conditions that you may see when checking in item records. In Millennium Circulation, these will display on the screen in a small dialog box. The first type of message will display when you retrieve an item record during check in. These will be generic or specific messages that were previously added to an item record. Here is an example of an item record with a message that the item needs to be returned to a special storage area. Click on the Yes button to acknowledge the message and proceed with the check in. The second type of message is warnings that will display as you attempt to check in items that have a system generated condition. Following are several examples of these check in messages. If you check in an item whose status is not On Shelf (see note below), Millennium Circulation asks if you want to clear the Item record's status (that is, it sets the status back to On Shelf). NOTE: The system does not change the STATUS field of an item when it is checked out - it remains as the ON SHELF or AVAILABLE value - but it does update other fields in the item record, including the Due Date field. For example, if the item you are checking in has been marked as Missing, Millennium Circulation asks if you want to clear the status. Choose Yes to have Millennium Circulation check in the item and change its status back to On Shelf. If you choose No, Millennium Circulation still checks in the item, but does not alter its status. If an item's status has been designated Library Use Only, Millennium Circulation does not alter the (1 of 2) [6/2/2005 4:26:12 PM]

81 Print: Checking In Items That Have Special Conditions status when the item is checked in. No message will display. If you check in an item that satisfies a hold request, Millennium Circulation alerts you that the item should be placed on the hold shelf along with patron information. The system sets the item's status to 'On Holdshelf.' You can print a hold slip to accompany the item if you answer Yes to the question "Print slip to place in book?" Also, the system may be set to generate a pickup notice for the hold, generated in the same manner as regular overdue and other notices, which can be sent to a patron or used to call the patron. When you check in an item that belongs at another location, Millennium Circulation can automatically set the item status to In Transit. Additionally, the system inserts a Transit note in the item record that indicates when and where the transit status was set. This note is removed when the item is checked in at the correct location. After checking in the item, you may be prompted to print a Transit Slip. If the item was previously set to In Transit at another location and you are checking the item in at its owning location, Millennium Circulation clears the item's status, that is, it sets the status back to On Shelf. Additionally, Millennium Circulation removes the Transit note from the item record. No messsage will display. For additional information, refer to the User Manual, Page # : Checking In Items that have Special Conditions close window (2 of 2) [6/2/2005 4:26:12 PM]


82 Print: Waiving Fines And Collecting Money At Check-In Waiving Fines And Collecting Money At Check-In Millennium Circulation allows you to collect money or waive fines at the time of check in, using Check In - Patron Present. Scan in the items you wish to check in. The system retrieves the patron record and checks in the items. Select the items for which you will be collecting money or waiving charges, then click either the Collect Money or Waive Charges button, as appropriate. If you click on the Collect Money button, you will be allowed to specify the amount to collect. If you enter less than the total amount due, you will be asked if you want to waive the remaining fines. (1 of 4) [6/2/2005 4:26:28 PM]

83 Print: Waiving Fines And Collecting Money At Check-In NOTE: You cannot specify the specific amount to be waived, so you should always choose Collect Money for both partial and full payments. If you choose the Waive Charges button, it will always waive the total amount selected. A receipt dialog will display. You can print the receipt, or click OK to close the dialog without printing. After checking in items for one patron, if you check in an item for another patron, by default Millennium Circulation clears the Total box of any fines the previous patron accumulated. However, if the Collect Money For Multiple Patrons option is enabled on your system, Millennium Circulation continues to display the fines accumulated by previous patrons. This allows you to collect fines for multiple patrons. (2 of 4) [6/2/2005 4:26:28 PM]


84 Print: Waiving Fines And Collecting Money At Check-In After selecting the items you want, you can collect money or waive charges. Note that the receipt will show all money collected for all patrons. If you want to clear the Total box before you scan an item for a different patron, choose the Close icon. Otherwise the checked in items, and any fines accumulated, for all patrons will continue to display. Millennium Circulation adds all fines to the patron record when you check in an item. The Waive charges on items being checked in box is an optional feature that allows you to waive all fines that would have been assessed during the check in session. (3 of 4) [6/2/2005 4:26:28 PM]

85 Print: Waiving Fines And Collecting Money At Check-In By default, the Waive charges on items being checked in check box is present but not selected. This feature is available in both Check In - Patron Present and Check In - No Patron. If the Waive charges on items being checked in box is selected before you check in any items, Millennium Circulation does not assess any fines for those overdue items that are checked in. Note that the status column will show any amount waived. For additional information, refer to the User Manual, Page # : Collecting Money at Check-in & Page # :Waiving Fines at Check-in close window (4 of 4) [6/2/2005 4:26:28 PM]

86 Print: Circulation Desk Mode Circulation Desk Mode In Circulation Desk mode, the bottom half of the main window consists of Patron Information Tabs. These tabs display circulation specific information for the current patron. Each tab contains a table of information. For example, the table in the Checked Out Items tab displays the items currently checked out to the patron. To view a tab, you can: Click on the tab Choose the corresponding menu option from the Go menu (1 of 2) [6/2/2005 4:26:40 PM]

87 Print: Circulation Desk Mode Use function keys to switch tabs. For example, some default function keys are: F1=Check Out, F6= Checked Out Items, F7=Holds, F9=Check In NOTE: Password authorization may be required to access some of the information displayed and functions available on the patron tabs. For additional information, refer to the User Manual, Page # : Patron Information Tabs close window (2 of 2) [6/2/2005 4:26:40 PM]

88 Print: Renewing Items Renewing Items In general, the Loan Rule for the transaction (specified in the item record's Loanrule field) determines whether the patron can renew the item, and how long to extend the loan period. There are several ways to renew items. It can either be done from Circulation Desk mode, or from the Renew mode. Starting from a patron's record in Circulation Desk mode, there are three methods you can use: If the patron brings you the items for renewal, you can scan those items in the Check Out tab From the Checked Out Items tab you can select the items that the patron wants to renew and choose the Renew button From the same tab, you can use the Change Due Date button. A. Renew items by scanning them from the patron record 1. Retrieve the patron record and be sure the Check Out tab is selected. Scan the item barcode. The system will prompt you to confirm the item should be renewed. 2. Click Yes. If the item is eligible for renewal, the system will display the new due date. Millennium Circulation uses the relevant Loan Rule to calculate the due date for the renewal. (1 of 9) [6/2/2005 4:27:35 PM]


89 Print: Renewing Items If you'd like to change the Due Date for an item that you just scanned, Millennium Circulation allows you to modify the due date for that renewal, using the Change Due Date button. Make sure you do it before processing the transaction by closing out of the patron record. For instructions on how to use the Change Due Date button, see below. B. Renew items using the Renew button 1. Retrieve the patron record and switch to the Checked Out Items tab. 2. Select the items to renew by checking the appropriate boxes in the All column. (2 of 9) [6/2/2005 4:27:35 PM]


90 Print: Renewing Items 3. Choose the Renew button. Millennium Circulation attempts to renew each of the items that you have selected using the Loan Rule for the transaction. If you'd like to change the Due Date for an item that you just renewed, Millennium Circulation allows you to modify the due date for that renewal, using the Change Due Date button. It is important to do so before closing out of the patron record, while the Status column still indicates that the items have just been renewed. (3 of 9) [6/2/2005 4:27:35 PM]


91 Print: Renewing Items Otherwise, using the Change Due Date button will count as an additional renewal. For instructions on how to use the Change Due Date button, see below. C. Renew items using the Change Due Date button If you use the Change Due Date button, Millennium Circulation allows you to specify the due date for the renewals, instead of using the Loan Rule to determine the date. 1. Select the items to renew, or the already renewed items whose due dates you want to change. Choose the Change Due Date button. 2. Millennium Circulation displays the Change Due Date dialog. You may choose a date up to 365 days from the current date. To move forward one month, click on the single right arrow (>). To move forward one year, click on the double right arrow (>>). 3. To select a date, it is important that you actually click on the date you would like and have the text at the top of the dialog box change. Then click OK. D. Renew items from the Renew mode Change to Renew mode on the Navigation Bar. (4 of 9) [6/2/2005 4:27:35 PM]

92 Print: Renewing Items This is Renew - No Patron mode, which allows you to renew books without retrieving a patron's record. Simply scan in the item barcode, and Millennium Circulation will attempt to renew the item as previously discussed. Millennium Circulation uses the relevant Loan Rule to calculate the due date for the renewal. There is no possibility to set the date manually. (5 of 9) [6/2/2005 4:27:35 PM]

93 Print: Renewing Items (6 of 9) [6/2/2005 4:27:35 PM]


94 Print: Renewing Items Regardless of the method you use, you may sometimes encounter messages, depending upon the status of the item you try to renew. When you attempt to renew an overdue item, the behavior of Millennium Circulation depends on whether the patron has been fined. Note that if you are renewing an overdue item, Millennium Circulation will always calculate the due date from the date of the renewal, even if your system is set to renew from the original due date. When the patron owes a fine, Millennium Circulation displays the money owed by the patron and offers three options: Don't renew. Millennium Circulation does not renew the item. Renew and add fine. If the item was not billed, the system adds the fine to the patron record. If the item was billed, the system reduces the Money Owed field to reflect the new bill. Renew with no fine. Millennium Circulation renews the item and cancels the entire fine or bill. When you renew multiple items Millennium Circulation tries to renew each item you selected in the order that it appears in the table. If Millennium Circulation prompts you to make a decision for an item, it will put the (7 of 9) [6/2/2005 4:27:35 PM]

, you will see a")
95 Print: Renewing Items focus on that item's row. There are some other messages you may encounter when attempting to renew items: You will see this message and not be allowed to renew the item if it is on hold for another patron. If a patron tries to renew an item too soon after it has been checked out (according to the Loan Rule), you will see a message indicating that the item is too soon to renew. (8 of 9) [6/2/2005 4:27:35 PM]

96 Print: Renewing Items Also, if the number of renewals has exceeded the maximum number of renewals allowed you will see a message that this person has too many renewals on this item. For additional information, refer to the User Manual: Page # : Renewing Items Page # : Renewing Items from a Patron's Record Page # : Calculating the New Due Date for a Renewal Page # : Changing Due Dates for Renewed Items Page # : Renewing an Overdue Item Page # : Possible Messages (Renewing Items) Page # : Renewing Items Without a Patron's Record close window (9 of 9) [6/2/2005 4:27:35 PM]
. The total number of items that a patron has checked out displays in parentheses in the tab's title.")
![In this example, the patron has fourteen items checked out. If the patron has any overdue items, the system displays the tab's title in an alert color [the default color is red].](/docs-images/92/107966373/images/97-2.jpg "You have the ability to limit and sort the items in the Checked Out Items table. If the Limit to Overdue option is set in the drop-down list http://innhouse.iii.com/ruslan/circul/print_circul1.")
97 Print: Checked Out Items Checked Out Items The Checked Out Items tab displays the items currently checked out to the patron, but does not include any items that have just been checked out. (They are listed in the Check Out tab until you close the patron record). The total number of items that a patron has checked out displays in parentheses in the tab's title. In this example, the patron has fourteen items checked out. If the patron has any overdue items, the system displays the tab's title in an alert color [the default color is red]. You have the ability to limit and sort the items in the Checked Out Items table. If the Limit to Overdue option is set in the drop-down list (1 of 7) [6/2/2005 4:27:47 PM]


98 Print: Checked Out Items and the patron has fines for overdue items, Millennium Circulation displays the amount owed in the Status column. You can select the All option to reset the table. Sorting items in the table is performed by clicking on the column header by which you would like to sort. For example, you may wish to sort items by the Due Date. The first click will sort the items by due date in ascending order; a second click will sort them in descending order. To reset the table to the original order, which is sorted in the order the items were checked out, click on the number (or pound) sign column header. (2 of 7) [6/2/2005 4:27:47 PM]


99 Print: Checked Out Items Another example of a common way that items are sorted is by location. This will sort the items by each library collection. For example, you can sort by location to find all of the video recordings from a particular library checked out to this patron. This makes it easier to select similar items to perform a function. The functions you can perform within the Checked Out Items tab are: Renewing Items Changing Due Date Marking Items as Lost Claiming Items Returned There are several other useful tools available in tables. You can temporarily resize columns by clicking and dragging a column header divider. (3 of 7) [6/2/2005 4:27:47 PM]
 does not fully display, you can move the mouse cursor over the field.")


100 Print: Checked Out Items You can also temporarily move a column to a different position by clicking and dragging a column header. If an entire title (or another field) does not fully display, you can move the mouse cursor over the field. The Table Tooltips feature will show a box with more information. Using the Right Mouse Button allows you to right click for several functions. In the Checked Out Items tab, you can copy the selected field. First, left click in the field you wish to copy to select it, then right click in the field and choose the Copy command. You can use the Windows paste command (Ctrl+v) to paste the information elsewhere in Millennium Circulation, or into another program. (4 of 7) [6/2/2005 4:27:47 PM]


101 Print: Checked Out Items The View This Item command allows you to view the full item record, which contains many fields used during circulation transactions. For example, there are fields related to the item type, the location and the actual loan rule used for this transaction. There are also fields specifically about the transaction, such as the check out date and time, the checkout location, the patron number, the last patron number who had this checked out, the number of renewals, the number of overdues and the status of the item. (5 of 7) [6/2/2005 4:27:47 PM]

102 Print: Checked Out Items Note that the Status does not change when the item is checked out, but the Due Date field is filled in. This is what will display in the public catalog. There are also a number of fields used for statistical purposes. The last right click command, Print Table, is an alternate way to print the list of checked out items or the list of items checked out to a patron. (6 of 7) [6/2/2005 4:27:47 PM]

103 Print: Checked Out Items close window (7 of 7) [6/2/2005 4:27:47 PM]


104 Print: Claiming Items Return Claiming Items Return If a patron claims to have returned an item, but the item has not yet been checked in, you can claim the item returned. When you claim an item returned, Millennium Circulation places a claim return note in the item record and it places a claim return note in the patron record. (1 of 5) [6/2/2005 4:28:13 PM]

105 Print: Claiming Items Return Millennium Circulation also allows the item to be checked in or remain checked out and allows the status of the item to be changed to either Claims Returned or Missing. To claim one or more items as returned by a patron: 1. Retrieve the patron record. 2. Choose the Checked-Out Items tab. 3. In the table of items checked out to the patron, select the items to claim returned by checking the appropriate boxes in the All column. (2 of 5) [6/2/2005 4:28:13 PM]


106 Print: Claiming Items Return If you select more than one item, all selected items will have the same claim returned date and will be checked in or left checked out together. 4. Then choose the Claim Returned button. Millennium Circulation displays a calendar dialog for choosing the claim returned date. If the patron does not know when he/she returned the item, choose the Blank Date button at the bottom of the dialog. The claim returned notes will indicate an Unknown Date. Otherwise, select the claims returned date and click OK. After you have selected a date, Millennium Circulation offers three options: (3 of 5) [6/2/2005 4:28:13 PM]
 and change status to CLAIMS RETRND.")
 and change status to CLAIMS RETRND.")
107 Print: Claiming Items Return Check in items (with no fines) and change status to MISSING. Millennium Circulation changes the item's status to Missing and checks the item record back into the system. If there are outstanding holds on the item, Millennium Circulation prompts you to cancel these holds. Check in items (with no fines) and change status to CLAIMS RETRND. Millennium Circulation changes the item's status to Claims Returned and checks the item record back into the system. If there is an outstanding fine or bill for the item, Millennium Circulation waives this charge. Leave items checked out (send overdue notices) and change status to CLAIMS RETRND. Millennium Circulation changes the item's status to Claims Returned and leaves the item record checked out to the patron. The system will continue to send overdue notices and generate bills. The system will verify that the items were claimed returned. This is also noted in the Status column for those items. For additional information, refer to the User Manual: Page # : Claiming Items Returned Page # : Possible Messages (Claiming Items Returned) (4 of 5) [6/2/2005 4:28:13 PM]
108 Print: Claiming Items Return close window (5 of 5) [6/2/2005 4:28:13 PM]


109 Print: Marking Items as Lost Marking Items as Lost Millennium Circulation enables you to mark an item as lost. You can use this feature when a patron reports that a checked out item has been lost. To mark one or more items as lost by a patron: 1. Retrieve the patron record. 2. Choose the Checked-Out Items tab. 3. In the table of items checked out to the patron, select the items to mark as lost by checking the appropriate boxes in the All column. 4. Choose the Mark Lost Items button. Millennium Circulation displays the selected items in the Mark Lost Items window. By default only the first item is selected. There are four buttons at the bottom of the Mark Lost Items window: If you choose Cancel, the items will not be marked lost. View Item allows you to view the full item record for any item being marked as lost. Note that the status has not yet changed to Lost. (1 of 4) [6/2/2005 4:28:52 PM]

110 Print: Marking Items as Lost Update Bill allows you to change the amount of a bill for a lost item. Select the item whose bill should change. Choose the Update Bill button and the Updating Bill dialog displays. You can update the amount to be charged for Item Cost, Processing Fee, or Billing Fee. You can also reduce the amount owed to zero by entering a zero amount for each element in the bill. Millennium Circulation updates the bill amount for the item when you choose OK; choose Cancel to close the dialog without updating the bill. (2 of 4) [6/2/2005 4:28:52 PM]


111 Print: Marking Items as Lost Add Bills is used to mark the items as lost. Millennium Circulation would prompt you to cancel any holds that exist on the item. Note that the lost items will no longer display on the Checked Out Items tab. To view the items after marking them as lost, click on the Fines tab. For additional information, refer to the User Manual: Page # : Marking Items as Lost Page # : Changing the Billed Amount (3 of 4) [6/2/2005 4:28:52 PM]
112 Print: Marking Items as Lost close window (4 of 4) [6/2/2005 4:28:52 PM]


113 Print: Fines Tab Fines Tab The Fines tab displays the patron's outstanding fines and bills. The amount of money owed by the patron displays in parentheses in the tab's title. If the amount owed by a patron is greater than a pre-determined amount, the title of the Fines tab displays in an alert color, usually red. With authorization, you can perform several functions within the Fines tab: Collect Money Waive and Adjust Charges Add a Manual Charge View a Patron's History of Fines Paid View the Notes in a Patron Record close window [6/2/2005 4:28:57 PM]


114 Print: Collecting Money for Fines and Bills Collecting Money for Fines and Bills To collect money for a patron's outstanding charges: Retrieve the patron's record and select the Fines tab. Millennium Circulation lists the total amount owed from all charges for the patron in the Total field. For each charge, Millennium Circulation lists the Status, Title, Location of the item or where the charge was generated, and the Amount. In the table of the patron's outstanding charges, select the charges for which you want to collect money. As you select and de-select charges, Millennium Circulation adjusts the Amount selected field. After you have selected the charges for which you want to collect money, choose the Collect Money button. Millennium Circulation prompts you to enter the amount to collect. The dialog initially displays the total amount of the selected charges, which corresponds to the value of the Amount Selected field. (1 of 5) [6/2/2005 4:29:10 PM]


115 Print: Collecting Money for Fines and Bills NOTE: You cannot enter an amount greater than the selected amount, nor can you enter a negative number. If the patron is paying the selected amount, choose OK. Millennium Circulation displays a receipt for the selected charges. To print this receipt, choose the Print button. To close the window without printing, choose the OK button. If the patron is paying less than the selected amount, after choosing Collect Money key that amount and then choose OK. Millennium Circulation asks if you want to waive the remaining fines. (2 of 5) [6/2/2005 4:29:10 PM]

116 Print: Collecting Money for Fines and Bills If you choose Yes, Millennium Circulation waives the remaining amount, that is, the total amount of the selected charges minus the reduced amount you entered above. If you answer No, Millennium Circulation applies the reduced amount against each of the selected items, starting with the first charge in the group, until the reduced amount is exhausted. For this reason, it is important that you choose the specific items for which you want to collect money. Millennium Circulation displays a receipt for the selected charges and updates the status of any charges that receive only a partial payment (e.g., from Overdue to Remaining Overdue). (3 of 5) [6/2/2005 4:29:10 PM]

117 Print: Collecting Money for Fines and Bills Millennium Circulation also allows you to waive charges without taking a partial payment. After you have selected the charges that you want to waive, choose the Waive Charges button. Millennium Circulation asks if you want to waive the fines. If you answer No, Millennium Circulation does not waive the selected fines. If you choose Yes, Millennium Circulation waives the entire amount of the selected fines. NOTE: You will never be allowed to specify the amount to waive. After you waive fines, Millennium Circulation displays a receipt with a zero amount paid. (4 of 5) [6/2/2005 4:29:10 PM]
 close window http://innhouse.iii.com/ruslan/circul/print_circul2_1.")
118 Print: Collecting Money for Fines and Bills For additional information, refer to the User Manual: Page # : Collecting Money for Fines/Bills Page # : Collect Money Page # : Waive Fines Page # : Printing Receipts Page # : Possible Messages (Collecting Money) close window (5 of 5) [6/2/2005 4:29:10 PM]

119 Print: Adjusting Fine Amounts Adjusting Fine Amounts Using Millennium Circulation, you can adjust the amount of a fine. Within the Fines tab, right-click on the fine to adjust and choose View This Fine from the menu. Millennium Circulation displays detailed information for the fine. (1 of 3) [6/2/2005 4:29:24 PM]
120 Print: Adjusting Fine Amounts You can use the Print button to print or this information. To adjust the charges, choose the Adjust button. This allows you to edit the amount of the charge. (2 of 3) [6/2/2005 4:29:24 PM]

121 Print: Adjusting Fine Amounts When you have finished adjusting the charges, choose OK. Millennium Circulation updates the patron's Fines tab with the new information. For additional information, refer to the User Manual, Page # : Adjusting Fine Amounts close window (3 of 3) [6/2/2005 4:29:24 PM]


122 Print: Adding a Manual Charge Adding a Manual Charge Millennium Circulation allows you to add a Manual Charge, that is, one that is not generated automatically from an overdue or billed item, to a patron record. For example, you might assess a manual charge to a patron who has returned a damaged book, has lost a library card, or has used another library service for which there is a charge. Within the Fines tab, choose the Add Charge button. Millennium Circulation displays the Add Charge dialog. In this dialog, you can enter the Amount of the charge, the Reason for the charge, or choose a Predefined reason from the dropdown menu and, if necessary, the library Location to associate with the charge. (1 of 3) [6/2/2005 4:29:42 PM]


123 Print: Adding a Manual Charge NOTE: You are not allowed to enter a negative Amount. The maximum length for the Reason is 100 characters. You must enter a Reason for the charge, otherwise the system will not allow you to add it. Millennium Circulation supplies a default Location, which is normally the code for the library where the transaction is generated. After you have entered this information, choose OK. The Reason for the charge appears in the Title column on the Fines table. (2 of 3) [6/2/2005 4:29:42 PM]
 close window http://innhouse.iii.")
124 Print: Adding a Manual Charge Once you have added a charge to the patron record, the charge will appear on the next bill that is sent to the patron. If the patron is present, you can collect the amount immediately. For additional information, refer to the User Manual, Page # : Adding a Fine (Manual Charge) close window (3 of 3) [6/2/2005 4:29:42 PM]


125 Print: Viewing a Patron's History of Fines Paid and Notes in a Patron Record Viewing a Patron's History of Fines Paid and Notes in a Patron Record Whenever the library collects money from a patron, the system records the details of the transaction in the Fines Paid file, which retains approximately 3-6 months of data [this will vary depending on your library's configuration]. Millennium Circulation allows you to view the history of Fines Paid by the patron. To view the history of Fines Paid by a patron: From the Fines tab, choose the Fines Paid button. Millennium Circulation displays the Fines Paid window. You can choose the Print button to print or this summary. To view the details for a fine, select the fine's row, and then choose the View Fine button. (1 of 5) [6/2/2005 4:30:37 PM]

126 Print: Viewing a Patron's History of Fines Paid and Notes in a Patron Record The Paid Fine Details window displays. You can also print or this view of the fine. (2 of 5) [6/2/2005 4:30:37 PM]
127 Print: Viewing a Patron's History of Fines Paid and Notes in a Patron Record NOTE: The Invoice number is a system-generated number associated with each charge. If the fine is associated with an item record, that is, the fine is not a manual charge, you can choose the View Item Record button to view the item record. (3 of 5) [6/2/2005 4:30:37 PM]


128 Print: Viewing a Patron's History of Fines Paid and Notes in a Patron Record Millennium Circulation also allows you to view all of the Note fields in a patron record. These could include Overdue Penalty notes, Claims Returned notes, and Lost Book notes as well as any Note fields that were manually added by library staff. From the Fines tab, choose the Patron Notes button. (4 of 5) [6/2/2005 4:30:37 PM]

129 Print: Viewing a Patron's History of Fines Paid and Notes in a Patron Record Millennium Circulation displays a window containing the Notes fields from the patron record. For additional information, refer to the User Manual: Page # : Viewing a Patron's History of Fines Paid Page # : Viewing the Notes in a Patron Record close window (5 of 5) [6/2/2005 4:30:37 PM]


130 Print: Search / Holds Mode Search / Holds Mode In Circulation Desk mode, you may be authorized to search by Bibliographic and Item record indexes, but the purpose of searching here is to check out items, rather than to retrieve the records for other purposes. (1 of 3) [6/2/2005 4:30:44 PM]

, and performing hold functions. http://innhouse.iii.com/ruslan/circul/print_search.")
131 Print: Search / Holds Mode In fact, if you retrieve a bibliographic record with only one attached item record, or if you select an item record from a summary screen, the item is immediately checked out to the current patron, without allowing you to view the record. Millennium Circulation has another mode, called Search/Holds mode, that allows you to retrieve bibliographic and item records for viewing, editing (if you are authorized), and performing hold functions. (2 of 3) [6/2/2005 4:30:44 PM]

132 Print: Search / Holds Mode NOTE: Many hold functions can be performed either from Circulation Desk Mode for single patron transactions or from Search/Holds mode for single or multiple patron transactions. close window (3 of 3) [6/2/2005 4:30:44 PM]

133 Print: Searching the Database to Retrieve Records Searching the Database to Retrieve Records To begin your search in Search/Holds mode, you first need to select the search index that you're going to use. You can do this from the pull down menu of indexes. There are a number of ways to select your index. You can: Click on the index with the mouse. If you know the index tag you'd like to search by, you can type it at this point. In the case of 'Title' that would be 't'. If the index is highlighted, which is indicated by a thin blue line on the inside of the black line, you can use the arrow keys on the keyboard to move through the list. (1 of 7) [6/2/2005 4:33:41 PM]

134 Print: Searching the Database to Retrieve Records If you know the index tag you'd like to search by, you can type it at this point. In the case of 'Title' that would be 't'. NOTE: If you selected an incorrect index, use Shift/Tab to highlight the index menu again. The cursor then moves to the white area where you type in your search string. Note that you do not have to type in the entire title. Then hit return or click on the Search button. If your search result is not an exact match of a record, you'll be given a browse screen. (2 of 7) [6/2/2005 4:33:41 PM]


135 Print: Searching the Database to Retrieve Records You can highlight the title in the browse screen by clicking on it with the mouse and it will change the display in the brief area in the top of the screen. You can also use the arrow keys to move through the browse list. To select a title you wish to view, highlight the title and then: Click the Select button or use the keyboard command Alt+L. Double-click the title. Press the Enter key. (3 of 7) [6/2/2005 4:33:41 PM]


136 Print: Searching the Database to Retrieve Records Millennium Circulation displays the brief bibliographic record in the top section of the screen, and the Holds Summary tab in the lower section. This tab displays information about item records in a similar format to the Web OPAC. You could use this function to provide information to patrons about the availability of items. There are buttons for hold functions. You can limit this display to those items that belong to your location by selecting the Current Location option under the All drop-down list. To retrieve a specific item record, highlight the line for that item in the list, then either double-click on the line or choose the Record tab. (4 of 7) [6/2/2005 4:33:41 PM]

 The current patron who has an item checked out will display in the status bar at the bottom of")
137 Print: Searching the Database to Retrieve Records From the full display of the item record, you can find information such as: The date and time the item was checked out from the Checkout Date field. The checkout location, which is indicated by a number in the Checkout Location field when an item is checked out. The Loan Rule used for the checkout. (The loanrule is '0' if the item is not checked out) The current patron who has an item checked out will display in the status bar at the bottom of the record. (5 of 7) [6/2/2005 4:33:41 PM]
 field. If you need to view a different item record, you can click on the Summary tab.")

138 Print: Searching the Database to Retrieve Records You can also view the full patron record by clicking on the patron record number in the Patron Number (#) field. If you need to view a different item record, you can click on the Summary tab. The Close button or ALT+Q command will close the record. For additional information, refer to the User Manual Page # : Searching Databases to Retrieve Records (6 of 7) [6/2/2005 4:33:41 PM]
139 Print: Searching the Database to Retrieve Records close window (7 of 7) [6/2/2005 4:33:41 PM]


140 Print: Placing Holds All copies from the patron's branch are checked out, but there are available copies at other branches. The system can generate a Paging Slip to notify the owning branch to send the item to the hold pickup location. The patron's branch does not own a copy, but there are available copies at another branch. This will also generate a Paging Slip. (2 of 3) [6/2/2005 4:34:03 PM]


141 Print: Placing Holds Additionally, item-level holds can be used for a situation where an item's status is On Shelf, but the item cannot be located. When the hold is placed, you have the option of changing the status of the item to Missing. close window (3 of 3) [6/2/2005 4:34:03 PM]

142 Print: Placing a Title-Level Hold from Circulation Desk Mode Placing a Title-Level Hold from Circulation Desk Mode To place a title-level hold for a patron from Circulation Desk mode: 1. Retrieve the patron's record and choose the Holds tab. In the Holds tab, Millennium Circulation displays the holds that are active for the current patron. 2. Choose the Add Holds button. Millennium Circulation opens a new search window. 3. Search the database to retrieve the desired title. (1 of 5) [6/2/2005 4:34:22 PM]


143 Print: Placing a Title-Level Hold from Circulation Desk Mode 4. From the Summary tab, choose the Hold Copy Returned Soonest button. 5. Millennium Circulation prompts you to enter the information for the hold. (2 of 5) [6/2/2005 4:34:22 PM]

144 Print: Placing a Title-Level Hold from Circulation Desk Mode NOTE: If you are placing title-level holds for a patron from the Holds tab, Millennium Circulation can automatically use the Pickup Location, Not-Wanted-Before Date, and Not-Wanted-After Date you specify for any subsequent holds you place for this patron. However, Millennium Circulation will not retain these settings after you close the patron record. Pickup Location Millennium allows you to choose from the locations previously defined in the Hold Pickup Locations table. Millennium displays these locations in a drop-down list. (3 of 5) [6/2/2005 4:34:22 PM]


145 Print: Placing a Title-Level Hold from Circulation Desk Mode Limit to Location Because Millennium Circulation does not verify that any of the bibliographic record's items actually belong to the location you specify here, it is recommended that in most cases you do not limit a title-level hold to the first item returned at a specific location. Not wanted before date The patron can specify a date before which Millennium should not fill the holds. You can key in a date, or use the 'C' command to access the calendar. Millennium will only accept a date that falls within the next 180 days. NOTE: If all of the other holds on a title are satisfied before the Not-Wanted-Before-Date occurs, Millennium will be unable to page an item to satisfy the hold. An item must be checked in on or after the Not-Wanted- Before-Date to trigger the hold. Because of this, it is recommended that you specify Not-Wanted-Before- Dates only for holds that are placed on high demand items. (4 of 5) [6/2/2005 4:34:22 PM]

146 Print: Placing a Title-Level Hold from Circulation Desk Mode Not wanted after date The patron can specify a date after which the hold request will expire. If the hold is still active after this date but is not yet on the holdshelf, it will be removed when expired holds are periodically cleared. Hold Note You can enter a brief informational note. Hold notes display when you view the holds for a patron or the holds on a bibliographic or item record. Hold notes also appear on the paging slips that are printed when items are requested from other locations. After you click OK, the hold is placed and it appears as a line in the patron's Holds tab. NOTE: If the patron that you select has exceeded the number specified in the Max Holds element in the Automatic Patron Blocks table, Millennium Circulation prompts you to override the Max Holds block. For additional information, refer to the User Manual: Page # : Placing a Title-level Hold from Circulation Desk Mode Page # : Entering Title-level Hold Information Page # : Possible Messages (Placing Title-level Holds) close window (5 of 5) [6/2/2005 4:34:22 PM]


147 Print: Adding a Patron to a Title-Level Hold Queue Adding a Patron to a Title-Level Hold Queue From Search/Holds mode, you can retrieve a bibliographic record and place a title-level hold for one or more patrons by adding them to the hold queue. You can do this either from the Holds Summary tab, by clicking on the Hold Copy Returned Soonest button, or from the Bib-Level Holds tab, by clicking on the Add Patron button. Millennium opens a Search for Patron window so you can retrieve the desired patron. Once you have retrieved a patron record, you can enter the information for the hold. (1 of 2) [6/2/2005 4:34:39 PM]


148 Print: Adding a Patron to a Title-Level Hold Queue After you click OK, the hold is placed and it appears in the hold queue display. For additional information, refer to the User Manual Page # : Adding a Patron to a Title-level Hold Queue close window (2 of 2) [6/2/2005 4:34:39 PM]


149 Print: Placing an Item-Level Hold from Circulation Desk Mode Placing an Item-Level Hold from Circulation Desk Mode To place an item-level hold for a patron from Circulation Desk mode: 1. Retrieve the patron's record and select the Holds tab. In the Holds tab, Millennium Circulation displays the holds that are active for the current patron. 2. Choose the Add Holds button. Millennium Circulation opens a new search window. 4. Retrieve the desired item by searching the database. 5. In the Summary of the bibliographic record's attached item records, choose the Hold Selected Item button. (1 of 3) [6/2/2005 4:34:54 PM]


150 Print: Placing an Item-Level Hold from Circulation Desk Mode 6. Enter the hold information. 7. After you click OK, the hold is placed and it appears as a line in the patron's Holds tab. (2 of 3) [6/2/2005 4:34:54 PM]
151 Print: Placing an Item-Level Hold from Circulation Desk Mode For additional information, refer to the User Manual: Page # : Placing an Item-level Hold from Circulation Desk Mode Page # : Placing an Item-level Hold from the Summary Tab Page # : Entering Item-level Hold Information Page # : Possible Messages (Placing an Item-level Hold) close window (3 of 3) [6/2/2005 4:34:54 PM]

152 Print: Canceling Holds Canceling Holds As with many holds functions, you can cancel holds either from Search/Holds mode, or from a patron's Holds tab in Circulation Desk mode. To cancel one or more of a patron's holds from Circulation Desk mode: 1. Retrieve the patron's record and select the Holds tab. 2. Select the hold that you want to cancel and choose the Cancel Holds button. If your library is configured to print Hold Cancellation Notices, Millennium Circulation may prompt Print hold cancel notice? To print a hold cancellation notice, choose Yes. Millennium Circulation prompts you to select a hold cancellation message. (1 of 5) [6/2/2005 4:35:11 PM]


153 Print: Canceling Holds This allows the notice to have different text to explain the reason why a hold was cancelled. In this example the title was lost or missing, or the patron requested that the hold be cancelled. When you cancel multiple holds for the same patron, Millennium Circulation prompts you only once to select a hold cancellation notice message (i.e., the same message will be used for all of the hold cancellation notices you generate). To cancel holds in Search/Holds mode: 1. Search for the appropriate title. (2 of 5) [6/2/2005 4:35:11 PM]


154 Print: Canceling Holds In the case of title-level holds, click on the Bib-Level Holds tab. 2. Select the hold you wish to cancel and click on the Cancel Holds button. You may be prompted to print the hold cancel notice. The system will indicate that the hold was cancelled. For item-level holds: 1. Select the item from the Summary tab. (3 of 5) [6/2/2005 4:35:11 PM]


155 Print: Canceling Holds 2. Choose the Item-Level Holds tab. 3. Choose the hold you wish to cancel and click on the Cancel Holds button The system will ask if you want to change the status to Missing, or leave it set as is. (4 of 5) [6/2/2005 4:35:11 PM]

156 Print: Canceling Holds You may be prompted to print the hold cancel notice. The system will indicate that the hold was cancelled. For additional information, refer to the User Manual: Page # : Cancelling Holds within the Holds Tab Page # : Cancelling Holds from within a Hold Queue Page # : Generating Hold Cancellation Notices Page # : Possible Messages (Cancelling Holds) close window (5 of 5) [6/2/2005 4:35:11 PM]


157 Print: Holds Queue Holds Queue When you have retrieved a bibliographic record in Search Holds mode, two of the tabs are for viewing the hold queues. The first is the Item-Level Holds tab; the second is the Bib-Level Holds tab. The tabs display the number of holds that have been placed. But in the case of the item-level holds, the number will appear only when you have selected an item record that actually has holds. You will know this from the right-hand column labeled Holds. In the Bib-Level Holds tab, the number of title-level holds that have been placed will always show. In addition to Adding Patrons, Canceling and Modifying Holds, you can re-sequence a hold queue if you are authorized. To re-sequence the patrons in a hold queue: 1. Select the patron you want to move and choose the Change Priority button (1 of 3) [6/2/2005 4:35:23 PM]

")


158 Print: Holds Queue 2. Millennium Circulation prompts New Priority. 3. Select the new priority (that is, the new position for the hold in the queue) from the drop-down list and choose the OK button. Millennium moves the selected hold to the specified position. (2 of 3) [6/2/2005 4:35:23 PM]
159 Print: Holds Queue For additional information, refer to the User Manual: Page # : Viewing Hold Queues Page # : Resequencing a Hold Queue close window (3 of 3) [6/2/2005 4:35:23 PM]


160 Print: Modifying Holds Modifying Holds Millennium Circulation allows you to modify the hold information that was entered at the time the hold was placed. This function can be performed from either the patron's Holds tab in Circulation Desk mode, or from one of the Hold tabs accessed from Search/Holds mode. From a Hold tab in Search/Holds mode: 1. Depending upon the type of hold that was placed, select either the Item-Level Holds tab or the Bib-Level Holds tab. Select the holds to modify from the table. 2. Millennium Circulation prompts you to change the information for the holds that you selected. (1 of 3) [6/2/2005 4:35:34 PM]


161 Print: Modifying Holds 3. To change a hold parameter, enter the new information in the data field. In this example, an incorrect Pickup Location was originally entered, and the patron wishes to extend the Not Wanted After date. 4. After you click OK, the hold will be modified. For additional information, refer to the User Manual: (2 of 3) [6/2/2005 4:35:34 PM]
Circulation. Sierra Training Manual
 Circulation Sierra Training Manual 1 Overview Sierra Circulation allows staff to do the following: check out items, check in items, search all patrons, place holds, maintain hold queues, maintain course
Circulation I Sierra Training Manual
 Circulation I Sierra Training Manual PrairieCat website: http://support.prairiecat.info/ Copyright 2009 by Innovative Interfaces, Inc. This publication is supplied for the exclusive use of customers of
WorkFlows Learning to Use the Staff Client. Version 3.5
 WorkFlows Learning to Use the Staff Client Version 3.5 Contents Basic Terms... 4 SAILS... 4 Symphony... 4 WorkFlows... 4 Enterprise... 4 Getting Started... 5 Logging into WorkFlows... 5 The WorkFlows screen...
Sierra Circulation MILS
 Sierra Circulation MILS Copyright 2009-2015 by Innovative Interfaces, Inc. This publication is supplied for the exclusive use of customers of Innovative Interfaces with the understanding that it shall
C/W MARS Evergreen Circulation
 C/W MARS Evergreen Circulation This document is an introduction to using Evergreen Circulation to check items in and out, to renew items, to pay fines, and to place and search item holds. It also includes
ALEPH/McGill Circulation Module Part One: Basic Circulation
 ALEPH/McGill 1. Training schedule and online calendar... 3 2. Introduction... 4 a) Structure of the course... 4 b) Terminology... 5 c) Shortcuts... 5 d) Help... 5 e) Feedback... 5 3. Getting started...
Basic Millennium INTRODUCTION
 Basic Millennium INTRODUCTION Welcome to the Basic Millennium tutorial. Navigation tools, such as the Continue button, will display as you progress through the presentation, while playback functions are
Basic Workflows Training
 Basic Workflows Training 1. Menu Bar 2. Tool Bar a. Common Tasks b. User Information and Maintenance c. Item Information and Maintenance d. Holds Information and Maintenance e. In-Transit Items f. Special
Optimizing ImmuNet. In this chapter: Optimizing Browser Performance Running Reports with Adobe Acrobat Reader Efficient Screen Navigation
 Optimizing ImmuNet In this chapter: Optimizing Browser Performance Running Reports with Adobe Acrobat Reader Efficient Screen Navigation Optimizing Browser Performance Unless instructed to do otherwise,
Optimizing GRITS. In this chapter:
 Optimizing GRITS In this chapter: Creating Favorites and Shortcuts Optimizing Browser Performance Running Reports with Acrobat Reader Efficient Screen Navigation Creating Favorites and Shortcuts To access
Unit 2: Managing Patron Records
 LINCC Circulation Unit 2 Unit 2: Managing Patron Records This unit provides an overview of patron records and describes searching for a patron record, editing patron information, and adding a new patron
Unicorn WorkFlows Academic Reserves Training Guide
 Unicorn Library Management System Unicorn WorkFlows Academic Reserves Training Guide Sirsi 101 Washington Street SE Huntsville, Alabama 35801 (256) 704-7000 Doc No. 400 1100 000 04 1 2002 Sirsi Corporation
Mandarin M3. Daily Use Handbook ver 1.7SP5g 2014
 Mandarin M3 TM Daily Use Handbook ver 7SP5g 2014 Table of Contents Table of Contents Getting Started with M3...3 Using Circulation...4 Using the OPAC...12 Maintenance...19 Contacts & Credits...20 Getting
LEAP MANUAL AN OVERVIEW ON THE PUBLIC SERVICES/FRONT DESK FUNCTIONS IN POLARIS LEAP
 LEAP MANUAL AN OVERVIEW ON THE PUBLIC SERVICES/FRONT DESK FUNCTIONS IN POLARIS LEAP MARCH 2018 MARIGOLD POLARIS LEAP MANUAL Last Update: March 2018 This manual provides an overview on the public services/front
SirsiDynix Symphony Training Guide
 SirsiDynix Symphony Training Guide Circulation December 2010 N a m e o f T r a i n i n g G u i d e i Publication Name: SirsiDynix Symphony Training Guide Updated: December 2010 Additional copies of this
SirsiDynix Symphony Training Guide
 SirsiDynix Symphony Training Guide Circulation April 2013 N a m e o f T r a i n i n g G u i d e i Publication Name: SirsiDynix Symphony Training Guide Updated: April 2013 Additional copies of this document
The terms Offline Interface and Standalone Mode mean the same thing a separate program to handle simple circulation tasks while the network is down.
 Chapter 10 - Standalone Mode The terms Offline Interface and Standalone Mode mean the same thing a separate program to handle simple circulation tasks while the network is down. Several features are available
DEVELOPED BY THE SHARE BIBLIOGRAPHIC SERVICES TEAM SPRING 2013 REVISED MAY
 ITEM RECORDS DEVELOPED BY THE SHARE BIBLIOGRAPHIC SERVICES TEAM SPRING 2013 REVISED MAY 2014 Table of Contents General cataloging steps... 3 Matching... 3 General match points... 3 Creating Item Records...
SirsiDynix Symphony Training Guide
 SirsiDynix Symphony Training Guide Circulation January 2015 N a m e o f T r a i n i n g G u i d e i Publication Name: SirsiDynix Symphony Training Guide Updated: January 2015 Additional copies of this
WHAT S NEW IN HTML5 TABLE OF CONTENTS
 WHAT S NEW IN HTML5 Insignia Software is proud to announce that our HTML5 version is now available to all our customers. Our major focus in the HTML5 release was making Insignia customizable to your needs.
INSIGNIA LIBRARY SYSTEM LIBRARIAN TRAINING GUIDE DATE: NOVEMBER 9, 2017 INSIGNIA SOFTWARE CORPORATION
 INSIGNIA LIBRARY SYSTEM LIBRARIAN TRAINING GUIDE DATE: NOVEMBER 9, 2017 INSIGNIA SOFTWARE CORPORATION TABLE OF CONTENTS TABLE OF CONTENTS... 2 WELCOME TO INSIGNIA SOFTWARE... 4 SYSTEM REQUIREMENTS... 4
INSIGNIA LIBRARY SYSTEM TRAINING GUIDE FOR TORONTO CATHOLIC SCHOOL DISTRICT DATE: AUG 25 -SEP 05/2014 INSIGNIA SOFTWARE CORPORATION
 INSIGNIA LIBRARY SYSTEM TRAINING GUIDE FOR TORONTO CATHOLIC SCHOOL DISTRICT DATE: AUG 25 -SEP 05/2014 INSIGNIA SOFTWARE CORPORATION Table of Contents Welcome to Insignia Software... 4 System Requirements...
Mandarin Oasis TM Library Automation System
 Mandarin Oasis TM Library Automation System Daily Use Handbook This handbook explains routine library tasks using Mandarin Oasis. It is designed to supplement Oasis training by providing simple, step-by-step
NiceForm User Guide. English Edition. Rev Euro Plus d.o.o. & Niceware International LLC All rights reserved.
 www.nicelabel.com, info@nicelabel.com English Edition Rev-0910 2009 Euro Plus d.o.o. & Niceware International LLC All rights reserved. www.nicelabel.com Head Office Euro Plus d.o.o. Ulica Lojzeta Hrovata
Union List Circulation / OPAC Training Manual. To get to the PrairieCat Encore catalog for searching, go to:
 Union List Circulation / OPAC Training Manual To get to the PrairieCat Encore catalog for searching, go to: http://search.prairiecat.info Revised October 27, 2015 1 Table of Contents Searching in Encore
USING STANDALONE 11/12/2010
 USING STANDALONE We are recommend that libraries use the Off-Line circulation function that is built into Workflows for check-out only. Here are some important things to know about this before you begin:
Horizon Launcher Configuration Guide
 Horizon Launcher Configuration Guide Windows NT and Windows 2000 are registered trademarks of Microsoft Corporation. All other product or company names are trademarks or registered trademarks of their
Qwik Start Guide. For Destiny 9.5 MEDT Dr. Phyllis Snipes. Whitney Fletcher. Natalie Hamlin. Tiffany Johnson
 Qwik Start Guide For Destiny 9.5 MEDT 6468 Dr. Phyllis Snipes Whitney Fletcher Natalie Hamlin Tiffany Johnson 1 Table of Contents Section I: In the Beginning Page # 4 Setting up Patrons types 4 Adding
Managing Your Website with Convert Community. My MU Health and My MU Health Nursing
 Managing Your Website with Convert Community My MU Health and My MU Health Nursing Managing Your Website with Convert Community LOGGING IN... 4 LOG IN TO CONVERT COMMUNITY... 4 LOG OFF CORRECTLY... 4 GETTING
Teacher Guide. Edline -Teachers Guide Modified by Brevard Public Schools Revised 6/3/08
 Teacher Guide Teacher Guide EDLINE This guide was designed to give you quick instructions for the most common class-related tasks that you will perform while using Edline. Please refer to the online Help
2010 College Center for Library Automation
 Cat al ogi ng Al ephver si on20 2010 College Center for Library Automation Contents Unit 1: Overview of the LINCC Cataloging Module... 1 LESSON 1: NAVIGATING THE CATALOGING MODULE... 1 LESSON 2: USING
Leap Patron Services & Circulation. Polaris ILS 5.0 SP3 Training THE LIBRARY IS OPEN
 Leap Patron Services & Circulation Polaris ILS 5.0 SP3 Training THE LIBRARY IS OPEN Leap Overview What is Leap? What are some of the features that are available in Leap? Do we still need the Polaris Client?
Overview. Resources to help you. Getting Started with Destiny Library Manager
 Overview Destiny brings all your library automation together on one server: circulation, cataloging, searching, and reporting. It is completely browser-based providing access to your library from virtually
OU EDUCATE TRAINING MANUAL
 OU EDUCATE TRAINING MANUAL OmniUpdate Web Content Management System El Camino College Staff Development 310-660-3868 Course Topics: Section 1: OU Educate Overview and Login Section 2: The OmniUpdate Interface
New User Orientation PARTICIPANT WORKBOOK
 New User Orientation PARTICIPANT WORKBOOK INTEGRATED SOFTWARE SERIES New User Orientation PARTICIPANT WORKBOOK Version 2.0 Copyright 2005 2009. Interactive Financial Solutions, Inc. All Rights Reserved.
Horizon Serials. User s and Administrator s Guide
 Horizon Serials User s and Administrator s Guide Microsoft, Windows, and Windows NT are registered trademarks of Microsoft Corporation. Sybase is a registered trademark of Sybase, Inc. Adobe and Acrobat
Intro to Excel. To start a new workbook, click on the Blank workbook icon in the middle of the screen.
 Excel is a spreadsheet application that allows for the storing, organizing and manipulation of data that is entered into it. Excel has variety of built in tools that allow users to perform both simple
Missouri Evergreen II. November, 2017
 Missouri Evergreen II November, 2017 1 Table of Contents Welcome Back 3 Patron Registration 3 Checking Out UPIs 5 Renewing Items 7 Renewing an Expired Account 10 Searching the Catalog and Placing a Hold
CATALOGUING MANUAL. Summer SirsiDynix. All Rights Reserved.
 CATALOGUING MANUAL Summer 2008 2008 SirsiDynix. All Rights Reserved. Table of Contents SIRSI RECORD STRUCTURE AND DISPLAY... 1 ITEM SEARCH AND DISPLAY WIZARD... 2 CALL NUMBER AND ITEM MAINTENANCE WIZARD...
 Getting Started with the Custom Intranet Sales & General Business Phone: 978-499-1897 Fax: 636-444-1897 Email: sales@intranetconcepts.com Intranet Concepts, Inc. P.O. Box 1139 Newburyport, MA 01950-6139
expressreports Guide
 expressreports Guide i Table of Contents expressreports Guide TABLE OF CONTENTS Chapter Chapter 1. Chapter 2. Page INTRODUCTION...1 Internet Access to Reports...1 Documentation...2 ACCESSING YOUR REPORTS...4
Expedient User Manual Getting Started
 Volume 1 Expedient User Manual Getting Started Gavin Millman & Associates Pty Ltd 281 Buckley Street Essendon VIC 3040 Phone 03 9331 3944 Web www.expedientsoftware.com.au Table of Contents Logging In...
School Installation Guide ELLIS Academic 5.2.6
 ELLIS Academic 5.2.6 This document was last updated on 2/16/11. or one or more of its direct or indirect affiliates. All rights reserved. ELLIS is a registered trademark, in the U.S. and/or other countries,
IBM Notes Client V9.0.1 Reference Guide
 IBM Notes Client V9.0.1 Reference Guide Revised 05/20/2016 1 Accessing the IBM Notes Client IBM Notes Client V9.0.1 Reference Guide From your desktop, double-click the IBM Notes icon. Logging in to the
Scorebook Navigator. Stage 1 Independent Review User Manual Version
 Scorebook Navigator Stage 1 Independent Review User Manual Version 11.2013 TABLE OF CONTENTS Getting Started... 1 Browser Requirements... 1 Scorebook Navigator Browser Compatability... 1 Logging in...
Introduction to Personal Computing
 Introduction to Personal Computing Academic Computing Services www.ku.edu/acs Abstract: This document explains the basics of the Microsoft Windows operating system. It is intended for users who are either
Using Adobe Contribute 4 A guide for new website authors
 Using Adobe Contribute 4 A guide for new website authors Adobe Contribute allows you to easily update websites without any knowledge of HTML. This handout will provide an introduction to Adobe Contribute
OMICS Publishing Group Online Submission System
 OMICS Publishing Group Online Submission System Editorial Manager - Author Tutorial Editorial Manager is an online manuscript submission, review and tracking systems for quality and quick review processing.
PowerPoint Introduction
 PowerPoint 2010 Introduction PowerPoint 2010 is a presentation software that allows you to create dynamic slide presentations that can include animation, narration, images, and videos. In this lesson,
A Guide to Quark Author Web Edition 2015
 A Guide to Quark Author Web Edition 2015 CONTENTS Contents Getting Started...4 About Quark Author - Web Edition...4 Smart documents...4 Introduction to the Quark Author - Web Edition User Guide...4 Quark
Sage Library System Evergreen Circulation
 Sage Library System Evergreen Circulation This document is a more comprehensive introduction to using Evergreen Circulation to check items in and out, to renew items, to pay fines, and to place and search
File Cabinet Manager
 Tool Box File Cabinet Manager Java File Cabinet Manager Password Protection Website Statistics Image Tool Image Tool - Resize Image Tool - Crop Image Tool - Transparent Form Processor Manager Form Processor
Clackamas Education Service District Special Education User Guide
 Clackamas Education Service District Special Education User Guide Canby CESD Colton Estacada Gladstone Lake Oswego Molalla River North Clackamas Oregon City Oregon Trail West Linn-Wilsonville Support Options
The PeopleSoft Financials System
 The PeopleSoft Financials System 2 Introduction...................... 14 Signing In and Out.................... 14 Signing In to the System.............. 14 Signing Out................... 17 Navigation
Sierra Procedures Manual
 Educational Technology and Library Services Sierra Procedures Manual A library operations guide for DPS Library Media Specialists, Library Techs, and Library Paraprofessionals. Sierra Procedures Manual
RONA e-billing User Guide
 RONA e-billing Contractor Self-Service Portal User Guide RONA e-billing User Guide 2015-03-10 Table of Contents Welcome to RONA e-billing What is RONA e-billing?... i RONA e-billing system requirements...
Guide to User Interface 4.3
 Datatel Colleague Guide to User Interface 4.3 Release 18 June 24, 2011 For corrections and clarifications to this manual, see AnswerNet page 1926.37. Guide to User Interface 4.3 All Rights Reserved The
Outlook - an Introduction to Version 2003 Table of Contents
 Outlook - an Introduction to E-mail Version 2003 Table of Contents What is Outlook Starting Outlook The Navigation Pane Getting Help Creating and Sending a Message Using the College Exchange Directory
Florida Virtual Campus.
 I nt erl i br aryloan Al ephver si on20 Florida Virtual Campus www.flvc.org Contents Unit 1: Overview of the ILL Module... 1 LESSON 1: UNDERSTANDING IMPORTANT LINCC ILL TERMS... 1 LESSON 2: NAVIGATING
CREATING A NEW USER RECORD
 CREATING A NEW USER RECORD Information to include when creating a record for a new user. User Registration : Identify New 1. Click on the New User Registration wizard or the Register New User helper on
Banner Navigation Information
 Banner Navigation Information Barbara Scheidt Fall 2016 Banner Information Barbara Scheidt Enterprise Systems 270-745-8812 -- MMTH 373 barbara.scheidt@wku.edu A web-based application, works best when using
Document Imaging User Guide
 Release 4.9 IMAGING TECHNOLOGY GROUP Document Imaging Systems Document Imaging User Guide IMAGING TECHNOLOGY GROUP IMIGIT tm Document Imaging User Guide Release 4.91 March 2007 Imaging Technology Group
smartdata.gen2 Corporate Cardholder Guide February 2014
 smartdata.gen2 Corporate Cardholder Guide February 2014 Table of Contents Chapter 1 Getting Started... 1-i Introduction... 1-1 Browser Requirements... 1-1 Security... 1-2 Selecting a Language Preference...
A new clients guide to: Activating a new Studio 3.0 Account Creating a Photo Album Starting a Project Submitting a Project Publishing Tips
 Getting Started With Heritage Makers A Guide to the Heritage Studio 3.0 Drag and Drop Publishing System presented by Heritage Makers A new clients guide to: Activating a new Studio 3.0 Account Creating
All The News That Fits! What s New in Polaris 4.1
 Enter bullet text here Second level All The News That Fits! What s New in Polaris 4.1 Bill Schickling, President and CEO MidAtlantic PUG, April 20, 2012 1 1 Polaris PowerPAC Redesigned! Easier to use,
Icons what they mean. - Checks the authority files. - Validates the MARC fields. - Checks for duplicates. - Place a hold.
 What to notice when looking at bibliographic record: and the mouse wheel allows for one to zoom in and out but only in the MARC display Owner most bibliographic records are owned by SHARE If owned
Beginner s Guide to ACD5
 Beginner s Guide to ACD5 AIA Contract Documents Online Service for Single-Users A step-by-step guide to creating, editing, sharing and managing contract documents Beginner s Guide to ACD5 AIA Contract
INFOLIB2015 USER INSTRUCTION GUIDE
 INFOLIB2015 USER INSTRUCTION GUIDE Welcome to Infolib2015. This is the step-by-step tutorial on how to use Infolib2015. To enter the program, Double click the Infolib Icon from the desktop. For the first
LLC PATRON REGISTRATION/EDITING STANDARDS FOR SIERRA CIRCULATION
 LLC PATRON REGISTRATION/EDITING STANDARDS FOR SIERRA CIRCULATION Both sides of the Registration Form must be filled out. It must include the registering library, initials of the staff member, and the date
Procedures Oracle FLEXCUBE Universal Banking Release 12.0 [May] [2012] Oracle Part Number E
![Procedures Oracle FLEXCUBE Universal Banking Release 12.0 [May] [2012] Oracle Part Number E](/thumbs/82/86805977.jpg "Procedures Oracle FLEXCUBE Universal Banking Release 12.0 [May] [2012] Oracle Part Number E") Procedures Oracle FLEXCUBE Universal Banking Release 12.0 [May] [2012] Oracle Part Number E51527-01 Table of Contents Procedures 1. ABOUT THIS MANUAL... 1-1 1.1 INTRODUCTION... 1-1 1.2 AUDIENCE... 1-1
Procedures Oracle FLEXCUBE Universal Banking Release 12.0 [May] [2012] Oracle Part Number E51527-01 Table of Contents Procedures 1. ABOUT THIS MANUAL... 1-1 1.1 INTRODUCTION... 1-1 1.2 AUDIENCE... 1-1
Outlook Quick Start Guide
 Getting Started Outlook 2013 Quick Start Guide File Tab: Click to access actions like Print, Save As, etc. Also to set Outlook Options. Quick Access Toolbar: Add your mostused tool buttons to this customizable
Part 1: Understanding Windows XP Basics
 542362 Ch01.qxd 9/18/03 9:54 PM Page 1 Part 1: Understanding Windows XP Basics 1: Starting Up and Logging In 2: Logging Off and Shutting Down 3: Activating Windows 4: Enabling Fast Switching between Users
Adobe Dreamweaver CS5 Tutorial
 Adobe Dreamweaver CS5 Tutorial GETTING STARTED This tutorial focuses on the basic steps involved in creating an attractive, functional website. In using this tutorial you will learn to design a site layout,
HGC SUPERHUB HOSTED EXCHANGE
 HGC SUPERHUB HOSTED EXCHANGE EMAIL OUTLOOK WEB APP (OWA) 2010 USER GUIDE V2013.6 HGC Superhub Hosted Email OWA User Guide @ 2014 HGC. All right reserved. Table of Contents 1. Get Started... 4 1.1 Log into
FrontPage 2000 Tutorial -- Advanced
 FrontPage 2000 Tutorial -- Advanced Shared Borders Shared Borders are parts of the web page that share content with the other pages in the web. They are located at the top, bottom, left side, or right
Udio Systems. Front Desk
 Udio Systems Front Desk Table of Contents 1. Tour of Udio... 5 2. Login... 6 2.1 First Time User... 6 2.2 Login to Udio... 6 2.3 Changing your Password... 6 3. The Dashboard... 7 3.1 People Search... 7
WorldShare Management Services Release Notes. Introduction Administrative Actions... 3 Follow-up Actions... 3
 WorldShare Management Services Release Notes Release Date: January 18, 2015 Contents Introduction... 3 Administrative Actions... 3 Follow-up Actions... 3 Browser Support... 4 Acquisitions... 5 New Features...
CMS Attendance for Windows
 User's Guide CMS Attendance for Windows By Church Management Solutions Copyright 1996, ParishSOFT L.L.C. and Church Management Solutions. All rights reserved. Release 2 (12/1/95) Microsoft is a registered
Word - Basics. Course Description. Getting Started. Objectives. Editing a Document. Proofing a Document. Formatting Characters. Formatting Paragraphs
 Course Description Word - Basics Word is a powerful word processing software package that will increase the productivity of any individual or corporation. It is ranked as one of the best word processors.
HDS Web Compliance Management System (WCMS) User s Guide Version 6. Virginia Housing Development Authority
 User s Guide Version 6. Virginia Housing Development Authority") HDS Web Compliance Management System (WCMS) User s Guide Version 6 Virginia Housing Development Authority 601 South Belvidere Street Richmond, Virginia 23220-6505 (804) 782-1986 HDS WEB COMPLIANCE MANAGEMENT
HDS Web Compliance Management System (WCMS) User s Guide Version 6 Virginia Housing Development Authority 601 South Belvidere Street Richmond, Virginia 23220-6505 (804) 782-1986 HDS WEB COMPLIANCE MANAGEMENT
Roxen Content Provider
 Roxen Content Provider Generation 3 Templates Purpose This workbook is designed to provide a training and reference tool for placing University of Alaska information on the World Wide Web (WWW) using the
Using Standalone/Offline Mode
 Using Standalone/Offline Mode Use standalone/offline mode is for use if your library loses Internet connectivity, and one cannot log into Evergreen. Download Offline Patron List Once a week, download the
Handout: Using Item Search and Display and Place Hold in WorkFlows
 Handout: Using Item Search and Display and Place Hold in WorkFlows Contents Introduction... 3 A review of terms... 3 Item Search and Display... 3 Place Hold... 8 Moving between Item Search and Display
Wholesale Lockbox User Guide
 Wholesale Lockbox User Guide August 2017 Copyright 2017 City National Bank City National Bank Member FDIC For Client Use Only Table of Contents Introduction... 3 Getting Started... 4 System Requirements...
VDX Manual for Member Libraries
 Contents How to Access VDX... 3 Searching VDX... 3 Making an ILL Request... 6 The Work Queue... 8 The Borrower Work Queue... 10 Borrower Work Queue Statuses... 10 Idle Requests Sending requests to lenders...
Secure Guard Central Management System
 Speco Technologies, Inc. Secure Guard Central Management System Usage Information Contents 1 Overview... 7 2 Installation... 7 2.1 System Requirements... 7 2.2 System Installation... 7 2.3 Command Line
USING OFF-LINE CIRCULATION
 USING OFF-LINE CIRCULATION We are recommend that libraries use the Off-Line circulation function that is built into Workflows for check-out only. Here are some important things to know about this before
Wimba Classroom Version 6.1 Room Administrator Guide
 Wimba Classroom Version 6.1 Room Administrator Guide Wimba Classroom 6.1 Room Administrator Guide 1 Administration Tools 2 Room Management 3 Creating a New Room (RoomCreators Only) 3 Setting up a Room
Outlook Skills Tutor. Open Outlook
 Outlook Skills Tutor Lakewood School District Open Outlook Working with the Inbox Receiving new email Sorting your Inbox Reading email Using the Reading Pane Sending, replying to, and forwarding messages
Marigold Polaris Manual. An overview on the public services/front desk functions in Polaris
 Marigold Polaris Manual An overview on the public services/front desk functions in Polaris www.marigold.ab.ca/pd January 2016 Marigold Polaris Best Practices Manual Last Update: January 2016 This manual
New Finance Officer & Staff Training
 New Finance Officer & Staff Training Overview MUNIS includes many programs and tools to allow for the management of the District financials. As newer finance officers and staff, you are charged with understanding,
Chapter 1 -- Getting Started, Getting Help
 Chapter 1 -- Getting Started, Getting Help Logging In Click on the Evergreen staff client icon located on your desktop or select the Evergreen Staff Client from your Start menu: The login screen opens:
COPYRIGHTED MATERIAL. Using Adobe Bridge. Lesson 1
 Lesson Using Adobe Bridge What you ll learn in this lesson: Navigating Adobe Bridge Using folders in Bridge Making a Favorite Creating metadata Using automated tools Adobe Bridge is the command center
Adobe Acrobat 8 Professional Forms
 Adobe Acrobat 8 Professional Forms Email: training@health.ufl.edu Web Site: http://training.health.ufl.edu 352 273 5051 This page intentionally left blank. 2 Table of Contents Forms... 2 Creating forms...
Florida Safe Families Network Multi-Topic Basics How Do I Guide
 Florida Safe Families Network How Do I Guide May 12, 2017 The Florida Safe Families Network () How Do I Guide helps you understand the steps to complete your work in the system. It is a desk reference
Introduction. Getting to Know Word The Ribbon. Word 2010 Getting Started with Word. Video: Exploring Your Word 2010 Environment.
 Word 2010 Getting Started with Word Introduction Page 1 Word 2010 is a word processor that allows you to create various types of documents such as letters, papers, flyers, faxes and more. In this lesson,
Click the buttons in the interactive below to learn how to navigate and interact with slides in the
 PowerPoint 2010 Getting Started with PowerPoint Introduction Page 1 PowerPoint 2010 is a presentation software that allows you to create dynamic slide presentations that may include animation, narration,
PDF Creator Plus 6.0. Version 6.0. User Guide. PEERNET Inc.
 Version 6.0 User Guide PEERNET Inc. Copyright 2004-2012 Updated: 12/12/2012 Table of Contents Welcome... to PDF Creator Plus 1 Legal... Notices 2 System... Requirements 3 Typographic... Conventions 4 Activating...
AutoCAD 2009 User InterfaceChapter1:
 AutoCAD 2009 User InterfaceChapter1: Chapter 1 The AutoCAD 2009 interface has been enhanced to make AutoCAD even easier to use, while making as much screen space available as possible. In this chapter,
TYPO3 Editing Guide Contents
 TYPO3 Editing Guide Contents Introduction... 2 Logging in... 2 Selecting your Workspace for editing... 2 Working with Content Elements... 3 Working in the Editing Window... 4 Pasting content from MS Word