LabelPoint 350 User Guide
|
|
|
- Cornelius Garrett
- 6 years ago
- Views:
Transcription


1 LabelPoint 350 User Guide
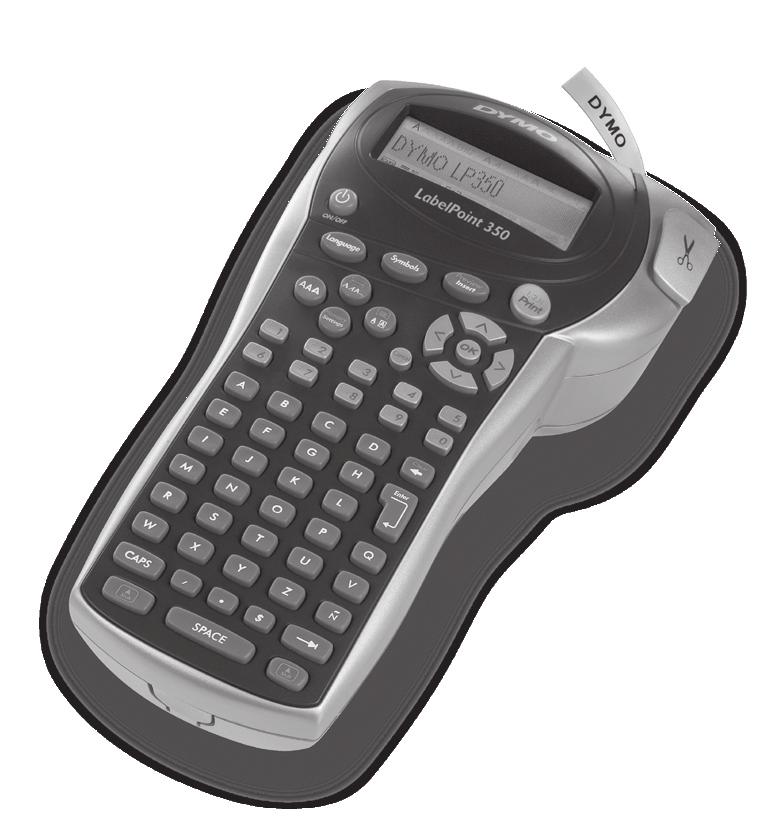
2 LabelPoint 350 User Guide Power Connector USB Connector Label Exit Cutter LCD Display Power Symbols Language Fixed Length/Style Font Align/Box Underline Memory/Settings Numeric Keys Alpha Keys Language Symbols Preview Insert 1, 2..N Print/Incremental Print Preview/Insert Navigation/OK Cancel Backspace/ Clear Enter CAPS Tab Currency Space Bar Shift Figure 1 LabelPoint 350 Professional Labelmaker 2
, 9 mm (3/8 ), 12 mm (1/2 ), or 19 mm (3/4 ).")
3 About Your New Labelmaker With your new LabelPoint 350 labelmaker, you can create a wide variety of high-quality, self-adhesive labels. You can choose to print your labels in many different sizes and styles. The labelmaker uses D1 label cassettes in widths of 6 mm (1/4 ), 9 mm (3/8 ), 12 mm (1/2 ), or 19 mm (3/4 ). Label cassettes are also available in a wide range of colors. Visit for information on obtaining labels and accessories for your labelmaker. Warranty Registration Please complete the warranty registration card and return it to the appropriate Customer Support address within seven days. Visit for details. Getting Started Follow these instructions to print your first label. Connecting the Power The labelmaker is powered by standard batteries, an optional, rechargeable battery pack, or an AC power adapter. To save power, the labelmaker will automatically turn off after two minutes of inactivity. Inserting the Batteries The labelmaker uses six AA alkaline batteries. To insert the batteries 1. Remove the battery compartment cover. See Figure 1. Figure 1 2. Insert the batteries following the polarity markings (+ and ). 3. Replace the battery compartment cover.! Remove the batteries if the labelmaker will not be used for a long period of time. Using the Battery Pack An optional, rechargeable battery pack can be used to power the labelmaker. The battery pack can be purchased through your local reseller. The labelmaker must be connected to external power through the AC adapter to charge the battery pack. When the battery pack is completely discharged, allow four to five hours to fully charge the battery.! When connected to external power, the battery charging indicator may continue to display even though the battery pack is fully charged. To use the battery pack 1. Open the battery compartment door. 2. Insert the battery pack. See Figure 2. Figure 2 3. To charge the battery pack, connect the AC adapter as described in the next section. Connecting the Power Adapter An optional AC power adapter can also be used to power the labelmaker. Connecting the AC adapter to the labelmaker disconnects the batteries as a power source. 3
4 To connect the power adapter 1. Plug the power adapter into the power connector on the top, left side of the labelmaker. 2. Plug the other end of the power adapter into a power outlet.! Make sure the labelmaker power is turned off before you disconnect the power adapter from the main power source. Otherwise, your most recent memory settings will be lost. Inserting the Label Cassette Your labelmaker comes with one label cassette. Visit for information about purchasing additional label cassettes. To insert the label cassette 1. Press and release the label cassette cover to open the label compartment. See Figure 3. Remove cardboard insert Select label cassette size Figure 4 2. Set the cassette switch for the size of the label cassette that you are inserting. See Figure 4. A notch in the cassette fits over the switch when the cassette is in the correct position. 3. Make sure the label and ribbon are taut across the mouth of the cassette and that the label passes between the guideposts. If necessary, turn the spool clockwise to tighten the ribbon. 4. Insert the cassette with the label and ribbon positioned between the print head and pinch roller. See Figure 5. CLICK!! Figure 3 The first time you use the labelmaker, remove the protective cardboard insert from between the print head and pinch roller. See Figure 4. Figure 5 5. Press firmly until cassette clicks into place. 6. Close the label cassette cover and press A to turn on the power. Settings You can select the language and corresponding units of measure you want the labelmaker to use. 4
5 Selecting a Language You can select from a number of different language options. By default, the language is set to English. To select a language Language 1. Press. 2. Use the arrow keys to select the language you want and press. Selecting Units of Measure You can choose to show measurements in inches or millimeters. By default, the units of measure are set to inches. To set the units of measure 1. Press. 2. Use the arrow keys to select Set Units and press. 3. Select inches or millimeters and press. Printing Your First Label You are now ready to print your first label. To print a label 1. Enter text to create a simple label. 2. Press G. 3. Use the cutter lever to cut the label. Congratulations! You have printed your first label. Continue reading to learn more about the options available for creating labels. Getting to Know the Labelmaker The following sections describe each feature in detail. Become familiar with the location of the feature and function keys on your labelmaker. See Figure 1 on the inside front cover. Power The A button turns the power on and off. After two minutes of no activity, the power is switched off automatically. The last label created is remembered and displayed when the power is turned back on. The previously selected style settings are also restored. LCD Display The labelmaker s LCD display shows a row of 16 characters. However, you can enter up to 99 characters and spaces. The display is similar to a window that scrolls across the text. (See Figure 6.) The number of characters actually displayed can vary due to proportional spacing. The quick brown fox jumps over the lazy dog. Figure 6 In addition, feature indicators appear on the display to let you know when a feature is selected. See Figure 7. CAPS mode Font Multiple Lines Fixed Length Style Align/Justify Box/Underline Figure 7 Mixed Formats # of Copies Scroll Bar 5

6 CAPS Mode The key toggles capitalization on and off. When CAPS mode is turned on, the CAPS mode indicator is shown on the display and all letters that you enter will be capitalized. The default setting is CAPS mode on. When CAPS mode is off, all letters entered appear in lower case. Shift Key The key, when used in combination with an alphabet key, changes the case of the selected letter. When used in combination with number keys or function keys, the key selects the alternate function shown on the key. For example, when you press, the character to the left of the cursor is deleted; however, when you press + together, the entire label text and formatting is deleted and the display is ready for you to type a new label. Space Bar The in your text. Backspace key inserts one or more blank spaces The key removes the character to the left of the cursor. Pressing + clears all label text and formatting. Cancel The key allows you to exit from a menu without making a selection or to cancel an action. Navigation Keys You can review and edit your label using the left and right arrows on the Navigation key. You can navigate through menu selections using the up and down arrow keys, and then press to make a selection. Connecting to Your Computer Your labelmaker can be used as a standalone label printer or you can print labels from your computer using Label Software. Your labelmaker connects to your computer using the USB connection located on the top of the labelmaker. See Figure 8. Figure 8 Refer to the LabelPoint 350 Quick Start Card for installation instructions and the Label Software User Guide for information about designing and printing labels. Formatting Your Label You can choose from a number of formatting options to enhance the appearance of your labels.! The labelmaker remembers the last selection made so that each time you enter one of the feature menus described in this section, you are positioned at the last item selected from that menu. 6
7 Changing the Font Size Seven font sizes are available for your labels: Arial Narrow Arial Normal Arial Wide BIG Times New Roman When you select a font, that font applies to all characters on a label. If you want to use more than one font, you must insert format breaks. See Using Mixed Formats on page 7 for more information. To set the font 1. Press the X key. 2. Move to the desired font and then press. Using Mixed Formats You can apply different fonts and format styles to the text on a label by inserting format breaks to divide the label into blocks or sections of text. You can add two format breaks allowing you to apply three separate formats per label. Alignment, underline, box styles, and background patterns cannot be mixed on a label. These styles are common to the entire label. To add a format break 1. Enter and format text for the first section. Preview 2. Press. Insert 3. Select Insert Format Break and press. A new section character is displayed at the end of the first section, but will not print on the label. 4. Continue entering and formatting text for the next section of the label. Adding Font Styles You can choose from thirteen different font styles to apply to your text. See Figure 9. Normal Vertical Italic Bold Outline Shadow 3D Italic + Bold Italic + Outline Italic + 3D Italic + Shadow Strike-through Mirror Figure 9 When you select a style, that style applies to all characters on a label. If you want to use more than one style, you must insert format breaks. See Using Mixed Formats for more information. However, when you use mirror or vertical style, that style applies to the whole label. Styles can be used with all alphanumeric characters and symbols. See Using Symbols and Special Characters on page 8 for more information on printing symbols. To set the font style 1. Press the key. 2. Use the arrow keys to move to the desired style and then press. 7
8 Adding Box and Background Styles You can further highlight your text by choosing a box, underline, or background style. Normal Underline Square Box Pointed Box Rounded Box Crocodile Box Scroll Box 3D Box Dots Wood Grain Bricks Checkers Parquet Diamonds Weave Figure 10 A label can be underlined or enclosed in a box or background, but not both together. To set the box style 1. Press the > key. 2. Select a frame style and then press. On multi-line labels, all lines are underlined. In box style mode, all the lines are enclosed in one box style. Creating Multiple-Line Labels The number of lines you can print on a label depends on the size label you are using: Maximum of five lines on 19 mm (3/4") labels Maximum of three lines on 9 mm (3/8") and 12 mm (1/2") labels Maximum of one line on 6 mm (1/4") labels To create a multiple-line label 1. Type the text for the first line, and press. A new line character is displayed at the end of the first line, but will not print on the label. 2. Type the text for the second line. The display shows the line on which you are currently entering text. The example below indicates that the second line is the current line on the label. Use the arrow keys to move between lines. Using Tabs You can add tabs to a label to align text on multi-line labels. Tabs are left justified and the default spacing is 50 mm (2.0 ). To change the tab spacing 1. Press. 2. Select Set Tab Length and press. 3. Use the up and down arrow keys to increase or decrease the tab setting, and then press. To insert a tab 1. Enter your text. 2. Press the key and continue entering text. Using Symbols and Special Characters Symbols and other special characters can be added to your labels. 8


9 Adding Symbols The labelmaker supports the extended symbol set as shown in Figure 11. Figure 11 To add a symbol 1. Press Symbols. The first row of symbols shown in the table appears in the display. 2. Use the arrow keys to move to the desired symbol. The left and right arrows move horizontally along a row of symbols. The up and down arrow keys scroll vertically through the rows of symbols. To quickly see a row of symbols, you can press the letter corresponding to the row you want. 3. When you locate the desired symbol, press to add the symbol to your label text. Adding International Characters The labelmaker supports the extended Latin character set using RACE technology. Similar to using a mobile phone keypad, if you type a letter multiple times within a very short time, you will scroll through variations on that letter. For example, if French is selected as the language and you repeatedly press the letter a, you will see a à â æ and so on through all the variations available. The character variations and the order in which the variations appear depend on the language you have selected to use. Currency Symbols The currency key also uses RACE to scroll through a number of currency symbols: $ The order these symbols appear depends on the language you have selected. Printing Options You can print multiple copies of a label at one time, print serialized labels, print fixed-length labels, review label text and format, and adjust the printing contrast. 9
10 Printing Multiple Copies You can print up to 16 copies of a label at one time. When printing multiple copies, a dotted cut-line is printed between each label. To print multiple copies of the label 1. Press and then select Set # Copies. 2. Press the up arrow key to increase the number of copies to print. 3. Press the down arrow key to begin decreasing the number of copies from Press. 5. Press G to begin printing. When printing is finished, the number of copies to print returns to the default value of 1. Serializing Your Labels You can print a series of labels with the last number incremented by one number. The number of labels serialized depends upon the number of copies you selected to print. Only the last series of numbers that follows any letter, space, or punctuation will be serialized. For example, abc123 will print as abc123, abc124, abc125; and will print as , , , and so on. To serialize your labels 1. Enter the text for your label. 2. Select the number of labels to print as described in Printing Multiple Copies on page Select + G. Printing a Fixed-Length Label Normally, the length of the label is determined by the length of the text entered. However, you may wish to make a label for a specific purpose that is a fixed length regardless of the length of the text. You can specify a fixed length for a label in 2 mm (0.1 ) increments between 40 mm (1.5 ) and 400 mm (15.0 ). The preset fixed length is 100 mm (4.0 ). Any change you make to the fixed-length setting remains in effect until you change it. To set the label length 1. Press Select ON to turn on Fixed Length. 3. Press the up arrow to increase the length. 4. Press the down arrow to decrease the length. 5. Press to set the fixed length. 6. After you print the label, repeat step 1 and turn Fixed Length OFF; otherwise, all your subsequent labels will print with this fixed length. Printing Barcode Labels The labelmaker can print barcodes in six standard formats: UPC A, UPC E, EAN8, EAN13, CODE-39, and CODE-128. You can only print a barcode on 19 mm (3/ 4 ) labels; and you can only print one barcode per label. The barcode prints horizontally along the label with the text in small print underneath the barcode. You can optionally add text before and after the barcode. Or, you can add text above or below the barcode by creating a two-line label. See Creating Multi-Line Labels on page 6. Four of the standard barcodes require a fixed number of characters to generate the barcode: EAN-8, EAN-13, UPC-A, and UPC-E. CODE-39 and CODE-128 barcodes allow a variable number of characters to be entered. To create a barcode 1. Press. 2. Select Set Barcode and press. 3. Use the arrow keys to select the barcode type, and press. 10
11 One or more question marks appear between the barcode symbols ( ). You may see a 0 in the far right position for some barcode types. This is a check digit and will be replaced with a number when the barcode data is entered. 4. Enter the data for the barcode, replacing the question marks, and press when finished. 5. Enter the text you wish to appear before the barcode on the label. (Optional) Preview 6. Press. Insert 7. Use the arrow keys to select Insert Barcode, and press. 8. Enter any text you wish to appear after the barcode. (Optional) 9. Press G. Previewing Your Label You can preview the text or format of your label prior to printing. A two-line label is previewed as a singleline label. To preview your label Preview 1. Press +. Insert 2. Select Text or Format. If you select Text, the text of the label scrolls across the display. If you select Format, the format selected displays briefly. Aligning the Text???????0 When you print a fixed length label you can choose to align the text at the left, center, or right side of the label. For multi-line labels, all lines of text are aligned left, center, and right relative to each other. To align the text 1. Press + >. 2. Select the desired alignment using the arrows keys and press. 3. Press to turn off the alignment setting. Adjusting the Print Contrast You can adjust the print contrast to fine tune the print quality of your label. To set the contrast 1. Press. 2. Select Print Contrast and press. 3. Select a contrast setting and press. Using Labelmaker Memory The labelmaker has a powerful memory feature that stores text and formatting as follows: Automatically stores the last fifteen labels printed. Allows you to store the text of up to ten labels you use frequently. Allows you to name and store up to ten commonly used label formats. Storing Label Text The labelmaker automatically keeps the last fifteen labels printed in a text buffer. In addition, you can store up to ten specific labels you use frequently. To store the current label text 1. Press Select Save and then Label. The first of ten memory fields is displayed. 3. Use the arrow keys to move through the fields. You can store new text in any of the memory locations, however, if you select a location that is filled, the previous label text will be overwritten. 11
12 4. Select a memory location and press. Your label text is saved and you are returned to the label. Storing Formats In addition to label text, you can store up to ten specific label formats you use frequently. This feature stores only the formatting information not the label text. To store the current format 1. Press Select Save and then Format. The first of ten memory fields is displayed. 3. Use the arrow keys to move through the fields. You can store a new format in any of the memory locations, however, if you select a location that is filled, the previously stored format will be overwritten. 4. Select a field and press. The word Name? appears in the field. 5. Enter a name for the format and press. The label format is saved and you are returned to the label. Recalling Stored Labels and Formats You can easily recall labels and formats stored in memory to use at a later time. To recall labels or formats 1. Press Select Recall and then Label, Format, or Last Printed. The first memory location is displayed similar to storing a label or format. 3. Select a label or format to recall and press. Caring for Your Labelmaker Your labelmaker is designed to give you long and trouble-free service, while requiring very little maintenance. Clean your labelmaker from time to time to keep it working properly. Clean the cutter blade each time you replace the label cassette. To clean the cutter blade 1. Remove the label cassette. 2. Press and hold down the cutter lever to expose the cutter blade. 3. Use a cotton ball and alcohol to clean both sides of the blade. 4. Release the cutter lever.! You can also follow this procedure if the cutter blade becomes lodged in the forward position and will not move. To clean the print head Clean the print head using the cleaning tool located inside the label compartment lid. 12
13 Troubleshooting Review the following possible solutions if you encounter a problem while using your labelmaker. Problem/Error Message Solution No display Ensure the labelmaker is turned on. Replace discharged batteries. Poor Print Quality Replace discharged batteries or attach power adapter. Ensure label cassette is installed properly. Clean the print head. Replace the label cassette. Poor Cutter Performance Clean the cutter blade. See Caring for Your Labelmaker. Printing No action required. Message disappears when printing is finished. Too many characters Exceeded maximum number of characters in buffer. Delete some or all of the buffer text. Too many lines Exceeded maximum number of lines allowed. Select another format. Insert Label Cassette Label cassette missing or empty. Insert a new label cassette Battery low Batteries almost discharged. Replace batteries or connect AC power adapter. Label Jam Motor is stalled due to label jam. Too many pages Exceeded maximum number of format breaks allowed. Page not empty Label size too small Set Fixed-length label selected and the length necessary to print the label exceeds the selected length. Remove jammed label and replace label cassette. Clean cutter blade. Change label layout. Delete all content on the page. Change label size or press Cancel to exit Box/Background menu. Following this message, a fixed-length value is displayed which indicates the minimum label length necessary to fit the text. Do one of the following: Adjust the fixed-length label setting appropriately, or Select a narrower font size. If you still need assistance, contact Customer Support. Refer to Contacting Customer Support at the back of this User Guide to locate the contact number for your country. 13
14 Documentation Feedback We are constantly working to produce the highest quality documentation for our products. We welcome your feedback. Send us your comments or suggestions about our user guides. Please include the following information with your feedback: Product name, model number, and User Guide page number Brief description of instructions that are inaccurate or unclear, areas where more detail is needed, and so on We also welcome your suggestions about additional topics you would like to see covered in the documentation. Send messages to: Please keep in mind that this address is only for documentation feedback. If you have a technical question, please contact Customer Support. This product is CE marked in accordance with the EMC directive and the low voltage directive and is designed to conform with the following international standards: US FCC Class B Compatibility Safety - EN 60950, IEC 950, UL 1950 EMC Compatibility EN /3 ; EN /3/4/5/6/8/11; ENV 50204; EU Immunity - EN & addendums A1, A2 Electromagnetic Compatibility (EMC) - Information Technology equipment, Immunity Characteristics Emissions EN : Electromagnetic Compatibility (EMC) - Part 6: Generic Standards - Section 3: Emission standard for residential, commercial and light industrial environments. 14
15 Produced by/produit par/producido por: Corp., Stamford, CT A Division of/une Division de/una División de Newell Rubbermaid Imported into Canada by/importé au Canada par Sanford Canada LP, Oakville, ON L6H 5R6 En México importado y distribuido por: Berol, S. de R.L. de C.V. Vía Dr. Gustavo Baz , Col. La Loma C.P , Tlanepantla, Edo. de México Sanford Australia, 1-11 Keysborough Avenue, Keysborough, VIC Australia Sanford New Zealand, 1 Verisimo Drive, Mangere, Auckland New Zealand
Figure 1 LabelMANAGER 450 Electronic Labelmaker
 USB Connector AC Power Connector LCD Display Tape Exit www.dymo.com Font Style/Size Font/Fixed Length Box/Align Symbols Power Cutter Memory Language Preview/Insert Tab CAPS Language Memory Preview Symbols
Electronic Labelmaker User Guide
 1, 2..N TM Language Symbols Preview Insert Electronic Labelmaker User Guide US NZ AUS w Power Connector USB Connector Label Exit Cutter LCD Display Power Symbols Language Fixed Length/Style Font Align/Box
LabelManager 150 User Guide
 LabelManager 150 User Guide www.dymo.com LabelManager 150 User Guide AC Power Connector Tape Exit LCD Display Cutter Button On/Off Button Style Key Frame/Align Key Font/Fixed Length Key Extra Key Numeric
Professional Labelmaker User Guide
 TM Professional Labelmaker User Guide US NZ AUS w Label Exit Align/Underline Box Cutter LCD Display Power Style Fixed Length/Font Memory/Extra Numeric Keys Print Ok Cancel Navigation Clear/Delete Alpha
User Guide
 LetraTag User Guide www.dymo.com LTRazor_cover.indd 1 13-01-2006 14:40:24 LetraTag User Guide Label Exit Extra Power Insert Cancel Memory Save Memory Recall LCD Display Cutter Print Settings OK Navigation
Professional Labelmaker User Guide
 Professional Labelmaker User Guide US NZ AUS w USB Connector AC Power Connector Auto-cutter LCD Display Label cassette door release www.dymo.com Label Exit Font Size/Style Font/Fixed Length Underline-Box/Align
DYMO LetraTag 100-H. Figure 1. Label Exit. LCD Display. Settings Power Insert Cancel. Cutter Button Print Format OK Navigation Num Lock CAPs
 DYMO LetraTag 100-H Label Exit Settings Power Insert Cancel Memory Save Memory Recall LCD Display Cutter Button Print Format OK Navigation Num Lock CAPs Clear Space Bar Backspace Figure 1 2 About Your
User Guide
 www.labelcity.com/rhino User Guide LCD Display Label Exit Cutter Key Power Key Print/Copies Key Navigation Key Delete/Clear Key Symbol Hot Keys Language Key Size Key CAPS Key Style Key Function/Shift Key
Contents. LM450D_manual_UK_WEU.indd :22:53
 2 Contents About Your New Label Maker... 5 Warranty Registration... 5 Getting Started... 5 Connecting the Power... 5 Connecting the Power Adapter... 5 Inserting the Batteries... 5 Inserting the Tape Cassette...
LabelManager 210D. User Guide. The easy-to-use label maker for your desktop.
 LabelManager 210D The easy-to-use label maker for your desktop User Guide www.dymo.com LM210D_manual_US_cover1.indd 1 7/9/2007 9:30:03 AM Contents About Your New Label Maker... 5 Product Registration...5
Electronic Labelmaker
 LM150 WEUdef.qxd 23-09-2003 16:07 Pagina 1 150 Electronic Labelmaker User Guide Etiqueteuse Electronique Guide D Utilisation Elektronische Labelmaker Gebruikershandleiding Elektronisches Beschriftungsgerät
LabelManager 120P Basic label maker with easy-to-use smart keys
 LabelManager 120P Basic label maker with easy-to-use smart keys User Guide www.dymo.com LM120P_Cover_US.indd 1 8/22/2007 10:18:32 AM Contents About Your New Label Maker...5 Product Registration...5 Getting
Contents. M220P-UK_WEU.indd :13:12
 Contents About Your New Label Maker...5 Product Registration... 5 Getting Started...5 Connecting the Power... 5 Inserting the Batteries... 5 Connecting the Optional Power Adapter... 6 Inserting the Tape
COLORPOP! User Guide
 COLORPOP! User Guide Copyright 2018 Newell Rubbermaid Europe, LLC. All rights reserved. Rev. 6/18 No part of this document may be reproduced or transmitted in any form or by any means or translated into
DYMO DYMO. Power Supply
 1 1 Introduction The Dymo LabelPoint 200 enables you to create a wide variety of high quality self-adhesive labels of up to 90 characters. The LabelPoint uses 6mm ( 1 / 4"), 9mm ( 3 / 8") or 12mm ( 1 /
DYMO DYMO. Creating your first label You will no doubt be anxious to see what your new LabelManager LM200 can do. Before we go on to
 1 1 Introduction The Dymo LabelManager LM200 enables you to create a wide variety of high quality self-adhesive labels of up to 90 characters. The LabelManager uses 6mm ( 1 / 4"), 9mm ( 3 / 8"), 12mm (
Industrial Labelprinter
 WRAP FLAG 1 FLAG 2 FIXED TBLOCK VERT CAPS BFONT STYLE BOX ULINE BCODE PRINT CLEAR VERT BOX/UL CARD ID ALIGN ERASE BCODE LANG SAVE SAVE GRAPHIC 219 Industrial Labelprinter Instructions for Use www.dymo.com
Quick Start Guide. LabelManager 420P. High-Performance Portable Label Maker with PC or Mac Connection
 Quick Start Guide LabelManager 420P High-Performance Portable Label Maker with PC or Mac Connection Insert % Shift Quick Start Make sure you have all the items shown in Figure 1. (Labels included in the
Quick Reference Guide. LabelManager 280
 Quick Reference Guide LabelManager 280 Copyright 2012 Sanford, L.P. All rights reserved. No part of this document or the software may be reproduced or transmitted in any form or by any means or translated
uline.com OVERVIEW OF CONTROLS
 π H-5135 1-800-295-5510 uline.com BROTHER P-TOUCH D400AD DESKTOP PRINTER OVERVIEW OF CONTROLS LCD DISPLAY AND KEYBOARD 1 3 2 4 5 6 12 CONTROL PANEL PARTS 7 # DESCRIPTION # DESCRIPTION 1 Caps Mode 20 Clear
iii Product Name User Guide
 BC Copyright 2015 Sanford, L.P. All rights reserved. Rev. 10/2/17 No part of this document or the software may be reproduced or transmitted in any form or by any means or translated into another language
ELECTRONIC LABELING SYSTEM. E110 English. User s Guide
 ELECTRONIC LABELING SYSTEM E110 English User s Guide GETTING STARTED ELECTRONIC LABELING SYSTEM Thank you for purchasing a Brother P-touch labeling system! Use your new Brother P-touch labeling system
ELECTRONIC LABELING SYSTEM. H110 English. User s Guide
 ELECTRONIC LABELING SYSTEM H110 English User s Guide 1 GETTING STARTED Power Supply and Tape Cassette ELECTRONIC LABELING SYSTEM With your new Brother P-touch label maker, you can create a wide variety
User s Guide English
 User s Guide English www.brother.com. Safety Precautions WARNING Follow these guidelines to avoid the risk of fire, burns, injury, electric shocks, rupture, overheating, abnormal odours or smoke. printer
User s Guide M95. User s Guide. English. Version 0 UK ENG
 User s Guide M95 M95 User s Guide English Version 0 UK ENG Installing the Power Supply and Tape Cassette Using the Optional AC Adapter Installing the Power Supply and Tape Cassette 1 Cassette 2 cover Cutter
2007 Sanford, L.P. All rights reserved. DYMO and LabelWriter are registered trademarks of Sanford, L.P. All other trademarks are the property of
 Quick Start Guide 2007 Sanford, L.P. All rights reserved. DYMO and LabelWriter are registered trademarks of Sanford, L.P. All other trademarks are the property of their respective holders. Switching Adapter
LabelManager Wireless PnP USER GUIDE
 LabelManager Wireless PnP USER GUIDE dymo.com Copyright 2013 Newell Rubbermaid Europe LLC. All rights reserved. No part of this document or the software may be reproduced or transmitted in any form or
Quick Start Guide. LabelWriter
 Quick Start Guide LabelWriter 450 Duo Copyright 2010 Sanford, L.P. All rights reserved. Revised 12/10. No part of this document or the software may be reproduced or transmitted in any form or by any means,
1800/1810 USER S GUIDE. Read this User s Guide before you start using your P-touch. Keep this User s Guide in a handy place for future reference.
 1800/1810 USER S GUIDE Read this User s Guide before you start using your P-touch. Keep this User s Guide in a handy place for future reference. INTRODUCTION Thank you for purchasing the P-touch 1800/1810!
User s Guide Read this User s Guide before you start using your P-touch. Keep this User s Guide in a handy place for future reference.
 1750 User s Guide Read this User s Guide before you start using your P-touch. Keep this User s Guide in a handy place for future reference. INTRODUCTION Thank you for purchasing the P-touch 1750! Your
BMP 21-PLUS LABEL PRINTER QUICK START GUIDE
 BMP 21-PLUS LABEL PRINTER QUICK START GUIDE REGISTER YOUR PRINTER English Register your printer online at www.bradycorp.com/ register. TECHNICAL ASSISTANCE For troubleshooting and FAQs, visit: http://www.qualityserviceandsupport.com/brady
Copyright. Trademarks
 BC Copyright 2017 Newell Rubbermaid Europe LLC. All rights reserved. Revised 8/29/17 No part of this document or the software may be reproduced or transmitted in any form or by any means or translated
EXCEL BASICS: MICROSOFT OFFICE 2007
 EXCEL BASICS: MICROSOFT OFFICE 2007 GETTING STARTED PAGE 02 Prerequisites What You Will Learn USING MICROSOFT EXCEL PAGE 03 Opening Microsoft Excel Microsoft Excel Features Keyboard Review Pointer Shapes
Standard Windows Keyboard Layout & Keyboard Shortcuts
 Standard Windows Keyboard Layout & Keyboard Shortcuts Desktop keyboard Laptop keyboard Explanation of the Keys on a Windows QWERTY Keyboard Q W E R T Y "The name "QWERTY" for our computer keyboard comes
MSOffice WORD Microsoft Office 20 13
 MSOffice WORD Microsoft Office 2013 Objectives: Identify parts of the Word screen Name and save a document Key text into a document Edit text Print a document Close a document Modify font size, style,
E550W INTRODUCTION EDITING A LABEL LABEL PRINTING USING THE FILE MEMORY USING P-TOUCH SOFTWARE NETWORK RESETTING & MAINTENANCE TROUBLESHOOTING
 E0W In order to use your P-touch safely, read the included Quick Setup Guide first. Read this guide before you start using your P-touch. Keep this guide in a handy place for future reference. Please visit
LabelWorks LW-600P User's Guide
 LabelWorks LW-600P User's Guide Contents LabelWorks LW-600P User's Guide... 7 Introduction to Your LabelWorks Printer... 8 Product Box Contents... 8 Notations Used in the Documentation... 9 Label Printer
EXCEL BASICS: MICROSOFT OFFICE 2010
 EXCEL BASICS: MICROSOFT OFFICE 2010 GETTING STARTED PAGE 02 Prerequisites What You Will Learn USING MICROSOFT EXCEL PAGE 03 Opening Microsoft Excel Microsoft Excel Features Keyboard Review Pointer Shapes
User Manual. Monarch Printers AAFES Kit Paxar Americas, Inc. a subsidiary of Avery Dennison Corp. All rights reserved.
 User Manual Monarch Printers AAFES Kit TC9416AAUM Rev. AC 12/07 2006 Paxar Americas, Inc. a subsidiary of Avery Dennison Corp. All rights reserved. Each product and program carries a respective written
USER S GUIDE. Read this User s Guide before you start using your P-touch. Keep this User s Guide in a handy place for future reference.
 1800 USER S GUIDE Read this User s Guide before you start using your P-touch. Keep this User s Guide in a handy place for future reference. INTRODUCTION Thank you for purchasing the P-touch 1800! Your
Formatting and Editing Skills. Apply formatting and editing features and operational keys appropriately.
 Formatting and Editing Skills Apply formatting and editing features and operational keys appropriately. Word Processing Word processing software is a type of application software that is used for creating
GM_horizontal QUICK START GUIDE GM_horizontal_ vertical stacked offset 4-color process identity Version 4.10
 QUICK START GUIDE BEGIN HERE Machine Set Up 1. Tighten the ribbon. 4. Connect the adapter. 2. Open the cover. Check the manual for using AA batteries or Sanyo enloop rechargeable batteries. See Manual
CONTENTS Getting Started For Your Information
 CONTENTS Getting Started INTRODUCTION AND SAFE OPERATION... 2 GENERAL PRECAUTIONS... 4 WARRANTY INFORMATION... 5 GENERAL DESCRIPTION... 6 KEYBOARD & LCD DISPLAY... 7 BATTERIES... 8 OPTIONAL AC ADAPTER...
Grade: 7 Lesson name: Creating a School News Letter Microsoft Word 2007
 Grade: 7 Lesson name: Creating a School News Letter Microsoft Word 2007 1. Open Microsoft Word 2007. Word will start up as a blank document. 2. Change the margins by clicking the Page Layout tab and clicking
Lesson 4 - Creating a Text Document Using WordPad
 Lesson 4 - Creating a Text Document Using WordPad OBJECTIVES: To learn the basics of word processing programs and to create a document in WordPad from Microsoft Windows. A word processing program is the
Introduction to Microsoft Word 2010
 Introduction to Microsoft Word 2010 THE BASICS PAGE 02! What is Microsoft Word?! Opening Microsoft Word! The Title Bar! Page View and Zoom MENUS...PAGE 03! Quick Access Toolbar! The Ribbon! File Tab! Home
Graded Project. Microsoft Word
 Graded Project Microsoft Word INTRODUCTION 1 CREATE AND EDIT A COVER LETTER 1 CREATE A FACT SHEET ABOUT WORD 2010 7 USE A FLIER TO GENERATE PUBLICITY 12 DESIGN A REGISTRATION FORM 16 REVIEW YOUR WORK AND
Core Essentials. Word Module 1. Diocese of St. Petersburg Office of Training
 Core Essentials Word 2010 Module 1 Diocese of St. Petersburg Office of Training Training@dosp.org Diocese of St. Petersburg 9/5/2014 This Page Left Intentionally Blank Diocese of St. Petersburg i 9/5/2014
Introduction to Microsoft Excel 2010
 Introduction to Microsoft Excel 2010 THE BASICS PAGE 02! What is Microsoft Excel?! Important Microsoft Excel Terms! Opening Microsoft Excel 2010! The Title Bar! Page View, Zoom, and Sheets MENUS...PAGE
In so many ways summary
 In so many ways summary Many of Word s functions can be activated in a variety of different ways. Often you can use the menu, a tool on the toolbar or a shortcut key to achieve the same result. Rather
WORD BASICS: MICROSOFT OFFICE 2010
 WORD BASICS: MICROSOFT OFFICE 2010 GETTING STARTED PAGE 02 Prerequisites What You Will Learn USING MICROSOFT WORD PAGE 03 Microsoft Word Components The Keyboard SIMPLE TASKS IN MICROSOFT WORD PAGE 08 Typing
Microsoft Excel Level 1
 Microsoft Excel 2010 Level 1 Copyright 2010 KSU Department of Information Technology Services This document may be downloaded, printed, or copied for educational use without further permission of the Information
DuraLabel.com USER GUIDE
 800.788.5572 DuraLabel.com USER GUIDE Copyright Information No part of this manual, including the products and software described in it, may be reproduced, transmitted, transcribed, stored in a retrieval
Microsoft. Computer Training Center 1515 SW 10 th Avenue Topeka KS
 Microsoft Computer Training Center 1515 SW 10 th Avenue Topeka KS 66604-1374 785.580.4606 class@tscpl.org www.tscpl.org Microsoft Word 2007 Introduction to Word Processing 1 How to Start Word is a full-featured
Radio Mini Wireless Wheel Mouse User s Guide MODEL: RFMSW-15
 Radio Mini Wireless Wheel Mouse User s Guide MODEL: RFMSW-15 Trademark Recognition Windows, Office 97 and MS-IntelliMouse are registered trademarks of Microsoft Corp. RFMSW-15 THIS DEVICE COMPLIES WITH
Software User's Guide
 Software User's Guide The contents of this guide and the specifications of this product are subject to change without notice. Brother reserves the right to make changes without notice in the specifications
For Australia Only:
 P. IBM is a trademark of International Business Machines, Inc. Microsoft and Windows are registered trademarks of Microsoft Corporation, USA. The names of other software or products used in this document
Setting Up a Paper in APA Style Using Microsoft Word 2007
 Setting Up a Paper in APA Style Using Microsoft Word 007 Open Microsoft Word 007. By default Word opens a new blank document. It is easiest if you create all of these settings before you begin your paper.
USER S GUIDE. Read this User s Guide before you start using your P-touch. Keep this User s Guide in a handy place for future reference.
 2200,,,,,,,,,,,,,,,,,,,,, USER S GUIDE Read this User s Guide before you start using your P-touch. Keep this User s Guide in a handy place for future reference. INTRODUCTION Thank you for purchasing the
Graded Project. Microsoft Word
 Graded Project Microsoft Word INTRODUCTION 1 CREATE AND EDIT A COVER LETTER 1 CREATE A FACT SHEET ABOUT WORD 2013 6 USE A FLIER TO GENERATE PUBLICITY 9 DESIGN A REGISTRATION FORM 12 REVIEW YOUR WORK AND
Word 2010 Essentials. Training Manual. Narre Community Learning Centre Inc
 Word 2010 Essentials Training Manual Narre Community Learning Centre Inc TABLE OF CONTENTS Module One: Getting Started... 2 Workshop Objectives... 3 Module Two: Opening and Closing Word... 4 Opening Word...
WEEK NO. 12 MICROSOFT EXCEL 2007
 WEEK NO. 12 MICROSOFT EXCEL 2007 LESSONS OVERVIEW: GOODBYE CALCULATORS, HELLO SPREADSHEET! 1. The Excel Environment 2. Starting A Workbook 3. Modifying Columns, Rows, & Cells 4. Working with Worksheets
The first time you open Word
 Microsoft Word 2010 The first time you open Word When you open Word, you see two things, or main parts: The ribbon, which sits above the document, and includes a set of buttons and commands that you use
Microsoft Office Word. Part1
 Microsoft Office 2010 - Word Part1 1 Table of Contents What is Microsoft Word?... 4 Creating a document... 5 Toolbar... 6 Typing in MS Word Text Area... 7 Cut, Copy and Paste Text... 9 Paste Preview...
PT-1700 USER S GUIDE. Read this User s Guide before you start using your P-Touch. Keep this User s Guide in a handy place for future reference.
 PT-1700 USER S GUIDE Read this User s Guide before you start using your P-Touch. Keep this User s Guide in a handy place for future reference. CONTENTS CONTENTS... 1 OVERVIEW... 2 GENERAL PRECAUTIONS...
Spreadsheet Concepts Using Microsoft Excel
 Spreadsheet Concepts Using Microsoft Excel lab 5 Objectives: Upon successful completion of Lab 5, you will be able to Create and edit a simple spreadsheet document Describe the advantage of using formulas
YJ Carat and Gold Scales
 99 Washington Street Melrose, MA 02176 Phone 781-665-1400 Toll Free 1-800-517-8431 Visit us at www.testequipmentdepot.com YJ Carat and Gold Scales Instruction Manual EN-2 YJ Series YJ Scale Mark Standard
Contents. Launching Word
 Using Microsoft Office 2007 Introduction to Word Handout INFORMATION TECHNOLOGY SERVICES California State University, Los Angeles Version 1.0 Winter 2009 Contents Launching Word 2007... 3 Working with
T4 series user s manual. Version: 1.1
 Version: 1.1 Table of contents 1. Introduction...1 1.1 In the box...1 1.2 Printer Features...2 1.2.1 Front view...2 1.2.2 Rear view...2 1.2.3 Interior view...3 2. Getting start...4 2.1 Loading the ribbon...4
Microsoft Office Suite
 Module 3 MODULE OVERVIEW Part 1 Getting Familiar with Microsoft Word 2007 for Windows Part 2 Microsoft Word 2007 Basic Features Part 3 More Basic Features Microsoft Office Suite Microsoft Word 2007 Part
INTRODUCTION GETTING STARTED EDITING A LABEL LABEL PRINTING USING THE FILE MEMORY MAINTAINNING YOUR P-TOUCH TROUBLESHOOTING APPENDIX INDEX
 INTRODUCTION GETTING STARTED EDITING A LABEL LABEL PRINTING USING THE FILE MEMORY MAINTAINNING YOUR P-TOUCH TROUBLESHOOTING APPENDIX INDEX LW000 INTRODUCTION Thank you for purchasing the P-touch 00. Your
Microsoft Word Important Notice
 Microsoft Word 2013 Important Notice All candidates who follow an ICDL/ECDL course must have an official ICDL/ECDL Registration Number (which is proof of your Profile Number with ICDL/ECDL and will track
An office program used to create documents. Documents include: resumes, cover letters, and essays. Let Go. Microsoft Word
 MICROSOFT WORD: Navigating Word and Basic Formatting An office program used to create documents. Documents include: resumes, cover letters, and essays. THE RIBBON: A toolbar used to edit the document.
Creating Accessible Word Documents
 Creating Accessible Word Documents 1 of 11 Creating Accessible Word Documents Contents 1. General principles... 1 2. Styles/ Headings... 2 3. Table of Contents... 3 Updating a Table of Contents... 5 4.
Bold, Italic and Underline formatting.
 Using Microsoft Word Character Formatting You may be wondering why we have taken so long to move on to formatting a document (changing the way it looks). In part, it has been to emphasise the fact that
What can Word 2013 do?
 Mary Ann Wallner What can Word 2013 do? Provide the right tool for: Every aspect of document creation Desktop publishing Web publishing 2 Windows 7: Click Start Choose Microsoft Office > Microsoft Word
Setting Up a Paper in APA Style Using Microsoft Word 2008 for MACs
 Setting Up a Paper in APA Style Using Microsoft Word 008 for MACs Open Microsoft Word 008. By default Word opens a new blank document. It is easiest if you create all of these settings before you begin
Microsoft Excel 2007 Level 1
 Information Technology Services Kennesaw State University Microsoft Excel 2007 Level 1 Copyright 2008 KSU Dept. of Information Technology Services This document may be downloaded, printed or copied for
Microsoft Word: Steps To Success (The Bare Essentials)
") Microsoft Word: Steps To Success (The Bare Essentials) Workbook by Joyce Kirst 2005 Microsoft Word: Step to Success (The Bare Essentials) Page Contents 1 Starting Word 2 Save 3 Exit 5 Toolbars, Alignment,
Microsoft Word: Steps To Success (The Bare Essentials) Workbook by Joyce Kirst 2005 Microsoft Word: Step to Success (The Bare Essentials) Page Contents 1 Starting Word 2 Save 3 Exit 5 Toolbars, Alignment,
VnM 2 SignMaker User Manual Version Updated: 07/2010
 VnM 2 SignMaker User Manual Version 2.0 Updated: 07/200 Introduction Thank you for purchasing the VnM2 SignMaker. Let your imagination run wild with the VnM2 by creating a variety of signs and labels
Software User's Guide
 Software User's Guide The contents of this guide and the specifications of this product are subject to change without notice. Brother reserves the right to make changes without notice in the specifications
Introduction to Microsoft Office 2016: Word
 Introduction to Microsoft Office 2016: Word Last Updated: September 2018 Cost: $2.00 Microsoft Word is a word processing software. You can use it to type letters, reports, and other documents. This class
What is Word? How to Open Word. Intro to Word 2010 by Lodi Memorial Library Developed by Barb Hauck-Mah for ESL Literacy Grant
 Intro to Word 2010 by Lodi Memorial Library Developed by Barb Hauck-Mah for ESL Literacy Grant What is Word? Word is a computer software program that has many tools for typing and editing documents with
Word - Basics. Course Description. Getting Started. Objectives. Editing a Document. Proofing a Document. Formatting Characters. Formatting Paragraphs
 Course Description Word - Basics Word is a powerful word processing software package that will increase the productivity of any individual or corporation. It is ranked as one of the best word processors.
Excel 2010: Getting Started with Excel
 Excel 2010: Getting Started with Excel Excel 2010 Getting Started with Excel Introduction Page 1 Excel is a spreadsheet program that allows you to store, organize, and analyze information. In this lesson,
Learn more about Pages, Keynote & Numbers
 Learn more about Pages, Keynote & Numbers HCPS Instructional Technology May 2012 Adapted from Apple Help Guides CHAPTER ONE: PAGES Part 1: Get to Know Pages Opening and Creating Documents Opening a Pages
MICROSOFT EXCEL KEYBOARD SHORCUTS
 MICROSOFT EXCEL KEYBOARD SHORCUTS F1 Displays the Office Assistant or (Help > Microsoft Excel Help) F2 Edits the active cell, putting the cursor at the end F3 Displays the (Insert > Name > Paste) dialog
Microsoft Visio 2016 Foundation. Microsoft Visio 2016 Foundation Level North American Edition SAMPLE
 Microsoft Visio 2016 Foundation Microsoft Visio 2016 Foundation Level North American Edition Visio 2016 Foundation - Page 2 2015 Cheltenham Group Pty. Ltd. All trademarks acknowledged. E&OE. No part of
Opening Microsoft Word. 1. Double click the Word 2016 icon on the desktop to launch word.
 Intro to Microsoft Word 2016 Class Description: This class will provide an introduction to the word processing program Microsoft Word 2016. Learn how to create a simple document, edit and format text,
SIMPLE TEXT LAYOUT FOR COREL DRAW. When you start Corel Draw, you will see the following welcome screen.
 SIMPLE TEXT LAYOUT FOR COREL DRAW When you start Corel Draw, you will see the following welcome screen. A. Start a new job by left clicking New Graphic. B. Place your mouse cursor over the page width box.
KEYBOARD SHORTCUTS AND HOT KEYS
 KEYBOARD SHORTCUTS AND HOT KEYS Page 1 This document is devoted to using the keyboard instead of the mouse to perform tasks within applications. This list is by no means the "be all and end all". There
LabelWriter. Print Server. User Guide
 LabelWriter Print Server User Guide Copyright 2011 Sanford, L.P. All rights reserved. 04/11 No part of this document or the software may be reproduced or transmitted in any form or by any means or translated
MS Word Professional Document Alignment
 MS Word Professional Document Alignment Table of Contents CHARACTER VS. PARAGRAPH FORMATTING...5 Character formatting...5 Paragraph Formatting...5 USING SHOW/HIDE TO REVEAL NON-PRINTING CHARACTERS...5
Microsoft Excel Keyboard Shortcuts
 Microsoft Excel Keyboard Shortcuts Here is a complete list of keyboard shortcuts for Microsoft Excel. Most of the shortcuts will work on all Excel versions on Windows based computer. Data Processing Shortcuts
Introduction to Microsoft Word 2010
 1 Introduction to Microsoft Word 2010 Handout from Lodi Memorial Library (Developed by Barb Hauck Mah for ESL Tech Literacy Grant; Modified by Jennifer Cohen Feb. 2015) What is Microsoft Word? Microsoft
Unit D Lecture Notes Word 2003
 Unit D Lecture Notes Word 2003 Objectives: In this project you will learn: Set document margins Divide a document into sections Insert page breaks Insert page numbers Add headers and footers Edit headers
Table of Contents. Introduction 2 1. Intelligent Remote Control 2 2. Charging the Remote Control 3
 Table of Contents Introduction 2 1. Intelligent Remote Control 2 2. Charging the Remote Control 3 Getting Started 6 1. Activating the Remote Control 6 2. Selecting a Device 7 3. Operating a Device 8 4.
LabelWriter 400 LabelWriter 400 Turbo
 LabelWriter 400 LabelWriter 400 Turbo Quick Start www.dymo.com LW 400 T_QSC.indd 1 27-01-2006 14:08:39 Quick Start Follow these steps to install the LabelWriter printer and print your first label. 1. Unpacking
DOING MORE WITH WORD: MICROSOFT OFFICE 2007
 DOING MORE WITH WORD: MICROSOFT OFFICE 2007 GETTING STARTED PAGE 02 Prerequisites What You Will Learn USING MICROSOFT WORD PAGE 03 Viewing Toolbars Adding and Removing Buttons MORE TASKS IN MICROSOFT WORD
Title bar: The top most bar in Word window that usually displays the document and software names.
 1 MICROSOFT WORD Table of Contents LINC ONE Hiding Standard toolbar, Formatting toolbar, and Status bar: To hide the Standard toolbar, click View Toolbars on the Menu bar. Check off Standard. To hide the