High Tech Center Training Unit McClellan Rd. Cupertino, CA
|
|
|
- Ursula Flowers
- 6 years ago
- Views:
Transcription

1 Advanced OCR High Tech Center Training Unit McClellan Rd. Cupertino, CA Foothill De Anza Community College District California Community Colleges
2 Advanced OCR with OmniPage and FineReader 10:00 A.M. 10:30 A.M. Introductions and Expectations FineReader in Kurzweil Basic differences: cost Abbyy $300, OmniPage Pro $150/Pro Office $600; automating; crashing; graphic vs. text OCR program: Abbyy FineReader Looking at options Working with TIFF files Opening the file Zoom window Running OCR layout preview modifying spell check looks for barcodes Blocks Block types Adding to blocks Subtracting from blocks Reordering blocks Customize toolbars Adding reordering shortcut to the tool bar Save and load blocks Eraser Saving Types of documents Save to file Formats settings Optional hyphen in Word remove optional hyphen (Tools > Format Settings) Tables manipulating Languages Training 11:45 A.M. Lunch 1:00 P.M. OCR program: ScanSoft OmniPage Looking at options Languages Working with TIFF files SET Tools (see handout) rev. 9/27/2011
3 2:30 P.M. Break Opening the file View toolbar with shortcut keys (View > Toolbar) Running OCR On-the-fly zoning modifying spell check Zone type Resizing zones Reordering zones Enlargement tool Ungroup Templates Saving Save individual pages Save all files in one document One image, one document Training Format types Use true page for PDF, not Word Use flowing page or retain fronts and paragraphs for Word Optional hyphen in Word Tables manipulating Scheduler/Batch manager: Workflow Speech Saving speech files (WAV) Creating a Workflow 2:45 P.M. OmniPage and FineReader head to head more complex documents technical documents 4:30 P.M. 4:45 P.M. Wrap-up End Objectives Participants will be able to do the following: 1. understand the OCR process 2. use the basic functions of OmniPage and FineReader 3. use zones/blocks to facilitate the OCR process 4. compare and contrast OmniPage and FineReader rev. 9/27/2011
4 Advanced OCR High Tech Center Training Unit of the California Community Colleges at the Foothill-De Anza Community College District McClellan Road Cupertino, CA (408) (800) URL to our CC license: Creative Commons website:
5 Table of Contents Basic Workflow... 1 Creating the Image File... 2 Abbyy FineReader... 2 Interface... 2 Toolbar Set-up... 3 Options Set-up... 4 Document Tab Scan/Open Tab Read Tab... 6 Important! Save Tab... 7 View Tab... 8 Advanced Tab... 9 Spell Checker Settings Processing an Image (TIFF or PDF) File Step One: Open an Image File or a PDF File Step Two: Analyze Layout Step Three: Adjust Areas Step Four: Read Document Step Five: Check Spelling Step Six: Save the Document FineReader Tips Automating Tasks Creating an Automated Task OmniPage Pro Interface Document Manager Configuration for Blind User Toolbars Options Set-up OCR Tab Process Tab Proofing Tab General Tab Text Editor Tab Scanner Tab Processing an Image (TIFF or PDF) File Step One: Load a File Step Two: Run the OCR Step Three: Adjust Zones Step Four: Save the Document OmniPage Tips ii Rev. April 27, 2010
6 Basic Workflow 1. Remove spine from book. 2. Separate pages in book page-by-page (have pages at least six inches apart glue can be transparent and stretchy!!). 3. As you separate the pages, get a sense of the book, and choose a few representative pages note if there are pages that may require different scanner settings sticky notes help make it easy to return the pages later. (For easy books, 1 page may be enough, and usually 6 or so is plenty.) 4. Scan those pages. 5. Run OCR on pages. 6. If you re getting more than one recognition error per page, go back and adjust the scanner settings. 7. Rerun steps 4 6 until the recognition errors drop. (As an aside, I find that most people go too quickly through the scanning step and do not get a good scan the result is hours and hours of editing later!) 8. During the test-ocr phase, use your test pages to create a template for the book in your OCR program (OmniPage or FineReader). 9. Scan the book usually in chapters, but you may scan the entire book, depending on your policies/procedures. 10. Open the TIFF files in a review program (Microsoft Office Document Imaging software works well and is free) rescan any pages that did not scan well. 11. OCR the book using the template you created. 12. Edit the book in your OCR program. 13. Save your OCR files, as well as any formats you create. BASIC WORKFLOW CHECKLIST Remove book spine Separate pages Choose a few representative pages Scan test pages Run OCR on test pages Adjust scanner settings if needed Create a template Scan the book Review the scanned files OCR using the template Edit Save 1 Rev. April 27, 2010

7 Creating the Image File Although you can scan with either OmniPage or FineReader, we recommend that you scan your files to TIFF, using the scanning utility that comes with your scanner, and then work with the resulting multipage image. There are a number of reasons: it preserves the TIFF files for later use with other applications, it prevents problems with crashing in the middle of scans, it allows you to take full advantage of the options that are built into your scanner. Please note that you can combine multiple scanned files (TIFF and JPEG, etc.) within the OCR program. Abbyy FineReader ABBYY USA Fremont Boulevard Fremont, CA Interface 2 Rev. April 27, 2010


8 Toolbar Set-up Go to View > Toolbars. Turn on the Quick Access Toolbar. Go to View > Toolbars > Customize Toolbars. Set the Categories to Image, and find the Eraser tool under Commands. Click the double-headed arrow to move the eraser tool onto your Quick Access Toolbar. Choose View > Customize Toolbars. Move the Order Areas icon onto the Quick Access Toolbar. 3 Rev. April 27, 2010

9 Options Set-up In the menus, go to Tools > Options or use the keyboard shortcut CTRL + Shift + O. Document Tab Under the Document tab, you can choose the languages that are in your document. Click the Edit Languages button to access mathematical and scientific options. 4 Rev. April 27, 2010
 that are used as mathematical symbols. 1.")
.")
10 The more precise you can be about the languages in a document, the better your recognition will be. Remember to include Greek whenever you process math so that you recognize the Greek letters (like pi) that are used as mathematical symbols. 1. Scan/Open Tab Make sure that Do not read and analyze is unchecked. You want to be able to control what FineReader does, not have it start automatically. Do enable the image preprocessing. That feature allows FineReader to deskew and enhance the scanned image (or PDF). If you have two pages per image page, you can choose Split dual pages. It is better to rotate the pages yourself, rather than asking FineReader to do so. 5 Rev. April 27, 2010

11 2. Read Tab Under the Read tab, you can choose the reading mode (Thorough) and opt to train the patterns of unusual fonts. FineReader now behaves much more like OmniPage with its ability to train recognition of unusual fonts. In order to use this feature, make sure that Train user pattern is selected. To load an already established pattern, select Use user pattern. Below are the instructions from the FineReader help menu. 1. Select Tools > Options and click the 2. Read tab. 2. Select Train user pattern under Training. 3. Click the Pattern Editor button. 4. In the Pattern Editor dialog box, click New. 5. In the Create Pattern dialog box, type in a name for your new pattern and click OK. 6. Close the Pattern Editor and the Options dialog boxes by clicking the Close button in each. 7. On the toolbar at the top of the Image window, click Read. 8. Now if ABBYY FineReader encounters an unknown character, a Pattern Training dialog box will display the unknown character. 9. Teach new characters and ligatures. A ligature is a combination of two or three "glued" characters (for example, fi, fl, ffi, etc.). These characters are difficult to separate because they are "glued" 6 Rev. April 27, 2010

12 during printing. In fact, better results can be obtained by treating them as single compound characters. Note: Words printed in bold or italic type in your text or words in superscript/subscript may be retained in the recognized text by selecting the corresponding options under Effects. To go back to a previously trained character, click the Back button. The frame will jump to its previous location and the latest trained "character image-keyboard character" correspondence will be removed from the pattern. The Back button will function only within one word. Important! You can only train the system to read the characters included in the alphabet of the recognition language. To train ABBYY FineReader to read characters that cannot be entered from the keyboard, use a combination of two characters to denote these nonexistent characters or copy the desired character from the Insert Character dialog box (click to open the dialog box). Each pattern may contain up to 1,000 new characters. However, avoid creating too many ligatures, as this may adversely affect OCR quality. 3. Save Tab Under the Save Tab, you can access settings for particular formats. 7 Rev. April 27, 2010

13 You can set the options for how FineReader will save documents into different formats. For Microsoft Word, you can retain the page breaks, if you wish. Please note that it is generally best to use Formatted text for the layout, rather than Exact Copy or Editable Copy, which may result in text boxes. View Tab Under the View tab, you can now choose whether to see thumbnails or details in the document window. For those using screen readers, I would recommend using the Details panel. Both views can be adjusted to include exactly the information that you want to show. Click the Customize button. 8 Rev. April 27, 2010


14 Note that in the combo box at the bottom of the page, you can choose which colors to use for highlighting uncertain characters, non-dictionary words, etc. Advanced Tab On the Advanced tab, you usually do not want to open the last FineReader document at startup. 9 Rev. April 27, 2010


15 Spell Checker Settings Under the Spell Checker Settings button, you can uncheck the "Stop at words not found in dictionary" option if you will be spell checking anyway later in Word. If you will not be taking the document into Word, then go ahead and turn on the dictionary. Note that if FineReader is not quite getting the spacing around punctuation correct, you can adjust the setting in this window. You can also choose specialized dictionaries in this tab by selecting the View Dictionaries button. Note that if you are running OCR on a science text related to medicine, biology, or chemistry, it is good to turn on the English Medical Terminology. Similarly, if you are working on a business or legal text, you may receive better results by loading the English Legal Terminology Rev. April 27, 2010


16 Processing an Image (TIFF or PDF) File Step One: Open an Image File or a PDF File Click on the Open icon or use File > Open or use the keyboard shortcut Ctrl + O Rev. April 27, 2010

17 Step Two: Analyze Layout Use the Analyze Layout option (Document > Analyze Layout or Ctrl + Shift + E) first on complex layouts then read the pages. This workflow reduces the chance of the program crashing and allows layout adjustment without running OCR more than once.. Step Three: Adjust Areas Use the tools to add to or delete areas (formerly called blocks). To reorder zones, right click and turn on the Area Properties. It will display at the bottom of the image window. To change the reading order, simply change the number after the # sign. Tip: To see more of the page, turn off the Area Properties by right-clicking on the image and deselecting Area Properties Rev. April 27, 2010

18 Step Four: Read Document Go to Document > Read Document or use the keyboard shortcut Ctrl + Shift + R Rev. April 27, 2010


19 Step Five: Check Spelling Go to Tools > Check Spelling. If you wish to change the settings for the spell checker, you can click on Options Rev. April 27, 2010

20 Step Six: Save the Document File > Save As > Microsoft Word Document Note that you can adjust your settings for a specific format by clicking on Options. To avoid text boxes, save the layout as Formatted Text Rev. April 27, 2010
21 FineReader Tips Zoom window: FineReader has a zoom window (View > Zoom Window) that allows you to enlarge selected areas of the image or text. Stop spell check: To tell the program just to find OCR errors and not unknown words, go to Tools > Options > Check Spelling. Uncheck "Stop at words not found in dictionary.". Document, Page, or Area: Controls are now broken out under menu choices based on the size of the overall section that you want to work on. To apply a command to the entire document, look under Document on the menu bar. When you wish to work on an individual page, look under Page, etc. Eraser: The eraser tool allows you to edit the underlying TIFF file by deleting pixels (i.e., changing black to white). If you wish to save the changes, go under File to Save Images. The eraser tool is now located under Page > Edit Page Image or use the shortcut keys Ctrl + Shift + C. The image for the page you are on will open in a new window titled Edit Image Rev. April 27, 2010

22 Automating Tasks You can now set up workflows in Abbyy FineReader. Creating an Automated Task As an example, we will create a workflow to OCR TIFF files that are in a folder and then save the files as a FineReader file. All files will be saved in one FineReader batch. 1. Start the Automation Manager (select Tools> Automation Manager or Ctrl + T) Rev. April 27, 2010

23 2. In the Automation Manager dialog box, click the New button on the toolbar. 3. In the Automation Wizard dialog box, click the desired step from the list of steps in the left-hand pane. The selected step will be displayed in the right-hand pane Rev. April 27, 2010
24 19 Rev. April 27, 2010


25 Click Change to change the properties of the step. In this case, click Change and then Browse to find the folder containing the files you wish to process. If you want to be able to make adjustments to the layout, then save the document right after analyzing the layout Rev. April 27, 2010
26 If you simply want to read the document and save it, choose Read Rev. April 27, 2010


27 22 Rev. April 27, 2010


28 4. Once you have added all the necessary steps to your automated task and selected their properties, click Finish Rev. April 27, 2010

29 OmniPage Pro Nuance 1 Wayside Road Burlington, MA Interface Document Manager Of the two OCR programs, OmniPage is the more accessible for someone who is blind, and the main reason for that is the document manager. As a sighted-user, I generally prefer to work with it off, since I do not want to allot the screen space to it. For a quick check to see exactly where the program is in the OCR process, however, it can be very useful. Alt V + N will toggle the document manager on and off. It appears at the bottom of the window, and the area can be modified by dragging the horizontal bar at the top of the pane. The document manager is completely accessible with screen readers (JAWS, Window- Eyes, SuperNova, etc.) and will give you a lot of information about your OmniPage document. You will need to configure it, however, or else it will provide a lot of confusing, extraneous information Rev. April 27, 2010
30 Configuration for Blind User The directions below are written to be usable by someone who is blind or sighted. OmniPage includes four possible views: 1. The thumbnail images: This view shows thumbnails for each page and allows easy mouse navigation from one page to another. Once in this pane, you can also navigate with the arrow keys. 2. The page image: This is the original image of the document. Both the page image and thumbnail image are part of the Image Panel. This panel is optional for a blind user. 3. The text editor: This view shows the text after OCR has been run. 4. The document manager: This view provides a great deal of information about the document, and it is fully accessible to screen readers and refreshable Braille displays. All of these views can be turned on and off under the View (Alt + V) menu on the menu bar. Please note that the F6 key will move you from one pane to the next. To configure the document manager, you need to go under the View menu to Customize Columns ( Alt V + C). The default at the beginning is to have all the columns on. This is not helpful; in fact, some of them show icons, which is totally useless for someone who is blind. I recommend just using the first six columns on the list: Status Characters Suspect words Reject characters Words % Accuracy You may find that you want to add other columns later as you get used to working with the program Rev. April 27, 2010

31 If the screen reader does not immediately start reading the choices in the choice box, Alt + C should move the focus to that window. These are check boxes, so you can use your space bar to select and deselect. Mostly, you will want to deselect. Leave the first five selected then go through the list and deselect the rest. The down arrow key will move you properly from one to the other. A minor point, but once you have deselected the rest of the long list, you might want to use your up arrow (just hold it down until you hear Status ) to go back to the top of the list. The columns are set too narrow for a sighted person to read the column labels, and I do not know whether every screen reader will read them configured like that or not. You can reset the sizes as follows: With the cursor on the column name (for instance, Status is the first column name), go to the Column Width edit box (Alt + W). Type in 100 (the unit is pixels). Alt + C will move you back to the column list and you can arrow down to the next column name and repeat the process. If you are using a Braille display, you may want to play with the column sizes a bit more to get a precise fit. The 100 pixel width is just a rule of thumb. For a more precise fit, try starting with these settings: Status: 67 pixels Characters: 68 pixels Reject Characters: 103 pixels 26 Rev. April 27, 2010
32 Words: 48 pixels Suspect Words: 87 pixels One more refinement: I would recommend going to the Reject Characters choice and move it up (Alt + U). Now arrow down to the Words choice and again move it up (Alt + U). This order change allows you to hear total characters followed by suspect ones and then total words followed by suspect words, which gives you a sense of how well-recognized the page was. Too many errors, and you may need a better scan. Make sure to say OK when all of this is done. OmniPage will remember the settings, so you should only need to do all this once. If your focus is not in the Document Manager pane, use the F6 key to navigate to the proper pane. As the screen reader reads across the row in the document manager, you will hear the page number where your focus is, then the status, then the characters on the page, the number of rejected characters, the number of words on the page, and the number of suspect words. You can use the arrow keys to move from page to page. You may find that you need even fewer columns than I ve suggested, but these five are a nice starting point for you to experiment with. As an example of one way to use the document manager, you may have recognized (i.e., run OCR) on a portion of the document and then stopped. At a later time, you want to resume processing the document. To find out where you left off, you would move down the list until you find a page that has not been recognized. It will say acquired (meaning that the image file is present but OCR has not yet been run). Starting at the first one that says Acquired, hold down your shift key and use your down arrow until you have selected all the pages in the document. Once the pages have been selected, use Control + 2 to run the OCR. I like to run the OCR separate from the proofreading, as I believe that combining the two leads to more crashing. If the two are still linked, that is, if the proofreading window opens while the OCR is still running, then change your options. Go to Tools and Options: Alt T + O. In the Options window, go to the Proofing tab. Uncheck the second checkbox on the list, Automatically proofread results after OCR. Then say OK Rev. April 27, 2010

33 Toolbars To help you become accustomed to using the shortcut keys, turn on the shortcut keys on the toolbars: View > Toolbars. Check the Show ToolTips and Show Shortcut Keys in ToolTips checkboxes Rev. April 27, 2010

34 Options Set-up In the menus, go to Tools > Options or use the keyboard shortcut Alt + T + O. OCR Tab The OCR tab allows you to select the languages that are included in a document. If you are working on a foreign language document, you can choose English, as well as the foreign language. Choosing a foreign language allows the program to recognize that letters in that language that use diacritical marks (umlauts, cedillas, accents, etc.). If you are processing a math book, turn on Greek so that the Greek letters (alpha, pi, theta, etc.) used in mathematics will be recognized. Be sure that you only select the languages that you need, however, as the program will look for (and find!) the letters used in those languages. If you are processing a document that has a great deal of financial, legal, or medical terminology, be sure to turn on the professional dictionary for that subject. Please note that you can also load custom dictionaries if there is a great deal of unusual vocabulary Rev. April 27, 2010

35 Process Tab The OCR tab allows you to specify where to add pages to the OmniPage document if you have somehow skipped a page during scanning or need to add a page that needed to be rescanned. Make a TIFF file of the page to add and then set the option in this window prior to inserting it. Note that you can set the option to before current page if you need to insert a page in the middle of the document. Make sure to set the Page rotation option to None. You can manually rotate a page if you need to, and the program does not do a good job of analyzing orientation Rev. April 27, 2010

36 Proofing Tab Depending on whether or not you will run a spell check later during your workflow, you may check or uncheck the Mark all non-dictionary words option. If you will be running a spell check in MS Word, you can leave this uncheck. Make sure to uncheck Automatically proofread results after OCR. You can launch the proofreading window automatically, and there are other methods for proofreading your document that you may prefer using. If you wish to use the IntelliTrain feature, you will need to use the proofreading window. IntelliTrain remembers the corrections that you have made and looks for patterns that the program can apply to better recognize unusual fonts. It makes most sense to use IntelliTrain if you are processing a book in sections. You can load the IntelliTrain data from a previous section before processing the next one, ensuring better recognition. If you use this feature, check the box to prompt to save. If you are not using the feature, then uncheck that box. You can load IntelliTrain data from a previous file by selecting the three-dot browse button Rev. April 27, 2010
37 General Tab There are a number of useful features on this tab, depending on how you use your program. You can add OmniPage to your system tray for quick access. You can enable update detection to make sure that you always have the latest versions. We will not be using any of the features in this tab for this class Rev. April 27, 2010

38 Text Editor Tab Under Show, mark sure that Headers and Footers is unchecked. Otherwise, OmniPage will attempt to automatically detect these features, and you cannot easily access them either to include the page number or to reorder the zone. It also will not include the header or footer when you save out to Word, which means that page numbers will be lost. Make sure to check Reading Order. If this feature is not checked, you will not see the reader order of the zones (i.e., which zone comes before which other zone) or reorder them. If your text in the text editor pane ever looks funny (running off the screen), check to make sure that Wrap to Ruler is turned on. Having it on is the default, so this should not be an issue Rev. April 27, 2010

39 Scanner Tab We do not generally recommend using OmniPage for scanning; however, if you need to do a great deal of color scanning, you might wish to use if. If you do use OmniPage for scanning, make sure to install the actual scanning program for your scanner in OmniPage. You can embed the drivers that came with your scanner in the OCR program. Do not use the generic drivers that came with OmniPage. Even using this technique, you may find a loss of speed and features scanning through OmniPage. Unless you have a compelling reason to scan through this program, stick with using the scanning utility that comes with your high speed scanner Rev. April 27, 2010

40 35 Rev. April 27, 2010

41 Processing an Image (TIFF or PDF) File Step One: Load a File Step Two: Run the OCR Be sure to select the pages before running the OCR. Click on the first thumbnail and use CTRL + A to select all Rev. April 27, 2010


42 37 Rev. April 27, 2010

43 Step Three: Adjust Zones Use the "on-the-fly" tool to redraw zones. To reorder zones, right click in Text Editor view and change reading order. You may need to ungroup the zones first. Right click and choose ungroup Rev. April 27, 2010
44 Next right click and choose, Change Reading Order. You will now see numbers showing the order of the zones Rev. April 27, 2010
45 Right click again and choose Define Reading Order. Your numbers will now disappear, and you can click on the zones in the order that you wish to have them read Rev. April 27, 2010

46 When you are satisfied with the order, right click one last time and select Apply Order Rev. April 27, 2010

47 Step Four: Save the Document Make sure to set the view for your text editor to Formatted Text View before you save. The setting is under View > Text Editor Views or the buttons at the bottom left of the text editor pane Rev. April 27, 2010

48 When you save the document, you have a number of options. You can save the text in MS Word or other text formats. You can save the document as a graphical PDF or a TIFF. You can also choose save as multiple and save to Word and PDF or Word and TIFF at the same time Rev. April 27, 2010
49 If you have a PDF document that you want to convert to TIFF, you can load the file into OmniPage and then jump directly to save as (step 3), without running the OCR. Since you are essentially going from one graphical format to another, there is no point to introducing possible recognition errors by running OCR. The only reason to run the OCR would be if you wanted to delete portions of the document before saving it to TIFF. If you are saving to Word and you do not want any textboxes, you will need to remove the retain drop cap option. After selecting Microsoft Word as the file type to save, click on the Options button. Scroll down until you see the Retain drop caps checkbox and uncheck it. Note that you can check the Make changes permanent button if you want to change the default Rev. April 27, 2010

50 Also note that you have a choice of saving the entire OmniPage file to one document, saving individual pages as separate documents, and other variations Rev. April 27, 2010
51 46 Rev. April 27, 2010
52 OmniPage Tips Shortcut: To see the shortcut keys associated with menu items, go to View > Toolbars and check "with shortcut keys." On-the-fly zoning: You can now modify zones without having to reimage the entire page. For small changes, click on the "on the fly" button. Stop spell check: To tell the program just to find OCR errors and not unknown words, go to Tools > Options > Proofing and uncheck "Mark non-dictionary words." Reordering zones: You can reorder the zones in the text editor window; however, it must be set to True Page view (View > Text Editor Views > True Page). If the zones are locked, right click and choose the "ungroup" option. Then choose "change reading order" and "define reading order." Verifier: A zoom window, called the verifier, is included in the text editor view. Click on show/hide verifier or use F9 while in the text editor window. Saving: Note that you can save one document as individual pages, save multiple documents into one, or save each image as one document. Be aware of which you choose. Formats: For PDF, use True Page. For Word, use Flowing Page or Retain Fonts and Paragraphs. Batch manager: The batch manager is the new scheduler for running OCR, converting documents, etc. Note that you can also cancel a scheduled job through the batch manager. Templates: For books with a standard layout, you can create a template specifically for that book. Speech: OmniPage will read text to speech as well as responding to verbal commands in some of the windows Rev. April 27, 2010
53 Scanning Flowchart for End Formats Scan documents (Use the utility that comes with the scanner, not Kurzweil, FineReader, OmniPage, etc.) Load image (TIFF) into Kurzweil 3000 Pro* (or WYNN Wizard) Runs OCR limited structural control Creates a TIFF (Image) Note: Can go to PDF at this point, but it is an image!! Some scan/read products do not access a graphical PDF well. Load image (TIFF) into Abbyy FineReader or Nuance OmniPage** Runs OCR full structural KESI file (Kurzweil format) PDF MS Word doc RTF Text (ASCII) HTML / XML Can create MP3 Braille Translation DAISY MP3, WAV * Other similar scan and read software for students with learning disabilities has the same workflow, e.g., WYNN Wizard, Read&Write Gold, Universal Reader Plus, Easy Scan, etc. ** We most often recommend FineReader and OmniPage for optical character recognition (OCR), but there are other OCR programs available.

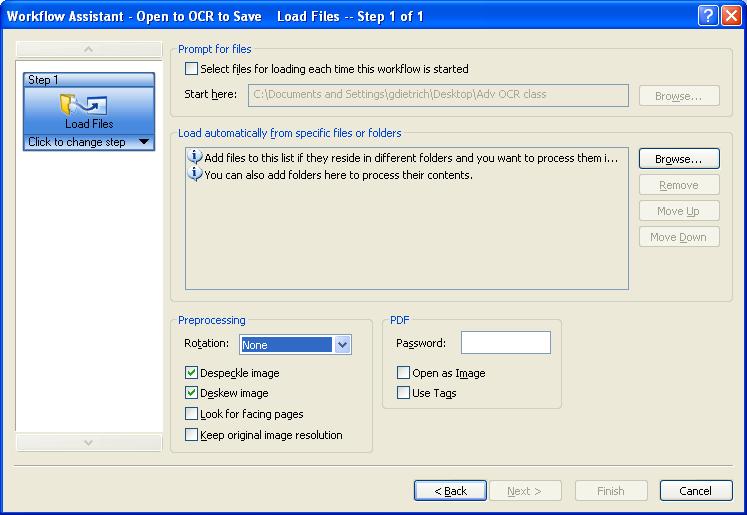
54 Creating a Workflow in OmniPage 17 We are creating a workflow to open documents in a folder and run OCR on those documents.

55

56


57


58

59
60 Handouts High Tech Center Training Unit McClellan Rd. Cupertino, CA
61 OmniPage Pro Keyboard Guide Function key F1 F2 F4 F5 F6 F7 F8 F9 Action Show the online Help topic for the current screen area or dialog box. Open the Edit note dialog box in the Document Manager for the current page. Find next suspect in the Text Editor. Enable/disable Speech mode. Move the focus to the next non-hidden splitter pane. Start proofreading. Temporarily hide/show verifier display while pressed. Enable/disable verifier. Shift+F10 Open a shortcut menu for the current position. Functions Bold Clear Copy Cut Delete current page End of table column End of table row Export Results button Find Get Page button Go to page Insert soft hyphen Insert soft new line Italic New Next page Key combinations Ctrl+B Delete Ctrl+C Ctrl+X Ctrl+D Alt+Page Down Alt+End Ctrl+3 (main keyboard) Ctrl+F Ctrl+1 (main keyboard) Ctrl+G Ctrl+- Shift+Return Ctrl+I Ctrl+N Ctrl+Page Down OmniPage Pro Keyboard Guide 1 Adv OCR
62 Functions Open OmniPage Document Paste Perform OCR button Previous page Redo Replace Save Select all Select table Start of table column Start of table row Underline Undo Key combinations Ctrl+O Ctrl+V Ctrl+2 (main keyboard) Ctrl+Page Up Ctrl+Y Ctrl+H Ctrl+S Ctrl+A Alt+Clear (Num 5 with Num Lock off) Alt+Page Up Alt+Home Ctrl+U Ctrl+Z Verifying text After performing OCR, you can compare any part of the recognized text against the corresponding part of the original image, to verify that the text was recognized correctly. To do this: Turn verifier on Turn verifier off Turn verifier on/off temporarily Show verifier until next keystroke Zoom display in Zoom display out Use this: F9 or Esc or F9 or F8: press and hold down Double-click on word Make verifier dynamic or docked/floating Alt + Num / Dynamic context (scroll through 3 values) Alt + Num * Alt + Num + or click in verifier Alt + Num or click in verifier The verifier tool is in the Formatting toolbar. The verifier can also be controlled from the View menu. OmniPage Pro Keyboard Guide 2 Adv OCR
63 To modify the size of the text context: Press Alt + Num * as many times as required. Select the appropriate Verifier menu item from the View menu. You should proofread and verify texts before doing large-scale editing. If you cut and paste large blocks of text, the links between text and image may be disturbed. You can use OmniPage Pro s text-to-speech facility to have the recognized text read aloud as another way of verifying text. You can hear the text letter-by-letter, word-by-word, line-by-line, sentence-by-sentence or in whole pages. Suspect and non-dictionary words may be marked in the Text Editor. Proofing stops only on marked words, and removes the marking as you move on. You can verify any words in the text, whether marked or not. Turn the verifier on and use the Find Next Suspect tool or F4 to quickly verify suspect words. Use the shortcut menu to get dictionary suggestions and proofing commands. Converting Text to Speech OmniPage Pro can convert your recognized text into speech and read it out loud, allowing you to listen to your document. This may help you as you verify the text. ScanSoft RealSpeak speech facility is offered for a wide range of languages: currently: English (US and International), Brazilian Portuguese, Dutch, French, German, Italian, Spanish and Swedish..All speech systems will be installed with OmniPage Pro if you choose a complete installation. If you perform a custom installation, you can choose the languages you need. If you later want to read text aloud in a language you did not choose, you can install it from your program CD. To have text read aloud: 1. Enable the Text-to-Speech facility with the menu item Speech Mode in the Tools menu, or with the F5 key. 2. Use the menu item Speech Settings to select a voice (for example, male or female for a given language), a reading speed and the volume. 3. From now on, movements of the insertion point in the Text Editor will cause text to be read aloud. Make selections with the mouse or use keyboard keys as shown below. 4. Turn the Text-to-Speech facility off by clicking the Speech Mode menu item again. OmniPage Pro Keyboard Guide 3 Adv OCR
64 To hear text: One character at a time, forward or back Use these keys: Right or left arrow. Letter, number or punctuation names are spoken. Current word Ctrl + Numpad one ( 1 ) One word to the right Ctrl + right arrow * One word to the left Ctrl + left arrow * A single line Next line Previous line Place the insertion point in the line Down arrow Up arrow Current sentence Ctrl + Numpad two ( 2 ) From insertion point to end of sentence Ctrl + Numpad six ( 6 ) From start of sentence to insertion point Ctrl + Numpad four ( 4 ) Current page Ctrl + Numpad three ( 3 ) From top of current page to insertion point Ctrl + Home From insertion point to end of current page Ctrl + End Previous, next or any page Typed characters Ctrl + PgUp, PgDn or navigation buttons Each typed character is pronounced, one by one, including punctuation. * If the cursor is in the middle of a word, you will first hear a word fragment, but from the second keystroke you will hear whole words. The three basic speech keys are neighbors on the keyboard. Use Ctrl + Numpad one, Ctrl + Numpad two and Ctrl + Numpad three respectively for Read current word, Read current sentence and Read current page. You also have the following keyboard controls: To do this: Use this: Pause/Resume Ctrl + Numpad five ( 5 ) Set speed higher Ctrl + Numpad plus ( + ) Set speed lower Ctrl + Numpad minus ( - ) Restore speed Ctrl + Numpad asterisk ( * ) Be sure the selected RealSpeak voice is for the same language as the text you intend to read. OmniPage Pro Keyboard Guide 4 Adv OCR
65 ABBYY FineReader Hot Keys File menu To: Open image from file CTRL+O Press: Scan image CTRL+K Scan multiple images CTRL+SHIFT+K Stop scanning Create new batch Open a batch Save text to file Save image to file CTRL+T CTRL+N CTRL+P CTRL+F2 F12 Edit menu Undo the last action Redo the last undone action To: CTRL+Z CTRL+Y Press: Cut the selection and put it to the clipboard Copy the selection to the clipboard Paste the clipboard contents Delete the active block, the selection, the selected pages Select all text in the Text window, select all batch pages, select all blocks on the open image Find the specified text Find the next occurrence of the search text Search for and replace the specified text CTRL+X CTRL+INS or CTRL+C CTRL+V or SHIFT+INS DEL CTRL+A CTRL+F F3 CTRL+H ABBYY FineReader Keyboard Guide 1 Adv OCR
66 View menu To: Press: Magnify the image in the Image window CTRL+SHIFT+NUM+ Zoom Out the image in the Image window CTRL+SHIFT+NUM- Zoom In to selected blocks Properties CTRL+SHIFT+NUM* ALT+ENTER Batch menu To: Press: Open next batch page Open previous batch page Open page with specified number Close the current page Delete the recognized text in the Text window Delete all blocks in the Image window and all recognized text in the Text window Update page list ALT+Down ALT+Up CTRL+G CTRL+F4 CTRL+SHIFT+Del CTRL+Del F5 Process menu To: Press: Scan and read an image Open and read an image Start Scan&Read Wizard Analyze layout Analyze layout on all batch pages Read active or selected pages Read all batch pages Read active or selected blocks CTRL+D CTRL+SHIFT+D CTRL+W Ctrl+E CTRL+SHIFT+E CTRL+R CTRL+SHIFT+R CTRL+SHIFT+B ABBYY FineReader Keyboard Guide 2 Adv OCR
67 Tools menu Spell the recognized text To: F7 Press: Move to the next error or uncertain word. Move to the previous error or uncertain word. View Dictionaries Translate word with Lingvo Open the Language Editor dialog where you can create and edit languages and language groups Open the Pattern Editor dialog where you can create and edit the user's patterns Set the scanner parameters Open the Formats settings dialog where you can set save options for supported output formats Open the Options dialog F4 SHIFT+F4 CTRL+SHIFT+V CTRL+SHIFT+T CTRL+SHIFT+L CTRL+SHIFT+A CTRL+SHIFT+S CTRL+SHIFT+X CTRL+SHIFT+O Window menu To: Open the next window Open the previous window Open the Batch window Open the Image window Open the Text window Open the Zoom window Press: CTRL+F6 CTRL+SHIFT+F6 ALT+1 ALT+2 ALT+3 ALT+4 Switch to the Advanced search window ALT+5 Open the Advanced search window ALT+F3 ABBYY FineReader Keyboard Guide 3 Adv OCR
68 Help menu To: Press: Open help F1 General To: Make the selection bold Make the selection italic CTRL+B CTRL+I Press: Make the selection underlined CTRL+U Go to the next table cell left arrow, right arrow, up arrow, down arrow ABBYY FineReader Keyboard Guide 4 Adv OCR
69 Command Name Modifiers Key Menu All Caps Ctrl+Shift+ A Annotation Alt+Ctrl+ M Insert App Maximize Alt+ F10 App Restore Alt+ F5 Apply Heading1 Alt+Ctrl+ 1 Apply Heading2 Alt+Ctrl+ 2 Apply Heading3 Alt+Ctrl+ 3 Apply List Bullet Ctrl+Shift+ L Auto Format Alt+Ctrl+ K Auto Text F3 Auto Text Alt+Ctrl+ V Bold Ctrl+ B Bold Ctrl+Shift+ B Bookmark Ctrl+Shift+ F5 Insert Browse Next Ctrl+ Page Down Browse Prev Ctrl+ Page Up Browse Sel Alt+Ctrl+ Home Cancel Esc Center Para Ctrl+ E Change Case Shift+ F3 Char Left Left Char Left Extend Shift+ Left Char Right Right Char Right Extend Shift+ Right Clear Del Clear Close Document Ctrl+ w Close or Exit Alt+ F4 Close Pane Alt+Shift+ C Column Break Ctrl+Shift+ Return Column Select Ctrl+Shift+ F8 Copy Ctrl+ C Copy Ctrl+ Insert Copy Format Ctrl+Shift+ C
70 Command Name Modifiers Key Menu Copy Text Shift+ F2 Create Auto Text Alt+ F3 Customize Add Menu Shortcut Alt+Ctrl+ = Tools Customize Keyboard Shortcut Alt+Ctrl+ Num + Customize Remove Menu Alt+Ctrl+ - Shortcut Cut Ctrl+ X Cut Shift+ Del Date Field Alt+Shift+ D Delete Back Word Ctrl+ Backspace Delete Word Ctrl+ Del Distribute Para Ctrl+Shift+ J Do Field Click Alt+Shift+ F9 Doc Close Ctrl+ W Doc Close Ctrl+ F4 Doc Maximize Ctrl+ F10 Doc Move Ctrl+ F7 Doc Restore Ctrl+ F5 Doc Size Ctrl+ F8 Doc Split Alt+Ctrl+ S Window Double Underline Ctrl+Shift+ D End of Column Alt+ Page Down End of Column Alt+Shift+ Page Down End of Doc Extend Ctrl+Shift+ End End of Document Ctrl+ End End of Line End End of Line Extend Shift+ End End of Row Alt+ End End of Row Alt+Shift+ End End of Window Alt+Ctrl+ Page Down End of Window Extend Alt+Ctrl+Shift+ Page Down Endnote Now Alt+Ctrl+ D Extend Selection F8
71 Command Name Modifiers Key Menu Field Chars Ctrl+ F9 Field Codes Alt+ F9 Find Ctrl+ F Font Ctrl+ D Font Ctrl+Shift+ F Font Size Select Ctrl+Shift+ P Footnote Now Alt+Ctrl+ F Go Back Shift+ F5 Go Back Alt+Ctrl+ Z Go To Ctrl+ G Edit Go To F5 Edit Grow Font Ctrl+Shift+. Grow Font One Point Ctrl+ ] Hanging Indent Ctrl+ T Header Footer Link Alt+Shift+ R Help F1 Hidden Ctrl+Shift+ H Hyperlink Ctrl+ K Indent Ctrl+ M Italic Ctrl+ I Italic Ctrl+Shift+ I Justify Para Ctrl+ J Left Para Ctrl+ L Line Down Down Line Down Extend Shift+ Down Line Up Up Line Up Extend Shift+ Up List Num Field Alt+Ctrl+ L Lock Fields Ctrl+ 3 Lock Fields Ctrl+ F11 Macro Alt+ F8 Mail Merge Check Alt+Shift+ K Mail Merge Edit Data Source Alt+Shift+ E
72 Command Name Modifiers Key Menu Mail Merge to Doc Alt+Shift+ N Mail Merge to Printer Alt+Shift+ M Mark Citation Alt+Shift+ I Mark Index Entry Alt+Shift+ X Mark Table of Contents Entry Alt+Shift+ O Menu Mode F10 Merge Field Alt+Shift+ F Microsoft Script Editor Alt+Shift+ F11 Microsoft System Info Alt+Ctrl+ F1 Move Text F2 New Ctrl+ N File Next Field F11 Next Field Alt+ F1 Next Misspelling Alt+ F7 Next Object Alt+ Down Next Window Ctrl+ F6 Next Window Alt+ F6 Normal Alt+Ctrl+ N View Normal Style Ctrl+Shift+ N Normal Style Alt+Shift+ Clear (Num 5) Open Ctrl+ O Open Ctrl+ F12 Open Alt+Ctrl+ F2 Open or Close Up Para Ctrl+ 0 Other Pane F6 Other Pane Shift+ F6 Outline Alt+Ctrl+ O Outline Collapse Alt+Shift+ - Outline Collapse Alt+Shift+ Num - Outline Demote Alt+Shift+ Right Outline Expand Alt+Shift+ = Outline Expand Alt+Shift+ Num + Outline Move Down Alt+Shift+ Down
73 Command Name Modifiers Key Menu Outline Move Up Alt+Shift+ Up Outline Promote Alt+Shift+ Left Outline Show First Line Alt+Shift+ L Overtype Insert Page Alt+Ctrl+ P View Page Break Ctrl+ Return Page Down Page Down Page Down Extend Shift+ Page Down Page Field Alt+Shift+ P Page Up Page Up Page Up Extend Shift+ Page Up Para Down Ctrl+ Down Para Down Extend Ctrl+Shift+ Down Para Up Ctrl+ Up Para Up Extend Ctrl+Shift+ Up Paste Ctrl+ V Paste Shift+ Insert Paste As Hyperlink Edit Paste Format Ctrl+Shift+ V Prev Field Shift+ F11 Prev Field Alt+Shift+ F1 Prev Object Alt+ Up Prev Window Ctrl+Shift+ F6 Prev Window Alt+Shift+ F6 Print Ctrl+ P Print Ctrl+Shift+ F12 Print Preview Ctrl+ F2 Print Preview Alt+Ctrl+ I Proofing F7 Redo Alt+Shift+ Backspace Redo or Repeat Ctrl+ Y Edit Redo or Repeat F4 Edit Redo or Repeat Alt+ Return Edit
74 Command Name Modifiers Key Menu Reject All Changes in Doc Reject Reject All Changes Shown Reject Repeat Find Shift+ F4 Repeat Find Alt+Ctrl+ Y Replace Ctrl+ H Edit Reset Char Ctrl+ Space Reset Char Ctrl+Shift+ Z Reset Para Ctrl+ Q Revision Marks Toggle Ctrl+Shift+ E Right Para Ctrl+ R Save Ctrl+ S Save Shift+ F12 Save Alt+Shift+ F2 Save As F12 File Select All Ctrl+ A Edit Select All Ctrl+ Clear (Num 5) Edit Select All Ctrl+ Num 5 Edit Select Table Alt+ Clear (Num 5) Toolbar Show All Ctrl+Shift+ 8 Show All Headings Alt+Shift+ A Show All Headings Alt+Shift+ A Show Heading1 Alt+Shift+ 1 Show Heading2 Alt+Shift+ 2 Show Heading3 Alt+Shift+ 3 Show Heading4 Alt+Shift+ 4 Show Heading5 Alt+Shift+ 5 Show Heading6 Alt+Shift+ 6 Show Heading7 Alt+Shift+ 7 Show Heading8 Alt+Shift+ 8 Show Heading9 Alt+Shift+ 9 Shrink Font Ctrl+Shift+, Shrink Font One Point Ctrl+ [ Shrink Selection Shift+ F8
75 Command Name Modifiers Key Menu Small Caps Ctrl+Shift+ K Space Para1 Ctrl+ 1 Space Para15 Ctrl+ 5 Space Para2 Ctrl+ 2 Spike Ctrl+Shift+ F3 Spike Ctrl+ F3 Start of Column Alt+ Page Up Start of Column Alt+Shift+ Page Up Start of Doc Extend Ctrl+Shift+ Home Start of Document Ctrl+ Home Start of Line Home Start of Line Extend Shift+ Home Start of Row Alt+ Home Start of Row Alt+Shift+ Home Start of Window Alt+Ctrl+ Page Up Start of Window Extend Alt+Ctrl+Shift+ Page Up Style Ctrl+Shift+ S Style Separator Alt+Ctrl+ Return Subscript Ctrl+ = Superscript Ctrl+Shift+ = Symbol Font Ctrl+Shift+ Q Thesaurus Shift+ F7 Language Time Field Alt+Shift+ T Toggle Character Code Alt+ X Toggle Field Display Shift+ F9 Toggle Master Subdocs Ctrl+ \ Tool Shift+ F1 Translate Pane Alt+Shift+ F7 Language Un Hang Ctrl+Shift+ T Un Indent Ctrl+Shift+ M Underline Ctrl+ U Underline Ctrl+Shift+ U Undo Ctrl+ Z
76 Command Name Modifiers Key Menu Undo Alt+ Backspace Unlink Fields Ctrl+ 6 Unlink Fields Ctrl+Shift+ F9 Unlock Fields Ctrl+ 4 Unlock Fields Ctrl+Shift+ F11 Update Auto Format Alt+Ctrl+ U Update Fields F9 Update Fields Alt+Shift+ U Update Source Ctrl+Shift+ F7 VBCode Alt+ F11 Web Go Back Alt+ Left Web Go Forward Alt+ Right Word Count List Ctrl+Shift+ G Word Count Recount Ctrl+Shift+ R Word Left Ctrl+ Left Word Left Extend Ctrl+Shift+ Left Word Right Ctrl+ Right Word Right Extend Ctrl+Shift+ Right Word Underline Ctrl+Shift+ W Shortcuts with WINDOWS Key WINDOWS Key WINDOWS Key + M WINDOWS Key + SHIFT + M WINDOWS Key + D WINDOWS + PAUSE / BREAK* WINDOWS Key + TAB Start Menu (toggles) minimizes all your running applications, bringing up the Desktop restores your minimized applications brings up your Desktop opens the System Properties Dialog Box brings your focus to the Task Bar * PAUSE / BREAK Key is usually located on the top row of your keyboard on the right hand side, three keys to the right of the F12 Key.
77 Short Cut Keys for Editing SHIFT+ENTER A line break CTRL+ENTER A page break CTRL+SHIFT+ENTER A column break CTRL+HYPHEN An optional hyphen CTRL+SHIFT+HYPHEN A nonbreaking hyphen CTRL+SHIFT+SPACEBAR A nonbreaking space ALT+CTRL+C The copyright symbol ALT+CTRL+R The registered trademark symbol ALT+CTRL+T The trademark symbol ALT+CTRL+period An ellipsis Character and paragraph formatting Copy formatting CTRL+SHIFT+C Copy formatting from text CTRL+SHIFT+V Apply copied formatting to text Change or resize the font CTRL+SHIFT+F Change the font CTRL+SHIFT+P Change the font size CTRL+SHIFT+> Increase the font size CTRL+SHIFT+< Decrease the font size CTRL+] Increase the font size by 1 point CTRL+[ Decrease the font size by 1 point Apply character formats CTRL+D Change the formatting of characters (Font command, Format menu) SHIFT+F3 Change the case of letters CTRL+SHIFT+A Format letters as all capitals CTRL+B Apply bold formatting CTRL+U Apply an underline CTRL+SHIFT+W Underline words but not spaces CTRL+SHIFT+D Double-underline text CTRL+SHIFT+H Apply hidden text formatting CTRL+I Apply italic formatting CTRL+SHIFT+K Format letters as small capitals Short Cut Keys for MS Office 1 9/27/2011
78 CTRL+EQUAL SIGN CTRL+SHIFT+PLUS SIGN CTRL+SPACEBAR CTRL+SHIFT+Q Apply subscript formatting (automatic spacing) Apply superscript formatting (automatic spacing) Remove manual character formatting Change the selection to the Symbol font View and copy text formats CTRL+SHIFT+* (asterisk) SHIFT+F1 (then click the text whose formatting you want to review) CTRL+SHIFT+C CTRL+SHIFT+V Display nonprinting characters Review text formatting Copy formats Paste formats Set line spacing CTRL+1 Single-space lines CTRL+2 Double-space lines CTRL+5 Set 1.5-line spacing CTRL+0 (zero) Add or remove one line space preceding a paragraph Align paragraphs CTRL+E Center a paragraph CTRL+J Justify a paragraph CTRL+L Left align a paragraph CTRL+R Right align a paragraph CTRL+M Indent a paragraph from the left CTRL+SHIFT+M Remove a paragraph indent from the left CTRL+T Create a hanging indent CTRL+SHIFT+T Reduce a hanging indent CTRL+Q Remove paragraph formatting Apply paragraph styles CTRL+SHIFT+S Apply a style ALT+CTRL+K Start AutoFormat CTRL+SHIFT+N Apply the Normal style ALT+CTRL+1 Apply the Heading 1 style ALT+CTRL+2 Apply the Heading 2 style ALT+CTRL+3 Apply the Heading 3 style CTRL+SHIFT+L Apply the List style Short Cut Keys for MS Office 2 9/27/2011
79 Insert an international character by using a shortcut key To insert à, è, ì, ò, ù À, È, Ì, Ò, Ù á, é, í, ó, ú, ý Á, É, Í, Ó, Ú, Ý â, ê, î, ô, û Â, Ê, Î, Ô, Û ã, ñ, õ Ã, Ñ, Õ ä, ë, ï, ö, ü, ÿ Ä, Ë, Ï, Ö, Ü, Ÿ Press CTRL+` (ACCENT GRAVE), the letter CTRL+' (APOSTROPHE), the letter CTRL+SHIFT+^ (CARET), the letter CTRL+SHIFT+~ (TILDE), the letter CTRL+SHIFT+: (COLON), the letter å, Å CTRL+SHIFT+@, a or A æ, Æ CTRL+SHIFT+&, a or A œ, Œ CTRL+SHIFT+&, o or O ç, Ç CTRL+, (COMMA), c or C ð, Ð CTRL+' (APOSTROPHE), d or D ø, Ø CTRL+/, o or O ALT+CTRL+SHIFT+? ALT+CTRL+SHIFT+! ß CTRL+SHIFT+&, s
All Shortcut keys for MS Word
 All Shortcut keys for MS Word Command Name Modifiers Key About Accept All Changes in Doc Accept Accept All Changes Shown Accept All Caps Ctrl+Shift+ A Annotation Alt+Ctrl+ M App Maximize Alt+ F10 App Restore
Shortcut Keys for Microsoft Office (Educational Support)
") Shortcut Keys for Microsoft Office (Educational Support) http:// SHORTCUT KEYS - I Basic Shortcuts Go to "Tell me what you want to do" ALT+Q Open CTRL+O Save CTRL+S Close CTRL+W Cut CTRL+X Copy CTRL+C
Shortcut Keys for Microsoft Office (Educational Support) http:// SHORTCUT KEYS - I Basic Shortcuts Go to "Tell me what you want to do" ALT+Q Open CTRL+O Save CTRL+S Close CTRL+W Cut CTRL+X Copy CTRL+C
Quick Reference Summary
 Microsoft Word 2010 Quick Reference Summary Microsoft Word 2010 Quick Reference Summary All Caps WD 81 Change Case button (Home tab Font, UPPERCASE AutoCorrect Entry, Create WD 86 Options (File tab), Proofing
MS Word Keyboard Shortcuts - PC
 MS Word Keyboard Shortcuts - PC Command Name Modifiers Key Menu About All Caps Ctrl+Shift+ A Annotation Alt+Ctrl+ M App Maximize Alt+ F10 App Restore Alt+ F5 Apply Heading1 Alt+Ctrl+ 1 Apply Heading2 Alt+Ctrl+
Quick Reference Summary
 Microsoft Word 2010 Quick Reference Summary Microsoft Word 2010 Quick Reference Summary Number Mouse Ribbon Menu AddressBlock Merge Field, Add AddressBlock Merge Field, Edit WD 349 WD 349 Address Block
Introduction to Microsoft Word
 Introduction to Microsoft Word Presented by Plainfield Public Library Screen Layout Formatting Text The formatting toolbar is the easiest way to change many attributes of text. If the toolbar as shown
Outlook 2002 Keyboard Shortcuts
 General F1 Display the Assistant balloon (if the Assistant is turned off. F1 opens the Help window) ALT+ the letter underlined in an option Select an option in a dialog box. select or clear a check box
Microsoft Outlook 2002 Keyboard Shortcuts
 F1 ALT+ the letter underlined in an optn ALT+A ALT+C ALT+C ALT+D ALT+ ALT+ ALT+EQUAL SIGN ALT+F4 ALT+HYPHEN SIGN ALT+I ALT+LEFT ALT+LEFT ALT+number ALT+O ALT+O ALT+O, and then press B ALT+O, and then press
The Keyboard Shortcut Magic!
 This is free ebook & may be freely distributed The Keyboard Shortcut Magic! Discover The MAGIC Of Your Keyboard That Can Practically REPLACE Your Mouse! (Over 250 Keyboard Shortcuts Revealed) By Wong Hing
Word 2013 Shortcuts. When text or an object is selected, opens the Create New Building Block dialog box.
 Alt Alt+End Alt+F1 Alt+F10 Alt+F11 Alt+F3 Alt+F5 Alt+F6 Shortcut Word 2013 Shortcuts Description Selects the active tab of the Ribbon and activates the access keys. To the last cell in a row Goes to the
Introduction to Microsoft Word 2010
 Introduction to Microsoft Word 2010 Microsoft Word is a word processing program you can use to write letters, resumes, reports, and more. Anything you can create with a typewriter, you can create with
KEYBOARD SHORTCUTS AND HOT KEYS
 KEYBOARD SHORTCUTS AND HOT KEYS Page 1 This document is devoted to using the keyboard instead of the mouse to perform tasks within applications. This list is by no means the "be all and end all". There
Computer Nashua Public Library Introduction to Microsoft Word 2010
 Microsoft Word is a word processing program you can use to write letters, resumes, reports, and more. Anything you can create with a typewriter, you can create with Word. You can make your documents more
Outlook 2007 Shortcuts and Function Keys
 Outlook 2007 Shortcuts and Function Keys Basic navigation Switch to Mail. Switch to Calendar. Switch to Contacts. Switch to Tasks. Switch to Notes. Switch to Folder List in Navigation Pane. Switch to Shortcuts.
MS WORD HOW TO START MSWORD WINDOW OF MSWORD
 MS WORD MS WORD is word processing software. We can write any type of matter or text in this software and attractive do this. In this software, file is called document and the extension name of the file
Introduction to Microsoft Word 2010
 Introduction to Microsoft Word 2010 Microsoft Word is a word processing program you can use to write letters, resumes, reports, and more. Anything you can create with a typewriter, you can create with
Microsoft Outlook Keyboard Shortcuts. For basic navigation
 Microsoft Outlook Keyboard Shortcuts For basic navigation Switch to Mail Switch to Calendar Switch to Contacts Switch to Tasks Switch to Notes Switch to Folder List in Navigation Pane (Navigation Pane:
Keyboard shortcuts for Visio
 Sign in Apps Install Office 365 Training Admin Search all Office help Keyboard shortcuts for Visio Applies To: Visio Professional 2016, Visio Standard 2016, Visio 2013, Visio Professional 2013 The keyboard
MICROSOFT EXCEL KEYBOARD SHORTCUTS
 MICROSOFT EXCEL KEYBOARD SHORTCUTS KEY DESCRIPTION CTRL+PgUp CTRL+PgDn CTRL+SHIFT+( CTRL+SHIFT+& CTRL+SHIFT_ CTRL+SHIFT+~ CTRL+SHIFT+$ CTRL+SHIFT+% CTRL+SHIFT+^ CTRL+SHIFT+# CTRL+SHIFT+@ CTRL+SHIFT+! Switches
PowerPoint 2016 for Windows keyboard shortcuts
 PowerPoint 2016 for Windows keyboard shortcuts Use keyboard shortcuts to create your presentation This topic itemizes keyboard shortcuts for PowerPoint 2016. Notes: The shortcuts in this topic refer to
Accelerated Technology Training Workshops. Using Microsoft FrontPage to Create Web Sites ENGL 1423.B2 Dr. Richard Cunningham
 Accelerated Technology Training Workshops Using Microsoft FrontPage to Create Web Sites ENGL 1423.B2 Dr. Richard Cunningham Copyright User Support Centre February 2007 Dynamic Web Sites F r o n t P a g
Keyboard shortcuts for Visio
 Seite 1 von 7 Keyboard shortcuts for Visio The keyboard shortcuts described in this Help topic refer to the U.S. keyboard layout. Hide All To print this topic, press to select Show All, press, and then
Keyboard Access Guide
 Kurzweil 3000 for Windows Keyboard Access Guide Revised: April 18, 2017 For many users, using a mouse to interact with Kurzweil 3000 can be a challenge. In order to make the Kurzweil 3000 experience positive
Shortcuts. According to Keys. Edit. Insert Elements. Quick Replace widget. CTRL+C or CTRL+INSERT. Insert Characters
 C H E A T S H E E T / / F L A R E 2 0 1 8 Shortcuts According to Keys Edit Find and Replace Insert Elements CTRL+B Bold CTRL+F Quick Find widget CTRL+E Equation CTRL+C or CTRL+INSERT Copy CTRL+H Quick
Excel 2010 Keyboard Shortcuts Ctrl combination shortcut keys
 CTRL+PgUp Excel 2010 board Shortcuts Ctrl combination shortcut keys Switches between worksheet tabs, from left-to-right. Switches between worksheet tabs, from right-to-left. CTRL+SHIFT+Plus (+) Displays
Shortcuts. According to Keys. Edit. Find and Replace. Quick character. CTRL+C or CTRL+INSERT. Quick Replace widget. Insert Elements.
 C H E A T S H E E T / / F L A R E 2 0 1 7 R 3 Shortcuts According to Keys Edit Find and Replace Insert Characters CTRL+B Bold CTRL+F Quick Find widget F11 Quick character CTRL+C or CTRL+INSERT Copy CTRL+H
High Tech Center Training Unit McClellan Rd. Cupertino, CA
 Tips and Tricks with MS Word High Tech Center Training Unit 21050 McClellan Rd. Cupertino, CA 95014 www.htctu.net Foothill De Anza Community College District California Community Colleges www.htctu.net
Ctrl+A Select All None Ctrl+B Bold Format, Cells, Font, Font Style, Bold Ctrl+C Copy Edit, Copy Ctrl+D Fill Down Edit, Fill, Down Ctrl+F Find Edit,
 Ctrl+A Select All None Ctrl+B Bold Format, Cells, Font, Font Style, Bold Ctrl+C Copy Edit, Copy Ctrl+D Fill Down Edit, Fill, Down Ctrl+F Find Edit, Find Ctrl+G Goto Edit, Goto Ctrl+H Replace Edit, Replace
Keyboard shortcuts for Microsoft Outlook 2013 and 2016
 Keyboard shortcuts for Microsoft Outlook 2013 and 2016 This reference article provides a comprehensive list of all keyboard shortcuts for Microsoft Outlook 2013 and 2016 (desktop version). Shortcuts are
Tips and Tricks for Microsoft Word 2010
 Tips and Tricks for Microsoft Word 2010 TABLE OF CONTENTS Shortcuts for Selecting Text... 1 Create Automatic Borders... 1 Bulleted and Numbered List Shortcuts... 1 Insert Normal Text Within a List... 2
Excel shortcut and function keys
 Page 1 of 8 Microsoft Office Excel Excel shortcut and function keys Applies to: Microsoft Office Excel 2007 Hide All The following lists contain CTRL combination shortcut keys, function keys, and some
MICROSOFT WORD KEYBOARD SHORTCUTS
 MICROSOFT WORD KEYBOARD SHORTCUTS One character to the left Left Arrow One character to the right Right Arrow One word to the left Ctrl+Left Arrow One word to the right Ctrl+Right Arrow One paragraph up
In a PivotTable, it selects the entire PivotTable report. Displays the Insert dialog box to insert blank cells.
 CTRL+PgUp CTRL+PgDn CTRL+SHIFT+( CTRL+SHIFT+) CTRL+SHIFT+& CTRL+SHIFT_ CTRL+SHIFT+~ CTRL+SHIFT+$ CTRL+SHIFT+% CTRL+SHIFT+^ CTRL+SHIFT+# CTRL+SHIFT+@ CTRL+SHIFT+! CTRL+SHIFT+* CTRL+SHIFT+: CTRL+SHIFT+"
2Word Basics. 6Reviewing, Viewing. 3More Word Basics. 5Reference Tools & 4Graphics, Tables & Word 2010 T ABLE O F C ONTENTS.
 The Original Quick Reference Guides Microsoft Word 2010 Microsoft Word is a word processor that can be used to create documents with text, tables, graphics, reference and navigation sections, and much
Decrease font size one value.
 Microsoft Office basics Word Shortcut keys Display and use windows Make letters bold. Make letters italic. Make letters underline. Decrease font size one value. Copy a picture of the screen to the Clipboard.
Word - Basics. Course Description. Getting Started. Objectives. Editing a Document. Proofing a Document. Formatting Characters. Formatting Paragraphs
 Course Description Word - Basics Word is a powerful word processing software package that will increase the productivity of any individual or corporation. It is ranked as one of the best word processors.
Word 2013 Keyboard shortcuts
 Word 2013 Keyboard shortcuts Microsoft Office basics Display and use windows ALT+TAB Switch to the next window. CTRL+F6 When more than one window is open, switch to the next window. ALT+SHIFT+TAB CTRL+W
Microsoft Office basics and shortcuts including Word
 Microsoft Office basics and shortcuts including Word Display and use windows Switch to the next window. Switch to the previous window. Close the active window. Restore the size of the active window after
Excel keyboard shortcuts and function keys
 Excel keyboard shortcuts and function keys This article describes keyboard shortcuts, function keys, and some other common shortcut keys for Microsoft Excel 2016 for Windows. This includes the shortcuts
Quick Reference: Microsoft Excel Keyboard Shortcuts
 Quick Reference: Microsoft Excel Keyboard s FORMATTING Bold the selection Italicize the selection Underline the selection Strike through the selection Open the Style dialog box Open the Format Cells dialog
Outlook keyboard shortcuts
 Page 1 of 9 Outlook keyboard shortcuts This list gives you a glance of (nearly) all shortcut combinations in outlook. Please take the time to read it. I'm sure you'll find many of them useful. 1. Main
MS Word-II.
 MS Word-II www.bcpl.org Contents Tabs (Ribbons)/Main Document page... 1 To bypass the Start screen/begin with a blank document... 1 Resume sample... 2 Creating a resume... 3-6 Creating a flyer... 7-10
Bridge Course Information and Communication Technology
 Bridge Course Information and Communication Technology Microsoft Word 1. Which bar is usually located below that Title Bar that provides categorized options? A. Menu bar B. Status Bar C. Tool bar D. Scroll
FOR EXCEL [should work on any spreadsheet] Keys for editing data. Keys for editing data. Keys for inserting, deleting, and copying a selection
![FOR EXCEL [should work on any spreadsheet] Keys for editing data. Keys for editing data. Keys for inserting, deleting, and copying a selection](/thumbs/71/65769850.jpg "FOR EXCEL [should work on any spreadsheet] Keys for editing data. Keys for editing data. Keys for inserting, deleting, and copying a selection") FOR EXCEL [should work on any spreadsheet] Keys for editing data Note enlarge the Help window to fill the screen, press ALT+SPACEBAR and then press X. restore the window to its previous size and location,
FOR EXCEL [should work on any spreadsheet] Keys for editing data Note enlarge the Help window to fill the screen, press ALT+SPACEBAR and then press X. restore the window to its previous size and location,
San Pedro Junior College. WORD PROCESSING (Microsoft Word 2016) Week 4-7
 Week 4-7") WORD PROCESSING (Microsoft Word 2016) Week 4-7 Creating a New Document In Word, there are several ways to create new document, open existing documents, and save documents: Click the File menu tab and then
WORD PROCESSING (Microsoft Word 2016) Week 4-7 Creating a New Document In Word, there are several ways to create new document, open existing documents, and save documents: Click the File menu tab and then
Excel shortcut and function keys
 Excel shortcut and function keys The following lists contain CTRL combination shortcut keys, function keys, and some other common shortcut keys, along with descriptions of their functionality. Tip To keep
Microsoft Word 2010 Part 1: Introduction to Word
 CALIFORNIA STATE UNIVERSITY, LOS ANGELES INFORMATION TECHNOLOGY SERVICES Microsoft Word 2010 Part 1: Introduction to Word Summer 2011, Version 1.0 Table of Contents Introduction...3 Starting the Program...3
Keyboard shortcuts for Microsoft Word 2016 for Windows
 Keyboard shortcuts for Microsoft Word 2016 for Windows Frequently used shortcuts This table shows the most frequently used shortcuts in Microsoft Word. Go to "Tell me what you want to do" Open Save Close
Info Sheet - Resource
 DANA-FARBER / HARVARD CANCER CENTER - Resource Office for Human Research Studies Microsoft Word Tips & Tricks Quick Selection By holding down the shift key while using one of the navigational shortcut
Microsoft Word 2010 Introduction
 www.jadehorizon.com Microsoft Word 2010 Introduction Introduction Microsoft Word 2010 Table of Contents Table of Contents INTRODUCTION... 5 CONVENTIONS... 5 QUICK REFERENCE... 7 SCREEN FEATURES... 7 Ruler...
A Guide to Quark Author Web Edition 2015
 A Guide to Quark Author Web Edition 2015 CONTENTS Contents Getting Started...4 About Quark Author - Web Edition...4 Smart documents...4 Introduction to the Quark Author - Web Edition User Guide...4 Quark
Shortcuts Cheat Sheet
 Shortcuts Cheat Sheet According to Keys Find and Replace Insert Elements Edit CTRL+F Quick Find widget CTRL+E Equation CTRL+B Bold CTRL+H Quick Replace widget CTRL+G Image CTRL+C or CTRL+INSERT CTRL+I
Microsoft Word Part I Reference Manual
 Microsoft Word 2002 Part I Reference Manual Instructor: Angela Sanderson Computer Training Coordinator Updated by: Angela Sanderson January 11, 2003 Prepared by: Vi Johnson November 20, 2002 THE WORD SCREEN
Microsoft Word XP (2002)
") Microsoft Word (2002) Creating & Editing Documents Edited by Sahid Yogyakarta State University Adopted from: http://www.course.com/downloads/newperspectives/officexp/index.html 2 31 Maret 2009 Creating
Microsoft Word (2002) Creating & Editing Documents Edited by Sahid Yogyakarta State University Adopted from: http://www.course.com/downloads/newperspectives/officexp/index.html 2 31 Maret 2009 Creating
Word 2010 Beginning. Technology Integration Center
 Word 2010 Beginning File Tab... 2 Quick Access Toolbar... 2 The Ribbon... 3 Help... 3 Opening a Document... 3 Documents from Older Versions... 4 Document Views... 4 Navigating the Document... 5 Moving
Keyboard shortcuts for Microsoft PowerPoint
 Keyboard shortcuts for Microsoft PowerPoint Frequently used shortcuts The following table itemizes the most frequently used shortcuts in PowerPoint. Make selected text bold. Ctrl+B Change the font size
Contents. Launching Word
 Using Microsoft Office 2007 Introduction to Word Handout INFORMATION TECHNOLOGY SERVICES California State University, Los Angeles Version 1.0 Winter 2009 Contents Launching Word 2007... 3 Working with
Microsoft Word for Windows
 Microsoft Word for Windows Formatting To change the look. Common short cut keys in Word Open Files Print Save This is for fonts style A A A A A A This text is font size A
Getting Started Guide. Appendix A Keyboard Shortcuts
 Getting Started Guide Appendix A Keyboard Shortcuts Copyright This document is Copyright 2010 2016 by the LibreOffice Documentation Team. Contributors are listed below. You may distribute it and/or modify
Introduction to MS Word XP 2002: An Overview
 Introduction to MS Word XP 2002: An Overview Sources Used: http://www.fgcu.edu/support/office2000/word/files.html Florida Gulf Coast University Technology Skills Orientation Word 2000 Tutorial The Computer
Life After Word An Introduction to Microsoft Word The University of Iowa ITS Campus Technology Services Iowa City, IA 52242
 Life After Word 2003 An Introduction to Microsoft Word 2007 ITS Campus Technology Services Iowa City, IA 52242 March 2007 2 TABLE OF CONTENTS TABLE OF CONTENTS... 2 INTRODUCTION... 4 WHAT S NEW... 4 GETTING
OU EDUCATE TRAINING MANUAL
 OU EDUCATE TRAINING MANUAL OmniUpdate Web Content Management System El Camino College Staff Development 310-660-3868 Course Topics: Section 1: OU Educate Overview and Login Section 2: The OmniUpdate Interface
Kingsoft Writer 2016 Kingsoft Writer 2016 emphasizes its latest improvements. The 2016 version has completely adjusted its technical line and focused
 1 1 Kingsoft Writer 2016 Kingsoft Writer 2016 emphasizes its latest improvements. The 2016 version has completely adjusted its technical line and focused on its compatibility. The Kingsoft Writer module
Shortcut Keys and Icon in Make The Cut (as of version 4.62)
") Shortcut Keys and Icon in Make The Cut (as of version 4.62) Shortcut Icon Description Menu, Other Location Standard Functions Ctrl+N Open a new file/project File>New Ctrl+N Open a new file/project Tab
Shortcut Keys and Icon in Make The Cut (as of version 4.62) Shortcut Icon Description Menu, Other Location Standard Functions Ctrl+N Open a new file/project File>New Ctrl+N Open a new file/project Tab
ABBYY FlexiCapture 8.0 Professional Data Capture Operator s Guide
 ABBYY FlexiCapture 8.0 Professional Data Capture Operator s Guide Overview... 2 Loading images... 2 Recognition... 3 Verification... 3 Export... 7 Appendix... 8 Overview The typical data capture process
Step-by. A Very Warm Welcome to the Exciting World of Computers. Let s get Started It s easy with my Step- Instructions
 A Very Warm Welcome to the Exciting World of Computers Let s get Started It s easy with my Step- by-step Instructions This lesson is all about getting to know your Main Menu Bar at the top of your screen.
Word 97: Increasing Efficiency
 Windows 95 Word 97: Increasing Efficiency Increasing Your Efficiency Word for Windows has a number of features that can help you perform word processing tasks more quickly or to increase efficiency by
Access 2013 Keyboard Shortcuts
 Access 2013 Keyboard Shortcuts Access app shortcut keys Design-time shortcut keys These shortcut keys are available when you are customizing an app in Access. Many of the shortcuts listed under Desktop
Word 2013 Beginning. Technology Integration Center
 Word 2013 Beginning Getting Started... 2 Quick Access Toolbar... 3 The Ribbon... 3 Help... 4 Compatibility Mode... 4 Document Views... 4 Navigating the Document... 5 Moving Around in the Document... 5
Microsoft Word. Teaching 21 st Century Skills Using Technology August 3, Short Cut Keys. Templates
 Teaching 21 st Century Skills Using Technology August 3, 2011 Short Cut Keys Microsoft Word Cut Copy Paste Bold Italicize Underline Left Align Center Right Align Justify Undo Ctrl + X Ctrl + C Ctrl + V
Getting Started Guide. Appendix A Keyboard Shortcuts
 Getting Started Guide Appendix A Keyboard Shortcuts Copyright This document is Copyright 2010 2013 by its contributors as listed below. You may distribute it and/or modify it under the terms of either
Masterclass. Microsoft Word. Part 3
 Masterclass Microsoft Word Part 3 Table of Contents Introduction... 2 About Ideagen... 2 Tips, Tricks and Shortcuts... 3 Select text... 3 Move text... 3 Write anywhere... 4 Filler text... 4 Extended clipboard...
Excel Shortcut Keys. Print and Print Preview. Worksheets
 Excel Shortcut Keys. Print and Print Preview Print Print Preview In Print Preview Move around the page when zoomed in. Move by one page when zoomed out. Move to the first page when zoomed out. Move to
Microsoft Office Suite
 Module 3 MODULE OVERVIEW Part 1 Getting Familiar with Microsoft Word 2007 for Windows Part 2 Microsoft Word 2007 Basic Features Part 3 More Basic Features Microsoft Office Suite Microsoft Word 2007 Part
Quick Reference Summary
 Microsoft Office 2010 Quick Reference Summary Table 1: Microsoft Word 2010 Quick Reference Summary All Caps WD 81 Change Case button (Home tab Font, UPPERCASE AutoCorrect Entry, Create WD 86 Options (File
SKILL AREA 210: USE A WORD PROCESSING SOFTWARE. Lesson 1: Getting Familiar with Microsoft Word 2007 for Windows...5
 Contents Microsoft Word 2007...5 Lesson 1: Getting Familiar with Microsoft Word 2007 for Windows...5 The Microsoft Office Button...6 The Quick Access Toolbar...6 The Title Bar...6 The Ribbon...6 The Ruler...6
Using Microsoft Word. Table of Contents
 Using Microsoft Word Table of Contents The Word Screen... 2 Document View Buttons... 2 Selecting Text... 3 Using the Arrow Keys... 3 Using the Mouse... 3 Line Spacing... 4 Paragraph Alignment... 4 Show/Hide
Microsoft Office 2000 & Microsoft Word 2000 Page 1. ***** Help Options ***** To access [? ] quickly & for specific use then
![Microsoft Office 2000 & Microsoft Word 2000 Page 1. ***** Help Options ***** To access [? ] quickly & for specific use then](/thumbs/90/104468223.jpg "Microsoft Office 2000 & Microsoft Word 2000 Page 1. ***** Help Options ***** To access [? ] quickly & for specific use then") Microsoft Office 2000 & Microsoft Word 2000 Page 1 ***** Help Options ***** Microsoft Help: Options and Search [ F1 ] Fastest way to get to Office Assistant and MS Office Help! ESC to Exit File > Help
Microsoft Office 2000 & Microsoft Word 2000 Page 1 ***** Help Options ***** Microsoft Help: Options and Search [ F1 ] Fastest way to get to Office Assistant and MS Office Help! ESC to Exit File > Help
Computer Shortcuts. Files menu options in current program. Edits options in current program Universal Help in almost every Windows program.
 www.bankjobszone.com Computer Shortcuts Shortcut keys Concept: Shortcuts keys help provide an easier and usually quicker method of navigating and using computer software programs. Shortcut keys are commonly
6Reviewing, Viewing & 2Word Basics. 3More Word Basics. 5Reference Tools & 4Graphics, Tables & Word 2016 T ABLE O F C ONTENTS
 The Original Quick Reference Guides Microsoft Word 2016 Microsoft Word helps you create robust text documents with the inclusion of tables, graphics, headers and borders, reference and navigation sections,
12 BASICS OF MS-EXCEL
 12 BASICS OF MS-EXCEL 12.1 INTRODUCTION MS-Excel 2000 is a Windows based application package. It is quite useful in entering, editing, analysis and storing of data. Arithmetic operations with numerical
Quick Access Toolbar. You click on it to see these options: New, Open, Save, Save As, Print, Prepare, Send, Publish and Close.
 Opening Microsoft Word 2007 in the practical room UNIT-III 1 KNREDDY 1. Nyelvi beállítások az Office 2007-hez (Language settings for Office 2007 (not 2003)) English. 2. Double click on the Word 2007 icon
Word 2016 Advanced. North American Edition SAMPLE
 Word 2016 Advanced Word 2016 Advanced North American Edition WORD 2016 ADVANCED Page 2 2015 Cheltenham Group Pty. Ltd. All trademarks acknowledged. E&OE. No part of this document may be copied without
Appendix A Keyboard Shortcuts
 Writer Guide Appendix A Keyboard Shortcuts Using Writer Without a Mouse Copyright This document is Copyright 2011 2014 by the LibreOffice Documentation Team. Contributors are listed below. You may distribute
Adobe Acrobat Reader Release 4 Mini Guide. Introduction to Adobe Acrobat Reader 4 and Hints and Tips for reading and printing PDF's
 Adobe Acrobat Reader Release 4 Mini Guide Introduction to Adobe Acrobat Reader 4 and Hints and Tips for reading and printing PDF's Contents: 1 INTRODUCTION 1 2 USING ACROBAT READER RELEASE 4 1 2.1 Viewing
Published by SDL International ( Copyright SDL International. All rights reserved. Documentation for SDLX2004.
 Guide to SDL Edit & Translating ITDs Published by SDL International (http://www.sdlintl.com). Copyright SDL International. All rights reserved. Documentation for SDLX2004. Microsoft and Windows are registered
PRESENCE. RadEditor Guide. SchoolMessenger 100 Enterprise Way, Suite A-300 Scotts Valley, CA
 PRESENCE RadEditor Guide SchoolMessenger 100 Enterprise Way, Suite A-300 Scotts Valley, CA 95066 800-920-3897 www.schoolmessenger.com Contents Contents... 2 Introduction... 3 What is RadEditor?... 3 RadEditor
Keyboard shortcuts. Ease of Access keyboard shortcuts: General keyboard shortcuts: Display Help. Paste the selected item
 Keyboard shortcuts Ease of Access keyboard shortcuts: Right Shift for eight seconds Left Alt+Left Shift+PrtScn (or PrtScn) Left Alt+Left Shift+Num Lock Turn Filter Keys on and off Turn High Contrast on
Understanding Word Processing
 Understanding Word Processing 3.0 Introduction In this chapter you are going to learn how to create a simple memo or note or a complex and complicated multi column business document using word processing
Microsoft Office Word. Help. Opening a Document. Converting from Older Versions
 Microsoft Office 2007 - Word Help Click on the Microsoft Office Word Help button in the top right corner. Type the desired word in the search box and then press the Enter key. Choose the desired topic
Standard Windows Keyboard Layout & Keyboard Shortcuts
 Standard Windows Keyboard Layout & Keyboard Shortcuts Desktop keyboard Laptop keyboard Explanation of the Keys on a Windows QWERTY Keyboard Q W E R T Y "The name "QWERTY" for our computer keyboard comes
Keyboard shortcuts for Microsoft Access 2013 and 2016
 Keyboard shortcuts for Microsoft Access 2013 and 2016 Frequently used shortcuts This table itemizes the most frequently used shortcuts in Access desktop databases. Select the active tab of the ribbon and
Nama Shortcut Tombol Shortcut Penjelasan Shortcut Align Bottom B Aligns selected objects to the bottom Align Centers Horizontally E Horizontally
 Nama Shortcut Tombol Shortcut Penjelasan Shortcut Align Bottom B Aligns selected objects to the bottom Align Centers Horizontally E Horizontally aligns the centers of the selected objects Align Centers
A Guide to Quark Author Web Edition October 2017 Update
 A Guide to Quark Author Web Edition 2015 - October 2017 Update Contents Getting Started...1 Smart Documents...1 Introduction to the Quark Author Web Edition User Guide...1 Quark Author Web Edition configuration...1
PowerPoint 2000 Tutorial
 PowerPoint 2000 Tutorial Getting Started Open Power Point and you will be prompted by a dialog box with four choices. Each of these options are explained on this page. If Power Point is already open or
User Manual Version 1.1 January 2015
 User Manual Version 1.1 January 2015 - 2 / 112 - V1.1 Variegator... 7 Variegator Features... 7 1. Variable elements... 7 2. Static elements... 7 3. Element Manipulation... 7 4. Document Formats... 7 5.
SANDY SENIOR CENTER PRESENTS Course 222. Word Processing Using Microsoft Word
 SANDY SENIOR CENTER PRESENTS Course 222 Word Processing Using Microsoft Word March 2001 Revised July 2017 Introduction Sandy Senior Center Word Processing This manual is designed to assist the student
Getting To Know the Chromebook Keyboard
 Getting To Know the Chromebook Keyboard App Google Drive Description Google Drive is a file storage and synchronization service provided by Google. Google Drive is the home of Google Docs, Sheets and Slides,
Windows Computer A to Z Shortcut Key list with PDF
 Windows Computer A to Z Shortcut Key list with PDF In the Computer world, a keyboard shortcut is a combination of one or more command to execute a particular action. These shortcuts are really helpful
1. Which short keys is used to "Select All" Text? A. CTRL+A B. CTRL+B C. CTRL+C D. CTRL+D. Answer: A
 1. Which short keys is used to "Select All" Text? A. CTRL+A B. CTRL+B C. CTRL+C D. CTRL+D 2. Which short keys is used to "Copy" Text? A. CTRL+B B. CTRL+A C. CTRL+X D. CTRL+C 3. Which short keys is used