Aeronautical Navigator USER MANUAL. Your Journey, Our Technology
|
|
|
- Jasper Armstrong
- 6 years ago
- Views:
Transcription
1 Aeronautical Navigator USER MANUAL Your Journey, Our Technology
2
3 INDEX Navigatore Aeronautico AvMap EKPV 1. LEARN BEFORE USE 4 I. Safe temperature range 4 II. Battery and power source recommendations 4 III. Warning 4 IV. Box Content 5 V. Unit setup 5 VI. Powering Up the unit 5 2. General controls to operate the unit 6 I. Button, Joystick and Wheel controls 6 II. EKP V Views 6 3. GPS Page 6 4. Main Menu 7 5. System Setup 7 6. Map Setup 9 7. Explore the Map 10 I. PAN mode 10 II. Map information and cursor menu 10 III. MODE menu on Map GoTo - Direct Navigation 12 I. Cursor 12 II. Airport Search 12 III. Other objects Flight Plan 14 I. How to create, delete or reverse a FP 14 II. How to assign a name to a FP 15 III. How to add, delete and show-on-map a Waypoint 15 IV. How to change the WP order in a FP 15 V. How to activate and navigate a FP 15 VI. How to change the WP INFO visualized in the WP List Area 15 VII. How to show/hide the FP Vertical Profile 15 VIII. How to activate the Airspace Check function 16 IX. How to create a SAR (Search and Rescue) FP 16 X. How to select an approach EKP V Simulator Tools 16 I. Checklists 17 II. XM Weather Profiles 17
4 1. LEARN BEFORE USE I. Safe temperature range DANGER: do not operate EKP V beyond the operating temperature range. Temperature MIN MAX Operating temperature Storage temperature* - 20 C / - 4 F 60 C / F - 30 C / - 22 F 80 C / F *without battery DANGER: do not store EKP V beyond the Storage temperature range. Remove the battery before storage. II. Battery and power source recommendations EKP V is provided with a Li-Ion rechargeable battery. The battery compartment is in the back side of the unit, under the battery cover. DANGER: Never operate or store EKP V without the battery cover in place. DANGER: The battery could explode in case of improper use or short-circuit. Battery is recharged connecting EKP V to a power source using the cigarette lighter cable or the wall charger. DANGER: Use only the original cables provided in the box to power EKP V. Full charge of battery requires about 6 hours. EKP V can be operative while charging; in this case the full charge of battery could take up to 12 hours. ATTENTION: If the battery is completely discharged, it could be necessary to remove it and then to power up the unit on external power. Once the unit is running re-insert the battery. III. Warning The electronic cartography displayed by the EKP V is not certified for use for VFR or IFR flights. The EKP aeronautical GPS navigator is meant as an aid to VFR navigation and is not a substitute for official PUBLICATIONS, NOTAM, BRIEFINGS and AERONAUTICAL CHARTS that must be in any case carefully consulted before and during any flight. The information provided by the EKP is GPS based information which is only intended to supplement official charts. All critical flight information is presented for reference only and must be verified by the user. The EKP is not a substitute for on-board instruments. The sector MORA values provide a minimum 1000 foot clearance above terrain and physical obstructions. Terrain and obstacle data provided are only to be used as a general reference to your surroundings and as an aid for situational awareness. Street network information has only been provided with the purpose of reference during flight and should be used with caution. The altitude shown by EKP V is the geometric distance from the sea level based on GPS data. XM Weather data is meant to show atmospheric disturbances in order to select alternative routes, and not to guide you through the bad weather conditions. The Global Positioning System (GPS) is a space-based global navigation satellite system operated by the U.S. Government, which is solely responsible for its accuracy and maintenance. EKP V has an internal data logger where the flight data is recorded. Data logger is not accessible without disassembling the unit. EKP V chart and database data are provided by third parties, included but not limited to 4 - Quick Manual
5 Navteq and Jeppesen. Cartographic data loaded in the EKP V can differ from reality. The pilot in command assumes total responsibility and risk associated with the use of this device and remains solely responsible for flying in safe conditions. AvMap disclaims any liability deriving from an improper use of the device, in a way that may violate the flight and navigation rules, regulations and safety. IV. Unit setup 1. Open the battery compartment 2. Insert the Micro SD, if not already inserted 3. Insert the battery 4. Close the battery compartment door 5. Rotate the GPS antenna to the maximum sky visibility position. 6. Connect EKP V to a power source for battery charging: 6.1 Connect the cigar lighter cable with the label face up to the EKP V side connector, or 6.2 Connect the USB cable to a PC (slow battery charge), or 6.3 Connect the USB cable to the wall charger. 7. The unit will automatically switch on. V. Powering Up the unit The EKP V can be powered up both running on battery or on external power. When running on battery to power up the unit press once the POWER button. When the external power cable is connected either with battery inserted or not inserted the unit will automatically switch on. In the power up phase two consecutive splash screens will appear. After a few seconds the second splash screen will be replaced by the Warning page. To move to the map press the joystick (ENTER). Quick Manual - 5
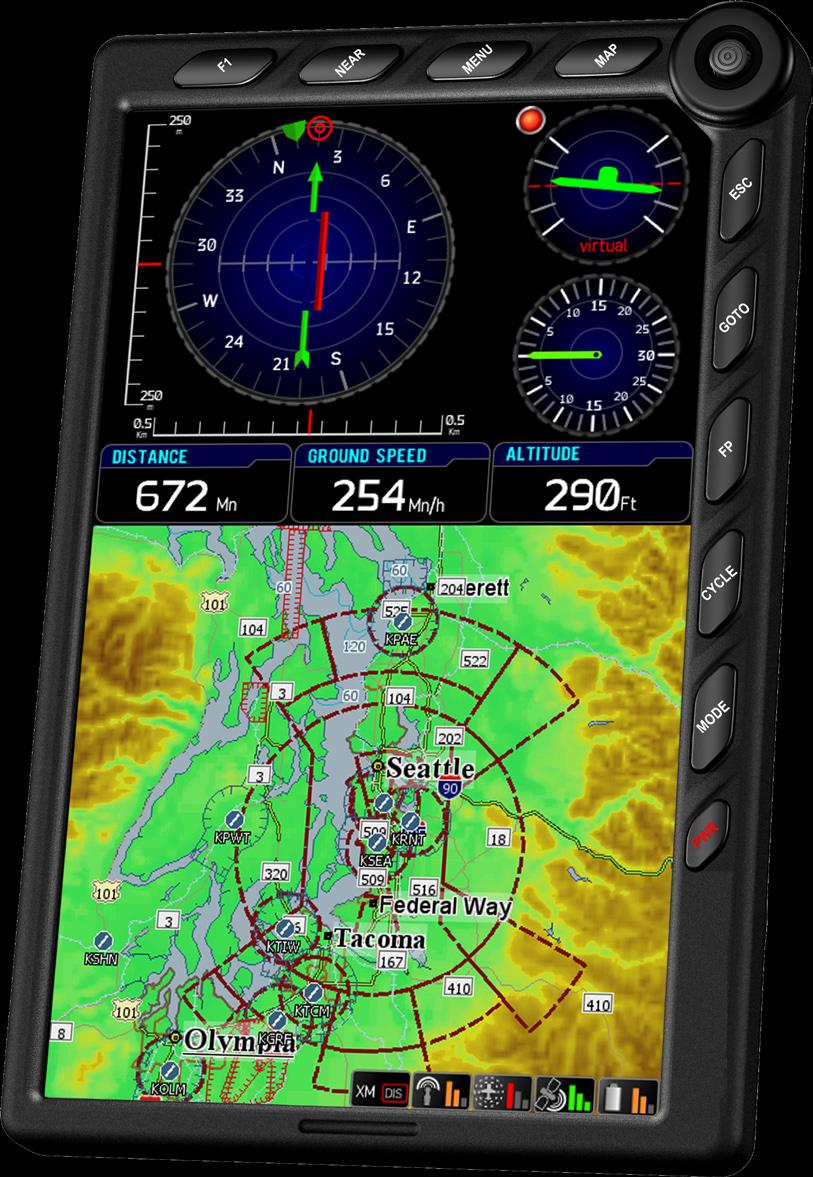
6 POWER Turns On/Off the EKP V and controls brightness and contrast (press once). JOYSTICK Used for pan the map, navigating in the Menus and as ENTER button when clicked. WHEEL Used for Zoom In/Zoom out on the map and for navigating in the Menus. II. EKP V Views The EKP V software is made by two main views: Map and Menu. The Map view is accessed pressing the map button; it contains the moving-map representation. Three different configurations can be selected by the user: Track Up, Course Up and North Up. The Menu view is made by different pages and contains data and settings. 2. General controls to operate the unit I. Button, Joystick and Wheel controls F1 Provides quick access to several function at user choice NEAR Lists nearest objects MENU Opens Main Menu page MAP Goes back to the Map ESC Escapes from one menu page or menu item to the prior menu GOTO Activates navigation to selected object FP Opens Flight Plan Menu CYCLE Toggles between various cartographic settings MODE Provides quick access to options regarding map visualization and map layout How to operate in the Map view Move the joystick to move the cursor on the map. Push the joystick to open the cursor menu. The wheel (or knob) controls the ZOOM level on the map. How to operate in the Menu view The Main Menu bar is available on the top of the page displayed. Each page has different areas. To move to an area below the current one, move the joystick down; to move to an area above, move the joystick leftor press ESC. To focus on the desired option use the wheel. To select a menu item push the joystick. 3. GPS Page To optimize the GPS antenna reception, we advise that you open the antenna and keep 6 - Quick Manual

7 it lifted upon a parallel position in reference to the sky. The GPS status is displayed in all pages and also in the map view by the satellite icon. Three green bars mean a perfect signal reception, instead the icon made with a red bar and a WARNING symbol inside a triangle means that the signal is not present. To control the reception status, you need to access to System Setup menu in the main menu and select GPS Page. In this page you can see the signal level for each satellite and the constellation scheme, together with additional data regarding the reception and the position. In the EXT. GPS box, you can see the wording EXT. if you are using the external antenna, while you can see the wording DIS. if you are using the internal antenna. WARNING: Global Positioning System is a system provided and maintained by The United States of America Government, who is solely responsible for keeping it working. AvMap is not responsible for any possible damage, changes and calculation adjustment that could affect the data accuracy. 4. Main Menu Push the MENU button to open the main menu. In the top menu bar it is possible to choose between: - Map Setup, to change the visualization of information and objects on the map - Navigation Setup, to change the navigation parameters - Database, to operate on the database of aeronautical objects and personal data - Tools, to operate on specific function as weather, checklist, etc - Profiles, to create and manage different user settings - System Setup, to change the general settings of the EKP V - About, to check the version of system components 5. System Setup System Setup menu allows you to set several basic settings and preferences in order to customize the unit according to user needs. The orientation of the display can be set as vertical or horizontal. The language can be changed to the mother language of the Quick Manual - 7


8 user (default language is English). Regional settings can be switched between American and Other. Also other functions such as the Max Power Save mode and the Standby Timeout can be selected in this menu. Max Power save profile can be used when it is required to save battery. In this mode, display is switched off after 10 seconds since last user action or software command. Display shall switch on automatically when software detects a variation of relevant parameters as speed or when the FP approaches a waypoint where a maneuver is requested. Standby Timeout is the timeout the unit waits before moving to Sleep Mode when no user action or input is detected. F1 Button Another important feature which can be accessed through the System Setup Menu is the F1 button setup. F1 is a button that can be set up to be associated with several functions. In order to set it up: Push MENU button and then F1 button The list of the possible functions that can be associated with this button appears on the screen. Choose the favorite functions among the listed ones. Push ESC button to come back to the map. After you set up it, whenever you push F1 button during the navigation, the customized menu will be opened and using it you will 8 - Quick Manual

9 able to access to all your favorite functions. If you set up only one function for this button, F1 will allow you to access directly to it, without opening a menu window. 6. Map Setup The Map Setup menu is the first menu available in the top menu bar of the main menu page. In this menu it is possible to optimise the map details and information based on the navigational need and conditions. Map Visualization: This section permits to setup the map orientation and the predefined zoom level. Map Layout: In this section it is possible to configure the layout of the map page. EKP V gives the possibility to customize in detail the content of each data field and its position. Moreover, it is possible to select and display data fields both in the vertical and in the horizontal bar. Select Layout Configuration to modify the layout of the map page. There are 3 sections to configure, selecting each of them on the selecting bar on top of the menu page: Vertical Profile (VP) Permits to show or to hide the Vertical Profile during navigation. HSI window Permits to show or to hide the HSI window. Data fields The data fields can be hidden or shown in 4 ways; one line, two lines, three lines or one vertical column. The scheme shown in this page represents the map page. The highlighted zone is the one that you re going to modify. To configure one of the options, scroll with the wheel selector or joystick through the options. Push ENTER to confirm the option and check the result on the scheme shown in the centre of the page. The Map layout configuration menu can also be reached by pushing the MODE button (see next paragraphs). Objects: To avoid map cluttering caused by too many objects, it is possible to select which objects are shown on the map and which are hidden. When using the menu Selective Display it is possible to setup 3 cycles. For each cycle you Quick Manual - 9
.")
10 separation between the aircraft and the land elevation to highlight the dangerous land elevations, allowing the map to be more easily and readily interpreted. To enable TAWS function, Land Elevation needs to be enabled. TAWS has two settings: Low Separation and High Separation. The colour shading is based on Obstacle Clearance Height (OCH). In case of HIGH SEP setting all terrain with an OCH value under 1000 feet are highlighted in red, while a LOW SEP highlights all terrain with an OCH value under 500 feet. 7. Explore the Map can pre-define the visualization of different objects on different Zoom levels. Once you setup this menu you can easily change the visualization of the map by selecting the CYCLE button. Every time you touch the CYCLE button the map visualization will be modified according to the pre-defined customized cycles. Data Overlay: In this section you can choose which information you would like to be displayed on the map: Terrain Awareness Warning System (TAWS) or XM weather information (North America and Canada only). TAWS highlights safe and unsafe elevation for an easier to read map display. TAWS is a very powerful feature that uses the I. PAN mode If the GPS signal is available, the icon of the aircraft is shown on the map. When moving the Joystick, the cursor will appear on the map and you enter in the PAN mode, which permits you to explore the map and the shown objects. The cursor is represented by a round icon with a cross in the centre and an arrow for orientation. The orientation of the cursor is always in the direction of your proper position. When the GPS signal is missing the icon made with a red bar and a WARNING symbol inside a triangle is displayed, the cursor is shown on the map but the orientation arrow of the cursor will disappear. For zooming, touch the wheel selector and scroll from left to right to ZOOM IN or ZOOM OUT on the map. II. Map information and cursor menu When placing the cursor on top of an object, an information window appears that shows some important information as LAT/ LON, Bearing, Elevation, and aeronautical objects info in case the cursor is positioned 10 - Quick Manual


11 on an airport, VFR, etc... To get complete information of the object, select ENTER. The cursor menu will appear from which it is possible to select: Objects info, to visualize the information of the selected object. Airspaces, to visualize the information of the airspaces of the cursor position. Add to FP, to add the cursor point (Object) to the activated Flight Plan. Add user point, to save the cursor point as user point. III. MODE menu on Map Important options regarding map visualization and map layout can be accessed without leaving the map page, using the Mode menu. When the map is displayed, press the MODE button on the keyboard. A menu of two lines will appear on the bottom of the map page. Scroll with the joystick or with the wheel on top of the line above to select the set of options to modify. Data overlay Land Elevation Vertical Profile HSI window Data fields Select ENTER on top of one of these fields to enter in the line below, where you can scroll down and choose various options. For example, select Land Elevation, push ENTER and choose between to show or to hide the visualization of the coloured Land Quick Manual - 11

12 Elevation. Selecting HSI or Data Fields in the list it is also possible to get access to the Layout Configuration Page introduced in the previous paragraph. Selecting Data Overlay it is possible to enable the TAWS feature. 8. GoTo - Direct Navigation Direct navigation to an object can be activated selecting the GOTO button. The menu permits to choose different types of destinations. In particular, From the GOTO menu it is possible to search for a specific point as destination: Cursor Airports VOR, NDB, Intersections Address POI objects User Points Lat/Lon I. Cursor This is the quickest way to plan a route. Search for the destination point by exploring the map with the cursor, place the cursor on the precise position (use the ZOOM level to be more precise) and press the GOTO button. The GOTO menu will appear and select Cursor. The selected position is now your destination and the navigation is immediately active. II. Airport Search In the GoTo menu select Airports to search the destination in the airport and airfield database. You can search for an: ID Name City When you enter the airport database page, the ID field is highlighted. Select ENTER to search an ID or scroll down with the Joystick to search on Name or City. For Example, scroll down with the joystick to City and press the ENTER button to select the City field. The virtual keyboard will appear. The virtual keyboard is build up in three parts: The keyboard permits you to select the letters moving the joystick up, down, left and right. Press ENTER to confirm the desired letter and select the OK button or rotate the wheel to move to the results 12 - Quick Manual


13 list. The result list: Based on the selected letters a result list will appear. Scroll with the wheel selector through the list and select the desired destination and push ENTER to confirm. The result list will be modified each time you will add or remove a letter. The text field that shows the selected letters. ATTENTION: use only the wheel selector to scroll down the result list. When touching the joystick, you will modify the selection, from the list to the keyboard and vice versa. Thanks to the real time research, it is not necessary to insert the complete name of the City. For example, you can insert only MIL to search MILAN and then pass from the keyboard to the result list to select the desired airport. Once you select the desired airport form the result list you can: Search for Information: The information of the airports are available on different pages scrolling down through the different options in the bar. Select the airport as your destination: To activate the navigation, select the title above the ID field and push ENTER. The airport menu will appear. Choose GO TO. III. Other objects As well, it is possible to select other items in the GoTo list and navigate towards these objects. Quick Manual - 13

, containing the info of the Vertical Profile along the FP. To move from FP Tab Area to WP List Area move DOWN the Joystick, vice versa move LEFT the Joystick or press ESC. I.")
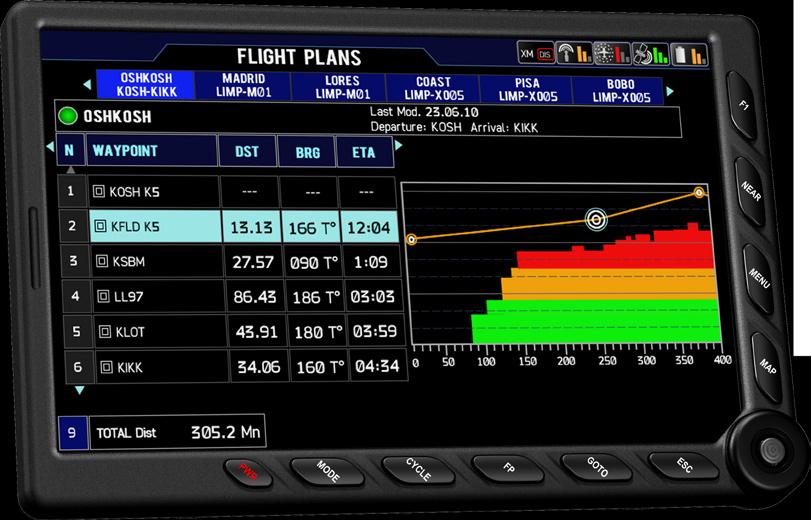
14 9. Flight Plan FP page You can store up to 50 Flight Plans (FP) in your EKP V at the same time. Only one FP can be shown on the map at any time. To access the FP Page press the FP button on the keyboard. FP Page is divided in 4 areas, top down: FP Tab Area, containing the list of the available FPs. FP Information Area (not selectable), containing info on the selected FP WP List Area, containing the list of the WP of the selected FP. VP Area (not selectable), containing the info of the Vertical Profile along the FP. To move from FP Tab Area to WP List Area move DOWN the Joystick, vice versa move LEFT the Joystick or press ESC. I. How to create, delete or reverse a FP To create a FP select Add FP in the FP Tab Area. The virtual keyboard is visualized: write the desired name for the FP and select OK on the virtual keyboard. A FP tab with the assigned name will appear in the FP Tab Area. To delete a FP, select it in the FP Tab Area, press ENTER and choose the option Delete. To reverse a FP, select it in the FP Tab Area, press ENTER and choose the option Reverse Quick Manual
 to a FP: In the FP page select ADD WP in the WP List Area and choose the kind of WP to add.")
15 II. How to assign a name to a FP Select a FP in the FP Tab Area, press ENTER and choose the option Edit Name. Write the desired name and confirm selecting the OK on the virtual keyboard. III. How to add, delete and show-onmap a Waypoint There are two methods to add a Waypoint (WP) to a FP: In the FP page select ADD WP in the WP List Area and choose the kind of WP to add. Available options are: Airport, VOR, NDB, Intersection, User Point, Address or Lat/Lon. From the map, move the cursor to the desired location and press ENTER. Choose the option Add to FP: a WP with the selected location will be added to the active FP. To delete a WP, select it in the WP List Area, press ENTER and choose the option Delete. To show-on-map a WP, select it in the WP List Area and choose the option Locate on Map. IV. How to change the WP order in a FP Select the WP which must be moved in the WP List Area, press ENTER and choose the option Change Order pressing ENTER. Change the WP position using the Joystick UP/DOWN or the knob (counter clockwise) and confirm pressing ENTER. V. How to activate and navigate a FP To start the navigation on a FP, it must be active. To activate a FP, select it in the FP Tab Area and choose the option Activate/Deactivate. A green icon is shown in the FP Information Area of the active FP. VI. How to change the WP INFO visualized in the WP List Area In the WP List Area there are three information fields per each WP. By default setting, the info fields are Bearing, Distance and ETA (Estimated Time of Arrival). To change the content of the info fields, select a FP in the FP Tab Area and choose the option Setup data fields. In the Data Fields window select the desired information to be displayed in each column. It s not possible to display the same info in more than one column. Press ESC button to go back to FP page. VII. How to show/hide the FP Vertical Profile Select a FP in the FP Tab Area and choose Quick Manual - 15

16 Show/Hide Vertical Profile. A new Area displaying the Vertical Profile of the ground along the FP will appear/disappear at the bottom of the FP page. VIII. How to activate the Airspace Check function To visualize the list of airspaces intersected by a FP, select the FP on the FP Tab Area, press ENTER and choose the option FP airspace check. Press ESC to go back to FP page. IX. How to create a SAR (Search and Rescue) FP Create a new FP, select it in the FP Tab Area, press ENTER and choose the option Add SAR FP. Choose one of the three available patterns, set the desired characteristic and press ENTER to confirm each parameter. Select Create SAR option to create the FP. The WP list is created automatically starting from the current position depending on the chosen pattern. X. How to select an approach Select a FP with an airport as final destination as your active FP. Press the FP button and access to the FP menu. In the FP tab Area, press ENTER and choose the option select approach. The list of approaches for the destination airport is shown. Select one approach scrolling the list using the joystick or the wheel. Go back to the map and the legs for the selected approach are shown on the map. other parameters, even if the GPS signal is not available. To start a simulation, access to the Main Menu and select the Navigation Setup submenu. Using the joystick move to Simulator item and press ENTER. A new window will appear where Simulation can be activated and some parameters modified. Press ENTER on Simulation and modify from Off to On. Then press ESC to go back to Navigation Setup menu or MAP to move directly to the map. 10. EKP V Simulator 11. Tools It is possible to setup a flight simulation of a route or a flight plan, selecting speed and Tools are pages or functions useful to flight planning and navigation Quick Manual

17 of the item can be further edited selecting the item and pressing ENTER); Save and Exit, to save the actual checklist; Delete All, to delete all items in the checklist; Exit without save, to close without saving; Edit, to modify the name of the checklist; Delete, to delete the checklist. A pre-arranged checklist can be modified, selecting Edit at the bottom of the list itself. II. XM Weather In North America the meteorological service XM Weather is available, which is compatible with the EKP V with respect to the following products: I. Checklists The checklist is the traditional list of actions to be performed before, during and after each flight. EKP V has a few pre-configured checklist, but it is possible to customize an existing checklist or to create a new one. How to create a Checklist Select Add Checklist in the top bar in the Checklist page. Enter a name for the checklist using the virtual keyboard and confirm clicking OK. Scroll the top bar and select the newly created checklist, press ENTER and then select Edit. The following options are shown: Add new item, to add an item (the name 1. NEXRAD 2. Lightning 3. Precipitation 4. METAR 5. TAF 6. TFR To enable the XM WX feature, simply connect the device to the EKP V using the USB plug and activate the reception of information in the TOOLS Menu by selecting XM Weather and turning the DATA RECEPTION and DATA OVERLAY to ON. If DATA OVERLAY is OFF, the unit may still receive the XM signal, but it will not de displayed on the map. 12. Profiles EKP V allows you to set up more than one user profile, so you can record more than one set of preferences. This is a very useful function if you want, for example, to use the Quick Manual - 17
18 navigator in several aircraft or if the navigator has to be used by several pilots. You can find the Profiles Menu by going through the selection bar in the main menu. In this menu you can: Create a new profile Select the profile you want to enable Modify or delete the currently used profile WARNING: when you modify the selective display settings and the map configuration, these changes are recorded in the currently used profile Quick Manual
19
20 MQEK5AM0AE040 *MQEK5AM0AE040*
Aeronautical Navigator USER MANUAL. Update Software version V R. Your Journey, Our Technology
 Aeronautical Navigator USER MANUAL Update Software version V1.6.069R Your Journey, Our Technology INDEX Navigatore Aeronautico AvMap EKPV 1. LEARN BEFORE USE 4 I. Safe temperature range 4 II. Battery
model: 660 Quick Start Manual
 model: 660 Quick Start Manual Copyright 2016 Garmin Ltd. or its subsidiaries. All rights reserved. This manual reflects the operation of System Software version 1.0 or later. Some differences in operation
model: 660 Quick Start Manual
 model: 660 Quick Start Manual Copyright 2016-2018 Garmin Ltd. or its subsidiaries. All rights reserved. This manual reflects the operation of System Software version 3.3 or later. Some differences in
GPSMAP 695/696. Portable Aviation Receiver Quick Reference Guide
 GPSMAP 695/696 Portable Aviation Receiver Quick Reference Guide Overview Overview 7 WVGA (800x480) Color Display Power Button Backlit Keypad Unit Overview 1 SD Card Slot External GPS Antenna Connector
GPS Nothing comes close to a Cobra. Owner s Manual ENGLISH
 Owner s Manual GPS 1080 GLOBAL POSITIONING SYSTEM RECEIVER Nothing comes close to a Cobra Printed in China Part No. 480-146-P ENGLISH IMPORTANT INFORMATION Cautions and Warnings Caution: The user is responsible
G3X. Multi Function Display Quick Reference Guide
 G3X Multi Function Display Quick Reference Guide Overview GPS Navigation Flight Planning Hazard Avoidance Additional Features Appendices Index Warnings, Cautions & Notes WARNING: The indicators represented
NVX226 Navigation System. User s Manual
 NVX226 Navigation System User s Manual 1287693 Contents Getting started-------------------------------------------------------------------------------------- 1 Charging the battery -------------------------------------------------------------------------------
models: 795 and 796 Quick Reference Guide
 models: 795 and 796 Quick Reference Guide OVERVIEW GPS NAVIGATION FLIGHT PLANNING HAZARD AVOIDANCE UTILITIES APPENDIX INDEX Copyright 2011, 2012, 2017 Garmin Ltd. or its subsidiaries. All rights reserved.
Precautions Very important information. Please read this section carefully before using this product.
 Precautions Very important information. Please read this section carefully before using this product. This product is intended to provide turn-by-turn instructions to safely guide you to your desired destination.
GDU 37X. Multi Function Display Quick Reference Guide
 GDU 37X Multi Function Display Quick Reference Guide OVERVIEW GPS NAVIGATION FLIGHT PLANNING HAZARD AVOIDANCE ADDITIONAL FEATURES APPENDICES INDEX Copyright 2008-2009, 2012 Garmin Ltd. or its subsidiaries.
Pub Mapping GPS and Multimedia Player Quick Start Guide
 Pub. 988-0160-461 Mapping GPS and Multimedia Player Quick Start Guide 1 Power Cable The Lowrance XOG GPS operates on an internal rechargeable battery. Battery charge is probably low at time of purchase.
GPS 500. Quick Reference
 GPS 500 Quick Reference 1 KeyS AND KNOBS Left and Right-hand Keys and Knobs l The Power Knob controls unit power. Rotate clockwise to turn the unit on. RNG The range key allows you to select the desired
montana 600 series quick start manual for use with models 600, 650, 650t Montana 600 Series Quick Start Manual 1
 montana 600 series quick start manual for use with models 600, 650, 650t Montana 600 Series Quick Start Manual 1 Getting Started warning See the Important Safety and Product Information guide in the product
User Manual Ituran GPS GPS 350
 User Manual Ituran GPS GPS 350 Table of contents Operation manual Quick start 1. Opening screen 2. Map display 3. Main Menu 4. Navigation 5. Route Manager 6. Settings 7. Ituran BIG 8. Map Manager 9. Help
Aeronautical Navigator
 Aeronautical Navigator COCKPIT DOCKING STATION INSTALLATION GUIDE Standard and OEM Versions Your Journey, Our Technology DISCLAIMER & WARNINGS This product is not TSO-certified and have received no EASA
Getting started. Mounting your navigation device. 1. Push the EasyPort Mount on your TomTom START against the windshield in your car.
 TomTom START 1. Getting started Getting started Mounting your navigation device 1. Push the EasyPort Mount on your TomTom START against the windshield in your car. 1 2. Adjust the angle of your device.
R300. Quick Start Guide 15G06A E3403
 R300 E3403 Quick Start Guide 15G06A348000 Layout Features 1 2 6 5 3 4 7 8 9 10 11 12 1 External Antenna port Connects to an external antenna for better signal performance (the external antenna is optional)
PolNav Navigation Software
 PolNav Navigation Software User s Manual Version 2008 Q1 For use with PC/PDA/Personal Navigators I Polstar Technologies, Inc. http://www.polstargps.com Tel: +886-3-552-5279 Fax: +886-3-552-5269 Address:
Odyssey Quick Start Guide. Version:
 Odyssey Quick Start Guide Version: 2009.3 2 Odyssey Quick Start Guide Copyright About Version: 2009.3 Doc. Date: 20 February 2009 Copyright Copyright 2006-2009. All rights reserved. No part of this publication
Range (map scale) Menu. COM power/volume. COM flip-flop. Direct-To. Enter. VLOC flip-flop. VLOC volume. Clear. Small right knob.
 Menu. COM power/volume. COM flip-flop. Direct-To. Enter. VLOC flip-flop. VLOC volume. Clear. Small right knob.") GNS 430 Quick Reference KEYS AND KNOBS Left-hand Keys and Knobs Right-hand Keys and Knobs COM power/volume VLOC volume COM flip-flop VLOC flip-flop Range (map scale) Direct-To Clear Menu Enter Small left
GNS 430 Quick Reference KEYS AND KNOBS Left-hand Keys and Knobs Right-hand Keys and Knobs COM power/volume VLOC volume COM flip-flop VLOC flip-flop Range (map scale) Direct-To Clear Menu Enter Small left
Honda Toyota Accord Venza Quick Start Guide
 Multimedia Navigation System Honda Pilot Quick Start Guide In-Dash Multi-Media / Navigation System Honda Toyota Accord Venza Quick Start Guide G System Features: Navigation Bluetooth Hands-Free ipod and
Table of. Contents Getting started 2. Introduction 1. Map settings 3. Setting a destination 4. Route guidance 5. Storing a location/route 6
 FOREWORD Thank you for purchasing a NISSAN vehicle. This user s manual is for the navigation system only. This manual contains operating instructions for the NISSAN Navigation System offered in your NISSAN
Owner s manual NZ503
 Owner s manual NZ503 US English Thank you for choosing the Clarion NZ503 as your navigator. Start using Clarion NZ503 right away. This document is the detailed description of the navigation software. You
Zeus 2 QuickStart Guide
 Zeus QuickStart Guide Font panel 7 units 9 & units 5 6 4 9 7 4 MARK 5 6 7 7 MARK 8 No. Description Touch screen Rotary knob. Rotate to scroll through menu items, then press to confirm a selection. Rotate
FriendlyPanels
 FriendlyPanels Software WARNING This operating manual has been writen following the original GARMIN GNS 430/430A Pilot s Guide and Reference, but it's not intended to be valid for training purposes other
Air Navigation Pro 4. Quick Start Guide. Available on the
 Air Navigation Pro 4 Quick Start Guide Available on the The information in this document is subject to change without notice and does not represent a commitment on the part of Xample ltd. The software
GNS 430/430A. Quick Reference
 GNS 430/430A Quick Reference KEYS AND KNOBS 1 2 3 4 5 6 7 8 9 10 11 12 13 14 15 16 17 18 1 COM Power/Volume 7 RNG (map range) 13 OBS 2 VLOC Volume 8 MENU 14 MSG (message) 3 COM Flip-flop 9 ENT (enter)
Action: Verify that the unit is not in the Mute mode In addition, increase the volume using the scroll bar
 Instruction Manual: Thank you for purchasing Ituran's navigation system. The unit provides easy to use highly accurate navigation instructions based on GPS technology. General instructions: 1. Do not charge
Before Using the Navigation System
 Before Using the Navigation System WARNING Read this manual first Read this manual carefully before using the navigation system. We are not liable for accidents or other problems resulting from failure
Table of contents 1. INTRODUCTION INSTALLATION GENERAL INTRODUCTION NAVIGATE TO... 7
 Table of contents 1. INTRODUCTION... 1 2. INSTALLATION... 3 2.1. INSTALLING THE HARDWARE...3 2.2. INSTALLING THE SOFTWARE...3 2.3. ACTIVATING THE GPS...4 3 GENERAL INTRODUCTION... 5 3.1. LEFT-HAND BUTTONS...5
User Manual Alpine Navigation
 User Manual Alpine Navigation Navigation software for the Alpine INE-W960/INE-W960S/INE-NAV-60 US English January 2015, ver. 1.0 Thank you for choosing the Alpine unit as your navigator. Start using your
Quick Start Guide Ford Mustang
 Multimedia Navigation System Quick Start Guide Ford Mustang *FOR MODELS WITH FORD SYNC ONLY Navigation Bluetooth Hands-Free (For use with Sync) ipod and MP3 compatible (For use with Sync) Back-up camera
All necessary data input and manipulation can be done using the seven keys as shown below:
 The LX Colibri Logger is an FAI approved flight logger/recorder. It is operated via seven keys identified by symbols. All the data and flight information is displayed on a 2x8 character LCD matrix display.
GPS NAVIGATION SYSTEM NAV USER MANUAL
 GPS NAVIGATION SYSTEM NAV USER MANUAL ENGLISH Thank you for choosing the the Zenec Device as your navigator. Start using your device right away. This document is the detailed description of the navigation
Navigator for Android Manual MapFactor s.r.o.
 Navigator for Android Manual I Navigator for Android Table of Contents Foreword 0 Part I Introduction 4 Part II Installing navigator 6 1 Installing Navigator... application 6 2 Installing maps... 7 Part
montana 600 series quick start manual for use with models 600, 650, 650t Montana 600 Series Quick Start Manual 1
 montana 600 series quick start manual for use with models 600, 650, 650t Montana 600 Series Quick Start Manual 1 Getting Started warning See the Important Safety and Product Information guide in the product
Odyssey Mobile User's Guides. Version: 3.0
 Odyssey Mobile User's Guides Version: 3.0 Last Update: 22-June-2006 2 Odyssey Mobile User s Guide Copyright About Odyssey Mobile Version: 3.0 Documentation Date: 22-June-2006 Copyright Copyright 2005-2006.
LX700 V1.0. GPS Navigation System
 LX700 V1.0 GPS Navigation System 1 Contents 1 CONTENTS... 1 2 GENERAL... 3 2.1 TECHNICAL DATA... 3 2.2 ROTARY SWITCHES AND KEYS (BUTTONS)... 3 2.2.1 On/Start Button (ON/START)... 4 2.2.2 MODE selector
Owner's manual NX604. Navigation
 Owner's manual NX604 Navigation Thank you for choosing the Clarion NX604 as your navigator. Start using Clarion NX604 right away. This document is the detailed description of the navigation software. You
agellan RoadMate User Manual
 agellan RoadMate User Manual www.carid.com Magellan RoadMate GPS Receiver The Magellan RoadMate receiver is a vehicle navigation product that utilizes GPS signals from satellites to calculate your precise
GNS 430/430A. Quick Reference
 GNS 430/430A Quick Reference KEYS AND KNOBS 1 2 3 4 5 6 7 8 9 10 11 12 13 14 15 16 17 18 1 COM Power/Volume 7 RNG (map range) 13 OBS 2 VLOC Volume 8 MENU 14 MSG (message) 3 COM Flip-flop 9 ENT (enter)
Chart Plotter USER MANUAL
 Chart Plotter USER MANUAL 1. Disclaimer and warnings 5 2. Introduction 6 2.1 Keyboard 6 2.2 Connections scheme 7 3. Getting started 10 3.1 Switching ON 10 3.2 Switching OFF 10 3.3 First Setup page 10
Mobile Navigation. TravelPilot Lucca 3.3. Operating Instructions (long version)
") Mobile Navigation TravelPilot Lucca 3.3 Operating Instructions (long version) Device Overview Device Overview 2 Device Overview The following button are located beside the display: 1. Power (Screen ON/OFF):
Mobile Navigation TravelPilot Lucca 3.3 Operating Instructions (long version) Device Overview Device Overview 2 Device Overview The following button are located beside the display: 1. Power (Screen ON/OFF):
MEDALLION INSTRUMENTATION SYSTEMS MasterCraft Viper system
 MEDALLION INSTRUMENTATION SYSTEMS 2010 MasterCraft Viper system MEDALLION INSTRUMENTATION SYSTEMS VIPER CHART PLOTTING OPERATORS MANUAL MAP SCREEN This manual will attempt to familiarize the
Hook2 Series. Operator Manual. 5 HDI, 5 TS, 7X GPS TS, 7 HDI, 7 TS, 9 TS, 9 HDI, and 12 TS ENGLISH
 Hook2 Series Operator Manual 5 HDI, 5 TS, 7X GPS TS, 7 HDI, 7 TS, 9 TS, 9 HDI, and 12 TS ENGLISH www.lowrance.com Preface Disclaimer As Navico is continuously improving this product, we retain the right
Europe / Australia / New Zealand Edition. icn 600 series. Version 3.0. with Smart. User Manual
 Europe / Australia / New Zealand Edition icn 600 series TM with Smart Version 3.0 User Manual Contents 1. Introduction... 3 2. icn Features... 4 3. Memory Card... 6 4. Turning your icn On and Off... 7
Lenovo TAB A User Guide V1.0. Please read the safety precautions and important notes in the supplied manual before use.
 Lenovo TAB A10-70 User Guide V1.0 Please read the safety precautions and important notes in the supplied manual before use. Chapter 01 Lenovo TAB A10-70 Overview 1-1 Appearance 1-2 Buttons 1-3 Turning
SeeYou Mobile Tips. Paul Remde September 1, Preliminary Not complete or corrected yet
 SeeYou Mobile Tips Paul Remde www.cumulus-soaring.com paul@remde.us September 1, 2011 Preliminary Not complete or corrected yet SeeYou Mobile is powerful and yet easy-to-use (once setup to your liking)
Navigation System... 1 Radio Frequently Asked Questions Troubleshooting MAIN TABLE OF CONTENTS
 Navigation System... 1 Radio... 41 Frequently Asked Questions... 53 Troubleshooting... 56 MAIN TABLE OF CONTENTS i NAVIGATION SYSTEM TABLE OF CONTENTS Safety Guidelines... 1 System Introduction... 3 System
LX Flarm Graphic Display V1.02
 LX Flarm Graphic Display V1.02 A high tech solution for your safety Users manual High resolution graphic display ( 128 x 128 dots) Replaces conventional Flarm LED display Connectable to any Flarm unit
User manual PLUS S320
 User manual PLUS S320 PLUS S320 Introduction Congratulations on buying the Sapphire Plus Portable Navigator and Fixed Speed Camera location system. This user manual aims to provide you with installation
B. HDS-5m & HDS-7m. GPS Mapping Receiver. Operations Guide
 988-0176-02B HDS-5m & HDS-7m GPS Mapping Receiver Operations Guide Software updates for your unit. Occassionally check the Lowrance website for free software upgrades for your unit. Go to www.lowrance.com
Taking Your First Trip with GPS Navigator by palmone
 Taking Your First Trip with GPS Navigator by palmone Copyright and Trademark 2004 palmone, Inc. All rights reserved. palmone, the palmone logo, Zire, the Zire logo, Tungsten, the Tungsten logo, HotSync,
LX Flarm 57mm Graphic Display V2.0
 LX Flarm 57mm Graphic Display V2.0 A high tech solution for your safety Users manual High resolution graphic display ( 160 x 160 dots) Replaces conventional Flarm LED display Connectable to any Flarm unit
USER MANUAL. icn 700. series. with SmartS English - Australia/Canada/United States
 USER MANUAL NavPix Navigate to pictures icn 700 series with SmartS 2006 en English - Australia/Canada/United States icn 700 series User Manual English Australia / Canada / United States 2006 Brunswick
User guide. DRIVE 10s Sygic, a.s. All rights reserved.
 User guide DRIVE 10s 2014 Sygic, a.s. All rights reserved. ... 1 I. Getting Started... 1 The Navigation Screen... 1 Entering an Address... 2 Turn by Turn Navigation... 6 Acquiring GPS Position... 7 II.
Dual Electronics XGPS170 ADS-B Receiver Equipment Supplement
 Dual Electronics XGPS170 ADS-B Receiver Equipment Supplement 3 9-Jul-2014 Revision Notes Revision Date Change Description A 17-Jun-2013 Initial Release A1 19-Jun-2013 Corrected error in Section 4 regarding
3700 SERIES USER MANUAL
 SAFETY GUIDE This manual contains the precautions necessary to ensure your personal safety as well as for protection for the products and the connected equipment. These precautions are highlighted with
Using the Magellan explorist
 www.carid.com Using the Magellan explorist The Magellan explorist GPS receiver is designed to be easy enough for the casual explorer as well as having all of the advance features the enthusiast requires.
GPS Personal Navigation GEOVISION 5000 Quick Guide Version 1.0
 GPS Personal Navigation GEOVISION 5000 Quick Guide Version 1.0 Important Safety Instructions CAUTION RISK OF ELECTRIC SHOCK DO NOT OP This symbol alerts you that important literature concerning operation
Table of contents. Main Map Screen... 2 Basic Commands... 5 Exploring menu screens... 5 Using keyboards... 5 Performing a search...
 Table of contents Welcome!... 2 Main Map Screen... 2 Basic Commands... 5 Exploring menu screens... 5 Using keyboards... 5 Performing a search... 7 Go screen... 7 How to Navigate... 8 Navigate to an address...
Magellan explorist 310. User Manual
 Magellan explorist 310 User Manual www.magellan.com.au MiTAC Digital Corporation 471 El Camino Real, Santa Clara, CA 95050 USA www.magellangps.com Revisions Initial Release B /1 /201 Initial release with
Nexus DSC Quick Setup Guide 9 ESC OK
 Nexus DSC Quick Setup Guide 7 8 9 ESC OK 4 5 6 0 OFF ON Version. Firmware version.x.x Last revised on January 5 th, 07 Printed in Australia Nexus DSC - Quick Setup Guide Copyright Copyright 04-07 Astro
GPS NAVIGATION SYSTEM MAIN USER MANUAL
 GPS NAVIGATION SYSTEM MAIN USER MANUAL ENGLISH Thank you for choosing the ZENEC deviceas your navigator. Start using your ZENEC device right away. This document is the detailed description of the navigation
GPS Navigation. User s Manual
 GPS Navigation User s Manual Important Safety Notices and Warnings When using the GPS Navigation For Dummies device, it is your responsibility to make sure you are operating the device in compliance with
Hook2 X Series. Operator Manual. 4x GPS, 4x Sonar, 5x GPS HDI, 7x GPS HDI ENGLISH
 Hook2 X Series Operator Manual 4x GPS, 4x Sonar, 5x GPS HDI, 7x GPS HDI ENGLISH www.lowrance.com Preface Disclaimer As Navico is continuously improving this product, we retain the right to make changes
M-Nav 750. User Manual GPS TRACKING AND FLEET MANAGEMENT SOLUTIONS
 M-Nav 750 User Manual GPS TRACKING AND FLEET MANAGEMENT SOLUTIONS Contents 1 Introduction............................................ 5 1.1 Important Safety Information 5 1.2 Disclaimer 5 1.3 Glossary
User Manual JRV9000. Navigation software for the JRV9000. English April 2016, ver. 1.0
 User Manual JRV9000 Navigation software for the JRV9000 English April 2016, ver. 1.0 Table of contents 1 Getting started... 5 1.1 Initial set-up... 5 1.2 Screen controls... 6 1.2.1 Using the buttons and
simplugins Panel Builder
 simplugins Panel Builder ADD-ON MFD GPS BajuSoftware, LLC Page 1 of 38 Version 1.4 April, 2015 Table of Contents Introduction... 3 Technical Requirements... 5 Installation Procedure... 6 Running the GPS
Navigation Software User Manual
 Navigation Software User Manual Thank you for choosing the Falcon Navigator as your navigator You can start using your Falcon Navigator right away This document is the detailed description of the navigation
User Manual. The PC application to manage your AvMap EKP V. Contents. Your journey, Our technology. 1. Introduction AvMap Suite installation 2
 The PC application to manage your AvMap EKP V Contents User Manual 1. Introduction 2 2. AvMap Suite installation 2 3. First connection 2 4. Basic Operations 3 4.1 Starting the Suite 3 4.2 Closing the Suite
Xtra.Remote Control (mk2)
") Xtra.Remote Control (mk2) 1. INSTALLATION OF THE REMOTE CONTROL The following accessories are related to the Remote Control Unit: Remote Control Unit Adapter (1A @ 5V DC) Pair of rechargeable batteries
Xtra.Remote Control (mk2) 1. INSTALLATION OF THE REMOTE CONTROL The following accessories are related to the Remote Control Unit: Remote Control Unit Adapter (1A @ 5V DC) Pair of rechargeable batteries
CAR MULTIMEDIA SERIES 530. Enjoy it. Operating instructions Navigation
 CAR MULTIMEDIA SERIES 530 Enjoy it. Operating instructions Navigation Thank you for choosing the Blaupunkt Navigation as your navigator. Start using Blaupunkt Navigation right away. This document is the
Owner s manual NX405. English. Clarion NX405 English 1
 Owner s manual NX405 English Clarion NX405 English 1 Thank you for choosing the Clarion NX405 as your navigator. Start using Clarion NX405 right away. This document is the detailed description of the navigation
ADL110 - ADL110B - ADL120 User Manual
 ADL110 - ADL110B - ADL120 User Manual Version 3.00 20.08.2016 Valid for ADL110, ADL110B, ADL120 and ADL130 firmware version 2.00 and later Due to different firmware versions you may find minor differences
User Guide. Model Temperature Datalogger Kit Model Temperature and Humidity Datalogger Kit Model SW276 Datalogging Software SW276
 User Guide Model 42265 Temperature Datalogger Kit Model 42275 Temperature and Humidity Datalogger Kit Model SW276 Datalogging Software SW276 Introduction Congratulations on your purchase of Extech Instrument
AVIC-F220. English. Operation Manual HIDE-AWAY NAVIGATION SYSTEM
 Operation Manual HIDE-AWAY NAVIGATION SYSTEM AVIC-F220 Be sure to read Important Information for the User first! Important Information for the User includes the important information that you must understand
2015 Mazda Motor Corporation Apr (Print1)
") 2015 Mazda Motor Corporation Apr. 2015 (Print1) Table of contents 1 Warnings and Safety information...4 2 Getting started...6 2.1 Before using the navigation system... 6 2.2 Navigation menu... 8 2.3 Buttons
2015 Mazda Motor Corporation Apr. 2015 (Print1) Table of contents 1 Warnings and Safety information...4 2 Getting started...6 2.1 Before using the navigation system... 6 2.2 Navigation menu... 8 2.3 Buttons
FltPlan Go FAQ. What operating system is FltPlan Go available for? FltPlan Go is available on ios (ipad/iphone), Android, Windows 10, and Mac.
, Android, Windows 10, and Mac.") What operating system is FltPlan Go available for? FltPlan Go is available on ios (ipad/iphone), Android, Windows 10, and Mac. How much does FltPlan Go cost/how many devices can you download it on? FltPlan
What operating system is FltPlan Go available for? FltPlan Go is available on ios (ipad/iphone), Android, Windows 10, and Mac. How much does FltPlan Go cost/how many devices can you download it on? FltPlan
A Charging LED B Touchscreen C On/Off button D Speaker E External antenna connector F USB connector G RDS-TMC connector H Memory card slot
 TomTom ONE XL 1. What s in the box What s in the box a Your TomTom ONE XL A B C D E F G H A Charging LED B Touchscreen C On/Off button D Speaker E External antenna connector F USB connector G RDS-TMC connector
ique 3600a integrated handheld
 ique 3600a integrated handheld Que applications guide Copyright 2004 Garmin Ltd. or its subsidiaries Garmin International, Inc. 1200 East 151st Street, Olathe, Kansas 66062, U.S.A. Tel. 913/397.8200 or
quick start manual PERSONAL NAVIGATOR
 quick start manual foretrex 301 and 401 PERSONAL NAVIGATOR Battery Information The Foretrex operates on two AAA batteries. Use alkaline or NiMH batteries. Use precharged NiMH batteries for best results.
IMPORTANT SAFETY WARNINGS
 IMPORTANT SAFETY WARNINGS The Magellan explorist GC receiver is a navigation aid designed to assist you in arriving at your selected destination. When using the Magellan explorist GC receiver, these safety
Vulcan. Getting Started ENGLISH. bandg.com
 Vulcan Getting Started ENGLISH bandg.com Vulcan Getting Started 3 4 Vulcan Getting Started Contents 9 Introduction 9 The Home page 10 Application pages 11 Integration of 3 rd party devices 12 GoFree wireless
DELORME. Earthmate. PN-Series. User Manual. Updated for 2.6 Firmware. GPS for Serious Outdoor Adventures
 DELORME Earthmate PN-Series User Manual Updated for 2.6 Firmware GPS for Serious Outdoor Adventures Earthmate PN-Series Accessories We offer a variety of products designed to carry, securely mount, and
GliderGuider USER GUIDE
 Thank you for purchasing the GliderGuider. A hand-held computing device dedicated to the running of a selection of Moving Map applications as an aid to VFR navigation. Note! The GliderGuider is an aid
GPS Cycle Computer Device. Quick Stat Guide
 GPS Cycle Computer Device Quick Stat Guide 1 What is GPS? The Global Positioning System (GPS) is a space-based satellite navigation system that provides location and time information in all weather conditions,
GPS NAVIGATION SYSTEM DNX7540BT
 GPS NAVIGATION SYSTEM DNX7540BT GPS NAVIGATION INSTRUCTION MANUAL ІНСТРУКЦІЯ З КОРИСТУВАННЯ GPS-НАВІГАТОРОМ РУКОВОДСТВО ПО ЭКСПЛУАТАЦИИ НАВИГАЦИОННОЙ СИСТЕМЫ GPS B64-4525-00 Contents Safety Precautions
AT01 AIRPLANE FLIGHT MANUAL
 1.0 General The airplane is equipped with a Bendix / King KMD 150 Multifunction Display / GPS Navigator herein referred as the Navigator. The KMD 150 is capable of providing VFR (IFR) enroute and terminal
SwiftMaps Plugin User Guide
 SwiftMaps Plugin User Guide UPDATED ON 2/21/2019 PlanSwift Authored by: Dave Hansen 1 Table of Contents Overview... 3 Purchasing and Installation... 4 Purchasing Plugins... 4 Installation and Uninstallation...
User Manual. VMS Navigation. Navigation software for the Touring 7500 In-Dash Series (igo Primo) September 2012, ver. 2.0
 September 2012, ver. 2.0") User Manual VMS Navigation Navigation software for the Touring 7500 In-Dash Series (igo Primo) September 2012, ver. 2.0 Thank you for choosing the Touring 7500 as your navigator. This document is the detailed
User Manual VMS Navigation Navigation software for the Touring 7500 In-Dash Series (igo Primo) September 2012, ver. 2.0 Thank you for choosing the Touring 7500 as your navigator. This document is the detailed
User Manual Alpine Navigation
 User Manual Alpine Navigation Navigation software for the Alpine INE-W970BT UK English January 2013, ver. 1.0 Thank you for choosing the Alpine unit as your navigator. Start using your device right away.
Table of. Introduction 1. Map settings 3. Setting a destination 4. Route guidance 5. Storing a location/route 6. Viewing technical information 7
 Table of Introduction 1 Contents Getting started 2 Map settings 3 Setting a destination 4 Route guidance 5 Storing a location/route 6 Viewing technical information 7 Other settings 8 Voice recognition
GO XSE. Getting Started. simrad-yachting.com ENGLISH
 GO XSE Getting Started ENGLISH simrad-yachting.com Contents 7 Introduction 7 The Home page 8 Application pages 10 Basic operation 10 System Controls dialog 10 Turning the system on and off 11 Selecting
2nd Generation. Pilot s Guide. ForeFlight
 2nd Generation Pilot s Guide ForeFlight Copyright Information Stratus Second Generation Pilot s Guide, 2012-2013 Appareo Systems, LLC. All Rights Reserved. All content within is copyrighted by Appareo
Multimedia Navigation Wolfsburg
 www.blaupunkt.com Multimedia Navigation Wolfsburg Operating instructions Navigation Thank you for choosing our product as your navigator. Start using Blaupunkt Navigation right away. This document is the
to your Pocket PC? 3. Click new to connect
 P i-geo+ USERS MANUAL How to connect your i-geo+ Version Issue date Description A 14 Nov. 2005 Initial Release Your Polstar i-geo+ GPS receiver uses world-class technology to provide you with a GPS receiver
Quick Start Guide. Magellan SmartGPS
 For complete details on using your Magellan SmartGPS, please go to magellangps.com/support and download the user manual in.pdf format. Quick Start Guide Magellan SmartGPS MiTAC Digital Corporation 471
HDS Gen2 Touch Chartplotter Operator manual
 HDS Gen2 Touch Chartplotter Operator manual ENGLISH lowrance.com Copyright 2013 Navico All Rights Reserved Lowrance and Navico are registered trademarks of Navico. Fishing Hot Spots is a registered trademark
Play DVDs, Audio CDs, MP3 Discs. Supports steering wheel controls. Customizable backgrounds. Bluetooth Phonebook and favorites
 Multimedia Navigation System Quick Start Guide GM Series Navigation Bluetooth Hands-Free ipod and MP3 compatible Back-up camera ready Play DVDs, Audio CDs, MP3 Discs Supports steering wheel controls Customizable