MEDALLION INSTRUMENTATION SYSTEMS MasterCraft Viper system
|
|
|
- Vernon Carter
- 5 years ago
- Views:
Transcription

1
2 MEDALLION INSTRUMENTATION SYSTEMS 2010 MasterCraft Viper system
3
4
5
6

7
8
9
10
11
12
13
14
15
16 MEDALLION INSTRUMENTATION SYSTEMS VIPER CHART PLOTTING OPERATORS MANUAL
 satellites, and a map database to calculate and display route directions.")
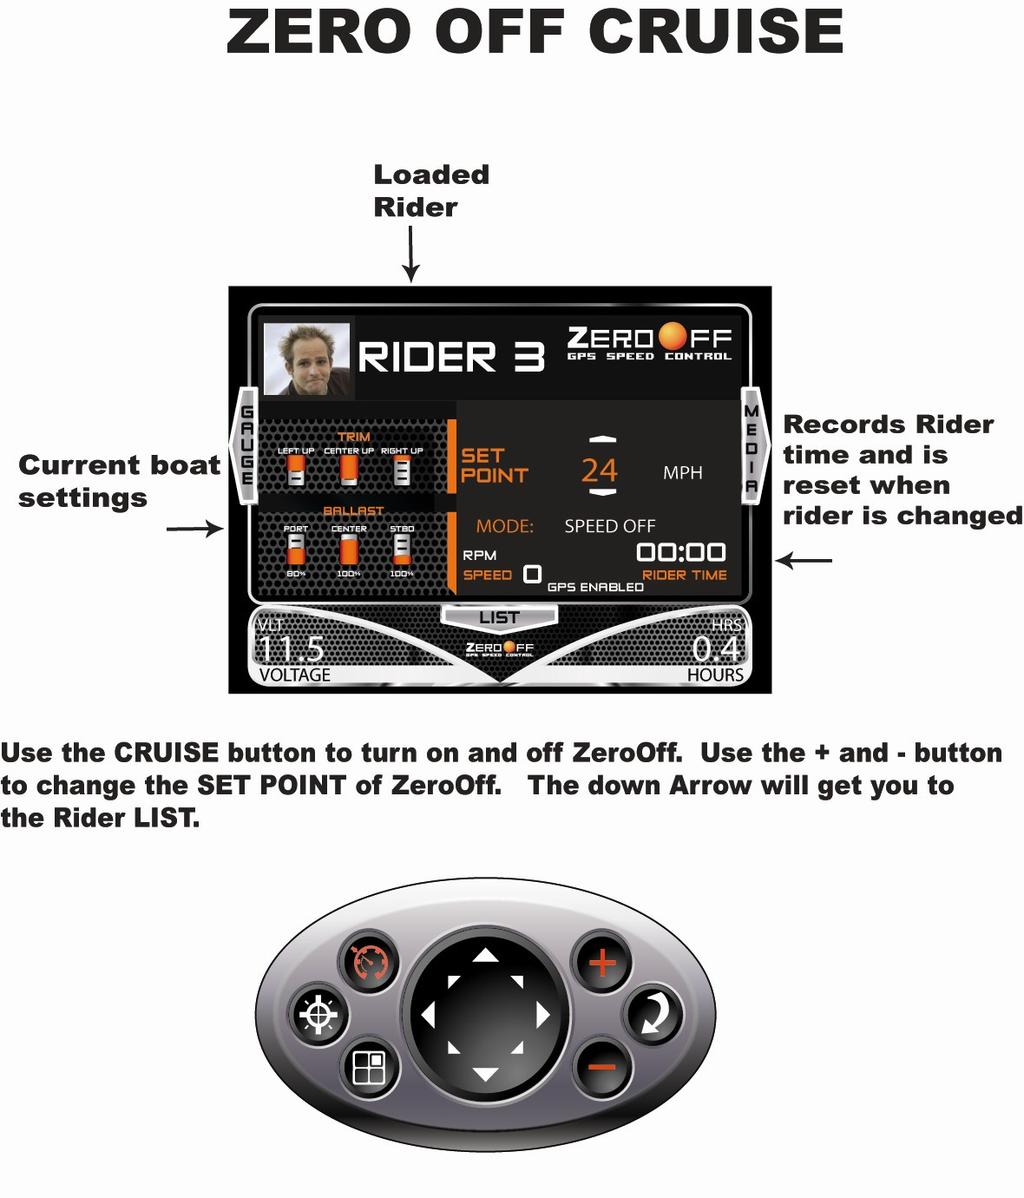
17 MAP SCREEN This manual will attempt to familiarize the operator with the features and functions of this system. The Medallion Navigation system uses GPS (Global Positioning System) satellites, and a map database to calculate and display route directions. The GPS is based on satellites which orbit the earth and continuously emit signals. The GPS receiver located on the boat receives those signals and calculates, based on the signals, its distance from the respective satellites. This information is used to calculate your current geographic position. The signals of at least three satellites are needed to determine the current location. When entering the Navigation system, the screen below is the first screen that is displayed. Current Location Screen zoom level GPS Location Gauge Information Main Map Screen When entering the Navigation area, this is the first screen that comes up. Each section of the screen is highlighted above and described below. CURRENT LOCATION This image shows the current location of the boat. ZOOM LEVEL This bar shows the zoom distance across the screen. In the example above the distance from the left of the screen to the right of the screen is 1 nautical mile. This can be adjusted from 0.1 to 4000 nautical miles by pressing the + or buttons. GPS LOCATION This area of the screen shows the coordinates from the GPS antenna. This can be configured to display 1. Degrees, 2. Degrees, Minutes, 3. Degrees, Minutes, Seconds. GAUGE SCREEN This area of the screen shows up to seven informational gauge screens. This gauge screen section can be turned on or off in the SET UP menu (FULL/GAUGE).

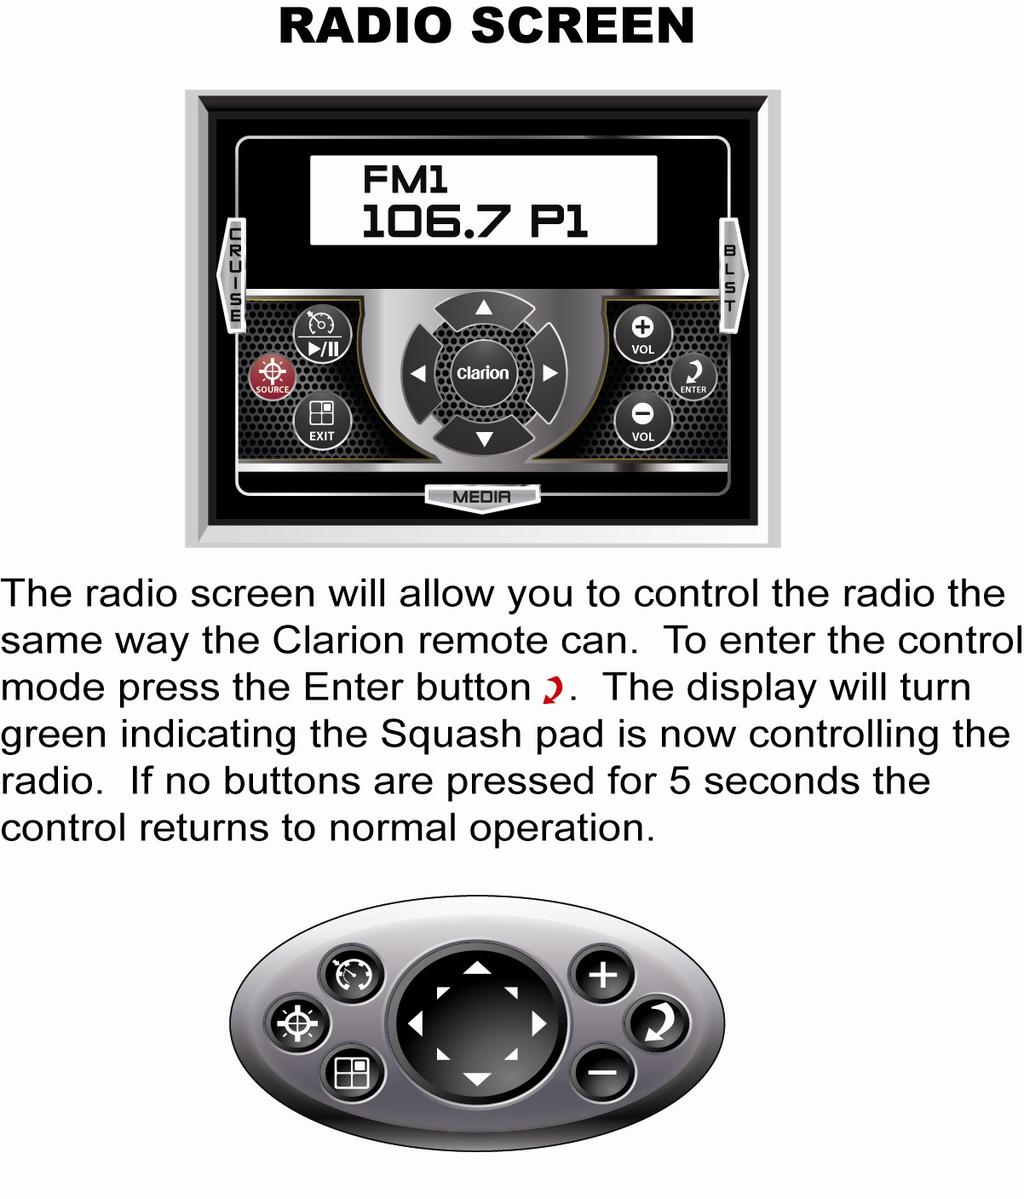
18 SQUASH PAD The ARROWS in the center of the squash pad allow for eight directional inputs throughout all of the menus. From the MENU screen, each arrow will bring up a different menu. The CRUISE button acknowledges any messages or alarms. It also takes the operator back to the MAP screen from the MENU screen. The PLUS or increment button, used to increase zoom level, options or values. The NAVIGATION button will take the operator into the navigation screens. In the navigation area, this button will become the WAYPOINT button. Deletes Man overboard markers, rename Way points, and centers the display when in North up mode. The MENU button will take you out of the NAVIGATION section of the display and back to the boat functions. The MINUS or decrement button, used to decrease zoom levels, options or values. The ARROWS in the center of the squash pad are mirrored on the display in the MENU screen Above is the main navigation menu screen. From here the operator can get to any area of the navigation system. Pressing the ENTER button will display the MAP screen. At the center of the screen is an image of the SQUASH PAD. Pressing the associated arrow on the squash pad will bring up that menu. The following pages will describe each area.

19 NAVIGATION MENU MAP VIEW FULL GAUGE Starting at the Navigation Menu screen, the MAP screen can be adjusted to show the MAP on the entire screen or show gauge information along the right hand side of the display. Underneath the words MAP VIEW are the words FULL and GAUGE. The word that is highlighted indicates how the MAP screen will be displayed. Pressing the UP arrow on the squash pad will cause the highlight to change between FULL and GAUGE. Examples of FULL and GAUGE screens are shown above. For more information on the GAUGE screens, see the SET UP menu options.

20 NAVIGATION MENU MAP ORIENT BEARING NORTH The MAP screen can be adjusted to orient the map with north always at the top of the screen, or with the boat heading at the top of the screen. Underneath the words MAP ORIENT, toward the top left of the screen, are the words BEARING and NORTH. The word that is highlighted indicates how the MAP screen will be oriented. Pressing the UP/RIGHT arrow on the squash pad will cause the highlight to change between BEARING and NORTH. Examples of BEARING and NORTH. screens are shown above. Note the compass heading in the lower right corner of the display rotates on the BEARING orientation.


21 SELECT COURSE CREATING A NEW COURSE From the Navigation Menu screen press the RIGHT arrow on the squash pad to begin creating a course. Use the down arrow to highlight the NEW option. Then press the ENTER button. Using the arrow buttons, highlight the NEW COURSE and press ENTER. A new name is not required, the generic name will be used if the following steps are skipped. A new screen will appear, using the arrow buttons, highlight the ENTER COURSE NAME. A keyboard will appear. Use the arrows to highlight the letter desired and press ENTER. Once the course name is entered, highlight the OK and press ENTER. The new course name will appear in that window. Highlighting the ENTER WP NAME will bring up the keyboard again. A new name is not required, but is optional. The generic name will be used if these steps are skipped.
 to the beginning location of the desired course and press the WAYPOINT button.")

22 SELECT COURSE CREATING A NEW COURSE (cnt) Using the arrow buttons, highlight the SELECT WAYPOINT LOCATION. Using the arrow buttons, move the cursor (cross) to the beginning location of the desired course and press the WAYPOINT button. A new window will appear showing the available waypoint options. Use the arrows to highlight the desired waypoint and press ENTER. The map screen will be shown again with the waypoint in the location that the cursor was. Use the arrows to move the cursor to the next waypoint and press the WAYPOINT button. Repeat this for all of the waypoints desired. NOTE: It is very important that the last waypoint be a COURSE COMPLETE waypoint.


23 SELECT AUTO COURSE CREATING A NEW AUTO COURSE From the Navigation Menu screen press the RIGHT arrow on the squash pad to begin the course. Use the down arrow to highlight the NEW option. Then press the ENTER button. Using the arrow buttons, highlight NEW AUTO COURSE and press ENTER. A new screen will appear, using the arrow buttons, highlight the ENTER COURSE NAME. A keyboard will appear, use the arrows to highlight the letter desired and press ENTER to select it. Once the course name is entered, highlight the OK and press ENTER. The new course name will appear in the ENTER COURSE NAME window. A new name is not required, but is optional. The generic name will be used if this step is skipped. Position your boat where you would like this course to start. Highlight the START COURSE RECORD to begin tracking your course.
24 SELECT COURSE CREATING A NEW AUTO COURSE (cnt) After selecting START COURSE RECORD, the map will appear. Your location is the boat image (in the screen to the left it is within the blue box). The navigation software will track your movements until the STOP COURSE option is selected. NOTE: Be sure to make the last waypoint the COURSE COMPLETE waypoint.

25 FILTER The FILTER menu allows the operator to adjust/change what is displayed throughout the various screens. From the Navigation Menu screen press the DOWN/RIGHT arrow on the squash pad to adjust the filters. The screen above shows the objects that may be available to display. If there is an object that is not desired, remove the check box and that object will not be displayed in the map.
26 GPS STATUS From the Navigation Menu screen press the DOWN arrow on the squash pad to access the GPS STATUS screen. The GPS STATUS menu allows the operator to view up to a 16 position satellite signal strength graph on the right side of the display, and a 4 point compass graphic showing the relative position of each satellite on the left side of the display.
27 SETUP From the Navigation Menu screen press the DOWN/LEFT arrow on the squash pad to access the SETUP menu. The SETUP menu allows the operator to adjust, view and configure the navigation system through eight menus.

28 SETUP SCREEN LEVEL SCREEN LEVEL is the contrast adjustment menu. Highlight the SCREEN LEVEL and press the ENTER button. The screen below will appear. Using the arrows, UP/DOWM changes between the low/high scale, Normal Mode, High Contrast, and Night View. The LEFT/RIGHT arrows control the slide on the Low to High brightness scale. Highlighting the EXIT and pressing ENTER will bring the display back to the MENU screen.

29 SETUP TRANSPARENCY LEVEL TRANSPARENCY LEVEL can be set to enable the user to see the map while viewing the menus. Highlight the TRANSPARENCY LEVEL and press the ENTER button. The screen below will appear. Using the arrows, UP/DOWM changes between the transparency scale and the EXIT. The LEFT/RIGHT arrows control the slide on the transparency scale. Highlighting the EXIT button and pressing ENTER will bring the display back to the MENU screen.


30 SETUP GPS SETUP GPS SETUP can be set to enable what data and accuracy the user wants to see on the map while operating the menu features. Highlight the GPS SETUP and press the ENTER button. The screen below will appear. Using the arrows, UP/DOWM changes between the Coordinate styles and WAAS status options. Highlighting the EXIT button and pressing ENTER will bring the display back to the MENU screen.
31 SETUP GPS STATUS MAP GPS STATUS MAP will display the satellite signal strength. Highlight the GPS STATUS MAP and press the ENTER button. The screen below will appear. The GPS STATUS menu allows the operator to view up to a 16 position satellite signal strength graph on the right side of the display, and a 4 point compass graphic showing the relative position of each satellite on the left side of the display.


32 SETUP SYSTEM GAUGE SETUP SYSTEM SETUP will display the gauge options that can be shown when the gauge information is displayed on the right side of the screen. Highlight the SYSTEM SETUP and press the ENTER button. The screen below will appear. Any of the options listed above can be displayed in the gauge area of the MAP screen. Only seven items can be selected to be displayed at one time. Highlighting the EXIT button and pressing ENTER will bring the display back to the MENU screen.

33 SETUP DEPTH LEVEL SETUP DEPTH LEVEL SETUP will display the options for how to draw the mapped depth contours of the various waterways. Highlight the DEPTH LEVEL SETUP and press the ENTER button. The screen below will appear. The options listed above will change how the waterways are to be displayed on the MAP screen. Depending on which setting is chosen will enable how much detail is drawn into each waterway. Highlighting the EXIT button and pressing ENTER will bring the display back to the MENU screen.

34 SETUP SYSTEM UNITS SETUP SYSTEM UNITS SETUP will enable the operator to change speed units between Knots and Miles Per Hour. This menu also allows the operator to change distance units between Nautical Miles and Miles. Highlight the SYSTEM UNITS SETUP and press the ENTER button. The screen below will appear. The options listed above will change how the speed and distance are to be displayed on the MAP screen. Depending on which setting is chosen will enable the appropriate units. Highlighting the EXIT button and pressing ENTER will bring the display back to the MENU screen.


35 SETUP SYSTEM UNITS SETUP COLOR SETUP will enable the operator to change the color settings on most menu options. Highlight the COLOR SETUP and press the ENTER button. The screen below will appear. The options listed above will change the color of that feature that is to be displayed on each screen. Highlight the desired option and press ENTER. This will display a dropdown box with the color options available. Highlighting the EXIT button and pressing ENTER will bring the display back to the MENU screen.
36 SETUP EXIT SETUP Highlighting the EXIT SETUP and pressing ENTER will bring the display back to the MENU screen.

 Point Of Interest along with the seven gauge screens (if")
37 NAV BY MAP COMPASS OFF From the Navigation Menu screen press the LEFT arrow on the squash pad to change the way the system navigates. There are three modes of navigation; MAP, COMPASS, and OFF. MAP mode shows the Course name, Next Waypoint, and Destination. COMPASS mode shows the compass rotating with the heading always at the top of the screen. This option also shows the Course name, Next Waypoint, Destination and distance to (POI) Point Of Interest along with the seven gauge screens (if selected). OFF mode clears the Course name, Next Waypoint, and Destination from the display.
38 NAV BY COMPASS From the Navigation Menu screen press the LEFT arrow on the squash pad to change the highlight to COMPASS. This will change the top three options in the menu to the screen below. POI NOTIFY (ON/OFF) Indicates when you are near a Point Of Interest on the map. TRACK TRAIL (ON/OFF) Will leave a trail in the direction of where your last waypoint was. ADJUST NOTIFY BAND Pressing the UP/RIGHT arrow brings up a box that allows the setting of the notify distance to the next POI. When NAV BY is set to COMPASS mode. The MAP screen will show the image to the right which shows the compass rotating with the heading always at the top of the screen. This option also shows the Course name, Next Waypoint, Destination and distance to (POI) Point Of In-
39 MEDALLION INSTRUMENTATION SYSTEMS 2010 ProStar Dash


40 3 SPEEDO LCD FUNCTIONS The Digital Interface Gauge (3 Speedometer, DIG) controls the Instrument System. Indicated Gauge values are sent from the DIG to each gauge via the LIN data link The DIG receives information for the gauges from multiple sources including CAN, external sensors and internally generated signals. Speedometer LCD Functionality Navigating the Displays The various LCD Screens may be accessed in a sequential order by repeatedly pressing the external display button up/down to scroll through the available screens in a continuous loop. Plug & Play: The Depth, Air Temp, and water temp screens are hidden when no sensor is connected.
 Scroll to the Depth Display Hold the external display button down for 3 seconds, or until the alarm set point is displayed and flashing indicating that the system has entered the set point")
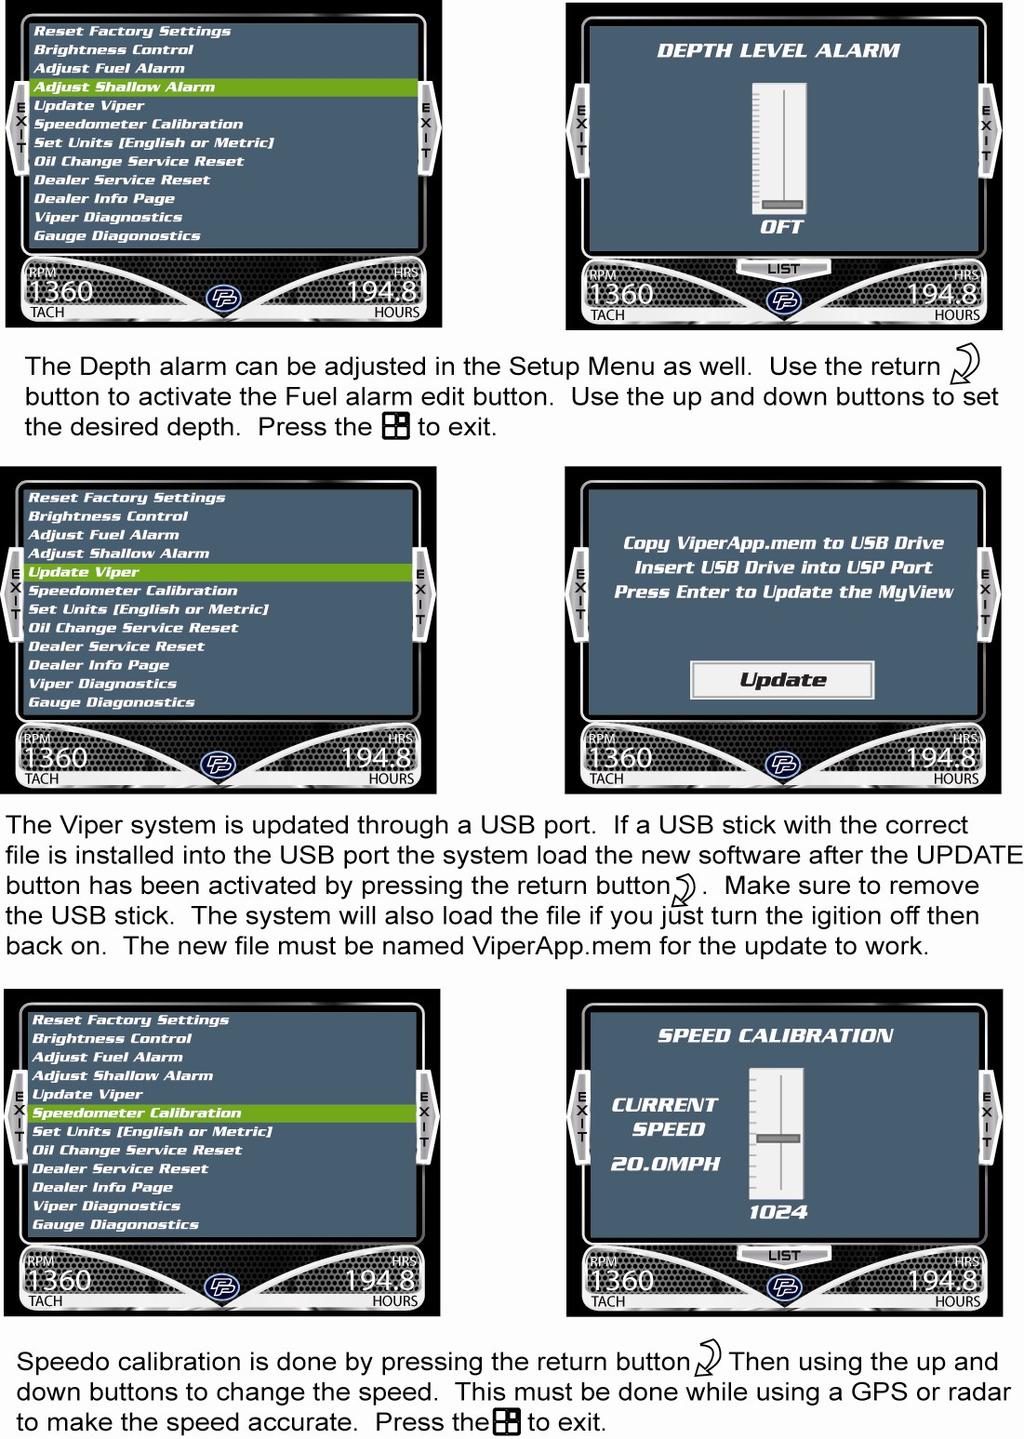
41 3 SPEEDO LCD FUNCTIONS Setting the Shallow Alarm The Shallow Alarm Default is set to off (0.0 ft/m) Scroll to the Depth Display Hold the external display button down for 3 seconds, or until the alarm set point is displayed and flashing indicating that the system has entered the set point adjust mode. Adjust the set point by pressing and/or holding the external display button up/down until the desired set point is displayed. If no changes have been made within 3 seconds, the system will save the set point and return to normal operation. Calibration Procedure: Scroll to the Speed Display Hold the external display button down for 3 seconds, the system will enter speedo calibration mode as indicated by the flashing display. Press and/or hold the external display button up/down to increment/decrement the displayed value until it agrees with the Speedometer. If no changes have been made within 3 seconds, the system will return to normal operation. Procedure for changing units Scroll to the Engine Hour meter Display Hold the external display button down for 3 seconds, the display will indicate the units selected as: ENG for English Units MET for Metric Units Pressing the external display button up/down will toggle the display between English and Metric. If no changes have been made within 3 seconds, the system will return to normal operation. Anytime Metric Units are selected the METRIC Icon will be illuminated Diagnostic Procedure: Scroll to the Tachometer Display Hold the external display button down for 3 seconds, the system will enter the diagnostic mode: All the segments in the Speedometer LCD shall illuminate. The Buzzer shall be activated for one second as the test begins The pointer in each gauge shall perform the following exercise: Reset for 2 seconds Move to mid-scale for 3 seconds Move to full-scale for 3 seconds This cycle will be repeated twice then the display will return to normal operation.
MEDALLION INSTRUMENTATION SYSTEMS VIPER CHART PLOTTING OPERATORS MANUAL
 MEDALLION INSTRUMENTATION SYSTEMS VIPER CHART PLOTTING OPERATORS MANUAL TABLE OF CONTENTS Map Screen... 3 Squash Pad... 4 Navigation Menu Map View... 5 Orient View... 6 Select Course... 7 Creating a New
Table of Contents pg " Display pg Cruise Mode pg Map Screen pg Stereo Screen pg Depth Screen pg.
 USER GUIDE TABLE OF CONTENTS Table of Contents pg. 2 12.3" Display pg. 3-4 Cruise Mode pg. 5-6 Map Screen pg. 6-13 Stereo Screen pg. 14-17 Depth Screen pg. 17 Settings Screen pg. 18-24 Media Screen pg.
GO XSE Quick Guide. Front panel. The System controls dialog. No. Key Function
 GO XSE Quick Guide EN Front panel 1 No. Key Function 1 Power Press and hold to turn the unit ON/OFF. Press once to display the System control dialog. The System controls dialog Used for quick access to
B. HDS-5m & HDS-7m. GPS Mapping Receiver. Operations Guide
 988-0176-02B HDS-5m & HDS-7m GPS Mapping Receiver Operations Guide Software updates for your unit. Occassionally check the Lowrance website for free software upgrades for your unit. Go to www.lowrance.com
GETTING STARTED. Link Controller. Remote
 GETTING STARTED i-pilot Link Controller Software Updates Link Controller 1. Loading the software file onto the SD card. Note that no other software loads (FF or remote) can be on the card. 2. Prep the
GN70/MX610/MX612 QuickStart Guide
 GN70/MX610/MX612 QuickStart Guide EN The front panel 1 2 3 PAGE MENU 8 10 POS NAV 9 HDG AIS 11 4 5 6 ESC MOB 7 ENT USB 12 13 USB No. Description 1 PAGE key: Brings up different screen page every time this
Moomba Boats PV480 Color Display
 Moomba Boats PV480 Color Display 2018 Owner s Manual 1715055 2017-08-30 We continually strive to bring you the highest quality, full-featured products. As a result, you may find that your actual display
GPSMAP 78 series. quick start manual. for use with the GPSMAP 78, GPSMAP 78s, and GPSMAP 78sc
 GPSMAP 78 series quick start manual for use with the GPSMAP 78, GPSMAP 78s, and GPSMAP 78sc Getting Started warning See the Important Safety and Product Information guide in the product box for product
Hook2 Series. Operator Manual. 5 HDI, 5 TS, 7X GPS TS, 7 HDI, 7 TS, 9 TS, 9 HDI, and 12 TS ENGLISH
 Hook2 Series Operator Manual 5 HDI, 5 TS, 7X GPS TS, 7 HDI, 7 TS, 9 TS, 9 HDI, and 12 TS ENGLISH www.lowrance.com Preface Disclaimer As Navico is continuously improving this product, we retain the right
GO XSE Quick Start Guide
 GO XSE Quick Start Guide EN Front panel 1 No. Key Function 1 Power Press once to display the System control dialog. Press and hold to turn the unit ON/OFF. The System controls dialog Used for quick access
Vulcan. Getting Started ENGLISH. bandg.com
 Vulcan Getting Started ENGLISH bandg.com Vulcan Getting Started 3 4 Vulcan Getting Started Contents 9 Introduction 9 The Home page 10 Application pages 11 Integration of 3 rd party devices 12 GoFree wireless
PowerView Model PV780. Operations Manual Section 78
 PowerView Model PV780 Operations Manual 00-02-0859 2013-03-19 Section 78 In order to consistently bring you the highest quality, full featured products, we reserve the right to change our specifications
Hook2 X Series. Operator Manual. 4x GPS, 4x Sonar, 5x GPS HDI, 7x GPS HDI ENGLISH
 Hook2 X Series Operator Manual 4x GPS, 4x Sonar, 5x GPS HDI, 7x GPS HDI ENGLISH www.lowrance.com Preface Disclaimer As Navico is continuously improving this product, we retain the right to make changes
GPS Nothing comes close to a Cobra. Owner s Manual ENGLISH
 Owner s Manual GPS 1080 GLOBAL POSITIONING SYSTEM RECEIVER Nothing comes close to a Cobra Printed in China Part No. 480-146-P ENGLISH IMPORTANT INFORMATION Cautions and Warnings Caution: The user is responsible
GPSMAP 62 series quick start manual. For use with the GPSMAP 62, 62s, 62st, 62sc, and 62stc
 GPSMAP 62 series quick start manual For use with the GPSMAP 62, 62s, 62st, 62sc, and 62stc Getting Started warning See the Important Safety and Product Information guide in the product box for product
Table of contents 1. INTRODUCTION INSTALLATION GENERAL INTRODUCTION NAVIGATE TO... 7
 Table of contents 1. INTRODUCTION... 1 2. INSTALLATION... 3 2.1. INSTALLING THE HARDWARE...3 2.2. INSTALLING THE SOFTWARE...3 2.3. ACTIVATING THE GPS...4 3 GENERAL INTRODUCTION... 5 3.1. LEFT-HAND BUTTONS...5
Nautique LINC Event Supplemental Owners Manual
 Nautique LINC 2.0 3-Event Supplemental Owners Manual 1010636 05-09-2012 Table of Contents Tournament Events... 3 Tournament Slalom... 5 Tournament Jump... 11 3-Event Trick... 16 Tournament Events The 3-Event
HOOK2 Quick Guide. 5 HDI, 5 TS, 7x GPS TS, 7 HDI, 7 TS, 9 HDI, 9 TS and 12 TS models. Front controls
 HOOK Quick Guide 5 HDI, 5 TS, 7x GPS TS, 7 HDI, 7 TS, 9 HDI, 9 TS and 1 TS models Front controls EN 1 3 4 5 6 7 1 Pages Press to activate the Home page. Press to zoom the image. Zoom in/ Press both keys
2 MOVING MAP. Set Up Moving Map Display. Set the Chart Theme
 2 MOVING MAP The Moving Map provides you with position information when connected to an approved GPS receiver. Set Up Moving Map Display To meet your needs, FliteMap provides numerous options for setting
quick start manual PERSONAL NAVIGATOR
 quick start manual foretrex 301 and 401 PERSONAL NAVIGATOR Battery Information The Foretrex operates on two AAA batteries. Use alkaline or NiMH batteries. Use precharged NiMH batteries for best results.
DELORME. Earthmate. PN-Series. User Manual. Updated for 2.6 Firmware. GPS for Serious Outdoor Adventures
 DELORME Earthmate PN-Series User Manual Updated for 2.6 Firmware GPS for Serious Outdoor Adventures Earthmate PN-Series Accessories We offer a variety of products designed to carry, securely mount, and
GO XSE. Getting Started. simrad-yachting.com ENGLISH
 GO XSE Getting Started ENGLISH simrad-yachting.com Contents 7 Introduction 7 The Home page 8 Application pages 10 Basic operation 10 System Controls dialog 10 Turning the system on and off 11 Selecting
GPS 72H. quick start manual
 GPS 72H quick start manual 190-01119-01_0A.indd 1 7/22/2009 3:44:22 PM See the Important Safety and Product Information guide in the product box for product warnings and other important information. Manual
Chart Plotter USER MANUAL
 Chart Plotter USER MANUAL 1. Disclaimer and warnings 5 2. Introduction 6 2.1 Keyboard 6 2.2 Connections scheme 7 3. Getting started 10 3.1 Switching ON 10 3.2 Switching OFF 10 3.3 First Setup page 10
HDS Gen3 Quick Start Guide
 HDS Gen3 Quick Start Guide EN Overview 1 4 6 5 7 2 3 8 9 10 11 No. Key Function 1 Touchscreen 2 Pages key Activates the home page 3 Cursor keys Pans the cursor, moves through menu items and adjusts values
2015 Mercury Marine. MercMonitor
 2015 Mercury Marine MercMonitor 8M0104520 415 eng eng General Information Basic Operation and Features... 1 MercMonitor Gateway Models Description... 3 MercMonitor Gateway Protocol Acceptance Description...
Boating Tip #45: Chartplotters
 Boating Tip #45: Chartplotters As navigation technology has advanced, hand held GPS receivers have further evolved into chartplotters. Chartplotters graphically display a vessel s position, heading and
NVX226 Navigation System. User s Manual
 NVX226 Navigation System User s Manual 1287693 Contents Getting started-------------------------------------------------------------------------------------- 1 Charging the battery -------------------------------------------------------------------------------
HelmView Model HVS780. Operations Manual Section 78
 HelmView Model HVS780 Operations Manual 00-02-0883 2013-02-20 Section 78 In order to consistently bring you the highest quality, full featured products, we reserve the right to change our specifications
2005 Buick Rendezvous Navigation System M
 2005 Buick Rendezvous Navigation System M Overview... 1-1 Overview... 1-2 Features and Controls... 2-1 Features and Controls... 2-2 Navigation Audio System... 3-1 Navigation Audio System... 3-2 Index...1
GO XSE. Getting Started. ENGLISH
 GO XSE Getting Started ENGLISH www.simrad-yachting.com Contents 6 Introduction 6 The Home page 7 Application pages 9 Basic operation 9 System Controls dialog 9 Turning the system on and off 10 Selecting
2009 Mercury Marine SmartCraft Monitor 5.0v
 i 2009 Mercury Marine SmartCraft Monitor 5.0v 90-879172249 1109 ii TABLE OF CONTENTS General Information MercMonitor Gateway Models Description...1 MercMonitor Gateway Protocol Acceptance Description...5
User Manual. Meridian Series of GPS Receivers
 User Manual Meridian Series of GPS Receivers. WARNINGS FOR SAFETY REASONS, THE DRIVER SHOULD NOT USE THIS DEVICE IN A VEHICLE WHILE IN MOTION TO ASSIST THE DRIVER TO NAVIGATE. Please do not try and change
WILD 2400 ASSIGNMENT #1: GPS TUTORIAL*
 WILD 2400 ASSIGNMENT #1: GPS TUTORIAL* Overview: In this tutorial you will learn how to collect, download, and display data using a Garmin GPSMAP 64 unit, the DNRGPS Application, and Google Earth. For
HDS Gen2 Touch Chartplotter Operator manual
 HDS Gen2 Touch Chartplotter Operator manual ENGLISH lowrance.com Copyright 2013 Navico All Rights Reserved Lowrance and Navico are registered trademarks of Navico. Fishing Hot Spots is a registered trademark
NSS evo2. Operator Manual ENGLISH
 NSS evo2 Operator Manual ENGLISH Preface Disclaimer As Navico is continuously improving this product, we retain the right to make changes to the product at any time which may not be reflected in this version
PacTracs 2.0 Quick Start Guide
 PacTracs 2.0 Quick Start Guide If this Quick Start Guide or the Help menu does not provide the information needed, call the Marine Exchange s 24 hour Operations Center and our watchstander will provide
NSS evo3 Quick Start Guide
 NSS evo3 Quick Start Guide EN Front panel 2 3 4 5 6 7 8 9 10 11 12 12 1 No. Description 1 Touch screen. Pages/Home key - press to open the Home page for page selection and setup 2 options. WheelKey - user
GLOBE-AIS Overview. AIS In GLOBE. GLOBE-AIS module basics
 GLOBE-AIS Overview AIS In GLOBE The AIS module for GLOBE allows you to take the information from the AIS hardware and display it on GLOBE electronic charts. The module allows easy access to the information
Handheld GPS Connection Kit _D
 Handheld GPS Connection Kit 531324-1_D Thank You! Thank you for choosing Humminbird, America s #1 name in fishfinders. Humminbird has built its reputation by designing and manufacturing top-quality, thoroughly
TOF-Watch SX Monitor
 TOF-Watch SX Monitor User manual Version 1.2 Organon (Ireland) Ltd. Drynam Road Swords Co. Dublin Ireland Contents General information... 3 Getting started... 3 File Window... 7 File Menu... 10 File Open
Using the Magellan explorist
 www.carid.com Using the Magellan explorist The Magellan explorist GPS receiver is designed to be easy enough for the casual explorer as well as having all of the advance features the enthusiast requires.
B&G LCD CHART USER S GUIDE AND INSTALLATION HB
 B&G LCD CHART USER S GUIDE AND INSTALLATION WARNING! Please read this notice before using the B&G LCD Chart The electronics chart is an aid to navigation designed to facilitate the use of authorised government
Precautions Very important information. Please read this section carefully before using this product.
 Precautions Very important information. Please read this section carefully before using this product. This product is intended to provide turn-by-turn instructions to safely guide you to your desired destination.
HelmView 450 Model HV450. Operation Manual Section 78
 HelmView 450 Model HV450 Operation Manual 00-02-0870 2015-04-16 Section 78 In order to consistently bring you the highest quality, full-featured products, we reserve the right to change our specifications
2012 Mercury Marine MercMonitor Version M eng i
 eng i 2012 Mercury Marine MercMonitor Version 6.0 90-8M0055062 411 ii eng General Information Basic Operation and Features... 1 MercMonitor Gateway Models Description... 3 MercMonitor Gateway Protocol
ALLECO NAVIGATOR application
 ALLECO NAVIGATOR application (version 19.5.2016) Quick Start Guide Start using the Navigator app! You must first read the full User Instructions of the Alltab. They contain important safety information.
HDS Live Quick Guide. Keys. Press to activate the home page Repeat short presses to cycle the favorite buttons Press to open the new waypoint dialog
 HDS Live Quick Guide EN Keys Pages Press to activate the home page Repeat short presses to cycle the favorite buttons Press to open the new waypoint dialog B Waypoint Press twice to save a waypoint Press
SOLIX QUICK START GUIDE. Power On/Off. Open the Home Screen. Tap the top, right corner of the status bar. Select Power Off.
 SOLIX_QSG_532549-1EN_D.qxp_Layout 6 12/11/17 4:44 PM Page 1 SOLIX QUICK START GUIDE Power On/Off Tap the top, right corner of the status bar. Select Power Off. Press and hold the POWER key to power on/off.
HDS Gen2 Touch. Operator manual. lowrance.com ENGLISH
 HDS Gen2 Touch Operator manual ENGLISH lowrance.com Copyright 2012 Navico All Rights Reserved Lowrance and Navico are registered trademarks of Navico. Fishing Hot Spots is a registered trademark of Fishing
DELORME Earthmate PN-60 GPS
 DELORME Earthmate PN-60 GPS User Manual The Latest and Most Comprehensive PN-Series Information is Always Online! User Manuals, Getting Started Info, Tutorials The DeLorme Wiki is your link to comprehensive
2005 Mid-Size Truck Navigation System M
 2005 Mid-Size Truck Navigation System M Overview... 1-1 Overview... 1-2 Features and Controls... 2-1 Features and Controls... 2-2 Navigation Audio System... 3-1 Navigation Audio System... 3-2 Index...
General Guide. Welcome to Buster Q! Overview. Quick Start. Available Applications. Technology. Application icons:
 General Guide en Welcome to Buster Q! To facilitate a new way of boating, Buster Boats has completely rethought the way you interact with the boat. Inspired by the automotive and smartdevice industries,
Teledyne PDS. Trailing Suction Hopper. Version April Teledyne RESON B.V. Stuttgartstraat AS Rotterdam The Netherlands
 Trailing Suction Hopper Teledyne PDS Version 1.1.0 April 2017 Teledyne RESON B.V. Stuttgartstraat 42-44 3047 AS Rotterdam The Netherlands Tel.: +31 (0)10 245 15 00 www.teledyne-reson.com Teledyne RESON
Marine Navigator. Overview. Limitations. Basics. Dash Boards. Import of BSB/KAP Charts. Enhanced Import Procedures. Import of 3rd party MNX Charts
 Marine Navigator Overview Limitations Basics Dash Boards Import of BSB/KAP Charts Enhanced Import Procedures Import of 3rd party MNX Charts Selecting of Chartsets and Charts Change Scroll Mode Change Chart
2005 GMC Yukon/Yukon XL, Yukon Denali/Yukon Denali XL Navigation System M
 2005 GMC Yukon/Yukon XL, Yukon Denali/Yukon Denali XL Navigation System M Overview... 1-1 Overview... 1-2 Features and Controls... 2-1 Features and Controls... 2-2 Navigation Audio System... 3-1 Navigation
User Manual Ituran GPS GPS 350
 User Manual Ituran GPS GPS 350 Table of contents Operation manual Quick start 1. Opening screen 2. Map display 3. Main Menu 4. Navigation 5. Route Manager 6. Settings 7. Ituran BIG 8. Map Manager 9. Help
SECTION IIB DIAGNOSTIC MODES FOR 95Re LCD UNITS ONLY
 SECTION IIB DIAGNOSTIC MODES FOR 95Re LCD UNITS ONLY Welcome Screen... 3 Workout Screen... 4 Main Menu... 5 System Test Menu... 6 System Diagnostics... 7 Test Engineering... 8 Telemetry Test... 9 LifePulse
GPS Tutorial for Hikers How to efficiently use your mobile as GPS navigator for hiking
 GPS Tutorial for Hikers How to efficiently use your mobile as GPS navigator for hiking By Marc TORBEY Examples from the Android software OruxMaps V1.0 1 Table of contents Basics about GPS for hiking slide
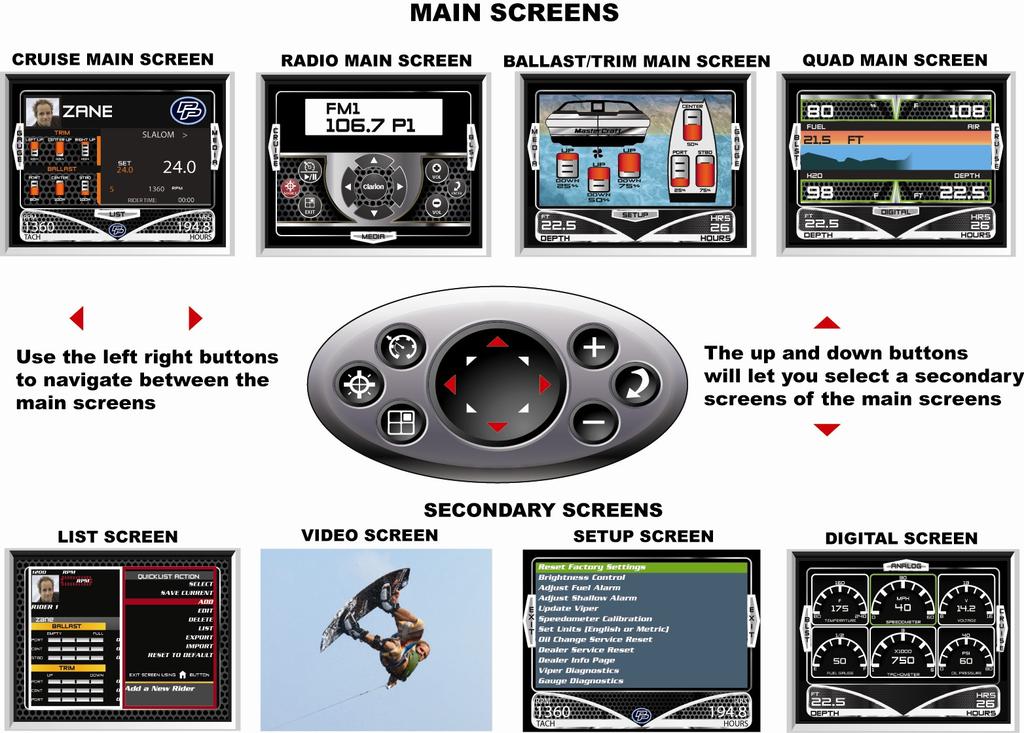
MasterCraft 2008 PerfectPass Integrated System With Digital Video Display. Table of Contents
 MasterCraft 2008 PerfectPass Integrated System With Digital Video Display Table of Contents Page No. Quick Reference Guide 1 Section 1 Using WakeboardPro 2 Wakeboard Speed Mode 2 Adjustable Parameters
Operation Manual. Simrad NSE8 and NSE12 Multi-function Displays. English. A brand by Navico - Leader in Marine Electronics.
 Operation Manual Simrad NSE8 and NSE12 Multi-function Displays English www.simrad-yachting.com A brand by Navico - Leader in Marine Electronics Preface Disclaimer As Navico is continuously improving this
GR4 GPS Receiver Accessory Manual B. offered by Busse-Yachtshop.de
 GR4 GPS Receiver Accessory Manual 531248-1-B Thank You! Thank you for choosing Humminbird, America's #1 name in fishfinders. Humminbird has built its reputation by designing and manufacturing top-quality,
IS40 PRO. Operator Manual ENGLISH
 IS40 PRO Operator Manual ENGLISH Preface Disclaimer As Navico is continuously improving this product, we retain the right to make changes to the product at any time which may not be reflected in this
etrex quick start manual for use with models 20 and 30
 etrex quick start manual for use with models 20 and 30 Getting Started Device Overview warning See the Important Safety and Product Information guide in the product box for product warnings and other important
ENGLISH HOOK-4 HOOK-5 HOOK-7 HOOK-9
 HOOK Series Operation manual ENGLISH HOOK-4 HOOK-5 HOOK-7 HOOK-9 Lowrance and Navico are registered trademarks of Navico. Fishing Hot Spots is a registered trademark of Fishing Hot Spots Inc. Navionics
DELORME. Earthmate PN-60 GPS. User Manual
 DELORME Earthmate PN-60 GPS User Manual November 2011 Contents Getting Started... 3 Home Page... 9 Map Page... 10 Satellites Page... 18 Compass Page... 20 Trip Info Page... 22 Find Page... 24 Waypoints
MULTI FUNCTION DISPLAY MFD8/MFD12
 MULTI FUNCTION DISPLAY MFD8/MFD12 User's Handbook The purpose of this guide is to provide the basic operation for this equipment. For more detailed information, see the Operator's manual. All brand and
User Guide. Model Temperature Datalogger Kit Model Temperature and Humidity Datalogger Kit Model SW276 Datalogging Software SW276
 User Guide Model 42265 Temperature Datalogger Kit Model 42275 Temperature and Humidity Datalogger Kit Model SW276 Datalogging Software SW276 Introduction Congratulations on your purchase of Extech Instrument
Community Medical Centers EMR 10.1 Physician Reference
 Community Medical Centers EMR 10.1 Physician Reference Contents: Section Page Number 1. Logging On...1 2. Completing Signature Deficiencies...2 3. AutoSign...4 4. Completing Dictation Deficiencies...4
C10 Color Display Configuration Manual
 C10 Color Display Configuration Manual P/N 99954-620161 All information, illustrations, photographs and specifications contained in this book are based on the latest product information available at the
v SMS 12.2 Tutorial Observation Prerequisites Requirements Time minutes
 v. 12.2 SMS 12.2 Tutorial Observation Objectives This tutorial will give an overview of using the observation coverage in SMS. Observation points will be created to measure the numerical analysis with
Keynote 08 Basics Website:
 Website: http://etc.usf.edu/te/ Keynote is Apple's presentation application. Keynote is installed as part of the iwork suite, which also includes the word processing program Pages and the spreadsheet program
R300. Quick Start Guide 15G06A E3403
 R300 E3403 Quick Start Guide 15G06A348000 Layout Features 1 2 6 5 3 4 7 8 9 10 11 12 1 External Antenna port Connects to an external antenna for better signal performance (the external antenna is optional)
Cut-True 29A & 29H Guillotine Cutters
 Cut-True 29A & 29H Guillotine Cutters 11/2016 PROGRAMMING MANUAL First Edition Table of Contents TOPIC PAGE Calibration 1 Manual Mode 1 Absolute Mode 1 Incremental Mode 2 Manual Back Gauge Movement 2
montana 600 series quick start manual for use with models 600, 650, 650t Montana 600 Series Quick Start Manual 1
 montana 600 series quick start manual for use with models 600, 650, 650t Montana 600 Series Quick Start Manual 1 Getting Started warning See the Important Safety and Product Information guide in the product
v Observations SMS Tutorials Prerequisites Requirements Time Objectives
 v. 13.0 SMS 13.0 Tutorial Objectives This tutorial will give an overview of using the observation coverage in SMS. Observation points will be created to measure the numerical analysis with measured field
HEMA Navigator Ezi-Ozi User Guide
 HEMA Navigator Ezi-Ozi User Guide Table of Contents HEMA Navigator Ezi-Ozi User Guide... 1 Introduction... 2 Starting OziExplorer... 2 Screen Layout... 3 Acquiring a GPS Satellite Fix... 4 Standard Program
Cruizer II Snow Depth Feature
 Operation Guide Cruizer II Snow Depth Feature Snow Depth Feature Overview The Cruizer II snow depth feature is designed to help snowcat or trail grooming equipment operators accurately gauge the current
2013 CES (Consumer Electronics Show) C/net Best of Show.
 C/net Best of Show.") Presented by Paul Pearson National Corvette Museum, August 30, 2013 2013 CES (Consumer Electronics Show) C/net Best of Show. 2013 CTIA (Cellular Telecommunications Industry Association)2013 Emerging Technology
Presented by Paul Pearson National Corvette Museum, August 30, 2013 2013 CES (Consumer Electronics Show) C/net Best of Show. 2013 CTIA (Cellular Telecommunications Industry Association)2013 Emerging Technology
Zeus 2. Operator Manual ENGLISH. bandg.com
 Zeus 2 Operator Manual ENGLISH bandg.com Preface Disclaimer As Navico is continuously improving this product, we retain the right to make changes to the product at any time which may not be reflected
User Manual JRV9000. Navigation software for the JRV9000. English April 2016, ver. 1.0
 User Manual JRV9000 Navigation software for the JRV9000 English April 2016, ver. 1.0 Table of contents 1 Getting started... 5 1.1 Initial set-up... 5 1.2 Screen controls... 6 1.2.1 Using the buttons and
OWNER S MANUAL USER S U P E R A I R N A U T I Q U E
 OWNER S MANUAL USER SUPER AIR NAU TIQUE Nautique LINC 2.0 Product Information The Nautique LINC 2.0 display is designed for instrumentation and control on electronically controlled engines communicating
Vulcan. Operator Manual ENGLISH. bandg.com
 Vulcan Operator Manual ENGLISH bandg.com Preface Disclaimer As Navico is continuously improving this product, we retain the right to make changes to the product at any time which may not be reflected
MERCURY 100 User Manual
 MERCURY 100 User Manual Disclaimer...2 Warning...3 About GPS...4 Thank You for Choosing the MERCURY 100...5 Conditions for Use:...5 1. Introduction...6 1.1 Package Contents:...6 1.2 Maintenance:...6 1.3
McIDAS-V Tutorial Displaying Polar Satellite Imagery updated July 2016 (software version 1.6)
") McIDAS-V Tutorial Displaying Polar Satellite Imagery updated July 2016 (software version 1.6) McIDAS-V is a free, open source, visualization and data analysis software package that is the next generation
McIDAS-V Tutorial Displaying Polar Satellite Imagery updated July 2016 (software version 1.6) McIDAS-V is a free, open source, visualization and data analysis software package that is the next generation
gsfgdsgsf GPS Navigation User Guide
 gsfgdsgsf TM GPS Navigation User Guide CONTENTS NAVIGATION Selecting on or off road modes... 3 STREET NAVIGATION Getting started with street navigation... 4 Navigating to an address... 4 Using the on screen
Owner s manual NX405. English. Clarion NX405 English 1
 Owner s manual NX405 English Clarion NX405 English 1 Thank you for choosing the Clarion NX405 as your navigator. Start using Clarion NX405 right away. This document is the detailed description of the navigation
Handheld GPS Connection Kit _A
 Handheld GPS Connection Kit 531324-2_A Thank You! Thank you for choosing Humminbird, the #1 name in marine electronics. Humminbird has built its reputation by designing and manufacturing top-quality, thoroughly
CONTENTS SETTING THE TIMERS AND LAP TIMER...18
 CONTENTS GENERAL INTRODUCTION TO B&G NETWORK... 2 INSTRUMENTS NAVIGATIONAL AIDS... 2 AUTOPILOTS COMMUNICATIONS... 2 INTRODUCTION TO NETWORK SPEED... 3 NETWORK SPEED DISPLAY UNIT... 3 EXAMPLES SYSTEMS USING
HDS Carbon Operator Manual
 HDS Carbon Operator Manual ENGLISH www.lowrance.com Preface Disclaimer As Navico is continuously improving this product, we retain the right to make changes to the product at any time which may not be
GO7. Operator Manual ENGLISH. simrad-yachting.com
 GO7 Operator Manual ENGLISH simrad-yachting.com Preface Disclaimer As Navico is continuously improving this product, we retain the right to make changes to the product at any time which may not be reflected
User Guide. SmartTruckRoute Android Navigation App for Truck Drivers. Introduction: Installation - Activation
 User Guide SmartTruckRoute Android Navigation App for Truck Drivers Introduction: Installation - Activation Download SmartTruckRoute from Google Play. Use the app free of charge from 1-2 PM and 1-2 AM
SIMDIS Quick Start Guide
 SIMDIS Quick Start Guide SIMDIS 10.0 (SR3) March 2018 U.S. Naval Research Laboratory Electronic Warfare Modeling and Simulation Branch Code 5770 Contents 1 SIMDIS Quick Start 1 1.1 Starting SIMDIS.................................
2006 HUMMER H3 Navigation System M
 2006 HUMMER H3 Navigation System M Overview... 1-1 Overview... 1-2 Features and Controls... 2-1 Features and Controls... 2-2 Navigation Audio System... 3-1 Navigation Audio System... 3-2 Index... 1 GENERAL
Operation of DynaFlight-SeisBag And Simulator
 THIS MANUAL CONTAINS INSTRUCTIONS FOR: Operation of DynaFlight-SeisBag And Simulator DynaNav Systems Inc. 121 18799 Airport Way Pitt Meadows. BC, Canada, V3Y 2B4 www.dynanav.com DynaFlight-SeisBag Deployment
Welcome to part 3 of the factory navigation system tutorial. You can find the second installment available for download also on my website here:
 Section 5 Waypoints Welcome to part 3 of the factory navigation system tutorial. Please note that this tutorial is not intended to replace the OEM Navigation system manual nor is it intended to be all
Pub Mapping GPS and Multimedia Player Quick Start Guide
 Pub. 988-0160-461 Mapping GPS and Multimedia Player Quick Start Guide 1 Power Cable The Lowrance XOG GPS operates on an internal rechargeable battery. Battery charge is probably low at time of purchase.
AG3000 Terminal Navigation. Basic Mode Operation
 AG3000 Terminal Navigation Basic Mode Operation AG3000 Basic Mode Index Select an Option AG3000 Calibration Procedure 1.) How To Establish an A+B Line 2.) How To Establish a Contour Line 3.) How To Establish
IS35 Color Display. User Manual ENGLISH. simrad-yachting.com
 IS35 Color Display User Manual ENGLISH simrad-yachting.com Preface Navico is continuously improving this product, therefore we retain the right to make changes to the product at any time which may not
MLEP Intermediate GPS Workshop Exercise Two Using Maps
 During this exercise, you will scale coordinates from a map and enter them into the GPS receiver. This requires a ruler (provided) and all calculations require a paper and pencil. During this exercise,