RS-1260 Digital Signage Player
|
|
|
- Ami Waters
- 5 years ago
- Views:
Transcription


1 RS-1260 Digital Signage Player User Manual V1.3
2 Legal Notice and Disclaimer Thank you for choosing RapidSignage products. This user manual provides a description of the Player relevant guidelines for key functions. Please read this document carefully and adhere to its instructions. Legal Notice All features, functionality, and other product specifications are subject to change without prior notice or obligation. Information presented is subject to change without notice. No part of this publication may be reproduced, stored in a retrieval system, or transmitted, in any form or by any means, mechanical, electronic, photocopying, recording, or otherwise, without prior written permission of RapidSignage Inc. RapidSignage and the RapidSignage logo are registered trademarks of RapidSignage Inc. Other products and company names mentioned herein may be the trademarks of their respective companies. Disclaimer In no event shall RapidSignage Inc. liability exceed the price paid for the product from direct, indirect, special, incidental, or consequential damages resulting from the use of the product, its accompanying software, or its documentation. RapidSignage makes no warranty or representation, expressed, implied, or statutory, with respect to its products or the contents or use of this documentation and all accompanying software, and specifically disclaims its quality, performance, merchantability, or fitness for any particular purpose. RapidSignage reserves the right to revise or update its products, software, or documentation without obligation to notify any individual or entity.
3 For technical questions, please contact Website
4 Table of Contents 1. Getting Started I/O Layout Connecting to Player Typical Setup Procedure Player User Interface Overview Screen Config Normal Mode Irregular Mode Supported Video Wall Matrix Design New Design Media List Widgets Application References Load Design Plan Create a New Plan Load Plan Export Plan Player Management Overview System Configure Logs... 62
5 1. Getting Started 1.1. I/O Layout Power Button 2 COM Ports (x2) LAN -1 LAN -2 3 Display Ports (x15) 7 USB 3.0 (x2) 4 Power Switch 8 USB 2.0 (x4) 5 AC in 9 Audio Out

6 1.2. Connecting to Player Direct Connect RS-1260 LAN-2 Default IP Address: , Netmask: Change the PC/Laptop network TCP/IP Address to and the same network mask. User Chrome and connect to Default login name and password are both admin.

7 DHCP Connect If you want the Player connect to a DHCP network, you need to directly connect with Player first and change the networking setting of the Player: 1. Connect the LAN cable to LAN-1 to use a DHCP connection 2. Click SystemConfig on the main page of Player, then click Network config Tab. 3. Double-click textbox of DHCP and make sure DHCP is turned on, then Click Apply. 4. Click Power tab, and click Reboot button to reboot the Player. 5. After reboot, the Player IP address will be displayed on the boot screen. Example: Change the RS-1260 into the diagram below: AP / Router / Switch
8 1.3. Typical Setup Procedure Step 1 Screen Mode Setting: Click Screen Config on the Player user interface to setup screen mode. For more information, please refer to 2. Screen configure. Step 2 Start Design: Click New Design to create a new content design, or click Load Design to load an existing Design to edit. For more information, please refer to 3. Design. Step 3 Creating a Plan: Click New Plan to setup a new content playback schedule, or click Load Plan to load an existing Plan to edit. For more information, please refer to 4. Plan. Step 4 Save and Publish: Click Save to save the plan to publish for playback immediately.


9 1.4. Player User Interface Overview 1. Language Setting The Player supports multiple languages, including: English Traditional Chinese Simplified Chinese Japanese Korean Spanish German Click Language and the selection list appears. This user interface will switch to selected language. 2. Screen Config Setting of the Player s display matrix, resolution, rotation, and bezel compensation.

10 3. New Design Design the uploads and page Design of videos, pictures, advertising, and other media materials to be displayed. 4. Load Design Loading and modify existing Design. 5. New Plan Arrange the schedule of the Designs. 6. Load Plan Load an existing Plan. 7. Export Plan Export a Plan for manual update. 8. Overview Shows the information of Player, including the version and the system status. 9. Logout Click at the right top of Main page of Player, then select Logout to exit Player.
11 2. Screen Config 2.1. Normal Mode B A G C D E F FEATURE DESCRIPTION A Cols Click Cols then select the number of the display devices from the drop down. Rows Click Rows then select the number of the display devices from the drop down. B Horizontal Enter horizontal and vertical value of border between each Vertical monitor. Note: Use only for adjust Bezel Compensation function. C Resolution Click Resolution then set resolution of the Canvas. (Too high resolution will decrease the performance of system. Please set proper resolution according to the performance of your hardware
 Selections include: 4096 x 2160, 3840 x 2160, 3200 x 1800, 2560 x 1920, 2560 x 1440, 1920 x 1080 (default), 1600 x 1200, 1600 x 800, 1440 x 1080, 1440 x 1050, 1366 x 768, 1360 x 768, 1280 x 1024,")
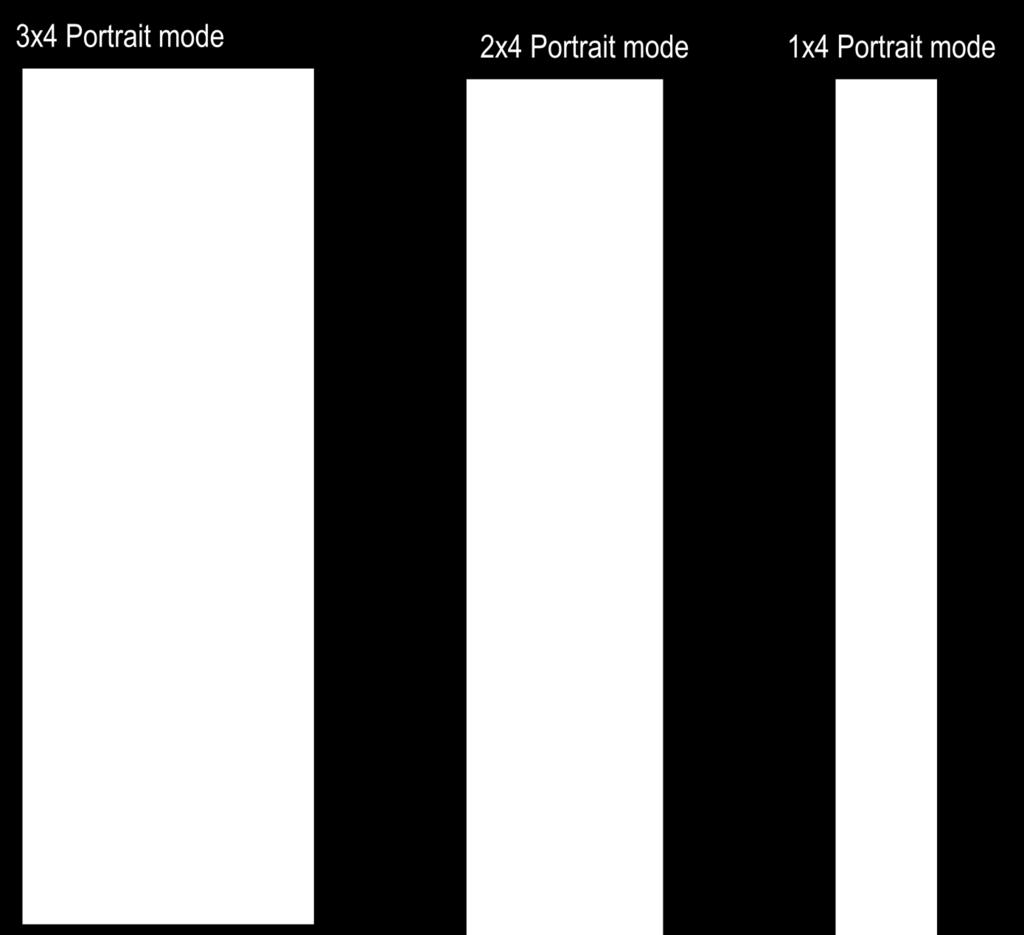
12 system.) Selections include: 4096 x 2160, 3840 x 2160, 3200 x 1800, 2560 x 1920, 2560 x 1440, 1920 x 1080 (default), 1600 x 1200, 1600 x 800, 1440 x 1080, 1440 x 1050, 1366 x 768, 1360 x 768, 1280 x 1024, 1280 x 800, 1280 x 720, 1024 x 768, 854 x 480, 800 x 600, 720 x 480, 640 x 480 D Rotation Click Rotation then set the screen to Landscape mode or Portrait mode. E Identify Start Press Identify Start to identify the physical screens. F Bezel Start Press Bezel Start and drag to change the bezel value. G Apply When you have completed any changes, click Apply to finish all the screen setting Irregular Mode A B C D
13 FEATURE DESCRIPTION A Virtual Size Enter the resolution of the Canvas B Screen ID Double click a screen icon to open up the Screen Properties. D Add Screen Click Add Screen to set up the positioning of the display, Screen Resolution and aspect ratio of the display. D Apply When you have completed any changes, click Apply to finish all the screen setting. The buttons at the top of page A B C D Buttons DESCRIPTION A Menu Click Menu to return to the main page of Player. B Overview Click Overview to go to System Information page directly. C Logs Click Logs to go to Logs page directly. D System Config Click System Config to go to System configure page directly.

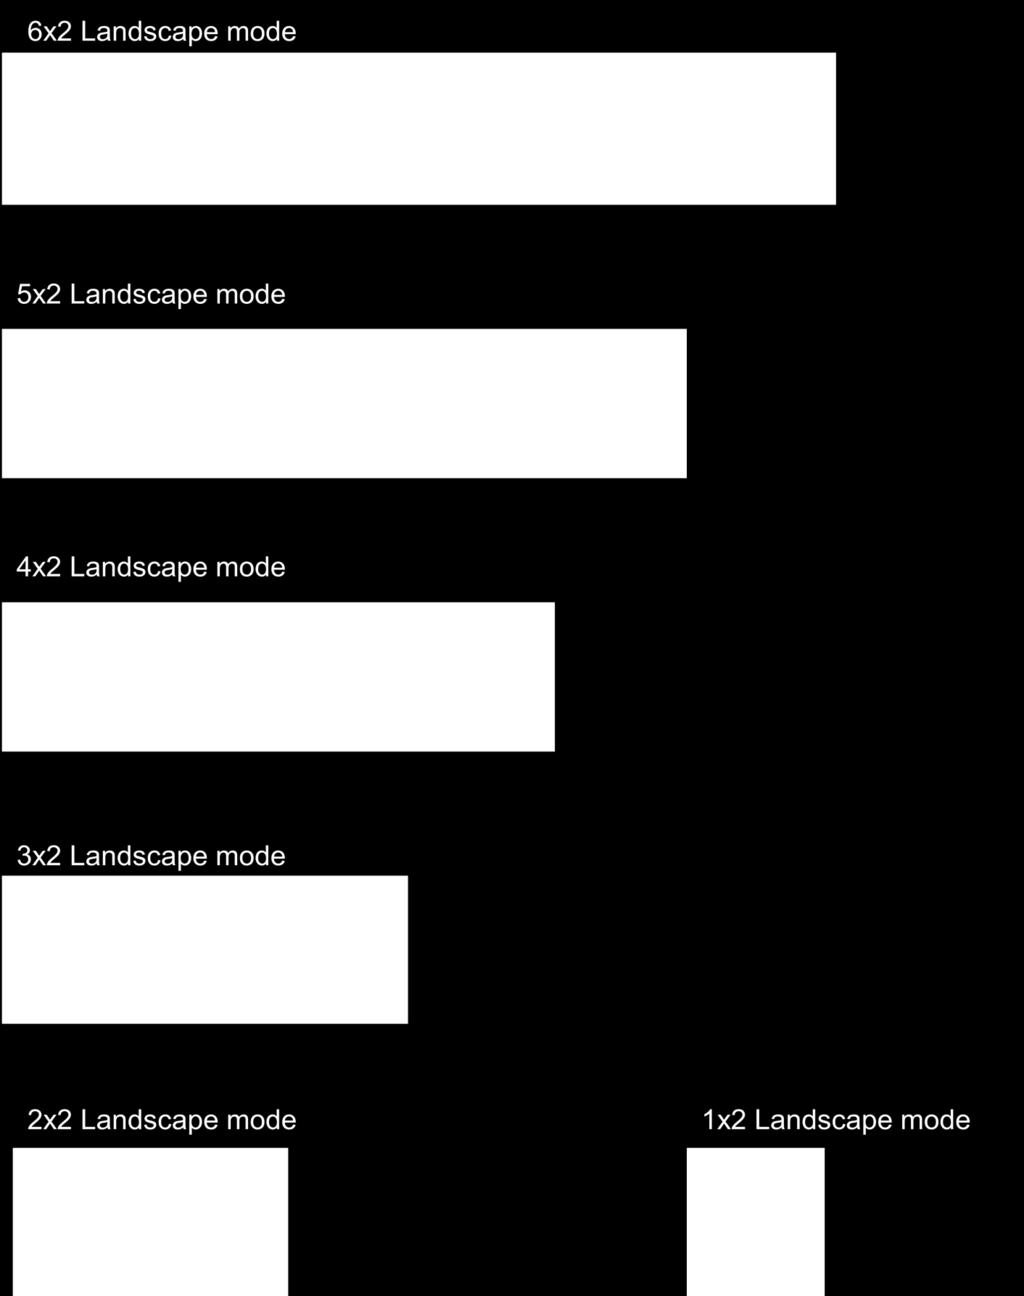
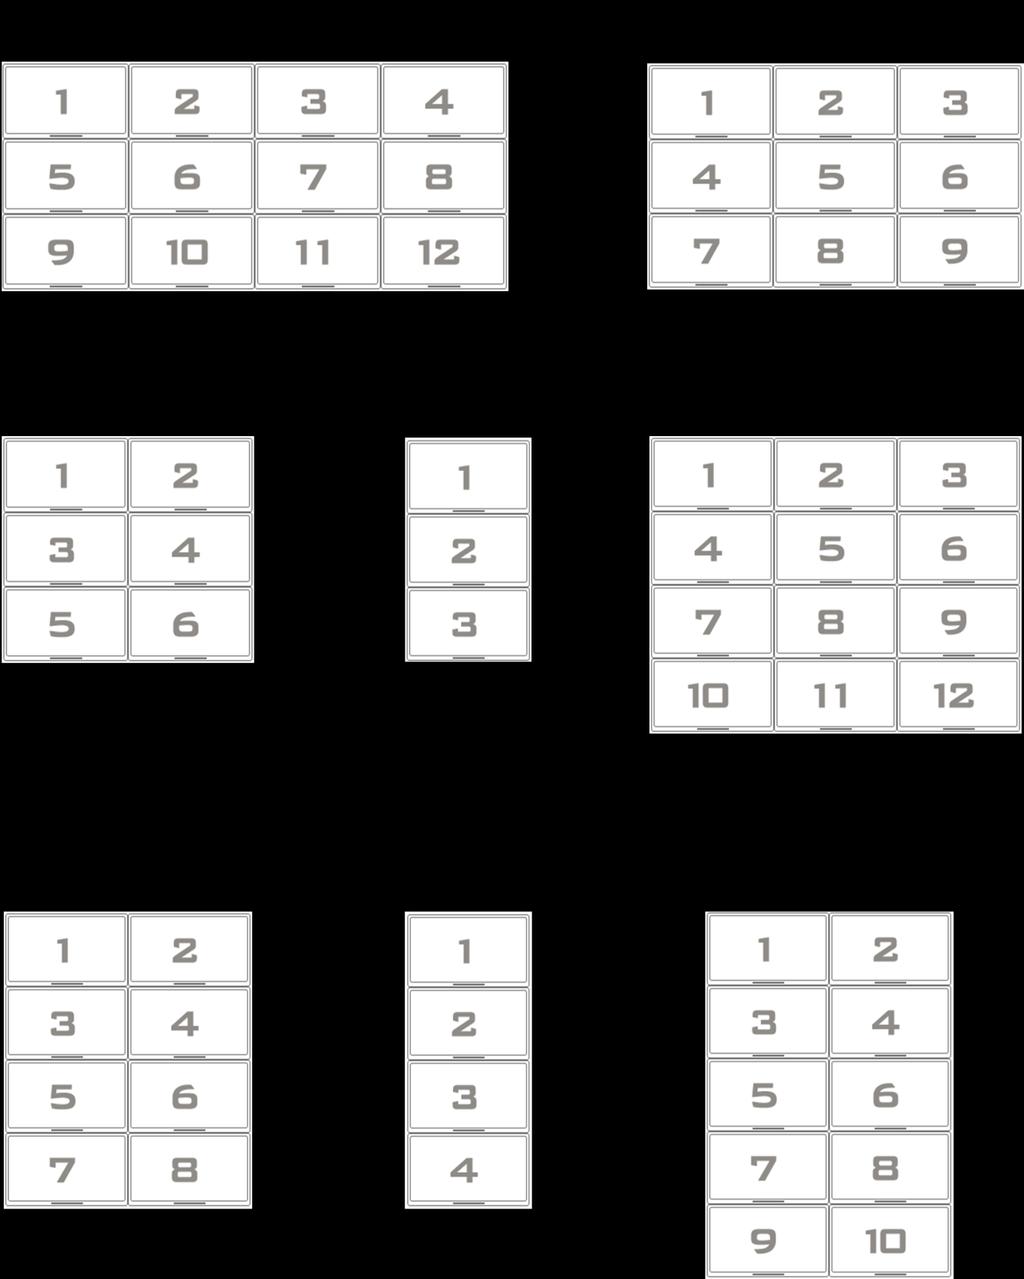
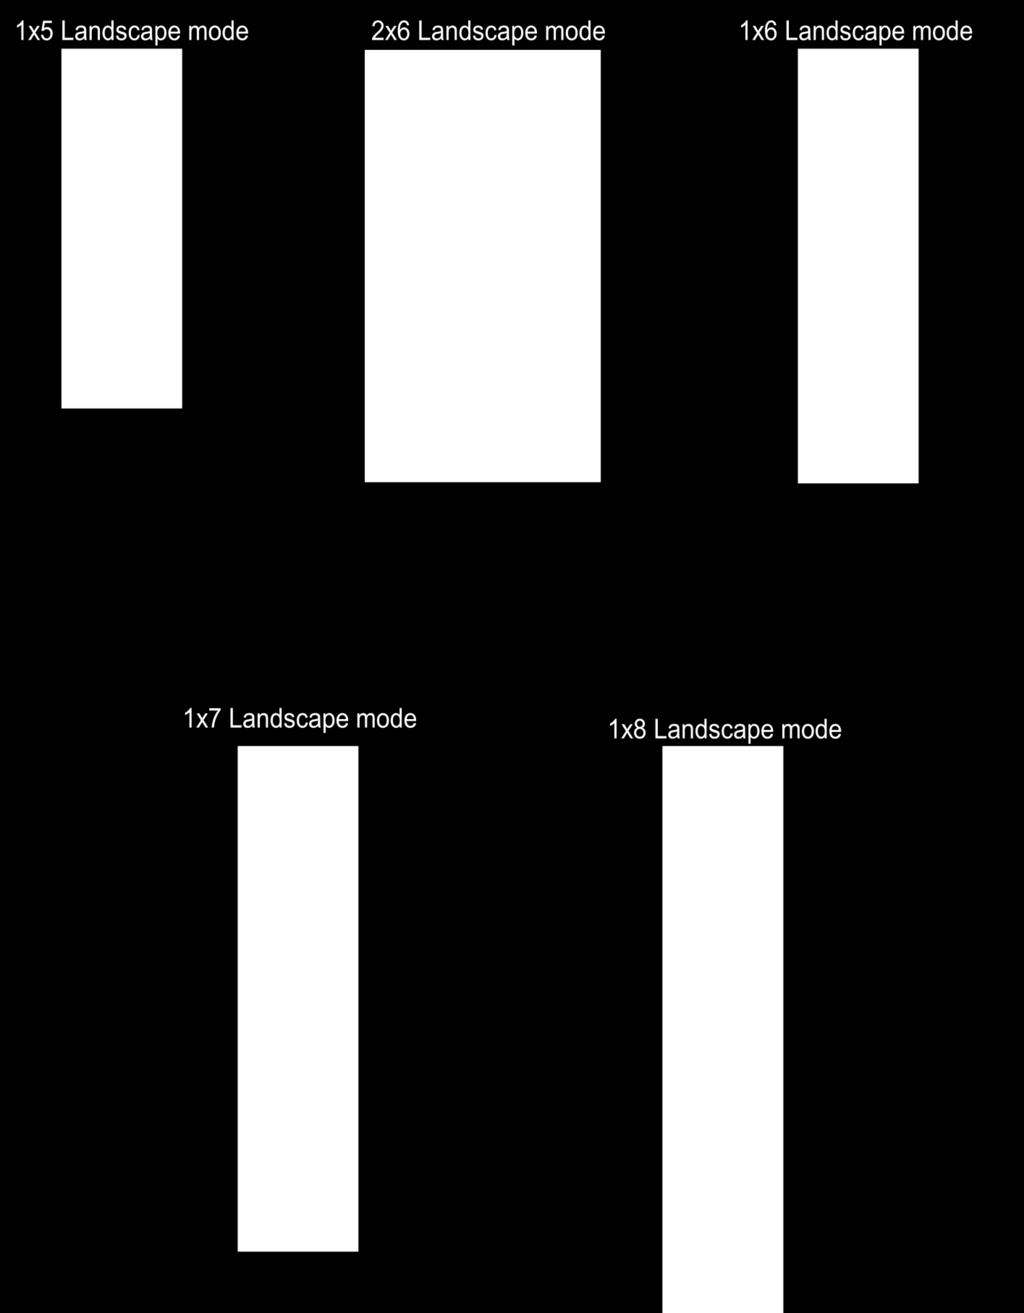
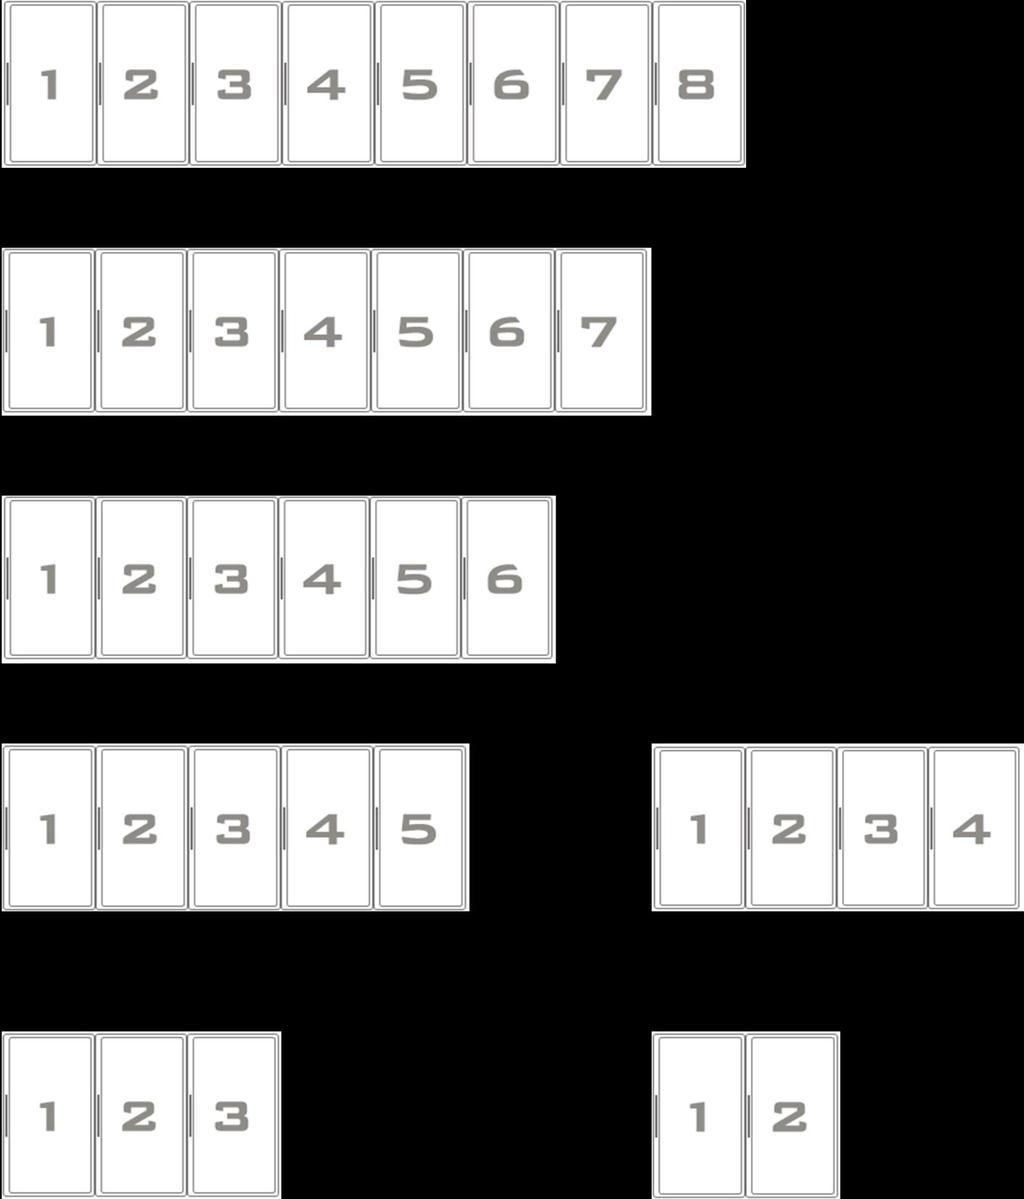
14 2.3. Supported Video Wall Matrix
15
16
17
18
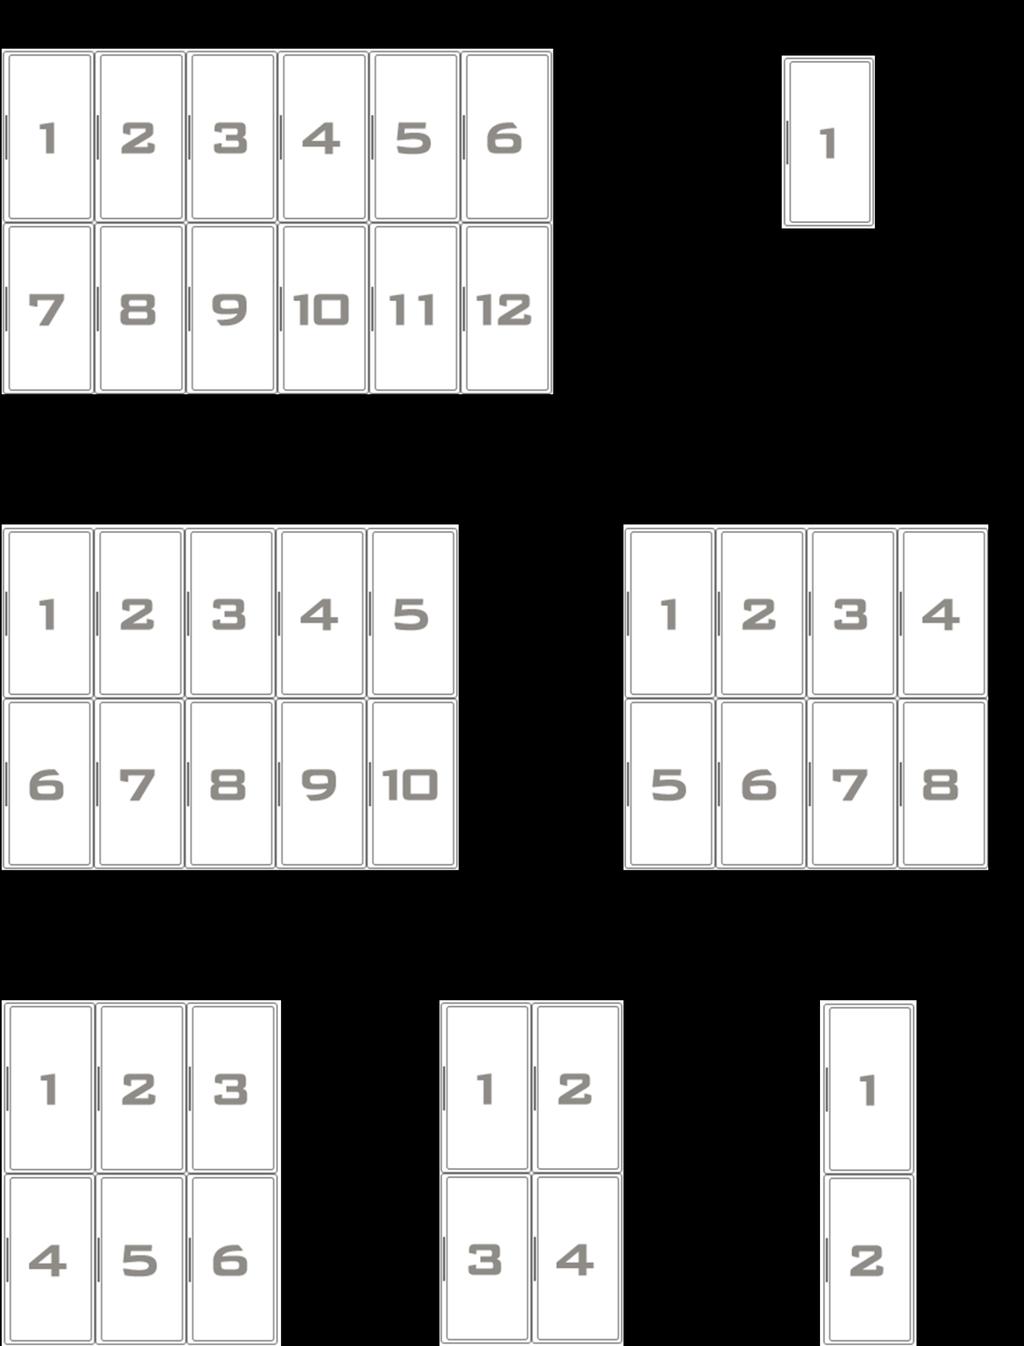
19
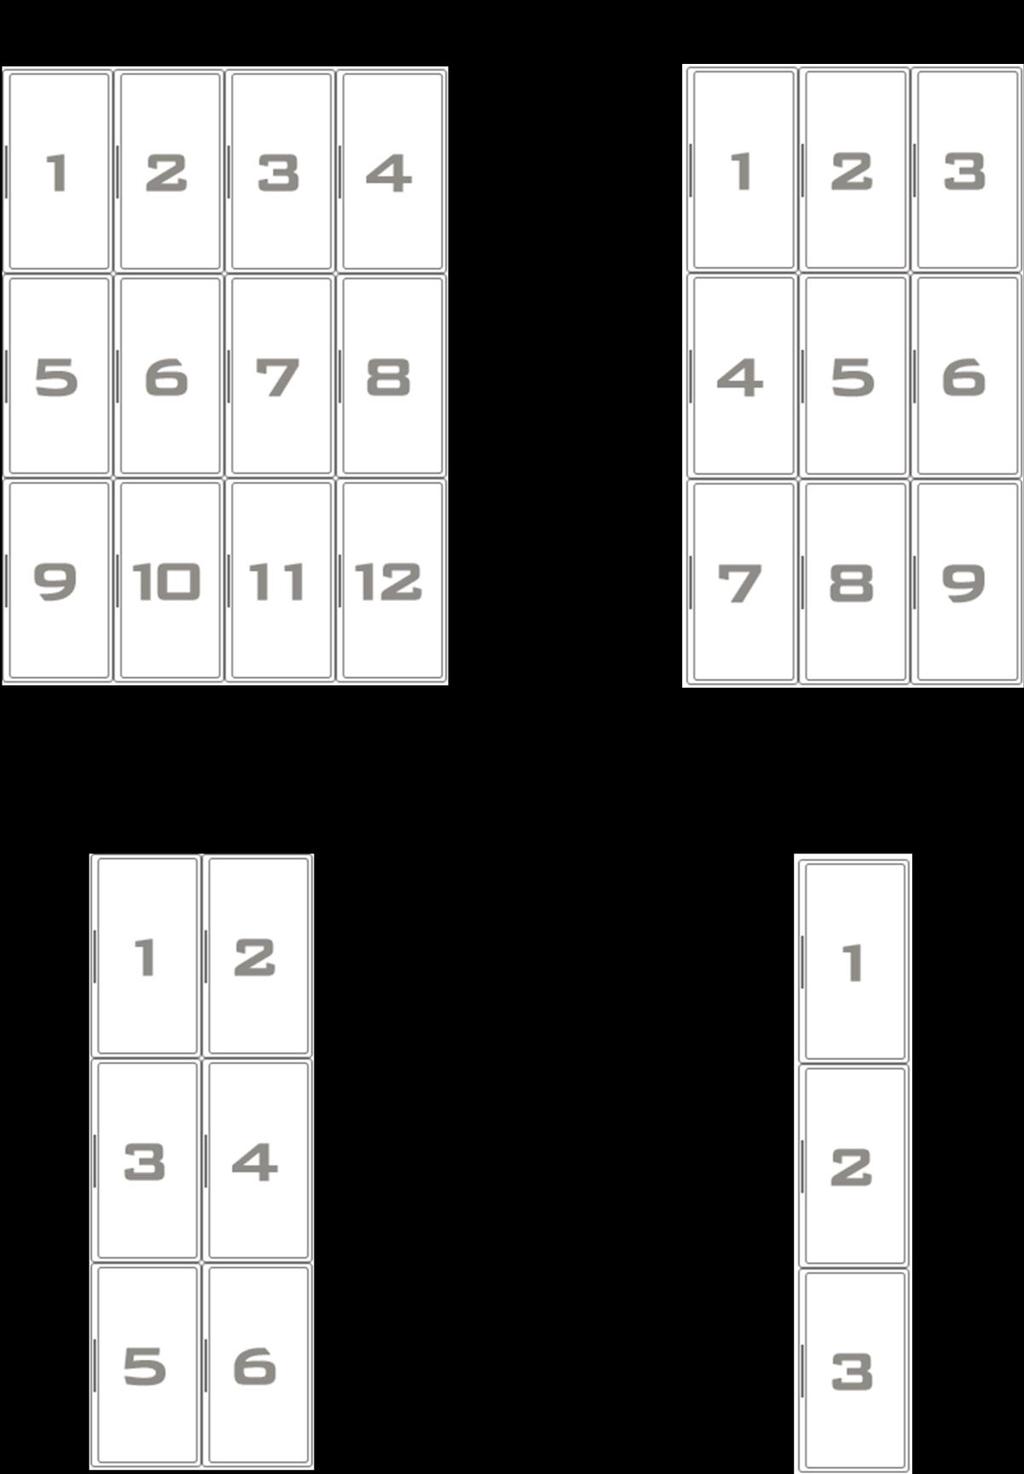
20
21

22

23

24 3. Design 3.1. New Design With this option, user can design to the whole Canvas, and use the intuitive drag and drop operation to adding objects on Canvas. B A C A B C Media list Media Widget bar Canvas 1. Compose the Design Step 1: Upload Files to Media list. Step 2: Click and hold Widgets from the Widget bar or Media from the Media list, then drag and drop it to a location on the Canvas. Step 3: Property window will pop up for user to set the Widget, or Right click on the Widget then select Properties to setting.

25 Step 4: Click Save at the top of Design page then enter the Design name and Description. Step 5: Click Save as Design. 2. Right-click menu of Media objects Right click of the Widget, then right-click menu appears. This menu provides user to modify Widget s Properties, assign its Playlist and Delete the Widget from the Canvas. 3. Adding a Playlist A playlist is a sequence of Widget that you choose for display in a zone. Each zone has its own playlist and runs independently of other playlists. To create a playlist with multiple Widget objects, follow these steps: Step 1: Click on a Widget in the Media widget bar, and drag and drop the Widget onto the Canvas. Step 2: then click on a Widget and drag and drop it onto the first Widget, then playlist dialog appears, click OK. Step 3: Right click of playlist to change duration of a Widget or change Widget order in this playlist.

26 The buttons at the top of Design page A B C D E F FEATURE DESCRIPTION A Menu Click Menu to return to Main page of Player. B New Click New to create new Design, if user is not finishing current Design, please Save it before exiting from this page. C Load Click Load Then Designer dialog appears, select existing Design file form list, then click Load Design to modify Design. D Save Click Save to save the new Design or design changes. E Delete Click Delete Then Delete design dialog appears, select one or more existing design file form list, then click Delete Design to delete Design. F RS Scheduler Click RS Scheduler to go to Plan page directly.


27 Media List A B FEATURE DESCRIPTION A B Upload files Remove file Click Upload to browse user s files on desktop, extra device and devices on the network directly. If user wants to remove the file from the list, please drag and drop the file to Delete button. Media Properties
28 FEATURE Media type Alias Media duration(sec) Volume DESCRIPTION Display the media type. Display the file name. To edit the time intervals, edit the Value by double clicking the cell and add the amount of seconds you want it to display. To edit sound volume, edit the Value by double clicking the cell and choosing a number between 1 and 10. X(Pixel) or Y(Pixel) To edit the location of the media to pixel perfection, find X(Pixel) or Y(Pixel) and edit the Value by double clicking the cell and adjusting the values. Width or Height To edit the width and height, find Width or Height and edit it to best fit your layout. Layer order To change the order of Layer in the Canvas.
29 Widgets HTML Text Text banner Image Analog clock Digital Clock RSS Streaming Capture in Queuing Remote Folder Live Data 1. HTML Widget: FEATURE Media type Media duration(sec) X(Pixel) or Y(Pixel) DESCRIPTION Display the media type. To edit the time intervals, edit the Value by double clicking the cell and add the amount of seconds you want it to display. To edit the location of the media to pixel perfection, find X(Pixel) or Y(Pixel) and edit the Value by double clicking the cell and adjusting the values. Width or Height To edit the width and height, find Width or Height and edit it to best fit your layout. Offset X or Offset Y Double click at Value next to the Offset X or Offset Y and it will shift the webpage s left / top corner. Layer order URL Reload To change the order of Layer in the Canvas. Enter the web site URL into the field. To edit webpage reload time (sec).
30 2. Text Widget: A widget to display static text content. FEATURE Media type Media duration(sec) X(Pixel) or Y(Pixel) DESCRIPTION Display the media type. To edit the time intervals, edit the Value by double clicking the cell and add the amount of seconds you want it to display. To edit the location of the media to pixel perfection, find X(Pixel) or Y(Pixel) and edit the Value by double clicking the cell and adjusting the values. Width or Height To edit the width and height, find Width or Height and edit it to best fit your layout. Layer order Foreground color Background color Opacity To change the order of Layer in the Canvas. To edit the text color. To edit background color of the text. To set Widget visible on the Canvas. The default is 255 that completely opaque and 1 is almost completely transparent. Text Enter the text into the field. Font size To edit the text size. The default is 70.
31 3. Text banner Widget: A widget to display scrolling text content. FEATURE Media type Media duration(sec) X(Pixel) or Y(Pixel) DESCRIPTION Display the media type. To edit the time intervals, edit the Value by double clicking the cell and add the amount of seconds you want it to display. To edit the location of the media to pixel perfection, find X(Pixel) or Y(Pixel) and edit the Value by double clicking the cell and adjusting the values. Width or Height To edit the width and height, find Width or Height and edit it to best fit your layout. Layer order Direction To change the order of Layer in the Canvas. Select text move direction, the selection includes: Right to Left (default), Left to Right, Bottom to Top, Top to Bottom Speed To edit the banner s speed. The default is 10. Foreground color Background color Opacity To edit the text color. To edit background color of the text. To set Widget visible on the Canvas. The default is 255 that completely opaque and 1 is almost completely transparent. Text Enter the text into the field. Font size To edit the text size. The default is 70.
32 4. Image banner How to Create image banner: Step 1: Click and hold Image banner Widget then drag and drop it to a location on the Canvas. Step 2: Create image window will pop up, drag image and drop it to the image area, click OK to close the dialog. FEATURE Media type Media duration(sec) X(Pixel) or Y(Pixel) DESCRIPTION Display the media type. To edit the time intervals, edit the Value by double clicking the cell and add the amount of seconds you want it to display. To edit the location of the media to pixel perfection, find X(Pixel) or Y(Pixel) and edit the Value by double clicking the cell and adjusting the values. Width or Height To edit the width and height, find Width or Height and edit it to best fit your layout. Layer order Direction To change the order of Layer in the Canvas. Select text move direction, the selection includes: Right to Left (default), Left to Right, Bottom to Top, Top to Bottom Speed To edit the banner s speed. The default is 10.
33 5. Analog clock Widget FEATURE Media type Media duration(sec) X(Pixel) or Y(Pixel) DESCRIPTION Display the media type. To edit the time intervals, edit the Value by double clicking the cell and add the amount of seconds you want it to display. To edit the location of the media to pixel perfection, find X(Pixel) or Y(Pixel) and edit the Value by double clicking the cell and adjusting the values. Width or Height To edit the width and height, find Width or Height and edit it to best fit your layout. Layer order To change the order of Layer in the Canvas. Template To change the clock template from Template 1 to 10. Offset (GMT) Opacity To edit the time zone. To set Widget visible on the Canvas. The default is 255 that completely opaque and 1 is almost completely transparent.
34 6. Digital Clock Widget FEATURE Media type Media duration(sec) X(Pixel) or Y(Pixel) DESCRIPTION Display the media type. To edit the time intervals, edit the Value by double clicking the cell and add the amount of seconds you want it to display. To edit the location of the media to pixel perfection, find X(Pixel) or Y(Pixel) and edit the Value by double clicking the cell and adjusting the values. Width or Height To edit the width and height, find Width or Height and edit it to best fit your layout. Layer order Offset (GMT) Foreground color Background color Opacity To change the order of Layer in the Canvas. To edit the time zone. To edit the time text color. To edit background color of the time text. To set Widget visible on the Canvas. The default is 255 that completely opaque and 1 is almost completely transparent. Font size To edit the text size. The default is 70. Format string To change the Format string, EX: (HH:mm:ss MM-dd-yyyy) or yyyy-mm-dd HH:mm:ss (default) etc.
35 7. RSS Widget User can display newsfeeds from external sources on the Player. FEATURE Media type Media duration(sec) DESCRIPTION Display the media type. To edit the time intervals, edit the Value by double clicking the cell and add the amount of seconds you want it to display. X(Pixel) or Y(Pixel) To edit the location of the media to pixel perfection, find X(Pixel) or Y(Pixel) and edit the Value by double clicking the cell and adjusting the values. Width or Height To edit the width and height, find Width or Height and edit it to best fit your layout. Layer order Foreground color Background color To change the order of Layer in the Canvas. To edit the text color. To edit background color of the text. Opacity To set Widget visible on the Canvas. The default is 255 that completely opaque and 1 is almost completely transparent. Direction Select text move direction, the selection includes: Right to Left (default), Left to Right, Bottom to Top, Top to Bottom Speed To edit the RSS banner s speed. The default is 10. Font size To edit the text size. The default is 70. URL Enter the RSS website address into the field.
36 (for example, DESIGNER_PROP_REFRESH_TIME To edit website reload time. (second). The default is 600.
37 8. Streaming Widget Support the Real Time Streaming Protocol (RTSP). The Streaming widget can receive the live streaming from IP-cam or streaming support. FEATURE Media type Alias Media duration(sec) DESCRIPTION Display the media type. Display the live streaming name. To edit the time intervals, edit the Value by double clicking the cell and add the amount of seconds you want it to display. Volume To edit sound volume, edit the Value by double clicking the cell and choosing a number between 1 and 10. X(Pixel) or Y(Pixel) To edit the location of the media to pixel perfection, find X(Pixel) or Y(Pixel) and edit the Value by double clicking the cell and adjusting the values. Width or Height To edit the width and height, find Width or Height and edit it to best fit your layout. Layer order URL To change the order of Layer in the Canvas. Enter the live streaming address into the field. Ex: IP camera address or RTSP server address...etc.
38 9. Capture in Widget Support USB webcam and HDMI-in. FEATURE Media type Alias Media duration(sec) DESCRIPTION Display the media type. Display the live streaming name. To edit the time intervals, edit the Value by double clicking the cell and add the amount of seconds you want it to display. Volume To edit sound volume, edit the Value by double clicking the cell and choosing a number between 1 and 10. X(Pixel) or Y(Pixel) To edit the location of the media to pixel perfection, find X(Pixel) or Y(Pixel) and edit the Value by double clicking the cell and adjusting the values. Width or Height To edit the width and height, find Width or Height and edit it to best fit your layout. Layer order Capture Input To change the order of Layer in the Canvas. The Capture Input type selection includes: HDML1, HDML2, Webcam
39 10. Queueing Widget FEATURE Media type Queueing type DESCRIPTION Display the media type. The Queueing type selection includes: Multiple Rows, Single Rows Media duration(sec) To edit the time intervals, edit the Value by double clicking the cell and add the amount of seconds you want it to display. Volume To edit sound volume, edit the Value by double clicking the cell and choosing a number between 1 and 10. X(Pixel) or Y(Pixel) To edit the location of the media to pixel perfection, find X(Pixel) or Y(Pixel) and edit the Value by double clicking the cell and adjusting the values. Width or Height To edit the width and height, find Width or Height and edit it to best fit your layout. Layer order Foreground color Background color Opacity To change the order of Layer in the Canvas. To edit the text color. To edit background color of the text. To set Widget visible on the Canvas. The default is 255 that completely opaque and 1 is almost completely transparent. Group Number Text To edit group number. To edit data Value number, Ex: #VALUE1#, #VALUE2#, #VALUE3#... Font size To edit the text size. The default is 70.
40 11. Remote Folder Widget FEATURE Media type Media duration(sec) DESCRIPTION Display the media type. To edit the time intervals, edit the Value by double clicking the cell and add the amount of seconds you want it to display. X(Pixel) or Y(Pixel) To edit the location of the media to pixel perfection, find X(Pixel) or Y(Pixel) and edit the Value by double clicking the cell and adjusting the values. Width or Height To edit the width and height, find Width or Height and edit it to best fit your layout. Layer order Server IP address To change the order of Layer in the Canvas. Enter the source link. Ex: Remote path Enter the share folder of the server. Ex: /share Username Enter the username to login to folder. if the folder access without username and password, please enter guest and don t need to enter the password. Password Sync Interval Image duration Video duration Enter the password to login to folder. To edit Synchronize interval time (sec). To define the time duration of the images. To define the time duration of the Video.
41 12. Live Data Widget FEATURE Media type Media duration(sec) DESCRIPTION Display the media type. To edit the time intervals, edit the Value by double clicking the cell and add the amount of seconds you want it to display. X(Pixel) or Y(Pixel) To edit the location of the media to pixel perfection, find X(Pixel) or Y(Pixel) and edit the Value by double clicking the cell and adjusting the values. Width or Height To edit the width and height, find Width or Height and edit it to best fit your layout. Layer order Foreground color Background color Opacity To change the order of Layer in the Canvas. To edit the text color. To edit background color of the text. To set Widget visible on the Canvas. The default is 255 that completely opaque and 1 is almost completely transparent. Text Display the text from Live Data file. Font size To edit the text size. The default is 70. Source Type To choose source type. The Capture Input type selection includes: CSV, JSON, XML Source Link Enter the source link. Ex: Data mapping Enter target data. Ex: { "col": 2, "row": 3 } Refresh Interval To edit refresh interval time (sec).
 Players menuboard.csv Step 1: Create the products price file (ex, menuboard.csv) and save to Server (ex, row 1 row 2 row 3 row 4 row 5 52.xxx.xxx.1).")
42 Application References Live Data Widget User can use Live Data Widget to publish or change price of products from server to Players. Server IP: 52.xxx.xxx.1 Player (Live Data Widget) Players menuboard.csv Step 1: Create the products price file (ex, menuboard.csv) and save to Server (ex, row 1 row 2 row 3 row 4 row 5 52.xxx.xxx.1). Content of menuboard.csv col 1 col 2 Step 2: Link to Player and create New Design. Step 3: Drag and drop to adding Live Data Widget on Canvas, then change properties, for example: Source Type: CSV Source Link: Data Mapping: { "col": 1, "row": 2 }

43 Step 4: Close the property window, the Live Data Widgets will show PIZZA wording. Step 5: Click Save to finish Design. Step 6: Creating a Plan and Publish Plan. { "col": 1, "row": 2 }{ "col": 2, "row": 2 } { "col": 1, "row": 6 } { "col": 2, "row": 6 }
 Players /share Step 1: Create the folder and set up folder sharing (ex, share) Step 2: Import images and video to this folder.")
44 Remote Folder Widget User can use Remote Folder Widget to publish images or videos from server to Players. Server IP: 52.xxx.xxx.1 Player (Remote Folder Widget) Players /share Step 1: Create the folder and set up folder sharing (ex, share) Step 2: Import images and video to this folder. Content of share folder Step 3: Link to Player and create New Design. Step 4: Drag and drop to adding Remote Folder Widget on Canvas, then change properties, for example: Server IP Address: 52.xxx.xxx.1 Remote path: /share Username: user_1 Password: a12345

45 if the folder access without username and password, please enter guest and don t need to enter the password. Step 5: Close the property window and click Save to finish Design. Step 6: Creating a Plan and Publish Plan. Remote Folder Widget

46 Queueing Widget User can use Queueing Widget and command tools to design your Queueing program. Step 1: Copy the Queueing command tool file to Server (ex, C:\), and Unzip RsTcpCommand.rar. Content of RsTcpCommand folder Step 2: Link to RS-CMS and create New Design. Step 3: Drag and drop to adding Queueing Widget on Canvas, then change properties. Text content: NO.#VALUE1# please come to the Counter. Step 4: Close the property window and click Save to finish Design.

47 Step 5: Click Save to finish Design. Step 6: Creating a Plan and Publish Plan. Step 7: Opening Command Prompt, then change to C:\RsTcpCommand directory. Step 8: Enter command: RsTcpCommand "{ \"GROUP\" : \"GROUP1\", \"KEY\" : \"VALUE1\", \"VALUE\" : \"125\",\"ACTION\" : \"QUEUEING_SET\" }" The player screen: Player IP address
48 3.2. Load Design To modifying existing Design please follow these steps: Step 1: Click Load Design from Main page of Player or button at the top of Design page. Step 2: Then Designer dialog appears. Step 3: Select existing Design file from list, then click Load Design to modify Design.

49 4. Plan With Plan option is providing user to control which Designs are displayed on what days and at what times and how often by creating a Schedule Create a New Plan A B A B Design list Timetable To create a new Plan please follow these steps: Step 1: Click Plan from Main page of Player. Step 2: Drag Design file from Design list and drop it onto Timetable. Step 3: Double click the Plan of Timetable, then Plan dialog appears. Step 4: To define the star and end date and time. Step 5: Click Apply to confirm and close Plan dialog.

50 To assign two or more Design to a Plan please follow these steps: Step 1: Click Plan from Main page of Player. Step 2: Drag Design file from Design list and drop it onto Timetable. Step 3: Drag second Design file from Design list and drop it onto the first Plan. Step 4: Double click the Plan of Timetable, then Plan dialog appears. Step 5: To define the star and end date and time. Step 6: Click Apply then Click Save (the button at the top of Plan page). To delete the content of Plan please follow these steps: Step 1: Double click the Plan of Timetable, then Plan dialog appears. Step 2: Click to delete the content in Sequence. To delete the Plan please follow these steps: Step 1: Double click the Plan of Timetable, then Plan dialog appears. Step 2: Click Delete to delete the plan.
51 The buttons at the top of Plan page A B C D E FEATURE DESCRIPTION A Menu Click Menu to return to Main page of Player. B New Click New to create new Plan, if user is not finishing current Plan, please Save it before exiting from this page. C Load Click Load then Planner dialog appears, select existing Plan file from list, then click Load Plan to modify Design. D Save Click Save to save the new Plan or Plan changes. E RSDesigner Click RSDesigner to go to Design page directly.

52 4.2. Load Plan To modifying existing plan please follow these steps: Step 1: Click Load Plan from Main page of Player or button at the top of Plan page. Step 2: Then existing Plan will appears.

53 4.3. Export Plan With Export Plan option is provide user to export Plan file from Player to Local disk. To export Plan please follow these steps: Step 1: Click Export Plan from Main page of Player. Step 2: Then Export Plan dialog appears. To import plan to Player please follow these steps: Step 1: Copy the export plan file to USB device, and Unzip rs_export.zip. Step 2: Connect USB device to Player. Step 3: Waiting for plan upload to Player, and it will be playing schedule automatically. Note: The default directory by export is C:\Users\Username\Downloads.
54 5. Player Management 5.1. Overview The page provides details of the environmental performance of your Player. The display contains the following information Tab System info DESCRIPTION View the Player information, including: Player name, firmware version, Current Plan and Current Design. CPU/RAM Status Network View the current CPU loading and the current memory size status. View current Network setting, including: IP address, MAC address. etc. To change network setting please refer to 5.2. System Configure/ Network Configure. Graphics Storage View the all screen configure. View the storage capacity and The % of total storage used by the Player.

55 5.2. System Configure 1. Power The main use of the Power On and Power Off are for scheduling the Player. To Reboot and Shutdown please follow these steps: Step 1: Click Reboot or Shutdown then the dialog appears. Step 2: Click OK, the Player will Reboot or Shutdown immediately. To setting Power Schedule please follow these steps: Step 1: Choose Time from the drop-down list. Step 2: Drag the Hour or Minute bar left or right, user also can enter time in the textbox at the top of the drop-down list, then Click Done.

56 Step 3: Then select power action and date. Step 4: Click Add, this power schedule will add in the Task list. To Edit Power Schedule please follow these steps: Step 1: Select currently schedule from the task list. Step 2: Click Edie to the setting. Step 3: Click the Save button. To Delete Power Schedule please follow these steps: Step 1: Select currently schedule from task list. Step 2: Click Delete to remove this schedule.

57 2. Playback User can stop or restart Player from this page, and also to set Audio output. 3. Register Information Tab Download Register DESCRIPTION User can click Apply to download register information. Information License Key To Register the License key and unlock all features of the player. For technical questions, please contact Player Information User can change player name from this option.
58 4. Server Information The Pairing Key of Player provides Player pair to RS-CMS Server. a Player only pair an Player at the same time. To Register a player to The RS-CMS server please follow these steps: Step 1: Check IP address of the RS-CMS server. Step 2: Check Pairing Key from the RS-CMS server. please refer to the RS-CMS user s manual. Step 3: Enter the IP address and Pairing Key of the RS-CMS. Step 4: Then click Apply.
59 5. Change Password User can change administer password with this option. 6. Network Configure Use the Network options to configure and check the Player network connection. To change IP address please follow these step: Step 1: Double click textbox of IP address to change IP address. Step 1: Then click Apply.
60 7. Date/Time Configure Use the Date/Time option to configure the time source and time zone for Player. Best for accuracy that requires the Player to have network connection to an extremal NTP server. If you chose on of the NTP methods, you must enter the URL of at least one NTP server
61 8. Log configure A log file is a file that records either events that occur in an Player. Click Log Enable to enable this function, and set up log size. About content please refer to 5.3 Logs. 9. System Upgrade From the menu, choose the Firmware Upgrade item to select the file, then click Apply to start to upgrade firmware. Note: If Reset Database is checked, all media, designs, and schedules in the system will be deleted.

62 9.1. Logs Choose the Logs and the System Logs screen appears. This screen shows a history of system usage and important events such as recent login information for all the users, and system booting. The event log appears in reverse order which means the latest event log shows first. With this option also provides user to export all configurations to a zip file. Note: The default directory by export is C:\Users\Username\Downloads.
GV-IP Decoder Box Plus User s Manual
 GV-IP Decoder Box Plus User s Manual Before attempting to connect or operate this product, please read these instructions carefully and save this manual for future use. DBPV10-UM-A 2015 GeoVision, Inc.
QUICK START GUIDE FOR AVSIGNCLOUD
 Control Your Video VIDEO WALLS VIDEO PROCESSORS VIDEO MATRIX SWITCHES EXTENDERS SPLITTERS WIRELESS CABLES & ACCESSORIES QUICK START GUIDE FOR AVSIGNCLOUD QUICK START GUIDE FOR AVSIGNCLOUD ABOUT THIS DOCUMENT
X-Sign 2.0 User Manual
 X-Sign 2.0 User Manual Copyright Copyright 2018 by BenQ Corporation. All rights reserved. No part of this publication may be reproduced, transmitted, transcribed, stored in a retrieval system or translated
W-E
 Signage Suite V2.20 User Guide 605220-02-01-W-E-051613-02 Trademarks Windows XP, Windows Vista, Windows 7, and Microsoft are registered trademarks of Microsoft Corporation. All other trademarks are the
SaviSign Manager User Manual
 SaviSign Manager User Manual Digital Signage Management Software For The P100 Signage Player For use with Windows 7 or Higher Easy-to-use, powerful software Perfect for crafting digital signage displays!
Copyright. Disclaimer
 X-Sign User Manual Copyright Copyright 2017 by BenQ Corporation. All rights reserved. No part of this publication may be reproduced, transmitted, transcribed, stored in a retrieval system or translated
MagicInfo VideoWall Author
 MagicInfo VideoWall Author MagicInfo VideoWall Author User Guide MagicInfo VideoWall Author is a program designed to construct a VideoWall layout and create VideoWall content by adding various elements
Setup and Configuration
 Setup and Configuration OmniStream TM Solution Guide OmniStream Atlona Setup Guide Version Information Version Release Date Notes 1 02/19 Initial release 2 03/19 Audio added 3 03/19 USB added OmniStream
Installation Guide. DVI Net ShareStation GDIP201 PART NO. M1048
 Installation Guide DVI Net ShareStation 1 GDIP201 PART NO. M1048 2 Table of Contents Package Contents 4 Hardware Installation 5 USB Server software installation - XP 10 DisplayLink software installation
Copyright. Disclaimer
 X-Sign User Manual Copyright Copyright 2017 by BenQ Corporation. All rights reserved. No part of this publication may be reproduced, transmitted, transcribed, stored in a retrieval system or translated
Welcome to Playlist, the world s easiest to use digital signage software
 http://www.viewtv.co.nz/playlist Playlist User Guide V2.1 Welcome to Playlist, the world s easiest to use digital signage software CONTENTS 1.0 LOGIN 1.1 ViewTV NZ Server 1.2 ViewTV Playlist PC Server
SQP110 Series. User s Manual V1.0.3 SQP110V103-B
 SQP110 Series User s Manual V1.0.3 SQP110V103-B 2012 GeoVision, Inc. All rights reserved. Under the copyright laws, this manual may not be copied, in whole or in part, without the written consent of GeoVision.
Senstar Thin Client. 3.x User Guide
 Senstar Thin Client 3.x User Guide Contents Contents Introduction...4 System requirements... 4 Performance guidelines... 4 Log in to the Web interface...4 Configuration... 5 Configure the Thin Client...5
Intelli-Signage Signage Designer Software
 Intelli-Signage (User Manual V1.0) version: V3.0.0.0 Contents 1. Introduction... 1 2. System requirement... 1 2.1 Signage Player Software... 1 2.2... 1 3. Installation/Uninstallation of... 2 4. interface...
Digital Signage Player Management Software
 3-296-173-11 (1) Digital Signage Player Management Software Operating Instructions Before operating the software, please read this manual thoroughly and retain it for future reference. VSPA-D7 Version
Viewer for Luma Fisheye IP Surveillance Camera. Software Manual
 Viewer for Luma Fisheye IP Surveillance Camera Software Manual Important Notes This software is a third-party program that allows you to view, in a normal view, surveillance recordings that were made in
MPX Server Software User Manual
 MPX Server Software User Manual Contents 1 Server Software Installation... - 3 - Initial Setup... - 6-2 Software Interface... - 10 - Login Page:... - 10-2.1 Homepage... - 12-2.2 Resources... - 13-2.3 Composer...
Senstar Thin Client. 3.x User Guide
 Senstar Thin Client 3.x User Guide Contents Contents Introduction...4 Supported hardware...4 Performance guidelines... 4 Log in to the Web interface...4 Configuration... 6 Configure the Thin Client...6
SignWare-Pro. User s Guide. SignWare-Pro v1.2.
 SignWare-Pro User s Guide SignWare-Pro v1.2 www.smartavi.com Table of Contents Introduction... 3 Disclaimer Notice... 4 What s in the Box?... 5 Limited Warranty Statement... 6 Section 1 -Setting up the
Network Management Software ALLNET Zone Controller
 Network Management Software ALLNET Zone Controller For ALL0558N / ALL02850N / ALL02860ND / ALL02880ND User Manual v1.0 Table of Contents 1. Installation & Un-installation... 4 1.1. Install NMS Suite...
User Manual of VSPlayer Software. VSPlayer Software. User Manual UD06784B
 VSPlayer Software User Manual UD06784B i User Manual COPYRIGHT 2017 Hangzhou Hikvision Digital Technology Co., Ltd. ALL RIGHTS RESERVED. Any and all information, including, among others, wordings, pictures,
Senstar Thin Client. 3.x User Guide
 Senstar Thin Client 3.x User Guide Contents Contents Introduction...4 Supported hardware...4 Performance guidelines... 4 Log in to the Web interface...4 Configuration... 6 Configure the Thin Client...6
SLS-ENVR2016 Network Video Recorder V2.2.2 Quick Setup Guide
 SLS-ENVR2016 Network Video Recorder V2.2.2 Quick Setup Guide The SLS-ENVR2016 series NVR is an intelligent and compact appliance that provides a network interface to monitor, record and playback video
PRESENTERWALL. User s Guide PresenterWall v4.4.
 PRESENTERWALL User s Guide PresenterWall v4.4 www.smartavi.com 1 Table of Contents Introduction 3 Disclaimer 4 What s in the Box? 5 Limited Warranty Statement 6 Section 1 Installing the PresenterWall Hardware
12-Port DP Video Wall Media Player VS1912
 12-Port DP Video Wall Media Player VS1912 The VS1912 12-Port DP Video Wall Media Player is a PC-based media player and an ideal solution for multidisplay applications such as digital signage, video walls,
VSPlayer Software User Manual
 VSPlayer Software User Manual UD03888B User Manual COPYRIGHT 2016 Hangzhou Hikvision Digital Technology Co., Ltd. ALL RIGHTS RESERVED. Any and all information, including, among others, wordings, pictures,
Copyright 2017 Xi an NovaStar Tech Co., Ltd. All Rights Reserved. No part of this document may be copied, reproduced, extracted or transmitted in any
 ViPlex Express LAN-Based Screen Management Software Product Version: V1.1.0 Document Number: NS120100166 Copyright 2017 Xi an NovaStar Tech Co., Ltd. All Rights Reserved. No part of this document may be
RemoteManager Software
 RMS RemoteManager Software User Manual Contents of this user manual are protected under copyrights and computer program laws. Functions or configurations are subject to be changed or modified without prior
VNNOX Cloud-Based Publishing Service XI'AN NOVASTAR TECH CO.,L Quick Start Guide Product Version: Document Number: V6.5.0 NS
 VNNOX Cloud-Based Publishing Service XI'AN NOVASTAR TECH CO.,L Product Version: Document Number: V6.5.0 NS170100150 Copyright 2018 Xi an NovaStar Tech Co., Ltd. All Rights Reserved. No part of this document
Pro71600N3 NVR User Manual
 Pro71600N3 NVR User Manual User Information Admin User Name: Admin Password: IP Address: System Name: Table Of Contents 1. Menu Operation...4 1.1 Main Menu...4 2. Start & Shutdown System...5 2.1 Start
User Manual. Minidraw
 User Manual Minidraw Version 1.8 2 Minidraw for HSAJet MiniTouch Table of Contents Before you start 4 How to... create a package 4 How to... add fonts 5 How to... add locales 8 How to... add logos 10 How
ContentSmart 3.0 Software User Manual
 ContentSmart 3.0 Software User Manual Copyright 01/01/2017 by Planar Systems, Inc. All rights reserved. Contents of this publication may not be reproduced in any form without permission of Planar Systems,
Pro7400H1 Hybrid DVR User Manual
 Pro7400H1 Hybrid DVR User Manual User Information Admin User Name: Admin Password: IP Address: System Name: Table Of Contents 1. Menu Operation... 4 1.1 Main Menu... 4 2. Start Up/Shutdown System... 5
Network Digital Signage Player. Users Manual
 Network Digital Signage Player Users Manual Table of Contents I. Introduction II. Specifications III. Signage Player Kit IV. Playlist Operation V. Client Device Setup 1. Client Installation 2. Client Main
User Manual PDUTracker
 User Manual PDUTracker Management Software for PDU Table of Contents 1. Overview... 1 1.1. Introduction... 1 1.2. Features... 1 2. Install and Uninstall... 1 2.1. System Requirement... 1 2.2. Software
TENVIS Technology Co., Ltd. User Manual. For H.264 Cameras. Version 1.0.0
 TENVIS Technology Co., Ltd User Manual For H.264 Cameras Version 1.0.0 Catalogue Basic Operation... 3 Hardware Installation... 3 Search Camera... 3 For Internet Explorer... 6 Playback Record Files... 9
User Manual. MPPTracker. Management Software for Solar Charge Controller. Version: 1.2
 User Manual MPPTracker Management Software for Solar Charge Controller Version: 1.2 Table of Contents 1. MPPTracker Overview... 1 1.1. Introduction... 1 1.2. Features... 1 2. MPPTracker Install and Uninstall...
Pro7804N1 NVR User Manual
 Pro7804N1 NVR User Manual Pro7804N1 User Manual BW R6.indd 1 User Information Admin User Name: Admin Password: IP Address: System Name: Table Of Contents 1. Menu Operation...4 1.1 Main Menu...4 2. Start
PN400, PN300 & SQP133
 PN400, PN300 & SQP133 User s Manual PN400V100-A-EN 2016 GeoVision, Inc. All rights reserved. Under the copyright laws, this manual may not be copied, in whole or in part, without the written consent of
C (1) Remote Controller. Setup software RM-IP Setup Tool guide Software Version Sony Corporation
 Remote Controller. Setup software RM-IP Setup Tool guide Software Version Sony Corporation") C-499-100-12 (1) Remote Controller Setup software RM-IP Setup Tool guide Software Version 1.1 2017 Sony Corporation Table of Contents Introduction... 3 Using This Manual...3 Downloading and Starting the
C-499-100-12 (1) Remote Controller Setup software RM-IP Setup Tool guide Software Version 1.1 2017 Sony Corporation Table of Contents Introduction... 3 Using This Manual...3 Downloading and Starting the
LED show User Manual
 LED show User Manual Setup & Environment Introduction LEDshow is designed for LED program play and management. It mainly applied to full color LED display, both synchronous and asynchronous control system.
InfoSAP HC1. User s Manual
 InfoSAP HC1 User s Manual Version 1.0 Copyright 2009 Table of Contents Introduction... 1 Overview... 1 Installing the Software... 1 Program Interface... 4 Main Screen... 4 Program Screen... 5 Menu Bar...
HIP2P Network Video Camera Client Terminal User Manual
 HIP2P Network Video Camera Client Terminal User Manual Document version:5.1 Page 1 of 34 } Preface Thank you for using our company's products. The network video camera client terminal is used to implement
SuperSign Lite/W/V OWNER S MANUAL. Please read this manual carefully before operating your set and retain it for future reference.
 OWNER S MANUAL SuperSign Lite/W/V Please read this manual carefully before operating your set and retain it for future reference. www.lgecommercial.com i Copyright Contents and programs in this software
Network Digital Menu Board Hardware User Manual
 Network Digital Menu Board Hardware User Manual Manual Version DMA1 Safety Instructions Please keep the display away from any heat sources. Place the display in a stable and well-ventilated place. Please
Operating Instructions. Windows. Video Wall Adjustment & Calibration Software. Video Wall Manager Ver. 1.8
 Operating Instructions Video Wall Adjustment & Calibration Software Windows Video Wall Manager Ver. 1.8 Thank you for purchasing this Panasonic product. Before using this software, please read the instructions
CSV Roll Documentation
 CSV Roll Documentation Version 1.1 March 2015 INTRODUCTION The CSV Roll is designed to display the contents of a Microsoft Excel worksheet in a Breeze playlist. The Excel worksheet must be exported as
TRIDENT - CMS Plus. 64CH Central Management System Software
 TRIDENT - CMS Plus 64CH Central Management System Software Please read instructions thoroughly before operation and retain it for future reference. For video demonstration about CMS Lite operation, please
S3 MagicView Standalone Edition Version 3.1 User Manual
 S3 MagicView Standalone Edition Version 3.1 User Manual 2011 S3 Graphics Co., Ltd. All rights reserved Page 1 8/14/2012 www.s3graphics.com S3 Graphics Terms and Conditions of Software Use Please read these
User Guide. BrightAuthor Release 2.0. BrightSign HD110, HD210, HD210w, HD410, HD810, HD1010, and HD1010w. COMPATIBLE WITH
 User Guide BrightAuthor Release 2.0 COMPATIBLE WITH BrightSign HD110, HD210, HD210w, HD410, HD810, HD1010, and HD1010w www.brightsign.biz Copyright Copyright 2010 by BrightSign, LLC. All rights reserved.
M73 Series Network Projector Operation Guide
 M73 Series Network Projector Operation Guide V1.00 Copyright Copyright 2017 BenQ Corporation. All rights reserved. No part of this publication may be reproduced, transmitted, transcribed, stored in a retrieval
PediGait IP. Users Manual
 PediGait IP Users Manual April 2012 Table of Contents Clients Tab... 2 Open a Client file... 2 Delete Client file(s)... 2 Edit a Client... 3 Add a new client... 3 Add Comments to client files... 4 Profiles
TCIT Media. User Manual. Windows Version 1.0(b) Prepared on 4/29/2014
 Prepared on 4/29/2014") TCIT Media Windows Version 1.0(b) Prepared on 4/29/2014 User Manual Trademarks TCIT and TCIT logo are registered trademarks of Taiwan Colour & Imaging Technology Corporation. Microsoft product names such
TCIT Media Windows Version 1.0(b) Prepared on 4/29/2014 User Manual Trademarks TCIT and TCIT logo are registered trademarks of Taiwan Colour & Imaging Technology Corporation. Microsoft product names such
POS Android Digital Advertising Display (Network) Hardware User Manual
 Hardware User Manual") POS Android Digital Advertising Display (Network) Hardware User Manual Manual Version POSW3.0 Safety Instructions Please keep the display away from any heat sources. Place the display in a stable and well-ventilated
POS Android Digital Advertising Display (Network) Hardware User Manual Manual Version POSW3.0 Safety Instructions Please keep the display away from any heat sources. Place the display in a stable and well-ventilated
HDR-8X8-Plus. User Manual. HDMI 4K 8x8 Switch Matrix Connect up to eight different HDMI video sources to eight different outputs.
 HDR-8X8-Plus User Manual HDMI 4K 8x8 Switch Matrix Connect up to eight different HDMI video sources to eight different outputs. Made in U.S.A. www.smartavi.com 1-800-AVI-2131 1 Table of Contents What s
SolarPower Pro. User s Manual. Management Software for Solar Inverter
 SolarPower Pro User s Manual Management Software for Solar Inverter Table of Contents 1. SolarPower Pro Overview... 2 1.1. Introduction... 2 1.2. Structure... 2 1.3. Features... 3 2. SolarPower Pro Install
InPro Camera SpecoView
 InPro Camera SpecoView Speco Technologies 200 New Hwy Amityville NY 11701 TEL: 1-800-645-5516 Http://www. specotech.com INPRO CAMERA SPECOVIEW... 1 INTRODUCTION... 4 INSTALL SPECOVIEW PROGRAM... 5 STARTUP
Quick Start Guide (V1.03) UD.6L0201B1064A01
 UD.6L0201B1064A01") ivms-4200 PCNVR Quick Start Guide (V1.03) UD.6L0201B1064A01 Thank you for purchasing our product. If there is any question or request, please do not hesitate to contact the dealer. This manual applies
ivms-4200 PCNVR Quick Start Guide (V1.03) UD.6L0201B1064A01 Thank you for purchasing our product. If there is any question or request, please do not hesitate to contact the dealer. This manual applies
Multi-NVR Manager. Quick Start Configuration Usage
 Multi-NVR Manager Quick Start Configuration Usage 2014. All rights are reserved. No portion of this document may be reproduced without permission. All trademarks and brand names mentioned in this publication
Quick Start Guide GV-VMS
 Quick Start Guide GV-VMS Thank you for purchasing GV-VMS. This guide is designed to assist the new user in getting immediate results from the GV-VMS. For advanced information on how to use the GV-VMS,
LS-300 Media Station
 LS-300 Media Station User Manual English AREC Inc. All Rights Reserved 2017. l All information contained in this document is Proprietary Table of Contents Introduction Specifications Package Contents Product
SLS-ENVR16 Network Video Recorder V2.1.5 Quick Setup Guide
 SLS-ENVR16 Network Video Recorder V2.1.5 Quick Setup Guide The SLS-ENVR16 series NVR is an intelligent and compact appliance that provides a network interface to monitor, record and playback video from
HP Video Over Ethernet. User Guide
 HP Video Over Ethernet User Guide 2016 HP Development Company, L.P. The information contained herein is subject to change without notice. The only warranties for HP products and services are set forth
Decoder Firmware B1D-220-V AC User s Manual Decoder Firmware B1D-220-V AC User s Manual
 Decoder Firmware B1D-220-V3.03.07-AC User s Manual i Table of Contents INTRODUCTION 1 1.1 Minimum system requirements 1 1.2 Preparation before setup 2 1.2.1 Setup your PC network 2 1.3 Configuring the
WSDA User Guide
 User Guide Version 8500-0029 rev. 006 WSDA -1000 User Guide www.microstrain.com Little Sensors, Big Ideas. 2012 by 459 Hurricane Lane, Suite 102 Williston, VT 05495 Phone 802-862-6629 Fax 802-863-4093
Ultra-High Definition Digital Signage Player
 User s Manual Ultra-High Definition Digital Signage Player User s Manual DS200 Series Version 2.0 Copyright 2016 DELTA Electronics, Inc. All rights reserved. Table of Contents 1. GETTING STARTED... 4 1.1
TOPAZ CMS. Software User Manual. Design Led Solutions Driven TOPAZ CMS
 Our Full Product Range Full details of all TOPAZ products available can be found by visiting our web site www.topazdigital.com Small Format POS 10 TOPAZ POS 10 TOPAZ HDMI 23 TOPAZ POS Your NOT so silent
Milestone_TCIT Match Software
 Milestone_TCIT Match Software Prepared on11/24/2014 User Manual Trademarks TCIT and TCIT logo are registered trademarks of Taiwan Colour & Imaging Technology Corporation. Microsoft product names such as
Digital Signage CDMS
 Digital Signage CDMS User Manual V4.0 * The information contained in this document is subject to change without notice. Revision History Revision Revision Date Principle Changes V1.0 Jun 2012 Created based
User Guide. Illumineye DS Suite
 User Guide Illumineye DS Suite User Guide Published on 13 th June 2016 Last Updated on 17 th October 2016 Document Version 1.2 Documentation Disclaimer Screenshots and graphics in this manual may differ
SLS-ENVR4 Network Video Recorder V2.1 Quick Setup Guide
 SLS-ENVR4 Network Video Recorder V2.1 Quick Setup Guide The SLS-ENVR4 series NVR is an intelligent and compact appliance that provides a network interface to monitor, record and playback video from up
hp l1619a smart attachment module
 hp l1619a smart attachment module user s guide Smart Attachment Module 1 Notice This manual and any examples contained herein are provided as is and are subject to change without notice. Hewlett-Packard
CLIQ Web Manager. User Manual. The global leader in door opening solutions V 6.1
 CLIQ Web Manager User Manual V 6.1 The global leader in door opening solutions Program version: 6.1 Document number: ST-003478 Date published: 2016-03-31 Language: en-gb Table of contents 1 Overview...9
TH800DS CONTROLLER MANUAL
 TH800DS CONTROLLER MANUAL 1 Introduction 3 1.1 Overview 3 1.2 Features 4 1.3 Specifications 4 1.4 Panel 5 1.4.1 Front Panel 5 1.4.2 Rear Panel 6 2 Hardware Installation 7 3 Accessing the Device 8 3.1 Before
Digital Signage Station
 Digital Signage Station User s Manual For V1.01.04 Version Legal Notice Disclaimer The information contained in this document is intended for general information purposes. The manufacturer shall not be
Aimetis Thin Client 2.7. User Guide
 Aimetis Thin Client 2.7 User Guide Disclaimers and Legal Information Copyright 2016 Aimetis Inc. All rights reserved. This material is for informational purposes only. AIMETIS MAKES NO WARRANTIES, EXPRESS,
FortiTester Handbook VERSION FortiTester Handbook Fortinet Technologies Inc.
 FortiTester Handbook VERSION 2.3.2 FortiTester Handbook 2.3.2 1 FORTINET DOCUMENT LIBRARY http://docs.fortinet.com FORTINET VIDEO GUIDE http://video.fortinet.com FORTINET BLOG https://blog.fortinet.com
Matrox MuraControl for Windows
 Matrox MuraControl for Windows User Guide (for software version 6.00) 20179-301-0600 2017.09.25 Contents About this user guide... 6 Using this guide... 6 More information... 6 Overview... 7 Supported Matrox
[ Getting Started with Analyzer, Interactive Reports, and Dashboards ] ]
![[ Getting Started with Analyzer, Interactive Reports, and Dashboards ] ]](/thumbs/88/117545107.jpg "[ Getting Started with Analyzer, Interactive Reports, and Dashboards ] ]") Version 5.3 [ Getting Started with Analyzer, Interactive Reports, and Dashboards ] ] https://help.pentaho.com/draft_content/version_5.3 1/30 Copyright Page This document supports Pentaho Business Analytics
Version 5.3 [ Getting Started with Analyzer, Interactive Reports, and Dashboards ] ] https://help.pentaho.com/draft_content/version_5.3 1/30 Copyright Page This document supports Pentaho Business Analytics
Legal Notes. Regarding Trademarks. Models supported by the GX printer driver KYOCERA Document Solutions Inc.
 Legal Notes Unauthorized reproduction of all or part of this guide is prohibited. The information in this guide is subject to change without notice. We cannot be held liable for any problems arising from
Configuring and Managing the IP Camera
 CHAPTER 3 The Cisco Video Surveillance IP Camera provides configuration windows that you use to configure and manage the IP camera. This chapter explains how to access the configuration windows, describes
Luminis AiO Dedicated Support Line: T: User Guide
 Luminis AiO Dedicated Support Line: T: 0844 561 0514 User Guide Contents Rear Connection Diagram 2 Introduction 3 Normal Usage 3 Manage my Media 4 Edit my Templates and Media 5 Manage Multimedia Playlist
Aurora Multi-image System Control Software. User Manual
 Aurora Multi-image System Control Software User Manual Product Information Model: Aurora Controller Software Version: V010200 Release Date: January 18th, 2017 Company OSEE TECHNOLOGY CO., LTD. Contact
SLS-ENVR16 Network Video Recorder V2.1 Quick Setup Guide
 SLS-ENVR16 Network Video Recorder V2.1 Quick Setup Guide The SLS-ENVR16 series NVR is an intelligent and compact appliance that provides a network interface to monitor, record and playback video from up
Velodyne LiDAR Sensor Firmware Update
 1 Velodyne LiDAR Sensor Firmware Update Technical Bulletin Revision Date: February 9, 2018 Phoenix LiDAR Systems 3384 Robertson Pl, Ste 102 Los Angeles, CA 90034 www.phoenixlidar.com +1.323.577.3366 info@phoenixlidar.com
Media Player Mdea User Manual
 Media Player Mdea User Manual Version: V04 Date: 2015-07-31 CONTENTS 1 System Overview... 1 2 System Features... 1 3 Technical Specifications:... 2 4 System Solutions... 3 5 Software Application... 3 5.1
ADOBE DREAMWEAVER CS4 BASICS
 ADOBE DREAMWEAVER CS4 BASICS Dreamweaver CS4 2 This tutorial focuses on the basic steps involved in creating an attractive, functional website. In using this tutorial you will learn to design a site layout,
Copyright and Trademark Notices
 Copyright and Trademark Notices Copyright 2011 VXL Instruments Limited. All Rights Reserved. Information in this document is subject to change without prior notice and does not represent a commitment on
PIVOT CMS CLIENT SOFTWARE USER MANUAL
 PIVOT CMS CLIENT SOFTWARE USER MANUAL 1 CMS USER GUIDE 1.1 PC REQUIREMENT Recommended PC Requirement OS CPU VGA RAM HDD Graphics Card OS CPU VGA RAM HDD Windows Vista, 7 or higher Intel Core2Quad Q9400
GRAND IP VIDEO SERVER PRO. User s Manual INDEX
 INDEX GRAND IP VIDEO SERVER PRO Video & Audio Transmission/ iphone Web Browser Support User s Manual ISSUE:Mar 16, 2010 1. Package Contents.... 1 2. Introduction.... 1 3. System Requirements...... 1 4.
GV-VMS. New Feature Guide V VMSV FG-B
 GV-VMS New Feature Guide V15.10.1.0 VMSV151010-FG-B 2016 GeoVision, Inc. All rights reserved. Under the copyright laws, this manual may not be copied, in whole or in part, without the written consent of
BRIGHTAUTHOR RELEASE NOTES
 Release Notes April 7, 2013 BRIGHTAUTHOR RELEASE NOTES BrightSign, LLC. 16795 Lark Ave., Suite 200 Los Gatos, CA 95032 408-852-9263 www.brightsign.biz BrightAuthor Requirements PC with Windows Vista or
NVR-0316 User s Manual 1 NVR User s Manual. Version 1.0.0
 NVR-0316 User s Manual 1 NVR-0316 User s Manual Version 1.0.0 2 NVR-0316 User s Manual Table of Contents Hardware... 4 Overview... 4 LED & Buttons Definitions... 4 Connect to the NVR... 5 Use NVR Search
Flipping Book Publisher for Image also provides different output methods for you to publish your
 Note: This product is distributed on a try-before-you-buy basis. All features described in this documentation are enabled. The unregistered version will be added a demo watermark. About Flipping Book Publisher
SAMSUNG ALL-IN-ONE SECURITY SYSTEM
 Quick Start Guide KIT MODEL SDH-B74041/SDH-B74081 DVR MODEL SDR-B74301 SAMSUNG ALL-IN-ONE SECURITY SYSTEM Thank you for purchasing the Samsung DVR Security System. Follow the simple steps in this guide
Manual Download. Please visit SUNIX website by searching keyword isafe or KEY-256UN1 for detail.
 Manual Download Please visit SUNIX website http://www.sunix.com by searching keyword isafe or KEY-256UN1 for detail. 1 User s Manual Copyright Copyright 2014 SUNIX Co., Ltd. All Rights Reserved. No part
VNNOX Cloud-Based Publishing Service XI'AN NOVASTAR TECH CO.,L User Guide (Pro) Product Version: Document Number: V6.5.0 NS
 Product Version: Document Number: V6.5.0 NS") VNNOX Cloud-Based Publishing Service XI'AN NOVASTAR TECH CO.,L (Pro) Product Version: Document Number: V6.5.0 NS170100148 Copyright 2018 Xi an NovaStar Tech Co., Ltd. All Rights Reserved. No part of this
VNNOX Cloud-Based Publishing Service XI'AN NOVASTAR TECH CO.,L (Pro) Product Version: Document Number: V6.5.0 NS170100148 Copyright 2018 Xi an NovaStar Tech Co., Ltd. All Rights Reserved. No part of this
exacqvision Web Service Configuration User Manual Version 9.4
 exacqvision Web Service Configuration User Manual Version 9.4 www.exacq.com 1 of 12 June 12, 2018 Information in this document is subject to change without notice. Copyright 2008-2018, Exacq Technologies,
Genie XMS Central Management Software
 Enterprise-Level, Intelligent Analysis, Distributed Connectivity User s Manual Copyright EverFocus Electronics Corp, Release Date: January, 2015 Notice: The content is subject to change without notice.
DMS Local. User Manual. For Projector Management V 1.01
 DMS Local User Manual For Projector Management V 1.01 2 Copyright Copyright Copyright 2018 BenQ Corporation. All rights reserved. No part of this publication may be reproduced, transmitted, transcribed,