Océ CS9050. Operation Instructions. Eco Solvent
|
|
|
- Colleen Heath
- 6 years ago
- Views:
Transcription

1 Océ CS9050 Operation Instructions Eco Solvent
2
3 Copyright notice COPYRIGHT 19/6/08 Océ-Technologies B.V.All rights reserved. Océ-Technologies B.V. reserves the right to modify the information contained in this manual at any time without prior notice. This document may not be reproduced by any means, in whole or in part, without written permission of the copyright owner. This document is furnished to support the Océ CS9050 series printers. In consideration of the furnishing of the information contained in this document, the party to whom it is given, assumes its custody and control and agrees to the following: The information herein contained is given in confidence, and any part thereof shall not be copied or reproduced without written consent of Océ-Technologies B.V. This document or the contents herein under no circumstances shall be used in the manufacture or reproduction of the article shown and the delivery of this document shall not constitute any right or license to do so. 19 June 2008 Published: Océ-Technologies B.V., St. Urbanusweg 43 Venlo, The Netherlands, P.O. Box 101, NL 5900 MA Venlo AP Revision 1.0 3
4 4 AP Revision 1.0
5 Table of contents Chapter 1 Safety instructions Compliance with the following regulations Managing VOCs Handling inks + waste Warnings, cautions and notes Safety instructions Warning labels Handling the operation procedure labels Chapter 2 Product overview Names of parts and functions Front section Rear section Operation Panel In-The-Box contents Items in the printer box Items in the Waste fluid tank box Items in the accessory bag Items in the starter kit Items in the stand box Installation requirements Installation environmental conditions for installation Installation space AP Revision 1.0 5
6 Chapter 3 Basics Power cable connection Connection procedure Connecting the printer to PC System requirements Preparing cables Connecting a network interface cable Switching the power ON/OFF Switching the power ON Switching the power OFF Installing ink cassettes for the first time Replacing ink cassettes Disposal of waste fluids Disposal period Disposal method Transfer and transportation Transferring the printer Transporting the printer Handling and installing media Installing roll media Setting roll media Performing a nozzle check Head height adjustment Media feed compensation AP Revision 1.0
7 Chapter 4 Periodical maintenance Done by end user Cleaning the printer Cleaning the outer case Cleaning the inside of the printer Head cleaning Cleaning the cleaning wiper Done by Authorized Océ Technician Periodical replacement of parts Periodical inspection part list Chapter 5 Menu overview AP Revision 1.0 7
8 8 AP Revision 1.0
9 Safety instructions Chapter 1 Safety instructions 1 This chapter explains the installation of this printer, warning terms that operators need to know, caution items and warning labels on the printer main unit. Important When installing and operating this printer, be sure to follow the directions and warnings in this guide. 1.1 Compliance with the following regulations The CE marking is a mandatory European marking for certain product groups to indicate conformity with the essential health and safety requirements set out in European Directives. By affixing the CE marking, the manufacturer, his authorized representative, or the person placing the product on the market or putting it into service ensures that the item meets all the essential requirements of all applicable EU directives and that the applicable conformity assessment procedures have been applied. Your product is designed and manufactured with high-quality materials and components, which can be recycled and reused. When this crossed-out wheeled bin submenu is attached to a product, it means the product is covered by the European Directive 2002/96/EC - WEEE regulation. Please inform yourself about the local separate collection system for electrical and electronic products. Please act according to local rules and do not dispose of your old products with your normal household waste. The correct disposal of your old product will help prevent potential negative consequences for the environment and human health. AP Revision 1.0 9
10 Safety instructions 1.2 Managing VOCs During the operation of the Océ CS9050 volatile organic compounds (VOCs) will release originating from the Eco-solvent ink. In order to avoid any health risk the user needs to take all necessary precautions in accordance with all applicable local, state and federal regulations. Océ recommends a minimum ventilation of 150 m3/hr. This means that for a Océ CS9050 installed in a room with a volume of 50 m3, a ventilation rate of at least 3 times per hour is necessary i.e. the room volume of 50 m3 has to be refreshed three times per hour. The recommended ventilation should be applied in case the printer is used at nominal printing speed (7m2/h) at daily print volumes of 21 m2/day (3 times the average intended use). In case of more intensive use of the printer, the ventilation frequency should be increased accordingly. 10 AP Revision 1.0
11 Safety instructions 1.3 Handling inks + waste Before handling inks / cleaning fluids and their waste, please read the Material Safety Data Sheets (MSDS) and the labels for important health, safety and environmental information carefully. All safety data sheets are periodically updated. These sheets and their translations can be found on the MSDS CD. Only use original manufacturer s ink and appropriate cleaning liquid. Before installing an ink holder, shake it gently. Doing so will preserve print quality. When ink is moved from a cold place to a warm place, keep the ink for three hours or more in the new printing environment before printing. Do not disassemble ink holders. Otherwise, ink may get in your eyes or on your skin. A disassembled ink holder can not be used either. When refilling ink, use original manufacturer s ink. Our Océ printers are designed to use original ink. If you use ink which are not produced by the original manufacturer: Printing might become blurred and the end of the ink in the holder might not be detected correctly. Any problems caused by using an ink holder other than those recommended above will not be covered by the warranty, and repair expenses will be paid by the customer. For handling waste: refer to section 13 on the MSDS-sheet. Inks / Waste General advice: wear safety glasses and gloves especially when handling the waste ink. After spill: remove contaminated clothing. After inhalation: if difficulties occur after vapour / aerosol has been inhaled, remove to fresh air and seek medical attention. After skin contact: wash thoroughly with soap and water. After eye contact: wash affected eyes for at least 15 minutes under running water while the eyelids are held open. After swallowing: rinse mouth and drink plenty of water. Never induce vomiting. 1.4 Warnings, cautions and notes 1 Safety terms in this manual and the contents of warning labels attached to the printer are categorized into the following three types, depending on the degree of risc (or the scale of accident). Read the following explanations carefully and follow the instructions in this manual. Safety terms Important Caution s Details Must be followed carefully to avoid death or serious bodily injury. Must be observed to avoid bodily injury (moderate or light) or damage to your equipment. Contains important information and useful tips on the operation of your printer. AP Revision
12 Safety instructions 1.5 Safety instructions Machines must be installed according to Océ s Installation Guide also after moving machines to another location; maintenance needs to be done according to the maintenance manual. To prevent fire or electrical shock, never use a power supply source other than the one rated for the product in the country where you purchased the product. To prevent fire or electrical shock, machines must be connected to a properly grounded electrical power outlet. Do not connect the power cable to a power strip or a power source shared by other electrical devices. Make sure that no foreign substances such as dust etc. are stuck to the power plug. Make sure that the power plug is firmly inserted to the edge of the power socket. Use only the provided power cable. To prevent fire or electrical shock, follow the instructions below when handling the power cable: Do not cut or modify the cable. Do not put heavy objects on the cable. Do not bend, twist, knot or pull the cable. Do not wire the cable near equipment that generates heat. Do not use the cable with any other electrical device. Do not handle the cable with wet hands. Be aware of all caution and warning labels to avoid potentially hazardous situations. Do not disable any safety precautions systems. Do not operation the unit unless all parts are mounted. Do not stand on or place heavy objects on your machine. Doing so may result in the machine tipping or falling over and causing injury. Do not place the machine in humid and dusty areas or in areas exposed to flammables. Doing so may result in electrical shock or fire. Do not place the machine in the following areas. Doing so may result in the machine tipping or falling over and causing injury. Unstable surfaces Sloping floors Areas subject to vibration by other equipment. Do not cover the ventilation hole of your machine with cloth, such as a blanket or table cloth. Doing so could obstruct ventilation and cause fire. Do not insert or drop metal or inflammable objects into openings, such as ventilation outlets. Doing so may result in electrical shock and fire. Do not touch the media guide during printing. It is hot and may cause a burn. Do not touch the media feed slot, platen or media guide while heaters are operating. They are hot and may cause a burn. Keep the machine horizontally during transportation. To prevent back pains and other injuries, always work with at least 4 people to unpack or move the machine. 12 AP Revision 1.0
13 Safety instructions Stop using your machine if a liquid has been spilled into it. This may cause electrical shock or fire. Switch the machine off as soon as possible, unplug the power cord, and contact your local Océ representative. Be sure to power OFF the machine and unplug the power cable from the outlet before cleaning the machine. Use a damp cloth to clean the machine. Do not use thinner, benzene, alcohol or other active agents. Doing so may result in damage or paint peeling from the casing. Do not bend or pull the waste fluid tube. Doing so may cause waste fluid to leak out and malfunction of the product. Do not tilt the machine, place it against a wall or turn it upside down. Doing so may cause ink to leak inside the machine. Movement after transport is also not covered by the warranty. When cutting roll media, be careful of the following. Incorrect handling can result in injury to the hands and fingers from the razor blade. When holding the media, do not place fingers over the media cut groove. Move the razor blade slowly along the media cutting groove. Do NOT transport the machine to another room without contacting your local Authorized Océ representative. 1 AP Revision

14 Safety instructions 1.6 Warning labels Be sure to read and understand the safety warnings before handling the printer. A warning label is used on parts of the printer which especially needs your attention. Understand the locations and the descriptions of the danger associated with each label before operating the printer Handling the operation procedure labels N Description AP Revision 1.0
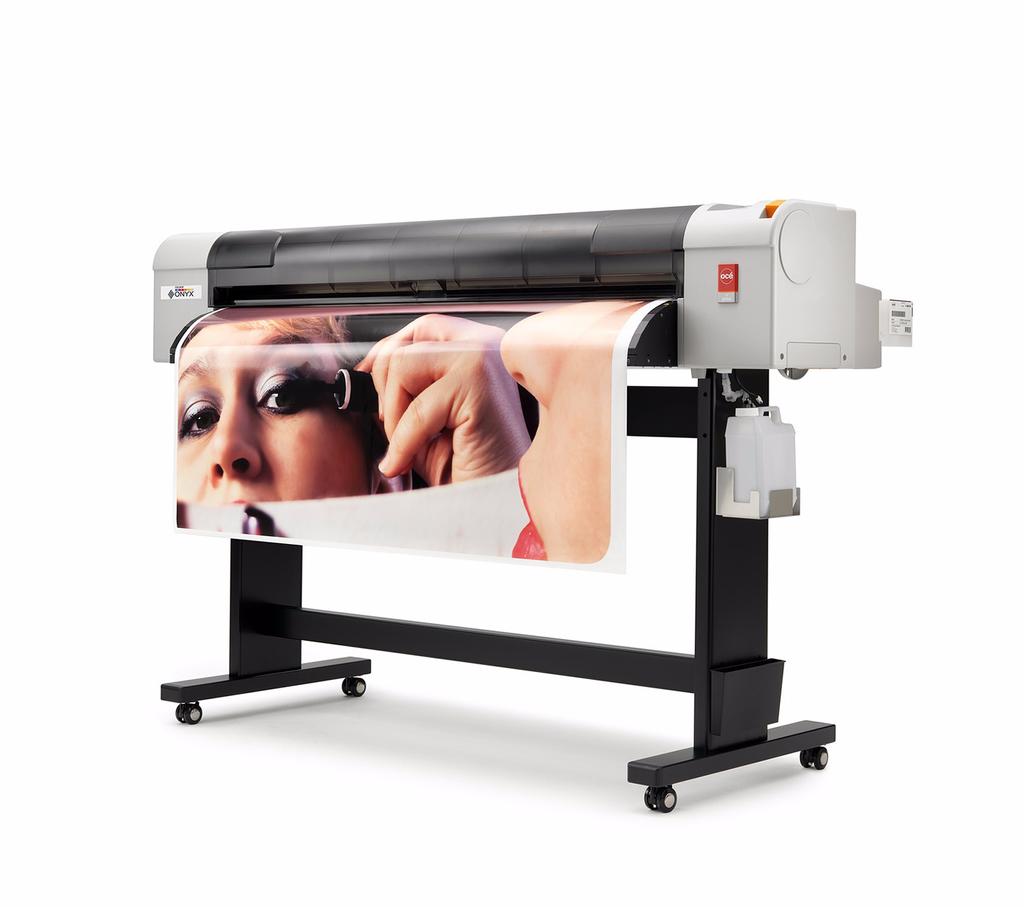
15 Product overview Chapter 2 Product overview This chapter explains the features of the printer along with the names and functions of each part. 2.1 Names of parts and functions 2 This section explains the names and functions of each part. Be sure to read and understand the safety warnings before handling the printer Front section N Description Function 1 Media loading lever Used to release or fix the media 2 Operation panel 3 Front cover Operation condition setting, printer display and various function settings are performed. Used to prevent that a user comes in contact with the driving mechanism during the print operations. It is normally closed 4 Stand To install the printer on a level floor. 5 Book holder Quick reference manual etc. can be stored here. 6 Media guide Used to feed media smoothly when the media is set or printed. The printer has also an incorporated heater (after heater) to dry ink. AP Revision
16 Product overview N Description Function 7 Media cut groove 8 Pressure rollers 9 Platen Installed inside of the front cover. Used to cut media straight. Installed inside of the front cover. Press and hold the media when printing. Installed inside of the front cover. The heater (platen heater) to dry ink is installed Rear section N Description Function 1 AC inlet Used to connect the power cables 2 Network interface connector Connects a network interface cable 3 USB connector Not used in this printer 4 Scroller receiver Set the scroller when roll media is used. 5 Media feed slot Used to feed media 6 Ink cassette slot Insert the ink cassette 7 Media guide 8 Waste fluid tank 9 Waste fluid valve Used to feed the media smoothly through. The heater (pre heater) to warm media is installed Used to collect waste ink discharged from the printer. Open and close when discharging the waste fluid from the waste fluid tank. the default position is closed. 16 AP Revision 1.0
17 Product overview Operation Panel 2 The operation keys are assigned with different functions and names depending on the printer status(normal or Setup menu display) AP Revision
18 Product overview Operation keys N Key Normal Setup menu display 1 [Menu] key 2 [Enter] key [Cleaning] key 3 [Cancel] key 4 Shifts to the Setup menu. Restarts printing during printing. Press and hold this key for two seconds or more to clean the print head. When printing: Forcefully terminates printing and deletes one file of the remaining data. When receiving or analysing: Deletes data that are already received and analysed, and delete the next data. [<] key [Nozzle Check] key 5 [>] key 6 [Backward ] key Press and hold this key for two seconds or more to perform Nozzle Check printing. Sets Cleaning Mode. The lamp of Cleaning Mode lights up in green. Media is fed in the reverse direction. [+] key Shifts from Setup menu display to Normal. Shifts to the selected menu The setting is determined and saved. Returns to the previous menu hierarchy. Changes made in the setting are discarded. Shifts from Setup menu display to Normal. The following menu changes the set value. Origin menu Down the menu level in the directory tree. Changes to the previous item in the displayed menu. The setting is changed to the forward direction. The numeric value is increased during numerical input. 18 AP Revision 1.0
19 Product overview N Key Normal Setup menu display 7 [Forward ] key [ ] key 8 [Power] key Media is fed in the forward direction. Pause to print during printing. Switches the printer ON and OFF. Changes to the previous item in the menu. The setting is changed to the reverse direction. The numeric value is decreased during numerical input. Switches the printer ON and OFF. 2 AP Revision
20 Product overview Display section N Name Color Status Description 9 Power lamp Green 10 Data lamp Orange 11 High lamp Green 12 Low lamp Green 13 Wave lamp Green 14 Fine &S.Fine lamp Green 15 Strong lamp Green Lamp ON Lamp blinks Lamp OFF Lamp ON Lamp blinks Lamp OFF Lamp ON Lamp OFF Lamp ON Lamp OFF Lamp ON Lamp OFF Lamp ON Lamp OFF Lamp ON Lamp OFF Power ON. An error has occurred. Error content is displayed on the LCD. Power OFF. Analysing received data. Under printing. Receiving data. Data is not received and analysed. The head height is set to High. The head height is set to Low. The head height is set to Low. The head height is set to High. The Effect menu is set to Wave or Fuzz. The Effect menu is set to None. The Effect menu is set to Fine or Super Fine. The Effect menu is set to Wave or Fuzz. When the Wave lamp is switched OFF, the Effect menu is set to None. Cleaning Mode is set to Strong. When the Normal lamp is also switched on, Cleaning Mode is set to Economy. Cleaning Mode is set to Normal. 20 AP Revision 1.0
21 Product overview N Name Color Status Description 16 Normal lamp Green 17 LCD display section Lamp ON Lamp OFF Cleaning Mode is set to Normal. When the Strong lamp is also switched on, Cleaning Mode is set to Economy. Cleaning Mode is set to Strong. Displays operation status of the printer or an error message. 2 AP Revision
22 Product overview 2.2 In-The-Box contents Items in the printer box N Description Qty 1 Printer main body 1 2 A0 Scroller 3 inch 1 3 Waste fluid tank box 1 4 Accessory bag 1 5 Power cable 1 22 AP Revision 1.0
23 Product overview Items in the Waste fluid tank box N Description Qty 1 Waste Fluid tank 1 2 Waste fluid tank holder 1 3 Waste fluid tank holder stabilizing screws Items in the accessory bag N Description Qty 1 Operation manual CD 1 2 Quick reference 1 3 Installation manual 1 4 Poly-knit wiper 10 sheets AP Revision
24 Product overview Items in the starter kit N Description Qty 1 Power cable EU 4.5m rightangle 1 2 Power cable UK 4.5m rightangle 1 3 Ink starter kit Cleaning cassettes Ink cassettes User s Guide (Océ Europe version) 1 5 Installation guide 1 6 Wave stitching documentation 1 7 Polyknit wiper 30 8 PE gloves 100 Pcs 9 Eco-Solvent cleaning 250 ml 10 CD with Océ manuals 1 11 Océ CS9050 name plate 1 12 Powered by Onyx decall 1 24 AP Revision 1.0
25 Product overview Items in the stand box N Description Qty 1 Left support 1 2 Right support 1 3 Caster section (left, right) 2 4 Central beam 1 5 Stabilizer 1 6 Book holder 1 7 Hexagon socket head cap screw 12 8 Butterfly bolt 2 9 Hexagon wrench 1 AP Revision
26 Product overview 2.3 Installation requirements Installation environmental conditions for installation Do not open the front cover during printing. If the front cover is opened, printing will be interrupted. Printing restarts if you close the front cover. However, you are not guaranteed to have high print quality. Be sure to read and understand the safety warnings before handling the printer. Floor strength of the installation place Power specifications Environmental conditions Power supply Frequency range Power capacity Operative condition Guaranteed range of printing accuracy Change rate Archiving environment More than 2940 Pa (300 kg/m²) AC 90 V V 50/60Hz 10A or more Temperature: 20 C to 32 C Humidity: 40% to 60%, No condensation Temperature: 20 C to 32 C Humidity: 40% to 60% Temperature: Within 2 C per hour Humidity: within 5% per hour Temperature: -20 C to 60 C Humidity: 20% to 80% no condensation Concerning temperature and humidity, avoid: Places where temperature or humidity may rapidly change, even though within the required conditions. Places that receive direct sunlight, increased illumination or direct air, for example from an air conditioner. To keep the temperature and humidity constant, install this product in a location where the air condition is adjustable. 26 AP Revision 1.0

27 Product overview Installation space Install the printer on a levelled floor which has enough strength to support the weight of the entire machine. 2 AP Revision
28 Product overview 28 AP Revision 1.0
29 Basics Chapter 3 Basics 3.1 Power cable connection This section explains power cable connection. 3 Be sure to use the power cable supplied with the printer. Using other power cables can cause an electric shock or fire. Do not use a damaged power cable. It could lead to an electric shock and fire Connection procedure Be sure to read and understand the safety warnings before handling the printer. Step 1: Make sure that the printer is switched OFF. The power is ON when the [Power] key of the operation panel is pressed in. Press the key once again to switch OFF the power. AP Revision
30 Basics Step 2: Connect the power cable to the AC inlet on the back of the printer. N Description 1 AC inlet 2 Power cable Step 3: Insert the power cable plug firmly in the socket. If a power cable is damaged, contact your local Océ representative. If you cannot use earth terminals nor find any of them, contact your local Océ representative. Do not unplug the power cables when the printer is ON. If the power cables have been unplugged, leave the printer for at least 1 minute before plugging the cables back in. 30 AP Revision 1.0
31 Basics 3.2 Connecting the printer to PC System requirements The following are the system requirements for this printer and software server RIP (optional). Operating system CPU Memory (RAM) Hard disk free space Windows 2000 Professional, Windows XP Pentium III processor 1 GHz or more 512 MB or more 10 GB or more 3 The required memory varies depending on the application software or the print data type. A large hard disk and memory are recommended Preparing cables The printer is equipped with a network interface to connect with a PC. You need a network interface cable to connect a PC with this printer. Prepare the cable depending on the PC that it will be connected to Connecting a network interface cable Step 1: Step 2: Switch OFF both the printer and PC. Insert the connector of the network interface cable into the network interface connector located in the back of the printer. N Description 1 Network interface cable 2 Network interface cable connector AP Revision
32 Basics Step 3: Fix the network interface cable to the cable clamp. N Description 1 Network interface cable 2 Cable clamp Step 4: Connect the other connector of the network interface cable to your PC. For network setting on the side of the printer, refer to the Panel setup menu in the User s Guide. 32 AP Revision 1.0
33 Basics 3.3 Switching the power ON/OFF Switching the power ON Step 1: Press the [Power] key on the operation panel to switch ON the printer. The Power lamp on the operation panel lights up in green. The printer starts initial operation. When the initial operation is complete, the printer enters Normal. 3 If there is a problem during the initial operation, a message is displayed on the operation panel and the printer may stop operating. In case the operation stops, refer to the Troubleshooting chapter in the User s Guide. Be sure to read and understand the safety warnings before handling the printer Switching the power OFF Step 1: Step 2: Verify the following regarding the operational condition of the product. Printing or other operations are not in progress. The operation panel display is Normal. The Low lamp on the operation panel lights up in green. Press the [Power] key on the operation panel to switch OFF the printer. The Power lamp on the operation panel switches OFF. If the [POWER] key is pressed or the power indication light lights up green, the power is ON. Press the key once again and switch OFF the power. "Power OFF" is displayed on the operation panel. If the head height is set to High, "Change Head Gap Low" is displayed on the operation panel and the procedure to switch the power OFF stops. To restart the procedure, return the head height to Low. AP Revision
34 Basics All the lamps on the operation panel and the LCD monitor are switched OFF. The printer automatically switches the power OFF. If there is a problem during the power OFF operation, a message is displayed on the operation panel and the printer may stop operating. In case the operation stops, refer to the troubleshooting chapter in the User s Guide. After switching OFF the printer, wait for 10 seconds or longer to switch it ON again. Step 3: When not using the printer for a long period, push the media loading lever to the back. N Description 1 Media loading lever 34 AP Revision 1.0
35 Basics 3.4 Installing ink cassettes for the first time When filling ink in the machine, use the ink of original product manufacturer. This printer has been adjusted for the use of genuine ink cassettes. In case of using ink cassettes which are not a product of the original manufacturer, Printing might become blurred and end of ink in the cassette might no longer be correctly detected. The problems caused by doing so will not be covered by the warranty and repair expenses will be paid by the customer. Do not shake the ink cassettes strongly, this to avoid ink leaking out of the cassette. Do not disassemble the ink cassette. A disassembled ink cassette cannot be used. Make sure to use a dedicated cleaning fluid. Before installing the ink cassette, shake it gently. Doing so will preserve printing quality. When storing the ink cassettes in a cold room, be sure to take them out of stock at least 3 hours before using them. Insert or remove the ink cassettes not more than 10 times. If the ink cassette is inserted or removed 10 times or more, it cannot be used even if there is some remaining ink inside. A dedicated smart chip is included with the ink cassette for this printer. If you insert or remove the ink cassette during printing, information contained in the smart chip may be damaged and the ink cassette may be obsolete. 3 Be sure to read and understand the safety warnings before handling the printer. Step 1: Step 2: Switch the unit ON. The printer starts the initializing operation. The operation panel displays [Start ink charge ==> E], press Enter. The operation panel displays during washing. The shipping liquid is being flushed out. If the operation panel displays Wash retry? select Yes. (Repeat Wash retry until cleaning liquid is coming through to the tank, then select NO. The operation panel displays insert cleaning cartridges. Take a cleaning cassette out of the bag. AP Revision
36 Basics Step 3: Install the cleaning cartridge into the ink cartridge slot. Keep the mark of the cleaning cartridge facing up and insert it into the slot of the printer. Insert the cleaning cartridge all the way to the end of the slot. N Description 1 Cleaning cassette 2 ink cassette slots Step 4: Step 5: The printer starts filling cleaning fluid. After the cleaning fluid is filled, take out the cleaning cartridge. "During washing" is displayed on the operation panel and the printer starts Head washing. After the Head washing is complete, "Insert InkCartridges" is displayed on the operation panel. After the Head washing is complete, take out the ink cartridge from the bag and shake it gently two to three times. Slots for ink cartridges are specified depending on the colours of the ink cartridge. Match the mark on each slot with the color of the ink cartridge. Keep the mark of the ink cartridge facing up and insert it into the slot of the printer. Insert the ink cartridge all the way to the end of the slot. Ink Refill//% is displayed on the operation panel and ink replenishment starts. Ink replenishment takes about 4 minutes. Ink filling operation and pause operation are repeated during the ink replenishment. When 100% is displayed, the ink replenishment is complete. Do not perform the following operations during ink filling. Do not switch the printer OFF. Do not unplug the power cable. Do not open the front cover. Do not push the media loading lever backward. 36 AP Revision 1.0
37 Basics After the ink replenishment is complete, "Media End" is displayed on the operation panel. If the printer perform the nozzle check printing immediately after initial ink replenishment is complete, the following results may occur. Printed lines become blurred. The data is partially not printed. In such cases, refer to Head cleaning in the User s guide" and refill a small amount of ink. Then, check the printing result. If there is no improvement in the print result even after refill a small amount of ink, leave the printer unused for an hour or more. Then, refill a small amount of ink again and check the print result. If there is still no improvement, contact your local Océ representative Replacing ink cassettes Replacement time When [****] InkNearEnd is displayed on the operation panel. This message is displayed when there is a small amount of ink remaining in the ink cassette. The alarm buzzer sounds. To stop the buzzer, press the [ENTER] key on the operation panel. Replace with the new ink cassette. When [****]InkEnd is displayed on the operation panel. This message e is displayed when there is no ink remaining in the ink cassette. Type The alarm buzzer sounds. To stop the buzzer, press the [ENTER] key on the operation panel. Immediately replace the empty cassette with a one. Our genuine ink cassettes which can be used with the CS9050 are as follows. Description Model N IJC930 Eco-Solvent ink cartridge Black 0.22l IJC930 Eco-Solvent ink cartridge Cyan 0.22l IJC930 Eco-Solvent ink cartridge Magenta 0.22l IJC930 Eco-Solvent ink cartridge Yellow 0.22l AP Revision
38 Basics Replacement steps Do not shake ink cassettes. Doing so may cause ink leakage Do not disassemble the ink cassette. A disassembled ink cassette cannot be used. When an ink cassette is moved from a cold place to a warm place, keep the ink cassette unused for 3 hours or more in the printing environment. Do not refill the ink cassettes. Doing so may result in incorrect printing. Insert or remove the ink cassette at the time of replacement only. Inserting or removing ink cassettes except at the time of replacement may result in incorrect printing. Do not replace ink cassettes when the printer is switched OFF. Doing so may result in incorrect detection of the remaining ink and result in abnormal printing behaviour. A used ink cassette should be put in a vinyl bag or a bag used for this kind of waste. Disposal of an ink cassette has to be done in compliance with the regulations and instructions of the local authorities. Open the ink cassette solvent resistant blister just before attaching the ink cassette into the cassette slot. Leaving the ink cassette open for a long time may result in an abnormal print. Replace the ink cassette within 6 months after installing it into the printer. Insert or remove the ink cassette not more than 10 times. This to prevent that the smart chip or its reader would be worn out and malfunction in this way. If inserted or removed more than 10 times the ink cassette could malfunction even if there is some ink remaining. The printer resumes printing when you have replaced (and) ink cassette(s) after an ink end occurred during printing. Be sure to read and understand the safety warnings before handling the printer. Step 1: Step 2: Step 3: Step 4: Verify that the printer has been switched ON. Remove the empty ink cassette from the ink cassette slot. Unpack the next ink cassette and insert it into the cassette slot. Verify that the printer returns to the Normal mode. 38 AP Revision 1.0
39 Basics 3.5 Disposal of waste fluids Disposal period Dispose of waste fluids in the following cases: When the waste fluid tank is more than half full. When Waste Ink Tank Full is displayed on the operation panel Disposal method 3 Important The waste fluid from the printer is industrial waste. Proper waste fluid disposal according to industrial waste disposal laws and ordinances of you local government is required. Consign disposal of waste fluids to a specialized processor. Step 1: Step 2: Step 3: Ready an empty container such as a supply waste fluid bottle, to contain the waste fluid. Lay a protective material on the floor under the waste fluid tank. Open the waste fluid valve, and transfer the waste fluid to the container. When transferring the waste fluid to the empty container, the waste fluid may splash. When transferring the waste fluid to the empty container, put the container underneath and close the waste fluid valve afterwards. N Description 1 Waste fluid valve 2 Empty container Step 4: Step 5: Step 6: After Transferring the waste fluid to the empty container, close the waste fluid valve securely. Wipe the opening of the waste fluid valve with a cloth, etc. Dispose of the waste fluid as an industrial waste product. AP Revision

40 Basics 3.6 Transfer and transportation Transferring the printer When using the dedicated stand, transfer the printer according to the procedure below. Be sure to read and understand the safety warnings before handling the printer. Pre-transfer steps Step 1: Step 2: Step 3: Step 4: Step 5: Dispose of waste fluid Refer to Disposal of waste fluids on page 39. Make sure that the printer is switched OFF. Check that the butterfly bolts (2) attaching the stand and the printer are not loosen. Check that the printer head is in the rightmost position Bind the CR belt in the centre section of the printer by fastening the CR belt clip around it. N Description 1 CR belt 2 CR belt clip Step 6: Step 7: Remove the scroller. Remove all the cables, such as the power cable. 40 AP Revision 1.0
41 Basics Step 8: Release the lock of the caster and transfer it. The casters supplied with the dedicated stand are manufactured for little movement in flat indoor areas, not for transporting equipment. When moving the printer outdoors in places with big step differences, move the stand and the printer separately. 3 N Description 1 Caster Reinstalling the printer Step 1: Step 2: Step 3: Step 4: Step 5: Step 6: Step 7: After moving the printer, follow the procedure below to set it ready for use. Select a suitable place for installation Refer to Installation requirements on page 26. Move and install the printer to the location. Check the butterfly bolts (2) fixing the stand and the printer are well fixed. Attach all needed cables. Perform a nozzle check, and then confirm that there is no clogging in the print head. Refer to Performing a nozzle check on page 48 Perform Alignment. AP Revision
42 Basics Transporting the printer Pre-transportation procedure Step 1: Step 2: Step 3: Step 4: Step 5: Step 6: Step 7: Switch ON the unit Confirm that the printer functions correctly. Remove all ink cassettes. Switch OFF the printer. Dispose of waste fluid Refer to Disposal of waste fluids on page 39. Check that the printer head is in the rightmost position Bind the CR belt in the centre section of the printer by fastening the CR belt clip around it. Step 8: Remove the scroller. Step 9: Remove all the cables, such as the power cable. Step 10: Remove the printer from the stand. Step 11: Repack the printer. Post-transportation procedure Step 1: Perform unpacking, assembling and setting the printer as described in the installation guide. 42 AP Revision 1.0
43 Basics 3.7 Handling and installing media It is recommended to use tested and compatible media for this printer Installing roll media This section explains how to load roll media. Use the exclusive scroller included with this printer for loading roll media. 3 The following roll media can be set on the scroller included with this printer. Media tube diameter: three inches, outside diameter of media: 150 mm or less, weight: 19 kg or less Follow the procedure below to load roll media. Caution Load roll media on an even surface such as a desk. If you load roll media with the scroller standing vertical, there is a possibility that the scroller might get damaged. Step 1: Step 2: Load roll media to the scroller so that it is rolled in an anti clockwise direction when viewed from the fixed flange. Push the roll media until its core hits the right edge of the fixed flange. N Description 1 Fixed flange 2 Roll media AP Revision
44 Basics Step 3: Attach the movable flange firmly to the roll media core. N Description 1 Movable flange 2 Roll media Step 4: Set the scroller to the scroller receiver facing the fixed flange to the side of the ink cartridge slot. N Description 1 Scroller 2 Fixed flange 3 Ink cassette slot 4 scroller receiver 44 AP Revision 1.0
45 Basics Setting roll media This section explains how to set roll media. Step 1: Switch ON the unit. Caution Step 2: Step 3: Do not operate the media loading lever during initial operation. The print head portion may touch the pressurizing roller portion, and cause a malfunction The printer starts the initializing operation. "Media End" is displayed on the operation panel. Push the media loading lever to the back. "Lever Up" is displayed on the operation panel. Set the roll media to the media feed slot. 3 If the roll media end gets loose, roll up the media again and load it. N Description 1 Roll media 2 Media feed slot Step 4: Open the front cover, and pull out the roll media. AP Revision
46 Basics Step 5: Holding the front edge of the roll media, roll it back using the scroller to remove a bend and slant. N Description 1 Roll media 2 Scroller Step 6: Pull the media loading lever forward. When loading the new roll media, cut the front edge of the media if it is not straight. Step 7: Step 8: Step 9: Close the front cover. The Media type setup menu is displayed on the operation panel. Press the [+] key or [ ] key to select the type of the loaded media. Press the [Enter] key on the operation panel. The media type is set. "Media Initial" is displayed on the operation panel and media initial operation starts. If the following operations are performed in the media type setup menu, the printer starts media initial operation without specifying a media type. Pressing the [Cancel] key on the operation panel. No keys on the operation panel are pressed for 10 seconds. After media initial operation is complete, "Ready to Print" is displayed on the operation panel and the display shifts to Normal. 46 AP Revision 1.0
47 Basics Step 10: Wind the roll media around the scroller to remove slack. N Description 3 1 Roll media 2 Scroller This completes media loading. AP Revision
48 Basics 3.8 Performing a nozzle check If the nozzle check result indicates that the checked points are blurred or missing, clean the print head. Step 1: Switch ON the printer and load the roll media. Refer to: Setting roll media on page 45 Step 2: Step 3: Step 4: Confirm that the printer functions normally. Press the [Nozzle Check] key on the operation panel for at least 2 seconds. Perform the nozzle check printing. Check the print sample and confirm that the checked points are blurred or missing. Step 5: If the nozzle check result indicates that the checked points are blurred or missing, clean the head. Refer to: perform a head cleaning in the user s guide. 48 AP Revision 1.0

49 Basics 3.9 Head height adjustment When used? Use the head height adjustment feature to prevent the print head from touching the media, when printing at high speeds or when using strongly curved media. If the head height adjustment lever is raised, high print quality will not be guaranteed. Do not open the front cover nor change the head height during printing. If the head height is changed, the head alignment will be changed and high print quality will not be guaranteed. 3 Procedure Step 1: Open the front cover. Step 2: Change the head height by moving the head height adjustment lever (orange). N Description 1 Head height adjustment lever Step 3: The High lamp on the operation panel lights up in green. Close the front cover. AP Revision
50 Basics 3.10 Media feed compensation After every printed swat, the media is fed a certain distance. Depending on the kind of media (weight, backing) another media feed compensation has to be set. This to avoid the following phenomenon: Printed swats overlap White lines between every swat. In such cases, follow the procedure below and adjust the media feed compensation value. Step 1: Display the Media feed compensation menu on the operation panel. Step 2: Press the [Menu] key on the operation panel Menu1: Setup>] is displayed on the operation panel. The operation panel shifts to the Setup menu display. Press the [>] key on the operation panel. Set1: MediaType is displayed on the operation panel. Press the [ENTER] key on the operation panel. Media: Type1 is displayed on the operation panel. Press the [+] key or [-] key on the operation panel to select the media type to use. Press the [ENTER] key on the operation panel. **>1: Print Mode is displayed on the operation panel. Press the [+] or [-] key to select **2: PF Adjust. Press the [>] key on the operation panel. PF1: Initial Print is displayed on the operation panel. Proceed to Media feed compensation menu. Perform an initial adjustment print. Press the [ENTER] key on the operation panel. FeedLength: 250mm is displayed on the operation panel. The length of media that is fed for the initial adjustment print is normally set to 250 mm. If you increase the feeding length, the accuracy of the media feed compensation improves. To change the feeding length, press the [+] or [-] key on the operation panel and change the set value. 50 AP Revision 1.0
51 Basics Press the [ENTER] key on the operation panel. Printing is displayed on the operation panel. Start Initial adjustment printing. 3 N Description 1 Feed length 2 Media feeding direction Step 3: Step 4: Step 5: When the initial adjustment printing is complete, the printer enters the Normal status. After the initial adjustment printing, cut the media. Measure the distance between the two pluses in the initial adjustment print using a ruler. Sets up Initial Adjust Change. Press the [+] key or [ ] key on the operation panel to select "PF2: Initial Change". Press the [Enter] key on the operation panel. "Init.: 250.0/250 mm" is displayed on the operation panel. Press the [+] key or [ ] key on the operation panel and enter the measured value in step 3. Press the [Enter] key on the operation panel. The initial adjustment value is saved. "PF2: Initial Change" is displayed on the operation panel. Performs confirm print. Press the [+] key or [ ] key on the operation panel to select "PF3: Confirm Print". Press the [Enter] key on the operation panel. "Feed Length: 250 mm" is displayed on the operation panel. The length of media that is fed for the initial adjustment print is normally set to 250 mm. If you increase the feeding length, the accuracy of the media feed compensation improves. To change the feeding length, press the [+] or [-] key on the operation panel and change the set value. AP Revision
52 Basics Press the [ENTER] key on the operation panel. "Printing" is displayed on the operation panel. Start Confirmation adjustment printing. N Description 1 Feed length 2 Media feeding direction Step 6: When the Confirm Print is complete, the printer enters Normal. After the confirmation adjustment printing, cut the media. Measure the distance between the two pluses in the confirmation adjustment print using a ruler. Then, confirm that the distance matches the feeding length when printing. If the distance does not match the feeding length, follow the procedure from Step 1 to Step 5 and readjust. If the distance matches the feeding length, proceed to step AP Revision 1.0

![Press the [+] key or [ ] key on the operation panel to select "PF4:Micro Print". Press the [Enter] key on the operation panel.](/docs-images/75/71560305/images/53-1.jpg "\"Printing\" is displayed on the operation panel. Start Micro adjustment printing.")
53 Basics Step 7: Perform Micro adjustment printing. Display the Media feed compensation menu on the operation panel in the same way as in step 1. Press the [+] key or [ ] key on the operation panel to select "PF4:Micro Print". Press the [Enter] key on the operation panel. "Printing" is displayed on the operation panel. Start Micro adjustment printing. 3 Step 8: After the micro adjustment printing is completed, "PF4:Micro Print" is displayed on the operation panel. Refer to the illustrations below and check the printing result. AP Revision
54 Basics Step 9: Sets up Micro Adjustment Change. Press the [+] key or [ ] key to select "PF5:Micro Change". Press the [Enter] key on the operation panel. "Micro: 0pulse" is displayed on the operation panel. Press the [+] key or [ ] key and enter the micro adjustment value according to the printing result in Step 7. Press the [Enter] key on the operation panel. The micro adjustment value is saved. "PF5:Micro Change" is displayed on the operation panel. Press the [Cancel] key on the operation panel several times. The operation panel returns to Normal. Step 10: The adjustment of media feed compensation value is complete. 54 AP Revision 1.0
55 Periodical maintenance Chapter 4 Periodical maintenance 4.1 Done by end user This section describes the periodical services requited on a CS9050 series printer. The periodical maintenance ensures stable printout quality of the machine. In the periodical maintenance, some service parts need to be checked, cleaned ore replaced. 4 Important Be sure to wear gloves when working with inks or cleaning liquid. Perform periodical inspections according to the table below. N Action Frequency 1 Clean the wiper Weekly 2 Clean around the bottom of the head Weekly 3 Replace the spitting box sponges bi-monthly "Do not insert or drop metal or other objects through openings of the printer. It could lead to an electric shock and / or fire. "When substances or liquids such as water entered the printer, do NOT use the printer. It could lead to an electric shock and/or fire. Immediately Switch OFF the printer. Disconnect the power plugs from the electric sockets. Contact your local Océ representative. Available articles for the end user and the order number N Description part N 1 PE gloves Handygrip (100 Pcs) Swabs & Applicator foam (50 Pcs) Eco solvent cleaning 250 ml AP Revision

56 Periodical maintenance Cleaning the printer Periodic cleaning is necessary to use the printer in good condition Cleaning the outer case Be sure to read and understand the safety warnings before handling the printer. This sub-section describes how to clean the outer case. Wipe out dust and dirt attached to the outer case by using a soft cloth Cleaning the inside of the printer This sub-section describes how to clean the inside of the printer. Follow the procedure below. Step 1: Open the front cover. Step 2: Remove paper powder and dust attached to the pressure rollers using a soft brush. Do not blow paper powder inside the printer using tools such as an air duster. It may cause an abnormal noise from the inside of the printer. N Description 1 Pressure roller 56 AP Revision 1.0
 area in the centre of the grid roller.")
57 Periodical maintenance Step 3: Apply a damp and tightly squeezed soft cloth to wipe out paper powder and ink attached to the platen and media guide. N Description 4 1 Platen 2 Media guide Step 4: Apply a damp and tightly squeezed soft cloth to wipe off the dirt of the unpainted (silver colour) area in the centre of the grid roller. N Description 1 Grid roller AP Revision

58 Periodical maintenance Clean the timing fence Step 1: Step 2: Open the front cover. clean the timing fence with a dry poly-knit wiper. N Description 1 Timing fence Clean the Y-rail Step 1: Step 2: Open the front cover. clean the Y-rail with a poly-knit wiper. N Description 1 Y-rail 58 AP Revision 1.0

59 Periodical maintenance Clean the P-rear sensor surface Step 1: Step 2: Open the front cover clean the P-rear sensor surface with a swab. 4 N Description 1 P-rear sensor AP Revision
60 Periodical maintenance Head cleaning If printed data is blurred or lacks part of it, clean the print head surface and nozzles (Head cleaning). Follow the procedure below to perform Head cleaning. When not using the printer for a long period (one week or more), perform a Head cleaning once a week. If not performing a Head cleaning, the print head is clogged. Doing so will preserve print quality. Remove media when cleaning. Cleaning with media loaded may lead head crashes Step 1: Step 2: Step 3: Confirm that the operation panel is Normal. Confirm that the media loading lever is returned to the front. Press the [>] key on the operation panel to select the cleaning mode. Step 4: Press the [Cleaning] key on the operation panel for at least 2 seconds. "Cleaning **%" is displayed on the operation panel. Start Head cleaning. After Head cleaning is complete, the operation panel shifts to Normal. If blurs or lacking parts in printed media do not disappear with one time of Head cleaning, perform Strong cleaning. 60 AP Revision 1.0

61 Periodical maintenance Cleaning the cleaning wiper This sub-section describes how to clean the cleaning wiper. Cleaning time Once a week, or when blurs or lacking parts appear on printed media after Head cleaning. Cleaning method Follow the procedure below to clean the cleaning wiper. Use the poly-knit wiper to clean the cleaning wiper. 4 Step 1: Step 2: If the printer is switched ON, make sure that: Printing or other operations are not in progress. The operation panel display is Normal. Display the CR Maintenance menu on the operation panel. Press the [Menu] key on the operation panel. Step 3: "Menu 1: Setup>" is displayed on the operation panel. The operation panel shifts to the Setup menu display. Press the [>] key on the operation panel. "Set1: MediaType" is displayed on the operation panel. Press the [+] key or [ ] key to select "Set20: CR Maintenance". Press the [Enter] key on the operation panel. "CR Mainte.: Start" is displayed on the operation panel. The display enters the CR Maintenance menu. Press the [Enter] key on the operation panel. Maintenance starts. The print head moves to centre. "CR Maintenance: End" is displayed on the operation panel. AP Revision
Océ CS9060. User s Guide. Eco Solvent
 Océ CS9060 User s Guide Eco Solvent Océ CS9060 - INSTALLATION GUIDE Thank you for purchasing a Océ CS9060 Eco Solvent Printer! Please read this manual before using the printer, otherwise things might go
VJ-1304 INSTALLATION MANUAL
 Please read this manual before using Thank you for purchasing a MUTOH product. This manual explains the steps for unpacking, mounting and basic installation before using the MUTOH Full-color inkjet printer
MUTOH EUROPE N.V. Tel.:32-(0) Fax:32-(0)
 Fax:32-(0)") MUTOH INDUSTRIES LTD. Tel.:8-(0)-570-00 Fax:8-(0)-570-00 E-mail:ibd@mutoh.co.jp http://www.mutoh.co.jp MUTOH AMERICA INC. Tel.:-80-968-777 Fax:-80-968-7990 E-mail:sales@mutoh.com http://www.mutoh.com MUTOH
MUTOH INDUSTRIES LTD. Tel.:8-(0)-570-00 Fax:8-(0)-570-00 E-mail:ibd@mutoh.co.jp http://www.mutoh.co.jp MUTOH AMERICA INC. Tel.:-80-968-777 Fax:-80-968-7990 E-mail:sales@mutoh.com http://www.mutoh.com MUTOH
VJ-1618 INSTALLATION MANUAL
 Please read this manual before using Thank you for purchasing a MUTOH product. This manual explains the steps for unpacking, mounting and basic installation before using the MUTOH Full-color inkjet printer
VJ-1614 INSTALLATION MANUAL
 VJ-6 INSTALLATION MANUAL Please read this manual before using Thank you for purchasing a MUTOH product. This manual explains the steps for unpacking, mounting and basic installation before using the MUTOH
VJ-1604 INSTALLATION MANUAL
 Please read this manual before using Thank you for purchasing a MUTOH product. This manual explains the steps for unpacking, mounting and basic installation before using the MUTOH Full-color inkjet printer
Océ CS9160. User s Guide. Eco Solvent
 Océ CS960 User s Guide Eco Solvent This page is left blank intentionally 2 AP-40790 Rev.0-4/03/2008, COPYRIGHT NOTICE COPYRIGHT 2008 Océ-Technologies B.V. All rights reserved. This document may not be
VJ-1624 INSTALLATION MANUAL
 VJ-6 INSTALLATION MANUAL Please read this manual before using Thank you for purchasing a MUTOH product. This manual explains the steps for unpacking, mounting and basic installation before using the MUTOH
Océ CS9160. Eco Solvent. Low Solvent Ultra. User s Guide. Bio-Lactite
 Océ CS960 Eco Solvent User s Guide Low Solvent Ultra Bio-Lactite 2 AP-40790 Rev 2.0-23/08/20, COPYRIGHT NOTICE COPYRIGHT 20 Océ-Technologies B.V. All rights reserved. This document may not be reproduced
Startup Guide VJ-628. Unpacking and Initial Setup. Unpacking Assembly Connecting the Cables Setting up the Printer...
 VJ-628 Startup Guide Unpacking and Initial Setup Unpacking............................. 2 Assembly.............................. 5 Connecting the Cables.................. 9 Setting up the Printer..................
User s Guide ValueJet 1614
 User s Guide ValueJet 1614 For Maintenance Kits, Spares, Service and Support Call: +44 (0) 1628 588755 E-mail: support@colourgen.com FOR EUROPE ONLY! This page is left blank intentionally 2 AP-75790 Rev
OPERATION MANUAL. G rand-f ormat Inkjet P rinter. Toucan LT R H R H Read This Manual Before Using The Equipment. Rev.
 OPERATION MANUAL G rand-f ormat Inkjet P rinter Toucan LT R H2-8064 R H2-8087 Rev. RH280E-A-01 Read This Manual Before Using The Equipment. 1 SAFETY INSTRUCTIONS 1.1 Introduction................................
Océ CS9065 Océ CS9090. User Guide. Eco Solvent
 Océ CS9065 Océ CS9090 User Guide Eco Solvent User s Guide CS9000 Eco-Solvent series printer This page is intentionally left blank 2 AP-75037, Rev. 1.1, 24/04/2006 COPYRIGHT NOTICE User s Guide CS9000 Eco-Solvent
Important Notice. 1. For Users in Europe. 2. For Users in the United States
 VJ-2638/638/638W OPERATION MANUAL Important Notice. For Users in Europe The CE marking is a mandatory European marking for certain product groups to indicate conformity with the essential health and safety
Removal and Installation8
 8 Screw Types 8-4 Top Cover Assembly 8-5 Left Hand Cover 8-6 Right Hand Cover 8-10 Front Panel Assembly 8-14 Left Rear Cover 8-15 Right Rear Cover 8-16 Extension Cover (60" Model only) 8-17 Media Lever
Multi-touch Touch-Screen. Installation Guide
 Multi-touch Touch-Screen Installation Guide Table of Contents Read before use...3 Safety and troubleshooting information...4 Installing Software...8 Connecting Cables... 13 Calibrating the Touch Screen...
Océ User manual. Océ CS2024. Quick Start Guide
 Océ User manual Océ CS2024 Quick Start Guide Océ Technologies B.V. Copyright 2005, Océ-Technologies B.V. Venlo, The Netherlands. All rights reserved. No part of this work may be reproduced, copied, adapted,
DOT MATRIX PRINTER SP6000 SERIES
 DOT MATRIX PRINTER SP6000 SERIES Hardware Manual < Approval: CEL > Trademark acknowledgments SP6000 : Star Micronics Co., Ltd. Notice All rights reserved. Reproduction of any part of this manual in any
Setup Guide. Confirming the Installation Space. Installation space (W x D x H) 70.5 x 66.3 x 61.5 inches (1790 x 1684 x 1560 mm) 23.
 70.5 x 66.3 x 61.5 inches (1790 x 1684 x 1560 mm) 23.") Introductory Information Setup Guide ENGLISH Read this manual before attempting to operate the printer. Keep this manual in a handy location for future reference. Caution Instructions in this Setup Guide
Introductory Information Setup Guide ENGLISH Read this manual before attempting to operate the printer. Keep this manual in a handy location for future reference. Caution Instructions in this Setup Guide
KM-4800w. Installation Guide
 KM-4800w Installation Guide TABLE OF CONTENTS page 1 Installation Requirements 2 2 Unpacking 3 2. 1 Unpacking 3 2. 2 Confirmation of Accessories 5 3 Leveling the Machine 7 4 Setup of the Roll Deck 9 5
Smartphone Photo Printer Item No
 Smartphone Photo Printer Item No. 205984 Safety Precautions Safety Precautions Denotes the possibility of serious injury or death Please keep you away at least 20cm distance from printer when printing.
PHOS mini OPERATING INSTRUCTIONS
 PHOS mini OPERATING INSTRUCTIONS TABLE OF CONTENTS Safety Instructions...4 Electrical Safety... 4 Burns and Fire Safety... 5 Lamp Safety...5 Safety during installation and operation... 6 Technical Overview
Machine Starters Kit
 Machine Starters Kit Océ CS9000 Eco-Solvent printer series Dear Customer, Thank you for buying an Océ CS9000 Eco-Solvent printer series. This kit contains some tools to make your printer operative. Please
Unpacking and Setup Guide
 English Unpacking and Setup Guide Safety Instructions.......................... 1 Checking the Contents...................... 3 Unpacking and Assembling EPSON Stylus Pro 9880/9880C/9450....................
FT-20 Fire Training Fog Machine User Manual English
 FT-20 Fire Training Fog Machine User Manual English 2018 Antari Lighting and Effects Ltd. 1 User Manual - English Safety Information Please read the following safety information carefully before operating
4P M. Wireless LAN Connecting Adapter <BRP069A45> Installation Manual
 4P359542-3M Wireless LAN Connecting Adapter Installation Manual Wireless LAN Connecting Adapter Installation Manual Homepage: http://www.onlinecontroller.daikineurope.com For details
FT-20 Fire Training Fog Machine User Manual English
 FT-20 Fire Training Fog Machine User Manual English 2017 Antari Lighting and Effects Ltd. 1 User Manual - English Safety Information Please read the following safety information carefully before operating
Trademarks...3 Safety Information...4 Positions of RWARNING and RCAUTION labels...8 ENERGY STAR Program...10 How to Read This Manual...
 Setup Guide Read This First Trademarks...3 Safety Information...4 Positions of RWARNING and RCAUTION labels...8 ENERGY STAR Program...10 How to Read This Manual...11 Guide to the Printer Exterior: Front
4P S. Wireless LAN Connecting Adapter <BRP069A41> Installation Manual
 4P359542-1S Wireless LAN Connecting Adapter Installation Manual Wireless LAN Connecting Adapter Installation Manual Homepage: http://www.onlinecontroller.daikineurope.com For details
INFORMATION AMPLIFIER TA-102 OPERATING INSTRUCTIONS TABLE OF CONTENTS
 OPERATING INSTRUCTIONS INFORMATION AMPLIFIER TA-102 INFORMATION AMPLIFIER TA-102 MIC AUX POWER TABLE OF CONTENTS 1. SAFETY PRECAUTIONS... 2 2. GENERAL DESCRIPTION... 4 3. EACH PART NAME AND FUNCTIONS Top
The following symbols are used to show dangerous operation or handling. Make sure you understand them before reading the guide.
 Safety Instructions Before use Thank you very much for purchasing this product. This product is an interface box called "Connection & Control Box" for EPSON short throw projectors. For your safety, read
PHOS 20/40 downlight OWNER'S MANUAL
 PHOS 20/40 downlight OWNER'S MANUAL TABLE OF CONTENTS Safety Instructions...4 Electrical Safety... 4 Lamp Safety...4 Burns and Fire Safety... 5 Safety During Installation And Operation... 5 Technical Overview...
Model No. ET-JPF200BE
 Operating Instructions Floor Stand Kit Commercial Use Model No. ET-JPF200BE ET-JPF200WE ENGLISH FRANÇAIS ESPAÑOL DEUTSCH ITALIANO * The above illustration is of this product mounted to an optional projector.
Exterior...12 Inside...14 Control Panel...15
 Setup Guide Read This First Trademarks...3 Safety Information...4 Positions of RWARNING and RCAUTION labels...8 ENERGY STAR Program...9 Manuals for This Printer...10 How to Read This Manual...11 Guide
4P Wireless LAN Connecting Adapter <BRP069B41> <BRP069B42> <BRP069B43> <BRP069B44> <BRP069B45> Installation Manual
 4P481234-1 Wireless LAN Connecting Adapter Installation Manual Wireless LAN Connecting Adapter Installation Manual Homepage: http://www.onlinecontroller.daikineurope.com
PRECAUTIONS FOR USE. Be sure to use indoor wiring within the specified voltage requirements. For extension cord, use the specified rating or more.
 PRECAUTIONS FOR USE WARNING Be sure to consult an industry specialist when setting up, moving or transporting this product. This product should not be set up, moved or transported by any one other than
Unpacking and Setup Guide
 English Unpacking and Setup Guide Safety Instructions.......................... 3 Checking the Contents...................... 5 Unpacking and Assembling EPSON Stylus Pro 9800/9400............ 5 Unpacking
INSEBO2IRF 2.1MP 1080P IP Eyeball Camera with IR
 INSEBO2IRF 2.1MP 1080P IP Eyeball Camera with IR Quick Start Guide Version 1.0.0 Welcome Thank you for purchasing our Network camera! This user s manual is designed to be a reference tool for your system.
USER MANUAL ENGLISH 285-S COMPACT VALUE COUNTER
 USER MANUAL ENGLISH 285-S COMPACT VALUE COUNTER INTRODUCTION ENGLISH Thank you for purchasing the Safescan 285-S compact value counter, a product of outstanding ease-of-use and quality. We recommend that
650/1000 Fresnel 650/1000 PC 300/500 Antihalo 300/500 Fresnel theatre spotlight. user manual
 650/1000 Fresnel 650/1000 PC 300/500 Antihalo 300/500 Fresnel theatre spotlight user manual Musikhaus Thomann Thomann GmbH Hans-Thomann-Straße 1 96138 Burgebrach Germany Telephone: +49 (0) 9546 9223-0
DISCLAIMER: All products, logos, brand names, or companies are trademarks or registered trademarks of their respective owners!
 DISCLAIMER: While every effort has been made to ensure that the information in this manual is accurate and complete, no liability can be accepted for any errors or omissions ELTRADE reserves the right
POWER SUPPLY UNIT PSU-3
 INSTRUCTION MANUAL NEITS INSTRUMENTS CO., LTD. International Division 2013.09 Thank you for purchasing the NEITZ Power Supply Unit PSU-3. This unit has been designed for the use with NEITZ Binocular Indirect
HX1 Bluetooth Stereo Headset
 HX1 Bluetooth Stereo Headset Ref. nr.: 130.115 INSTRUCTION MANUAL V1.1 ENGLISH Congratulations to the purchase of this Max product. Please read this manual thoroughly prior to using the product in order
Auto-Cutter (JM98901) User's Manual
 User's Manual") Auto-Cutter (JM98901) User's Manual -2- Contents Notice 3 SAFETY SIGNS that must be strictly observed! 5 1. Function 7 2. Main specifications of auto-cutter 7 3. Checking items inside the accessory box
Auto-Cutter (JM98901) User's Manual -2- Contents Notice 3 SAFETY SIGNS that must be strictly observed! 5 1. Function 7 2. Main specifications of auto-cutter 7 3. Checking items inside the accessory box
EVO-TM2A EVO-TM2B Touch Screen Monitor
 User Manual Revision v1.3 Dec. 2010 EVO-TM2A EVO-TM2B Touch Screen Monitor Copyright 2010 August All Rights Reserved Manual Version 1.3 Part Number: The information contained in this document is subject
Machine Starters Kit
 Machine Starters Kit Spitfire 65/90 Extreme Dear Customer, Thank you for buying a Mutoh Spitfire 65/90 Extreme series Printer. This kit contains some tools to make your printer operative. Please refer
Please read this guide before using the printer
 PD-450/450W/480/480W User Guide Please read this guide before using the printer Safety Precautions Safety Precautions Denotes the possibility of serious injury or death Use only recommended power sources.
Wireless LAN Connecting Adapter [BRP072B42] Installation Manual
![Wireless LAN Connecting Adapter [BRP072B42] Installation Manual](/thumbs/88/114605229.jpg "Wireless LAN Connecting Adapter [BRP072B42] Installation Manual") Wireless LAN Connecting Adapter [BRP072B42] Installation Manual Wireless LAN Connecting Adapter [BRP072B42] Installation Manual Website: http://www.daikinthai.com/wlan3/modbus For details on specifications,
Wireless LAN Connecting Adapter [BRP072B42] Installation Manual Wireless LAN Connecting Adapter [BRP072B42] Installation Manual Website: http://www.daikinthai.com/wlan3/modbus For details on specifications,
Camera A14 and A34 Dome Camera
 Camera A14 and A34 Dome Camera Quick Start Guide Thank you for purchasing our product. If there are any questions, or requests, please do not hesitate to contact the dealer. About This Manual: This manual
MX3 BT LED Party Tube
 MX3 BT LED Party Tube Ref. nr.: 130.121 INSTRUCTION MANUAL V1.1 ENGLISH Congratulations to the purchase of this Max product. Please read this manual thoroughly prior to using the product in order to benefit
PA Series. Available in 6.0MP and 8.0MP
 Camera Quick Install Guide PA Series Available in 6.0MP and 8.0MP Thank you for purchasing a PA Series CCTV Surveillance Camera. This Quick Install Guide covers basic setup, installation and use of your
Copyrights and Trademarks
 CMP0012-01 EN Copyrights and Trademarks Copyrights and Trademarks Microsoft and Windows are registered trademarks of Microsoft Corporation. Apple, Macintosh, Mac OS, and OS X are registered trademarks
The following symbols are used to show dangerous operation or handling. Make sure you understand them before reading the guide.
 Safety Instructions Before use Thank you very much for purchasing this product. This product is an interface box called "Connection & Control Box" for EPSON short throw projectors. For your safety, read
Mercury Helios ASSEMBLY MANUAL & USER GUIDE
 Mercury Helios ASSEMBLY MANUAL & USER GUIDE TABLE OF CONTENTS INTRODUCTION...1 1.1 MINIMUM SYSTEM REQUIREMENTS 1.1.1 Apple Mac Requirements 1.1.2 PC Requirements 1.1.3 Supported PCIe Cards NOTE: Boot Camp
RP-U420. Using this online operator s guide. Operator s Manual
 RP-U420 Operator s Manual Using this online operator s guide The words on the left side of this screen are bookmarks for all the topics in this guide. Use the scroll bar next to the bookmarks to find any
Smartphone Photo Printer
 Smartphone Photo Printer Safety Precautions Safety Precautions Denotes the possibility of serious injury or death Please keep you away at least 20cm distance from printer when printing. Use only recommended
To Purchase This Game, Visit BMI Gaming Or Contact International Sales at (USA)
") The following safety precautions are given throughout this manual. They must be strictly followed to protect those who install, use or maintain this product as well as to protect players, visitors and
The following safety precautions are given throughout this manual. They must be strictly followed to protect those who install, use or maintain this product as well as to protect players, visitors and
ESV3000 ETDRS Illuminated Cabinet INSTRUCTION MANUAL
 ESV000 ETDRS Illuminated Cabinet INSTRUCTION MANUAL ACTUAL SIZE LETTER FOOT METER SIZE 0 0 80 24 24M 6 50 40 2 25 20 16 19 15 12 9.5 7.5 6 4.8 Developed by Lea Hyvärinen, M.D. FOR TESTING AT FEET ( METERS)
Richter Optica. Instructions for Model: MDS2 Middle School Microscope
 Richter Optica info@richter-optica.com Instructions for Model: MDS2 Middle School Microscope Eyepiece 360 Rotatable Head Revolving Nosepiece Carrying Handle Objectives Rack Stop Stage Stage Clips Disc
3M Duplex Polishing Machine 6851-E with Universal Dual Holder Instructions
 3M Duplex Polishing Machine 6851-E with Universal Dual Holder Instructions Safety Information Read, understand and follow all safety information contained in these user instructions prior to use of the
Powergate³ User. Instruction manual and user s guide
 Powergate³ User Instruction manual and user s guide This manual explains features and provides basic information about how to set up and operate the Powergate³ User, including instructions on how to install
Available in 2.0MP, 4.0MP, 6.0MP and 8.0MP, with 2.8mm and 3.6mm lenses.
 Camera Quick Install Guide VDMINIIRCB Series Available in 2.0MP, 4.0MP, 6.0MP and 8.0MP, with 2.8mm and 3.6mm lenses. Thank you for purchasing a VDMINIIRCB Series CCTV Surveillance Camera. This Quick Install
Fire Fogger 1500 fog machine. user manual
 Fire Fogger 1500 fog machine user manual Musikhaus Thomann e.k. Treppendorf 30 96138 Burgebrach Germany Telephone: +49 (0) 9546 9223-0 E-mail: info@thomann.de Internet: www.thomann.de 31.01.2013 Table
USER S GUIDE QL-500/QL-560
 DEUTSCH FRANÇAIS NEDERLANDS Maintenance and Getting started QL-500 / QL-560 USER S GUIDE QL-500/QL-560 Be sure to read and understand this guide before using the machine. We recommend that you keep this
Available in 2.0MP, 4.0MP and 8.0MP variants
 Camera Quick Install Guide FBMINIIR Series Available in 2.0MP, 4.0MP and 8.0MP variants Thank you for purchasing a FBMINIIR Series CCTV Surveillance Camera. This Quick Install Guide covers basic setup,
Z-350 FAZER USER MANUAL
 www.clubsoundrent.nl Z-350 FAZER USER MANUAL English Français Deutsch 2013 Antari Lighting and Effects Ltd. 1 User Manual Safety Information Please read the following safety information carefully before
Network Camera. Quick Guide DC-B1203X. Powered by
 Network Camera Quick Guide DC-B1203X Powered by Safety Precautions English WARNING RISK OF ELECTRIC SHOCK DO NOT OPEN WARNING: TO REDUCE THE RISK OF ELECTRIC SHOCK, DO NOT REMOVE COVER (OR BACK). NO USER-SERVICEABLE
Safety precautions This chapter describes safety measures in using the printer. Please read carefully before using the printer.
 サトー取説 _E 04.8.17 6:21 PM ページ a Safety precautions This chapter describes safety measures in using the printer. Please read carefully before using the printer. About the pictograms This instruction manual
Richter Optica. Instructions for Model: HSX1 High School Microscope
 Richter Optica info@richter-optica.com Instructions for Model: HSX1 High School Microscope Eyepiece 360 Rotatable Head Objectives Carrying Handle Revolving Nosepiece Rack Stop Slide Holder Focus Tension
HiTi P310W. user manual V_0.1.
 HiTi P310W user manual www.hiti.com V_0.1 TABLE OF CONTENTS Chapter 1. Important Safety Instruction Environments 1-1 Handling Instruction 1-2 Handling Instruction for Consumable and Printed Output 1-3
E-37-V Dome Network Camera. Quick Start Guide
 E-37-V Dome Network Camera Quick Start Guide i Welcome Thank you for purchasing our Network camera! This user s manual is designed to be a reference tool for your system. Please read the following safeguard
User s Manual (Model A) isappos 9/12 Stand
 isappos 9/12 Stand") User s Manual (Model A) isappos 9/12 Stand Section 1 Overview The Jacket (unit: mm) Package Contents Aluminum base plate Aluminum Stand body Jacket for ipad 1 x Micro-USB cable (For charging and data syncing)
User s Manual (Model A) isappos 9/12 Stand Section 1 Overview The Jacket (unit: mm) Package Contents Aluminum base plate Aluminum Stand body Jacket for ipad 1 x Micro-USB cable (For charging and data syncing)
V 1.0 ISSUE DATE : Feb.17, 2011
 V 1.0 ISSUE DATE : Feb.17, 2011 The following safety precautions are given throughout this manual. They must be strictly followed to protect those who install, use or maintain this product as well as to
For Sales + Purchasing Info, Click Page To Visit BMI Gaming (800)
") For Sales + Purchasing Info, Click Page To Visit BMI Gaming www.bmigaming.com + 561-391-7200 (800) 746-2255 The following safety precautions are given throughout this manual. They must be strictly followed
For Sales + Purchasing Info, Click Page To Visit BMI Gaming www.bmigaming.com + 561-391-7200 (800) 746-2255 The following safety precautions are given throughout this manual. They must be strictly followed
Camera. Network Bullet Camera. Quick Operation Guide
 Camera Network Bullet Camera Quick Operation Guide 1 Thank you for purchasing our product. If there are any questions, or requests, please do not hesitate to contact the dealer. About This Document This
4P R. Wireless LAN Connecting Adapter <BRP069A81> Installation Manual
 4P359542-4R Wireless LAN Connecting Adapter Installation Manual Wireless LAN Connecting Adapter Installation Manual Homepage: http://www.onlinecontroller.daikineurope.com For details
Deckblatt von Marketing / Foto fehlt
 R-Biopharm AG RIDA QUICK SCAN II (V2.5) Deckblatt von Marketing / Foto fehlt Bedienungsanleitung 2017-11-04 2 All rights reserved. This manual may be used only for its intended purpose. It may not be reproduced
TURBO HD TVI Bullet & Turret Camera
 TURBO HD TVI Bullet & Turret Camera User Manual UD03589B User Manual Thank you for purchasing our product. If there are any questions, or requests, do not hesitate to contact the dealer. This manual applies
HD Mini IR Waterproof Fixed Network Camera. Quick Start Guide. Version 1.2.0
 HD Mini IR Waterproof Fixed Network Camera Quick Start Guide Version 1.2.0 Welcome Thank you for purchasing our Network camera! This user s manual is designed to be a reference tool for your system. Please
Datacard CR500 Instant Issuance System. User Reference Guide. July Rev B
 Datacard CR500 Instant Issuance System User Reference Guide July 2015 527495-001 Rev B Datacard CR500 User Reference Guide The CR500 Instant Issuance System Contents The CR500 Instant Issuance System The
Always there to help you. Register your product and get support at DS3150/12. Question? Contact Philips.
 Always there to help you Register your product and get support at www.philips.com/welcome Question? Contact Philips User manual DS3150/12 Contents 1 Important 3 Risk of swallowing coin battery 4 2 Your
Operation Manual WARNING. Be sure to read this Operation Manual before use. Universal Space Amusement Equipment Ltd.
 WARNING Be sure to read this Operation Manual before use. Universal Space Amusement Equipment Ltd. CONTENTS 1. The company..2 2. Specifications.. 3 3. Package Contents..5 4. Installation, Fix and Transport..6
LTK1100 Series Card Reader User Manual
 LTK1100 Series Card Reader User Manual User Manual About this Manual This Manual is applicable to Card Reader. The Manual includes instructions for using and managing the product. Pictures, charts, images
CX1 Outdoor Color-Changing Wireless Bluetooth Speaker Please fully charge the speaker prior to first use!
 CX1 Outdoor Color-Changing Wireless Bluetooth Speaker 130.109 Please fully charge the speaker prior to first use! 1 ENGLISH Congratulations to the purchase of this Max product. Please read this manual
User Guide Microsoft Portable Power (DC-21)
") User Guide Microsoft Portable Power (DC-21) Issue 1.0 EN-US User Guide Microsoft Portable Power (DC-21) Contents For your safety 3 About your portable charger 4 Keys and parts 5 Charge your portable charger
User Guide Microsoft Portable Power (DC-21) Issue 1.0 EN-US User Guide Microsoft Portable Power (DC-21) Contents For your safety 3 About your portable charger 4 Keys and parts 5 Charge your portable charger
OPERATING INSTRUCTIONS PA AMPLIFIER P-1812
 OPERATING INSTRUCTIONS PA AMPLIFIER P-1812 Please follow the instructions in this manual to obtain the optimum results from this unit. We also recommend that you keep this manual handy for future reference.
February P Xerox 8265/8290/8365/8390 Wide Format Color Printer User Guide
 February 2010 701P50370 Xerox 8265/8290/8365/8390 Wide Format Color Printer User Guide 2010 Xerox Corporation. All rights reserved. Xerox, the sphere of connectivity design, and Xerox 8265/8290/8365/8390
Chapter 1 Names and Functions This chapter explains the names and functions of the parts.
 PRIMERGY SX650 Storage Blade Hardware Guide Areas Covered Before Reading This Manual This section explains the notes for your safety and conventions used in this manual. Make sure to read before using
USER MANUAL. Uninterruptible Power Supply Line-interactive VCL Series UPS VA. GE Critical Power
 Critical Power USER MANUAL Uninterruptible Power Supply Line-interactive VCL Series UPS 400 600 800 1000 1500 VA GE Consumer & Industrial SA General Electric Company CH 6595 Riazzino (Locarno) Switzerland
When You Need More Than Staples. Toll Free: Fax: Electric VeloBinder Operating Instructions
 When You Need More Than Staples. Toll Free: 800-658-8788 Fax: 801-927-3037 info@abcoffice.com Electric VeloBinder Operating Instructions IMPORTANT SAFEGUARDS Warning: For your protection, do not connect
FAZE 800 FT PRO USER MANUAL. Version: 1.2. ROBE Lighting s.r.o. Czech Republic
 FAZE 800 FT PRO USER MANUAL Version: 1.2 ROBE Lighting s.r.o. Czech Republic www.robe.cz FAZE 800 FT PRO Table of contents 1. Introduction 4 2. Cautions 4 3. Opening the package and inspecting the machine
WIRELESS POWERLINK USER MANUAL
 WIRELESS POWERLINK USER MANUAL Contents General... 3 Wireless Powerlink... 3 Package Contents... 4 Disposal of Old electrical Devices... 6 Installation... 7 Pairing Function... 7 Connecting the Devices...
English User s Manual
 User s Manual M00061801EN All rights reserved. No part of this publication may be reproduced, stored in a retrieval system, or transmitted in any form or by any means, electronic, mechanical, photocopying,
AstroJet TM M2 Quick Start Guide
 AstroJet TM M2 Quick Start Guide Step 1 Remove Printer and Accessories from packaging. Place Printer on a flat, even surface. Step 2 Remove Service Station Transport Tab 1. Open Top Cover. 2. Open Print
Network Camera. Quick Guide DC-T3243HRX. Powered by
 Network Camera Quick Guide DC-T3243HRX Powered by Safety Precautions WARNING RISK OF ELECTRIC SHOCK DO NOT OPEN WARNING: TO REDUCE THE RISK OF ELECTRIC SHOCK, DO NOT REMOVE COVER (OR BACK). NO USER-SERVICEABLE
Card Enrollment Station. User Manual UD05870B
 Card Enrollment Station User Manual UD05870B User Manual 2017 Hangzhou Hikvision Digital Technology Co., Ltd. This manual is applied for D8E series card enrollment station. It includes instructions on
Optional Lens User s Manual
 English Optional Lens User s Manual Important Safety Instructions (Always follow these instructions) Please read this section on important safety instructions before replacing the projector lens. To prevent
Epson SureLab D700 Operation Guide
 Epson SureLab D700 Operation Guide Copyrights and Trademarks Copyrights and Trademarks EPSON, SureLab, and UltraChrome are registered trademarks, and EPSON Exceed Your Vision is a registered logomark of
Dahua HD IR Vari-Focal Fixed Network Camera. Quick Start Guide
 Dahua HD IR Vari-Focal Fixed Network Camera Quick Start Guide Version 1.0.0 Dahua Technology CO., LTD Welcome Thank you for purchasing our Network camera! This user s manual is designed to be a reference
PAR-WT50R-E PAR-WR51R-E
 Wireless Remote Controller and Receiver PAR-WT50R-E PAR-WR51R-E This manual explains installation of the PAR-WR51R-E wireless receiver and the PAR-WT50R-E wireless remote controller, and settings of these