Dissecting a keyboard
|
|
|
- Cathleen Sanders
- 5 years ago
- Views:
Transcription

1 Dissecting a keyboard The keyboard on Jacky s PC died. Another opportunity to take something apart and admire its design and construction. I turned it over and pulled out all the screws. The back wouldn t come off

2 Well, sometimes they hide the final screw under the label. The label, by the way, suggests this PC was made in Makes sense; we got it in November, Gives you an idea of the level of technology we ll be looking at.

3 I peeled off the label. No joy.

4 Ha! The final screws were under the stick-on pads, one on either corner.

5 With the top tipped back, we first see a small circuit board with the LEDs.

6 Here it is, right-side up. Some lint is visible here, but there s lots lots more! Immunizing keyboards from contamination is one of the things we ll be looking at.

7 Atop the LEDs, a clear plastic bezel whose function is to guide the light through the holes in the cover, thereby making it more visible. By plugging the holes, the plastic domes also keep some of the dirt out.

8 The plastic bezel half removed. These two photos were taken later in the sequence, after everything had been torn apart.

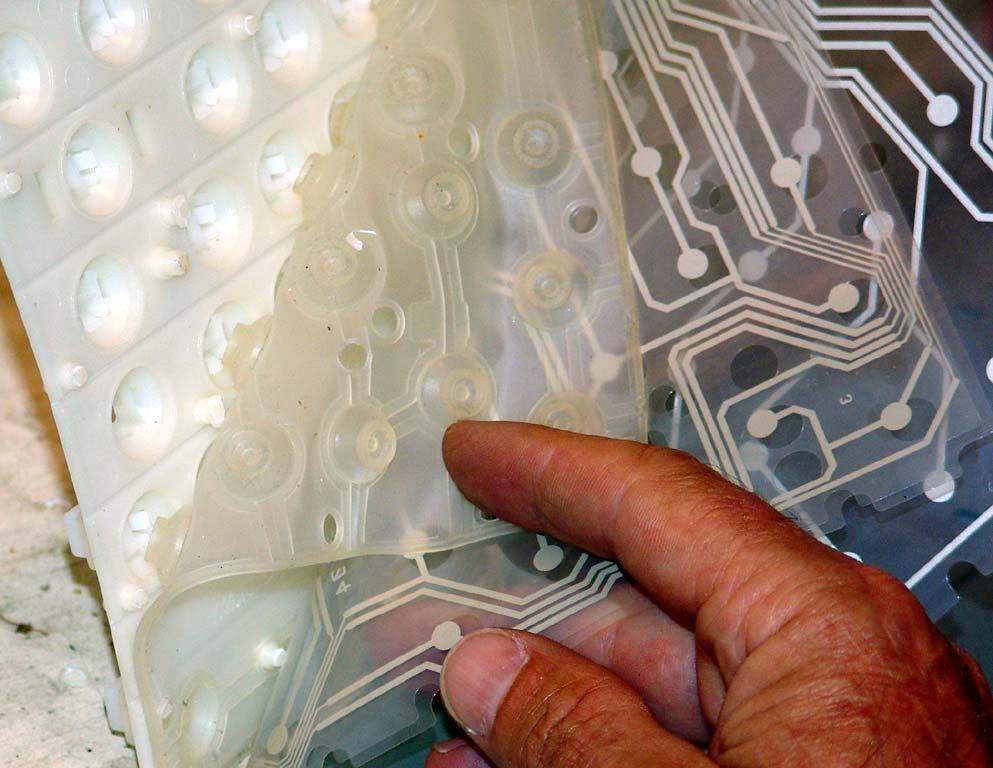
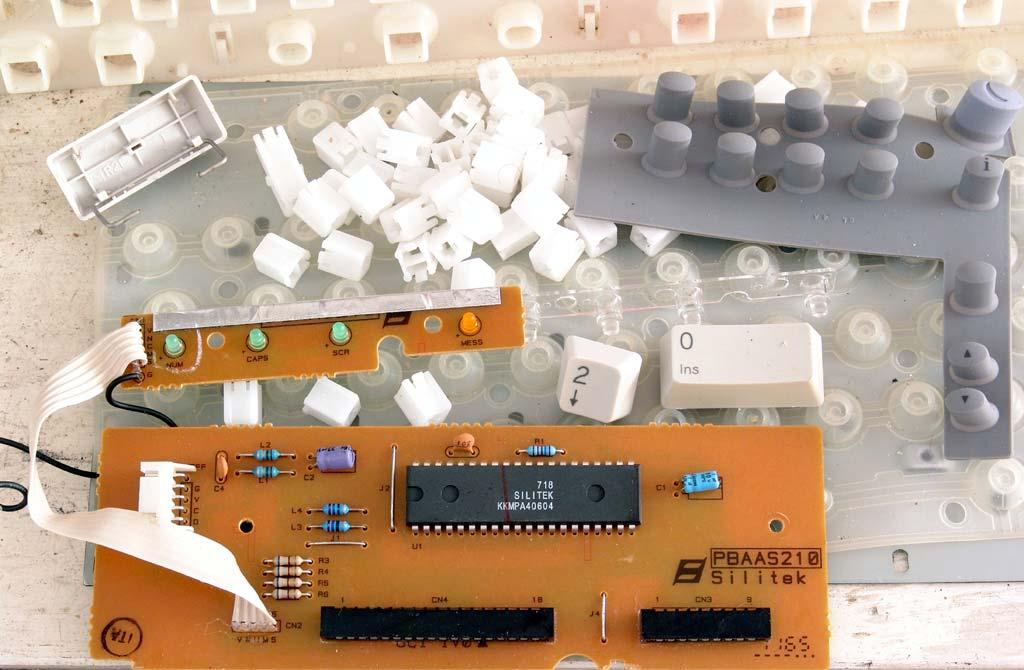
9 As well as the LED panel, there s another little circuit board. The date code on the IC probably means 1997 week 18. The cable to the LED panel plugs in to the left of the picture. The two ribbon connectors are part of the conductor matrix that forms the keyswitches themselves. And the clear circles on the metal backplate are bits of plastic, melted to clamp the thin sandwich that is the working part of the keyboard.

10 The bottom of this larger circuit board.

11 The tray that forms the bottom of the keyboard, with the keyswitch sandwich assembly rotated upward at the top of the picture. Notice all the black grounding wires. Good hygiene!

12 If we pull off a couple of the keys, we see that they simply clamp onto the top of their plungers. Both plunger and base appear to be something like nylon, which is not only impervious to spills, but has low sliding friction. The second line of defense against dirt and spills is the high conical surround, molded into the baseplate and completely enclosed by the keycap.

13 Now let s look at the keys themselves. This photo is after blowing out much of the lint and debris, but there s still plenty left! To the right, we the ALT key, a little larger than the others, but basically the same, a single key resting on a single pedestal with a single plunger. To the left, we see most of the space bar. To keep it aligned, it actually travels on three parallel guides, two of which are visible. The larger one, at the center of the key, is the plunger that activates the switch. And there s a wire spring that helps return the key to the neutral position. About a dozen of the larger keys had these springs, but only the space bar had multiple guides. The reddish dot is a spot of grease.

14 The spacebar removed, showing the three guides, the plunger in the center, the wire spring.

15 Usually the cap comes off, leaving the plunger behind, but sometimes the plunger pops out.

16 Looking into the switch assembly through the hole where the plunger isn t, we see a flexible membrane that yet again protects the electronics from spills and dirt. This membrane is made of something like rubber, and has enough elasticity that it pops the keys back up to their neutral positions. As we observed, however, some of the larger keys require external spring assists.

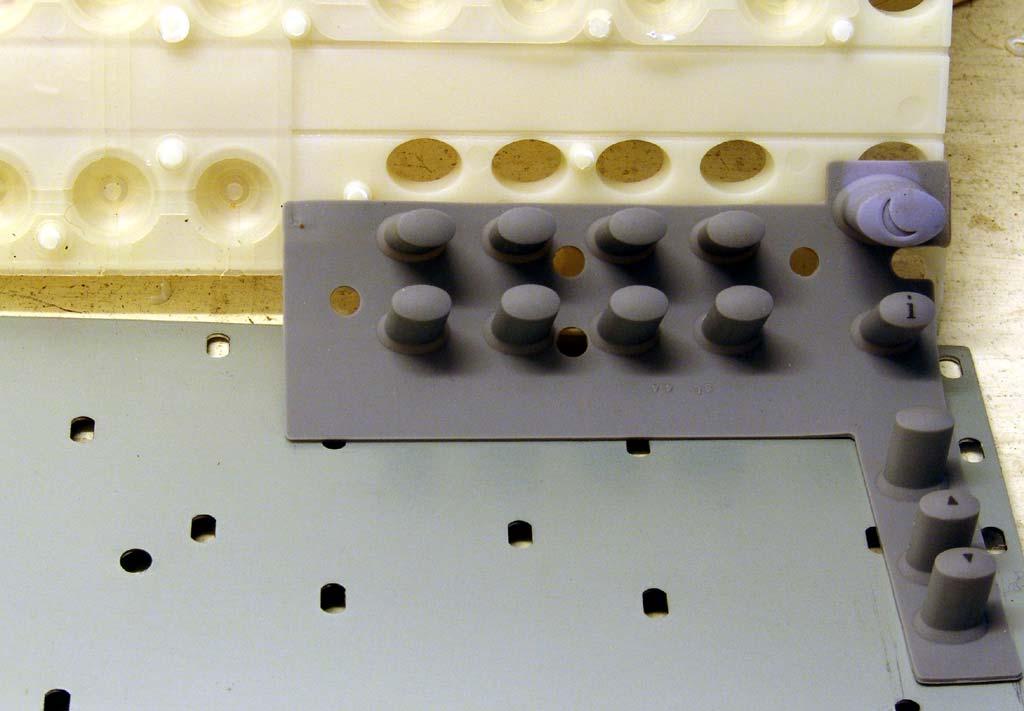
17 The outer shell removed, along with all of the keycaps. Most of the lint and dirt has been blown free or wiped free. At the top right, we see the ribbon connectors that connect to the circuit board. There is also a set of special pushbutton keys, a single piece of molded rubber. The actual switch mechanism is the same as the others, but these are not keys for touch typing, so they don t need and don t have rapid response characteristics necessary for the other keys. Saving money! Yet another vital attribute of the design. Until now, we could theoretically reassemble the keyboard into a working unit. But now we pop the sandwich apart, breaking all those melted plastic links sandwiching the layers together, and there s no going back.

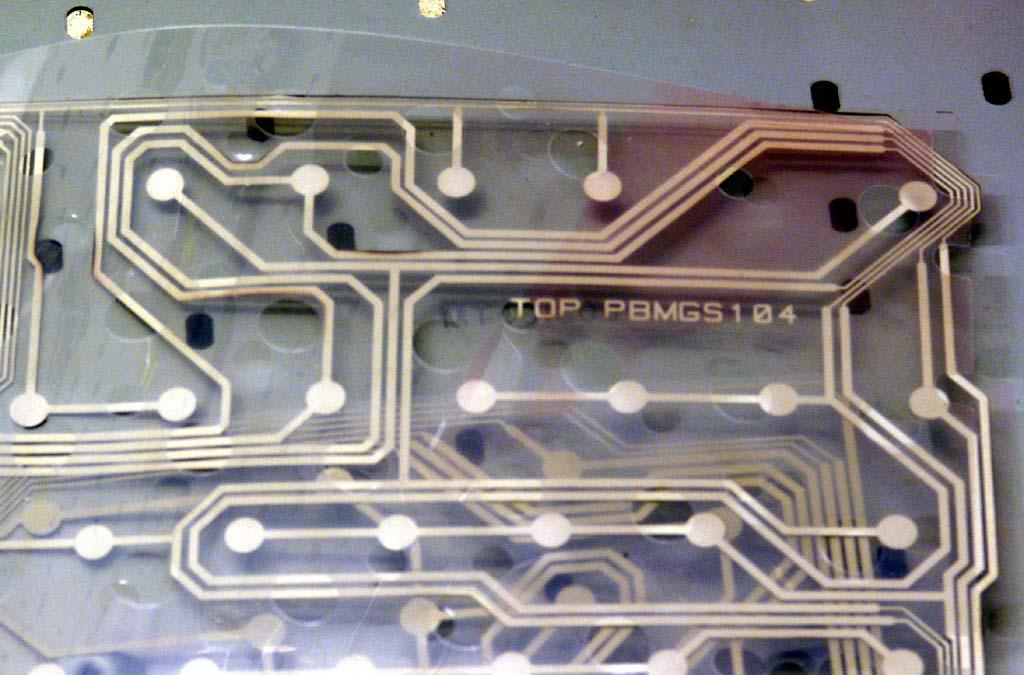
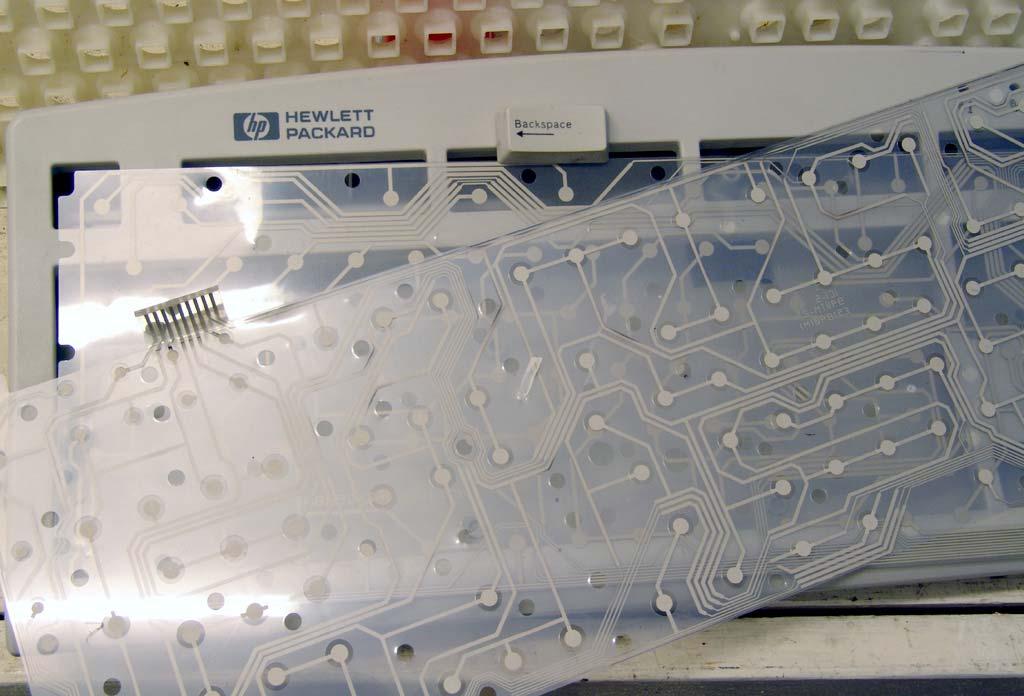
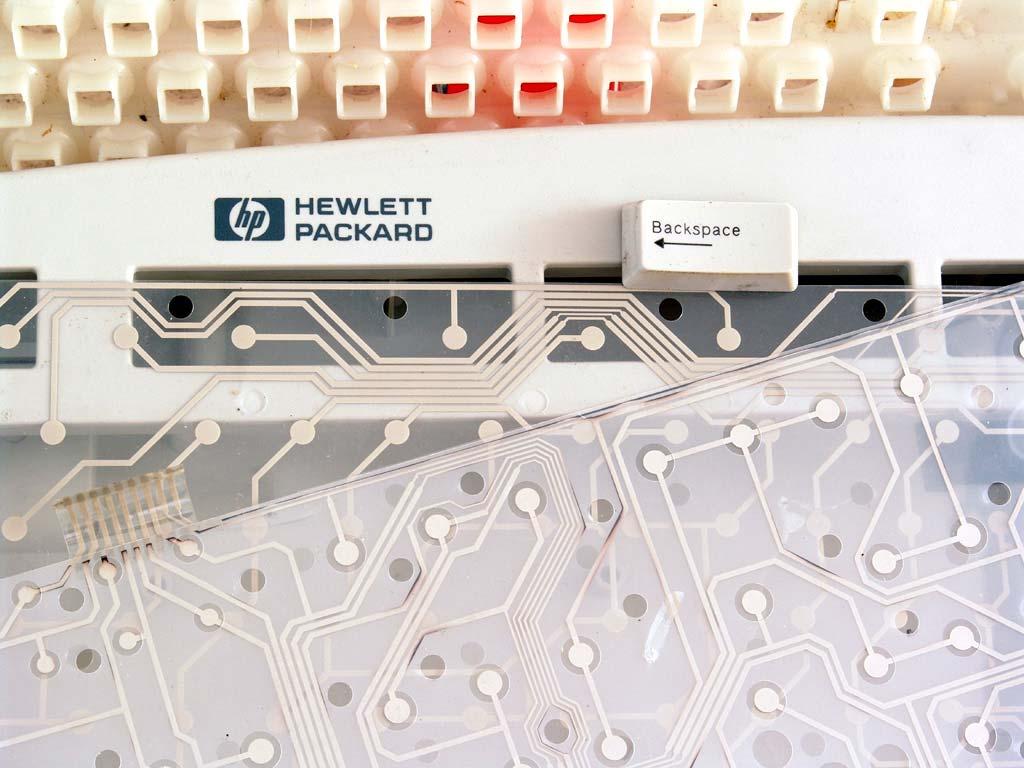
18 The white dots are the melted plastic pins that used to tie the sandwich together. There are three layers in the keyswitch assembly itself. In the foreground is a layer for columns. In the background, a layer for rows. Between the two, there s a third layer with no circuitry, just holes in the mylar where the row layer and the column layer can be shorted together by the pressure of a plunger.

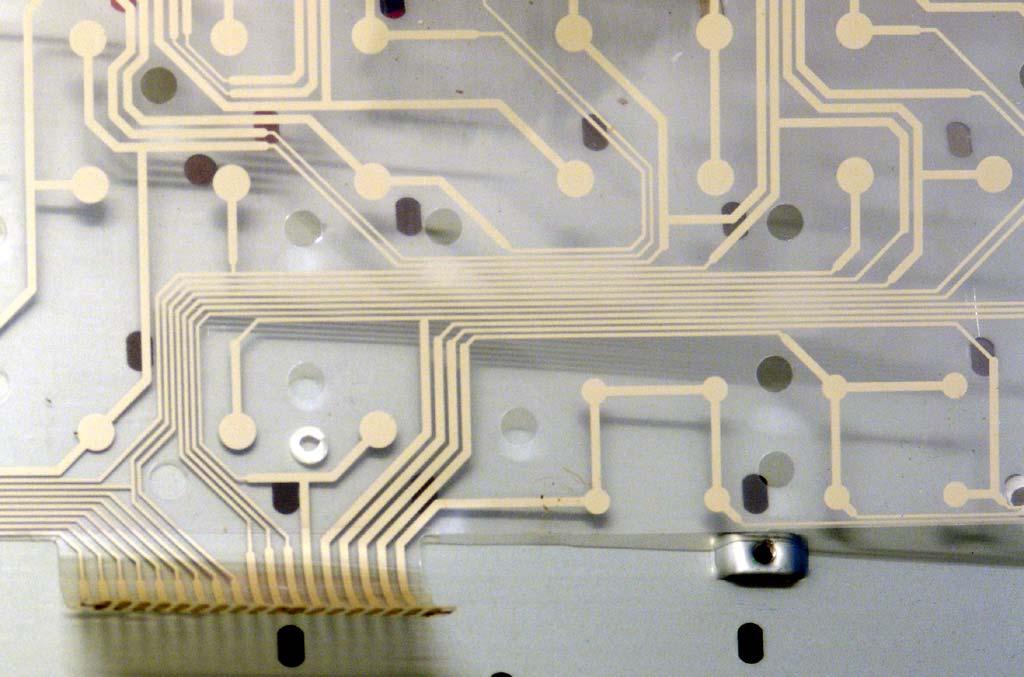
19 Showing how the ribbon connectors come off the layers. The columns cable has 18 conductors; the rows cable has 9. That would theoretically allow for 162 keys. Of course, a keyboard is far from a simple rectilinear matrix I look at the keyboard on my current PC, and speculate that it would need about 21 colums but only 6 rows. To reiterate, however, it s far from a simple rectilinear matrix.

20 To the left, the nylon baseplate, plungers in some of the holes. Next, the flexible rubber dirt guard and springy return for the plungers. Then the column layer. The intermediate layer isn t that easy to see, but the row layer is toward the right. My hand isn t really bloody. It s just an artifact of the lighting!
21
22

23 An attempt to show the three layers, the intermediate one comprising nothing but holes.
24

25 Here s that set of special keys, designed for dirt protection and low cost. As we see, there s a hard rubber plunger in the center of each key, so the switch mechanism is the same as for the other keys. It s easy to predict that you couldn t touch-type on them.
26

27 The flexible sheet, combining dirt and spill resistance with spring return and low cost. Most of the keyholes still contain their plungers, but I show one plunger separately. Interesting to notice that the plungers have a definite E-W or N-S orientation, an orientation that has to match the keycap or else!

28 To summarize: here s the nylon top plate, the steel baseplate with the flexible springy layer, and the plungers, which just fall out once you take it all apart.

29 The same, with a few more of the bits and pieces. Very functional, very cost-effective. As well as being inexpensive to make the components, you could imagine something pretty close to robot assembly, as well.
30
31
32
Toshiba Satellite A105-S4011 Touchpad
 Toshiba Satellite A105-S4011 Touchpad Replacement This guide will instruct you on how to remove the current touchpad from this laptop and how to reinstall another. This is a straightforward process and
Installing PRO/DGX or Pro Soloist MIDI interface. R Grieb 9/08/2017
 Installing PRO/DGX or Pro Soloist MIDI interface. R Grieb 9/08/2017 Please read these instructions before purchasing the MIDI interface, to make sure you are comfortable performing the necessary steps.
Apple PowerBook G4 17
 Apple PowerBook G4 17 PRAM Battery Installation Manual Your computer is a static-sensitive device. It is susceptible to invisible damage if not protected during installation. We recommend proper grounding
Nov. 07, 2013 p. 5 - changed the B axis unit value to from Changed by Randy per Frank s request.
 Correction notes Nov. 07, 2013 p. 5 - changed the B axis unit value to 45.1389 from 40.0000. Changed by Randy per Frank s request. Jan. 22, 2018 p. 5 - changed the B axis unit value and corresponding picture
Written By: Anthony Valdez
 ASUS Eee PC 1018P Fan Replacement This guide will show how to remove the fan, in order to replace it. Written By: Anthony Valdez ifixit CC BY-NC-SA www.ifixit.com Page 1 of 12 INTRODUCTION The CPU Fan
ASSET LGA1366 Top-side Probe
 ASSET LGA1366 Top-side Probe (Manual version 1.1) For gaining test access to the debug port of Intel processors that are designed for use in LGA1366 Sockets (Socket B). These include the Intel Core i7
ibook G4 14" 933 MHz-1.33 GHz Hard Drive
 ibook G4 14" 933 MHz-1.33 GHz Hard Drive Replacement Written By: irobot ifixit CC BY-NC-SA www.ifixit.com Page 1 of 25 INTRODUCTION You can install hard drives up to 9.5mm thick. TOOLS: Coin (1) Phillips
Game Boy Micro Motherboard Replacement
 Game Boy Micro Motherboard Replacement Written By: Brendan Kelly ifixit CC BY-NC-SA www.ifixit.com Page 1 of 12 INTRODUCTION In this guide, we will show you how to remove and replace the motherboard and
Written By: Brendan Kelly
 Game Boy Micro LCD Screen Replacement Written By: Brendan Kelly ifixit CC BY-NC-SA www.ifixit.com Page 1 of 13 INTRODUCTION In this guide, we'll show you how to change the LCD Screen. TOOLS: Phillips #00
Written By: Ben Eisenman
 iphone 3GS Rear Panel Replacement Replace a broken rear case on your iphone 3GS. Written By: Ben Eisenman ifixit CC BY-NC-SA www.ifixit.com Page 1 of 22 INTRODUCTION The plastic rear half of the iphone.
HP Flyer Red Hard Disc Drive Replacement
 HP Flyer Red Hard Disc Drive Replacement This guide will show you how to remove your hard drive. Written By: Anthony Ciotti ifixit CC BY-NC-SA www.ifixit.com Page 1 of 12 INTRODUCTION This guide is helpful
Phi-panel backpack assembly and keypad options Dr. John Liu 12/16/2012
 Phi-panel backpack assembly and keypad options Dr. John Liu 12/16/2012 1. Introduction:... 3 Currently available:... 3 2. Backpack assembly... 4 3. Connecting to a keypad... 6 4. Rotary encoder keypads...
Instructions to Install Retrofit Kit RVMC 4/5000 Machine (MDB Only)
") Instructions to Install Retrofit Kit RVMC 4/5000 Machine (MDB Only) **TURN POWER OFF OF MACHINE BEFORE INSTALLATION** READ ALL INSTRUCTIONS BEFORE STARTING INSTALLATION Retrofit Kit Contents PART NAME
Instructions to Install Retrofit Kit RVMC 4/5000 Machine (MDB Only) **TURN POWER OFF OF MACHINE BEFORE INSTALLATION** READ ALL INSTRUCTIONS BEFORE STARTING INSTALLATION Retrofit Kit Contents PART NAME
ibook G3 14" Hard Drive Replacement
 Written By: irobot ifixit CC BY-NC-SA www.ifixit.com Page 1 of 20 INTRODUCTION How to remove the hard drive and its bracket from your computer. TOOLS: Coin (1) Paper Clip (1) Phillips #00 Screwdriver (1)
ipod Touch 4th Generation 30 Pin Dock Connector Replacement
 ipod Touch 4th Generation 30 Pin Dock Connector Replacement Learn how to replace the 30 pin dock connector on an ipod touch 4th generation. Written By: Gabe Keehn ifixit CC BY-NC-SA www.ifixit.com Page
Seeburg JCU-DEC Kit Convert Your Seeburg DEC Wallbox Into a Jukebox
 Seeburg JCU-DEC Kit Convert Your Seeburg DEC Wallbox Into a Jukebox MP3 Compact Flash Player Coin Operated or Free Play Integrated Power Amplifier Line-Out to External Amplifier Programmable Autoplay IR
ibook G3 14" Top Shield Replacement
 Written By: irobot ifixit CC BY-NC-SA www.ifixit.com Page 1 of 18 INTRODUCTION The metallic top shield protects the logic board from electromagnetic interference. TOOLS: Coin (1) Paper Clip (1) Phillips
iphone 3G Headphone Jack Replacement Replace a broken audio port in an iphone 3G. Written By: irobot ifixit CC BY-NC-SA
 iphone 3G Headphone Jack Replacement Replace a broken audio port in an iphone 3G. Written By: irobot ifixit CC BY-NC-SA www.ifixit.com Page 1 of 18 INTRODUCTION No audio? Replace the headphone jack! TOOLS:
Mac Mini Mid 2010 SSD Installation
 Mac Mini Mid 2010 SSD Installation Replace your Mac Mini Mid 2010's hard drive for more storage space and an increase in speed. Written By: Dozuki System 2017 guides.crucial.com Page 1 of 15 INTRODUCTION
REMOTE HEAD ADAPTER INSTALLATION GUIDE
 REMOTE HEAD ADAPTER INSTALLATION GUIDE The Remote Head adapter is a valuable accessory for the Uniden BC-780, 785 and 796 scanners. It allows the scanner's control panel to be removed from the radio and
apple Service Source ibook ibook (Opaque 16 VRAM), ibook (32 VRAM) November 6, Apple Computer, Inc. All rights reserved.
, ibook (32 VRAM) November 6, Apple Computer, Inc. All rights reserved.") apple Service Source ibook ibook (Opaque 16 VRAM), ibook (32 VRAM) November 6, 2002 2002 Apple Computer, Inc. All rights reserved. apple Service Source Take Apart ibook (Opaque 16 VRAM), ibook (32 VRAM)
apple Service Source ibook ibook (Opaque 16 VRAM), ibook (32 VRAM) November 6, 2002 2002 Apple Computer, Inc. All rights reserved. apple Service Source Take Apart ibook (Opaque 16 VRAM), ibook (32 VRAM)
ATTENTION: OBSERVE PRECAUTIONS FOR HANDLING ESD-SENSITIVE DEVICES
 Hard Drive Removal IMPORTANT NOTE: If you are replacing a PATA hard drive with a SATA hard drive, please see PATA to SATA Hard Drive Conversion. Hard Drive Identification: To determine whether your hard
Nintendo DS Lite Rear Display Bezel Replacement
 Nintendo DS Lite Rear Display Bezel Replacement Replacement of the Nintendo DS Lite rear display bezel. Written By: Matt Newsom ifixit CC BY-NC-SA www.ifixit.com Page 1 of 17 INTRODUCTION Replace the rear
Written By: Andrew Bookholt
 ipod Nano 4th Generation Display Replacement Use this guide to replace your 4th Generation Nano's display. Written By: Andrew Bookholt ifixit CC BY-NC-SA www.ifixit.com Page 1 of 11 INTRODUCTION Use this
apple Service Source ibook G4 (14.1 LCD) October 22, Apple Computer, Inc. All rights reserved.
 October 22, Apple Computer, Inc. All rights reserved.") apple Service Source ibook G4 (14.1 LCD) October 22, 2003 2003 Apple Computer, Inc. All rights reserved. apple Service Source Take Apart ibook G4 (14.1 LCD) 2003 Apple Computer, Inc. All rights reserved.
apple Service Source ibook G4 (14.1 LCD) October 22, 2003 2003 Apple Computer, Inc. All rights reserved. apple Service Source Take Apart ibook G4 (14.1 LCD) 2003 Apple Computer, Inc. All rights reserved.
HP Envy TouchSmart m7 k010dx Screen
 HP Envy TouchSmart m7 k010dx Screen Replacement Use this guide to replace the screen in your HP Envy TouchSmart m7 k010dx. Written By: Owen Ou ifixit CC BY-NC-SA www.ifixit.com Page 1 of 12 INTRODUCTION
Z-Truck (Vertical Moving) Z-truck Flag. Y-Truck (Horizontal Moving) FIGURE 1: VIEW OF THE Z-TRUCK. Flexshaft Assembly
 Z-truck Flag. Y-Truck (Horizontal Moving) FIGURE 1: VIEW OF THE Z-TRUCK. Flexshaft Assembly") Replacing the LCD Cable To remove and replace the LCD Cable you will need the following tools: #2 Phillips screwdriver (magnetic tip preferred) Socket wrench with 10mm socket Removing the Side Panel 1.
Replacing the LCD Cable To remove and replace the LCD Cable you will need the following tools: #2 Phillips screwdriver (magnetic tip preferred) Socket wrench with 10mm socket Removing the Side Panel 1.
ibook G4 12" 800 MHz-1.2 GHz RJ-11 Board
 ibook G4 12" 800 MHz-1.2 GHz RJ-11 Board Replacement Written By: irobot ifixit CC BY-NC-SA www.ifixit.com Page 1 of 24 INTRODUCTION The standard telephone jack port for connecting to the 56k internal modem.
Removing and Replacing Parts
 Removing and Replacing Parts Preparing to Work Inside the Computer Recommended Tools Screw Identification System Components Hard Drive Fixed Optical Drive Media Bay Devices Memory Modules Mini PCI Card
HP Compaq 6730b Display Replacement
 Here is a HP Compaq 6730b with a cracked LCD after having been dropped. This is a straight forward repair. Written By: oldturkey03 ifixit CC BY-NC-SA www.ifixit.com Page 1 of 11 INTRODUCTION This laptop
How Computer Mice Work
 How Computer Mice Work Inside this Article 1. Introduction to How Computer Mice Work 2. Evolution of the Computer Mouse 3. Inside a Mouse 4. Connecting Computer Mice 5. Optical Mice 6. Optical Mouse Accuracy
Q2 XBee Handheld Controller Assembly Guide
 Q2 XBee Handheld Controller Assembly Guide Copyright Quantum Robotics Inc. Q2 Controller V1.0 1 Parts List: The kit comes with 14 individual bags. 1. Case Top and Bottom 2. Case Screw Package containing:
Nabi Big Tab HD24 Speakers Replacement
 Replacing the speakers in your tablet to get the sound back. Written By: Kevin Garcia ifixit CC BY-NC-SA www.ifixit.com Page 1 of 11 INTRODUCTION The Nabi Big Tab HD 24 has two internal speakers. When
Rédigé par: Matthew Newsom
 Replacement of the Nintendo DS Lite microphone. Rédigé par: Matthew Newsom ifixit CC BY-NC-SA fr.ifixit.com Page 1 de 18 INTRODUCTION Can't make Bowser breath fire by blowing in the microphone anymore?
Microsystems. SCI-6 Sound Card Interface Kit Version 1.09 January 2015
 UM Unified Microsystems SCI-6 Sound Card Interface Kit Version 1.09 January 2015 The SCI-6 interface was designed to be a low cost, high quality interface between your PC s sound card and radio transceiver.
Samsung Galaxy Tab G SIM Card Reader
 Samsung Galaxy Tab 10.1 4G SIM Card Reader Replacement If you're having issues with your SIM card reader, this guide will help you replace the faulty reader with a new one. Written By: Ashley Stark ifixit
Nintendo 3DS XL 2015 Motherboard
 Nintendo 3DS XL 2015 Motherboard Replacement This guide details how to access and remove the motherboard. Written By: Zoe Cagle ifixit CC BY-NC-SA www.ifixit.com Page 1 of 11 INTRODUCTION The motherboard
Proto-DB (#28310): Prototyping Daughterboard
: Prototyping Daughterboard") Web Site: www.parallax.com Forums: forums.parallax.com Sales: sales@parallax.com Technical: support@parallax.com Office: (916) 624-8333 Fax: (916) 624-8003 Sales: (888) 512-1024 Tech Support: (888) 997-8267
Web Site: www.parallax.com Forums: forums.parallax.com Sales: sales@parallax.com Technical: support@parallax.com Office: (916) 624-8333 Fax: (916) 624-8003 Sales: (888) 512-1024 Tech Support: (888) 997-8267
Xbox 360 Teardown. Xbox 360 Teardown. Written By: Chris Green. ifixit CC BY-NC-SA Page 1 of 17
 Xbox 360 Teardown Written By: Chris Green ifixit CC BY-NC-SA www.ifixit.com Page 1 of 17 INTRODUCTION The Microsoft Xbox 360 released in 2005, is one of the most powerful gaming consoles on the market.
XEROX PHASER 5500 TONER & DRUM CARTRIDGE REMANUFACTURING INSTRUCTIONS
 XEROX PHASER 5500 TONER & DRUM CARTRIDGE REMANUFACTURING INSTRUCTIONS XEROX PHASER 5500 TONER CARTRIDGE XEROX PHASER 5500 DRUM CARTRIDGE REMANUFACTURING THE XEROX PHASER 5500 TONER & DRUM CARTRIDGES By
Installing imac Intel 27" EMC 2390 Dual HDD or
 Installing imac Intel 27" EMC 2390 Dual HDD or SSD Drive Installing a secondary HDD or SSD in the mid 2010 27" imac EMC 2390. Written By: Brett Hartt ifixit CC BY-NC-SA www.ifixit.com Page 1 of 23 INTRODUCTION
Nintendo 3DS XL 2015 Directional Pad Replacement
 Nintendo 3DS XL 2015 Directional Pad Replacement This guide will give instruction on how to replace the directional pad on a Nintendo 3DS XL 2015 Written By: Thomas Cho ifixit CC BY-NC-SA www.ifixit.com
How Computers Work. Processor and Main Memory. Roger Young
 How Computers Work Processor and Main Memory Roger Young Copyright 2001, Roger Stephen Young All rights reserved. No part of this book may be reproduced, stored in a retrieval system, or transmitted by
Lenovo IdeaTab A1000L Audio Jack
 Lenovo IdeaTab A1000L Audio Jack Replacement If you are unable to or having difficulty hearing using headphones, chances are you need a new headphone jack. Written By: Lauren Pluim ifixit CC BY-NC-SA www.ifixit.com
Fuser. Figure Remove the fuser assembly (1 of 2) 184 Chapter 5 Removal and replacement ENWW
 184 Chapter 5 Removal and replacement ENWW") Fuser 1. Remove the following assemblies. Scanner assembly. For the HP LaserJet 3015, see Scanner assembly. For the LaserJet 3020 and 3030, see Scanner assembly. Left cover. See Printer side covers. Rear
Fuser 1. Remove the following assemblies. Scanner assembly. For the HP LaserJet 3015, see Scanner assembly. For the LaserJet 3020 and 3030, see Scanner assembly. Left cover. See Printer side covers. Rear
MacBook Core 2 Duo Clutch Cover
 MacBook Core 2 Duo Clutch Cover Replacement Replace the clutch cover on your MacBook Core 2 Duo. Written By: Ben Eisenman ifixit CC BY-NC-SA www.ifixit.com Page 1 of 29 INTRODUCTION Replace the curved
ASUS ROG G75VX-BHI7N11 Speakers
 ASUS ROG G75VX-BHI7N11 Speakers Replacement This guide will go over the steps on how to take the speakers out and replace them. Written By: Logan Smith ifixit CC BY-NC-SA www.ifixit.com Page 1 of 9 INTRODUCTION
Quicksilver 606 TR-606 CPU Upgrade
 Quicksilver 606 TR-606 CPU Upgrade D650C 128 Installation Guide Social Entropy Electronic Music Instruments TABLE OF CONTENTS WARNINGS... 1 OVERVIEW... 2 WHAT'S IN THE BOX... 3 OPENING THE TR-606 CASE...
imac Intel 27" EMC 2429 SSD Dual Drive
 imac Intel 27" EMC 2429 SSD Dual Drive Installation Install the dual hard drive kit in an imac Intel 27" EMC 2429. Written By: Dozuki System 2017 guides.crucial.com Page 1 of 22 INTRODUCTION This guide
Branch PLC. Velocio s Branch PLC
 Velocio s Branch PLC Branch PLC The Branch PLC is a member of the Velocio s groundbreaking series of programmable logic controllers. These PLCs introduce revolutionary new concepts, capabilities, performance
GT-400 Lithium Battery Replacement
 Graphic guide to the replacement of the lithium battery in the GT-400 Tools needed ESD Grounding Strap worn at all times Antistatic mat clear of debris to protect the terminal from scratches #2 Philips
ipod Touch 4th Generation Front-Facing Camera Replacement
 ipod Touch 4th Generation Front-Facing Camera Replacement Replace the front-facing camera on your 4th generation ipod Touch. Written By: Walter Galan ifixit CC BY-NC-SA www.ifixit.com Page 1 of 12 INTRODUCTION
Written By: Matt Newsom
 Nintendo DS Lite Touchscreen Replacement Replacement of Nintendo DS Lite touchscreen. Written By: Matt Newsom ifixit CC BY-NC-SA www.ifixit.com Page 1 of 15 INTRODUCTION After many hours of stylus use,
Form: Effective: 9/2007 Supersedes: /95
 DR 4500 & DR4500A Circular Chart Recorder Servo Plate Assembly Kit Replacement Instruction Assembly 30754975-50 (-Pen Model) Assembly 30754975-502 (2-Pen Model) Assembly 30754975-503 (Truline Model) Form:
Installing 6 Indexer: PRS Standard Tools
 888-680-4466 ShopBotTools.com Installing 6 Indexer: PRS Standard Tools Copyright 2016 ShopBot Tools, Inc. page 1 Copyright 2016 ShopBot Tools, Inc. page 2 Table of Contents Overview...5 Installing the
Acer Iconia Tab A3-A10 Touchscreen
 Acer Iconia Tab A3-A10 Touchscreen Replacement You broke the digitizer but the display is still intact? Just simply replace the broken touchscreen!! Written By: Cecil His Mahier ifixit CC BY-NC-SA www.ifixit.com
HGR-2488 Prism Installation Instructions
 HGR-2488 Prism Installation Instructions These installation instructions are applicable to the following models: TASCAM 2488 MK1 (original model) TASCAM 2488 MK II TASCAM 2488 NEO Page 1 of 8 Important
Written By: Andrew Bookholt
 iphone 3GS Power Button Replacement Use this guide to replace the plastic power button cover on your iphone 3GS. Written By: Andrew Bookholt ifixit CC BY-NC-SA www.ifixit.com Page 1 of 16 INTRODUCTION
imac Intel 27" EMC 2309 and 2374 Hard Drive
 imac Intel 27" EMC 2309 and 2374 Hard Drive Replacement imac Intel 27" EMC 2309 and 2374 Hard Drive replacement. Escrito por: Andrew Bookholt ifixit CC BY-NC-SA es.ifixit.com Página 1 de 17 INTRODUCCIÓN
ASUS Zen Pad 10 Micro USB Port & Camera Replacement
 ASUS Zen Pad 10 Micro USB Port & Camera Replacement Remove the motherboard and replace the camera and micro USB port. Written By: Mr Circuit ifixit CC BY-NC-SA www.ifixit.com Page 1 of 13 INTRODUCTION
ibook G3 Clamshell Hard Drive Replacement
 ibook G3 Clamshell Hard Drive Replacement Written By: irobot ifixit CC BY-NC-SA www.ifixit.com Page 1 of 22 INTRODUCTION You can install hard drives up to 9mm thick. TOOLS: 5mm Nut Driver (1) Coin (1)
PlayStation 3 Super Slim Optical Drive Replacement
 PlayStation 3 Super Slim Optical Drive Replacement Faulty optical drive? This guide will walk you through replacing your PS3's optical drive. Written By: Joseph O'Connor ifixit CC BY-NC-SA www.ifixit.com
Nintendo DSi Trigger Button/SD Board
 Nintendo DSi Trigger Button/SD Board Assembly Replacement of the trigger buttons and SD card board cable. Written By: Walter Galan ifixit CC BY-NC-SA www.ifixit.com Page 1 of 10 INTRODUCTION Use this guide
3 Indexer Installation For PRSalpha Tools
 888-680-4466 ShopBotTools.com 3 Indexer Installation For PRSalpha Tools Copyright 2016 ShopBot Tools, Inc. page 1 Copyright 2016 ShopBot Tools, Inc. page 2 Table of Contents General Safety and Precautions...5
Written By: Walter Galan
 Replace a cracked screen on your iphone 4S. Written By: Walter Galan ifixit CC BY-NC-SA www.ifixit.com Page 1 of 32 INTRODUCTION Use this guide to replace the screen on your iphone 4S. After successfully
Mounting Accessory Guide
 Apr. 12 2010 Table of Contents Mounting Accessory Guide 1 Overview 5 Introduction... 5 Types of Mounting Methods... 5 Surface... 5 Wall... 5 L-Type Wall Mount (PMAX-0308) 6 Heavy Duty Wall Mounts (PMAX-0305
 This tutorial was written by Team Xecuter. If you use anything from this tutorial please give credits and also a direct link to this page. Also if we have made any mistakes or left anything out please
Colecovision 5v Memory Mod Installation
 Colecovision 5v Memory Mod Installation The Colecovision suffers from common failure points: the power supply, power switch, and 4116 DRAM. The power supply suffers from poor soldering, the power switch
MOTOROLA Z3 DISASSEMBLY GUIDE
 Page: 1 MOTOROLA Z3 DISASSEMBLY GUIDE This guide will help you replace housing parts and get to the inner parts of your phone. I am in no way responsible for any damage occurred to your phone. If you follow
Motorola Cliq LCD Screen Replacement
 Motorola Cliq LCD Screen Replacement Use this guide to replace or upgrade the LCD screen in your Motorola Cliq. Written By: Tony Tran ifixit CC BY-NC-SA www.ifixit.com Page 1 of 15 INTRODUCTION Does your
Nintendo 3DS XL Upper LCD Display
 Nintendo 3DS XL Upper LCD Display Replacement This guide is going to help you take apart the Upper LCD screen so you will be able to once again play your favorite games on your Nintendo 3DS XL! Written
Sony NEX-7 Screen Replacement
 Sony NEX-7 Screen Replacement If your camera's screen is broken or non functioning, this guide will show you how you can replace the screen. Written By: Jay Miley ifixit CC BY-NC-SA www.ifixit.com Page
Replacement Instructions. Backplane PCA for the HP Router 650
 Replacement Instructions Backplane PCA for the HP Router 650 Copyright Hewlett-Packard Company 1994. All rights reserved. Publication Number 5962-8369 Edition 1, August 1994 Printed in USA This guide provides
Portable Qi Charger. Created by Ruiz Brothers. Last updated on :20:38 AM UTC
 Portable Qi Charger Created by Ruiz Brothers Last updated on 2017-12-05 01:20:38 AM UTC Guide Contents Guide Contents Overview Prerequisite Guides Parts, Tool & Supplies Universal Qi Wireless Charging
Phase Loss Protection Upgrade. Phase Loss Protection Upgrade. In this bulletin:
 Phase Loss Protection Upgrade In this bulletin: Introduction... 2 Purpose... 2 General... 2 Applicability... 2 HD3070 Phase Loss Protection Upgrade Kit Parts... 2 Preparation... 4 Install the Phase Loss
into the EMU E4 Classic and E4 Platinum Samplers
 Installing the CF-CARD SCSI Card Reader/Writer Drive into the EMU E4 Classic and E4 Platinum Samplers Thank you for purchasing the CF-CARD Internal Card Reader Drive Installation Kit from SCSICardReaders.com.
Nintendo 3DS XL 2015 Upper Screen
 Nintendo 3DS XL 2015 Upper Screen Replacement Showing how to replace the Upper Screen of the Nintendo 3DS XL. Written By: Ryan Butler ifixit CC BY-NC-SA www.ifixit.com Page 1 of 13 INTRODUCTION This guide
OLPC XO-4 Touch Mouse Buttons Controller Replacement
 OLPC XO-4 Touch Mouse Buttons Controller Replacement This guide will show you how to replace the mouse buttons controller. Written By: Michael Kellerman ifixit CC BY-NC-SA www.ifixit.com Page 1 of 12 INTRODUCTION
Live emate repair at WWNC.
 Live emate repair at WWNC Frank Gründel http://www.pda-soft.de A word about me Frank Gründel alias Frank Gruendel Approx. 45 years old Married to an amazing wife One child Hardware developer for 15 years
LeapFrog LeapPad Platinum Motherboard Replacement
 LeapFrog LeapPad Platinum Motherboard Replacement In this guide, you will learn how to remove and replace the LeapPad Platinum's motherboard. Written By: Kaitlyn Kinerk ifixit CC BY-NC-SA www.ifixit.com
Written By: Walter Galan
 iphone 6 Plus Front Panel Replacement Replace the Front Panel in your iphone 6 Plus. Written By: Walter Galan ifixit CC BY-NC-SA www.ifixit.com Page 1 of 27 INTRODUCTION Use this guide to strip and replace
Audi Climate Control LCD Rebuild Kit
 Audi Climate Control LCD Rebuild Kit Restores cracked, leaking or missing segment LCD s for the following vehicles: 1997-98 Audi A4 with electronic climate control center 1995-97 Audi A6 with electronic
Yamaha DX7 LCD Installation Guide
 Table of Contents Required Tools/ Getting Started... p. 2 Installation... p.3-11 Opening the DX7... p. 3 Locating and Removing the LCD Bracket... p. 4 Removing the LCD Bezel Cover... p. 5 Removing the
ROBOT LINE TRACKING MOUSE KIT C-9801
 ROBOT LINE TRACKING MOUSE KIT TOOLS you'll need Alimentation 4 batteries 1,5 V AA (not included) The mouse is a line follower robot that follows a black line (or any other color) on a white background
Olympus Stylus 1030 SW Camera Lens Replacement
 Olympus Stylus 1030 SW Camera Lens Replacement Written By: Shanmei Zheng ifixit CC BY-NC-SA www.ifixit.com Page 1 of 11 TOOLS: Phillips #00 Screwdriver (1) ifixit Opening Tools (1) Spudger (1) T6 Torx
Alcatel One Touch Pop 7 Display Assembly Replacement
 Alcatel One Touch Pop 7 Display Assembly Replacement This guide will show you how to replace the display panel and the digitizer. Written By: Riley Cooper ifixit CC BY-NC-SA www.ifixit.com Page 1 of 9
imac Intel 21.5" EMC 2389 Stand Replacement
 imac Intel 21.5" EMC 2389 Stand Replacement Replace a broken or cosmetically unappealing stand on the imac 2389 21.5 Written By: Aaron Cooke ifixit CC BY-NC-SA www.ifixit.com Page 1 of 30 INTRODUCTION
The Radio Control Temperature Logger (RCTL) Manual For hardware version 1.0 Manual version 1.0b
 Manual For hardware version 1.0 Manual version 1.0b") The Radio Control Temperature Logger (RCTL) Manual For hardware version 1.0 Manual version 1.0b All materials owned by Dan Gebhardt Introduction This device records the temperature of a model engine during
The Radio Control Temperature Logger (RCTL) Manual For hardware version 1.0 Manual version 1.0b All materials owned by Dan Gebhardt Introduction This device records the temperature of a model engine during
Motorola Droid X Motherboard Replacement
 Motorola Droid X Motherboard Replacement Written By: Yong hoon choun ifixit CC BY-NC-SA www.ifixit.com Page 1 of 19 TOOLS: ifixit Opening Tools (1) ifixit CC BY-NC-SA www.ifixit.com Page 2 of 19 Motorola
FIELD REPLACEABLE UNIT DOCUMENTATION. Portege R100 GENERAL INFORMATION. Tools Required for Proper Disassembly and Reassembly:
 Portege TM GENERAL INFORMATION Tools Required for Proper Disassembly and Reassembly: 1. Phillips Screwdriver (Size 0) 2. Flat head Screwdriver 3. Case Separator 4. ESD Wrist Strap 5. ESD mat 6. Tweezers
itech Training Courses iphone 5S LCD Assembly Replacement Guide
 itech Training Courses iphone 5S LCD Assembly Replacement Guide 2014 icracked, Inc. All rights reserved. ios, all Apple product names, and Apple logos are trademark property of Apple, Inc. The content
Nikon D610 Flash Capacitor Replacement
 Nikon D610 Flash Capacitor Replacement This guide will help to show you how to replace the D610's Flash Capacitor. Written By: Daniel Eagan ifixit CC BY-NC-SA www.ifixit.com Page 1 of 10 INTRODUCTION In
Acer Aspire 5100 Motherboard Replacement
 Replace motherboard in an Acer Aspire 5100. Written By: Brad Rollinson Page 1 of 14 INTRODUCTION Replace motherboard in an Acer Aspire 5100. TOOLS: Phillips #0 Screwdriver (1) Spudger (1) PARTS: Replacement
Vintage Korg CX-3 Board Repair Service Kit
 Vintage Korg CX-3 Board Repair Service Kit Disassembly and Shipping Instructions Figure 1. The Korg CX-3 Organ 98-13000610 Page 1 Revised June, 2011 Table of Contents Table of Contents... 2 Contents of
Toshiba Satellite A215 S4697 Screen
 Toshiba Satellite A215 S4697 Screen Replacement When your computer screen is cracked or does not work anymore, it may need a new screen. Written By: Carlos ifixit CC BY-NC-SA www.ifixit.com Page 1 of 15
ipad Mini Wi-Fi Front Facing Camera Replacement
 ipad Mini Wi-Fi Front Facing Camera Replacement Replace the Front Facing Camera in your ipad Mini Wi-Fi. Written By: Andrew Optimus Goldberg ifixit CC BY-NC-SA www.ifixit.com Page 1 of 42 INTRODUCTION
Game Boy Micro Buttons Replacement
 Game Boy Micro Buttons Replacement Scritto Da: Jack ifixit CC BY-NC-SA it.ifixit.com Pagina 1 di 12 INTRODUZIONE Use the following guide to replace buttons in the device. STRUMENTI: Phillips #00 Screwdriver
Toshiba Satellite E105-S1602 Front Panel Replacement
 Toshiba Satellite E105-S1602 Front Panel Replacement Use this guide to replace/remove the front panel. Prerequisite to removing the front panel for more detailed work. Written By: Ian Washburne INTRODUCTION
Replacement Keyswitch Assembly
 Installation Instructions Replacement Keyswitch Assembly (Catalog No. 2711E-NKSW1) Applicable Terminals Use this replacement keyswitch with PanelView Terminals 2711-KA1, -KC1, -TA1, -TC1, -TA4, -TC4 and
Megatouch FORCE Monitor Chassis Board Replacement
 Megatouch FORCE Monitor Chassis Board Replacement Visit the Merit Industries, Inc. Web site http://www.meritind.com merit industries, inc. PM0337-01 Rev C Table of Contents FORCE Classic Monitor Chassis