OrderSmart. April 21, Passport Health Communications, Inc. All Rights Reserved
|
|
|
- Francis Bryant
- 5 years ago
- Views:
Transcription

1 OrderSmart P hysician Office userguide April 21, Passport Health Communications, Inc. All Rights Reserved
2 Table of Contents 1.0 General Information Product Overview Authorized Use Permission Workflow User Role and Work Flow User Role: Physician Office Admin Physician Office Operator Physician Order Flow Office Setup and Worksheets Office Setup at user level Physician Physician Office admin Physician Office Operator Worksheets Physician Office Admin and Physician office operator Physician: Access to the system Introduction Passport Health Communications, Inc. All Rights Reserved April 2014, Page2
3 5.2 Access to the System Login to OrderSmart Home Page Add patient tab Add patient Place Order Place Order page Ordering Physician Physician Office: Facility Selection Priority Diagnosis codes: Procedure codes Attachments: Scheduling Details: Authorization Details Additional Details Medical Necessity Check Place Order: Print Requisition... Error! Bookmark not defined. 7.0 Search Patient Passport Health Communications, Inc. All Rights Reserved April 2014, Page3
4 8.0 Today s Patients TODAY S PATIENTS TAB Today s Patients: Edit patient details Place order Show Orders Actions: Orders Tab Workqueue View New Workqueue View Create Workqueue Workqueue filters Workqueue Management: Date Filters Workqueue filters: Facility, Primary Insurance, and Patient Last Name Controls Workqueue filters: Order Source Workqueue filter: Order Status Workqueue filter: Account Status Workqueue filter: Alerts Actions Configure columns Delete Workqueue Passport Health Communications, Inc. All Rights Reserved April 2014, Page4
5 10.0 Alerts Icon Alerts Count Sign-Pending Orders Draft Orders Passport Health Communications, Inc. All Rights Reserved April 2014, Page5
6 1.0 General Information 2014 Passport Health Communications, Inc. All Rights Reserved April 2014, Page6
7 1.0 General Information 1.1 Product Overview OrderSmart OrderSmart is the part of Experian Health ecare NEXT Orders Suite. OrderSmart is an easy-to use web based application which helps the physician office users to send and receive electronic orders, directly to hospitals and ancillary facilities, clinics and labs. Hospitals and clinics use OrderSmart to connect to other health care operations to track the entire patient orders and categorize them on the basis of priority, order status and schedule details. Through OrderSmart the communication is secured between the physician office and facility in a much easy yet effective fashion with the help of alerts that display critical information and patient guidelines through attachments As an office of Experian Health ecare NEXT, prior to the order schedules, OrderSmart helps the users to: - Schedule order for new patient or an existing patient. - View and manage Patient schedules on the basis of priority, Order Status and schedule details. - Manage patient details and issues in a timely fashion without calling the hospitals for scheduling details. - Allow physician offices to schedule orders, and send the orders to hospitals and other health care facilities electronically. - Maintain two way communications between clinics, hospitals and ancillary facilities. - Automatically routes orders and displays critical EMR data at the point of ordering. - Displays alerts critical information and patient specific guidelines. - Identifies and collects appropriate financial papers such as waiver forms, History and Physical Examination. - Electronically creates and identifies preauthorization and referral fax forms Passport Health Communications, Inc. All Rights Reserved April 2014, Page7
8 1.2 Authorized Use Permission Usage of this software is limited to its owner via the terms of its development. OrderSmart is wholly owned by Passport Health Communications, and may not be used or referenced without their express consent. 2.0 Workflow 2014 Passport Health Communications, Inc. All Rights Reserved April 2014, Page8
9 2.0 Workflow 2014 Passport Health Communications, Inc. All Rights Reserved
10 3.0 User Role and Work flow 2014 Passport Health Communications, Inc. All Rights Reserved April 2014, Page10
11 3.0 User Role and Work Flow 3.1 User Role: Physician Office Admin The Physician office admin can perform various actions like 1. The physician office admin can send and receive orders from hospitals and their ancillary facilities. 2. As an admin the user can perform various actions like - Create Worksheets - Edit physician details and Physician office operator details. 3. At order level the user can - Add patient - Edit patient information - Place order to physician or the facility. - Search orders on the basis of their schedule details, ordering physician and sending facility and date and time of the order. - Create Work queues - Cancel Order. - Duplicate an Order. - View Order History. - Communicate with facility about patient s orders. - Can have the count of the sign-pending orders, draft orders and alerts{ communication alerts from the facility} 3.1.2Physician Office Operator The Physician Office operator can perform all the actions like physician office admin except Add New Users and worksheets 2014 Passport Health Communications, Inc. All Rights Reserved April 2014, Page11
12 3.1.3 Physician 1. The physician can send and receive orders from clinics, hospitals and their ancillary facilities. 2. As an ordering physician the user can perform various actions like - Authorize signatures on the sign-pending orders. - Search orders on the basis of their schedule details, order status, order details{date and time of the order} and sending facility - Modify patient orders {if not signed by the patient} by changing the order details. 3. At functional level the user can create his own worksheets 4. At order level the physician can perform the same action like the physician office admin and Operator. 3.2 Order Flow 1. Create Patient: The user add the patient to the system by furnishing the patient personal information, contact information and Insurance Information. Once the patient is added to the system, the user can create an order for the patient. 2. Order Creation: The physician office admin creates an Order by providing the necessary information like - Ordering Physician-Mandatory - Associated Facility - Mandatory - Priority - Mandatory - Reason for exam - Order Instructions - Diagnosis codes - Procedure codes 2014 Passport Health Communications, Inc. All Rights Reserved April 2014, Page12
13 - Schedule information, Authorization detail Depends on the facility configuration discussed in the latter portion of the guide. - Patient Signature - Depends on the facility configuration discussed in the latter portion of the guide. - Medical Necessity Check With all the above mentioned data, the user places the order or saves the order as Draft. 3. Draft Order - After the patient is added to the system, the user can create an order on the patient s name. If the user doesn t have complete information to place an order, the user can save the order as Draft. - The order which is saved as draft is called as a Draft order. - The draft order can be transformed into either Signed order or Sign-pending order depending on the user to which the order is placed 4. Place Order The placing of an order can be done in two ways i. Send to Physician: - The physician office admin creates an order and sends it the physician for his signature. {Only if the user does not have the signing authority}. - If the patient signature is not file, the physician can modify the order by changing the diagnosis codes or procedure codes. Once the order details changes the medical necessity results will be erased. - The physician cannot modify the order, if the patient signature is on file. - The physician signs the order and sends the order to the facility. - If the order is created at the physician office level, without the physician signature on the file the order cannot be placed. ii. Send to Facility: - If the physician office admin has the signing authority, the user can attach the physician signature to the file and send the order to the facility. In this scenario the user can send a copy of the order to the physician for his reference Passport Health Communications, Inc. All Rights Reserved April 2014, Page13
14 - Once the order is sent to facility, if required, the facility can change the order details like diagnosis codes, procedure codes and medical necessity results. - The facility gets the all the verifications like a. Address verification b. Eligibility verification c. Authorization verification d. Patient s payment estimates. Once the facility has all the necessary information the facility will schedule the order. iii. In both the above mentioned scenarios the physician office user cannot modify the order once the order is sent to either the physician or the facility. 5. Order Status: i. Unsigned-Placed: - The order that is sent to physician for signature is Sign pending order / Unsigned Draft order. - The order that is placed directly to the facility without physician signature on file also comes under the order status Unsigned- Placed ii. Signed- Placed - Once the physician receives the order and verifies it and signs the order, the order status changes to Signed Placed. - The order that is placed directly to the facility with physician signature on file also comes under the order status Signed- Placed iii. Draft Order: - The Order which is saved as draft comes under the order status Draft order 2014 Passport Health Communications, Inc. All Rights Reserved April 2014, Page14
15 4.0 Office Setup and Worksheets 2014 Passport Health Communications, Inc. All Rights Reserved April 2014, Page15
16 4.0 Office Setup and Worksheets 4.1 Office Setup at user level The office setup constitutes of the Physician and office users who are associated with the office. - From the office setup page the user can verify the details about the office. - Only authorized users can edit the details of the office Physician - The physician has the signing authority. - The physician can delegate the signing authority to his office users by accepting the terms and conditions about the delegation. - The physician can access the terms upon the initial login and access the delegation terms from his profile page Physician Office admin - The physician office admin is the authorized user for whom the Office Setup tab is enabled. - The user is authorized to edit the office details and update office worksheet to the edit office details page. - As an office admin the user is entitled to edit the following physician information i. Physician contact information ii. Change Physician user name iii. Change Physician password iv. Update physician signature to the physician details page. v. Enable/ Disable Physician - As an office admin the user is entitled to edit the following staff information i. Staff first name and Last name ii. Staff contact information iii. Change password iv. Change staff user name 2014 Passport Health Communications, Inc. All Rights Reserved April 2014, Page16
17 v. Enable/ Disable staff Physician Office Operator - The physician office operator is also an authorized user for whom the Office Setup tab is enabled. - The user is authorized to edit the office details and update office worksheet to the edit office details page. - As an office operator the user is can only view the physicians and the staff who are associated with the office. 4.0 Worksheets Please note: Creating worksheets is not mandatory as the user can search and locate either the diagnosis codes and procedure codes through auto suggest. Worksheet is a popup designed to help the users to organize procedure codes and diagnosis based on the ordering physician under one roof. - Worksheets help the users to locate codes in much more easy fashion. - The users can create tabs on the basis of specialties and categorize codes under the relevant tab. - The user can mark the frequently used codes as favorites for easy identification. - Only authorized users can create worksheets Physician Office Admin and Physician office operator 1. Physician office admin can create worksheet at office level. 2. Physician office admin can copy and create new worksheets for physician/physician office using facility level worksheet 3. Depending on the ordering physician selectes, particular physician / physician office and facility level worksheets are available for procedure selection in place order screen. 4. Default worksheet: The selection is based on default worksheet configuration for the ordering physician and if nothing is configured as default worksheet at physician office level 1st worksheet in the list will show up in the worksheet. 5. Physician office users can edit worksheets of physician/ physician office level only Passport Health Communications, Inc. All Rights Reserved April 2014, Page17
18 4.2.2Physician: 1. Physician can create worksheet at physician level. 2. Physician users can edit worksheets of physician level only 3. The worksheets that are created by the physician can be accessed by physician office users and facility users 4. Physician user can select and view procedures in facility level worksheets. 5. Physician can copy and create new worksheets for physician office using facility level worksheet. 6. Default worksheet: The selection is based on default worksheet configuration for the ordering physician and if nothing is configured as default worksheet at physician office level 1st worksheet in the list will show up in the worksheet Passport Health Communications, Inc. All Rights Reserved April 2014, Page18
19 5.0 Access to the system 2014 Passport Health Communications, Inc. All Rights Reserved April 2014, Page19

20 5.0 Access to the system 5.1 Introduction The module explains all the main features and services offered by the Surgical Orders. The system is designed and developed to serve the user in the best possible way. All the capabilities are neatly structured and presented in a user-friendly manner. 5.2 Access to the System To access the system: Passport Health Communications, Inc. All Rights Reserved April 2014, Page20

21 5.3 Login to OrderSmart Steps to follow: 1. Provide User name and Password 2. Click on the login button 3. If the user name or passwords are incorrect a warning message will show up stating Invalid username or password Passport Health Communications, Inc. All Rights Reserved April 2014, Page21


22 4. Click on the reset button and enter the correct user name and password and click on the login button. * PLEASE NOTE: PATIENT DATA USED THROUGH OUT THIS DOCUMENT IS NOT REAL DATA * List of tabs in the application TABS Today s Patients Add Patient Orders/Schedules Add patient Alerts Show Order The presentation details about 1. Add Patient: To add a new patient and place an order for the patient. 2. Today s Patients: Lists the patients whose orders are placed or details are redacted. 3. Search Patient: To search an existing patient through patient details like First name, SSN, Telephone number etc 4. Orders: To organize all the patient orders by order status, schedule details and order source and priority 2014 Passport Health Communications, Inc. All Rights Reserved April 2014, Page22

23 5.4 Home Page The first screen that appears after the user login will be the Electronic orders/facility orders -workqueue which the user marked as default work queue in the user preferences tab Passport Health Communications, Inc. All Rights Reserved April 2014, Page23
24 6.0 ADD Patient 2014 Passport Health Communications, Inc. All Rights Reserved April 2014, Page24

25 6.0 Add patient tab 6.1 Add patient 2014 Passport Health Communications, Inc. All Rights Reserved April 2014, Page25
26 Steps to Add Patient: Click on the <Add Patient> Tab on the Home page Add Patient Details A. Demographics Tab: Lists the patient s details like Name, Contact Information and Insurance details. i. At the minimum, enter the mandatory fields. ii. Insurance: If the user selects - Relation to Patient: {Guarantor details} Self {Default option} If this option is selected then <Last name>, <First name> and <DOB> will get disabled Passport Health Communications, Inc. All Rights Reserved April 2014, Page26
27 - Relation to patient: If any other option is selected, then the user may have to provide <Last name>, <First name> and <DOB>. - Primary Insurance: Details of the patient s like insurance provider name, Group number, contact information. - Secondary Insurance: Details of the patient s secondary insurance {not mandatory}. B. Employer Tab: Lists the patient s work information.can provide if the user has the information {Not mandatory}. C. Guarantor Tab: Lists the patient s guarantor details same as the details furnished in the relation to patient field and other details include - Guarantor s personal information like name, age, ssn, work details and insurance details. D. After the necessary details are offered, click on the <save> button and the <Place order >button will show up 2014 Passport Health Communications, Inc. All Rights Reserved April 2014, Page27

28 6.2 Place Order Steps to navigate from Demographics/Employer/Guarantor tab to Place order page. A. After the patient details are furnished, click on the <Save> Button. B. Once the <Save> button is clicked, <Place order> button shows up Passport Health Communications, Inc. All Rights Reserved April 2014, Page28

29 C. Click on the <place order> button and the page navigates to <place order page> D. After the patient details are furnished, click on the <Save> Button. E. Once the <Save> button is clicked, <Place order> button shows up. F. Click on the <place order> button and the page navigates to <place order page> 6.3 Place Order page 2014 Passport Health Communications, Inc. All Rights Reserved April 2014, Page29

30 6.3.1 Ordering Physician Steps to select Physician: i. Type the physician name in the autosuggest box. ii. Select the physician from the search results Physician Office: Steps to select Physician office - The physician office shows up by default Facility Selection 2014 Passport Health Communications, Inc. All Rights Reserved April 2014, Page30

31 i. When the user logs in as <Physician Office Admin> user, by default the facility name will be displayed if the office is associated with single office. ii. If the office is associated with more than one facility, a drop down shows up for the selection Priority iii. iv. Steps to Select Priority: Click on the <Priority> dropdown. Select the appropriate priority Diagnosis codes: 2014 Passport Health Communications, Inc. All Rights Reserved April 2014, Page31
32 There are 2 ways to select the diagnosis codes 1. Worksheet Pop up: i. Click on the icon next to diagnosis codes. Worksheet window will open. ii. The worksheet popup lists all the worksheets that belong to the selected physician, selected physician office and the facility. iii. Select the appropriate worksheet and click on the check box next to diagnosis codes. iv. The user can search the code within the worksheet. v. The user can also select from the favourites tab of the worksheet. vi. The user can click on the procedures tab to select the procedures or close the window by clicking on the <Done> button at the bottom of the worksheet. 2. ICD-9 and ICD-10 a. By default the ICD-9 will be selected. ICD 10 support is configurable at user level. i. User can select what type of codes are being entered.icd9 or ICD10 ii. ICD10 effective date can be configurable iii. In Place Order screen if order entry date is before ICD10, ICD9 selection is default otherwise ICD10 iv. In MNC tab if Date Of Service is before ICD10 then ICD9 is default otherwise ICD10 v. No change in the functionality when ICD 09 is selected b. If ICD10 option is selected i. All description and ICD10 code searches will return only ICD10 codes ii. If valid specific ICD9 code is selected, system will look up equivalent icd10 codes 1. if there is exactly one ICD10 match the system automatically adds that code set 2. If there are multiple options a popup screen with selections (Scenario based view) will show up. iii. After user selects one of the scenarios and clicks 'OK' add the codes to selection Passport Health Communications, Inc. All Rights Reserved April 2014, Page32
33 iv. This functionality will reflect in place order screen, Mednec Tab, Global MNC. 3. Autosuggest: {Look up by icd code/description} A. The user can search the diagnosis either by entering the icd code or the description. v. From the search results, can select the appropriate code and the code gets added to the place order page Procedure codes There are 2 ways to select the procedure codes 1. Worksheet Pop up: i. Click on the icon next to procedure codes. Worksheet window will open. ii. The worksheet popup lists all the worksheets that belong to the selected physician, selected physician office and the facility. iii. Select the appropriate worksheet and click on the check box next to diagnosis codes. iv. The user can search the code within the worksheet. v. The user can also select from the favourites tab of the worksheet Passport Health Communications, Inc. All Rights Reserved April 2014, Page33


34 vi. The user can click on the procedures tab to select the procedures or close the window by clicking on the <Done> button at the bottom of the worksheet. 2. ICD-9 and ICD-10 {SAME AS ABOVE} 3. Autosuggest: {Look up by cpt code/description} a. The user can search the diagnosis either by entering the cpt code or the description. b. From the search results, can select the appropriate code and the code gets added to the place order page Attachments: {Only accepts PDF file} Steps to attach a document to the order i. Click on the Attachments link. ii. If the user has a specific document {PDF FORMAT} saved on the system, can browse the file and select it. iii. Select document type: Select the document type from the list. iv. When the user hits ok an alert shows up asking the user to save the order as draft. Click on <Save order as draft> button to save the order as draft Passport Health Communications, Inc. All Rights Reserved April 2014, Page34


35 v. Repeat steps I, ii, iii and iv. vi. The system show a <Done> message when the document is attached Scheduling Details: vii. This group of check boxes allows the user to select the details depending on their current schedule status. viii. If the schedule details are configured as <Hide> the option won t show on the place order page. ix. If the scheduled details are configured as < Optional> The can furnish the details if they have or can skip the option. x. If the Scheduled details are configured as <Required> It is compulsory to supply details to place order. In other case an alert shows up asking the user to provide necessary details. 1. Scheduled: Steps to add Scheduled Details: i. Select the radio button next to scheduled. ii. The option to select <Date of Service and Time> will open up. iii. Click on the calendar icon and the calendar pop up will be displayed. iv. All the previous days and facility s non-working days will be greyed out. v. Depending on the facility s configuration about the minimum days to get the authorization. vi. Select the time from the drop down Passport Health Communications, Inc. All Rights Reserved April 2014, Page35


36 2. To be scheduled: Steps to add To be Scheduled Details : i. Click on the radio button besides To be scheduled option. ii. Select the appropriate option from the pop up whether the facility should call the patient or the patient will call the facility. iii. Anticipated date of service: Click on the calendar to select the date of service. iv. Note: To supply any further information about the order. 3. None: xi. If the schedule details are not required select the option <none> Authorization Details - If the Authorization details are configured as <Hide> the option won t show on the place order page. - If the Authorization details are configured as < Optional> the user can furnish the details if they have or can skip the option. - If the Authorization details are configured as <Required> it is compulsory to supply details to place order. In other case an alert shows up asking the user to provide necessary details Passport Health Communications, Inc. All Rights Reserved April 2014, Page36


37 Steps to add Authorization details: NOTE: i. Click on the Authorization dropdown. ii. The user needs to select the appropriate option from the dropdown. - If the minimum required days to get authorization is set to 2 and the user selects <scheduled option >with service date as today/tomorrow and <authorization details> as facility should get authorization an alert shows up{ Facility requires 2 business day to get authorization from payers. Please select "Date of service" later than 2 business days.} asking the user to change the date of service for the scheduled detail 1. Available: - If the user has the all the information like Authorization number, Visits Authorized and Effective date they can be entered here. - If the user wants to provide additional details they can be entered in the <Note> field Passport Health Communications, Inc. All Rights Reserved April 2014, Page37

38 2. Request Submitted: - If the request is already submitted the details can be furnished here. - Along with the Confirmation Number. - If the user wants to provide additional details they can be entered in the <Note> field. 3. Physician will Obtained: - If the physician will collect the information, select the option <physician will obtain>. 4. Facility will get the authorization: - Select the option if the facility needs to get the authorization. 5. Authorization not required: - Select the option if the authorization is not required for the order Additional Details 2014 Passport Health Communications, Inc. All Rights Reserved April 2014, Page38

39 - - To attach any further information about the order, the details can be typed here Medical Necessity Check Steps to run medical necessity check: i. Click on the link on the place order page. ii. The medical necessity check window opens up with the selected procedures. iii. To select the rule on which the medical necessity needs to be checked, click on the dropdown button and select the relevant Medical necessity rule. iv. Check: Once the rule is selected, click on the <check> button. v. The results will be displayed, whether the procedure is pass or fail Passport Health Communications, Inc. All Rights Reserved April 2014, Page39


40 - Click on <Ok> to save the results a. If the procedure has a frequency question, select the <YES/NO> from the dropdown b. If the procedure did not exceed the particular time period the procedure will pass the medical necessity check. c. If the procedure exceeds the time limit, the procedure fails 2014 Passport Health Communications, Inc. All Rights Reserved April 2014, Page40


41 i. Has the patient accepted responsibility for payment? : Select any of the option by clicking on the radio button. ii. ABN Finalized: If the patient accepts the responsibility, click on the option <ABN Finalized> iii. SIGNED ON PAPER: If the patient signature is captured on a paper, click on the check box next to <Signed on paper> iv. View ABN: To view the ABN form click on the <View ABN> button. v. Print ABN: Click on the <Print Abn> to print the form. vi. OK: Click <Ok> button to finalize all the options. vii. Cancel: To cancel the whole process, click on the <Cancel> button 2014 Passport Health Communications, Inc. All Rights Reserved April 2014, Page41

42 Place Order: A. Place Order: Click on the <Send to physician> button to place the order. If the physician has delegated the signing authority, the user can send the order directly to the facility. If the physician has not delegated the signing authority to the user, the user should send the order to the physician B. A pop up opens up Do you want to print requisition form?. Click on <Yes> to print the form and <No > to cancel the process. C. Save as Draft: To save the order, click on the <save as draft> button Passport Health Communications, Inc. All Rights Reserved April 2014, Page42

43 2014 Passport Health Communications, Inc. All Rights Reserved April 2014, Page43

44 Steps to print requisition 1. Once the order is placed, a pop up opens with option Do you want to print requisition 2. Click on the <Yes> Option 3. Click on the open in new window? On the Order Requisition form pop op. 4. Requisition form opens up in a new window Passport Health Communications, Inc. All Rights Reserved April 2014, Page44
45 7.0 Search Patient 2014 Passport Health Communications, Inc. All Rights Reserved April 2014, Page45

46 7.0 Search Patient Steps to Search patient i. From the hope page type the patient name/dob/mrn/ssn in the Search Box. ii. The page navigates to search results page. iii. Edit Patients details: Row click anywhere on the order. Update necessary patient s details and click on the <save> button Passport Health Communications, Inc. All Rights Reserved April 2014, Page46
47 The page will show Patient details updated message but will remain in the same window with other options <Place order> and <Back to patients>. Place Order: Click on the <Place Order> button and the page navigates to PLACE ORDER PAGE from where the user can place order for the patient by selecting the necessary information.{ place order -discussed in detail in the earlier part of the user guide.ref#6.3} iv. Back to patients: Click on back to patients to return to the patient search results page a. - Click the <Place Order> icon to place a new order for the patient. b. - Click on the <Show Patient s Orders> icon to view the history of the patients orders..{ Show patients orders will be discussed in detail in the later part of the user guide} 2014 Passport Health Communications, Inc. All Rights Reserved April 2014, Page47
48 8.0 Today s Patients 2014 Passport Health Communications, Inc. All Rights Reserved April 2014, Page48
49 8.0 Today s Patients 8.1 TODAY S PATIENTS TAB Today s Patients: A. Click on Today s Patient s tab from the home page. B. Today s patients: If patient details are updated or a new order is ordered for the patient, those patients will be shown under today s patient list Edit patient details A. Row click anywhere on the patient details. B. The page navigates to update patient details page. C. Update necessary patient details and click on the <save> button. D. Place Order: To place a new order for the patient. The page navigates to Place Order page..{ place order -discussed in detail in the earlier part of the user guide.ref#4.3} E. Back to Patients: to return to today s patients, click on <back to patients> button Passport Health Communications, Inc. All Rights Reserved April 2014, Page49

50 8.2 Place order - Click the <Place Order> icon to place a new order for the patient. 8.3 Show Orders -Click on the <Show Patient s Orders> icon to view the history of the patients orders 1. In Show Orders page, the users can Place New Order, Recreate Order, and Delete Draft, Back to Patients. 2. The Show Orders Lists all the Orders including Draft Orders that are placed on the patients name either from Physician Office logins or Facility Logins 2014 Passport Health Communications, Inc. All Rights Reserved April 2014, Page50


51 3. The Place Order page gives the User the options like <save as Draft>, Place Order, Back to Patients. 4. If the User is going through Today s Patients > Show Orders > Once the Order is placed the page will be redirected to Patients Orders 5. If the Order is created from Physician Office logins the status will be Signed-Draft/Unsigned-Draft and if the Order is created from Facility Login the Status will be Singed-Placed/Unsigned Placed Actions: i. Cancel Order : i. Click on the <Cancel> icon to cancel the patient s order. An alert message shows up for confirmation. ii. Click on <OK> to cancel the order. ii. Order History 2014 Passport Health Communications, Inc. All Rights Reserved April 2014, Page51


52 - To view the complete history of the order, click on the <Order History> icon iii. Duplicate Order : To mark an order as duplicate, follow the steps shown below i. Once the order is marked as Duplicate, the order cannot fit in the workqueue filters. ii. The user can find the order through search criteria to change the status of the order. iv. Recreate Order 2014 Passport Health Communications, Inc. All Rights Reserved April 2014, Page52
53 Steps To recreate order: i. Click on the <recreate this order> icon under the actions column ii. Click <ok> button in the pop up. iii. The page navigates to the place order page. iv. Can continue with the same order details or can edit them. v. Click on the <place order> to place a new order for the patient. vi. Click on the <Back to patients> button to return to the show orders page. vii. Click on the <save as draft> button to save the order draft. viii. The draft order can be viewed from search patient> show orders Passport Health Communications, Inc. All Rights Reserved April 2014, Page53

54 v. Alerts Steps to send an Alert i. Click on the <alert> icon under the actions column ii. In the <order alerts> type the message in the place holder. iii. Click on the <Send Alert> to send the alert to the clinic. iv. Once the alert is sent the alert status can be viewed under <New> and<all> v. Click on the <close> button to close the window 2014 Passport Health Communications, Inc. All Rights Reserved April 2014, Page54

55 vi. Delete order Delete option is available only for the <Draft Orders> Steps to delete the order: i. Click on the <Delete option > under the actions column ii. Click on <Yes> option to delete the order. iii. Once the order is deleted, it goes off from the order s list. iv. Click on the <No> option to cancel the process Passport Health Communications, Inc. All Rights Reserved April 2014, Page55
56 9.0 Orders 2014 Passport Health Communications, Inc. All Rights Reserved April 2014, Page56
57 9.0 Orders Tab Click on the orders tab on the menu bar. The Actions that can be carried out from the <Orders> tab are 1. Categorize the Orders on the basis of their Order status, Ordering Physician, Facility, Orders date. 2. Row click on the order and view the order details depending on the order status. 3. Can perform various actions like Cancel Order View Order History Recreate Order Duplicate order Send notifications to the facility. The user can view the order depending on the order status. 1. Order status Signed-placed and Draft order can be view the order details {Row click option is available} 2. The user can perform various other actions as mentioned above {Refer to 8.3} 3. The user can print the requisition form for the signed-placed orders Passport Health Communications, Inc. All Rights Reserved April 2014, Page57
58 4. Draft order: The order can be transformed to either sign-pending or signed-placed order. 9.1 Workqueue View 1. Create customized workqueues using workqueue search criteria. 2. Can create workqueue from the existing workqueue. 3. Configure columns for the customized workqueue. 4. Context Menu Mark Order as NPR : Mark Order as Duplicate Mark Order as Cancel Schedule Info Order Alerts 5. Mark the workqueue as Private New Workqueue View 2014 Passport Health Communications, Inc. All Rights Reserved April 2014, Page58
59 Steps to go to new workqueue view 1. From the orders tab, click on the WorkQueue View link 2. The page navigates to the workqueue page. 3. Click on the expand Workqueue Search Criteria, the search criteria shows up. 4. Only authorized users can create workqueues. Creating Work queue: Only authorized users, (admin users), can create and assign workqueues to specific users or user groups Create Workqueue xii. Steps to create workqueue: To create workqueue, the user needs to select create workqueue option from the dropdown Workqueue filters 2014 Passport Health Communications, Inc. All Rights Reserved April 2014, Page59


60 2014 Passport Health Communications, Inc. All Rights Reserved April 2014, Page60


61 Steps to add workqueue filters i. The Workqueue Management window contains 14 different categories that users can employ to create workqueues for the Orders Tab,. ii. When managing an existing workqueue, the user can modify the workqueue and save the workqueue. iii. The Workqueue dropdown allows you to designate the creation of a new workqueue or select an exisiting workqueue to manage iv. To add the filters to the workqueue, the user need to select the filters, furnish the search criteria and click on the apply button to add the filter. v. To remove the filters from the workqueue, the can click on the remove icon next to the workqueue filter on the right side of the panel Passport Health Communications, Inc. All Rights Reserved April 2014, Page61


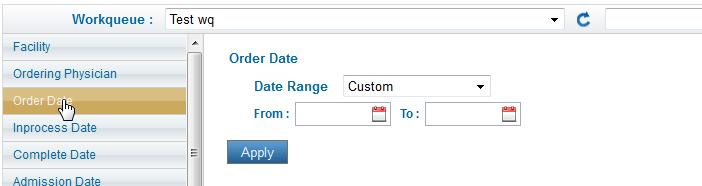
62 9.1.4 Workqueue Management: Date Filters There are six date selections that all work the same way on the different dates that are available for an order 2014 Passport Health Communications, Inc. All Rights Reserved April 2014, Page62

63 Steps to create workqueue management: i. Admission Date ii. Order Date- this is the date the origional patient record is received by PPH via the interface iii. Inprocess date this is the date an open order is moved to an Inprocess queue iv. Registration Date v. Service Date 2014 Passport Health Communications, Inc. All Rights Reserved April 2014, Page63


64 vi. Complete Date this is the date an open or inprocess order is moved to a Completed queue. vii. Each selection has a dropdown from which The user select either a sliding date range or The user input a custom or hardcoded date range. - Custom - 1st of last month - Today - Sunday of this week - Yesterday - Sunday of last week - This Week - Monday of this week - Last Week - Monday of last week - 1 st of this month - Between viii. Click on the apply button to add the filter and remove icon to remove the filter Workqueue filters: Facility, Primary Insurance, and Patient Last Name Controls 2014 Passport Health Communications, Inc. All Rights Reserved April 2014, Page64

65 2014 Passport Health Communications, Inc. All Rights Reserved April 2014, Page65
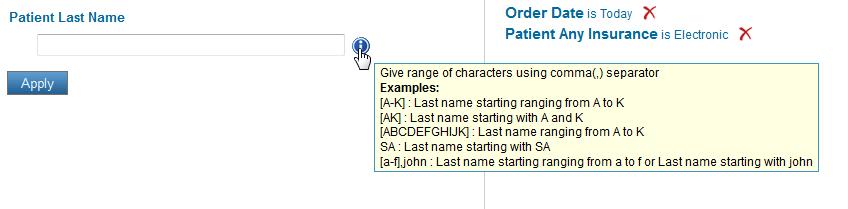
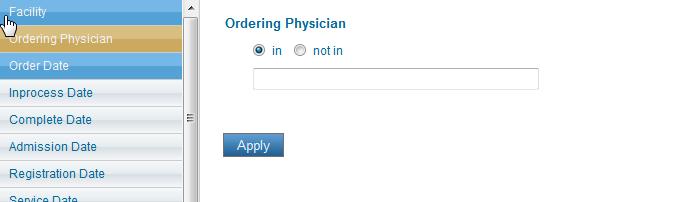
66 Steps to create workqueue with Facility, primary insurance and patient last name: i. Facility The facility name will be displayed. - If the Physician office is associated with more than one facility, the list populates in the dropdown - The check boxes allows the user to select multiple options at the same time. - This selection includes In and Not in radio buttons - The user can check all of the items or uncheck all items by selecting either In or Not in radio buttons - This selection the Not in check box, which means the workqueue will contain the inverse of what is selected in the dropdown - Click on the apply button to add the filter and remove icon to remove the filter. ii. Ordering Physician: - The user can type text into the Filter text box to display a subset of items in the dropdown. - The user can check all of the items or uncheck all items by clicking the Add checked Add all or close. - This filter includes the Not in check box, which means the workqueue will contain the inverse of what is selected in the dropdown - To remove all the selected physicians click on the remove all option iii. Insurance - Any/Primary Insurance/ Secondary Insurance The check boxes allows the user to select multiple options that appear on the workqueue - Custom radio button: This radio button selection allows you to limit the Electronic/Non Electronic/Custom insurances that appear on the workqueue - Click on the apply button to add the filter and remove icon to remove the filter Passport Health Communications, Inc. All Rights Reserved April 2014, Page66
67 9.1.6 Workqueue filters: Order Source Steps to create Order source filter Order Source This filter lists the following controls: Electronic, Fax, Patient, Facility i. The check boxes allow the user to select multiple options at the same time. ii. This selection includes In and Not in radio buttons iii. The user can check all of the items or uncheck all items by selecting either In or Not in radio buttons iv. This selection has the Not in check box, which means the workqueue will contain the inverse of what is selected in the dropdown. v. Click on the apply button to add the filter and remove icon to remove the filter Workqueue filter: Order Status 2014 Passport Health Communications, Inc. All Rights Reserved April 2014, Page67

68 Steps to create Order status filter: i. The check boxes allows the user to select multiple options at the same time. ii. This selection includes In and Not in radio buttons iii. The user can check all of the items or uncheck all items by selecting either In or Not in radio buttons iv. This selection has the not in check box, which means the workqueue will contain the inverse of what is selected in the dropdown. v. Click on the apply button to add the filter and remove icon to remove the filter Passport Health Communications, Inc. All Rights Reserved April 2014, Page68

69 9.1.8 Workqueue filter: Account Status Steps to create Account status filter: i. This selection control will list the following account statuses: Scheduled, Unscheduled, Inprocess Scheduled, Inprocess Unscheduled, and Completed ii. The check boxes allows the user to select multiple options at the same time. iii. This selection includes In and Not in radio buttons iv. The user can check all of the items or uncheck all items by selecting either In or Not in radio buttons v. This selection the Not in check box, which means the workqueue will contain the inverse of what is selected in the dropdown 2014 Passport Health Communications, Inc. All Rights Reserved April 2014, Page69

70 vi. Click on the apply button to add the filter and remove icon to remove the filter Workqueue filter: Alerts Alerts Alerts are two way communications between the physician office user and hospitals and its ancillary facilities. Through alerts the physician office admin should be able to 1. Request and provide additional information to the facility 2. Be notified of requests for such additional information (notification alerts on home page) 3. Be notified that the additional information requested has been provided and is now available Passport Health Communications, Inc. All Rights Reserved April 2014, Page70
71 4. Acknowledge the received alerts from the hospitals and its ancillary facilities 6. Exchange Order specific notes between physician/offices and facilities. Steps to create Alerts filter: i. The check box allows the user to select whether to add filter or not. ii. Click on the apply button to add the filter and remove icon to remove the filter Actions Steps to carry out actions i. Go: Select the search criteria and click on the Go button to retrieve the resuts. ii. Reset: To reset the current search criteria iii. Save Workqueue When modifications were made to the existing workqueue. iv. Save New Workqueue To save a new workqueue Passport Health Communications, Inc. All Rights Reserved April 2014, Page71
72 Configure columns Steps to configure columns to the Workqueue: i. From the workqueue search criteria, click on the configure column button. ii. The page navigates to the workqueue management page. iii. Under workqueue columns 2014 Passport Health Communications, Inc. All Rights Reserved April 2014, Page72

73 - To add columns to the workqueue select the required column names and click on arrow and click on Save Button. - To remove the columns from the list select the required columns names and click on arrow and click on Save Button. - By selecting these arrows the user can arrange the workqueue columns - iv. Sort Columns : Select the primary sort column and the secondary sort column names from the dropdown Delete Workqueue Steps to Delete Workqueue: i. Select the workqueue from the dropdown. ii. Click on the configure column button iii. In the workqueue management page,click on the delete option iv. An alert shows up to confirm deletion v. Click on yes to delete the worksheet and no to cancel the process Passport Health Communications, Inc. All Rights Reserved April 2014, Page73
74 10.0 Alerts 2014 Passport Health Communications, Inc. All Rights Reserved April 2014, Page74


75 10.0 Alerts Icon 10.1 Alerts Count 2014 Passport Health Communications, Inc. All Rights Reserved April 2014, Page75


76 Steps To add view and acknowledge alerts i. Click on the alert count on the home page ii. The page navigates to the workqueue where the user can view the order details.{the user cannot save any workqueue from this page} iii. Click on the alert icon, to view or acknowledged alert, send a new alert to the facility users iv. To send a new alert: Click on the place holder Send a message to facility, type the alert and click on the <send alert>button. v. To view the alert, click on the <ALL> tab 2014 Passport Health Communications, Inc. All Rights Reserved April 2014, Page76
77 vi. vii. viii. If there are any new alerts from the facility, they can be acknowledged by clicking on the <New> tab. Once the alert is acknowledged, the row colour of the order changes {as it doesn t fit the workqueue criteria} and upon refresh the order goes off the workqueue. The count of the alert icon changes upon page refresh 2014 Passport Health Communications, Inc. All Rights Reserved April 2014, Page77
78 11.0 Sign-Pending Order 2014 Passport Health Communications, Inc. All Rights Reserved April 2014, Page78
79 11.0 Sign-Pending Orders Orders that need Physician s signature come under the Sign-Pending Status. The count specifies the number of orders physician need to sign. The physician office admin can view the order by clicking on the Order. Though the user can view the order, he cannot edit it. The user is entitled to perform various other actions like 2014 Passport Health Communications, Inc. All Rights Reserved April 2014, Page79
80 Steps to view Sign-Pending Orders i. Click on the Sign-pending link on the menu bar. ii. View the order: Row click on the order to view the order details. iii. The order details cannot be modified. iv. The user can perform the following action {All the below mentioned steps are explained in detail in earlier part of the guide. Refer 8.3} Mark the order as duplicate. Mark the order as cancel. Recreate the order. Delete the order. View and Acknowledge View Order History 2014 Passport Health Communications, Inc. All Rights Reserved April 2014, Page80
81 12.0 Draft Orders 2014 Passport Health Communications, Inc. All Rights Reserved April 2014, Page81


82 12.0 Draft Orders Steps to view Draft Orders i. Click on the Draft orders link on the menu bar. ii. View the order: Row click on the order to view the order details. iii. The order details can be modified. iv. The Order can be sent to Physician or to the facility. v. The user can perform the following action {All the below mentioned steps are explained in detail in earlier part of the guide. Refer 8.3} 2014 Passport Health Communications, Inc. All Rights Reserved April 2014, Page82
83 Mark the order as cancel. Delete the order. View and Acknowledge View Order History 2014 Passport Health Communications, Inc. All Rights Reserved April 2014, Page83
Quanum elabs and Quanum EHR Basic Functionality Frequently Asked Questions
 Quanum elabs and Quanum EHR Basic Functionality Frequently Asked Questions Table of Contents Application Interface... 4 How can I optimize the view of the system on my computer?... 4 What does the message
List of Lifepoint Changes 9/1/16-2/17/17 Date Revision Case /
 List of Lifepoint Changes 9/1/16-2/17/17 Date Revision Case / Description Project 9/2/2016 63424 SC24124 The message that displays on the User Mode / User Profile page when a user tries to enter a new
Provider Secure Portal User Manual
 Provider Secure Portal User Manual Copyright 2011 Centene Corporation. All rights reserved. Operational Training 2 August 2011 Table of Contents Provider Secure Portal... 5 Registration... 6 Provider -
PETNET Direct/Dose Credit Request
 PETNET Direct Preferences Add Patient Add Physician Ordering Doses Editing Dose Status Adding Doses to Reports Only Custom Report Writer Dose Credit Request Entering a Dose Credit Request Adding an Rx
Reference Services Web Portal
 User Guide What is the Reference Services Web Portal? T he Reference Services Web Portal is a way for all of the Marshfield Labs Reference clients to access and maintain their client information remotely
Link 1500 / Online Claims Entry User Guide
 Link 1500 / Online Claims Entry User Guide ABILITY Network Inc Copyright and Trademark Copyright Copyright 2016 ABILITY Network Inc. All Rights Reserved. All text, images, and graphics, and other materials
Medical Mastermind: How to Guide
 2013 Medical Mastermind: How to Guide Front Office Manual This guide will serve as a navigation tool for the Drummond Certified, Medical Mastermind software product. This guide will provide step by step
Table of Contents RURO, Inc. All Rights Reserved
 Table of Contents ABOUT THIS GUIDE... 7 Purpose of this Guide...7 ACCESSING THE SYSTEM AS A CLIENT PORTAL USER... 7 Navigating the Client Portal...7 Creating and Submitting a New Requisition...8 Accepting
Care360 Labs & Meds Frequently Asked Questions
 Frequently Asked Questions Table of Contents Application Interface... 4 How can I see more of on my computer?... 4 What does the message You have multiple sessions open mean?... 4 Why do I receive the
Secure Provider Website. Instructional Guide
 Secure Provider Website Instructional Guide Operational Training 1 March 2017 Introduction The Secure Provider Web is a secure website developed to allow Providers across Centene health plans to perform
CERECONS. Provider Training
 CERECONS Provider Training February 2012 Table of Contents 1. Physician Dashboard 2 Eligibility Highlights 2 Clinical Alerts 3 Referral Alerts and Stats 4 Group Information 5 2. Edit Profile 6 3. Eligibility
NEW AUTHORIZATION REQUEST USER GUIDE. For Premera Blue Cross Medicare Advantage Plans providers using Clear Coverage
 NEW AUTHORIZATION REQUEST USER GUIDE For Premera Blue Cross Medicare Advantage Plans providers using Clear Coverage 1 CLEAR COVERAGE NEW AUTHORIZATION REQUEST USER GUIDE 1. Log into One Health Port (OHP)
Appointment History this function provides a record of all appointments and or cancellations by patient.
 Appointment Scheduling Introduction Next Available - this mode searches for the next available appointments within a given range of time and/or days, whether for one provider or several providers. Reschedule
Specialty Services Requests. Referrals
 Referral Submission Specialty Services Requests Referrals Request Categories Specialty Outpatient Admission ALL physician office services Clinic Visits, Consults, Follow Up Visits, Testing Procedures,
Title of Manual: Specimen Collection Document Number: GPA.SPC.52.0
 Page 1 of 17 I._PURPOSE This document is a guideline of procedures for Outreach 2.0 ordering and results application. It is intended to outline the features and functions of Outreach 2.0. All major functionality
DXWeb Webenabled Version 4.0 Supplement
 DXWeb Webenabled Version 4.0 1 DXWeb Webenabled Version 4.0 Supplement To be used with the DENTRIX 9.0 User s Guide 727 E. Utah Valley Drive, Suite 500 American Fork, UT 84003 Tel. (801) 763-9300 Fax (801)
CONSOLIDATED LABORATORY SERVICES
 TABLE OF CONTENTS 2 INTRODUCTION 3 LOGIN 4 DESKTOP 5 TEST RESULTS 6 Basic Features 12 Advanced Features 16 TEST ORDERS Coming Soon 17 ACTIVITY REPORTS 17 Trace Accession 18 Activity Report 19 ADMINISTRATOR
CareDx Customer Web Portal User Guide Version 3.6.3
 CareDx Customer Web Portal User Guide Version 3.6.3 Copyright Notice CareDx, Inc, 3260 Bayshore Blvd, Brisbane, CA 94005 Copyright 2015 CareDx All rights reserved. This document is protected by the copyright
Table of Contents RURO, Inc. All Rights Reserved
 Table of Contents ABOUT THIS GUIDE... 7 Purpose of this Guide...7 ACCESSING THE SYSTEM AS A CLIENT PORTAL USER... 7 Navigating the Client Portal...7 Creating and Submitting a New Requisition...8 Accepting
e-mds Patient Portal TM
 e-mds Patient Portal TM Version 6.3.0 The Patient s Guide to Using the Portal e-mds 9900 Spectrum Drive. Austin, TX 78717 Phone 512.257.5200 Fax 512.335.4375 e-mds.com 2009 e-mds, Inc. All rights reserved.
Preauthorization Overview for Providers and Office Personnel
 Preauthorization Overview for Providers and Office Personnel Table of Contents 1. Preauthorization Requests 2. Medicare Advanced Organizational Determinations (AOD) 3. Clear Coverage 4. EviCore 2 Preauthorization
Provider Portal 3.0 Manual. Health Axis 3.0 Provider Portal User Guide
 Provider Portal 3.0 Manual Health Axis 3.0 Provider Portal User Guide Table of Contents Provider Portal 3.0... 4 How to Access the Provider Portal... 4 Login credentials:... 4 How to Request Access to
Aerial iexchange Users Guide
 Aerial iexchange Users Guide 2014.1 How to Run the Util\\\ \user Disclaimer How to reach us Copyright Information contained in this document is subject to change without notice and does not present a commitment
MillinPro+ USER GUIDE. A Complete Web-Based Platform for Managing Medical Bills and Insurance Claims
 MillinPro+ A Complete Web-Based Platform for Managing Medical Bills and Insurance Claims MILLIN ASSOCIATES, LLC USER GUIDE 2010-2012 Copyrights Reserved Millin Associates, LLC Document Change History Version
Helpful Hints: Request an Initial Authorization
 Helpful Hints: Request an Initial Authorization Select Location Select Location Window Patient Selection Referral Source Type Patient Last Name Patient First Name Patient DOB Insurance Name Subscriber
Provider Portal User Guide
 Provider Portal User Guide Updated: January 1, 2019 Table of Contents Introduction... 1 How to Register for the Provider Portal... 3 Manage Your Profile... 5 User Administration... 8 Authorizations & Referrals...
Provider Portal User Guide. For the Provider Portal External Use
 Provider Portal User Guide For the Provider Portal External Use IT Department Issued January 2017 mynexus 2017. All rights reserved. Version 1.4 Revised 07122017 Contents Getting Started with the Portal...
HPHConnect for Employers User s Guide
 HPHConnect for Employers User s Guide Copyright 2017 Harvard Pilgrim Health Care, Inc. All rights reserved. Harvard Pilgrim Health Care and the Harvard Pilgrim Health Care logo are trademarks of Harvard
Meritain Connect User Manual. for Employees. 1 Meritain Connect User Guide for Employees
 Meritain Connect User Manual for Employees 1 Meritain Connect User Guide for Employees Contents Introduction... 4 Accessing Meritain Connect... 5 Logging In... 5 Forgot Password... 6 Registration Process...
A guide to the Sema4 provider portal
 A guide to the Sema4 provider portal Table of contents Getting started 3 Supported browsers 4 Creating an account 5 Account security 5 Your account 6 Changing your email preferences 7 Changing your password
AGENCYCORE MOBILE ios MANUAL
 1 AGENCYCORE MOBILE ios MANUAL 2 Table of Contents DOWNLOADING APP... 3 HOME PAGE... 8 MY MESSAGES... 9 Common Icons & Buttons Messages... 9 Compose New Message:... 12 MY SCHEDULE... 13 Visit Information...
Patient Portal Users Guide
 e-mds Solution Series Patient Portal Users Guide Version 7.2 How to Use the Patient Portal CHARTING THE FUTURE OF HEALTHCARE e-mds 9900 Spectrum Drive. Austin, TX 78717 Phone 512.257.5200 Fax 512.335.4375
Physician Online Data System
 Physician Online Data System Medical Network One, PC 4986 Adams Rd., Suite D Rochester, MI 48306 Physician Online Data System (PODS) Register for PODS... 4 User name and password... 7 Login... 8 Member
RIS RECEPTION. Quick Reference Guide
 Quick Reference Guide RIS RECEPTION Adding and Editing Physician Information........................................ Next Avaiable Time Slot.......................................................... Editing
Table of Contents Getting Started: Login... 3 Home Page & Basic Navigation... 4 Messaging... 5 Visits My Medical Record...
 Table of Contents Getting Started: Login... 3 Home Page & Basic Navigation... 4 Messaging... 5 Read Messages (Inbox)... 5 Delete Messages... 5 Get Medical Advice... 6 Letters... 7 Request Rx Refill...
BSynchro [E-AUTHORIZATION USER GUIDE] BSYNCHRO
![BSynchro [E-AUTHORIZATION USER GUIDE] BSYNCHRO](/thumbs/74/70571461.jpg "BSynchro [E-AUTHORIZATION USER GUIDE] BSYNCHRO") BSynchro 2014 BSYNCHRO [E-AUTHORIZATION USER GUIDE] This Document is intended as a user guide for providers who are planning to use the e-authorization system. Contents I. Introduction... 2 II. Purpose
BSynchro 2014 BSYNCHRO [E-AUTHORIZATION USER GUIDE] This Document is intended as a user guide for providers who are planning to use the e-authorization system. Contents I. Introduction... 2 II. Purpose
e-mds Patient Portal Version User Guide e-mds 9900 Spectrum Drive. Austin, TX Phone Fax e-mds.
 e-mds Patient Portal Version 6.2.0 TM User Guide e-mds 9900 Spectrum Drive. Austin, TX 78717 Phone 512.257.5200 Fax 512.335.4375 e-mds.com 2008 e-mds, Inc. All rights reserved. Product and company names
Affinity Provider Portal - PRISM. User Guide
 Affinity Provider Portal - PRISM User Guide Affinity Medical Group 1221 Broadway, Suite 300 Oakland, California 94612 Affinity Provider Portal - PRISM User Guide Page ii Contents Accessing the Affinity
PROVIDER WEBSITE SITE ADMINISTRATOR GUIDE » PATIENT INQUIRY» CLAIM CENTER» FIND A DOCTOR» CLAIMS EDITING SYSTEM (CES)
") PROVIDER WEBSITE SITE ADMINISTRATOR GUIDE» PATIENT INQUIRY» CLAIM CENTER» FIND A DOCTOR» CLAIMS EDITING SYSTEM (CES) 2018 WPS Health Plan, Inc. 1 All rights reserved. JO7048 28898-085-1801 ADMINISTRATIVE
PROVIDER WEBSITE SITE ADMINISTRATOR GUIDE» PATIENT INQUIRY» CLAIM CENTER» FIND A DOCTOR» CLAIMS EDITING SYSTEM (CES) 2018 WPS Health Plan, Inc. 1 All rights reserved. JO7048 28898-085-1801 ADMINISTRATIVE
Change Healthcare Provider Portal
 MED3000, a wholly owned subsidiary of Change Healthcare Change Healthcare Provider Portal Overview The provider portal provides secure, web-enabled, role-based access. You will be able to perform the following
QUICK START GUIDE PROVIDER PORTAL. QuickCap Product Manual Provider Portal
 QuickCap Product Manual Provider Portal QUICK START GUIDE PROVIDER PORTAL 8 4 7. 2 2 2. 1 0 0 6 M E D V I S I O N - S O L U T I O N S. C O M Page 1 of 33 Table of Contents INTRODUCTION... 3 ELIGIBILITY...
Table of Contents 1. ABOUT THE GIS PANGEA SYSTEM 5 2. HOME DASHBOARD OVERVIEW MANAGER DASHBOARD OVERVIEW 66
 Table of Contents 1. ABOUT THE GIS PANGEA SYSTEM 5 PANGEA SYSTEM REQUIREMENTS 5 PANGEA MOBILE COMPATIBILITY 6 LOGGING IN TO PANGEA 6 MANAGING USER ACCOUNT SECURITY AND DELEGATE INFORMATION 13 ABOUT SESSION
Scottish Care Information. SCI Gateway v10.3. Sending Referrals & Receiving Discharges User Guide
 Scottish Care Information SCI Gateway v10.3 Sending Referrals & Receiving Discharges User Guide Contents 1 Introduction... 1-1 2 Accessing SCI Gateway... 2-1 Accessing SCI Gateway Through GPASS... 2-2
Session 1 Navigation & Administration
 Session 1 Navigation & Administration Agenda Launching ACPM from AC AC/ACPM Integration Basic Navigation Tips in ACPM Administration Overview ACPM Help Launching ACPM from AC Amazing Charts Practice Management
Maine ASO Provider Portal Atrezzo End User Guide
 Maine ASO Provider Portal Atrezzo End User Guide October 2018 CONTENTS INTRODUCTION... 4 The KEPRO/Maine s Atrezzo Portal Guide... 4 SETUP AND ACCESS ATREZZO... 5 A. New Provider Registration/ Register
Covisint MIPS Quick Start User Guide
 Covisint MIPS Quick Start User Guide The Quick Start instructions explain the MIPS registration process, collecting and entering patient data online, and the submission process. Updated December 2017 Table
Contents Welcome to Halo... 3 Secure Sign-In... 4 Forgot Password... 4 Messages... 5 Create and Send a Message... 5 Message Enhancements...
 Halo Web App GUIDE Contents Welcome to Halo... 3 Secure Sign-In... 4 Forgot Password... 4 Messages... 5 Create and Send a Message... 5 Message Enhancements... 6 Quick Note... 6 Mark as Urgent... 6 Add
Employer Self Service (ESS) User Quick Guide
 User Quick Guide") Employer Self Service (ESS) User Quick Guide i Table of Contents Getting Started 6 Accessing the Employer Self Service (ESS) Portal 6 Maintaining Account Settings 7 Switching Employers within Session 7
Employer Self Service (ESS) User Quick Guide i Table of Contents Getting Started 6 Accessing the Employer Self Service (ESS) Portal 6 Maintaining Account Settings 7 Switching Employers within Session 7
Xifin Client Portal User s Guide Version 1.0. January 2018
 Xifin Client Portal User s Guide Version 1.0 January 2018 Table of Contents Getting Started... 3 Contacting Allina Health Laboratory Billing... 3 Xifin Client Portal Information... 3 Logging in to Xifin
User Guide. Version 3.0. Revision Date: 11-Feb Esoterix, Inc., All Rights Reserved
 User Guide Version 3.0 Revision Date: 11-Feb-04 2004 Esoterix, Inc., All Rights Reserved Contact Us Contact us if you have any questions or comments. Client Services and Technical Support Phone Fax (800)
ORACLE RDC ONSITE RESEARCH COORDINATOR TRAINING
 ORACLE RDC ONSITE RESEARCH COORDINATOR TRAINING TRAINING REQUIREMENTS RDC system training is designed and conducted for access to OnSite. Additional RDC training will be provided on a per study basis by
Revision History. Document Version. Date Name Comments /26/2017 Training and Development Initial Creation
 Pharmaceutical Assistance Contract for the Elderly (PACE)/ Pharmaceutical Assistance Contract for the Elderly Needs Enhancement Tier (PACENET)Web Provider Enrollment/Provider Management Corporate User
User Guide. Product: GreenFolders. Version: 3.8
 User Guide Product: GreenFolders Version: 3.8 Release Date: October 2014 GreenFolders 3.8 User Guide Introduction Table of Contents 1 Introduction... 6 2 General Information... 7 2.1 Login Procedure...
AlwaysAssist User Guide Vision Care Provider Portal Page 0
 AlwaysAssist User Guide Vision Care Provider Portal Page 0 AlwaysAssist User Guide Vision Care Provider Portal Table of Contents Entering the Site... 2 Provider Login... 2 Password Change... 3 Password
Staff/Professional Tools in KaleidaCare Solutions
 Staff/Professional Tools in KaleidaCare Solutions 2008 1 of 26 Table of Contents Introduction... 4 Staff/Professionals Tools... 4 Adding A Staff/Professional... 5 Staff/Professional Name... 5 SSN/SIN...
Colorado Access Provider Portal Guide
 Colorado Access Provider Portal Guide coaccess.com 1 CONTENTS INTRODUCTION... 3 SYSTEM REQUIREMENTS... 3 NEW PROVIDER REGISTRATION... 4 Provider Information... 4 New Provider Registration... 4 New Registration...
pathx pathx Laboratory Information System
 A LETTER FROM THE PRESIDENT. At PathX, we fully understand that your lab is focused on more than just patient reports and information processing. For most pathology labs, primary concerns include responsible
Cerner WebConnect. User Manual LB-079-MED* *ISO 15189:2012 accreditation applies for the NRL Dubai laboratory only
 Cerner WebConnect User Manual LB-079-MED* *ISO 15189:2012 accreditation applies for the NRL Dubai laboratory only 2 CONTENTS INTRODUCTION 3 1 BEFORE YOU GET STARTED 1.1 System Requirements 1.2 Internet
ORACLE RDC ONSITE RESEARCH COORDINATOR TRAINING
 ORACLE RDC ONSITE RESEARCH COORDINATOR TRAINING TRAINING REQUIREMENTS RDC system training is designed and conducted for access to OnSite. Additional RDC training will be provided on a per study basis by
AP Easy HL7 Interface
 AP Easy HL7 Interface AP Easy signing out to HL7 interface for Easy Billing Professional In AP Easy select "Go To" (menu) and choose Reports Logs > General Query. Do a search for Dated Signed using yesterday
ANZ TRANSACTIVE GLOBAL SERVICE REQUESTS USER GUIDE
 ANZ TRANSACTIVE GLOBAL SERVICE REQUESTS USER GUIDE September 2017 CONTENTS Introduction 3 Commercial Cards Service Requests 4 Commercial Cards Service Request Types... 4 Commercial Cards Service Request
How to Create an Appointment Request Page 2 Creating a request for a patient to be seen by a clinician, or for a family visit
 ABOUT AHS ischeduler AHS ischeduler provides the ability for account holders to submit requests for Telehealth (videoconference) meetings, learning events, clinical case conferences, group patient education,
FCDS IDEA User Accounts
 FCDS IDEA User Accounts 1.) Do I need an FCDS IDEA User Account? Yes, anyone accessing IDEA will need an FCDS IDEA User Account. 2.) How do I create an FCDS IDEA user account? Please follow the instructions
PSR/BSR Touchworks Training
 PSR/BSR Touchworks Training A guide to Sharp Rees-Stealy s Ambulatory Electronic Health Record (EHR) 1 Table of Contents Schedules... 3 The Floating Clinical Tool Bar... 5 Patient Banner Bar... 8 Patient
RETAIL PRODUCER PORTAL
 RETAIL PRODUCER PORTAL This presentation is a high-level summary and for general informational purposes only. The information in this presentation is not comprehensive and does not constitute legal, tax,
ACHieve Access 4.3 USER GUIDE
 ACHieve Access 4.3 USER GUIDE TABLE OF CONTENTS SECTION 1: OVERVIEW...3 Chapter 1: Introduction...3 How to Use This Manual...3 Overview of ACHieve Access Administrative Functions...3 System Access and
ProviderConnect Registered Services Autism Service Provider User Manual ASD Behavioral Assessment, Treatment Plan and Program Book Development
 ProviderConnect Registered Services Autism Service Provider User Manual ASD Behavioral Assessment, Treatment Plan and Program Book Development Created 9/1/17 Table of Contents Introduction... 3 Accessing
OpenEMR Users Guide. Based on Version 4.0. Getting Started Getting to the Login Page. Changing Passwords Main Screen & Navigation.
 OpenEMR Users Guide Based on Version 4.0 Table of Contents Getting Started Getting to the Login Page Logging In Changing Passwords pg 3 pg 3 pg 3 pg 3 Main Screen & Navigation Navigation Traditional Tree
Scottish Care Information. SCI Gateway v11.1. Receiving Referrals User Guide
 Scottish Care Information SCI Gateway v11.1 Receiving Referrals User Guide Contents 1 Introduction...1-1 2 Accessing SCI Gateway...2-1 Accessing SCI Gateway...2-2 Passwords & Security...2-3 Logging on
OpenEMR Users Guide. Based on Version 4.0. Getting Started Getting to the Login Page. Changing Passwords Main Screen & Navigation.
 OpenEMR Users Guide Based on Version 4.0 Table of Contents Getting Started Getting to the Login Page Logging In Changing Passwords pg 3 pg 3 pg 3 pg 4 Main Screen & Navigation Navigation Traditional Tree
Electronic Appraisal Delivery (EAD) Portal. FHA EAD General User Guide
 Portal. FHA EAD General User Guide") Electronic Appraisal Delivery (EAD) Portal FHA EAD General User Guide Last Updated: October 2015 FHA EAD General User Guide Page 2 of 87 Version 1.3.1 TABLE OF CONTENTS INTRODUCTION... 6 WHAT IS THE ELECTRONIC
Electronic Appraisal Delivery (EAD) Portal FHA EAD General User Guide Last Updated: October 2015 FHA EAD General User Guide Page 2 of 87 Version 1.3.1 TABLE OF CONTENTS INTRODUCTION... 6 WHAT IS THE ELECTRONIC
Covisint DocSite Enterprise
 Covisint DocSite Enterprise June 2013 Site Administrator User Guide Covisint DocSite Enterprise Site Administrator Guide Compuware-Covisint All rights reserved 2013 SiteAdminGuideDocSite-2013.5-061113
Release Notes v9.0.20
 Release Notes v9.0.20 Some exciting features in this release! EMR Features Redesigned Co-Sign and In-Progress Encounter modules Enhanced Group Appointments Ability to Copy Patient Details from Existing
A handy reference for the S.C. Medicaid Web-based Claims Submission Tool: Lists (pg.1) History (pg. 3) Claims Entry (pg. 2)
 History (pg. 3) Claims Entry (pg. 2)") A handy reference for the S.C. Medicaid Web-based Claims Submission Tool: Lists (pg.1) History (pg. 3) Claims Entry (pg. 2) Eligibility (pg. 5) Claim Submission (pg.3) e-remits (pg.6) Status (pg. 4) Lists
A handy reference for the S.C. Medicaid Web-based Claims Submission Tool: Lists (pg.1) History (pg. 3) Claims Entry (pg. 2) Eligibility (pg. 5) Claim Submission (pg.3) e-remits (pg.6) Status (pg. 4) Lists
Note: The higher the resolution, the less top to bottom and side to side scrolling is required to see the entire screen. Consider using 1280 by 1024
 1 2 Note: The higher the resolution, the less top to bottom and side to side scrolling is required to see the entire screen. Consider using 1280 by 1024 pixels if you can. 3 4 5 6 To obtain the HNFS System
OAR (Online Assigned Risk) User Documentation Page 1
 User Documentation Page 1") OAR (Online Assigned Risk) User Documentation Page 1 TABLE OF CONTENTS Overview...2 OAR Menu Bar...2 Home page... 2 How do I register as a new OAR user?...2 How do I log in to OAR?...2 Registration page...
OAR (Online Assigned Risk) User Documentation Page 1 TABLE OF CONTENTS Overview...2 OAR Menu Bar...2 Home page... 2 How do I register as a new OAR user?...2 How do I log in to OAR?...2 Registration page...
FastAttach User Manual
 FastAttach User Manual Version 4.1 Revision Date: 02/09/2018 www.nea-fast.com (800) 782-5150 Page 1 Contents Updating & Logging into FastAttach... 5 Forgot Password... 5 Update Password... 6 Terms & Conditions
Treasury Management User Guide. Online Banking
 Treasury Management User Guide Online Banking Released August 2018 Treasury Management... 4 Logging in to Treasury Management...5 Helpful Hints...10 User Menu... 12 Profile and Preferences... 12 Notification
OpenEMR Users Guide. Based on Version Getting Started Getting to the Login Page. Changing Passwords Main Screen & Navigation.
 OpenEMR Users Guide Based on Version 3.1.0 Table of Contents Getting Started Getting to the Login Page Logging In Changing Passwords pg 3 pg 3 pg 3 pg 4 Main Screen & Navigation Navigation Traditional
Applying On-Line. Go to You will be presented with the log-in page Click on Apply Online
 Applying to: Applying On-Line Go to www.blueskymss.com/ehealth You will be presented with the log-in page Click on Apply Online Selecting Region You will be prompted to select a region or division from
The LifeVest Network Patient Data Management System Quick Start Guide. Information for Healthcare Professionals
 The LifeVest Network Patient Data Management System Quick Start Guide Information for Healthcare Professionals Monitor and prioritize your patient s needs anywhere, anytime. The LifeVest Network is ZOLL
WCB Online A User Guide for Tiered Service Providers
 WCB Online User Guide for Tiered Service Providers WCB Online A User Guide for Tiered Service Providers A Nova Scotians safe and secure from workplace injury Table of Contents WCB Online 1 Profile Creation
QUICK TIPS FOR FULL-ACCESS ACCOUNTS. Florida SHOTS. Contact Information.
 Florida SHOTS FOR FULL-ACCESS ACCOUNTS Contact Information www.flshots.com Free help desk: 877-888-SHOT (7468) Monday Friday, 8 A.M. to 5 P.M. Eastern Quick Content Finder LOGGING IN 1 FORGOTTEN PASSWORD
Augusta University Health: Physician Portal User Guide. Improved Access to Patient Information from Augusta University Medical Center
 Augusta University Health: Physician Portal User Guide Improved Access to Patient Information from Augusta University Medical Center Rev. 7/06 User Guide Index. Accessing the AU Health Physician Portal.
N C MPASS. Getting Started. Version 6.8
 N C MPASS Getting Started Version 6.8 Ontario Telemedicine Network (OTN) All rights reserved. Last update: May 24, 2018 This document is the property of OTN. No part of this document may be reproduced
Interpreter Intelligence Scheduling System User-Guide For Interpreters
 Interpreter Intelligence Scheduling System User-Guide For Interpreters 2 A. Overview... 3 B. How to Navigate the Interpreter Intelligence Full Site... 4 Logging In & Resetting Your Password... 4 Reviewing
MICROSOFT OFFICE OUTLOOK 101
 MICROSOFT OFFICE OUTLOOK 101 Open Outlook Find the Outlook icon on your desktop and double-click (If there is no icon, go to the start menu, All Programs, folder named Microsoft Office, double-click Outlook)
Layout and display. STILOG IST, all rights reserved
 2 Table of Contents I. Main Window... 1 1. DEFINITION... 1 2. LIST OF WINDOW ELEMENTS... 1 Quick Access Bar... 1 Menu Bar... 1 Windows... 2 Status bar... 2 Pop-up menu... 4 II. Menu Bar... 5 1. DEFINITION...
Microsoft Office Outlook 101
 Microsoft Office Outlook 101 Open Outlook Find the Outlook icon on your desktop and double-click (If there is no icon, go to the start menu, All Programs, folder named Microsoft Office, double-click Outlook)
Provider Portal Handbook
 Provider Portal Handbook WELCOME! Welcome to AlphaMCS, a next generation Managed Care System designed specifically to meet the needs of Managed Care Organizations and the behavioral healthcare providers
Wholesale Lockbox User Guide
 Wholesale Lockbox User Guide August 2017 Copyright 2017 City National Bank City National Bank Member FDIC For Client Use Only Table of Contents Introduction... 3 Getting Started... 4 System Requirements...
Present and Pay. User Manual Payer Analyst
 Present and Pay User Manual Payer Analyst Table of Contents 1.0 Glossary of Terms... 1 2.0 How to Use this Manual... 3 3.0 Common User Features and Functions... 3 3.1 Present and Pay User Interface...
Blue Care Network s New e-referral Tool Frequently Asked Questions
 Blue Care Network s New e-referral Tool Frequently Asked Questions September 2014 Overview Blue Care Network is introducing a new e-referral system for managing referral and authorization requests. This
FCDS IDEA USER ACCOUNT Page 1 2. FACILITY ACCESS ADMINISTRATOR (FAA) Page 3 5. FCDS ABSTRACTOR CODE Page 6 9
 Page 3 5. FCDS ABSTRACTOR CODE Page 6 9") FCDS IDEA USER ACCOUNT Page 1 2 p. 1 p. 2 FCDS IDEA User Account Set up Password Reset User ID Retrieval User Account Renewal FACILITY ACCESS ADMINISTRATOR (FAA) Page 3 5 p. 3 FCDS Requirements Establishing
FCDS IDEA USER ACCOUNT Page 1 2 p. 1 p. 2 FCDS IDEA User Account Set up Password Reset User ID Retrieval User Account Renewal FACILITY ACCESS ADMINISTRATOR (FAA) Page 3 5 p. 3 FCDS Requirements Establishing
Patient Portal User Guide The Patient s Guide to Using the Portal
 2014 Patient Portal User Guide The Patient s Guide to Using the Portal Table of Contents: What is the Patient Portal?...3 Enrolling in the Patient Portal.......... 4-19 A. Enrollment Option #1: First-Time
ProviderLink. Healthcare Providers eclaim Application. User Guide - Release 1.0 MAY in partnership with
 Healthcare Providers eclaim Application User Guide - Release 1.0 MAY 2012 in partnership with www.eclaimlink.ae 1 Table of Contents Getting Started 3 Registration 4 Logging In & Setup 5 ProviderLink System
ONLINE EMPLOYER CENTER GUIDE
 ONLINE EMPLOYER CENTER GUIDE 2019 Table of Contents: Login Screen... 2 My Account... 3 Admin... 5 Add Administrator User Accounts... 6 View Users... 7 Eligibility Maintenance... 8 Add Subscriber/Family...
Provider Portal User Guide
 Provider Portal User Guide May 2018 1 TABLE OF CONTENTS SECTION 1 WELCOME TO THE PROVIDER PORTAL SECTION 2 ACCESS THE PROVIDER PORTAL SECTION 3 HOME PAGE SECTION 4 ELIGIBILITY - BENEFITS Section 5 CLAIM
2. Type your use name and password in their respective fields.
 Logging on to the Portal To log on to the application 1. Open a Web browser and in the address bar type https://mrp.oiarad.com/amikportal.web/ 2. Type your use name and password in their respective fields.
Quick Start for Premier Billing
 Quick Start for Premier Billing This Quick Start will take you through the basics of the program and guide you through entering your first claim. NOTE: Refer to the full online manual for information on