ARC Memo Manager User Guide for Airlines
|
|
|
- Anissa Watkins
- 6 years ago
- Views:
Transcription
1 ARC Memo Manager User Guide for Airlines Have Questions? Contact Us!
2 Table of Contents Welcome to ARC Memo Manager!... 4 Benefits... 4 System Requirements... 4 Navigation... 4 Global Footer... 5 Global Headers... 6 Accessing the Administration Page... 7 Airline Entity Settings... 8 ARC Memo Manager User Roles... 9 ARC Memo Manager Access... 9 Home Page Agency Location Quick View Memo Aging Memo Activity Searches Saving a Search Running a Saved Search Applying a Default Search Removing a Default Search Setting Deleting a Search View Memos Changing the Width of a Column Move Columns Sort Columns Memo Details Status Ticket Information Correspondence Memo Reasons Attachments Memo Financial Details (USD) Disputes Entity-Specific Information Payments GDS Access Airline/Supplier Contact Information Print Memo History Exporting History Quick View Ticket Information Memo Reasons Attachments Memo Financial Details (USD) Entity Specific Information GDS Access Airline/Supplier Contact Information Adding Airline/Supplier Contact Information Load the Memo into Memo Manager Adjusting the Memo Balance Closing a Memo Reactivate a Memo
3 Ticket Information Correspondence Adding Public Correspondence Adding Private Correspondence Memo Reasons Airline/Supplier Reason Agency Reason Attachments Opening an Attachment Memo Financial Details (USD) Disputes Accept Dispute Reject Dispute Entity-Specific Information Payments IAR Payments Non-IAR Payments Customizing Payment Columns GDS Access Granting GDS Access Remove GDS Access Airline/Supplier Contact Information Editing Airline/Supplier Contact Information Print Memo History Exporting History Quick View Creating a Memo Ticket Information Memo Reasons Attachments Memo Financial Details (USD) Entity Specific Information GDS Access Remove GDS Access Airline/Supplier Contact Information Adding Airline/Supplier Contact Information Load the Memo into Memo Manager Adjusting the Memo Balance Closing a Memo Reactivate a Memo
4 Welcome to ARC Memo Manager! ARC Memo Manager (AMM) is a Web-based product that automates the distribution, processing and settlement of memos between the carriers and travel agencies. This one stop application allows for the processing of debit memos, credit memos, and recall commission statements. In addition, Ticket Resolution Service (TRS) transactions are processed as well. Benefits Mitigates the travel industry s last remaining large-scale paper-based process. Reduces the processing time and cost for both carriers and travel agents. Improves cash flow through electronic payment and communication. Provides superior data quality and accuracy. Provides easy access for analysis. Memo data and history is stored in a central repository. Provides immediate access to the status of a memo. Simplifies communication between carriers and travel agents. Eliminates the need for travel agents to manually enter memo data into IAR. System Requirements Recommended hardware and software system requirements include: PC with Microsoft Windows 98, 2000, XP, or above. Connection to the Internet via a modem, broad-band or high-speed connection. Web browser that supports a 128-bit encryption for SSL connectivity, such as Microsoft Internet Explorer 8.0. *Adobe Flash Player 10.1 or above. A screen resolution of 1024 x 768 or greater should be used. *If needed, users will be alerted to either install or upgrade (their version) Adobe Flash Player. Navigation The navigation functionality enables a user to move around within ARC Memo Manager. There are two distinct ways to navigate within ARC Memo Manager, within a screen and between screens. In addition, navigation buttons are available to view data that is not displayed on a single screen. Within a screen navigation refers to the ability to move between fields within a screen. By taking advantage of Web-browser based technology and other advances in technology, ARC Memo Manager is an easy to use system that relies on point and click, drop down boxes, buttons, and other controls that allow a user to easily navigate through the screens necessary to display desired data. 4
5 Between screen navigation refers to the ability to move from screen to screen within the application. In this area, ARC Memo Manager uses global headers, global footers, navigational links, navigation buttons, and bread crumbs. Global headers are a set of main links that appear at the top of every page of the application. It allows the user to get to specific sections of ARC Memo Manager quickly and easily. Global footers are a set of main links that appear at the bottom of every page of the application. It allows the user to get to related pages that are separate from the application. Navigation links and buttons allow a user to move between screens, as well as view data that are not displayed on a single screen. Bread crumbs are links that allow you to navigate from your current page to the previously viewed page. Global Footer ARC Memo Manager utilizes global navigation footers that are a set of main links that appear at the bottom of every page. The use of global footers ensures that you can easily access information concerning ARC Memo Manger s Terms of Use, Privacy Policy, Contact Us and Feedback. To access a global footer, 1. Click any global footer link on any ARC Memo Manager page. 2. The first page of the associated link displays in a new browser web window. Terms of Use The Terms of Use for ARC Memo Manager require you to comply with and be bound to certain provisions as set out in the document, to access the Terms of Use document, 1. Click the Terms of Use global footer link on any ARC Memo Manager page. 2. Once selected, the Terms of Use displays in its own web browser. 3. Click the Close button to exit the Terms of Use. 5
6 Privacy Policy ARC Memo Manager s Privacy Policy is ARC s official statement on the type of information collected for the site, how the information is used and how you can access the data. Also included is information regarding systems in place to protect the data. To access the ARC Memo Manager Privacy Policy, 1. Click the Privacy link on an ARC Memo Manager page. 2. Once selected, the Privacy Policy displays in its own browser window. Contact Us To contact ARC for any reason, go to ARC's Contact page on ARC's Corporate Web site. To view ARC's contact page, 1. Click the Contact Us global footer link on any ARC Memo Manager page. 2. Once selected, the Contact Us page displays in its own web browser. Feedback If you want to provide feedback on ARC Memo Manager, complete ARC s Product Feedback form. To access the form, 1. Click the Feedback global footer link on any ARC Memo Manager page. 2. Once selected, the Product Feedback form displays in its own web browser. Global Headers ARC Memo Manager uses global navigation headers that are a set of main links appearing on every page of the application. The ARC Memo Manager global headers ensure that you can easily access those sections of the application. The ARC Memo Manager global header contains up to three components; Close, Help, and Administration (only applicable to the MyARC Tool Administrator for ARC Memo Manager). From any ARC Memo Manager screen, 1. Click on any link in the global header to access the desired page. 6
7 2. The first screen of the associated link displays. Close When your work in ARC Memo Manager is complete, you should terminate your session by closing ARC Memo Manager. To close out of the application, 1. Click on the global header Close link located on each ARC Memo Manager page. 2. Once you have logged out, you will be redirected to the MyARC home page. Help At any ARC Memo Manager screen you may access the Online Help system. To access Online Help, 1. Click the global Help header. 2. The Online Help system displays in a new browser window. Administration The Administration function of AMM allows an administrator to manage their entity s settings in the system. By default, the Administration page will provide the user s entity type and the entity s ID. In addition, the administrator can provide settings for their entity such as dispute limits, age limits, production support address and business support address. Accessing the Administration Page To access the Entity Administration page, 1. Click the Administration global header link. 2. The Administration page will display. 7
8 Airline Entity Settings In the Airline Entity Settings section of the Administration page, the administrator can set a dispute and age limit for your entity s memos. In addition you can provide a Production Support and a Business Support address. To apply airline entity settings, 1. Click the Administration global header link on the home page. 2. Go to the Airline Entity Setting section on the Entity Administration page. 3. Type the limit for the number of times a memo can be disputed in the Dispute Limit textbox. 4. Type the age limit for your entity s memos in the Aging Roll-Off textbox. 5. Type the address where you want to receive your ARC Memo Manager file import audit reports in the Production Support textbox. 6. Type your business support address in the Business Support textbox. 7. Click the Save Changes button to save, or click Reset to refresh the page. 8
9 ARC Memo Manager User Roles User roles determine what access rights you have within ARC Memo Manager. A user role controls what a user can access and do. Every user will be assigned a user role. Based upon a user's role, pages and fields in ARC Memo Manager may be active, disabled, or hidden. In this way, a user will only be able to perform actions to which they have the rights to perform. There are three user roles; Memo Administrator, Memo User, and Memo Corresponder. In addition, at the MyARC level there is a MyARC Tool Administrator for ARC Memo Manager. Airline Roles Memo Administrator There may be multiple Memo Administrators per entity. The Memo Administrator is responsible for the management of the entity s settings. This includes managing the age limits of a memo, and the dispute limits. In addition, the Memo Administrator can create memos, accept/reject disputes, view memos and send correspondence. Memo User An entity may have multiple Memo Users. Memo Users can create memos, accept/reject disputes, view memos, and send correspondence. Memo Corresponder - An entity can have multiple Memo Corresponders. A Memo Corresponder can view memos and send correspondence only. MyARC User Roles MyARC Tool Administrator An entity can have multiple MyARC Tool Administrators for ARC Memo Manager. The MyARC Tool Administrator is responsible for managing user access to ARC Memo Manager. The tool administrator is able to assign/revoke access to ARC Memo Manager, and assign user roles. ARC Memo Manager Access Access to ARC Memo Manager is controlled by MyARC, which is your centralized access point to a growing list of ARC tools and resources. To access MyARC you must have a MyARC account. If you do not currently have one, one will be provided to you upon successful registration to ARC Memo Manager. Accessing ARC Memo Manager Access to ARC Memo Manager begins at ARC s Corporate Web site. To access, 1. Open a Web browser and navigate to the ARC Corporate Web site at 2. Go to the My ARC Login box on the top left side of the page. 9

10 3. Type your My ARC user name in the User Name textbox. 4. Type your My ARC password in the Password textbox. 5. Click the Log In button. 6. Once accessed, you will navigate to the secured My ARC micro-site. 7. Go to the Your Products area of the Your Profile portlet. Click the Your Products heading to expand the area. A list of products you have access to will display in alphabetical order. 8. Click the Memo Manager link to launch the ARC Memo Manger application. Home Page Upon launching the ARC Memo Manager application, the ARC Memo Manager home page displays. The AMM home page is one of the main pages in ARC Memo Manager. This page provides a listing and access to all available memos. This page is made up of the following sections: Memo Aging Memo Activity Applied Searches List of Memos (Open, Closed, Inactive, All) These sections are used as searches in the viewing of memos based on specific criteria that is met. Memos can be displayed by Agency Number (ACN), or by Quick View. 10

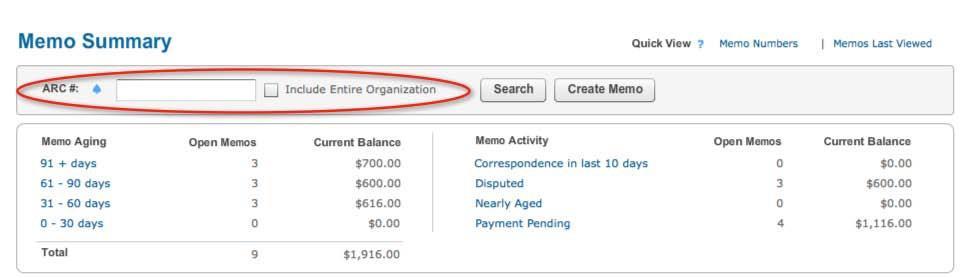
11 Agency Location To display memos by agency location, 1. Type the ACN of the location to be displayed in the ARC # textbox. 2. Click the All check box to display all locations. 3. Click the Search button to execute your search. 11
12 12
13 Quick View The Quick View section provides you the ability to display the memo that was last viewed or to quickly search for memos by providing the memo number. 1. Last Viewed - To display the last memo viewed, click the Memos Last Viewed link in the Quick View section. 2. Search To search for a memo by memo number, click the Memo Numbers link. The Memo Quick View window will appear. Type the 10-digit memo number in the Memo Quick View window, and click the View button. You can search up to 50 memo numbers at a time. To search for multiple memos, enter the memo numbers and separate each by a comma in the Memo Quick View window. Click the View button to execute or tab to the View button and hit Enter. Memo Aging The Memo Aging section of the AMM home page provides users access and information to open memos by the age range. The age of a memo is calculated by the Current Date minus the memo s Load Date. The age ranges are: 91+ days days days 0-30 days For each age range, the total number of open memos associated with the range is provided as well as the accumulative current balance. The Memo Aging section also provides an overall total for the number of Memos and an overall current balance in the category. 13
14 Age Ranges Users are able to view a listing of memos that fall within an age range by clicking the specific age range link. By clicking an age range link, the memos that fall into the age category will display. 1. Memos that are 91 days or older, fall into the 91+ days range. To view these memos, Click the 91+ days link. 2. Memos that are 61 to 90 days old fall into the days range. To view these memos, Click the days link. 14
15 3. Memos that are 31 to 60 days old fall into the days range. To view these memos, Click the days link. 4. Memos that are 0 to 30 days old fall into the 0-30 days range. To view these memos, Click the 0-30 days link. Click the Clear button in the Search section of the Memo Summary page to clear your search results. 15
16 Memo Activity The Memo Activity section of the home page provides users with a total count for the number of open memos by activity for: Correspondence in the last 10 days Disputed Nearly Aged Payment Pending Each count provides a total dollar value of the accumulative current balance. Users are able to view a listing of memos by clicking the specific activity link. Correspondence in the last 10 days ARC Memo Manager provides a total count of the number of open memos that have received correspondence within the last ten days and the accumulative current balance of the memos. To see the total number of memos that received correspondence within the last ten days and its associated accumulative current balance, 1. Go to the Correspondence in last 10 days under Memo Activity on the home page. 2. Click the Correspondence in last 10 days link to view a list of the memos. 3. Click the Clear button in the Search section of the Memo Summary page to clear your search results. 16
17 Disputed ARC Memo Manager provides a total count of open memos that are being disputed and the accumulative current balance of the memos. To see the total number of open memos that are being disputed and the associated accumulative current balance, 1. Go to the Disputed under Memo Activity on the home page. 2. Click the Disputed link to view a listing of the memos that are being disputed. 3. Click the Clear button in the Search section of the Memo Summary page to clear your search results. Nearly Aged ARC Memo Manager provides a total count of open memos that are reaching their age limit and the accumulative current balance of the memos. To see a total number of open memos approaching their aging limit and the associated accumulative current balance, 1. Go to the Nearly Aged under Memo Activity on the home page. 2. Click the Nearly Aged link to view a listing of the memos that are nearly aged. 3. Click the Clear button in the Search section of the Memo Summary page to clear your search results. 17
18 Payment Pending ARC Memo Manager provides a total count of open memos that have a payment pending and the accumulative current balance of the memos. To see the total number of open memos with pending payments and the associated accumulative current balance, 1. Go to the Payment Pending under Memo Activity on the home page. 2. Click the Payment Pending link to view a listing of the memos that have a payment pending. 3. Click the Clear button in the Search section of the Memo Summary page to clear your search results. Searches The Search section on the ARC Memo Manager home page is an advanced search area. Here the user s current search criteria are displayed. Users can perform advanced searches, save searches and edit existing searches. When performing a search, users can clear their search results by clicking the Clear button in the Search section of the Memo Summary page. 18
19 Advanced Search To perform an advanced search, go to the Search section on the ARC Memo Manager home page. 1. Click the Edit Search link. 2. An Edit Search pop-up box will display, providing various search criteria options. 3. To search by secondary status, select a status under the Secondary Status drop down menu. 4. Enter the memo number(s) or memo number range in the Memo Numbers textbox to do search by memo number(s) or a memo number range. 5. Enter the associated ticket number(s) or ticket number range of the memo in the Ticket Numbers textbox to do search by associated ticket number(s) or a ticket number range. 6. Select an age range under the Age drop down menu to perform a search by memo age. 7. Select the memo type from the Memo Type drop down menu to perform a search by the type of memo. 8. Click the Original Amount drop down menu to select the original amount options. 9. Click the Current Balance drop down menu to select the current balance options. 10. Type the agency name or at least the first three characters of an agency name followed by an * for a wild card search in the Agency Name textbox to perform a search by agency name. 11. Select the supplier under the Supplier drop down menu to perform a search by the validating supplier. 12. Select the system provider from the System Provider drop down menu to perform a search by system provider. 13. To perform a search by issuing date, select the beginning date from the Issue Date From calendar. Select the ending date from the Issue Date To calendar. 19
20 14. To perform a search by the date a memo was loaded into AMM, select the beginning date from the Load Date From calendar. Select the ending date from the Load Date To calendar. 15. To perform a search by the date a correspondence was posted, select the beginning date from the Correspondence Posted From calendar. Select the ending date from the Correspondence Posted To calendar. 16. To perform a search by the date memos were settled in IAR, select the beginning date from the IAR Settled Date From calendar. Select the ending date from the IAR Settled Date To calendar. 17. To perform a search by the date a memo was last modified, select the beginning date from the Last Modification From calendar. Select the ending date from the Last Modification To calendar. 18. To perform a search by the date memos were closed, select the beginning date from the Closed Date From calendar. Select the ending date from the Closed Date To calendar. 19. Type the airline reason or at least the first three characters of a airline reason followed by an * for a wild card search in the Airline Reason textbox to perform a search by airline reason. 20. Type the agency reason or at least the first three characters of a agency reason followed by an * for a wild card search in the Agency Reason textbox to perform a search by agency reason. 21. To perform a search by TRS reason, select a TRS reason from the TRS Memo drop down menu. 22. Type the first flex field or at least the first few characters of the flex field followed by an * for a wild card search in the Flex Field 1 textbox to do a search by Flex Field Type the second flex field or at least the first few characters of the flex field followed by an * for a wild card search in the Flex Field 2 textbox to do a search by Flex Field Type the third flex field in the or at least the first few characters of the flex field followed by an * for a wild card search Flex Field 3 textbox to do a search by Flex Field Type the fourth flex field or at least the first few characters of the flex field followed by an * for a wild card search in the Flex Field 4 textbox to do a search by Flex Field Type the fifth flex field or at least the first few characters of the flex field followed by an * for a wild card search in the Flex Field 5 textbox to do a search by Flex Field Type the sixth flex field or at least the first few characters of the flex field followed by an * for a wild card search in the Flex Field 6 textbox to do a search by Flex Field Click the Update Results button to run your search. 20

21 One or many search criteria can be applied to each search. Saved Searches Each time you provide a criteria to define a search, you can save the search. The save search feature enables users to easily execute frequently used searches without having to enter the search criteria repeatedly. Saving a Search To save a search, 1. Go to the Search section on the ARC Memo Manager home page. 2. Click the Edit Search link. 3. An Edit Search pop-up box will display, providing various search criteria options. 4. Select your search criteria. 5. Click the Save this Search link to save your search. 6. Enter the name of your search in the Enter a name for this search textbox on the Save Current Search box. 7. Click the Save button to save your search. 21


22 Running a Saved Search To run a saved search, 1. Go to the Search section of the ARC Memo Manager home page. 2. Click the Saved Searches link. 3. Highlight the desired saved search from your list of saved searches in the Saved Searches box and click the Apply button to run your search. Or double click your saved search to run. 4. Click the Apply button to run your search. 22

23 Applying a Default Search A default search is run and applied each time you log into AMM. When you log into AMM, your list of memos displayed will be defined by your default search settings. To apply a search as your default setting, 1. Go to the Search section of the ARC Memo Manager home page. 2. Click the Saved Searches link. 3. Highlight the desired saved search from your list of saved searches in the Saved Searches box. 4. Check the Run on Login check box. 23

24 Removing a Default Search Setting To remove a default search setting, 1. Go to the Search section of the ARC Memo Manager home page. 2. Click the Saved Searches link to display your saved searches. 3. Uncheck the Run on Login check box of your default search. Deleting a Search At any time you can delete a saved search. To delete a saved search, 1. Go to the Search section of the ARC Memo Manager home page. 2. Click the Saved Searches link to display your saved searches. 3. Click the Delete icon of the saved search to be deleted. 4. An Alert box will appear asking you to confirm the deletion. Click the Yes button to confirm. 5. Click the Close icon to return to the home page. View Memos ARC Memo Manager provides you the ability to view a list of memos. This is provided immediately from the home page once you have accessed the system. Your list of memos is categorized into four tab sections; Open, Closed, Inactive, and All. Defined qualifiers are provided to help you sort and work with your memos. These qualifiers can be used to display a specific type of memo or memos that meet certain conditions. As you are working your memos, you can view summary and detailed information as it pertains to your needs. 24


25 Up to one hundred memos are displayed per page. If you have more than one hundred, you can view those memos by selecting the desired page number, or by moving to the next page. Select a page to be viewed by clicking the Page drop down menu located at the bottom of the page and select the desired page number. Click the right arrow button to navigate to the next page, or the double right arrow button to move to the last page. Click the left arrow button to navigate to the previous page, or the double left arrow button to navigate back to the first page. Open Memo Tab The Open memo tab is displayed by default. This is a listing of all memos that have an open status, including new memos received. Closed Memo Tab ARC Memo Manager provides you the ability to view a list of all memos that have been closed. The list of closed memos can be accessed from the home page by clicking the Closed tab in the list of memos section. 25


26 Inactive Memo Tab ARC Memo Manager provides you the ability to view a list of all memos that are inactive. An inactive memo is a memo that has reached its age limit. The list of inactive memos can be accessed from the home page by clicking the Inactive tab in the list of memos section. All Memo Tab ARC Memo Manager provides you the ability to view a list of all memos. This includes memos with an open, closed and inactive status. A list of all memos can be accessed from the home page by clicking the All tab in the list of memos section. Customizing Columns The columns within your list of memos (Open, Closed, Inactive, All) are customizable. You can customize these columns to meet your needs such as changing the width of a column, changing the order of the columns and sorting by column. Changing the Width of a Column To change the width of a column, 1. Go to your list of Open, Closed, Inactive, or All memos from the home page. 2. Go to the desired column heading. 3. Click on the column line. Once there the shape of the cursor will change. 4. Move the column line to the right to expand the width or to the left to decease the width. Move Columns To move a column, 1. Go to your list of Open, Closed, Inactive, or All memos from the home page. 2. Scroll over the column heading you want to move. 3. Click and drag the column heading to the new position. 26
 You have the ability to add correspondence and attachments from your list of memos.")
27 Sort Columns To sort by column, 1. Go to your list of Open, Closed, Inactive, or All memos from the home page. 2. Go to the column you want to sort by and click the column. You may sort by multiple columns. Correspond/Attachments (Group Actions) You have the ability to add correspondence and attachments from your list of memos. You can add correspondence or attachments to one memo or multiple memos. To add, 1. Go to your list of memos on the home page under the Open memo tab. 2. Click the check boxes next to memo(s) you want to add correspondence or attachments to. To select all memos on the current page, click the first check box. To select memos from different pages, go to the desired page(s) and click the check boxes next to the memos to add correspondence to. Click the Clear link to undo your selection. 3. Click the Select Action drop down menu. 4. Select the Correspond/Attach option. 5. *The Correspond/Attach screen displays providing a list of memos you have selected. 6. Type your correspondence in the Comment (Public) textbox to add a correspondence that is being sent externally. 7. Type your correspondence in the Comment (Private) textbox to add an internal correspondence. 8. Click the Attach File link under Attachments to attach your supporting documentation. 9. Click the Submit button to save your correspondence and attached files or click Cancel, to cancel and exit the Correspond/Attach screen. 10. You can delete selected tickets and attachments prior to the submission. To delete selected tickets. Click the X icon next to the tickets to be deleted. To delete 27

28 attachments, click the X icon next to the selected attachments. Please note, once submitted, deletions cannot to be performed. *From your selected list of memos on the Correspond/Attach screen, you can view previous submitted correspondence or attachments for a memo. To view, click the View link under the Correspondence/Attachments for the memo to be viewed. The Correspondence & Attachments window will display. The Public tab is the default tab displaying all external correspondence (sent, received). Click the Private tab to display all internal correspondence that were sent or received. Click the All tab to display both public and private correspondence. The Attachments section of the Correspondence & Attachments window will display links for each file attachment. Click the link of the file attachment you wish to view. *Note, do not attach attachments that include sensitive data such as credit card numbers. 28

29 Export (Group Actions) You have the option to view the Memo Details or to export them into a CSV, PDF, or Plain Text format as it pertains to your needs. To export a memo, 1. Go to your list of memos on the home page. 2. Go to the appropriate memo tab (Open, Closed, Inactive, or All) in which the memo(s) falls under. 29
 and click the check boxes next to the memos to be exported. Click the Clear link to undo your selection. 4.")
30 3. Click the check boxes next to the memo(s) you want to export or click the top box to select all memos on the page to be exported. To select memos from different pages, go to the desired page(s) and click the check boxes next to the memos to be exported. Click the Clear link to undo your selection. 4. Click the Select Actions drop down menu or click the Export link to export all memos for the tab 5. Select the Export option. 6. The Export Selected Memos box will appear. In the Export as section, select the radio button next to the file type you want to export in. 7. Click the Export button to export or Cancel to terminate your request. When exporting, your results will return the Memo Details of the memo. This is all of the data that is provided on the Memo Details page the memo. 30
. 8.")
31 View Memo Details (Group Actions) By default your list of memos will be in a summary view. You can view detailed information about the memo by accessing the Memo Details page. To access the memo details, 1. Go to your list of memos on the home page. 2. Go to the appropriate memo tab (Open, Closed, Inactive, or All). 8. Click the check boxes next to the memo(s) you want to view or click the top box to select all memos on the current page. To select multiple memos from across multiple pages, go to the desired page(s) and click the check boxes next to the memos to be viewed. Click the Clear link to undo your selection. 3. Click the Select Actions drop down menu. 4. Select the View option. 5. The Memo Details of the selected memo(s) will display. You can also display the Memo Details by clicking the memo number you want to view from your list of memos. If you have selected to view multiple memos, click the Next link on the Memo Details page that is currently being viewed to navigate to the next memo to be viewed. Memo Details The Memo Details section of a memo provides detailed information about each memo. Here you will find the memo number, the memo type, the original memo amount, the balance, the airline code of the validating airline, the Agency s ARC number, the age of the memo, the associated passenger name and the supplier code. If the memo was issued by the airline, the supplier will be the airline code. This information is for informational purposes only and is non-modifiable. 31
32 In addition to the memo s general information, the Memo Details section includes, Status Ticket Information Correspondence Memo Reasons Attachments Memo Financial Details Disputes Entity-Specific Information Payments GDS Access Airline/Supplier Contact Information The Memo Details tab will display by default. To see the history of the memo, click the History tab. Status The Status section of the memo provides the viewer the date the memo was issued, the date the memo was loaded, the date the memo was settled in IAR (if applicable), the status (i.e. open, closed), and the date the memo was last modified. If the memo was reactivated by the issuing airline, the reactivated date will be provided. If the memo is a TRS memo, the TRS reason will be provided. 32

33 Ticket Resolution Services (TRS) A Ticket Resolution Service (TRS) debit memo is a debit memo issued by a airline for a airline identified unreported sale, flown and refunded or credit card chargeback transaction. TRS debit memos can be issued for the following reasons: Unreported sales Invalid credit card account number Expired credit card account Invalid/no approval code Fraudulent unauthorized use Unauthorized use Flown and refunded TRS debit memos are processed in ARC Memo Manager and settled in IAR. Ticket Information The Ticket Information section lists the ticket(s) associated with the memo. The tickets are listed by the airline code of the validating airline, ticket number, the system provider code of the system provider associated with the ticket, the ticket amount, the issue date, the associated passenger name, the issuing agent s employee id, and the product category. Correspondence All correspondence on a memo is displayed in the Correspondence section of the Memo Details screen. The correspondence is viewable to any user who has the access rights to view the memo. The correspondence section has three section tabs, Public, Private and All. The Public tab displays all correspondence that is sent or received from an external party. The Private correspondence tab displays all correspondence that was sent and received internally within your organization. The All correspondence tab displays both public and private correspondence. 33
34 Click the associated tab of the type of correspondence you would like to view. The following sections instruct how to add Public and Private Correspondence to individual memos. To add correspondence to a group of memos, go the Correspond/Attachments (Group Actions) section. Please note, sensitive data such as credit card numbers should not be entered into ARC Memo Manager. If a credit card number is detected, the account will be encrypted. The leading numbers will be replaced by an asterisk, with only the last 4-digits being displayed. Adding Public Correspondence To add Public Correspondence, at the Memo Details screen, 1. Go to the Correspondence section. 2. Click the Public radio button. 3. Type your correspondence in the textbox. 4. Add your comment by clicking the Add to Correspondence link. 5. Once added, a Success box appears, indicating the memo was updated successfully. 6. Click the OK button. Your added comment is viewable under the Public and All tabs in the Correspondence section. It is displayed by the date the correspondence was posted, the time the correspondence was posted, the user who posted the correspondence and the actual correspondence. 34
35 All users who have access to the memo will be able to view the public correspondence. This includes both internal and external users. Adding Private Correspondence To add Private Correspondence to an internal recipient, at the Memo Details screen, 1. Go to the Correspondence section. 2. Click the Private radio button. 3. Type your correspondence in the textbox. 4. Add your comment by clicking the Add to Correspondence link. 5. Once added a Success box appears, indicating the memo was updated successfully. 6. Click the OK button. 35
36 Your added comment is viewable under the Private and All tabs in the Correspondence section. It is displayed by the date the correspondence was posted, the time the correspondence was posted, the user who posted the correspondence and the actual correspondence. Memo Reasons The Memo Reasons section of the Memo Details page provides an explanation for the issuance of a memo. This can be viewed in the Airline/Supplier Reason box for a reason issued by a airline/supplier or in the Agency Reason box for a reason issued by an agent. Airline/Supplier Reason A airline/supplier can provide an explanation as to why a memo was issued. The airline/supplier s reason will be viewed in the Airline/Supplier Reason textbox. The reason will be viewable to the receiving agency. 36
37 The airline/supplier reason can only be provided at the creation of the memo. Please note, sensitive data such as credit card numbers should not be entered into ARC Memo Manager. If a credit card number is detected, the account will be encrypted. The leading numbers will be replaced by an asterisk, with only the last 4-digits being displayed. Agency Reason An agent s explanation for the issuance of a memo will be provided in the Agency Reason textbox. Attachments ARC Memo Manager gives you the ability to attach supporting documents of different file types to use as additional information on a memo. To attach supporting documents, 1. Go to the Memo Details screen. 2. Click the Attach Files link in the Attachments section. 3. Click the Add File button in the Attach File(s) box to search for the file to be attached. 4. *Select your file and click the Upload button or from your list of attached files select a file you want to delete and click the Remove File button. 5. Once a file is uploaded, the file will be attached to the memo. 37
 section. the *Note,.exe,.bat,.dll,.xml,.lnk,.scr, or.bsp files types are not accepted.")
38 You can select multiple files by holding down your Control key on your computer s keyboard for each file to attach. The maximum file size is 10 MB/10240kB. You can add attachments to a group of memos. For more information, go to Correspond/Attachments (Group Actions) section. the *Note,.exe,.bat,.dll,.xml,.lnk,.scr, or.bsp files types are not accepted. *Note, do not attach attachments that include sensitive data such as credit card numbers. Opening an Attachment To open an attachment, 1. Click the file link in the Attachments box. 2. In the File Download box, click the Open button to open the attachment, or click Save, to save the attachment to your computer. 38

39 Memo Financial Details (USD) The Memo Financial Details (USD) section provides a financial calculation of the issuance of a memo. The issuing airline will provide both the airline computation and the agent computation of the associated ticket of the memo. The difference will be the original amount of the memo. The airline and agent computation includes, Fare Amount Total Tax Commission Amount Service Charge Penalty Amount Other Fees Total Amount of the Ticket Disputes The Disputes section provides a list of all memos that are being disputed. The disputed memos are listed by dispute date, the amount being disputed, the user name of the disputer, and the status of the dispute. When a dispute is initially made, it will have a pending status until action has been taken by the airline. Note, though a memo has been disputed, it does not mean the dispute was accepted. Check the status of the dispute to determine if the dispute was accepted or rejected. Accept Dispute ARC Memo Manager provides carriers the ability to accept disputed amounts submitted by travel professionals. To accept a dispute, 1. Click the Disputed link in the Memo Activity section of the ARC Memo Manager home page to display a list of memos in dispute. 2. Check the Selected box of the disputed memo(s) you want to accept from your list of disputed memos. 39
 textbox. Please note, sensitive data such as credit card numbers should not be entered into ARC Memo Manager.")
40 3. Select the View option from the Select Action drop down menu. 4. Go to the Disputes section of the Memo Details page. 5. Click the Accept link to display the Accept Dispute box. 6. Type your comments in the Comment (Public) textbox. Please note, sensitive data such as credit card numbers should not be entered into ARC Memo Manager. If a credit card number is detected, the account will be encrypted. The leading numbers will be replaced by an asterisk, with the last 4-digits being displayed. 7. Click the Submit button. 8. Once submitted, a Success pop-up box will display indicating the memo was updated successfully. 9. Click OK to close the Success box. 10. The status of the dispute will change from Pending to Accepted. Reject Dispute ARC Memo Manager provides carriers the ability to reject disputed amounts of a memo submitted by travel professionals. To reject a dispute, 1. Click the Disputed link in the Memo Activity section of the ARC Memo Manager home page to display a list of memos that have a Dispute Pending status. 2. Check the Selected box of the disputed memo(s) you want to view from your list of memos. 3. Select the View option from the Select Action drop down menu. 4. Go to the Disputes section of the Memo Details page. 5. Click the Reject link to display the Accept Reject box. 40

41 6. Type your comments in the Comment (Public) textbox. Please note, sensitive data such as credit card numbers should not be entered into ARC Memo Manager. If a credit card number is detected, the account will be encrypted. The leading numbers will be replaced by an asterisk, with the last 4-digits being displayed. 7. Click the Submit button. 8. Once submitted, a Success pop-up box will display indicating the memo was updated successfully. 9. Click OK to close the Success box. 10. The status of the dispute will change from Pending to Rejected. Entity-Specific Information The Entity-Specific Information section provides six additional data fields, also known as Flex Fields. These additional fields are customizable allowing you to provide additional data or information that is not standard on the memo. To add data to the Flex Fields, 1. Go to the Entity-Specific Information section of the Memo Details page. 2. Click the Update Flex Fields link. A Flex Fields pop-up box will display, 3. Type your data in the Flex Field 1 textbox. 4. Type your second flex field data into the Flex Field 2 textbox. 5. Type your third flex field data into the Flex Field 3 textbox. 6. Type your fourth flex field data into the Flex Field 4 textbox. 7. Type your fifth flex field data into the Flex Field 5 textbox. 41
42 8. Type your sixth flex field data into the Flex Field 6 textbox. 9. Click the Apply button to save your flex fields data. 10. Click the Update Flex Fields link to make modifications to your flex fields. 11. Click the Clear link to delete your flex field data. Payments The Payments section provides a history of payments that were made on the memo. This section is comprised of IAR Payments and Non-IAR Payments. IAR Payments IAR payments are payments made directly in ARC Memo Manager and settled through the agent s IAR sales report. IAR payments are listed by the date a payment was submitted, the user who submitted the payment, the amount paid, the IAR transaction number, the status of the payment, the IAR settled date, and the settled amount. Initial payments will have a status of pending until the memo has been settled in IAR. 42
43 Non-IAR Payments Agents have the option of sending payments directly to the airline instead of paying through ARC Memo Manager. The Non-IAR Payments section will list all payments that are being sent directly to the validating airline. The payments are listed by the payment date, the user who submitted the payment, the amount, the payment number, the payer and the type of payment. Note, Non-IAR Payments will only display the non-iar payments that were identified by the agent in ARC Memo Manager. If a airline receives payment outside of IAR that was not identified in ARC Memo Manager, the airline can add the payment information in the Non-IAR Payment section. To make a non-iar payment, 1. Check the Selected box of the memo(s) you want to make payment from your list of memos on the home page. 2. Select the View option from the Select Action drop down menu. 3. Go to the Non-IAR section under Payments of the Memo Details page. 4. Click the Record Payment link to display the Record Non-IAR Payment box. 5. Type the amount to be paid in the Payment Amount (USD) textbox. 6. Type the name of the payer in the Payor textbox. 7. Type the payment number in the Payment Number textbox. 8. Select the payment type from the Form of Payment drop down menu. 9. Select the payment date from the Payment Date (MM/DD/YYYY) calendar. 10. Type your comments in the Comment (Public) textbox. 11. Click the Submit button to submit your payment information. 12. Once submitted, a Success pop-up box will display indicating the memo was updated successfully. 13. Click OK to close the Success box. Note: Credit cards are not valid forms of payment and should not be entered into ARC Memo Manager. If a credit card number is detected, the account number will be encrypted. The leading numbers will be replaced by an asterisk, with only the last 4-digits being displayed. 43

44 Customizing Payment Columns In addition to adjusting the width of the IAR and Non-IAR Payment columns, you can move columns and sort by columns. To move a column, 1. Scroll over the column heading you want move. 2. Click and drag the column heading to the new position. To sort by column, 1. Go to the column you want to sort by and click into the column heading. 2. You may sort by multiple columns GDS Access The GDS Access section of the Memo Details screen allows a user to grant GDSs access to the memo. The access privileges include view and correspond of the memo only. The GDS will not have access to any other memo unless access is granted. 44

45 Granting GDS Access To grant GDS access to a memo, at the Memo Details page of a memo, 1. Go to the GDS Access section. 2. Select the GDS(s) you want to grant access to in the Available GDS s box. 3. Click the > Add > link to add the GDS. 4. Once added, the GDS will display in the GDS s Granted Access box. 5. The date access was granted, will be provided. Remove GDS Access To remove GDS access from your memo, at the Memo Details page, 1. Go to the GDS Access section. 2. Select the GDS(s) you want to remove from the GDS s Granted Access box. 3. Click the < Remove < link to remove the GDS. 4. Once removed, the selected GDS will display in the Available GDS box. Airline/Supplier Contact Information For each memo issued, the validating airline or supplier can provide their contact information to be viewed. In the Airline/Supplier Contact Information section of the Memo Details screen, the following contact information can be viewed: Airline/Supplier Name Airline/Supplier # Contact Name Address 1 Address 2 Phone Number Address 45
46 Address 3 City State/Province Postal Code Country Code Editing Airline/Supplier Contact Information Carriers/suppliers are able to edit or update their contact information after a memo has been created and added to AMM. To edit or update contact information for a memo, 1. Go to the Airline /Supplier Contact Information section on the Memo Details screen. 2. Type the airline/supplier name in the Airline Supplier Name textbox. 3. Type the airline/supplier number in the Airline/Supplier # textbox. 4. Type the airline/supplier contact name in the Contact Name textbox. 5. Type the phone number in the Phone textbox. 6. Type the address in the textbox. 7. Type the address in the Address 1 textbox. 8. If applicable, type the address in the Address 2 textbox. 9. If applicable, type the address in the Address 3 textbox. 10. Type the city in the City textbox. 11. Type the state or province in the State/Province textbox. 12. Type the postal code in the Postal Code textbox. 13. Type the country code in the Country Code textbox. 14. Click the Save link to save your changes or Cancel Changes to cancel. 46
47 Print Memo The print functionality allows you to print the Memo Details page of a memo in a formatted print layout. The print layout provides four standard pages. The first page includes the Memo Details, Ticket Information, Memo Financial Details, GDS Access information, and Airline/Supplier Contact Information. The second page provides Disputes, Payments (IAR, Non-IAR), Attachments, and Entity (agency, airline, GDS) Specific Information. The third page includes the Memo Reasons (if applicable), and the fourth page includes all Correspondence (if applicable). To print the Memo Details of a memo, 1. Click the Print Details button on the Memo Details page. 2. The Memo Details page will display in a print format. 3. Click the Print icon located on the top left hand corner of the print layout page to print all pages. To print a selected page, click the Printed Selected Page Only check box and then click the Print icon. The Print Command box will appear once the print selection has been made. 4. Select a printer. 5. In the Page Range section, click the All radio button to print all pages, the Selection radio button for a specific page(s) selection, or the Current Page radio button to print the current page. 6. If you want to print specific pages, click the Pages radio button and type in the pages to be printed in the textbox. 7. Select the number of copies to print in the Number of copies: section. 47

48 8. Click the Print button to print or Cancel to terminate the print command. You can only print one memo at a time. If you are viewing multiple memos, you must click the Print Details button for each memo you want to print. To print multiple memos, export the memos into a CSV, PDF or Plain Text format. History The History tab provides a log of the details of the memo prior to the last change to the memo. To view the history of a memo, 1. Go to your list of memos on the home page. 2. Go to the appropriate memo tab (Open, Closed, Inactive, or All) in which the memo(s) falls under. 3. Click the check boxes next to the memo(s) you want to open. 4. Click the Select Actions drop down menu. 5. Select the View option. 6. The Memo Details of the selected memo(s) will display. 7. Click the History tab for each memo to view the history. 48
 in which the memo(s) falls under. 3.")
49 Exporting History You can export the history of a memo into a CSV, PDF, or Plain Text format as it pertains to your needs. To export the history of a memo, 1. Go to your list of memos on the home page. 2. Go to the appropriate memo tab (Open, Closed, Inactive, or All) in which the memo(s) falls under. 3. Click the check boxes next to the memo(s) you want to export. 4. Click the Select Actions drop down menu. 5. Select the View option. 6. The Memo Details of the selected memo(s) will display. 7. Click the Export History button. 8. The Export History box will appear. Click the radio button next to the file type you want the History to be exported in. 9. Click the Export button to export or Cancel to terminate your request. 49


50 Quick View The Quick View section at the top of the Memo Details page allows for you to search memos by memo number. To search, 1. Click the Memo Numbers link. The Memo Quick View window will appear. 2. Type the 10-digit memo number in the Memo Quick View window. To search for multiple memos, enter the memo numbers and separate each by a comma in the Memo Quick View window. 3. Click the View button to execute the search or tab to the View button and hit Enter. 50
51 Creating a Memo Memos are automatically loaded into ARC Memo Manager through a SFTP transmission or manually keyed into the system. To manually key a memo into ARC Memo Manager, 1. Go to the ARC Memo Manager home page 2. Click the Create Memo button to go to the Create Memo page. 3. Type the memo form serial number in the Memo Number textbox 4. If there is an associated passenger, type the passenger name in the Passenger textbox. 5. Select the memo s date of issue from the Issue Date calendar. 6. Type the agency s ARC Number in the Agency # textbox 7. Type the amount of the memo in the Amount (USD) textbox. 8. If this is a TRS memo, select the TRS reason from the TRS dropdown menu. 51
 textbox. 5.")
52 Ticket Information In the Ticket Information section, 1. Click the Add Ticket link. A Ticket Info popup box will appear. 2. Type the associated airline/supplier code in the Airline # textbox 3. Type the associated ticket number in the Ticket # textbox. 4. Type the amount of the associate ticket in the Ticket Amount (USD) textbox. 5. Select the associated ticket s date of issue in the Issue Date (mm/dd/yyyy) calendar. 6. Type the passenger name of the associated ticket in the Passenger textbox. 7. Type the employee id of the associated ticket in the Employee ID textbox. 8. Type the Product Category of the associated ticket in the Product Category textbox 9. Click the Apply button to add the ticket to the memo. 10. For each ticket added, click the Edit Ticket icon under the Edit/Clear column to make necessary modifications 11. Click the Edit Ticket button to save your changes. 12. To delete a ticket, click the Clear Ticket icon. 13. An Alert pop up box will display. Click the Yes button to confirm your deletion. Memo Reasons In the Memo Reason section, type your reason for issuing the memo in the Airline/Supplier Reason textbox. Please note, sensitive data such as credit card numbers should not be entered into ARC Memo Manager. If a credit card number is detected, the account will be encrypted. The leading numbers will be replaced by an asterisk, with the last 4-digits being displayed. 52

53 Attachments ARC Memo Manager gives you the ability to attach supporting documents of different file types to use as additional information on a memo. To attach supporting documents, 1. Click the Add File button in the Attachments box section to search for the file to be attached. 2. *Select your file and click the Open button to attach the file. 3. To remove a file from your list of attachments, select the file you want to delete and click the Remove File button. *You can select multiple files by holding down your Control key on your computer s keyboard for each file to attach. The maximum file size is 10 MB/10240kB. *Note,.exe,.bat,.dll,.xml,.lnk,.scr, or.bsp files types are not accepted. *Note, do not attach attachments that include sensitive data such credit card numbers. Memo Financial Details (USD) The Memo Financial Details (USD) section provides a financial calculation of the memo. The issuing airline can provide both the Airline Computation and the Agent Computation of the associated ticket of the memo. The difference will appear in the Total column of the Memo Financial Details section. This will be the original amount the memo was issued for. The Airline and Agent Computation includes, 53

54 Fare Amount Total Tax Commission Amount Service Charge Penalty Amount Other Fees Total Amount of the Ticket To add the Memo Financial Details (USD), 1. Click the Edit Financial Details link. A Financial Data screen will appear. 2. Type the correct fare of the ticket in the Fare textbox under Airline Financial Details. 3. Type the correct tax of the ticket in the Tax textbox under Airline Financial Details. 4. Type the correct commission of the ticket in the Commission textbox under Airline Financial Details. 5. Type the correct service charge of the ticket in the Service Charge textbox under Airline Financial Details. 6. Type the correct penalty of the ticket in the Penalty textbox under Airline Financial Details. 7. Type the correct other fees of the ticket in the Other Fees textbox under Airline Financial Details. 8. Type the agent issued fare of the ticket in the Fare textbox under Agent Financial Details. 9. Type the agent issued tax of the ticket in the Tax textbox under Agent Financial Details. 10. Type the agent issued commission of the ticket in the Commission textbox under Agent Financial Details. 11. Type the agent issued service charge of the ticket in the Service Charge textbox under Agent Financial Details. 12. Type the agent issued penalty of the ticket in the Penalty textbox under Agent Financial Details. 13. Type the agent issued other fees of the ticket in the Other Fees textbox under Agent Financial Details. 14. Click the Apply button to save the financial data or Clear to refresh the data fields. 54


55 Entity Specific Information The Entity-Specific Information section allows you to provide additional data by using Flex Fields. In the Flex Fields you can provide any data you want. To add data to the Flex Fields, 1. Go to the Entity-Specific Information section of the Create Memo page. 2. Click the Edit Flex Fields link. A Flex Fields pop up box will display, 3. Type your data in the Flex Field 1 textbox. 4. Type your second flex field data into the Flex Field 2 textbox. 5. Type your third flex field data into the Flex Field 3 textbox. 6. Type your fourth flex field data into the Flex Field 4 textbox. 7. Type your fifth flex field data into the Flex Field 5 textbox. 8. Type your sixth flex field data into the Flex Field 6 textbox. 9. Click the Apply button to save your flex fields data. 10. Click the Edit Flex Fields link to make modifications to your flex fields. 11. Click the Clear link to delete your flex field data. 55
56 GDS Access The GDS Access section allows you to grant GDSs access to the memo. The access privileges include view and correspond of the memo only. The GDS will not have access to any other memo unless access is granted. GDS who have access to the memo will be displayed in this section. To grant access GDS access, 1. Go to the GDS Access section. 2. Select the GDS(s) you want to grant access to in the Available GDS s box. 3. Click the > Add > link to add the GDS. 4. Once added, the GDS will display in the GDS s Granted Access box. 5. The date access was granted, will be provided. Remove GDS Access To remove GDS access from your memo, 1. Go to the GDS Access section. 2. Select the GDS(s) you want to remove from the GDS s Granted Access box. 3. Click the < Remove < link to remove the GDS. 4. Once removed, the selected GDS will display in the Available GDS s box. Airline/Supplier Contact Information For each memo issued, the validating airline or supplier can provide their contact information to be viewed. In the Airline/Supplier Contact Information section of the Memo Details screen, the following contact information can be viewed: Airline/Supplier # Contact Name Airline/Supplier Name 56
57 Address 1 Address 2 Phone Number Address Address 3 City State/Province Postal Code Country Code Adding Airline/Supplier Contact Information To add Airline/Supplier Contact Information, 1. Go to the Airline /Supplier Contact Information section on the Create Memo screen. 2. Type the Airline/supplier name in the Airline Supplier Name textbox. 3. Type the Airline/supplier number in the Airline/Supplier # textbox. 4. Type the carrier s/supplier s contact name in the Contact Name textbox. 5. Type the phone number in the Phone textbox. 6. Type the address in the textbox. 7. Type the address in the Address 1 textbox. 8. If applicable, type the address in the Address 2 textbox. 9. If applicable, type the address in the Address 3 textbox. 10. Type the city in the City textbox. 11. Type the state or province in the State/Province textbox. 12. Type the postal code in the Postal Code textbox. 13. Type the country code in the Country Code textbox. Once the Airline/Supplier Contact Information is provided, a Airline or supplier will not have provided this information again when creating another memo. This information will be pre-populated based on your initial issuance. This information can be edited. 57
58 Load the Memo into Memo Manager When you have finished entering the memo details on the Create Memo screen, you can save it and load it into the system. Once loaded, the newly created memo will be accessible by the receiving agent. To save a memo, 1. Click the Load Memo button. 2. Click the Cancel button if you choose not save the memo. 3. Click the Clear Memo button to refresh the data fields. 4. If you save your memo, you can enter another memo by clicking the New Memo button or click Done to return to your home page. Adjusting the Memo Balance To adjust the balance of a memo, from the home page, 1. Go to your list of memos. 2. Check the check box of the memo you want to adjust. 3. Select View from the Select Action drop down menu. 4. Click the Adjust button on the Memo Details screen. 5. Click the Change balance to drop down menu. 6. Select the Change balance to option to change the balance to a specific amount. 7. Select the Decrease balance by option to decrease the balance by a specific amount. 8. Select the Increase balance by option to increase the option by a specific amount. 9. Type the adjusted amount in the textbox. 10. Type your comments in the Comment (Public) textbox. 11. Click the Submit button to save your adjustment. 12. Once saved, a Success pop-up box will display. Click the OK button to return to the Memo Details page. 58


59 The memo s adjusted amount will be reflected in the Balance (USD) field. Closing a Memo To close a memo, from the home page, 1. Go to your list of memos. 2. Check the check box of the memo you want to adjust. 3. Select View from the Select Action drop down menu. 4. Click the Close Memo button on the Memo Details screen. 5. An Alert pop-up screen will display. Click the Yes button to confirm. 6. Once confirmed, a Success pop-up box will display. Click the OK button to return to the Memo Details page. The Balance (USD) will be adjusted to a 0.00 amount. 59

60 Once a memo has been closed, it cannot be reopened. Reactivate a Memo Once a memo reaches its age limit, the memo automatically becomes inactive. The validating Airline has the option to reactivate the memo making it active for the receiving agency. To reactivate a memo, 1. Click the Inactive tab from the home page to display a list of inactive memos. 2. Click the check box of the memo you would like to reactivate. 3. Select the View option from Select Action drop down menu to go to the Memo Details page. 4. Click the Reactivate button. 5. An Alert box will display asking if you are sure you want to reactivate this memo. Click the Yes button to confirm. 6. A Success box will display confirming the memo has been updated. Click the OK button to close the box. 60
ARC Memo Manager User Guide for System Providers. Have Questions? Contact Us!
 ARC Memo Manager User Guide for System Providers Have Questions? Contact Us! CHD@arccorp.com 703.816.8007 Last updated: March 2013 Table of Contents Welcome to ARC Memo Manager!... 4 Benefits... 4 System
SANTANDER TREASURY LINK USER GUIDE
 SANTANDER TREASURY LINK USER GUIDE Welcome to Santander Treasury Link Santander Treasury Link is a secure Web application that allows you to manage accounts, payments, transfers, reports, and users. This
IAR BOS (Back Office System) File User Guide
 File User Guide") IAR BOS (Back Office System) File User Guide Got Questions? Contact us! Email: CCCHelp@arccorp.com Phone: +1.855.816.8003 Last Updated: November 2016 1 of 28 Table of Contents Back Office System (BOS)...
IAR BOS (Back Office System) File User Guide Got Questions? Contact us! Email: CCCHelp@arccorp.com Phone: +1.855.816.8003 Last Updated: November 2016 1 of 28 Table of Contents Back Office System (BOS)...
Business ebanking User Guide
 Business ebanking User Guide If you have any questions, please contact Business ebanking Support at 1-800-593-4345 Contents About Business Online Banking... 3 System Requirements/Considerations... 4 Password
User s Guide. (Virtual Terminal Edition)
") User s Guide (Virtual Terminal Edition) Table of Contents Home Page... 4 Receivables Summary... 4 Past 30 Day Payment Summary... 4 Last 10 Customer Transactions... 4 View Payment Information... 4 Customers
User s Guide (Virtual Terminal Edition) Table of Contents Home Page... 4 Receivables Summary... 4 Past 30 Day Payment Summary... 4 Last 10 Customer Transactions... 4 View Payment Information... 4 Customers
I. Overview... 2 A. Users and User Roles... 2 B. System Information... 2 C. Help Menu... 3 D. Changing Your Password... 3 E. Logging In... 3 F.
 I. Overview... 2 A. Users and User Roles... 2 B. System Information... 2 C. Help Menu... 3 D. Changing Your Password... 3 E. Logging In... 3 F. Logging Off... 4 G. Navigation Bar... 4 II. Search Menu...
Meritain Connect User Manual. for Employees. 1 Meritain Connect User Guide for Employees
 Meritain Connect User Manual for Employees 1 Meritain Connect User Guide for Employees Contents Introduction... 4 Accessing Meritain Connect... 5 Logging In... 5 Forgot Password... 6 Registration Process...
SmartPay Express User Guide
 SmartPay Express User Guide Table of Contents INTRODUCTION... 4 SmartPay Express Overview... 4 System Requirements... 5 Trusted Sites... 5 Available Resources... 7 Additional Resources... 7 LOGGING IN...
User Guide. Trade Finance Global. For customers using Guarantees. October nordea.com/cm OR tradefinance Name of document 5/8 2015/V1
 User Guide Trade Finance Global For customers using Guarantees October 2015 nordea.com/cm OR tradefinance Name of document 2015/V1 5/8 Table of Contents 1 Trade Finance Global (TFG) - Introduction... 4
BBVA Compass Spend Net Payables
 User Guide BBVA Compass Spend Net Payables User Guide Vault Services Table of Contents Introduction 2 Technical Requirements 2 Getting started 3 Sign In 3 General Navigation 4 Upload/Create Payment 5
accessmoney Manager ACTION PAGES
 accessmoney Manager ACTION PAGES 1 accessmoney Manager Action Pages accessmoney Manager Action Pages are quick reference pages that provide information for the major components of accessmoney Manger. Click
POSITIVE PAY U S E R G U I D E
 POSITIVE PAY U S E R G U I D E Positive Pay User Guide Getting Started... 3 Administration... 3 Company Administration... 3 Manage Users... 3 Communication... 4 Manage Alerts... 5 Positive Pay Check...
Simply e C A S H M A N A G E M E N T U S E R G U I D E
 Simply e C A S H M A N A G E M E N T U S E R G U I D E Simply e Cash Management Rev. 06/01/15 Simply e Cash Management Rev. 06/01/15 Table of Contents 1. WELCOME TO 7 1A. TYPES OF ACTIVITY 7 1B. GETTING
Treasury Management User Guide. Online Banking
 Treasury Management User Guide Online Banking Released August 2018 Treasury Management... 4 Logging in to Treasury Management...5 Helpful Hints...10 User Menu... 12 Profile and Preferences... 12 Notification
Rabo Supplier Finance User Manual - Suppliers -
 Rabo Supplier Finance User Manual - Suppliers - Page 2 of 33 Table of Contents 1 About This Document... 3 1.1 Objectives of This Document... 3 1.2 Inside This Document... 3 2 Rabo Supplier Finance platform...
PRW Product Registration and Warranty. User Guide
 PRW Product Registration and Warranty User Guide June 2016 1 Table of Contents PRW User Guide TABLE OF CONTENTS A. Getting Started in PRW 4-9 1. Screen Layout 4 2. System Navigation 8 3. System Requirements
Expense Transfer Journal Module: FTS Transfers. Table of Contents
 Expense Transfer Journal Module: FTS Transfers Table of Contents Overview... 2 Access to FTS Transfers Module... 2 Training... 2 Backup Documentation... 2 Email Notification... 2 Accounting Services...
CyberSource Business Center
 CyberSource Business Center CS3-609-06-16-09 Copyright 2009 Harris Connect, LLC. all rights reserved. Reproduction in any form without the express written consent of Harris Connect, LLC. is strictly prohibited
ATB Online Business General User. User Guide
 ATB Online Business General User User Guide Contents Welcome to ATB Online Business 4 How to use this guide 5 Roles and entitlements in ATB Online Business 5 Administrator role 5 User roles 5 Limits 6
TAS User Guide. 12 January Version 1.0
 TAS User Guide 12 January 2012 Version 1.0 Disclaimer This user guide is for information purposes and might not exactly match the functionality and display of the TAS Registration system and the TLD Application
DSWR User Guide. In effect from January 29 th,, BCLDB Direct Sales Web Reporting User Guide Page 1
 DSWR User Guide In effect from January 29 th,, 2017 BCLDB Direct Sales Web Reporting User Guide Page 1 Contents Introduction... 4 Before You Get Started... 4 Registering for the DSWR Application... 5 Log-in...
Present and Pay. User Manual Payer Analyst
 Present and Pay User Manual Payer Analyst Table of Contents 1.0 Glossary of Terms... 1 2.0 How to Use this Manual... 3 3.0 Common User Features and Functions... 3 3.1 Present and Pay User Interface...
OPENING A NEW JACS ACCOUNT... 15
 JACS Online Help TABLE OF CONTENTS ACCESSING YOUR JACS ACCOUNTS ONLINE... 4 REGISTERING FOR A USER NAME AND PASSWORD... 4 Registration Instructions... 4 Step 1 - Terms and Conditions... 5 Step 2 Do You
Student Financials - Inquiry. Finance and Accounting Student Accounts
 Student Financials - Inquiry Finance and Accounting Student Accounts 5/7/2009 Table of Contents Introduction... iv Lesson 1 - Basic Navigation... 1 1.1 Navigating in Student Financials... 1 Lesson 2 -
Production Assistance for Cellular Therapies (PACT) PACT Application System User s Guide
 PACT Application System User s Guide") Production Assistance for Cellular Therapies (PACT) PACT Application System User s Guide Version 1.0 February 9, 2017 Version 1.0 TABLE OF CONTENTS 1.0 Getting Started... 1 1.1 Access to the Internet...
Production Assistance for Cellular Therapies (PACT) PACT Application System User s Guide Version 1.0 February 9, 2017 Version 1.0 TABLE OF CONTENTS 1.0 Getting Started... 1 1.1 Access to the Internet...
BUSINESS BANKING ONLINE. Deskside User Guide
 BUSINESS BANKING ONLINE Deskside User Guide INTRODUCTION TO BUSINESS BANKING ONLINE Business Banking Online (BBOL) offers our business customers both large and small the tools and features needed to manage
Wire & Internal Transfers
 Wire & Internal Transfers USER GUIDE Transfer funds easily and securely. Convenience. Transfer money between accounts at Union Bank and different banks domestically and internationally. Ease. Say goodbye
Reference Guide (IRIS)
") Reference Guide For Santander Bank s Interactive Reporting & Initiation Services (IRIS) Equal Housing Lender. Santander Bank, N.A. is a Member FDIC and a wholly owned subsidiary of Banco Santander, S.A.
Reference Guide For Santander Bank s Interactive Reporting & Initiation Services (IRIS) Equal Housing Lender. Santander Bank, N.A. is a Member FDIC and a wholly owned subsidiary of Banco Santander, S.A.
Amadeus Web UETT Report
 Amadeus Web UETT Report User Guide Date: April 9, 2015 Version: v1.0.3 2014 Amadeus North America, Inc. Table of Contents _ 1 Overview 3 _ 2 Amadeus Web UETT Report 4 Access 4 Functional Specification
View Payments. User Guide. Online Merchant Services
 View Payments User Guide Online Merchant Services Copyright Statement Copyright 2010-2011 by American Express Company. All rights reserved. No part of this document may be reproduced in any form or by
core user guide business gateway TABLE OF CONTENTS BANKING > WEALTH > INSURANCE
 business gateway core user guide TABLE OF CONTENTS Getting Started... 2 Administration Approval... 8 Logging In... 2 Administration Report... 8 Electronic Report Delivery (ERD)... 17 Security Key... 2
User Guide. Join us on
 User Guide www.neopost.ca Join us on TABLE OF CONTENTS Getting started Hardware and subscription requirements 4 PC requirements - browsers 4 Activating the application 5 Weighing your items Get weight
HealthStream Connect Administrator User Guide
 HealthStream Connect Administrator User Guide ii Contents About HealthStream Connect... 1 Administrator Overview of HealthStream Connect... 2 Administrator Access and Privileges... 2 Navigating HealthStream
User Guide Product Design Version 1.7
 User Guide Product Design Version 1.7 1 INTRODUCTION 3 Guide 3 USING THE SYSTEM 4 Accessing the System 5 Logging In Using an Access Email 5 Normal Login 6 Resetting a Password 6 Logging Off 6 Home Page
Heritage Bank Correspondent Lockbox. Lockbox. User Guide
 Heritage Bank Correspondent Lockbox Lockbox User Guide Contents Accessing Lockbox... 1 Messages... 2 Moving messages... 4 Batch messages... 5 Message administration... 6 Creating a message... 6 Recalling
Business Online Banking
 First State Community Bank Business Online Banking End User Guide Table of Contents Logging In... 3 Navigation... 5 Account Activity Options... 7 Transactions... 8 Transfers... 9 Stop Payments...10 Statements...12
Mobile Banking Online Banking Features Dashboard Pending Transactions Account Export Bill Pay Online Bill Pay
 3 5 6 6 7 8 Desktop need to use the last 4 digits of their social security number or Telephone banking/dial PIN as their password. If help is needed logging on, please call Member Services and a representative
Sterling Virtual Terminal. User Guide
 Sterling Virtual Terminal User Guide Version 3.1.00 August 2015 Chapter 1: Getting started Table of Contents USER GUIDE... 1 CHAPTER 1: GETTING STARTED... 5 SYSTEM REQUIREMENTS... 5 STERLING VIRTUAL TERMINAL
CitiManager Job Aids. Cardholder
 CitiManager Job Aids Cardholder Contents Account Info... 2 Reactivating a User s Profile... 2 View Unbilled Transactions... 2 Setup E-mail Alerts... 3 Apply for New Card Invitation Passcode... 4 Apply
Supplier Reference Guide (QRG) Table of Contents
 Table of Contents") Supplier Onboarding Supplier Reference Guide (QRG) Table of Contents Supplier Checklist... 2 New Supplier Onboarding Steps... 3 Introduction... 4 Registration... 6 Certification... 16 Acceptance... 35
Supplier Onboarding Supplier Reference Guide (QRG) Table of Contents Supplier Checklist... 2 New Supplier Onboarding Steps... 3 Introduction... 4 Registration... 6 Certification... 16 Acceptance... 35
ONLINE BANKING COMMERCIAL CASH MANAGEMENT ACH END-USER GUIDE
 ONLINE BANKING COMMERCIAL CASH MANAGEMENT ACH END-USER GUIDE 1 P a g e TABLE OF CONTENTS CASH MANAGER ACH... 3 CREATE ACH BATCH... 4 ACH BATCH LIST... 4 MANUALLY CREATE AN ACH BATCH... 5 UPLOADING A NACHA
Easthampton Savings Bank Online Business Banking User Guide
 Easthampton Savings Bank Online Business Banking User Guide Page 1 of 100 Table of Contents SECURITY...6 PASSWORD TAB FUNCTIONALITY...6 SECURE DELIVERY TAB FUNCTIONALITY...9 CHALLENGE CODE TAB FUNCTIONALITY...10
ACT Test Accessibility and Accommodations System (TAA) User Guide
 User Guide") ACT Test Accessibility and Accommodations System (TAA) User Guide www.act.org ACT Test Accessibility and Accommodations System (TAA) User Guide Table of Contents Overview... 2 Introduction to the Test
ACT Test Accessibility and Accommodations System (TAA) User Guide www.act.org ACT Test Accessibility and Accommodations System (TAA) User Guide Table of Contents Overview... 2 Introduction to the Test
Wholesale Lockbox User Guide
 Wholesale Lockbox User Guide August 2017 Copyright 2017 City National Bank City National Bank Member FDIC For Client Use Only Table of Contents Introduction... 3 Getting Started... 4 System Requirements...
Warranty Claims User Guide
 Warranty Claims User Guide Date: April, 2016 Lenovo Warranty Claims User Guide 1 Index Overview... 3 User Preparation... 3 Log In... 3 Password Formats... 4 Welcome Page... 5 Home Tab... 5 Processing Claim
User Guide Regions Association Image Lockbox Online
 User Guide Regions Association Image Lockbox Online 2012 Regions Bank. Regions Lockbox Services subject to product terms and conditions. Rev. 111312 Association Image Lockbox User Guide Association Image
smartdata.gen2 Corporate Cardholder Guide February 2014
 smartdata.gen2 Corporate Cardholder Guide February 2014 Table of Contents Chapter 1 Getting Started... 1-i Introduction... 1-1 Browser Requirements... 1-1 Security... 1-2 Selecting a Language Preference...
Table of Contents CLIENT INTERNET ACCESS...4. Mobile Devices...4. Browser Compatibility...4 SYSTEM NAVIGATION Header Links...
 WebLink User Guide Table of Contents CLIENT INTERNET ACCESS...4 Mobile Devices...4 Browser Compatibility...4 SYSTEM NAVIGATION... 9 Header Links... 9 Navigation Bar... 9 USER OPTIONS... 9 Change Password...
User Guide. General Navigation
 User Guide General Navigation Table of Contents INTRODUCTION 2 TECHNICAL REQUIREMENTS 3 Screen Display for Laptop 3 Screen Display for Desktop PC 3 NAVIGATION 4 Contact Us 4 Log Out 4 Menu > Sub Menu Display
User Documentation for School Activity Funds Accounting
 User Documentation for School Activity Funds Accounting By: Applied Business Services, Inc. 800 S. Frederick Avenue, Suite 101 Gaithersburg, MD 20877 1-800-451-7447 ext. 130 www.appliedbusinessservices.com
User Guide. Customer Self Service (CSS) Web Application Progress Software Corporation. All rights reserved.
 Web Application Progress Software Corporation. All rights reserved.") User Guide Customer Self Service (CSS) Web Application 1993-2017 Progress Software Corporation. Version 2.1 March 2017 Table of Contents Welcome... 3 Accessing the Customer Self Service (CSS) Web Application...
User Guide Customer Self Service (CSS) Web Application 1993-2017 Progress Software Corporation. Version 2.1 March 2017 Table of Contents Welcome... 3 Accessing the Customer Self Service (CSS) Web Application...
ENTERPRISE SUBSCRIBER GUIDE
 ENTERPRISE SUBSCRIBER GUIDE Enterprise Subscriber Guide 880 Montclair Road Suite 400 Birmingham, AL 353 www. TABLE OF CONTENTS Table of Contents Introduction...6 Logging In...6 Navigation Bar, Sub-Menu
Employer Self Service (ESS) User Quick Guide
 User Quick Guide") Employer Self Service (ESS) User Quick Guide i Table of Contents Getting Started 6 Accessing the Employer Self Service (ESS) Portal 6 Maintaining Account Settings 7 Switching Employers within Session 7
Employer Self Service (ESS) User Quick Guide i Table of Contents Getting Started 6 Accessing the Employer Self Service (ESS) Portal 6 Maintaining Account Settings 7 Switching Employers within Session 7
Cardholder & Program Administrator
 Access Online Transaction Management User Guide Cardholder & Program Administrator Version 2.9 Contents Introduction...3 Transaction Management Variables by Organization... 3 Procedures in This Guide...
Nexsure Training Manual - Accounting. Chapter 7
 Nexsure Training Manual - Accounting Vendor Entries In This Chapter Vendor Entries at the Organization and Territory Level Vendor Entity Definition Disbursements to Vendors Line Item Distribution Receiving
Attorney Training Manual
 Attorney Training Manual Contact Information Phone Number: -855-264-2237 Email: efilingsupport@judicial.state.co.us Revised May 207 Table of Contents LOGIN / REGISTER ORGANIZATION... 2 NAVIGATION BAR...
2018 Gen Con Housing. How to book, modify and cancel a room assignment in Cvent Passkey
 2018 Gen Con Housing How to book, modify and cancel a room assignment in Cvent Passkey BROWSER RECOMMENDATION The Cvent Passkey Attendee Websites are supported on the following browsers: Chrome 30 or higher
Online Banking Quick Reference Guide
 Online Banking Quick Reference Guide Sign-On to Online Banking On the initial Sign-On page, sign on to online banking as follows: 1. Type your ID in the SIGN ON ID field. Note: If you cannot remember your
B2B WEBSITE 2017 USER GUIDE VOYAGES-SNCF.EU
 USER GUIDE VOYAGES-SNCF.EU HOMEPAGE - UNCONNECTED 2 HOMEPAGE - UNCONNECTED URL address remains the same Login: username & password remain the same Create a new agency account 3 CREATE A NEW AGENCY ACCOUNT
Check Positive Pay. User Guide
 Bu Check Positive Pay User Guide Table of Contents Overview... 2 Issues... 2 Issue Entry... 2 Import Issues... 5 Issue Activity... 17 Decisions... 20 Decision Items... 20 Decision Activity... 25 Subscriptions...
Student Financials - Inquiry
 Student Financials - Inquiry Customer Account Inquiries Finance and Accounting Student Accounts 5/7/2009 Table of Contents Introduction... iii Performing a Customer Account Inquiry... 1 Page ii Introduction
USER HELP. Copyright Information Copyright 2016 Global Payments Inc. All rights reserved worldwide.
 MERCHANT SALES: 800-637-8268 New Merchant Accounts PARTNER PROGRAMS: 800-637-8268 New and existing partnerships CUSTOMER CARE: 800-338-6614 Existing merchant account support Statements and deposits Changes
HOSPICE ABSTRACTION REPORTING TOOL (HART) USER GUIDE
 USER GUIDE") HOSPICE ABSTRACTION REPORTING TOOL (HART) USER GUIDE IN SUPPORT OF VERSION 1.5.0 (APRIL 2019) Page 1 of 60 TABLE OF CONTENT TABLE OF CONTENT... 2 INTRODUCTION... 4 INSTALLATION... 4 Installers Access Rights...
HOSPICE ABSTRACTION REPORTING TOOL (HART) USER GUIDE IN SUPPORT OF VERSION 1.5.0 (APRIL 2019) Page 1 of 60 TABLE OF CONTENT TABLE OF CONTENT... 2 INTRODUCTION... 4 INSTALLATION... 4 Installers Access Rights...
Building Standards Department Markham eplan Applicant Handbook For Building Permits, Sign Permits and Zoning Preliminary Review
 Markham eplan Applicant Handbook For Building Permits, Sign Permits and Zoning Preliminary Review In addition to this user manual, please refer to the instructions provided in the electronic forms (eforms)
Isi Net User Manual for Bank customers
 1 Table of Contents 1 Introduction and overview... 4 1.1 Isi Net User Types... 4 1.2 Accessing the Isi Net service... 5 1.2.1 User Login... 5 1.2.2 User Logout... 7 1.3 User Interface... 7 1.3.1 Menus...
GOQUO AGENT PORTAL USER GUIDE
 1 GOQUO AGENT PORTAL USER GUIDE 2 1. General Overview This document is designed for the purpose of providing users (Agents as well as Admin user) with all main steps in the whole process, as well as detailed
WELCOME TO WEBLINK Accessing WebLink...6. Registration Process...6. Log In Process After Registration On-Line Help...
 WebLink User Guide Table of Contents WELCOME TO WEBLINK... 1 Internet Explorer Browser Settings...3 WebLink Features... 5 Accessing WebLink...6 Registration Process...6 Log In Process After Registration...
Concur Getting Started QuickStart Guide. Concur Technologies Version 1.3
 Concur Technologies Version 1.3 January 23, 2017 Page 1 Document Revision History Date Description Version Author 05/12/2016 11/30/2016 converted to new template updated proprietary statement 1.2 Concur
Unit Data Manager (UDM) User Guide
 User Guide") Unit Data Manager (UDM) User Guide Issued: 10/01/18 If at any time assistance is needed, contact Central Support. Phone: 215-320-4933 E-mail: centralsupport@pcrb.com Page 2 TABLE OF CONTENTS A. Introduction
Unit Data Manager (UDM) User Guide Issued: 10/01/18 If at any time assistance is needed, contact Central Support. Phone: 215-320-4933 E-mail: centralsupport@pcrb.com Page 2 TABLE OF CONTENTS A. Introduction
Customer User Guide Commercial Online Access
 Customer User Guide Commercial Online Access Getting Started To access the customer portal, enter the following URL: nationwide.com/agclient Once you access this site, save it as a Favorite on your computer
INBUSINESS BANKING SYSTEM
 Introducing your new INBUSINESS BANKING SYSTEM Companion Guide to Business Banking Video Tutorials Updated 0.09.8 WELCOME TO THE INBUSINESS SYSTEM The InBusiness System will help you efficiently and securely
Probate Court E File System User Guide
 Probate Court E File System User Guide Honorable Anthony J. Russo Presiding Judge Honorable Laura J. Gallagher Judge Introduction This document will assist users in the electronic registration and submission
Access Online. Reporting. User Guide. Version 1.9 Cardholder
 Access Online Reporting User Guide Version 1.9 Cardholder Contents Introduction... 1 Basic Steps... 2 Select a Report to Run... 3 Set Report Parameters... 5 Set Criteria... 7 Account Code Validation Status...
About MassMutual Electronic Bill Presentment & Payment
 Group Billing and Collections Frequently Asked Questions (FAQs) for ebill and epay About MassMutual Electronic Bill Presentment & Payment E-Bill Questions and Problems Payment Process Questions Payment
USER GUIDE. Version 2.0. Reflex Online Cash Management
 TM USER GUIDE Version 2.0 Reflex Online Cash Management Table of Contents USER GUIDE VERSION 2.0 Table of Contents... 2 1. Introduction... 4 1.1 What is Reflex?... 4 1.2 How do I access Reflex?... 4 1.3
online payment center T-Mobile user guide
 online payment center T-Mobile user guide table of contents introduction 1 features.. 1 getting started. 2 starting Qpay.. 2 login.. 2 changing your password 3 navigating... 3 processing payments 4 how
ezbusiness Credit Card Management User s Guide
 ezbusiness Credit Card Management User s Guide This document provides an overview of the different options available within your Internet-based ezbusiness Card Management website. TABLE OF CONTENTS (click
BE Share. Microsoft Office SharePoint Server 2010 Basic Training Guide
 BE Share Microsoft Office SharePoint Server 2010 Basic Training Guide Site Contributor Table of Contents Table of Contents Connecting From Home... 2 Introduction to BE Share Sites... 3 Navigating SharePoint
BUSINESS ADVANTAGE USER GUIDE
 Table of Contents Getting Started... Account Summary...5 Navigation Tools...6 Account History...8 Quick Reference Guide...9 Frequently Asked Questions... Need Help?... Getting Started. Visit.. In the Online
JITs Portal. User Manual
 JITs Portal User Manual November 2017 JITs Portal 1 Table of Contents Chapter 1 Introduction... 2 1.1 What is the JITs Portal?...3 1.2 User Guide structure...4 Chapter 2 Working with the JITs Portal...
edeposit edeposit User Guide
 edeposit User Guide December 27, 2017 Table of Contents edeposit Overview... 2 Enhanced Security... 2 Login... 3 ANB Bank Website... 3 Errors... 11 Magnetic Ink Character Recognition MICR... 11 Correcting
Intellix Payments Reference Guide
 Intellix Payments Reference Guide Table of Contents Overview 3 Accessing Payment Functionality 3 About this Guide and Additional Training 3 Using List Functionality in Intellix Payments 4 Overview 4 Standard
Create a Travel Authorization from a Blank Form. A Travel Authorization must be created in order to receive a cash advance.
 Create a Travel Authorization from a Blank Form A Travel Authorization must be created in order to receive a cash advance. Travel Authorization s are required for the following reasons: When a maximum
Welcome to the Vale Vendor Portal Guide
 Welcome to the Vale Vendor Portal Guide 1. Introductory 1.1 How to access? 1.2 Presenting the Portal 2. Onboarding Process 3. Negotiate Module 4. Purchase Module 5. Payment Module 1. Introductory Main
User Guide. Release 16.0
 User Guide Release 16.0 ibusinesscapturepro Web Deposit User Guide Contents About the Product... 6 Product Support... 6 Chapter 1 - Deployment... 7 Getting Started... 8 Client Hardware Requirements...
YOUR GUIDE TO BUSINESS ONLINE BANKING
 YOUR GUIDE TO BUSINESS ONLINE BANKING II Published by Murphy & Company, Inc. 360 Barrett Office Dr St. Louis, MO 630 www.mcompany.com 009-07 Murphy & Company, Inc. Microsoft, Microsoft Money, Windows and
Direct Fare Filing (Sabre MyFares) STUDENT GUIDE
 STUDENT GUIDE") Direct Fare Filing (Sabre MyFares) STUDENT GUIDE Table of Contents Objectives... 4 Testing your Input... 4 Getting Started... 5 Overview... 5 Organize Contract Information... 6 Authorization to Use the
Direct Fare Filing (Sabre MyFares) STUDENT GUIDE Table of Contents Objectives... 4 Testing your Input... 4 Getting Started... 5 Overview... 5 Organize Contract Information... 6 Authorization to Use the
This product is the proprietary material of CheckCare Enterprises, LLC. And is not to be distributed or copyrighted without written permission from
 CheckCare ACH Gateway Reference Secure Pay Edition This product is the proprietary material of CheckCare Enterprises, LLC. And is not to be distributed or copyrighted without written permission from CheckCare
Business Online Banking
 » Flagstar business Banking Business Online Banking Reference Guide Flagstar Bank Corporate Headquarters 5151 Corporate Drive Troy, MI 48098 (888) 324-4100 flagstar.com/business Member FDIC 1 Table of
eclubhouse CLUB OFFICIAL USER GUIDE
 eclubhouse CLUB OFFICIAL USER GUIDE eclub Club Users Guide 11/2013 Table of Contents eclubhouse... 1 CLUB OFFICIAL USER GUIDE... 1 LOGGING IN... 3 RESETTING PASSWORD & UNLOCKING ACCOUNT... 4 ADMINISTRATION...
Create Expense Report (Net-Card or Employee Paid)
") Create Expense Report (Net-Card or Employee Paid) All employees are responsible for ensuring that their Expense Reports are complete, accurate and adhere to the expense reimbursement requirements of CUNY,
Create Expense Report (Net-Card or Employee Paid) All employees are responsible for ensuring that their Expense Reports are complete, accurate and adhere to the expense reimbursement requirements of CUNY,
This document contains information that will help you to create and send graphically-rich and compelling HTML s through the Create Wizard.
 This document contains information that will help you to create and send graphically-rich and compelling HTML emails through the Create Email Wizard. or warranty by AT&T and is subject to change. 1 Contents
Contents. Announcer Pro Version 4.6 Page 2 of 35 Version V4.6
 User Guide Contents 1. Introduction... 3 1.1. Getting Started... 3 1.2. Navigation... 4 2. Create a Newsletter... 6 2.1. Confirm Company Details... 6 2.2. Choose Template... 8 2.3. Edit Newsletter... 8
AN INTRODUCTION TO QUICKBOOKS ONLINE. Getting Started Guide
 AN INTRODUCTION TO QUICKBOOKS ONLINE Getting Started Guide Copyright Copyright 2014 Intuit Ltd. All rights reserved. Intuit Canada Trademarks 2014 Intuit Inc. All rights reserved. Intuit the Intuit logo,
Payments & Transfers User Guide
 Payments & Transfers User Guide Table of Contents Payee Maintenance...1 ACH Payments...4. Batch Creation...4 Creating a Manual Batch...4 Transaction Import...6 Templates & Recurring Payments... 7 Wire
GSA QMAC. Transportation Service Provider (TSP) TransPort Integrator User Guide. TransPort Integrator Service. Version 3.0
 TransPort Integrator User Guide. TransPort Integrator Service. Version 3.0") GSA QMAC TransPort Integrator Service Transportation Service Provider (TSP) TransPort Integrator User Guide Version 3.0 Change Log Version # Date of Change Section Description of Change Changed By 1.0
GSA QMAC TransPort Integrator Service Transportation Service Provider (TSP) TransPort Integrator User Guide Version 3.0 Change Log Version # Date of Change Section Description of Change Changed By 1.0
Concur Getting Started QuickStart Guide. Concur Technologies Version 1.2
 Concur Technologies Version 1.2 May 12, 2016 Page 1 Document Revision History Date Description Version Author 05/12/2016 converted to new template 1.2 Concur Proprietary Statement These documents contain
User Guide. Product Design. Version 2.2.2
 User Guide Product Design Version 2.2.2 Table of Contents Bridge User Guide - Table of Contents 1 TABLE OF CONTENTS... 1 INTRODUCTION... 4 Guide... 4 PRODUCTS... 5 Creating a New Product... 5 Viewing and
Residential Builder User Manual for the New Home Buyer Protection System v2.0
 Residential Builder User Manual for the New Home Buyer Protection System v2.0 Prepared by New Home Buyer Protection Office Alberta Municipal Affairs Contents 1 Introduction... 4 2 Using the Residential
TRACS Enterprise Manual
 TRACS Enterprise Manual Table of Contents Welcome to NAPA TRACS... 1 What's New in NAPA TRACS... 1 Registering your NAPA TRACS Application... 2 Backing Up NAPA TRACS... 2 Online Updates... 2 Chapter 1