2013, WordStream Inc. All rights reserved. WordStream technologies are protected by pending US patents.
|
|
|
- Gertrude Morris
- 5 years ago
- Views:
Transcription
1
2 2 Quick Guide: Landing Pages & Leads Here is a complete user s guide to WordStream's NEW Landing Pages & Leads feature for PPC Advisor. To skip ahead, please make use of the handy table of contents below. If you have a question not listed here, shoot us a note and we'll be sure to answer it and add it to the list. Table of Contents Launch Creation of a New Page Name a Page Apply a Color Theme & Background Color Add a Logo Add a Main Image Add a Headline & Body Copy Customize a Lead Capture Form Build a Thank You Page Add a Downloadable Document Add Conversion Tracking Code Redirect Users to a URL Assign a Landing Page URL Set Up a Custom Sub Domain Add Analytics Tracking Code Add a Footer Publish a Page Preview a Page Edit a Page Rename a Page Pause or Activate a Page Delete a Page View Collected Leads Export Leads Analyze Landing Pages
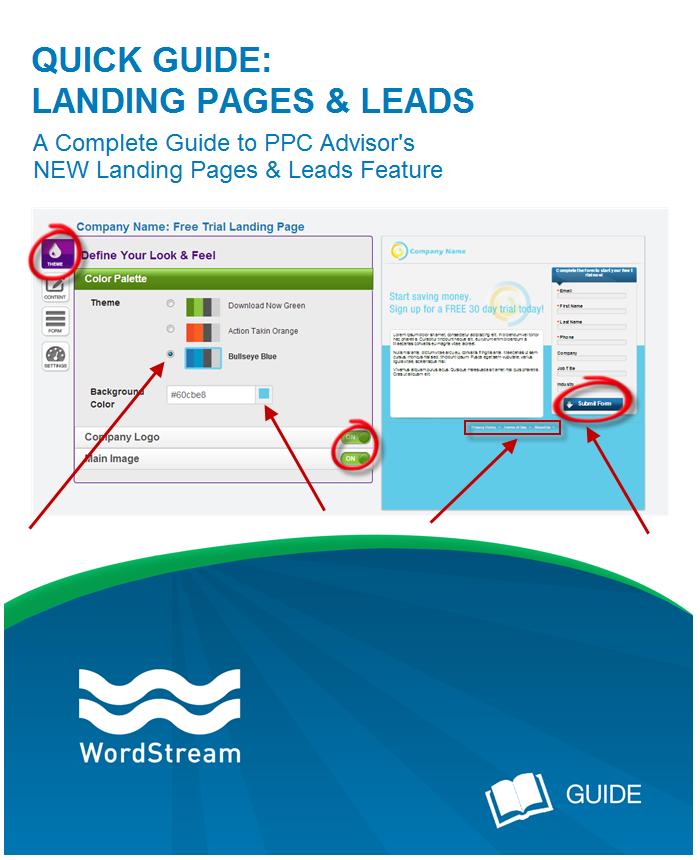
3 3 Launch Creation of a New Page Log into your WordStream account. Navigate to the tab called Landing Pages at the top of your PPC Advisor screen. Click the large orange button at the top right that says Create New Landing Page! to start building a new page. Name a Page In Step 1 of Getting Ready to Build, you are asked to nickname your page so that it is easy to reference and can be distinguished from the rest of your landing pages. Choose a name that will be meaningful to you later on, such as Demo Sign-up, or Request Flooring Quote. This name will also be used as the HTML <title> of the page, and will therefore appear in browser and taskbar tabs. Apply a Color Theme and Background Color Navigate to the Theme icon on the left side of your Landing Page Tool. Under Color Palette, check off one of the three color theme options (Download Now Green, Takin Action Orange, Bullseye Blue), which will apply to both the header and CTA (call-to-action) on your lead capture form. In the Background Color field directly below the themes, click inside the entry box to select a custom color from the dropdown or enter a hex code. This color will apply to the bottom half of your landing page. Add a Logo Navigate to the Theme icon on the left side of your Landing Page Tool. To include a logo, click on the Company Logo bar in the tool. Select Upload to browse your computer and add your image of choice. JPG, PNG, and GIF formats are supported, and the maximum size is 1 MB. You can make various edits to your logo (e.g., resize, crop, filter, enhance) by clicking the blue "Edit" button at the bottom of the Image Loader pop-up. Once your edits are complete, click the blue "Save" button at the top right of the editor screen. To have your logo redirect visitors to another page, enter the full web address starting with " (e.g., in the field called Logo URL. Note: Make sure to switch the On/Off lever before moving on to the next step. Selecting Off will prevent your uploaded logo from being shown. Add a Main Image Navigate to the Theme icon on the left side of your Landing Page Tool. To include a large main image, click on the Main Image bar in the tool. Select Upload to browse your computer and add your image of choice. JPG, PNG, and GIF formats are supported, and the maximum size is 1 MB. You can make various edits to this image (e.g., resize, crop, filter, enhance) by clicking the blue "Edit" button at the bottom of the Image Loader pop-up. Once your edits are complete, click the blue "Save" button at the top right of the editor screen. Note: Make sure to switch the On/Off lever before moving on to the next step. Selecting Off will prevent your main image from being shown.
4 4 Add Headline and Body Copy Navigate to the Content icon on the left side of your Landing Page Tool. Use the two text editor boxes to create copy for both your headline and page body. The toolbar at the top of each box allows you to customize text and add in images as desired. Customize a Lead Capture Form Navigate to the Form icon on the left side of your Landing Page Tool. Click on the bar that says Form Header and type in the text box to create a header that will appear at the very top of your lead capture form. Click on the bar that says Form Fields to customize the content of your capture form. Fields can be added (checkboxes at top), removed (uncheck boxes at top or click the red X to the right of each field), or edited (click the blue gear icon to the right of each field). To add custom fields such as dropdowns, radio buttons, checkboxes, or free response areas, click on the Custom Fields tab. The ordering of your fields can be edited simply by drag-and-drop. Click the bar that says Call-To-Action Button and type in the box to create a label for your clickable CTA, which will appear at the bottom of the form. Some good, motivating examples for CTA include Download Now! and Request a Demo! Note: Make sure to switch the On/Off lever on the Form Header section. Selecting Off will prevent your header from being shown. Build a Thank You Page Navigate to the Form icon on the left side of your Landing Page Tool. Click on the Thank You Page bar in the tool and select the Thank You Page option. Enter thank you messaging in the text box below, customizing text and adding in images as desired. Add a Downloadable Document Navigate to the Form icon on the left side of your Landing Page Tool. Click on the Thank You Page bar in the tool and find the second field down that says Add an asset for users, such as a whitepaper. Click the blue Browse button and upload your file, which will download automatically to your lead s computer once the capture form has been submitted. Note: You must select Thank You Page as an option before you can upload a document for download. If you select the Redirect users to the following URL option, you will not be able to attach a document. Add Conversion Tracking Code Navigate to the 20-Minute Work Week, and then to Manage PPC. Go to Show Me More and find Conversion Tracking in the list. If you are going to reuse one of your existing conversions, click on it in the left tree so that the code appears in the box on the right. If you would like to create a new conversion, click the funnel + button near the top of the screen. Once the code appears in the box, select and copy it to your computer s clipboard. Navigate to the Form icon on the left side of your Landing Page Tool. Click on the Thank You Page bar in the tool and paste your conversion code into the light yellow text field at the bottom.

5 5 Note: You may enter multiple pieces of tracking code into this text field, including Google AdWords and Bing. Redirect Users to a URL Navigate to the Form icon on the left side of your Landing Page Tool. Click on the Thank You Page bar in the tool and select the "Redirect users to the following URL" option at the very bottom, and enter your full destination URL in the bottom text field (e.g., Assign a Landing Page URL Navigate to the Settings icon on the left side of your Landing Page Tool. Click on the Landing Page URL bar in the tool and type a URL for your new page in the Domain box. Note: This URL will be visible to users at the end of your web address (for example, if you chose to make the URL enter_contest, it would appear as the bold section in the following: Set Up a Custom Sub Domain A sub domain is the piece of your web address that is most likely "www" and appears in bold in the following example: Since the www sub domain is probably where you keep your main website, WordStream cannot publish landing pages there. Instead, you ll need to create a new sub domain that WordStream can use. When deciding what to choose for this new sub domain, keep in mind: a) It will be the same for all your WordStream-created landing pages. b) It will be a real, visible part of your landing page address. Navigate back to the Landing Pages tab and find the gear icon near the top left of the table; a Sub Domain Name Setup box will pop up. Your new sub domain should look professional, nonspecific, and like part of your site. Some good examples include marketing, info, or offers. Avoid using anything that looks too similar to another site, nonsensical words or phrases, or anything too personal, like your own initials. In the Domain field of the pop-up box, enter the main part of your actual domain. For example: If your website s full address was you would enter just the abcmarketing.com portion in this field. When you click the blue Add Domain button, you will be given a long web address which will be an important piece of information as you create a CNAME entry or CNAME record. Copy this address along with your custom sub domain name and contact your domain name registrar (the organization that manages your domain name - click here

6 6 to find your registrar) to set up your sub domain. Once you complete this step, you will have to wait up to 48 hours for the internet to verify your new sub domain. You can always go back to the gear icon to check on the status. Note: Need more help contacting your registrar? Detailed instructions are as follows: You will need two key pieces of information in order to register your new sub domain: 1. Your custom sub domain name 2. Your unique long WordStream address, also called a CNAME entry, shown in the pop-up below. You can now either ask your IT department to contact your domain name registrar with this information or contact them yourself in order to complete the setup of your new sub domain. Once this has been done, you will have to wait up to 48 hours for the internet to verify your new sub domain. You can always click the gear icon at the top left of the Landing Page Tool to check on the status to see if it has changed from Pending to Verified. The following is a sample message that can be sent to your IT department about creating your new sub domain: I am working on a project that needs a custom sub domain to be registered. Here is the information that you will need to give our domain name registrar: Sub Domain Name: (Insert your sub domain name here) CNAME Entry: (Insert your long WordStream URL here) Thank you in advance for your help. See Appendix A for illustrated GoDaddy.com instructions. See Appendix B for illustrated Network Solutions instructions. See Appendix C for illustrated Domains.com instructions.
7 7 See Appendix D for illustrated Register.com instructions. Add Analytics Tracking Code By default, Google Analytics codes are set up to track the traffic from different sub domains, as though each sub domain is an entirely separate website. For example: Traffic that moves from your new landing page to your main website will show up as a referral visit in the Analytics report of your main site. If that s OK with you, you can simply copy the same Analytics code that you use for the rest of your website. Navigate to the "Settings" icon on the left side of your Landing Page Tool and paste your code into the text field within the "Analytics Codes & Scripts" section. If you would rather track visitors who arrive at your landing pages and then travel through to your main website as one continuous visit, you will need to customize the Analytics code on both your WordStream-created landing pages and the rest of your website. You will need to remove the sub domain from the setdomainname attribute. Click here for more detailed instructions on how this is done. Add a Footer Navigate to the Settings icon on the left side of your Landing Page Tool. To include a footer, click on the Footer bar in the tool and then Add Link. Choose a display name and corresponding URL (e.g., and click Add. You can add multiple footers to your page in this way. Display names for footers should be self-explanatory, so that visitors know exactly where they are being sent upon clicking, e.g. About Our Company, Contact Us, FAQ. Note: Google's guidelines suggest including footers for Privacy Policy and Terms of Use on every landing page. While these are not technically a requirement, there is a risk of suspension for not having them in place if you do any remarketing or undergo a review by Google. Publish a Page The blue Publish button is located at the bottom right within both the landing page tool and the preview page. Note: You can edit, rename, pause, or delete a page after it has been published. Preview a Page The blue Preview button is located at the bottom right of the landing page tool. When you are finished previewing your page, click the blue Edit More at the bottom right to return to your work in the landing page builder. Note: If you click My Landing Pages (bottom left) instead of Edit More, you will be brought back to your full table of existing pages. Edit a Page Navigate to your full list of landing pages either by clicking the Landing Pages tab at the top of the page or My Landing Pages at the bottom. Identify the page you wish to edit, and mouse over it in the first column to make the downward arrow icon appear. Select Edit Page from this dropdown, which will send you back into the tool to make changes.
8 8 Rename a Page Navigate to your full list of landing pages either by clicking the Landing Pages tab at the top of the page or My Landing Pages at the bottom. Identify the page you wish to rename, and mouse over it in the first column to make the downward arrow icon appear. Select Rename Page from this dropdown, enter new name, and save. Pause or Activate a Page Navigate to your full list of landing pages either by clicking the Landing Pages tab at the top of the page or My Landing Pages at the bottom. Identify the page you wish to pause, and mouse over it in the first column to make the downward arrow icon appear. Select Pause Page from this dropdown. This page will no longer be served, until you reactivate it by selecting Activate Page from the same dropdown menu. Note: Any live links to a paused page will result in a 404 "Not Found" page. Having your ads return a 404 page is a major violation of Google AdWords policy, and may result in punitive action such as decrease in quality score. Delete a Page Navigate to your full list of landing pages either by clicking the Landing Pages tab at the top of the page or My Landing Pages at the bottom. Identify the page you wish to delete, and mouse over it in the first column to make the downward arrow icon appear. Select Delete Page from this dropdown. Note: Deleting a landing page is a permanent action and cannot be reversed. Any live links to a deleted page will result in a 404 "Not Found" page. Having your ads return a 404 page is a major violation of Google AdWords policy, and may result in punitive action such as decrease in quality score. View Collected Leads Log into your WordStream account. Navigate to your full list of leads by clicking the Leads tab at the top of the page. Click on a specific lead to see detailed information in the window to the right of the table. Note: The Start Date and End Date above the landing page table can be used to view leads generated strictly within a constrained period of time. The search bar can be used freely to filter what is shown in the table. Export Leads Navigate to your full list of leads by clicking the Leads tab at the top of the page. Find the blue Export All Leads button at the bottom left of this page and click to transfer your leads to a CSV Excel document and download to your computer. Analyze Landing Pages Navigate to your full list of landing pages either by clicking the Landing Pages tab at the top of the page or My Landing Pages at the bottom. Here you can view the # of views, # of leads, and conversion rate of each landing page, in addition to the averages across all of your pages.
 Log in to your GoDaddy.")
9 9 Note: The Start Date and End Date above the landing page table can be used to view page activity strictly within a constrained period of time. The search bar can be used freely to filter what is shown in the table. Appendix A Instructions for registering your custom sub domain with GoDaddy.com: 1) Log in to your GoDaddy.com account and go to My Account. 2) Click the Launch button within the Domains section.


10 10 3) At the top, select DNS Manager under the DNS menu. 4) Click Edit Zone under the domain you want to use.
 section.")


11 11 5) Click Quick Add under the CNAME (Alias) section. 6) Enter the new sub domain you chose in the first box, and the long URL provided by WordStream in the second.

12 12 7) Click Save Zone File and confirm your changes. 8) Log Out. You re done! You may have to wait hours for the changes to take place. Note: You can check the status of your changes at any time by logging in to your WordStream profile and clicking the Edit Settings button on the Landing Pages tab. If you run into problems or need assistance, you can visit GoDaddy.com online support or call (480)
 Log")
 Click Change Where Domain Points.")
13 13 Appendix B Instructions for registering your custom sub domain with Network Solutions: 1) Log in to your Network Solutions Account and click My Domain Names. 2) Click Change Where Domain Points.


14 14 3) Select Advanced DNS and click Continue. 4) Scroll down and click the Edit CNAME Records button.


15 15 5) In the Alias column, enter your subdomain name. Select the Other Host column and then enter the long URL provided by WordStream in the text box. Then click Continue. 6) Confirm your changes by clicking Save Changes. Note: 7) Log Out. You re done! You may have to wait hours for the changes to take place. You can check the status of your changes at any time by logging in to your WordStream profile and clicking the Edit Settings button on the Landing Pages tab.
. Appendix C Instructions for registering your custom sub domain with Domains.com: 1) Log in to your Domains.com account and click Manage DNS.")
16 16 If you run into problems or need assistance, you can visit Network Solutions online support or call ( for outside of US). Appendix C Instructions for registering your custom sub domain with Domains.com: 1) Log in to your Domains.com account and click Manage DNS.

17 17 2) In the Forward column enter your new sub domain. In the To column, enter the long URL provided by WordStream. In the Type column, select CNAME. Then click UPDATE. Note: 3) Log Out. You re done! You may have to wait hours for the changes to take place. You can check the status of your changes at any time by logging in to your WordStream profile and clicking the Edit Settings button on the Landing Pages tab. If you run into problems or need assistance, you can contact Domains.com support via web form by clicking the Support link, and then Contact.
 Log in to your Register.")
18 18 Appendix D Instructions for registering your custom sub domain with Register.com: 1) Log in to your Register.com account click on the domain you want to associate with your WordStream landing pages.

19 19 2) Scroll down and click on Edit Domain Aliases Records. 3) In the first box, enter your new sub domain. In the second box, enter the long URL profile provided by WordStream. Then click Continue. 4) Click Continue again to confirm your changes.

20 20 5) Log Out. You re done! You may have to wait hours for the changes to take place. Note: You can check the status of your changes at any time by logging in to your WordStream profile and clicking the Edit Settings button on the Landing Pages tab. If you run into problems or need assistance, you can visit Register.com online support or call
Instructions for Registering Your Custom Sub Domain with GoDaddy.com:
 Instructions for Registering Your Custom Sub Domain with GoDaddy.com: 1) Log in to your GoDaddy.com account and go to My Account. 2) Click the Launch button within the Domains section. 2 3) At the top,
WebStore by Amazon: Quick Start Guide
 WebStore by Amazon: Quick Start Guide Introduction to WebStore by Amazon WebStore by Amazon is a powerful tool that allows you to create a complete e- commerce site. The WebStore by Amazon setup wizard
WEBSITE INSTRUCTIONS
 Table of Contents WEBSITE INSTRUCTIONS 1. How to edit your website 2. Kigo Plugin 2.1. Initial Setup 2.2. Data sync 2.3. General 2.4. Property & Search Settings 2.5. Slideshow 2.6. Take me live 2.7. Advanced
USER MANUAL. WeConnect
 USER MANUAL WeConnect Welcome to WeConnect, a user-friendly website builder for your church or organization. WeConnect lets anyone easily create a beautiful, professional website with no programming experience
WEBSITE INSTRUCTIONS. Table of Contents
 WEBSITE INSTRUCTIONS Table of Contents 1. How to edit your website 2. Kigo Plugin 2.1. Initial Setup 2.2. Data sync 2.3. General 2.4. Property & Search Settings 2.5. Slideshow 2.6. Take me live 2.7. Advanced
ALES Wordpress Editor documentation ALES Research websites
 ALES Wordpress Editor documentation ALES Research websites Contents Login... 2 Website Dashboard... 3 Editing menu order or structure... 4 Add a new page... 6 Move a page... 6 Select a page to edit...
Lava New Media s CMS. Documentation Page 1
 Lava New Media s CMS Documentation 5.12.2010 Page 1 Table of Contents Logging On to the Content Management System 3 Introduction to the CMS 3 What is the page tree? 4 Editing Web Pages 5 How to use the
Wordpress Training Manual
 The Dashboard... 2 If this is your first time logging in:... 2 How do I change my password or email address?... 3 Search Engine Optimization (SEO)... 4 SEO for Pages... 4 SEO for Images... 5 Managing Pages...
Clients Continued... & Letters. Campaigns Continued To create a Custom Campaign you must first name the campaign and select
 Clients Continued... Campaigns Continued To create a Custom Campaign you must first name the campaign and select what type of campaign it will be. Next you will add letters to your campaign from your letter
Autoresponder Guide. David Sharpe
 David Sharpe There are two autoresponders that I personally use and recommended AWeber and Sendlane. AWeber AWeber is a great service to use if you already have a website you are using. You can easily
GENERAL TEMPLATE AREAS
 1 GENERAL TEMPLATE AREAS SIU Headers SIU Headers are created and edited through the main administration of the CMS. Users do not have access edit SIU headers. Logo and Identifier Logo or the College Identifier
Vetstreet Web Builder Editor Tool User Guide v2.1. Web Builder. User Guide v2.1
 Web Builder User Guide v2.1 Contact your Account Manager at (888) 799-8387 or email support@vetstreet.com with questions. Page 1 Index... 1 The Editor Tool... 7 Forgot Your Username or Password?... 7 How
RocSite DIY (Design It Yourself) Website Designer Reference Manual
 Website Designer Reference Manual") RocSite DIY (Design It Yourself) Website Designer Reference Manual Revised 01.08.2017 RocSite Website Builder Manual Contents 1. Website/Pages/Stripes/Items/Elements...2 2. Click & Edit, Mix & Match (Drag
RocSite DIY (Design It Yourself) Website Designer Reference Manual Revised 01.08.2017 RocSite Website Builder Manual Contents 1. Website/Pages/Stripes/Items/Elements...2 2. Click & Edit, Mix & Match (Drag
Contents. Page Builder Pro Manual
 PRISM Contents 1. Website/Pages/Stripes/Items/Elements... 2 2. Click & Edit, Mix & Match (Drag & Drop)... 3 3. Adding a Stripe... 4 4. Managing Stripes... 5 5. Adding a Page... 7 6. Managing Pages and
HealthStream Connect Administrator User Guide
 HealthStream Connect Administrator User Guide ii Contents About HealthStream Connect... 1 Administrator Overview of HealthStream Connect... 2 Administrator Access and Privileges... 2 Navigating HealthStream
Creating a Portfolio in LiveText
 Creating a Portfolio in LiveText Create a New Document A Template Outline will appear on the right side of the screen once a document template has been selected. The outline reflects the page and section
File Cabinet Manager
 Tool Box File Cabinet Manager Java File Cabinet Manager Password Protection Website Statistics Image Tool Image Tool - Resize Image Tool - Crop Image Tool - Transparent Form Processor Manager Form Processor
Introduction to Qualtrics
 Introduction to Qualtrics Copyright 2014, Software Application Training, West Chester University. A member of the Pennsylvania State Systems of Higher Education. No portion of this document may be reproduced
Working with Pages... 9 Edit a Page... 9 Add a Page... 9 Delete a Page Approve a Page... 10
 Land Information Access Association Community Center Software Community Center Editor Manual May 10, 2007 - DRAFT This document describes a series of procedures that you will typically use as an Editor
Login: Quick Guide for Qualtrics May 2018 Training:
 Qualtrics Basics Creating a New Qualtrics Account Note: Anyone with a Purdue career account can create a Qualtrics account. 1. In a Web browser, navigate to purdue.qualtrics.com. 2. Enter your Purdue Career
Logging Into Your Site
 This training document is meant as a step-by-step guide to creating and delivering a UW-Madison site in the current UW-Madison theme. In this training class, you will learn how to log in to access your
This document contains information that will help you to create and send graphically-rich and compelling HTML s through the Create Wizard.
 This document contains information that will help you to create and send graphically-rich and compelling HTML emails through the Create Email Wizard. or warranty by AT&T and is subject to change. 1 Contents
Advanced Training Manual: Surveys Last Updated: October 2013
 Advanced Training Manual: Surveys Last Updated: October 2013 Advanced Training Manual: Surveys Page 1 of 28 Table of Contents Introduction Training Objective Surveys Overview Survey Table Survey Options
Pardot Setup Implementation Guide
 Pardot Setup Implementation Guide Salesforce, Summer 18 @salesforcedocs Last updated: May 31, 2018 Copyright 2000 2018 salesforce.com, inc. All rights reserved. Salesforce is a registered trademark of
Creating an with Constant Contact. A step-by-step guide
 Creating an Email with Constant Contact A step-by-step guide About this Manual Once your Constant Contact account is established, use this manual as a guide to help you create your email campaign Here
Introduction to Qualtrics ITSC
 Introduction to Qualtrics ITSC August 2015 Contents A. General Information... 4 B. Login... 5 New Qualtrics User... 5 Existing Qualtrics User... 7 C. Navigating Qualtrics... 9 D. Create Survey... 10 Quick
Act! Marketing Automation
 Act! Marketing Automation A Guide to Getting Started Helping your business grow with marketing automation Act! Marketing Automation Getting Started Guide 2 Contents Page Page 8 Page 10 Page 11 Page 11
Kurant StoreSense Quick Start Guide
 Kurant StoreSense Quick Start Guide Version 5.7.0 2004 Kurant Corporation. Kurant, StoreSense, and the Kurant logo are trademarks of Kurant. All other products mentioned are trademarks of their respective
Contents. Xweb User Manual
 USER MANUAL Contents 1. Website/Pages/Sections/Items/Elements...2 2. Click & Edit, Mix & Match (Drag & Drop)...3 3. Adding a Section...4 4. Managing Sections...5 5. Adding a Page...8 6. Managing Pages
CLASS 6: March 5, 2014 MULTIMEDIA TOOLS: DGIM 601-W01 (127469)
") CLASS 6: March 5, 2014 MULTIMEDIA TOOLS: DGIM 601-W01 (127469) AGENDA: Homework Review: Website Logo (Save As: YourInitials_logo.psd ) Photoshop Lesson 6: Start Midterm Set-Up OBJECTIVE: Set-Up Photoshop
CLASS 6: March 5, 2014 MULTIMEDIA TOOLS: DGIM 601-W01 (127469) AGENDA: Homework Review: Website Logo (Save As: YourInitials_logo.psd ) Photoshop Lesson 6: Start Midterm Set-Up OBJECTIVE: Set-Up Photoshop
Pinnacle Cart User Manual v3.6.3
 Pinnacle Cart User Manual v3.6.3 2 Pinnacle Cart User Manual v3.6.3 Table of Contents Foreword 0 Part I Getting Started Overview 7 Part II Categories & Products 11 1 Manage... Categories Overview 11 Add
Creating an with Constant Contact. A step-by-step guide
 Creating an Email with Constant Contact A step-by-step guide About this Manual Once your Constant Contact account is established, use this manual as a guide to help you create your email campaign Here
CreateASite Beginner s Guide
 Contents Getting Started... 3 Access the CreateASite Control Panel... 3 Select a Category/Subcategory... 4 Select a Template... 6 Change the Site Template... 10 Change Colours... 12 Change Fonts... 13
Figure 1 Forms category in the Insert panel. You set up a form by inserting it and configuring options through the Properties panel.
 Adobe Dreamweaver CS6 Project 3 guide How to create forms You can use forms to interact with or gather information from site visitors. With forms, visitors can provide feedback, sign a guest book, take
OU EDUCATE TRAINING MANUAL
 OU EDUCATE TRAINING MANUAL OmniUpdate Web Content Management System El Camino College Staff Development 310-660-3868 Course Topics: Section 1: OU Educate Overview and Login Section 2: The OmniUpdate Interface
BCI.com Sitecore Publishing Guide. November 2017
 BCI.com Sitecore Publishing Guide November 2017 Table of contents 3 Introduction 63 Search 4 Sitecore terms 66 Change your personal settings 5 Publishing basics 5 Log in to Sitecore Editing 69 BCI.com
Working with WebNode
 Workshop 28 th February 2008 Page 1 http://blog.larkin.net.au/ What is WebNode? Working with WebNode WebNode is an online tool that allows you to create functional and elegant web sites. The interesting
The following topics describe how to work with reports in the Firepower System:
 The following topics describe how to work with reports in the Firepower System: Introduction to Reports Introduction to Reports, on page 1 Risk Reports, on page 1 Standard Reports, on page 2 About Working
Monitoring and Evaluation Tool
 Monitoring and Evaluation Tool USER MANUAL March, 2014 www.menarid.icarda.org THIS PAGE LEFT EMPTY INTENTIONALLY USER MANUAL Definitions and abbreviations Chart... Graphical representation of M&E project
XactSite Website Reference Guide
 XactSite Website Reference Guide Welcome to your new XactSite website! This guide is designed to help you easily personalize your website so you can begin to acquire leads and manage your customer interactions.
Table of Contents. Page 2 of 72. High Impact 4.0 User Manual
 Table of Contents Introduction 5 Installing High Impact email 6 Installation Location 6 Select Mail Client 6 Create a ReadyShare Account 6 Create a Default Profile 6 Outlook Configuration Message 6 Complete
If you have questions or need assistance in any way, please contact MicroEdge Technical Support.
 AngelPoints Advanced Reporting Users Guide 2017 Advanced Reporting leverages existing technologies current employed in GIFTS Online to provide AngelPoints users with a new and more robust environment to
USER GUIDE. versie 1.1
 versie 1.1 INTRODUCTION Dear instructor, Thank you for downloading this Ephorus User Guide. If you have any questions, please contact the Ephorus key user within your educational institute. You can find
AGENT123. Full Q&A and Tutorials Table of Contents. Website IDX Agent Gallery Step-by-Step Tutorials
 AGENT123 Full Q&A and Tutorials Table of Contents Website IDX Agent Gallery Step-by-Step Tutorials WEBSITE General 1. How do I log into my website? 2. How do I change the Meta Tags on my website? 3. How
Advanced Marketing Techniques: Zach Stone, Molly McCormick, Dave Frees, Connie Gray, Karen Martin, and Mischelle Davis
 Advanced Marketing Techniques: Zach Stone, Molly McCormick, Dave Frees, Connie Gray, Karen Martin, and Mischelle Davis You have access to some incredible tools, and Zach, Connie, Molly, Karen, Dave, and
How to Edit Your Website
 How to Edit Your Website A guide to using SimpleCMS Overview 2 Accessing the CMS 2 Resetting Your Password 2 Pages 3 Managing Files 3 Shortcuts 4 Uploading 4 Page Options 4 Relabel 4 Duplicate 4 Google
Getting Started with ShortStack
 Getting Started with ShortStack presented by SHORTSTACK Welcome to ShortStack! This guide covers our platform s five main sections: Tabs, Designer, Media, Templates, and Forms & Promos so that you can
WWF CMS Map Tool User Guide
 WWF CMS Map Tool User Guide July 2007 In the latest (1.7) release of the WWF Content Management System (CMS) a dynamic map creation tool is available in all CMS instances. Examples of maps created with
Cropping an Image for the Web
 Cropping an Image for the Web This guide covers how to use the Paint software included with Microsoft Windows to crop images for use on a web page. Opening Microsoft Paint (In Windows Accessories) On your
Campaign page templates
 Campaign Page Campaign page templates The campaign page templates have been built for marketing campaigns which require a landing experience that cannot be supported by the Product Detail Page templates
QRG: Using the WYSIWYG Editor
 WYSIWYG Editor QRG: Using the WYSIWYG Editor WYSIWYG stands for What You See Is What You Get. The WYSIWYG Editor is the reason you don t need to be an IT Programmer to write content for your web page.
1. Login to your Survey Monkey account. your account and choose Build a New Survey from Scratch
 1. Login to your Survey Monkey account 2. To create a new survey, click +Create Survey in the upper right corner of your account and choose Build a New Survey from Scratch 3. Name your survey Client Satisfaction
An Introduction to Google Chrome
 An Introduction to Google Chrome Box is an online file sharing and cloud content management service and it provides features such as: Getting Google Chrome 1. To get started with Google Chrome, you have
User Guide clickbooq v4 r
 User Guide clickbooq v4 r.02.01.12 Introduction About clickbooq Welcome to clickbooq! clickbooq is an easy-to-use website creation, management, and hosting solution developed exclusively for professional
Working with Reports
 The following topics describe how to work with reports in the Firepower System: Introduction to Reports, page 1 Risk Reports, page 1 Standard Reports, page 2 About Working with Generated Reports, page
Amazon Marketing Services User Guide
 Contents Register Your Brand...2 Add Additional Users and Brands...2 Add a new brand...2 Add a brand user to AMS...3 Change the permission level for a brand user...3 Amazon Pages...4 Begin working with
While editing a page, a menu bar will appear at the top with the following options:
 Page Editor ===> Page Editor How Can I Use the Page Editor? The Page Editor will be your primary way of editing your website. Page Editor Basics While editing a page, you will see that hovering your mouse
Drupal User Guide for Authors
 0 Drupal User Guide for Authors SSU WEB CONTENT EDITING Information Technology Services SALEM STATE UNIVERSITY ITS-TRAINING@SALEMSTATE.EDU Author User Guide DRAFT version 2 Author User Guide DRAFT version
SCRIPT REFERENCE. UBot Studio Version 4. The UI Commands
 SCRIPT REFERENCE UBot Studio Version 4 The UI Commands UI Text Box This command creates a field in the UI area at the top of the browser. Drag the command from the toolbox into the scripting area. In the
Swiiit User Guide 09/11/2016
 Swiiit User Guide 09/11/2016 Contents Getting Started... 4 Overview of Main Tools... 5 Webpages... 6 Main pages (Sections)... 6 Rearrange Sections... 6 Subpages... 7 Change the Title of a Webpage... 8
End User Guide Faculty Folders
 End User Guide Faculty Folders Hannon Hill Corporation for California State Polytechnic University, Pomona Hannon Hill Corporation 3423 Piedmont Road, Suite 520 Atlanta, GA 30305 www.hannonhill.com 678.904.6900
User Manual For SmartRoom Managers
 User Manual For SmartRoom Managers Table of Contents 1.0 Login 2.0 Confidentiality Agreement 3.0 Software Installation 4.0 Dashboard 5.0 Document Review and Index Maintenance 5.1 View by Index 5.1.1 Index
Today s workshop introduces CommonSpot, ECU s Web Content Management System, through hands-on training.
 Belinda Perkinson ITCS Training and Communication perkinsons@ecu.edu Introduction Today s workshop introduces CommonSpot, ECU s Web Content Management System, through hands-on training. 1. Introduction
Ascendix Search Admin Guide
 Ascendix Search Admin Guide Updated: 11/03/2017 Version: 1.0.9 www.ascendix.com support@ascendix.com Table of Contents What is Ascendix Search?... 2 Preparing Salesforce for Ascendix Search... 3 Defining
CAT ALUMNI MEMBER USER GUIDE
 THE BASICS CAT ALUMNI MEMBER USER GUIDE Logging in Click on CAT Login at the top of homepage or go to http://racstl.com/artcommunity/community-arts-training-institute/cat-institute-alumni-login/. Use the
Center for Faculty Development and Support. Google Docs Tutorial
 Center for Faculty Development and Support Google Docs Tutorial Table of Contents Overview... 3 Learning Objectives... 3 Access Google Drive... 3 Introduction... 4 Create a Google Document... 4 Upload
GURUBoards Setup User Guide v
 GURUBoards Setup User Guide v. 5.7.1 Copyright 2014-2018 eschooldata, LLC All rights reserved. TABLE OF CONTENTS Overview... 3 District Setup... 4 eschooldata Main Application...4 GURU Analytics Setup
2 P a g e P o w e r H o u s e C e r t i f y ( A M S ) 1. 1 U s e r G u i d e
 1. 1 U s e r G u i d e") Content User Manual AMS Introduction... 5 The AMS Assessment Workflow... 5 Adding a Qualification to Your Site... 5 Assessment Certification Process... 5 The Learner Dashboard... 6 Learning Material...
Content User Manual AMS Introduction... 5 The AMS Assessment Workflow... 5 Adding a Qualification to Your Site... 5 Assessment Certification Process... 5 The Learner Dashboard... 6 Learning Material...
Managing Your Website with Convert Community. My MU Health and My MU Health Nursing
 Managing Your Website with Convert Community My MU Health and My MU Health Nursing Managing Your Website with Convert Community LOGGING IN... 4 LOG IN TO CONVERT COMMUNITY... 4 LOG OFF CORRECTLY... 4 GETTING
In the fourth unit you will learn how to upload and add images and PDF files.
 Introduction Here at SUNY New Paltz, we use the Terminal Four (T4) web content management system (CMS). This puts the power of editing content on our college s webpage in the hands of our authorized users.
CourseWorks Quick Start
 Introduction CourseWorks Quick Start CourseWorks (aka Sakai ) is the university's new course management system, which allows instructors to develop and maintain course Web sites. With CourseWorks, instructors
GoLive will first ask you if your new site will be for one individual or a work group; select for a Single User, and click Next.
 Getting Started From the Start menu, located the Adobe folder which should contain the Adobe GoLive 6.0 folder. Inside this folder, click Adobe GoLive 6.0. GoLive will open to its initial project selection
Page Gentics Software GmbH Enterprise Portals and Content Management Systems
 1. 2012 Gentics Software GmbH Page 2 Table of Contents 1. Table of Contents... 3 2. Foreword Infoportal and Support... 6 3. First steps... 6 3.1 Login and logout... 6 3.2 Password change... 7 3.3 User
Subscription Item Administrator s Guide
 Table of Contents Introduction... 2 What is GovDelivery?... 2 What is Email Subscription?... 2 How Does It Work?... 2 What is an Item Administrator?... 2 Logging into GovDelivery... 3 Logging Out of GovDelivery...
WORD 2010 TIP SHEET GLOSSARY
 GLOSSARY Clipart this term refers to art that is actually a part of the Word package. Clipart does not usually refer to photographs. It is thematic graphic content that is used to spice up Word documents
Swiiit User Guide 03/09/2015
 Swiiit User Guide 03/09/2015 Contents Getting Started... 4 Overview of Main Tools... 5 Webpages... 6 Main pages (Sections)... 6 Rearrange Sections... 6 Subpages... 7 Change the Title of a Webpage... 8
Downloading Adobe Digital Editions (ADE)* (for users of the black & white Nook or other basic ereader)
* (for users of the black & white Nook or other basic ereader)") Downloading Adobe Digital Editions (ADE)* (for users of the black & white Nook or other basic ereader) *This is a one-time download and registration. If you have already downloaded ADE, skip to page 8.*
Downloading Adobe Digital Editions (ADE)* (for users of the black & white Nook or other basic ereader) *This is a one-time download and registration. If you have already downloaded ADE, skip to page 8.*
The Etomite Manual for website editors.
 The Etomite Manual for website editors. (Version: 1.1) Etomite is a web tool that allows your website to be user-editable. This means that you can add, edit, and delete pages and whole website sections
Your Cart User Manual v3.6
 Your Cart User Manual v3.6 2 Your Cart User Manual v3.6 Table of Contents Foreword 0 7 Part I Getting Started Overview 11 Part II Categories & Products 1 Manage Categories... Overview 11 Add a New... Category
Introduction to Cascade Server (web content management system) Logging in to Cascade Server Remember me Messages Dashboard Home
 Logging in to Cascade Server Remember me Messages Dashboard Home") Introduction to Cascade Server (web content management system) Last Updated on Jul 14th, 2010 The College of Charleston's web site is being produced using a Content Management System (CMS) called Cascade
Introduction to Cascade Server (web content management system) Last Updated on Jul 14th, 2010 The College of Charleston's web site is being produced using a Content Management System (CMS) called Cascade
BombBomb Guide 2017
 BombBomb Email Guide 2017 BOMBBOMB WEBSITE 1. Go to app.bombbomb.com to sign into your account. 2. Enter your email address and password. 3. Click the LOGIN button. CREATE AN EMAIL Create a new email using
Drupal Basics. for COS and CLASS site maintainers
 Drupal Basics for COS and CLASS site maintainers Introduction This guide is meant as a starting point for site maintainers in the UNT College of Science and College of Liberal Arts and Social Sciences
T T USER GUIDE. 1. Website/Pages/Stripes/Items/Elements Click & Edit, Mix & Match (Drag & Drop) Adding a Stripe Managing Stripes...
 Adding a Stripe Managing Stripes...") T T T Contents USER GUIDE 1. Website/Pages/Stripes/Items/Elements... 2. Click & Edit, Mix & Match (Drag & Drop)... 3. Adding a Stripe... 4. Managing Stripes... 5. Adding a Page... 6. Managing Pages and
T T T Contents USER GUIDE 1. Website/Pages/Stripes/Items/Elements... 2. Click & Edit, Mix & Match (Drag & Drop)... 3. Adding a Stripe... 4. Managing Stripes... 5. Adding a Page... 6. Managing Pages and
Oracle Eloqua Engage User Guide
 http://docs.oracle.com Oracle Eloqua Engage User Guide 2018 Oracle Corporation. All rights reserved 24-Aug-2018 Contents 1 Engage 4 1.0.1 What's in it for the marketing side of the house? 6 2 Installing
Working with Confluence Pages
 Working with Confluence Pages Contents Creating Content... 3 Creating a Page... 3 The Add Page Link... 3 Clicking on an Undefined Link... 4 Putting Content on the Page... 4 Wiki Markup... 4 Rich Text Editor...
Cascade User Guide. Introduction. Key System Features. User Interface
 Cascade User Guide Introduction Key System Features User Interface Menus and Moving Through the System Files and Pages Working with Existing Pages File Action Menu Version Control Deleting files Restoring
Campaign Manager 2.0 for Sitecore CMS 6.6
 E-Mail Campaign Manager 2.0 Marketer's Guide Rev: 2014-06-11 E-Mail Campaign Manager 2.0 for Sitecore CMS 6.6 Marketer's Guide User guide for marketing analysts and business users Table of Contents Chapter
IIBA Chapter Website: Quick Start Guide Version 1.3
 IIBA Chapter Website: Quick Start Guide Version 1.3 Table of Contents Introduction... 3 Website Quick Start Guide... 4 A. Prerequisites... 4 B. Change Temporary Password... 4 C. User Groups... 8 D. Sections...
LightUp Studio. Evaluation Guide CONTENTS. Introduction Creating Integrated App Launcher Tiles and Help Desk Links to the Training Portal...
 LightUp Studio Evaluation Guide CONTENTS Introduction... 2 Creating Integrated App Launcher Tiles and Help Desk Links to the Training Portal... 3 Controlling the Visibility of Libraries in the Training
MARKOMI Marketing Automation Tool. User s Guide Version: 2.0
 MARKOMI Marketing Automation Tool User s Guide Version: 2.0 MARKOMI Table of contents I Table of contents What is Markomi?... 1 Purpose of this guide... 1 How to get Markomi... 1 Create a bizhub Evolution
Converting Your PDFs to Excel
 Converting Your PDFs to Excel Easy 3-Step Guide STEP 1: OPEN YOUR PDF Select the Open... command from the File menu. STEP 3: CONVERTING TO EXCEL After selecting, you are ready for conversion. For conversions
Site Owners: Cascade Basics. May 2017
 Site Owners: Cascade Basics May 2017 Page 2 Logging In & Your Site Logging In Open a browser and enter the following URL (or click this link): http://mordac.itcs.northwestern.edu/ OR http://www.northwestern.edu/cms/
Administrative Training Mura CMS Version 5.6
 Administrative Training Mura CMS Version 5.6 Published: March 9, 2012 Table of Contents Mura CMS Overview! 6 Dashboard!... 6 Site Manager!... 6 Drafts!... 6 Components!... 6 Categories!... 6 Content Collections:
Goldfish 4. Quick Start Tutorial
 Goldfish 4 Quick Start Tutorial A Big Thank You to Tobias Schilpp 2018 Fishbeam Software Text, Graphics: Yves Pellot Proofread, Photos: Tobias Schilpp Publish Code: #180926 www.fishbeam.com Get to know
Somerville College WordPress user manual. 7th October 2015
 Somerville College WordPress user manual 7th October 05 0 INDEX YOUR SITE IMAGES FORMS THE MENU 4 4 5 0 YOUR SITE The Content Management System The Somerville website has been built using the WordPress
leveraging your Microsoft Calendar Browser for SharePoint Administrator Manual
 CONTENT Calendar Browser for SharePoint Administrator manual 1 INTRODUCTION... 3 2 REQUIREMENTS... 3 3 CALENDAR BROWSER FEATURES... 4 3.1 BOOK... 4 3.1.1 Order Supplies... 4 3.2 PROJECTS... 5 3.3 DESCRIPTIONS...
Course: Google Drive Episode: Introduction. Note-Taking Guide
 Episode: Introduction ü This course is designed to provide you with the skills needed for using the system called Google Drive. ü Google Drive is a resource that can be used on your,, or. ü When you sign
RITIS Training Module 4 Script
 RITIS Training Module 4 Script Welcome to the Regional Integrated Information System or RITIS Module 04 CBT. To begin, select the start button or press Shift+N on your keyboard. This training module will
EKTRON 101: THE BASICS
 EKTRON 101: THE BASICS Table of Contents INTRODUCTION... 2 TERMINOLOGY... 2 WHY DO SOME PAGES LOOK DIFFERENT THAN OTHERS?... 5 LOGGING IN... 8 Choosing an edit mode... 10 Edit in context mode (easy editing)...
Website Management with the CMS
 Website Management with the CMS In Class Step-by-Step Guidebook Updated 12/22/2010 Quick Reference Links CMS Login http://staging.montgomerycollege.edu/cmslogin.aspx Sample Department Site URLs (staging