HTML5 Reference Manual. it just makes sense
|
|
|
- Arron Flynn
- 5 years ago
- Views:
Transcription

1 HTML5 Reference Manual it just makes sense
2 Revision History Version Date Author Description 1.0 8/20/18 A. Burgundy Initial Version 2018 Cloud9Ortho All rights reserved. Cloud9Ortho 1945 Vaughn Road Kennesaw, GA USA No part of the document may be reproduced or transmitted in any form or by any means, electronic or mechanical, for any purpose, without the express written permission of Cloud9Ortho. Under the law, reproducing includes translating into another language or format. Every effort has been made to ensure that the information in this manual is accurate. Cloud9Ortho is not responsible for printing or clerical errors. Information in this document is subject to change without notice.
3 Contents Welcome to Cloud Getting Started... 2 Access and Log in to Cloud Menus and Buttons... 3 Home Menu... 4 Patient... 4 Treatment... 4 People/Companies... 5 Treatment Card... 5 Financial... 5 Schedule... 6 Letters... 6 Financial Menu... 6 Reports Menu... 7 Edit Menu... 7 View Menu... 7 Help Menu... 8 Patient Header... 8 Buttons... 9 Lookup an Existing Person... 9 Addresses and Contact Info Patient Management Adding a Patient Patient fields Financially Responsible Fields Adding a New Patient and Responsible Party Adding a Sibling of a Current or Previous Patient Adding an Adult Patient Adding a Patient from an Existing Person Viewing a Patient... 18
4 Editing a Patient Patient Tab Tracking Tab Relationships Tab Adding a Relationship Editing a Relationship Deleting a Relationship Referrals/Professionals Tab Adding a Referral/Professional Adding to Patients Referred Editing a Referral/Professional Deleting a Referral/Professional Insurance Tab Add an Insurance Policy Edit an Insurance Policy Delete an Insurance Policy Inactivate an Insurance Policy Appointments Tab History Tab Comments/Alerts Adding a Patient Comment/Alert Editing a Patient Comment/Alert Deleting a Patient Comment/Alert Document Cabinet Importing a Document Viewing a Document ing a Document Deleting a Document People/Companies Accessing People/Companies People... 43
5 Companies Available People/Company Functionality Managing People Searching for a Person Adding a Person Editing a Person Delete a Person Printing a Single Label or an Envelope Managing Companies Searching for a Company Adding a Company Editing a Company Deleting a Company Treatment Management Treatment Card Navigating the Treatment Card Window Toolbar Buttons Upper section, left-hand side Upper section, right-hand side Middle section, left-hand side Middle section, right-hand side Bottom section, Treatment Notes Bottom section, Treatment Plan Changing the Treatment Card Window View Resizing Treatment Card Closing and Opening the Resize bar Managing Treatment Card Entries Editing and Deleting a Treatment Card Entry and Treatment Notes Managing Treatment Plan and Notes Applying a Treatment Plan Modifying a Treatment Plan... 66
6 Managing Generic Notes Printing the Treatment Card Tooth Chart Adding Horizontal and Vertical Elastics Changing One or More Teeth from Primary to Permanent Selecting teeth as Missing, Extracted, Uncovered or Evaluation Changing the Number System Being Used Deleting Any Added Treatments Imaging Accessing the Images Window Importing Images, Acquiring Ceph and Acquiring Pan Importing Images Acquiring Ceph Acquiring Pan Viewing the Image Series and Individual Images Managing and Editing the Image Series Managing the Image Layout Rotating, Resizing and Cropping an Image Deleting a Series Managing and Editing Individual Images Questionnaires Creating Questionnaires Question Types Answer Types Managing Questionnaires Viewing Questionnaire Responses Editing Questionnaires Responses Linking a Document to a Questionnaire Running a Questionnaire From the Questionnaires Window From the Home Menu
7 Financials Using the Ledger Financial Transaction Buttons Accounts Receivables, Referred to the Aging Section Responsible Party and Insurance Ledger Tabs Ledger Table Ledger Summary, Totals Posting Charges Posting Payments Posting a Patient Payment Posting Family Payment Posting Insurance Payments ing and Printing receipts Accounting Activities Corrections Making a Correction Reversing a Payment Voiding/Returning a Payment Adjustments Posting a Balance Adjustment Adjust a Patient Ledger Adjust a Contract Balance Adjust an Insurance Balance Posting a Refund Posting a Transfer Posting a Receivables Transfer Posting a Contract Transfer Contracts Creating Contracts with No Insurance Creating Contracts with Insurance Create an Auto Payment Plan
8 Create a Manual Auto Payment Plan Create an OpenEdge (XWeb) Auto Payment Plan Change Contract Amounts Changing the First Monthly Charge Changing All Monthly Charges Updating Contracts Correcting Out of Balance Changing an Auto Payment Date Canceling an Auto Payment Plan Insurance Queue View a Claim from the Insurance Claim Queue Editing Patient Information from the Insurance Claims Queue Add a Manual Claim Submit a Claim View a Claim Status View the Claim Status Report View Claim Report Immediately after Submitting Claim View Claim Report Later After Submitting Claim Change a Claim s Status Correct and Resubmit a Rejected Claim Claim History Accessing the Claim History Adding a Note Deleting a Note Scheduling Setting up Schedule Templates Navigating the Patient Locator Selecting a location Changing a Patient s Appointment Status Manually Changing a Patient s Appointment Status Dragging the Patient s Appointment
9 Using the Scheduling Buttons Managing Appointments Viewing the Practice Schedule Managing Notes Managing the Week-at-a-Glance Window Viewing and Selecting Schedule Print Options Displaying the Number of Appointments and Patients for the Current Day Closing the Schedule Navigating the Toolbar/Clipboard Displaying an Orthodontist s Schedule Displaying the Schedule Template Name Using the Mini-Calendar Viewing Patients Who Need Appointments Viewing patients who want a sooner appointment Navigating the Appointment Area Selecting a Schedule View Selecting a Day/Week/Month Viewing the Schedule Navigating the Lightbar Locator Details Document Editor Creating Letter, , and Text Documents Creating a Financial Arrangements Document Using Spellcheck Importing a Document Exporting a Document Using Save As Deleting a Document Home Menu Insert Menu Additional Header/Footer options
10 Additional Table Tools options Mail Merge Menu Page Layout Menu Insert a Table into a Template Insert and Format an Image into a Table Create Headers and Footers Insert and Format an Image into a Header or Footer Restoring a Document Printing a Template Reports Navigating the Report Viewer Accessing a Report Printing and Exporting Reports Basic Reports Charges Adjustments Receipts Financial Reports Case Starts by Start Date Claim Status Reports Completed Contracts by Date Range Contract Starts by Date Range Contracts by Start Date Daily Close Reports Daily Totals Monthly Close Reports Financial Ledger Deferred Revenue Totals Net Receipts by Date Range OrthoBanc Payments Practice Monitor by Date Range
11 Balancing the Practice Monitor Report Proper Setup Information for the Practice Monitor by Date Range Report Transaction Types Report Production by Date Range Receipts by Date Range Reports Adjustments by Date Range Accounts Receivable (A/R) Aging Balancing Worksheet Practice Summary Recurring Payment Report Summary of Activity Today s Financial Report Treatment and Financial Summary Schedule Reports Appointment Classes Appointment Schedule Appointment Status List Appointment Types Daily Collections Kept Appointments Operatory Schedule Operatory Schedule (Portrait) Patient Appointments Patients by Appointment Status Patients Needing a Future Appointment Scheduled Appointment Types Patient Reports Missed Treatment Card Entries Monthly New Patient Exams New Patient Status Patient Statistical Profile
12 Patient Tray Covers Patient Tray Covers, No Treatment Plan Patients by Birthday Patients by Patient Status Patient Flow Details Patients Over Estimated Completion Date Recalls Recalls by Date Range Spotlight History By Patient Procedure Reports Procedure Detail Procedure Summary by Assistant Procedure Summary by Location Procedure Summary by Month Referral Reports Patients by Referring Party Referral by Source Referral List Referral Sources Labels Label Avery Label Single Address (3.5 x 1) Patient Birthday Labels Patient Chart Labels Patient Labels Recall Labels Referral Labels Employee Employee List Employee Time Card Employee Time Card by Day
13 Employee Time Card by Location ToDos by Date Range Miscellaneous Reports Contact Info Types Employers List Edit Menu View Menu Chat Starting a Conversation Replying to a Chat Message Creating a Reminder from a Chat Message Deleting a Message or Conversation Retrieving Deleted Messages Patient Check-In Release Locks To-Do List Adding a To-Do Managing To-Dos Searching for To-Dos Help Screen Sharing Through the Browser Screen Sharing Through the Help Menu


14 Welcome to Cloud9 The goal is for your office to start using Cloud9 HTML5 without a pause in your daily routine. This document is designed to help you to navigate and use the Cloud9 HTML5 features to manage your practice. Once you become familiar with the look and functionality of Cloud9, you ll discover the menus and buttons are consistent throughout the windows. In HTML5, you ll be able to perform your daily functions. From time-to-time, you may need to access the Cloud9 Silverlight platform to customize your office s setups and configurations including adding, editing and deleting preferences. Eventually, users will perform all set up and configurations directly on the Cloud9 HTML5 platform. In this manual, Setup available in Silverlight: Edit menu > Setup > Preference indicates the navigational path to access Cloud9 system setup in Silverlight. Here s how to access Cloud9 Silverlight setup in Silverlight: 1. Login to Cloud9 Silverlight. 2. Click Edit and Setup. The System Setup window displays. 1

15 3. Along the left-hand side, select the desired preference to be updated. The corresponding window for the preference displays. 4. Make the desired updates to the selected preference. Getting Started Access and Log in to Cloud9 1. From your default Internet browser, enter your Cloud9Ortho assigned URL in the address bar. Note: The program downloads into the browser for use until you either logout or close the browser window. Another option is to click the Cloud9 icon if it is installed on your desktop. The log in window displays. 2. Enter your User Name, Password, and desired Schedule. 3. Click Login. Cloud9 displays. 2


16 Menus and Buttons There are six menus available in Cloud9: Home Menu Financial Menu Reports Menu Edit Menu View Menu Help Menu Each menu contains a series of categories that provide fast and easy access to specific functions. There are also buttons located in the upper right-hand corner of the window and a Close button in the lower left-hand corner of the window. 3

17 Home Menu The following tables define the options available on the Home menu. Patient Option Add View Edit Comments/Alerts Document Cabinet Used to Add a new patient to your database. View a patient s information. You cannot edit information in this window. Modify a patient s information. Add/change comments and alerts for a patient. Open a patient s Document Cabinet. Treatment Option Treatment Card Images View Questionnaires Used to Open a patient s Treatment Card. Open a patient s Images. Open a patient s Questionnaire. 4
18 Option Run Questionnaire Used to Create a new Questionnaire. People/Companies Option People Companies Used to Search for a person by profession or name. A new person can be added through this window. Search for a company by an employer, insurance company, insurance billing center or other. New companies can be added here. Treatment Card Option Treatment Card Tooth Chart Images View Questionnaires Run Questionnaire Used to Access a patient s treatment card. Access a patient s tooth chart. Access images for a patient. Access a patient s responses for completed questionnaires Access the Run Questionnaires window to complete a questionnaire. Financial Option Ledger Post Charge Patient Payment Family Payment Used to Open a patient s ledger. Post a charge to a patient s ledger Post a payment to the patient s ledger. Post a payment to multiple patients linked to the same Responsible Party. 5

19 Schedule Option View Locator Details Used to Open the Appointment Schedule. Open the flow details of the patients that are scheduled today. Letters Used to Document Editor Letter Queue Used to Create/modify letter templates. Manage all letter functions, add, merge, delete, print or . Financial Menu Option Ledger Post Charge Patient Payment Family Payment Used to Open a patient s ledger. Post a charge to a patient s ledger Post a payment to the patient s ledger. Post a payment to multiple patients linked to the same Responsible Party. 6

20 Reports Menu Option Reports Used to Provide access to Cloud9 reports. Edit Menu Option Reset Password Used to Provide users with the ability to reset their passwords. View Menu Option Chat Patient Check-In Release Locks SignalR Monitor To-Do Used to Open the Chat window. Allow patients to check in and be assigned the Waiting status. Note: The Check-In application is on all workstations. Access to releasing locks if assigned permission to do so. Only available if privileges are assigned; mainly Cloud9 Support Manage items that need to be accomplished by a specific date. Note: To-Do s can be assigned to you or another employee for their completion. 7


21 Help Menu Option Release Notes Quick Reference Documentation About Used to View past release notes and screen share with Support. Click on the link of the version you want to view. Load the Quick Reference Guide for assistance. Provide access to the Users Meeting Attendee Guidebook, along with documents and videos to assist you in using Cloud9 to the fullest. Display the version of Cloud9 you are currently using. Download c9agent Provides access to the c9agent that needs to be downloaded before you can use the Topaz Signature Pad. Patient Header When a patient s data is displayed on a window, dropdown arrow displays next to the patient s name and id. When the user clicks the patient name or selects the dropdown arrow, the Patient Header displays. All the listed options provide access to the patient s data. 8

22 Buttons Quick access buttons located in the upper right-hand corner of the HTML5 screen. Time Clock Chat Full Screen Lock Screen Logout Close All button located in the lower left-hand corner. Lookup an Existing Person Throughout Cloud9, the Lookup an Existing Person button is available to see if a person already exists in Cloud9. Using the lookup feature helps you to avoid duplicate records. Note: The tooltip for each Lookup button reflects specifically the type of person, such as an existing person or existing responsible party. 1. Click the Lookup an Existing Person button. The Lookup Person dialog box displays. 2. Select the Profession. 3. Enter the name or a portion of the name and click Search. The matching results display. 9
23 4. Do one of the following: Does the person exist? Yes Then Select the person and click Select. No Click Add. The Person dialog box displays. Enter the person s data. Click Save. The person now exists in Cloud9. Addresses and Contact Info Throughout Cloud9, you ll need to add, edit and delete addresses and contact information. 10
24 Buttons Used to Add <Address or Contact> Edit <Address or Contact> Delete <Address or Contact> Rank Up for Address or Contact Rank Down for Address or Contact Sharing Options for Address or Contact Info: Share <Address or Contact> allow the item to be shared Unique <Address or Contact> not allow the item to be shared 11

25 Patient Management Patient management covers the spectrum of handling patient data. You can access patient management functions from the Home menu under the Patient section. The function includes the following: Adding a Patient Viewing a Patient Editing Data for a Patient Adding Patient Comments/ Alerts Managing documentation in the Document Cabinet Note: The following patient management features will be available in a future release: Adding to the Patient s Referred Count - Cloud9 currently counts professional referrals, but a patient s count will be coming. Scanning or Acquiring a Document Directly into Cloud9 - Scanning is valuable for capturing insurance cards or other documentation and will be available soon. ing a Document into Document Cabinet - The Document Cabinet will have this ability when the functionality is available. Editing a Referral/Professional s Demographics -This function will be readily available in the new People section. 12
26 Adding a Patient The Add Patient functionality is used to add patients, including: New Patients and Responsible Party Siblings of a current or previous patient Adult patients Existing persons in Cloud9 who become a patient The screen is divided into two components: Patient (left-hand side) and Financially Responsible (right-hand side). Patient fields Field Title Lookup an Existing Person First Name Middle Name Description Optional dropdown list. Click the arrow and choose the title from the list. Create a new patient from an existing person/relationship in the database. Required field. It is not necessary to press the shift key to capitalize the first letter. Optional field. It is not necessary to press the shift key to capitalize the first letter. 13
27 Field Last Name Gender Suffix Greeting Description Required field. It is not necessary to press the shift key to capitalize the first letter. Optional field. Click the arrow and choose the patient s gender. You can type an M or F if you prefer. Optional field. Example: Jr. or III Optional field. The name a patient prefers to be called by. Birthdate Optional field. Enter the two-digit month, day, and year example The date will be formatted correctly with slashes and the patient s age calculated in years and months. Social Orthodontist Location Street Postal Code City State Type Description Info Carrier Optional field. Enter the patient s social security number. Required field. If your practice has one doctor, this field automatically fills in. If more than one doctor, you need to select a doctor from the list. Required field. If your practice has one location, this field automatically fills in. If more than one location, you need to select the office the patient prefers to be seen at. Optional field. It is not necessary to press the shift key to capitalize the street name. Optional field. Type the first digit of the postal code. If you have used the number before, select from the list. If the postal code is not in the list, then continue to add the new code. Optional field. If the postal code has been used before, the city field automatically fills in. If it is not correct, enter the correct city. Optional field. If the postal code has been used before, the state field automatically fills in. If it is not correct, enter the correct state code. Required field if you plan on contacting the patient via phone, or text. Select the method of contact. Optional field. Type a descriptive name of the method of contact. Required field if you plan on contacting the patient via phone, or text. Enter the phone number or valid address. Required field if you want to send text messages or text reminders. This field will be dimmed out if not required for the selected type or remain bold if required. Example, if you select Cell for the type, you must select the carrier that the patient uses if you want to send text messages or text reminders. 14
28 Financially Responsible Fields Field Relationship Type Title Lookup an Existing Responsible Party First Name Middle Name Last Name Gender Suffix Greeting Description Required field. Select the appropriate relationship between the financially responsible party and the patient. Optional field. Select the appropriate title if it is the office protocol. Lookup an existing responsible party. Required field. It is not necessary to press the shift key to capitalize the first letter. Optional field. It is not necessary to press the shift key to capitalize the first letter. Required field. It is not necessary to press the shift key to capitalize the first letter. Optional field. Click the arrow and choose the patient s gender. You can type an M or F if you prefer. Optional field. Example: Jr. or III Optional field. What the responsible party prefers to be called by. Birthdate Optional field. Enter the two-digit month, day, and year example The date will be formatted correctly with slashes and the patient s age calculated in years and months. Social Addresses Contact Info Referrals & Relationships Optional field. Enter the responsible party s social security number. Optional field. If the patient lives with the responsible party, right-click in the field and select the correct item. If the patient does not live with the responsible party, enter the appropriate address and contact info. Optional field. Add any additional relationships or referral information for the patient. Adding a New Patient and Responsible Party 1. Select the Home menu. 2. Select Add under Patient. The Add Patient window displays. 15

29 3. Enter the required fields for: - Patient: First Name, Last Name, Orthodontist, Location - Financially Responsible: Relationship, First Name, Last Name 4. Enter any additional information. Note: If the patient lives with the responsible party, click Sharing Options in the Addresses section and select Share Address. 5. Depending on your next task for the patient, select Schedule, Edit, or Close. Adding a Sibling of a Current or Previous Patient When adding a sibling of a current or previous patient, start entering information on the financially responsible (right side) of the Add Patient window. Since the financially responsible party is already in your database, you can look them up and all information is entered automatically. 1. Select the Home menu. 2. Select Add under Patient. The Add Patient window displays. 3. On the Financially Responsible side of the window, click Lookup an Existing Responsible Party. 4. From the Lookup Person box, enter the last name <comma> first name and click Search. The matching results display. 5. Select the appropriate responsible party and click Select. The financially responsible party s information displays. Note: If you change any information in this window, such as address or contacts, this information for all related patients is updated with the change. Make sure you have the correct individual before changing any modifiable information. 16
30 6. Complete the Patient side of the window. Note: Since there are people related to the added patient, all related people display in a dialog box. 7. Depending on your next task for the patient, select Schedule, Edit, or Close. Adding an Adult Patient 1. Select the Home menu. 2. Select Add under Patient. The Add Patient window displays. 3. On the Patient side, enter patient data, including the required fields: First Name, Last Name, Orthodontist, Location. 4. On the Financially Responsible side, select Self from the Relationship Type dropdown box. The information from the patient side automatically displays. 5. Depending on your next task for the patient, select Schedule, Edit, or Close. Adding a Patient from an Existing Person If a person is already in your database, you can turn them into a patient by using the Lookup icon on the left side of the window. 1. Select the Home menu. 2. Select Add under Patient. The Add Patient window displays. 3. On the Patient side of the window, click Lookup an Existing Person. 4. From the Lookup Person dialog box, enter the last name <comma> first name and click Search. The matching results display. 5. Highlight the desired person and click Select. The information for the selected person displays. 17

31 Note: If the person already exists as a patient, Cloud9 displays a prompt informing you. Note: For security purposes, you cannot delete a patient from the system; however, you can change the status of duplicate patients to Inactive from the Tracking Tab on Edit Patient. 6. On the Financially Responsible side, enter the required fields for Relationship, First Name, Last Name, if not already displayed. 7. Depending on your next task for the patient, select Schedule, Edit, or Close. Viewing a Patient The View Patient functionality allows users to view the patient information. 1. Select the Home menu. 2. Select View under Patient. The View Patient window displays. 18
32 Editing a Patient The Edit Patient functionality allows users to edit the patient information. Users must be granted permission to be able to edit patient information. The screen is organized into the following seven tabs that categorize the patient s information: Patient Tracking Relationships Referrals/Professionals Insurance Appointments History Patient Tab The Patient tab contains the information that was entered when the new patient was added (created). There are several fields that can be added anytime the patient provides the information. These additional fields are described below. If a patient moves, be sure to change the information in the Patient and Relationship tabs. For example, when you update the child s address, you ll need to update the parent s address on the Relationship tab. You must have the correct permissions to edit a patient. Setup available in Silverlight: Edit menu > Setup > Employees. 19
33 Field School Correspondence OrthoBanc Provider OrthoBanc Pat ID Patient ID Assistant Norm Treatment Coordinator Models Description Optional field. Used to track the school the patient is attending. Setup available in Silverlight: Edit menu > Setup > Schools. If the patient is an adult, check the preferred method type of correspondence. This area also determines the method that is automatically filled in on the Send Reminders window. Required field if your office is enrolled with OrthoBanc and the patient wants to sign up for automatic payments. Setup available in Silverlight: Edit menu > Setup > OrthoBanc Provider. Required field if your office is enrolled with OrthoBanc and the patient wants to sign up for automatic payments. This field identifies the patient ID and is provided by OrthoBanc. A unique ID number that is assigned by Cloud9. If the patient is assigned a specific assistant or requests an assistant, select the individual. Setup available in Silverlight: Edit menu > Setup > Employees > Employee Type. Optional field. Select the patient s race if performing a Ceph analysis. If the patient is assigned a specific treatment coordinator, select the individual. Setup available in Silverlight: Edit menu > Setup > Employees > Employee Type. If your office stores models, this is the place to enter the model number. 20
34 Field Location Address Contact Info Description The office the patient is assigned. All financial information is assigned to this location. The address the patient lives. The contact information the patient/responsible party can be reached. Tracking Tab The Tracking tab contains tracking information about the patient. This includes patient status, dates of specific procedures and when a patient s contract was started. Recall information can also be entered in this window. Field Entry Date Patient Status Status Start Date Estimated Months in Status Description The date the patient was entered Cloud9. The status the patient is currently in. It changes or prompts automatically as the patient progresses through treatment. Setup available in Silverlight: Edit menu > Setup > Appointment Types > Patient Status Changes. The date the patient and his/her status were entered. The number of months designated for the patient to remain in the status. Setup available in Silverlight: Edit menu > Setup > Patient Statuses > Default Months. 21
35 Field Estimated Completion Date New Patient Exam Date Case Start Date Panorex Date Progress Date Cleaning Date Deband Date Patient Category Patient Type Treatment Type Recall Date Recall Type Recall Appointment Type Recall Comment Description The date calculated from the status start date and the estimated months in status, the date for the patient s estimated completion of the status. The date the patient completed their exam. Setup available in Silverlight: Edit menu > Setup > Appointment Types > Tracking. The date recorded when you start a contract or when they are changed to a Patient Status that is marked Is Case Start. Setup available in Silverlight: Edit menu > Setup > Patient Statuses. Note: A patient has only one case start date but can have many phases of treatment. Cloud9 will fill in the start date only one time, it will be when the first event occurs: The Contract Start or the Patient Status marked Is Case Start. The date of the most recent panorex is acquired or imported. The date a patient should have a progress exam. When opening a patient, you receive a prompt indicating that a Progress Exam is needed. Setup available in Silverlight: Edit menu > Setup > Patient Statuses > Progress Months. A manual entry date for the patient s last cleaning. This date does not fill in automatically. The date that automatically updates once the patient is changed to a Patient Status that is marked Is Retention. Setup available in Silverlight: Edit menu > Setup > Patient Statuses. Optional field that you can use as you wish. Setup available in Silverlight: Edit menu > Setup > Patient Categories. Optional field that you can use as you wish. Setup available in Silverlight: Edit menu > Setup > Patient Types. Optional field that you can use as you wish. Setup available in Silverlight: Edit menu > Setup > Treatment Types. Date assigned to schedule a patient for a specific appointment. Optional field used to assist in tracking recall types. For example, you might enter a Treatment Coordinator type. Be careful to ALWAYS enter the type the same each time. The appointment type the patient needs to be scheduled. The X button deletes the appointment type selected. Any information you want to be reminded about the specific recall. 22
36 Relationships Tab This tab contains all people related to the patient. This includes responsible parties, referrers, professionals and insurance subscribers. The responsible party s information has already been entered when you created the new patient. Additional relationships can be added manually. Collapsed Expanded The Relationships tab displays a detailed view option for each Related Person. The tab defaults to open with details expanded for the first related person and a + next to other related persons. Field New Person Lookup Person Relationship Type Account Number Description Add a new relationship to your patient. Lookup an existing person in the database. Select the appropriate relationship to the patient. This field is currently reserved for future development. 23
37 Field Preferred Mail Method Correspondence Late Fee Amount Late Fee Option Per Visit Fee Note Address Contact Info Employment Status Marital Status Billing Option Risk Code Portal Login Portal Login Password OrthoBanc Resp ID This person is financially responsible This person is a family member Adding a Relationship Description 1. Click the Relationships tab. Identify the individual s preferred mail method. Select how this individual prefers to be contacted. Checking a box determines what is automatically filled in on the Send Reminders window. Enter the dollar value of the late fee to be charged to the responsible party. If an amount is entered in this field, it overrides the default late fee assigned in Setup available in Silverlight: Edit menu > Setup > Transactions Types. Choose if a patient should receive a late fee or not. Enter dollar value that should be charged to the responsible party for each visit if they do not have a contract. Enter specific information concerning the related person. Provide how to address the Related Person. Provide contact information the related person can be reached. Enter the employment status of the related person. Enter the marital status of the related person. Select whether this related person should receive a statement. Enter a rating concerning the related person s credit risk. If an A or B is used in this field, Case Starts reports to show only those patients can be generated. Enter the patient login to access Cloud9Ortho patient portal information. Enter the patient password to access Cloud9Ortho patient portal information. Enter the unique ID number that is required if the office is enrolled with OrthoBanc and the patient has elected to pay through OrthoBanc. OrthoBanc provides this ID number. Check the box ONLY if the person is responsible for paying the contract. Do not check the box if the person is NOT financially responsible, but only the insurance subscriber. Check the box if the person is a family member of the patient. 24
38 2. Click Add, located in the lower right-hand corner of the window. The Add Related Person window displays. 3. Click Lookup and search for the person to be added. Note: This helps to prevent creating duplicate records. 4. Do one of the following: If the person Exists Does not exist Then a. Select the person and click Select. The data associated with that person automatically fills the fields. b. Select the Relationship Type for this related person. c. Enter additional data in the optional fields. d. Click OK. The new related person displays on the Relationships tab. 1. Click Add. The Person dialog box displays. 2. Proceed to the next step. 25

39 If the person Then 5. Enter the related person s data; the required fields are Relationship Type; First Name; Last Name. 6. Click OK. The new related person displays on the Relationships tab. Editing a Relationship There are times when a relationship needs to be modified, but not deleted. Note: You must have the correct permissions to edit a patient comment. Setup available in Silverlight: Edit menu > Setup > Employees > Edit Patient Comments. 1. From the Home menu or the patient header, click Edit. 2. Select Relationships tab. 3. Locate the relationship to be edited and click Edit in the last column of that relationship. The Edit Related Person window displays. 26
40 4. Make the desired changes. 5. Click OK. The relationship is updated with the edited information. Deleting a Relationship Once a relationship is no longer needed, you can delete it. Note: Cloud9 does not allow deleting a relationship that is marked Is Financially Responsible. Also, Cloud9 does not permit unchecking the Is Financially Responsible box if that party has any transactions on the patient s ledger. 1. From the Home menu or the Patient Header, click Edit. 2. Select Relationships tab. 3. Locate the relationship to be deleted and click Delete in the last column of that relationship. The confirmation dialog box displays. 27

41 4. Click Delete. The relationship is deleted and no longer displays. Referrals/Professionals Tab This tab contains both the patient s Referrals and Professionals. Users can add new people or edit the relationship type. Important: Demographic information cannot be edited in this window and must be accomplished through the Relationships tab. Adding a Referral/Professional The referral options include Referrals In, Referrals Out, and Professionals. 1. Click Referrals/Professionals tab. 2. Click Add in the section desired; the options include: Referrals In Professionals Referrals Out Patients Referred The Referral/Professional dialog box displays. 28

42 3. Select the desired Referral Type Person or Company. 4. Click Search. The Lookup Person or Lookup Company dialog box displays, depending on the referral type selected. 5. Search for and select the desired person or company and click Select. The Referral/ Professional dialog displays again. 6. Select Relationship Type and check Is the patient s professional box, if applicable. 7. Click OK. Adding to Patients Referred From the Edit Patient window for the patient who referred a second patient: 1. Click Add in the Referrals In section. The Referral/Professional dialog window will display. 2. Select Person as the Referral Type. 3. Click Search. The Lookup Person dialog box will display. 4. Under Name, search for the patient and click Select. The window will return to the Referral/Professional dialog box. 5. Click Ok. 6. Click Save. To verify: From the Edit Patient window for the patient who was added to Referred In. 1. Click the Referrals/Professionals tab. 2. Check the Patients Referred section. The name of the first patient should appear. 29

43 Editing a Referral/Professional Currently, to edit a Referral or Professional s demographics need to be completed in Silverlight. Setup available in Silverlight: Edit menu > Setup > People. Note: Full referral or professional editing functionality will be available in a future release. Deleting a Referral/Professional If a patient s relationship no longer exists, or you have created one in error, you can delete it. This will not remove the individual s information from the database but removes them as the patient s referral/professional. Once you click the Delete, the individual is removed immediately. 1. Click Referrals/Professionals tab. 2. Click Delete to the right of the referral or professional to be removed. The Referring Party is immediately removed. Insurance Tab This tab contains all insurance information that the patient is eligible for. If the patient acquires a new policy, be sure to enter this information in this window. The Subscriber and Responsible Party fields are required. 30
44 Field Is Active Insurance Rank Employer/Plan Insurance Company Subscriber Responsible Fee Schedule Default Policy Number Group Number Accept Assignment Initial Claim Required Continuation Claims Required Policy Notes Insurance Info Employer/Plan Notes Description This checkbox is checked by default when you add a policy. Uncheck if an insurance policy becomes inactive. This number indicated the order of tabs in the patient contract. This is NOT an indication of primary and secondary. The name of the subscriber s employer and plan. The name of the insurance company the employer is associated with. The individual that holds the insurance policy. The financially responsible party. This might not be the policy subscriber. The appropriate fee schedule for the insurance company. The fee schedule that is the default for the practice. The subscriber s individual insurance policy number. The number the insurance company assigns the employer. This checkbox is checked if you accept payment from the insurance company. This checkbox is checked if the insurance company requires an initial claim to be generated. This checkbox is checked if the insurance company requires continuation of benefit claims to be submitted periodically. Any specific information concerning the individual policy. Address and contact info that should fill in automatically when selecting the insurance billing center. Any specific information about the insurance plan. Add an Insurance Policy 1. Click Insurance tab. 2. Click Add. 3. Enter the appropriate information; Subscriber and Responsible are required. 4. Click Add. The insurance policy displays on the grid. 31
45 Edit an Insurance Policy 1. Click Insurance tab. 2. Click Edit. 3. Make desired updates. 4. Click Edit. The updates are saved. Delete an Insurance Policy 1. Click Insurance tab. 2. Select the desired insurance to be deleted. 3. Click Delete. The Delete Patient Insurance Policy confirmation dialog box displays. 4. Click Delete. The insurance policy is removed from the grid. Inactivate an Insurance Policy You may need to inactive an insurance policy that was entered because the patient thought they had orthodontic insurance, but it was a medical-only plan. To a avoid confusion, inactive the insurance policy. 1. Click Insurance tab. 2. Click Edit. 3. Uncheck the Is Active checkbox. 4. Click Edit. 32

46 Appointments Tab From the Edit Patient window, click the Appointments tab. The Appointments tab will display the following future and past appointments. Field Treatment Card Next Visit Patient Recall Appointments to Show Show Family Description Information in this section comes from the treatment card s last entry. If a patient has a recall, it is displayed in this section. You are not able to create or modify this information, only view. These boxes are checked to: Show Canceled Appointments Show Rescheduled Appointments Show No-Show Appointments This box is checked to view appointments of related family members. Family appointments display in a different color. 33
47 History Tab This tab contains historical information on ALL changes to a patient s record and the employee that performed the line entry. This includes status changes, messages that were sent and documents created. 1. From the Edit Patient window, click History tab. The historical list of major changes displays. 2. Check the box for Show All Patient Changes to ensure primary and minor changes display. Minor items like Person Changed type also display. Comments/Alerts Patient comments and alerts can be created to appear when specific actions are taken. For example, you can have a comment display when you open a ledger, when the patient checks in/out or during a time range. You can have a prompt display that must be acknowledged and display an icon. Comments set to Prompt (must acknowledge) trigger Patient Alerts that display when the patient is accessed. 34


48 Note: You must have the correct permissions to add, edit, delete or view any patient comment. Setup available in Silverlight: Edit menu > Setup > Employees > Login/Permissions tab. There are four permission type categories starting with PCT (Patient Comment Type): PCT Add PCT Edit PCT Delete PCT View Here is a sample of full permission types for PCT Add: PCT Add: PCT Add: PCT Add: PCT Add: PCT Add: PCT Add: PCT Add: Check In Comment Check Out Comment Collection Comment Ledger Comment Medical History Update Patient Comment Schedule Comment After PCT Add, the full permissions for PCT Edit, PCT Delete and PCT View are listed. 35

49 Adding a Patient Comment/Alert Field Patient Comment Type Description Enter the name of the patient you are creating the comment for. Select the type of comment. The options include: Responsible Party Insurance Show in Date Range Checkboxes Select a specific responsible party, if applicable. Select the insurance, if applicable. Select the date range when the comment/alert should display. Check the boxes where the comments should display. Once you select the type of comment the appropriate checkbox should automatically be checked. If you want the comment to appear in additional places, check the desired boxes. Check the Prompt (must acknowledge) to have the Patient Alert dialog box display and require the user to click OK before proceeding. 36
50 Field Icon Description Choose an icon that represents the comment, if desired. The icon options include: Comment Type the text of the comment to appear. 1. From the Home menu or the patient header, click Patient Comments/Alerts. 2. Click Add. The Add Patient Comment/Alert dialog box displays. 3. Enter the relevant fields. 4. Click Add. The added comment displays. 37
51 Editing a Patient Comment/Alert There are times when a comment needs to be modified, but not deleted. 1. From the Home menu or the patient header, click Patient Comments/Alerts. 2. Highlight the Comment from the list. 3. Click Edit. The Edit Patient Comments/Alert dialog box displays. 4. Make the desired changes. 5. Click Edit. The edited comment displays. Deleting a Patient Comment/Alert Once a comment is no longer needed, you can delete it from the patient s chart. 1. From the Home menu or the Patient Header, click Patient Comments/Alerts. 2. Highlight the Comment from the list. 38
52 3. Click Delete. The Delete Patient Comment confirmation dialog box displays. 4. Click Delete. The comment is deleted. Document Cabinet The Document Cabinet contains all correspondence for the patient, including letters created in Cloud9 and merged. The Document Cabinet allows you to view, print and the document. Once a document has been imported into the Document Cabinet, the document opens in its original application. For example, if a document was created in MS Word and imported into the Document Cabinet, the document opens in MS Word. The document can be modified, but changes are not saved to the document in the Document Cabinet. The document needs to be saved in the original application and re-imported back into the Document Cabinet. Importing a Document 1. From the Home menu, select Document Cabinet. The Lookup Patient dialog box displays. 2. Search for the desired patient and click Select. The Document Cabinet window displays. 3. Click Import. The Open dialog box displays. 4. Select the desired files to import. Note: Multiple files can be selected using the Ctrl and Shift keys. 5. Click Open. The Import Documents dialog box displays and shows the file(s) being imported. A green checkbox appears when the file import is completed. 39

53 6. Click Close. The uploaded file displays on the patient s Document Cabinet. Viewing a Document 1. From the patient s Document Cabinet, click the document row. The selected row becomes highlighted and the View, and Delete buttons display in the third column. 2. Click View. The following pop-up displays. 3. Select the desired option: Click Open and the file displays in its original application. Click Save to save the file to a specific location on your drives Click Cancel to do nothing. 40

54 ing a Document 1. From the patient s Document Cabinet, click the document row. The selected row becomes highlighted and the View, and Delete buttons display in the third column. 2. Click . The Send dialog box displays. 3. Enter the content and click Send. A confirmation dialog box displays. 41
55 Deleting a Document 1. From the patient s Document Cabinet, click the document row. The selected row becomes highlighted and the View, and Delete buttons display in the third column. 2. Click Delete. The Delete Patient Document dialog box displays. 3. Click Delete. The file is deleted and removed from the Document Cabinet table. 42
56 People/Companies Accessing People/Companies You can access the People/Companies functionality from the Home menu. People In Cloud9, you can associate People to a patient s chart as professionals and referrals: Professionals treat the patient. Referrals have referred the patient to your practice and are considered a source for new business. You can designate a person as both a professional and a referral, but a referral does not have to be a professional. Companies Cloud9 classifies Companies into one of the following types: Employer the name of the employer that has an assigned employer plan (insurance). Note: An employer may have multiple employer (insurance) plans available to their employees. For example, Ford Motor Company could have three separate employer plans and be entered three times in Cloud9 as the following: o Ford Motor Company/Aetna/12345 or Ford Motor Company/Aetna/Executive o Ford Motor Company/Aetna/98765 or Ford Motor Company/Aetna/Salary o Ford Motor Company/Aetna/57575 or Ford Motor Company/Aetna/Hourly 43
57 Insurance Company the name of the insurance company along with Payer Code and benefit information Insurance Billing Center the address where claims should be sent Other names of other companies, including social media like Google and Facebook, that may be a referral Available People/Company Functionality While you can search for all people and companies, the current release focuses on People and Employers. You will still need to use Silverlight for some functions, especially for Insurance Companies and Insurance Billing Centers. The following chart outlines what is currently available in HTML5, Silverlight and future releases. Function People Employer Insurance Company Companies Insurance Billing Center Other Search HTML5 HTML5 HTML5 HTML5 HTML5 Add HTML5 HTML5 must add an employer plan Silverlight HTML5 future release Silverlight HTML5 future release HTML5 Edit HTML5 HTML5 Silverlight HTML5 future release Silverlight HTML5 future release HTML5 Delete HTML5 Silverlight HTML5 future release Silverlight HTML5 future release Silverlight HTML5 future release Future HTML5 Release Print HTML5 a single address label or envelope - Works if there s an address Silverlight listing all HTML5 future release Silverlight listing all HTML5 future release Silverlight listing all HTML5 future release Future HTML5 Release - Defaults to the first address and you cannot switch addresses 44

58 Managing People You can associate people to a patient s chart as professionals and referrals. Professionals treat the patient. Referrals have referred the patient to your practice and are considered a source for new business. In Cloud9, you can designate a person as both a professional and a referral, but a referral does not have to be a professional. When you select People from the Home menu, the Lookup Person dialog box displays. When you click Add or Select from the Lookup Person dialog box, the Person dialog box displays. The Person dialog box gives you the ability to add and edit a person s demographic information, print a single address label and an envelope with the person s address and delete a person. 45
59 Field Profession Title First Name Middle Name Last Name Suffix Greeting Gender Social Birthdate Correspondence Addresses Contact Info Other tab, Note The Person s Optional field. Profession Optional field. Title First Name Optional field. Last Name Optional field. Example: Jr. or III Optional field. Preferred name. Optional field. Gender Optional field. Social Security Number Optional field. Birthdate Optional field. Preferred way(s) to be contacted. Optional field. Addresses Optional field. Contact information Optional Field. Additional information 46
60 Searching for a Person 1. From the Home menu, click People. The Lookup Person dialog box displays. 2. Enter the search criteria: Profession, Name or both. 3. Click Search. The search results display. 4. Select the desired person and click Select. The Person dialog box displays with the person s demographic data. Adding a Person Pre-requisite: The person does NOT already exist in Cloud9. 1. From the Home menu, click People. The Lookup Person dialog box displays. 2. To avoid duplicates, search for the person, and do one of the following: Does the Person Exist? Yes No Then Do NOT add the person. Go to the next step. 3. Click Add. The Person dialog box displays. 4. Enter the person s information. 5. Click Save. The person is added to Cloud9. Editing a Person 1. From the Home menu, click People. The Lookup Person dialog box displays. 2. Enter the search criteria: Profession, Name or both. The search results display. 3. Select the desired person and click Select. The Person dialog box displays with the person s demographic data. 4. Make edits. 5. Click Save. Cloud9 saves the edits. 47

61 Delete a Person 1. From the Home menu, click People. The Lookup Person dialog box displays. 2. Enter the search criteria: Profession, Name or both. The search results display. 3. Select the desired person and click Select. The Person dialog box displays with the person s demographic data. 4. Click Delete. The Delete Person dialog box displays. 5. Click OK. The person is deleted from Cloud9. Printing a Single Label or an Envelope Pre-requisite: An address must be added to be able to print a single label or an envelope. Reminder: Cloud9 uses the first address as the default, and you cannot select another listed address. 1. From the Home menu, click People. The Lookup Person dialog box displays. 2. Enter the search criteria: Profession, Name or both. The search results display. 3. Select the desired person and click Select. The Person dialog box displays with the person s demographic data. 4. Click Print. A pop-up window displays with the options for Print Single Address Label and Print Envelope. 48

62 5. Do one of the following: To print a(n) Single Address Label Then 1. Click Print Single Address Label. The Print Envelopes/Labels dialog box displays. 2. Select the Label Type and click Print. The Report Viewer window displays the single label. 3. Click Print, select the print preferences and click Print. The single address label prints. Envelope 1. Click Print Envelope. The Report Viewer window displays with the envelope. 2. Select the Label Type and click Print. The Report Viewer window displays the single label. 3. Click Print, select the print preferences and click Print. The single address label prints. Managing Companies The Company dialog box gives you the ability to add and edit employers and other companies. In a future release, you ll be able to add and edit insurance companies and insurance billing centers in HTML5. For more details about current and future company functionalities, please see Available People/Company Functionality. When you select Companies from the Home menu, the Companies dialog box displays. When you click Add or Select from the Companies dialog box, the Company dialog box displays. 49
63 Field Name Address Contact Info Emp. Plans (Employer Plans) The Company s Company Name Note: For employers, Cloud9 recommends using the name of the company and the insurance plan name. Examples: Federal Express/Cigna/12345 or Federal Express/Cigna/Salary Addresses Contact Required for Employers: 50
64 Searching for a Company 1. From the Home menu, click Company. The Company dialog box displays. 2. Enter the search criteria: Company Type, Name or both. 3. Click Search. The search results display. 4. Select the desired company and click Select. The Company dialog box displays the company information. Adding a Company For Employers and Other Companies Pre-requisite: The company does NOT already exist in Cloud9. 1. From the Home menu, click Company. The Company dialog box displays. 2. To avoid duplicates, search for the company, and do one of the following: Does the Company Exist? Yes No Then Do NOT add the company. Go to the next step. 3. Click Add. The Company dialog box displays. 4. Enter the company s address and contact information. 5. Only required for employers: Enter the employer plans (Emp. Plans). 6. Click Save. You ve added the company to Cloud9. For Insurance Companies and Insurance Billing Centers Setup available in Silverlight: Edit menu > Setup > Insurance Companies Setup available in Silverlight: Edit menu > Setup > Insurance Billing Centers 51
65 Editing a Company For Employers and Other Companies 1. From the Home menu, click Company. The Company dialog box displays. 2. Enter the search criteria: Company Type, Name or both. The search results display. 3. Select the desired company and click Select. The Company dialog box displays with the company s information. 4. Make edits. 5. Click Save. Cloud9 saves the edits. For Insurance Companies and Insurance Billing Centers Setup available in Silverlight: Edit menu > Setup > Insurance Companies Setup available in Silverlight: Edit menu > Setup > Insurance Billing Centers Deleting a Company Deleting a company is not currently available in HTML5. Below are the delete options for the four company types: Company Type Employer Insurance Company Insurance Billing Center Other Setup available in Silverlight: Edit menu > Setup > Employers > Delete Edit menu > Setup > Insurance Companies > Delete Edit menu > Setup > Insurance Billing Centers > Delete No set up available in Silverlight: Currently not available; will be available in a future HTML5 release 52
66 Treatment Management Under the Treatment header on the Home menu, you can access the following treatment topics: Treatment Card Tooth Chart Images View Questionnaires Run Questionnaires 53

67 Treatment Card Pre-requisite: Before you can start charting treatment notes for your patients, treatment card templates with the information that your office wants to chart in Silverlight; Setup available in Silverlight: Edit menu > Setup > Treatment Cards. When creating a treatment card for the first time, have a list of the items that you want to chart before starting. This makes a lot easier to create a treatment card. Your office may use multiple treatment cards depending upon the type of treatment you offer or have with one. Available treatment cards display on the middle section of the Treatment Card window as tabs: Navigating the Treatment Card Window The Treatment Card window is divided into four sections: Toolbar buttons providing quick access to adding a treatment entry, recall, send a message, print treatment card and other treatment options, refresh, save, save and close and close. Upper section patient and referral information Middle section treatment card, treatment card notes and image series Bottom section treatment plan and notes 54
68 Toolbar Buttons Button Add Entry Recall Send Message Print Treatment Card Refresh Save Save and Close Close Click to Add a treatment card entry Set up a patient recall Send a message Print one of the following patient information: Print Treatment Card Print Patient Tray Cover Print Patient Tray Cover (No Treatment Plan) Print Patient Appointments Print Single Address Label Print Envelope Refresh and update the window Save changes Save changes and close the treatment card window Close the treatment card window without saving changes 55
 Description This bar changes color to indicate the progress of treatment based upon the months")
69 Upper section, left-hand side This part of the Treatment Card provides detailed information about the patient without opening the Edit Patient window. Field Treatment Bar Patient Birthdate Status Models Deband Next Appt Location School Gdr (Gender) Description This bar changes color to indicate the progress of treatment based upon the months indicated in the tracking tab of the edit patient window. The left date is the starting date of the status and the right date is the projected ending date of the status. The middle information displays how many months along in treatment of the total number of months. The name of the patient. The birthdate and age of the patient. The patient s status currently. The model information entered in the patient tab of the edit patient window. The deband date that was entered in the tracking tab of the edit patient window. If a patient has a next appointment scheduled, the date appears in this field. The patient s assigned location. The school information that was entered in the patient tab of the edit patient window. The gender of the patient. Alerts Red circle/sunburst means there is a total due on the patient s contract. Hover the mouse to view the amount. Green circle/sunburst means $0 is due by the patient. The Exclamation point indicates there is an alert for the patient. Hover the mouse to view the alerts. 56


70 Upper section, right-hand side Related People: All related people listed on the relationship tab of the Edit Patient window display as well as the referring information. Middle section, left-hand side Field Treatment Card Tabs Entries and Notes Description Available treatment cards. Treatment card entries and added notes. Middle section, right-hand side Series: Displays the selected image series. 57
71 Bottom section, Treatment Notes Notes tab: This is where generic notes are entered and displayed. The Notes tab allows you to make notes about a specific patient. For example, you may want to document that the patient is willing to have images used for presentation purposes or consent forms have been signed. The Notes tab can be used for whatever purpose the office needs. Bottom section, Treatment Plan Treatment Plan tab: This is where treatment plans and treatment plan notes are entered and displayed. Regardless of using the Treatment Plan or Notes section, Cloud9 retains the last selection by the user. In other words, if the user was last on the Notes tab, Cloud9 opens the Treatment Card displaying the notes. 58

72 Changing the Treatment Card Window View If there are more entries and notes than visible, you can use the Resize bars to change the view. Resizing Treatment Card 1. From the Treatment Card, position the mouse on the Resize bar. The mouse turns into a double arrow. 2. Hold down the mouse button and move the Resize bar. 3. When the desired view displays, release the mouse button. The window is resized. 59


73 Closing and Opening the Resize bar 1. Position the mouse on the center of the Resize bar. The center portion turns yellow and indicates Close. 2. Click the Close portion of the Resize bar. The Resize bar closes that portion of the window. Once a portion of the Treatment Card is closed, the center of the Resize bar becomes Open. 3. Click the Open portion of the Resize bar. The Resize bar opens that portion of the window. Once a portion of the Treatment Card is opened, the center of the Resize bar becomes Close. 60


74 Managing Treatment Card Entries You enter treatment card entries electronically to capture the procedures details for patients during their visit. This involves: Adding new treatment card entries and treatment notes Editing and deleting treatment card entries and treatment notes The Treatment Card Entry window is set up in Silverlight. Setup available in Silverlight: Edit menu > Setup > Treatment Cards. Your office can customize the columns and entry types on the treatment card. Below is an example of a treatment card entry. Three Types of Treatment Entries There are three types of treatment entry types: V Visit; must enter all required fields E Emergency; must enter all required fields C Comment; can bypass required fields Entry Type Options for Fields When setting up your treatment card in Silverlight, you have several entry type options for each field: Entry Type The user can Example Single- Select List Select one item from the list 61

75 Entry Type The user can Example Multi- Select List Select one or more items from the list Rich Text Box Text Box Select from Quick Pick items Notes: These items are commonly used throughout treatment and can be selected quickly rather than typing the text each time for a patient. You can add formatting to the text, such as bold, italicize, underscore, font and color, to add emphasis. Enter up to 50 characters in this box. Note: This field does not offer formatting choices. 62
76 Required Fields During the setup in Silverlight, you can designate a field as required by clicking the required checkbox. Adding a New Treatment Card Entry and Treatment Notes 1. From the Treatment Card window, click Add Entry. The Treatment Card Entry window displays, and the cursor displays in the Asst field. 2. Select the name of the assistant. The next field automatically becomes highlighted. 3. Continue to select the options for each field. Note: In addition to moving automatically from field-to-field, other options include clicking in the desired field and using the Prev and Next buttons. 4. To add TX notes, click Click here to add notes. The TX NOTES box displays. 5. Enter the TX notes or, if set up, select the canned comments and select the desired Separator if you enter multiple canned comments. 6. To save the treatment card entry, click Save and Close. The Treatment Card Entry window closes. Note: To not save the treatment card entry, click Cancel. Editing and Deleting a Treatment Card Entry and Treatment Notes You can edit or delete a treatment entry or note for 24 hours. If the note was saved at 2 pm on Monday, it can be edited or deleted until 2 pm on Tuesday. 1. Determine the treatment card entry to be edited or deleted. 2. On the right-hand side of the treatment card entry, click Edit or Delete. 3. Do one of the following: If you clicked Edit Then the Treatment Card Entry window displays > Make the desired edits to the treatment card fields > Position the 63

77 If you clicked Delete Then the mouse over the TX notes until it turns into a hand > Click on the note and make edits > Click Save and Close. Confirm Deletion box displays > Click Yes. Managing Treatment Plan and Notes When the first treatment note has been added for a patient, it may be time to create the Treatment Plan for the patient or add additional notes. Beneath the Treatment Note section is the area where this information is created and saved. To save time, you can create default standard steps that can be used for specific patient malocclusions. Setup available in Silverlight: Edit menu > Setup > Treatment Plans. You can customize the default steps on a per patient basis, if needed. Applying a Treatment Plan 1. From the patient s Treatment Card window, click the Treatment Plan tab. 2. Click the Add Plan to the right of the Plan field. The Choose an Orthodontic Treatment Plan dialog box displays. 64
78 3. Select the desired plan and click OK. The selected plan displays in the Plan field, the status becomes New and the plan s steps display. Notes: The status indicates New, which means that the patient has not started treatment. Once the patient has started treatment, you will need to change the status to Active. Once the patient has completed treatment, you need to change the status to Completed. If someone other than the doctor creates the patient s treatment plan, the Approved: area provides the doctor a place to enter their initials as verification that they reviewed and approved the plan. 65

79 Modifying a Treatment Plan The following table outlines how to modify components of a patient s treatment plan. If you want to Add a Treatment Plan Delete a Treatment Plan Then from the Treatment Plan tab 1. Click Add Plan. 2. Select the desired plan. 1. Select the desired plan. 2. Click Delete Plan. 3. Click OK to confirm the deletion. Add a Step Note: The steps are limited to 50 characters. 1. Select (highlight) a step. 2. Click Insert and select if you want the step to be inserted before or after or a child of the selected step. The Patient Treatment Plan Step (Ortho) - <New Step> dialog box displays. 3. In the name field, enter the new step. 4. Click Save. The step is added. Reorder a Step 1. Select (highlight) a step. 66
80 If you want to Then from the Treatment Plan tab 2. Use the Move Up and Move Down to place the step in the desired location. Edit a Step 1. Select (highlight) a step. 2. Click Edit. The Patient Treatment Plan Step (Ortho) - <Step> dialog box displays. 3. Make edits and click Save. Delete a Step 1. Select (highlight) a step. 2. Click Delete. The Delete Patient Treatment Plan Step dialog box displays. 3. Click OK. Add, edit or delete Treatment Plan Notes Note: Since steps are limited to 50 characters, you may want to add additional information related to steps. 1. Click on the notes grey section. The Edit Treatment Card Notes? dialog box displays. 2. Click OK. The notes section becomes white and is open to enter and edit notes. 3. Enter, edit or delete the note, using the formatting tools to format the text. 67

81 Managing Generic Notes The Notes tab provide additional space to include notes about the treatment plan. Since the steps are limited to 50 characters, you may want to include additional information on the Notes tab. 1. From the Treatment Card window, select the Notes tab. 2. Click on the notes grey section. The Edit Treatment Card Notes? dialog box displays. 3. Click OK. The notes section becomes white and is open to enter and edit notes. 4. Enter, edit or delete the note, using the formatting tools to format the text. Printing the Treatment Card From the Treatment Card window, you can print the following: Treatment Card Patient Tray Cover Patient Tray Cover (No Treatment Plan) Patient Appointments Single Address Label Envelope 68
82 1. Click Print Treatment Card. The printing options display. 2. Select the desired printing option. The Report Viewer displays with the selected option. 3. Click Print. The Print dialog box displays. 4. Select the desired printing options and click Print. The selected option prints to the designated printer. 69
83 Tooth Chart Users can open the Tooth Chart from the Patient Header/Menu from the patient s Treatment Card. Note: The Tooth Chart is also accessible from the Home tab. 70


84 Using the options at the top of the Tooth Chart, users can: Add horizontal and vertical elastics Mark teeth from primary to permanent Mark teeth as missing or extracted Change the number system being used From the Chart Items listed at the bottom of the Treatment Card, users can delete the desired listed treatment. 71

85 Adding Horizontal and Vertical Elastics From the patient s Tooth Chart window. 1. Select the desired teeth. 2. Click + Elastic. Cloud9 marks the selected teeth with a green line to indicate the applied elastic. Changing One or More Teeth from Primary to Permanent From the patient s Tooth Chart window. 1. Click the desired tooth or teeth. 2. Click the dropdown list next to the Tooth and select the desired option: Cloud9 marks the selected tooth or teeth to indicate the selected option. Selecting teeth as Missing, Extracted, Uncovered or Evaluation From the patient s Tooth Chart window. 1. Click the desired tooth or teeth. 2. Click the dropdown list next to the Tooth and select the desired option: 72

86 Cloud9 marks the selected tooth or teeth to indicate the selected option. Changing the Number System Being Used From the patient s Tooth Chart window. 1. Click the dropdown list next to the displayed numbering system. 2. Select the desired numbering system. Cloud9 applies the selected numbering system. Deleting Any Added Treatments From the Chart Items listed at the bottom of the Treatment Card, select Delete next to the desired listed treatment. Cloud9 removes the deleted treatment from the Chart Items. 73
87 Imaging When opening a patient s images, Cloud9 loads the patient s most recent image series layout. Once Cloud9 displays the image series and the individual images, you can position the images in a precise manner for viewing. This creates continuity when showing the images rather than the jerky effect from viewing images that are not the same size and orientation. In addition, you only need to set the grids one time and then they are available from that point forward. *HTML5 BONUS* In HTML5, when you click on Import Images, you can choose to take a photo using the camera on the ipad, phone or tablet and import one image at a time. IMPORTANT: Prior to using imaging functionality in HTML5, use Silverlight to set up image categories, image series types and image types. Setup available in Silverlight: Edit menu > Setup > Image Categories Setup available in Silverlight: Edit menu > Setup > Image Series Types Setup available in Silverlight: Edit menu > Setup > Image Types Accessing the Images Window You can access the Images window from the following locations: 74


88 Location Scheduling window Description Click on the appointment and select View Patient Images. Treatment Card window Click on the image under the Series section and select View Image. Home menu Select Images under the Treatment heading from the Home menu. 75

89 Location Description Patient Header Select View Images under the Imaging heading from the Patient Header. 76


90 Importing Images, Acquiring Ceph and Acquiring Pan Once the image categories, image series types and image types are set up in Silverlight, you can import your images into Cloud9. Bonus: In HTML5, when you click on Import Images, you can choose to take a photo using the camera on the ipad, phone or tablet and import one image at a time. Importing Images 1. From the patient s Images window, click Import/Acquire. 2. Select Import Images. The Open dialog box displays. 3. Select the images to import and click Open. The Import Images window displays showing the imported images. 4. Click Close. The Import Images window displays with the imported images. 77

91 5. In the Series field, click <Add New Series>. The Image Series dialog box displays. 78


92 6. In the Type field, select a type. The Type displays, and the Description field displays the selected type, automatically checking the appropriate Before Series or After Series checkbox. 7. Click Add. The Series name displays on the Import Images dialog box. 8. Click Auto Fill to designate the type of image that is being imported. Note: The images are named according to the order specified in setup. 79
 d.")
93 9. If you need to edit an image prior to importing, select the image and click the dropdown list to: a. Rename an image b. Crop this Image c. Rotate this image to the left (counter-clockwise) d. Remove this image from the import Note: Even though you can edit images in the Import window, it is much easier to perform any edits in the Image window. 80
94 10. Click Import. The Images window is updated with imported images, designated practice logo and the image tree on the left-hand side. 81


95 Acquiring Ceph 1. From the patient s Images window, click Import/Acquire. 2. Select Acquire Ceph. The Acquire Ceph dialog box displays. 3. Select the series to import and click Acquire. Cloud9 acquires Ceph. Acquiring Pan 1. From the patient s Images window, click Import/Acquire. 2. Select Acquire Pan. The Acquire Pan dialog box displays. 3. Select the series to import and click Acquire. Cloud9 acquires Pan. 82

96 Viewing the Image Series and Individual Images After being imported, the images display on the patient s Image window where you can edit and manage the series of images or a single image. Note: When opening a patient s images, Cloud9 loads the patient s most recent image series layout. From the image tree, you can: Select Image Layouts to manage the series, including changing the layout, resizing, rotating, exporting, printing and deleting an entire series. 83

97 Select an Individual Image to manage an individual image, including rotating, flipping, zooming, auto correcting, adjusting, reverting to the original image, changing the image type and deleting the selected image. Managing and Editing the Image Series Pre-requisite: Before you can start managing the image layout, be sure the image layout is unlocked. Click Unlock. Unlock You ll know if the image layout is unlocked if the Lock button is displayed. Lock 84
98 Managing the Image Layout Use the following buttons to manage the image layout: Click Layout Then The Send dialog box displays. Enter the following fields: To; Subject and Message. Click Send. Cloud9 sends the layout as a jpeg. Print Layout The Print dialog box displays. Enter the desired printing options. Click Print. Cloud9 prints the layout. Export Layout Export Series The options to Export Layout and Export Series displays. Select either option. The Enter file name dialog box displays. Enter the file name. Click Save. For Export Layout, Cloud9 saves the layout as the file as a single jpeg. For Export Series, Cloud9 creates a zip file containing each image. The layout is unlocked, and the button toggles to Lock Layout. Unlock Layout The layout is locked, and the button toggles to Unlock Layout. Lock Layout The option to Edit Grid Lines and the grid lines display; turns on the Edit Grid Lines Mode and acts as a toggle between showing and not showing the grid lines. Note: You only must set the grids one time and then they are available from that point forward. 85
99 Click Then The following buttons display: Add Grid Line Edit Grid Line Delete Grid Line Add Grid Line Edit Grid Line The Add Grid Line dialog box displays. Select the image type; select orientation; enter slope and select line color. Click Add. Cloud9 adds the grid line. The Edit Grid Line dialog box displays. Select where the grid lines should display; the orientation; the location where the grid lines should display and the color for the grid line. Click Edit. Cloud9 adds the grid line. Pre-requiste: Select the grid line to be deleted. Cloud9 deletes the selected grid line. Delete Grid Line Fit to Screen Layout Cloud9 fits the image layout to the window. The button toggles between fit to and not fit to the screen. The layout options display. Select the desired layout. Cloud9 displays the selected layout. 86


100 Rotating, Resizing and Cropping an Image 1. From the Images window, click Unlock Layout. Cloud9 outlines the images with a black boarder. Locked Image: No Boarder Unlocked Image: With Boarder 2. Select the image to edit. Cloud9 outlines the image with a blue boarder and blue size boxes. If you want to Resize the image Then a. Place the mouse on a corner blue square. The mouse turns into a sizing double arrow. b. Drag the double arrow to increase or decrease the image size. 87

101 If you want to Then Rotate the image a. Place the mouse on the blue square hanging down from the top center. The mouse turns into a crosshair cursor. b. Drag the cursor to rotate the image. Crop the image Drag the mouse to resize the image and anything outside the black outline is cropped out. 3. Click on another image to see the changes. 4. Click Lock to lock the images. 88


102 5. Click Save or Close (and Save). Deleting a Series 1. From the image tree, click the first line with the date and image series name. A gear symbol displays in front of the date. 89


103 2. Click the gear. A dropdown list displays. 3. Select Delete Series. The Delete Image Series dialog box displays. 4. Click Delete. Cloud9 deletes the image series. 90
104 Managing and Editing Individual Images Use the following buttons and features to edit and manage the image layout: Click Image Then The Send dialog box displays. Enter the following fields: To; Subject and Message. Click Send. Cloud9 sends the image as a jpeg. The Print dialog box displays. Print Image Enter the desired printing options. Click Print. Cloud9 prints the layout. Export Original Export with Annotations Export without Annotations The options to Export Layout and Export Series displays. Note: Export with Annotations is shaded and only becomes an option when annotations are added. Select desired option. The Enter file name dialog box displays. Enter the file name. Click Save. Cloud9 saves the file as a single jpeg. Rotate Left The Enter Rotation Left dialog box displays. Enter the degrees of rotation. Click OK. Cloud9 rotates the image. Rotate Right The Enter Rotation Right dialog box displays. Enter the degrees of rotation. Click OK. Cloud9 rotates the image. Flip Horizontal The image rotates horizontally. Note: The button toggles between the flip and the original. Flip Vertical The image rotates vertically. Note: The button toggles between the flip and the original. 91
105 Click Then The following warning box displays. Zoom In Click OK. Continue to click Zoom In until you reach the desired view. Pre-requiste: The image must have been zoomed in. The image is zoomed in. Zoom Out Auto corrects the image. Auto Correct Adjustments The Brightness/Contrast/Gamma dialog box displays. Drag the black box on the brightness, contrast and gamma lines to adjust. The image reflects the changes. Click OK. Cloud9 saves the changes. Revert to Original The Revert to Original confirmation dialog box displays. Do one of the following: o Click Revert to go back to the original image and not save any changes. o Click Cancel to not revert to the original image. Change Image Type Delete The Change Image Type dialog box displays. Select the new image type. Click OK. Cloud9 updates the image type. The Delete Image confirmation dialog box displays. Click OK to confirm the deletion. The image is deleted from the image layout. 92

106 Questionnaires From the Home menu and under the Treatment heading, you can View and Run Questionnaires. Questionnaires help you collect and store relevant patient information from new patient forms, progress review updates, financial forms, insurance verification documentation and medical history. Cloud9 enables you to create questionnaires and merge the gathered data into documents. Creating Questionnaires Your administrator has access to creating questionnaires including creating questions and answers in Silverlight: Setup available in Silverlight: Edit menu > Setup > Questionnaires > Print/Add/Import/Edit/Delete (optional) Setup available in Silverlight: Edit menu > Setup > Question Categories Question Types Here are the options available for questions. Note: The following screenshots are from Silverlight. Field Order Description The numeric order of the question on the questionnaire. 93

107 Field Type Description The type of the question determines what can be selected for the answer. Currency The answer will be formatted as money. Date Picker A calendar button is provided to select the desired date. Header Used to categorize questions. Displays on the questionnaire as a larger font, blue text identifier. Multi-Select List Allows user to select multiple responses to a question. Also appears on the questionnaire screen with all possible answers. 94

108 Field Description Radio Button Select List Radio buttons are displayed for you to select from rather than clicking on the arrow to display the list. Single-Select List Allows user to select only one response to a question. Appears in the questionnaire window as a drop-down field. Tooth Chart A tooth chart appears as a question and allows user to mark selected teeth with an X. This tooth chart is for information only and will not merge into a document. Text Narrative A text box appears allowing the user to free type in response to a question. Single Line Text Box A text box displays allowing one line only for data entry. 95
109 Field Description Category Question Answers Can be created under Edit menu > Setup icon > Question Categories. These can help group questionnaire responses when viewing. The question to be asked. The available answers to select for the question. Order Column The numeric order of the answers. Text Column The default answer text that can be displayed in a document. Quantify Column Should the answer have a specific parameter? For example, a midline is to the right by how many millimeters? Prompt Column What is the prompt for entering the quantifying answer? Technical Text Column Displays the technical text that was entered for an answer. This text can be displayed in a document for a dental professional. Layman s Text Column Displays the layman text that was entered for an answer. This text can be displayed in a document for a non-dental individual. Answer Types Here are the options available for answers. Field Order Text Quantify this Answer Quantify Prompt Technical Text Description The numeric order of the answer. The response to the answer that shows on the questionnaire. Check to add an additional text field to the answer. If you check this box, be sure to add the parameter in the appropriate location in the Technical Text or Layman s Text field. You must enter the parameter exactly as it is indicated above. Text that displays to help identify the quantify input. Text that displays on a letter if technical text is the desired output. 96

110 Field Layman s Text Description Text that displays on a letter if layman s text is the desired output. Managing Questionnaires The Questionnaires window displays the selected patient s questionnaires that include responses. In addition to viewing, you can run a new questionnaire and edit the responses to an existing questionnaire. Button Used to easily access the Run Questionnaire window to run a different questionnaire New Edit Edit Questionnaire window to update the displayed questionnaire. Viewing Questionnaire Responses 1. From the Home menu and under the Treatment heading, click View Questionnaires. The View Questionnaire window displays. 2. Click the dropdown arrow in the Questionnaire field. A list of available questionnaires display. 3. Select the desired questionnaire. The selected questionnaire with the entered responses displays. Editing Questionnaires Responses 1. From the Questionnaires window, select the desired questionnaire. 97
111 2. Click Edit. The Edit Questionnaires window displays. 3. Make the desired updates. 4. Click Save. The changes are saved. Linking a Document to a Questionnaire In Document Editor, you can create a document letter, , text or financial arrangement with Questionnaire Merge fields, enabling you to merge the responses from a patient s questionnaire into the document. Note: Please see the Document Editor section for additional details about using Document Editor. 1. From the Home menu, click Document Editor under the Letters heading. 98
112 2. From the Document Editor, select a New document type letter, , text or financial arrangements. The blank document displays. 3. Position the cursor in the document where you want to insert the questionnaire response. 4. Select Mail Merge. 5. Click Insert. A dropdown list of merge field categories displays. 6. Select Questions and Questionnaire Question. The Insert Questionnaire Merge Field dialog box displays. 7. Click the dropdown arrow in the Questionnaire field. A list of the available questionnaires displays. 99
113 8. Select the desired questionnaire. The corresponding questions display in the Question field. 9. Select (highlight) the question for the desired response that you want to merge into the document. 10. From the Text Style field, select one of the following answer types: - Default: Answer is suitable for dental professionals, such as doctors and clinical assistants and non-dental professionals, such as patients and responsible parties - Layperson: Answer is suitable for a non-dental professional - Technical Person: Answer is suitable for a dental professional 11. Click Insert. The merge field is inserted at the cursor location. 12. Do the following: If you want to Enter multiple merge fields in bulk Insert the next merge field in a specific location in the document End adding merge fields Then Continue to select and insert merge fields with the intention of moving each merge field to the desired location in the document. Click Close to return to the document, position the cursor in the document where you want to insert the next questionnaire response, and complete steps Click Close. Running a Questionnaire Running a questionnaire for a patient triggers the information gathering process. You can access the Run Questionnaire window from the Home menu and the Questionnaires window. Once the desired questionnaire is selected, the corresponding questions display. You can enter and save the responses under the questionnaire s name and run date. 100
114 From the Questionnaires Window 1. From the Questionnaires window, select the desired questionnaire. 2. Click New. The Run Questionnaires window displays. 3. Click the dropdown arrow in the Questionnaire field. A list of available questionnaires display. 4. Select the desired questionnaire. The selected questionnaire displays. 5. Enter the requested information. 6. Click Save. The information is saved with the name of the template and the date. The Questionnaires window displays with the saved information. From the Home Menu 1. From the Home menu and under the Treatment heading, click Run Questionnaires. The Run Questionnaire window displays. 2. Click the dropdown arrow in the Questionnaire field. A list of available questionnaires display. 3. Select the desired questionnaire. The selected questionnaire displays. 4. Enter the requested information. 5. Click Save. The information is saved with the name of the template and the date. The Questionnaires window displays with the saved information 101
115 102

116 Financials Using the Ledger A patient s ledger provides all the financial information for that patient. From the patient s ledger, you can: Post charges Post payments Make corrections Post adjustments Manage contracts Manage insurance When you perform these activities, Cloud9 immediately updates the ledger to reflect these actions. There are five main sections of the ledger: 1. Financial Transaction buttons. 2. Accounts Receivable, referred to as the Aging section. 3. Responsible Party, Insurance and All ledger tabs. 4. Ledger Table. 5. Ledger Summary and Totals. 103

117 Financial Transaction Buttons Button Reload Post Charge Click to Refresh the ledger Note: The ledger refreshes immediately without clicking on the Reload icon, but you can always click the icon to refresh. Add a charge to the ledger Post a Payment Add a payment to the ledger Post a Family Payment Add a payment to several members with the same responsible party. Correction Options Select: Correction to correct a transaction that was posted with the incorrect amount. Reverse to correct a transaction that should not have been posted to a ledger. Void/Return to correct a payment by voiding the transaction or refunding money to the patient or insurance company. Adjustment Adjust an account due to financial changes. 104
118 Button Contract Click to Setup a contract (s) and auto payment plan. Print Ledger Print the open ledger. Note: Clicking on Print Ledger displays a date range, to make printing a ledger for flexible spending accounts easier. There is also a checkbox to choose to print ledger comments. Close the window. Accounts Receivables, Referred to the Aging Section The top of the ledger provides aging information, including calculated past due amounts. You can easily see how much the patient owes currently and in the future. Aging Bucket Over 90 Over 60 Over 30 Current Due Now Future Due Total Due The amount 90 days past due 60 days past due 30 days past due Reflecting the current month activity Of the aged amounts plus the current amount Of the contract that has not been posted to the ledger as of today Owed if a patient wants to pay off the entire balance: Due Now Amount + Future Due = Total Due 105


119 Responsible Party and Insurance Ledger Tabs There are three ledger tabs available used to track ledger activity: Financially Responsible tab Insurance tab includes the name of the subscriber below the name of the plan. All is a combined ledger of both responsible parties and insurance. Ledger Table Field Ledger Actions Description The first column appears blank; however, displays the hamburger menu when you select a payment. A receipt can be printed or ed at any time. 1. Select a payment. The hamburger menu displays in the blank column. 2. Click the hamburger menu. A menu with the options to Re-print Receipt or Receipt displays. 106
120 Field Date Time S Description The date of the transaction. The exact time of the transaction. Transaction status N New D Close the Day has been completed M Close the Month has been completed. P Periodic, such as a monthly or quarterly charge or payment. L O E Category Type Reference Location Posted Orthodontist Employee Transaction Type. Cloud9 defaults to the following colors, but the colors can be customized in Transaction Types setup. 1. Charges Red 2. Payments Green 3. Adjustments Blue Setup available in Silverlight: Edit menu > Setup > Transaction Types. The type of transaction; examples include Credit Card, Patient Statement and Invisalign. Check number or the last 4 digits of a Credit Card Note Amount Due Now Total Due The notes do not appear on the receipt, if printed. Amount of the transaction. Current due + Transaction Amount Due Now + Future Charges 107
121 Ledger Summary, Totals The bottom of the ledger provides information on total charges, payments, adjustments for this patient. Net Payments provides the total amount of payments, including any reversal or corrections performed on the ledger. Total Charges Payments Adjustments (Contract Charges) Net Payments Describes The total amount of charges that have been posted to the ledger. The total amount of payments that have been posted to the ledger. The total amount of adjustments that have been posted to the ledger. If the patient has an active contract, the total of the periodic charges posted now. The total amount of payments, including reversals and corrections, performed on the ledger. Posting Charges You can post charges from the patient s ledger by clicking Post Charge. 108
122 The Post Charges window displays. Field Patient Location Responsible Party Insurance Policy Date of Service Description The patient s name to charge. The location that the patient was assigned to when the transaction was posted. The responsible party s ledger to which the charge should be posted. The insurance company to which the responsible party is a subscriber. The actual date of the charge. You can backdate a charge if necessary. Column Headers Type Description Note Amount Claim Description The number of the transaction type. The name of the transaction type. Relevant information about the charge. If the transaction type has a fee, this field automatically populates. However, if necessary, you can modify the amount. Important: If the transaction type does not have an associated fee, it is still beneficial to list it for record-keeping purposes. Checked if the fee can be submitted to insurance. 109
123 Column Headers Delete Description Note: The Claim box will only appear if the following criteria are met: 1. The patient has insurance. 2. The Charge Type must have a CDT code tied to it. Used to remove the charge from the window. 1. From the Ledger, click Charge. The Post Charges window displays. 2. Click Add. The Choose a Charge window displays. 3. Check the box for a charge, or several charges, from the list. Note: These checkboxes can be checked and unchecked until all the correct charges are selected. 4. Click OK. The Post Charge window displays with the charge(s). Note: You can designate if the charge is or isn t a claim by checking or unchecking the Claim checkbox. 5. Designate the Responsible Party or Insurance Policy. Note: Both fields cannot be selected. 6. Click Save. The charge is posted to the ledger and indicates who is financially responsible. Posting Payments There are four types of payments you can post to a patient s account: Patient Payments Family Payments 110

124 Insurance Payments Insurance Bulk Payments Note: This functionality will be available in a future release. Field Patient Posting Location Responsible Insurance Payment Type Description Enter the patient s name. Enter the location where the payment should be posted to. Select the responsible party s ledger to which the charge should be posted. Select the insurance company to which the responsible party is a subscriber. Select the payment type from the dropdown: Amount Enter in the amount of the payment. 111
125 Field Card Type Reference # Note Receipt # Receipt Note Print Receipt Receipt Authorize Credit/Debit Card Due Now Future Due Total Due Description If the payment is a credit/debit card, enter the name for reference. Optional field. If a credit card, you can put in the approval code. Optional field. Enter any information you want to add as a ledger note. Optional field. Rarely used; enter if your office writes paper receipts from a receipt book. Optional field. Enter any note you would like to add to the printed receipt. Check if you want to print a paper copy. Check if you want to a receipt, rather than printing a copy. If enrolled with an integrated processor and the payment type has been selected as a credit card, check this checkbox to authorize the card. You receive an authorization code after processing. The current due now owed. The amount owed that has not been charged to the ledger. The amount owed to pay off the contract. Posting a Patient Payment Access the Post a Payment window from one of the following paths: Patient Ledger > Post a Payment Home menu > Patient Payment Financial menu > Patient Payment Patient Header > Patient Payment Treatment Card > Patient Payment 2. Select the Posting Location. 3. Select Responsible (Party) or Insurance. Note: Both cannot be selected. 112
126 4. Select the Payment Type. 5. In the Amount field, enter the payment amount. 6. Optional: Enter the following applicable fields: Card Type; Reference #; Note; Receipt # and Receipt Note. 7. Optional: Check the desired options: Print Receipt and Receipt. Note: If Credit Card payment type is selected, automatically the Authorize Credit/Debit Card checkbox is checked. 8. Click Save. If you checked Neither the or Print Receipt checkboxes Receipt checkbox Then the Ledger displays. Send dialog box displays. Print Receipt checkbox Report Viewer displays the receipt and the Print dialog box displays. 113
127 8. Do the following: If you re Not ing or printing a receipt ing the receipt Printing the receipt Then Click Reload. The payment displays on the ledger. See ing and Printing receipts. See ing and Printing receipts. Posting Family Payment 1. Access the Post a Family Payment window from one of the following paths: Patient Ledger > Post a Family Payment Home menu > Family Payment Financial menu > Family Payment Patient Header > Family Payment Treatment Card > Family Payment Note: The Responsible field is automatically filled. 114

128 2. Select the Posting Location. 3. Select the Payment Type. 4. Enter the Amount and click the Check Mark. The Amount and Payment Total fields turn green and the entered payment amount displays in the first patient s To Apply field. 5. In the patients To Apply fields, enter the amounts to be applied to each patient. Note: If the totals do not add up to the payment amount, Cloud9 turns the Amount and Payment Total fields red. Once the discrepancy is resolved, Cloud9 turns these fields back to green. 6. Optional: Enter the following applicable fields: Card Type; Reference #; Note; Receipt # and Receipt Note. 7. Optional: Check the desired options: Print Receipt and Receipt. Note: If Credit Card payment type is selected, automatically the Authorize Credit/Debit Card checkbox is checked. 8. Click Save Payment. 115
129 If you checked Neither the or Print Receipt checkboxes Receipt checkbox Then the Ledger displays for the first patient. Send dialog box displays. Print Receipt checkbox Report Viewer displays the receipt and the Print dialog box displays. 9. Do the following: If you re Not ing or printing a receipt ing the receipt Then Click Reload. The payment displays on the ledger. See ing and Printing receipts. 116
130 If you re Printing the receipt Then See ing and Printing receipts. Posting Insurance Payments Posting payments to the insurance ledger follows the same process as posting payments to the responsible party s ledger with a few minor differences. The choice of payment type should distinguish the payment as an insurance payment. Make sure that the payment is being posted to the insurance ledger. Notes: Insurance Bulk Payments will be available in a future release. It will enable you easily handle the bulk payment by using the Bulk Check Payment feature. If you have not done so, be sure to add in the correct payment transaction types in Silverlight: Silverlight setup: Edit menu > Setup icon > Transaction Types. 1. Access the Post a Payment window from one of the following paths: Patient Ledger > Post a Payment Home menu > Payment Financial menu > Payment Patient Header > Payment Treatment Card > Payment 2. Select the Posting Location. 3. Select Insurance. 4. In the Payment Type field, select Ins Ck (Insurance Check). 5. In the Amount field, enter the insurance payment amount. 6. Optional: Enter the following applicable fields: Reference #; Note; Receipt # and Receipt Note. 7. Optional: Check the desired options: Print Receipt and Receipt. Note: If Credit Card payment type is selected, automatically the Authorize Credit/Debit Card checkbox is checked. 117

131 8. Click Save. The patient ledger displays. 9. Click Reload. The insurance payment is applied to the insurance ledger. ing and Printing receipts When posting a payment, you have the option to the receipt. 1. From the Post a Payment or Post a Family Payment window, complete the fields related to posting the payment. 2. Check the desired options: Print Receipt and/or Receipt. 3. Do one of the following: Click Save from the Post a Payment window. Click Save Payment from the Post a Family Payment window. If you checked Receipt checkbox Then the Send dialog box displays. Print Receipt checkbox The Print dialog box displays on top of the Report Viewer, displaying the receipt. 118

132 If you checked Then the Both the Receipt and Print the Receipt checkboxes Report Viewer with the Print dialog box displays firsts. The Send dialog box is behind the print windows. 4. Do the following: If you re ing the receipt Then a. Enter the To, Subject and Message fields. b. Click Send. Cloud9 sends the and attaches the receipt to the . Ledger displays. c. Click Reload. The payment displays on the ledger. 119

133 If you re Then Printing the receipt a. Select the desired printing options. b. Click Print. The receipt prints Ledger displays. c. Click Reload. The payment displays on the ledger. ing and printing the receipt a. Complete printing the receipt. b. Complete ing the receipt. 120
 Correction You are Fixing a mistake made when posting a payment, such as entering $1,000 when you meant to enter $100.")
134 Accounting Activities From the ledger, you can make corrections and adjustments to an account. When you re making a(n) Correction You are Fixing a mistake made when posting a payment, such as entering $1,000 when you meant to enter $100. Adjustment Updating the account to bring the account to its correct balance, such as adjusting the ledger when an over payment was made. Corrections Corrections provide you the opportunity to fix incorrect transactions. The three types of corrections include: Correction Type Correction Used to correct a transaction That was posted with the incorrect amount. Note: When correcting a payment, the new amount needs to be a negative amount entered as either or (100.00). Reverse (a payment) That was posted to the incorrect ledger or should have never been posted. 121
135 Correction Type Void/Return Used to correct a transaction By voiding the transaction or returning the money to the patient or insurance company. Note: Void is only used for credit cards. Making a Correction To correct an incorrect posted amount 1. From the ledger, select the row with the incorrect payment. 2. Click Corrections Options and select Correction. The Correct a Transaction dialog box displays. 3. In the New Amount field, enter the correct payment amount. Note: When correcting a payment, the new amount needs to be a negative amount entered as either or (100.00). 4. Select the Posting Location. 5. Click OK. The ledger is updated. 122

136 Reversing a Payment To correct a payment posted to the incorrect ledger 1. From the ledger, select the row with the payment that needs to be posted to the correct ledger. 2. Click Reverse. The Reverse a Transaction dialog box displays. 3. Click Reverse. The ledger is updated. Voiding/Returning a Payment Note: Voiding and returning payments are only for Credit Cards. Is your office enrolled in OpenEdge (X-Web)? Then Yes You can void the payment until OpenEdge batches and processes the payment, which could still be less than 24 hours. Once OpenEdge processes the payment, you have reverse in OpenEdge s portal and do a balance adjustment on the patient s ledger to show the void. 123
137 Is your office enrolled in OpenEdge (X-Web)? Then After 1:00 you must reverse in X-Web s portal. No You must void the Credit Card payment through your portal and then do an adjustment to the patient s ledger. Adjustments You can post ledger, contract and insurance adjustments. There are four main types of adjustment types: Adjustment Type Balance Adjustment Refund Transfer Custom Adjustments Description Raises or lowers the balance from either the ledger or the contract. Returns money to the patient or insurance company. Moves money from ledger-to-ledger, contract-to-contract, ledgerto-contract or contract-to-ledger. Behind the scenes, acts like a balance adjustment, refund or transfer, but are set up in Silverlight: Setup available in Silverlight: Edit menu > Setup > Transaction Types. Examples include: Bad Debt Write Off to write off money your practice is not collecting. Discount Adjustment to give a discount from within the Contract window. Bulk Insurance Adjustment to give an insurance adjustment in the Bulk Insurance Payment window a future feature that will be released. Note: This feature will be available in a future release. 124
138 When you click Adjustment from the ledger, the Post Adjustment dialog box displays, where you enter and post an adjustment. Field Patient Responsible Party Insurance Contract Before This Adjustment After This Adjustment Adjustment Type Contract Adjustment Balance Adjustment Comment Description Name of the patient whose ledger is open. Name of the responsible party s ledger. Name of the insurance company s ledger. Contract description for contract that will be adjusted. Current amount due now, the contract future due, other future due and total due BEFORE the adjustment. Adjusted amount due now, the contract future due, other future due and total due AFTER the adjustment. List of adjustment options. Amount the user enters to adjust the CONTRACT. Amount the user enters adjust the LEDGER. Required field. Notes the user enters to detail why the ledger or contract is being adjusted. 125
139 Posting a Balance Adjustment You can to adjust the balance for the patient ledger, insurance ledger or contracts. Adjust a Patient Ledger 1. From the patient s Ledger, click Adjustment. The Post Adjustment window displays. 2. Select the Responsible Party. 3. View the Before Adjustment to see the current balances. Note: The amounts under the After Adjustment will be the same. 4. Under Adjustment Details section in the Adjustment Type field, select Balance Adjustment from the dropdown. 5. In the Balance Adjustment field, enter the adjustment amount. Note: The Balance Adjustment value may be a positive or negative amount. A negative amount to indicate a credit, such as an overcharge. A positive amount to indicate a debit, such as an undercharge. 6. In the Comment field, provide a detailed explanation of the adjustment. Note: This is a required field. 7. Click Save. The patient s ledger reflects the adjustment. 126
140 Note: If the patient has a contract with a balance, the Contract Adjustment pop-up window displays; click OK. Note: The Contract Adjustment window points out that after the adjustment, the terms of the contract are different from the original setup. No action is necessary, however; your office may benefit from changing the charge amount or the charge frequency. Adjust a Contract Balance 1. From the patient s Ledger, click Adjustment. The Post Adjustment window displays. 2. Select the Responsible Party. 3. Select the contract to be adjusted. 4. View the Before Adjustment to see the current balances. Note: The amounts under the After Adjustment will be the same. 5. Under Adjustment Details section in the Adjustment Type field, select Balance Adjustment from the dropdown. 127
141 6. In the Contract Adjustment field, enter the adjustment amount. Note: The Contract Adjustment value may be a positive or negative amount. A negative amount to indicate a credit, such as an overcharge. A positive amount to indicate a debit, such as an undercharge. 7. In the Comment field, provide a detailed explanation of the adjustment. Note: This is a required field. 8. Click Save. The appropriate ledgers reflect the adjustment. Note: If the patient has a contract with a balance, the Contract Adjustment pop-up window displays; click OK. Note: The Contract Adjustment window points out that after the adjustment, the terms of the contract are different from the original setup. No action is necessary, however; your office may benefit from changing the charge amount or the charge frequency. Adjust an Insurance Balance 1. From the patient s Ledger, click Adjustment. The Post Adjustment window displays. 2. Select the Responsible Party. 128

142 3. Select the insurance plan to be adjusted. The Before Adjustment and After Adjustment sections updates to display the insurance amounts. 4. View the Before Adjustment to see the current balances. Note: The amounts under the After Adjustment will be the same. 5. Under Adjustment Details section in the Adjustment Type field, select Balance Adjustment from the dropdown. 6. In the Balance Adjustment field, enter the adjustment amount. Note: The Balance Adjustment value may be a positive or negative amount. A negative amount to indicate a credit, such as an overcharge. A positive amount to indicate a debit, such as an undercharge. 7. In the Comment field, provide a detailed explanation of the adjustment. Note: This is a required field. 8. Click Save. The ledger reflects the adjustment. Note: If the patient has a contract with a balance, the Contract Adjustment pop-up window displays; click OK. 129

143 Note: The Contract Adjustment window points out that after the adjustment, the terms of the contract are different from the original setup. No action is necessary, however; your office may benefit from changing the charge amount or the charge frequency. Posting a Refund Posting a refund returns money to the patient or insurance company. 1. From the patient s Ledger, click Adjustment. The Post Adjustment window displays. 2. Select the Responsible Party. 3. If this is an insurance refund, select the insurance plan in the Insurance field to be refunded. Otherwise, go to the next step. 4. Select Refund from the Adjustment Type dropdown list. 130

144 5. In the Balance Adjustment field, enter the refund amount. 131
145 5. View the After Adjustment amounts to verify the desired result. Note: The amounts under the After Adjustment reflect the refund. 6. In the Comment field, provide a detailed explanation of the adjustment. Note: This is a required field. 7. Click Save. The ledger reflects the refund. 132
146 Posting a Transfer A transfer moves money from ledgers, contracts or ledgers and contracts: Ledger-to-ledger Contract-to-contract Ledger-to-contract Contract-to-ledger Common examples of transfers include: Receivables transfer: Ledger-to-ledger When money is posted to one sibling and should be posted to another. Contract transfer: Ledger-to-contract A patient loses insurance benefits, and the money needs to be transferred back to the financially responsible individual s contract. IMPORTANT: Be sure to select Adjustment from the ledger from which the money will be transferred. Left side Going FROM Ledger Ledger FROM where the money is being transferred Right side Going TO Ledger Ledger where the money is being transferred TO 133

147 Field Patient Responsible Party Insurance Contract Before This Adjustment After This Adjustment Adjustment Type Contract Adjustment Due Now Adjustment Comment Transfer to Contract Transfer to Receivables Description The name of the patient whose ledger is open. The name of the responsible party s ledger. The name of the insurance company s ledger. The description of the contract the adjustment is for. The current totals of the due now, the contract future due and total due BEFORE the adjustment. The adjusted totals of the due now, the contract future due and total due AFTER the adjustment. The adjustment type you are performing. The amount to adjust the CONTRACT. The amount to adjust the LEDGER. Note as to why you are adjusting the ledger or contract. Required field. Note: This is a required field. Amount being transferred to a specific CONTRACT. Amount being transferred to a specific LEDGER. 134

148 Posting a Receivables Transfer 1. Go to the patient s ledger from which the money will be transferred FROM. 2. Click Adjustment. The Post Adjustment window displays. 3. Select Transfer from the Adjustment Type dropdown list. The Post Adjustment Transfer From/Transfer To window displays. 4. Under the Transfer To section, do the following: a. Click Select Patient to lookup and select the patient. b. Click the dropdown arrow in the Responsible Party field and select the financially responsible individual. c. Click the dropdown arrow in the Insurance field and select the insurance plan. 5. Under the Adjustment Details section, select Receivables. 6. In the Balance Adjustment field, enter the amount that will be transferred. Cloud9 automatically adjusts the amounts. 7. In the Comment field, type a note about the transfer. Note: This is a required field. 135

149 8. Click Save. The From ledger displays, noting the transfer. Other ledgers are also updated. FROM Patient Ledger TO Patient Ledger Posting a Contract Transfer 1. Go to the patient s ledger from which the money will be transferred FROM. 2. Click Adjustment. The Post Adjustment window displays. 3. Select Transfer from the Adjustment Type dropdown list. The Post Adjustment Transfer From/Transfer To window displays. 4. Under the Transfer From section in the Insurance field, select the insurance plan. The Before and After Adjustment sections change to display amounts related to insurance. Display BEFORE you select the insurance plan 136

150 Display AFTER you select the insurance plan 5. In the Contract Adjustment field, enter the amount that needs to be transferred to the contract. The Before and After Adjustments section under the Transfer From and Transfer To sections are updated. 6. Under the Transfer To section, do the following: a. Click Select Patient to lookup and select the patient. b. Click the dropdown arrow in the Responsible Party field and select the financially responsible individual. c. Click the dropdown arrow in the Insurance field and select the insurance plan. 7. Under the Transfer To section in the field Adjustment Details section, click Contract. The Contract button turns blue. The Before and After Adjustment sections under the Transfer From and To sections reflect the update. 137

151 8. Click Save. The From ledger displays, noting the transfer. Other ledgers are also updated. 138

152 Contracts Contracts, also referred to as payment plans, help patients finance orthodontic expenses. Patients with insurance coverage can apply their insurance payment and set up a contract to offset the uncovered expenses. In some cases, patients may have more than one financially responsible individual and be covered by multiple insurance plans. A common example would be children who are covered under their mother and father s insurance. To access the Contract window, click Contracts from the patient s ledger. Pre-requisites to creating contracts Before creating contracts, a financially responsible individual must be set up in Cloud9 before creating a contract. If a patient has insurance, the insurance plan must also be set up in Cloud9 prior to creating the contract. Pre-requisite #1: Verify financially responsible individual(s) a. From the Home menu, click Edit Patient. b. From the Edit Patient window, click the Relationship tab. c. Verify that True displays under the Financially Responsible column for those individuals responsible for payment. Note: The following graphic indicates that both Sally and Bob Kelly are responsible for payment. If only Sally was responsible, False would display for Bob. 139

153 d. Do the following: If the financially responsible individual(s) is/are Listed Not listed Then Proceed to creating the contract Click Add to add the missing financially responsible individuals. Note: For detailed steps, please see Adding a Relationship under the Patient Management section. Pre-requisite #2: Verify insurance a. From the Home menu, click Edit Patient. b. From the Edit Patient window, click the Insurance tab. c. Verify insurance has been entered. If not, then see Add Insurance (Patient Management). d. Do the following: If the insurance is Listed for all financially responsible individuals Not listed for each financially responsible individual Then Proceed to creating the contract Click Add to add the missing insurance. Note: For detailed steps, please see Adding an Insurance Policy under the Patient Management section. 140

154 Creating Contracts with No Insurance When a patient starts a contract and doesn t have insurance, the financially responsible individual section displays in the bottom have of the window. If there are more than one financially responsible individual on the contract, everyone will have their own section. Fields for contract and financially responsible individual sections Field Patient Plan Status Plan Description Treatment Fee Charge Type Description The patient s name the contract is for. The status of the contract plan. The contract description is an optional field. Enter text that describes the plan, Full Braces, Invisalign, etc. Select the appropriate treatment fee that was created in the transaction type window. The amounts can be overridden in the treatment fee amount field. 141
155 Field Discount Type Posting Location Expected Contract Start Date Expected First Chg. Treatment Fee Amount Discount Amount Contract Sub-Total Initial CDT Code Payment Plan Totals Plan Amount Start Date Down Payment Description Select the appropriate discount offered to the patient. These were created in the transaction type window. Select the location desired. If not starting the contract immediately, but the patient wants to take home a financial letter to review, enter in the EXPECTED start date so that the field can be used in a letter template. This date does NOT start the contract. If not starting the contract immediately, but the patient wants to take home a financial letter to review, enter in the first EXPECTED monthly charge date so that the field can be used in a letter template. Fills in automatically based upon your setup selections. You can change this number by highlighting and entering in a different amount. Fills in automatically based upon your setup selections. You can change this number by highlighting and entering a different amount. The contract total after any discounts have been applied. Insurance code that displays on the initial claim form. This code is generated based on the treatment fee charge type selected. Use the lookup button to select a new initial CDT fee code. This field remains red until the plan amount field equals the payment plan sub-total. The payment plan total is the sum of the plan amounts fields. The amount the responsible party is expected to pay. Start date, which automatically fills when the start button is clicked. The amount of money that the responsible party is paying to start treatment. # of Payments The number of payments to complete the plan. 142

156 Field Frequency Future Due Auto Pay this contract Description The timeframe of the contract charges. Note: The default day is always the first of the following month. The total amount remaining that the responsible party is expected to pay after the down payment has been deducted from the plan amount field. This checkbox to designate an autopayment set up. Note: This option is only available after starting a contract. Buttons on the Contract Section Button When clicked Starts the contract Start Saves and closes the contract Close Cancels the contract entries Cancel Buttons on Financially Responsible Section 143
157 Button Calculate Fill Description Performs calculations based on amounts entered on the payment section on the contract Automatically fills selected options from the Fill dialog box: Date; Amount; Auto Pay and Auto Pay Date Currently unavailable Coupons To create a contract without insurance 1. Verify the financially responsible individual(s) have been set up in Cloud9. 2. From the patient s ledger, click Contracts. The Contracts dialog box displays. 3. Click Add. The Contract window displays. 4. In the Treatment Fee Charge Type field, click Lookup. The Choose a Treatment Fee Charge Type dialog box displays. 144
158 5. Select the desired treatment fee charge type and click Select. The corresponding fields automatically fill on the window. 6. If a discount needs to be applied, click Lookup in the Discount Type field, select the desired discount and click Select. The discount amount displays in the Discount Amount field and is applied to the contract sub-total. 7. Do the following: If there Is only one financial responsible individual Then a. In the Plan Amount field under the financially responsible section, enter the amount specified in the Contract Sub-Total field and then click anywhere on the contract. Cloud9 automatically calculates and populates the # of payments field and the charges in the table. Also, the Payment Plan Totals field is filled and no longer red b. In the Down Payment field, enter the amount the responsible individual is going to pay to start treatment and then click anywhere on the contract. Cloud9 automatically adjusts the charge amount based the # of payments. c. In the # of Payments field, adjust the number if the financially responsible individual wants a different # of payments. Cloud9 automatically adjusts the charge amount based the # of payments. d. In the Frequency field, enter the timeframe of the contract charges. Cloud9 automatically adjusts the charge amount based the # of payments. Are more than one financial responsible individual Complete above steps a through d for each additional financially responsible individual. Note: If you are not planning to start the contract but want the patient to take home a financial letter to review, enter the Expected Contract Start Date and the Expected First Monthly Charge Date fields. These fields can be used in letters for the Expected 145

159 information without starting the contract. 8. Do the following: If you want to Start the contract Then a. Click Start. The Charge Date column is now filled in and many fields cannot be modified. b. Click Close. The contract is started and saved. The contract window closes. NOT start the contract Click Close. The contract is saved, but NOT started. The contract window closes. Creating Contracts with Insurance When a contract includes insurance, the insurance section displays on the lower right-hand side of the financially responsible individual section. 146
160 Insurance Fields The fields for contract and financially responsible individual sections are the same as contracts with insurance. Below are the additional fields for the insurance section. Field Plan Amount Start Date Down Payment Cont. Code Initial checkbox Continuation checkbox Future Due Initial Claim Description The amount the insurance is expected to pay. Start date, which automatically fills when the start button is clicked. The amount of money that the insurance is paying to start treatment. The periodic contract ADA code that displays on the claim form. Checkbox checked if to have an initial claim generated automatically based upon specific dates. Checkbox checked if the insurance company requires continuation of forms generated automatically based upon specific dates. The total amount remaining the insurance is expected to pay after the down payment has been deducted from the plan amount field. The amount displayed on the initial claim. Note: If no amount is specified, the claim form displays $0.00. # of Claims The number future claims that should be automatically generated for the patient. Frequency The designated timeframe for generating the claim monthly; quarterly; semiannually or annually. 147


161 Buttons on Insurance Section Button Initial Claim When clicked Opens the initial claim and provides opportunity to review it before submission Note: The Initial Claim check box must be checked to see this button. Calculates the form and ledger amounts Calculate Fill Automatically fills selected options from the Fill dialog box: Date; Form Amount and Ledger Amount To create a contract with insurance 1. Verify that the responsible parties have been identified as financially responsible. 2. Verify the insurance information has been set up. 3. From the patient s ledger, click Contracts. The Contracts dialog box displays. 4. Click Add. The Contract window displays. 148

162 In the Treatment Fee Charge Type field, click Lookup. The Choose a Treatment Fee Charge Type dialog box displays. 5. Select the desired treatment fee charge type and click Select. The corresponding fields automatically fill on the window. 6. If a discount needs to be applied, click Lookup in the Discount Type field, select the desired discount and click Select. The discount amount displays in the Discount Amount field and is applied to the contract sub-total. 7. Under the Insurance ledger, enter the insurance benefit in the Plan Amount field. 8. In the Down Payment field, enter what the insurance company is expected to pay to start treatment. 9. In the Initial Claim field, put the Treatment Fee Amount that displays on the Initial Claim Form. Note: This amount is typically the amount displayed on the Contract Sub-Total field. 10. In the # of Claims field, enter how many claims should be generated. 11. In the Frequency field, select the appropriate frequency of claim submission. The Number of Charges and the Amount are automatically calculated for you based on the selections you made in the Down Payment and # of Payments fields. The Future Due is divided into equal monthly charges. 149
163 The Payment Plan Totals field displays red as the patient s contract has not yet been filled. 12. Do the following: If the insurance company does Require a Continuation of Benefits Claim Then a. In the first Form Amount cell, enter in the amount you want the claim form to display. For example, If the payment percentage is 50%, double what the amount is in the Ledger Amount column. b. Highlight the line if needed, click Fill. c. Check the Form Amount checkbox. NOT require a Continuation of Benefits Claim d. Click OK. The amount you entered in the first cell is now is all the Form Amount cells. Go to the next step. 13. Do the following: If there Is only one financial responsible individual Then a. In the Plan Amount field under the financially responsible section, enter the amount specified in the Contract Sub-Total field minus the Plan Amount under the Insurance section and then click anywhere on the contract. Cloud9 automatically calculates and populates the # of payments field and the charges in the table. Also, the Payment Plan Totals field is filled and no longer red. b. In the Down Payment field, enter the amount the responsible individual is going to pay to start treatment and then click anywhere on the contract. Cloud9 automatically adjusts the charge amount based the # of payments. 150
164 If there Then c. In the # of Payments field, adjust the number if the financially responsible individual wants a different # of payments. Cloud9 automatically adjusts the charge amount based the # of payments. d. In the Frequency field, enter the timeframe of the contract charges. Cloud9 automatically adjusts the charge amount based the # of payments. Are more than one financial responsible individual Complete above steps a through d for each additional financially responsible individual. Note: If you are not planning to start the contract but want the patient to take home a financial letter to review, enter the Expected Contract Start Date and the Expected First Monthly Charge Date fields. These fields can be used in letters for the Expected information without starting the contract. 14. Do the following: If you want to Start the contract Then a. Click Start. The Charge Date column is now filled in and many fields cannot be modified. b. Click Close. The contract is started and saved. The contract window closes. NOT start the contract Click Close. The contract is saved, but NOT started. The contract window closes. 151
; fully integrated with Cloud9")
165 Create an Auto Payment Plan Once a contract has been started, you have the option to create an Auto Payment Plan for the patient. There are two ways auto payments can be set up: Manually; not integrated with Cloud9 for offices not signed up to partner with OpenEdge or OrthoBanc Via OpenEdge (XWeb); fully integrated with Cloud9 IMPORTANT: While auto payments can be set up in HTLML5, you need to process auto payments in Silverlight until this functionality is available in a future HTML5 release. Silverlight: Financial menu > Post Auto Payments. 152
166 Create a Manual Auto Payment Plan Pre-requisite: The patient s contract needs to be set up and started to have access to the auto pay option for the contract. Notes: If your office chooses NOT to sign up to partner with OpenEdge or OrthoBanc, you are still able to post payments all at once. It is your responsibility to get notifications through your credit card or ACH processor s portal if the payment has cleared to post the payments. Remember: If you process payments more than once or twice in a month, this could turn into a very labor-intensive process. The fewer dates you offer to your patients, the less complicated it is for the staff to keep up with. Most offices give the 1 st and 15 th only. If selecting a Manual Auto Payment Plan, you need to go into your processor s portal and enter the payment information, amounts, dates, and whatever else is required by your processor. 1. Access the patient s contract: a. Access the patient s ledger. b. Click Contracts. c. Select the contract and click Edit. The patient s contract displays. 2. In the responsible party s section, check Auto Pay this contract. The Select Auto Payment Type dialog box displays. Reminder: If you cannot check the Auto Pay this contract checkbox, you must start the contract. 3. In the Provider field, select None. 153


167 4. Select Manual. Note: The Post Dated Checks option is used for Canadian offices. 5. Select the Payment Type. 6. Click Save. The Contract window displays with the following updates: The Auto Pay field is populated as same as the Amount field. The Auto Pay Date field is populated with the Charge Date. 154

168 7. In the first row, enter the charge amount in Auto Pay field. 8. Select the Auto Pay Date. 9. Click Fill. The Fill dialog box displays. 10. Check Auto Pay and Auto Pay Date check boxes and keep Date and Amount checked. 11. Click Fill. Cloud9 automatically fills the remaining Auto Pay and Auto Pay Date fields. 155
169 12. Click Close to close and save the contract. Create an OpenEdge (XWeb) Auto Payment Plan Cloud9 is fully integrated with OpenEdge Technologies for setting up Auto Payment Plans. The plan is the same as a manual plan, except: Your practice needs to sign up with OpenEdge for a credit card account, ACH (Automated Clearing House) account or both. If you have both a credit card and ACH account, you need to select the appropriate one based on the patient s preference. Notes: OpenEdge assigns accounts to specific locations but will default to the Cloud9 assigned location listed on the Edit Patient window. If a patient has OpenEdge and their location is changed, Cloud9 prompts you to update the auto payment to the new location. Pre-requisite: The patient s contract needs to be set up and started to have access to the auto pay option for the contract. 1. Access the patient s contract: a. Access the patient s ledger. b. Click Contracts. c. Select the contract and click Edit. The patient s contract displays. 2. In the responsible party s ledger, check Auto Pay this contract. The Select Auto Payment Type dialog box displays. 156

170 Note: If you cannot check the Auto Pay this contract checkbox, you must start the contract. 3. In the Provider field, select XWeb. The XWeb field automatically displays Practice. 4. Do one of the following: Select the payment type Credit Card Bank Account Then The Set Up Auto Pay dialog box displays. a. Enter the Card Number and Expiration Date. b. Click Submit. The Set Up Auto Pay dialog box displays. a. Enter the Bank Account Number. b. Click Submit. 5. Enter the appropriate information for the credit card or bank account. 6. Click Save. The Contract window displays with the following updates: The Auto Pay field is populated as same as the Amount field. The Auto Pay Date field is populated with the Charge Date. 7. In the first row, enter the charge amount in Auto Pay field. 8. Select the Auto Pay Date. 157

171 9. Click Fill. The Fill dialog box displays. 10. Check Auto Pay and Auto Pay Date and keep Date and Amount checked. 11. Click Fill. Cloud 9 automatically fills the remaining Auto Pay and Auto Pay Date fields. 12. Click Close to close and save the contract. 158

172 Change Contract Amounts After the contract has been started, patients may want to change the first monthly charge amount or all monthly charge amounts. Changing the First Monthly Charge If a patient wants to pay a larger amount the first month, you can easily change that one monthly charge. As a result, the balance will be reduced, and Cloud9 will adjust payments accordingly. 1. From the patient s contract, enter the monthly amount in the Amount field on the first row. 2. Select the row and click Fill. The Fill dialog box displays. 3. Make sure the Date and Amount checkboxes are checked. Note: If this contract has autopayment, also check the Auto Pay and Auto Pay Date checkboxes. 4. Click Fill. Cloud9 automatically calculates the new # of payments and updates the number of charge rows. 159


173 5. Click Close to close and save the contract. Changing All Monthly Charges If a patient decides that they want to pay a different monthly amount, you can adjust the monthly payment amount. For example, the patient decides to pay a higher amount each month to pay off their contract quicker. 1. From the patient s contract, enter the new monthly amount in the Amount field on the first row. 2. Select the row and click Fill. The Fill dialog box displays. 3. Make sure the Date and Amount checkboxes are checked; if this contract has autopayment, also check Auto Pay and Auto Pay Date checkboxes. 160

174 4. Click Fill. Cloud9 automatically calculates the new # of payments, updates the number of charge rows and fills in the new amount for each charge. 5. Click Close to close and save the contract. 161

175 Updating Contracts Once contracts are started, you may need to make the following updates: Correct an out of balance between the future due and the sum of future transactions Change a payment date Cancel autopayment Correcting Out of Balance Contracts are out of balance when the Future Due amount does NOT equal the Sum of Future Transactions for a specific financially responsible individual or insurance. Below is an example for a financially responsible individual; an out of balance for insurance would display the same way under the insurance section of the contract. You receive a warning once you click OK. The contract that is out of balance displays in red. 162
176 Example: Due Now shows $0.00, Future Due is $0.00 and the Total Due $376.00, but it should be a $0.00 Total Due. You'll want to start a Contract Balance Adjustment and put a ($376.00) amount in the Due Now field to adjust the Total Due to $ Determine what the correct ledger balance should be. 2. Complete a contract balance adjustment. Cloud9 updates the ledger to reflect the adjustment and the Contract window is no longer red. Notes: The Contract Adjustment value may be a positive or negative amount. A negative amount to indicate a credit, such as an overcharge. A positive amount to indicate a debit, such as an undercharge. In the Comment field, provide an explanation of the adjustment; e.g., Fixing contract out of balance. This is a required field. 163


177 Changing an Auto Payment Date If your practice processes auto payments on certain days of the month, you may need to update the auto pay dates to be consistent. You can change the Auto Pay Date to match a day when your practice processes the auto payments. 1. From the patient s contract, select the row of a charge. 2. Enter the new date in the Auto Pay Date column. 3. Click Fill. The Fill dialog box displays. 4. Check the Auto Pay Date checkbox. 5. Click Fill. Cloud9 updates the Auto Pay Dates after the charge row with the updated Auto Pay Date. 164

178 6. Click Close to close and save the contract. Canceling an Auto Payment Plan If you make a mistake on an auto payment plan, you can cancel that plan and start a new plan. 1. From the Contract window, uncheck the Auto Pay this contract checkbox. Cloud9 clears out the content in the Auto Pay and Auto Pay Date fields. 2. Check the Auto Pay this contract checkbox. The Select Auto Payment Type dialog box displays. 3. Continue setting up the contract. 4. Once the new contract is set up, click Close to close and save the contract. 165


179 Insurance Queue No matter if you accept assignment or not, you manage all claims through the Insurance Claim Queue. From the Insurance Claim Queue window, you can do the following regarding claims viewing, adding, printing, e-filing, changing a claim status and looking up specific patient claims. Note: If using our integrated electronic claim submission service, Change Healthcare, you can also get the status of a claim by downloading reports directly from Change Healthcare. You can access the Insurance Claim Queue window from the Financial menu. Insurance Claim Queue window 166
180 Buttons Button Description Reload Queue Print Claims Send Claims Add Claim Edit Claim Set Status (for a claim) Claim History 167
181 Fields The following fields are used to query which claims you desire to access: Field Claim Status Include Substatuses Claim Type Location Patient Use Date Range Start Date End Date Rank Description The status of the claim you want to display New (default), Printed Submitted Rejected Paid Partially Paid Deleted. Additional status to further define the primary status. One of the following claim types: Continuation Initial One- Time or Pre-Determination or view them All. The specific location, if you have several offices. Patient you re looking up claims for. Checked if using a date range. Note: Start and End dates need to be entered. Start date of the date range. Last date of the date range. Desired insurance as it is listed on the Insurance tab from the Edit Patient window. Note: This is NOT an indication of primary and secondary. 168
182 View a Claim from the Insurance Claim Queue 1. From the Insurance Claim Queue window, check the box to the left of the claim you want to open. 2. Click Edit Claim. The ADA Dental Claim Form displays. 3. Click Close. 169

183 Editing Patient Information from the Insurance Claims Queue If you need to correct any information on the claim form, click Insurance Claim Actions., the shortcut menu called The shortcut menu provides quick access to the following features: Edit Patient Financial Ledger Contract Edit Insurance Company Edit Insurance Billing Center 1. From the Insurance Claim Queue window, click the Insurance Claim Actions menu. The menu displays. 2. Select the desired option from the following: 3. Edit Patient Financial Ledger Contract Edit Insurance Company Edit Insurance Billing Center The corresponding window displays. 3. Make and save the desired change. 170

184 4. Return to the Insurance Claim Queue window. 5. Select the desired claim and click Edit Claim. The claim displays. 6. From the Claim window, click Rebuild Claim. The system updates the claim. 7. Click Save and then Close. The Insurance Claim Queue window displays. Note: From the Insurance Claim Queue window, click Reload Queue to update the content displayed on the window. Add a Manual Claim 1. From the Insurance Claim Queue window, click Add Claim. The Add Claim dialog box displays. 2. Select the Patient. 3. Select the Insurance Plan. 4. Select the Claim Type. 5. Select the Claim Date. 6. Click Add. The new claim displays. 7. Click Close. The Insurance Claim Queue window displays. The claim is listed on the Insurance Claim Queue table. 171

185 Submit a Claim 1. From the Insurance Claim Queue window, check the box next to the claim to send. 2. Do one of the following: Are you enrolled in Change Healthcare? Yes No Then click Send Claims. Cloud9 sends the selected claim to the Change Healthcare to be processed. Print Claims. The selected claim prints. View a Claim Status 1. From the Insurance Claim Queue window, click in the Claim Status field or use the dropdown arrow. The list of available statuses display. 2. Select the desired status. 3. Click Reload Queue. The Insurance Claim Queue table displays a list of the claims with the selected status. View the Claim Status Report As the claim is being sent to Change Healthcare, reports are being downloaded indicating the status of past-submitted claims. You can choose to view the reports after downloading or open the report later. If you choose to view later, be sure to view these reports within 24 hours after submission. 172
186 View Claim Report Immediately after Submitting Claim 1. From the Financial menu, click Insurance Claim Queue. 2. Do NOT select any claims and click Send Claims. This updates the report and the statuses of claims in the queue. View Claim Report Later After Submitting Claim Note: This information comes directly from Change Healthcare. 1. From the Reports menu, click Reports. 2. Select Claim Status Reports from the list, click Lookup. 3. In the From Date and To Date fields, enter the desired date range. 4. Click Search. 5. Select the File Name of the report you want to view. 6. Click OK. Change a Claim s Status 1. From the Insurance Claim Queue window, check the box next to the claim that needs to have its status changed. 2. Click (Set) Status. The Set Claims Status dialog box displays. 173


187 3. In the New Claims Status field, select the desired status. Note: It is extremely important to mark a claim as Paid or Partially Paid. Marking the submitted claim properly will help you stay on top of paid claims. 4. Click Select. 5. Click Reload Queue. The claim s status is updated. Correct and Resubmit a Rejected Claim 1. From the Insurance Claim Queue window, select Rejected from the Claim Status field. 2. Click Reload Queue. The rejected claims display on the table. 3. Select the desired rejected claim. 4. Click Edit Claim. The claim displays. 5. Make the desired changes to the claim. 174

188 6. Click Save. The Insurance Claim Queue displays. 7. Click Send Claims for e-filing. A Send Claims confirmation dialog box displays. 8. Click OK. 9. In the Claim Status field, select Submitted/Re-submitted. The status of the claim becomes Submitted/Re-submitted. Note: If you don t see the claim on the table, select (All) in the Claim Status field and click Reload Queue. Since the status was changed, the original status query may not display the updated claim. Claim History The Claim History window tracks the actions and associated details taken for a claim. In addition, you can add or delete a note to provide information for future reference. Button Description Reload History Add Note Delete Note Close (window) 175
189 Accessing the Claim History 1. From the Insurance Claim Queue window, select the checkbox next to the desired claim. 2. Click History. The Claim History window displays and lists the history entries. Adding a Note 1. From the Claim History window, click Add Note. 2. Type the note in the box. 3. Click Save. The note displays on the table. 176
190 Deleting a Note 1. From the Claim History window, select the desired claim to delete. The row becomes highlighted. 2. Click Delete. The Delete Note confirmation dialog box displays. 3. Click Yes. The note is removed from the table. 177
191 Scheduling The Schedule provides a variety of navigation tools to move around the window and display information. When View is selected under the Schedule heading on the Home menu, the Scheduling window (aka the Schedule) displays. Selecting Opens the That View Scheduling window Provides a lot of tools to help you navigate the schedule and manage your appointments. Locator Details Locator Details window Displays all scheduled patients for the current day. The Schedule can also be accessed from the Patient Header: 178

192 Understanding how to navigate the Scheduling window helps you plan your schedule and run your office like clockwork. The Scheduling window has the following five sections: 1. Patient Locator tracks patients through the appointment process. 2. Scheduling Buttons provide quick access to commonly used functions. 3. Toolbar/Clipboard provide a variety of schedule functions. 4. Schedule View displays appointments. 5. Light Bar provides quick access to view which chairs the patients are located. 179
193 Setting up Schedule Templates Your office can have as many schedule templates as required. If you have several practices, you need to create templates for each practice, even if you are open at the same time and schedule the same appointments. Your designated administrator creates, edits and deletes schedule templates; Setup available in Silverlight: Edit menu > Edit Template Administrators may need to set up these additional features for schedules and templates: Setup available in Silverlight: Edit menu > Setup > Schedule View Appointment Classes Appointment Types Employees (to set up permissions to setup access to setting up templates) Notes: Appointment classes are used to group specific appointment types together. All appointment types belonging to a specific class should be the same time length. Appointment classes allow searching for spots tied to multiple appointment types. You can create as many classes as you need but remember if you have more than 15 classes, it might be difficult to place them all on a single day without constricting the day. Some offices prefer using an open template in which their schedule have no specific designated appointments types. They only want to have their closed time displayed, and the front desk is free to schedule any type of appointment that fits into the open time. As a result, you will NOT be able to use the search feature when: o Scheduling the patient s next appointment o Using the Treatment Card Next Visit section In addition, you will need to manually schedule every appointment. 180
194 Navigating the Patient Locator The Patient Locator displays the current patient names and their status while tracking these patients through the appointment process. The menu button is used to select the desired office location and view the patients statuses for the selected location. Selecting a location 1. On the Patient Locator, click the menu button. The office s locations display. The current location being displays on the Patient Locator is check marked. 2. Click the desired location. The Patient Locator changes to show the patient statuses for the selected location. Note: Each time you log into Cloud9, the system remembers the location you logged into as displayed in the Location field. If you do not select a different location at login, you can change it now. Also, if this area is blank, you must select your location, as none has been set. Changing a Patient s Appointment Status There are two ways of moving a patient through the appointment process to change the appointment status: Manually changing the patient s appointment status. Dragging the patient s appointment through the various patient locator statuses or Light Bar. 181


195 Manually Changing a Patient s Appointment Status 1. On the Patient Locator, click the patient s status: Scheduled Waiting Seated The patients with that status display in blocks. 2. Click on the desired patient. The Patient Locator Status dialog box displays. 3. Do one of the following to select the desired status: Click the dropdown arrow next to the Status field. The status options display. Click the Forward Arrow to scroll forward through the various statuses. 4. Select the desired status. Note: Use the Checkout button to move the patient to the Ready for Checkout status. 182
196 5. Click OK. The system moves the patient to the selected status on the Patient Locator to reflect the change in status. Dragging the Patient s Appointment 1. On the Patient Locator, click the Scheduled cell. 2. Select the desired patient appointment. 3. Drag the appointment to the Patient Locator cell or Light Bar. Cloud9 updates the status based on where the appointment is dragged. Using the Scheduling Buttons The Scheduling Buttons, located under the Patient Locator, provide quick access to navigating the schedule and managing appointments. Note: Some Scheduling Buttons are specific to managing appointments versus navigating the Scheduling window. These buttons include: Search (for an appointment) Patient Appts. Reminders No Shows These buttons are described below; however, to learn how they are used when making appointments, please see Appointment Management. Left-Hand Buttons 183
197 Button Search (for an appointment) Patient Appts Click to Search for a time or an appointment. For more details on using this feature, see Appointment Management. Display a patient s appointments. For more details on using this feature, see Appointment Management. Display a calendar showing the practice s location schedules. Practice (Schedule View) Reminders (Schedule) Notes Display the list of appointment reminders. For more details on using this feature, see Appointment Management. Add, edit and delete schedule notes. An example of a schedule note would be to inform the staff of special events, like training sessions or visitors. Note: If there are notes available for the day displayed on the calendar, the Notes button will also display on the right-hand buttons. No Shows Display all patients who didn t show up for their appointments. Note: It is important to keep track of these patients before they fall behind in treatment. For more details on using this feature, see Appointment Management. Display the entire week. Week (at-a-glance) List options for printing the schedule. Print Schedule 184
198 Right-hand Buttons and Appointment Information Tool/Button # of Appointments and Patients Today Refresh Description Displays the number of appointments and patients for the day displayed on the calendar. Displays the number of appointments and patients for the current day (today), remains on the same location and refreshes the entire Schedule View to today s date. Refreshes the entire Schedule View and stays on whatever date and location. This includes updating the # of appointments and patients for the day displayed on the schedule. Closes the schedule. Close Managing Appointments See Appointment Management to learn how these buttons are used to manage appointments: Search (for an appointment) Patient Appts Reminders No Shows 185


199 Viewing the Practice Schedule If your practice has many locations, you can view a schedule showing the all practice locations. The colors for each location can be set up in Silverlight; Setup available in Silverlight: Edit menu > Setup > Schedule View. Practice (Schedule View) 1. Click Practice (Schedule View). The Practice calendar displays. 2. Use the arrow buttons to advance to or go back a month. 3. Click the X on the Practice Schedule View tab, located across the bottom of the window, to close the window. 186

200 Managing Notes There are two types of notes: Prompt Note notifies everyone when they open the schedule that an event is occurring on a specific day. For example, a staff member is on vacation. It is not a specific time, but when you open the day with a Schedule Note, you must acknowledge the note before you can use the schedule for the day. Block Note blocks out a specific timeframe. For example, a Lunch and Learn from 12:00 2:00 pm. It displays across all columns of the schedule over the chosen hours. Clicking Notes provides access to creating, viewing, editing and deleting notes. (Schedule) Notes Creating Notes 1. Click Notes. The Schedule Note - < Date displayed on the calendar> dialog box displays. 2. Click Add. The Add Schedule Note dialog box displays. 3. Select the desired date. 187

201 4. For the start and end time fields, do one of the following: If you are creating a Prompt Note Block Note Then Do NOT enter a start and end date time Do enter a start and end time 5. Enter the note. 6. Click OK. Viewing Notes To view all notes for the current day displayed on the calendar, click Notes. The Schedule Note <date> pop-up window displays. For Prompt Notes, click Reload. The note displays as a pop-up Schedule Note - <DATE> window. 188

202 Note: The pop-up Schedule note window also displays on the designated date when you open the schedule. For Block Notes, go to the designated day and time entered for the note. The note displays on the schedule. Editing and Deleting Notes 1. Open the Schedule to the appropriate day. 2. Click Notes. The Schedule Note <date> pop-up window displays. 3. Click Delete or Edit to perform the desired action. 4. Click OK. The edits are saved, or the note is deleted, depending on which option was chosen. Managing the Week-at-a-Glance Window The Week View displays the schedule for the entire week. Week (at-a-glance) 189


203 You have the same functionality in the week view as you have in the daily view except for rescheduling an appointment because the clipboard/menu is not visible in this window. Note: The template appointment class/type is visible for each day. If an appointment is scheduled, it displays as a solid color rounded rectangle. 1. Click Week. The Week-at-a-Glance window displays. 2. Click the mouse on a specific appointment. The appointment details and an options list display. 190
204 3. Select an option from the list. Note: For more details regard appointment options, please see Appointment Management. 4. Use the buttons at the top of the window to navigate. If want to Advance or go back a week at a time Select a different location Select specific days to display Close the Week-at-a-Glance view Click Left arrow to go back a week Right arrow to advance a week Dropdown arrow and select desired location Select the desired days to display and click OK. 191
205 Viewing and Selecting Schedule Print Options 1. Click Print Schedule. The Schedule Print Options window displays. Field Start Time/End Time Rows Height Fit to page Columns Width Show Reservations Show Manual Overrides Landscape Use to Select the timeframe to print. Specify the printed row height. Check if the schedule width should print on one page. Specify the printed column width. Note: Checking the Fit to page checkbox overrides any number entered in this box. Check if the template background should be printed. Print appointments that have had manual overrides applied. Indicate the schedule should be printed in landscape orientation. 2. Make the desired selections. 3. Click OK. 192
206 Displaying the Number of Appointments and Patients for the Current Day The number of appointments and patients for the day automatically displays on the calendar. If you want to Displays the number of appointments and patients for the current day (today). Click Update the # of appointments and patients for the day displayed on the schedule. Refresh Closing the Schedule Click Close. The Scheduling window closes. 193
207 Navigating the Toolbar/Clipboard The Toolbar/Clipboard provides quick access to functions related to the calendar. Field Orthodontist Template Mini-Calendar Toolbar/Clipboard Used to View only the patients who are assigned to a specific orthodontist; select the doctor from the list and the patients who are not assigned to him or her are dimmed out. Show the assigned schedule template. Go to a specific day, month, or year. Click on the month to select a different month. Click on the year to select a different year. Use the arrow keys to go forward or backward. Hide and restore the Toolbar/Clipboard view, using the Left pointing arrows. This allows viewing more columns on the schedule. If your practice has many chairs and you would like to see more columns on the schedule at various times of the day, you can toggle between displaying and hiding the Toolbar/Clipboard. 194

208 Field Clipboard Revert Appointments only on the Clipboard Needs Appt Sooner Used to Hold an appointment being rescheduled, preserving the original location. An appointment is dragged on the Clipboard until they are dragged to the new day and time. Cancel moving an appointment. Revert Appointments easily returns the appointment to the original location on the schedule. List active patients who doesn t have a scheduled appointment or recall. It prevents patients from being lost in the shuffle and falling off their treatment plan. List patients who would like an earlier appointment if one becomes available. When creating a patient appointment, you have the option to check a box for Sooner if possible. This places the patient on the list. If an appointment becomes available, you can reschedule them and remove the checkmark. If an appointment does not become available, the patient drops off the list automatically. Displaying an Orthodontist s Schedule If the practice has several orthodontists and you want to view only the patients that are assigned to a specific orthodontist, select the doctor from the list. 1. Click the dropdown arrow next to the Orthodontist field. The available orthodontist calendars display. 2. Select the desired orthodontist or All Orthodontists. The selected calendar displays and the patient appointments who are not assigned to the selected orthodontist are dimmed. 195


209 Displaying the Schedule Template Name The name of the schedule template automatically displays underneath under the Template header. Using the Mini-Calendar The mini-calendar is used to go to a specific day, month, or year. Click the month to select a different month. Click the year to select a different year. Use the arrow keys to go forward or backward. Viewing Patients Who Need Appointments A patient appears on the Needs Appt tab if they are ACTIVE, have no scheduled appointment and no recall. Click the Needs Appt tab. Use the scroll bars to see additional patients and information. Note: If you have access permission, you can also use the Patients Needing Appointment report to identify patients needing appointments. 196

210 Viewing patients who want a sooner appointment The Sooner tab contains a list of patients who would like an earlier appointment if one becomes available. When creating a patient appointment, you have the option to check a box for Sooner if possible. This places the patient on the list. If an appointment becomes available, you can reschedule them and remove the checkmark. If an appointment does not become available, the patient drops off the list automatically. Scroll to display additional information about the appointment. Navigating the Appointment Area The Appointment Area displays the patients appointments and chair assignments for the designated location and day. The three areas of the Appointment Area include: Schedule View Day Navigation Schedule View 197

211 Selecting a Schedule View The Schedule View options can be displayed as either a dropdown list or separate tabs. Setup available in Silverlight: Edit menu > Setup > Employees > Show Schedule Views in Dropdown Checkbox. Schedule View Tabs Click on the Schedule View tab to display the desired Schedule View to display; in this example, Atlanta or Woodstock. Schedule View Dropdown List Click the dropdown arrow and select the desired Schedule View to display. Selecting a Day/Week/Month The Day/Week/Month (M/W/M) functionality allows you to advance or move back the calendar date or by days, weeks and months. You ll use the D/W/M on the left-hand side to go to a past date and the D/W/M on the righthand side to go to a future date. 198

212 1. Determine if you want to display a future or past date to use the appropriate M/W/D fields: To view a date in the Past Future Use the M/W/D on the Left-hand side Right-hand side 2. Enter the number of months, weeks or days in the corresponding field. 3. Click M for months, W for weeks or D for days, to move the date forward or backward. The calendar automatically moves to the date corresponding to your selection. Viewing the Schedule The Schedule View displays the appointments schedule. The tools on the Scheduling window help to navigate the calendar, schedules and appointments. 199


213 Navigating the Lightbar The Lightbar indicates where (which chair) the patient is currently seated and works in conjunction with the Patient Locator: When a patient is moved from Waiting to Be Seated status Seated to Ready for Checkout status On the Lightbar, the patient Displays under the assigned seat Is removed To see the available options once a patient is seated, click on the seated patient displayed on the Lightbar: Option Call Doctor Text Doctor Call Emergency Doctor is Present Cancel Call Description Places a number in the upper right corner of the chair and causes the appointment to blink. The number represents the order that the option was selected and whom the doctor should see next. Sends a text to the doctor listed on the APPOINTMENT, not the doctor that is listed on the Edit Patient tab. This of course, could be the same individual. Turns the appointment color to emergency and starts to blink. Indicates when the doctor comes to the chair; the header turns green indicating to everyone where the doctor is. Eliminates the number and the blinking. The next number in the sequence is now blinking and displays the number

214 Option Edit Patient Import Images Treatment Card View Images Description Opens the patient s information. Import images (not x-rays) from this option. Opens the patient s treatment card, if not automatically specified in the setup menu. Displays a patient s images. Note: Some practices have many more chairs that can comfortably be displayed in one column. A chair can be displayed in a single column, or several chairs in one column, the choice is up to the practice. For these practices, there is an option that displays chairs in as many columns as needed and a prescribed seating order. Setup available in Silverlight: Edit menu > Setup > Schedule View. 201

215 Locator Details When Locator Details is selected under the Schedule heading on the Home menu, the Locator Details window displays. Field Hide Patient Images Sort by Check-in Time Refresh Close Description Check the box to hide images. Check the box to sort by check-in time, not status. Click to refresh the locator details. Click to close the Locator Details window. The Locator Details window displays in a table format displaying all scheduled patients for today. This window works in conjunction with the Patient Locator and the Light Bar. The statuses on the table are color-coded based on your office s preference. Note: These colors can be Setup in Silverlight: Edit menu > Setup > Schedule View. 202

216 Each appointment status can be handled through the locator details by dragging the patient s picture or name to the cell on the Patient Locator. 203

217 Document Editor The Document Editor manages the document templates created for letters, s, texts, and financial arrangements. IMPORTANT: The term Document refers to a document template, which is used to generate letters that reuses static content from the document template and allows users to insert merge fields to customize the letter. Document Type Letter Text Financial Arrangement Use to Create templates for any merged correspondence. Create appointment reminder s for the Reminders Queue. Note: Letters can be ed, but the document type is only used to create reminder s. Create text reminders for the Reminders Queue. Create documents focusing on contractual arrangements. From the Home menu, click Document Editor under the Letters heading. The Document Editor opens with a blank, untitled document. 204

218 Creating Letter, , and Text Documents 1. From the Home menu, click Document Editor under the Letters heading. The Document Editor opens with a blank, untitled document. 2. Under the File menu, select New. A dropdown list displays with the options to create a New Letter, New , New Text, or a New Financial Arrangement document. 3. Select one of the following options: New Letter; New ; or New Text. Note: Creating a New Financial Arrangement is covered in the following section. 4. Click the mouse in the body of the blank document. The blinking cursor displays. 5. Type any static text in the body. 6. Using the mouse, position the cursor the where the merge field should be inserted and click the mouse. 7. Click Mail Merge and Insert. A dropdown list displays different categories of merge fields. Note: The Financial Arrangement category is only available when a new financial arrangement document is selected. 8. Select the merge field to be inserted where the cursor is positioned. 9. Repeat adding merge fields until all desired of fields have been inserted. 10. From the File menu, click Save As. 11. Enter a descriptive name for the document, select the desired location, and click Save. 205

219 Creating a Financial Arrangements Document Note: If the Financial Arrangement document or merge fields are not present, contact Cloud9 support. Support will investigate and enable an app preference. 1. From the Home menu, click Document Editor under the Letters heading. The Document Editor opens with a blank, untitled document. 2. Under the File menu, select New. A dropdown list displays with the options to create a New Letter, New , New Text, or a New Financial Arrangement document. 3. Select New Financial Arrangement. 4. Click the mouse in the body of the blank document. The blinking cursor displays. 5. Type any static text in the body. 6. Using the mouse, position the cursor where the merge field should be inserted and click the mouse. 7. Click Mail Merge and Insert. A dropdown list displays different categories of merge fields. Note: Unlike a new letter, new , or new text, the Financial Arrangement category displays. 8. Select Financial Arrangement. Merge fields for a Financial Arrangement displays. 206
220 9. Select the merge field to be inserted where the cursor is positioned. 10. Repeat adding merge fields until all desired of fields have been inserted. 11. From the File menu, click Save As. 12. Enter a descriptive name for the document, select the desired location, and click Save. Using Spellcheck In HTML5, spellcheck is done in real-time instead of being triggered by a button. 1. In the Document Editor, open a document with text. Automatically, misspellings are underlined in red. 2. Move the mouse anywhere in the document and click. The flashing cursor displays on the document. 207

221 3. Right-click the mouse. A menu displays, providing spelling standard spellcheck options. 4. Do one of the following: Select the desired spellcheck option. Click Spelling to spellcheck the entire document. Importing a Document The import document feature allows importing for the following document formats:.doc.docx.rtf.txt 1. From the Document Editor, click Import. The Open dialog box displays. 2. Locate the file and select the file. 3. Click Save. The file displays in the Document Editor. Exporting a Document 1. From the Document Editor, click Export. The following options display: 2. Do one of the following: Click Open to open the file without downloading it. 208


222 Click Save to download and save the file to your local drive. Using Save As 1. From the Document Editor, open the desired file to save with a different name while maintaining the original file and name. 2. From the File tab, click Save As. The Save Document dialog box displays. 3. Enter the name of the document, select the location for which this document will be available, and click Save. Note: Offices with multiple locations may want to have customized documents for each location. The original file is saved and the new file displays in the Document Editor window; the title of the Save As document displays in the title bar. 209
 documents. 3. Click Delete.")

223 Deleting a Document 1. From the File tab in the Document Editor, click Delete. The Delete dialog box displays. 2. Select one or more (using Shift and Ctrl keys) documents. 3. Click Delete. The dialog box closes, and the document(s) is deleted from the server. Home Menu The Home menu contains all editing/formatting functions. Menu item Clipboard Font Paragraph Use to Cut, copy, and paste. Change the font elements. Control how your paragraphs look and act. 210

224 Menu item Styles Editing Use to Pre-defined formats for your templates. Find and replace. Insert Menu The Insert menu is used to insert images, create envelopes, and insert websites and headers and footers. Menu Item Page Break Table Inline Picture Bookmark Hyperlink Header Footer Page Number Page Count Text Box Symbol Use to Insert page breaks Used to insert an image in line with other text. Once you click in the table, two menus are available for editing the table. Inserts pictures (logo). Used to 1) create envelopes to be printed in the letter queue with the letter and 2) associate images to a location on the document. Insert a link to a website. Insert a header to repeat on every page. Once you click on the Header icon, another menu is available for editing the Header. Insert a footer to repeat on every page. Once you click on the Footer icon, another menu is available for editing the Footer. Insert page numbers. Insert the total number of pages. Insert a box for additional text. Insert a special symbol into your template. 211


225 Additional Header/Footer options Additional Table Tools options Mail Merge Menu The Mail Merge menu is used to insert merge fields. All merge fields are found in this menu. Insert Displays the Merge categories for you to choose from. 212

226 Page Layout Menu The Page Layout menu is used to change the margins, orientation, and size of documents or add columns. Menu Item Margins Orientation Size Columns Breaks Page Color Use to Change to a preset margin Portrait or landscape. Change the paper size of the template. Add columns to your template. Add section breaks Change the background color of the page. Insert a Table into a Template Tables are ideal for formatting information generated from questionnaires. Tables can format several columns of questions and responses neatly. 1. Click Open to access an existing template or click New to create a new template. 2. Position the cursor where the table will be inserted. 3. Click Insert and Table. The Insert Table dialog box displays. Note: Another option is to click the drop-down arrow next to Table and select the number of rows and columns to create. 4. Enter the desired number of columns and rows and click OK. 5. Use the options under the Design and Layout tabs to customize the table. 213
227 If you want to Format the table, including predefined table formats, adjust borders, and assign table style options View gridlines, delete the table, and manage rows, columns, and cells Then position the cursor in the table and click Design Layout Insert and Format an Image into a Table 1. Position the cursor in the table cell where the image will be inserted. 2. Click Insert. 3. Click Inline Picture. 4. From the Insert Picture dialog box, select where the image is coming from the web or your computer select the image and click OK. 5. To format the image, ensure the image is selected and click Format. The Format menu displays providing options to use shape styles and arrange the image that includes wrapping text, positioning, bringing the image to the front, and sending the image to the back. 6. To resize an image, select the image, position the mouse over the image points; the mouse turns into a double-ended arrow, hold down the left mouse button, and drag to expand or decrease the image size. Create Headers and Footers 1. Click Open to access an existing template or click New to create a new template. 2. Click Insert. 3. Click either Header or Footer. The Header & Footer menu displays. 4. Use the following options to manage header or footer created: Go to Header Opens the header section. Go to Footer Opens the footer section. Show Previous Displays the previous page header. Show Next Displays the next page header. 214
228 Link to Previous Headers on different pages can be linked to one another. If you change one, the balance changes also. Different First Page Used when the first page contains letterhead, and the remaining pages don t. Different Odd-Even Pages Use for a book format. Close Header and Footer Close the header and footer sections and return to the body of the template. 5. Click Close Header and Footer to return to the body of the template. Insert and Format an Image into a Header or Footer 1. Access the header or footer. 2. Position the cursor in the header or footer where the image will be inserted. 3. Click Insert. 4. Click Inline Picture. 5. From the Insert Picture dialog box, select where the image is coming from the web or your computer select the image and click OK. 6. To format the image, ensure the image is selected and click Format. The Format menu displays providing options to use shape styles and arrange the image that includes wrapping text, positioning, bringing the image to the front, and sending the image to the back. 7. To resize an image, select the image, position the mouse over the image points; the mouse turns into a double-ended arrow, hold down the left mouse button, and drag to expand or decrease the image size. 215
 documents. 3. Click Restore. The dialog box closes, and the document(s) is restored and available on the server.")
229 Restoring a Document 1. From the File tab in the Document Editor, if a document needs to be restored, click Restore. The Restore Documents dialog box displays. 2. Select one or more (using Shift and Ctrl keys) documents. 3. Click Restore. The dialog box closes, and the document(s) is restored and available on the server. 216

230 Printing a Template Note: This will just print the document template. To print a document merged with patient information, please go to the Letter Queue. 1. From the File tab in the Document Editor, open the desired document template to be printed. 2. Click Print. The Print dialog box displays. 3. Select the printer and page range. 4. Click Print. 217
231 Reports You can access the Reports window from the menu bar. Cloud9 provides over 70 reports that fall into the following categories: Schedule Financial Patient Procedure Referrals Labels Employees Misc. 218

232 Note: These reporting features will be available in a future release of Cloud9. Data Miner used to create custom reports Monthly Close Reports OrthoBanc Payments and Statements Navigating the Report Viewer Once a report is selected from the Reports window, the Report Viewer window displays. You can: Filter data Run the report (Preview) Export and print the report The four primary areas on the Report Viewer window include: Standard navigation buttons, including print and export buttons Filter parameters that vary from report to report 219
233 Preview button to view filter results Note: The Preview button remains shaded until you select all the required parameters for the report. Report, including the data results from the filter Accessing a Report 1. From the Report menu, click Report. The Reports window displays. 2. In Search, type a few letters of the report name. A list of matching results displays. 3. Select the desired report. The Report Viewer window displays. 4. Choose the filters and parameters from the right column. 5. Click Preview. The resulting report displays. 220

234 Printing and Exporting Reports 1. Follow the steps to accessing a report. The report displays. 2. Do one of the following: Click Then The export options display. Export Select from the dropdown list the desired export type and save the file. Print The Print dialog box displays. Select the desired print options and click Print. 221
235 Basic Reports Become familiar with the following basic reports in HTML5: Charges Adjustments Receipts Charges Lists every charge posted within the Date Range, listed in order by date and time posted. This report displays from the contract, Periodic Charges (insurance and responsible party), Down Payment Charges. Miscellaneous Charges All other Charges not cycled from Contracts. 222
236 Adjustments Lists adjustments posted within a designated date range in date and time posted order. 223
237 Receipts Provides a listing of receipts for a designated date range and sorted by either location or orthodontist. 224
238 Financial Reports The following reports provide: Financial analytical and forecasting information Insight to your office s financial status and productivity Case Starts by Start Date For any contracts started within the date range, displays Gross Fee, Discount Amount, Discount Type, Net Fee, Estimated insurance, Down Payment, Periodic Fee amount, Due Date, number of Periodic Fees and number of Tx visits. Contracts are grouped by Treatment Fee Charge Type and give totals for each type. There are two companion Case Starts reports: Generates results if the associated Risk Code is entered into Edit Patient, Responsible Party or have a Courtesy Discount and have a started contract. 225
239 Case Starts (A) by Start Date, including A+, A and A- Case Starts (B) by Start Date, including B, C, 100% Courtesy Discount 226

240 Claim Status Reports If your practice uses Emdeon Dental to process your online claims, they will send reports within 24 hours of the claims that have been submitted. These reports provide you with information on the status of the claims as well as the ones that have been accepted by the provider. 227
241 Completed Contracts by Date Range Provides information on contracts that have been completed by the desired date range. You can specify All locations which is checked by default, or the locations required. Fill in the date range and generate the report. 228
242 Contract Starts by Date Range Categorizes contract starts into New Case Starts and Additional Starts, as well as by Treatment Fee Charge types. Lists patient information and the gross fee. Notes: A New Case Start is a contract started and the patient s Case Start Date is either blank or the same date as the contract. An Additional Start is a contract started for a patient whose Case Start Date is prior to the contract date. Starting a contract causes the patient s Case Start Date to fill in as that date, unless the patient already has a Case Start Date in place. The aspect of New Case Start vs. Additional Starts appears on the Practice Monitor by Date Range report in Columns O and P, and in turn column Q. 229
243 Contracts by Start Date Lists contracts within a designated date range by location Includes the Gross Fee, Discount and Net Fee Provides a clear picture of how discounts are applied to contracts over a date range Compare new contracts per location 230

244 Daily Close Reports Note: In addition to accessing this report from the Reports window, when you close the day, you can print this report from the Close the Day window: Compiles the following four sections related to close the day: Daily Deposits Intended to match the deposit offices take to the bank; it usually contains only Cash and Check payments. Includes any payments made for payment transaction types marked as Is Deposit. 231

245 Daily Receipts Lists all payments, broken down by Payment Type. Daily Transactions Lists all transactions, broken down by Transaction Type. 232

246 Daily Down Payments Lists the down payment charges for started contracts. Daily Totals Lists the production, charges, receipts, and adjustment totals for each daily close. Note: This report can ONLY be used after a month has been closed. 233
247 Monthly Close Reports Note: In an upcoming release, you ll have the ability to perform Close the Month in HTML5 under the Financial menu. This function is available in Silverlight. The Close the Month report reprints the documents that were generated from the Close the Month activity. This report provides an additional filter by Employee, which lists their financial activities within that month. Provides production, charges, receipts and adjustments for the selected month. 234
248 Financial Ledger Note: In addition to accessing this report from the Reports window, you can print this report from the Patient Ledger window: From the Patient Ledger window, click Print. 235
249 Deferred Revenue Totals Note: The title on this report is Case Starts Summary. Accounts for all New Case Starts and any Production Adjustments posted in the date range (not including discounts). This report provides: The Production Adjustments total is for all adjustments made to Due Now using an Adjustment Type that is marked to Affect Production. Gross and net totals for each potential treatment fee charge type used on contracts A consistent CSV file to download and apply to other accounting spreadsheets outside of Cloud9, if needed 236
250 Net Receipts by Date Range Lists all payments posted by location, then by payment type. Each location has a section for Payment, then a section for Adjustment. These adjustments include your Reversals, Corrections, and Voids that were applied to Payments within the Date Range of the report. Each location has a Total Count of transactions and the Net Total of the Payments and Adjustments. Grand Totals are at the end of the report. 237
251 OrthoBanc Payments Lists all information for each statement date if you use OrthoBanc as your payment processor. 238
252 Practice Monitor by Date Range Provides monthly totals for Production, Receipts, Net Adjustments, Accounts Receivable, and other information on past due accounts and new patient exams. Notes: The Balancing Worksheet and Practice Monitor reports follow the same logic: Charges that do NOT affect production are categorized as Adjustments. There are setup items that are necessary to define production and new patient exams according to the office s definitions. Setup/Edit/Delete is available in Silverlight: Edit menu > Setup > Transaction Types. Column Field Description A Gross Production* Hinges on the transaction types setup and the setting to Affect Production. B Gross Receipts To verify: Balance line-by-line using the Receipts by Date Range report with the same date range and location breakdown. C Receipts % of Gross Receipts divided by Gross Production. Production (B /A) D Net Adjustments The Grand Total of Adjustments for the date range. To verify: Balance line-by-line using the Adjustments by Date Range report with the same date range and location breakdown. 239
253 Column Field Description E Adjustments % of Net Adjustments divided by Gross Production. Production (D/A) F Accounts Receivable Total due Accounts Receivable for all patients as of the ending date of the month. To verify: The Accounts Receivable report with the following criteria: Age of Balance Total Due Amount of Balance ($99,999.00) Include Insurance Balances checked Include Responsible Party Balances checked Date the last date of the month verifying G Ratio: A/R % of Accounts Receivable divided by Gross Production. Production (F/A) H # of Patients Patients with a total due balance as of the ending date of the report. I # Patients > $30-30 Days Past Due Patient accounts with a balance more than 30 days old by at least $30. J % - Ratio (I/H) Patient accounts with 30+ (I) divided by Total Patient accounts. K # of Insurance Accounts # of Insurance Accounts with a total due balance as of the ending date of the report. L # Insurance > $30 Insurance accounts with balance more 30 days past due. 30 Days Past Due M % - Ratio (L/K) Insurance accounts with 30+ (L) divided by Insurance Accounts with a total due (K). N New Patient Exams Appointments with New Patient Exam tracking that have been dismissed during report date range. O Case Starts Patients with a contract start and status start date on the same day during the date range. P Add l Ph Starts Patients with a contract start but the status start date happened on a previous date. Q % Ratio The Case starts by New Patient Exams. (O/N) Last Avg Case Fee (A/O) Gross Production divided by New Patient Exams. 240
254 Balancing the Practice Monitor Report The following formula can be used for balancing the Practice Monitor numbers from one month to the next: +(Plus) -(Minus) +(Plus) Previous Month s Ending Account Receivable New Production Net Receipts New Net Adjustments New Month s Ending Accounts Receivable Proper Setup Information for the Practice Monitor by Date Range Report What is Included in Production? Because Cloud9 rolls out the new contract charges in one lump sum on a ledger, the Periodic Charges and Initial/Down Payment Charges do NOT need to Affect Production. If marked as Affect Production, these Periodic Charges and Initial/Down Payment Charges appear on our Production by Date Range report, but with a $0 amount. Balance Adjustment and Contract Adjustment are used to shift money out from Contract Future Due to Due Now or vice versa. Since neither is used to add or take away money as a whole, they should not be marked as Affect Production. If you need to add money owed to a ledger, you should Post a Charge that is marked to Affect Production accordingly. If you need to remove money owed from a ledger, you should Post a Write Off, which should be marked as Affect Production accordingly. Transaction Types on our list for every office that should NOT be marked to Affect Production 1. Balance Adjustment 2. Contract Adjustment 3. Insurance Initial Charge 4. Initial Periodic Charge 5. Payment Plan Down Payment Charge 6. Payment Plan Periodic Charge If correction is necessary, edit the Transaction Type: Setup/Edit/Delete is available in Silverlight: Edit menu > Setup > Transaction Types 241
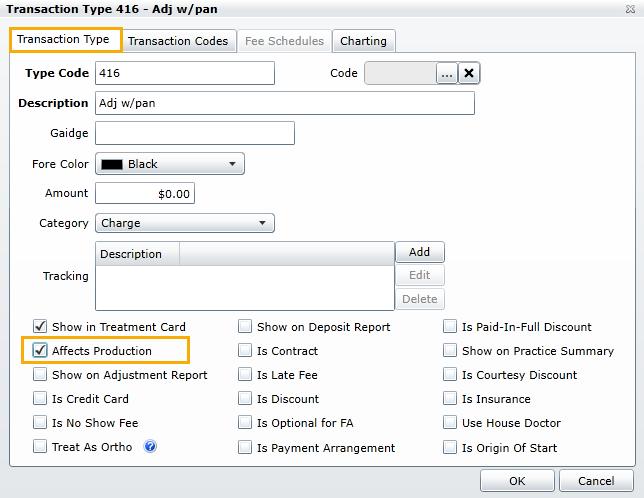
255 242
256 Transaction Types Report To confirm if the Production total is containing the correct transactions, run the Transaction Types report to confirm the setup. This report displays all transaction types in your database and the options that have been selected for each. You can use this report to verify that the transaction types have been setup correctly. 243
257 Production by Date Range Displays all production for a specific date range or location. 244
258 Notes: As indicated in the Practice Monitor by Date Range report section, you should use the Transaction Types report to verify and work through the Affects Production setting of all transaction types. This report can be used to verify the Production total on the Practice Monitor by Date Range report. There are setup items that are necessary to define production and new patient exams according to the office s definitions. Setup/Edit/Delete is available in Silverlight: Edit menu > Setup > Transaction Types. Offices should consider how they want to handle the following: o Write-Offs It is up to the office, but Write-Offs would typically be marked to Affect Production so when used, it reduces the Production Total for the Practice. o Discounts If Contract Discounts are marked to Affect Production, the Production Total includes the full Treatment Fee. If Contract Discounts are NOT marked to Affect Production, the Production Total will NOT include the amount of the Discount. o Charges Offices must decide what charges they consider to be Production and mark those Charges to Affect Production accordingly. Any corrections can be made in Transaction Types. Setup/Edit/Delete is available in Silverlight: Edit menu > Setup > Transaction Types. 245
259 Receipts by Date Range Reports There are five reports on receipt data related to the payment types: Applied Payment Cash Bulk insurance payments Insurance checks Personal checks The name of each report reflects how the data is sorted and if the receipts are itemized or summarized. Net Receipt by Date Range Lists all payments by location, then by payment type and adjustments, including reversals, corrections and voids that were applied to payments within the date range of the report. Each location will have a total count of transactions and the net total of payments and adjustments. Grand totals are at the end of the report. 246
260 Receipt Summary by Date Range - Lists the total of each payment types posted during a designated date range. Receipt Summary by Payment Type - Lists the total of each payment type for a selected daily close date. 247
261 Receipts Lists the receipts within the designated date range in the date and time order the receipts were posted. Receipts by Date Range - Shows all payments posted for a specific date range or location. Note: You can use this report to verify the receipts total on the Practice Monitor by Date Range report. 248
262 Adjustments by Date Range Lists adjustments that do NOT affect production for a specified date range and location. Note: You can use this report to verify the Net Adjustments total on the Practice Monitor by Data Range report. 249
263 Accounts Receivable (A/R) Aging Provides detailed financial information for the patients who match the criteria you designate for the report s parameters. Notes: The Last Payment Amount and Last Payment Date displayed on the report are both useful when working with Past Due Accounts both insurance and responsible party. An insurance account that does NOT show a Last Payment helps you confirm if insurance has started sending payments towards treatment. 250
 and")
264 Balancing Worksheet Within in a designated time range, lists the: Previous A/R at the start date; Any contract starts, payments, charges or adjustments occurring during the time range; and Ending A/R of the time range Note: This report shows both responsible party (patient A/R) and insurance A/R. 251
265 Practice Summary Summarizes the following information for a designated time range: Accounts Receivables Charges This Period Payments This Period Adjustments This Period Control Numbers Page 1 252
266 Page 2 What displays on this report is largely dependent on the Show On Practice Summary checkbox found within each transaction type. 253


267 Show On Practice Summary - Within each transaction type, there is a checkbox for the category to appear. Setup/Edit/Delete is available in Silverlight: Edit menu > Setup > Transaction Types Tracking Offices can create Tracking Categories. These categories are used to group Appointment Types together, and one total will display on this report in the Control Numbers section. Setup/Edit/Delete is available in Silverlight: Edit menu > Setup > Appointment Types 254
268 Recurring Payment Report Shows the grand total for the following auto payment types: Auto Payments Bank Account Auto Payments Post Dated Check Auto Payments (used for Canadian offices) Manual Auto Payments 255
269 Summary of Activity Provides a summary of Gross Production, Production Adjustments, Net Production, Gross Collections, Collections Adjustments, Net Collections, Increases or Decreases in A/R along with Total Contracts Amounts. Also displays patient and insurance aging information. 256
270 Today s Financial Report Lists Daily Deposits, Daily Receipts, Daily Transactions and Daily Down Payments broken down by each payment performed by a designated employee. 257
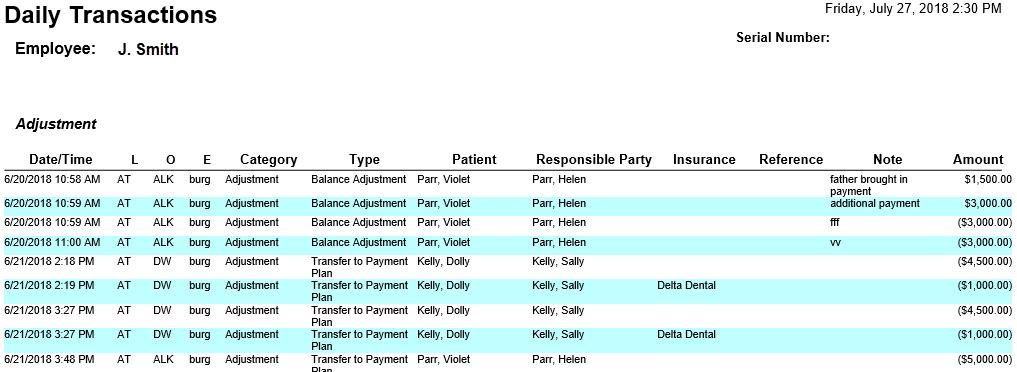
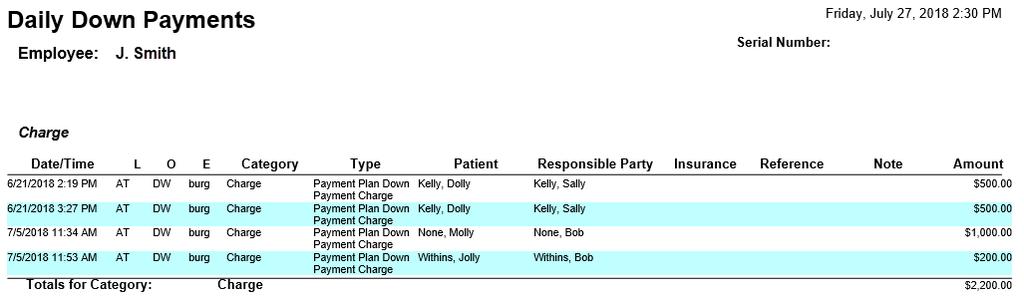
271 258
272 Treatment and Financial Summary Compiles various counts and financial totals to meet the monthly reporting needs for practices that use the consulting services of Hummingbird Associates. 259
273 Schedule Reports The following reports provide schedule information. Appointment Classes Lists all Appointment Classes created that may be on your schedule template. Appointment Schedule Lists every patient with an appointment for a specific day and location. 260
274 Appointment Status List Lists all appointment statuses, where they are displayed and the locator position. Appointment Types Lists all appointment types. 261
275 Daily Collections Lists every patient with an appointment AND a Due Now balance on the responsible party s ledger. This report does NOT list any patients who have a $0 Due Now balance. Note: The financial balances are ONLY for the responsible parties and do NOT include insurance balances. 262

276 Kept Appointments Organized by appointment type, lists appointments patients kept, or the office dismissed. This report ONLY looks at past appointments, not future appointments. For example, you can use this report to get a list of new patient exams from last month or a listing of consultations from last week. This report does NOT include appointments that were: No Shows Cancelled Re-scheduled Left as Waiting, Seated or Ready for Checkout 263
277 Operatory Schedule Displays the operatory schedule in landscape orientation, sorted by appointment time by default or you can sort by patient name. Lists financial balances for ALL patients on the schedule, even if they owe $0. The columns with balances are intentionally missing the column headings and the decimal points to keep the report protected if left out in the treatment area of the office. From left to right the columns are Past Due, Current Due, Due Now, and Total Due. The financial balances include BOTH insurance and responsible party balances. 264
278 Operatory Schedule (Portrait) Displays the operatory schedule in portrait orientation, sorted by appointment time by default or you can sort by patient name. The last column displays the Due Now amount. The last column is intentionally missing the column heading and the decimal points to keep the report protected if left out in the treatment area of the office. The financial balances include BOTH insurance and responsible party balances. 265

279 Patient Appointments Lists all the appointments scheduled for a selected patient. Note: You can also access this report from: Edit Patient window, Appointments tab Patient Treatment Card 266
280 Patients by Appointment Status Lists patients by appointment status for a specified date range; you select which appointment status(es), date range and location. 267
281 Patients Needing a Future Appointment Lists patients who need a future appointment and meet the following criteria: Have an active Patient Status, such as observation recall or tx-full band. Note: Patient statuses are listed and managed in Silverlight. Setup Available in Silverlight: Edit Menu > Setup > Patient Statuses Do not have a future scheduled appointment. Do not have a future recall date. Note: When you run this report for the first time, you ll probably see a long list of patients who include patients who have not had appointments or activity for several years. To remove the inactive accounts, go to Silverlight: Edit > Run Utility > Inactivate Accounts. 268

282 Scheduled Appointment Types Lists the scheduled appointment types you select; can be used for past and future date ranges. 269
283 Patient Reports Missed Treatment Card Entries Lists all patients who had an appointment within a designated date range, but the date of the appointment does NOT have a Treatment Card Entry with the same date. 270
284 Monthly New Patient Exams Lists patients who have a new patient exam date within a designated date range. There are setup items that are necessary to define new patient exams according to the office s definitions. Setup/Edit/Delete is available in Silverlight: Edit menu > Setup > Transaction Types. Exams can be included in tracking within the setup of any applicable appointment types. When those appointment types are dismissed, the patient s new patient exam date automatically fills in under Edit Patient Tracking tab unless the patient already has a new patient exam date in place. 271
285 New Patient Status Provides detailed information on patients whose entry date falls with a designated date range. You can use the information to track the new patients added to your office s database. 272
286 Patient Statistical Profile Provides a detailed list of patient statuses and the patient count and percentages for each patient status. Breaks down patient counts into adults and children. 273

287 Patient Tray Covers Provides useful information related to a designated patient and their treatment card history. Note: Some offices print the patient tray cover report before the patient day begins. 274

288 Patient Tray Covers, No Treatment Plan Provides useful information related to a designated patient and their treatment card history, excluding the patient s treatment notes and treatment plan. 275
289 Patients by Birthday Lists patients and their age who have a birthday within a designated time range and match the designated patient status(es). Note: Offices typically use a date range within the current year. 276
290 Patients by Patient Status Lists every patient for a designated date range and patient status(es). Note: Leaving the Date Range blank yields a report of patients who are in designated patient status(es) as of the day the report is generated. 277
291 Patient Flow Details Pre-requisite: For this report to accurately reflect each category, it is vital that your office moves appointments sequentially from Scheduled to Waiting to Seated to Ready for Checkout and then Dismissal. Failure to move the appointment sequentially through all appointment statuses causes some of the categories to display inaccurate times. Displays each appointment within the designated date range displays the time for Appointments, Check In, Lobby, On Deck and Chair, Ready for Checkout and Total Time. 278
292 Patients Over Estimated Completion Date Provides detailed information on any patients whose estimated completion date was within the designated date range. Note: The estimated date is found under Edit Patient window > Tracking tab. 279
293 Recalls Retrieves recalls for a single month and includes the deband date. Note: The date you choose retrieves recalls for all days within that month. This is NOT a per day report. When you enter a date parameter, Cloud9 lists all patients with recalls within that month. For example, if you enter 8/15/18, you ll receive a list of patients with recalls for August,
294 Recalls by Date Range Retrieves recalls within a date range and does not include the deband date. Note: If you ONLY enter a data range and leave all other report parameters blank, the report will list ALL patients with recalls within that date range. 281
295 Spotlight History By Patient Displays the selected patient s Date, Event, Employee, Completed and any Notes concerning the event. 282

296 Procedure Reports Procedure reports use treatment card entries to display totals and performance measures. Procedure Detail Lists all procedures, ordered by treatment card entry, date or patient, entered on treatment card entries within the designated date range. Displays the Patient Name, Patient Status, Date, Location, Orthodontist and Assistant that were entered in the Treatment Card. 283

297 Procedure Summary by Assistant Lists each procedure and assistant who made treatment card entries within the designated date range and provides the totals of each procedure entered for each assistant. 284

298 Procedure Summary by Location Lists each procedure and each location and gives you the total of each within the designated date range. 285

299 Procedure Summary by Month Lists every procedure and the count and charge amount total for each. Note: This report is intended to give data over a large date range, but you can use it for one or more months, if needed. 286
300 Referral Reports Referral reports provide information regarding your patients referrals. Patients by Referring Party Lists the Patient Name, Patient Entry Date and Patient Status for any patients referred by the selected referrer. Note: You can select from social media, parents, doctors, or any other referral source in your database. 287
301 Referral by Source Provides details about sources who referred patients into the practice and your patients your office referred out to other professionals for a designated date range. To get a report that can help determine the conversion rate of active patients from the referral sources, use a large date range and choose Activity = Both. The date range applies to the patient s Entry Date listed in the Edit Patient window > Tracking tab. 288
302 Referral List Lists the name of the referring party, their profession, contact information as well as the number of patients referred within the designated date range and the total amount of the contracts that were started for the Referred Patients. 289
303 Referral Sources Lists every referral source that has referred a patient to your practice throughout time. Both the referral source name and number of patients referred are displayed. There are no parameters for this report. 290
304 Labels Label Avery 5160 Label Single Address (3.5 x 1) Patient Birthday Labels Lists name and addresses for any patients in an Active Patient Status who have a birthday within the date range. This list is formatted for Avery Patient Chart Labels Lists Patient Last Name, First Name and Patient ID for any patients with future appointments that match the search criteria. This list is formatted for Avery Patient Labels Lists Patient Names and Addresses for any patients who match the Patient Status and Status Start Date criteria. This list is formatted for Avery The date range applies to the patient s Status Start Date found under Edit Patient, Tracking tab. Recall Labels Lists Names and Addresses for any patients with a recall date within the month chosen. The list is formatted for Avery When entering a recall date, it applies to any recalls within that month and NOT just that single day. A recall type can also be entered if the office uses Recall Types. Leaving Recall Type blank and only entering a Recall Date should give labels for all patients with a Recall Date within that month. Referral Labels Lists Names and Addresses for the matching referral source. This list is formatted for Avery The date range applies to the patient s Entry Date found under the Edit Patient, Tracking tab. Names and address can be sorted for viewing. 291
305 Employee The Employees Reports provides employee information based on time card information. Employee List Lists all employees that have been entered in your database. These employees can be deleted or still current. 292

306 Employee Time Card Lists all employee time stamps within the designated date range. Notes: Leaving the employee drop-down field blank causes the report to include all employee time stamps on the same report. You do NOT have to pull reports one employee at a time. Employees who do not have the permission for this report can only view or print their own time card report. The permission required to review all employees time card is Setup in Silverlight: Edit > Employees> RPT: Employee Time Card. 293

307 Employee Time Card by Day Lists all employee time stamps by day within the designated date range. Leaving the employee drop-down field blank causes the report to include all employee time stamps on the same report. Important: You do NOT have to pull reports one employee at a time. Employees who do not have the permission for this report can only view or print their own time card report. The permission required to review all employees time card is Setup in Silverlight: Edit > Employees> RPT: Employee Time Card. 294
308 Employee Time Card by Location Lists all employee time stamps by location within the designated date range listed together. Leaving the employee drop-down field blank causes the report to include all employee time stamps on the same report. Important: You do NOT have to pull reports one employee at a time. Employees who do not have the permission for this report can only view or print their own time card report. The permission required to review all employees time card is Setup in Silverlight: Edit > Employees> RPT: Employee Time Card. 295
309 ToDos by Date Range Lists all employee to dos within the designated date range. Leaving the employee drop-down field blank causes the report to include all employees on the same report. Important: You do NOT have to pull reports one employee at a time. Employees who do not have the permission for this report can only view or print their own ToDos report. The permission required to review all employees To-Dos is Setup in Silverlight: Edit > Employees> RPT: Employee Time Card. 296
310 Miscellaneous Reports Contact Info Types Displays the Contact Types created in your database, plus deleted ones, if desired. 297
311 Employers List Displays the employers created in your database, plus deleted ones, if desired. 298

312 Edit Menu Users can reset their password in HTML5, via the Edit menu. In addition, Cloud9 prompts users to change passwords 5 days before passwords expire. 1. Click Edit. The Reset Password option displays. 2. Select Reset Password. The Reset dialog box displays. Cloud9 automatically displays the number of days before you are required to reset your password. 3. Enter the current password, new password, confirm password and password hint. Note: Click the checkbox next to Show Password Requirements to see the requirements. 4. Click Reset. The password is reset; you ll have to use the new password the next time you login to Cloud9. 299
313 View Menu The View menu provides you with the following options: Chat Opens the Chat window to communicate with team members Patient Check-In Enables patients to check-in and be in the Waiting status Release Locks Releases any locks you have on your computer SignalR Monitor Reserved for system administration To-Do Provides access the office s To-Do list 300

314 Chat The chat function enables you to have conversations with other team members. In addition, you can convert a message into a reminder that displays on the To-Do List window. Cloud9 automatically deletes chat messages after 30 days. If you want to save a chat message, turn it into a To-Do item. Tool/Button Click to Start a conversation with a team member Create a reminder for a selected message Delete a message Show archived messages Close the Chat window Starting a Conversation 1. From the View menu, click Chat. The Chat window displays. 2. Click New. The Create New Conversation dialog box displays. 3. Click Select Employee(s) and select the employee(s) for the chat. 4. Enter the message in the empty field. 301

315 5. Click Create. The message displays on the Chat window in a new tab. The chat recipient(s) chat envelope turns yellow and flashes. 6. Continue the chat by entering your message in the open field across the bottom of the window and click Send. Replying to a Chat Message 1. Click flashing yellow Envelope/Chat. 2. Select the message tab of the individual. 3. At the bottom of the Chat window, type your reply and click Send. 302
316 Creating a Reminder from a Chat Message 1. From the View menu, click Chat. The Chat window displays. 2. Click the checkbox next to the message that you want to set as a reminder. 3. Click Reminder. The Add To-Do dialog box displays. 4. Enter the related information and click Save. Note: Date/Time Due is a required field. The reminder is added to the To-Do List window. 303
317 Deleting a Message or Conversation 1. From the View menu, click Chat. The Chat window displays. 2. Do one of the following: If you want to delete a. Then click the Message Checkbox next to the message that you want to delete. Click Delete. Cloud9 removes the message from the window; however, the message can be retrieved by clicking Show Archived. Conversation X on the conversation tab. Cloud9 removes the tab from the window; however, the messages can be retrieved by clicking Show Archived. Retrieving Deleted Messages 1. From the View menu, click Chat. The Chat window displays. 2. Click Show Archived. The conversation tabs for the deleted messages and conversations display. 3. To hide the deleted messages and conversations, click Show Archived, which toggles between displaying and hiding the messages and conversations. 304

318 Patient Check-In 1. From the View menu, select Patient Check-In. The Choose Schedule View dialog box displays. 2. Select the desired location and click Select. The Press the first letter of your last name to check in window displays. Patients do the following: Enters the first letter of their last name. The Enter your birth month and day window displays. Enters their birth date. The Tap your appointment to check yourself in window displays. 305

319 Clicks their appointment. The Successfully Checked in dialog box displays, and Cloud9 puts the patient into a Waiting status. Release Locks 1. From the View menu, select Release Locks. The Release Locks dialog box displays. 2. From the Lock Type field, select either Computer to release a locked computer or Instance release an 306

320 To-Do List Tool/Button Add Edit Delete Complete Fill Reload Click to Add a To-Do Edit a selected To-Do Delete a selected To-Do Mark a selected To-Do as Completed Future functionality Refresh the To-Do List window Close the To-Do List window Close 307
321 Adding a To-Do In addition to creating To-Dos for clinical checks, care calls and reminders, since Cloud9 automatically deletes messages after 30 days, if you want to save a message for longer, save it as a reminder. 1. From the View menu, select To-Do. The To-Do List window displays. 2. Click Add. The Add To-Do dialog box displays. 3. Enter the required fields Employee; Text and Date/Time Due and any of the optional fields. 4. Click Save. Cloud9 adds the To-Do on the list. Managing To-Dos 1. From the View menu, select To-Do. The To-Do List window displays. 2. Select the message. 3. Do one of the following: 308


322 If you want to. Edit the To-Do Then click Edit The Edit To-Do dialog box displays Make the desired edits and click Save. Delete the To-Do Delete The Confirm Deletion dialog box displays/ Click Delete. Cloud9 removes the To-Do from the To-Do List. Mark the To-Do as Complete Complete Cloud9 marks the To-Do as complete and removes the To-Do from the To-Do List. Searching for To-Dos Make the desired selections in the filter section of the To-Do window to locate To-Dos. If you want to search by. To-Do Items Then click To-Do Item Types 309

323 If you want to search by. Patient Then click Date Range Completed Items Help The following options are available from the Help menu: Release Notes Provides links to release notes Quick Reference Provides access to a quick reference guide Documentation Provides links to manuals, help documents and videos About Provides version number and computer name. Note: In the Computer field, you can enter the name you want to name the computer and click Save. Download c9agent Allows you to run or save the application to be able to use the Topaz Signature Pad When you call our Support Team, they may need to share your screen to walk you through the solution to your question. Call us at , option 2 to see if the team needs to screen share with you. There are two ways to share your screen with support. Screen Sharing Through the Browser 1. Open a new browser window. 310

324 2. Type the URL: help.cloud9ortho.com. The ConnectWise Control window displays. 3. Type the 4-digit Invitation Code provided by the support team member and click Join to provide access to your computer. Screen Sharing Through the Help Menu 1. Click Help from the menu. 2. Click Release Notes icon. 3. Under the Support Link title, click the Help Me!! link. 4. Type the 4-digit Invitation Code provided by the support team member and click Join to provide access to your computer. 311
Introduction to Release 5.1 HTML5
 it just makes sense Summary We are thrilled to introduce you to the newest release of Cloud9, Release 5.1 HTML5! This document is designed to get you up and running without a pause in your daily routine.
Tracker Enhancements Highlights Helping You Get the Most Out of Tracker
 OnLine Tools Mobile Confirmation Agent Two-Way Texting Tracker v11.27 has the option of allowing you to engage in two-way texting with patients. Currently, when a patient sends an invalid text, they are
Easy Dental Release Guide
 Easy Dental 12.1 Release Guide www.easydental.com 1-800-824-6375 PUBLICATION DATE October 2018 COPYRIGHT 1987 2018 Henry Schein One. All rights reserved. No part of this publication may be reproduced,
DXWeb Webenabled Version 4.0 Supplement
 DXWeb Webenabled Version 4.0 1 DXWeb Webenabled Version 4.0 Supplement To be used with the DENTRIX 9.0 User s Guide 727 E. Utah Valley Drive, Suite 500 American Fork, UT 84003 Tel. (801) 763-9300 Fax (801)
MillinPro+ USER GUIDE. A Complete Web-Based Platform for Managing Medical Bills and Insurance Claims
 MillinPro+ A Complete Web-Based Platform for Managing Medical Bills and Insurance Claims MILLIN ASSOCIATES, LLC USER GUIDE 2010-2012 Copyrights Reserved Millin Associates, LLC Document Change History Version
Medical Mastermind: How to Guide
 2013 Medical Mastermind: How to Guide Front Office Manual This guide will serve as a navigation tool for the Drummond Certified, Medical Mastermind software product. This guide will provide step by step
Meritain Connect User Manual. for Employees. 1 Meritain Connect User Guide for Employees
 Meritain Connect User Manual for Employees 1 Meritain Connect User Guide for Employees Contents Introduction... 4 Accessing Meritain Connect... 5 Logging In... 5 Forgot Password... 6 Registration Process...
User s Guide. (Virtual Terminal Edition)
") User s Guide (Virtual Terminal Edition) Table of Contents Home Page... 4 Receivables Summary... 4 Past 30 Day Payment Summary... 4 Last 10 Customer Transactions... 4 View Payment Information... 4 Customers
User s Guide (Virtual Terminal Edition) Table of Contents Home Page... 4 Receivables Summary... 4 Past 30 Day Payment Summary... 4 Last 10 Customer Transactions... 4 View Payment Information... 4 Customers
Session 1 Navigation & Administration
 Session 1 Navigation & Administration Agenda Launching ACPM from AC AC/ACPM Integration Basic Navigation Tips in ACPM Administration Overview ACPM Help Launching ACPM from AC Amazing Charts Practice Management
Dolphin Management. What s New
 What s New Dolphin Management 8 Requirements Dolphin Management 8 has been fully tested and certified under Windows 7, Windows 8 and 8.1, Windows 10, Windows Server 2008 and 2012, SQL Server 2008, 2012
Patient Registration
 Patient Registration Adding a Patient Adding a new patient through SequelMed can be accomplished through just a few steps: Defining the Patient Attaching a Plan (optional) Attaching Documents (optional)
User Guide Product Design Version 1.7
 User Guide Product Design Version 1.7 1 INTRODUCTION 3 Guide 3 USING THE SYSTEM 4 Accessing the System 5 Logging In Using an Access Email 5 Normal Login 6 Resetting a Password 6 Logging Off 6 Home Page
Tracker Enhancements Highlights [Tracker eservices] [Reporting] [Admin] [Clinical] [Tword] [Ortho]
![Tracker Enhancements Highlights [Tracker eservices] [Reporting] [Admin] [Clinical] [Tword] [Ortho]](/thumbs/81/82649739.jpg "Tracker Enhancements Highlights [Tracker eservices] [Reporting] [Admin] [Clinical] [Tword] [Ortho]") Tracker 11.28 Enhancements Highlights [Tracker eservices] [Reporting] [Admin] [Clinical] [Tword] [Ortho] 1110 Finch Ave. West, Suite 600 Updated Videos! Check out http://bridge-network.com/videos/ for
Tracker 11.28 Enhancements Highlights [Tracker eservices] [Reporting] [Admin] [Clinical] [Tword] [Ortho] 1110 Finch Ave. West, Suite 600 Updated Videos! Check out http://bridge-network.com/videos/ for
CAMPUS PORTAL QUICK REFERENCE GUIDE: STUDENT PORTAL
 CAMPUS PORTAL QUICK REFERENCE GUIDE: STUDENT PORTAL 1 CONTENTS How to Set Up Your Portal Web Account... 3 How to Personalize Your Homepage... 4 How to View Holds Applied to Your Portal Account... 4 How
PowerSoftMD Enhancements 2018
 11/13/2018 0029 The Employee Time Clock has a new option you can set to allow Employees to run the Time Report and only see their own time records based on their Time In Pin Number. Please call Data Tec
EasyDent Enhancements 2016
 11-21-2016 0043 You can now update the patient s Next Recall date from the top of the EDR Visit Note screen. Select the top Recall option. 0042 You can now specify a Fee Schedule Number on the Insurance
e-mds Patient Portal Version User Guide e-mds 9900 Spectrum Drive. Austin, TX Phone Fax e-mds.
 e-mds Patient Portal Version 6.2.0 TM User Guide e-mds 9900 Spectrum Drive. Austin, TX 78717 Phone 512.257.5200 Fax 512.335.4375 e-mds.com 2008 e-mds, Inc. All rights reserved. Product and company names
FastAttach Desktop & Web User Manual
 FastAttach Desktop & Web User Manual Version 4.1 Revision Date: 01/20/2019 www.nea-fast.com (800) 782-5150 Page 1 Contents Updating & Logging into FastAttach... 6 Forgot Password... 6 Update Password...
April Communication Manager User s Guide
 April 2012 Communication Manager User s Guide Table of Contents Overview... 4 Navigating ecentral... 5 WebSync Wizard... 8 WebSync Setup... 8 Login Setup... 9 Schedule WebSync... 9 WebSync Options... 9
Provider Secure Portal User Manual
 Provider Secure Portal User Manual Copyright 2011 Centene Corporation. All rights reserved. Operational Training 2 August 2011 Table of Contents Provider Secure Portal... 5 Registration... 6 Provider -
esd Portal: Parent View User Guide v
 esd Portal: Parent View User Guide v. 5.0.0 Copyright 2002-2016 eschooldata, LLC All rights reserved. TABLE OF CONTENTS Overview... 3 Parent Portal Registration... 3 Logging In... 5 Getting Help... 7 Navigating
Employer Self Service (ESS) User Quick Guide
 User Quick Guide") Employer Self Service (ESS) User Quick Guide i Table of Contents Getting Started 6 Accessing the Employer Self Service (ESS) Portal 6 Maintaining Account Settings 7 Switching Employers within Session 7
Employer Self Service (ESS) User Quick Guide i Table of Contents Getting Started 6 Accessing the Employer Self Service (ESS) Portal 6 Maintaining Account Settings 7 Switching Employers within Session 7
esd Portal: Parent View User Guide v
 esd Portal: Parent View User Guide v. 5.9.0 Copyright 2002-2018 eschooldata, LLC All rights reserved. TABLE OF CONTENTS Overview... 3 Parent Portal Login Page... 3 Online Registration...4 Parent Portal
Go to click on the Online Giving icon at the bottom of the page, A new window will open up that looks like this:
 Go to www.newlifeodessa.org, click on the Online Giving icon at the bottom of the page, A new window will open up that looks like this: 1. At the bottom of the area, under Log In, click Need an Account
Microsoft Outlook Basics
 Microsoft Outlook 2010 Basics 2 Microsoft Outlook 2010 Microsoft Outlook 2010 3 Table of Contents Getting Started with Microsoft Outlook 2010... 7 Starting Microsoft Outlook... 7 Outlook 2010 Interface...
User Guide. Product Design. Version 2.2.2
 User Guide Product Design Version 2.2.2 Table of Contents Bridge User Guide - Table of Contents 1 TABLE OF CONTENTS... 1 INTRODUCTION... 4 Guide... 4 PRODUCTS... 5 Creating a New Product... 5 Viewing and
Udio Systems. Front Desk
 Udio Systems Front Desk Table of Contents 1. Tour of Udio... 5 2. Login... 6 2.1 First Time User... 6 2.2 Login to Udio... 6 2.3 Changing your Password... 6 3. The Dashboard... 7 3.1 People Search... 7
Treasury Management User Guide. Online Banking
 Treasury Management User Guide Online Banking Released August 2018 Treasury Management... 4 Logging in to Treasury Management...5 Helpful Hints...10 User Menu... 12 Profile and Preferences... 12 Notification
MyOrthodontist AnywhereDolphin
 What s New MyOrthodontist AnywhereDolphin Refined Home Screen We ve revamped the Home Screen, now displaying the menu items available in the application. The menu options are also still available on the
CareLogic: Staff User Guide
 CareLogic: Staff User Guide 1 Table of Contents Logging into Care Logic... 5 How to Change Your Log In Password and Electronic Password... 7 Care Logic Shortcuts... 8 ECR: Maintaining Client Information...
BBVA Compass Spend Net Payables
 User Guide BBVA Compass Spend Net Payables User Guide Vault Services Table of Contents Introduction 2 Technical Requirements 2 Getting started 3 Sign In 3 General Navigation 4 Upload/Create Payment 5
Early Learning SF User Guide for Families
 Early Learning SF User Guide for Families Instructions Sherry Clark Contents 1 Home Page... 2 2 New Application... 2 2.1 Initial Assessment... 3 2.2 Ineligible Outcome... 3 2.3 Eligible Outcome... 4 2.4
Patient Portal User Guide The Patient s Guide to Using the Portal
 2014 Patient Portal User Guide The Patient s Guide to Using the Portal Table of Contents: What is the Patient Portal?...3 Enrolling in the Patient Portal.......... 4-19 A. Enrollment Option #1: First-Time
Employee User Guide What Employees Need to Know About Using the Burnham & Flower Wealthcare
 Employee User Guide What Employees Need to Know About Using the Burnham & Flower Wealthcare Table of Contents Getting started...2 My accounts...3 My expenses...13 Communications...15 Enrollment...17 Resources...21
Tyler SIS Student 360 Parent Portal
 To begin using the Parent Portal, follow these steps: 1.) Your password will be emailed to the address KSD has on record for you. 2.) Go to the Tyler SIS Student 360 web page https://sis.kunaschools.org/idkn360
CONTENTS. SETUP SECURITY ENHANCEMENTS Existing User New User (Enrolled by Employer or Self)... 18
... 18") FSA EMPLOYEE WEBSITE GUIDE CONTENTS BROWSER COMPATIBILITY... 2 ONLINE ENROLLMENT... 3 Online Enrollment Process... 3 Online Enrollment Option for Existing Employees... 11 REGISTERING YOUR ACCOUNT FOR ONLINE
FSA EMPLOYEE WEBSITE GUIDE CONTENTS BROWSER COMPATIBILITY... 2 ONLINE ENROLLMENT... 3 Online Enrollment Process... 3 Online Enrollment Option for Existing Employees... 11 REGISTERING YOUR ACCOUNT FOR ONLINE
e-mds Patient Portal TM
 e-mds Patient Portal TM Version 6.3.0 The Patient s Guide to Using the Portal e-mds 9900 Spectrum Drive. Austin, TX 78717 Phone 512.257.5200 Fax 512.335.4375 e-mds.com 2009 e-mds, Inc. All rights reserved.
Practice-Web Dental Quick Start Basics
 Practice-Web Dental Quick Start Basics Office Setup Click on Setup In the Setup menu, click on Practice Enter Practice information Add Providers Click on LIST In the List Menu, click on Providers Click
AN INTRODUCTION TO OUTLOOK WEB ACCESS (OWA)
") INFORMATION TECHNOLOGY SERVICES AN INTRODUCTION TO OUTLOOK WEB ACCESS (OWA) The Prince William County School Division does not discriminate in employment or in its educational programs and activities against
INFORMATION TECHNOLOGY SERVICES AN INTRODUCTION TO OUTLOOK WEB ACCESS (OWA) The Prince William County School Division does not discriminate in employment or in its educational programs and activities against
Sponsor User s Guide
 Sponsor User s Guide Contents Chapter 1: Getting Started Overview 2 Logging on and off 6 Time Clock/Attendance 6 Online Account Management 8 Changing passwords and Sign-in/out codes 2 Changing your password
Tenant Portal Guide PURPOSE. Page 1. The purpose of this document is to review the features associated with the Tenant Portal.
 Tenant Portal Guide Page 1 PURPOSE The purpose of this document is to review the features associated with the Tenant Portal. Page 2 Table of Contents Tenant Portal... 3 Logging into the Tenant Portal...
PERSONIFY: GETTING STARTED MANUAL
 Personify Standard Operating Procedures PERSONIFY: GETTING STARTED MANUAL Associated Builders and Contractors... by Pearl Lewis This guide has been created to assist you with the transition from your Access
PayrollSE Year End Checklist
 Classification - Public PayrollSE 2014-15 Year End Checklist Introduction Welcome to the PayrollSE Year End Checklist. This document is designed to guide you through the Year End process, although not
Palisades School District PowerSchool Parent Portal Guide
 Palisades School District PowerSchool Parent Portal Guide Get Started To get started, you must create a parent account in the PowerSchool Parent Portal. Create a Parent Account Use this procedure to create
Table of Contents COURSE OVERVIEW... 3 LESSON 1: OUTLOOK 2010 CALENDAR INTERFACE... 5
 Table of Contents COURSE OVERVIEW... 3 LESSON 1: OUTLOOK 2010 CALENDAR INTERFACE... 5 OPEN OUTLOOK CALENDAR... 5 Ribbon... 6 Navigation Pane... 6 Appointment Area... 6 Task Pane... 6 To-Do Bar... 6 THE
FastAttach User Manual
 FastAttach User Manual Version 4.1 Revision Date: 02/09/2018 www.nea-fast.com (800) 782-5150 Page 1 Contents Updating & Logging into FastAttach... 5 Forgot Password... 5 Update Password... 6 Terms & Conditions
Teacher Connect Interface User Guide v
 Teacher Connect Interface User Guide v. 6.4.0 Copyright 2002-2019 eschooldata, LLC All rights reserved. TABLE OF CONTENTS Overview... 3 Accessing Teacher Connect... 3 Quick Access Icon...3 Course Number...3
Patient Portal Users Guide
 e-mds Solution Series Patient Portal Users Guide Version 7.2 How to Use the Patient Portal CHARTING THE FUTURE OF HEALTHCARE e-mds 9900 Spectrum Drive. Austin, TX 78717 Phone 512.257.5200 Fax 512.335.4375
Plan Central Employer Portal Learning Guide
 Plan Central Employer Portal Learning Guide Contents Introduction... 2 Enhancements to the New Plan Central... 2 User Roles... 3 Printer Friendly... 3 Accessing Plan Central... 3 Plan Central Welcome Page...
PARENT PORTAL VIEW LEARNING GUIDE
 PARENT PORTAL VIEW LEARNING GUIDE Central Susquehanna Intermediate Unit, USA TABLE OF CONTENTS Overview... 3 Account Registration... 3 Logging In... 5 Getting Help... 7 Navigating the Portal... 8 Messages...
Table of Contents. Enhancements provided at no additional charge as part of your annual support program
 Table of Contents The EZ-CARE2 Makeover (page 2) Accounts Receivable (page 3) Audit (page 4) Backup & Restore (page 4) Data Entry (page 4) Email (page 5) EZ-Viewer (page 5) Reports (page 6) Staff (page
Table of Contents Getting Started: Login... 3 Home Page & Basic Navigation... 4 Messaging... 5 Visits My Medical Record...
 Table of Contents Getting Started: Login... 3 Home Page & Basic Navigation... 4 Messaging... 5 Read Messages (Inbox)... 5 Delete Messages... 5 Get Medical Advice... 6 Letters... 7 Request Rx Refill...
PatientXpress. User Manual. Copyright HRDSQ, LLC
 PatientXpress User Manual Table of Contents 1. PatientXpress Layout...3 2. Birthday...4 3. Appointment Confirmation...6 4. Feedback...9 5. Contact......11 6. Setup.....16 7. Recalls.......19 8. Call Logs......21
esuite Administrator s Guide October 26, 2017
 new world ERP esuite Administrator s Guide October 26, 2017 2017 Tyler Technologies. All Rights Reserved. All rights reserved. Information within this document is the sole property of Tyler Technologies
Odyssey File & Serve. Review Queue User Guide Release 3.11
 Odyssey File & Serve Review Queue User Guide Release 3.11 OFS-FS 200 3375 v.1 June 2015 COPYRIGHT AND CONFIDENTIALITY Copyright 2015 Tyler Technologies, Inc. All rights reserved. All documentation, source
Getting Started with Transaction Express. Transaction Express User Guide
 Getting Started with Transaction Express Transaction Express User Guide Table of Contents Transaction Express User Guide... 5 Section 1 Getting Started... 5 Welcome Email... 5 Merchant List... 5 Navigation...
Using Home Access Center. Attendance Month View Page. Calendar Page. Career Plan Page. Classwork Page. Course Requests Page.
 Using Home Access Center Home Access Center Menu View another student Attendance Month View Page Change months View attendance details Subscribe to attendance email alerts Calendar Page Customize calendar
OpenEMR Users Guide. Based on Version Getting Started Getting to the Login Page. Changing Passwords Main Screen & Navigation.
 OpenEMR Users Guide Based on Version 3.1.0 Table of Contents Getting Started Getting to the Login Page Logging In Changing Passwords pg 3 pg 3 pg 3 pg 4 Main Screen & Navigation Navigation Traditional
e-medsys Practice Management v. 21.6
 e-medsys Practice Management v. 21.6 Patient Registration When selecting a new pharmacy, the system will pull and store the pharmacy address. Pharmacy When selecting a new pharmacy, the system will pull
VANTAGE TIP SHEET SERIES
 VANTAGE TIP SHEET SERIES Administrator: Organization Setup We recommend using the following workflow when setting up your Organization in Vantage. 1. Confirm organization settings and security permissions
Part B. NGSConnex User Guide. https:/www.ngsconnex.com. Visit our YouTube Channel to view all of our videos! https://www.youtube.com/user/ngsmedicare
 NGSConnex User Guide Part B This guide provides information for our Part B providers on the different options available within our self-service portal, NGSConnex. https:/www.ngsconnex.com Visit our YouTube
User Manual. phr.mtbc.com
 User Manual Table of Contents Introduction Appointments Appointment History Claims History CCDA Report Demographics Health History Lab Reports Online Payment Secure Messages Health Recommendation Patient
Using Home Access Center
 Using Home Access Center Home Access Center (HAC) is a browser-based student information system that allows you to view student registration, report card, attendance, discipline, transcript, next year
June 2012 Benefits Guide. EbixBenergy. EbixBenergy Benefits Guide
 June 2012 Benefits Guide EbixBenergy EbixBenergy Benefits Guide Page 2 Benefits Guide June 22, 2012 Table of Contents Introduction Overview... 4 Getting Started... 4 Portal Setup: Benefits Portal Setup:
Table of Contents RURO, Inc. All Rights Reserved
 Table of Contents ABOUT THIS GUIDE... 7 Purpose of this Guide...7 ACCESSING THE SYSTEM AS A CLIENT PORTAL USER... 7 Navigating the Client Portal...7 Creating and Submitting a New Requisition...8 Accepting
EDUCATION PORTAL INFORMATION CENTER (EPIC) FAO USER MANUAL. Version 1.2
 FAO USER MANUAL. Version 1.2") EDUCATION PORTAL INFORMATION CENTER (EPIC) FAO USER MANUAL Version 1.2 Table of Contents INTRODUCTION... - 3 - GENERAL SCREEN DESIGN AND NAVIGATION... - 3 - LOGIN... - 3 - FORGOT USERNAME OR PASSWORD...
EDUCATION PORTAL INFORMATION CENTER (EPIC) FAO USER MANUAL Version 1.2 Table of Contents INTRODUCTION... - 3 - GENERAL SCREEN DESIGN AND NAVIGATION... - 3 - LOGIN... - 3 - FORGOT USERNAME OR PASSWORD...
PETNET Direct/Dose Credit Request
 PETNET Direct Preferences Add Patient Add Physician Ordering Doses Editing Dose Status Adding Doses to Reports Only Custom Report Writer Dose Credit Request Entering a Dose Credit Request Adding an Rx
Admissions & Intro to Report Editing Participants Guide
 IBM Cognos Analytics Admissions & Intro to Report Editing Participants Guide Welcome to Cognos - Admissions and Introduction to Report Editing! Today s objectives include: Gain a Basic Understanding of
Welcome to the Investor Experience
 Welcome to the Investor Experience Welcome to the Black Diamond Investor Experience, a platform that allows advisors to customize how they present information to their clients. This document provides important
McKinney ISD Home Access Center User Assistance Secondary Home Access Center User Assistance
 McKinney ISD Home Access Center User Assistance Secondary Home Access Center User Assistance Using Home Access Center Home Access Center Menu View another student Attendance Month View Page Change months
JAZZ HARMONY User Manual
 JAZZ HARMONY User Manual Copyright 2017 Imaging. All rights reserved. This manual and the software described herein are protected by copyright laws and international copyright treaties, as well as other
E-Bill & Collect User Guide June 2016
 E-Bill & Collect User Guide June 2016 Table of Contents Page Introduction Simple Web Manual Payments Enter Payment Details Verify Payment Details Payment Confirmed Authenticated & SSO Payments Lookup Account
InformationNOW Census
 InformationNOW Census Overview This document covers the options available under the Census menu in InformationNOW. People Module The People module stores all persons in the database, including students,
5 Steps to Success with RevenueWell 1/6
 5 Steps to Success with RevenueWell 1/6 Step 1: Finish Set Up Now that you re up and running, please make sure to visit the Settings tab and review the below settings areas to keep your practice looking
GROUPWISE INSTRUCTIONS
 Viewing the GroupWise Home Desktop From the Folder List on the left-hand side of the screen, [Click] on the yourname HOME FOLDER The Home view provides panels of shortcut views which can be customized.
HOSPICE ABSTRACTION REPORTING TOOL (HART) USER GUIDE
 USER GUIDE") HOSPICE ABSTRACTION REPORTING TOOL (HART) USER GUIDE IN SUPPORT OF VERSION 1.5.0 (APRIL 2019) Page 1 of 60 TABLE OF CONTENT TABLE OF CONTENT... 2 INTRODUCTION... 4 INSTALLATION... 4 Installers Access Rights...
HOSPICE ABSTRACTION REPORTING TOOL (HART) USER GUIDE IN SUPPORT OF VERSION 1.5.0 (APRIL 2019) Page 1 of 60 TABLE OF CONTENT TABLE OF CONTENT... 2 INTRODUCTION... 4 INSTALLATION... 4 Installers Access Rights...
ONLINE EMPLOYER CENTER GUIDE
 ONLINE EMPLOYER CENTER GUIDE 2019 Table of Contents: Login Screen... 2 My Account... 3 Admin... 5 Add Administrator User Accounts... 6 View Users... 7 Eligibility Maintenance... 8 Add Subscriber/Family...
Table of Contents RURO, Inc. All Rights Reserved
 Table of Contents ABOUT THIS GUIDE... 7 Purpose of this Guide...7 ACCESSING THE SYSTEM AS A CLIENT PORTAL USER... 7 Navigating the Client Portal...7 Creating and Submitting a New Requisition...8 Accepting
Provider User Guides
 Provider User Guides Table of Contents What's New... 1 Overview of Changes:... 1 User Interface Changes... 2 Data Model Changes... 2 First Time Logging In... 5 SmartCare Basics... 9 Open a Client... 13
SMS Reminder Settings Setting Up Reminders in Demographics Custom Text Reminders... 38
 Table of Contents Activating Patient Portal... 1 Patient Portal... 3 Premium Patient Portal Admin Function... 3 Set Up... 3 How to Make Changes to the Portal Landing Page... 5 Premium Patient Portal Features...
Compliance Document Manager User Guide
 Compliance Document Manager User Guide Contents OVERVIEW... 3 SYSTEM REQUIREMENTS... 3 VENDORMATE PASSWORD REQUIREMENTS... 3 LOGIN... 4 THE HOME SCREEN... 5 BA Screening... 5 BA Oversight... 5 My Screening
ChartMaker Medical Suite is a registered trademark of STI Computer Services, Inc.
 This document, as well as the software described in it, is provided under a software license agreement with STI Computer Services, Inc. Use of this software and all related documentation is subject to
NextGen UD2 Upgrade Enhancements
 NextGen UD2 Upgrade Enhancements Summary NextGen EHR Enhancements May 23, 2016: Workflow Module Patient Information Bar Alerts Medication Module Allergy Module Encounter/Category View Filters NG Share
LONG TERM CARE HOSPITAL ASSESSMENT SUBMISSION ENTRY & REPORTING TOOL (LASER) USER GUIDE IN SUPPORT OF VERSION (APRIL 2017)
 USER GUIDE IN SUPPORT OF VERSION (APRIL 2017)") LONG TERM CARE HOSPITAL ASSESSMENT SUBMISSION ENTRY & REPORTING TOOL (LASER) USER GUIDE IN SUPPORT OF VERSION 1.3.0 (APRIL 2017) Updated 3/2017 TABLE OF CONTENT INTRODUCTION... 4 INSTALLATION... 4 Installers
LONG TERM CARE HOSPITAL ASSESSMENT SUBMISSION ENTRY & REPORTING TOOL (LASER) USER GUIDE IN SUPPORT OF VERSION 1.3.0 (APRIL 2017) Updated 3/2017 TABLE OF CONTENT INTRODUCTION... 4 INSTALLATION... 4 Installers
Early Intervention QClaims Setup Guide
 Early Intervention QClaims Setup Guide The Early Intervention Central Billing Office is providing an electronic billing solution for Early Intervention providers to submit their claims electronically to
Customer User Guide Commercial Online Access
 Customer User Guide Commercial Online Access Getting Started To access the customer portal, enter the following URL: nationwide.com/agclient Once you access this site, save it as a Favorite on your computer
Amazing Charts PM Billing & Clearinghouse Portal
 Amazing Charts PM Billing & Clearinghouse Portal Agenda Charge Review Charge Entry Applying Patient Payments Claims Management Claim Batches Claim Reports Resubmitting Claims Reviewing claim batches in
Home Access Center User Assistance
 User Assistance Using Home Access Center Home Access Center Menu View another student Attendance Month View Page Change months View attendance details Subscribe to attendance email alerts Calendar Page
MICROSOFT OFFICE OUTLOOK 101
 MICROSOFT OFFICE OUTLOOK 101 Open Outlook Find the Outlook icon on your desktop and double-click (If there is no icon, go to the start menu, All Programs, folder named Microsoft Office, double-click Outlook)
Microsoft Office Outlook 101
 Microsoft Office Outlook 101 Open Outlook Find the Outlook icon on your desktop and double-click (If there is no icon, go to the start menu, All Programs, folder named Microsoft Office, double-click Outlook)
Regions Image Lockbox Online User Guide Options
 Regions Image Lockbox Online User Guide Options 2011 Regions Bank. Regions Lockbox Services subject to product terms and conditions. Rev. 041411. Image Lockbox Online Image Lockbox Online allows you to
Practice CS: Integration Points with Other CS Professional Suite Applications. Table of Contents
 Table of Contents Dashboards... 3 FileCabinet CS... 3 GoFileRoom... 3 Project Solutions (Staff and Client Dashboards)... 3 Outlook Tasks (Staff Dashboard)... 4 Outlook Calendar (Staff Dashboard)... 4 Outlook
HPHConnect for Employers User s Guide
 HPHConnect for Employers User s Guide Copyright 2017 Harvard Pilgrim Health Care, Inc. All rights reserved. Harvard Pilgrim Health Care and the Harvard Pilgrim Health Care logo are trademarks of Harvard
ALL MEMBERS AND PAYEES
 Table of Contents Click a link to walk through a specific procedure. ALL MEMBERS AND PAYEES 1 GETTING STARTED How do I register? How do I log on? How do I update security questions? How do I retrieve/reset
Outlook 2007 Web Access User Guide
 Outlook 2007 Web Access User Guide Table of Contents Page i TABLE OF CONTENTS OUTLOOK 2007 MAIL... 1 Launch Outlook Web Access... 1 Screen Elements... 2 Inbox... 3 Read Mail... 3 Delete a Message... 3
User Manual. Home Access Center User Assistance
 User Assistance User Manual Using Menu View another student Attendance Month View Page Change months View attendance details Calendar Page Customize calendar information Change calendar views Classwork
ezbusiness Card Management 7/1/2015
 ezbusiness Card Management 7/1/2015 Table of Contents Logging In........ 3 Out-of-Band Processing.... 5 Navigation.....5 Viewing Pages. 5 Sorting Lists.5 Accessing Online Help...6 Menu Options and Navigation...6
ARC Memo Manager User Guide for Airlines
 ARC Memo Manager User Guide for Airlines Have Questions? Contact Us! CHD@arccorp.com 703.816.8007 1 Table of Contents Welcome to ARC Memo Manager!... 4 Benefits... 4 System Requirements... 4 Navigation...
This document contains information that will help you to create and send graphically-rich and compelling HTML s through the Create Wizard.
 This document contains information that will help you to create and send graphically-rich and compelling HTML emails through the Create Email Wizard. or warranty by AT&T and is subject to change. 1 Contents
[Type text] DLC Client Manager Welcome Manual
![[Type text] DLC Client Manager Welcome Manual](/thumbs/87/96515013.jpg "[Type text] DLC Client Manager Welcome Manual") [Type text] DLC Client Manager Welcome Manual Table of Contents Getting Started Prepping Your Data in Expert... 3 Logging In... 4 Synching with Expert... 5 Getting Started with Client Manager... 6 Working
[Type text] DLC Client Manager Welcome Manual Table of Contents Getting Started Prepping Your Data in Expert... 3 Logging In... 4 Synching with Expert... 5 Getting Started with Client Manager... 6 Working