Introduction. System. Hardware
|
|
|
- Rolf McCormick
- 5 years ago
- Views:
Transcription

1
2 Table of Contents Introduction... 2 Quick Start... 4 Setting up...5 Cuety App...7 Remote App...12 Creating Personalities emanager Appendix A: Touch-2 Connectivity Elation Professional All rights reserved. No parts of this work may be reproduced in any form or by any means - graphic, electronic, or mechanical, including photocopying, recording, taping, or information storage and retrieval systems - without the written permission of the publisher. While every precaution has been taken in the preparation of this document, the publisher and the author assume no responsibility for errors or omissions, or for damages resulting from the use of information contained in this document or from the use of programs and source code that may accompany it. In no event shall the publisher and the author be liable for any loss of pro1t or any other commercial damage caused or alleged to have been caused directly or indirectly by this document. Due to the dynamic nature of product design, the information contained in this document is subject to change without notice. Revisions of this information or new editions may be issued to incorporate such changes. Products that are referred to in this document may be either trademarks and/or registered trademarks of the respective owners. The publisher and the author make no claim to these trademarks. 1

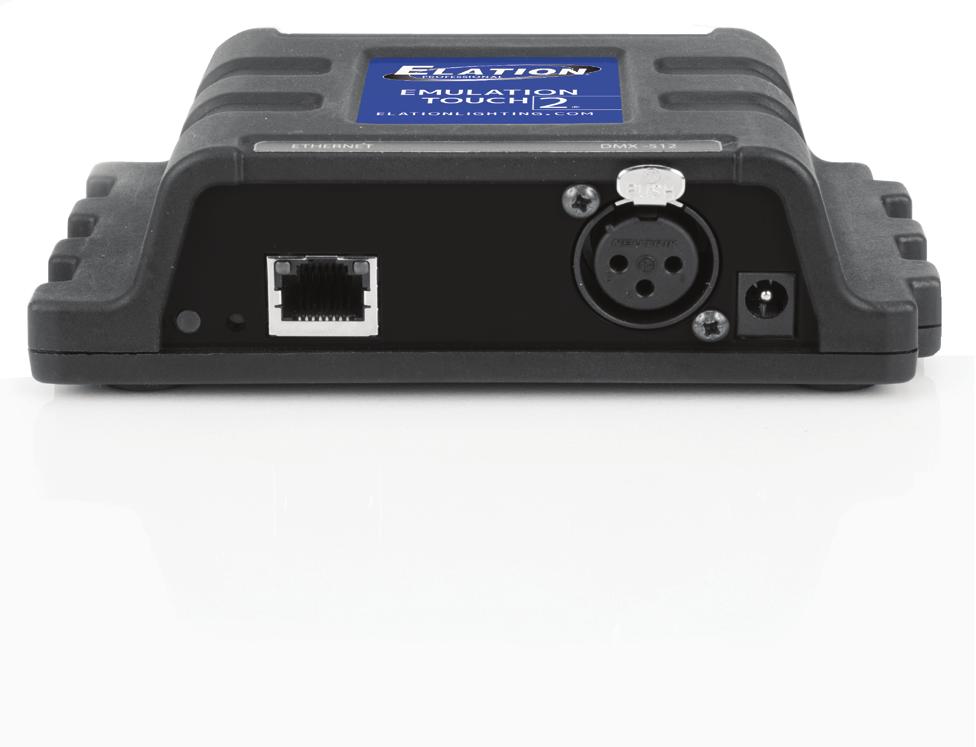
3 Introduction Thank you for choosing the v lighting controller. This manual will discuss setting up the hardware and software as well as programming your light show. System The c system consists of the Touch hardware and the Cuety App running on your ipad. In order for the Touch and the App to communicate you would need to provide a Wi-Fi access point yourself. You can expand the system by also running the Remote App on your iphone. Hardware The Touch hardware device is the brain of the system. This box takes care of all the calculation of DMX levels, Cue timing and FX engine. Therefore, all the information about the patch and cues are stored in this device. In a way, the Apps are just 'user interface'. This means that when the communication between the Touch and the App is interrupted perhaps because of a Wi-Fi problem then your show will continue to run. This also means that when you use the Touch for lighting in a permanent installation then you only need to connect the (Remote) App when you want to change to a di<erent cue. When not connected to an App, the Touch will just continue to run the currently active cues. Touch-1 vs Touch-2 The Touch is available in two versions, the Touch-1 and the Touch-2. The di<erence between the two units is that the Touch-2 has additional options to connect to external systems. Only the Touch-2 has support for OSC, TCP, UDP and HTTP protocols, making it very suitable to be integrated in permanent systems. Appendix A discusses the Touch-2's connectivity in detail. 2
, program cues and FX and operate the playbacks like a live")


4 Apps The main App is the Cuety App for the ipad, it is published by Visual Productions. This App allows you to create a patch (the list of 1xtures you are controlling), program cues and FX and operate the playbacks like a live lighting console. In some situations you might not need the ability to modify all the details of your light show; sometimes you just want a simple way of choosing between the pre-programmed cues. In this case you can use the Remote App for iphone. The Remote App is also useful to give to other users of your lighting that have less privileges; the Remote App does not enable the user to make any changes to the patch or cues. Both Apps are available in the Apple App Store. Further Help Please visit for more technical support or customer support support@elationlighting.com 3

 then please use a pencil to shortly push the reset button.")
. Patch Go to the PATCH screen and select the 1rst 1xture cell (top left).")


5 Quick Start This chapter o<ers you a brief step-by-step instructions on how to get your Emulation Touch system up and running. All steps are explained in further detail in the subsequent chapters. In this Quick Start example we are using a simple 3-channel RGB 1xture that is set to start-address 1. Connect Power up your Touch device with the accompanied PSU. Use the network cable to connect the Touch to your router. DHCP We assume here that you have a router that acts as a DHCP server. Make sure your Touch device is also set to DHCP. The LED should be blinking in red. If it's blinking in white (static IP) then please use a pencil to shortly push the reset button. Cuety We assume you have an ipad that is already connected to your network. Start your Cuety app on your ipad and go to the OPTIONS screen. Select the Touch from the list. There now should be a green LED in the Cuety GUI (right next to the OPTIONS button). Patch Go to the PATCH screen and select the 1rst 1xture cell (top left). Press the PERSONALITY button and go to the 'Generic' manufacturer, where you choose a 'RGB 01x' model. Edit Exit the PATCH screen, you are now back in the main playback screen. Press the EDIT button and then select a playback cell. This opens the EDIT screen. Select the 1xture and set some RGB values in the 'programmer' below. Press ADD for >1 second to add a cue to the list and record it immediately. Now set some other RGB values and press ADD again for 1> second to create the second cue. Playback Press the BACK button to return to the main playback screen. Now you can activate your edited playback by clicking on it. The playback status should indicate a yellow colour and the attached 1xture should show our 1rst RGB levels. By clicking the playback button again it will go to the next cue. You could go back into the EDIT screen to set fade times and change the cues' conditions to make it traverse automatically. 4

 Conrad (order code")

6 Setting up This chapter discusses the steps to set up the Emulation Touch system. Mounting The Touch device can be placed desktop or it can be DIN rail mounted DIN Rail The device is prepared for DIN Rail mounting by using the 'DIN rail holder TSH 35' from Bopla (Product no ). This adapter is amongst others available from: Farnell / Newark (order code ) Conrad (order code ) Distrelec (order code ) Kensington Lock You can secure your device by using a Kensington style laptop lock. Power The Touch device requires a DC power supply between 9 and 12 Volts with a minimum of 500mA. The 2,1 mm DC is center-positive. 5


7 Network Connect the Touch device to a Wi-Fi access point by using the supplied CAT-5 cable. You can either connect it directly to the access point or via a network switch. The Touch's Ethernet port is auto-sensing so it does not matter whether you use a cross or straight cable. Per factory default the Touch is set DHCP. It will be automatically assigned with an IP address by the DHCP server in your network (usually done by your router). When set to DHCP the heartbeat LED on the Touch indicates red. You switch the Touch to a static IP address by brieky pressing the reset button on the device. When set to static, the heartbeat LED on the Touch will indicate white. Static IP addresses are useful when you have no DHCP server in your network, for instance when you make a direct peer-to-peer connection between your Touch and your tablet/computer. It is also useful in case you want to make sure that the IP address of the Touch will never change, e.g. in a permanent installation. When using static IP addresses you have to make sure that all equipment on your network have unique IP addresses. You can also change the IP settings inside the Cuety App. By pressing the reset button on the device for 3 seconds or more, you will recon1gure the unit to the factory default IP address and sub-net mask. No other settings will be changed. The default IP address is with the sub-net mask set to If you wish to reset and fully erase the patch and playback memory in the Touch then you can perform a 'Factory Defaults' by using the emanager software tool. This tool is discussed on page 14. 6
 and available through the Apple App Store (published by Visual Productions).")
8 Cuety App The Cuety App is the main tool to program your light-show and to operate it live. Please note that you 1rst need to connect to a Touch hardware before you can create a patch or record cues. This App is available for ios (an Android version is pending) and available through the Apple App Store (published by Visual Productions). Options To connect to your Touch hardware 1rst open the Options page. Devices Here you can choose your Touch device from the list. Once your Touch is selected it will be possible to change the IP address of the unit. When changing the IP be careful to keep it within the IP range of your tablet. Moving the IP address of your Touch outside this range will result in the device disappearing from the list. In this case press the physical reset button shortly on the Touch to switch back to DHCP (red LED) or press it long to revert back to the default static IP address (white Kashing LED) which is Art-Net & sacn You can also enable the Art-Net and/or sacn protocols. These protocols are not required for normal use of the Emulation Touch system. The protocols will allow you for instance to connect to a 3D visualizer for rendering your lighting rig. Show )les All your show data is located in the Touch hardware, however, it is possible to create a backup show 1le on your tablet. This show 1le can later be 'opened' in the hardware. You can access these show 1les through itunes and copy them to your desktop computer. You can make a show 1le read-only by editing the XML-based show 1le with a standard text editor. When you replace the <show> tag by <show readonly="true"> then this can no longer be removed, renamed or overwritten by the Cuety App. It is possible to import a show 1le made in Emulation, another lighting software package made by Elation Professional. After copying the Emulation show 1le to the ipad using itunes it will become visible in the show 1le listing. The Emulation show 1les remain read-only. Opening this 1le will import the patch and some playback settings. The cues, however, will not be imported as Emulation saves this information in di<erent style. 7
xtures To add 1xtures to your patch 1rst select one or more 1xture cells.")
9 Patch After successfully connecting to your hardware the logical next step would be to create a patch. A patch is a con1guration in which you tell the Cuety which DMX 1xtures you are using. Cuety supports a maximum of 64 1xtures. These 1xtures can be of many di<erent types and brands. Adding )xtures To add 1xtures to your patch 1rst select one or more 1xture cells. Then press the 'Personality' button. This will popup a dialog that lets you traverse through the library of personalities (also known as pro1les). Personalities are descriptions of a DMX-512 capable apparatus. Cuety is equipped with a large library of approximately personalities. It includes popular and even obscure brands, it ranges from moving lights to special e<ects. A special 'manufacturer' to take into consideration is 'Generic'. This collection contains many typical DMX 1xtures with common traits like dimmers and RGB spots. It is likely that some of your DMX equipment will correspond with items from the Generic list. In case you have a DMX 1xture that is not represented in the Cuety library then please consult page 13. Addressing Each DMX 1xture needs to be set to a 'start address'. You would need to set the addresses on the actual 1xtures. Then you need to make sure that the same addresses are set in the patch of Cuety. Please refer to the 1xture's documentation on how to set it on the actual 1xture. In Cuety, you select one or more 1xture cells and press the 'address' button. If you have multiple 1xtures selected Cuety will automatically increment the addresses between the consecutive 1xtures. Invert Pan/Tilt When using moving lights like yokes then depending on the orientation of your 1xture you might want to invert the pan and/or tilt movement. This way you can make sure that moving 'left' on your controller in reality also makes the lights to go 'left'. In case you attach your moving head to a vertical truss you might want to use the Swap Pan/Tilt option. Virtual Dimmer If the 1xture has RGB(AW) colour mixing but no DMX channel for intensity you would need to lower all RGBAW faders identically to reduce the intensity but to keep the colour. This can be quite awkward. You can enable the Virtual Dimmer; this option will give the 1xture intensity capability separate from the RGBAW control. The Touch device will calculate the necessary DMX levels internally. Sub-Fixtures Cuety does not support sub-1xtures. We use sub-1xtures in our personality 1les when 1xtures have multiple 'parts' like RGB-pixels or dimmer channels. Our other software, Emulation(Pro), takes use of that. In Cuety all personality modes with sub-1xtures are ignored. The way how to add a 1xture with multiple dimmer channels in Cuety is to add several 'Generic - Dimmer 01x' 1xtures. You can control multiple-pixel lights by adding several 'Generic RGB 01x' 1xtures. 8
10 Playback The Playback view presents you with 64 playback buttons. Each Playback can contain one or more cues. Cues are explained in more detail later on. You can directly access all the playback buttons to start and stop them. To start a playback just hit the playback button one time. To release a playback (that means to stop it) you can either press the playback button for longer than one second, or 1rst enable the 'Release' button at the top and then choose a playback button. To release all playbacks in the system press the 'Release' button longer than one second. To change the intensity and speed of a playback you 1rst need to select the appropriate bank. The blue bar indicates the currently selected bank. You can move the bar around by using three 1ngers (on ios) or by using the mouse wheel or PageUp/PageDown keys (on Windows, Mac OS & Ubuntu). Swap You can move the contents of a playback to another location by enabling the Swap button at the top, then click on the playback you would like to move and then click on the destination playback. The contents of those two playbacks will be swapped. Properties Each playback has a few properties. You can change them by enabling the Props button at the top and then choose a playback button. Background By enabling Background the playback will start automatically when the Touch device is powered on. Also, the playback will ignore the Release All command (a long press on the 'Release' button). The Background feature is useful for controlling 1xtures that should never turn o<; e.g. some lights backstage that provide safety to artists coming on stage. Exclusive When you have multiple playbacks on the same bank that have Exclusive enabled, then only one of them will be active at the same time. Starting a new exclusive playback will automatically release the other exclusives. Please note that the scope of the Exclusive feature is limited within the bank, i.e. an exclusive playback in one bank will not inkuence an exclusive playback in another bank. By using Exclusive you can create LTP-like or palette-like behaviour, both features usually found in professional-grade lighting controllers. Go Mode This will change the behaviour of the playback button. By default it is set to Go; the button will send a Go Forward (Go+) command to the playback which then will start, or if it was running already it will progress to the next cue. Pressing the button for a long time will release the playback. The next option is Toggle; in this case pressing the button for the 1rst time will start the playback and pressing it again will release it. The Flash mode will make the playback active while the button is depressed. The Solo mode does the same, however, it will also temporarily blackout all other playbacks. Repeat This property determines what the playback does when it 1nishes the last cue. When set to Loop it will just start over from the beginning. Bounce will make it traverse back to the beginning; it will keep going back and forth. In the Random mode the order of the cues will be random; the playback will continue inde1nitely. When set to O< the playback will automatically release when reaching the end of the cues. 9

11 Edit This page allows you to edit the contents of a playback. Cues A cue is a step in a lighting sequence. A cue is sometimes also called a scene, it means the same. We, however, prefer to use the word cue. Sometimes you just need a single cue e.g. to create a static lighting 'look'. Sometimes you need multiple cues; perhaps when you created a look for each scene in a theatre play. In this case you step through the cues as each scene starts. You can also use multiple cues to create a 'chase' for example for a disco party. To build a chase you just make a cue for each step of the chase and tell Cuety to run through the cues automatically. You can use the 'Add' and 'Remove' buttons change the number of cues inside this playback. Pressing the 'Remove' button for longer than one second will remove all cues. Once you select a cue (it will indicate in blue) you can alter its properties by using the 'Rename', 'Condition', 'Delay' and 'Fade' buttons. Condition The Condition property determines whether there is a pause between each cue. When set to 'Halt' the playback will pause after the fading of the cue is 1nished. It will wait until the user presses the playback button to give a Go command. When receiving the Go command it will start playing the next cue. When set to 'Follow' the playback will automatically continue to the next cue. This condition is useful for creating automatic chases. Delay The delay time is only used when using the Follow condition. In this case once the a cue has 1nished cross-fading the playback will automatically progress to the next cue. It will then 1rst wait for the time speci1ed by 'Delay' before starting its cross-fading. Fade The cue will fade from the current levels to its programmed levels. The time it takes to cross-fade is speci1ed by 'Fade'. When fade is set to 0 then there will be no cross-fade; the values will change instantly. Fixtures This grid enables you to select 1xtures. The changes you make in the 'Programmer' area below are applied to the selected 1xtures. The 1xture cells will indicate in red when one of their attributes are set in this playback. 10

12 Programmer The view at the bottom of the Edit page is called the Programmer. The Programmer contains a lighting 'look' i.e. it can contain levels for various attributes for various 1xtures. Basically, you build up your lighting 'look' inside the Programmer and then save it to a cue by using the 'Record' button. This overwrites the contents of the cue by whatever is present in the Programmer. A single cue needs to be selected in order to use the 'Record' button. To modify a cue, you 1rst transfer the contents of the cue back to the Programmer by using the 'Load' button. After that the procedure is the same as making a new cue: change the values inside the Programmer and store it in the cue with the 'Record' button. Use the 'Clear' button to remove values from the Programmer. When you have certain 1xtures selected and hit 'Clear' then only the values of those 1xtures are reset. When the 1xtures have no values set any more or no 1xtures are selected when you hit Clear then all values of all 1xtures inside the Programmer are cleared. In practice, clicking twice on the Clear button will completely erase the Programmer. The controls will indicate in red when a certain attribute is set in this playback. FX Your playback consists of cues and cues are static lighting 'looks'. To animate your lighting you usually create multiple cues and have the playback chase between them. However, you can use FX to quickly create a dynamic animation in your lighting. For example a smooth circular movement on your moving head or scan would require you to program many steps. With FX you simply select the 'Circle' e<ect for your position attribute, set a few parameter levels and it's done. There are also FX for RGB colour mixing e.g. a rainbow e<ect. FX also exists for the intensity attribute. You can use intensity e<ects for quickly creating some chases by using the 'Phase' parameter. 11


13 Remote App The Cuety Remote App is a small tool for remote controlling the Touch device. The Remote App does not allow you to edit the settings inside the controller. It is assumed that you would have already programmed the contents of the Touch by using the Cuety App. This App is available for ios only (an Android version is pending) and available through the Apple App Store. It runs on both iphones and ipads. The Remote App allows you to trigger playback buttons. To connect to a Touch device open the settings page and choose your device from the list. Emulation The Remote App can also be used to control the Emulation lighting control system from Elation Lighting. Emulation is a DMX control system larger and more powerful than Cuety. 12

14 Creating Personalities Cuety has a large library of personality 1les built in. It is possible, however, that a lighting 1xture you wish to control does not exist in our library. If you like to add a new personality 1le to Cuety then you can request via our forum at Please make sure you mention that the personality is required for Cuety and you would need to include a link to the 1xture s manual. Alternatively you can create your own personality 1le by using the ebuilder software. This tool can be downloaded from our website at You will need ebuilder v or higher. In order to create the personality and use it in Cuety you have to make the following steps: - Create the personality 1le (the ebuilder is explained in the last chapter of the Emulation manual) - Press the Cuety Export button - Go to the folder User/Elation/eBuilder - Copy the 1le user.personality to your Cuety App by using itunes Now you can select the personality from the listing in Cuety s patch menu. 13

15 emanager A special software tool called emanager has been developed to manage the various network-based lighting controllers supplied by Elation Lighting. This tool is available on Microsoft Windows, Mac OS X and Ubuntu Linux and is available via our website, free of charge. emanager allows you to perform a 1rmware upgrade on your Touch device (emanager v1.4.0 or higher is required). The 1rmwares are contained in the emanager software. Downloading a new emanager version might give you a new 1rmware for your Touch device. Please note that emanager has more features that are dedicated to other equipment from Elation such as the ArtSSC and ArtIO. Some buttons will be disabled while working with a Touch device because they do not apply to this piece of hardware. Blink You can set the device's LED to blink fast for identifying a particular unit amongst multiple devices. The blinking is enabled by double-clicking on a device in the 'Devices' list or by selecting a device and then clicking the 'Blink' button. Upgrade Firmware To upgrade the 1rmware, 1rst select your device and press the 'Upgrade Firmware' button. The dialogue allows you to select from the 1rmware available. Caution: Make sure the power to the device is uninterrupted during the upgrade process. Factory Defaults The memory containing all user data like cues, recordings and actions is completely erased and all settings are reverted to their defaults by pressing the 'Factory Defaults' button. This action does not a<ect the device's IP settings. 14
16 Appendix A: Touch-2 Connectivity The following functionality is only supported by the Touch-2, not by the Touch-1. OSC OSC (Open Sound Control) is a protocol for communicating between computers, software and various multimedia type devices. OSC uses the network to send and receive messages, it can contain MIDI, time-code and custom information. There are apps available for creating custom-made user interfaces on ios (ipod, iphone, ipad) and Android. These tools allow you to program fool-proof user-interfaces for controlling the device. E.g. TouchOSC from OSC is also integrated in the ArtSSC, ArtIO and ArtB6 from Elation Lighting. It is the preferred way of connecting equipment like the ArtB6 to a Touch-2. The functionality within the Touch-2 can controlled by using the following OSC messages: Description URI Parameter Typ Parameter RangRemarks Release all playbacks /release - - Set playback intensity /pbxx/in float 0-100% Replace XX by playback number [01,64] Set playback speed /pbxx/sp float -100%-100% Control playback button /pbxx/bu bool false / true Control playback flash /pbxx/fl bool false / true Release playback /pbxx/re - - Playback Go Forward /pbxx/go - - Playback Jump /pbxx/ju unsigned 1-48 The Touch2 uses port 8000 for receiving the OSC messages. TCP & UDP TCP (Transmission Control Protocol) is a protocol for sending messages across an Ethernet network. TCP provides reliable, ordered and error-checked delivery of messages between programs running on computers connected to a local area network, intranet or the public Internet. UDP (User Datagram Protocol) is a simple protocol for sending message across the network. It does not provide any error checking. Although UDP is a bit faster than TCP, it is less secure. Typically either TCP or UDP is supported by various media devices like video projectors and show controllers. The functionality within the Touch-2 can controlled by using the following ASCII strings (human readable text) messages: Description String Parameter RangRemarks Example Release all playbacks release - release Set playback intensity pbxx/in=[0,100] 0-100% Replace XX by playback number [01,64] pb01/in=100 Set playback speed pbxx/sp=[-100,100] -100%-100% pb33/sp=-10 Control playback button pbxx/bu=[0/1] up / down pb59/bu=0 Control playback flash pbxx/fl=[0/1] up / down pb64/fl=1 Release playback pbxx/re - pb10/re Playback Go Forward pbxx/go - pb21/go Playback Jump pbxx/ju=[1,48] 1-48 pb45/ju=10 The Touch-2 uses port 7000 for receiving the TCP and UDP messages. 15
17 HTTP HTTP (Hyper Text Transfer Protocol) is the standard protocol to access web pages. It can also be used to control the Touch-2, using the URLs listed below. You can send your HTTP GET requests to port 80. Description URL Range Example Release all playbacks /ajax/release - Set playback intensity /ajax/pbxx/in=[0,100] 0-100% Set playback speed /ajax/pbxx/sp=[-100,100] -100%-100% Control playback button /ajax/pbxx/bu=[0/1] up / down Control playback flash /ajax/pbxx/fl=[0/1] up / down Release playback /ajax/pbxx/re - Playback Go Forward /ajax/pbxx/go - Playback Jump /ajax/pbxx/ju=[1,48]
18 Alphabetical Index Art-Net...7 Background... 9 Blink Bounce...9 Builder Clear...11 Condition...10 cue Cuety App... 7 DC...5 Delay Devices...7 DHCP...6 DIN Rail... 5 ebuilder...13 emanager Emulation...7 Exclusive...9 Factory Defaults...14 Fade...10 firmware upgrade...14 Flash...9 Follow forum... 3 FX...11 Generic... 8 Go...9 Go Mode...9 Halt HTTP...16 Invert Pan/Tilt...8 ios...7 itunes...7 Kensington... 5 LED... 6 Load lock... 5 Loop... 9 Off...9 Options... 7 OSC...15 patch...8 personalities... 8 Playback...9 Power... 5 profiles...8 Programmer...11 properties...9 Props...9 Quick Start...4 Random... 9 read-only...7 Record Release...9 Remote App...12 Repeat... 9 reset...6 sacn... 7 show file...7 Solo...9 start address...8 Static IP...6 Sub-Fixtures...8 sub-net mask...6 Swap... 9 TCP...15 Toggle...9 Touch Touch UDP Upgrade Firmware...14 Virtual Dimmer...8 Wi-Fi
lighting control
 lighting control www.visualproductions.nl WIN MAC LINUX CueluxPro CueluxPro is an advanced and scalable lighting control application. The software is designed to control medium to large lighting installations,
B-STATION MANUAL VISUAL PRODUCTIONS BV
 B-STATION MANUAL VISUAL PRODUCTIONS BV WWW.VISUALPRODUCTIONS.NL Contents 1 Introduction 5 2 Protocols 8 3 Quickstart 10 4 Setting up 16 5 Network 17 6 Patch 22 7 Cuelist 24 8 Show Control 26 9 Monitors
CUELUX MANUAL VISUAL PRODUCTIONS BV
 CUELUX MANUAL VISUAL PRODUCTIONS BV WWW.VISUALPRODUCTIONS.NL Contents 1 Introduction 4 2 Installing Drivers 7 3 Options 10 4 Patch 14 5 Playbacks 17 6 Groups 21 7 Cuelists 23 8 Stacklists 31 9 Globals
SUNLITE is a trademark of Bruno Nicolaudie. WINDOWS is a trademark of the MICROSOFT CORPORATION. All rights reserved. No parts of this work may be
 SUNLITE is a trademark of Bruno Nicolaudie. WINDOWS is a trademark of the MICROSOFT CORPORATION. All rights reserved. No parts of this work may be reproduced in any form or by any means - graphic, electronic,
Show Designer 1. Software Revision 3.11
 Show Designer 1 Software Revision 3.11 OVERVIEW The Show Designer 1 is a lighting controller based on the successful and simple to use Show Designer. The Show Designer 1 adds to the existing features of
A R T SS C + A R T I O MAN UA L
 ART SSC SOLID-STATE CONTROL A R T SS C + A R T I O MAN UA L Table of Contents Introduction... 2 Art SSC... 2 Art IO... 2 Further Help... 3 Setting up... 4 Mounting... 4 Power... 4 Network... 5 amanager
TIMECORE MANUAL VISUAL PRODUCTIONS BV
 TIMECORE MANUAL VISUAL PRODUCTIONS BV WWW.VISUALPRODUCTIONS.NL Contents 1 Introduction 5 2 Protocols 8 3 Quickstart 11 4 Setting up 16 5 Network 18 6 vmanager 21 7 Show Control 24 8 Monitors 28 9 Settings
EmulationPro. Manual
 EmulationPro Manual Contents 1 Overview 4 2 Patch 8 3 Matrix 12 4 Groups 16 5 Palettes 17 6 Cuelists 18 7 Playbacks 26 8 Actions 30 9 Kiosc 35 10 Hardware 39 11 Tempo 43 12 MIDI 44 13 OSC 51 14 Options
Software Revision 1.13
 Software Revision 1.13 OVERVIEW...1 REAR PANEL CONNECTIONS...1 TOP PANEL...1 MENU AND SETUP FUNCTIONS...3 CHOOSE FIXTURES...3 PATCH FIXTURES...4 PATCH CONVENTIONAL DIMMERS...4 COPY FIXTURE...5 LOAD FIXTURE
ART SSC SOLID-STATE CONTROL ART SSC 2 MANUAL
 ART SSC SOLID-STATE CONTROL ART SSC 2 MANUAL Contents 1 Introduction 4 2 Protocols 7 3 Quickstart 12 4 Setting up 24 5 Network 26 6 Operating Modes 31 7 Tracks 34 8 Playbacks 41 9 Show Control 48 10 Protocol
SUNLITE is a trademark of Bruno Nicolaudie. WINDOWS is a trademark of the MICROSOFT CORPORATION. All rights reserved. No parts of this work may be
 SUNLITE is a trademark of Bruno Nicolaudie. WINDOWS is a trademark of the MICROSOFT CORPORATION. All rights reserved. No parts of this work may be reproduced in any form or by any means - graphic, electronic,
ART SSC + ART IO MANUAL
 ART SSC SOLID-STATE CONTROL ART SSC + ART IO MANUAL Table of Contents Introduction... 2 Art SSC... 2 Art IO... 2 Further Help... 3 Setting up... 4 Mounting... 4 Power... 4 Network... 5 Access via Internet...
IOCORE2 MANUAL VISUAL PRODUCTIONS BV
 IOCORE2 MANUAL VISUAL PRODUCTIONS BV WWW.VISUALPRODUCTIONS.NL Revision History Revision Date Author(s) Description 1 04.09.2017 ME Initial version. 2 19.10.2017 ME Rackmount adapter added. Quickstart system
virtual controller 4
 virtual controller 4 PATCH connect patch arrange Virtual Controller 4 can be used with any DMX512 compatible lighting fixture. Lights are linked to your PC or Mac by connecting an XLR cable to one of Daslight
Cameo D4 Available on
 Cameo D4 Available on PATCH connect patch arrange Cameo D4 can be used with any DMX512 compatible lighting fixture. Lights are linked to your PC or Mac by connecting an XLR cable to one of Cameo s DVC4
Airstream DMX for IOS. Revision 1.1
 Airstream DMX for IOS Revision 1.1 1 Contents Overview... 4 Connecting to the Airstream DMX Bridge... 5 App Navigation... 7 Fixtures Tab... 9 Patching Fixtures... 9 Custom Profiles... 11 Bridge Settings...
LEAP FROG 48/96 OPERATING MANUAL
 LEAP FROG 48/96 OPERATING MANUAL LEAP FROG 48/96 OPERATING MANUAL If a portable or temporary three phase mains supply is used to power this desk, we recommend that the desk mains plug is removed before
Solution Series. Quick Start Guide English 1.0
 Solution Series Quick Start Guide English 1.0 Introduction This Manual This manual describes the operation of the Solution and Solution XL lighting desks. This chapter contains an overview of the capabilities
OPERATING MANUAL. including
 OPERATING MANUAL including & If a portable or temporary three phase mains supply is used to power this desk, we recommend that the desk mains plug is removed before connecting or disconnecting the supply.
User manual DMX CONTROL 512. Table of contents
 User manual DMX CONTROL 512 Table of contents 1. SAFETY INSTRUCTIONS... 4 2. OPERATING DETERMINATIONS... 4 3.OVERVIEW... 6 3.1.REAR PANEL CONNECTIONS... 6 3.2.FRONT PANEL... 6 4.MENU... 6 4.1.CHOOSE FIXTURES...
NEO Console Software Version Version Release Summary
 Page 1 of 7 SUBJECT: NEO CONSOLE SOFTWARE VERSION 3.1.1.56 RELEASE DISTRIBUTION: General Release SERIES: NEO Consoles STATUS: Routine Introduction NEO Console Software Version 3.1.1.56 Philips Strand Lighting
Copyright 2008 Compulite Systems (2000) Ltd. All rights reserved.
 Ltd. All rights reserved.") Vector PC Copyright 2008 Compulite Systems (2000) Ltd. All rights reserved. This documentation is delivered subject to the following conditions and restrictions: This document is protected by copyright
Vector PC Copyright 2008 Compulite Systems (2000) Ltd. All rights reserved. This documentation is delivered subject to the following conditions and restrictions: This document is protected by copyright
FROG 2 QUICK START GUIDE
 FROG 2 QUICK START GUIDE If a portable or temporary three phase mains supply is used to power this desk, we recommend that the desk mains plug is removed before connecting or disconnecting the supply.
Introduction. Thank you very much for trusting us.
 User Manual V 1.1 1 Introduction LightShark series is a new concept within the lighting control systems that adapts to the daily needs, offering a powerful, compact and economical solution. Perfect for
CUECORE2 MANUAL VISUAL PRODUCTIONS BV
 CUECORE2 MANUAL VISUAL PRODUCTIONS BV WWW.VISUALPRODUCTIONS.NL Contents 1 Introduction 7 2 Protocols 10 3 Quickstart 15 4 Setting up 26 5 Network 28 6 Operating Modes 33 7 Tracks 36 8 Playbacks 43 9 Show
Release Notes - Version
 Release Notes - Version 3.4.0.2 Important Information for Updating Fixed Bugs and Improved Functionality Appendix Known Limitations You will find the latest system requirements for several products on
Airstream DMX for IOS. Revision 1.3
 Airstream DMX for IOS Revision 1.3 1 Contents Overview... 4 Connecting to the Airstream DMX Bridge... 5 App Navigation... 7 Fixtures Tab... 9 Patching Fixtures... 9 Custom Profiles... 11 Bridge Settings...
ORB SERIES OPERATING MANUAL
 ORB SERIES OPERATING MANUAL ORB SERIES OPERATING MANUAL If a portable or temporary three phase mains supply is used to power this desk, we recommend that the desk mains plug is removed before connecting
liniled Lighting Control Solutions
 liniled Lighting Control Solutions 1 liniled Lighting Control Solutions European quality & manufacturing liniled System The liniled System is a concept which consists of high quality, flexible LED strips
2.028 CODE ELECTRONIC CO., LTD.
 Lighting Console User s Manual Ver. 2.028 CODE ELECTRONIC CO., LTD. Content 1. Welcome to Use the Phantom 2048...1 1.1. Setting up Phantom 2048...1 1.2. The Front Panel of Phantom 2048...1 1.2.1. Unit...2
ORB OPERATING MANUAL
 ORB OPERATING MANUAL ORB OPERATING MANUAL If a portable or temporary three phase mains supply is used to power this desk, we recommend that the desk mains plug is removed before connecting or disconnecting
Axcor Spot 300. User Menu 12/2017. Main Menu Level 1 Level 2 Level 3 Choices / Values. DMX Address IP address byte
 Axcor Spot 300 User Menu 12/2017 Main Menu Level 1 Level 2 Level 3 Choices / Values SET UP DMX Address 001-512 IP address byte 1 000-255 Custom IP Address IP address byte 2 000-255 IP address byte 3 000-255
Application Notes. Using Art-Osc with Colour-Tramp
 Support for Art-Osc was introduced with v5.08 of Colour-Tramp. Support has also been added to numerous other Artistic Licence products. Art-Osc is a new protocol developed by Artistic Licence which defines
Elation Professional Los Angeles, Ca
 DMX Partner USER MANUAL Version 1.0 24-004-1631 Elation Professional Los Angeles, Ca 90058 www.elationlighting.com Table of contents 1. General Introduction...3 2. Safety Information & Maintenance...3
ACCLAIM LIGHTING YOUR SOURCE FOR ADVANCED LED LIGHTING SOLUTIONS ART IO. Model: DMX Controllers.
 YOUR SOURCE FOR ADVANCED LED SOLUTIONS Model: input/output interface module ipad not included Inputs Outputs port Artnet Show control function Ingress Protection Rating compatible Power-over-, 9-12V DC~500mA
Martin M-PC Reference guide. The most powerful lighting software
 Martin M-PC Reference guide The most powerful lighting software Martin M-PC Martin M-PC user interface What is M-PC? M-PC is the Martin M-Series free online and offline editing tool. M-PC also runs on
MIDIcon. user manual. ELATION MIDIcon user manual
 MIDIcon user manual ELATION MIDIcon user manual 2016 ELATION PROFESSIONAL all rights reserved. Information, specifications, diagrams, images, and instructions herein are subject to change without notice.
EasyDMX. User Manual. Please read user manual before operating
 EasyDMX User Manual Please read user manual before operating Interface Configuration: The first time the software is executed it will ask you which controller is installed on your system or you can open
ORB Series. Quick Start Guide. English 2.0
 ORB Series Quick Start Guide English 2.0 Introduction This Manual This manual describes the operation of the ORB Series of lighting desks. This chapter contains an overview of the capabilities and controls
Step Fixed value & transition mode (fade/snap) for each channel, with a duration.
 for each channel, with a duration.") V8.2.13 Conventions Step Fixed value & transition mode (fade/snap) for each channel, with a duration. Scene (or light scene) Sequence of steps. Media file Audio or video file (mp3, wav, avi, jpg, png,...),
V8.2.13 Conventions Step Fixed value & transition mode (fade/snap) for each channel, with a duration. Scene (or light scene) Sequence of steps. Media file Audio or video file (mp3, wav, avi, jpg, png,...),
Axon HD Content Management Application (CMA)
") [ ] Axon HD Content Management Application (CMA) A Content Management Application (CMA) running on an Axon HD media server or a computer connected through an Ethernet network gives you remote control of
[ ] Axon HD Content Management Application (CMA) A Content Management Application (CMA) running on an Axon HD media server or a computer connected through an Ethernet network gives you remote control of
SUNLITE is a trademark of Bruno Nicolaudie. WINDOWS is a trademark of the MICROSOFT CORPORATION. All rights reserved. No parts of this work may be rep
 SUNLITE is a trademark of Bruno Nicolaudie. WINDOWS is a trademark of the MICROSOFT CORPORATION. All rights reserved. No parts of this work may be reproduced in any form or by any means - graphic, electronic,
SUNLITE is a trademark of Bruno Nicolaudie. WINDOWS is a trademark of the MICROSOFT CORPORATION. All rights reserved. No parts of this work may be
 SUNLITE is a trademark of Bruno Nicolaudie. WINDOWS is a trademark of the MICROSOFT CORPORATION. All rights reserved. No parts of this work may be reproduced in any form or by any means - graphic, electronic,
Welcome to NEO Software Release Version
 Welcome to NEO Software Release Version 3.8.2.97 Philips Strand Lighting has released a new version of software for the NEO lighting control family of products. This software, version 3.8.2.97 is available
NEO Console Software Version 3 Build 43. Version 3 Build 43 Release Summary
 Page 1 of 10 SUBJECT: NEO CONSOLE SOFTWARE VERSION 3 BUILD 43 RELEASE DISTRIBUTION: General Release SERIES: NEO Consoles STATUS: Routine Introduction NEO Console Software Version 3 Build 43 Philips Strand
Content Management Application (CMA)
") Chapter 13: CHAPTER 13 A running on an Axon HD media server or a computer connected through an Ethernet network gives you remote control of content, software and configuration management functions. The
Chapter 13: CHAPTER 13 A running on an Axon HD media server or a computer connected through an Ethernet network gives you remote control of content, software and configuration management functions. The
Table of contents. I Preface. II First steps 1. 3D stage 2. Your first stage
 Table of contents I Preface 1 II First steps 3 1. 3D stage 2. Your first stage III User mode 2 3 7 1. Rendering options 2. Resolution 3. Cameras 4. DMX levels 5. Universes patch 6. Movie recorder 6 7 7
Software and Hardware Data-sheet
 Software and Hardware Data-sheet V.1.0.5 Summary: P.1 General Information P.2 Standard DMX 512 installation P.2 Recommended DMX512 installation P.3 512 and 1024 Channel USB to DMX interfaces P.4 Front
CUELUXPRO MANUAL 2013 VISUAL PRODUCTIONS BV
 CUELUXPRO MANUAL 2013 VISUAL PRODUCTIONS BV WWW.VISUALPRODUCTIONS.NL CueluxPro Manual Written for CueluxPro 1.03.44 October 2013 2013 Visual Productions BV All rights reserved. No parts of this work may
JUST A TOUCH. to control your. Lights
 JUST A TOUCH to control your Lights QUIVER DMX CONTROLLER QUIVER is Sagitter s new lighting console, characterized by an innovative design and dedicated to the control of all the conventional and automated
LED Commander 16/2 DMX controller. user manual
 LED Commander 16/2 DMX controller user manual Musikhaus Thomann Thomann GmbH Hans-Thomann-Strasse 1 96138 Burgebrach Germany Telephone: +49 (0) 9546 9223-0 E-mail: info@thomann.de Internet: www.thomann.de
Installation Instructions for the RGB DMX Stick 3 Controller
 Installation Instructions for the RGB DMX Stick 3 Controller #RGB-DMX-CONT-STICK3 1. Mount an electrical box inside the wall The controller can be installed in any standard electrical backbox. If you use
Controlling CHAPTER CueMix from an ipad using TouchOSC
 Controlling CHAPTER CueMix from an ipad using TouchOSC The CueMix mixer in your MOTU audio interface can be controlled from an ipad using an ipad app called TouchOSC. From your ipad, you can perform all
uremote User Manual Version 1.3 Jan 2017
 Version 1.3 Table of Contents Table of Contents... 2 1 Introduction... 3 1.1. Operating Systems and Installations:... 3 1.2. How to Use this Manual Effectively... 4 2 WHERE TO USE UREMOTE... 4 2.1. Remote
User Instructions. Rev. 3/04
 User Instructions Rev. 3/04 Improvement and changes to specifications, design and this manual, may be made at any time without prior notice. All rights reserved. Contents Features 1 General Instructions
ATG Electronics DynColor 500-SL RGB DMX Controllers
 Page 1 of 20 ATG Electronics DynColor 500-SL RGB DMX Controllers USER GUIDE Part Number HCD-SL500-000000-0U NOTE: This user guide is to explain the steps necessary to use the specified and assure peak
Elevation 24. Product Manual Kinesys Projects Ltd. Manual Version 2.2.0
 Product Manual Manual Version 2.2.0 All rights reserved. No parts of this work may be reproduced in any form or by any means - graphic, electronic, or mechanical, including photocopying, recording, taping,
Сенсорный DMX контроллер STICK-DE3
 Сенсорный контроллер STICK-DE3 +7 (495) 510-71-29 +7 (495) 510-71-52 ps@planeta-sveta.ru www.planeta-sveta.ru Sunlite Touch-sensitive Intelligent Control Keypad Ref. STICK-DE3 Page 1/4 Technical datasheet
ChamSys Ltd MagicQ User Manual VERSION
 MagicQ User Manual VERSION 1.3.0.0 This manual is designed for operators of the MagicQ lighting console to help them quickly and effectively learn how to use the console. It has been written by lighting
Note: Mi Light applications will not work with Mi Light bulbs unless the Mi Light Wi-Fi control box is within range of the bulbs.
 Thank you for the purchase of the Mi Light Wi-Fi controllable RGBW LED bulbs and the Mi Light Wi-Fi control box. This manual will guide you through the various functions associated with the Mi Light LED
Installation Instructions for the RGB DMX Stick 3 Controller
 Installation Instructions for the RGB DMX Stick 3 Controller #RGB-DMX-CONT-STICK3 Installing the Controller 1. Mount an electrical box inside the wall The controller can be installed in any standard electrical
6. Show Adding Controls to Show Mode * iPhone/iPad/Android (Easy Remote app) * Other Information...
 * Other Information...") mydmx 3.0 English mydmx 3.0 Table of contents 1. Quick Start... 1 1.1.Installing the Software... 1 1.2.Adding Lighting Fixtures... 3 1.3.Programming a Scene... 5 1.4.Controlling Live... 9 1.5.Creating
mydmx 3.0 English mydmx 3.0 Table of contents 1. Quick Start... 1 1.1.Installing the Software... 1 1.2.Adding Lighting Fixtures... 3 1.3.Programming a Scene... 5 1.4.Controlling Live... 9 1.5.Creating
SCENE PROGRAMMING (STEPS)
") DMX 5 CONTROLLER SERIES DMX-3B Version:. Feb 9 This product manual contains important information about the safe installation and use of this projector. Please read and follow these instructions carefully
DMX 5 CONTROLLER SERIES DMX-3B Version:. Feb 9 This product manual contains important information about the safe installation and use of this projector. Please read and follow these instructions carefully
INSTALLATION & OPERATING INSTRUCTIONS when Touch-5 Wi-Fi Module is Installed in PCR-4 Driver/Receiver
 INSTALLATION & when Touch-5 Wi-Fi Module is Installed in PCR-4 Driver/Receiver Apple ios Step 1. Download App to your iphone or ipad from the itunes App Store. Enter pal lighting as your search term and
Version WIFI Lighting Control Console. Art-Net Compatible. Thierry Schanen & Fabien Mirault
 Version 1.98 WIFI Lighting Control Console Art-Net Compatible Thierry Schanen & Fabien Mirault DMX WIFI light console Run the Show DMX is a DMX light console designed to monitor the RTS DMX 512 box, Art-
DM-X Channel DMX Controller. Item ref: UK User Manual. Version 2.0
 DM-X10 192 Channel DMX Controller Item ref: 154.091UK User Manual Version 2.0 Caution: Please read this manual carefully before operating Damage caused by misuse is not covered by the warranty Contents
Compulite R&D Documentation Version 21 August User s Guide For
 Compulite R&D Documentation Version 21 August 1999 User s Guide For Table of Contents Part 1 - General Chapter 1 Introduction...1-1 Using this User s Guide...1-3 Setting up...1-3 New users...1-3 Common
CONTENTS USER MANUAL. Safety instructions... 1 Introduction... 2 Hardware... 3 Connections... 3 LED Signal... 4
 USER MANUAL USER MANUAL CONTENTS Safety instructions... 1 Introduction... 2 Hardware... 3 Connections... 3 LED Signal... 4 Software Setup... 5 Fixture Patch... 5 Fixture Setup... 5 Create Fixture... 5
STANDALONE INTERFACES USB-DMX 512 & 1024 CHANNELS V.1.1
 STANDALONE INTERFACES USB-DMX 512 & 1024 CHANNELS V.1.1 SUMMARY Hardware technical specifications... 3 Front Face of the 512 / 1024 channels interfaces... 4 Side Faces of the 512 / 1024 channels interfaces...
Cobra Dimmer Master DMX Controller User Manual
 Cobra Dimmer Master DMX Controller User Manual User Manual Dimmer Master Dear Customer, Thank you for purchasing the Dimmer Master DMX controller. With decades of experience in design and production, we
Welcome Operation Installation... 3 Scope of function... 3 Pre-requirements... 3 Number of clients... 4 Version number...
 Contents Revox Joy S232 App 1 4 network receiver Contents Welcome... 3 Installation... 3 Scope of function... 3 Pre-requirements... 3 Number of clients... 4 Version number... 4 Operation... 5 Switching
Tutorial 1: Basic functions
 Tutorial 1: Basic functions In this tutorial, you will learn the basic functions of CueluxPro. You will learn to patch and control fixtures, program scenes and play them. Note: This is a tutorial created
BlueBridge. Networking Reference Guide
 BlueBridge Networking Reference Guide BB-1616DT BlueBridge DSP BlueBridge TSD-BB44 4 Channel Digital Signal Processor ETHERNET IP RESET BlueBridge GREEN = SIGNAL RED = PEAK INPUT 1 INPUT 2 INPUT 3 IP INPUT
User and Reference Manual
 User and Reference Manual User & Reference Manual All rights reserved. No parts of this work may be reproduced in any form or by any means - graphic, electronic, or mechanical, including photocopying,
Controller DMX DC-192
 Manual Controller DMX DC-192 Table of contents 1. Safety instructions... 3 1.1. FOR SAFE AND EFFICIENT OPERATION... 3 2. Overview... 5 2.1. Front view... 5 2.2. Rear view... 6 3. Joystick setup... 7 3.1.
FLX S24 & FLX S48 User Manual
 Lighting Controls FLX S lighting console FLX S24 & FLX S48 User Manual Version 1 Correct as per ZerOS Version 7.9.3 This product must be earthed Apparatets stikprop skal tilsluttes en stikkontakt med jord,
STICK-DE3. Sunlite Touch Sensitive Intelligent Control Keypad. Overview
 STICK-DE3 Sunlite Touch Sensitive Intelligent Control Keypad Overview The feature rich lighting controller has been designed to provide a control solution for the most demanding of projects, whilst maintaining
DOC-103-D idirect User Manual SOFTWARE VERSION 1.10
 idirect User Manual SOFTWARE VERSION 1.10 1.0 Introduction 4.0 idirect Overview 1.1 Contact RCL P.1 1.2 ipad Resources P.1 1.3 Minimum Requirements P.1 1.4 Required Equipment P.2 1.5 Spotlight Limits P.2
Wireless DMX Control. Show Performer DMX Controller. Stage Desk 48 DMX Controller
 Wireless DMX Control SRC-260 Each unit is a transmitter and receiver based on its Dip settings. Connect a DMX 512 standard controller to the SRC-260 and set another SRC-260 set in receivers mode down range
DATAGATE MK2. Box Contents. Additional Features (licenses) Features. Safety
 Features. Safety") DATAGATE MK2 Box Contents Datagate Mk2 (pn: 70044) Straight connect Ethernet lead (pn:79102) IEC power cord (country dependent plug) This User manual Features 8 DMX ports isolated up to 1500V Gigabit Ethernet
DATAGATE MK2 Box Contents Datagate Mk2 (pn: 70044) Straight connect Ethernet lead (pn:79102) IEC power cord (country dependent plug) This User manual Features 8 DMX ports isolated up to 1500V Gigabit Ethernet
SUNLITE is a trademark of Bruno Nicolaudie. WINDOWS is a trademark of the MICROSOFT CORPORATION. All rights reserved. No parts of this work may be rep
 SUNLITE is a trademark of Bruno Nicolaudie. WINDOWS is a trademark of the MICROSOFT CORPORATION. All rights reserved. No parts of this work may be reproduced in any form or by any means - graphic, electronic,
Contents. Version 1.5 and later. Introduction Panel Descriptions Sending Still Images to the VR-4HD... 12
 VR-4HD RCS is software designed to control the VR-4HD remotely using a computer. By connecting the VR-4HD and a computer via USB, along with operating the unit from the computer, you can also save and
SCAN OPERATOR FX II. User Manual. For Software Version Internet:
 SCAN OPERATOR FX II User Manual For Software Version 1.5 email: service@glp.de Internet: http://www.glp.de Contents 1 Features... 5 2 Overview... 6 2.1 Front View... 6 2.2 Rear View... 8 2.3 Installation
MANUAL 2011 VISUAL PRODUCTIONS
 MANUAL 2011 VISUAL PRODUCTIONS WWW.VISUALPRODUCTIONS.NL Written for Cuelux 1.03.24 January 2011 2011 Visual Productions All rights reserved. No parts of this work may be reproduced in any form or by any
DMX MASTER. Professional Lighting Technology CA-2416W. User Guide Please read these instructions carefully before use
 DMX MASTER Professional Lighting Technology CA-2416W User Guide Please read these instructions carefully before use CONTENTS 1. Features 2 Page 2.General Instructions 3 Page 3.Overview. 2 Page 3-1.Front
Release Notes Version
 Release Notes Version 3.6.1.1 Important Information for Updating New Feature Mode2 for grandma3 Compact and Compact XT Consoles Fixed Bugs and Improved Functionality Appendix Known Limitations You will
User's Manual DMX OPERATOR 192. Technical Specifications.
 Technical Specifications Power Input...DC9~15V, 500mA Internal Fuse...500mA 250V, 5x20mm MIDI IN...5Pin MIDI connector DMX OUT...3Pin XLR (female) DMX connector SOUND INPUT...RCA connector EXT STEP CONTROL...DB-9
HOG 4 Console. A. General:
 A. General: HOG 4 Console 1. The lighting control console shall be a Flying Pig Systems HOG 4 console. The console shall be available from High End Systems, Inc., 2105 Gracy Farms Lane, Austin, TX 78758,
Full Boar 4 Console. A. General:
 A. General: Full Boar 4 Console 1. The lighting control console shall be a Flying Pig Systems Full Boar 4 console. The console shall be available from High End Systems, Inc., 2105 Gracy Farms Lane, Austin,
User Manual Version 1.0
 User Manual Version 1.0 Copyright 2013 DELTA Electronics, Inc. All rights reserved. Page 1 Table of Contents 1. GETTING STARTED... 3 1.1 Key features... 3 1.2 Modes of operation... 3 1.2.1 Stand-alone
DENT Instruments ELITEpro Mobile App
 DENT Instruments ELITEpro Mobile App Version 3.0 Instruction Guide Revision: Final Draft May 20, 2015 Page 2 of 16 Instruction Guide: ELITEpro Mobile App 2015 DENT Instruments, Inc. All rights reserved.
The Lighting Controller. User Guide
 The Lighting Controller User Guide TABLE OF CONTENTS BEFORE YOU BEGIN... 3 INTRODUCTION... 4 USB TO DMX CABLE FEATURES... 4 BOX INTERFACE FEATURES... 4 RACK MOUNT INTERFACE FEATURES... 5 SETUP... 6 CPU
Veritas LED Control Cross-platform User Manual for Windows and MAC OS X /ios
 Veritas LED Control Cross-platform User Manual for Windows and MAC OS X /ios Veritas LED Control Software Release 1.01.01 Document Revision August 2018 Products Information www.veritaslight.com North America
DVR RANGE ENGINEER MANUAL
 INSPIRE DVR RANGE ENGINEER MANUAL Contents Hardware Inspire DVR range Connections Connecting a mouse Connecting keyboard Connecting PTZ cameras Connecting Keyboard/PTZ Alarm connections Using front panel
Artistic Licence. Net-Lynx I/P. User Guide. Net-Lynx I/P User Guide. Version 1-5
 Artistic Licence Net-Lynx I/P User Guide Version 1-5 Please read these instructions before using the product. This product has been designed & manufactured for professional use only. It should only be
AEQ FORUM VIRTUAL USER S MANUAL ED. 03/15 Firmware Version: PBA Base CPU v1.65 or higher Software Version: AEQ FORUM VIRTUAL v1.
 USER S MANUAL ED. 03/15 V. 1.2-03/10/2016 Firmware Version: Software Version: PBA Base CPU v1.65 or higher v1.30 or higher CONTENTS 1. INSTALLING AND RUNNING THE APPLICATION.... 3 1.1. Installation. System
Hardware technical specifications Front Face of the 512 / 1024 channels interfaces LED 7-segments display operation:...
 SUMMARY Hardware technical specifications... 4 Front Face of the 512 / 1024 channels interfaces... 5 LED 7-segments display operation:... 5 LED 7-segments Sleep option:... 6 selection Mode button... 6
Lightkey User Guide. Professional DMX lighting control. Mac style. Rev
 Professional DMX lighting control. Mac style. Rev. 2.4.1 www.lightkeyapp.com Contents 1 Welcome 8 2 Activate Lightkey 9 Buy a License... 9 Activate Lightkey... 9 Renew a License... 10 Transfer a License
ELATION PLATINUM SPOT 35 PRO dmx traits
 1 1 1 2 2 2 3 3 4 4 3 5 5 6 4 6 7 8 5 7 9 10 6 8 11 12 7 9 13 14 8 10 15 PAN MOVEMENT [8 BIT] 0-255 PAN Movement PAN FINE MOVEMENT [16 BIT] 0-255 Fine Control of PAN Movement TILT MOVEMENT [8 BIT] 0-255
Artistic Licence. daligate quad. User Guide. daligate quad User Guide. Version 1-0
 Artistic Licence daligate quad User Guide Version 1-0 Please read these instructions before using the product. This product has been designed & manufactured for professional use only. It should only be