CUELUXPRO MANUAL 2013 VISUAL PRODUCTIONS BV
|
|
|
- Brent Dean
- 5 years ago
- Views:
Transcription

1 CUELUXPRO MANUAL 2013 VISUAL PRODUCTIONS BV
2 CueluxPro Manual Written for CueluxPro October Visual Productions BV All rights reserved. No parts of this work may be reproduced in any form or by any means - graphic, electronic, or mechanical, including photocopying, recording, taping, or information storage and retrieval systems - without the written permission of the publisher. While every precaution has been taken in the preparation of this document, the publisher and the author assume no responsibility for errors or omissions, or for damages resulting from the use of information contained in this document or from the use of programs and source code that may accompany it. In no event shall the publisher and the author be liable for any loss of pro,t or any other commercial damage caused or alleged to have been caused directly or indirectly by this document. Due to the dynamic nature of product design, the information contained in this document is subject to change without notice. Revisions of this information or new editions may be issued to incorporate such changes. Products that are referred to in this document may be either trademarks and/or registered trademarks of the respective owners. The publisher and the author make no claim to these trademarks. The Graphics Interchange Format (c) is the Copyright property of CompuServe Incorporated. GIF (sm) is a Service Mark property of CompuServe Incorporated. p1
3 Thank you for choosing CueluxPro. We started developing lighting control software at Visual Productions in CueluxPro is our latest generation software for controlling lighting,xtures and it is the most advanced system we have ever built. It represents all our experience that we have gained and techniques we have developed over the past 15 years. We hope you will enjoy using CueluxPro as much as we enjoyed developing it. Be sure to keep checking for the latest software releases as CueluxPro will continue to evolve over the next years. Welcome to the CueluxPro user s manual, this document describes the CueluxPro software and the basics of lighting programming. Table of Contents 1 Overview User-Interface Patch Matrix Groups Palettes Cuelists Playbacks Actions Hardware Tempo Control MIDI Controllers Mappings OSC Options Personality Files Notes Index If, after consulting this manual, you still have questions then you can obtain additional information and help through the on-line support forum. CueluxPro users and employees of Visual Productions share their experiences and tips on this forum. You can,nd the forum at p2

 Astronomical Clock (sunrise, sunset) Scheduling (date, time, weekday) 2,500+ personality,les Optimized for Touch Screen SUPPORTED HARDWARE CueluxPro works in combination")
4 1 OVERVIEW CueluxPro is an advanced and scalable lighting control application. The software is designed to control medium to large lighting installations, for both architectural and live-entertainment situations. FEATURES Cross-platform (Windows, Mac, Linux) 20 Universes (10,240 DMX channels) Industry-standard Cuelist system FX Generator Pixel Mapping DMX in MIDI in & out OSC in & out UDP in & out Art-Net in & out Timecode (SMPTE, MTC) Astronomical Clock (sunrise, sunset) Scheduling (date, time, weekday) 2,500+ personality,les Optimized for Touch Screen SUPPORTED HARDWARE CueluxPro works in combination with the CueCore and IoCore as its DMX and IO interfaces, the B- Station is supported as a remote control unit. All devices are connected by Ethernet. CueCore IoCore B-Station LICENSING The CueluxPro software is available for download. The licence is included in the CueCore, i.e. each CueCore unlocks 2 universes in the CueluxPro software. The maximum number of CueCores of p3
5 supported CueCores is 10. SYSTEM REQUIREMENTS Please make sure your system has at least the following speci,cations. 32 or 64 bit Intel i5 processor of equivalent 1GB RAM minimal screen resolution of 1280 x 800. The following operating systems are supported: Windows XP Windows Vista Windows 7 Windows 8 OSX 10.5 OSX 10.6 OSX 10.7 OSX 10.8 Ubuntu p4

6 2 USER-INTERFACE The main user-interface of CueluxPro consists of the following sections: Fixtures Groups Palettes Playback Faders Programmer Playback Buttons Command Line p5

7 3 PATCH The PATCH menu allows you to setup the DMX,xtures which are connected to CueluxPro. UNIVERSE In the Universes tab you can set up the number of DMX universes that you will be using. You can add, remove and rename universes. The maximum number universes is 20. Each universe needs to be linked to a DMX port on a CueCore. Each DMX port on a CueCore can only be linked to one universe. When one DMX port becomes linked to a universe then CueluxPro will become the 'master' of this CueCore. The CueCore will then suspend any standalone operation and become solely a input/output interface for CueluxPro. When the DMX port is unlinked from the universe or the CueluxPro software is closed, then the CueCore will automatically resume its standalone operation. The CueCore can also manually be unlinked from CueluxPro by disabling the 'Master' setting in the universes table. When connected to a CueCore, each universe's DMX data can also be send out via Art-Net. CueluxPro supports both broad-cast and uni-cast for transmitting Art-Net. FIXTURE The Fixture tab allows you to add, remove and change the,xtures in your patch. p6

8 Add Click ADD to open the Add Fixture dialog. Browse the manufacturers list, and choose the MANUFACTURER of the,rst,xture you would like to add. To quickly,nd a manufacturer, start typing the name of the manufacturer you re looking for on your keyboard. While typing, the list will jump to the correct manufacturer in the list. Browse the MODELs for the selected manufacturer and choose one by clicking it. To quickly,nd a model in a long list, click on the model list and start typing the name of the model you re looking for. If you would like to choose a,xture that is not present in these lists then please refer to page 38 to see how to obtain new personality,les. Remove To remove one or more,xtures from the patch, select them in the Patch view by clicking or dragging and click REMOVE. To remove all,xtures, click REMOVE and keep the button pressed for at least 1 second. Replace If you have pre-programmed a show with your,xtures, and,nd out these,xtures are running in a dikerent mode or are even a completely dikerent,xture when on location, then you can 'replace' these,xtures. Select the 'manufacturer's',eld of,xtures you would like to replace by clicking or dragging in the Patch view and click CHANGE. This will open the CHANGE FIXTURE dialog, which is similar to the ADD FIXTURE dialog. Choose another mode for the same model, or choose even another model. Rename To give your,xtures a more clear name, select the 'label' cells of 1 or multiple,xtures and press CHANGE. Type a new name for the,xture and click OK or press <ENTER.>. If you ve renamed multiple,xtures, CueluxPro will automatically add 01, 02, 03 etc. to the name you have entered. Address CueluxPro automatically sets the DMX address when adding,xtures to the patch, by,nding the,rst available DMX channel in your con,guration. However, if you want to change the address, select the 'addresss' cell of 1 or multiple,xtures and click CHANGE. Enter the new address and click OK. If you had multiple,xtures selected, CueluxPro will set the entered address for the,rst selected,xture and will automatically have the next selected p7

9 ,xtures follow the previous ones. For example, if you select 4 8-channel dimmers in the patch, click ADDRESS and enter 101. This will result in addresses 101, 109, 117 and 125 for the selected dimmers. Properties Selecting the 'properties',eld of a,xture and clicking on the CHANGE button will pop up the Fixture Properties window. This window allows you to enable INVERT PAN, INVERT TILT and SWAP PAN TILT in case the,xture is a moving light. If the,xture has RGB colour mixing but no DMX channel for intensity, you can enable VIRTUAL DIMMER. This option will give the,xture dimmer capability separate from the RGB control. p8


10 4 MATRIX CueluxPro contains a 2-dimensional matrix controller for pixel mapping on arrays of lighting,xtures. These lighting,xtures are typically LED,xtures, however, the matrix control can also be applied to any other DMX,xture. LAYOUT To control a matrix you,rst patch the,xtures as usual in the Patch menu. The next step is to add the only the,xtures that are part of the matrix to the members list in the Matrix->Layout menu. In this tab you can also set the width and height of the matrix. Next you should arrange them to reoect the physical location of the,xtures. In the Layout tab you can select a matrix-member and them move it around using the arrow-keys. Alternatively, you could use ARRANGE ALL button to have all the members automatically positioned according some typical patterns. Tos assist you in establishing the layout you can enable the INDICATE check-box, this will make the lighting,xture to display the same colour as used in the layout diagram. This will speed up the process because it helps you with recognizing which,xture is selected and how it is orientated. LAYER Once the layout is created you should add at least one layer in the Layer tab. Typically this layer has the same dimensions as the matrix; this is quickly achieved by pressing the FULL SIZE button. Each layer can playback a graphical ekect. When you add more layers then this will allow you overlay multiple ekects and crossfade or blend layers into each other. By reducing the size of the layer you can create picture-in-picture ekects. Also, when two separate matrices are patches next to each other in the layout then both could be covered by a separate layer; thus allowing independent control of multiple matrices within CueluxPro. p9


. Some pattern bene,t from the gobo scroll to be enabled, others require the speed parameter that can is located on the MISC tab.")
11 PATTERN The Pattern tab shows the ekects that are available to be played back on the layers. When starting a new show-,le the patterns are loaded by default, however, you are free to add or remove any pattern. Some patterns have properties that can be modi,ed by using the EDIT button. OVERVIEW The overview tab renders the output of the matrix control. USING THE MATRIX CONTROL For each layer that you have added a 'virtual',xture will appear in the status menu. This virtual,xture represents the layer. You turn on the layer by selecting it and then creating a scene in the programmer window, just like you would be with moving light for example. The layer would need its intensity to be brought up and a colour-mix to be set (typically open white), then by using the gobo wheel you can select the pattern-page (gobo wheel 1) and the pattern (gobo wheel 2). Some pattern bene,t from the gobo scroll to be enabled, others require the speed parameter that can is located on the MISC tab. When you like the scene you have created for the layer then you can record it into a palette or cue, just like you would do for a moving light for example. p10
 2. Select,xtures 3. Press RECORD 4.")
12 5 GROUPS You to create groups with,xtures and/or sub-,xtures. This makes selection of multiple (sub),xtures easy and quick. To create a group you go to the Status menu and follow the steps: 1. Make sure the programmer is cleared (press CLEAR twice) 2. Select,xtures 3. Press RECORD 4. Click on an empty the group cells You can also edit an existing group by enabling the EDIT button and then click on a group cell. This will bring up the group dialog where you can add or remove individual,xtures. To rename a group you,rst enable the RENAME button and click on a cell. SUB-FIXTURES CueluxPro uses the concept of sub-,xtures. This means that some,xtures consist of multiple sub-,xtures, like a 10-channel dimmer rack is - in our terms - just one,xtures with 10 sub-,xtures. This also works for LED,xtures with multiple segments/pixels. The reason behind the concept of sub-,xtures is that it makes patching easier; you only add the physical,xtures to your patch and you don t have to worry about setting starting addresses per dimmer channel, or worse, per LED segment. p11
13 6 PALETTES Palettes are memories that can contain a single lighting scene for one or more,xtures. This scene can contain just a single attribute (e.g. only intensity) or contain multiple attributes. When you activate a palette then the scene is loaded into the programmer. The palettes are useful for live controlling your lights as you can make quick changes just clicking on dikerent palette cells. Also, the palettes can be used to store scenes into cuelists. In that case no actual values are stored into the cues, in stead a reference to the palette is saved. This allows you to later on change the palette and have the change reoected in each cue that is referring to this particular palette. To create a palette go to the Status menu and simply build a scene in the programmer window, enable the RECORD button and then click on an empty palette cell. You can also edit an existing palette by enabling the EDIT button and clicking on a palette cell. Similarly, renaming a palette is done via the RENAME button and then choosing a palette cell. When you activate a palette then the behavior depends on the,xture selection. When no,xture is selected then clicking on a palette cell will,rst select the,xture programmed in this palette. Clicking the cell again will activate transfer the values to the programmer. If there are already,xtures selected then clicking on the palette cell will apply the palette only of the,xture selection. When there are,xtures selected that do not appear in the palette then the values inside the palette will still be applied on these,xtures using a let's make the best of it policy. p12


14 7 CUELISTS A lighting scene is stored in a 'Cue' and cues are stored in 'Cuelists'. Each cuelist can contain one or more cues. You can create multiple cuelists that each control a part of your show, or you can create one single cuelist that addresses all your lights. You can either create and change cues in the Status menu or use the Memories->Cue menu. This chapter discusses both approaches. 8.1 TRACKING Cuelist based lighting controllers can be either tracking or non-tracking. CueluxPro is a tracking console. Tracking means that in a cuelist, only changes need recording. If a light has the same value in two consecutive cues you don't need to store the second value, instead you make sure the second contains 'no' value so the,rst value remains unchanged through those cues. 8.2 CREATING CUELISTS IN THE STATUS MENU The fastest way to create cuelists is to do it in the Status menu. Special buttons like RECORD, LOAD and KNOCKOUT are provided to make this process intuitive. Programmer When recording cues, you,rst have to create a lighting scene which will be then stored in the cue. The Programming window is the place where you create the scene. First you select a,xture, the programming window will update to show you the capabilities of that,xtures and enables you to set the dikerent parameters, e.g. set a dimmer level, pick a colour or gobo. You can now also deselect the,xture and select a new one; the values will be kept in the programming window's memory. FX CueluxPro has an inbuilt FX generator for dynamic ekects on the Intensity, Position and ColourMix attribute. To enable a FX click on the FX-button close to the attribute and choose an algorithm for the FX dialog. You also need to set the size, speed and phase levels. Clear Any values that reside in the programming windows' memory have priority. For example you might have a cuelist running that sets a certain dimmer to 50% but if the programming window contains a p13

15 dimmer level of 10% for that particular,xture, then this dimmer will be set 10%. Therefor it is important to clear the programmer once you're,nished recording cues. Press the CLEAR button once for clearing all values for the currently selected,xtures and press it twice for clearing all values, even for,xtures currently not selected. Remove attributes To remove an attribute from the Programmer-memory to make sure that it will not be recorded in a Cue, press the KNOCKOUT button and click the Attribute or Attribute-page in the Programmer to knock it out. Fine Adjustments Some,xtures support 16-bit values for controlling their attributes. To make small changes to a value in order to take use of very,ne 16-bit control, you can use the CTRL key in combination with the mouse wheel to,ne tune a fader's value. Flip A moving light of the yoke type not a scanner is, by using its fork and head, able to reach a certain position through two dikerent pan/tilt con,gurations. When the programmer is containing position values for one or more,xtures you can use the FLIP button to reach exactly the same position by using the opposite pan/tilt values. Record a cue Once you've built up a scene in the programming window you can transfer the values to a new cue by following the next steps. Press the RECORD button Press the GO button of an empty playback This will create a new cuelist with one cue that contains the scene from the programmer. The cuelist is automatically assigned to the playback. You can repeat this process to add new cues to the cuelist. Edit a Cue To edit the cue,,rst make sure the cue is outputted by activating the cuelist and stepping to the cue you want to edit using the PLAY button. Select the,xtures you want to change and change the attributes in the Programmer. You can also add other attributes by changing the attributes for the selected,xtures. Other,xtures can also be added: Select them and change the values you would like to store in the cue. Press RECORD and click on the PLAY button of the cuelist where the cue you want to edit is active. A window will pop-up, asking you what to do. Choose MERGE to merge the active information in the Programmer with the cue. Remove values or 0xtures from a cue To remove values or,xtures from a cue, we re going to load the complete cue into the programmer, make the changes, and store the programmer back into the cue by replacing the old information. Make sure the cue is active by activating the cuelist and stepping to the cue you want to edit using the PLAY button. p14
16 Load the cue into the Programmer by pressing LOAD and clicking on the PLAY button of the cuelist. All information in the current cue is now loaded into the Programmer. To remove a,xture from the Programmer, select the,xture and press CLEAR in the Programmer once. To remove one or more attributes, select the,xtures, press DELETE and click on the attribute or the attribute-page; this action will delete the attribute or the complete attribute page from the programmer. To store the Programmer back into the cue, press RECORD and click the PLAY button of the cuelist where the cue you want to edit is active. In the pop-up window, choose REPLACE to replace the cue with the information in the Programmer. 8.3 MODIFYING A CUELIST VIA THE MENU Next to working in the Status menu, you can also edit cuelists via the Memories->Cuelist menu. Although you can create a new cuelist in the CUE menu, the menu is more setup for modifying cuelists once created in the Status menu. To change an existing cuelist, open the Cuelist menu. Select a Cuelist and click EDIT to open the Cuelist editor. Here you can edit the properties of the CUELIST and the individual cues. The following properties can be set for the cuelist: Chase When CHASE is enabled, the cuelist will no longer follow the cues timings and conditions. The cuelist will be played back as a chase. The cross-fade can be changed using the ATTAK slider in the playback settnigs. The speed of the chase is linked to the main Chase tempo, which can be found at the bottom left of the CueluxPro window. All cuelists set to CHASE will run synchronous to this tempo. In the Cuelist Editor, you can also specify a tempo divider for the chase. 1/1: Chase will step further on every beat of the main chase tempo. 1/2: Chase will step further once in every 2 beats of the main chase tempo. 1/4: Chase will step further once in every 4 beats of the main chase tempo Etc. Loop / Bounce / Random These check-boxes allow you to change the behaviour of the cuelist. Setting it to Loop will make the cuelist repeat itself. Bounce will make it run forwards and backwards. Random will make it jump to random cues. 8.4 MODIFYING A CUE VIA THE MENU The following properties can be set per cue: Label The label is the name of the cue for your reference. Condition The condition speci,es when the cue will be triggered. There are 3 possible Conditions: p15
17 Halt Follow Wait The cue will be triggered when you press the GO button. The cue will be triggered as soon as the previous cue has,nished fading. The cue will be triggered autocratically after the previous cue has been triggered. Cue Timing To explain the dikerent timings in combination with the Cue Condition, see the following diagram: Delay The delay time (in seconds) is the time between the cue being triggered, and the cue actually starting to fade. Fade In The Fade In time (in seconds) is the fade time for all dimmers fading in (dimmer values going UP) in the cue and all other fading attributes (e.g. colour mix, position). Fade Out The Fade Out time (in seconds) is the fade time for all dimmers fading out (dimmer values going DOWN) in the cue. Click and drag to select multiple properties for multiple cues, e.g. fade in for multiple cues or delay & fade in for multiple cues p16


18 Edit The values in a cue can also be edited in the Cue Editor. Select a Cue and click EDIT. Insert Use Insert to add an attribute to the cue. Delete Use Delete to remove an attribute from the cue. The attribute's column will still show until it is removed from every cue. Change Select one or multiple values and click Change to change the value. 8.5 WIZARD The wizard can automatically create typical cuelists that might have taken quite a while to program if done by hand. To use the generated cuelist, it still has to be assigned to a playback fader or button. See page 9 for instructions. Chase The wizard can create a chase over multiple,xtures. You can select any of the attributes that is supported by the,xtures you have selected. The wizard also okers dikerent orders in which the chase can run e.g. Forward, Reverse, Zig Zag, Synchronous or Random. Test Sequence The wizard can make you a cuelist that contains a sequence of steps for testing,xtures. Based on the personality,le of the selected,xture it will generate cues for each attribute the,xture features. It is advised to create one test sequence per type of,xture. p17
 and stop ('release' the playback) the cuelist, as well as controlling other parameters like intensity, speed, attack, etc.")

19 8 PLAYBACKS Playbacks are an important element in a cuelist based lighting controller like CueluxPro. Cuelists are not activated directly, instead they are assigned to a playback. The playback allows the user to start (give the playback a 'Go') and stop ('release' the playback) the cuelist, as well as controlling other parameters like intensity, speed, attack, etc. Illustration 1: Playback Faders Illustration 2: Playback Buttons There are two types of playbacks, playback faders and playback buttons. They work in a similar way, the dikerence is that a playback button does not feature the intensity fader and the Oash button. Therefor the playback button takes up less space in the CueluxPro user-interface. Playback buttons are more suitable for controlling cuelists that have,xed-value attributes like,xed colours, gobo, prism and shutter. On the other hand, playback faders are better suited for controlling cuelists containing levelvalue attributes like dimmer, RGB colour, iris, strobe, etc. Assignment You can assign a playback in two ways. Firstly, you can double-click on the 'indicator' just above a playback to bring up the Playback Settings view. Pressing the ASSIGN button in this dialog will bring up the assignment dialog. Alternatively, you can also assign by creating a new cuelist in Status menu, this implicitly assigns the new cuelist to a playback. Please refer to the Cuelist chapter for an explanation on how this is done. Indicator The small rectangle above the playbacks are called 'indicators', they provide some basic feedback on the contents of the playback. p18
20 Green = running Cuelist's name Intensity level Attack level At Cue 1 out of 5 Speed level Speed The speed fader will control the overall speed of the playback. When set in the middle the speed will be neutral; it will not ekect the programmed speed of the cues and fades. If the cuelist is set as a chase then the cuelist will no longer follow the cues timings and conditions. The speed of the chase is linked to the main Chase tempo, which can be found at the bottom left of the CueluxPro window. All cuelists set to CHASE will run synchronous to this tempo. In this case the Speed slider will specify a tempo divider/multiplier for the chase. For example: 4/1: Chase will make four steps within every beat of the main chase tempo. 2/1: Chase will make two steps within every beat of the main chase tempo. 1/1: Chase will step further on every beat of the main chase tempo. 1/2: Chase will step further once in every two beats of the main chase tempo. 1/4: Chase will step further once in every four beats of the main chase tempo Attak When the cuelist is set as a Chase, then the cross-fade can be changed using the ATTAK slider. FXRate The FXRate will modify the programmed speed for all FX in the cuelists. Keeping this slider in the middle will not change the programmed FX speed. Background If a playback is set to 'background' then it will start running automatically at the software's startup. Also, it will not be released by the 'release all' command (a 'release all' is performed when the RELEASE button is pressed for over one second). The background feature is useful for cuelists controlling,xtures that should not be turned ok during a show, e.g. 'work' lights backstage. Fader Start With Fader start enabled, the playback will automatically be triggered when the corresponding fader is being moved up or the Oash button is pressed. The playback will also be released as soon as the fader is back at the bottom or when the Oash button is released. p19
21 Bundle You bundle playbacks together so they work mutually exclusive; i.e. only one playback is active at the same time. Whenever you start a playback it will automatically release any other playback in the same bundle. You can set up up to 20 dikerent bundles. Bundles come in handy if you have a couple of playbacks controlling cuelists for the same,xtures, especially if those cuelists contain HTP attributes like dimmer. Button Primary/Secondary These properties allow you change the function of the Oash button (Primary) and the go+ button (Secondary). Banksafe Some cuelists you will need to change so frequently, that you would like to access them from each bank. In the PLAY menu, you can achieve this quickly by selecting the playback's cell in the table and clicking BANKSAFE. p20

22 9 ACTIONS CueluxPro needs to respond to the outside world. With today's ever more demanding lighting projects, chances are it needs to respond to various dikerent signals or protocols. The CueluxPro software supports a variety of protocols. In the Memories->Action menu you determine how your CueCore will respond to which signal and what tasks it will perform when triggered. This structure consists of action-lists and actions. All the dikerent kind of signals CueluxPro can receive are categorized as 'sources'. Each action-list relates to one source and can contain multiple actions. Each action details to which speci,c signal it is listening and contains a list of tasks it will perform when triggered. Action-lists and actions are further discussed on page 22. Templates The Memories->Action menu provides ready-made Templates for several typical action arrangements. Templates can be easily copied to the Source list and modi,ed in necessary. The following table describes the functionality of the templates. GPI Dashboard Playback Buttons GPI Playback Fader + Dimmer Control the playback buttons via the GPI port of a CueCore or IoCore or through the push-buttons of the B-Station. Control the playback faders via the analog GPI ports of a IoCore. VisualTouch Creating a VisualTouch layout is done by creating a 'Touch Screen' action-list and adding actions. For each action you can choose between various controls like buttons and sliders. The order of the actions will control the arrangement in VisualTouch. p21
23 ACTIONS Programming the show controller involves adding action-list and specifying actions. Action-lists In the Action-lists table you can include the sources you will be using in your project. You can choose from input sources like: DMX, Art-Net, MIDI, GPI, Time-code, Scheduler & OSC. Each Action-list can be enabled and disabled. The available sources are: Touch Screen Art-Net DMX In MIDI Timecode Scheduler System OSC GPI GPO UDP Triggers from the VisualTouch software tool. Trigger on reception of Art-Net or convert Art-Net universes to DMX. Convert to complete universe to Art-Net or trigger by individual DMX channels. Trigger by or convert from incoming MIDI messages like Notes, Control Changes or Program Changes. Trigger by exact time-code frames. You specify the time-code protocol in the settings page. The inbuilt RTC allows triggering on time, day, weekday and sunrise/sunset. Miscellaneous triggers like 'OnStartup' Incoming OSC messages State changes on the CueCore's or IoCore's GPI port. State changes on the IoCore's relays. Incoming UDP messages p22
24 Actions Within each Action-list you can create multiple Actions. For each Action you specify when it will be triggered and which Tasks it will perform when that trigger occurs. To change the details of an action, select it and press the EDIT button. This will open the Action page. Flank For most types of actions you can set the Oank. For example when editing a GPI action, it will be triggered only on closing the contact (also known as 'normally open') when the speci,er is set to DOWN. When set to UP, the action will be only trigger on opening the contact (a.k.a. 'normally closed'). Finally, when the speci,er is set to CHANGE, the action will be triggered on both closing and opening of the contact. Trigger Specify the exact trigger on which to execute the tasks. In the case of a GPI action, the trigger denotes the trigger port number (there are 4 ports on the CueCore and 8 ports on a IoCore). Tasks You can specify up to 64 Tasks per action. When triggered, the Tasks are performed in the same order as they are listed in the Action. Tasks can control various elements and protocols in CueluxPro, such as playbacks, MIDI, OSC or,xture selection. Tasks can also be used to trigger other Actions, enable or disable action-lists and start/stop the internal time-code. Some tasks manipulate the software entities in the engine and other tasks control the user-interface of CueluxPro; the latter are called 'Dashboard' tasks. For example there is a 'Playback Fader' task and a 'Dashboard Playback Fader' task. The 'Playback Fader' task has features like 'Go+' and 'Release', directly changing the state of the playback. The 'Dashboard Playback Fader' task does, however, only control the buttons and faders in CueluxPro that belong to that particular playback. This task allows you to press and release the 'Oash' and 'go' button. Because a Task can do a wide variety of things they are organized in dikerent Task 'Types'. When adding a task a pop-up window will allow you to choose from the following types: UDP DMX Send a UDP message. Control the DMX channels in the 'Show Control buker'. This data can be send out via the DMX ports and/or Art-Net. Please set the 'Output Routing' in the Settings page p23
25 UDP MIDI OSC Timecode Selection Special Pattern Action Action List Playback Fader Playback Button Dashboard Playback Fader Dashboard Playback Fader Grid Dashboard Playback Button Dashboard Playback Button Grid Dashboard Bank Fader Dashboard Bank Button Dashboard Master Dashboard Tempo Dashboard Selection Dashboard Programmer Dashboard Command Serial Led Palette Dashboard Palette Grid Universe Send a UDP message. accordingly. Send a MIDI message. Send an OSC message. Control the time-code properties like selecting the input source or start/stop the internal time-code generator. Control the,xture selection Special tasks like 'run program' to start an external application. Change the properties of a pattern. Trigger another action. Control the properties of an Action-list (e.g. Enable check-box). Control a playback fader. Use the identi,er,eld to denote which playback. Control a playback button. Use the identi,er,eld to denote which playback. Control the GUI that belongs to a playback fader. Use the identi,er,eld to denote which playback. Control the playback faders via an 8x8 grid in the GUI. Control the GUI that belongs to a playback button. Use the identi,er,eld to denote which playback. Control the playback buttons via an 8x8 grid in the GUI. Control the bank selection GUI for the playback faders. Control the bank selection GUI for the playback buttons. Control the master GUI. Control the tempo GUI. Control the,xtures selection GUI. Control the progammer GUI. Control the command-line GUI Send out RS-232 messages. Control the LEDs on a B-Station. Control the palettes Control the 8x8 palette grid in the GUI. Set the properties of a universe in the patch view. p24
26 Feature For each task you can select a Feature. The choice in Features dikers for each Type. DMX features: Set Value Set a channel Bump Channel Momentary set a channel to certain value MIDI features: Send Send a MIDI message. OSC features: Send Send Float Send Unsigned Send Bool Send String Send Colour Send a message with a Ooat type parameter (legacy). Send a message with a Ooat type parameter (preferred). Send a message with a unsgined type parameter. Send a message with a bool type parameter. Send a message with a string type parameter. Send a message with a colour type parameter. Function Each Task also has a Function,eld. The choice of Functions depends on the Task-Type and the selected Feature. For example, when you add a Task with the 'Playback Fader' Type and set its Feature to 'Intensity' then you can select of the following Functions: Set Control Specify an intensity level Set the intensity to the level that is provided as an argument from the source that triggered this task. For example, if this task was triggered by the DMX input then the level of the DMX channel will be used for the intensity level. p25
27 Scheduling An important input Source is the Scheduler. The Scheduler uses the computers system time. There are several ways to specify a trigger. Date and Time You can use the Scheduler to trigger actions on certain dates and times. When specifying a date and time it is possible to choose 'Don't Care' for each value by entering 'X'. E.g. if you set a date and specify 'Don't Care' for the year,eld, this Action will be triggered each year. Weekday and Time Sometimes you would like to de,ne a trigger based on a day in the week, rather then a speci,c date. CueluxPro supports this, it allows to choose any combination of weekdays and time. Astronomical Clock CueluxPro keeps an astronomical clock that based on the day of the year and position on the globe (as con,gured in the settings page) calculates the sunrise and sunset times. This allows you to trigger events on sunrise or sunset. p26
28 10 HARDWARE The CueluxPro software works together with the CueCore, IoCore and B-Station hardware. To unlock the software you need at least one CueCore. You can add more CueCores to unlock more DMX universes. IoCores can be added provide GPI triggers or switch external equipment with the GPO relays. B-Stations provide a physical user-interface to select for example cues, palettes or other ekects. Dumping content into the CueCore Once the CueCore is connected to the CueluxPro software it becomes 'mastered' and will act as input/output interface; capturing incoming DMX, MIDI, timecode and GPI triggers in real-time as well outputting the CueluxPro's data via the DMX outputs. The CueCore also has many features for standalone usage, making it a powerful and compact solid-state lighting controller. The lighting scenes can programmed via the CueCore's web-interface or captured via DMX or Art-Net input. Alternatively, you can use the CueluxPro software to program the standalone memory of the CueCore. The CueCore has two type of memory: Cues in the 'console' page and Recordings in the 'Recorder' page; both can be uploaded by CueluxPro. To program the cues simply create a lighting scene and dump this 'DMX snapshot' into one of the 255 available cues by pressing the DUMP button and entering the cue number followed by ENTER. The command-line would show for example: > DUMP 3 You can also store a cuelist into the recording memory of the CueCore. First you create a cuelist and assign it to playback. Then press the DUMP button, then press the playback's GO button, enter the recording number followed by enter. In the command-line it would show like: > DUMP PB2 12 When the cuelist has multiple cues and their conditions are set to follow, then the complete cuelist will be stored taking into account the programmed delay and fade times. When the current cue in the cuelist has a condition set to halt, then only that cue is stored. If this cue contains any matrix patterns or intensity FX, colour FX or other FX then the duration of the FX will be used for the recording. In this case, CueluxPro will automatically make sure the pattern of FX will make one complete cycle in order to record a seam-less loop. When your patch is spread out over multiple CueCores, CueluxPro will distribute the generated DMX data over the recording in the various CueCores. p27
29 11 TEMPO CONTROL All cuelists with property CHASE enabled, are synced to the Tempo. You can,nd the controls for the Tempo on the bottom left of the CueluxPro window. Using the TEMPO button below the tempo display, you can tap to the music to change the tempo in CueluxPro. You can also click the tempo display and drag up (tempo UP) or to the right (tempo DOWN). Break Click the BREAK button below the tempo display to pause all chases. Click again to continue all chases. MIDI Clock When the MIDI Input device you ve selected in the MIDI Options (see chapter MIDI Controllers ) sends out MIDI Clock messages, the Tempo will be automatically locked to the MIDI Clock tempo. This allows exact tempo matching when controlling CueluxPro from sequencer software for example at a concert. In order for the tempo to be controlled by the MIDI Clock, the display should be set to 'midi' mode. Press the TEMPO button for more than one second to switch to 'midi' mode. Press the TEMPO again to switch back to 'manual' mode. p28

30 12 MIDI CONTROLLERS MAPPINGS CueluxPro supports various MIDI control surfaces. The buttons and faders on those controllers are assigned to features in the CueluxPro User-interface in a pre-de,ned midi-map. The following diagrams illustrate those assignments. Generic Midi-map Next to the hardware speci,c midi-maps, CueluxPro also okers a generic midi-map in which all the software functions that can be controlled through MIDI are assigned to Note or Control Change message. This midi-map is intended for use with external MIDI software like sequencers or DAWs. Elation MIDIcon The Elation MIDIcon is supported Plug & Play. p29
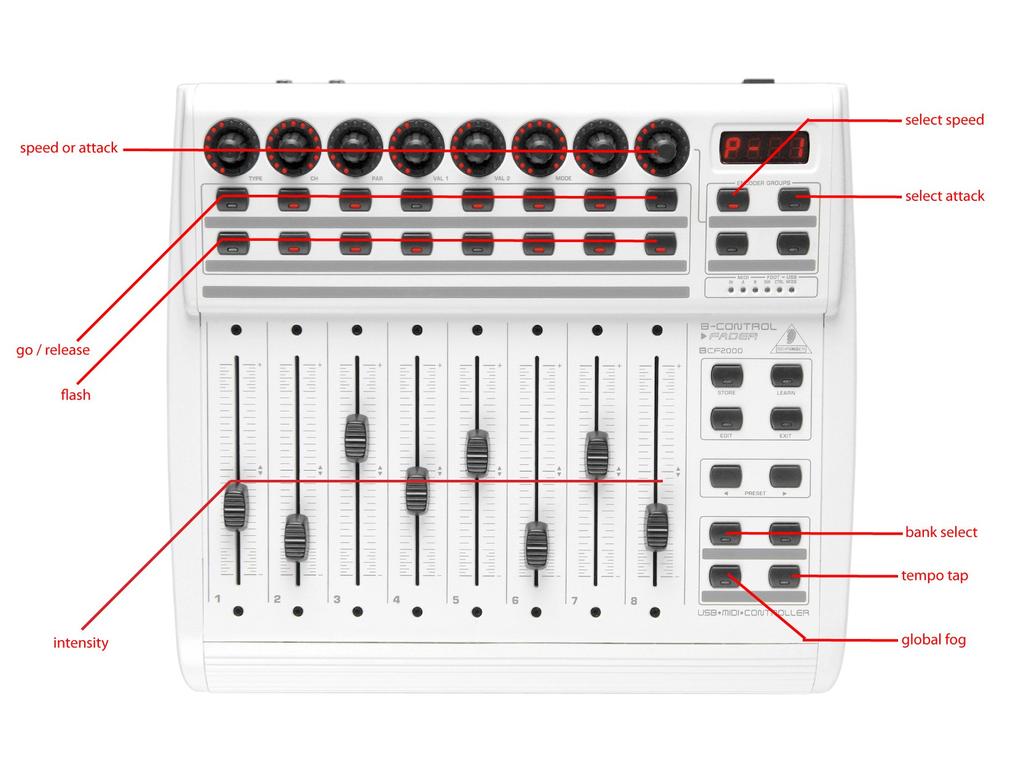
31 Behringer BCF-2000 The Behringer BCF-2000 is supported Plug & Play: However, for optimal use we ve included a Sysex-,le that can either be found in the Program Files/Visual Productions/CueluxPro/Sysex/ folder on Windows systems, or it can be obtained at the forum ( The Sysex,le can be uploaded to the BCF-2000 using one of the following (free) tools: Midi-OX for Windows: SyEx Librarian for Mac OS X: After sending the Sysex,le to the BCF-2000, please notice that the received preset is in a temporary memory. If you switch ok the BCF-2000, the preset will be lost. When you ve received the preset on the BCF-2000, press STORE, use the PRESET buttons to choose a preset number for storing the preset, and press STORE again. The preset will be saved in the BCF p30
32 p31
33 Livid Instruments Ohm64 The Livid Instruments Ohm64 is supported Plug & Play. p32
34 Novation Launchpad The Novation Launchpad is supported Plug & Play. p33

35 Korg nanokontrol The Korg nanokontrol is supported Plug & Play. p34

36 13 OSC Open Sound Control (OSC) is a protocol for communicating between computers, software and various multi-media type devices. OSC uses the network to send and receive messages, it can contain MIDI, time-code and custom information. There are apps available for creating custom-made user interfaces on IOS (ipod, iphone, ipad) and Android. These tools allow you to program fool- proof user-interfaces for controlling the device. E.g. TouchOSC from Remote Control CueluxPro has an inbuilt implementation for remote controlling the software by OSC. There is a TouchOSC layout available from pro.html that is con,gured to mimic the userinterface of CueluxPro. You can use this OSC layout as a 'rigger's remote' for controlling CueluxPro by ipad or Android tablet. Actions You can also trigger to incoming OSC messages and de,ne the actions that need to be performed your self. You just add a OSC source to the action-list in the Memories->Action menu and specify the actions, triggers and tasks. More information about programming actions can be found on page 21. Forwarding The TouchOSC app can only send its OSC messages to one IP address, however, sometimes you need to send it to multiple IP addresses. In that case you can use the OUTPUT IP OSC table in the Options- >Communication->OSC & UDP menu. Simply add IP addresses to this table and enable the FORWARD check-box. p35

37 14 OPTIONS The Options menu enables you to change preferences and view various settings. GENERAL This tab enables you to choose a language and a screen resolution. The astronomical clock in the CueluxPro calculates the sunrise and sunset times based on day of the year, latitude, longitude and UTC values. The latitude and longitude values de,ne your position in the world and should be entered in degrees. The latitude value should be positive for North and negative for South, the longitude should positive for East and negative for West. The website can help you,nd the latitude and longitude values for your location. The time-zone and perhaps daylight saving time of your location is expressed in the UTC (Coordinated Universal Time) value. UTC is in this context equivalent to GMT (Greenwich Mean Time). For example, Visual Productions' HQ is based in the city of Haarlem, the Netherlands. During the winter we are UTC +1 and in the summer during day light saving time we are UTC +2. So, our settings are: COMMUNICATION In this tab you can select the midi-maps for the attached MIDI control surfaces. You can specify two MIDI devices. CueluxPro supports various MIDI control surfaces; it allows you to control CueluxPro' user interface (UI) through the buttons and faders on the MIDI controller. The software ships with a list of prede,ned Midimaps. A midi-map,le describes the MIDI controller and how its features (buttons, faders, etc) are mapped to the CueluxPro UI. To set up CueluxPro for use with your MIDI controller, select the appropriate INPUT DEVICE and optionally an OUTPUT DEVICE. The output device is used by CueluxPro to provide feedback to MIDI controller's LEDs and motorized faders. Then select the MAP that corresponds to your MIDI controller. p36

38 Please take into account that the MIDI controller needs to be connected to the computer before CueluxPro starts up; CueluxPro only scans for MIDI devices at start up. After that you would need to use the REFRESH button to scan again. Please refer to page 29 for diagrams describing the layout of various Midi-maps. This tab also allows you to change the settings for OSC and UDP communication. You can change the default network ports used for listening to incoming OSC and UDP messages. Also, you can have incoming OSC or UDP messages forwarded to other IP addresses. For this you add the ipaddress:port information to the OUTPUT IP OSC and OUTPUT IP UDP tables. Furthermore, you can specify the incoming time-code protocol used by CueluxPro. FILE The File tab allows you to load and save show-,les. A show-,le contains all information about the patch, playback assignments, cuelists, etc. You don't need to save your show-,le as CueluxPro will check for changes every few seconds and automatically save the,le if needed. By saving manually and choosing a name for the show-,le you can manage dikerent lighting projects or create backup versions. The show-,les are stored in XML format at the following locations: Windows XP Windows Vista Windows 7 / 8 Mac OS X Ubuntu Linux C:\Documents and Settings\[username]\My Documents\Visual Productions\CueluxPro C:\Users\[username]\Documents\Visual Productions\CueluxPro C:\Users\[username]\Documents\Visual Productions\CueluxPro /Users/[username]/Visual Productions/CueluxPro /home/[username]/visual Productions/CueluxPro p37
39 By copying the show-,le you can easily transfer your show between dikerent computers or even Operating Systems. ABOUT This tab displays the software's version number. p38
40 15 PERSONALITY FILES Most,xtures diker in the way how they are controlled by DMX. CueluxPro reads 'personality,les' (sometimes referred to as 'pro,les') to determine a,xture's DMX traits. When you patch a,xture you need to choose your,xture from a list of supported personalities (as described on page 7). This chapter describes how to obtain additional personality,les in case your,xture is not yet present in our list GENERIC Some types of,xtures typical have identical DMX traits. These common,xtures (e.g. Dimmers, fog generators, RGB LED,xtures) are represented in the 'Generic' collection in our library REQUEST NEW PERSONALITIES Visual Productions provides a free-of-charge service for creating personality,les on request. Please make the request on the Visual Productions Forum ( and include a link to the user-manual or DMX- chart of your,xture. When you receive the,le from Visual Productions it needs to be copied into the following location, before starting up CueluxPro: Windows XP Windows Vista Windows 7 / 8 Mac OS X Ubuntu Linux C:\Documents and Settings\[username]\My Documents\Visual Productions\Common\Personalities\Factory C:\Users\[username]\Documents\Visual Productions\Common\Personalities\Factory C:\Users\[username]\Documents\Visual Productions\Common\Personalities\Factory /Users/[username]/Visual Productions/Common/Personalities/Factory /home/[username]/visual Productions/Common/Personalities/Factory 16.3 CREATE YOUR OWN Sometimes it is better to create your own personality,le, maybe you need it urgently and you're outside oyce hours. Or perhaps you don't have a manual available so you would need to create a,le through trial-and-error, testing it on the physical,xture. For any of these cases we supply an editor for creating the personalities yourself; the Personality Builder. It is an external tool for creating and modifying the personality,les used by CueluxPro. The Builder is supplied free-of-charge for all CueluxPro users and can be downloaded from For a detailed description of this editor please read its user manual. p39
41 16 NOTES p40
42 17 INDEX About Action Action-list Actions Address... 7 Assignment astronomical clock...36 Background...19 backup Banksafe BCF Behringer Break...28 Bundle...20 Chase Clear...13 Condition cuelist daylight saving time...36 Delay...16 Don't Care...26 Elation Fade In...16 Fade Out...16 Fader Start Flank...23 Oash button...18 Flip Follow...16 Forwarding...35 FX GMT Go Halt Indicator Invert pan... 8 INVERT PAN...8 Invert tilt...8 Knockout...14 Korg nanokontrol...34 language latitude Launchpad Livid Instruments longitude manufacturers... 7 Merge MIDI MIDI Clock...28 midi-map... 29, 36 MIDIcon model... 7 Novation Ohm Options OSC...35 phase Playbacks...18 Programmer Properties... 8 Refresh...37 release Replace... 7 resolution...36 Scheduling show-,le...37 sunrise...36 sunset Swap pan tilt...8 Sysex...30 Tasks...23 Templates Test Sequence time-zone...36 TouchOSC...35 tracking...13 Trigger UTC Virtual Dimmer...8 VisualTouch...21 Wait Weekday wizard p41
EmulationPro. Manual
 EmulationPro Manual Contents 1 Overview 4 2 Patch 8 3 Matrix 12 4 Groups 16 5 Palettes 17 6 Cuelists 18 7 Playbacks 26 8 Actions 30 9 Kiosc 35 10 Hardware 39 11 Tempo 43 12 MIDI 44 13 OSC 51 14 Options
CUELUX MANUAL VISUAL PRODUCTIONS BV
 CUELUX MANUAL VISUAL PRODUCTIONS BV WWW.VISUALPRODUCTIONS.NL Contents 1 Introduction 4 2 Installing Drivers 7 3 Options 10 4 Patch 14 5 Playbacks 17 6 Groups 21 7 Cuelists 23 8 Stacklists 31 9 Globals
lighting control
 lighting control www.visualproductions.nl WIN MAC LINUX CueluxPro CueluxPro is an advanced and scalable lighting control application. The software is designed to control medium to large lighting installations,
MANUAL 2011 VISUAL PRODUCTIONS
 MANUAL 2011 VISUAL PRODUCTIONS WWW.VISUALPRODUCTIONS.NL Written for Cuelux 1.03.24 January 2011 2011 Visual Productions All rights reserved. No parts of this work may be reproduced in any form or by any
SUNLITE is a trademark of Bruno Nicolaudie. WINDOWS is a trademark of the MICROSOFT CORPORATION. All rights reserved. No parts of this work may be
 SUNLITE is a trademark of Bruno Nicolaudie. WINDOWS is a trademark of the MICROSOFT CORPORATION. All rights reserved. No parts of this work may be reproduced in any form or by any means - graphic, electronic,
Tutorial 1: Basic functions
 Tutorial 1: Basic functions In this tutorial, you will learn the basic functions of CueluxPro. You will learn to patch and control fixtures, program scenes and play them. Note: This is a tutorial created
B-STATION MANUAL VISUAL PRODUCTIONS BV
 B-STATION MANUAL VISUAL PRODUCTIONS BV WWW.VISUALPRODUCTIONS.NL Contents 1 Introduction 5 2 Protocols 8 3 Quickstart 10 4 Setting up 16 5 Network 17 6 Patch 22 7 Cuelist 24 8 Show Control 26 9 Monitors
A R T SS C + A R T I O MAN UA L
 ART SSC SOLID-STATE CONTROL A R T SS C + A R T I O MAN UA L Table of Contents Introduction... 2 Art SSC... 2 Art IO... 2 Further Help... 3 Setting up... 4 Mounting... 4 Power... 4 Network... 5 amanager
ART SSC + ART IO MANUAL
 ART SSC SOLID-STATE CONTROL ART SSC + ART IO MANUAL Table of Contents Introduction... 2 Art SSC... 2 Art IO... 2 Further Help... 3 Setting up... 4 Mounting... 4 Power... 4 Network... 5 Access via Internet...
Introduction. System. Hardware
 Table of Contents Introduction... 2 Quick Start... 4 Setting up...5 Cuety App...7 Remote App...12 Creating Personalities... 13 emanager... 14 Appendix A: Touch-2 Connectivity...15 2014-2015 Elation Professional
liniled Lighting Control Solutions
 liniled Lighting Control Solutions 1 liniled Lighting Control Solutions European quality & manufacturing liniled System The liniled System is a concept which consists of high quality, flexible LED strips
Cameo D4 Available on
 Cameo D4 Available on PATCH connect patch arrange Cameo D4 can be used with any DMX512 compatible lighting fixture. Lights are linked to your PC or Mac by connecting an XLR cable to one of Cameo s DVC4
virtual controller 4
 virtual controller 4 PATCH connect patch arrange Virtual Controller 4 can be used with any DMX512 compatible lighting fixture. Lights are linked to your PC or Mac by connecting an XLR cable to one of Daslight
EasyDMX. User Manual. Please read user manual before operating
 EasyDMX User Manual Please read user manual before operating Interface Configuration: The first time the software is executed it will ask you which controller is installed on your system or you can open
ACCLAIM LIGHTING YOUR SOURCE FOR ADVANCED LED LIGHTING SOLUTIONS ART IO. Model: DMX Controllers.
 YOUR SOURCE FOR ADVANCED LED SOLUTIONS Model: input/output interface module ipad not included Inputs Outputs port Artnet Show control function Ingress Protection Rating compatible Power-over-, 9-12V DC~500mA
ArtDMX DMX control software V1.4
 User manual ArtDMX DMX control software V1.4 1 2 Table of contents : 1. How to start a new Project...6 1.1. Introduction...6 1.2. System Requirements...6 1.3. Installing software and drivers...7 1.4. Software
Show Designer 1. Software Revision 3.11
 Show Designer 1 Software Revision 3.11 OVERVIEW The Show Designer 1 is a lighting controller based on the successful and simple to use Show Designer. The Show Designer 1 adds to the existing features of
SUNLITE is a trademark of Bruno Nicolaudie. WINDOWS is a trademark of the MICROSOFT CORPORATION. All rights reserved. No parts of this work may be
 SUNLITE is a trademark of Bruno Nicolaudie. WINDOWS is a trademark of the MICROSOFT CORPORATION. All rights reserved. No parts of this work may be reproduced in any form or by any means - graphic, electronic,
ESA2. Table of contents
 ESA2 English SUNLITE is a trademark of Bruno Nicolaudie. WINDOWS is a trademark of the MICROSOFT CORPORATION. All rights reserved. No parts of this work may be reproduced in any form or by any means -
Step Fixed value & transition mode (fade/snap) for each channel, with a duration.
 for each channel, with a duration.") V8.2.13 Conventions Step Fixed value & transition mode (fade/snap) for each channel, with a duration. Scene (or light scene) Sequence of steps. Media file Audio or video file (mp3, wav, avi, jpg, png,...),
V8.2.13 Conventions Step Fixed value & transition mode (fade/snap) for each channel, with a duration. Scene (or light scene) Sequence of steps. Media file Audio or video file (mp3, wav, avi, jpg, png,...),
TIMECORE MANUAL VISUAL PRODUCTIONS BV
 TIMECORE MANUAL VISUAL PRODUCTIONS BV WWW.VISUALPRODUCTIONS.NL Contents 1 Introduction 5 2 Protocols 8 3 Quickstart 11 4 Setting up 16 5 Network 18 6 vmanager 21 7 Show Control 24 8 Monitors 28 9 Settings
2.028 CODE ELECTRONIC CO., LTD.
 Lighting Console User s Manual Ver. 2.028 CODE ELECTRONIC CO., LTD. Content 1. Welcome to Use the Phantom 2048...1 1.1. Setting up Phantom 2048...1 1.2. The Front Panel of Phantom 2048...1 1.2.1. Unit...2
LiveProfessor 2. User Manual. Rev audiostrom.com
 LiveProfessor 2 User Manual Rev 1.0 - audiostrom.com Contents Introduction 4 System Requirements 4 License files 4 First Run 5 Installing Plugins Plugin Manager Audio Settings MIDI Inputs 7 Replacing A
SUNLITE is a trademark of Bruno Nicolaudie. WINDOWS is a trademark of the MICROSOFT CORPORATION. All rights reserved. No parts of this work may be rep
 SUNLITE is a trademark of Bruno Nicolaudie. WINDOWS is a trademark of the MICROSOFT CORPORATION. All rights reserved. No parts of this work may be reproduced in any form or by any means - graphic, electronic,
Introduction. Thank you very much for trusting us.
 User Manual V 1.1 1 Introduction LightShark series is a new concept within the lighting control systems that adapts to the daily needs, offering a powerful, compact and economical solution. Perfect for
USER MANUAL HOW TO CREATE PROFILES V
 USER MANUAL HOW TO CREATE PROFILES V. 1.5.4 SUMMARY Introduction... 3 Opening the Profile Editor... 3 Creating a new Profile... 4 Creating and adding Channels... 5 List of available channels types... 6
Easy Stand Alone (U8) Getting Started Guide for Pixel Control
 Getting Started Guide for Pixel Control") 11235 West Bernardo Court, Suite 102 San Diego, CA 92127 888-880-1880 Fax: 707-281-0567 EnvironmentalLights.com Kit Front Back Easy Stand Alone (U8) Getting Started Guide for Pixel Control Install "Easy
11235 West Bernardo Court, Suite 102 San Diego, CA 92127 888-880-1880 Fax: 707-281-0567 EnvironmentalLights.com Kit Front Back Easy Stand Alone (U8) Getting Started Guide for Pixel Control Install "Easy
Release Notes - Version
 Release Notes - Version 3.4.0.2 Important Information for Updating Fixed Bugs and Improved Functionality Appendix Known Limitations You will find the latest system requirements for several products on
Software Revision 1.13
 Software Revision 1.13 OVERVIEW...1 REAR PANEL CONNECTIONS...1 TOP PANEL...1 MENU AND SETUP FUNCTIONS...3 CHOOSE FIXTURES...3 PATCH FIXTURES...4 PATCH CONVENTIONAL DIMMERS...4 COPY FIXTURE...5 LOAD FIXTURE
LEAP FROG 48/96 OPERATING MANUAL
 LEAP FROG 48/96 OPERATING MANUAL LEAP FROG 48/96 OPERATING MANUAL If a portable or temporary three phase mains supply is used to power this desk, we recommend that the desk mains plug is removed before
NEO Console Software Version 3 Build 43. Version 3 Build 43 Release Summary
 Page 1 of 10 SUBJECT: NEO CONSOLE SOFTWARE VERSION 3 BUILD 43 RELEASE DISTRIBUTION: General Release SERIES: NEO Consoles STATUS: Routine Introduction NEO Console Software Version 3 Build 43 Philips Strand
CUECORE2 MANUAL VISUAL PRODUCTIONS BV
 CUECORE2 MANUAL VISUAL PRODUCTIONS BV WWW.VISUALPRODUCTIONS.NL Contents 1 Introduction 7 2 Protocols 10 3 Quickstart 15 4 Setting up 26 5 Network 28 6 Operating Modes 33 7 Tracks 36 8 Playbacks 43 9 Show
6. Show Adding Controls to Show Mode * iPhone/iPad/Android (Easy Remote app) * Other Information...
 * Other Information...") mydmx 3.0 English mydmx 3.0 Table of contents 1. Quick Start... 1 1.1.Installing the Software... 1 1.2.Adding Lighting Fixtures... 3 1.3.Programming a Scene... 5 1.4.Controlling Live... 9 1.5.Creating
mydmx 3.0 English mydmx 3.0 Table of contents 1. Quick Start... 1 1.1.Installing the Software... 1 1.2.Adding Lighting Fixtures... 3 1.3.Programming a Scene... 5 1.4.Controlling Live... 9 1.5.Creating
Welcome to NEO Software Release Version
 Welcome to NEO Software Release Version 3.8.2.97 Philips Strand Lighting has released a new version of software for the NEO lighting control family of products. This software, version 3.8.2.97 is available
Martin M-PC Reference guide. The most powerful lighting software
 Martin M-PC Reference guide The most powerful lighting software Martin M-PC Martin M-PC user interface What is M-PC? M-PC is the Martin M-Series free online and offline editing tool. M-PC also runs on
ART SSC SOLID-STATE CONTROL ART SSC 2 MANUAL
 ART SSC SOLID-STATE CONTROL ART SSC 2 MANUAL Contents 1 Introduction 4 2 Protocols 7 3 Quickstart 12 4 Setting up 24 5 Network 26 6 Operating Modes 31 7 Tracks 34 8 Playbacks 41 9 Show Control 48 10 Protocol
How to create Profiles (Libraries) User Manual
 User Manual") How to create Profiles (Libraries) User Manual (V.1.2) Create Profiles (libraries) User Manual 1 Summary: P. 2 Index of Pictures P. 3 Opening the Profile Editor P. 3 Creating a Profile P. 4 Creating and
How to create Profiles (Libraries) User Manual (V.1.2) Create Profiles (libraries) User Manual 1 Summary: P. 2 Index of Pictures P. 3 Opening the Profile Editor P. 3 Creating a Profile P. 4 Creating and
Designer 2.2 holds several new features and fixes. This document contains the following items:
 Contents VLC, Quick Start, Live Video for LPC X Designer 2.2 holds several new features and fixes. This document contains the following items: Pharos VLC o Overview o Programming a VLC in Designer 2 o
Copyright Daslight, all rights reserved
 User Manual Index Driver and Install... 5 Package contents... 5 System requirements... 5 Installation and update of the drivers... 5 Software installation and update... 7 SETUP mode... 8 Create a new project...
SCAN OPERATOR FX II. User Manual. For Software Version Internet:
 SCAN OPERATOR FX II User Manual For Software Version 1.5 email: service@glp.de Internet: http://www.glp.de Contents 1 Features... 5 2 Overview... 6 2.1 Front View... 6 2.2 Rear View... 8 2.3 Installation
Editor/Plug-In Editor Manual
 Editor/Plug-In Editor Manual E Table of Contents Introduction... 1 Main features...1 Please note before use...1 M50 Editor and M50 Plug-In Editor operating requirements...1 Installation... Installation
IOCORE2 MANUAL VISUAL PRODUCTIONS BV
 IOCORE2 MANUAL VISUAL PRODUCTIONS BV WWW.VISUALPRODUCTIONS.NL Revision History Revision Date Author(s) Description 1 04.09.2017 ME Initial version. 2 19.10.2017 ME Rackmount adapter added. Quickstart system
Palette v3.4.2 Software Release Notes June Palette/Rack Palette/Light Palette Series Consoles Bulletin No:
 Strand Lighting Palette v3.4.2 Software Release Notes June 2007 Palette/Rack Palette/Light Palette Series Consoles Bulletin No: 2007061100 Introduction This document details changes to the Strand Lighting
SUNLITE is a trademark of Bruno Nicolaudie. WINDOWS is a trademark of the MICROSOFT CORPORATION. All rights reserved. No parts of this work may be rep
 SUNLITE is a trademark of Bruno Nicolaudie. WINDOWS is a trademark of the MICROSOFT CORPORATION. All rights reserved. No parts of this work may be reproduced in any form or by any means - graphic, electronic,
Solution Series. Quick Start Guide English 1.0
 Solution Series Quick Start Guide English 1.0 Introduction This Manual This manual describes the operation of the Solution and Solution XL lighting desks. This chapter contains an overview of the capabilities
SUNLITE is a trademark of Bruno Nicolaudie. WINDOWS is a trademark of the MICROSOFT CORPORATION. All rights reserved. No parts of this work may be
 SUNLITE is a trademark of Bruno Nicolaudie. WINDOWS is a trademark of the MICROSOFT CORPORATION. All rights reserved. No parts of this work may be reproduced in any form or by any means - graphic, electronic,
QUICK START GUIDE. The purpose and actions available for each of the major forms in the HandShake interface
 QUICK START GUIDE Overview The High End Systems HandShake controller for Palm OS hand-helds provides show creation and playback along with DMX diagnostics and remote communication to fixtures supporting
*Note that LL Studio can also work in Stand-alone mode with an SD card.
 PC System requirements: Operating System : Microsoft Windows XP / Windows Vista / Windows 7 / Windows 8 C.P.U : Intel Pentium IV at 2.0 GHz (or higher) Video Card : 128 MB VRAM Memory : 1 GB RAM Hard Disk
MainStage 2. Exploring MainStage
 MainStage 2 Exploring MainStage KKApple Inc. Copyright 2011 Apple Inc. All rights reserved. Your rights to the software are governed by the accompanying software license agreement. The owner or authorized
Airstream DMX for IOS. Revision 1.1
 Airstream DMX for IOS Revision 1.1 1 Contents Overview... 4 Connecting to the Airstream DMX Bridge... 5 App Navigation... 7 Fixtures Tab... 9 Patching Fixtures... 9 Custom Profiles... 11 Bridge Settings...
Release Notes Version
 Release Notes Version 3.6.1.1 Important Information for Updating New Feature Mode2 for grandma3 Compact and Compact XT Consoles Fixed Bugs and Improved Functionality Appendix Known Limitations You will
New Features in Nuendo 4.2
 New Features in Nuendo 4.2 Cristina Bachmann, Heiko Bischoff, Marion Bröer, Sabine Pfeifer The information in this document is subject to change without notice and does not represent a commitment on the
The Lighting Controller. User Guide
 The Lighting Controller User Guide TABLE OF CONTENTS BEFORE YOU BEGIN... 3 INTRODUCTION... 4 USB TO DMX CABLE FEATURES... 4 BOX INTERFACE FEATURES... 4 RACK MOUNT INTERFACE FEATURES... 5 SETUP... 6 CPU
STANDALONE INTERFACES USB-DMX 512 & 1024 CHANNELS V.1.1
 STANDALONE INTERFACES USB-DMX 512 & 1024 CHANNELS V.1.1 SUMMARY Hardware technical specifications... 3 Front Face of the 512 / 1024 channels interfaces... 4 Side Faces of the 512 / 1024 channels interfaces...
User manual DMX CONTROL 512. Table of contents
 User manual DMX CONTROL 512 Table of contents 1. SAFETY INSTRUCTIONS... 4 2. OPERATING DETERMINATIONS... 4 3.OVERVIEW... 6 3.1.REAR PANEL CONNECTIONS... 6 3.2.FRONT PANEL... 6 4.MENU... 6 4.1.CHOOSE FIXTURES...
Pharos Designer 2. Copyright Pharos Architectural Controls (15/1/2015)
") Pharos Designer 2 Welcome Welcome to Pharos Designer 2. We are delighted to introduce you to an entirely new version of the Pharos Designer software that picks up where the venerable and much- loved version
Pharos Designer 2 Welcome Welcome to Pharos Designer 2. We are delighted to introduce you to an entirely new version of the Pharos Designer software that picks up where the venerable and much- loved version
FROG 2 QUICK START GUIDE
 FROG 2 QUICK START GUIDE If a portable or temporary three phase mains supply is used to power this desk, we recommend that the desk mains plug is removed before connecting or disconnecting the supply.
THE LIGHTING CONTROLLER
 Software Version 6.26 User Manual THE LIGHTING CONTROLLER www.thelightingcontroller.com TABLE OF CONTENTS 1. BEFORE YOU BEGIN... 4 WHAT IS INCLUDED... 5 UNPACKING INSTRUCTIONS... 5 MANUAL CONVENTIONS...
Controlling CHAPTER CueMix from an ipad using TouchOSC
 Controlling CHAPTER CueMix from an ipad using TouchOSC The CueMix mixer in your MOTU audio interface can be controlled from an ipad using an ipad app called TouchOSC. From your ipad, you can perform all
DM-X Channel DMX Controller. Item ref: UK User Manual. Version 2.0
 DM-X10 192 Channel DMX Controller Item ref: 154.091UK User Manual Version 2.0 Caution: Please read this manual carefully before operating Damage caused by misuse is not covered by the warranty Contents
User Manual OsiMIDI 1.6
 User Manual OsiMIDI 1.6 Table of contents 1 Introduction... 3 2 Setup... 6 3 Configurator... 9 3.1 Application start... 9 3.2 Main window... 10 3.3 Creating and editing configurations... 11 3.3.1 New configuration...
Release Notes - Version
 Release Notes - Version 3.5.0.3 Important Information for Updating Bugfix version 3.5.0.3 Fixed Bugs and Improved Functionality Appendix Known Limitations You will find the latest system requirements for
Lightkey User Guide. Professional DMX lighting control. Mac style. Rev
 Professional DMX lighting control. Mac style. Rev. 2.4.1 www.lightkeyapp.com Contents 1 Welcome 8 2 Activate Lightkey 9 Buy a License... 9 Activate Lightkey... 9 Renew a License... 10 Transfer a License
and close the various Traktor Panels. Setup: click on the setup icon to open the setup dialog. Close: clicking this icon will close TRAKTOR DJ Studio.
 Welcome... TRAKTOR DJ Studio 2 Quick Reference...to TRAKTOR DJ Studio 2, the latest and most advanced version of the software that changed the way DJs think about computers. We ve introduced a number of
R E L E A S E N O T E S V E R S I O N 1. 2
 R E L E A S E N O T E S V E R S I O N 1. 2 The information in this document is subject to change without notice and does not represent a commitment on the part of ArKaos Pro S.A. No part of this publication
Mastertracks Pro 4 Review
 Mastertracks Pro 4 Review Introduction The Macintosh sequencer wars are really starting to hot up with the release of Mastertracks Pro 4 from Passport Designs Inc. First this year there was OpCode s Vision,
MagicQ Tutorial 2015 ChamSys MagicQ Tutorial 1 of 19
 ChamSys MagicQ Tutorial 1 of 19 Tutorial 1 : Windows & Buttons This tutorial introduces MagicQ, showing you how to open and close windows and perform simple operations using the MagicQ interface. It uses
Copyright 2008 Compulite Systems (2000) Ltd. All rights reserved.
 Ltd. All rights reserved.") Vector PC Copyright 2008 Compulite Systems (2000) Ltd. All rights reserved. This documentation is delivered subject to the following conditions and restrictions: This document is protected by copyright
Vector PC Copyright 2008 Compulite Systems (2000) Ltd. All rights reserved. This documentation is delivered subject to the following conditions and restrictions: This document is protected by copyright
Remixvideo for PC FAQ
 Remixvideo for PC FAQ This is a short list of the most frequently asked questions. For more information about Remixvideo for PC or Mixvibes, or if you need support, please email support@mixvibes.com. Last
Version History. Version 11.0 Upgrade Procedure. New Features. Version Release Date Details /5/18 New features, improvements and fixes.
 Version History Version Release Date Details 11.0 14/5/18 New features, improvements and fixes. Version 11.0 Upgrade Procedure 1. Upgrading from: All Consoles: Please note that version 10 and above will
icms Pro USER s MANUAL Ver 1.0
 icms Pro USER s MANUAL Ver 1.0 Contents Target Audience for this Document... 5 Copyright, Trademarks and Important Information... 5 Copyright... 5 Disclaimer... 5 Introduction... 6 Tabs... 6 Panes... 7
Accusonus Inc. Lexington, Massachusetts USA
 The information in this document is subject to change without notice and does not represent a commitment on the part of Accusonus Inc. The software described by this document is subject to a License Agreement
Cobra Dimmer Master DMX Controller User Manual
 Cobra Dimmer Master DMX Controller User Manual User Manual Dimmer Master Dear Customer, Thank you for purchasing the Dimmer Master DMX controller. With decades of experience in design and production, we
Realizzer Fixture Builder Manual
 2 Table of Contents Part I Program Overview 3 1 Main Window... 4 2 Visual... Settings Window 4 3 Test Console... Window 5 4 3D Preview... Window 6 5 Wheel... Editor Window 7 6 Scene... Graph Window 8 7
LanBox & LCedit+ Manual Version 4.01
 LanBox & LCedit+ Manual Version 4.01 Version 4.01 changes: Added MIDI Program Change section LanBox Products CDS advanced technology bv Thames 9 3144 DG Maassluis THE NE THE R LANDS +31 (0) 85 877 1276
ATG Electronics DynColor 500-SL RGB DMX Controllers
 Page 1 of 20 ATG Electronics DynColor 500-SL RGB DMX Controllers USER GUIDE Part Number HCD-SL500-000000-0U NOTE: This user guide is to explain the steps necessary to use the specified and assure peak
Using The Akai MPC With Ableton Live
 Using The Akai MPC With Ableton Live Written By Andy Avgousti (MPC-Tutor) Copyright Andy Avgousti 2012 Published by MPC-Samples.com 2012 All rights reserved. No part of this book, nor any of its associated
This is a Quickstart document, for detailed technical information please check the Documentation PDF file that installs with the software.
 This is a Quickstart document, for detailed technical information please check the Documentation PDF file that installs with the software. Table of content Introduction 1 Registration 1 Interface Overview
ORB SERIES OPERATING MANUAL
 ORB SERIES OPERATING MANUAL ORB SERIES OPERATING MANUAL If a portable or temporary three phase mains supply is used to power this desk, we recommend that the desk mains plug is removed before connecting
FM 4/100 USB Software for OSX
 FM 4/100 USB Software for OSX JLCooper makes no warranties, express or implied, regarding this software s fitness for a particular purpose, and in no event shall JLCooper Electronics be liable for incidental
Standard Set Up. Page 2 of 25
 A brief session on How to use our new lights 1. Setting Up (Page 2) 2. Fixture types (Page 4) 3. Starting MPC (Page 5) 4. Explaining/exploring Views (Page 6) 5. Creating groups (Page 10) 6. Trying colours
SUNLITE is a trademark of Bruno Nicolaudie. WINDOWS is a trademark of the MICROSOFT CORPORATION. All rights reserved. No parts of this work may be rep
 SUNLITE is a trademark of Bruno Nicolaudie. WINDOWS is a trademark of the MICROSOFT CORPORATION. All rights reserved. No parts of this work may be reproduced in any form or by any means - graphic, electronic,
SCANCOMMANDER. User s Manual
 SCANCOMMANDER User s Manual Version 4.x October 1996 Contents 1. Introduction (Version 4.x)... 5 1.1 General remarks... 5 1.2 Specifications and extras... 6 1.3 Installation... 6 2. Setup... 7 2.1 Top
Martin Professional M2PC
 Martin Professional M2PC...the ultimate M-PC companion M2PC Reference Guide Rev J Introduction The newest member of the M-Series of controllers from Martin Professional Welcome to the Martin M2PC The ultimate
User Guide Version 1.0.0
 obotic ean C R E A T I V E User Guide Version 1.0.0 Contents Introduction... 3 Getting Started... 4 Loading a Combinator Patch... 5 The Front Panel... 6 On/Off... 6 The Display... 6 Reset... 7 Keys...
Client Workstation Software
 Client Workstation Software User and Administration Manual Version 8.5 Rev. 11/12/2012 Client Workstation Software All rights reserved. No parts of this work may be reproduced in any form or by any means
VirtualDJ 8 American Audio VMS4 1
 VirtualDJ 8 American Audio VMS4 1 Table of Contents INSTALLATION... 3 Firmware & Drivers & Setup... 3 VirtualDJ 8 Setup... 3 ADVANCED SETUP... 4 Midi Operation... 4 Audio Setup... 4 CONTROLS... 5 A.Mixer...
HOG 4 Console. A. General:
 A. General: HOG 4 Console 1. The lighting control console shall be a Flying Pig Systems HOG 4 console. The console shall be available from High End Systems, Inc., 2105 Gracy Farms Lane, Austin, TX 78758,
STANDALONE INTERFACES USB-DMX 512 & 1024 CHANNELS V.1.0.5
 STANDALONE INTERFACES USB-DMX 512 & 1024 CHANNELS V.1.0.5 SUMMARY Hardware technical specifications... 4 Top Face of the 512 / 1024 channels interfaces... 5 LED 7-segments display operation:... 5 LED 7-segments
ORB OPERATING MANUAL
 ORB OPERATING MANUAL ORB OPERATING MANUAL If a portable or temporary three phase mains supply is used to power this desk, we recommend that the desk mains plug is removed before connecting or disconnecting
Manual addendum written by Nadine Raihani, Cornelius Lejeune Manual version: 1.3 (09/2008) Software version: 2.0.4
 Software version: 2.0.4") MANUAL ADDENDUM The information in this document is subject to change without notice and does not represent a commitment on the part of NATIVE INSTRUMENTS GmbH. The software described by this document
MANUAL ADDENDUM The information in this document is subject to change without notice and does not represent a commitment on the part of NATIVE INSTRUMENTS GmbH. The software described by this document
Stick 2 (STICK-GU2) Sunlite Touch-Sensitive Intelligent Control Keypad Getting Started Guide
 Sunlite Touch-Sensitive Intelligent Control Keypad Getting Started Guide") 11235 West Bernardo Court, Suite 102 San Diego, CA 92127 888-880-1880 Fax: 707-281-0567 EnvironmentalLights.com Kit STICK-GU2 Stick 2 (STICK-GU2) Sunlite Touch-Sensitive Intelligent Control Keypad Getting
11235 West Bernardo Court, Suite 102 San Diego, CA 92127 888-880-1880 Fax: 707-281-0567 EnvironmentalLights.com Kit STICK-GU2 Stick 2 (STICK-GU2) Sunlite Touch-Sensitive Intelligent Control Keypad Getting
OPERATING MANUAL. including
 OPERATING MANUAL including & If a portable or temporary three phase mains supply is used to power this desk, we recommend that the desk mains plug is removed before connecting or disconnecting the supply.
NEO Console Software Version Version Release Summary
 Page 1 of 7 SUBJECT: NEO CONSOLE SOFTWARE VERSION 3.1.1.56 RELEASE DISTRIBUTION: General Release SERIES: NEO Consoles STATUS: Routine Introduction NEO Console Software Version 3.1.1.56 Philips Strand Lighting
MorphEdit for Windows. Copyright 1994,1995,1996 PJA White
 MorphEdit for Windows Copyright 1994,1995,1996 PJA White Table of Contents 1. INTRODUCTION... 1 2. REQUIREMENTS... 2 3. INSTALLATION... 3 4. STARTING THE EDITOR... 4 5. MODES OF OPERATION... 5 5.1 STAND-ALONE
Prophet '08 PlugSE Editor
 Prophet '08 PlugSE Editor SoundTower PlugSE for Prophet 08 Synthesizer VST (PC/Mac) AudioUnits (Mac) SoundEditor, PlugSE, and ipad Products Reach Inside... SoundTower Inc. 2012 www.soundtower.com Special
Circuit Editor PRO Read Me.
 EDITOR PRO READ ME Circuit Editor PRO Read Me. This document will guide you through editing patches and creating patches for your circuit. It will not be going into details of synthesizer patch design,
User And Developer Documentation of ARS Facade Simulator And Control 1.0.3
 User And Developer Documentation of ARS Facade Simulator And Control 1.0.3 Valid since 2009-03-06 Copyright Ars Electronica Futurelab 2009. All rights reserved. All names used for hardware and software
ORB Series. Quick Start Guide. English 2.0
 ORB Series Quick Start Guide English 2.0 Introduction This Manual This manual describes the operation of the ORB Series of lighting desks. This chapter contains an overview of the capabilities and controls
Handout Objectives: a. b. c. d. 3. a. b. c. d. e a. b. 6. a. b. c. d. Overview:
 Computer Basics I Handout Objectives: 1. Control program windows and menus. 2. Graphical user interface (GUI) a. Desktop b. Manage Windows c. Recycle Bin d. Creating a New Folder 3. Control Panel. a. Appearance