Kaltura Quick Start Guide
|
|
|
- Archibald Cameron
- 5 years ago
- Views:
Transcription
1 Kaltura Quick Start Guide Content Management (Content Tab) Content Syndication & SEO (Content Tab) Live Streaming (Content Tab) Video Delivery Settings (Settings Tab) Access Control Settings (Settings Tab) Metadata Schema (Settings Tab) Advertising (Studio Tab) Player Design (Studio Tab) 1

2 Content Management Logging into the Kaltura Management Console (KMC) Uploading videos from your desktop to your website o Upload videos to the KMC o Embed videos on your site Creating and embedding a playlist on your website o Manual Playlist o Rules Based Playlist o Embed a playlist on your site Creating and managing content categories Migrating content from your existing hosting / video service Logging into the Kaltura Management Console (KMC) Go to the Kaltura Management Console (KMC) at: and log-in with the credentials that you received in the Kaltura Registration Confirmation . 2


3 Uploading videos from your desktop to your website Upload videos to the KMC 1. Go to the Content tab > Upload section. 2. Select the Transcoding Profile to use in this upload session using the drop-down menu 3. Click the Upload button to launch the Media Uploader. 4. In the Media Uploader, click the browse button to select videos from your desktop. Hold down the CTRL key to select multiple files. 3


4 5. Click the upload button to start the file transfer 6. Add titles and tags to your videos. 7. After the system completes the file conversions you will be able to see your uploads and their status in the Manage tab. 4

5 Embed videos on your site 1. In the Manage tab, locate the files that you want to place on your website and click on Preview & Embed 2. Select your preferred player skin from the drop down menu and grab the embed code. 5


6 3. Add the embed code to your website HTML source and you're done Creating Playlists and embedding them on your website A playlist is a list of media items (videos, audios, images) that can be embedded with a player in your website. Manual playlists allow you to select a static list of items, while rules based playlists allow you to define a dynamic list. Go to the Content tab >Playlist section and select either a Manual Playlist or a Rule Based Playlist 6
7 Creating a Manual Playlist 1. Enter a name for your playlist (required) and select Manual in the Type field. 2. Using the Filters search for the entries you d like to include - the results will appear in the Entries Table. 3. Add entries to your playlist by clicking the desired entry followed by the Add or Remove buttons. 4. Click "Save" to complete the process. Add to Playlist Remove from Playlist Change order of entries Creating a Rules Based Playlist A rules based playlist is a dynamic playlist that is automatically updated when content is uploaded or edited. For example you can create a Most Viewed playlist, a Most Recent playlist, as well as a playlist based on single or multiple filters, such as videos tagged with dogs and created during January Your playlist can be based on a single rule or multiple rules: Single Rule Playlist 1. Enter a name for your playlist (required). 2. Using the Filters search for the entries you d like to include - the results will appear in the Entries Table. Note: You can choose more than one type of filter (for instance, text search + date + media type), the logical relationship between fields will be an "AND" relationship. 3. Select your preferred video order from the Order By drop down menu 7
. 3.")
8 4. Select the total number of entries you d like to include in the playlist via the Limit Playlist result box. 5. Click Save Changes to complete the process. Multiple Rule Playlist - Advanced Mode Advanced Mode enables you to create playlists based on multiple rules. 1. Click Switch to Advanced Mode. 2. Enter a name for your playlist (required). 3. Click Add Rule to create a new playlist rule (see Single Rule Playlist to learn about creating rules) 4. Add any number of additional rules. Use the Remove Rule and Edit Rule buttons to make changes to your list of rules. 5. Rules will be applied to the playlist in the order they appear, so use the arrows to change the order of the rules 8


9 Change the order of the rules Embedding a Playlist on your site 4. Go to the Content tab > Playlists section and locate the playlist that you want to place on your website. Click on Preview & Embed. 5. Select your preferred playlist skin from the drop down menu and grab the embed code. 9

10 6. Add the embed code to your website HTML source. Creating and Managing Content Categories Media entries are divided into categories. The different categories are built in a tree-like hierarchy where each category can include multiple sub-categories. 1. To add a content category click Edit on the top left corner of the Filter bar. 10


11 2. Add or remove categories by clicking on the + / - icons that appear when you hover with your mouse over a specific category. 3. To change the tree location of any category just drag-and-drop categories from one location to another. 4. To assign a media entry to a specific category, just drag-and-drop the entry from the entries table on the right to the desired category on the left. Migrating content from your existing hosting / video service Bulk Upload Process 1. Go to the Content tab > Upload section > Import from Existing Host 2. Download the sample CSV file the file contains examples of how to add the URLs and metadata of your existing content. Replace the sample data with your own. 11

12 3. Click Submit CSV to upload the modified file. 4. The process is complete once the status in the table is Finished. 5. The videos will now appear in the Entries table in the KMC Content tab > Manage section. 12

13 Content Syndication & SEO Content Syndication o TubeMogul o itunes SEO o Google o Yahoo! Content Syndication Kaltura allows you to create video feeds in multiple formats that are ready for submission to 3 rd party platforms. TubeMogul This premium syndication service enables you to distribute your content to over 20 video portals including YouTube, Dailymotion, Metacafe, etc. Note: requires a Kaltura-TubeMogul premium account (contact us to learn more) 1. Go to the Content tab > Syndicate section and click Create New Feed. 13


14 2. Enter the feed name (required), select TubeMogul from the Feed Type drop down, enter the TubeMogul Parameters and click Add Feed 3. Copy the Feed URL 14
15 4. Login to your Kaltura TubeMogul account and go to Advanced Tools > More Tools > select MRSS Feed Manager > Submit your feed itunes This feed allows you to submit your content to the itunes Store as a podcast. 1. Go to the Content tab > Syndicate section and click Create New Feed. 2. Enter the feed name (required), select itunes from the Feed Type drop down, enter the itunes Parameters and click Add Feed 3. To test the feed before submitting to the itunes Store: (a) copy the URL (b) Launch the itunes application installed on your desktop (c) Go to Advance > Subscribe to podcast and submit the feed URL 4. To submit this feed to the itunes Store as a podcast/ video podcast: Note that you will need an active Apple ID and the itunes application installed (a) Copy the feed URL (b) Go to (launches itunes application in the right page) (c) Submit your feed 15

16 Test Feed Submit Feed SEO Submitting feeds to major search engines helps to increase your content s SEO, and ultimately direct more traffic to your website. Google 1. Go to the Content tab > Syndicate section and click Create New Feed. 2. Enter the feed name (required), select Google from the Feed Type drop down, enter the Google Parameters and click Add Feed 16
17 3. Submission of video feeds to Google is free of charge, yet requires some technical knowledge. It is recommended that your website s webmaster be available for assistance. Here are the technical guidelines for submission: a. Google Webmaster Tool Setup Setup a Google Webmaster account for your website: Setup your website in the Google Webmaster Tool follow the directions here: Make sure your site is valid based on the Google instructions. b. Feed submission Create a server page on your website that redirects to this feed URL For example, for a php implementation save a php file named redirect.php with the following content (replace the XXXXX with your feed URL) <?php Header( "HTTP/ Moved Permanently" ); Header( "Location : XXXX );?> Login to the Google Webmaster Tool Within the Google Webmaster Tool go to Site configuration > Sitemaps > Submit a sitemap Submit the feed as your redirect page in your site, for example 17

, select Yahoo!")
18 Yahoo! 1. Go to the Content tab > Syndicate section and click Create New Feed. 2. Enter the feed name (required), select Yahoo! from the Feed Type drop down, enter the Yahoo Parameters and click Add Feed 18
19 3. Copy the feed URL 4. Go to 5. Fill in the form and submit your feed as a Full feed Live Streaming Basic setup o HW & SW setup o Set up a stream in the KMC o Broadcasting setup o Viewing setup Advanced configuration options Kaltura s Live Streaming is a paid service. To enable live streaming for your account contact us or call Once your account has been enabled, follow the steps below to set up Kaltura s Live Streaming service. 19
 3.")

20 Basic setup HW & SW setup 1. Download Flash Media Encoder (FME) from: 2. Install FME on your local Windows machine (follow the FME installation guide and minimum requirements described in Appendix A of this document) 3. Connect your camera to the installed computer Set up a stream in the KMC 1. Login into the Kaltura Management Console, navigate to the Content/ Manage tab and click on the New Live Stream button. 2. Fill in the form with the following details: Name the name of the stream that will appear in the KMC entries list Description a description of the stream (optional) 20

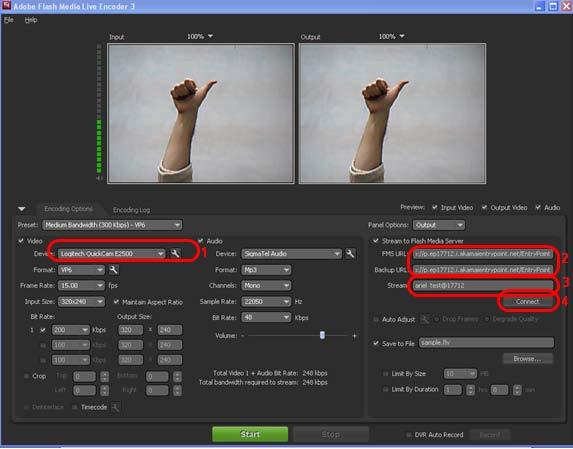
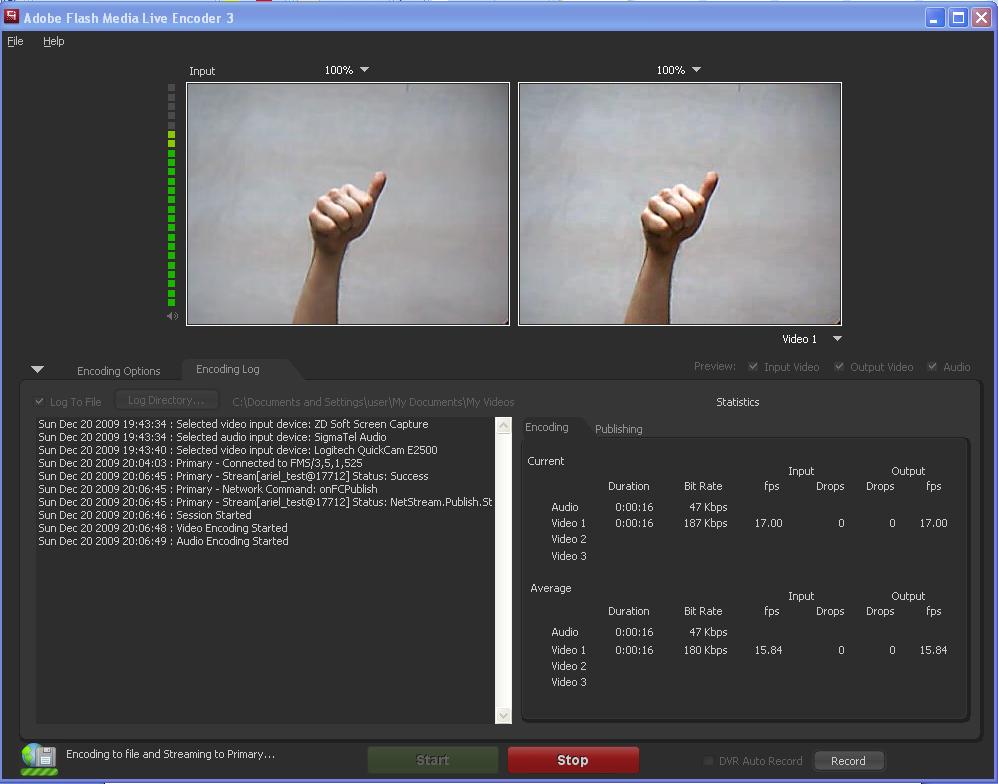
21 Primary encoder IP the public address that will be used for streaming (the computer where the client encoder is installed) Note: your IP address can be retrieved by browsing from the computer where the FME is installed to Secondary encoder IP if you are using two encoders for redundancy, fill in the secondary encoder. If you are using only a single encoder, simply copy the Primary encoder IP to the secondary encoder IP field. Broadcasting password the password required for broadcasting. You will be required to fill this into your client encoder (FME). If you do not chose a password the system will create one for you. Note: it may take up to 20 minutes until the stream is provisioned with the CDN. Broadcasting setup Go to the Broadcasting tab of the live entry you just created and copy the details to your FME, you can do this either by copying the details manually, or by using the Export XML to FME option: Connect your camera to the broadcasting computer Run the FME software Configure your FME with the following parameters: 1. Select the relevant camera from the dropdown menu in the FME software 2. Enter the Primary URL and Secondary URL as displayed in the KMC 3. Enter the stream name as displayed in the KMC 4. Click Connect 5. Enter the User Name and Password as displayed in the KMC and click OK 6. Click Start you are now broadcasting 7. When your broadcast is finished, click Stop 21
22 5 22
23 6 7 23

24 Viewing setup 1. Click on the Preview & Embed link from the KMC 2. Select the player from the drop down menu and copy the embed code 3. Paste the embed code within an HTML page 4. Browse to the page where the embed code was inserted and press play on the video player. Advanced configuration options There are multiple factors that influence the video quality for live streaming. In order to receive good results you should optimize the settings based on your specific needs. The table below can be used as a starting point for optimization and setup - it provides a rough estimate for the different factors based on the video dimensions. Video Dimensions Bitrate Required (Mbps) Camera Requirements FME HW Requirements 320x Dual Core 2GB RAM 640x Quad Core support frame size & bitrate Xeon 3GB RAM 1024x Core Xeon 3GB RAM Broadcaster Uplink, Viewer Downlink Requirements (Mbps) GB GB GB Throughput example for 1000 concurrent viewers of 1 hour broadcast 24
25 For further reading on how to set up these parameters in FME, as well as additional advanced configuration options please refer to the FME guide available at: Video Delivery Settings Video Delivery Settings o HTTP Delivery o RTMP Delivery with Adaptive Bitrate o Adding the flavor selector module Video Delivery Settings Choose between two types of video delivery settings - HTTP Delivery or RTMP Delivery with Adaptive Bitrate. HTTP Delivery With HTTP Progressive download, the digital media begins downloading and once a specified amount of data becomes available to the video player, the media begins to play while the rest of the data continues to buffer. To select this delivery setting go to Content > Manage > Preview and Embed and select Progressive Download (HTTP) from the drop-down menu. 25
26 RTMP Delivery with Adaptive Bitrate Adaptive bitrate is a technique of detecting a watcher's bandwidth and CPU capabilities in real time and then adjusting the quality of a video stream. The result is very little buffering, fast start time and a good experience for both high-end and low-end connections. The RTMP protocol maintains a single persistent connection and allows real-time communication. Video and data are split into fragments, which then guarantees smooth delivery of video and audio streams. To select this delivery setting go to Content > Manage > Preview and Embed and select Adaptive Streaming (RTMP) from the drop-down menu. 26

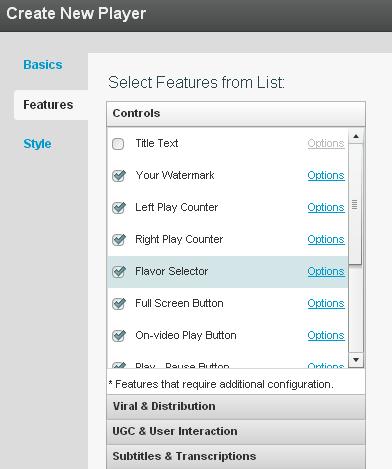
27 Adding the Flavor Selector Module Any entry is available in various transcoding flavors. The flavor selector module allows the viewer to manually select the video flavor he wishes to watch, based on his preferences. Note: If you are broadcasting with Adaptive RTMP then the flavor selector will be set to auto. In order to add the flavor s selector module: 1. Go to Studio > Players List and create a new player or edit an existing one. 2. In the Features tab, go to the Features List > Controls and check Flavor Selector. 3. Preview your selection and click Save Changes to complete the process. 27

28 28

29 Access Control Settings Access Control Settings o Domain Restrictions Restricting content to specific domains o Geo Restrictions - Restricting content to specific Countries o Assigning an Access Control Profile to an Entry o Content Scheduling Access Control Settings An Access Control Profile defines authorized and restricted domains where your content can or cannot appear, countries from which it can or cannot be viewed, Kaltura Network preferences and security settings. In this area you can view existing profiles and create new ones. Domain Restrictions Restricting content to specific domains 1. Go to the Settings tab > Access Control section and click Add Profile. 2. Enter an informative name for the new profile and give it a description. 3. Under Authorized Domains you can choose between allowing all domains, listing a group of approved sites or a list of domains to exclude. 4. To add or remove a domain click the + Add another domain or Remove selected domains links. 5. Continue to add other parameters or click Create New to save your new profile. 29

30 Geo Restrictions - Restricting content to specific countries 1. Go to the Settings tab > Access Control section and click Add Profile. 2. Enter an informative name for the new profile and give it a description. 3. Scroll down to the Authorized Countries section and choose to allow viewers from any country, select a group of approved countries or a group of excluded countries. 4. Use the +Add / -Remove countries link to add or remove countries. 5. Continue to add other parameters or click Create New to save your new profile. 30


31 Assigning an Access Control Profile to an entry 1. Go to Content > Manage section and click on the Entry to which you want to assign an Access Control Profile. 2. Go to the Access Control tab and select an existing Profile from the drop-down menu. 3. Click Save Changes to complete the process 31

32 Content Scheduling Content Scheduling determines when your entry will be displayed on your website. 1. Go to Content >Manage section and click on an Entry. 2. Go to the Scheduling tab and select and set your specific time range. 3. Click Save Changes to complete the process 32

33 Custom Metadata Adding Custom Metadata Fields Setting Values for Custom Metadata Fields (Per Entry) Search ing Based on Metadata Fields Adding Custom Metadata Fields 1. To create an additional field, click the Add Field button. 2. Select the field type from the following options: Text field values are free text Text select list this is similar to the text field, but allows the publisher to set a predefined list of values from which the user can choose (for example select the country out of a list of options) Date a date field Entry ID link a link to a different entry (asset) in order to create a compound structure. An example of this would be multiple high res images relating to the video. 33


34 3. Add a description, or full description 4. Change the order of the fields by clicking the up and down arrows 34

35 Setting Values for Custom Metadata Fields (Per Entry) To add values to the custom metadata fields create, go to the entry drilldown window (It is also possible to set them as part of bulk upload or API) 35

36 Searching Based on Metadata Fields Custom fields can be used to perform a search and create playlists. To search textual fields use the regular search box, for canned lists use the Metadata Filters. Advertising Advertising o Connecting with Ad Servers and networks via AdapTV o Connecting with Tremor Media o Connecting with any ad server that supports IAB standards (VAST 1.0 / VAST 2.0) Targeting with an Ad Server How to locate the Ad Tag URL Advertising Connecting with Ad Servers and networks via adap.tv To add adap.tv s service to your Kaltura players start by signing up with adapt.tv (Contact us to learn more) you will then receive an adapt.tv Partner Key. 36

37 1. Go to the Studio tab and edit an existing player or create a new one 2. Go to the Advertising section 3. Enable ads for this player 4. Select adaptv from the Ad Source drop down 5. Enter your adapt.tv Partner Key in Key Value Pairs section, in the following format key=[your ADAPTV KEY] 6. Target, manage and customize your ads via the adap.tv console 7. Via adapt.tv you can also connect to additional ad servers & ad networks such as AdTech, Atlas, DART, OpenX, Advertising.com, ScanScout, SpotExchange, Google AFV, AdBrite, AdDynamic, AdEngage, AdFish, AdoTube and over 20 other networks and servers. For example connecting to DART via adapt.tv would simply require pasting the Ad Tag URL that the AdTech Server supplies. 37
 you will then receive a Tremor Media Program ID. 2.")
38 Adpa.tv onesource console: integrating with additional ad servers Connecting with Tremor Media 1. To add Tremor Media s service to your Kaltura players start by signing up with Tremor Media (Contact us to learn more) you will then receive a Tremor Media Program ID. 2. Go to the studio tab and edit an existing player or create a new one 3. Go to the Advertising section 4. Enable ads for this player 5. Select Tremor from the Ad Source drop down 6. Enter your acudeo Program id in the Key Value Pairs section, in the following format: progid=[your ACUDEO PROGRAM ID]. Additional targeting parameters should be separated with semicolons. 38
.")

39 7. Target, manage and customize your ads via the Tremor Media console (Acudeo). Via Tremor Media s Acudeo console you can specify ad sources for each ad slot within your content. Program id s are available in the program list 39
, Microsoft Atlas, OpenX, ScanScout, and many others.")

40 Connecting with any ad server that supports IAB standard (VAST 1.0 / VAST 2.0) Most of the leading Ad Servers and Ad Networks are now VAST compliant. This includes DoubleClick, Dart for publisher (DFP), Microsoft Atlas, OpenX, ScanScout, and many others. To see the full list of servers and networks that comply with VAST please refer to the IAB website: 1. To add any ad server that supports the VAST standard you first need an ad tag URL from your ad server, To learn more browse the how to find Ad Tag URL section below 2. Go to the studio tab and edit an existing player or create a new one 3. Go to the Advertising section 4. Enable ads for this player 5. Select VAST Ad Server from the Ad Source drop down 6. For Pre-roll ads select the Pre-roll section, set it to enabled and paste the Ad Tag URL received from the ad server 40
 select the bumper section, and set it to enabled.")

41 7. For bumper videos (a bumper video is a static pre-roll that does not use an ad server) select the bumper section, and set it to enabled. Select a Kaltura entry id that will be used as the bumper, and add the click URL. 8. For Overlay ads select the overlay section, set it to enabled and paste the Ad Tag URL received from the ad server. 41


42 9. For Post-roll ads select the Post-roll section, set it to enabled and paste the Ad Tag URL received from the ad server Targeting with an Ad Server While ads targeting is performed within the ad server, Kaltura s advertising module is designed to pass all the relevant targeting information to the ad server. Targeting information can be set in several levels: 1. Targeting per player and ad slot you can add additional key value pairs within the adtag URL. The ad server will use these for targeting. 2. Targeting per content item - The Kaltura VAST module supports dynamic pulling of metadata from the content item, and passes it to the ad server. For example for targeting a specific content category : a) Drag content items into the category within the KMC 42
 Add category template category={mediaproxy.entry.")


43 b) Define the additional parameter in your ad server. For example in OpenX set the category parameter through Site - Variable c) Add category template category={mediaproxy.entry.categories} into the AdTag URL. At runtime this template will be populated with the actual values for each video played. The following targeting templates are available for targeting category={mediaproxy.entry.categories} tags={mediaproxy.entry.tags} name={mediaproxy.entry.name} id={mediaproxy.entry.id} 3. Targeting per viewer In some cases the targeting information is not defined per content item, but per viewer. To support these cases the Kaltura VAST module dynamically pulls metadata from the website via flashvars passed to the player. For example targeting per a specific age group. This example assumes that the hosting site has a user database and would like to further target known users. 43
 Define the additional parameter in your ad server.")


44 a) Pass the viewer age from your internal DB to the player via Flashvar. b) Define the additional parameter in your ad server. For example in OpenX, set the viewerage parameter through Site - Variable c) Add the flashvar template into the AdTag URL, this template will be populated in runtime with the actual values. The template is FLASHVAR_NAME={configProxy.flashvars.FLASHVAR_NAME } and in the viewerage example it would be: viewerage={configproxy.flashvars.viewerage} 44
 is at the bottom of the widget. OpenX In OpenX the adtag URL is linked to an OpenX Zone, in the following format: http://[openx_install]/fc.php?")
45 How to locate the Ad Tag URL DFP In DFP there is a Tag Generator utility in the dashboard to generate the ad tag url. The ad tag url ( ) is at the bottom of the widget. OpenX In OpenX the adtag URL is linked to an OpenX Zone, in the following format: &format=vast&charset=utf_8&nz=1&zones=z1=[zone_id] for openx hosted, the URL is d1.openx.org., from within your OpenX account you can retrieve the zone Id. for example for zone id in openx hosted the ad tag url would be: mat=vast&charset=utf_8&nz=1&zones=z1=

46 AdapTV (via VAST) Copy the Specific Ad Tag from the Ad screen 46
47 Player Design Designing and Configuring a New Player or Playlist o Configuring the player settings o Configuring the player features Additional feature configuration options for playlists o Configuring the player style o Creating a Multiple Playlist Designing and Configuring a New Player or Playlist The Studio section of the KMC enables you to create new configurations and design for players and playlists. Add, remove and adjust multiple buttons and features, and create a look to match your site. Start by logging-in to the KMC and going to the Studio tab. Select the type of player you would like to create: player, player with playlist (horizontal/vertical) or player with multiple playlists. Configuring the Template Settings 1. Begin by selecting a name for your player (required). We suggest choosing an informative name it will help you when you're ready to embed players into your site. 2. Set the Video Ratio select normal/wide and opt to either keep or stretch your media to fit the player when the media and player aspect ratios are different. 3. Select auto-play features 4. If you're creating a Player & Playlist you'll also see the Playlist Controls check "Automatically continue" to play the playlist media consecutively. For playlists with images, set the duration for images to be displayed during the continuous play of the playlist. 47


48 Configuring the Player Features In the Features Tab you can select the features (buttons, layers and modules) to be included in your player. Any changes you make will appear in the preview area (click Preview button to see changes you ve made). Features List: Select the features you want,to add and remove Preview Pane: Change the player size and preview your Features List changes The features list is made up of different sections, controlling the various features of the player. 48
.")


49 Player (A) below displays the default settings. The following instructions will show you how to create a more customized player, for example, Player (B). Note that Player (B) presents only one of many set-up scenarios. There are many configuration options within this section. Click the Help button on the top right of any page to learn more. Player A Player B 1. Change the location of the watermark logo Go to Controls Watermark click Options In the Watermark Location drop-down menu select Top Left, click Preview and then Apply to confirm your choice 2. Change the label of the Share button Go to Viral & Distribution Share Button Options Locate the Label field and change the default text to "Share now!", then click Apply 49
50 3. Add Download button to the video area only Go to Viral and Distribution check the Download feature click Options Remove the check mark from the Controls Area option 4. Change existing Fullscreen button on the control area to text button Go to Controls Fullscreen Options In the Display in Controls Area drop-down select Label If desired, change the label text in the Button Label field 50


51 Additional feature configuration options for playlists When creating a playlist (either with one or multiple tabs) you will see additional configuration options under the Playlist Items section. This will allow you to display various types of information for each of the playlist items, such as number of plays, tags, rank etc. Play around some more to get a feel for the Features section and then continue to customize the player's design in the Style section. Configuring the Player Style In the Style Tab you can select the theme, colors and fonts for your player. 1. Select either a dark or light player skin. 2. Choose the colors of the icons/labels and online video buttons by clicking the small colored squares. This will open a color picker where you can select a color or enter a color value. 51


52 3. Change the font. 4. Once you are finished defining your player template, features and style, click Save Changes to complete your player configuration and design. 5. Your new player will now appear in the player list Creating a Multiple Playlist A Multiple Playlist is a playlist with a multiple tabs, each containing a different playlist. Creating a Multiple Playlist: 1. If you haven t already, create the playlists that you wish to use (learn how to create a playlist) 2. In the Studio Tab, select New Player Multiple Playlist 3. Design and configure your playlist as described above. 4. Continue to the Content tab and add pre-existing playlists to your new Multiple Playlist by selecting them and clicking the arrows. 5. Save Changes to complete the process. 52

53 6. The new player will appear in the Players List. 53
54 54
55 55
Kaltura Quick Start Guide. Kaltura Management Console (KMC) Content Section. Kaltura Management Console Content Section
 Content Section. Kaltura Management Console Content Section") Kaltura Quick Start Guide Kaltura Management Console Content Section Kaltura Management Console Application Studio Kaltura Management Console (KMC) Content Section Logging into the Kaltura Management Console
Kaltura Quick Start Guide Kaltura Management Console Content Section Kaltura Management Console Application Studio Kaltura Management Console (KMC) Content Section Logging into the Kaltura Management Console
Kaltura Quick Start Guide
 Kaltura Quick Start Guide 1 Content Management Logging into the Kaltura Management Console (KMC) Uploading videos from your desktop to your website o Upload videos to the KMC o Embed videos on your site
Kaltura Management Console (KMC) User Manual. Version: Hercules
 User Manual. Version: Hercules") Kaltura Management Console (KMC) User Manual Version: Hercules Kaltura Business Headquarters 5 Union Square West, Suite 602, New York, NY, 10003, USA Tel.: +1 800 871 5224 Copyright 2013 Kaltura Inc. All
Kaltura Management Console (KMC) User Manual Version: Hercules Kaltura Business Headquarters 5 Union Square West, Suite 602, New York, NY, 10003, USA Tel.: +1 800 871 5224 Copyright 2013 Kaltura Inc. All
Kaltura Management Console (KMC) User Manual. Version: Gemini
 User Manual. Version: Gemini") Kaltura Management Console (KMC) User Manual Version: Gemini Kaltura Business Headquarters 5 Union Square West, Suite 602, New York, NY, 10003, USA Tel.: +1 800 871 5224 Copyright 2012 Kaltura Inc. All
Kaltura Management Console (KMC) User Manual Version: Gemini Kaltura Business Headquarters 5 Union Square West, Suite 602, New York, NY, 10003, USA Tel.: +1 800 871 5224 Copyright 2012 Kaltura Inc. All
Kaltura Management Console (KMC) User Manual. Version: Kajam
 User Manual. Version: Kajam") Kaltura Management Console (KMC) User Manual Version: Kajam Kaltura Business Headquarters 250 Park Avenue South, 10th Floor, New York, NY 10003 Tel.: +1 800 871 5224 Copyright 2015 Kaltura Inc. All Rights
Kaltura Management Console (KMC) User Manual Version: Kajam Kaltura Business Headquarters 250 Park Avenue South, 10th Floor, New York, NY 10003 Tel.: +1 800 871 5224 Copyright 2015 Kaltura Inc. All Rights
Kaltura Management Console User Guide
 Kaltura Management Console User Guide Version: 5.20 Next Generation August 2018 Kaltura Management Console User Guide 1 Introducing KMC Next Generation Kaltura Business Headquarters 250 Park Avenue South,
Version: 5.42 Next Generation October Kaltura Management Console User Guide
 Kaltura Management Console User Guide Version: 5.42 Next Generation October 2018 Kaltura Management Console User Guide Introducing KMC Next Generation Kaltura Business Headquarters 250 Park Avenue South,
Kaltura Video Building Block 4.0 for Blackboard 9.x Quick Start Guide. Version: 4.0 for Blackboard 9.x
 Kaltura Video Building Block 4.0 for Blackboard 9.x Quick Start Guide Version: 4.0 for Blackboard 9.x Kaltura Business Headquarters 5 Union Square West, Suite 602, New York, NY, 10003, USA Tel.: +1 800
Kaltura Video Package for Moodle 2.x Quick Start Guide. Version: 3.1 for Moodle
 Kaltura Video Package for Moodle 2.x Quick Start Guide Version: 3.1 for Moodle 2.0-2.4 Kaltura Business Headquarters 5 Union Square West, Suite 602, New York, NY, 10003, USA Tel.: +1 800 871 5224 Copyright
Kaltura Admin Console Quick Start Guide
 Kaltura Admin Console Quick Start Guide Login Publisher Management How to search and view the details of registered publishers How to access a KMC account of a registered publisher How to access a KMC
MIXPO GUIDE SERIES. Mixpo Platform User Guide: Overview of Rich Media Ad Units RICH MEDIA
 MIXPO GUIDE SERIES Mixpo Platform User Guide: Overview of Rich Media Ad Units RICH MEDIA Welcome to Mixpo! The contents of this User Guide and appendices will help you effectively navigate the Mixpo platform
Universal Studio Information Guide. Version: v2
 Universal Studio Information Guide Version: v2 Kaltura Business Headquarters 250 Park Avenue South, 10th Floor, New York, NY 10003 Tel.: +1 800 871 5224 Copyright 2014 Kaltura Inc. All Rights Reserved.
TRITON DIGITAL ON DEMAND MANAGER
 TRITON DIGITAL ON DEMAND MANAGER OnDemand Manager User Guide July 12 th, 2012 www.tritondigital.com Page 1 Content 1 INTRODUCTION 4 2 PRODUCT OVERVIEW 4 3 VIDEO ASSETS MANAGER 4 3.1 ADD/DELETE A VIDEO
OOYALA LIVE USER GUIDE
 OOYALA LIVE USER GUIDE CONTENTS OOYALA LIVE OVERVIEW 4 BEFORE YOU START 6 DELIVERING LIVE CONTENT 7 Setting Up a 24x7 or Ad-hoc Channel Channel General Setup Channel Encoding Setup Channel Packaging Setup
Universal Studio Information Guide
 Universal Studio Information Guide Version: v2 Universal Studio Information Guide 1 Overview of the Universal Studio Kaltura Business Headquarters 250 Park Avenue South, 10th Floor, New York, NY 10003
Version 3.5 Organization Administrator Guide
 Version 3.5 Organization Administrator Guide This document provides information Ensemble Video Organization Administrators can use to manage Ensemble Video libraries and users. April 2013 Table of Contents
Version 3.1 Content Administrator Guide
 Version 3.1 Content Administrator Guide This document is a guide to assist Content Administrators as they upload, catalog, publish, and share videos using the Ensemble Video enterprise video publishing
Introduction to Kaltura
 Introduction to Kaltura The Kaltura media content management system allows users to record, stream, and manage multimedia files. This industry-leading enterprise system offers many robust tools. This guide
Universal Studio Information Guide
 Universal Studio Information Guide Version: v2 Universal Studio Information Guide 1 Overview of the Universal Studio Kaltura Business Headquarters 250 Park Avenue South, 10th Floor, New York, NY 10003
BeetleEye Application User Documentation
 BeetleEye Application User Documentation BeetleEye User Documentation 1 Table of Contents Welcome to the BeetleEye Application... 6 Overview... 6 Navigation... 6 Access BeetleEye... 6 Update account information...
A PRACTICAL GUIDE TO USING WIX TO BUILD A WEBSITE
 A PRACTICAL GUIDE TO USING WIX TO BUILD A WEBSITE AN AID TO ENABLE STUDENTS TO UNDERSTAND THE FUNDAMENTELS OF WEBSITE DESIGN WITHIN THE FRAMEWORK OF A WEBSITE PROJECT USING WEB DESIGN TOOLS YANNIS STEPHANOU
OBS STUDIO TO AWS ELEMENTAL MEDIALIVE TO AWS ELEMENTAL MEDIAPACKAGE
 DOCUMENT TITLE OBS STUDIO TO AWS ELEMENTAL MEDIALIVE TO AWS ELEMENTAL MEDIAPACKAGE Workflow Example CONTENTS Introduction... 3 Requirements... 3 Order of Work... 3 Prerequisite: Obtain Needed Information...
Google Sites 101. Mrs. Wilson
 Google Sites 101 Mrs. Wilson Google Sites 101 Create a site 1. Go to http://sites.google.com/ 2. Login with your Google Account [or Google Apps account] email address and password You can create a Google
PlayerLync Forms User Guide (MachForm)
") PlayerLync Forms User Guide (MachForm) Table of Contents FORM MANAGER... 1 FORM BUILDER... 3 ENTRY MANAGER... 4 THEME EDITOR... 6 NOTIFICATIONS... 8 FORM CODE... 9 FORM MANAGER The form manager is where
PlayerLync Forms User Guide (MachForm) Table of Contents FORM MANAGER... 1 FORM BUILDER... 3 ENTRY MANAGER... 4 THEME EDITOR... 6 NOTIFICATIONS... 8 FORM CODE... 9 FORM MANAGER The form manager is where
Orchestrate Video MMD Live Guide
 Orchestrate Video MMD Live Guide May 2016 Information herein, including the URL and other Internet website references, is subject to change without notice. Unless otherwise noted, the companies, organizations,
Classroom Blogging. Training wiki:
 Classroom Blogging Training wiki: http://technologyintegrationshthornt.pbworks.com/create-a-blog 1. Create a Google Account Navigate to http://www.google.com and sign up for a Google account. o Use your
DVS-200 Configuration Guide
 DVS-200 Configuration Guide Contents Web UI Overview... 2 Creating a live channel... 2 Inputs... 3 Outputs... 6 Access Control... 7 Recording... 7 Managing recordings... 9 General... 10 Transcoding and
White Label HD Broadcasting Enterprise Solution
 White Label HD Broadcasting Enterprise Solution 1 TikiLIVE Features Unlimited SD/HD/4K channels and VOD supported Auto-record every live event VOD and LIVE Transcoding Broadcast Live and Recorded media
Website Creating Content
 CREATING WEBSITE CONTENT As an administrator, you will need to know how to create content pages within your website. This document will help you learn how to: Create Custom Pages Edit Content Areas Creating
Wowza Cloud Preview. Quick Start Guide. Copyright by Wowza Media Systems, LLC. All rights reserved.
 Wowza Cloud Preview Quick Start Guide This document is for informational purposes only and in no way shall be interpreted or construed to create warranties of any kind, either express or implied, regarding
Organizing Your Network with Netvibes 2009
 Creating a Netvibes Account 1. If you closed your Internet browser from the last exercise, open it and navigate to: htt://www.netvibes.com. 2. Click Sign In in the upper right corner of the screen. 3.
Introduction. The topics included in this guide are:
 Introduction Caorda Content is a powerful content management tool that allows you to update your web site through a standard Internet web browser. The purpose of this guide is to introduce you to Caorda
Universal Studio Information Guide
 Universal Studio Information Guide Version: v2 Player v 2.47 Universal Studio Information Guide 1 Kaltura Business Headquarters 250 Park Avenue South, 10th Floor, New York, NY 10003 Tel.: +1 800 871 5224
KEY BENEFITS OF A TIKILIVE NETWORK
 EXTEND YOUR BRAND AND GENERATE REVENUE WITH TIKILIVE HD STREAMING COMMUNITY TIKILIVE.COM KEY BENEFITS OF A TIKILIVE NETWORK Easily brand connect, manage and monetize your HD content Realize immediate viewer
Administrator Quick Guide
 1 Administrator Quick Guide Login Screen The first page employees will see when visiting their training site is the login screen. This is where employees must enter their username and password to access
C1 CMS User Guide Orckestra, Europe Nygårdsvej 16 DK-2100 Copenhagen Phone
 2017-02-13 Orckestra, Europe Nygårdsvej 16 DK-2100 Copenhagen Phone +45 3915 7600 www.orckestra.com Content 1 INTRODUCTION... 4 1.1 Page-based systems versus item-based systems 4 1.2 Browser support 5
Universal Studio Information Guide
 Universal Studio Information Guide Version: v2 Universal Studio Information Guide 1 Kaltura Business Headquarters 250 Park Avenue South, 10th Floor, New York, NY 10003 Tel.: +1 800 871 5224 Copyright 2016
DIGITAL DESIGN. advertising specs
 DIGITAL DESIGN advertising specs August 2018 BANNERS: WEB & MOBILE Dimension measurements provided in pixels BHMG BANNER ADS ON OUR LOCAL SITES File Formats: GIF, JPG, HTML5, Third-party ad tags (DoubleClick
BitGravity Live Streaming Information Guide. Version: Hercules
 BitGravity Live Streaming Information Guide Version: Hercules Kaltura Business Headquarters 5 Union Square West, Suite 602, New York, NY, 10003, USA Tel.: +1 800 871 5224 Copyright 2014 Kaltura Inc. All
Evoq 9 Content Managers Training Manual
 Evoq 9 Content Managers Training Manual Table of Contents Chapter 1: User Login... 2 User Login...2 User Login Screen...2 User Logout...2 Chapter 2: Navigating within Evoq 9...3 Editing Bar...3 Dashboard...4
Logging in to the management system.
 Welcome to your new site! The Wordpress publishing platform is a robust tool that helps you publish your content to the web without getting too involved with the code. This guide is designed to help you
Creating a Recording in Canvas Embedding a Recording in Canvas To embed a recording into a discussion
 Table of Contents What is Kaltura... 3 Things to Remember... 3 My Media... 3 To access My Media... 3 Upload Media... 4 To perform a media upload... 4 Viewing Videos... 6 Add New List Options... 6 Media
Screencast.com. Getting the Most from Your Screencast.com Account. July TechSmith Corporation. All rights reserved.
 Screencast.com Getting the Most from Your Screencast.com Account July 2009 2009 TechSmith Corporation. All rights reserved. Contents Contents...2 First Things First: Get Organized...3 Get Familiar with
2015 / 11/ 11 Version 1.6
 1 2015 / 11/ 11 Version 1.6 TABLE OF CONTENT Chapter 1. Gridow Basic Requirement 1 1.1 Software Release Version. 1 1.2 Requirements for Service Environment 1 1.3 Equipment, Purpose and Role description
DIGITAL DESIGN. advertising specs SP35056
 DIGITAL DESIGN advertising specs SP35056 OCTOBER 2018 BANNERS: WEB & MOBILE Dimension measurements provided in pixels BHMG BANNER ADS ON OUR LOCAL SITES GUIDELINES: File Formats: GIF, JPG, HTML5, Third-party
Quickstart in Qbrick Video Platform
 Quickstart in Qbrick Video Platform 1 Table of content Introduction... 3 Library... 4 Live... 6 Analytics... 7 Summary... 8 2 Introduction The video platform is a service that helps you organize and publish
VIVVO CMS Plug-in Manual
 VIVVO CMS Plug-in Manual www.vivvo.net 1 TABLE OF CONTENTS INTRODUCTION...4 PLUGIN: CONTACT FORM BUILDER PLUG-IN...5 DESCRIPTION:...5 HOW TO INSTALL?...5 ACTIVATION:...5 ACCESS:...5 USER LEVEL:...5 ACTIONS:...6
Xerte. Guide to making responsive webpages with Bootstrap
 Xerte Guide to making responsive webpages with Bootstrap Introduction The Xerte Bootstrap Template provides a quick way to create dynamic, responsive webpages that will work well on any device. Tip: Webpages
Creators Basic Guide to Using UICapture (Mac)
") Creators Basic Guide to Using UICapture (Mac) Download the software from http://helpdesk.its.uiowa.edu/software/signin.htm After downloading the software and setting up an account with your local IT support,
Creators Basic Guide to Using UICapture (Mac) Download the software from http://helpdesk.its.uiowa.edu/software/signin.htm After downloading the software and setting up an account with your local IT support,
Blogger Frequently Asked Questions
 Blogger Frequently Asked Questions Blogger is an easy to use blogging tool, allowing you to contribute to existing blogs and create your own. Blogger requires a Google account to register. This guide will
Evoq 8 Content Managers Training Manual
 Evoq 8 Content Managers Training Manual Table of Contents Chapter 1: User Login... 2 User Login...2 User Login Screen...2 User Logout...2 Chapter 2: Navigating within Evoq 8...3 Editing Bar...3 Dashboard...4
Percussion Documentation Table of Contents
 Percussion Documentation Table of Contents Intro to the Percussion Interface... 2 Logging In to Percussion... 2 The Dashboard... 2 Managing Dashboard Gadgets... 3 The Menu... 4 The Finder... 4 Editor view...
Creating a Website with Wordpress
 Creating a Website with Wordpress Wordpress Fundamentals Version 1.6 Fayette County Public Schools June 28, 2013 Sow-Foong Hedman Technology Web Team Contents What is Wordpress?... 4 Overview... 4 Key
Streaming Presentation Manager User Guide
 Streaming Presentation Manager User Guide This user guide is intended to be used in conjunction with Slides, Audio with Slides Streaming or Video with Slides Streaming. First we will review the product
In This Guide. More Help Elsewhere. Quick Start Guide WRTG 101 with Professor Hoskins edspace.american.edu
 Quick Start Guide WRTG 101 with Professor Hoskins edspace.american.edu In This Guide Log In 2 Change Password 2 Change Display Name and Set Profile 3 Orientation to Dashboard and Toolbar 4 Setting Your
Learn how to login to Sitefinity and what possible errors you can get if you do not have proper permissions.
 USER GUIDE This guide is intended for users of all levels of expertise. The guide describes in detail Sitefinity user interface - from logging to completing a project. Use it to learn how to create pages
Getting Started with Composer 2
 Getting Started with Composer 2 Composer 2 is our online schedule and playlist management tool that provides a way for stations to share their program content with their listeners online. The tool set
Geo Apps: Modern Day GIS
 Geo Apps: Modern Day GIS Exercise 1: Create a customer service request app Estimated time: 20 minutes Exercise 2: Create a story map Estimated time: 30 minutes Exercise 3: Use Web AppBuilder for ArcGIS
CUSTOMER PORTAL. Custom HTML splashpage Guide
 CUSTOMER PORTAL Custom HTML splashpage Guide 1 CUSTOM HTML Custom HTML splash page templates are intended for users who have a good knowledge of HTML, CSS and JavaScript and want to create a splash page
Swiiit User Guide 09/11/2016
 Swiiit User Guide 09/11/2016 Contents Getting Started... 4 Overview of Main Tools... 5 Webpages... 6 Main pages (Sections)... 6 Rearrange Sections... 6 Subpages... 7 Change the Title of a Webpage... 8
A Guide to Understand, Install and Use Pie Register WordPress Registration Plugin
 A Guide to Understand, Install and Use Pie Register WordPress Registration Plugin 1 P a g e Contents 1. Introduction... 5 2. Who is it for?... 6 3. Community v/s PRO Version... 7 3.1. Which version is
Cisco TelePresence Content Server
 Data Sheet Figure 1. Product Overview With the Cisco TelePresence Content Server (Content Server), your organization can share knowledge and enhance communication by recording video conferences. You can
Setting up your Netvibes Dashboard Adding a Blog to your Dashboard
 Cr e a t i ngali s t e ni ngda s hboa r d wi t hne t vi be s Ne t v i be s Table of Contents Introduction... 1 Setting up your Netvibes Dashboard... 2 Adding a Blog to your Dashboard... 2 Adding Twitter
StreamingChurch.tv Administrator Guide Updated: November 2016
 StreamingChurch.tv Administrator Guide Updated: November 2016 This Administrator Guide contains information on features for your Premium and Premium Plus Account Church Name You may always contact us Support@StreamingChurch.tv
SupeTube Server Guide
 SupeTube Server Guide SAFARI Montage now offers school districts a way to publish video content for anyone in the world to access. SupeTube provides a familiar web-based interface with thumbnails that
DVS-100P Configuration Guide
 DVS-100P Configuration Guide Contents Web UI Overview... 2 Creating a live channel... 2 Applying changes... 4 Live channel list overview... 4 Creating a VOD channel... 5 Stats... 6 Creating and managing
This presentation will show you how to create a page in a group eportfolio.
 This presentation will show you how to create a page in a group eportfolio. 1 If you are using your eportfolio for presenting group work, you will need to create a group eportfolio page, which all the
Digital Signage Player Management Software
 3-296-173-11 (1) Digital Signage Player Management Software Operating Instructions Before operating the software, please read this manual thoroughly and retain it for future reference. VSPA-D7 Version
How To Guide. Hannon Hill Corporation for Rowan University
 How To Guide Hannon Hill Corporation for Rowan University Hannon Hill Corporation 3423 Piedmont Road, Suite 520 Atlanta, GA 30305 www.hannonhill.com 678.904.6900 info@hannonhill.com Rowan University: How
RealPresence Media Manager
 RealPresence CloudAXIS Suite Administrators Guide Software 1.3.1 USER GUIDE Software 6.7 January 2015 3725-75302-001A RealPresence Media Manager Polycom, Inc. 1 Copyright 2015, Polycom, Inc. All rights
Apple News Apple Advertising Platforms Specifications May 2018
 Apple News Apple Advertising Platforms Specifications May 2018 About Advertising on Apple News Ads on Apple News can run across iphone, ipod touch, and ipad devices. Ad options include a variety of display
Making online easy. Cube Reviews User Guide
 Making online easy Cube Reviews User Guide Introduction page Funnel How to Link Your Review Sites page How to Customise Funnel Content page How to Customise Funnel Set-Up page 7 Widgets page 8 Invites
Welcome to Playlist, the world s easiest to use digital signage software
 http://www.viewtv.co.nz/playlist Playlist User Guide V2.1 Welcome to Playlist, the world s easiest to use digital signage software CONTENTS 1.0 LOGIN 1.1 ViewTV NZ Server 1.2 ViewTV Playlist PC Server
Apple News Apple Advertising Platforms Specifications November 2017
 Apple News Apple Advertising Platforms Specifications November 2017 About Advertising on Apple News Ads on Apple News can run across iphone, ipod touch, and ipad devices. Ad options include a variety of
If you have any questions, please contact Broadcaster Support: Option 2 or
 Getting Started Thank you for signing up with RadioLoyalty. In order to start earning premium revenue, the first few steps are setting up your UniversalPlayer and then placing our launch code on your website.
Panopto Focus- Lecture Capture, Instructions
 Table of Contents Installation... 2 Media Standards... 3 Folder Quotas... 3 Logging Into the Recorder Application... 4 The Recorder Application... 5 The Basics... 5 Using Hotkeys... 5 Settings Menu...
USER MANUAL. SuiteCRM Customer Portal for Joomla TABLE OF CONTENTS. Version: 2.0
 USER MANUAL TABLE OF CONTENTS Introduction... 1 Benefits of Customer Portal... 1 Prerequisites... 1 Installation... 2 SuiteCRM Plug-in Installation... 2 Joomla Manual Plug-in installation... 3 Plug-in
EFM Community 3.1 Portal Administration Guide
 EFM Community 3.1 Portal Administration Guide WHITE PAPER For technical support please call: 1-800-787-8755 Or visit: Hwww.Vovici.comH Please contact Vovici technical support if you believe any of the
Monarch Services Website Quick Guide
 January 2016 Monarch Services Website Quick Guide www.monarchscc.org Credentials Wordpress Login URL: http://www.monarchscc.org/wp-login Login name :Nancya Password: wcs9na! Hosting Login at dreamhost.com
DVS-200 Configuration Guide
 DVS-200 Configuration Guide Contents Web UI Overview... 2 Creating a live channel... 2 Inputs... 3 Outputs... 7 Access Control... 8 Recording... 8 Managing recordings... 10 General... 11 Transcoding and
My Sysco Reporting Job Aid for CMU Customers. My Sysco Reporting. For CMU Customers (Serviced by Program Sales)
") My Sysco Reporting For CMU Customers (Serviced by Program Sales) 1 Accessing My Sysco Reporting... 2 Logging In... 2 The Reporting Dashboard... 3 My Sysco Reporting Process... 6 Generating a Report...
My Sysco Reporting For CMU Customers (Serviced by Program Sales) 1 Accessing My Sysco Reporting... 2 Logging In... 2 The Reporting Dashboard... 3 My Sysco Reporting Process... 6 Generating a Report...
Universal Ad Package (UAP)
") Creative Unit Name Medium Rectangle imum Expanded not Additional for OBA Self- Reg Compliance (Note 1) Polite File User- Initiated File Additional Streaming File for Universal Ad Package (UAP) Video &
Creative Unit Name Medium Rectangle imum Expanded not Additional for OBA Self- Reg Compliance (Note 1) Polite File User- Initiated File Additional Streaming File for Universal Ad Package (UAP) Video &
Enterprise Portal Train the Trainer User Manual WEB PARTS
 Enterprise Portal Train the Trainer User Manual WEB PARTS Version 1.2.1 Date: January 31, 2012 Table of Contents Table of Contents... 2 1 I Need To... 3 2 Media Web Part... 10 3 Content Editor... 15 4
WordPress Manual For Massachusetts Academy of Math and Science
 WordPress Manual For Massachusetts Academy of Math and Science September 19, 2017 Table of Contents Who should use this manual... 4 Signing into WordPress... 4 The WordPress Dashboard and Left-Hand Navigation
Scholastic Learning Zone User s Guide
 Scholastic Learning Zone User s Guide Copyright 2015 by Scholastic Inc. All rights reserved. Published by Scholastic Inc. SCHOLASTIC, SCHOLASTIC LEARNING ZONE, TRUEFLIX, BOOKFLIX, and associated logos
Pages are static content, generally linked in your navigation. They are used for things like your about page and contact page.
 North Star Marketing Client : The Guthrie Group Deliverable : Website Training +++ LOGGING IN AND OUT +++++++++ 1. Go to http://tgg.northstarmarketing.com/wp admin/. This is the address for the staging
Google Sites Training
 The How to Dos of Google Sites Overview Page 1 Google Sites offers tremendous functionality to make collaborating and sharing information simple. This job aid provides the step-by-step instructions that
Clover Menu Board App User Manual. Table of Contents App Introduction App Requirements Installing the App App Configuration FAQs
 Clover Menu Board App User Manual Table of Contents App Introduction App Requirements Installing the App App Configuration FAQs App Introduction Industry Weapon has partnered with Clover POS, LG and Best
SAS Report Viewer 8.3 Documentation
 SAS Report Viewer 8.3 Documentation About SAS Report Viewer Introduction to SAS Report Viewer SAS Report Viewer (the report viewer) enables users who are not report designers to view a report using a web
2013, Active Commerce 1
 2013, Active Commerce 1 2013, Active Commerce 2 Active Commerce User Guide Terminology / Interface Login Adding Media to the Media Library Uploading an Item to the Media Library Editing the Media Meta
Administrative Training Mura CMS Version 5.6
 Administrative Training Mura CMS Version 5.6 Published: March 9, 2012 Table of Contents Mura CMS Overview! 6 Dashboard!... 6 Site Manager!... 6 Drafts!... 6 Components!... 6 Categories!... 6 Content Collections:
User s Guide to MiParque.org
 User s Guide to MiParque.org Columbia College IAM Team 2012 12/9/2012 TABLE OF CONTENTS 1. Logging In / Dashboard 2. Appearance 3. Plugins 4. Users 5. Tools 6. Settings 7. MiIdea (Disqus) 8. Pages 9. Polls
Agent and Agent Browser. Updated Friday, January 26, Autotask Corporation
 Agent and Agent Browser Updated Friday, January 26, 2018 2018 Autotask Corporation Table of Contents Table of Contents 2 The AEM Agent and Agent Browser 3 AEM Agent 5 Privacy Mode 9 Agent Browser 11 Agent
X-Sign 2.0 User Manual
 X-Sign 2.0 User Manual Copyright Copyright 2018 by BenQ Corporation. All rights reserved. No part of this publication may be reproduced, transmitted, transcribed, stored in a retrieval system or translated
MN Studio Website - User Guide
 MN Studio Website - User Guide Version 1.1 MN Studio Website Program 1. Introduction Welcome to the new website program! The MN Studio Website program allows you to create your own website with customized
Microsite Overview. The Basics: How to build and manage your ISA Section microsite
 Microsite Overview The Basics: How to build and manage your ISA Section microsite We are excited to work with you to build your microsites within the all-new www.isa.org. The website has state-of-the-art
ENABLING WEBCHAT HOSTED USER GUIDE
 ENABLING WEBCHAT HOSTED USER GUIDE CONTENTS... 1 Sign up Process... 2 Sign up Process (Continued)... 3 Logging In/ Out... 4 Admin Dashboard... 5 Creating, Edit, Delete A User... 5 Creating, Edit, Delete
Creating and Managing Your Personal Mines Website on WordPress
 Creating and Managing Your Personal Mines Website on WordPress Table of Contents Creating your site... 2 Managing your site... 2 About WordPress... 2 Logging in... 2 Pages... 2 Editing an Existing Page...
CUSTOMER PORTAL Splash Pages
 CUSTOMER PORTAL Splash Pages SPLASHPAGES In the splash page area, you can either create a custom splash page or use our editing tool and create a custom splash page using your own code. These splash pages
Configuring Shared Links for Web Access
 Configuring The Web Access feature lets you access CIFS share data or NFS export data stored in the Nasuni Filer using a Web browser. Some of the actions you can perform depend on the capabilities of the