Data Collector Series Z.A.C ( Version 1.00 ) User s Manual
|
|
|
- Gabriel Bruce
- 6 years ago
- Views:
Transcription


 User")
1 Data Collector Series Z.A.C ( Version 1.00 ) User s Manual
2 Revision History Changes to the original manual are listed below: Version Date Description of Version 1.0 March 1, 2013 Initial release 1.1 August 1, 2013 Added how to import file section 1.2 Nov. 20, 2013 Added download, upload, and import instructions 1.3 December 3, 2013 Added lookup table instructions 1.4 July 29, 2014 Delete unsupported instructions, and correction change description & pictures 1.5 December 5, 2016 Add 2D Reader Setting 1.6 August 4, 2017 New data types Data Collector Series User s Manual Version /01/2016
3 Important Notice No warranty of any kind is made in regard to this material, including, but not limited to, implied warranties of merchantability or fitness for a particular purpose. We are not liable for any errors contained herein or incidental or consequential damages in connection with furnishing, performance or use of this material. No part of this document may be reproduced, transmitted, stored in a retrieval system, transcribed, or translated into any language or computer language in any form or by any means electronic, mechanical, magnetic, optical, chemical, manual or otherwise, without express written consent and authorization. We reserve the right to make changes in product design without reservation and without notification. The material in this guide is for information only and is subject to change without notice. All trademarks mentioned herein, registered or otherwise, are the properties of their various respective owners. Fonts by Arphic, Copyright Arphic Technology Co., LTD 2017 All Rights Reserved. Guidance for Printing This manual is in A5 size. Please double check your printer setting before printing it. i ZAC
4 Table of Contents Important Notice... i Introduction... 1 Features... 1 System Requirement... 1 Main Menu... 3 Quick Tools... 3 Language Setting... 5 Menu Tree... 6 Getting Started... 7 Installation... 7 Starting ZAC... 7 Connecting Data Collector... 8 Setting up the Device... 8 Initial Settings... 8 Function Key Settings Security Settings File Name Barcode Setting Upload Custom Application Upload Scanned Data to PC Upload Lookup File Convert AGX to ZAC Start Up Customization Navigation Import Prompts & Message Reset Prompts Default Data Field Properties Prompt Modifier Managing Menus Customizing a Menu Properties Data Action Item Settings Reset Current Menu Managing Lookup Files Customizing a Lookup file Lookup Table Properties Lookup Data When record doesn t match ZAC ii
5 Data Structure When record format is wrong How to use Lookup with ZAC/Data Collector Locate / Produce Lookup Table Setting up Relationship Sending Lookup to Data Terminal Test and verified Managing Forms Customizing a Form Navigation Time Stamp Lookup Table Branch More Data Collecting Reset Current Form iii ZAC
6
7 Introduction ZAC is the powerful software for developing custom templates for your data collector. It enables users to create their own application templates without using any program code. Features Simple to use Supports Windows XP, Vista, win7 and win8 Supports real-time device and barcode settings Supports direct-link transfer of data System Requirement ZAC requires a PC with the following specifications: Windows XP Windows Vista Windows 7 Windows 8 1 ZAC

8 Overview Refer to the following illustrations to familiarize yourself with the user interface. Quick Tools Main Menu Language Settings Navigational Pane Description Main Menu Quick Tools Navigational Pane Language Settings Working Area Working Area Function To access all the functions in the program Frequently used functions are listed here Select + to expand the menu tree and access the programming options Choose the display language. The main settings area. ZAC 2
9 Main Menu Main Menu can be used to initiate tasks on your system. Please refer to the following table to see what each menu item can do. Menu Item Function New Create a new application template Open Open an existing application template (ZAC and AGX format only) File Save Save the current working template file Save as Save the current working template file with a new file name Exit Quit the program Download the current template file from the PC to Send Application the data collector Transfer Receive Application Upload ZAC file from the data collector to the PC Send Lookup Download the associated lookup file from the PC to the data collector Direct-Link Data Transfer Upload data from the data collector to the PC Tools Simulator Initiate the data collector simulator. You can test applications here before running them on the actual device Help About ZAC Show information about ZAC Quick Tools Quick Tools provide the most frequently used functions from the Main Menu for you convenience. Icon Name Function New Open Save Create a new application template Open an existing application template (ZAC and AGX format only) Save the current working template file 3 ZAC

, or File >> Open. 2.")
10 Send Application Send Lookup Direct-Link Data Transfer About Download the current template file from the PC to the data collector Download the associated lookup file from the PC to the data collector Upload data from the data collector to the PC Show information about ZAC Importing other types of application file (such as.agx) into ZAC 1. Click on Open from the shortcut bar (as shown below), or File >> Open. 2. At Open dialog box, Select the correct file type, such as AGX and click OK. ZAC 4
11 Language Setting 1. To change the language you must first create a language file. Locate the default.lng file in the language folder where ZAC program files are located and duplicate and rename the default.lng file to a new language file; for instance, Japanese.LNG. The file type must be.lng for the change to take effect. 2. Next, you must edit the language file so the new language can be displayed properly. Open the newly created file and you will see a list of strings displayed in the user interface of ZAC. Change string to a different language 3. Change the right side of the strings (the strings after the equal signs) from English to your desired language and save the file. 4. To display the new language, select the new language from the Language menu in ZAC. 5 ZAC
12 Menu Tree Menu Sub-Menu Function StartUp none Allows you to configure the program sequences and customizes the user interface Allows the user to configure the data collector Setting Up The function key, password, output file and equipment Device Settings operation mode Barcode Setting Allows you to configure symbologies and barcode parameters Menu Menu1 ~ Manu10 Customizes the hierarchical arrangement of applications under the main menu of application Lookup 1st Lookup ~ Configure how the lookup files retrieve data for the 3rd Lookup application Form Form1 ~ Form10 Designed to accept user inputs. It may contain multiple input fields and can be arranged to follow up a menu ZAC 6
13 Getting Started This section covers basic functions such as configuring device settings and symbologies. See later chapters for advanced functions. Installation A driver must be installed to establish connections between the PC and the data collector. Follow the instructions below to install the driver on your computer. 1. Connect the device to your computer via USB cradle. 2. A window appears in the bottom right-hand corner of Windows that says Found new hardware. In a few seconds a "Found New Hardware Wizard" window opens up. Double click the found new hardware icon to pull up the window if it does not appear automatically. Select "No, not this time" to continue. 3. Click "Next" to continue installation. 4. Click Install from a list or specific location (Advanced) and click Next. 5. Check the Include this location option and use Browse to locate the driver in your computer. Click Next to go to the next step. 6. Click Next and Finish when the installation is done. Starting ZAC To start ZAC: 1. Obtain the latest version of ZAC. Please contact your dealer for assistance. 2. Locate the ZAC folder and open the executable file. 3. The ZAC main screen appears on the desktop. 7 ZAC

14 Connecting Data Collector To connect the data collector to a PC via cradle: 1. Place the data collector on the cradle and connect the cradle to PC using the USB cable. 2. The PC should auto-detect the device as a COM device and ask for the driver when connecting the first time. 3. Please install the driver from the CD. The system should assign a COM port to the device after the driver installation. Connect the power adapter to the cradle when necessary. Make sure the unit is turned on after the cable is connected. Check the COM and LPT section in the device manager for the assigned COM port. The data collector should appear as a virtual com device. Setting up the Device Initial Settings Select Settings on the navigational pane and select the Initial tab on the right to enter the setup. ZAC 8
15 The Initial property page covers the following settings: Data Manipulation: Setting Value Function Prompt the user after upload is complete to decide to Data Deletion Manual keep or delete the data on the data collector Configures if the data should be deleted Delete the data automatically from data collector Automatic from the data after the upload is completed collector after it is uploaded to a host Keep the data on the data collector after upload is No completed No Prompt Entry Option Configures what information to display on data collector after Show count data entry is completed Show record Stay On the LCD Press any key to continue 1 ~ 99 * 100ms n/a Display nothing after data entry is completed Display the current record number being stored Display the data recorded after data entry is completed Select 1~99 ms to specify the time of the count/record review Select this option to display the count/record review until a key is pressed Keypad & LCD Configure the tone of the key click and the LCD/keypad backlight. Setting Value Function Mute Select desired tone from Tone 1~Tone5 or Mute to Key Click Tone 1 mute it ~ Tone 5 Turn off, Backlight Turn the backlight on or off Turn on Turn backlight off if idle Cursor Mode Select idle duration (1~9 *10 secs) for turning off 1 ~ 9 * 10 secs backlight when the backlight is on Disable Cursor Prohibit the cursor display Fixed Cursor Cursor does not blink Blink Cursor Show the blinking cursor 9 ZAC
16 Notification Configure the device beep sound for status feedback. Setting Value Function Mute Select desired warning feedback options (one ~ three Warning Beep One Beep ~ beeps) or Mute for no feedback Three Beeps Good Read Beep Mute One Beep ~ Three Beeps Select desired Good Read feedback options (one ~ three beeps) or Mute for no feedback Reset Public Settings Select this option to reset the current form back to default values. ZAC 10
17 Function Key Settings Select Settings on the navigational pane and select the Function Key tab on the right to enter the setup. The data collector includes default shortcut keys (FN+1~FN+7) to quick-access applications or menus. The Function Key settings enable users to customize their own shortcut keys. To change the settings check the Function Key Mappings checkbox and select options from the drop down menu for each key you want to configure. Setting Value Function Nil No function Function 1 (Fn + 1) ~ Function 7 (Fn+7) Collect Upload Utilities Settings Browse Data Delete Data Reader Test Set Date/Time Load Program Memory & Power Load Lookup Upload Port Download Port Baud Rate Backlight Data Deletion Entry Option View Settings Calculator Assign function to the shortcut key 11 ZAC

18 Security Settings Select Settings on the navigational pane and select the Security tab on the right to enter the setup. The Security settings enable users to add access restrictions to specified resources. Security Checking You may specify a password and check one or more items to lock the item. Locked items must be unlocked with the password before you can use them. Check the checkbox and enter the password to add the restriction. Up to 10 alphanumeric characters is permitted for the password. Upload ZAC You may set a password to restrict ZAC upload. Check the checkbox and enter the password to add the restriction. Up to 5 alphanumeric characters is permitted for the password. ZAC 12

19 File Name Select Settings on the navigational pane and select the File Name tab on the right to enter the setup. You may save collected data from a specific form separately. Check the checkbox and enter the file names to save to activate this function. Barcode Setting Learn how to customize the barcode settings for your data collector unit in this section. Select Settings/Barcode Setting from the navigational pane to enter the setup. 13 ZAC
20 ZAC 14
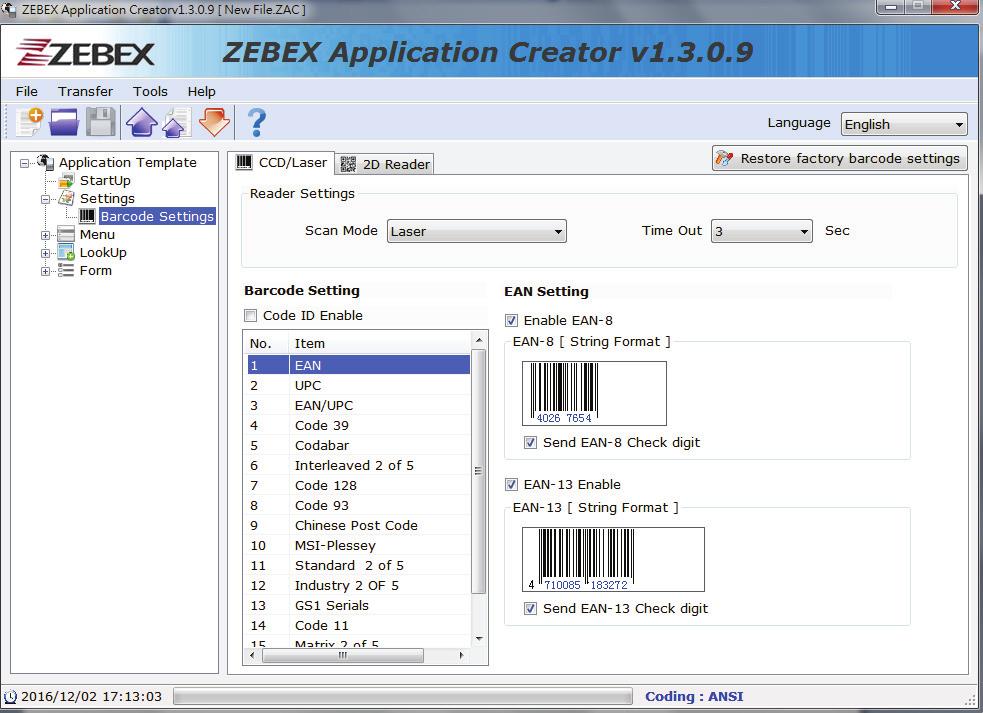
21 Reader Settings The Reader Settings covers the following settings: Setting Value Function Continuous Set scan mode to non-stop scanning Scan Mode Hold the trigger to start scanning. The scanning will Laser only stop when a barcode is read or the set timeout expires or the trigger is released Time Out 0~99 Sec Set the time out for the scan mode to 0~99 seconds Code ID Setting /Disable barcode recognition. 15 ZAC
22 CCD/Laser Barcode Setting The Barcode Setting covers the following settings: Symbology Setting Function EAN8 EAN13 UPC-A UPC-E Send Check Digit Send Check Digit Send UPCA Leading 0 Send Check Digit Send UPCE Leading 0 Send Check Digit /Disable to read EAN-8 /Disable to transmission check digit /Disable to read EAN-13 /Disable to transmission check digit /Disable to read UPC-A /Disable to transmission leading 0 /Disable to transmission check digit /Disable to read UPC-E /Disable to transmission leading 0 /Disable to transmission check digit ZAC 16
23 UPCE to UPCA UPC-A to EAN-13 Format The UPCE barcode will be converted into UPCA, and the next processing will follow the settings configured for UPCA The UPC-A barcode will be converted into EAN-13 and the next processing will follow the settings configured for EAN-13 ISBN/ ISSN Conversion Barcodes starting with 977/978 will be converted to ISBN EAN/UPC Code39 17 EAN8 to EAN-13 EAN13 first 0 can transmit EAN13 with first 0 ID code same as UPC/EAN Add-On The EAN-8 barcode will be converted into EAN-13 and the next processing will follow the settings configured for EAN-13 /Disable to EAN13 First 0 transmission Use this option to first 0 ID code same as options: EAN-13 UPC-A Use this option to set supplemental options: No Supplement 2 Digits 5 Digits Digits /Disable to read Code39 Send Start / /Disable transmission Start and Stop asterisks Stop Character Check Digit Verification /Disable to check digit verification Send Check Digit Full Code39 Min Length & Max Length ITPR Conversion ITPR Transmit A Character /Disable to transmission check digit : Using full ASCII encoding reading Disable: Direct code reading (Please refer to the specification of code39) Set the length qualification to fixed length or min/max length from 0 ~ 64 /Disable to read Code32 (Italian Pharmacy code) When reading code32, enable/disable to transmission an "A" character ZAC
24 Send Start/Stop Character Check Digit Verification /Disable to read Codabar /Disable transmission Start and Stop character /Disable to check digit verification Codabar Send Check Digit ST / SP Min Length & Max Length /Disable to transmission check digit Set start / stop characters to ABCD DC1 DC4 a/t,b/n,c/*,d/e abcd / abcd Set the length qualification to fixed length or min/max length from 0 ~ 64 /Disable to read Interleaved 25 Check Digit Verification /Disable to check digit verification Send Check Digit /Disable to transmission check digit Interleaved 2 of 5 Fix Length 1 Default Set the length qualification to fixed length Fix Length 2 Default Min Length & Max Length Set the length qualification to fixed length Set the length qualification to fixed length or min/max length from 0 ~ 64 ZAC 18
25 Code 128 Code 93 Chinese Post Code MSI/ Plessey /Disable to read Code 128 Check Digit Verification /Disable to check digit verification Send Check Digit /Disable to transmission check digit Min Length Set the length qualification to fixed length or & Max Length min/max length from 0 ~ 64 /Disable to read Code 93 Check Digit Verification /Disable to check digit verification Send Check Digit /Disable to transmission check digit Min Length & Max Length Min Length & Max Length Check Digit Selection Min Length & Max Length Set the length qualification to fixed length or min/max length from 0 ~ 64 /Disable to read Chinese Post Code Set the length qualification to fixed length or min/max length from 0 ~ 64 /Disable to read MSI-Plessey Set check digit to Without check digit Single check but no send Single check and send digit Double check but no send Double check and send first digit Double check and send both digit Set the length qualification to fixed length or min/max length from 0 ~ ZAC
26 /Disable to read Standard 25 Standard 2 of 5 Industrial 2 of 5 IATA Check Digit Verification Send Check Digit Min Length & Max Length /Disable to read IATA Code /Disable to check digit verification /Disable to transmission check digit Set the length qualification to fixed length or min/max length from 0 ~ 64 /Disable to read Industrial 25 Check Digit Verification /Disable to check digit verification Send Check Digit /Disable to transmission check digit Min Length Set the length qualification to fixed length or & Max Length min/max length from 0 ~ 64 GS1 /Disable to read GS1 GS1 Serials Code 11 GS1 Limited GS1 Expanded Min Length & Max Length /Disable to read GS1 Limited /Disable to read GS1 Expanded Set the length qualification to fixed length or min/max length from 0 ~ 64 /Disable to read Code 11 Check Digit Verification /Disable to check digit verification Send Check /Disable to transmission check digit Digit Set the number of check digit: The number of One Check Digit check digit Two Check Digits Min Length & Max Length Set the length qualification to fixed length or min/max length from 0 ~ 64 ZAC 20
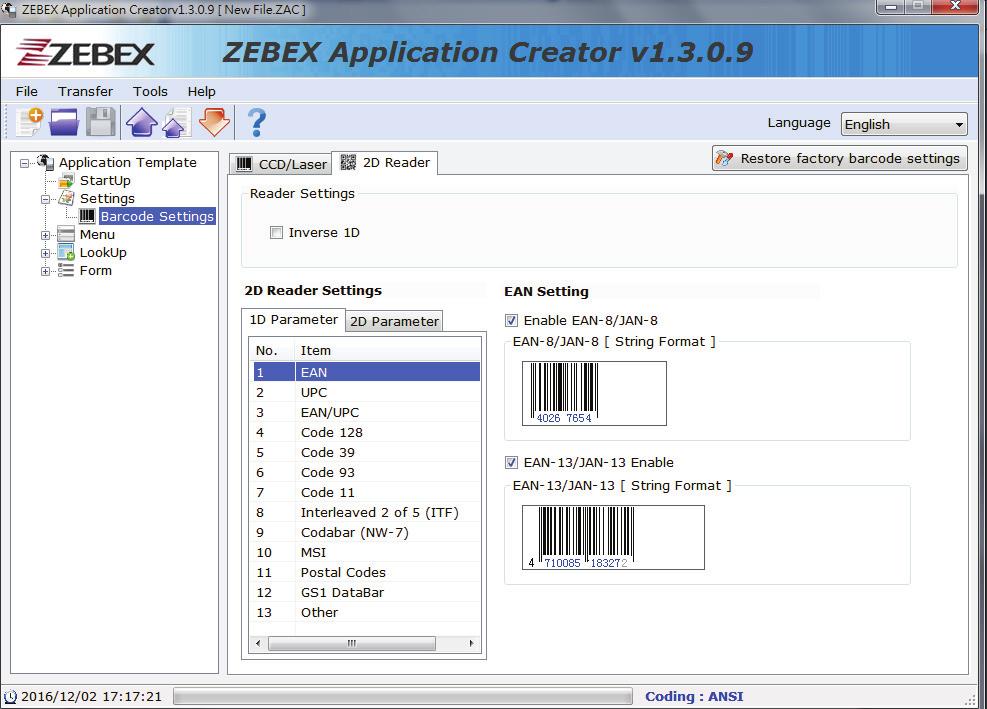
27 Matrix 2 of 5 Telepen /Disable to read Matrix 25 Check Digit Verification /Disable to check digit verification Send Check /Disable to transmission check digit Digit Min Length & Max Length Set the length qualification to fixed length or min/max length from 0 ~ 64 /Disable to read Telepen Set Telepen to: Telepen Mode Telepen Numeric mode AIM Telepen mode Min Length Set the length qualification to fixed length or & Max Length min/max length from 0 ~ 64 2D Reader Barcode Setting, 1D Parameter The Barcode Setting covers the following settings: Symbology Setting Function EAN8 /Disable to read EAN-8 EAN13 /Disable to read EAN-13 /Disable to read UPC-A Send Check Digit /Disable to transmission check digit UPC-A Use this option to set supplemental options: UPC-A Preamble No Preamble System Character System Character & Country Code /Disable to read UPC-E Send Check Digit /Disable to transmission check digit UPC-E UPC-E Preamble Use this option to set supplemental options: No Preamble System Character System Character & Country Code 21 ZAC
28 UPC-E1 Send Check Digit UPC-E1 Preamble Bookland EAN /Disable to read UPC-E1 /Disable to transmission check digit Use this option to set supplemental options: No Preamble System Character System Character & Country Code Bookland EAN Bookland ISBN Format Use this option to set supplemental options: Bookland ISBN-10 Bookland ISBN-13 Use this option to set supplemental options: Ignore Supplementals Decode Decode UPC/EAN/JAN only with Supplementals UPC/EAN/JAN Autodiscriminate UPC/EAN/JAN Suppliementals Supplementals smart Supplemental Mode EAN/UPC UPCE to UPCA UPCE1 to UPCA The UPCE barcode will be converted into UPCA, and the next processing will follow the settings configured for UPCA The UPCE1 barcode will be converted into UPCA, and the next processing will follow the settings configured for UPCA EAN8 and JAN8 Extend ISBN/ ISSN Conversion EAN8 and JAN8 Extend Barcodes starting with 977/978 will be converted to ISBN Code 128 Code39 /Disable to read Code 128 /Disable to read GS1-128 (formarly UCC/EAN-128) Min Length Set the length qualification to fixed length or & Max Length min/max length from 0 ~ 64 /Disable to read Code39 /Disable to read Trioptic Code 39 Code 39 to The Code 39 barcode will be converted into Code 32 ZAC 22
29 Code 93 Code 11 Code 32 Check Digit Verification Send Check Digit Full Code39 Min Length & Max Length /Disable Code 32 Prefix /Disable to check digit verification /Disable to transmission check digit : Using full ASCII encoding reading Disable: Direct code reading (Please refer to the specification of code39) Set the length qualification to fixed length or min/max length from 0 ~ 64 /Disable to read Code 93 Min Length & Max Length Set the length qualification to fixed length or min/max length from 0 ~ 64 /Disable to read Code 11 The number of check digit Send Check Digit Min Length & Max Length Set the number of check digit: One Check Digit Two Check Digits /Disable to transmission check digit Set the length qualification to fixed length or min/max length from 0 ~ 64 /Disable to read Interleaved 25 Check Digit Verification Set the number of check digit: One Check Digit Two Check Digits Interleaved 2 of 5 Send Check Digit /Disable to transmission check digit Convert Convert I 2 of 5 to EAN-13 Min Length & Max Length Set the length qualification to fixed length or min/max length from 0 ~ 64 /Disable to read Codabar(NW-7) Codabar(NW-7) Min Length & Max Length Set the length qualification to fixed length or min/max length from 0 ~ ZAC
30 MSI/ Plessey Postal Code Check Digit Selection Check Digit Algorithm Selection Send Check Digit Min Length & Max Length Send Check Digit Send Check Digit /Disable to read MSI-Plessey Set check digit to One MSI Check Digit Two MSI Check Digit Set check digit Algorithm to MOD 10/MOD 10 MOD 10/MOD 11 /Disable MSI check digit Set the length qualification to fixed length or min/max length from 0 ~ 64 /Disable US Postnet /Disable US Planet /Disable Transmit US Postnet and US Planet check Digit /Disable UK Postal /Disable to Transmit UK Postal Check Digit /Disable Japan Postal /Disable Australia Post ZAC 24
31 GS1 Serials GS1 GS1 Limited GS1 Expanded /Disable to read GS1 /Disable to read GS1 Limited /Disable to read GS1 Expanded Other /Disable to read Chinese 2 of 5 /Disable to read Korean 3 of 5 Set check digit to Regular Only Inverse 1D Inverse Only Inverse Autodetect 2D Reader Barcode Setting, 2D Parameter The Barcode Setting covers the following settings: PDF417 /Disable to read PDF417 /Disable to read MicroPDF417 /Disable to read Data Matrix Data Matrix Data Matrix Inverse Set check digit to Regular Only Inverse Only Inverse Autodetect /Disable to read QR Code /Disable to read MicroQR Set check digit to QR Code Regular Only QR Inverse Inverse Only Inverse Autodetect /Disable to read Axtec Set check digit to Aztec Regular Only Aztec Inverse Inverse Only Inverse Autodetect Other /Disable to read Maxicode 25 ZAC
32 Upload Custom Application To upload custom application from PC to the data collector: 1. Power on the data collector and select 3.Utilities and 6.Load Application on the data collector main menu. 2. Connect the cradle to the PC and place the data collector on the cradle. 3. Open ZAC and click the Open icon to select the application file on your PC. ZAC 26
33 4. Click the Send Application icon. 5. Check the Device Manager on your PC for the COM port your data collector is using and select the same COM port in the Communication parameters. 6. Click Start Download to send the application to the data collector. 27 ZAC

34 Upload Scanned Data to PC To upload scanned data from the data collector to PC: 1. Power on the data collector and select 2.Upload on the data collector main menu. 2. Connect the cradle to the PC and place the data collector on the cradle. 3. Open ZAC and click the Direct-Link Data Transfer icon. 4. Select Browse to open the Save as window. Specify the name for your data file and click Save to save the file. ZAC 28
35 5. Check the Device Manager on your PC for the COM port your data collector is using and select the same COM port in the Communication parameters. 6. Select the desired save mode (Overwrite or Append). 7. Click Start Upload to upload data. 8. A message appears in ZAC when upload is completed. To view received data, select Yes, otherwise select No. 9. To delete the data you just sent on your data collector, select Yes when prompted on the data collector screen. Otherwise select No. 29 ZAC
36 Upload Lookup File To upload lookup file from PC to the data collector: 1. Power on the data collector and select 3.Utilities and 6.Load Application on the data collector main menu. 2. Connect the cradle to the PC and place the data collector on the cradle. 3. Open ZAC and click the Open icon to select the application file on your PC. 4. Click the Send Application icon. ZAC 30
37 5. Check the Device Manager on your PC for the COM port your data collector is using and select the same COM port in the Communication parameters. 6. Click Start Download to send the application to the data collector. 7. Select 8. Load Lookup on your data collector and place it back on the cradle. 8. Click the Send Lookup icon. 31 ZAC

38 9. Check the Device Manager on your PC for the COM port your data collector is using and select the same COM port in the Communication parameters. 10. Select Browse and select the lookup file. 11. Select Start Download to send the lookup file. ZAC 32
39 Convert AGX to ZAC To import.agx files into ZAC: 1. Open ZAC and click the Open icon. 2. Click the arrow in File Type in the Open menu. 2 options appear as illustrated below. 3. Select the ForceAG Application File (*.AGX) option. The.AGX type files will appear. 4. Select the desired.agx file and click Open. 33 ZAC
40 Start Up Start Up settings allow you to customize the preset settings. Customization 1. Run ZAC on your PC. 2. From the navigational pane, select StartUp to expand the menu and select one of the menus or simply select Start Up from the working area. Check the following section for the options you can configure. Navigation Select an option to start the application from: Form 1 Menu 1 Import Prompts & Message Click this button to import existing template file for the prompts and messages. ZAC 34
41 Reset Prompts Default Click this button to load the pre-defined default prompts. Data Field Properties Data Field Properties are used to provide the information about the data structure. Setting Value Function Number of delimiter (ASCII) Nil ~ 2 Delimiter is used to separate the data fields. Set the number of delimiter you are using and set the delimiter using included ASCII characters Prompt Modifier Select + to expand the menu tree on the left and select an item to display its default prompts on the right. You may change the default prompts by editing them in the User Define Prompts fields. 35 ZAC

42 Managing Menus A menu is used to display commands that allow users to access various data collecting forms. Users can add one or more forms to a menu, and use multiple menus to create an application template. Customizing a Menu 1. Run ZAC on your PC. 2. From the navigational pane, select Menu to expand the menu and select one of the menus or simply select Menu from the navigational pane and click Menu from the working area. Check the following section for the options you can configure. ZAC 36
43 Properties Properties cover the following settings: Setting Value Function Title n/a Configure the menu title display ESC Main, Form1 ~ Form10, Select the function to perform when ESC is pressed Menu1 ~ Menu10 Data Action Data Action covers the following settings: Setting Save Caption Save Selected Item Pass Down Function Check this option to save the menu caption to the transaction record with the data Check this option to save the name of the selected item to the transaction record When Save Selected Item is checked, this option becomes available. Check this option to pass down the enabled information to the next form Item Settings Use this option to manage items in a menu. Item Settings cover the following settings: Setting Value Function Item Name n/a Enter the item names to be displayed in the menu Next Main, Form1 ~ Form10, Assign a form or menu to the selected item name Menu1 ~ Menu10 Reset Current Menu Select this option to reset the device back to default settings. 37 ZAC
44 Managing Lookup Files A lookup file is used for information reference in a database. It makes it possible for users to check what are stored on the database and retrieve information when necessary. Up to three lookup files are supported by ZAC. Customizing a Lookup file 1. Run ZAC on your PC. 2. From the navigational pane, select Lookup to expand the menu and select one of the Lookup Files or simply select Lookup from the navigational pane and click Lookup from the working area. Check the following section for the options you can configure. ZAC 38
45 Lookup Table Properties Lookup Table Properties are used to provide the information about the data structure. Setting Value Function Number of Fields Fixed Length Delimiter 0 ~ 8 n/a ASCII characters Set the number of fields in the lookup file you are using. You must set a number that is no smaller than the lookup file s actual field amount Select this option to set fixed length for the data in lookup files Delimiter is used to separate the data fields. Use this option to set the delimiter using included ASCII characters Lookup Data Lookup Data configures how the data in the lookup file should be handled. Setting Only read data once Show message when the data is matched lookup data can be uploaded Trim space when lookup data be uploaded Function Check this option to restrict a key field data to only one reading Check this option to show message when the data is matched Check this option to allow lookup data to be uploaded from data collector to host This option becomes available when the Delimiter option is checked. Select this option to remove the spaces in a lookup file that has delimiters when it is uploaded to your PC 39 ZAC
46 When record doesn t match This setting configures the actions for the data collecting form to take when the incoming data finds no match in the lookup files. Setting Function Select this option to allow the incoming data input into its field even if no match in the lookup files is found If the Record mode of the data collecting form is set to Continue "Save", "Save & update", "Save & output record", "Save & output screen" or Save & remove on the Form property page, data can only be saved in a data file Select this option to display a warning message when no match Show warning message is found in the lookup files Select this option to allow the incoming data input into its field even if no match in the lookup files is found. The data will be saved as a key lookup file. Append to lookup file The incoming data will be written into the target lookup file if the Record mode of the data collecting form is set to "Update lookup", "Save & update", Remove from lookup, or Save & remove Select this option to display a warning message before Show warning message accepting the incoming data into the & insert lookup file even if no match is found in the lookup file Select this option to clear the screen when no match is found in Clear the screen the lookup files Show warning & clear screen Select this option to display a warning message before clearing the screen when no match is found in the lookup files ZAC 40
47 Data Structure Data Structure covers the following settings: Setting Offset Length Key Field Function This option becomes available when Fixed Length is selected. It is used to specify the start position for each referred data field Specify the fixed length/maximum length for each referred data field in Fixed Length/Delimiter. The maximum value is 255 Select a key field so that an index file can be created for the lookup file When record format is wrong This setting configures the actions for the data collecting form to take when the incoming data format is wrong. Setting Stop the download process Truncate/Reformat the record Skip the record Function Select this option to stop the downloading process if the record format is wrong Select this option to truncate/reformat the data during downloading if the record format is wrong Select this option to continue downloading but discard the mismatched data Reset Current Lookup File Select this option to reset the current form back to default values. 41 ZAC

48 How to use Lookup with ZAC/Data Collector Lookup table serves as a reference database. Scanned data is first compare with corresponding data fields on the lookup table with pre-define rules and conditions. If they are met, comparison result will appear on the screen; if not met, warning messages will alert the user, or prompting user to take necessary actions. Setting up lookup table is straight-forward and simple. The process usually involves the following steps: 1) Locate / produce lookup table (usually in TXT format). 2) Launch ZAC to setup relationship between application and lookup table. 3) Setup rules and conditions when comparing data with lookup table. 4) Send both the custom application + lookup table to data collector. 5) Test your application. Locate / Produce Lookup Table Lookup table usually contains rows and columns of data field. Each filed will be pre-define and contains different pieces of information such as name, barcode, or quantity, etc. You can create the table, or you can export all the data out from existing database. Below you will find an example of lookup table in TXT format. Notice a typical lookup table will contains all your records separated by,. Each record is uniquely identified by at least one column (in this case, the unique identifiable column would be the first column, item number which starts with 0001, 0002 ). A column heading may or may not be necessary for the lookup table to work properly. ZAC 42

49 Setting up Relationship Once the lookup table has been gathered, we now need to design custom application which will link to specific lookup table. Keep in mind in any ZAC application; you can have up to three lookup tables. Each form can only be link to one lookup table at anytime. Before you can import/upload the lookup table to data terminal, you will need to setup rules and conditions during import and compare. Here you can setup the properties, rules when record doesn t match, rules when record format is wrong, and preview the data structure of the lookup table. Keep in mind the data structure has to match the data structures on the TXT file. If they don t match, error message may appear according to the rules specified in the When record format is wrong section. For more information on the description of each rules and condition, please refer to ZAC user s manual Managing Lookup Files. 43 ZAC
50 Sending Lookup to Data Terminal Once the data structure and rules have been setup, it is time to upload the lookup table to data terminal. In order for lookup table to function properly, you will need to up load custom application first, follow by lookup table. If you receive error message during lookup table uploading process, you need to go back to ZAC and adjust the data structure to match the data structure of your lookup table. For instruction on how to upload application and lookup up table, please refer to ZAC user s manual Upload Custom Application and Upload Lookup File. Test and verified Once both application and lookup table have been uploaded, execute (by going back to Main Menu and press 1. Collect). If all goes well, when you input one of the data listed in the uniquely identifiable column, data terminal will display the corresponding search result on the screen. If you are getting record not found error message, you need to go back to ZAC and check application settings under Form and Lookup. ZAC 44

51 Managing Forms A form consists of a sequence of inputs that can take on various values for data collecting purpose. You can add one or more forms to a menu, and use multiple menus to create an application template. You can also connect forms and menus to each other to fit your data collecting needs. A form is designed to ask for inputs on the screen when it is run on the data collector. Once all the input fields are completed, the inputted data will be stored as a transaction record and saved into a data file on the data collector. You can add the transaction record to the lookup database that the form refers to, or directly output it to a printer. Customizing a Form 1. Run ZAC on your PC. 2. From the navigational pane, select Form to expand the menu and select one of the Forms or simply select Form from the navigational pane and click Form from the working area. Check the following section for the options you can configure. 45 ZAC
52 Navigation Navigation covers the following settings: Setting Value Function Main, ESC Form1 ~ Form10, Select the function to perform when ESC is pressed Menu1 ~ Menu10 Next Main, Select the next function to execute when the current Form1 ~ Form10, form of work is completed Menu1 ~ Menu10 Record Action The Record function tells the system what to do when all the input fields of a form is completed Save Update Lookup Save & Update Pass down Output record Output screen Save & output record Save & output screen Remove form look up Save & remove Saves the record in order Update the lookup file associated with the form Save the record in order and updates the lookup file Pass down the data to the next form or menu without saving Outputs the record directly to a printer instead of saving it to a file Outputs what is displayed on the screen such as the prompts and data collected Save the record in order and output it directly to a printer Save the record in order and output what is displayed on the screen Remove the record from the lookup file Save the record in order and removes it from the lookup file ZAC 46
53 Time Stamp Use this feature to set the date and time stamp written format. Options available are: Setting No Stamp Before the record After the record Function Write data without using date and time stamp Date and time stamp added to the front Date and time stamp added at the end Date & Time Stamp Settings Setting Value Function Separate DATA stamp and Time stamp to two fields User defined The date + time format delimiter Year 4 Digits (YYYY) 2 Digits (YY) /Disable years format, used to write data reference. Month n/a /Disable month format Day n/a /Disable day format Separator User defined The date format delimiter Date Style Year.Month.Day1 Month.Day.Year1 Day.Month.Year1 Select the date format combinations. Hour n/a /Disable hour format Minute n/a /Disable minute format Second n/a /Disable seconds format Separator User defined The time format delimiter 47 ZAC

54 Lookup Table Lookup files are used to provide the information about the data structure. You must first configure the lookup file settings before this option becomes available. The lookup table covers the following settings: Setting Value Function No Lookup Select a lookup file as the reference file when 1st Lookup Lookup Table fetching data. Select no lookup to use the pre-defined 2nd Lookup initial value 3rd Lookup Branch Branch configures the keypad shortcut for the data collector to switch between the forms and menus. Up to four shortcuts can be configured. Setting Value Function Fn + 1 Fn + 2 Fn + 3 Fn + 4 Disable, Form1 ~ Form 10 Configuring additional Fn + 1~ Fn + 4 shortcuts operations More Press the More button for advanced settings: ZAC 48
55 Field Data Setting Value Function 0 ~ 255, Left aligned (padded with space), Check this option and select a value fixed data Right aligned (filled with space), and alignment to set the data length length Left aligned (padded with 0), within the specified value Right aligned (filled with 0) initial value or text User defined (up to 9 characters) add prefix code User defined(up to 10 characters) add suffix code User defined(up to 10 characters) show input mask User defined(only 1 character) Check this option and enter a value or text to display the initial value or text on the data collector screen. The value or text will be replaced by data input Check this option and enter a value or text to add a prefix code such as a $ sign in front of the inputted data Check this option and enter a value or text to add a suffix code after the inputted data Check this option and enter a mark or symbol such as an asterisk (*) to highlight the input field 49 ZAC

56 Barcode Input Setting Value Function Read Partial Barcode Start Position Check Leading Code Auto Enter Start Position: 1 ~ 80 Maximum Length: 1 ~80 User defined(up to 6 characters) No Scan + Enter Enter + Scan To collect only a part of the barcode scanned, check this option and set the start and maximum length of the data Check this option and enter a value or text to enable leading code check. When the leading characters do not match the entered code, the barcode will be rejected Configure the use of the Enter key for input Data Collecting The bottom half of the Form settings are used to configure the elements of the input fields in a data collecting form. ZAC 50
57 Data Type Setting Value Function Nil None Select this option to reject any data regardless of the format Text $1a2b3c=-*/ Select this option to accept any ASCII character Integer -1,0,1,2 Select this option to accept whole numbers Real 8.88 Select this option to accept any number with a decimal Letter Aa ~ Zz Select this option to accept any letter Auto [+/-] 8, 8.88 Boolean Lookup Fixed Data Prompt Counter Passdown Extension Pause Alphameric 51 0 or 1, Y or N, T or F Matching data Pre-defined Pre-defined Counter Data from previous form Space User defined ABC123xyz Select this option to accept Real and Integer numbers and perform arithmetic + or depending on the field setting Select this option to accept a true or false type input No data accepted. Select this option to fetch associated lookup value for reference No data accepted. Select this option to show data pre-defined in the Prompt field. Fixed Data will be saved as part of the transaction record No data accepted. Select this option to show data pre-defined in the Prompt field. Prompt will not be saved as part of the transaction record No data accepted. Select this option to record the count of user s data collecting process Select this option to imports the data collected by the previous form that is set to Pass down for the Record mode No data accepted. Select this option to reserve field space for an input field above it when it is too long to completely display on the screen No data accepted. Select this option to show an alert defined in the Prompt field Select this option to accepts any alphabetic, numeric, or alphanumeric characters ZAC
58 Setting Value Function Date YYYY/MM/DD Write data using date stamp. Time HH:MM:SS Write data using time stamp. Accumulator Accumulator No data accepted. Select this option to record the count of user s data collecting process. Change accumulator parameter in "More" option. Prompt Setting Value Function Prompt User defined Used for the label or name of an input field. Enter a string for an input field if necessary Input Type Setting Value Function Input Type Minimum Length Reader, Keypad, Both Setting Value Function Select the option to set where the data is collected from. Auto Enter in the barcode settings must be enabled for the Reader option to function Min 0 ~ 80 Set the minimum length of the input data Maximum Length Setting Value Function Max 0 ~ 80 Set the maximum length of the input data ZAC 52
59 Fields Fields are only available when the data collecting form is set to refer to a lookup file. Setting Value Function Fields Nil Field 1, Field 2 Accept no data Select to set an input field to either admit the data read or fetch lookup value 53 ZAC
60 Variables Variables are only used when the data collecting form is not referring to any lookup file. Setting Value Function Variables Nil get v1 ~ get v8, set v1 ~ set v8 get & setv1~ get & setv8 Accept no data Input field set to set v1 can be fetched by the input field set to get v1 in the succeeding form; input field set to get v1 can fetch the data from input field set to set v1 Input field set to get & setv1 will fetch the value from an input field set to set v1 in the preceding form and sets the fetched value to the new variable that is to be fetched by the succeeding from. This selection is applicable when a data needs to pass down to an over next form Reset Current Form Select this option to reset the current form back to default values. ZAC 54
Portable Data Collector Series Z-9000 ( Version 1.0) User s Manual ZEBEX INDUSTRIES INC.
 User s Manual ZEBEX INDUSTRIES INC.") Portable Data Collector Series Z-9000 ( Version 1.0) User s Manual ZEBEX INDUSTRIES INC. WWW.ZEBEX.COM Revision History Changes to the original manual are listed below: Version Date Description of Version
Portable Data Collector Series Z-9000 ( Version 1.0) User s Manual ZEBEX INDUSTRIES INC. WWW.ZEBEX.COM Revision History Changes to the original manual are listed below: Version Date Description of Version
SKYWALKER USER GUIDE i
 SKYWALKER USER GUIDE i CONTENTS 1. Introduction... 1 1.1. Install Skywalker... 2 1.2. Work area... 5 1.3. Menu Bar... 6 1.4. Tool Bar... 8 2. Getting start... 9 2.1. Menu Form... 11 2.2. Action Form...
2D Imaging Barcode Scanner GLLS. Programming Guide. Advanced Handheld High-Speed Laser Scanner
 2D Imaging Barcode Scanner GLLS Programming Guide 1 Advanced Handheld High-Speed Laser Scanner Revision History Changes to the original manual are listed below: Version Date Description of Version 1.0
510-2d Complete Configuration Guide Worth Data Inc. 05/2010
 510-2d Complete Configuration Guide Worth Data Inc. 05/2010 i User Preferences Table 5-1. User Preferences Default Table Parameter Parameter Number Default Page Number User Preferences Set Default Parameter
2D Imaging Barcode Scanner GLLS. Programming Guide. Advanced Handheld High-Speed Laser Scanner
 2D Imaging Barcode Scanner GLLS Programming Guide 1 Advanced Handheld High-Speed Laser Scanner Revision History Changes to the original manual are listed below: Version Date Description of Version 1.0
FORGE Batch Application Generator
 FORGE Batch Application Generator 8000 / 8300 / 8400 / 8500 Series Mobile Computers DOC Version 2.19 Copyright 2008~ 2009 CIPHERLAB CO., LTD. All rights reserved The software contains proprietary information
DS6707 Digital Imager Scanner. Product Reference Guide
 Symbol DS6707 Product Reference Guide Manual DS6707 Digital Imager Scanner Product Reference Guide Table of Contents Revision History... iii About This Guide Introduction... xv Configurations... xv Chapter
530-2D-USB 2D Scanner High Speed Imaging USB Bar Code Scanner
 530-2D-USB 2D Scanner High Speed Imaging USB Bar Code Scanner Worth Data USB 2D Bar Code Scanner - Scan 1D & 2D Matrix Bar codes www.worthdata.com Owner s Manual Warning: This equipment generates, uses
su Portable Data Collector Series Z-9000 ( Version 1.0) User s Manual ZEBEX INDUSTRIES INC.
 User s Manual ZEBEX INDUSTRIES INC.") su Portable Data Collector Series Z-9000 ( Version 1.0) User s Manual ZEBEX INDUSTRIES INC. WWW.ZEBEX.COM ZEBEX INDUSTRIES INC. Revision History Changes to the original manual are listed below: Version
su Portable Data Collector Series Z-9000 ( Version 1.0) User s Manual ZEBEX INDUSTRIES INC. WWW.ZEBEX.COM ZEBEX INDUSTRIES INC. Revision History Changes to the original manual are listed below: Version
Advanced Data Formatting (ADF) Programmer Guide
 Programmer Guide") Advanced Data Formatting (ADF) Programmer Guide Advanced Data Formatting Programmer Guide 72E-69680-02 Revision A April 2009 ii Symbol DS3407 Product Reference Guide 2009 by Motorola, Inc. All rights
Advanced Data Formatting (ADF) Programmer Guide Advanced Data Formatting Programmer Guide 72E-69680-02 Revision A April 2009 ii Symbol DS3407 Product Reference Guide 2009 by Motorola, Inc. All rights
Area Imager Bar Code Scanner 2 D C O N F I G U R A T I O N G U I D E
 Area Imager Bar Code Scanner 2 D C O N F I G U R A T I O N G U I D E Copyright @ 2017 This manual is copyrighted, with all right reserved. Under the copyright laws, this manual may not, in whole or in
Product Engineering Specification Scan Utility
 Product Engineering Specification Scan Utility Overview: 1. What is Scan Utility? Scan Utility provides a user interface that communicates with the scanner. It can set up the scanner, download the scanner
If you want to do other configurations please refer to below programming barcodes.
 NT-1202 Quick Setup Guide This is 1D&2D plug and play model if you use a US keyboard. If you use other type of keyboard, plug the USB cable on your device, setup keyboard language before you use it. (refer
Factory Default Configuration. Factory Default Configuration
 Factory Default Configuration Trigger Mode Terminator Factory Default Configuration Setup Code *open Parameter code close Parameter code Product information 1. Serial Port Using Serial Portread moudle
Area Imager Bar Code Scanner
 Area Imager Bar Code Scanner 2 D C O N F I G U R A T I O N G U I D E SYMBOLOGY PROGRAMMING for POCKET SCANNERS Copyright @ 2017 This manual is copyrighted, with all right reserved. Under the copyright
Leitor Zebra LI
 Leitor Zebra LI4278 Criado para uso diário e contínuo, o LI4278 oferece liberdade sem fio, compatível com Bluetooth. Oferece também uma melhor criptografia para uma segurança aprimorada e um melhor desempenho
5.22 Manage Triggers. Tap on the Hardware tab, and choose a GPS hardware port and the appropriate Baud rate.
 Manage Triggers Tap on the Hardware tab, and choose a GPS hardware port and the appropriate Baud rate. Windows Mobile 6 automatically manages access to the GPS receiver. However, some programs may not
POSSAFE LQ300 BARKOD OKUYUCU. Configuration Manual
 POSSAFE LQ300 BARKOD OKUYUCU Configuration Manual System function setting Factory Default setting All scanners have a factory default settings, scan "Factory Default "bar code, will make the scanner all
Code Reader 2300/2600/3600/CR3600 DPM Configuration Guide
 Code Reader 2300/2600/3600/CR3600 DPM Configuration Guide 1 Table of Contents Modem Settings (for use with the Charging Station with an Embedded CodeXML Modem or the external CodeXML M3 Modem when paired
Wireless Data Collector
 su Portable Data Collector Series Z-900XRF ( Version 1.0) User s Manual ZEBEX INDUSTRIES INC. WWW.ZEBEX.COM ZEBEX INDUSTRIES INC. Revision History Changes to the original manual are listed below: Version
If you want to have other configurations please refer to below programming barcodes. Check Scanner Version
 NT-1228BL V18.7.12 Quick Setup Guide This model can work both via USB cable or via bluetooth. Connection Mode Working via USB cable Get Started: Connect scanner with your device via USB cable. If you use
If you want to do other configurations please refer to below programming barcodes.
 NT-W8 V18.9.1 Quick Setup Guide This model can work both via USB cable or 2.4G receiver. Connection Mode Working via USB cable Get Started: Connect scanner with your device via USB cable. If you use US
1D IMAGER MODELS - 7Ci, 7Di, D700
 COMMAND BARCODES 1D IMAGER MODELS - 7Ci, 7Di, D700 This document pertains to the following 7Ci, 7Di, D700: The part number (P/N) is labeled inside the battery compartment for the CHS 7 Series. Ci Di Model
MIRROR VT/5250 Terminal Emulation
 MIRROR VT/5250 Terminal Emulation 9400 / 9500CE / 9500PPC Mobile Computers DOC Version 1.10 Copyright 2007~ 2008 CIPHERLAB CO., LTD. All rights reserved The software contains proprietary information of
Nuscan 3200 Optical Laser Barcode Scanner
 Nuscan 3200 Optical Laser Barcode Scanner Programming Manual FCC Compliance This equipment has been tested and found to comply with the limits for a Class A digital device, pursuant to Part 15 of the FCC
User s Manual WARNING CIPHER 1000 CCD SERIES
 CIPHER 1000 CCD SERIES User s Manual WARNING This equipment has been tested and found to comply with the limits for a Class A digital device, pursuant to Part 15 of FCC Rules. These limits are designed
CR2300 CR2600 CR3600 (DPM)
") CONFIGURATION GUIDE ENGLISH CR2300 CR2600 CR3600 (DPM) CONFIGURATION GUIDE: VERSION 12 SUPPORTED FIRMWARE: READERS 0956+, MODEM 2000+ RELEASE DATE: SEPTEMBER 2014 www.codecorp.com User Manuals YouTube.com/codecorporation
CONFIGURATION GUIDE ENGLISH CR2300 CR2600 CR3600 (DPM) CONFIGURATION GUIDE: VERSION 12 SUPPORTED FIRMWARE: READERS 0956+, MODEM 2000+ RELEASE DATE: SEPTEMBER 2014 www.codecorp.com User Manuals YouTube.com/codecorporation
OPL-DCL Standard Demo Manual With (Micro) PDF417 and RSS. User s Manual. Version LFBP0510
 PDF417 and RSS. User s Manual. Version LFBP0510") OPL-DCL Standard Demo Manual With (Micro) PDF417 and RSS User s Manual Version LFBP0510 Supported models: OPL9723, OPL9724, OPL9712, OPL9728, DCL1530, DCL1531 (For Operating System versions LBxV0225 or
OPL-DCL Standard Demo Manual With (Micro) PDF417 and RSS User s Manual Version LFBP0510 Supported models: OPL9723, OPL9724, OPL9712, OPL9728, DCL1530, DCL1531 (For Operating System versions LBxV0225 or
Advanced Handheld High-Speed Laser Scanner
 GLLS 1 Advanced Handheld High-Speed Laser Scanner Revision History Changes to the original manual are listed below: Version Date Description of Version 1.0 2015/03/03 Initial release 1.1 2015/04/15 Added
CONFIGURATION GUIDE ID-110
 CONFIGURATION GUIDE ID-110 HSD 0320.011 / 09.17-V01de Table of content Bluetooth Settings 7 Bluetooth Radio Disconnect (Reconnect via Quick Connect Barcode) 7 () Bluetooth Auto Reconnect - Default 7 ()
Code Interleaved 2 of 5. Plessey Minimum And Plessey Maximum Length. Field Size/Char. Enabled.
 Chapter 5: Configuration Decoded (HHP) Plessey Minimum And Plessey Maximum Length These parameters apply to Plessey bar codes.the length of a code refers to the number of characters (i.e., human readable
User s Manual. Xi3000 Scanner. Table of Contents
 Xi3000 Scanner User s Manual Table of Contents Restore Default Settings... 1 Exit Setup without Changes... 1 Configure Through RS232... 1 List Setting... 1 Buzzer Settings... 2 Reading Redundancy Setting...
BS8050-3V Piranha (1D) Barcode Scanner. User Guide
 Barcode Scanner. User Guide") BS8050-3V Piranha (1D) Barcode Scanner User Guide Disclaimer 2015 Fujian Newland Auto-ID Tech. Co., Ltd. All rights reserved. Please read through the manual carefully before using the product and operate
BS8050-3V Piranha (1D) Barcode Scanner User Guide Disclaimer 2015 Fujian Newland Auto-ID Tech. Co., Ltd. All rights reserved. Please read through the manual carefully before using the product and operate
FORGE Batch Application Generator
 FORGE Batch Application Generator For 8 Series Mobile Computers: 8000 / 8300 / 8400 / 8500 DOC Version 2.22 Copyright 2008~2010 CIPHERLAB CO., LTD. All rights reserved The software contains proprietary
Code Reader 2300/2600 Configuration Guide
 Code Reader 2300/2600 Configuration Guide 1 Table of Contents Modem Settings (for use with the Charging Station with an Embedded CodeXML Modem or the external CodeXML M3 Modem when paired with a CR2300/CR2600)
Xi2000-BT Series Configuration Guide
 U.S. Default Settings Sequence Reset Scanner Xi2000-BT Series Configuration Guide Auto-Sense Mode ON UPC-A Convert to EAN-13 OFF UPC-E Lead Zero ON Save Changes POS-X, Inc. 2130 Grant St. Bellingham, WA
RT206 User Guide. RT206 OEM 2d Scan Engine User Guide
 RT206 OEM 2d Scan Engine User Guide Table Of Contents Chapter 1 Getting Started... 1 About This Guide... 1 Connecting EVK to PC... 1 Barcode Programming... 2 Factory Defaults... 2 Custom Defaults... 3
PA700 Programming Manual
 PA700 Programming Manual V2.6.1 2015-02-03 PA700 UNITECH Contents 1. USI Communication... 2 1.1. Enable/disable Scan2Key... 3 1.2. Initialize Data Receiving Procedure... 3 1.3. Receive scanned data...
User s Manual WARNING. WWS800/850 Bluetooth Wireless Scanners
 WWS800/850 Bluetooth Wireless Scanners User s Manual WARNING This equipment has been tested and found to comply with the limits for a Class A digital device, pursuant to Part 15 of FCC Rules. These limits
MP720 Presentation Imager
 MP720 Presentation Imager User Manual Version: MP720_UM_EN_V1.1.3 Notice Ensure that the optional DC adapter works at +5V, especially for the RS-232 interface cable. 1. All software, including firmware,
Advanced Handheld High-Speed Laser Scanner
 GLLS 1 Advanced Handheld High-Speed Laser Scanner Revision History Changes to the original manual are listed below: Version Date Description of Version 1.0 2013/05/02 Initial release 1.1 2013/8/26 Made
SIMATIC Ident Handheld reading systems SIMATIC MV325 Configuration guide Compact User Manual
 SIMATIC Ident Handheld reading systems Compact User Manual Legal information Warning notice system This manual contains notices you have to observe in order to ensure your personal safety, as well as to
MIRROR VT/5250 Terminal Emulation
 MIRROR VT/5250 Terminal Emulation For 9 Series Mobile Computers: 9300 / 9600 DOC Version 1.22 Copyright 2007~2011 CIPHERLAB CO., LTD. All rights reserved The software contains proprietary information of
NT-1228BL. Quick Setup Guide V Connection Mode. Working via Bluetooth. Barcode Programming
 NT-1228BL V18.7.12 Quick Setup Guide This model can work both via USB cable or via bluetooth. Connection Mode Working via USB cable Get Started: Connect scanner with your device via USB cable. If you use
Configuration Manual PULSAR C CCD SCANNER. Table of Contents
 Table of Contents PULSAR C CCD SCANNER Configuration Manual Metrologic Instruments GmbH Dornier Strasse 2 82178 Puchheim Germany Tel +49 89 890190 Fax +49 89 89019200 www.europe.metrologic.com Metrologic
2 D C O N F I G U R A T I O N G U I D E B T S C A N N E R
 Area Imager Bar Code Scanner 2 D C O N F I G U R A T I O N G U I D E B T S C A N N E R Copyright @ 2018 This manual is copyrighted, with all right reserved. Under the copyright laws, this manual may not,
2D Wired Barcode Scanner Overview. Keyboard Language In order to let scanner upload the codes in a correct way, you have to set the keyboard language.
 2D Wired Barcode Scanner Overview Netum wired 2D Plug and Play barcode scanner integrates a high-performance processer with an effective decoding board, combining a fast decoding speed.the device can easily
GS500 2D Area-Imaging Scanner. User Manual
 GS500 2D Area-Imaging Scanner User Manual Table of Contents Table Of Contents... 1 Chapter 1 Getting Started... 6 About This Guide... 6 Barcode Scanning... 6 Barcode Programming... 6 Factory Defaults...
2D Scan Engine Confguration Guide. 2D Barcode Scanner Configration Guide
 2D Barcode Scanner Configration Guide 1 Table of Contents USB Settings USB Keyboard Mode...6 (A1) USB Downloader Mode...6 (A2) USB Virtual COM One Way Mode...6 (A3) USB Native Two Way Mode...6 (A4) USB
Operating Manual BCS-1 *
 Operating Manual BCS-1 * Barcode scanner Doc.Nr.:60000372 MANUAL BCS-1 NEX REV 0.0 EN 04.06.09 N.B. - 1 - List of Contents List of Contents...2 Introduction...3 BCS-1 * models available...4 Technical Data...5
RT209 OEM 2d Scan Engine User Guide
 RT209 OEM 2d Scan Engine User Guide Table Of Contents Chapter 1 Getting Started... 1 About This Guide... 1 Connecting EVK to PC... 1 Barcode Scanning... 1 Barcode Programming... 1 Custom Defaults... 3
This configuration including four steps. Please scan below codes one by one.
 Bluetooth Wireless Barcode Scanner Overview Netum bluetooth wireless model integrates a high-performance processer with an effective decoding board, combining a fast decoding speed. High precision and
marson MT8200S 2D Handheld Scanner User Manual V / 6 / 25 - I -
 marson MT8200S 2D Handheld Scanner User Manual V1.1 2018 / 6 / 25 - I - Table of Contents 1 Gettting Started...1 1.1 Introduction...1 1.2 Configuring MT8200S...1 1.2.1 Barcode Configurability...1 1.2.2
Manual de Programación
 Manual de Programación SM2410, SM2410B, SM2420 y SM2430 ESPECIFICACIONES SUJETAS A CAMBIO SIN PREVIO AVISO. Enter/Exit Programming Mode (This barcode is also found at page 8.) IMPORTANT NOTICE Every effort
User s Manual. Xi3000 Bluetooth Scanner WARNING
 Xi3000 Bluetooth Scanner WARNING This equipment has been tested and found to comply with the limits for a Class A digital device, pursuant to Part 15 of FCC Rules. These limits are designed to provide
Scan quantity demo application description. for OPL9728. Version LFD24390 SCAN QUANTITY DEMO OPL9728
 Scan quantity demo application description Version LFD24390 for OPL9728 CAUTION: This user s manual may be revised or withdrawn at any time without prior notice. Version User s manual for Graphical scanning
XB-8200 Hand Free Area Image Scanner Configuration Guide
 XB-8200 Hand Free Area Image Scanner Configuration Guide V1.3 Table of Contents Chapter 1 General Description... 1 Chapter 2 Introduction... 2 Chapter 3 User Preferences... 4 RETURN TO DEFAULT... 4 PARAMETER
Code Reader 1000/1400/8000 Configuration Guide
 Code Reader 1000/1400/8000 Configuration Guide Code Reader 1000 Code Reader 1400 Code Reader 8000 1 Table of Contents USB Settings USB Keyboard Mode...6 (A1) USB Downloader Mode...6 (A2) USB Virtual COM
FS02 user manual. HID mode for IOS 1. Turn on the barcode reader, and read below barcodes sequence, the blue LED will flash rapidly.
 FS02 user manual HID Mode for IOS HID mode for IOS 1. Turn on the barcode reader, and read below barcodes sequence, the blue LED will flash rapidly. 2. Enable the bluetooth of IOS to pair with the barcode
2D Wired Barcode Scanner Overview
 2D Wired Barcode Scanner Overview Netum wired 2D Plug and Play barcode scanner integrates a high performance processer with an effective decoding board, combining a fast decoding speed. IP67 waterproof
Data Converter. For 8 Series Mobile Computers. Version 3.02
 Data Converter For 8 Series Mobile Computers Version 3.02 Copyright 2010~2014 CIPHERLAB CO., LTD. All rights reserved The software contains proprietary information of CIPHERLAB CO., LTD.; it is provided
User s Manual WARNING. CIPHER 1160/1260 Bluetooth Wireless Scanner
 CIPHER 1160/1260 Bluetooth Wireless Scanner User s Manual WARNING This equipment has been tested and found to comply with the limits for a Class A digital device, pursuant to Part 15 of FCC Rules. These
Wireless Laser Barcode Scanner ils 6300BU. User s Manual
 Wireless Laser Barcode Scanner ils 6300BU User s Manual FCC Compliance This equipment has been tested and found to comply with the limits for a Class A digital device, pursuant to Part 15 of the FCC Rules.
QLabel-IV Operation Manual
 P/N. 920-0060611-02 Edition C 07.2009 QLabel-IV Operation Manual QLABEL-Ⅳ... 3 PART I: ABOUT QLABEL-Ⅳ...3 1: INTRODUCTION... 3 2: INSTALLATION... 3 PART II: STARTING ON QLABEL-IV...6 3: START QLABEL-Ⅳ...
NCR Realscan 7837 High-Performance Scanners. User s Guide Issue A
 NCR Realscan 7837 High-Performance Scanners User s Guide 497-0427357 Issue A Table of Contents Chapter 1 - Getting Started About This Manual... 1-1 Unpacking the Scanner... 1-2 RealScan 7837 High-Performance
Model NT-1203 With SPP Mode
 Model NT-1203 With SPP Mode Get Started: This is 1D and 2D bluetooth scanner. Follow below "bluetooth connection" instruction to pair with your device and then setup the keyboard language (if you US keyboard,
Wireless Pocket 2D Imager Scanner
 Wireless Pocket 2D Imager Scanner - MS920P - User's Manual Version 1.0 2014 unitech Electronics Co., Ltd. All rights reserved. unitech is a registered trademark of unitech Electronics Co., Ltd. Table
User s Manual 131 Tiny III Decoder
 User s Manual 131 Tiny III Decoder Document Number : 131-0114 Release Date : Mar 16, 1998 1998, SYNTECH INFORMATION Co., Ltd.. All rights reserved. CipherLab is a registered trademark of SYNTECH INFORMATION
Decoding dept & Min Barcode width. Operating Temperature. Humidity. Safety. Drop Test Fast Scan Water Proof. Decoding dept & Min Barcode width
 KP1101 ADVANCE PLUS 1D LASER Laser 82 x 67 x 168mm 168 gr RJ45 8Pin connector Bepper HID Keyboard Optional: RS232, USB Virtual COM 645-660 nm Laser Diode 200 Read /sec Skew ±65 - Pitch ±65 - Roll ±42 25%
Introduction Contact us User Interface Menubar Edit area Work Procedures Select barcode type Edit barcode properties Export barcode image Batch
 Introduction Contact us User Interface Menubar Edit area Work Procedures Select barcode type Edit barcode properties Export barcode image Batch generator Introduction Barcode Generator gives you the ability
MD60xx Image Barcode Scanner
 MD60xx Image Barcode Scanner User Manual Version: MD60xx_UM_EN_V1.1.2 Notice Ensure that the optional DC adapter works at +5V, especially for the RS-232 interface cable. 1. All software, including firmware,
Getting Familiar with Wi-Fi Scanner
 Getting Familiar with Wi-Fi Scanner Thank you for choosing Cino FuzzyScan Wi-Fi Cordless Scanner. Powered by the 802.11 WLAN technology, it is not only easily integrated into an existing enterprise wireless
APPENDIX E COMMAND BARCODES
 APPENDIX E COMMAND BARCODES Scan command barcode(s) to quickly configure the CHS 7X or 7XRx. By default, the CHS is in HID mode as a Keyboard device. IMPORTANT! Make sure the CHS is not connected to a
2D Barcode Reader User Guide V 1.2.1
 2D Barcode Reader User Guide V 1.2.1 Table of Contents 1 Getting Started... 3 1.1 About This Guide... 3 1.2 Barcode Scanning... 3 1.3 Factory Defaults... 3 1.4 Firmware Version Number... 3 2 Communication
BAR CODE. SYMBOLOGY PROGRAMMING for POCKET SCANNERS
 BAR CODE SYMBOLOGY PROGRAMMING for POCKET SCANNERS Programming Menu V4.1 Notice The manufacturer shall not be liable for technical or editorial errors or omissions contained herein; nor for incidental
2D/1D IMAGER MODEL - D760, S860
 COMMAND BARCODES 2D/1D IMAGER MODEL - D760, S860 This document pertains to the following D760, S860: Model D760 Construction Orange Model S860 Black D760 Safety Green D760 Utility Gray TABLE OF CONTENTS
AI-6820/AI-6820HD. 2D Scanner. User Guide.
 AI-6820/AI-6820HD 2D Scanner User Guide http://www.argox.com service@argox.com V1.10-09-01-2018 Regulatory Compliance FEDERAL COMMUNICATIONS COMMISSION INTERFERENCE STATEMENT This equipment has been tested
This confirguration including four steps,please scan below codes one by one.
 Wireless 2D Barcode Scanner Overview Netum wireless 2D model integrates a high-performance processer with an effective decoding board, combining a fast decoding speed. High precision and a high anti-interference
Table of Contents Sleep Settings How to Configure the Scanner. 7 Chapter 2 System Setup
 Table of Contents Chapter 1 System Information 1.1 Setup Scanner with PC 1.2 Setup Scanner with Mobile Device 1.3 Configure ios On-Screen Keyboard 1.4 Memory Mode 3 4 4 5 1.5 Sleep Settings 6 1.6 How to
MK D Imager Barcode Scanner Configuration Guide
 MK-5500 2D Imager Barcode Scanner Configuration Guide V1.4 Table of Contents 1 Getting Started... 3 1.1 About This Guide... 3 1.2 Barcode Scanning... 3 1.3 Factory Defaults... 3 2 Communication Interfaces...
FD-011WU. 2D Barcode Reader User Guide V1.6CC
 FD-011WU 2D Barcode Reader User Guide V1.6CC Table of Contents 1 Getting Started... 1 1.1 Factory Defaults... 1 2 Communication Interfaces...2 2.1 TTL-232 Interface... 2 2.2 Baud Rate... 3 2.3 Data Bit
MS336 2D Imager Scanner
 MS336 2D Imager Scanner Product Reference Guide Rev. C Preface About This Manual This manual explains how to install, operate and maintain the Unitech MS336 Imager Scanner. No part of this publication
1504 Barcode Scanner. Setup barcodes included. Version 1.00
 1504 Barcode Scanner Setup barcodes included. Version 1.00 Copyright 2011 CIPHERLAB CO., LTD. All rights reserved The software contains proprietary information of CIPHERLAB CO., LTD.; it is provided under
Configuration Guide. Code Reader C005435_02_CR1000_CR8000_ConfigurationGuide 1
 Code Reader 1000/8000 Configuration Guide Code Reader 1000 Code Reader 8000 C005435_02_CR1000_CR8000_ConfigurationGuide 1 Table of Contents USB Settings USB Keyboard Mode...6 (A1) USB Downloader Mode...6
User s Manual. MS140-3 or MS140I-3 Keyboard Wedge Slot Reader. PC Keyboard Wedge Setup Label
 User s Manual MS140-3 or MS140I-3 Keyboard Wedge Slot Reader PC Keyboard Wedge Setup Label 1 Overview There are two models of the MS140 decoded slot reader available: The MS140-3 keyboard wedge slot reader
User Manual. PULSAR C CCD Hand-Held Scanner WARNING
 WARNING PULSAR C CCD Hand-Held Scanner User Manual This equipment has been tested and found to comply with the limits for a Class A digital device, pursuant to Part 15 of FCC Rules. These limits are designed
Keyboard Language In order to let scanner upload the codes in a correct way, you have to set the keyboard language before you use it.
 2.4G Wireless Barcode Scanner Overview Netum 2.4G wireless model integrates a high-performance processer with an effective decoding board, combining a fast decoding speed. High precision and a high anti-interference
User s Guide. Linear Imager
 User s Guide 3200 Linear Imager Disclaimer Hand Held Products, Inc. ( Hand Held Products ) reserves the right to make changes in specifications and other information contained in this document without
MP168 Screen Barcode Image Platform
 MP168 Screen Barcode Image Platform User Manual Version: MP168_UM_EN_V1.1.1 Notice Ensure that the optional DC adapter works at + 5 VDC, especially for the RS-232 interface cable. 1. All software, including
Disclaimer. Please read through the manual carefully before using the product and operate it
 ONEBRAND,ONESOLUTI ON 2D Handhel dbar codescanner UserManual Disclaimer Please read through the manual carefully before using the product and operate it according to the manual. It is advised that you
Wireless Pocket 2D Imager Scanner
 Wireless Pocket 2D Imager Scanner - MS920 - User Manual Table of Contents 1. Package Contents...1 2. Scanner Detail...1 3. Getting Started...2 4. Specifications...5 5. Appendix - Bar Code Configuration
Printer Driver Manual Label Printer Rev. 5.00
 Manual Label Printer Rev. 5.00 http://www.bixolon.com Introduction This printer driver Manual provides information on installation, uninstallation, detailed specifications, and usage of the printer s Windows
MD65xx Image Barcode Scanner
 MD65xx Image Barcode Scanner User Manual Version: MD65xx_UM_EN_V1.1.1 Warning: Ensure that the optional DC adapter works at +5V, especially for the RS-232 interface cable. NOTICE: 1. All software, including
ScanManager for Scanner Configuration
 ScanManager for Scanner Configuration For 1 Series Barcode Scanners: 1000, 1090+, 1100, 1105, 1166, 1200 & 1266 Version 3.01 Copyright 2006~2011 CIPHERLAB CO., LTD. All rights reserved The software contains
2D Imaging Barcode Scanner. Programming. Advanced Handheld High Speed Laser Scanner
 2D Imaging Barcode Scanner Programming 1 Advanced Handheld High Speed Laser Scanner This Programming Guide is intended for: 2D Image Handheld Scanner: Z 3272 Plus Revision History Changes to the original
USB Server User Manual. USB Server Manual (DN-13010)
") USB Server Manual (DN-13010) Copyright Notice Copyright 2010. Al rights reserved. Disclaimer Incorporated shall not be liable for technical or editorial errors or omissions contained herein; nor for incidental
USB Server Manual (DN-13010) Copyright Notice Copyright 2010. Al rights reserved. Disclaimer Incorporated shall not be liable for technical or editorial errors or omissions contained herein; nor for incidental
2D Imaging Barcode Scanner. Programming. Advanced Handheld High-Speed Laser Scanner
 2D Imaging Barcode Scanner Programming 1 Advanced Handheld High-Speed Laser Scanner This Programming Guide is intended for: 2D Image Engine: Z-5212 Revision History Changes to the original manual are
2D Imaging Barcode Scanner. Programming. Advanced Handheld High Speed Laser Scanner
 2D Imaging Barcode Scanner Programming 1 Advanced Handheld High Speed Laser Scanner This Programming Guide is intended for: 2D Image Handheld Scanner: Z 3172 Plus 2D Image Hands Free Scanner: Z 8072,
DuraLabel.com USER GUIDE
 800.788.5572 DuraLabel.com USER GUIDE Copyright This manual is copyrighted with all rights reserved. No portion may be copied or reproduced by any means without the prior consent of Graphic Products, Inc.
Code Reader 1000/1400/8000 Configuration Guide
 Code Reader 1000/1400/8000 Configuration Guide Code Reader 1000 Code Reader 1400 Code Reader 8000 1 Table of Contents USB Settings USB Keyboard Mode...6 (A1) USB Downloader Mode...6 (A2) USB Virtual COM