VidyoRoom and VidyoPanorama 600
|
|
|
- Osborne Hines
- 5 years ago
- Views:
Transcription


1 VidyoRoom and VidyoPanorama 600 Quick User Guide Product Version 3.3 Document Version G April, Vidyo, Inc. all rights reserved. Vidyo s technology is covered by one or more issued or pending United States patents, as more fully detailed on the Patent Notice page of Vidyo's website as well as issued and pending international patents. The VIDYO logotype is a registered trademark of Vidyo, Inc. in the United States and certain other countries, and is a trademark of Vidyo, Inc. throughout the world. VIDYO and the Vidyo family of marks are trademarks of Vidyo, Inc. in the United States and throughout the world.
2 TABLE OF CONTENTS 1. About this Guide Using the Infrared Remote Control or the Radio Frequency Remote Control... 2 Understanding the Buttons on the Infrared Remote Control or the Radio Frequency Remote Control... 2 The Infrared Remote Control... 3 The Radio Frequency Remote Control... 5 Configuring System Settings... 6 Pre-Call... 7 Viewing the Pre-Call Menu... 7 Joining a Contact s Room or Calling a Contact Directly... 9 Calling a User on a Different VidyoPortal or an H.323/SIP Endpoint Using the VidyoRoom Calendar Understanding the Status Icons Projecting Content in Your System In-Call Viewing the In-Call Menu Becoming the Moderator In-Call Viewing Modes Pinning Participants to Specific Screens Sharing Content to a Conference Adjusting Your Content Source to Avoid Cropping Using the VidyoRemote 3 for ios App Downloading the VidyoRemote 3 for ios App Adding VidyoRooms Pairing VidyoRemote 3 for ios with Your VidyoRoom System Configuring System Settings Pre-Call Viewing the Pre-Call Menu Joining a Contact s Room or Calling a Contact Directly Calling a User on a Different VidyoPortal or an H.323/SIP Endpoint Using the VidyoRoom Calendar Understanding the Status Icons Projecting Content in Your System Managing Missed Call Notifications In-Call Viewing the In-Call Menu Becoming the Moderator In-Call Viewing Modes Pinning Participants to Specific Screens i
3 TABLE OF CONTENTS Sharing Content to a Conference Adjusting Your Content Source to Avoid Cropping Unpairing VidyoRemote 3 for ios from Your VidyoRoom System Using the VidyoRemote 3 for Android App Downloading the VidyoRemote 3 for Android App Adding VidyoRooms Pairing VidyoRemote 3 for Android with Your VidyoRoom System Configuring System Settings Pre-Call Viewing the Pre-Call Menu Joining a Contact s Room or Calling a Contact Directly Calling a User on a Different VidyoPortal or an H.323/SIP Endpoint Using the VidyoRoom Calendar Understanding the Status Icons Projecting Content in Your System Managing Missed Call Notifications In-Call Viewing the In-Call Menu Becoming the Moderator In-Call Viewing Modes Pinning Participants to Specific Screens Sharing Content to a Conference Adjusting Your Content Source to Avoid Cropping Unpairing VidyoRemote 3 for Android from Your VidyoRoom System Licensing Attribution ii
4 1. About this Guide VidyoRoom and VidyoPanorama 600 software allows you to use your VidyoRoom and VidyoPanorama 600 hardware to join Vidyo conference calls, make point-to-point calls, display appointments from a connected calendar account, invite others to appointments, and control your Vidyo conferencing experience all from a single application with an intuitive user interface. When the VidyoRoom and VidyoPanorama 600 software starts up, you should be automatically logged in to the system based on information configured by your system administrator. You can control the VidyoRoom using the handheld infrared remote control or the handheld radio frequency remote control that was shipped with your VidyoRoom system. Alternatively, you can control your system using VidyoRemote 3 for ios. VidyoRemote 3 is a native ipad application for controlling VidyoRoom version and later systems. It is available on the Apple App Store. For information about how to perform system tasks using the infrared remote control or the radio frequency remote control, see 2. Using the Infrared Remote Control or the Radio Frequency Remote Control. For information about how to perform system tasks using the VidyoRemote 3 for ios app, see 3. Using the VidyoRemote 3 for ios App. For information about how to perform system tasks using the VidyoRemote 3 for Android app, see 4. Using the VidyoRemote 3 for Android App. Note Do not plug both the infrared receiver and the radio frequency transceiver into your system. Both VidyoRoom handheld remote controls cannot be used on your system at the same time. However, you can use VidyoRemote 3 for ios in conjunction with either of the handheld remote controls. If you have a Logitech CC3000e, many of the handheld remote functions also work with controls on the CC3000e base console and remote control. For more information, refer to Using the Logitech CC3000e with VidyoRoom Systems Technical Note. 1
5 2. Using the Infrared Remote Control or the Radio Frequency Remote Control This chapter describes how to perform pre-call and in-call tasks with your VidyoRoom system when you are using either the infrared remote control or the radio frequency remote control. Understanding the Buttons on the Infrared Remote Control or the Radio Frequency Remote Control This section describes the buttons on the hand-held infrared remote control and the buttons on the hand-held radio frequency remote control. It also includes information about the Lucky Clover remote control keypad, which is an alphanumeric character input method for your VidyoRoom infrared remote control. 2

6 The Infrared Remote Control Pre-Call Functions CONNECT: Not applicable. DISCONNECT: Not applicable. In-Call Functions CONNNECT: Not applicable. DISCONNECT: Ends the meeting. ARROWS: Use the arrow keys to navigate and highlight options for selection. After hiding the Pre-Call menu, supported cameras may be controlled as follows: left and right buttons pan; up and down buttons tilt. OK: Press to select a highlighted option. ARROWS: Use the arrow keys to navigate and highlight options for selection. Supported cameras may be controlled after using the Self-View button as follows: left and right buttons pan; up and down buttons tilt. OK: Press to select a highlighted option. VOLUME: Adjusts the speaker sound level. ZOOM: After hiding the Pre-Call menu, zooms in and out for supported cameras. VOLUME: Adjusts the speaker sound level. ZOOM: Zooms in and out for supported cameras. SELF-VIEW: Turns your own video on and off. When on, allows you to control supported cameras using the Zoom and Arrow keys. MUTE: Not applicable. SELF-VIEW: Turns your own video on and off. When on, allows you to control supported cameras using the Zoom and Arrow keys. MUTE: Mutes the audio source. ALPHANUMERIC KEYPAD: Use the keys to enter field values on menus. ALPHANUMERIC KEYPAD: Use the keys to enter field values on menus. BACK: Takes you to the previous field or menu. MANAGE: Turns the Pre-Call menu off and on. Displays connected content Shares in Projection Mode. HOME: Shows the Pre-Call menu. DELETE: Acts as a backspace when typing in a field. PRIVACY: Not applicable. SETTINGS: Turns the Settings menu on. Press Back to return to the Pre-Call menu. SHARE: Not applicable. TOGGLE: Not applicable. BACK: Takes you to the previous field or menu. MANAGE: Turns the In-Call menu on and off. HOME: Press to reset supported cameras to the initial (home) position. DELETE: Acts as a backspace when typing in a field. PRIVACY: Turns your video feed off and on. SETTINGS: Press once to show the In-Call menu. Press twice to show the Pre-Call Settings menu. SHARE: Turns connected Share sources on and off. TOGGLE: Cycles through your shared sources, including none. A: Swaps your displays when running dual screens. B: Not applicable. C: Turns Caps Lock on and off. D: Not applicable. A: Swaps your displays when running dual screens. B: Enables DTMF dialing. C: Turns Caps Lock on and off. D: Depending on your display size, turns the remote participant layout from stretch to letterbox. 3
7 The Lucky Clover Remote Control Keypad The Lucky Clover remote control keypad is an alphanumeric character input method for your VidyoRoom handheld infrared remote control. Enabled by default, the feature can be disabled, if desired. For more information, see Configuring System Settings. To disable the Lucky Clover remote control keypad: 1. Press the Settings button on the remote control. 2. The Settings menu displays with the Accoun tab selected by default. 3. Use the arrow buttons to navigate to the Advanced tab. 4. Press the down arrow key to the Lucky Clover Keypad field, then the right arrow key to turn it OFF. To use the Lucky Clover remote control keypad: 1. When in applicable text fields, press any button on the alphanumeric keypad. The corresponding number is shown in the text field. Alphanumeric options for the selected number are presented in a surrounding, clockwise clover format starting from the top. 2. Use the arrow keys to select the options presented from top, right, bottom, or left (where applicable). Note Characters are automatically selected when either an arrow key is pressed; an alphanumeric character is pressed again, or is pressed. Tip: When available, remote control hints display on the lower part of the screen. 4


8 The Radio Frequency Remote Control Pre-Call Functions TV: Turns supported televisions on and off. SEARCH: Puts the cursor in the Search field on the Pre- Call menu. SETTINGS: Turns the Settings menu on. Press Back to return to the Pre-Call menu. SHARE: Not applicable. TOGGLE: Not applicable. In-Call Functions TV: Turns supported televisions on and off. SEARCH: Not applicable. SETTINGS: Press once to show the In-Call menu. Press twice to shown the Pre-Call Settings menu. SHARE: Turns connected Share sources on and off. TOGGLE: Cycles through your shared sources, including none. MUTE: Mutes the sound level when showing a video using Projection mode. LAYOUT: Not applicable. PRE-CALL MENU: Turns the Pre-Call menu off and on. Displays connected content Shares in Projection Mode. SELF-VIEW: Turns your own video on and off. When on, allows you to control supported cameras using the Zoom and Arrow keys. CONNECT: Not applicable. BACK: Takes you to the previous field or menu. DISCONNECT: Not applicable. MUTE: Mutes the audio source. LAYOUT: Turns Preferred mode (showing the speaker in the main tile) on and off (known as Non-Preferred mode). IN-CALL MENU: Turns the In-Call menu on and off. SELF-VIEW: Turns your own video on and off. When on, enables you to control supported cameras using the Zoom and Arrow keys. CONNECT: Not applicable. BACK: Takes you to the previous field or menu. DISCONNECT: Ends the meeting. ARROWS: Use the arrow keys to navigate and highlight options for selection. After hiding the Pre-Call menu, supported cameras may be controlled as follows: left and right buttons pan; up and down buttons tilt. OK: Press to select a highlighted option. ARROWS: Use the arrow keys to navigate and highlight options for selection. Supported cameras may be controlled after using the Self-View button as follows: left and right buttons pan; up and down buttons tilt. OK: Press to select a highlighted option. VOLUME: Adjusts the sound level. MUTE MICROPHONE: Not applicable. PRIVACY: Not applicable. ZOOM: Zooms in and out for supported cameras after hiding menus or when using self-view. VOLUME: Adjusts the sound level. MUTE MICROPHONE: Turns your microphone on and off. PRIVACY: Turns your video feed off and on. ZOOM: Zooms in and out for supported cameras. ALPHANUMERIC KEYPAD: Use the keys to enter field values on menus. ALPHANUMERIC KEYPAD: Use the keys to enter field values on menus. A: Swaps your displays when running dual screens. B: Not applicable. C: Turns Caps Lock on and off. D: Not applicable. DELETE: Acts as a backspace when typing in a field. QWERTY Keyboard CAPS and Function Keys A: Swaps your displays when running dual screens. B: Enables DTMF dialing. C: Turns Caps Lock on and off. D: Depending on your display size, turns the remote participant layout from stretch to letterbox. DELETE: Acts as a backspace when typing in a field. CAPS: Turns Caps Lock on and off. FN: Turns the Function Keys on and off. Note: Press the CAPS or FN button once to enable the desired mode. Press the same button again to disable the mode. 5
. To configure the system settings: 1.")


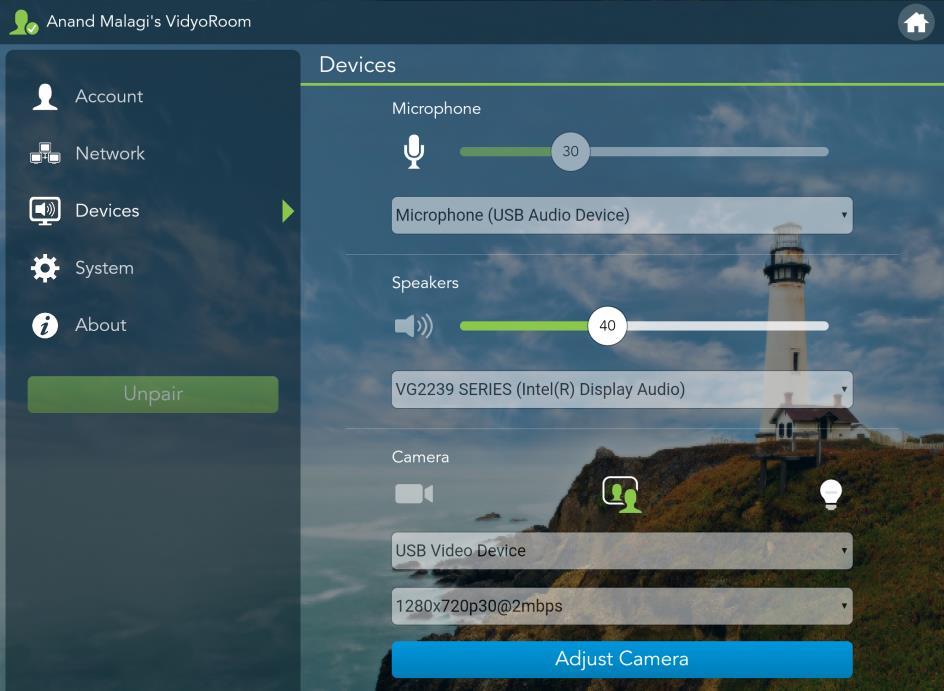
9 Configuring System Settings The Settings menu enables the VidyoRoom or VidyoPanorama 600 system administrator to configure the system and can be accessed anytime (pre-call or in-call). To configure the system settings: 1. Press Settings on your remote control (press twice if you are in a call). The Settings menu displays. 2. Select any of the following icons on the Settings menu to access the settings for that screen: Icon Description Enables you to enter values for the VidyoPortal, username, and password. Enables you to turn your proxy ON or OFF and specify UDP Range values as desired. Your VidyoRoom or VidyoPanorama 600 is set to Use DHCP by default. This enables it to automatically obtain its IP address. If you want to change the disabled network settings, turn DHCP OFF and provide values for IP Address, Subnet, Gateway, and DNS. Enables you to select a microphone, adjust the microphone level, select from available speakers, adjust the speaker volume, turn join and exit sounds or navigation sounds ON or OFF, and turn echo cancellation ON or OFF. 6


10 Icon Description Enables you to select a camera source, select the video quality, select a shared content source, turn the backlight ON or OFF, and reset the camera position. Enables you to select whether to automatically answer incoming calls, automatically share connected devices, allow remote users to control your camera, and turn the Lucky Clover keypad ON or OFF. Note If your VidyoRoom does not detect an IR remote, it automatically turns OFF the Lucky Clover keypad. You can also set your Room s PIN, configure your system with an access code to PIN-protect your VidyoRoom or VidyoPanorama 600 settings, upload background images for display on the Settings menu, and set the language and time zone. You can also select Reboot System on this screen to reboot your machine. Displays the VidyoRoom or VidyoPanorama 600 version being used, the Vidyo company description, and the copyright statement. Pre-Call Viewing the Pre-Call Menu

11 1. The name and extension of your VidyoRoom or VidyoPanorama 600 is based on the information stored in the VidyoPortal to which you are connected. The current VidyoRoom or VidyoPanorama 600 system time and date also displays. 2. The search box where you can enter a name to search for a contact or room. As soon as you begin typing in this box, search results display. 3. The three most recent appointments from a calendar (if your system administrator has synchronized your VidyoRoom or VidyoPanorama 600 system with a Microsoft Exchange calendar, a Google Calendar, or another supported calendar). For more information, see Using the VidyoRoom Calendar. 4. The list of your contacts. 5. The number of pages of contacts. You can navigate through additional pages using your remote control arrow keys. 6. Hints about how to use your handheld remote control. 8
12 Joining a Contact s Room or Calling a Contact Directly To join a contact s room or call a contact directly: 1. Enter a name to search. 2. Use the arrow keys on your remote control to move down from the search box and highlight the desired contact from the search results. 3. Select OK. 4. Use the arrow keys on your remote control to navigate to the following options: Select Call to make a direct call. Select Add to My Contacts to add the selected contact to your list. Select a room to join that contact s room. 9

13 Calling a User on a Different VidyoPortal or an H.323/SIP Endpoint To call a user on a different VidyoPortal or an H.323/SIP endpoint: 1. Enter the address of the contact that is on a different VidyoPortal or on an H.323/SIP endpoint. 2. Use the arrow keys on your remote control to move down from the search box and highlight your contact. 3. Select Call. Using the VidyoRoom Calendar The calendar integration feature enables the VidyoRoom to display upcoming scheduled meetings from a Google Calendar, a Microsoft Exchange calendar, or another supported calendar specified by your system administrator. This feature enables the system to display meetings that are taking place up to three hours in the future and up to one hour in the past, as well as display or hide meeting details. Note If meeting participants use calendar software other than the one configured for your VidyoRoom by your system administrator, some tags and notifications may not display correctly when viewed in different mail and calendar clients. 10
. 2. The name of the meeting organizer (unless marked as Private ). 3.")

14 Viewing Meeting Details The On Screen UI displays meetings as tiles below the search box on the Pre-Call screen The following information is displayed about each meeting: 1. The subject of the meeting (unless marked as Private ). 2. The name of the meeting organizer (unless marked as Private ). 3. Whether the meeting is Vidyo-enabled: Vidyo-enabled meetings display as green tiles; they remain on the screen as gray tiles for an hour after the scheduled start time. Non-Vidyo-enabled meetings display as blue tiles; they disappear from the screen right after the scheduled start time. 4. The meeting status indicator: Icon Description The time of the upcoming scheduled meeting. Note Only appointments scheduled up to three hours in the future display on the screen. 11
15 Icon Description The number of minutes that remain before the scheduled meeting begins. Note Starting from five minutes before the meeting, the indicator begins counting down each minute until the meeting begins. The appointment is occurring now. The meeting has taken place in the past. Note Only Vidyo-enabled meetings remain on the screen for an hour after the scheduled start time and display as a gray tile. Non-Vidyo-enabled meetings disappear from the screen right after the scheduled start time. If you are in a meeting, this icon shows how many minutes remain before the next scheduled meeting begins. Note Starting from five minutes before the meeting, the indicator begins counting down each minute until the next meeting begins. If you are in a meeting, this icon shows that the next scheduled meeting has begun. To view appointment details: 1. Use the arrow keys on your remote control to move down from the search box and highlight the desired meeting tile. 12

16 2. Select Details. The meeting details dialog box displays showing the following details: The name of the meeting organizer. The meeting start time. The meeting end time. The meeting attendees. Required attendee names display with a regular font, while optional attendees are italicized. Joining Vidyo-Enabled Meetings Five minutes before the scheduled Vidyo-enabled meeting begins, a dialog box displays reminding you of the upcoming meeting. You can join the meeting directly from this dialog box, or alternatively, you can manually join a meeting. 13

17 To join a Vidyo-enabled meeting: If a dialog box displays reminding you of an upcoming meeting, select Yes if you want to join the meeting or select No if you do not want to join the meeting. The dialog box remains on the screen indicating Starts in X minutes or Started X minutes ago for one hour after the ending time of your Vidyo-enabled meeting or until acknowledged. If you want to manually join an upcoming meeting, do the following: 1. Use the arrow keys on your remote control to move down from the search box and highlight the desired meeting tile. 2. Select Join. Understanding the Status Icons The following tables provide status icons and explanations as they display in your system. 14
18 Contact Status Icon Description The contact is online and available to receive incoming calls. The contact is online but is currently in a call. You cannot make a direct call to this contact; however, you can join the contact s room. The contact is offline (not logged into the VidyoPortal). You cannot make a direct call to this contact; however, you can join the contact s room. The contact is connected to another VidyoPortal or is an H.323/SIP endpoint. Room Status Icon Description The room is available and empty, so you can enter the room. The room is available and PIN-protected. If you attempt to join the room, you will be asked to enter a PIN. The room is occupied but available to enter. The room is locked, so you cannot enter it. The room is full, so you cannot enter it. Projecting Content in Your System To project content on your local system when you are not in a call: 1. Connect a compatible content-sharing device to your laptop and your VidyoRoom system. The system does the following: a. If you are using more than a single display, your Share automatically displays on your second display. b. If you are using a single display, press MANAGE on your handheld infrared remote control or press PRE-CALL MENU on your radio frequency remote control to project your Share on your single display. 15

19 In-Call VidyoRoom and VidyoPanorama 600 Quick User Guide We refer to this as Projection Mode as the content is only displayed on your local VidyoRoom system. For information about sharing to the entire conference while in-call, see Sharing Content to a Conference. Viewing the In-Call Menu To view the In-Call menu: 1. Press MANAGE on your handheld infrared remote control or press PRE-CALL MENU on your radio frequency remote control. 16


20 2. Select any of the following: Icon Description Signal the meeting moderator that you have raised your hand when participating in conferences that are using the Presenter Mode feature. For more information, refer to the VidyoDesktop Quick User Guide. Toggle your self-view preference. Show or hide the video feed from your camera. Mute, unmute, and control your microphone volume. Control your speakerphone volume. Mute and unmute your speakerphone volume. Pan, tilt, and zoom your camera. Lock and unlock your meeting room. Note This function only displays when you re the moderator of the room. For more information, see Becoming the Moderator. You can view conference participants, add them to your My Contacts list, pin them to specific system screens, view a participant s Share, and pan, tilt, and zoom their cameras. Moderators can also mute, unmute, hide video, show video, and remove a selected participant or all participants from the conference. For more information, see Becoming the Moderator. Enter a name in this text box to search for a contact. As soon as you begin typing, search results display. Use the arrow keys on your remote control to move down from the search box and highlight a desired contact from the search results. Note This option only displays when you re the moderator of the room. 17
21 Icon Description Use the arrow keys on your remote control to move down and highlight a desired Share available for viewing in the conference. Note The Start Sharing My Content button only displays when using compatible content-sharing devices with your VidyoRoom system. The shared content source should be selected automatically, but you can manually select it from the Configuring System Settings menu as described on page 6. For information about sharing, see Sharing Content to a Conference. Use the arrow keys on your remote control to move down and highlight a desired Camera on the lower-left of the screen, and then select Pan, Tilt, and Zoom preferences. Use the arrow keys on your remote control to move down and enter the Moderator PIN and become an additional moderator of the conference. Becoming a moderator allows you to use call control functions including recording capabilities. For more information, see Becoming the Moderator. Select your desired Recording Profile for recording VidyoRoom or VidyoPanorama 600 conferences. If no Recording Profiles are configured, contact your system administrator. The Vidyo conference is being recorded. The recording is paused. Pausing while recording results in a single recording file stored in the.flv format on your VidyoPortal. The recording is stopped. Stopping while recording results in separate recorded files stored in the.flv format on your VidyoPortal. Note This option is only enabled if your organization has VidyoReplay and when you re the moderator of the room. For more information, contact your Vidyo sales representative. Becoming the Moderator Becoming a moderator allows you to use call control functions, such as muting and unmuting the conference participants and recording the conference. If you want to become the conference moderator, you must first enable a Moderator PIN for the conference room. To do so, you must: Ask your VidyoPortal Administrator to set up the Moderator PIN on a specific conference room via the Admin portal. 18


22 Set the Moderator PIN via VidyoDesktop or via the VidyoPortal User portal. For more information, refer to the VidyoDesktop Quick User Guide or the VidyoPortal Administrator Guide. To become the moderator: 1. Press the MANAGE button on your handheld remote control. 2. Select Moderate. 3. Enter the Moderator PIN. You then become the conference moderator and the conference moderation functions, such as Mute, Unmute, Hide Video, Show Video, and Remove, display on the Participants screen while you are in the call. For more information refer to the Controlling a Meeting Room section in the VidyoConferencing Administrator Guide. 19
23 In-Call Viewing Modes When in a conference, participants can easily modify the layout for a variety of viewing experiences. Some of the more popular ones include the following: Pinning participants to specific viewing screens. For more information, see Pinning Participants to Specific Screens. The following viewing methods are also available: Toggle the conference participants from Non-Preferred mode to Preferred mode by pressing # on your remote control. Toggle the Share from Preferred mode to Full-Screen mode by pressing * on your remote control. Note This only applies when viewing content Shares on a single display (hybrid screen) configuration. Otherwise, the Share is shown full-screen on the second (content) display. Pinning Participants to Specific Screens To pin participants to specific screens: 1. Press the MANAGE button on your handheld remote control. The In-Call menu displays. 2. Use the arrow keys on your remote control to move right and select the Participants tab. 3. Use the arrow keys on your remote control to move down and highlight the conference participant you wish to pin to a specific screen. 4. Select OK. The conference participant is then shown along with the list of available screens. The number of available screens depends on the number of screens you have connected to your VidyoRoom or VidyoPanorama 600 system. 20

24 5. Use the arrow keys on your remote control to move down and highlight the specific screen to which you wish to pin the conference participant. 6. Select OK. The corresponding screen number now displays on the icon shown to the left of the conference participant s name, and the screen checkbox is selected. The participant is now pinned to the selected screen and remains there regardless of loudest speaker settings. To move a participant to a different screen, repeat steps 3 through 6 but select a different screen. To unpin the participant and revert back to automatic layout, repeat steps 3 through 6, but select the screen to which the participant is pinned and remove the check mark from that screen. 21
25 Sharing Content to a Conference To share content to a conference while in a call: VidyoRoom and VidyoPanorama 600 Quick User Guide 1. Connect a compatible content-sharing device to your laptop and your VidyoRoom system. While your content now displays on the video screen of your VidyoRoom system, it is not shared to the participants in your conference. This is called Projection Mode. For more information, see Projecting Content in Your System. The Content Share Encode Status icon displays in gray on the upper-right of the screen. 2. Select from your available content sources in the Content Source settings under the Settings > Devices tab. For more information, see Configuring System Settings. 3. Press the Share button. For more information, see The Infrared Remote Control, The Radio Frequency Remote Control, Viewing the In-Call Menu, and Configuring System Settings. Adjusting Your Content Source to Avoid Cropping Some VidyoRoom systems may crop content you share from your computer screen. Other computers default to a mirrored or duplicated multiple display output setting when connected to a VidyoRoom system as a shared device. This section describes how to adjust your computer as needed. Note The following information is not applicable when using an Epiphan device. Adjusting a Computer that Crops Content To adjust a computer that crops content: On a PC: 1. Select Control Panel > Display > Screen Resolution. 2. Select 720p in the Resolution drop-down. On a Mac: 1. Select Display > Preferences. 2. Select the Scaled option. 3. Select 720p. On all other platforms: 1. Select Display > Advanced Settings. 2. Select the Maintain Display Scaling option. 22
26 Adjusting a Computer that Defaults to a Mirrored Display Output Setting To adjust a computer that defaults to a mirrored or duplicated multiple display output setting: On all platforms: 1. Select Extend display from the Multiple Display field. 2. Select 720p for the resolution of your second display. 23
27 3. Using the VidyoRemote 3 for ios App This chapter describes how to perform pre-call and in-call tasks with your VidyoRoom or VidyoPanorama 600 system when you are using the VidyoRemote 3 for ios app. Downloading the VidyoRemote 3 for ios App Before downloading the VidyoRemote 3 for ios app, ensure that the following requirements have been met: You must have an Apple ipad running ios 7.1 or higher. The VidyoRoom system must be reachable by the VidyoRemote 3 over the Wi-Fi network. TCP ports 8090 and 443 http must be opened (bi-directional) to allow communication between the VidyoRemote 3 and the VidyoRoom. TCP port 80 must also be opened for VidyoRoom SE; however, it is not required for other VidyoRoom models. For more information, contact your system administrator. To download the VidyoRemote 3 for ios app: 1. Download and install VidyoRemote 3 for ios from the App Store. 2. Open VidyoRemote 3 for ios on your device. Adding VidyoRooms To add VidyoRooms: 1. Click Add Room System Connection. 24
28 2. Click the VidyoRoom SE or VidyoRoom button depending on the type of VidyRoom system that you are adding. Select the VidyoRoom SE button if you are adding a software edition room system that you want to deploy using your own hardware. Select the VidyoRoom button if you are adding a VidyoRoom or VidyoPanaroma system. 3. Enter the IP Address for the VidyoRoom system. 4. Enter a name for the VidyRoom system. The Add button becomes active. 5. Click the Add button. The room is added to the list of rooms on the main screen. 25
29 To add more VidyoRooms, click on the button on the main screen. To edit or delete a room, swipe your finger from right to left over the VidyoRoom's name that you wish to edit or delete. Once you pair successfully and start navigating to in-call/pre-call screens, tap the screen three times to return to this screen to add, delete, or modify any rooms when necessary. Pairing VidyoRemote 3 for ios with Your VidyoRoom System After logging in to a VidyoRoom system, you are immediately prompted for a pair code if one has been set in the Admin UI. The pair code enables you to connect your device with your VidyoRoom system. If you need to obtain the pair code, contact your system administrator. For more information, see the Configuring the Remote Control Interface section in the VidyoRoom and VidyoPanorama600 Administrator Guide. 26
30 To pair VidyoRemote 3 for ios with your VidyoRoom system: VidyoRoom and VidyoPanorama 600 Quick User Guide 1. Click the name of the room from the Select a room to connect field. 2. Enter the Pair Code. 3. Tap Submit. The system pairs your device. 4. If another handheld remote control or VidyoRemote device is used to operate your system, the following message displays: a. Click Resume Control. b. Re-enter the Pair Code. c. Tap Submit. 27
31 For information about unpairing VidyoRemote 3 for ios, see Unpairing VidyoRemote 3 for ios from Your VidyoRoom System. Configuring System Settings The Settings menu enables the VidyoRoom or VidyoPanorama 600 system administrator to configure the system and can be accessed anytime (pre-call or in-call). To configure the system settings: 1. Tap on the upper-right corner of any screen. The Access Code page displays. 2. Enter the access code in the text field. 3. Tap Yes. Once the access code has been set, then any of the settings here can be changed at any time. 4. Tap any of the following items on the left menu to access the settings for that screen. 28

32 If the Setting menus are protected with an access code you will be prompted by the app to enter the access code when you try to modify a protected settings, enter your access code and tap. Icon Description Enter values for the VidyoPortal, username, and password and click Log In to connect to your VidyoPortal. Click Set Your Room PIN to PIN-protect your room. 29
33 Icon Description Network settings made by your system administrator display for viewing only (read-only) on this screen and include your MAC address, whether or not VidyoProxy is enabled, and specific UDP range values. IPv4 and IPv6 (if configured) settings also display showing the IP address, subnet, gateway, DNS, and whether or not your system is set to use DHCP and automatically obtain its IP address. 30

34 Icon Description Select Microphone, Speaker, Camera, and Content Source settings: For the Microphone settings, you can adjust the microphone level, select from available microphones, and enable or disable echo cancellation. For the Speakers settings, you can adjust the speaker volume and select from available speakers. For the Camera settings, you can enable or disable the video feed, turn self-view on or off, and turn the backlight setting on or off. You can also select your camera input, the resolution, pan, tilt or zoom adjust your camera, and select if participants are allowed to pan, tilt, or zoom adjust your camera. For the Content Source settings, you can select from available content sources, select whether to automatically share content to conferences when you join then, and/or preview your share locally to review your automatic share before sending it to conferences. 31
35 Icon Description Select the language and time zone of the VidyoRoom, select whether to automatically answer incoming calls, enable the system to play tones when participants join or exit conferences, and enable an access code. If you enable an access code, users will have to enter the code in order to make changes to various screens or fields, such as the Account and Network screens. You can also tap Reboot VidyoRoom on this screen to reboot your machine. 32
36 Icon Description View the VidyoRoom or VidyoPanorama 600 model, image, version being used, the Vidyo company description, INOGENI, and the copyright statement. 33

37 Pre-Call Viewing the Pre-Call Menu The status and name of your VidyoRoom. For more information about status, see Understanding the Status Icons. 2. The search box where you can enter a name to search for a contact or room. As soon as you begin typing, search results display in the Directory. 3. The list of your contacts and their status. For more information about status, see Understanding the Status Icons. 4. Icon that toggles self-view. 5. The VidyoRoom or VidyoPanorama 600 system date and time. 6. The System Settings button. For more information, see Configuring System Settings. 7. Icon that toggles local share preview (Projection). 8. A list of upcoming appointments from your calendar (if your system administrator has synchronized your VidyoRoom or VidyoPanorama 600 system with a Microsoft Exchange calendar, a Google Calendar, or another supported calendar). 34
38 For more information, see Using the VidyoRoom Calendar. Joining a Contact s Room or Calling a Contact Directly To join a contact s room or call a contact directly: 1. Tap the name of the desired contact in My Contacts or the Directory. 2. Tap any of the following options: Tap Call to make a direct call. Tap to add the selected contact to your list. Tap or (if the room is PIN-protected) to join the contact s room. 35
39 If the room is PIN-protected, do the following: VidyoRoom and VidyoPanorama 600 Quick User Guide a. Enter your PIN number. b. Tap. Calling a User on a Different VidyoPortal or an H.323/SIP Endpoint To call a user on a different VidyoPortal or an H.323/SIP endpoint: 1. Enter the address of the contact that is on a different VidyoPortal or on an H.323/SIP endpoint. 2. Tap the contact that displays in the External Contact list. 3. Tap Connect. 36

40 Using the VidyoRoom Calendar VidyoRoom and VidyoPanorama 600 Quick User Guide The calendar integration feature enables the VidyoRoom to display upcoming scheduled meetings from a Google Calendar, a Microsoft Exchange calendar, or another supported calendar specified by your system administrator. This feature enables the system to display meetings that are taking place up to three hours in the future and up to one hour in the past, as well as display or hide meeting details. Viewing Meeting Details Meetings are displayed as tiles on the right side of the Pre-Call screen The following information is displayed about each meeting: 1. The time the meeting is scheduled to begin. Note Only appointments scheduled up to three hours in the future display on the screen. 2. The subject of the meeting. 3. The name of the meeting organizer. 37
41 4. The following meeting status details display in the meeting status region five minutes before, during, and one hour after your meeting: If it s five minutes before your meeting, a timer displays and counts down your meeting time. Note The system also asks you if you want to join or ignore the meeting both five minutes prior and during your meeting. For more information, see Joining Vidyo-Enabled Meetings. If your meeting is taking place, a green progress bar displays. If your meeting is complete, a red progress bar displays for one hour after the ending time of your meeting, and then the meeting tile disappears from your calendar. 5. Whether the meeting is Vidyo-enabled: Vidyo-enabled meetings display with green hexagonal icons on the right of the tile. When the meeting ends, the red progress par displays and the meeting remains on the screen for one hour after the ending time of your meeting, and then the meeting tile disappears from your calendar. For more information, see Joining Vidyo-Enabled Meetings. Non-Vidyo-enabled meetings display with gray calendar icons on the right of the tile; they disappear from your calendar right after the scheduled start time. 6. Tap to expand your meeting details and tap to collapse them. 38
42 The details include the following: The meeting start time. The meeting end time. The required meeting attendees. The optional meeting attendees. Joining Vidyo-Enabled Meetings To join a Vidyo-enabled meeting: If you want to manually join an upcoming meeting, tap on the right of the meeting tile. If a dialog box displays reminding you of an upcoming meeting, tap Join if you want to join the meeting or tap Ignore if you do not want to join the meeting. Note This dialog box displays if your system administrator has synced up a Google Calendar, a Microsoft Exchange calendar, or another supported calendar with your VidyoRoom system. For more information, see Using the VidyoRoom Calendar. The dialog box remains on the screen indicating Starts in XX:XX or Active for XX:XX for one hour after the ending time of your Vidyo-enabled meeting or until acknowledged. 39
43 Understanding the Status Icons VidyoRoom and VidyoPanorama 600 Quick User Guide The following tables provide status icons and explanations as they display in VidyoRemote 3 for ios. Contact Status Icon Description The contact is online and available to receive incoming calls. The contact is online but is currently in a call. You cannot make a direct call to this contact; however, you can join the contact s room. The contact is offline (not logged in to the VidyoPortal). You cannot make a direct call to this contact; however, you can join the contact s room. The contact is connected to another VidyoPortal or is an H.323/SIP endpoint. Room Status Icon Description The room is available and empty, so you can enter the room. The room is available and PIN-protected. If you attempt to join the room, you will be asked to enter a PIN. The room is occupied but available to enter. The room is locked, so you cannot enter it. The room is full, so you cannot enter it. 40
44 Projecting Content in Your System To project content on your local system when you are not in a call: 1. Connect a compatible content-sharing device to your laptop/pc or your VidyoRoom system. The content will be displayed on the screen of your VidyoRoom system if the Preview Local Content checkbox is selected in the Settings tab of the Admin User Interface. This is called Projection Mode as the content is locally displayed on your VidyoRoom system. In addition, this will also depend upon the selected settings in the VidyoRemote 3 application. Note If a remote user on the call is sharing content and then stops, Projection Mode becomes disabled until content is shared again. For information about sharing to the entire conference while in-call, see Sharing Content to a Conference. Managing Missed Call Notifications If an incoming call is not answered, a list of current and previous missed calls displays. Click OK and the list will disappear. 41
45 In-Call Viewing the In-Call Menu The name of your VidyoRoom. 2. The search box where you can filter through all active participants on the call. As soon as you begin typing, search results display in the Directory. 3. The list of participants currently in the call. 4. The System Settings button. For more information, see Configuring System Settings. 5. Drop-down that displays available profiles from the VidyoRecorder so that the call can be recorded. This drop-down is available only if you join your own room or if you are the room moderator. Once you are connected to a conference, the In Call Menu displays. For more information, see Joining a Contact s Room or Calling a Contact Directly. 42
46 Icon Description Click to signal the meeting moderator that you have raised your hand when participating in conferences that are using the Presenter Mode feature. For more information, refer to the VidyoDesktop Quick User Guide. Click to end the conference. Click to mute, unmute, and control your microphone volume. Click to mute and unmute your speakerphone volume. Click to show or hide the video feed from your camera. Control your speakerphone volume. Click to toggle sharing to the conference. Projection Mode is enabled by default when sharing local content. Note This icon is transparent when no share device is connected to your system, opaque when one is connected and not yet shared, and green when the share device is sharing to a conference. Configure your shares in the Content Source settings under the Settings > Devices tab. For more information, see Configuring System Settings. Click to toggle your self-view preference. Click to change your primary and secondary screens. Click to enter the appropriate DTMF call control option. Click to select how to view the participants video windows during the conference. Click to pan, tilt, and zoom your camera. Click to lock and unlock your meeting room. Note This function only displays when you re the moderator of the room. For more information, see Becoming the Moderator. 43
47 Icon Description The Vidyo conference is being recorded. The recording is paused. Pausing while recording results in a single recording file stored in the.flv format on your VidyoReplay. The recording is stopped. Stopping while recording results in separate recorded files stored in the.flv format on your VidyoReplay. Select your desired Recording Profile for recording VidyoRoom or VidyoPanorama 600 conferences. If no Recording Profiles are configured, contact your system administrator. Note The record, pause, stop, and select recording profile options are only enabled if your organization has VidyoReplay and when you re the moderator of the room. For more information, contact your Vidyo sales representative. Tap the Participants tab to view conference participants and pin them to specific system screens, view a participant s Share, and pan, tilt, and zoom their cameras. Tap the Moderator tab and enter the Moderator PIN and become an additional Moderator of the conference. Note The Moderator tab is only available if you own the room or have the existing Moderator PIN in your possession. Moderators can also mute, unmute, hide video, show video, and remove a selected participant or all participants from the conference. For more information refer to the Controlling a Meeting Room section in the VidyoConferencing Administrator Guide. For more information, see Becoming the Moderator. Tap the Invite Participan tab to invite participants to join the call if you are the meeting room owner or can moderate the meeting. Note The Invite Participan tab is only available if you own the room or have the existing Modeator PIN in your possession. 44
48 Becoming the Moderator Becoming a moderator allows you to use call control functions, such as muting and unmuting the conference participants and recording the conference. If you want to become the conference moderator, you must first enable a Moderator PIN for the conference room. To do so, you must: Ask your VidyoPortal Administrator to set up the Moderator PIN on a specific conference room via the Admin portal. Set the Moderator PIN via VidyoDesktop or via the VidyoPortal User portal. For more information, refer to the VidyoDesktop Quick User Guide or the VidyoPortal Administrator Guide. To become the moderator: 1. Tap the Moderator tab. 2. Enter the Moderator PIN. 3. Tap. 45
49 You then become the conference moderator and the conference moderation functions, such as Mute, Unmute, Hide Video, Show Video, and Remove, display on the Moderator tab while you are in the call. For more information, refer to the Controlling a Meeting Room section in the VidyoConferencing Administrator Guide. In-Call Viewing Modes When in a conference, participants can easily modify the layout for a variety of VidyoRoom viewing experiences. When using VidyoRemote 3 for ios, you can pin participants to specific viewing screens as explained in the following section. Pinning Participants to Specific Screens To pin participants to specific screens: 1. Tap the Conference Participants tab. 2. Tap next to your desired contact. The Pin Video to Monitor screen displays. 3. Tap the numbered screen in your system to which you want the contact pinned. The participant is now pinned to the selected screen and remains there regardless of the loudest speaker settings. 46
50 To move a participant to a different screen, repeat steps 1 and 2 but select a different screen. To unpin the participant and revert back to the automatic layout, repeat steps 1 and 2, and select None. Sharing Content to a Conference To share content to a conference while in a call: 1. Connect a compatible content-sharing device to your laptop and your VidyoRoom system. While your content now displays on the video screen of your VidyoRoom system, it is not shared to the participants in your conference. This is called Projection Mode. For more information, see Projecting Content in Your System. The Content Share Encode Status icon displays in gray on the upper-right of the screen. 2. Select from your available content sources in the Content Source settings under the Settings > Devices tab. For more information, see Configuring System Settings. 3. Tap. Note This icon is transparent when no share device is connected to your system, opaque when one is connected and not yet shared, and green when the share device is sharing to a conference. For more information, see Viewing the In-Call Menu and Configuring System Settings. Adjusting Your Content Source to Avoid Cropping Some VidyoRoom systems may crop content you share from your computer screen. Other computers default to a mirrored or duplicated multiple display output setting when connected to a VidyoRoom system as a shared device. This section describes how to adjust your computer as needed. Note The following information is not applicable when using an Epiphan device. Adjusting a Computer that Crops Content To adjust a computer that crops content: On a PC: 1. Select Control Panel > Display > Screen Resolution. 2. Select 720p from the Resolution drop-down. 47
51 On a Mac: 1. Select Display > Preferences. 2. Select the Scaled option. 3. Select 720p. On all other platforms: 1. Select Display > Advanced Settings. 2. Select the Maintain Display Scaling option. Adjusting a Computer that Defaults to a Mirrored Display Output Setting To adjust a computer that defaults to a mirrored or duplicated multiple display output setting: On all platforms: 1. Select Extend display from the Multiple Display field. 2. Select 720p for the resolution of your second display. Unpairing VidyoRemote 3 for ios from Your VidyoRoom System To unpair VidyoRemote 3 for ios from your VidyoRoom system: 1. Tap Unpair. The system asks if you are sure you want to unpair your device and displays a warning that you will have to enter the Pair Code to use the device to control the system in the future. 2. Enter the Pair Code in the text field below. 3. Tap Yes. The system unpairs your device. 48

52 4. Using the VidyoRemote 3 for Android App This chapter describes how to perform pre-call and in-call tasks with your VidyoRoom or VidyoPanorama 600 system when you are using the VidyoRemote 3 for Android app. Downloading the VidyoRemote 3 for Android App Before downloading the VidyoRemote 3 for Android app, ensure that the following requirements have been met: You must have an Android tablet running Android version or higher. The VidyoRoom system must be reachable by the VidyoRemote 3 over the Wi-Fi network. TCP ports 8090 and 443 http must be opened (bi-directional) to allow communication between the VidyoRemote 3 and the VidyoRoom. TCP port 80 must also be opened for VidyoRoom SE; however, it is not required for other VidyoRoom models. For more information, contact your system administrator. To download the VidyoRemote 3 for Android app: 1. Download and install VidyoRemote 3 for Android from the Google Play Store. 2. Open VidyoRemote 3 for Android on your device. Adding VidyoRooms To add VidyoRooms: 1. Click Add Room System Connection. 49
53 2. Click the VidyoRoom SE or VidyoRoom button depending on the type of VidyRoom system that you are adding. Select the VidyoRoom SE button if you are adding a software edition room system that you want to deploy using your own hardware. Select the VidyoRoom button if you are adding a VidyoRoom or VidyoPanaroma system. 3. Enter the IP Address for the VidyoRoom system. 4. Enter a name for the VidyRoom system. The Add button becomes active. 5. Click the Add button. The room is added to the list of rooms on the main screen. To add more VidyoRooms, click on the button on the main screen. To edit or delete a room, swipe your finger from right to left over the VidyoRoom's name that you wish to edit or delete. Once you pair successfully and start navigating to in-call/pre-call screens, tap the screen three times to return to this screen to add, delete, or modify any rooms when necessary. 50
54 Pairing VidyoRemote 3 for Android with Your VidyoRoom System After logging in to a VidyoRoom system, you are immediately prompted for a pair code if one has been set in the Admin UI. The pair code enables you to connect your device with your VidyoRoom system. If you need to obtain the pair code, contact your system administrator. For more information, see the Configuring the Remote Control Interface section in the VidyoRoom and VidyoPanorama600 Administrator Guide. To pair VidyoRemote 3 for Android with your VidyoRoom system: 1. Click the name of the room from the Select a room to connect field. 2. Enter the Pair Code. 3. Tap Submit. The system pairs your device. 51
55 4. If another handheld remote control or VidyoRemote device is used to operate your system, the following message displays: a. Click Resume Control. b. Re-enter the Pair Code. c. Tap Submit. For information about unpairing VidyoRemote 3 for Android, see Unpairing VidyoRemote 3 for Android from Your VidyoRoom System. Configuring System Settings The Settings menu enables the VidyoRoom or VidyoPanorama 600 system administrator to configure the system and can be accessed anytime (pre-call or in-call). To configure the system settings: 1. Tap on the upper-right corner of any screen. The Access Code page displays. 2. Enter the access code in the text field. 3. Tap Yes. 52

56 Once the access code has been set, then any of the settings here can be changed at any time. 4. Tap any of the following items on the left menu to access the settings for that screen. If the Setting menus are protected with an access code you will be prompted by the app to enter the access code when you try to modify a protected settings, enter your access code and tap. Icon Description Enter values for the VidyoPortal, username, and password and click Log In to connect to your VidyoPortal. Click Set Your Room PIN to PIN-protect your room. 53
57 Icon Description Network settings made by your system administrator display for viewing only (read-only) on this screen and include your MAC address, whether or not VidyoProxy is enabled, and specific UDP range values. IPv4 and IPv6 (if configured) settings also display showing the IP address, subnet, gateway, DNS, and whether or not your system is set to use DHCP and automatically obtain its IP address. Select Microphone, Speaker, Camera, and Content Source settings: For the Microphone settings, you can adjust the microphone level and select from available microphones. For the Speakers settings, you can adjust the speaker volume and select from available speakers. For the Camera settings, you can enable or disable the video feed, turn self-view on or off, and turn the backlight setting on or off. You can also select your camera input, the resolution, pan, tilt or zoom adjust your camera, and select if participants are allowed to pan, tilt, or zoom adjust your camera. For the Content Source settings, you can select from available content sources, select whether to automatically share content to conferences when you join then, and/or preview your share locally to review your automatic share before sending it to conferences. 54
58 Icon Description 55
59 Icon Description Select the language and time zone of the VidyoRoom, select whether to automatically answer incoming calls, enable the system to play tones when participants join or exit conferences, and enable an access code. If you enable an access code, users will have to enter the code in order to make changes to various screens or fields, such as the Account and Network screens. You can also tap Reboot VidyoRoom on this screen to reboot your machine. 56
60 Icon Description View the VidyoRoom or VidyoPanorama 600 model, image, version being used, the Vidyo company description, INOGENI, and the copyright statement. 57
61 Pre-Call Viewing the Pre-Call Menu The status and name of your VidyoRoom. For more information about status, see Understanding the Status Icons. 2. The search box where you can enter a name to search for a contact or room. As soon as you begin typing, search results display in the Directory. 3. The list of your contacts and their status. For more information about status, see Understanding the Status Icons. 4. Icon that toggles self-view. 5. The VidyoRoom or VidyoPanorama 600 system date and time. 6. The System Settings button. For more information, see Configuring System Settings. 7. Icon that toggles local share preview (Projection). 8. A list of upcoming appointments from your calendar (if your system administrator has synchronized your VidyoRoom or VidyoPanorama 600 system with a Microsoft Exchange calendar, a Google Calendar, or another supported calendar). 58
62 For more information, see Using the VidyoRoom Calendar. Joining a Contact s Room or Calling a Contact Directly To join a contact s room or call a contact directly: 1. Tap the name of the desired contact in My Contacts or the Directory. 2. Tap any of the following options: Tap Call to make a direct call. Tap to add the selected contact to your list. Tap or (if the room is PIN-protected) to join the contact s room. 59
63 If the room is PIN-protected, do the following: a. Enter your PIN number. b. Tap. Calling a User on a Different VidyoPortal or an H.323/SIP Endpoint To call a user on a different VidyoPortal or an H.323/SIP endpoint: 1. Enter the address of the contact that is on a different VidyoPortal or on an H.323/SIP endpoint. 2. Tap the contact that displays in the External Contact list. 3. Tap Connect. Using the VidyoRoom Calendar The calendar integration feature enables the VidyoRoom to display upcoming scheduled meetings from a Google Calendar, a Microsoft Exchange calendar, or another supported calendar specified by your system administrator. This feature enables the system to display meetings that are taking place up to three hours in the future and up to one hour in the past, as well as display or hide meeting details. Viewing Meeting Details Meetings are displayed as tiles on the right side of the Pre-Call screen. 60


64 The following information is displayed about each meeting: 1. The time the meeting is scheduled to begin. Note Only appointments scheduled up to three hours in the future display on the screen. 2. The subject of the meeting. 3. The name of the meeting organizer. 4. The following meeting status details display in the meeting status region five minutes before, during, and one hour after your meeting: If it s five minutes before your meeting, a timer displays and counts down your meeting time. Note The system also asks you if you want to join or ignore the meeting both five minutes prior and during your meeting. For more information, see Joining Vidyo-Enabled Meetings. 61
65 If your meeting is taking place, a green progress bar displays. If your meeting is complete, a red progress bar displays for one hour after the ending time of your meeting, and then the meeting tile disappears from your calendar. 5. Whether the meeting is Vidyo-enabled: Vidyo-enabled meetings display with green hexagonal icons on the right of the tile. When the meeting ends, the red progress par displays and the meeting remains on the screen for one hour after the ending time of your meeting, and then the meeting tile disappears from your calendar. For more information, see Joining Vidyo-Enabled Meetings. Non-Vidyo-enabled meetings display with gray calendar icons on the right of the tile; they disappear from your calendar right after the scheduled start time. 6. Tap to expand your meeting details and tap to collapse them. The details include the following: The meeting start time. The meeting end time. The required meeting attendees. The optional meeting attendees. 62
66 Joining Vidyo-Enabled Meetings To join a Vidyo-enabled meeting: If you want to manually join an upcoming meeting, tap on the right of the meeting tile. If a dialog box displays reminding you of an upcoming meeting, tap Join if you want to join the meeting or tap Ignore if you do not want to join the meeting. Note This dialog box displays if your system administrator has synced up a Google Calendar, a Microsoft Exchange calendar, or another supported calendar with your VidyoRoom system. For more information, see Using the VidyoRoom Calendar. The dialog box remains on the screen indicating Starts in XX:XX or Active for XX:XX for one hour after the ending time of your Vidyo-enabled meeting or until acknowledged. Understanding the Status Icons The following tables provide status icons and explanations as they display in VidyoRemote 3 for Android. 63
67 Contact Status Icon Description The contact is online and available to receive incoming calls. The contact is online but is currently in a call. You cannot make a direct call to this contact; however, you can join the contact s room. The contact is offline (not logged in to the VidyoPortal). You cannot make a direct call to this contact; however, you can join the contact s room. The contact is connected to another VidyoPortal or is an H.323/SIP endpoint. Room Status Icon Description The room is available and empty, so you can enter the room. The room is available and PIN-protected. If you attempt to join the room, you will be asked to enter a PIN. The room is occupied but available to enter. The room is locked, so you cannot enter it. The room is full, so you cannot enter it. 64

68 Projecting Content in Your System To project content on your local system when you are not in a call: 1. Connect a compatible content-sharing device to your laptop/pc or your VidyoRoom system. The content will be displayed on the screen of your VidyoRoom system if the Preview Local Content checkbox is selected in the Settings tab of the Admin User Interface. This is called Projection Mode as the content is locally displayed on your VidyoRoom system. In addition, this will also depend upon the selected settings in the VidyoRemote 3 application. Note If a remote user on the call is sharing content and then stops, Projection Mode becomes disabled until content is shared again. For information about sharing to the entire conference while in-call, see Sharing Content to a Conference. Managing Missed Call Notifications If an incoming call is not answered, a list of current and previous missed calls displays. Click OK and the list will disappear. 65

69 In-Call Viewing the In-Call Menu The name of your VidyoRoom. 2. The search box where you can filter through all active participants on the call. As soon as you begin typing, search results display in the Directory. 3. The list of participants currently in the call. 4. The System Settings button. For more information, see Configuring System Settings. 5. Drop-down that displays available profiles from the VidyoRecorder so that the call can be recorded. This drop-down is available only if you join your own room or if you are the room moderator. Once you are connected to a conference, the In Call Menu displays. For more information, see Joining a Contact s Room or Calling a Contact Directly. 66
70 Icon Description Click to signal the meeting moderator that you have raised your hand when participating in conferences that are using the Presenter Mode feature. For more information, refer to the VidyoDesktop Quick User Guide. Click to end the conference. Click to mute, unmute, and control your microphone volume. Click to mute and unmute your speakerphone volume. Click to show or hide the video feed from your camera. Control your speakerphone volume. Click to toggle sharing to the conference. Projection Mode is enabled by default when sharing local content. Note This icon is transparent when no share device is connected to your system, opaque when one is connected and not yet shared, and green when the share device is sharing to a conference. Configure your shares in the Content Source settings under the Settings > Devices tab. For more information, see Configuring System Settings. Click to toggle your self-view preference. Click to change your primary and secondary screens. Click to enter the appropriate DTMF call control option. Click to select how to view the participants video windows during the conference. Click to pan, tilt, and zoom your camera. Click to lock and unlock your meeting room. Note This function only displays when you re the moderator of the room. For more information, see Becoming the Moderator. 67
71 Icon Description The Vidyo conference is being recorded. The recording is paused. Pausing while recording results in a single recording file stored in the.flv format on your VidyoReplay. The recording is stopped. Stopping while recording results in separate recorded files stored in the.flv format on your VidyoReplay. Select your desired Recording Profile for recording VidyoRoom or VidyoPanorama 600 conferences. If no Recording Profiles are configured, contact your system administrator. Note The record, pause, stop, and select recording profile options are only enabled if your organization has VidyoReplay and when you re the moderator of the room. For more information, contact your Vidyo sales representative. Tap the Participants tab to view conference participants and pin them to specific system screens, view a participant s Share, and pan, tilt, and zoom their cameras. Tap the Moderator tab and enter the Moderator PIN and become an additional Moderator of the conference. Note The Moderator tab is only available if you own the room or have the existing Moderator PIN in your possession. Moderators can also mute, unmute, hide video, show video, and remove a selected participant or all participants from the conference. For more information refer to the Controlling a Meeting Room section in the VidyoConferencing Administrator Guide. For more information, see Becoming the Moderator. Tap the Invite Partipican tab to invite participants to join the call if you are the meeting room owner or can moderate the meeting. Note The Invite Participan tab is only available if you own the room or have the existing Modeator PIN in your possession. 68

72 Becoming the Moderator Becoming a moderator allows you to use call control functions, such as muting and unmuting the conference participants and recording the conference. If you want to become the conference moderator, you must first enable a Moderator PIN for the conference room. To do so, you must: Ask your VidyoPortal Administrator to set up the Moderator PIN on a specific conference room via the Admin portal. Set the Moderator PIN via VidyoDesktop or via the VidyoPortal User portal. For more information, refer to the VidyoDesktop Quick User Guide or the VidyoPortal Administrator Guide. To become the moderator: 1. Tap the Moderator tab. 2. Enter the Moderator PIN. 3. Tap. 69
73 You then become the conference moderator and the conference moderation functions, such as Mute, Unmute, Hide Video, Show Video, and Remove, display on the Moderator tab while you are in the call. For more information, refer to the Controlling a Meeting Room section in the VidyoConferencing Administrator Guide. In-Call Viewing Modes When in a conference, participants can easily modify the layout for a variety of VidyoRoom viewing experiences. When using VidyoRemote 3 for Android, you can pin participants to specific viewing screens as explained in the following section. Pinning Participants to Specific Screens To pin participants to specific screens: 1. Tap the Conference Participants tab. 2. Tap next to your desired contact. The Pin Video to Monitor screen displays. 3. Tap the numbered screen in your system to which you want the contact pinned. The participant is now pinned to the selected screen and remains there regardless of the loudest speaker settings. 70
74 To move a participant to a different screen, repeat steps 1 and 2 but select a different screen. To unpin the participant and revert back to the automatic layout, repeat steps 1 and 2, and select None. Sharing Content to a Conference To share content to a conference while in a call: 1. Connect a compatible content-sharing device to your laptop and your VidyoRoom system. While your content now displays on the video screen of your VidyoRoom system, it is not shared to the participants in your conference. This is called Projection Mode. For more information, see Projecting Content in Your System. The Content Share Encode Status icon displays in gray on the upper-right of the screen. 2. Select from your available content sources in the Content Source settings under the Settings > Devices tab. For more information, see Configuring System Settings. 3. Tap. Note This icon is transparent when no share device is connected to your system, opaque when one is connected and not yet shared, and green when the share device is sharing to a conference. For more information, see Viewing the In-Call Menu and Configuring System Settings. Adjusting Your Content Source to Avoid Cropping Some VidyoRoom systems may crop content you share from your computer screen. Other computers default to a mirrored or duplicated multiple display output setting when connected to a VidyoRoom system as a shared device. This section describes how to adjust your computer as needed. Note The following information is not applicable when using an Epiphan device. Adjusting a Computer that Crops Content To adjust a computer that crops content: On a PC: 1. Select Control Panel > Display > Screen Resolution. 2. Select 720p from the Resolution drop-down. 71

75 On a Mac: 1. Select Display > Preferences. 2. Select the Scaled option. 3. Select 720p. On all other platforms: 1. Select Display > Advanced Settings. 2. Select the Maintain Display Scaling option. Adjusting a Computer that Defaults to a Mirrored Display Output Setting To adjust a computer that defaults to a mirrored or duplicated multiple display output setting: On all platforms: 1. Select Extend display from the Multiple Display field. 2. Select 720p for the resolution of your second display. Unpairing VidyoRemote 3 for Android from Your VidyoRoom System To unpair VidyoRemote 3 for Android from your VidyoRoom system: 1. Tap Unpair. The system asks if you are sure you want to unpair your device and displays a warning that you will have to enter the Pair Code to use the device to control the system in the future. 2. Enter the Pair Code in the text field below. 3. Tap Yes. The system unpairs your device. 72
VidyoDesktop. Installation and User Guide
 VidyoDesktop Installation and User Guide Product Version 3.6 Document Version C July, 2016 2016 Vidyo, Inc. All rights reserved. Vidyo s technology is covered by one or more issued or pending United States
NexiDesktop. Quick User Guide
 NexiDesktop Quick User Guide May, 2015 NexiDesktop enables you to easily join Nexi conference calls, either as a guest or as a registered user, make point-to-point calls, invite others to your meetings,
Release Notes. VidyoRoom. Version May, Doc. Rev A
 Release Notes VidyoRoom Version 2.2.2.00385 May, 2013 Doc. Rev A 2013 Vidyo, Inc. all rights reserved. Vidyo s technology is covered by one or more issued or pending United States patents, as more fully
RVC3000 User Guide VERSION 1.2. Vytru, Inc. 0
 2015 RVC3000 User Guide VERSION 1.2 Vytru, Inc. 0 Contents 1.1 Vytru RVC3000 System... 2 1.2 About Vytru RVC3000 User Guide... 2 2. Getting Started with the RVC3000... 2 2.1 Powering the System On and
Vidyo CLINiC 12x Clinical Care Device User Guide. CLINiC-V-12X-A01 Document Version 2.3
 Vidyo CLINiC 12x Clinical Care Device User Guide CLINiC-V-12X-A01 Document Version 2.3 Copyright 2018 Iron Bow Technologies All Rights Reserved. Specifications subject to change without notice. For general
VidyoPortal and VidyoDesktop User Guide
 TM VidyoPortal and VidyoDesktop User Guide Version 1.4 Table of Contents 1 Document Overview 2 Minimum/Optimum Requirements 3 Definitions 5 Logging In 6 Installing the VidyoDesktop Software 8 Overview
VidyoRoom HD-40 Getting Started Guide
 Part Number: DEV-ACC-DOC-HD40-GSG-REVA VidyoRoom HD-40 Getting Started Guide What s Included The HD-40 box contains the HD-40 device, a power adapter, an infrared remote control with a 6 ft (1.828 m) USB
VidyoRoom HD-100 Revision D Getting Started Guide
 Part Number: DEV-ACC-DOC-GSG100-D9020-RB VidyoRoom HD-100 Revision D Getting Started Guide What s Included Your HD-100 Revision D ships with the HD-100 Revision D codec, an infrared remote control, and
VidyoRoom HD-40 Revision B Getting Started Guide
 Part Number: DEV-ACC-DOC-HD40B-GSG-REVA VidyoRoom HD-40 Revision B Getting Started Guide What s Included Your HD-40 Revision B shipped with the HD-40 Revision B codec, a power adapter, an infrared remote
System Version 2.2 Document Version 2.2
 VidyoReplay User Guide System Version 2.2 Document Version 2.2 TABLE OF CONTENTS 1. Overview... 1 2. Making a Recording... 3 Preparing To Record... 3 Recording... 4 3. Hosting a Webcast... 6 Preparing
Cisco WebEx Meeting Center Video Conferencing User Guide
 First Published: 2016-08-05 Last Modified: 2016-11-09 Americas Headquarters Cisco Systems, Inc. 170 West Tasman Drive San Jose, CA 95134-1706 USA http://www.cisco.com Tel: 408 526-4000 800 553-NETS (6387)
User Guide for Avaya Scopia Control
 User Guide for Avaya Scopia Control Version 8.3 For Solution 8.3 March 2014 2000-2014 Avaya Inc. All intellectual property rights in this publication are owned by Avaya Inc. and are protected by United
Room 4 User Guide. Version 1.0
 Room 4 User Guide Version 1.0 Contents 1. About Room 4... 2 2. Getting Started with Room 4... 2 2.1 Powering Room 4 On... 2 2.2 Meeting Room Identity and Calendar... 3 2.3 Room sign-in... 6 2.4 Signing-In
Getting Started Guide. Version January 4, 2015
 Getting Started Guide Version 2.9.1 January 4, 2015 2. Entering the Scheduled Meeting Room and Joining the Conference Participants enter the room: Note: If Moderator publishes the meeting (via Advanced
HP Visual Collaboration Desktop. User Guide
 HP Visual Collaboration Desktop User Guide HP Visual Collaboration Desktop v2.0 First edition: November 2010 Legal notices Copyright 2010 Hewlett-Packard Development Company, L.P. The information contained
NLTVC USER MANUAL FOR. Version 1.4
 NLTVC USER MANUAL FOR HD Version 1.4 1 Table of contents 1.0 System Start up... 4 1.1 Function of Icons... 5 1.2 System Configuration... 6 1.2.1 General... 7 1.2.2 Audio & Video... 8 1.2.3 Date & Time...
Skype for Business for Android
 Skype for Business for Android November 2015 Topics in this guide include: Joining meetings Updating availability status Managing contacts Having conversations Customizing your settings For more information
Collaborate App for Android Tablets
 The AT&T Collaborate service provides the Collaborate app to help you manage calls and conferences on your Android tablet on the go. The Collaborate app for Android tablets provides these communication
The first time you launch the application you will have to accept the Terms and Conditions.
 Cisco WebEx Meetings Updated as of 8/7/18 Use Guide Cisco Webex Meetings Mobile (Android) Install Webex Meetings View Your Upcoming Meetings Join a Meeting Connect to the Audio Conference Schedule a Meeting
Mississippi University for Women
 Mississippi University for Women Center for Teaching and Learning Fall 07 Objectives Signing In Zoom Video Conferencing Getting Started Home Screen Settings Meeting Options Zoom is the leader in modern
Table of Contents. The Home and More screens... 14
 Table of Contents SmartMeet Overview...1 From SmartMeet, you can:...1 Setup... 2 System requirements... 2 Downloading SmartMeet....3 Starting SmartMeet for the first time... 4 Add user details...5 To add
VidyoRoom HD-40 with Pro Pack Getting Started Guide
 Part Number: DEV-ACC-DOC-HD40Pro-GSG-REVA VidyoRoom HD-40 with Pro Pack Getting Started Guide What s Included Your HD-40 shipped with the HD-40 device, a power adapter, an infrared remote control with
Getting Started Guide
 Getting Started Guide User Guide Chapters 1. Scheduling Meetings Configuring Meeting Details Advanced Options Invitation Email, received by the Participants Invitation Email, sent to the Moderator (scheduler)
For Windows Microsoft Corporation. All rights reserved.
 For Windows 1 About Skype for Business... 4 Skype for Business Window... 5 Audio... 6 Set up your audio device... 6 Make a call... 6 Answer a call... 7 Use audio call controls... 7 Check voicemail... 8
Getting Started with Lync 2010 for iphone
 Getting Started with Lync 2010 for iphone Getting started with Lync 2010 on the iphone» Requirements» Installing Lync» Removing Lync» Signing in to Lync» Signing out of Lync Requirements iphone 3GS, iphone
Canvas Conferencing Tool
 Canvas Conferencing Tool Contents Web Conferencing in Canvas... 2 Invite Course Members... 4 Select Individual Members... 4 Starting a Conference... 5 Conference Layout... 5 View Conference Tools... 6
BlueJeans Events Instructions for Moderators. October 2017
 BlueJeans Events Instructions for Moderators October 2017 Scheduling Events Schedule an Event 1. Enter an Event Title 2. Provide a Description 3. Select an available Event Size (your plan will dictate
Release Notes. VidyoDesktop. for Windows and Mac. Anchor Version (17) June, 2015 Doc. Rev A
 June, 2015 Doc. Rev A") Release Notes VidyoDesktop for Windows and Mac Anchor Version 3.5.2 (17) June, 2015 Doc. Rev A 2015 Vidyo, Inc. all rights reserved. Vidyo s technology is covered by one or more issued or pending United
Release Notes VidyoDesktop for Windows and Mac Anchor Version 3.5.2 (17) June, 2015 Doc. Rev A 2015 Vidyo, Inc. all rights reserved. Vidyo s technology is covered by one or more issued or pending United
AT&T Connect Mobile and iphone User Guide
 Version 2.0 May 2010 AT&T Connect Mobile and iphone User Guide 2010 AT&T Intellectual Property. All rights reserved. AT&T, 1 the AT&T logo and all other AT&T marks contained herein are trademarks of AT&T
TDS managedip Hosted Unified Communication (UC) User Guide
 User Guide") Installation and Setup To Install the Application: The application is available for both PC and MAC. To download, visit the TDS Support Site at: http://support.tdsmanagedip.com/hosted To log into the Application:
Installation and Setup To Install the Application: The application is available for both PC and MAC. To download, visit the TDS Support Site at: http://support.tdsmanagedip.com/hosted To log into the Application:
Getting Started Guide. Lifesize Dash
 Getting Started Guide Lifesize Dash Introduction Lifesize Dash is a software-based video communication solution that turns small, multipurpose meeting spaces into collaboration hotspots. We leverage WebRTC
Table of Contents. iii
 TECHNICAL GUIDE Table of Contents MobileMeet Overview... 1 From MobileMeet, you can:... 1 Setup... 2 System requirements... 2 Bandwidth and Data Transfer... 3 Downloading MobileMeet... 4 Starting MobileMeet
BlueJeans User Guide V3.1
 BlueJeans User Guide V3.1 Chapters 1. Scheduling Meetings Configuring Meeting Details Advanced Options Invitation Email, received by the Participants Invitation Email, sent to the Moderator (scheduler)
UNIFIED MEETING 5 DOWNLOAD AND SETUP
 UNIFIED MEETING 5 M A C U S E R G U I D E Unified Meeting 5, our meeting and collaboration application enhances the way you communicate by making meetings convenient and easy to manage. It improves your
Getting Started. Conference Details, How to Join by Phone, How to Join by Web, How to Start a Conference On-Demand
 User Guide Table of Contents Getting Started Conference Scheduling Settings & Features Conference Details 4 Step 1: Pick a date & time 29 PIN-less Entry & SM S Notifications 47 Where to find your conference
USER MANUAL. Infoshare Web Conferencing
 USER MANUAL Infoshare Web Conferencing Table of Contents Contents Table of Contents... 1 What is Infoshare?... 3 Infoshare Control Panel and Key Functions... 3 1. Launching Infoshare... 4 2. Meeting Types...
Product Version 1.1 Document Version 1.0-A
 VidyoDashboard Installation Guide Product Version 1.1 Document Version 1.0-A Table of Contents 1. Overview... 3 About This Guide... 3 Prerequisites... 3... 5 Installing the OVA for VMware ESXi... 5 Configuring
how to use CTi Connect
 Access Your Account From Any Computer Navigate to videxio.com from any web browser and click User Login in the upper right hand corner Enter your credentials (Use the same credentials set up during your
User Guide for Cisco Jabber for Mac 11.6
 User Guide for Cisco Jabber for Mac 11.6 User Guide 2 New and Changed Information 2 Availability 2 Contacts 4 Chats 5 Calls 7 Meetings 10 Custom Tabs 13 Accessibility 14 Troubleshooting 17 Revised: April
Grandstream Networks, Inc.
 Grandstream Networks, Inc. IPVideoTalk Cloud Conferencing System Table of Contents OVERVIEW... 3 Prerequisites... 3 HOW TO JOIN A MEETING... 4 Download IPVideoTalk Mobile App... 4 Join a Meeting via Mobile
PerkinElmer s Force Multiplier Pilot Program
 PerkinElmer s Force Multiplier Pilot Program This document is intended to provide the first-time user with the needed information to conduct a Virtual Product Lab session using Connectivity s Advanced
Captivate your audience by integrating Operator Assi sted audio conferencing with the cutting edge Adobe Connect online collaboration solution.
 ADOBE CONNECT O P E R A T O R A S S I S T E D A U D I O C O N T R O L S U S E R G U I D E F O R H O S T S Captivate your audience by integrating Operator Assi sted audio conferencing with the cutting edge
Collaborate App for Android Smartphones
 Collaborate App for Android Smartphones The AT&T Collaborate service provides the Collaborate app to help you manage calls and conferences on the go. The app comes in 3 versions: Collaborate - Mobile Collaborate
Available to download FREE from the Apple App Store and Google Play, managing your meetings from your smartphone has never been easier.
 SMARTMEET Q U I C K S T A R T G U I D E SmartMeet is the cornerstone of on-the-go Reservationless-Plus meetings. Discover a full-circle approach to meeting from your iphone and Android smartphone. Not
Voyant Connect User Guide
 Voyant Connect User Guide WELCOME TO VOYANT CONNECT 3 INSTALLING VOYANT CONNECT 3 MAC INSTALLATION 3 WINDOWS INSTALLATION 4 LOGGING IN 4 WINDOWS FIRST LOGIN 6 MAKING YOUR CLIENT USEFUL 6 ADDING CONTACTS
Infinity Connect Mobile App Quick Guide
 Infinity Connect Mobile App Quick Guide All you need to do to make a call into a Pexip Infinity environment using the Infinity Connect mobile client is install it, enter your name, and then enter the alias
Infinity Connect Mobile App Quick Guide
 Infinity Connect Mobile App Quick Guide All you need to do to make a call into a Pexip Infinity environment using the Infinity Connect mobile client is install it, enter your name, and then enter the alias
Scopia Management. User Guide. Version 8.2. For Solution
 Scopia Management User Guide Version 8.2 For Solution 8.2 8.2 2000-2013 RADVISION Ltd. All intellectual property rights in this publication are owned by RADVISION Ltd and are protected by United States
Getting Started Guide for the VSX Series
 product pic here Getting Started Guide for the VSX Series Version 8.7 July 2007 Edition 3725-21286-010/A Trademark Information Polycom, the Polycom logo design, SoundStation VTX 1000, and ViewStation are
AM-101 AM-101AirMedia Presentation Gateway. Supplemental Guide Crestron Electronics, Inc.
 AM-101 AM-101AirMedia Presentation Gateway Supplemental Guide Crestron Electronics, Inc. Crestron software, including without limitation, product development software and product operating system software
NovoConnect B360. Wireless Presentation & Collaboration System. User Manual Version 0.98
 NovoConnect B360 Wireless Presentation & Collaboration System User Manual Version 0.98 Copyright 2013 DELTA Electronics, Inc. All rights reserved. Page 1 Table of Contents TABLE OF CONTENTS... 2 1. GETTING
User s Guide for the Polycom RealPresence Group Series
 [Type the document title] 4.1.1 July 2013 3725-69986-002/A User s Guide for the Polycom RealPresence Group Series Polycom Document Title 1 Trademark Information POLYCOM and the names and marks associated
User s Guide for Polycom HDX Desktop Systems
 User s Guide for Polycom HDX Desktop Systems Version 2.0.1 November 2007 Edition 3725-26470-001/A Version 2.0.1 Trademark Information Polycom, the Polycom logo design, and ViewStation are registered trademarks
Infinity Connect Mobile for Android Quick Guide
 Infinity Connect Mobile for Android Quick Guide All you need to do to make a call into a Pexip Infinity environment using the Infinity Connect Mobile client is install it, enter your name, and then enter
User s Guide for Polycom HDX Room Systems
 product pic here User s Guide for Polycom HDX Room Systems Version 2.0.2 February 2008 Edition 3725-23978-004/A Version 2.0.2 Trademark Information Polycom, the Polycom logo design, ViewStation, and VSX
HP Visual Collaboration Room. User Guide
 HP Visual Collaboration Room User Guide HP Visual Collaboration Room v2.0 First edition: November 2010 Legal notices Copyright 2010 Hewlett-Packard Development Company, L.P. The information contained herein
About This Guide 1. Terminology Used in this Guide 1 System Requirements 1. Getting Started 2. Downloading and Installing Meeting Software 2
 RP1Cloud User Guide Contents About This Guide 1 Terminology Used in this Guide 1 System Requirements 1 Getting Started 2 Downloading and Installing Meeting Software 2 Install the Plug-in 2 Install the
ACTION. to join in. This STEP Profile > My. You can a. USE Adobe. Note:
 USE R GUIDE Adobe Connect Direct Event Audio Controls Guide for Hostss Direct Event Audio Conferencing is an integrated audio conferencing which provides streamlined conference entry on event calls byy
Crestron Mercury Tabletop UC Audio Conference Console for Microsoft Teams
 CCS-UC-1-T Crestron Mercury Tabletop UC Audio Conference Console for Microsoft Teams Supplemental Guide Crestron Electronics, Inc. Crestron product development software is licensed to Crestron dealers
Unified Meeting 5 User Guide for MAC
 Unified Meeting 5 User Guide for MAC Unified Meeting 5, a meeting and collaboration application enhances the way you communicate by making meetings convenient and easy to manage. It improves your meeting
User Guide - itlc. Setting Up Your Presentation
 User Guide - itlc Setting Up Your Presentation 1. If the screen is blank, tap the screen to begin. Select: Presentation from the menu at the top of the touch panel (See image below). 2. A list of sources
CALL MANAGER DOWNLOAD AND SETUP
 CALL MANAGER W I N D O W S U S E R G U I D E Call Manager, our meeting and collaboration application enhances the way you communicate by making meetings convenient and easy to manage. It improves your
Microsoft Lync 2013 Quick-Start Guide. ThinkTel Communications Professional Services Last Updated: June 18, 2013
 Microsoft Lync 2013 Quick-Start Guide ThinkTel Communications Professional Services Last Updated: June 18, 2013 Instant Messaging & Presence Accept an IM request Click anywhere on the picture display area
QUICK START GUIDE NTS HOSTED PBX CALL MANAGER. Welcome. Getting Oriented
 QUICK START GUIDE NTS HOSTED PBX Welcome Welcome to NTS Hosted PBX! This guide is intended to get you up and running with the basic features associated with the product. For more in-depth information,
Group Telepresence. Group Telepresence 3351 Group Telepresence 3330 (GT Mini)
") Group Telepresence Group Telepresence 3351 Group Telepresence 3330 (GT Mini) User Guide 01 February 2018 Contents About StarLeaf room systems 4 Introducing the touchscreen controller 4 Out-of-hours power
Group Telepresence Group Telepresence 3351 Group Telepresence 3330 (GT Mini) User Guide 01 February 2018 Contents About StarLeaf room systems 4 Introducing the touchscreen controller 4 Out-of-hours power
TSS-7/TSS-10 7" and 10.1" Room Scheduling Touch Screens
 TSS-7/TSS-10 7" and 10.1" Room Scheduling Touch Screens Supplemental Guide Crestron Electronics, Inc. Crestron product development software is licensed to Crestron dealers and Crestron Service Providers
ShoreTel Mobility User s Guide for iphone and ipod touch
 ShoreTel Mobility User s Guide for iphone and ipod touch Release 7.0 July 2013 Legal Notices Document and Software Copyrights Copyright 1998-2013 by ShoreTel Inc., Sunnyvale, California, USA. All rights
StarLeaf App User Guide 28 February 2018
 StarLeaf App User Guide 28 February 2018 Contents Signing into the app 4 Minimum Requirements 4 Computers and Laptops 4 Android 5 iphone and ipad 5 Localization 5 Making a call 6 Calling outside of your
Android Rep Console
 Android Rep Console 2.2.10 2003-2018 BeyondTrust, Inc. All Rights Reserved. BEYONDTRUST, its logo, and JUMP are trademarks of BeyondTrust, Inc. Other trademarks are the property of their respective owners.
VidyoGateway. Administrator Guide. Product Version Document Version A February, 2017
 VidyoGateway Administrator Guide Product Version 3.5.1 Document Version A February, 2017 2017 Vidyo, Inc. all rights reserved. Vidyo s technology is covered by one or more issued or pending United States
RGA APPLICATION GATEWAY CONFERENCE USER GUIDE
 RGA APPLICATION GATEWAY CONFERENCE USER GUIDE INT-31625 Revision 1.0 NEC Corporation of America reserves the right to change the specifications, functions, or features at any time without notice. NEC
Cisco TelePresence MCU 4.3
 Cisco TelePresence MCU 4.3 Product administration guide D14845.03 April 2012 Contents Using the web interface 7 Logging into the web interface 7 Failing to log into the web interface 7 Joining and viewing
FusionWorks: Fusion Communicator for iphone 2/24/2016 USER GUIDE
 FusionWorks: Fusion Communicator for iphone 2/24/2016 Contents: About this Document.............................................................................................. 4 Audience and Purpose..........................................................................................
SX10 & SX20. CE 9.2 Cisco TelePresence User Guide ghi jkl mno pqrs tuv wxyz
 1 2 3.@ abc def CE 9.2 Cisco TelePresence User Guide ghi jkl mno 7 8 9 pqrs tuv wxyz * 0 # SX10 & SX20 1 Contents What s in this guide Introduction to Video Conferencing Tour the Screen... 4 Operating
Reservationless-Plus Web-enabled Conferencing Leader Guide
 Reservationless-Plus Web-enabled Conferencing Leader Guide Web Moderator Leader Guide Access to your Reservationless-Plus Owner details, conference default options and online web tool is available by logging
Polycom RealPresence Group Series and the Polycom Touch Control
 User s Guide 4.1.3 February 2014 3725-64325-005/A Polycom RealPresence Group Series and the Polycom Touch Control Trademark Information POLYCOM and the names and marks associated with Polycom's products
Signing in. Signing in. Which Skype should I use? Quick Start Guide. Sign in using your Massey address and password.
 Quick Start Guide Signing in Signing in Sign in using your Massey email address and password. Which Skype should I use? Skype for Business is for connecting with a co-worker or business associate. Skype
WebEx New user Orientation. Meeting Organizer Guide
 WebEx New user Orientation Meeting Organizer Guide OBJECTIVE: AGENDA: I. II. III. IV. Utilize the tools provided at Kent State University to host and attend online meetings via the WebEx application and
EasyConference. User Manual. Seamless user experience between Video conferencing systems, Win OS, Mac OS, and Mobile devices with Easymeeting
 EasyConference User Manual Seamless user experience between Video conferencing systems, Win OS, Mac OS, and Mobile devices with Easymeeting EasyConference Meet them all EasyConference is a cloud service
Controls. Assisted. Audio ACTION. Captivate your. Connect. This. From. audio STEP Provider drop-down. menu and. field. just Op Assisted.
 USE R GUIDE Adobe Connect Operator Assisted Audio Controls Guide forr Hosts Captivate your audience by integrating Operator Assisted audio conferencing service with the cutting edge Adobe Connect online
BT CLOUD PHONE. USER GUIDE FOR MY EXTENSION.
 BT CLOUD PHONE. USER GUIDE FOR MY EXTENSION. WHAT S IN THIS GUIDE. 1. Welcome to BT Cloud Phone. 3 2. Express setup. 4 3. Accessing the BT Cloud Phone Portal. 5 4. My Extension Dashboard. 6 4.1 Overview:
Unified Meeting 5 User Guide for Windows
 Unified Meeting 5 User Guide for Windows Unified Meeting 5 is a web based tool that puts you in complete control of all aspects of your meeting including scheduling, managing and securing your meetings.
User s Guide for Polycom HDX Room Systems
 User s Guide for Polycom HDX Room Systems Version 2.5.0.6 September 2009 3725-23978-006/A Trademark Information Polycom, the Polycom Triangles logo, and the names and marks associated with Polycom s products
MiTeam Stream. Launch MiTeam. MiTeam Stream tabs. QMiTeam for Enterprise Quick Reference Guide
 QMiTeam for Enterprise Quick Reference Guide MiTeam is a workstream communications and collaboration tool that provides a highly collaborative, persistent workspace for team-based meetings, conversations,
Quick Reference Guide: SAP CONNECT
 Quick Reference Guide: SAP CONNECT CONTENTS (CLICK EACH ENTRY TO ACCESS DETAILS) 1 MUTE & UNMUTE... 4 2 RECORD MEETINGS... 5 3 PHONE VOLUME CONTROLS... 7 5 DISCONNECT OR HANG UP PARTICIPANTS... 8 6 INVITE
Genesys Meeting Center User Guide v4.11.7
 Genesys Meeting Center User Guide v4.11.7 For more information: 866.436.3797 www.genesys.com Genesys Meeting Center is your perfect everyday business conferencing tool. Our award-winning technology integrates
Troubleshooting. Cisco WebEx Meetings Server User Guide Release 3.0 1
 Participants List Displays Multiple Entries for the Same User, page 2 404 Page Not Found Error Encountered, page 2 Cannot Start or Join a Meeting, page 2 SSO Does Not Work with ios Devices, page 4 Meeting
Univago End User Guide. Web Portal and URoom Virtual Meeting Rooms. Michael Brandofino. Version 1.4 9/19/2016
 Univago End User Guide Web Portal and URoom Virtual Meeting Rooms Michael Brandofino Version 1.4 9/19/2016 1 Contents Univago User Portal Overview...5 Accessing the Univago User Portal... 5 Univago User
Infinity Connect Web App via Explorer Quick Guide
 Infinity Connect Web App via Explorer Quick Guide The Infinity Connect Web App allows you to make calls into a Pexip Infinity environment using a browser, without any downloads or plugins. Making a call
VidyoRoom : Users Guide HD-200 & HD-100
 TM VidyoRoom : Users Guide HD-200 & HD-100 Version 1.4 Table of Contents 1 Document Overview 2 Definitions 4 Overview of the VidyoRoom Remote Control 6 Overview of VidyoRoom On-Screen Icons 7 Overview
Quick Reference Guide WebEx on an ipad
 Quick Reference Guide WebEx on an ipad Install WebEx Meetings for ipad In order to schedule and attend WebEx meetings from your ipad you need to download, install and activate the Cisco WebEx Meetings
Version Android User's Guide. May-02-13
 Version 12.5 Android User's Guide May-02-13 Table of Contents Chapter 1 Overview 1 Getting Help 2 Other Resources 3 Documentation and Learning Resources 3 Technical Support 4 Community 4 Blackboard Collaborate
The Conferencing Center Reservationless-Plus Call Manager
 The Conferencing Center Reservationless-Plus Call Manager The Reservationless-Plus Call Manager adds the power of the Internet to your audio call. It turns your call into an integrated experience that
ADOBE CONNECT TECHNICAL CHECK
 AUDIO DIAL OUT For Adobe Connect meetings using teleconference audio, you will be automatically prompted to provide a call-back number for the system to call you into the teleconference after joining the
Grandstream Networks, Inc.
 Grandstream Networks, Inc. GVC3200/GVC3202 Video Conferencing System for Android TM Skype for Business Application Note GVC3200/GVC3202 Skype for Business Application Note Index DOWNLOAD AND INSTALL SKYPE
COALESCE PROFESSIONAL (PRO)
") USER MANUAL WC-COA-PRO COALESCE PROFESSIONAL (PRO) 24/7 AT OR VISIT BLACKBOX.COM TABLE OF CONTENTS 1. SPECIFICATIONS... 4 2. THE COALESCE PRO APP... 6 2.1 What is Coalesce Pro?...6 2.2 Networking...6 2.3
USER MANUAL WC-COA-PRO COALESCE PROFESSIONAL (PRO) 24/7 AT OR VISIT BLACKBOX.COM TABLE OF CONTENTS 1. SPECIFICATIONS... 4 2. THE COALESCE PRO APP... 6 2.1 What is Coalesce Pro?...6 2.2 Networking...6 2.3
You ll find everything you need to get started with your VaaS-t conferencing account in the following pages.
 make meeting simple You ll find everything you need to get started with your VaaS-t conferencing account in the following pages. Quick Start Guide Getting Started Making your first call Creating your Contact
IBM LotusLive Meetings Quick Start Guide
 IBM LotusLive Meetings Quick Start Guide Starting a meeting with IMB LotusLive Meetings is easy because you can start it from anywhere and at anytime. There s no reason to carry your laptop or copies of
Troubleshooting. Cisco WebEx Meetings Server User Guide Release 2.7 1
 Participants List Displays Multiple Entries for the Same User, page 2 Internet Explorer Browser Not Supported, page 2 404 Page Not Found Error Encountered, page 2 Cannot Start or Join Meeting, page 3 SSO
Dolby Conference Phone. User's guide for BT MeetMe with Dolby Voice
 Dolby Conference Phone User's guide for BT MeetMe with Dolby Voice Version 3.2 21 June 2017 Copyright 2017 Dolby Laboratories. All rights reserved. Dolby Laboratories, Inc. 1275 Market Street San Francisco,