ST7501 Free-bundled. IP Surveillance
|
|
|
- Opal Robertson
- 5 years ago
- Views:
Transcription

1 ST7501 Free-bundled IP Surveillance
2 Table of Contents Getting Started...1 Introducing ST Special Features...1 ST7501 Server and Client Components...2 ST7501 Use Scenario...2 Functionality of ST7501 Server...3 Functionality of ST7501 LiveClient...4 Functionality of ST7501 Playback...5 Minimum System Requirements...6 ST7501 Installation...7 Installing the ST7501 Software...7 ST7501 Server...10 Activating ST7501 Server...10 How to Configure the Server...10 How to Stop/Reboot the Server...10 ST7501 LiveClient Configuration...12 Activating ST7501 LiveClient and Login to a ST7501 Server...12 User Interface of ST7501 LiveClient...13 Menu Bar...13 Status Panel...13 Quick Access Bar...14 Live Video Monitoring Window...14 Device tree...15 Camera Control Panel...16 PTZ Control Panel...16 Two Way Audio Control Panel...17 Language Selection...17 How to Manage Devices...18 Insert Devices...18 Insert Devices with Known IP Address...18 Insert Devices in LAN...20 View Live Videos...22 Dual Streams...22 Refresh...22 Camera Settings...22 Remove Live Video from the Video Monitoring Window...23 i i - User's Manual
3 Delete Devices from the Server...24 Update Devices...25 How to Change Video Viewing Mode...26 Change the Layout of Live Video Monitoring Window...26 Switch Video Channels...26 Configure Layout Mode...26 Rotating Video Pages...27 Edit Layout...27 Maximize/Minimize the Live Video Monitoring Window...29 View Live Video with Dual Monitors...30 View the maximum 32 channels simultaneously...31 Use different layout on each monitor...31 How to Manage User Accounts...32 The Default User Roles and Privileges of User Accounts...32 Add User Account...33 Modify User Account...34 Delete User Account...34 How to Configure Station General Settings...35 How to Edit Recording Groups...36 Recording Groups Settings...36 Manually Start to Record/Stop Recording...38 How to Edit Recording Schedules...39 Edit Schedule List...40 Add Schedules...41 Rename Schedules...41 Delete Schedules...41 Load/Save Schedule Templates...41 Edit Camera List...42 Edit Time Frame List...43 Add New Time Frames...44 The Concept of Repeat Frequency...46 Repeat Frequency: Weekly (DayBase)--Set up time segments within a day...47 Repeat Frequency: Weekly (WeekBase)--Set up time segments within a week...49 How to Use Talking Panel...52 Add Camera to the Talking Panel...52 There are two ways to insert a Network Camera to the talking panel:...52 Remove Camera from the Talking Panel...53 How to Manage Event Trigger...54 User's Manual - ii
4 DI/DO Settings...54 How to Configure Client Settings...56 Snapshot Settings...56 Take a Snapshot...57 AVI Settings...58 Record an AVI File...59 View Settings...60 Display Location...60 Date and time Format...61 Video Display Mode...61 Font Settings...61 General Settings...62 System Settings...62 Rotation Settings...62 How to Search for a Device on the Device Tree...63 How to Print Out a Video Picture...64 How to Lock LiveClient for Security Concerns...64 How to Logout from the Server...65 How to Exit the Application...65 ST7501 Playback Configuration...66 Activating ST7501 Playback and Login to a Server...66 User Interface of ST7501 Playback...67 Menu Bar...67 Status Panel...67 Quick Access Bar...68 Recorded Video Playback Window...68 Language Selection...69 Query Panel-- Browsing Page...69 Query Panel--Event Search Page...70 Query Panel--Log Viewer Page...71 Video Clips List Window...72 Playback Control Panel...73 How to View Recorded Video...74 Select a Recorded Video Clip...74 Remove Recorded Video Clips from Video Cells...76 Use Playback Control Panel...76 Timeline Slider Bar and Histogram...76 iii - User's Manual
5 Zoom in and zoom out the Histogram...77 Control the Audio...78 How to Change Recorded Video Viewing Mode...79 Change the Layout of Recorded Video Playback Window...79 Switch Video Channels...79 Configure Layout Mode...79 Maximize/Minimize the Recorded Video Playback Window...80 View Recorded Video with Multiple Monitors...81 How to Search Events...82 Select Event Category...83 Event Category-All Events...83 Event Category-All Motion Events...83 Event Category-All IVA Events...84 Event Category-All DI Events...84 Specify the Search Time Range...85 Start Event Search and Display the Search Results...85 View the Retrieved Video Clips...87 How to Search Logs...88 Select Log Category/Log Type/Log Level...89 Search for All Local Logs...89 Search for Login History...90 Search for Login Activities...90 How to Configure Client Settings...92 Snapshot Settings...92 Take a Snapshot...93 AVI Settings...94 Convert an AVI File...95 View Settings...96 Display Location...96 Date and time Format...97 Video Display Mode...97 Font Settings...97 How to Search for a Device on the Device Tree...98 How to Print Out a Video Picture...99 How to Lock Playback for Security Concerns...99 How to Logout from the Server How to Exit the Application User's Manual - iv
6 Getting Started Introducing ST7501 VIVOTEK ST7501 is new generation central management software, featuring reliable recording and easy system management for diverse IP surveillance applications. ST7501 has three major components including: ST7501 Server for recording, ST7501 LiveClient for viewing live media data and managing the system, and ST7501 Playback for browsing the database and retrieving the recorded media data. You can install and run the three components on a single computer, or install all of them in three separate computers. ST7501 Server is able to record network video streams up to 32 channels; while ST7501 LiveClient allows you to have real-time remote monitoring. For the video playback, you can use ST7501 Playback to retrieve the database with multiple advanced functions such as searching, browsing, and exporting. With ST7501 LiveClient and ST7501 Playback installed on other computers in different locations, you can have live viewing and database access for more efficient video management. Working seamlessly with VIVOTEK network cameras and video servers, ST7501 central management software privodes you with reliable video surveillance unit. Special Features Client/Server for Remote Video Management Real-time 32-channel Live Video Monitoring Simultaneous 16-channel Playback Efficient Recording System Pan/Tilt/Zoom Camera Control Interface Powerful Playback Control Functions Role-based User Account Management Lightweight Remote Login to Access All Functions Easy-to-use Snapshot Function Exports AVI Files to Local Host Seamlessly Integrates with All VIVOTEK Network Cameras Supports Dual-stream Live Viewing and Recording Cameras Accessible through NAT Event-triggered or Scheduled Recording Mode User's Manual - 1
7 ST7501 Server and Client Components ST7501 has three components: one server component--st7501 Server, and two client components--st7501 LiveClient and ST7501 Playback. ST7501 server provides a centralized management site for video recording. ST7501 LiveClient is a client program for the user to login the target server over the network to modify the server's configuration, edit the server's recording group and schedules, etc.; ST7501 Playback is also a client program for the user to login the target server to browse the recorded video database and video clips related to specific events. ST7501 Use Scenario The three components can be installed separately or combined together on the same host. You can just install the components you need on your local host. For example, you can only install ST7501 LiveClient on your local computer to monitor the live video from a remote ST7501 server; or you can only install ST7501 Playback on another local computer to login a remote server to review recorded videos. For user that only manages a few cameras, we recommend installing the client and server components on the same computer. A host with all of the three components installed is recognized as a stand-alone site. All the functions can be simultaneously performed on this site. Below we illustrate the use scenario of ST7501 server and client components. Remote Server Structure ST7501 LiveClient ST7501 Playback ST7501 Server Network Cameras Router Local Server Structure Stand-alone site ST7501 Server ST7501 LiveClient ST7501 Playback Network Cameras Router 2 - User's Manual
8 Functionality of ST7501 Server Serves as a centralized management site Performs 32-channel video recording Provides recording in multiple hard disks Feeds live video to the local/remote LiveClient users Feeds recorded video to the local/remote Playback users Zero waiting database recovery after unpredictable crash or power failure To configure the server, you should use ST7501 LiveClient to login to it; there are convenient and intuitive user interface in ST7501 LiveClient for you to edit the settings of the target server. User's Manual - 3

9 Functionality of ST7501 LiveClient Login to the ST7501 server Controls the server functions Manages user accounts of the server Edits the recording groups of the server Edits recording schedule of the server Provides powerful monitoring window Dual screens for maximum 32 channels simultaneous monitoring 1x1, 2x2, 1+5, 3x3, 1+12, 4x4, 5x5, 1+31 monitoring layouts Multiple video viewing pages and page switching Supports convenient evidence exporting Exports AVI file of live video in real-time Snapshots the live video pictures Prints out the live video pictures Supports convenient multiple monitor switching Provides PTZ operation panel for PTZ camera control Remote configuration for network cameras Log settings for security concern 4 - User's Manual

10 Functionality of ST7501 Playback Login to the ST7501 server Browses the database of recorded video from the server in day base Provides convenient playback window Maximum 16 channels simultaneous playback 1x1, 2x2, 1+5, 3x3, 1+12, 4x4 playback layouts Supports powerful playback functions 1/8, 1/4, 1/2 slow-down playback 2, 4, 8, 16, 32, 64 speed-up playback Supports convenient evidence exporting Exports AVI file of recorded video in real-time Snapshots the recorded video pictures Prints out the recorded video pictures Supports convenient multiple monitor switching Powerful search engine Event search Log search User's Manual - 5
11 Minimum System Requirements Before installing the ST7501 software, please make sure your system meets the following recommended minimum hardware requirements. If you only want to install ST7501 server, please prepare the following hardware system: Server Operating System CPU RAM Network Interface Card Graphics Adapter Hard Disk Type Hard Disk Space Windows XP Professional (32 and 64 bit), Windows Vista Business Intel Pentium 4 or higher (Inter Xeon recommended), minimum 2.0 GHz Minimum 1 GB for Windows XP Professional, 2 GB for Windows Vista Business Ethernet, 1 Gbit recommended AGP or PCI-Express, minimum , 16 bit colors ATA-100, SATA, SCSI, SAS (7200 rpm or faster) 80 GB free (depends on the amount of Network Cameras and recording settings) If you want to install both server and client programs, please upgrade your hardware system as below: LiveClient and Playback Operating System CPU RAM Graphics Adapter Network Interface Card Hard Disk Type Hard Disk Space Windows 2K/XP Professional (32 and 64 bit), Windows Vista Intel Core 2 quad 2.0 GHz or above Minimum 1 GB for Windows XP Professional, 2 GB for Windows Vista Business AGP or PCI-Express, minimum , 16 bit colors Minimum 128MB Video RAM, 512MB recommended Minimum 10/100M, 1Gbit recommended ATA-100, SATA, SCSI, SAS (7200 rpm or faster) 80 GB free (depends on the amount of Network Cameras and recording settings) Only user with the authority as Administrator can install or use ST7501 on Windows Vista system. 6 - User's Manual


12 ST7501 Installation Installing the ST7501 Software 1. Run the ST7501_Setup.exe program on your computer. Click I ACCEPT for the License Agreement and specify a location to install. 2. Select the items you want to install, and then click Next to continue. If you do not want to install ST7501 Server, uncheck the ST7501 server and click Next to install. Skip the following steps. Server component Client components 3. Assign administrator username and password for ST7501 Server which will run on this computer and then click Next. Please remember the administrator username and password to login later. User's Manual - 7


13 4. Install a database for your server. There are two options--postgresql or SQL server. PostgreSQL If you don't have a database, we recommend you to select PostgreSQL (8.2 version above is recommended) as your database since ST7501 will instruct you to finish the installation procedure. Please note that PostgreSQL may be interrupted by some antivirus program. If you cannot use ST7501 without antivirus program, please use SQL server as your database engine. Follow the steps below to install PostgreSQL: a. Select it on the drop-down list and assign a password. ST7501 will default store the recorded media file under c:\recording. If you plan to store data under other path, you could click Browse in the dialog to change the path. Then click Next to continue. b. A dialog will pop up. If you don't have PostgreSQL installed on your computer, click No to begin the installation. If you already have PostgreSQL installed on your computer, click Yes. A PostgreSQL configuration window will pop up. Enter the Super Password and click Browse to specify the Folder. c. Wait for the installation process to complete and then click Close to exit the installation program. 8 - User's Manual


14 SQL Server If you want to select SQL Server as your database, you have to install it in advance, and then start ST7501 installation. Follow the steps below to install SQL Server: a. Install and activate SQL server on your computer. SQL server 2005 express version is recommended. Please note that currently only the SQL server installed on the same computer is supported. b. Follow step 1-3 to run the ST7501_Setup.exe program on your computer. c. Select SQL Server on the drop-down list and assign a password. Click Next to continue. d. Select Windows authentification or SQL Server authentification. (Username and Password are necessary according to the settings when you install SQL server.) Then click Install to begin the installation. e. Wait for the installation process to complete and then click Close to exit the installation program. Once you have the user account of a specific ST7501 station, you can login to ST7501 server from any computer over the network through LiveClient and Playback. User's Manual - 9

15 ST7501 Server Activating ST7501 Server The ST7501 Server is a service program that will run automatically when the computer starts up. How to Configure the Server Please follow the steps below to configure the ST7501 server: 1. Find a local/remote computer that has installed ST7501 LiveClient. 2. Activate ST7501 LiveClient and login to the target ST7501 Server. 3. Configure the server using ST7501 LiveClient user interface. How to Stop/Reboot the Server Please follow the steps below to stop/reboot the server: 1. Under Microsoft Windows, choose "Start > Settings > Control Panel > Adminstrative Tools > Services." 2. The Service window will pop up. Search for "ST7501 Uranus Watch Dog" in the window User's Manual
16 3. Right-click ST7501 Uranus Watch Dog and click Stop to stop the services of ST7501 server. Click Restart to reset ST7501 server. User's Manual - 11

17 ST7501 LiveClient Configuration Activating ST7501 LiveClient and Login to a ST7501 Server ST7501 LiveClient allows you to monitor live video from cameras managed by a ST7501 Server; also, it is the main user interface to control lots of server functions. After installing ST7501 LiveClient program, please follow the steps below to activate ST7501 LiveClient: 1. Run the ST7501 LiveClient program. 2. A Login window will pop up. Enter the blanks as below: If you want to login to a remote ST7501 server, enter the IP address, user name, password and communication port of the server to login. Click Login to login the target server or Cancel to exit the system. If you want to login to your local host which is currently running ST7501 server, check Login local station checkbox, then the local IP address will show up automatically. Enter the username, password, and communication port of the local server to login. Click Login to login the target server or Cancel to exit the system. 3. The ST7501 LiveClient monitoring window will be displayed. Functions of the ST7501 LiveClient will be enabled according to the role of your login account. For more details about the privileges of the user account, please refer to How to Manage User Accounts on page User's Manual
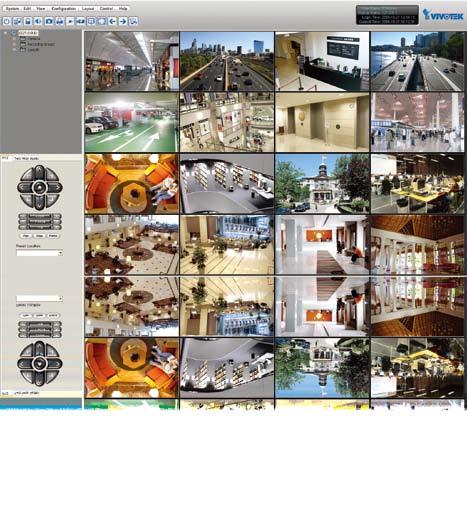
18 User Interface of ST7501 LiveClient F B A C D E A. Menu bar B. Quick access bar C. Device tree D. Camera control panel (PTZ control panel / Two way Audio control panel) E. Live video monitoring window F. Status panel Menu Bar Menu Item System Edit View Configuration Layout Control Help Drop-down Options Language / Lock / Start to Rotate (Stop Rotating) / Enable Click On Image (Disable Click On Image) / Second View / Logout / Exit Start to Record (Stop Recording) / Snapshot / Print / Record to AVI / Find Full Screen / Minimize Cameras Management / User Management / Event Trigger Management / Station General Settings / Recording Group Settings / Recording Schedule Settings / Client Settings Edit / Choose Motion / Zoom / Focus / Iris / Pan / Patrol About Status Panel User Name Station Name (IP Address) Login Time (yyyy-mm-dd hh:mm:ss) Current Time (yyyy-mm-dd hh:mm:ss) User's Manual - 13
19 Quick Access Bar Icon Function Description Exit Logout Exit the system Logout from the current station Lock Click to Lock the system for security concerns ( Unclock the system) Audio on Adjust the audio volume of the focused video ( Mute) Snapshot Print Capture pictures from the focused video Print out pictures of the focused video Record to AVI Video compression in AVI format ( Recording AVI) Remove All Connections Layout Full Screen Page Up Page Down Switch Screen Remove all live videos from the live video monitoring window Change the layout of live video monitoring window Maximize the live video monitoring window Switch to the previous video monitoring page Switch to the next video monitoring page Switch current window to other screen Some buttons will be disabled if the selected devices does not support those functions. Live Video Monitoring Window The "VIVOTEK" logo represents that no camera has been assigned to this video cell. The red frame ( ) represents the focused cell. Video Cell 14 - User's Manual
 / / / / VIVOTEK fixed network camera Red dot means that the camera is recording. VIVOTEK PTZ network camera Red dot means that the camera is recording.")
20 Device tree Station Name (IP address) Devices list under the station Camera name (IP Address) Deivces that have been assinged to the default recording group Layout list Icon Description A station (a computer that has installed ST7501 server) / / / / VIVOTEK fixed network camera Red dot means that the camera is recording. VIVOTEK PTZ network camera Red dot means that the camera is recording. VIVOTEK dome network camera Red dot means that the camera is recording. VIVOTEK video server Red dot means that the video server is recording. / Digital input on / off / Digital output on / off A layout of the live monitoring window The station that cannot be connected now. The device that cannot be connected now. User's Manual - 15

21 Camera Control Panel PTZ Control Panel Up Top left Left Bottom left Zoom out Focus near Close Start to auto pan Top right Return to home position Right Bottom right Down Auto focus Zoom in Focus far Open Auto iris Start to auto patrol Sop auto panning/patrolling Drop-down list of preset positions Only PTZ and speed dome cameras associated with the icon or on the device tree will enable the PTZ Control Panel. You can also click Control on the menu bar, and select the PTZ function on the drop-down list. Click System > Enable Click On Image, then you can use mouse to control the pan/tilt/zoom function for all live videos of PTZ cameras in video cells User's Manual


22 Two Way Audio Control Panel The two way audio function allows the user to communicate with people around the network camera. Selected Device that you can use two way audio function Click to talk Click to play sound on camera side Remove all cameras in the Talking Panel Click to adjust microphone volume Click to test the selected sound on the client side Click to adjust volume For detailed information about how to use the Talking Panel, please refer to page 53. Only cameras with two way audio function can be added to the talking panel. Language Selection ST7501 currently supports multi-language user interface, and language options are availabe in: English, Deutsch, Español, Français, Italiano, 日本語, Português, 簡体中文 and 繁體中文. If you want to select other language for the interface, please click System > Language on the menu bar to select a desired language. Please note that if you want to change the language option, a message will remind you to restart the system. User's Manual - 17

23 How to Manage Devices Please follow the steps below to manage devices under a station: a. Click the station on the device tree. b. Click Configuration > Camera Management on the menu bar (or right-click the station, and then select Camera Management). c. The Camera Management window will pop up. Then you can begin insert or update devices under the station. b b a c Insert Devices Insert Devices with Known IP Address Please follow the steps below to add devices with known IP address to a station: a. Click the station on the device tree, and then click Configuration > Camera Management on the menu bar (or right-click the station, and then select Camera Management). b. The Camera Management window will pop up. Enter the device's IP address, (User Name and Password if necessary), HTTP Port, Transmission Protocol, and Camera Name. The transmission protocol determines how the live video stream is sent from the camera to the local computer. (Please refer to the note on next page for the detailed description of each transmission protocol.) 18 - User's Manual
24 In Step b, choose the transmission protocol according to your network environment and the desired video quality. The characteristics of each protocol is shown in the following table. Protocol UDP TCP HTTP Description This protocol allows near real-time audio and video streams. However, network packets may be lost due to network burst traffic and images may be obscured. Activate UDP connection when occasions require timesensitive responses and video quality is less important. This protocol guarantees the delivery of streaming data and thus provides better video quality. Nevertheless, the downside with this protocol is that the realtime effect is worse than that with the UDP protocol for a narrower bandwidth. This protocol allows the same quality as TCP protocol and the users don t need to open specific port for streaming under some network environment. Users inside a firewall can utilize this protocol to allow streaming data to come through. c. Click Detect Model to detect the model name and MAC address of the device. d. The model name and MAC address of the device will automatically show up in the blanks if the connection is successful. Specify the channel index for multi-channel video server; specify the recommended monitoring and recording stream for camera. If the camera does not support dual streams, these two fields will be disabled. e. If you want to make sure if this is the device you concern, click Connection Test to preview the live video from the device. f. Click Insert to add the device to the station, and it will show up under the device tree. f b c e d f h User's Manual - 19
25 g. To insert more devices to the station, repeat the above steps. You can manage up to 32 channels at the same time. h. When completed, click Close to exit the camera management window and return to the monitoring window. i. Back to the main window, you will find the newly inserted devices appear under the station and show up in the video cell. Insert Devices in LAN You can insert devices in LAN easily by using our convenient camera searching function. Please follow the steps below to add devices in LAN to a station: a. Click the station on the device tree in the monitoring window, and then click Configuration > Camera Management on the menu bar (or right-click the station, and then select Camera Management). b. The Camera Management window will pop up. Click Search Camera to detect all VIVOTEK's network cameras/video servers in LAN. b c. A Camera List window will pop up and show a list of detected cameras in LAN. d. On the top of Camera List window, you can select "List the cameras which are not inserted" or "List all cameras". The items listed below will then change accordingly. e. You can click Mac, IP Address, Model, Http port to sort the items. f. Select a device from the list you want to insert to the station. Its IP address, model name, MAC and HTTP port information will automatically show up in the corresponding blanks in Camera Management window. g. Enter the device's Camera Name, (User Name and Password if necessary). h. Specify the channel index for a multi-channel video server; specify the recommended monitoring and recording stream for a camera User's Manual

26 i. If you want to make sure if this is the device you concern, click Connection Test to preview the live video from the device. j. To insert more devices to the system, repeat the above steps. You can manage up to 32 channels at the same time. k. When all settings are done, click Insert to add the device to the station. The device will show up under the device tree. l. When completed, click Close to exit the camera management window and return to the monitoring window. m. Back to the main window, you will find the newly inserted devices appear under the station and show up in the video cell. c d e f k g f i h m k l In Step h, you can select the Initial Viewing Stream and the Initial Recording Stream. If you want to change the stream source of viewing stream later on, you can right-click the focused cell, and then select a desired stream. Please refer to Dual Streams on page 22 for detailed illustration. If you want to change the stream source of recording stream later on, you can modify it when you edit a recording group. Please refer to Recording Group Settings step f. on page 37 for detailed illustration. User's Manual - 21

27 View Live Videos The server will automatically add newly-inserted device to video cell for live viewing. You also can double-click the target device or drag-and-drop the target device from the device tree window to the video cell in the live video monitoring window. Dual Streams For dual-stream devices, you can right-click on the focused cell to select streaming 1 or streaming 2. Refresh Click Refresh, the LiveClient will request the latest information of the device from the server. Camera Settings Click Camera Settings to open LiveClient Browser to configure detailed settings. Some functions in the browsing window in ST7501 will be disabled dual to limitation. If you really need to change the settings, use your own browser to connect to the device directly User's Manual
28 Remove Live Video from the Video Monitoring Window There are two ways to remove a live video from the video cell: 1. Right-click the video cell and select Remove. 2. Drag-and-drop the live view from the video cell to the device tree window. If you want to remove all live videos from the video cells, please click on the menu bar. User's Manual - 23
29 Delete Devices from the Server There are two ways to delete a device from the server: Select either step 1 or step 2: 1. Select the device on the device tree, and then right-click to delete. Note that a dialog will pop up. Click Yes to delete the device along with recorded data; click No to delete the device but remain the recorded data; click Cancel to cancel the delete action. 2. Delete a device from the server via Camera Management window: a. Click the station on the device tree, and then click Configuration > Camera Management on the menu bar (or right-click the station, and then select Camera Management). b. The Camera Management window will pop up. The device tree managed by the station will display in the left Camera List window. c. Select a device on the list you want to delete. Its IP address, model name, MAC and HTTP port information will automatically show up in the corresponding blanks in Camera Management window. d. Click Delete to delete it from the server. Note that a dialog will pop up. Click Yes to delete the device along with recorded data; click No to delete the device but remain the recorded data. e. To delete more devices, repeat the above steps. f. When completed, click Close to exit the camera management window and return to the monitoring window. The deleted device will disappear from the station. b c d f 24 - User's Manual
30 Update Devices Please follow the steps below to update a device via Camera Management window: a. Right-click the target device on the device tree, and then click Camera Management. b. The Camera Management window will pop up. The device tree managed by the station will display in the left Camera List window. c. Select a device on the list you want to update. Its IP address, model name, MAC and HTTP port information will automatically show up in the corresponding blanks in Camera Management window. d. After modifying the settings, you can click Connection Test to preview the live video from the device. e. When all settings are done, click Update to enable the settings. a b c d e User's Manual - 25


31 How to Change Video Viewing Mode Change the Layout of Live Video Monitoring Window VIVOTEK ST7501 LiveClient supports up to 32-CH simultaneous video viewing on single monitor, and it allows you to change the layout of live video monitoring window based on the number of inserted devices. Switch Video Channels To move a video channel to another empty video cell, drag-and-drop the view to the target video cell. To switch two channels, drag-and-drop one view to the other, then the two channels will switch with each other. Configure Layout Mode Click the Layout button on the quick access bar. Select a desired layout mode, the layout window will change accordingly. Below we illustrate 8 kinds of layout modes and corresponding page numbers: Layout mode Description Video page 1 x x x x x More than 1 video page; rotation function is enabled Only 1 video page; rotation function is disabled Some layout modes (1 x 1, 2 x 2, 1 + 5, 3 x 3, , 4 x 4) will divide all video channels into several pages User's Manual


32 For example, under 3 x 3 layout mode, you can switch among the three pages by clicking and on the quick access bar. To arrange the content of each page, manually drag-and-drop cameras from the device tree to the video cells on each page. Page 1 Page 2 Page Rotating Video Pages For layout modes that contain more than one page, ST7501 LiveClient offers the rotatiing function to display all video pages in turns. To enable this function, click System > Start to Rotate on the menu bar, which will become Stop Rotating, then the video pages will start to rotate, and you don't have to click for next page. To disable this function, click System > Stop Rotating, which will become Start to Rotate on the menu bar. The default rotating time interval is 6 seconds. If you want to edit rotation settings, please refer to Rotation Settings on page 64. Edit Layout Please follow the steps below to save a layout: a. Arrange a layout mode and drag devices to desired video cells. b. Click Layout > Edit > Save to > New on the menu bar. A Layout Name dialog will pop up. c. Enter a descriptive name for the the layout, and then click OK to enable the setting. User's Manual - 27


 or existing layout (replace with the new one) on the menu bar.")
33 d. Back to the monitoring window, the new layout will show up under the device tree as below. You can save up to 10 layouts. e. To change to another layout, double-click the layout items on the device tree, or click Layout > Choose on the menu bar to select a desired layout. If you want to edit an existing layout, arrange a layout mode and drag devices to desired video cells, and then click Layout > Edit > Save to > New (save as a new layout) or existing layout (replace with the new one) on the menu bar. If you want to delete an existing layout, right-click the layout items on the device tree or click Layout > Edit > Delete on the menu bar to select the layout you want to delete User's Manual
34 Maximize/Minimize the Live Video Monitoring Window Single View: to maxmize a video cell to the whole video playback window Double-click the video cell, or right-click the video cell and then check Single View. The focused video will occupy the whole playback window as below. To restore to the original layout, double-click the video cell or right-click the video cell and then uncheck Single View. User's Manual - 29

35 Full Screen: to maximize live video monitoring window to the whole screen Click Full Screen on the quick access bar or right-click the video cell and then check Full Screen. In addition, you can also click View > Full Screen on the menu bar to maximize the live video monitoring window. To restore to the original layout, right-click a video cell and then uncheck Full Screen. You also can click Esc button on the keyboard to leave the full screen mode. Minimize: If you click View > Minimize on the menu bar, the LiveClient will minimize to the Windows tool bar. View Live Video with Dual Monitors ST7501 also supports live video viewing with dual monitors, and you can manage up to 32 channels concurrently. Moreover, the layout of video monitoring window on different monitor can be set up individually. Below we illlustrate the applications of dual monitors: Please follow the steps below to set up dual-screen mode: a. Set up dual monitors for your local computer. b. Launch ST7501 LiveClient on monitor 1. c. Click System > Second View on monitor 1, then the live video monitoring window will show up in monitor 2 as below. c Monitor 1 Monitor 2 e d. There are two ways to view live videos. One is to drag-and-drop the target device from the device tree window to the video cells. The other is to click any video cell on monitor 1 or monitor 2, and then double-click the target device; the live video will display in monitor 1 or 2 according to your choice. e. If you click Switch Screen on the quick access bar, the live monitoring window of monitor 1 and monitor 2 will exchange with each other User's Manual


36 View the maximum 32 channels simultaneously If you select 4x4 layout on dual screens, you can view the maximum of 32 channels live video simultaneously. In this case, each layout contains only 1 video page. Monitor 1 Monitor Use different layout on each monitor You also can select different layout for two monitors, just click the Layout button on the quick access bar. Below shows an example of 2x2 layout with 4 video pages on monior 1 and 4x4 layout with 1 video page on monitor 2. In the left monitor, you can click and to switch among four video pages. Monitor 1 - page 1 Monitor Click Monitor 1 - page User's Manual - 31
37 View Live Video with Multiple Monitors If you have multiple screens in your monitoring center, you can switch the ST7501 LiveClient Window among these screens. If you have two monitors, click Switch Screen on the menu bar, the LiveClient window of monitor 1 will switch to monitor 2. Monitor 1 Monitor 2 If you have three or more monitors, a drop-down list will display when you click Switch Screen on the menu bar. The number of items on this list depends on the number of your screens. Select a desired screen on the drop-down list, the LiveClient Window will then switch to the specified screen. Monitor 1 Monitor 2 Monitor User's Manual
38 How to Manage User Accounts ST7501 allows users to add user accounts with four-level user roles: Administrator > Power User > Operator > Guest. Each role has different privileges listed as below. Moreover, Administrators have the highest privileges, while Power Users can only add/edit user roles as Power Users, Operators, and Guests. The Default User Roles and Privileges of User Accounts Privileges \ User Roles Administrator Power User Operator Guest User Management Camera Management Delete Camera PTZ Control Talk Control Digital Output Control Event Trigger Management Access Camera Configuration Access Recording Group/ Recording Schedule Settings Modify Recording Group/ Recording Schedule Settings Manually Recording Event Search Log Viewer The privileges of Administrator cannot be unchecked. User's Manual - 33

39 Add User Account Please follow the steps below to add a new user account for a station: a. Click the station on the device tree. b. Click Configuration > User Management on the menu bar (or right-click the station, and then select User Management). c. The User Management window will pop up. The user accounts under the station will be displayed under the device tree. d. Enter User Name, Password, and specify the User Role of this user. e. Check or uncheck the privileges for this user if you want to limit the access right. Please note that you cannot uncheck the privileges of Administrator. f. When all settings are done, click Add to add the user account to the station. The new user account will show up under the device tree. g. Click Close to exit the User Management window. b b a c c d e f 34 - User's Manual
.")

40 Modify User Account Please follow the steps below to modify an existent user account: a. Click the station on the device tree, and then click Configuration > User Management on the menu bar (or right-click the station, and then select User Management). The User Management window will pop up. b. The user accounts under the station will be displayed under the device tree. c. Click the user account you want to modify in the device tree. d. The account information of this user will be displayed on the right side. e. Uncheck the privileges if you want to limit the access right. Please note that you cannot uncheck the privileges of Administrator. f. Click Save to enable the new settings. c d f Delete User Account Please follow the steps below to modify an existent user account: a. Select a station from the device tree and click Configuration > User Management on the menu bar (or right-click the station, and then select User Management). b. The Management window will pop up. The user accounts under the station will be displayed under the device tree. c. Click the user account you want to delete on the device tree. d. Click Delete, a delete user dialog will pop up. Click OK to delete the user account. The last administrator of the system could not be removed. The last administrator of the system could not be removed. User's Manual - 35
, Normal (record high and normal logs), Low (record high, normal, and low-level logs) or All.")
41 How to Configure Station General Settings In this section, you can set up Log Settings for the station. Log level: Select High (only record high-level logs), Normal (record high and normal logs), Low (record high, normal, and low-level logs) or All. Reserve Time: Enter the time interval that you want to reserve the log record. The maximum value is 416 days. For detailed information about log level, please refer to How to Search Log on page User's Manual
42 How to Edit Recording Groups By default setting, all devices are assigned to the default recording group. You can manually remove a device from the default recording group. However, only those devices which belong to a recording group can produce recorded media data. Another purpose of setting recording group is that you can distribute the recording loads to a number of hard-disks on the server side. The live media data will be stored in the first assigned hard-disk initially, and when the available free space of the first hard-disk approaches to the preset reserved space, the media data will be stored in the second disk, and so on. If the available spaces of that last disk approaches to the reserved spaces, the recorded data in the first disk will be erased for recording new media data. This procedure is called "Cyclic Recording". Recording Groups Settings Please follow the steps below to set up recording groups for a station: a. Click the station on the device tree. b. Click Configuration > Recording Group Settings on the menu bar (or right-click the station on the device tree, and then select Recording Group Settings). c. The Recording Group Settings window will pop up. By default, all devices are assigned to the Default Recording Group. So you also can right-click DefaultGroup on the device tree, and then click Recording Group Settings. d. Click << to delete devices from the DefaultGroup. Note that a Delete Camera dialog will pop up. Click Yes to delete the device along with recorded data; click No to delete the device but remain the recorded data; click Cancel to cancel the delete action. Please note that only those devices which belong to a recording group can produce recording videos. e. Click >> to add devices to the DefaultGroup. f. For dual-stream device, select a desired source of recording stream. g. The default Recording path is C:\Recording. The total space and free space of the disk shows below for reference. To modify the Reserved space of a path, select the path in Recording path for DefaultGroup, and then click Change settings to modify its value. h. To add other recording path in your local computer, click Add local path to open a Local Path dialog to select a desired path. The total space and free space of the selected disk will be shown in the dialog for reference. Then click OK to enable the settings, or click Cancel to discard the settings. b a b To delete devices from the DefaultGroup, you can also right-click the device on the device tree, and then click Delete to delete it. User's Manual - 37


43 i. To remove a path, select the path in Recording path for DefaultGroup, and then click Delete path to delete it. j. When all settings are done, click OK to confirm and save your settings. If you want to cancel all of your editing, click Restore to return to the previous settings or click cancel to discard the settings. c f h c i e g c d f e j d 38 - User's Manual

44 Manually Start to Record/Stop Recording By default setting, all devices are assigned to the default recording group and default recording schedule. Therefore, once you insert a device to the station, the ST7501 server will begin to record live video according to the default recording schedule. (Please refer to How to Edit Recording Schedules on page 40.) However, if you have changed the default schedule and in any emergency, you can manually click to enable a device start to record without setting up a recording schedule. Please follow the instruction below to manually enable recording. Click the device on the device tree under Default Group, and then click Edit > Start to Record on the menu bar (or right-click the device, and then select Start to Record). The string on the menu bar will turn into Stop Recording as below. The ST7501 server will start to record video from the target camera. Please note that its priority will be higher than a recording schedule, so it won't stop unless you click Stop Recording. After you click Stop Recording, the device will then follow the recording schedule. User's Manual - 39
45 How to Edit Recording Schedules After editing recording group settings, you can begin to edit recording schedules for the devices in a recording group. By default setting, all devices are assigned to the default recording schedule (Please refer to the default time frame on page 44). Therefore, once you insert a device to the station, the ST7501 server will begin to record live video according to the default recording schedule. You can manually remove a device from the default recording schedule. However, please note that you cannot assign recording schedules to those devices which have been deleted from a recording group. Following is the illustration of recording schedules, which are composed of several time frames. For each time frame, it has its own time segments, applying time range, repeat interval, and recording mode. Therefore, you can create different recording schedules with simple or complex time frames based on your need. Devices in Recording Group Time Frame a Router Time Frame b Recording Schedule 1 Time Frame n Time Frame y Recording Schedule N Time Frame z In addition, you can arrange the priority of each time frame according to its importance. The recording schedule with the highest priority will be applied first. This design is very useful because you can specify a new time frame with the highest priority for temporary need without modifying all the other time frames. Features of the recording schedules: Each device can be assigned to only one recording schedule. Each recording schedule may contain many time frames. Each time frame has its own repeat frequency and recording mode. To save your time of editing recording schedules and time-frames, we also provide a useful template function for you to save your setting of schedules/time-frames. That is, you can save a specified schedule and download it as a template for future application or upload a wellarranged schedule template designed by others. Please note that after you save the recording settings to the server, the recording schedule will begin automatically according to your settings User's Manual

. c. The Recording Schedule Settings window will pop up.")
46 Edit Schedule List Please follow the steps below to set up the schedule lists: a. Click the station on the device tree. b. Click Configuration > Recording Schedule Settings on the menu bar (or right-click the station, and then select Recording Schedule Settings). c. The Recording Schedule Settings window will pop up. By default, all cameras under the station are assigned to Default Schedule, Default Time Frame, and Default Camera List. a b b c d e f g h b c d e f User's Manual - 41

47 Add Schedules d. To add a new recording schedule, click Add. A Schedule Name dialog will pop up for you to enter a descriptive name for the new schedule. Click OK to confirm the settings or Cancel to discard the settings. The new recording schedule will show up on the schedule drop-down list. Rename Schedules e. To rename an existent schedule, select the schedule on schedule drop-down list and click Rename. A Schedule Name dialog will pop up for you to enter a descriptive name for the new schedule. Click OK to confirm the settings or Cancel to discard the settings. The new recording schedule will show up on the schedule drop-down list. Delete Schedules f. To delete an existent schedule, select the schedule on schedule drop-down list and click Delete. A Remove Schedule dialog will pop up. Click OK to confirm the settings or Cancel to discard the settings. The new recording schedule will show up on the schedule drop-down list. Load/Save Schedule Templates g. If you have a schedule template with time frames settings, you can upload it to ease the editing of schedule. Click Load Template, a Load File dialog will pop up. Select the template file and click Open to load it. h. If you want to save a schedule as a template for future use, select the schedule on schedule dropdown list and click Save as Template. A Save File dialog will pop up for you to save the template file. g h 42 - User's Manual
48 Edit Camera List Please follow the steps below to assign a device to a recording schedule: a. Click the station on the device tree, and then click Configuration > Recording Schedule Settings on the menu bar (or right-click the station, and then select Recording Schedule Settings). b. The Recording Schedule Settings window will pop up. By default, all cameras under the station are assigned to Default Schedule, Default Time Frame, and Default Camera List. c. Select a recording schedule on the schedule drop-down list. d. By default, all devices under the station are assigned to the Default Schedule. e. Click << to remove devices from the Default Schedule. Click >> to add devices to the Default Schedule. Note that those devices that have been assigned to a schedule will be added with a yellow dot as. f. Click OK to confirm the settings or Cancel to discard the settings. c d e f User's Manual - 43


49 Edit Time Frame List Default Time Frame: Weekly daybase, Mon.~Sun., 24-hour, continuous recording Click Edit to open the default time frame settings page as below User's Manual


50 Add New Time Frames Please follow the steps below to add new time frames for a schedule: a. Select a recording schedule on the schedule drop-down list. b. Click Add to open the Time Frame Settings window. c. If you have a time-frame template, you can upload it to ease the editing of schedule. Click Load Template, a Load File dialog will pop up. Select the template file and click Open to load it. d. Enter a descriptive name for new time frame. a b d c g f i e User's Manual - 45
51 c e. To edit the new time frame, select a Repeat Frequency (Weekly-DayBase or Weekly-WeekBase) on the drop-down list and edit time segments, applying days, applying time range, and repeat time interval. For the detailed settings of each repeat frequency, please refer to The Concept of Repeat Frequency on page 47. f. Click Save to enable the settings. g. If you want to save this time frame as a time-frame template for future use, click Save as Template. A Save file dialog will pop up for you to save the template. g h. If you want to add more time frames to a schedule, repeat above steps. i. Close the window when you finish the time frame settings. j. Back to the Recording Schedule Settings window, the new time frame will show up in Time Frame List. k. If you want to edit an existent time frame, select if on the Time Frame List and click Edit to set up. l. If you want to delete an existent time frame, select if on the Time Frame List and click Delete. m. If you want to change the priority of a time frame, select it on the Time Frame List and click Up or Down to shift its position. The time frame on the top of the list would have the highest priority User's Manual

52 p j n k l m o n. Select a Recording Mode for the time frame. There are three options: None, Continuous, and Event. None: No recording action. Continuous: Endless recording. Event: Start recording for 20 seconds if event triggers. There are two kinds of event sources: Motion Trigger: Select Trigger to enable motion trigger Digital Input: Select Rising/Falling for low-to-high/high-to-low digital input signals. o. Click OK to confirm the settings or Cancel to discard the settings. p. Close the window when you finish the recording schedule settings. The Concept of Repeat Frequency ST7501 free-bundled version offers two kinds of repeat frequency--weekly (DayBase) and Weekly (WeekBase). The meaning of each type is listed in the following table. Repeat Frequency Weekly (DayBase) (Default Time Frame) Weekly (WeekBase) Meaning Specify arbitrary time segments within a day, Apply only on selected days of a week, Repeat the segments every N weeks in the specified time range Specify arbitrary time segments within a week, Repeat the segments every N weeks in the specified time range User's Manual - 47

 means 24 hours a day.")
53 Repeat Frequency: Weekly (DayBase)--Set up time segments within a day To set up Weekly (DayBase) repeat frequency, please configure the following items: Time segments within a day, Applying days within a week, Applying time range, and Repeat time interval. Daily timeline control bar Time segments within a day *You can drag the daily timeline bar for more than one time segment within a day. Applying days within a week Applying time range Repeat time interval Set up time segments within a day You can specify several time segments within an day. The number 0~23 on the daily timeline control bar (the purple rectangles) means 24 hours a day. There are two ways to set up time segments: one is to use the computer mouse to draw timeline bars; the other is to enter the precise start and end time value in the corresponding fields. Add time segments: Choose either step 1 or step 2 to set up 1. Use mouse to roughly drag timeline bars: Left-click on the wihte area under the daily timeline control bar and drag the mouse. The red timeline bars representing new time segments will appear. You can drag many time segments within a day. In the following illustrator, the red arrows show the dragging direction of the mouse. You can drag it from left to right or from right to left. Click the red timeline bar, the corresponding time segment will also show up in the Start Time and End Time fields. Note that if you want to set up a time frame precisely, please click the red timeline bar and manually adjust its Start Time and End Time, and then click Add to modify it User's Manual
54 2. Enter precise Start Time and End Time: a. Directly enter the value in Start Time and End Time fields, and then click Add. b. The corresponding timeline bar will automatically show up. a b Delete time segments: Choose either step 1 or step 2 to set up 1. Use mouse to roughly erase the timeline bar: Right-click on an existing timeline bar and drag the mouse. A green timeline bar representing the deleted part of a time segment will erase the red timeline bar. In the following illustrator, the green arrows show the dragging direction of the mouse. You can drag it from left to right or from right to left. 2. Use delete button to remove the whole timeline bar: a. Click an existing timeline bar. b. The corresponding time segment will show up in the Start Time and End Time fields. c. Click Delete, the selected timeline bar will disappear. a b c Set up applying days within a week For repeat frequency--"weekly-day", you can apply the time segments only on selected days of a week. In the following example, only Sunday and Saturday are selected in the time frame. User's Manual - 49


55 Set up applying time range For all kinds of repeat frequency, you can set up the applying date and time range for the time frame. Specify the start date and time in Start field; specify the end date and time in End field if you have an end time for applying this time frame. You can manually enter a specific time. Date Hour Minute Click the year and then click or to select a year Click to select a month on the drop-down list Click here to move to current date A calendar date-picker will appear when you click on the date drop-down list. Click or to select the month, and then pick a desired day in the calendar. If you do not have a terminating time for this time frame, select Never in End field. Set up repeat time interval The applying time intervals for repeat frequency "Weekly-day" and "Weekly-period" is "by every N weeks" as below. Repeat every 1 week means the time frame would apply for every week within the time rage. For repeat frequency "Weeklyday" and "Weekly-period" Repeat Frequency: Weekly (WeekBase)--Set up time segments within a week To set up Weekly (WeekBase) repeat frequency, please configure the following items: Time segments within a week, Applying time range, and Repeat time interval. Weekly timeline control bar Daily timeline control bar Time segments within a week *You can drag the timeline bar for more than one time segment within a week. Applying time range Repeat time interval 50 - User's Manual
 means 7 days a week, and the daily timeline contol bar means 24 hours a day.")

56 Set up time segments within a week You can specify several time segments within a week. The weekly timeline contol bar (the purple rectangles) means 7 days a week, and the daily timeline contol bar means 24 hours a day. The daily timeline control bar is only valid if one of the days on the weekly timeline control bar has been selected. There are two ways to set up time segments: one is to use the computer mouse to draw timeline control bars; the other is to enter the precise start and end time value in the corresponding fields. Add time segments: Choose either step 1 or step 2 to set up 1. Use mouse to roughly drag timeline bars: a. Click a day on the weekly timeline control bar. The seleced bar will turns into green color. b. Left-click on the wihte area under the daily timeline control bar and drag the mouse. You can drag more than one time segment within a day. In the following illustrator, the red arrows show the dragging direction of the mouse. You can drag it from left to right or from right to left. c. The red timeline bars representing new time segments will also appear under the weekly timeline control bar. d. Click a red timeline bar under the weekly timeline control bar, the corresponding time segment will also show up in the Start Time and End Time fields. Note that if you want to set up a time frame precisely, please click the red timeline bar and manually adjust its Start Time and End Time, and then click Add to modify it. a d c d b b 2. Enter precise Start Time and End Time: a. Directly select a day and enter the value in Start Time and End Time fields, and then click Add. b. The corresponding timeline bars will automatically show up. Following shows an example of a long-term time segment from Mon. 8:00 to Wed. 9:00: b a b User's Manual - 51


57 If you click on the weekly timeline control bar, the corresponding time segment on the selected day will show up accordingly: Delete time segments: Please refer to page 49 for detailed illustration. Set up applying time range Please refer to page 50 for detailed illustration. Set up repeat time interval Please refer to page 50 for detailed illustration User's Manual


58 How to Use Talking Panel ST7501 LiveClient supports two way audio function which allows the user to communicate with people around the network camera. Following is the illustration of two way audio function: Audio send from network camera Network Camera with internal or external microphone Audio send from operators Add Camera to the Talking Panel There are several ways to insert a Network Camera to the talking panel: Drag-and-drop a camera from the video cell or from the device tree to the talking panel as below. You also can right-click the target camera or the video cell, and then click Send to Talking Panel on the pop-up menu. User's Manual - 53
59 An icon with camera name will show up in the talking panel. Click to talk Click to play sound on camera side Remove all cameras in the Talking Panel Click to select a path of sound Click to adjust microphone volume Click to test the selected sound on the client side Please note that you cannot Talk and Play Sound at the same time. When you are talking or playing sound, you cannot add other cameras to the talking panel. If you want to add more cameras to the talking panel, please click Stop and Stop Playing first. Click to stop talking Click to stop playing 54 - User's Manual

60 Remove Camera from the Talking Panel Remove a camera Drag-and-drop a camera from the talking panel to the device tree as below. The camera icon will disappear. Remove all cameras Click, all cameras in the talking panel will be removed. User's Manual - 55


61 How to Manage Event Trigger ST7501 LiveClient supports event trigger management which allows the user to configure DI/DO settings of linked network cameras. DI/DO Settings Please follow the steps below to configure snapshot settings: a. Click Configuration > Event Trigger Management > DI/DO Settings on the menu bar to open the DI/DO Settings window. b. Check or uncheck the items to enable/disable the DI/DO function of linked network cameras. The items you've cheched will show up in the device tree. / Digital input on / off / Digital output on / off c. Click Save to enable the settings User's Manual
 or disable (Open) the digital output of the linked device.")
62 Before you configure DI/DO Settings on ST7501, please make sure you have linked your network camera or video server to the DI/DO devices, and set up correctly on the camera configuration page. You also can right-click the video cell, and then select Set DO to enable (Grounded) or disable (Open) the digital output of the linked device. User's Manual - 57
.\" Snapshot Settings Please follow the steps below to configure snapshot settings: a.")
63 How to Configure Client Settings In Client Settings, you can configure Snapshot Settings, AVI Settings, View Settings, and General Settings. It allows you to save snapshots and AVI files on "local computer (client side, not server side)." Snapshot Settings Please follow the steps below to configure snapshot settings: a. Click Configuration > Client Settings > Snapshot Settings on the menu bar to open the Snapshot Settings window. b. Select a picture format for snapshots (BMP or JPEG). If you select JPEG format, you can adjust the value of recompression quality (from 1 to 100). Note that higher value would generate higher picture quality but lower compression rate. c. Enter a descriptive Prefix for the filenames of snapshots. d. The default storage path for snapshot is C:\Program Files\Vivotek Inc\ST7501\Client\LiveClient\ Snapshot. If you want to change the storage path, click Browse to select another folder. b d c e The recompression quality is only enabled in MPEG-4 streaming. If your stream source is MJPEG, the system will directly save the JPEG image without recompression. e. If you check Generate a file name automatically, ST7501 will directly save snapshots with filename in the following format to the storage folder. Snapshot_ _173015_01.jpg File name prefix Date and time Picture format (YYYYMMDD_hhmmss) Serial number of snapshots 58 - User's Manual
64 If you uncheck Generate a file name automatically, a Save file dialog will pop up when you take a snapshot. And the file name prefix will automatically show up in the Save File dialog. Take a Snapshot Please follow the steps below to take a snapshot of live video: a. Select a video cell you want to take a snapshot. b. Click Snapshot on the quick access bar, or right-click the video cell and select Others > Snapshot in the pop-up menu. You also can click Edit > Snapshot to take a snapshot. c. The snapshots will be found in the storage folder on your local computer according to the snapshot settings. User's Manual - 59
.")

65 AVI Settings While you monitor a live video, the Record to AVI function allows you to record the live video in AVI format to your storage folder. Please follow the steps below to configure AVI converting and exporting settings: a. Click Configuration > Client Settings > AVI Settings on the menu bar to open the AVI settings window. b. Edit the value of AVI frame rate (frame number per second). c. Select Lengh of AVI file-- Maximum Size (1~2000MB) or Maximum Time interval (1~150 min). d. The default storage path for AVI exporting is C:\Program Files\Vivotek Inc\ST7501\Client\LiveClient\ AVI. If you want to change the storage path, click Browse to select another folder. c e b f Because an AVI file has limitation of maximum file size not larger than 2G bytes. If the setting time length would generate data bigger than 2G bytes, several files will be generated. d e. To modify the video compression settings, click Video Compression Setting to open the AVI Video Compression Setting window. Select the desired video compression algorithm, compression quality, intervals, and data rate in corresponding fields. If you do not compress the video, the generated AVI file would be very large. To modify the settings of a compression algorithm, click Configure, a dialog will then pop up for you to modify the settings. The settings dialog is different from different compression. To see the information of a compression algorithm, such as its version, click About, a dialog will then pop up showing the related information. The settings dialog is different from different compression User's Manual


66 f. To modify the audio compression settings, click Audio Compression Setting to open the AVI Audio Compression Setting window. Select the desired audio quality, format, and attributes in the corresponding fields. Record an AVI File Please follow the steps below to record an AVI file of live video: a. Select a video cell you want to record an AVI file. b. Click Record to AVI on the quick access bar, or right-click the video cell and check Record to AVI in the pop-up menu. You also can click Edit > Record to AVI on the menu bar. c. The icon of Record to AVI will then turns into Recording AVI, and a red AVI text string (AVI) will show at the right-bottom of the video cell. Note that only one video channel can be exported at a time. d. When you want to terminate the AVI Recording, click Recording AVI on the Quick Access Bar. The exporting process will then terminate and the button will change from to. The exported AVI files can be found in the storage folder on your local computer according to the AVI settings. Below is the file format of AVI files: _ avi Date and time Video format (YYYYMMDD_hhmmss) User's Manual - 61

67 View Settings This section allows you to set up the display mode of video cell, including Display Location, Date and time Format, Video Display Mode, and Font Settings. When you change the settings, the sample window will change accordingly for you to preview the settings. Display Location Display Area 1 Display Area 2 Display Area 3 Display Area 4 As the illustration shows, there are 4 display areas for you to put the information about the live video. Each drop-down list includes 6 options for you to select: Show None, Camera Name, Video Title, Camera Date, Camera Time, and Camera DateTime User's Manual


68 Date and time Format Same as local computer: Select this option, the date and time format will sync with the settings in the locale panel of your computer. Specify: Select a desired format for date and time on the drop-down list. Date format: Select YYYY/MM/DD or MM/DD/YY Time format: Select default TIme Format (sync with the settings in the locale panel of your computer), 12h AM/PM, or 24h. Video Display Mode Keep the aspect ratio: In default settings, the size of video cells will change according to the layout of the monitoring window you choose. Howerver, the frame size may be distorted. If you check Keep the aspect ratio, the video cell will be adjusted to the right frame size as the sample window shows. This function is disabled in default setting. Show motion window when triggered: If you check this item, the red frame of motion detection window will show up in the video cell when motion triggered. This function is enabled in default setting. For detailed information about how to set up the layout of the monitoring window, please refer to How to Change Video Viewing Mode on page 26. Change the Layout of Live Video Monitoring Window Font Settings This function allows you to change the font on video cell. Font: It will automatically list all fonts installed on your computer. Select a desired one. Color: Select a desired font color (white, red, green, blue). Size: Selet a desired font size (8, 10, 12, 14). User's Manual - 63

69 General Settings This section allows you to configure System Settings and Rotation Settings. System Settings Auto login after login operation system: If you check this option, ST7501 LiveClient will automatically login after you login Windows without entering the user name and password. The default setting of this function is disabled. Auto add newly-inserted camera to video cell: If you check this option, ST7501 LiveClient will automatically add newly-inserted device to video cell. The default setting of this function is enabled. Rotation Settings Rotate the page every second(s): Enter a desired time interval for rotation of video pages. The maximum value is 99 seconds. The default value is 6 seconds. Enable rotation after login: If you check this option, the video cells will start to rotate after you login LiveClient. The default setting of this function is disabled. For detailed information about how to set up the layout of the monitoring window and rotation function, please refer to How to Change Video Viewing Mode on page User's Manual


70 How to Search for a Device on the Device Tree This function is very convenient for you to quickly search for an inserted device, especially when you insert many devices. Please follow the steps below to find a device on the camera list: a. Click the station on the device tree. c b. Click Edit > Find on the menu bar. b a c. The Find window will pop up for you to set up your searching criteria. Find what: Enter a descriptive string in the blank. The string can be the full or partial name of the device you want to search. String Options: Match case means that the searching result should be identical to the string in lowercase or upper-case letters, and the string can be part of a word. Match whole word only means that the searching result should be identical to the string in every characters, and the string should be a complete word or phrase. If you select both items, the searching result should conform to all criteria listed above. Direction: Select either search up or search down. Search down Search up d. Click Find Next, the seaching result will be marked as below. Searching result d e. If there is nothing found in the camera list, a message will pop up as below: User's Manual - 65


71 How to Print Out a Video Picture There are two ways to print out a video picture of live video: 1. Select a video cell, then click Print on the quick access bar, or right-click the video cell and select Print in the pop-up menu. A Print window will pop up for you to choose the printer. 2. You also can click Edit > Print to print out a video picture. Focus Cell: Print out a picture of the target video. All Cells: Print out a picture with all video cells in the monitoring window. How to Lock LiveClient for Security Concerns If you are to be away from your computer, for security concerns, we suggest you lock the program. When LiveClient is locked, the user must enter the correct password to unlock and reaccess the program. To lock LiveClient, click Lock on the quick access bar or click System > Lock on the system menu. The icon of Lock will then turns into locked. To unlock LiveClient, enter the correct password in the popup window User's Manual
72 How to Logout from the Server To logout from the current server, click Logout on the quick access bar or click System > Logout on the menu bar. A confirmation window will pop up. Click OK to confirm or Cancel to return to the ST7501 LiveClient window. How to Exit the Application To exit ST7501 LiveClient, click Exit on the quick access bar or click System > Exit on the menu bar. A confirmation window will pop up. Click OK to confirm or Cancel to return to the ST7501 LiveClient window. When you exit the program, your user account will be automatically logged out from the current server. User's Manual - 67
73 ST7501 Playback Configuration Activating ST7501 Playback and Login to a Server ST7501 Playback is an application that allows you to search and playback recorded media data from a ST7501 Server. Once you insert a device to the device tree of ST7501 LiveClient, it will automatically show up on the device tree of ST7501 Playback. Then you can begin to use ST7501 Playback to view recorded video clips. After installing ST7501 Playback program, please follow the steps below to activate ST7501 Playback: 1. Run the ST7501 Playback program. 2. A Login window will pop up. Enter the blanks as below: If you want to login to a remote ST7501 server, enter the IP address, user name, password and communication port of the server to login. Click Login to login the target server or Cancel to exit the system. If you want to login to your local host which is currently running ST7501 server, check Login local station checkbox, then the local IP address will show up automatically. Enter the username, password, and communication port of the local server to login. Click Login to login the target server or Cancel to exit the system. 3. ST7501 Playback main window will be displayed. Functions of the ST7501 Playback will be enabled according to the role of your login account. For more details about the privileges of the user account, please refer to How to Manage User Accounts on page User's Manual
74 User Interface of ST7501 Playback G A B C D F E A. Menu bar B. Quick access bar C. Query panel (Browsing/Event search/log viewer) D. Recorded video playback window E. Video clips list F. Playback control panel G. Status panel Menu Bar Menu Item System Edit View Configuration Layout Help Drop-down Options Lock / Language / Logout / Exit Snapshot / Print / Convert AVI / Find Full Screen / Minimize Client Settings Change Layout About Status Panel User Name Station Name (IP Address) Login Time (yyyy-mm-dd hh:mm:ss) Current Time (yyyy-mm-dd hh:mm:ss) User's Manual - 69
75 Quick Access Bar Icon Function Description Exit Logout Exit the system Logout from the current station Lock Click to Lock the system for security concerns ( Unclock the system) Audio on Adjust the audio volume of the target video ( Mute) Snapshot Print Capture the picture of the target video Print out the picture of the target video Convert AVI Video compression in AVI format ( Converting AVI) Remove All Connection Layout Full Screen Switch Screen Remove all live videos from the live video monitoring window Change the layout of video monitoring window Maximize the live video monitoring window Switch to another screen Some buttons will be disabled if the selected devices does not support those functions. Recorded Video Playback Window The "VIVOTEK" logo represents that no camera has been assigned to this video cell. The red frame ( ) represents the focused cell. Video Cell 70 - User's Manual

 Devices listed under the station The dates with recorded video clips Refresh the display of recorded video clips Icon Description A station (a")
76 Language Selection ST7501 current supports multi-language user interface, and language options are availabe in: English, Deutsch, Español, Français, Italiano, 日本語, Português, 簡体中文 and 繁體中文. If you want to select other language for the interface, please click System > Language on the menu bar to select a desired language. Please note that if you want to change the language option, a message will remind you to restart the system. Query Panel-- Browsing Page Station Name (IP address) Devices listed under the station The dates with recorded video clips Refresh the display of recorded video clips Icon Description A station (a computer that has installed ST7501 server) The camera that still exists on the device tree of LiveClient. The camera that has been removed from the device tree of LiveClient. However, its recorded video (if any) is still accessible. The date with recorded video clips. User's Manual - 71

77 Query Panel--Event Search Page Select the devices you want to search event Select Event Category Specify search time range Click to start to search, and the result will be listed in the video clips list The Time Zone is the same as your local computer. The default End Time is the time when you use ST7501 Playback to login the server; the default Start Time is an hour earlier than the default End Time User's Manual

78 Query Panel--Log Viewer Page Select the station you want to search event Select Log Category Select User Account Select Result Select Log Type Select Log Level Specify search time range Click to start to search, and the result will be listed in the video clips list User's Manual - 73


79 Video Clips List Window After you select a date item, the video clips will be listed in the video clips list window. A date item may contain more than one video clips. Video clips ordering by time, no.1 is the earliest Device name Time range of video clips Remove all video clips from video cells, and then play the selected video clips Play the selected video clips in available video cells When you click one or more video clips, the two buttons above will be enabled. If you don't select any video clip on the list, these two buttons will be disabled User's Manual
80 Playback Control Panel After you select a video clip to play, the playback control panel will be enabled for you to use. Playback Timeline Slider Playback Control Buttons Playback Status Panel Playback Histogram Icon Function Description Histogram Zoom in Histogram Zoom out Last Time Interval Last Frame Pause Play Stop Next Frame Next Time Interval Slow Down Speed Up Zoom in the whole time range of the histogram Zomo out the whole time range of the histogram Go to previous video clip on the video clips list Go to previous video frame of the focused video clip Pause playback of the focused video clip Start to play the focused video clip Stop playing the focused video clip Go to next video frame of the focused video clip Go to next video clip on the video clips list Slow down the playing rate Speed up the playing rate The current time of the video clip Total length of the histogram The playing rate can be 1/8, 1/4, 1/2, 1X, 2X, 4X, 8X, 16X, 32X, and 64X. The playback status (Stop/Playing) User's Manual - 75
 to expand the device tree. 2.")


81 How to View Recorded Video Select a Recorded Video Clip Please follow the steps below to select a video clip: 1. In the Bowsing page, click the plus sign (+) to expand the device tree. 2. Right-click a device on the devices tree, and then click Refresh to display the recorded video clips. (or click the item, and then click Refresh on the bottom of the browing page.) Note that if you want to update all video clips of a station, click the station on the device tree and Refresh it. 3. There are two ways to view the video clips of a date. View one of the video clips of a date: a. Click a date item on the device tree. The corresponding recorded video clips will be listed in the video clip list window. b. Select one video clip in video clip list window. c. Double-click the video clip, it will start to play in an available video cell. (You can also directly drag-and-drop the video clip to a desired video cell in recorded video playback window. The video clip will start to play.) 76 - User's Manual


82 a c b View all of the video clips of a date: a. Select a date item on the device tree. b. Double-click the date item, or right-click the date item and click play, it will start to play in an available video cell. (You can also directly drag-and-drop the date item to a desired video cell in recorded video playback window. The video clip will start to play.) a b 4. Then you can make use of the playback control panel to playback the selected video clip. Please refer to Use Playback Control Panel on page 75. User's Manual - 77

83 Remove Recorded Video Clips from Video Cells There are two ways to remove a recorded video clip from the video cell: 1. Right-click the video cell and select Remove. 2. Drag-and-drop the live view from the video cell to the device tree window. If you want to remove all live videos from the video cells, please click on the menu bar. Use Playback Control Panel Timeline Slider Bar and Histogram The red part of the histogram shows the time range of a video clip. The timeline slider bar will move forward according to time shifting. To manually move forward/backward the video clip, drag-and drop the Timeline Slider Bar among the red part above the histogram to a desired position as below. The start time of the histogram The end time of the histogram The current time of the video clip will show up on the status panel. It will change according to the moving point of the timeline slider bar User's Manual
84 Zoom in and zoom out the Histogram If you only record a short video clip, you can click zoom in to extend it. Histogram zoom in Histogram zoom out As the second picture shows, click Histogram Zoom In, the total time range of the histogram will shorten to half of the original time range; while the red part of the histogram that shows the time range of the video clip will extend to twice of the original time range. In addition to clicking and to zoom in/zoom out the histogram, you can directly use mouse to drag the histogram to zoom in a fragment of the focused video clip. For example: a. Drag a fragment of the histogram. You can drag it from left to right or from right to left. b. The fragment will extend to the whole histogram as below. For more functions of the playback control buttons, please refer to page 75 for detailed description. User's Manual - 79
 a. Click Audio On on the quick access bar, and then check Mute.")

85 Control the Audio The audio function will be enabled if the device is equipped with internal or external microphone. Please follow the steps below to adjust the volume or turn on/off the audio of the focused video: To turn off the audio (Mute) a. Click Audio On on the quick access bar, and then check Mute. Or you can right-click on the video cell to open the pop-up menu, and then click Others > Mute. The mute option in the pop-up menu will then be checked. b. If you want to turn off the audio of all live video, check Apply all. c. The icon of Audio will then turn from into. a b To adjust the audio volume a. Click Audio On on the quick access bar. b. Drag-and-drop the slider bar. Slide to higher position for louder volume. To turn on the audio a. Click Mute on the quick access bar, and then uncheck Mute. Or you can right-click on the video cell to open the pop-up menu, and then click Others > Mute. The mute option in the pop-up menu will then be unchecked. b. If you want to turn on the audio of all live video, check Apply all. c. The icon of Audio will then turns from into. a b 80 - User's Manual

86 How to Change Recorded Video Viewing Mode Change the Layout of Recorded Video Playback Window VIVOTEK ST7501 Playback supports up to 16-CH simultaneous recorded video playing on single monitor, and it allows you to change the layout of live recorded video playback window based on the number of inserted devices. Switch Video Channels To move a video channel to another empty video cell, drag-and-drop the view to the target video cell. To switch two channels, drag-and-drop one view to the other, then the two channels will switch with each other. Configure Layout Mode Click the Layout button on the quick access bar or click Layout > Change Layout on the menu bar. Select a desired layout mode, the layout window will change accordingly. Below we illustrate 6 kinds of layout modes: Layout mode 1 x 1 2 x x x 4 Description User's Manual - 81


87 Maximize/Minimize the Recorded Video Playback Window Single View: to maxmize a video cell to the whole video playback window Double-click the video cell, or right-click the video cell and then check Single View. The focused video will occupy the whole playback window as below. To restore to the original layout, double-click the video cell or right-click the video cell and then uncheck Single View User's Manual
88 Full Screen: to maxmize the video playback window to the whole screen Click Full Screen on the quick access bar or right-click the video cell and then check Full Screen. In addition, you can also click View > Full Screen on the menu bar to maximize the recorded video playback window. To restore to the original layout, right-click the video cell and then uncheck Full Screen. You also can click Esc button on the keyboard to leave the full screen mode. Minimize: If you click View > Minimize on the menu bar, the Playback window will minimize to the Windows tool bar. View Recorded Video with Multiple Monitors If you have multiple screens in your monitoring center, you can switch the ST7501 Playback Window among these screens. If you have two monitors, click Switch Screen on the menu bar, the Playback window of monitor 1 will switch to monitor 2. Monitor 1 Monitor 2 If you have three or more monitors, a drop-down list will display when you click Switch Screen on the menu bar. The number of items on this list depends on the number of your screens. Select a desired screen on the drop-down list, the Playback Window will then switch to the specified screen. Monitor 1 Monitor 2 Monitor 3... User's Manual - 83
89 How to Search Events The ST7501 Playback offers users a powerful event searching engine to retrieve video clips from the database of recorded videos with different searching criteria, such as motion, IVA, or DI events. It will produce a video clip (20 seconds) for each event. Please follow the steps below to search events: a. Open the Event Search page. b. Select the target station/devices you want to search event. c. Specify the Event Category. For detailed information, please refer to Select Event Category on page 85. d. Specify the search time range. You can check the start time only, check the end time only, or check both the start time and end time. The search will only include the events according to your time range setting. If you uncheck both the start time and end time, the search will include all events recorded by the server. Please refer to page 87 for detailed information. e. Start event search and display the search results. Please refer to page 87 for detailed information. f. View the retrieved video clips. Please refer to page 89 for detailed information. a b c f d e e 84 - User's Manual


90 Select Event Category There are five event search categories: All Events, All Motion Events, All IVA Events, All DI Events. Event Category-All Events If you select All Events category, all the events of the three categories--motion detection, digital input, and abnormal video signal--will be included in the search. Event Category-All Motion Events The motion events indicates that there is motion detected by the camera. In the meanwhile, the parameter of the motion detection windows, such as detection sensibility, motion percentage, and the time of occurrence, are all recorded in the database of the server. If you select All Motion Events category, all detected motion events will be included in the search. If you want to change the parameters of the motion detection windows, such as position, size, detection sensibility, and motion percentage, please link to the camera's web setting page to modify the values. Video(TCP-AV) User's Manual - 85

91 Event Category-All IVA Events For cameras with embedded video content analysis, it is capable of detecting IVA (Intelligent Video Analysis) events, such as moving object detection, loitering detection, and tampering detection. The embedded video content analysis, superior to conventional motion detection function, is capable of distinguishing between creature s motions and still backgrounds or natural movements like swaying trees, waves or sunset so as to prevent the false alarms from environmental noise. With the tampering detection, it can detect incidents such as shooting redirection, blocking or defocusing of cameras, or even spray-painted. Additionally, a suspicious object in the predefined detection region will trigger alarms once the dwelling time of the object is longer than the given time. If you select All IVA Events category, all detected IVA events will be included in the search. If you want to change the parameters of IVA, such as detection region, loitering duration, etc, please link to the camera's web setting page to modify the values. Event Category-All DI Events The motion events represent that there is Digital-Input signal detected by the camera and its corresponding information, such as DI-High or DI-Low signal and the time of occurrence, is transmitted and recorded in the database of the station. For some models, the rising means from normal state to trigger state, and the falling means from trigger state to normal state. If you select All DI Events category, all triggered DI signals will be included in the search. If you want to change the DI/DO setting of the cameras, please link to the camera's web setting page to modify the settings User's Manual


92 Specify the Search Time Range This section is for you to specify the search time range for event search. Uncheck start time and end time: the search should include all the videos in the database. Only check the start time: the search should include all the videos recorded since the start time. Only check the end time: the search should include all the videos recorded before the end time. Check both start and end time: the search should include all the videos recorded within the start and end time. Specify the start date and time in Start field if you have an start time for applying this time frame; specify the end date and time in End field if you have an end time for applying this time frame. A calendar date-picker will appear when you click on the date drop-down list. Click or to select the month, and then pick a desired day in the calendar. You can manually enter a specific time. Click the year and then click or to select a year Click to select a month on the drop-down list Click here to move to current date Start Event Search and Display the Search Results After you specify all the search criteria mentioned above, check/uncheck Display in new result list and click Search to begin event search and display the results. If Display in new result list is unchecked, then click Search, all search results will display on the original single page as below. Unchecked Only one page User's Manual - 87


93 If Display in new result list is checked, then click Search, the search results will display on a new page as below. It's very convenient since you can put the search results of each search category on an individual page. You can set up to 5 pages in the video clip list window. Checked You can set up to 5 pages. Video clips ordering by time, no.1 is the earliest Device name Event time Event type Event parameters Right-click to: Right-click to: The Type field in search result page shows the event category, and the Description field displays the parameters of the corresponding event type. For example, the description for motion detection event will show the detection sensitivity of the camera User's Manual
94 View the Retrieved Video Clips Please follow the steps below to play the video clips listed in search result page: a. Select the video clips you want to view. You can select more than one video clips a time. b. Click Clear All Channels and Play if you want to remove all video clips from video cells. Then all the selected video clips will start to play in the video cells. c. Click Play with Current Channels if you want to keep the video clips on the occupied video cells. Then the selected video clips will start to play in those unoccupied video cells. d. The length of each video clip is 20 seconds. a b c User's Manual - 89

95 How to Search Logs The ST7501 Playback offers users a powerful log searching engine to search all local logs with different searching criteria, such as log category, log type, and log level. The search results will display in the log viewer window with detailed log history. Please follow the steps below to search logs: a. Open the Log Viewer page. b. Select the target station you want to search logs. c. Specify the Log Category. For detailed information, please refer to Select Log Category on page 91. d. Specify the User Account. If you have added other user accounts to the station, here you can select one to search its login history. For detailed information, please refer to How to Manage User Account on page 33. e. Specify the Search Result. Select All to display all search results; select Success to display successful log activities only; select Fail to display failed log activities only. f. Specify the Log Type. For detailed information, please refer to Select Log Type on page 91. g. Specify the Log Level. For detailed information, please refer to Select Log Level on page 91. h. Specify the search time range. You can check the start time only, check the end time only, or check both the start time and end time. The search will only include the events according to your time range setting. If you uncheck both the start time and end time, the search will include all events saved by the server. Please refer to page 87 for detailed information. i. Start log search and display the search results. Please refer to page 87 for detailed information. a b i c d e f g h i 90 - User's Manual

96 Select Log Category/Log Type/Log Level Following is the relationship of log category, level, and type. The search results will vary according to your options. Log Categories Log Levels Log Types Operation Log System Log Event Log Search for All Local Logs Normal High Low High High Login Logout Add User Update User Name Update User Password Update User Privilege Delete User Insert Camera Update Camera Information Delete Camera Set Digital Output Manual Start Recording Manual Stop Recording Set Recording Group Add Recording Schedule Update Recording Schedule Delete Recording Schedule Save Layout Update Layout Delete Layout Camera PTZ, Iris, Focus, Pan, Patrol Control Click on Image Select Preset Location Server Start Server Stop Camera Disconnected from the Server Camera Connected to the Server Camera Start Recording Camera Stop Recording Video clips ordering by time, no.1 is the latest Log Time Log Category Log Level Log Type Search Result (Success or Fail) User Account (Who login the server) Target Station Log Description Click to remove all search results from the list User's Manual - 91
 Search for Login Activities Click to remove all search results from the list This function allows you to search login activities the user has")

97 Search for Login History Select Login History in the log category field, the search results including all login logs will display on the Login History page. Video clips ordering by time, no.1 is the latest User Account (Who login the server) Search for Login Activities Click to remove all search results from the list This function allows you to search login activities the user has done during the login period. You can search for login activities on Local Logs and Login History page. Search for Login Activities on Local Logs page: a. Click on Local Logs page. b. Select a login/logout item on the list. c. Click Trace Login Activities. Or you can right-click a login/logout item on the list, and then click Trace Login Activities. b c c Right-click to: a 92 - User's Manual

98 d. The search results of login activities will display on the Login Activities page as below. Search for Login Activities on Local History page: a. Click on Login History page. b. Select a login/logout item on the list. c. Click Trace Login Activities. Or you can right-click a login/logout item on the list, and then click Trace Login Activities. b c c Right-click to: a d. The search results of login activities will display on the Login Activities page as below. When you select All in Log level field, the search results will include all levels of logs. If you select Low in Log level field, and check Including above level as the right picture below, the search results will also include all levels of logs. But if you select Normal in Log level field, and check Including above level as the right picture below, the search results will only include Normal-level and High-level logs. User's Manual - 93
.\" Snapshot Settings Please follow the steps below to configure snapshot settings: a.")
99 How to Configure Client Settings In Client Settings, you can configure Snapshot Settings, AVI Settings, and View Settings. It allows you to save snapshots and AVI files on "local computer (client side, not server side)." Snapshot Settings Please follow the steps below to configure snapshot settings: a. Click Configuration > Client Settings > Snapshot Settings on the menu bar to open the Snapshot Settings window. b. Select a picture format for snapshots (BMP or JPEG). If you select JPEG format, you can adjust the value of quality (from 1 to 100). Note that higher value would generate higher picture quality but lower compression rate. c. Enter a descriptive Prefix for the filenames of snapshots. d. The default storage path for snapshot is C:\Program Files\Vivotek Inc\ST7501\Client\Playback\ Snapshot. If you want to change the storage path, click Browse to select another folder. b d c e The recompression quality is only enabled in MPEG-4 streaming. If your stream source is MJPEG, the system will directly save the JPEG image without recompression. e. If you check Generate a file name automatically, ST7501 will directly save snapshots with filename in the following format to the storage folder. Snapshot_ _173015_01.jpg File name prefix Date and time Picture format (YYYYMMDD_hhmmss) Serial number of snapshots 94 - User's Manual

100 If you uncheck Generate a file name automatically, a Save file dialog will pop up when you take a snapshot. And the file name prefix will automatically show up in the Save File dialog. Take a Snapshot Please follow the steps below to take a snapshot of recorded video: a. Select a video cell you want to take a snapshot. b. Click Snapshot on the quick access bar, or right-click the video cell and select Others > Snapshot in the pop-up menu. You also can click Edit > Snapshot to take a snapshot. c. The snapshots will be found in the storage folder on your local computer according to the snapshot settings. User's Manual - 95
101 AVI Settings While you play a recorded video, the Convert AVI function allows you to export the recorded video in AVI format to your storage folder. Please follow the steps below to configure AVI converting and exporting settings: a. Click Configuration > Client Settings > AVI Settings on the menu bar to open the AVI settings window. b. Edit the value of AVI frame rate (frame number per second). c. Select Lengh of AVI file-- Maximum Size (1~2000MB) or Maximum Time interval (1~150 min). d. The default storage path for AVI exporting is C:\Program Files\Vivotek Inc\ST7501\Client\Playback\ AVI. If you want to change the storage path, click Browse to select another folder. b c e f d Because an AVI file has limitation of maximum file size not larger than 2G bytes. If the setting time length would generate data bigger than 2G bytes, several files will be generated. e. To modify the video compression settings, click Video Compression Setting to open the AVI Video Compression Setting window. Select the desired video compression algorithm, compression quality, intervals, and data rate in corresponding fields. If you do not compress the video, the generated AVI file would be very large. To modify the settings of a compression algorithm, click Configure, a dialog will then pop up for you to modify the settings. The settings dialog is different from different compression. To see the information of a compression algorithm, such as its version, click About, a dialog will then pop up showing the related information. The settings dialog is different from different compression User's Manual

 will show at the right-bottom of the video cell.")
102 f. To modify the audio compression settings, click Audio Compression Setting to open the AVI Audio Compression Setting window. Select the desired audio quality, format, and attributes in the corresponding fields. Convert an AVI File Please follow the steps below to convert an AVI file of recorded video: a. Select a video cell you want to convert an AVI file. b. Click Convert AVI on the quick access bar, or right-click the video cell and select Convert AVI in the pop-up menu. You also can click Edit > Convert AVI on the menu bar. c. The icon of Convert AVI will then turns into Converting AVI, and a red AVI text string (AVI) will show at the right-bottom of the video cell. Note that only one video channel can be exported at a time. d. When you want to terminate the AVI converting, click Converting AVI on the Quick Access Bar. The exporting process will then terminate and the AVI Export button will change from to. The exported AVI files can be found in the storage folder on your local computer according to the AVI convert settings. Below is the file format of AVI files: _ avi Date and time Video format (YYYYMMDD_hhmmss) User's Manual - 97
103 View Settings This section allows you to set up the display mode of video cell, including Display Location, Date and time Format, Video Display Mode, and Font Settings. When you change the settings, the sample window will change accordingly for you to preview the settings. Display Location Display Area 1 Display Area 2 Display Area 3 Display Area 4 As the illustration shows, there are 4 display areas for you to put the information about the live video. Each drop-down list includes 6 options for you to select: Show None, Camera Name, Video Title, Camera Date, Camera Time, and Camera DateTime User's Manual


104 Date and time Format Same as local computer: Select this option, the date and time format will sync with the settings in the locale panel of your computer. Specify: Select a desired format for date and time on the drop-down list. Date format: Select YYYY/MM/DD or MM/DD/YY Time format: Select default TIme Format (sync with the settings in the locale panel of your computer), 12h AM/PM, or 24h. Video Display Mode Keep the aspect ratio: In default settings, the size of video cells will change according to the layout of the monitoring window you choose. Howerver, the frame size may be distorted. If you check Keep the aspect ratio, the video cell will be adjusted to the right frame size as the sample window shows. This function is disabled in default setting. Show motion window when triggered: If you check this item, the motion detection window will show up in the video cell when motion triggered. This function is enabled in default setting. For detailed information about how to set up the layout of the monitoring window, please refer to How to Change Video Viewing Mode on page 26. Font Settings This function allows you to change the font on video cell. Font: It will automatically list all fonts installed on your computer. Select a desired one. Color: Select a desired font color (white, red, green, blue). Size: Selet a desired font size (8, 10, 12, 14). User's Manual - 99

 c.")


105 How to Search for a Device on the Device Tree This function is very convenient for you to quickly search for an inserted device, especially when you insert many devices. Please follow the steps below to find a device on the camera list: a. Click the station on the device tree, and then click Edit > Find on the menu bar. (Or you can rightclick the station, and then click Find on the pop-up menu.) c. The Find window will pop up for you to set up your searching criteria. Find what: Enter a descriptive string in the blank. The string can be the full or partial name of the device you want to search. String Options: Match case means that the searching result should be identical to the string in lower-case or upper-case letters, and the string can be part of a word. Match whole word only means that the searching result should be identical to the string in every characters, and the string should be a complete word or phrase. If you select both items, the searching result should conform to all criteria listed above. Direction: Select either search up or search down. Search down Search up d. Click Find Next, the seaching result will be marked as below. Searching result d e. If there is nothing found in the camera list, a message will pop up as below: User's Manual

106 How to Print Out a Video Picture There are two ways to print out a video picture of live video: 1. Select a video cell, then click Print on the quick access bar, or right-click the video cell and select Print in the pop-up menu. A Print window will pop up for you to choose the printer. 2. You also can click Edit > Print to print out a video picture. Focus Cell: Print out a picture of the target video. All Cells: Print out a picture with all video cells in the monitoring window. How to Lock Playback for Security Concerns If you are to be away from your computer, for security concerns, we suggest you lock the program. When ST7501 Playback is locked, the user must enter the correct password to unlock and reaccess the program. To lock Playback, click Lock on the quick access bar or click System > Lock on the system menu. The icon of Lock will then turns into locked. To unlock Playback, enter the correct password in the popup window. User's Manual - 101
ST7501 Free-standard. IP Surveillance
 ST7501 Free-standard IP Surveillance Table of Contents Getting Started...1 Introducing ST7501...1 Special Features...1 ST7501 Server and Client Components...2 Usage Scenario...2 ST7501 Server Functionality...3
Table of Contents Getting Started...2 Minimum system requirements...2. ST7501 Installation...3 Installing the ST7501 software...
 Free-bundled Table of Contents Getting Started...2 Minimum system requirements...2 ST7501 Installation...3 Installing the ST7501 software...3 ST7501 LiveClient Configuration...4 Activating ST7501 LiveClient...4
Quick Installation Guide
 Quick Installation Guide English Français Español Deutsch Português Italiano Türkçe Polski Русский Česky Svenska Central Management Software Package Contents English Software CD Quick Installation Guide
Central Management Software for NVR-915 / NVR-1615 CV5-M256
 Central Management Software for NVR-915 / NVR-1615 Table of Contents Chapter 1. Main Console... 4 1.1 Tool Bar... 4 1.2 NVR List... 5 1.3 Division List... 7 1.4 Group List... 9 1.5 PTZ Panel...11 1.6 Operation
User s Manual ST7501. Video Management Software. Rev CH Monitoring 16-CH Playback Multilingual Support
 ST7501 Video Management Software User s Manual 32-CH Monitoring 16-CH Playback Multilingual Support Rev. 1.11 User's Manual - 1 Table of Contents Revision History... 8 Getting Started... 11 Introduction...
NVMS User Manual. Version 2.1.0
 NVMS-1000 User Manual Version 2.1.0 Contents 1 Software Introduction... 1 1.1 Summary... 1 1.2 Operation Environment... 1 1.3 Install and Uninstall... 2 1.3.1 Install the Software... 2 1.3.2 Uninstall
ND8301. Network Video Recorder User s Manual. VAST inside HD Local Display Full Integration with VIVOTEK Cameras. Rev Rev. 1.
 ND8301 Network Video Recorder User s Manual VAST inside HD Local Display Full Integration with VIVOTEK Cameras Rev. 1.6.1.11 Rev. 1.0 1.2 Rev. 1.1b User's Manual - 1 Table of Contents Revision History...
Video Surveillance Management Software NVClient V5 User Manual
 Video Surveillance Management Software NVClient V5 User Manual Version: V5.0 Update Date: 2013-12-12 Welcome Thanks for using the Company's digital video surveillance management software. Please read this
NVMS User Manual
 NVMS-1000 User Manual Contents 1 Software Introduction...1 1.1 Summary... 1 1.2 Operation Environment... 1 1.3 Install and Uninstall... 2 1.3.1 Install the Software... 2 1.3.2 Uninstall the Software...
USER MANUAL. Mac Version
 USER MANUAL Mac Version Contents 1 Software Introduction... 1 1.1 Summary... 1 1.2 Install and Uninstall... 1 1.2.1 Install the Software... 1 2 Login Software... 3 2.1 Login... 3 2.2 Control Panel Instruction...
NVMS1000. User Manual
 NVMS1000 User Manual Contents 1 Software Introduction... 1 1.1 Summary... 1 1.2 Operation Environment... 1 1.3 Install and Uninstall... 2 1.3.1 Install the Software... 2 1.3.2 Uninstall the Software...
SecuGuard. Basic 5.0. User s manual. Dec Version: 5.0.x
 SecuGuard Basic 5.0 User s manual Dec. 2009 Version: 5.0.x SecuGuard Basic System Requirement...5 Installation...6 Before Installing the Software... 6 Starting the Installation... 6 Quick Start...9 Install
Central Management Software. Cam Viewer 3 Lite. User Manual
 Central Management Software Cam Viewer 3 Lite User Manual Version 1.0.0 Table of Contents 1. System Requirement...4 2. Software Installation...5 3. Configuration Wizard...9 3.1 Channel...10 3.1.1 Adding
NVMS User Manual
 NVMS-1000 User Manual Contents 1 Software Introduction...1 1.1 Summary... 1 1.2 Operation Environment... 1 1.3 Install and Uninstall... 2 1.3.1 Install the Software... 2 1.3.2 Uninstall the Software...
Table of Contents. Product Overview 3 System Requirements 4 Installing MicroView 5 Managing Users & Groups 8
 User s Manual Table of Contents Product Overview 3 System Requirements 4 Installing MicroView 5 Managing Users & Groups 8 Add a new user 8 Modify Group Privilege 9 How to Add a new camera 10 Add a new
Manual Version: V1.15. Video Management Software Guard Station User Manual
 Manual Version: V1.15 Video Management Software Guard Station User Manual Thank you for purchasing our product. If there are any questions, or requests, please do not hesitate to contact the dealer. Disclaimer
Camera Control for Windows
 Camera Control for Windows 1910012275 REV1.1.0 Contents Chapter 1 Introduction... 1 1.1 Overview... 1 1.2 System Requirement... 1 Chapter 2 Software Installation... 2 Chapter 3 Quick Start... 5 3.1 Create
SecuGuard. Basic 5.0. Version: xxx
 SecuGuard Basic 5.0 Ł` ˆª Ø Version: 5.0.2.xxx SecuGuard Basic ` Ø ˆ ˆ...6 ˆ Ø...7 Ł ˆ Ø»ˆÆ ˆ`... 7 ˆŁ` ˆ Ø»ˆÆ ˆ`... 7 Ø Æ Ł...10 Ø IP Camera(s)... 10 Ł` IP Camera(s)... 10 ˆ Ø Ł ˆ ˆ :... 14 Playback:...
NVMS-5000 NVMS User Manual
 NVMS-5000 NVMS-5000 User Manual NVMS-5000 User Manual Contents 1 Introduction... 4 1.1 NVMS-5000 Brief Introduction... 4 1.1.1 Summerization... 4 1.1.2 Software Architecture... 4 1.2 System Components...
Milestone XProtect Basis+
 XPB+ 6.0 FACTSHEET Milestone XProtect Basis+ Top performance IP video surveillance with an expanded feature set. XProtect Basis+ is the right product for small installations that need robust single-server
Multi-NVR Manager. Quick Start Configuration Usage
 Multi-NVR Manager Quick Start Configuration Usage 2014. All rights are reserved. No portion of this document may be reproduced without permission. All trademarks and brand names mentioned in this publication
NetClient software user manual
 NetClient software user manual 1-1. General information Net Client is an application which provides users not only viewing and controling remote DVRs, but also receiving realtime event data or alarm signals
IP Solution Intelligent Surveillance Solution
 IP Solution Intelligent Surveillance Solution user s manual Table of Contents TABLE OF CONTENTS TABLE OF CONTENTS...1 SYSTEM REQUIREMENT...5 INSTALLATION...6 QUICK START...10 1. MAIN CONSOLE...14 1.1 Start...16
Pro71600N3 NVR User Manual
 Pro71600N3 NVR User Manual User Information Admin User Name: Admin Password: IP Address: System Name: Table Of Contents 1. Menu Operation...4 1.1 Main Menu...4 2. Start & Shutdown System...5 2.1 Start
icms Pro USER s MANUAL Ver 1.0
 icms Pro USER s MANUAL Ver 1.0 Contents Target Audience for this Document... 5 Copyright, Trademarks and Important Information... 5 Copyright... 5 Disclaimer... 5 Introduction... 6 Tabs... 6 Panes... 7
Network Video Recorder Software 2.2 User Manual. Table of Contents
 Network Video Recorder Software 2.2 User Manual Table of Contents Chapter 1. Using NVR Software 2.2... 6 Chapter 1-1. System Settings... 6 Chapter 1-2. HDD Settings... 7 Chapter 1-3. Device Settings...
icms Pro USER S Manual Ver 1.4
 icms Pro USER S Manual Ver 1.4 Contents Panes... 7 How Can User Rights Affect Your Use of icms Pro SW?... 10 Minimum System Requirements... 11 Installing the icms Pro SW... 12 Download icms Pro from icatchinc
IP Camera Centralization Management. Client Application. (IPCMonitor) Feb, 2013 Version User Manual
 Feb, 2013 Version User Manual") IP Camera Centralization Management Client Application (IPCMonitor) Feb, 2013 Version 1.10 User Manual INDEX 1 Introduction... 3 2 Computer Requirement... 3 3 Installation... 4 4 Devices list... 4 4.1
IP Camera Centralization Management Client Application (IPCMonitor) Feb, 2013 Version 1.10 User Manual INDEX 1 Introduction... 3 2 Computer Requirement... 3 3 Installation... 4 4 Devices list... 4 4.1
Quick Start Guide (V1.03) UD.6L0201B1064A01
 UD.6L0201B1064A01") ivms-4200 PCNVR Quick Start Guide (V1.03) UD.6L0201B1064A01 Thank you for purchasing our product. If there is any question or request, please do not hesitate to contact the dealer. This manual applies
ivms-4200 PCNVR Quick Start Guide (V1.03) UD.6L0201B1064A01 Thank you for purchasing our product. If there is any question or request, please do not hesitate to contact the dealer. This manual applies
YesCam View User Manual For Easy Connection YesCam Series
 YesCam View User Manual For Easy Connection YesCam Series Seeing the video from anywhere Version:1.2.4 Date:2015.02.3 1 Table of Content 1. Introduction...4 2. System Requirement...4 3. Install YesCam
Table of Contents Surveillance Center Overview...3 Log...30 Live Camera Panel...31 Live Camera Panel Explained I...32
 Surveillance Center Overview...3 Introduction...3 System Requirements... 4 Features... 5 Checking the Hardware Requirements... 6 Installing and Accessing the Module... 8 Connecting a Camera to the Network...
VMS-A1 Client Software. User Manual
 VMS-A1 Client Software User Manual Contents Contents... 2 Chapter1. Overview... 4 1.1 Description... 4 1.2 Features & Functions... 4 Chapter2. Update Info... 6 Chapter3. Starting VMS-A1... 7 3.1 Installing
SKY l SYS DVR USER S MANUAL TABLE OF CONTENTS. Skydreamers Systems DVR Page 1
 TABLE OF CONTENTS Main System Application (Control) SERVER Startup Screen 6 Login/Logout/Shutdown 7 Control Screen 7 Setup 7 System Power Management 8 Auto Switching Interval 8 E-map 8 TV-Out 8 On-screen
Pro7804N1 NVR User Manual
 Pro7804N1 NVR User Manual Pro7804N1 User Manual BW R6.indd 1 User Information Admin User Name: Admin Password: IP Address: System Name: Table Of Contents 1. Menu Operation...4 1.1 Main Menu...4 2. Start
Video recorders Series DH
 Page: 1 DVRs for analog cameras, 960H, HD-SDI Viewclient Program Manual How to install and use the client program to the DVR Page: 2 Contents of this handbook This manual describes how to install and use
Product and company names appearing in this document are trademarks of each respective company or organization.
 . CMS_beta LEGAL INFORMATION Reproduction, transfer, distribution or storage of part or all of the contents in this document in any form without the prior written permission of the company is prohibited.
Application Note. VAST How to access VAST via a web interface
 VAST How to access VAST via a web interface 2010 VIVOTEK Inc. All Right Reserved VIVOTEK may make changes to specifications and product descriptions at any time, without notice. The following is trademarks
Grandstream Networks, Inc. GSurf User Manual
 Grandstream Networks, Inc. GSurf User Manual GSurf Contents Contents Introduction 3 Installation 4 Minimum Recommended Requirements 4 Login 4 Main Window 5 Menu Items 5 Toolbar Items 6 Play Bar Items 7
NVMS1000. User Manual
 NVMS1000 User Manual Contents 1 Software Introduction... 1 1.1 Summary... 1 1.2 Operation Environment... 1 1.3 Install and Uninstall... 2 1.3.1 Install the Software... 2 1.3.2 Uninstall the Software...
Lorex Client 7.0 & Lorex Message Master
 Lorex Client 7.0 & Lorex Message Master Software Manual English Version 1.0 MODELS: L19WD Series www.lorexcctv.com Includes L19WD800 & L19WD1600 Copyright 2008 Lorex Technology Inc. Table of Contents Table
Contents Contents. Chapter 1. Program Installation. Chapter 2. For the start of CMS. Chapter 3. Monitoring. Chapter 4. E-Map Mode
 CMS User's Manual Contents 0 Contents Chapter 1. Program Installation 1.1 PC specifications 1.2 Program Installation Chapter 2. For the start of CMS 2.1 Site Registration Setup (Network Camera Registration)
W Box VMS BOX T E C H N O L O G I E S.
 W Box VMS BOX T E C H N O L O G I E S www.wboxtech.eu Contents Contents... 1 Overview... 3 1.1 Description... 3 1.2 Running Environment... 3 1.3 Function Modules... 3 Live view... 6 2.1 User Registration
Intelligent Security & Fire
 Milestone XProtect Basis 4.0 Milestone XProtect Basis+ 4.0 Getting Started Guide 2005 PDF version Dear Milestone Customer, This Getting Started Guide explains how to install and use key features in Milestone
VMS2.0 Client Software. User Manual
 VMS2.0 Client Software User Manual Chapter 1 Contents Brief Introduction...1 1.1 Description... 1 1.2 Running Environment...1 Chapter 2 Installation... 2 Chapter 3 Live View... 4 3.1 User Login...4 3.2
Video Management Software
 Video Management Software User Manual Web: europesecurity.eu Mail: info@europesecurity.eu Tel.: 0541 352 952 User s Manual 2 Contents CHAPTER : XMS CENTRAL USER MANUAL 1 PC REQUIREMENT 3 2 INSTALL 3 3
Mirasys NVR. User s Guide
 Mirasys NVR User s Guide CONTENTS Contents... 2 Before you start... 3 Introduction... 6 Logging in... 9 User interface... 13 Navigator... 16 Cameras... 25 Video outputs... 41 Digital outputs... 46 Digital
Network Camera. Application Guide 1.5 Before operating the unit, please read this manual thoroughly and retain it for future reference.
 A-EAK-100-15 (1) Network Camera Application Guide 1.5 Before operating the unit, please read this manual thoroughly and retain it for future reference. 2012 Sony Corporation Table of Contents Overview
RAS (Remote Administration System)
") RAS (Remote Administration System) Digital Video Recorder Software User Guide Document 900.0314 Rev 2.00 RAS User Guide Revisions Issue Date Revisions 1.00 08/04 New document. 1.01 04/05 Update template,
RAS (Remote Administration System) Digital Video Recorder Software User Guide Document 900.0314 Rev 2.00 RAS User Guide Revisions Issue Date Revisions 1.00 08/04 New document. 1.01 04/05 Update template,
32 CHANNEL SURVEILLANCE SYSTEM MANUAL
 32 CHANNEL SURVEILLANCE SYSTEM MANUAL English version 1.0 SOFTWARE GUIDE Software Guide for Digimerge Networkable Cameras Copyright 2007 Digimerge Technologies Inc. 32-CH Surveillance System Note This
Table of Contents. VIVOTEK - A Leading Provider of Multimedia Communication Solutions
 Table of Contents Overview3 Read before use...3 Package contents...3 Physical description...4 Installation 8 Hard Disk installation...8 Network deployment...9 Home Page17 Configuration 19 Device...19 LAN...24
P r o f e s s i o n a l 4. 6 G e t t i n g S t a r t e d G u i d e
 Milestone XProtect P r o f e s s i o n a l 4. 6 G e t t i n g S t a r t e d G u i d e Dear Milestone Customer, With the purchase of Milestone XProtect Professional you have chosen a very powerful and intelligent
HIP2P Network Video Camera Client Terminal User Manual
 HIP2P Network Video Camera Client Terminal User Manual Document version:5.1 Page 1 of 34 } Preface Thank you for using our company's products. The network video camera client terminal is used to implement
Quick Operation Guide of ivms-4200
 Quick Operation Guide of ivms-4200 V1.02 2012-02-22 Description ivms-4200 is a video management software using a distributed structure to manage all the connectable devices. It can manage the NVR, DVR,
NVR 3 Workstation for Mac OS
 NVR 3 Workstation for Mac OS User s Manual For Version 3.0.09 2015/01/27 About This Manual Target Audience This manual is intended for End Users who actually execute security tasks such as monitoring activities,
Enterprise Pro Surveillance System User s Manual
 Enterprise Pro Surveillance System User s Manual 1 Table of Contents 1 FEATURES... 6 2 INSTALLATION... 8 2.1 Environment...8 2.2 Installation...8 2.3 Un-installation...10 3 NAVIGATION AND CONTROLS OF THE
LOREX CLIENT 3.0 SOFTWARE MANUAL IRMS Integrated Remote Management Software
 LOREX CLIENT 3.0 SOFTWARE MANUAL IRMS Integrated Remote Management Software Instruction Manual English Version 2.0 Copyright 2007 Lorex Technology Inc. www.lorexcctv.com Table of Contents Overview... -
Vivotek ST3402 User s Manual
 Vivotek ST3402 User s Manual 0 Contents Chapter 1 Installation... 1-3 1.1 System Hardware Requirements... 1-3 1.1.1 Recommended minimum system hardware requirements... 1-3 1.2 Software Installation...
CMS User's Manual. Version 1.9
 CMS User's Manual Version 1.9 Introduction 0 Introduction [ Principal function ] This CMS Interlocked with megapixel camera. This CMS supports easy connection and registration of the site(camera) This
ipims USER s MANUAL (ORION IP Device Total Management SW) Ver 1.2 by sj
 Ver 1.2 by sj") ipims USER s MANUAL (ORION IP Device Total Management SW) Ver 1.2 by sj Contents Contents... 2 Target Audience for this Document... 5 Minimum System Requirements... 5 Introduction... 6 Tabs... 6 Panes...
ipims USER s MANUAL (ORION IP Device Total Management SW) Ver 1.2 by sj Contents Contents... 2 Target Audience for this Document... 5 Minimum System Requirements... 5 Introduction... 6 Tabs... 6 Panes...
MagicInfo VideoWall Author
 MagicInfo VideoWall Author MagicInfo VideoWall Author User Guide MagicInfo VideoWall Author is a program designed to construct a VideoWall layout and create VideoWall content by adding various elements
Video Capture Card Manual
 Video Capture Card Manual 1. System Login System installation is completed, will generate desktop < DVR Surveillance System> icon, please double-click operation. Or choose Start -> All Programs -> DVR
Quick Start Guide 4/8/16/24-Ch DVR
 Quick Start Guide 4/8/16/24-Ch DVR 1.1 Install Hard Drive 4/8/16/24-CH DVR Quick Start Guide Notice: 1.4/3/16-ch DVR supports one SATA hard drive. 24-ch DVR supports three SATA hard drives. Please use
User Manual. Central Monitoring Software for TER-series recorders. CenPro
 EN User Manual Central Monitoring Software for TER-series recorders CenPro Contents CENPRO USER MANUAL 1 PC REQUIREMENT 3 2 INSTALL 3 3 UNINSTALL 5 4 BASIC OPERATION 7 4.1 Log In 7 4.2 Screen Layout 8
Manual Version: V1.01. ISS Manager Video Management Software User Manual
 Manual Version: V1.01 ISS Manager Video Management Software User Manual Notice The information in this manual is subject to change without notice. Every effort has been made in the preparation of this
Avigilon Control Center Server User Guide
 Avigilon Control Center Server User Guide Version 4.12 PDF-SERVER-E-Rev1 Copyright 2012 Avigilon. All rights reserved. The information presented is subject to change without notice. No copying, distribution,
USB 2.0 Video/Audio Grabber User s Guide
 USB 2.0 Video/Audio Grabber User s Guide Contents: Chapter 1: Introduction... 1 1.1 Package Contents... 1 1.2 System Requirements... 1 Chapter 2: Getting Started... 2 2.1 Connect USB A/V Adapter... 2 2.2
NVR User s Manual. Version /10/12
 NVR User s Manual Version 2.3.05 2012/10/12 Table of Contents 1 Overview 9 NVR Architecture... 9 NVR Server... 9 NVR Workstation... 10 NVR Web Client... 10 Hardware System Requirements... 11 Operating
INSTRUCTION MANUAL. NC-Titanium. Please read this manual thoroughly before use, and keep it handy for future reference.
 INSTRUCTION MANUAL NC-Titanium Please read this manual thoroughly before use, and keep it handy for future reference. Table of Contents Chapter 1 Introduction... 1 1.1 Features... 1 1.2 System Requirements...
Manual Version: V1.01. Video Management Server Client Software User Manual
 Manual Version: V1.01 Video Management Server Client Software User Manual Thank you for purchasing our product. If there are any questions, or requests, please do not hesitate to contact the dealer. Notice
Table of Contents. Index
 Index Table of Contents Chapter 1 Notice for All Users...1-1 Chapter 2 Installation...2-1 2-1 HD NVR Manager Setup...2-1 2-1-1 Installation Steps...2-2 2-1-2 License Activation...2-9 Chapter 3 SCM Program...3-1
User`s Manual. CMS Pro. Professional Central Monitoring Software. Full-featured Enterprise Class Surveillance Solution
 Professional Central Monitoring Software CMS Pro Full-featured Enterprise Class Surveillance Solution User`s Manual This document contains preliminary information and is subject to change without notice.
SLS-ENVR16 Network Video Recorder V2.1 Quick Setup Guide
 SLS-ENVR16 Network Video Recorder V2.1 Quick Setup Guide The SLS-ENVR16 series NVR is an intelligent and compact appliance that provides a network interface to monitor, record and playback video from up
icms Central Management Software User Manual
 icms Central Management Software User Manual 1 Contents 1. icms Installation... 3 1-1. System Requirements... 3 1-2. Bandwidth Requirements... 3 1-3. Installation... 4 2. Start to icms... 6 2-1. icms Introduction...
ACTi NVR User s Manual. Version /6/21
 ACTi NVR User s Manual Version 2.2.57 2010/6/21 Table of Contents NVR 2.2 SP3 (V2.2.57) User s Manual 1 Overview 9 ACTi NVR Architecture... 9 ACTi NVR Server... 9 ACTi NVR Workstation... 10 NVR Web Client...
Release Notes. PC spec. Enhancements. Product: ACTi NVR Server Version: v SR1 (build ) Release Date: Apr. 16, 2007
 Release Date: Apr. 16, 2007") Release Notes Product: ACTi NVR Server Version: v2.0.22 SR1 (build 07.0416) Release Date: Apr. 16, 2007 PC spec 1. Suggestions on PC Spec.: 16 Channel: Intel Core 2 Duo 2.4 GHz, 1 GB Memory, 250 GB HDD
Release Notes Product: ACTi NVR Server Version: v2.0.22 SR1 (build 07.0416) Release Date: Apr. 16, 2007 PC spec 1. Suggestions on PC Spec.: 16 Channel: Intel Core 2 Duo 2.4 GHz, 1 GB Memory, 250 GB HDD
NVMS-7000 Client Software User Manual Version 1.03
 NVMS-7000 Client Software User Manual Version 1.03 Contents Chapter 1. Overview... 3 1.1 Description... 3 1.2 Running Environment... 3 Chapter 2. Starting NVMS-7000... 4 2.1 User Registration... 4 2.2
TRIDENT - CMS Plus. 64CH Central Management System Software
 TRIDENT - CMS Plus 64CH Central Management System Software Please read instructions thoroughly before operation and retain it for future reference. For video demonstration about CMS Lite operation, please
User Manual. CENTRAL MANAGEMENT SYSTEM of H.264 NETWORK VIDEO RECORDE H.264 DIGITAL VIDEO RECORDER
 User Manual CENTRAL MANAGEMENT SYSTEM of H.264 NETWORK VIDEO RECORDE H.264 DIGITAL VIDEO RECORDER 1 TABLE of CONTENTS I. SPECIFICATION... 3 II. HARDWARE REQUIREMENTS... 5 A. MINIMUM REQUIREMENTS... 5 B.
XProtect Remote Client 3.7 User s Manual
 XProtect Remote Client 3.7 User s Manual Target Audience for this Document This document is aimed at users of the Milestone XProtect Remote Client. This document provides users with detailed descriptions
Digital Video Surveillance Center Management Software
 Digital Video Surveillance Center Management Software NVClient User Manual Revision: V3.2 Updated: 12-2011 Contents Chapter I General...- 3-1.1 INTRODUCTION... - 3-1.2 MAIN FUNCTIONS... - 3 - Chapter II
Pro7400H1 Hybrid DVR User Manual
 Pro7400H1 Hybrid DVR User Manual User Information Admin User Name: Admin Password: IP Address: System Name: Table Of Contents 1. Menu Operation... 4 1.1 Main Menu... 4 2. Start Up/Shutdown System... 5
The Intelligent Surveillance Solution. User manual
 The Intelligent Surveillance Solution User manual CONTENTS 1.1 System Requirement... 1 1.2 Installation... 1 1.3 Quick Start... 5 2.1 Start Menu... 10 2.2 Information Window:... 12 2.3 PTZ Config:... 12
Quick Start Guide 4/8-CH DVR
 Quick Start Guide 4/8-CH DVR 1 1. Install Hard Drive &DVD Writer 1.1 Install Hard Drive Notice: 1. this series support one SATA hard drives. Please use the hard drive the manufacturers recommend specially
Viewer for Luma Fisheye IP Surveillance Camera. Software Manual
 Viewer for Luma Fisheye IP Surveillance Camera Software Manual Important Notes This software is a third-party program that allows you to view, in a normal view, surveillance recordings that were made in
COMMAND STATION PC SOFTWARE
 COMMAND STATION PC SOFTWARE MULTI-SITE MANAGEMENT SOFTWARE USER MANUAL Version 1.6 OpenEye Command Station Software Manual V 1.6 Manual Edition 34863AI - June 2018 2018, OPENEYE All Rights Reserved No
Table of Contents. Product Overview...5 System Requirements... 5 Introduction...6 Features... 6 Installing Your IP Camera... 7
 Table of Contents Table of Contents Product Overview...5 System Requirements... 5 Introduction...6 Features... 6 Installing Your IP Camera... 7 Software Installation...8 Add Camera(s)...13 D-ViewCam Interface
Network Camera. Application Guide 1.8 Before operating the unit, please read this manual thoroughly and retain it for future reference.
 A-EAK-100-18 (1) Network Camera Application Guide 1.8 Before operating the unit, please read this manual thoroughly and retain it for future reference. 2012 Sony Corporation Table of Contents Overview
User Manual. For. CMS (WEB version)
") User Manual For CMS (WEB version) Contents 1 Preface...1 1.1 System requirements... 1 1.2 Main features... 2 2 Server Installation...3 2.1 System requirement... 3 2.2 Installation... 4 2.2.1 Complete...5
User Manual For CMS (WEB version) Contents 1 Preface...1 1.1 System requirements... 1 1.2 Main features... 2 2 Server Installation...3 2.1 System requirement... 3 2.2 Installation... 4 2.2.1 Complete...5
Milestone XProtect Basis+
 XPB+ 6.5 FACTSHEET Milestone XProtect Basis+ Top performance IP video surveillance with an expanded feature set. XProtect Basis+ is the right product for small installations that need robust single-server
Avigilon Control Center Web Client User Guide
 Avigilon Control Center Web Client User Guide Version: 4.12 Standard PDF-WEBCLIENT-S-E-Rev2 Copyright 2013 Avigilon. All rights reserved. The information presented is subject to change without notice.
A d m i n i s t r a t o r M o n i t o r I m a g e S e r v e r W e b a n d R e a l t i m e F e e d S e r v e r s
 milestone XProtect Professional 4.6 Administrator s Manual A d m i n i s t r a t o r M o n i t o r I m a g e S e r v e r W e b a n d R e a l t i m e F e e d S e r v e r s Target Audience for this Document
Quick Start Guide 4/8/16-Ch DVR
 Quick Start Guide 4/8/16-Ch DVR 1 1. Install Hard Drive &DVD Writer 1.1Install Hard Drive Notice: 1. Support two SATA hard drives. Please use the hard drive the manufacturers recommend specially for security
NetDVMS Rev. Installation and User Manual. IP-Based Surveillance Management System. On-Net Surveillance Systems, Inc.
 NetDVMS Rev 6.0 IP-Based Surveillance Management System Installation and User Manual 222 Route 59 Suite 303 Suffern, NY 10901 U.S.A Phone: (845) 369-6400 Fax: (845) 369-8711 www.onssi.com Table of Contents
NVR Equipment WEB Operation Guide ISSUE V1.1 DATE
 NVR Equipment WEB Operation Guide ISSUE V1.1 DATE 2018-05-15 About This Document About This Document Purpose This document describes how to use the web management system for NVR and the cameras managed
Unisight DVR System. Unisight DVR Manual. Ver rev1.3.4
 Unisight DVR Manual Ver2.7.1027 rev1.3.4 1 Table of Contents System Requirements.8 Unisight DVR Server.. 8 Server Hardware Requirements...8 Server Software Requirements 8 Client Hardware Requirements...
1. Web Viewer program
 1. Web Viewer program 1-1. General Remote DVR can be connected via network using IE (Internet Explorer) without prior installation of monitoring program. Live monitoring, remote playback, backup and PTZ
W-E
 Signage Suite V2.20 User Guide 605220-02-01-W-E-051613-02 Trademarks Windows XP, Windows Vista, Windows 7, and Microsoft are registered trademarks of Microsoft Corporation. All other trademarks are the
Decoder Firmware B1D-220-V AC User s Manual Decoder Firmware B1D-220-V AC User s Manual
 Decoder Firmware B1D-220-V3.03.07-AC User s Manual i Table of Contents INTRODUCTION 1 1.1 Minimum system requirements 1 1.2 Preparation before setup 2 1.2.1 Setup your PC network 2 1.3 Configuring the
GV-Recording Server. User's Manual V RSV13-A-EN
 GV-Recording Server User's Manual V1.3.0.0 RSV13-A-EN 2016 GeoVision, Inc. All rights reserved. Under the copyright laws, this manual may not be copied, in whole or in part, without the written consent
Quick Start Guide 4/8/16-Ch DVR
 Quick Start Guide 4/8/16-Ch DVR 1 1. Install Hard Drive &DVD Writer 1.1Install Hard Drive Notice: 1.This series support one SATA hard drive. Please use the hard drive the manufacturers recommend specially