The Distributor s Content Management Guide for subzero-wolf.com
|
|
|
- Joella Joseph
- 6 years ago
- Views:
Transcription
1 The Distributor s Content Management Guide for subzero-wolf.com Dear Distributor Partner Portal users, Please use this guide help you find your way around and assist you in editing Showroom detail page information, locator detail page information, and Showroom event information on the new subzerowolf.com website. Contents What is Sitecore?... 2 How do I log into Sitecore?... 2 What do I do in Sitecore?... 2 Sitecore CMS Layout & General Functionality... 2 Sitecore Tree... 2 Sitecore Ribbon Overview... 3 Editing, Saving & Publishing Workflow for Sitecore... 3 Locking an Item to Edit... 3 Saving an Item... 4 Publishing an Item... 5 Checking In an Item... 7 Add & Edit Images and Rich Text Workflow for Sitecore... 8 How to Edit a Rich Text Field... 8 How to Add and Edit Images... 9 Add a single image file by uploading or using the media library to Sitecore... 9 Adding/editing a file to an image field for a location or event Editing a Multi-Image Field Adding an Image Removing an image from a multi-select field Editing Showroom Pages Showroom Landing Page Fields for Editing Editing Showroom Sub-header Editing Description Editing Photo 1 and Photo For help with content management in Sitecore, please contact marketingwebfeedback@subzero.com.
2 Editing Products on Display Editing the Gallery Editing Staff Members Editing Complimentary Showroom Services Selecting an existing complimentary service to display on your page Creating a custom complimentary showroom service Selecting a featured complimentary showroom service from a drop-down menu Editing Hero Image Editing Event Sitecore Event Fields Adding a New Event to a Showroom Locating an Existing Event to Edit Edit Event Name Edit Event Occurrence Add a Location to an Event Add a Secondary Location to an Event Add a Teaser to an Event Add a Description to an Event Add a Photo to an Event Assign a Type to an Event Assign an Offsite Location for an Event Editing an Event Occurrence Marking an Event Occurrence as Full Deleting a Date and Registration URL Add, Edit and Remove Locations Create a New Location in the Portal Update a Location in the Portal Remove a Location in the Portal Editing Partner Location (Dealer, Designer, Service, Installer and Parts) Partner Location Fields Editing Description Editing Logo Editing Photo 1 and Photo Editing Services Provided... 46

3 What is Sitecore? Sitecore is the content management system (CMS) that is used to manage the content on the new subzero-wolf.com website. For the best possible experience for visitors to our website, some content about showrooms, showroom events, and dealer/designer accounts is now managed in Sitecore instead of Portal. How do I log into Sitecore? Step 1: Log into the Portal - Step 2: Navigate to the location you wish to edit, and click either the Edit Microsite link (for showroom locations) or the Edit Single Page link (for all other locations). You will be redirected to Sitecore. *Note* - the process of logging Portal users into Sitecore takes several seconds. We appreciate your patience while the system authenticates your account and directs you to the correct location within Sitecore. What do I do in Sitecore? Through Portal, you will access tools in Sitecore to: Manage most of the content on the subzero-wolf.com page for distributor showroom locations Created/edit/remove consumer and events organized by distributors Manage the description, logo and images displayed for dealers, designers, servicers, parts distributors and installers that have locations listed in Portal Sitecore CMS Layout & General Functionality Sitecore Tree In Sitecore, the website content is organized in a tree-like structure, with a hierarchy that has (+) and ( ) buttons to expand and collapse content items within the tree. Clicking on the (+) or (-) buttons help you see what s in each section.


4 Sitecore Ribbon Overview The Sitecore toolbar, or ribbon, is located at the top of the screen. The ribbon supplies you with many tools, such as saving and publishing, so that you can quickly modify the Locations and Events. Tools can be found by clicking the Tabs at the top of the ribbon. Editing, Saving & Publishing Workflow for Sitecore When making edits in Sitecore, there are four important steps to take every time you want to edit an item. Each step is outlined in more detail below. Step 1: Lock the item to edit. Make necessary changes. Step 2: Save the item. This saves the changes you made in the website database, but doesn t change the website. You can skip step 3 if you re making changes that you want to save for later, but aren t ready to have appear on the website quite yet. Step 3: Publish the item. At this step, the changes you ve made and saved will now appear on the website. Please note that there can be a delay between when you publish and when your changes appear on the site perhaps up to an hour. Step 4: Check in and unlock the item to make it available to other editors. Locking an Item to Edit You may be prompted to lock an item before you can edit. While it may sound counterintuitive, locking an item prevents another user from changing content at the same time you are, causing conflicts in the database. If you see the notification below, click on Lock and Edit.


5 Please wait several seconds as the item is locked. Once it s locked, you can edit it. Saving an Item When you complete your changes, click the Save button in the ribbon. If you are trying to leave an item with unsaved changes, you will be notified that you have unsaved changes. Some content templates in Sitecore have fields that are marked as required. If you save a content item with required fields left blank, you will see the error message below. The error message s purpose is to inform you that there are required fields being left blank, so if you continue with your Save, the items will remain blank. Please be assured that leaving any of the fields blank does not affect the website user s experience with viewing your page or seeing your content. Please click OK to close the window and continue with saving the item.

6 Publishing an Item Step 1: In the Ribbon, Click the Home tab, and then click Publish. Step 2: The Publish Wizard will appear. Click Next.


7 Step 3: Confirm Publishing If the Showroom location has Events to be published, you will see the Publish Select screen: *Note* - The first Item listed in the confirmation screen is for your location. Check it if you want to publish the Location. The rest of the items listed are events in the order they were last modified. Check the events that you would like to publish. If the location has no events, you will see the simple Publish Confirmation screen:

8 Step 4: When ready, click Start Publish. The publish process will begin and will automatically publish all Media Items that are in the Media folder (if applicable). Step 5: When the Publish process is finished, you will see the Results page: The results page will tell if it was successful or if it failed. If successful, click Finish in the lower right corner of the pop-up. Checking In an Item After you complete your edits on the item, please check it back in by clicking on Check In (in the Review tab in your ribbon): The item will become unlocked again. It is important to follow all four steps to ensure that your updates appear on the website.


9 Add & Edit Images and Rich Text Workflow for Sitecore How to Edit a Rich Text Field Step 1: Click Show Editor. A pop-up window will appear. Step 2: Enter the text in the pop-up window. Some limited formatting tools are available to add bold or italics to your copy, and to add links. You should not use the image tool to add pictures within your copy; please use the designated fields you see in Sitecore for images.


10 Step 3: Click Accept to confirm changes, or Click Reject to ignore changes. How to Add and Edit Images *Note* - If your image has not already been added to the Sitecore Media Library for you to add to a page, you will need to add the image to the Media Library first before you can add the image to a page. Image size requirements will vary depending on where the image will be used on the website. For example, hero images on showroom pages must be very large. Details on size and format requirements for images are listed for specific instances throughout this document, but in general, you ll be in good shape if you re uploading images that are at least 2000 pixels wide at 72 dpi. Add a single image file by uploading or using the media library to Sitecore Step 1: In the menu at the bottom left of the browser, click Media Library. Step 2: In the tree, click the (+) icon next to Images. Step 3: After expanding images, click the (+) icon next to Showrooms. Step 4: Right-click the folder representing the Showroom. Step 5: Click Insert, then Upload File.


11 Step 6: A popup will appear, click Browse. Step 7: Navigate to and choose the file you want to upload, and then click Open. The file will be added to Sitecore. Save your changes, and if you re ready for them to be displayed on the website, follow the steps for publishing your changes found on page 5. Adding/editing a file to an image field for a location or event Step 1: Click Browse for the image field you wish to update, a pop-up will appear. Step 2: Either search for the file by name, or click the Browse tab to navigate the tree to locate the Media Item. View of Media Item Search:


12 View of Media Item Browse: Step 3: Click the Media Item, and then click OK. Editing a Multi-Image Field Adding an Image Step 1: Click Select media items, a multi-selection field pop-up will appear.


13 Multi-selection pop-up view: Step 2: Use the (+) and (-) buttons to navigate the folders to find images. When you have an image you want, click on it, and then click the blue button to bring it over to the right side. You can use the blue up and down arrows at the far right to change the order of the images you selected. Step 3: When done, click OK to keep selections, or Cancel to ignore selections.

14 Removing an image from a multi-select field Step 1: Click Select media items, a multi-selection field popup will appear. Step 2: Clicks on the image you wish to remove on the right side of the multi-selection tool, and click the blue button to remove it from the right side. Step 3: When done, click OK to keep selections, or Cancel to ignore selections.
15 Editing Showroom Pages In the Portal, click on the Edit Microsite link for the showroom location you wish to edit. Remember, you will be redirected to Sitecore so you can begin editing the showroom content. *Note* - please remember save your changes, and if you are ready for them to be displayed on the website, follow the steps in the Editing, Saving & Publishing Workflow for Sitecore section (found on page 5) to ensure you edits are properly added to the website. Showroom Landing Page Fields for Editing For reference, here is a list of field names and types that you can edit for a Showroom page. More detailed instructions on how to edit each area are listed below the reference table. Name Text Field Location in Sitecore Template Description Rich Text Field Location Main Information Logo Image Location Main Information Photo 1 Image Location Main Information Photo 2 Image Location Main Information Showroom Sub-header Text field Showroom Services Provided Rich Text Field Showroom Products on Display Listing Field Showroom Live Products Listing Field Showroom Gallery Listing Field Showroom Staff Members Custom Staff Field Showroom Complimentary Showroom Service Listing Field Complimentary Showroom Service Custom Complimentary Showroom Service Heading Text Field Complimentary Showroom Service Custom Complimentary Multiline Text Showroom Service Field Content Complimentary Showroom Service Custom Complimentary Showroom Service Image Image Complimentary Showroom Service Featured Complimentary Service Linking Field Complimentary Showroom Service Hero Image Image Hero Section
.")

16 Editing Showroom Sub-header The Showroom Sub-header is the large text that appears below the Showroom name and hero image (outlined in red). To edit, type in text in the Showroom Sub-header text field. *Note* - if there is no content in this field, default text will automatically be used instead, so that the Showroom Sub-header section of the page is never left blank.
17 Editing Description The Description text is the smaller text that appears below the Showroom name and hero image (outlined in red). The Description field is a large text box where you can enter several lines of text. To edit the Description field, use the Rich Text Field instructions above (beginning on page 8). *Note* - if there is no content in this field, default text will automatically be used instead, so that the Description section of the page is never left blank.
.")
18 Editing Photo 1 and Photo 2 These two images appear below the map section of the Showroom page: Edit the Photo fields using the Edit Image instructions above (beginning on page 8).
 and (-) buttons in the section on the left to expand/collapse folders within the Sitecore tree to")
19 Editing Products on Display The Products on Display section allows you to select which products the showroom has on display (including live products) and lists them on the site. Step 1: To edit products on display, use the multi-selection tool pictured below: Step 2: Use the (+) and (-) buttons in the section on the left to expand/collapse folders within the Sitecore tree to navigate to the brand and category needed. Once in a category, navigate down to the product model with either a blue or red dot. There are several examples below of what level to look for to select a product (product to select is outlined in black). *Note* - Items can only be added at the colored dot level in Sitecore. Sub-Zero products have a blue dot, and Wolf products have a red dot. Examples for reference are below.
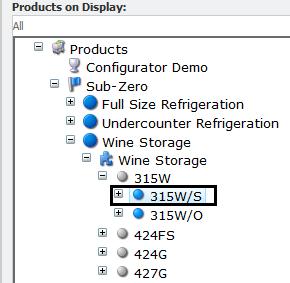
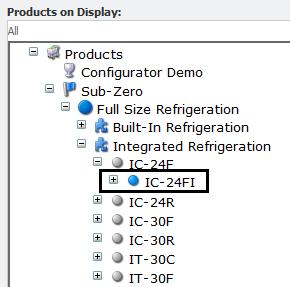
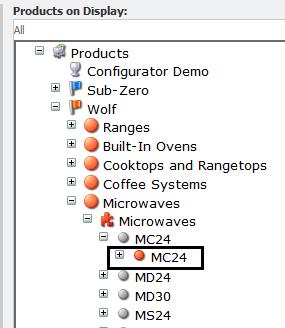
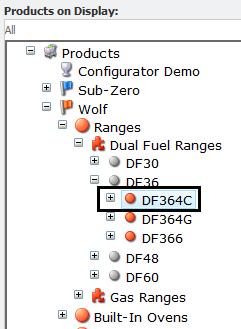
20
21 Step 3: Click on product selected, then click the blue arrow button. The selected product will be added to the right side of the multi-selection tool. Step 4: Keep moving through the tree until all products are selected. *Note* - You will not need to worry about how the products are ordered on the right side. The categorization and ordering of the products on the showroom page is generated automatically. *Note* - To remove products from the Products on Display, click on the product on the right side, click the blue arrow button, and the product will be removed. Step 5: Once you finish selecting the products on display, save the showroom page in Sitecore. After you save the page, you can assign which products are Live using the Live Products multi-selection tool. *Note* - The left side of the multi-selection tool includes all of the products added to the Products on Display. Step 6: To select live products, click on the product on the left side, click the blue arrow button, and the product will move to the right side of the multi-selection tool. *Note* - To remove the live status from a product from the Products on Display section, click on the product on the right side, click the blue arrow button, and the product will be removed from the right section.
 and (-) buttons in the left section to expand and collapse folders to find images.")
22 *Note* - Removing the live status for a product does not remove it from the Products on Display. Editing the Gallery The Gallery is the images shown on the bottom of the Showroom page. Step 1: To edit the gallery, use the multi-selection tool. Step 2: Use the (+) and (-) buttons in the left section to expand and collapse folders to find images. Step 3: Click on the image file to select it, then click the blue arrow button to add the image to the right side section. The images in the right side Selected column will appear in the Gallery. Use the blue up and down arrow buttons to sort the order of the images, which is the order in how they appear in the Gallery on the Showroom page. Please see the Add/Edit Image section (beginning on page 8) for more detail on how to add images to the Image Library so they are available to be included in the showroom gallery.


23 Editing Staff Members Staff Members are displayed at the bottom of the Complimentary Services section of the showroom page, and on the Trade Support Resources module on the Trade Sources landing page. Step 1: To add a staff member, click the Insert Staff Member button. A modal window will appear with the following fields:

24 Step 2: Populate the text boxes in the pop-up window, select an image from the Photo drop-down menu, and select a staff type from the Staff Type drop-down menu. The Is Active checkbox allows you to control the visibility of the staff member on the showroom page and on the Trade Support Resources module on the Trade Resources landing page. If the Is Active checkbox is checked, then the staff member will appear on the website. If the Is Active checkbox is not checked, then the staff member will not appear on the website. Step 3: Click OK when finished adding the staff member. *Note* -To edit a staff member, click on their name in the list and click the pencil button. The Staff Member modal window will appear with the selected staff member s information. Edit the fields as needed. Click OK to confirm changes. *Note* -To remove a staff member, click on their name in the list and click the red X button.

25 Editing Complimentary Showroom Services The Showroom Services section is below the Schedule a Visit section on the showroom page. This content is meant to provide a consistent and regionally-accurate explanation of the great services provided at our official showrooms. There are several components to the Showroom Services section: Selecting complimentary services from a multi-selection tool Creating a custom complimentary showroom service, which includes a heading and content field Adding an image to a complimentary showroom service Selecting a featured complimentary showroom service from a drop-down menu
 to move it to the right side of the multi-selection tool.")
26 Selecting an existing complimentary service to display on your page Step 1: To select the complimentary services you want on the showroom page, use the multi-selection tool. Step 2: From the left side, click on the service you want to add, then click the blue arrow (pointing right) to move it to the right side of the multi-selection tool. You can sort the order of the services on the right side by using the blue up and down arrows. *Note* - To remove a complimentary service from the showroom page, click on the service you want to remove in the right side of the multi-selection tool, and click the blue button to move it back to the left side. *Note* - You can use the Select All and Deselect All buttons at the top left of the multiselection tool to quickly add or remove all of the services from either side. Creating a custom complimentary showroom service Step 1: To create a custom complimentary showroom service, you will need to add a heading and description. The image field is currently not used, and therefore, an image is not required.


27 Step 2: Type in text in the heading and content fields. The heading appears as all caps on the showroom page, and the content is displayed below the heading. Selecting a featured complimentary showroom service from a drop-down menu Step 1: To select a featured complimentary service, select one from the drop-down menu. *Note* - If you are adding a custom service as the featured service, make sure to save the Sitecore item first, so that the new custom service appears in the drop-down menu.
.")

28 *Note* - The selected featured service will be at the top of the Complimentary Services section (detailed below). Editing Hero Image The hero image is the large image that appears at the top of the showroom page. Multiple images can be displayed in the Hero Image section.


29 Step 1: To edit the hero image, click the Select Media Items button and select an image. *Note* - For more detail on how to add or edit images, see the Add/Edit Image section (beginning on page 8).
30 Editing Event In the Portal, click on the Edit Events link for the showroom you wish to edit from the Sitecore redirect screen message. Remember, you will be redirected to Sitecore so you can begin editing the event content. *Note* - please remember save your changes, and if you are ready for them to be displayed on the website, follow the steps in the Editing, Saving & Publishing Workflow for Sitecore section (found on page 5) to ensure you edits are properly added to the website. For reference, here is a list of field names and types that you can edit for events. More detailed instructions on how to edit each area are listed below the reference table. Sitecore Event Fields Name Text Field Event Name Text field Dates Custom Dates Field Registration URL Custom Field Is full? Checkbox Custom field Location Linking Field Teaser Text Field Description Rich Text Field Photos Multi Image Field Event Type Multi-select Field Occurs Offsite Checkbox Field Offsite Description Text Field Offsite Address One Text Field Offsite Address Two Text Field Offsite City Text Field Offsite State Text Field Offsite Postal Code Text Field Offsite Country Text Field Offsite Primary Phone Text Field


31 Adding a New Event to a Showroom Step 1: Right click Events Step 2: Click Insert, then Event. Step 3: Enter name for event and click OK. *Note* - The event name you enter here will be the display name for the event listed in Sitecore. You can name it whatever will make the most sense to you and other content managers when they come back to search for events to manage in Sitecore. There is a field called Event Name on the event information that you can use to create a more customer-friendly event name that website users will see.

32 Step 4: Your new event is set up in Sitecore, and you can begin to edit the event fields with the instructions below. Locating an Existing Event to Edit Step 1: When you first arrive in Sitecore after clicking on the event management link in Portal, click the magnifying glass icon to pull up a list of events for the location. Step 2: A search box will appear. Leave the text box blank, and click the search magnifying glass on the right side of the text box. *Note* - By leaving the text box blank, you are requesting the search to return all event results. If you know the specific name of your event, you can enter text instead.


33 Step 3: Click on the event name in the list to edit. After several seconds, the event will load, and you can unlock the item to edit per the directions below.
34 Edit Event Name The Event Name is the name the user sees when viewing the event listing or detail page (outlined in red). Step 1: To edit the event name, type the event name text into the Event Name text box. Edit Event Occurrence A lot of showrooms have repeated events, so we added a feature where you only need to create the event once in Sitecore, and then add dates and times when the event occurs. Event Occurrences are listed on the event listing page and detail page (outlined in red).

35 Step 1: To add an occurrence, click the Insert Event Occurrence button above the Dates.


36 A window will appear with the following fields. Step 2: Select the date of the event using the Date of Event picker. *Note* - When an event is past, the event will self-expire on the website. You do not need to remove the occurrence from the event.

37 Step 3: Select the Start Time and End Time from the drop-down menus. *Note* - Make sure the end time is not before the start time.


38 Step 4: Add a registration URL if you are using a third-party website or service to take online reservations in the Registration URL field. The event registration URL will appear with its occurrence on the event detail page. *Note* - Add to the beginning of the URL (e.g. typing will work, but typing subzero-wolf.com will not work). Step 5: Click OK to save the event occurrence. Step 6: Continue to repeat these steps if you have multiple occurrences to set up. Add a Location to an Event For the event to be associated with a location, a location needs to be assigned to it. Step 1: Set Location Field to the Showroom location using the Location drop-down menu.
39 Add a Secondary Location to an Event If the event is available to a second showroom location, you can assign a second location using the Secondary Location drop-down menu. Select the second location from the drop-down. Step 1: Select the secondary showroom location from the Secondary Location drop-down menu. Add a Teaser to an Event This copy appears event modules and other areas of the site where the event is promoted. Step 1: Add teaser text in the Teaser text box. Add a Description to an Event The Description field is a large text box where you can enter several lines of text. Step 1: To edit the Description field, use the Rich Text Field instructions above (on page 6). Add a Photo to an Event Add a photo to the event using the Photos field. The photo is displayed with the event on event modules throughout the site.
.")

40 Step 1: Use the add/edit image instructions (beginning on page 8). Assign a Type to an Event Step 1: Select an event type from the Event Type drop-down menu.

41 Assign an Offsite Location for an Event If the event takes place offsite from the showroom location, you can enter on offsite address, which will appear on the event detail page. Step 1: Fill out the necessary text fields. *Note* - offsite address and contact information will not appear on the event unless the Occurs Offsite checkbox is checked.


42 Editing an Event Occurrence Step 1: Select the event date from the Dates list and click the Pencil icon. Step 2: Update fields as needed. Step 3: When finished, click OK to keep changes or CANCEL to ignore changes.
43 Marking an Event Occurrence as Full If the registration for the event is full, you can communicate that the event is full to users by checking the Is Full checkbox in the occurrence window. The event will be noted as full on the event listing page and event detail page. Deleting a Date and Registration URL Step 1: Select the event date from the Dates list and click the X icon. Step 2: Event will be removed
44 Add, Edit and Remove Locations Create a New Location in the Portal The process for creating a dealer or designer location in the Portal has not changed. Once you have created the location, and if you are a Portal User Account who has the role of Distributor Administrator or Distributor Marketing User, you will need to do the following: Step 1: Click on the Edit Single Page link for the location you with to edit the content that appears on the website. Step 2: After clicking the selected link, you will be redirected to Sitecore to edit the Sitecore Location. This redirect process will automatically log you into Sitecore with permissions to only modify information pertaining to the newly created Location. It may take several seconds for this page to load. What is the Sitecore Location? The Sitecore location is the location data that you add/manage in Sitecore that appears on the subzero-wolf.com website in addition to the data you set up when creating a location in the Portal. The Sitecore location data is separate from the Portal location account information that you initially set up in the Partner Portal. Portal location information includes Address, Contact Information, Hours, Locator Rank, and flags such as Living Kitchen, Is Smart Home Automation Dealer, and Kitchen Dealer. Update a Location in the Portal The process for updating a location in the Portal has not changed. Any changes that are made in the Portal will automatically be reflected on the subzero-wolf.com website. From the Portal, you can update Address and Contact information, Hours, Locator Rank and various flags. For any other information that would appear on the subzero-wolf.com website, such as Description and Logos, please refer to the rest of the guide. Remove a Location in the Portal Deleting a location still occurs from inside the Portal. Once the location is deleted in the Portal, it will automatically be deleted from the locations from Sitecore.

45 Editing Partner Location (Dealer, Designer, Service, Installer and Parts) In the Portal, click on the Edit Single Page link for the location to edit. Remember, you will be redirected to Sitecore so you can begin editing the content for the location you are working with. *Note* - please remember save your changes, and if you are ready for them to be displayed on the website, follow the steps in the Editing, Saving & Publishing Workflow for Sitecore section (found on page 5) to ensure you edits are properly added to the website. *Note* - Designer updates in this guide only reflect content used in the locator listing and location detail page that is not associated with a kitchen gallery. Partner Location Fields For reference, here is a list of field names and types to edit a Partner location. More detailed instructions on how to edit each area are listed below the reference table. Name Text Field Location in Sitecore Template Description Rich Text Field Location main information Logo Image Location main information Photo 1 Image Location main information Photo 2 Image Location main information Services Provided Rich Text Field Location main information Editing Description The Description text is the paragraph of text that appears below the map and contact information (outlined in red).

46 Step 1: The Description field is a large text box where you can enter several lines of text. To edit the Description field, use the Rich Text Field instructions above (beginning on page 8). *Note* - If there is no content in this field, default text will automatically be used instead, so that the Description section of the page is never left blank. Editing Logo The logo image appears in the location listing page and the location s detail page. To edit the logo, use the Edit Image Instructions above (beginning on page 8).
47 Editing Photo 1 and Photo 2 These two images appear between the About Us header and the Description copy. Edit the Photo fields using the Edit Image instructions above (beginning on page 8). Editing Services Provided The Services Provided text is the paragraph of text that appears below the description. The Services Provided field is a large text box where you can enter several lines of text. To edit the "Services Provided field, use the Rich Text Field instructions above (beginning on page 8).
Content Author's Reference and Cookbook
 Sitecore CMS 7.2 Content Author's Reference and Cookbook Rev. 140225 Sitecore CMS 7.2 Content Author's Reference and Cookbook A Conceptual Overview and Practical Guide to Using Sitecore Table of Contents
2013, Active Commerce 1
 2013, Active Commerce 1 2013, Active Commerce 2 Active Commerce User Guide Terminology / Interface Login Adding Media to the Media Library Uploading an Item to the Media Library Editing the Media Meta
Learning More About NetObjects Matrix Builder 1
 Learning More About NetObjects Matrix Builder 1 NetObjects Matrix Builder is a service that hosts your Web site, makes it easy to update, and helps you interact with visitors. NetObjects Matrix Builder
Overview NOTE: Listing Overview. User Profile. Language Selection. Asset(s) View. Asset(s) Details. Editing Mode
 View. Asset(s) Details. Editing Mode") Overview Listing Overview User Profile Language Selection Asset(s) View Asset(s) Details Editing Mode NOTE: Some functions may not be available to all users depending on permissions granted. Some of the
Overview Listing Overview User Profile Language Selection Asset(s) View Asset(s) Details Editing Mode NOTE: Some functions may not be available to all users depending on permissions granted. Some of the
Content Author's Reference and Cookbook
 Sitecore CMS 7.0 Content Author's Reference and Cookbook Rev. 130425 Sitecore CMS 7.0 Content Author's Reference and Cookbook A Conceptual Overview and Practical Guide to Using Sitecore Table of Contents
Microsite Overview. The Basics: How to build and manage your ISA Section microsite
 Microsite Overview The Basics: How to build and manage your ISA Section microsite We are excited to work with you to build your microsites within the all-new www.isa.org. The website has state-of-the-art
SCOUT SUSPENSE TRACKER Version 10.0
 SCOUT SUSPENSE TRACKER Version 10.0 USER S MANUAL For Civilian Personnel Management Service (CPMS) HPC-COM LLC Help Desk 800-795-1902 Updated: February 2011 Table of Contents SCOUT Suspense Tracker V10.0
BCI.com Sitecore Publishing Guide. November 2017
 BCI.com Sitecore Publishing Guide November 2017 Table of contents 3 Introduction 63 Search 4 Sitecore terms 66 Change your personal settings 5 Publishing basics 5 Log in to Sitecore Editing 69 BCI.com
How To Guide. Hannon Hill Corporation for Rowan University
 How To Guide Hannon Hill Corporation for Rowan University Hannon Hill Corporation 3423 Piedmont Road, Suite 520 Atlanta, GA 30305 www.hannonhill.com 678.904.6900 info@hannonhill.com Rowan University: How
EKTRON 101: THE BASICS
 EKTRON 101: THE BASICS Table of Contents INTRODUCTION... 2 TERMINOLOGY... 2 WHY DO SOME PAGES LOOK DIFFERENT THAN OTHERS?... 5 LOGGING IN... 8 Choosing an edit mode... 10 Edit in context mode (easy editing)...
HOW TO USE THE CONTENT MANAGEMENT SYSTEM (CMS) TABLE OF CONTENTS
 TABLE OF CONTENTS") HOW TO USE THE CONTENT MANAGEMENT SYSTEM (CMS) TABLE OF CONTENTS GETTING STARTED (LOGIN) 2 SITE MAP (ORGANIZE WEBPAGES) 2 CREATE NEW PAGE 3 REMOVE PAGE 6 SORT PAGES IN CHANNEL 7 MOVE PAGE 8 PAGE PROPERTIES
HOW TO USE THE CONTENT MANAGEMENT SYSTEM (CMS) TABLE OF CONTENTS GETTING STARTED (LOGIN) 2 SITE MAP (ORGANIZE WEBPAGES) 2 CREATE NEW PAGE 3 REMOVE PAGE 6 SORT PAGES IN CHANNEL 7 MOVE PAGE 8 PAGE PROPERTIES
Administrative Training Mura CMS Version 5.6
 Administrative Training Mura CMS Version 5.6 Published: March 9, 2012 Table of Contents Mura CMS Overview! 6 Dashboard!... 6 Site Manager!... 6 Drafts!... 6 Components!... 6 Categories!... 6 Content Collections:
Swiiit User Guide 09/11/2016
 Swiiit User Guide 09/11/2016 Contents Getting Started... 4 Overview of Main Tools... 5 Webpages... 6 Main pages (Sections)... 6 Rearrange Sections... 6 Subpages... 7 Change the Title of a Webpage... 8
Working with Images 1 / 12
 V2 APRIL 2017 1 / 12 To brighten up your website it is often nice to have images inserted onto various pages of your website. We have an easy option to size these photos on your page, as well as aligning
Center for Faculty Development and Support. Google Docs Tutorial
 Center for Faculty Development and Support Google Docs Tutorial Table of Contents Overview... 3 Learning Objectives... 3 Access Google Drive... 3 Introduction... 4 Create a Google Document... 4 Upload
SharePoint SITE OWNER TRAINING
 SharePoint SITE OWNER TRAINING Contents Customizing Your Site... 3 Editing Links...4 Give the site a new look...5 Changing Title, Description, or Logo...6 Remove the Getting Started Icons...6 Adding Apps
2016 TRTA Content Managers Resource Guide How to update and edit your local unit website. Roy Varney, TRTA Multimedia Specialist
 2016 TRTA Content Managers Resource Guide How to update and edit your local unit website. Roy Varney, TRTA Multimedia Specialist Table of Contents Introduction... 1 Basic information... 1 - How to log
Drupal FAQs for administrators
 Drupal FAQs for administrators Questions How do I edit content? Why can t I edit content? How do I publish content? How do I pull a piece of content back to draft after publishing? Where has the save button
Department User Guide
 Department User Guide Revision Chart Version Primary Author(s) Description of Version Date 1.0 Anthony Curley Initial Document 6/22/11 1.1 Anthony Curley Update to Publishing Changes & Navigation Changes
Percussion Documentation Table of Contents
 Percussion Documentation Table of Contents Intro to the Percussion Interface... 2 Logging In to Percussion... 2 The Dashboard... 2 Managing Dashboard Gadgets... 3 The Menu... 4 The Finder... 4 Editor view...
Joomla! 2.5.x Training Manual
 Joomla! 2.5.x Training Manual 1 Joomla is an online content management system that keeps track of all content on your website including text, images, links, and documents. This manual includes several
Revision Chart Version Primary Author(s) Description of Version Date
 Description of Version Date") Campus User Guide Revision Chart Version Primary Author(s) Description of Version Date 1.0 Anthony Curley Initial Document 6/22/11 1.1 Anthony Curley Added Approval steps 8/11/11 1.2 Joe Goble Added Sort
Campus User Guide Revision Chart Version Primary Author(s) Description of Version Date 1.0 Anthony Curley Initial Document 6/22/11 1.1 Anthony Curley Added Approval steps 8/11/11 1.2 Joe Goble Added Sort
AGENT123. Full Q&A and Tutorials Table of Contents. Website IDX Agent Gallery Step-by-Step Tutorials
 AGENT123 Full Q&A and Tutorials Table of Contents Website IDX Agent Gallery Step-by-Step Tutorials WEBSITE General 1. How do I log into my website? 2. How do I change the Meta Tags on my website? 3. How
Contact at Once Widget..5. Contact Us Widget...5 Contact Info Widget. 6 Dealership Contacts Widget. 6
 Table of Contents Flexible Design Overview. 3 Selecting the Flex Design. 3 Widget Overview. 4 Configuring Widgets..5 Contact at Once Widget..5 Contact Us Widget...5 Contact Info Widget. 6 Dealership Contacts
How to Add Word Heading Styles Explanation
 How to Add Word Heading Styles Explanation Using Word Heading Styles creates hierarchical structure and easier navigation throughout your file. Word Headings allow the user to navigate directly to various
MN Studio Website - User Guide
 MN Studio Website - User Guide Version 1.1 MN Studio Website Program 1. Introduction Welcome to the new website program! The MN Studio Website program allows you to create your own website with customized
ADMINISTRATIVE USER GUIDE FOR THE APTI-LEARN LEARNING MANAGEMENT SYSTEM (LMS)
") ADMINISTRATIVE USER GUIDE FOR THE APTI-LEARN LEARNING MANAGEMENT SYSTEM (LMS) Software Version 2.6 September 2012 Prepared by EM-Assist This page left intentionally blank. Software Version 2.6; Document
ADMINISTRATIVE USER GUIDE FOR THE APTI-LEARN LEARNING MANAGEMENT SYSTEM (LMS) Software Version 2.6 September 2012 Prepared by EM-Assist This page left intentionally blank. Software Version 2.6; Document
Chatter Answers Implementation Guide
 Chatter Answers Implementation Guide Salesforce, Spring 16 @salesforcedocs Last updated: April 27, 2016 Copyright 2000 2016 salesforce.com, inc. All rights reserved. Salesforce is a registered trademark
From the Insert Tab (1), highlight Picture (2) drop down and finally choose From Computer to insert a new image
, highlight Picture (2) drop down and finally choose From Computer to insert a new image") Inserting Image To make your page more striking visually you can add images. There are three ways of loading images, one from your computer as you edit the page or you can preload them in an image library
Inserting Image To make your page more striking visually you can add images. There are three ways of loading images, one from your computer as you edit the page or you can preload them in an image library
Go to the Directory at and click on the Login link.
 Welcome to Terra Dotta s Study Abroad Directory! Creating your programs for the directory is a simple task. These instructions will outline how to create, activate and update your program brochures. Logging
Major League Baseball Club Accreditation System
 Functional Specifications User Guide System Administrator Major League Baseball Club Accreditation System Club Accreditation User Guide System Administrator - v1.4 Page 1 Date Versio n Revision History
Creating an with Constant Contact. A step-by-step guide
 Creating an Email with Constant Contact A step-by-step guide About this Manual Once your Constant Contact account is established, use this manual as a guide to help you create your email campaign Here
ABOUT IAS CONNECT... 2 CONTRACT LOOKUP... 5 CLAIMS... 8 CANCELLATIONS ELECTRONIC PROCESSING... 14
 TABLE OF CONTENTS ABOUT IAS CONNECT... 2 ACCESSING IAS CONNECT... 2 FUNCTIONALITY IN IAS CONNECT... 2 NAVIGATING IAS CONNECT... 3 GETTING ADDITIONAL HELP... 3 CONTRACT LOOKUP... 5 LOOKING UP A CONTRACT...
SharePoint 2010 Site Owner s Manual by Yvonne M. Harryman
 SharePoint 2010 Site Owner s Manual by Yvonne M. Harryman Chapter 9 Copyright 2012 Manning Publications Brief contents PART 1 GETTING STARTED WITH SHAREPOINT 1 1 Leveraging the power of SharePoint 3 2
Custom SharePoint Workflows
 Custom SharePoint Workflows Using SharePoint Designer 2013 SharePoint Workflows Microsoft SharePoint, as a collaboration platform, contains a huge amount of business data - documents, contacts, meetings,
Technology Services. Leander ISD
 Technology Services Leander ISD 2017 2017 Contents Create Document... 3 Add Title... 4 Save Document... 4 Add/Edit Text... 4 Change/Add Fonts... 4 Edit Font... 5 Paint Format Tool... 5 Insert Image...
1.0 Overview For content management, Joomla divides into some basic components: the Article
 Joomla! 3.4.x Training Manual Joomla is an online content management system that keeps track of all content on your website including text, images, links, and documents. This manual includes several tutorials
Swiiit User Guide 03/09/2015
 Swiiit User Guide 03/09/2015 Contents Getting Started... 4 Overview of Main Tools... 5 Webpages... 6 Main pages (Sections)... 6 Rearrange Sections... 6 Subpages... 7 Change the Title of a Webpage... 8
Hands-on Session. Styles Tool. Bullets & Numbering
 Styles Tool 1. The Styles tool gives the ability to define a pre-set collection of font styles that make it easy and automatic to use branding throughout a document. 2. The Styles tool is located on the
Drupal 7 guide CONTENTS. p. 2 Logging In
 Drupal 7 guide Drupal is a widely used, open-source, free platform that has an easy-to-use content management system for updating websites. This guide was created by the Health Communication Core (www.healthcommcore.org)
Settings & Notifications
 Settings & Notifications CMS Settings Content Requirements Distributor Access Customs Folders DAL Settings Media Gallery Notifications NOTE: Some functions may not be available to all users depending on
Vetstreet Web Builder Editor Tool User Guide v2.1. Web Builder. User Guide v2.1
 Web Builder User Guide v2.1 Contact your Account Manager at (888) 799-8387 or email support@vetstreet.com with questions. Page 1 Index... 1 The Editor Tool... 7 Forgot Your Username or Password?... 7 How
PRESENCE. Photo Gallery Guide. SchoolMessenger 100 Enterprise Way, Suite A-300 Scotts Valley, CA
 PRESENCE Photo Gallery Guide SchoolMessenger 100 Enterprise Way, Suite A-300 Scotts Valley, CA 95066 888-527-5225 www.schoolmessenger.com Contents Introduction... 3 Key Information... 3 How to Add a Photo
New Website User Manual
 New Website User Manual General Notes 3 How To Login To Your Website And Access Admin Dashboard 4 Adding / Editing Sliders 5 Home Slider 5 School Slider (Same steps for ALL school pages) - Add a Slide
SharePoint 2010 Tutorial
 SharePoint 2010 Tutorial TABLE OF CONTENTS Introduction... 1 Basic Navigation... 2 Navigation Buttons & Bars... 3 Ribbon... 4 Library Ribbon... 6 Recycle Bin... 7 Permission Levels & Groups... 8 Create
Website Training Manual
 Website Training Manual Version 1.0 9/11/13 Section 1: Manage Users... 3 Adding Users... 3 Managing Users... 3 Section 2: Manage Content... 4 Section 3: Create Content... 5 Featured Slider... 5 Governance...
Contents. Common Site Operations. Home actions. Using SharePoint
 This is a companion document to About Share-Point. That document describes the features of a SharePoint website in as much detail as possible with an emphasis on the relationships between features. This
Chatter Answers Implementation Guide
 Chatter Answers Implementation Guide Salesforce, Summer 18 @salesforcedocs Last updated: July 26, 2018 Copyright 2000 2018 salesforce.com, inc. All rights reserved. Salesforce is a registered trademark
Workflow for efilecabinet On-Premise User Guide
 Workflow for efilecabinet On-Premise User Guide Page 1 of 32 Introduction: Workflow is a simple way to manage and automate the Workflow associated with the processing of documents. Workflow steps are visually
DRAFT. Table of Contents About this manual... ix About CuteSITE Builder... ix. Getting Started... 1
 DRAFT Table of Contents About this manual... ix About CuteSITE Builder... ix Getting Started... 1 Setting up... 1 System Requirements... 1 To install CuteSITE Builder... 1 To register CuteSITE Builder...
Author/Editor s View Adding Text & Modifying Text on an Existing Page (Article)
") Author/Editor s View Adding Text & Modifying Text on an Existing Page (Article) Assumed Preliminaries: (1) You ve registered with a username and password you selected and that you still remember. (2) Lloyd
Author/Editor s View Adding Text & Modifying Text on an Existing Page (Article) Assumed Preliminaries: (1) You ve registered with a username and password you selected and that you still remember. (2) Lloyd
212Posters Instructions
 212Posters Instructions The 212Posters is a web based application which provides the end user the ability to format and post content, abstracts, posters, and documents in the form of pre-defined layouts.
Content Author's Reference and Cookbook
 Sitecore CMS 6 Content Author's Reference and Cookbook Rev. 080627 Sitecore CMS 6 Content Author's Reference and Cookbook A Conceptual Overview and Practical Guide to Using Sitecore Table of Contents Chapter
SharePoint 2013 Site Owner
 SharePoint 2013 Site Owner Effective Content and Document Collaboration with Axalta Teams 9 May 2014 Instructor: Jason Christie Site Owner Course Topics to be Covered Content Management Creating and configuring
Advanced Marketing Techniques: Zach Stone, Molly McCormick, Dave Frees, Connie Gray, Karen Martin, and Mischelle Davis
 Advanced Marketing Techniques: Zach Stone, Molly McCormick, Dave Frees, Connie Gray, Karen Martin, and Mischelle Davis You have access to some incredible tools, and Zach, Connie, Molly, Karen, Dave, and
This document contains information that will help you to create and send graphically-rich and compelling HTML s through the Create Wizard.
 This document contains information that will help you to create and send graphically-rich and compelling HTML emails through the Create Email Wizard. or warranty by AT&T and is subject to change. 1 Contents
FileNET Guide for AHC PageMasters
 PageMasters have the permissions necessary to perform the following tasks with Site Tools: ACADEMIC HEALTH CENTER 2 Application Requirements...3 Access FileNET...3 Log in to FileNET...3 Navigate the Site...3
Boise State University. Getting To Know FrontPage 2000: A Tutorial
 Boise State University Getting To Know FrontPage 2000: A Tutorial Writers: Kevin Gibb, Megan Laub, and Gayle Sieckert December 19, 2001 Table of Contents Table of Contents...2 Getting To Know FrontPage
Introduction to Adobe CQ5
 UNDP Country Office User Guide Part I Introduction to Adobe CQ5 How to use Adobe CQ5 to build websites UNDP OC Web Team v1.1 1. How to log in to CQ5 1 Contents 1. How to log in to CQ5... 2 2. CMS terminology...
SHADOWS READYTHEME CUSTOMIZATION
 SHADOWS READYTHEME CUSTOMIZATION March 2018 Installing the Shadows ReadyTheme These instructions are for installing the Shadows ReadyTheme to a brand new store. If you have an existing store, please contact
RELEASE NOTES. Epic Offline Client Messaging 3. My Account 11. Announcement 12. Discussion Board 13. Exam 14.
 RELEASE NOTES October 5, 2011 Epic Offline Client 2.5.28.17 Inside this issue: Messaging 3 My Account 11 Announcement 12 Discussion Board 13 Exam 14 Update Client 19 Improving Communications and Exam Security
Lava New Media s CMS. Documentation Page 1
 Lava New Media s CMS Documentation 5.12.2010 Page 1 Table of Contents Logging On to the Content Management System 3 Introduction to the CMS 3 What is the page tree? 4 Editing Web Pages 5 How to use the
Cascade User Guide. Introduction. Key System Features. User Interface
 Cascade User Guide Introduction Key System Features User Interface Menus and Moving Through the System Files and Pages Working with Existing Pages File Action Menu Version Control Deleting files Restoring
Page Gentics Software GmbH Enterprise Portals and Content Management Systems
 1. 2012 Gentics Software GmbH Page 2 Table of Contents 1. Table of Contents... 3 2. Foreword Infoportal and Support... 6 3. First steps... 6 3.1 Login and logout... 6 3.2 Password change... 7 3.3 User
Guide for Researchers: Online Human Ethics Application Form
 Guide for Researchers: Online Human Ethics Application Form What is Quest Quest is our comprehensive research management system used to administer and support research activity at Victoria University.
Table of Contents. Page 2 of 72. High Impact 4.0 User Manual
 Table of Contents Introduction 5 Installing High Impact email 6 Installation Location 6 Select Mail Client 6 Create a ReadyShare Account 6 Create a Default Profile 6 Outlook Configuration Message 6 Complete
End-User Reference Guide Troy University OU Campus Version 10
 End-User Reference Guide Troy University OU Campus Version 10 omniupdate.com Table of Contents Table of Contents... 2 Introduction... 3 Logging In... 4 Navigating in OU Campus... 6 Dashboard... 6 Content...
Creating an with Constant Contact. A step-by-step guide
 Creating an Email with Constant Contact A step-by-step guide About this Manual Once your Constant Contact account is established, use this manual as a guide to help you create your email campaign Here
Box. Files and Folders. Upload files or folders. Create a folder.
 O F F I C E O F I NFORM AT I O N T E CH NO L O G Y S E RVIC E S Files and Folders Upload files or folders 1. From the Upload button, select either Upload Files or Upload Folders. 2. Navigate to the files
Getting Started with the Aloha Community Template for Salesforce Identity
 Getting Started with the Aloha Community Template for Salesforce Identity Salesforce, Winter 18 @salesforcedocs Last updated: November 30, 2017 Copyright 2000 2017 salesforce.com, inc. All rights reserved.
Creating Interactive PDF Forms
 Creating Interactive PDF Forms Using Adobe Acrobat X Pro for the Mac University Information Technology Services Training, Outreach, Learning Technologies and Video Production Copyright 2012 KSU Department
Guide for Researchers: Online Human Ethics Application Form
 Ethics & Integrity Research Office HUMAN RESEARCH ETHICS ONLINE APPLICATION October 2016/V1.03 Guide for Researchers: Online Human Ethics Application Form ENQUIRIES Senior Human Ethics Officer University
FileNET Guide for AHC PageMasters
 ACADEMIC HEALTH CENTER 2 PageMasters have the permissions necessary to perform the following tasks with Site Tools: Application Requirements...3 Access FileNET...3 Login to FileNET...3 Navigate the Site...3
CreateASite Beginner s Guide
 Contents Getting Started... 3 Access the CreateASite Control Panel... 3 Select a Category/Subcategory... 4 Select a Template... 6 Change the Site Template... 10 Change Colours... 12 Change Fonts... 13
Training Manual for Researchers. How to Create an Online Human Ethics Application
 Training Manual for Researchers How to Create an Online Human Ethics Application What is in this document This manual is intended to provide general tips on using functionality specific to QUEST online
UTAS CMS. Easy Edit Suite Workshop V3 UNIVERSITY OF TASMANIA. Web Services Service Delivery & Support
 Web Services Service Delivery & Support UNIVERSITY OF TASMANIA UTAS CMS Easy Edit Suite Workshop V3 Web Service, Service Delivery & Support UWCMS Easy Edit Suite Workshop: v3 Contents What is Easy Edit
* You can also just type in log in if you haven't already, and will be taken to the Slides page.
 1. Go to Google's home page and click on the grid in the upper right hand corner. From there, click on the Drive icon. You will be redirected to a log in page if you are signed out, if not you will be
Network Rail Brand Hub USER GUIDE
 Network Rail Brand Hub USER GUIDE The Brand Hub Using keywords, visual thumbnails and a more upto-date online interface, the new Brand Hub will make searching, browsing and downloading images, templates
PHOTO GALLERY USER MANUAL CHAPTER 3 SHARPSCHOOL. For more information, please visit: Chapter 3 Photo Gallery
 SHARPSCHOOL USER MANUAL CHAPTER 3 PHOTO GALLERY For more information, please visit: www.customernet.sharpschool.com www.sharpschool.com 0 TABLE OF CONTENTS 1. 2. 3. 4. 5. 6. INTRODUCTION... 1 KEY INFORMATION...
TEACHER PAGES USER MANUAL CHAPTER 6 SHARPSCHOOL. For more information, please visit: Chapter 6 Teacher Pages
 SHARPSCHOOL USER MANUAL CHAPTER 6 TEACHER PAGES For more information, please visit: www.customernet.sharpschool.com 0 TABLE OF CONTENTS 1. 2. 3. 4. 5. 6. 7. 8. 9. 10. 11. INTRODUCTION... 1 I. TEACHER PAGE
NJUNS Users Guide.
 NJUNS Users Guide www.njuns.com The National Joint Utilities Notification system, NJUNS, is a national organization of member utilities formed for the purpose of improving the coordination of joint ventures.
Use this guide to help you rebuild your existing EasySite Wizard website in Online Presence Builder
 Transition Guide from EasySite Wizard to Online Presence Builder Use this guide to help you rebuild your existing EasySite Wizard website in Online Presence Builder 1 Contents Getting Started... 3 Planning...
FCKEditor v1.0 Basic Formatting Create Links Insert Tables
 FCKEditor v1.0 This document goes over the functionality and features of FCKEditor. This editor allows you to easily create XHTML compliant code for your web pages in Site Builder Toolkit v2.3 and higher.
CCC ONE Workflow Appraiser Management Using IE10 or Higher
 CCC ONE Workflow Appraiser Management Using IE10 or Higher This job aid outlines the steps to upload estimate files to the claim folder using Windows Internet Explorer 10 or higher. NOTE: Internet Explorer
Microsoft Office Word 2016 for Mac
 Microsoft Office Word 2016 for Mac Introduction to Word University Information Technology Services Learning Technologies, Training & Audiovisual Outreach Copyright 2016 KSU Division of University Information
Administrator Quick Guide
 1 Administrator Quick Guide Login Screen The first page employees will see when visiting their training site is the login screen. This is where employees must enter their username and password to access
Learning and Development. UWE Staff Profiles (USP) User Guide
 User Guide") Learning and Development UWE Staff Profiles (USP) User Guide About this training manual This manual is yours to keep and is intended as a guide to be used during the training course and as a reference
Learning and Development UWE Staff Profiles (USP) User Guide About this training manual This manual is yours to keep and is intended as a guide to be used during the training course and as a reference
Carleton CMS Training
 1 Carleton CMS Training Contents Logging In... 2 Dashboard... 2 Pages... 2 Posts... 3 Organizing News/Posts... 3 Categories... 3 Tags... 4 News Listings... 4 Text... 4 Create columns... 5 Hyperlinks...
Managing your content with the Adobe Experience Manager Template Editor. Gabriel Walt Product Manager twitter.com/gabrielwalt
 Managing your content with the Adobe Experience Manager Template Editor Gabriel Walt Product Manager twitter.com/gabrielwalt Table of Contents 1. Introduction 3 1.1 Overview 3 1.2 Prerequisites 3 2. Getting
Act! Marketing Automation
 Act! Marketing Automation A Guide to Getting Started Helping your business grow with marketing automation Act! Marketing Automation Getting Started Guide 2 Contents Page Page 8 Page 10 Page 11 Page 11
Site Owners: Cascade Basics. May 2017
 Site Owners: Cascade Basics May 2017 Page 2 Logging In & Your Site Logging In Open a browser and enter the following URL (or click this link): http://mordac.itcs.northwestern.edu/ OR http://www.northwestern.edu/cms/
DSS User Guide. End User Guide. - i -
 DSS User Guide End User Guide - i - DSS User Guide Table of Contents End User Guide... 1 Table of Contents... 2 Part 1: Getting Started... 1 How to Log in to the Web Portal... 1 How to Manage Account Settings...
Using Sitecore 5.3.1
 Using Sitecore 5.3.1 An End-User s Guide to Using and Administrating Sitecore Author: Sitecore Corporation Date: December 12, 2007 Release: Rev. 1.0 Language: English Sitecore is a registered trademark.
Migrating SharePoint From 2007 to 2010
 Migrating SharePoint From 2007 to 2010 Presented By Scott Randall srandall@advancedlegal.com (888) 221 8821 Advanced Legal Systems, Inc. CREATING TECHNOLOGICAL CALM www.advancedlegal.com Table of Contents
PowerSchool Student and Parent Portal User Guide. https://powerschool.gpcsd.ca/public
 PowerSchool Student and Parent Portal User Guide https://powerschool.gpcsd.ca/public Released June 2017 Document Owner: Documentation Services This edition applies to Release 11.x of the PowerSchool software
Compliance Document Manager User Guide
 Compliance Document Manager User Guide Contents OVERVIEW... 3 SYSTEM REQUIREMENTS... 3 VENDORMATE PASSWORD REQUIREMENTS... 3 LOGIN... 4 THE HOME SCREEN... 5 BA Screening... 5 BA Oversight... 5 My Screening
CMS Workbook Rev May 2016
 CMS Workbook Rev. 2.9.1 May 2016 Table of Contents Getting Started 3 Finding Your Website in the Content Explorer... 3 Logging In... 3 Changing Communities... 4 Logging Out... 4 Quick References 5 Learning
REDESIGNING YOUR WEBSITE USING ONLINE PRESENCE BUILDER CUSTOMER USER GUIDE
 REDESIGNING YOUR WEBSITE USING ONLINE PRESENCE BUILDER CUSTOMER USER GUIDE 1 CONTENTS 1 GETTING STARTED...3 2 PLANNING...4 3 BACKING UP YOUR WEBSITE...5 4 REFRESHING YOUR WEBSITE...6 4.1 SETTING UP YOUR
Working with the website editor...5. Editing page properties Creating a new page Adding and editing content records...
 About this guide...3 About the structure of web pages in typo3...4 The outer template...4 The page record...4 Page content records...4 Access to editing and publishing records...4 Working with the website
CMS (Content Management System) for Beginners A Step by Step Approach
 for Beginners A Step by Step Approach") CMS (Content Management System) for Beginners A Step by Step Approach Table of Contents List of Topics Page No. Section 1: Getting Started....2 Section 2: Adding an Event to the Chapter Web Page. 4 Section
CMS (Content Management System) for Beginners A Step by Step Approach Table of Contents List of Topics Page No. Section 1: Getting Started....2 Section 2: Adding an Event to the Chapter Web Page. 4 Section